


Changing currency at WooCommerce checkout is easier to explain with a simple example: a shopper in Munich sees €169 instead of $184 for the same jacket.
Nothing about the product changed. Your margin didn't change either. You've just shown the price in the currency your customer expects.
That small change can remove a surprising amount of friction.
When the shopper sees $184, they have to figure out what that will cost in euros, whether their bank will add a conversion fee, and what happens if they need a refund.
So they open another tab to check the exchange rate. Once they leave your checkout, they may forget the purchase.
WooCommerce doesn't handle this on its own. Your store has one base currency, and shoppers don't get a built-in way to switch between currencies.
If you want that shopper to see €169, you need another solution.
The four common options are Stripe Adaptive Pricing, WooPayments multi-currency, a currency switcher plugin, or automatic currency detection based on the shopper's location.
We'll walk through each one and help you figure out which setup makes sense for your store.
We'll also cover whether the customer is actually charged in their local currency or simply sees a converted price.
Skip to the step-by-step process section
Table of Contents
- 1 What "Changing Currency At Checkout" Actually Means?
- 2 Which Of the Four Methods Does Your Store Need?
- 3 Method 1: Let Your Payment Gateway Handle It
- 4 Method 2: Add a Currency Switcher Plugin
- 5 Method 3: Switch Prices Automatically By Country
- 6 5 Best Practices for Using Currency Change at Checkout
- 7 Frequently Asked Questions
- 8 Offer Currency Change at WooCommerce Checkout and Boost Sales!
What "Changing Currency At Checkout" Actually Means?
People mean two very different things when they talk about changing currency, and choosing the wrong one can be the most expensive mistake in this setup.
| Parameter | Display-only conversion | Charge in the chosen currency |
|---|---|---|
| What the shopper sees while browsing | Converted prices | Converted prices |
| What the checkout total shows | Often flips back to your base currency | What she picked |
| What her card is charged in | Your base currency | What she picked |
| Who handles the exchange | Her bank, at its own rate | Your gateway, at a rate you can see |
| What the order record stores | Your base currency | What she picked |
A display-only converter is basically a shopping aid. It lets someone browse your products in euros, pounds, or another currency, but when they actually pay, the transaction goes through in your store's base currency.
So the shopper sees €169 while browsing, but their card might still be charged $184. Their bank then handles the conversion using its own exchange rate and may add a fee.
That can still be useful, but it is not the same as having a multi-currency checkout.
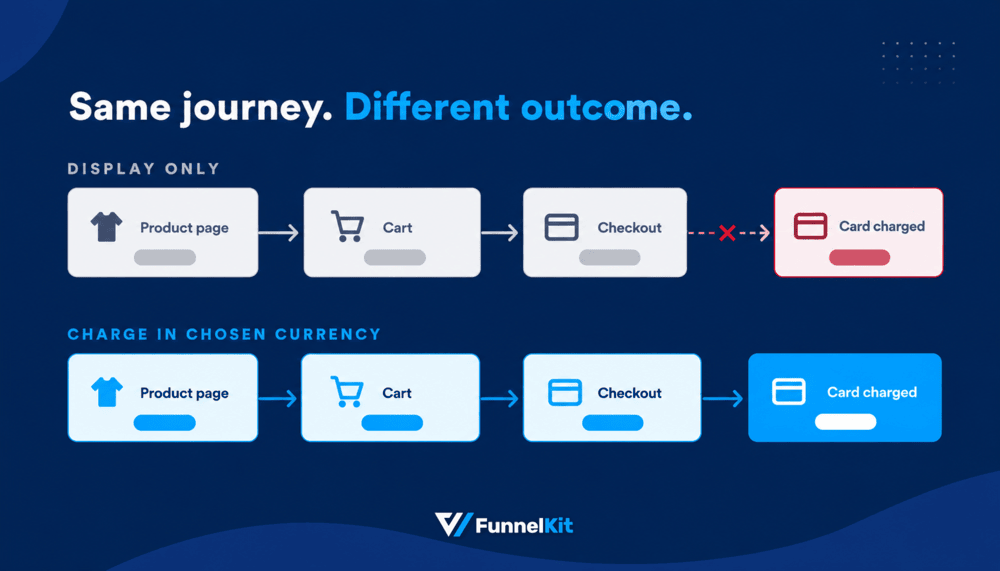
The WooCommerce Currency Switcher documentation makes this distinction perfectly clear.
It says that when the charge option is disabled, prices are shown in the selected currency, but the order is still processed and charged in the store's base currency.
The confusing part is that both setups can look exactly the same while someone is shopping. The real difference shows up only when the order is placed and you check which currency was actually charged.
That's why, whichever method you choose below, you should always test run it by placing a real test order and checking the currency on the payment and order records, not just the price displayed on the product page.
Which Of the Four Methods Does Your Store Need?
Start with your payment gateway. That usually narrows down the right option faster than comparing a dozen currency plugins.
1. Stripe adaptive pricing
If you already use the official Stripe extension, this is probably the simplest option.
Stripe shows the shopper a local-currency price at payment, then you still settle in your own currency. There's no extra fee for using Adaptive Pricing.
2. WooPayments multi-currency
This works in much the same way, but it's built into WooPayments.
You can add a currency switcher block so shoppers can choose the currency they want to see.
3. A currency switcher plugin
This is the more flexible option if you use PayPal, Mollie, Razorpay, another regional gateway, or simply want prices converted throughout the store.
Depending on the plugin, you can show local prices on product and category pages, in the cart, and at checkout.
Free versions are available, while paid options typically run somewhere around $34 to $99 a year.
4. Automatic currency detection
This method is a little different, i.e., a setting within one of the options above rather than a separate solution.
It detects the shopper's country or IP address and switches the currency automatically, so they don't have to look for a dropdown.
The big distinction is where the conversion happens.

In other words, start with your gateway, then decide how much of the shopping experience needs to use the local currency.
Method 1: Let Your Payment Gateway Handle It
This is the newest option, and most guides written before 2026 skip it entirely.
Stripe adaptive pricing
Stripe for WooCommerce 10.8.0 had turned on the Optimized Checkout Suite by default for eligible merchants and enabled Adaptive Pricing alongside it.
Shoppers across more than 150 countries see local pricing at real-time rates, and you get paid and refunded in your settlement currency.
When it is running, a selector appears directly above the Stripe payment form. Shoppers see a conversion fee of roughly 2-4% folded into their total, and refunds return the original purchase amount.
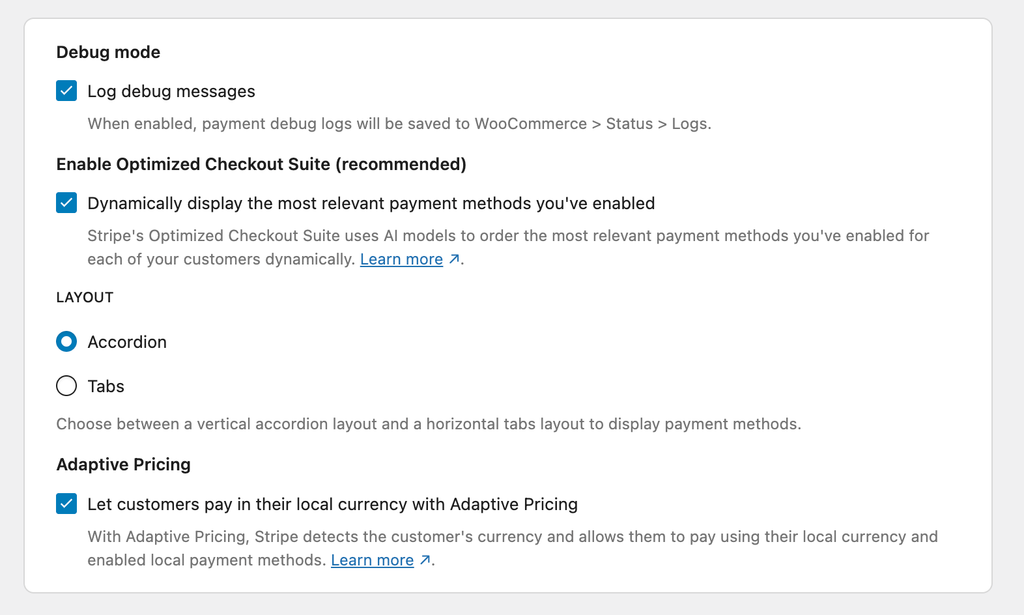
Go to WooCommerce ⇨ Settings ⇨ Payments ⇨ Stripe ⇨ Settings.
Under Advanced Settings, enable the Optimized Checkout Suite, then tick the option to let customers pay locally with Adaptive Pricing and save.
You should check these four things before you build your setup around Stripe Adaptive Pricing:
- Your WooCommerce base currency needs to match the currency Stripe pays you out in.
- You can't use it with the setting that authorizes payments at checkout and captures them later.
- It isn't available if your Stripe account is based in India.
- You need to enable it in your Stripe account and in WordPress. Turning it on in WooCommerce alone isn't enough.
Adaptive pricing only converts the price at payment. Your product catalog, coupons, and reports still use your store's original currency.
So if your store runs in USD, you're still managing the catalog and reporting in USD even though a shopper might see a price in euros at checkout.
That’s fine if you just want international shoppers to pay in their local currency. But if you want your entire store to show local prices, WooCommerce recommends looking at a dedicated multi-currency solution instead.
One more limitation is worth knowing. Adaptive pricing is tied to the official Stripe extension. If you're using a different Stripe gateway, it won't be available there.
For example, if you're using our free Stripe Payment Gateway for WooCommerce, adaptive pricing isn't part of the integration. In that case, look at Method 2 instead.
WooPayments multi-currency
WooPayments lets shoppers view your prices in different currencies and pay in the one they choose.
Before you switch it on, enable multi-currency to change the prices shoppers see, but it doesn't automatically mean you'll receive payouts in multiple currencies.
To set it up, go to Payments ⇨ Settings ⇨ Advanced settings and add the currencies you want under Add or remove currencies.
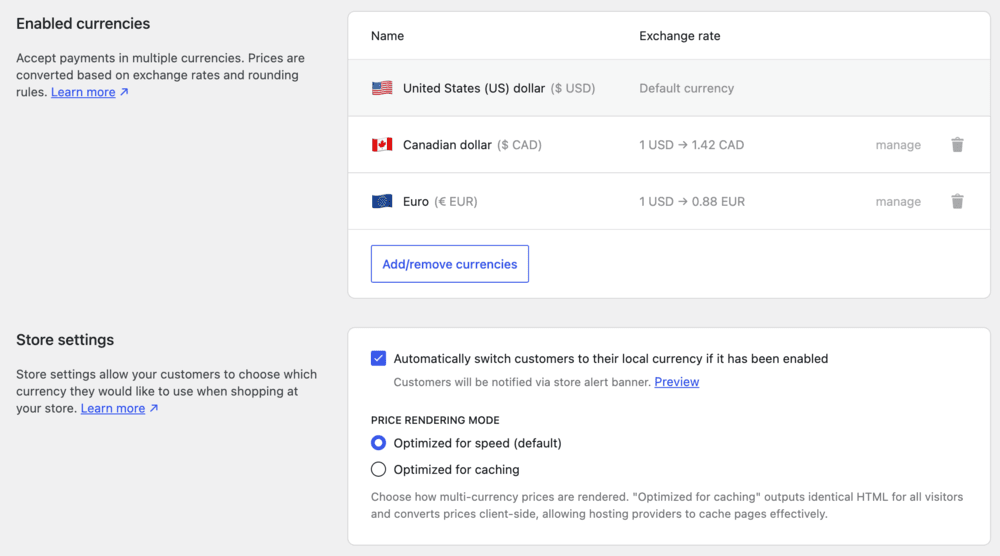
Then add the Currency Switcher block wherever you want shoppers to find it, such as your header, sidebar, or footer.
You'll also need to choose how WooPayments handles the currency switcher.
There are two rendering modes, and the right one depends on how your site handles caching.
If you don't use full-page caching, go with the speed-optimized mode.
If your site does use full-page caching, choose the caching-optimized mode instead.
Otherwise, cached pages can show the wrong currency while the switcher shows something else.
Method 2: Add a Currency Switcher Plugin
We will use FOX Currency Switcher to add a currency switcher option at the WooCommerce checkout.
It offers excellent features and lets you add a currency switcher at checkout for free, making it a great option for improving the user experience.
🔔 Note: The free version is enough to add the option to change currency on the checkout page in your WooCommerce store.
After installing and activating the plugin, follow these steps:
Step 1: Add your currencies
Next, go to WooCommerce ⇨ Settings and make sure you are on the Currency Tab.
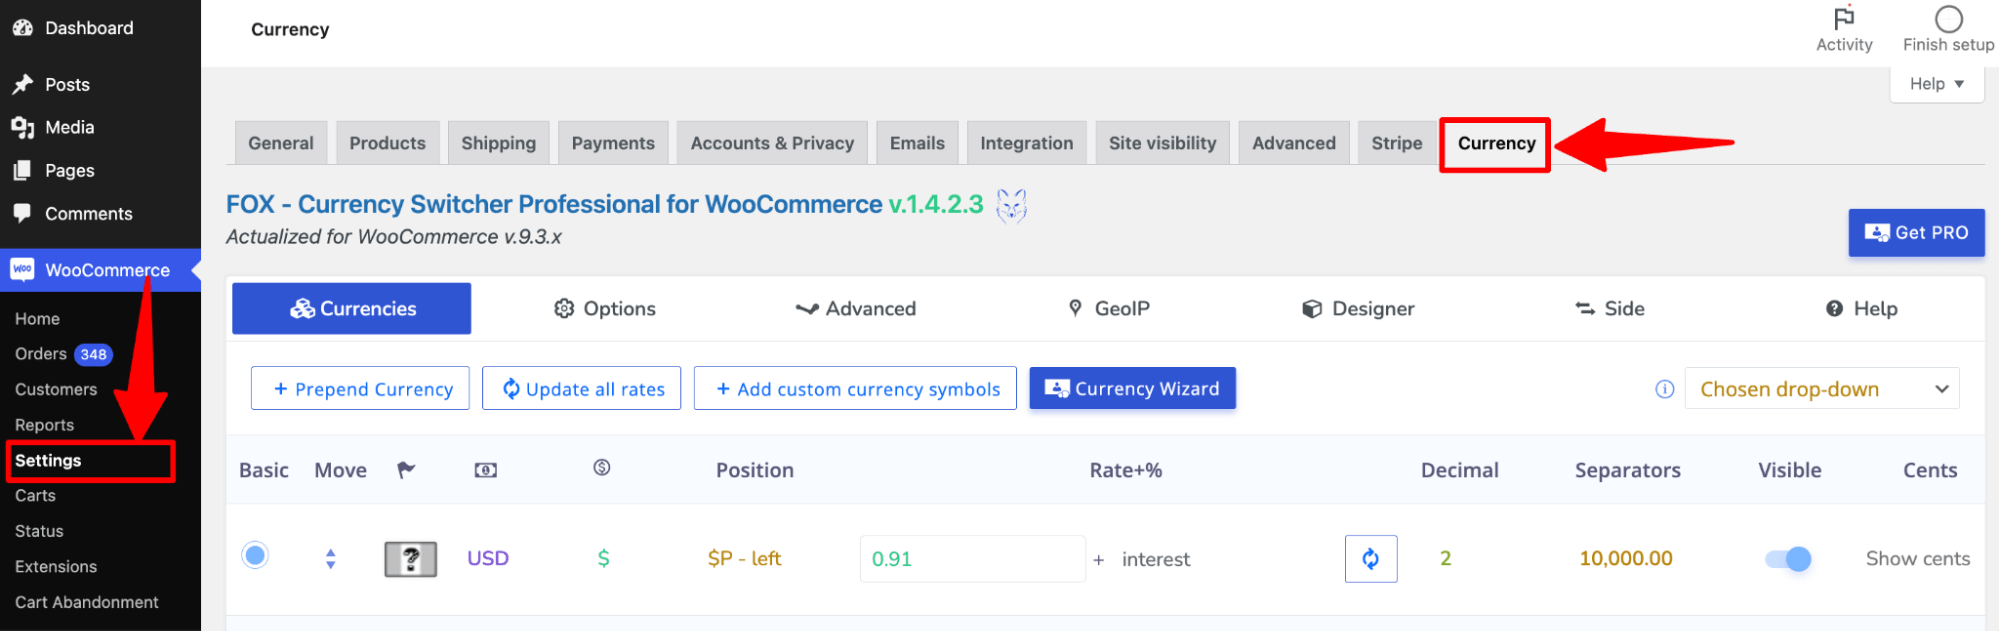
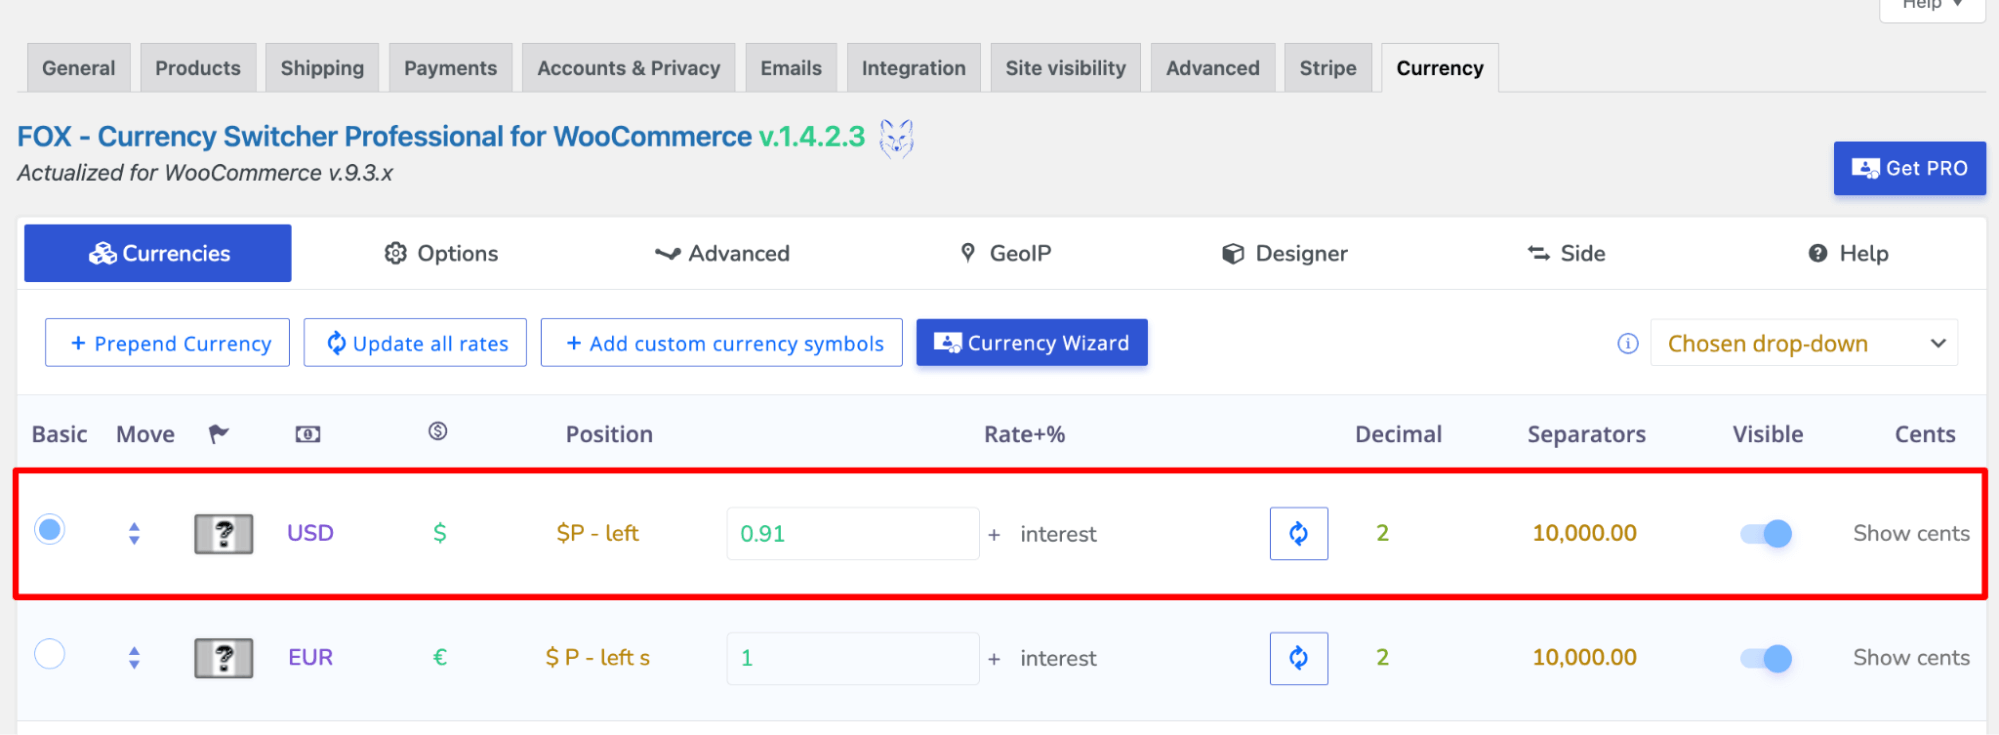
By default, the plugin supports two currencies: USD and EUR.
🔔 Note: The free version only allows you to offer two currency options.
You can customize the default currency to set your desired currency.
Here are the options you need to configure to set a currency:
- Flag: Click the flag, then choose the file from Media.
- Currency Code: Next, set the currency code. This document provides the 3-letter code for your desired country.
- Currency symbol: From the dropdown menu, choose the correct currency symbol.
- Position: Next, choose the currency position. You have four options: left, right, left space, and right space.
- Interest rate: Next, set the currency interest rate.
- Decimal: Set the number of decimal places for the currency.
- Separators: Choose the separator style from the dropdown.
- Visible: Turn the toggle on to show it on the checkout page.
- Cents: Choose if you want to show/ hide cents.
- Description: Add a description of the currency.
Step 2: Set up store currency switcher options
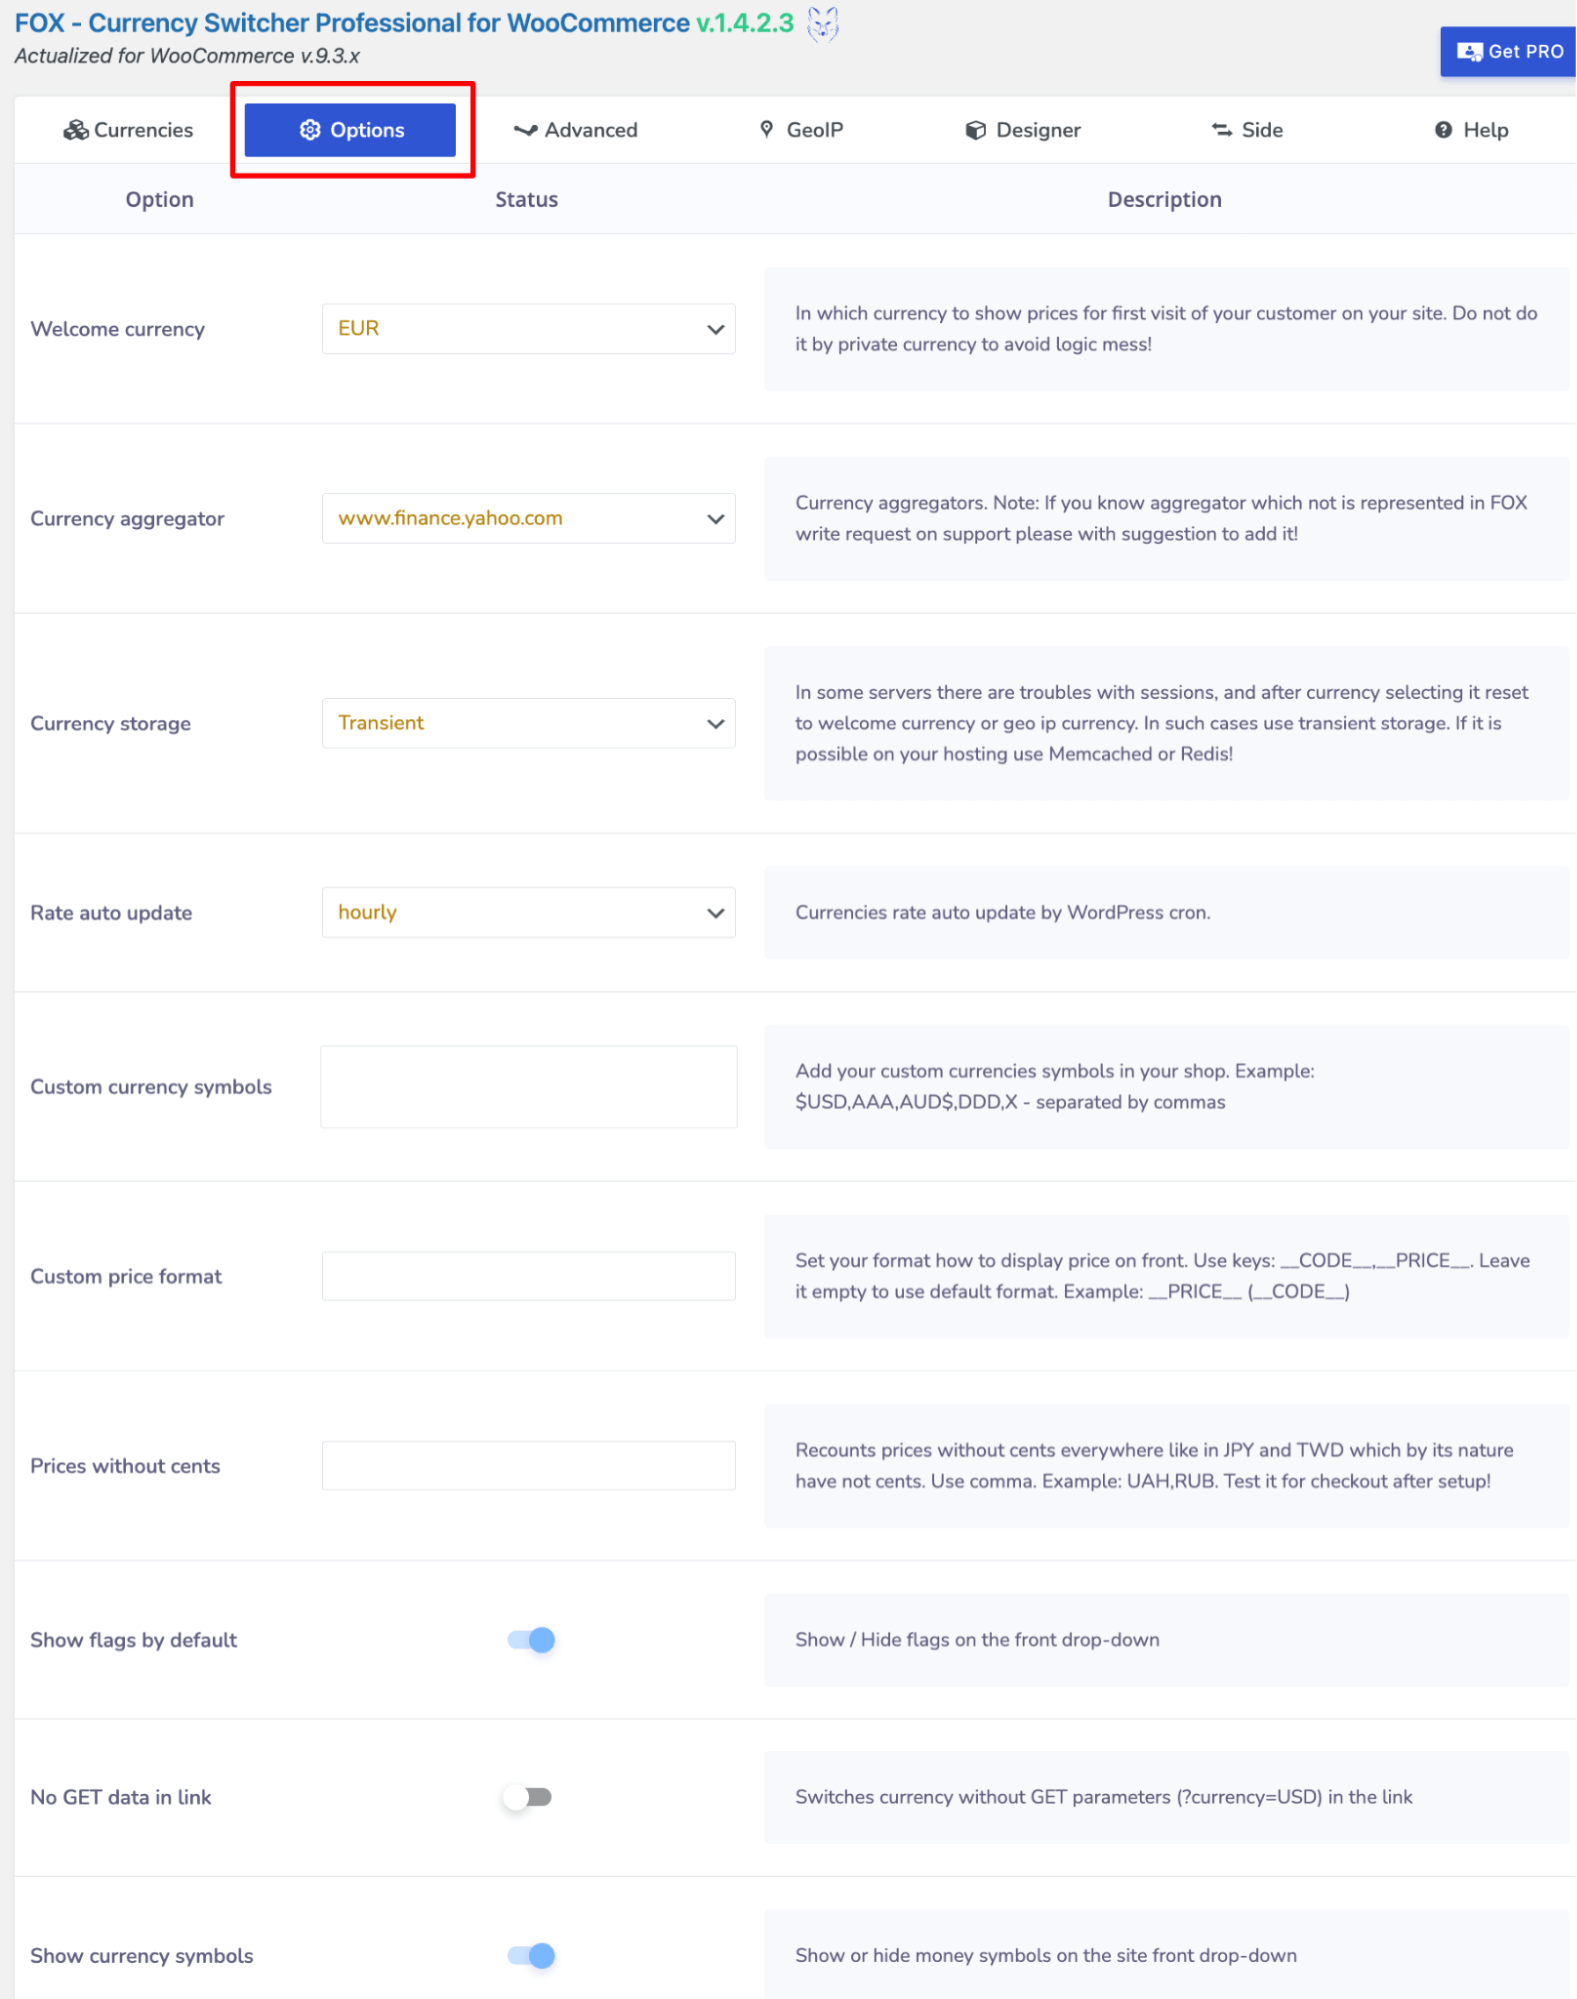
Next, move to the options tab and set the following:
- Welcome currency: Set the welcome currency shown to first-time users.
- Currency aggregator: Select the currency aggregator you want to use for the conversion rate.
- Currency storage: Choose the currency storage option. The default option is transient, but you can also choose other storage options, such as a PHP session or a FOX session.
- Rate auto update: Choose how often you want the currency rate to update.
- Custom currency symbols: Add custom currency symbols for your store. Use commas to separate multiple currencies.
- Custom price format: Set your display format using the CODE and PRICE keys. Leave empty for default format (e.g., PRICE (CODE)).
- Prices without cents: Round prices for currencies like JPY and TWD (no cents). Use a comma (e.g., UAH, RUB). Test after setup!
- Show flags by default: Enable flags to display by default next to currencies.
In this Options tab, you can control various settings, such as the Show price info icon, Email notice about "Rate auto update" results, and Show approximate amount, among others.
🔔 Note: Do not turn on the option “Hide switcher on the checkout page.”
Step 3: Set the GeoIP rule
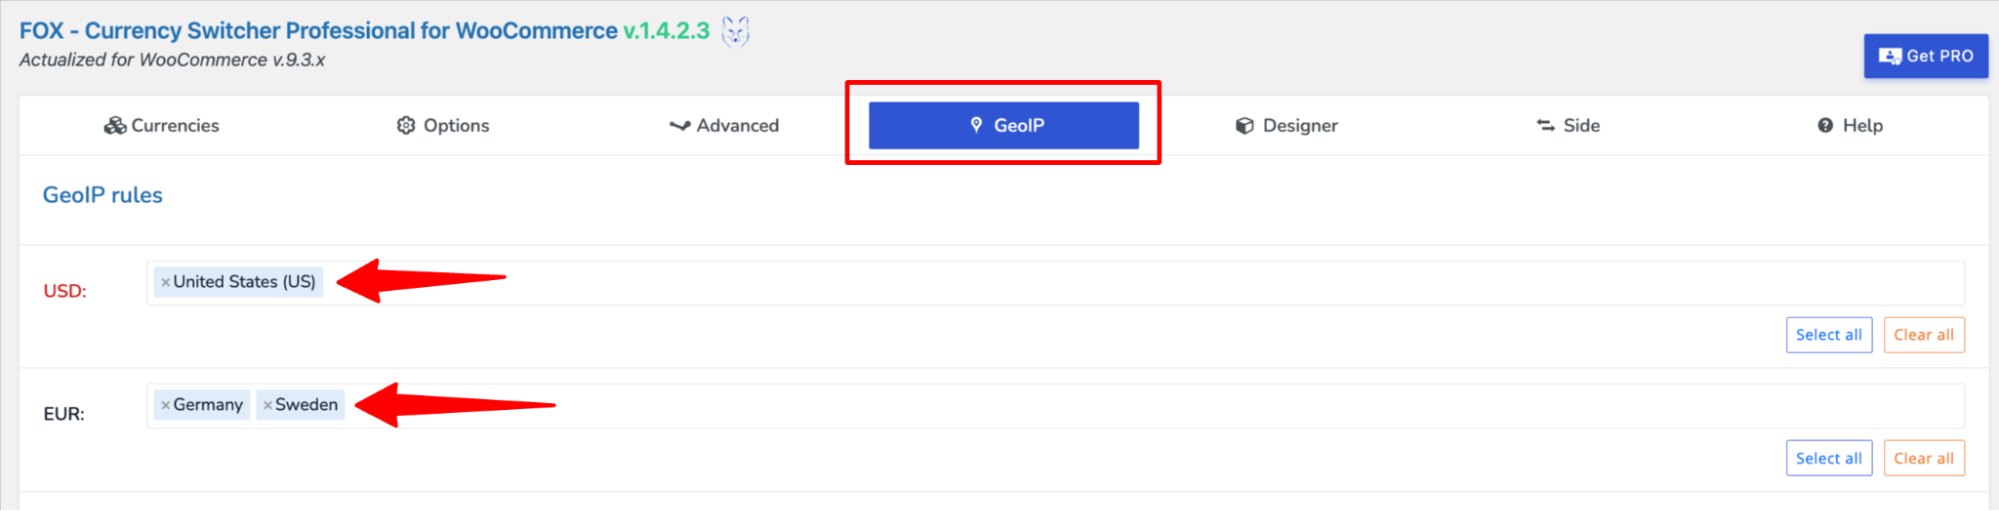
You can set the GeoIP rule to configure which currencies are available in which locations.
To add a search, select the tab for a currency, then add the country. Repeat the same process to assign currencies to countries.
Step 4: Set the design of the currency switcher (optional)
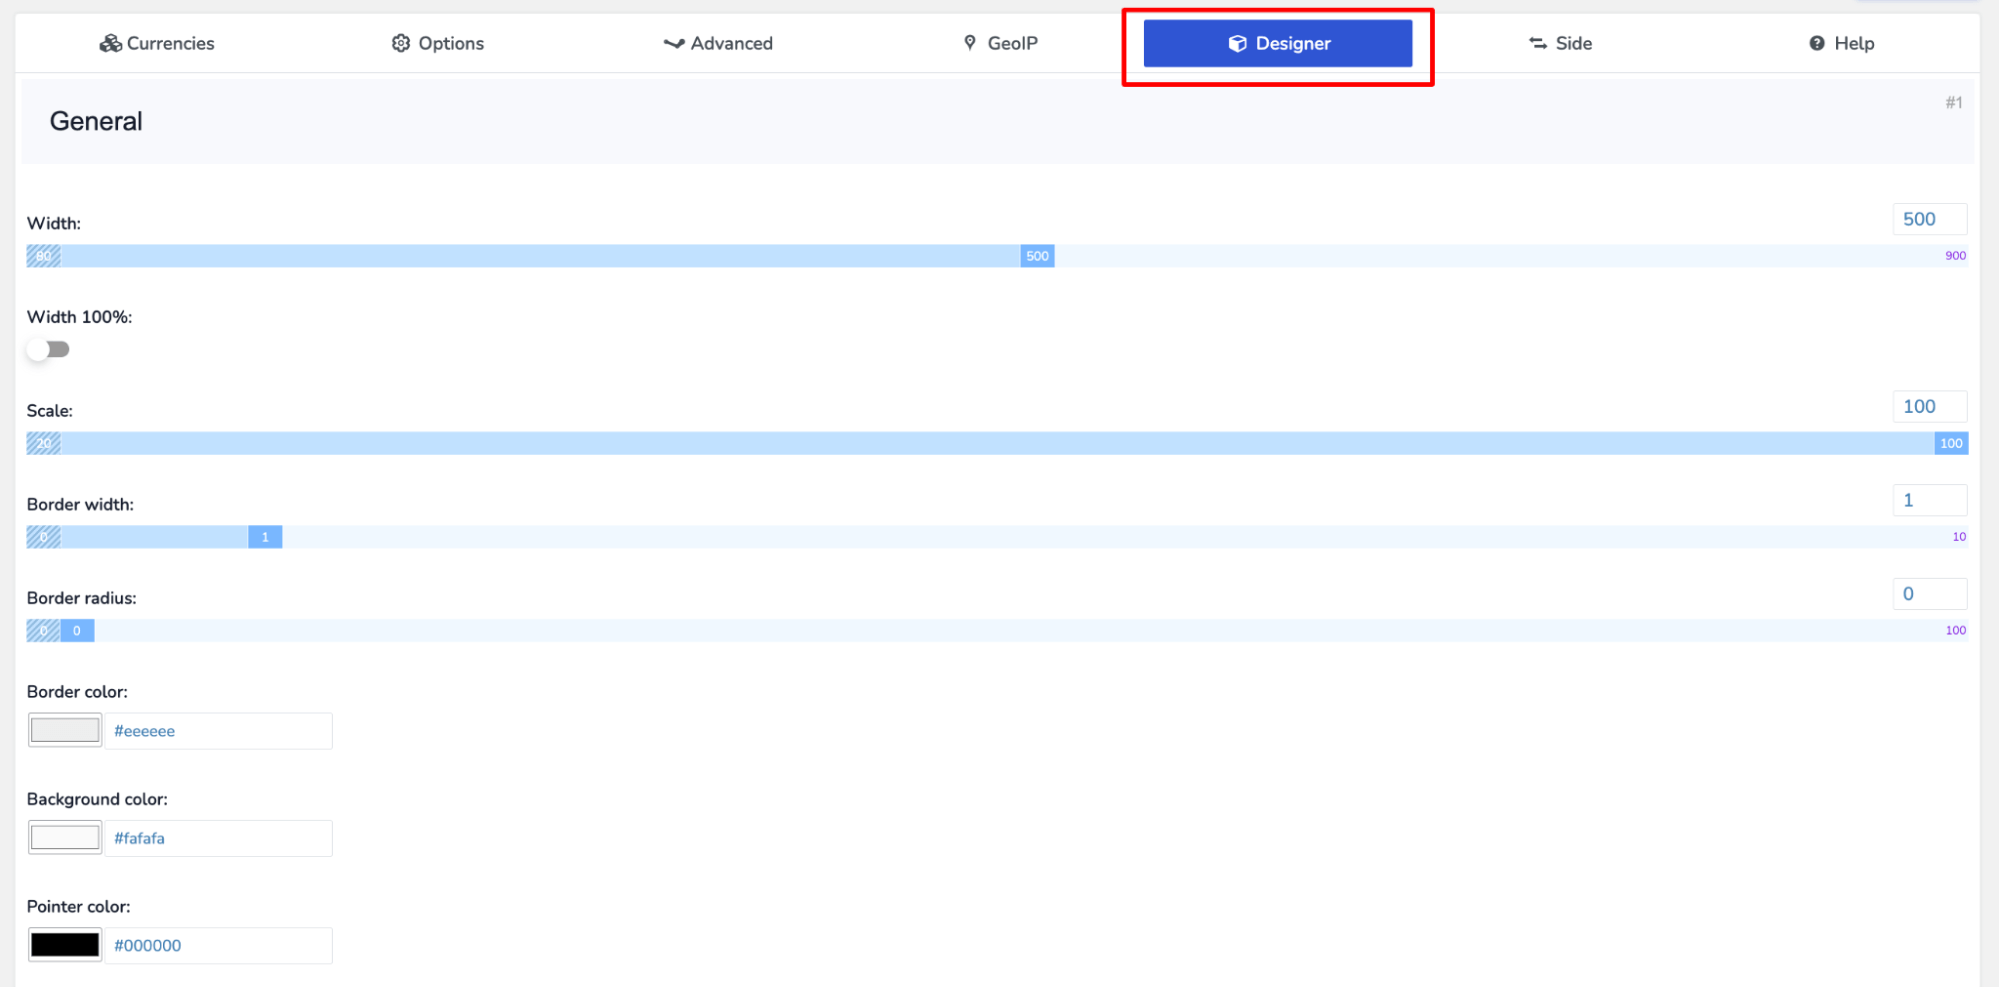
On the Designer tab, you can create a new design and add it to your checkout page using a shortcode.
You can change generation options such as width, border radius, border color, and background color here.
Scroll down a little to update the title color, font, etc. For the description, you also get similar options like font family, font color, etc.
After making design changes, click 'Save Changes'.
Step 5: Enable the side switcher
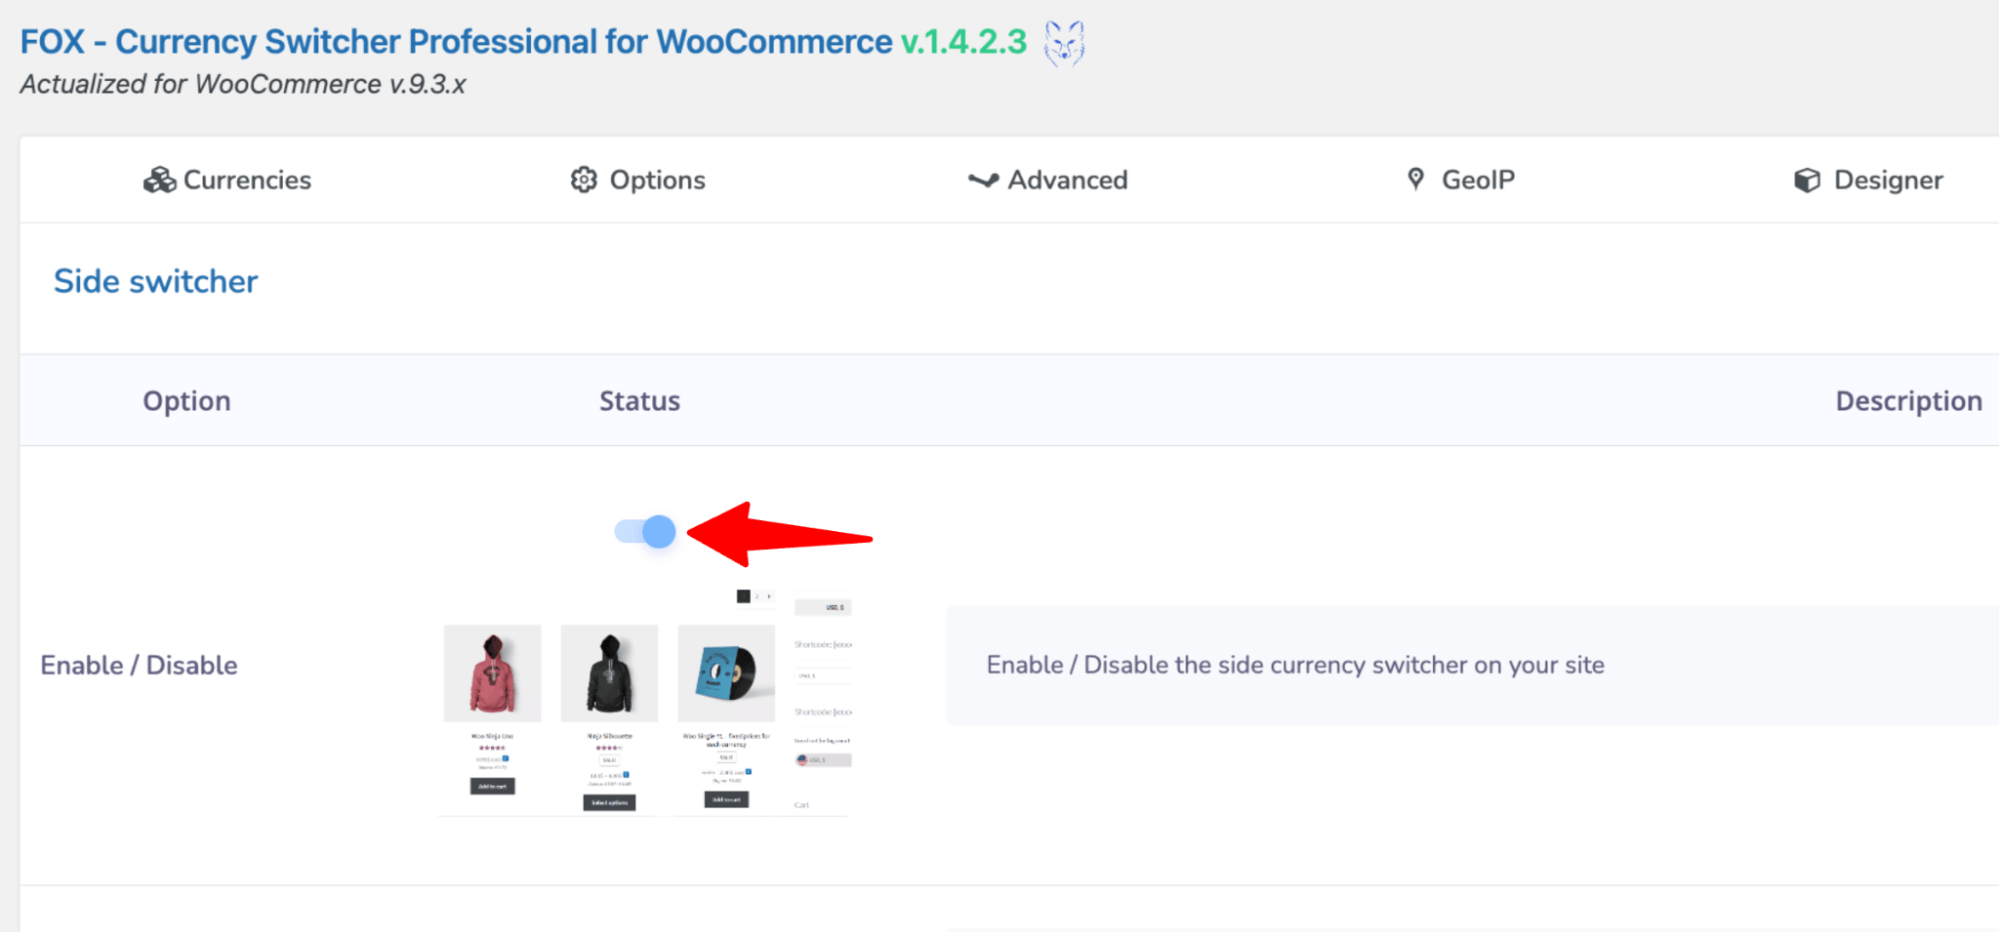
Now move to the Side tab and turn on the Toggle below Status to enable it.
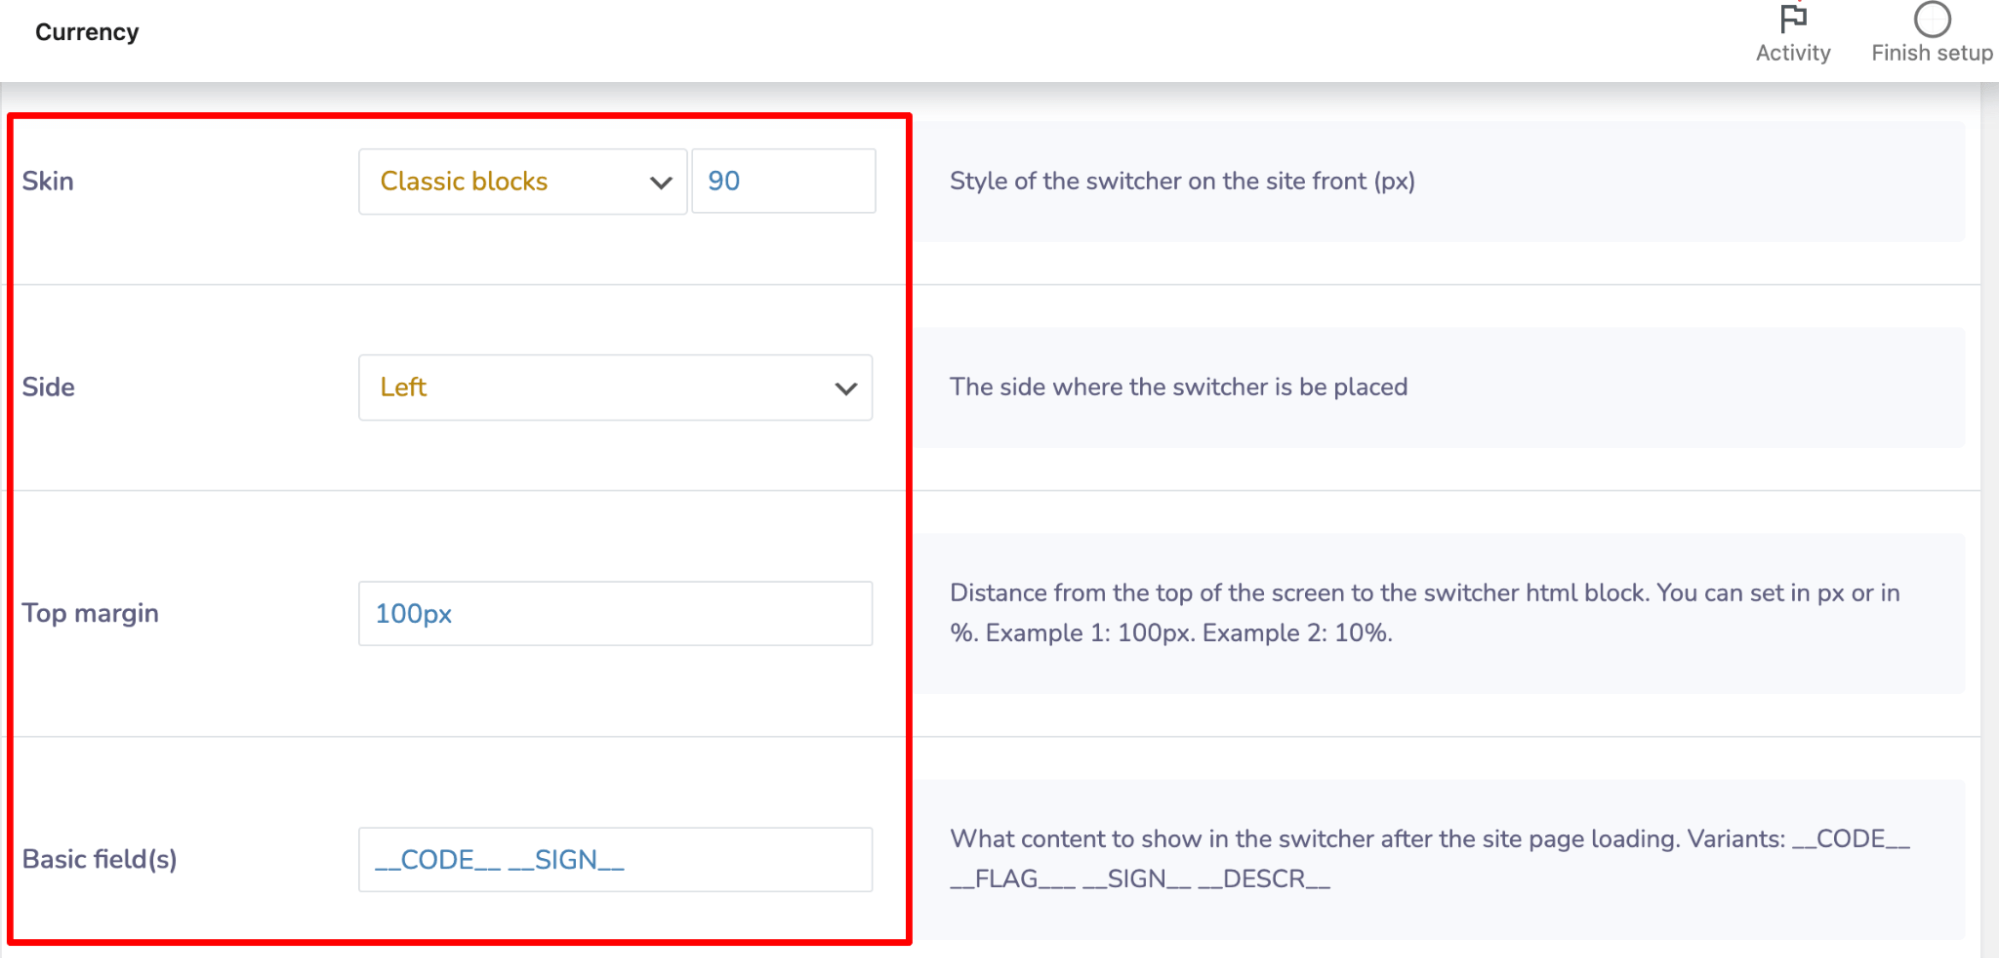
In this tab, you can choose the skin type for the currency switcher, select the sides it will appear on, add a margin, etc.
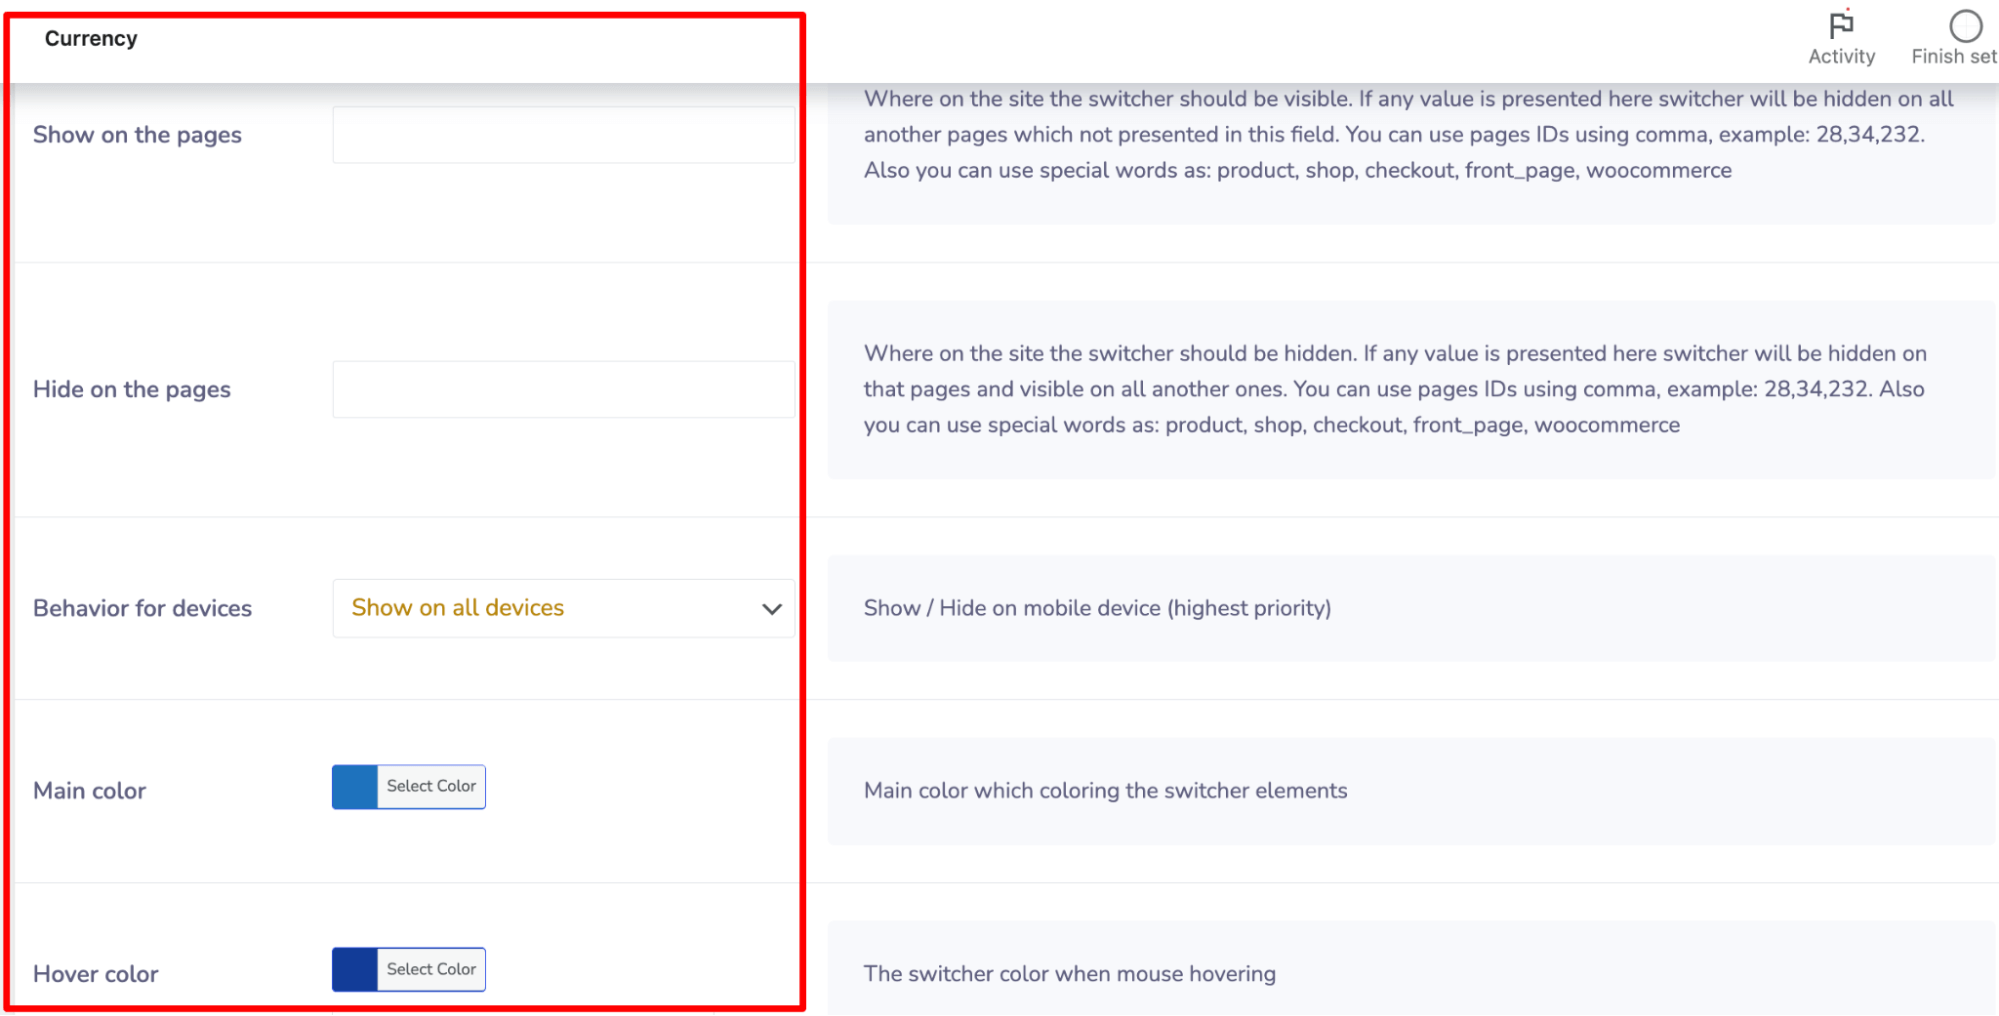
Scroll down to customize the currency switcher settings, where you can choose specific pages to display or hide the currency change option, control its visibility on different devices, and adjust the main and hover colors for a tailored look.
That's it. The currency switcher is ready.
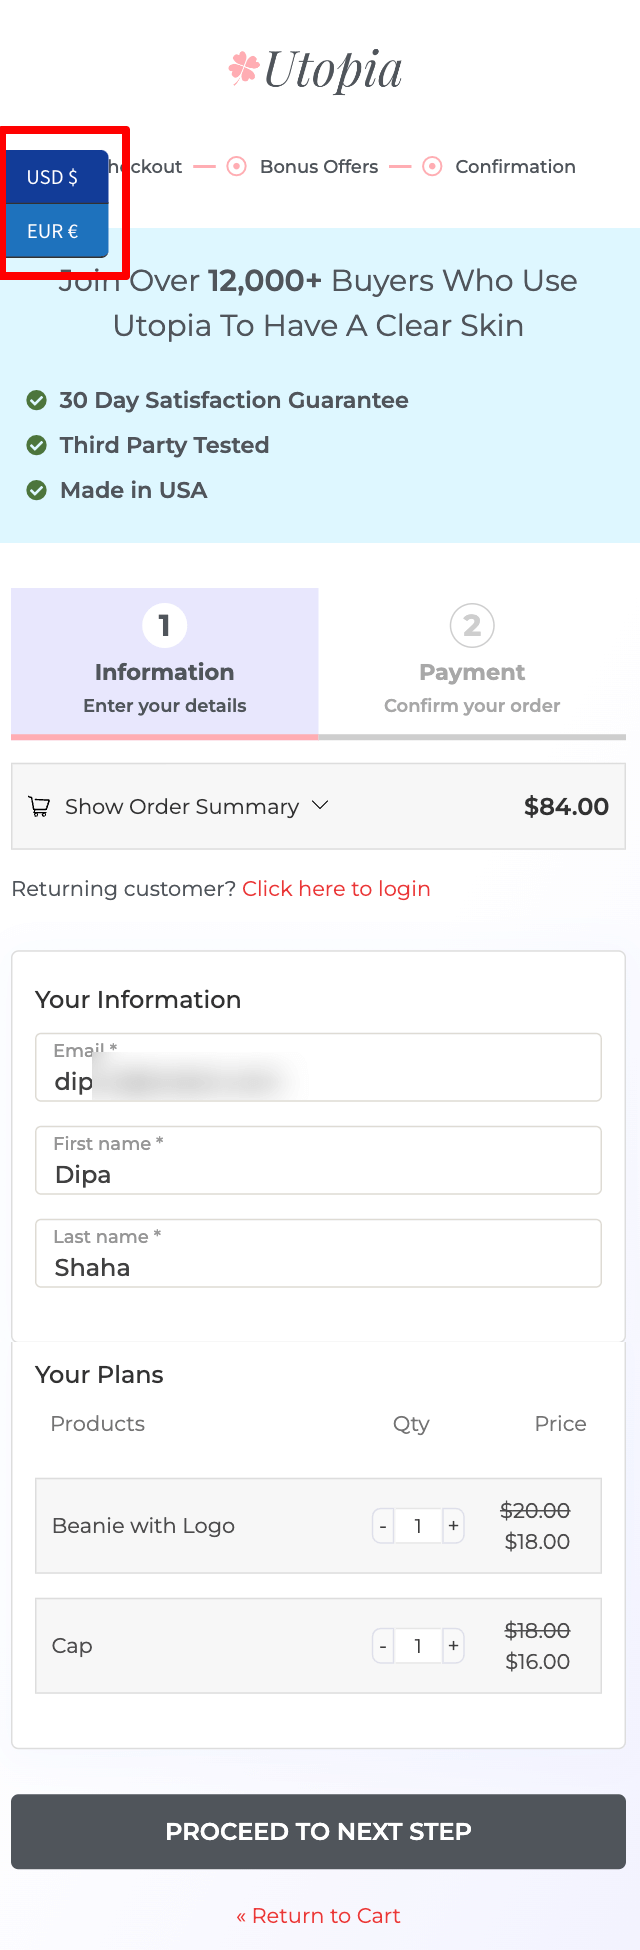
Now, place a test order and, on the top left/right side (depending on your settings), check whether the Currency Change option appears at checkout.
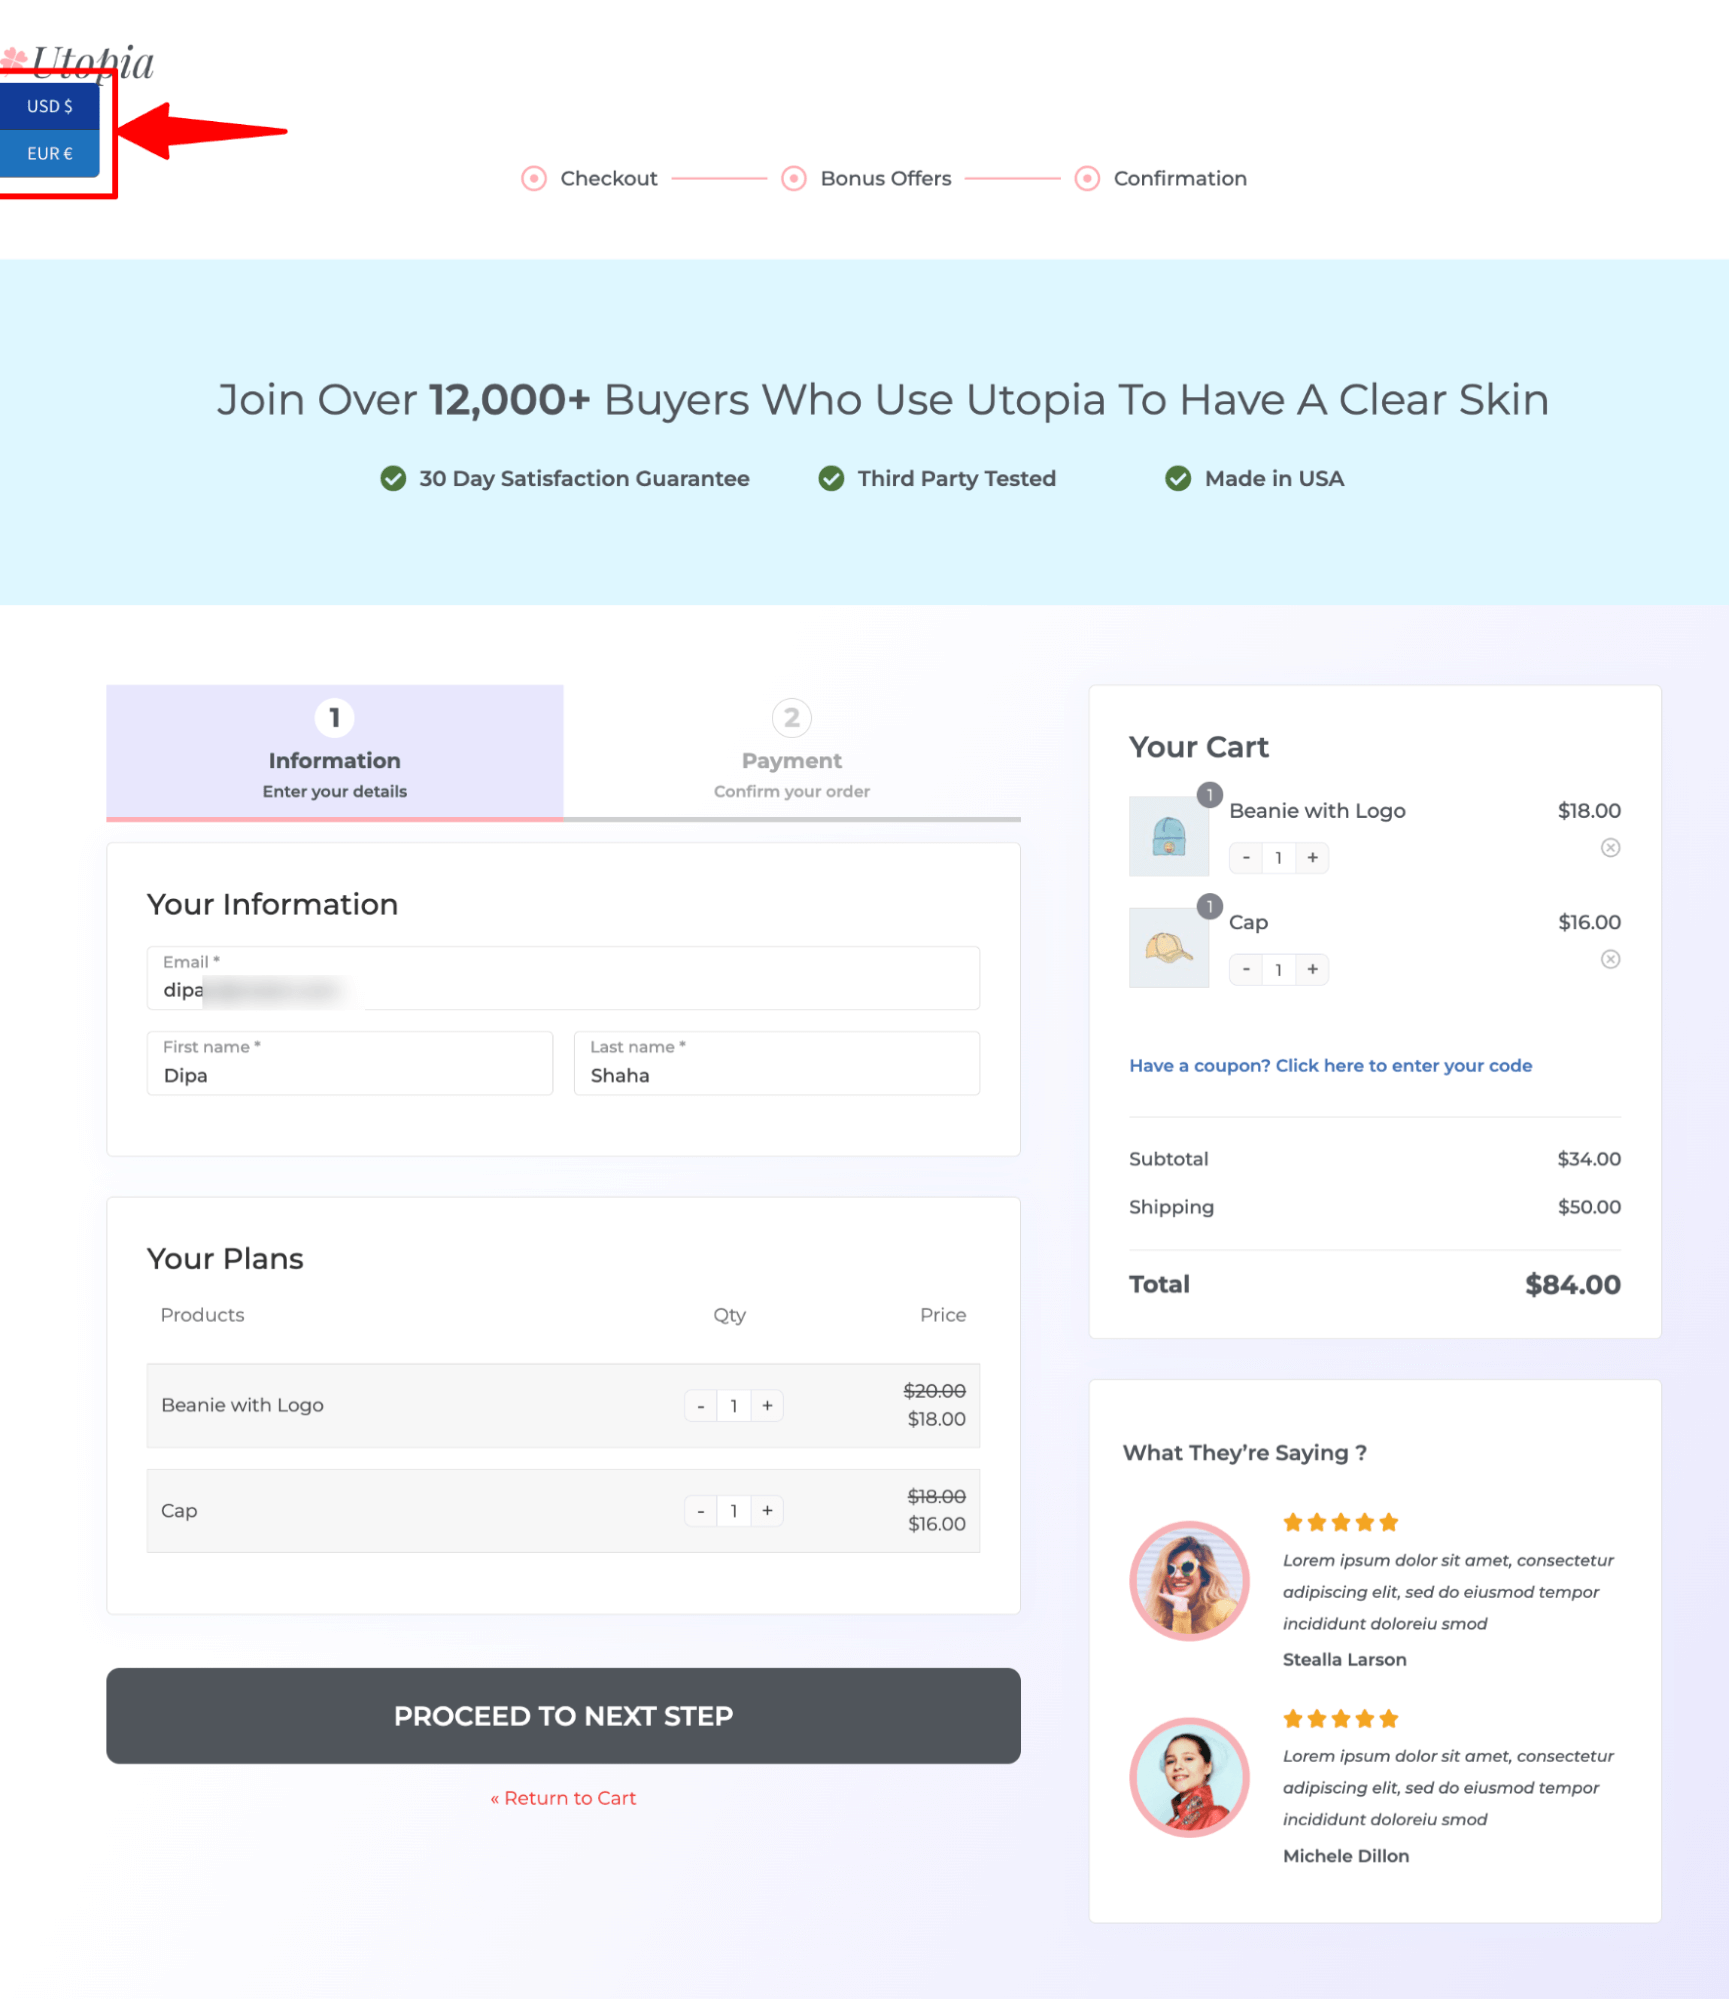

Here is what it looks like on mobile devices.
Method 3: Switch Prices Automatically By Country
A currency switcher only works if shoppers actually notice it and use it.
Automatic detection takes that extra step away by setting the currency before they have to do anything.
Three common ways to decide which currency to show work a little differently.
- By IP geolocation
In WooCommerce, set Default Customer Location to Geolocate and add a MaxMind license key.
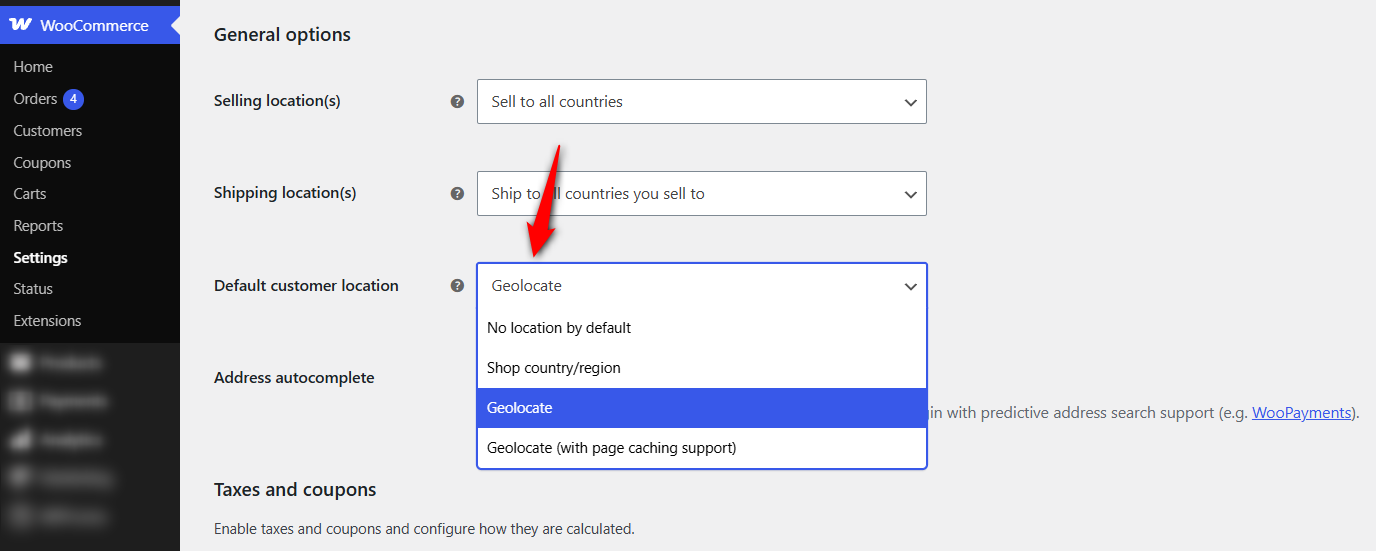
Your currency switcher can then use that location data to choose the currency automatically.
- By billing or shipping country
In this setup, the currency changes when the shopper selects their country during checkout.
It can be more accurate than IP detection because you're using the country they actually provide, but the downside is that the currency changes much later in the shopping journey.
- By site language
This works well for multilingual stores where changing the language also means changing the target market.
Popular multilingual plugins such as WPML and Polylang can work with major currency switchers to make this happen.
Whichever method you use, keep the manual currency switcher available too.
IP detection can get things wrong when someone is travelling, using a VPN, or browsing from a corporate network.
If the shopper has no way to correct the currency, you’re making them fight your checkout over something that should be simple.
Watch for one more thing: page caching.
If a currency-specific page gets cached, the next shopper may be served that same cached version instead of getting a fresh price for their location.
Keep cart and checkout pages excluded from caching, and use your currency plugin's cache-compatible mode if it offers one.
That combination gives you the convenience of automatic detection without taking away the shopper's ability to fix it when the detection gets it wrong.
5 Best Practices for Using Currency Change at Checkout
1. Manual currency selection options
Let users manually choose their preferred currency, since automated detection can be inaccurate.
This prevents misalignments with user preferences and unnecessary location tracking.
2. Place currency switchers on key pages
Position the currency switcher on important pages like the homepage, product pages, and checkout, where users will interact with it most.
3. Clearly display currency and final payment amount
Ensure the selected currency is displayed throughout checkout, including the final payment screen.
Highlight the currency and order total in the mini cart section using FunnelKit.
4. Optimize for mobile devices
Make sure the currency switcher is mobile-responsive and positioned well on smaller screens, especially on the checkout page, for a smoother customer experience.
5. Show accurate, up-to-date currency rates
Update currency rates regularly to avoid discrepancies in payment amounts.
Use plugins with automatic updates or manually check exchange rates to maintain accuracy.
Frequently Asked Questions
Yes, using a lightweight currency switcher plugin, you can offer multiple currencies without impacting the website’s performance.
However, choose reliable, well-coded plugins optimized for speed. You can choose any plugin from the list we shared in this blog.
No. In fact, if implemented properly, offering different currencies can enhance the shopping experience and help customers feel more comfortable completing purchases.
It's essential to display the currency clearly throughout the checkout process, so users know what currency they are being charged in.
Yes, a well-designed currency switcher can be configured to display taxes, shipping charges, and total costs in the selected currency.
While geo-location-based currency switching can be convenient, it’s important to let customers choose their currency manually. Geolocation features can be inaccurate, which can show users the wrong currency.
By providing a manual option, you let users take control of their experience and avoid potential mistakes.
No, WooCommerce doesn't offer a built-in currency switcher at checkout.
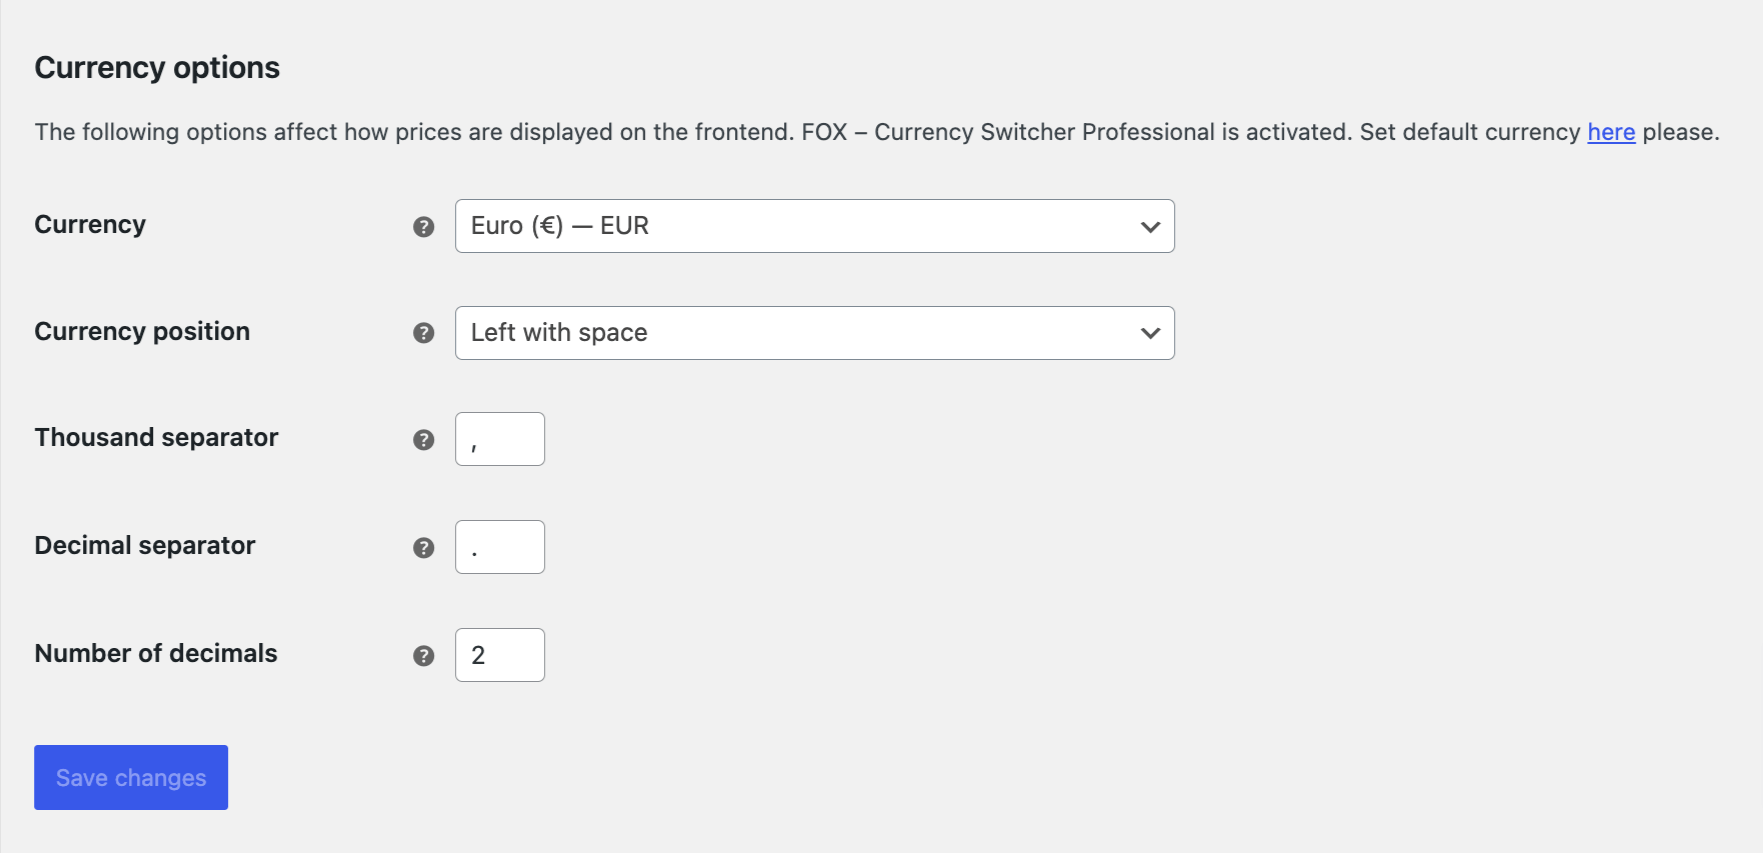
However, you can change your store's default currency under WooCommerce ⇨ Settings ⇨ General ⇨ Currency Options.
The woocommerce_currency and woocommerce_currency_symbol filters change what is displayed, and that is all they change.
Prices, taxes, shipping, and the amount sent to your gateway stay exactly the same.
Building the conversion layer yourself is a real project, which is why we recommend a gateway feature or a maintained plugin.
Offer Currency Change at WooCommerce Checkout and Boost Sales!
Integrating a currency change option at checkout in your WooCommerce store can significantly enhance the user experience for international shoppers.
By allowing customers to view prices in their preferred currency, you reduce confusion, build trust, and make the shopping process more transparent. This can lead to higher conversion rates and ultimately boost sales.
However, ensure real-time exchange rates are displayed during checkout.
Also, make the currency switcher prominent so users can easily find it and change the currency if they want to.
Along with offering the option to change currency, we also suggest using FunnelKit Funnel Builder to optimize your checkout page for conversion, with options such as Google Address autocomplete, multi-step preview, and express checkout.
Do get your hands on FunnelKit Funnel Builder today!

Editorial Team
September 11, 2026WooCommerce gift wrap might be the easiest extra money your store can make, yet most stores never offer it. Think about a department store in December. You buy a candle,...

Editorial Team
September 7, 2026Running a WooCommerce store means juggling a lot of moving parts. Security has to stay near the top of that list. WooCommerce's popularity cuts both ways though, since the same...

Editorial Team
September 2, 2026Adding trust badges to your WooCommerce checkout can help remove the hesitation shoppers feel before entering their card details. That hesitation matters because 19% of shoppers abandon checkout because they...






