Discover everything you need to know about WooCommerce caching, how it works, which pages to exclude, and how to configure it for optimal performance.
Caching helps speed up your website by temporarily storing frequently accessed data.
While caching significantly improves load times, WooCommerce stores rely on dynamic content like carts, checkout pages, and personalized pricing.
If not configured properly, caching can cause serious issues like incorrect prices or broken cart functionality.
In this blog, we’ll guide you through how to set up WooCommerce caching the right way, including which pages to exclude and best practices to follow, and much more.
Let’s dive in!
Table of Contents
- 1 What is Caching?
- 2 Different Sources of Caching
- 3 How Does Aggressive Caching Affect WooCommerce?
- 4 Why Do You Need to Configure WooCommerce Caching Explicitly?
- 5 What Should You Exclude from Caching?
- 6 Use Custom WooCommerce Checkout or Upsell Pages? Here’s How to Exclude the Pages Using Different Plugins...
- 7 How to Test the WooCommerce Store after Caching?
- 8 Effective Troubleshooting and Tips
- 8.1 Tip #1: Use the incognito mode to test your WooCommerce store processes after caching
- 8.2 Tip #2: Check your store checkout process with different devices in non-logged-in mode
- 8.3 Tip #3: Choose the right cache plugin
- 8.4 Tip #4: Clear browser cache
- 8.5 Tip #5: Check for plugin updates or disable any conflicting plugins
- 8.6 Tip #6: Check for WooCommerce error logs
- 9 Should You Minify Your Website’s Code During Optimization?
- 10 Are You Ready to Set Up WooCommerce Caching in Your Store?
What is Caching?
Caching, in simple terms, involves storing frequently accessed website data temporarily to reduce load time, allowing the end-user to load the website faster.
This cache consists of high-speed data storage that enables quick data retrieval when customers access your online store.
If a website has been cached, its assets can be served quickly than if a website has to load pages each time it’s requested.
This ensures swift data retrieval, boosting load speed and enhancing user experience in your store.
There are two main types of caching:
1. Full-page caching
Full-page caching refers to caching the entire website’s HTML output.
When a user visits your website, the server can quickly deliver the cached copy instead of processing each file individually.
2. Object caching
Object caching involves storing frequently accessed objects, such as database queries or API requests, in memory to enhance the performance of your website.
Many businesses utilize caching systems and tools, such as Memcached and Redis, to implement WooCommerce object caching.
These tools offer a fast and efficient method for storing and retrieving data in memory.
Different Sources of Caching
Let’s look at different sources of caching:
- Browser caching - It’s a mechanism used by web browsers to store web page resources (images, CSS, and scripts) locally. To shorten page load times, browsers save a copy of the web page’s content on the device’s hard drive and retrieve it when requested. This is rarely an issue to focus on.
- Plugin caching - Some plugins implement caching mechanisms that store frequently accessed data or computations. This helps optimize performance by storing and using such data, reducing the need for doing redundant computations or resource-intensive operations.
- Content Delivery Network (CDN) - A CDN caches content (such as images, videos, or webpages) in proxy servers, which are located closer to end users than origin servers. Because the servers are closer to users making the request, a CDN delivers content more quickly.
- Database caching - It involves storing frequently accessed query results or data objects in temporary memory. It stores a subset of data in a transient storage layer that serves data much faster because it can access the primary database.
How Does Aggressive Caching Affect WooCommerce?
By default, many caching plugins don’t cache logged-in users.
But even if you do cache logged-in users, your WooCommerce website can face some serious issues on desktop and mobile, such as:
- Products displaying outdated information, such as prices, stock availability, or product descriptions
- Improper functionality of shopping cart and checkout pages, where real-time and personalized data matter
- Customers are able to view other customers’ account information, carts, or order history
- Challenging cache invalidation that leads to delayed updates on your store
- Dynamic pricing issues that display original prices rather than discounted prices
- Search and filtering functionality is affected, leading to inaccurate results
As a store owner, you must ensure that your online store is secure and complies with all relevant legal requirements.
For that, it’s essential to set up WooCommerce caching correctly in your store.
Why Do You Need to Configure WooCommerce Caching Explicitly?
Caching improves website speed and performance by storing copies of content for faster delivery.
However, WooCommerce stores require special caching configuration because they serve dynamic, personalized content that changes frequently, like carts, stock levels, user sessions, and checkout data.
Unlike regular server-side caching, which focuses on speeding up static parts of your website, WooCommerce caching operates at a plugin level and must carefully handle user-specific, transactional data to avoid issues such as incorrect prices or broken cart functionality.
Here is a comparison between WooCommerce caching and server-side caching:
| Feature | WooCommerce Caching | Server-Side Caching |
|---|---|---|
| Scope | Plugin-level, WooCommerce-specific data | Whole site, including WordPress core |
| Purpose | Optimize WooCommerce performance (cart, product, query) | Improve page load speed and reduce server load |
| Dynamic Handling | Must handle cart, checkout, and logged-in users carefully | Needs exclusions for dynamic Woo pages |
| Common Tools | Redis, plugin cache (e.g. WP Rocket + Woo addon) | Varnish, Nginx cache, server PHP Opcache |
Because WooCommerce caching must balance speed with real-time accuracy, explicit configuration and exclusions are essential for maintaining a fast and functional online store.
The first step towards it is to exclude specific pages from the cache to avoid any issues or discrepancies in your WooCommerce store.
What Should You Exclude from Caching?
As discussed above, caching your WooCommerce website may cause several functionality issues affecting conversions in your store.
To avoid such scenarios, it’s crucial to exclude certain dynamic pages of your WooCommerce store.
WooCommerce pages to exclude from caching
Here is the list of WooCommerce pages that need exclusion from caching:
- Login and registration pages
- Cart page
- Product pages
- Checkout page
- My account page
These are the primary dynamic pages where the content changes based on user preferences.
In addition, WooCommerce has a DONOTCACHEPAGE constant that you can use to exclude specific pages from caching manually.
But you can use a reliable plugin compatible with WooCommerce to make things easier.
WooCommerce sessions to exclude from caching
Exclude the WooCommerce session identifier _wc_session from caching.
_wc_session holds all the details of your customers’ carts and their shipping-related information. Caching it could cause issues like showing the wrong cart items and incorrect billing or shipping details.
Some of the best WooCommerce cache plugins already exclude various query stems, including the _wc_session.
WooCommerce cookies to exclude from caching
There are four WooCommerce cookies that you should exclude from your cache:
- woocommerce_cart_hash - It handles the identifiers that determine when the cart gets updated or refreshed.
- woocommerce_items_in_cart - Identifiers that help WooCommerce determine the correct items inside the cart.
- wp_woocommerce_session - This cookie has a unique code to find the shopping cart data in the database for each customer.
- woocommerce_recently_viewed - It powers the recently viewed widget and ensures it correctly displays each item for every visitor.
For more information, check out the official WooCommerce documentation.
Use Custom WooCommerce Checkout or Upsell Pages? Here’s How to Exclude the Pages Using Different Plugins...
FunnelKit Funnel Builder powers 20,000+ WooCommerce stores. Users have been using it to create high-converting checkout pages and upsell offers to generate more revenue than ever.
You can use it to customize your checkout pages and include all the high-converting elements to drive conversions.
It's the best all-in-one WooCommerce checkout manager tool to have in your store.
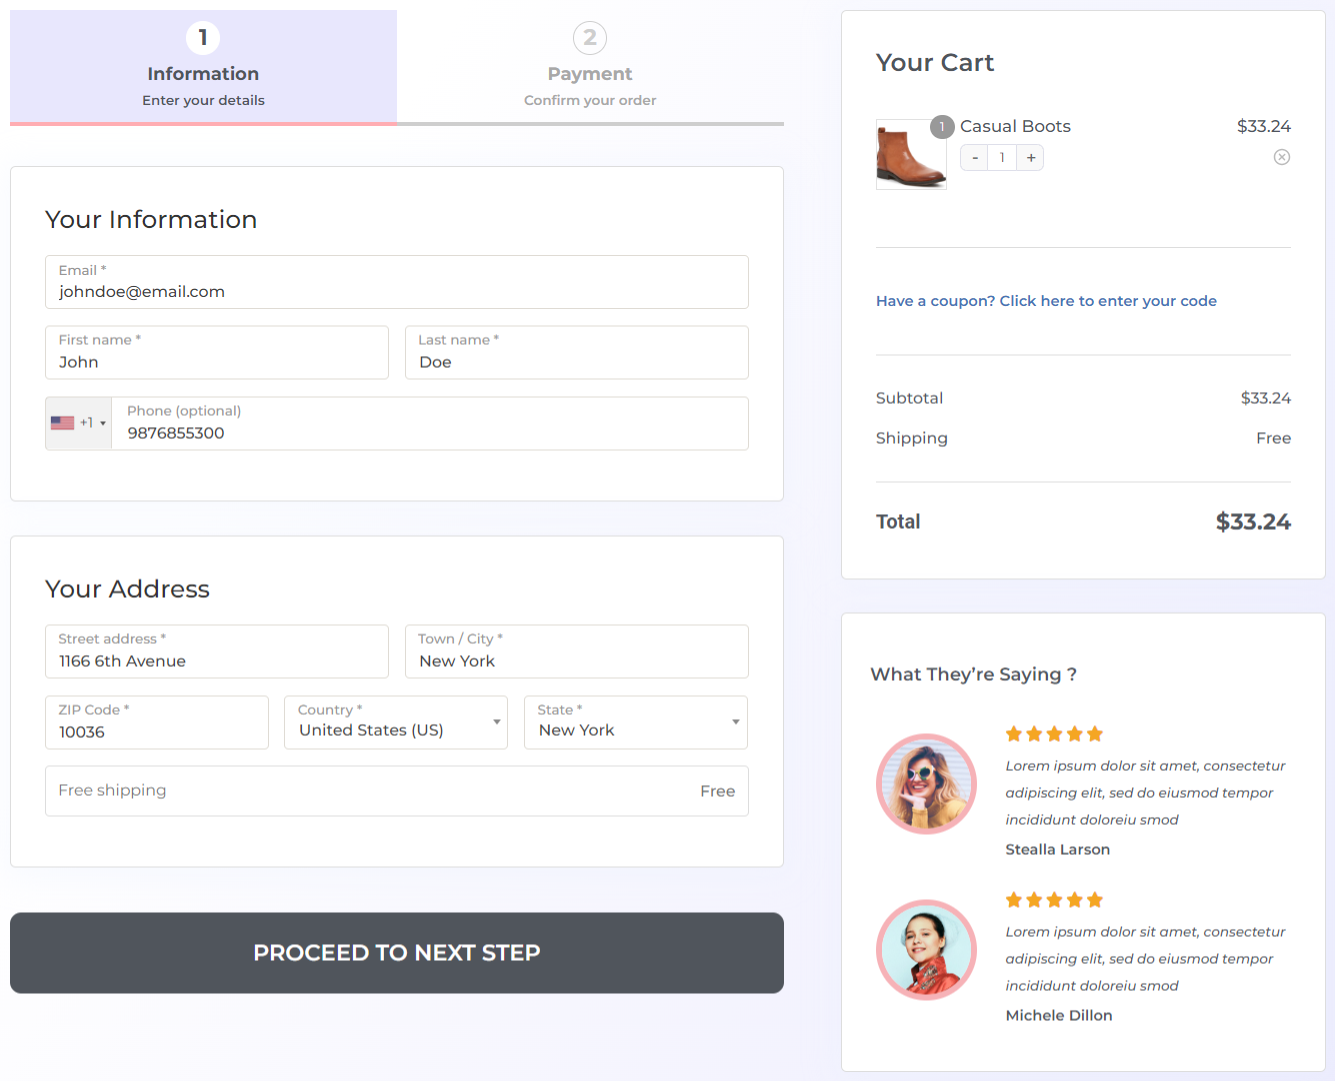
You can even offer order bumps and one-click upsells to boost the average order value in your WooCommerce store.
To ensure smooth operation, we recommend excluding pages created with FunnelKit Checkout or Upsells from your store.
In the section below, we will demonstrate how to exclude FunnelKit Checkout and Upsells from different caching plugins.
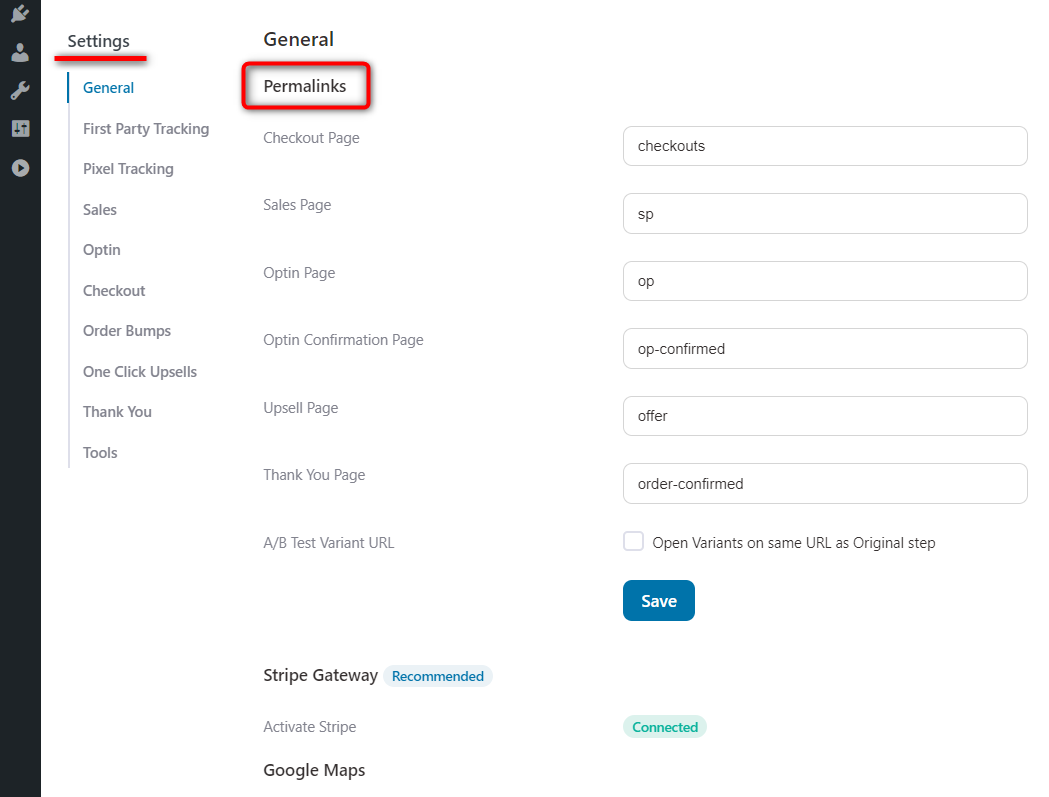
Make sure to copy the permalink slugs of checkout and upsell pages from the Funnel Builder's global settings.
Let’s explore.
Excluding the FunnelKit Checkout and Upsell pages from caching in WordPress plugins
Find the step-by-step process of excluding the checkout and upsell pages from caching with different WordPress plugins.
WP Rocket
Go to the WP Rocket settings.
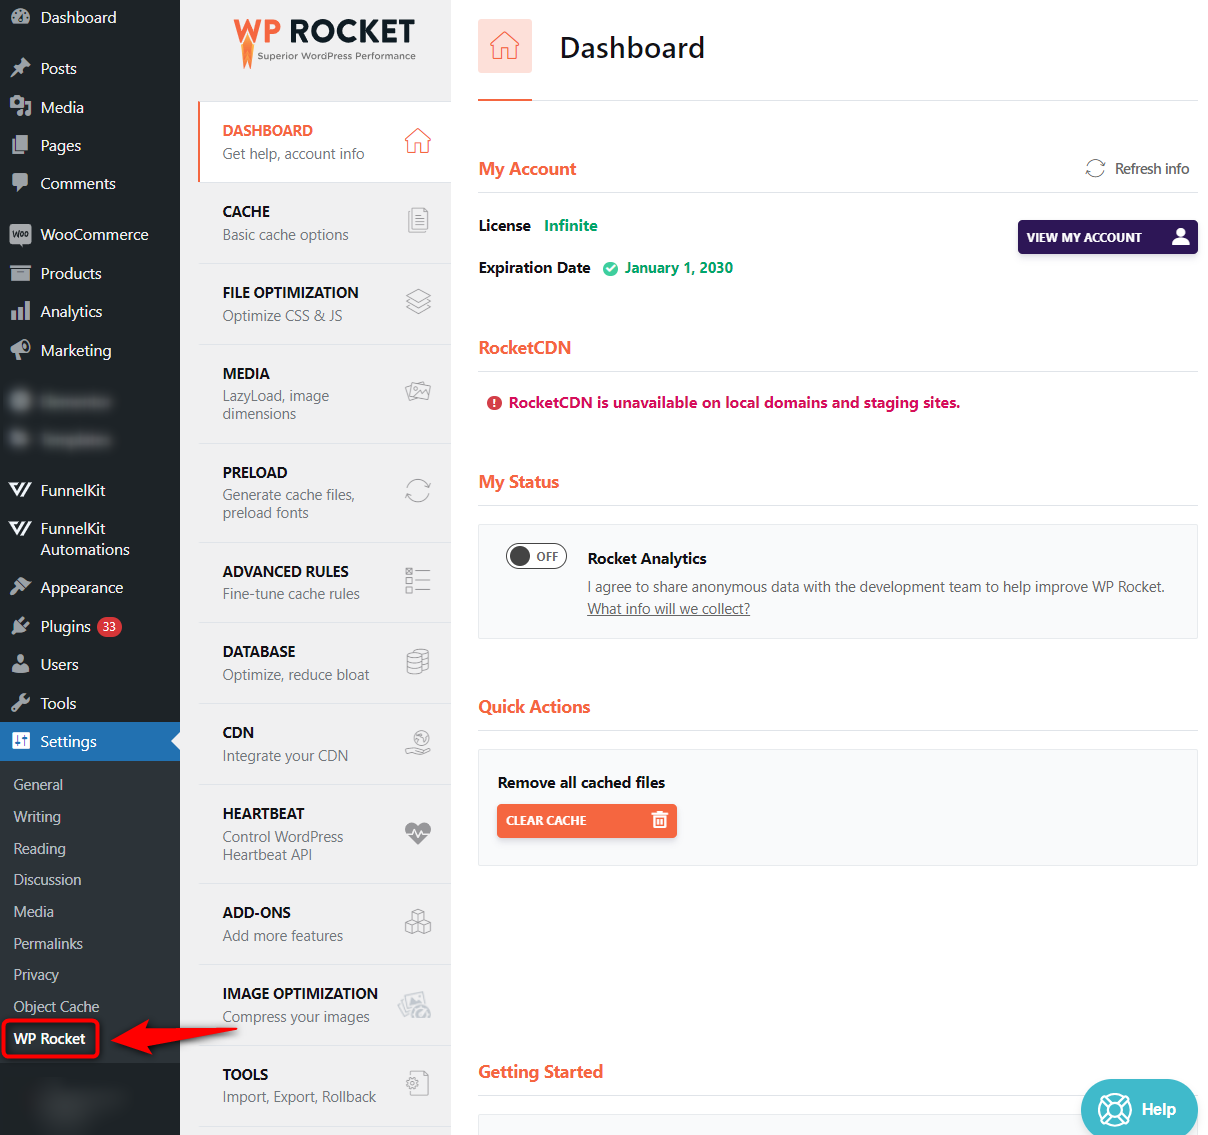
Next, hit the ‘Advanced Rules’ section and paste the permalink slugs there.
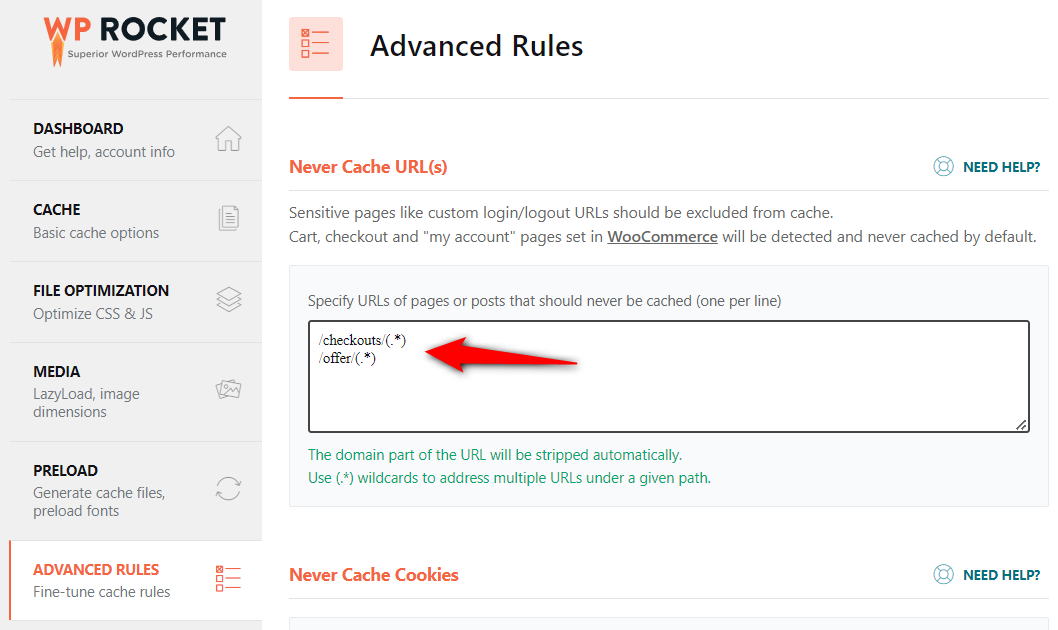
Once done, click on the ‘Save Changes’ button at the bottom.
Well done! You have successfully excluded FunnelKit Checkout and Upsell pages from caching using the WP Rocket plugin.
WP Super Cache
Open the settings of WP Super Cache and go to the ‘Advanced’ tab.
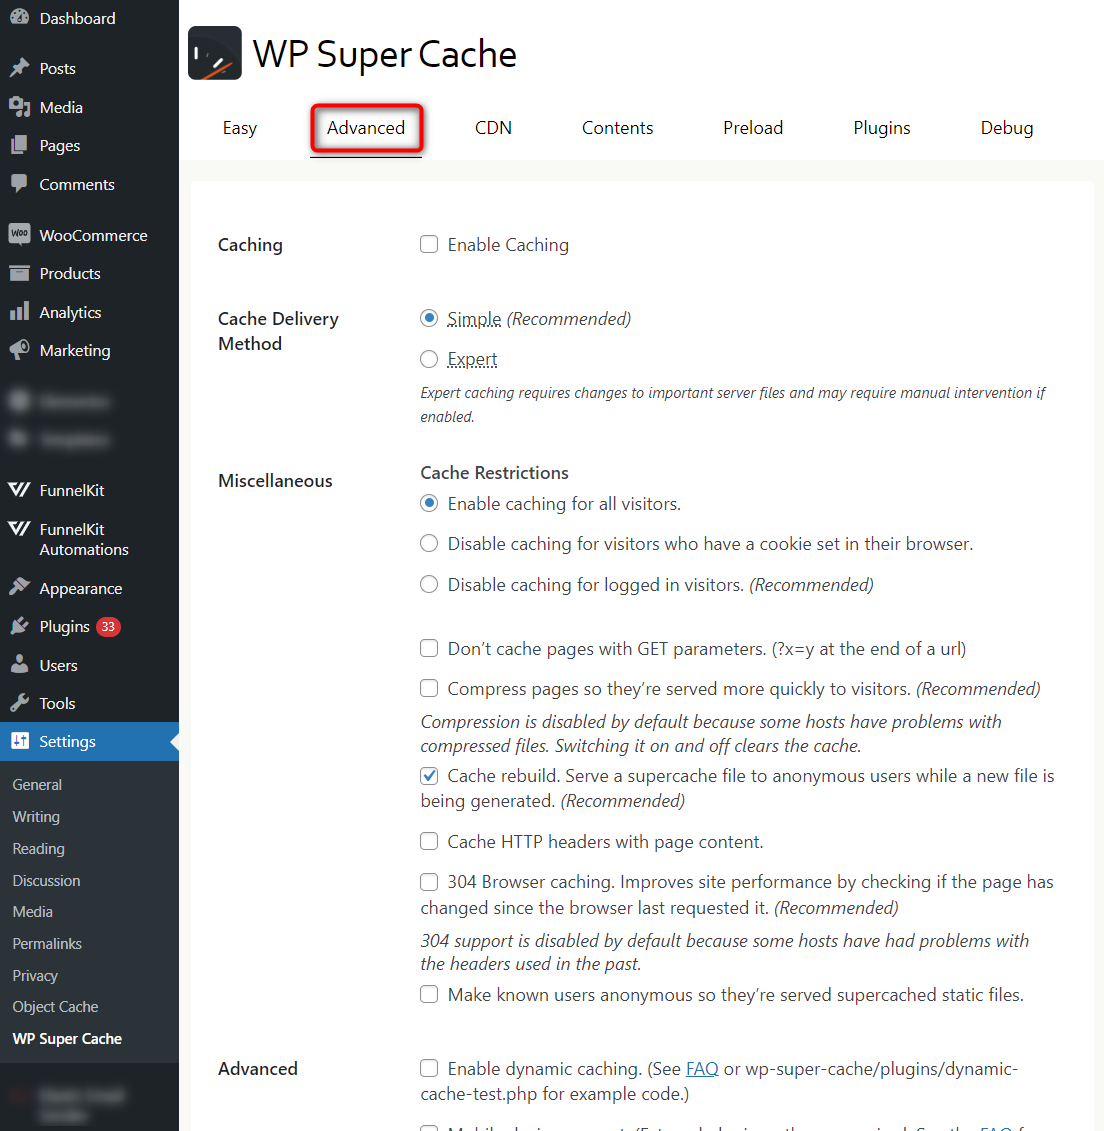
Scroll down to the ‘Rejected URL Strings’ section and paste the FunnelKit Checkout and Upsell permalink slugs.

Make sure to hit the ‘Save Strings’ button when done.
That’s it! This is how you can exclude the URL strings from caching using WP Super Cache.
W3 Total Cache
Go to settings of W3 Total Cache and click on ‘Page Cache’.
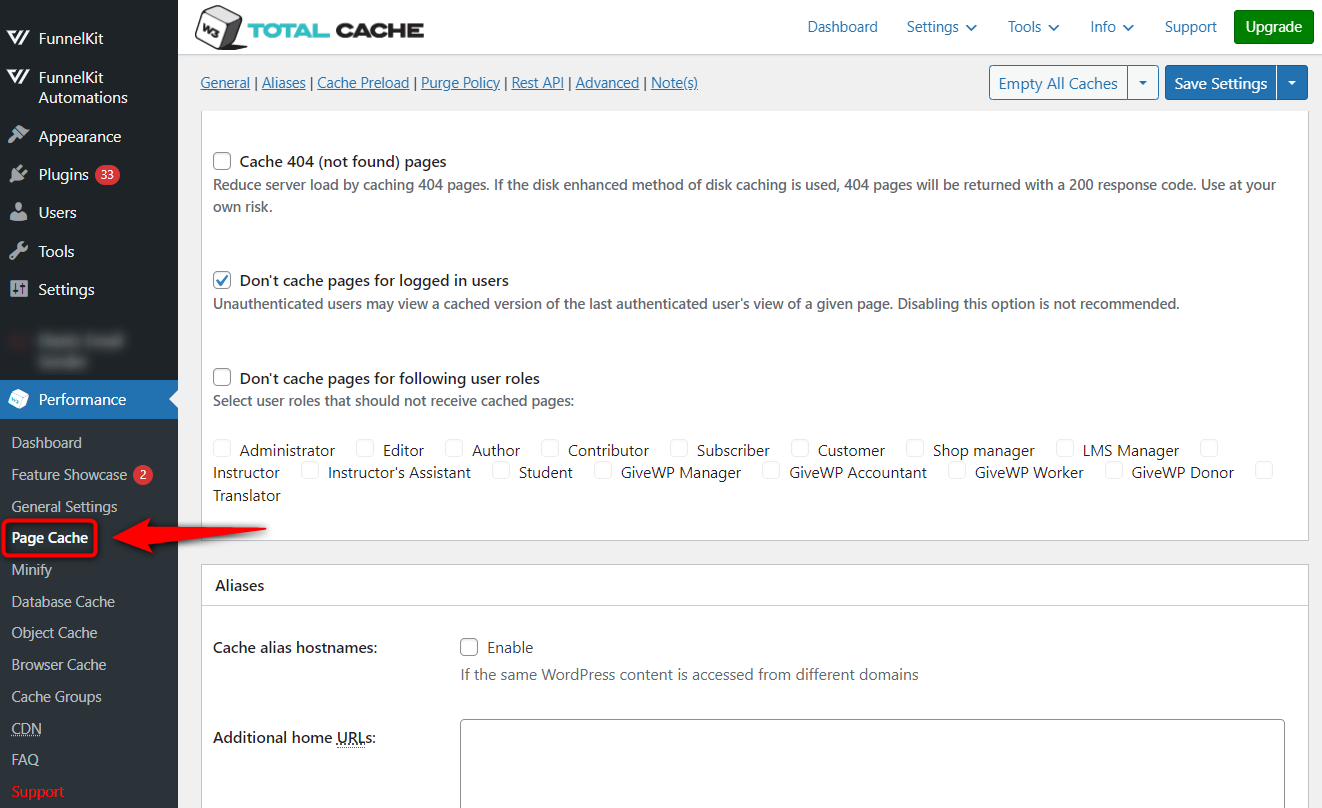
Scroll down to the ‘Never cache the following pages’ settings.
Paste the permalink slugs of the FunnelKit Checkout and Upsell pages there with /checkout* and /offer*.
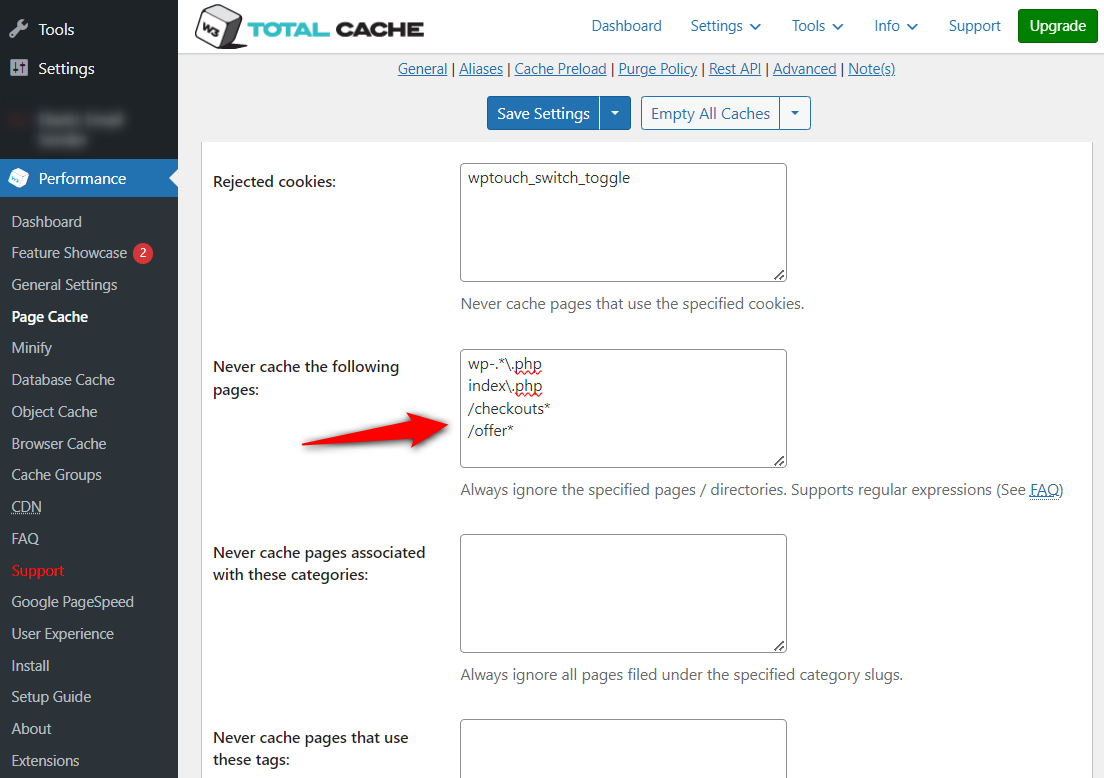
Once done, hit the ‘Save Settings’ button.
This will exclude all the FunnelKit Checkout and Upsell pages from caching.
WP Fastest Cache
Click on the WP Fastest Cache on your WordPress menu.
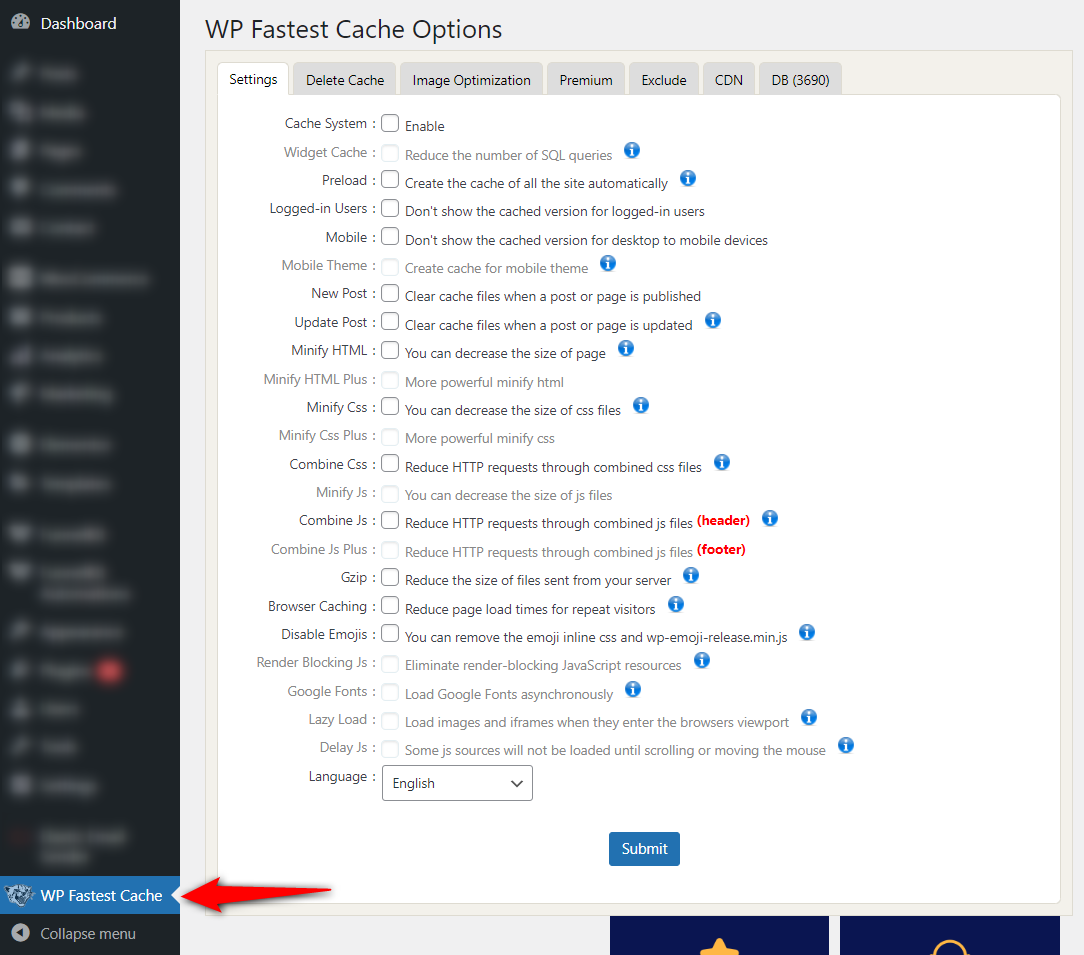
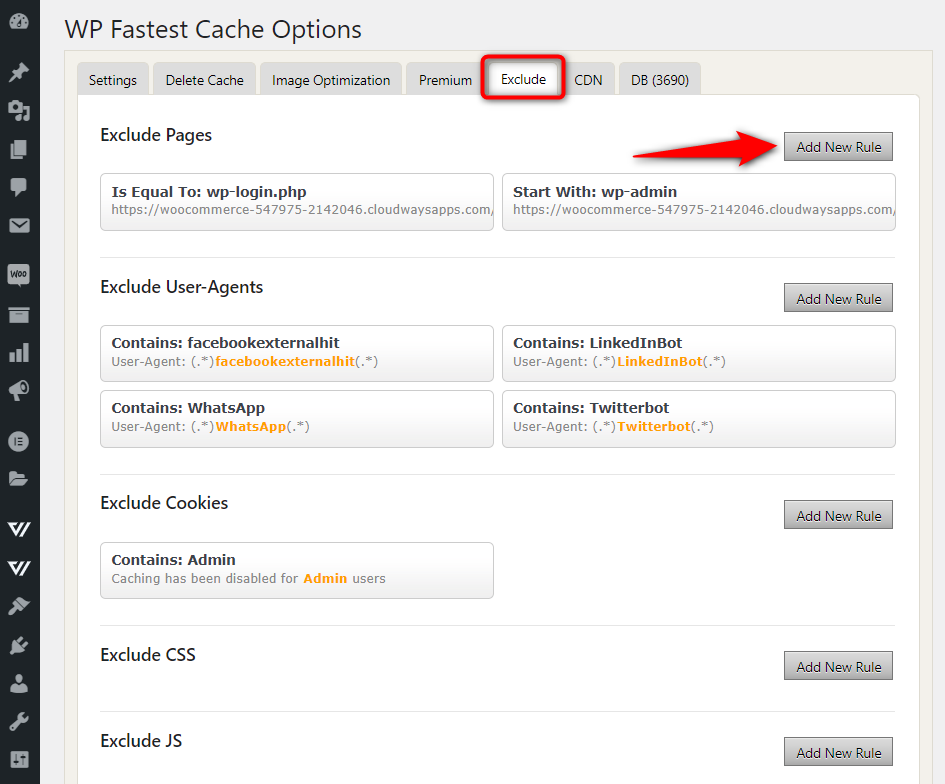
Go to the ‘Exclude’ tab and hit the ‘Add New Rule’ button.
Choose ‘Contains’ from the drop-down and paste the checkout permalink slug there.
Click on ‘Save’ when done.
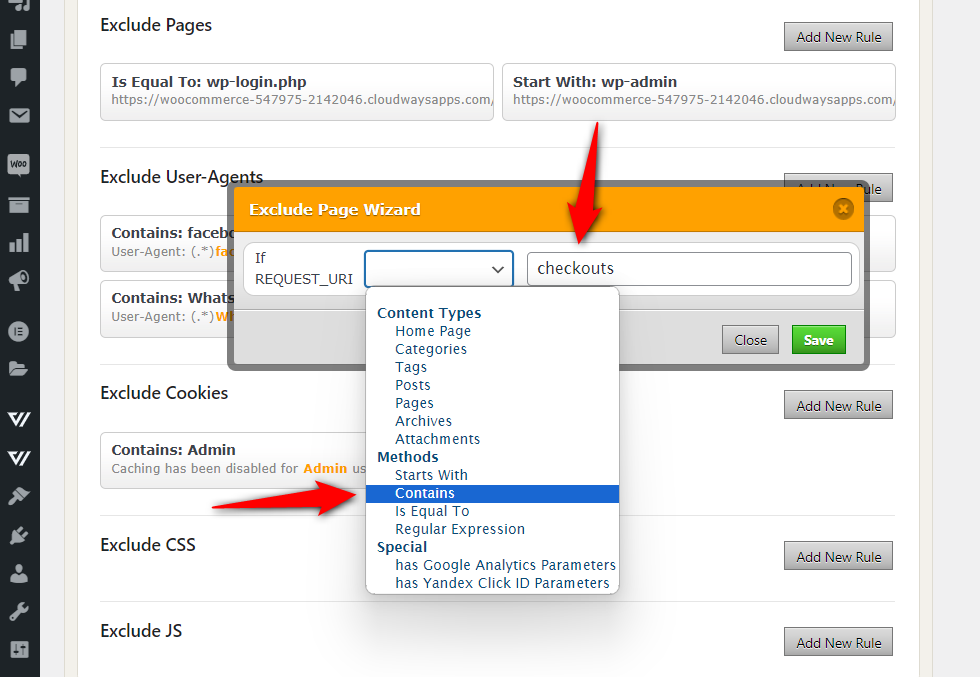
Similarly, do it with the FunnelKit Upsell permalink slug and save it.
These are the final settings you saved.
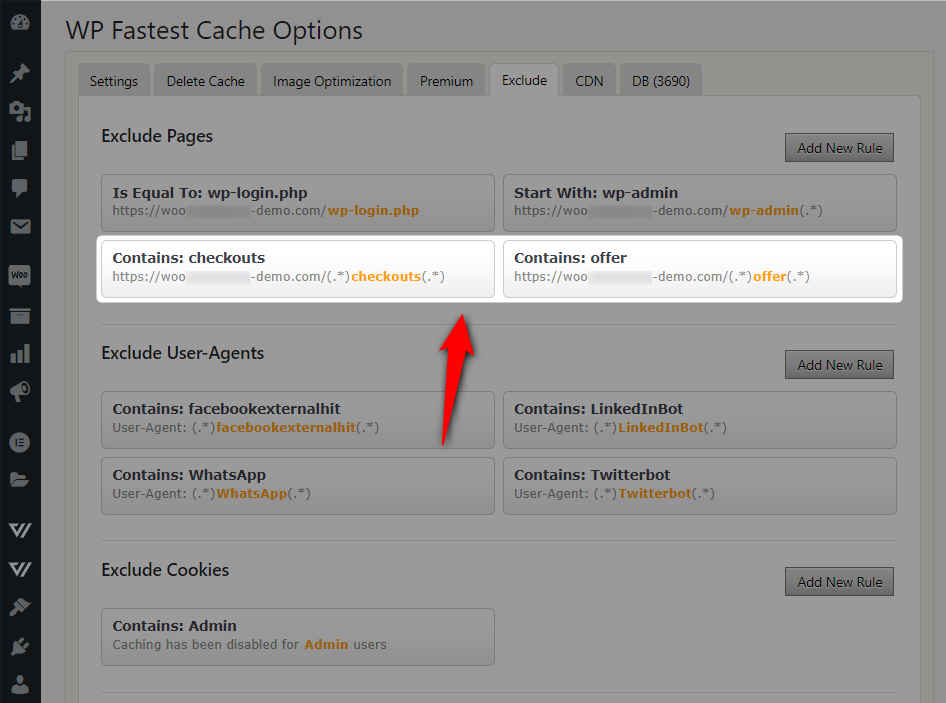
This will exclude all the FunnelKit Checkout and Upsell pages from caching with the WP Fastest Cache plugin.
LiteSpeed Cache
Navigate to Settings ⇨ LiteSpeed Cache from the WordPress menu and click on the 'Excludes' section.
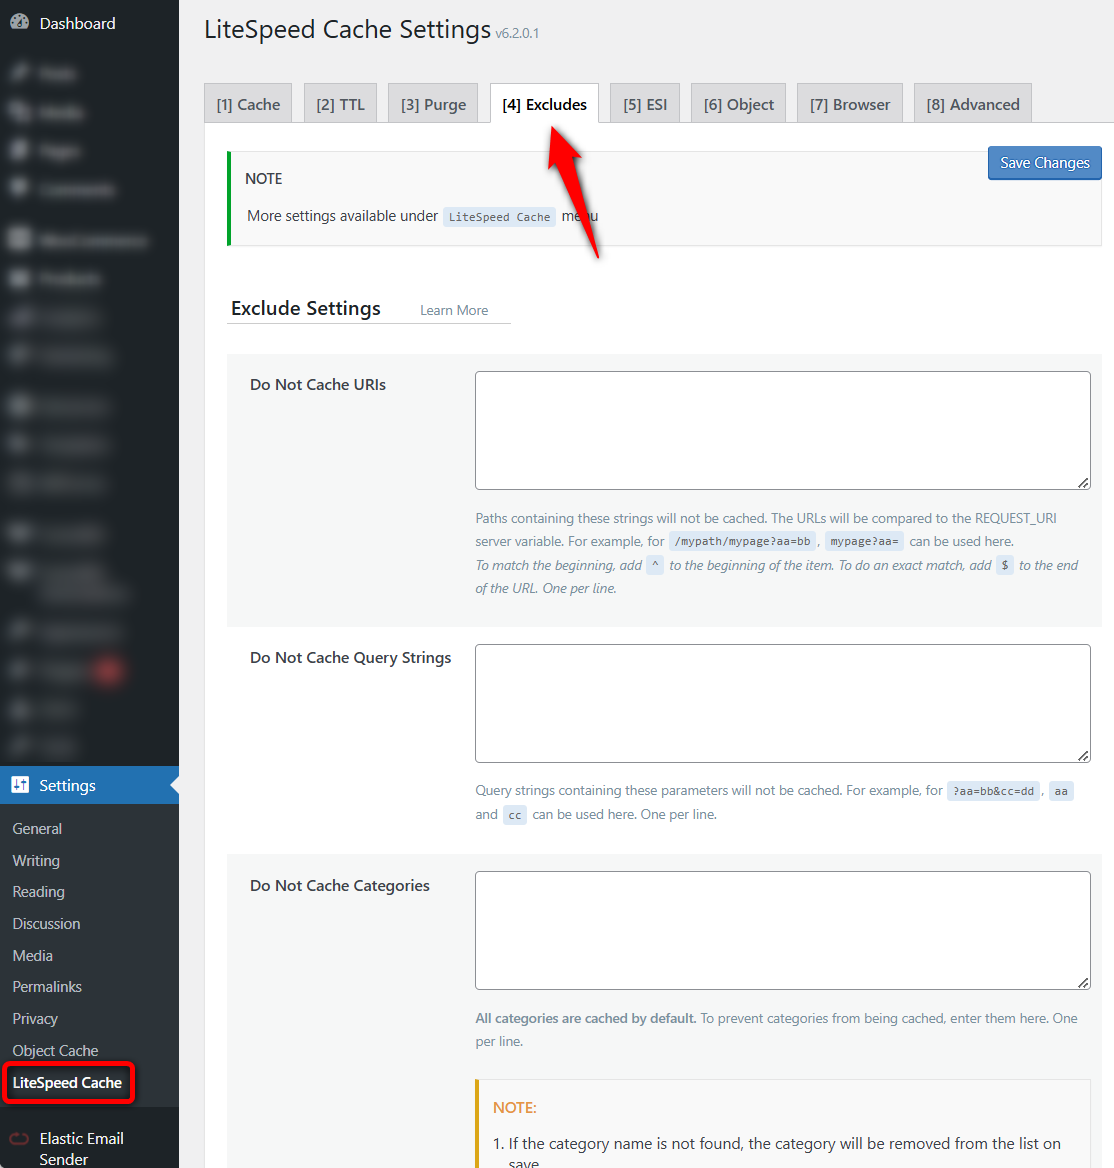
Paste the FunnelKit Checkout and Upsell URLs.
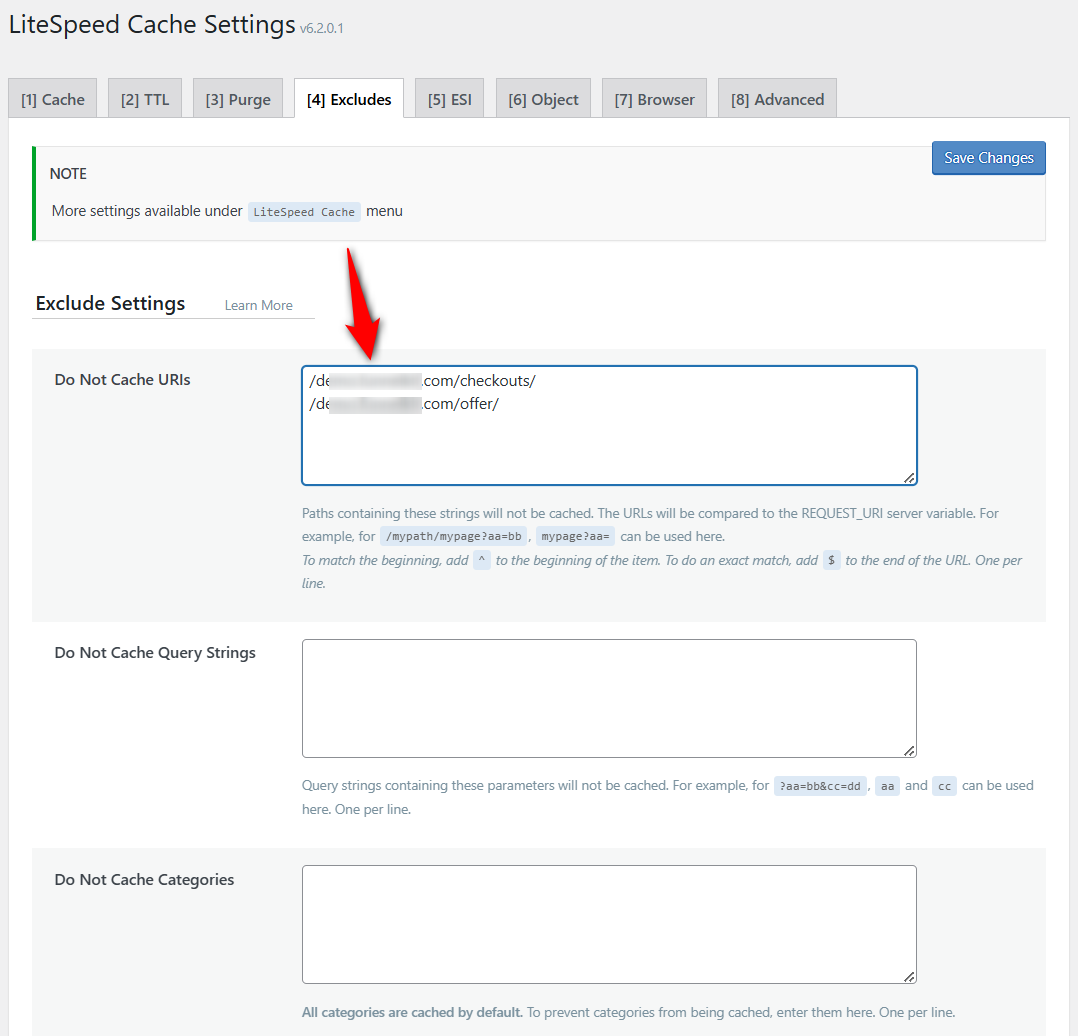
Make sure to hit the 'Save Changes' button to lock your changes.
This will exclude all the FunnelKit Checkout and Upsell pages from caching with the LiteSpeed Cache plugin.
Breeze (Cloudways)
Breeze is a WordPress cache plugin.
Navigate to Settings ⇨ Breeze from the WordPress menu and click on the ‘Advanced Options’ section.
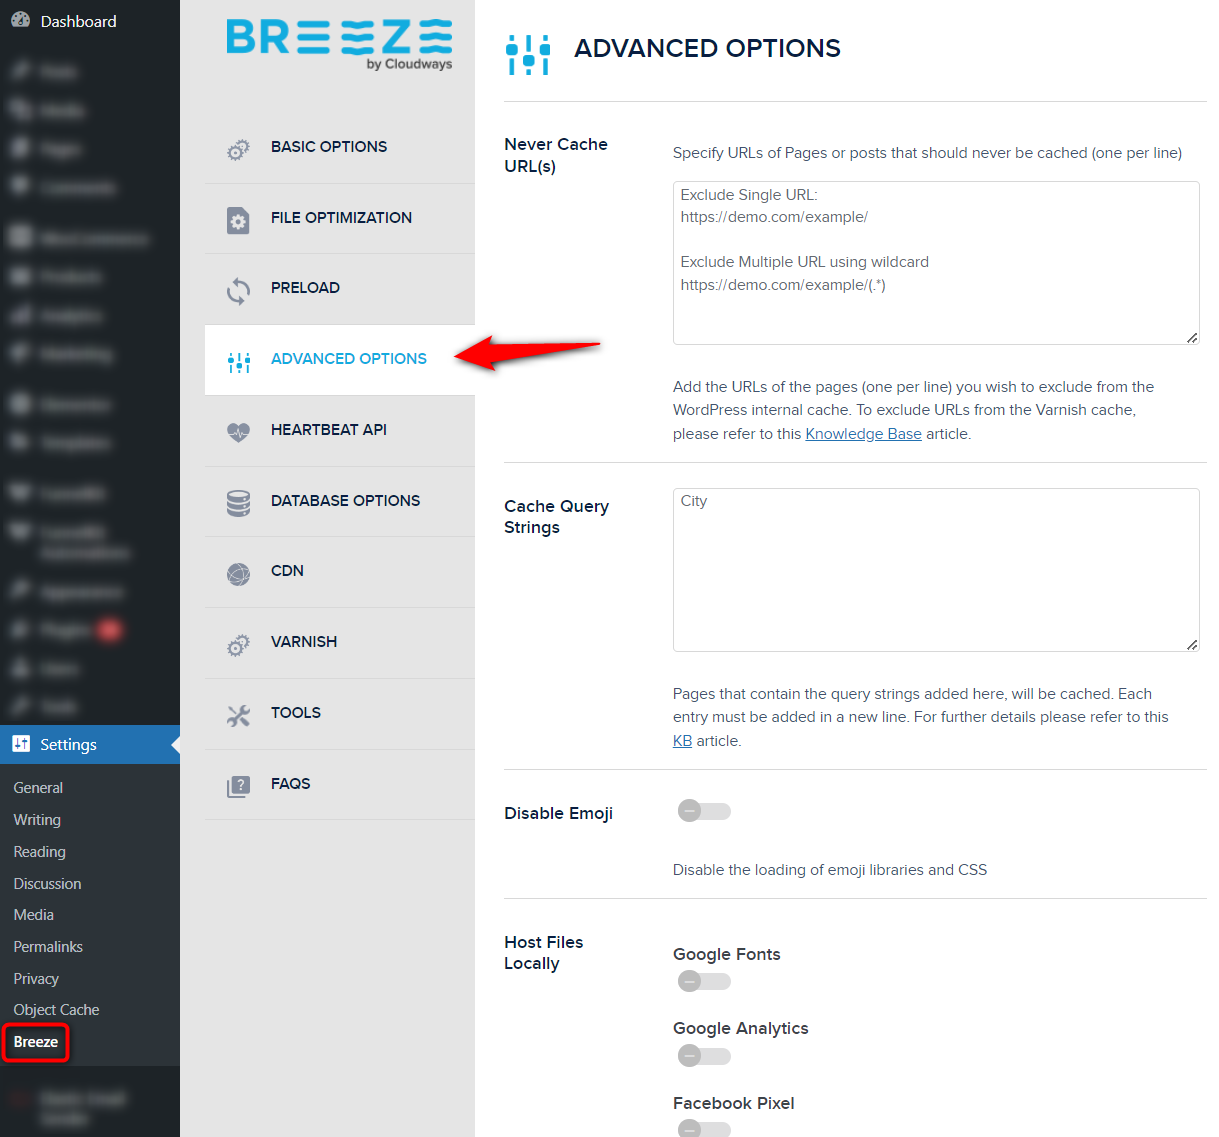
Paste the FunnelKit Checkout and Upsell URLs using the wildcard.
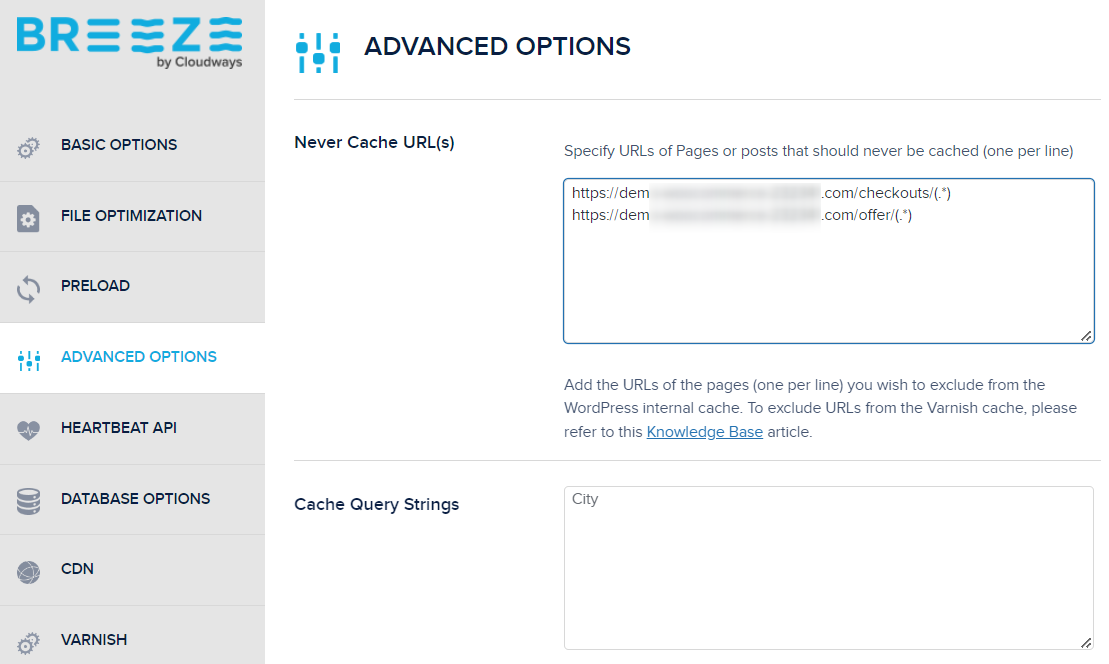
Hit the ‘Save Changes’ once done.
This way, you’ll be able to exclude the FunnelKit checkout and Upsell page URLs from caching using the Breeze plugin by Cloudways.
Excluding the FunnelKit Checkout and Upsell pages from caching with CDN Enabler (KeyCDN)
Go to the Settings of CDN Enabler.
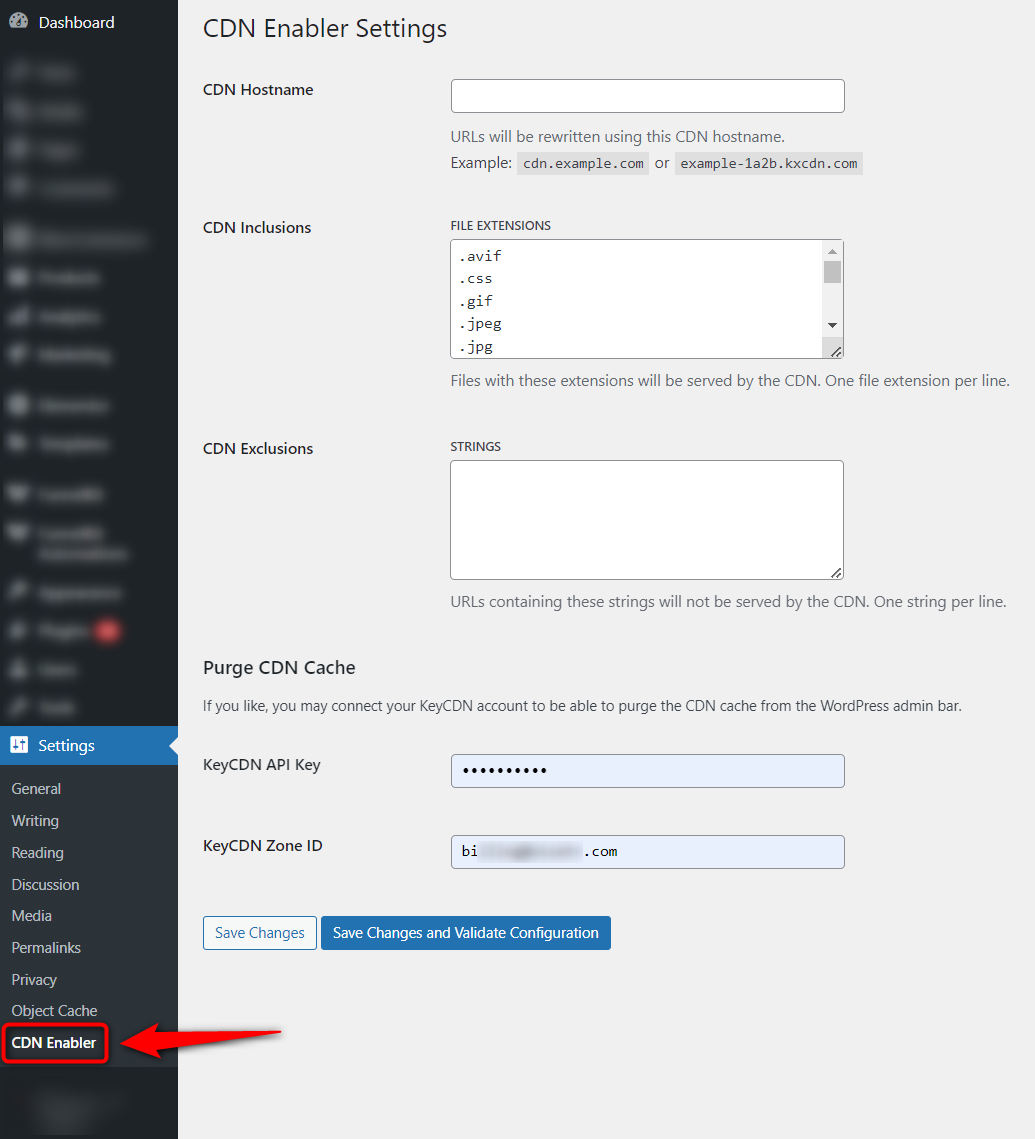
Paste the checkout and upsell page URLs into the ‘CDN Exclusions’ field, followed by the wildcard.
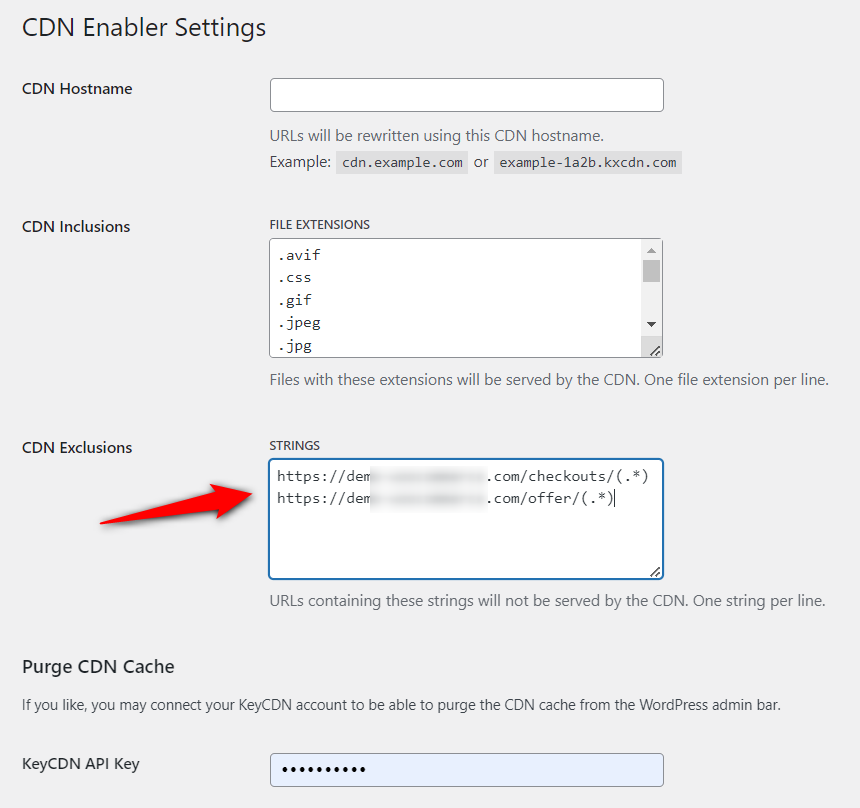
Once done, hit the ‘Save Changes’ button.
Excluding the FunnelKit Checkout and Upsell pages from caching in different hosting providers
Cloudflare
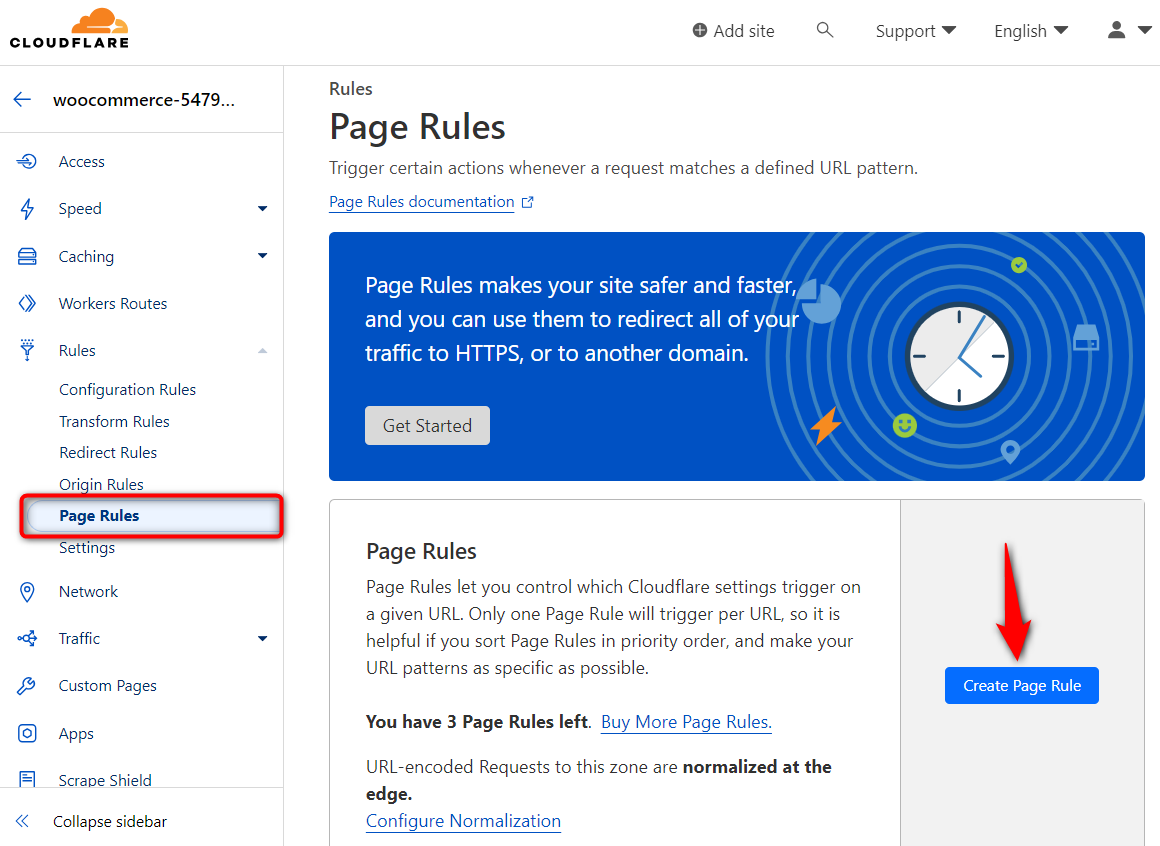
Log in to your Cloudflare account and go to the ‘Page Rules’ section.
Next, click on the ‘Create Page Rule’ button.
Paste the FunnelKit Checkout and Upsell page URL there.
Next, choose ‘Cache Level’ and choose ‘Bypass’ as the cache level.
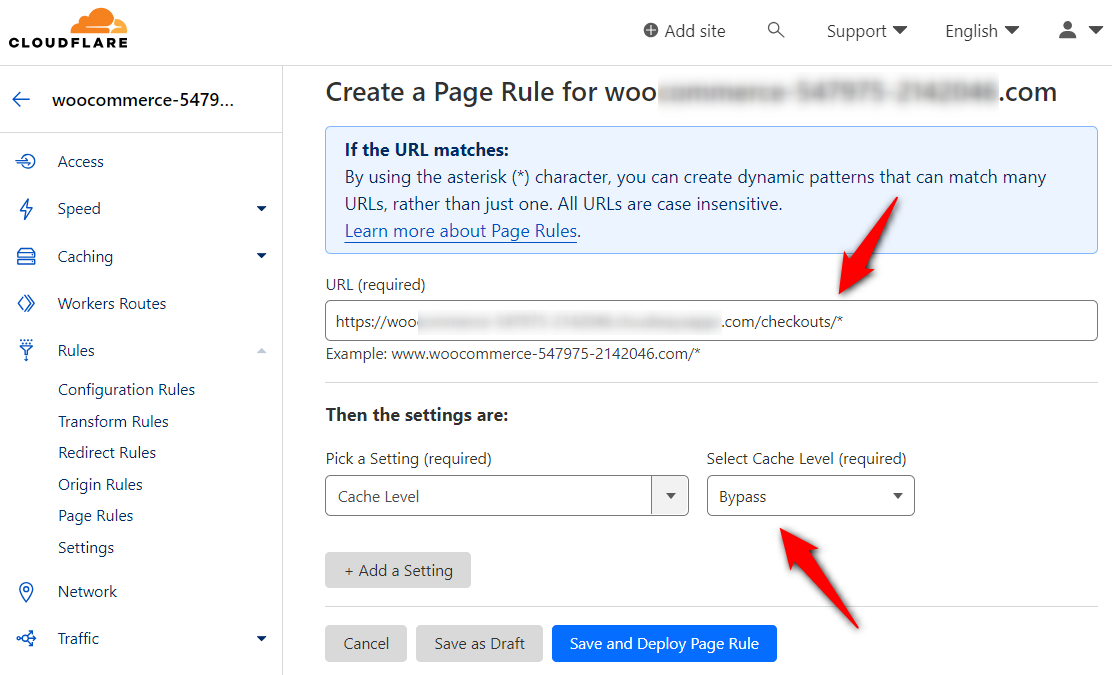
Make sure to hit the ‘Save and Deploy Page Rule’ button.
Then create the same page rule for the FunnelKit Upsell page URL; this is how you can exclude the checkout and upsell page URLs from caching in Cloudflare.
Other hosting providers
Similarly, you can send an email or raise a support ticket with your hosting providers to exclude the checkout and upsell pages from caching.
You can write this email prompt:
Their support team will help you with URL exclusion in no time.
How to Test the WooCommerce Store after Caching?
Once you’ve configured your caching plugins for WooCommerce, it’s time to test that everything works fine on the front end.
First, open the incognito mode of your web browser and test these things in your online store.
Product pages
Go to your store and make sure to test the following:
- Load the shop page and ensure that it displays the correct products
- Load the category pages and ensure these display the correct products
Checkout functionality for guest and existing customers
Add a product to your shopping cart and proceed to checkout as a guest customer. Make sure to test the following:
- The checkout page shows the correct information (including cart items, subtotal, payment methods, etc.)
- Proceed to the payment and check if it’s complete
- Go to the WooCommerce orders and see if the correct order status is applied
Once done, repeat the same steps after you log in to your store as an existing customer.
WooCommerce coupons
Create a WooCommerce discount coupon and apply it to the coupon section on the checkout page. Ensure the following:
- The coupon is successfully applied
- The amount in the cart and the subtotal are updated correctly
My accounts page
Go to the ‘My Account’ page and reset your account’s password. Log out of your account and log in again with the new credentials to ensure it works properly.
Well done! These are a few things you can do to test your WooCommerce store after caching.
Effective Troubleshooting and Tips
Let’s look at some troubleshooting and tips for effective WooCommerce caching.
Tip #1: Use the incognito mode to test your WooCommerce store processes after caching
Many cache plugins don’t cache the WordPress admin area to ensure that real-time changes can be made without interfering with cached versions.
So, when they test their flow from the product page to the checkout page to the thank you page, it seems everything works fine.
However, this is not the correct way to test your website after setting up WooCommerce caching.
Your customers or visitors may encounter certain issues that we talked about in this post, such as product prices getting incorrectly displayed, WooCommerce cart cache issue, payment transactions not going through, etc.
That’s where the incognito mode of your web browser really helps.
Using the incognito mode allows you to view the front end of your website as a regular user, ensuring the changes are indeed taking effect, and everything is working smoothly (including the page loads, dynamic information displaying correctly, and transactions effectively processing through).
Tip #2: Check your store checkout process with different devices in non-logged-in mode
The most probable reason why you see everything works on desktop and not on other devices is that you are logged in as an admin.
Logged-in users are never served from the cache. And when you check the process on another device, it gives you errors.
This is why, after implementing exclusions related to WooCommerce caching, you need to check your store checkout process using different devices in non-logged-in mode.
It'll help you resolve your issues and streamline your store checkout process.
Tip #3: Choose the right cache plugin
Choosing the right WordPress caching plugin for WooCommerce is crucial for optimizing your store’s performance.
There are different caching plugins, such as WP Rocket, WP Super Cache, W3 Total Cache, and WP Fastest Cache, and built-in cache plugins from hosting companies, including SiteGround, WP Engine, Bluehost, etc.
Make sure to consider different factors when selecting the best cache plugin for WooCommerce:
- Works seamlessly with WooCommerce
- Cache exclusion for WooCommerce
- Supports fragment caching for WooCommerce dynamic elements
- Offers mobile optimization features
The effectiveness of a caching plugin also depends on your specific hosting environment.
Thus, it’s essential to consider the recommendations of your hosting provider and your store’s requirements when choosing.
Tip #4: Clear browser cache
WooCommerce displays dynamic content such as product prices, stock availability, and cart details that update in real-time. Even if you properly configure WooCommerce and server-side caching, your browser may still load a cached version of your store’s pages, showing outdated information.
That’s why it’s important to know how to clear your browser cache for your WooCommerce store to ensure you’re viewing the latest updates. You can do this by clearing your browser’s cache or opening the store in an incognito/private browsing window.
To clear your browser cache, access your browser settings and navigate to the Privacy or History section to delete cached data.
Also, if you use caching plugins or a CDN, don’t forget to clear those caches too, to prevent stale content from being served.
Tip #5: Check for plugin updates or disable any conflicting plugins
It’s important to check the updates of your caching plugin on your WordPress dashboard.
Developers regularly release certain updates to fix bugs, improve performance, and ensure compatibility with the latest versions of WordPress and other plugins.
Also, ensure that your plugins don’t show any conflicting warnings because they can impact the functionality of your caching setup.
If there is a conflict, deactivate the plugin from your WordPress menu and contact the plugin team to solve the issue.
Tip #6: Check for WooCommerce error logs
Enable WooCommerce to debug logging after you’ve set up caching in your store. This helps you have general PHP and WordPress warnings, error messages, and status information.
To enable debug logging, check out the official Woo documentation.
Plus, you can check the error logs by navigating to WooCommerce ⇨ Status and on the Logs section.
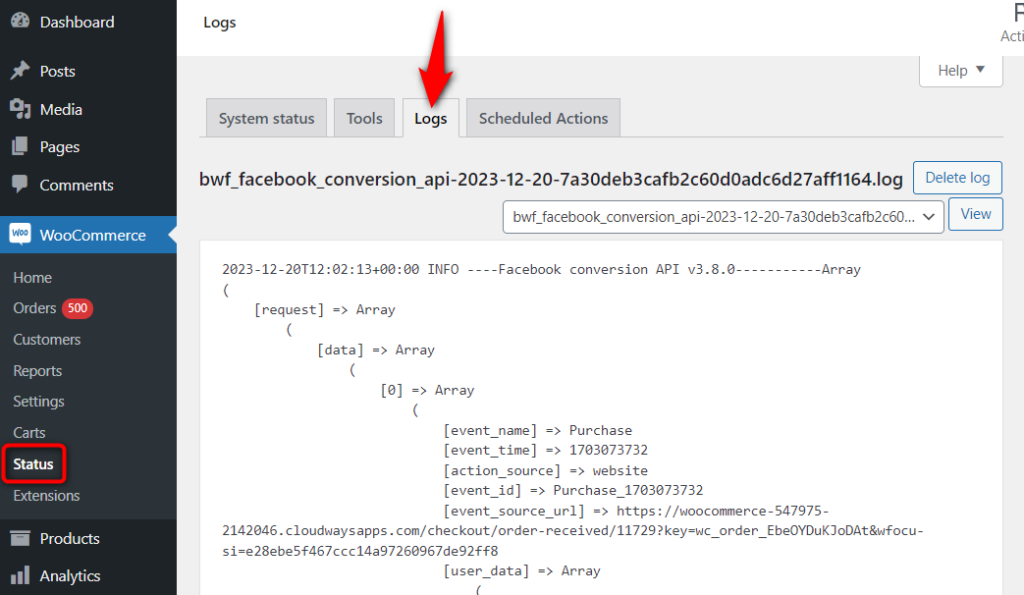
These logs can often provide valuable information about the reason for caching issues on your store.
If you face any issues, feel free to contact our Support Team, and we'll help you out.
Should You Minify Your Website’s Code During Optimization?
The size of your WooCommerce store or WordPress website’s code can impact its speed and functionality. That’s where minification comes into play.
Minification involves removing unnecessary characters, such as whitespaces and comments, from your website’s HTML, CSS, and JavaScript files.
This makes it easier for browsers to parse and deliver results quickly.
WooCommerce does not recommend minifying the JavaScript. But it can help improve the performance of your online store.
Our experts suggest that you minify JavaScript on your website but exclude WooCommerce scripts from this process.
- Avoid using inline JavaScript - By separating your JavaScript code into external files, you can reduce the code that gets parsed during each page load.
- Combine multiple JavaScript files into one - By merging all your JavaScript files, you can reduce the HTTP requests the customer’s browser makes.
It’s important to avoid minification on checkouts and upsells.
Are You Ready to Set Up WooCommerce Caching in Your Store?
As a WooCommerce store owner, it’s critical that you ensure that your WooCommerce website delivers the best shopping experience to your customers.
This includes correctly configuring WooCommerce caching in your online store.
We hope you’ve understood why aggressive caching leads to issues in your WooCommerce store and the importance of excluding dynamic content.
We’ve also demonstrated the exclusion process if you use FunnelKit Checkout and Upsells to transform your store’s shopping experience.
This guide is more than enough to keep you in a good position to take the next steps.
Also, if you’re not a FunnelKit user yet, you’re missing out on the opportunity to enhance your store’s conversions and make big sales!
So why wait?
Editorial Team
January 27, 2026Imagine a customer makes a purchase, but instead of the order smoothly processing through your system, it gets stuck in “Pending Payment” or “On Hold” indefinitely. You’re checking your settings...
Editorial Team
October 14, 2025Are shoppers dropping off before completing their purchase? You’re not alone! According to a Baymard Institute study, nearly 18% of customers abandon their carts because the checkout process is too...
Editorial Team
March 17, 2025Struggling to get your digital products to sell? WooCommerce has your back. Whether you're selling eBooks, software, or online courses, WooCommerce makes it simple to manage and sell your digital...


