



A WooCommerce Google Analytics integration can make your store’s revenue look twice as high as it actually is if the tracking is set up incorrectly and GA4 won’t even necessarily flag the problem.
Let's say you run a cast-iron cookware shop and sell a $65 skillet.
Two tracking plugins send the same sale to GA4, but each uses a different order ID. GA4 sees two purchases and reports $130 instead of $65.
That can make the ad campaign that brought in the customer look twice as profitable as it really is, so you give it more budget.
You made $65, GA4 says $130, and your next month’s ad spend is based on the wrong number.
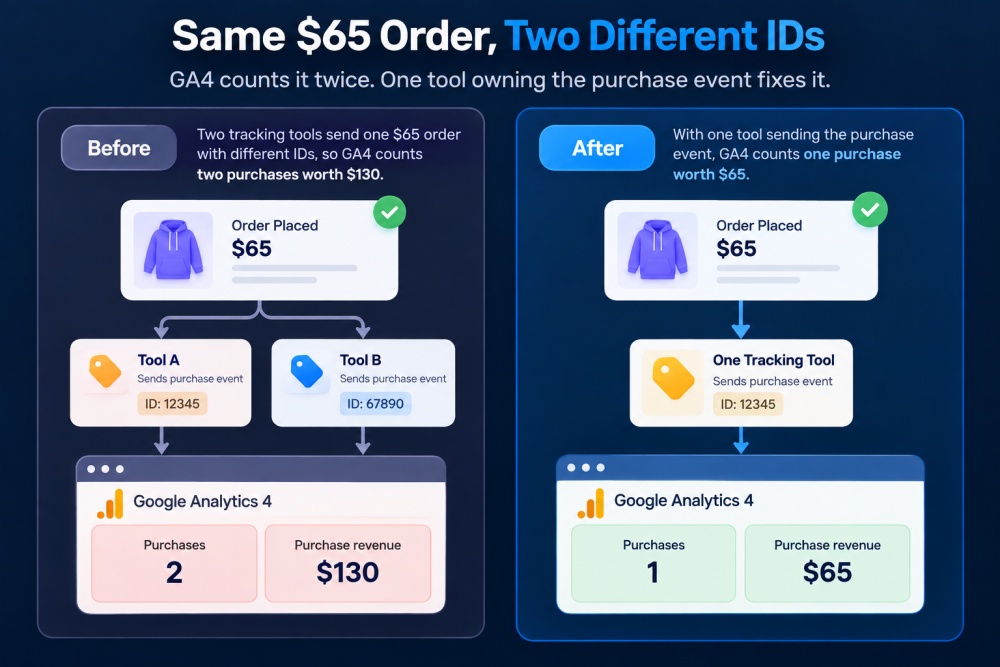
The opposite can happen, too. A plugin that relies on the thank-you page might miss an order even though the payment went through. A cookie banner can also block tracking events without anyone realizing it.
In this guide, we’ll cover four ways to connect WooCommerce to GA4, using the same skillet shop for each setup.
We’ll also test tracking, find your sales in GA4 reports, and troubleshoot missing or duplicated revenue.
What we changed in this update (October 1, 2026): We added Site Kit as a fourth method, covered the 2026 changes to Woo’s official plugin, and included a five-order upsell tracking test. We also corrected the official plugin’s event list and updated the DebugView instructions.
Table of Contents
- 1 Connect WooCommerce to GA4 in 4 Steps
- 2 Which WooCommerce GA4 Setup Fits Your Store?
- 3 Prerequisites for WooCommerce Google Analytics Setup
- 4 WooCommerce Events GA4 Can Track (and Which Tool Sends Each)
- 5 Method 1: Google Analytics for WooCommerce (Official, Free)
- 6 Method 2: Set Up GA4 With FunnelKit (Best for Funnels, Upsells, and Order Bumps)
- 7 Method 3: Use Google Tag Manager and GTM4WP
- 8 Method 4: Use Google Site Kit for Basic Purchase Tracking
- 9 How to Test Whether Events Are Capturing in Google Analytics?
- 10 Where to Find WooCommerce Sales in GA4 Reports
- 11 GA4 Consent Mode v2 & GDPR for WooCommerce
- 12 Fix Missing, Doubled, or Wrong Revenue in GA4
- 13 Frequently Asked Questions (FAQs)
- 14 Set Up Your WooCommerce Google Analytics Integration the Right Way!
Connect WooCommerce to GA4 in 4 Steps
- Copy your Measurement ID: In GA4, go to Admin ⇨ Data collection and modification ⇨ Data streams. Open your web stream and copy the ID that starts with G-.
- Install one tracking plugin: For most stores, that means Google Analytics for WooCommerce. Go to Plugins ⇨ Add New Plugin, search for it, then install and activate it.
- Add the ID: Go to WooCommerce ⇨ Settings ⇨ Integration ⇨ Google Analytics, paste your G- ID, select the tracking options you need, and save your changes.
- Test a real order: Log out, open your store through Tag Assistant, and place a test order. Then check GA4 Realtime or DebugView to make sure you see exactly one purchase event.
Use one tracking source only. If your theme, Site Kit, or another plugin is already loading GA4, turn it off first.
Two tracking sources can send the same order twice.
Jump to: Official plugin | FunnelKit | GTM4WP | Site Kit | Revenue fixes
Which WooCommerce GA4 Setup Fits Your Store?
Six tools can handle a WooCommerce GA4 integration, and we walk through four of them below.
Google Analytics Pro and MonsterInsights are paid alternatives, so we’ve included them in the table for comparison.
| Setup | Ecommerce events | Refunds | Upsell and bump tracking | Consent | Effort | Cost |
|---|---|---|---|---|---|---|
| Google Analytics for WooCommerce (official) | Product views through purchase | No | No dedicated events. Purchase needs the thank-you page | Denied by default in the EEA, UK, and Switzerland. WP Consent API | Low | Free |
| Google Analytics Pro (by Woo) | Official set plus coupons, cart changes, sign-ins | Yes, plus cancellations | Catches checkouts that skip the thank-you page | Via your consent plugin | Low | $79/year |
| Site Kit by Google | add_to_cart and purchase | No | No | Built-in setting. WP Consent API | Lowest | Free |
| GTM4WP + Tag Manager | Full GA4 set, as configured | No | Custom data layer work | Via GTM and your consent plugin | High | Free |
| FunnelKit Funnel Builder | Product views through purchase, plus leads | No | Yes: bumps, upsells, funnel steps | Via your consent plugin | Low | Free. Bumps and upsells need Pro |
| MonsterInsights | Purchases, cart, and checkout | Yes, server-side | No | Via your consent plugin | Low | Pro plan or higher |
Most stores can start with the first row. GA Pro makes more sense if you need refunds or user IDs, while GTM4WP is useful if someone already manages your tags through Google Tag Manager.
If your store uses an offer between payment and the thank-you page, such as the expansion offer in our board game shop, FunnelKit or GA Pro can handle that setup.
Prerequisites for WooCommerce Google Analytics Setup
Before you connect anything, you need three things in place:
- A GA4 property and Measurement ID. If you're still on a Universal Analytics property, it stopped collecting data on July 1, 2023, and won't work. You need GA4. If you do not have one yet, we show you how to create it in Method 1.
- WordPress admin access to install plugins and modify settings
- WooCommerce is installed and activated with at least one published product, so you can fire a real test event.
WooCommerce Events GA4 Can Track (and Which Tool Sends Each)
GA4 ecommerce tracking for WooCommerce runs on the events below.
Each one is on Google’s list of recommended eCommerce events, so the built-in reports fill in without custom setup.
| Event | Fires when | Sent by |
|---|---|---|
| view_item_list | A shop, category, or related-products list loads | Official plugin, GTM4WP |
| select_item | A shopper clicks a product in a list | GTM4WP. The official plugin sends these clicks as select_content |
| view_item | A product page loads | Official plugin, FunnelKit, GTM4WP |
| add_to_cart | A product goes into the cart, including an accepted order bump | All four |
| remove_from_cart | A product is removed, or its quantity is lowered | Official plugin, GTM4WP |
| view_cart | The cart page loads | GTM4WP |
| begin_checkout | The checkout page loads | Official plugin, FunnelKit, GTM4WP |
| add_shipping_info | The shopper enters shipping details | Official plugin (2.2.0+), FunnelKit Checkout (3.13.0+), GTM4WP |
| add_payment_info | The shopper picks a payment method | Official plugin (2.2.0+), FunnelKit, GTM4WP |
| purchase | The order is placed | All four |
| refund | You refund an order in WooCommerce admin | None of the four. Use GA Pro, MonsterInsights, or the Measurement Protocol |
| Bump conversion, upsell purchase, lead | A bump or offer is accepted, or an opt-in form is submitted | FunnelKit |
GTM4WP pushes these events into the data layer, but GA4 only receives the ones your Google Tag Manager tags actually send.
A standard order using the official plugin should trigger view_item on the product page, followed by add_to_cart, begin_checkout, add_shipping_info, add_payment_info, and finally one purchase event.
GA4 treats purchase as a key event by default, so you don’t need to create a separate conversion.
When you test the setup, make sure you get that sequence and only one purchase event.
Method 1: Google Analytics for WooCommerce (Official, Free)
The simplest free option is the official plugin, now called Google Analytics for WooCommerce (formerly named WooCommerce Google Analytics Integration).
It is built and maintained by WooCommerce. It adds standard GA4 eCommerce tracking and is a solid starting point for stores that don't run advanced funnels.
You can install it for free from the WordPress plugin directory.
It covers standard eCommerce events, but it doesn't track funnel-specific actions like order bumps or one-click upsells.
Step 1: Create a GA4 property and copy your Measurement ID
Log in to your Google Analytics account and open Admin.
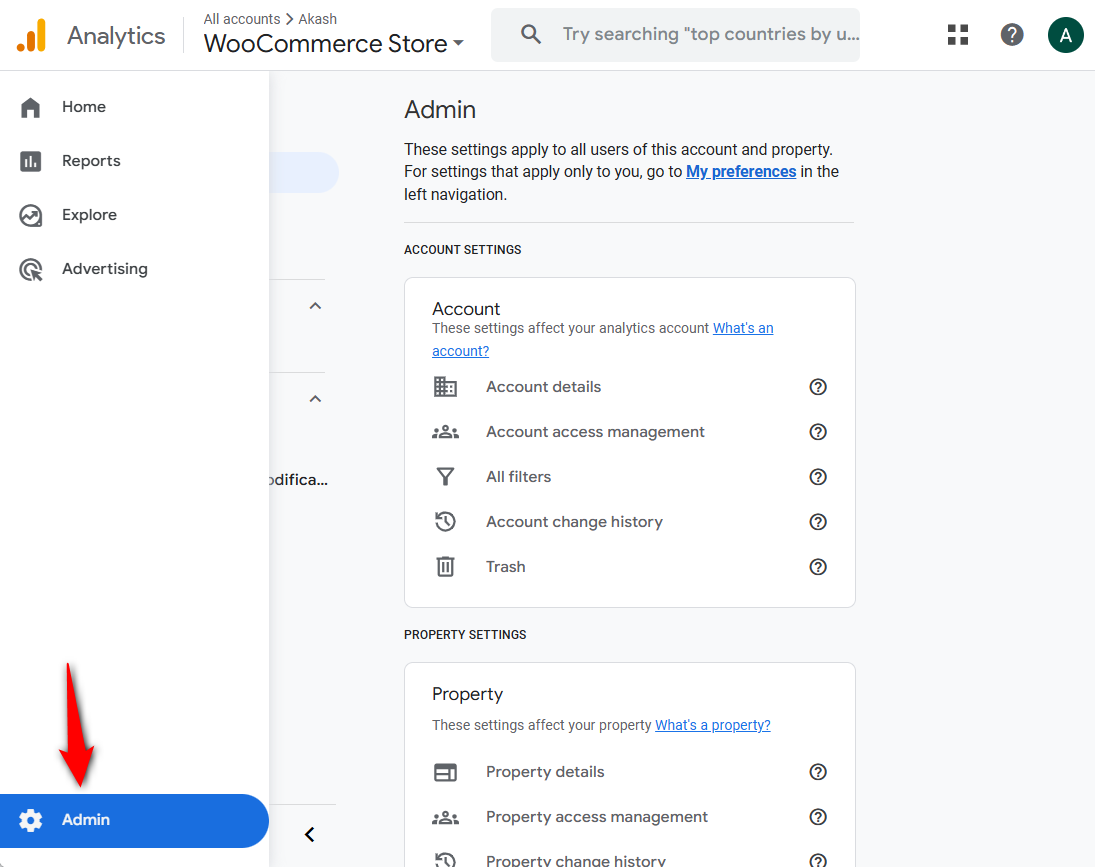
Create a new GA4 property from your admin dashboard:
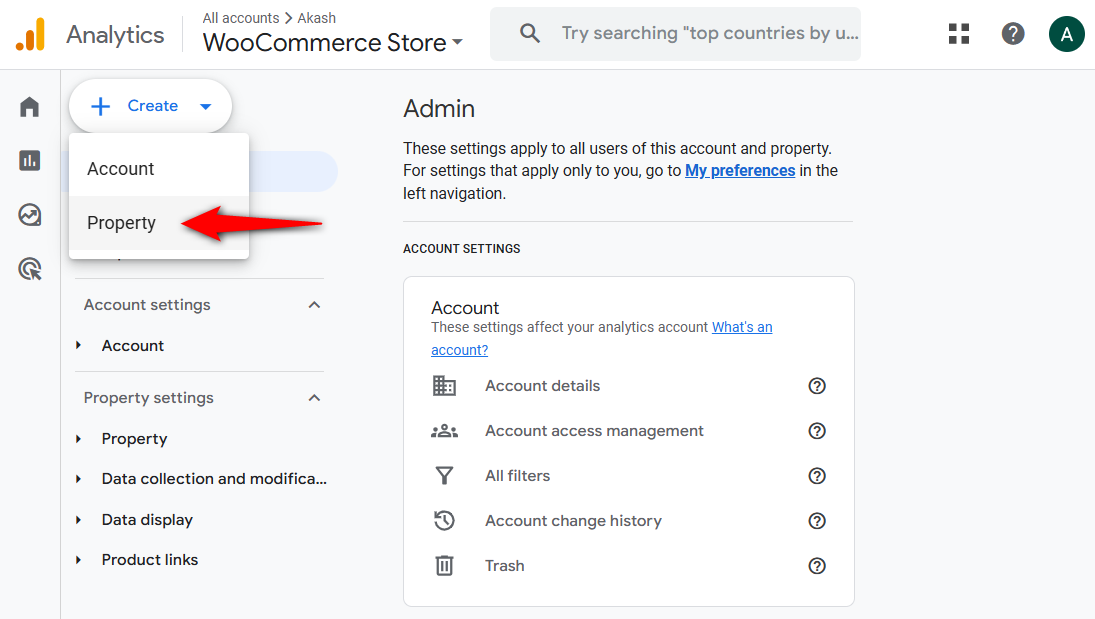
Enter your Google Analytics 4 property name, set the reporting zones, and specify your online store's currency.
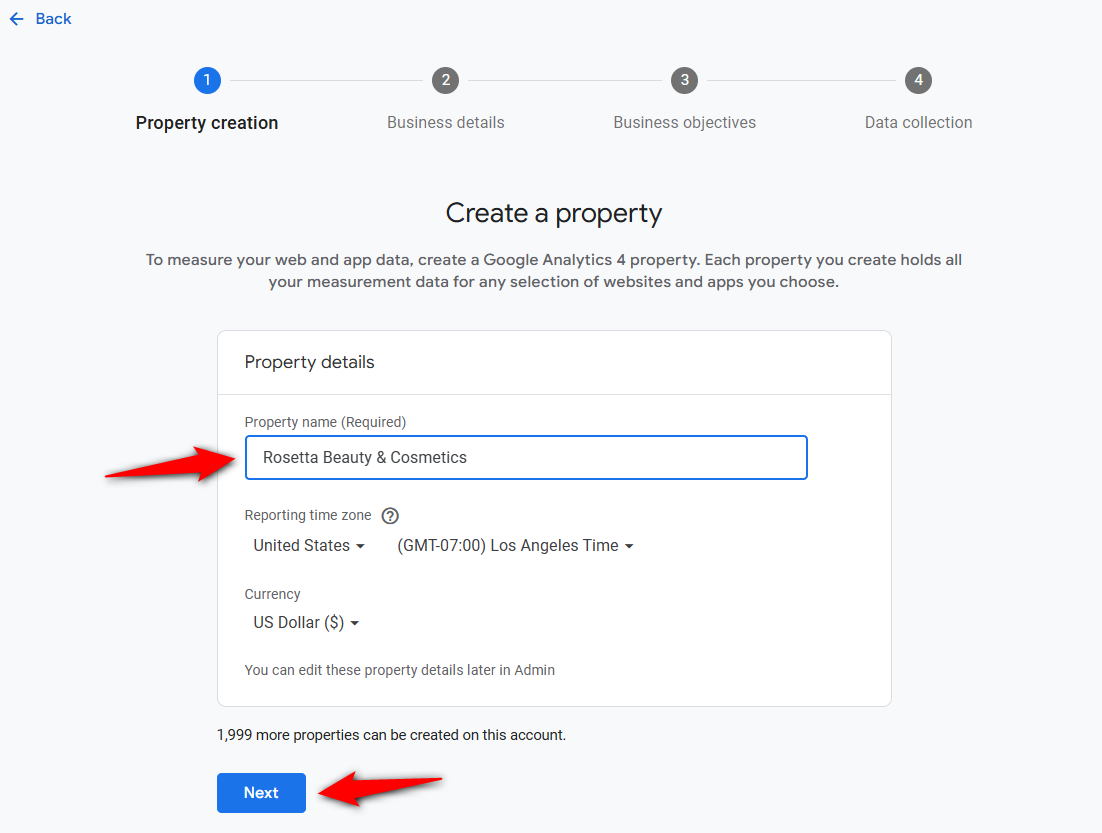
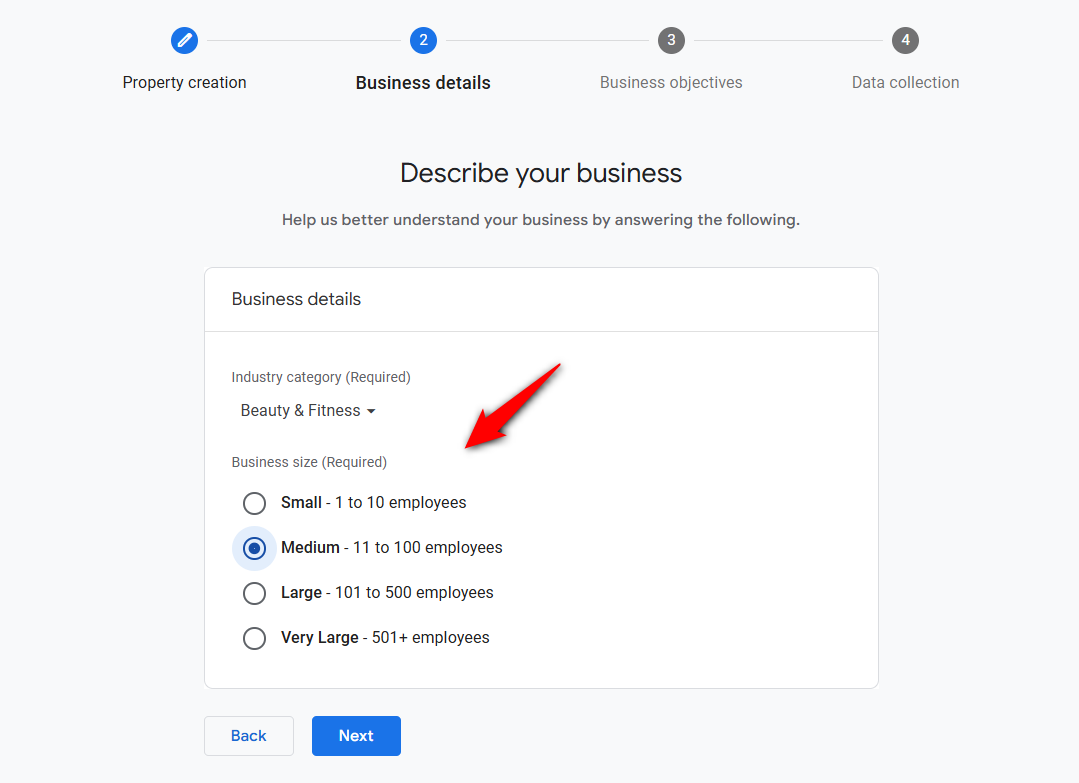
Next, select your business information, including its industry and size.
Choose your business objectives in the next step to create your Google Analytics 4 property.
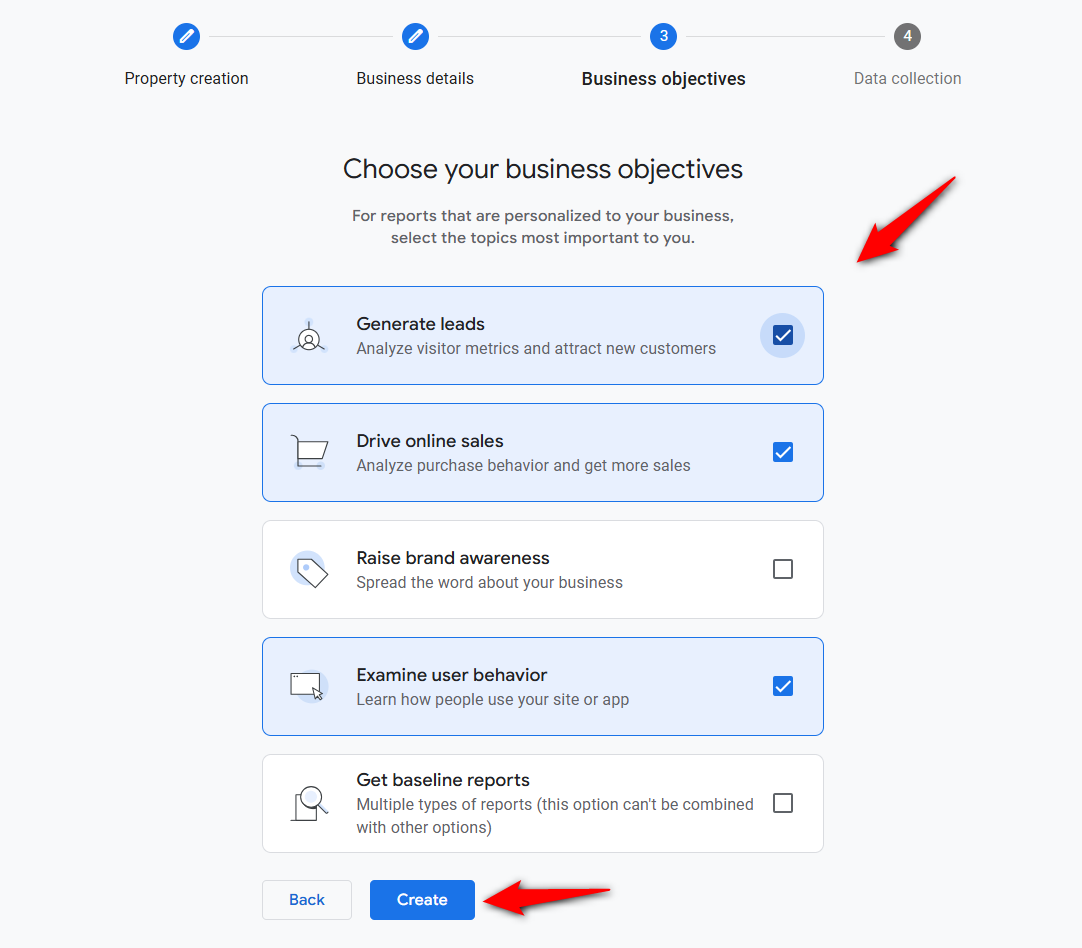
Clicking on ‘Create’ will create a new GA4 property. Then configure it for your WooCommerce store.
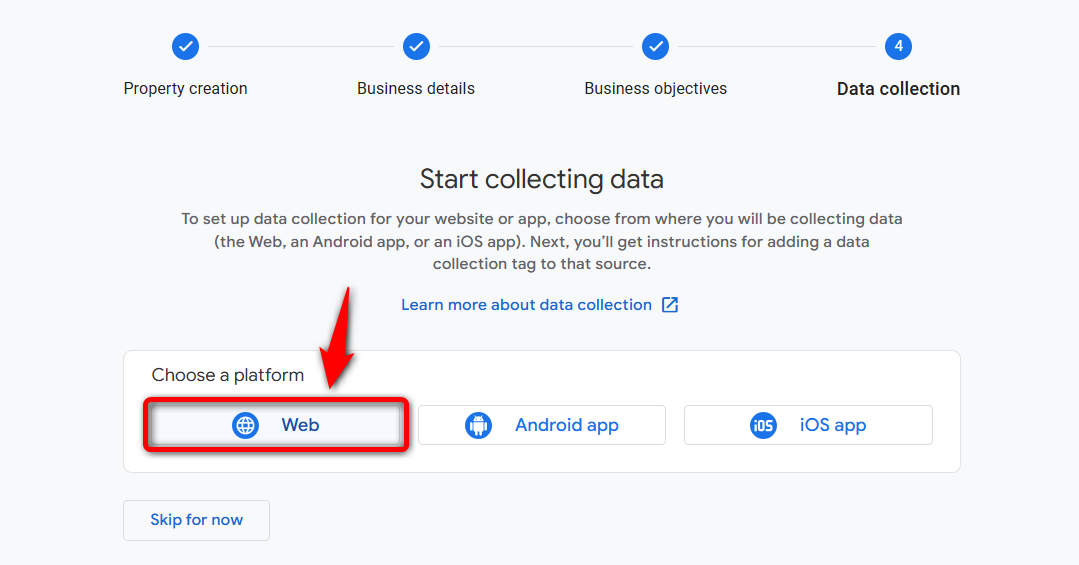
Next, set up data collection by selecting “Web” for your WooCommerce store.
Next, enter your WooCommerce store URL and your stream name.
Make sure to enable the enhanced measurement option there. This lets you measure interactions and content on your website in addition to standard page views.
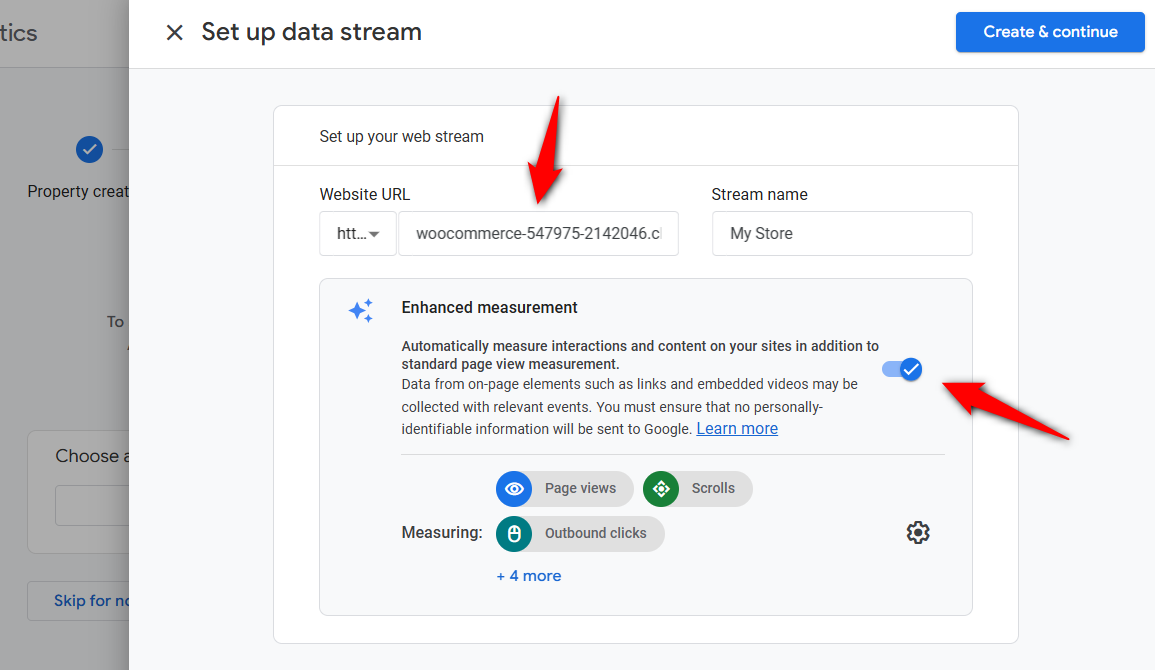
Clicking on ‘Create & continue’ will successfully create your data stream.
Simply close the next Tag window, and you’ll be able to see your Google Analytics 4 Measurement ID:
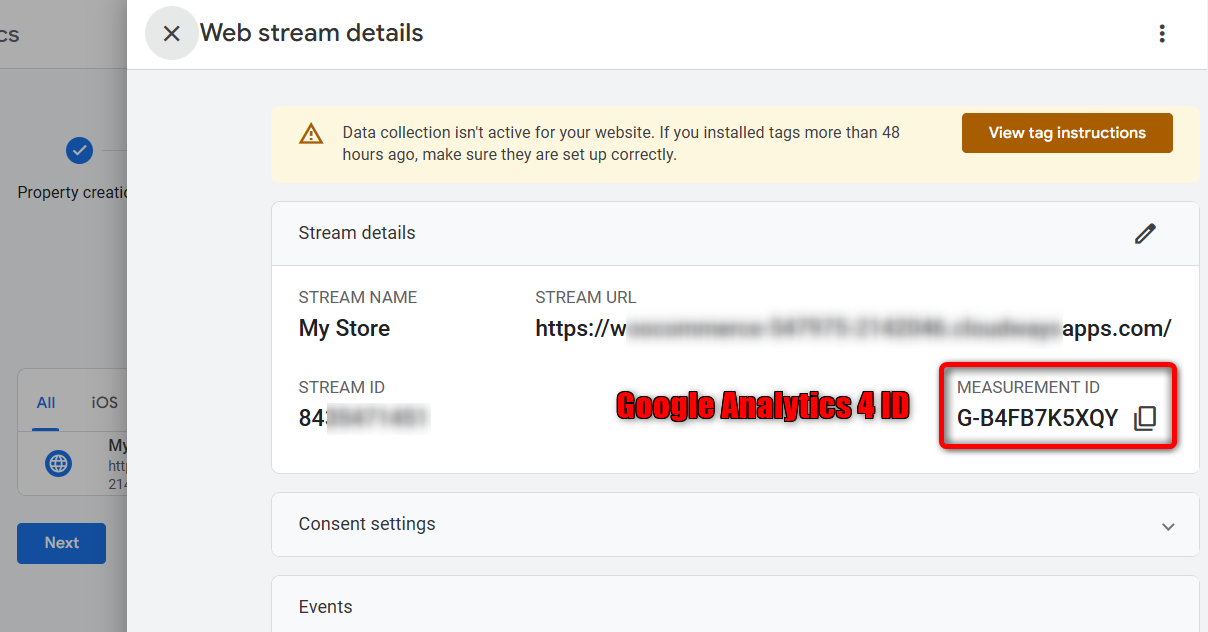
After the stream is created, copy the Measurement ID, which starts with G-.
Step 2: Install and activate the plugin
In your WordPress dashboard, go to Plugins, choose 'Add New', and search for Google Analytics for WooCommerce.
Install and activate it. The settings then appear under WooCommerce in the Integration tab.
Step 3: Enter your Measurement ID and enable eCommerce event tracking
Open the integration settings and paste your G- Measurement ID into the Google Analytics field.
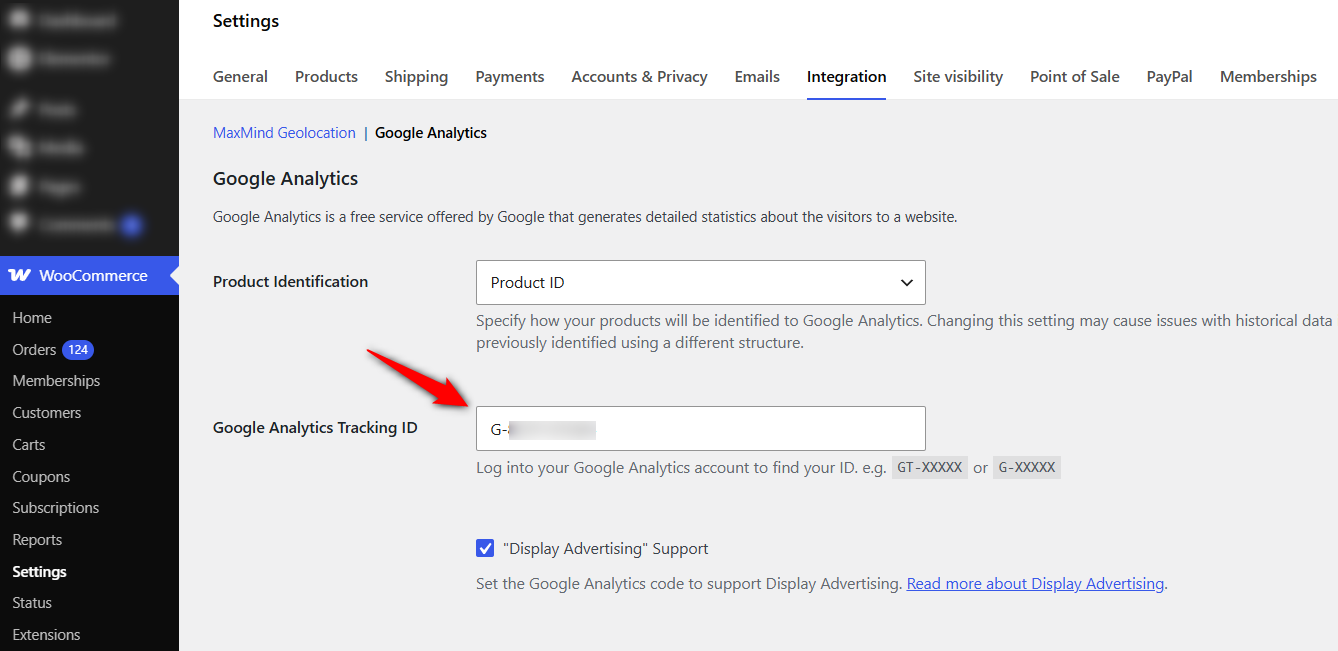
Turn on the ecommerce tracking options so the plugin sends add-to-cart, begin-checkout, and purchase events to GA4.
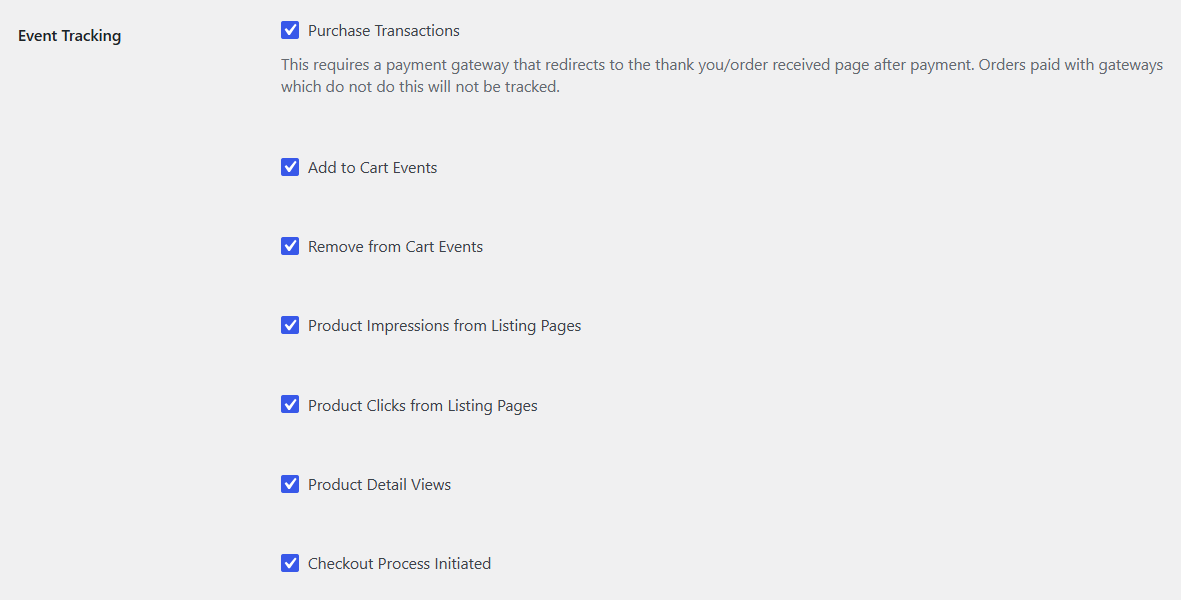
If you run another analytics plugin or Site Kit, disable its ecommerce tracking now. Two tools sending the same purchase event is the most common cause of duplicate revenue in GA4.
Save your settings, then place a test order from a product page through to the thank-you page.
Open GA4 Realtime or DebugView and confirm the events appear. Run the test on both desktop and mobile, since tracking can behave differently on each.
What changed in 2026 (v2.2 to 2.4.2)
Three releases this year changed what the WooCommerce Google Analytics integration sends to GA4. All three are listed in the plugin’s changelog on GitHub:
- 2.2.0 (June 9): Added add_shipping_info and add_payment_info, and changed transaction_id to use the WooCommerce order number.
- 2.4.1 (August 25): Purchase value is now calculated as item price × quantity, excluding tax and shipping, which matches how GA4 defines the value. Previously, it used the gross order total. For the board game shop, a $60 game with $8 shipping and $6 tax used to report $74. It now reports $60. If your GA4 revenue dropped in late August 2026 while WooCommerce sales stayed steady, this change is the likely reason.
- 2.4.2 (September 8): Removed the order key and other sensitive parameters from URLs sent to GA4. It also sends an explicit denied state for visitors who haven’t responded to the cookie banner on opt-in sites.
Version 2.4.0 raised the minimum WooCommerce version to 10.9, while 2.4.1 raised the minimum WordPress version to 7.0.
Is the free plugin any good? An honest review
At the time of writing, the plugin has a 2.8 out of 5 rating on WordPress.org, including 61 one-star reviews.
Many of those reviews mention consent-plugin conflicts and the limited event set.
If you use a redirecting payment gateway and a consent plugin that updates consent correctly, the free plugin can handle basic tracking.
Some of the complaints also predate version 2.2.0, which added the shipping and payment events.
The remaining limitations are more fundamental. It doesn’t send refund, view_cart, or coupon events. It also relies on the thank-you page loading to record purchases.
And unless you use the woocommerce_ga_gtag_consent_modes filter, it can overwrite consent defaults set by other plugins. Before updating, check the open issues on GitHub.
Free vs Google Analytics Pro
Google Analytics Pro for WooCommerce costs $79 a year.
Woo’s free vs Pro comparison lists several additional features, including refund and cancellation tracking, coupon and cart-quantity events, user ID tracking, sign-in events, and purchases from checkouts that never reach the thank-you page, including orders created in the admin.
Pro replaces the free plugin, so deactivate the free version when you install it.
Consider whether GA4 revenue needs to account for refunds, or whether many of your customers use payment gateways that don’t reliably redirect them back to the thank-you page.
Method 2: Set Up GA4 With FunnelKit (Best for Funnels, Upsells, and Order Bumps)
If your store runs sales funnels, the official plugin will miss your most profitable events.
To track standard ecommerce events and funnel actions from one place, we use FunnelKit Funnel Builder.
Its built-in pixel tracking sends GA4 events for page views, add-to-cart, and purchases, plus funnel-specific events like order bump conversions, one-click upsell acceptances, opt-in leads, and individual funnel steps.
FunnelKit offers a free Lite version on WordPress.org that includes GA4 integration, so you do not need a separate analytics plugin.
The Pro plan starts at $99.50/year and adds optimized checkouts, order bumps, and one-click upsells whose performance you can then measure directly in GA4.
Follow the step-by-step instructions below to connect GA4:
Step 1: Add the GA4 ID to FunnelKit pixel tracking
Navigate to FunnelKit ⇨ Settings ⇨ Pixel Tracking section within FunnelKit Funnel Builder.
Under Google Analytics, paste the Analytics ID.
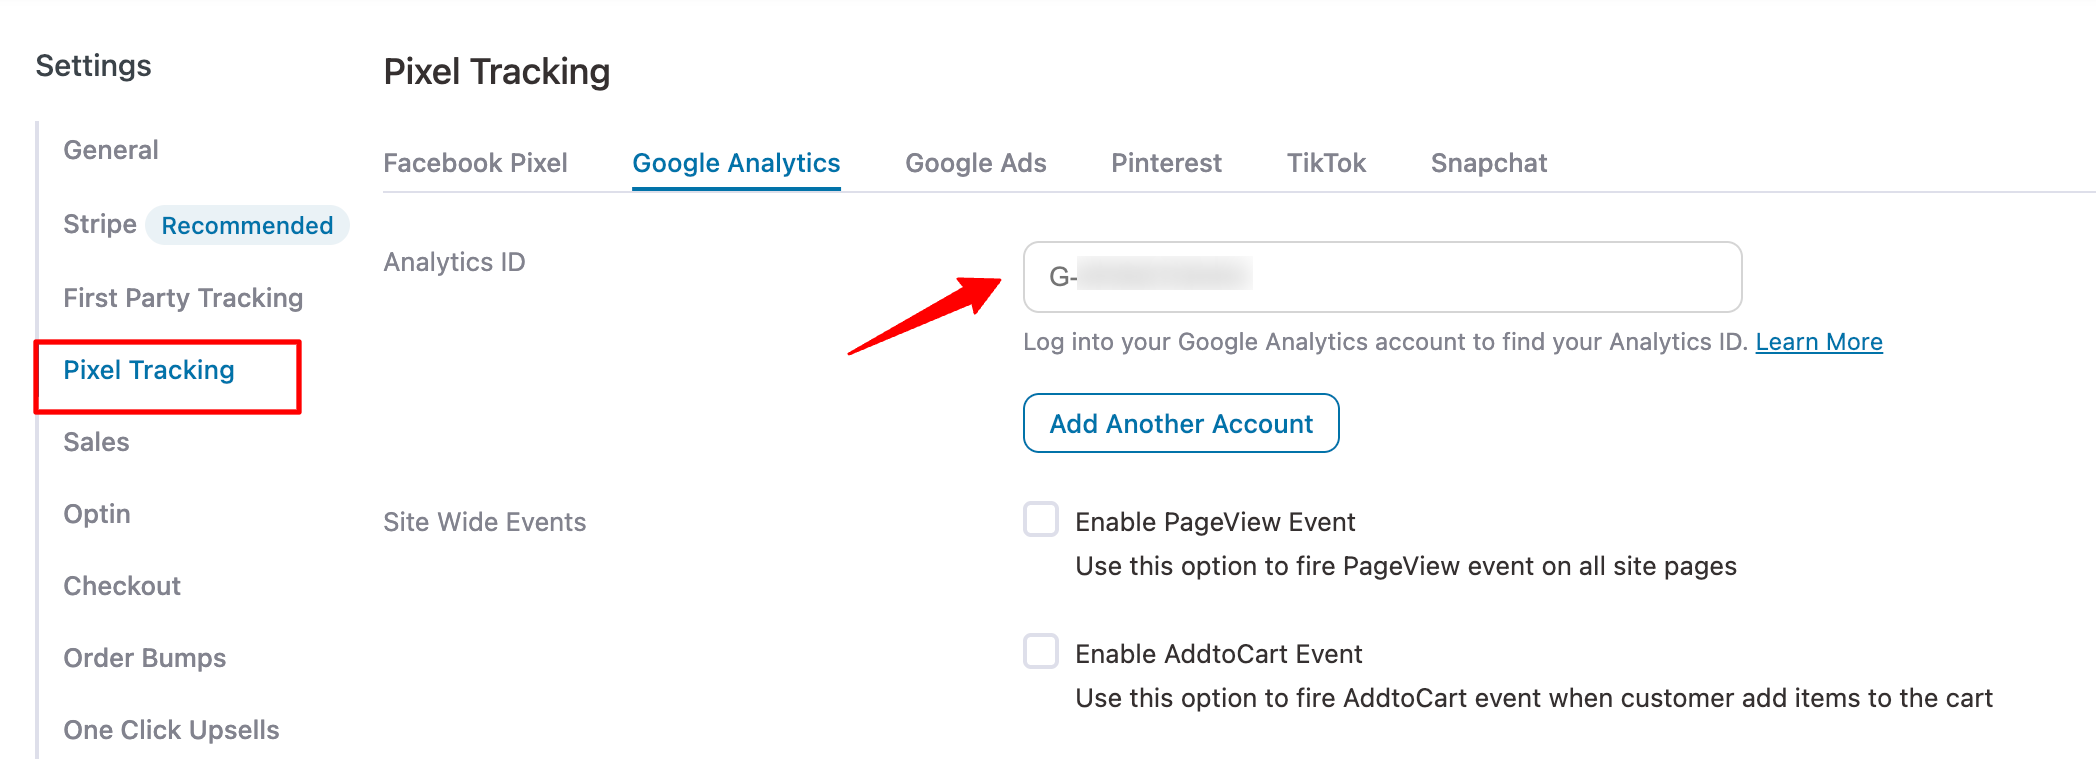
If you have multiple GA4 properties, click Add Another Account and enter each Analytics ID using the same process. You can add as many as you need.
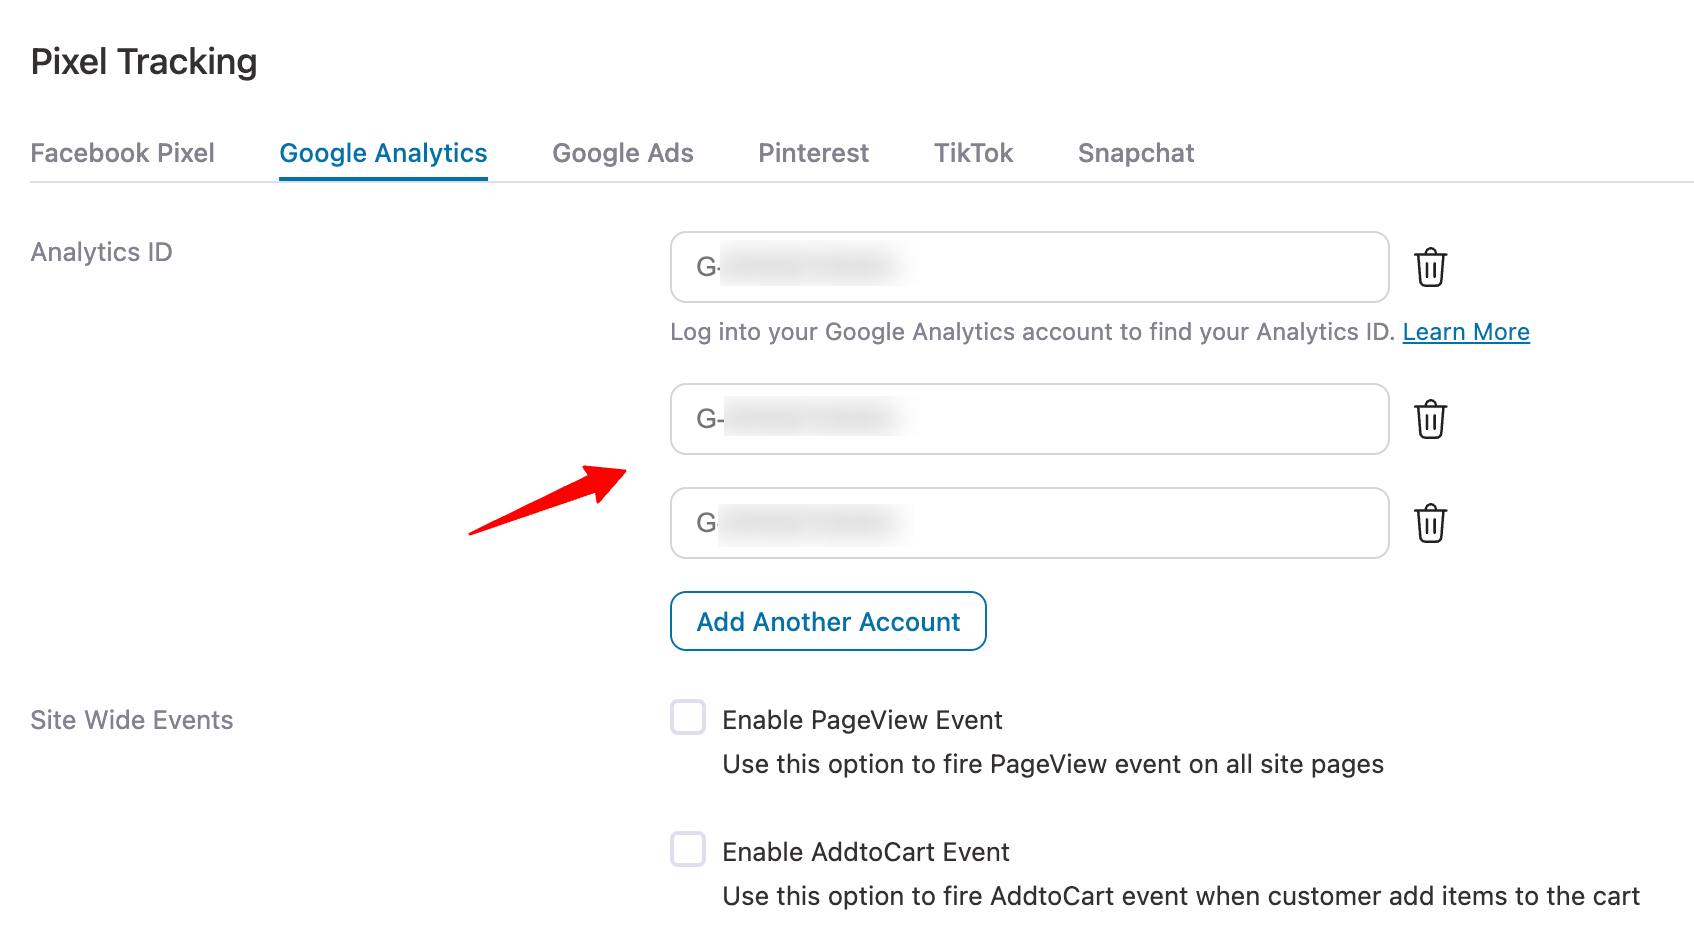
That’s it! You have successfully connected Google Analytics to your WooCommerce store.
You don’t need to enable any extra E-Commerce tracking settings; FunnelKit takes care of everything. Then, move on to the next step.
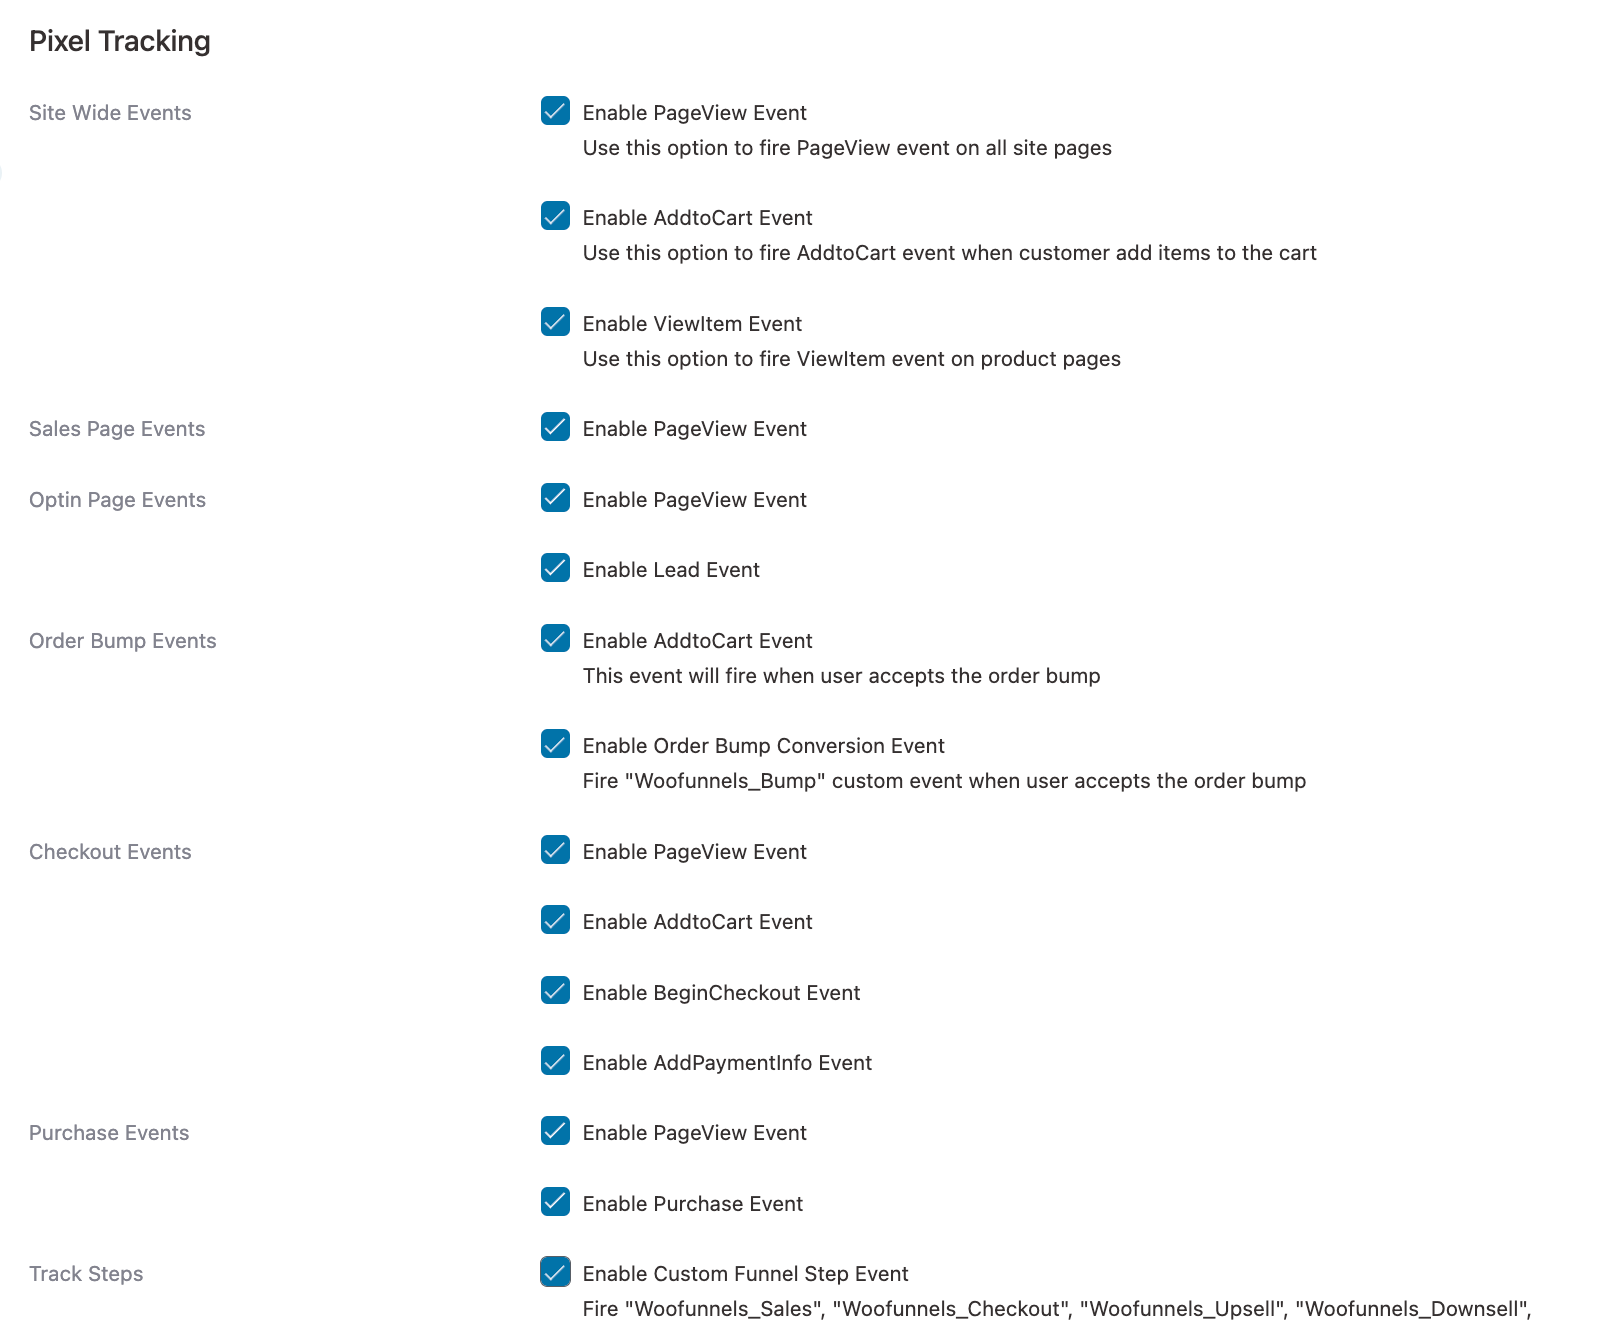
Step 2: Enable the different events you want to track
Here, you can enable the events you want to track with FunnelKit.
Here, enable the events you want to track on your website with FunnelKit.
Site-wide events
- Page View
- Add to Cart
- View Item
Sales page events
- Page View
Optin page events
- Page View
- Lead
Order Bump events
- Add to Cart
- Order Bump Conversion
Checkout page events
- Page View
- Add to Cart
- Begin Checkout Event
- Add Payment Info Event
Purchase events
- Page View
- Purchase
Track Steps
- Enable custom tracks
Enable custom funnel steps
Advanced
- Enable sending the parent product ID if your catalog doesn’t include variants.
- Add a prefix or suffix to the content_id (optional).
- Check to exclude shipping and/or taxes from the total.
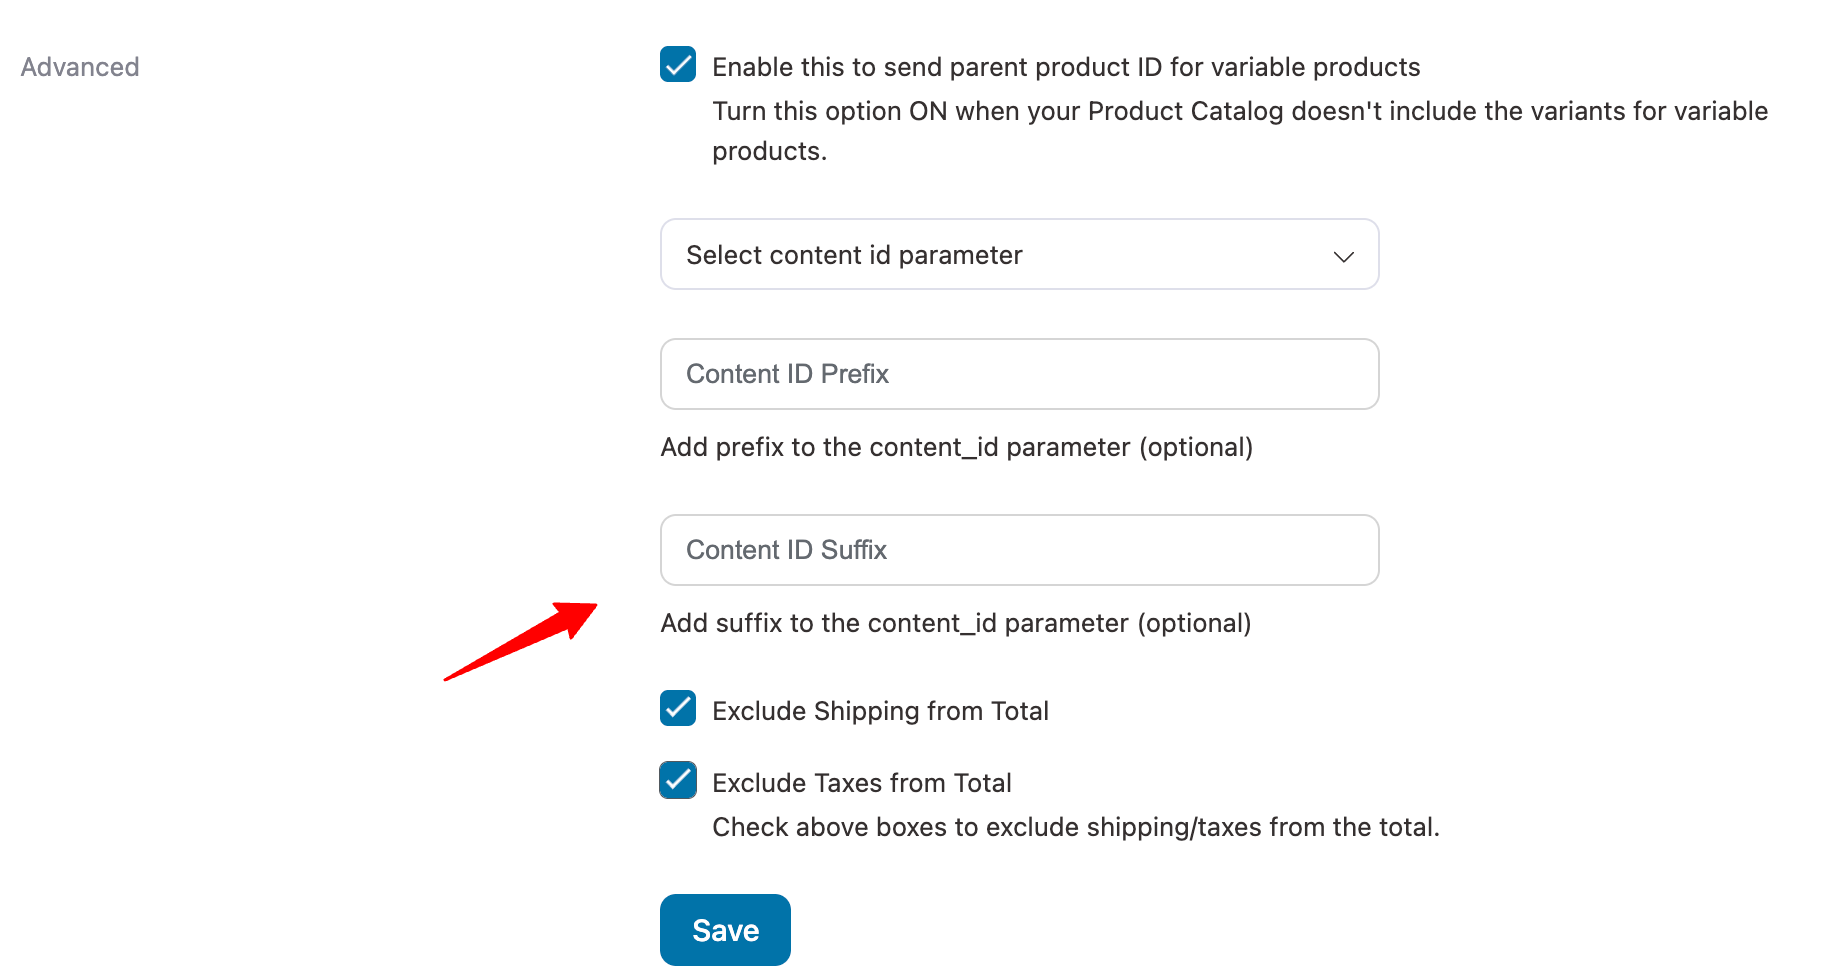
Once done, click on the 'Save Changes' button to lock in all the changes made.
This completes your WooCommerce Google Analytics integration using FunnelKit for free.
Method 3: Use Google Tag Manager and GTM4WP
For technical users who want granular control, Google Tag Manager (GTM), combined with the GTM4WP plugin, offers the most flexibility.
GTM4WP pushes WooCommerce data, such as cart contents and order details, into the data layer. GTM then reads that data layer and sends the events to GA4.
Choose this route if you already run GTM for other tags or if you need custom event logic.
This method does take longer to configure than a plugin, and you manage tags in two places.
A common question from store owners is whether they still need the official WooCommerce GA plugin when using GTM4WP.
In most cases, you don't, because GTM4WP and your GA4 tag in Google Tag Manager replace it. Running both will usually duplicate your tracking.
Step 1: Create a GTM container
Set up a free Google Tag Manager account and container for your store.
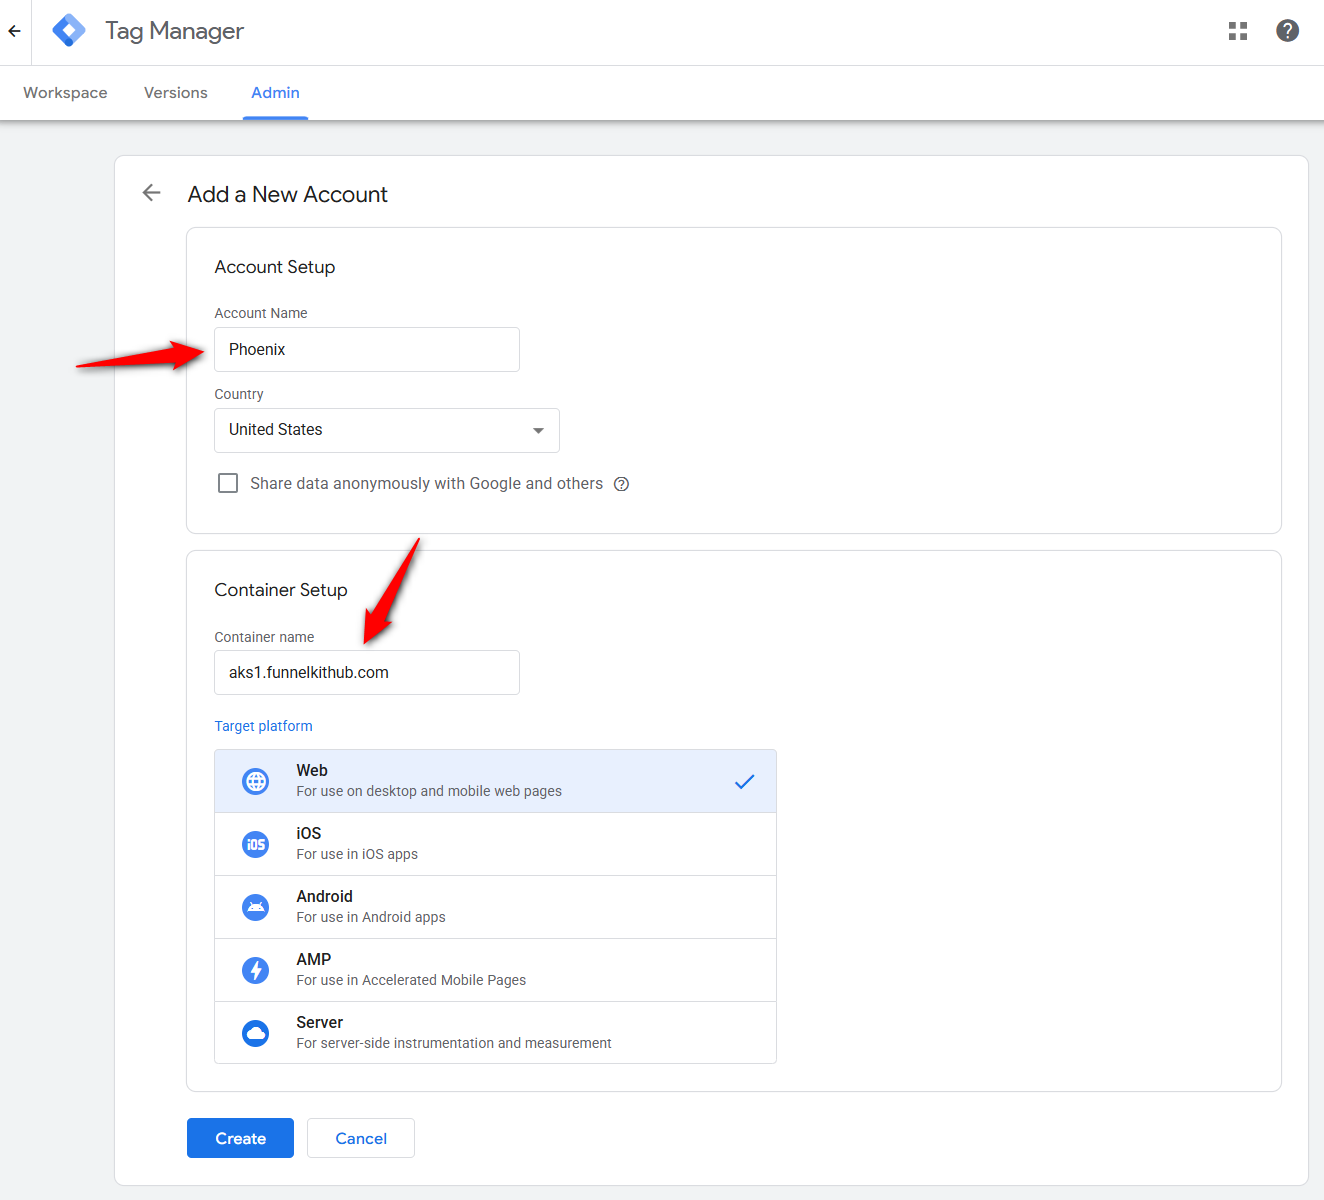
Copy the container ID, which starts with GTM-.
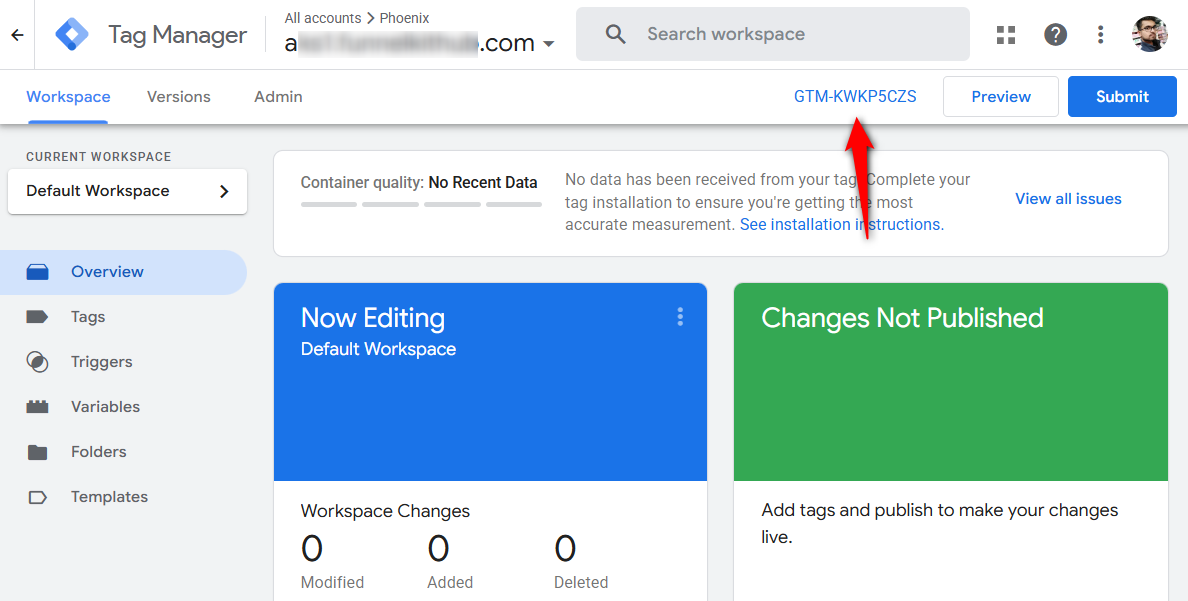
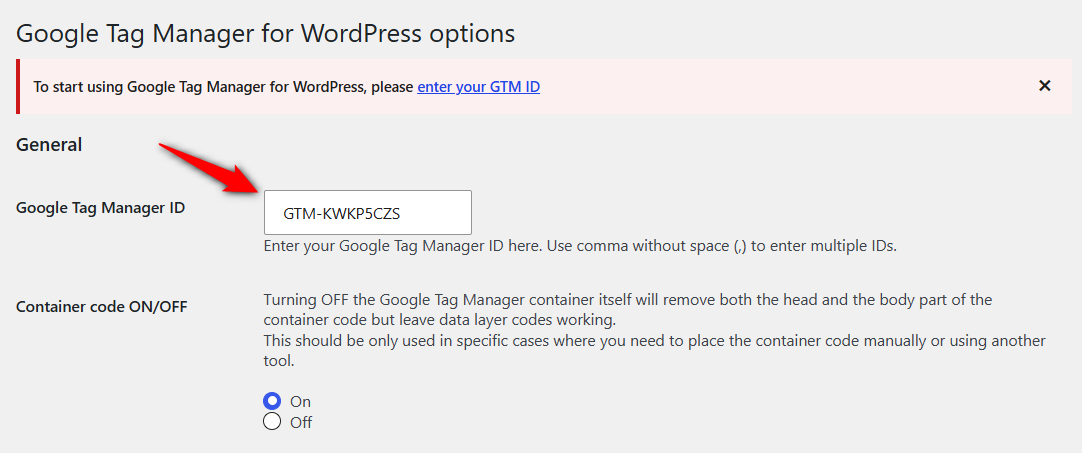
Step 2: Install GTM4WP and paste the GTM ID
Install and activate the GTM4WP plugin, then paste your Google Tag Manager Container ID into its settings so the container loads on your site.
Step 3: Turn on eCommerce in the data layer
In GTM4WP, open the Integration and WooCommerce options. Enable track ecommerce, add cart and order data to the data layer, and exclude tax from revenue so your numbers stay accurate.
Leave the other options off until you actually need them.
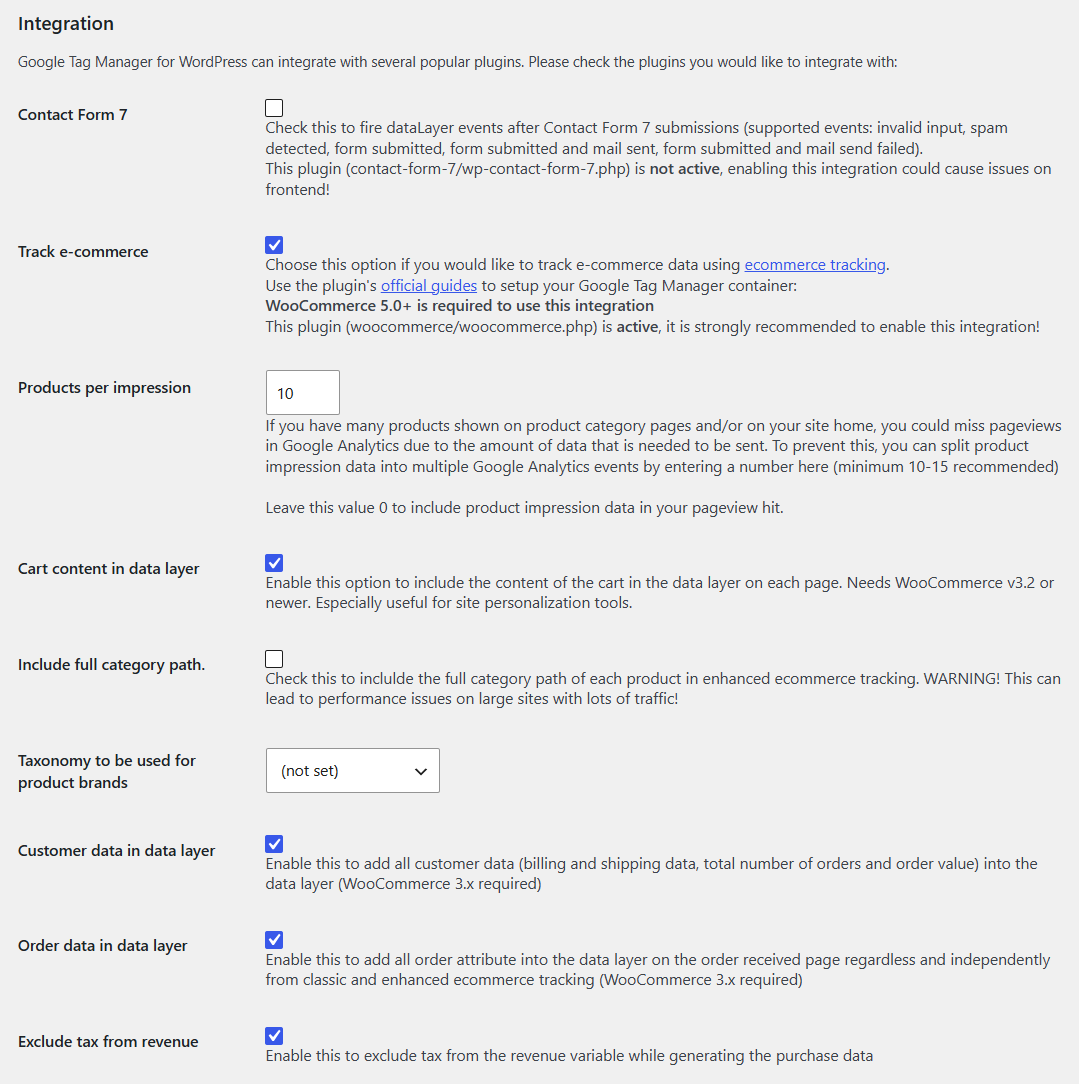
Hit 'Save Changes' when done.
Step 4: Create your GA4 tag in GTM
In Google Tag Manager, add a Google tag using your GA4 Measurement ID.
Then create GA4 event tags that fire on the data layer events GTM4WP provides, such as add_to_cart, begin_checkout, and purchase.
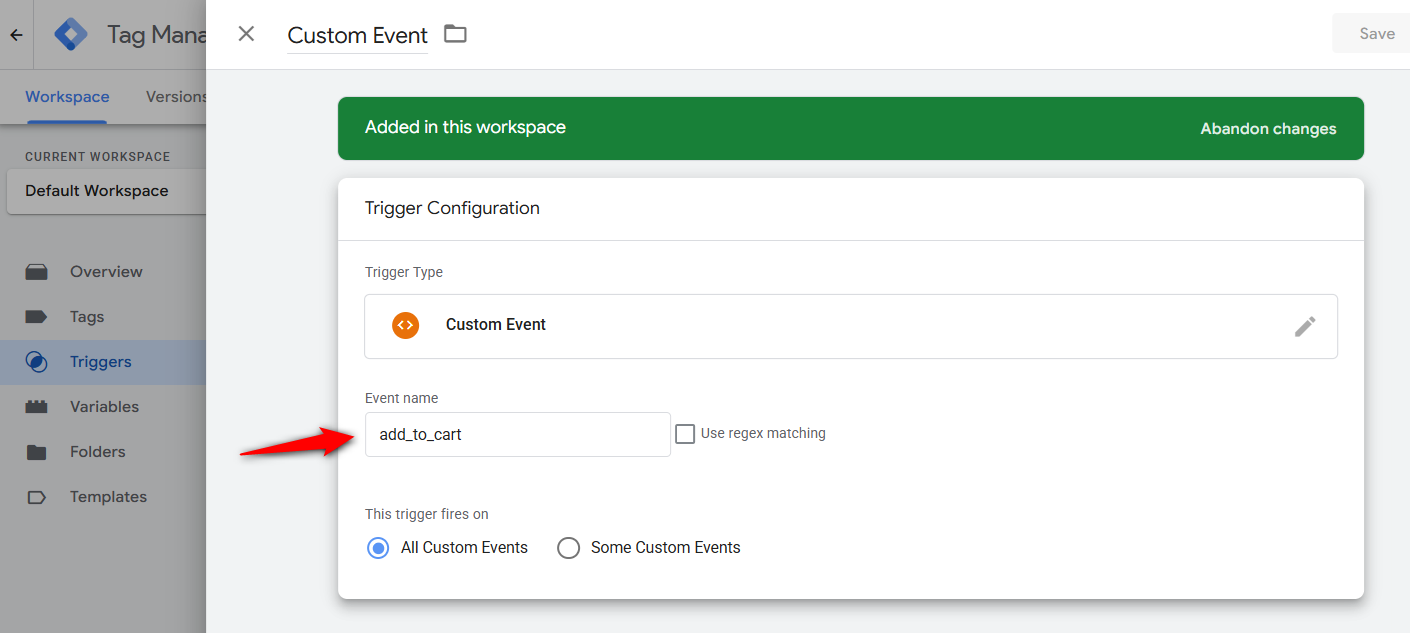
Once done, save and publish your changes.
This is how to set up Google Analytics in WooCommerce using Google Tag Manager.
Method 4: Use Google Site Kit for Basic Purchase Tracking
Site Kit by Google is free and runs on more than five million WordPress sites. Its plugin conversion tracking setting is enabled by default, and it tracks two WooCommerce events, i.e., add_to_cart and purchase.
Since version 1.187.0, it also shows those sales in a Site Goals report on your WordPress dashboard.
Step 1: Install Site Kit and connect Google Analytics
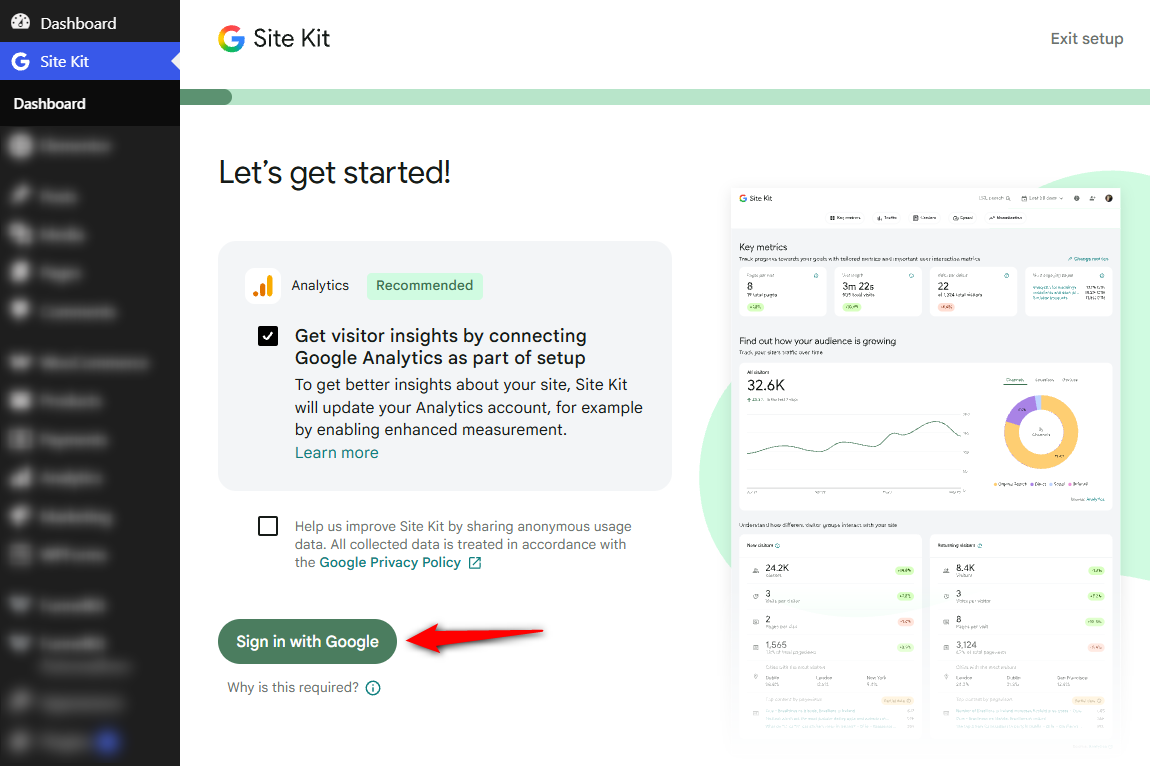
Install and activate Site Kit, then follow the setup wizard.
Sign in with the Google account that owns the store's GA4 property and select that property when Site Kit asks you to.
Step 2: Make sure plugin conversion tracking is on
Open Site Kit’s settings and look for plugin conversion tracking.
Google renamed this setting, so older guides may call it enhanced conversion tracking. This is what lets Site Kit detect your product's sale.
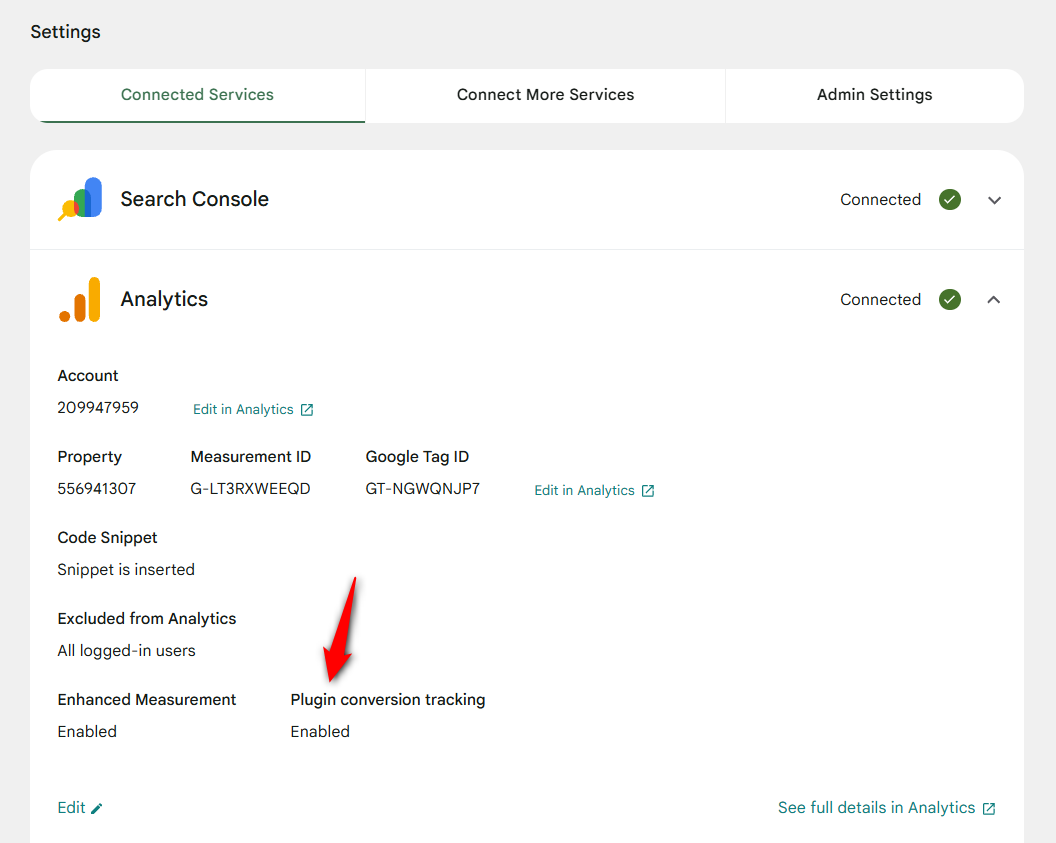
If it’s turned off, Site Kit can still track visits, but it won’t track purchases.
Step 3: Place a test order and check Site Goals
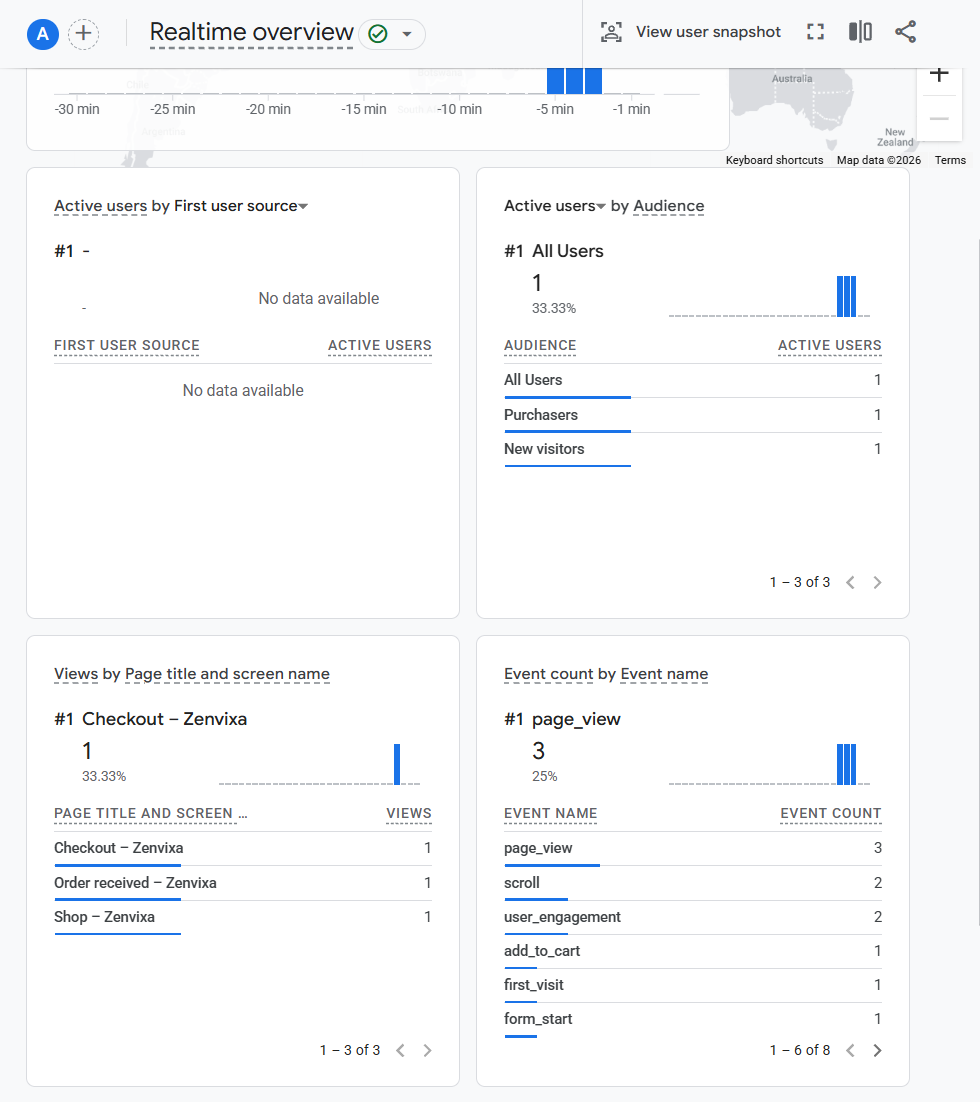
Log out and place a test order in your store. Once Site Kit detects a purchase or add_to_cart event, you should see it in the Site Goals section of your dashboard.
Check GA4’s Realtime report as well to confirm the purchase is coming through.
That’s all you need to set it up, but it’s also where the tracking stops.
With only two ecommerce events, Site Kit can tell you how many products were sold.
However, it won’t show how many people viewed the product first or where shoppers dropped off during checkout.
Running Site Kit alongside another tracking plugin?
Many stores keep Site Kit for its dashboard and use another tool for ecommerce tracking.
If you do that, turn off the Site Kit option that adds the Analytics code to your site, along with plugin conversion tracking.
That way, only one tool adds the GA4 tag and sends your ecommerce events.
How to Test Whether Events Are Capturing in Google Analytics?
Follow the steps below to test events in your WooCommerce store and verify that Google Analytics captures them.
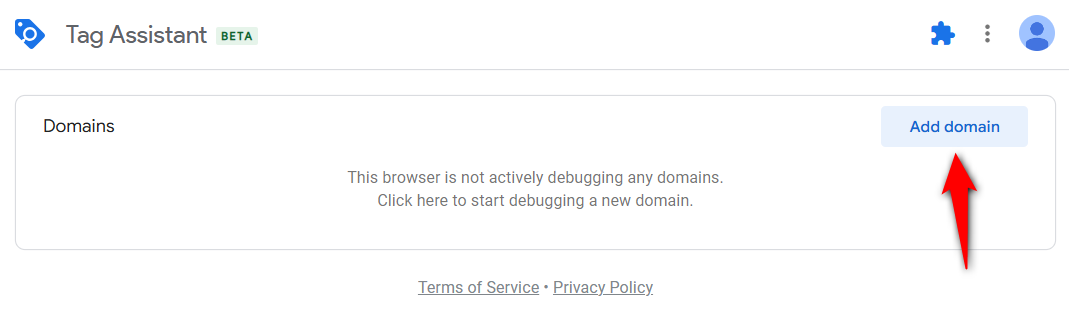
1. Add the domain to Google Tag Assistant
Go to Google Tag Assistant and add the domain.
Enter the URL of your website and click on the ‘Connect’ button.
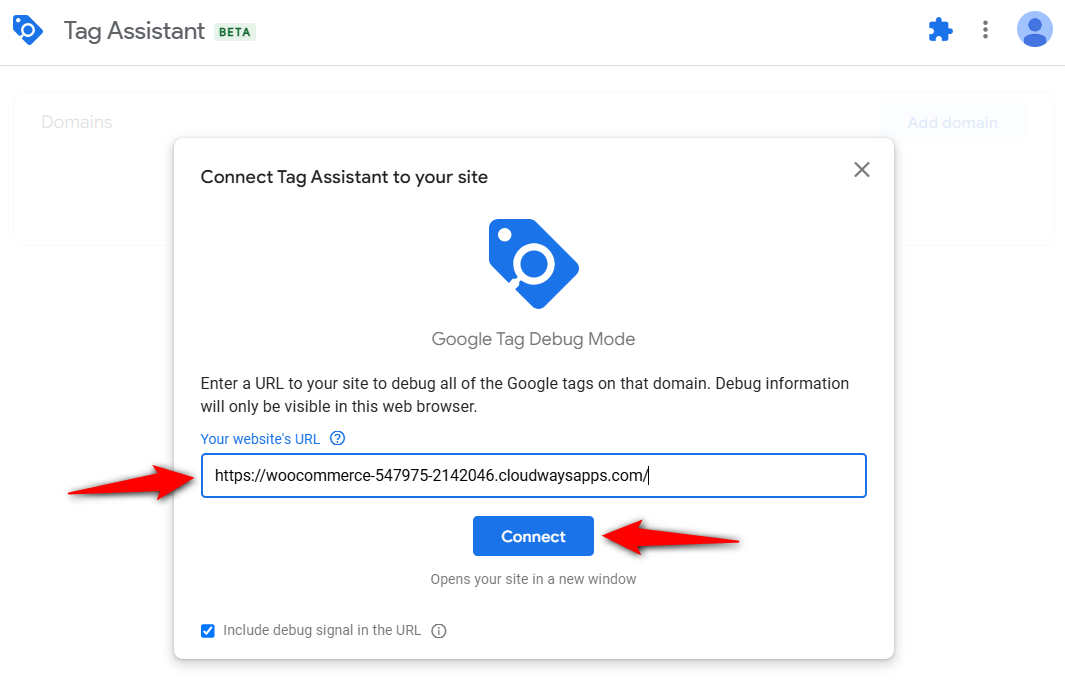
It’ll open up your website in a new tab.
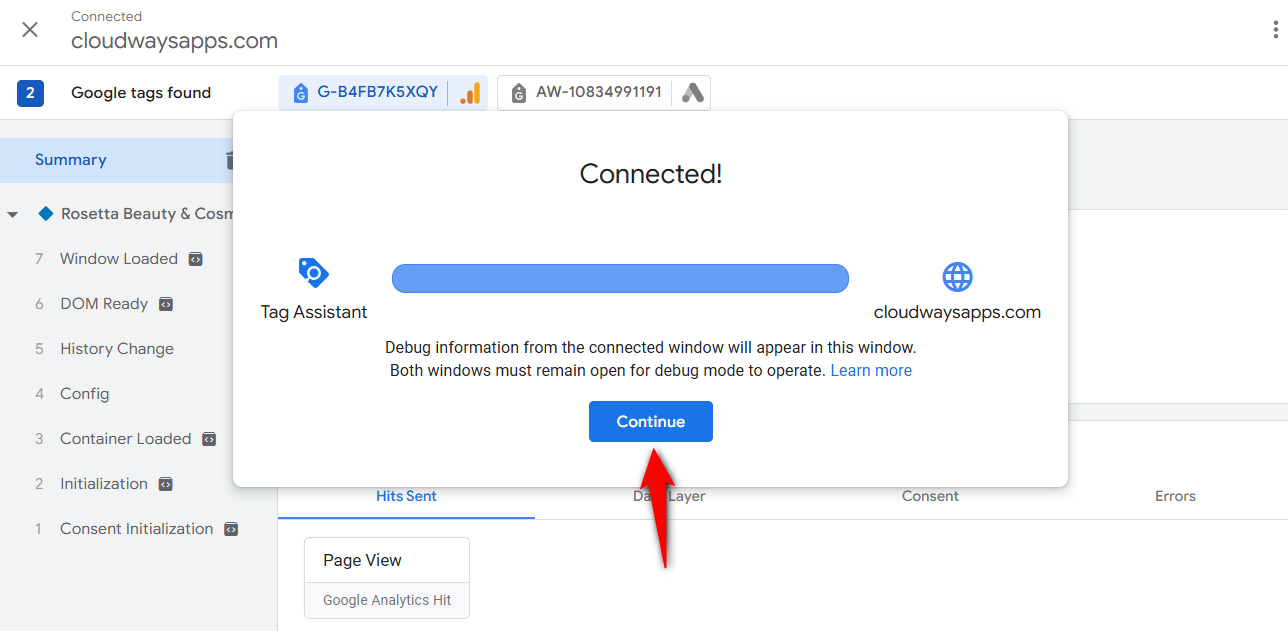
Now, navigate to the pages in your store, and the extension will show the events that were triggered in real-time.
Click on ‘Continue’ and start testing the WooCommerce Google Analytics integration.
2. Navigate to your website and check the triggered events
Now navigate to your WooCommerce website from the tab you opened in step 1.
Adding a product to the cart
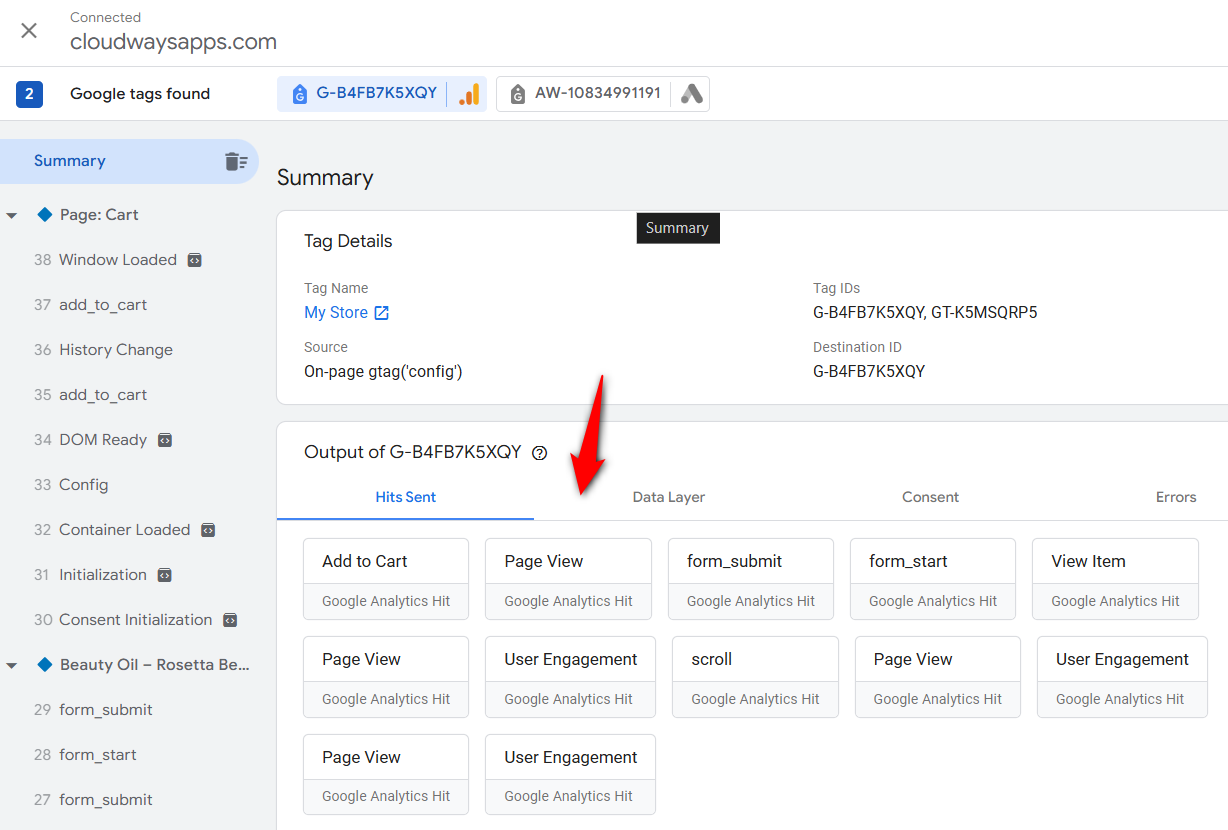
These are the events that get captured under Google Analytics 4 - WooCommerce integration:

As you can see, it has started capturing the events for your GA4 property.
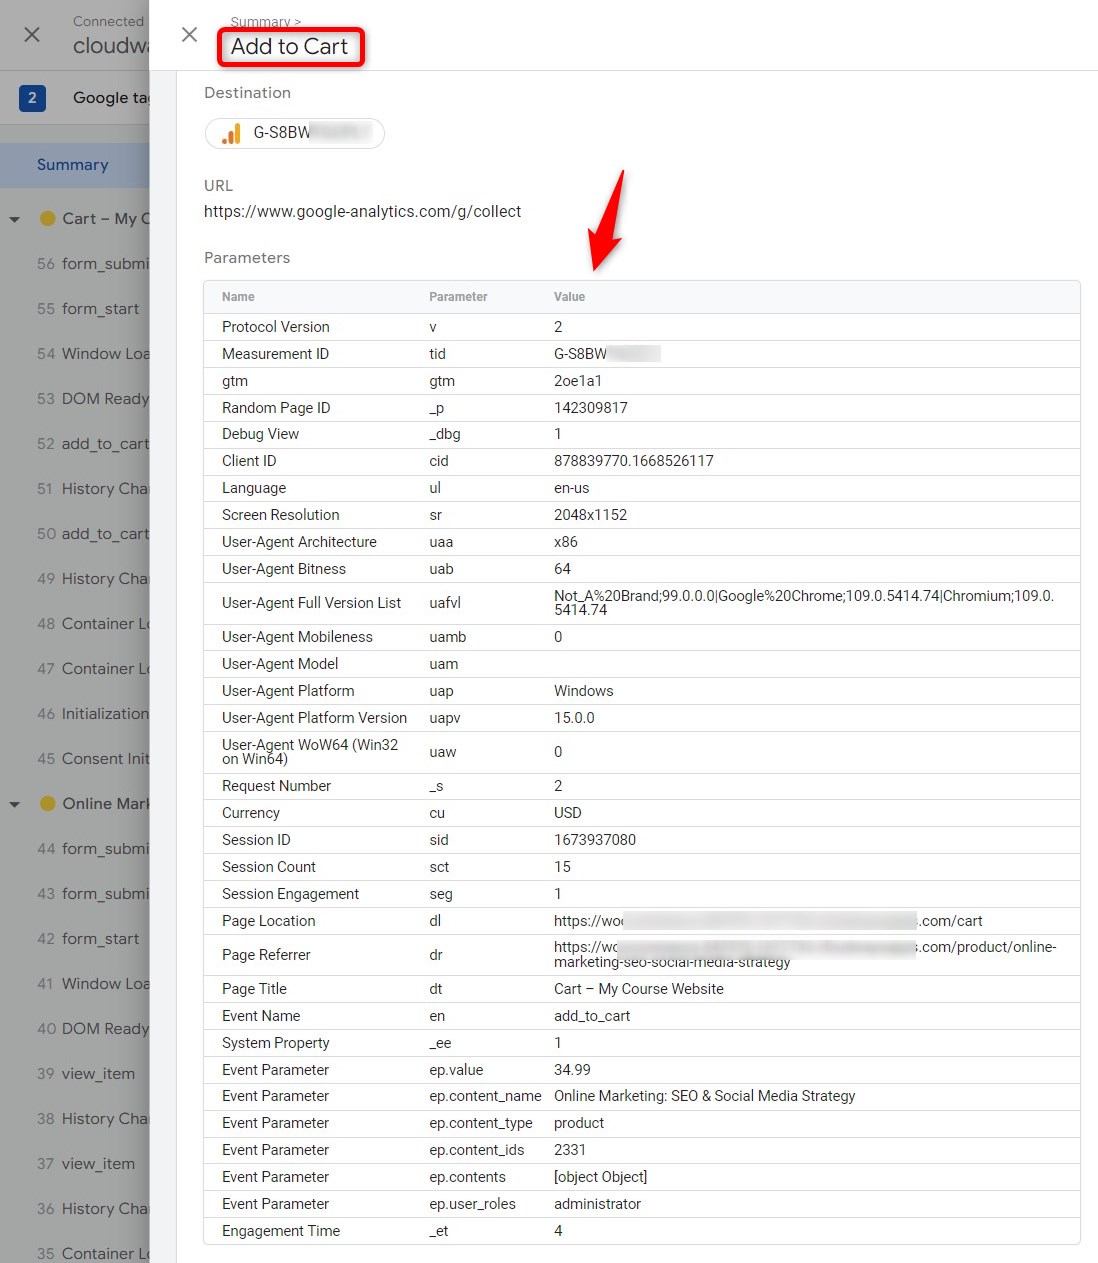
If you click on any of these blocks, you can see the detailed event being captured:
If you click on any of these blocks, you can see the detailed event being captured:
Initiating the Checkout process and making a purchase
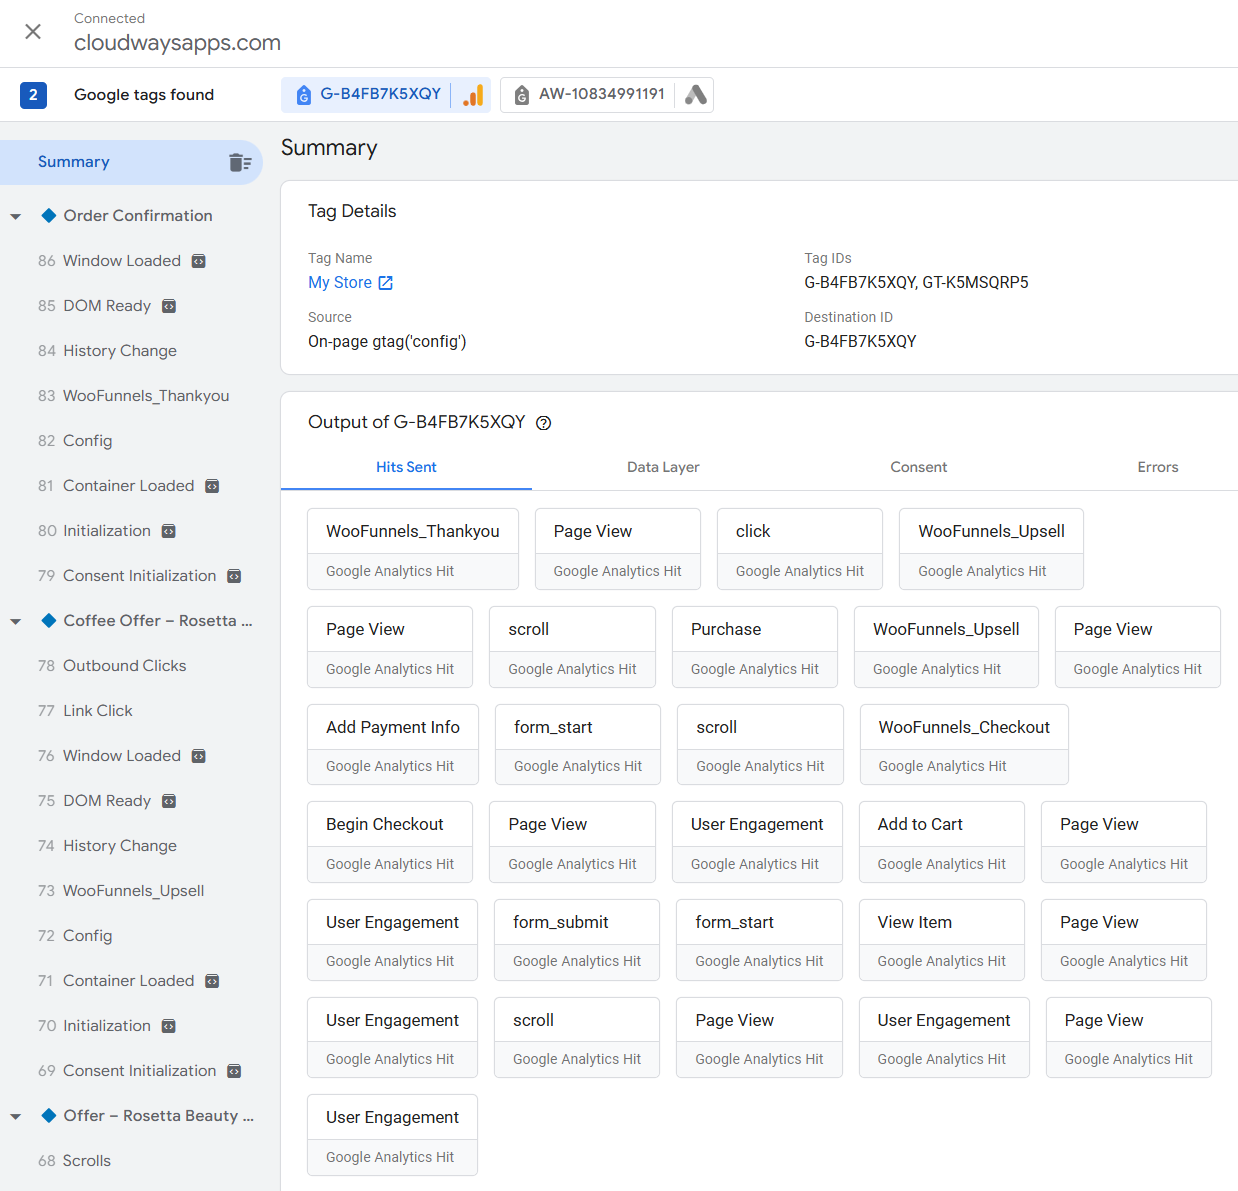
Next, we will start the checkout process and make a test purchase via the payment gateway.
These are the WooCommerce GA4 eCommerce tracking events that were triggered throughout the whole shopping process:
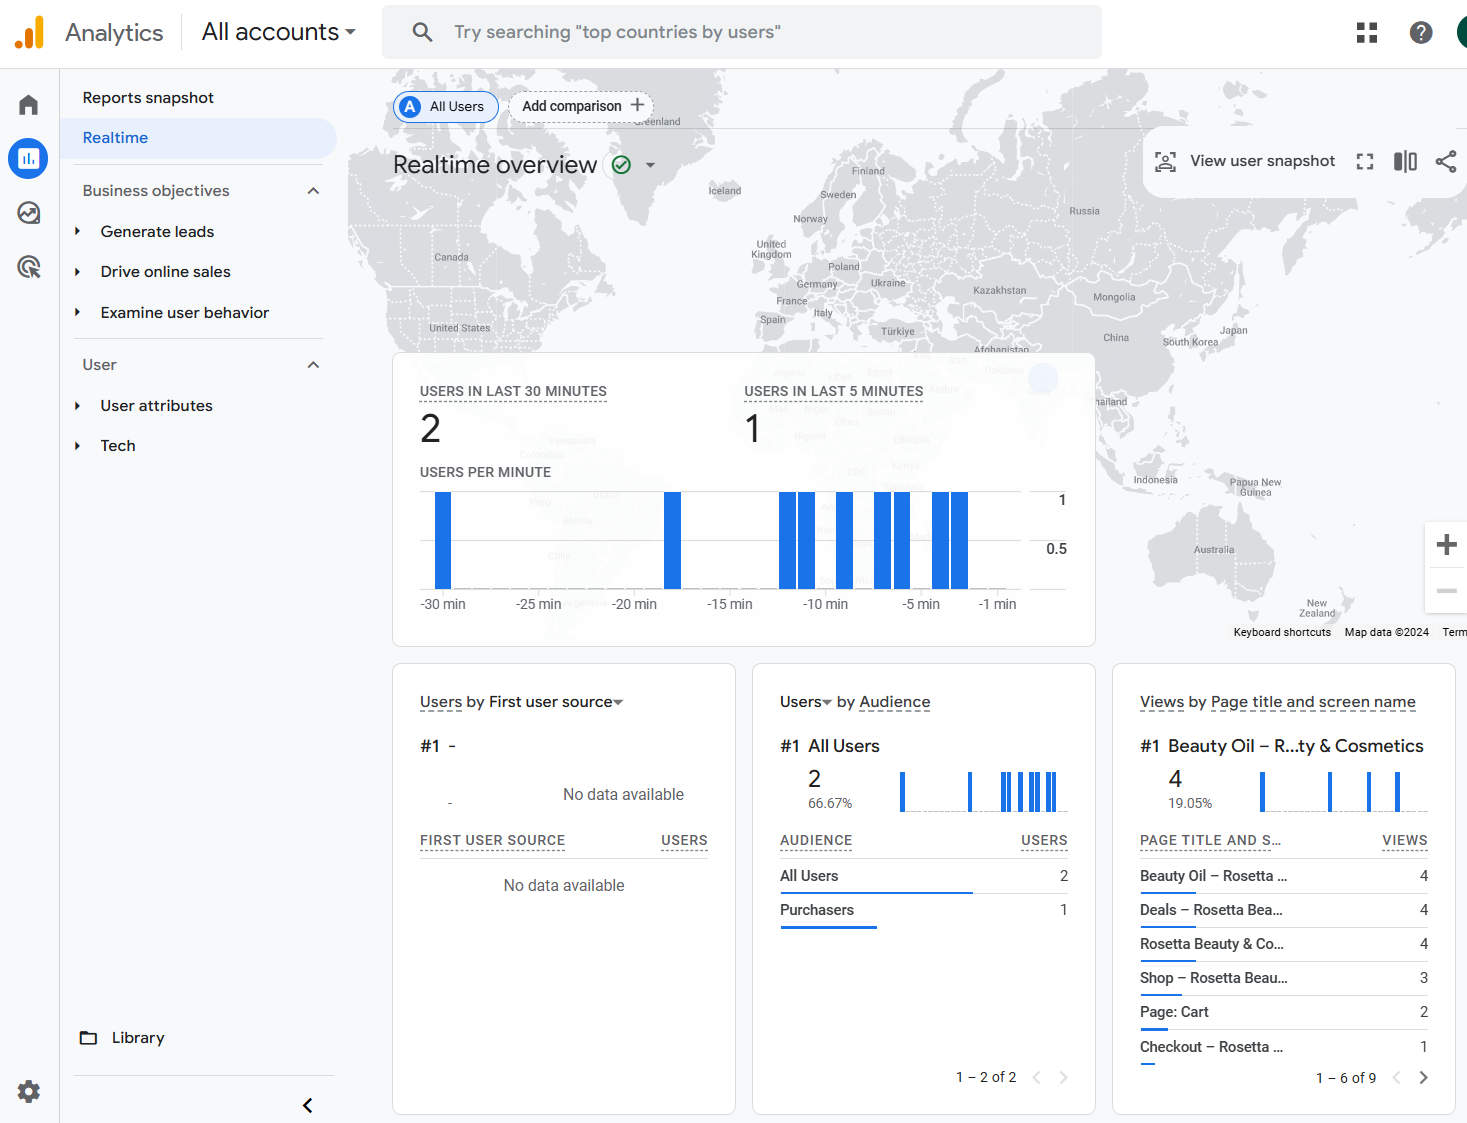
You can also see the data in real time in the Google Analytics dashboard.
Monitoring the events in DebugView
You can monitor all the events with the 'DebugView' option in Google Analytics.
This allows you to see all your data in a single timeline.
Go to Admin ⇨ DebugView inside your Google Analytics account.
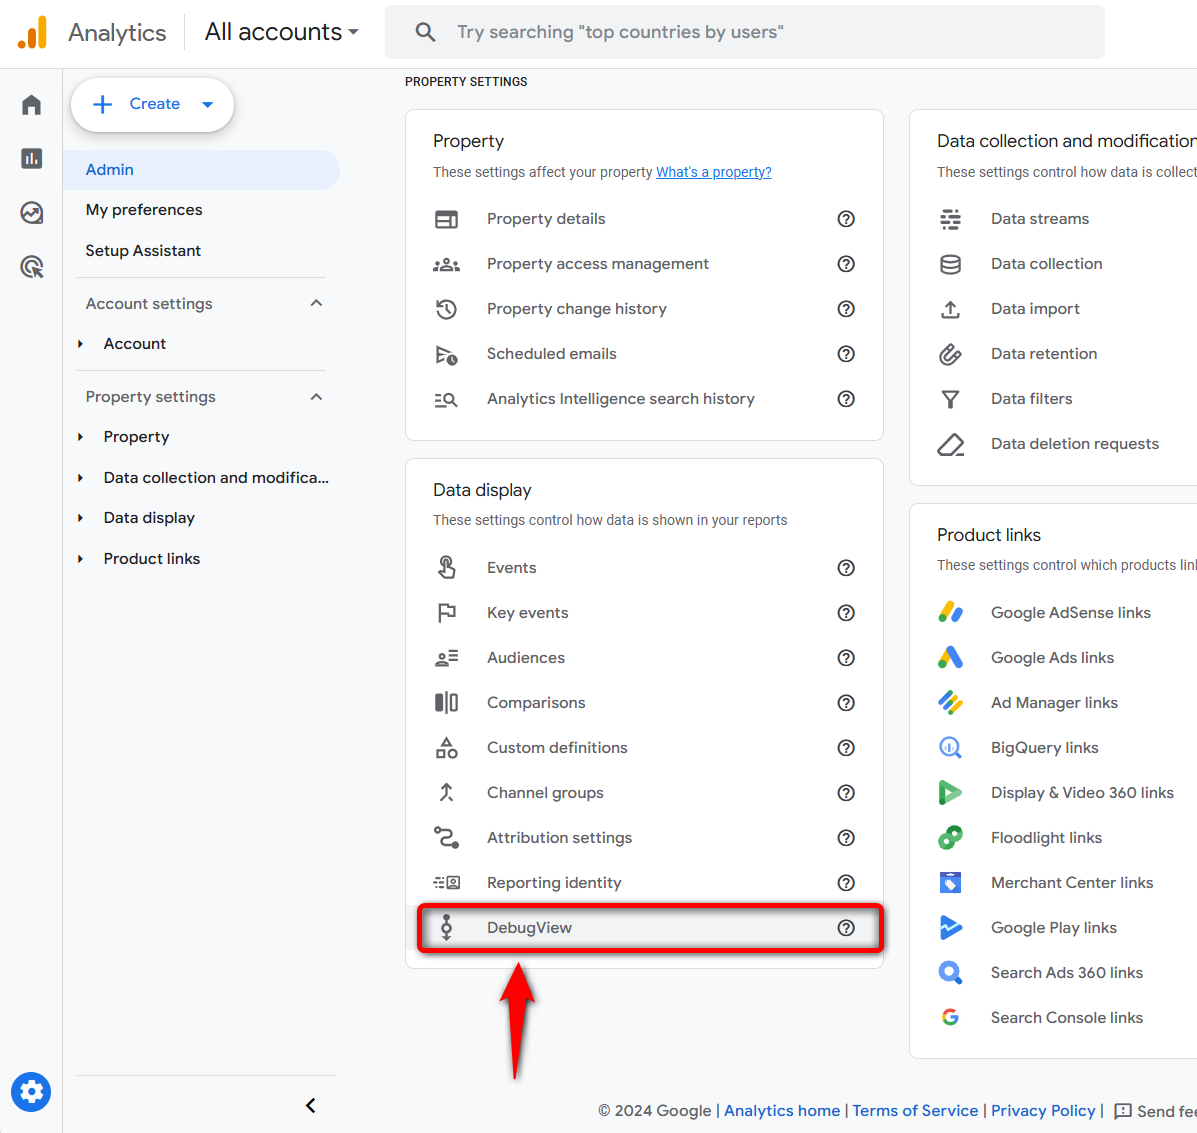
It'll show all the events getting triggered on your website based on your users' activities in a timeline.
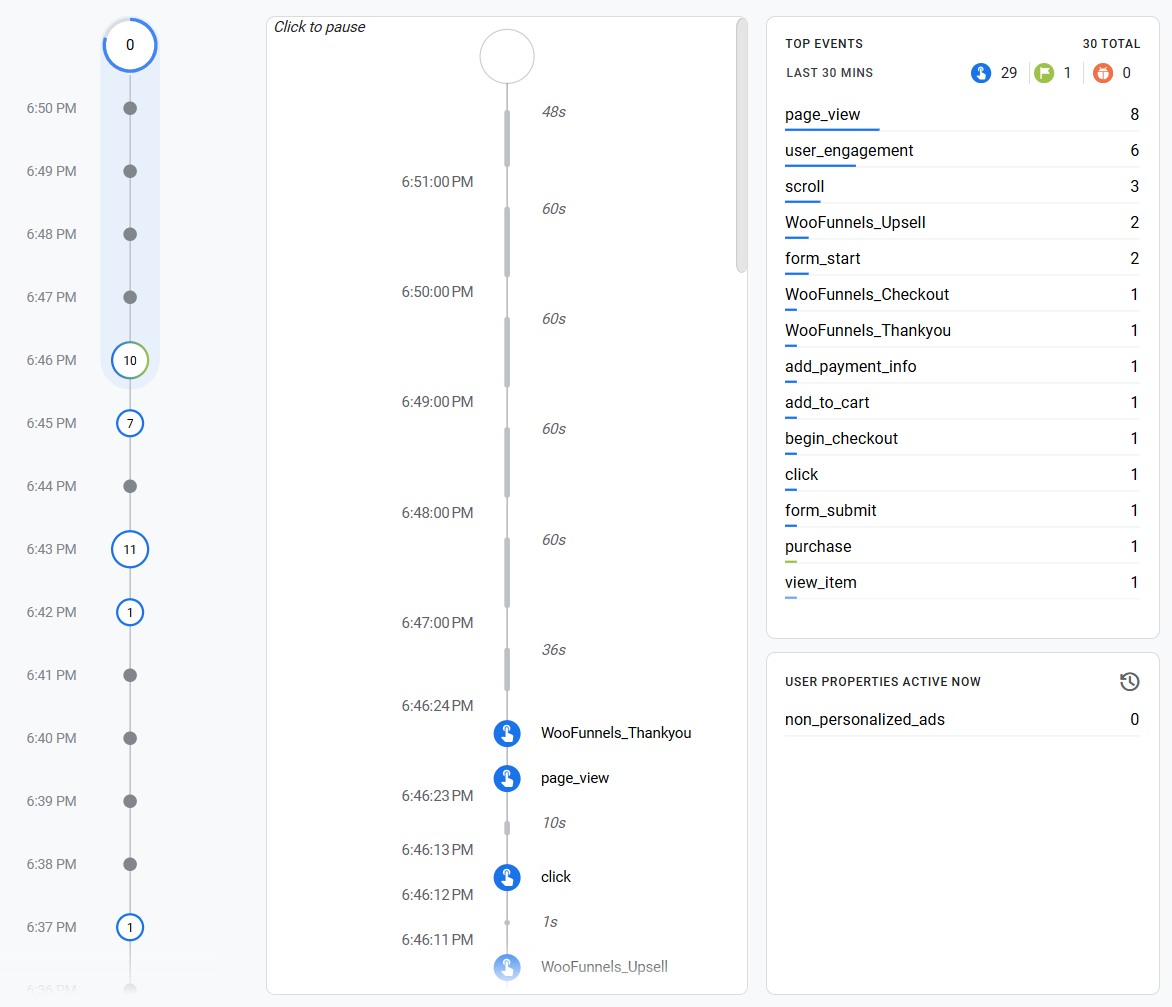
Since all events were captured, they are successfully firing to the Google Analytics ID.
The data and reports for a particular day will be generated after 24 to 48 hours. You can also view and analyze these metrics there.
This means that events are successfully being tracked for the Google Analytics 4 property in your WooCommerce store.
This is how you can test and verify the Google Analytics 4 implementations and event firing/capture on your WooCommerce store.
Where to Find WooCommerce Sales in GA4 Reports
Once your purchases are coming through, here’s where to find WooCommerce sales in GA4:
- Reports → Monetization → Ecommerce purchases: See revenue and quantity by product. On properties using the Business objectives collection, this may appear under Drive online sales.
- Reports → Acquisition → Traffic acquisition: Set the key event to purchase and keep Total revenue in view. Switch to Session source/medium or Session campaign to see revenue from your UTM-tagged links.
- Explore → Funnel exploration: Follow shoppers from view_item to add_to_cart, begin_checkout, and purchase. Break down the funnel by device to see whether mobile shoppers drop off more often.
- Reports → Monetization → Checkout journey: See where shoppers drop off between begin_checkout, add_shipping_info, add_payment_info, and purchase. This report will stay empty if your tracking tool doesn’t send the shipping and payment events.
If the shop’s funnel shows a big drop between begin_checkout and add_shipping_info, check for unexpected shipping costs first.
It’s also worth comparing GA4 with WooCommerce’s order attribution.
WooCommerce shows the source for each order in the Orders list. If a channel looks strong in WooCommerce but weak in GA4, check your consent settings and payment redirects before assuming the campaign isn’t working.
For revenue by bump, offer, and funnel step, FunnelKit includes built-in funnel-level analytics.
To tag campaign links so they appear cleanly in GA4, see our WooCommerce UTM tracking guide. For the reports available directly in WooCommerce, see our WooCommerce analytics guide.
GA4 Consent Mode v2 & GDPR for WooCommerce
Since March 2024, Google requires Consent Mode v2 for any site that serves EEA or UK visitors and uses Google Analytics or Google Ads.
Without it, you either collect data without proper consent (a GDPR problem) or lose conversion data because Google has no consent signal to work with.
Consent Mode v2 passes four signals to Google's tags, each set to granted or denied:
- analytics_storage: Analytics cookies (GA4)
- ad_storage: Advertising cookies
- ad_user_data: Whether user data can be sent for advertising (added in v2)
- ad_personalization: Whether data can be used for personalized ads (added in v2)
For EEA traffic, all four should default to denied and flip to granted only after the visitor opts in.
How to set it up on WooCommerce (no code):
- Install a Google-certified CMP that supports Consent Mode v2, such as Complianz, CookieYes, WPConsent, or WebToffee’s GDPR Cookie Consent.
- Install the free WP Consent API plugin. This is the bridge: it lets your consent banner broadcast consent decisions to every compatible plugin (Site Kit, WooCommerce’s own attribution tracking, and others) so they all respect the same choice.
- In your CMP, set region-specific defaults (EEA/UK denied by default) and map each cookie category to the right consent signal.
- Confirm Consent Initialization fires before any Google tag; the default state must be set before tracking loads.
Verify it works. Install Google's Tag Assistant extension, load your site, interact with the banner, and watch the consent state update from denied to granted.
If you run a caching or optimization plugin (WP Rocket, LiteSpeed), exclude your CMP's scripts from JS delay/minification, which is a frequent cause of consent signals not firing.
Fix Missing, Doubled, or Wrong Revenue in GA4
Fix duplicates before anything else. Every other comparison is off while a purchase fires twice.
| Symptom | Likely cause | Fix |
|---|---|---|
| WooCommerce GA4 purchase event not tracking | No redirect to the order-received page, a custom thank-you page without WooCommerce hooks, a JavaScript error, declined consent, or testing as admin | Log out, accept consent, and check the console. For upsell flows, let your funnel tool own purchase. |
| Purchase firing twice | Two sources, such as a theme snippet, Site Kit, or GTM alongside a plugin. Mismatched transaction_id formats (order ID vs. order number) stop GA4 from matching duplicates | Pick one owner and turn purchase off everywhere else. Search your page source for your G- ID. |
| GA4 revenue dropped in late August 2026 | Official plugin 2.4.1 excludes tax and shipping from purchase value | Nothing is broken. Add a GA4 annotation for August 25 and compare against sales minus tax and shipping. |
| GA4 revenue lower than WooCommerce | Declined consent, ad blockers, buyers leaving on upsell pages, or renewals | Fix consent, then the upsell gap, then send renewals server-side. Expect a steady gap from blockers; investigate a sudden one. |
| GA4 revenue higher than WooCommerce | Duplicate purchases or refunds never sent to GA4 | Fix duplicates, then send refunds through GA Pro, MonsterInsights, or the Measurement Protocol. |
| PayPal or Stripe shows as a referral | The buyer returns from the payment domain, which takes credit for the sale | Admin ⇨ Data streams ⇨ your stream ⇨ Configure tag settings ⇨ List unwanted referrals. Add paypal.com and stripe.com. |
| DebugView is empty | Browser not in debug mode, an ad blocker, denied consent, or cached scripts | Connect through Tag Assistant, disable blockers, accept the banner, and purge your cache. |
| Subscription renewals missing | Renewals are charged on a schedule with no visitor session | Send renewal purchases with the Measurement Protocol (see FAQ). |
Frequently Asked Questions (FAQs)
WooCommerce doesn’t include Google Analytics by default. You have to connect it. You don’t strictly need it to run a store, but without it, you have no reliable view of which products sell, where buyers abandon checkout, or which traffic sources drive revenue. WooCommerce's own Analytics tab gives you sales numbers; GA4 adds behavioral and source/medium data on top. Most stores want both.
No, you don't need Google Tag Manager for WooCommerce GA4. A plugin (the official one or FunnelKit) sends GA4 events without GTM. Reach for GTM4WP only when you need custom triggers, manage multiple pixels through a single container, or plan to switch to server-side tracking.
Yes, you can track individual product performance, customer behavior, and other key metrics using Google Analytics.
Yes, it can. If you use other methods or plugins, we recommend disabling the "eCommerce tracking" feature in other plugins to prevent the 'Purchase' event from firing twice.
Yes, you can track subscriptions by capturing the initial purchase value of subscription products. You get purchase events for product ID, subscription item, value, and other recurring data to track subscriptions.
No. WooCommerce Analytics reports orders, revenue, products, and coupons straight from your store’s database.
GA4 adds the things WooCommerce can’t see, like where visitors came from, what they did on your site, and where they left. When the two disagree on revenue, trust WooCommerce.
You can, but the basic snippet only tracks page views and general interactions.
It never sends add-to-cart, checkout, or purchase data, so GA4’s ecommerce reports stay empty. To fill them, you’d need custom code or a data layer plugin like GTM4WP.
Google Analytics 4. Universal Analytics stopped processing data on July 1, 2023.
If you’d rather move away from Google Analytics altogether, Matomo and Plausible both have WordPress plugins, although their ecommerce setups work differently.
GA4 will rarely match your order count exactly, because of consent choices, ad blockers, and browser privacy limits.
Its standard reports can take up to 48 hours to update, and some reports hide small numbers when Google signals are turned on.
It also takes time to learn, which is why many store owners pair it with a dashboard plugin inside WordPress.
Browser tracking can miss events when a shopper blocks scripts, declines consent, or never loads the page where the event fires.
Server-side tracking sends some of those events from your server instead, usually through Google’s Measurement Protocol or a server-side Tag Manager container.
The extra setup can make sense if a significant share of your revenue comes from renewals or manual orders.
It’s also worth considering if you need refund tracking in GA4, or if GA4 still shows much less revenue than WooCommerce after you’ve fixed duplicate events and consent issues.
Server-side events still need to respect each visitor’s consent choice. For most stores, there’s no need to start there.
Get your browser tracking working cleanly first, with one tool responsible for sending purchase events.
Set Up Your WooCommerce Google Analytics Integration the Right Way!
For WooCommerce store owners, closely monitoring user behavior and eCommerce conversions is crucial.
And you can do that with Google Analytics.
Google Analytics will tell you about your store’s performance - sales, user activities, abandonment, and almost anything else you want to know.
But first, you need to integrate it with your store.
Pick one tool to handle the purchase event, test it with a real order, and compare GA4 with WooCommerce monthly.
If you use order bumps and one-click upsells, FunnelKit Funnel Builder can track each funnel step in GA4 alongside the standard events.
That also covers buyers who complete payment and close the tab before the thank-you page loads.
Here are some additional resources for you:
- Set Up WooCommerce Facebook Pixel
- Add TikTok Pixel to WooCommerce
- Add Snapchat Pixel to WooCommerce
- Set Up Google Ads Conversion Tracking In WooCommerce
- Enable Pinterest Conversion Tracking In WooCommerce

Editorial Team
September 30, 2026Quick answer: A quiz funnel is a multi-step interactive path that replaces a static lead form where visitors answer 5-8 questions, opt in with their email, and receive a personalized...
Editorial Team
September 29, 2026A WooCommerce checkout template controls how your checkout page looks and works, and it's the last screen a shopper sees before paying. The default WooCommerce checkout does the job, but...
Editorial Team
September 28, 2026A free plus shipping plugin lets you offer a $0 product while charging customers for shipping and handling. At 2026 US postage rates, that fee may only cover the product,...






