
Running a WooCommerce store without the Facebook Pixel is like pouring money into ads while blindfolded. You're spending, but you have no idea what's actually working.
Every abandoned cart, every product page visit, every completed purchase holds valuable data. Without the pixel installed, that data is gone forever.
Facebook Pixel bridges the gap between your WooCommerce store and your ad campaigns. You can finally see the exact journey from an Instagram click to a completed checkout, letting you target the specific people who abandoned their carts yesterday instead of blasting cold traffic.
The result? Way cheaper acquisition costs and campaigns that actually generate revenue.
Retargeting alone can bump your conversion rates by up to 150% [Source: cropink.com].
In this post, we will tell you how you can all do this by setting up Facebook Pixel and Conversion API in WooCommerce. Further, you’ll learn to enable events to track conversions in your store.
Watch this video tutorial to add Facebook (Meta) Pixel to your WooCommerce store:
Table of Contents
- 1 What Is the WooCommerce Facebook Pixel (and Why It Matters)
- 2 Two Methods that Facebook Uses in Tracking Conversions
- 3 Free Tools We’ll Use to Set Up Facebook Pixel on Your WooCommerce Store
- 4 Types of Events That Can Be Tracked
- 5 How to Set Up WooCommerce Facebook Pixel in Your Store?
- 6 How to Test the Browser and Server Events on Your Store?
- 7 Additional Events Provided by the FunnelKit
- 8 Special Note for those Running One-Click Upsells
- 9 5 Essential Tips to Track the Performance of Facebook Ads
- 10 Frequently Asked Questions (FAQs) on WooCommerce Facebook Pixel
- 11 Start Tracking Every Conversion With the WooCommerce Facebook Pixel!
What Is the WooCommerce Facebook Pixel (and Why It Matters)
The Facebook Pixel, now officially called the Meta Pixel since the 2022 rebrand, is a JavaScript snippet that tracks visitor behavior on your WooCommerce store and sends that data back to Meta's advertising platform.
When someone clicks your Facebook or Instagram ad, visits your product page, adds an item to their cart, and completes a purchase on the checkout page, the pixel records each action as an event.
Meta uses this event data to do three critical things for your store:
- Conversion tracking: See exactly which ads, audiences, and creatives drive actual revenue, not just clicks. Without the pixel, Meta has no way to know whether an ad click led to a $200 order or a bounce.
- Audience building: The pixel lets you create retargeting audiences (people who viewed a product but didn't buy), lookalike audiences (new prospects who resemble your best customers), and exclusion audiences (people who already purchased).
- Ad delivery optimization: When you tell Meta to optimize for purchase events, the algorithm uses your pixel data to identify more people who are likely to buy. Without accurate pixel data, Meta optimizes blindly and your return on ad spend suffers.
In 2026, the pixel alone isn't enough. Browser privacy restrictions, iOS tracking limitations, and ad blockers mean that a client-side pixel misses a significant percentage of conversions.
That's why Meta strongly recommends pairing the pixel with the Conversions API (CAPI), a server-side tracking method that sends event data directly from your WooCommerce server to Meta, bypassing the browser entirely.
Why Pixel Tracking Can Be Perplexing When Setting Up for the First Time?
With the launch of iOS 14, Facebook has set up parameters for sending and receiving conversion events from tools such as the Facebook (Meta) Pixel.
Earlier, it was done only via the user’s browser. But now Facebook requires the data to be sent directly to its servers.
This process aims to send data related to various events and conversions to Facebook Ads Manager, which maintains data privacy.
For that, Facebook introduced its server-side tracking known as Conversion API (CAPI).
Therefore, you must set up the Facebook Pixel and Conversion API on your online store to track data effectively.
However, several guides and plugins, such as Facebook for WooCommerce, available on the internet, have made setting up WooCommerce Facebook Pixel quite challenging.
If you’re new to Facebook Pixel tracking, you may find setting it up from scratch overwhelming.
But don’t worry, we’ll show you a simple process of setting up Facebook Pixel on your WooCommerce store.
Two Methods that Facebook Uses in Tracking Conversions
Matching is the process by which Facebook connects an event fired on your website to a Facebook user.
This process ensures conversion tracking, targeting, and the creation of custom audiences for various events.
There are two types of conversion tracking that Facebook uses:
- Browser Events: This method uses the web browser to send data to Facebook. However, it’s not the most accurate method. For instance, ad blockers can block the sending of data from their browsers at any time. Or, with iOS 14, it won’t send data to Facebook if there's explicit content.
- Conversion API: Facebook introduced a new method known as Conversion API. It sends data over to its servers while bypassing the browser. These events can overcome browser limitations, such as ad blockers and privacy settings. It offers consumers transparency and control over their data, delivering accurate data and personalized experiences.
These two methods work together to provide data to Facebook.
If, at some point, browser events are blocked, the Conversion API ensures that data is sent to Facebook.
We recommend setting up both the Facebook Pixel and the Conversion API on your website to track data efficiently.
Free Tools We’ll Use to Set Up Facebook Pixel on Your WooCommerce Store
To set up WooCommerce Facebook Pixel on your store, you will need just these two tools:
1. FunnelKit Funnel Builder (WordPress Plugin)
2. Facebook Pixel Helper (Google Chrome Extension)
FunnelKit Funnel Builder
We recommend using the FunnelKit Funnel Builder for tracking pixels on your website.
This WooCommerce checkout solution not only lets you set up high-converting Checkout pages but also provides deep integration with Facebook Pixel.
It eliminates the need for multiple plugins to set up the Facebook Pixel. After all, it's the job of your checkout page to send purchase data to Facebook.
It has a built-in feature to track events site-wide. Not just Facebook, you can further track user activities from TikTok, Pinterest, Google Ads, Snapchat, etc., and integrate it even further with Google Analytics for detailed analysis.
Installation
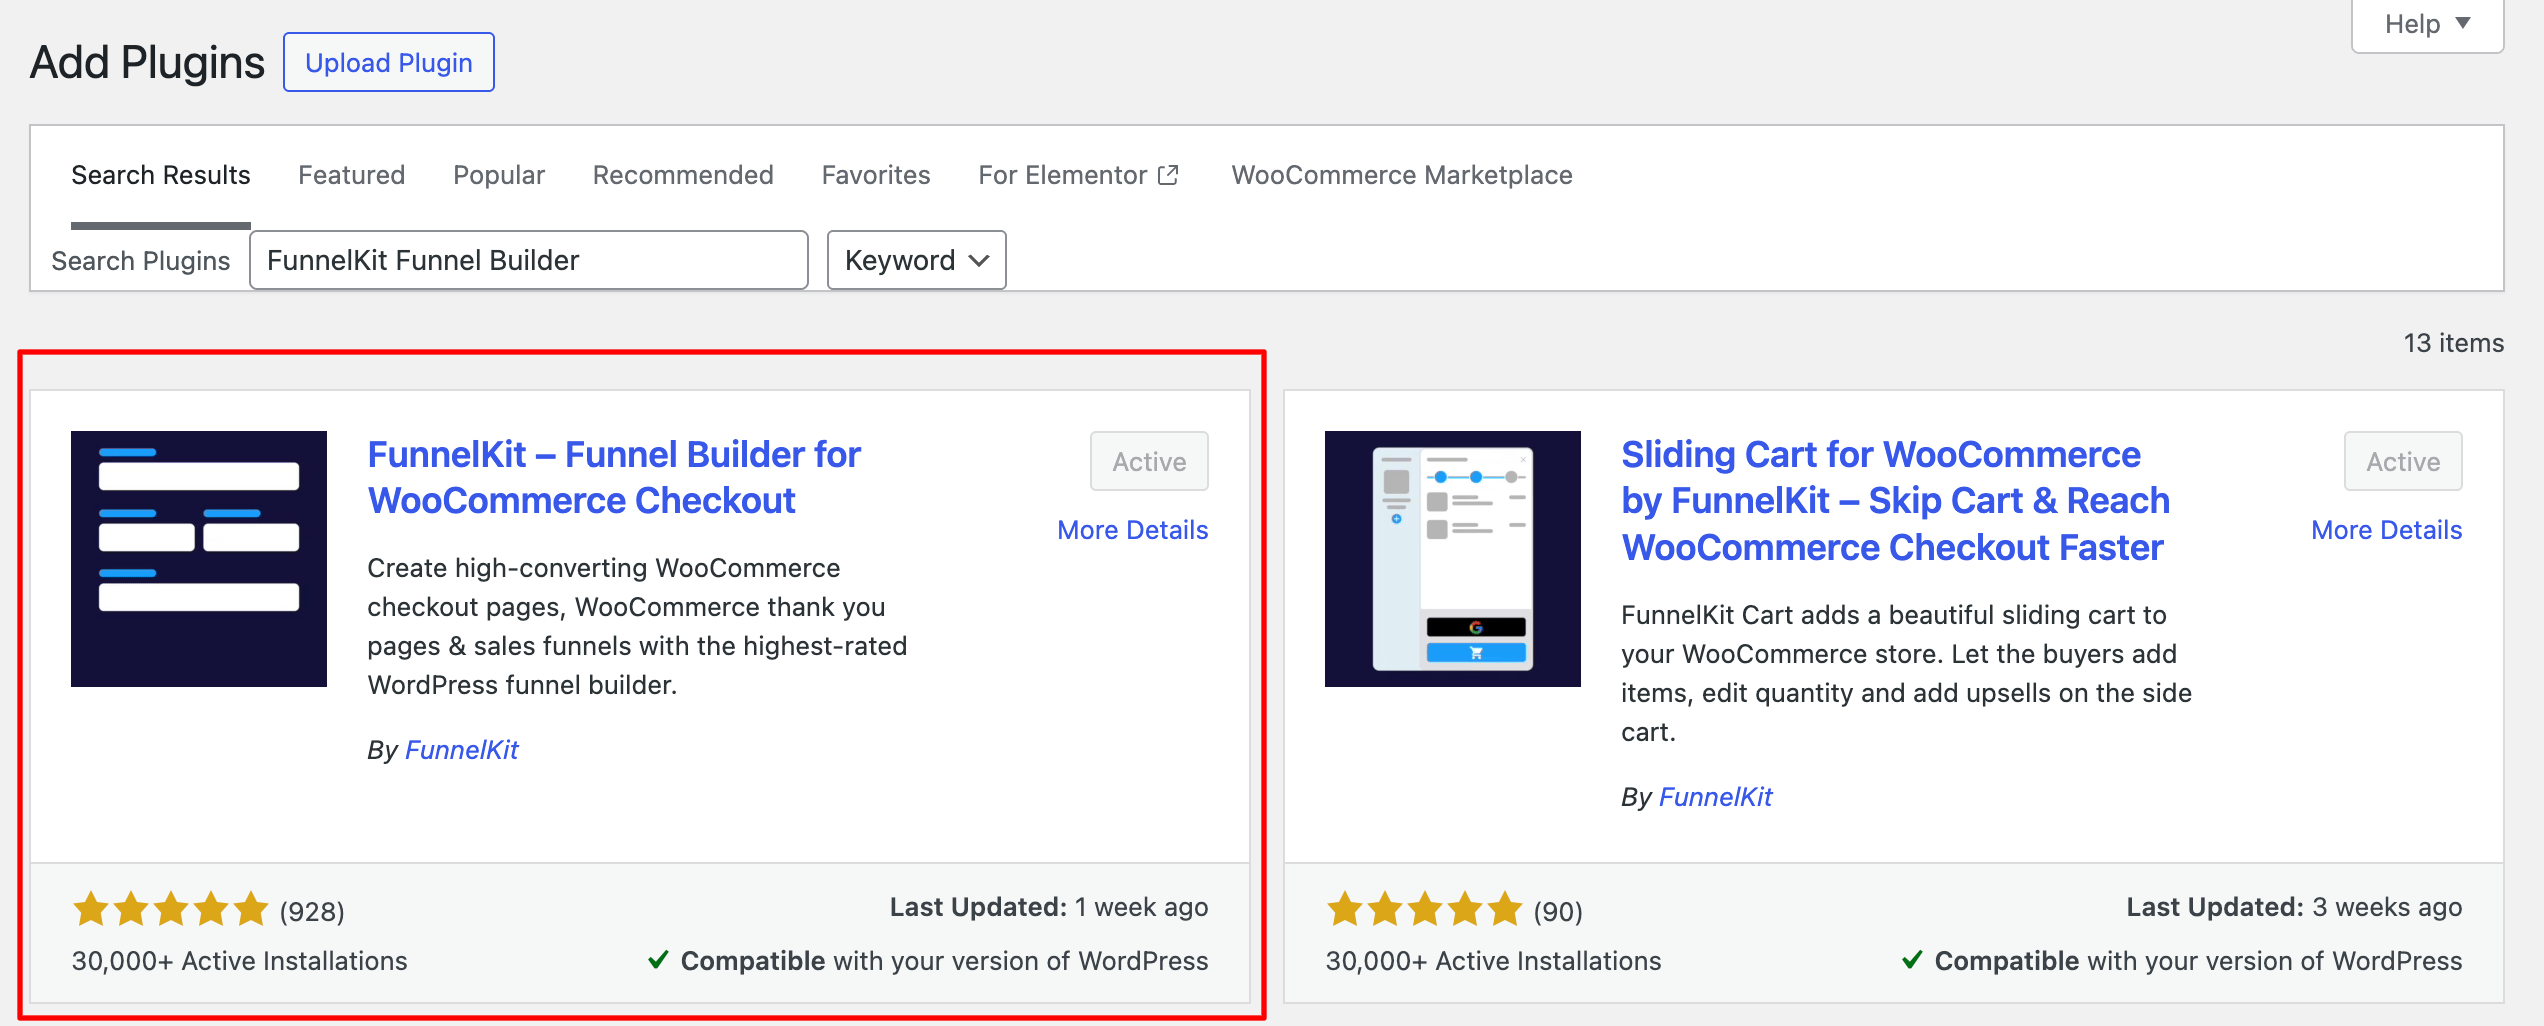
To install the FunnelKit Funnel Builder, go to your WordPress dashboard.
Then, click on Plugins > Add New. Next, look for the FunnelKit Funnel Builder and click on 'Install Now'.
Once done, hit 'Activate' to make it active on your website.
This is how you can install and activate the FunnelKit Funnel Builder plugin.
You're now set to install WooCommerce Facebook pixel on your store.
Facebook Pixel Helper (Chrome Extension)
The Facebook Pixel Helper is a Google Chrome extension that lets you validate the Facebook Pixel implementation.
It’s more of a troubleshooting tool that works in the background. It looks for conversion-related information and provides real-time feedback on the pixel implementation.
You can view the number of pixel events, along with a detailed overview of warnings, successes, and errors, on a single page.
Installation
Go to Facebook Pixel Helper from your Google Chrome web browser.
Click on ‘Add to Chrome’.
The Chrome browser will prompt you to confirm the installation of the extension.
Click on 'Add Extension'.
That's it! This will install the Facebook Pixel Helper extension on Google Chrome.
You're now ready to set up WooCommerce Facebook Pixel on your store.
Now that we have all the tools, look at the events you can track with the FunnelKit Funnel Builder.
Types of Events That Can Be Tracked
Here is the list of events that you can track with the Facebook Pixel on your WooCommerce store:
- Page view: A user lands on any of the pages on your website.
- Lead: A user signs up by submitting their information on your website.
- View content: A user views the product pages on your website.
- Add to cart: A user adds a product to their shopping cart.
- Initiate checkout: When users start the checkout process on your store.
- Add payment info: When a customer enters payment information during checkout.
- Purchase: Tracks this event once the purchase is completed. It's usually represented by getting an order confirmation or landing on the thank you page.
There are additional events that FunnelKit helps you track - which we’ve discussed later in this post.
How to Set Up WooCommerce Facebook Pixel in Your Store?
In this section, you’ll learn how to set up WooCommerce Facebook Pixel.
Step 1: Locate the Facebook Pixel ID
Go to your Facebook Business Suite and log in to your account using the credentials. Or simply click on the Meta Business Suite from your Facebook page.
If you don't have an account, you can create a Facebook (Meta) Business Suite account.
Next, go to the Events Manager on the Facebook Business Manager dashboard.
From the left sidebar, click on ‘(+) Connect Data Sources’.
Click on ‘Web’ and hit the ‘Connect’ button.
Next, name your WooCommerce Facebook pixel and click on ‘Create Pixel’.
Enter the URL of your WooCommerce website that you want to install Facebook Pixel.
Then, click on ‘Next’.
Next, you’ll have to choose how to connect your website.
You can do it through:
- Conversions API and Meta Pixel
- Meta Pixel
Select ‘Conversions API and Meta Pixel’ and click on the ‘Next’ button.
This step will let you install WooCommerce Facebook Pixel on your store.
If you don’t want to configure the Conversions API on your website, you can proceed with the ‘Meta Pixel only’ option.
Once done, your Facebook Pixel ID will be created.
Now, you need to set up the Conversion API on your website.
You'll get a pop-up window that explains the Conversion API.
Keep clicking on ‘Next’ till you reach the last slide.
Once you’re on the final slide, hit the ‘Set Up’ button.
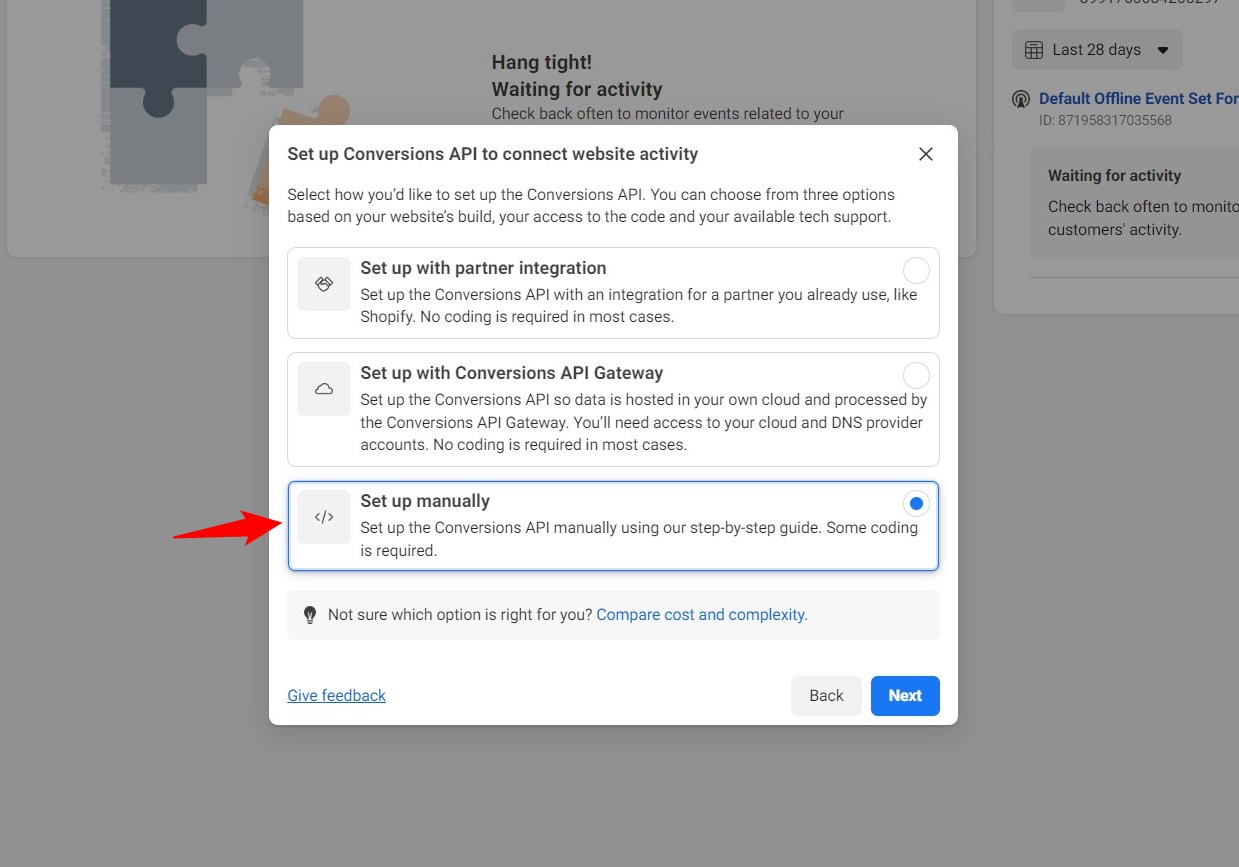
Next, you’ll need to specify how you’d like to set up the Conversions API.
Choose from the following options to set up WooCommerce Facebook Pixel:
- Set up partner integrations - Choose partners such as WooCommerce, Shopify, etc.
- Set up the Conversions API gateway - This helps host data in your cloud and process it through this gateway.
- Set up manually - Place the generated code in the header section of your website.
Specify all the events you want to enable for WooCommerce Facebook pixel conversion tracking.
Once it's done, it'll ask you to set it up manually or email instructions to a developer. You don't have to do anything because FunnelKit takes care of that. Simply close the window.
Go to the 'Settings' tab on your Pixel dashboard.
Here, you’ll get your Facebook Pixel ID.
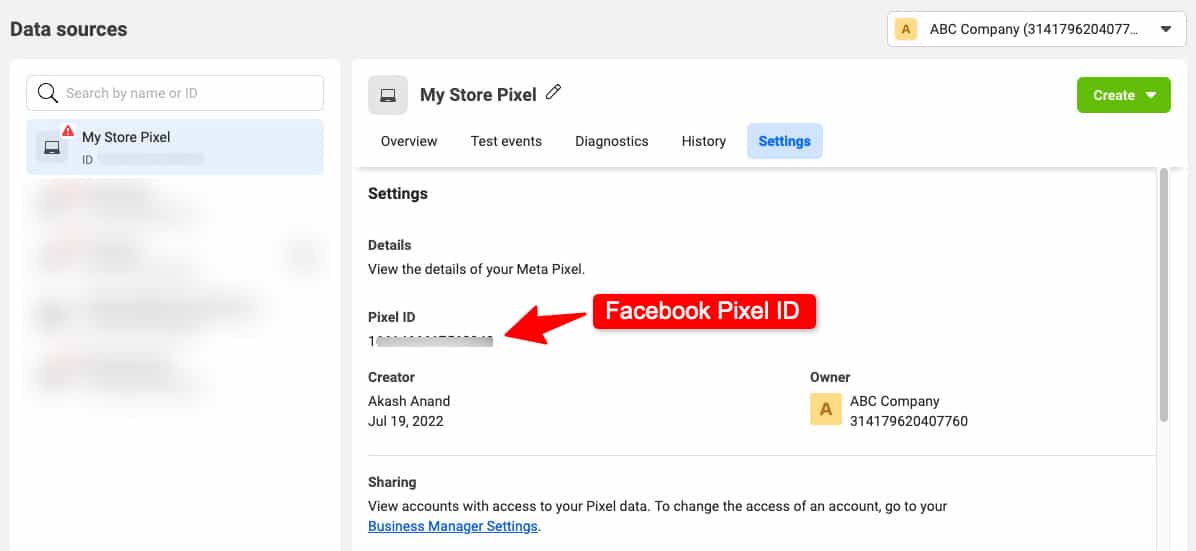
Click to copy the Pixel ID to the clipboard.
Step 2: Configure the Facebook Pixel ID in the Funnel Builder
Go to the ‘Settings’ section and click on the 'Pixel Tracking' tab. Now, on the Facebook Pixel, add the Pixel ID and Access Token.
If you want to add multiple pixel IDs, you can do that as well. Just hit Add Another Account, then add the Pixel ID and Access Token. Repeat the same process to add multiple Pixel IDs.
Step 3: Enable the events to track
After setting the Pixel IDs, turn on 'Purchase Event Logs' to start recording actual purchase data.
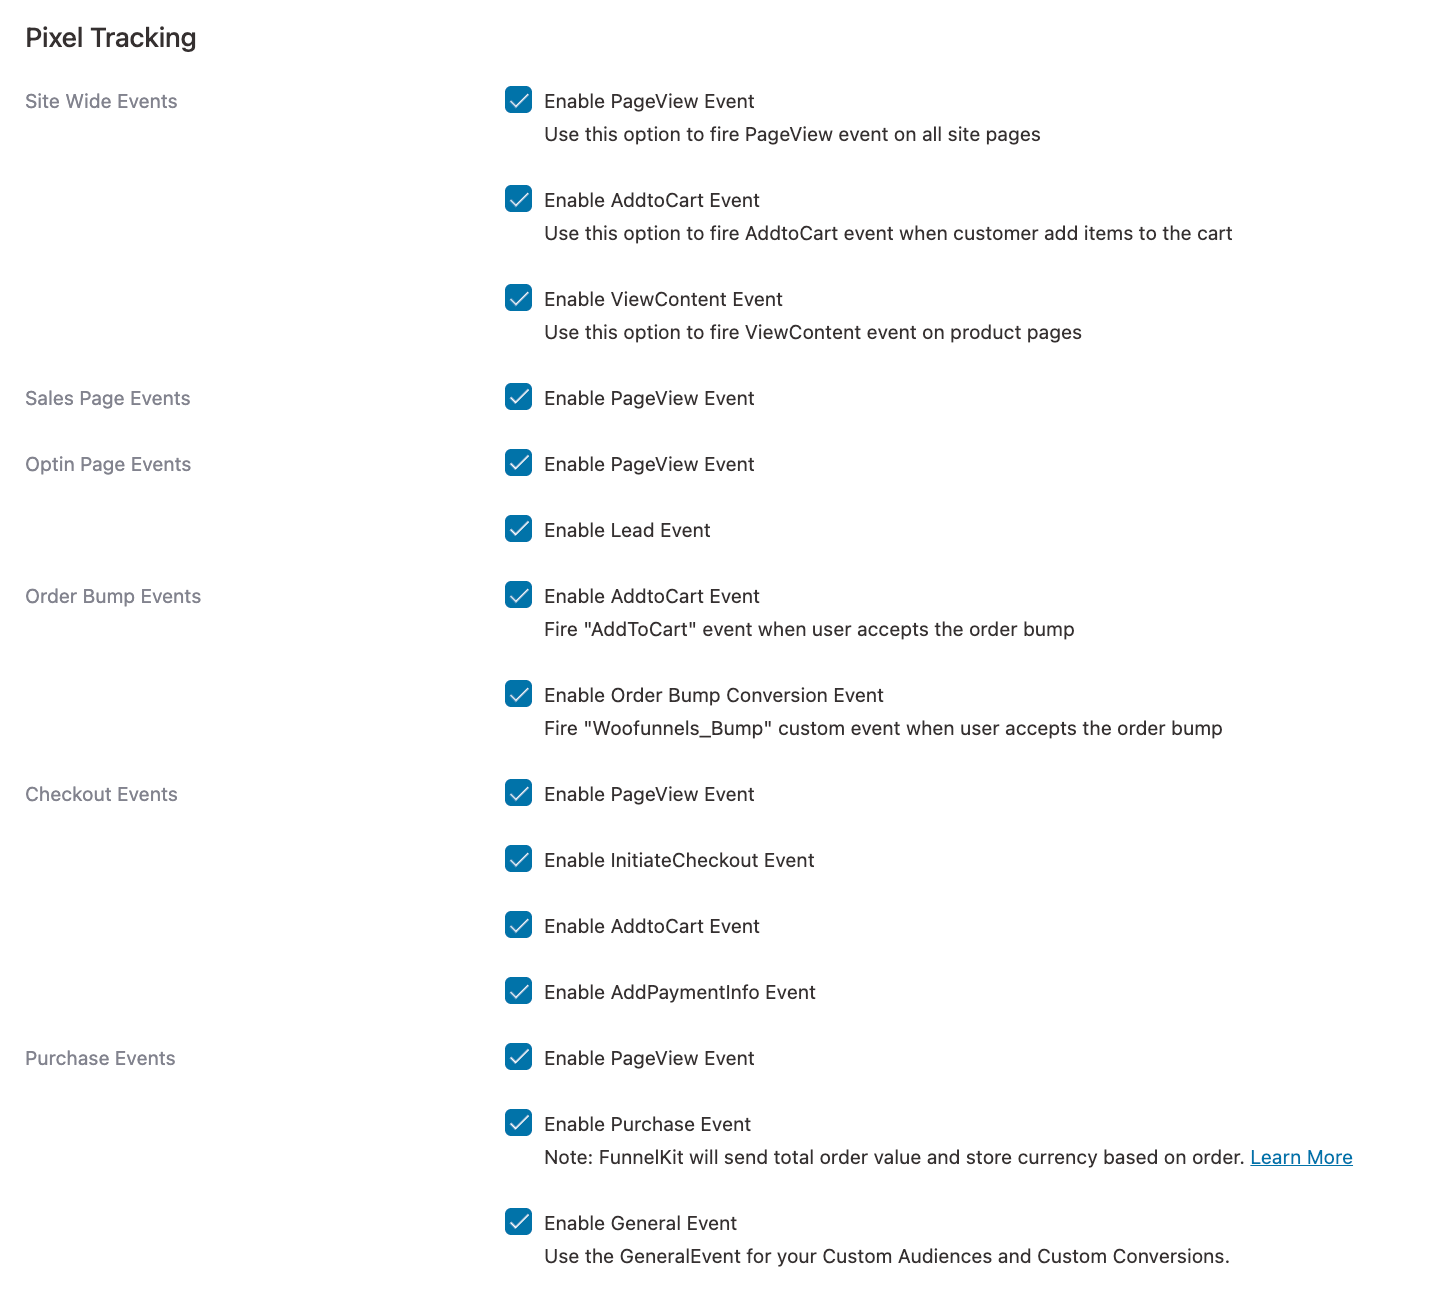
Here, enable the events you want to track with the Funnel Builder.
Site-wide events
- Page View
- Add to Cart
- View Content
Sales Page events
- Page View
Optin Page events
- Lead
Order Bump events
- AddtoCart Event
- Order Bump Conversion Event
Checkout Events
- PageView
- Initiate Checkout
- AddtoCart Event
- AddPaymentInfo Event
Purchase events
- Page View
- Purchase
- General Event
Track Steps
- Custom Funnel Step Event
Advanced Options
- Enable content settings for dynamic ads (Product catalog must be synced with Facebook)
- Treat variable products as simple products (Send parent product ID when variants are not in the catalog)
- Content ID prefix (Optional)
- Content ID suffix (Optional)
- Exclude shipping from total
- Exclude taxes from total
- Enable advanced matching with the Pixel (Sends available customer email, name, phone, address)
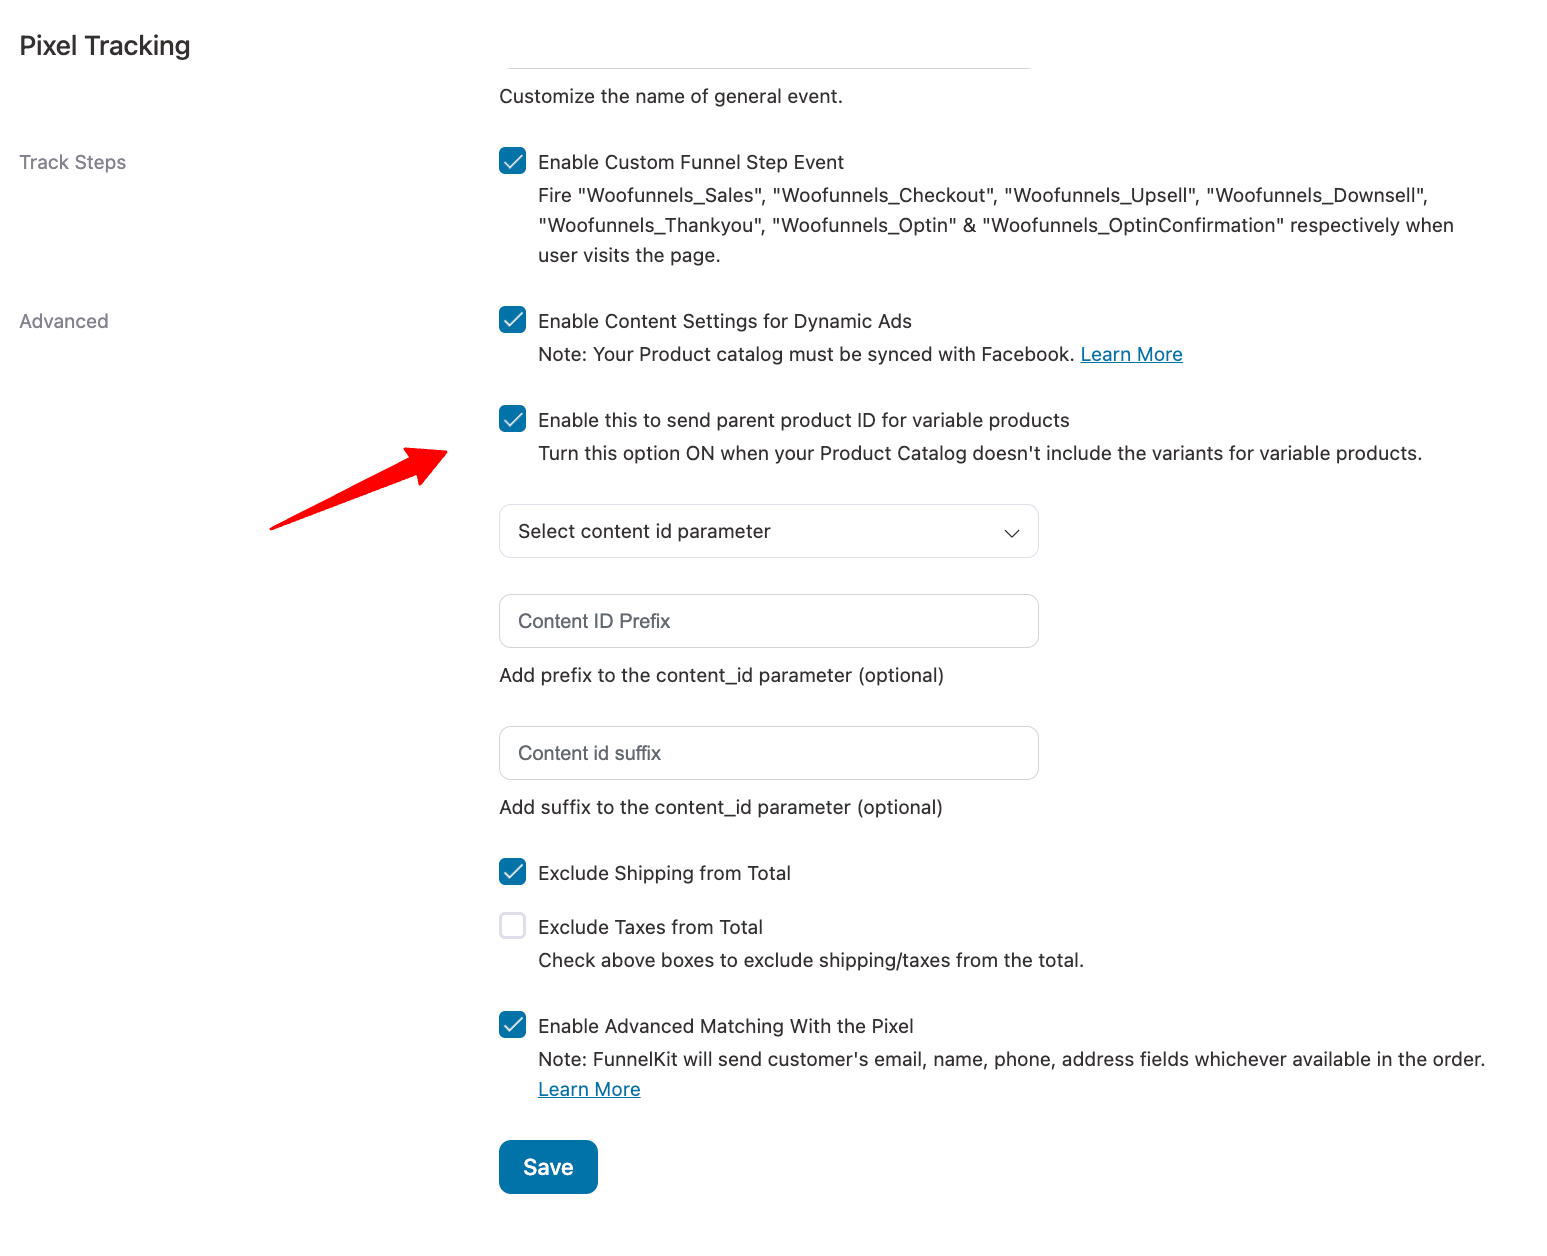
Make sure to hit the ‘Save Changes’ button when you’re done.
There you go! We have answered your 'how to connect Facebook pixel to WooCommerce' query.
This is how you can successfully install WooCommerce Facebook Pixel on your store.
How to Test the Browser and Server Events on Your Store?
You can test two types of events to ensure data tracking works effectively on your WooCommerce store.
- Browser events
- Server events
Follow the instructions on how to enable the different events and test the server & browser-side events on your WooCommerce store.
Testing the Browser Events
Here we will use the Chrome extension - Facebook Pixel Helper to test our browser events.
Test the browser events by visiting the products page of your WooCommerce store.
You’ll get notified of the number of WooCommerce Facebook pixels running on the ‘Facebook Pixel Helper’ extension.
On your product page, you’ll be able to see that the ‘PageView’ event gets fired.
Next, click on any product and you’ll be able to see the ‘PageView’ and ‘ViewContent’ events on the extension.
Next, add the product to the cart and proceed to checkout.
You’ll be able to see the 'InitiateCheckout', 'PageView' and 'AddToCart' events here.
Make a purchase and you'll see the 'Purchase' event gets fired.
It means your browser events are working accurately and the WooCommerce Facebook Pixel is running properly.
Testing the Server Events
Here, we will test the server events from the Facebook Pixel dashboard.
On the Funnel Builder settings section, enable the ‘Test server events via test_event_code’.
You’ll need to paste the Test Event Code here.
For that, you need to go to the ‘Test Events’ tab on the Pixel dashboard.
Paste the test code into the Funnel Builder.
The FunnelKit Funnel Builder has the setting to enable purchase event logs.
To test if the server-side events are working perfectly, enable the purchase event logs.
Now we will go to our website and perform activities such as adding products to the cart and starting the checkout process.
You’ll be able to see these events under the 'Test events' tab on your pixel dashboard.
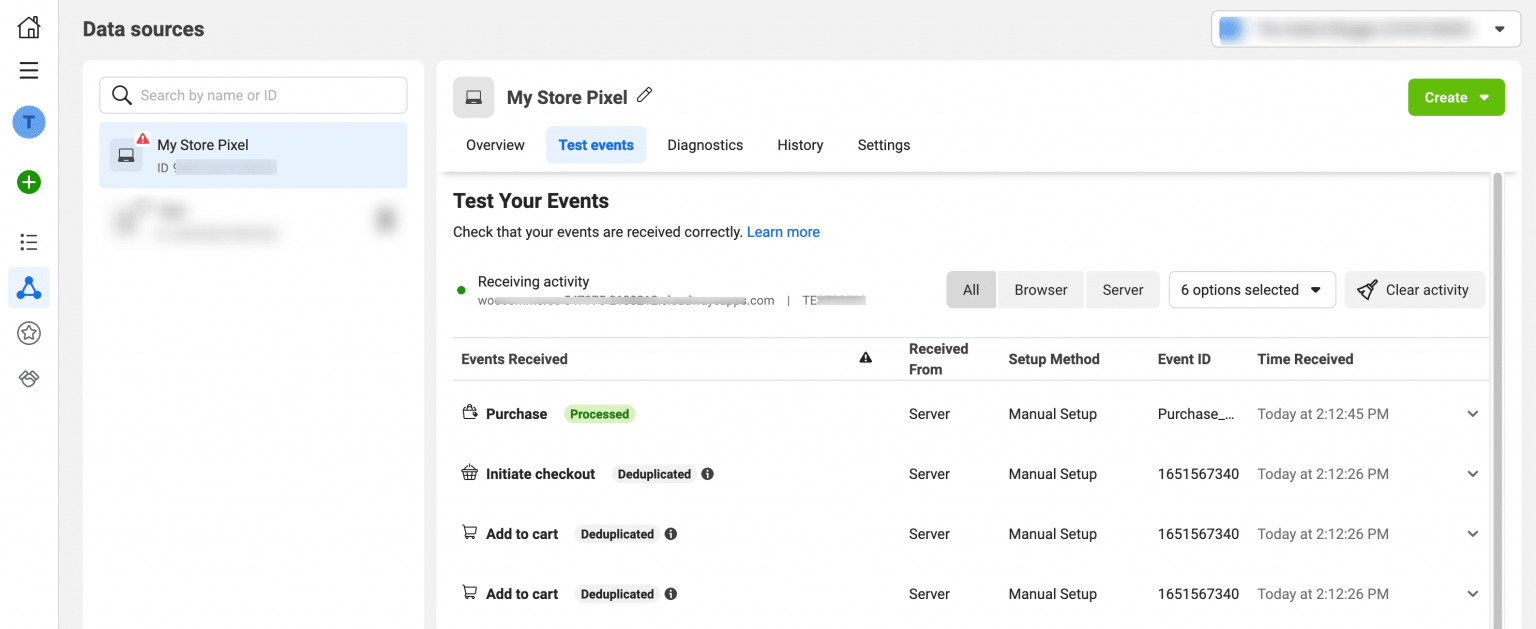
This means that the server events are working fine.
We recommend unchecking the ‘test events’ option for WooCommerce Facebook Pixel after you’ve completed testing the events on your website.
Now go to the ‘Overview’ tab.
Here you'll be able to see all your pixels, integrations, match quality score, events, and much more.
This is how you can successfully test the browser and CAPI events with the Facebook Pixel ID on your WooCommerce store.
Additional Events Provided by the FunnelKit
Apart from the usual ‘Page View’, ‘Add to cart’, ‘Purchase’, and other events, FunnelKit goes one step ahead and provides special events to track your funnels.
Let’s look at these events you can track with the WooCommerce Facebook Pixel using the FunnelKit Funnel Builder:
- Site-wide events: Use this setting to enable View event site-wide without needing any extra plugin.
- Lead events: Tracks the new leads who have submitted their details on your opt-in form.
- Order bump: Tracks the event when your customer accepts the bump offer and adds a product to the cart from the order bump on the checkout page.
- General: The general event is used for your custom target audiences and conversions.
- Custom Funnel steps: Track the custom funnel steps, such as sales page, checkout, upsell, downsell, thank you page, opt-ins, opt-in confirmation page, etc., when the user visits the page.
Special Note for those Running One-Click Upsells
One-Click Upsells by FunnelKit takes full responsibility for sending purchase data to Facebook. It would work even when funnels do not trigger.
It fires the purchase event of the main order on the upsell page.
Now for the upsell offer - if the upsell is accepted, the purchase event of the accepted offer is fired on the next step. The next step could be another upsell offer or the thank-you page.
If the upsell is rejected, then no purchase event is fired on the next step.
Further, the pixelation technique works even if the user abandons the upsell and does not reach the thank-you page.
This is how the One Click Upsells by FunnelKit sends accurate data to Facebook.
5 Essential Tips to Track the Performance of Facebook Ads
People often go to their Facebook ad campaigns, but they do not see the exact revenue over there compared to the revenue shown in their WooCommerce store.
This inaccuracy is due to multiple factors, such as an incorrect URL in the ad or ad blockers blocking it.
Here are a few tips to ensure Facebook properly tracks its revenue:
1. Make sure that URLs linked to Facebook ads do not lead to a 404 error
Check and verify that your store landing pages associated with the ads are correctly configured and accessible.
This allows users to be directed to the intended landing page without encountering any errors or broken links.
2. Include UTM parameters in the URLs associated with your Facebook ads
Add tracking parameters to your URLs to identify the source, medium, and campaign for each Facebook ad.
By incorporating UTM parameters, third-party tools like FunnelKit can accurately track the performance of your Facebook ad campaigns and gain insights into your marketing efforts.
3. Ensure that the conversion API is enabled
Enabling the conversion API is crucial to tracking conversions. Even if adblockers block browser events, the server can still relay information to Facebook (Meta).
4. A/B test your ads regularly
A/B test different ad creatives, audience targeting, headings, and CTA buttons to determine which performs better.
Create custom audiences to retarget visitors and lookalike audiences to find new potential buyers.
5. Verify your domain in Meta Business Manager
Domain verification is required for Meta's Aggregated Event Measurement, which controls how conversion events are tracked for iOS users who opt out of tracking.
Without verification, your pixel may lose access to key events.
Go to Business Settings in Meta Business Manager, select your domain, and add the DNS TXT record or upload the HTML verification file.
Frequently Asked Questions (FAQs) on WooCommerce Facebook Pixel
In this section, we will answer additional questions from users about the Facebook Pixel for WooCommerce.
Yes, it would be wise to disable your current Meta Pixel plugin and follow the steps outlined in this article. FunnelKit will help you avoid duplicate purchase conversions and provide accurate data in Meta Analytics.
Avoid duplicates: Setting up both the Meta pixel and the Conversion API can help avoid data discrepancies, including duplicate events. FunnelKit integrates directly with Facebook pixel and Conversion API, ensuring that no duplicate conversions are sent to Facebook.
Use a unified tool: We highly recommend using FunnelKit Funnel Builder as it eliminates the need for multiple plugins that might interfere with each other. This tool helps track events such as conversions, add-to-cart actions, and page views, reducing the chance of errors.
Yes, the FunnelKit Funnel Builder includes settings to track site-wide pixel events. This means you can track events on your website without any extra plugins.
We have discussed the step-by-step process of adding WooCommerce Facebook Pixel in this post. Feel free to browse through the section here.
Facebook Pixel typically means your pixel base code is loading, but the ecommerce event code is not. Check that your tracking plugin is properly configured to fire WooCommerce purchase events. If you added the pixel manually, you need a separate event code on the order confirmation page to fire the Purchase event with the order value and product data.
Yes, WooCommerce integrates with Facebook to track conversions from the ads. You just have to install FunnelKit, which gives you various insights into events happening on your website from Facebook ads.
You can easily add a Facebook pixel to your WordPress website. All you have to do is install FunnelKit, enter the Facebook pixel ID and enable the events you want to track. And you're all set!
The pixel begins collecting data immediately after installation. You will see PageView events in Meta Events Manager within minutes of activating the plugin.
Choosing the right plugin is one of the most common decisions WooCommerce store owners face. Here’s how the main options compare:
- FunnelKit Funnel Builder: Built-in pixel tracking with native CAPI support, automatic event deduplication, and deep WooCommerce integration, including one-click upsell tracking. Handles Facebook, Google Ads, GA4, TikTok, Pinterest, and Snapchat pixels from a single settings panel. Since it also manages your checkout pages, there are no plugin conflicts on the purchase event. Free version available; Pro version adds advanced funnel features.
- PixelYourSite: A well-established, dedicated tracking plugin supporting Meta Pixel, Google Analytics 4, and Google Ads. Automatically tracks WooCommerce events and supports the Conversions API. Offers granular control over which events fire and what parameters are sent. The free version covers basic tracking; the Pro version adds Dynamic Ads support, multiple pixel management, and Advanced Matching.
- Official Meta Pixel for WordPress: Installs the pixel, supports CAPI, and handles basic WooCommerce events. However, community reviews frequently cite a poor user interface, recurring critical errors that trigger WordPress alert emails, and domain verification requirements that create setup friction. The plugin is free but can be frustrating to configure.
- Pixel Manager for WooCommerce: Supports Meta, Google Ads, Google Analytics, and several other platforms. Known for high tracking accuracy and built-in GDPR compliance features. Integrates with major consent management platforms. Free version available.
Whether you want tracking bundled with your checkout optimization (FunnelKit), standalone tracking (PixelYourSite or Pixel Manager), or centralized tag management (GTM). Whichever you choose, use only one method, as stacking plugins can cause duplicate events and unreliable data.
Yes. If you need multiple pixels, for example, to track conversions for different ad accounts, use a plugin like FunnelKit or PixelYourSite Pro. It allows you to add multiple Meta Pixels to a single WooCommerce store. Be careful with multiple pixels, though, as duplicate event firing can distort your conversion data if not configured properly.
Setting up the WooCommerce Facebook Pixel is only the first step. The real value comes from using your pixel data to create targeted ad campaigns that convert.
Go to Meta Ads Manager and create a Custom Audience based on the AddToCart event. Filter for people who added items in the last 7 to 14 days but did not trigger a Purchase event. Target this audience with dynamic product ads that show the exact items left in their cart.
Create another Custom Audience based on ViewContent events, excluding anyone who triggered an AddToCart or Purchase event. These are window shoppers who showed interest but were not ready to commit. Target them with social proof ads, customer reviews, or limited-time discount offers to bring them back.
Once your pixel has recorded at least 100 purchase events (ideally 500 or more), create a Lookalike Audience based on your Purchase event data. Meta will find new users who share characteristics with your actual buyers. Start with a 1% Lookalike for the closest match to your customers, then test broader 2% to 5% Lookalikes as you scale.
If your WooCommerce store also collects email signups, form submissions, or account registrations, you can track these as custom events or use the Lead standard event. This allows you to build audiences of engaged prospects who have not yet purchased and nurture them with specific ad campaigns, such as welcome discount offers or product education content.
Start Tracking Every Conversion With the WooCommerce Facebook Pixel!
Facebook Pixel is vital for running ads because it provides detailed insights into conversions and the ROI of your marketing campaigns.
That’s why it’s a must for WooCommerce store owners to set up Facebook Pixel on their website.
However, the availability of many plugins and guides online has made this task much more complicated.
But thanks to Funnel Builder by FunnelKit, which provides deep integration with Facebook Pixel and its Conversion API.
It has eliminated the need for multiple WooCommerce Facebook Pixel plugins on your website.
Furthermore, the FunnelKit Funnel Builder offers various events that can be enabled to ensure accurate data tracking.
Set it up once. Verify it works. Then focus on what actually grows your business to create better offers, write stronger ad copy, and serve the right products to the right people.
Editorial Team
June 25, 2026Are you looking to create an effective WordPress lead-generation system that produces highly qualified leads? Generating a consistent stream of qualified leads is the most effective way to drive sales...
Editorial Team
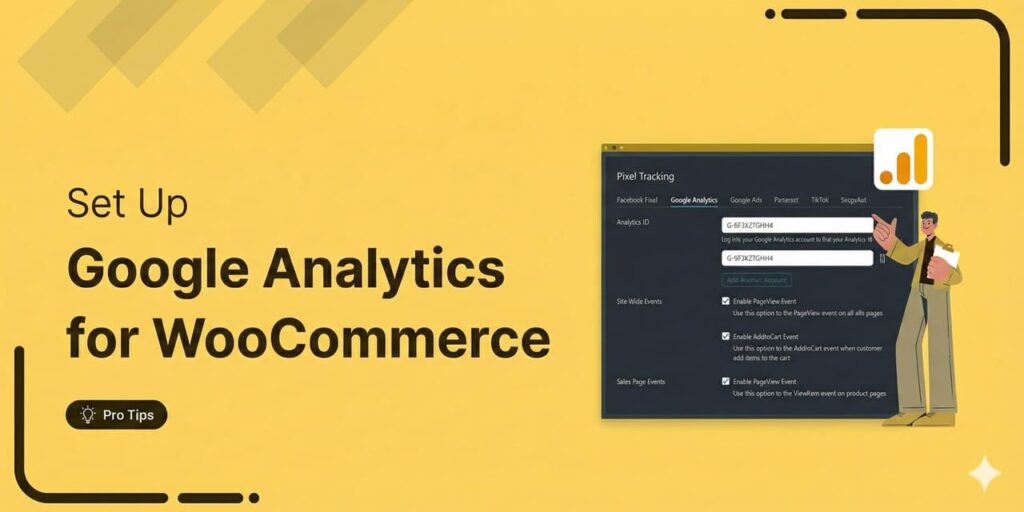
June 24, 2026There are three reliable ways to connect WooCommerce to Google Analytics 4: the official Google Analytics for WooCommerce plugin, Google Tag Manager via GTM4WP, or FunnelKit's built-in pixel tracking. The...
Editorial Team
June 24, 2026Finding a WordPress sales funnel builder that actually works is harder than it looks. Most plugins on the market do one or two things well and quietly skip the rest....


