
Are you looking to add a WooCommerce Snapchat pixel to track conversions in your store?
Snapchat is one of the fastest-growing social media platforms, and its dynamic ads let you bring users to your websites and drive massive conversions.
However, it’s equally important to keep a tab on ad spending and analyze the ROI of your campaigns.
For that, it’s important for you to set up Snap pixels.
By installing the Snapchat pixel in your store, you’ll be able to track real-time signups, cart abandonments, new purchases, user interaction, and so much more.
With a variety of plugins claiming to do the job, there isn’t a perfect online guide that lets you do this easily.
But we have a simple way (that too without any coding!).
In this post, we will show how you can add a Snapchat pixel to WooCommerce and enable event-based conversion tracking in your store.
Table of Contents
- 1 What is a Snapchat Pixel?
- 2 Events That Can Be Tracked With WooCommerce Snapchat Pixel
- 3 Tools To Help You Set Up WooCommerce Snapchat Pixel
- 4 How to Add Snapchat Pixels to WooCommerce and Track the Events on Your Store?
- 5 Testing the Snapchat Pixel Events on Your WooCommerce Store
- 6 Bonus Tip: Optimize Your WooCommerce Store and Boost Conversions
- 7 Frequently Asked Questions (FAQs) on WooCommerce Snapchat Pixel
- 8 All Set to Add WooCommerce Snapchat Pixel to Your Store?
What is a Snapchat Pixel?
A Snapchat pixel is a JavaScript code element that, when added to your website, helps you track the activities of Snapchat users on your website.
For example, if a Snapchat user goes on to your website from the app and views a page, then the ‘Page View’ event is captured on your Ad account.
With the help of Snapchat pixels, you can track purchases, cart abandonment, product views, new signups, and more.
You can take advantage of real-time event tracking for audience retargeting and ad campaign optimization.
Here are the three major benefits of using Snapchat Pixel:
- Tracking conversions on the website - View all the actions and conversions happening on your website that are being attributed to your ad campaigns.
- Reaching the ideal audience - Create custom audiences based on the Snapchat users who interacted or actions they took on your website.
- Optimizing the campaigns for sure shot conversions - Take advantage of real-time data to optimize and set up retargeting ad campaigns for getting sure shot conversions.
Events That Can Be Tracked With WooCommerce Snapchat Pixel
By installing the Snapchat pixel on your WooCommerce store, you’ll be able to track the following events:
- Page View - A user lands on a specific page on your WooCommerce store
- Add to Cart - A user adds an item to their WooCommerce shopping cart
- Initiate Checkout - A user goes on to the checkout page
- Purchase - A user makes a purchase by going from the checkout to thank you page
These are the events you can track with WooCommerce Snapchat pixel.
Not just the different events, you’ll be able to know detailed information about these events such as:
- Event variables - The variables associated with the event such as the product ID, product price, transaction ID, currency, and more.
- User data - The information about the user such as their email address, phone number, IP address, name, and more.
With such information at your disposal, it’s a must to add the Snapchat pixel to your online store.
Tools To Help You Set Up WooCommerce Snapchat Pixel
These are the tools available for free that we will use to set up WooCommerce Snapchat pixel and test its implementation in our store:
1. FunnelKit
2. Snap Pixel Helper
Let’s go through these tools.
FunnelKit Funnel Builder
Funnel Builder by FunnelKit is one of the most advanced sales funnel Builder plugins for your WordPress website.
You can not only design amazing pages from checkout pages to upsell offers, but it also integrates with Snapchat to help you easily add Snap pixels to WooCommerce.
It’s available for free - just install and activate it on your website.
Snap Pixel Helper
The Snap Pixel Helper is a Google Chrome extension that lets advertisers test and troubleshoot the Snapchat pixel implementation.
It gives you information about different events on a specific page in real time.
Just install the Snap Pixel Helper after you’ve set up the Snapchat Pixel on your website, and you’re ready to go!
How to Add Snapchat Pixels to WooCommerce and Track the Events on Your Store?
In this section, we’ll help you set up WooCommerce Snapchat Pixel and enable event-based conversion tracking in your store.
Just follow the instructions below.
Step 1: Go to the Snapchat Events Manager
First, log in or create an account (if you’re new) and go to Snapchat Ads Manager.
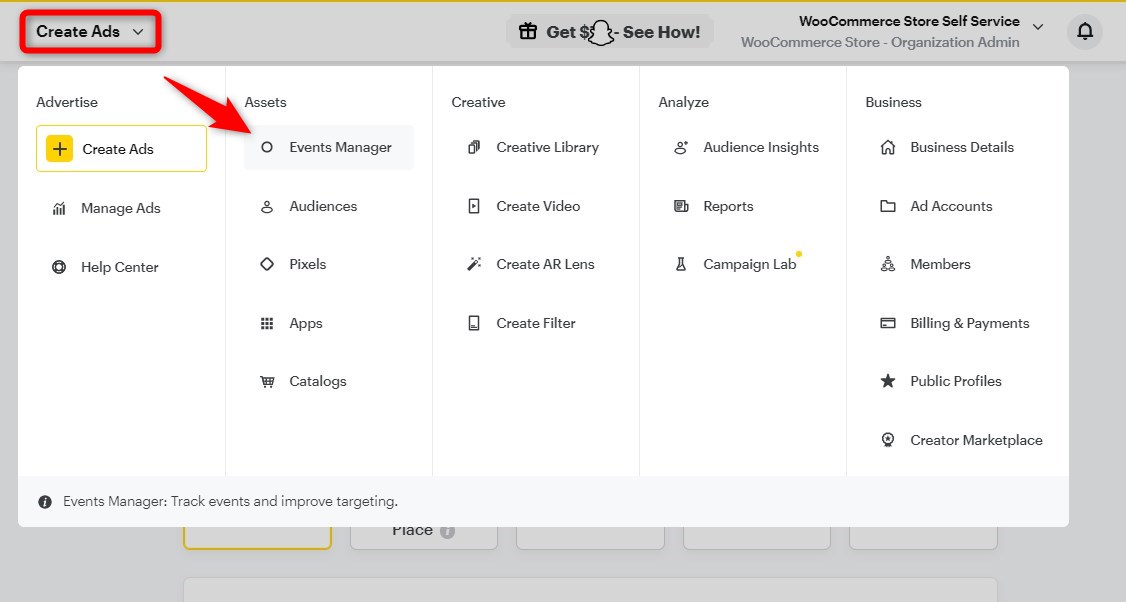
Now that you’re logged in, navigate to Create Ads ⇨ Events Manager as shown in the image below:
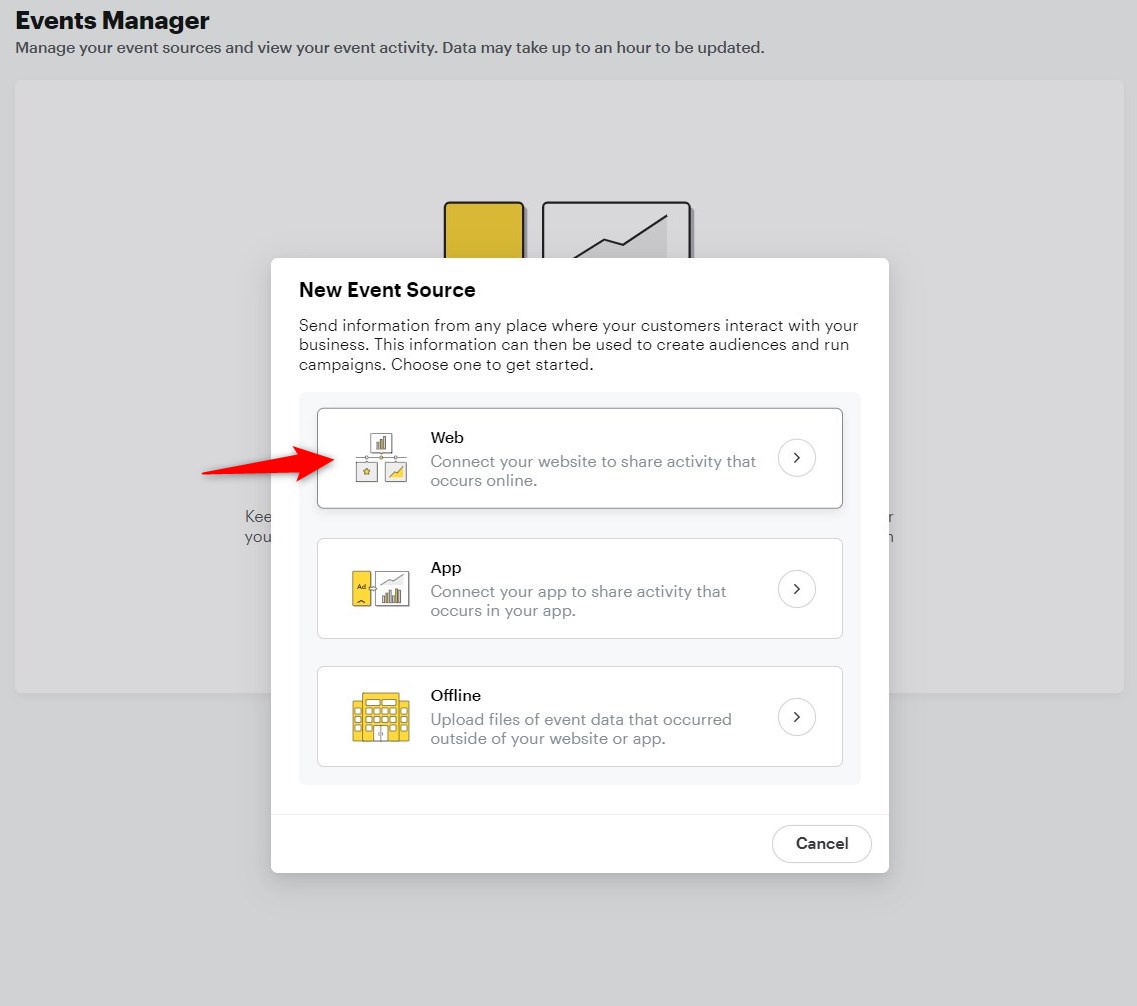
Step 2: Create Snap Pixel
Here, click on 'New Event Source'.
Once the popup window opens, hit the 'Web' option.
Next, enter the name of your Snapchat pixel and click on the 'Confirm' button.
Next, you must choose how you want to connect the Snap Pixel to your website.
Continue with the 'Pixel Code' option from here.
Now, a new screen will appear that will give you the pixel code.
You don’t have to copy and paste this code to your website because FunnelKit’s integration with Snapchat takes care of it.
Just simply hit the 'Close’ button.
That’s it! This is how you can create your Snap pixel and your Snapchat Pixel ID will get generated.
Step 3: Copy your Snapchat Pixel
Here you can locate your newly created Snapchat pixel ID:
Copy the Snap pixel ID.
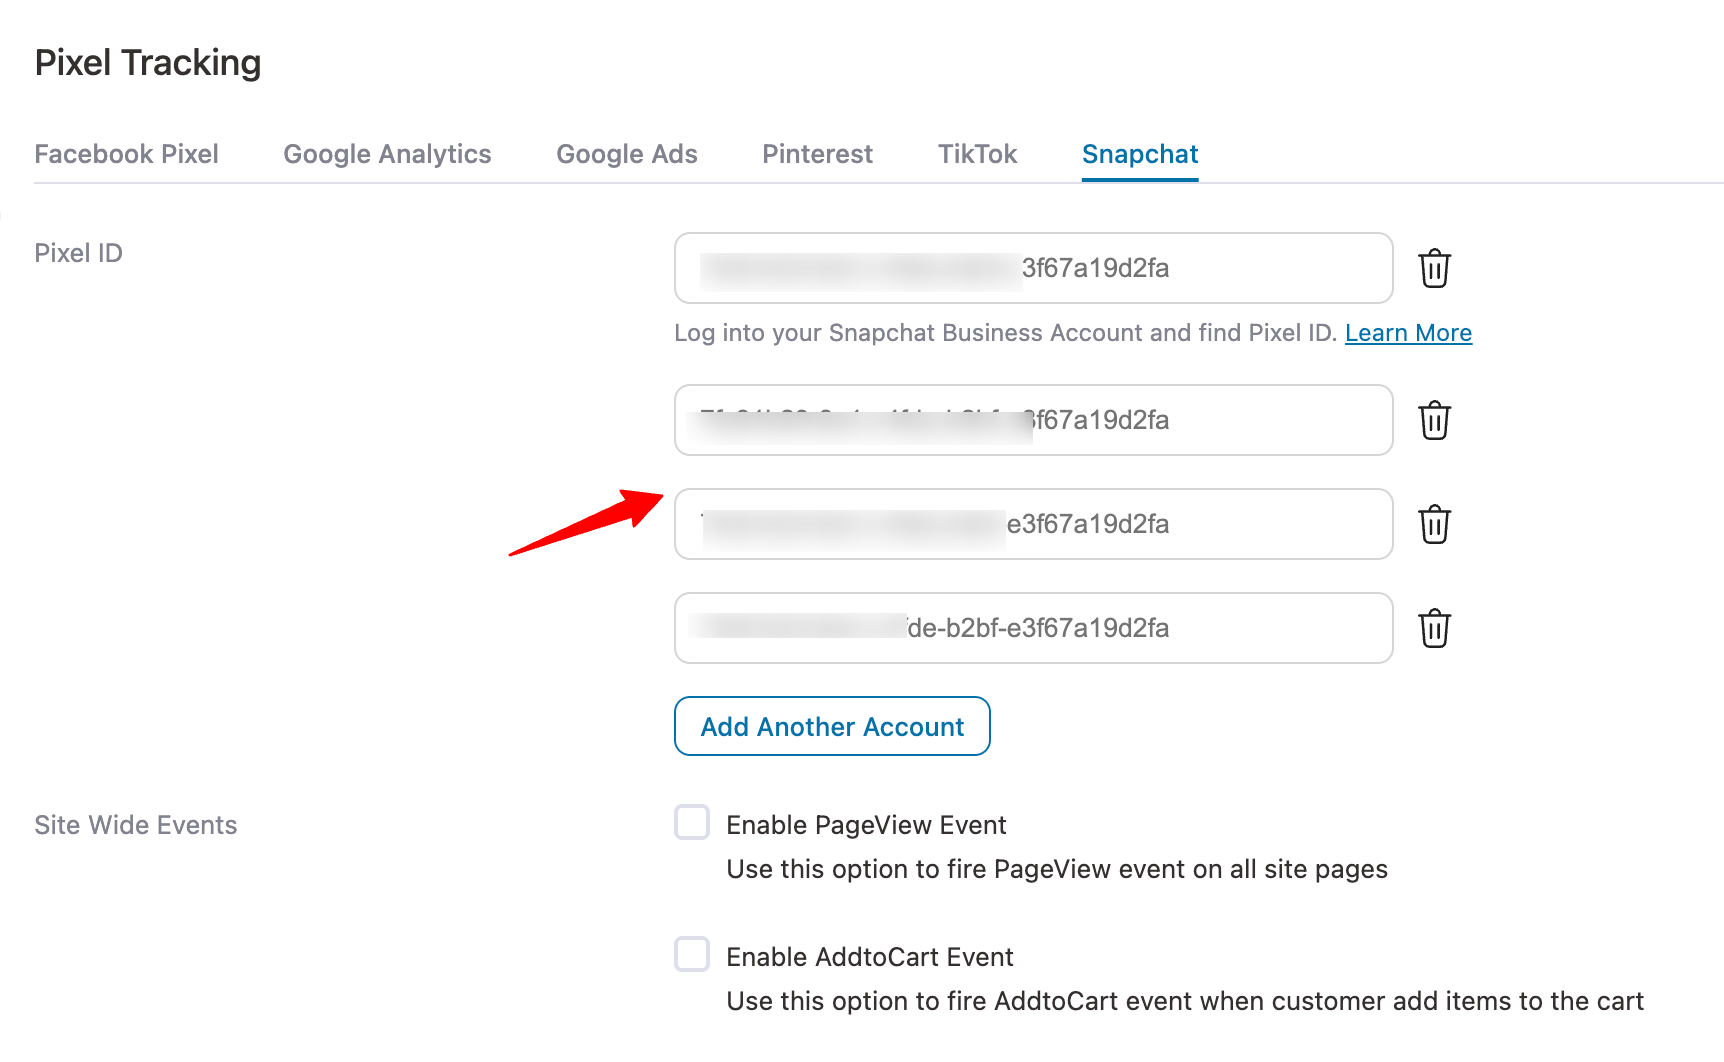
Step 4: Add Snapchat Pixel ID to WooCommerce
Go to the Settings > Pixel Tracking. Under Snapchat, paste your Snap pixel ID.
Easy, isn’t it?
This is how you can add a Snapchat pixel ID to WooCommerce.
If you want, you can add multiple Pixel IDs as well. Hit the "Add Another Account" and then add.
Step 5: Enable the events
Next, enable the events you want to capture and track.
You can find all these events:
- Site-wide events: Page View and Add to Cart
- Optin page event: Page View
- Sales page event: Page View
- Order bump event: Add to Cart
- Checkout events: Page View, Add to Cart and Initiate Checkout
- Purchase event: Purchase
- Advanced: Include parent product ID for variable products
This is how you can enable the events you want to track in your store with the help of WooCommerce Snapchat pixel.
Testing the Snapchat Pixel Events on Your WooCommerce Store
For testing the Snapchat pixel implementation, we’ll use the Snap Pixel Helper extension.
It’ll provide real-time updates on the events running on a page as we navigate through our website.
Navigating to the product's page
On your product’s page, you’ll be able to see the events running marked on the extension.
As you click on it, you’ll see the 'Page View' active on this page.
Adding the product to the cart
Go to the cart page by adding this item to your shopping cart.
Here, you’ll see 'Page View' and 'Add to Cart' events were fired:
Initiating the Checkout process
As you can click on the 'Checkout' button and start the purchase process, the extension will show 'Start Checkout' and 'Page View' events here.
Making the test purchase
Test purchase a product and the 'Purchase' event will get fired as you move on from checkout to the thank you page.
Since all the events are being fired correctly, it means our WooCommerce Snapchat pixel implementation is working perfectly.
This is how you can track and test your Snap pixel implementation in your WooCommerce store.
Bonus Tip: Optimize Your WooCommerce Store and Boost Conversions
Even with perfect Snapchat pixel tracking, a slow or confusing checkout process can kill conversions.
Here's how you can optimize your WooCommerce store for higher sales and conversions:
- Speed up your buying journey by implementing a side cart that leads shoppers straight to checkout
- Simplify the checkout process by setting up multi-step checkout and optimization options
- Leverage order bumps, one-click upsells, and cross-sells to increase average order value with relevant add-ons
- Fine-tune your sales funnels for better conversions
- Enable cart recovery automations by sending follow-up emails and SMS to recover lost sales
All these optimizations are possible with FunnelKit Funnel Builder and FunnelKit Automations. By refining both your ad strategy and store experience, you can maximize your Snapchat ad ROI and drive consistent sales growth.
Frequently Asked Questions (FAQs) on WooCommerce Snapchat Pixel
In this section, we have answered some of the frequently asked questions by users related to adding the Snapchat pixel to WooCommerce:
You can add Snapchat pixels to WooCommerce with FunnelKit. All you need to do is copy the Snapchat pixel ID and paste it into FunnelKit. Once done, enable the events you want to track, and you’re ready to go.
You can get pixels on Snapchat by going to the Snapchat Ads Manager. From there, create a new Snap pixel by selecting the event source and generating the ID.
To set up pixel tracking in WooCommerce, you need to put the code into the header section of your WordPress website. However, if you’re using FunnelKit Funnel Builder, you just need to enter your Snapchat pixel ID, enable the events, and you’re done.
All Set to Add WooCommerce Snapchat Pixel to Your Store?
The Snapchat pixel is crucial for running ads because it provides detailed insights into conversion-related metrics and tracks the ROI of your marketing campaigns.
Therefore, it’s important to set up a Snapchat pixel on your WooCommerce store.
We prefer FunnelKit for adding a Snapchat pixel because it’s a complete package.
Not only does it let you set up your high-converting sales funnels with ravishing built-in templates, but it also has a deep integration with Snapchat pixels.
Simply enter the Snap pixel ID and enable the desired events without copying and pasting any pixel codes.
Funnel Builder by FunnelKit is a must-have tool for all WooCommerce store owners looking to amplify their business.
Here are some additional resources for you:
- Set up WooCommerce Google Ads conversion tracking
- Integrate Google Analytics with your WooCommerce store
- Set up Facebook Pixels in WooCommerce
- Track conversions from TikTok ads to WooCommerce
- Enable Pinterest conversion tracking in WooCommerce

Editorial Team
July 29, 2026A WooCommerce one page checkout puts product selection, customer details, and payment on a single screen. It reduces redirects and page loads that drive abandonment and works either globally across...
Editorial Team
July 28, 2026Looking for the best WordPress order form plugin to take payments and customer details on a single page, without a full WooCommerce store? You’re in the right place. Across 93...
Editorial Team
July 27, 2026WooCommerce subscription upsell can help boost your revenue through subscription-based sales. Moreover, subscription-based products allow you to add predictability to your revenue. You can sell physical and digital products and...


