
The WooCommerce order confirmation page is the page customers see after they successfully complete a purchase.
It confirms the order, displays the purchase details, and marks the end of the checkout journey.
By default, WooCommerce generates this page automatically, but it is plain and underused. It shows the basic order summary and nothing else.
There is no branding, no post-purchase CTA, and no next step for the customer to take to encourage a second order.
In this guide, we will explain what the WooCommerce order confirmation page is and where it lives in your store.
We will then walk through how to customize it using a WordPress plugin with no code required, and how to do it through the template files if you prefer working in PHP.
Table of Contents
- 1 What is the WooCommerce Order Confirmation Page?
- 2 Where the Order Confirmation Page Lives in WooCommerce?
- 3 Method 1: Customize the WooCommerce Order Confirmation Page With Block Editor
- 4 Method 2: Customize the WooCommerce Order Confirmation Page Without Code
- 5 Method 3: Customize the WooCommerce Order Confirmation Page with Code (For Advanced Programmers Only)
- 6 What to Add to Your WooCommerce Order Confirmation Page
- 7 How to Set the WooCommerce Order Confirmation Page URL?
- 8 Creating Multiple WooCommerce Order Confirmation Pages For Different Product Attributes And Customer Data
- 9 7 Best Practices to Turn Your WooCommerce Order Confirmation Page Into a Revenue Driver
- 10 Frequently Asked Questions (FAQs)
- 11 Ready to Create a Custom WooCommerce Order Confirmation Page?
What is the WooCommerce Order Confirmation Page?
The WooCommerce order confirmation page, also known as the thank-you page or order-received page, is the page a customer lands on after successfully submitting an order at checkout.
This is the final step after checkout, where customers receive confirmation that their order was successfully placed.
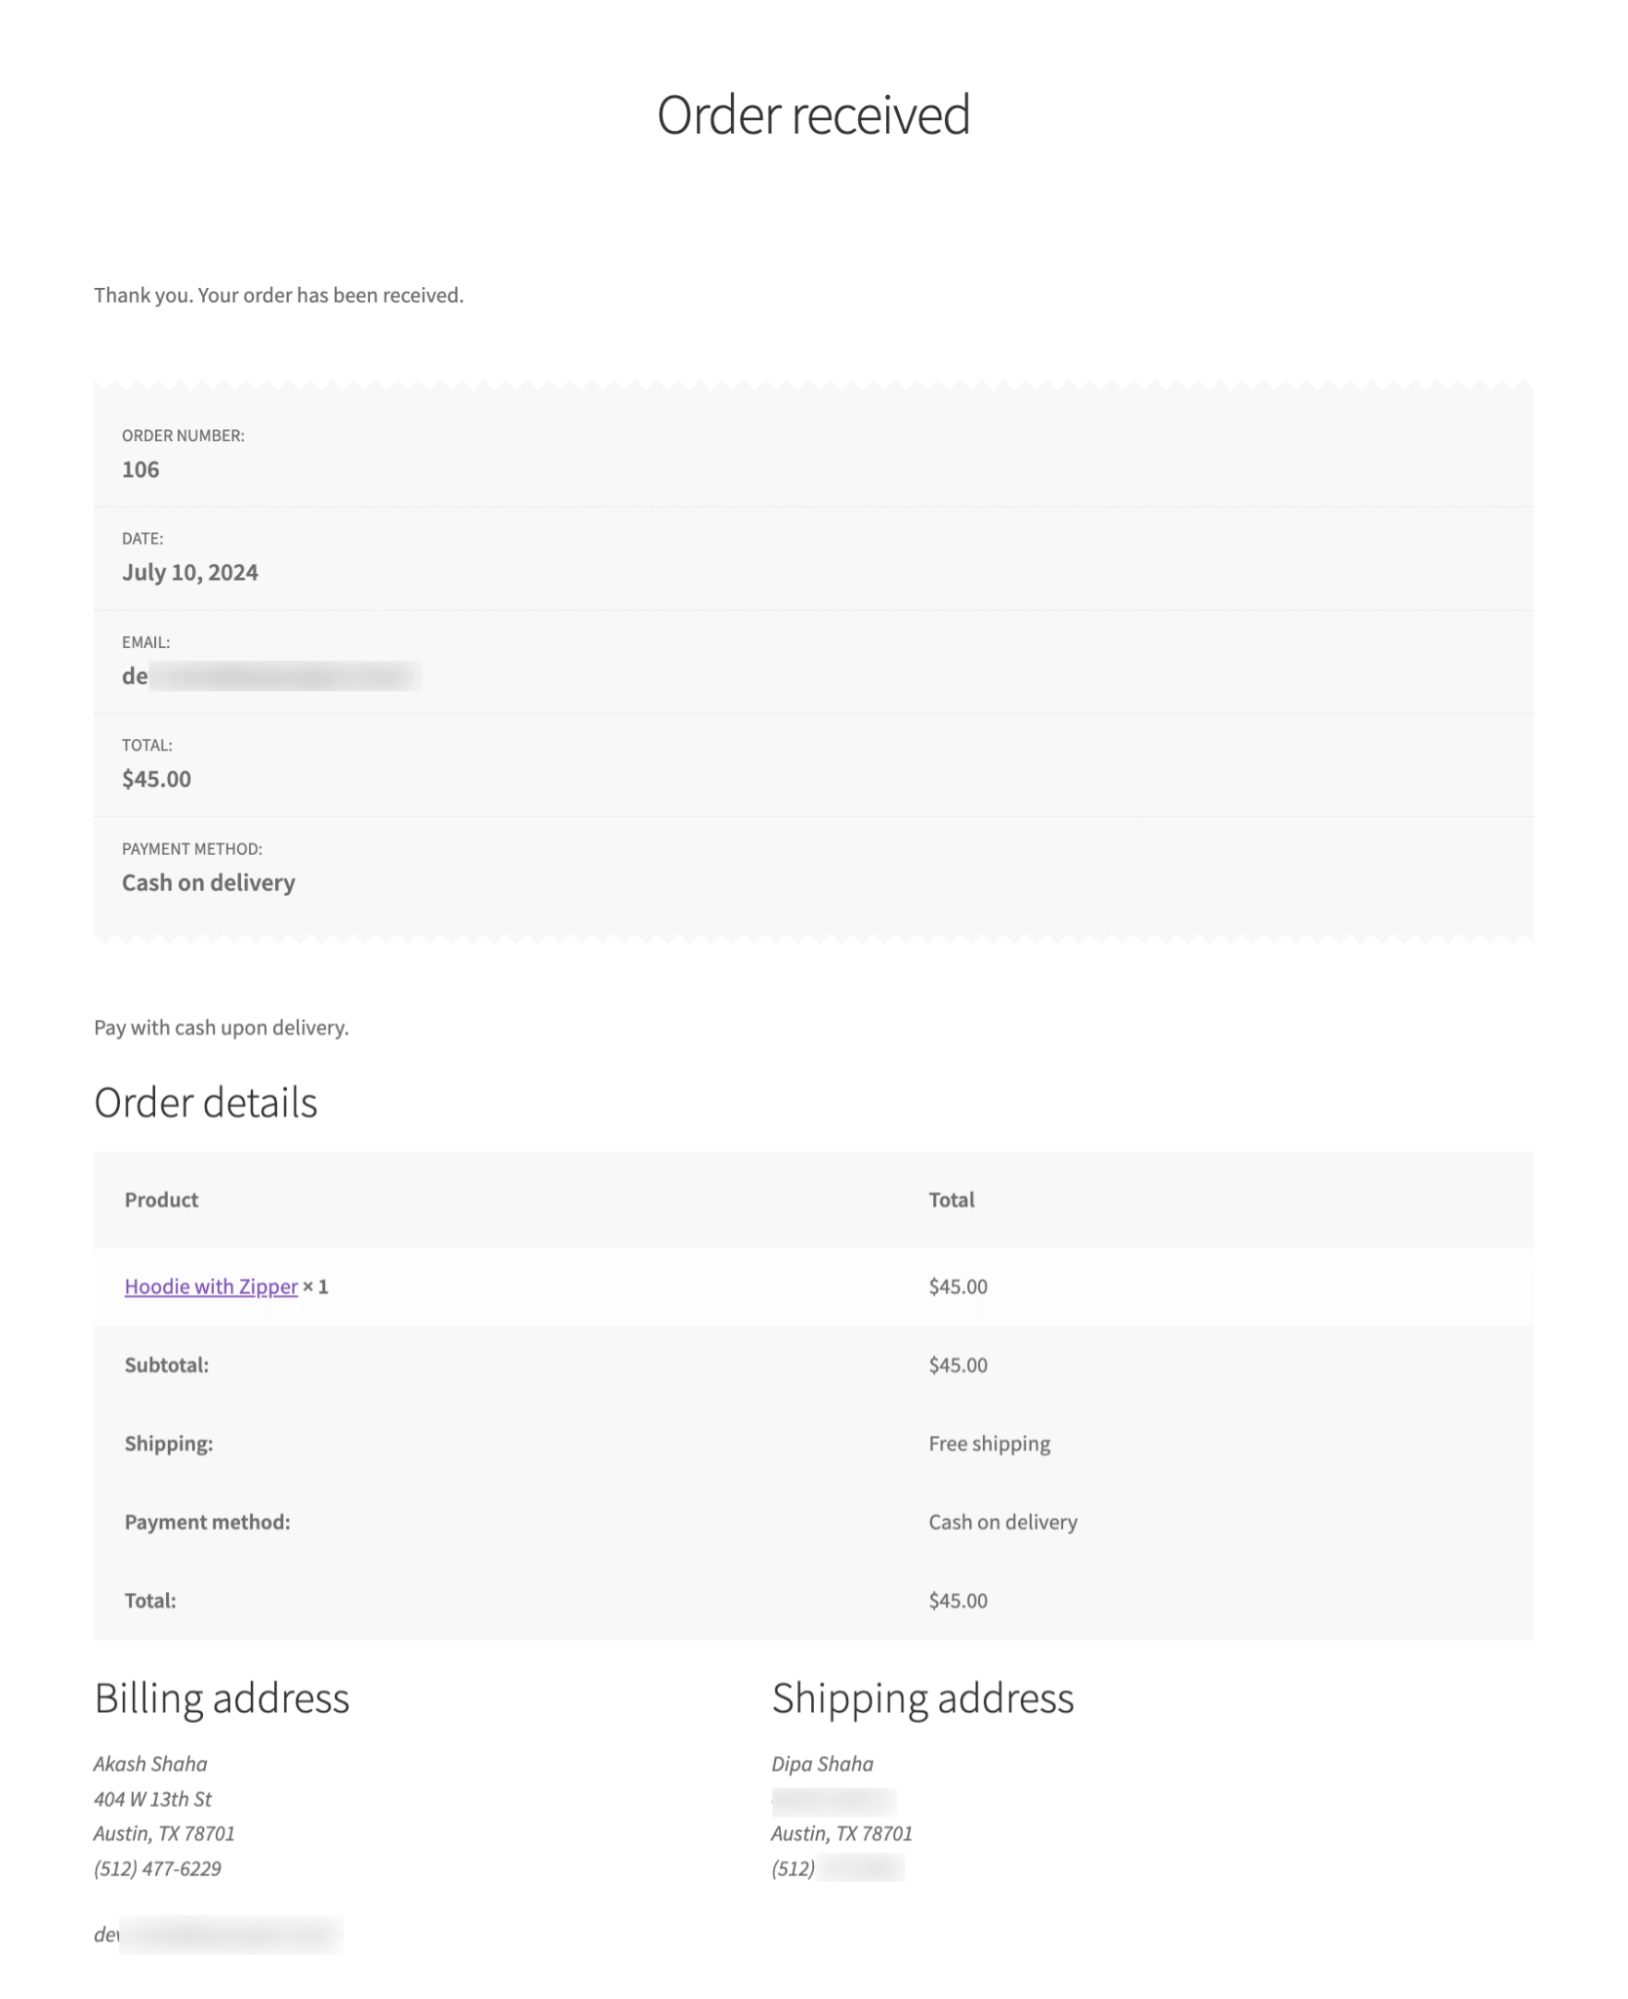
The default WooCommerce order confirmation page typically displays these key details:
- Confirmation message, such as "Thank you. Your order has been received."
- Order number and purchase date
- Customer email, name, and phone number
- Order details (items with quantity, shipping method, cost, subtotal, payment method, and order total)
- Chosen payment method
- Billing address and shipping address (if applicable)
While functional, the default WooCommerce order receipt page lacks personality, branding, and conversion potential.
What's missing from the default order confirmation page in WooCommerce:
- No product images or visuals in the order details
- Lacks a personalized thank you message
- No upsell or related product recommendations
- Don't have next steps (like “Track Your Order” or “Continue Shopping”)
- No brand engagement (social links, testimonials, support info)
That's why customizing it can make a huge difference in the post-purchase experience.
Where the Order Confirmation Page Lives in WooCommerce?
The order confirmation page is not a regular WordPress page that you can edit. WooCommerce generates it on the fly when the checkout completes, which is why you will not find it listed with your other pages.
The default confirmation page URL looks like this:
https://yourstore.com/checkout/order-received/{order_id}/?key=wc_order_{order_key}Here are the parts of this URL that can be edited:
- The checkout slug, coming from the checkout page assigned under WooCommerce ⇒ Settings ⇒ Advanced ⇒ Page setup. If you rename the Checkout page slug to "buy", the URL becomes /buy/order-received/
- The order-received endpoint, which is set under WooCommerce ⇒ Settings ⇒ Advanced ⇒ Checkout endpoints. You can rename this to "thank-you", "order-confirmed", or anything else.
Changing the URL only changes what shows in the address bar. To change the content itself, you need to work with the template.
does not change how the page is built. It only changes what shows in the address bar. To change the content itself, you need to work with the template.
Method 1: Customize the WooCommerce Order Confirmation Page With Block Editor
If you’re running a block theme (like Twenty Twenty-Five or any FSE-compatible theme):
Go to Appearance ⇒ Editor from your WordPress dashboard. Click Templates and look for the 'Order Confirmation' template in the list.
If you do not see this option, your theme may not be fully block-compatible, which is the issue many store owners on Rehub, Astra, and similar classic themes report on Reddit. In that case, use Method 2.
Click the template to open it in the Site Editor.
Edit the blocks like any other template. You can add, remove, and rearrange WooCommerce-specific blocks such as Order Summary, Order Totals, Downloads, and the Thank You heading block.
Add your own paragraph blocks, image blocks, and headings to layer in branding. Save your changes when done.
The Site Editor approach works well for basic branding and layout adjustments. However, it does not support post-purchase upsells, purchase-history-driven product recommendations, per-product routing, or A/B testing.
Larger stores that want the confirmation page to actively generate revenue typically combine the Site Editor template with a dedicated plugin like FunnelKit.
Method 2: Customize the WooCommerce Order Confirmation Page Without Code
To customize your order confirmation page, we'll use the FunnelKit Funnel Builder plugin.
It is the best sales funnel builder for WordPress and WooCommerce, allowing you to replace the default order confirmation page with a beautiful, optimized one.
The best part about this plugin is that you can customize your thank you page and checkout page. You can also offer pre- and post-purchase offers to boost the average order value.
Make sure you install and activate FunnelKit Funnel Builder.
Short on time? Watch the order confirmation page customization video here:

Lets follow the step-by-step guide:
Step 1: Customize the order confirmation page
Make sure to create a store checkout inside FunnelKit. Importing the template will already add the checkout and thank you page step.
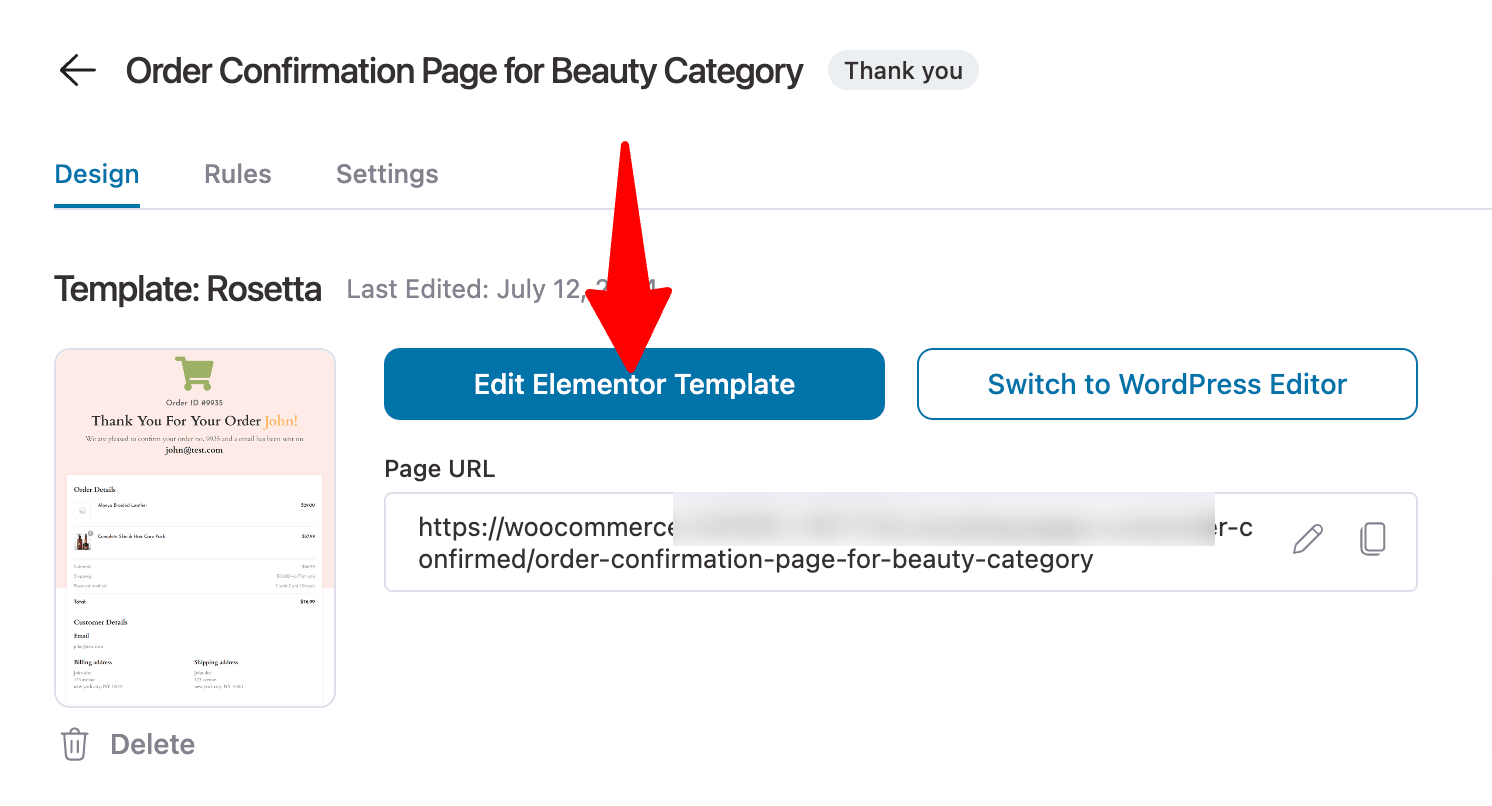
To edit the order confirmation page, click the "Thank you" page step.
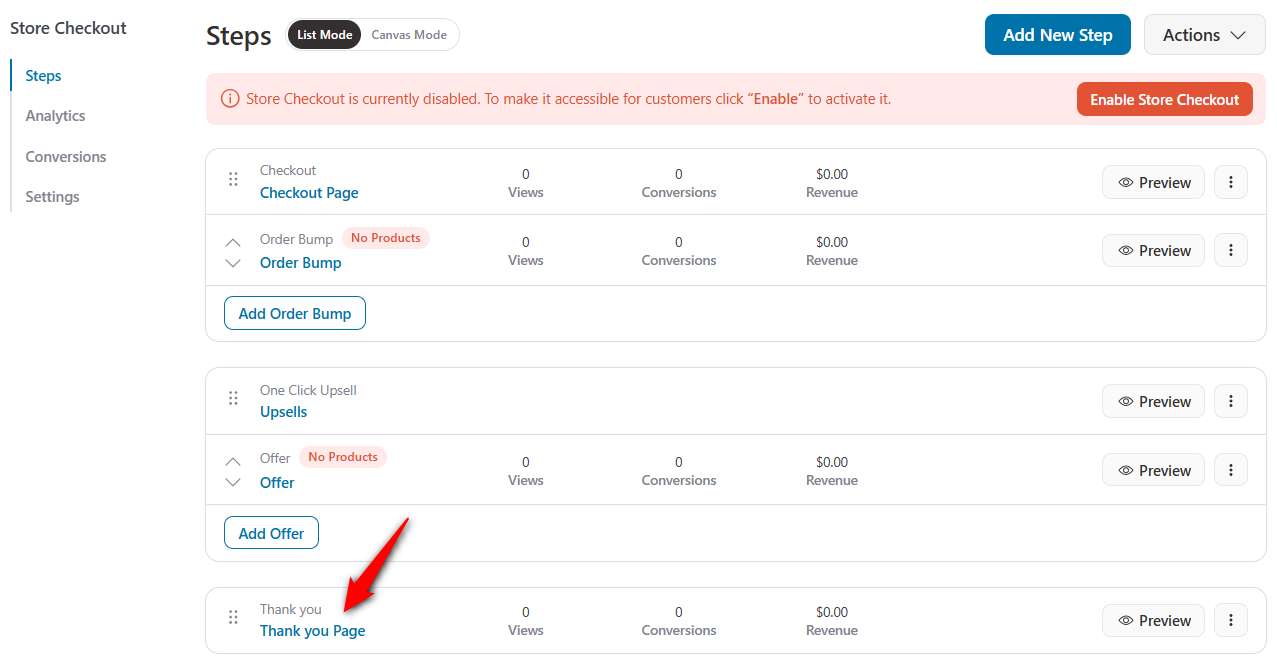
Then, hit 'Edit Template' to start customizing your order confirmation page.
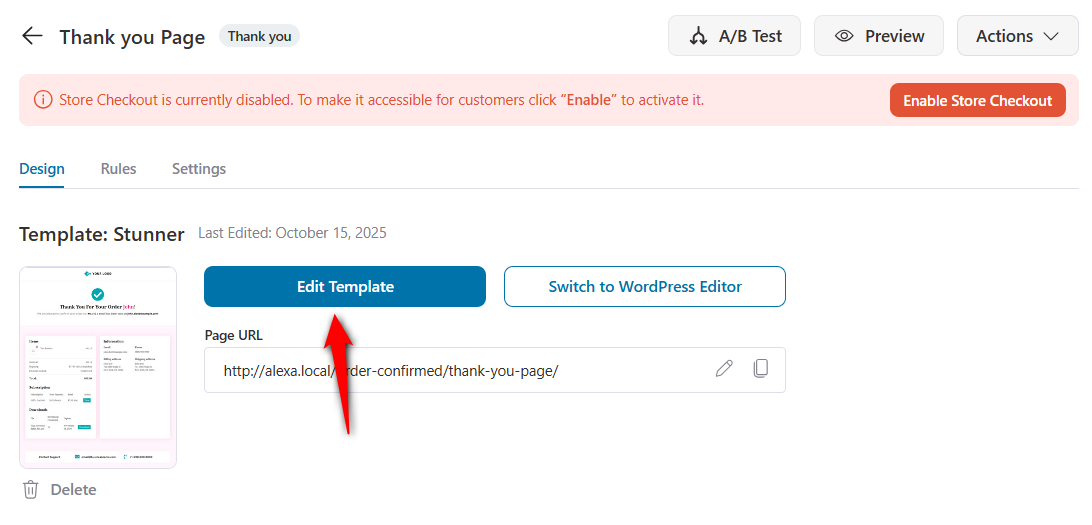
You can change every part of this template and add/remove any part.
Along with the design, you need to add dynamic customer and order information to make an effective thank you page.
These shortcodes help you dynamically display important customer and order details on your WooCommerce order confirmation page:
| Shortcode | Description |
|---|---|
| [wfty_customer_email] | Displays the customer’s email address. |
| [wfty_customer_first_name] | Shows the customer’s first name. |
| [wfty_customer_last_name] | Shows the customer’s last name. |
| [wfty_customer_phone_number] | Displays the customer’s phone number. |
| [wfty_order_number] | Shows the unique order number. |
| [wfty_order_total] | Displays the total amount of the order. |
| [wfty_order_meta key=""] | Displays custom order meta data. Replace key="" with your meta key. |
First, let’s customize the existing content one by one.
- Update the logo
Upload any custom logo to replace the template logo.
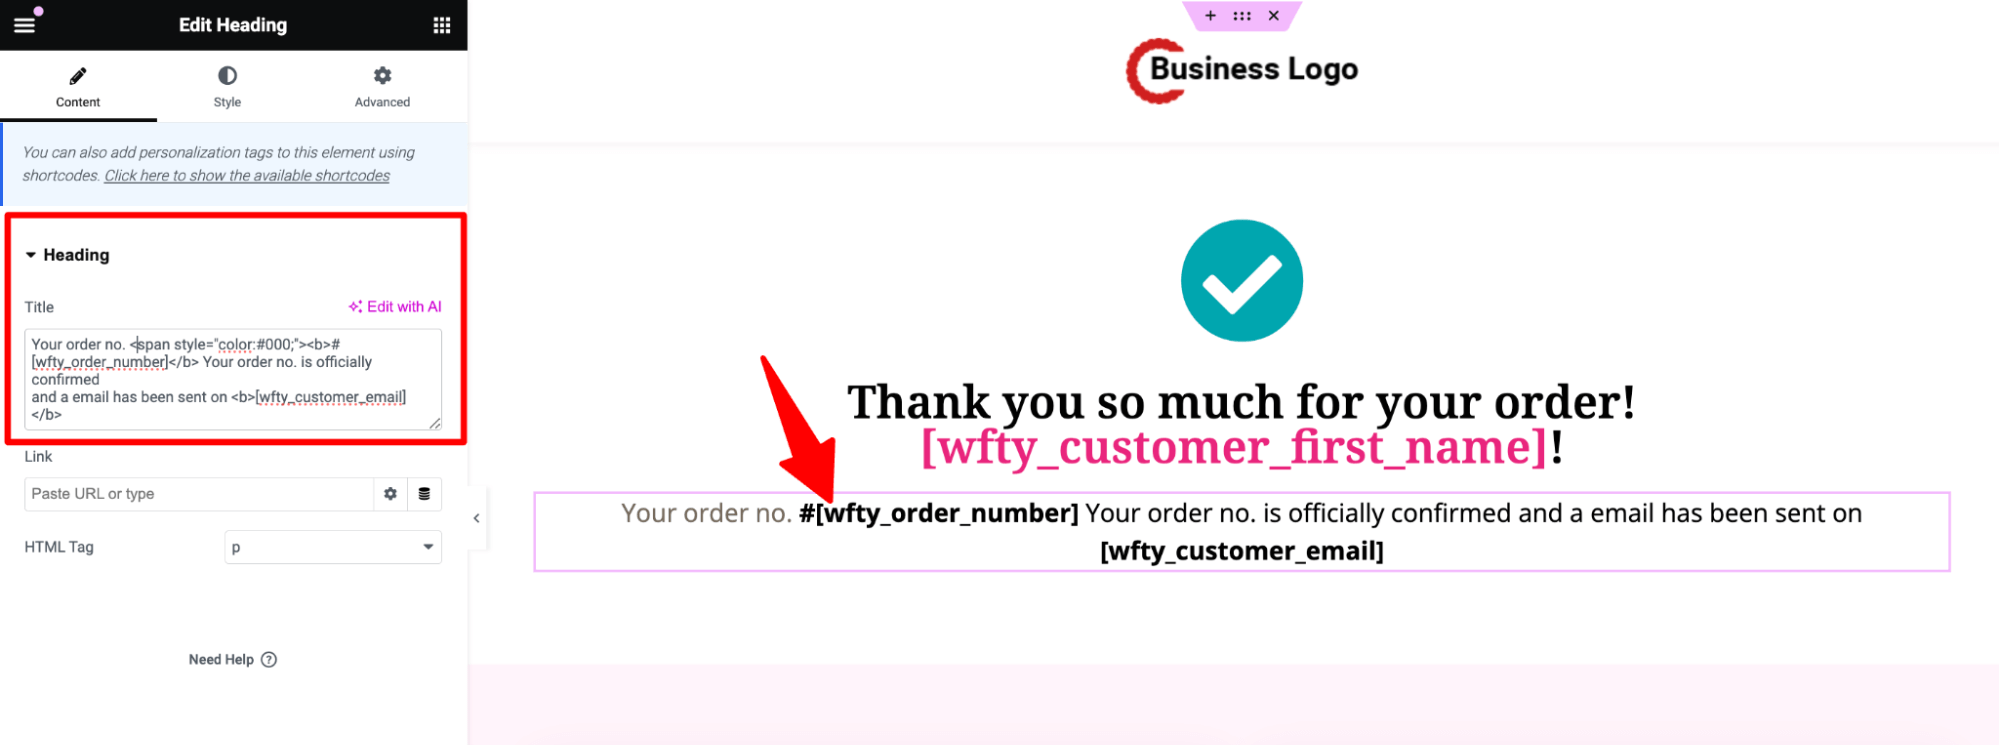
- Customize the header
Click on the section, then on the left side; you can easily change it. Remember, the template uses merge tags to display dynamic content like the customer's first name, order number, and email. So, keep that in mind.
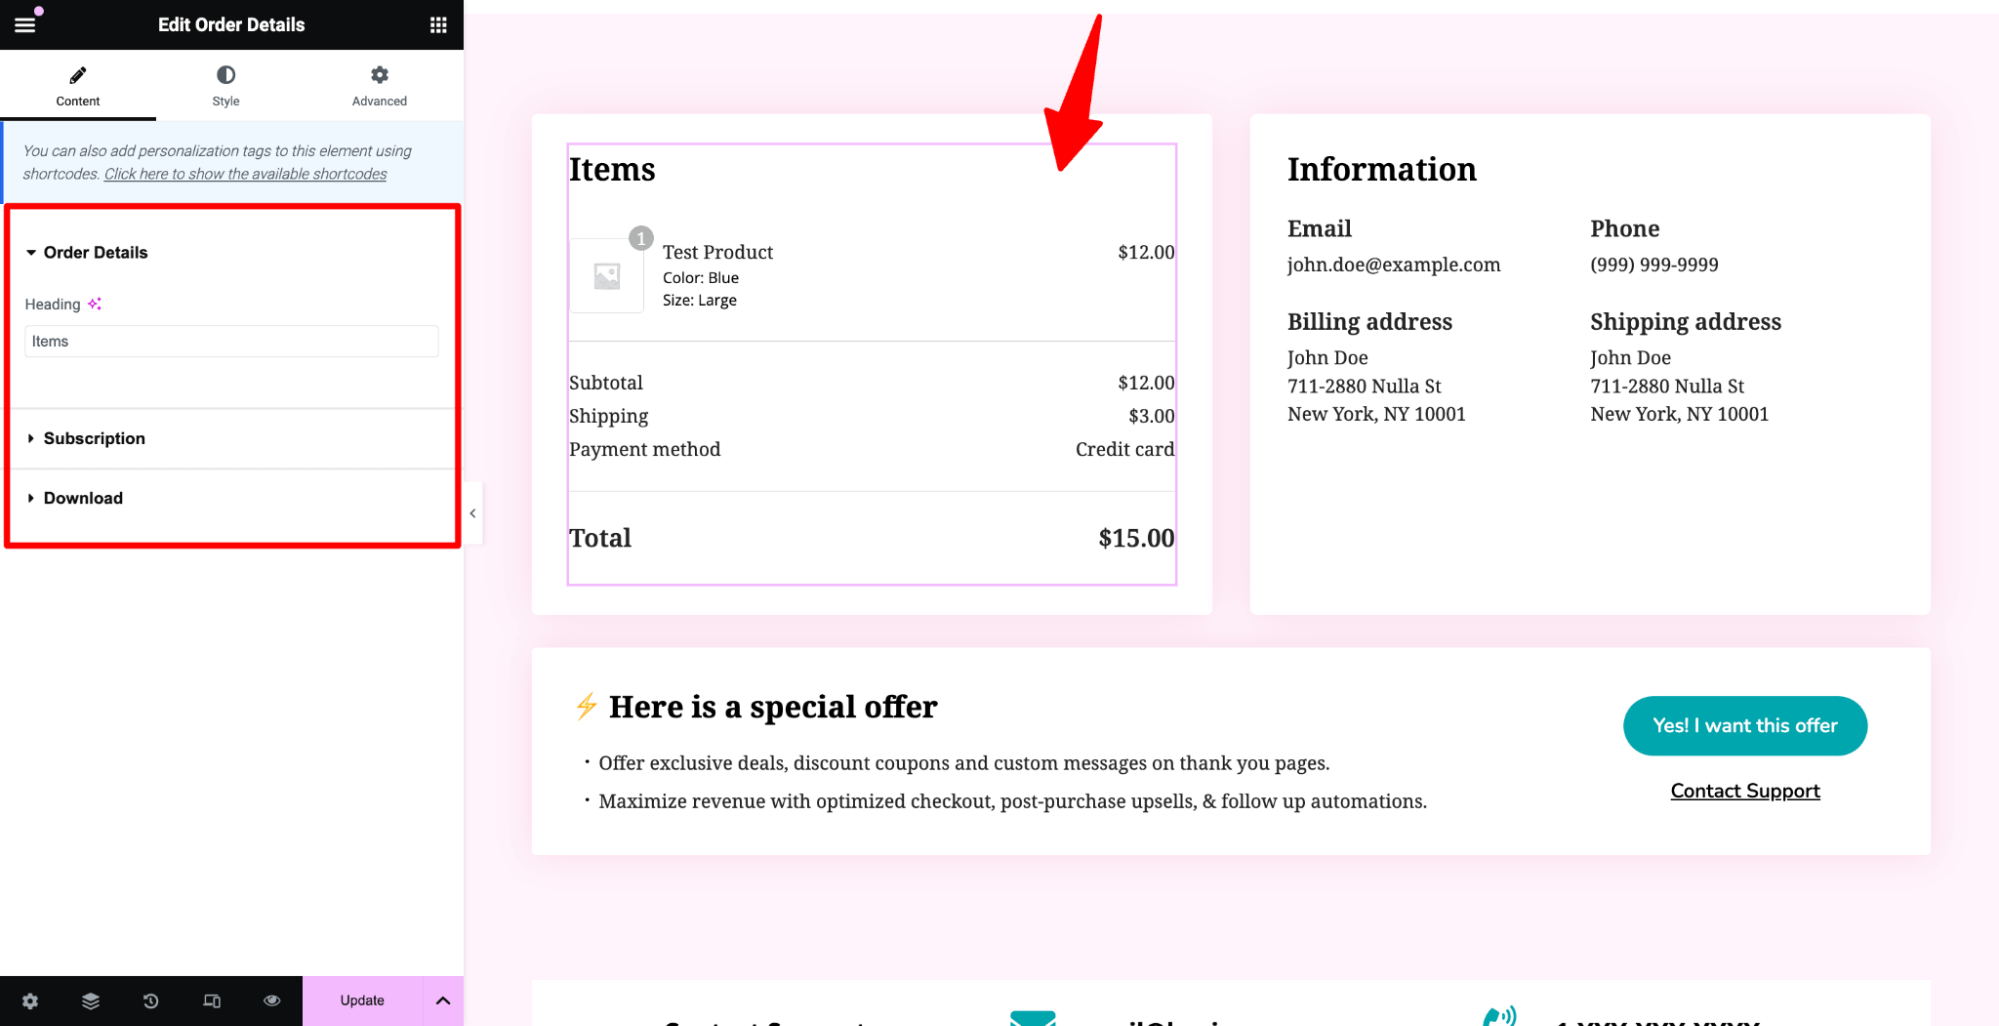
- Customize the order details section
Click on the order details section. Here, you can change the hedging. If you offer subscriptions, you can change the heading for those products as well.
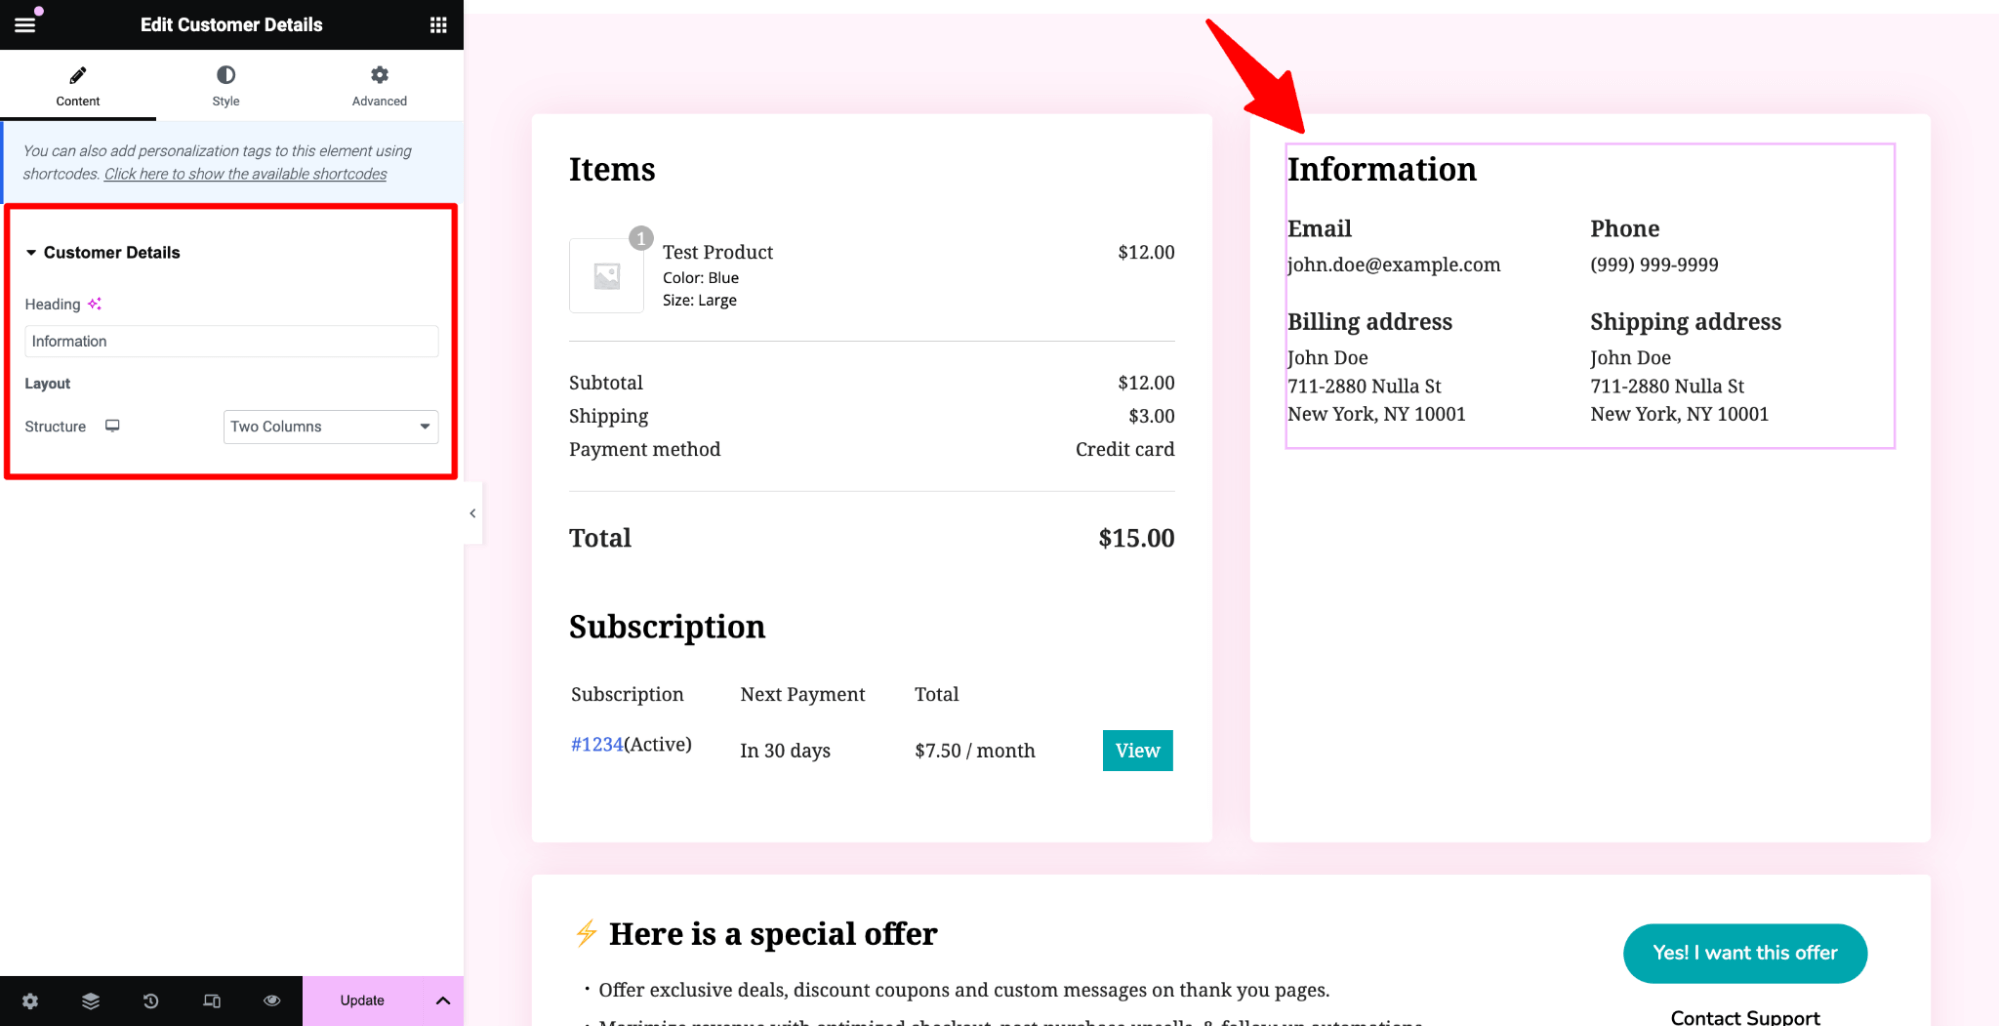
- Customize the customer details section.
You can change the heading and also the layout of the customer details section. Arrange it as one column or two columns, as you see fit.
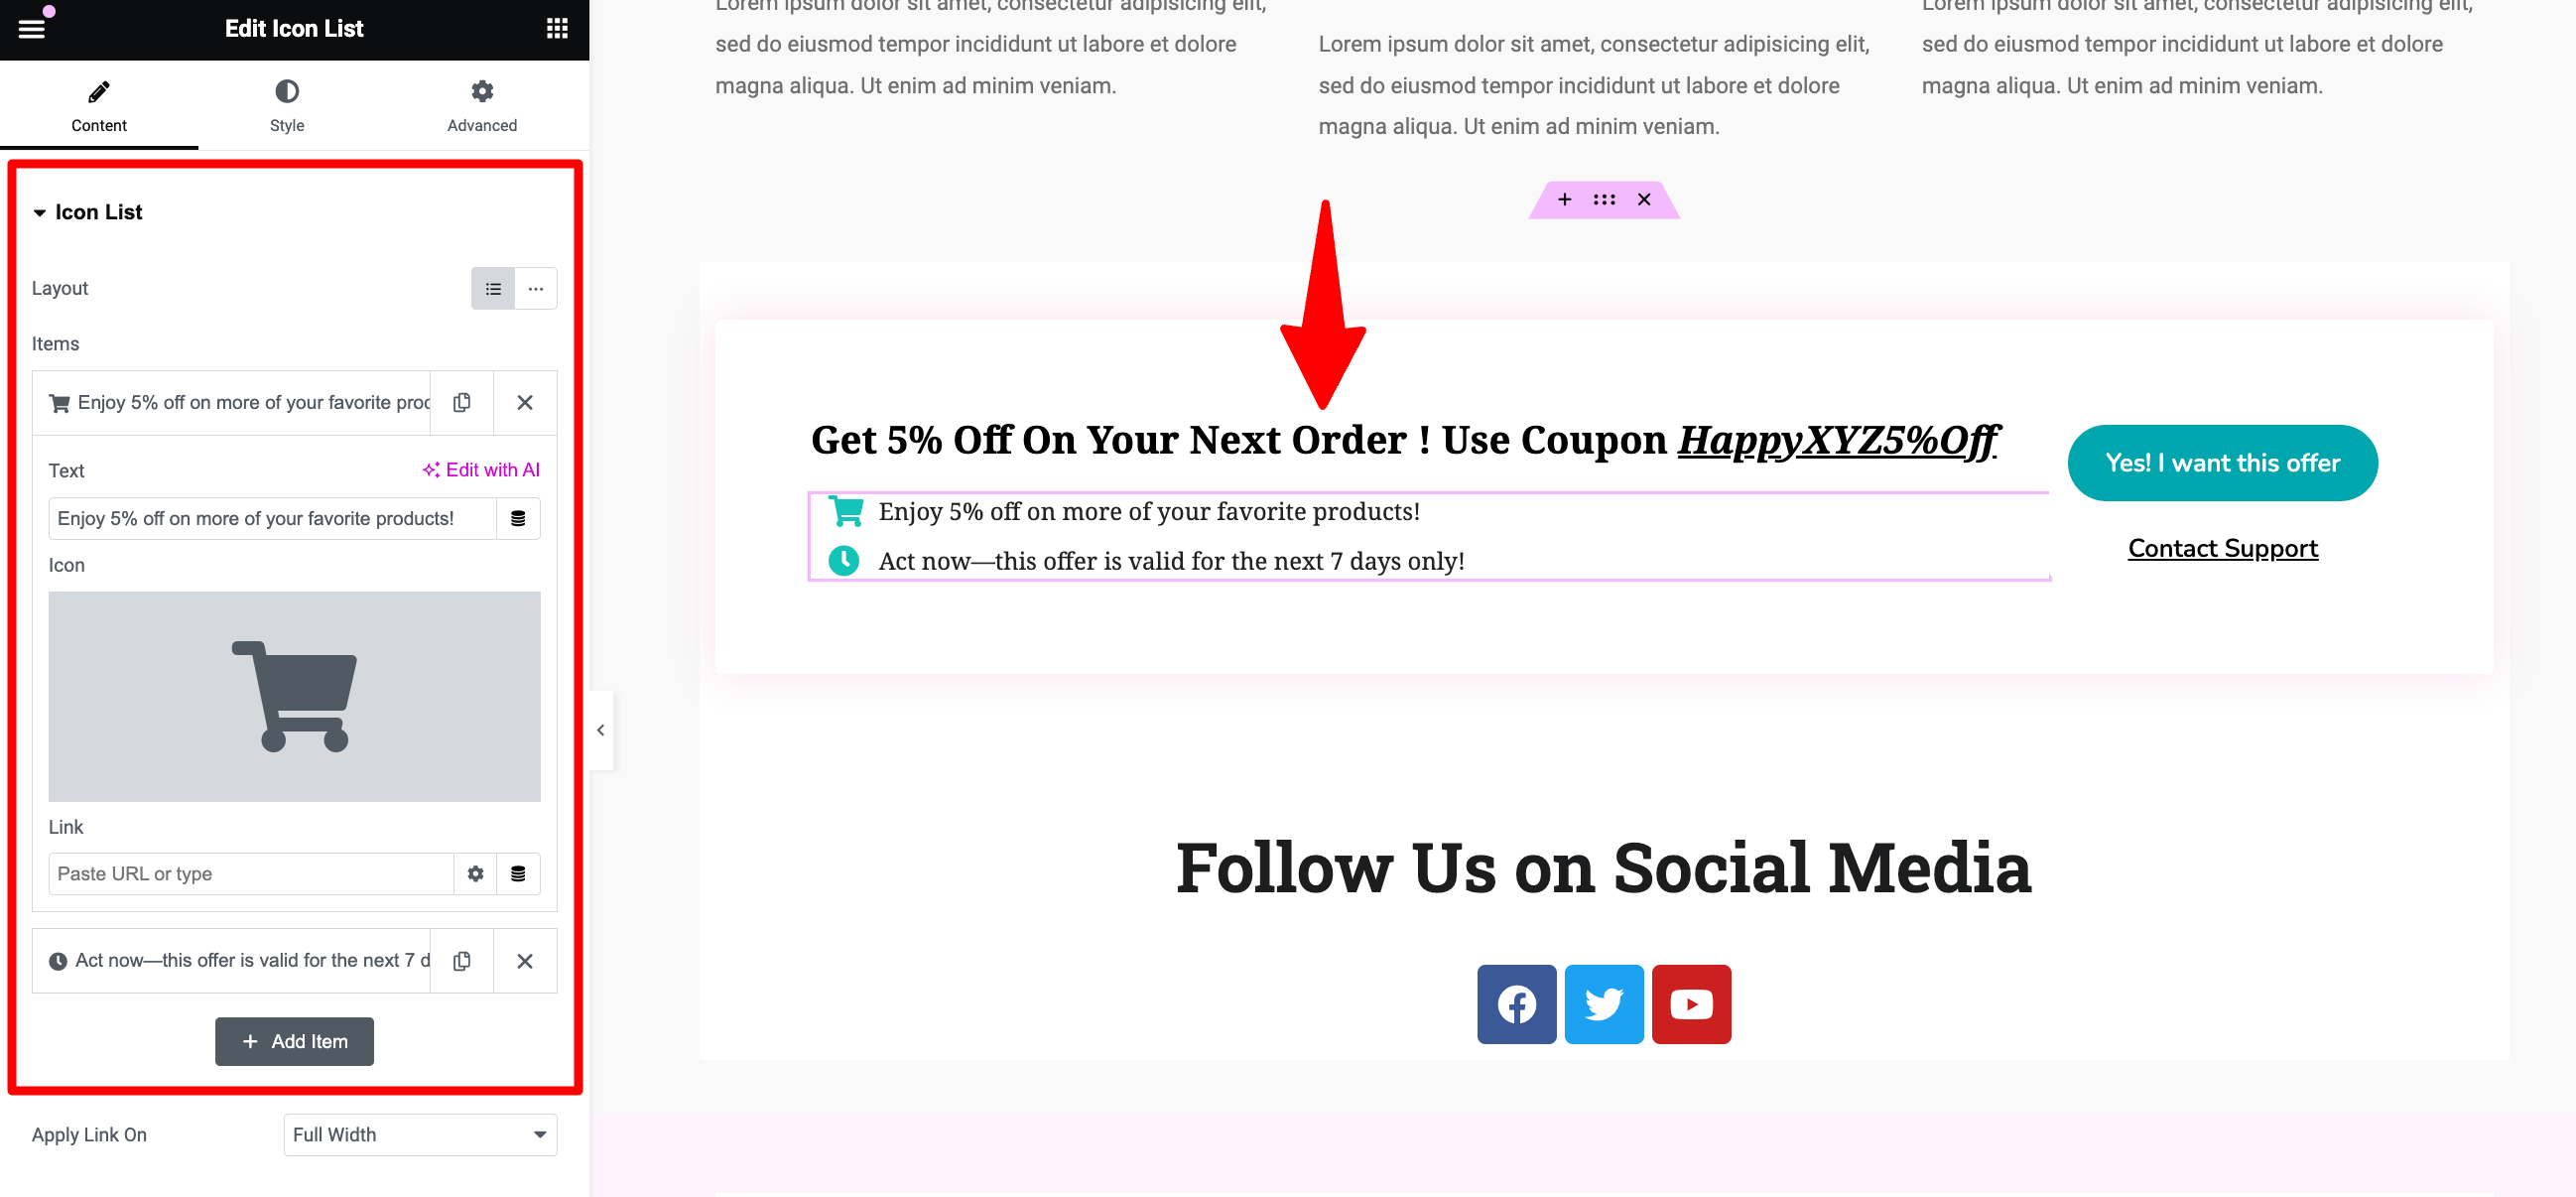
- Customize the special offer section to secure the next purchase
Highlight your special offers in this section to attract more buyers. For instance, we can offer a 5% discount on their next purchase, encouraging them to return and make additional purchases. You can share the discount coupon that they can use on their next purchase.
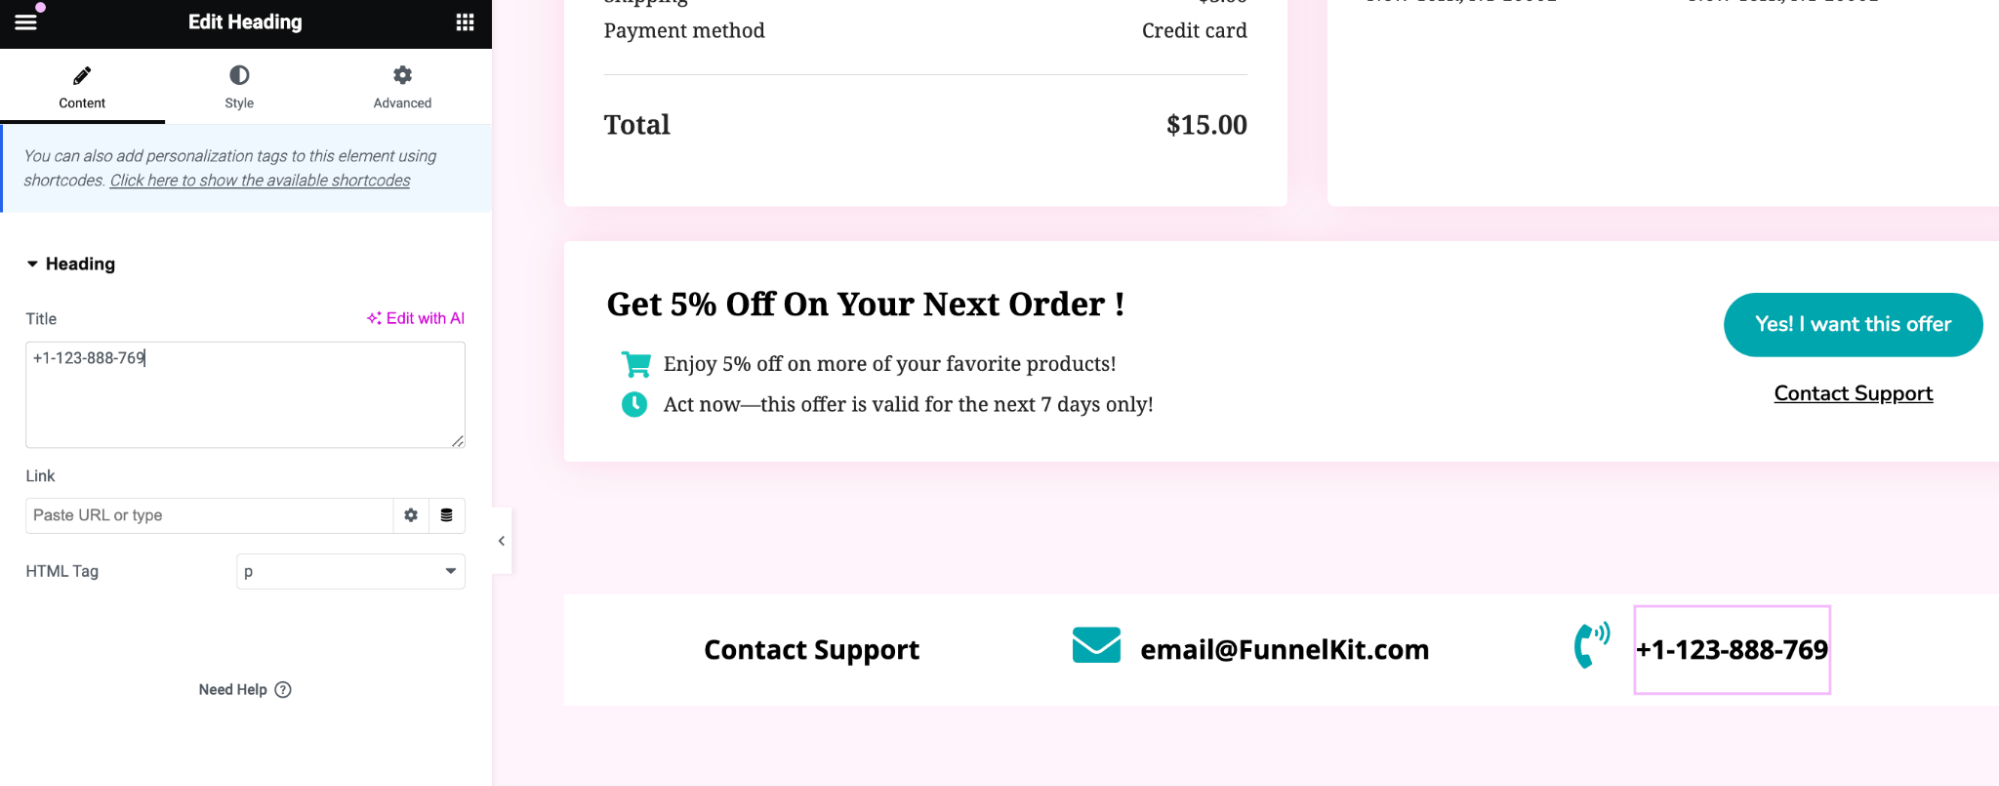
- Customize the contact section
Update the contact information in this section.
Step 2: Add additional content in the thank you template (optional)
You can take your WooCommerce Thank You page to the next level by adding valuable and engaging content.
For instance, you can embed an educational video that guides customers on how to use the product they just purchased. This not only enhances the post-purchase experience but also helps reduce product-related queries and refunds.
You can also include step-by-step instructions, helpful tips, or even a short product manual right on the page.
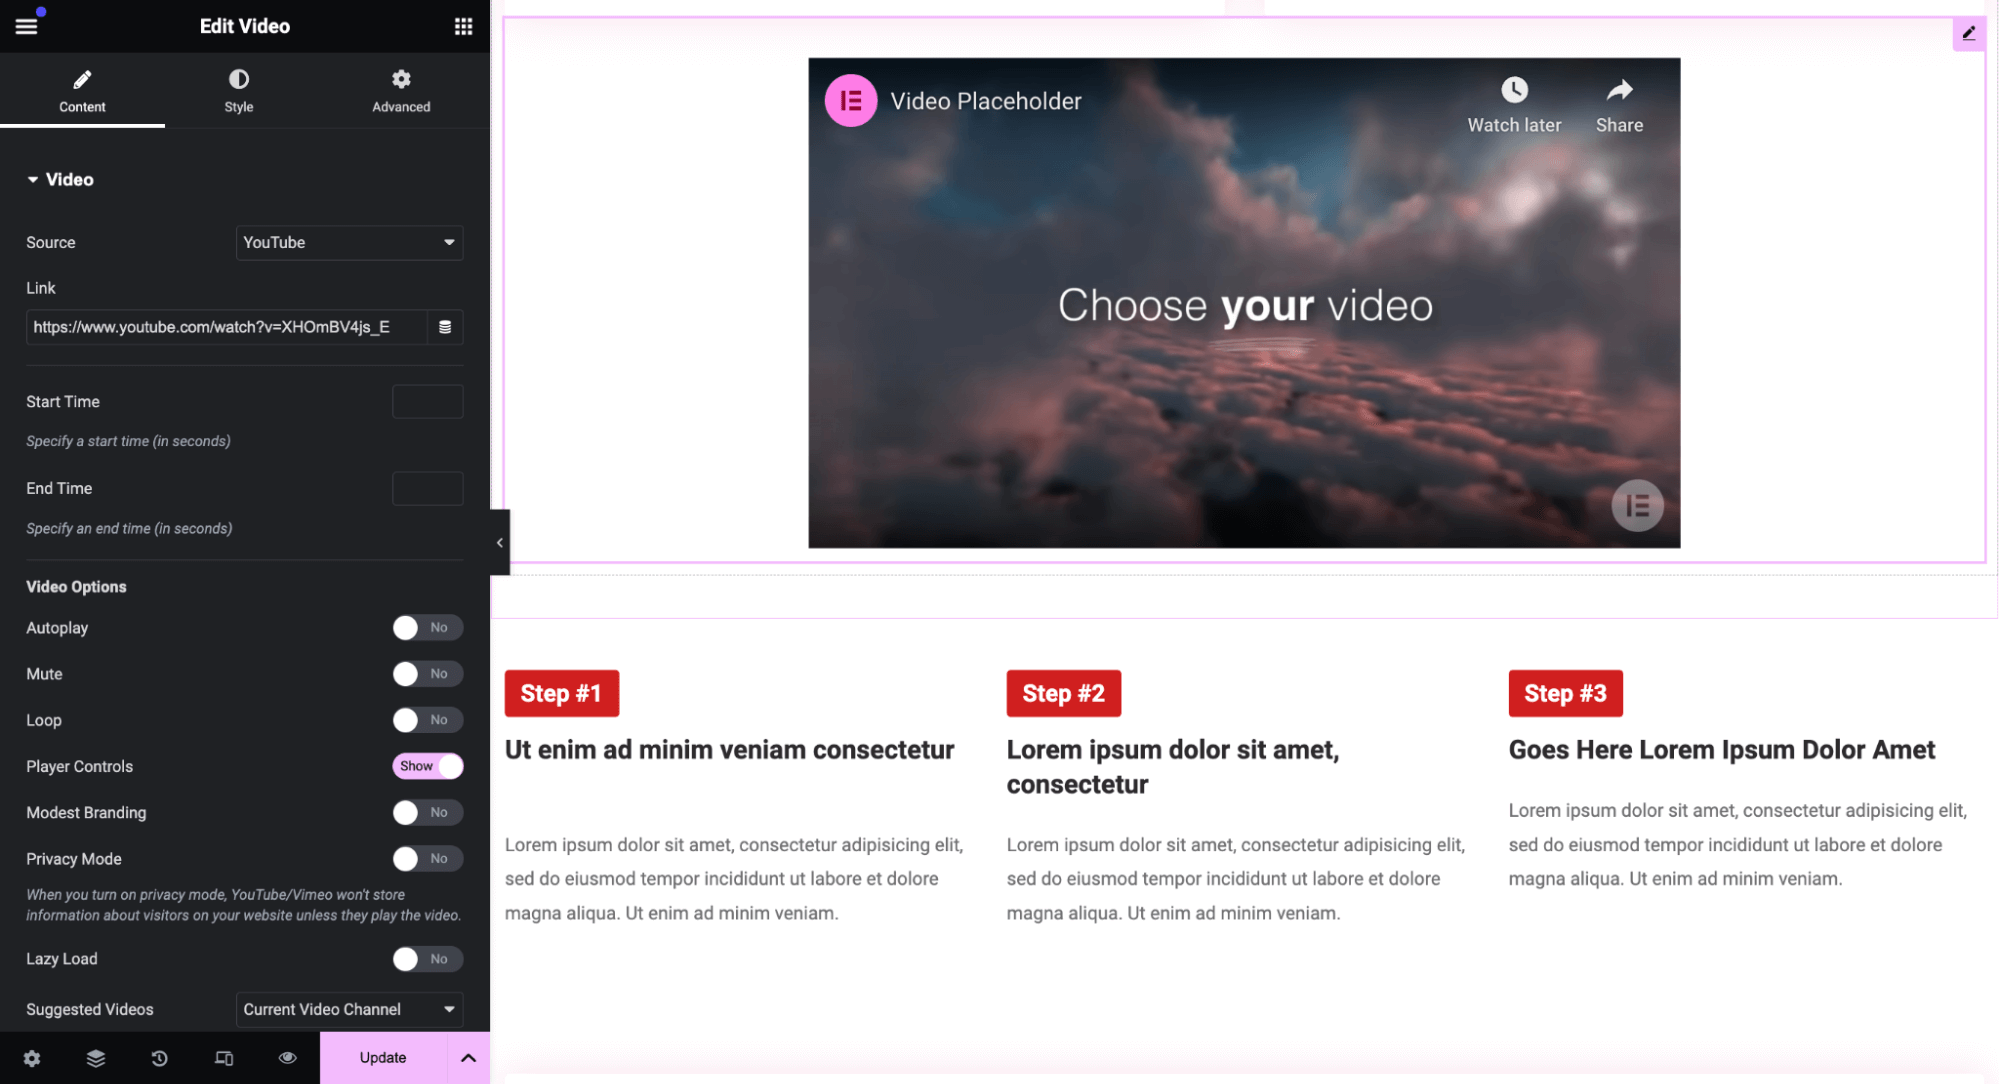
By offering this kind of educational content, you build trust and position your brand as an expert, which are the key factors for improving user satisfaction and long-term retention.
Encourage customers to stay connected with your brand. You can easily add social share icons using the Social Icons block.
For each icon, insert the link to your respective social media account, for example, Facebook, Instagram, YouTube, or X (formerly Twitter).
Once you’ve made all the desired changes, don’t forget to click the ‘Update’ button to save your customized template.
Here is the WooCommerce order confirmation page we designed:
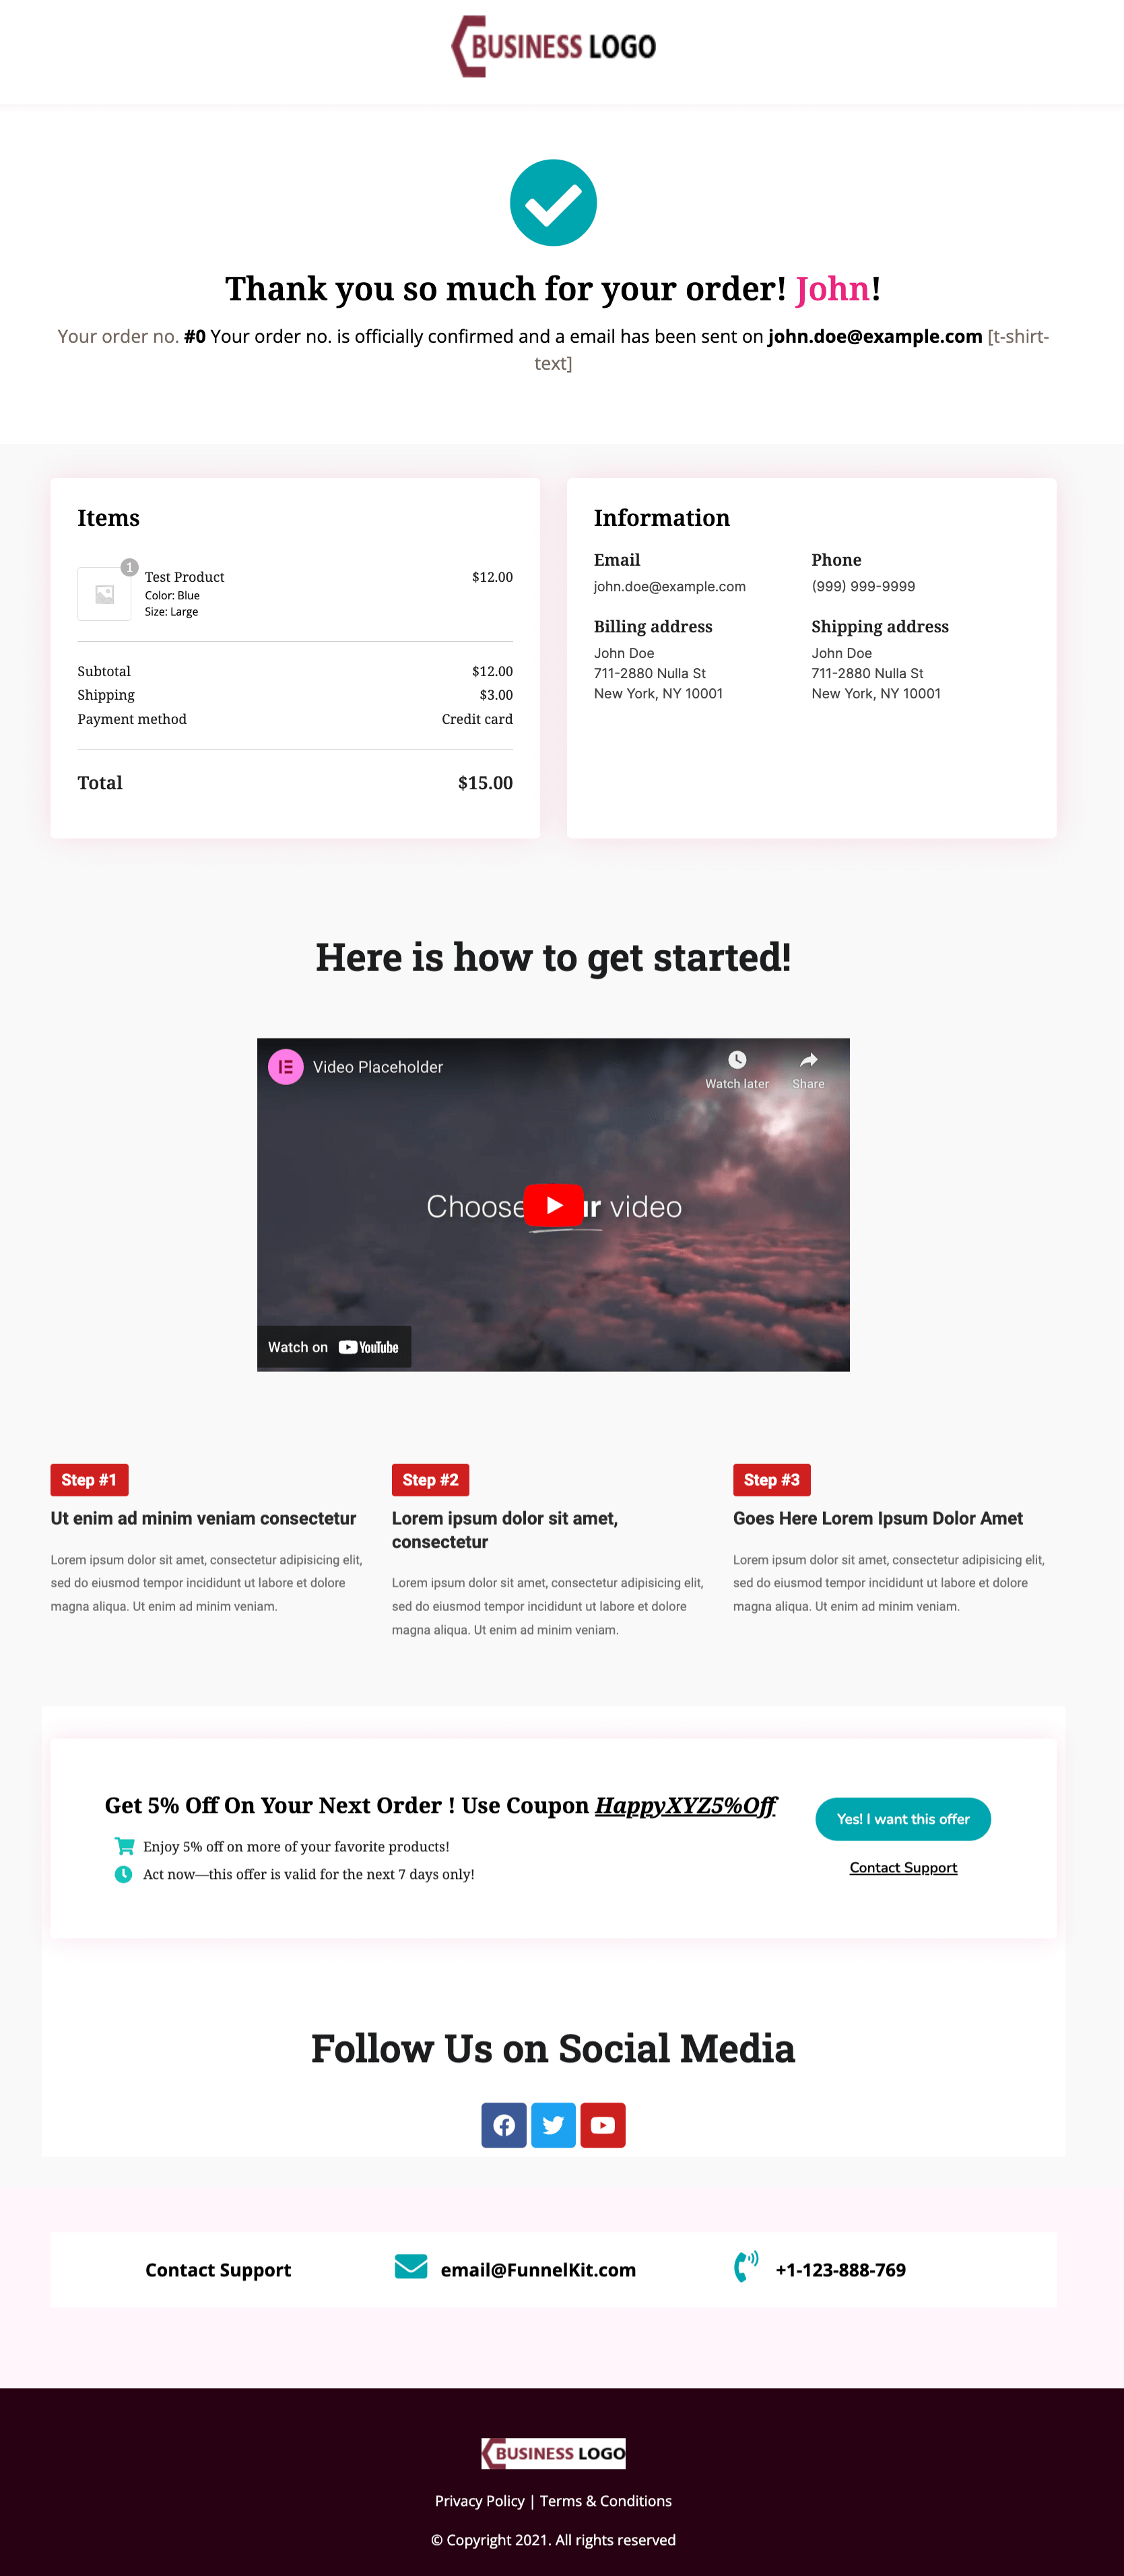
You can even add a 'Continue Shopping' button to your WooCommerce thank you page and link it to your Shop page.
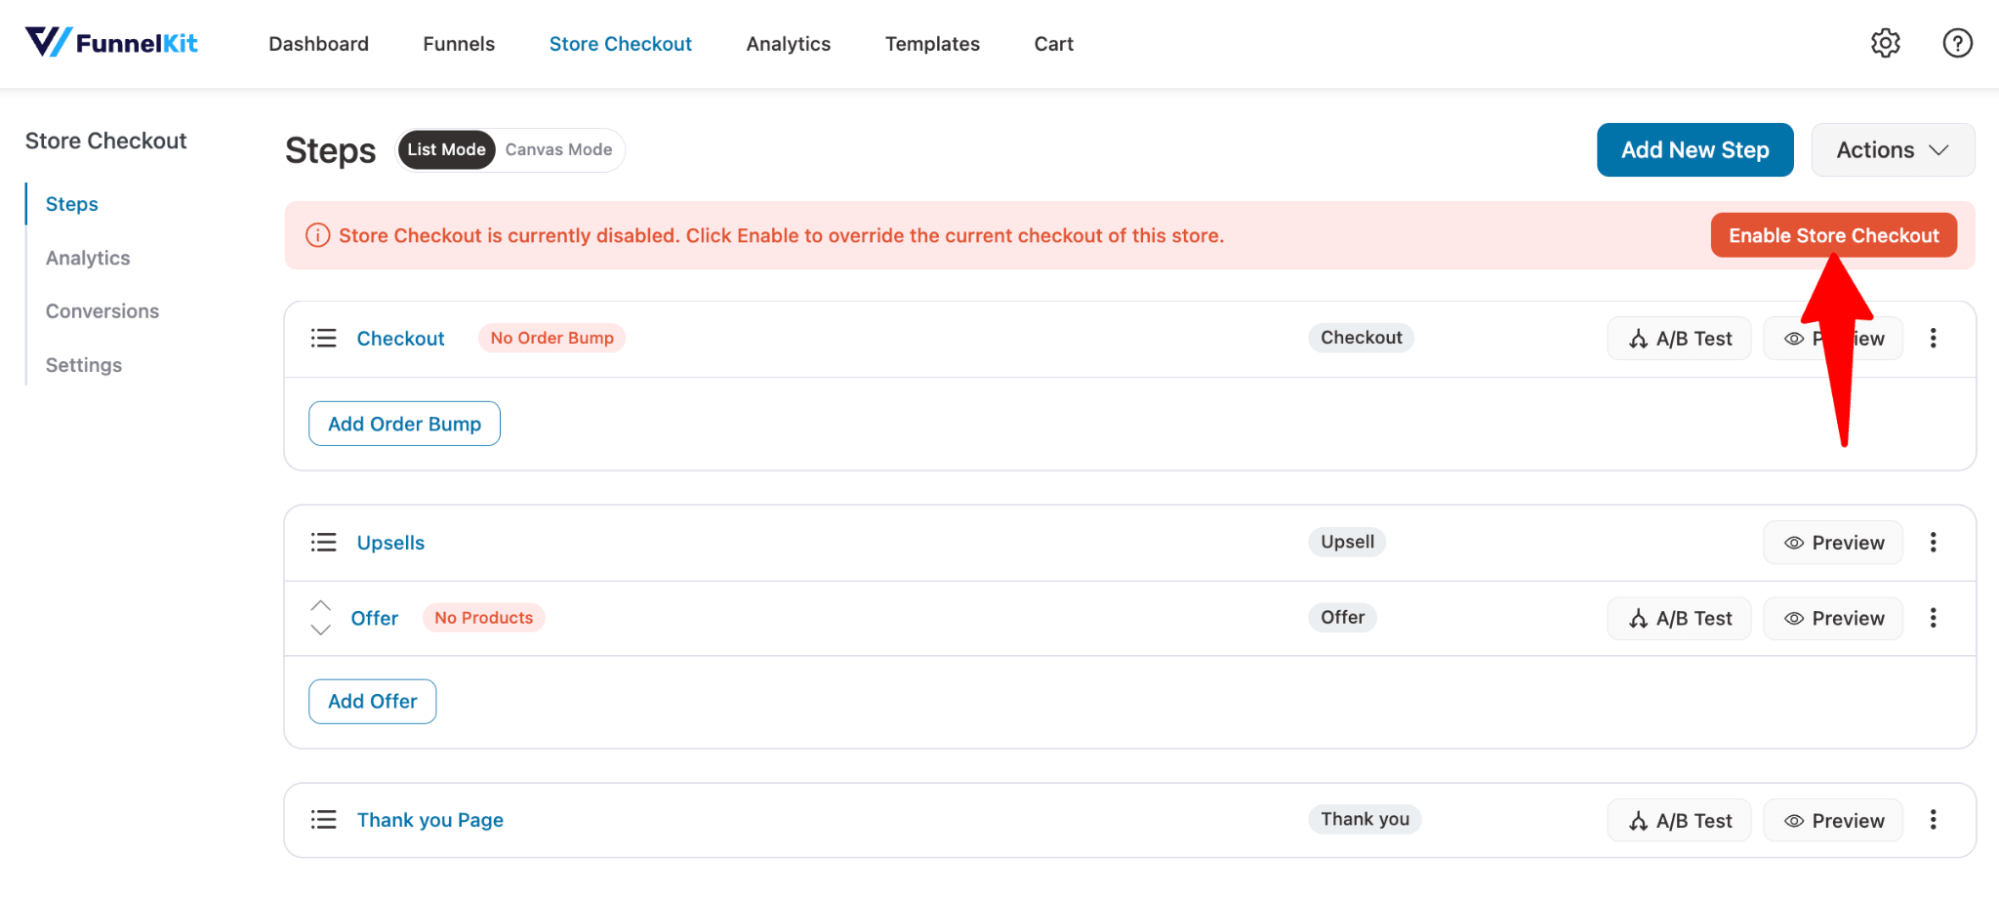
Step 3: Enable the store checkout
The last step is to enable the store checkout so that when someone buys from your store, they see this beautiful, optimized order confirmation page rather than the dull default one.
Just hit the “Enable Store Checkout” button to enable the store checkout.
This is how you can customize your order confirmation page without coding - using a simple plugin.
Method 3: Customize the WooCommerce Order Confirmation Page with Code (For Advanced Programmers Only)
This method is recommended for expert coders as it involves manually changing the actual code.
WooCommerce provides several action and filter hooks specifically for the thank you page. This method gives you full control and works with any theme, whether block or classic.
Add the following snippets to your child theme's functions.php file or use a code snippets plugin like WPCode or Code Snippets.
Follow these steps to customize the content:
Change the page title
Replace the default “Order received” heading:
add_filter( 'woocommerce_endpoint_order-received_title', 'custom_thank_you_title' );

function custom_thank_you_title( $old_title ) {
    return 'Thank You for Your Order!';
}
Change the thank you subtitle text
Personalize the subtitle with the customer’s first name:
add_filter( 'woocommerce_thankyou_order_received_text', 'custom_thank_you_text', 20, 2 );

function custom_thank_you_text( $text, $order ) {
    if ( $order ) {
        return 'Hey ' . $order->get_billing_first_name() . ', your order is confirmed and on its way!';
    }
    return $text;
}
Add custom content after order details
Use the woocommerce_thankyou action to add content below the order summary:
add_action( 'woocommerce_thankyou', 'custom_content_thankyou_page' );

function custom_content_thankyou_page( $order_id ) {
    $order = wc_get_order( $order_id );

    echo '<div class="custom-thankyou-box">';
    echo '<h3>What Happens Next?</h3>';
    echo '<p>We\'re preparing your order now. You\'ll receive a shipping confirmation email at <strong>' . esc_html( $order->get_billing_email() ) . '</strong> once your package is on its way.</p>';
    echo '<p>Estimated delivery: 3-5 business days.</p>';
    echo '</div>';
}
Embed a video on the order confirmation page
Video on the confirmation page is a powerful engagement tool. Use it for onboarding, product tutorials, or a branded thank-you message:
add_action( 'woocommerce_thankyou', 'add_video_to_thankyou', 5 );

function add_video_to_thankyou( $order_id ) {
    echo '<div class="thankyou-video">';
    echo '<h3>Watch: How to Get the Most from Your Purchase</h3>';
    echo wp_oembed_get( 'https://www.youtube.com/watch?v=YOUR_VIDEO_ID' );
    echo '</div>';
}
Add social sharing buttons
Let customers share their purchase on social media:
add_action( 'woocommerce_thankyou', 'add_social_sharing_thankyou', 15 );

function add_social_sharing_thankyou( $order_id ) {
    $share_url  = home_url();
    $share_text = urlencode( 'I just made a purchase at ' . get_bloginfo( 'name' ) . '!' );

    echo '<div class="thankyou-social-share">';
    echo '<h3>Share Your Purchase</h3>';
    echo '<a href="https://twitter.com/intent/tweet?text=' . $share_text . '&url=' . urlencode( $share_url ) . '" target="_blank" rel="noopener">Share on X</a> | ';
    echo '<a href="https://www.facebook.com/sharer/sharer.php?u=' . urlencode( $share_url ) . '" target="_blank" rel="noopener">Share on Facebook</a>';
    echo '</div>';
}
Redirect to a custom thank you page
If you want to use a completely different WordPress page as your confirmation page:
add_action( 'template_redirect', 'redirect_custom_thank_you' );

function redirect_custom_thank_you() {
    if ( ! is_wc_endpoint_url( 'order-received' ) || empty( $_GET['key'] ) ) {
        return;
    }

    $order_key = sanitize_text_field( $_GET['key'] );
    $order_id  = wc_get_order_id_by_order_key( $order_key );

    wp_safe_redirect( home_url( '/thank-you/?order_id=' . $order_id ) );
    exit;
}
Conditional redirects based on products or payment method
Send customers to different thank you pages depending on what they purchased or how they paid:
add_action( 'template_redirect', 'conditional_thank_you_redirect' );

function conditional_thank_you_redirect() {
    if ( ! is_wc_endpoint_url( 'order-received' ) || empty( $_GET['key'] ) ) {
        return;
    }

    $order_id = wc_get_order_id_by_order_key( sanitize_text_field( $_GET['key'] ) );
    $order    = wc_get_order( $order_id );

    // Redirect based on product
    foreach ( $order->get_items() as $item ) {
        if ( $item->get_product_id() === 456 ) {
            wp_redirect( home_url( '/vip-welcome/' ) );
            exit;
        }
    }

    // Redirect based on payment method
    if ( 'paypal' === $order->get_payment_method() ) {
        wp_redirect( home_url( '/paypal-confirmation/' ) );
        exit;
    }
}
Additionally, there are many more custom codes that you can implement to customize your order confirmation page.
What to Add to Your WooCommerce Order Confirmation Page
Once you have the customization method in place, the next question is what to actually put on the page.
These elements have the highest impact on repeat purchases and customer experience.
1. Offer a post-purchase upsell
Present one clear upsell offer directly on or right before the confirmation page, such as an accessory, a bundle, or a premium version of what the customer just bought.
Because the customer has already paid, a single-click acceptance adds the item to their order without another checkout step, which meaningfully lifts average order value.
2. Show personalized product recommendations
Display three to four related products based on the customer's most recent purchase.
This works especially well for stores with complementary catalogs (skincare, supplements, fashion accessories, kitchenware) and provides returning shoppers with a natural next step after they complete their current order.
3. Include a discount code for the next order
A small, time-limited coupon (for example, 10% off, valid for 7 days) turns first-time buyers into second-time buyers.
Display the code prominently with a copy-to-clipboard button, a clear expiry date, and any usage conditions in plain language.
4. Display delivery and tracking details
Show the estimated delivery window, the shipping carrier, and a tracking link if you have one, or a note that a tracking link will be sent by email.
Clear shipping information reduces “where is my order” support tickets and builds trust with first-time customers.
Add social sharing and referral links
Let customers share their purchase on social platforms or send a referral link to friends.
This works especially well for gifting products, subscription boxes, and community-driven brands, turning one sale into organic reach.
Add a guest-to-registered account prompt
If the customer checked out as a guest, add a one-click “Create an account” block with the customer’s email pre-filled.
A saved account means faster checkouts next time and an email address you can use for follow-up marketing, without adding friction to the original purchase.
How to Set the WooCommerce Order Confirmation Page URL?
Here, we have shared two ways to set the URL of the order confirmation page:
- Using WooCommerce default settings
Go to WooCommerce ⇒ Settings, then click on the Advanced tab.
Under Checkout endpoints, set the "Order Received" URL as your order confirmation page URL.
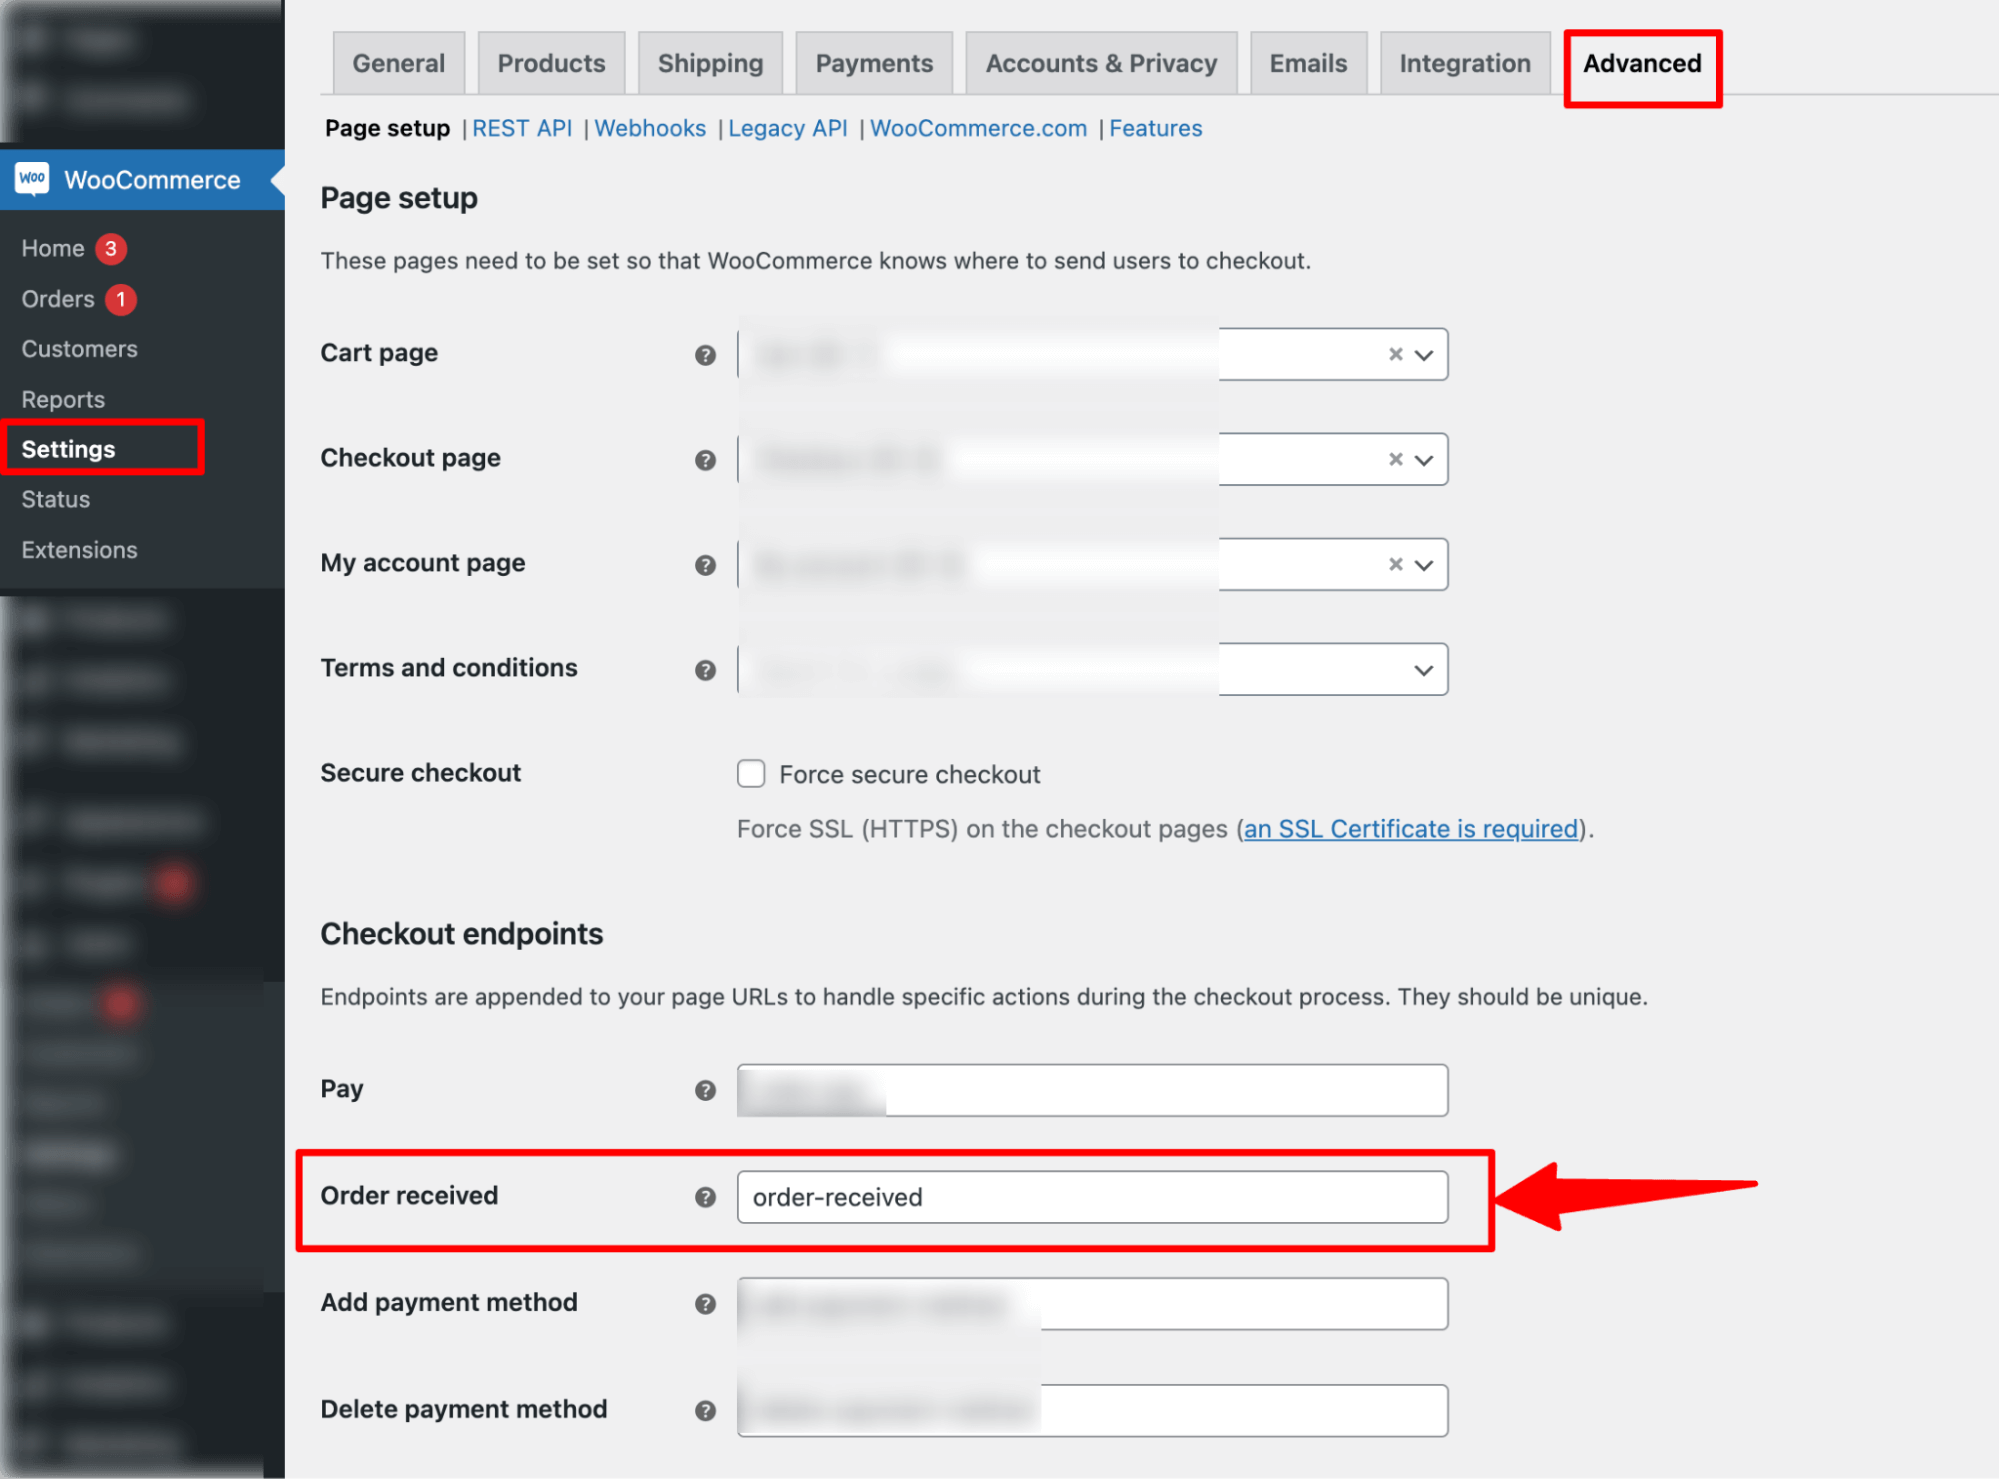
Make sure to save the changes.
The URL will be https://yourdomain.com/checkout/customURL
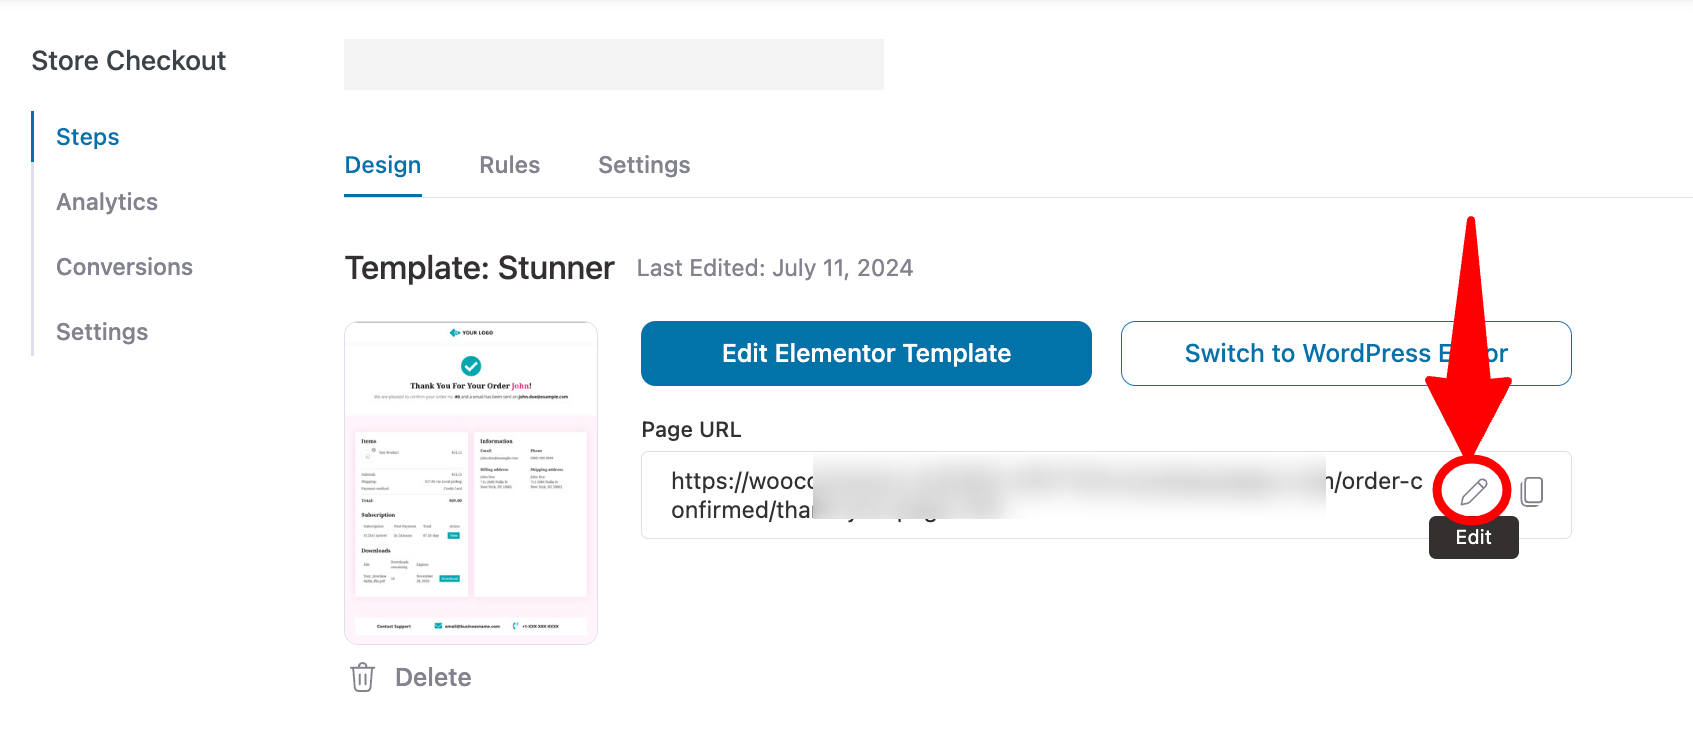
- Using FunnelKit Funnel Builder
To set a custom thank you page URL, click on the Edit icon of the thank you page URL.
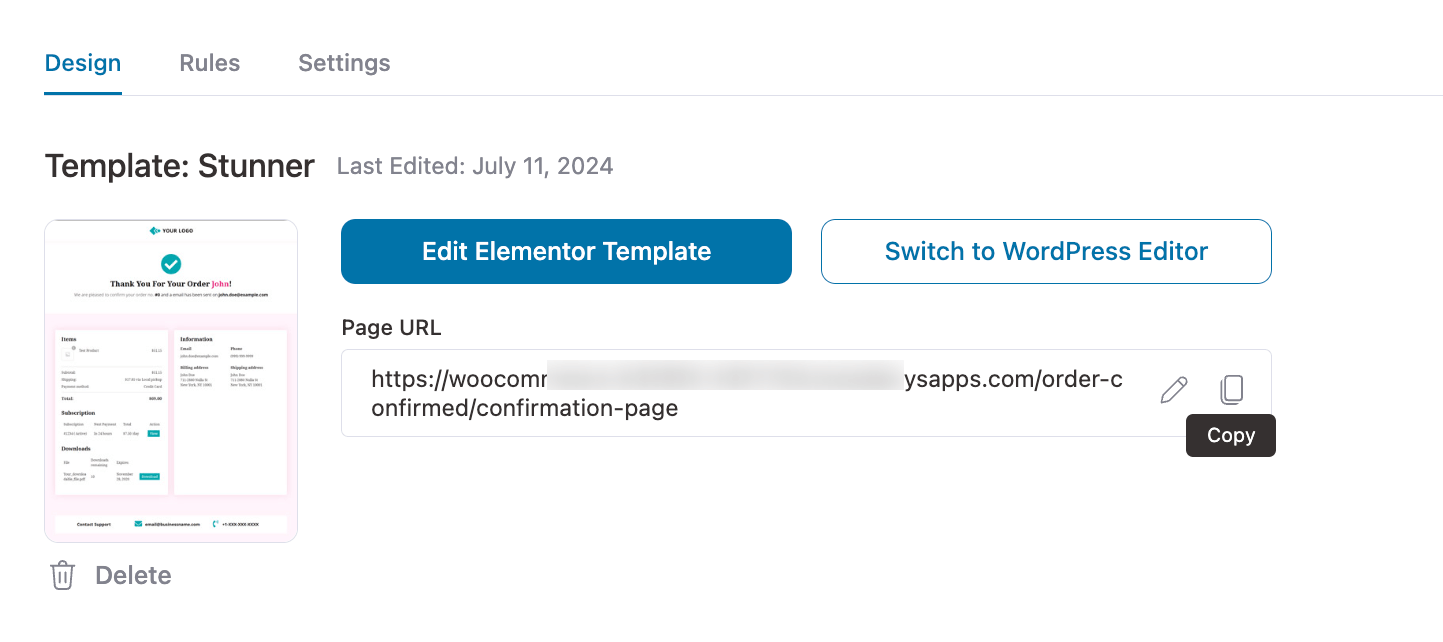
Enter the custom URL you want to set in the "Page URL Slug" section and hit update.
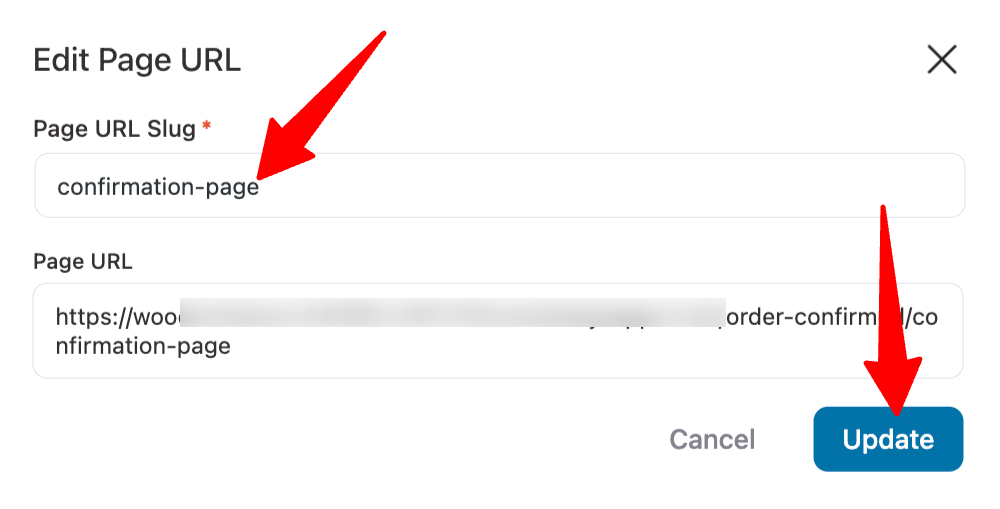
So, the custom WooCommerce Order Confirmation Page URL will be https://yourdomain.com/order-confirmed/customURL.
Creating Multiple WooCommerce Order Confirmation Pages For Different Product Attributes And Customer Data
With FunnelKit Funnel Builder’s powerful Rule Engine, you can tailor your WooCommerce order confirmation pages to match specific product attributes and customer details.
For example, you can display unique confirmation pages based on the product category your customers purchase from, delivering a personalized post-purchase experience. Alternatively, you could display a special-order confirmation page for customers from a specific geographic location to make them feel valued.
To set this up, start by creating multiple order confirmation pages. Then, use the Rule Engine to assign visibility rules so the right confirmation page appears based on product attributes or customer status.
Here are the steps you need to follow:
Step 1: Create multiple order confirmation pages
First, you need to create all the confirmation pages you want to show based on different criteria.
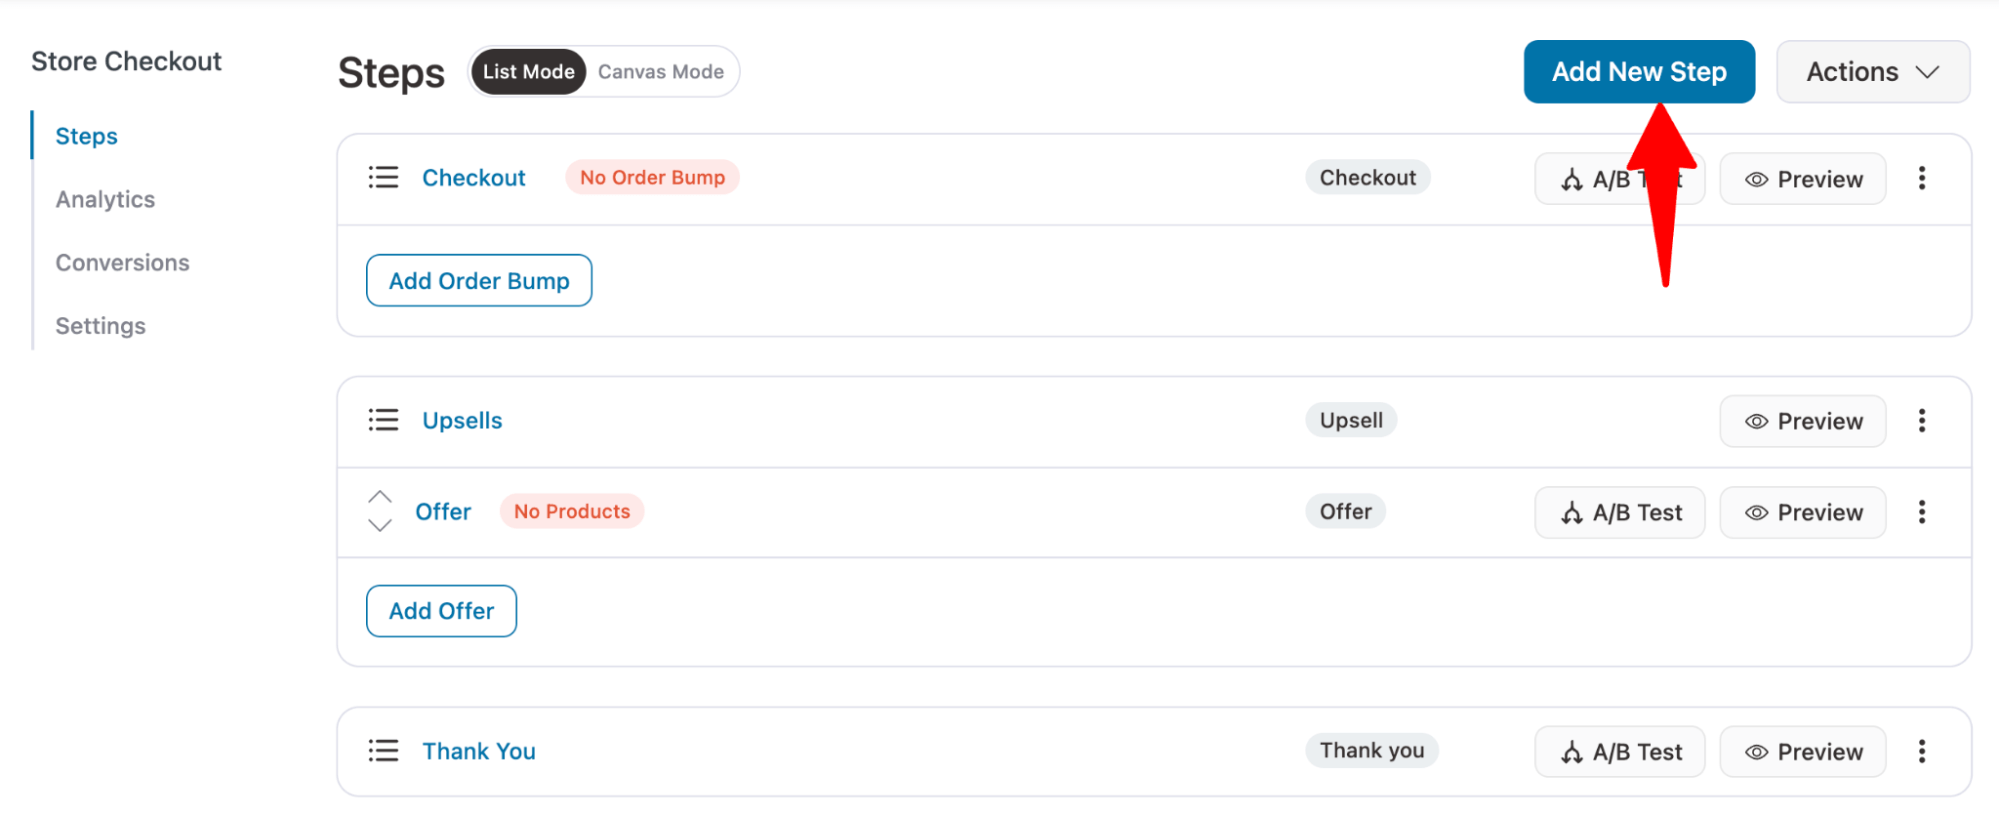
To create a thank you page, hit the “Add New Step”.
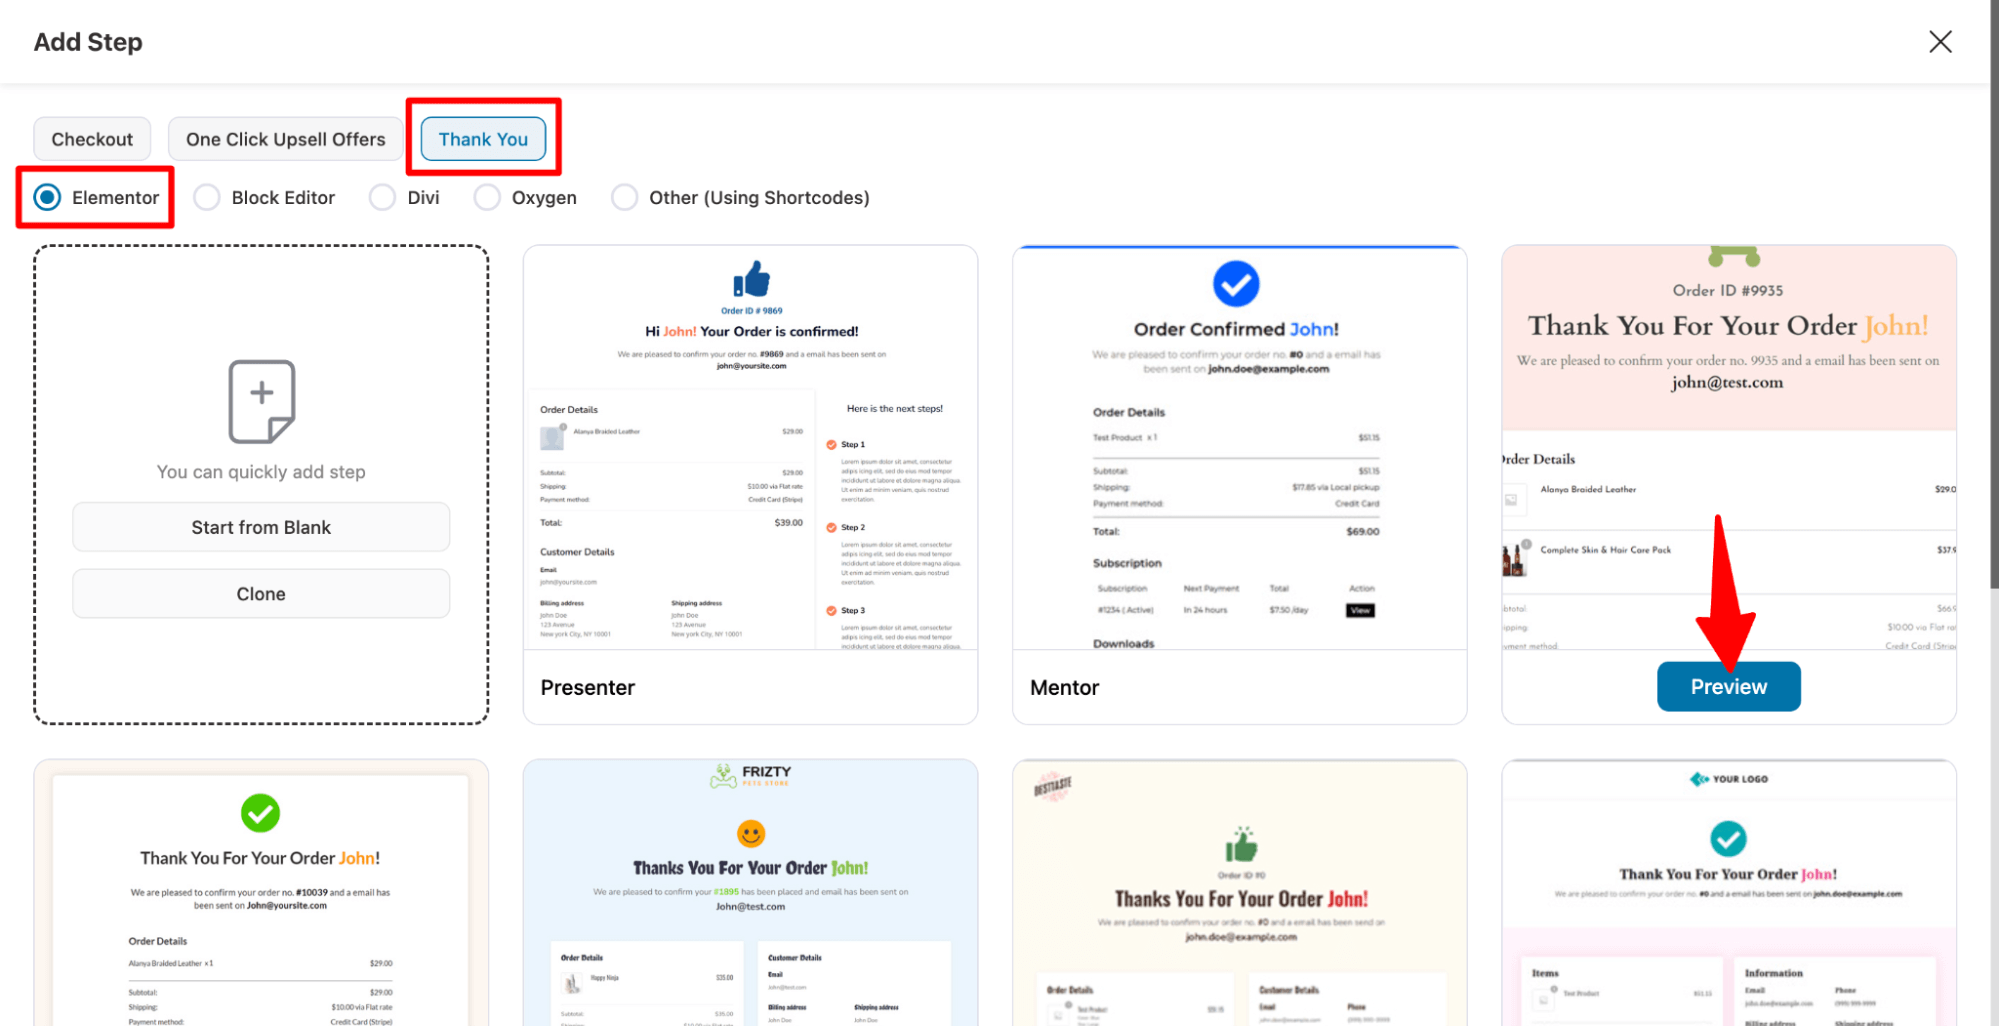
Then, choose the “Thank You” page and your favorite page builder. Then hover and click “Preview”.
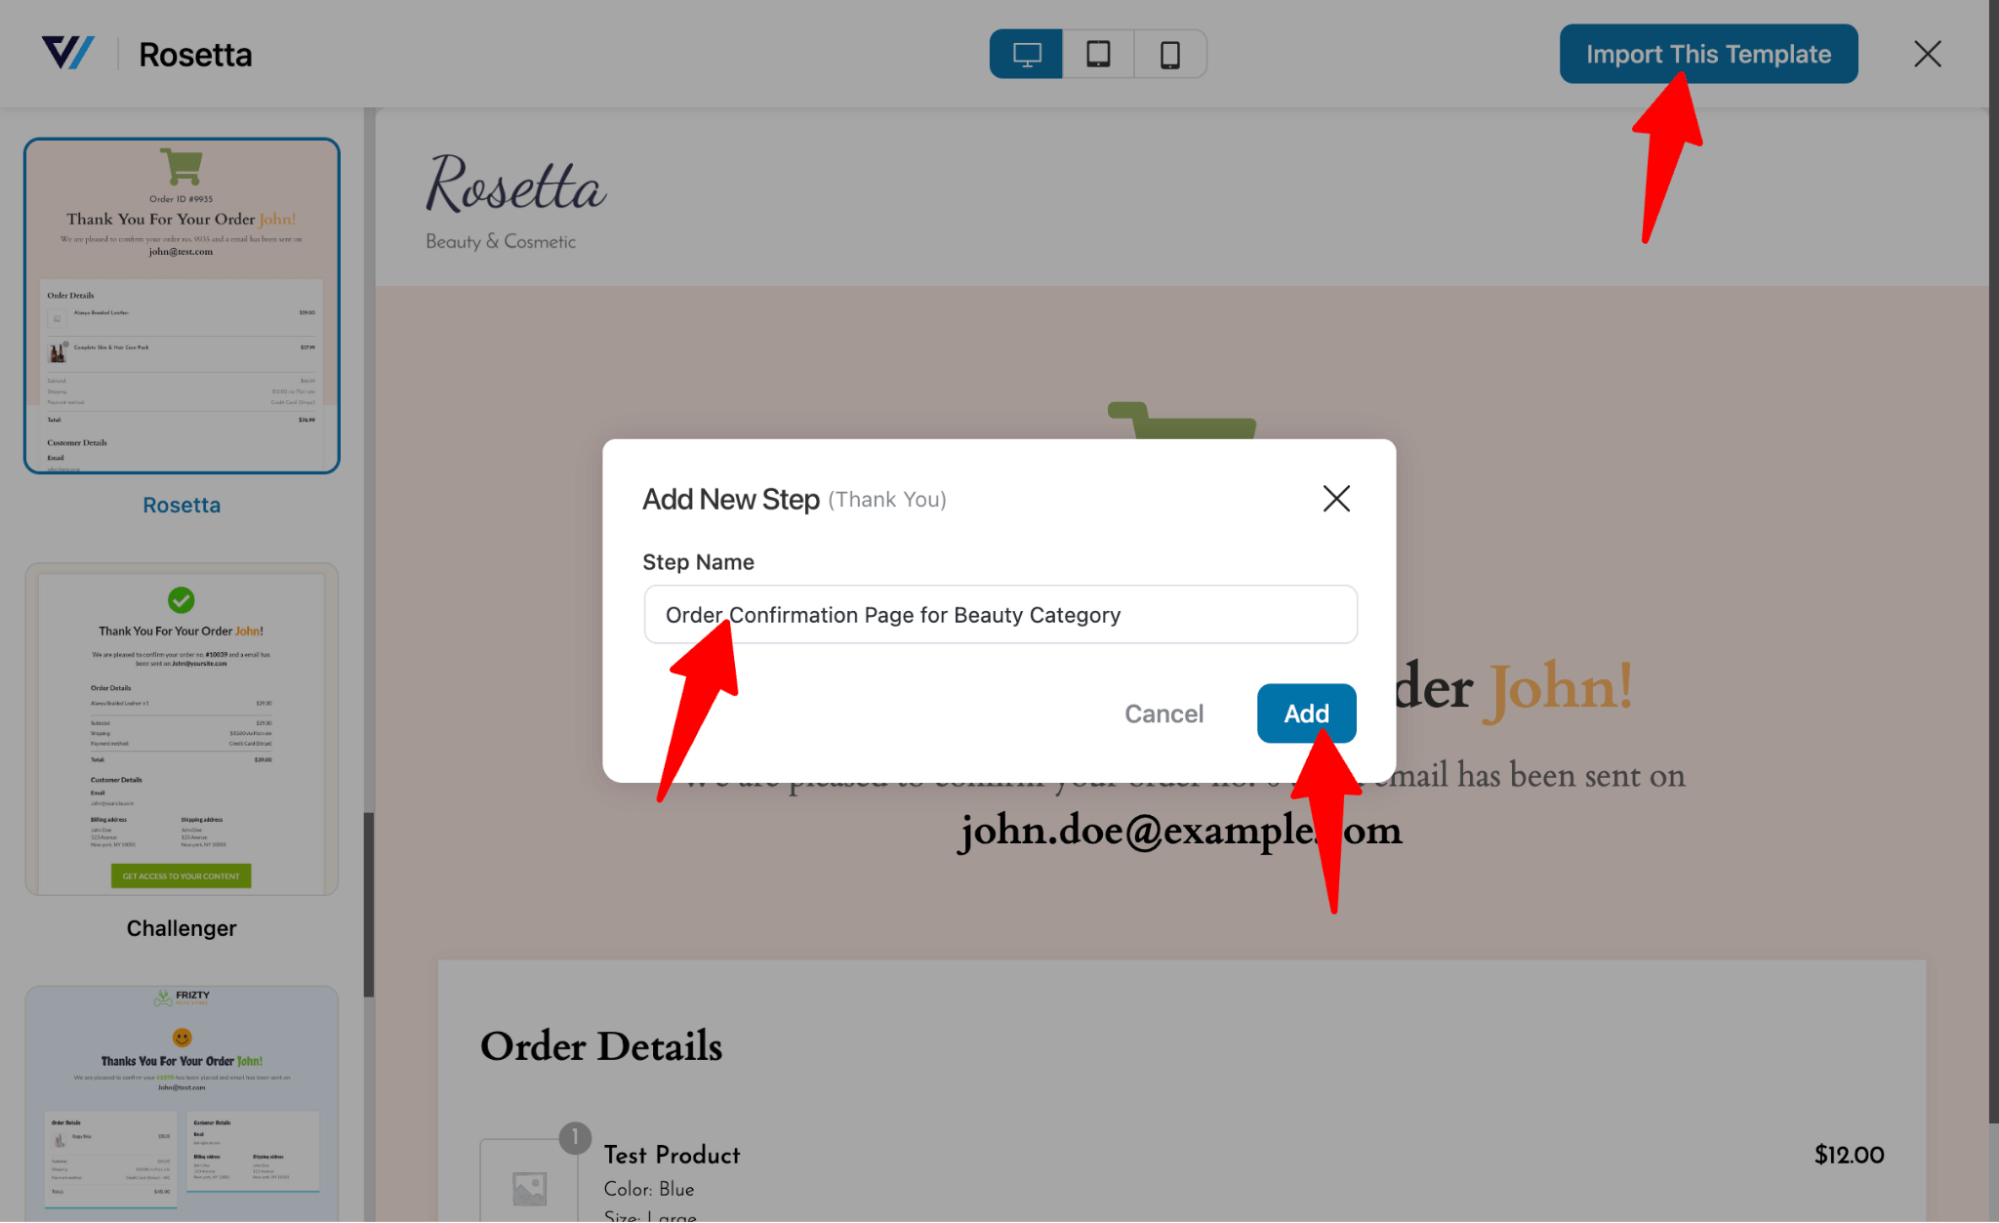
Now, to import, hit “Import This Template”, provide a name, and hit “Add”.
🔔 Note: You can choose different templates for different order confirmation pages.
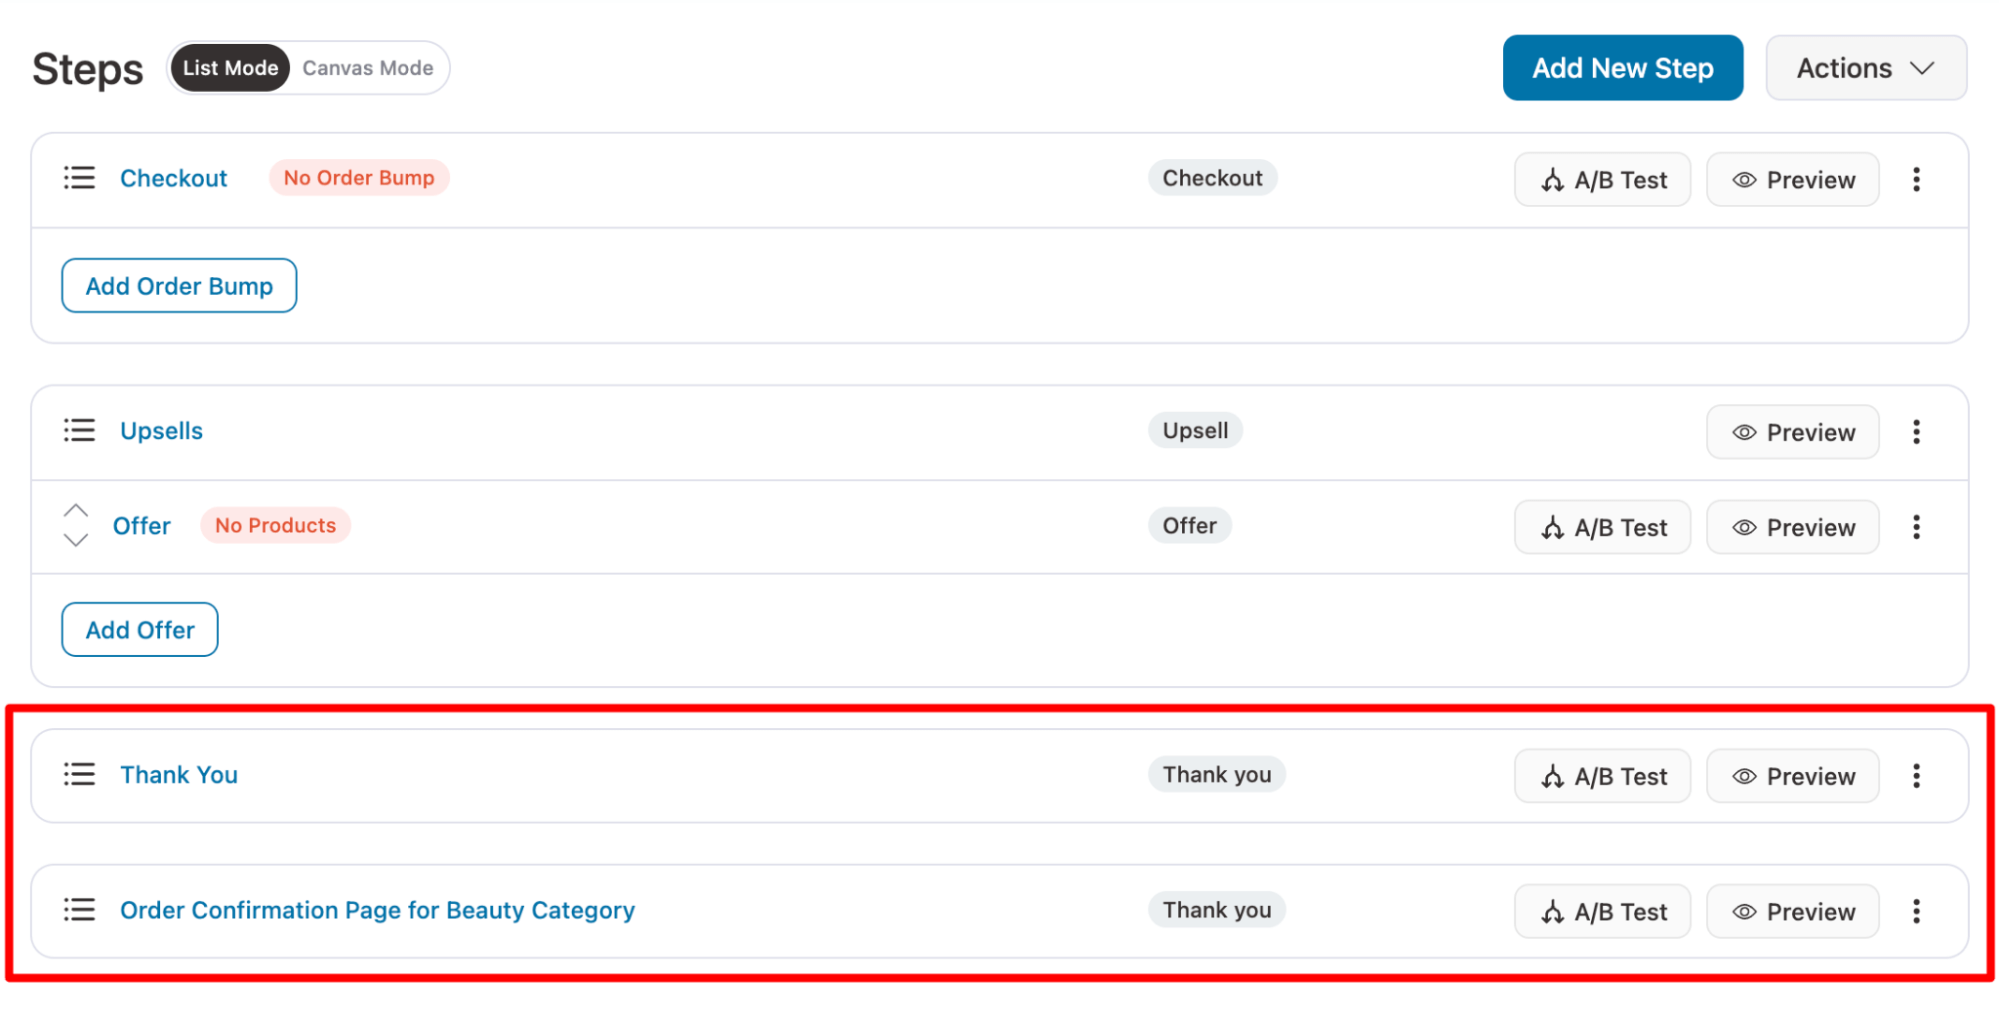
Repeat the same process to create as many order confirmation pages as you need.
Step 2: Customize the WooCommerce order confirmation page template
Now, customize the different confirmation pages you created in the first step to display what you want based on the rules you'll set later.
Step 3: Set rules to adjust the visibility based on product attributes and customer data
It’s time to establish rules so that different order confirmations appear based on specific product attributes or other order- and customer-related criteria.
For this, we need to set different rules for each thank-you page.
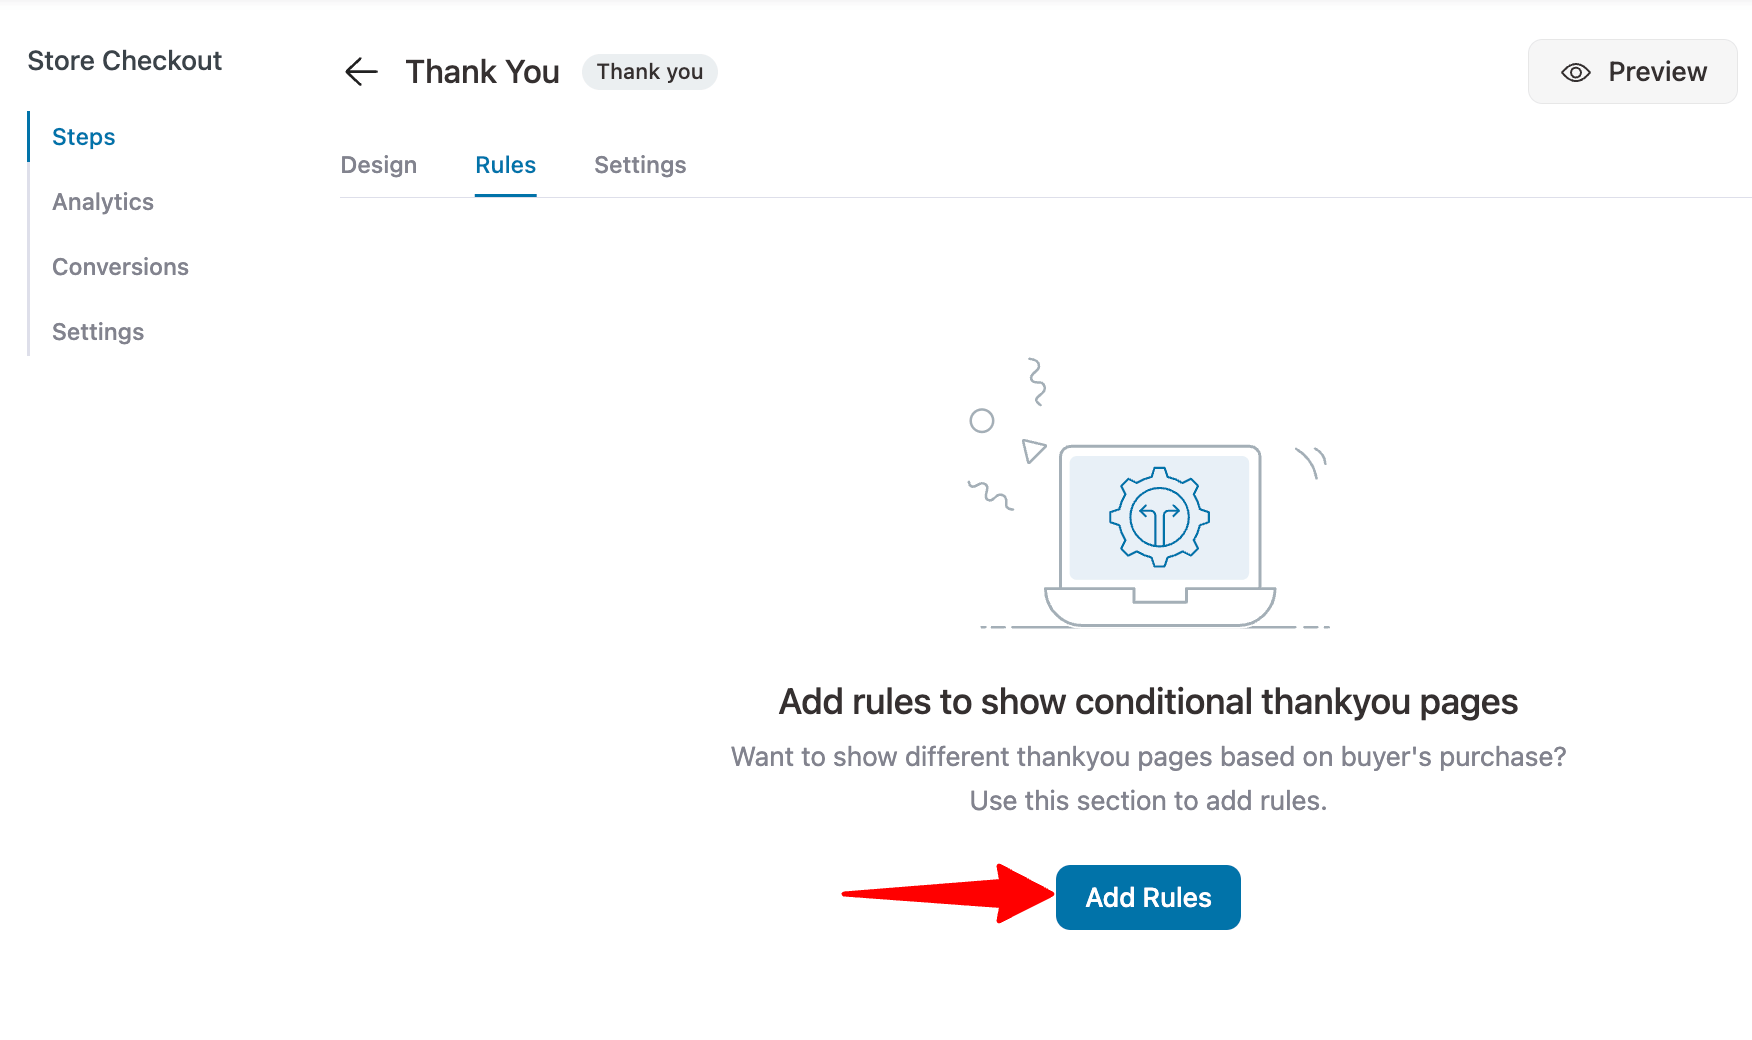
To set rules, go to the Rules tab and click on ‘Add Rules’.
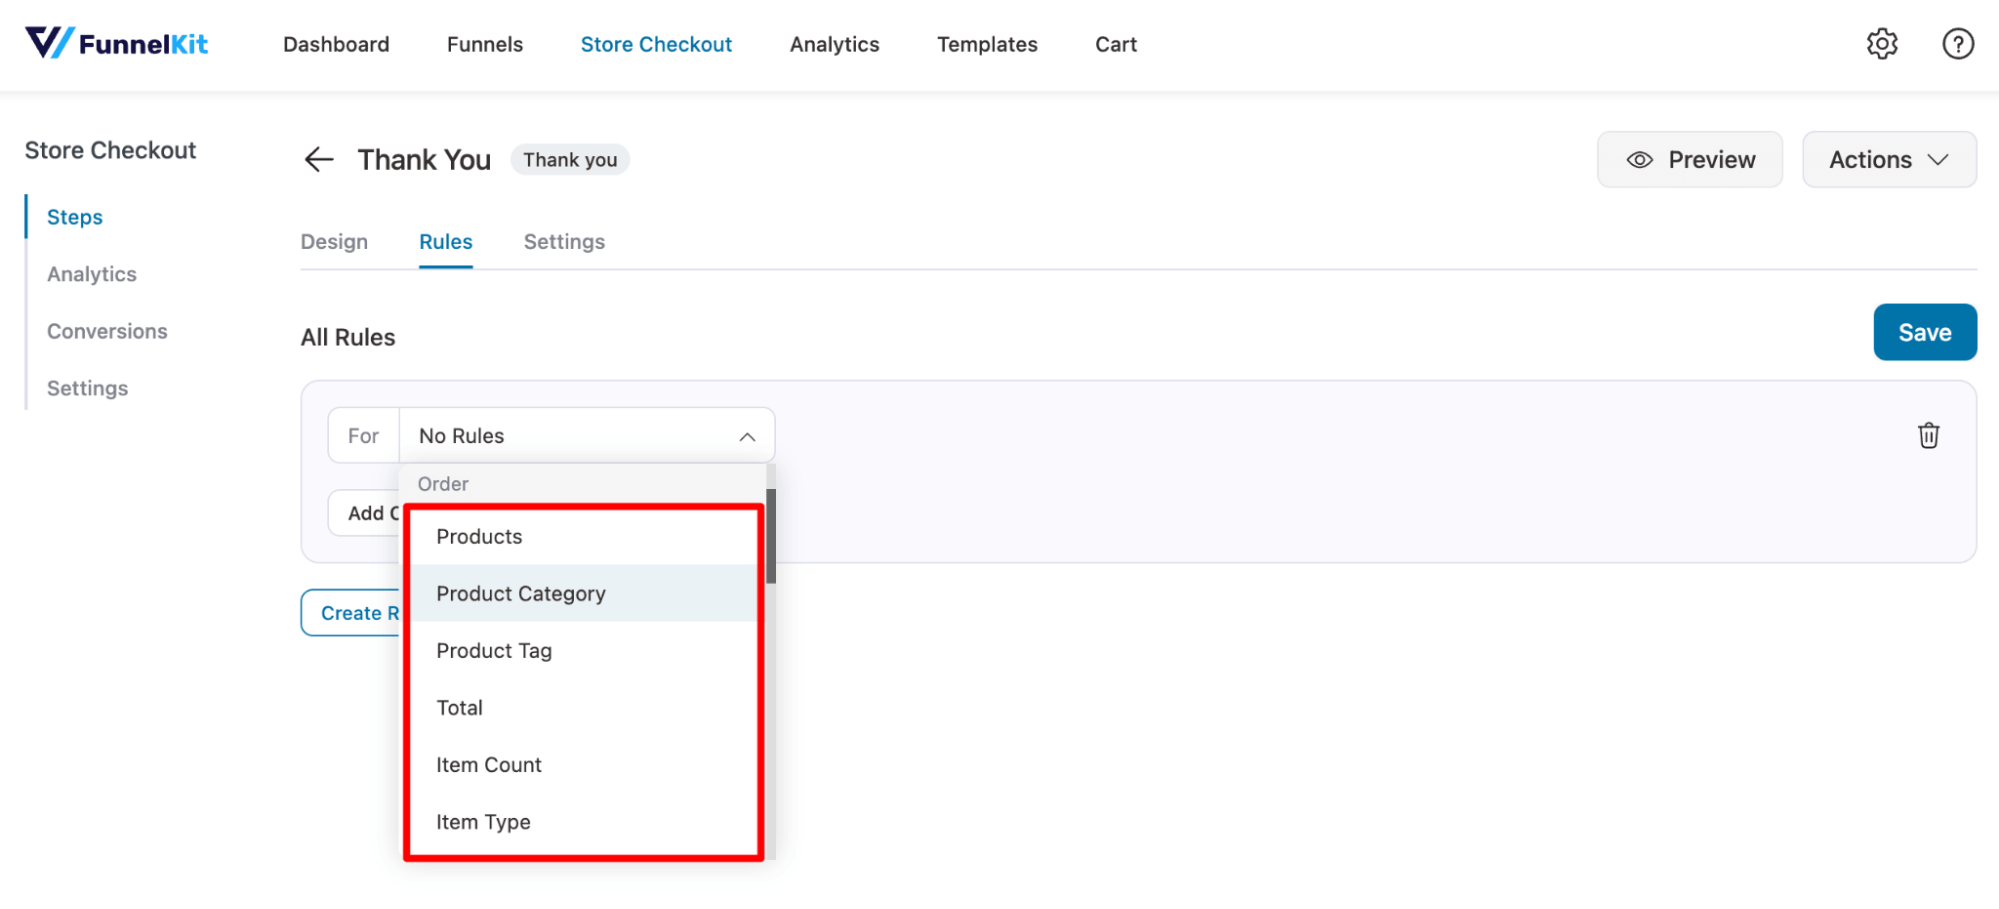
Now you can set conditions based on different metrics like:
- Order: Show a specific confirmation page based on the product, category, tag, total, item count, item type, payment gateway, or shipping method of the most recently placed order. You can also adjust visibility based on the coupons used or any custom field values shared at checkout.
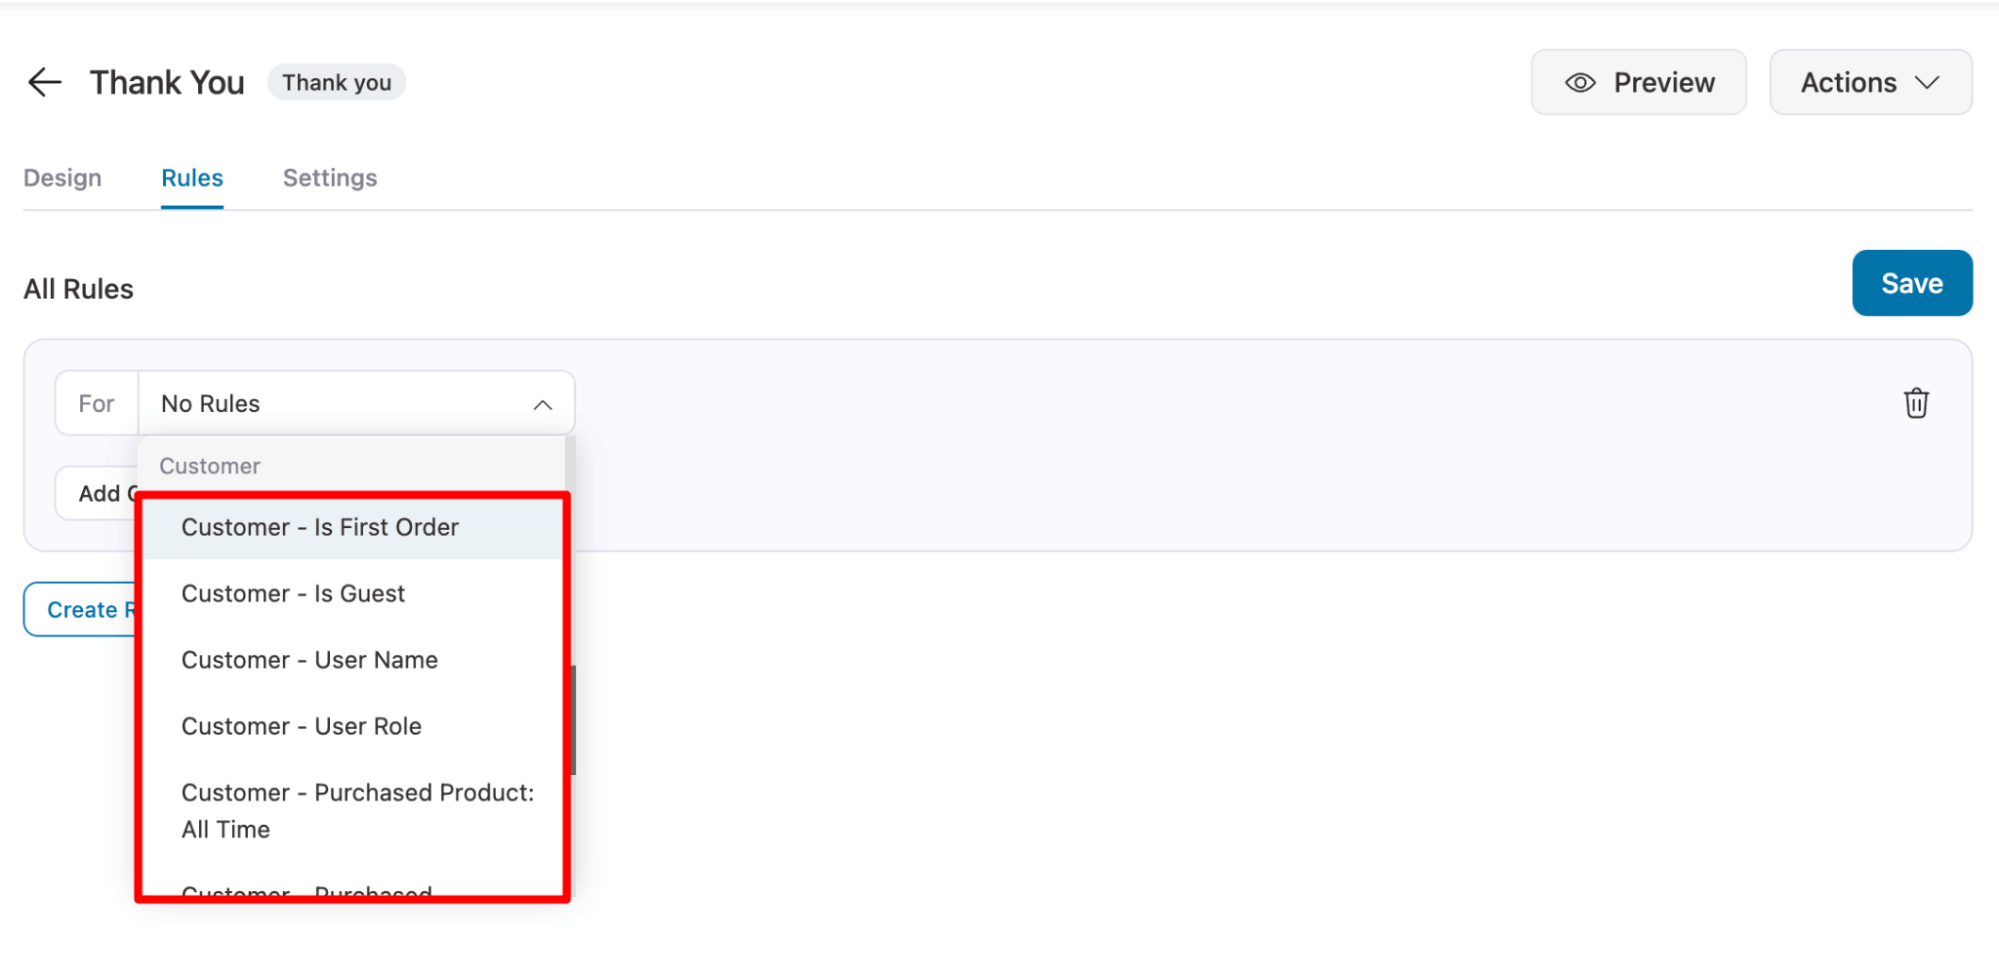
- Customer: Customer-specific information such as the customer’s first order, whether they are a guest, user role, user name, purchased products (all time), and purchased categories (all time).
- Geography: Show different thank-you pages based on the geographic locations used in their billing and shipping addresses.
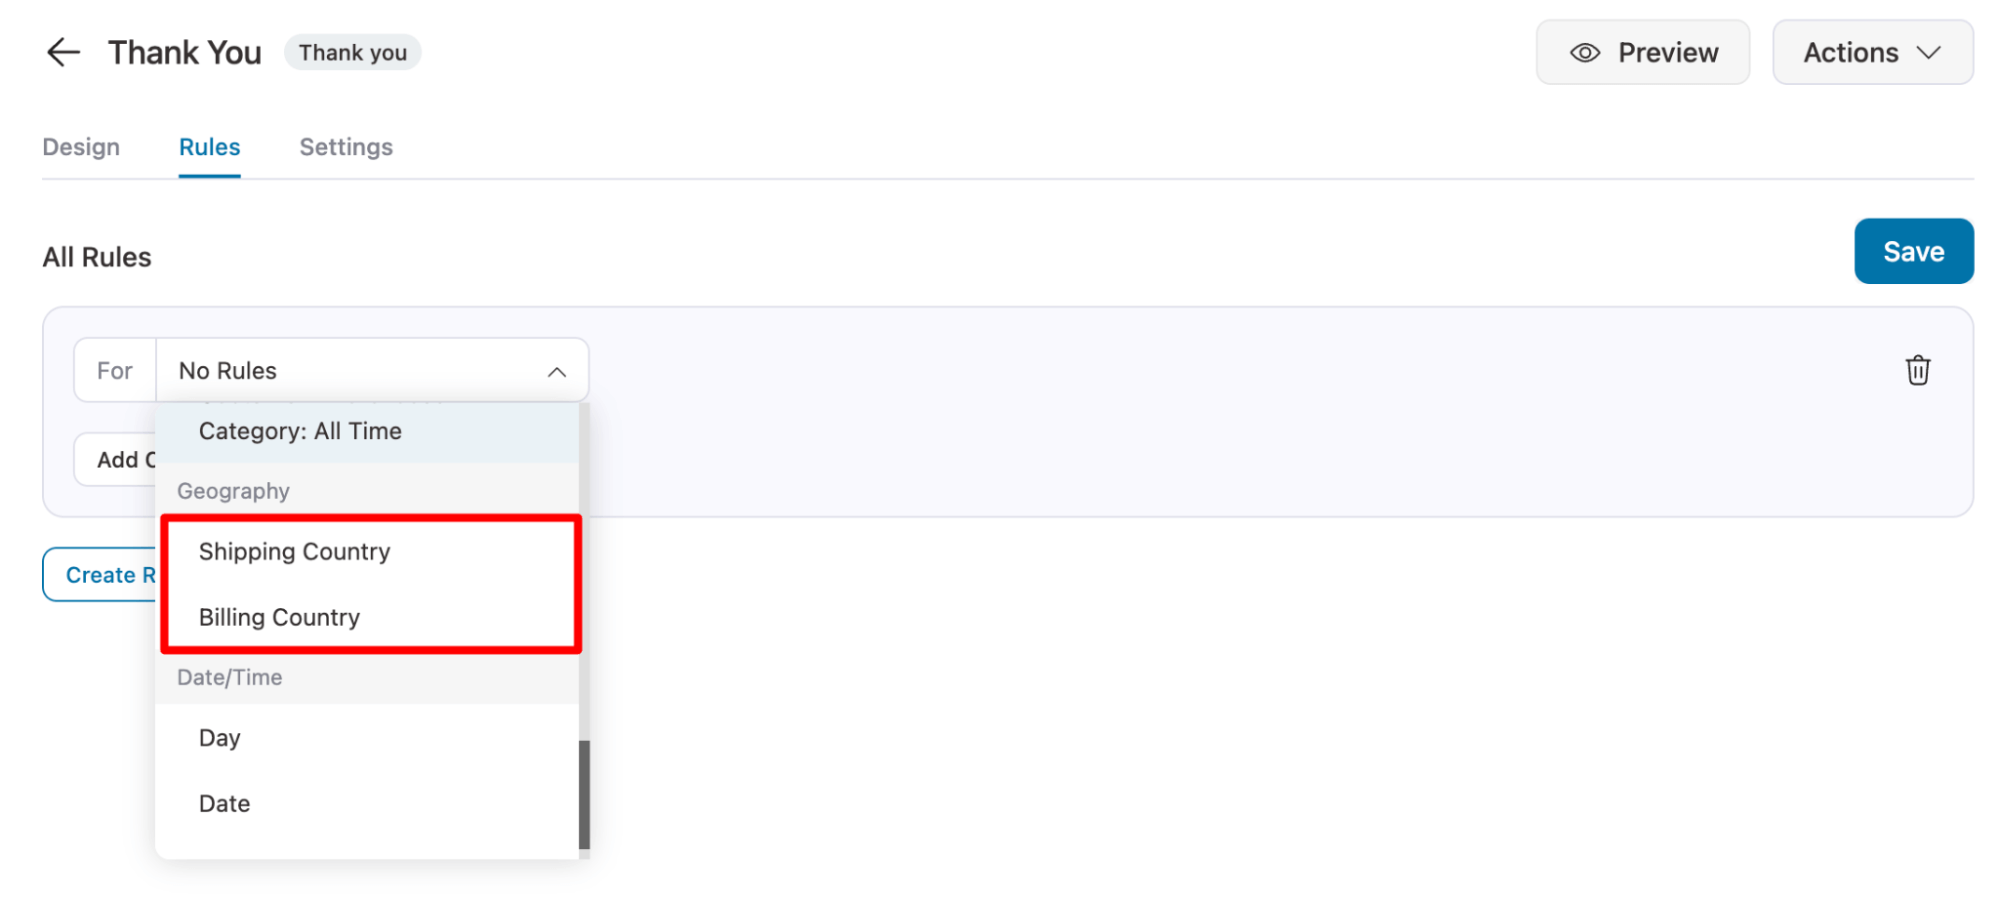
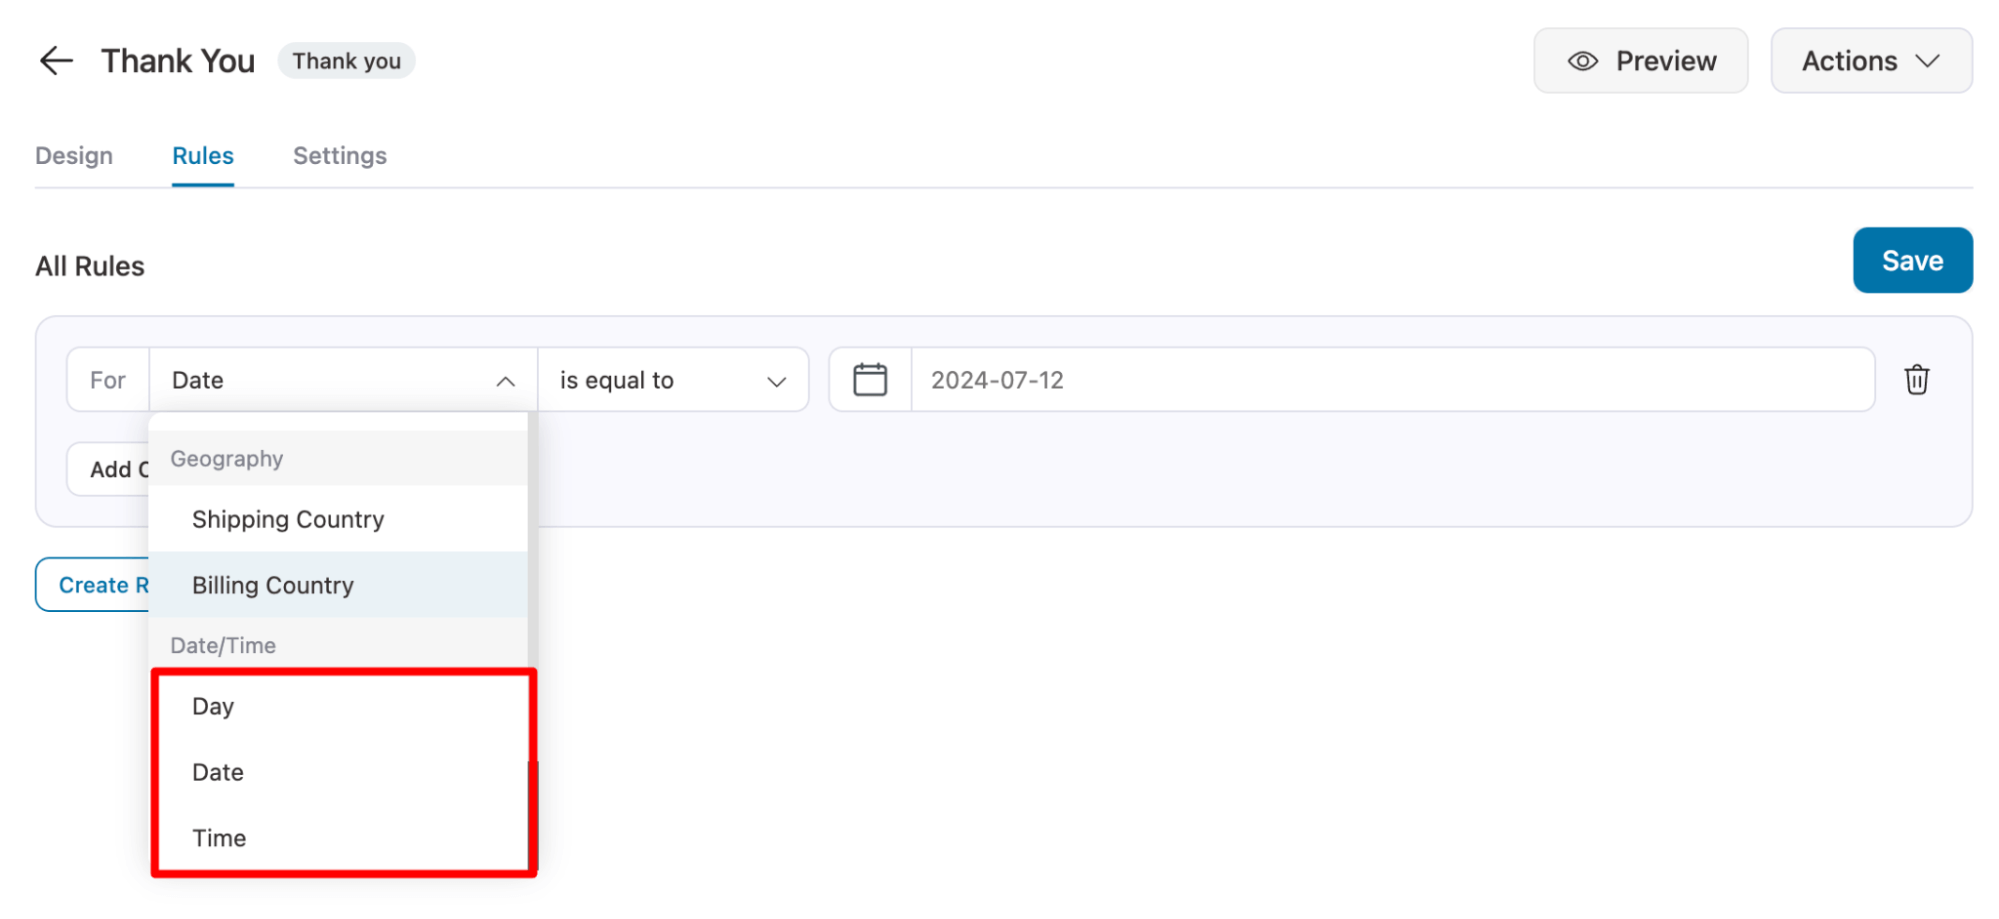
- Date/Time: Show different thank-you pages based on the order date, day, and time.
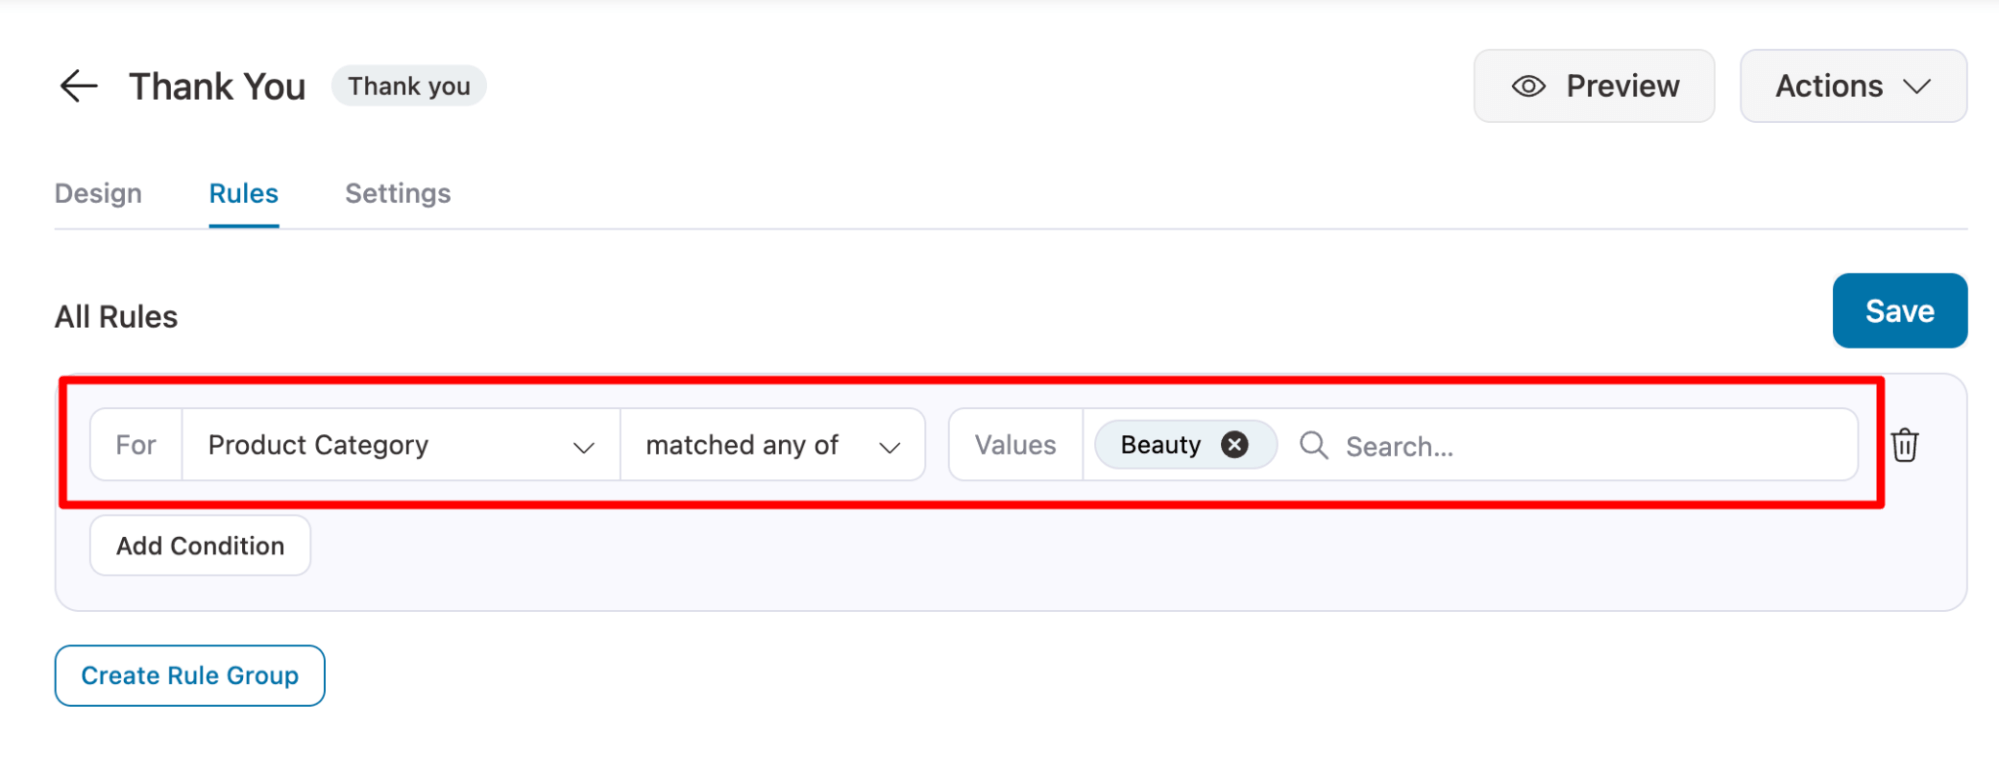
After choosing the factor, set the condition. For example, we have added this thank-you page to display only when the purchased product category is beauty.
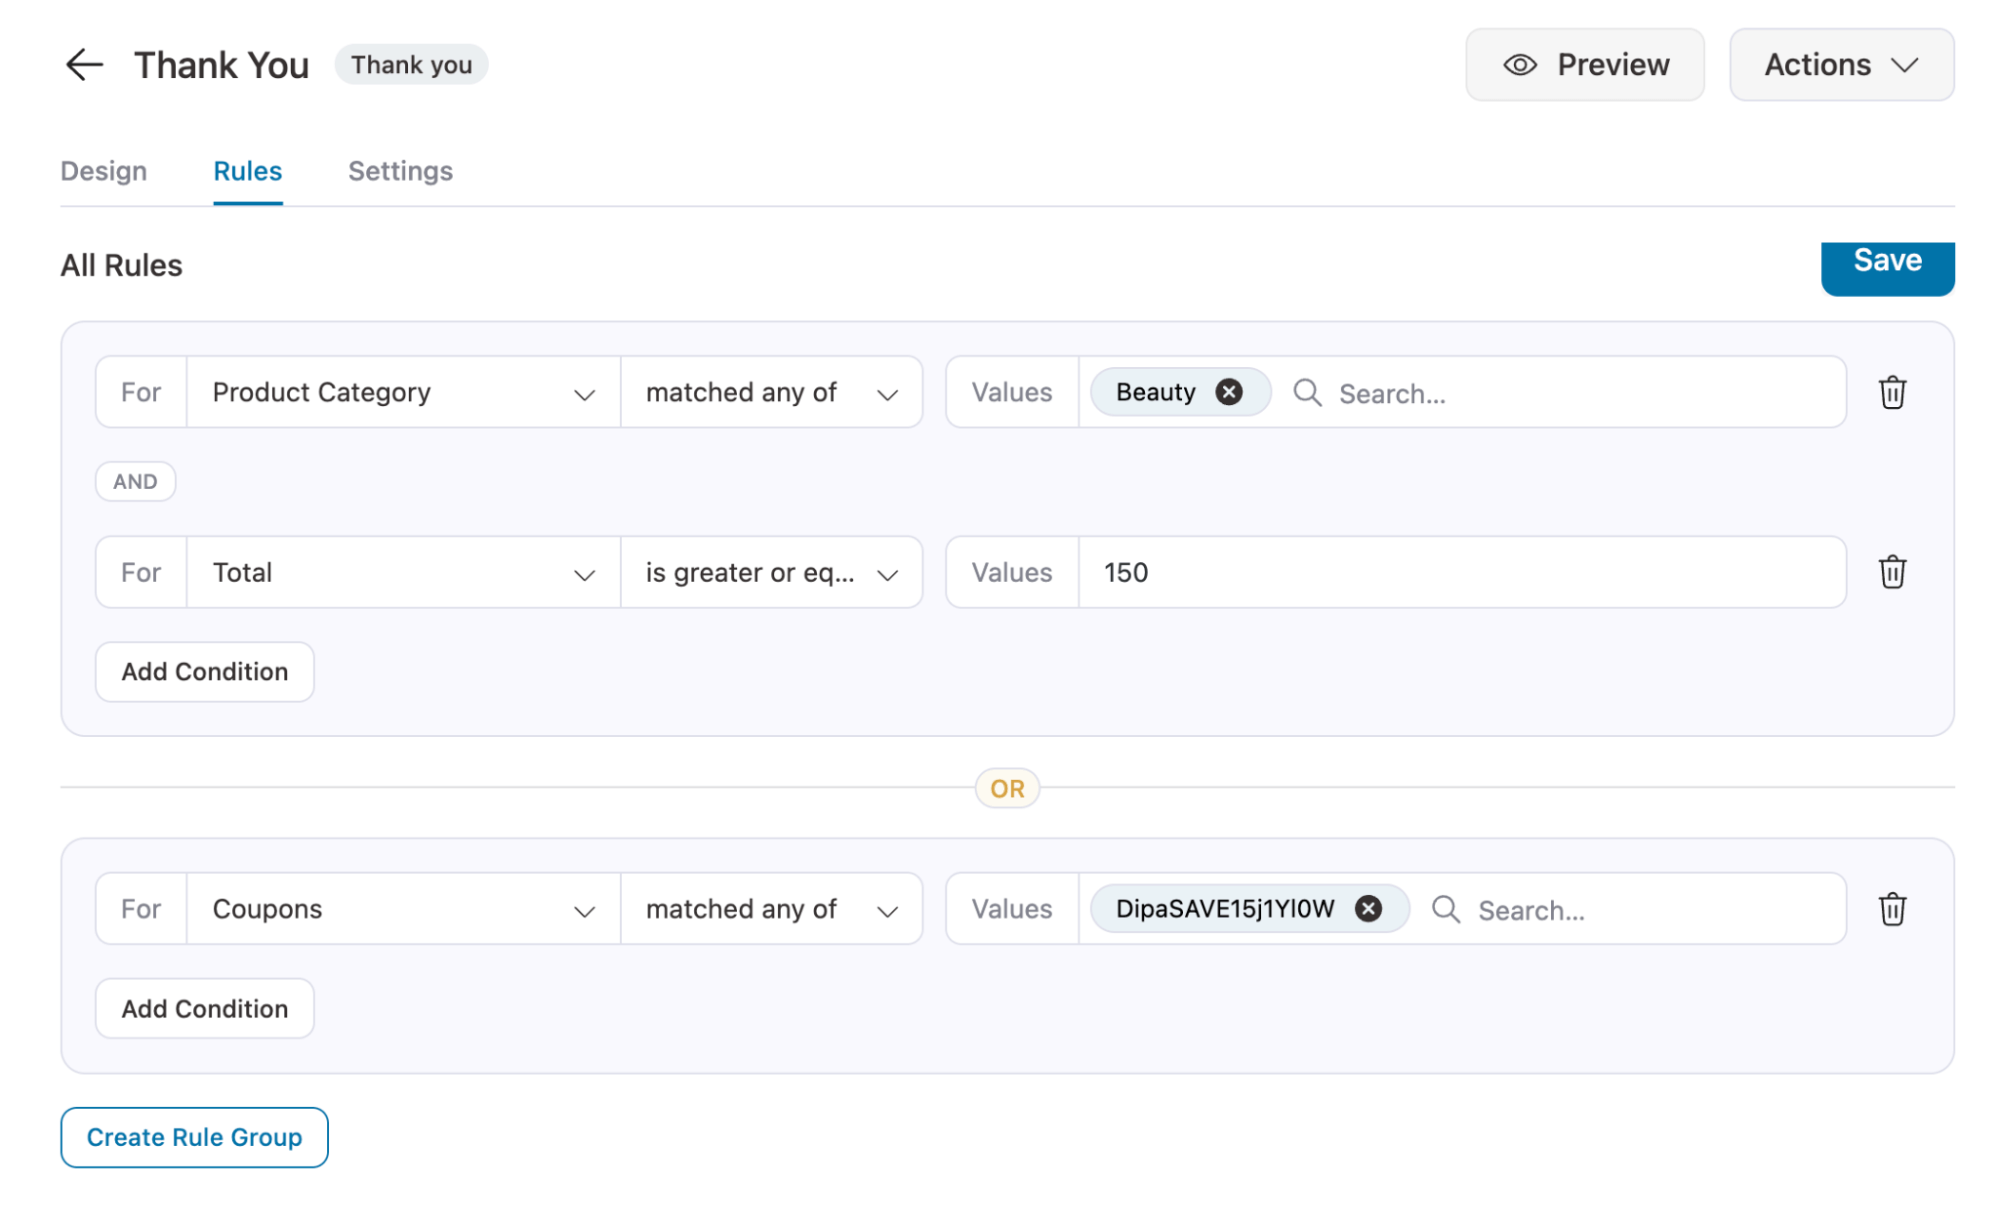
You can add multiple conditions as well. We are adding the condition that the cart product must be in the Beauty category and that the total should be greater than or equal to 150.

If you want to make the order confirmation page visible for multiple sets of rules, you can use the “Create Rule Group” option.
After setting the conditions, save the rules.
And that’s it. Your store will now show different order confirmations to different audiences based on the rules you set.
7 Best Practices to Turn Your WooCommerce Order Confirmation Page Into a Revenue Driver
Follow these tips to enhance user experience and boost repeat sales:
- Personalize the post-purchase experience
Use the customer’s first name and order details to make the page feel personal.
A simple message like “Thank you, Sarah! Your order is confirmed.” instantly builds a connection.
You can even add dynamic content, such as recently viewed items or recommended products, to encourage additional purchases.
- Add clear next steps
Avoid leaving buyers wondering what’s next. Include short guidance like: “You’ll receive your tracking details via email shortly.”
Clear communication reduces support tickets and increases customer confidence.
- Showcase educational or helpful content
Enhance customer satisfaction by embedding product usage guides, unboxing videos, setup tutorials for digital downloads, care tips, or how-to resources.
This not only improves UX but also reinforces your brand credibility.
- Keep the order confirmation page design simple and mobile-friendly
Avoid clutter and keep your order summary, confirmation message, and CTA (“Continue Shopping” or “Track Your Order”) easily visible.
Test the layout across devices because more than 60% of users view confirmation pages on mobile.
- Include upsells and cross-sells strategically
The thank-you page is a prime opportunity to showcase relevant upsells, such as accessories or add-on services.
Avoid overwhelming users by sticking to one or two personalized offers based on their order.
Plugins like FunnelKit Funnel Builder make it easy to display conditional offers using smart rules.
- Add conversion tracking and analytics
Embed your Facebook Pixel, Google Ads Tag, TikTok pixels, or conversion tracking script on your WooCommerce order confirmation page to measure ROI.
You can do this via FunnelKit, where you just have to add the pixel ID, or with code snippets using the woocommerce_thankyou hook, or
This ensures you’re tracking post-purchase actions such as upsell clicks or referrals.
- Encourage repeat engagement
Add a social share button (e.g., “Share your order on Instagram!”), Referral program links, newsletter signup prompts, etc., can significantly boost customer lifetime value (CLV).
Offer limited-time discounts or incentives to drive the next order and build customer loyalty.
Frequently Asked Questions (FAQs)
To display a custom field on the WooCommerce order confirmation page, you need to add it to the checkout page first. Once you collect the custom value at checkout, you can display it on the thank-you page.
Here are the steps you need to follow:
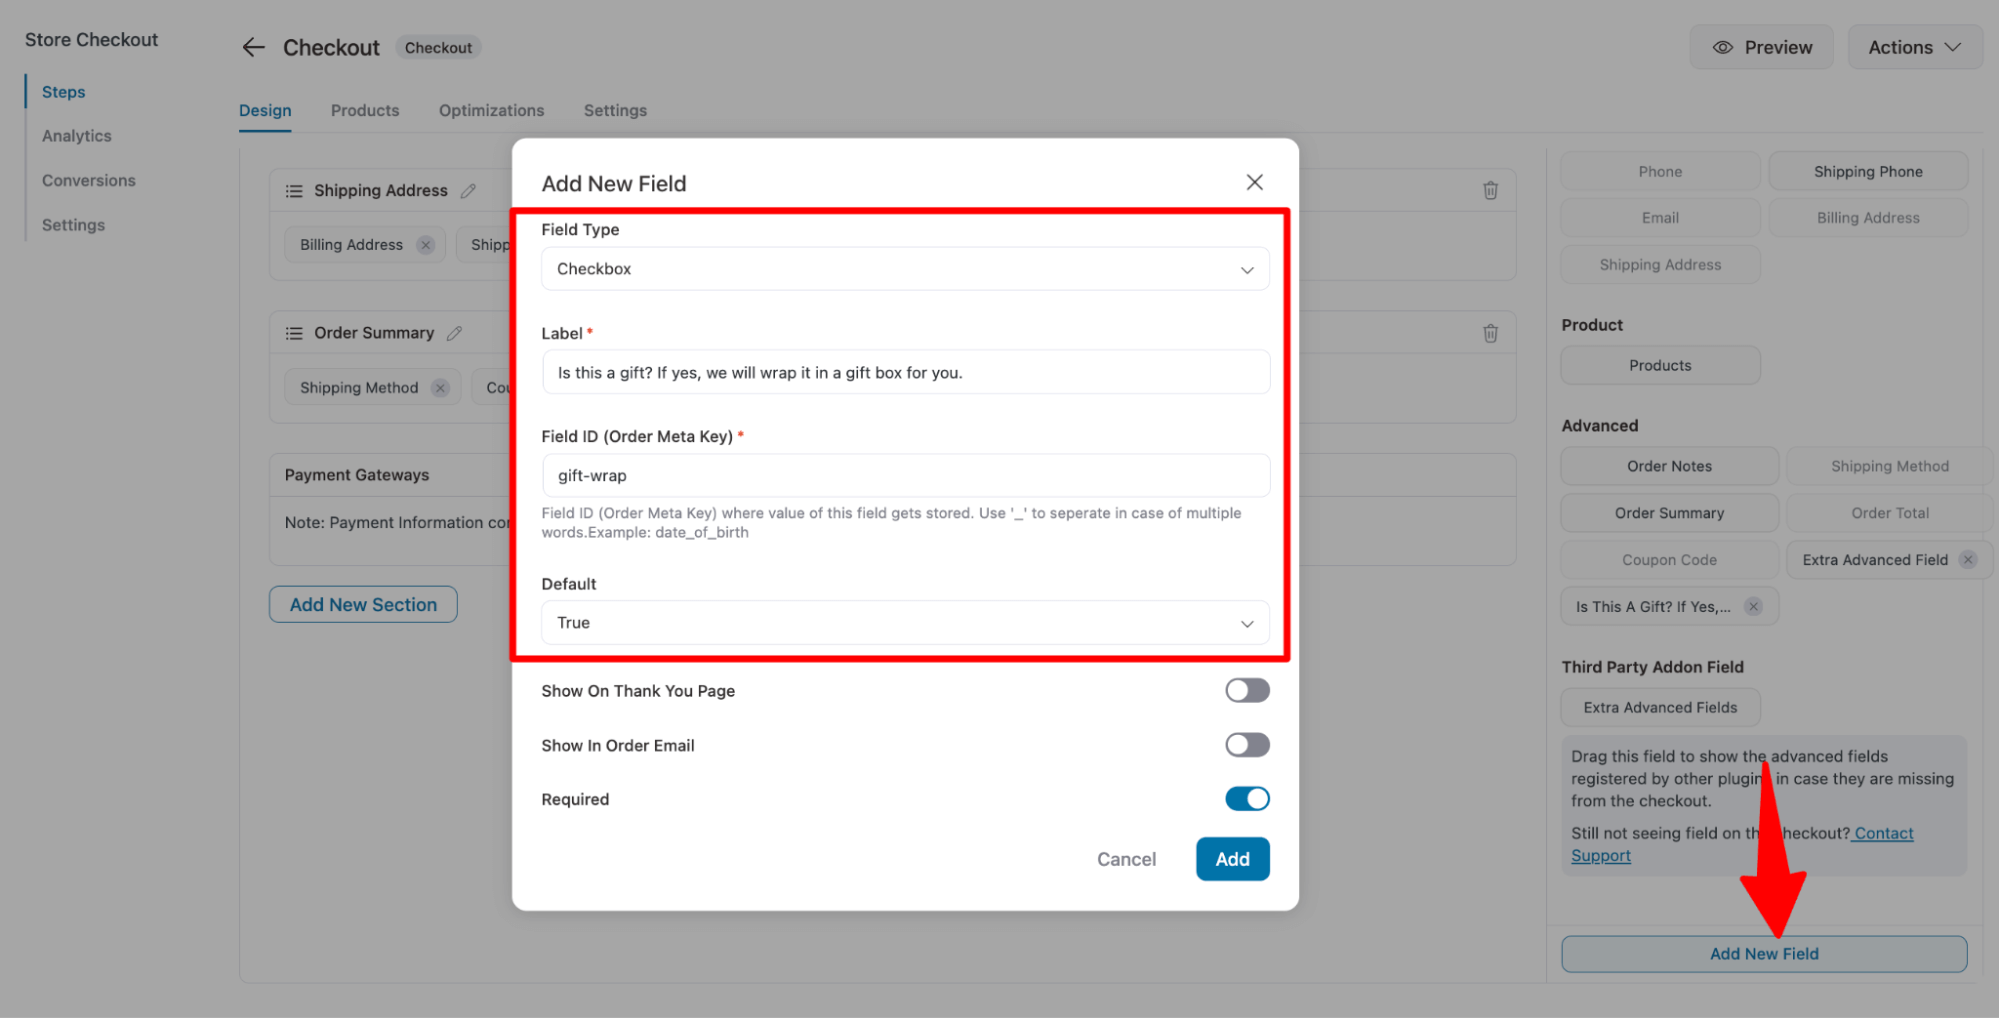
Step 1: Add a custom field to the WooCommerce checkout page
To do this, edit the checkout page, scroll down, and click on “Add New Field” to add the custom field.
Then set up the field you want to add. For example, we ask users whether the order is a gift. If yes, then we will wrap it in a gift wrapper.
Step 2: Show the custom field on the thank you page
Now, to ensure the custom field you just built is available on the thank you page, turn the toggle button for the 'Show On Thank You Page' option.
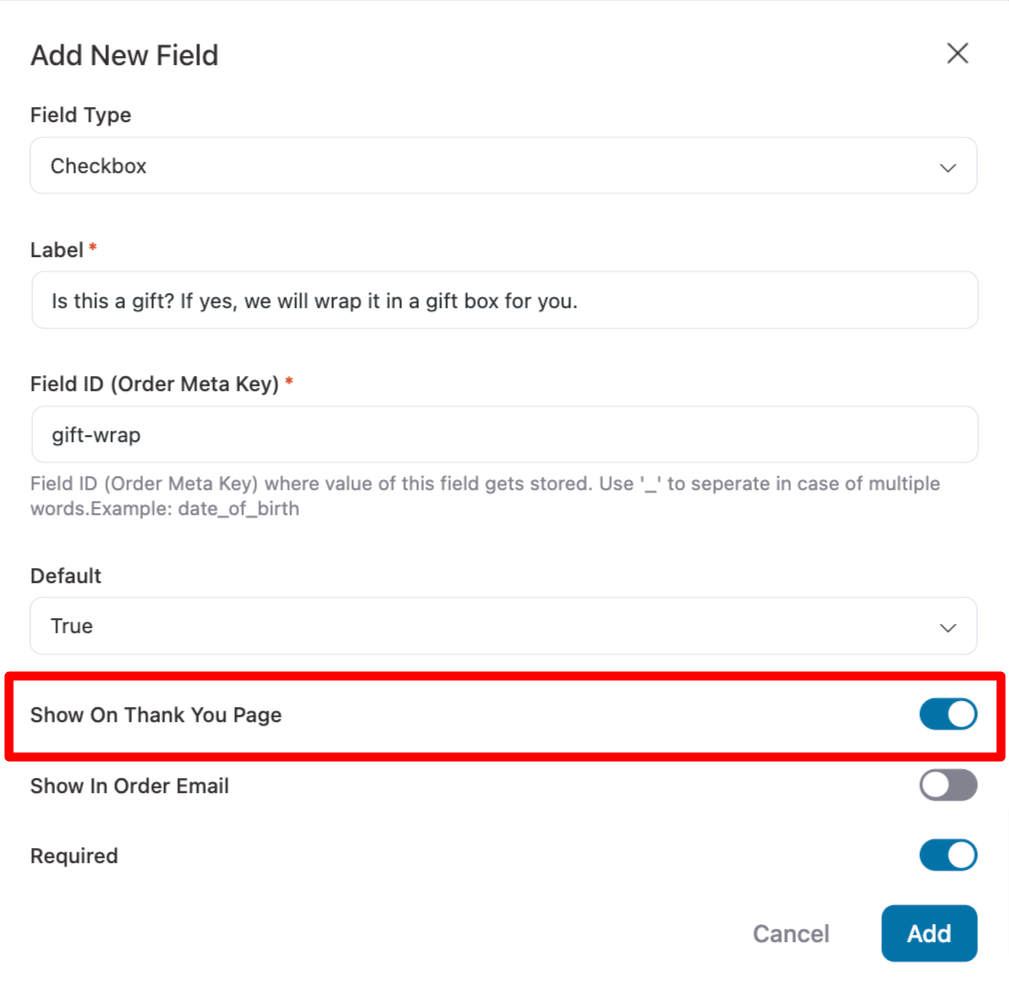
You can make the field required if you want. After setting up, click on 'Add'. Remember to update the template.
For more details, read our blog post on adding a custom field to the checkout page.
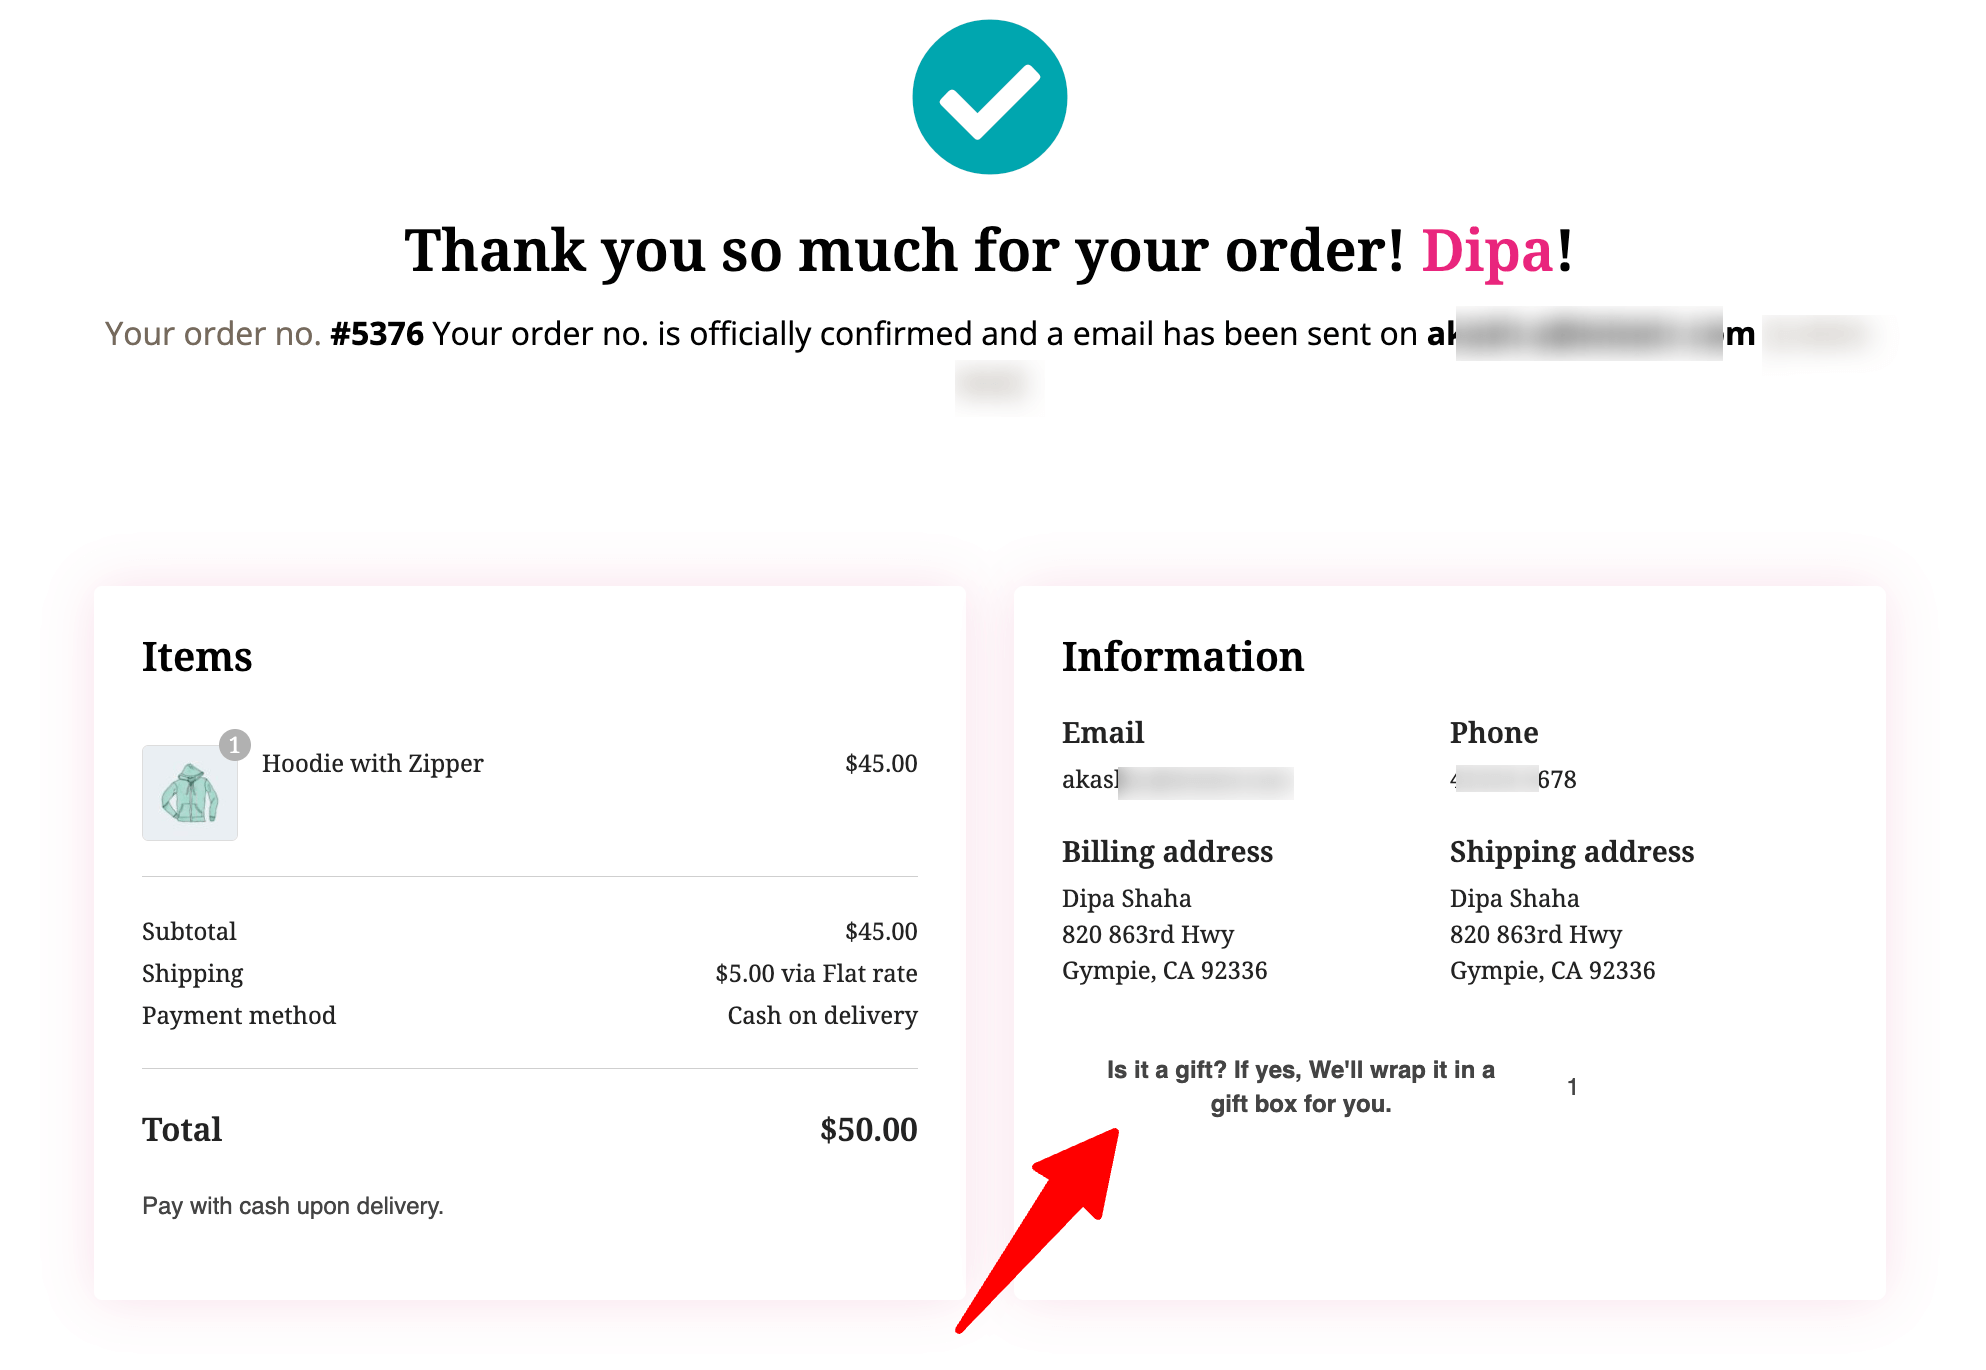
Step 3: Test the thank you page with the custom field
Now, if you place a test order, the thank-you page will display the custom field.
You can track conversions on your WooCommerce order confirmation page by setting up pixel tracking for different events such as page view, lead, initiate checkout, add to cart, purchase, and more.
Here are the platforms you can track conversions:
- Google Analytics 4
- Meta (Facebook) Pixel
- Google Ads
- TikTok Pixel
- Snapchat Pixel
- Pinterest Tag
The order confirmation page is usually found at yourstore.com/checkout/order-received/ after checkout. If you create a custom order confirmation page, you can also change the URL and slug. We have covered the details in this post.
Yes, WooCommerce automatically sends an order confirmation email to the customer after purchase. If you want to learn how to customize this email, read our blog on order confirmation emails.
The most common causes are a redirect set by another plugin, a custom thank-you page URL defined in a plugin that is no longer active, or a template override left behind by an old theme. Check your product-level redirects, review any funnel or upsell plugin settings, and clear your site and browser cache. If you recently switched themes, your child theme may be missing the woocommerce/checkout/thankyou.php override file.
Some of the best plugins for building and customizing WooCommerce thank you pages include:
1. FunnelKit Funnel Builder: Create personalized post-purchase pages with upsells and dynamic content.
2. NextMove Lite: Display order details, coupons, and social share buttons.
3. Custom Thank You Pages for WooCommerce: Set a unique thank you page per product or category.
These tools make it easy to enhance the UX of your order confirmation page and boost customer retention.
Ensure that all analytics scripts respect user consent preferences. Use cookie consent plugins and avoid preloading tracking scripts without explicit opt-in.
Ensure that all analytics scripts respect user consent preferences. Use cookie consent plugins and avoid preloading tracking scripts without explicit opt-in.
Ready to Create a Custom WooCommerce Order Confirmation Page?
A custom order confirmation page in your WooCommerce store can significantly impact how shoppers interact with your site and improve your customer retention rate.
By customizing this page, whether through a drag-and-drop plugin like FunnelKit Funnel Builder or via advanced code edits, you can transform a standard thank you page into a personalized, conversion-focused experience.
From displaying dynamic customer details and custom fields to offering special discounts, educational content, and upsells, every element contributes to a better post-purchase experience.
Using smart rules, multiple page variations, and targeted messaging, you can cater to different products, audiences, or locations, increasing the likelihood of repeat purchases.
Finally, you can measure ROI and continuously optimize your strategy by incorporating conversion tracking, analytics, and social sharing opportunities.
A thoughtfully designed WooCommerce order confirmation page doesn’t just confirm a purchase; it strengthens customer relationships, drives brand loyalty, and maximizes revenue potential.
Get FunnelKit Funnel Builder today and start building your custom order confirmation page to enhance customer engagement and boost sales!
Editorial Team
May 25, 2026WooCommerce variable products let you sell different versions of the same item from one product page. Sizes, colors, materials, styles, etc. Instead of a separate listing for each option, customers...
Editorial Team
May 22, 2026If you sell on WooCommerce, the checkout page is what makes or breaks conversions in your store. A clunky checkout leaks revenue. A clean one keeps customers moving from cart...
Editorial Team
May 15, 2026WooCommerce Ajax add to cart lets shoppers add products without reloading the page. This reduces friction, speeds up the buying flow, and lowers cart abandonment. By default, WooCommerce only enables...


