

WooCommerce shipping allows you to charge customers for delivery when they purchase from your store.
You create different delivery areas, called shipping zones, and then decide how much to charge for each one.
WooCommerce does not set this up automatically. You need to define where you ship and what the shipping costs will be. It might sound technical at first, but the setup is straightforward and only takes a few steps.
In this guide, we’ll walk you through exactly how to set up shipping in WooCommerce from start to finish. You’ll learn about the available shipping methods and how to configure them properly so everything works smoothly at checkout.
Why Properly Configuring WooCommerce Shipping Is Crucial
Unexpected shipping costs are one of the biggest reasons shoppers abandon their carts. According to Baymard Institute, 48% of customers leave at checkout due to extra costs like shipping.
Your shipping setup directly affects whether customers complete their purchase or leave. Missing zones, unclear rates, or checkout errors can instantly block sales.
Here’s why proper configuration matters:
- Prevents checkout errors. Incorrect or missing zones can trigger “no shipping options available” at checkout.
- Reduces cart abandonment. Clear, accurate shipping costs prevent last-minute surprises.
- Supports flexible pricing. Offer free domestic shipping while charging accurate international rates.
- Handles different product types. Use shipping classes for heavy, fragile, or oversized items.
- Builds customer trust. Professional options like local pickup or expedited delivery improve buyer confidence.
A well-optimized shipping setup doesn’t just avoid problems. It increases conversions.
Table of Contents
- 1 How Shipping Works in WooCommerce
- 2 How to Set Up WooCommerce Shipping Zones and Methods
- 3 How to Set Up Shipping Classes for Different Products to Charge Accurate Shipping Fees
- 4 Manage Shipping Zones And Methods in WooCommerce
- 5 7 WooCommerce Shipping Plugins to Expand Functionality
- 6 Closing Notes on WooCommerce Shipping
How Shipping Works in WooCommerce
WooCommerce shipping works in three main parts that work together to calculate delivery costs for your customers. Let’s break them down.
1. Shipping Zones – Where You Ship
A shipping zone is a geographic area where you deliver products. You can create zones for specific states, countries, or regions, depending on where you ship. Each zone can have its own delivery options and rates.
Example:
You sell across the US and Canada, then you create two shipping zones:
- US Zone → includes all US states
- Canada Zone → includes all Canadian provinces
Each zone can have its own shipping methods and rates. For instance, you might charge $10 shipping in the US but $25 in Canada.
2. Shipping Methods – How Much You Charge
Shipping methods are the options your customers see at checkout. WooCommerce offers three shipping options: Free shipping, Flat rate, and Local pickup. You can offer one, two or all three in any shipping zone and set different pricing per zone.
Example:
- In your US Zone, you offer:
- Free shipping for orders above $50
- Flat rate of $10 for smaller orders
- Local pickup is $2 for nearby customers
- In your Canada Zone, you might only offer a flat rate of $25.
This way, the checkout shows relevant options based on the customer’s location.
3. Shipping Classes – What You Charge for Different Products
Shipping classes let you group products with similar shipping needs, such as size, weight, or handling.
Example:
You sell T-shirts (lightweight) and boots (heavyweight). Then, you create two classes:
- Lightweight → $5 shipping
- Heavyweight → $15 shipping
Shipping calculation can be done in two ways. To understand, let’s say a customer buys 1 T-shirt and 1 pair of boots.
Now you can charge them in two ways:
- Per Class: $5 (T-shirt) + $15 (boots) = $20 total shipping
- Per Order: Only the highest rate is applied → $15 total shipping
Now you understand the three components of WooCommerce shipping. Let’s move to the next section to find out how you can set up different shipping zones and methods in WooCommerce.
How to Set Up WooCommerce Shipping Zones and Methods
First, we’ll create a shipping zone. Then, we’ll assign and configure shipping methods for that zone.
The entire process takes about 10-15 minutes. By the end of these steps, customers will be able to select shipping options and complete their purchases.
Follow the step-by-step instructions below to configure your shipping:
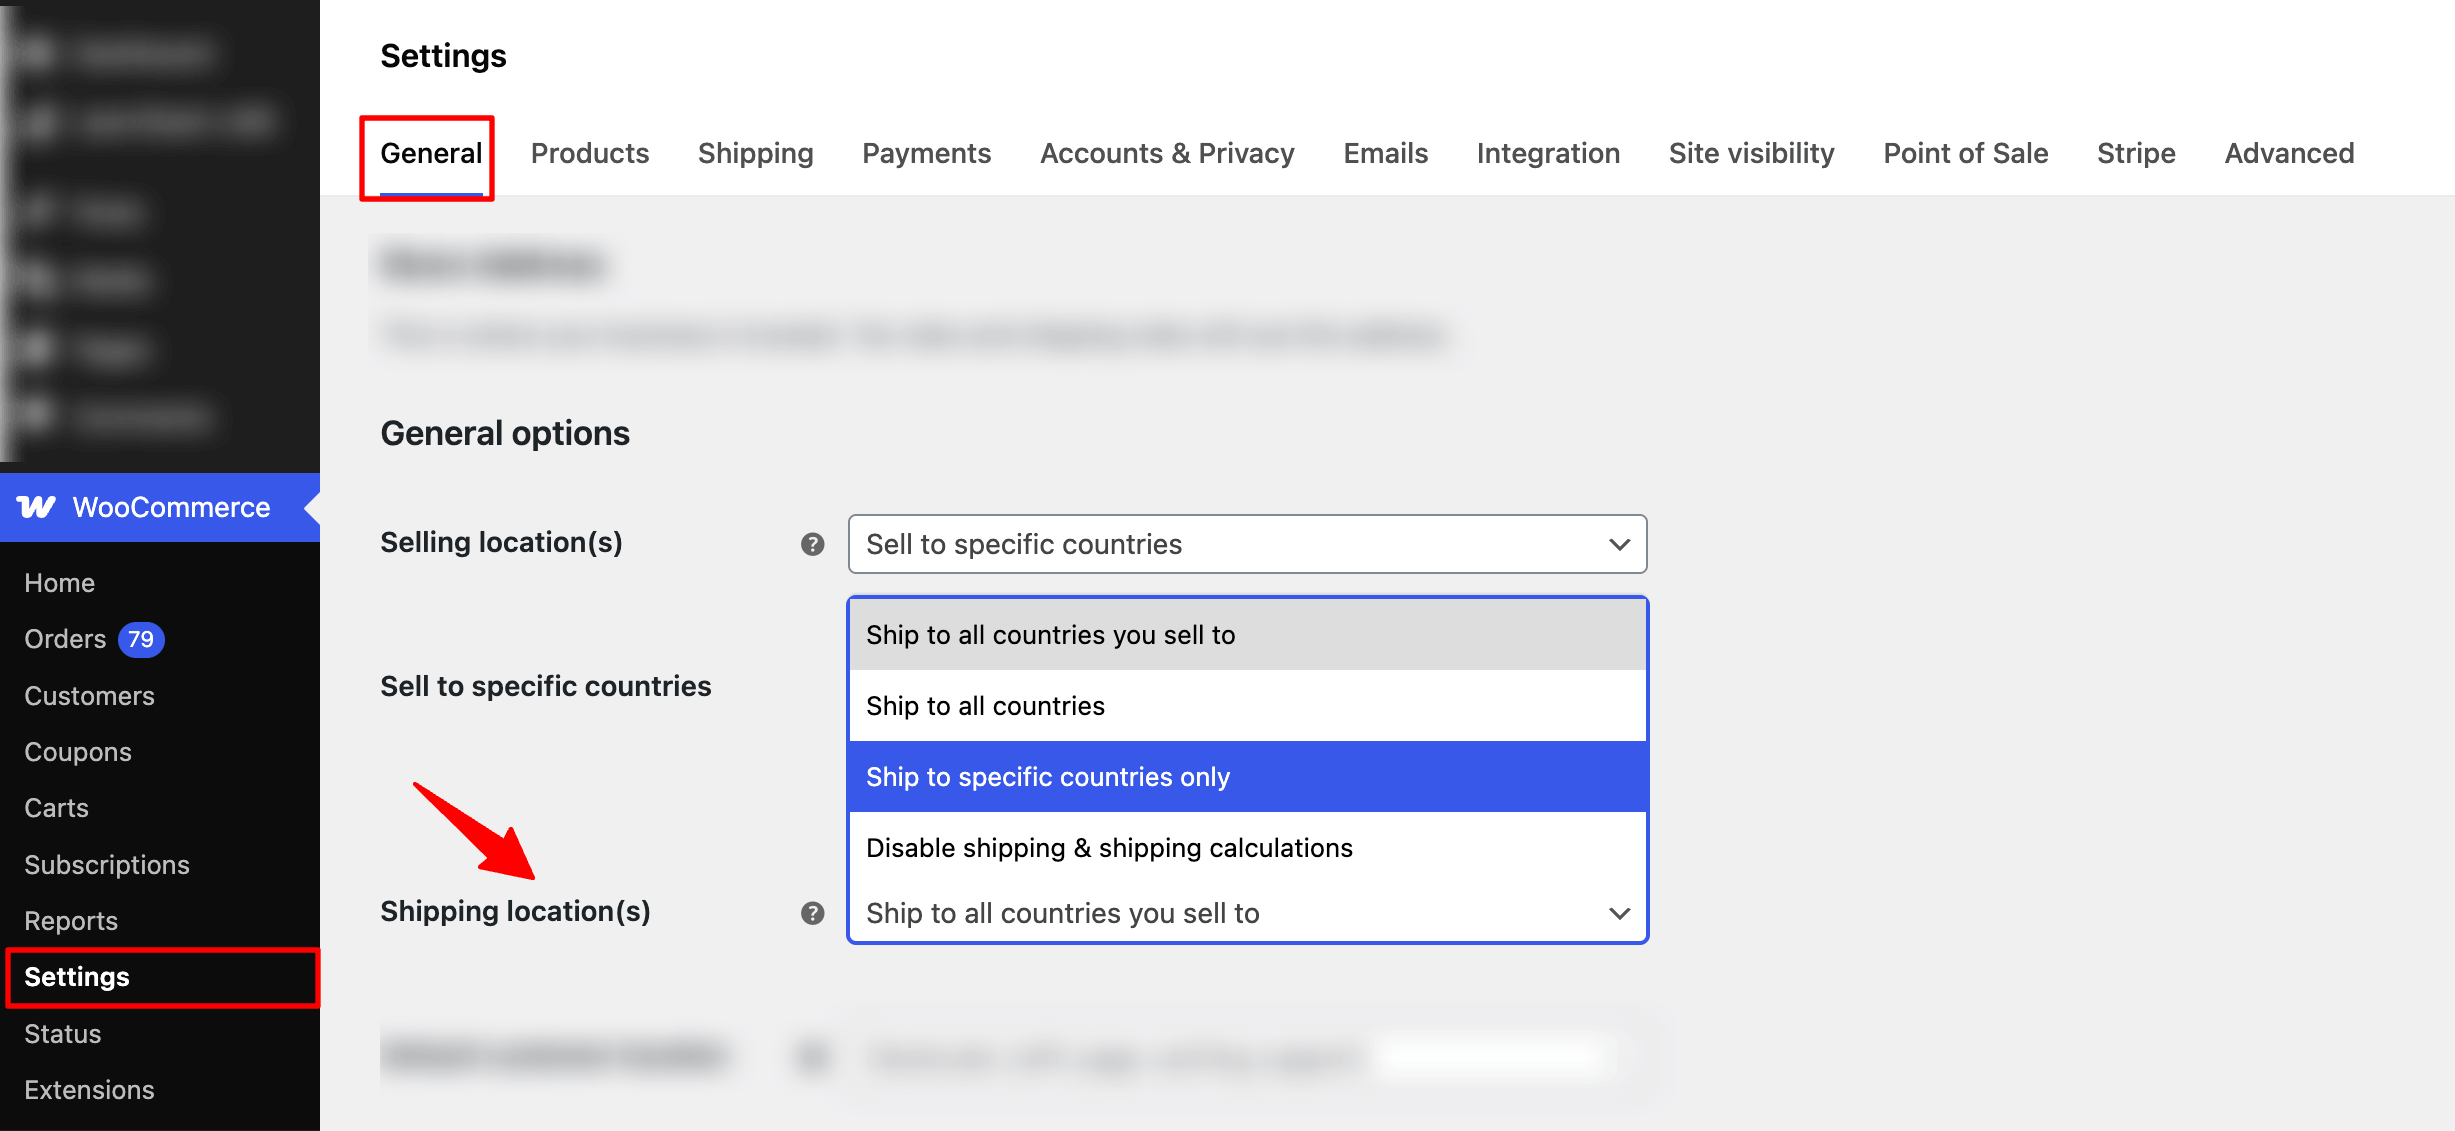
Step 1: Ensure shipping is enabled
Before creating any shipping zone, you should navigate to WooCommerce ⇒ Settings. On the General tab, you must ensure the Shipping Location is not set to “Disable Shipping and Shipping calculations.”
Step 2: Create a shipping zone
Next, go to the Shipping tab in WooCommerce settings and click the Add Shipping Zone button.
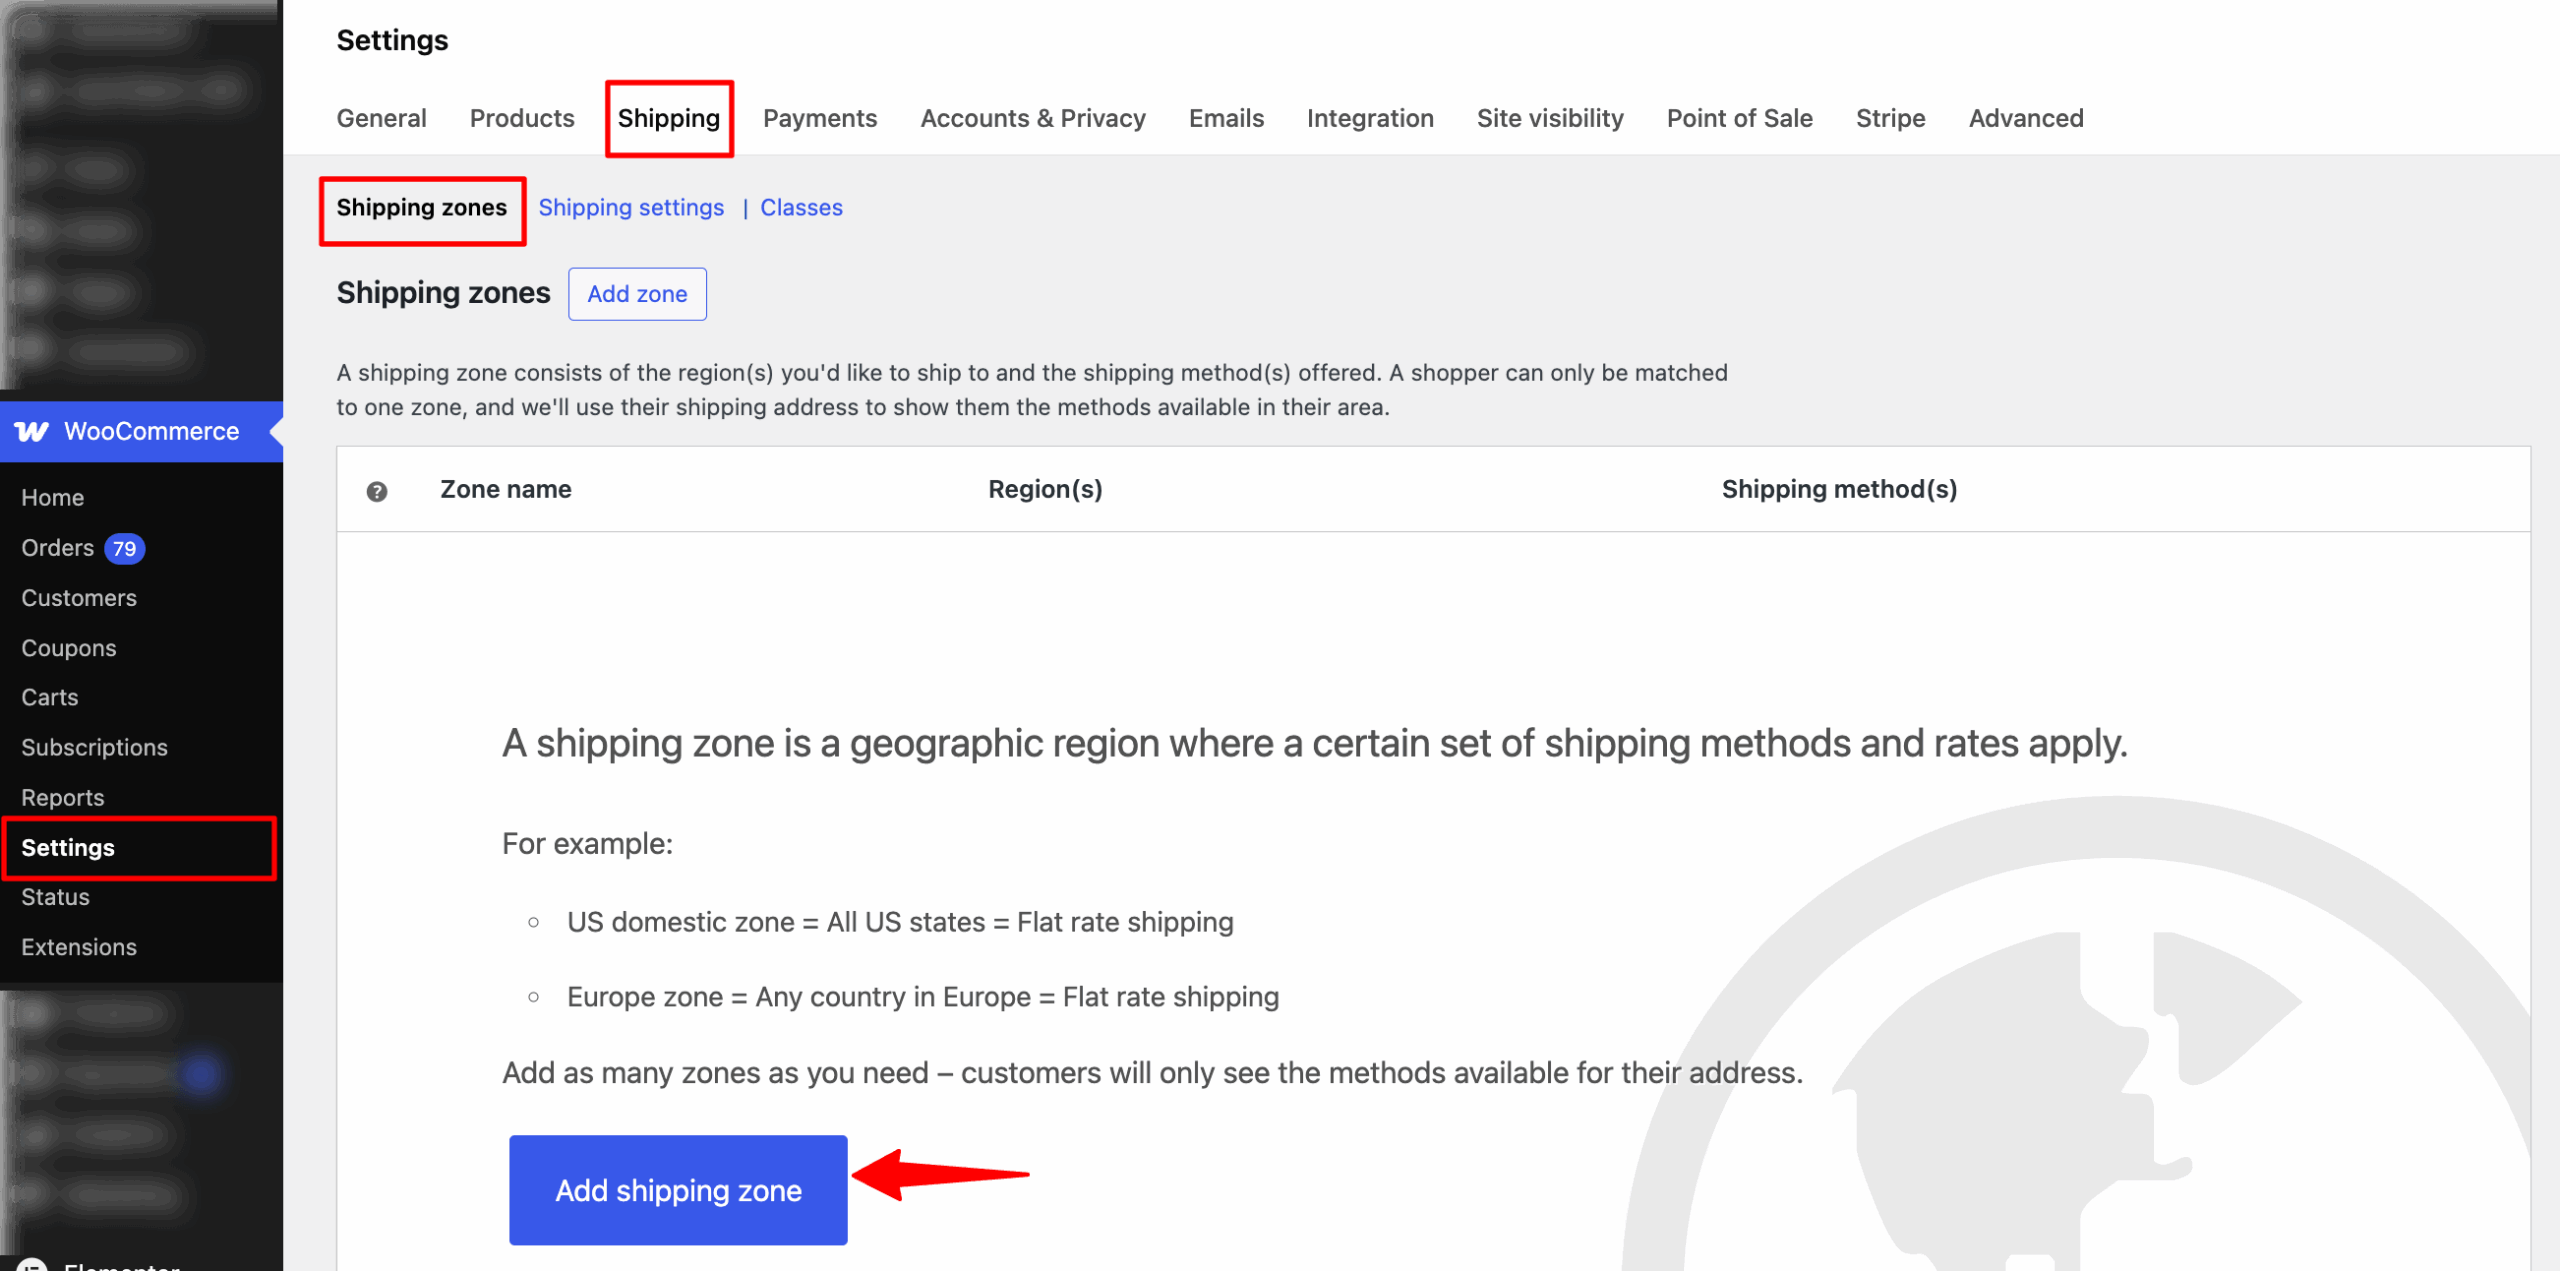
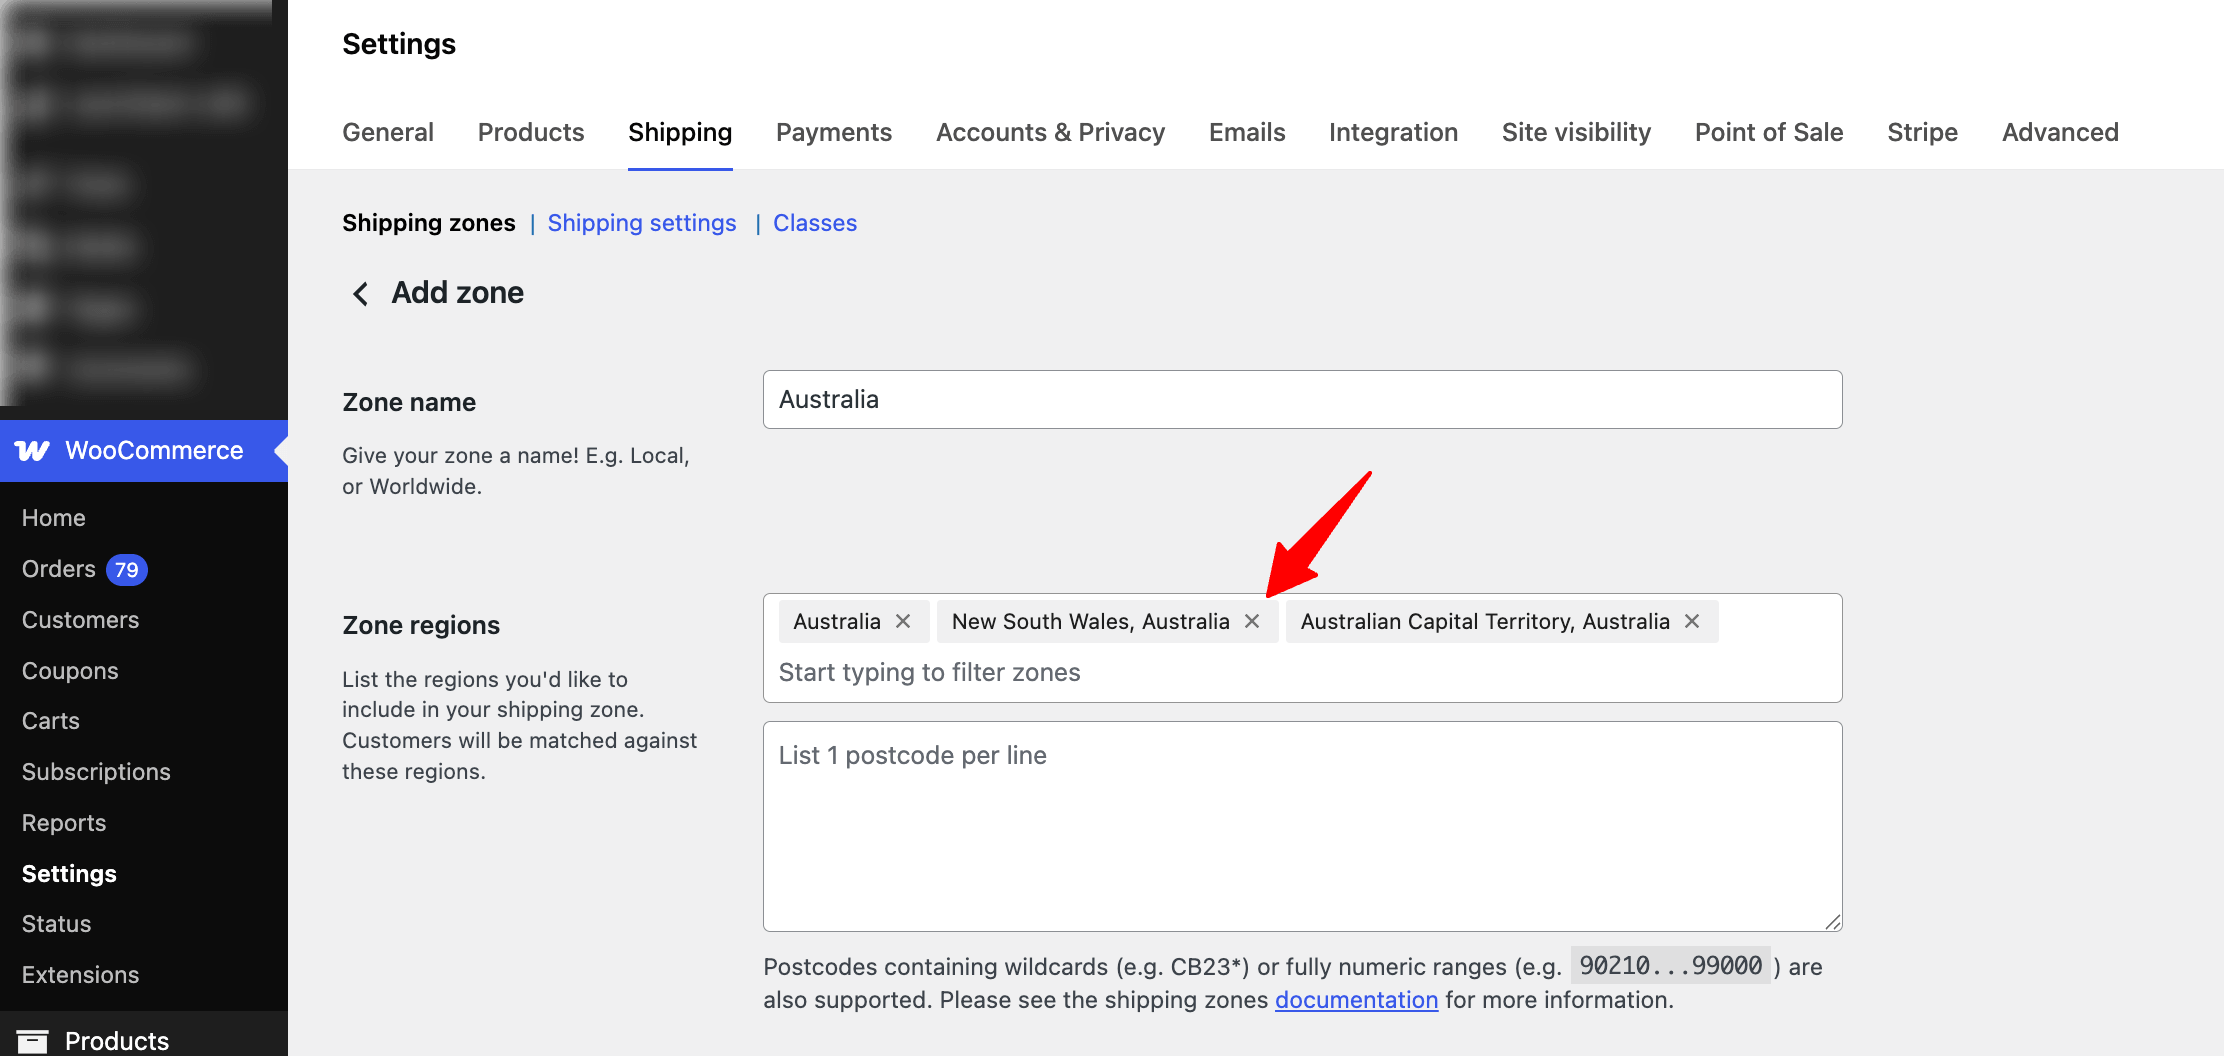
After that, provide a name for the Zone and specify the region.
You can type the initial of the region you want to choose and then select from the suggested dropdown list.
As mentioned earlier, you can select a country or state if you want. As shown below, you can choose the whole country, Australia, or any of the states.
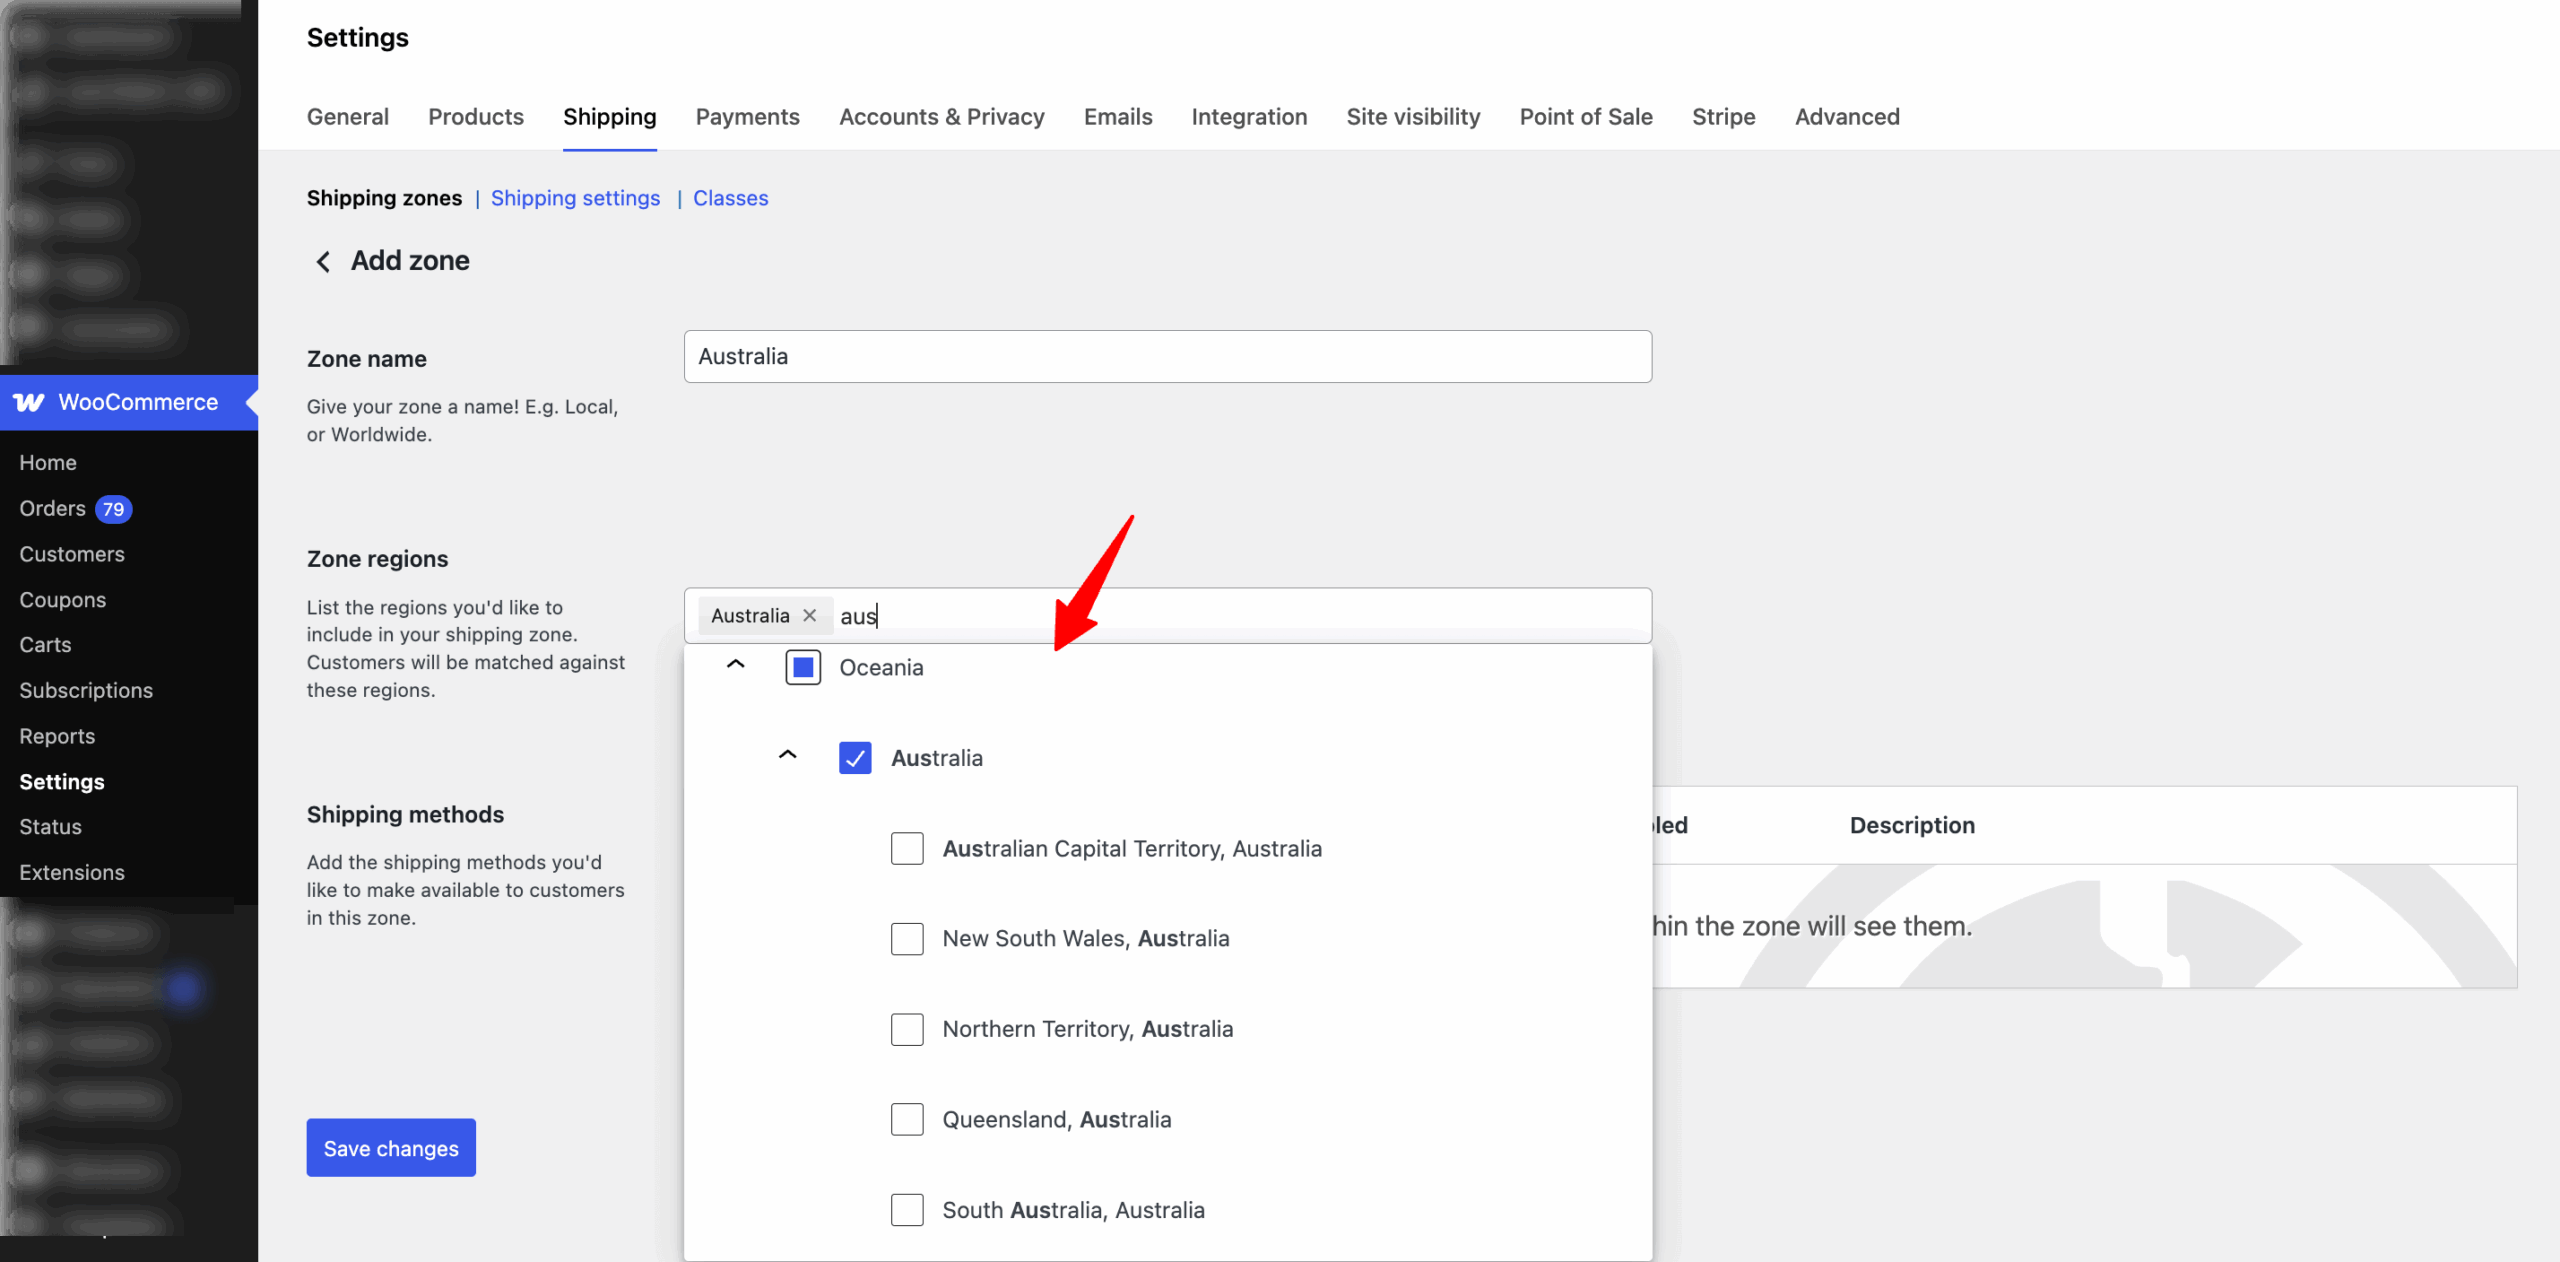
Regions can consist of multiple countries, states, or continents.
You can also choose a specific ZIP or postal code of a state.
For that, click on the “Limit to Specific Postcodes” and add the postcodes. You can add a set of postcodes (one per line), a range of postcodes (e.g., 2000…2999 for NSW), or use wildcards (e.g., 20*).
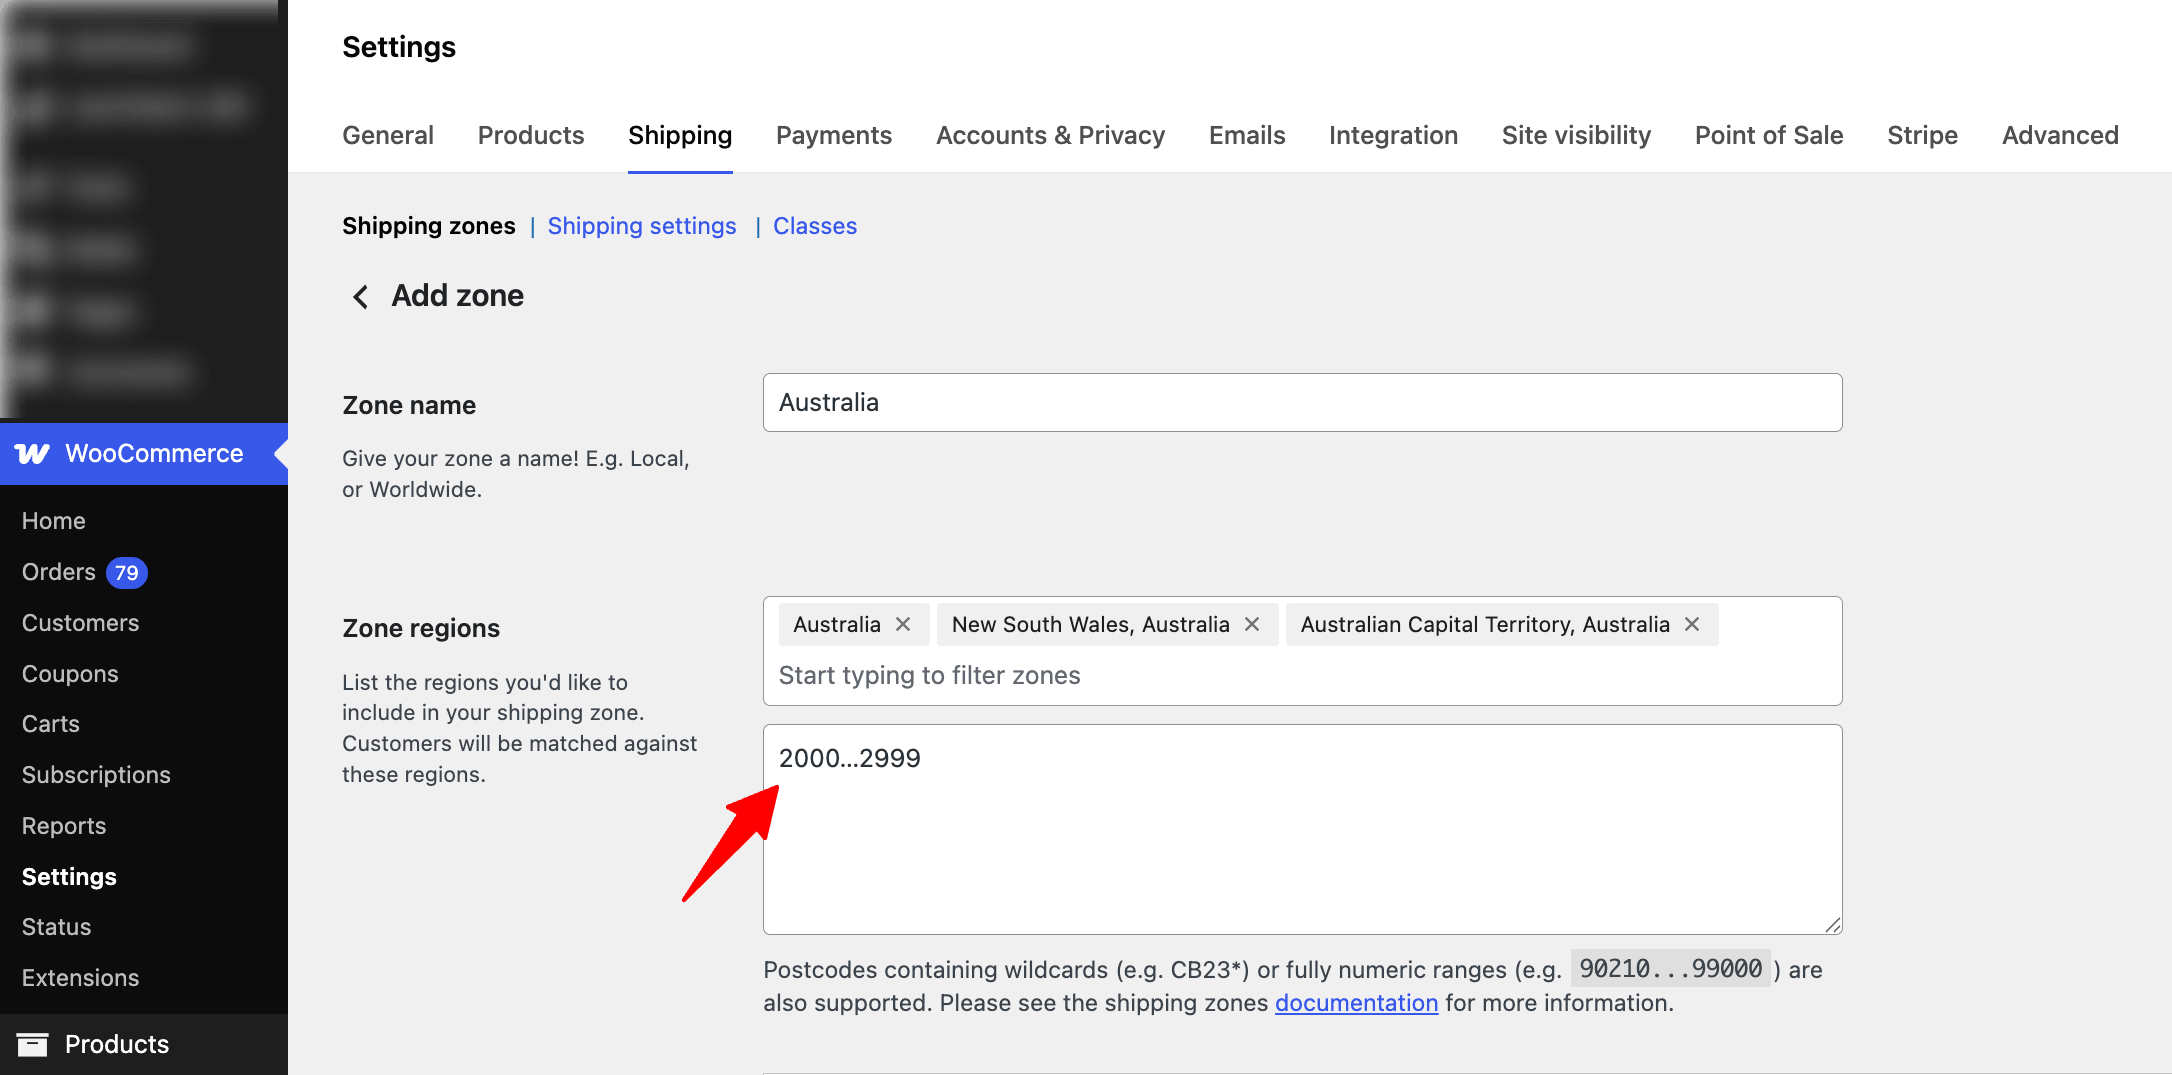
Make sure to save and create as many shipping zones as you need.
If a customer's location doesn't match any configured shipping zone, they won't be able to check out. Make sure to include all regions you ship to in your shipping zones.
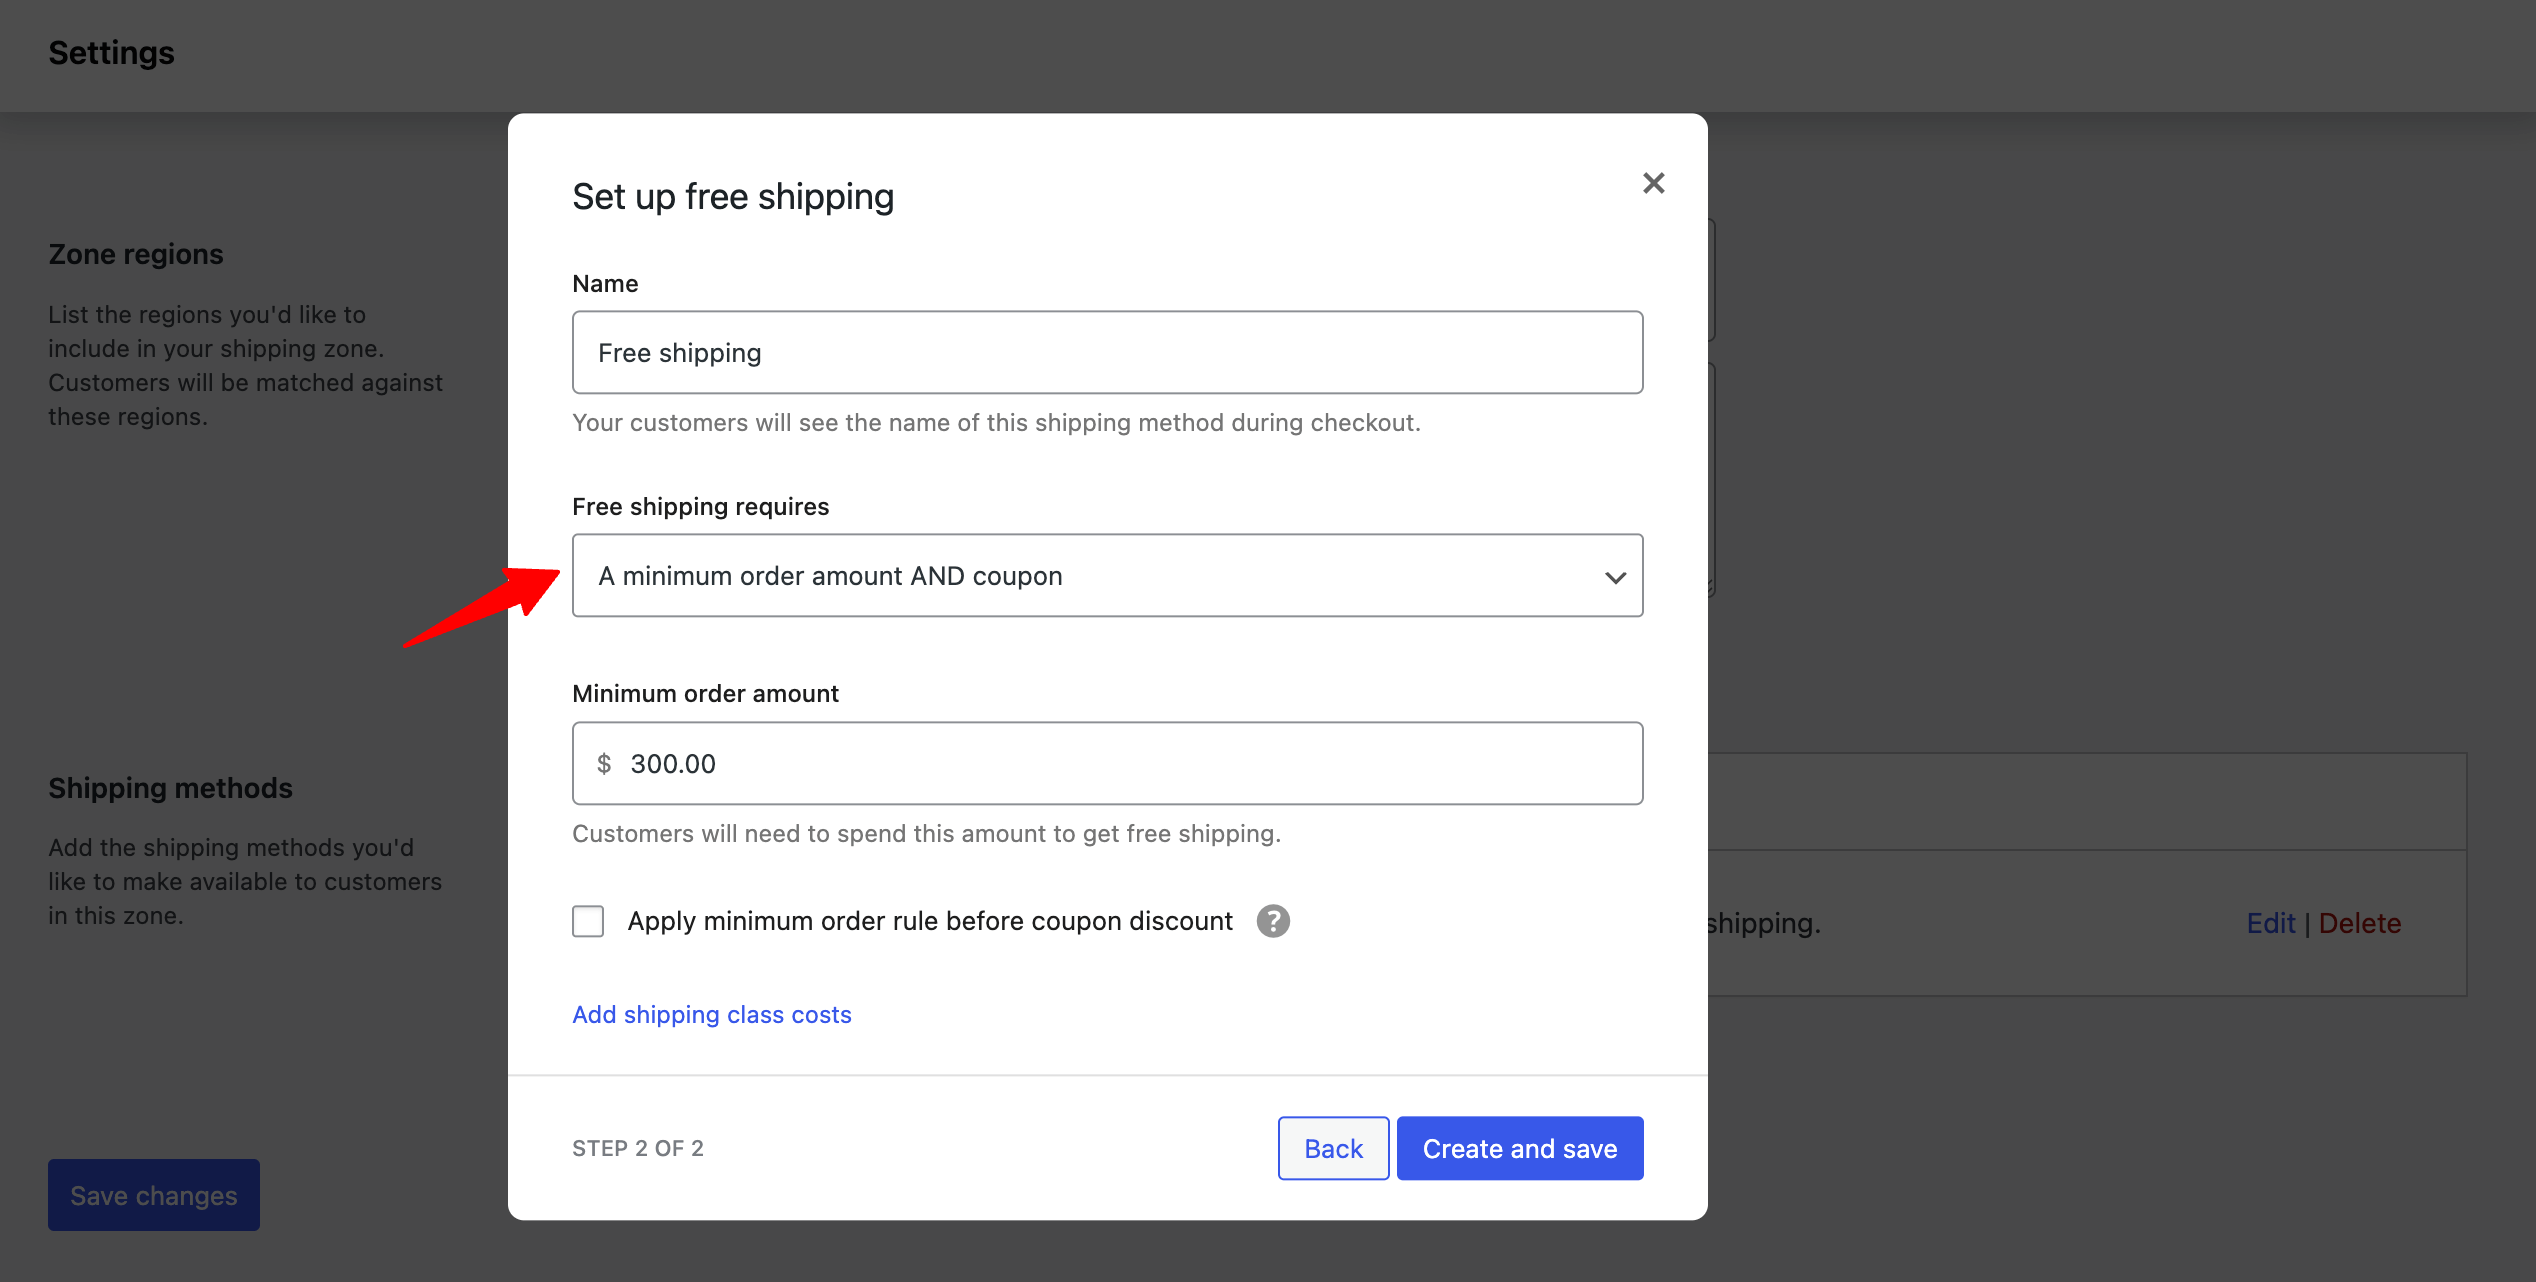
Step 3: Add a free shipping
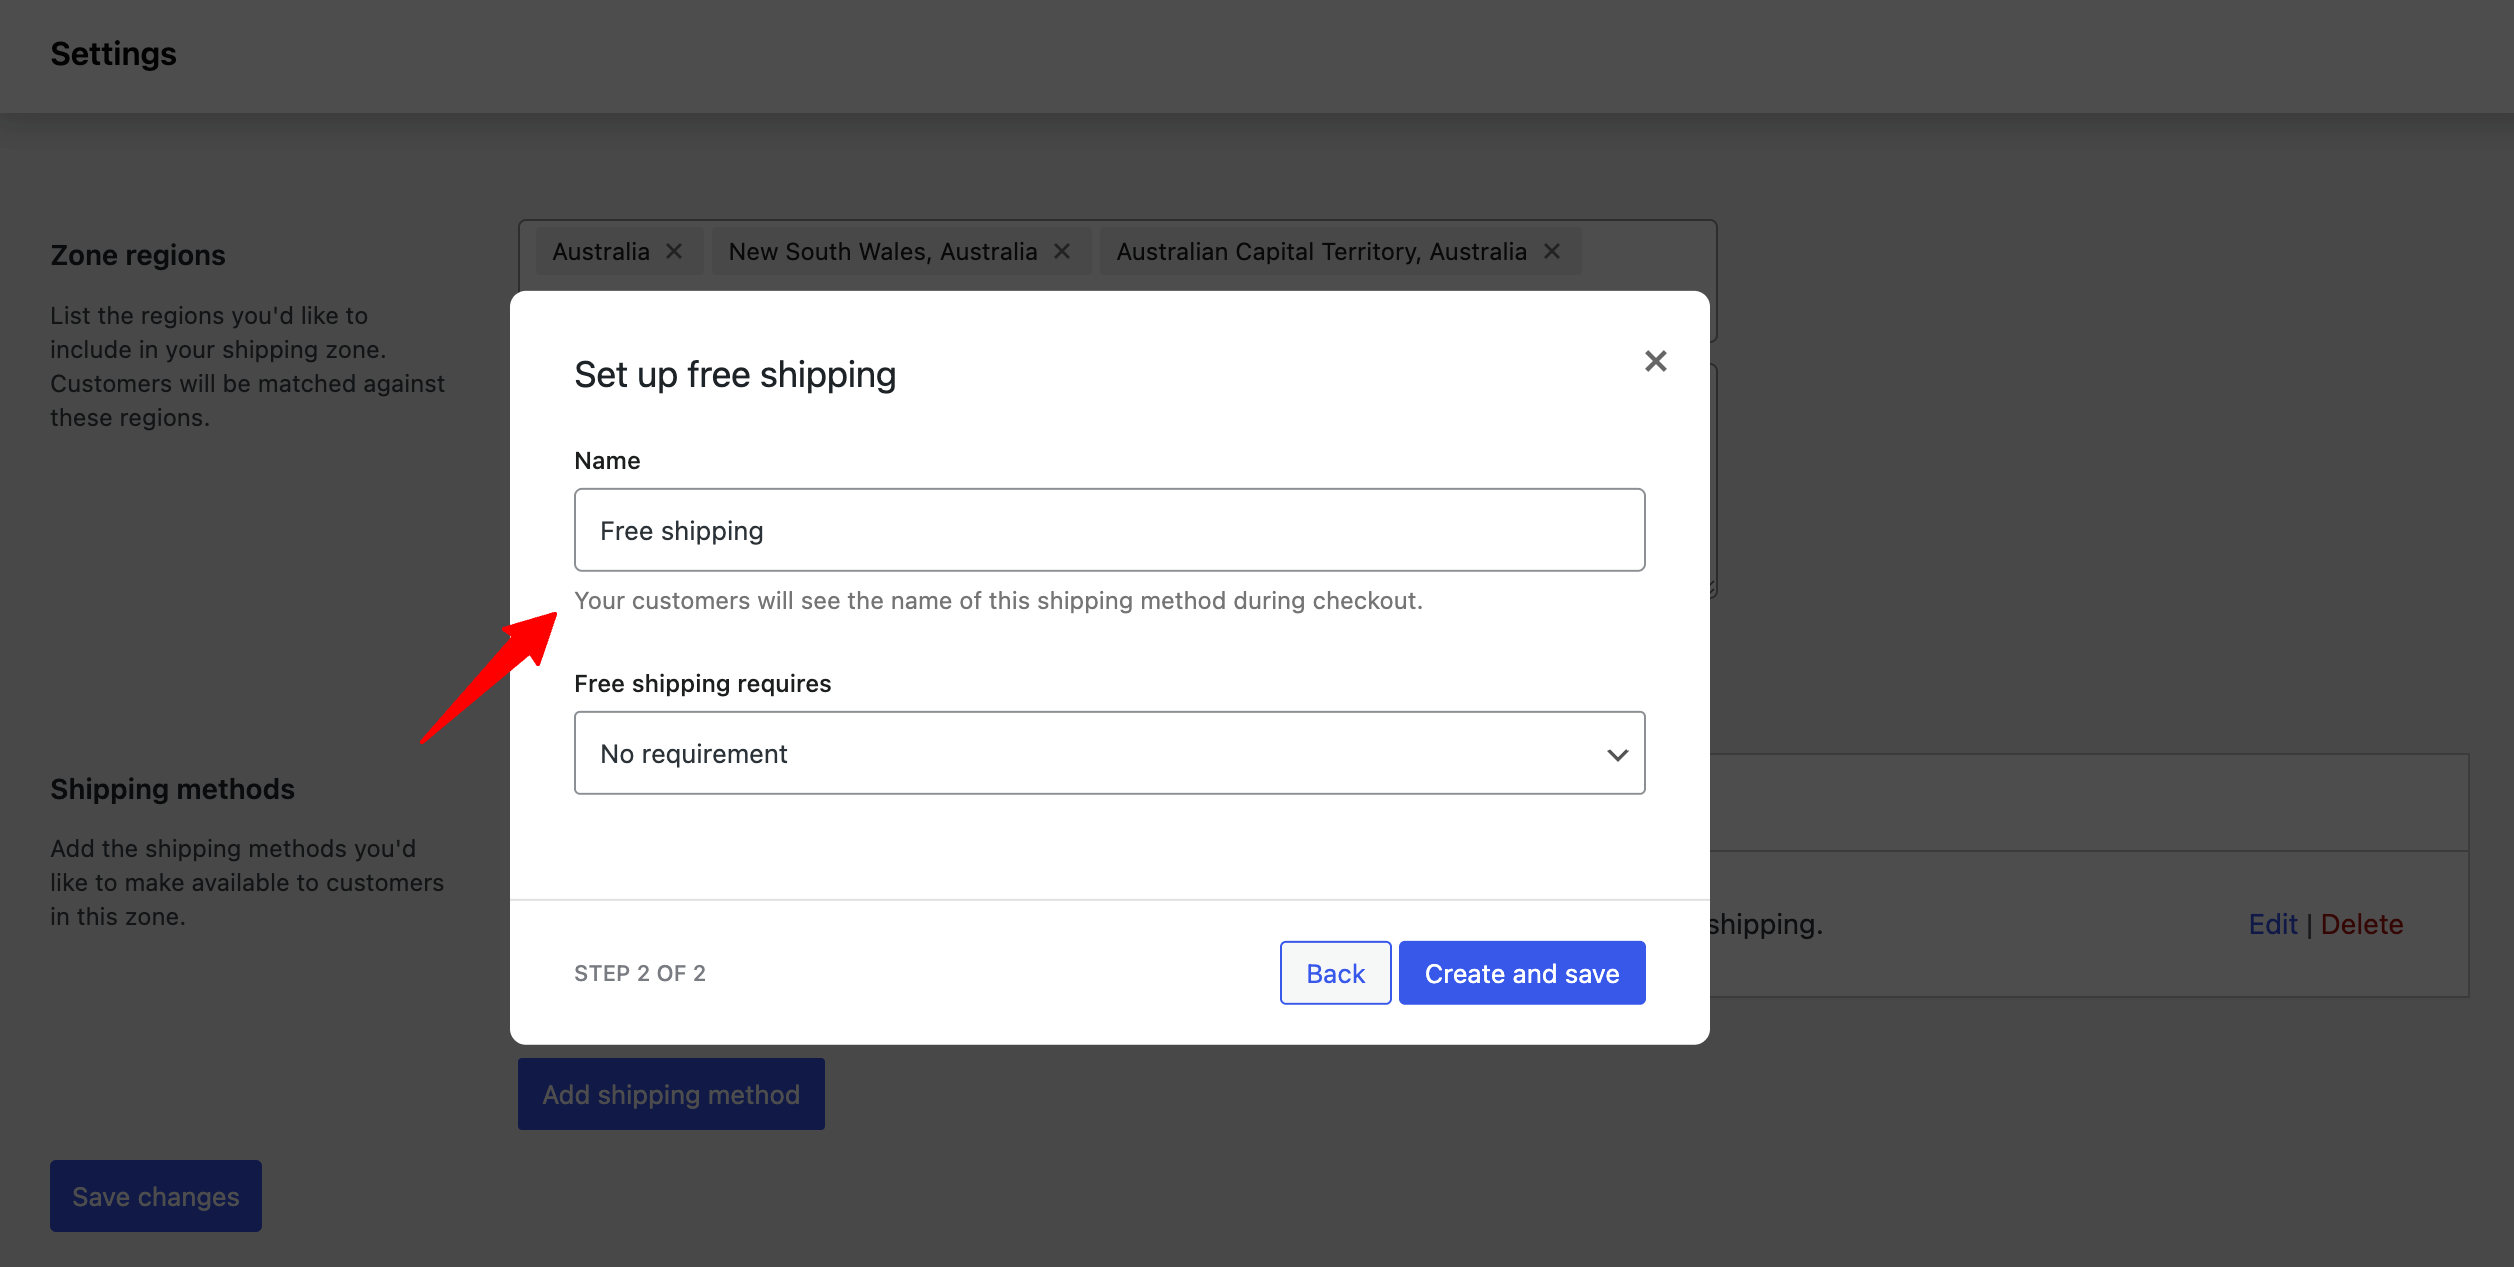
To add a shipping method, click Add Shipping Method and choose Free shipping from the list.
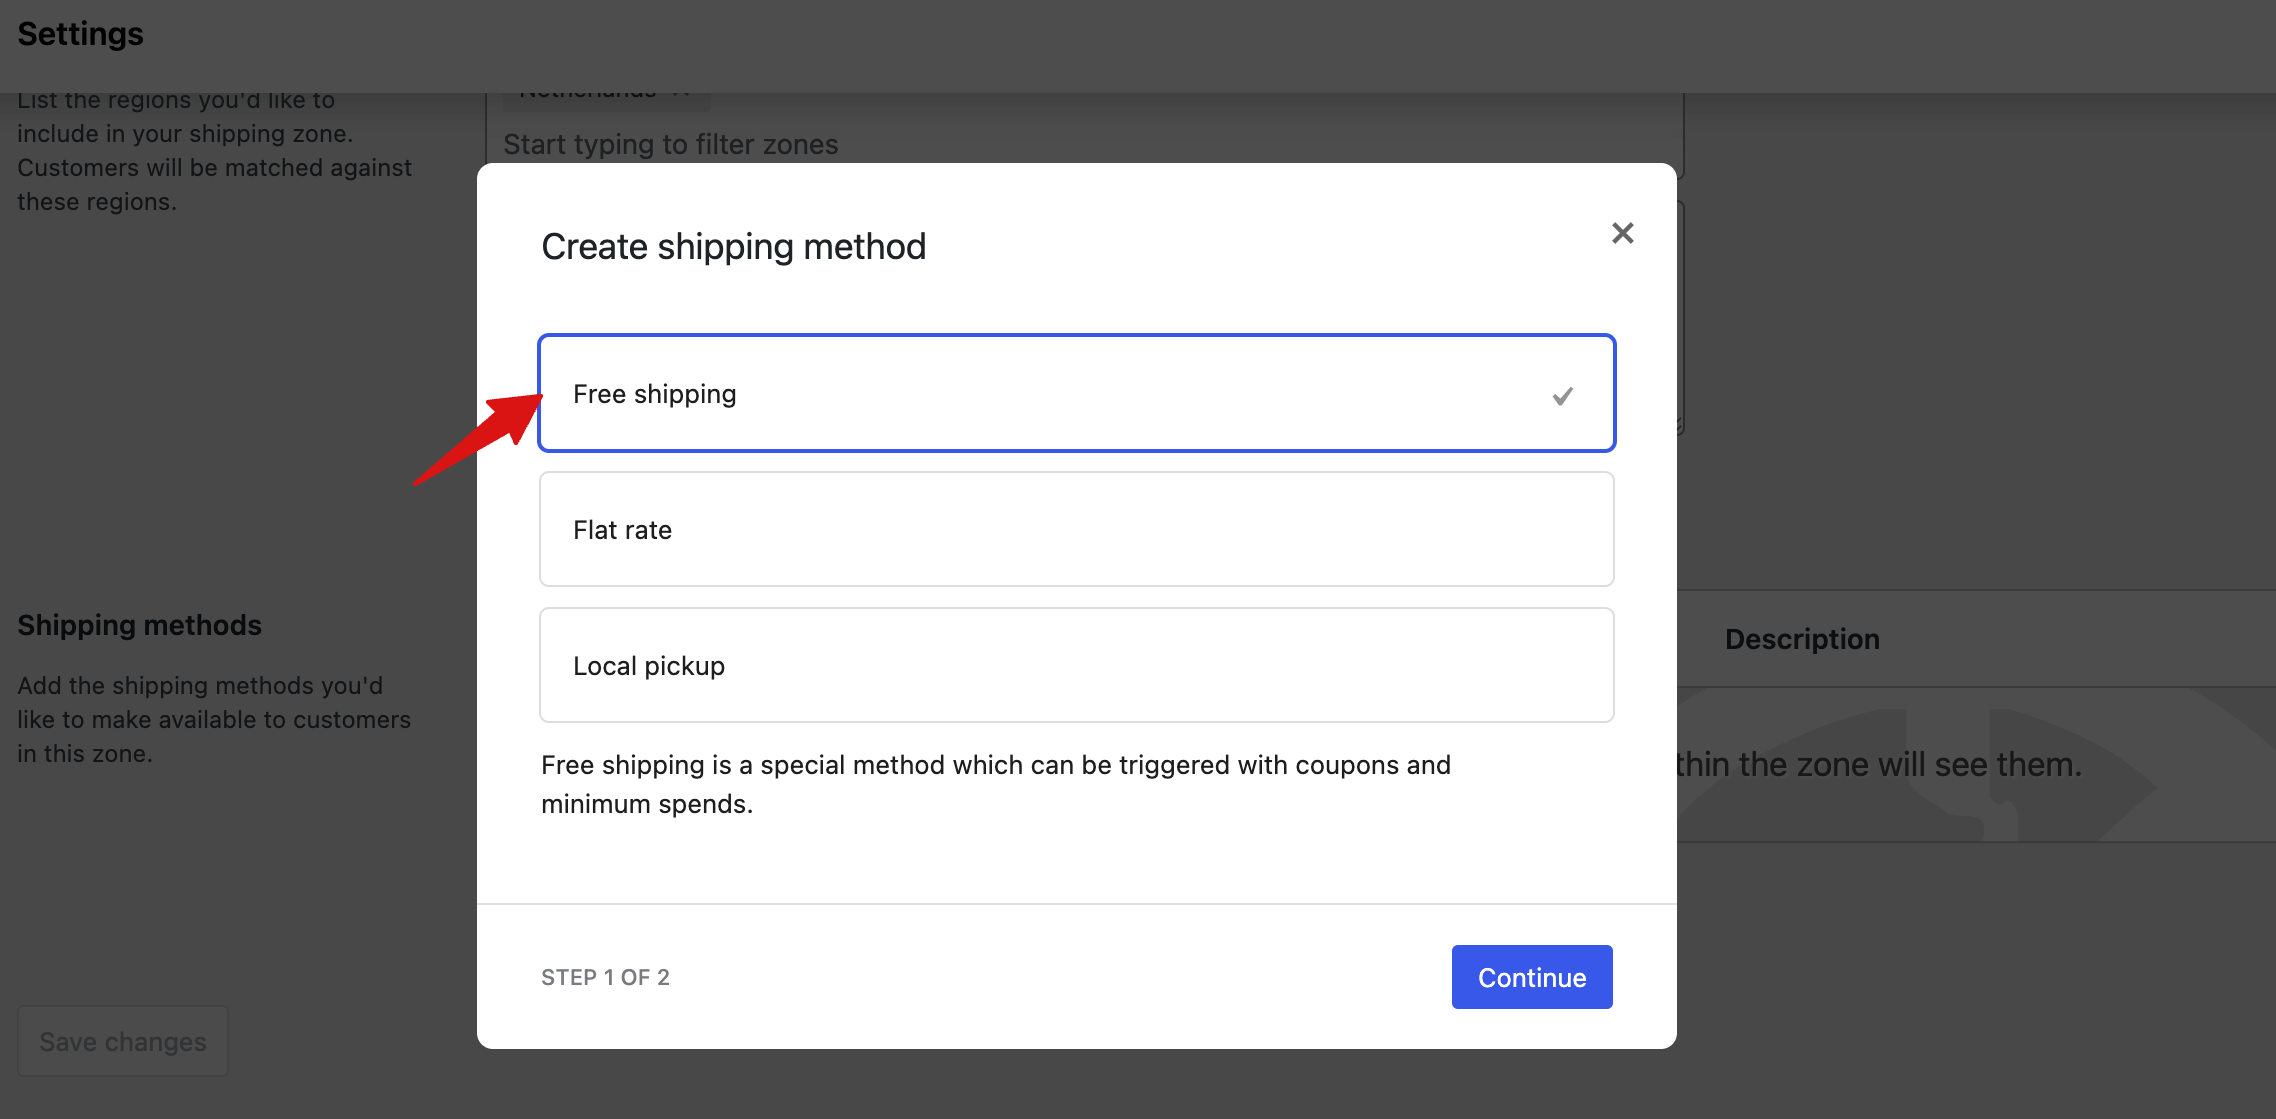
After you select free shipping, set a title for your customers to see and define the conditions for free shipping. If you want it to apply with no conditions, simply select "No requirement".
Here are the other options:
A valid free shipping coupon: If you choose this option, anyone with a valid coupon can avail themselves of free shipping for an order.
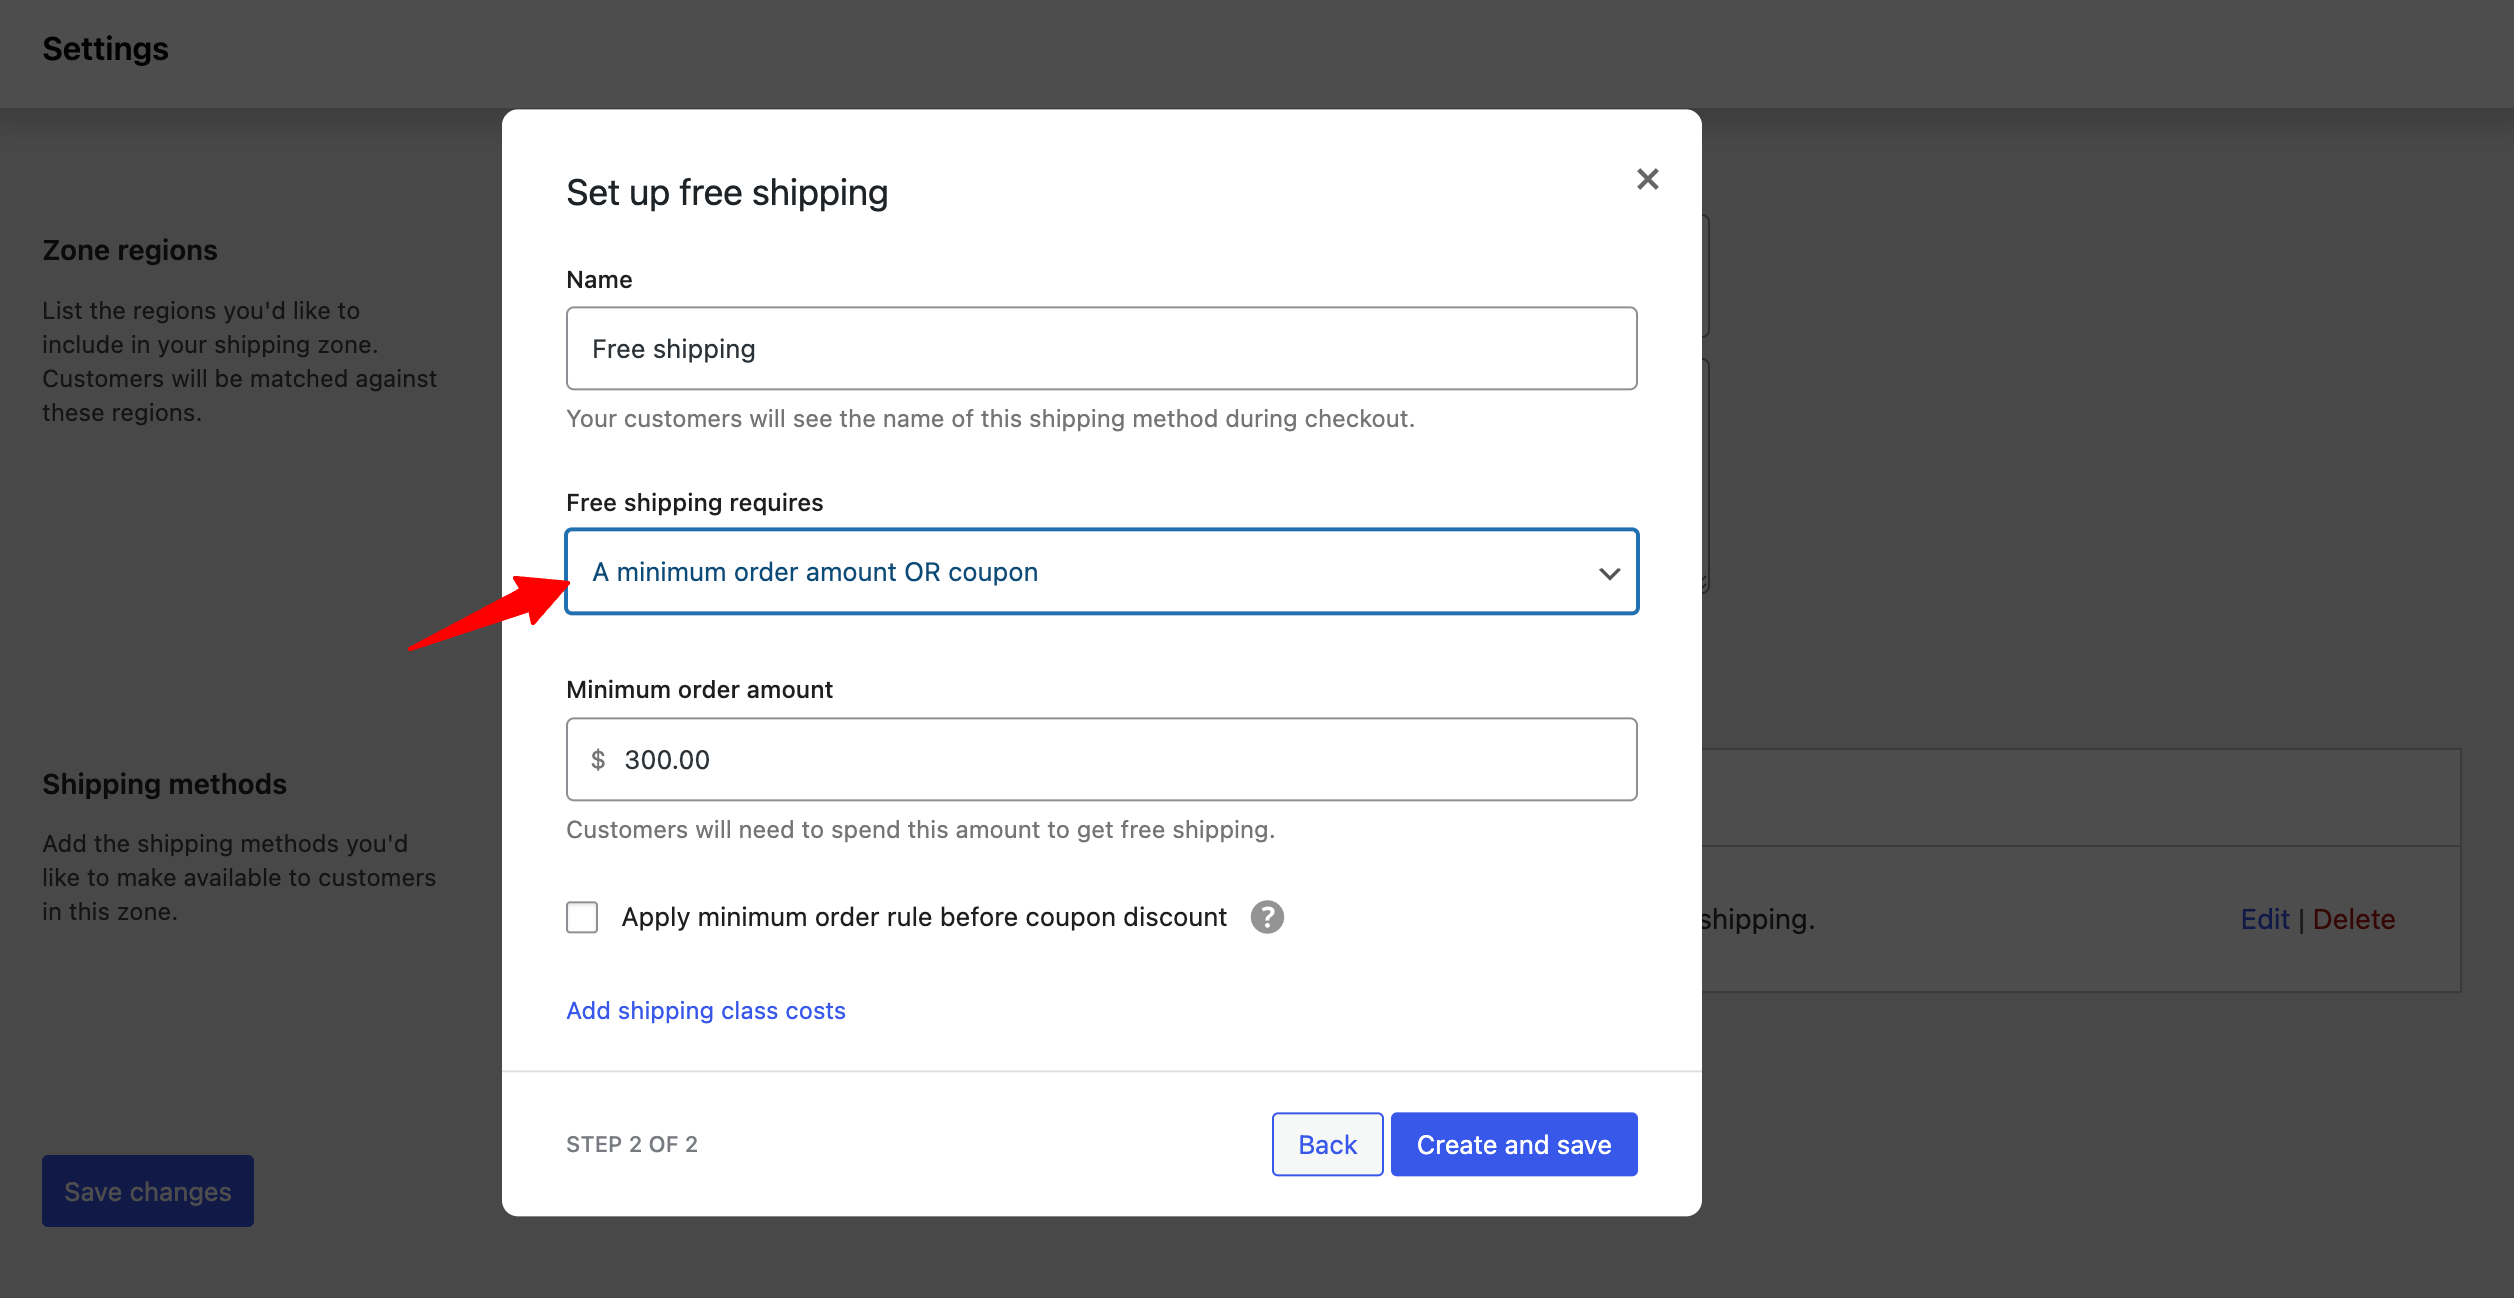
A minimum order amount: This option allows you to set a minimum order amount that a customer must place to qualify for free shipping. If you choose this option, you will get two more options:
- Minimum order amount: Set a minimum amount that must be spent to qualify for free shipping. For example, we have set a minimum of 150, so if someone wants to avail of free shipping, they have to purchase at least 150.
- Coupon discounts: To apply coupon discounts, check the “Apply minimum order rule before coupon discount” option. The checking option will allow free shipping based on the pre-discount order amount.

A minimum order amount OR a coupon: This option gives users both options. Either they can avail free shipping using a coupon, or if they purchase a product worth a certain amount.
A minimum order amount AND a coupon: If you choose this option, then customers have to do both: buy products worth a certain amount and apply a coupon code to avail of free shipping.
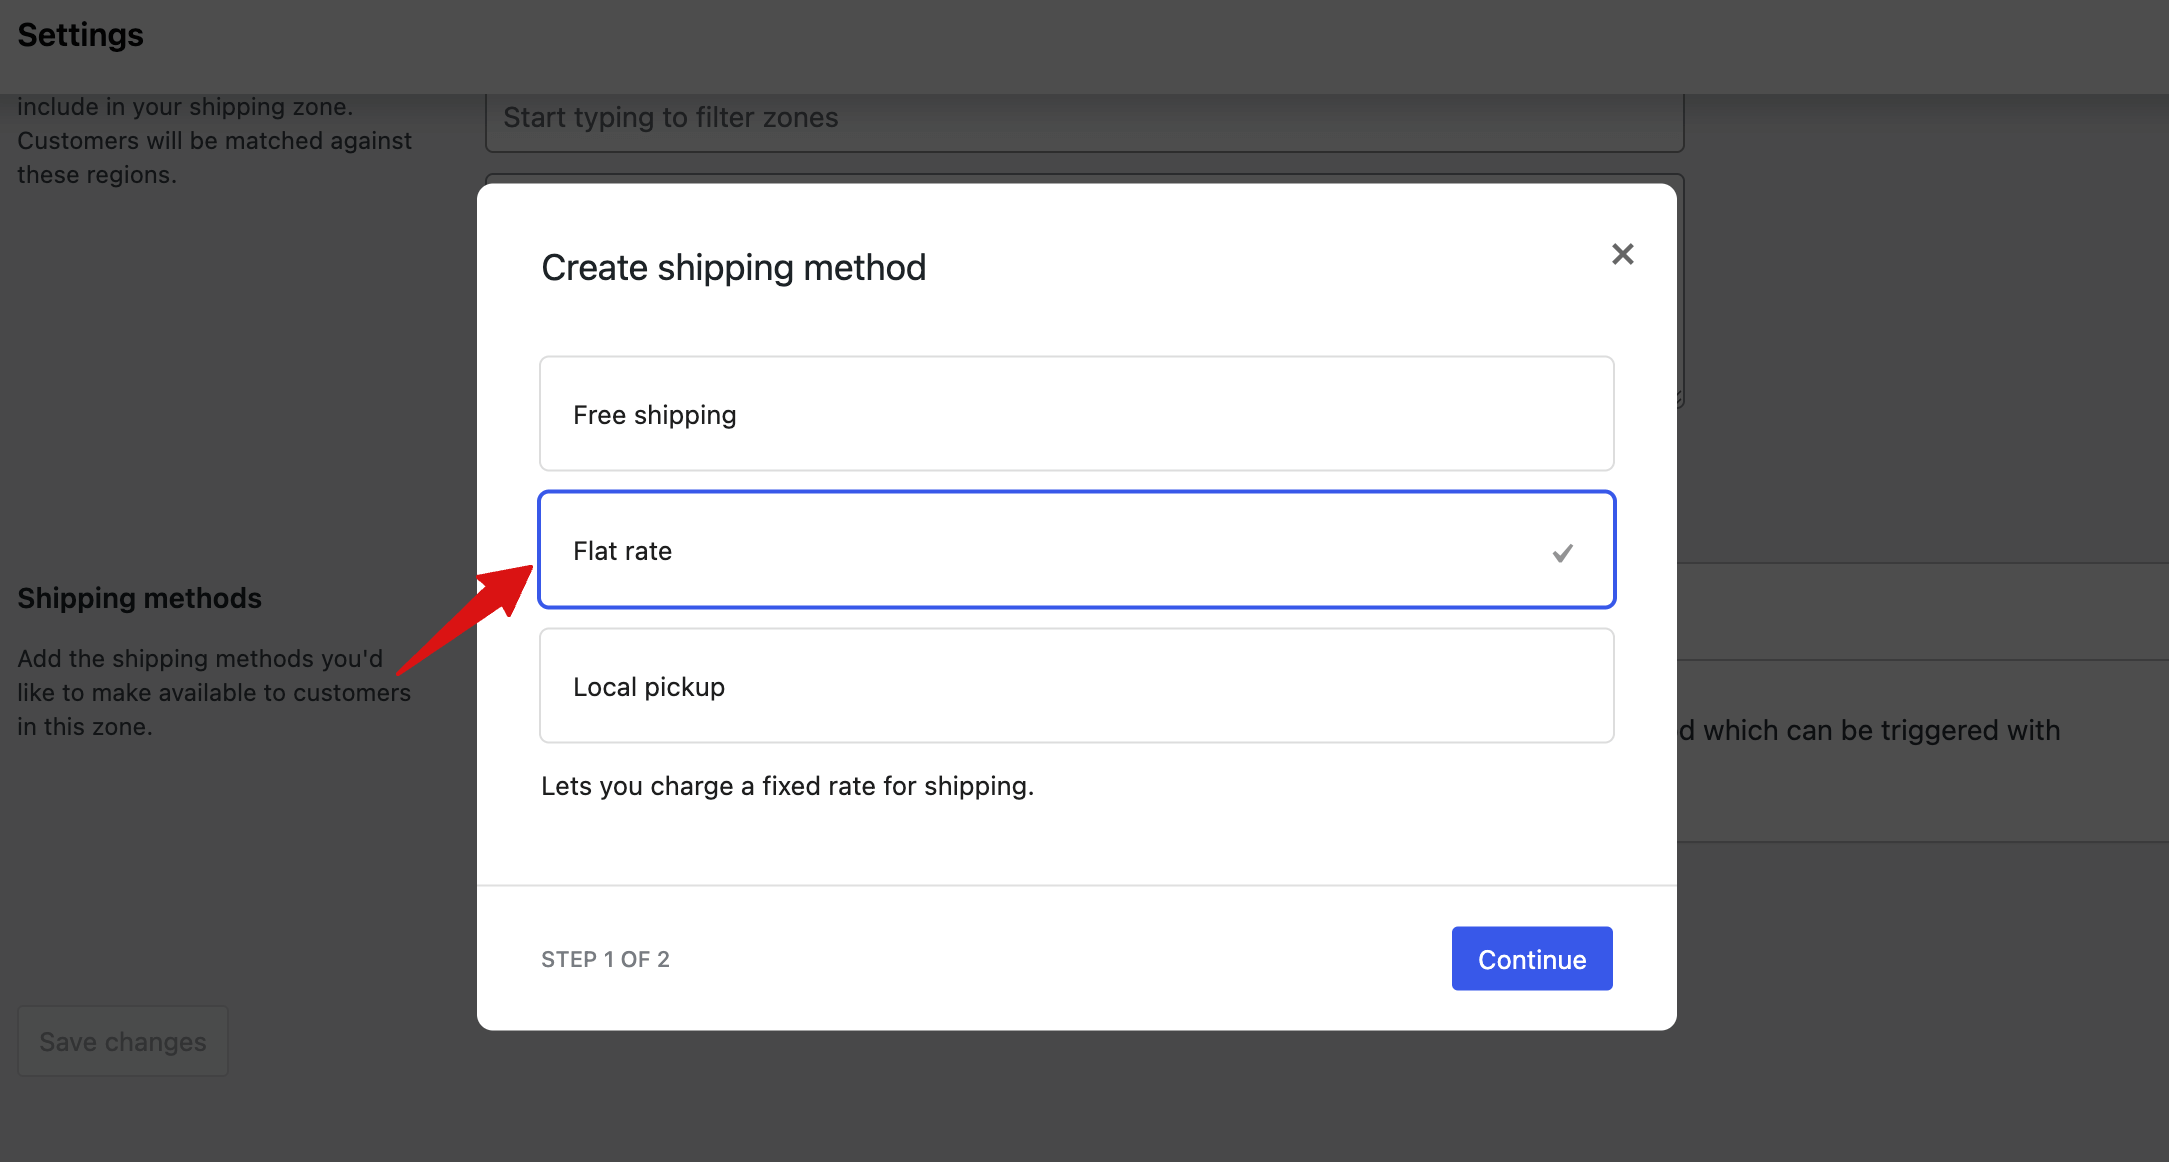
Step 4: Add a flat rate
The "Flat Rate" shipping method is a commonly used and flexible option that allows you to charge a fixed shipping fee for orders based on various criteria.
To add a flat rate, click on "Add Shipping Method", select Flat rate, and hit Continue.
Here's how the flat rate settings work in WooCommerce:
- Title: Set a title for the Flat Rate shipping method. It will be displayed to customers during the checkout process.
- Tax Status: Choose whether the shipping fee will be taxable or not.
- Cost: You define a fixed cost or fee that will be charged for shipping using the Flat Rate method. You can use a placeholder to charge per item or a percentage of the total order total instead of a flat rate.
The placeholder[qty] charges an additional fee for each product in the cart. For example, using 10 + (2 * [qty]) will charge a base of $10 plus $2 for each item in the order.
The placeholder [fee] adds an extra shipping fee as a percentage of the total. Set a percentage, then a min_fee or max_fee, so the fee can’t go below or above a certain amount.
For example, you can use something like 5 + [fee percent=”5″ max_fee=”15″]. This will cost your customer $5 dollar plus 5 percent of their order total, but not exceeding $15.
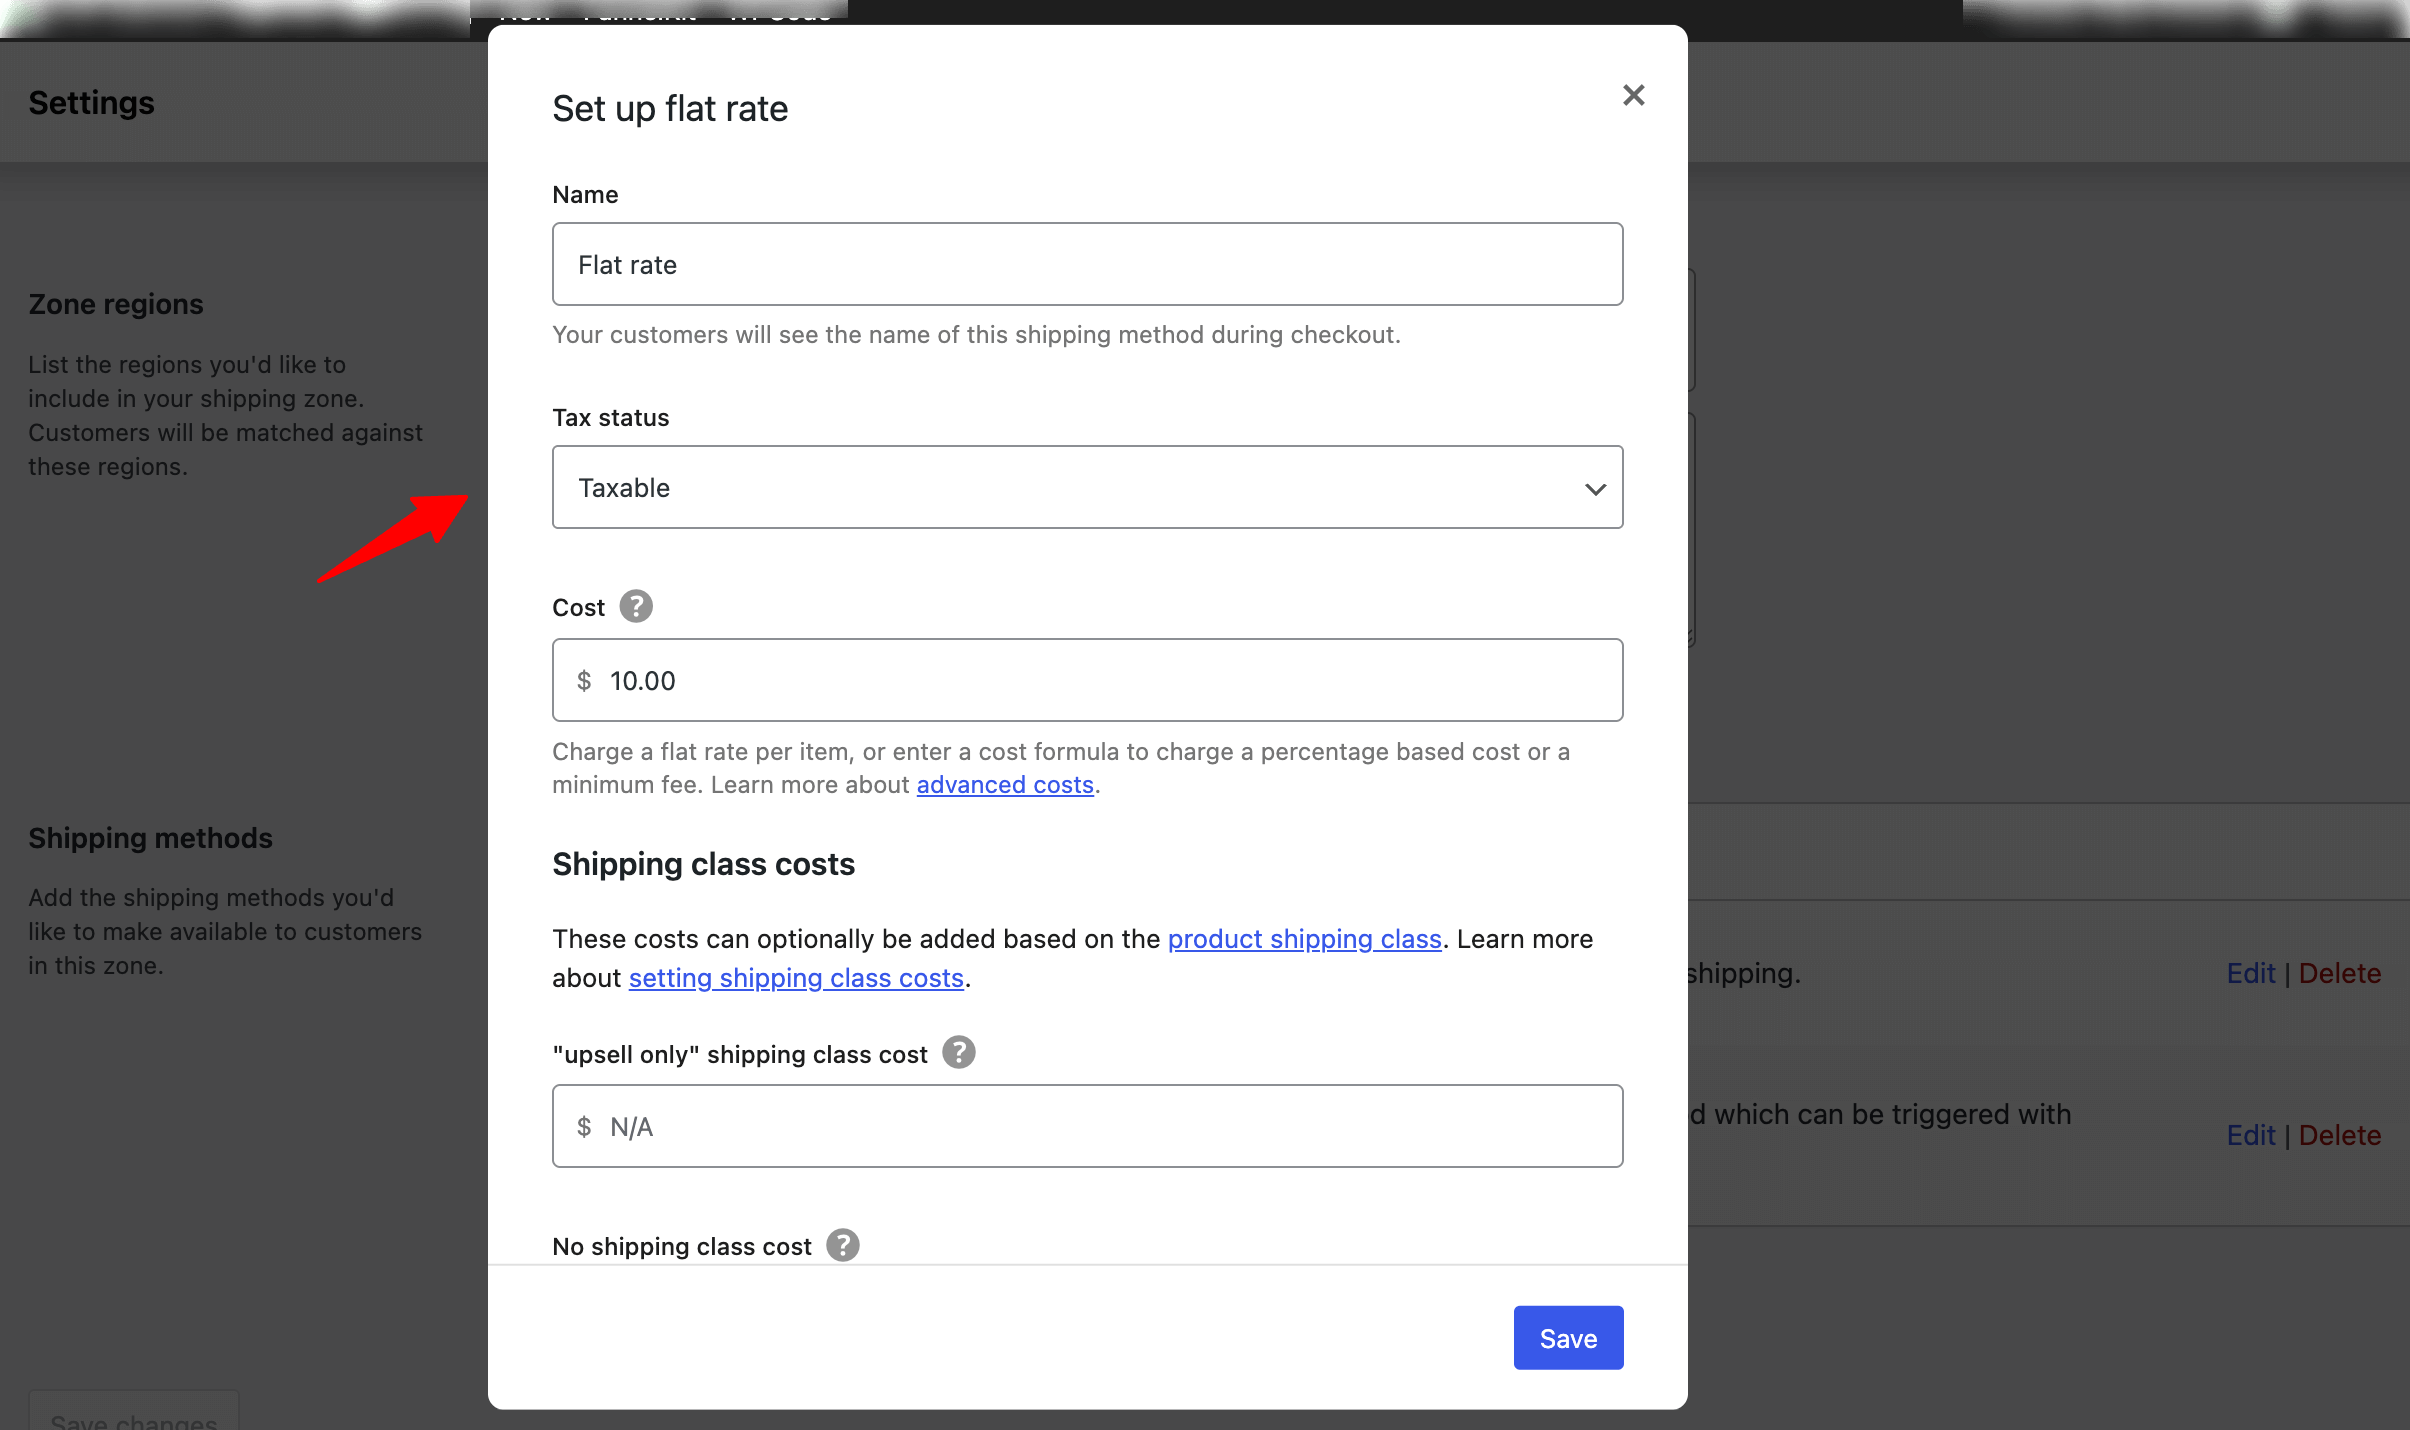
Make sure to hit the ‘Save changes’ button when done.
Step 5: Add a local pickup method
The local pickup shipping option allows customers to place orders online and then pick up their purchased items in person from a physical location, such as a retail store, warehouse, or any pickup point.
Again, to add local pick, click on "Add Shipping Method", select Local pickup, and hit Continue. Next, configure the following:
- Title: Set a title that will be displayed to customers during the checkout process.
- Cost: Define a fixed cost or fee that will be charged for this type of shipping.
- Tax Status: Specify whether the cost will be taxable or not. You can choose between "Taxable" and "None".
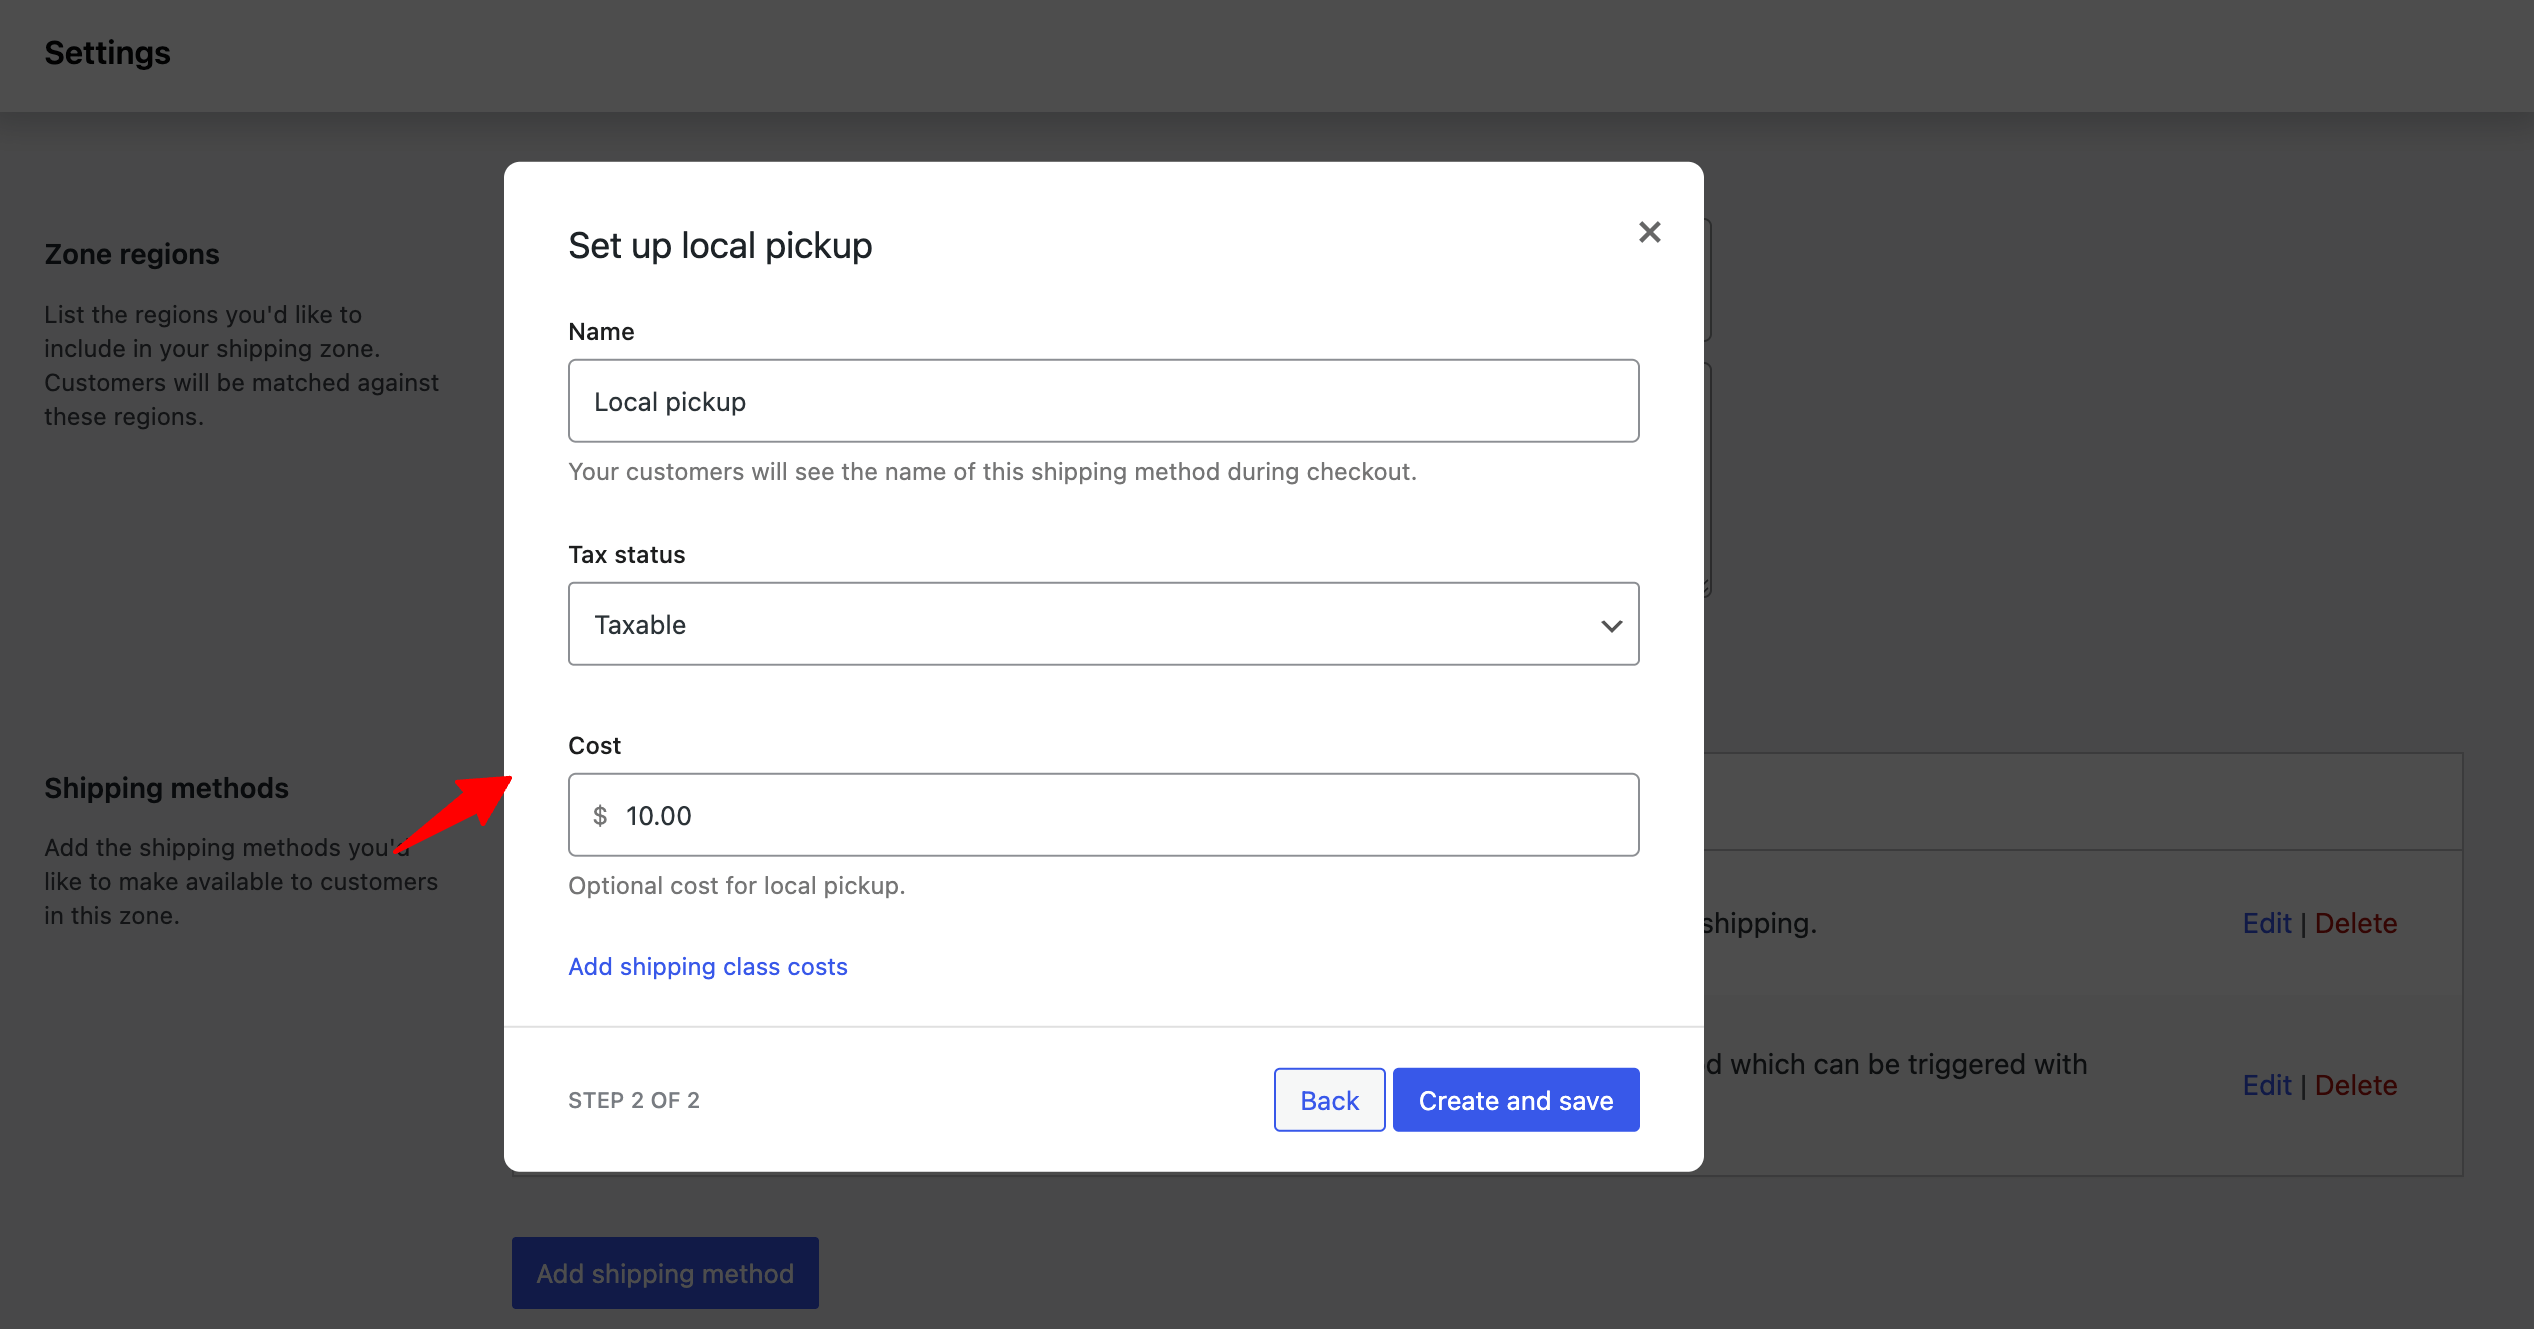
After adding the shopping methods, click on Save Changes to save the zone.
Here is how to configure a shipping zone and set different shipping methods.
You can repeat the same process to create multiple shipping zones and set methods based on your strategy. Later, in this blog, you can learn how to manage different shipping zones.
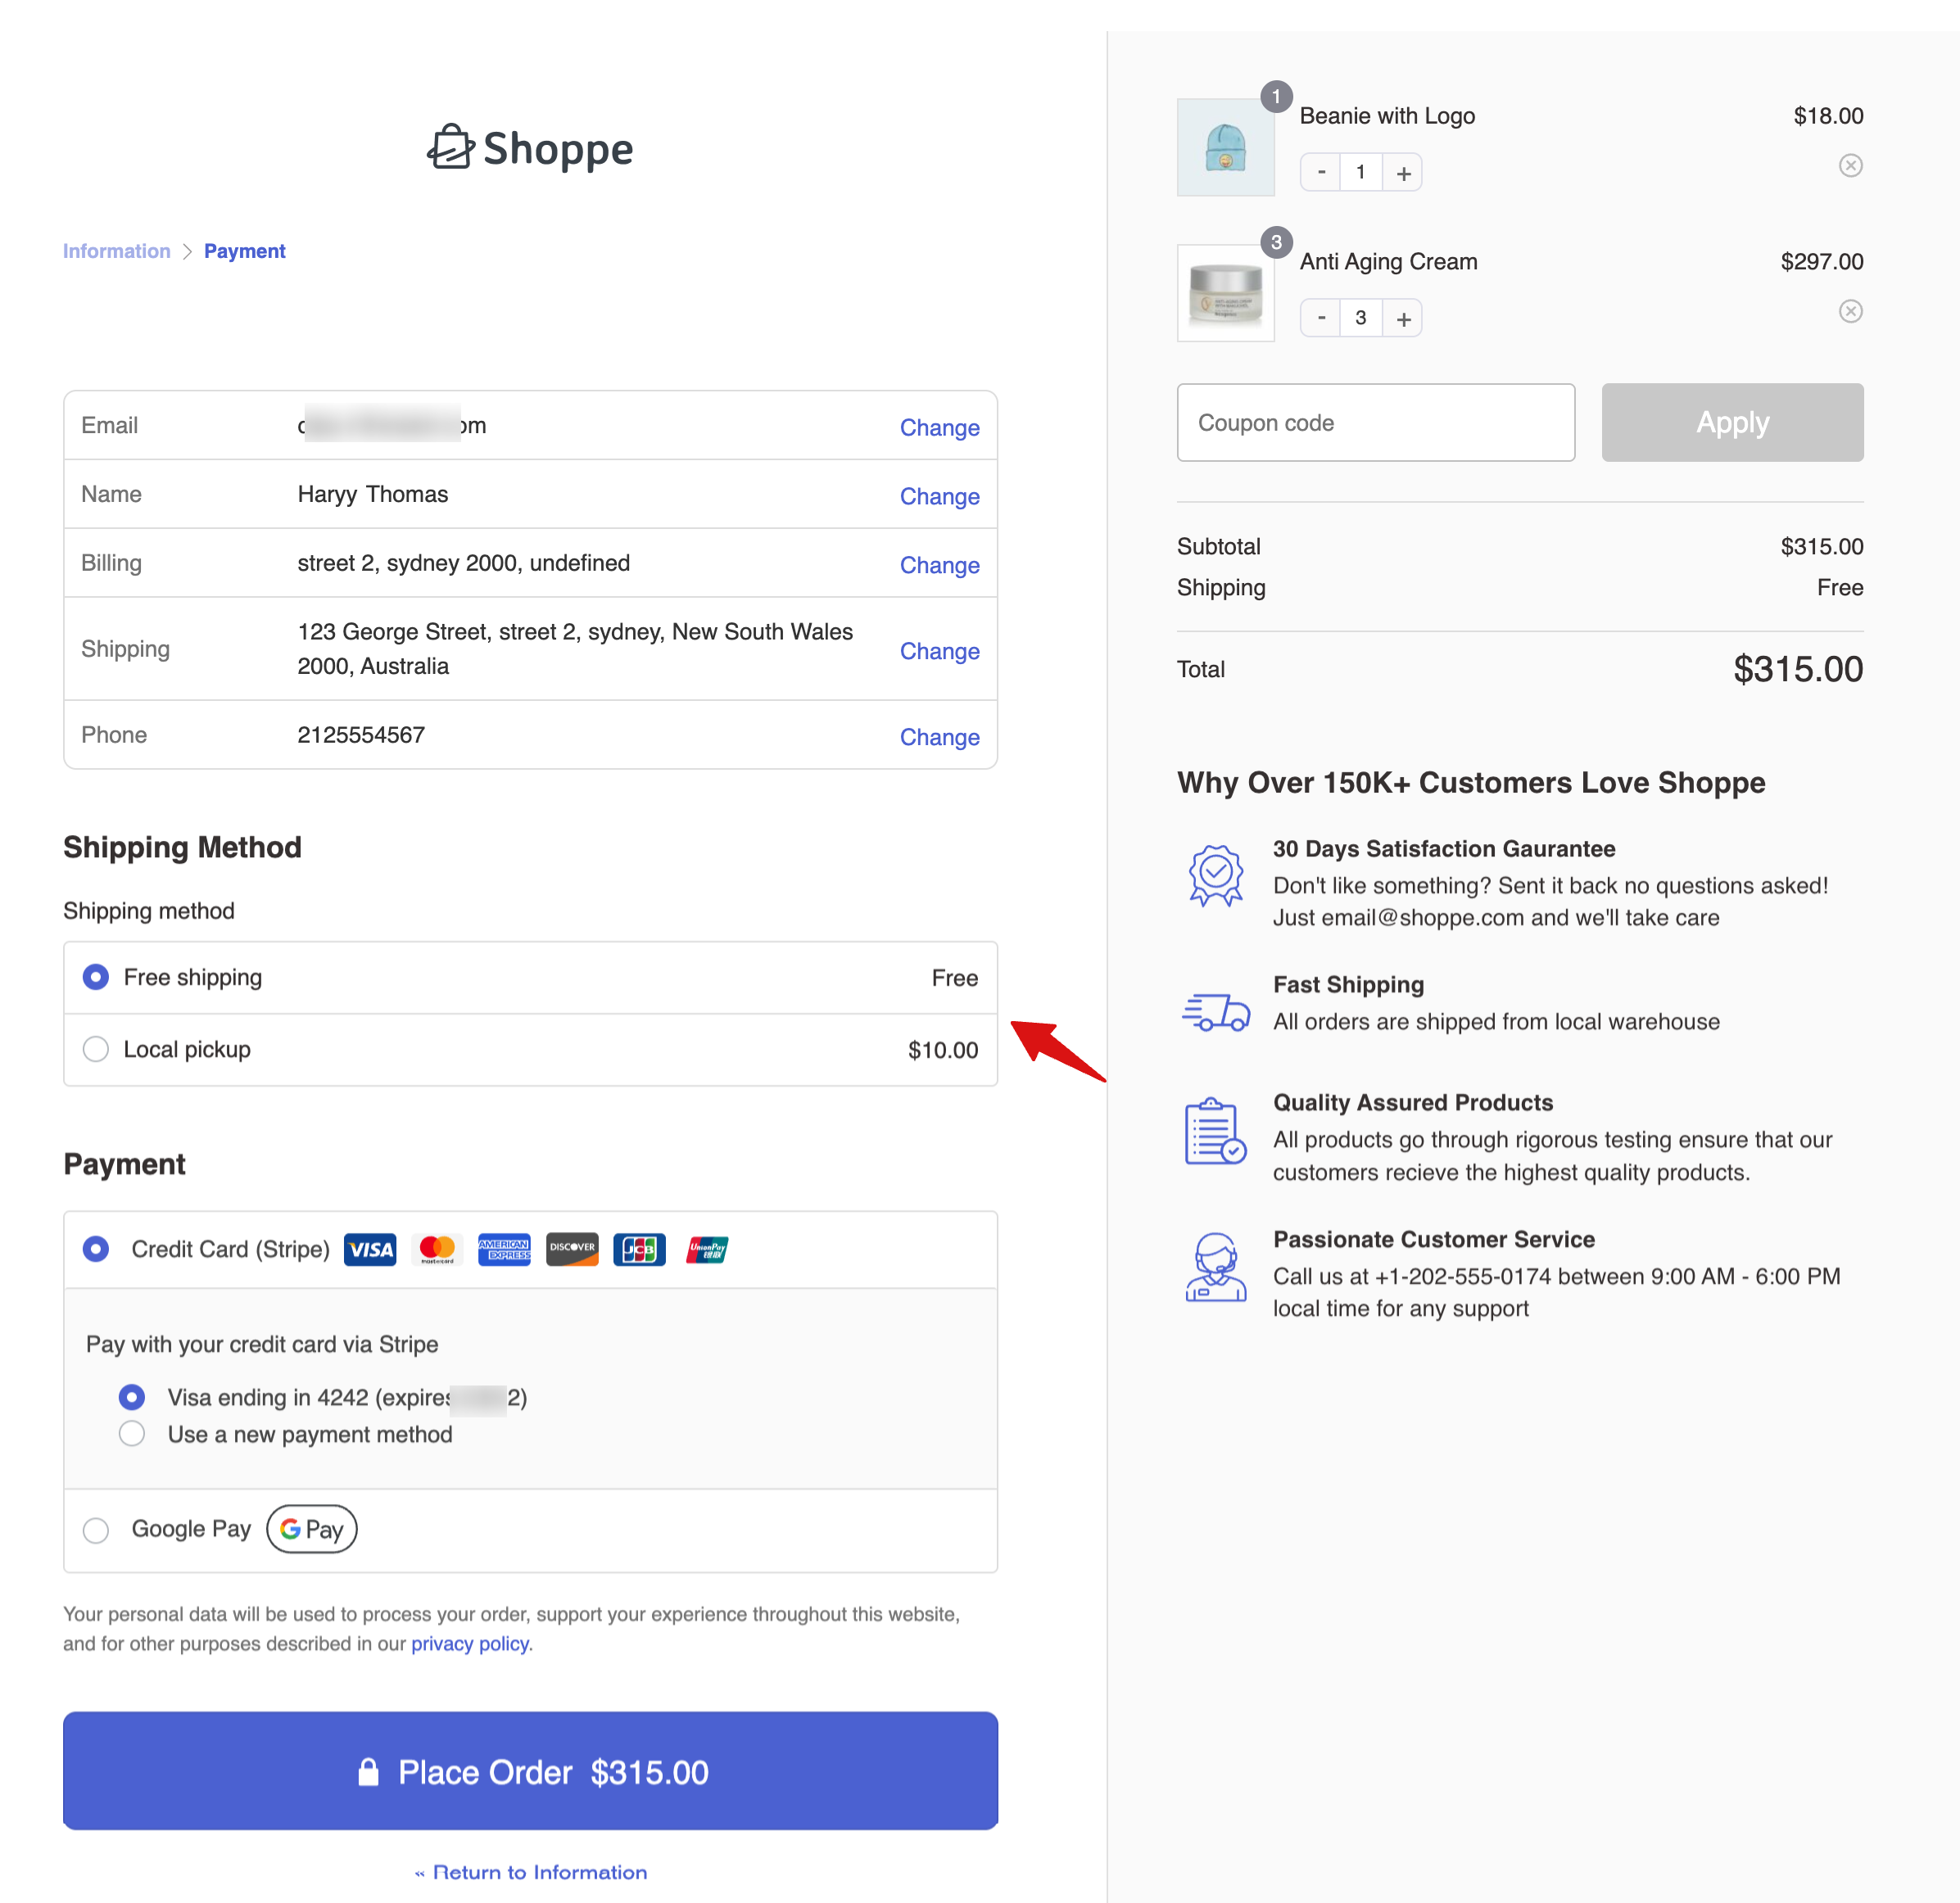
When a customer tries to place an order, WooCommerce automatically calculates and displays the available shipping methods at checkout based on the customer’s location and your shipping settings.
How to Set Up Shipping Classes for Different Products to Charge Accurate Shipping Fees
Shipping classes in WooCommerce let you group similar products to apply the same shipping rates and methods.
This feature is particularly useful when you have products with different shipping requirements, such as size, weight, or shipping destination, and you want to apply specific shipping rules to each group of products.
For example, a shirt weighs much less than boots. In this scenario, if you want to charge differently for these two items, you can set different shipping classes for them, like assigning lightweight to t-shirts and heavyweight to boots.
To use a WooCommerce shipping class, first, you need to create the class, then set up rates, and lastly, assign the classes to the products for which you want the WooCommerce shipping rates applicable.
Step 1: Create a shipping class
To create a shipping class, navigate to WooCommerce ⇒ Settings ⇒ Shipping. Then go to the WooCommerce shipping classes tab and click on “Add Shipping Class.”
After that, provide the shipping class name, slug, and description. Finally, click “Create” to save the new class.
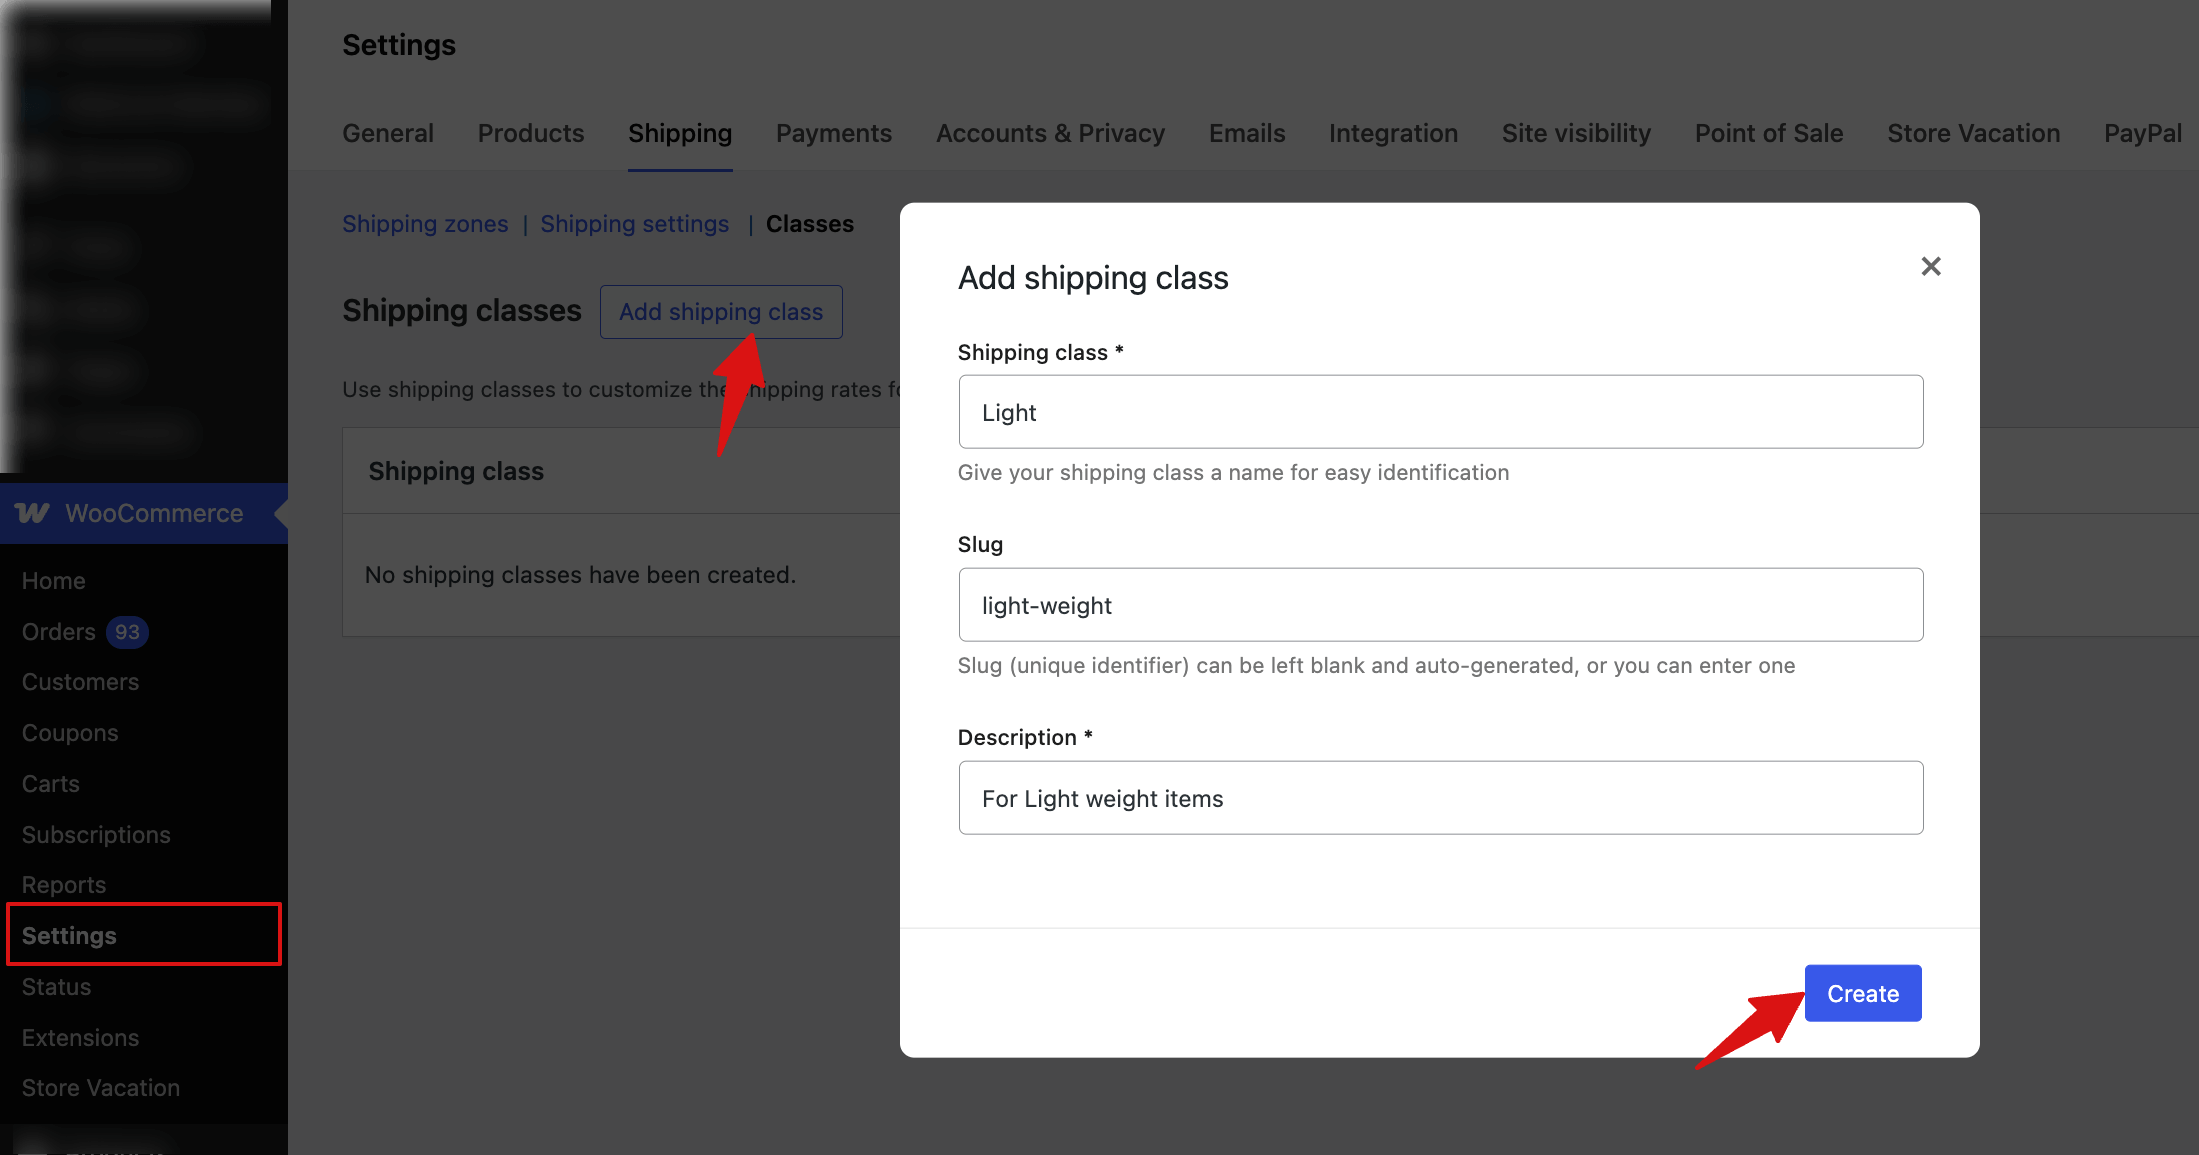
You can add as many WooCommerce shipping classes as you want.
Now, you can set up different rates for the WooCommerce shipping zones with flat rates for products with different shipping classes.
Step 2: Set up different rates for different shipping classes
Edit the Flat Rate shipping for the zone where you want to set up custom rates. You’ll now see new settings options.
Here, you’ll find fields to set shipping rates for all the WooCommerce shipping classes you’ve created.
You also have to choose the calculation type. The options are listed below:
- Per Class: The shipping class determines the shipping cost.
- Per Order: The most expensive item determines the shipping cost.
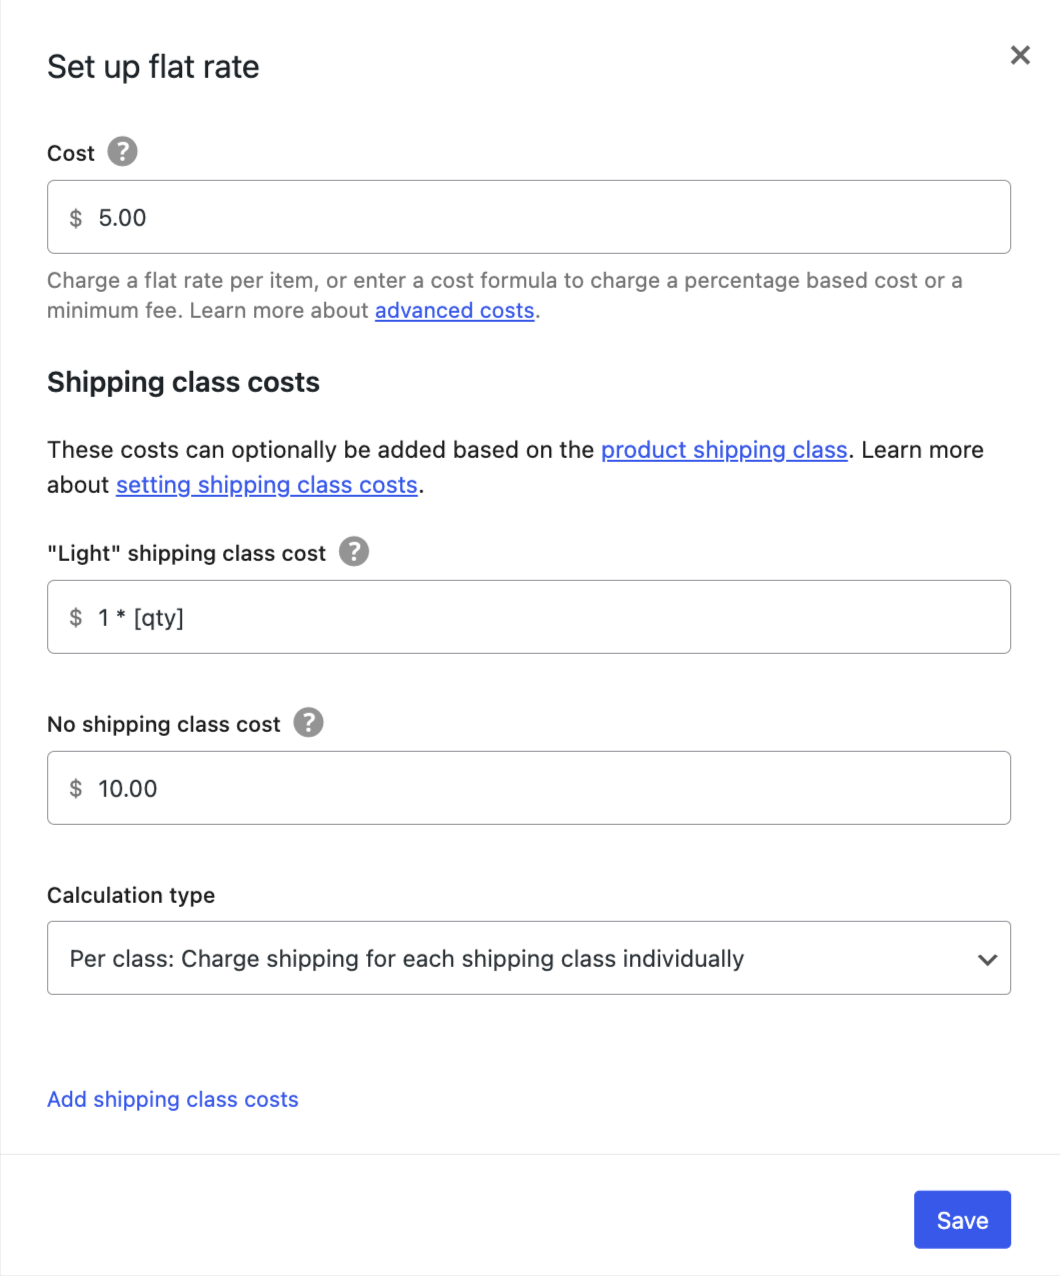
After setting up the rates, click on Save Changes.
Once your shipping classes are created, you must assign them to your WooCommerce store products.
Step 3: Assign WooCommerce shipping classes to products
To assign a shipping class, edit the product. Then, under the Product settings, go to the Shipping tab.
Here, you can add the shipping class from the dropdown.
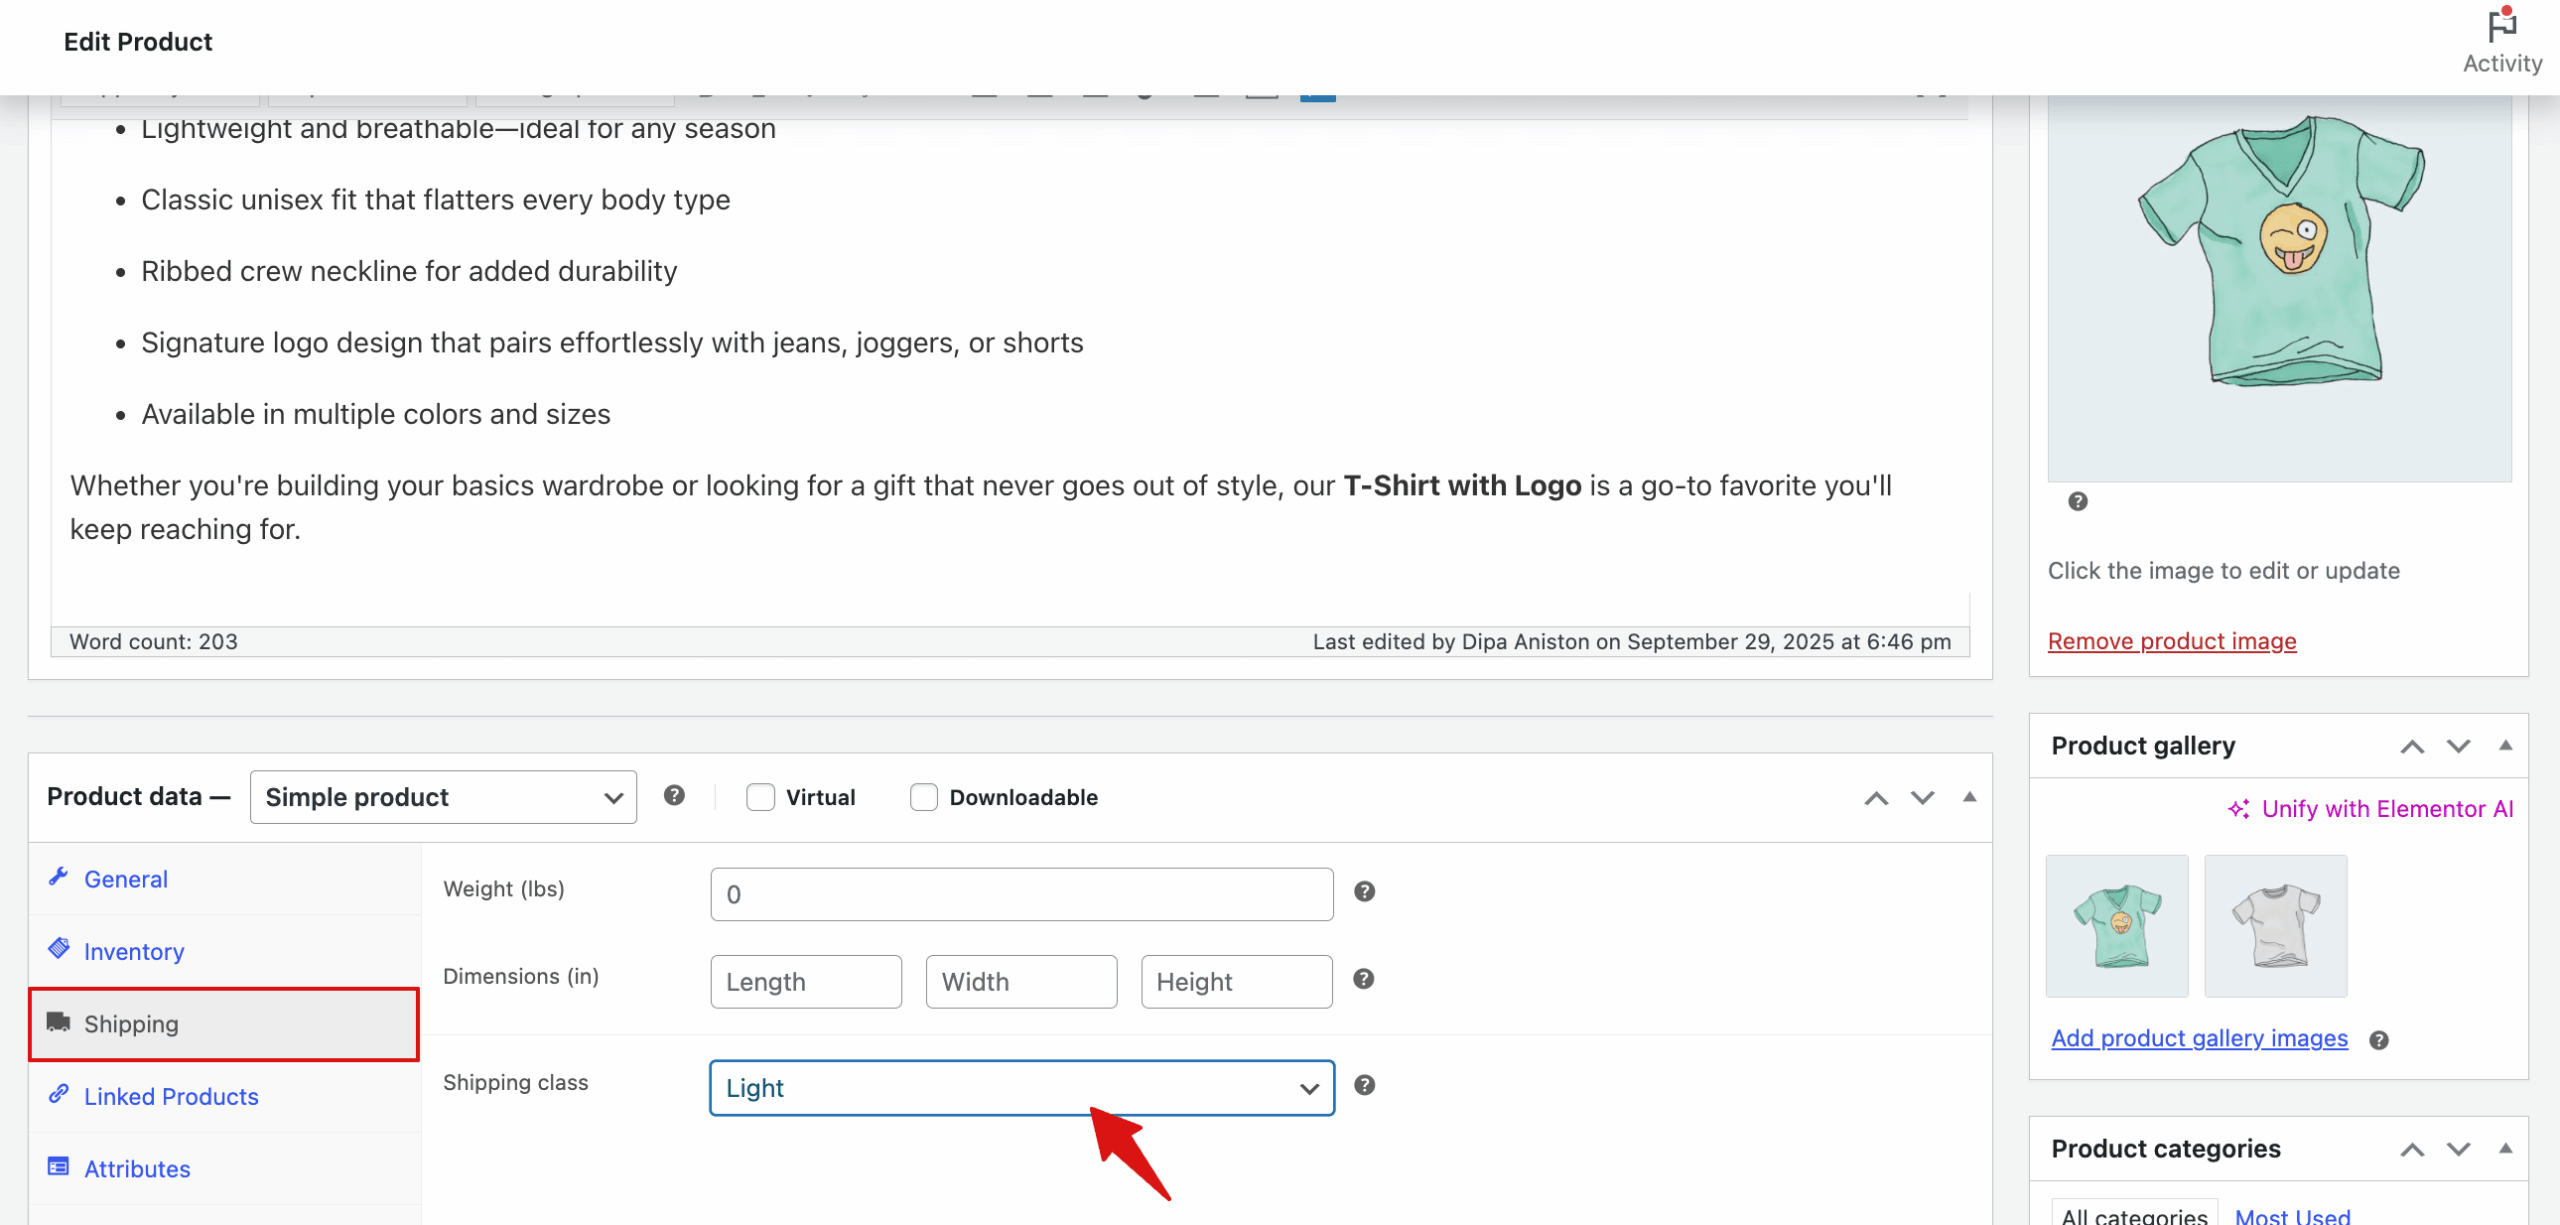
After adding the shipping class, click on Update.
This is how you can set up different shipping rates for different product groups.
Manage Shipping Zones And Methods in WooCommerce
Shipping zones let you control which shipping methods are available to customers based on their location.
Properly managing zones ensures accurate shipping costs and a smooth checkout experience.
Sort WooCommerce Shipping Zones
WooCommerce will match a customer’s shipping address to a single zone and offer them the shipping methods assigned to that zone. Shipping zones match the customer address from top to bottom; the first to match is always used.
You can sort the existing shipping zones just by drag and drop. Just click the six dots on the left side and drag and drop to change the order.
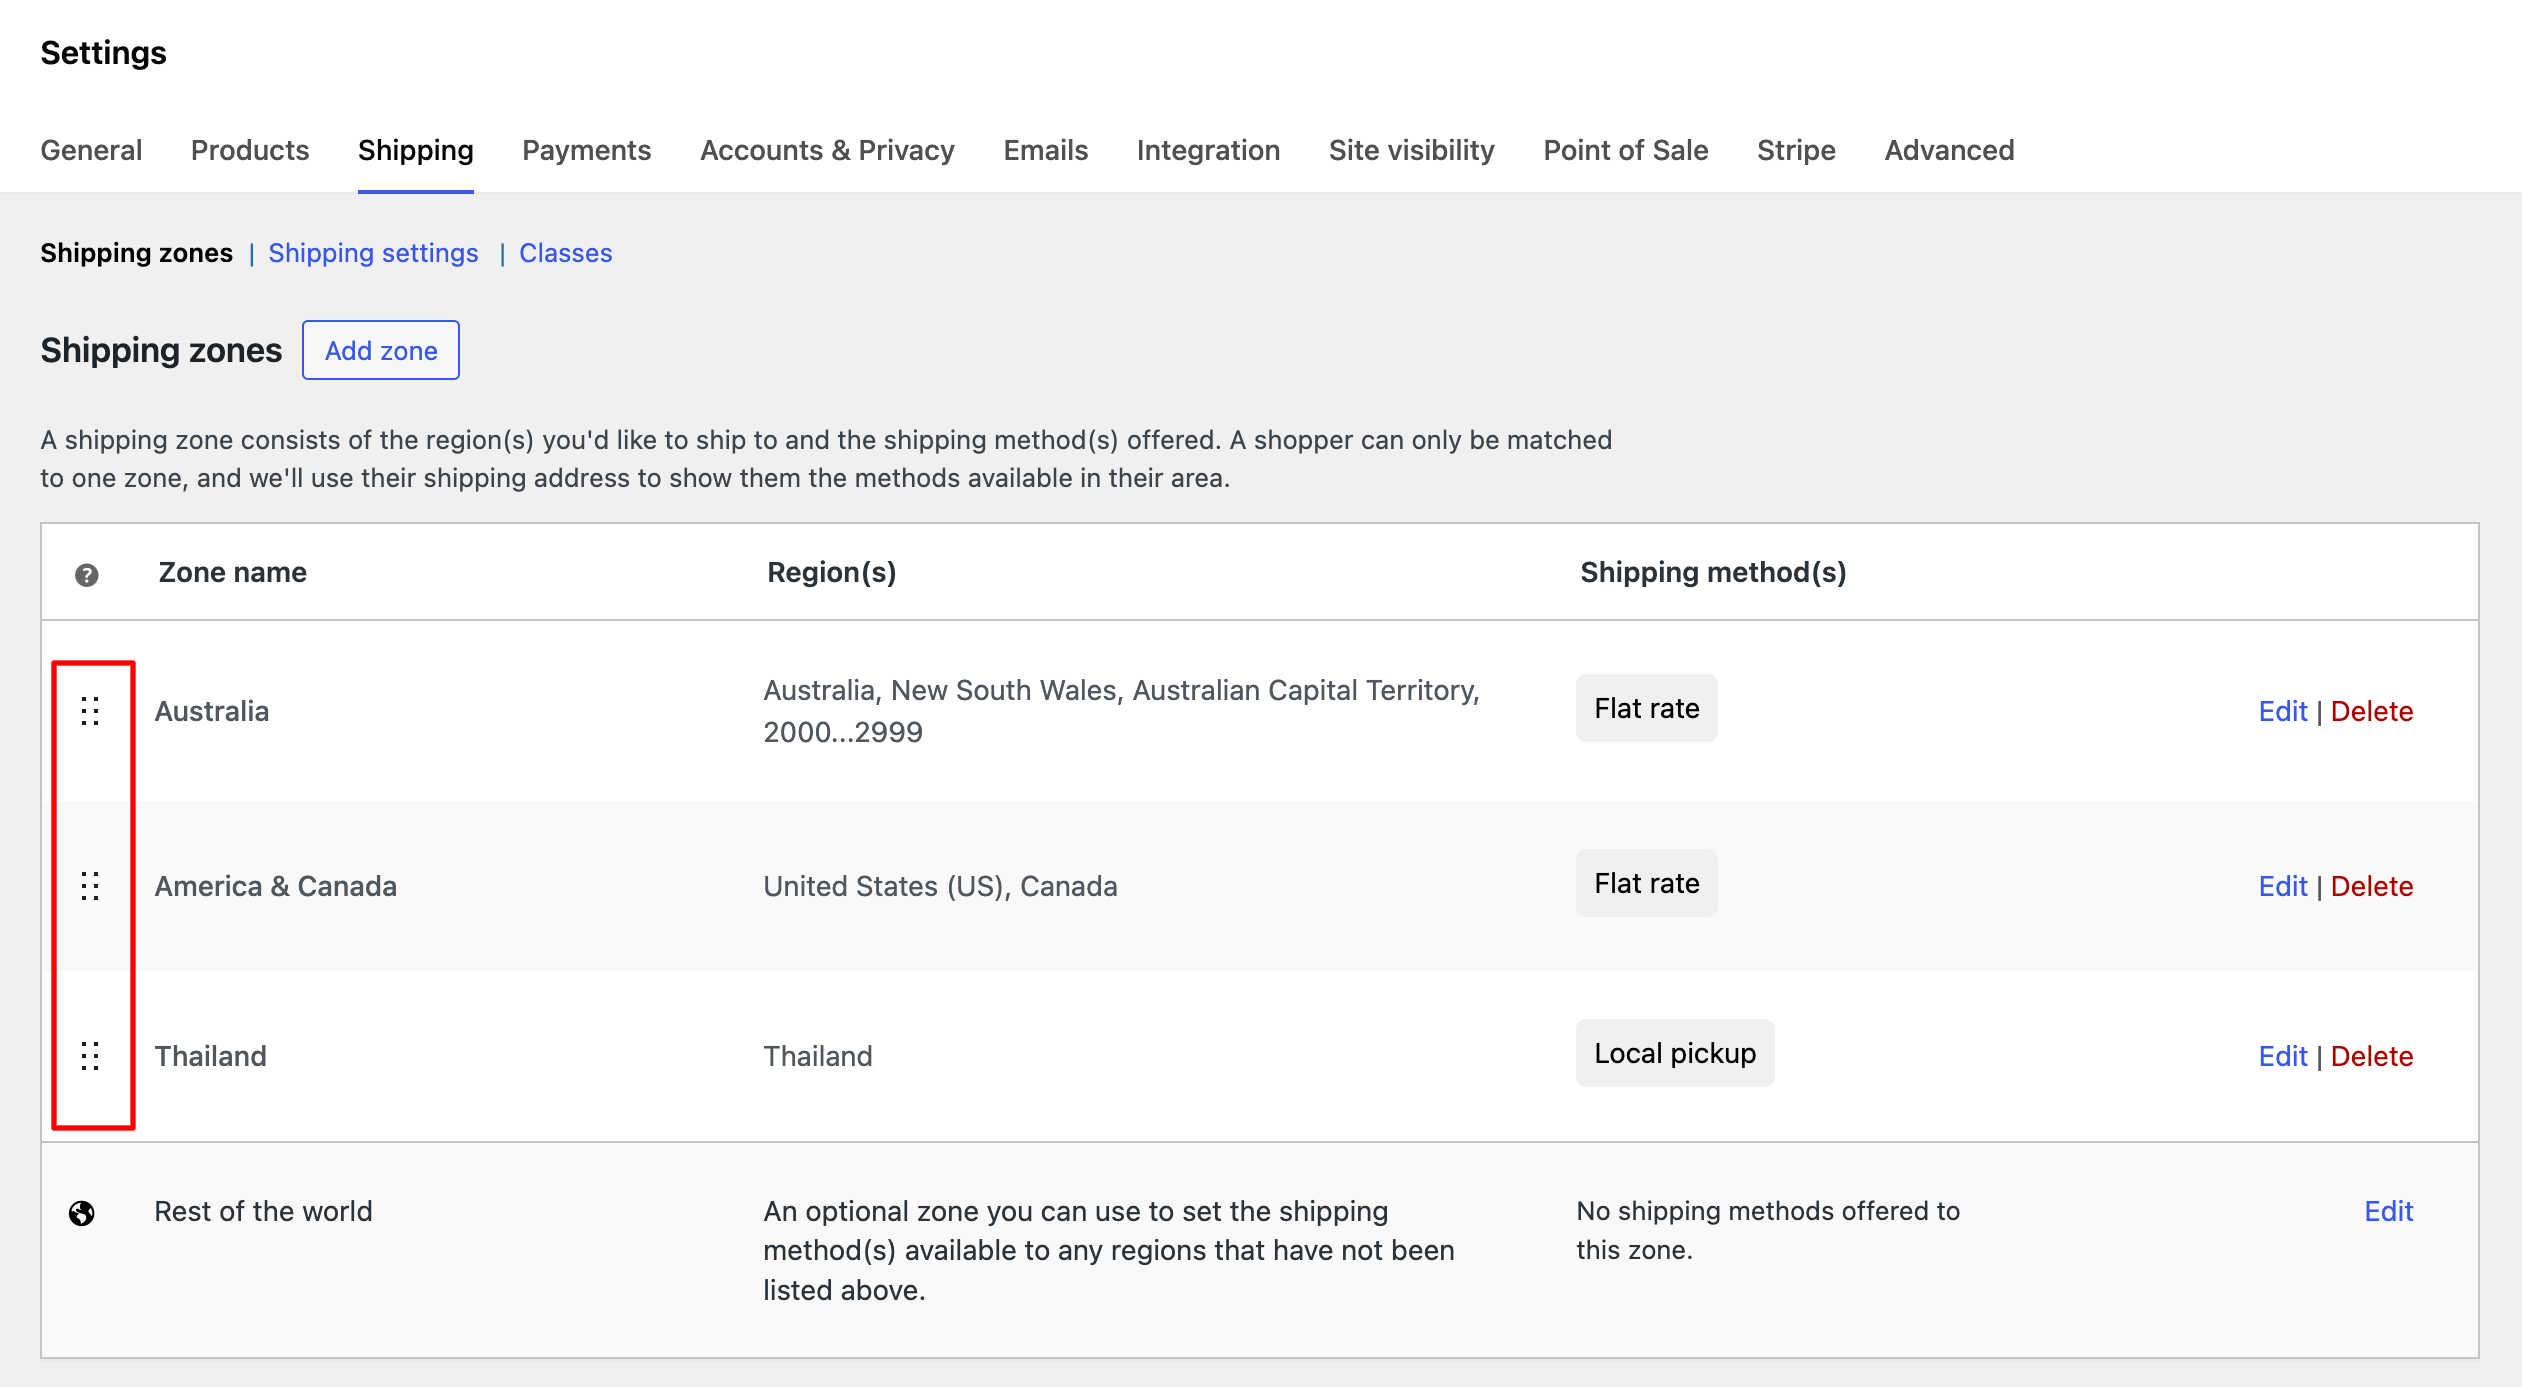
Here is how to rearrange your WooCommerce shipping zones.
Edit Shipping Zones in WooCommerce
To edit a shipping zone, hover over the Zone and click on the “Edit” option.
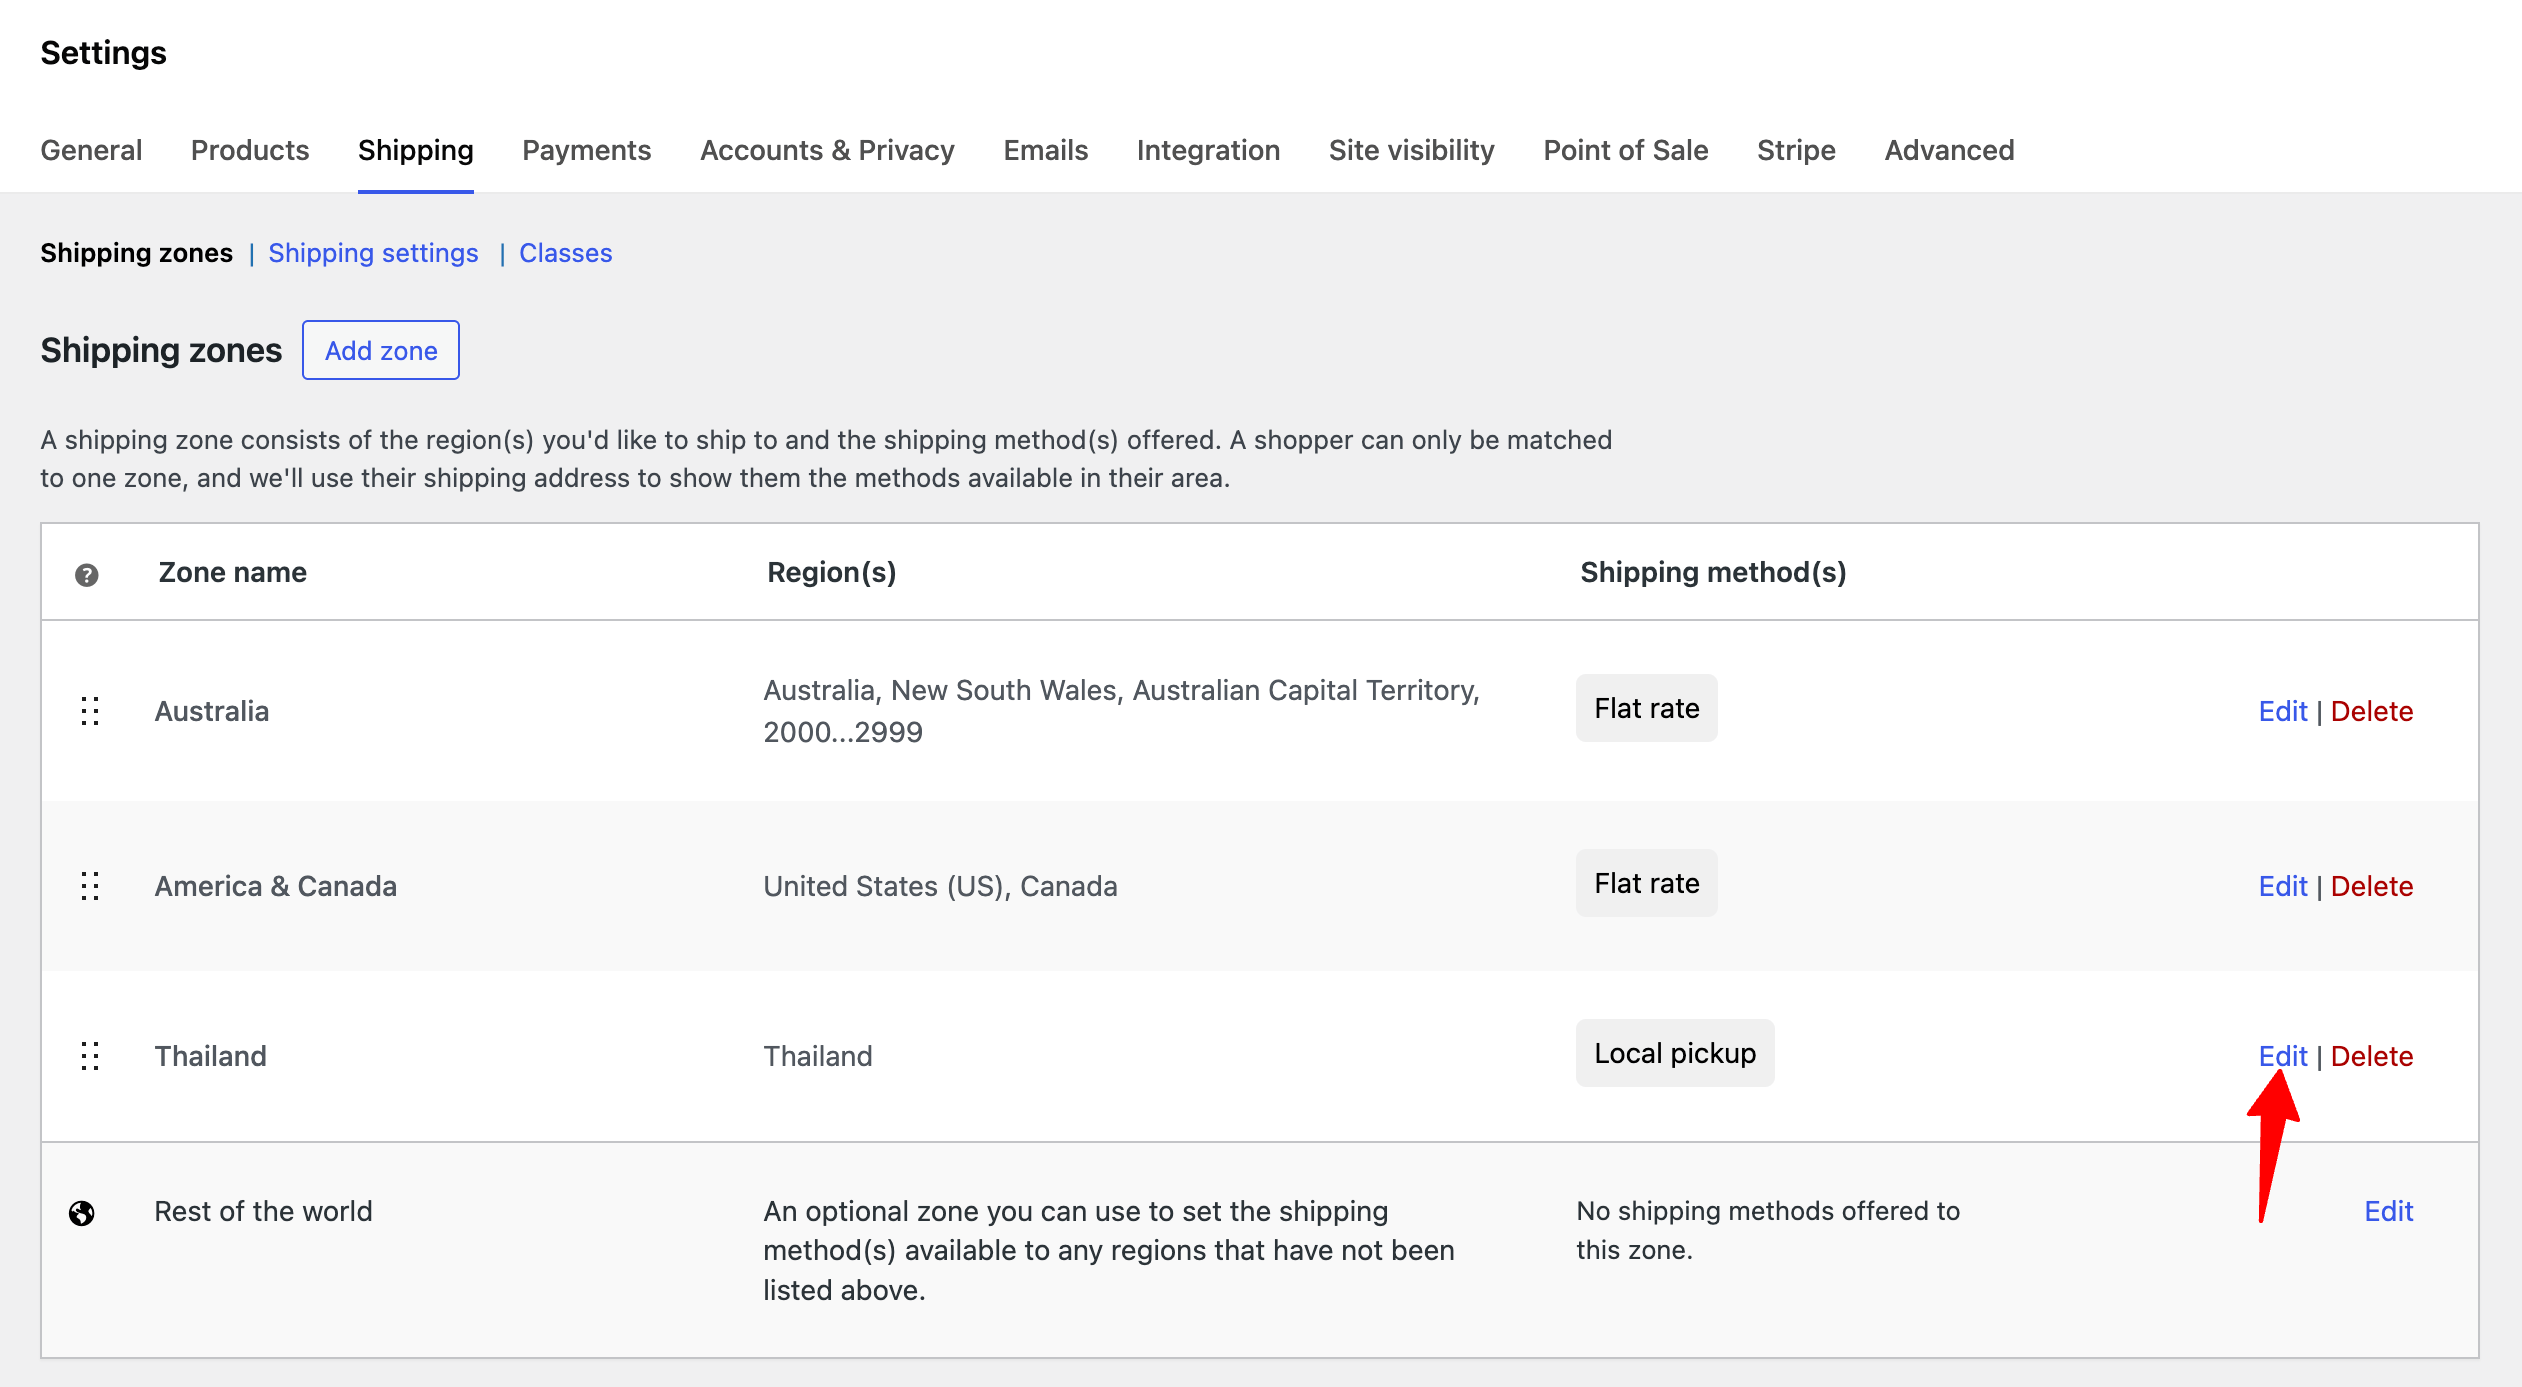
Now, you can modify the shipping name, zone, and shipping methods in WooCommerce. After making the changes, click on Save Changes.
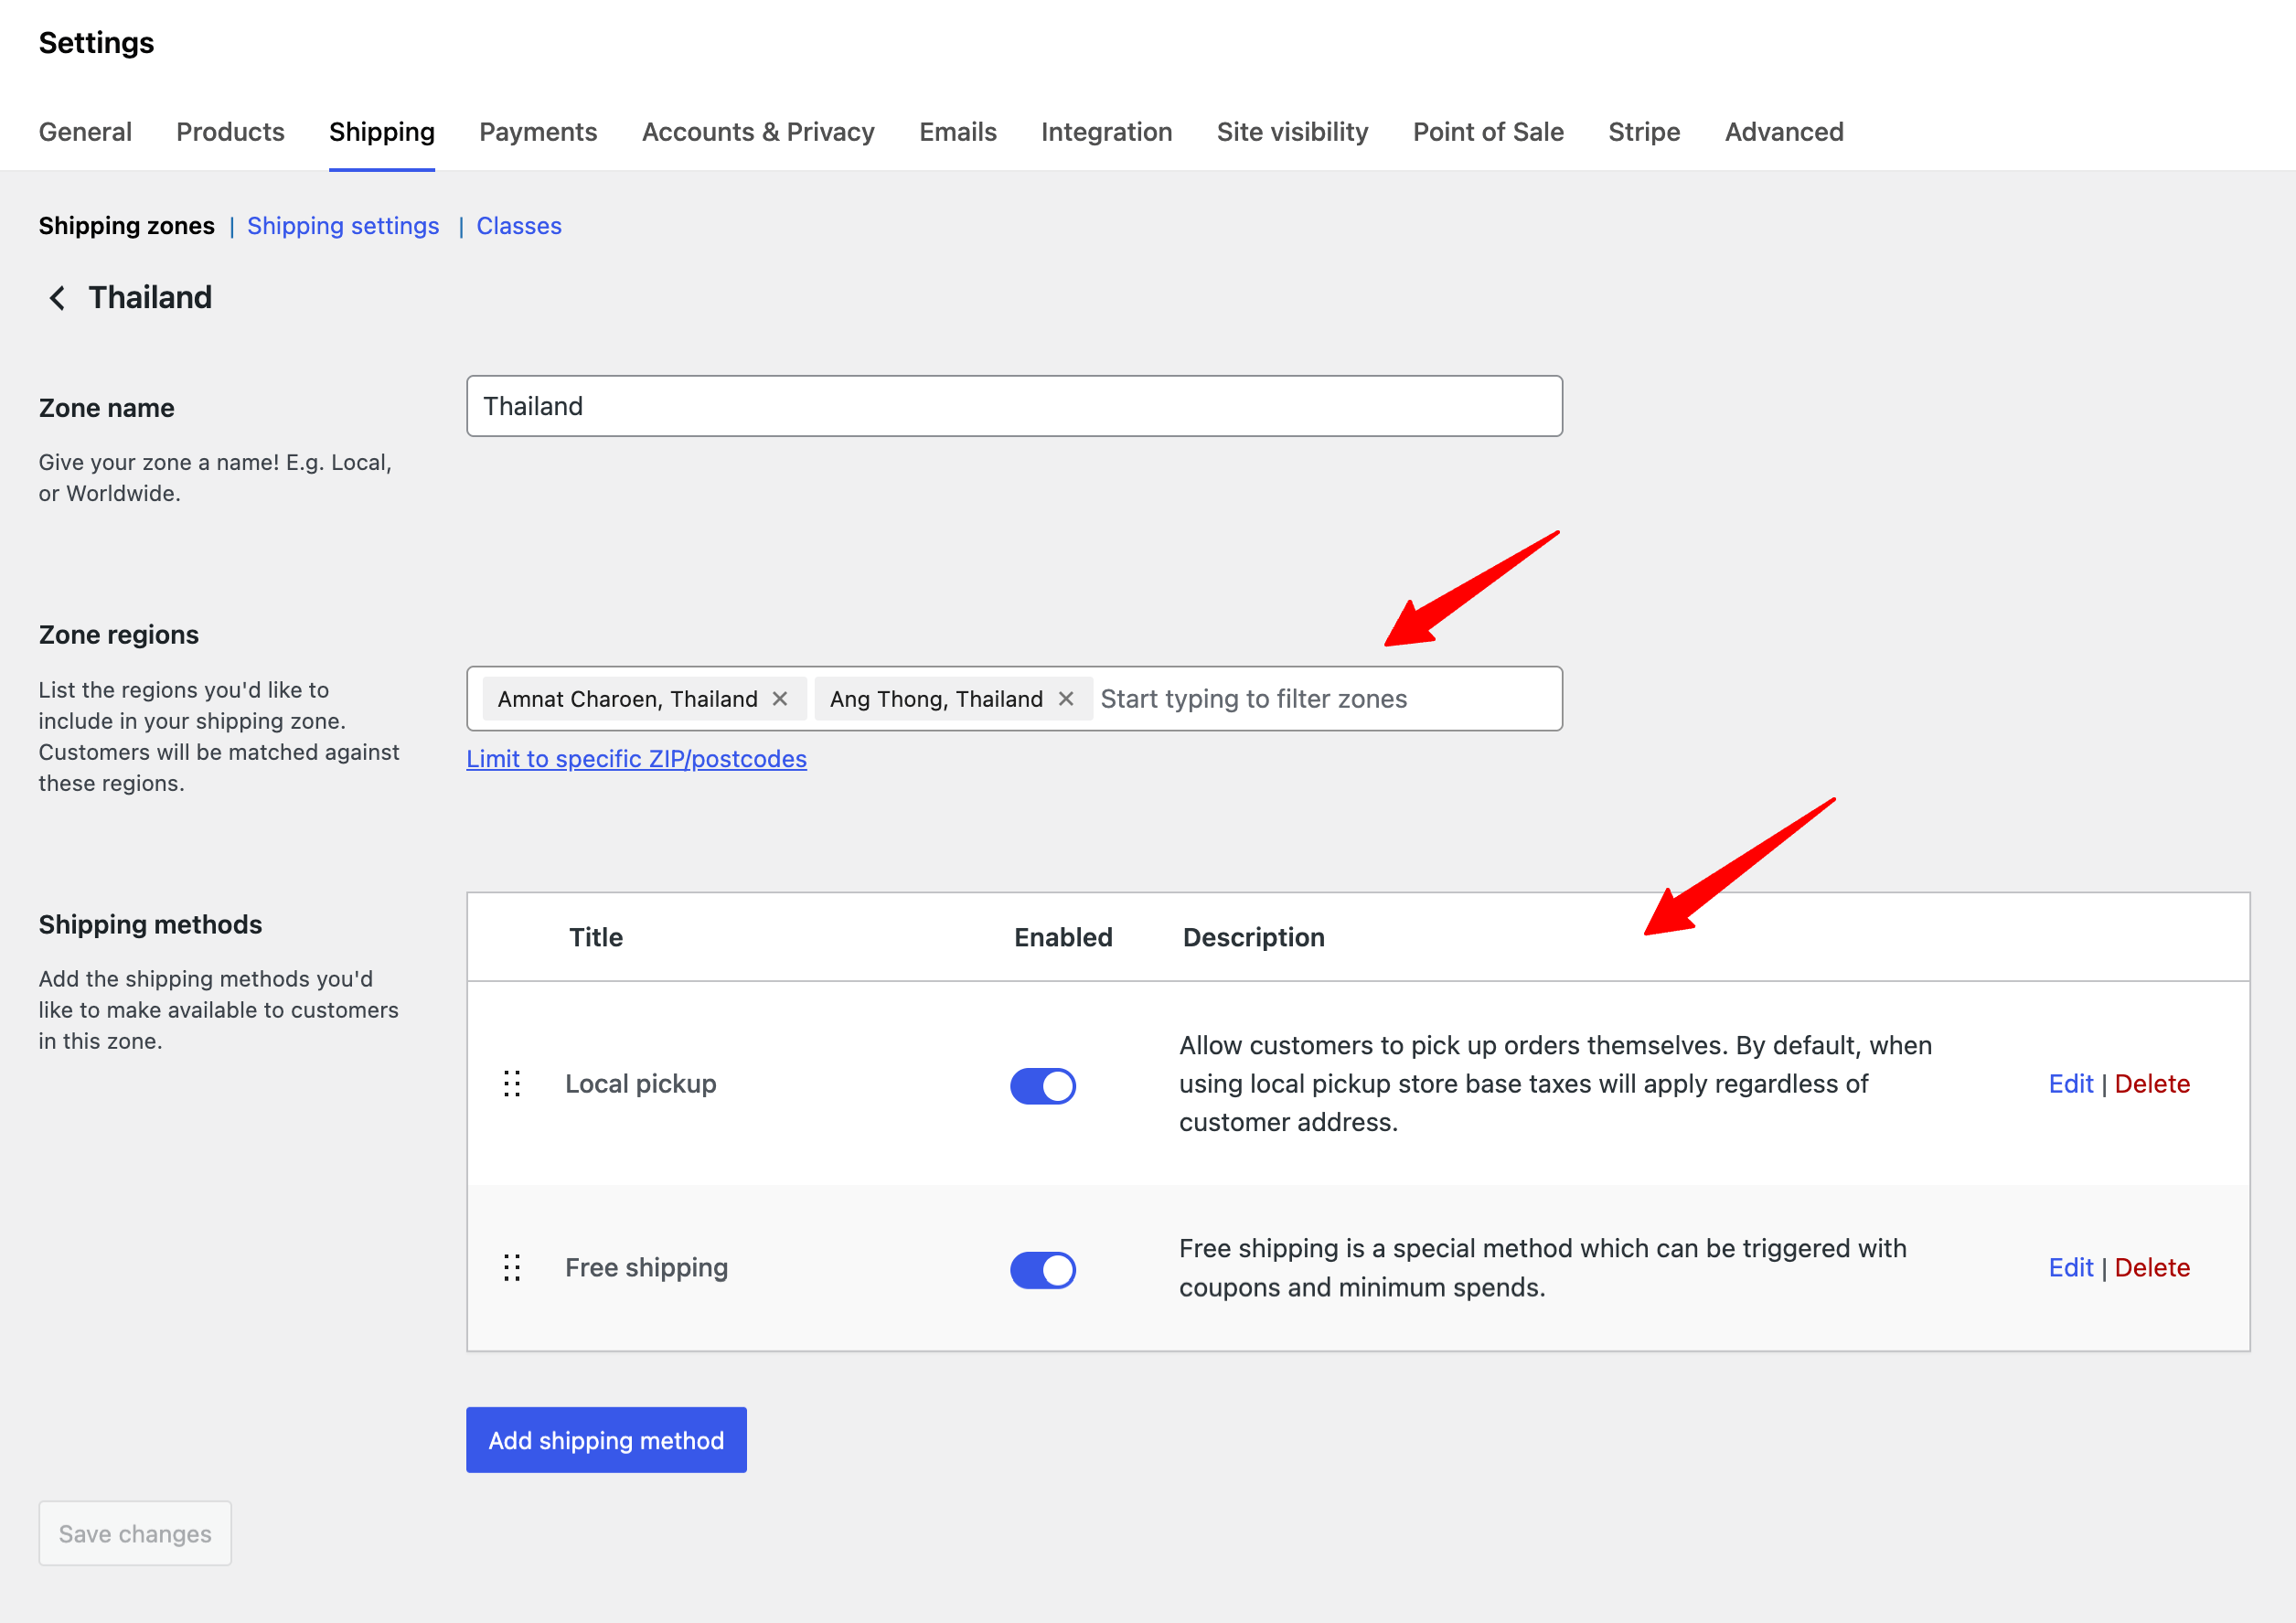
This will update the shipping Zone.
That's how you can update a shipping zone's details.
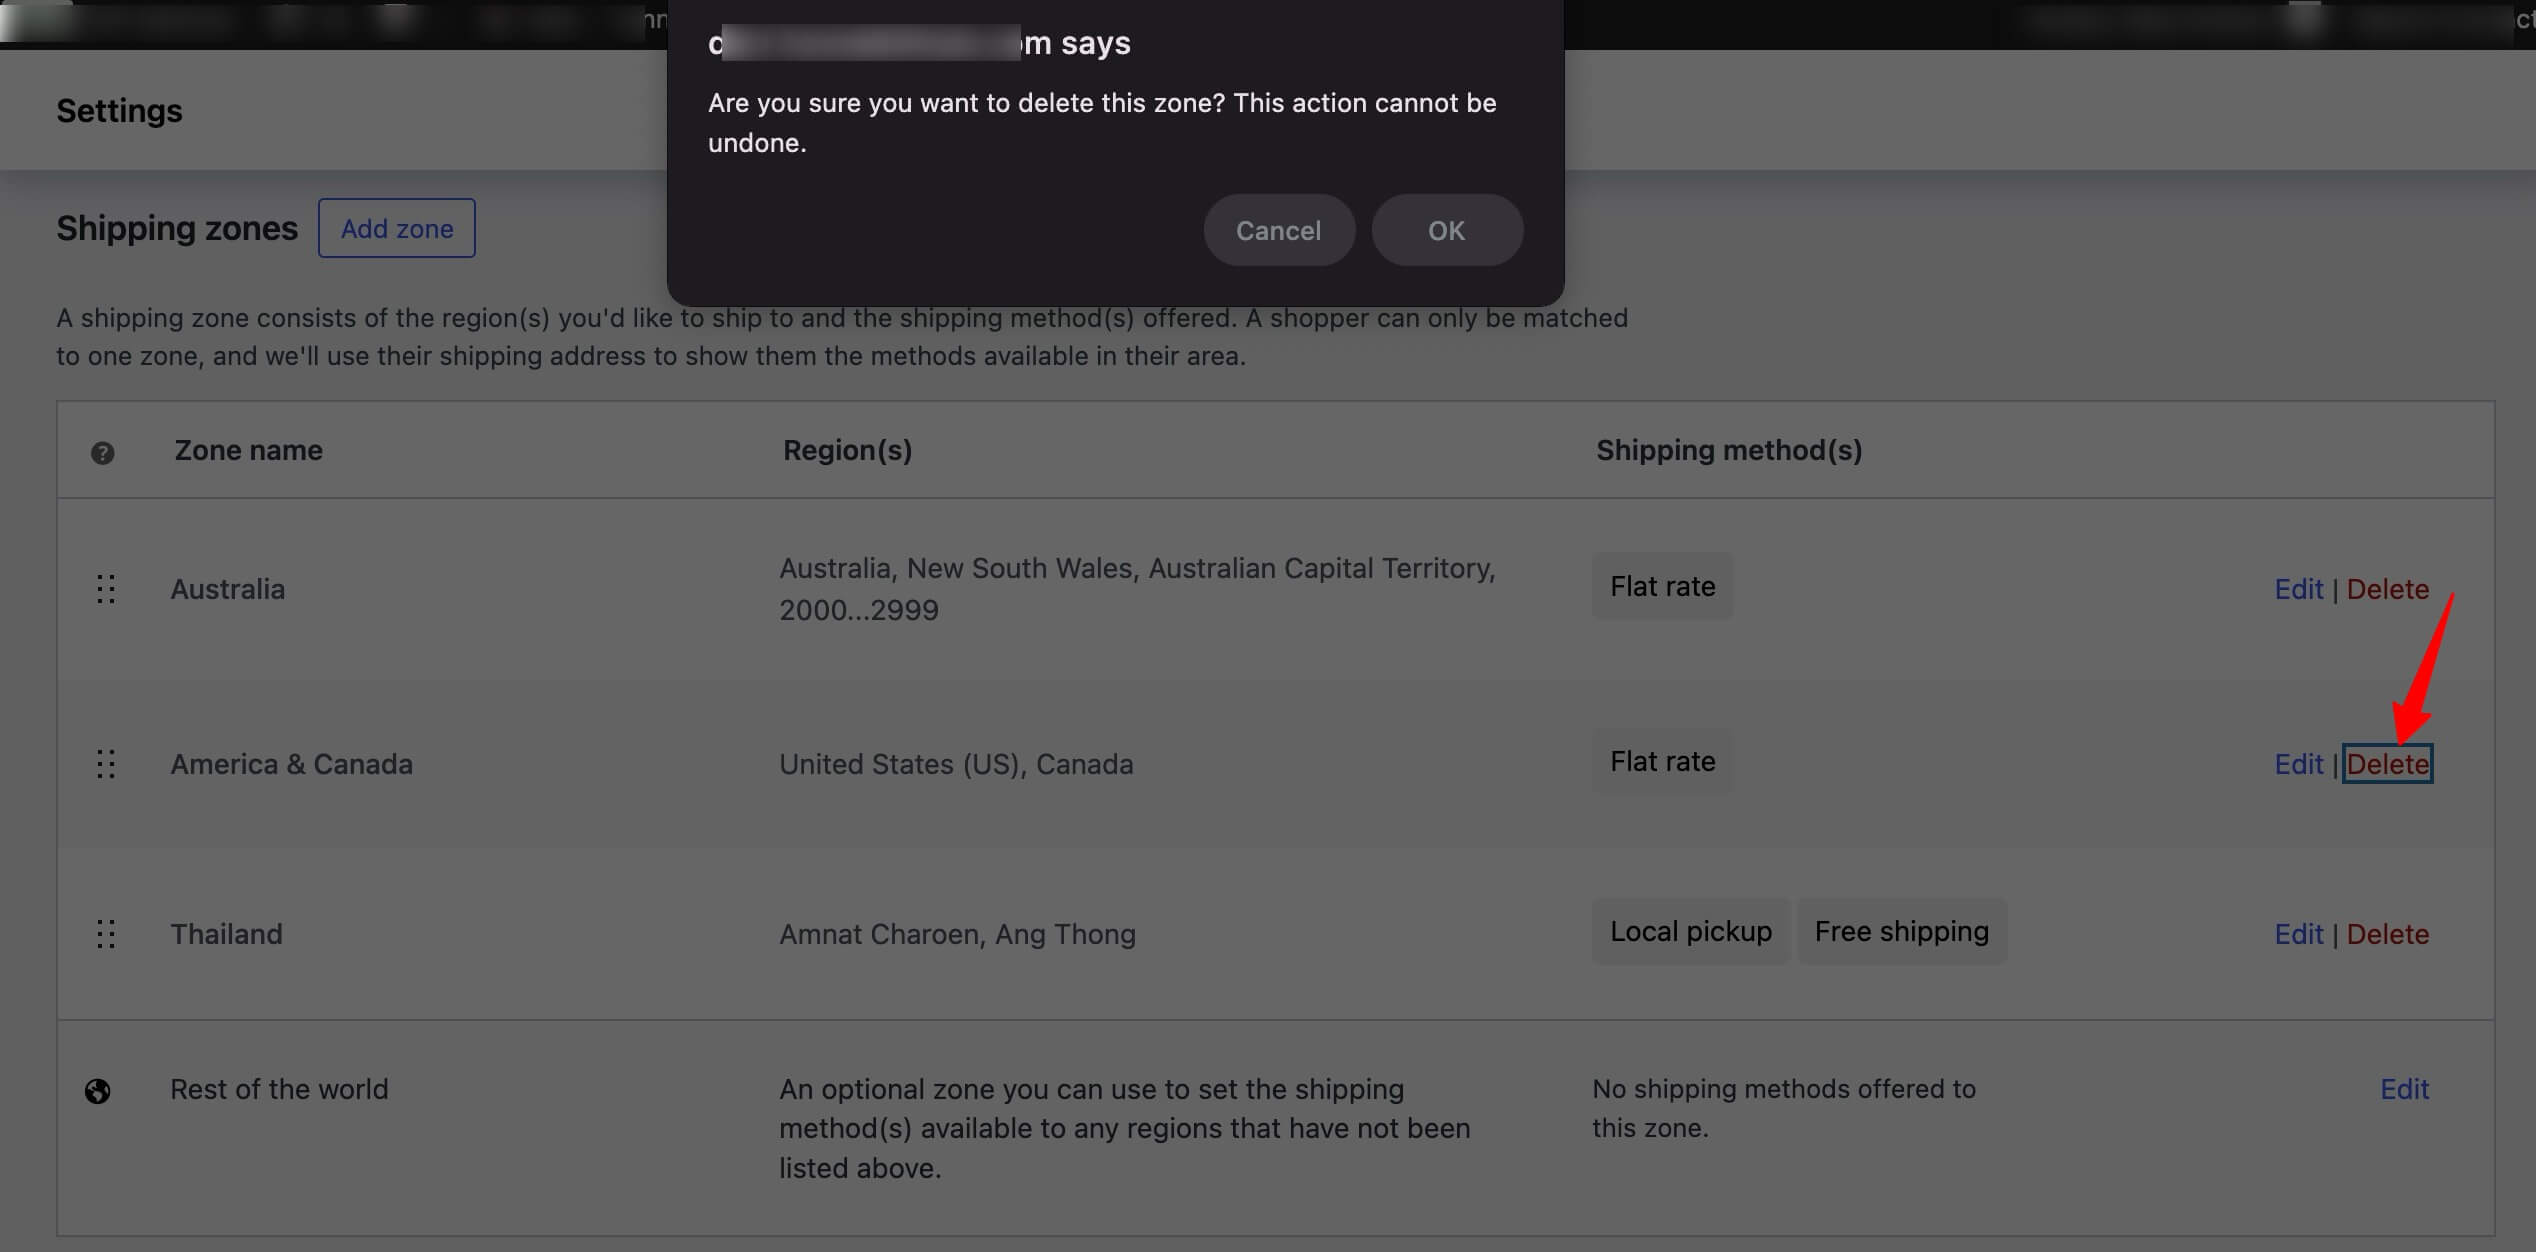
Delete a Shipping Zone in WooCommerce
You can delete a shipping zone if you want. To delete any WooCommerce shipping zone, hover over it and click on Delete. After that, you will be asked to confirm; click OK to confirm and delete the shipping zone.
Remove a shipping method from a shipping zone
As mentioned earlier, you can offer multiple shipping methods for a single shipping zone in WooCommerce.
But you can remove any unnecessary shipping methods from a shipping Zone at the same time.
To do that, go to the shipping zone, hover over the shipping method, and click ‘Delete’. After that, click on “OK” to confirm and delete the shipping method.
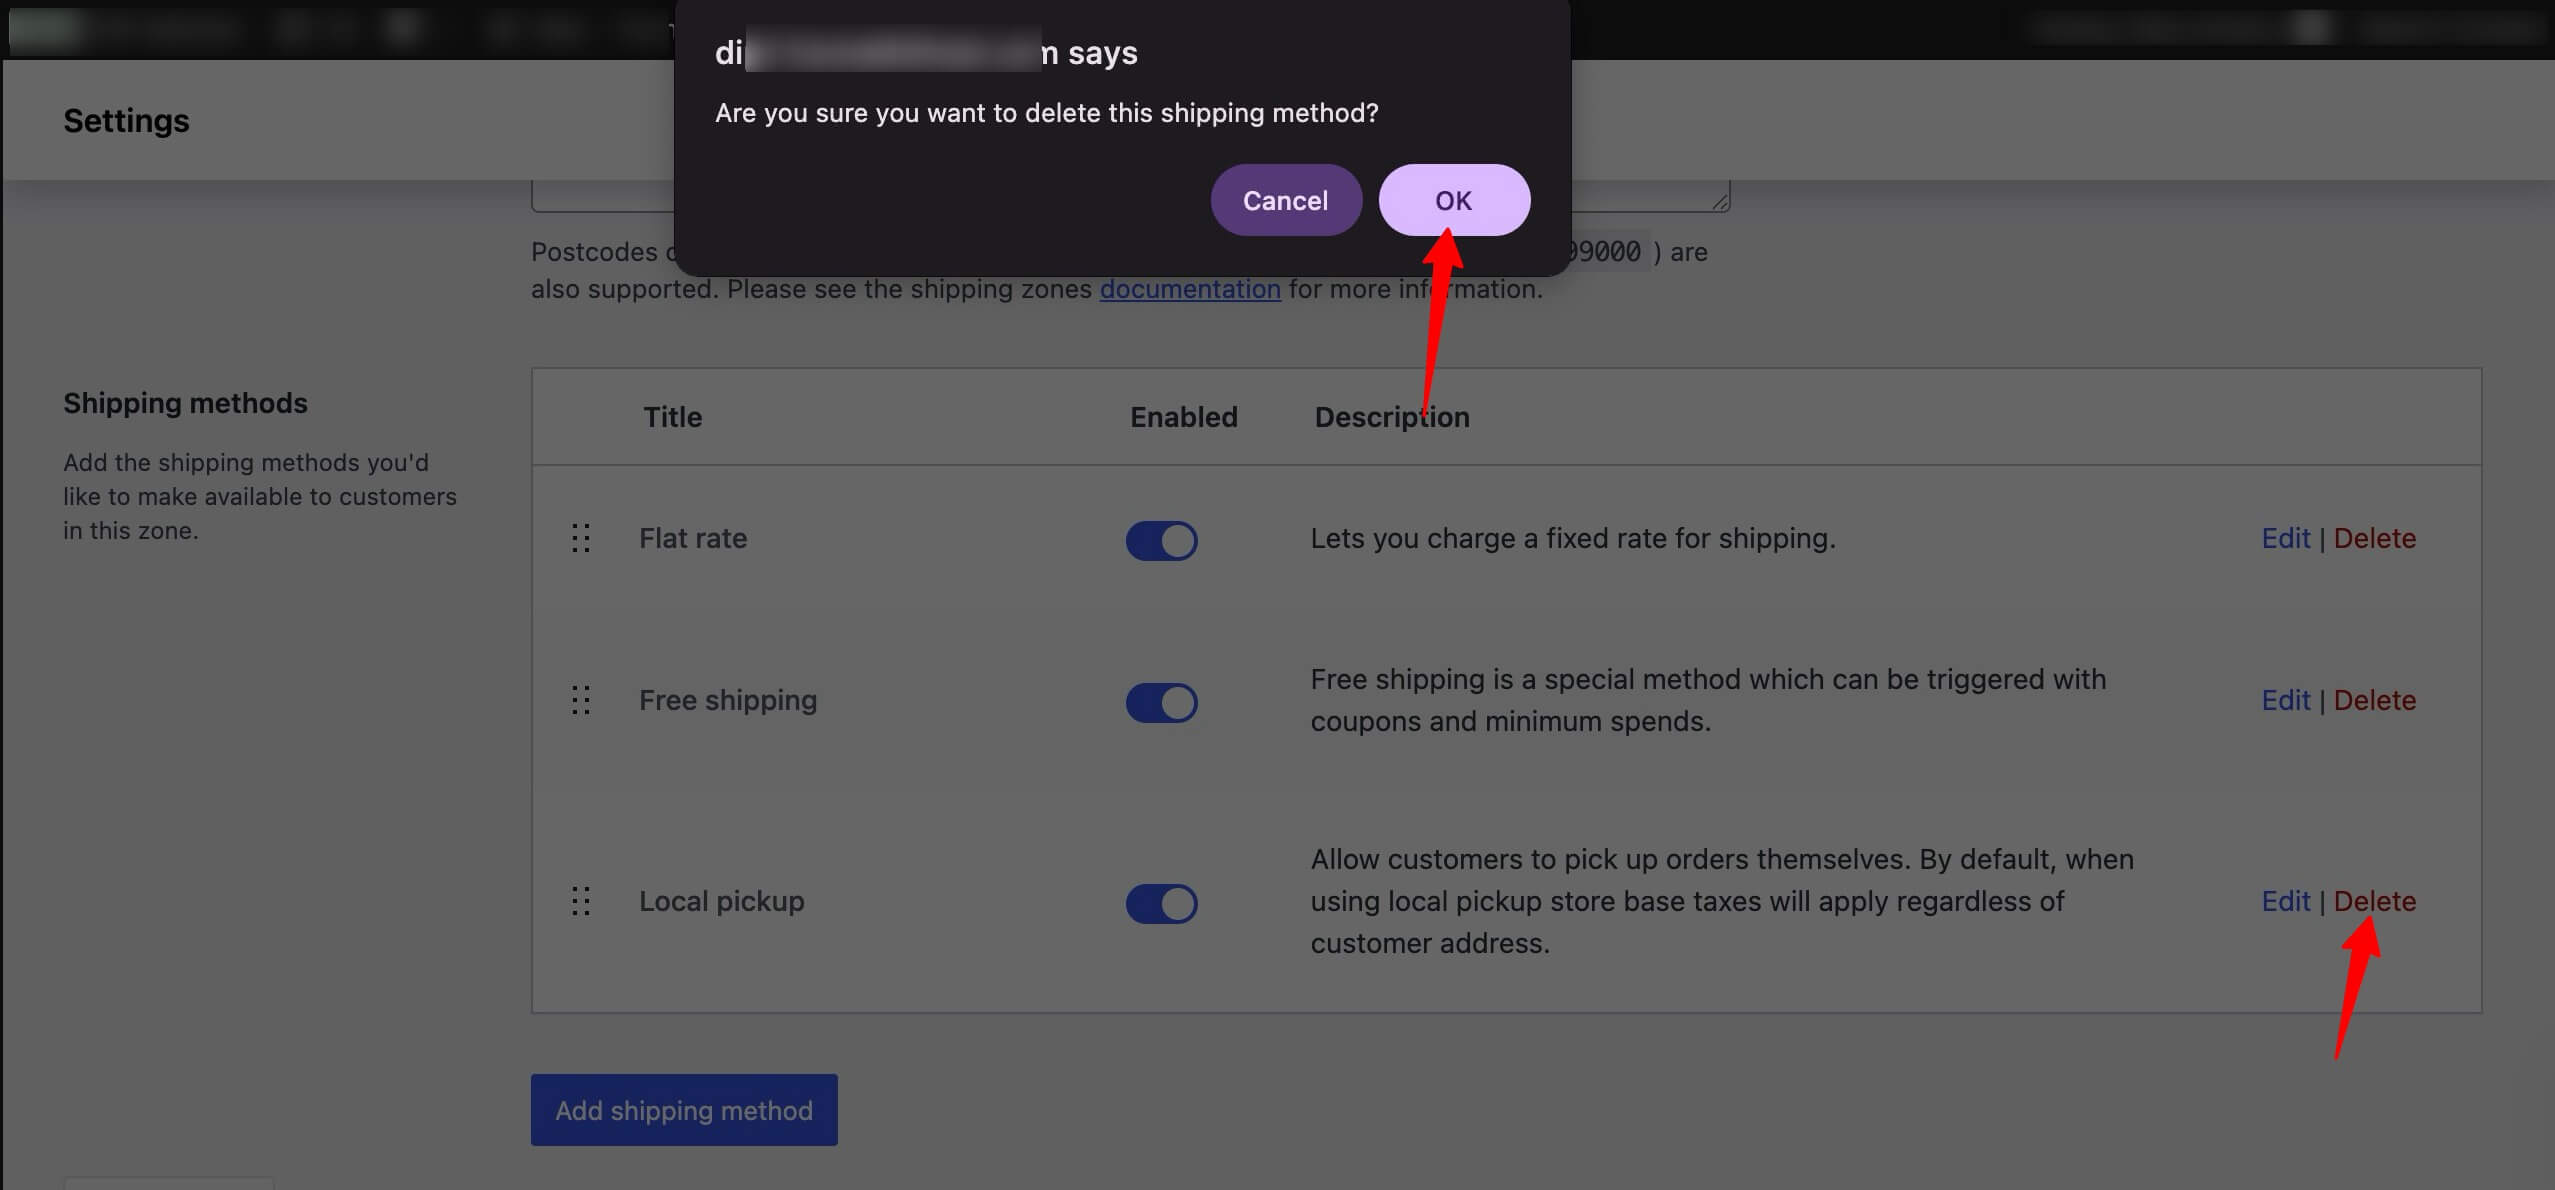
If you do not want to remove the shipping method completely, you can temporarily disable it by turning off the toggle button.
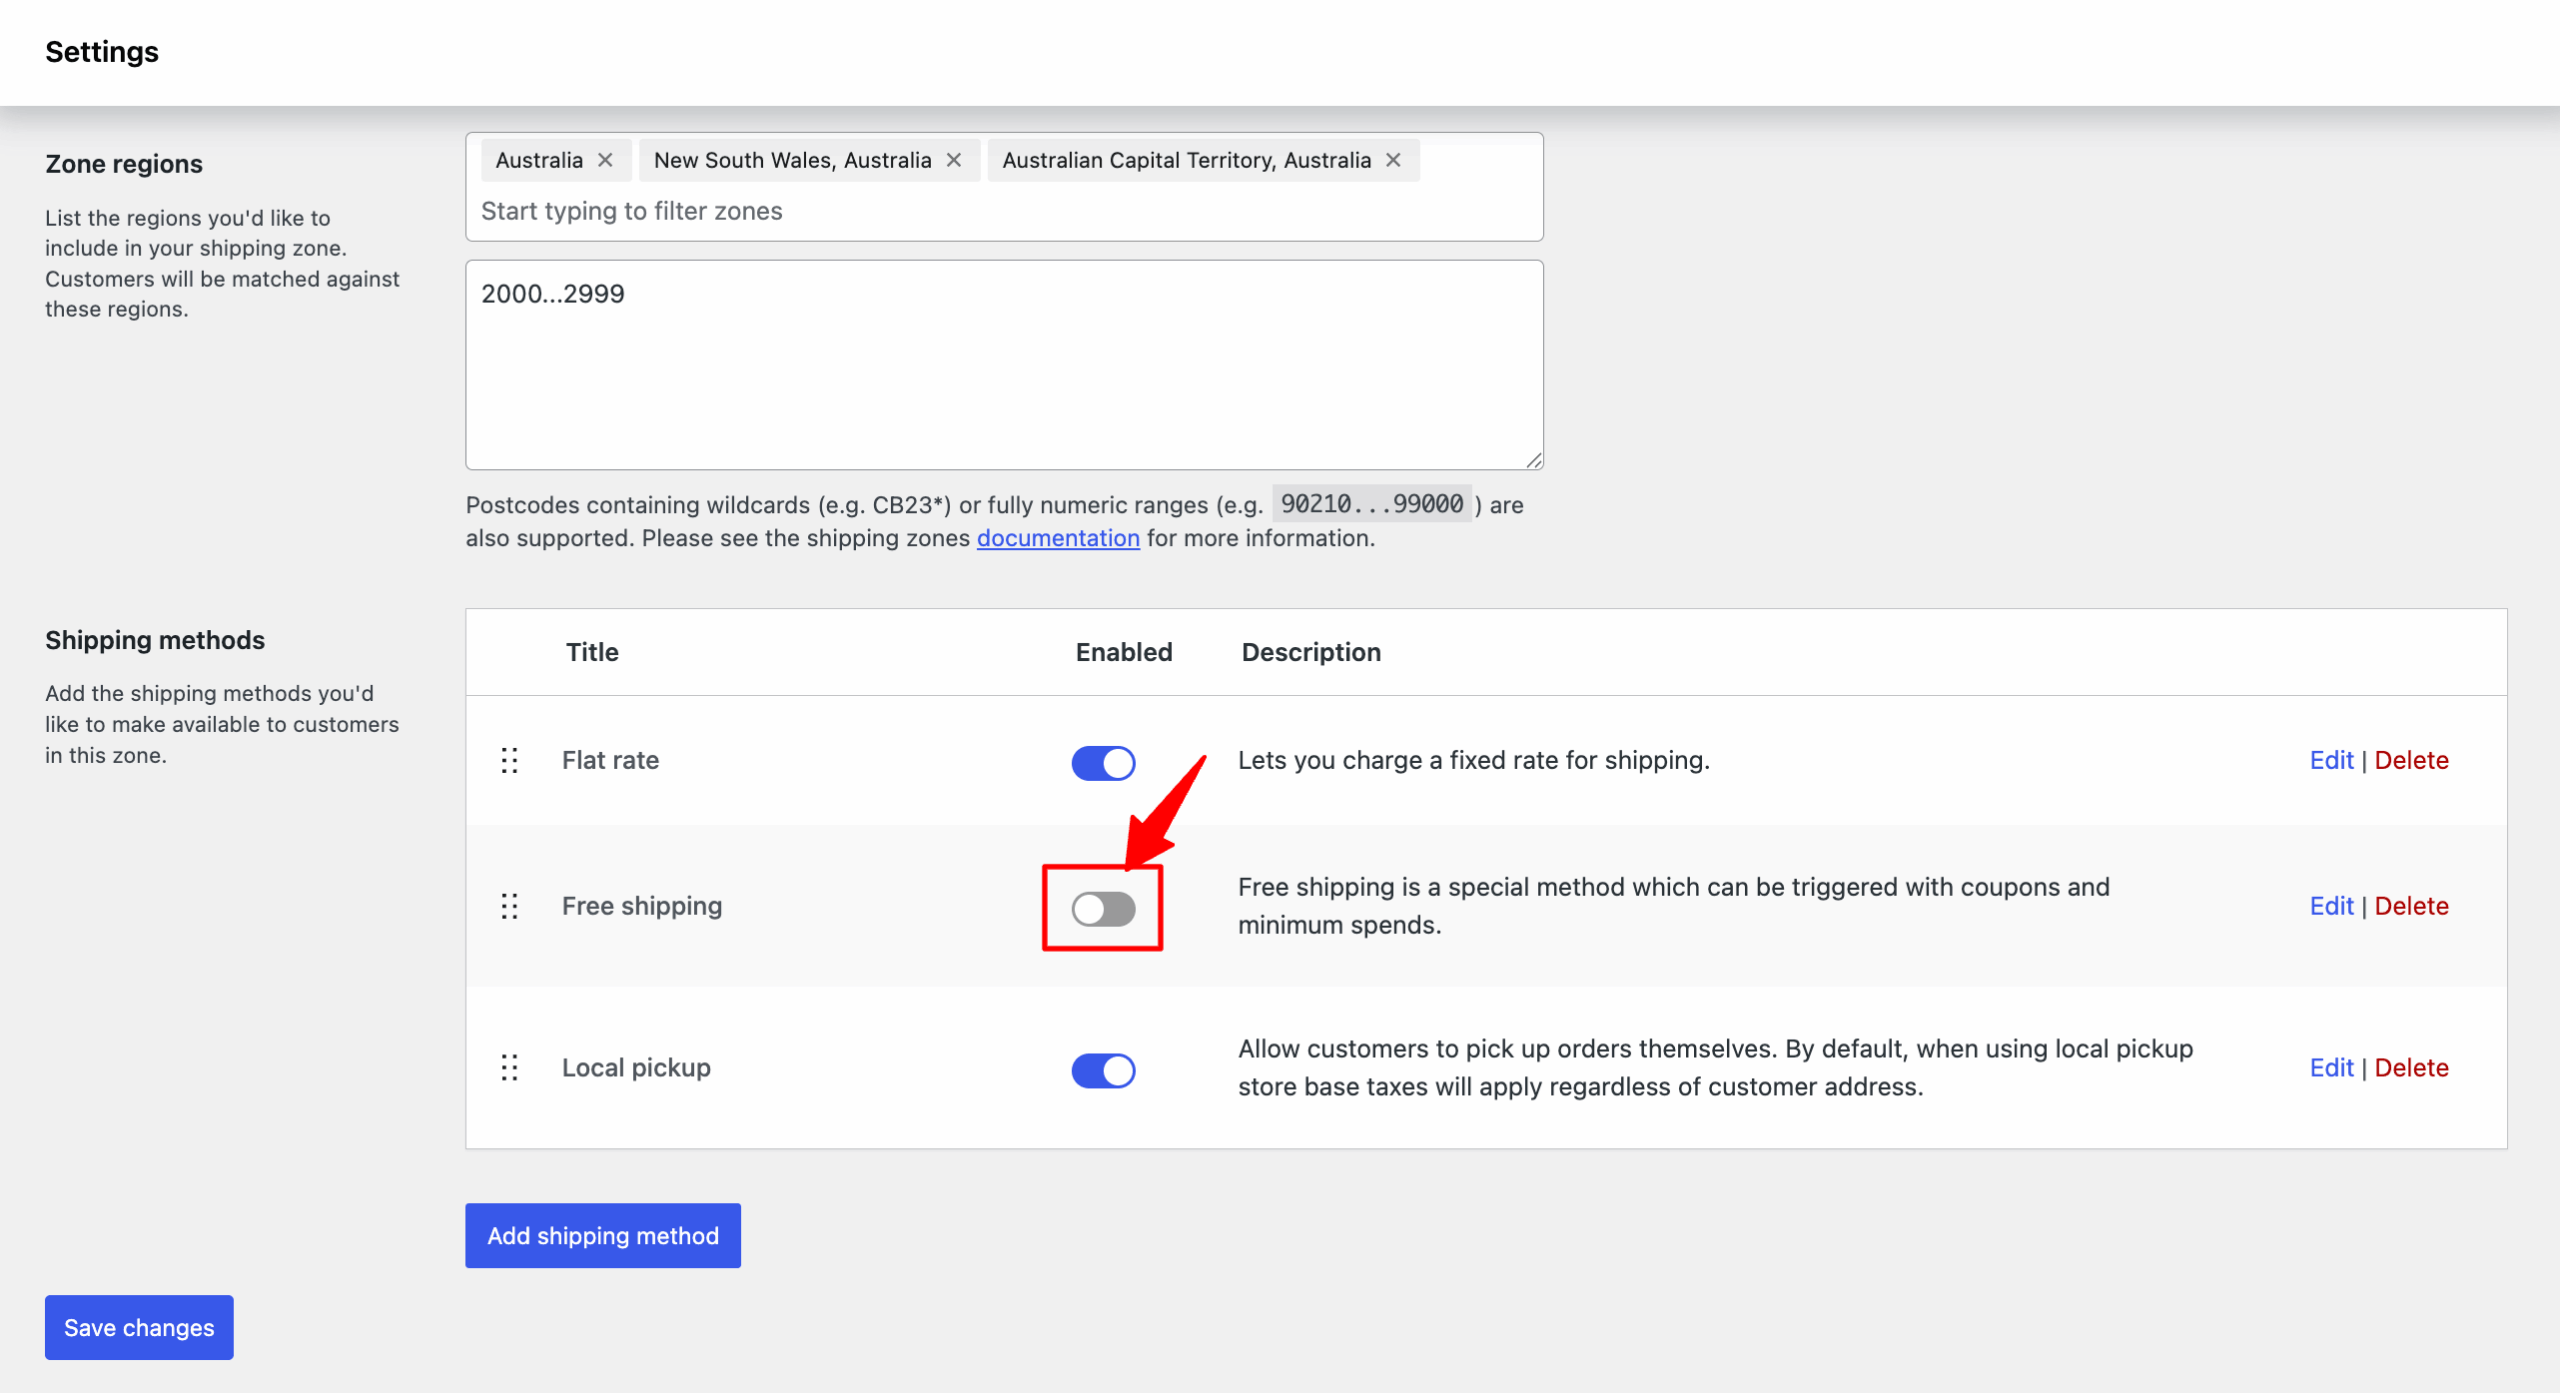
This will remove shipping from the WooCommerce checkout page.
As you can see, your WooCommerce checkout page displays all shipping options here.
The shipping rates have been calculated using the formula assigned to the heavy shipping class to which this product in the cart belongs.
7 WooCommerce Shipping Plugins to Expand Functionality
You can expand WooCommerce's shipping functionality with a range of advanced plugins.
We installed and tested each plugin on a live WooCommerce environment, configuring multi-zone shipping with weight-based rates. We checked checkout behavior, verified compatibility with common themes and page builders, and reviewed each plugin's update frequency and support quality.
Here are some of the best free and paid WooCommerce shipping plugins:
| Plugin Name | What It Does | Best For | Pricing |
| Table Rate Shipping | Creates multiple shipping rates based on location, price, weight, item count, or product class, with support for multiple rules per zone | Stores with complex or variable shipping pricing | $119/year |
| Order Tracking for WooCommerce | Shares order status and shipment tracking details on order pages and via email | Stores that want to reduce support queries and improve post-purchase trust | $49/year |
| FedEx Shipping Method | Shows real-time FedEx shipping rates at checkout using the FedEx API | US and Canada-based stores using FedEx carrier rates | $109/year |
| Flat Rate Shipping Plugin For WooCommerce | Builds conditional flat-rate or cost-based shipping methods by product, category, country, or quantity | Stores needing simple and predictable shipping rules | Free, Premium starts at $179/year |
| WooCommerce Weight-Based Shipping | Applies shipping rules based on order weight, destination, and cart subtotal | Stores selling products with varying weights or bulk orders | Free |
| WooCommerce PDF Invoices, Packing Slips, Delivery Notes, and Shipping Labels | Generates branded shipping documents directly from the WooCommerce dashboard | Stores handling in-house fulfillment and shipping paperwork | Free |
| Conditional Shipping for WooCommerce | Enables or restricts shipping methods based on products, weight, dimensions, or order value | Stores with shipping limitations or special delivery rules | Free |
Closing Notes on WooCommerce Shipping
Effective shipping management is crucial for the success of any WooCommerce store. By setting clear shipping policies and offering multiple shipping options, you can enhance your customers' shopping experience.
A great WooCommerce shipping strategy helps you meet customer expectations and leads to increased sales, customer loyalty, and overall business growth.
If you need more features than the default shipping options in WooCommerce, you can always rely on the advanced WooCommerce shipping plugin we discussed.
So make sure you develop a solid WooCommerce shipping strategy to help your business grow.
More WooCommerce Resources:
- How to Set Up WooCommerce Free Shipping
- How to Set Up WooCommerce Free Shipping Progress Bar
- How to Set Up WooCommerce Flat Rate Shipping
- Best WooCommerce Shipping Plugins
- The Ultimate Guide to Set Up Taxes in WooCommerce
Editorial Team
July 30, 2026Are you taking advantage of WooCommerce quantity discounts in your store? WooCommerce quantity discount is the concept of setting innovative pricing strategies by offering discounts on bulk items. Offering quantity...

Editorial Team
July 30, 2026A WooCommerce auto apply coupon adds a discount to your customer's cart without them needing to type or paste a coupon code. It works the way a supermarket loyalty card...
Editorial Team
July 27, 2026WooCommerce subscription upsell can help boost your revenue through subscription-based sales. Moreover, subscription-based products allow you to add predictability to your revenue. You can sell physical and digital products and...


