


The WooCommerce shipping calculator on the checkout page shows your customers their exact costs (with a breakdown of the shipping fee, tax, and item price, plus the total) the moment they start typing their address.
When it’s missing or misconfigured, buying from your store feels like ordering dinner through an app.
On the final payment screen, you added items worth $25, but some hidden fees push your total past $40. Suddenly, the leftovers in your fridge sound fine.
Baymard Institute notes that extra costs like shipping cause roughly 48% of checkout abandonments.
But do you know your online store already behaves this way natively? A customer types a country and postcode, WooCommerce matches that address against your shipping zones, and the rates in the order summary refresh.
The real work is configuring your zones and methods so the right rates appear, and knowing what to do when they refuse to.
In this guide, we will set up the checkout shipping calculator step by step, five native flat-rate formulas, and six fixes for when methods aren’t showing.
Table of Contents
- 1 Does WooCommerce Have a Built-In Shipping Calculator?
- 2 How to Set Up the Shipping Calculator on Your WooCommerce Checkout Page
- 3 How to Enable the Shipping Calculator on the Cart Page
- 4 5 Flat Rate Formulas for Variable Shipping Rates
- 5 How to Show WooCommerce Live Shipping Rates at Checkout
- 6 Shipping Calculator Not Showing at Checkout? 6 Fixes
- 7 Make Your Shipping Options Convert Better at Checkout
- 8 5 Best Practices to Keep Your Checkout Shipping Rates Accurate
- 9 Frequently Asked Questions
- 10 Start Showing Accurate Shipping Rates on Your WooCommerce Checkout Page
Does WooCommerce Have a Built-In Shipping Calculator?
Yes, WooCommerce calculates shipping automatically at checkout.
It reads the address, matches the first shipping zone that fits, and returns every method added to that zone.
Rates update over AJAX without a page reload, right in front of the customer.
The same engine feeds three placements:
- Product page: Not supported natively. Needs a third-party plugin.
- Cart page: Only appears if "Enable the shipping calculator on the cart page" is ticked in your settings.
- Checkout page: Always on, assuming the cart holds a physical product.
The job is to make sure your shipping zones actually return a rate for every customer who reaches your checkout.
How do rates update on the Block Checkout vs the Classic Checkout?
WooCommerce currently runs two checkout experiences, and the calculator behaves slightly differently on each.
- Checkout block
The default for new WooCommerce stores. Shipping options sit in their own step and refresh automatically as the customer completes the address fields.
Until enough address data exists, the block shows a prompt asking the customer to enter an address to view shipping options.
- Classic shortcode checkout
Stores using [woocommerce_checkout] get the traditional layout.
If you change the country, state, or postcode, it triggers an AJAX refresh of the order review table, where methods appear as radio buttons.
Both these checkouts work out of the box. If rates stop updating, the likely culprit is an outdated checkout template or an aggressive caching setup.
How to Set Up the Shipping Calculator on Your WooCommerce Checkout Page
The calculator can only display rates you have configured. If no zones or methods exist yet, customers see an error where the options should be.
Here we will build a real setup and carry it through every step.
We are building a United States zone offering free shipping on orders over $300, a $10 Standard rate, and a $20 Express rate.
Swap in your own regions and numbers as you go.
Step 1: Create a shipping zone
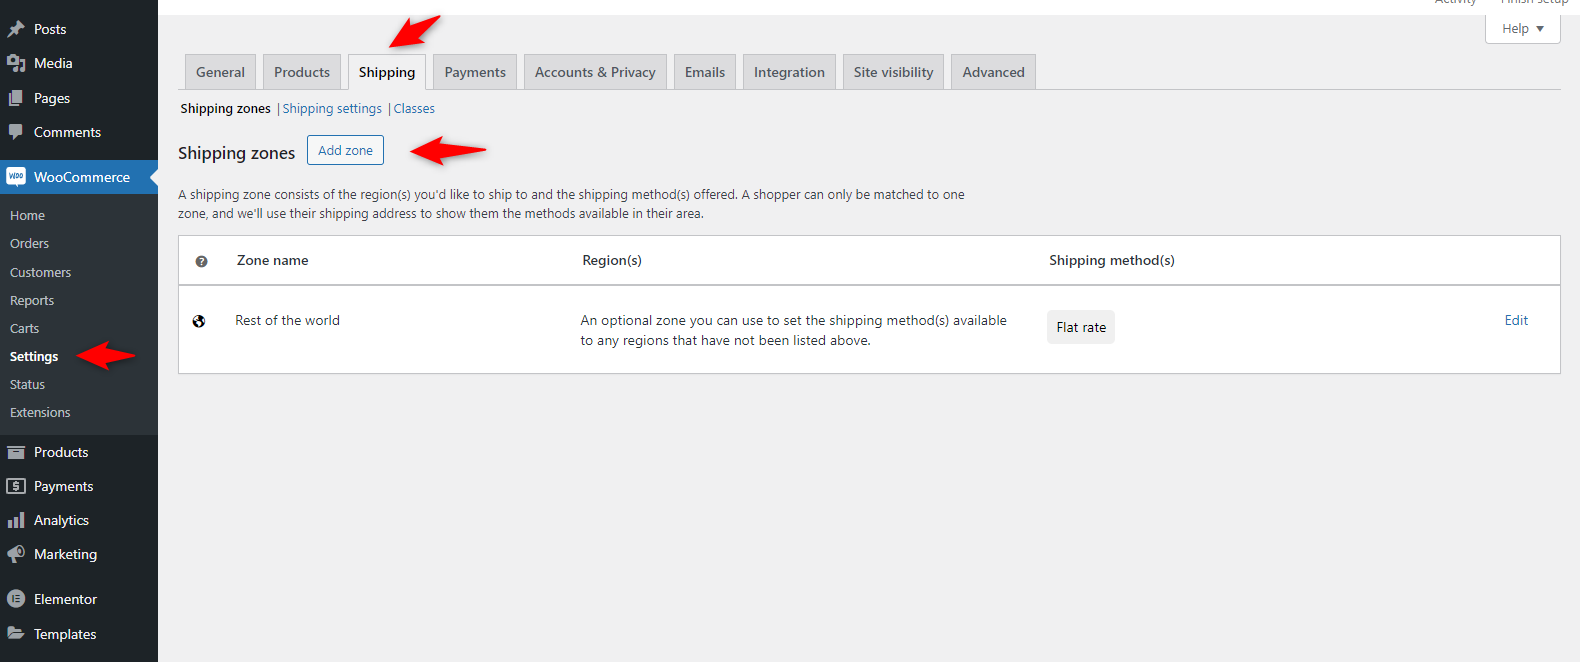
Navigate to WooCommerce ⇨ Settings and click on the 'Shipping' tab.
You'll find the option to add a shipping zone by clicking on 'Add zone'.
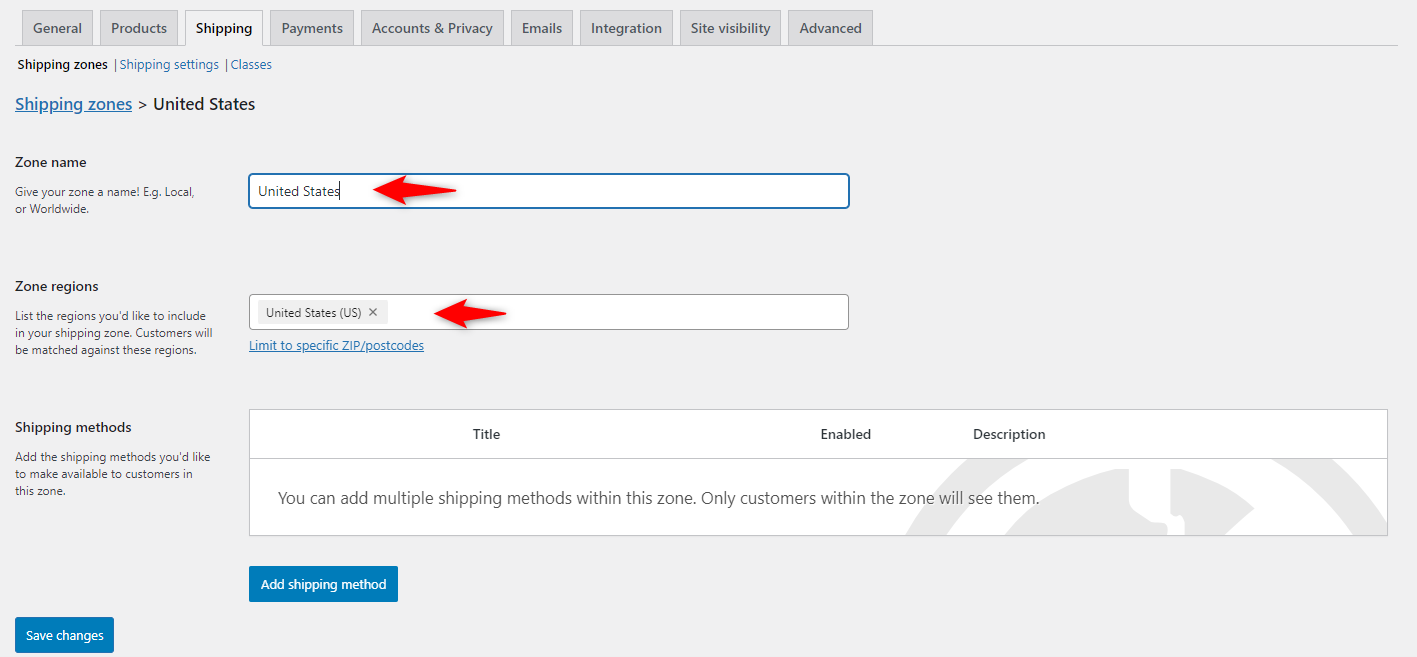
Add the title of your shipping zone in the menu and select the area.

Step 2: Add a free shipping method
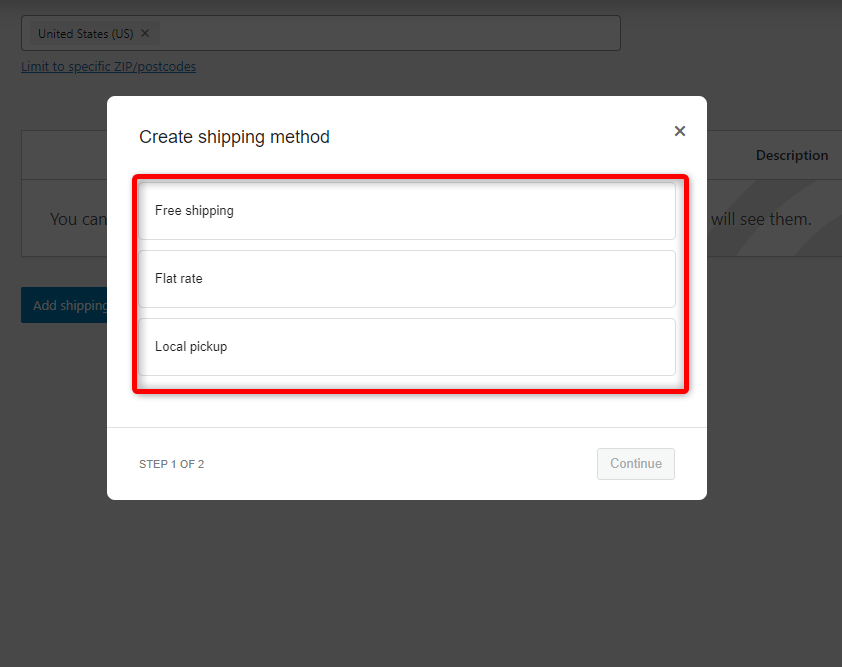
Inside the new zone, click Add shipping method and choose 'Free Shipping'.
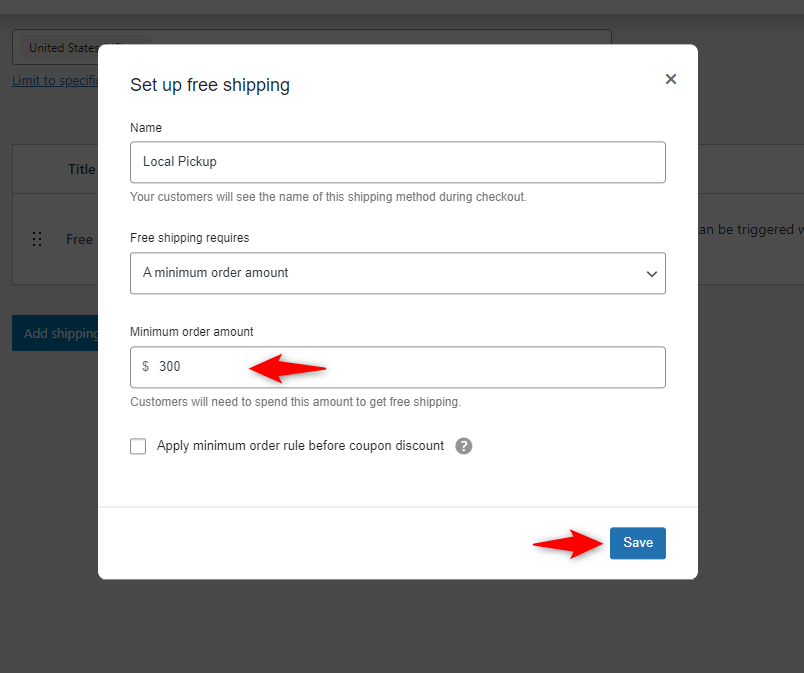
Set the requirement to A minimum order amount and enter your threshold.
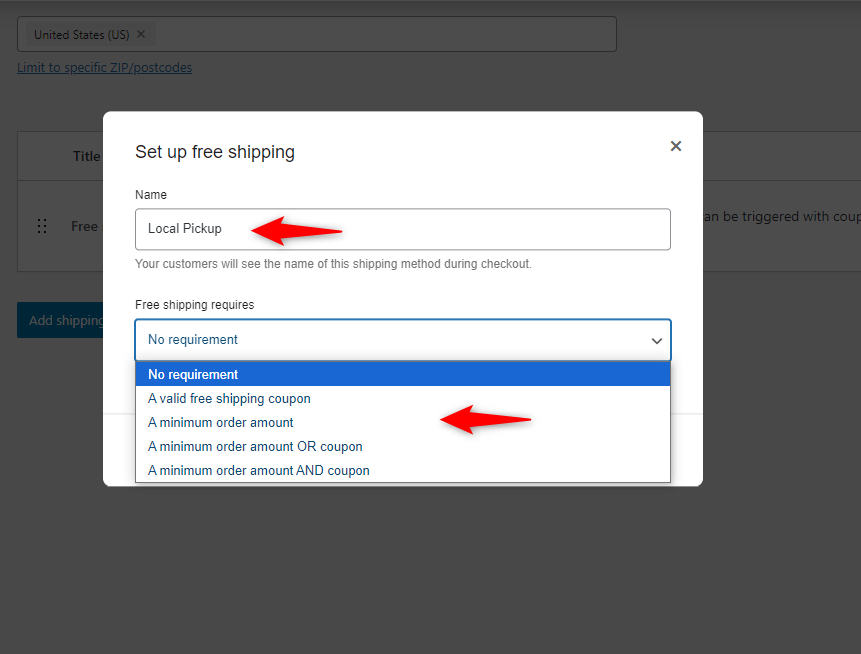
We are using $300. Pick this number deliberately.
Set it slightly above your current average order value so customers have a realistic reason to add one more product.
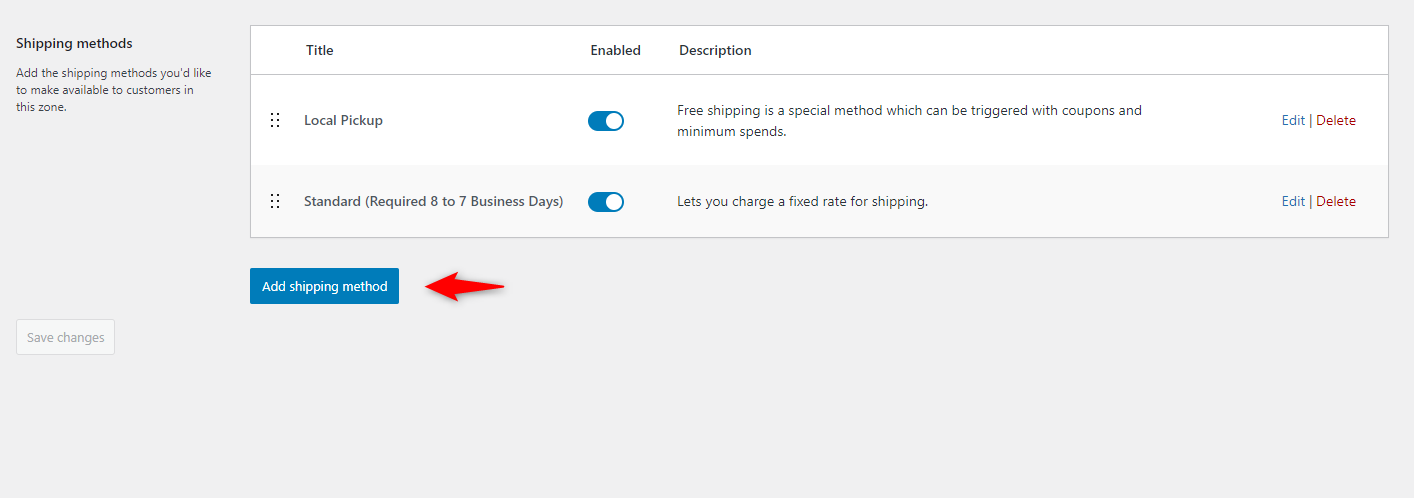
Here, you can see the method is on the list.
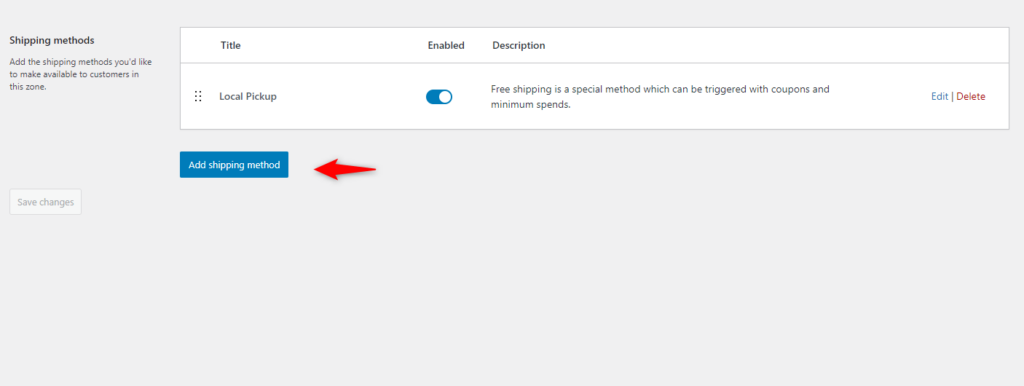
Let’s now add another shipping method.
Step 3: Add flat rate methods for Standard and Express
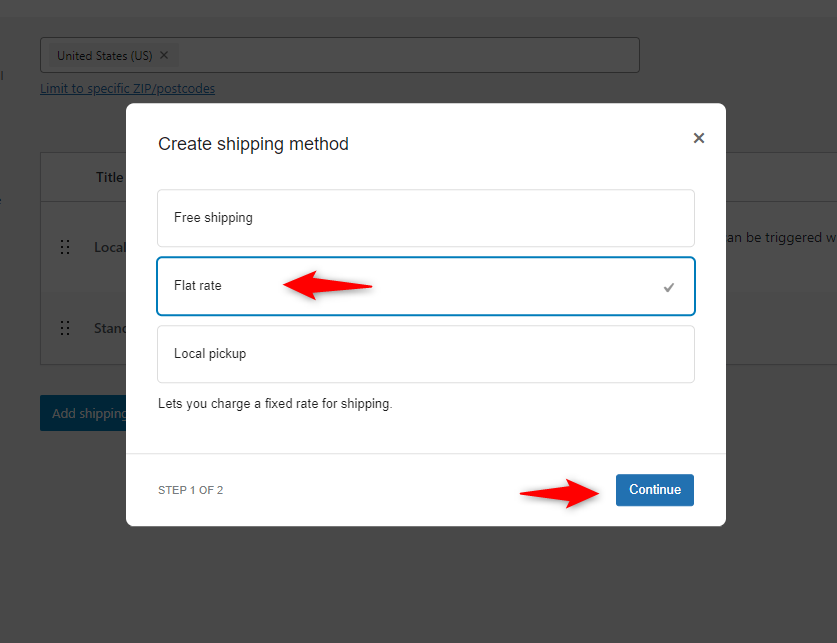
Click the “Add Shipping Method” button and select “Flat Rate”.
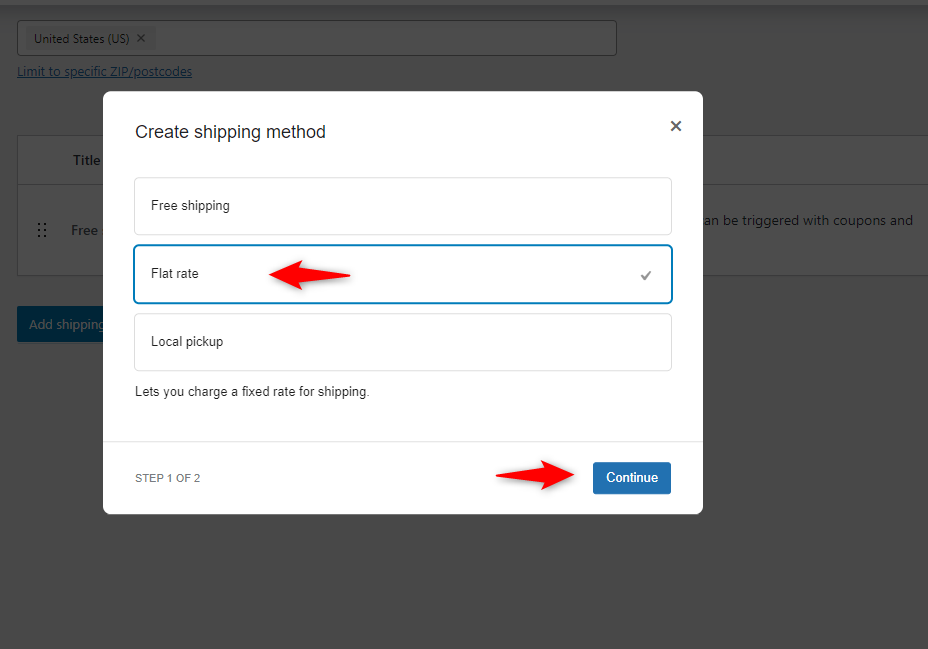
Provide the name of the method. We named it “Standard". It’s a basic one that ships in 7 to 8 business days. Also, set the cost at $10. Keep the tax status to none.
Hit the “Create and Save” button.
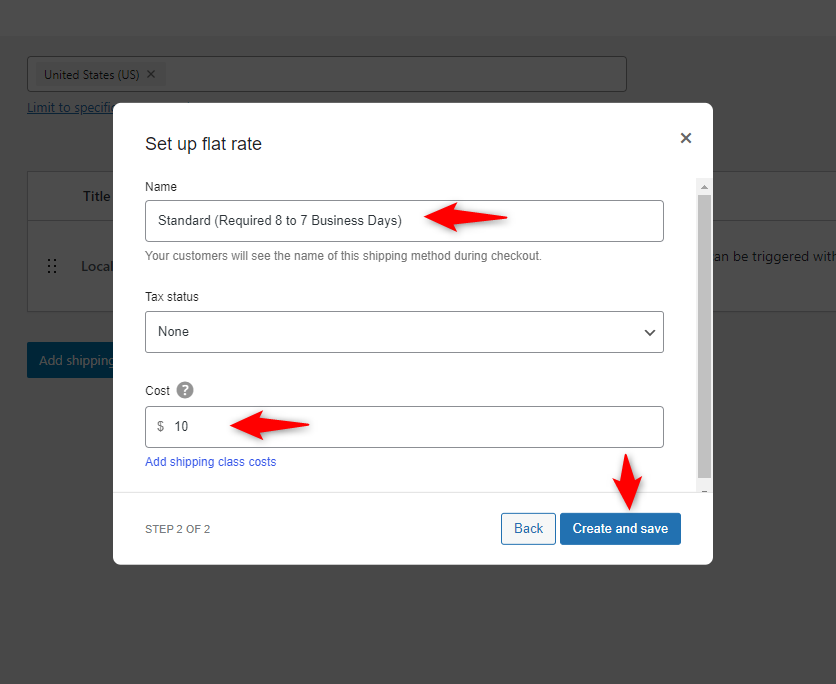
Similarly, create another shipping method.
We named it Express. You can choose this method if you want an urgent shipment to your preferred address.
So, click on the “Add Shipping Method” button.
Select flat rate. And then hit Continue.
Provide the method's name and set the cost. Keep the tax status set to None.
Then, hit the “Create and Save” button.
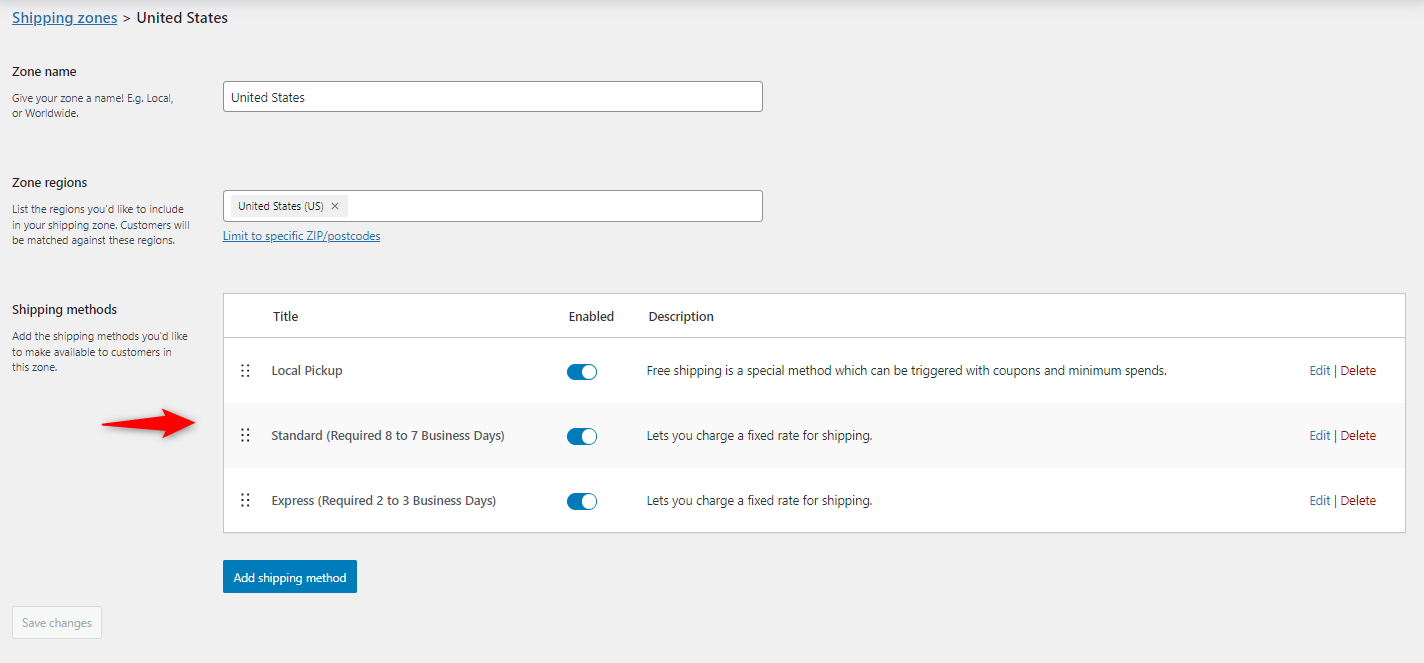
You’re all set. All three of your methods have been added successfully.
Step 4: Save and test the calculator at checkout
Save everything, open your store in an incognito window, add a product, and head to checkout.
Enter a US address. All three options should appear, with free shipping showing up once the cart passes $300.
Switch between methods and confirm the total updates instantly.
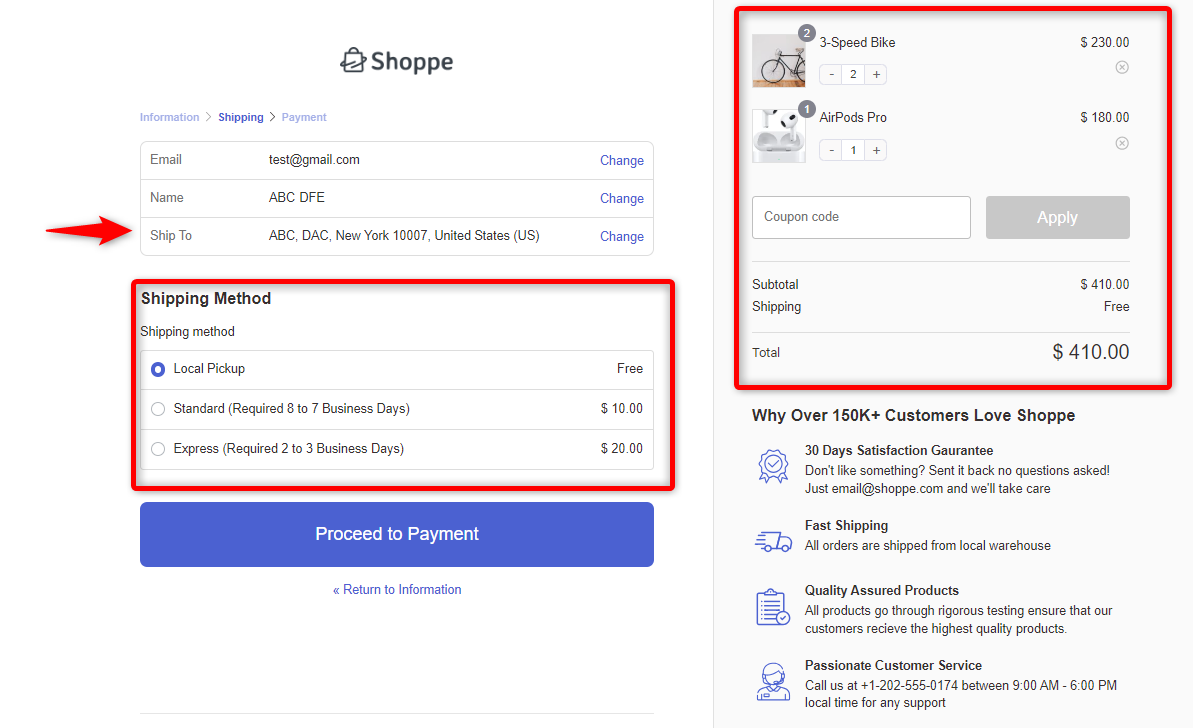
The checkout in our screenshots was built with FunnelKit Funnel Builder.
It allows you to fully customize your checkout process, creating high-converting, user-friendly funnels that reduce cart abandonment and boost sales.
We cover how it improves the way shipping options are displayed later in this guide.
How to Enable the Shipping Calculator on the Cart Page
WooCommerce can show the same estimator one step earlier, on the cart page.
Go to WooCommerce ⇨ Settings ⇨ Shipping ⇨ Shipping Settings and tick Enable the shipping calculator on the cart page.
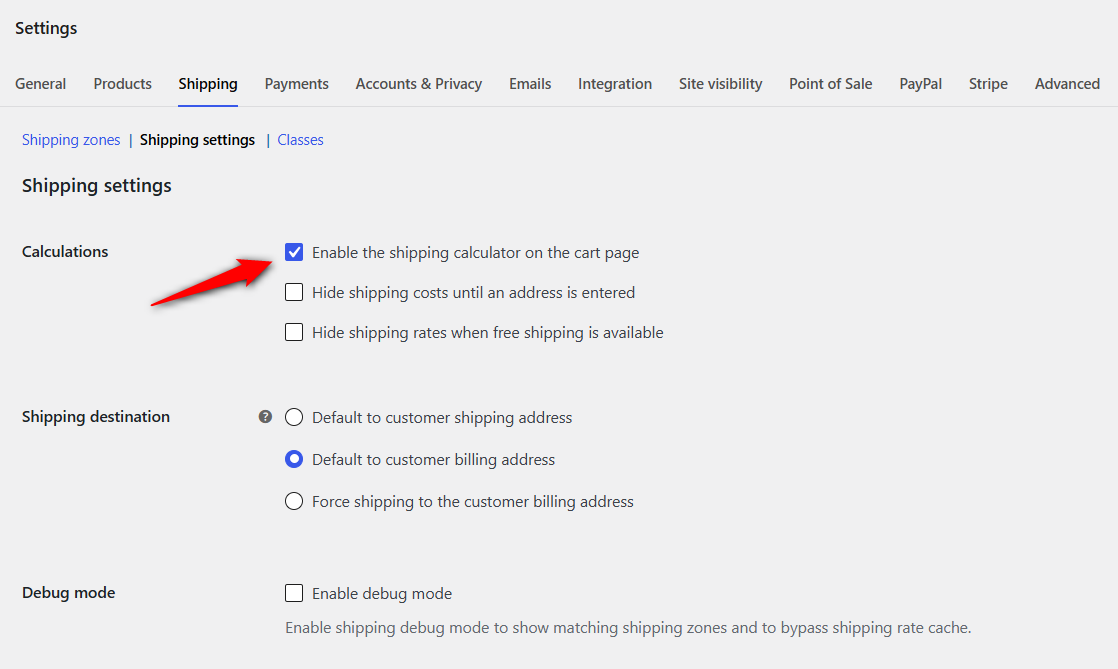
Customers can now enter a country and postcode in the cart totals box and see available rates before checkout begins.
Two related settings live on the same screen:
- Hide shipping costs until an address is entered: Turn this on only if your rates vary so much by location that a default estimate would mislead people.
- Enable debug mode: Leave it off for now. We will use it in the fixes section below.
5 Flat Rate Formulas for Variable Shipping Rates
The Flat Rate cost field accepts placeholders and basic math, which means variable shipping rates without any extra plugin.
Type these directly into the cost field.
1. Charge a fixed rate per item
Shipping Cost = [qty] * 2
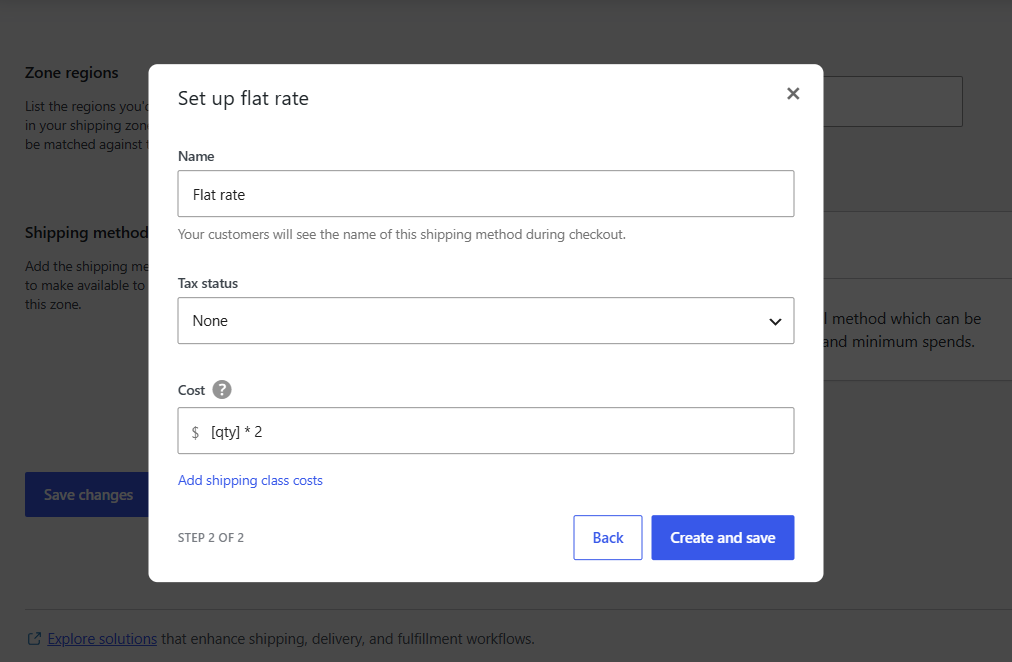
Three items cost $6 in shipping. A good fit for uniform products like apparel or prints.
2. Add a base fee plus per-item handling
Shipping Cost: 10 + ( 2 * [qty] )
The customer pays $10 for the box and label, plus $2 per item packed.
A five-item order ships for $20.
3. Charge a percentage of the cart total
The formula will be [fee percent="10"]
Shipping scales with order value, which suits high-value goods where insurance rises with the price.
Shipping scales with order value, which suits high-value goods where insurance rises with the price.
4. Combine a base fee with a percentage
The formula will be 10 + [fee percent="10"]
A $100 cart pays $20 in shipping: $10 fixed plus 10% of the subtotal.
5. Apply a percentage with a minimum and maximum fee
In the cost field, write this formula: [fee percent="10" min_fee="4" max_fee="25"]
The fee is 10% of the cart, never below $4 and never above $25.
The min_fee protects you on tiny orders, and the max_fee keeps shipping reasonable on large ones.
How to Show WooCommerce Live Shipping Rates at Checkout
Flat rates are predictable, and predictable rates undercharge on heavy or faraway orders.
WooCommerce live shipping rates solve this by querying a carrier’s API at checkout and displaying the exact price for that package and destination.
Install the carrier extension for the service you use, such as the USPS, FedEx, or UPS shipping method extensions.
Connect your carrier account, enable the services you want to offer, and the live quotes appear in the same shipping section of checkout.
Two requirements make or break live rates:
- Every product needs a weight and dimensions
Carriers price by size and weight. A product missing these fields returns no rate at all.
- Your store address must be accurate
Rates are calculated from your origin, set under WooCommerce ⇒ Settings ⇒ General.
Shipping Calculator Not Showing at Checkout? 6 Fixes
If checkout says “There are no shipping options available”, or the shipping section is missing entirely, work through these in order.
Fix 1: Turn on shipping debug mode
Go to WooCommerce ⇨ Settings ⇨ Shipping ⇨ Shipping Settings and enable Debug mode.
Visit your checkout as a customer. WooCommerce prints a notice showing which zone matched the address and why methods were hidden.
Make sure to switch it off when you are done.
Fix 2: Add a fallback zone for uncovered addresses
An address that matches no zone gets no rates.
In the shipping zones list, give the "Locations not covered by your other zones" row at least one flat rate method, so edge-case customers can still order.
Fix 3: Check that the matched zone has an active method
Open the zone and confirm each method is toggled on, flat rates have a cost entered, and the free shipping minimum is actually reachable.
Fix 4: Make sure shipping is not disabled globally
Under WooCommerce ⇨ Settings ⇨ General, check Shipping location(s).
If it reads Disable shipping & shipping calculations, no calculator will ever appear.
Fix 5: Look at what is in the cart
Virtual and downloadable products do not ship. A cart containing only those shows no shipping section at all.
Re-test with one simple physical product to isolate the problem.
Fix 6: Rule out caching and plugin conflicts
Exclude your cart and checkout pages from your caching plugin and CDN, then purge everything.
If rates are still missing, switch temporarily to a default theme with only WooCommerce active to find the conflict.
Make Your Shipping Options Convert Better at Checkout
Everything so far controls what the calculator charges. None of it controls how the checkout presents it, and the default presentation creates friction.
The stock checkout lists shipping methods as a plain radio group, and on mobile pushes the updated total far below the fold.
A checkout that keeps the address fields, shipping methods, and order summary in one view removes that friction.
FunnelKit Funnel Builder handles this with conversion-focused checkout templates that replace the default page while your zones, methods, and formulas keep working exactly as configured.
- Rates update in full view: On a one-page checkout layout, customers watch the shipping cost recalculate as they type.
- Addresses come in clean: Google address autocomplete fills the country, state, and postcode in one tap, which means faster zone matching and fewer wrong rates from mistyped ZIP codes.
- The total stays visible: A persistent order summary keeps the shipping line next to the grand total on every device.
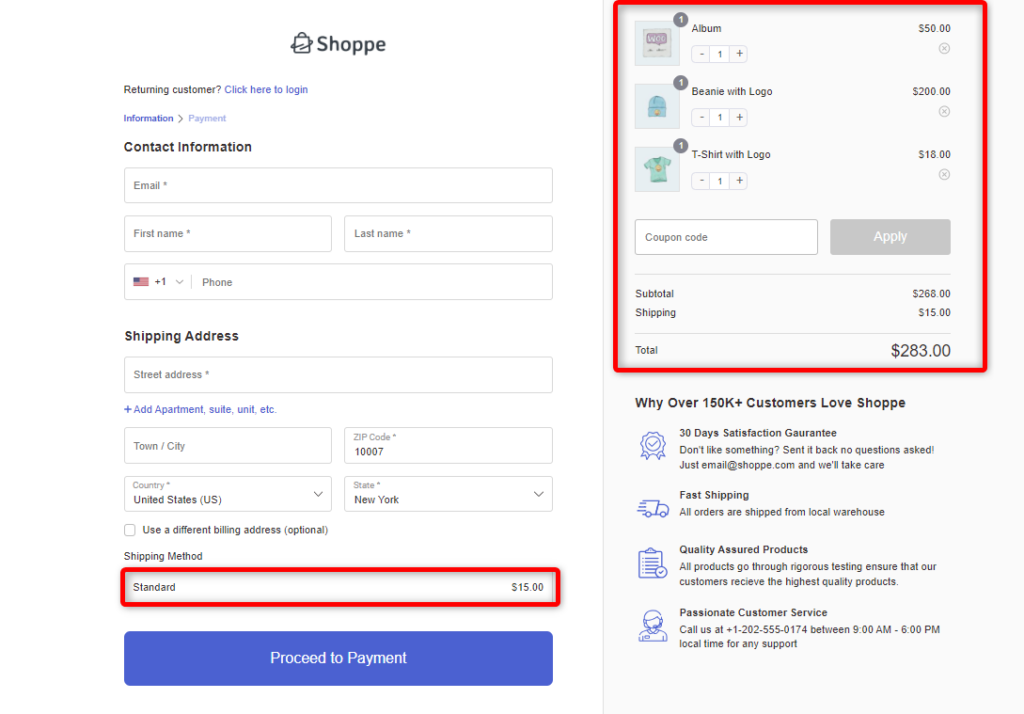
For the broader playbook on a faster buying process, see our WooCommerce checkout optimization guide.
5 Best Practices to Keep Your Checkout Shipping Rates Accurate
Following these best practices, you can balance affordability, accuracy, and convenience in your shipping rates.
1. Name every method with a delivery window
“Standard (5 to 7 business days)” answers the customer’s next question before they ask support.
2. List the cheapest option first
WooCommerce preselects the top method in each zone. Drag your methods into price order and let the default work for you.
3. Put a free-shipping progress bar in the cart
A message like “You’re $18 away from free shipping” turns your threshold into an order-value engine.
FunnelKit Cart handles this with a side-panel cart that shows the progress bar the moment something is added.
4. Audit product weights and dimensions quarterly
One product with a missing weight can distort live carrier quotes for an entire cart.
5. Test the checkout shipping calculator with real addresses
Test from every zone, and include one address outside all zones, so you see exactly what a stranded customer sees.
Frequently Asked Questions
WooCommerce has no standalone calculator shortcode. The classic cart shortcode [woocommerce_cart] includes the estimator when it is enabled in settings.
Yes. Developers can adjust or replace calculated rates by hooking into the woocommerce_package_rates filter in a child theme or custom plugin.
That depends on each method’s tax status. A method set to Taxable adds tax according to your tax configuration, while None charges exactly the amount entered.
To put a shipping cost estimator on the product page itself, you need a plugin.
- Shipping Calculator for WooCommerce (Kestrel): Adds a calculator to product pages in multiple positions and adapts to your theme.
- Product Page Shipping Calculator: A free calculator that shows available methods before an address is entered and updates via AJAX.
- Octolize Shipping Cost on Product Page: Enables a shipping cost display under your existing shipping settings.
Yes. The calculator on the cart and checkout pages is part of core WooCommerce at no cost.
Start Showing Accurate Shipping Rates on Your WooCommerce Checkout Page
We built the whole thing in five steps, including zones and methods that match your customers, flat rate formulas for variable pricing, live carrier rates for exact quotes, and six fixes for rates that refuse to appear.
Together, these remove the exact moment when nearly half of cart abandonment starts.
The calculator handles the math either way.
Pairing it with a checkout that keeps the rates and the running total in front of the customer is where the lift compounds.
FunnelKit Funnel Builder’s checkout templates are built for exactly that.
The free version is enough to start. Upgrade to Pro to get AOV-boosting features like order bumps, one-click upsells, A/B testing, analytics, and so much more.
Editorial Team
August 28, 2026WooCommerce order attribution tells you where your orders come from. Out of the box, no extra plugin needed. But the built-in report only tells half the story, crediting whichever click...
Editorial Team
August 27, 2026Have you ever noticed the cart icon at the top of many online stores? It’s more than just a design choice. It can greatly improve your customers' experience. A cart...
Editorial Team
August 27, 2026WooCommerce frequently bought together offers are one of the easiest ways to increase revenue on a product page. Think about the counter at a kitchen appliance store. Let's say someone...






