


You can customize the WooCommerce cart page with the Cart block, a page builder like Elementor, or CSS and PHP snippets.
Which method works for you depends on the cart your store runs: the Cart block or the classic [woocommerce_cart] shortcode.
Each one takes different tools. That's why you can follow a cart tutorial step by step and still end up with a screen that looks nothing like the tutorial, and why plenty of store owners give up and keep the default design.
That default deserves a second look. The cart page is the step right before checkout, so small changes there, like a clearer checkout button or a live shipping message, affect every order that passes through it.
In this blog, we'll share five ways to customize the cart, from the Site Editor to replacing the page with a side cart, plus the changes worth making first.
Table of Contents
- 1 What the Default WooCommerce Cart Page Includes
- 2 Which Cart Customization Method Is Right For Your Store?
- 3 First, Check Which Cart Your Store Is Running
- 4 Method 1: Edit the Cart Template in the Site Editor (Block Themes)
- 5 Method 2: Edit the Cart Page in the Block Editor (Classic Themes)
- 6 Method 3: Customize the Cart Page With Elementor (Pro or Free Add-Ons)
- 7 Method 4: Customize the Cart Page With CSS and PHP Snippets
- 8 Method 5: Replace the Cart Page With a Side Cart
- 9 7 Cart Page Changes That Improve Revenue
- 10 Frequently Asked Questions
- 11 Customize Your WooCommerce Cart Page the Right Way
What the Default WooCommerce Cart Page Includes
Before you change anything, take a look at what's actually on the page.
On a standard WooCommerce install using the Storefront theme, the cart page gives shoppers five main things:
- Cart notification banner: Confirms that an item was added and gives the shopper a Continue Shopping link.
- Cart table: Shows the product thumbnail, name, price, quantity control, line total, and remove link.
- Cart totals: Includes the subtotal, shipping options, and order total. The coupon field sits just below the cart table.
- Proceed to Checkout button: The action you ultimately want the shopper to take.
- You may be interested in: Products related to what's already in the cart.
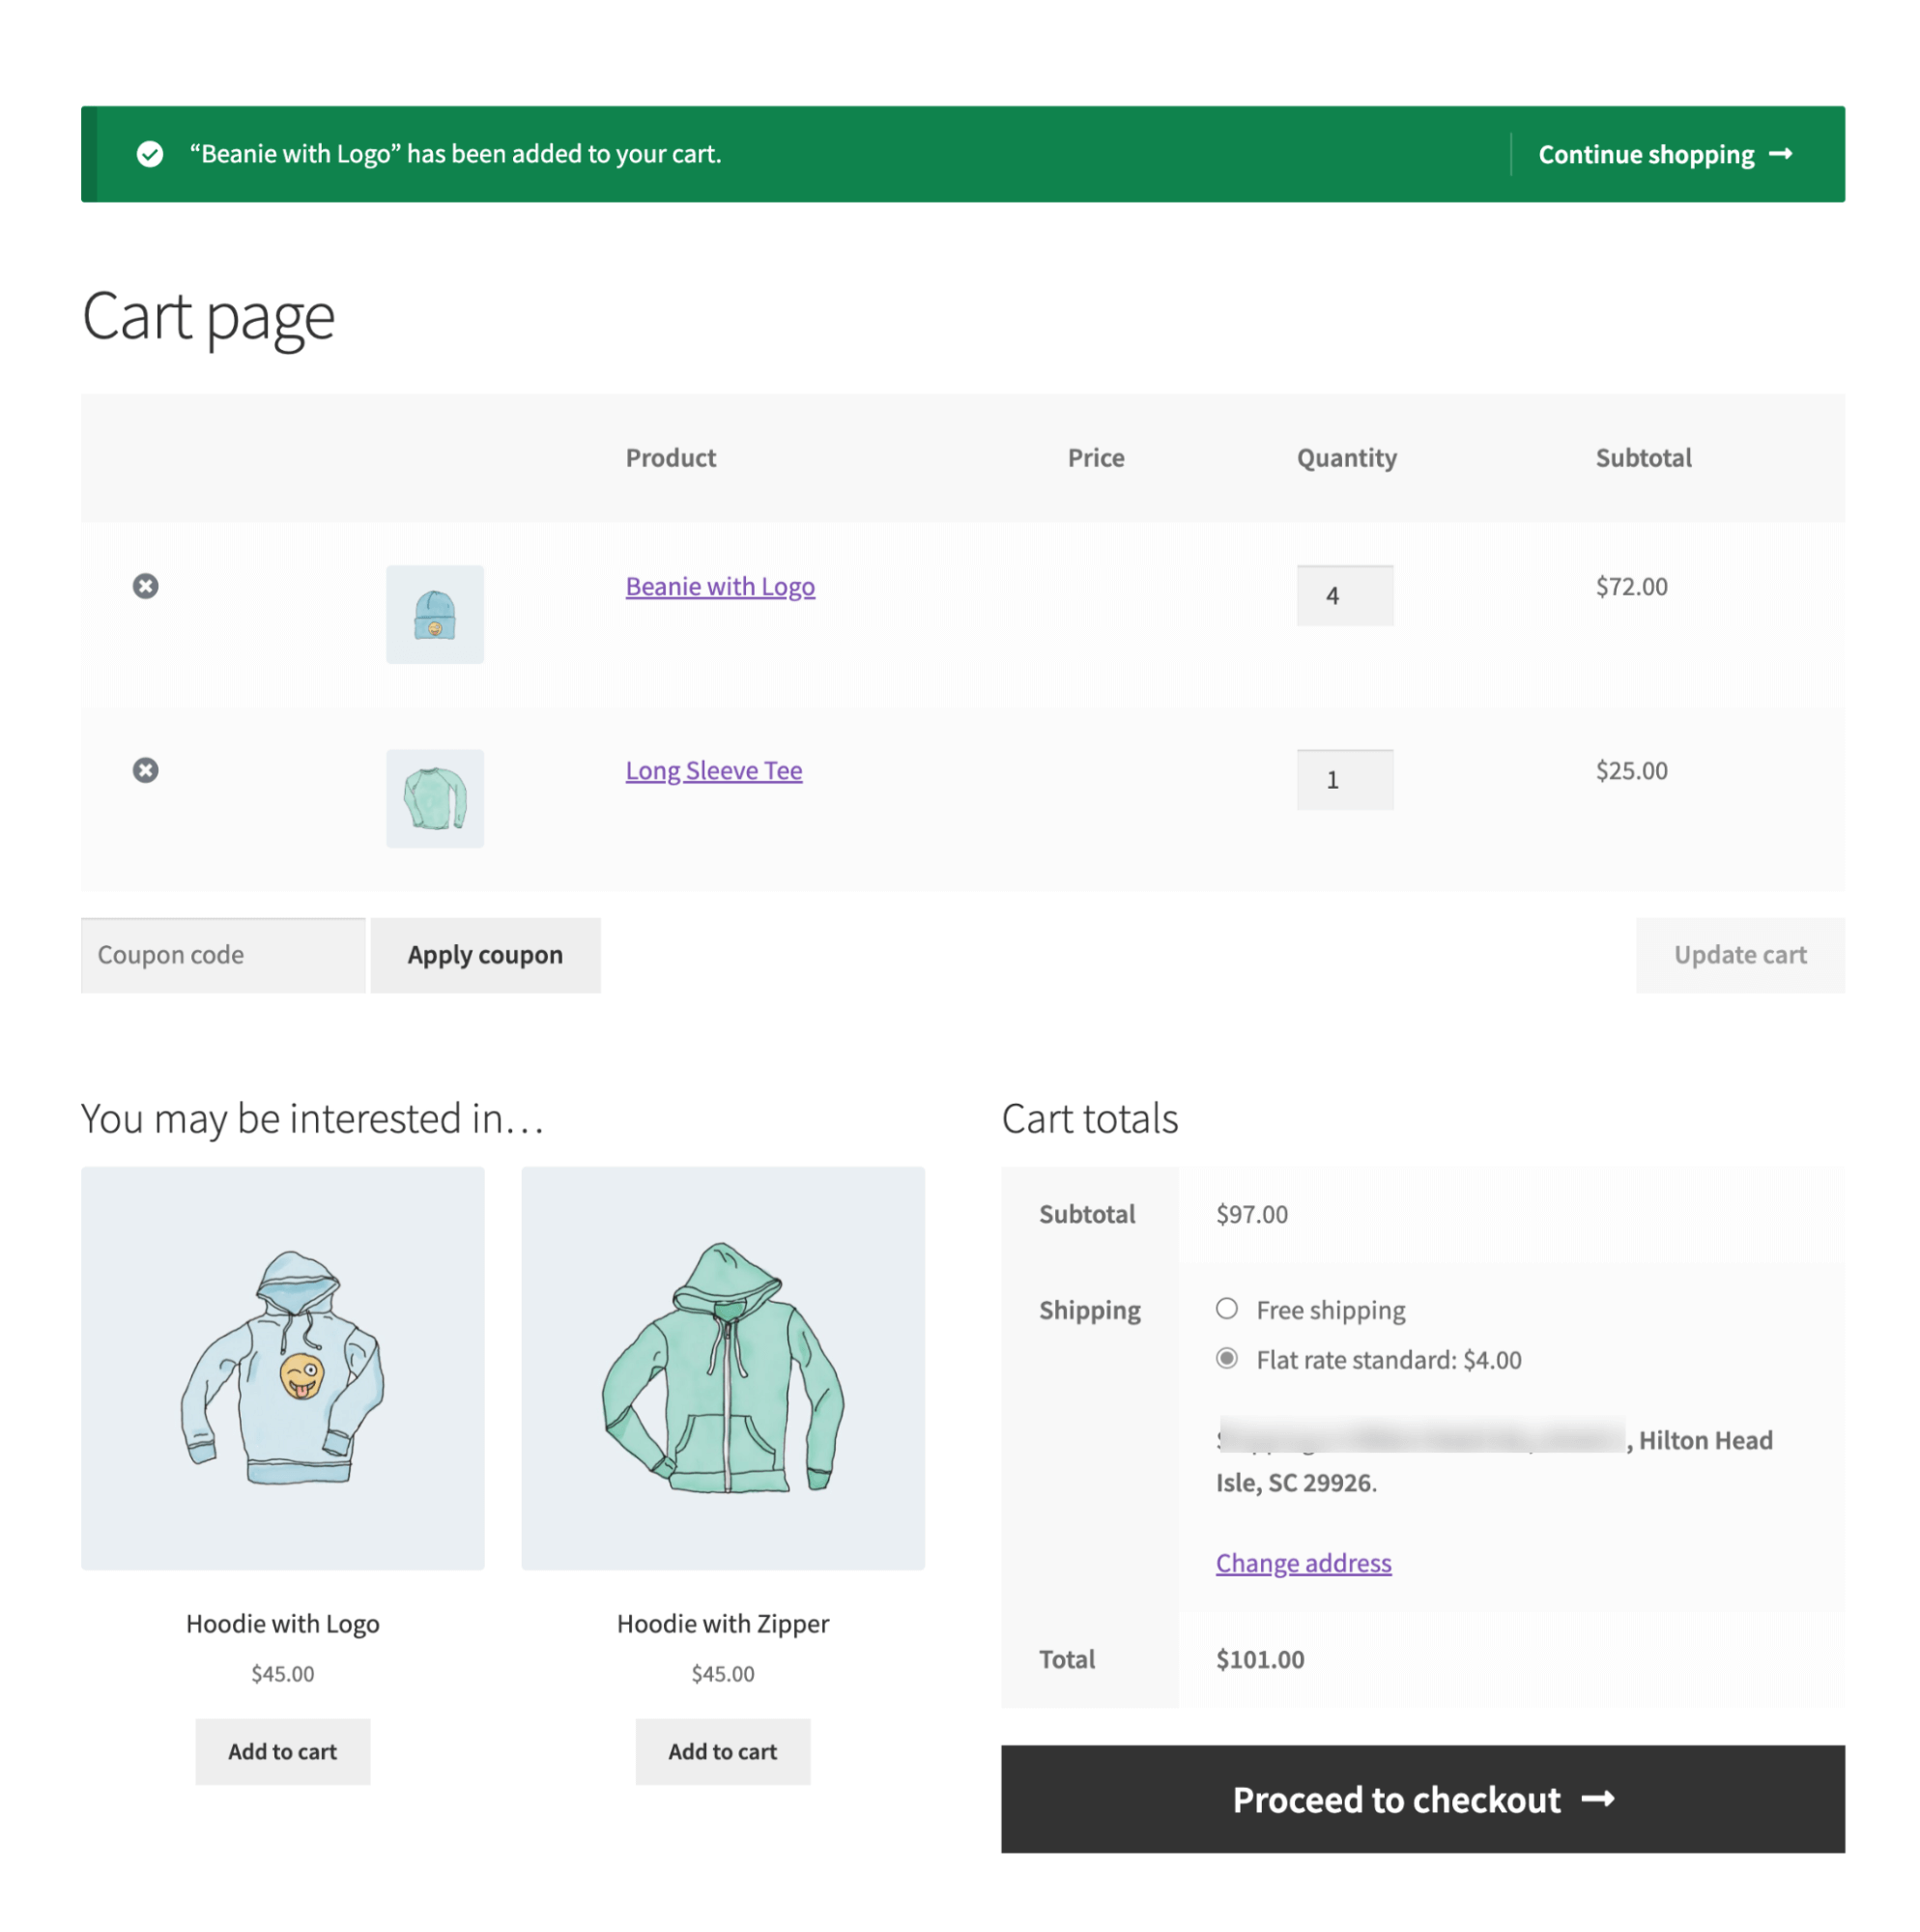
This layout has nothing inherently wrong with it. It's deliberately neutral because WooCommerce has no idea what you sell or what you want shoppers to do next.
The problem is that every element gets roughly the same treatment.
The checkout button doesn't stand out much from the Update cart button. Nothing gives the shopper a reason to add another product. And the coupon field can quietly send them off to search for a discount code somewhere else.
Which Cart Customization Method Is Right For Your Store?
| Method | Works with | Skill needed | What you can change | Where it stops |
|---|---|---|---|---|
| Site editor | Block themes only | None | Layout, inner blocks, cross-sells, shipping calculator, empty cart state, theme colors and type | Per-element styling, table structure, messages that change with the cart |
| Block editor | Classic themes | None | Section headings, added blocks above/below, cross-sell count | Anything inside the cart table |
| Elementor | Both, with Elementor Pro or a Woo addon | Low | Full visual control over layout, type, buttons, spacing | Adds page weight; needs Elementor Pro or an add-on |
| CSS + PHP hooks | Classic cart | Medium | Everything visible, plus dynamic content, conditional messages, field removal | Template hooks don't fire on the Cart block |
| Template override | Classic cart | High | The HTML structure itself | Needs review after WooCommerce updates |
| Side cart | Both | None | Replaces the page entirely | Not a fit for every store (see Method 5); some features need a paid plan |
If you're using a block theme, start with the Site Editor. Many PHP tutorials online won't apply to the Cart block.
If you want to use WooCommerce template hooks, you need the classic cart. Make that choice deliberately, before you start writing code.
First, Check Which Cart Your Store Is Running
Since WooCommerce 8.3 shipped in November 2023, new stores have used the Cart block by default. Older stores are usually still using the [woocommerce_cart] shortcode.
Don't rely on that rule alone. A theme, page builder, or previous developer may have switched the cart at some point.
Block cart vs classic shortcode: How to tell in 30 seconds
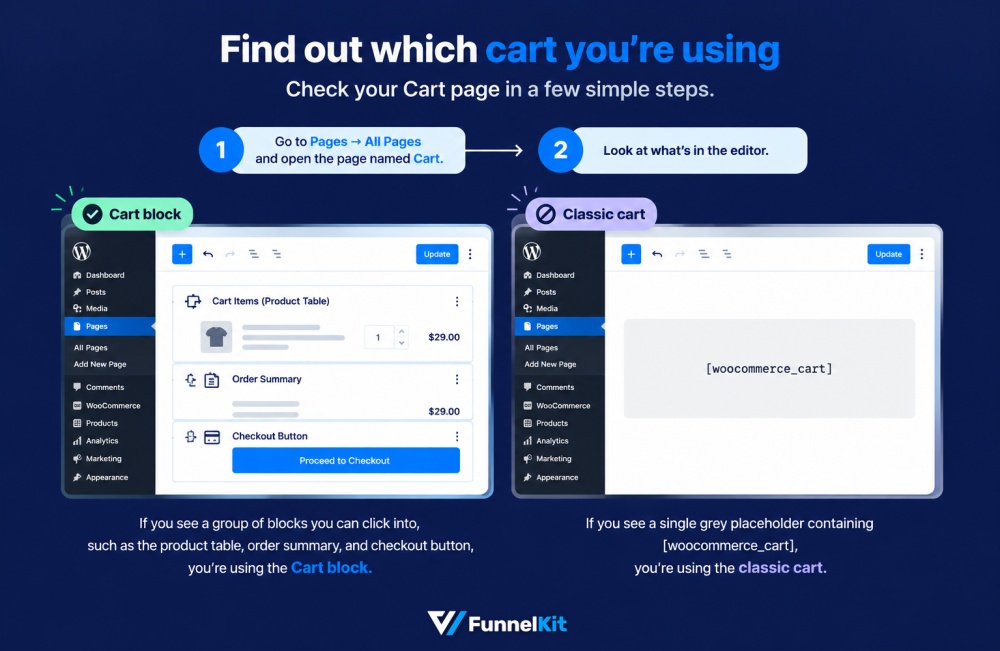
- Go to Pages ⇨ All Pages and open the page named Cart.
- Look at what's in the editor.
If you see a group of blocks you can click into, such as the product table, order summary, and checkout button, you're using the Cart block.
If you see a single grey placeholder containing [woocommerce_cart], you're using the classic cart.
Block themes add one extra step. The Cart page may look empty because the template controls the layout. In that case, go to Appearance ⇨ Editor ⇨ Templates ⇨ WooCommerce ⇨ Page: Cart.
Switch between the Cart block and the cart page shortcode
You can switch between the two in a few clicks, and the change is reversible.
- Open the Cart page. On a block theme, go to Appearance ⇨ Editor ⇨ Templates ⇨ WooCommerce ⇨ Page: Cart.
- Open List View and select the Cart block.
- Click Transform in the block toolbar.
- Choose Classic Shortcode.
- Save your changes.
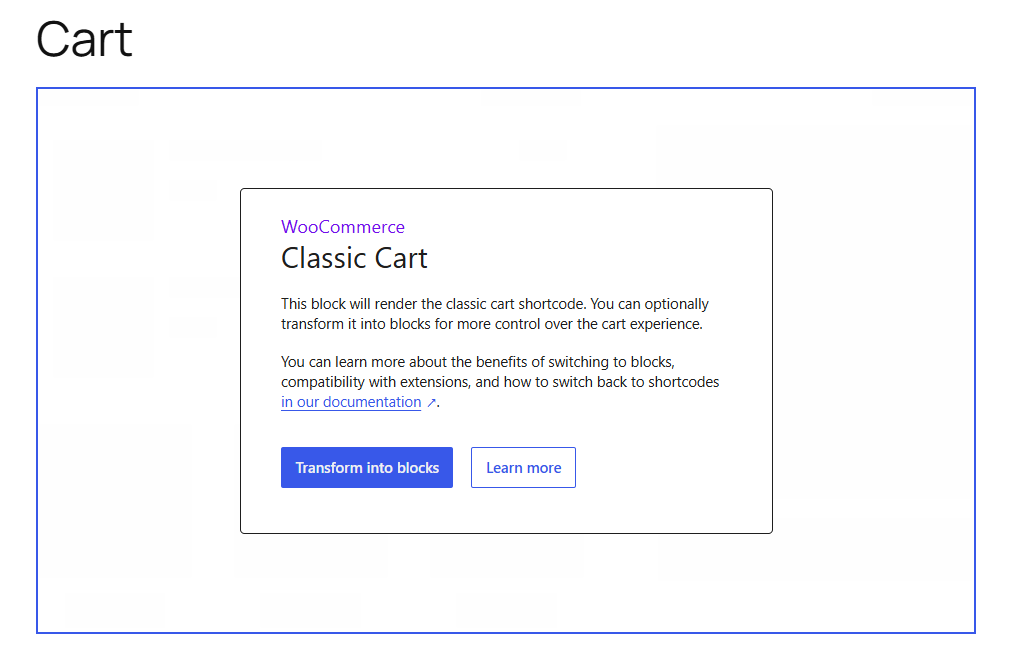
Check two things before switching.
First, the Cart and Checkout blocks are designed to work together. If you switch the cart back to the classic version, decide whether to switch checkout back too.
Second, some payment gateways and extensions support only one cart or checkout implementation.
WooCommerce shows a compatibility warning in the block sidebar when an active extension isn't compatible.
Note: You can also transform the checkout the other way around. See our guide to the WooCommerce checkout block editor for what changes there.
What each setup lets you change
With the classic cart, the PHP action and filter hooks in this guide are available as usual.
That includes woocommerce_before_cart, woocommerce_proceed_to_checkout, and woocommerce_cart_collaterals.
Template overrides work too, and CSS can target familiar classes such as .woocommerce-cart table.cart.
With the block cart, those classic PHP hooks don't run.
The block cart is built with React and loads its data through WooCommerce's Store API, so it never uses the PHP cart templates.
If you added a snippet to functions.php and nothing changed, check the cart type first. That's often the reason.
A few general WooCommerce filters still affect both carts. Snippet 2 in Method 4 is one of them.
Instead of template hooks, the Cart block gives you the block sidebar, the Site Editor, and JavaScript extension points.
Developers can change labels and line items with registerCheckoutFilters, or add content above the Proceed to Checkout button through the ExperimentalOrderMeta slot.
Without JavaScript, your options are more limited.
Method 1: Edit the Cart Template in the Site Editor (Block Themes)
If you're using a block theme such as Twenty Twenty-Four, Twenty Twenty-Five, Ollie, or a block-based Blocksy build, this is where you customize the cart.
On a block theme, editing the Cart page itself may not change what shoppers see. The theme can serve the cart through its WooCommerce template instead.
Step 1: Open the cart template
Go to Appearance ⇨ Editor ⇨ Templates ⇨ WooCommerce ⇨ Page: Cart.
You'll see a live preview of the cart, usually with a sample product already added.
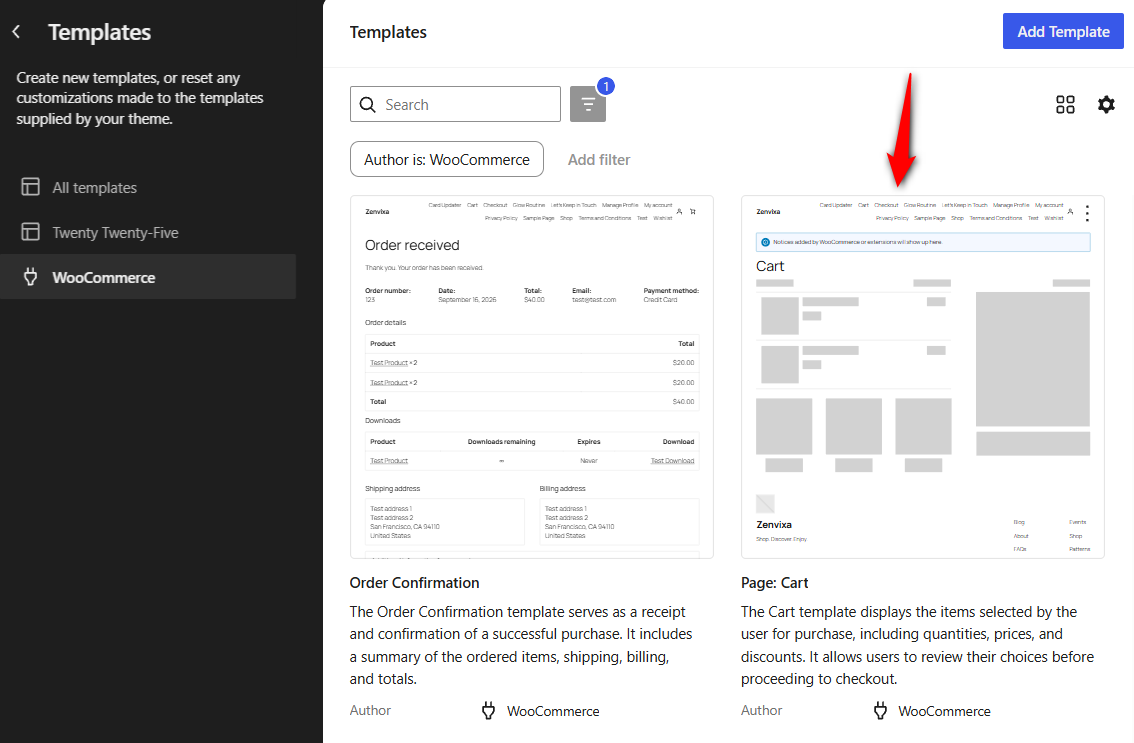
You can edit everything in this template, including the header and footer template parts.
Step 2: See what each inner block controls
The Cart block is a container. Open List View and expand it to see the pieces you can configure.
- Filled Cart / Empty Cart: Two views of the same Cart block. Use the view switcher in the toolbar to move between them. Changes to one view don't carry over to the other.
- Cart Line Items: The product rows, including the thumbnail, name, variation data, quantity stepper, and remove link.
- Cart Order Summary: The subtotal, coupon field, shipping, taxes, fees, and total. Each row can be selected as its own inner block.
- Proceed to Checkout: The checkout button, including its editable text.
- Cart Cross-Sells: The "You may be interested in" section.
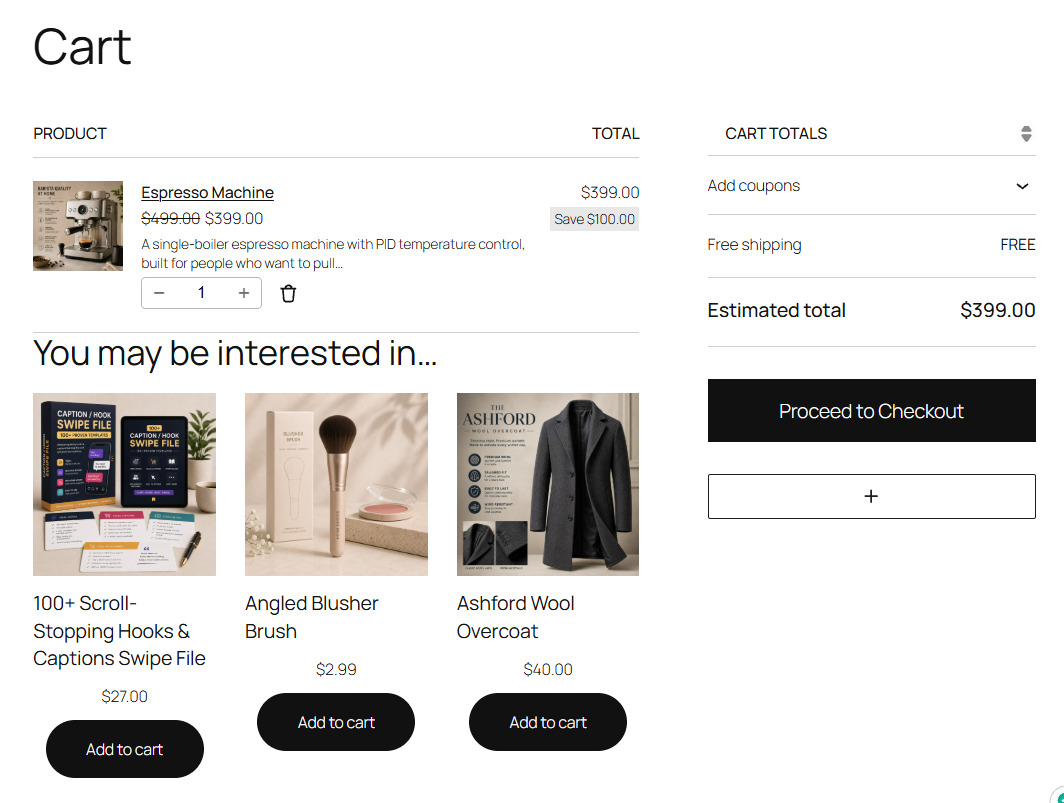
Click any of these blocks to see its settings in the right-hand sidebar.
The Cart block has gained controls over time, so older tutorials can be misleading. If you've read that it barely has any settings, check your editor before assuming you need code.
Step 3: Turn the shipping calculator and cross-sells on or off
Select Cart Order Summary, then the Shipping inner block.
The sidebar gives you a toggle for the shipping calculator, so you can turn it on or off.
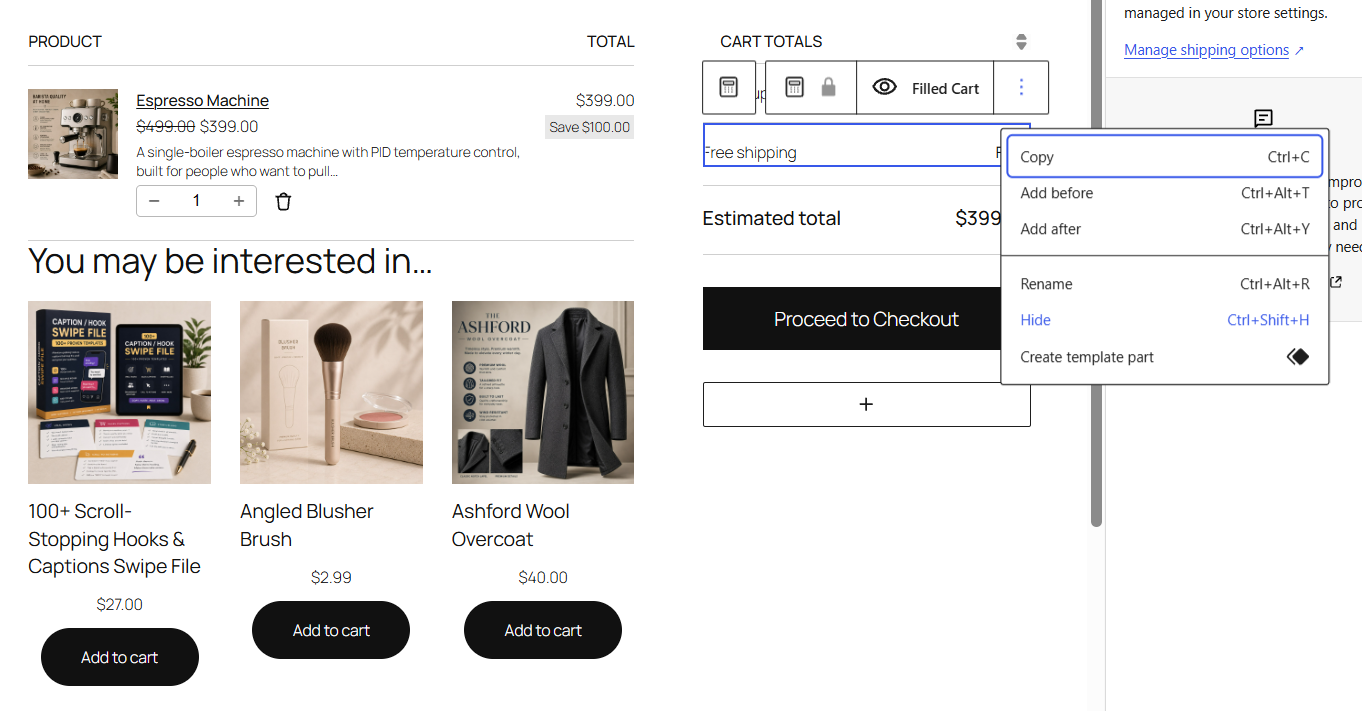
Leave it on if you charge for shipping. In Baymard Institute's abandonment research, 40% of shoppers who left for reasons other than browsing pointed to extra costs like shipping, tax, or fees. Another 12% couldn't see or calculate the total cost up front, which is the gap a shipping estimate on the cart fills.
Select Cart Cross-Sells and set how many products show.
We'd settle on two on desktop. On mobile, the right number is often zero, because on a narrow screen a cross-sell row does nothing except push the checkout button below the fold.
Step 4: Design the empty cart state
Switch the view to Empty Cart. By default, you'll get a simple message and a Browse store button. Most stores leave it as-is, but it's an easy part of the cart to improve.
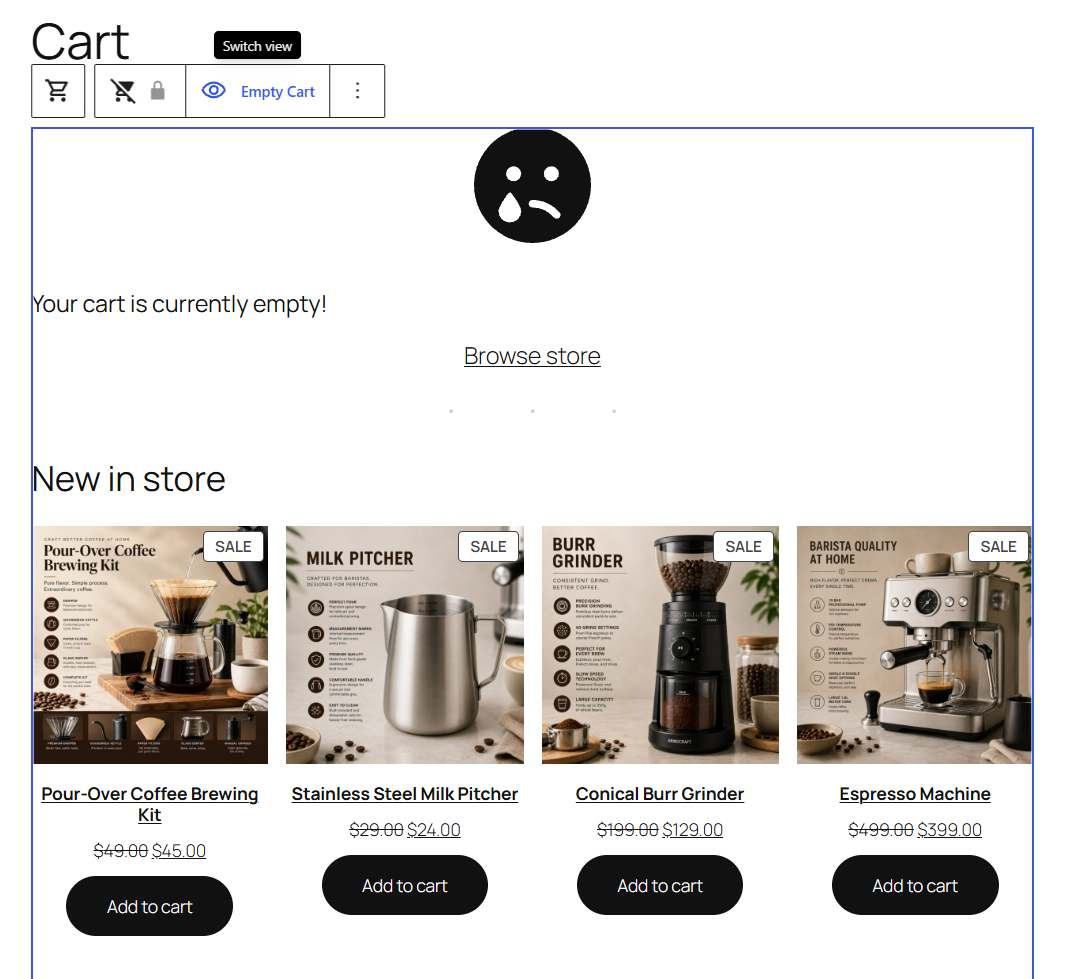
Add a heading that fits your store, style the button like your primary CTA, and consider adding a Hand-picked Products block with three bestsellers.
Someone who reaches an empty cart may have bookmarked the page, let a session expire, or removed everything from their cart.
Whatever brought them there, they were interested enough to have a cart in the first place. Give them an obvious next step.
Where this method stops
In the Site Editor, you can restyle the checkout button with your theme colors, trim cross-sells to two products, and design the empty cart.
The limits appear when you need something that changes with the cart, or a setting WooCommerce doesn't expose as a block option.
For example, you can add a paragraph that says "Free shipping on orders over $50", but it won't update as the cart total changes. There's also no sidebar setting to remove the coupon field.
Block cart stores have three ways around these limits:
- Hide the coupon field with Snippet 2 in Method 4. It uses a WooCommerce filter that the Cart block also reads.
- Add a live free-shipping message. The PHP version (Snippet 1) only works on the classic cart. On the Cart block, a developer can build one in the
ExperimentalOrderMetaslot, or you can use a side cart with a progress bar (Method 5). - Switch to the classic cart if you need several hook-based changes. The switch takes a few clicks and can be undone.
Method 2: Edit the Cart Page in the Block Editor (Classic Themes)
If you're using a classic theme such as Storefront, a non-FSE version of Astra, or most commercial WooCommerce themes, the cart is usually a regular WordPress page.
Go to Pages ⇨ All Pages ⇨ Cart ⇨ Edit to open it in the block editor.
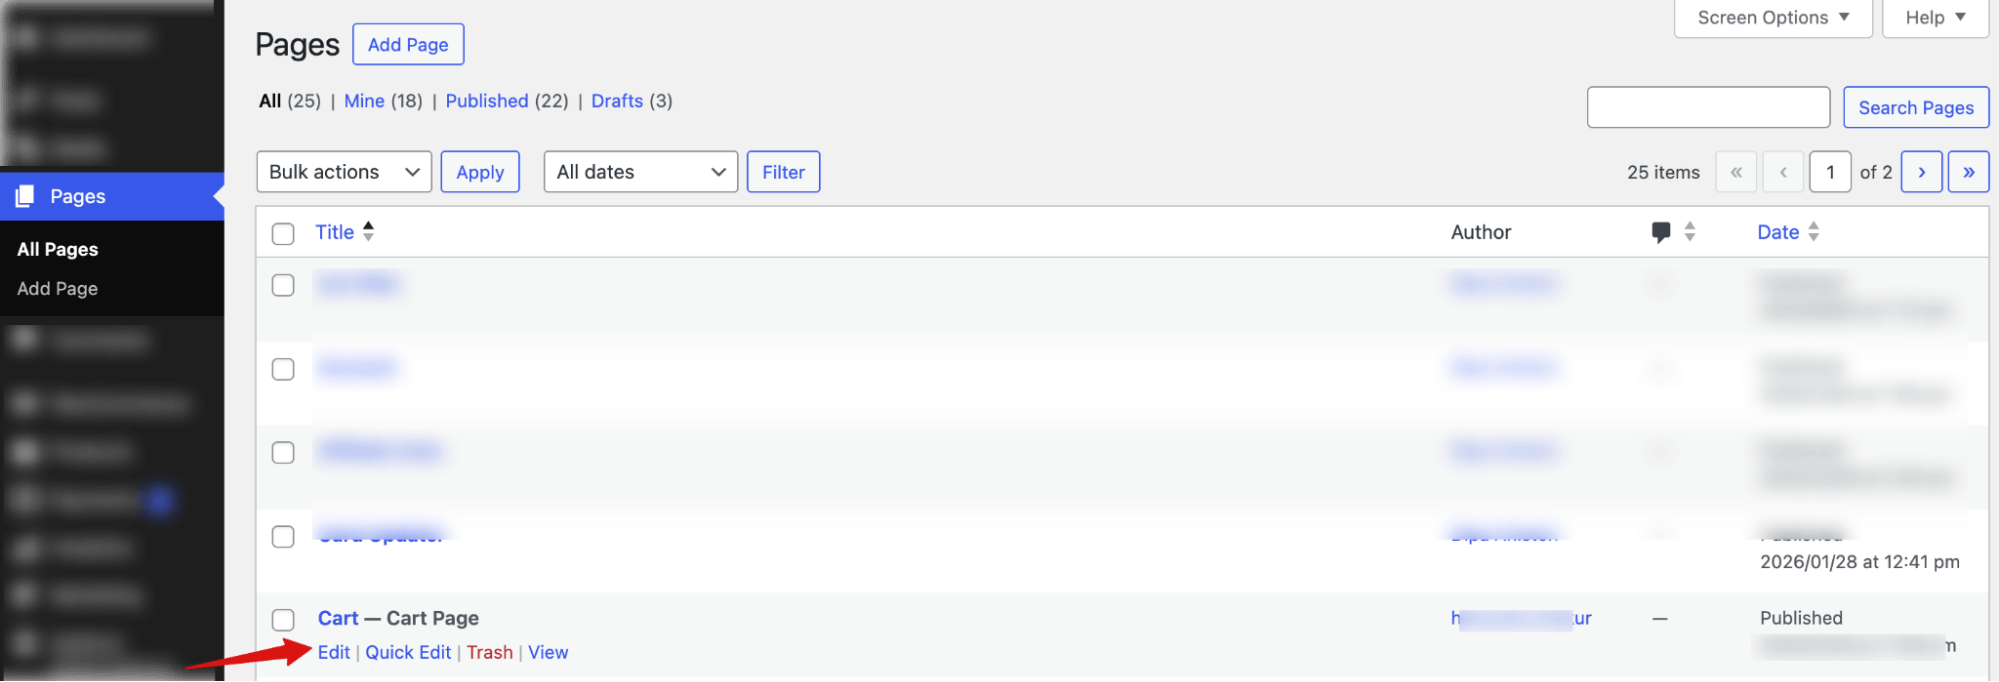
What you can change depends on what's sitting on that page.
- If the page contains the cart block, you get the same inner-block settings covered in Method 1.
You won't be editing a theme template, but the Cart block works the same way, so Steps 2 to 4 still apply.
- If the page contains [woocommerce_cart], your options are narrower.
The shortcode is a black box to the block editor. You can place blocks above or below it, but you can't reach inside the cart.
That still works for simple additions. For example, you can add a paragraph block above the shortcode that says "Free shipping on orders over $50".
The catch is that it's just text. It won't know whether the shopper has $5 or $500 in the cart.
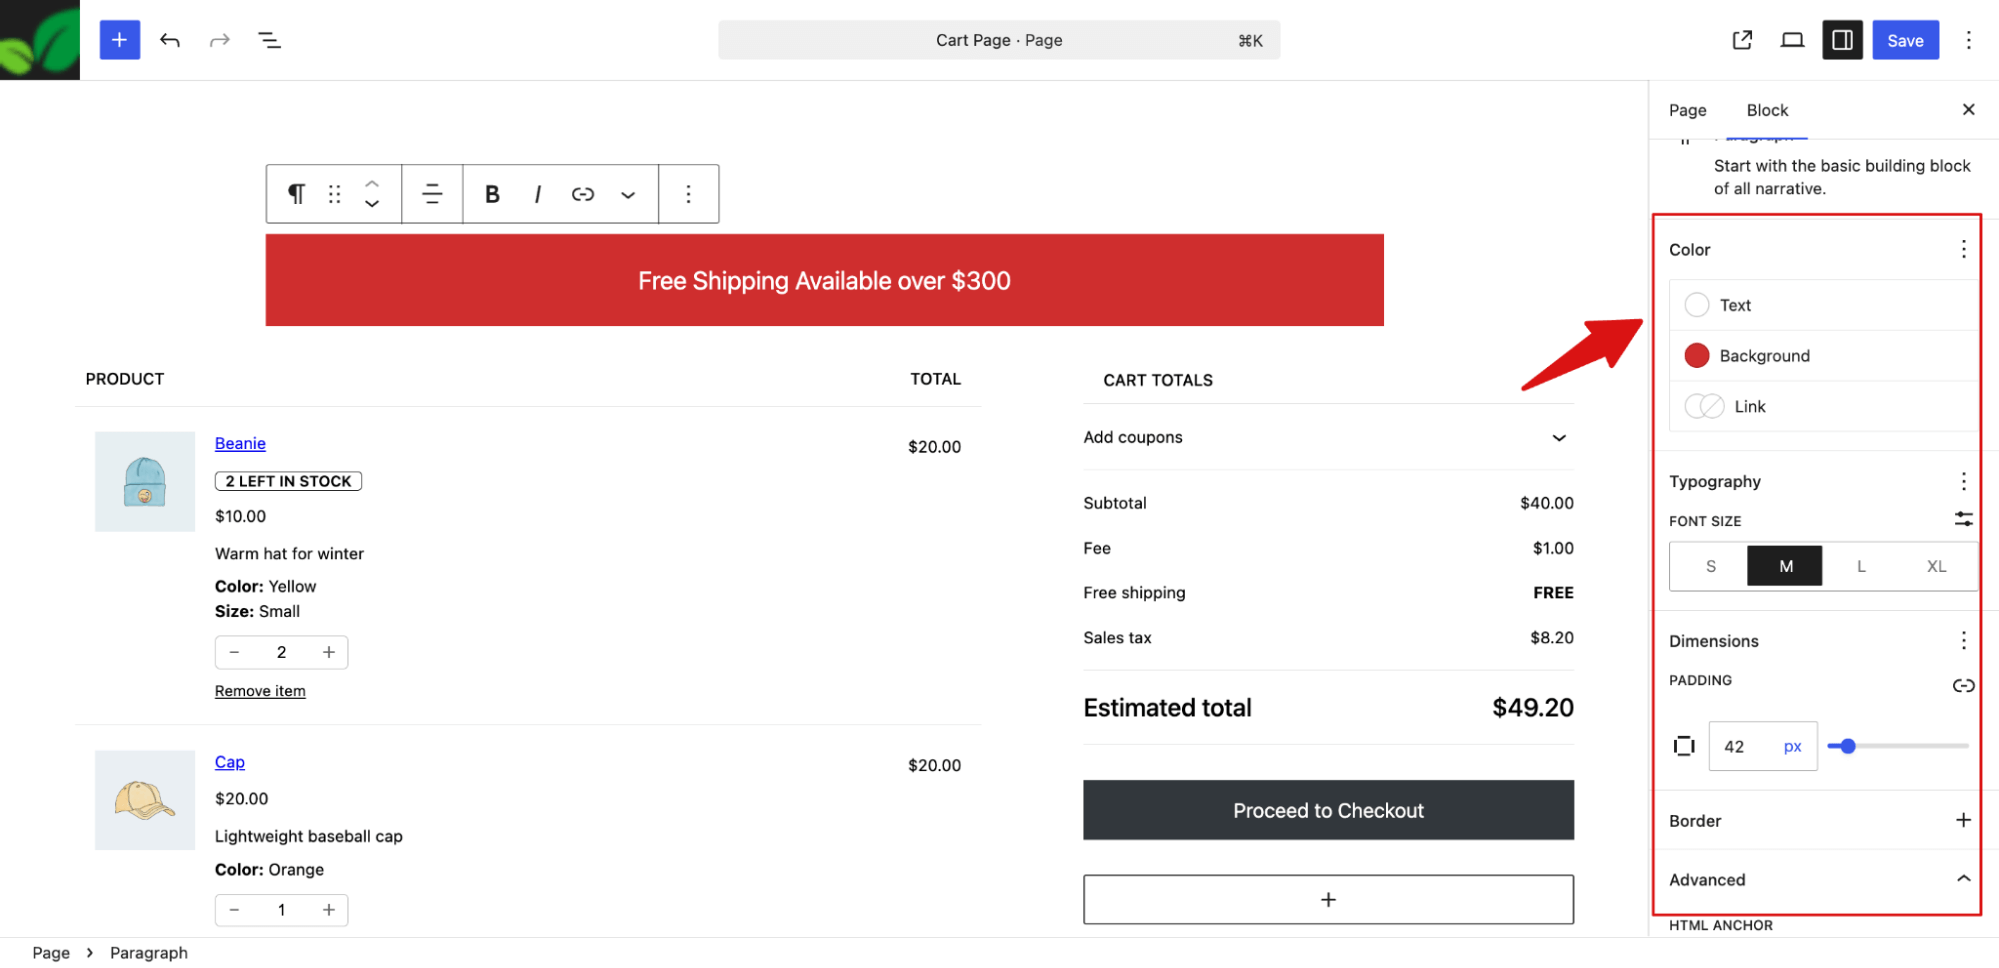
Use this method for banners, shipping notices, reassurance copy, and other static content.
When the message needs to react to the cart total, use Snippet 1 in Method 4.
It works here because the shortcode loads the classic cart.
Method 3: Customize the Cart Page With Elementor (Pro or Free Add-Ons)
If you want the cart to match your brand closely, including your type scale, button radius, spacing, and layout, a page builder can be the easiest route. You can do most of it without touching CSS.
We'll use Elementor here, but the idea is similar in other WooCommerce-compatible builders.
You'll need Elementor Pro, which includes a WooCommerce Cart widget.
On the free version of Elementor, add-ons such as ShopEngine, ShopLentor, or JetWooBuilder provide their own cart widgets and templates.
Step 1: Open the cart page in Elementor
Add a product to your cart in another tab first, so the editor preview has something to show.
Then go to Pages ⇨ All Pages, hover over Cart, and click Edit with Elementor.
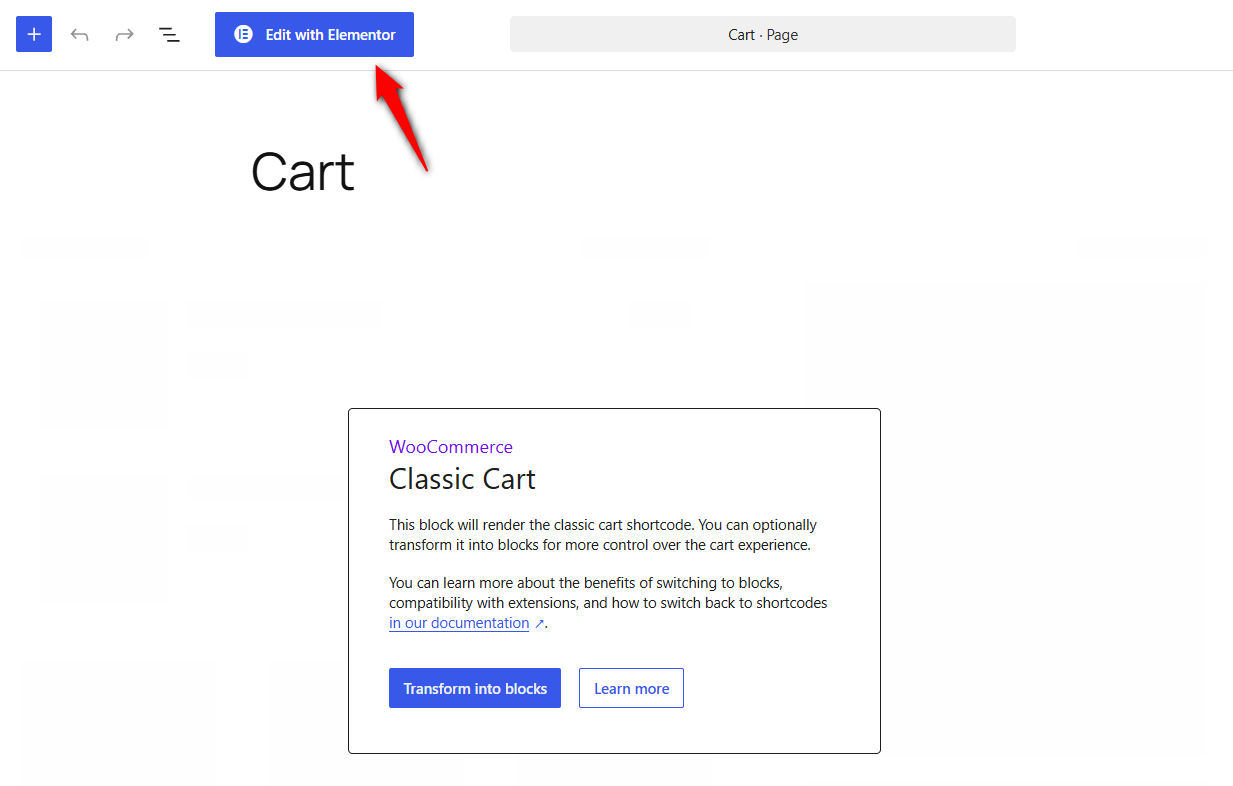
If the page still contains the Cart block or the [woocommerce_cart] shortcode, remove it so the widget is the only cart on the page.
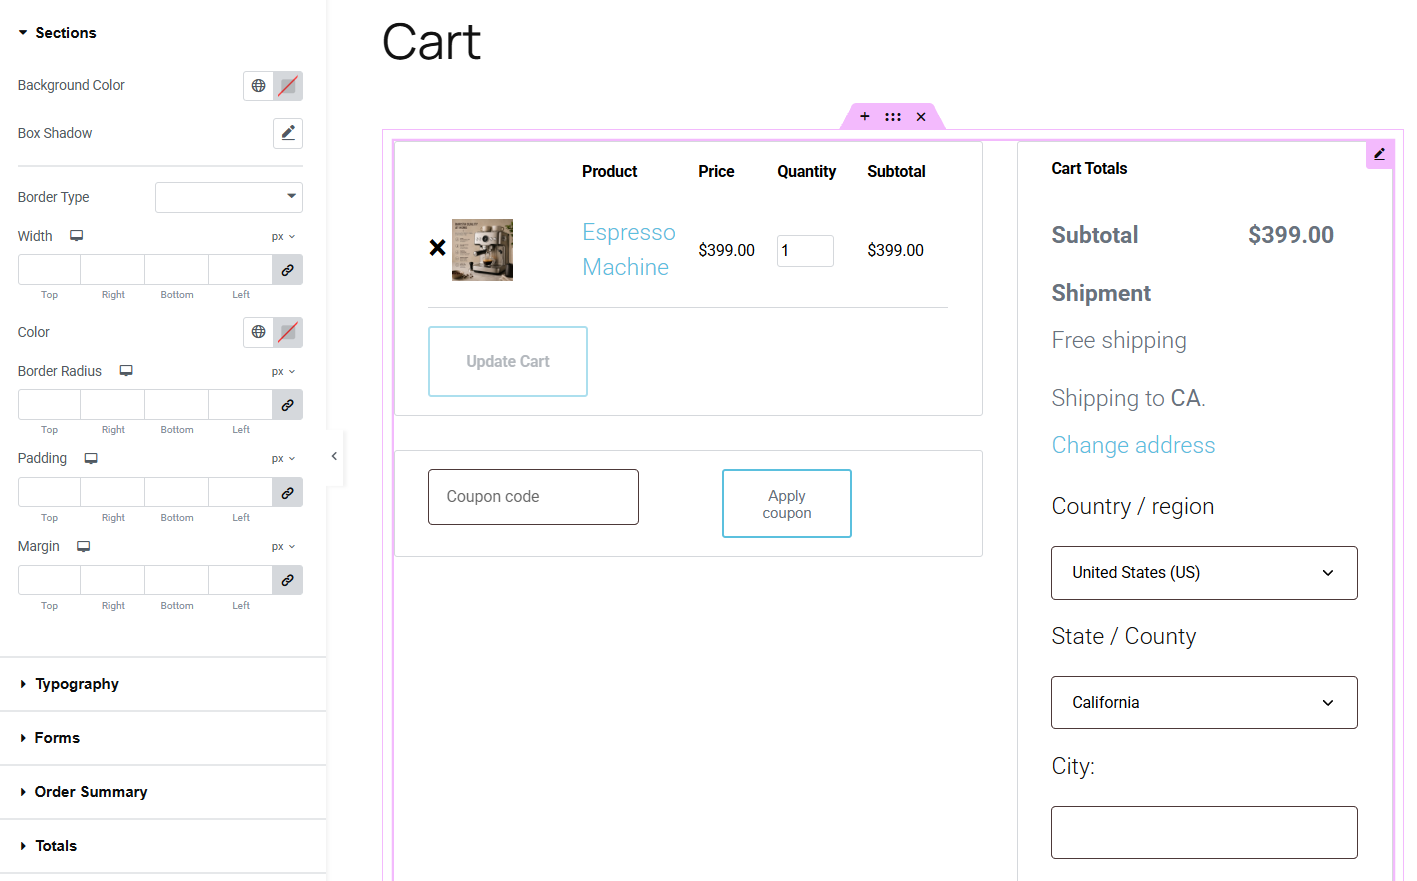
Step 2: Add and style the cart widget
Search the widget panel for "Cart" and drag the Cart widget onto the page.
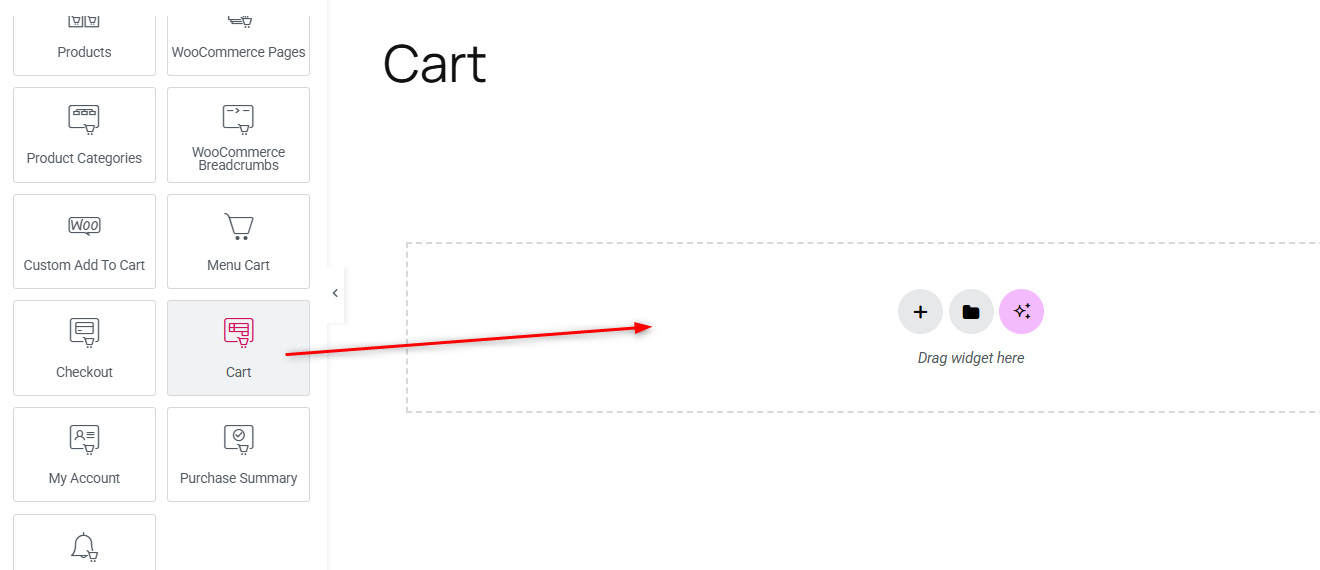
The widget's Content tab controls layout and behavior:
- Layout: One or two columns, with an optional sticky right column.
- Coupon: A Show/Hide toggle. Hide it if you don't want shoppers leaving your store to hunt for codes.
- Button text: Separate fields for the Update Cart, Apply Coupon, and Checkout buttons.
- Update Cart Automatically: Refreshes the totals when quantities change, without a button click.
The Style tab is where the design work happens. Start with the most important parts:
- Checkout button: Use your brand color, 16px vertical padding, and 18px text. It should look like the primary action, not another secondary button.
- Cart table: Try product thumbnails of at least 100px, product names around 1.4 to 1.6em, and enough vertical space between rows.
- Totals panel: Give the order total more visual weight than the subtotal, shipping, or tax, so shoppers can spot the final amount immediately.
Don't leave the mobile layout until the end. Check the cart at around 375px wide while you build. Product tables get cramped quickly on small screens.
Step 3: Publish and set it as the cart page
When you publish, Elementor offers to set the page as your store's default cart page.
Accept it, or confirm the setting under WooCommerce ⇨ Settings ⇨ Advanced ⇨ Page setup.
To replace the empty cart message, create a template in Elementor ⇨ Theme Builder.
Then open the Cart widget, go to Content ⇨ Additional Options, turn on Customize empty cart, and choose your template.
If you're using an add-on instead of Elementor Pro, build the cart in the add-on's template editor and assign it in the add-on's settings.
JetWooBuilder, ShopEngine, and ShopLentor each have a cart template setting for this.
Once it's set, open the cart in a private window and add a real product before testing.
An empty cart won't tell you whether the table, totals, quantities, or checkout button render correctly.
Fix: "My Elementor cart template isn't showing"
If the design looks right in Elementor but doesn't appear on the live cart, check these four things:
- The page is still using the Cart block: Remove any leftover Cart block or shortcode. If you're using an add-on template that attaches to the classic cart, transform the Cart block to Classic Shortcode first.
- The wrong page is set as the cart: Go to WooCommerce ⇨ Settings ⇨ Advanced ⇨ Page setup ⇨ Cart page and make sure it points to the page you edited.
- An add-on template isn't assigned: Check the builder's cart template settings as well as the template's own display conditions.
- Cache is serving the old version: Purge your page cache and CDN cache, then hard-reload the page.
The pattern is similar in other builders.
Divi uses its Theme Builder and WooCommerce modules. Bricks has a dedicated cart template type under Templates. Breakdance and Oxygen also provide WooCommerce elements for building custom layouts.
If you're using Gutenberg without a page builder, you don't need to add one just to customize the cart.
Method 1 or 2 plus the snippets in Method 4 is enough for many stores.
Method 4: Customize the Cart Page With CSS and PHP Snippets
This is where you get the things the visual editors don't expose.
You can restyle the cart with CSS, add live messages with PHP, and remove fields the editors can't reach.
Most of this method needs the classic cart. CSS works on both carts, but the selectors differ.
Snippet 2 also works on the Cart block. The template hooks don't.
Before you add any code, follow two rules:
- Use a child theme or a code snippets plugin. Don't put custom PHP in your parent theme's functions.php, because a theme update can overwrite it.
- Back up first, then add one snippet at a time. A missing semicolon can cause a PHP error. If you added three snippets at once, finding the broken one is much harder.
1. Style the cart page design with CSS
Go to Appearance ⇨ Customize ⇨ Additional CSS, or add it in your child theme's style.css file.
On block themes, use Appearance ⇨ Editor ⇨ Styles ⇨ Additional CSS.
Example: Full-width checkout button and remove sidebar
/* Make checkout button full-width and branded */
.wc-proceed-to-checkout .checkout-button {
   display: block;
   width: 100%;
   background-color: #2ecc71;
   color: #fff;
   font-size: 18px;
   font-weight: 700;
   padding: 16px;
   border-radius: 4px;
   border: none;
}

/* Remove sidebar and expand main content */
.woocommerce-cart #secondary { display: none; }
.woocommerce-cart #primary    { width: 100%; float: none; }
Tip: Sidebar selectors vary by theme, so use your browser's inspector to find the right class.
2. Add PHP snippets
Hooks let you add, remove, or change content on WooCommerce pages without editing templates.
- Action hooks add content at a specific spot, such as a message above the cart table.
- Filter hooks change something WooCommerce already outputs, such as a label, a link, or whether coupons are enabled.
Add each snippet to your child theme's functions.php file or a code snippets plugin, one at a time.
Snippet 1: Live free-shipping message (classic cart)
This shows "You are $X away from free shipping" above the cart table. It switches to a success message once the shopper qualifies.
It updates whenever shoppers change quantities, remove items, or apply a coupon.
It subtracts coupon discounts the same way WooCommerce's Free Shipping method does, so the amount matches what checkout will charge.
add_action( 'woocommerce_before_cart_table', 'fk_free_shipping_progress_message' );

function fk_free_shipping_progress_message() {
	$threshold = 50; // Set this to your Free Shipping minimum.

	$cart  = WC()->cart;
	$total = (float) $cart->get_displayed_subtotal();

	// Match WooCommerce's Free Shipping method, which subtracts coupon discounts.
	$total -= (float) $cart->get_discount_total();
	if ( $cart->display_prices_including_tax() ) {
		$total -= (float) $cart->get_discount_tax();
	}

	if ( $total <= 0 ) {
		return;
	}

	if ( $total < $threshold ) {
		$message = sprintf(
			/* translators: %s: amount left to spend */
			__( 'You are %s away from free shipping.', 'your-textdomain' ),
			wc_price( $threshold - $total )
		);
	} else {
		$message = __( 'You have unlocked free shipping.', 'your-textdomain' );
	}

	echo '<div class="fk-free-shipping-message">' . wp_kses_post( $message ) . '</div>';
}
Then style it with CSS:
.fk-free-shipping-message {
   padding: 12px 16px;
   margin-bottom: 16px;
   background: #f0faf4;
   border-left: 4px solid #2ecc71;
   font-weight: 600;
}
If you ticked "Apply minimum order rule before coupon discount" in your Free Shipping settings, delete the lines that subtract discounts.
Snippet 2: Hide the coupon field on the cart page (both carts)
Shoppers can still enter coupons at checkout. The Cart block checks this same setting when the page loads, so the snippet also hides its coupon form. Confirm it on a staging copy before going live.
add_filter( 'woocommerce_coupons_enabled', 'fk_hide_coupon_field_on_cart' );

function fk_hide_coupon_field_on_cart( $enabled ) {
	if ( is_cart() ) {
		return false;
	}
	return $enabled;
}
To turn coupons off across the whole store instead, untick "Enable the use of coupon codes" under WooCommerce ⇨ Settings ⇨ General.
Snippet 3: Trust line under the checkout button (classic cart)
Replace the example text with your real policies. WooCommerce prints the Proceed to Checkout button at priority 20, so priority 30 places this line right under it.
add_action( 'woocommerce_proceed_to_checkout', 'fk_cart_trust_line', 30 );

function fk_cart_trust_line() {
	echo '<p class="fk-cart-trust">' . esc_html__( 'Free 30-day returns · Ships in 1 to 2 days · Secure payment', 'your-textdomain' ) . '</p>';
}
Snippet 4: Remove product links in the cart (classic cart)
add_filter( 'woocommerce_cart_item_permalink', 'fk_remove_cart_product_links', 10, 3 );

function fk_remove_cart_product_links( $url, $cart_item, $cart_item_key ) {
	return false; // Product names show as plain text.
}
Classic cart hook reference:
| Hook | Where it runs |
|---|---|
| woocommerce_before_cart | Top of the cart page, before the cart form. WooCommerce prints notices here. |
| woocommerce_before_cart_table | Inside the cart form, just above the table |
| woocommerce_before_cart_contents | Inside the table, before the first product row |
| woocommerce_cart_contents | Inside the table, after the last product row and before the coupon and Update cart row |
| woocommerce_after_cart_table | Inside the cart form, just below the table |
| woocommerce_cart_collaterals | Below the cart form. WooCommerce outputs cross-sells and cart totals here at priority 10. |
| woocommerce_cart_totals_before_shipping | In the totals table, just before the shipping row |
| woocommerce_cart_totals_after_shipping | In the totals table, just after the shipping row |
| woocommerce_cart_totals_before_order_total | Just before the Total row |
| woocommerce_cart_totals_after_order_total | Just after the Total row |
| woocommerce_proceed_to_checkout | Below the totals. Express payment buttons print at priority 10 and the checkout button at 20. |
| woocommerce_after_cart | Bottom of the cart page, after cross-sells and totals |
The two shipping hooks only run when the cart needs shipping and shows it.
3. Edit the cart page HTML with a template override
For changes hooks can't make, such as reordering columns or removing table cells, you can override WooCommerce's cart template.
Step 1: Locate the original template
The main cart template is stored here:
wp-content/plugins/woocommerce/templates/cart/cart.phpThe totals panel lives in cart-totals.php in the same folder.
Step 2: Copy it to your child theme
Create a woocommerce/cart/ folder inside your child theme, then copy the file there:
wp-content/themes/your-child-theme/woocommerce/cart/cart.phpStep 3: Edit your copy
Open the copied file in a code editor and make your changes. WooCommerce now uses your copy instead of the plugin version.
Note: Each template has a version number at the top. When WooCommerce updates a template, your copy can fall behind. After updates, open WooCommerce ⇨ Status and scroll to the Templates section, which flags outdated overrides.
Method 5: Replace the Cart Page With a Side Cart
Everything so far assumes the cart page belongs in the shopping journey. For some stores, it does. For others, it adds another page between adding a product and reaching checkout.
Baymard Institute’s research puts average cart abandonment at around 70% across industries. In its survey, 17% of US online shoppers said they had abandoned an order because the checkout was too long or complicated.
A side cart keeps shoppers on the page they're browsing.
Instead of sending them to a separate cart page, the cart slides open when they add an item and stays available from anywhere on the site.
Shoppers can review items, change quantities, apply coupons, and head to checkout without leaving the page.
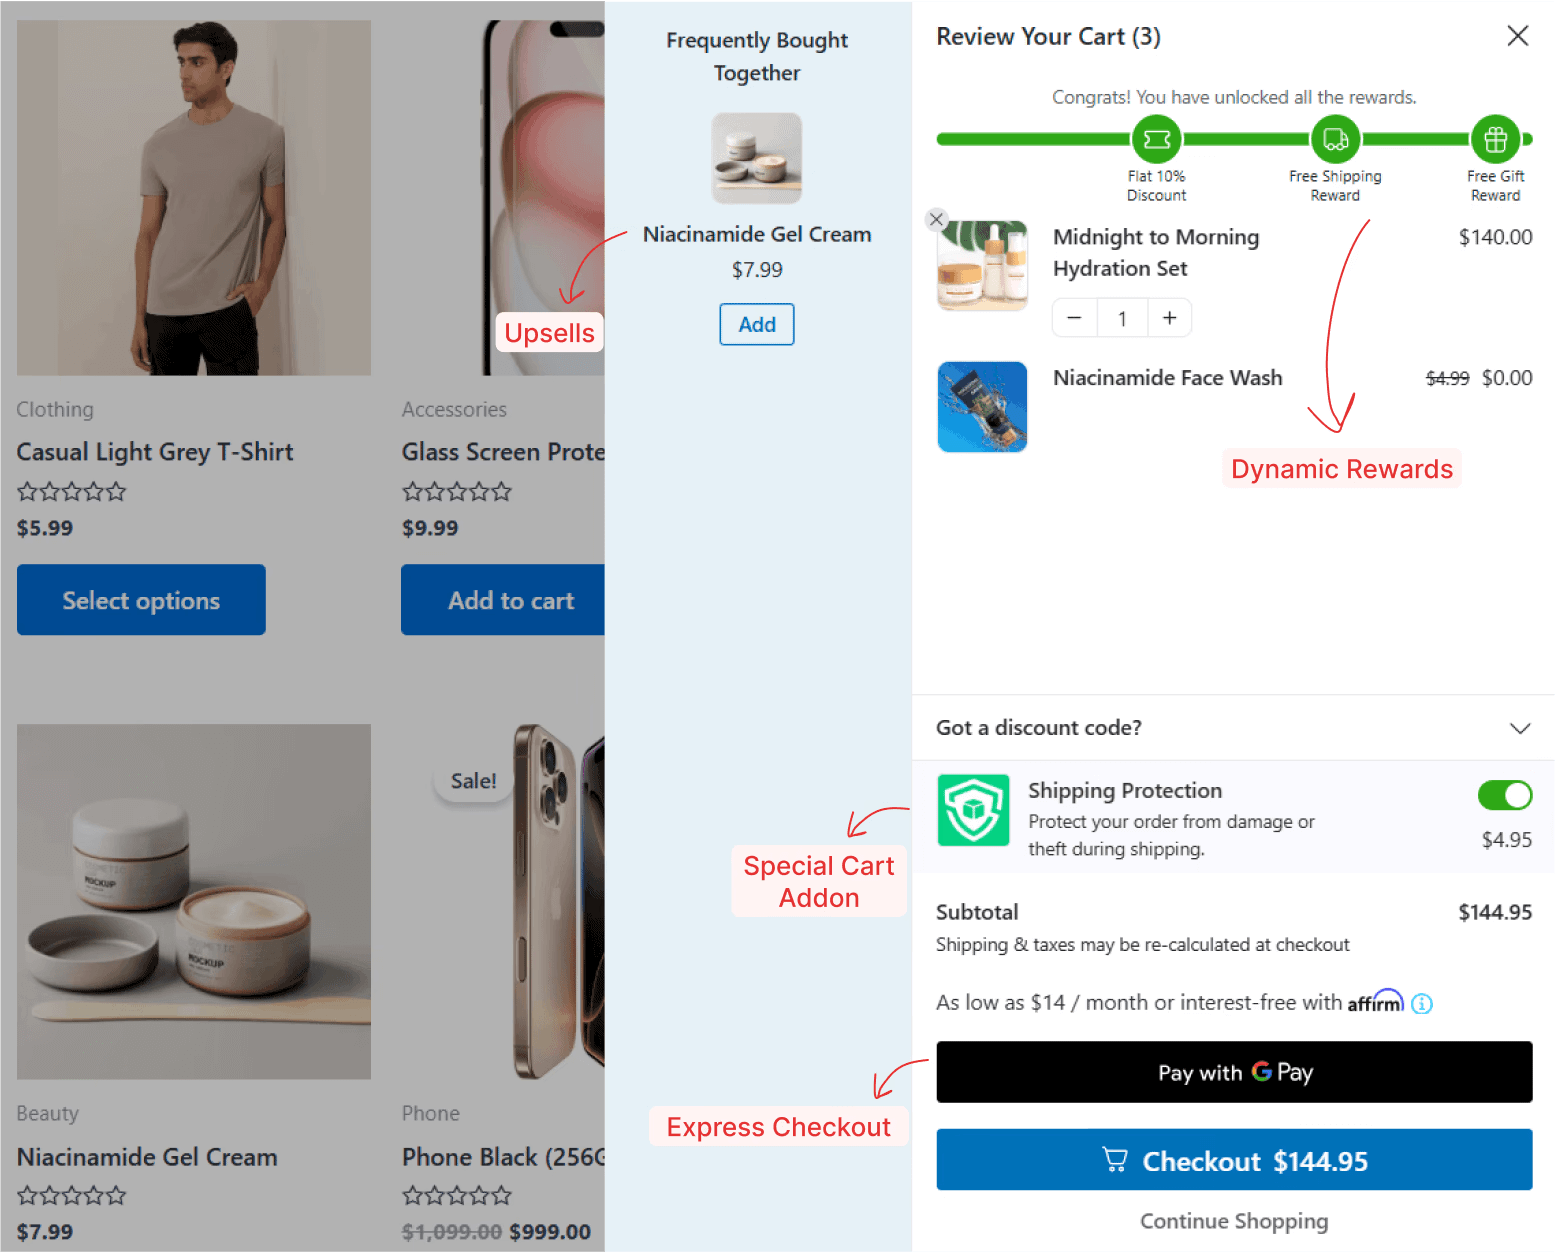
The free version of FunnelKit Cart includes the slide-in drawer, cart icon, quantity updates, coupon display, and styling options.
The Pro version adds in-cart upsells and cross-sells, free-shipping bars, gift rewards, and express payment buttons.
With Pro, a side cart can:
- Show a live free-shipping progress bar that tells shoppers how much more to spend as the total changes.
- Offer cross-sells and one-click add-ons inside the drawer while purchase intent is high.
- Unlock spend-threshold rewards, such as a discount or free gift at a set cart value.
- Display express checkout buttons such as Apple Pay and Google Pay, so shoppers can pay without visiting a cart page.
When this is the right call
A side cart can make sense for:
- Impulse and repeat-purchase products, such as coffee, cosmetics, consumables, and similar products where shoppers tend to make quick decisions.
- Small catalogs, where customers typically buy one or two products at a time.
- Mobile-heavy stores, where keeping the shopping flow compact can be useful.
- Stores with cross-sells, because you can put those recommendations right after the add-to-cart action instead of waiting for the shopper to reach the cart page.
When it isn't
A full cart page can still be useful when shoppers need to stop and review what they're buying.
- High-AOV or multi-variation orders: Apparel with multiple sizes and colors, or B2B orders with many line items, can benefit from having more room to review the order.
- Complex shipping or tax calculations: If shoppers need to see several shipping options, fees, or other details before paying, a compact drawer may feel cramped.
- Stores where the cart page is part of the established buying flow: If customers regularly use it to review their order, removing it can create confusion.
Match the cart experience to how people actually buy from your store. Removing a page can reduce friction, but it can also remove a useful review step.
Watch your conversion rate alongside returns and support questions before deciding the cart page is the problem.

7 Cart Page Changes That Improve Revenue
Design and code are just tools. What matters is where you use them.
If we were working through a store's cart, these are the seven changes we'd look at first, roughly in order of impact versus effort.
1. Make the checkout button the loudest thing on the page
Give it the full width, your brand color, generous padding, and space around it.
On many default themes, the Proceed to Checkout and Update cart buttons look surprisingly similar, even though only one moves the shopper forward.
The CSS in Method 4 covers both carts.
2. Add a live free-shipping message
On the classic cart, use Snippet 1 from Method 4. On the Cart block, use a side cart progress bar or have a developer add one through the ExperimentalOrderMeta slot.
A message showing that someone is only $6 away from free shipping gives them a concrete reason to add another product.
Test it against your actual average order value rather than assuming it will raise it.
Our guide to adding a WooCommerce free shipping bar covers the free and Pro setups.
3. Add two relevant cross-sells, not six random ones
Cross-sells work best when products naturally belong together, such as filters with a coffee grinder rather than another grinder.
Set them for each product under Product data ⇨ Linked Products ⇨ Cross-sells.
On mobile, reduce or hide them if they push the checkout button down.
For more ways to add offers to the cart, see our guide to WooCommerce cart add-ons.
4. Add express checkout
Wallet buttons such as Apple Pay and Google Pay remove most of the address and payment entry for shoppers with saved details.
If your payment gateway supports it, enable its express buttons on the cart page.
Test this early if much of your traffic comes from mobile.
5. Add three trust signals below the button
Keep them simple, such as returns, shipping speed, and payment security.
Snippet 3 adds them on the classic cart. They answer the last questions a shopper may have before committing.
6. Fix the mobile cart table
Open the cart on an actual phone and add three products. Check the product names, quantity controls, spacing, and checkout button.
If names wrap awkwardly, steppers are hard to tap, or the button falls below the fold, fix that before adding features.
7. Decide what happens when someone leaves anyway
Some shoppers will abandon the cart no matter how polished the page is.
An abandoned cart email sequence gives you another chance to bring them back, and it keeps working after the redesign.
Note: For the mechanics, see our guides to WooCommerce cart abandonment and WooCommerce cart discounts.
Frequently Asked Questions
Yes, and for many stores, that's the right answer. The Site Editor, the block editor, custom CSS, and PHP hooks are all built into WordPress and WooCommerce and cost nothing.
Methods 1, 2, 4, and 5 in this guide use no paid tools. You'd reach for a plugin when you want visual control without writing CSS, or when you want cart-level features like progress bars and in-cart upsells that would otherwise be a development project.
Yes. Elementor Pro includes a Cart widget, and add-ons like ShopEngine and ShopLentor bring their own cart widgets to the free version of Elementor.
With Pro, clear any Cart block or shortcode off the page first so the widget is the only cart. Some add-on templates attach to the classic cart instead, and those need the Cart block switched to the shortcode before you assign them.
Method 3 walks through the full build.
Because it isn’t supposed to. is_woocommerce() returns true only on pages served by WooCommerce's own templates: the shop archive, product categories and single product pages.
The cart and checkout are ordinary WordPress pages with WooCommerce content embedded in them, so the function returns false there by design.
Use is_cart() for the cart page and is_checkout() for checkout.
If you need to catch all of them, is_woocommerce() || is_cart() || is_checkout() || is_account_page() is the standard combination.
The default is at wp-content/plugins/woocommerce/templates/cart/cart.php.
To override it, copy it to wp-content/themes/your-child-theme/woocommerce/cart/cart.php and edit the copy. WooCommerce loads the child theme version instead.
This only applies to the classic cart. If you’re running the Cart block, there’s no PHP template to override, so use the Site Editor.
Out of the box, the cart shows cross-sells, set per product under Product data ⇨ Linked Products ⇨ Cross-sells.
That's product-by-product configuration, which gets tedious past a few dozen SKUs, and the placement is fixed below the cart table, where it's easy to miss on mobile.
If you want rules-based offers, or offers inside the cart drawer at the add-to-cart moment, cart plugins are for that. We've covered the options in our roundup of WooCommerce cart plugins.
By default, it’s yourstore.com/cart. You can change which page serves it under WooCommerce ⇨ Settings ⇨ Advanced ⇨ Page setup ⇨ Cart page, and change the slug by renaming the page itself.
If you change the slug on an established store, set up a redirect from the old one. Customers bookmark cart pages more often than you'd expect.
It depends on what you sell. Stores with small catalogs and simple products can often replace it with a side cart, or skip it and send shoppers straight to checkout.
Apparel stores with several sizes per product, or B2B stores taking orders with a dozen line items, usually need the review step.
Method 5 covers how to decide.
Not directly. The cart isn't a form like checkout, and anything typed there has to be carried into the order manually.
For gift messages, delivery dates, and engraving, the two supported places are the product page (stored as cart item meta) or the checkout page as a custom field.
Adding an input to the cart template without wiring it into the session and the order will lose the data at checkout.
Customize Your WooCommerce Cart Page the Right Way
Most cart pages are the page nobody really chose. They came with WooCommerce and happen to match the theme. They sit between an interested shopper and a paid order, doing little beyond listing the cart contents.
You don't need to try every method in this guide. Start by checking which cart you have, then pick the method that fits.
From there, make the checkout button easy to spot, add a live shipping message, trim cross-sells, and test the whole experience on a real phone. Those changes fit in an afternoon.
None of them will transform a store overnight. Small improvements add up across hundreds or thousands of orders, especially when you measure what changes instead of assuming every tweak helps.
If your shoppers usually buy one or two products at a time, a side cart may serve them better than any cart page.
It keeps them on the page they're browsing and brings progress bars, in-cart cross-sells, and express checkout into the same flow without custom code.
Set up a WooCommerce side cart and see whether it fits how your customers buy.
More WooCommerce Resources
- How to Skip the Cart Page and Redirect to Checkout
- Best Cart Plugins for WooCommerce
- How to Customize the WooCommerce Checkout Page (Block & Classic)
- How to Create WooCommerce Cart Discounts in Your Store
- How to Reduce WooCommerce Cart Abandonment
Editorial Team
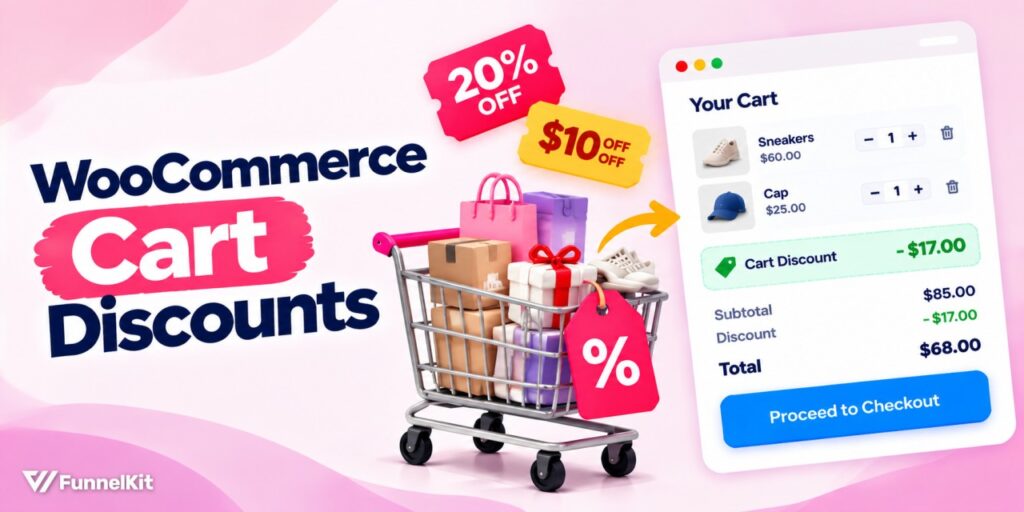
September 28, 2026A well-timed WooCommerce cart discount can be the difference between a completed order and an abandoned one. Studies show nearly 70% of online shoppers leave without buying, and unexpected checkout...
Editorial Team
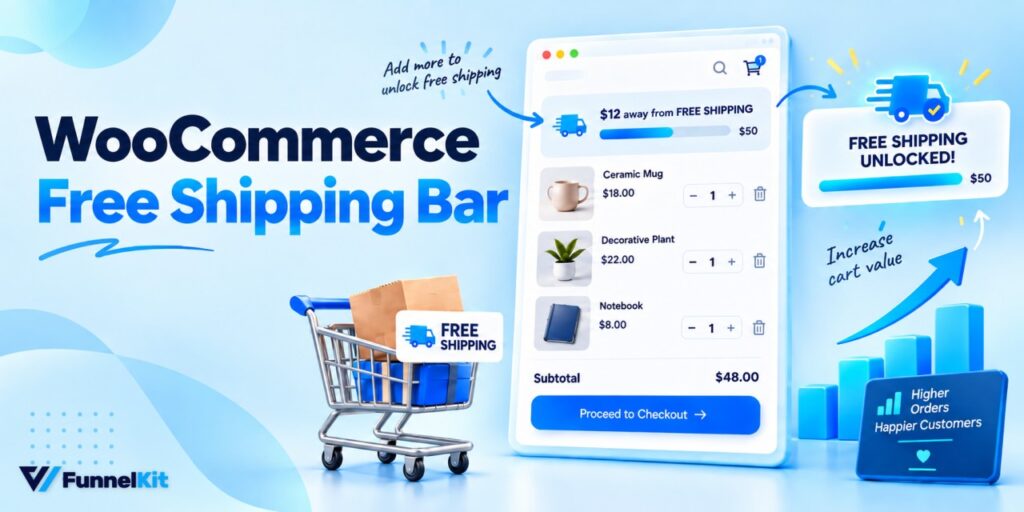
September 22, 2026A WooCommerce free shipping bar puts the free shipping threshold where shoppers can actually see it and act on it. Your store knows how much more a customer needs to...
Editorial Team
September 15, 2026Looking for an easy way to boost your store's average order value without pushing customers away? This is where WooCommerce cart add-ons help you in this competitive market. It helps...






