


The WooCommerce checkout block editor lets you build and customize your checkout page using Gutenberg, WordPress's native block editor.
It comes built into WooCommerce by default. But it’s more of a structured checkout editor than a full-blown checkout builder.
You can rearrange sections, show or hide certain fields, edit text, and adjust built-in settings, but you don’t get unlimited control over every checkout field and element out of the box.
That’s where the limitations start to show up. And if you’re using it for the first time, you might expect more customization than WooCommerce actually gives you.
In this guide, we'll cover what the Block Editor can do natively and how to work with it. Plus, how to extend its customization options with an additional plugin to create a checkout that fits your needs and boosts conversions.
Table of Contents
- 1 What the WooCommerce Checkout Block Editor Really Does
- 2 How to Use the WooCommerce Checkout Block Editor
- 3 How To Extend WooCommerce Checkout Block Editor Customization Options For Free
- 4 What Block Editor Functionality You Can Extend With a Premium Plugin
- 5 FAQs About WooCommerce Checkout Block Editor
- 6 Ready to Unlock the Full Power of the WooCommerce checkout Block Editor?
What the WooCommerce Checkout Block Editor Really Does
The checkout block editor is the Gutenberg-based system WooCommerce uses to render and manage checkout pages.
Earlier, WooCommerce used a single [woocommerce_checkout] shortcode that ran the classic checkout for over a decade.
![Earlier, WooCommerce used a single [woocommerce_checkout] shortcode that ran the classic checkout for over a decade.](https://funnelkit.com/wp-content/uploads/2026/08/WooCommerce-checkout-shortcode-1.png)
With the block editor, that changed. Every section now stands alone as its own block: contact fields, shipping, order summary each one selectable, movable, and configurable on its own.
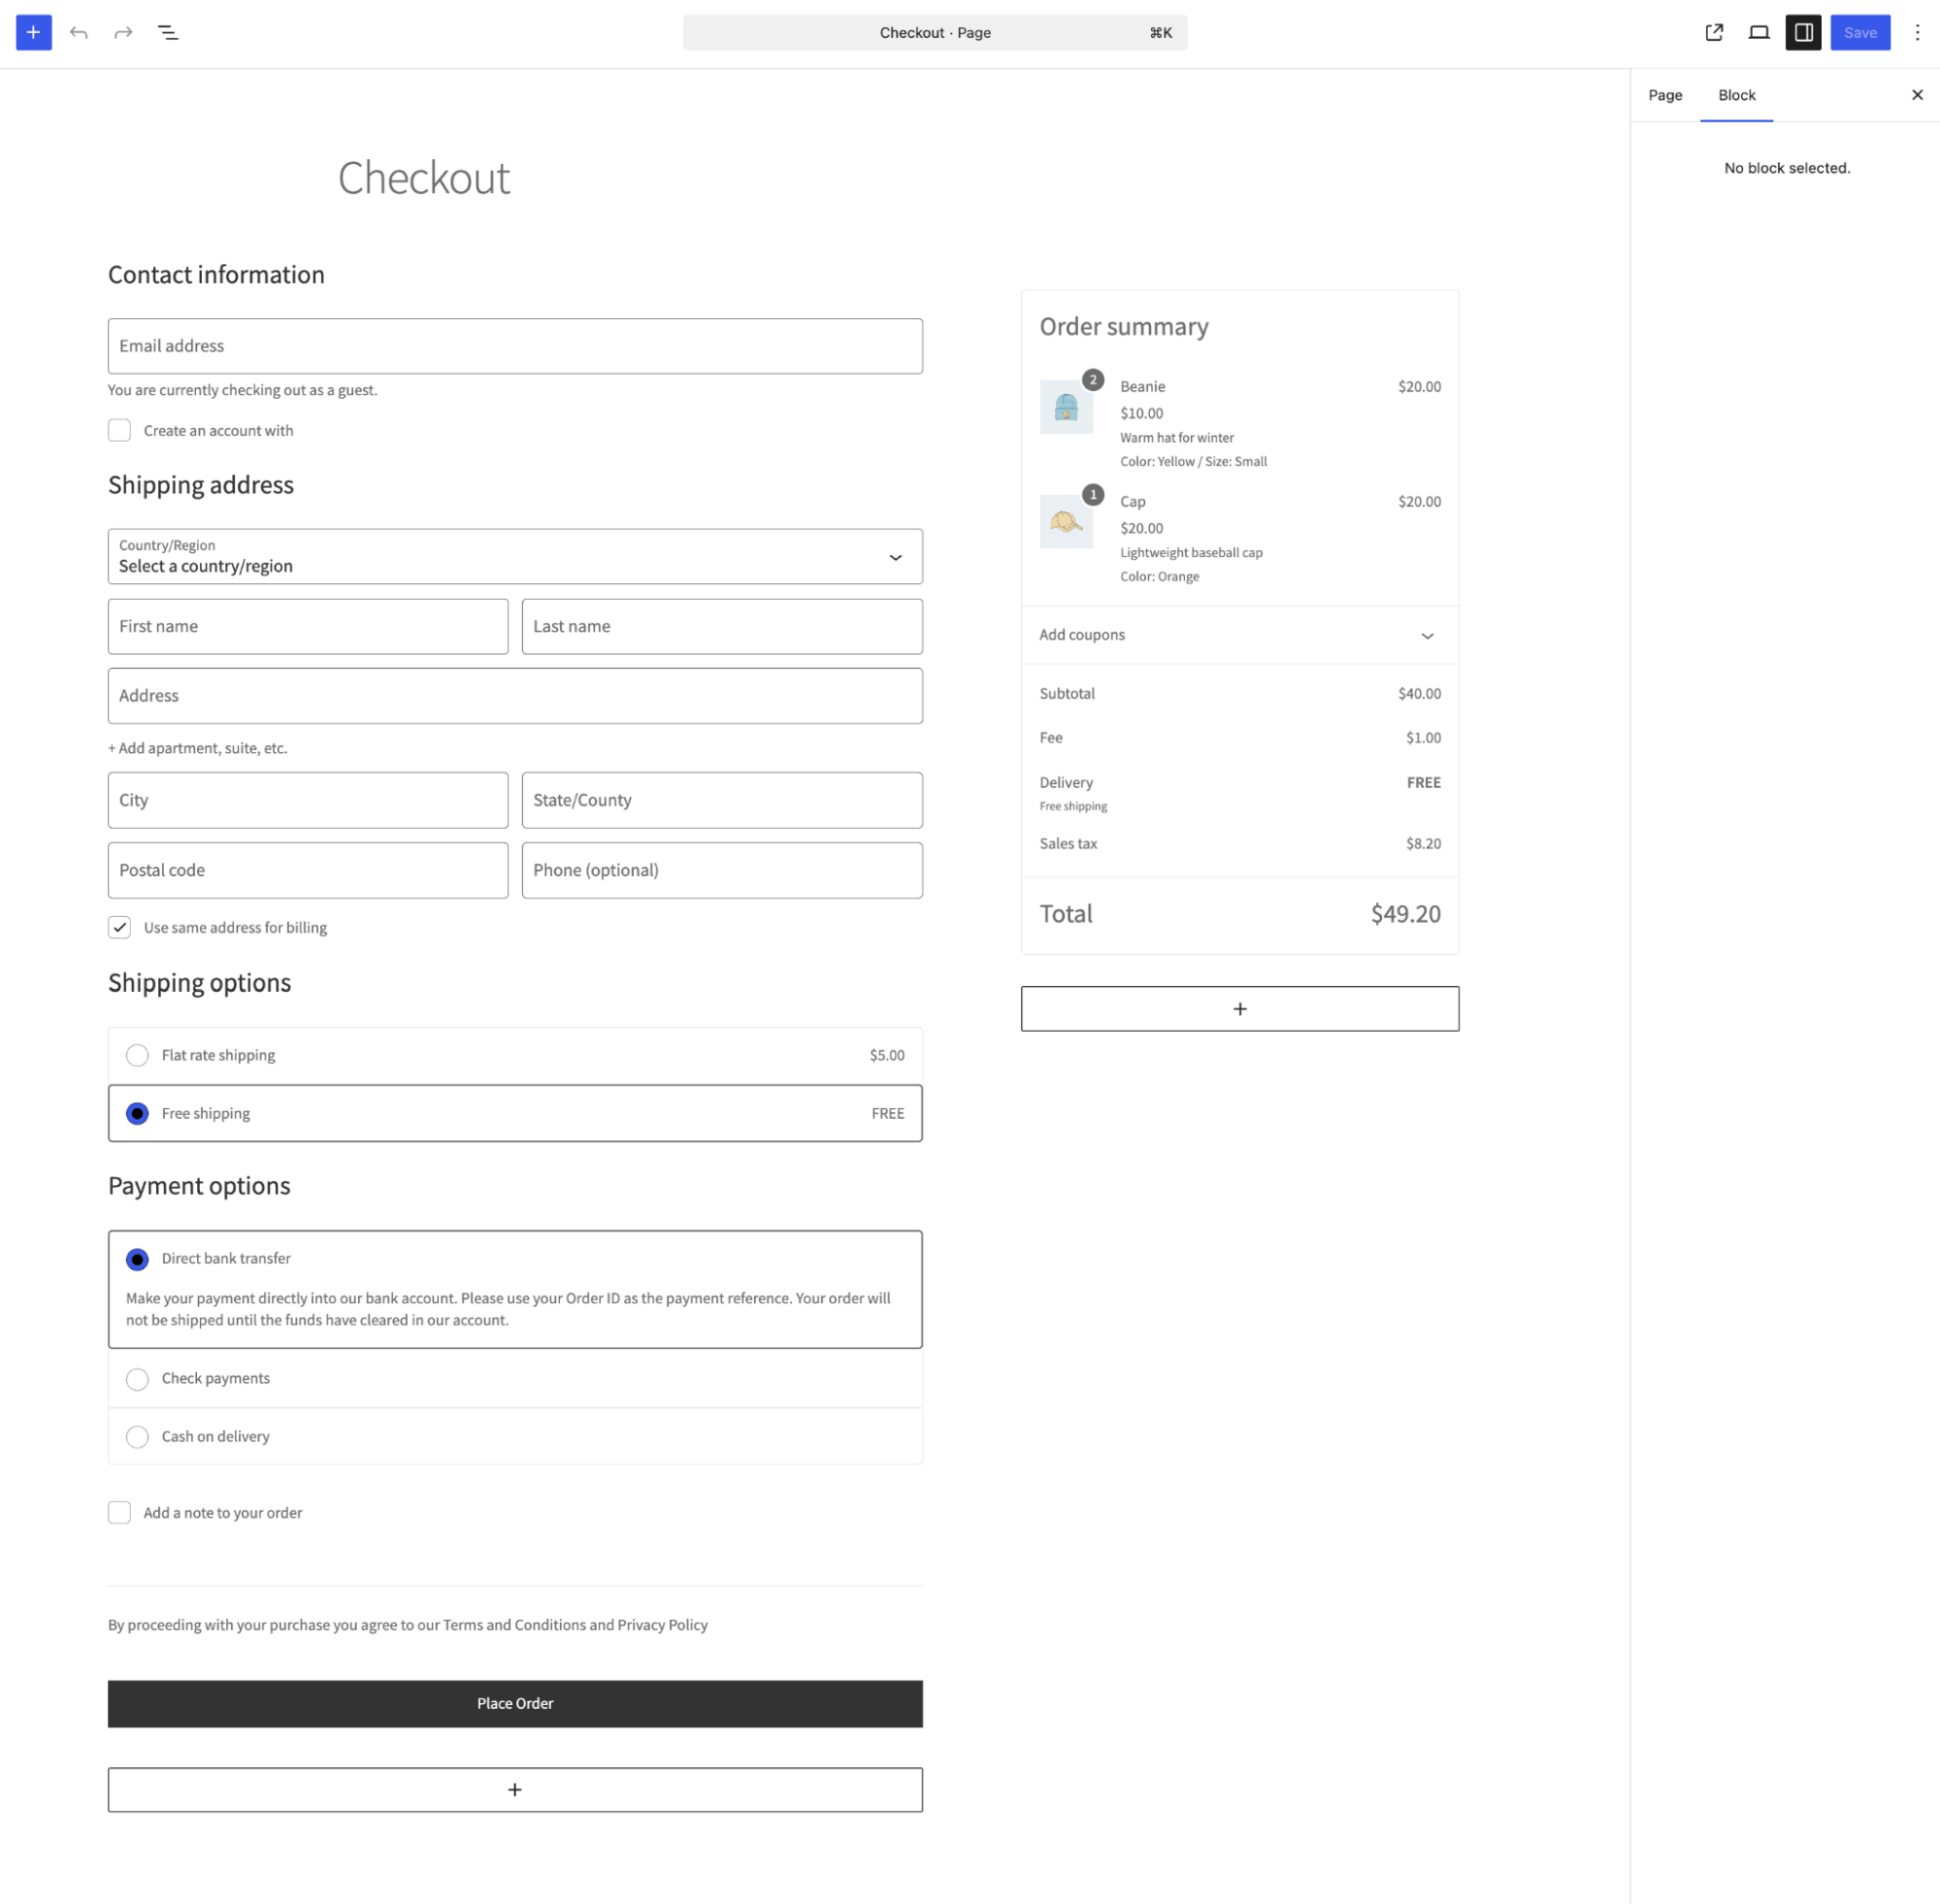
Here's what the native editor actually gives you, and where it stops.
- You control what customers see first: Reordering blocks means Order Notes, Terms and Conditions, or whatever else builds trust can sit wherever makes the most sense for your specific product.
- Fewer unexpected costs at checkout: 48% of shoppers abandon their carts when shipping fees or taxes are added late, according to research from the Baymard Institute. Move the order summary block earlier, and that problem mostly goes away.
- Express checkout reduces mobile friction: Turn on Apple Pay and Google Pay through the Express Checkout block, and mobile conversion can climb 10 to 20%, according to KISSmetrics' checkout benchmark data. It skips most of the form entirely for returning customers.
- It's free and already installed: No extra plugin needed for layout or settings changes, which makes it the obvious starting point before spending money on anything.
- A checkout built around your actual product: No more building a generic default; it closes a good chunk of that conversion gap on its own. But the native editor has a ceiling.
Here's exactly where it sits.
| Capability | Native Editor Support | Notes |
|---|---|---|
| Reorder page sections | Yes | Drag blocks like Contact, Shipping, and Order Summary into any order. |
| Toggle Terms and Conditions checkbox | Yes | Found in the block settings panel under Require Checkbox. |
| Show or hide Order Notes | Yes | Standalone block, can be removed entirely if not needed. |
| Toggle Return to Cart link | Yes | On/off setting in the block panel, no code required. |
| Reposition Express Checkout | Yes, if your gateway supports it | Controls visibility and placement, not the payment methods themselves. |
| Add brand-new custom fields | No | Requires a compatible plugin or the developer-facing Additional Checkout Fields API. |
| Multi-step layout | No | The native checkout block is single-step only. |
| Field-level conditional logic | No | Showing or hiding a field based on another field's value needs a plugin. |
How to Use the WooCommerce Checkout Block Editor
Step 1: Open and Review the Checkout Page in the Block Editor
Go to Pages > All Pages and open the page named Checkout.
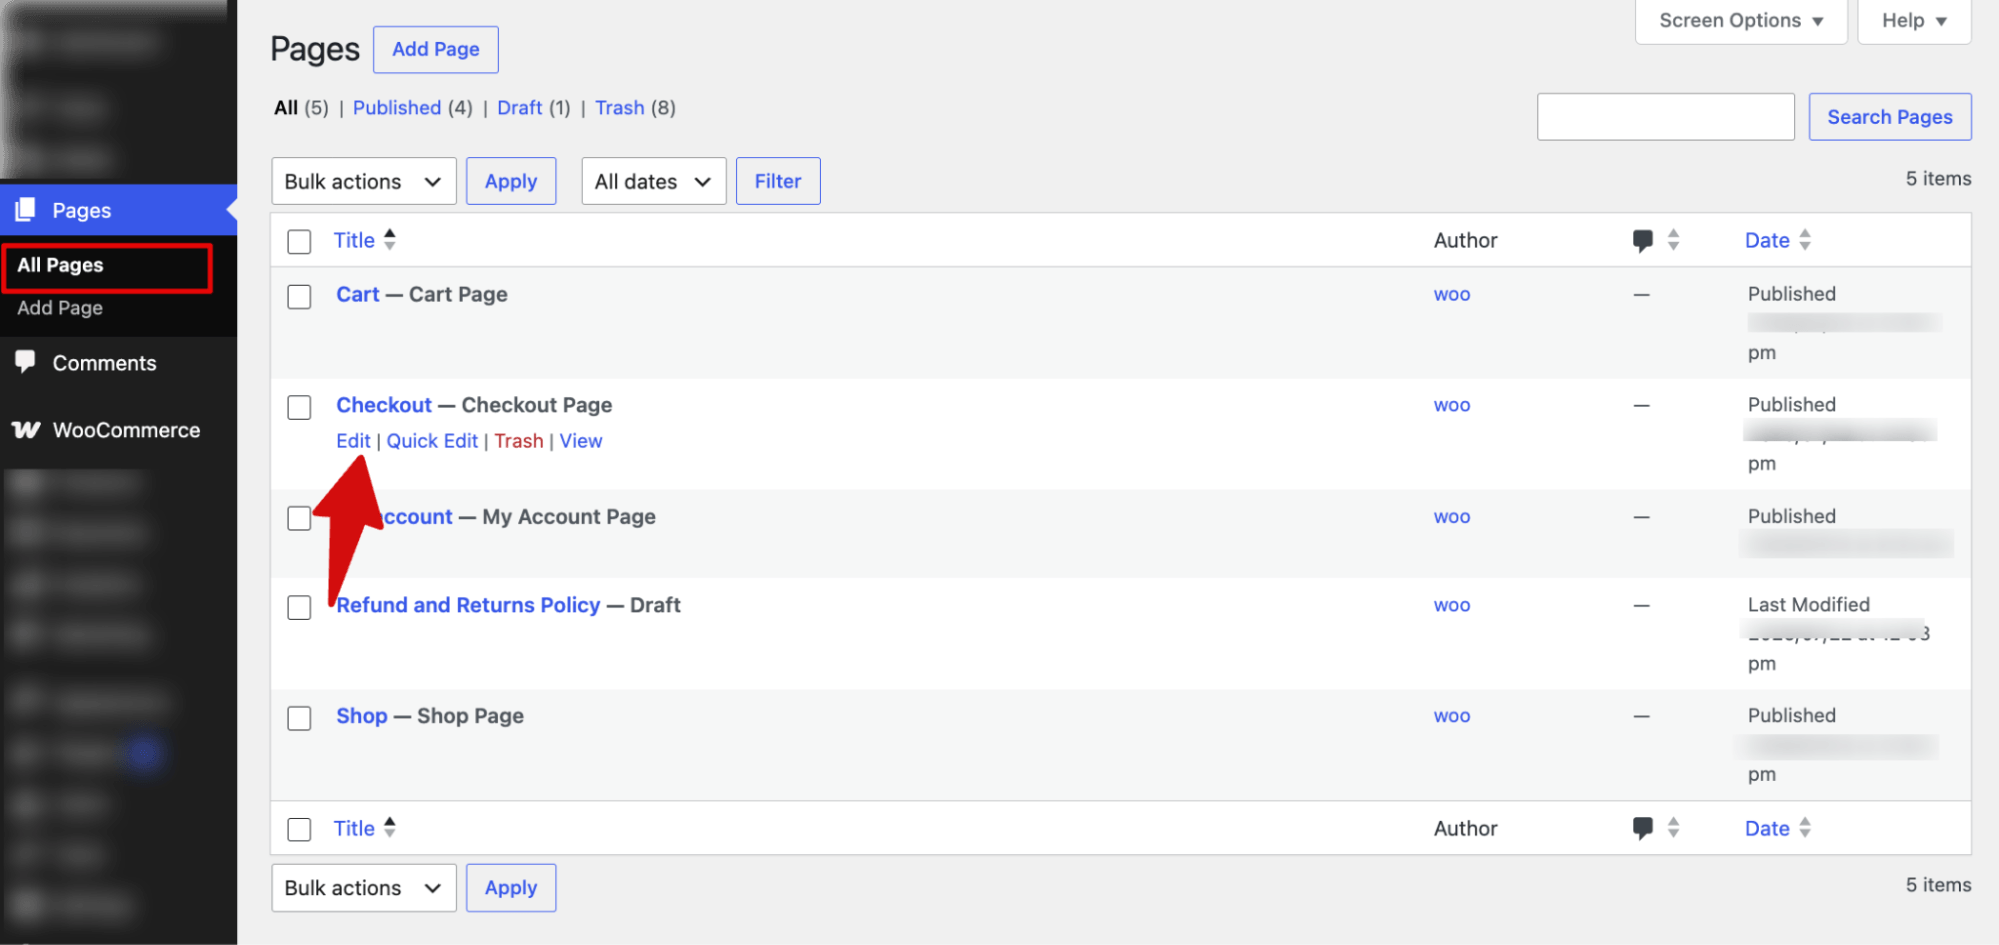
You can click “Exit Code Editor” to go to the block editor.
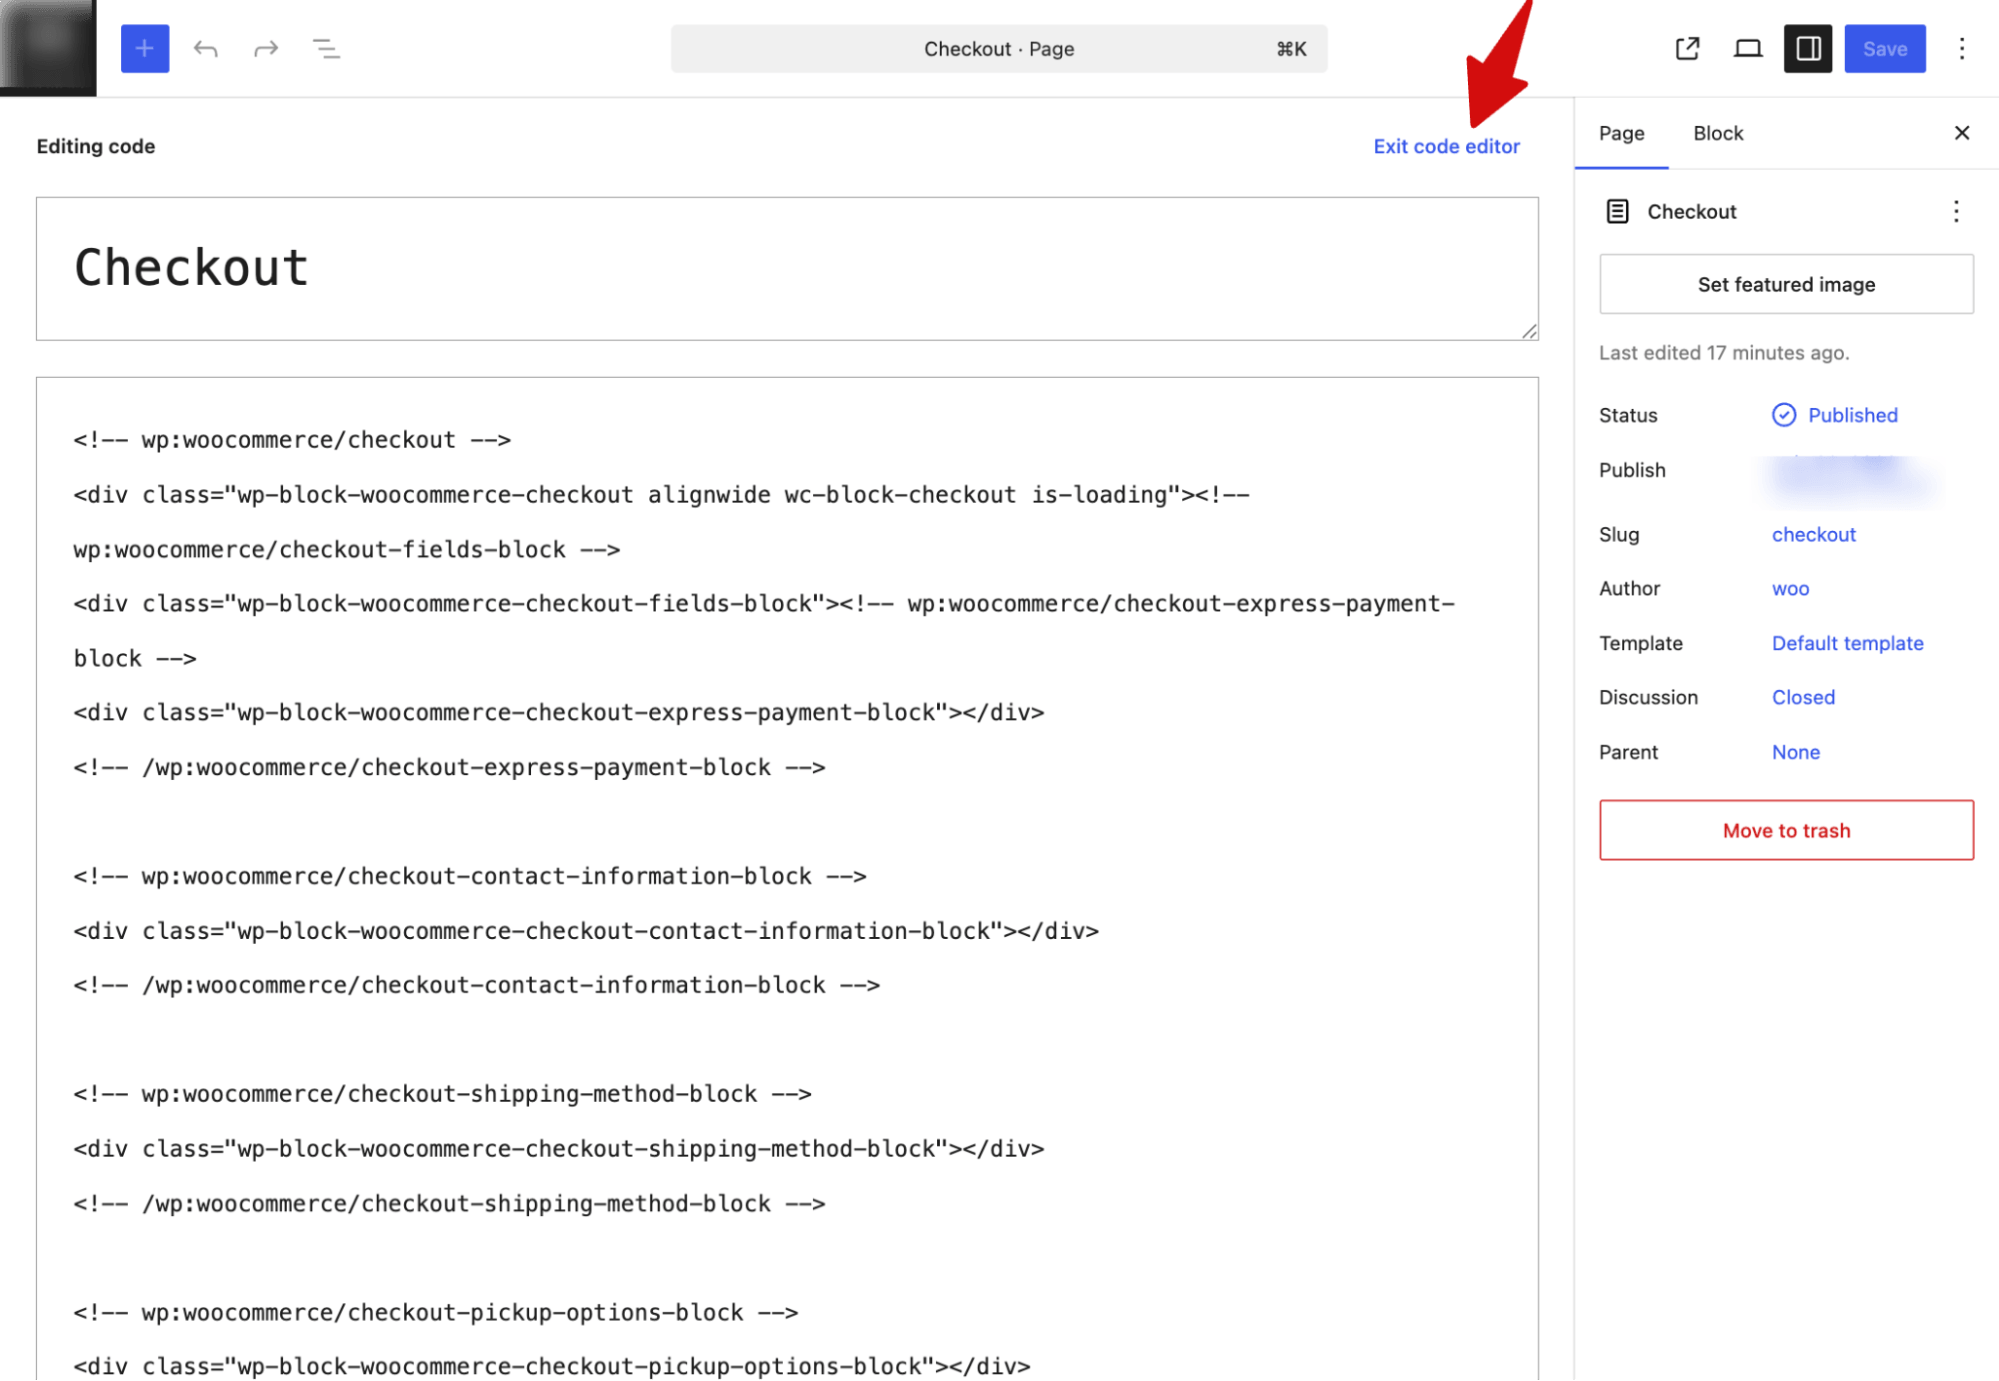
Next, visually customize the checkout with the Block Editor.
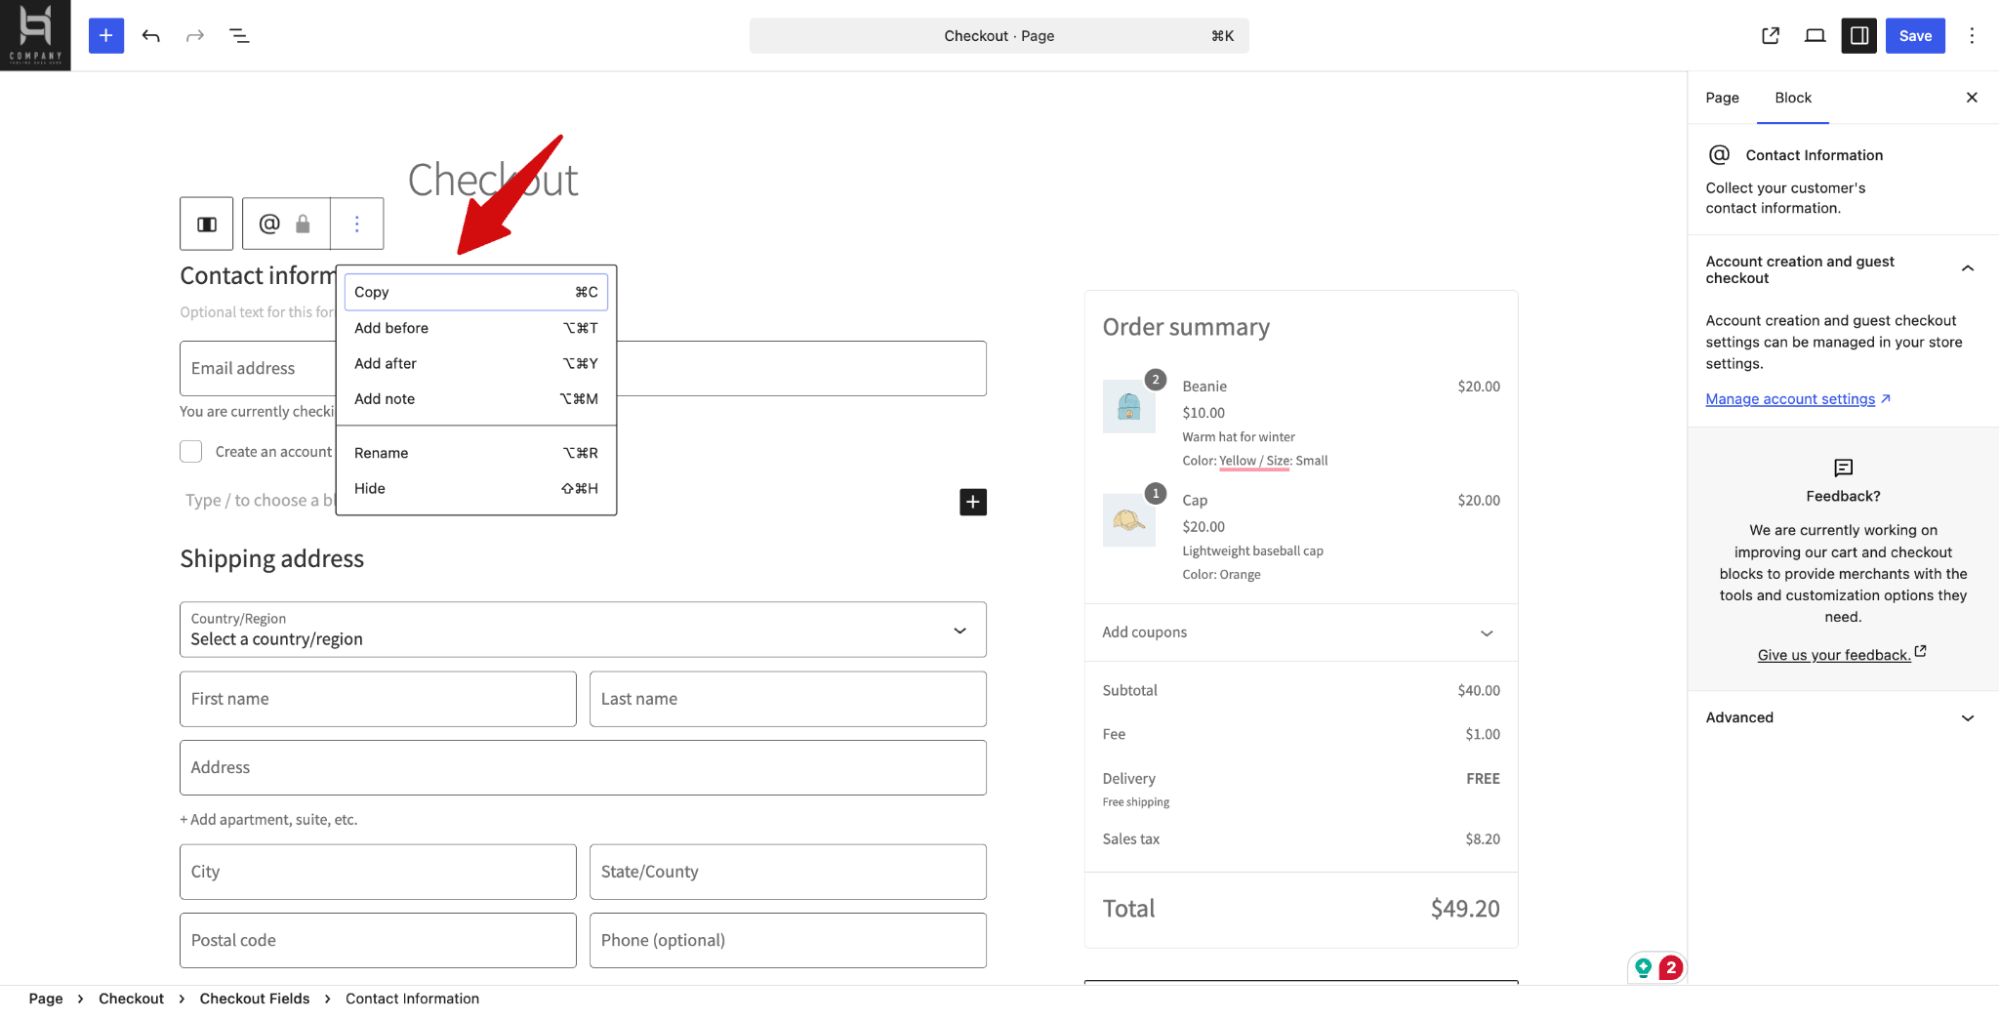
Step 2: Show or hide checkout form fields
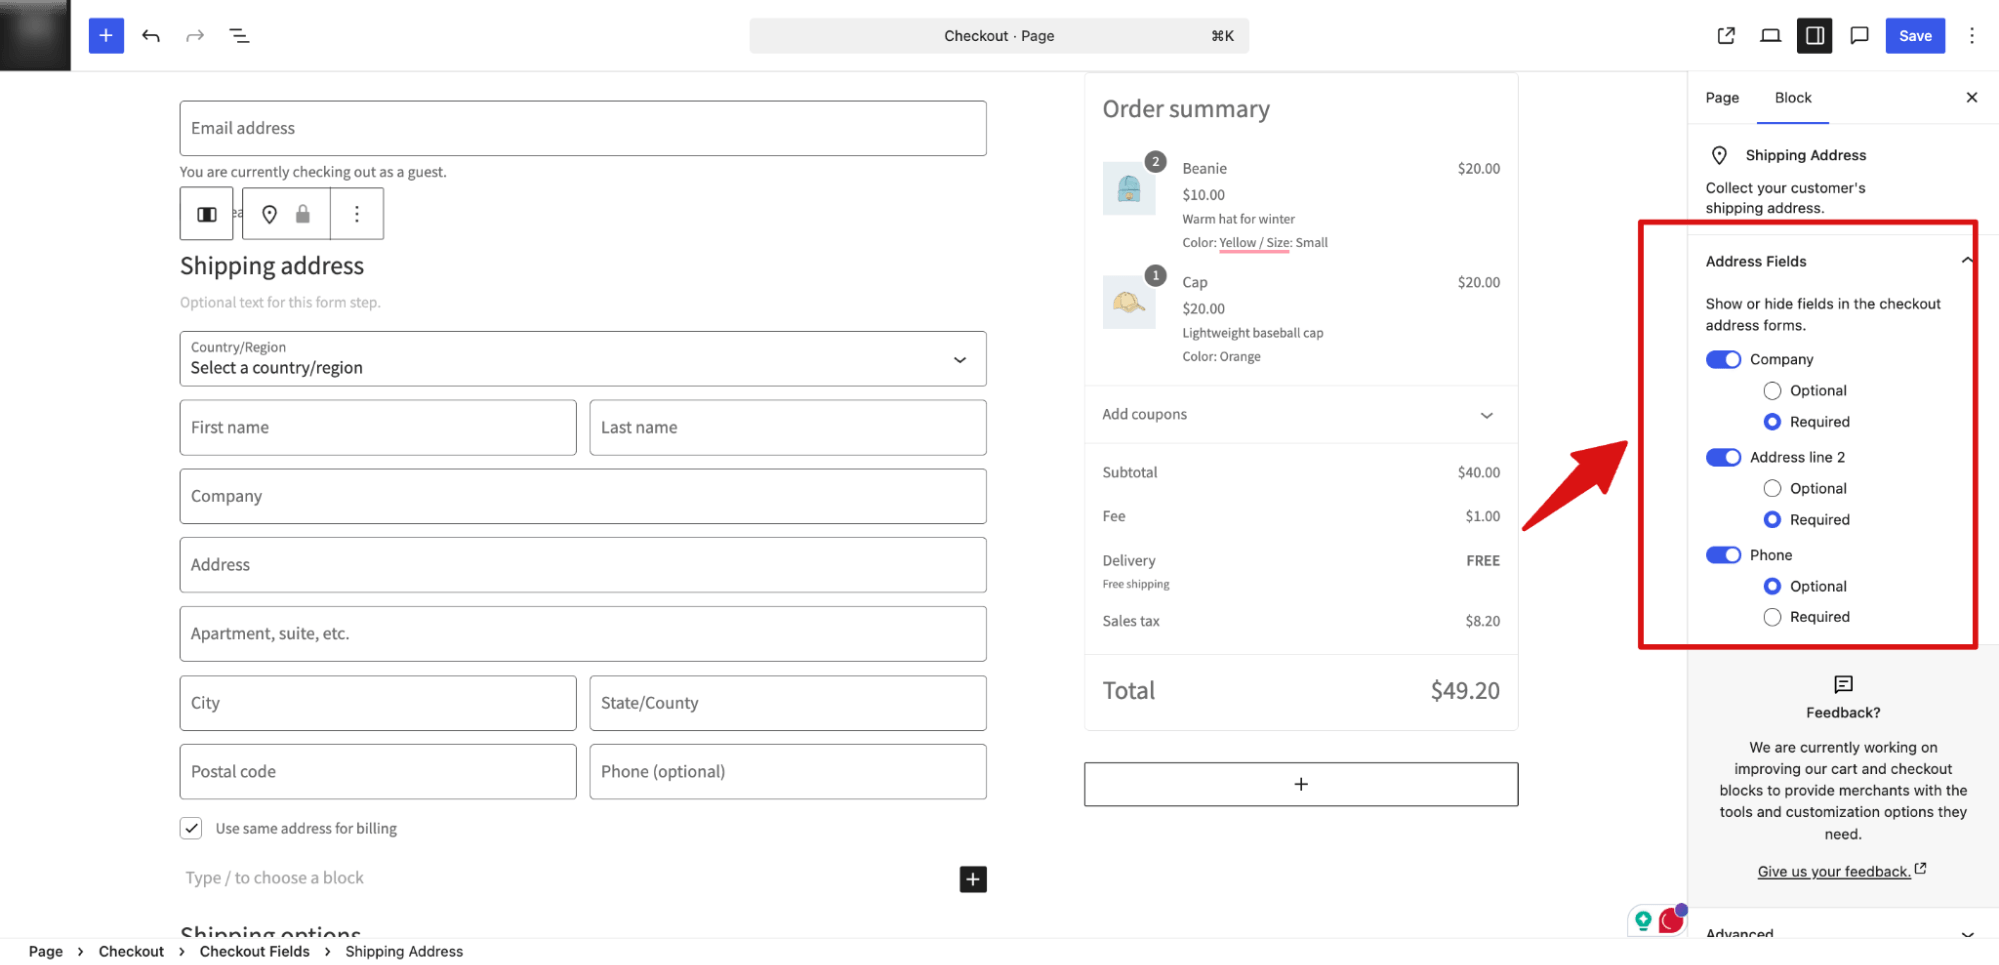
In the checkout form, you can show or hide checkout address fields (Company, Address line 2, Phone). You can also make them optional or required.
Step 3: Rearrange or hide sections to match your priorities
Select a block and drag it up or down using the move handle, or cut and paste it into a new spot through the block toolbar.
Selling one simple product? Move Order Notes below the payment section instead of above it. Fewer customers need to leave a note before paying anyway.
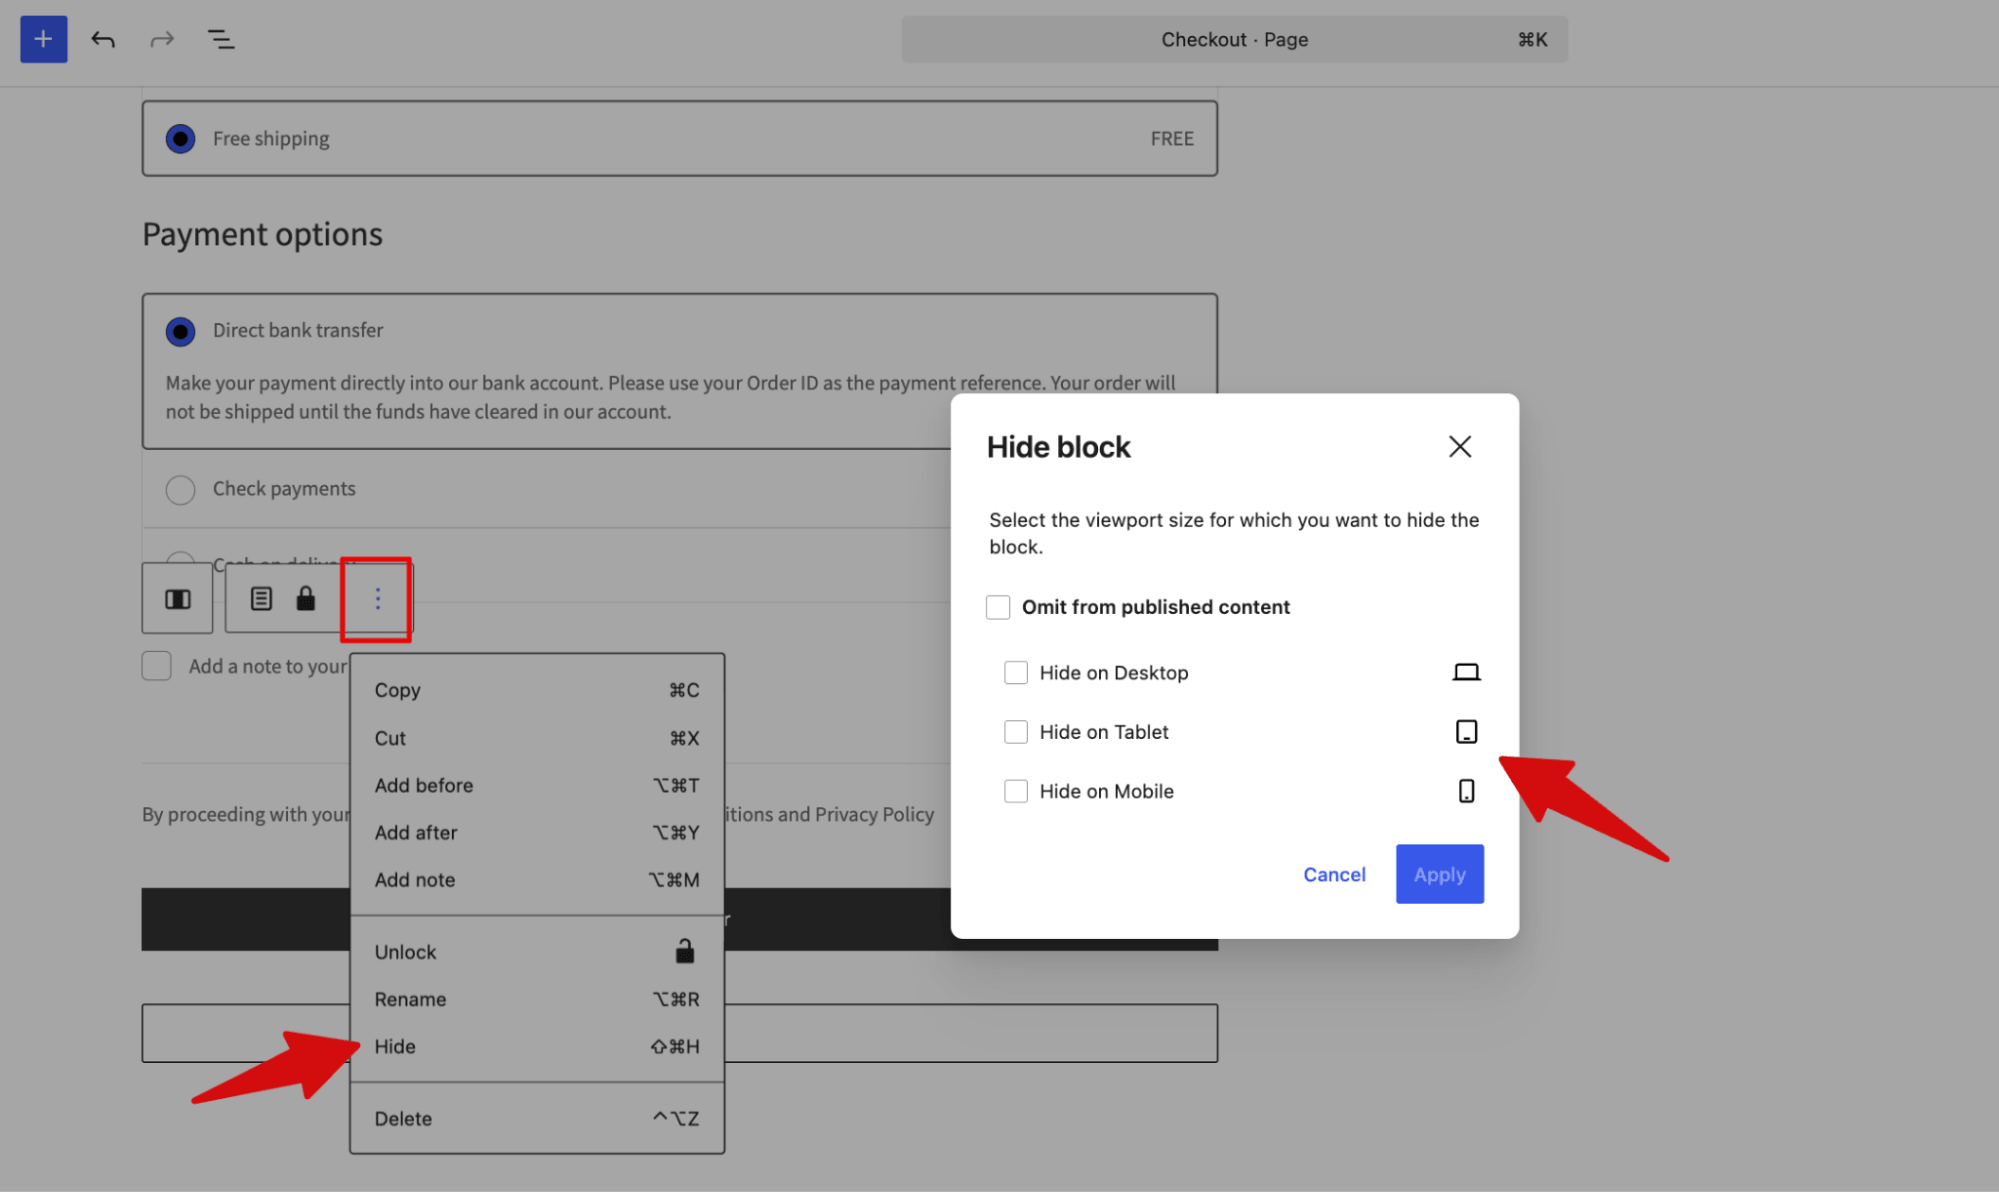
If you don't need a section, you can also hide it. For a better mobile experience, you can hide it on mobile only, or on mobile and tablet, while keeping it visible on desktop.
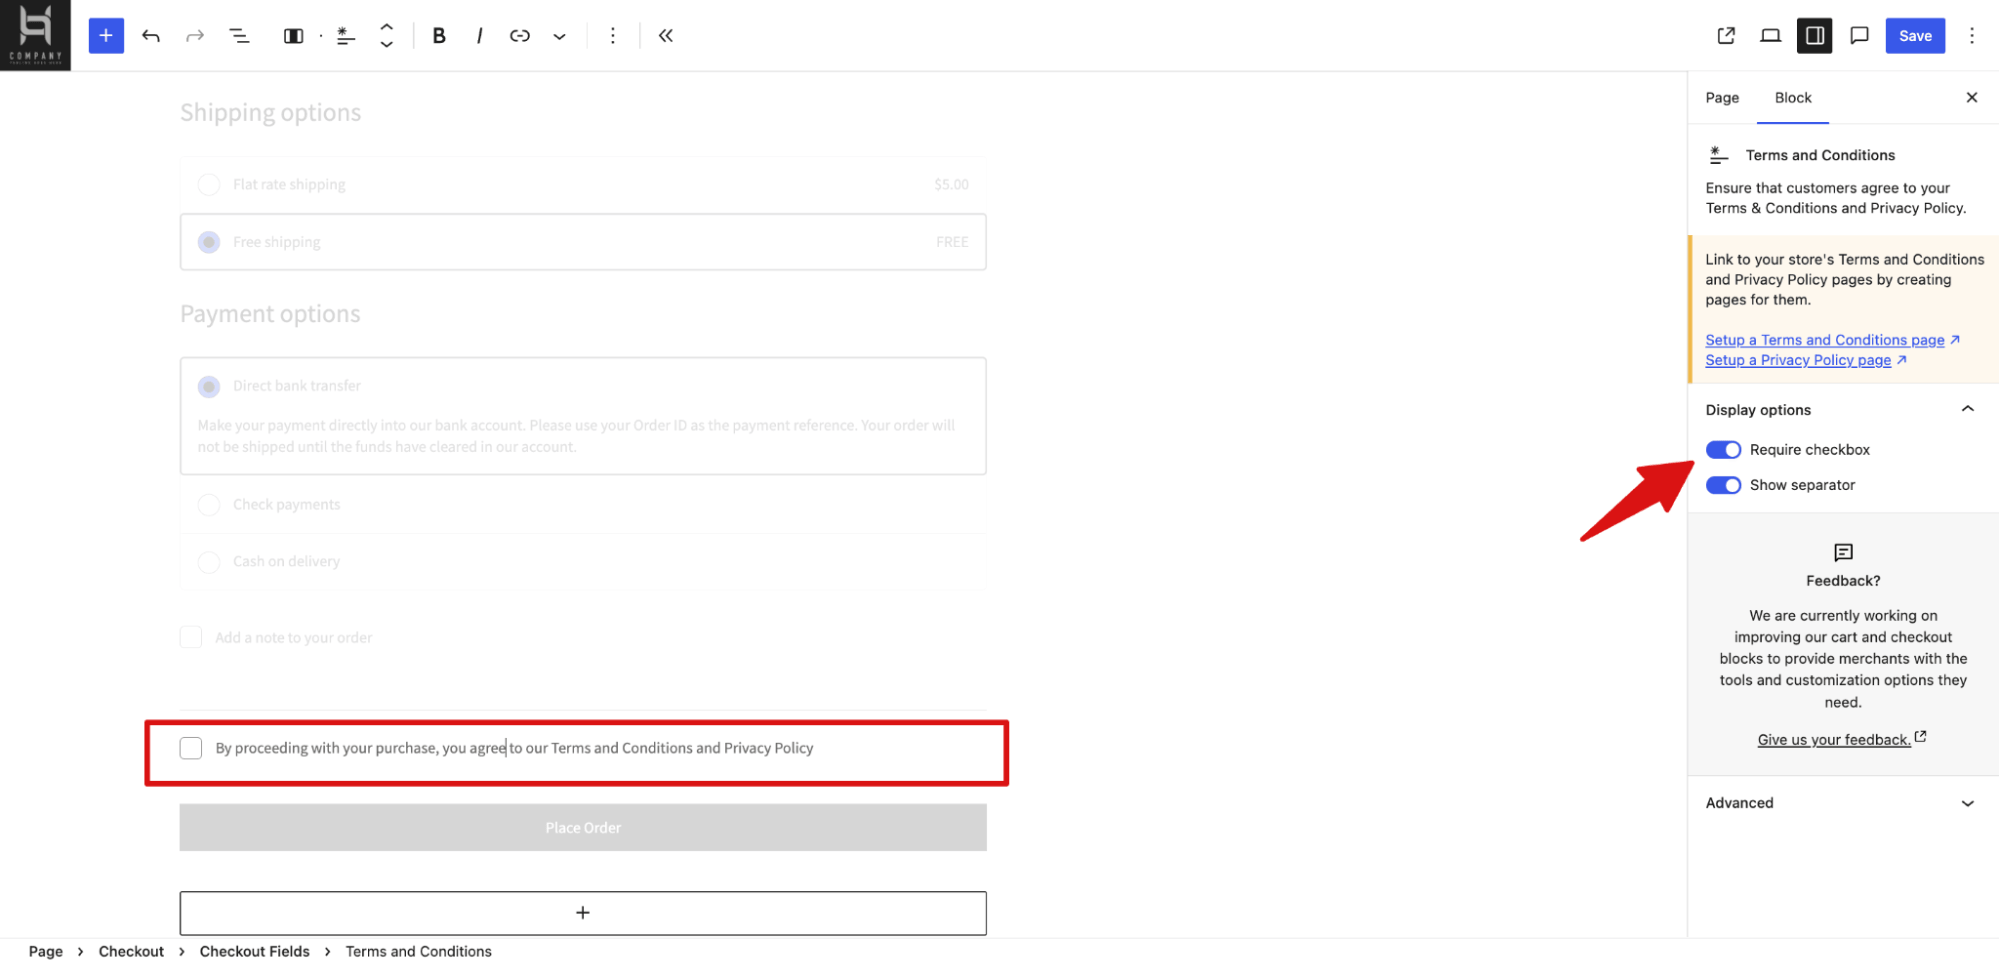
Plus, you can make the terms and conditions checkbox required at checkout.
Step 4: Add new elements to the checkout page
You can easily add a new section if needed without any coding.
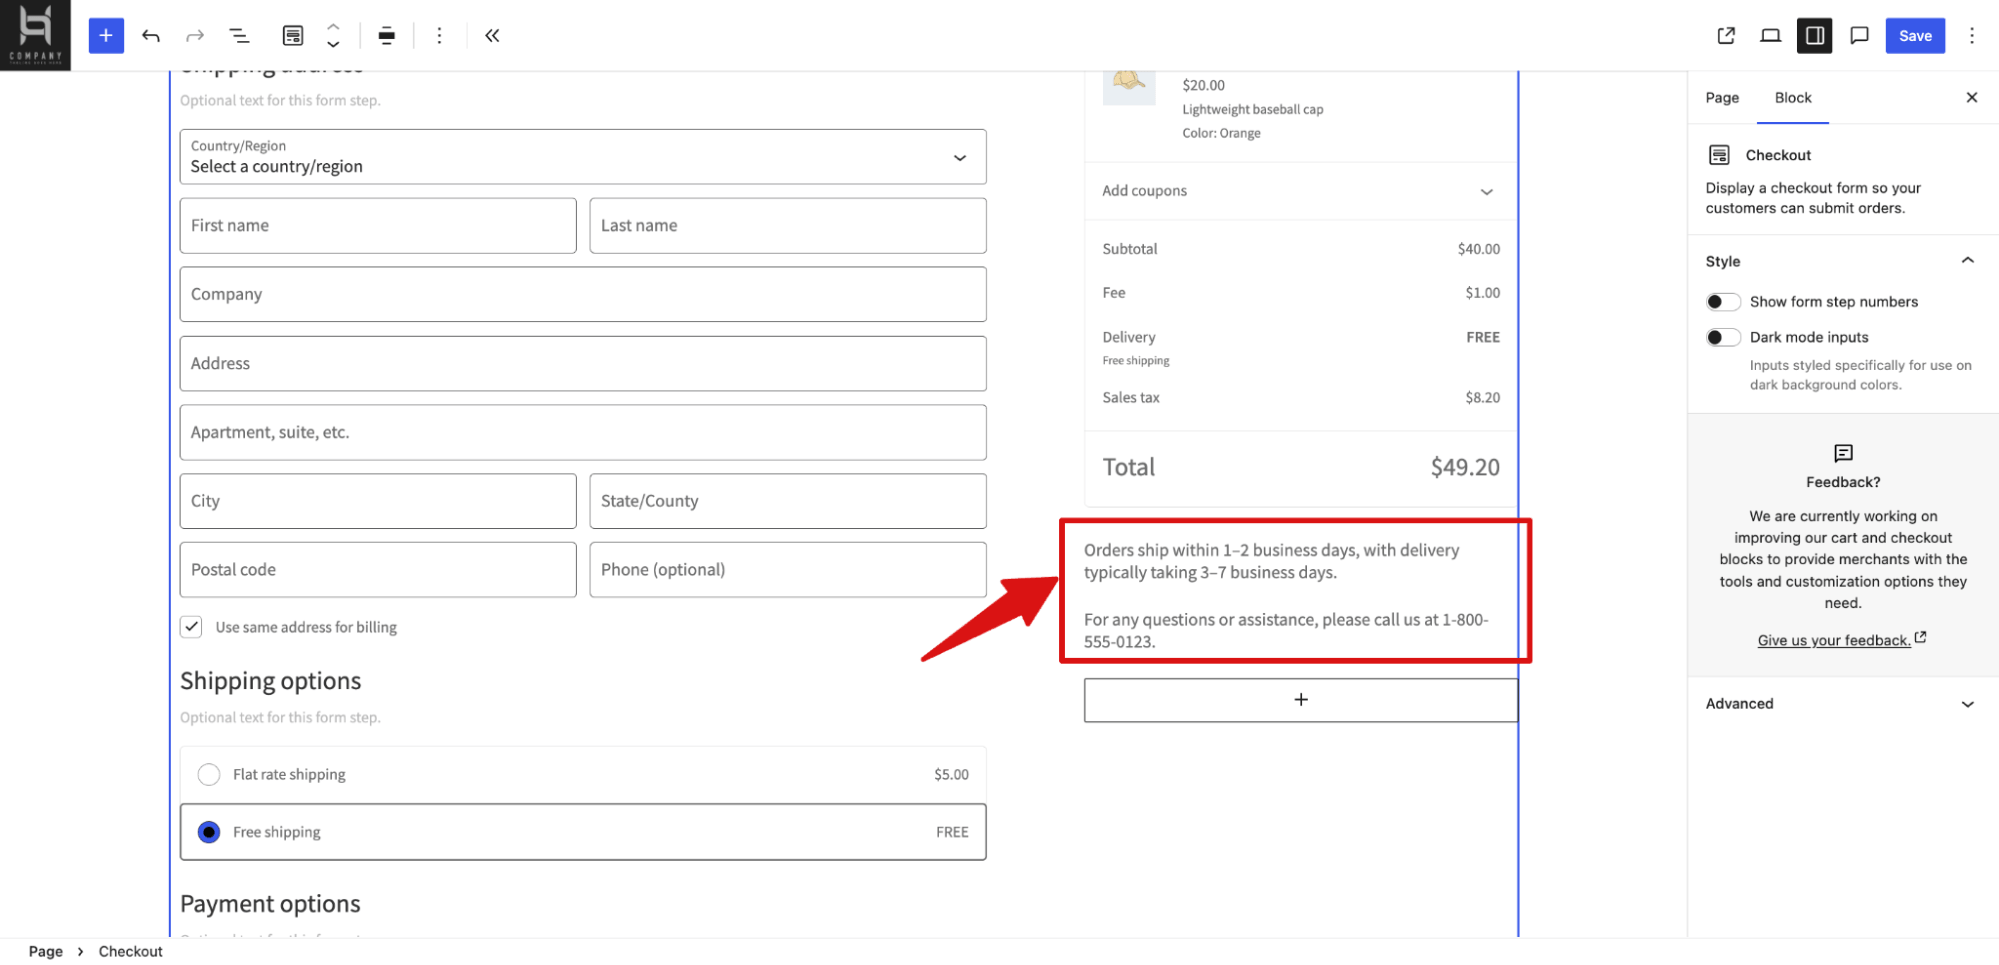
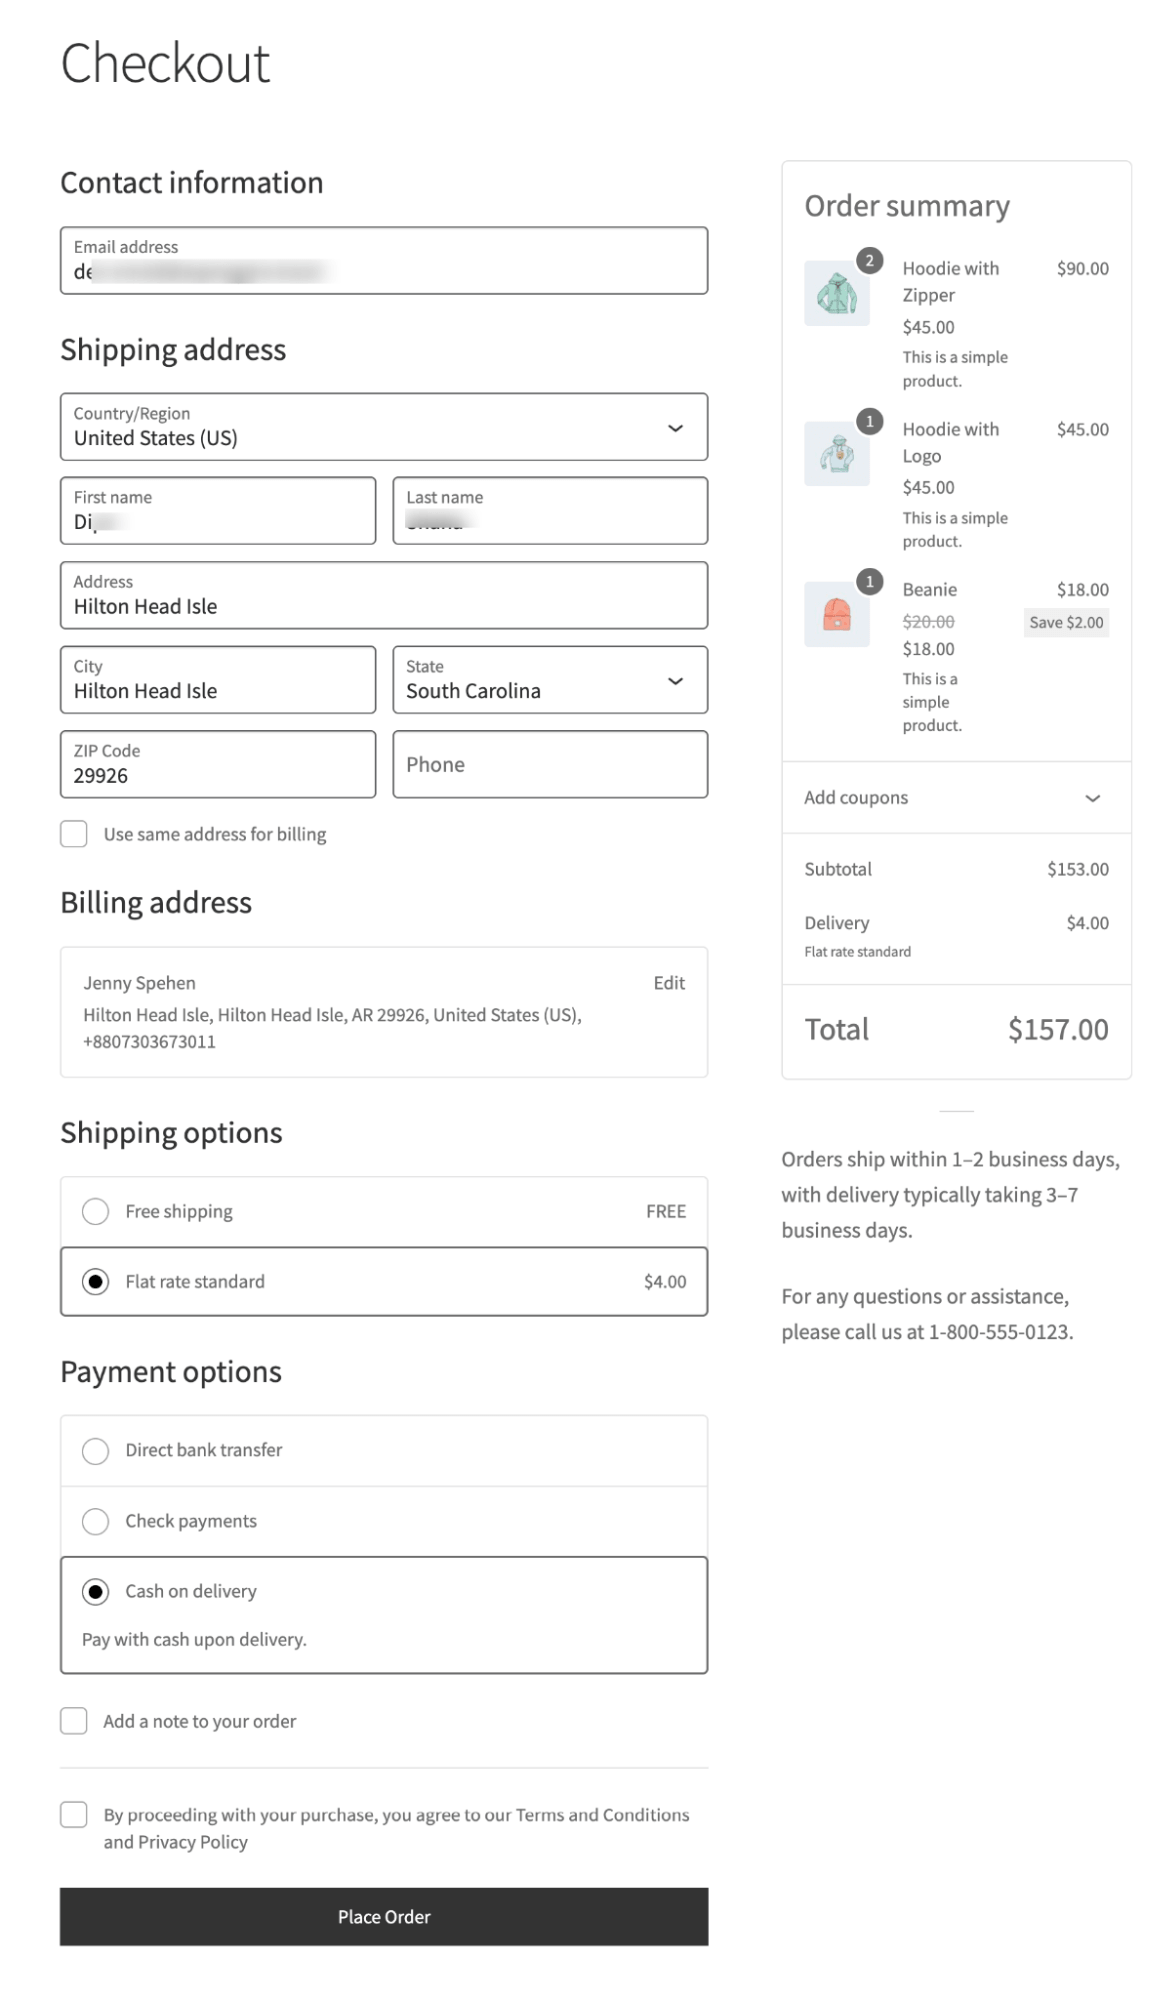
Make sure to hit “Save” to update. Here is what the block editor checkout looks like:
How To Extend WooCommerce Checkout Block Editor Customization Options For Free
For this, you need to install both the FunnelKit Funnel Builder Lite and SlingBlocks plugins. Both are free.
FunnelKit Funnel Builder is a full checkout customization plugin, and SlingBlocks is Gutenberg Blocks by FunnelKit.
With these two plugins together, you can extend the customization options of the block editor and replace your default checkout with a custom one. You get full control over layout and design, a collapsible order summary, better field organization, and options built to optimize conversions.
Plus, along with a custom checkout, you also get a custom thank you page.
Here are the steps you need to follow:
Step 1: Create a custom checkout with the block editor
Navigate to FunnelKit ⇒ Store Checkout and click on the "Create Store Checkout" button to start the process. Next, select any of the templates available.
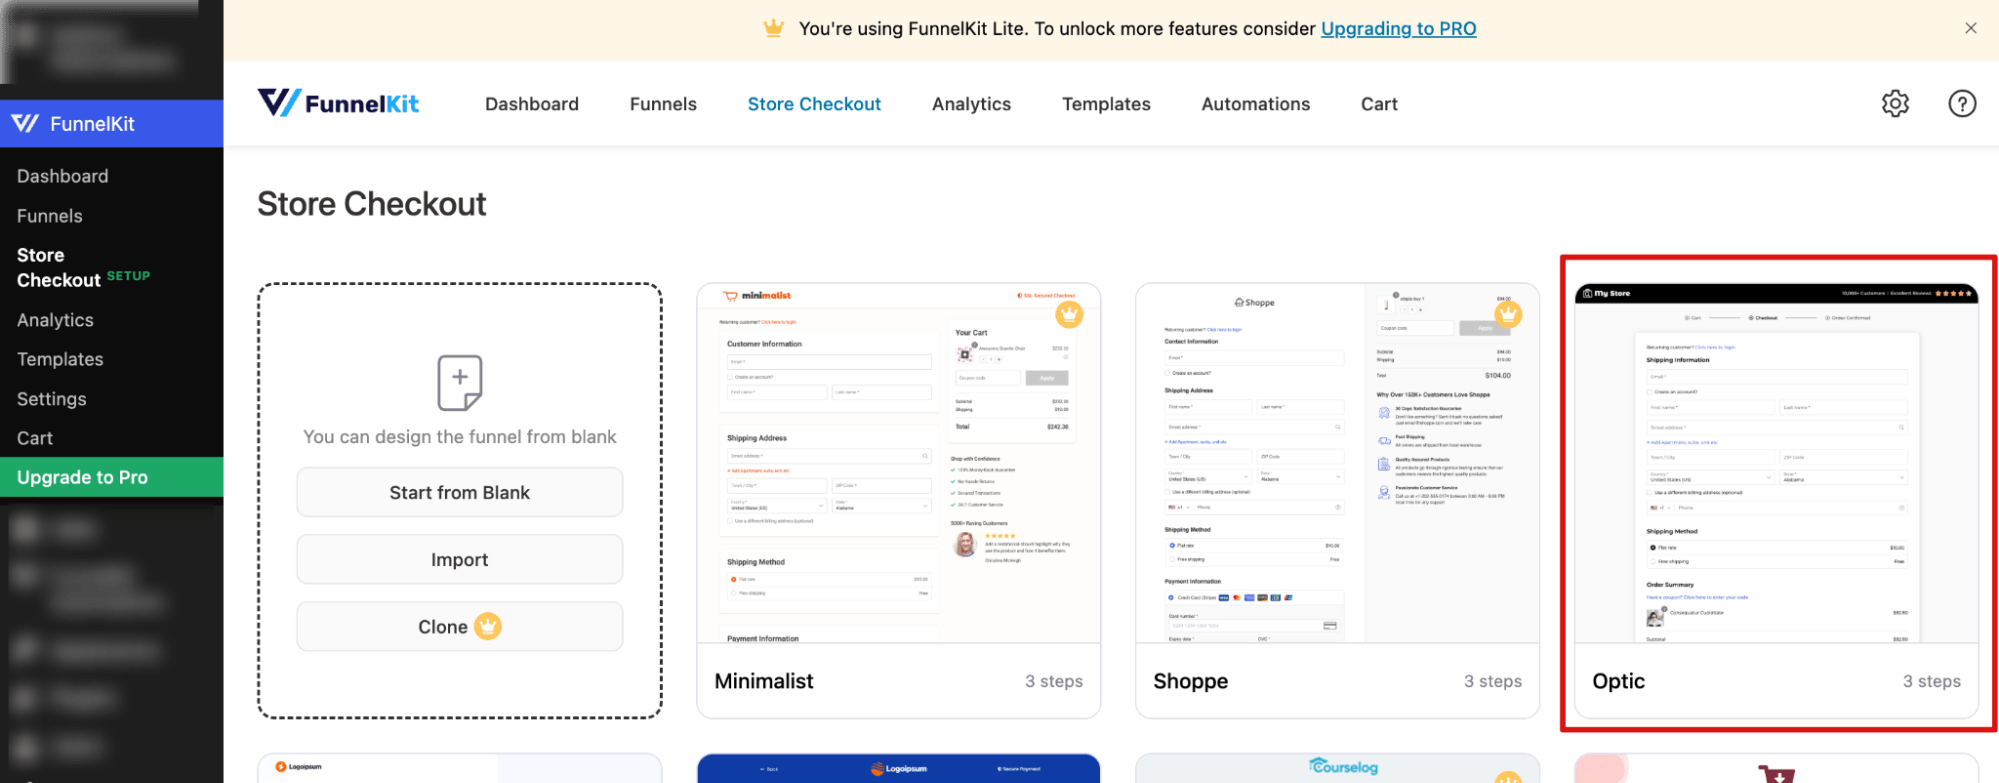
Next, provide a name and import the template.
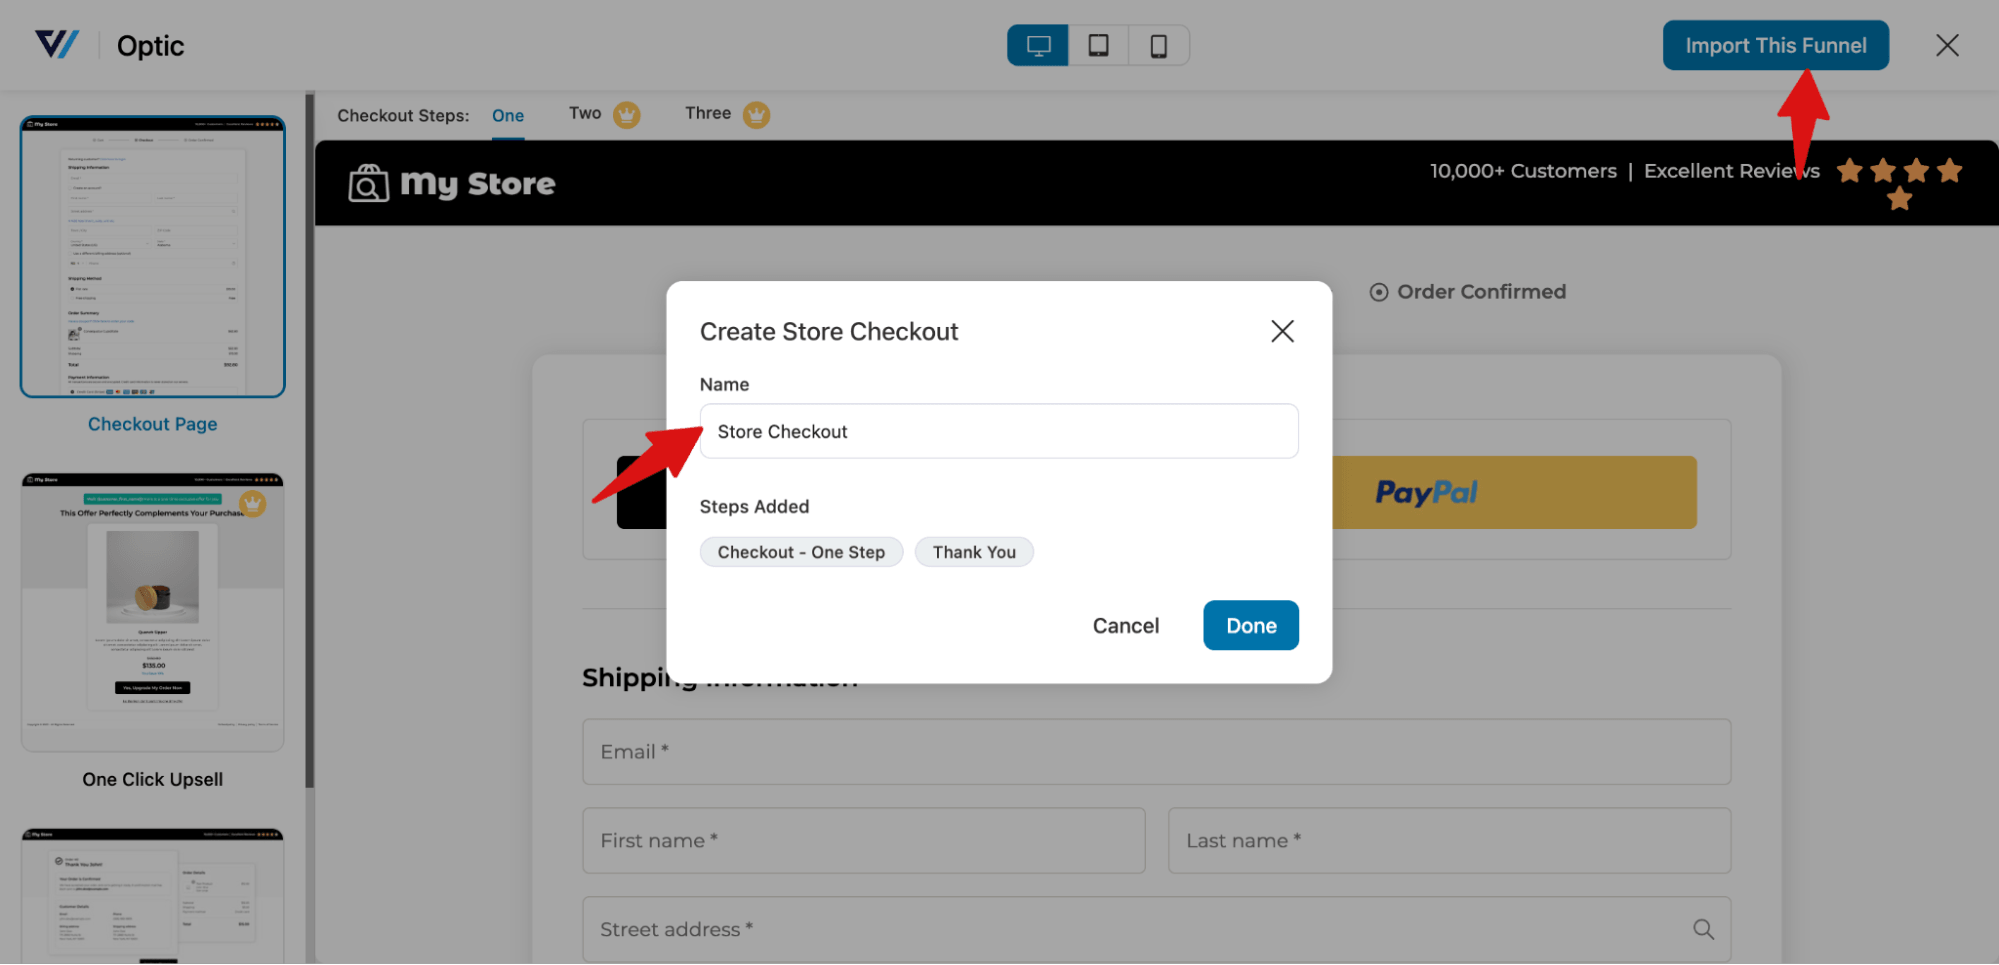
Step 2: Customize the checkout page design
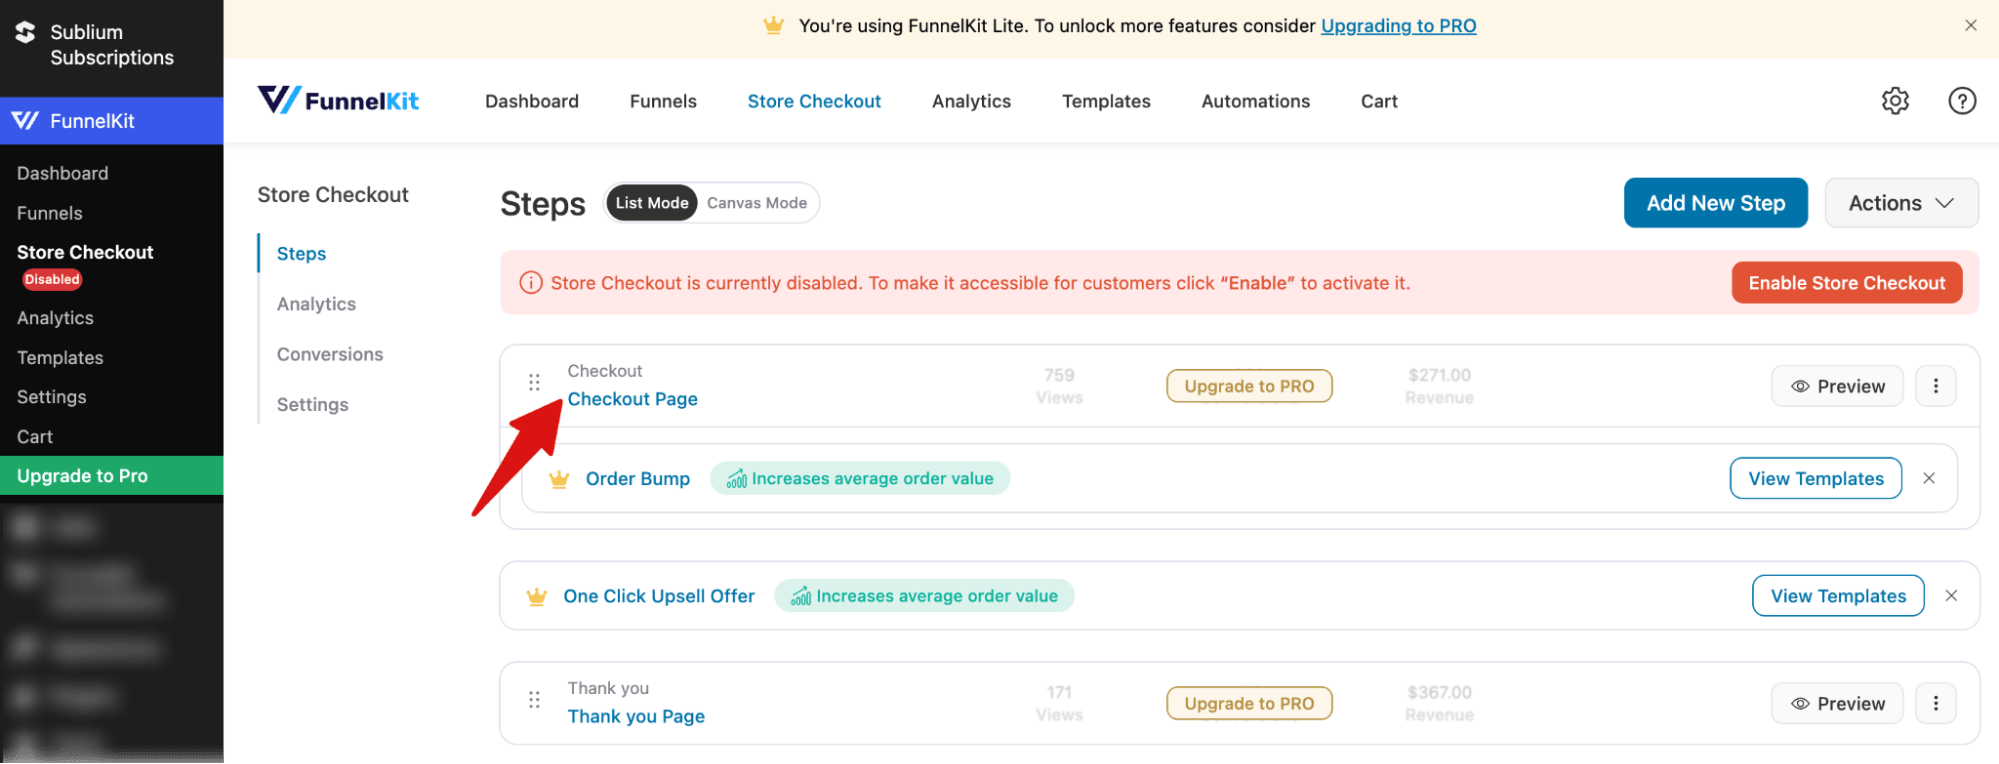
Now, to start customizing the checkout page with the Block Editor, click on the checkout step and click on “Edit Template”.
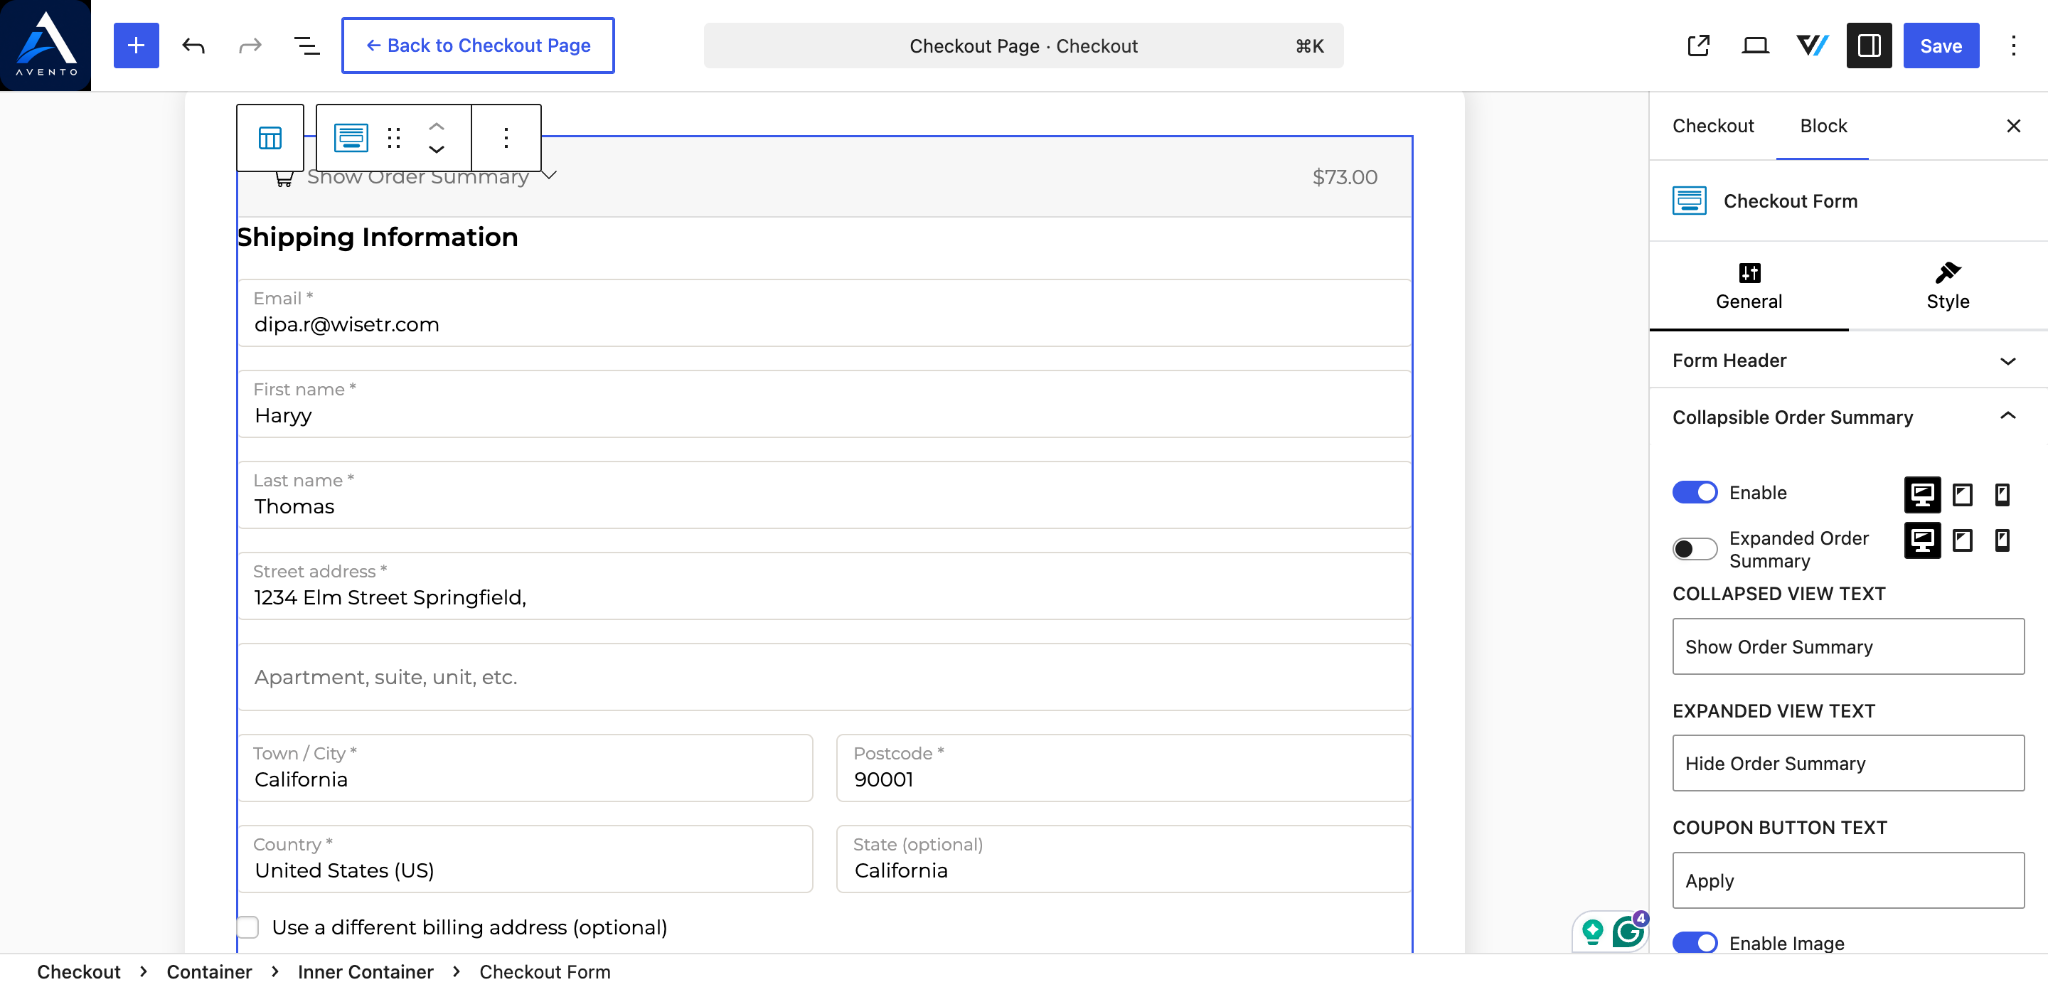
On the right side, you can customize every section of the checkout form. To start, you can add a collapsible order summary, which comes in handy for mobile viewing. Since it sits at the top, people can expand it to see everything at a glance.
You also get to decide what the order summary includes, things like the product image, coupon field, quantity switcher, and the option to allow deletion.
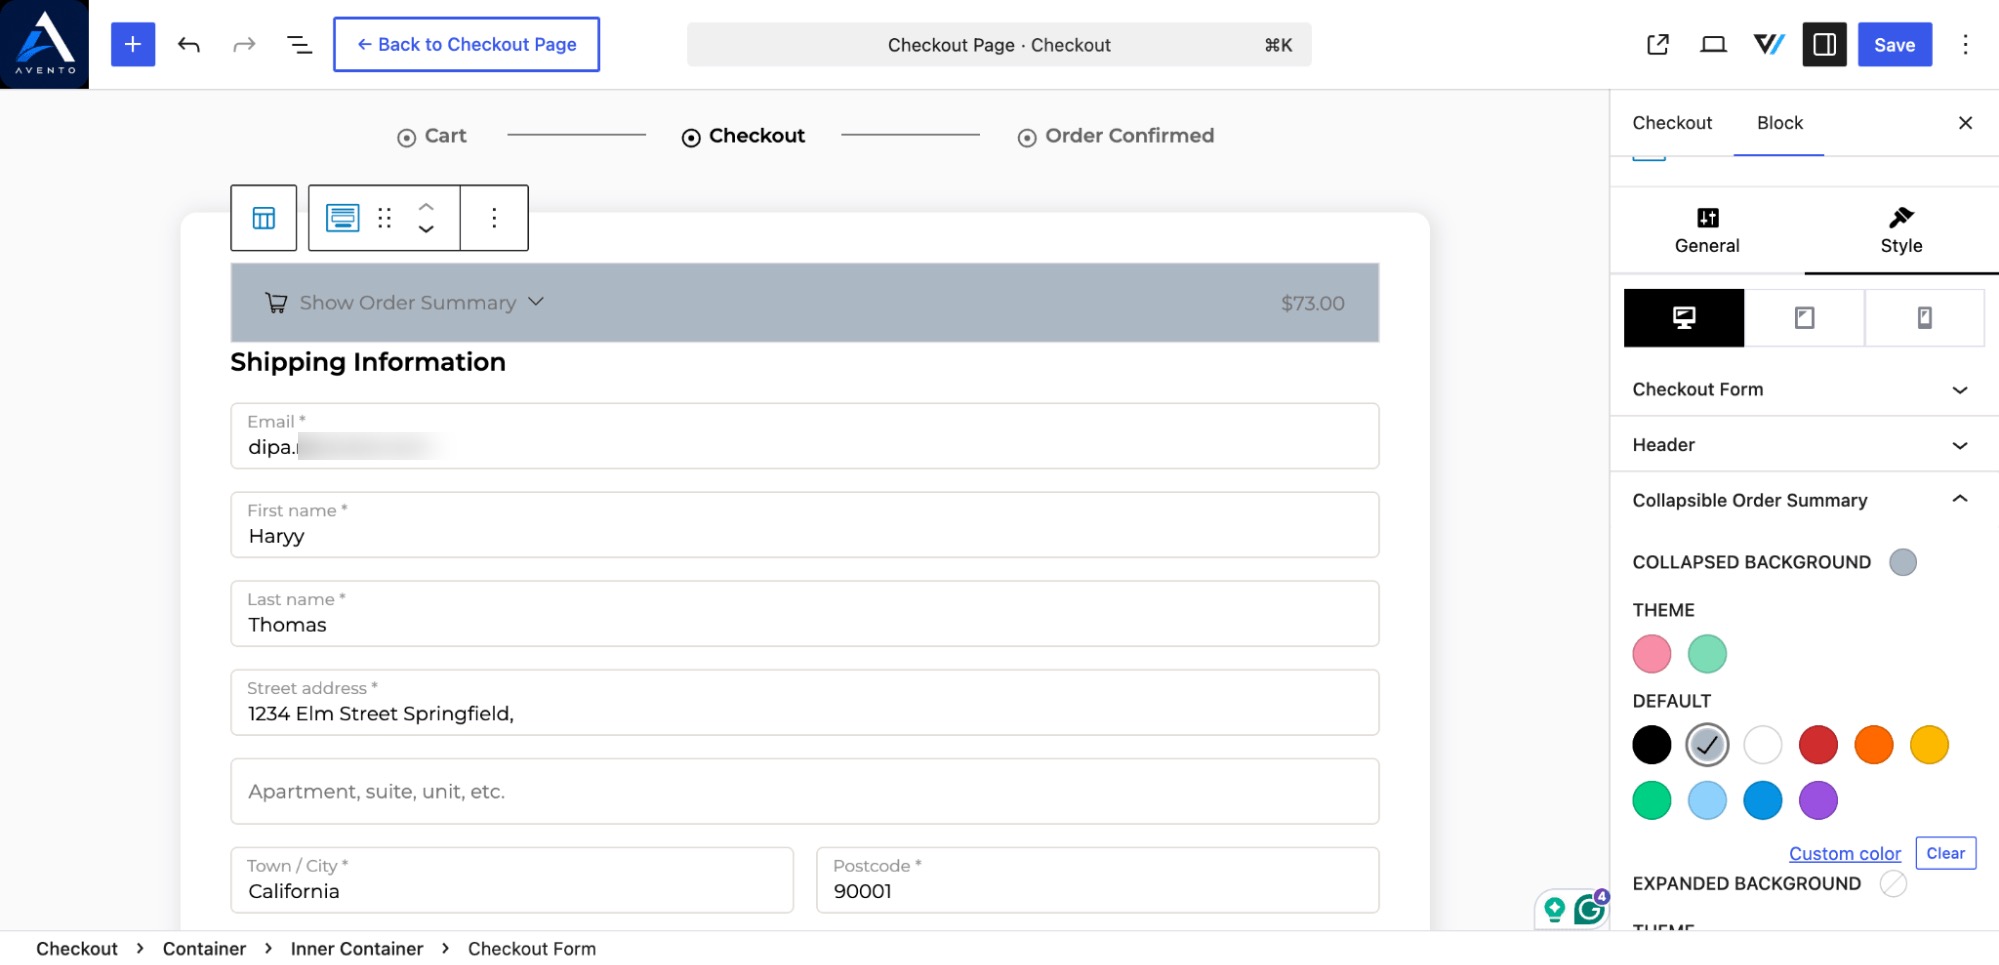
On the “Style” tab, you can also customize the style. For example, choose a collapsible background color, theme color, etc.
You can customize the style for all these sections, Heading, Fields, Section, Order Summary, Coupon, Payment Method, Privacy Policy, and Checkout Button(s), including spacing, background, border, and box shadow, without any coding. You can also make the checkout button sticky on mobile.
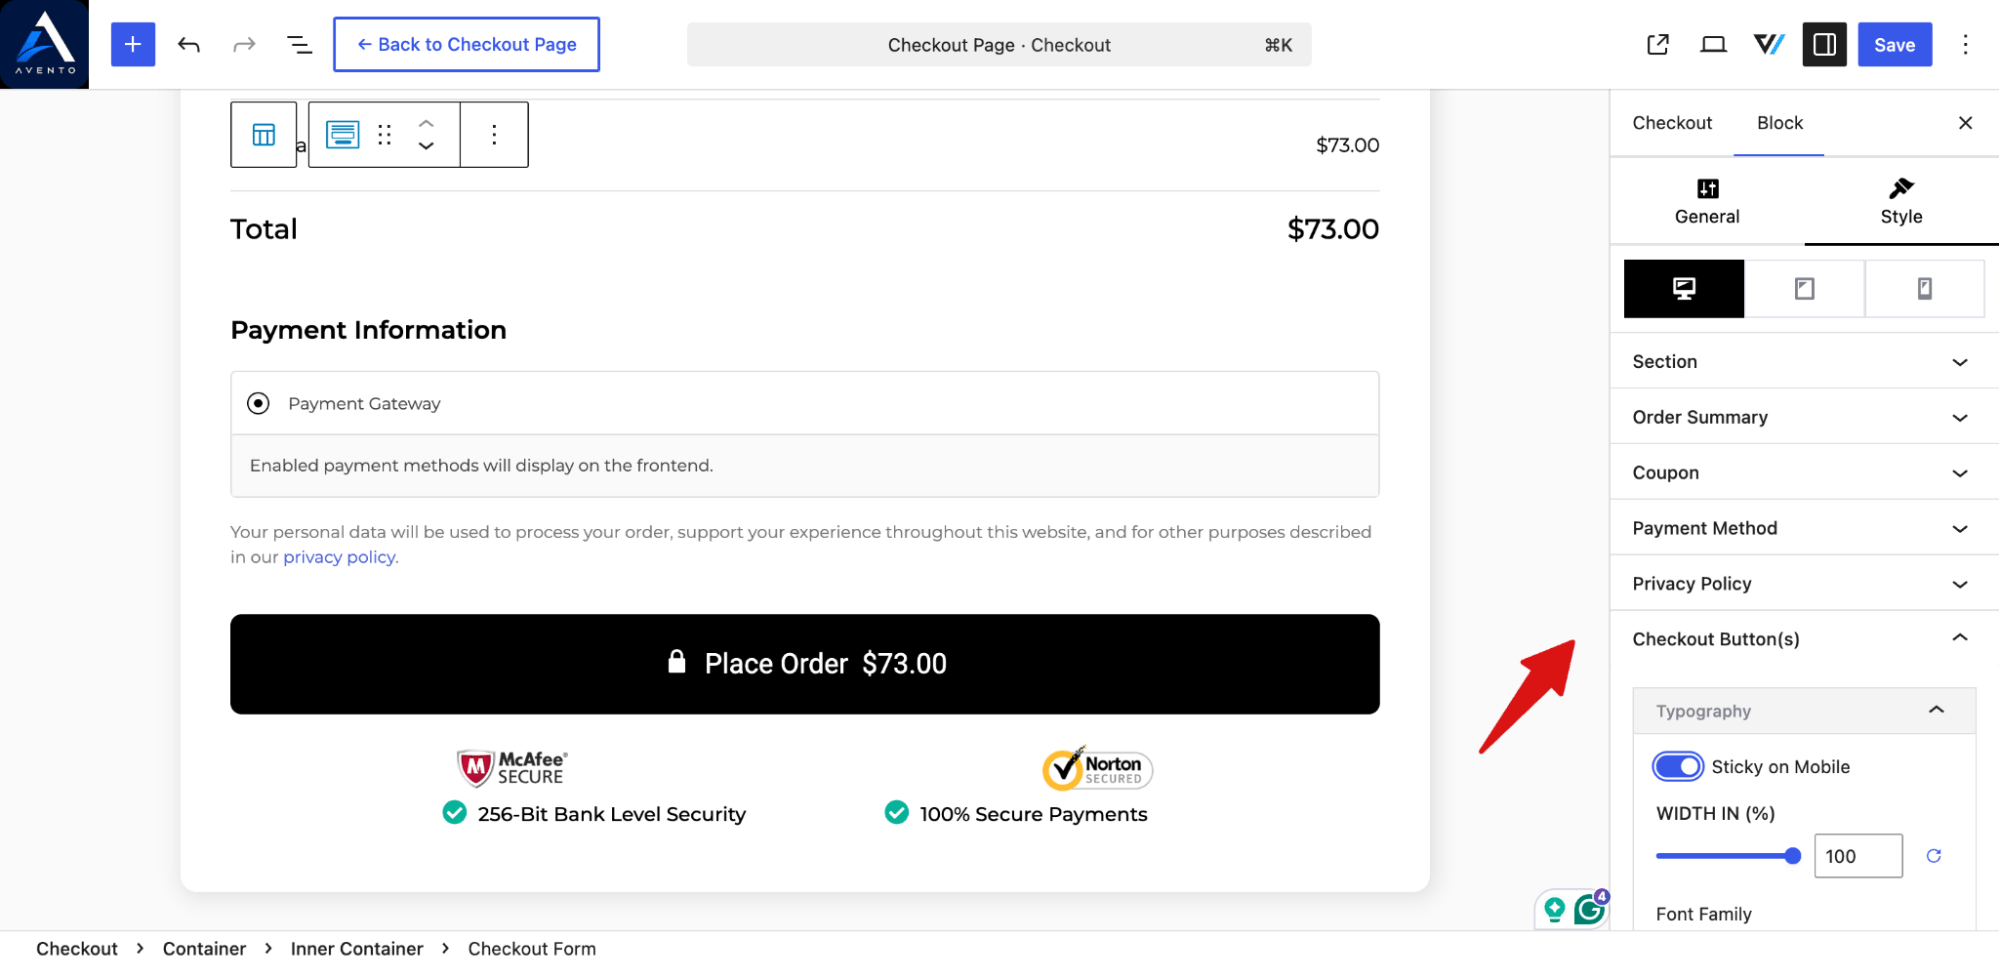
After you're done customizing the content, layout, design, and style, make sure to hit save so the changes go live.
 Note: For more details, check the guide on checkout customizations.
Step 3: Reorganize the checkout form fields
Next, scroll to “form field sections”. You can reorder any form field or section, and remove any section or field as needed.
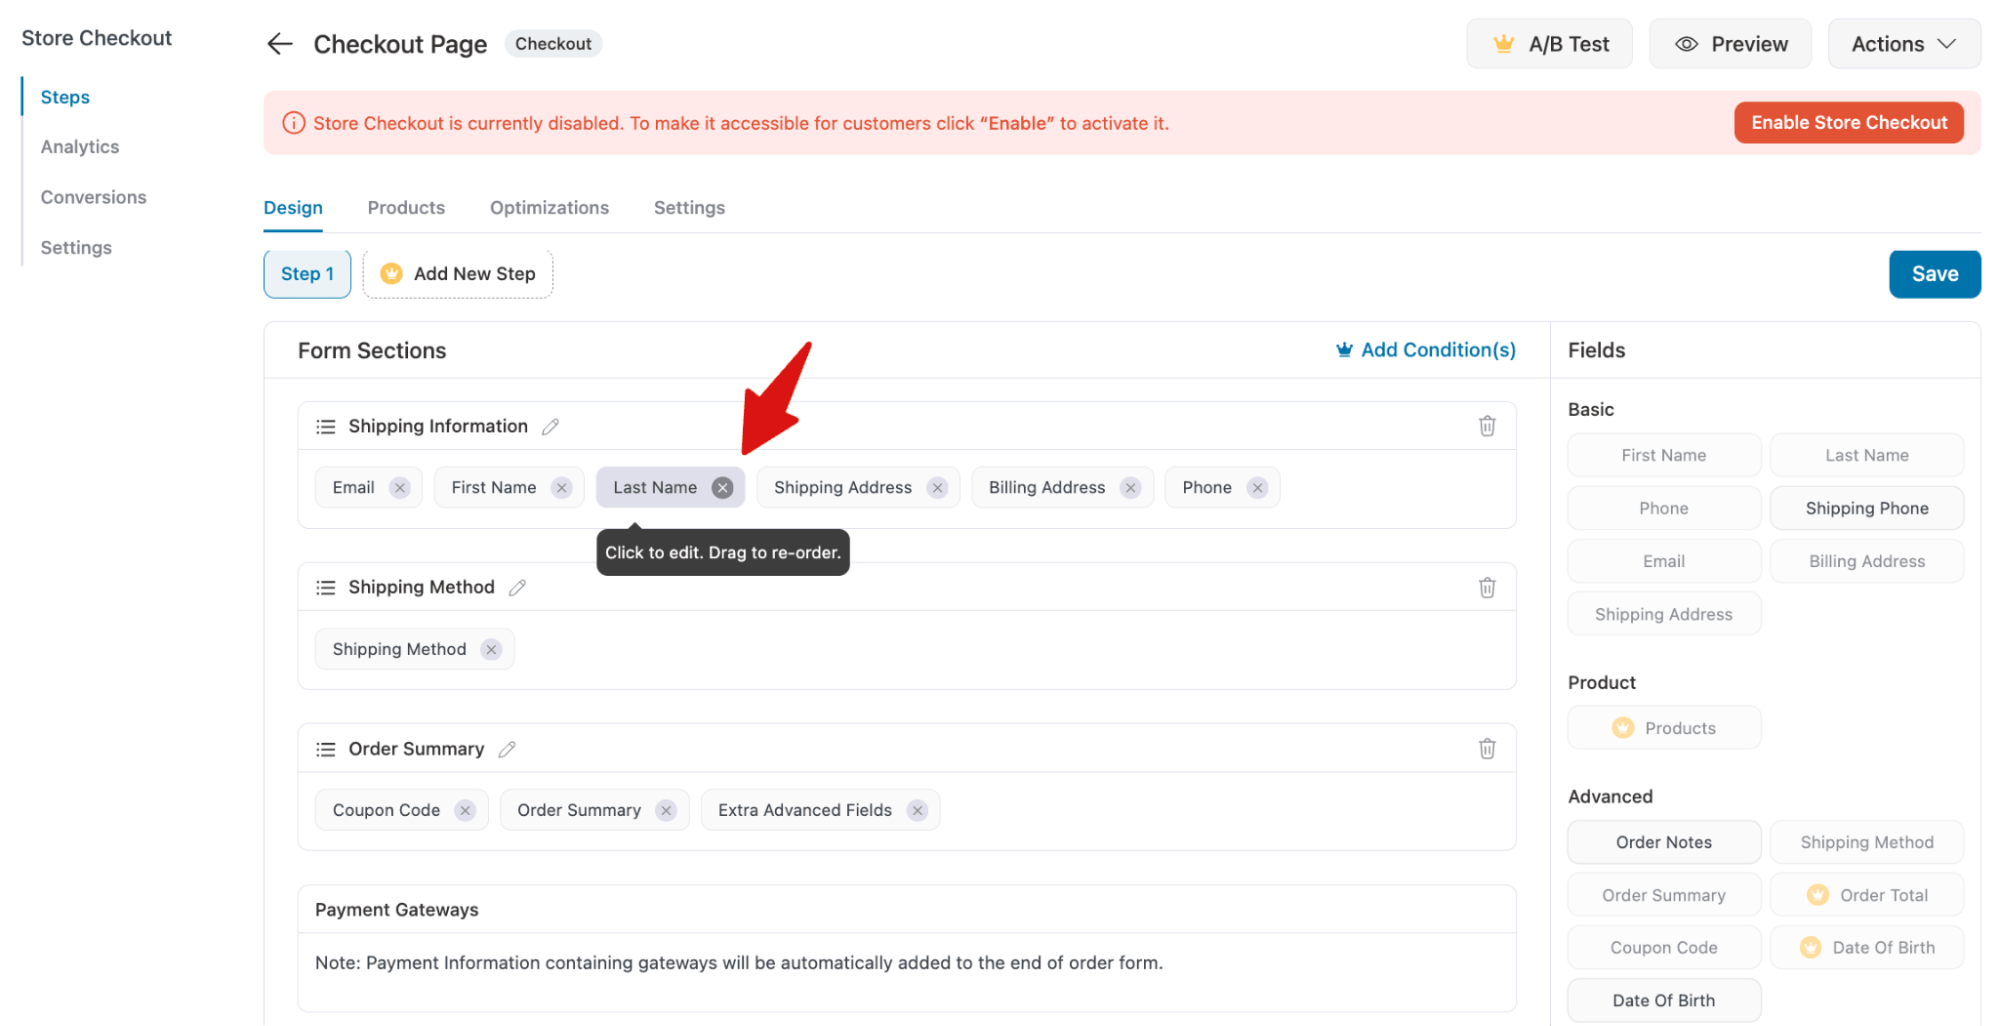
Note: You can customize the thank you page with the block editor the same way.
Step 4: Optimize the checkout page for conversions
In the optimization tab, you can enable express checkout buttons and choose from six placement options for where they appear.
Along with that, you also get other free optimization features, like address field validation, which makes sure the billing or shipping address includes a house or building number. This shows up as an inline field validation, along with a few other checks.
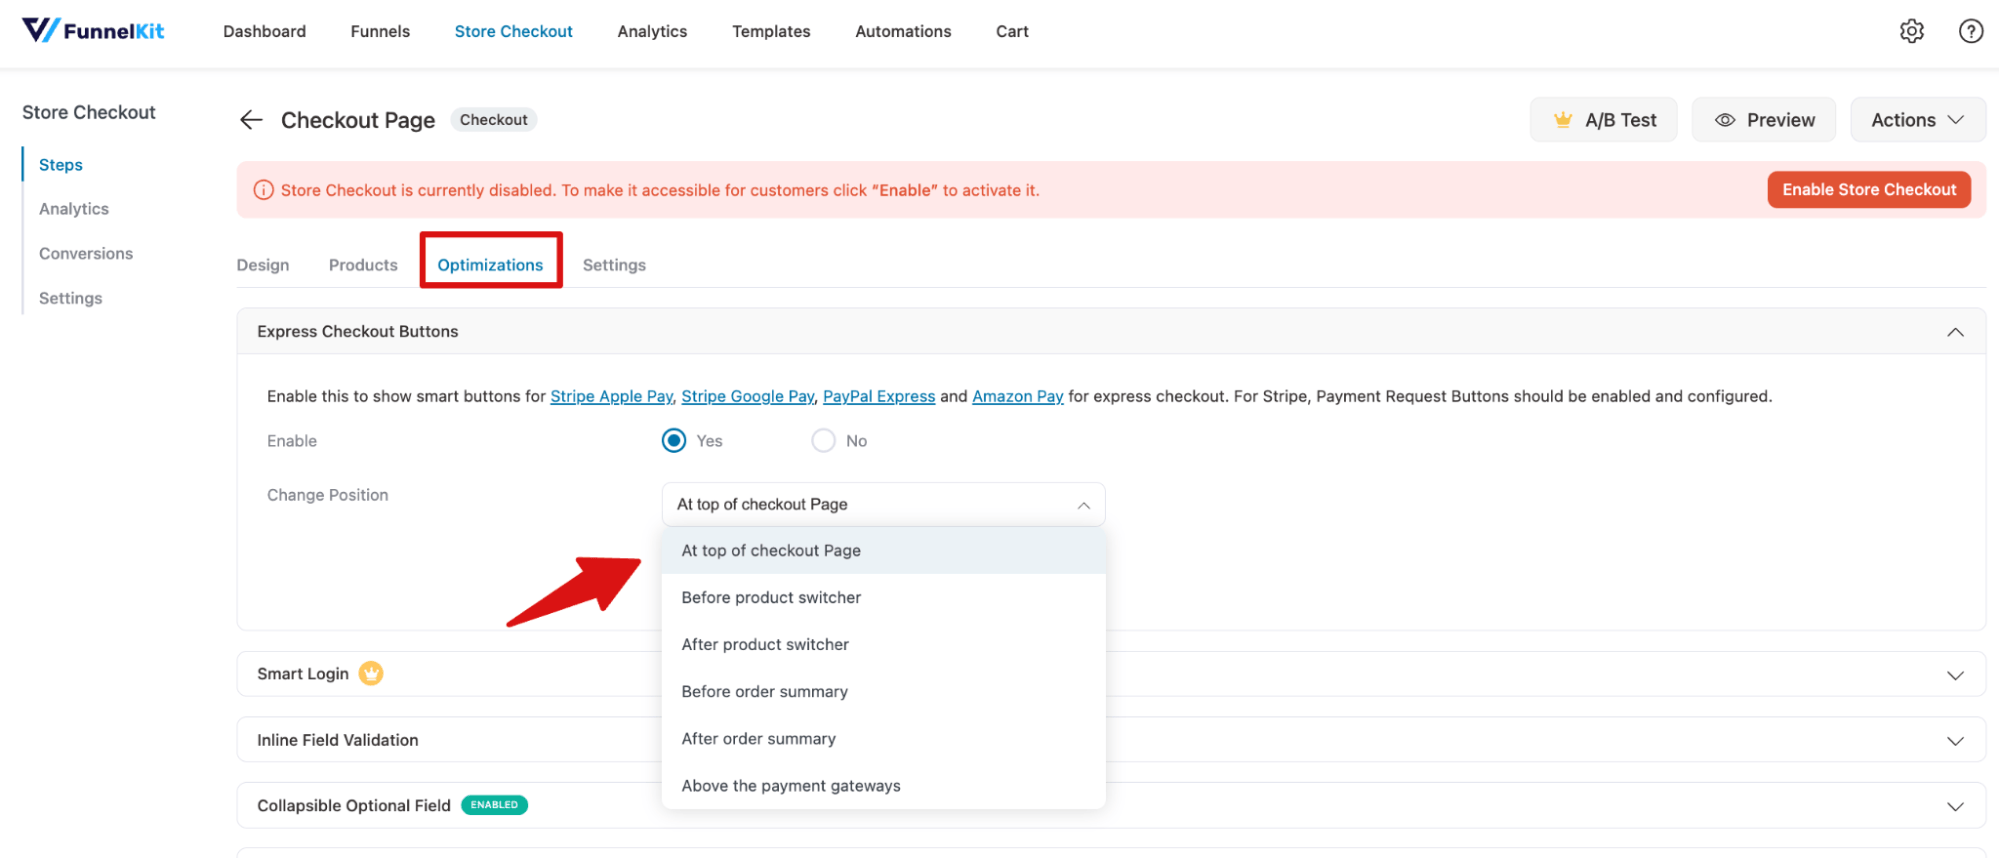
Step 5: Enable the custom WooCommerce checkout built with the block editor
Lastly, make sure to enable Store Checkout to replace the default checkout with a custom one.
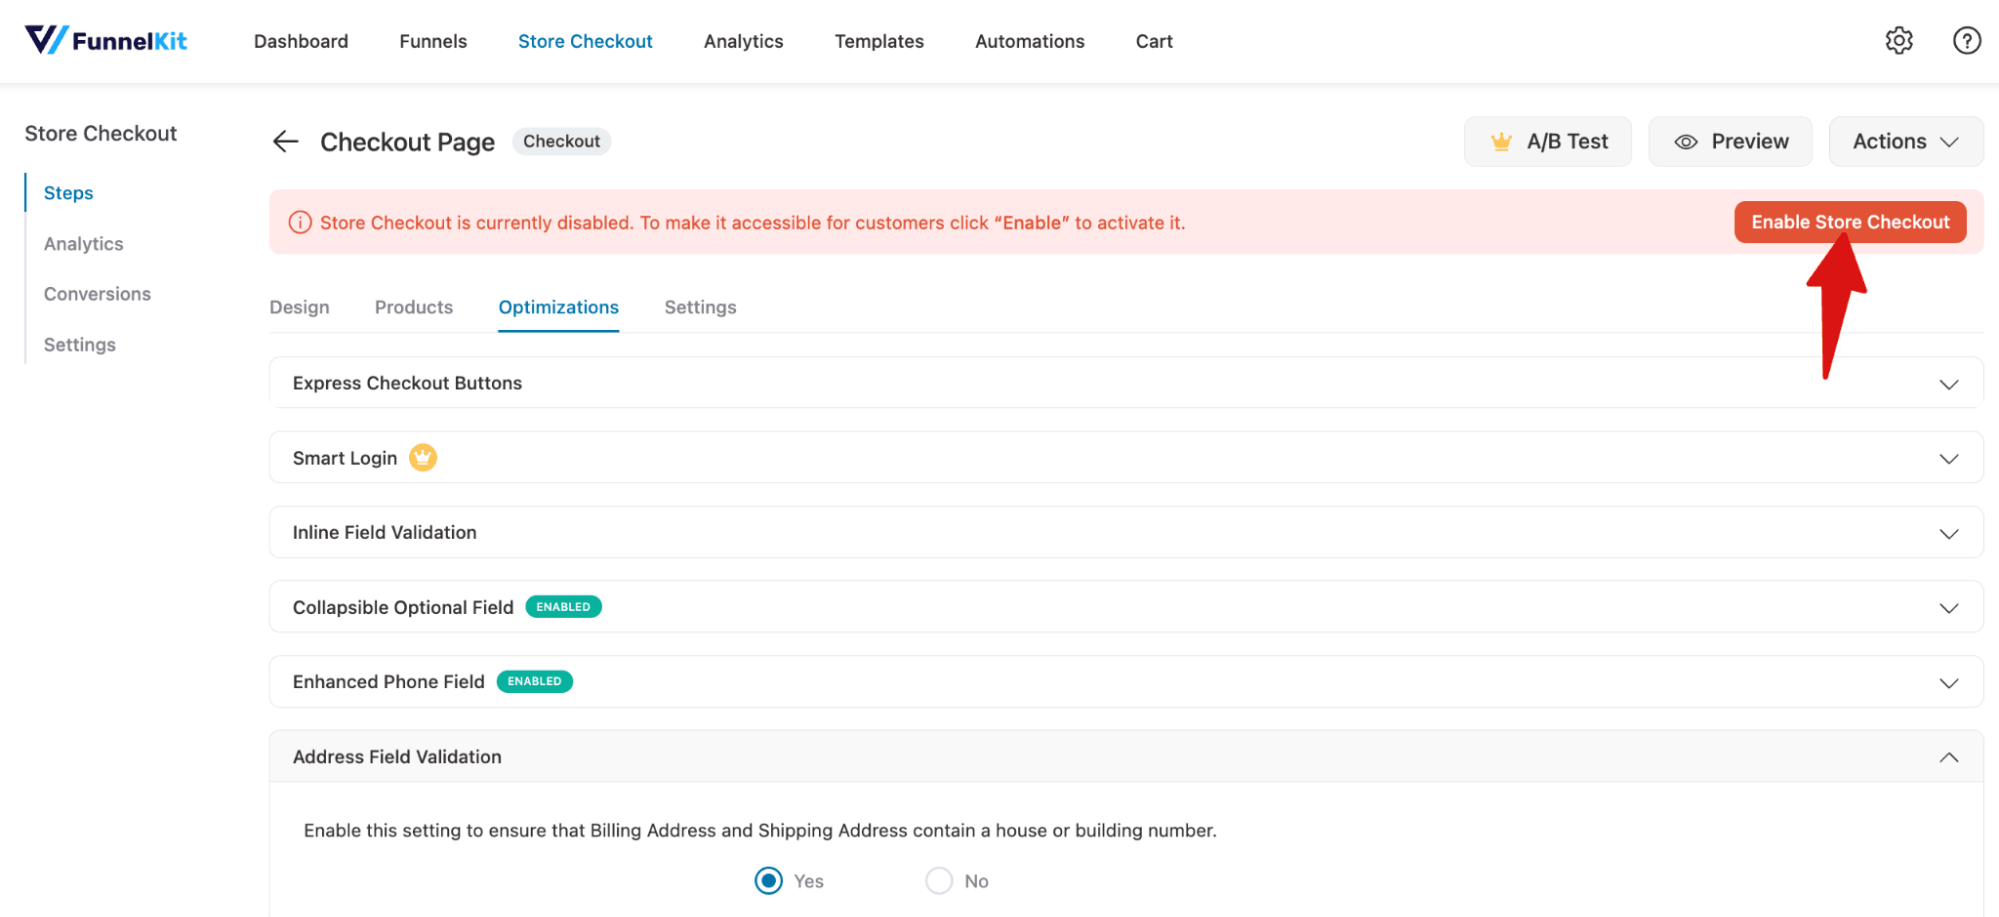
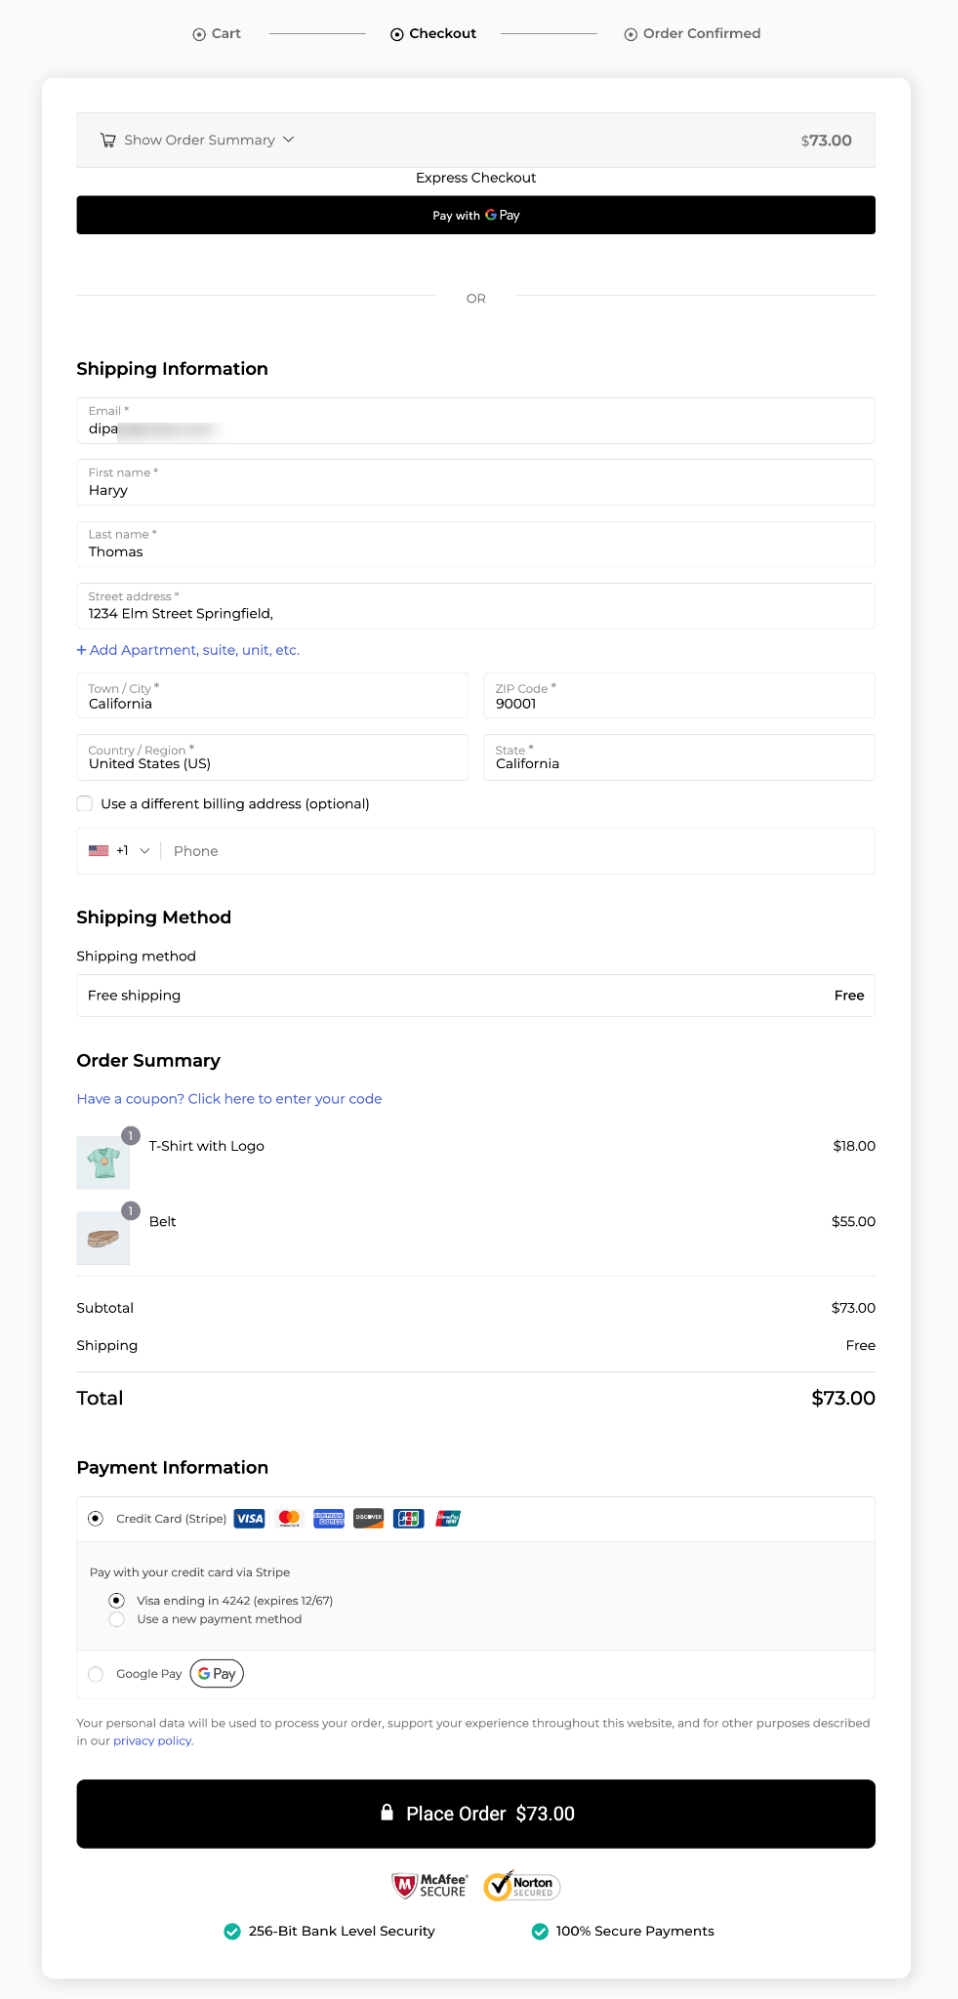
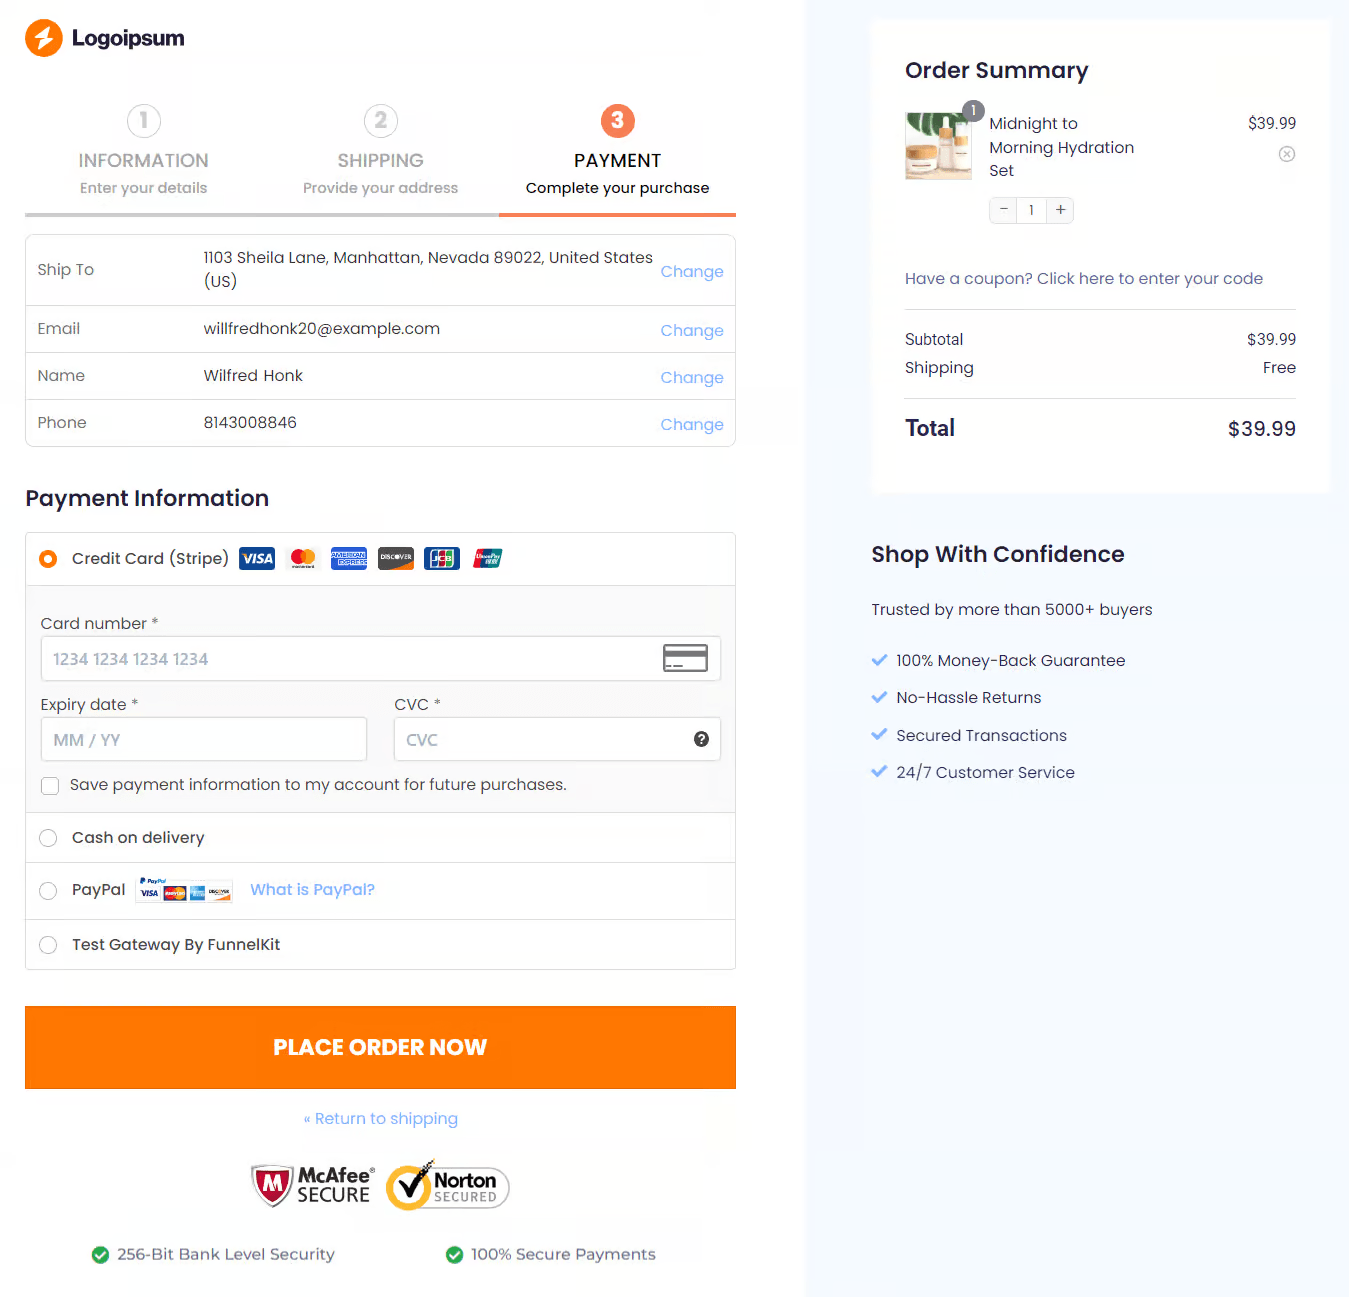
Here is what the custom checkout built with the WooCommerce Block Editor looks like:
What Block Editor Functionality You Can Extend With a Premium Plugin
The free options above cover layout, section order, and a handful of built-in settings.
If you upgrade to FunnelKit Funnel Builder Pro, the ceiling moves. Here's what typically becomes available.
Multi-step checkout
The native block editor only supports a single-step checkout, and most free plugins don't change that.
Premium checkout plugins let you split the form across multiple steps. This tends to help more with physical products that need more fields, where one long form starts to feel like a lot to fill out.
With FunnelKit Funnel Builder, you can create a multi-step checkout with a progress bar so shoppers can see how far along they are.
Custom fields
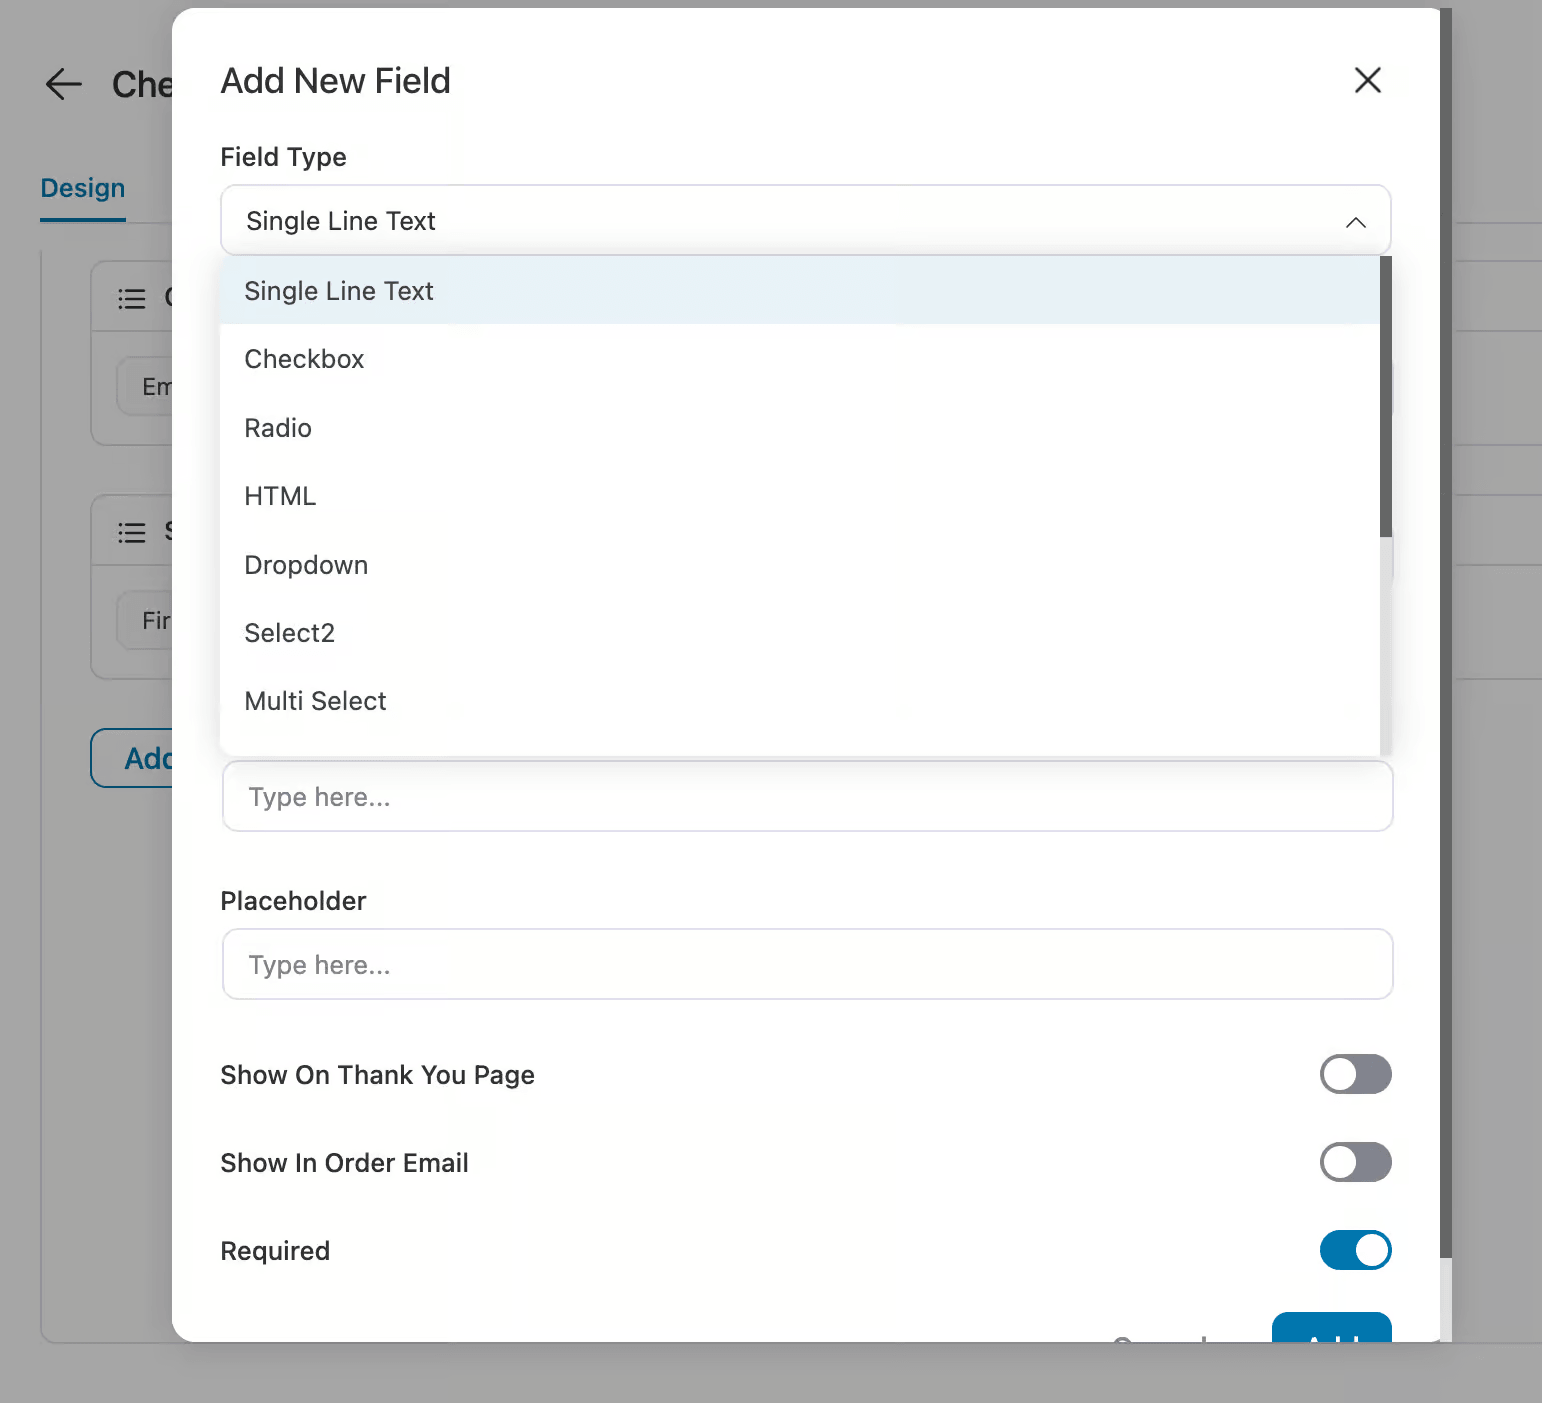
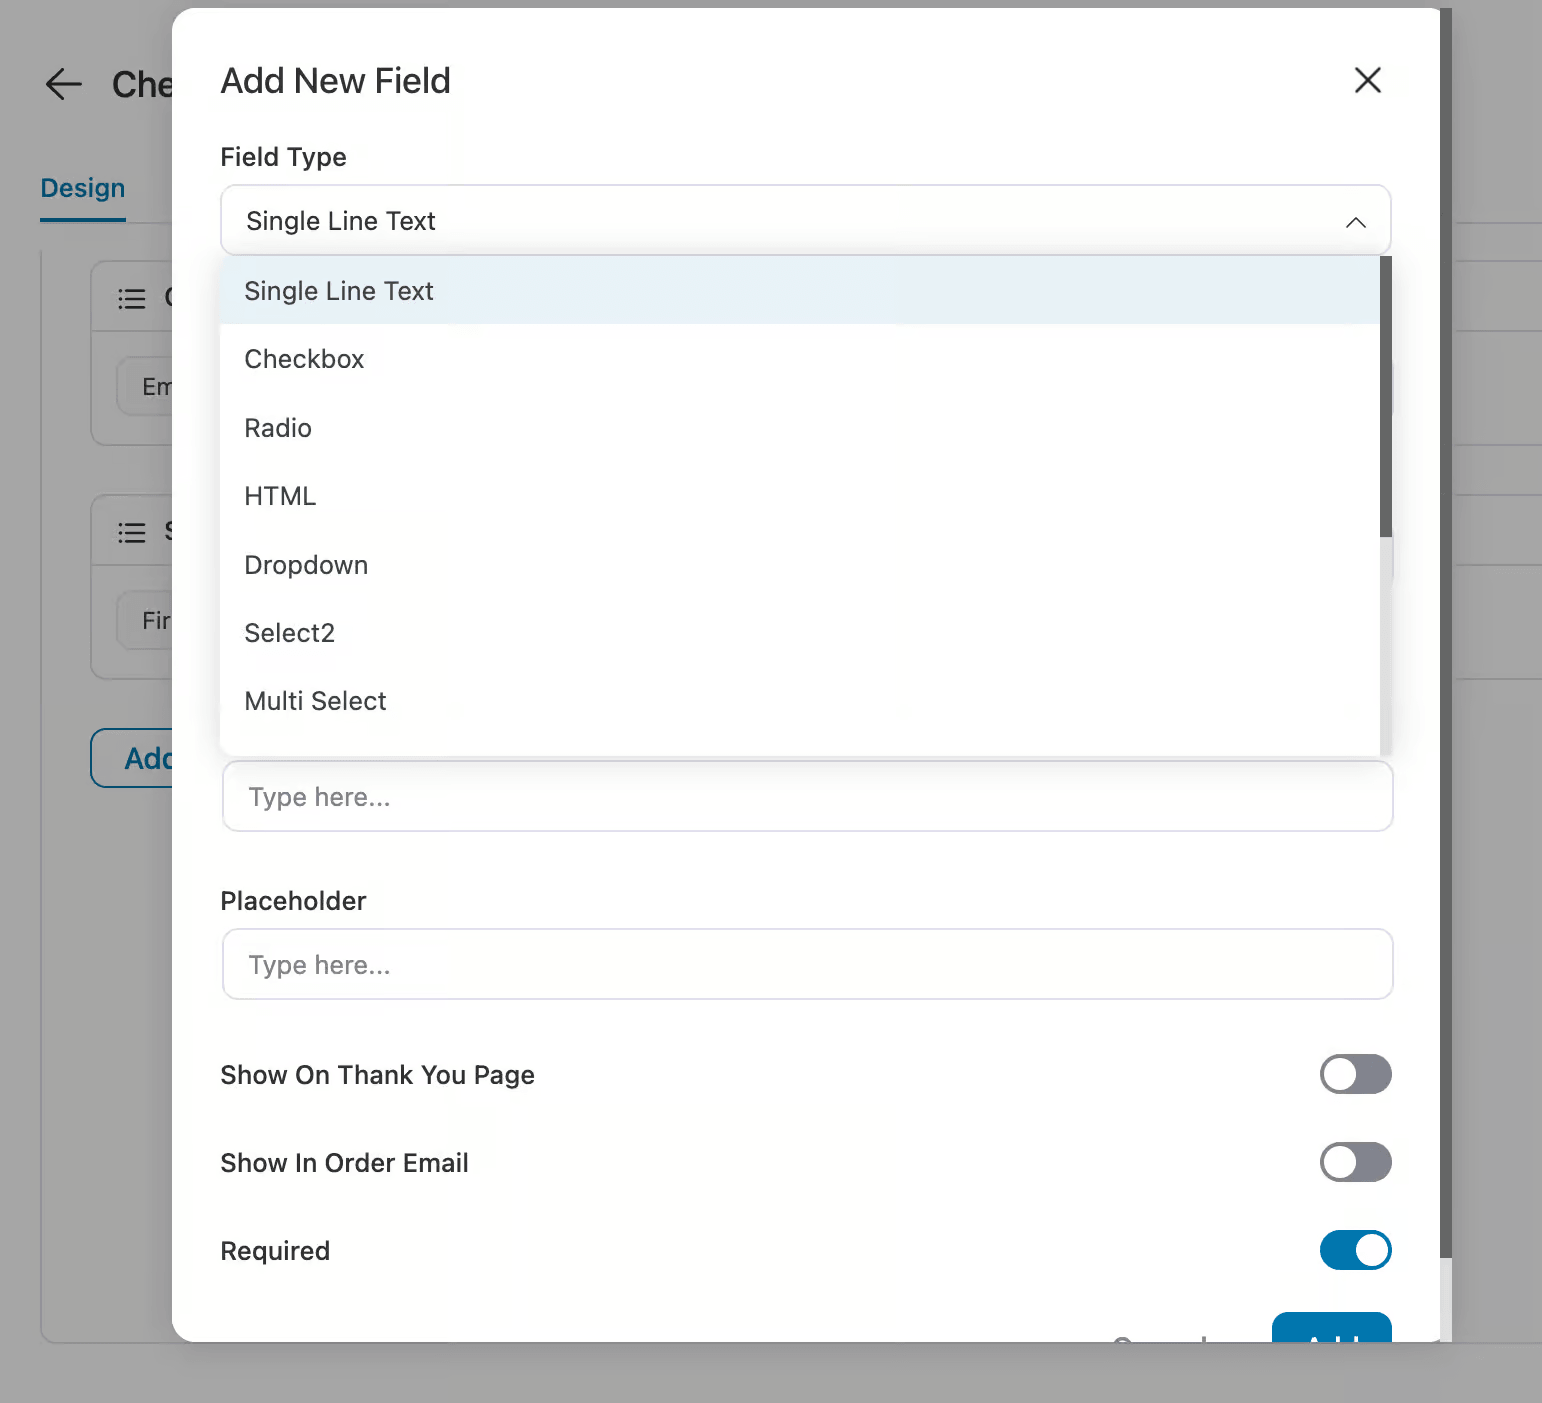
You can easily add custom fields without any custom code. You get up to 18 field types to choose from, including a simple single-line text input, a date-time picker, and file uploads. Whatever your checkout needs that isn't already built in, there's likely a field type for it.
You can show the custom field on thank you and order emails as well.
Conditional Fields and Sections
You can create conditional fields and show or hide fields and entire sections, based on conditions rather than making them visible to every buyer.
Conditions typically fall into three groups: user (role, logged in or guest), cart (total, category, coupons applied, virtual-only), and field (based on what's already entered, like email or address).
You can also combine conditions with AND/OR logic, for example, showing a "Company Name" field only when a wholesale product is in the cart and the customer is logged in.
More optimization options
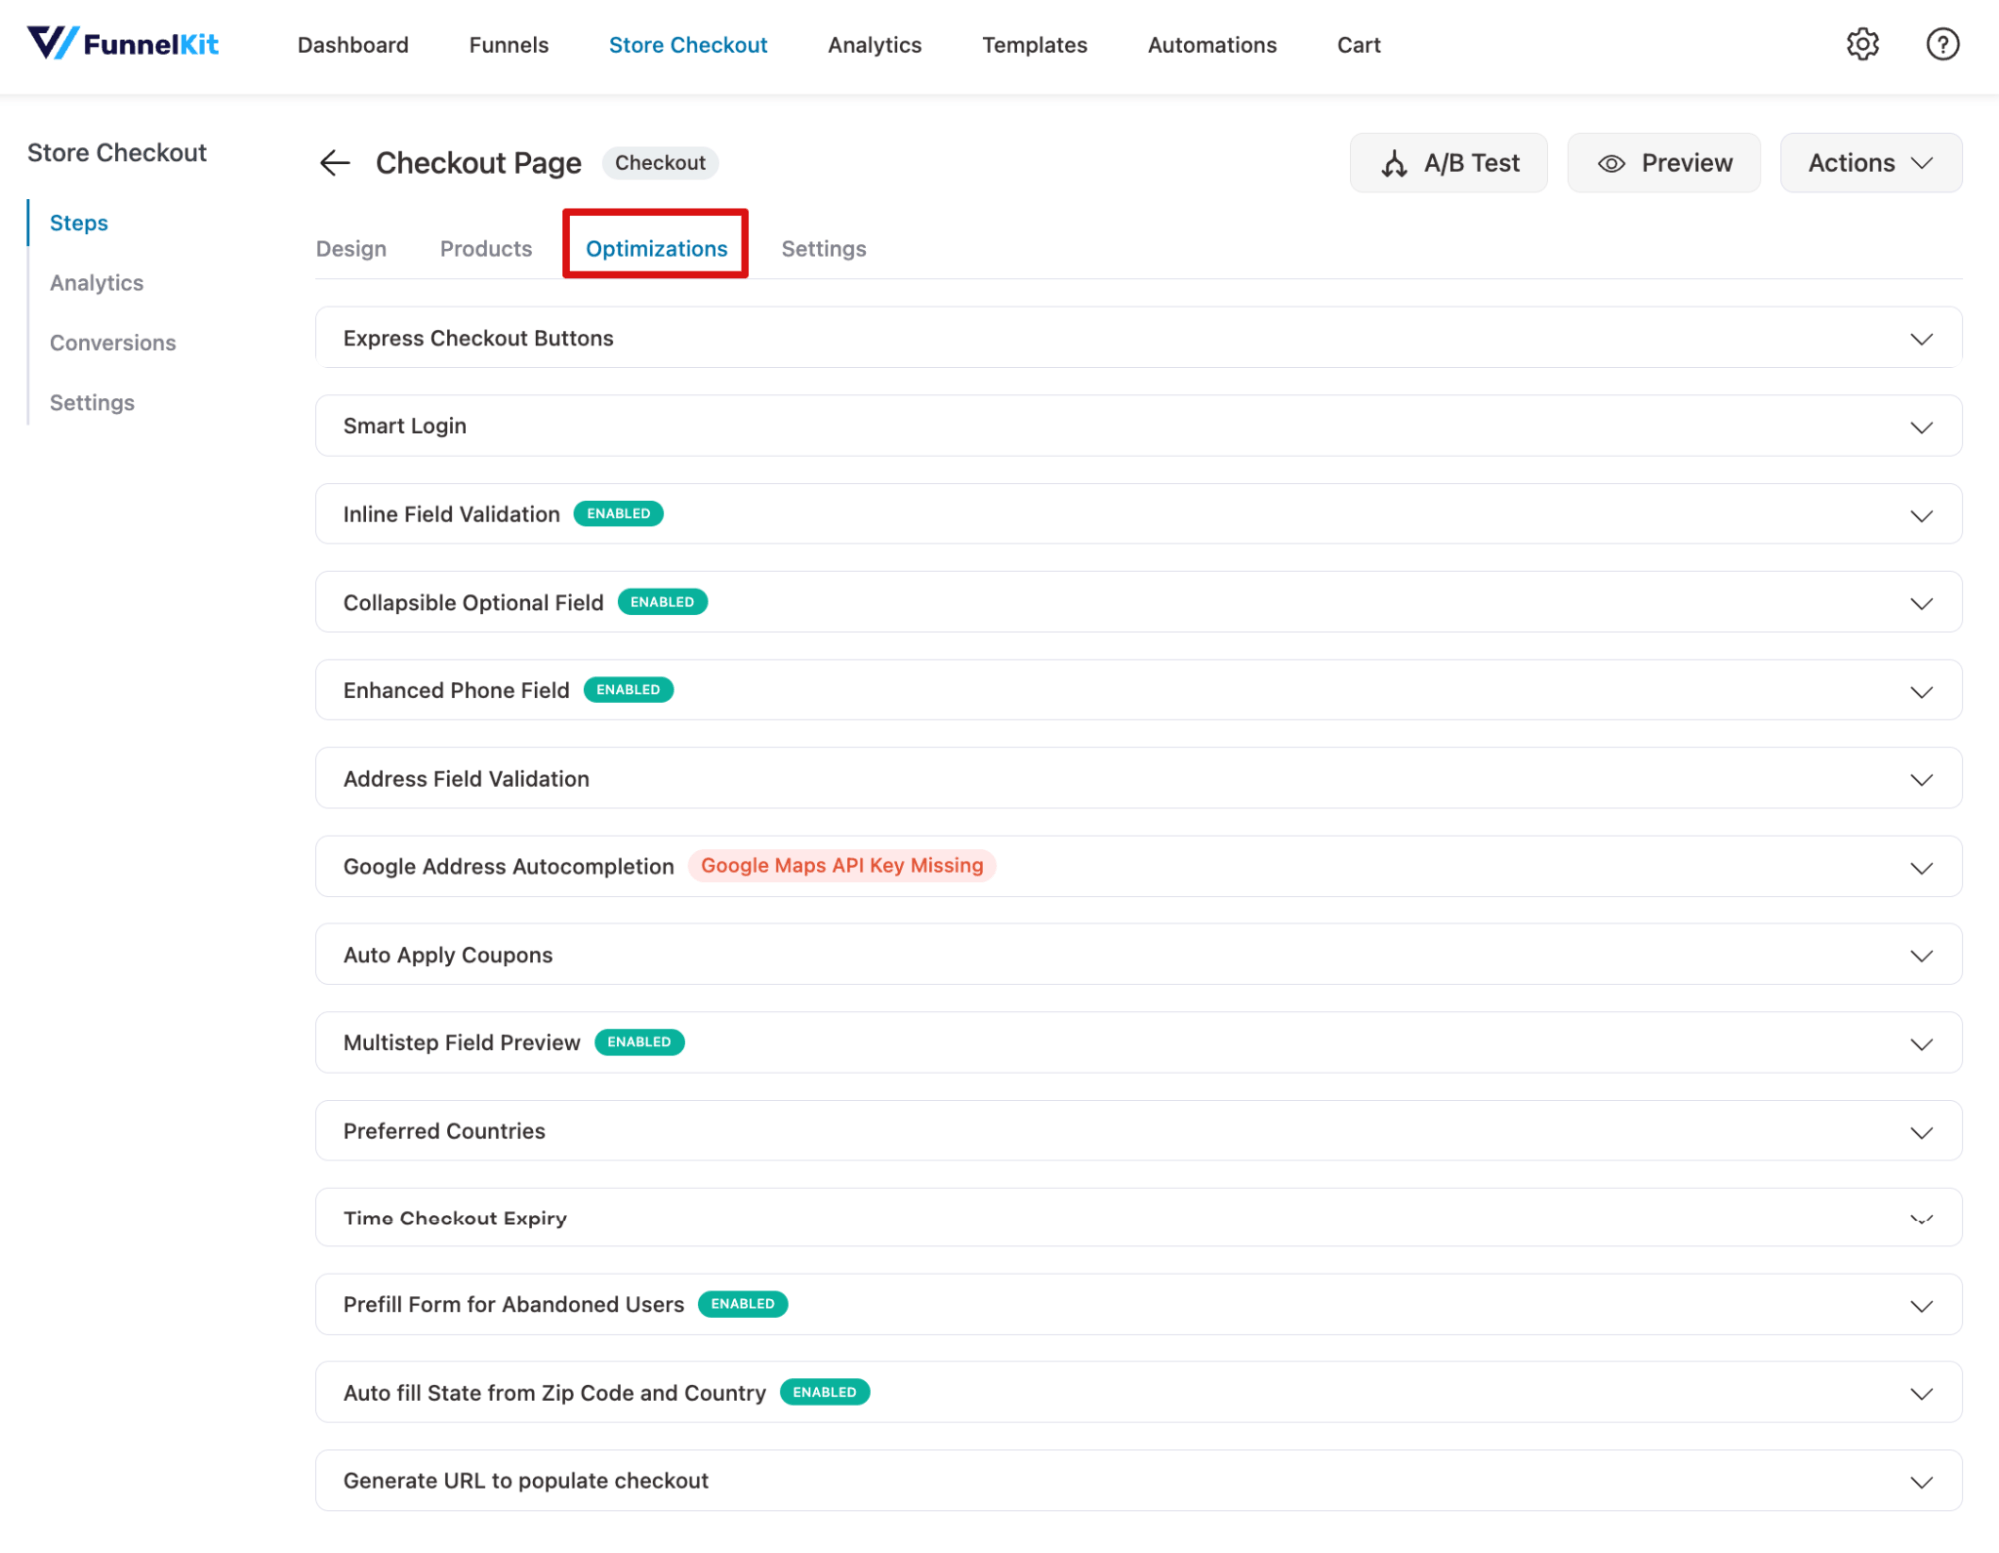
With a premium version, you get a longer list of checkout optimizations, including smart login, collapsible optional fields, an enhanced phone field, Google address autocompletion, auto-applied coupons, a multistep field preview, preferred countries, a checkout expiry timer, form prefill for abandoned users, auto-fill state from zip code, and the ability to generate a URL that pre-populates checkout fields.
If the free version's layout and settings changes aren't enough for what your store needs, this is the next step up.
FAQs About WooCommerce Checkout Block Editor
Not for the basics. Layout, section order, a few native settings, all built into the editor by default.
Custom fields though? Conditional logic that shows or hides fields based on what's in the cart? A multi-step checkout split across several screens? None of that exists in the native version, so a plugin is the only way in once your needs go past the basics.
Not even close. Classic runs on a single shortcode, [woocommerce_checkout], sitting on top of PHP templates that have barely changed in years.
The block editor works nothing like that. It breaks the whole checkout apart into individual Gutenberg blocks you can rearrange, hide, or restyle piece by piece, and that's been the default setup for a while now, not some optional add-on.
Split test it live, if you've got a plugin that does that. Runs old and new at once, no waiting.
No plugin? Before-and-after, but run it in full weeks and let your traffic decide the length, not a fixed number of days.
Yes, and it takes about thirty seconds. Add the [woocommerce_checkout] shortcode to any page, or find the classic checkout toggle buried in WooCommerce's settings.
Most stores use this as a temporary patch, not a permanent fix, something to fall back on while a payment gateway or extension finishes catching up to block compatibility.
No, not by itself. It ships inside WooCommerce core, not as some extra script tacked on afterward. Checkout dragging? Look at the theme first. Look at whatever else is running on that page next. Nine times out of ten, the slowdown traces back to something unrelated entirely, not the block editor itself.
Ready to Unlock the Full Power of the WooCommerce checkout Block Editor?
Native gets you further than most people expect. Section reordering, terms and conditions toggles, order notes, express checkout placement. No code, no cost, already sitting in your WordPress install the moment WooCommerce is active.
Custom fields are outside its reach. So is conditional logic that reacts to what's in the cart, and anything beyond a single checkout step. Not a limitation of how you're using the block editor. Just where the native version stops.
That's the point where a plugin like FunnelKit Funnel Builder takes over. Multi-step forms with a progress bar. Up to 18 field types. Conditions built from cart contents, user role, or what a shopper already typed into another field. Address autocomplete, auto-applied coupons, a checkout expiry timer, and A/B testing that splits live traffic instead of asking you to run two separate two-week tests.
Test the WooCommerce checkout block editor as it ships first. It costs nothing to find out where your checkout actually needs more than the native tool gives you, and most stores discover that answer faster than they expect.
Explore FunnelKit Funnel Builder's Store Checkout to see a fully customized checkout in action.
Dipa Shaha
September 17, 2026Speeding up your WooCommerce checkout starts with knowing where the delay actually lives. Is it your server, your scripts, your payment gateway, or the sheer number of fields on the...
Dipa Shaha
September 7, 2026The right WooCommerce landing page plugin can help you build pages that convert better. According to Call Digital Fire’s 2026 analysis, optimized landing pages can achieve conversion rates of 6–11%,...
Editorial Team
July 7, 2026Are shoppers adding products to their cart and leaving before they buy? According to Baymard Institute research on checkout usability, 18% of shoppers who abandon their cart do so because...






