
Adding a checkbox to the WooCommerce checkout is one of the easiest ways to collect information from customers, without asking them to do much extra.
Think about it.
The customer is already on the checkout page, entering their details, and about to click the Place Order button.
A single checkbox can prompt them to join your email list, request a gift receipt, add gift wrapping, confirm an age requirement, claim a warranty, and more, all in one tap.
There’s no heavy extra work for customers.
By default, WooCommerce doesn’t provide a way to add custom checkboxes to checkout. In this guide, we’ll show you two ways to do it:
We’ll also cover common use cases, tips to ensure your checkboxes actually get you the information without creating friction in the checkout flow.
Why Add a Checkbox to WooCommerce Checkout?
Checkout is the most valuable real estate in your entire store. According to Baymard Institute, 70.19% of online shopping carts are abandoned before purchase completion, and 18% of those are due to the complex checkout process.
But making checkout simple doesn’t mean you don’t ask for the information you need on the checkout form.
You just need to make them seamless.
Most store owners handle customer preferences the hard way: a free-text order notes field that customers fill in inconsistently, or a follow-up email that most people never open.
A checkbox fixes both problems at once.
Here is why this matters for your store:
- Captures Data at Peak Intent
When the customer is ready to buy, a checkbox captures data at the moment of peak intent. This option gets far more engagement than one in an email, a pop-up, or a post-purchase page.
- Replaces Messy Text Field with Structured Data
Order notes are often vague and require manual interpretation. A checkbox provides a clear yes or no option, seamlessly integrating with your workflow or CRM without guesswork.
- Keeps Checkout Fast and Frictionless
A checkbox adds minimal cognitive load. Customers make a quick decision in under a second and move on, unlike sign-up forms or pop-ups that introduce friction.
- Ensures Legal Protection
For EU customers, GDPR requires explicit consent for marketing emails. A properly placed checkbox is the simplest way to stay compliant without slowing checkout.
Table of Contents
- 1 When to Add a Checkbox to Your Checkout
- 2 Method 1: How To Add a Checkbox to WooCommerce Checkout Without Code
- 3 Method 2: How to Add a Checkbox to WooCommerce Checkout With Custom Code
- 4 5 Practical Use Cases Of Adding a Checkbox To WooCommerce Checkout
- 5 5 Best Practices For Adding a CheckBox To WooCommerce Checkout
- 6 Frequently Asked Questions About WooCommerce Checkout Checkbox Field
- 7 How can I make a checkbox required in WooCommerce checkout and show an error if unchecked?
- 8 Can I add a conditional checkbox to Checkout?
- 9 Can I add multiple checkboxes to the same checkout page?
- 10 Will a custom checkbox work on mobile devices?
- 11 Does adding a checkbox affect my checkout conversion rate?
- 12 Is a checkbox required for GDPR compliance?
- 13 What happens if a customer does not check the opt-in box?
- 14 How do I style the checkbox to match my store's theme?
- 15 Are there any alternative plugins to FunnelKit for adding checkboxes to WooCommerce checkout?
- 16 Add a Checkbox to WooCommerce Checkout and Collect Information Seamlessly!
When to Add a Checkbox to Your Checkout
Not every piece of information belongs in a checkbox. The wrong field type adds confusion, and too many fields push customers away from the buy button.
Here is how to decide whether a checkbox is the right fit or whether you need something else.
Add a checkbox when:
- The answer is a simple yes or no. There is no middle ground and no need to choose between options
- The decision is optional and should not block the purchase from going through
- You already have a plan to act on the response, whether that is an automated email, a fulfillment flag, or an order note that your team will actually read.
Skip a checkbox when:
- The customer needs to pick from multiple options. Use a dropdown or radio field instead.
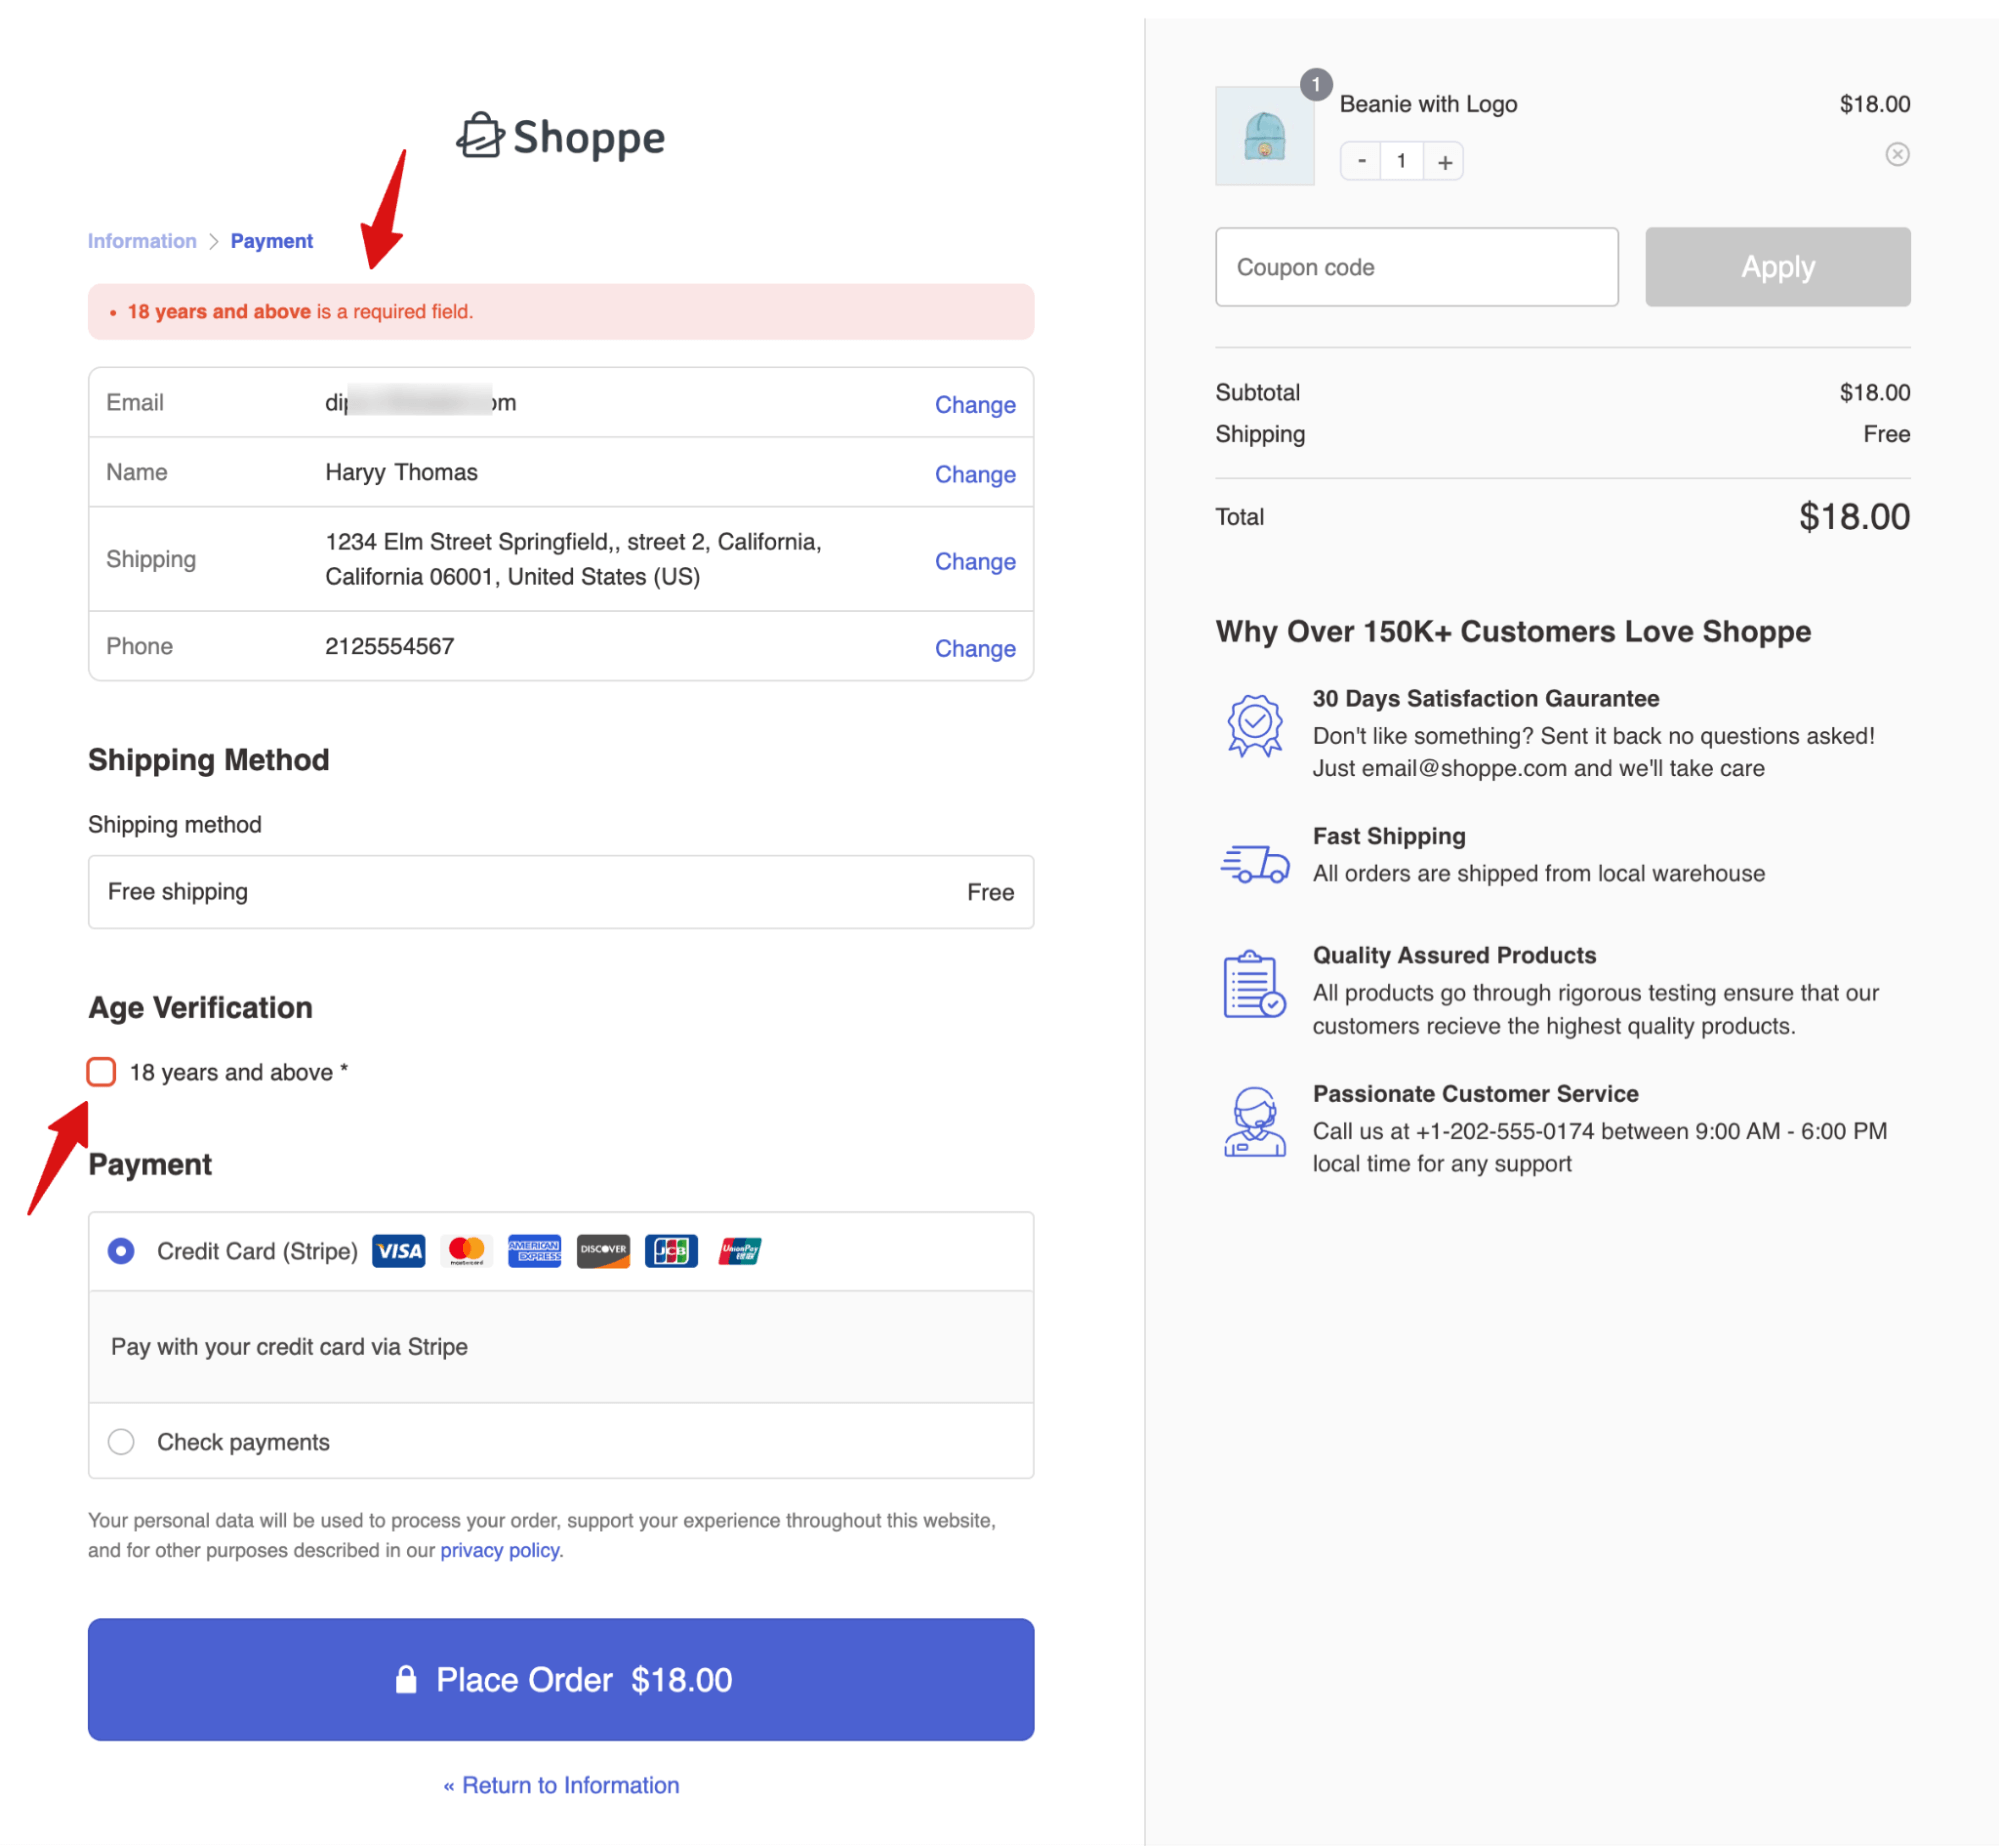
- You would need to make it required to get useful data, a required checkbox at checkout kills trust and increases abandonment, so only do this when the law demands it (age verification is the main exception).
- You are not sure what you would do with the data once it is collected. A checkbox you never act on is just noise that slows your customer down.
Method 1: How To Add a Checkbox to WooCommerce Checkout Without Code
To add a checkbox to the WooCommerce checkout page, we will use FunnelKit Funnel Builder, a checkout plugin trusted by over 40,000 store owners.
FunnelKit Funnel Builder lets you redesign your entire WooCommerce checkout page using a visual drag-and-drop editor.
You can add custom fields like checkboxes, drop-downs, select, radio, etc. Plus, you can rearrange fields, apply conditional logic, and preview changes. It is the fastest and easiest way to add a custom checkbox to checkout.
Both free and pro versions are required. Make sure to install and activate them.
Next, follow the steps below:
Step 1: Create a custom store checkout
To add a custom checkout field, first create a Global Store Checkout to replace the default WooCommerce checkout page.
To do so, go to FunnelKit ⇒ Store Checkout. FunnelKit offers a range of pre-built templates for high-converting sales funnels and checkout pages.
Hover over the template you like and click Preview. For this guide, we’re using the Shopify-like template.
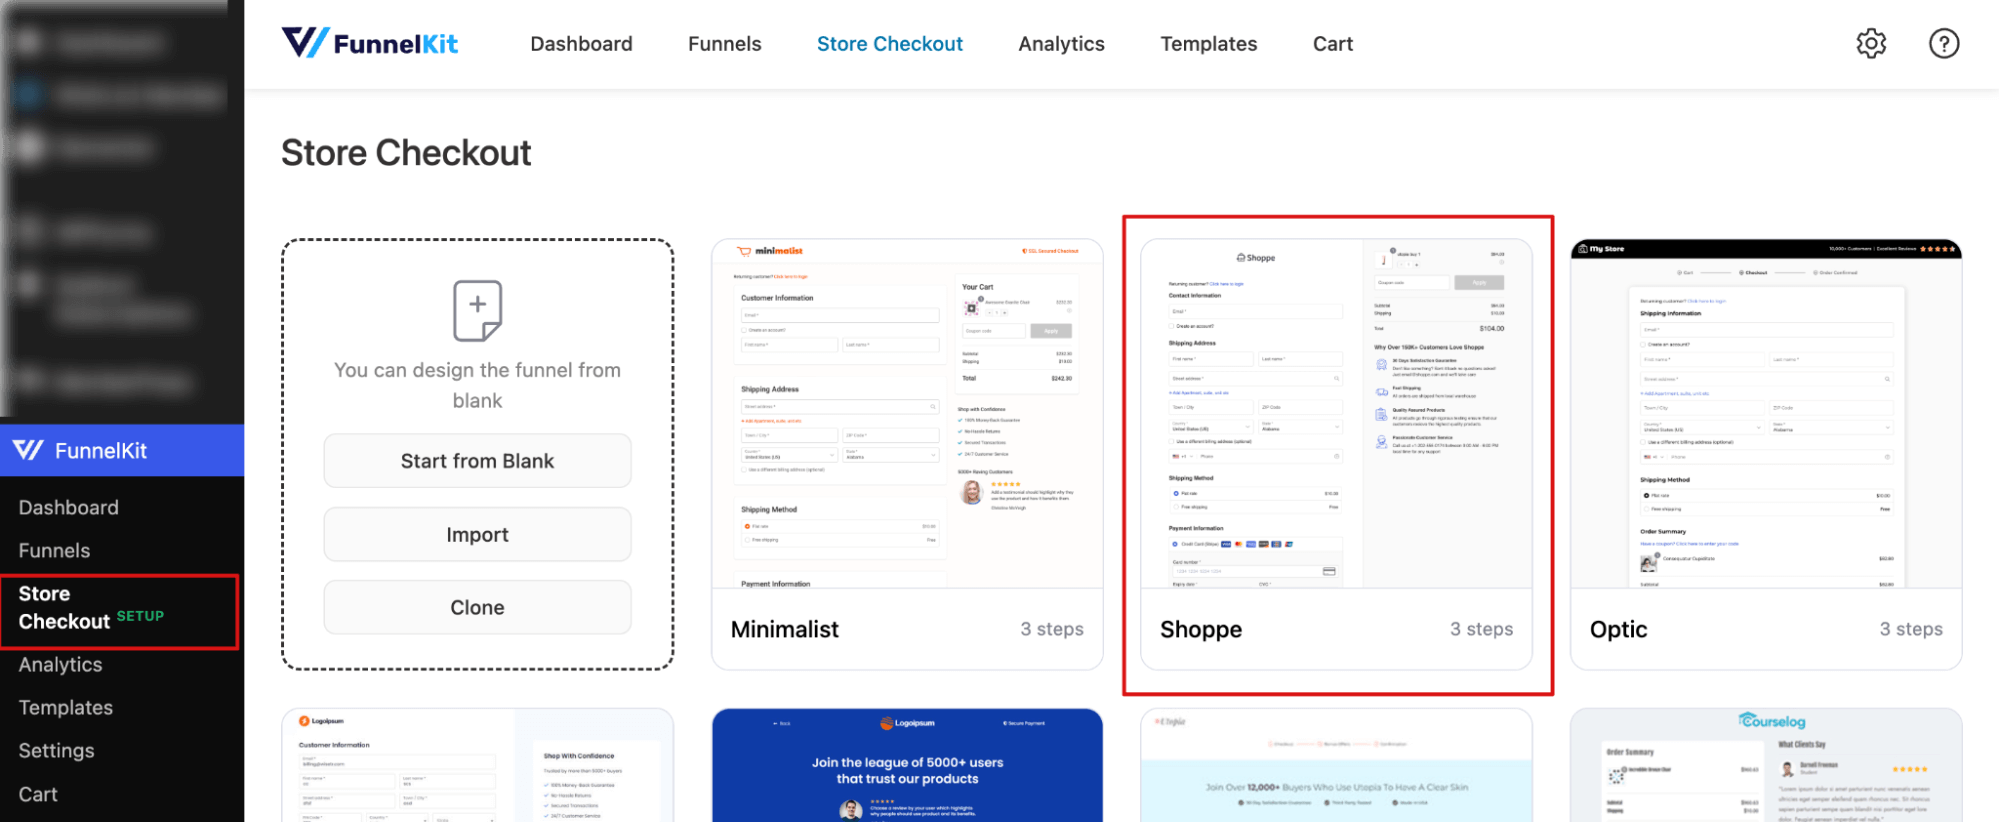
Next, select your checkout type: single or multi-step. Then click ‘Import This Funnel’, give it a name, and hit ‘Add’.
We’re selecting the two-step checkout for this blog.
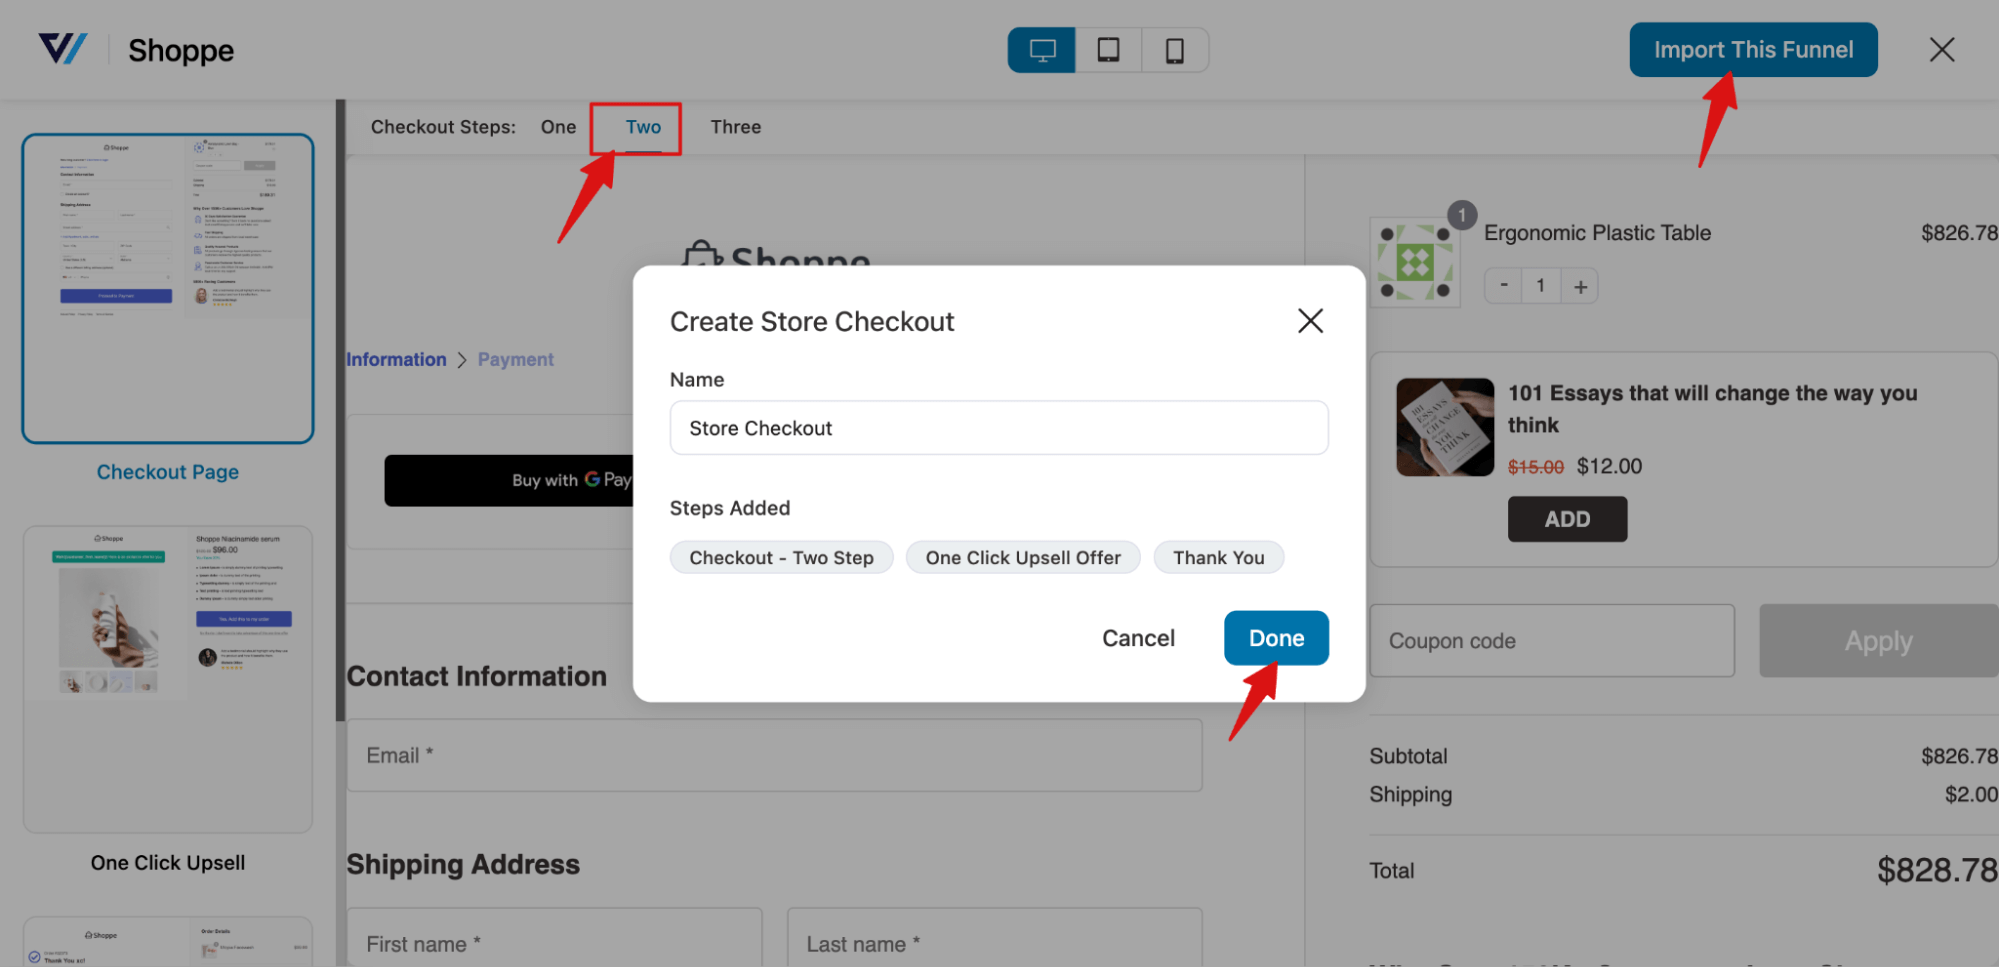
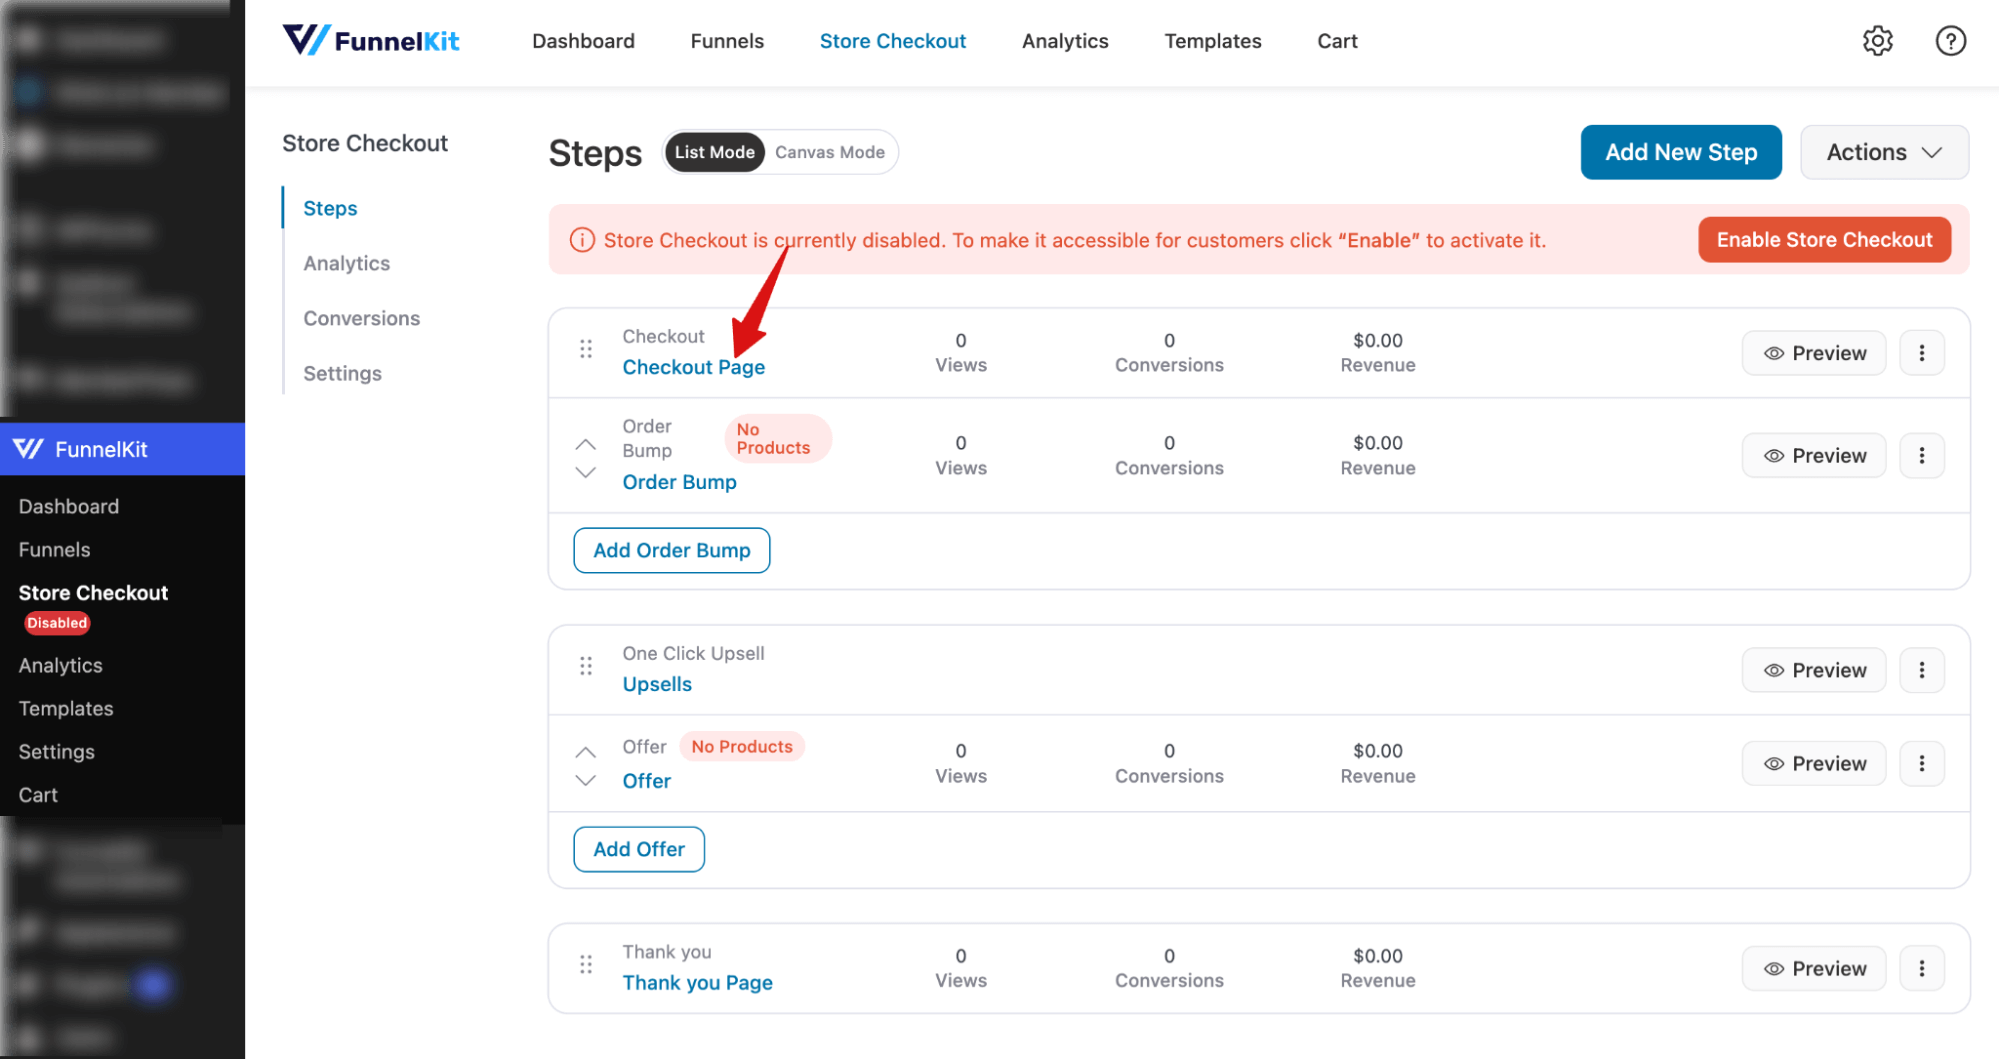
This will import a store checkout with three pages: Checkout, One Click Upsell, and Thank You page.
Step 2: Create a checkbox field
To customize the WooCommerce checkout page and add an extra field, click on the Checkout step.
Under the Design tab, you can customize the layout and content of your checkout page.
To create a checkout field, first scroll down to the checkout form fields section. Next, go to the Advanced section and click ‘Add New Field’.
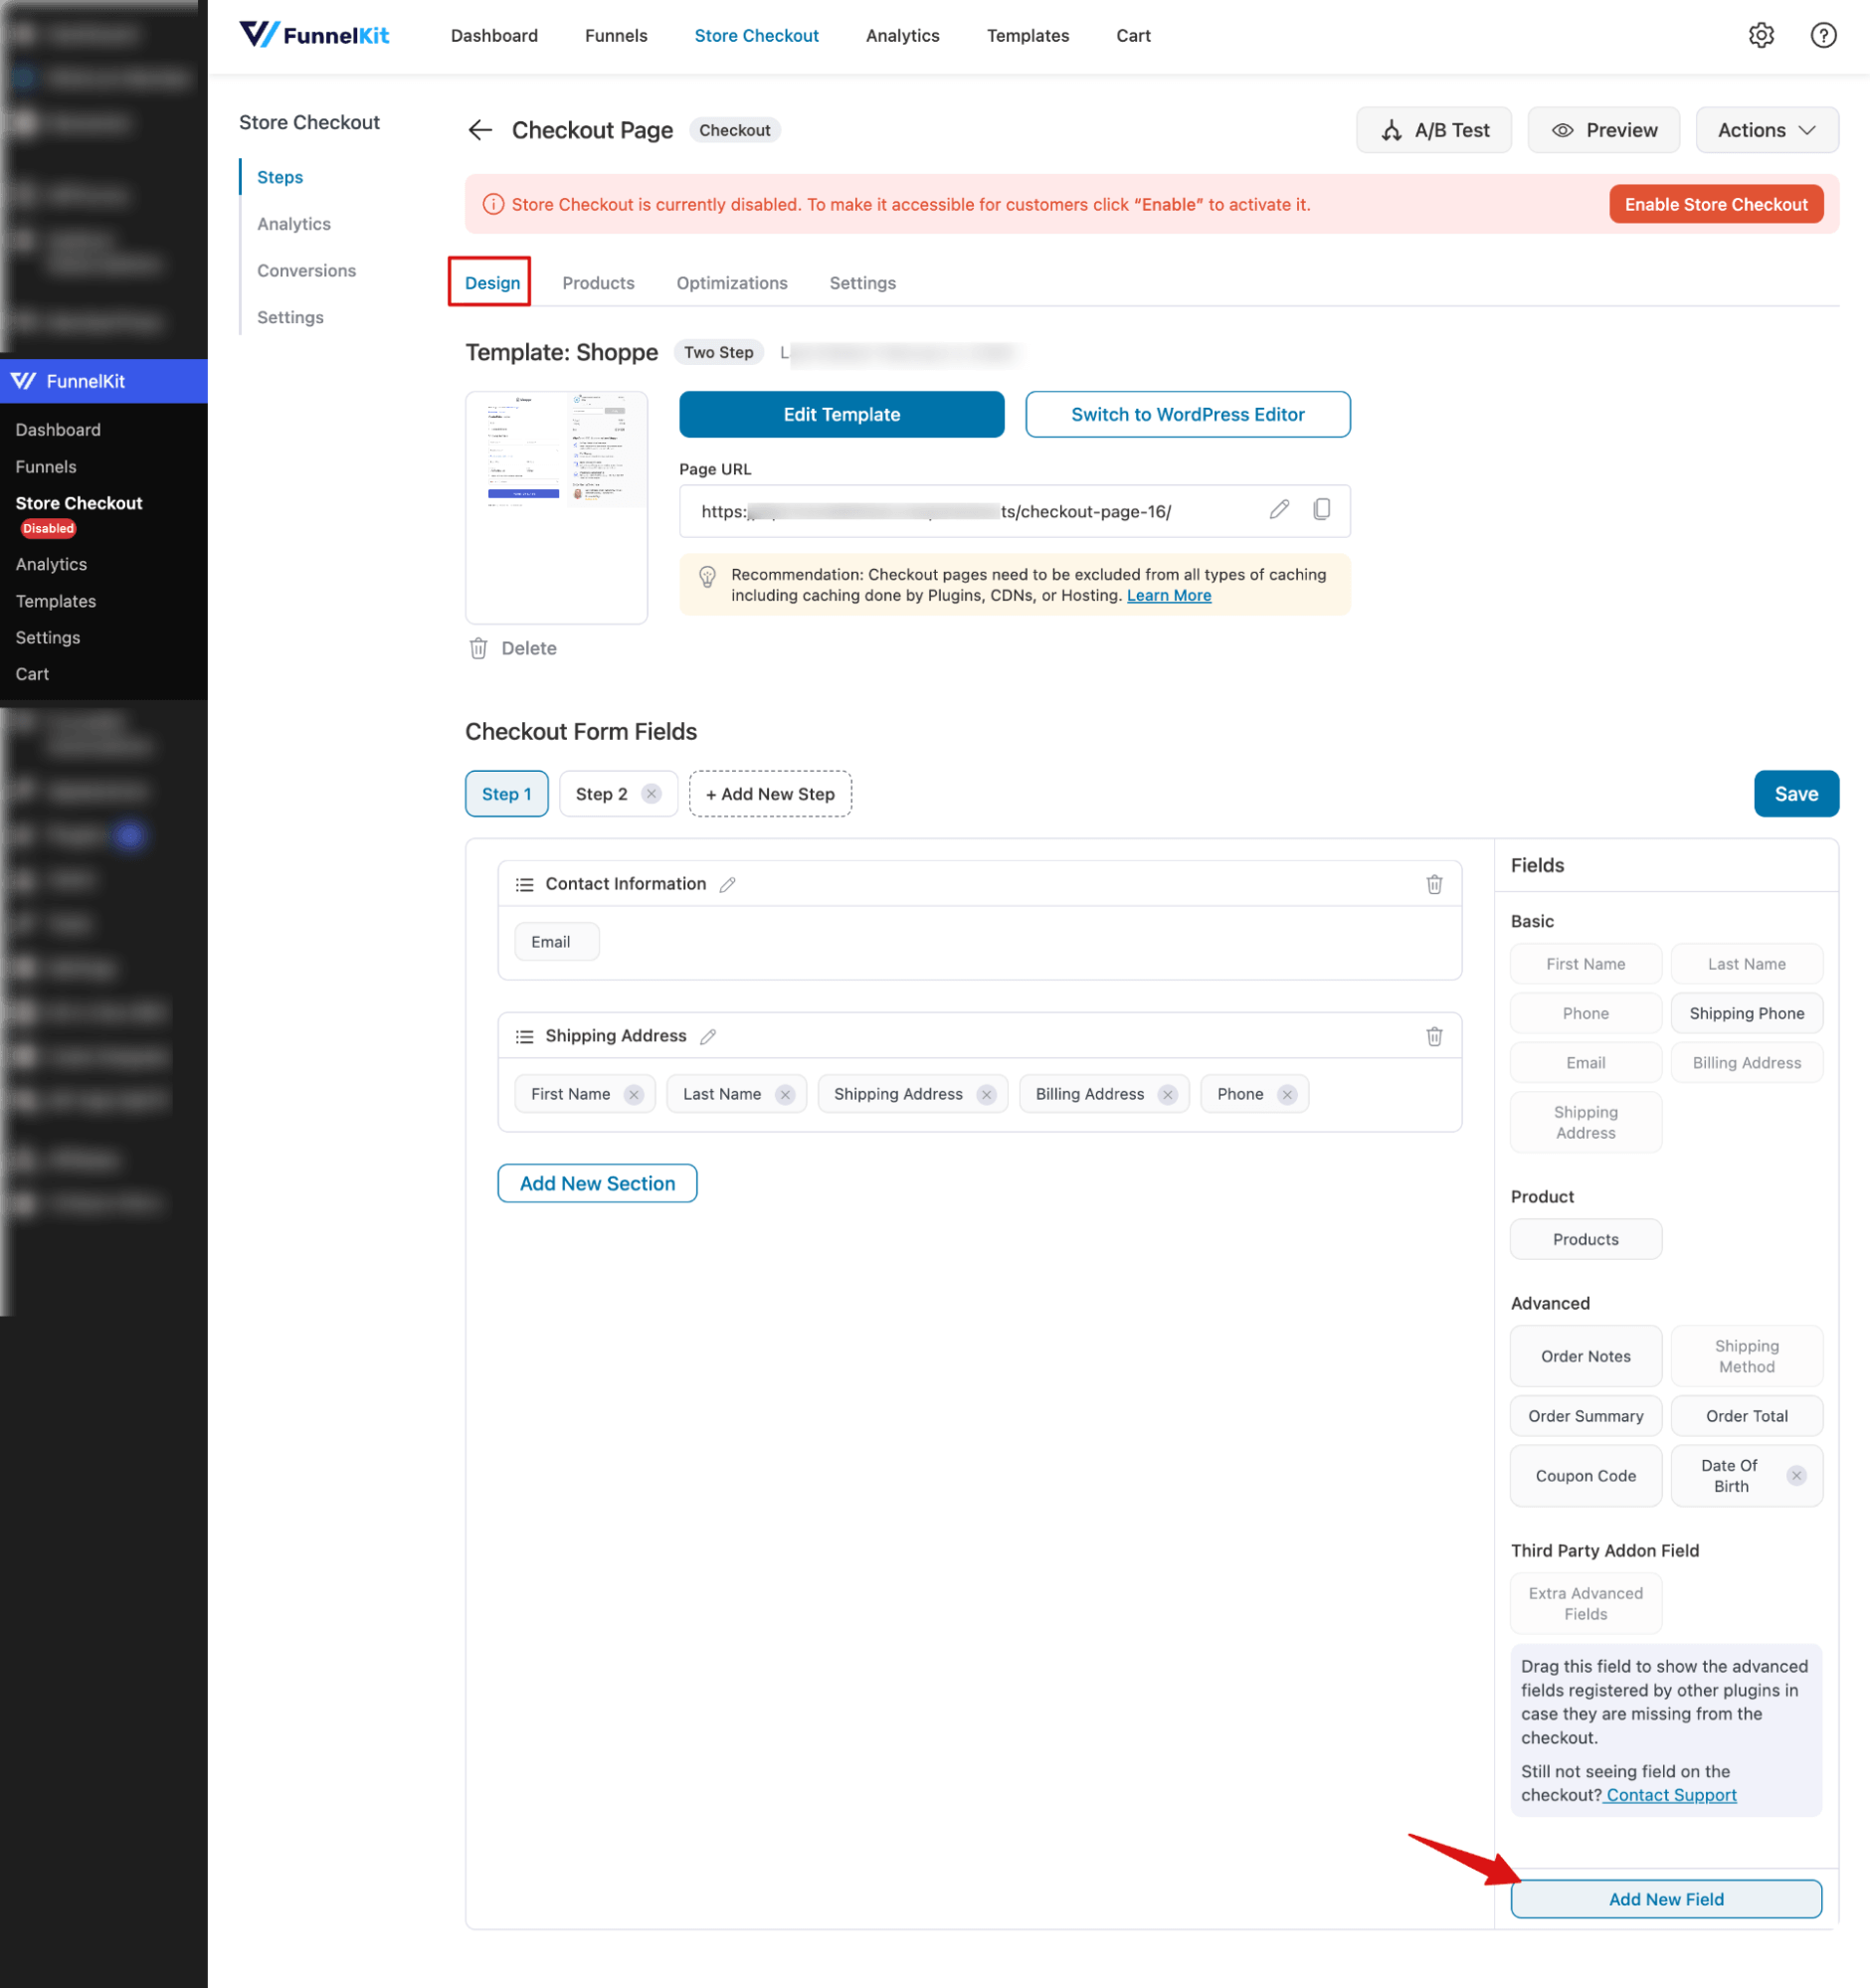
Note: You can create extra custom checkout fields in FunnelKit, including text, checkbox, radio, HTML, dropdown, multi-select, number, telephone, hidden, password, and email.
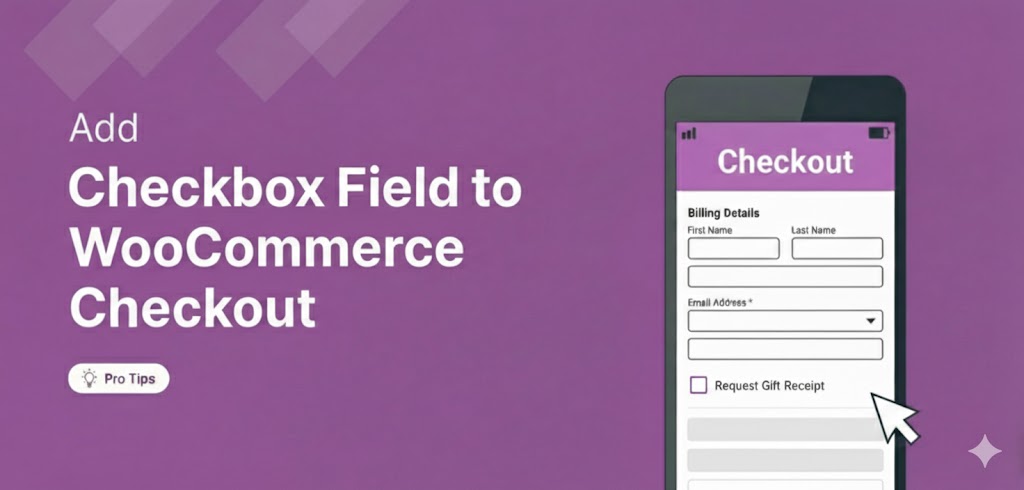
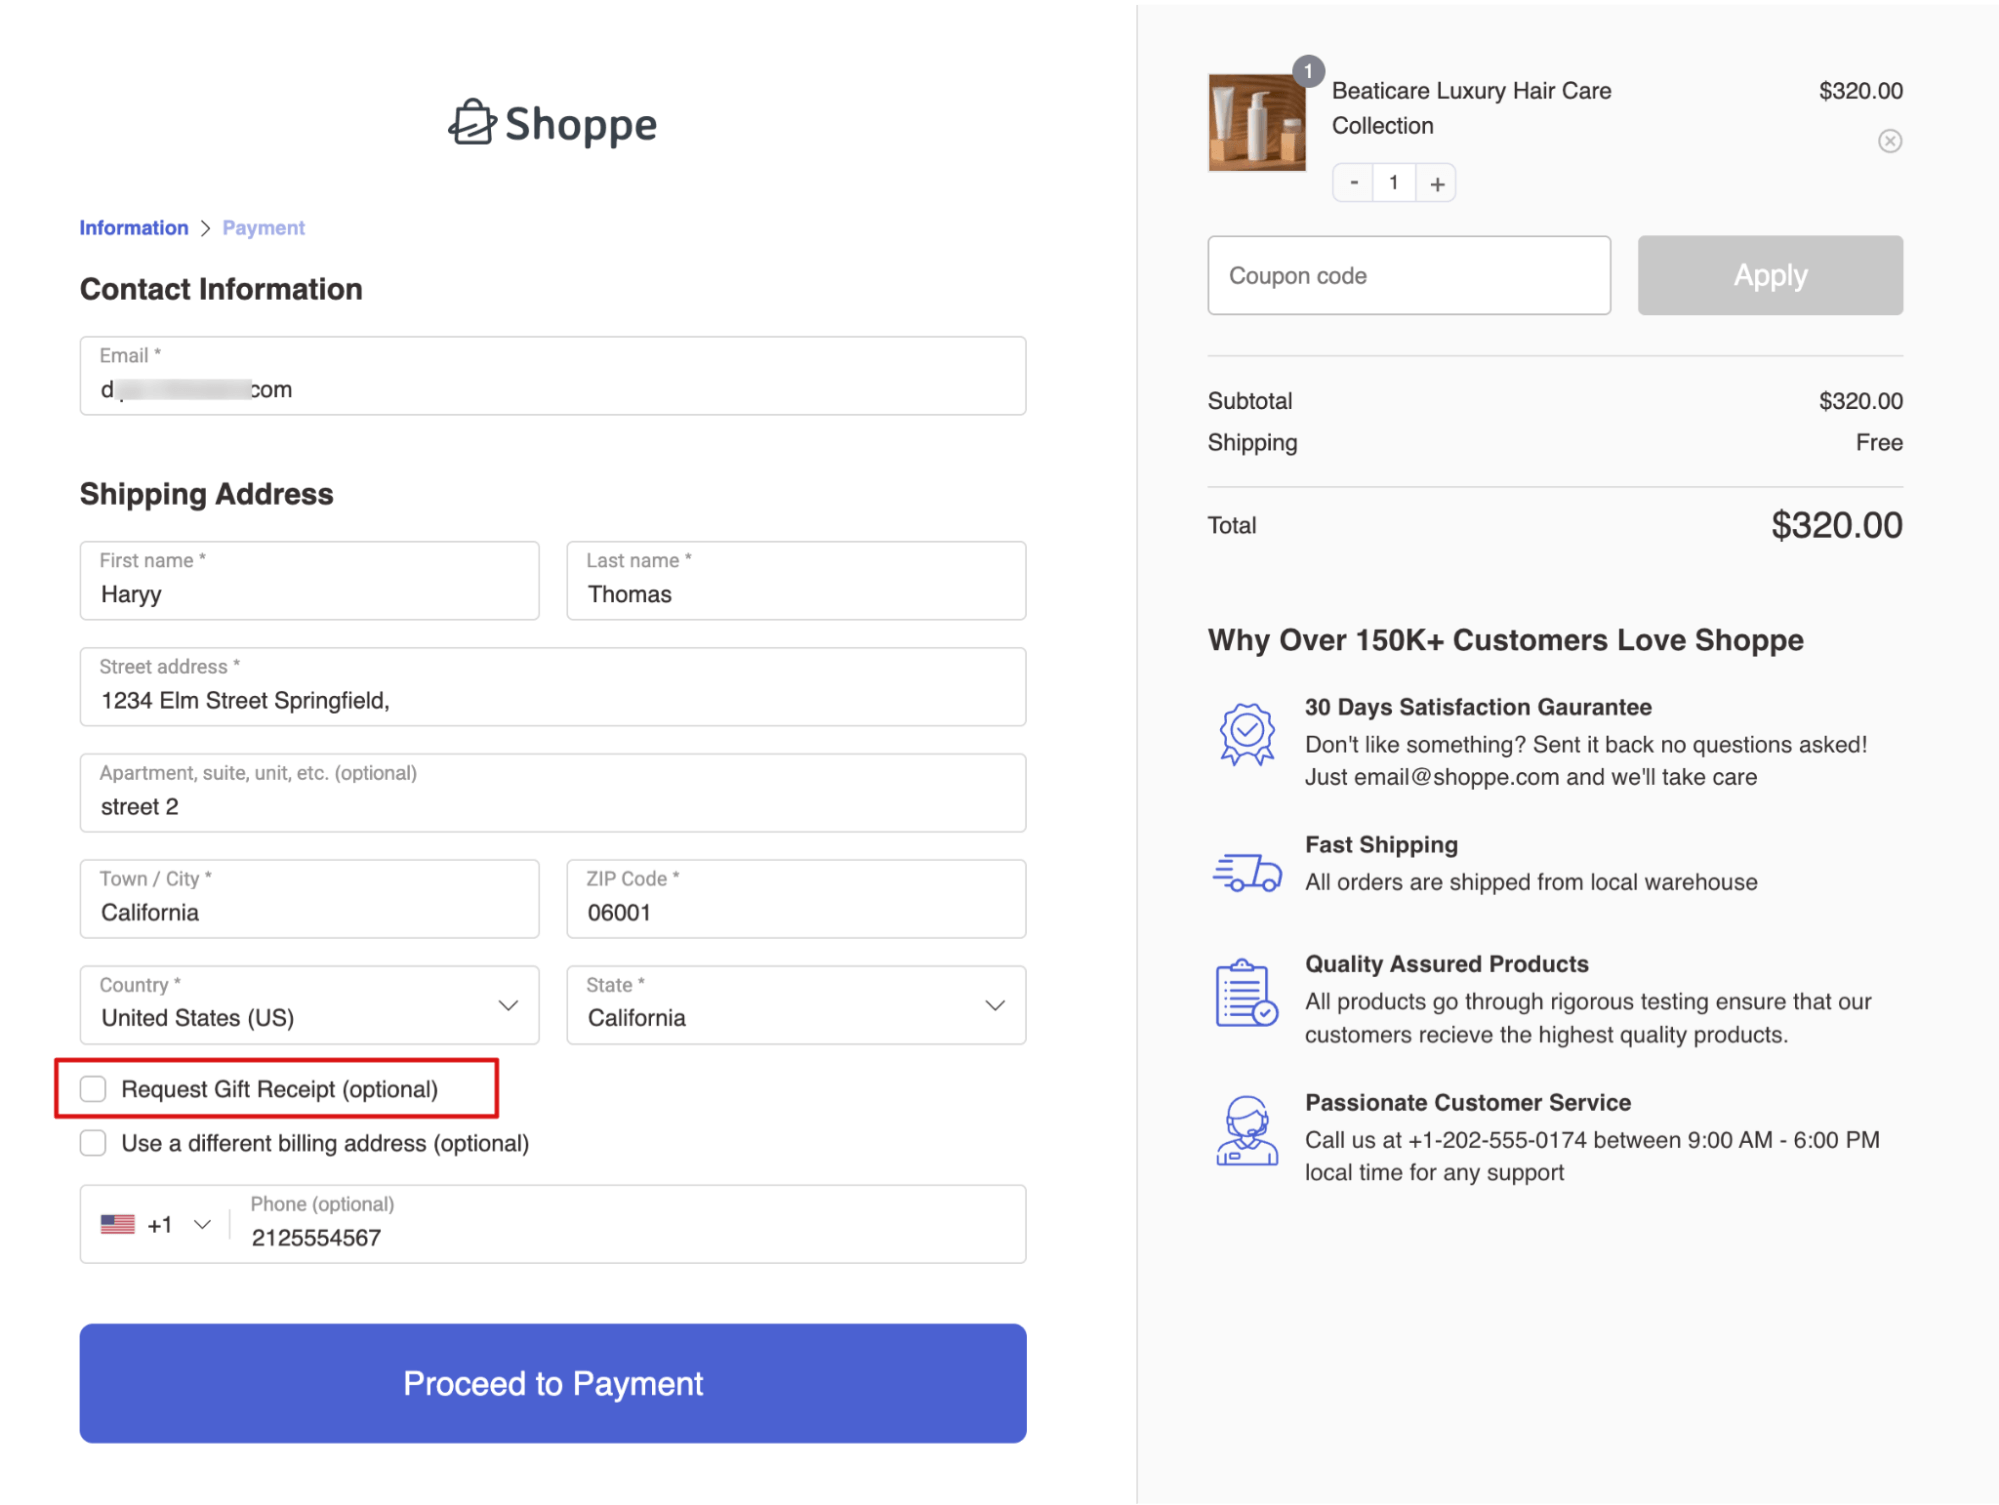
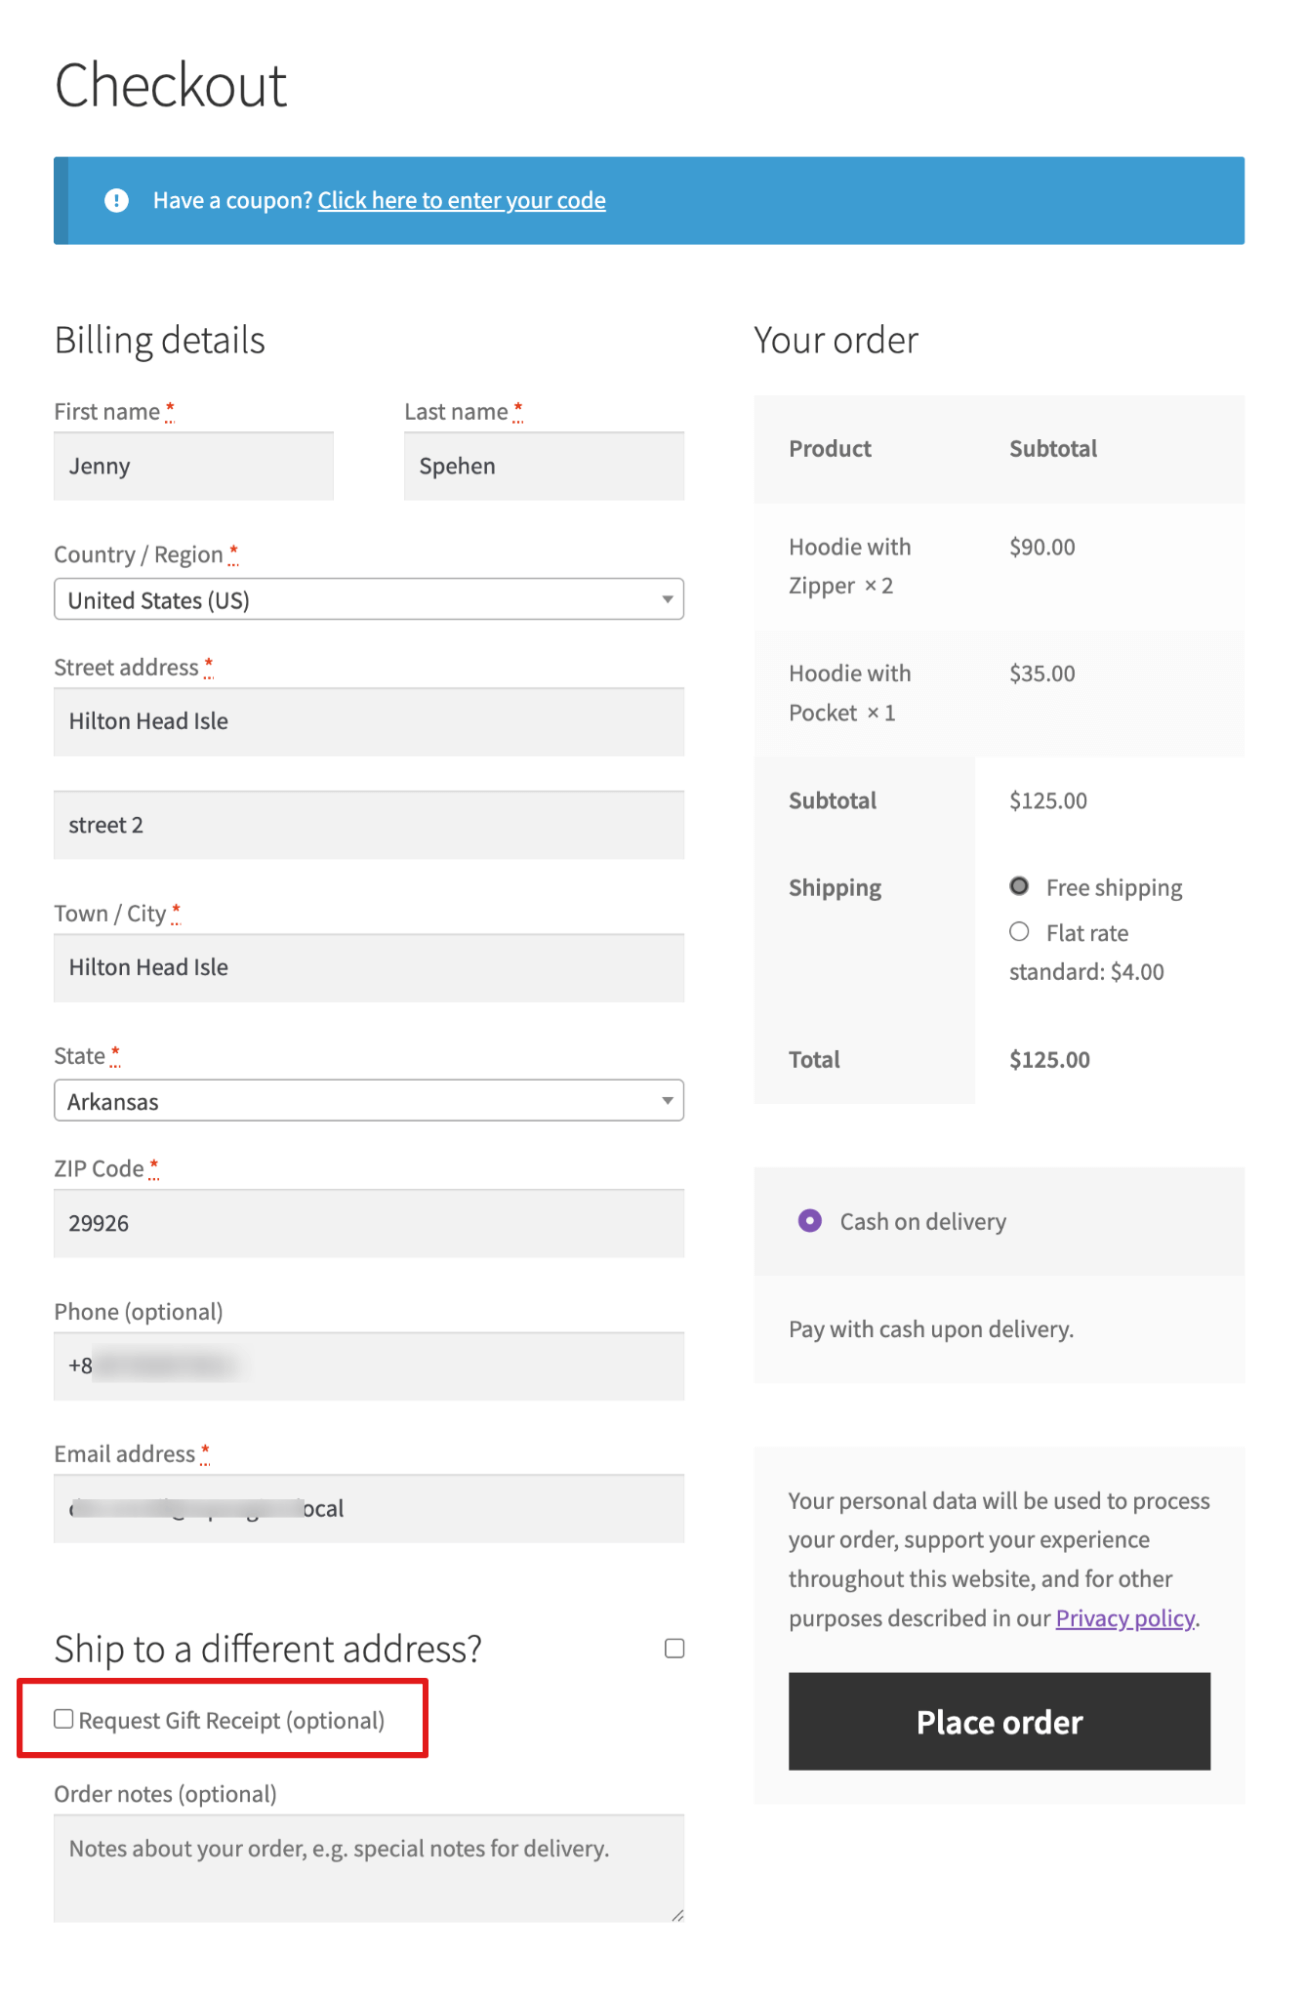
To show how to add a checkbox at checkout, we’ll create one called “Request Gift Receipt”. A gift receipt is a receipt that hides the price, so the recipient can receive the gift without seeing its cost.
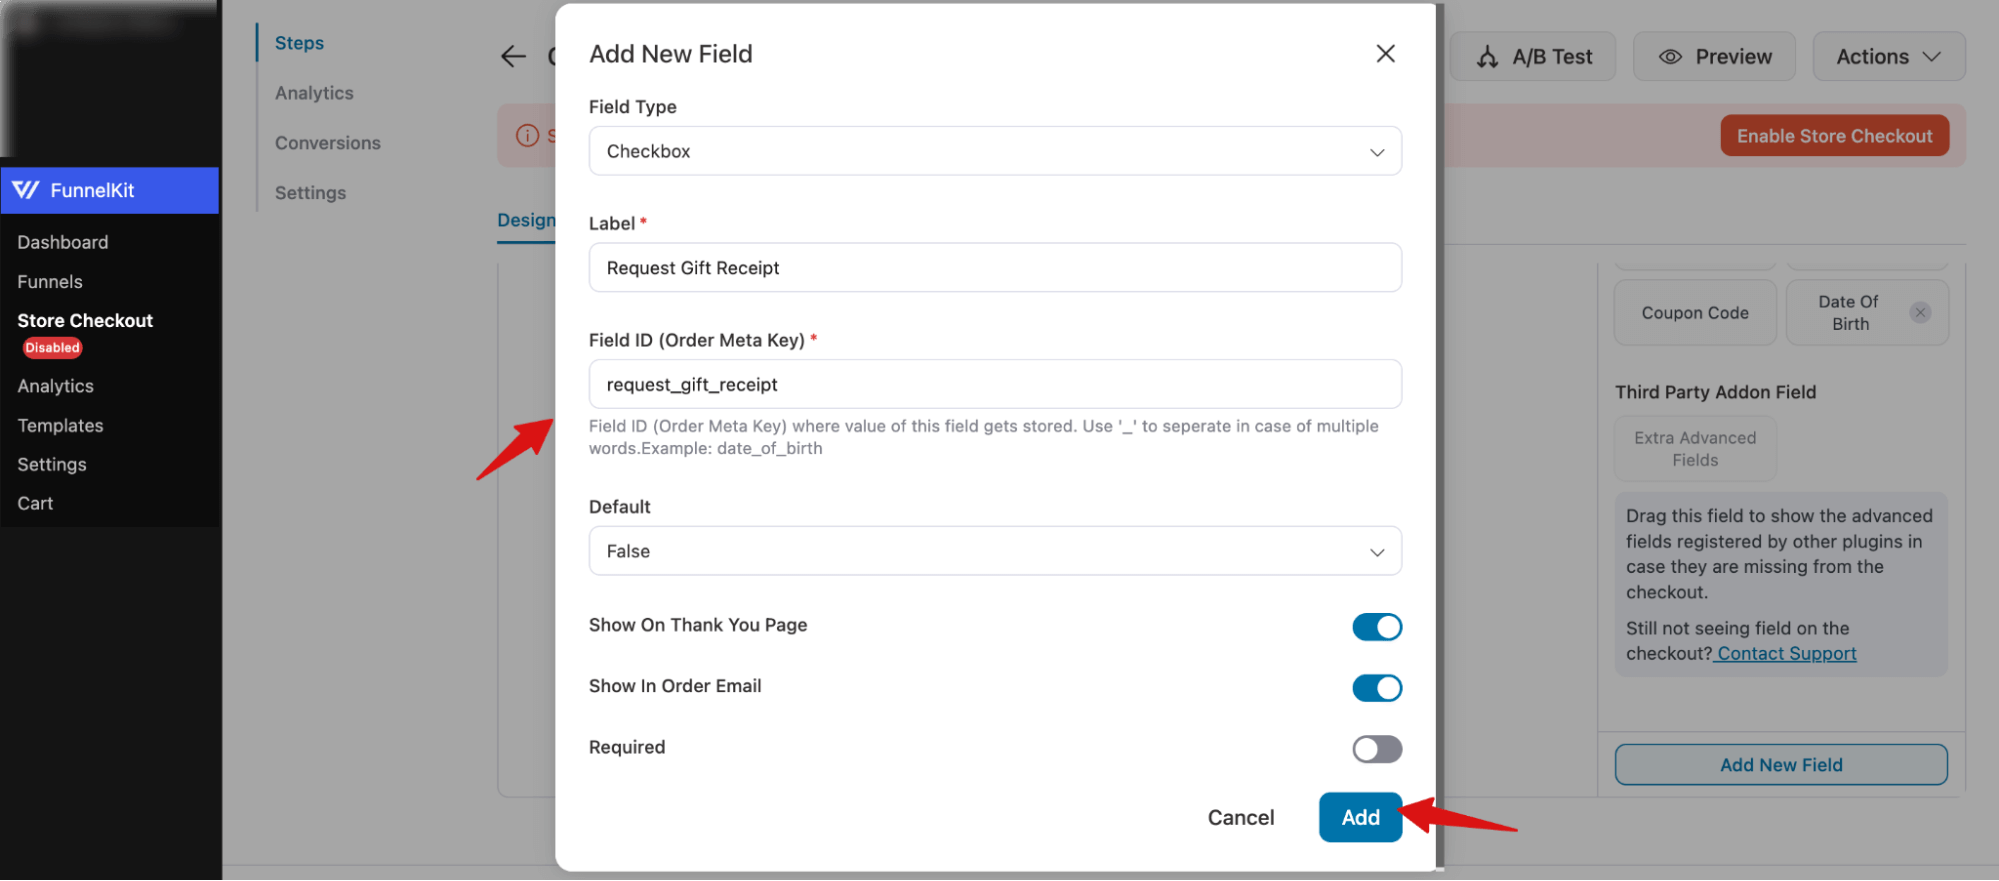
To add the “Request Gift Receipt” checkbox, configure the following:
- Field Type: Select Checkbox
- Label: Enter a label. Example: “Request Gift Receipt”
- Field ID (Order Meta Key): Add a field ID. Example: request_gift_receipt (use underscores for multiple words)
- Default: Set a default value if needed. Here, we set it to False, which means it is not checked.
- Show On Thank You Page: Enable to display the thank you page.
- Show In Order Email: Enable to include in order emails using merge tags.
- Required: Enable if this field must be checked by the customer. In our case, it’s not mandatory.
Finally, click on ‘Add’ to create the custom WooCommerce checkout field.
Step 3: Add the checkbox field to the WooCommerce checkout
The new checkbox field will appear in the Advanced section.
To add it to the checkout form, simply drag and drop it into the desired section. Here, we’re placing it under Shipping Address.
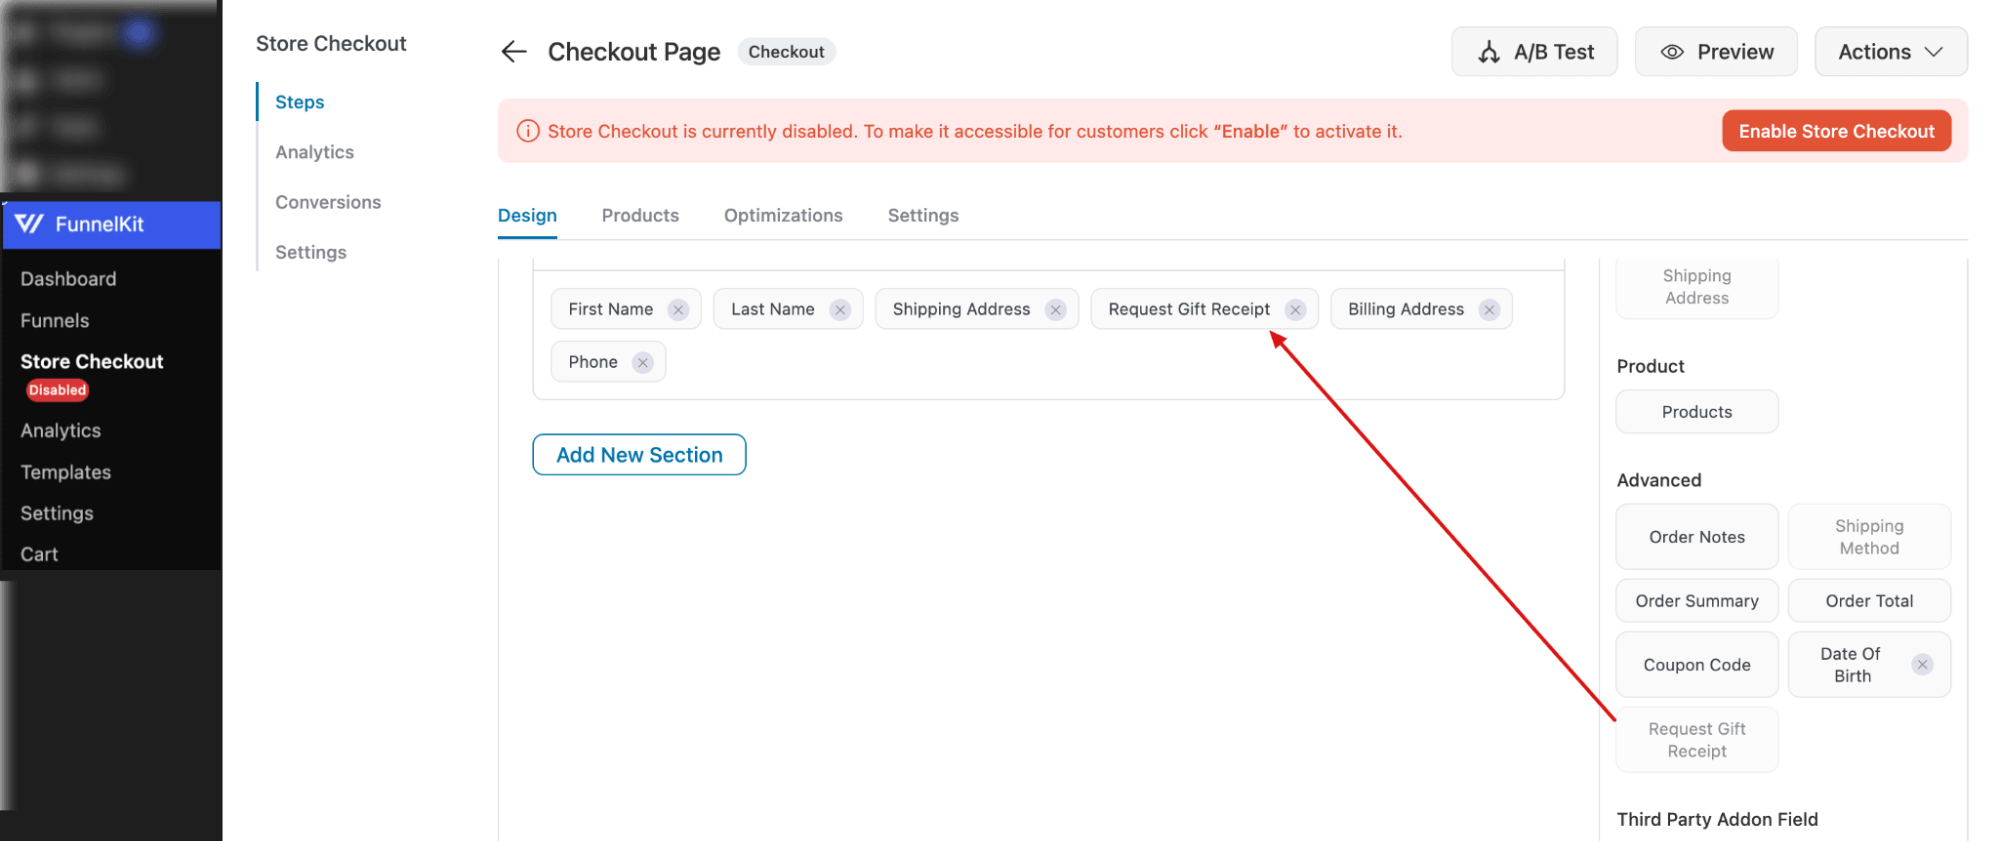
Make sure to hit Save changes.
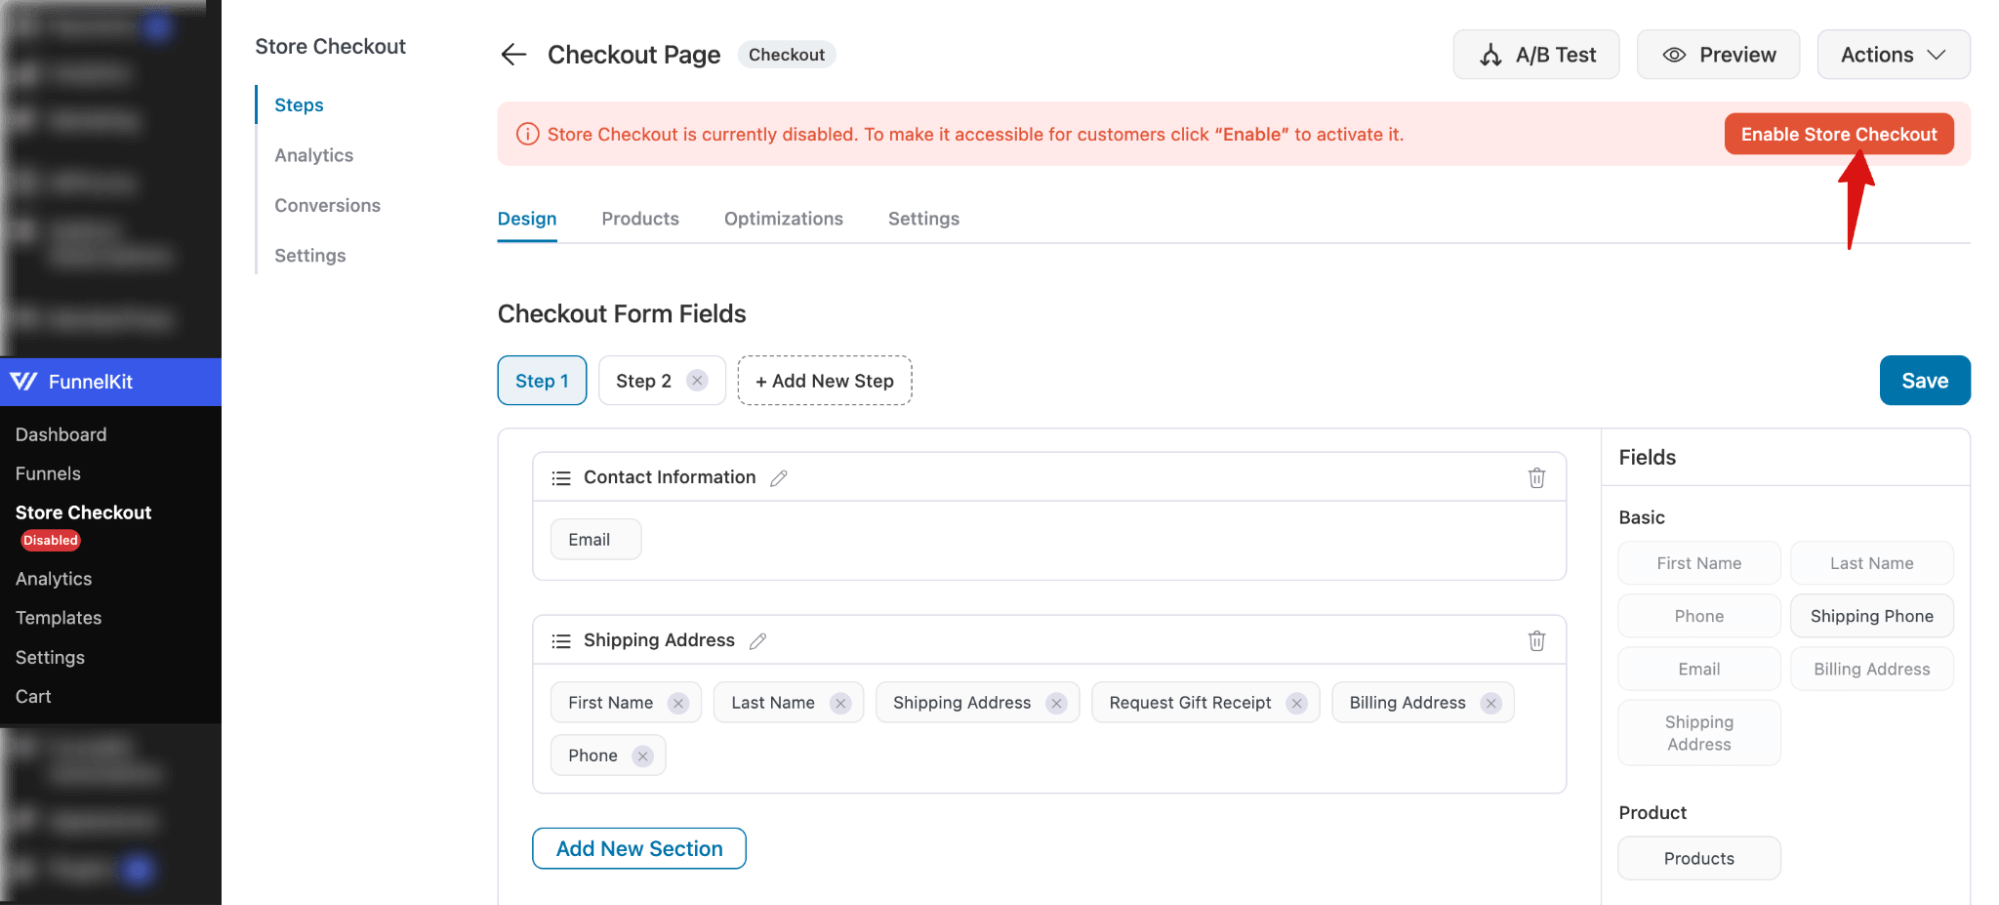
Step 4: Enable store checkout
Lastly, you need to hit the “Enable Store Checkout” button at the top to activate the customer checkout with a checkout field.
Step 5: Test the new checkbox in WooCommerce checkout
Now, try placing a test order to see if the custom checkbox appears on the checkout page.
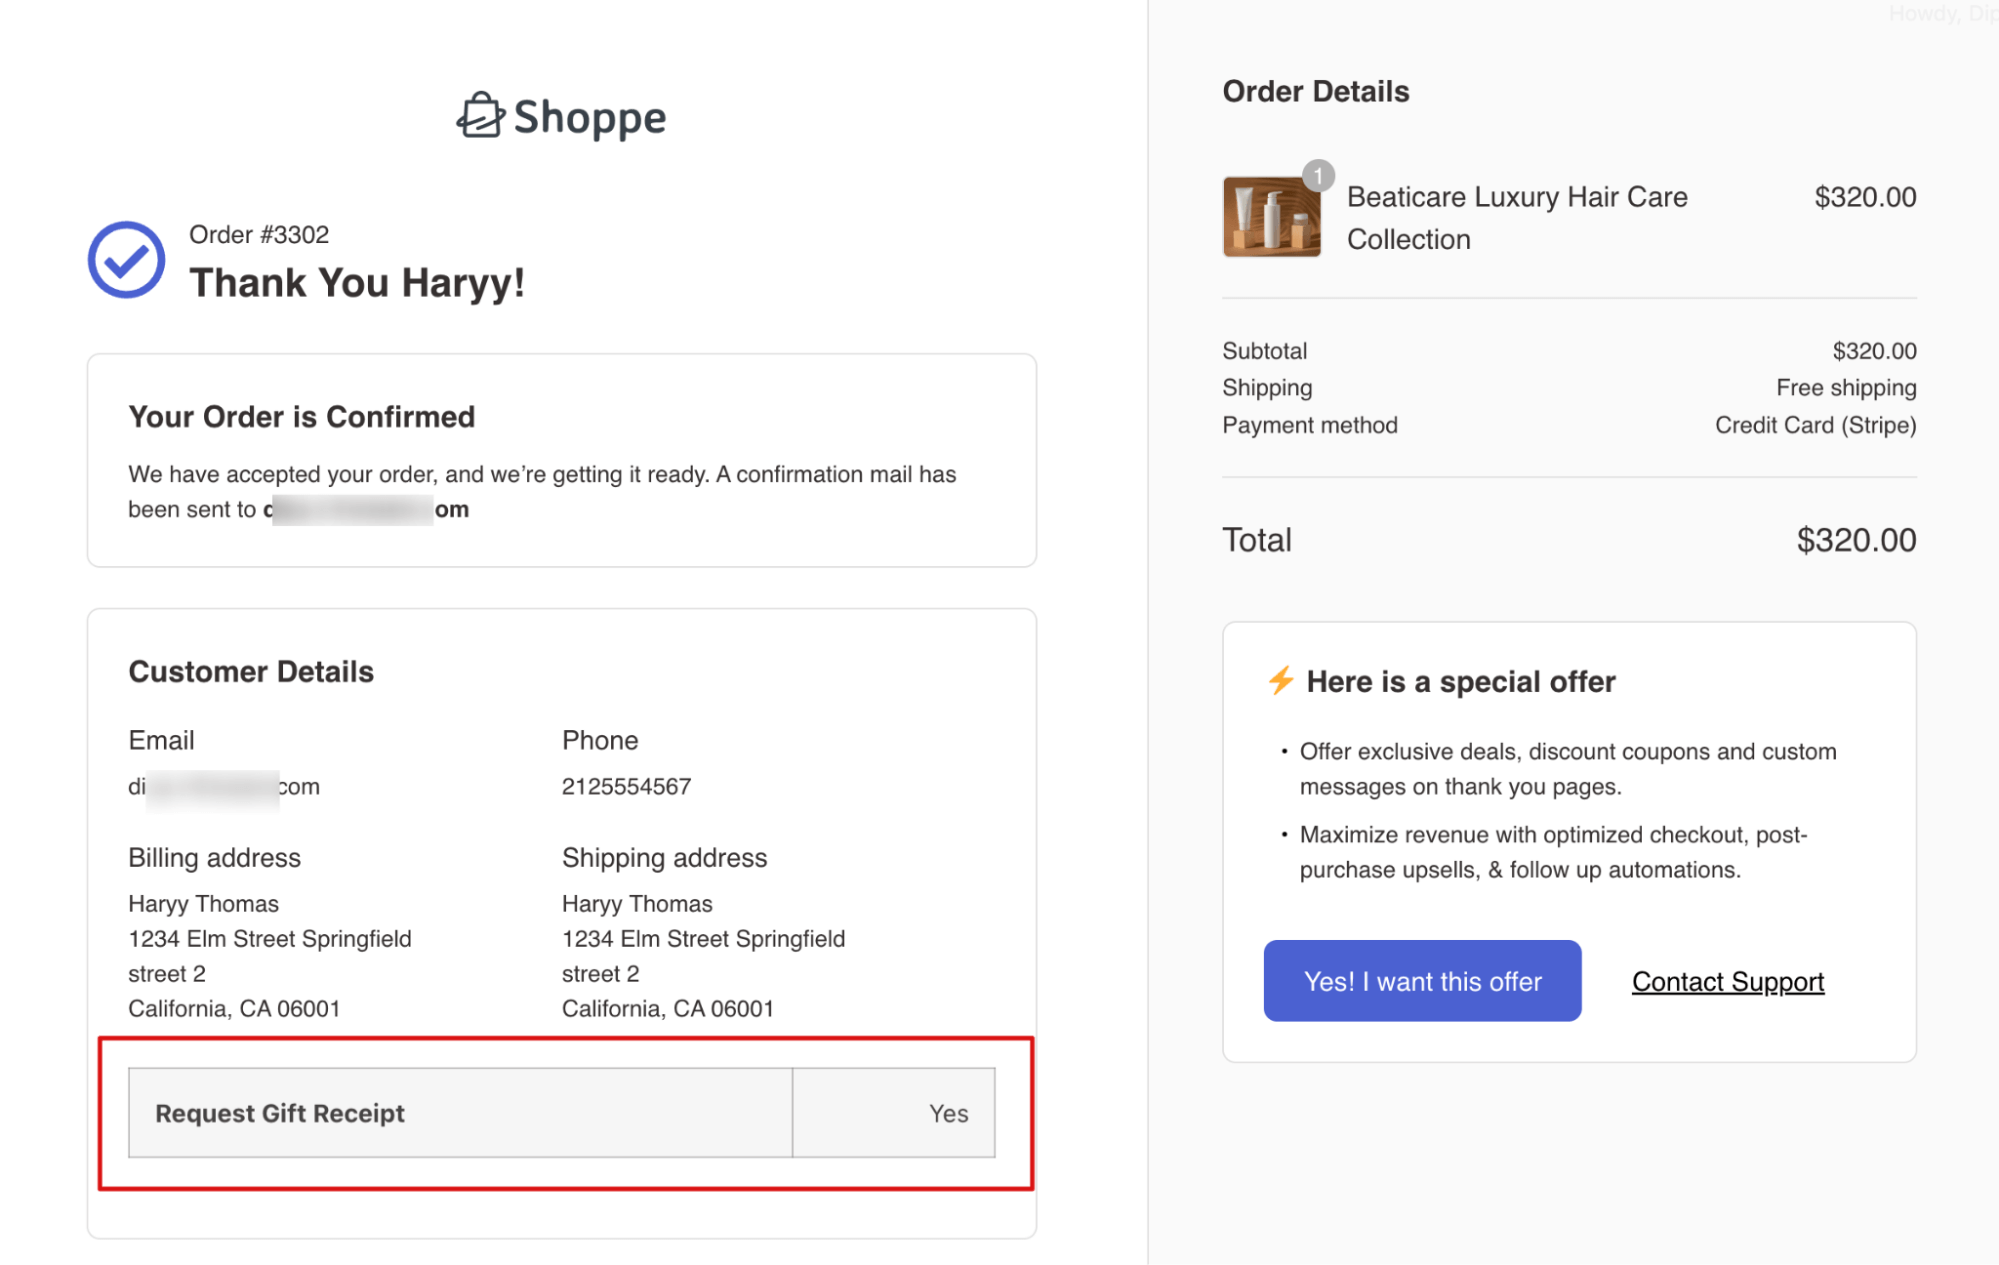
Depending on the value you choose, the checkbox should either be checked or unchecked.
Depending on your setup, the checkbox field should also be available on the thank-you page.
Here is how to easily add a checkbox field to the WooCommerce checkout page.
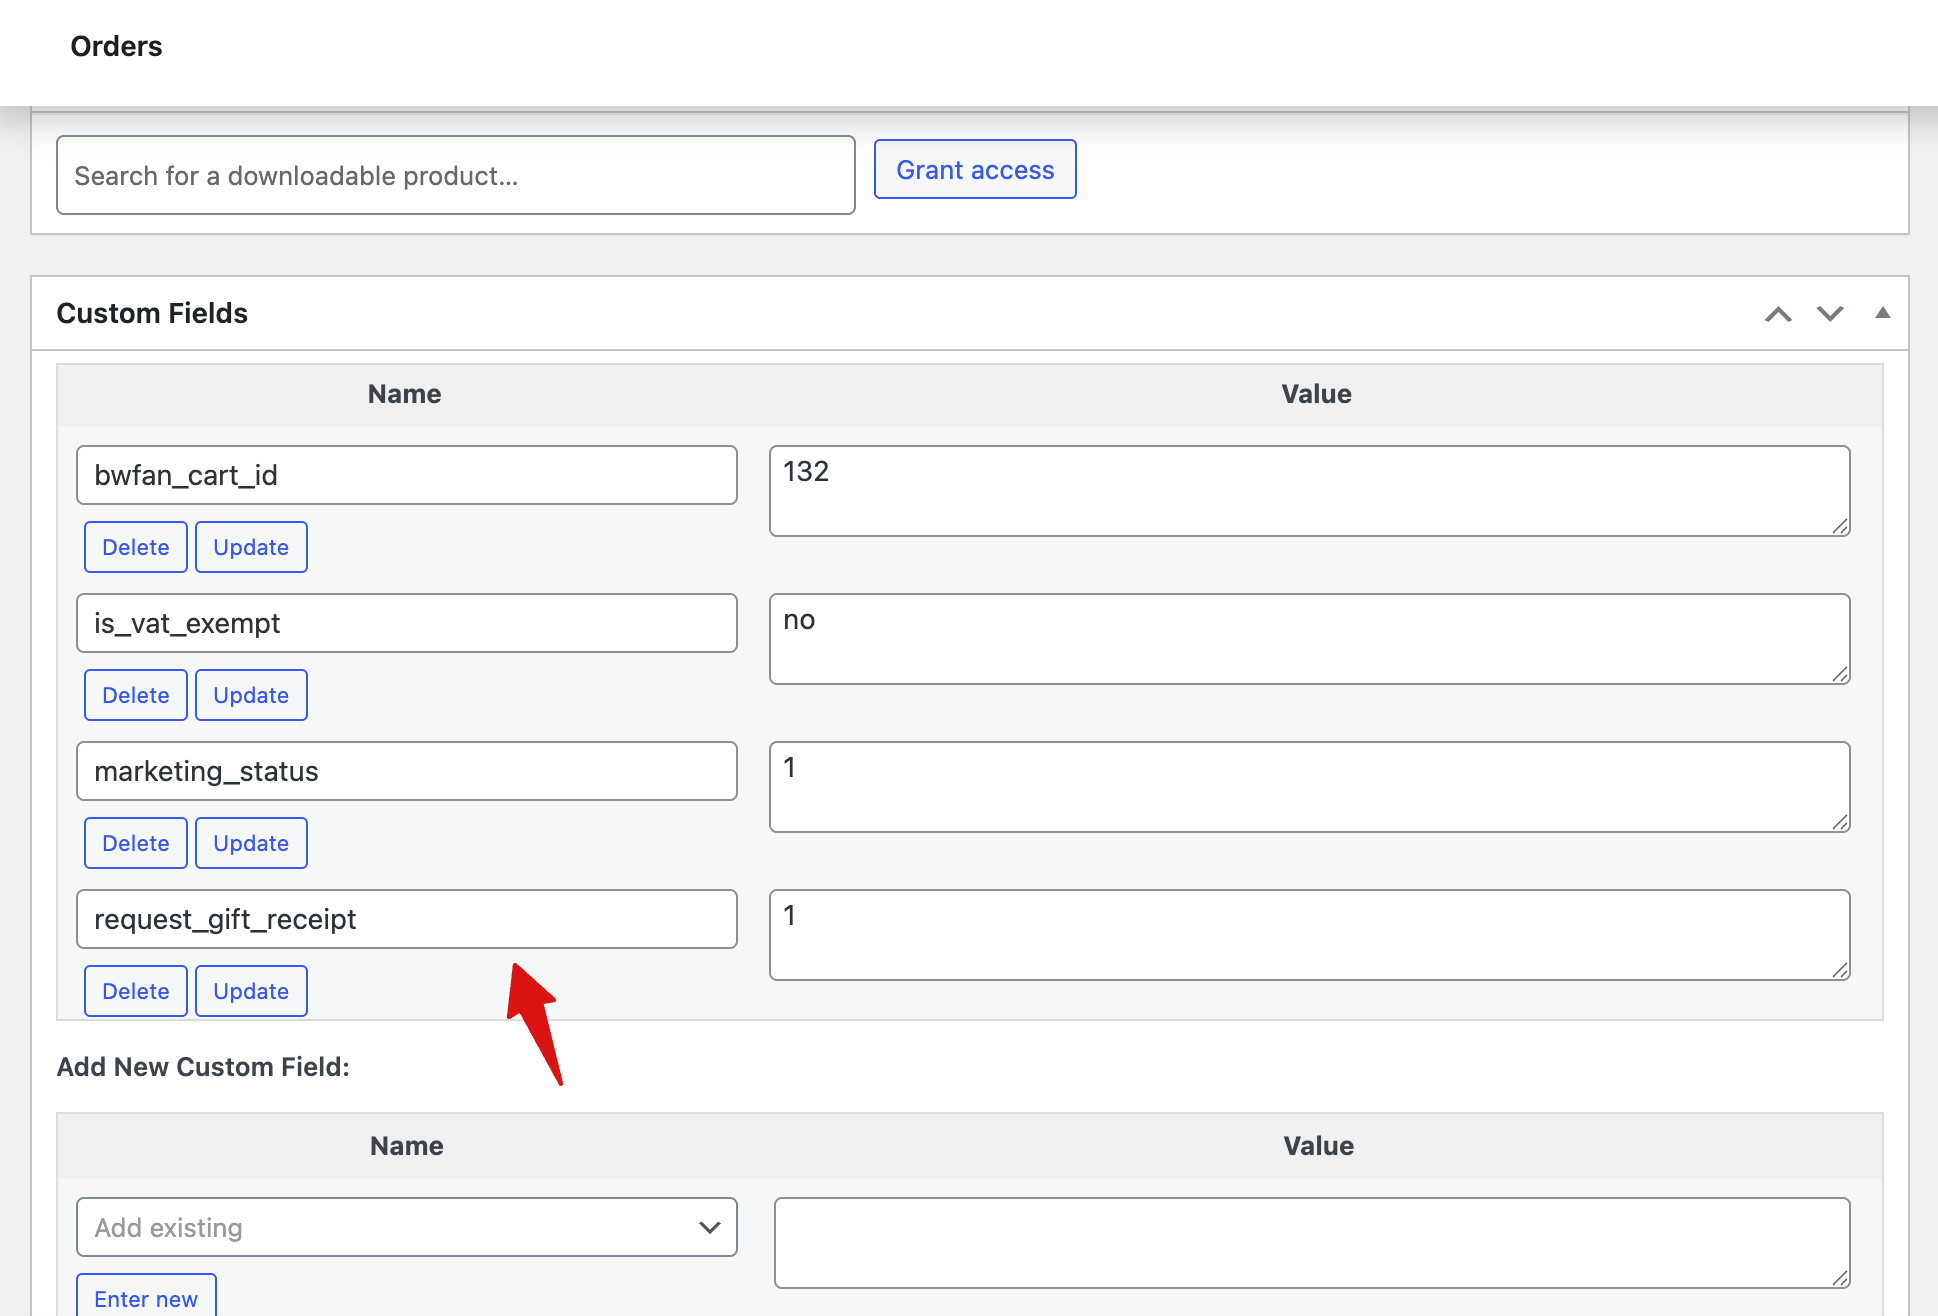
You can also find the custom field on the order details page (WP Admin) under the Custom field section.
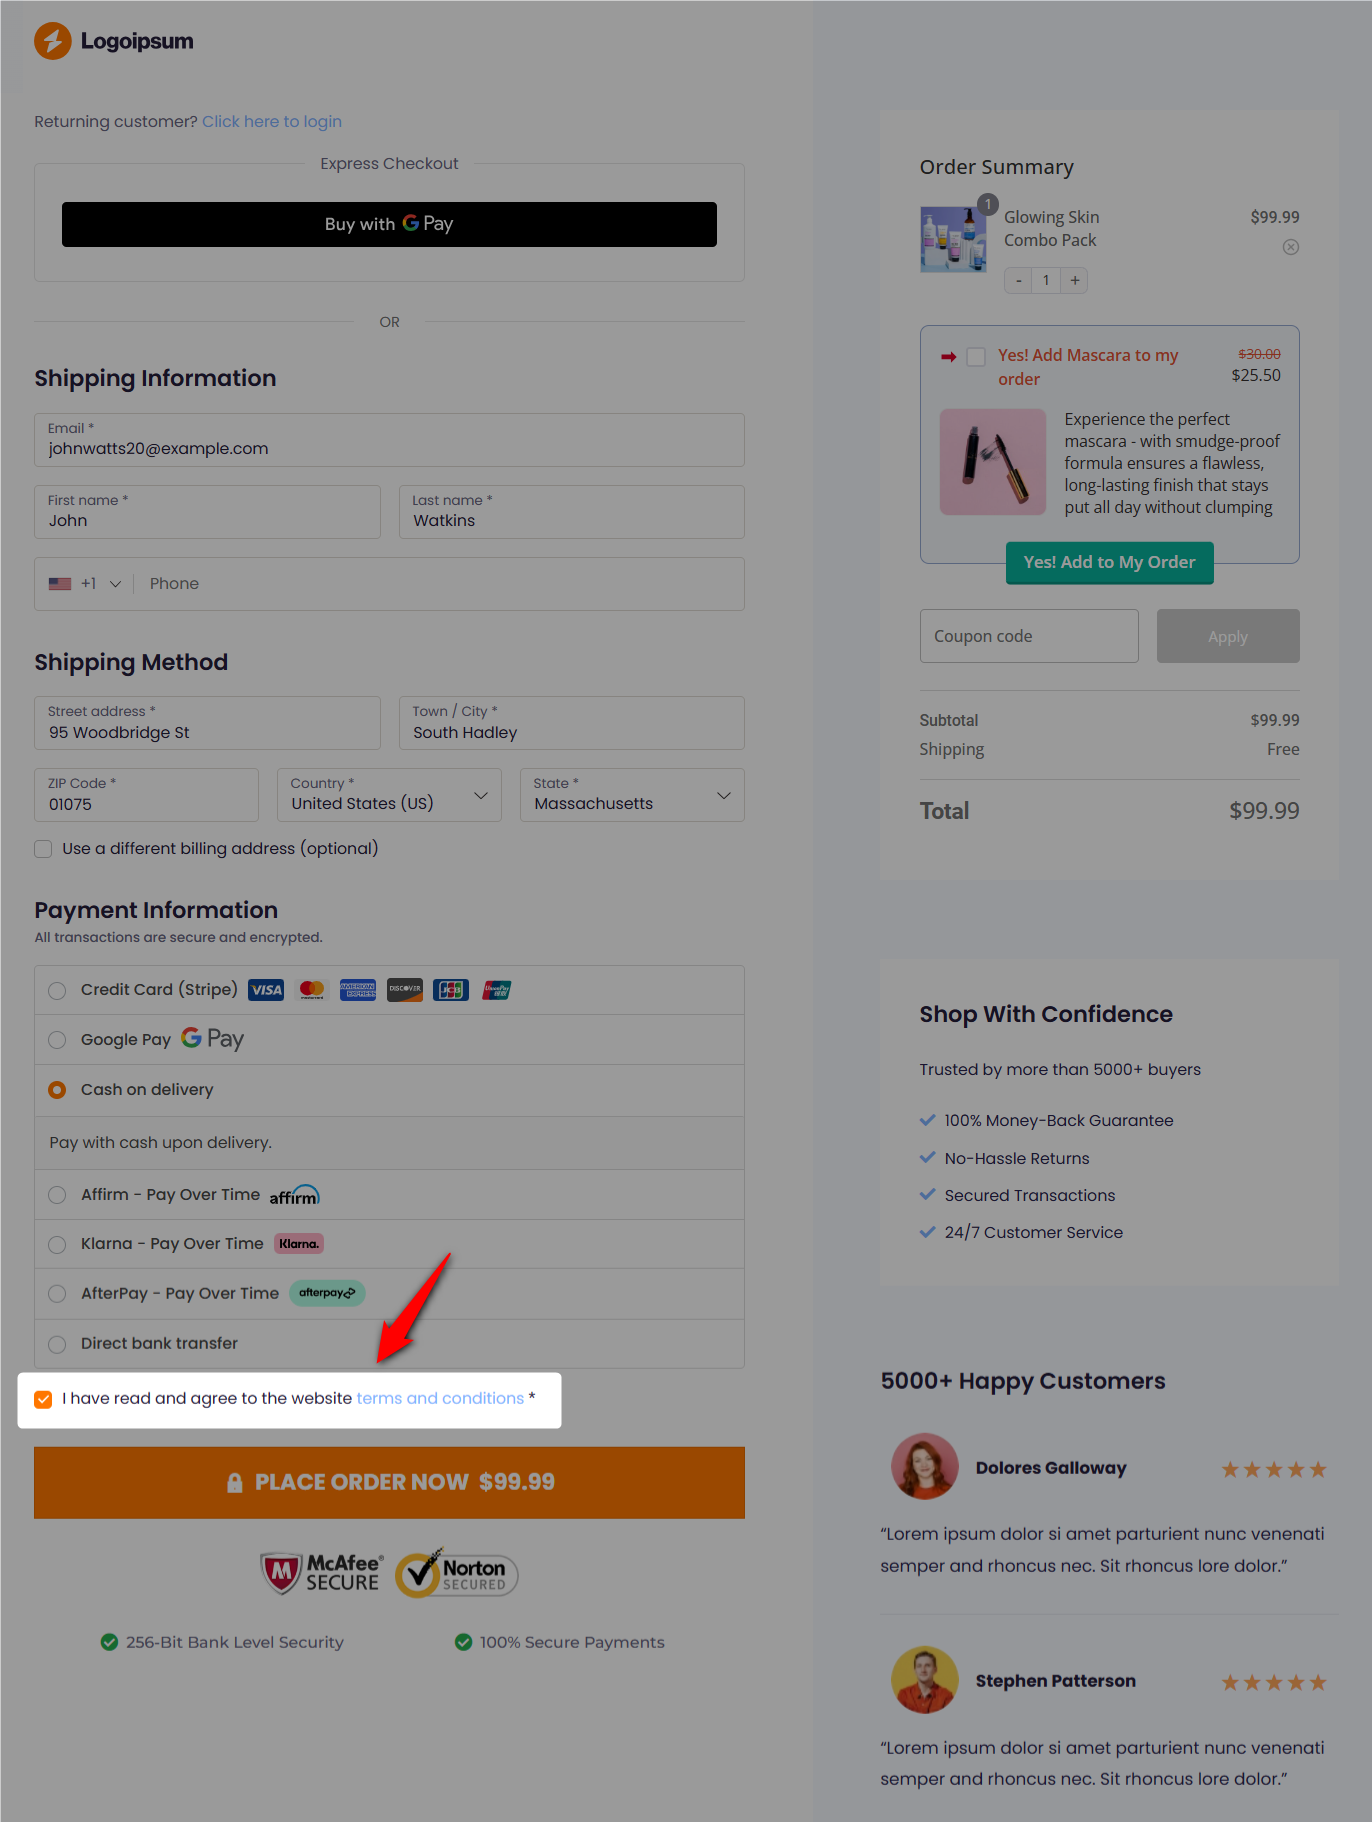
Method 2: How to Add a Checkbox to WooCommerce Checkout With Custom Code
The following code adds a single checkbox to your WooCommerce checkout page, positioned just before the order notes section.
It also saves the checkbox value to the order so you can reference it in the admin panel and order emails.
We are using the same example as used in the method 1.
// Add "Request Gift Receipt" checkbox to checkout
add_action( 'woocommerce_before_order_notes', 'add_request_gift_receipt_checkbox' );
function add_request_gift_receipt_checkbox() {
    woocommerce_form_field( 'request_gift_receipt', array(
        'type'        => 'checkbox',
        'class'       => array( 'form-row-wide' ),
        'label'       => __( 'Request Gift Receipt', 'woocommerce' ),
        'required'    => false,
    ) );
}

// Save "Request Gift Receipt" value to order meta
add_action( 'woocommerce_checkout_update_order_meta', 'save_request_gift_receipt_checkbox' );
function save_request_gift_receipt_checkbox( $order_id ) {
    if ( isset( $_POST['request_gift_receipt'] ) ) {
        update_post_meta( $order_id, '_request_gift_receipt', 'yes' );
    } else {
        update_post_meta( $order_id, '_request_gift_receipt', 'no' );
    }
}

// Display "Request Gift Receipt" value in admin order details
add_action( 'woocommerce_admin_order_meta', 'display_request_gift_receipt_checkbox' );
function display_request_gift_receipt_checkbox( $post ) {
    $value = get_post_meta( $post->ID, '_request_gift_receipt', true );
    echo '<p><strong>' . __( 'Gift Receipt Requested:', 'woocommerce' ) . '</strong> ' . ( $value === 'yes' ? 'Yes' : 'No' ) . '</p>';
}
Place this code in your active theme's functions.php file or, better yet, in a custom plugin so updates to your theme do not overwrite it.
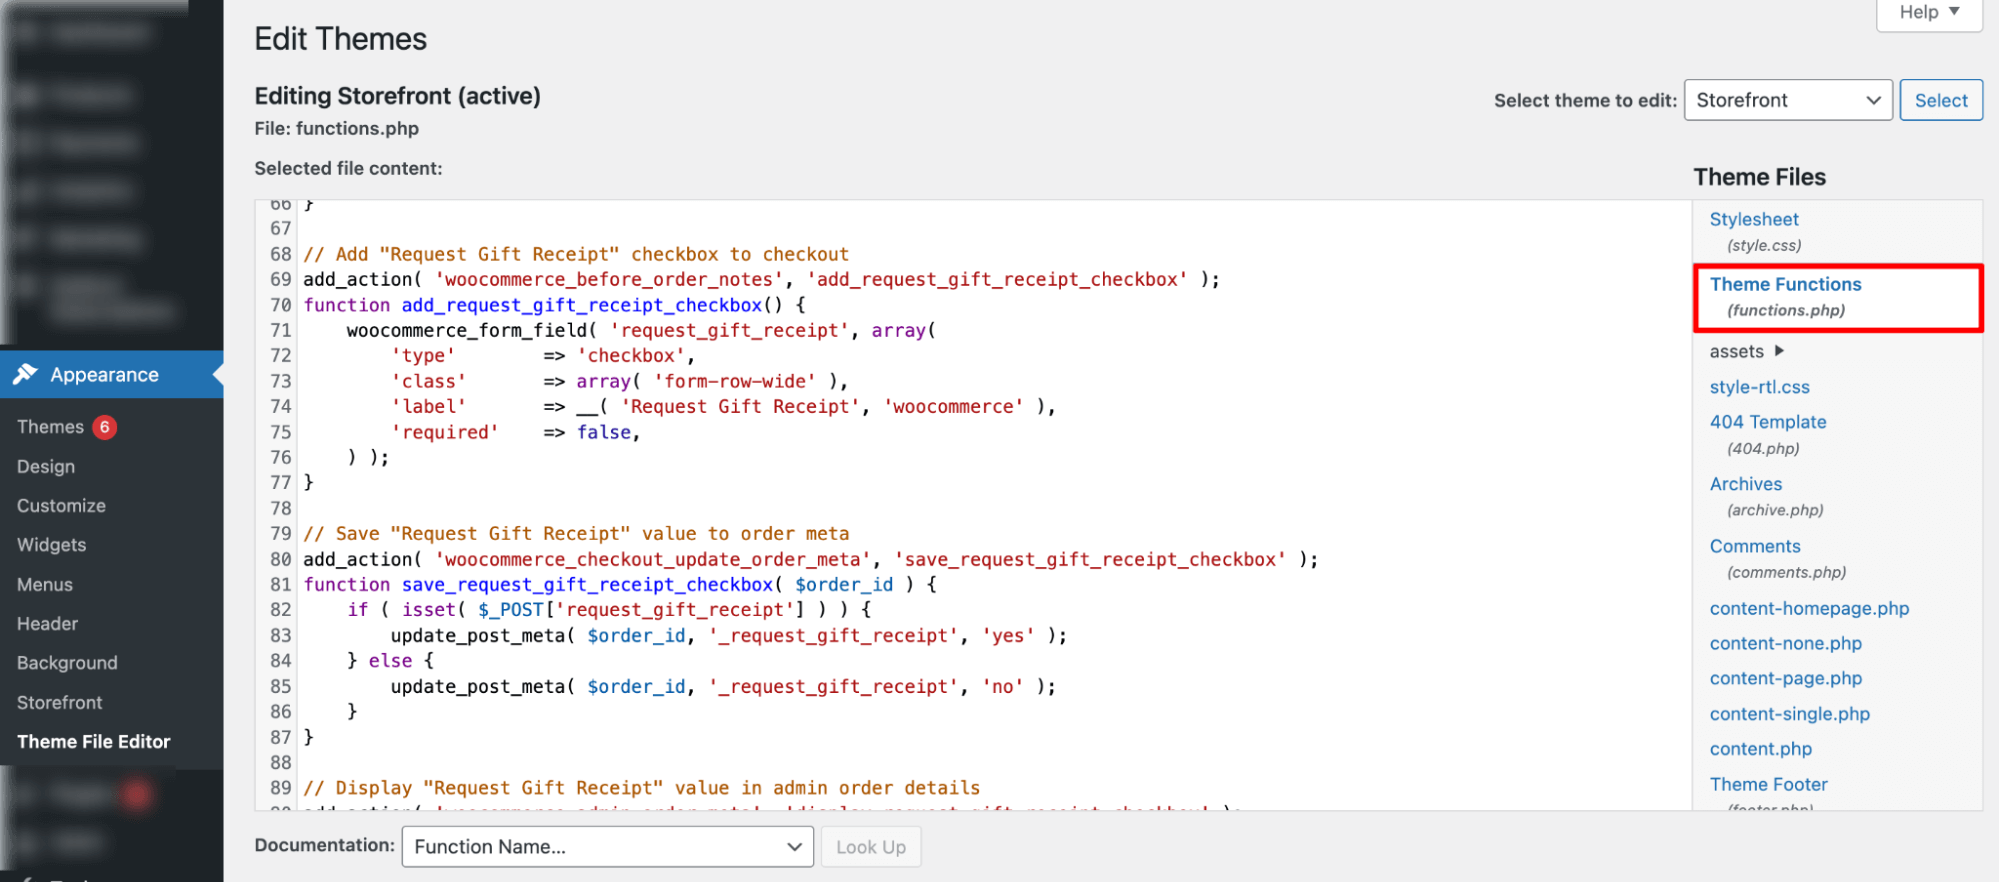
Here is what it looks like (With Storefront theme):
Limitations (Why this method is not recommended)
- No visual editor. Positioning, labels, and styling all require code changes
- Connecting to an email tool like Mailchimp or Klaviyo requires additional custom code or a third-party integration
- No conditional logic. The checkbox always appears regardless of the cart contents
- Custom CSS changes may break when your theme is updated
5 Practical Use Cases Of Adding a Checkbox To WooCommerce Checkout
1. Terms and Conditions
Adding a terms and conditions checkbox at checkout is a simple but powerful way to protect your store. It ensures customers explicitly agree to your policies, reduces disputes and chargebacks, and sets clear expectations for shipping, returns, warranties, and more.
This small step builds trust, limits liability, and keeps your checkout smooth and transparent. You can easily add a terms and conditions checkbox on both default WooCommerce and FunnelKit checkouts.
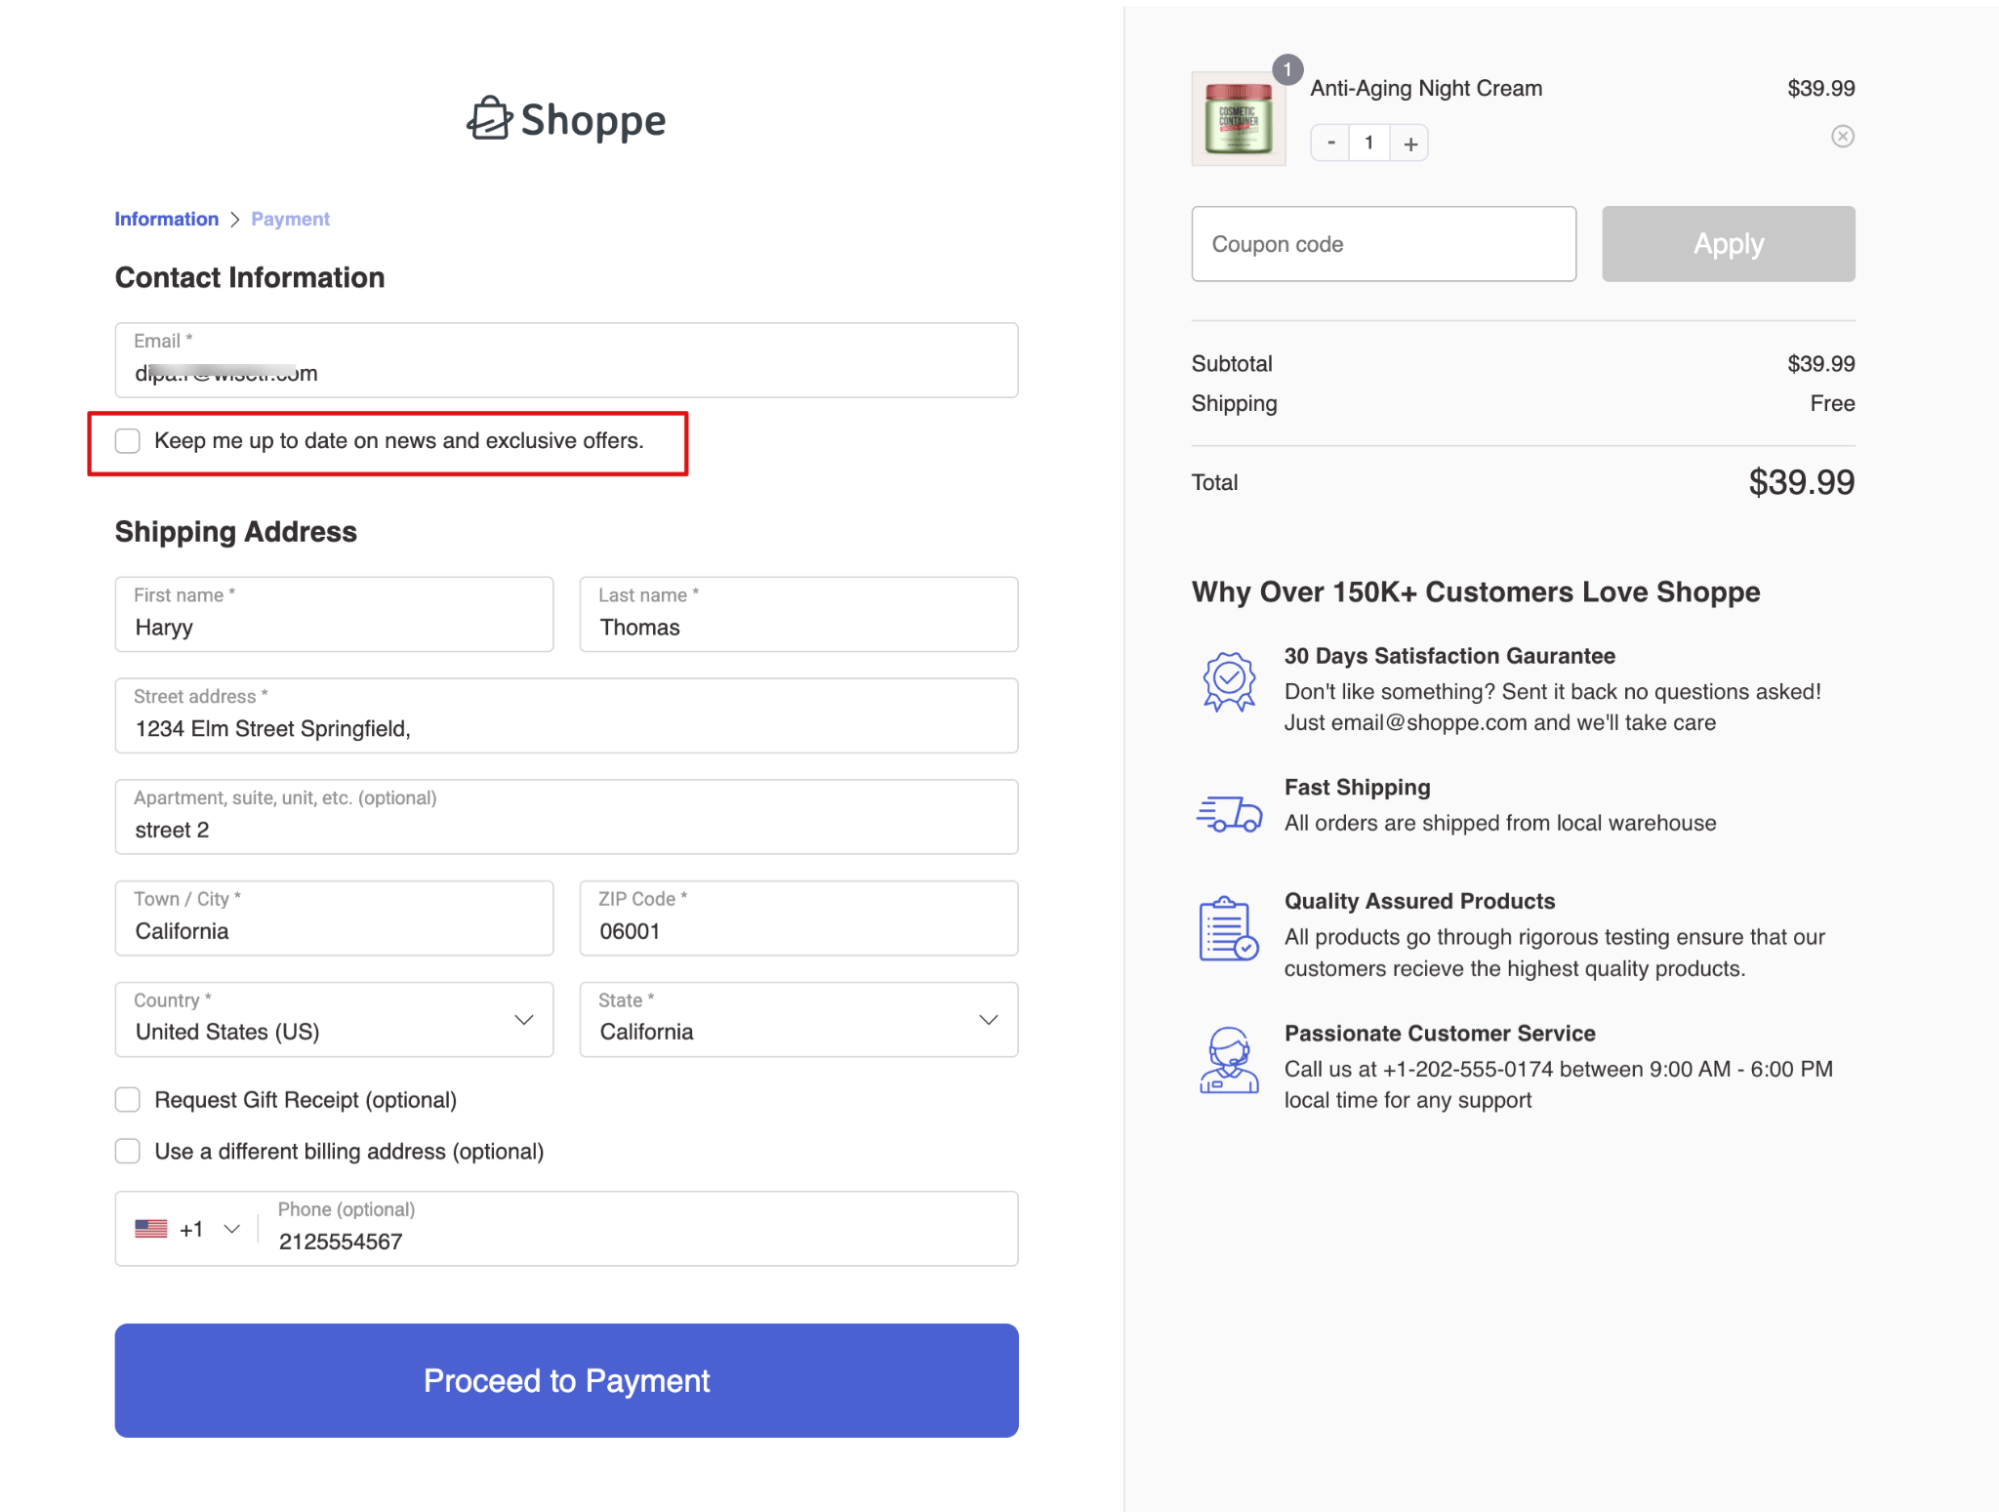
2. Email Marketing Opt-In
Adding an email marketing opt-in checkbox at checkout is an easy way to capture consent without extra effort. It ensures customers explicitly agree to receive emails, meeting GDPR requirements for EU stores.
This small step builds trust and compliance, and you can implement it easily with a plugin like FunnelKit Automations.
3. Age or Content Verification
Some products require customers to confirm that they are of a certain age or understand specific terms. A required checkbox at checkout handles this cleanly. This is common for alcohol, supplements, firearms accessories, and products with age restrictions.
4. Warranty or Insurance Add-On
For higher-value products, a checkbox offering an optional warranty or purchase protection plan is a low-friction way to increase order value. Customers see the option at the exact moment they are committing to buy, making it more likely they will say yes.
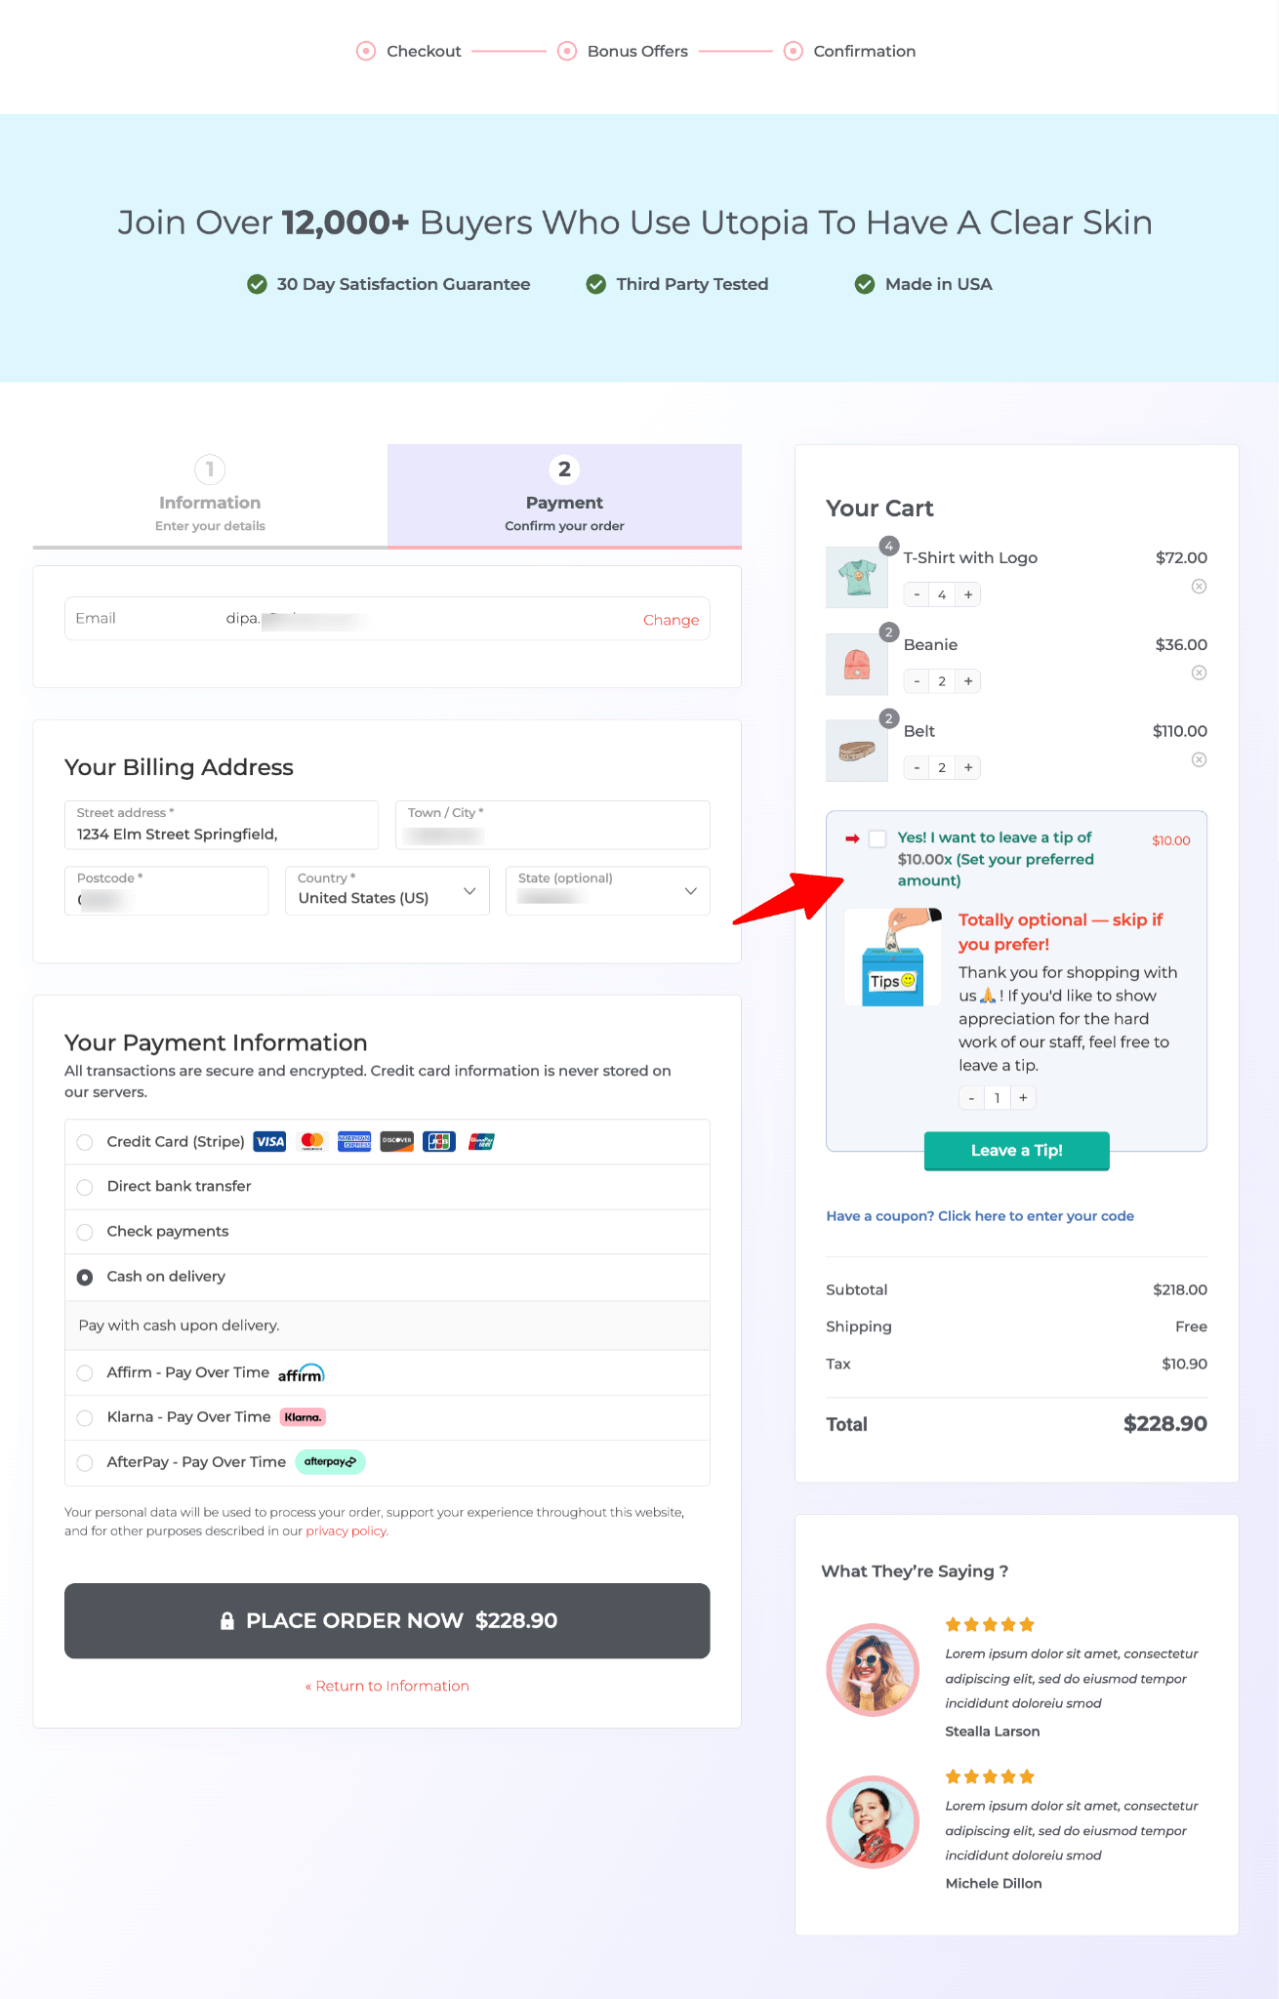
5. Tip option in the checkbox
Adding a tip option at checkout is a simple way to let customers leave a base amount or adjust it as they wish. It can boost average order value while keeping checkout smooth and optional.
With FunnelKit Funnel Builder, you can add a tip as an order bump, customize its content and pricing, and target specific orders, making your WooCommerce checkout more flexible and conversion-friendly.
5 Best Practices For Adding a CheckBox To WooCommerce Checkout
- Never pre-check consent checkboxes. Users must actively opt in.
- Keep labels short, clear, and easy to understand. This helps users make an informed decision.
- Limit the number of checkboxes to avoid overload. Only include what is truly necessary.
- Test on all devices to ensure checkboxes are visible and easy to tap.
- Provide easy access to relevant policies or information linked to each checkbox.
Frequently Asked Questions About WooCommerce Checkout Checkbox Field
Have a look at the most common questions with answers:
How can I make a checkbox required in WooCommerce checkout and show an error if unchecked?
With Method 1, you can make the checkbox field required in FunnelKit Funnel Builder, and it will automatically validate it and show an error message if left unchecked.
For method 2, you can use this custom code.
add_action( 'woocommerce_checkout_process', 'validate_request_gift_receipt_checkbox' );
function validate_request_gift_receipt_checkbox() {
    if ( ! isset( $_POST['request_gift_receipt'] ) ) {
        wc_add_notice( __( 'You must request a gift receipt to proceed with the order.', 'woocommerce' ), 'error' );
    }
}
Can I add a conditional checkbox to Checkout?
Yes! With FunnelKit Checkout, you can add a conditional checkbox that, when selected, reveals additional fully customizable and optional content based on your needs.
Can I add multiple checkboxes to the same checkout page?
Yes, but keep it minimal. One to three checkboxes work best, as each extra one can slow down checkout. Consider a dropdown or combined checkbox for multiple options.
Will a custom checkbox work on mobile devices?
Yes, checkboxes are natively supported on all mobile browsers and do not require any special handling. However, you should always test your specific implementation on iOS and Android before publishing.
Does adding a checkbox affect my checkout conversion rate?
A single optional checkbox can boost conversions by personalizing the checkout process, but multiple or required checkboxes increase risk and should be used only when legally necessary.
Is a checkbox required for GDPR compliance?
GDPR requires explicit consent before emailing EU customers, typically collected via an unchecked opt-in checkbox at checkout. It must not be pre-checked or mandatory, making it a simple, auditable method for ecommerce stores.
What happens if a customer does not check the opt-in box?
Nothing happens, and that’s correct. The order processes normally, but the customer isn’t added to your marketing list. This complies with GDPR and builds trust by respecting their choice.
How do I style the checkbox to match my store's theme?
With FunnelKit, your checkbox automatically inherits the style of the checkout template. You can further customize its appearance using the checkout fields settings. If you’re using custom code, styling changes will need to be added manually via CSS.
Are there any alternative plugins to FunnelKit for adding checkboxes to WooCommerce checkout?
While FunnelKit is a great option for adding custom checkboxes to WooCommerce checkout, there are several other plugins you can consider:
- YITH WooCommerce Checkout Manager – A feature-rich plugin for adding custom fields, including checkboxes, to your checkout page.
- ThemeHigh Checkout Field Editor – Allows you to easily add, edit, and manage custom checkout fields, including checkboxes.
- Booster for WooCommerce – Offers multiple customizations, including adding checkboxes and other fields to your checkout.
- Flexible Checkout Fields – A flexible plugin for adding various types of fields, including checkboxes, to your WooCommerce checkout process.
These plugins provide different features and flexibility, so you can choose one based on your specific requirements.
Add a Checkbox to WooCommerce Checkout and Collect Information Seamlessly!
Adding a checkbox to your WooCommerce checkout is one of the simplest ways to collect consent, capture preferences, or offer an upsell without adding a new step to the buying process.
If you want a no-code solution with built-in integrations, FunnelKit Funnel Builder is the fastest option.
If you prefer full control, the PHP snippet in Method 2 does the job, but it’s not recommended.
Either way, keep it simple, one or two checkboxes, clear labels, and a purpose that actually matters to your customer.
For a code-free solution to adding a checkbox to checkout, get FunnelKit Funnel Builder today.
More WooCommerce Resources
- How to Add a Date Picker Field to the WooCommerce Checkout Page
- How to Add a Dropdown to WooCommerce Checkout
- How to Collect the Date of Birth From the Customer at Checkout
- Show Different Checkout Pages with Custom Fields for Virtual and Non-Virtual products
- How to Add a Conditional Field Using a Radio Field in Checkout
Editorial Team
April 6, 2026Almost every store owner needs to export WooCOmmerce orders sooner or later. Maybe you need to send order data to your accountant, move records to a new site, or pull...

Editorial Team
April 6, 2026Want to turn one-time buyers into customers who keep coming back using WooCommerce? Then you need to find a WooCommerce subscription plugin. These plugins will help you automate billing, manage...

Editorial Team
March 30, 2026Discover how to boost sales and customer loyalty with three smart ways to offer free gifts in your WooCommerce store. Want to boost WooCommerce sales and delight your customers? Offer...


