


Add a date field to WooCommerce checkout, and your store can finally ask what every bakery counter asks first: "When do you need this?"
Your store has the same gap the moment timing matters to the order because WooCommerce ships no date field, no setting to switch one on, and no field type to pick in the checkout form.
The default checkout works; it just leaves revenue on the table wherever the date is part of the product.
There is a second problem most guides skip. WooCommerce now runs two different checkouts, and the method that works on one does nothing at all on the other.
In this guide, we will set one up the no-code way with a plugin, then with code on both the block and the classic checkout.
We will also cover restricting which dates customers can pick, getting the value into your order emails, and what to check when the field refuses to show or save.
Let's dive in.
Table of Contents
- 1 What Is a Checkout Date Field?
- 2 What Kind of Date Field Do You Need?
- 3 Method 1: Add a Date Field to WooCommerce Checkout Without Code
- 4 Method-2: Add a Date Field to the Block Checkout With Code
- 5 Method 3: Add a Date Field to the Classic Checkout With Code
- 6 Best WooCommerce Delivery Date Plugins Compared
- 7 5 Tips to Optimize Your Date Picker for a Better Checkout Experience
- 8 Frequently Asked Questions
- 9 Ready to Stop Guessing When Your Orders Are Due?
What Is a Checkout Date Field?
A checkout date field is a calendar input on your checkout form that saves the customer's chosen date to the order.
Merchants call it a delivery date picker, a collection date, or a booking date depending on the job it does.
However, the mechanics are the same. The customer picks a day, and that day travels with the order into your admin, your packing slips, and your emails.
Customers expect it.
Sendcloud’s eCommerce Delivery Compass 2026, a survey of 8,000 shoppers across eight European markets, found 76% of consumers prefer stores that show a specific delivery date at checkout.
The default WooCommerce checkout gives them nowhere to express that, which is the gap this whole post closes.
Block checkout or classic checkout? Check before you build:
Before you install anything or paste any code, find out which checkout your store runs. This is the single most common reason a new checkout field never appears.
Open Pages ⇨ Checkout and edit the page.
- A Checkout block in the editor means you are on the block checkout. WooCommerce ships this by default on new stores.
- The [woocommerce_checkout] shortcode means you are on the classic checkout.
- If a checkout plugin has replaced the page entirely, you are on a custom checkout and you manage fields inside that plugin.
Here is what works where:
| Your checkout | What adds a date field |
|---|---|
| Block checkout | A field editor plugin with block support, or the block fields API in Method 2 |
| Classic checkout | Most field editor plugins, or the classic hooks in Method 3 |
| Custom checkout page | The plugin’s own field editor, plus a third-party field slot for outside plugins |
The block checkout’s native fields API currently supports three field types: text, select, and checkbox.
There is no date type yet, and an open enhancement request on the WooCommerce repository is tracking it.
That is why a plugin is the shorter road on block checkout, and why the code method there looks different from what you may have seen elsewhere.
What Kind of Date Field Do You Need?
The date field covers four jobs that store the value in different places.
Getting this wrong is why some fields work fine and others produce useless data.
1. Collect a preferred delivery date
The most common use, and what most delivery date plugins are built for.
Bakeries, florists, and meal prep stores run on this field.
2. Offer a pickup or collection date
Local pickup needs a date and usually a time window so staff knows when to have the order boxed and waiting.
The field only makes sense once the customer has chosen pickup, which makes conditional display important here.
3. Capture a booking or appointment date
Services, photography sessions, salons, and equipment hire need a start date before the order is actionable.
If availability is capped per day, a booking plugin will serve you better than a plain checkout field.
4. Set a rental or event start date
Party supplies, tools, and venue bookings need the date the item is needed, not the date it ships.
These usually need a second field for the return date.
5. Collect a date of birth for age gates or birthday offers
A date of birth belongs to the customer rather than the order, so store it against their account instead of as order meta.
If you're collecting a birth date to send coupons later, see our guide to automated birthday emails in WooCommerce.
Method 1: Add a Date Field to WooCommerce Checkout Without Code
For most stores a dedicated plugin is the fastest and safest route. It handles the calendar, the lead time rules, the blocked dates, and the email output without you writing a line.
We will use Order Delivery Date and Time by ThemeHigh here. It is free, it covers both delivery and local pickup, and it puts the date into the order and the emails on its own.
Throughout this walkthrough, we will build for one running example for a physical product that asks users to input a delivery date.
Every setting below maps to a real constraint that a delivery store has.
Step 1: Turn the date field on and label it properly
Navigate to WooCommerce ⇨ Date and Time Scheduler and enable it on the WooCommerce checkout page.
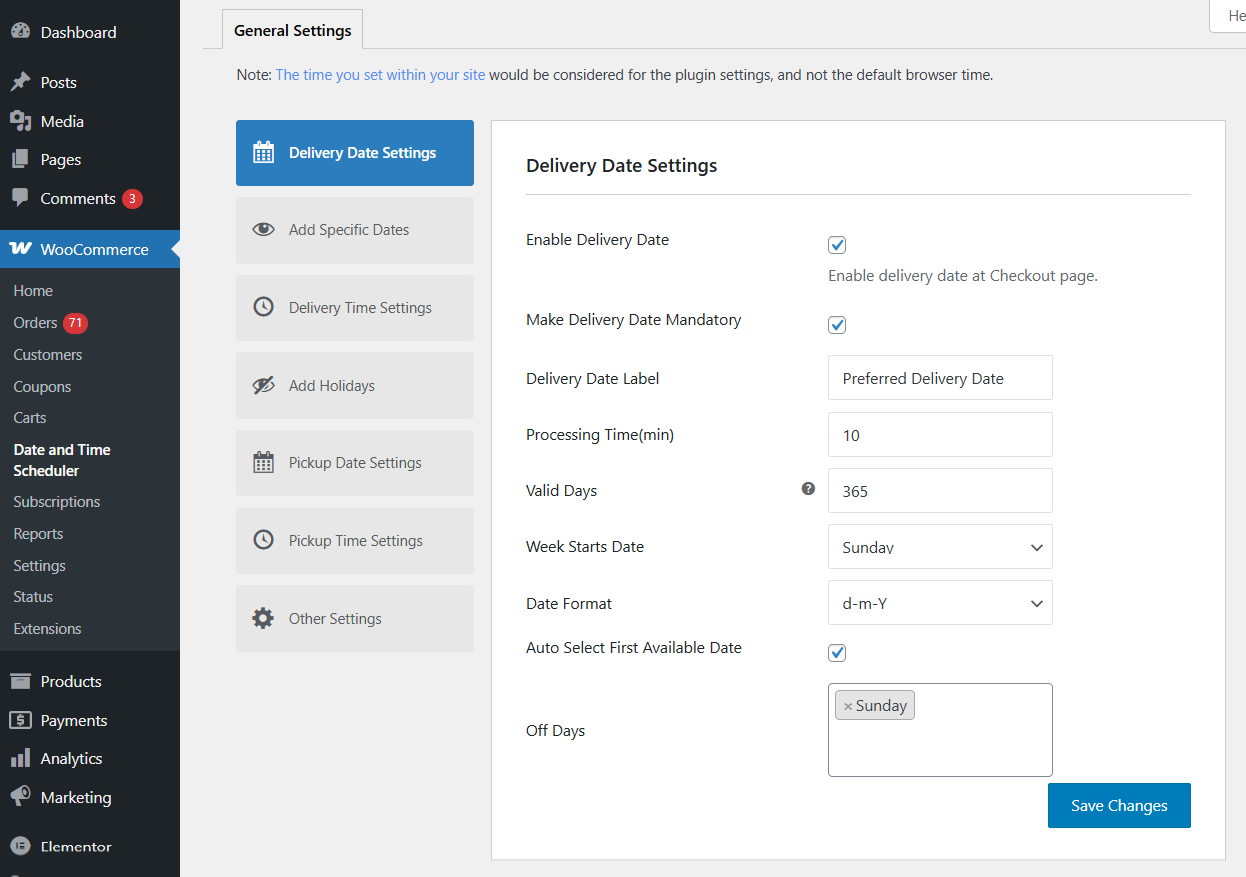
Configure the additional options based on your delivery workflow:
- Make delivery date mandatory: Prevents customers from placing an order without selecting a date.
- Delivery date label: Customize the field label shown to customers (for example, Preferred Delivery Date).
- Processing time (min): Set the minimum number of days required to prepare an order.
- Valid days: Select the weekdays when delivery is available.
- Week starts on: Choose the first day of the week (Sunday or Monday).
- Date format: Define how the date appears (for example, Y-m-d).
- Auto-select first available date: Automatically preselect the earliest valid delivery date.
- Off days: Disable specific weekdays such as Sundays or non-working days.
Click on ‘Save Changes’ when done.
Once saved, the date picker will appear in the WooCommerce checkout, allowing customers to select a valid delivery date before placing their order.
Step 2: Set your processing time and available days
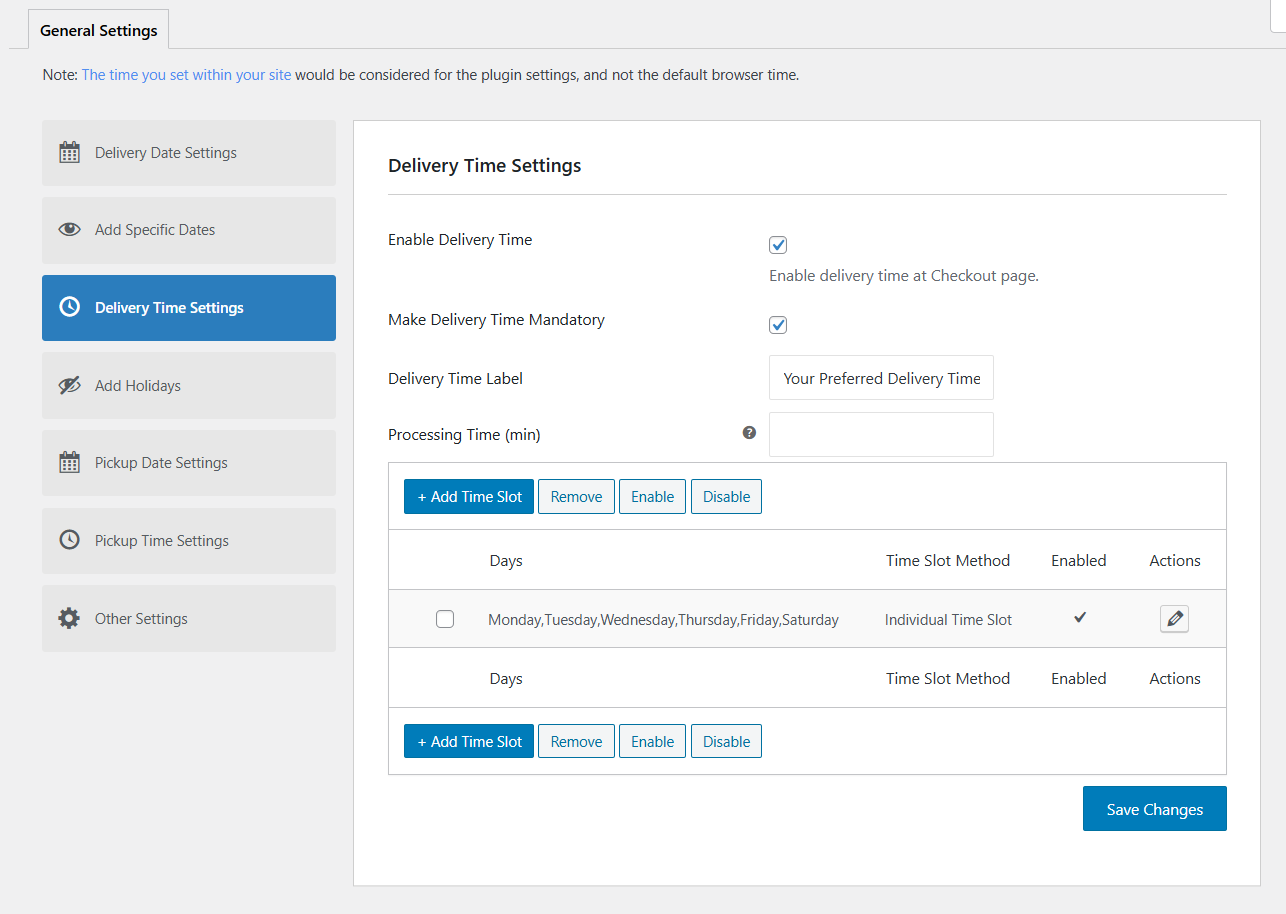
Next, configure delivery time options so customers can choose a preferred time slot during checkout.
- Enable delivery time: Displays the delivery time selector at checkout.
- Make delivery time mandatory: Requires customers to select a time slot before placing the order.
- Delivery time label: Customize the field label displayed at checkout (e.g., Preferred Delivery Time).
- Processing time (min): Set the minimum time required to prepare an order before delivery.
Step 3: Add your collection time slots
Below the main settings, click on the ‘+ Add Time Slot’ button to define when deliveries are available.
- Enable delivery time: Activates this specific delivery time slot.
- Time slot type: Select Individual Time Slot.
- Time slot for: Choose Week Days.
- Select delivery weekdays: Pick the days when this time slot applies (for example, Monday to Saturday).
- Time from - to: Set the delivery window (example, 09:00 AM - 12:00 PM)
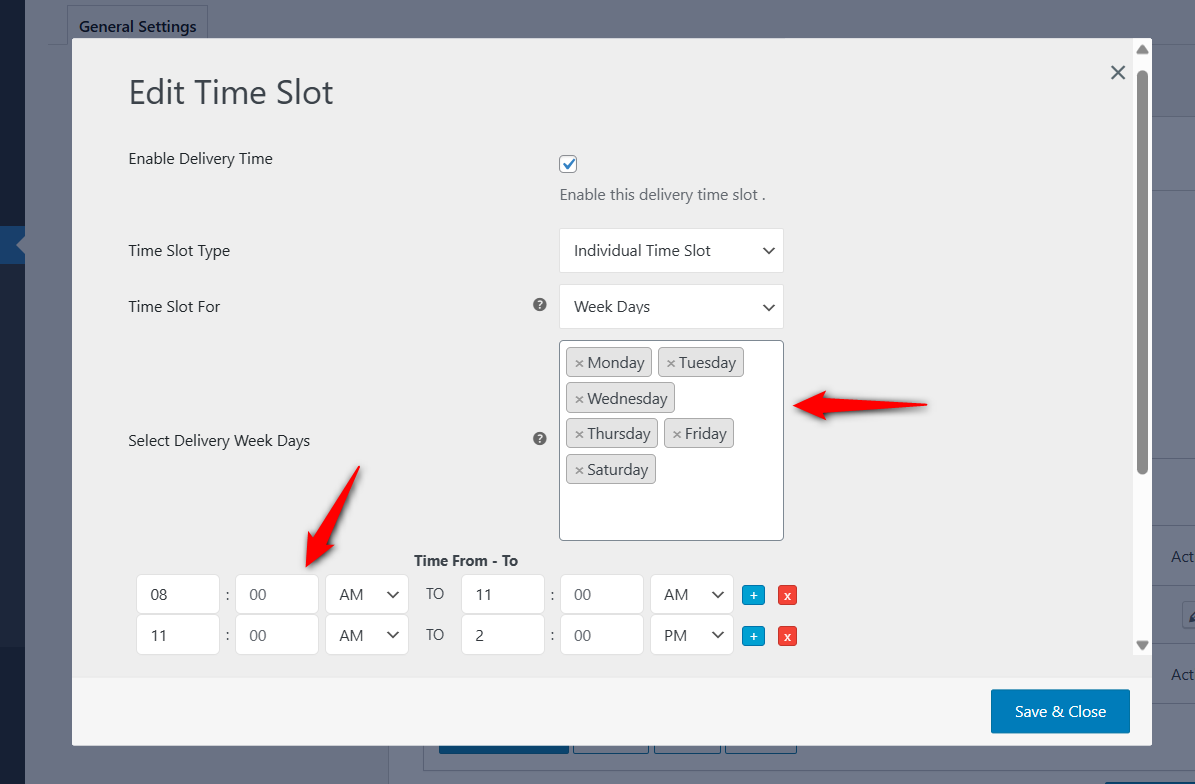
Once saved, this time slot will appear at checkout only for the selected days, ensuring customers choose from valid delivery windows.
This setup ensures customers only see valid delivery times based on your availability, reducing failed deliveries and order-related support requests.
Step 4: Place a test order
Once your date and time settings are saved, visit your WooCommerce checkout page to confirm everything is working correctly.
You’ll see a delivery date picker with valid dates available and a time selector showing the configured slots.
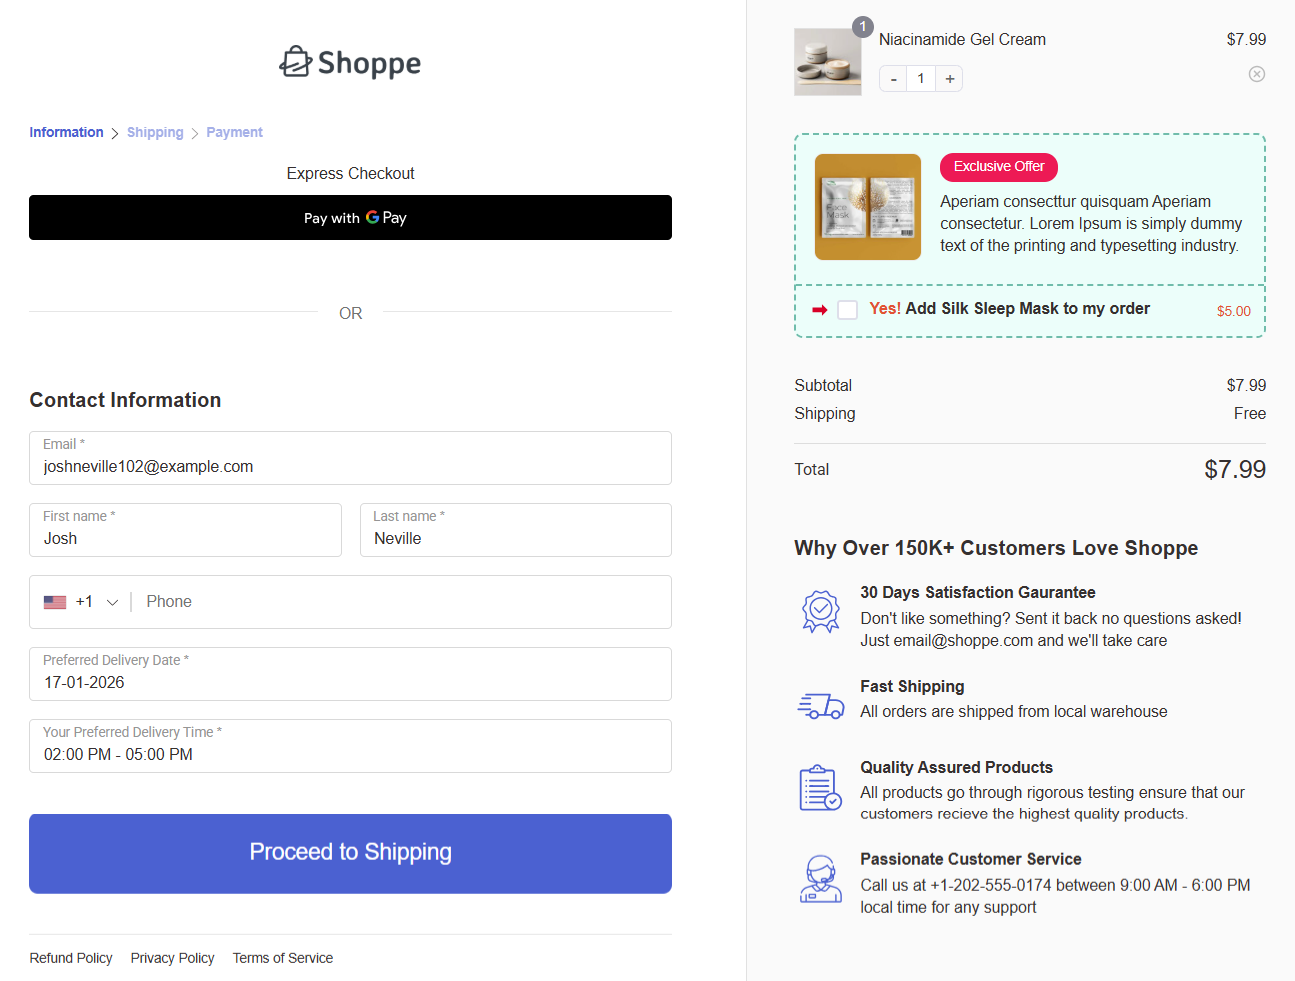
This checkout layout is built using FunnelKit, which helps create clean, conversion-focused checkout pages.
It allows you to customize field placement, optimize the layout for mobile users, and maintain a distraction-free checkout experience, all without writing code.
Place a test order to ensure the selected delivery date and time appear correctly in the order details and admin panel. This final check confirms the setup is ready for customers.
The delivery date and time will be displayed on the thank you page.
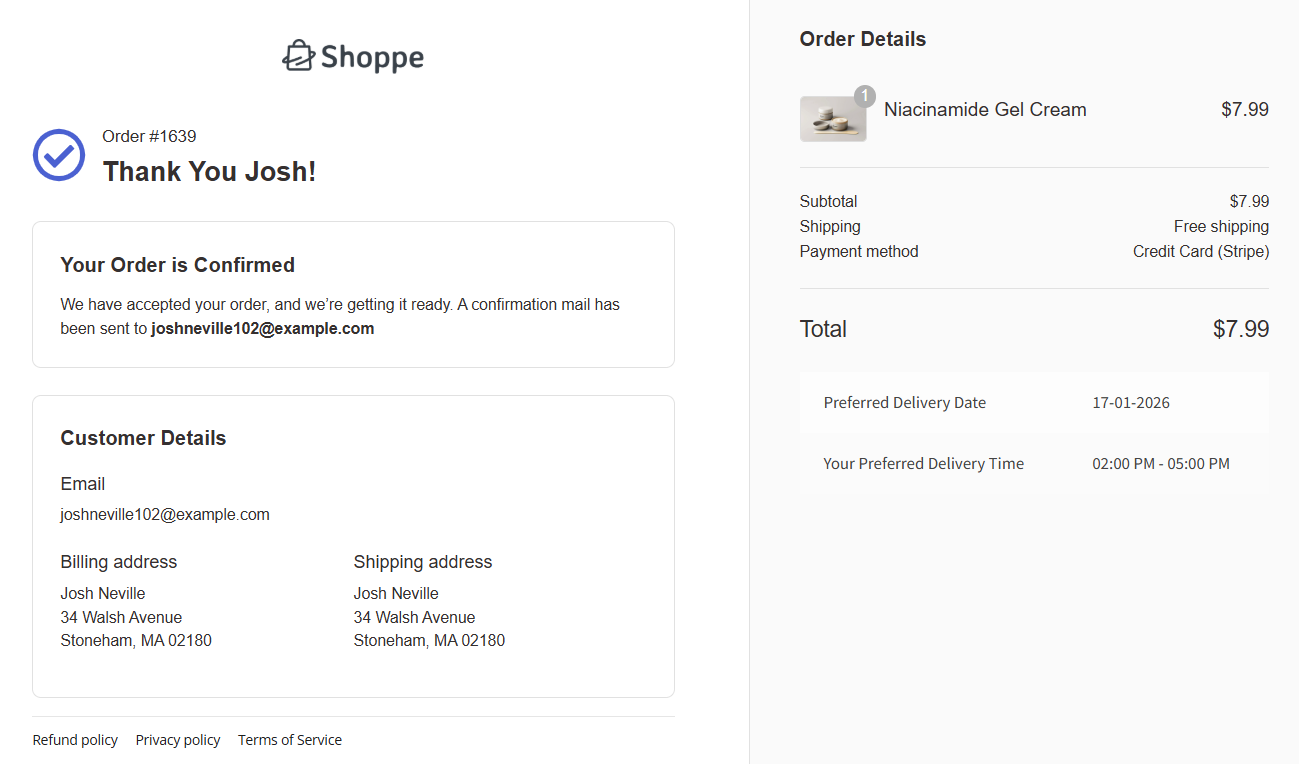
Then place a real test order. Open it in WooCommerce ⇨ Orders and confirm the date is stored against the order.
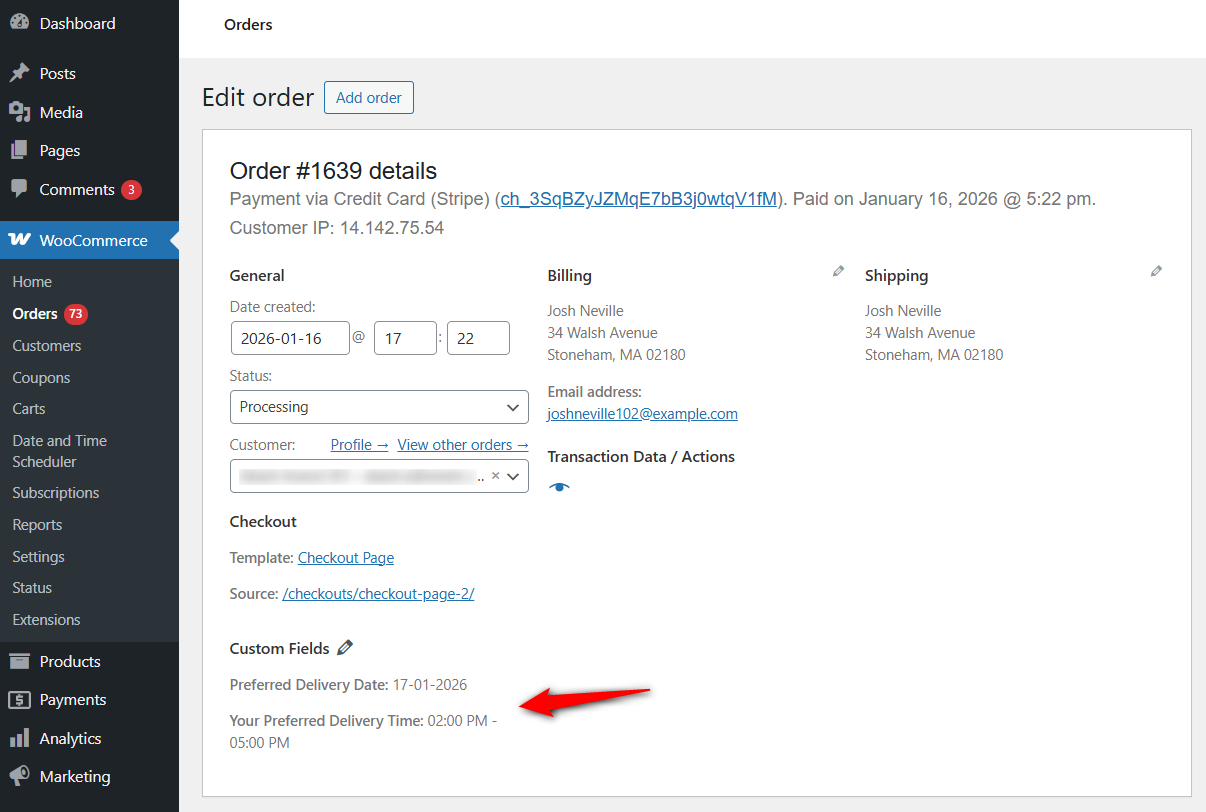
These custom fields ensure that both you and your customer have a clear record of the chosen delivery schedule.
If you want to include delivery date and time fields in emails, you can use FunnelKit Automations to create beautiful emails and add the order data merge tag to bring in these values into your marketing or transactional email.
Run the whole test again on a phone. Mobile carts abandon at a noticeably higher rate than desktop, and a calendar that opens off-screen or renders too small to tap will cost you more orders than the date field wins.
Method-2: Add a Date Field to the Block Checkout With Code
This is the modern API, and almost nothing written about it is correct.
Remember the constraint from earlier: text, select, and checkbox only. No native date type means no browser calendar here yet.
You've to register a text field with a strict format, validate it on the client and the server, and get a reliable date onto the order.
Step 1: Register the field
Copy and paste the following code into your child theme's functions.php file or better a code snippets plugin:
add_action( 'woocommerce_init', function () {

	woocommerce_register_additional_checkout_field(
		array(
			'id'         => 'funnelkit/delivery-date',
			'label'      => 'When do you need your order?',
			'location'   => 'order',
			'type'       => 'text',
			'required'   => true,
			'attributes' => array(
				'placeholder'  => 'YYYY-MM-DD',
				'title'        => 'Enter the date as YYYY-MM-DD',
				'autocomplete' => 'off',
			),
			'validation' => array(
				'type'         => 'string',
				'pattern'      => '^\d{4}-\d{2}-\d{2}$',
				'errorMessage' => 'Please enter your date as YYYY-MM-DD.',
			),
		)
	);

} );
Three rules the API enforces, each of which will kill your field silently if you miss it:
- The id must be namespaced as vendor/field-name. A bare delivery_date will not register at all.
- Registration must run on woocommerce_init or later. Hooking earlier causes initialization and translation problems that look like the field simply not existing.
- Location must be contact, address, or order. Use order for a delivery date, because it belongs to this purchase rather than the customer’s saved profile.
Step 2: Enforce the lead time on the server
Format validation is not enough. You still need to stop customers picking a date the kitchen cannot hit.
add_action( 'woocommerce_validate_additional_field', function ( WP_Error $errors, $field_key, $field_value ) {

	if ( 'funnelkit/delivery-date' !== $field_key ) {
		return;
	}

	$chosen   = DateTime::createFromFormat( 'Y-m-d', $field_value );
	$earliest = new DateTime( '+2 days' );

	if ( ! $chosen ) {
		$errors->add( 'fk_date_invalid', 'Please enter your date as YYYY-MM-DD.' );
		return;
	}

	if ( $chosen < $earliest ) {
		$errors->add( 'fk_date_too_soon', 'We need two days to prepare your order. Please choose a later date.' );
	}

}, 10, 3 );
The callback has to add to the WP_Error object it receives.
Returning a fresh WP_Error swallows the message, and the customer gets a checkout that fails with no explanation on screen.
Step 3: Show the field only when the customer picks collection
The required and hidden properties accept JSON Schema, so you can drive visibility straight from the cart state without touching JavaScript.
Add this to the registration array to show the date only when the customer has chosen local pickup:
'required' => array(
	array(
		'type'       => 'object',
		'properties' => array(
			'cart' => array(
				'properties' => array(
					'prefers_collection' => array( 'const' => true ),
				),
			),
		),
	),
),
'hidden'   => array(
	array(
		'type'       => 'object',
		'properties' => array(
			'cart' => array(
				'properties' => array(
					'prefers_collection' => array( 'const' => false ),
				),
			),
		),
	),
),
The hidden rule is inverted deliberately. The field should be hidden whenever prefers_collection is false, which is every case except the one you want.
The same pattern works against cart.shipping_rates, cart.items, or cart.totals.total_price, so you can vary the field by shipping method, product, or order value.
Step 4: Read the value back
Block checkout fields are saved under a managed prefix, so you do not get to choose your own meta key.
For an order or contact field, it is _wc_other/ plus your field ID:
$order = wc_get_order( $order_id );
$date  = $order->get_meta( '_wc_other/funnelkit/delivery-date' );
For anything beyond a direct meta read, WooCommerce recommends the CheckoutFields::get_field_from_object() helper, which survives future changes to how the values are stored.
The full reference lives in the WooCommerce additional checkout fields documentation.
Method 3: Add a Date Field to the Classic Checkout With Code
On the classic shortcode checkout, you get a real browser calendar because woocommerce_form_field() supports the native date input type.
Step 1: Register and save the field
add_filter( 'woocommerce_checkout_fields', function ( $fields ) {

	$fields['order']['delivery_date'] = array(
		'type'              => 'date',
		'label'             => __( 'When do you need your order?', 'your-textdomain' ),
		'required'          => true,
		'class'             => array( 'form-row-wide' ),
		'priority'          => 25,
		'custom_attributes' => array(
			'min' => date( 'Y-m-d', strtotime( '+2 days' ) ),
			'max' => date( 'Y-m-d', strtotime( '+30 days' ) ),
		),
	);

	return $fields;

} );
The min and max attributes hand you a lead time and a booking horizon for free. The browser will not let the customer choose outside that window.
Fields added through the woocommerce_checkout_fields array save to the order automatically. No separate save hook needed for this one.
Step 2: Validate on submit anyway
Browser attributes are a convenience, not a guarantee. Anyone can bypass them, so check the value server-side too.
add_action( 'woocommerce_checkout_process', function () {

	if ( empty( $_POST['delivery_date'] ) ) {
		return;
	}

	$chosen   = sanitize_text_field( wp_unslash( $_POST['delivery_date'] ) );
	$earliest = date( 'Y-m-d', strtotime( '+2 days' ) );

	if ( $chosen < $earliest ) {
		wc_add_notice( __( 'We need two days to prepare your order. Please choose a later date.', 'your-textdomain' ), 'error' );
	}

} );
Step 3: Read it with the correct meta key
WooCommerce saves custom checkout fields with an underscore prefix.
A field registered as delivery_date is stored as _delivery_date. Ask for the unprefixed key and you get an empty string, which looks exactly like a value that never saved.
// Wrong, returns nothing
$order->get_meta( 'delivery_date' );

// Correct
$order->get_meta( '_delivery_date' );
That underscore also marks the meta as protected, which is why it never appears in the Custom Fields panel on the order screen. The value is there. You just have to print it yourself.
Step 4: Print in the admin and order emails
// Order edit screen
add_action( 'woocommerce_admin_order_data_after_billing_address', function ( $order ) {

	$date = $order->get_meta( '_delivery_date' );

	if ( $date ) {
		echo '<p><strong>' . esc_html__( 'Requested date', 'your-textdomain' ) . ':</strong> ' . esc_html( $date ) . '</p>';
	}

} );

// Customer and admin order emails
add_filter( 'woocommerce_email_order_meta_fields', function ( $fields, $sent_to_admin, $order ) {

	$date = $order->get_meta( '_delivery_date' );

	if ( $date ) {
		$fields['delivery_date'] = array(
			'label' => __( 'Requested date', 'your-textdomain' ),
			'value' => esc_html( $date ),
		);
	}

	return $fields;

}, 10, 3 );
Reading through the order object with get_meta() rather than get_post_meta() keeps all of this working under High-Performance Order Storage, where orders no longer live in the posts table.
Note: for the full set of placement options on the classic checkout, see our guide to WooCommerce checkout hooks, and our guide to WooCommerce checkout validation for more validation patterns.
Best WooCommerce Delivery Date Plugins Compared
| Plugin | Block checkout | Date field free? | Standout feature | Price |
|---|---|---|---|---|
| Order Delivery Date and Time (ThemeHigh) | Via Checkout Field Editor Pro | Yes, on classic | Time slots plus delivery and pickup in one plugin | Free, Pro from $49/year |
| Delivery Date Picker for WooCommerce | Yes, natively | Paid extension | Works on both checkouts with no separate setup | Paid on WooCommerce.com |
| Flexible Checkout Fields (WP Desk) | Limited | No, date is a Pro type | Conditional logic across 20+ field types | Free, Pro from £59/year |
| Order Delivery Date (Tyche Softwares) | Partial | Yes, on classic | Date availability that changes by shipping method | Free, Pro from $119/year |
- Check block checkout support explicitly rather than assuming it
On ThemeHigh’s free Checkout Field Editor, the block tab currently offers text, select, radio, and checkbox, and the date picker for block checkout sits behind the Pro license.
Adding your field to the Classic tab while your store runs the block checkout is the number one reason people decide a plugin is broken.
- Then decide whether you are fixing a field or fixing a checkout
A single-purpose date plugin is the right answer when the rest of your checkout is fine.
If you are also carrying a long form, a weak mobile layout, or fields you want shown conditionally, a checkout builder like FunnelKit gives you the field management and the page together, and keeps third-party date plugins rendering where you place them.
For a wider comparison, see our guide to the best WooCommerce checkout plugins.
5 Tips to Optimize Your Date Picker for a Better Checkout Experience
Adding the date field is just step one. To truly boost conversions and prevent customer frustration, you need to optimize how that date picker behaves.
Here are 5 best practices to ensure your date selection process is seamless:
1. Block out non-delivery days
Nothing frustrates a customer more than booking a delivery for Sunday, only to receive an email later saying, “Sorry, we’re closed.”
To fix this, configure your plugin or code to automatically disable weekends, national holidays, and specific non-working days.
The date picker should simply grey these dates out so they cannot be clicked.
2. Set a minimum preparation time
If you sell custom cakes or handmade goods, you can't deliver an order within 1 hour of placing it.
For this, set a lead time or preparation buffer.
For example, if you need 24 hours to prepare an order, the date picker should automatically block today’s date. If it’s 4 PM and your cutoff is 2 PM, the system should automatically set the next available slot to the day after tomorrow.
3. Use clear date/time labels and placeholders
Don’t assume customers know why you are asking for a date.
Use a specific label like “Select Preferred Delivery Date” instead of just “Date”.
Add a brief description or placeholder text, such as “We require 2 days for processing your order”, to manage customer expectations immediately.
4. Default to the first available date
Reduce the number of clicks required to check out.
Instead of showing a blank field, pre-fill the date picker with the earliest possible delivery date.
Also, make sure to put it near the shipping section.
This guides the user and saves them a decision if they simply want their order as soon as possible.
5. Keep the date picker mobile-friendly
Over 60% of WooCommerce traffic comes from mobile devices. If your calendar pops up off-screen or is too small to tap, customers will leave.
If using custom code, stick to the type="date" attribute (native browser picker) as shown in Method 2.
This triggers the iPhone or Android native wheel picker, which is much easier to use than a tiny JavaScript calendar.
6. Hide the field when it does not apply
Digital products and virtual services do not need a delivery date, and an irrelevant required field is a dead end.
See our guide to conditional checkout fields for the rules.
By refining these settings, you prevent support tickets before they happen and ensure every order you receive has a realistic, achievable delivery date attached.
Frequently Asked Questions
Yes. If you are using a plugin like ThemeHigh, there is a setting to disable days, where you can uncheck Saturday and Sunday. If you are using custom code, you will need to add a JavaScript snippet to target the specific days in the jQuery datepicker function.
No. WooCommerce has no native delivery or pickup date selector on either checkout. You need a plugin or custom code to add a date field to the checkout page.
Yes. The browser-native date picker (used in the custom code method) uses the mobile phone’s default calendar interface, which is very user-friendly. Plugin solutions like FunnelKit are also fully responsive and optimized for touchscreens.
Yes. Advanced delivery date plugins allow date availability to be based on shipping methods, such as local pickup or flat-rate delivery.
Either the plugin’s “show in emails” setting is off, or your code is reading the wrong meta key.
Check the underscore prefix on classic checkout and the _wc_other/ prefix on block checkout before assuming the value was never saved.
Yes, and for rentals or per-item bookings you should.
Product-level dates travel through the cart as item meta rather than order meta, so they need a product fields or product add-ons plugin rather than a checkout field editor.
Ready to Stop Guessing When Your Orders Are Due?
A date field is a small change with an unusually clean payoff.
The customer tells you when they need the order, your team plans around a real day instead of a queue, and the “when will this arrive?” emails stop landing.
Whether you run a bakery, a flower shop, or a rental business, allowing customers to choose their delivery date eliminates uncertainty and creates a smoother path to purchase.
Start with a delivery date plugin and only reach for code when your rules outgrow the settings screen.
If your checkout also needs field management, conditional display, and a mobile layout that holds up under a calendar popup, FunnelKit gives you the page and the field editor in one place, and keeps third-party date fields rendering exactly where you drop them.
Editorial Team
October 6, 2026The WooCommerce checkout coupon field is where shoppers enter a discount code before they pay. Once coupons are turned on, WooCommerce adds it to both the cart and the checkout...
Editorial Team
September 25, 2026Removing checkout fields in WooCommerce is one of the fastest ways to simplify your store’s checkout and reduce cart abandonment. Every extra field you ask customers to fill in adds...

Editorial Team
September 14, 2026Changing currency at WooCommerce checkout is easier to explain with a simple example: a shopper in Munich sees €169 instead of $184 for the same jacket. Nothing about the product...






