
Do you want to learn about WooCommerce checkout hooks that allow seamless customization on your store’s checkout page?
WooCommerce is known for its flexibility in customization and one powerful tool that facilitates WooCommerce checkout page optimization is the clever use of hooks.
After implementing hundreds of checkout customizations, from adding custom validation fields to integrating shipping calculators, I’ve learned that mastering WooCommerce checkout hooks is essential for any serious WordPress developer.
By using checkout hooks, you can add, modify, or remove any elements, content, or functionality on your checkout page.
But the challenge is that not everyone wants to dive into custom coding. If that’s you, don’t worry! We’ve got a smarter and more efficient way to create high-converting checkout pages without touching a single line of code.
In this post, we’ll walk you through WooCommerce checkout hooks, show you how they work, and introduce an optimized solution that makes customization effortless.
By the end, you’ll not only understand how to leverage checkout hooks but also explore how to create a seamless checkout experience with just a few clicks.
Here’s a mini masterclass that gives you 20 tips to set up a high-converting checkout page:
Table of Contents
- 1 What are WooCommerce Checkout Hooks?
- 2 28 WooCommerce Checkout Page Hooks to Enhance Your Buying Process
- 3 Don’t Want to Use WooCommerce Checkout Hooks? Here’s a Better Way to Create Beautiful Checkout Pages (Without Coding)
- 4 How to Create High-Converting WooCommerce Checkout Pages (Without Custom Coding Checkout Hooks)
- 5 WooCommerce Checkout Hooks: Frequently Asked Questions (FAQs)
- 6 Final Decision: WooCommerce Checkout Hooks or the Smarter Alternative?
What are WooCommerce Checkout Hooks?
Hooks, in general, are predefined points in the code that allow you to add your custom code to modify or extend the default behavior without modifying core files.
WooCommerce offers a wide range of hooks to elevate your store experience.
WooCommerce checkout hooks are snippets of code that let store owners or developers tailor the user experience according to their needs.
It offers a powerful and flexible way to customize the checkout process of your online store.
When I first started with WooCommerce in 2017, I made the mistake of editing the plugin files directly. One update later, all my customizations vanished.
That painful lesson taught me the value of hooks. They survive updates because they work with the system rather than against it.
There are two types of checkout hooks in WooCommerce:
- Action hooks
- Filter hooks
Let’s go through the action and filter hooks one by one.
WooCommerce checkout action hooks
The WooCommerce checkout action hooks trigger specific functions during the checkout process that let you add extra functionality to your website.
You can add extra widgets, elements, or even a message with the help of action hooks.
Here’s an example of an action hook:
To help you understand, the woocommerce_before_checkout_form is the hook and custom_function is the function you can use to add custom scripts.
WooCommerce checkout filter hooks
The WooCommerce checkout filter hooks let you modify data and alter the behavior of a specific process.
The filter hook does not add anything new but rather just changes or filters the data.
Let’s say an example of a filter hook:
This filter allows you to modify or override the labels and placeholders of existing checkout fields. You can use the filter hooks as WooCommerce checkout validation hooks as well.
Let’s look at all the checkout page hooks in WooCommerce in the next section.
28 WooCommerce Checkout Page Hooks to Enhance Your Buying Process
In this section, we’ll look at the different WooCommerce checkout hooks that help you enhance your buying process.
Here is your WooCommerce visual hook guide for the checkout page:
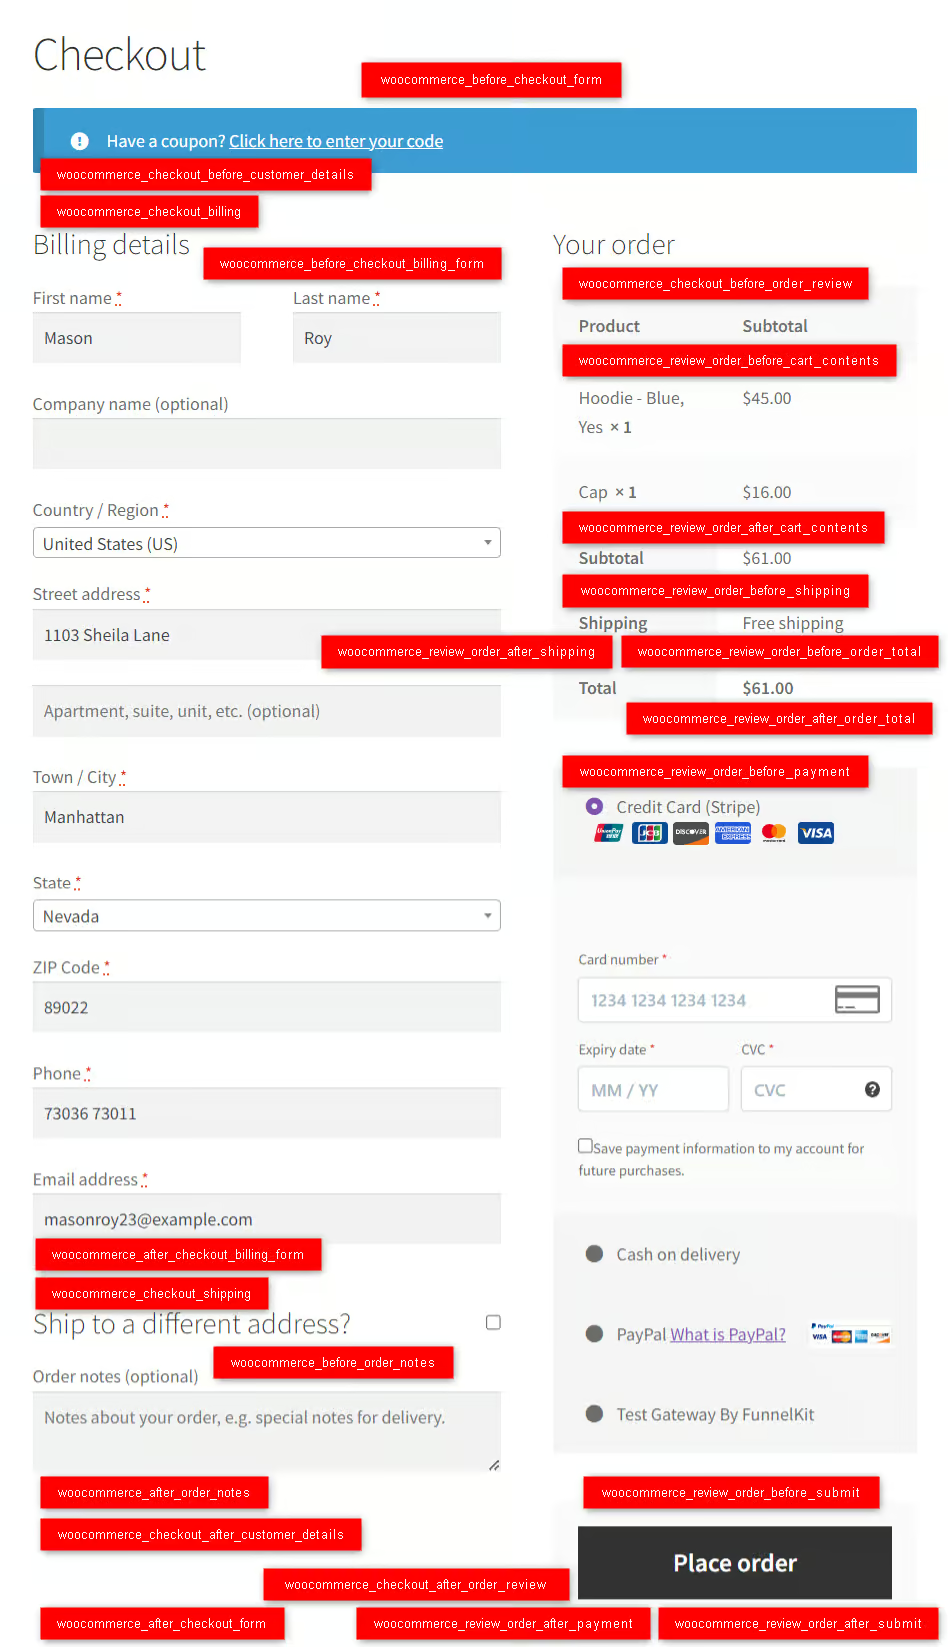
- woocommerce_before_checkout_form
This hook is defined before the checkout form and is usually placed above the coupon field on the WooCommerce checkout page.
- woocommerce_checkout_before_customer_details
This hook is specified before the customer details section on your checkout form.
- woocommerce_checkout_billing
This new WooCommerce checkout hook includes the billing form template on the checkout page.
- woocommerce_before_checkout_billing_form
This hook is defined before the start of the billing form on the checkout page.
- woocommerce_after_checkout_billing_form
This hook is defined after the completion of the billing form.
- woocommerce_before_checkout_registration_form
This action hook is defined in the billing form template. It's specified before the user registration form (if enabled) on the checkout page.
- woocommerce_after_checkout_registration_form
This hook is specified after the user registration form (if enabled) on the WooCommerce checkout page.
- woocommerce_checkout_shipping
The particular hook is defined in the shipping form template. It provides a convenient location to customize the display of shipping-related information.
- woocommerce_before_checkout_shipping_form
This ‘woocommerce_before_checkout_shipping_form’ hook is defined just before the start of the shipping form.
- woocommerce_after_checkout_shipping_form
The ‘after checkout WooCommerce shipping form’ hook is determined after the completion of the shipping form.
- woocommerce_before_order_notes
The action hook is triggered before the order notes section on the checkout page.
- woocommerce_after_order_notes
This checkout hook is defined after the order notes field on the checkout page.
- woocommerce_checkout_after_customer_details
This hook is triggered after the customer details section (after the billing and shipping fields) on the checkout page.
- woocommerce_checkout_before_order_review_heading
The particular hook is added to WooCommerce version 3.6.0 and triggered in the checkout template before the order review heading.
- woocommerce_checkout_order_review
This hook is defined in the checkout template and covers the complete order review table section on the page.
- woocommerce_checkout_before_order_review
The particular hook is specified before the order details section on the checkout page.
- woocommerce_review_order_before_cart_contents
This WooCommerce checkout hook covers the review order section before the cart contents.
- woocommerce_review_order_after_cart_contents
This hook is defined inside the order table section after the cart contents on the checkout page.
- woocommerce_review_order_before_shipping
The particular hook is defined before the shipping fields in the order review section.
- woocommerce_review_order_after_shipping
This hook is specified after the shipping fields in the order review section on the WooCommerce checkout page.
- woocommerce_review_order_before_order_total
The particular checkout hook is determined in the order review section before the order total.
- woocommerce_review_order_after_order_total
This hook is defined in the order review section after the order total on the checkout page.
- woocommerce_review_order_before_payment
The particular checkout hook is specified in the order review section before the payments.
- woocommerce_review_order_before_submit
This hook is defined before the place order button in the order review section on the checkout page.
- woocommerce_review_order_after_submit
This hook is specified after the place order button in the order review section on the checkout page.
- woocommerce_review_order_after_payment
The particular checkout hook is determined after the payment section, including the place order button.
- woocommerce_checkout_after_order_review
This WooCommerce checkout page hook is defined after the order review section (which includes the order details table and payment section).
- woocommerce_after_checkout_form
The ‘WooCommerce after checkout form’ hook is specified at the end of the checkout form to add or modify any element.
Let’s now look at how you can add or remove these checkout hooks. You can easily remove the sections by pasting the code to the functions.php file in your theme or, preferably, the child theme.
You can even add the code to WordPress code snippets, too.
Adding Custom Content with the Default WooCommerce Checkout Hooks
If you want to add any of the above hooks to your WooCommerce checkout page, you can use the following code:
This action will add the order review table to your WooCommerce checkout page.
Removing the Default WooCommerce Checkout Hooks
By default, WooCommerce uses only some of the checkout hooks:
- woocommerce_checkout_login_form: The user login form before the checkout form
- woocommerce_checkout_coupon_form: The coupon form before the checkout form
- woocommerce_order_review: The order review table on the checkout form
- woocommerce_checkout_payment: The payment method table on the checkout form
To remove these actions, use the following code:
You can use these WooCommerce checkout hooks to add (with action hooks) or modify (with filter hooks) different elements on your checkout page.
Common Checkout Hook Use Cases and Solutions
Through years of client work, these scenarios come up repeatedly:
Adding a Custom Checkout Field
Scenario: Client needs to collect a "delivery date" at checkout.
Modifying Checkout Field Labels
Scenario: Change "Phone" to "Mobile Number" for clarity.
Don’t Want to Use WooCommerce Checkout Hooks? Here’s a Better Way to Create Beautiful Checkout Pages (Without Coding)
The examples above show how you can add text using simple code snippets to the checkout page of your WooCommerce store.
But this may seem like a lot of work if you’re unfamiliar with custom codes or adding code snippets to your WordPress website.
Even if you can add these snippets, you won’t be able to add custom fields to your form using these WooCommerce checkout hooks.
Also, if you hire a professional web developer, you’ll have to spend a lot of money just to make small changes.
But don’t worry! There is an efficient way to customize your checkout page the way you want without coding or programming.
Introducing FunnelKit Funnel Builder.
Funnel Builder by FunnelKit is a powerful sales funnel builder plugin for WordPress and WooCommerce.
It lets you create high-converting opt-ins, sales pages, custom checkouts, order bumps, one-click upsells, and thank-you pages.
It's the most powerful WooCommerce checkout manager, streamlining your store's checkout process in minutes with simple steps (no code needed).
Here’s what you can do with FunnelKit Funnel Builder:
- Import pre-designed templates: FunnelKit Funnel Builder gives access to 20+ enhanced checkout templates that you can easily import and customize as you need. You get Shopify-style checkouts, order forms, one page checkouts, and more.
- Customize with page builders: Customize your checkout and sales funnels with your favorite page builders like Elementor, Bricks, Divi, Oxygen, Gutenberg, or any other page builders using shortcodes.
- Create multi-step checkouts: The default checkout page comprises just a single step. However, FunnelKit lets you create multi-step checkout pages, such as two or three-step checkouts. This way, it breaks the checkout page into steps and lets users complete their purchases without feeling overwhelmed.
- Add custom fields: Need to collect additional information from shoppers at checkout? FunnelKit Funnel Builder lets you add custom fields, such as order notes, file uploads, EU VAT details, or personalized messages, without writing any code.
- Modify or remove checkout fields: Simplify the checkout process by modifying or removing unnecessary fields. With FunnelKit’s built-in checkout field editor, you can rearrange form fields, rename labels, or delete non-essential steps. This helps reduce friction and make checkout faster for your customers.
- Optimize the checkout page: Optimize your WooCommerce checkout page by simplifying and streamlining the buying process in your store. Incorporate express checkouts, address auto-completion, auto-apply coupons, and more on your checkout page.
- Streamline for mobile checkout: Rearrange form fields, hide unnecessary elements, or streamline the process to create a frictionless mobile checkout experience that boosts conversions.
- Add a dynamic sliding cart: Bring a beautiful sliding cart that skips the redundant default WooCommerce cart page and helps you directly checkout. Add product recommendations and offer rewards inside your shopping cart.
- Offer order bumps and upsell offers: Maximize your business revenue with high-converting order bumps and post-purchase one-click upsells. Suggest related products or display exclusive one-time offers and use smart rules to personalize upsell recommendations.
- Set up thank you pages: FunnelKit Funnel Builder lets you customize thank you pages with order details, time-sensitive discounts, social sharing and collect customer feedback.
Get a copy of FunnelKit from below.
Read our step-by-step guide to install the FunnelKit Funnel Builder on your WordPress website.
Let’s learn how you can create fascinating checkout pages for your WooCommerce store.
How to Create High-Converting WooCommerce Checkout Pages (Without Custom Coding Checkout Hooks)
In this section, we’ll demonstrate the process of creating high-converting checkout pages in 5 simple steps without any code.
Step 1: Create a store checkout
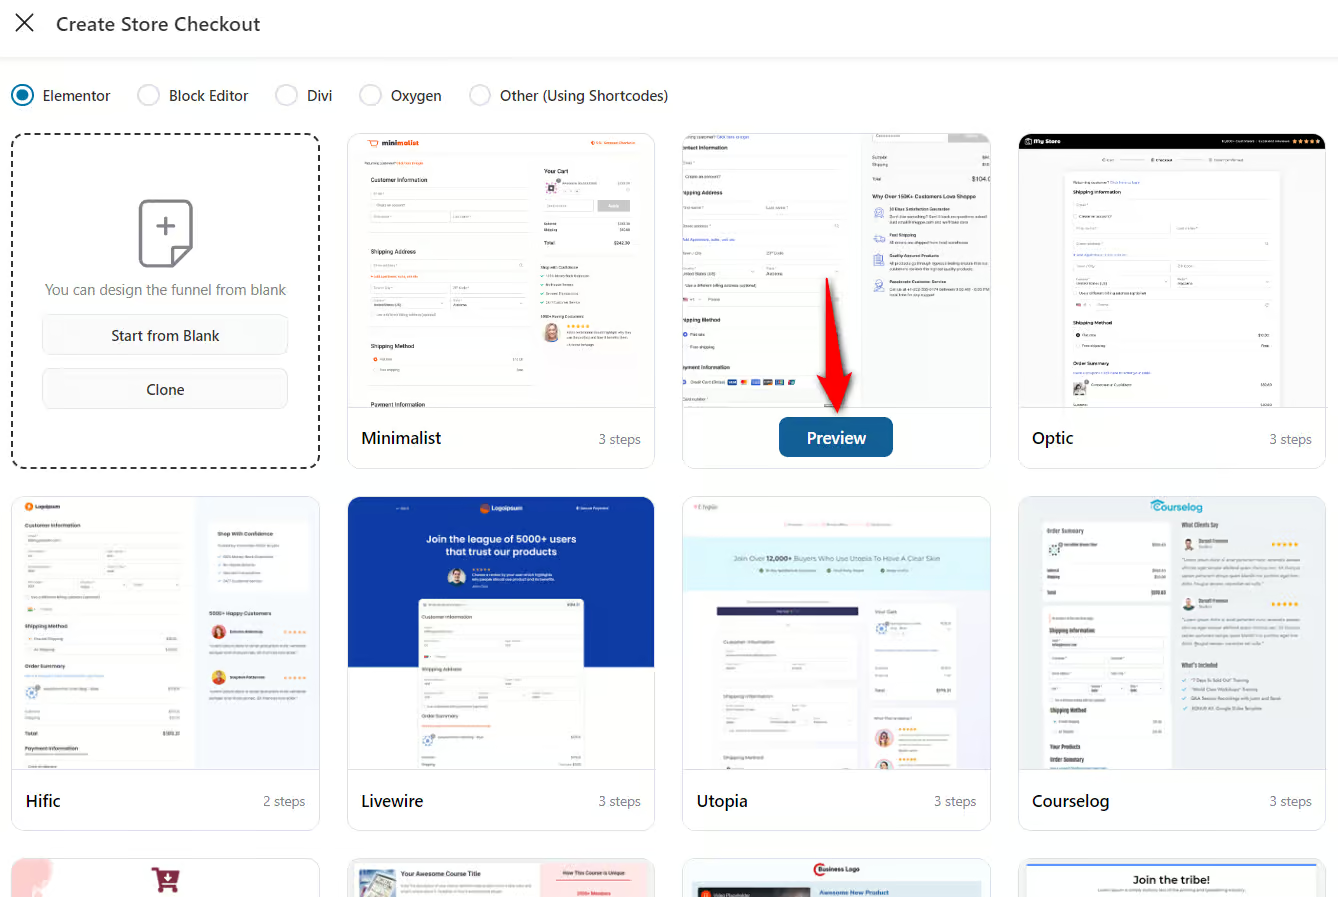
Navigate to FunnelKit ⇨ Store Checkout and click on the ‘Create Store Checkout’ button.
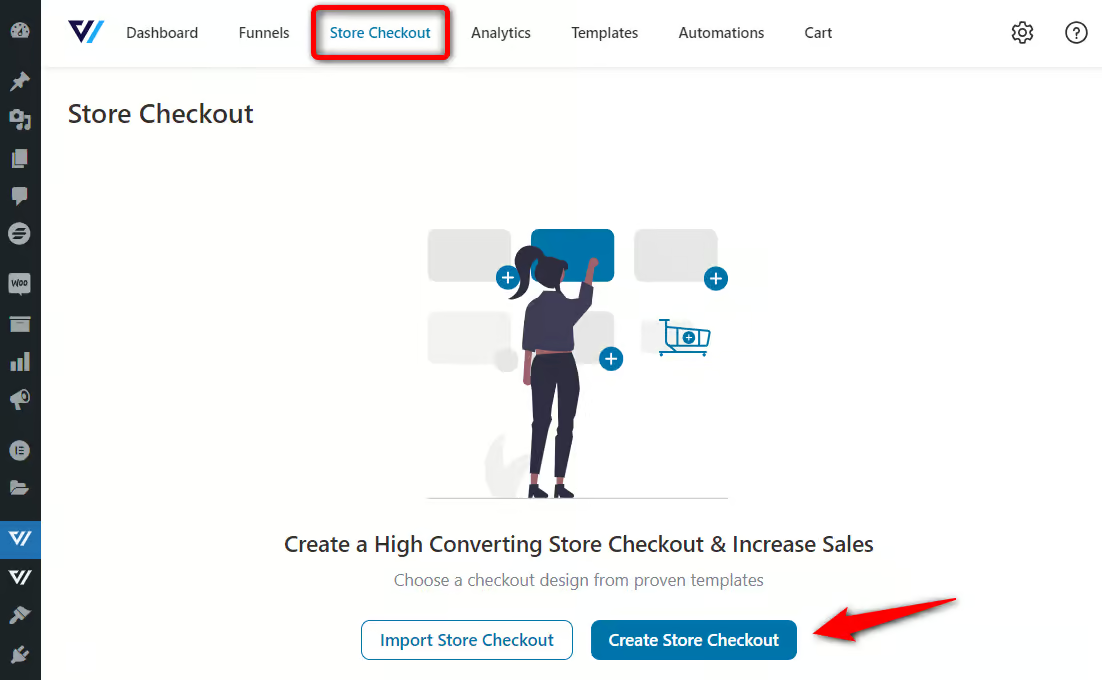
You’ll see different store checkout templates to choose from. Select the page builder and hit the template you want to use.
Here, we’ll select Elementor and preview the ‘Shoppe’ template.
Choose the number of steps you want on your checkout page template, whether you want a one page or multi-step checkout.
Then, hit the ‘Import This Funnel’ button and name your store checkout.
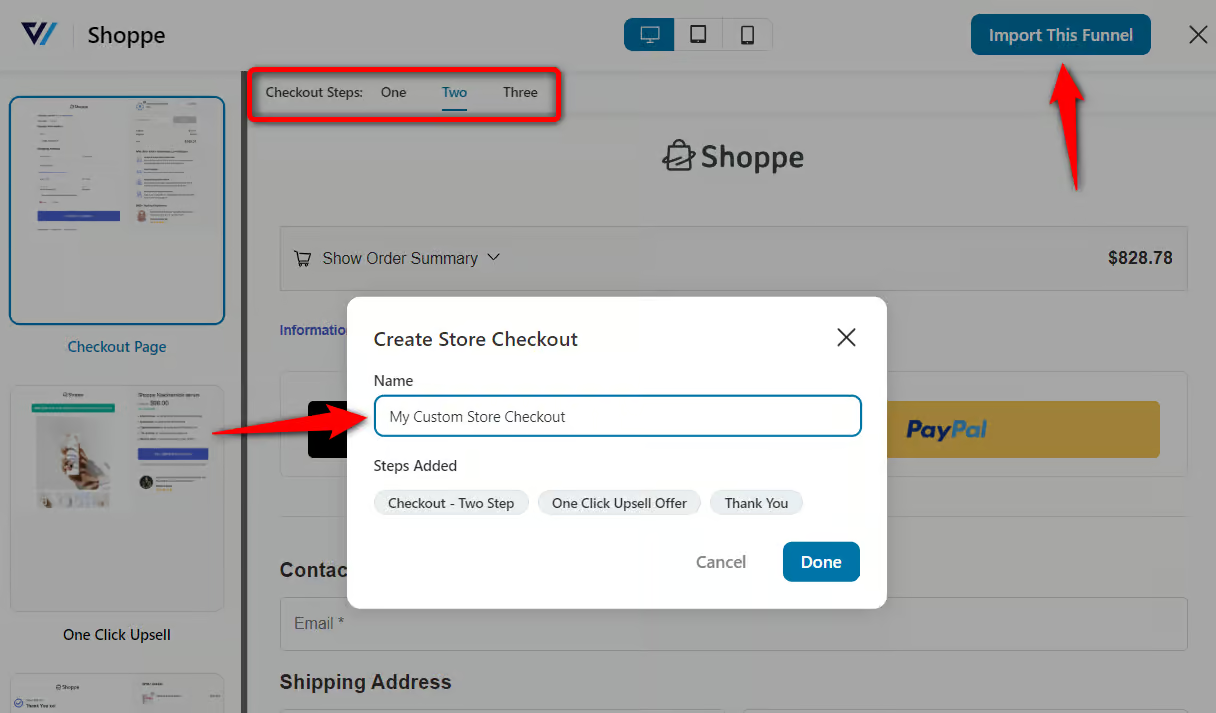
Clicking on ‘Done’ will import this template into your funnel, including the checkout page and thank-you page.
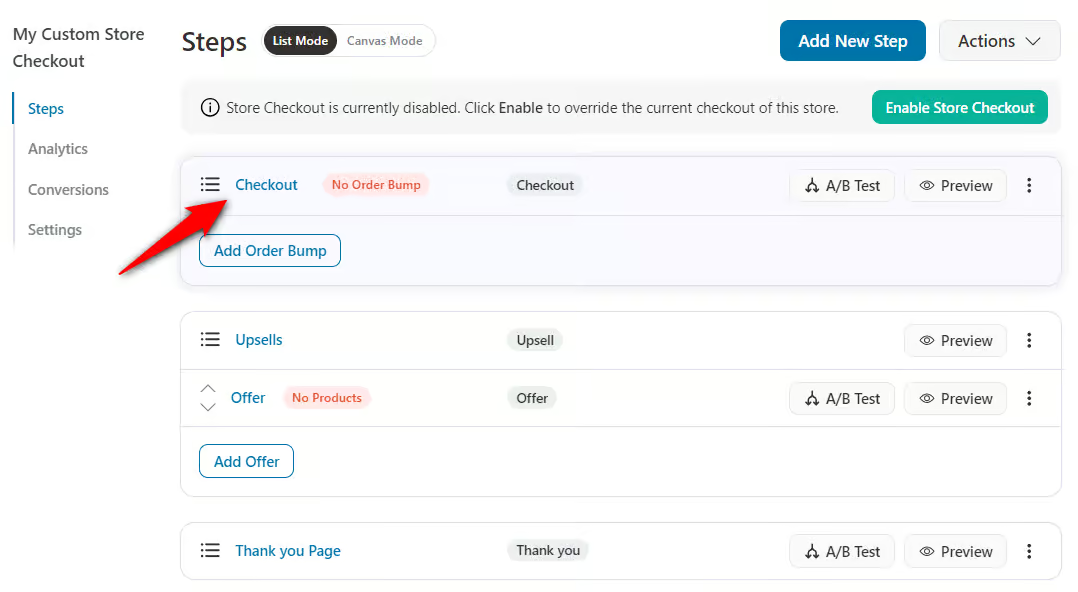
Step 2: Edit the design of your checkout page
In this section, you’ll learn how you can customize your checkout page design without using WooCommerce checkout page hooks.
Click on the name of your checkout page to start editing it.
On the ‘Design’ tab, you can customize the checkout page template with Elementor.
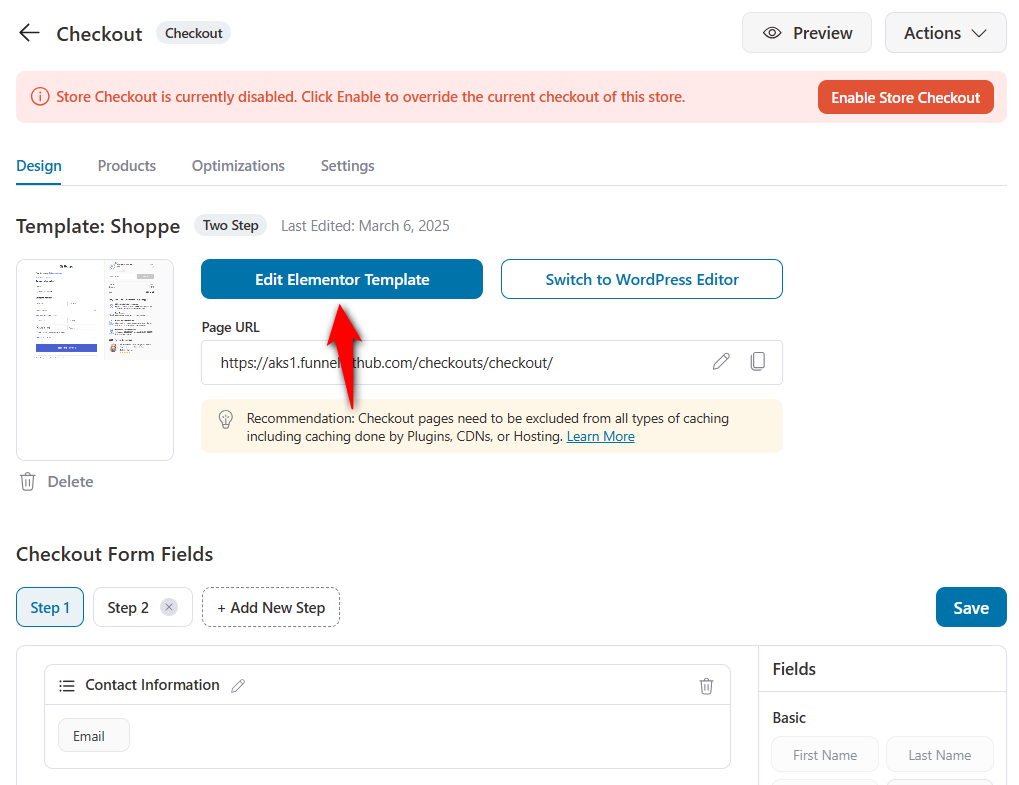
Drag and drop the different content widgets to design the checkout page the way you want.
Use the left menu to upload logo, design your checkout form, including breadcrumbs of your checkout page steps, button styling, checkout form field widths, and more.
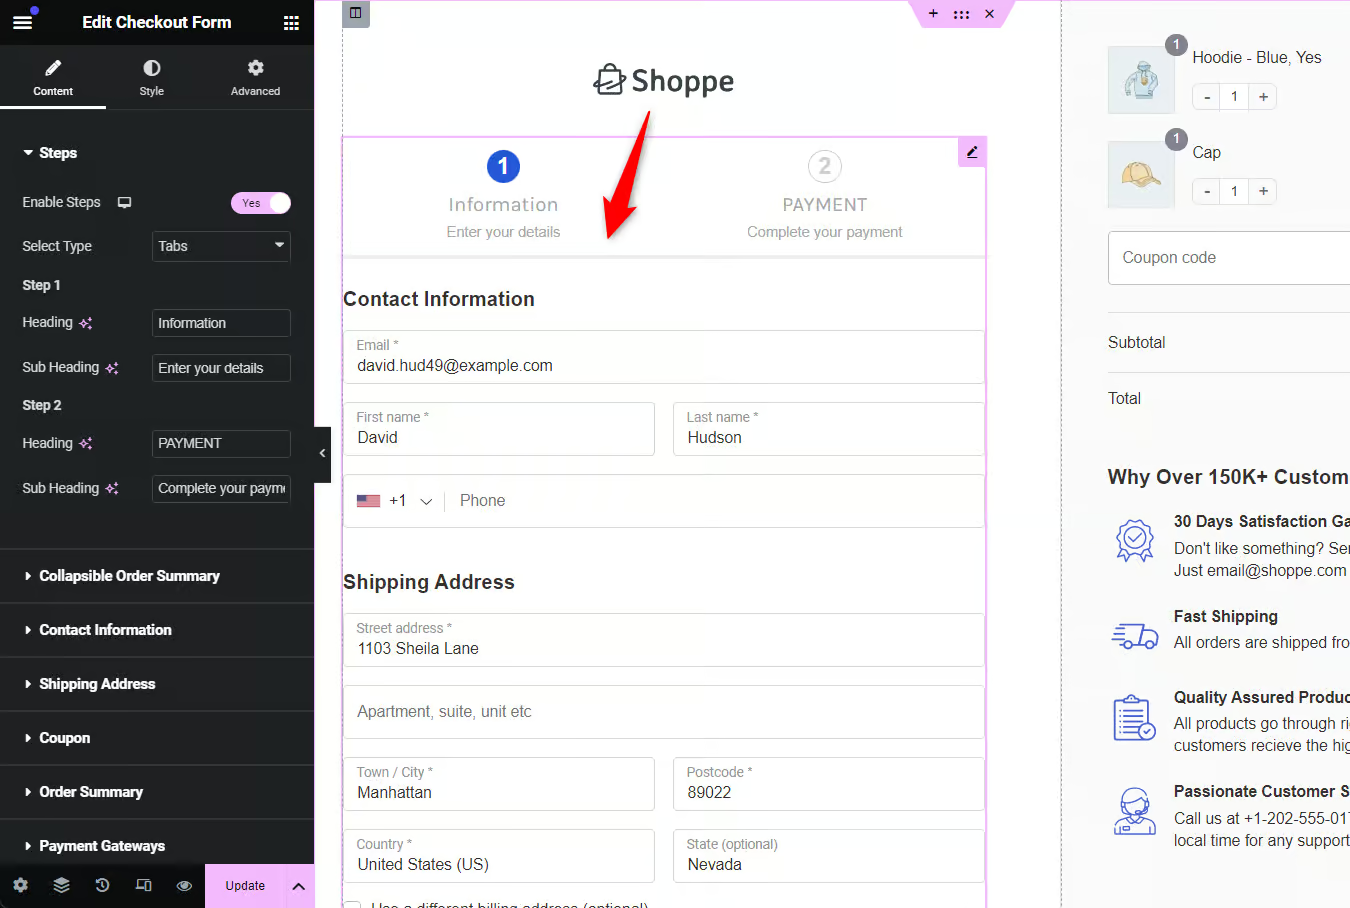
You can also add terms and conditions and secure checkout icons to make your checkout page conversion-friendly.
Step 3: Customize your checkout form fields
Go back to your store checkout funnel and scroll down under the Design section to customize the checkout form fields.
The built-in checkout form field editor lets you add and modify the fields and sections on your checkout form.
Just drag and drop the fields you want to place - you can even rearrange the sections within your checkout form.
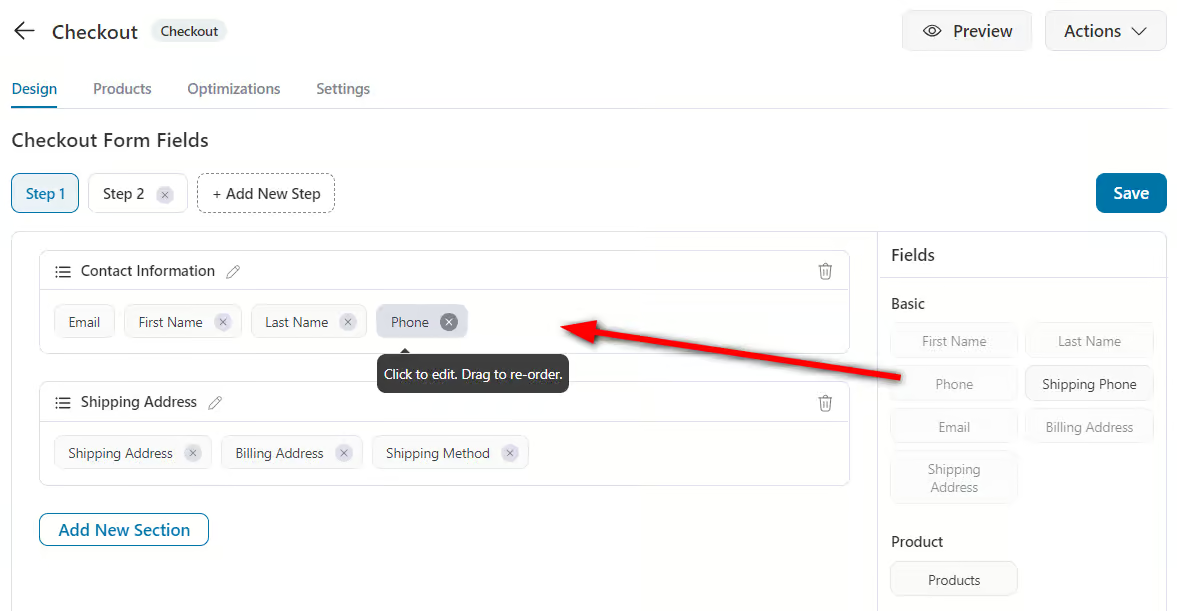
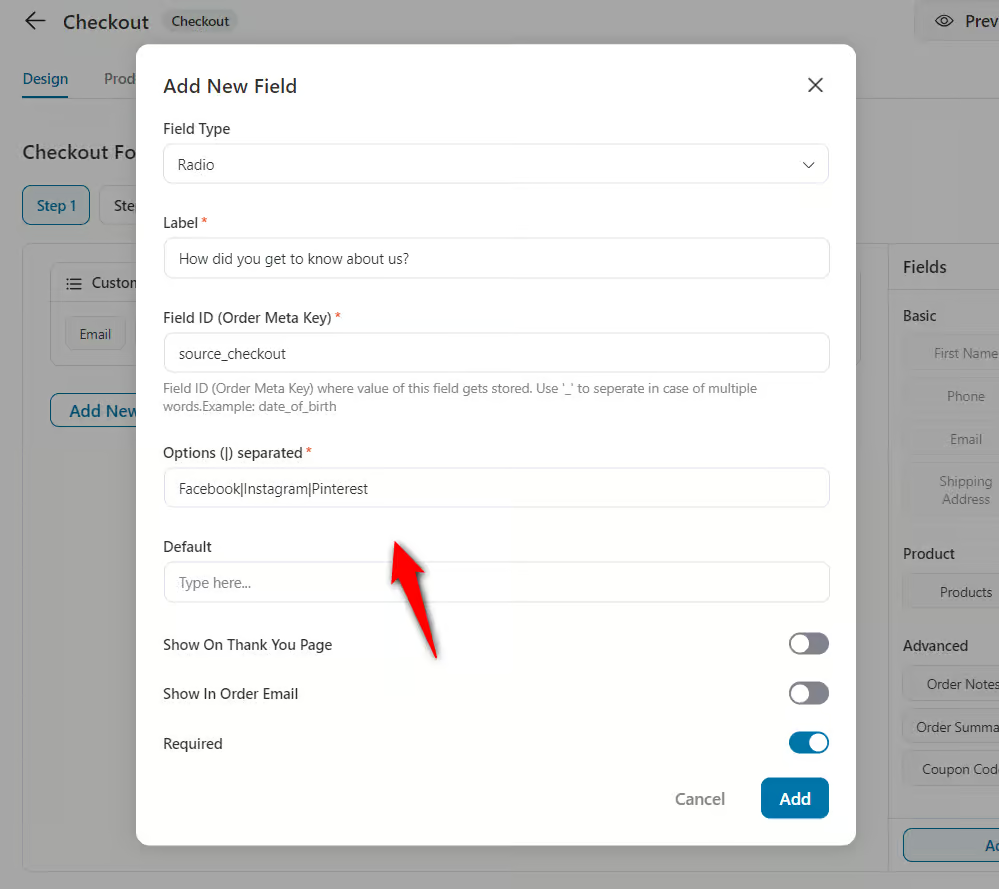
You can even add custom fields to your checkout form.
All you have to do is click on the ‘Add New Field’ button and enter the information about your custom field.
There are many custom field types you can choose from - text, checkbox, radio button, number, and more.
Plus, FunnelKit Funnel Builder lets you edit your checkout form fields, too.
Just hit the field you want to edit. Let’s say you want to edit the shipping address - click on it and choose the fields you want to display.
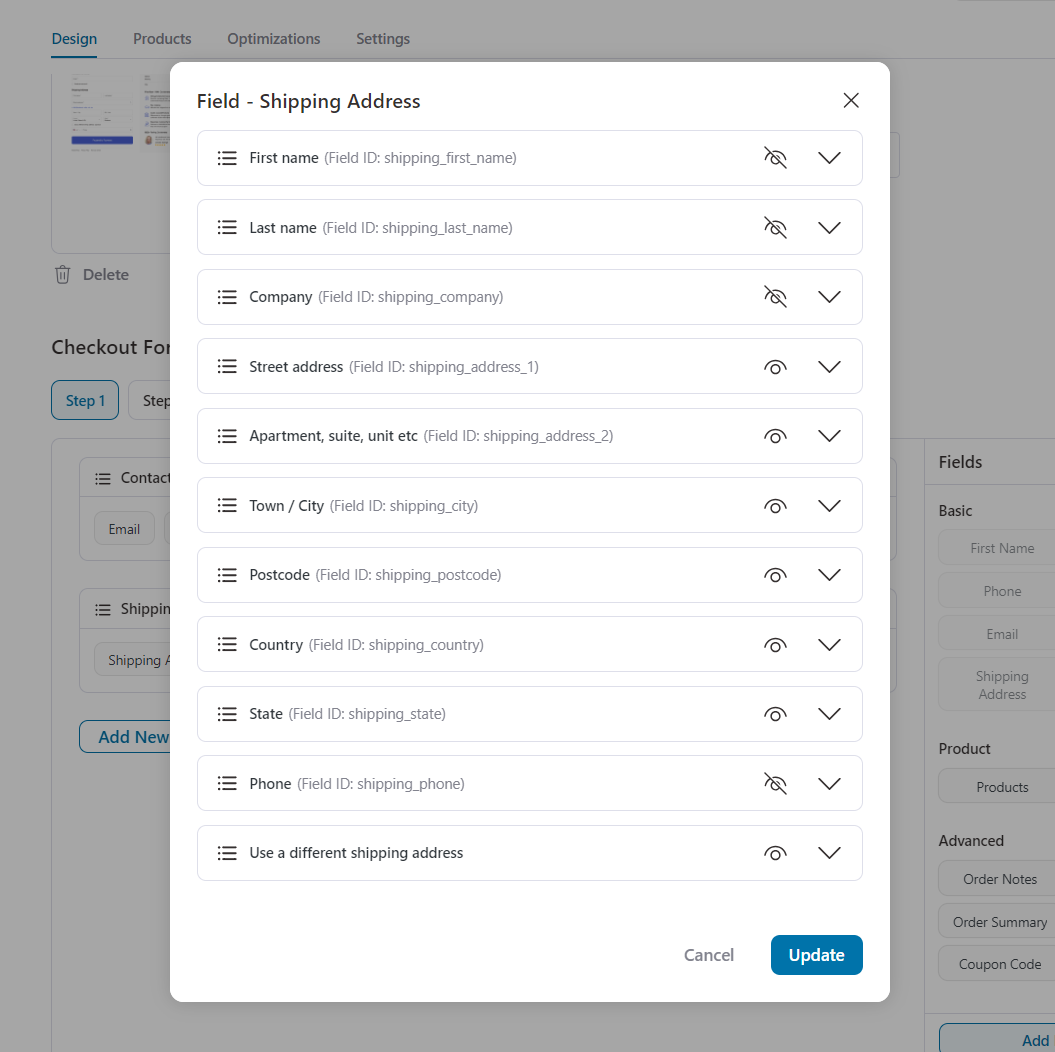
Once you’re satisfied with your checkout fields, click on ‘Save’.
This process is much easier than the custom coding method with WooCommerce checkout hooks.
Step 4: Optimize your checkout page for faster checkout
Checkout optimization should be your priority when setting up your checkout page. This helps streamline your checkout process and reduces the cart abandonment rate.
You can add checkout optimization techniques such as:
- Express checkout payment options: Add express checkout payment methods such as Google Pay, Apple Pay, Amazon Pay, PayPal Express, etc. This allows you to enable one-click checkout, encouraging quick purchases in your store.
- Auto-fill address suggestions: Enable the Google Address auto-completion feature on your checkout page so shoppers can select suggestions as they type their addresses. It automatically fills up street address, city, zip code, state, and country fields, reducing incorrect address queries.
- Auto-apply coupon codes: Incentivize shoppers with discount coupons at checkout. It automatically applies a discount to a shopper's order without them having to enter a coupon code manually.
- Multi-step field preview: This feature is enabled in multi-step checkout pages. It allows you to preview the entered information in different fields at each checkout step as you move through the checkout page. This way, you can check whether you’ve entered the correct information. If not, you can go back and change them anytime.
Go to the Optimizations section and enable the options you need on your checkout page:
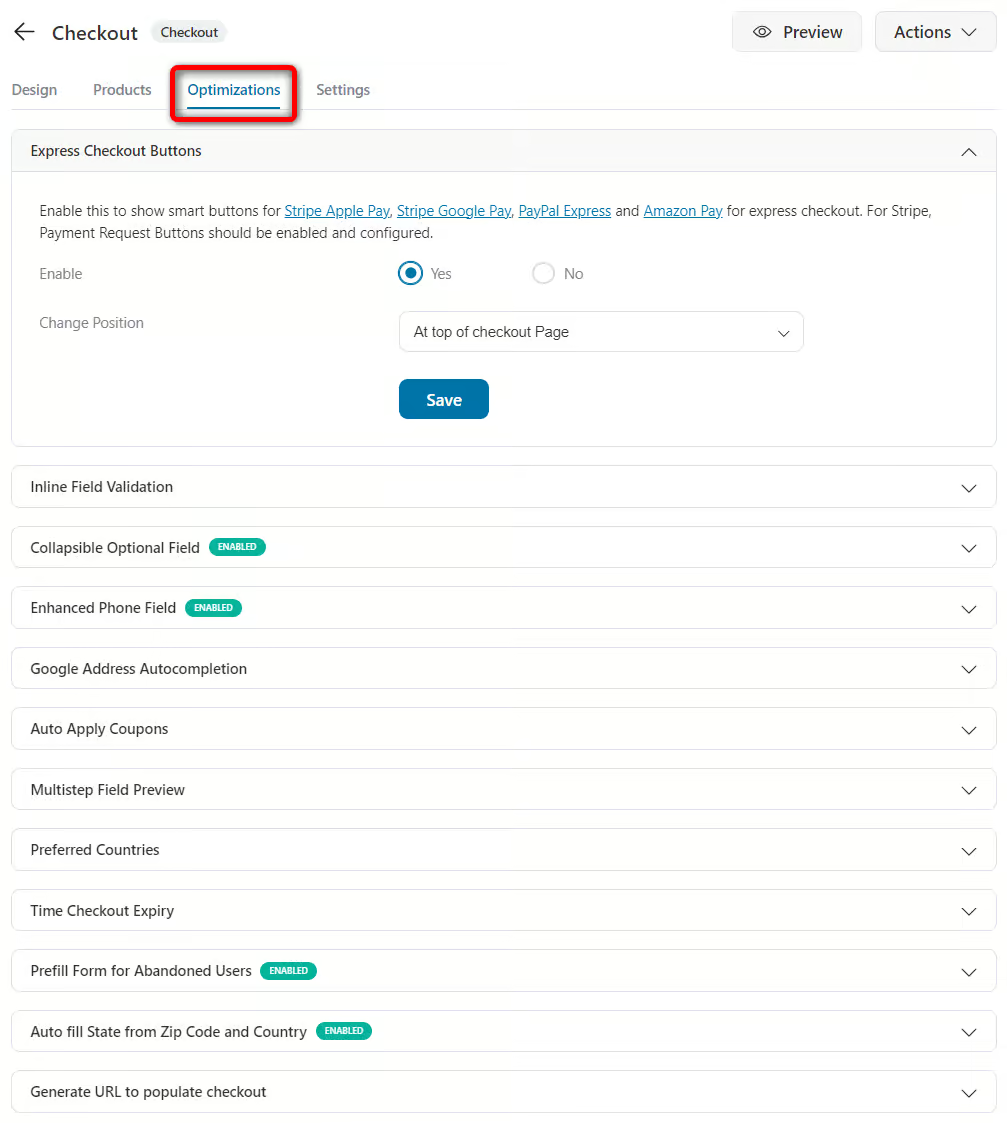
FunnelKit Funnel Builder offers various checkout optimization options, including smart customer login, enhanced phone field, inline field validation, and more.
It offers an additional advantage because you cannot apply these optimizations using WooCommerce checkout hooks.
👉 Check out our detailed WooCommerce checkout optimization post to explore the different strategies you can implement to streamline your checkout process.
Furthermore, you can even add order bumps and one-click upsells to maximize the revenue with each order.
Similarly, you can customize your order confirmation page and transform it, which helps you carry the conversation forward with your customers.
Step 5: Activate your store checkout
Once everything is set, toggle the store checkout to make it live.
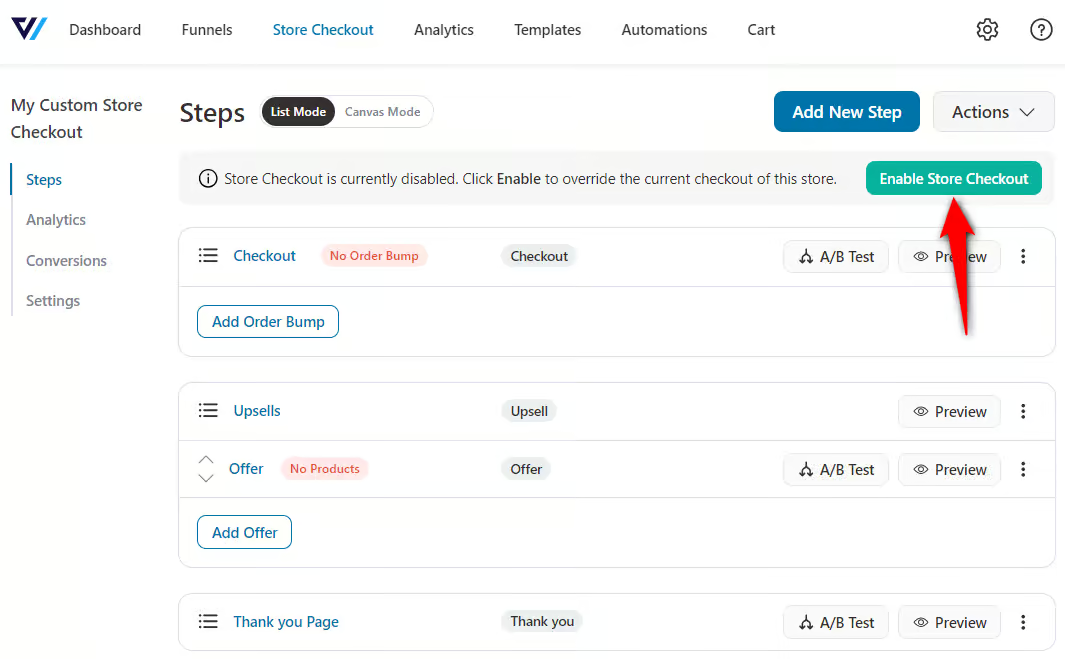
This is how your custom checkout page looks without using programming codes or WooCommerce hooks.
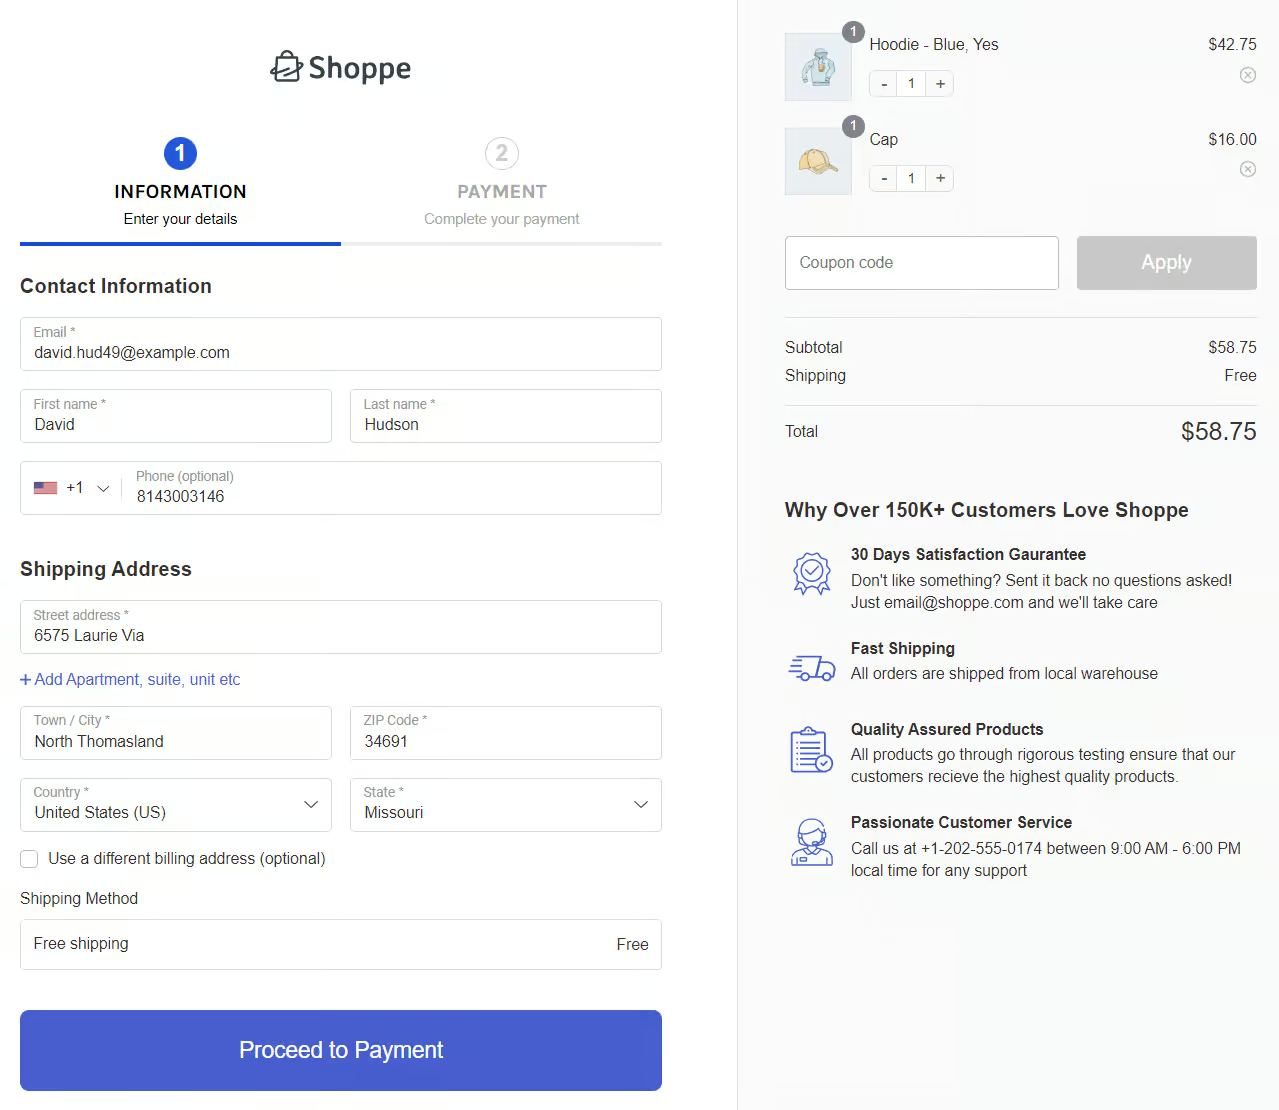
Well done! This is how you can set up a high-converting checkout page with easy drag-and-drop FunnelKit Funnel Builder.
Our experts recommend using this method if you don’t want to add checkout hooks via custom code snippets. This is a fairly easy process that gives the best result if you want to customize your WooCommerce checkout page easily.
WooCommerce Checkout Hooks: Frequently Asked Questions (FAQs)
We’ve answered some common questions related to WooCommerce checkout hooks:
While basic implementations may be accessible, you’d need a deeper understanding of code to maximize the potential of checkout hooks in WooCommerce.
Yes, there are risks involved with using checkout hooks. Like any customization, improper implementation can lead to conflicts or vulnerabilities on your website. It’s best to adhere to best practices that mitigate these risks.
Yes, there is an alternative method to create high-converting checkout pages and streamline your entire buying process without implementing any code. You can use the FunnelKit Funnel Builder (discussed in this post).
You can use woocommerce_new_order or woocommerce_thankyou hook. This will create a WooCommerce order hook that is triggered after an order is successfully received, regardless of how the user paid.
Yes, absolutely. I regularly use 5 to 10 hooks on complex checkout implementations. Just ensure your priorities are set correctly to control the execution order.
Hooks are part of WooCommerce's public API and remain stable across updates. However, occasionally hooks are deprecated (usually with 2+ years' notice). Always review WooCommerce release notes before major updates.
If you have any other questions, feel free to contact our Support Team.
Final Decision: WooCommerce Checkout Hooks or the Smarter Alternative?
We hope that you’ve completely understood WooCommerce checkout process hooks and how they help to enhance your store’s checkout experience.
While adding custom code to your functions.php file offers flexibility, it also demands technical expertise and ongoing maintenance.
But what if you could skip the coding hassle and still set up high-converting checkout pages effortlessly?
With FunnelKit Funnel Builder, you get a powerful, no-code solution to craft optimized checkout pages, complete sales funnels, and boost store conversions, all within a few clicks.
From order bumps to one-click upsells, FunnelKit empowers you to elevate the user experience in your store.
The choice is yours: Spend time tweaking hooks or take the easy, scalable route with FunnelKit Funnel Builder.
Get the FunnelKit Funnel Builder and transform your WooCommerce checkout experience!
Editorial Team
July 7, 2026Are you looking for WooCommerce checkout optimization hacks to streamline your users' shopping experience? 7 out of 10 shoppers who reach a WooCommerce checkout leave without paying; according to Baymard...
Editorial Team
July 6, 2026A WooCommerce order form lets customers select multiple products, set quantities, and choose variations from a single page instead of visiting individual product pages. There are two ways to add...
Editorial Team
July 6, 2026The Bricks WooCommerce builder is built directly into the Bricks theme. Activate the free WooCommerce plugin, and Bricks unlocks more than 30 store-specific elements plus visual templates for every part...


