
Need a sales funnel that converts and gets you customers on autopilot throughout the year?
Then the evergreen sales funnel is what you need to set up.
An evergreen sales funnel is a fully automated marketing and sales sequence that runs in the background, converting leads into customers without you needing to show up live or run a new launch every time.
The appeal is obvious. Build the system once, refine it over time, and let it work while you focus on other things.
No grinding through a new promotional campaign every few months.
The problem is that there is a significant gap between how Evergreen funnels are marketed and how they actually perform.
Most guides sell the dream and skip the part where you learn why yours is not converting. Building one that works consistently requires understanding what it actually is, what it is not, and where the usual advice falls short.
This blog covers all of that. In this, we will share what an evergreen sales funnel is, how it differs from a launch-based funnel, what it needs to work, and how to build one that does not just look good on paper.
Table of Contents
- 1 What Is an Evergreen Sales Funnel?
- 2 Evergreen vs. Launch-Based Funnels
- 3 The 4 Core Components of an Evergreen Sales Funnel And How They Work
- 4 How to Build an Evergreen Sales Funnel: Step-by-Step Guide
- 5 Frequently Asked Questions About Evergreen Sales Funnel
- 6 How long does it take to build and see results from an evergreen funnel?
- 7 What are the most common reasons evergreen funnels fail?
- 8 What is the difference between an evergreen sales funnel and a regular sales funnel?
- 9 How do I add real urgency without being dishonest?
- 10 How much traffic do I need for it to work?
- 11 Can evergreen funnels replace live launches?
- 12 Build Your Evergreen Funnel and Turn Leads Into Sales Automatically
What Is an Evergreen Sales Funnel?
An evergreen sales funnel is a system that moves a lead from first contact to purchase automatically, using pre-built content and timed email sequences rather than live events or time-limited campaigns.
The word "evergreen" refers to the fact that it remains green year-round, not seasonally. Anyone who enters the funnel on any given day gets the same experience, just triggered from whenever they opted in.
The simplest version looks like this: someone finds your content, opts in for a lead magnet, receives an automated email sequence, and is eventually presented with an offer.
That sequence plays out the same way whether it is a Tuesday in March or a Sunday in October. What makes it genuinely useful is not automation for its own sake. It is the ability to keep converting leads even when you are not actively marketing.
One thing worth understanding upfront, an evergreen funnel is not a rigid, linear pipeline. Real buyers jump between touchpoints, revisit your content, and move at their own pace. A well-built evergreen funnel gives structure to that non-linear behavior. It does not force a path. It surfaces the right information at the right stage, regardless of how the person got there.
Evergreen vs. Launch-Based Funnels
A launch funnel is built around a time window. For example, a coaching program closing enrollment on Friday, a live workshop with a registration cutoff, or a founding member deal for a new service. Once it shuts, the offer is gone until you decide to run it again.
An evergreen funnel has no open date, no close date, and no promotional push. The moment someone opts in, they automatically move through a sequence of emails and offers you built once.
The system handles everything from there, whether someone joins today or three months from now. The funnel stays exactly the same; it just keeps welcoming more people over time.
One demands your attention every time. The other just keeps running on its own.
Here are the key differences:
| Aspect | Launch Funnel | Evergreen Funnel |
| Duration | Fixed window (1–2 weeks) | Runs continuously |
| Urgency | Real, deadline-driven | Engineered (or value-driven) |
| Revenue pattern | Spikes during launch, flattens after | Steadier, lower baseline |
| Best for | Generating attention and a surge of sales | Capturing ongoing traffic between launches |
| Effort | High during promotion, low otherwise | Low ongoing, higher upfront build |
| Lead timing | Everyone buys at the same time | Leads convert whenever they opt in |
The 4 Core Components of an Evergreen Sales Funnel And How They Work
Before you build anything, it helps to understand what the system is actually made of. An evergreen funnel has four components working together. Weakness in any one of them limits what the whole system can do.
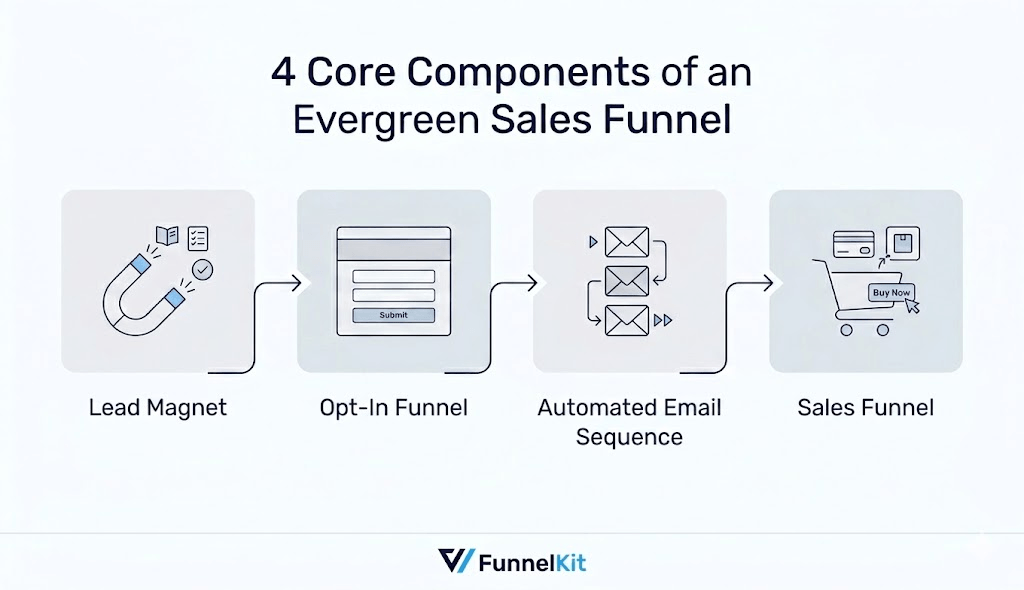
1. A Lead Magnet
This is how someone enters your funnel. It could be a free guide, a webinar replay, a quiz, a free trial, or a discount.
The entry point needs to be specific enough to attract the right person, and it needs to connect logically to what you are eventually selling.
2. An Opt-In Funnel with the Lead Magnet
Once someone is interested in the lead magnet, they need a page to claim it. This page does one job: to convert visitors into leads.
The page should be distraction-free, with no extra links or navigation pulling attention away. It needs to clearly communicate the lead magnet's specific benefit so the visitor knows exactly what they're getting.
And it must include an opt-in form requesting a name and email address, which allows you to follow up and continue the conversation after they leave.
3. An Automated Email Sequence
This is the actual funnel. After someone opts in, they receive a series of emails over a set number of days. Early emails deliver value and build trust. Later emails introduce the offer, address objections, and give the reader a clear reason to act now rather than later.
According to HubSpot's State of Marketing report, automated email sequences generate significantly higher engagement than one-off broadcast emails because they reach people based on behavior and timing rather than a calendar. (Source: HubSpot State of Marketing)
For lower-priced products, five to seven emails over about two weeks is a common starting point. For higher-ticket offers, sequences often run longer and include more educational content before the pitch.
4. A Sales Funnel with the Final Offer
A sales funnel with the final offer is where leads become customers. At some point in your sequence, you send people to a product landing page where they can actually buy. The page needs to clearly explain what the product is, handle the main objections, and make the next step obvious.
If your email sequence is doing its job, the sales page shouldn't have to work that hard. If it feels like it's doing all the persuasion from scratch, the sequence needs work, not the page design.
Depending on your product, you can also add an order bump at checkout, a one-click upsell right after purchase, and a thank-you page that feels personal rather than just confirming the order.
How to Build an Evergreen Sales Funnel: Step-by-Step Guide
Setting up an evergreen sales funnel is straightforward if you use WordPress CMS.
With WordPress, we are going to use FunnelKit Funnel Builder for the opt-in and sales funnels, and FunnelKit Automations for the email sequence that runs between them.
Both plugins are available together in the Professional plan or higher.
Trusted by over 40,000 users globally, FunnelKit is built to run evergreen sales funnels without the ongoing maintenance.
The best part is you get a prebuilt template for everything optin funnel, email automation, and sales funnels.
Once you set it up, it runs on its own.
Make sure to install and activate both plugins, and next, follow these steps:
Step 1: Choose optin funnel with an offer
First, decide what you want to offer as a lead. Next, navigate to FunnelKit ⇒ Funnels and click on “Create New Funnel”. On the “Lead Funnels” tab, you will find all the prebuilt templates.
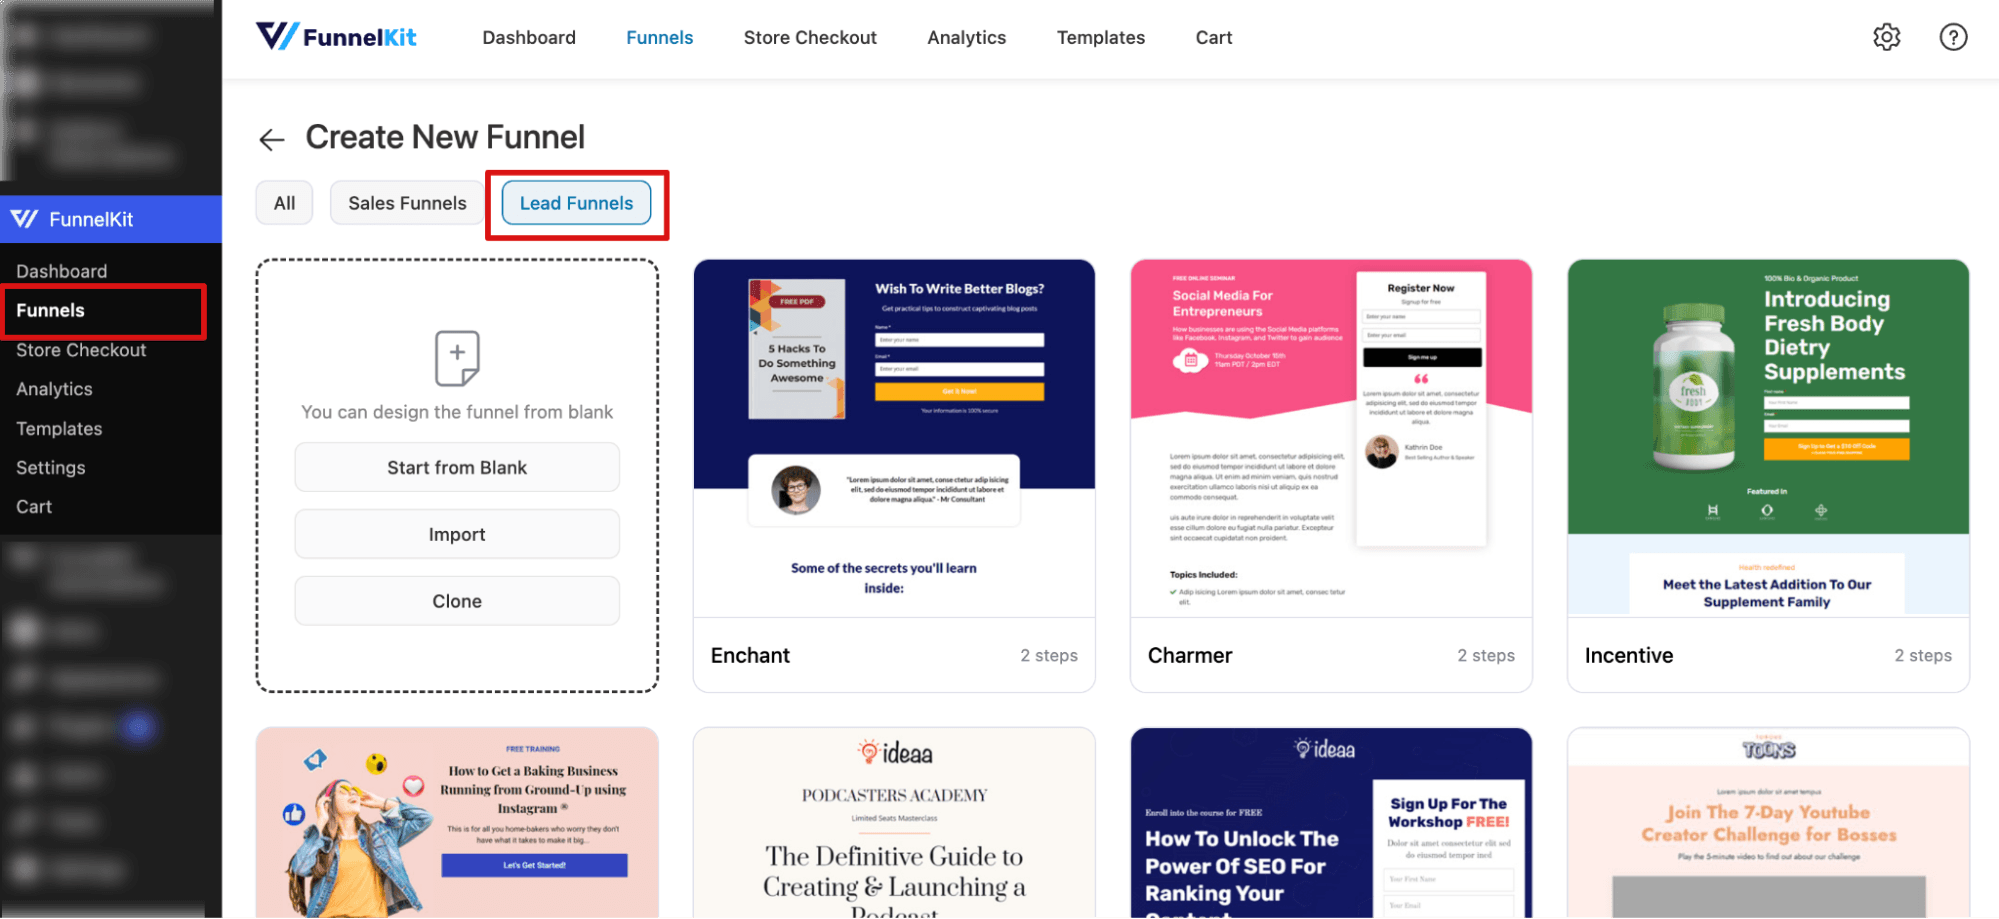
Depending on your offer, hover over any of the templates and import it. Each prebuilt template as a inbuilt opt-in form.
You can choose an inline style or a pop-up.
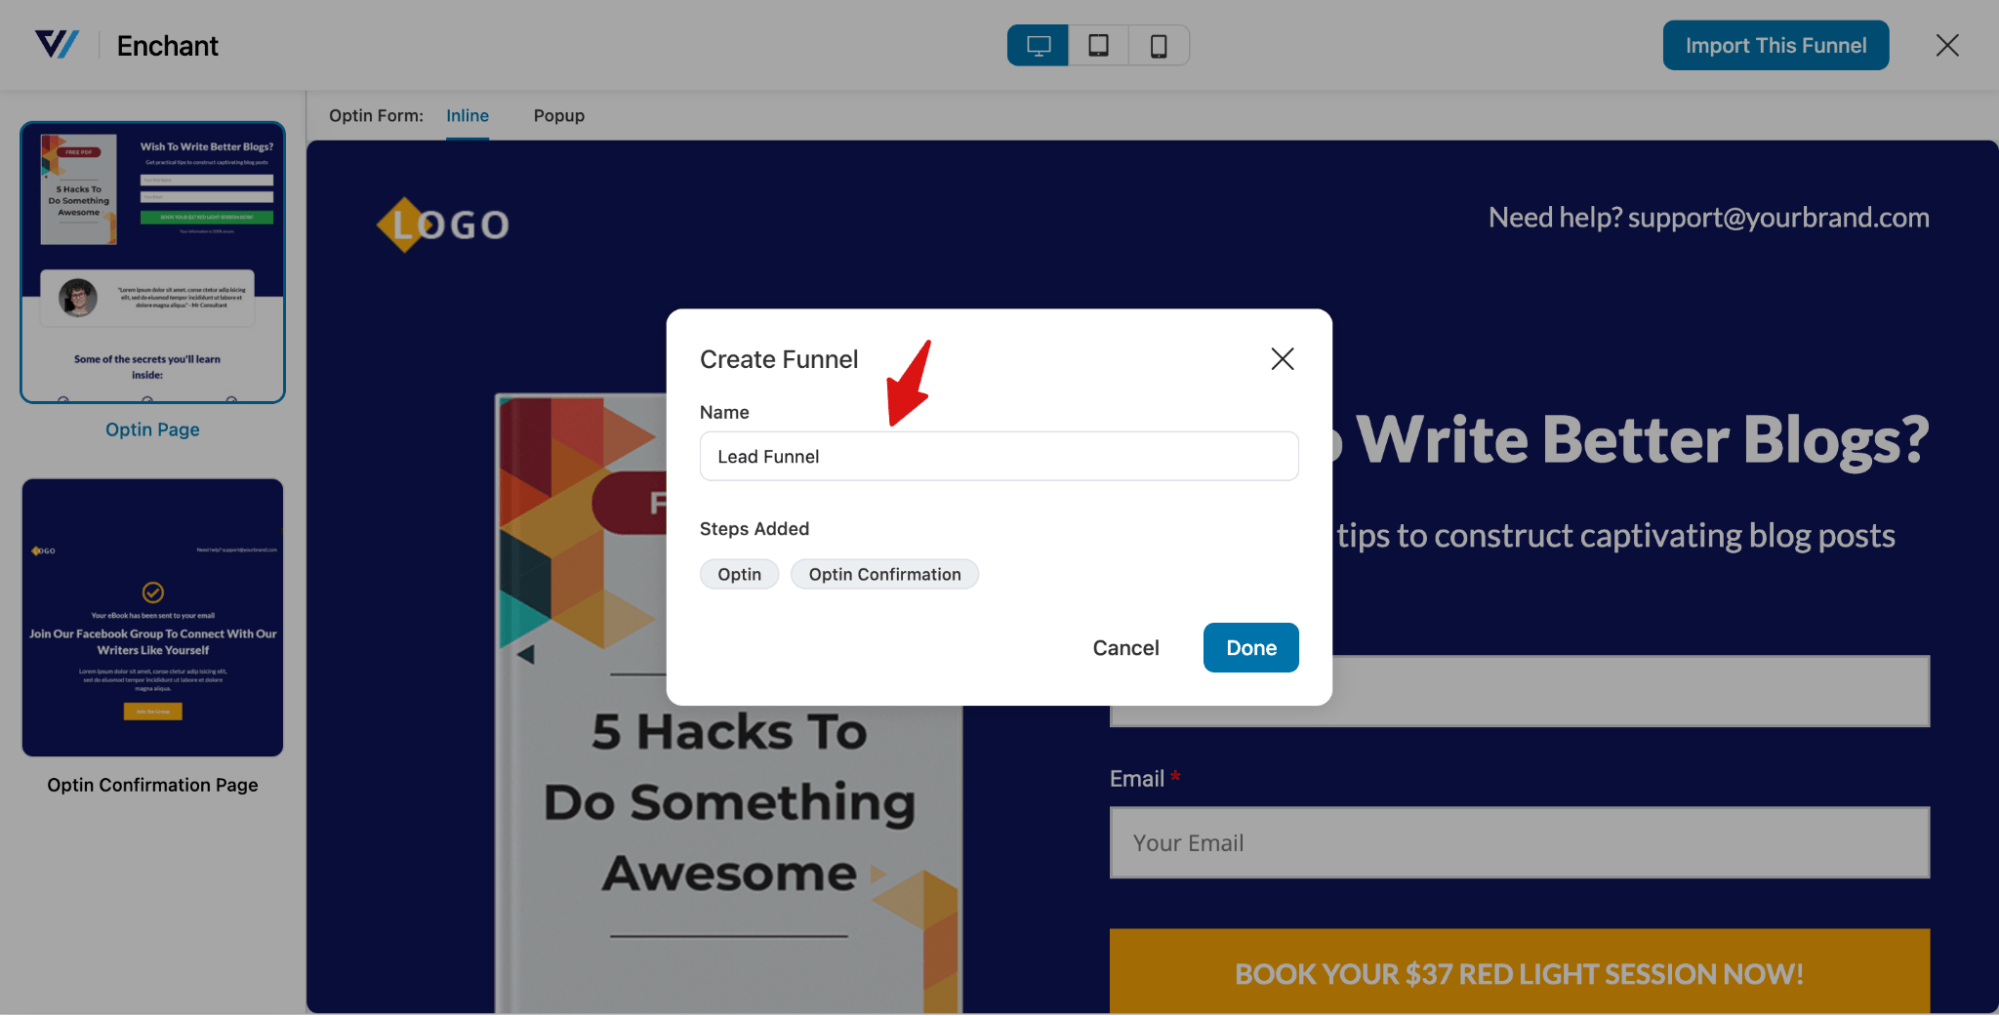
It will load the two-page Optin and Optin Confirmation page.
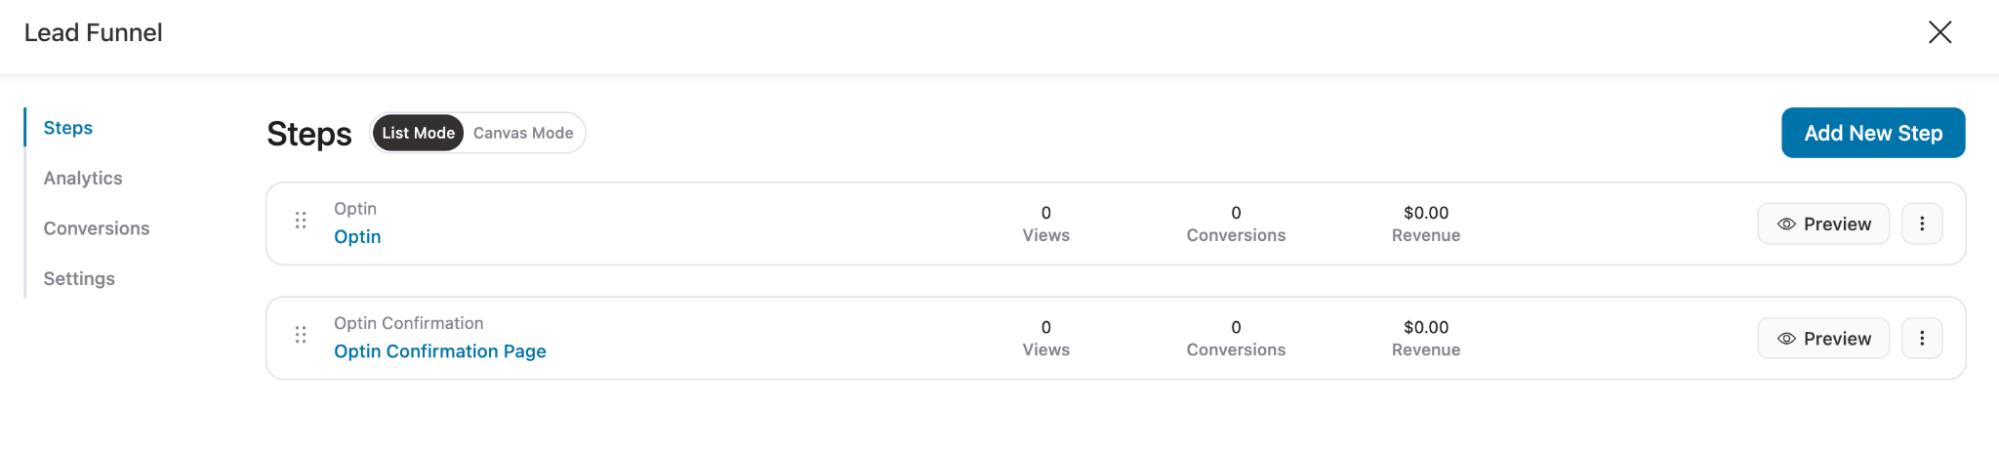
You can use your favorite page builders to customize both the design and content.
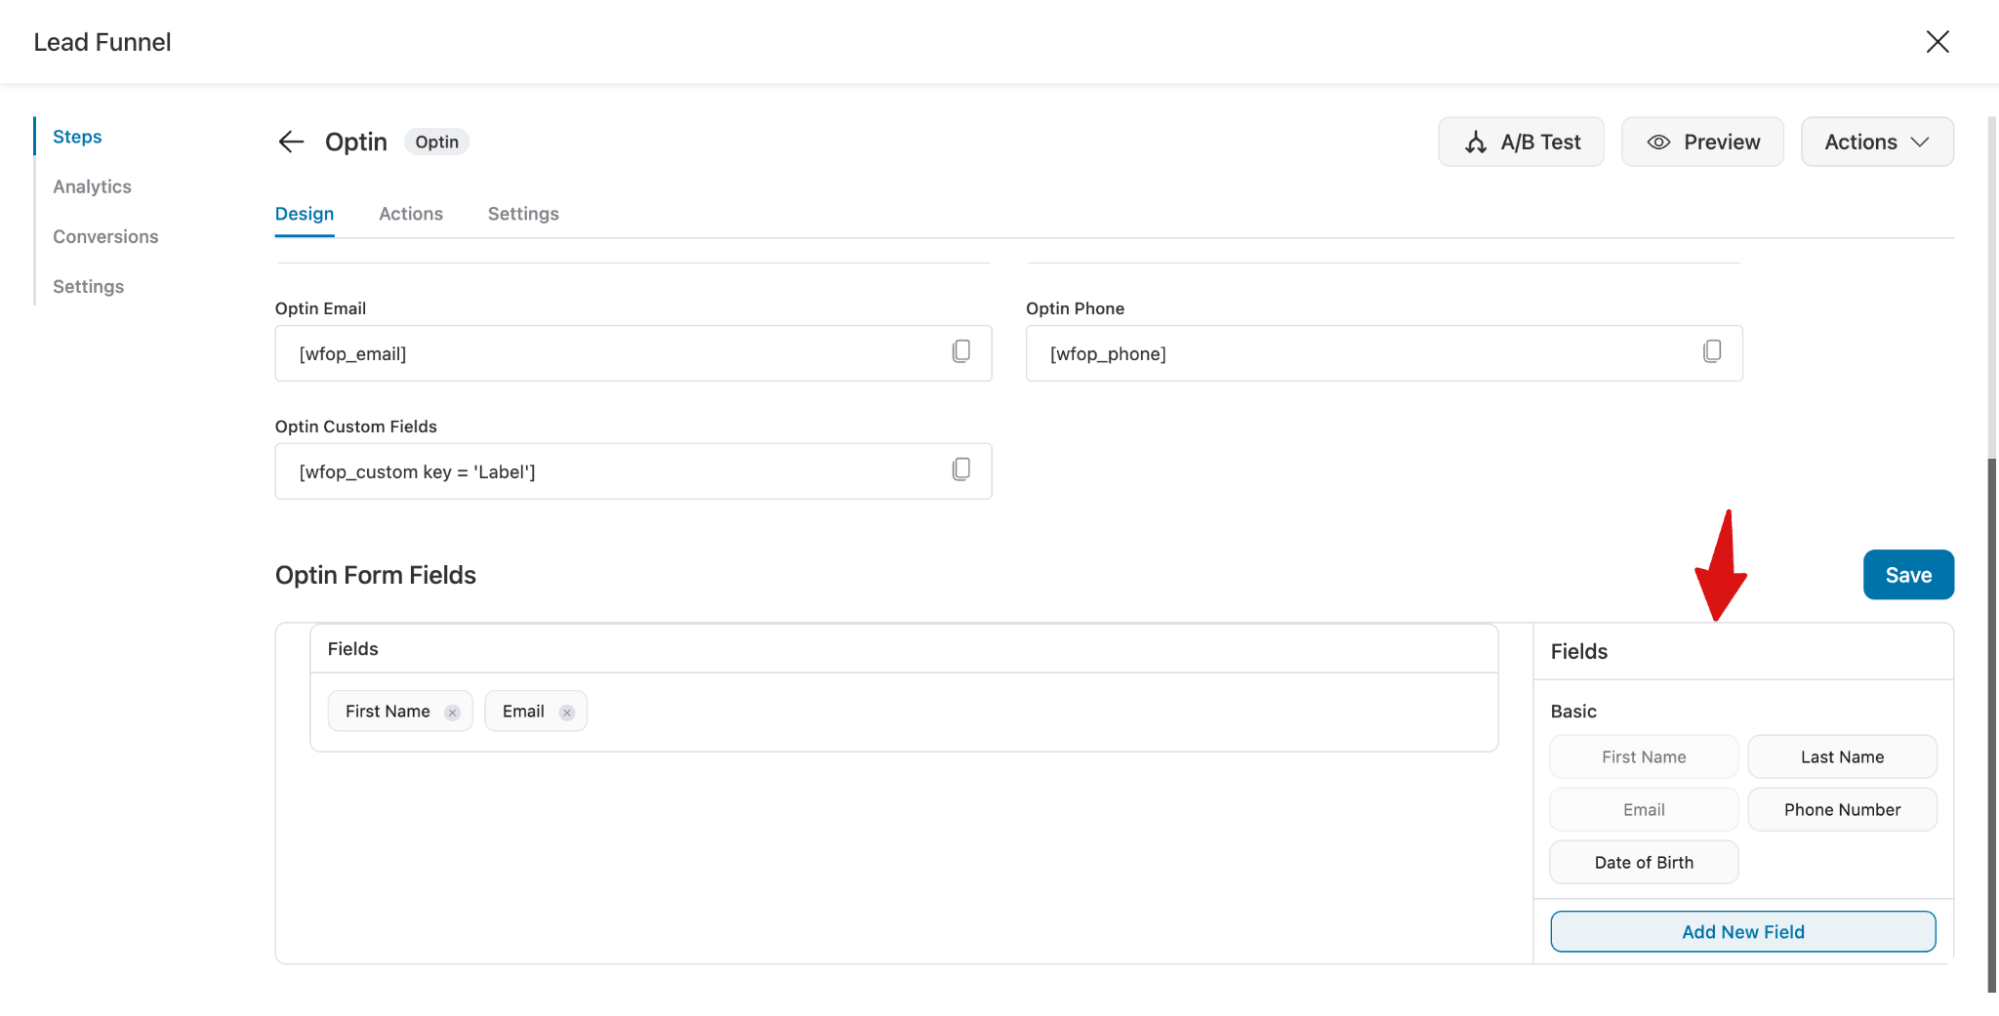
Also, for the opt-in form, you can add any custom fields you want. By default, it has two: first name and email. You can add more fields like last name, phone number, and date of birth. If needed, you can create any type of field, text, select, radio, etc.
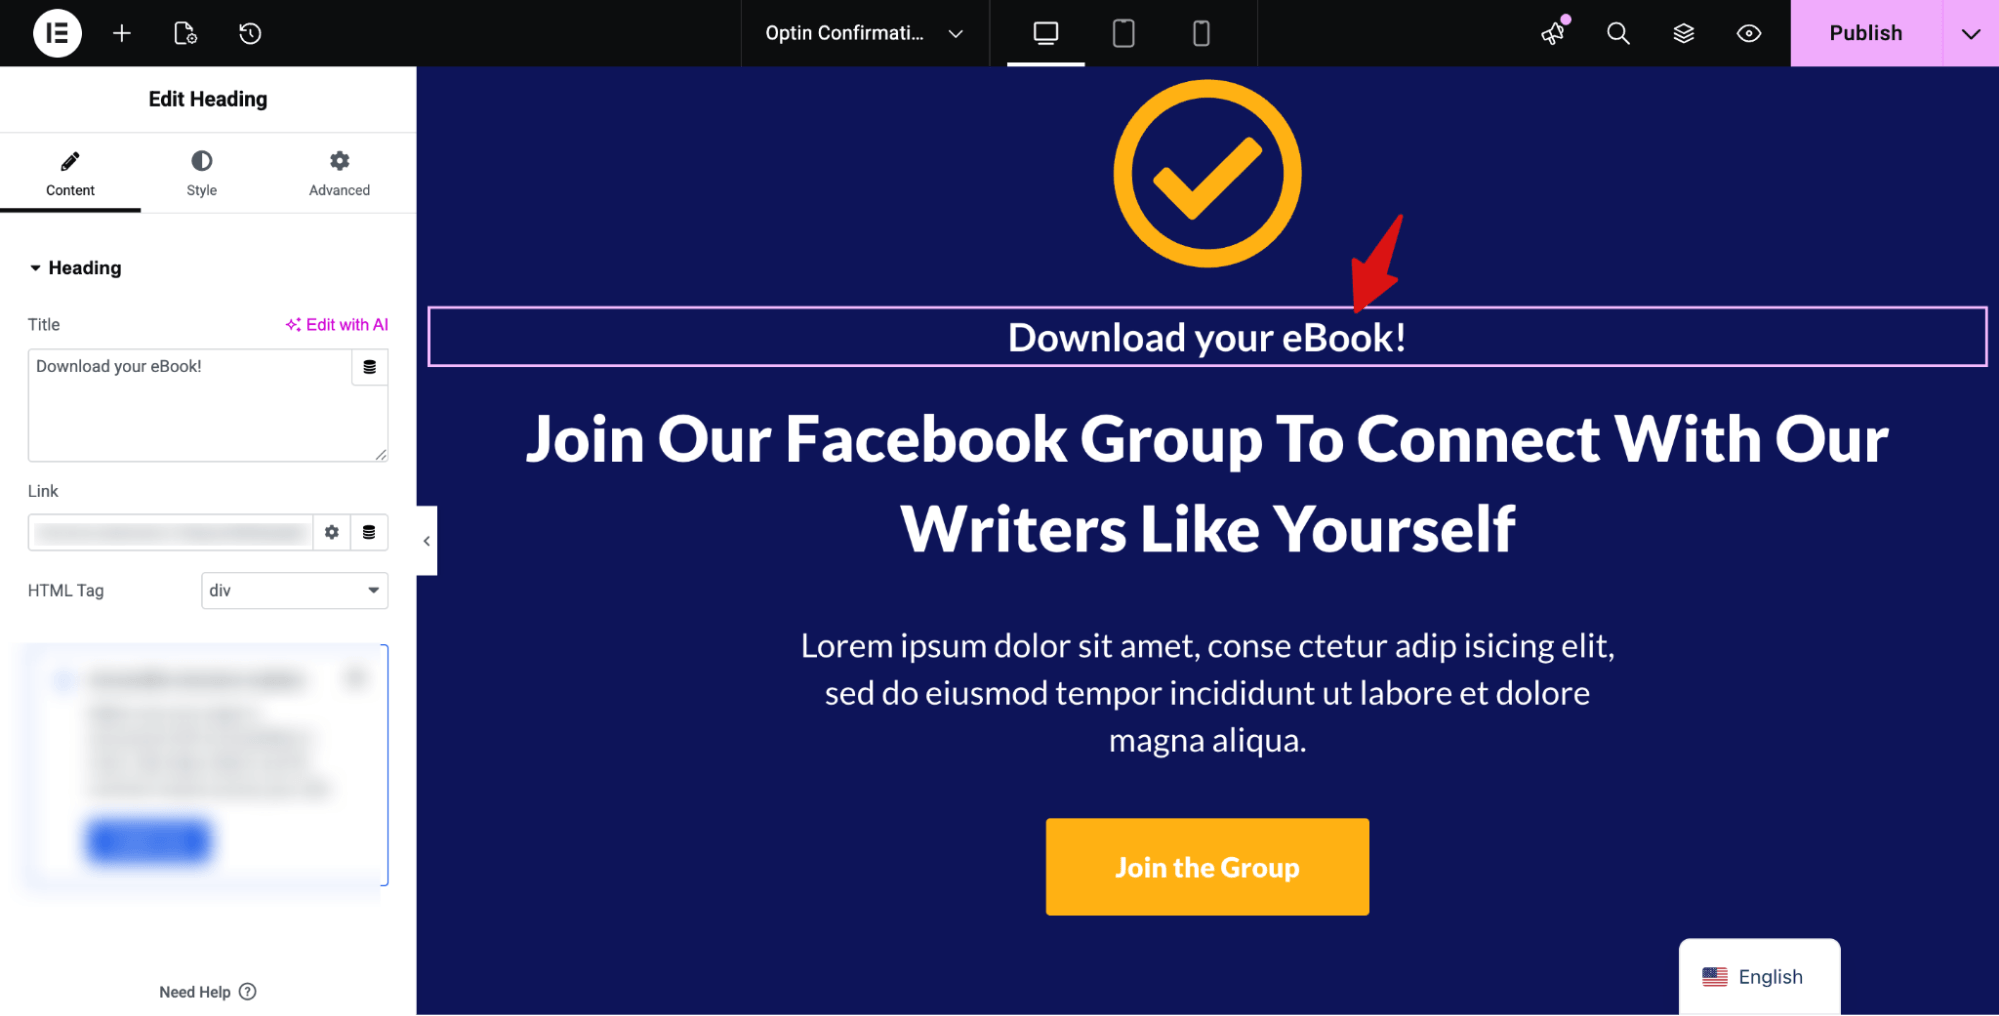
On the confirmation page, you can share your lead magnet details.
Guide: For more details, check our documentation on optin funnel.
Step 2: Set up email automation upon opt-in submission with a prebuilt recipe
Now it’s time to set up an email automation sequence. Here is a basic structure you can follow:
A basic structure that works:
- Email 1 (Day 0): Deliver the lead magnet. Set expectations for what is coming next.
- Email 2 (Day 2): Teach something genuinely useful. No pitch.
- Email 3 (Day 4): Address the biggest objection your buyer has before they even see the offer.
- Email 4 (Day 6): Introduce the offer. Explain what it is and who it is for.
- Email 5 (Day 8): Share a reason to act now, a bonus, a price increase, or a specific outcome they are currently missing out on.
- Email 6 (Day 10): Final reminder. Keep it short.
This is a starting point, not a formula. Some offers need more education before the pitch. Some audiences are ready to buy after three emails. Let your data tell you where to expand or trim.
To set up, navigate to FunnelKit Automations ⇒ Automations, and hit “Create Automation”.
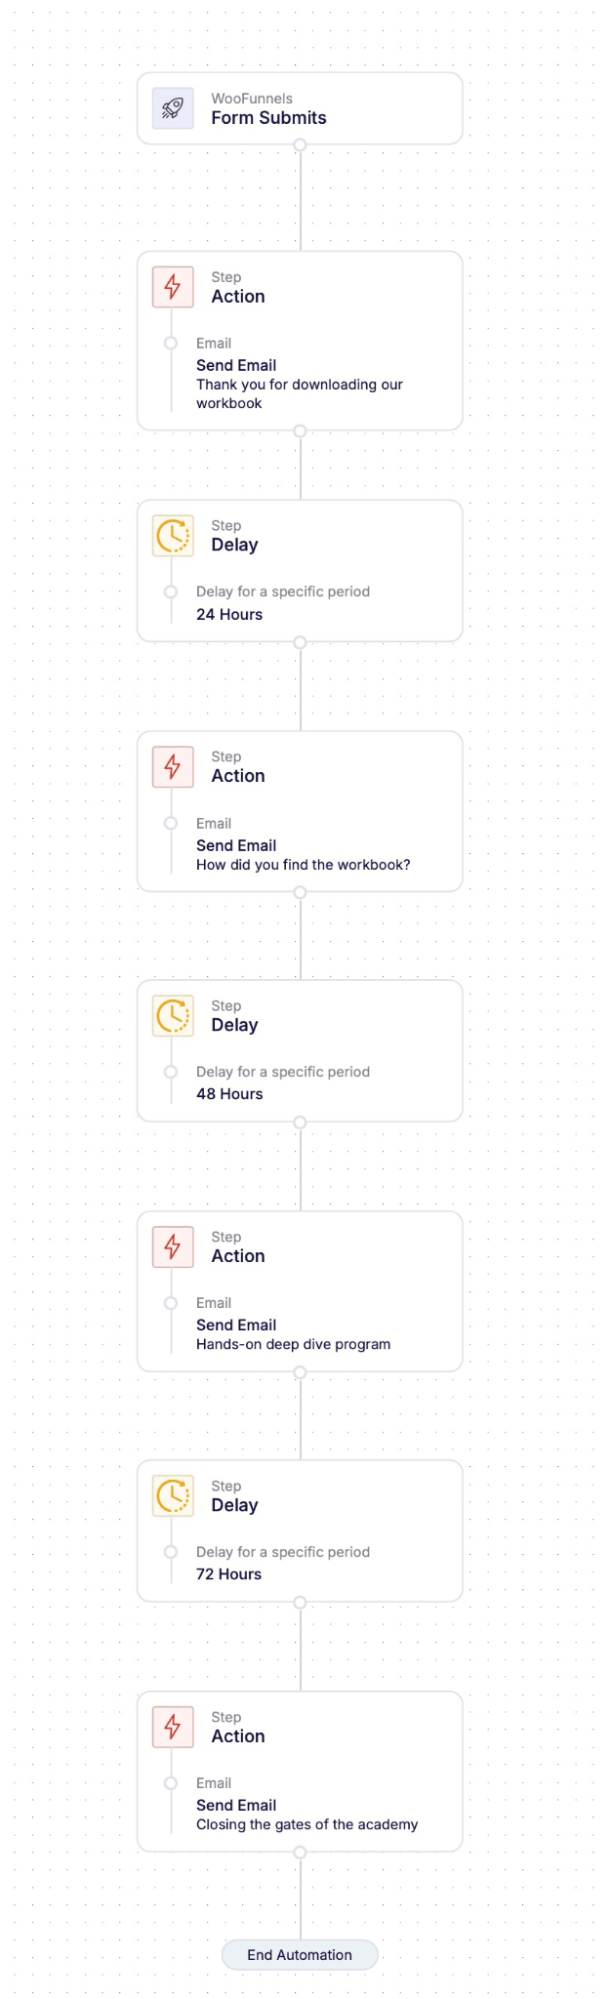
From the prebuilt template, you can import the “Optin Follow-up” prebuilt template. This includes
- Email 1 (Day 0 | Immediately): Thank you for downloading our workbook
- Email 2 (Day 1 | 24 hours later): How did you find the workbook?
- Email 3 (Day 3 | 48 hours later): Take a deeper dive with our hands-on program
- Email 4 (Day 6 | 72 hours later): Closing the doors to the academy
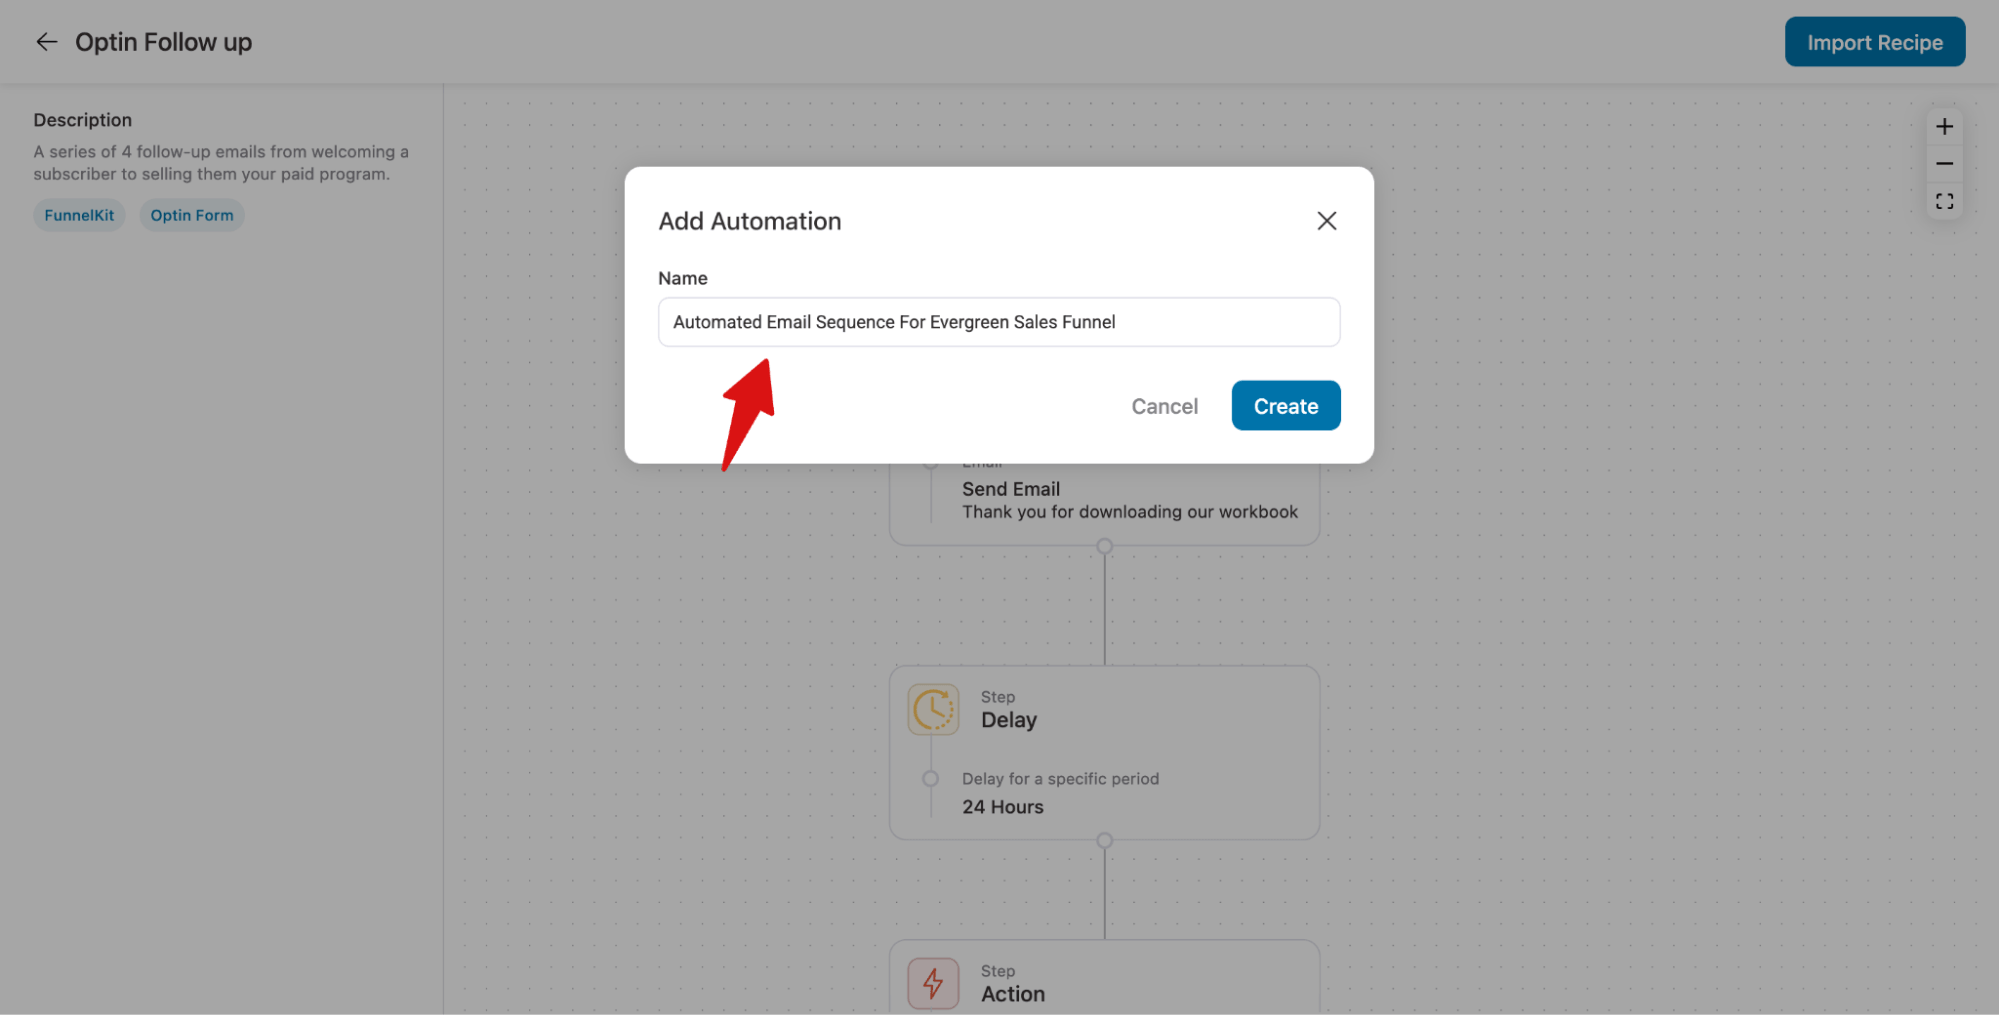
To import, hit “Import Recipe”, add a name, and hit “Create”.
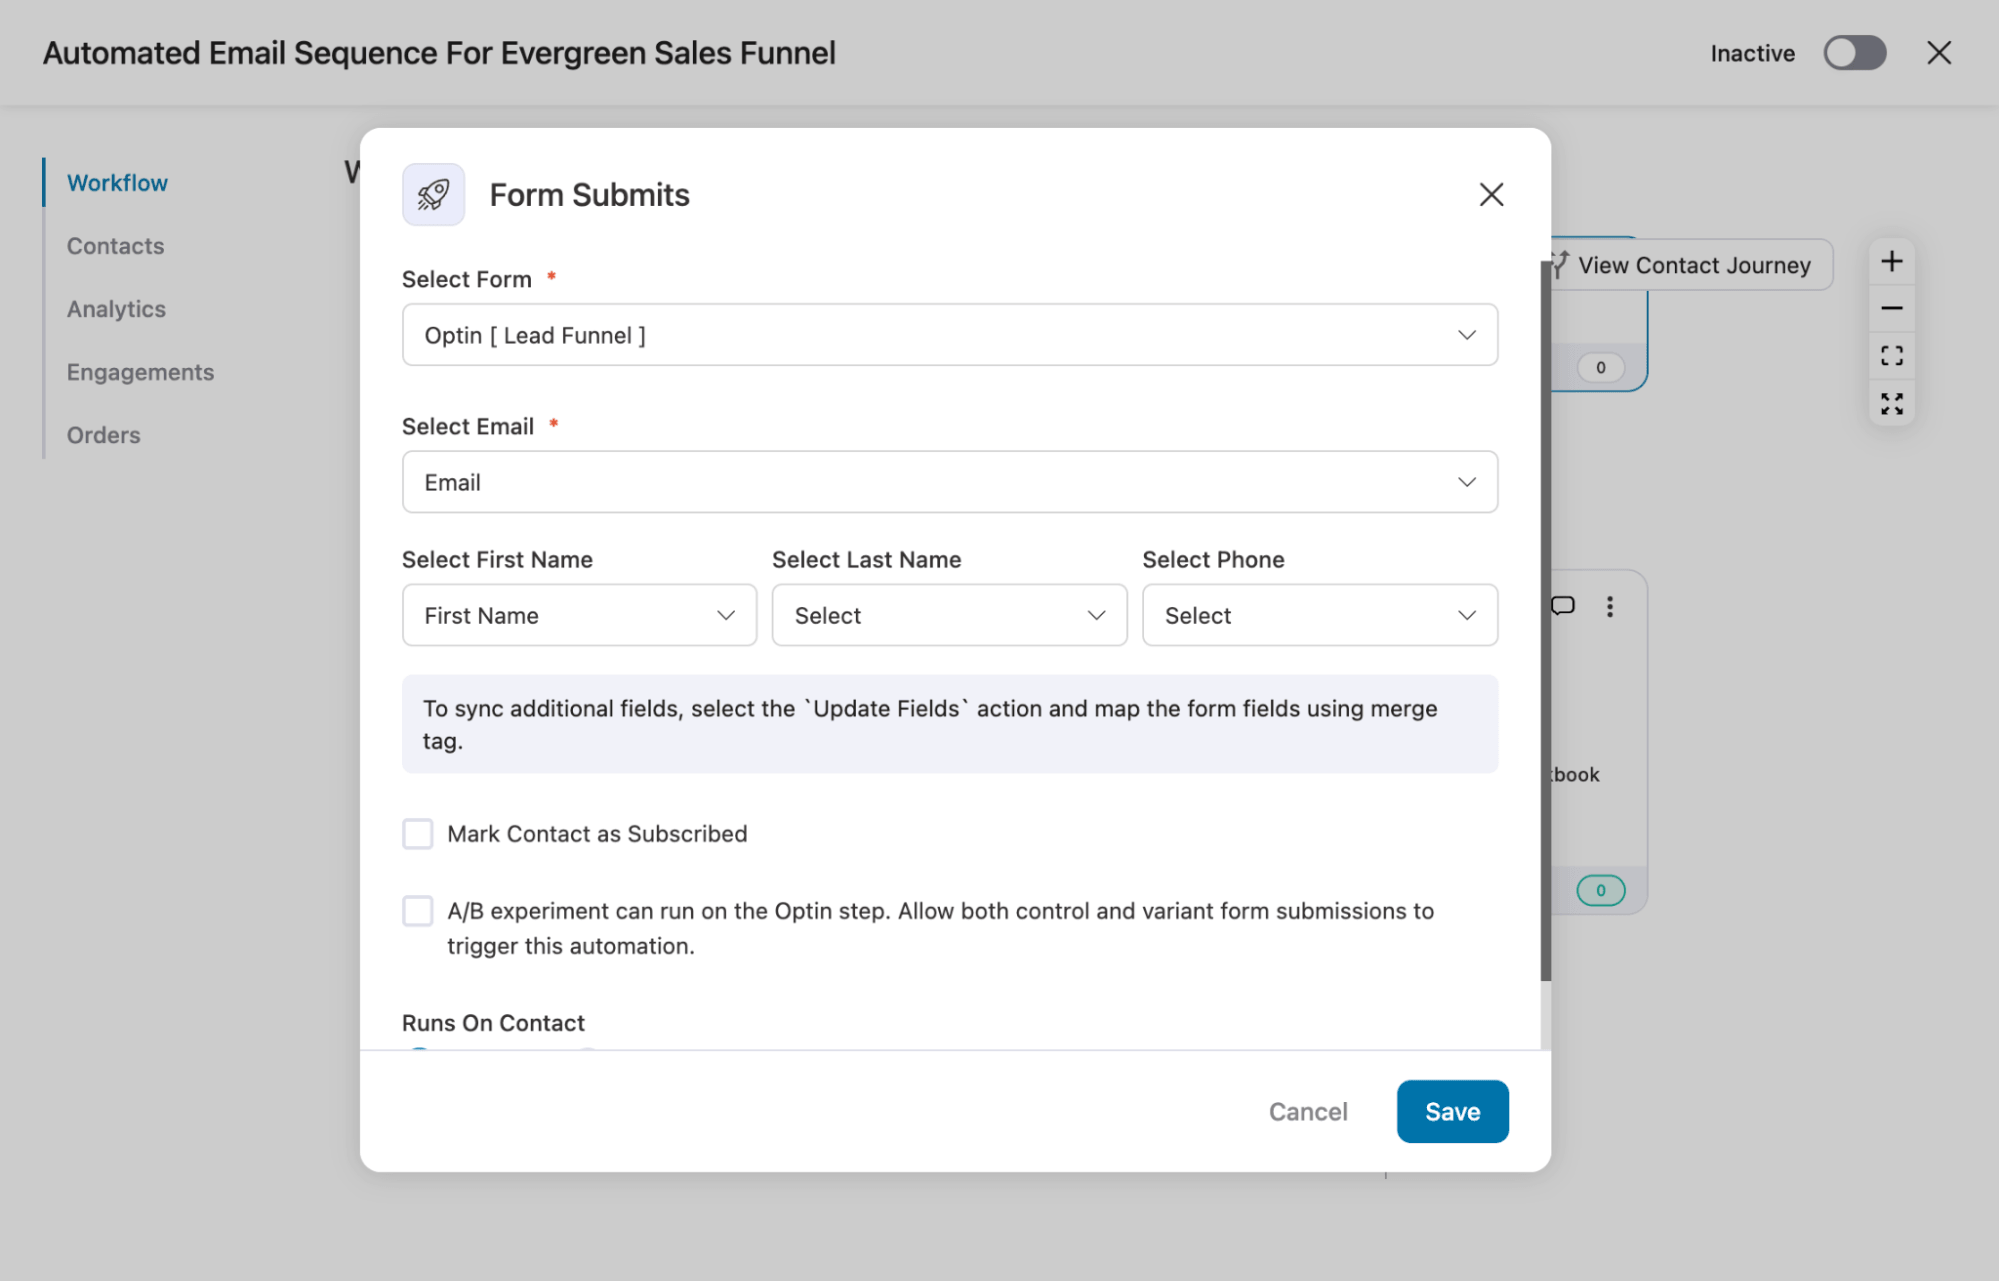
Configure optin form trigger event
Next, configure the “Form Submits” trigger by selecting the form used on your opt-in landing page and mapping the fields accordingly.
Customize email
Next, customize th existing email and delays according to your strategy.
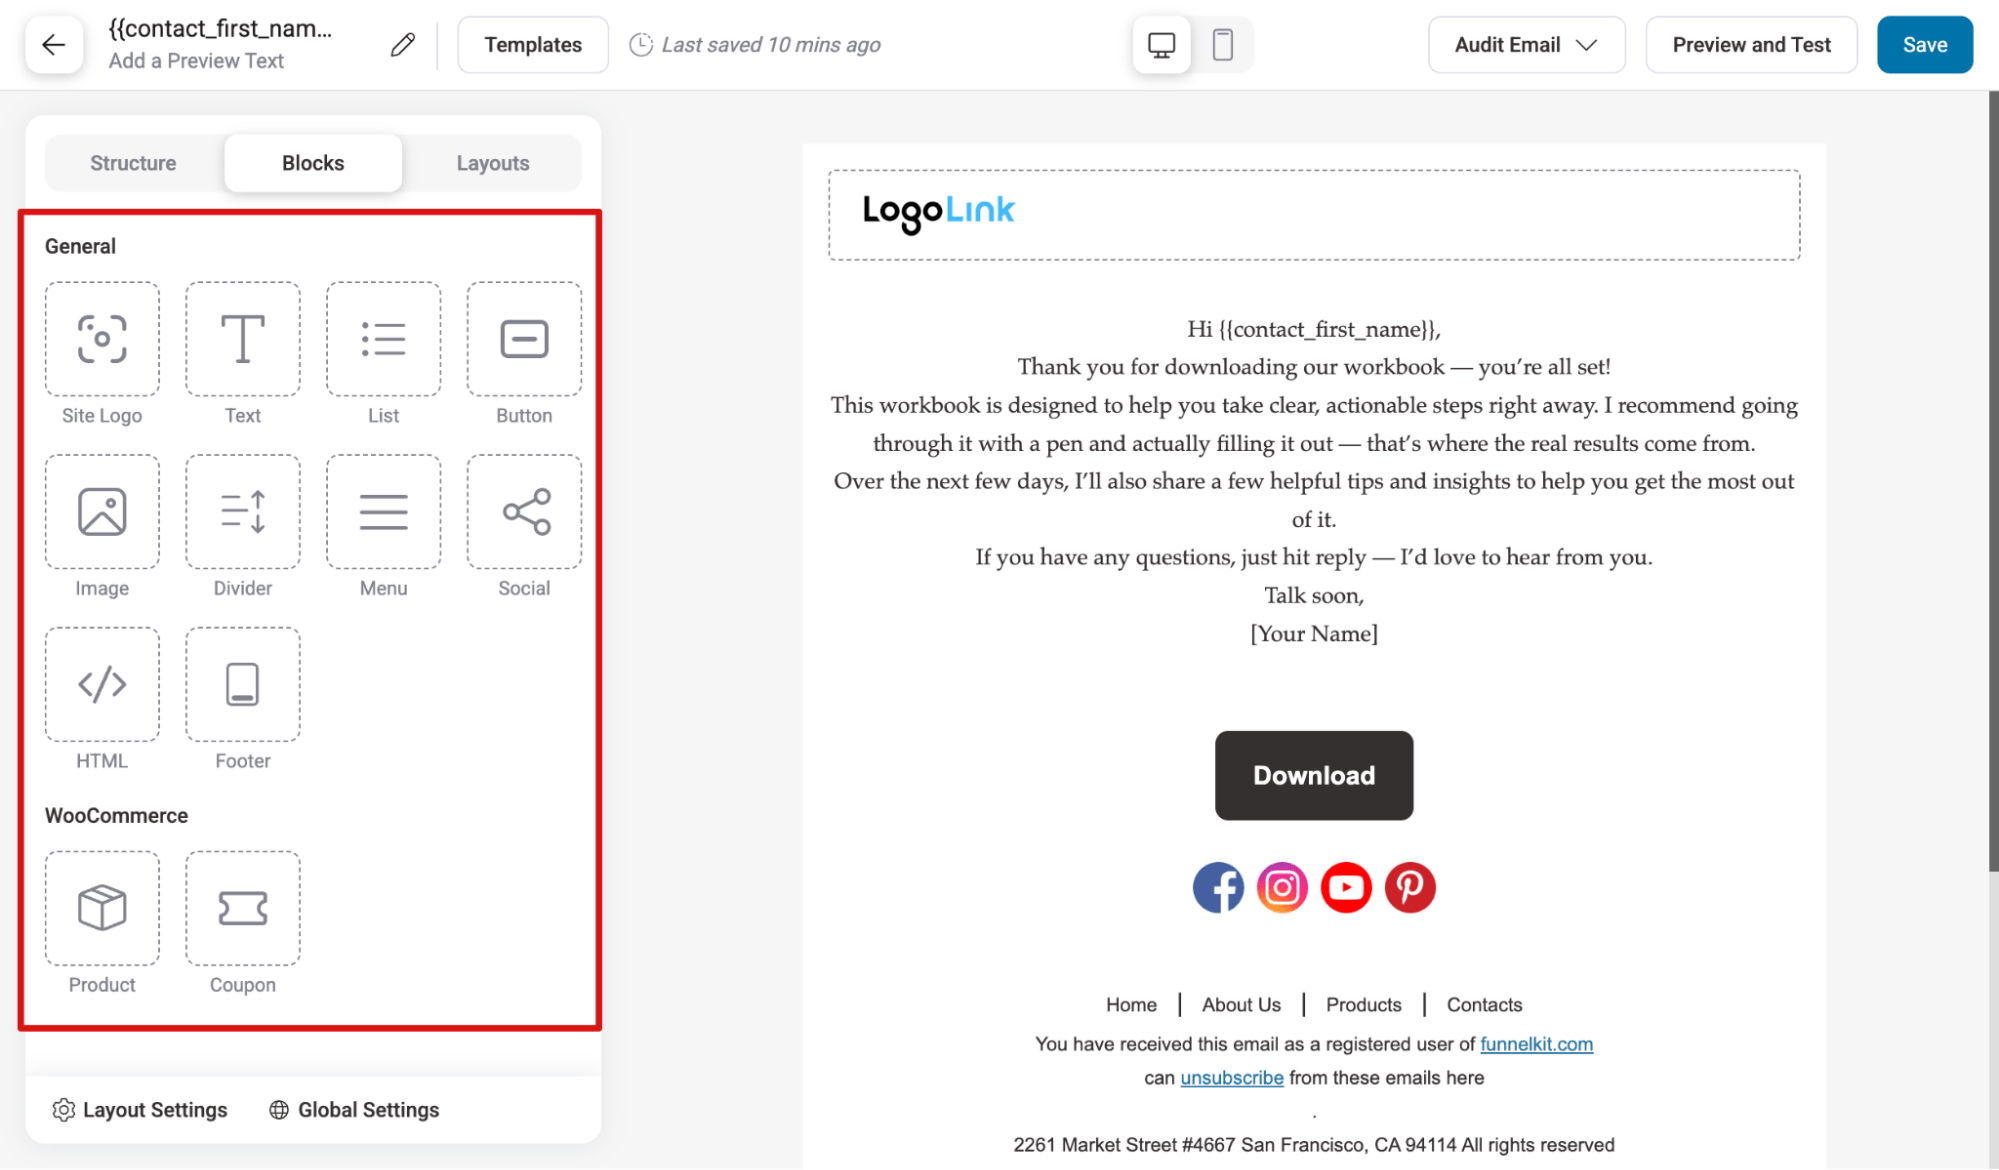
To customize any email, click the action, then change the subject and preview text, and add a personalized message with merge tags.
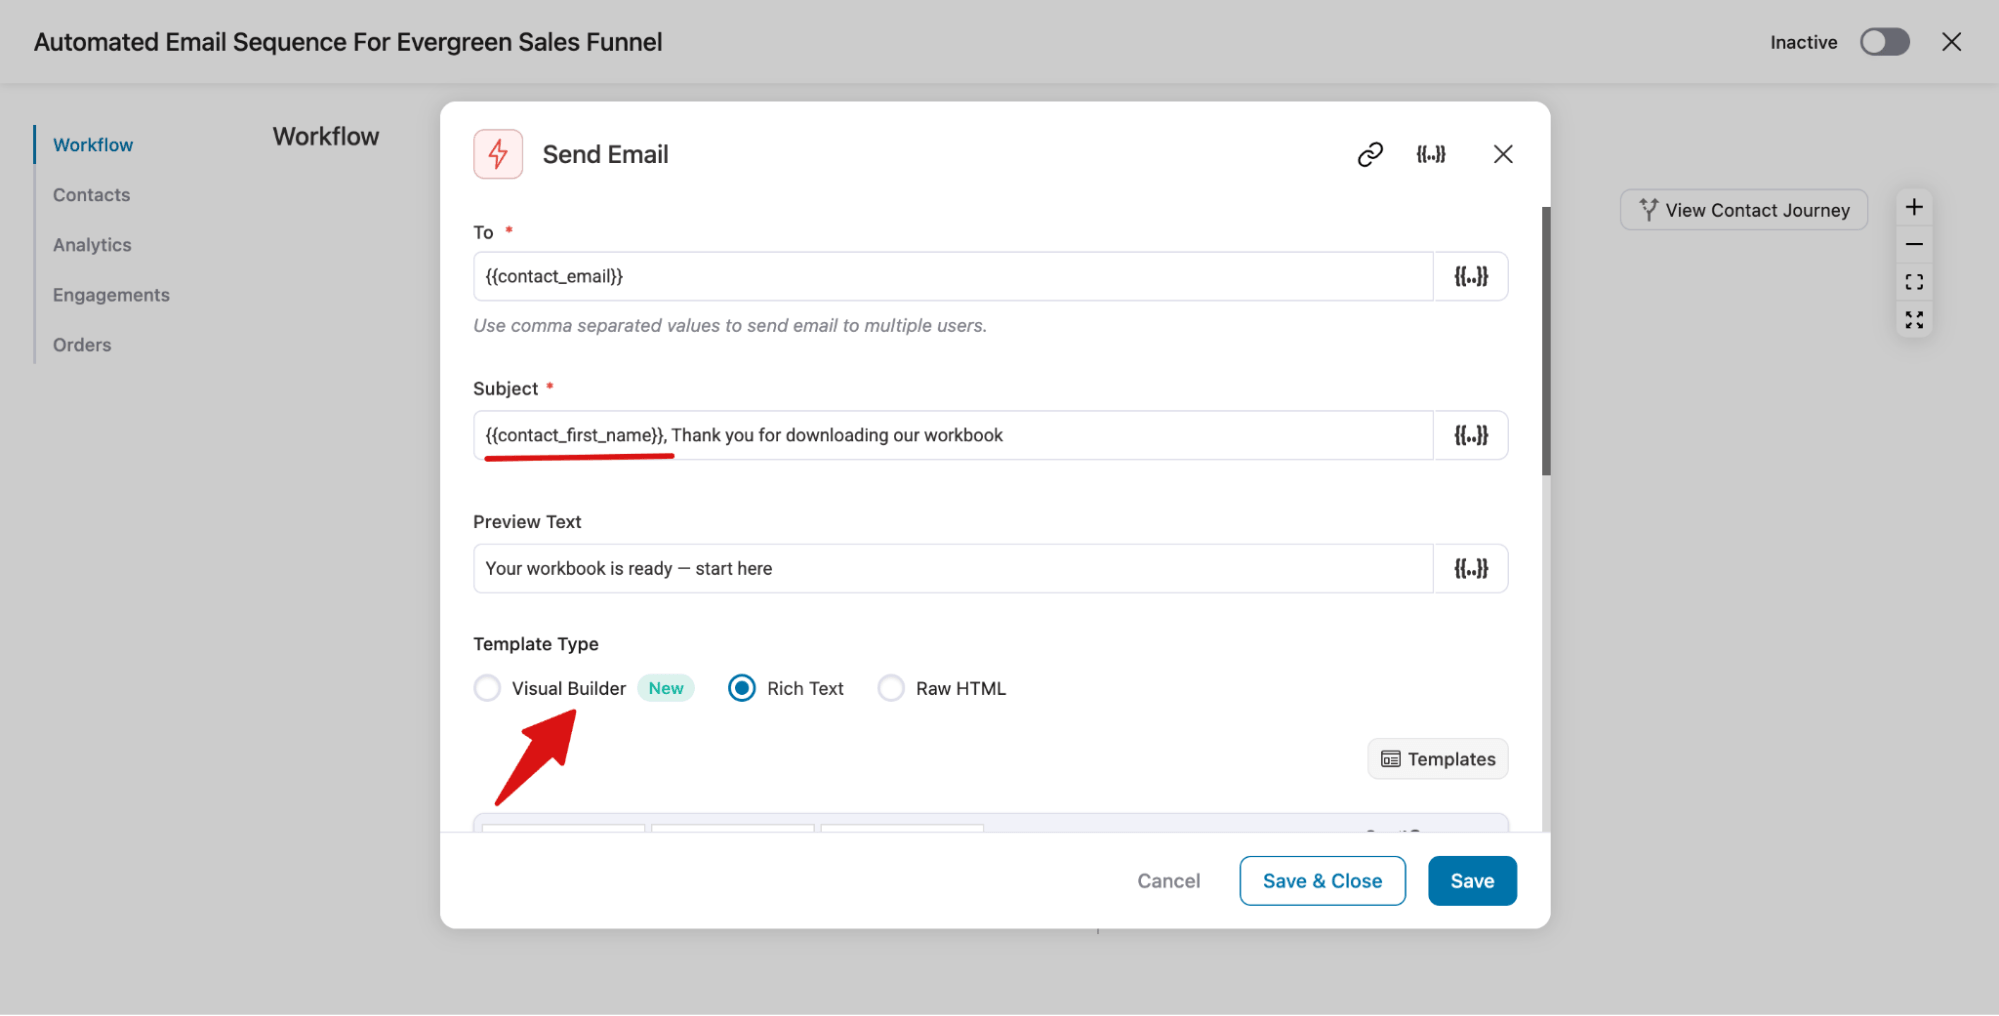
Then, you can design your email with three builders: Visual Builder, Rich Text, and Raw HTML.
We recommend using the Visual Builder, as it offers a variety of prebuilt templates you can import and use according to your needs.
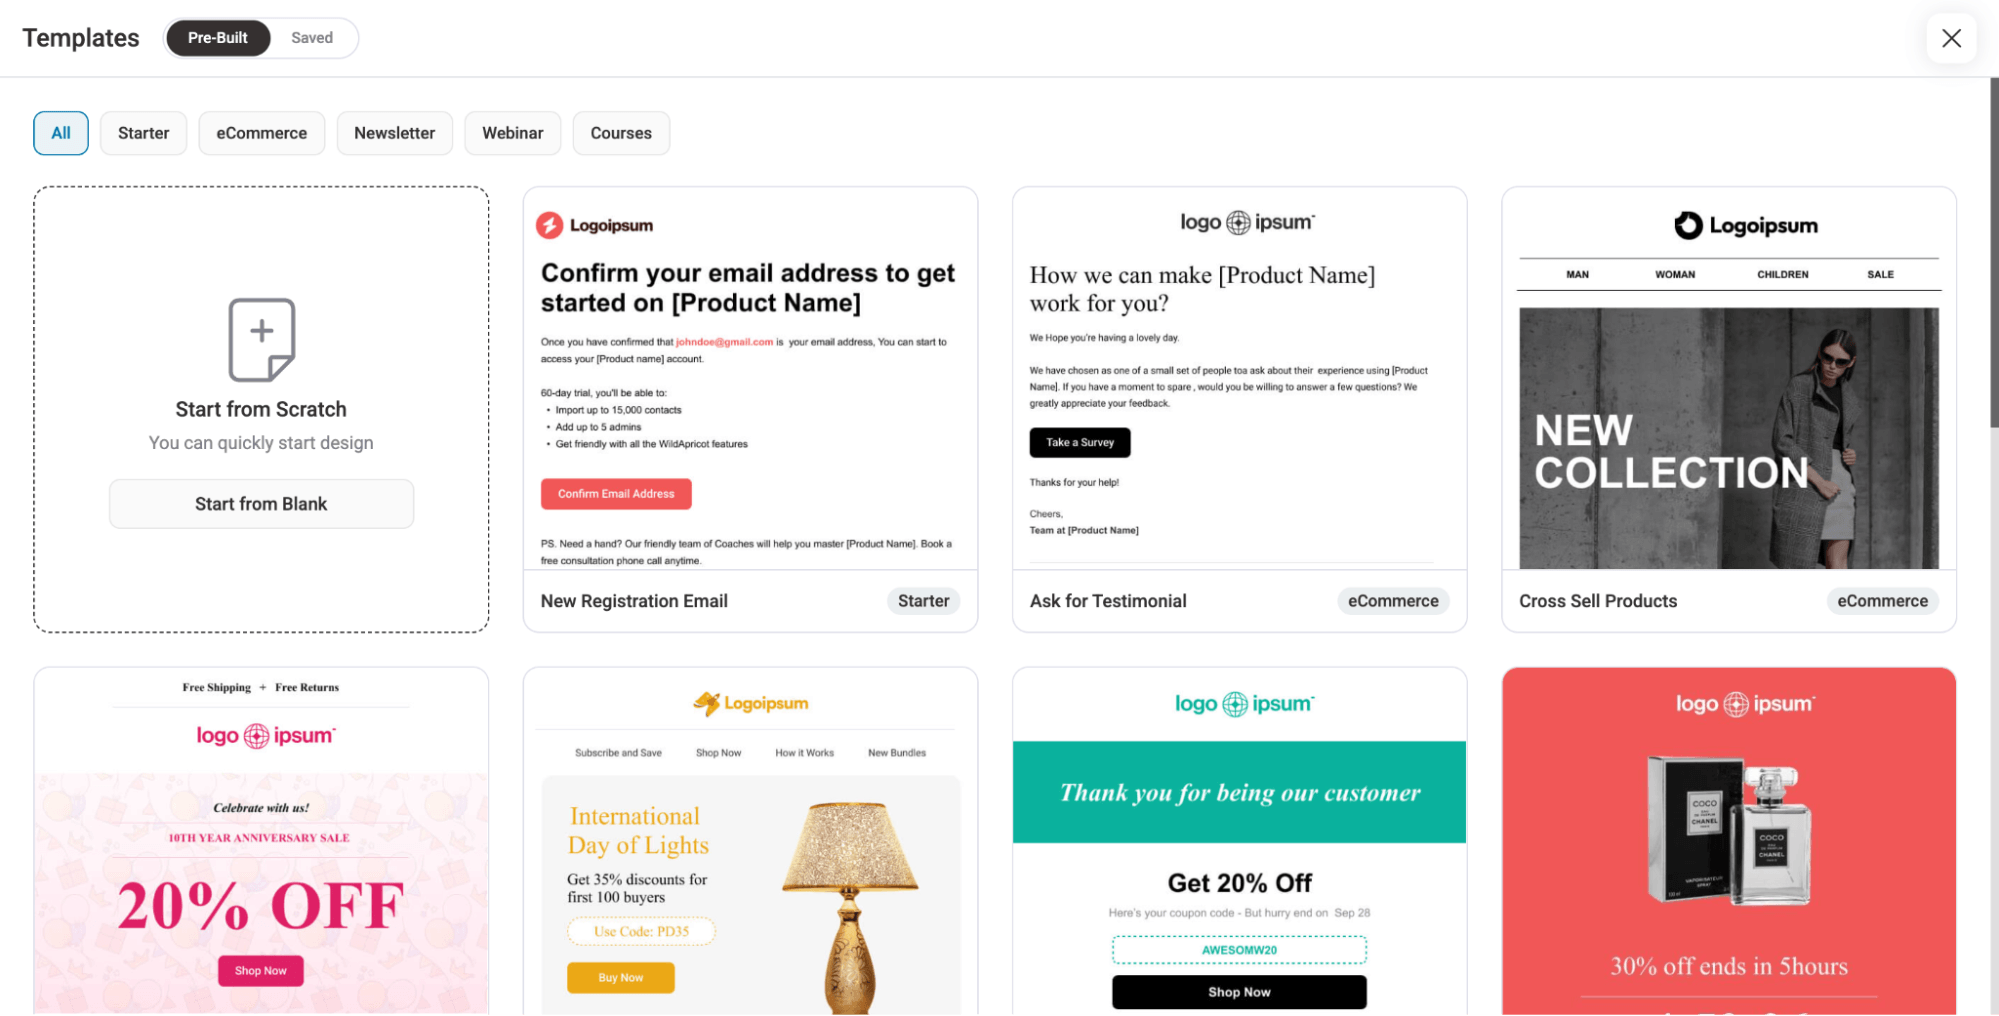
You also get many prebuilt blocks to create your email from scratch.
Customize delays
To customize the delay, hit on the action, then you can set it by hours, dats, weeks, etc.
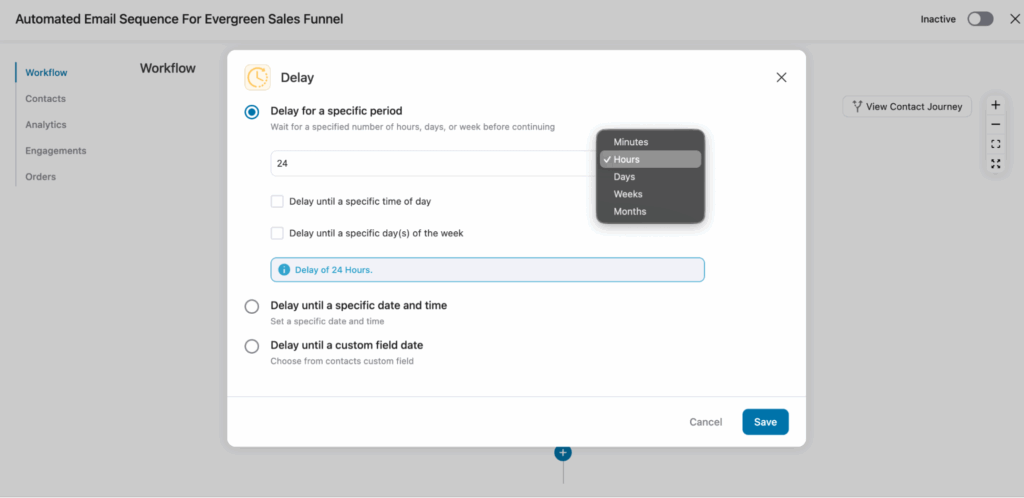
Since the prebuilt template has a limited number of emails, if needed, use Action to add both a delay and an email.
Just the “+” icon after the last email and select “Delay”.
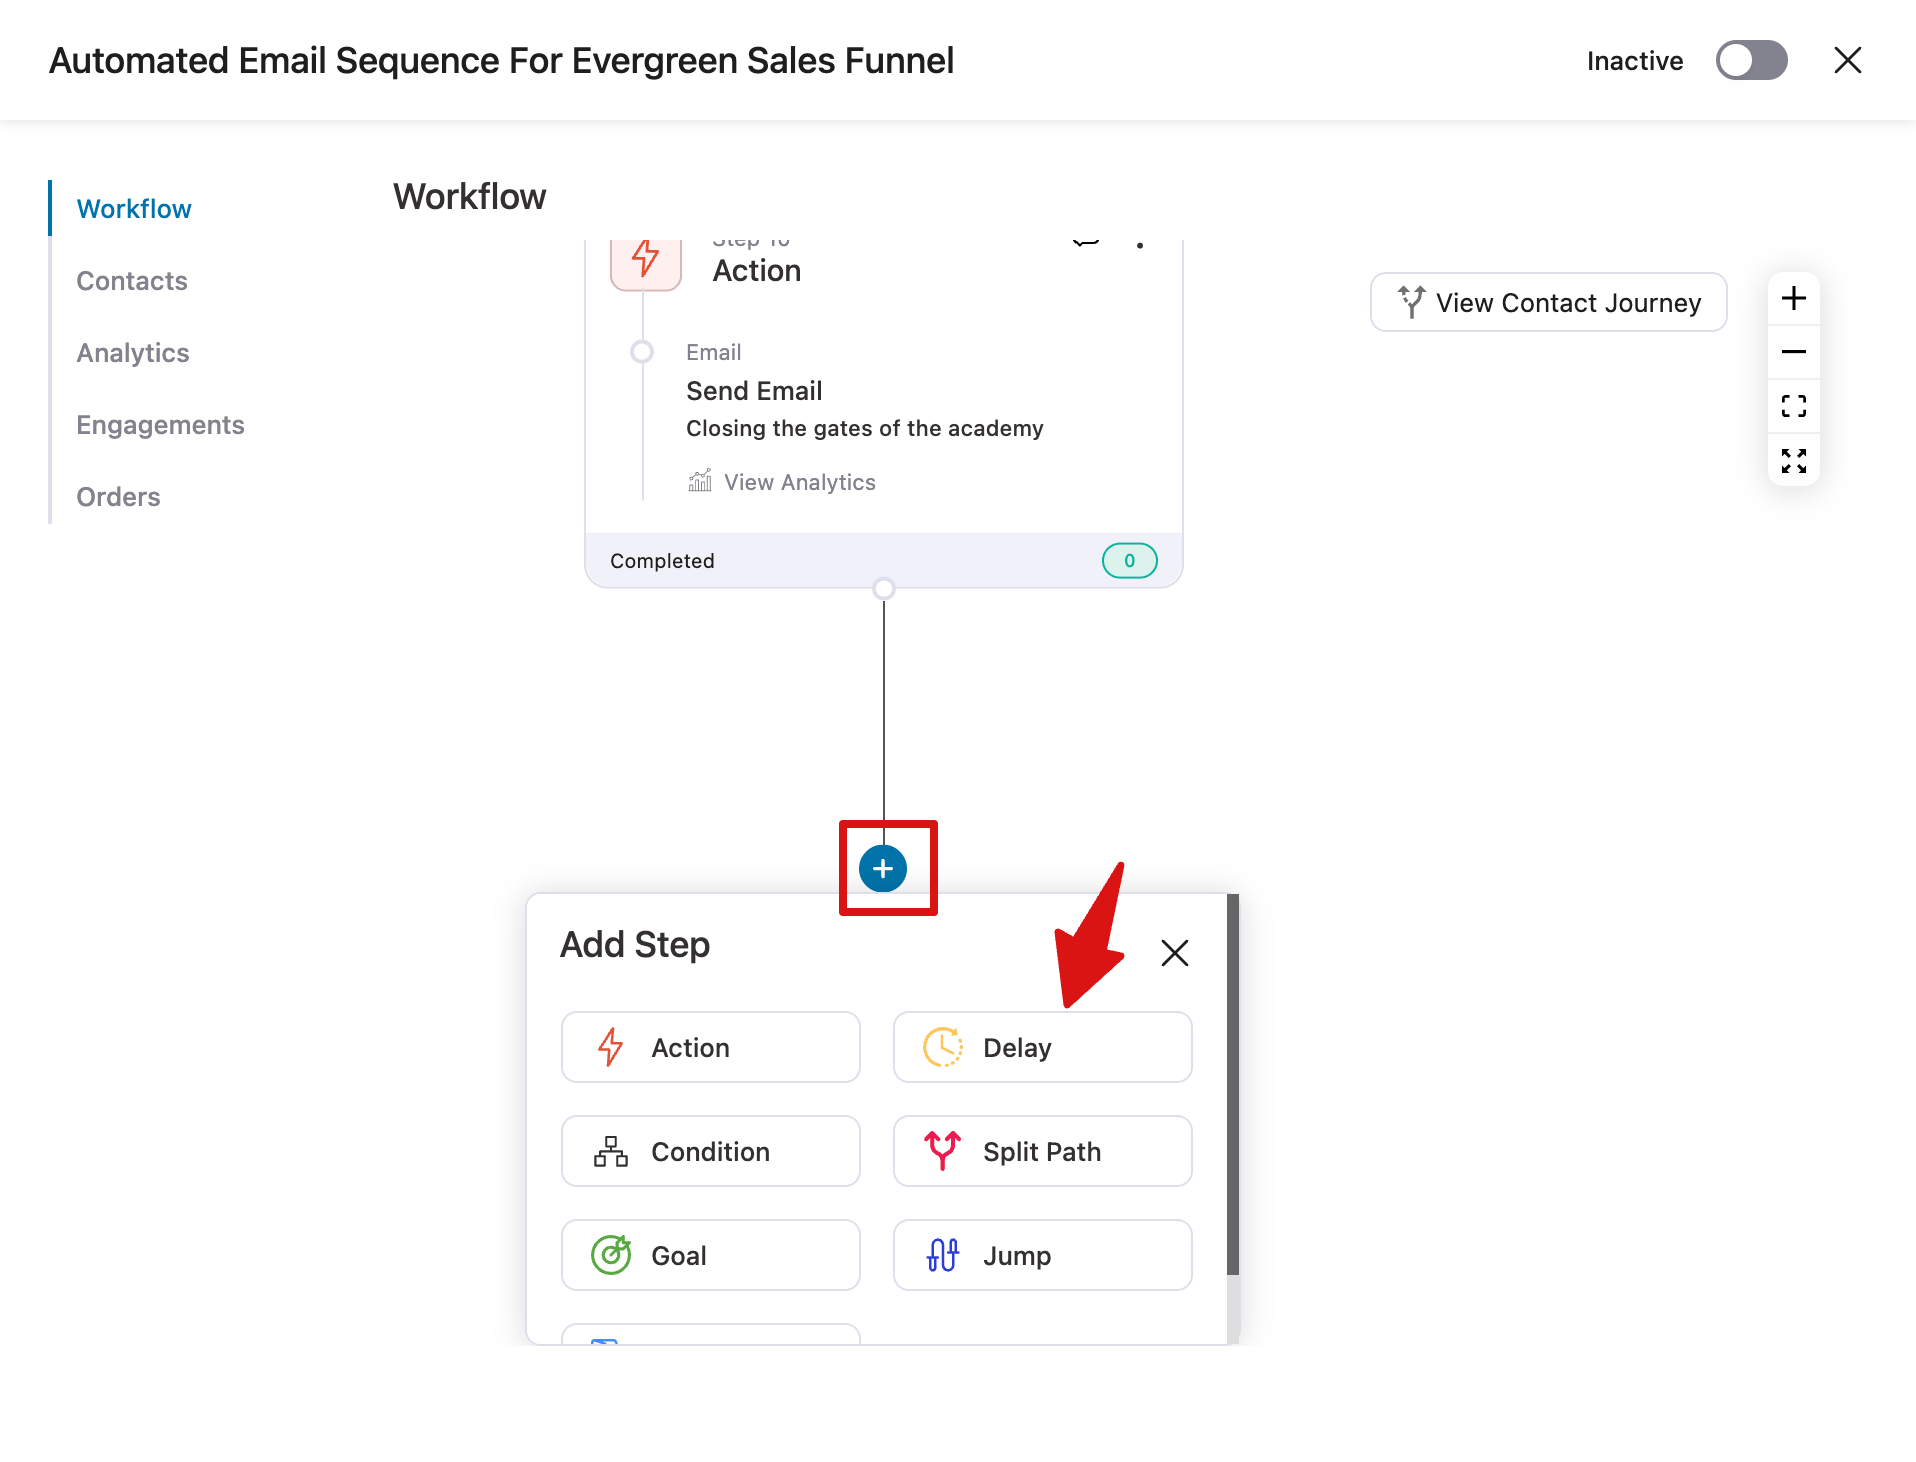
Next, configure the delay.
After the delay, again hit on the “+” icon but this time choose Action, then select “Send Email” action.
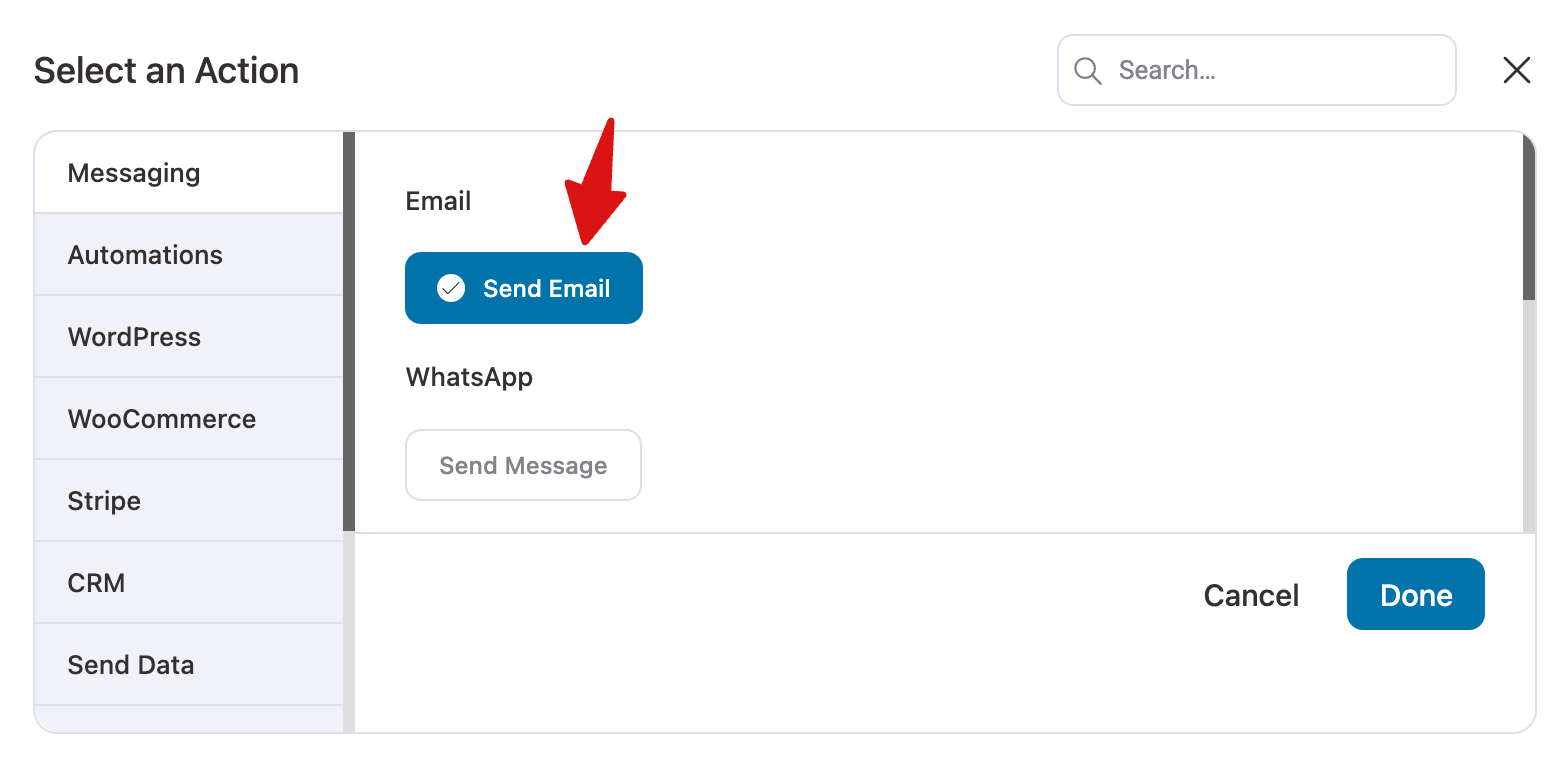
Note: Repeat the same process to add as many emails as your strategy requires, along with delays. Once finalized, hit the “Activate” button to activate the automation.
Step 3: Add a sales funnel with the final offer
Now, again, go to FunnelKit Funnel Builder ⇒ Funnels and hit “Create Funnel”. But, this time, make sure you are on the sales funnel tab.
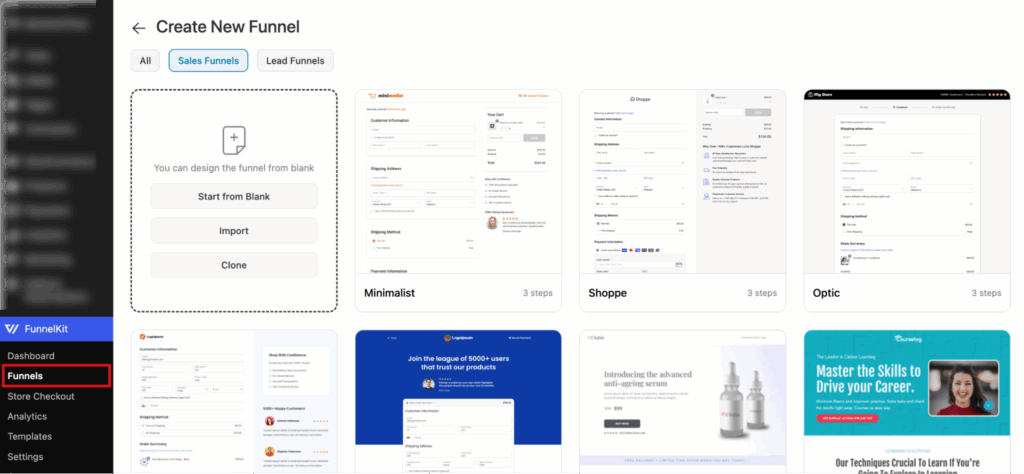
Here, select the funnel you like and import it. You can also select the steps you want in the checkout page while importing.
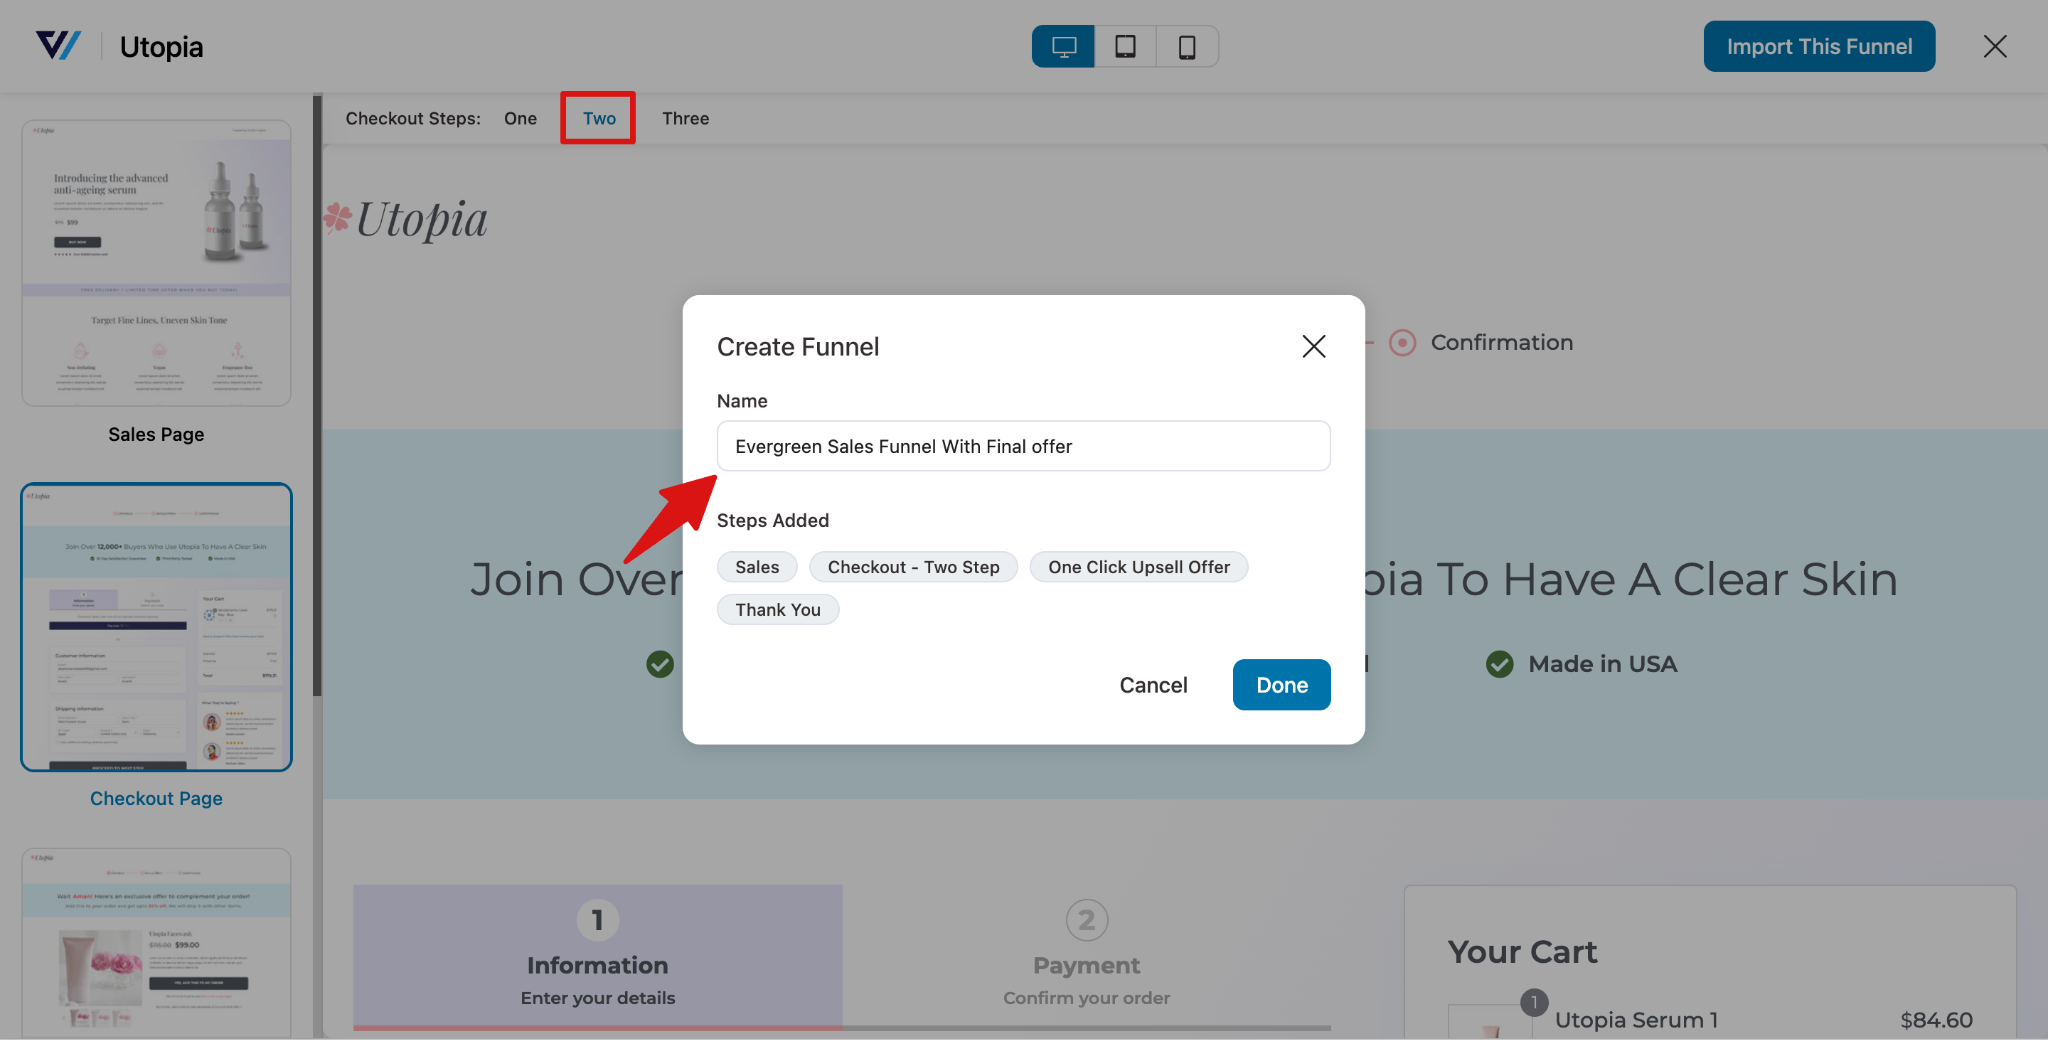
This will import the following pages:
- Landing page: where you promote your final offer
- Checkout page: where users complete their purchase
- Order bump: a small add-on offer shown on the checkout page
- One-click upsell: an upgrade or higher-value add-on after checkout
- Custom thank you page: shown after the purchase is complete
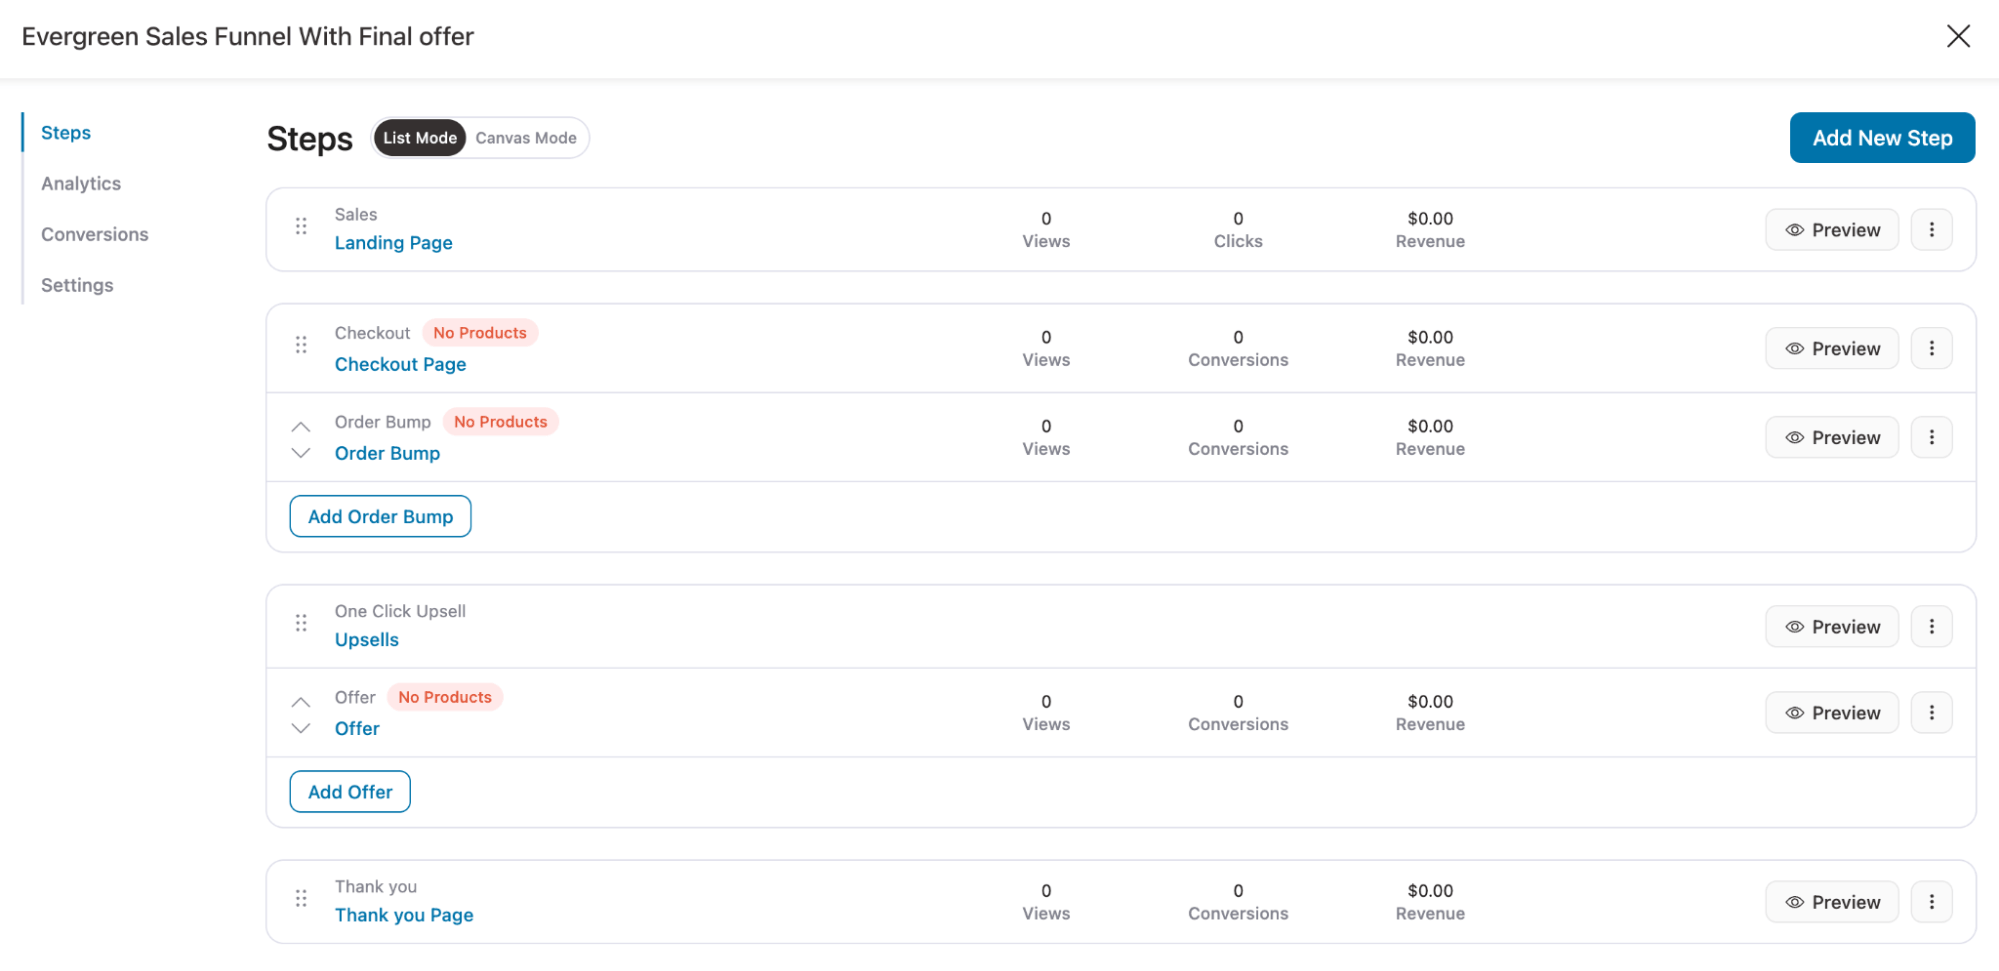
Make sure to customize all the pages according to your needs.
On the checkout page, move to the Products tab, search for and add the product.
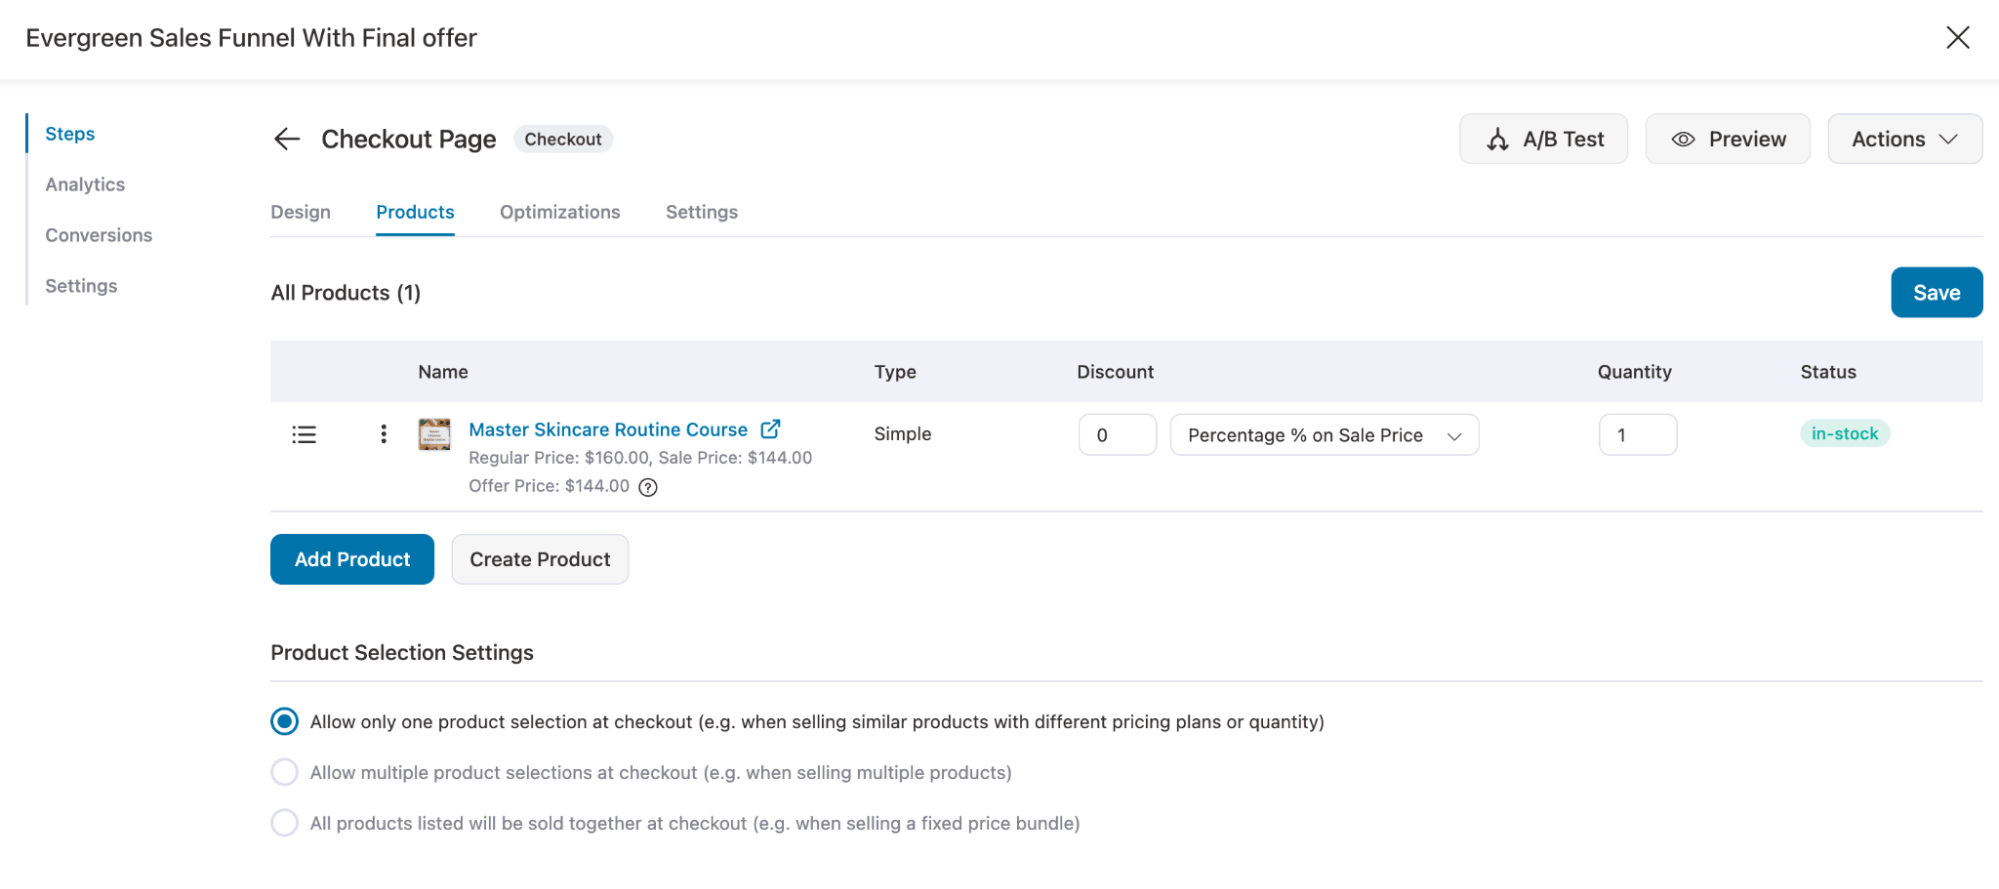
Once you set up, your funnel is ready.
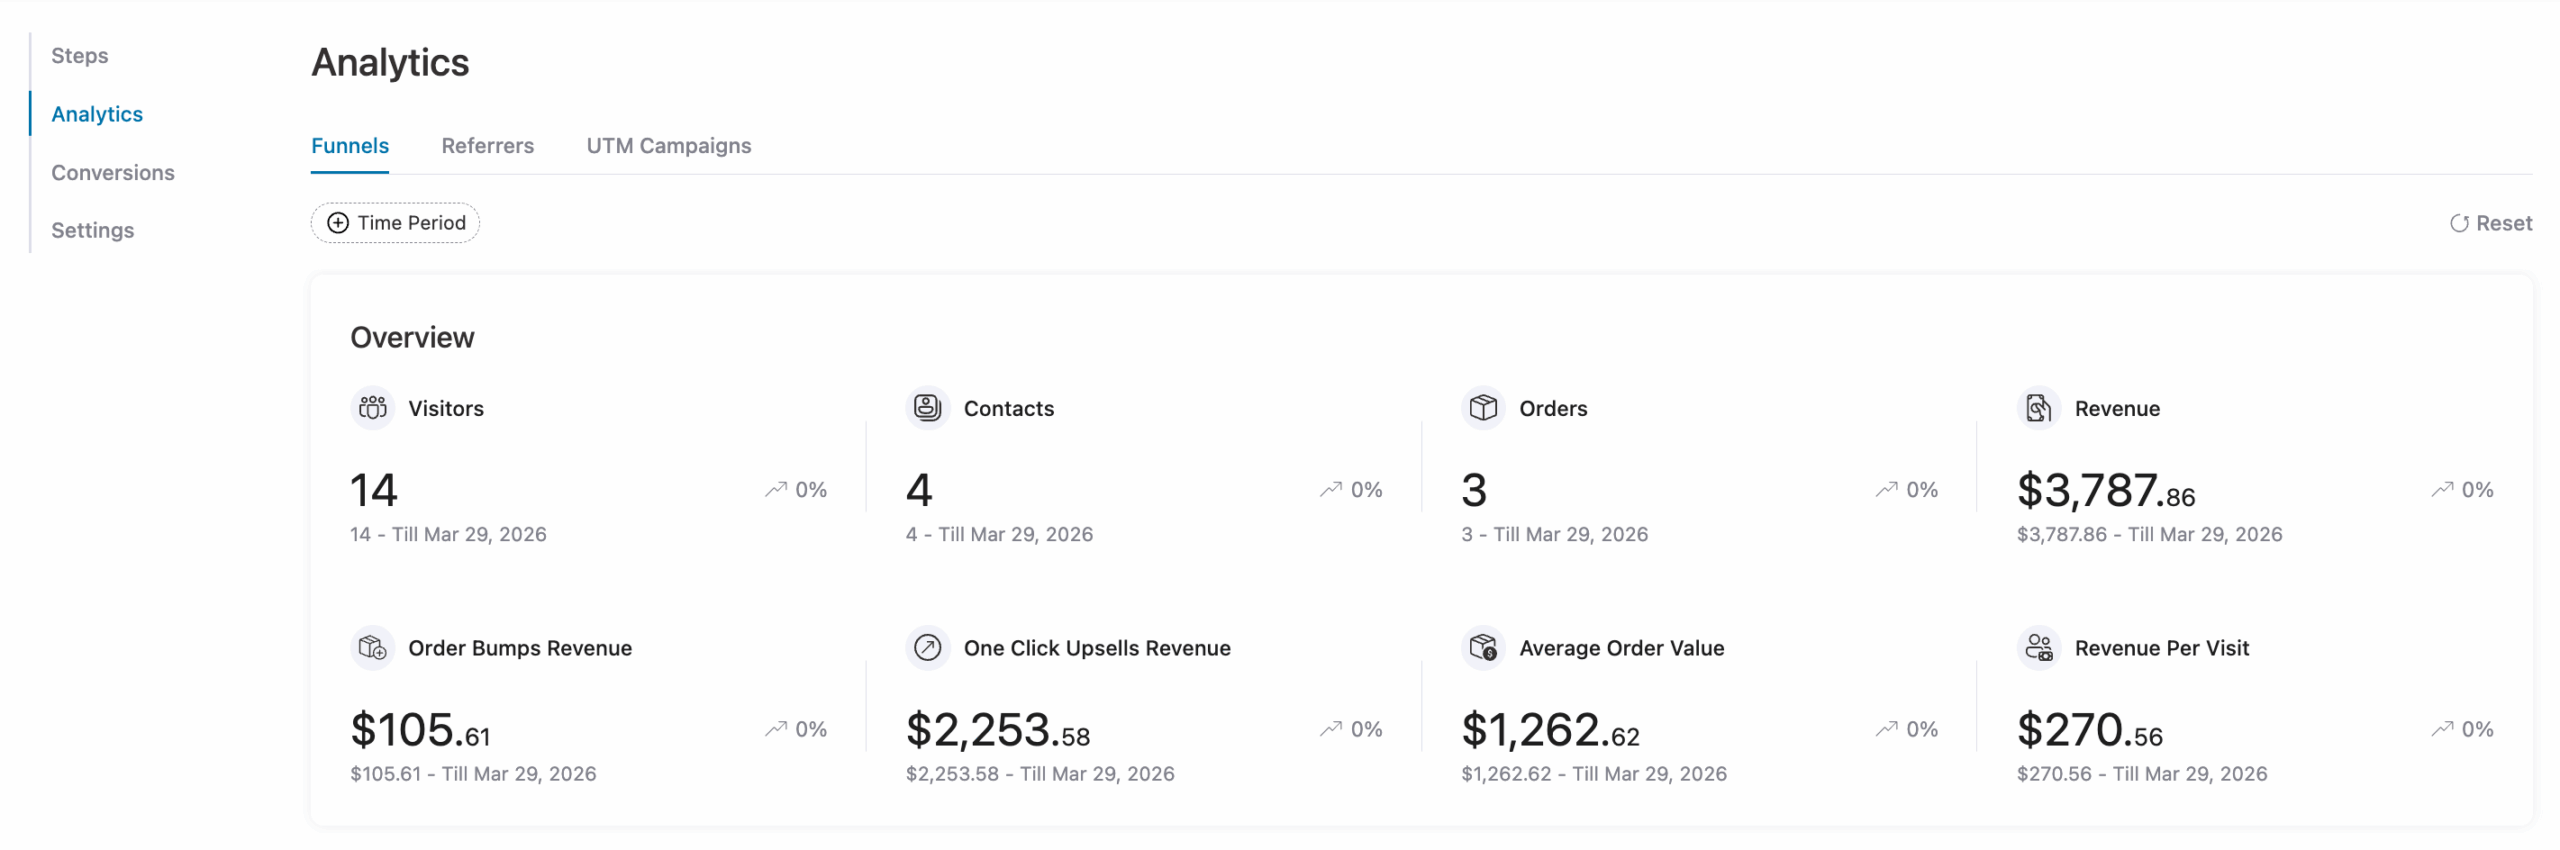
Step 4: Drive Traffic and Measure Before You Optimize
Your funnel won’t give you useful insights without real traffic. Start by driving consistent visitors into your funnel and avoid making changes too early. As a baseline, wait until you have at least 200 opt-ins before drawing conclusions.
Focus on tracking these key metrics:
- Opt-in rate on your landing page
- Email open rates across the sequence
- Click-through rate on your offer emails
- Conversion rate on your offer page
Each metric shows where people drop off. Always fix the earliest weak point first, because it impacts everything that comes after.
Frequently Asked Questions About Evergreen Sales Funnel
How long does it take to build and see results from an evergreen funnel?
It usually takes 2–4 weeks to build, plus 60–90 days of consistent traffic to gather meaningful data and see real results.
What are the most common reasons evergreen funnels fail?
The biggest issues are attracting the wrong audience, weak or short email sequences, poor lead nurturing before the offer, and inconsistent traffic flow.
What is the difference between an evergreen sales funnel and a regular sales funnel?
A regular sales funnel often refers to a live launch or time-limited campaign with a fixed start and end date. An evergreen funnel runs continuously with no fixed close date. Anyone who opts in starts at the beginning of the same automated sequence, regardless of when they found you.
How do I add real urgency without being dishonest?
Use real deadlines per subscriber or time-limited bonuses. Avoid fake timers that reset, as they break trust.
How much traffic do I need for it to work?
There’s no fixed number, but at least 200–300 opt-ins is a good baseline to see meaningful results.
Can evergreen funnels replace live launches?
Not completely. They work best alongside launches, converting leads consistently between campaigns.
Build Your Evergreen Funnel and Turn Leads Into Sales Automatically
An evergreen sales funnel only becomes powerful when it has time to run, collect real data, and improve over weeks and months. It is not something you switch on and expect instant perfection. The real performance comes from continuous testing, tracking, and refinement.
The biggest mistake is building it only when revenue slows down. At that point, you do not have enough time or data to optimize it properly. Instead, build it while your business is already stable so the system can quietly learn and improve in the background.
Start simple. One clear offer. One focused lead magnet. One solid email sequence. Then let real traffic flow in, observe where people drop off, and improve step by step. That is how an evergreen funnel turns from a concept into a reliable revenue system that runs on autopilot.
If you want a faster way to build high-converting evergreen funnels, then get your copy of FunnelKit products today.

Editorial Team
July 7, 2026Are shoppers adding products to their cart and leaving before they buy? According to Baymard Institute research on checkout usability, 18% of shoppers who abandon their cart do so because...
Editorial Team
June 29, 2026Broadcast emails are one-time campaigns sent to a specific audience, ideal for sharing sneak peeks, announcing offers, or revealing major updates. You can use them to announce a sale, introduce...
Editorial Team
June 25, 2026There are two things most people get wrong about the WooCommerce order confirmation email. First, they don't realize it's the Processing order email they need to switch on and not...


