
Hey, FunnelKit fans!
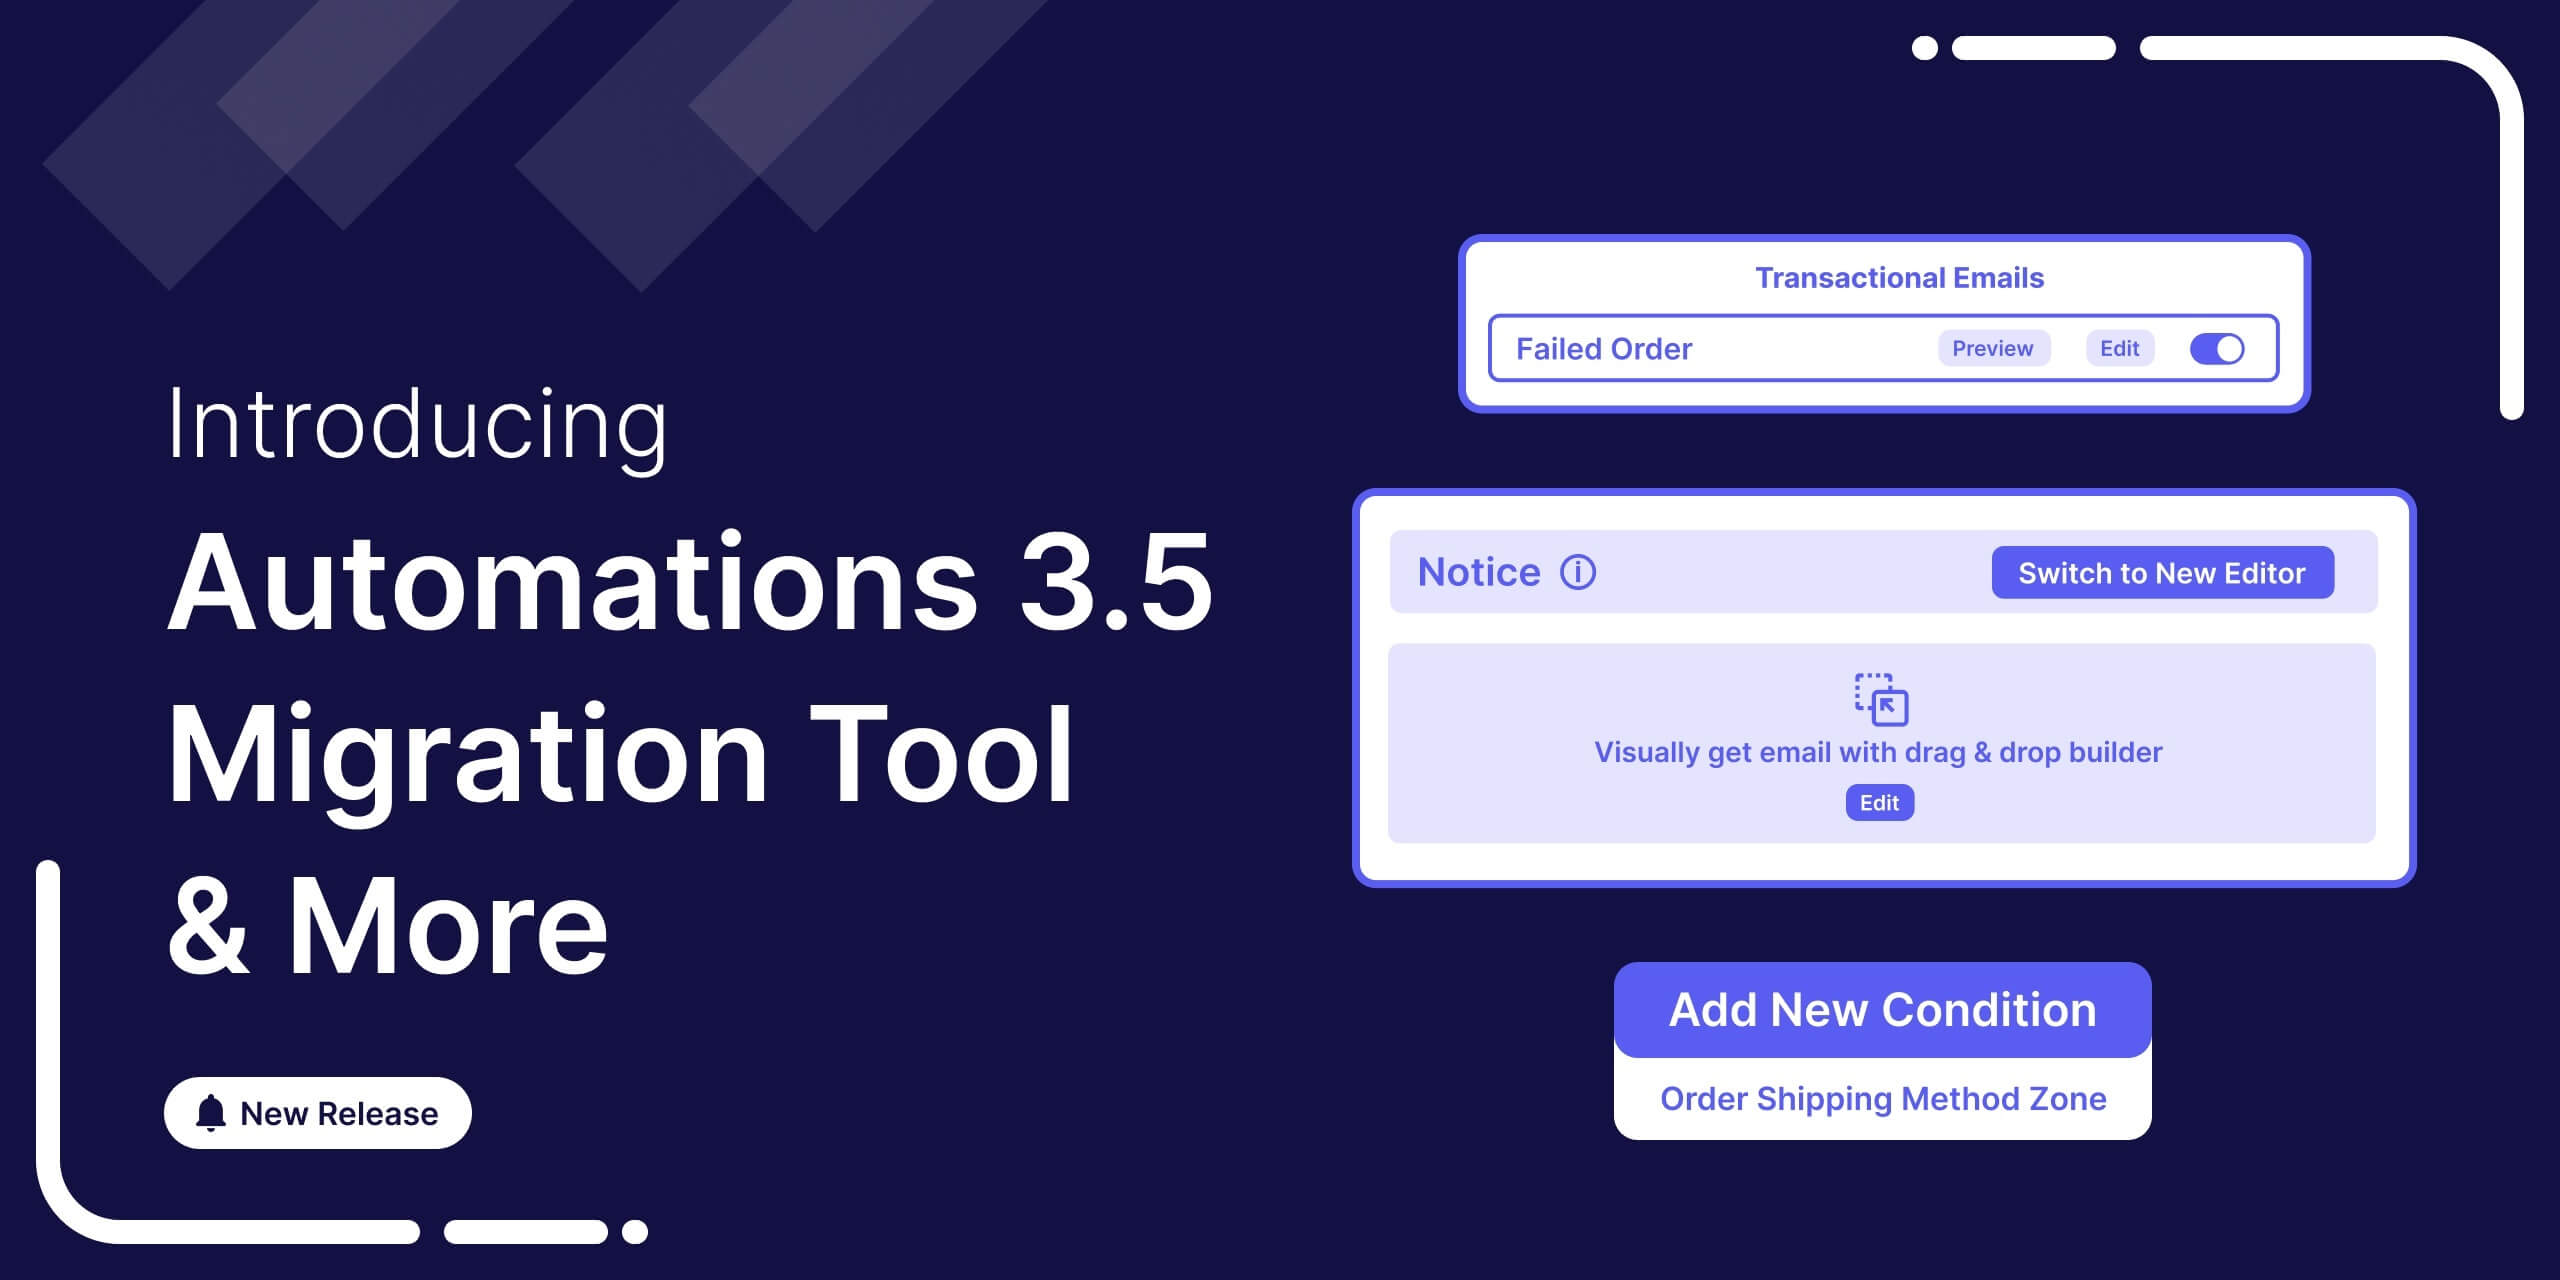
FunnelKit Automations 3.5 is live, and it’s packed with exciting upgrades and features!
With this release, migrating from the legacy email builder to the new visual builder is smoother than ever.
We’ve also introduced a brand-new transactional email to enhance customer communication. Plus, we’ve improved data management, making it easier to search emails, find audiences, and add tags or lists seamlessly.
This update is all about making your workflow faster, easier, and more efficient.
Let’s dive into the details!
In a hurry? Watch the quick video below! 👇
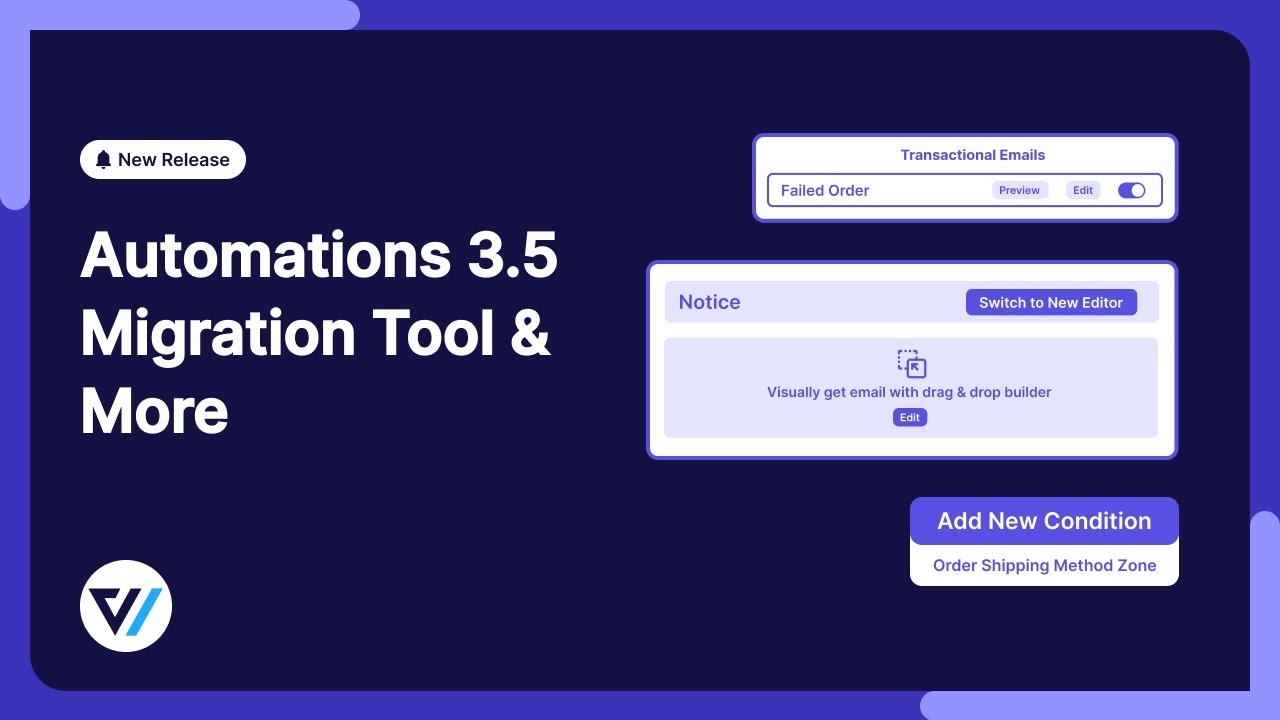
Table of Contents
- 1 One Click Migration Tool From Legacy Visual Builder to New Visual Email Builder
- 2 New Transactional Email - Failed Order Email
- 3 Add Other Receipts For All Transactional Emails
- 4 New Filter Option For Transaction Email In Email History
- 5 New Shipping Zone Rule Option For Automations
- 6 Easy Contact Management With Multiple Tag & List Addition
- 7 Enhanced Audience Filtering for Precision and Efficiency
- 8 Unsubscribe Page Compatibility With BreakDance Page Builder
- 9 More Enhancements and Refinements
- 10 Changelogs
- 11 Excited to Try the New Features in FunnelKit Automations 3.5?
One Click Migration Tool From Legacy Visual Builder to New Visual Email Builder
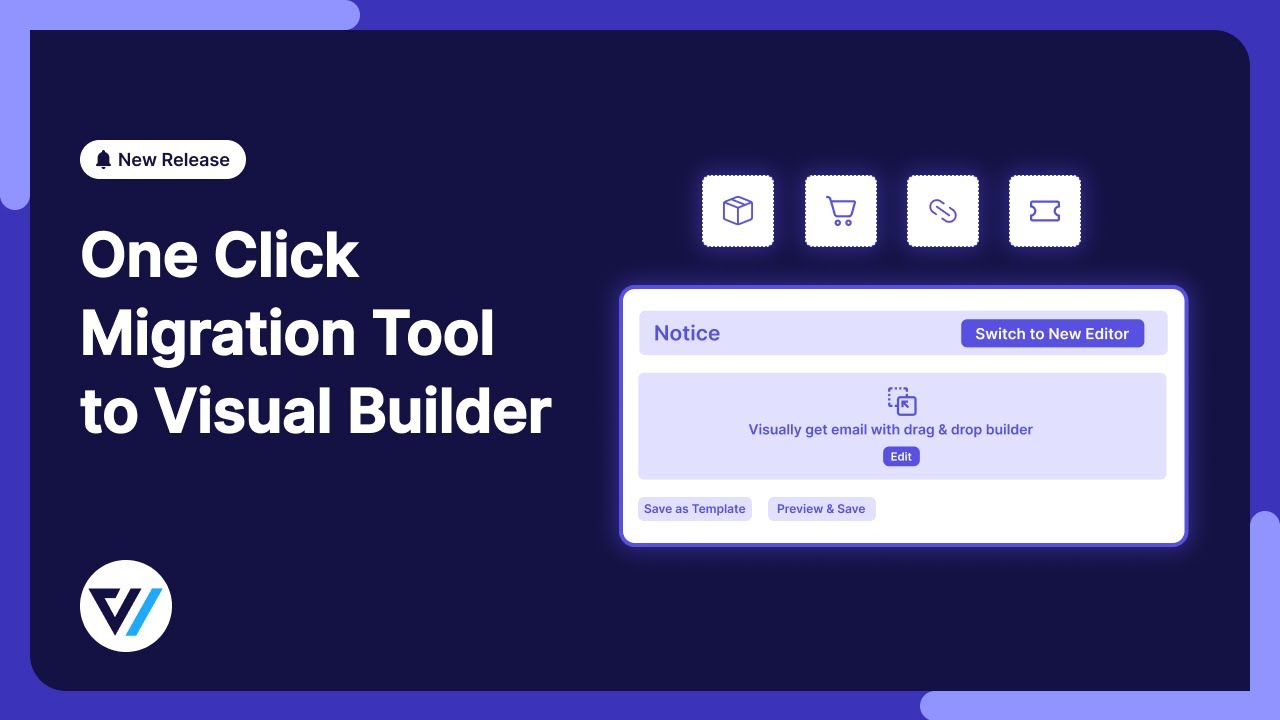
For everyone who’s been looking for an easy way to upgrade email templates from the Visual Builder (Legacy) to the New Visual Builder —this is it!
With our new one-click migration tool, you can seamlessly move your emails to the new visual builder in no time. No need to recreate templates from scratch—just hit Migrate, confirm, and you’re done!
You can migrate legacy emails of broadcasts, automations, and saved templates to new visual builders effortlessly.
Let’s walk through it step by step.
Migrate broadcast legacy emails to the new visual builder
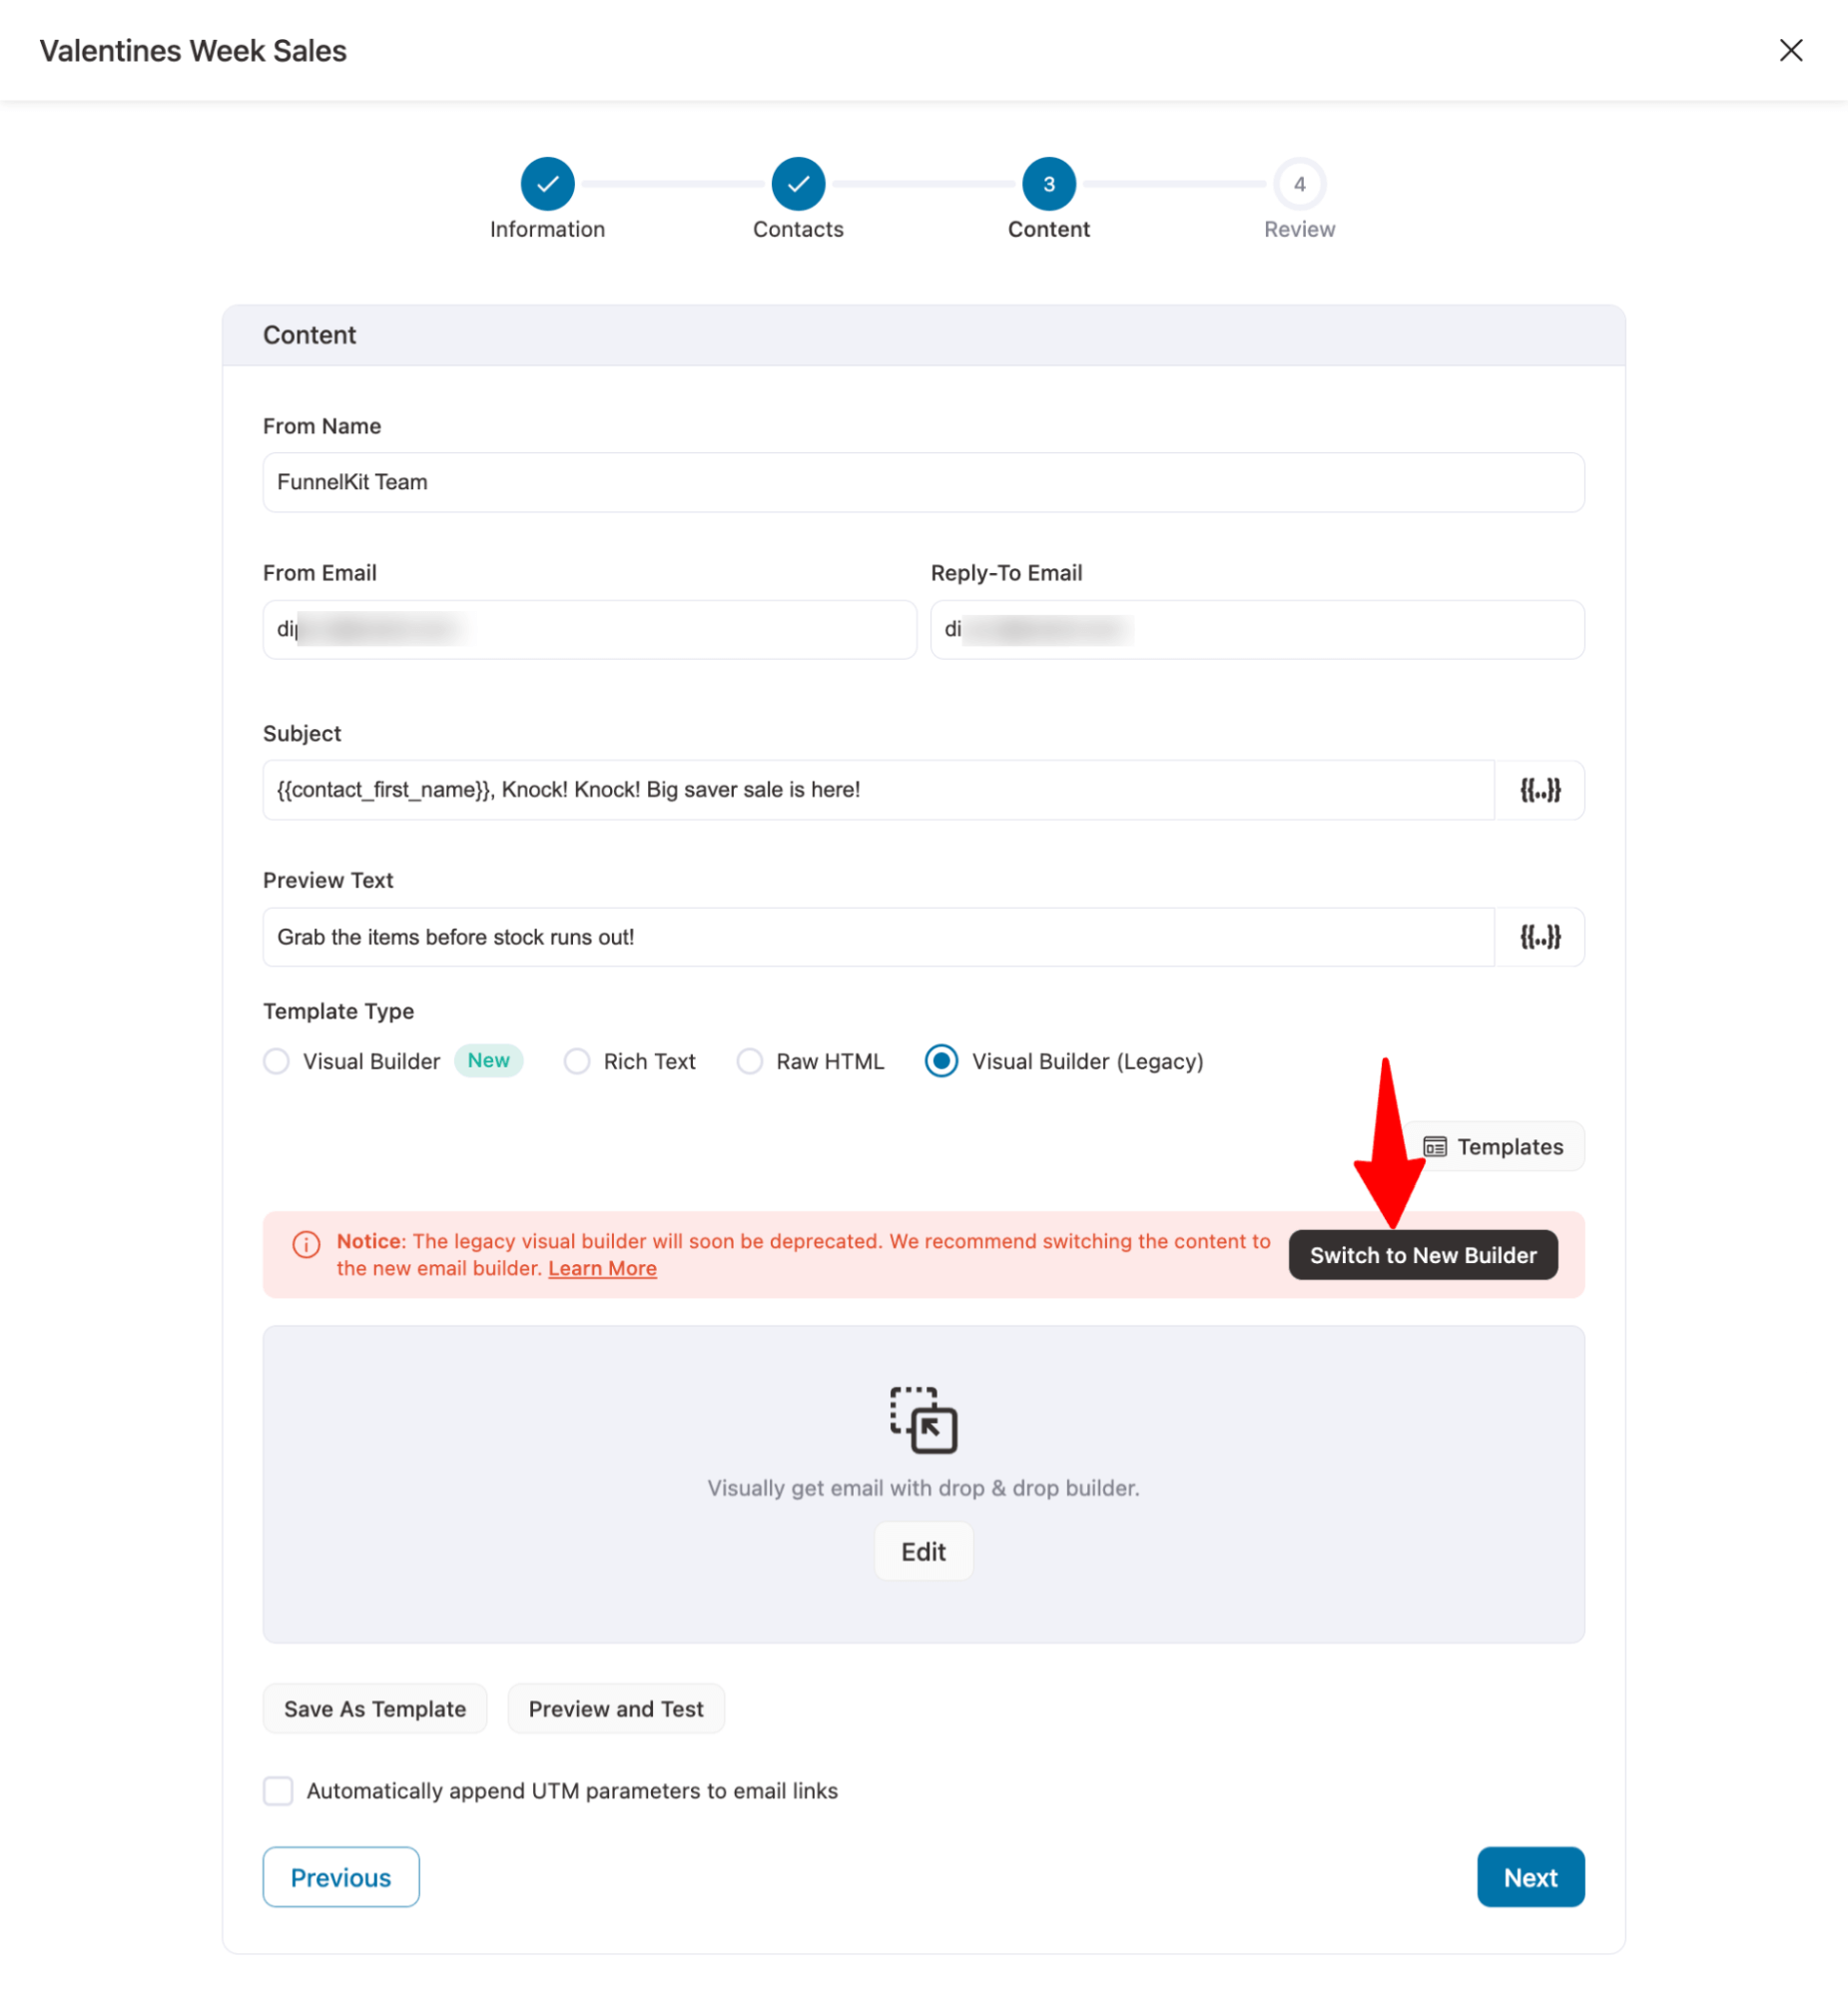
To upgrade any broadcast email, go to FunnelKit Automations ⇒ Broadcasts ⇒ Email and click on the one for which you want to upgrade to the new visual builder. Then, Edit the broadcast using the “Edit Broadcast” option.
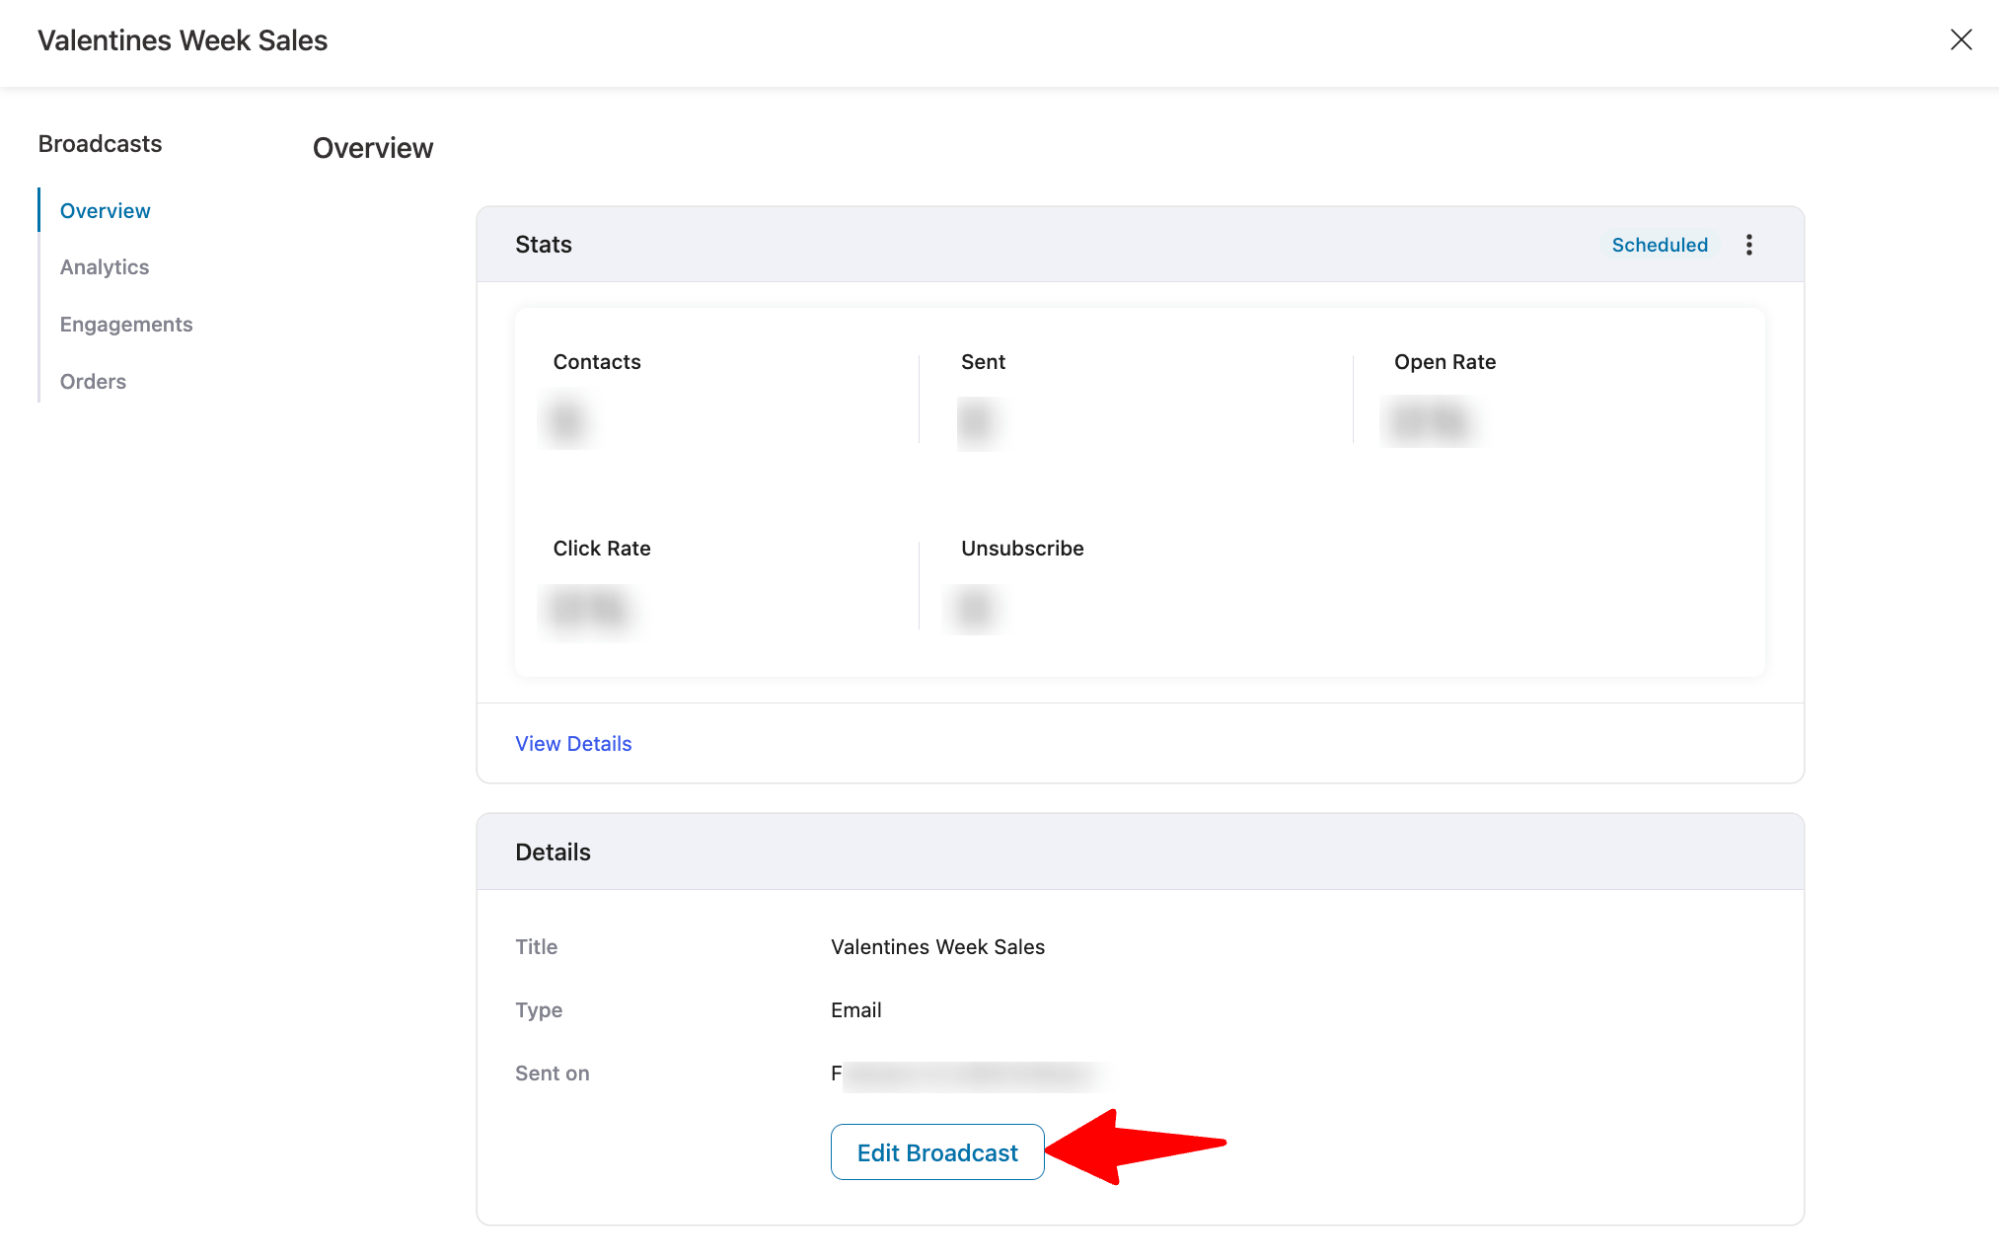
Then, go through the steps. Once you're on the Content tab, you'll see a notice box informing you that the legacy builder will be deprecated.
To migrate, click the “Switch to New Builder” button in the notice box.
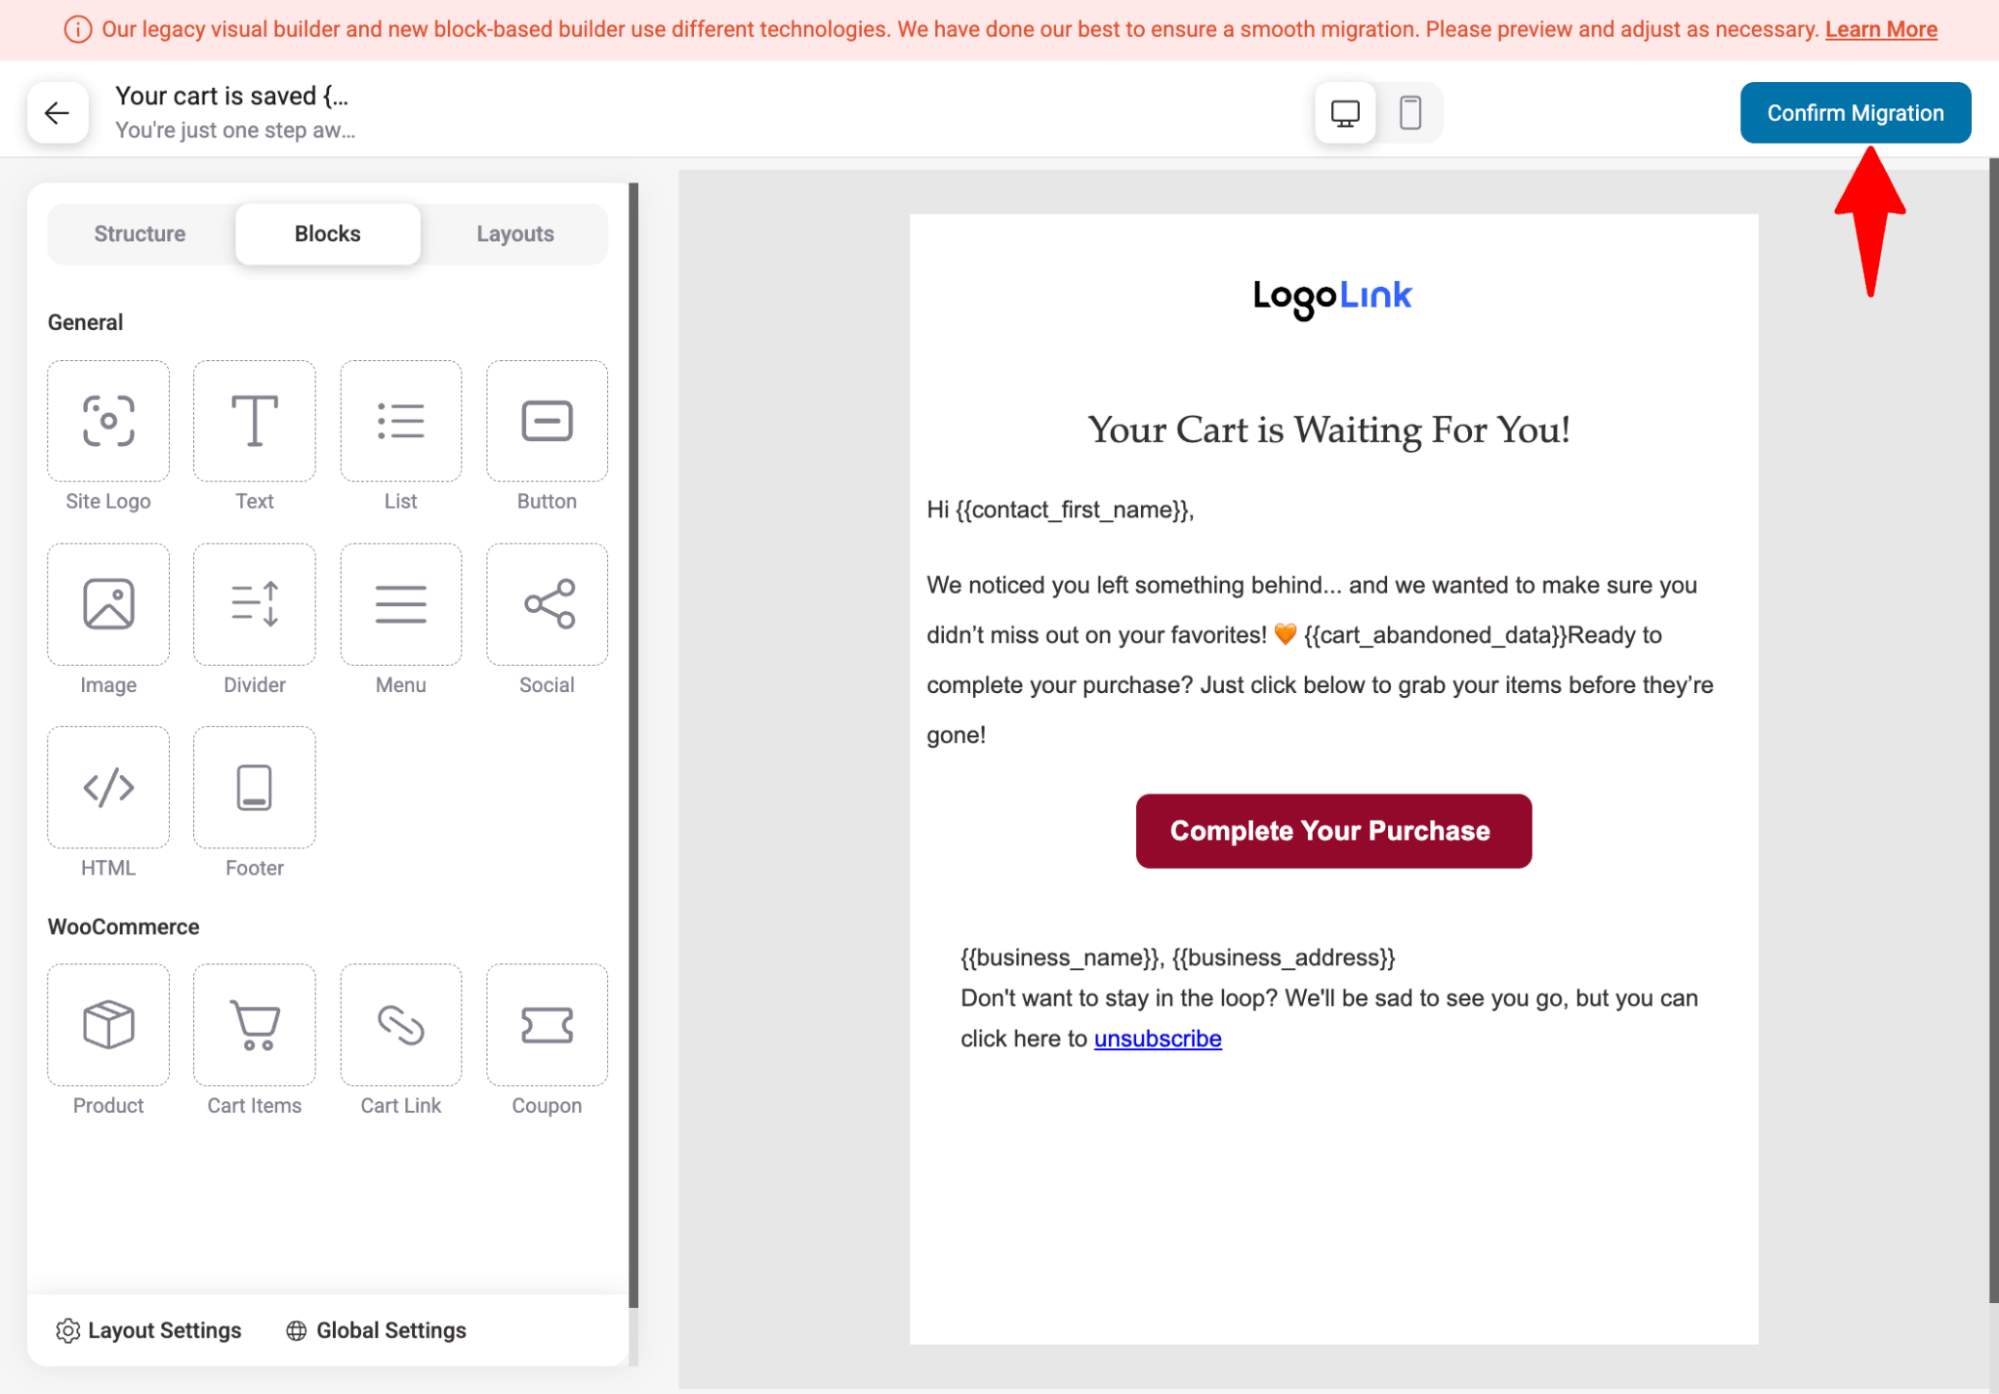
Next, hit the Confirm Migration button to confirm the upgrade.
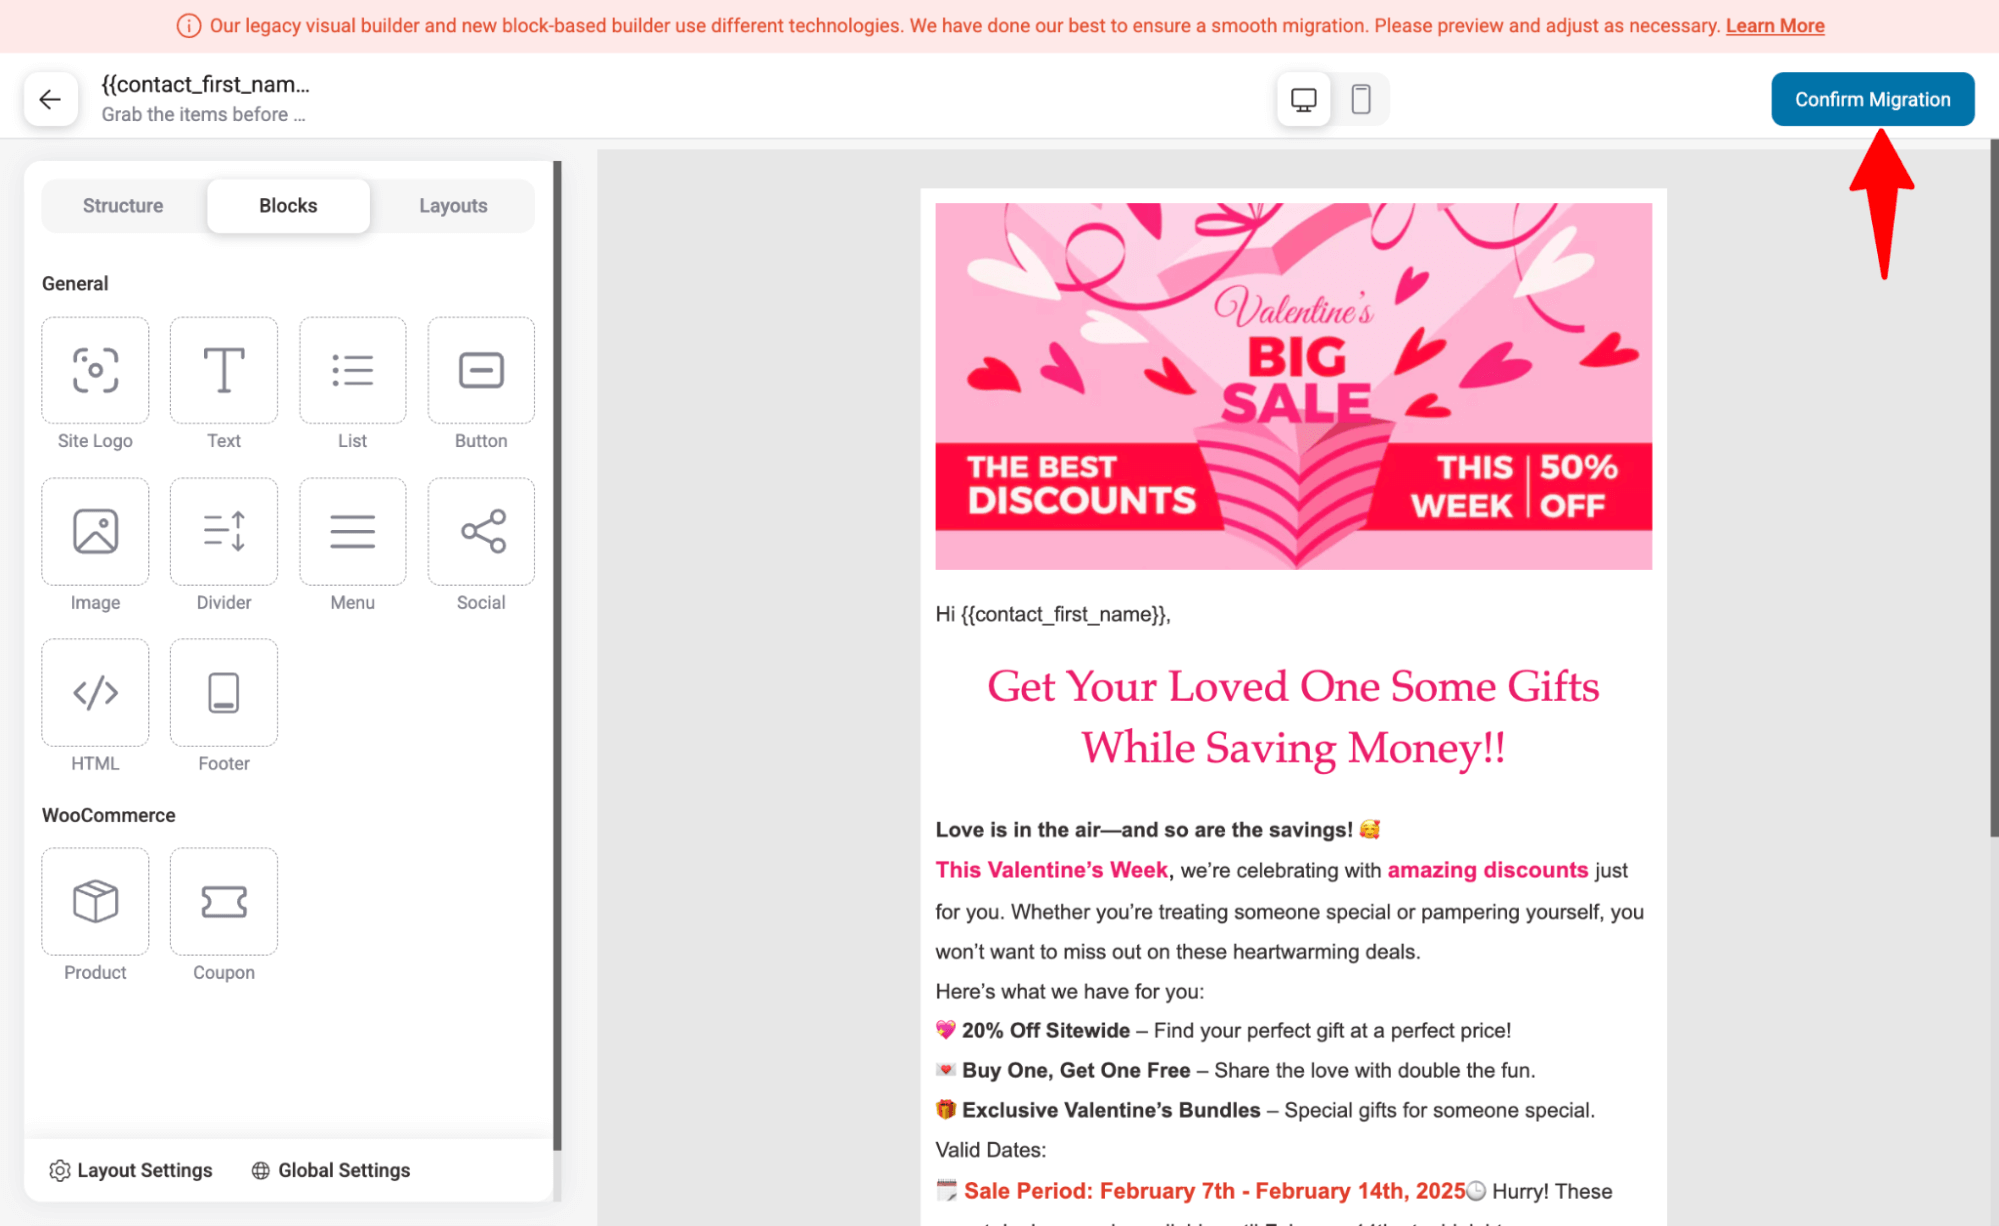
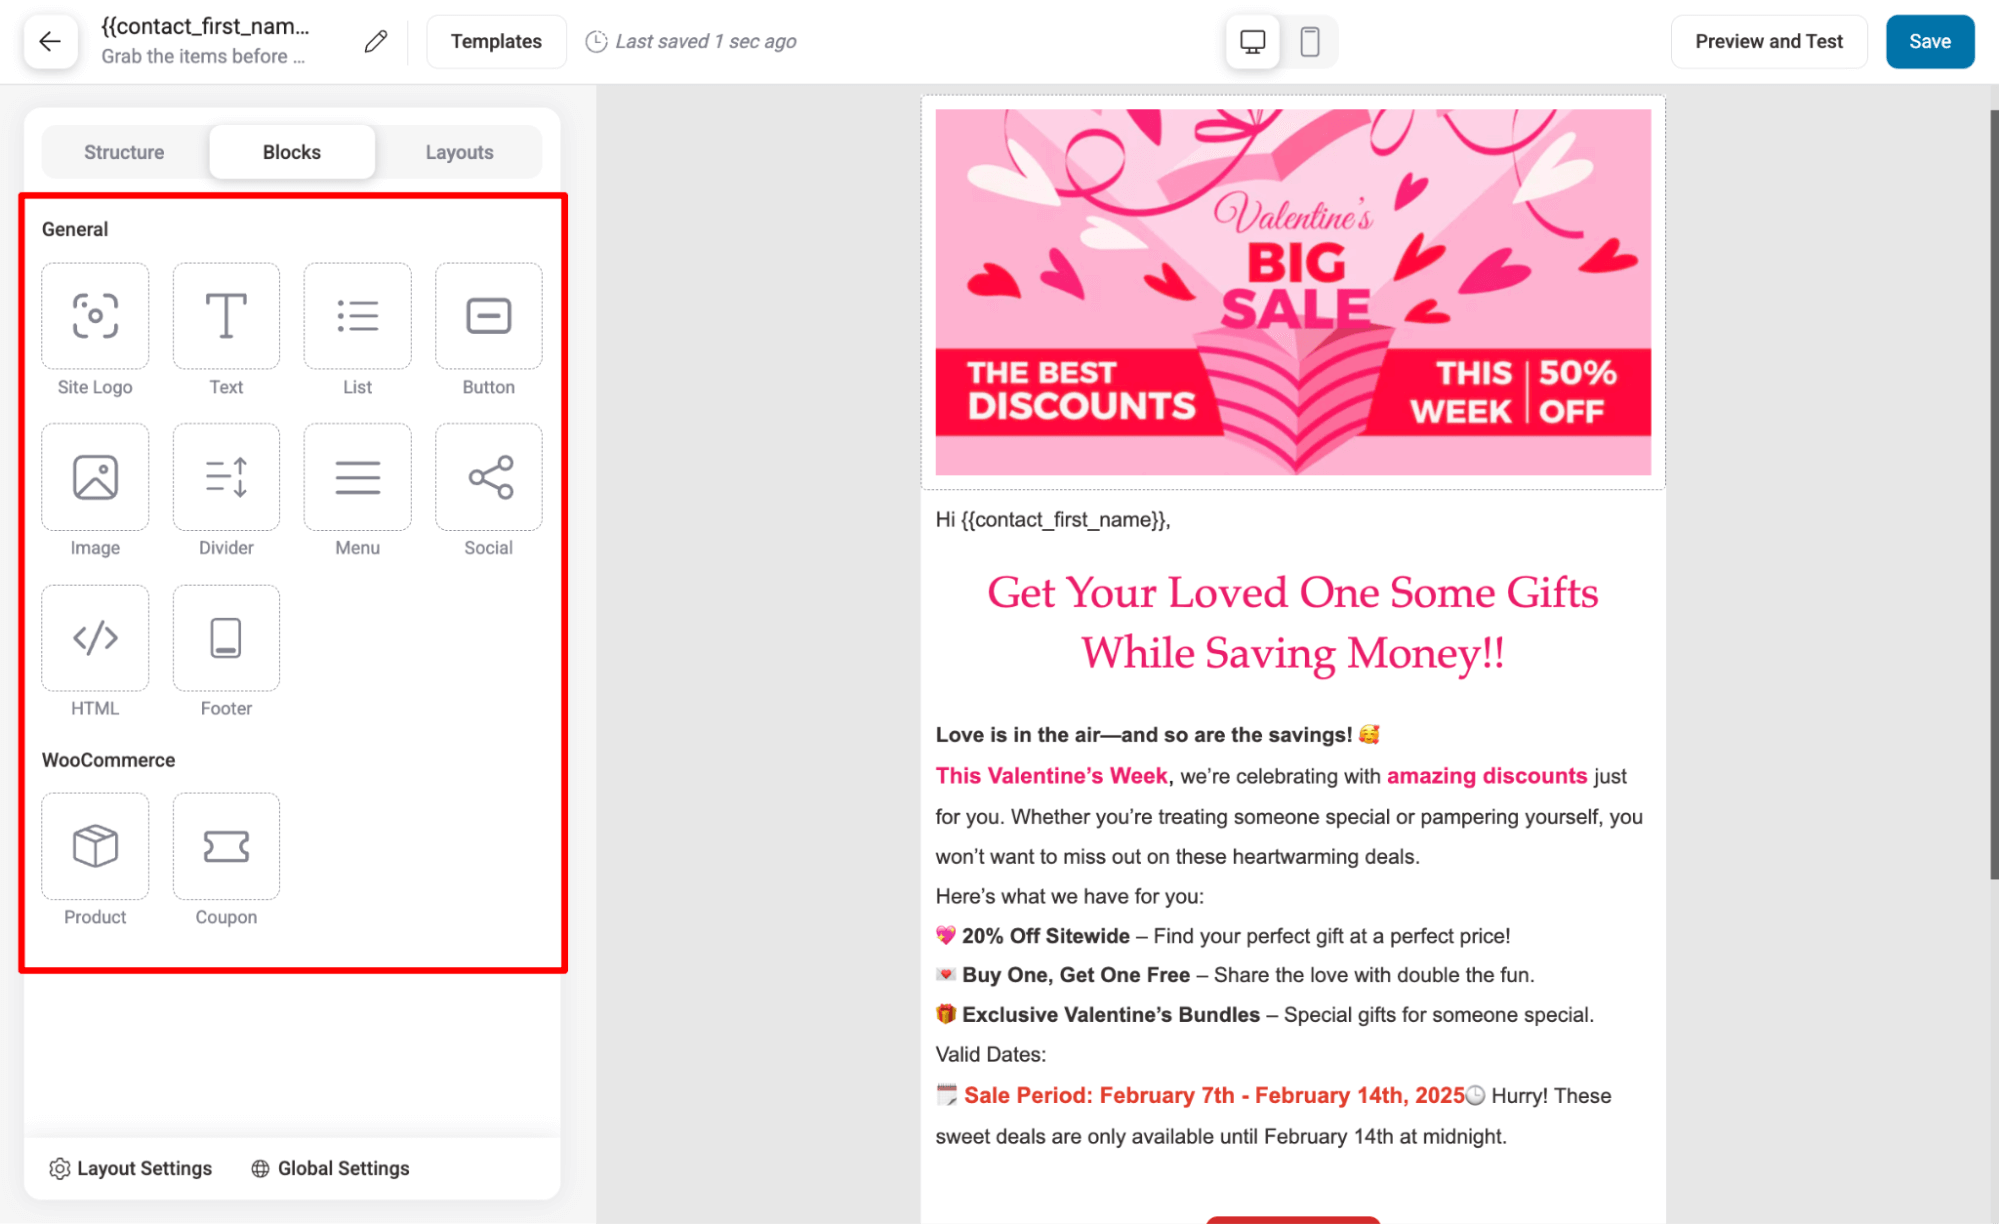
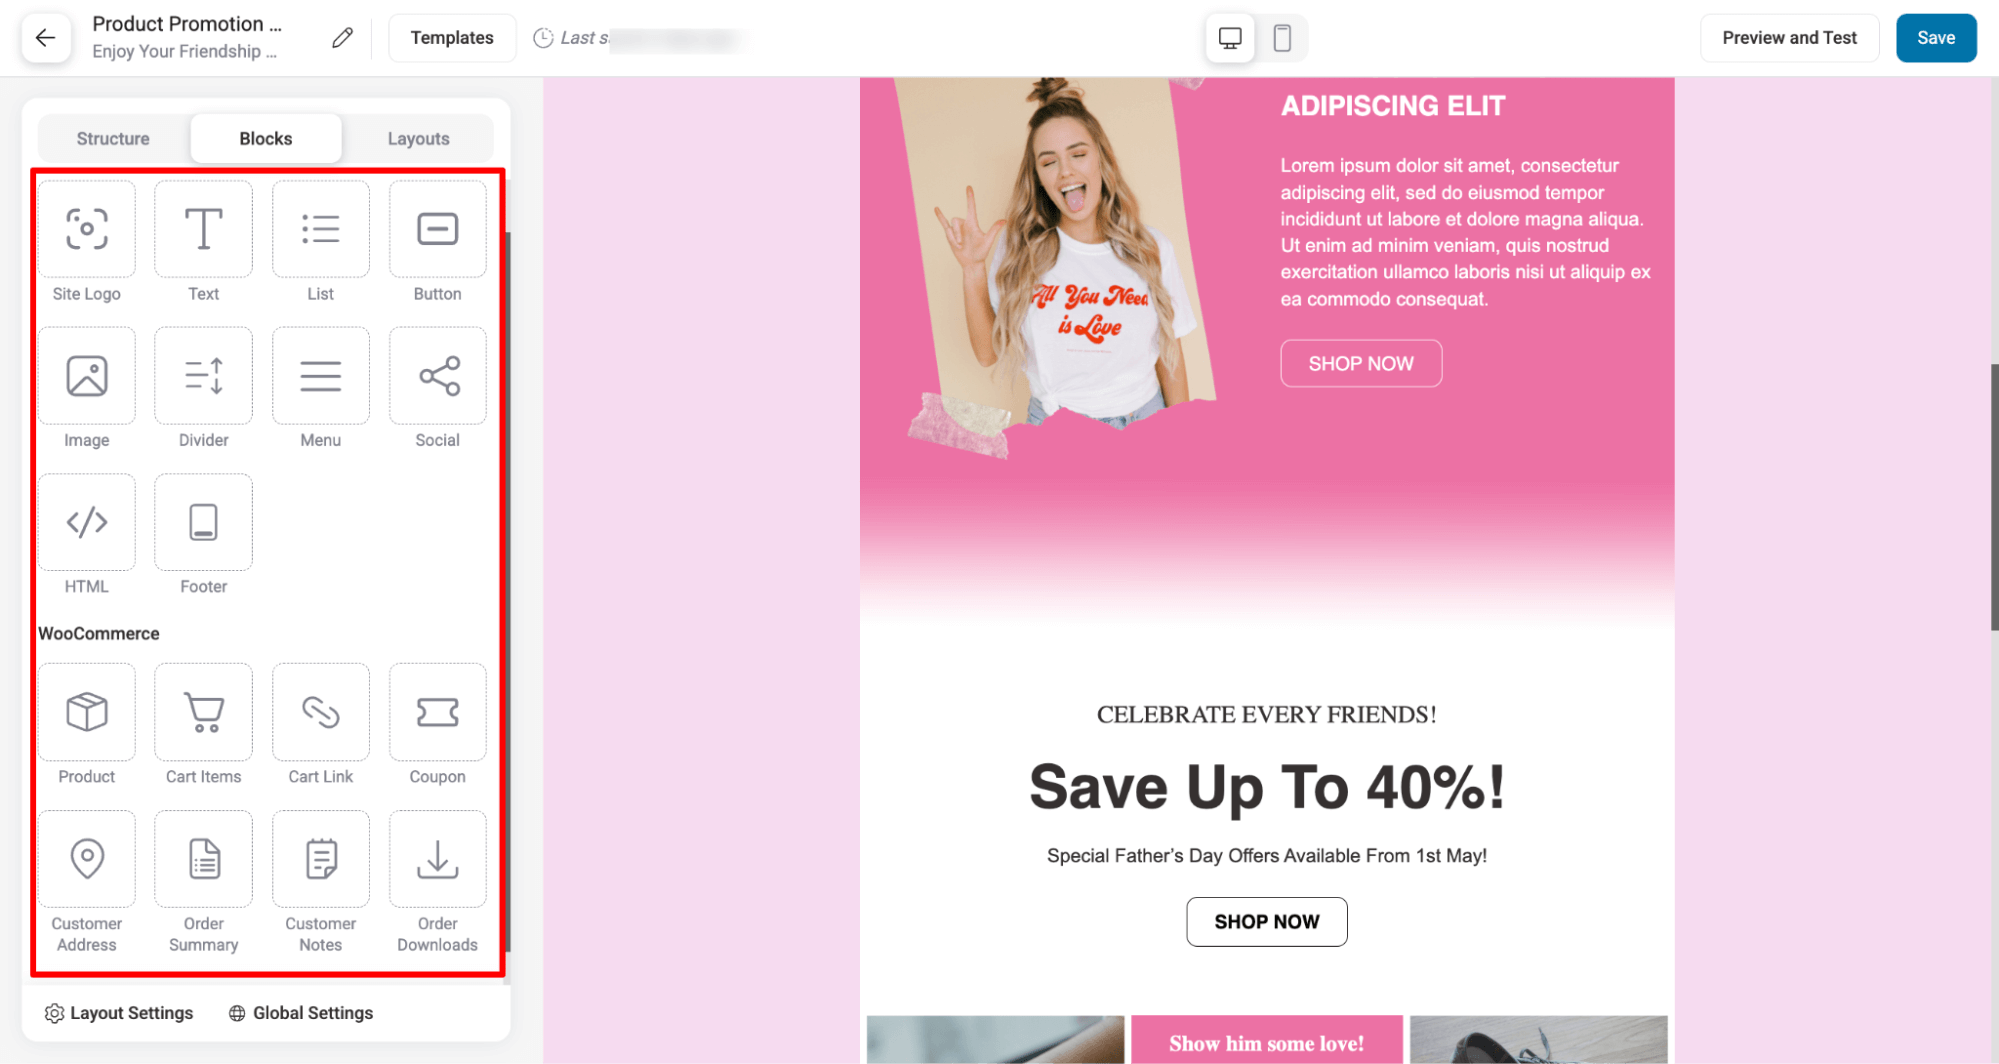
You can now see that the email template has been successfully migrated to the visual builder. You can customize your content using the new visual builder layouts and blocks.
Migrate automation legacy emails to the new visual builder
To migrate any email from the legacy builder to the new visual builder for any existing automation, go to that automation and hit the Send email action.

Next, hit the “Switch to New Builder” option.
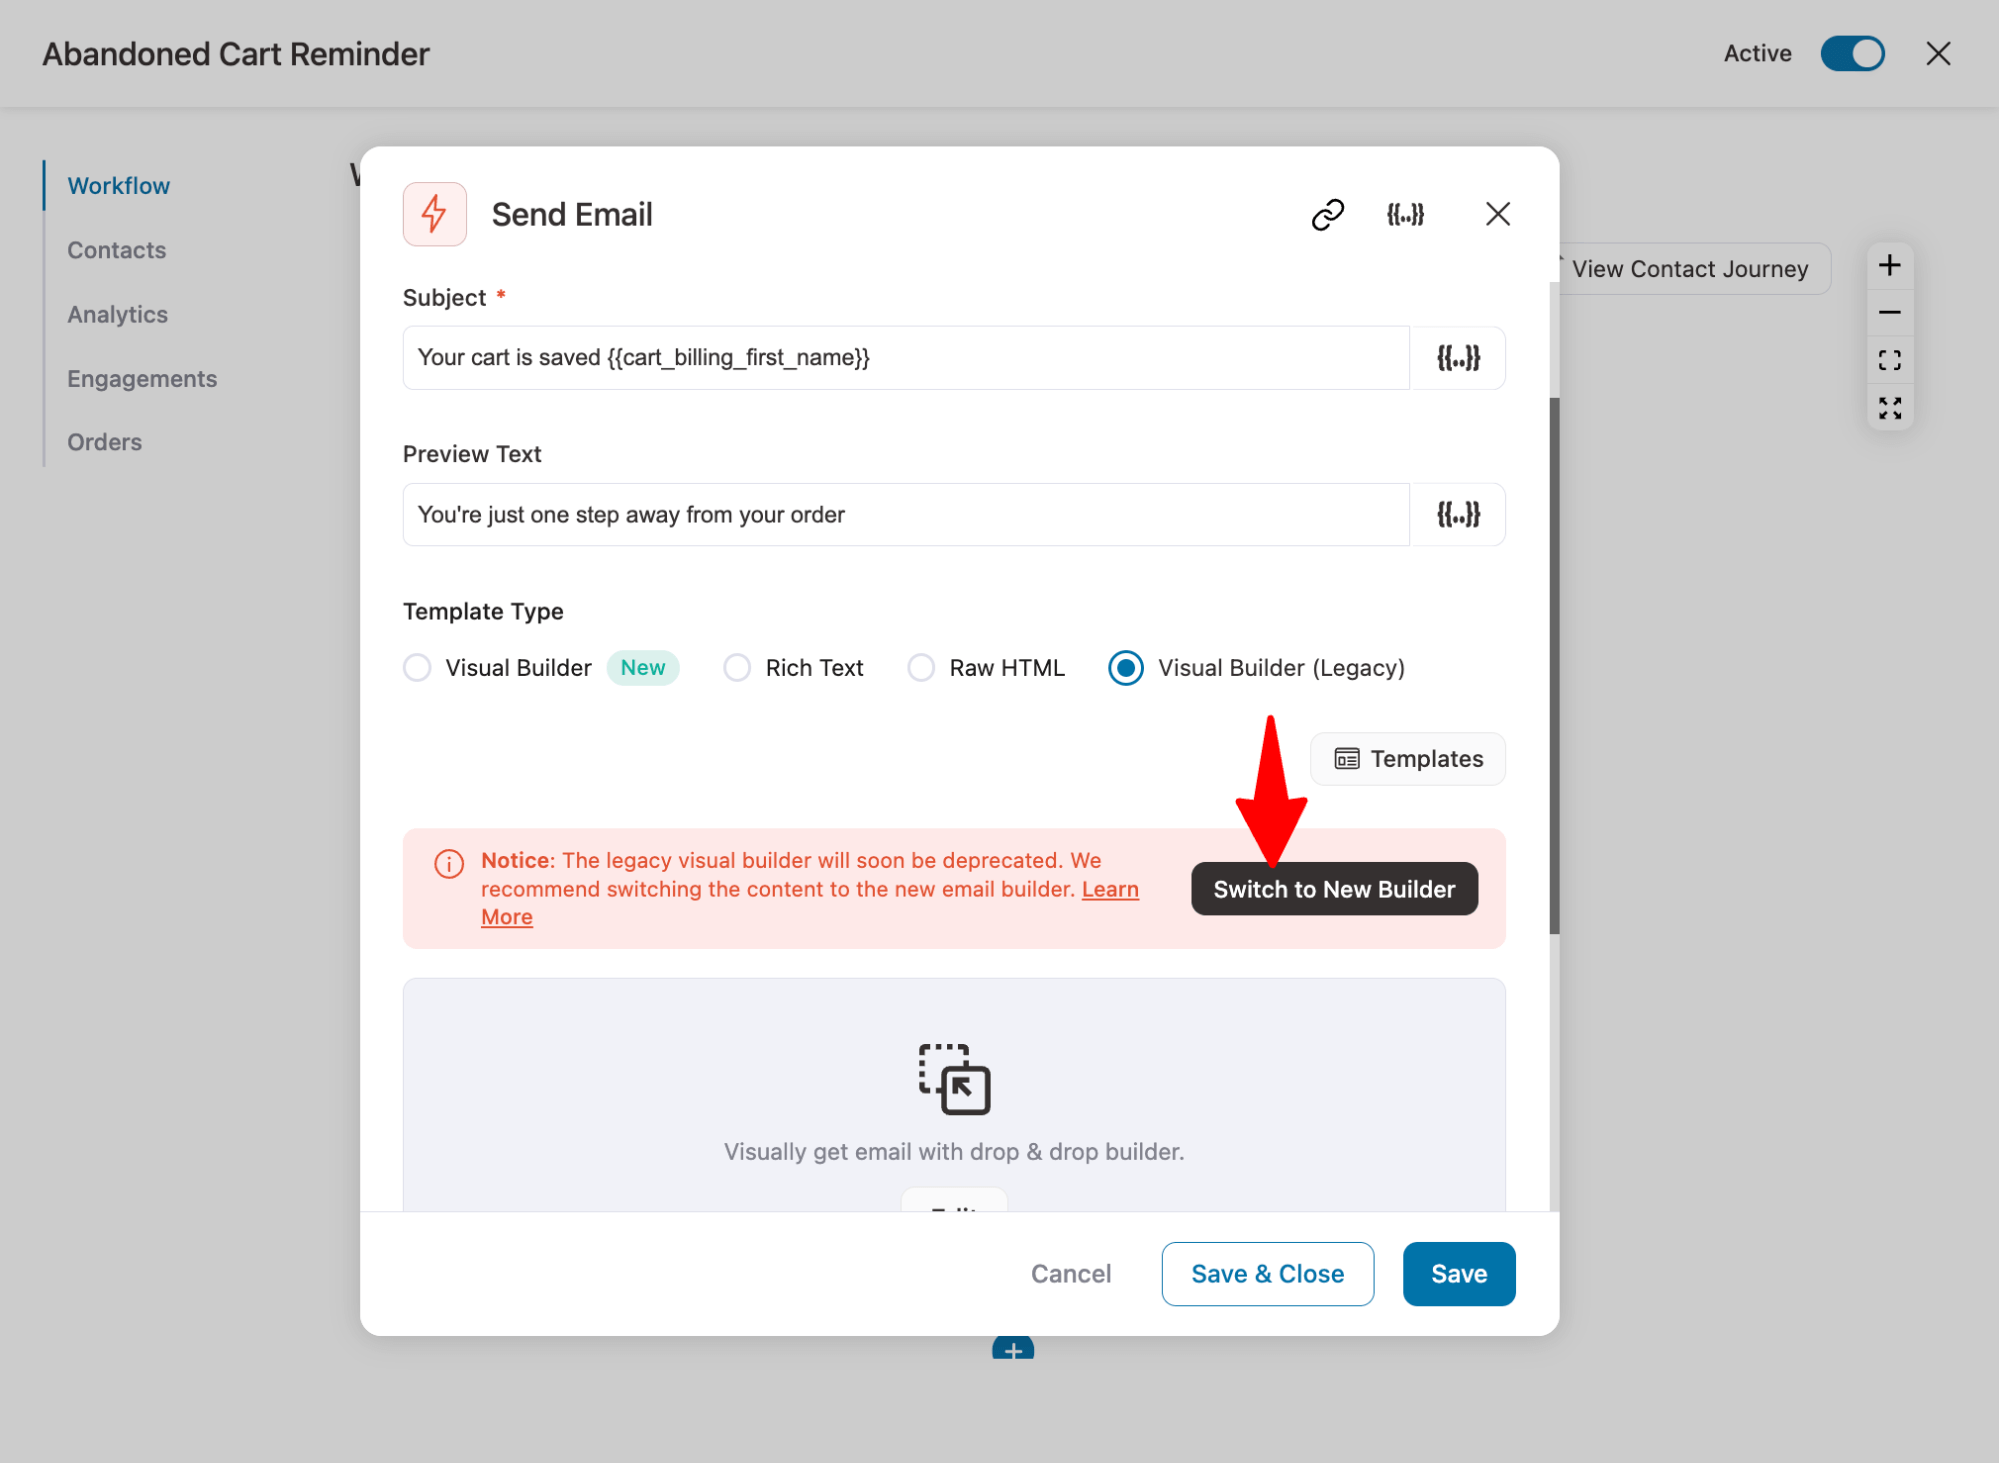
Now confirm by clicking on the button “Confirm Migration” button.
You should now see the same email in the new visual builder. You're all set to use it and customize it as needed!
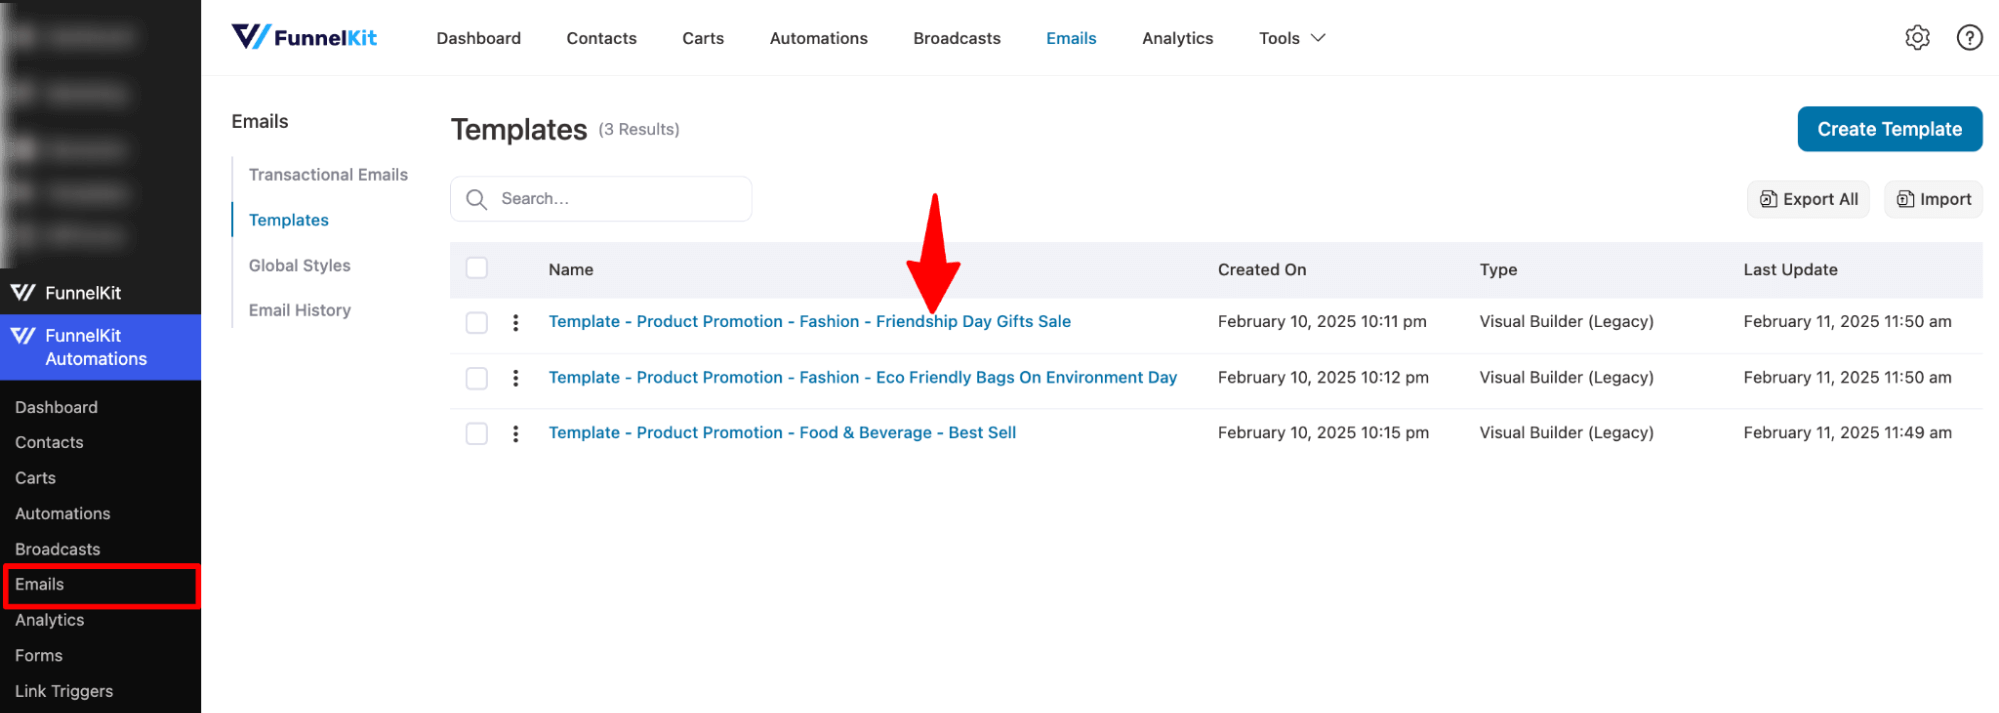
Migrate legacy email templates to the new visual builder
If you have existing email templates that you built earlier with legacy builder, you can upgrade them to a new visual builder as well.
You have to do the migration process one by one for each template.
To do so, go to FunnelKit Automations ⇒ Emails ⇒ Templates and hit on the template you want to upgrade.
The next process is similar to others. First, hit the “Switch to New Builder” button.
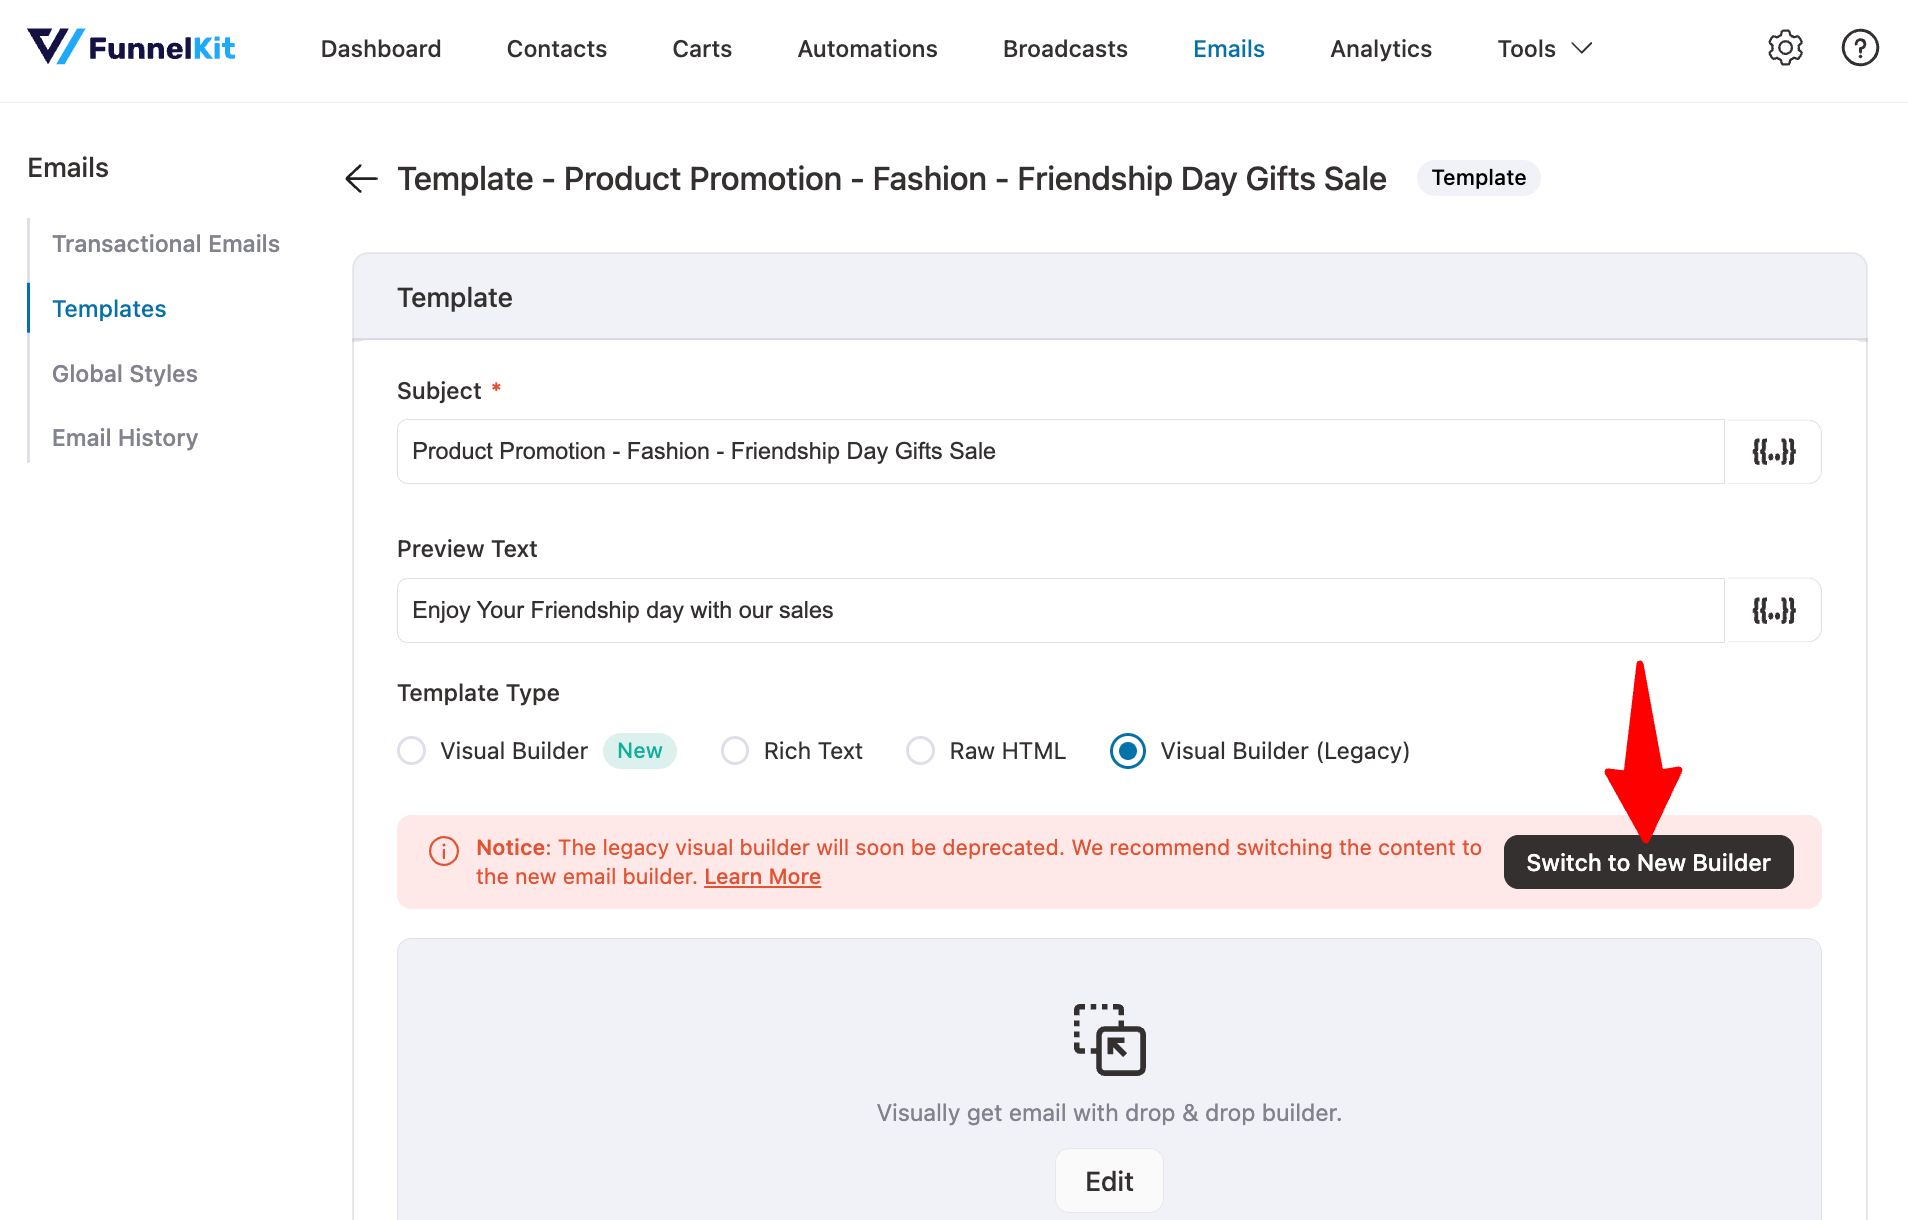
Next, confirm the migration.
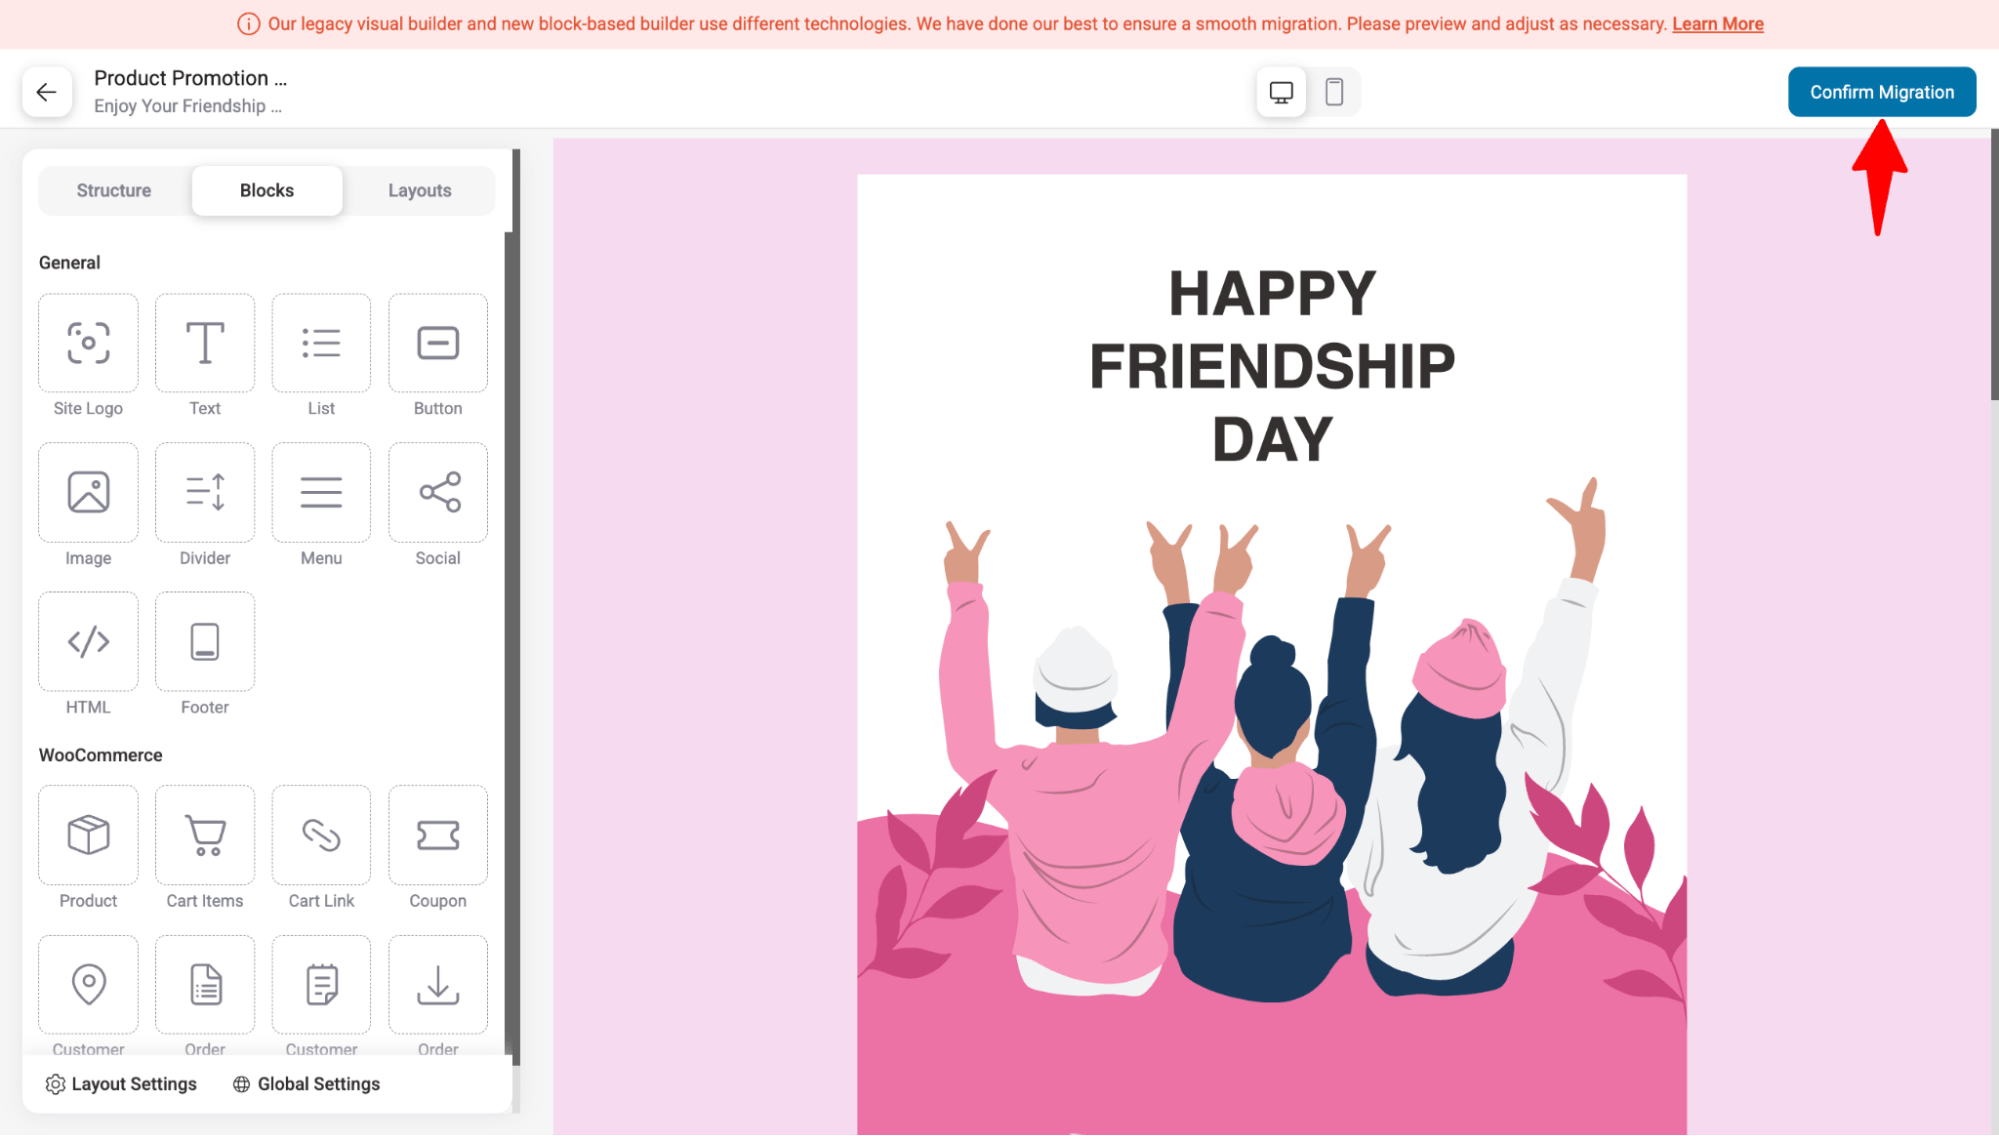
That’s it. Your email template should now be migrated to Visual Builder (New).
The old Visual Builder (Legacy) will soon be deprecated, so we recommend switching to the new Visual Builder for a smoother experience. Plus, with the new one-click migration tool, the transition is easier than ever!
New Transactional Email - Failed Order Email
In this release, we've introduced a new transactional email for failed orders. Previously, only admins received failed order notifications, but now, customers can be notified, too.
You can find the new failed order email for customers under the transactional email section.
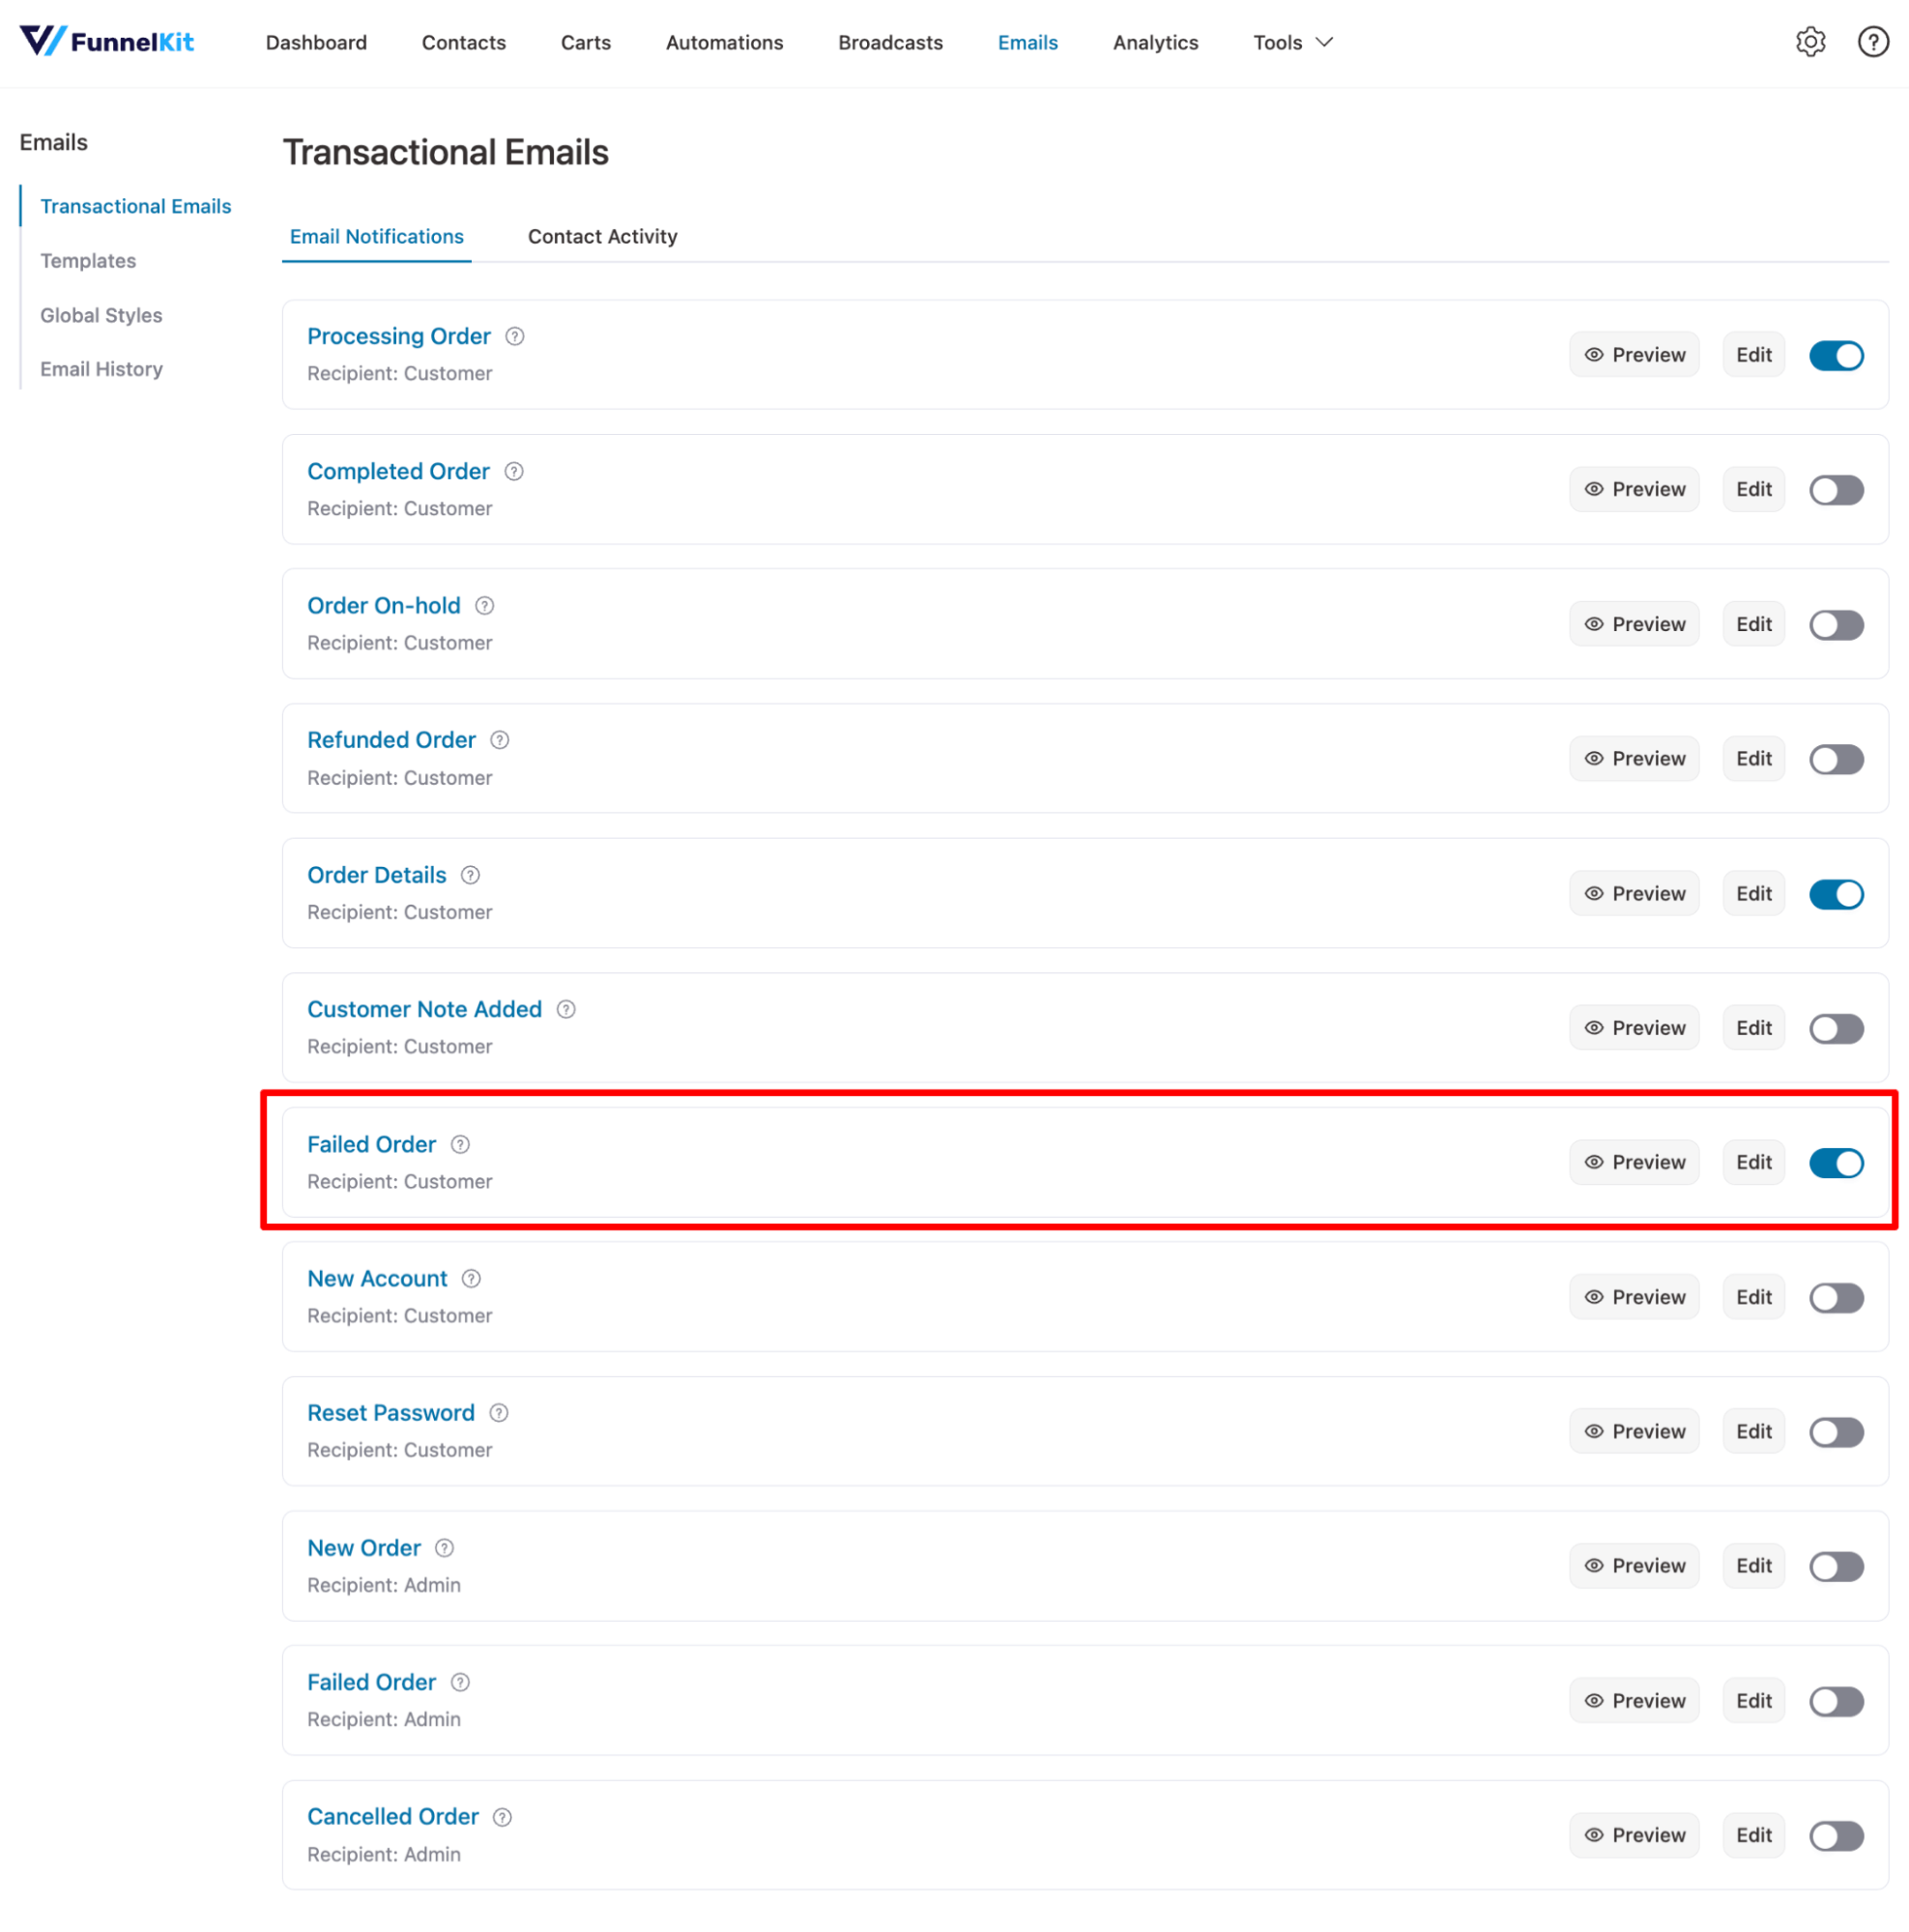
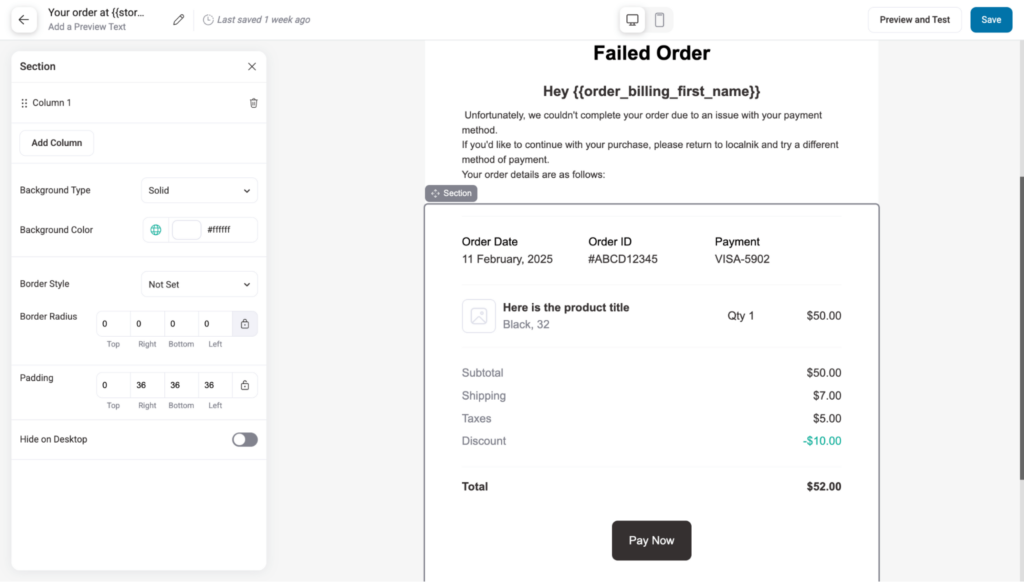
It comes with a prebuilt template that includes a logo, message, order summary, and CTA so users can go to the order summary page to complete the order.
You can easily customize this template with the visual builder according to your needs. For more details, you can check our blog on WooCommerce’s failed order to customers.
Remember, the needs to be enabled to send failed order emails to customers successfully.
On the contact activity tab, you can check whether the email has been sent, opened, or clicked.
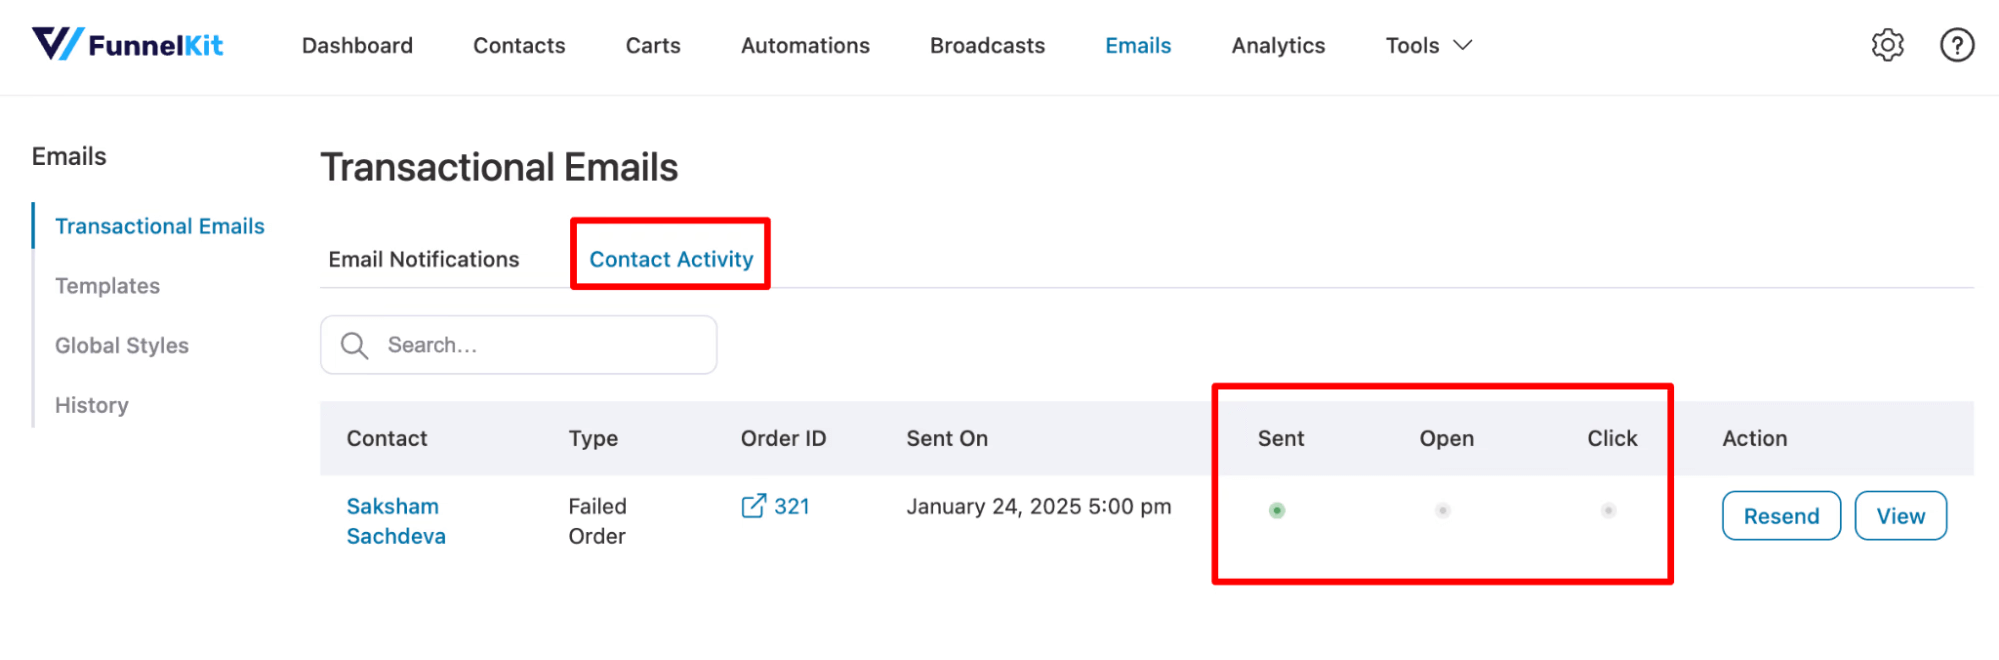
In case the email is opened but not click-through rate, you can resend the email by hitting the Resend button.

Now, you can notify customers about failed orders and recover the lost orders due to payment issues.
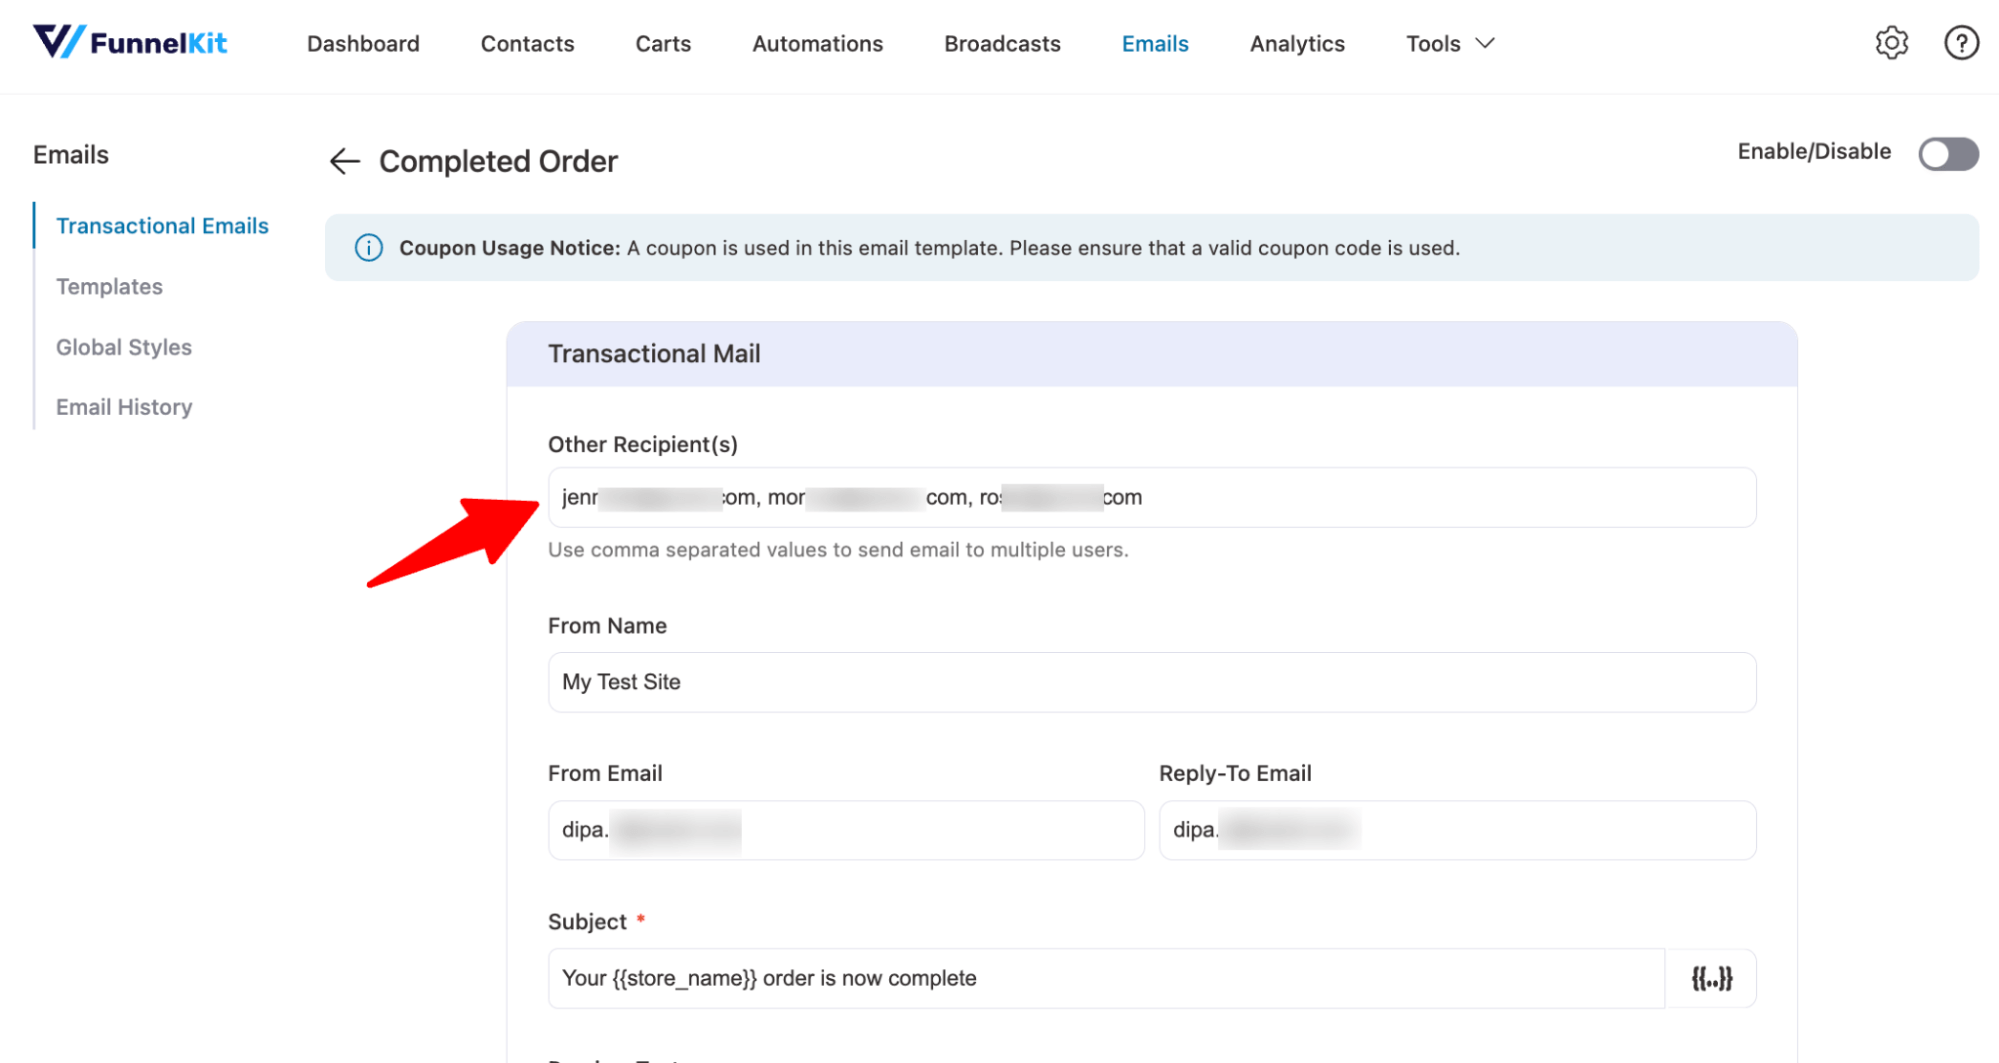
Add Other Receipts For All Transactional Emails
Now, for all transactional emails sent to customers like Processing Order, Completed Order, On-hold Order, Refunded Order, etc, you can add other recipients as well.
This ensures key stakeholders stay informed and improves record-keeping.
Add the other recipients under the field Other Recipient(s). You can separate multiple email addresses using a comma.
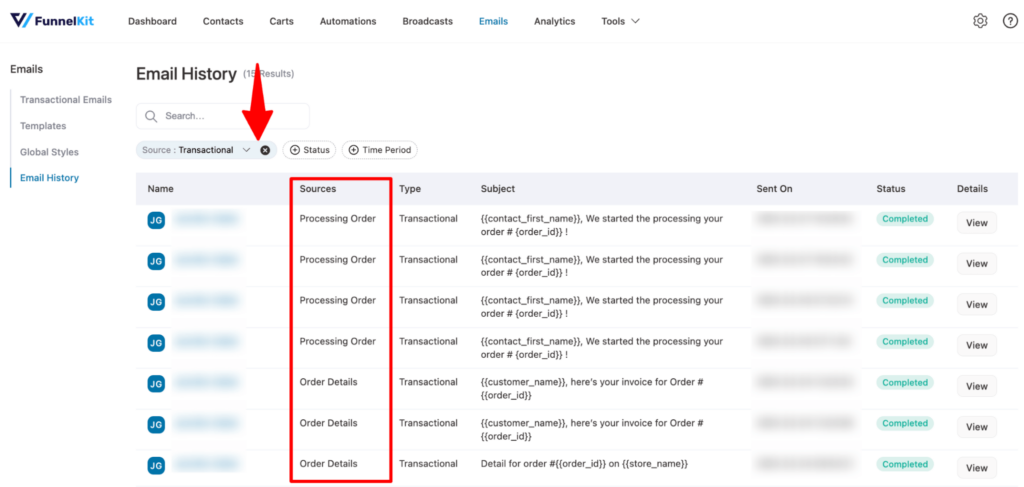
New Filter Option For Transaction Email In Email History
Now, under Email History, you can filter transactional emails. Earlier, you could only filter broadcast and automation emails. This makes it easier to track specific emails and improves email management.
All you need to do is navigate to Email History, choose Transactional Email under Source, and hit Apply.
Now, you should see the list of transactional emails along with their sources.
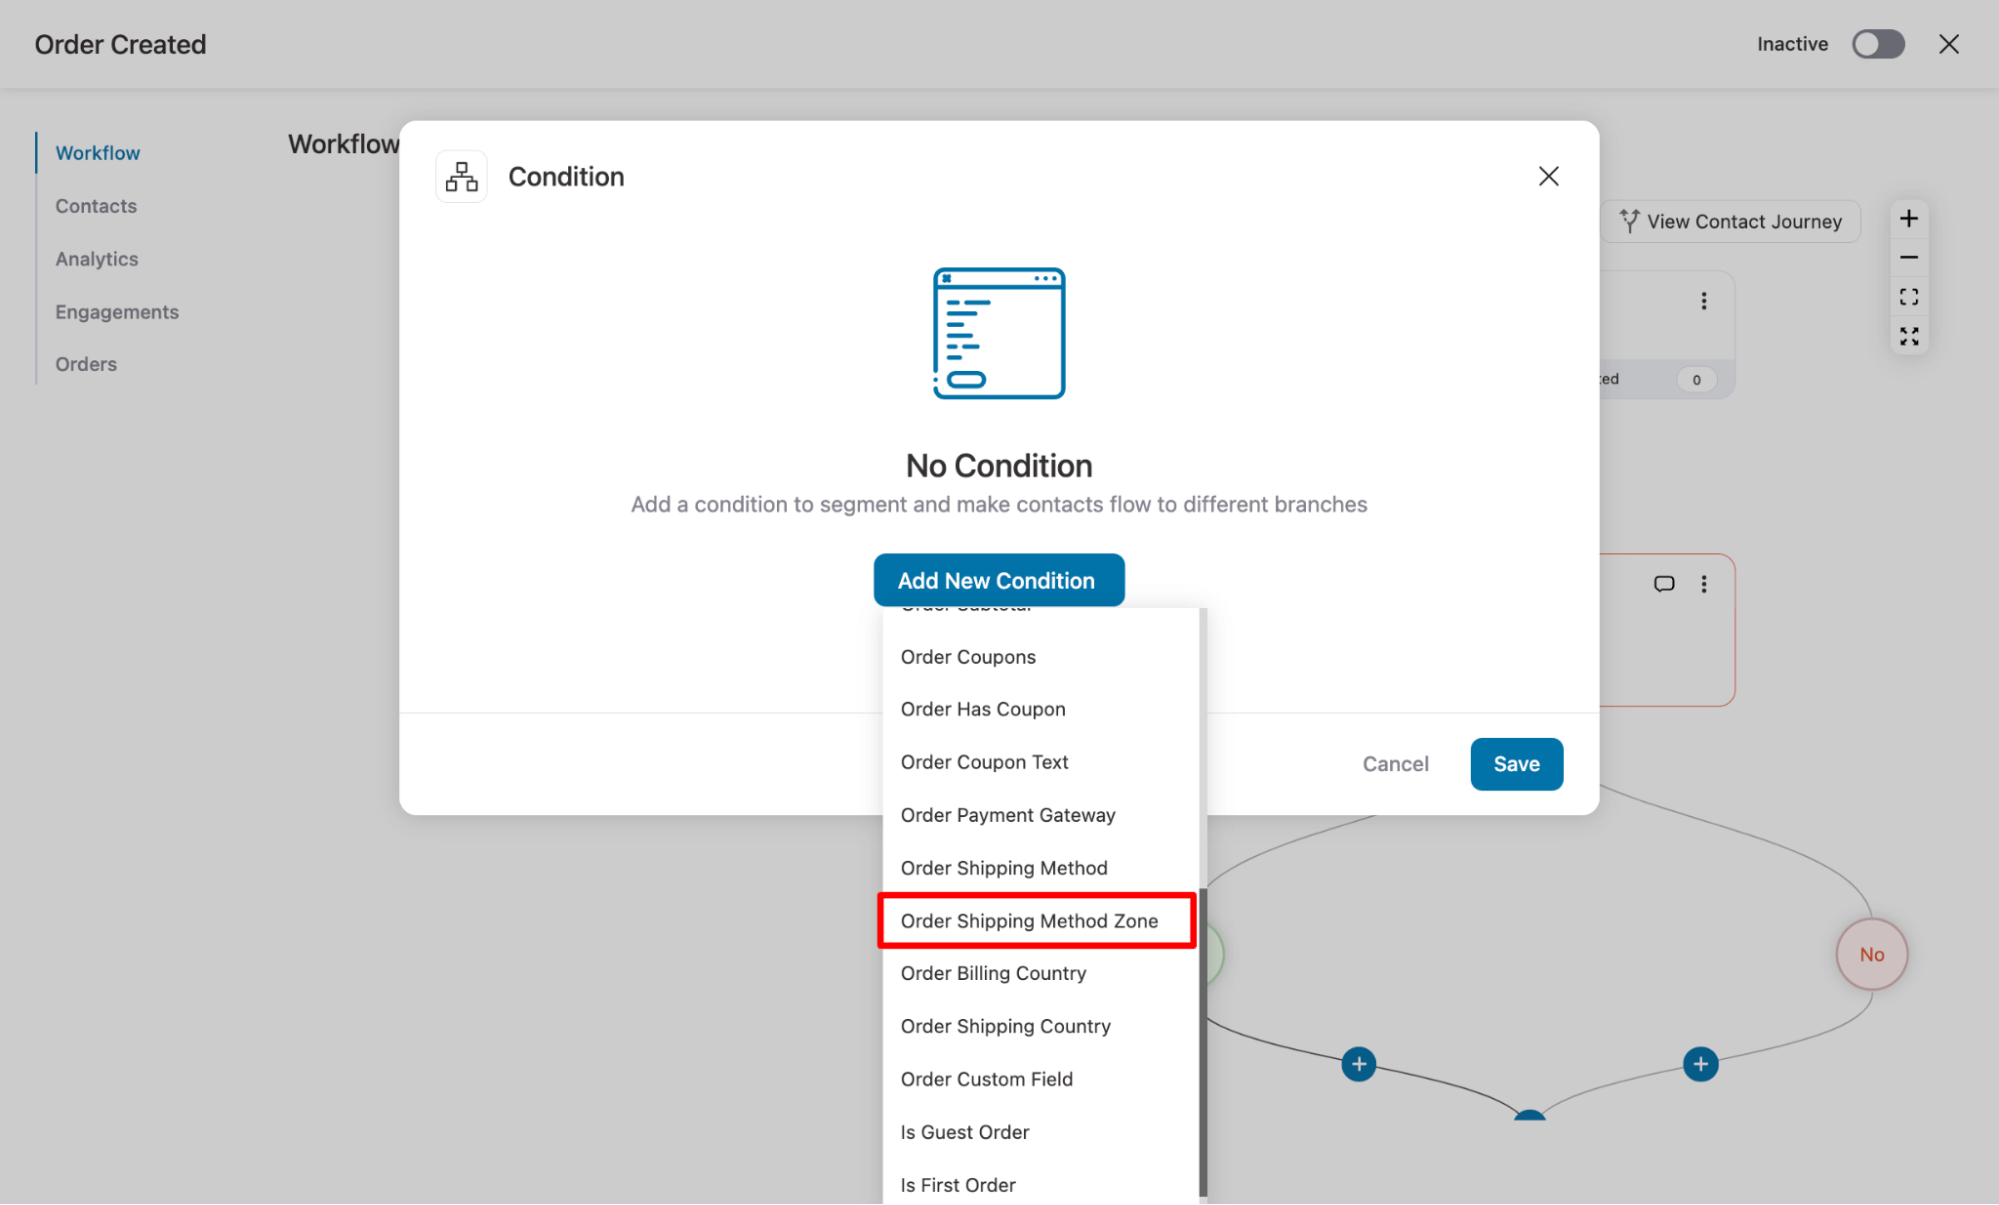
New Shipping Zone Rule Option For Automations
The new release adds a Shipping Zone condition for the Order Created event. You can now check the shipping zone and send relevant emails, ensuring better targeting and accuracy.
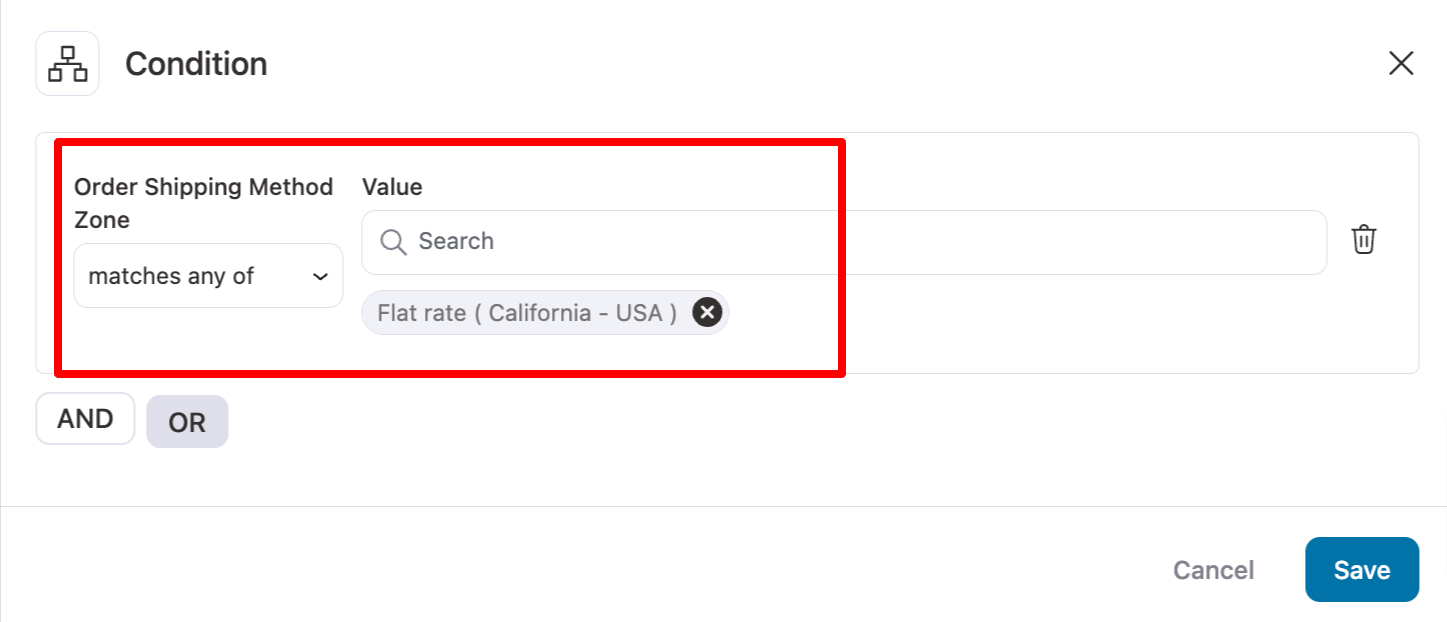
Find this option under Current WooCommerce Order as Order Shipping Method Zone.
After choosing the condition, you can match it with a specific value to set your rule.
Easy Contact Management With Multiple Tag & List Addition
Now, contact management is easier than ever. You can add multiple tags, and assign contacts to multiple lists in one go, improving organization and segmentation efficiency.
Go to any contact page, click on the +Add option, then in the popup, search and add as many tags as you want, and hit add to update.
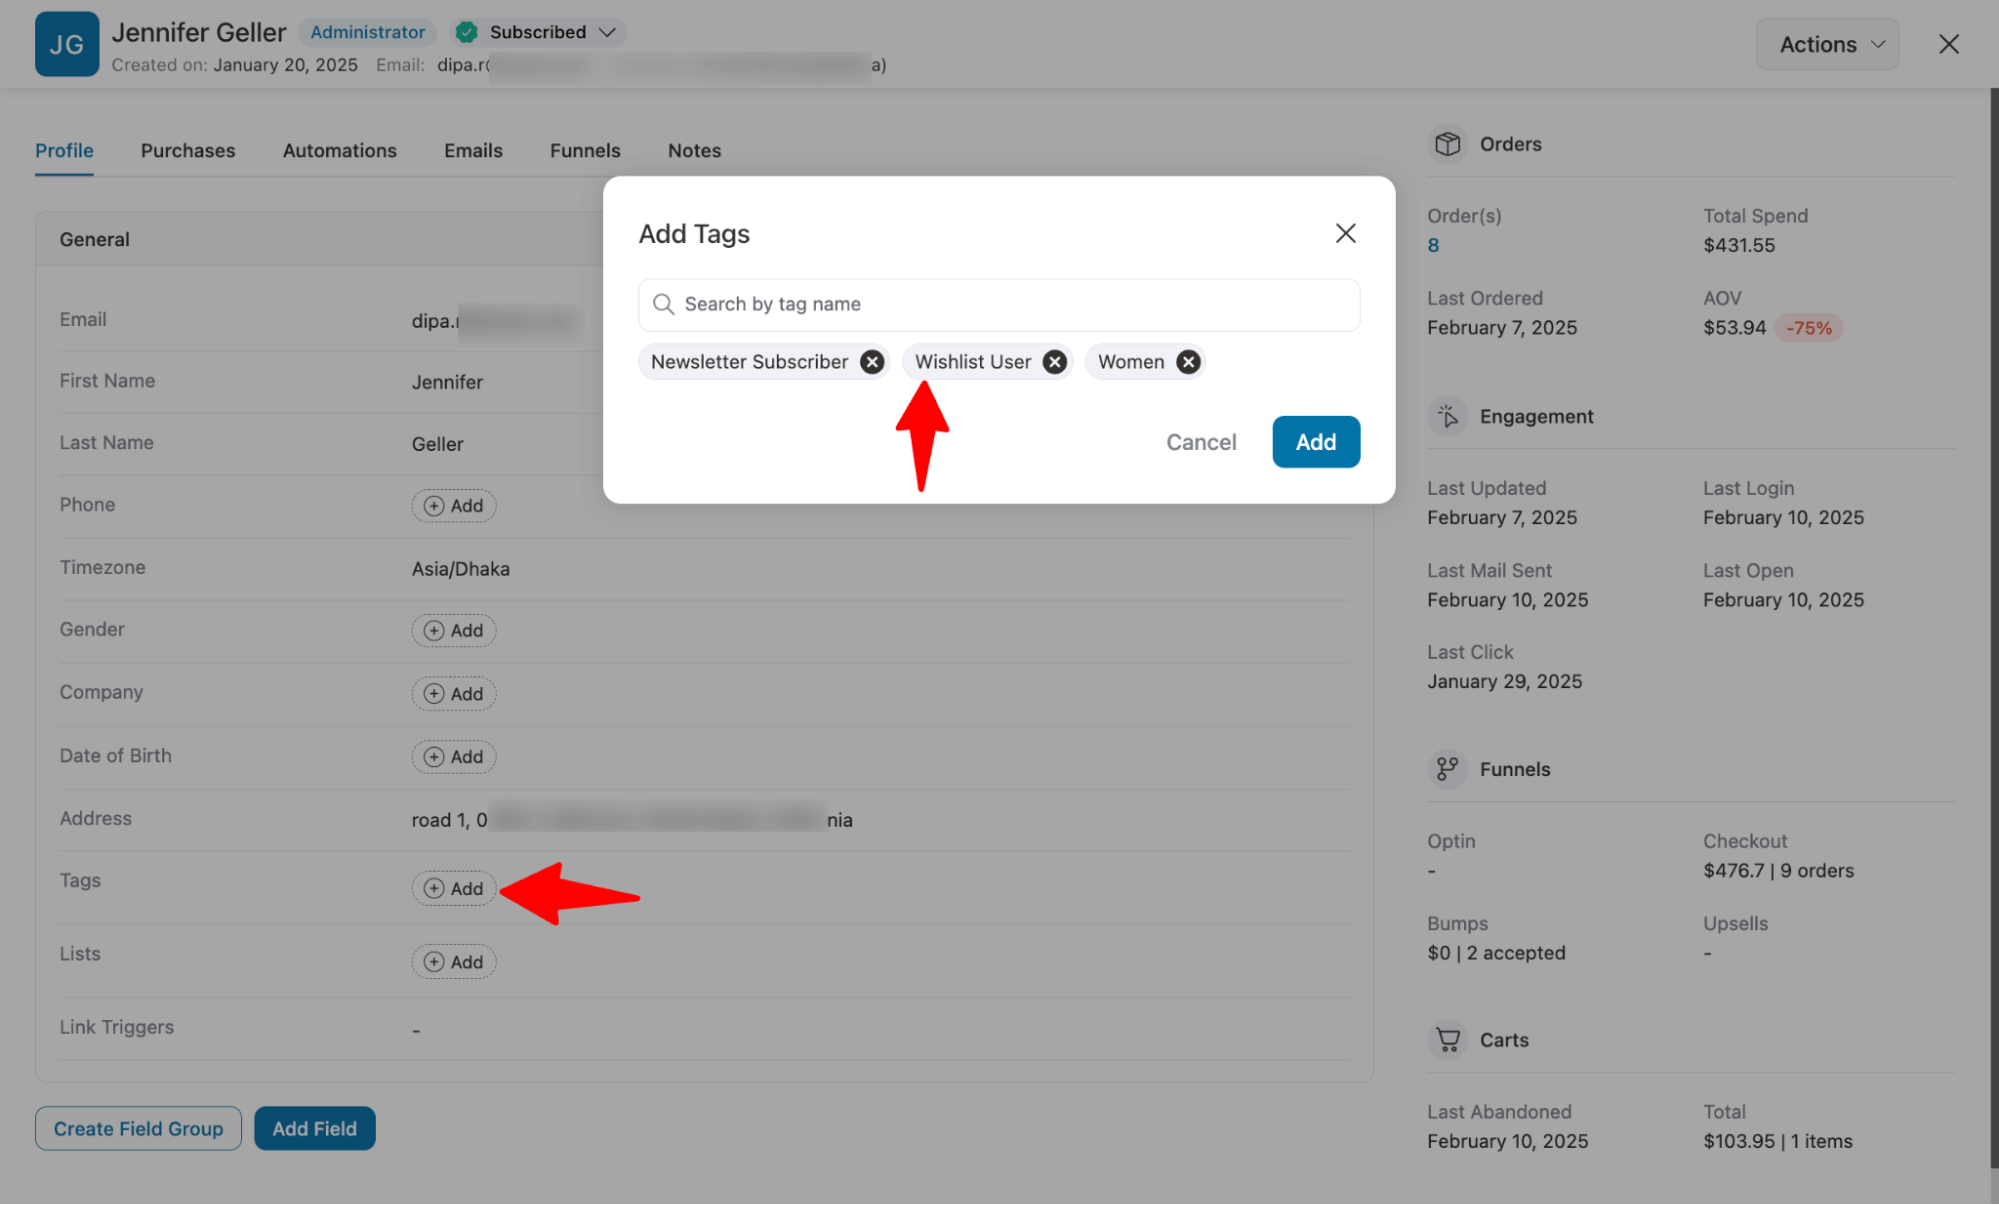
Similarly, hit the +Add option next to Lists, then search and add as many lists as you want.

Enhanced Audience Filtering for Precision and Efficiency
We’ve enhanced the audience filter feature. Previously, applying multiple filters would stack on top of each other, often leading to confusion and unexpected results.
Now, we've enhanced this functionality. When you apply a new filter, it overrides the existing results and provides you with a new set of audiences based on the latest applied filters. This makes audience management more precise and efficient.
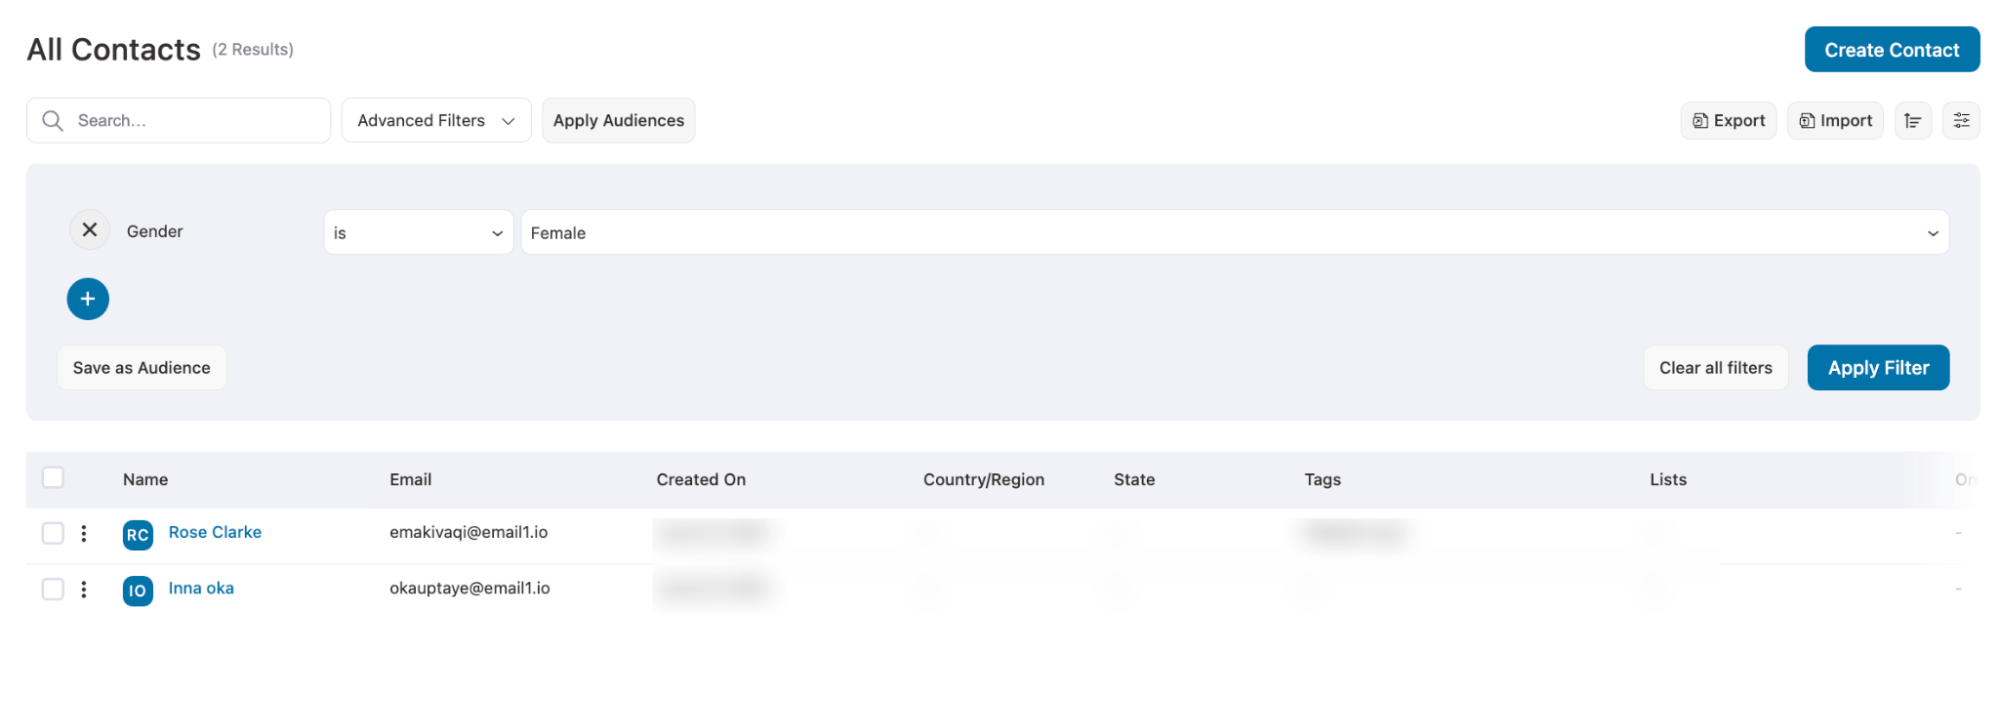
For instance, we filtered the audience using the VIP customers audience. Now, if we apply to women only.
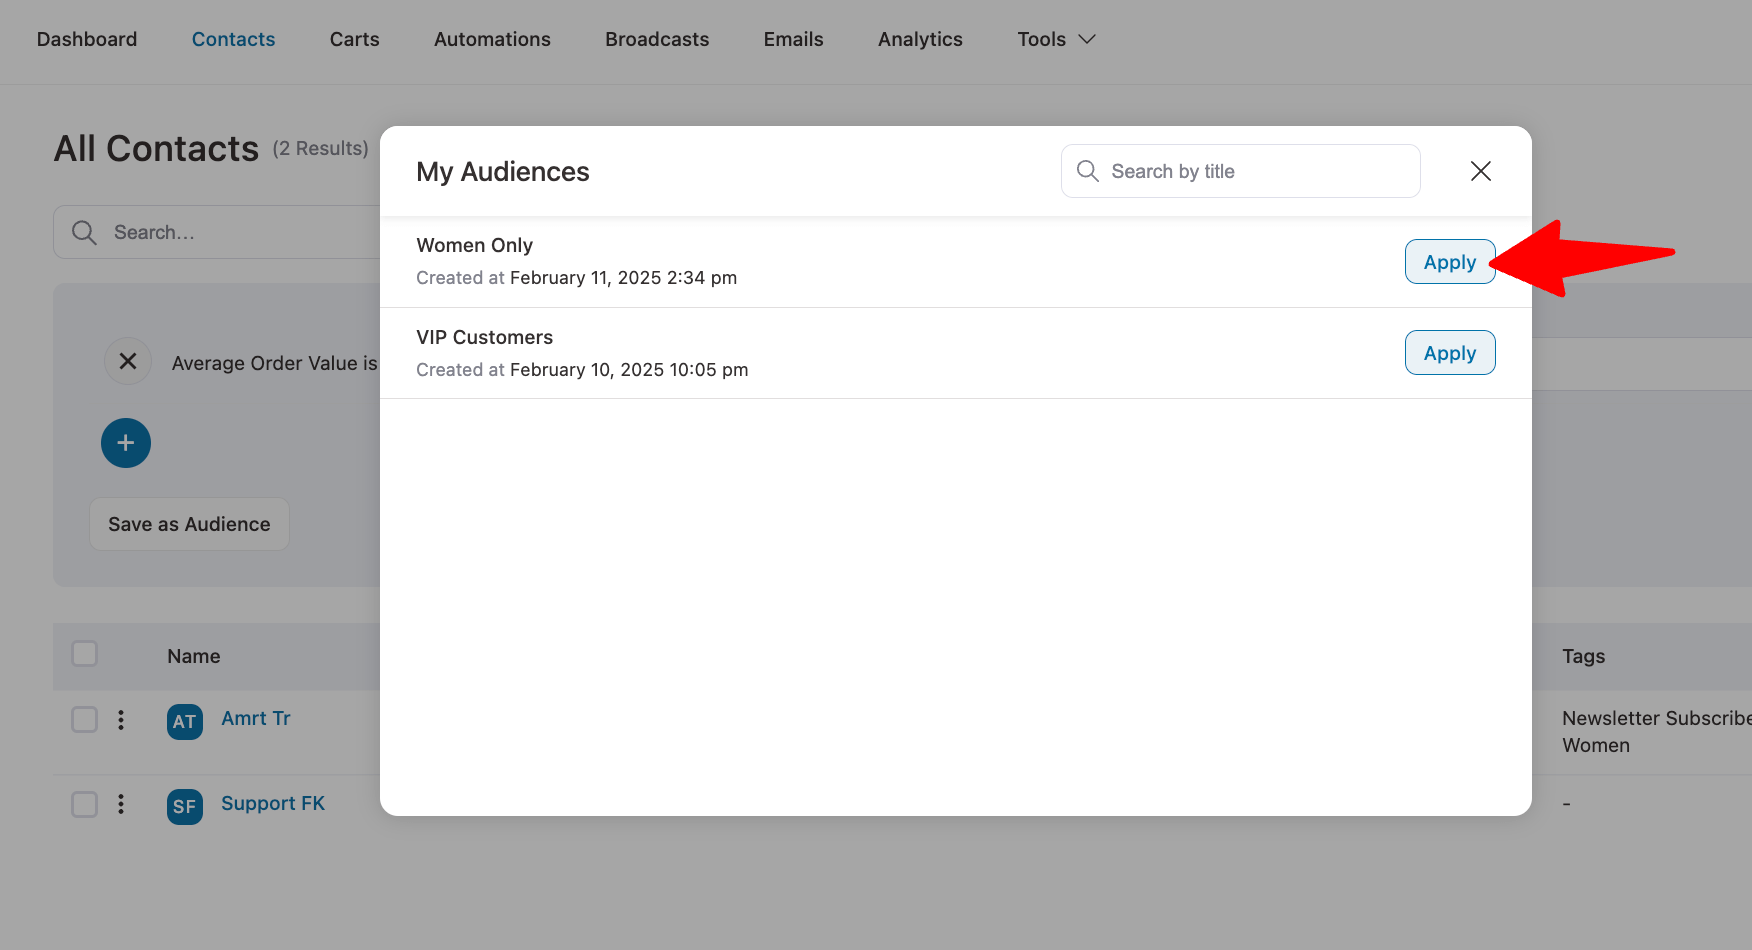
Here is the new result with the new audience rule.
Unsubscribe Page Compatibility With BreakDance Page Builder
Now, you can seamlessly create an unsubscribe page with BreakDance Page Builders.
For this, create a page with BreakDance Page Builder and add the subscription management form using the shortcode “. “
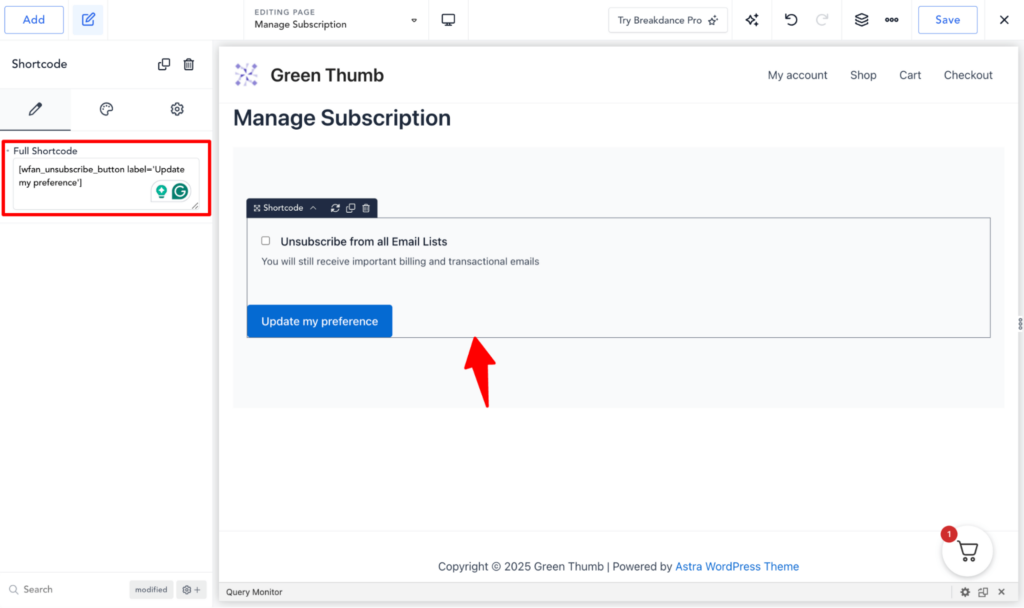
After publishing the page, navigate to Settings ⇒ Subscribe Page and select the BreakDance page. You can also allow users to manage the email lists they want to subscribe to.
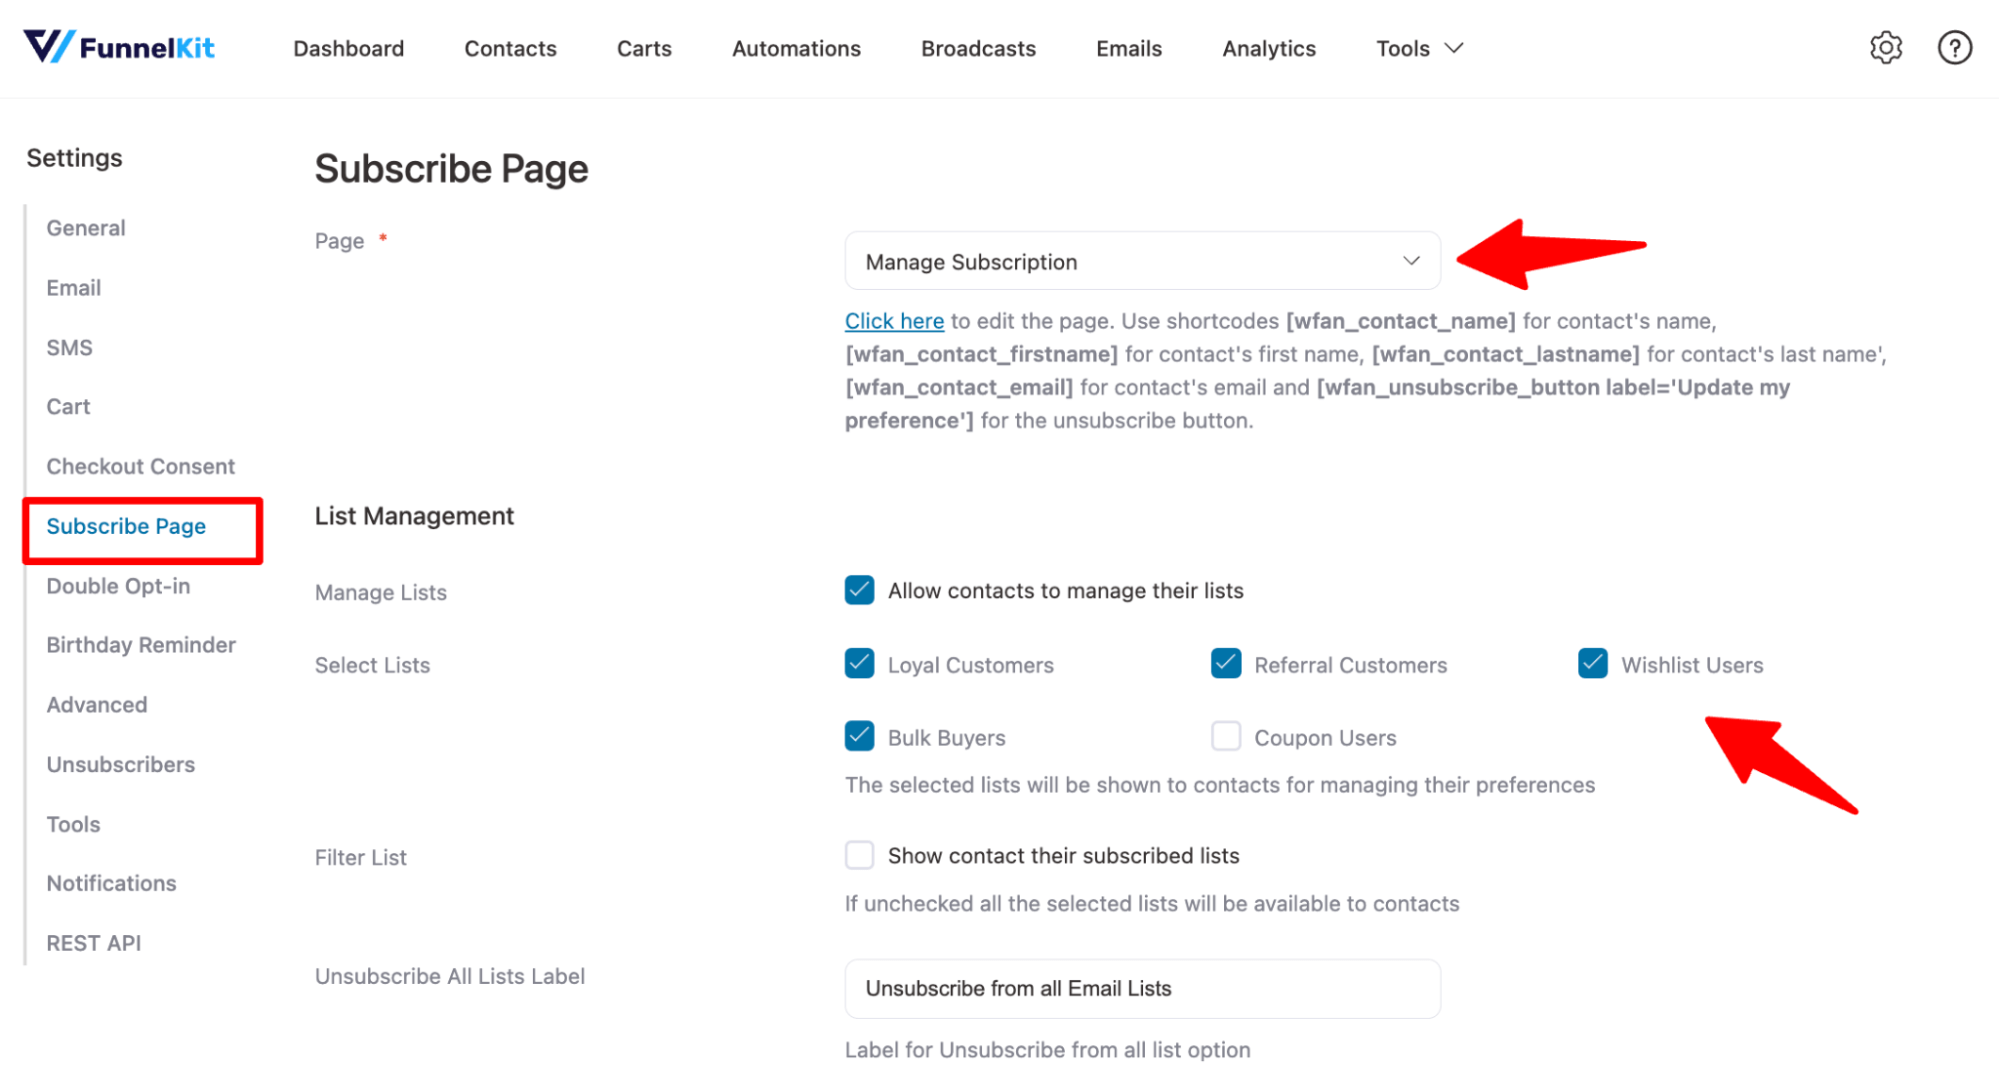
Don’t forget to update the settings.
More Enhancements and Refinements
That’s not all! We’ve added some minor enhancements as well to improve the user experience.
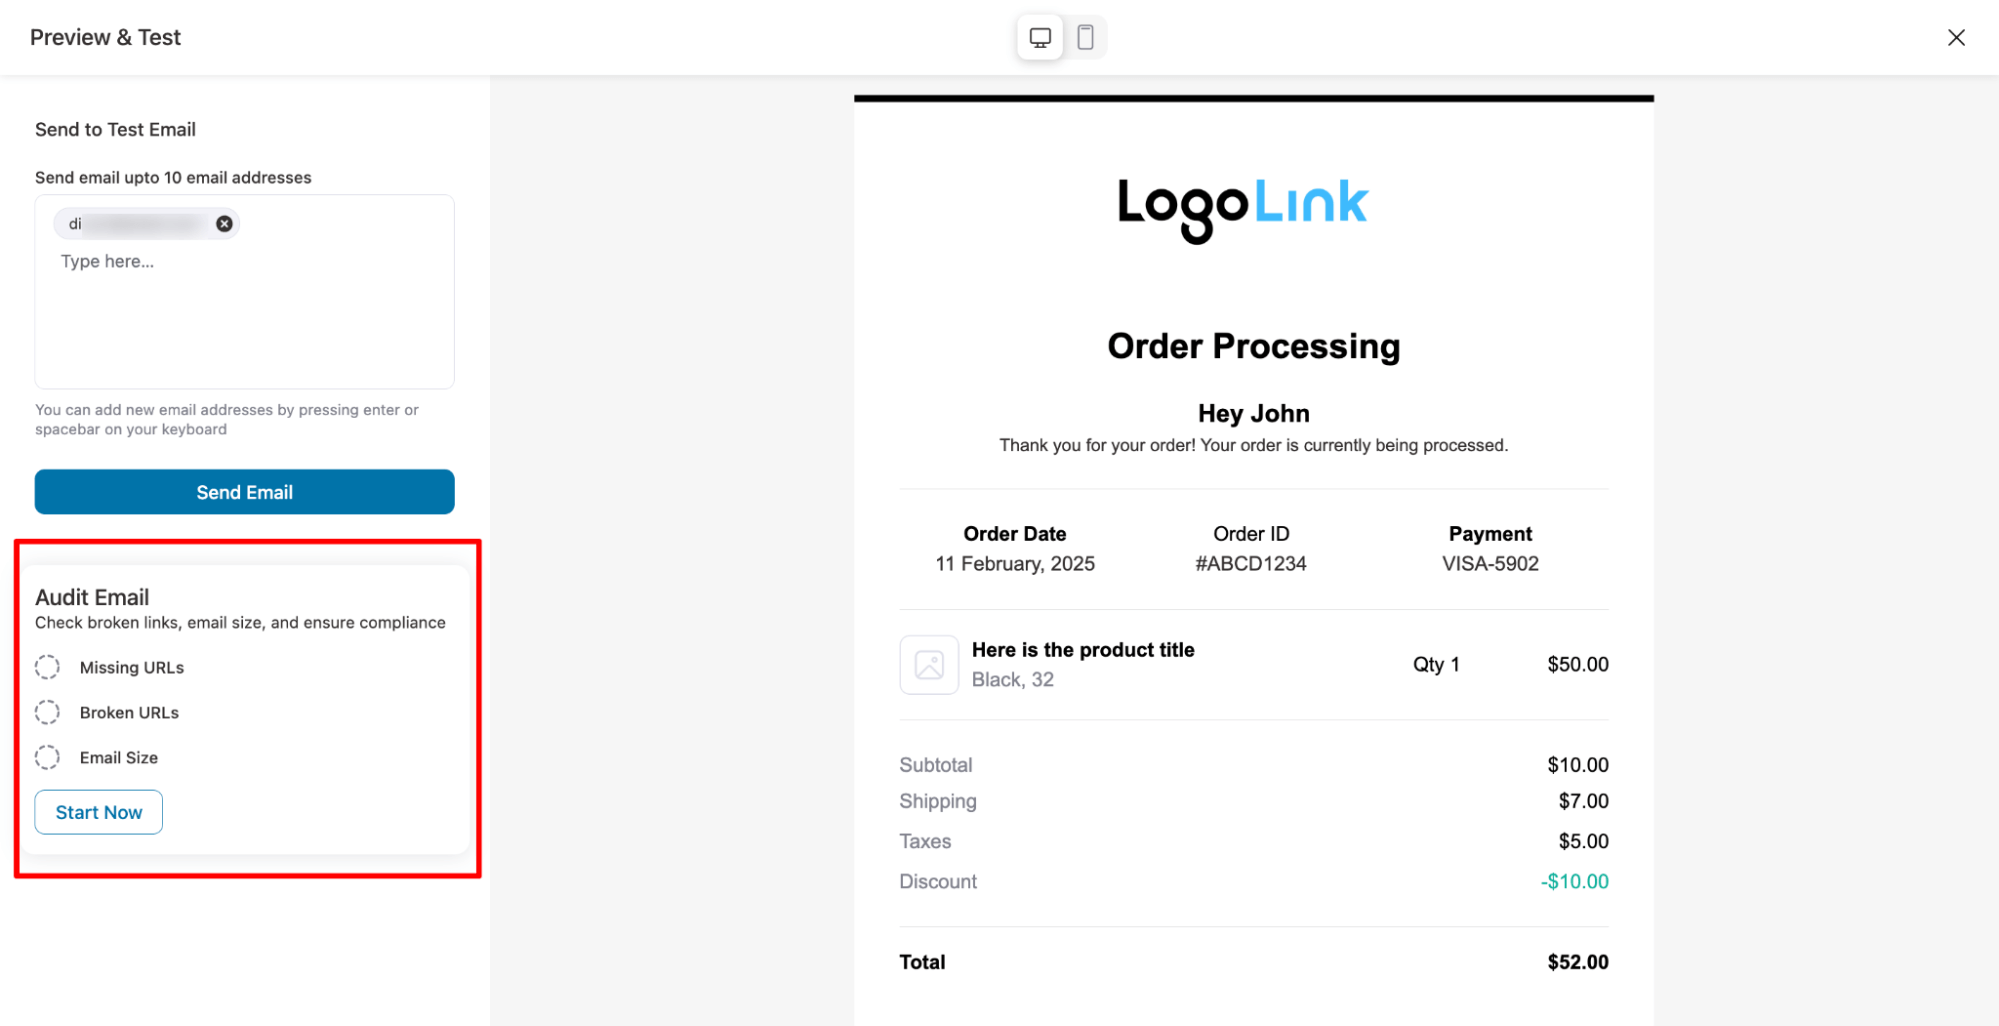
For instance, now you can Audit all your transactions email without going into the editing mode.
Just hit the Preview and Test button.
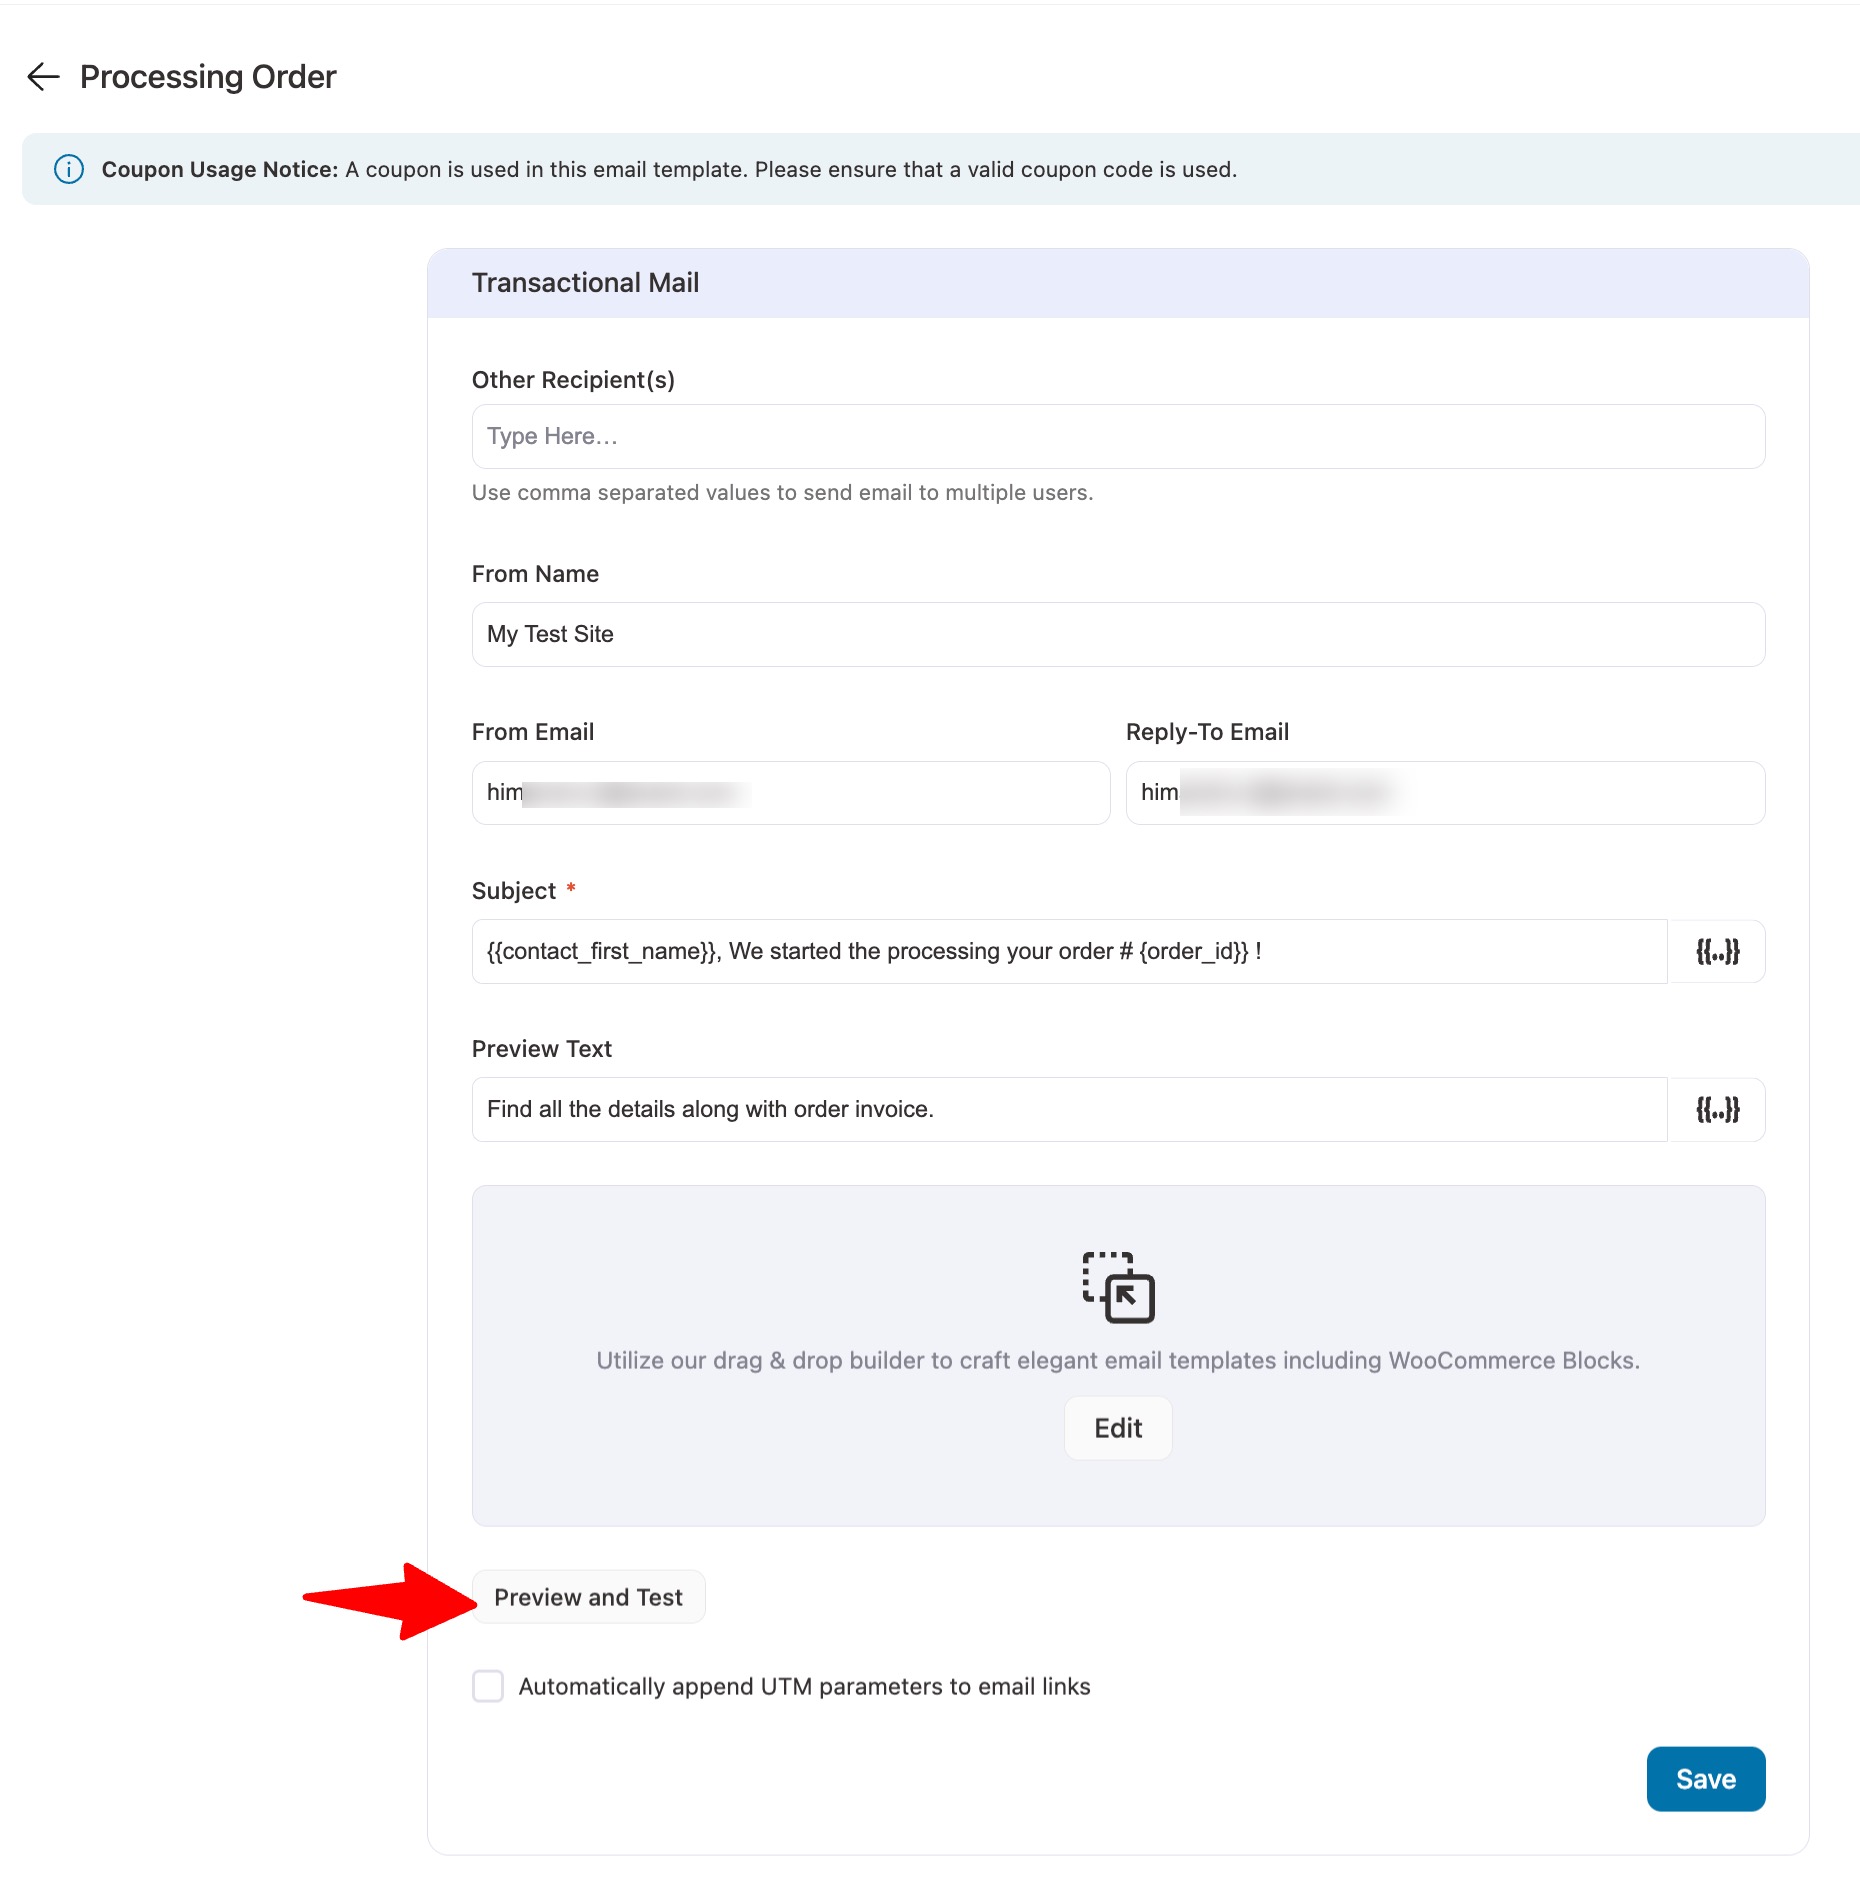
Here, you can audit your email, send a test email, and preview it—there is no need to go to the email editor.
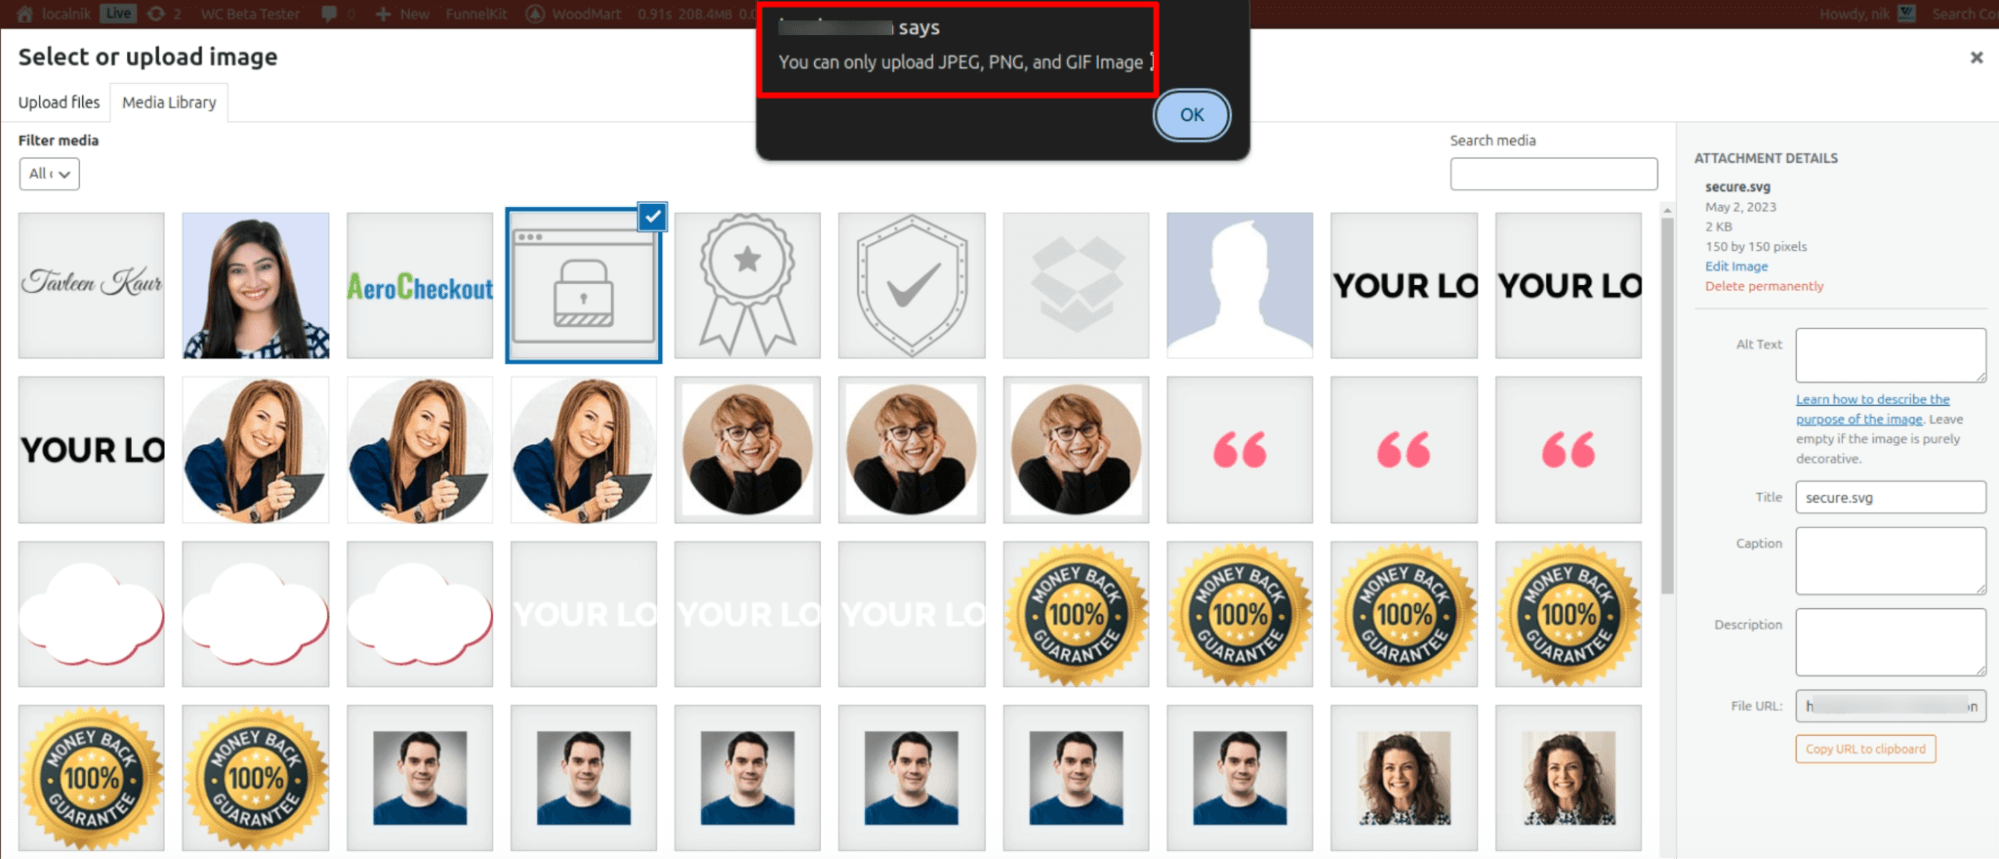
Moving on, we have disallowed uploading any SVG files for emails, as email clients don't support SVG.
Next, we have proper messaging for smart sending. As you know, with Smart Sending, the system first tests multiple email variants on a small portion of your audience and then automatically sends the best-performing version to the rest.
Now, for broadcasts with Smart Sending enabled, you will see a message at the top indicating the percentage of recipients included in Smart Sending.

Changelogs
More enhancements and fixes have been released in this version. Check out the full changelog below 👇
FunnelKit Automations Lite 3.5
- New: Introduced functionality to migrate content from the legacy builder to the new block builder, ensuring a seamless transition.
- New: Added compatibility for Breakdance Builder with the unsubscribe page shortcode for a smoother user experience.
- New: Enhanced compatibility with WooCommerce Product Add-ons to improve cart abandonment handling.
- New: Added an audit mail component in the transactional mail preview for better visibility.
- Added: Implemented an SVG image type restriction when uploading logos to maintain email compatibility.
- Added: Introduced a filter to modify the most interacted template based on opens or clicks, offering better insights.
- Added: Enabled copy mail functionality in the single contact header for ease of use.
- Added: Improved handling for datetime and time fields in older pro versions to maintain consistency.
- Added: Provided a hint message in the "Send Mail" action and transactional "Send To" field for better clarity.
- Added: Introduced a new rule for Shipping Zone to enhance order-related event handling.
- Added: Included a UID parameter in link triggers when sending a test mail for better tracking.
- Added: Added hooks to track connector connections and disconnections for better automation management.
- Improved: Transactional Mail Menu - Now includes an option to add additional recipients in customer emails.
- Improved: Reset Password Link - Now redirects to the WooCommerce "My Account" page when WooCommerce is activated.
- Improved: Conditional Sidebar - Enhanced to properly handle "not exists" condition cases.
- Improved: CSV Upload Route - Optimized to prevent conflicts with certain server settings for smoother uploads.
- Improved: Audience Filters - Enhanced by replacing previous filters with new, more efficient ones.
- Improved: Email Component - Added merge tags for subject and preheader fields for better personalization.
- Improved: Progress Bar Classes - Updated to prevent unintended CSS overrides.
- Improved: State & City Filters - Now include helpful hints for better usability.
- Improved: Broadcast Overview Notice - Added an option to customize the icon for better visual distinction.
- Improved: MySQL Queries - Optimized for better performance across all pages.
- Improved: Multiple Tag & List Addition - Users can now add multiple tags and lists by separating them with commas for easier management.
- Improved: Transactional Mail - Added a filter to show only transactional mails and display their type in the table for clarity.
- Fixed: Ensured accurate open rate data in email analytics.
- Fixed: Improved error handling in actions for nested error messages, ensuring smooth operation.
- Fixed: Resolved an issue with the
include_unsubscribeparameter when using the status filter. - Fixed: Addressed an export issue in "Get Contact" when modifying per-page and limit settings in Step 2.
- Fixed: Adjusted default preheader space to prevent body content from displaying incorrectly.
- Fixed: Resolved an issue with saving block email content in automation workflows.
- Fixed: Improved automation contact data fetching based on ID for accurate results.
- Fixed: Ensured correct scheduling for the midnight action scheduler's recurring time interval.
- Removed: Deprecated
pre_wp_mailfilter before sending mail for improved system efficiency.
FunnelKit Automations Pro 3.5
- Added: New form integration: Forminator Forms.
- Added: WooCommerce Transaction Emails: Support for failed order notifications for customers.
- Added: New merge tag: 'Funnel Builder Conversion Data' added.
- Added: New feature to track advanced logging, which can be activated under Tools > Advanced.
- Improved: Action: Create FunnelKit Contact: A new setting was added to update contact data if it already exists.
- Improved: FunnelKit Form Submission Event: Created coupons are now saved in the automation data, making them accessible on the thank-you page.
- Improved: Contact Filters: Added support for multiple values in the City filter, separated by commas.
- Improved: Broadcast: Improved user experience with smart sending-related messages.
- Improved: Adjusted the email pre-header spacing.
- Improved: WooCommerce Transaction Emails: Third-party plugin attachments, like invoices, are now included in emails.
- Improved: WooCommerce Transaction Emails: Fixed the formatting of items in the order summary block.
- Improved: Email SMTP Providers: Added handling for soft bounces and complaints via webhook.
- Improved: Formidable Forms: Added support for hidden fields in selection.
- Improved: Automation Actions: Enhanced "Add Tag" and "Add List" actions to allow multiple values separated by commas.
- Improved: Optimized database calls for better performance.
- Improved: Product Block in New Email Visual Builder: Now excludes hidden and search-only products.
- Fixed: WooCommerce Transactional Emails: Addressed warnings related to width in emails.
- Fixed: WooCommerce Transactional Emails: Fixed missing order item metadata in the order summary block.
- Fixed: WooCommerce Transaction Emails: Corrected UTM data syntax.
- Fixed: Automation Action (Stripe Offers): Improved the "Create Offer" action to handle scenarios where the automation runs multiple times.
- Fixed: Resolved a PHP warning that occurred during contact exports.
- Dev: Added the filter hook bwfan_subscription_product_types to modify the product type for subscription product searches.
Excited to Try the New Features in FunnelKit Automations 3.5?
The major addition is the one-click migration tool, which makes upgrading your emails to the new visual builder seamless.
Other new features, such as transactional emails for failed orders, the ability to add multiple recipients to emails, and the new shipping zone condition for automations, simplify email management.
Additionally, enhanced transactional email search, improved contact management with tags and lists, and better audience filtering further boost your efficiency.
Ready to take advantage of these exciting new features?
Update to FunnelKit Automations 3.5 today and leverage these powerful enhancements for better email marketing!

Editorial Team
March 30, 2026Discover how to boost sales and customer loyalty with three smart ways to offer free gifts in your WooCommerce store. Want to boost WooCommerce sales and delight your customers? Offer...
Editorial Team
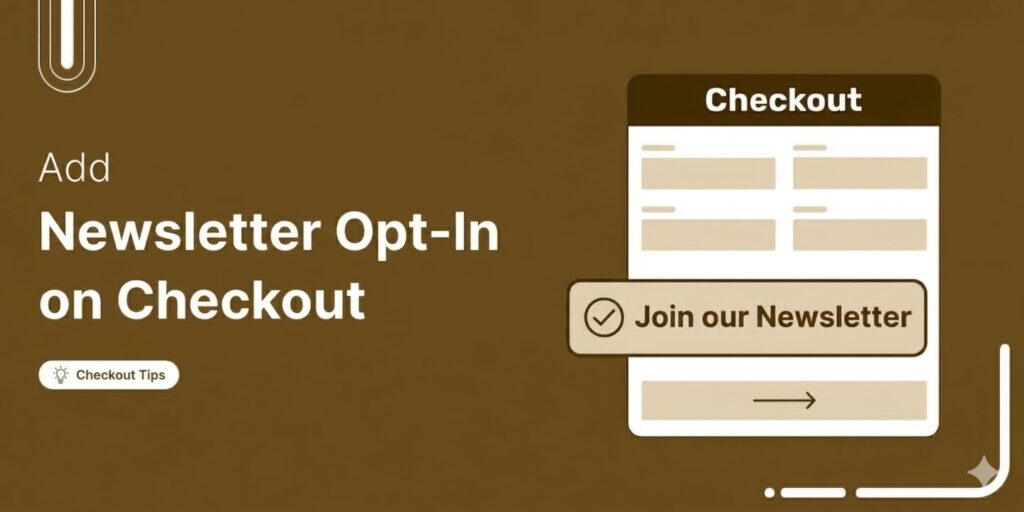
March 23, 2026Adding a newsletter opt-in checkbox to your WooCommerce checkout is one of the simplest ways to grow an email list that actually drives revenue. Every customer completing a purchase is...

Editorial Team
March 10, 2026A WooCommerce mini cart is a compact cart summary that displays product details, quantities, and totals without sending shoppers to a separate cart page. You can set it up as...


