
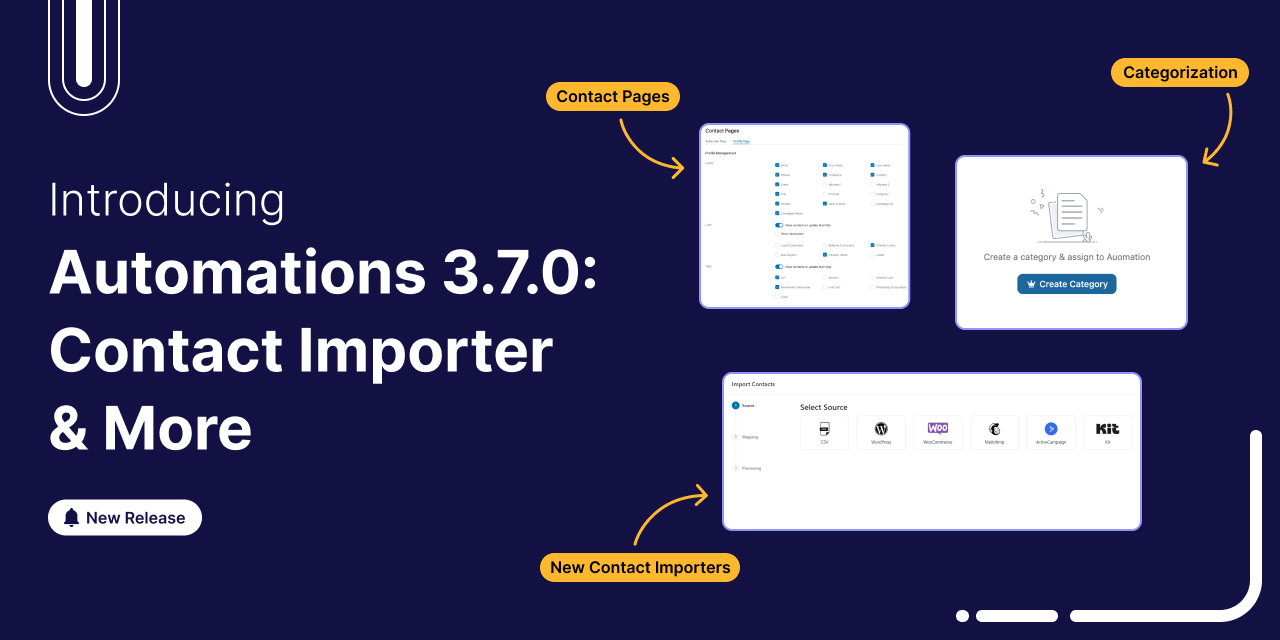
FunnelKit Automations 3.7.0 is here! 🎉 And it brings meaningful improvements that make building and managing your marketing automation easier than ever.
This release is all about giving you more control, cutting down setup time, and helping you stay organized as your workflows grow.
Here’s a quick look at what’s new in version 3.7.0:
- Redesigned contact pages with built-in brand styling
- Faster, more streamlined imports from popular platforms
- Advanced categorization tools to keep your automations tidy and easy to manage
- Conditional content in WooCommerce transactional emails for smarter personalization
Together, these updates simplify everyday tasks and create a smoother automation experience, whether you’re setting up new workflows or managing complex automation setups.
Let’s dive in and explore what’s new in more detail.
Table of Contents
- 1 1. Revamped Contact Importer with Direct API Integrations
- 2 2. Conditional Content in Transactional Emails
- 3 3. New Brand Style Settings & Distraction-Free Mode
- 4 4. All-New Subscriber Preference Center (Profile Page)
- 5 5. Advanced Categorization System for Better Organization
- 6 6. Additional Improvements and Enhancements
- 7 Ready to Try FunnelKit Automations 3.7.0?
1. Revamped Contact Importer with Direct API Integrations
Importing contacts just got a massive upgrade. In FunnelKit Automations 3.7.0, we've completely rebuilt the contact import experience to make switching from other platforms smooth, transparent, and reliable.
Whether you're importing from a CRM, an email marketing tool, or a CSV file, the entire workflow is now simpler and more powerful.
A Redesigned Contact Import Experience
You’ll find the new import flow by going to Contacts and clicking on the Import button. The process is now split into two clear steps:
- Create New: Start a new import job
- View List: Review your complete import history in one place
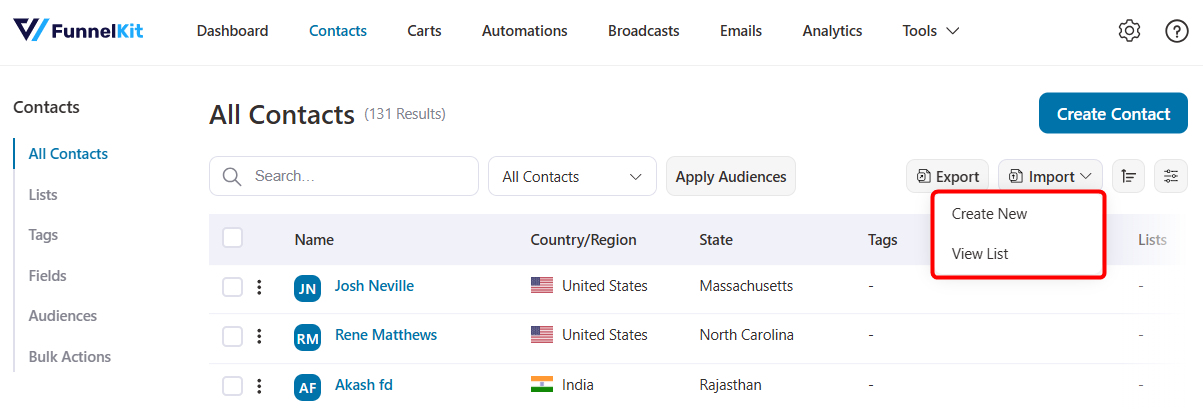
This separation makes it easier to manage new imports without losing visibility into past ones.
New Import Dashboard (View List)
The View List page gives you full visibility into every import you’ve run, including:
- A list of all previous imports with real-time status updates
- Import source (CSV, WordPress, WooCommerce, Mailchimp, ActiveCampaign, Kit, and more)
- Number of contacts successfully imported
- Date and time for each contact import
- Quick access to detailed results, including tags, fields, and lists
You can track each contact detail clearly without guessing about what happened during an import.
Direct API Imports (No CSVs Required)
Moving to FunnelKit from another CRM? You no longer need to manually export messy CSVs.
We have added direct API importers for:
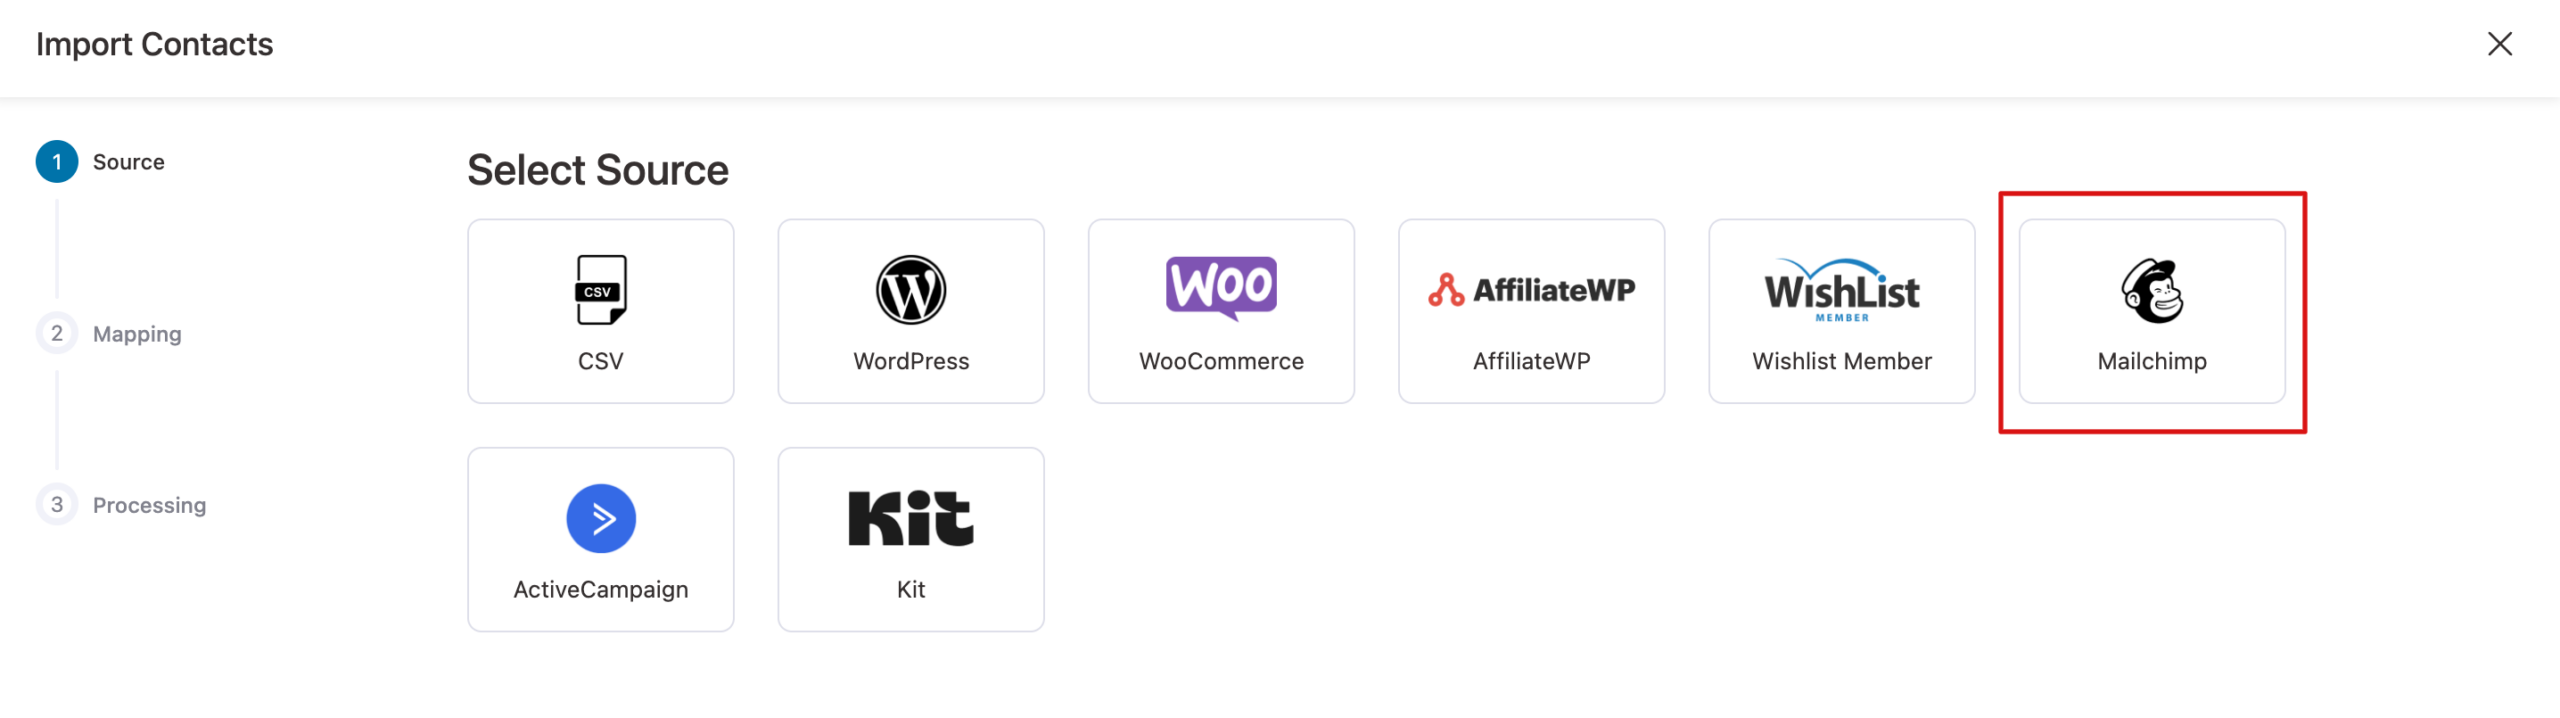
Simply enter your API key and select the list to import.
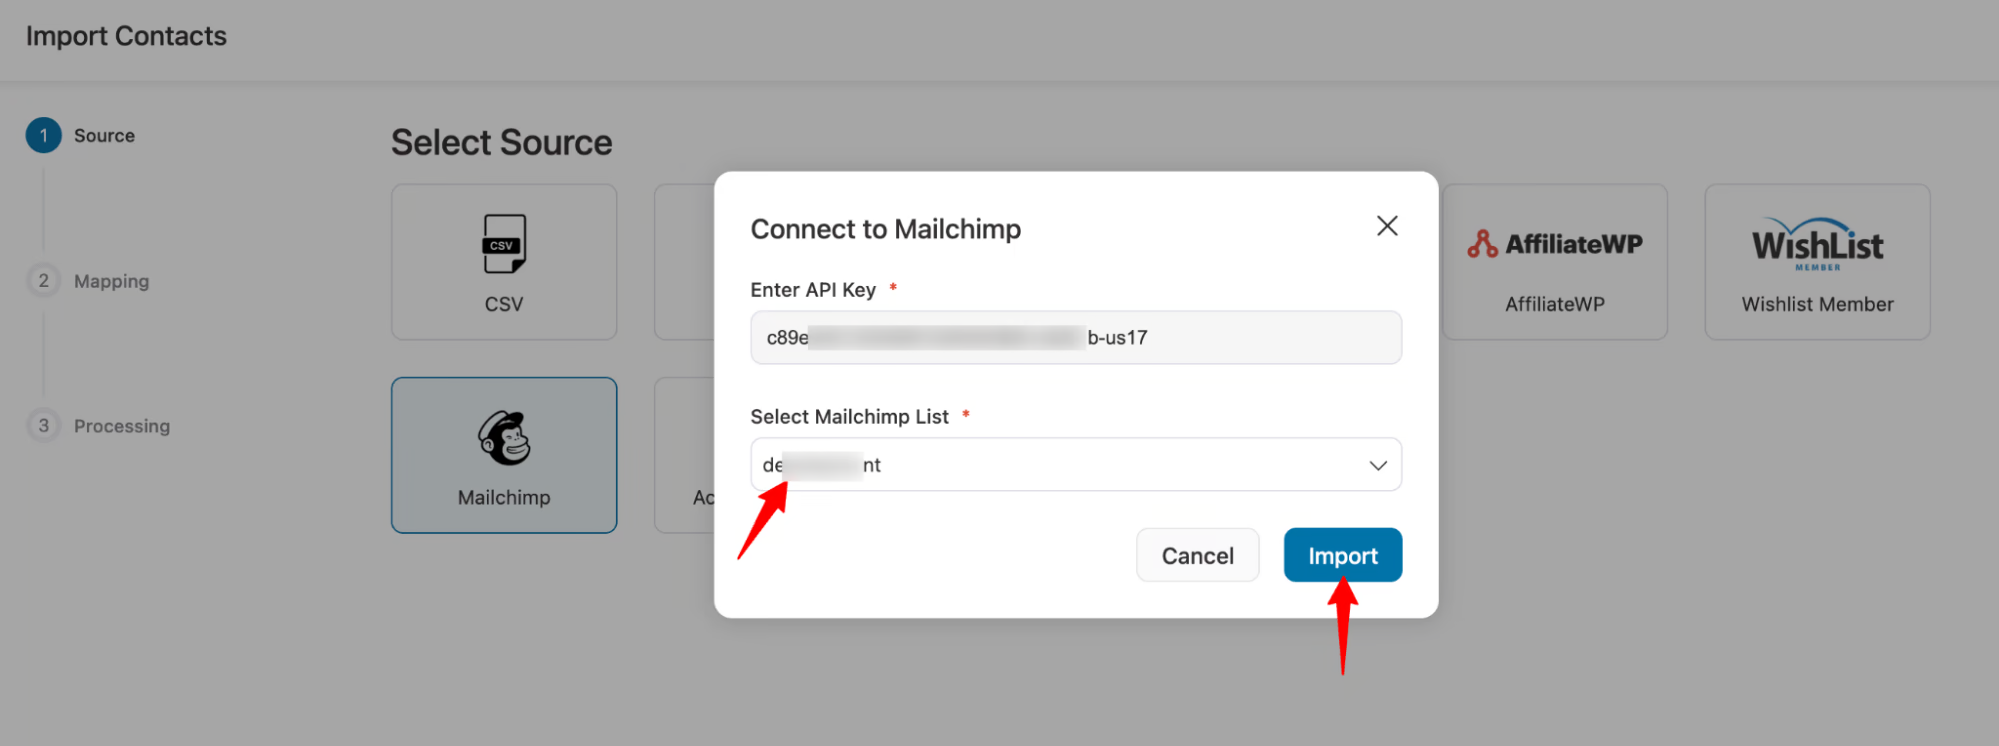
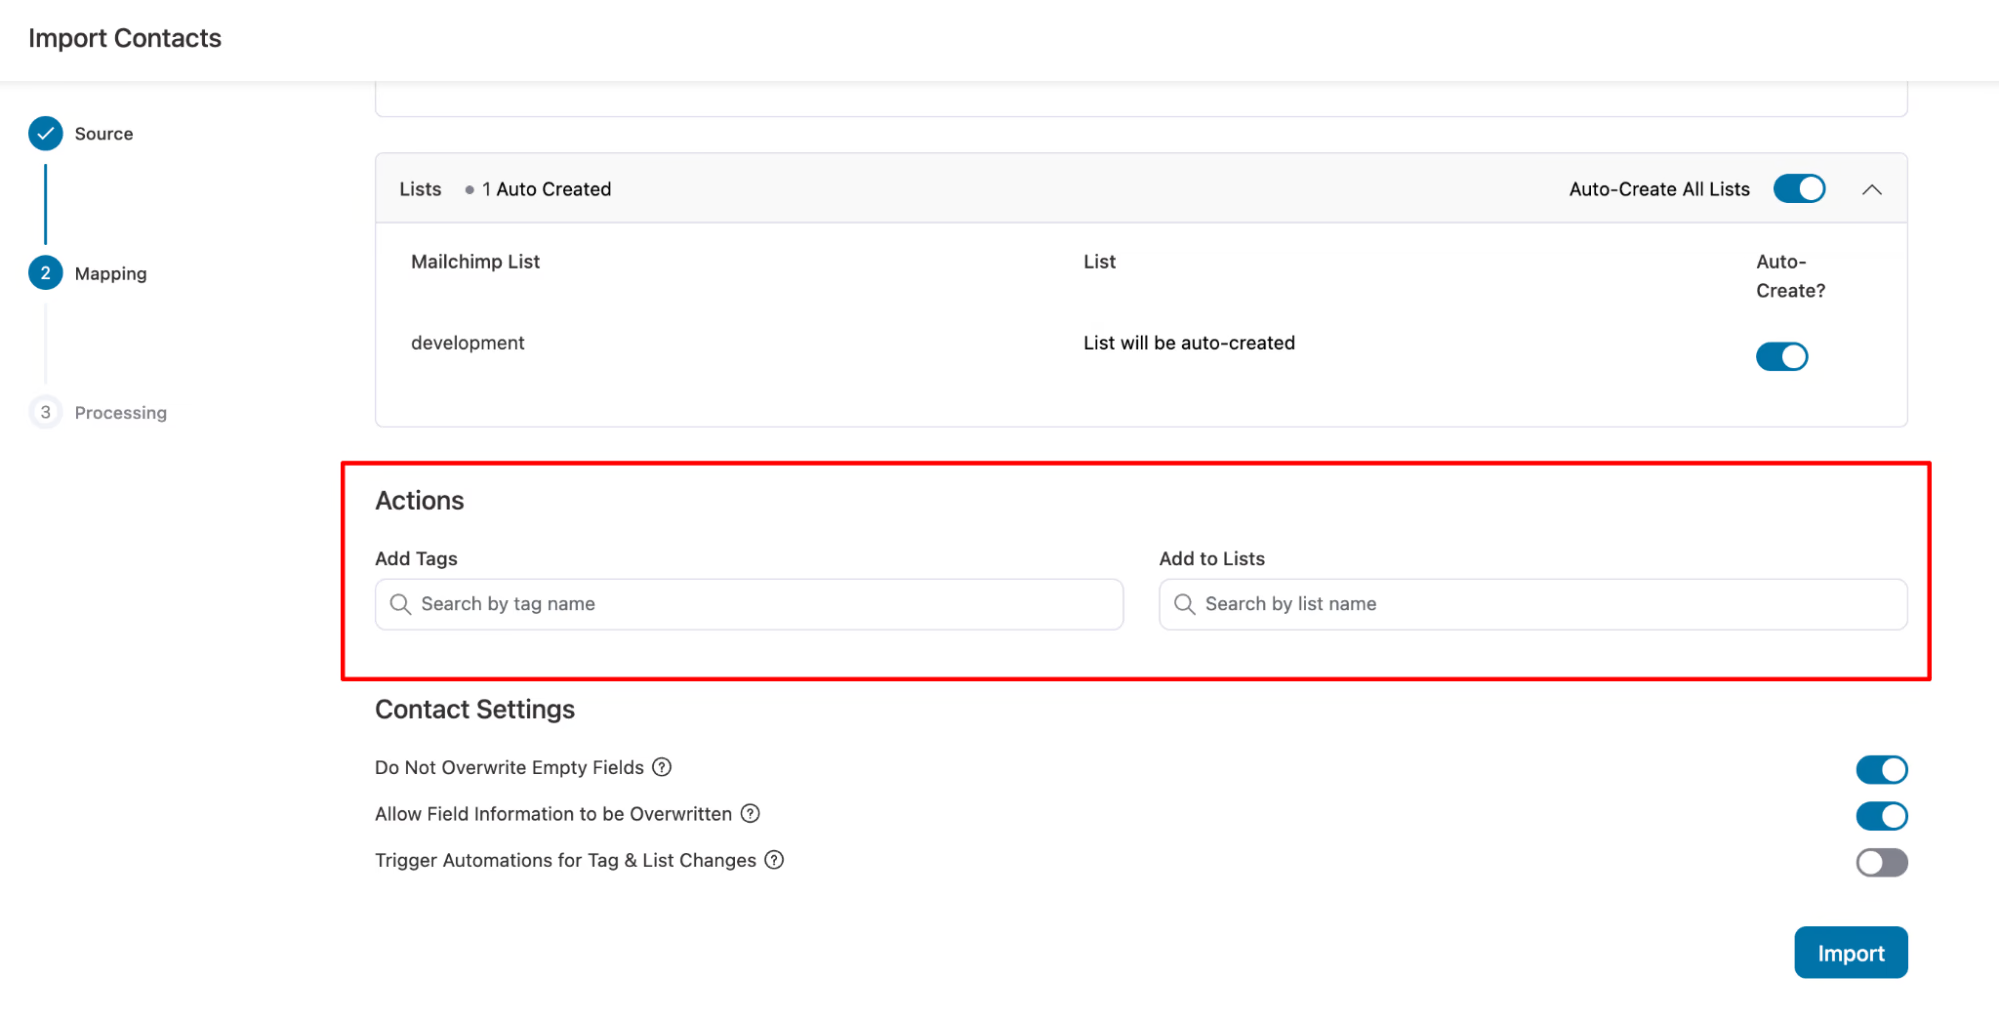
You can map custom fields with Mailchimp or any other CRM with the fields in FunnelKit Automations.
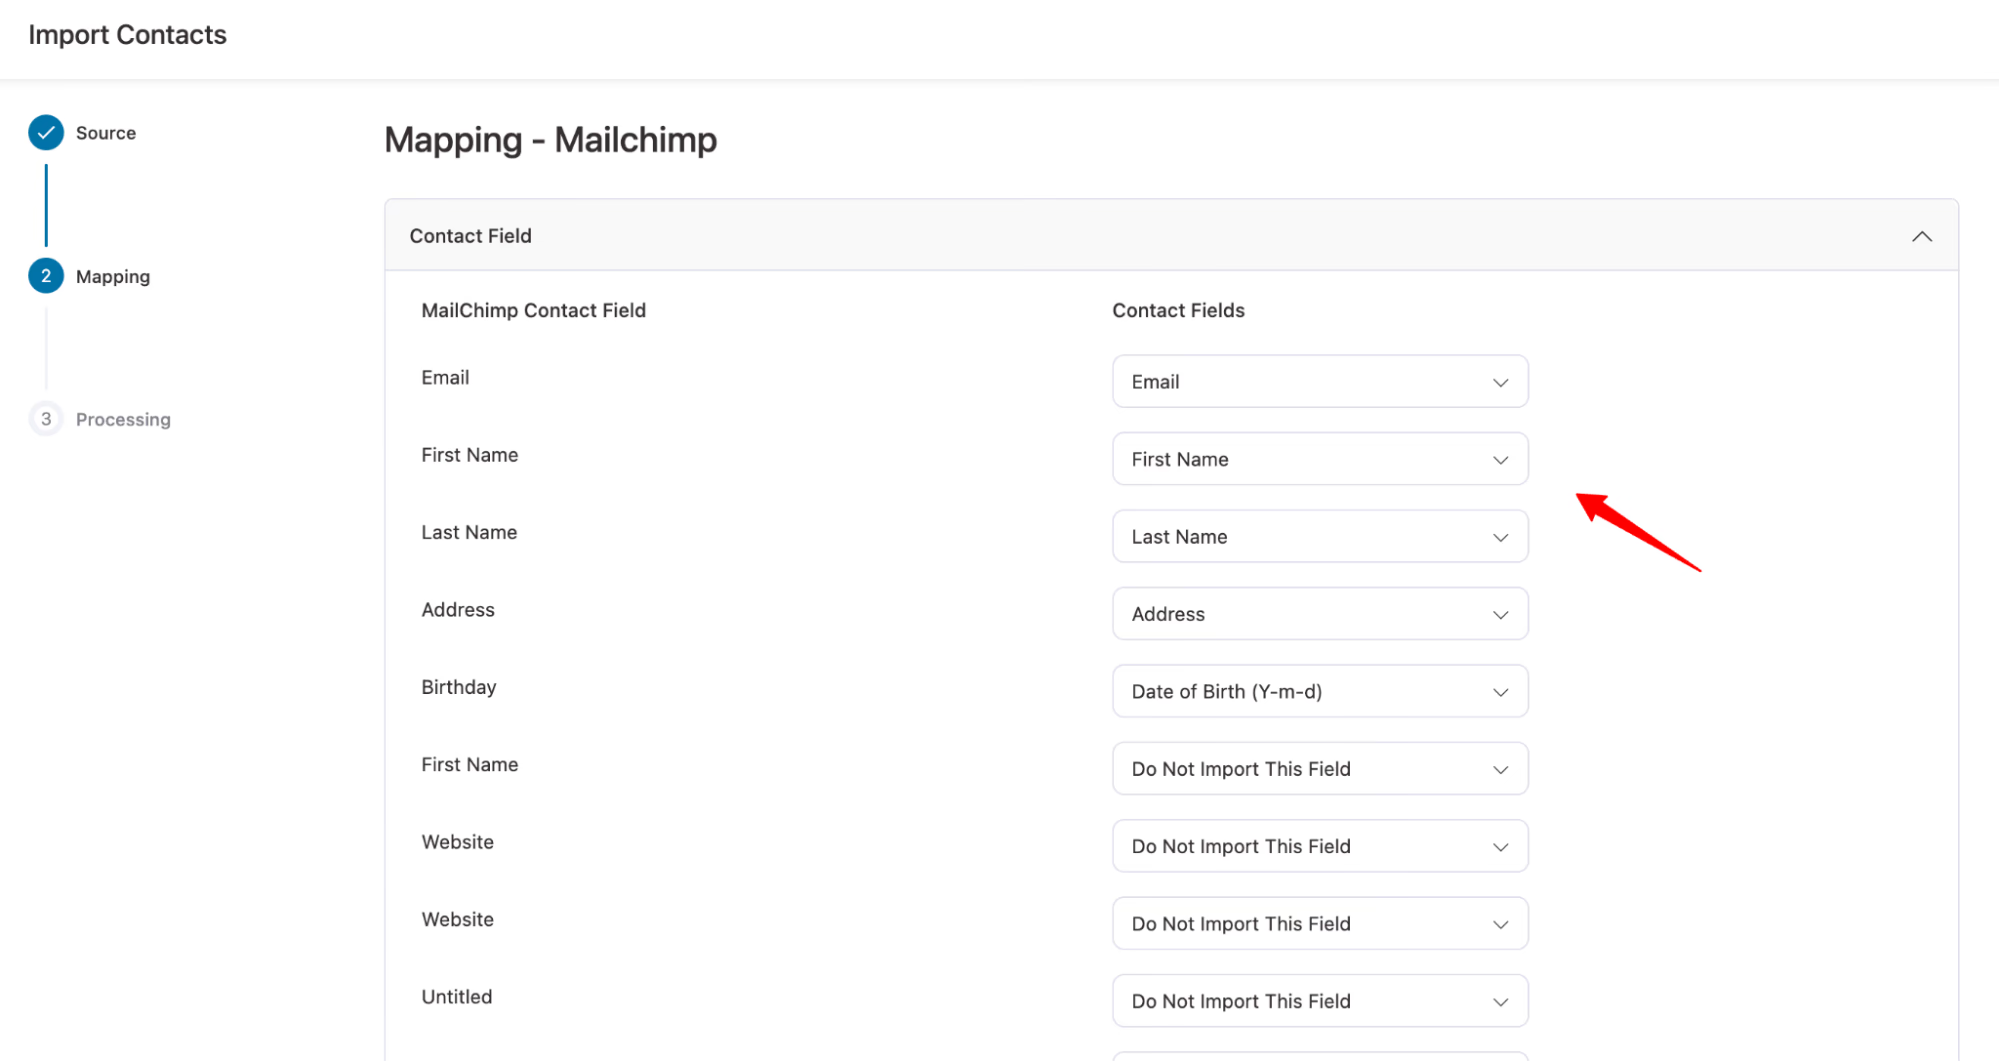
Auto-create tags or lists, and even trigger automations immediately upon import.
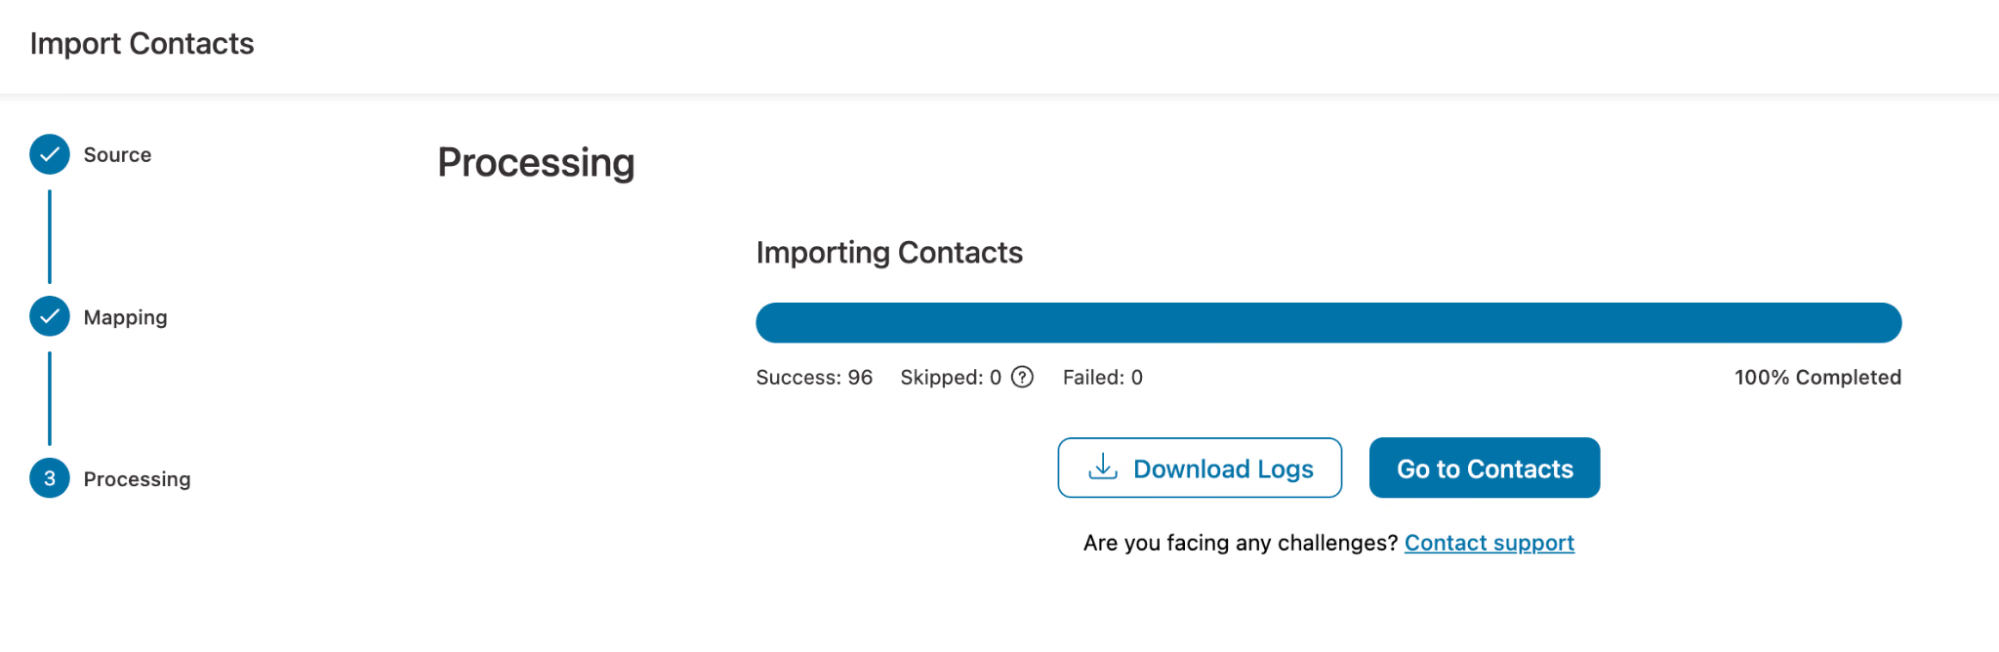
Once done, FunnelKit Automations will start automatically importing your contacts.
Import Tools Now Available in Lite
We’ve moved all contact import functionality, including CSV, WordPress, WooCommerce, and the new direct API integrations, from Pro to Lite.
Now, every user has access to professional-grade migration tools, completely free.
2. Conditional Content in Transactional Emails
Transactional emails don’t have to be one-size-fits-all anymore.
With FunnelKit Automations 3.7.0, you can now use conditional content inside the Visual Builder to control exactly what shows up in a transactional email and for whom.
That means smarter personalization, fewer email versions, and much cleaner automations.
You can display:
- Discount coupon blocks only for high-value orders
- Different product suggestions based on what was purchased
- Custom messaging for VIP customers vs. first-time buyers
- Content based on payment method, shipping zone, or order status
Set Up Conditional Content
Navigate to FunnelKit Automations ⇨ Emails ⇨ Transactional Emails and select the email you want to edit.
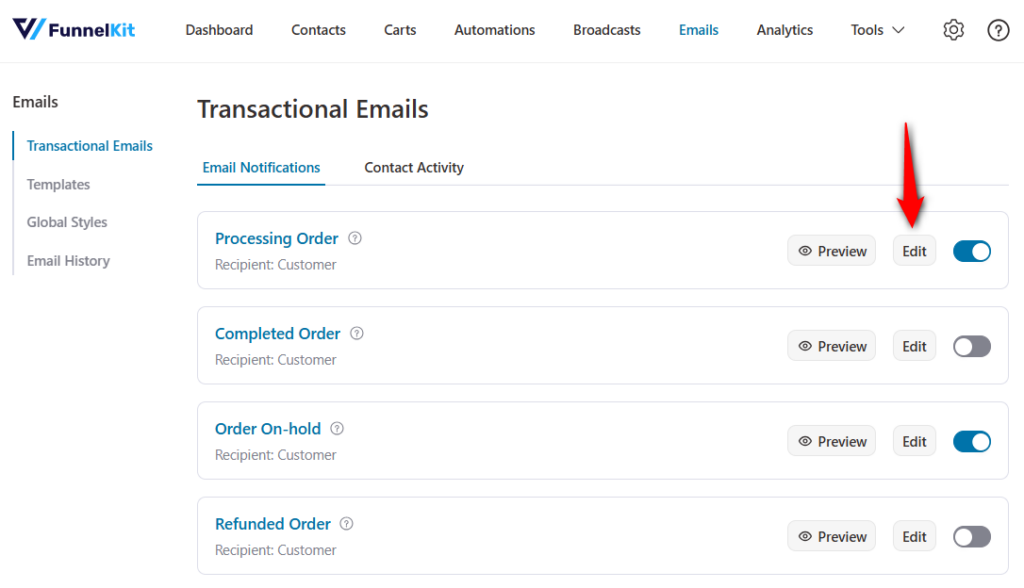
Click on ‘Edit’ to customize the email with Visual Builder.
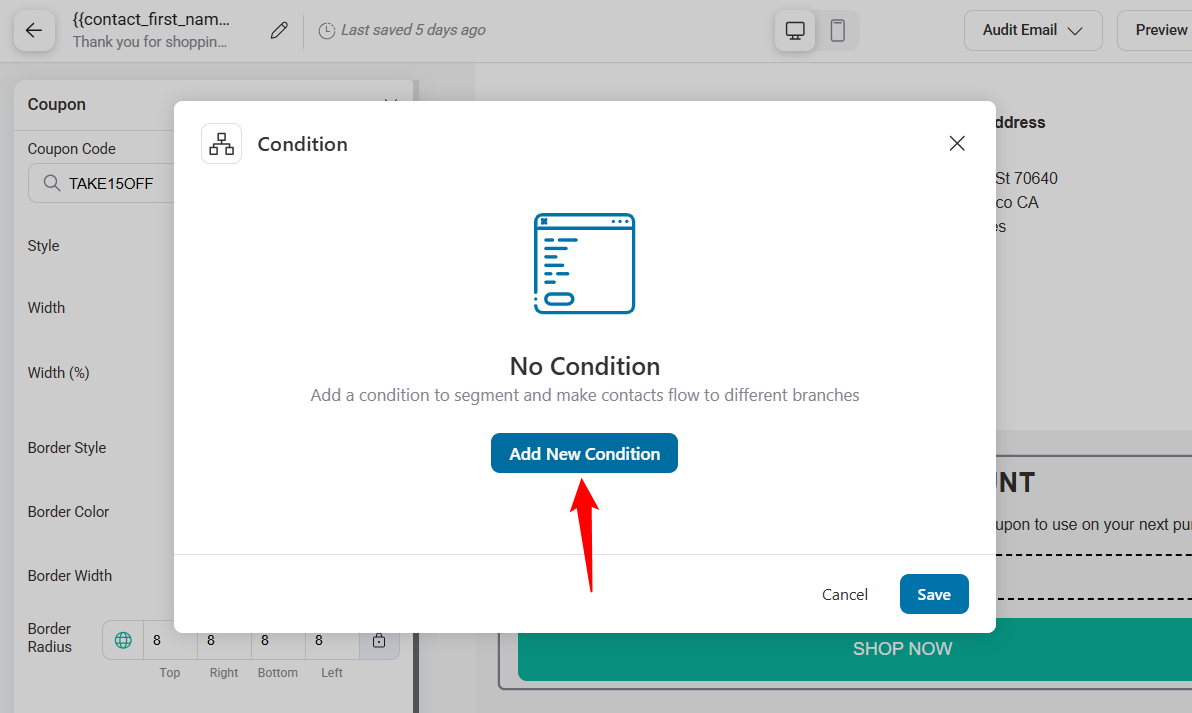
Click the block or section you want to make conditional. In the bottom-left panel, click ‘Add Condition’ under Display Condition.
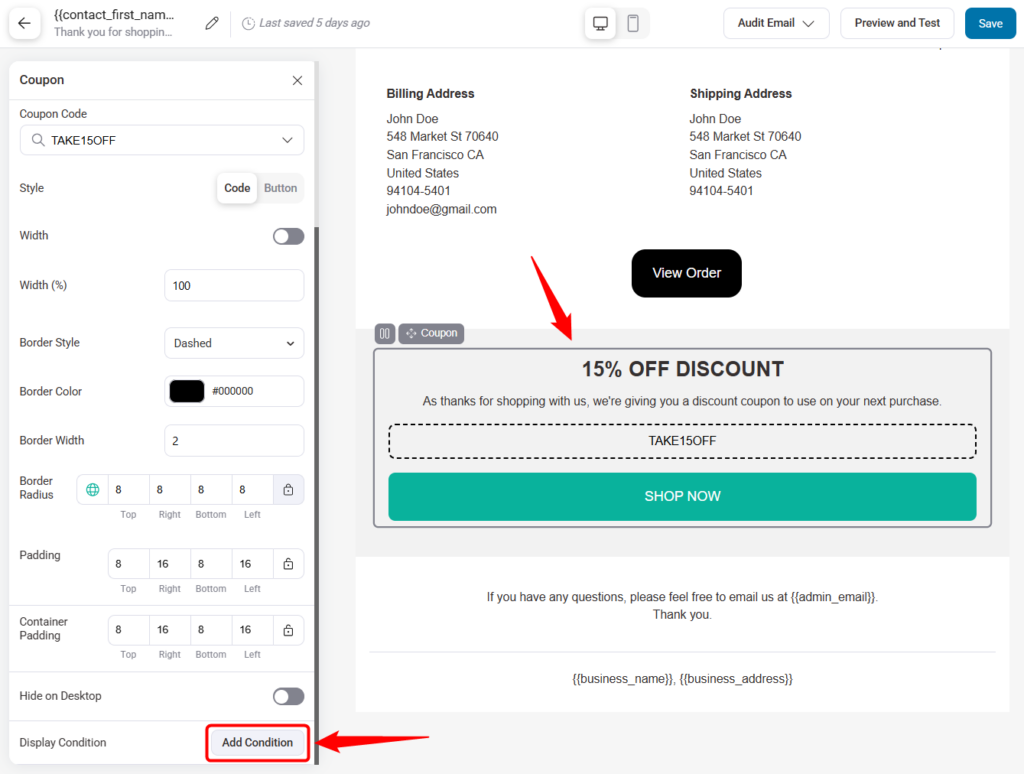
Click on the 'Add New Condition' button.
For example, to show a discount only for orders over $200, select Order Total under the Current Woo Order condition group.

Set the rule to be greater than or equal to 200.

Click ‘Save’ when done.
This section will now appear only when the order meets that condition.
Combine Conditions with AND / OR Logic
You’re not limited to just one rule. You can stack conditions for more precise targeting.
AND logic (all rules must be true):
Show a discount if the order total is more than $200 AND the customer has the VIP tag. Great for targeting high-value customers.
OR logic (any rule can be true):
Show a discount if the order total is greater than $200, OR the average order value is more than $150, OR the customer is tagged VIP.
Perfect when you want flexibility without losing relevance.
This lets you build advanced logic without building multiple emails.
Available Condition Groups
You get access to 12 powerful condition groups with 70+ parameters, including:
- Order data: Products, categories, attributes, totals, coupons, payment methods, shipping details
- Customer insights: Tags, lists, purchase history, first order, lifetime value
- Engagement: Email opens, link clicks, last activity
- Automation and broadcasts: Participation, completion, and interaction
- Geographic and date-based rules: Location, time, and date conditions
In short, you have everything you need to personalize deeply.
Before using conditional content in production, place at least two test orders. One that meets the condition and another that doesn’t.
This ensures your content appears (or stays hidden) exactly as expected.
3. New Brand Style Settings & Distraction-Free Mode
We have introduced a dedicated Brand Style section in the General Settings. You can now upload your logo and define your brand’s primary colors in one place.
These settings automatically cascade down to your unsubscribe and manage preference pages.
New Brand Styles Settings
Navigate to FunnelKit Automations ⇨ Settings ⇨ General and define your brand’s visual identity.
- Brand logo: Upload your company logo for consistent branding
- Brand color: Select your primary brand color, which automatically applies to subscription and profile pages
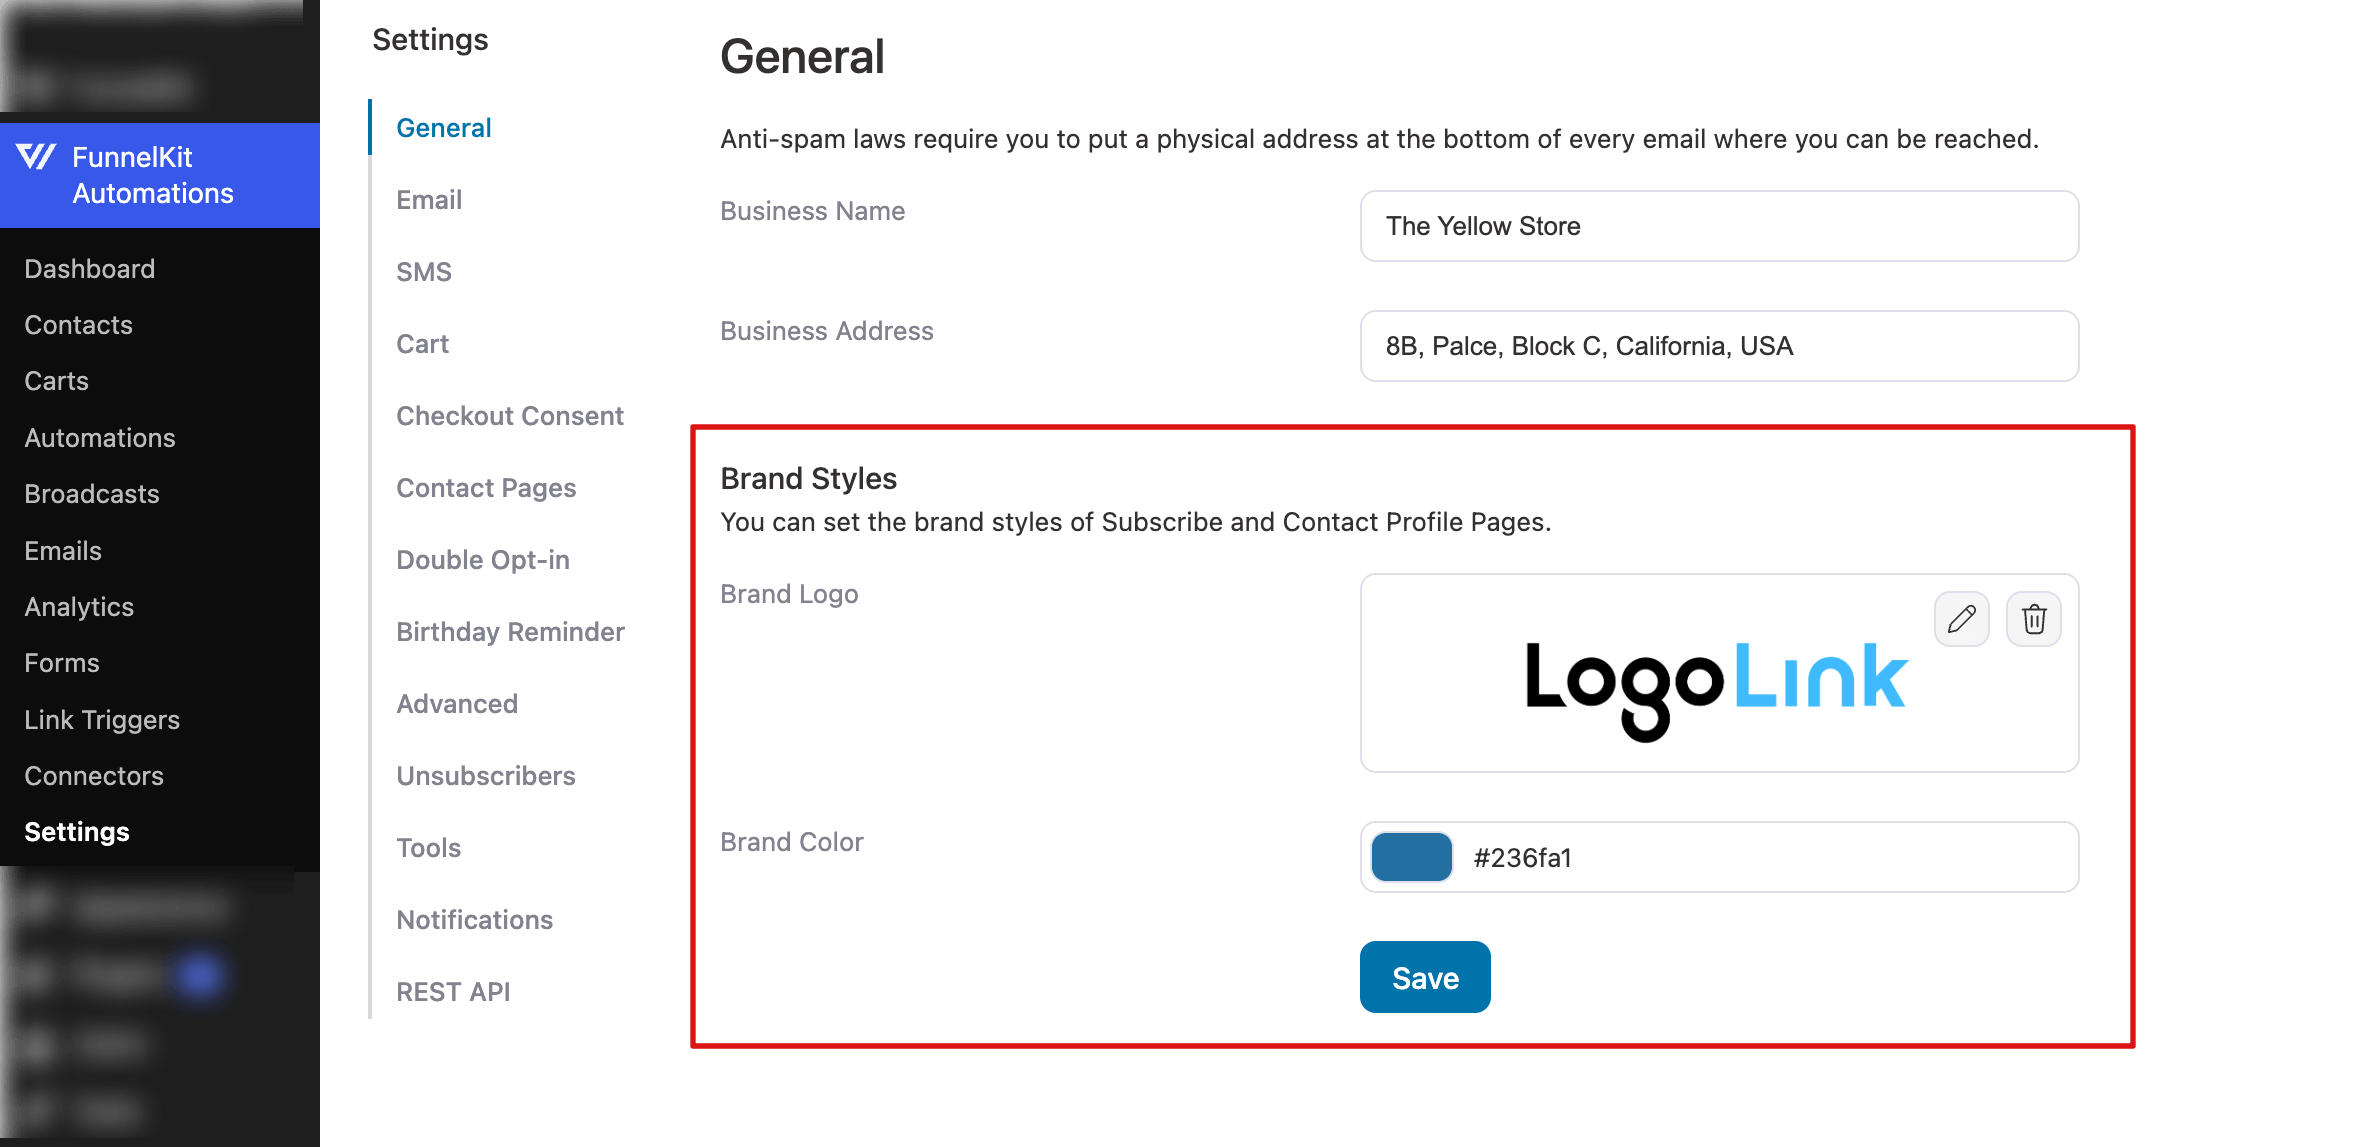
These settings ensure your Subscribe Pages and Contact Profile Pages look cohesive and professional across all touchpoints.
Redesigned Subscribe Page
The Subscribe Page has been fully reorganized with clearer navigation and more flexible options.
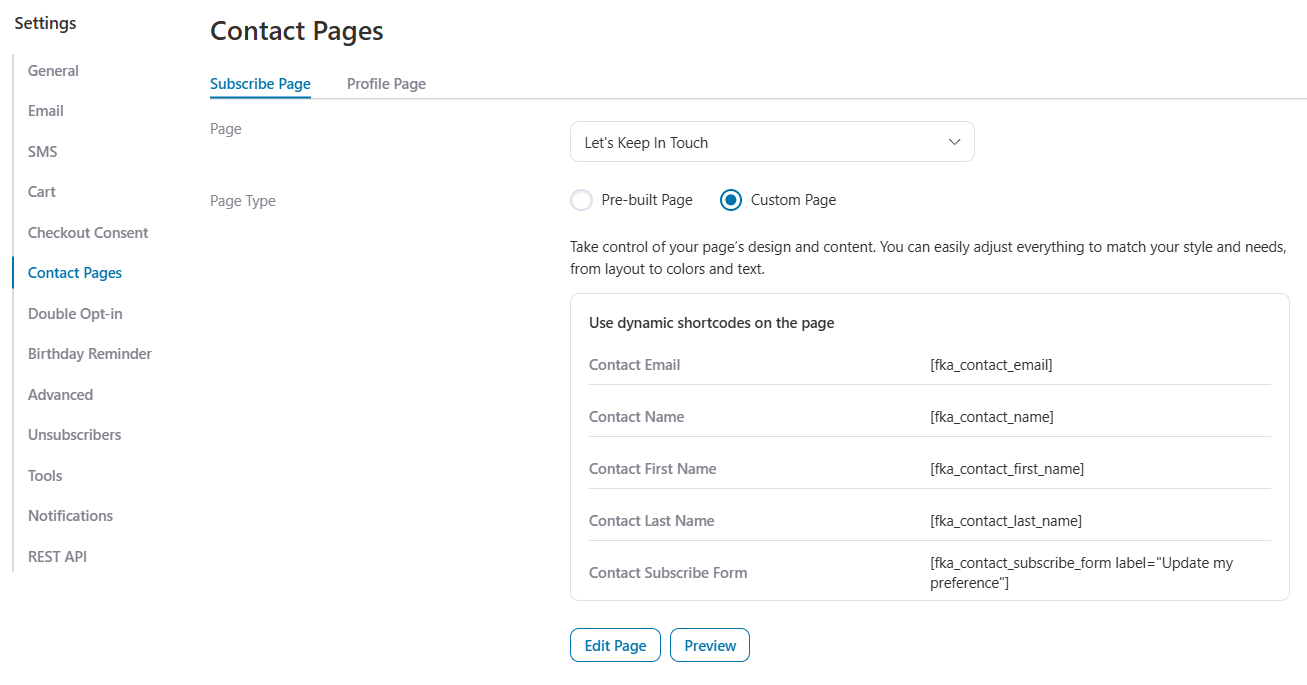
Go to FunnelKit Automations Settings ⇨ Contact Pages ⇨ Subscribe Page to access the new controls.
Choose between two display modes based on how much control you want.
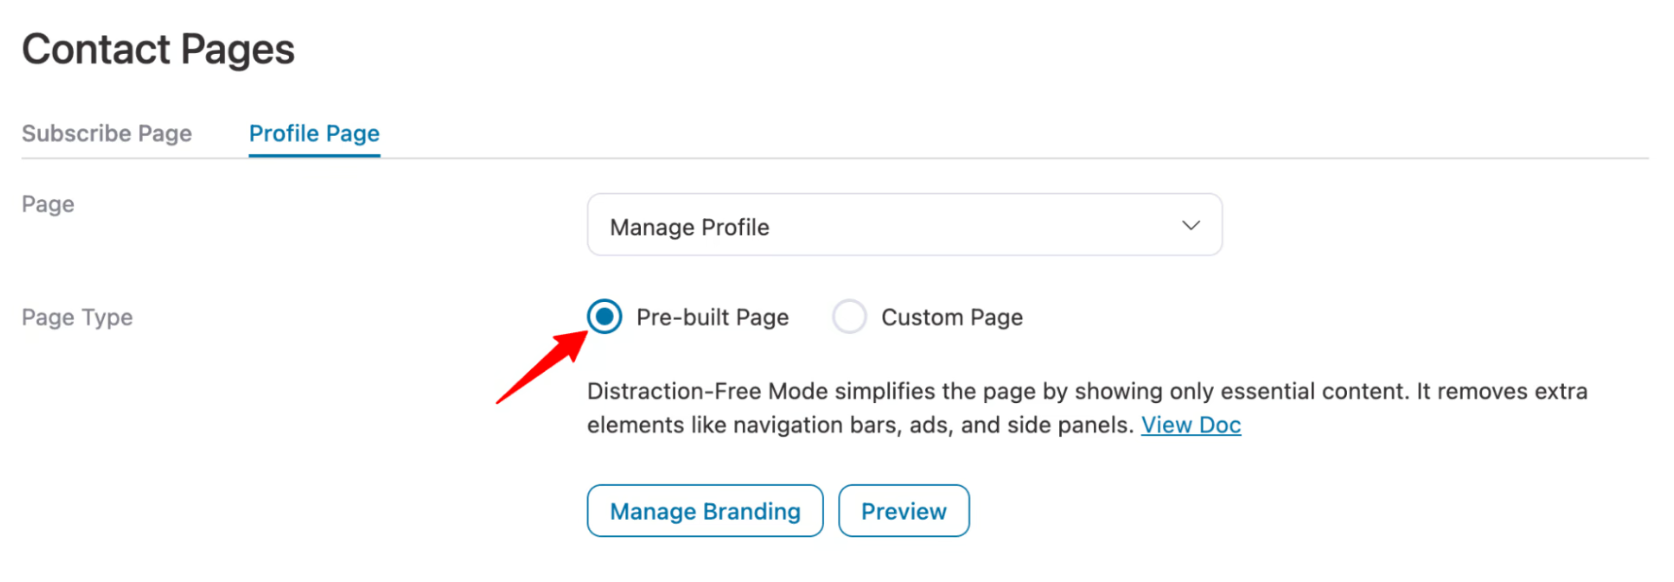
Pre-built Page (Distraction-Free Mode)
Previously, the unsubscribe page would load within your WordPress theme’s default layout. While you can still use a custom page, we have added a Pre-built Page option (Distraction-Free Mode).
When enabled, this mode removes your theme’s header, footer, and sidebar, displaying only the FunnelKit content. It ensures a clean, responsive, and branded experience that loads fast and looks great on mobile devices.
When using the Pre-built Page:
- Your brand logo and colors are automatically applied from General settings.
- Quick actions like Update Brand Logo or Manage Branding are available.
- The page is fully responsive and supports RTL (Right-to-Left) languages.

Custom Page
Use this option if you want complete design freedom with your WordPress page builder.
Customize everything visually, but you’ll need to use dynamic shortcodes to display subscription content. Click ‘Edit Page’ to get started or ‘Preview’ to view your page.
4. All-New Subscriber Preference Center (Profile Page)
Retaining subscribers is just as important as gaining new ones. With FunnelKit Automations 3.7.0, we’ve upgraded the traditional unsubscribe page into a full Subscriber Preference Center, also known as the Manage Profile Page.
Instead of forcing contacts to unsubscribe completely, you can now give them the flexibility to manage how they hear from you.
From the Profile Page, contacts can:
- Update personal details such as name, email address, and other selected fields
- Manage list subscriptions, opting in or out of specific email lists
- Update tag preferences based on how you’ve structured your segmentation
Why is this option useful?
Not every subscriber wants to leave your email list entirely. Some may want to stop receiving promotional emails while continuing to receive your weekly newsletter.
Others may simply want fewer emails rather than zero emails.
The new profile page settings help you reduce full unsubscribes by letting subscribers choose their own engagement level
Profile Page Types
Just like the Subscribe Page, you can choose how the Profile Page is displayed:
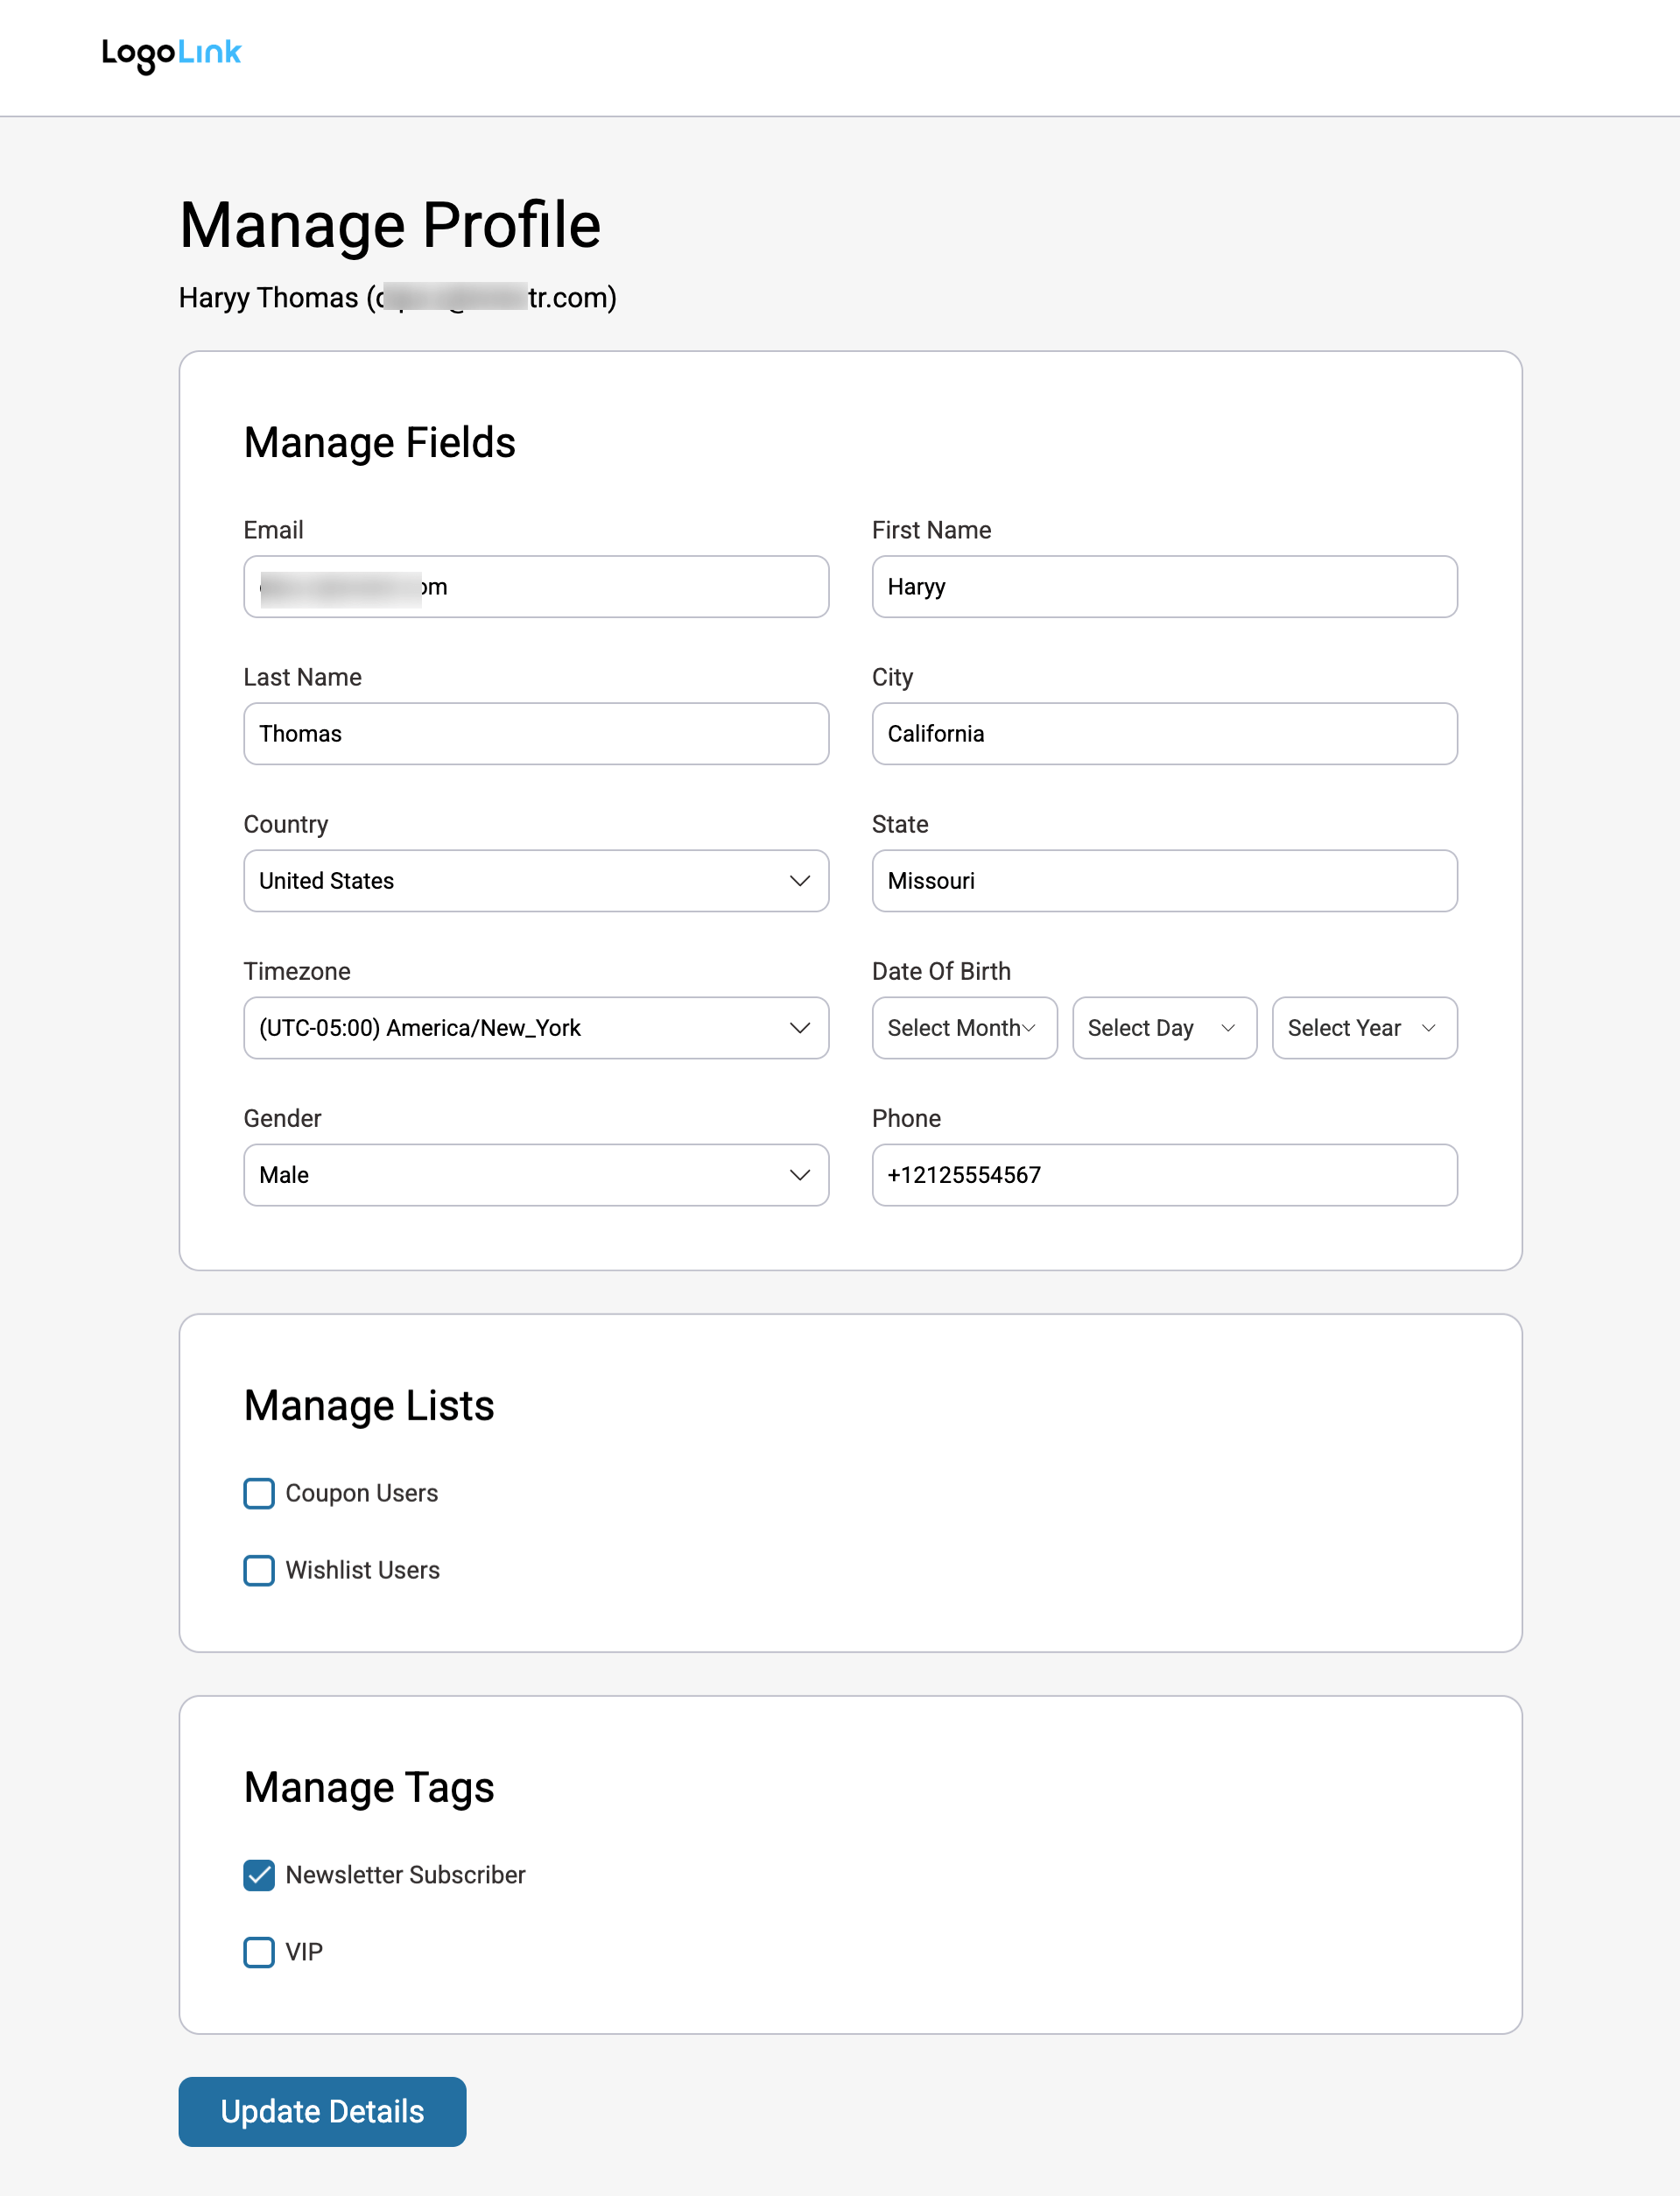
Pre-built Page
A clean, distraction-free layout with brand styles automatically applied from general settings.
This is what a pre-built profile page looks like:
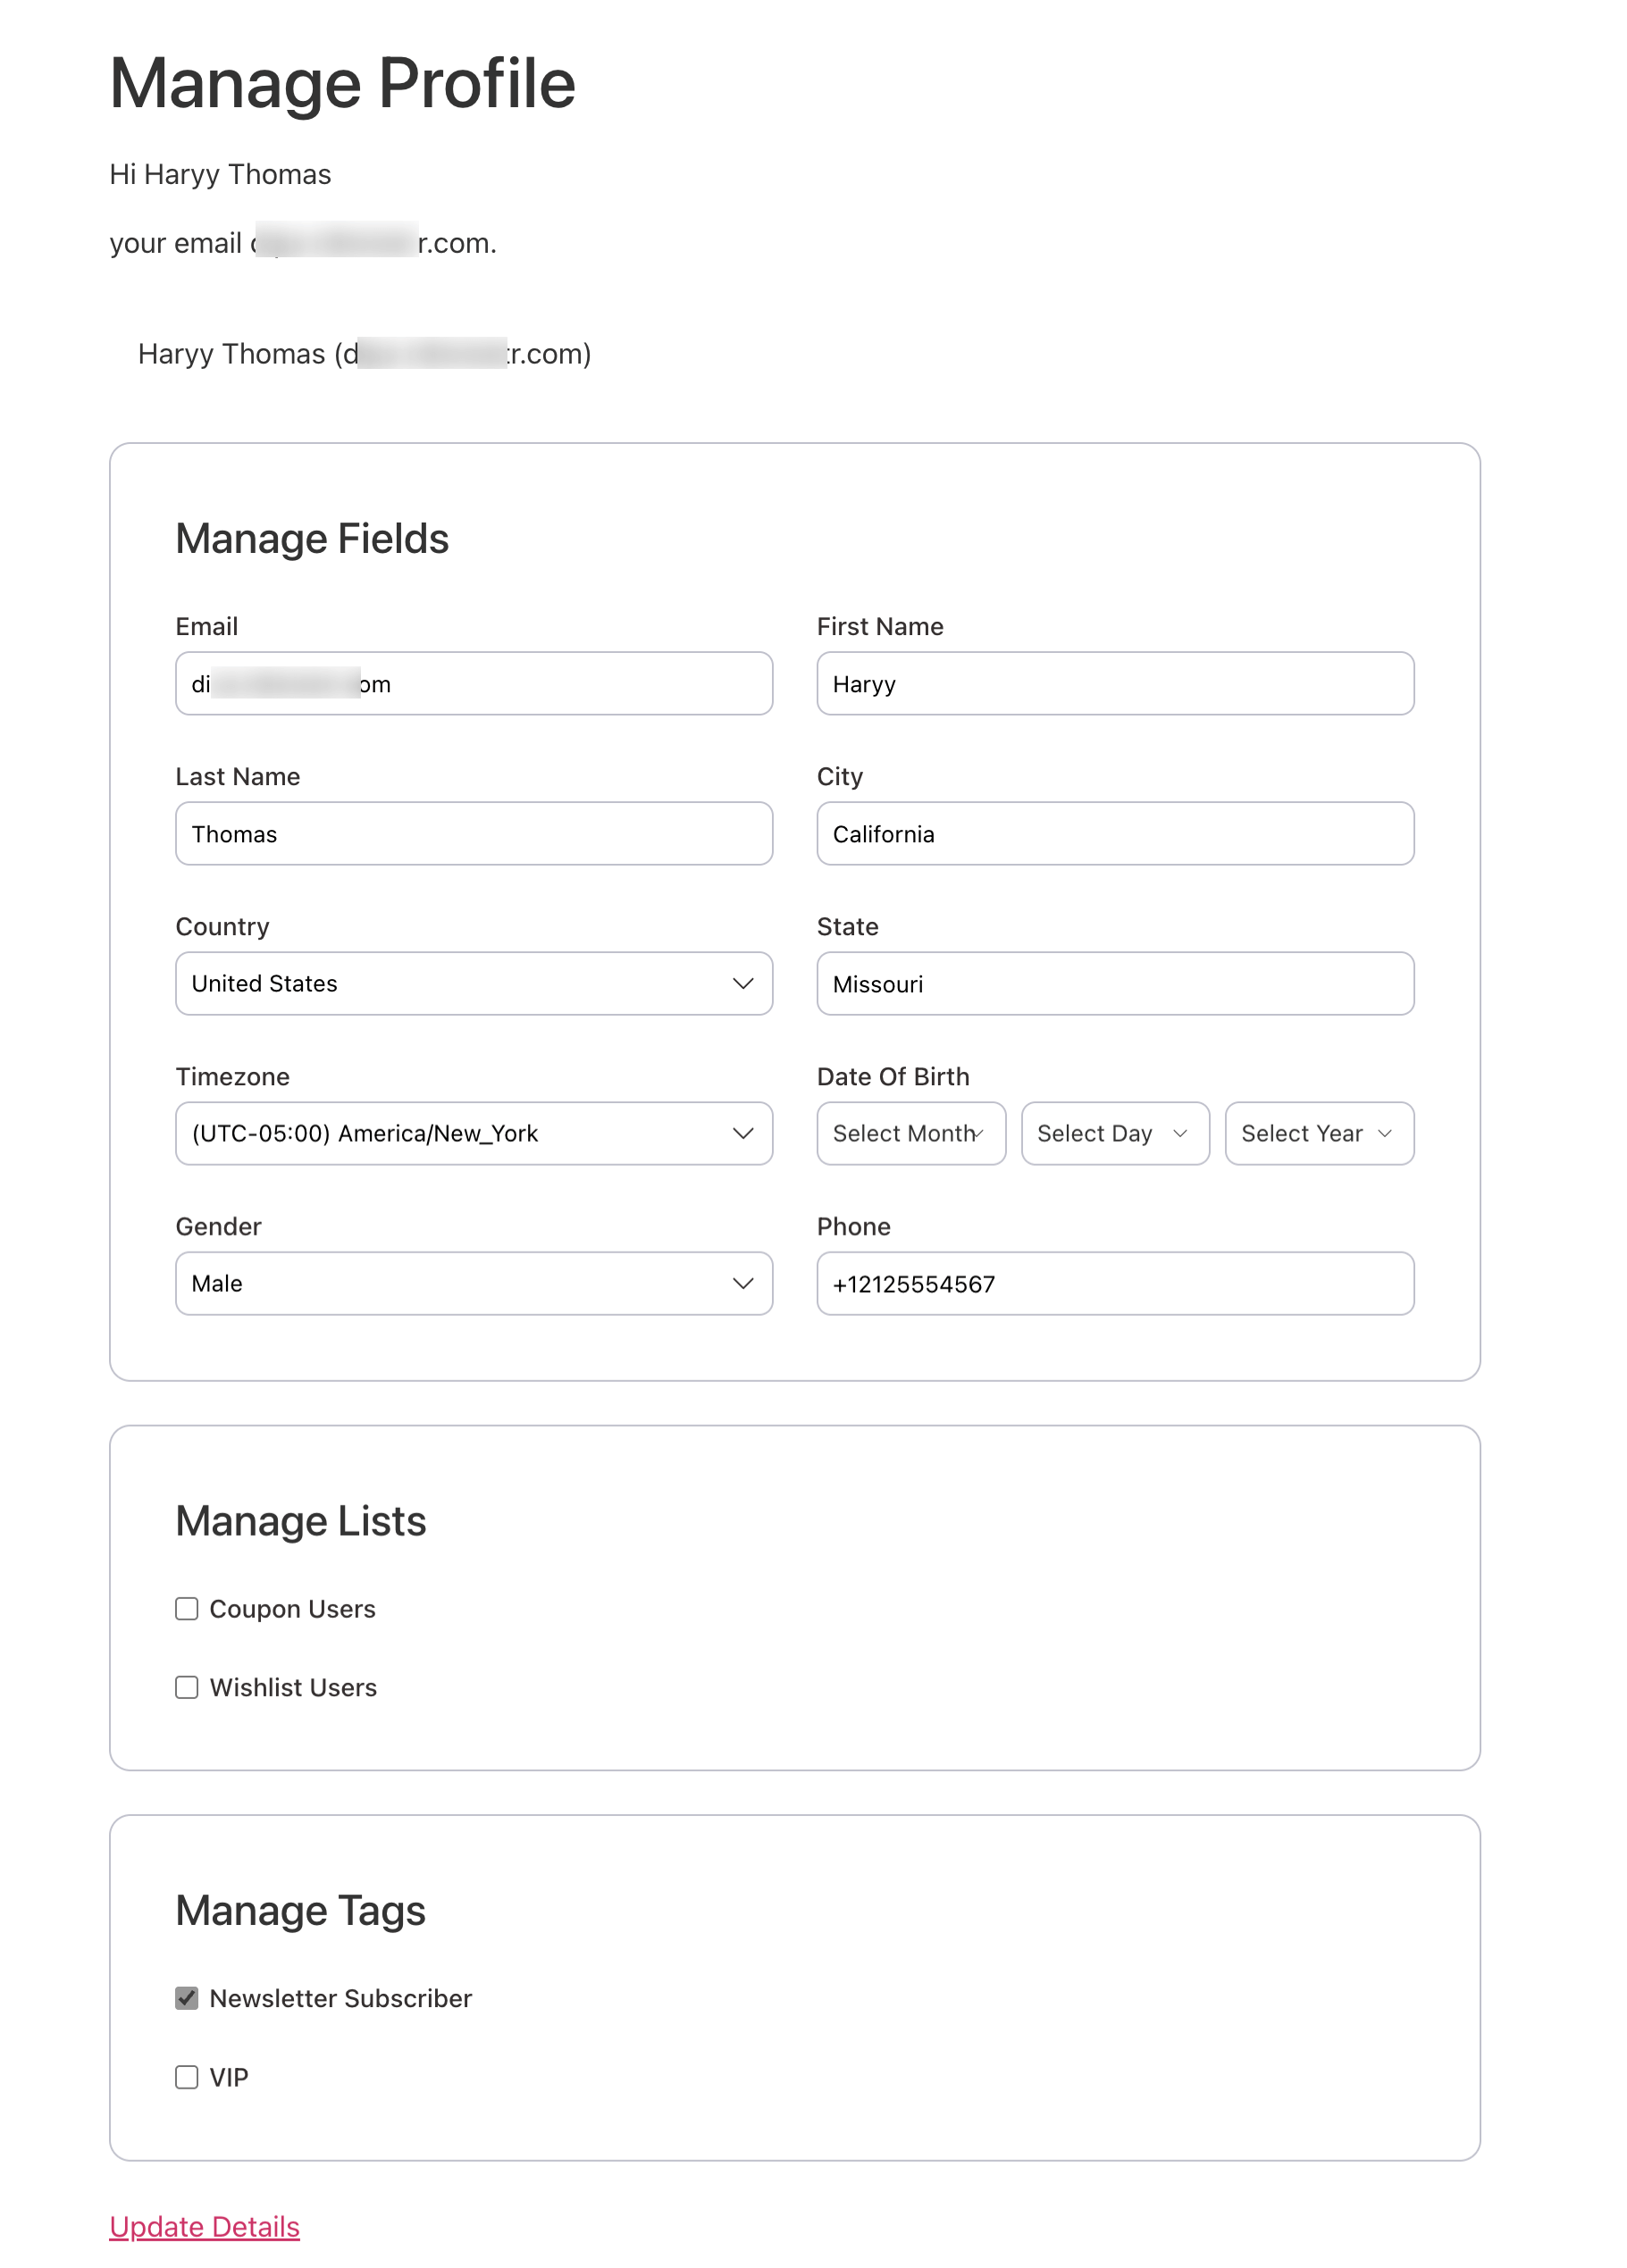
Custom Page
Full WordPress theme integration with complete page builder flexibility. Use dynamic shortcodes to display profile management sections.
This is what the custom profile page looks like (completely dependent on how you customize it):
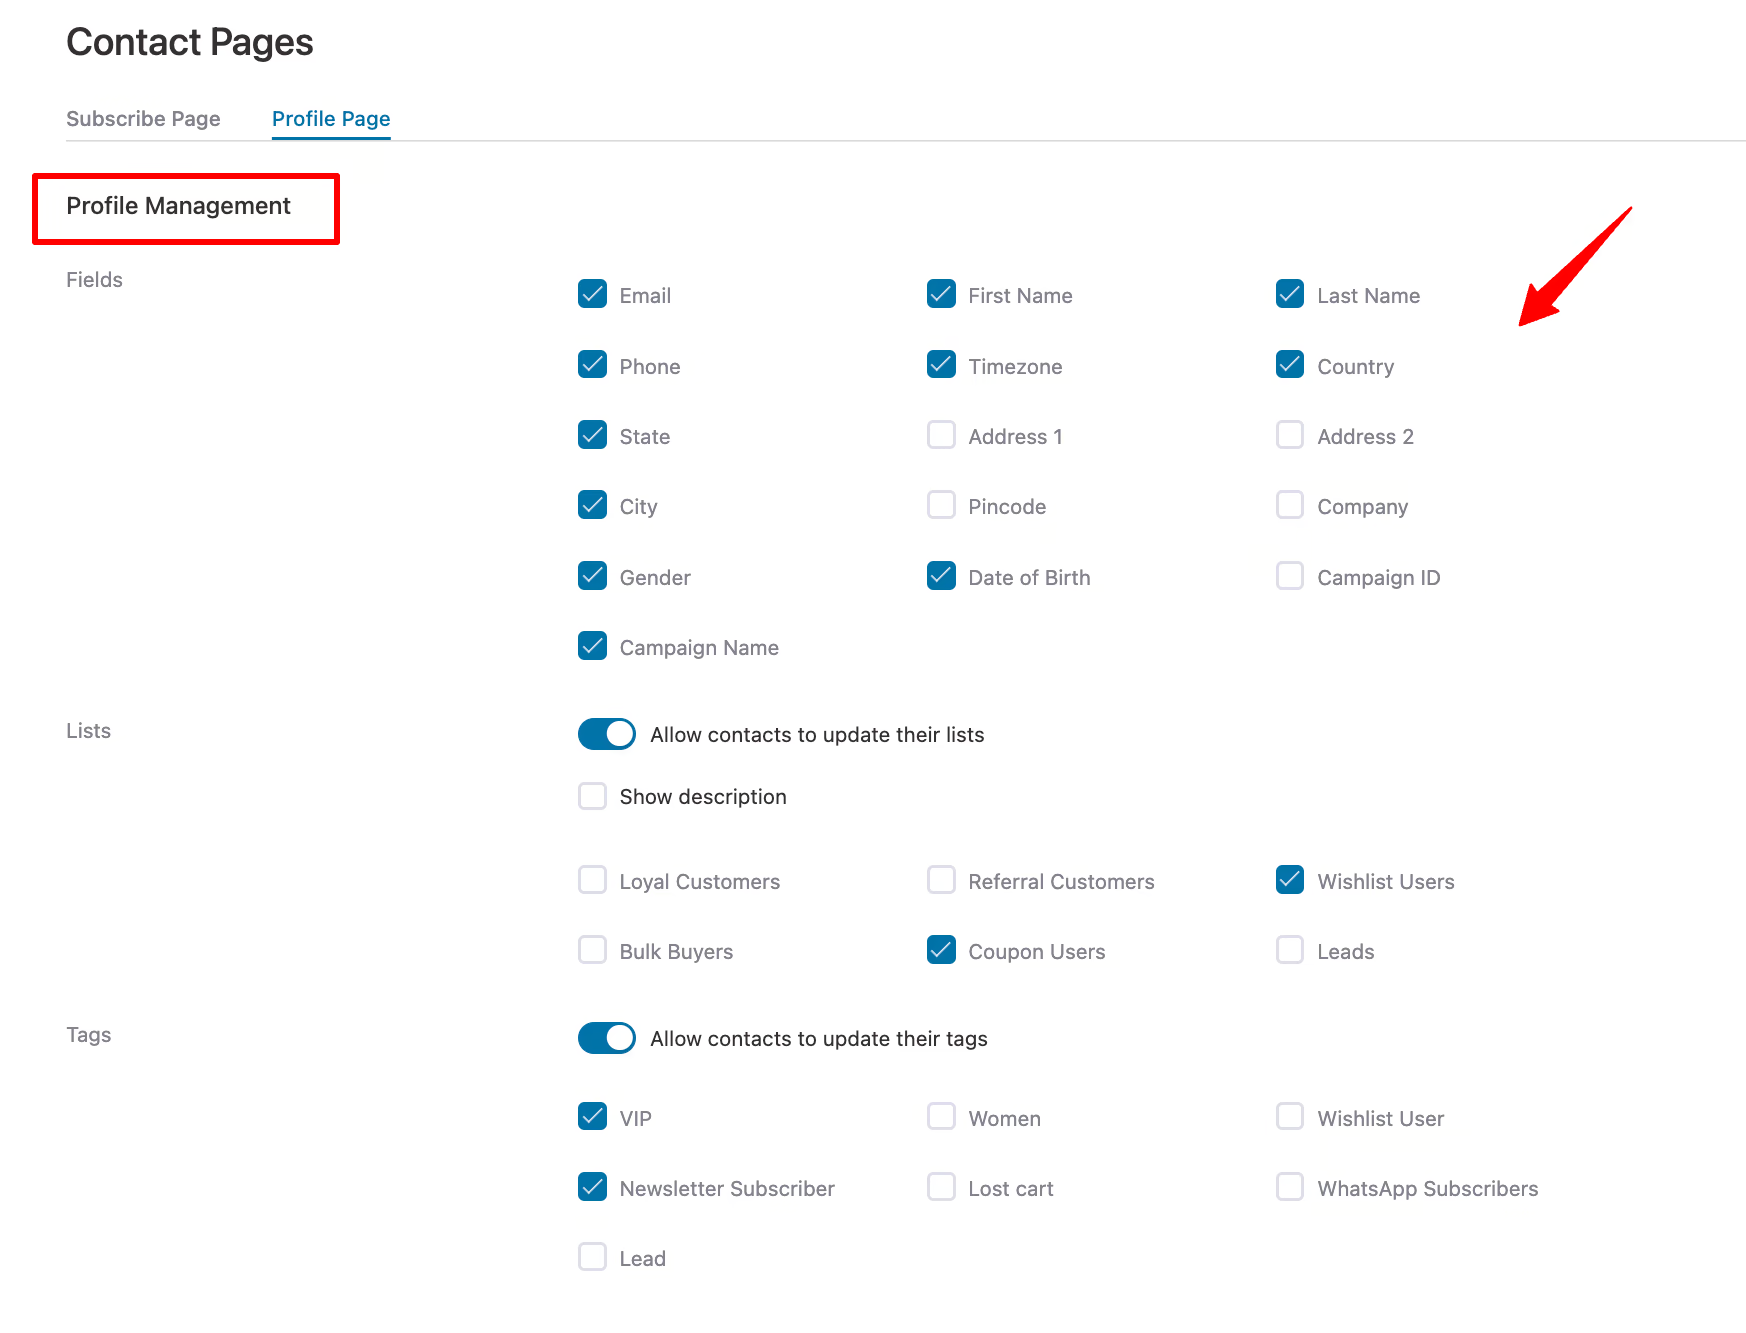
Profile Management Settings
Control exactly what contacts are allowed to update. Enabling or disabling the entities helps manage your customer or contact profiles more easily.
- Fields: Select editable contact fields, such as email, first name, address, etc.
- Lists: Enable list management and choose visible lists
- Tags: Enable tag management and select available tags
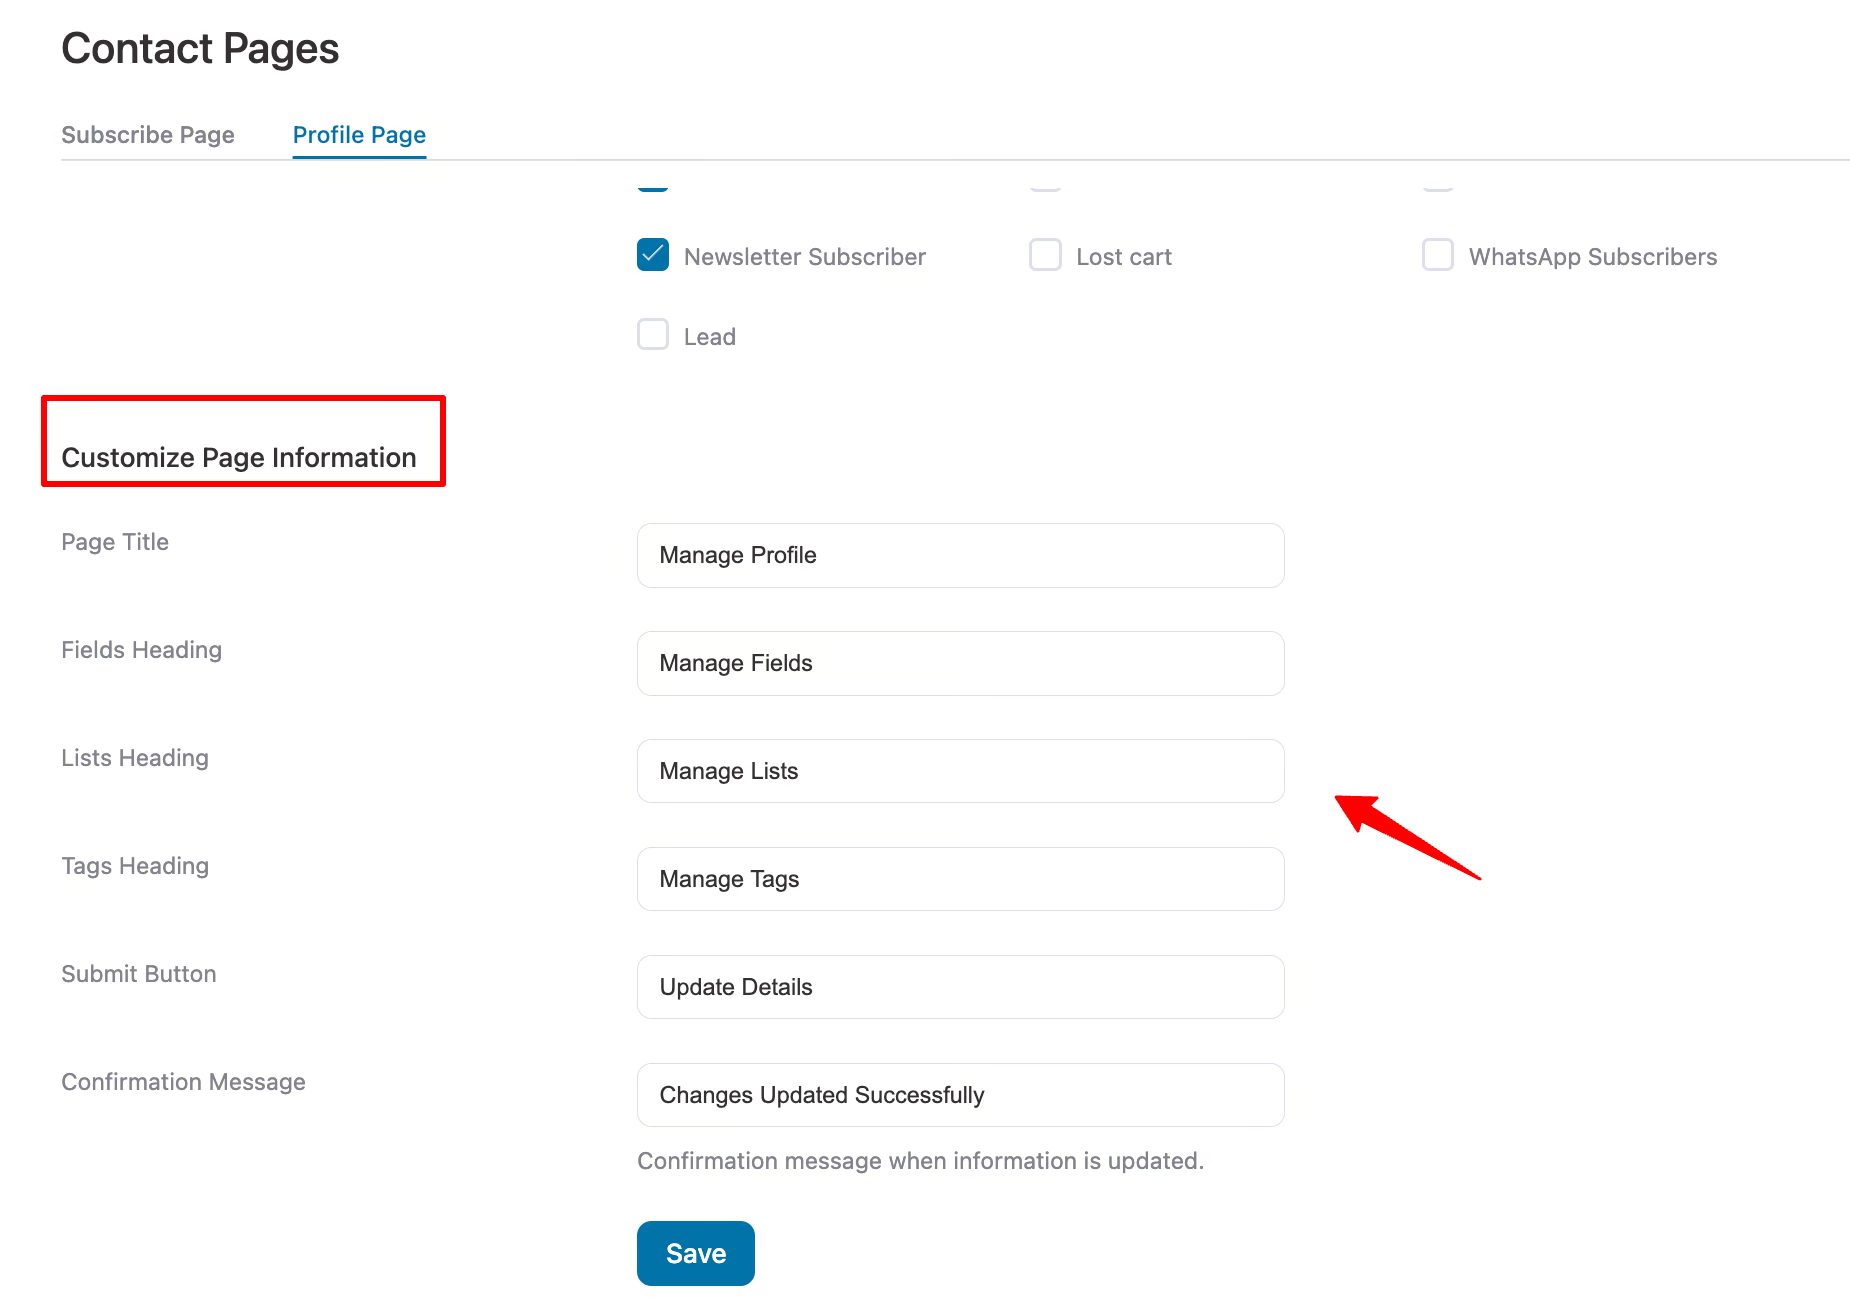
Profile Page Customizations
Personalize the profile page experience with custom text and labels:
- Page Title
- Fields Heading
- Lists Heading
- Tags Heading
- Submit Button text
- Confirmation Message shown after saving changes
New Merge Tag: Contact Profile Link
You can now easily link contacts to their profile page from emails using a new merge tag.
To use it, open the merge tag selector in the visual email builder and copy the Contact Profile Link merge tag.
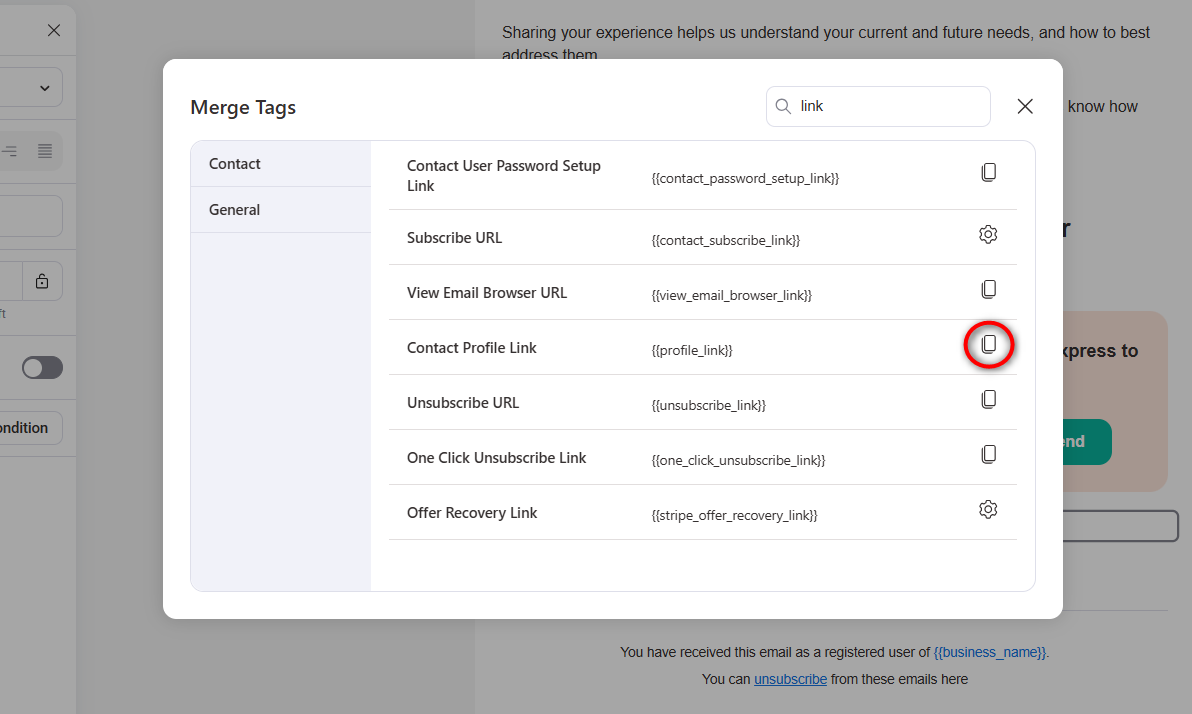
Paste the copied merge tag anywhere in your email.
This makes it easy for contacts to update their preferences directly from any email broadcast campaign or automation.
5. Advanced Categorization System for Better Organization
As your FunnelKit Automations setup grows, staying organized becomes just as important as creating new workflows.
With version 3.7.0, we’ve introduced a powerful categorization system that helps you organize, manage, and scale your marketing assets with ease.
Think of categories as smart folders that keep everything structured without limiting flexibility.
Where You Can Use Categories in FunnelKit Automations
The new categorization system works across five key areas inside FunnelKit Automations:
- Automations: Group related workflows together
- Broadcasts: Organize email and SMS campaigns by purpose, promotion, or timing
- Email Templates: Categorize templates for faster reuse
- Forms: Group forms by campaign or function
- Link Triggers: Organize tracked links for better reporting and management
This makes it easier to navigate even the largest setups.
Creating Categories Is Easy
Adding categories works the same way everywhere.
Go to Automations, Broadcasts, Templates, Forms, or Link Triggers. Open the category manager dropdown and click on ‘Create Category’.
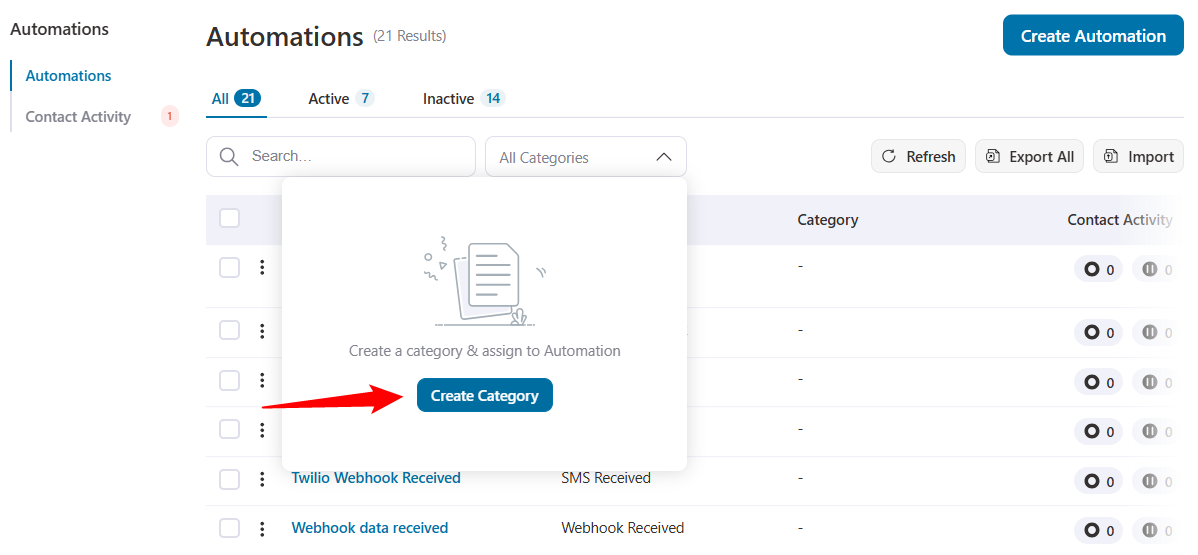
Create categories with names that make sense to you.

That’s it. Your new categories are ready to use immediately.
Assign Categories (Even in Bulk)
Once your categories are set up, organizing is fast.
Select one or multiple items and assign categories using bulk actions.
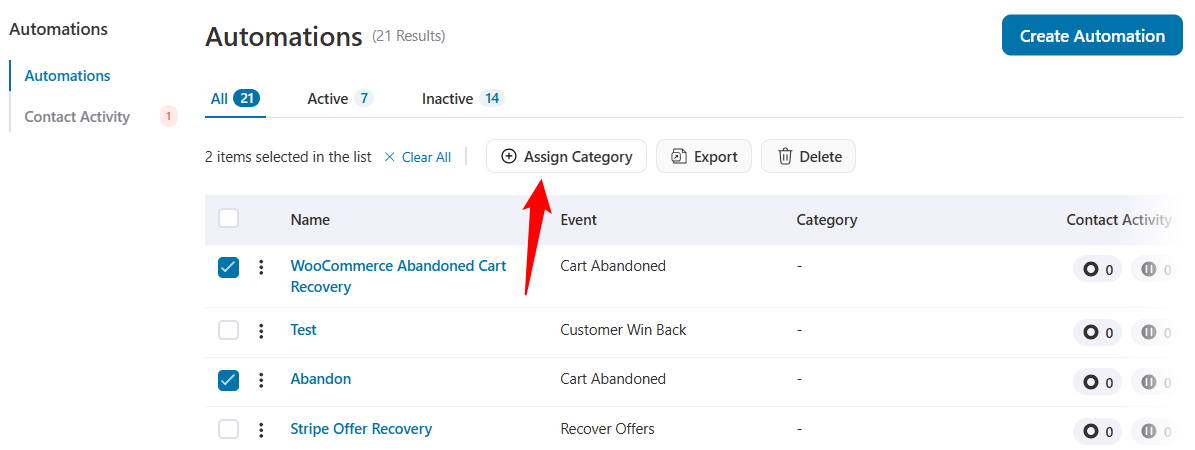
It’s flexible enough for small setups and powerful enough for big ones.
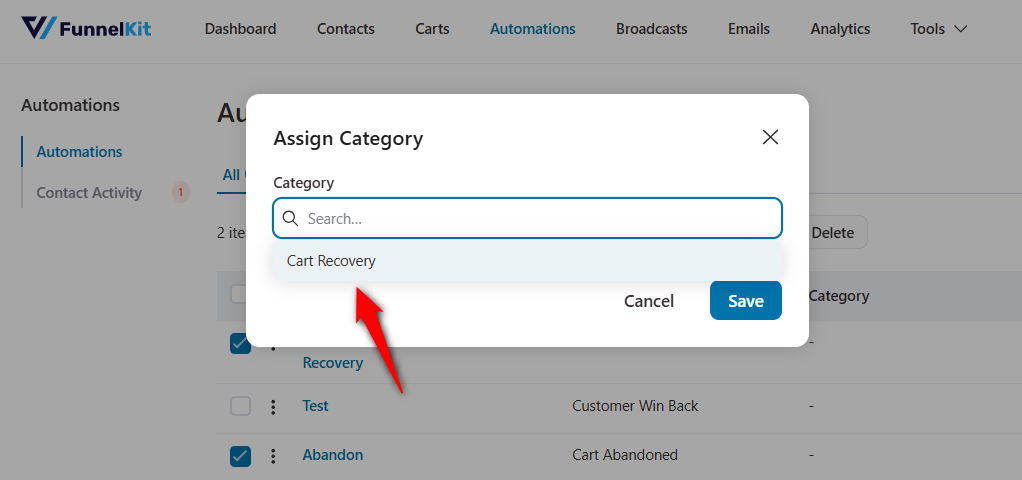
This is how you can assign categories to any automations, broadcasts, templates, forms, or link triggers.
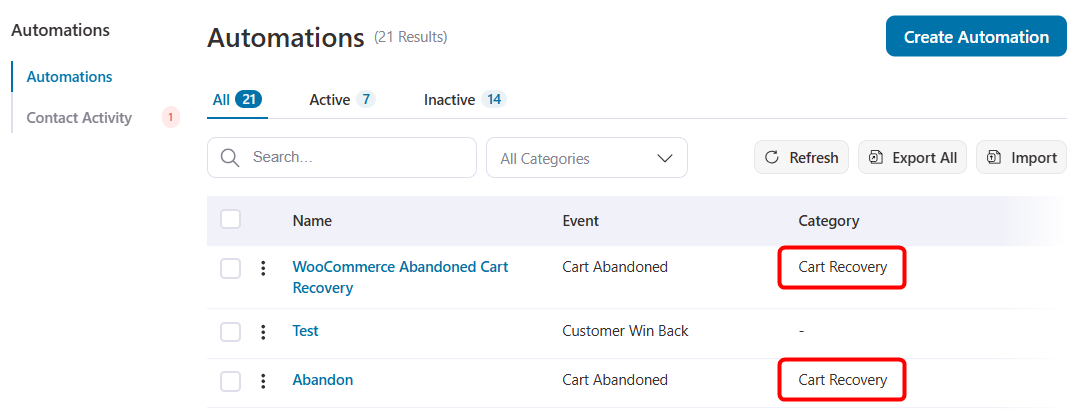
Filter What You Need
Categories double as smart filters, so finding things takes seconds.
Just click a category to instantly narrow your list and apply filters at once.
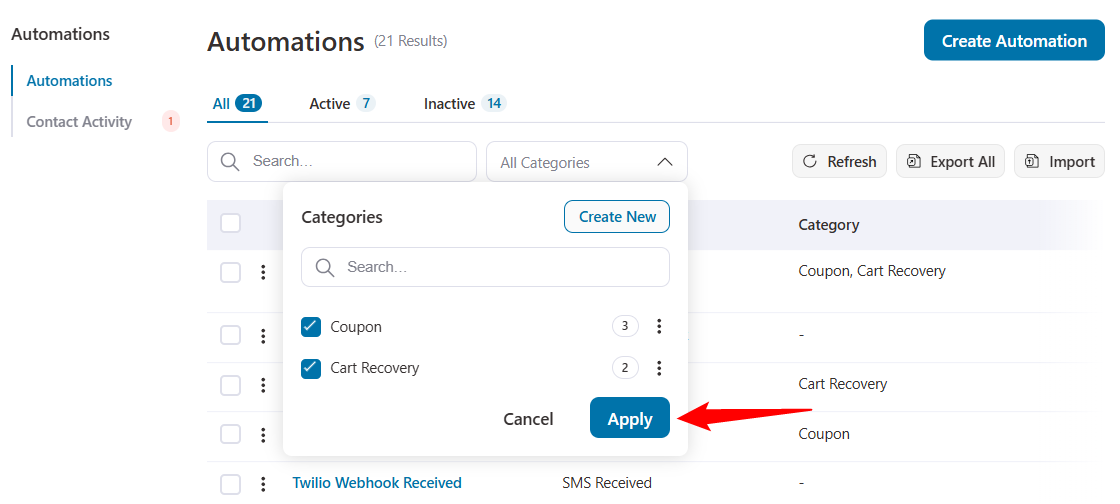
The applied category filters will display the desired results.
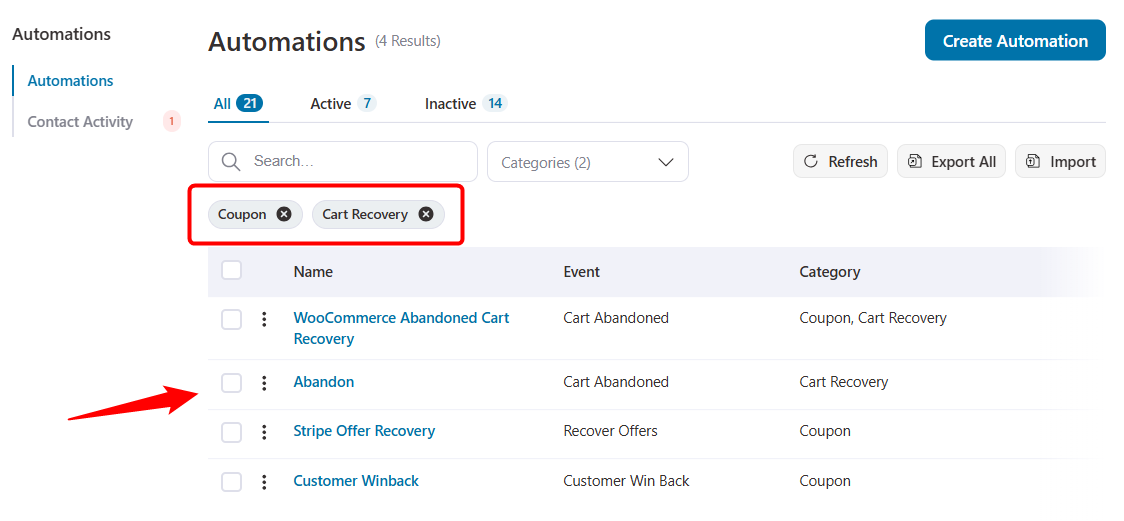
Combine categories with the search option for laser-focused results.
For effective management, rename categories as needed and delete those you no longer need.
When a category is removed, it’s simply unassigned; nothing gets deleted. Your automations and campaigns stay safe.
As your business grows, so does your list of automations, campaigns, and assets. This new categorization system helps you stay organized, reduce clutter, and keep everything easy to manage today and six months from now.
6. Additional Improvements and Enhancements
Along with the big headline features, FunnelKit Automations 3.7.0 delivers many small but important refinements across the platform.
These updates improve usability, performance, and overall day-to-day experience.
A Cleaner License Settings Page
We’ve refreshed the License Settings page to make everything easier to manage at a glance.
A cleaner layout with simpler navigation that displays all your license details in one place. It also offers faster license activation and deactivation.
Now, you don’t need to hunt around for license info anymore.
Smarter Navigation Across Settings
We’ve reorganized parts of the settings to make things more intuitive.
The Subscribe Page and Profile Page are now live under the ‘Contact Pages’ settings. This means that the customer-facing pages are easier to find and manage.
Related options are grouped more logically with consistent navigation patterns across the plugin.
Better Contact Activity Experience
Reviewing sent emails is now smoother and faster.
The ‘View’ button is easier to spot in activity logs, giving you faster access to email content.
You get an improved flow when working with transactional emails and a polished experience when checking email history.
Optimized Data Storage
We’ve introduced a new option, Optimize Email Engagement Tracking, to keep your database clean and efficient.
This removes outdated merge tag data to reduce clutter and improve performance.
And if older data isn’t available anymore, no worries. FunnelKit now handles it gracefully with clean placeholders, so your email history stays intact and error-free.
Under-the-Hood Improvements
Finally, FunnelKit Automations 3.7.0 includes several behind-the-scenes upgrades:
- Performance improvements for faster loading and smoother interactions
- Security enhancements to better protect data
- Bug fixes that improve overall stability
- Compatibility updates for the latest WordPress and WooCommerce versions
- Cleaner code and database optimizations for better performance at scale
Ready to Try FunnelKit Automations 3.7.0?
FunnelKit Automations 3.7.0 is a big step forward in making marketing automation more powerful, more organized, and much easier to manage.
With full branding control, smoother platform imports, smarter categorization, and conditional content inside transactional emails, this release is all about saving you time and giving you more control over how your automation works.
Your new branded contact pages create a polished, consistent experience for subscribers. The rebuilt import system makes it easy to move from other platforms. Advanced categorization helps you stay organized as you scale. And conditional transactional emails unlock a whole new level of personalization without added complexity.
If you’re already using FunnelKit Automations, update to version 3.7.0 and start using these improvements right away.
Not using FunnelKit yet? Take a look at our latest offers and see how FunnelKit Automations can transform the way you run marketing automation in WooCommerce 🚀
Editorial Team
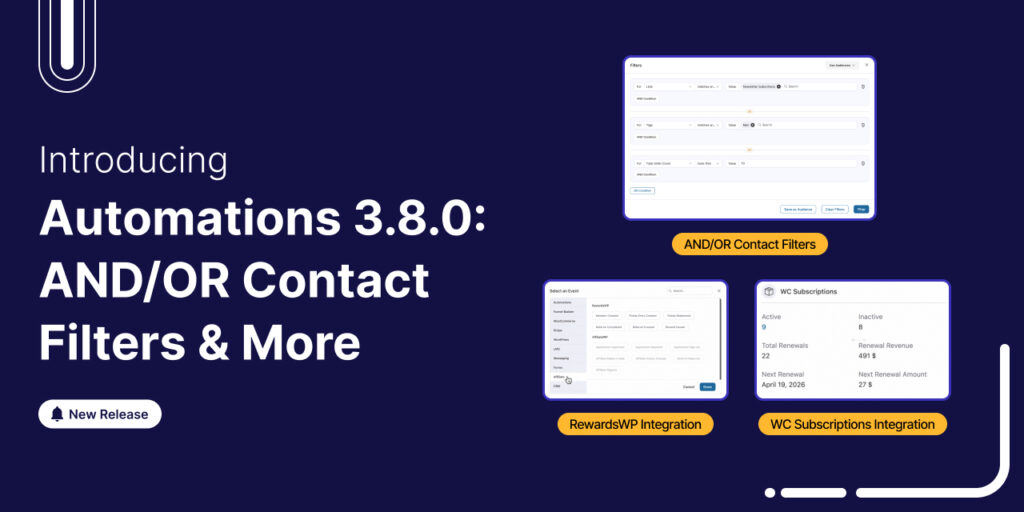
April 11, 2026We're thrilled to announce that FunnelKit Automations 3.8.0 is now live! And this one packs some serious firepower. This release turns FunnelKit Automations into a full-fledged CRM-grade targeting engine. You...
Editorial Team
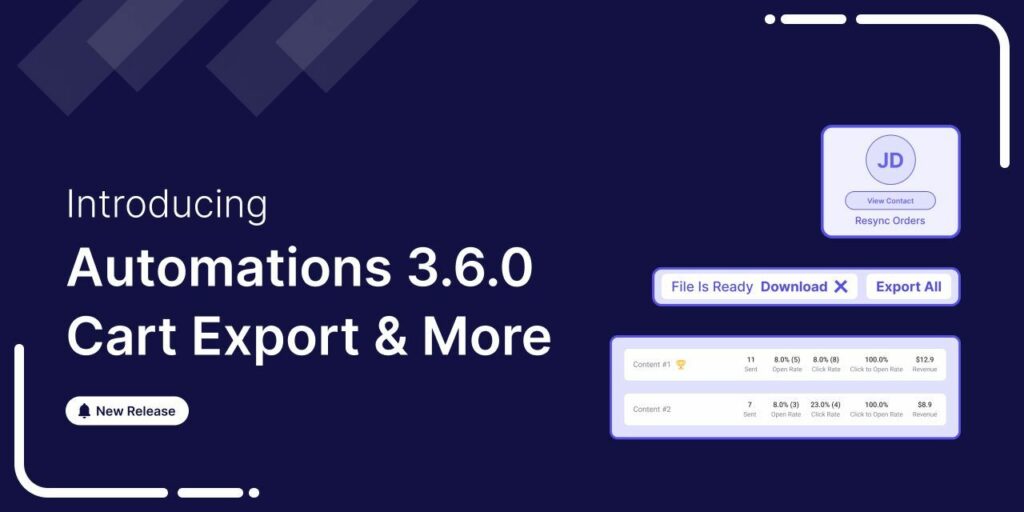
June 9, 2025FunnelKit Automations 3.6 is here, and it’s packed with powerful features to help you grow smarter and faster. With this release, you can: Export abandoned cart data with a click...
Editorial Team
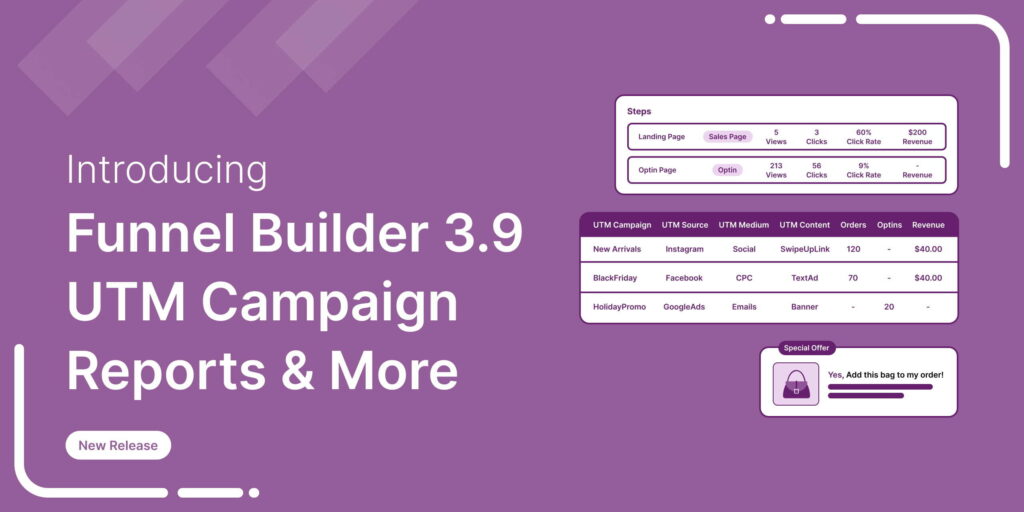
February 4, 2025The wait is over! We’re proud to announce the latest FunnelKit Funnel Builder version 3.9 release. This new release is packed with powerful new features designed to streamline your checkout...


