
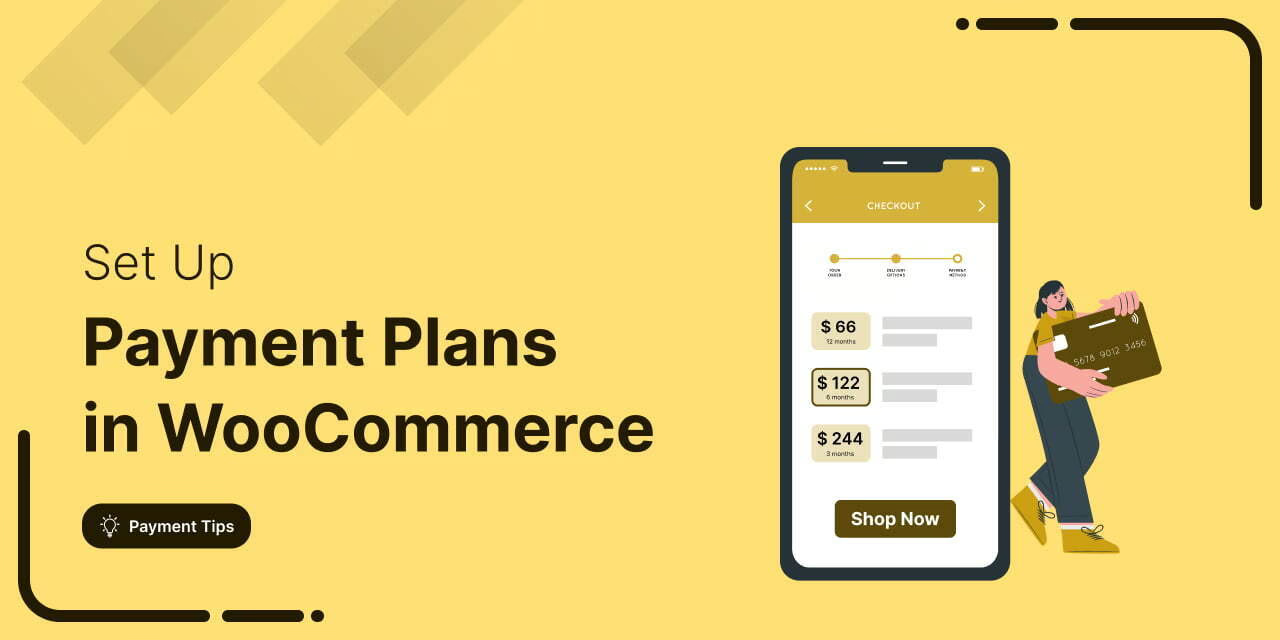
Want to boost your sales and make your products more affordable for customers?
Offering WooCommerce payment plans can help. Studies show that 35% of shoppers are more likely to buy when they can pay in installments. [Splitit]
High upfront costs often lead to abandoned carts. By offering payment plans, you can make your products more accessible and increase conversions. Setting this up in WooCommerce may seem tricky, but don’t worry!
In this post, we’ll show you how to set up WooCommerce payment plans in simple, easy steps.
Table of Contents
What Are WooCommerce Payment Plans?
WooCommerce payment plans let you offer different payment options for a single product or service. This is an effective way of attracting people with different budgets and making your products more accessible.
In WooCommerce, you can offer payment plans in three main ways, along with flexible tiered pricing options.
1. Installments / Pay in Parts
Installment payments allow customers to pay for a product in multiple parts over a set period. You can charge daily, weekly, monthly, or yearly.
- Applicable for one-time or fixed-price products only.
- Customers complete the full payment after all installments.
Example: You sell a phone for $300. Instead of asking for the full amount upfront, you offer:
- 3 monthly payments of $100
- 6 monthly payments of $50
That is the whole thing. No subscription running in the background, nothing to cancel later. Useful when the price is what is stopping people from buying.
2. Recurring Subscription Plans
Recurring subscriptions are billed on a regular schedule, such as weekly, monthly, or yearly, and continue until the customer cancels.
These plans are ideal for digital services, memberships, or products that require ongoing access.
Examples:
- A streaming service at $10/month or $100/year
- An online course platform at $15/month with access to all materials
You can also stack tiers on top of subscriptions:
- Basic ($10/month): Access to standard courses
- Plus ($15/month): Basic + weekly live group class
- Premium ($20/month): Plus + one-on-one session with an expert
3. Tiered Pricing Plan
Tiered pricing allows you to offer multiple levels or bundles of a product or service, with prices varying based on features, contents, or benefits.
- Works for both one-time purchases and recurring billing
- Gives customers with different budgets a way in
Example for digital products (subscription):
- Basic Plan ($10/month): Access to all courses
- Plus Plan ($15/month): Basic + weekly live group class
- Premium Plan ($20/month): Plus + one-on-one coaching
Example for physical products (one-time or recurring delivery):
- Tier 1 ($20): Face wash + moisturizer
- Tier 2 ($30): Face wash + moisturizer + toner
- Tier 3 ($40): Full bundle with serum
A single price point works for some buyers and loses others. Tiers let you keep both.
Why Should You Sell Products Using WooCommerce Payment Plans?
Have a look at some of the benefits you can enjoy if you utilize WooCommerce payment plans to sell your products.
- Convenient Payment Options for Customers
Payment plans such as installments allow users to buy high-priced products that might otherwise be out of reach. Breaking the total cost into smaller portions makes purchasing easier and enhances the overall customer experience.
Similarly, recurring subscriptions or tiered pricing plans provide flexible options, letting customers choose a plan that fits their budget or desired level of features.
- Boost Conversion Rates
Installments reduce the upfront financial burden, encouraging more users to complete their purchase.
Tiered products attract buyers who want access to your product at a lower cost or with limited features, which might otherwise be unaffordable.
Recurring subscription plans also increase conversions by providing an ongoing value proposition that keeps customers engaged.
- Increase Average Order Value (AOV)
When customers can pay via installments, they are more likely to purchase higher-priced items or multiple products at once, raising your store’s average order value.
Tiered pricing also encourages customers to upgrade to higher tiers with more features, further increasing AOV.
- Attract Budget-Conscious Buyers
Installments make expensive products accessible to customers with tighter budgets, helping you capture sales that might otherwise be lost.
Tiered products at lower price points also allow customers to try your offerings with limited features, creating opportunities for future upgrades.
Recurring subscription plans can provide ongoing value at manageable price points, keeping more customers engaged over time.
By offering a combination of installments, recurring subscriptions, and tiered pricing, you can make your products more accessible, improve customer satisfaction, and boost your WooCommerce store’s performance.
How to Set Up a Payment Plan In WooCommerce?
We highly recommend Sublium Subscriptions for creating payment plans in WooCommerce.
This is an all-in-one solution for all your payment plans. Along with creating different types of payment plans, you also get detailed analytics to track your sales, revenue, churn, and more.
In this tutorial, we’ll show you how to create installment payment plans in WooCommerce. Before starting, make sure you’ve created the product with a one-time price.
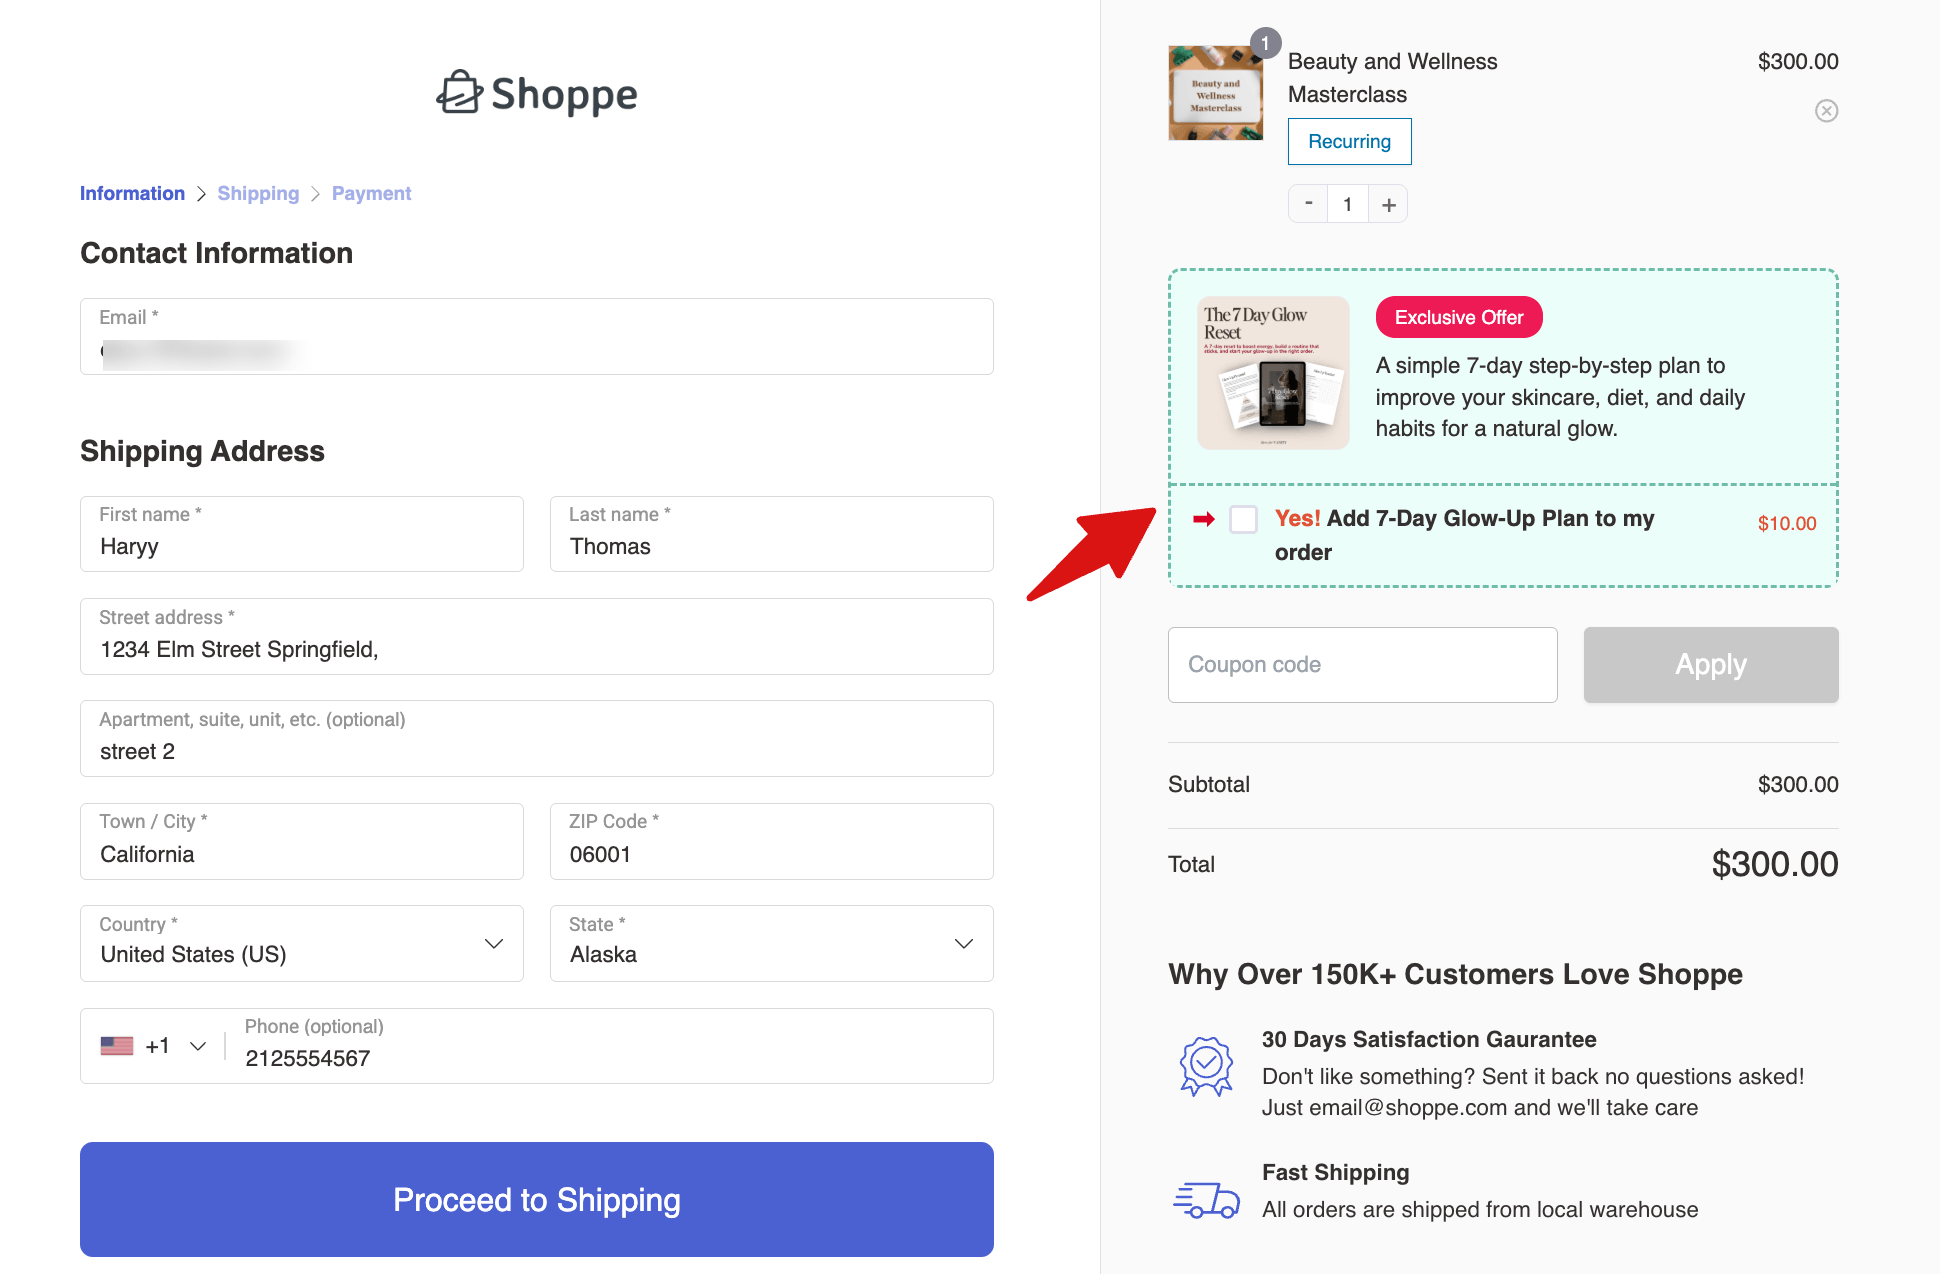
For example, we’ll use a virtual product, “Beauty and Wellness Masterclass,” priced at $300, and create two plans: $100/month for 3 months and $50/month for 6 months.
Note: Using the same plugin, you can easily create recurring payment plans as well as tiered payment plans.
Make sure to get both the free and pro versions of this plugin.
Next, follow these steps:
Step 1: Create an installment plan
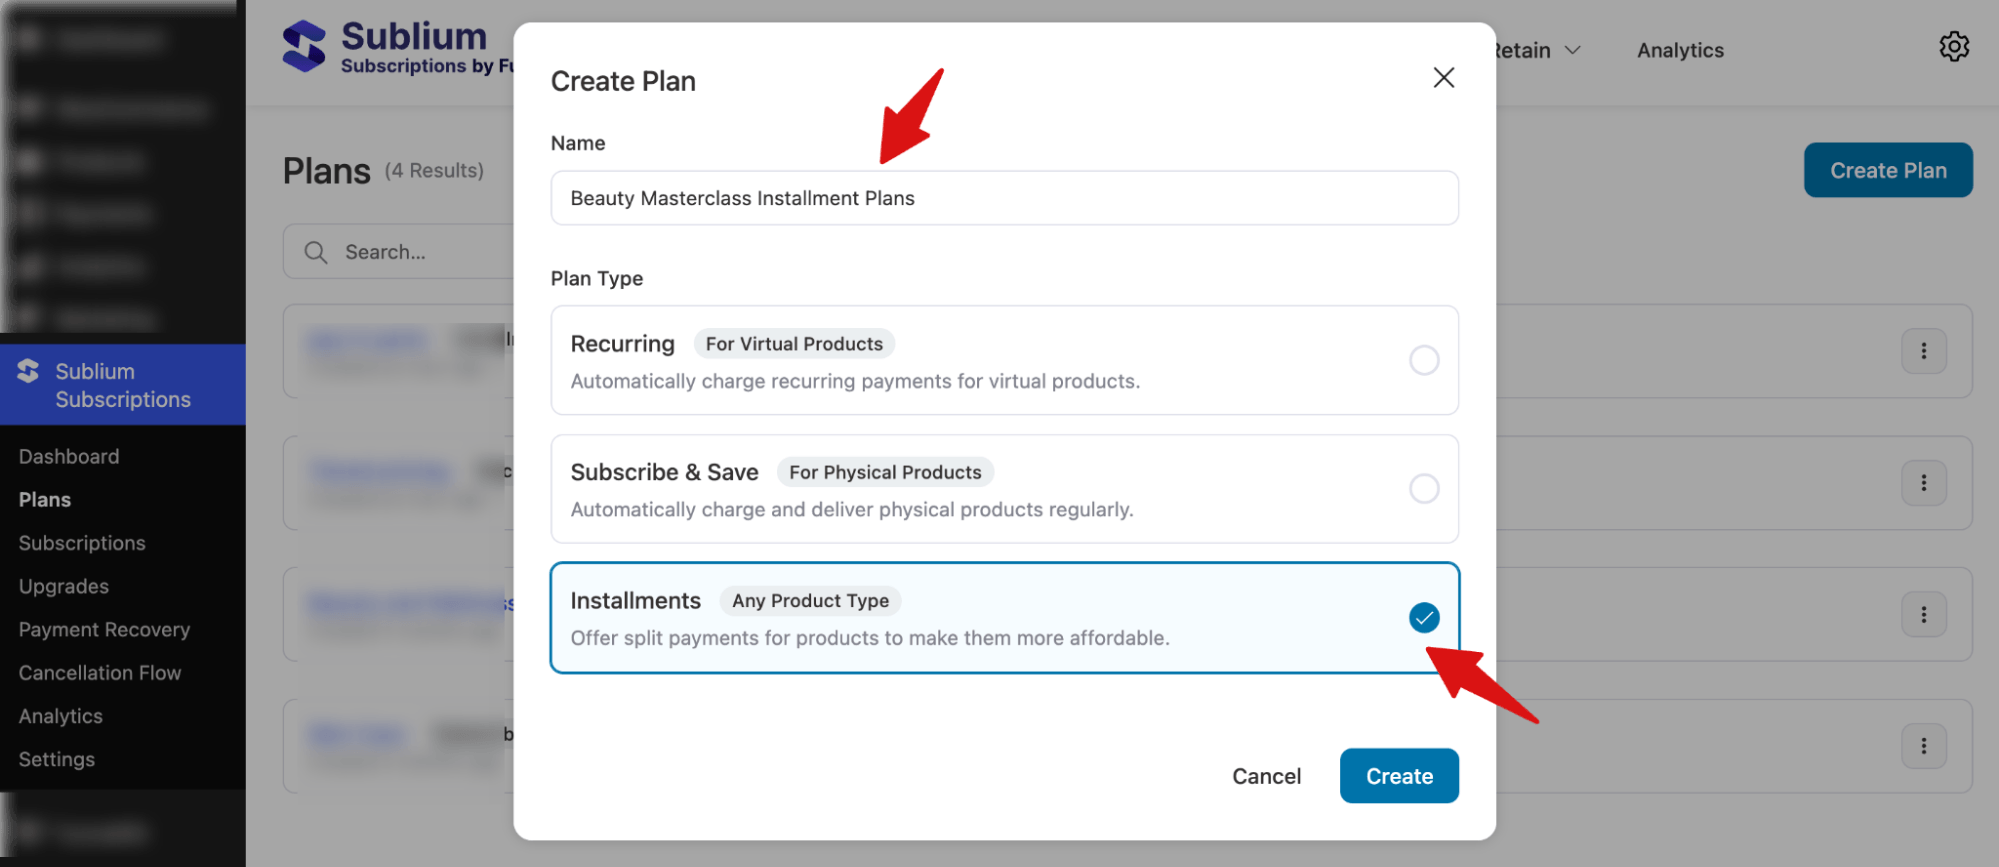
Go to Sublium Subscriptions ⇒ Plans, then click the “Create Plan” button.
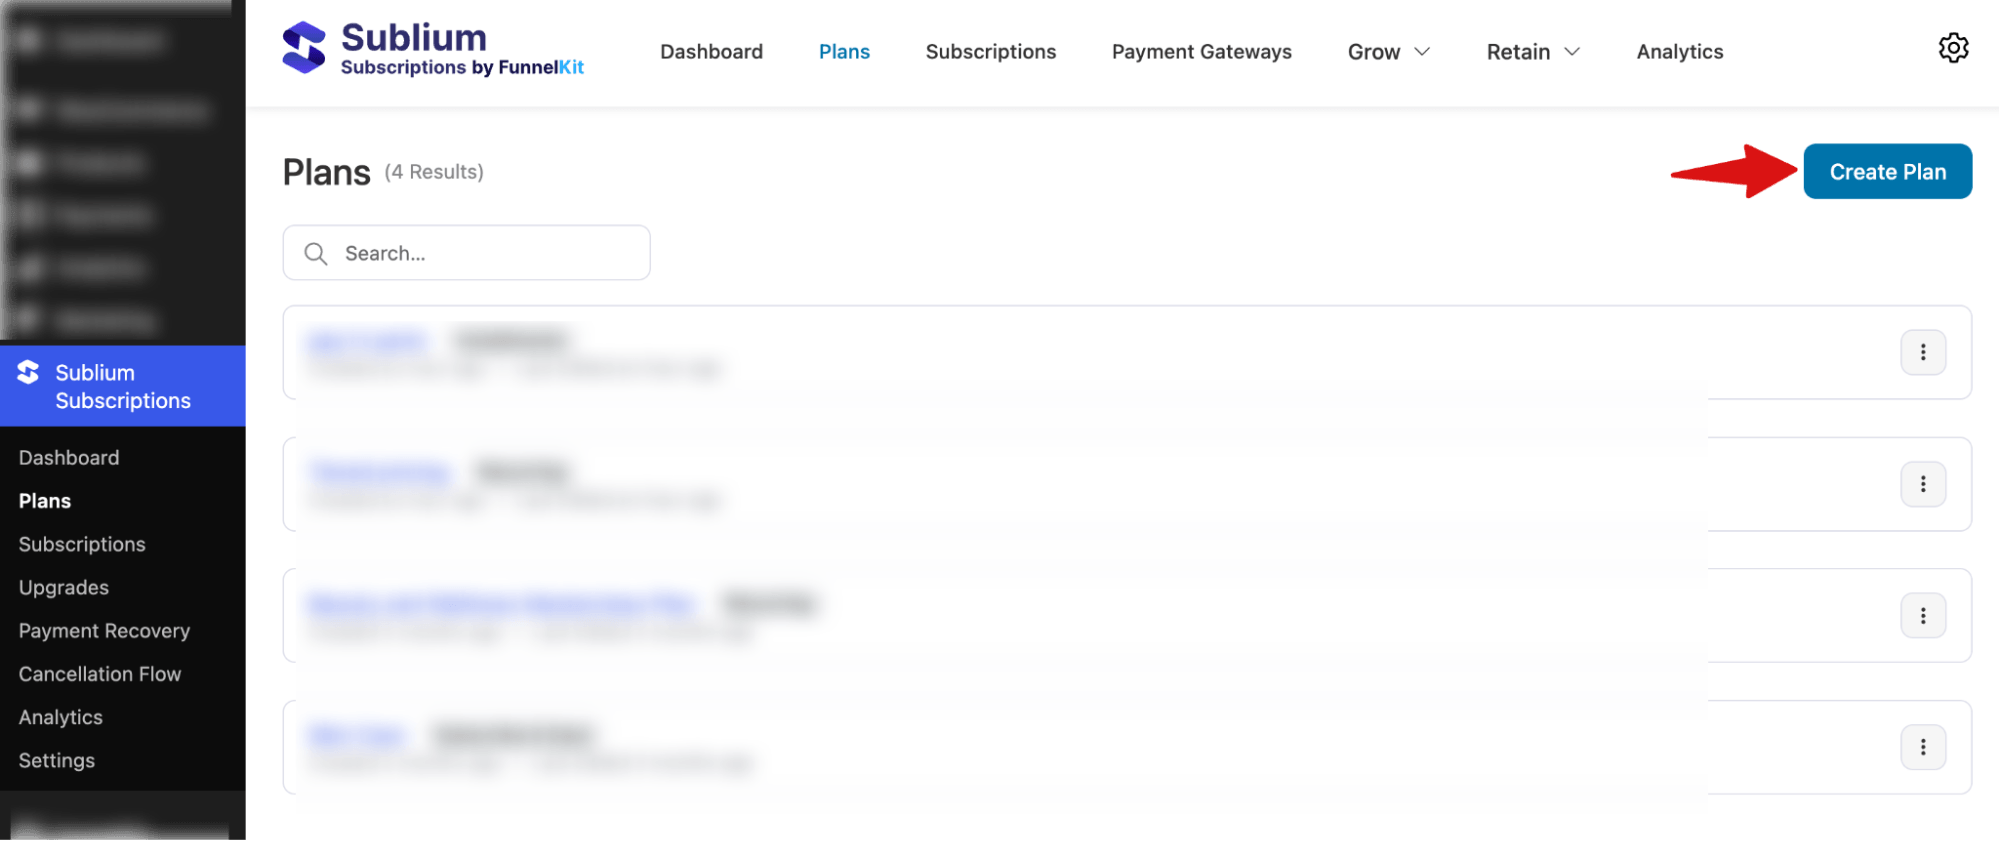
You will be presented with three plan types to choose from:
- Recurring
- Subscribe and Save
- Installments
Since you’re setting up an installment plan, choose “Installments” and give your plan a clear name (e.g., “Beauty Masterclass Installment Plans”). Then, click on “Create” to create your subscription plan.
Step 2: Configure the Installments
By default, installment plans have a “Pay in 2 Parts” plan. You can change the configuration to your desired implementation plans.
To start, click on the plan name.
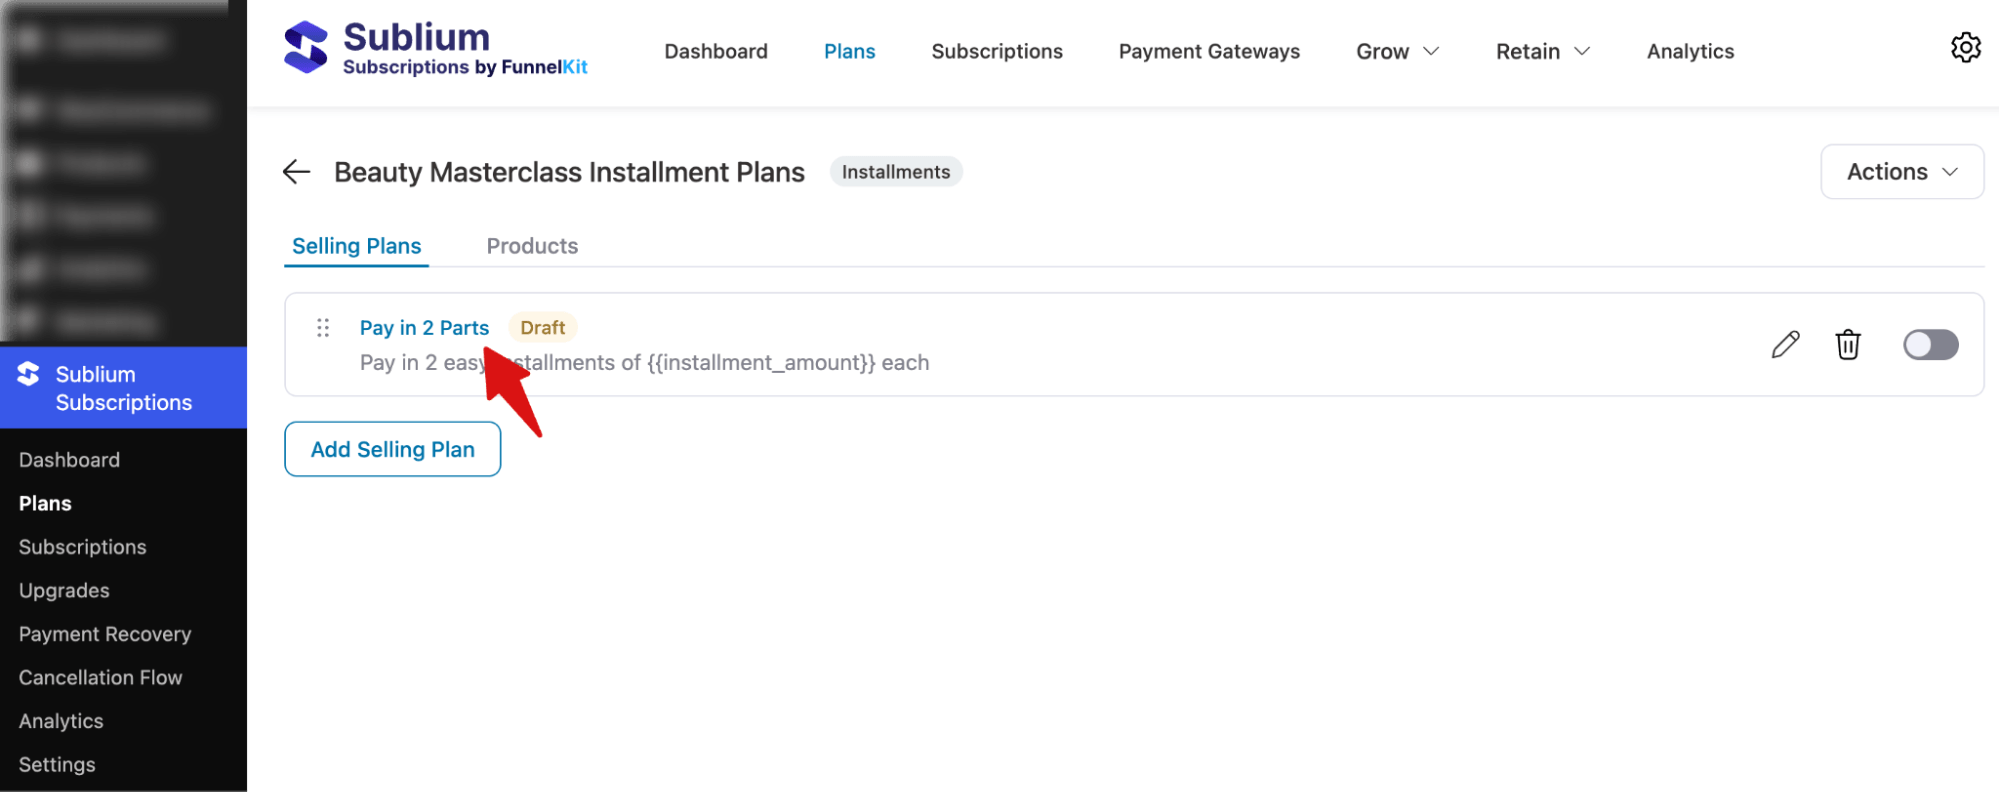
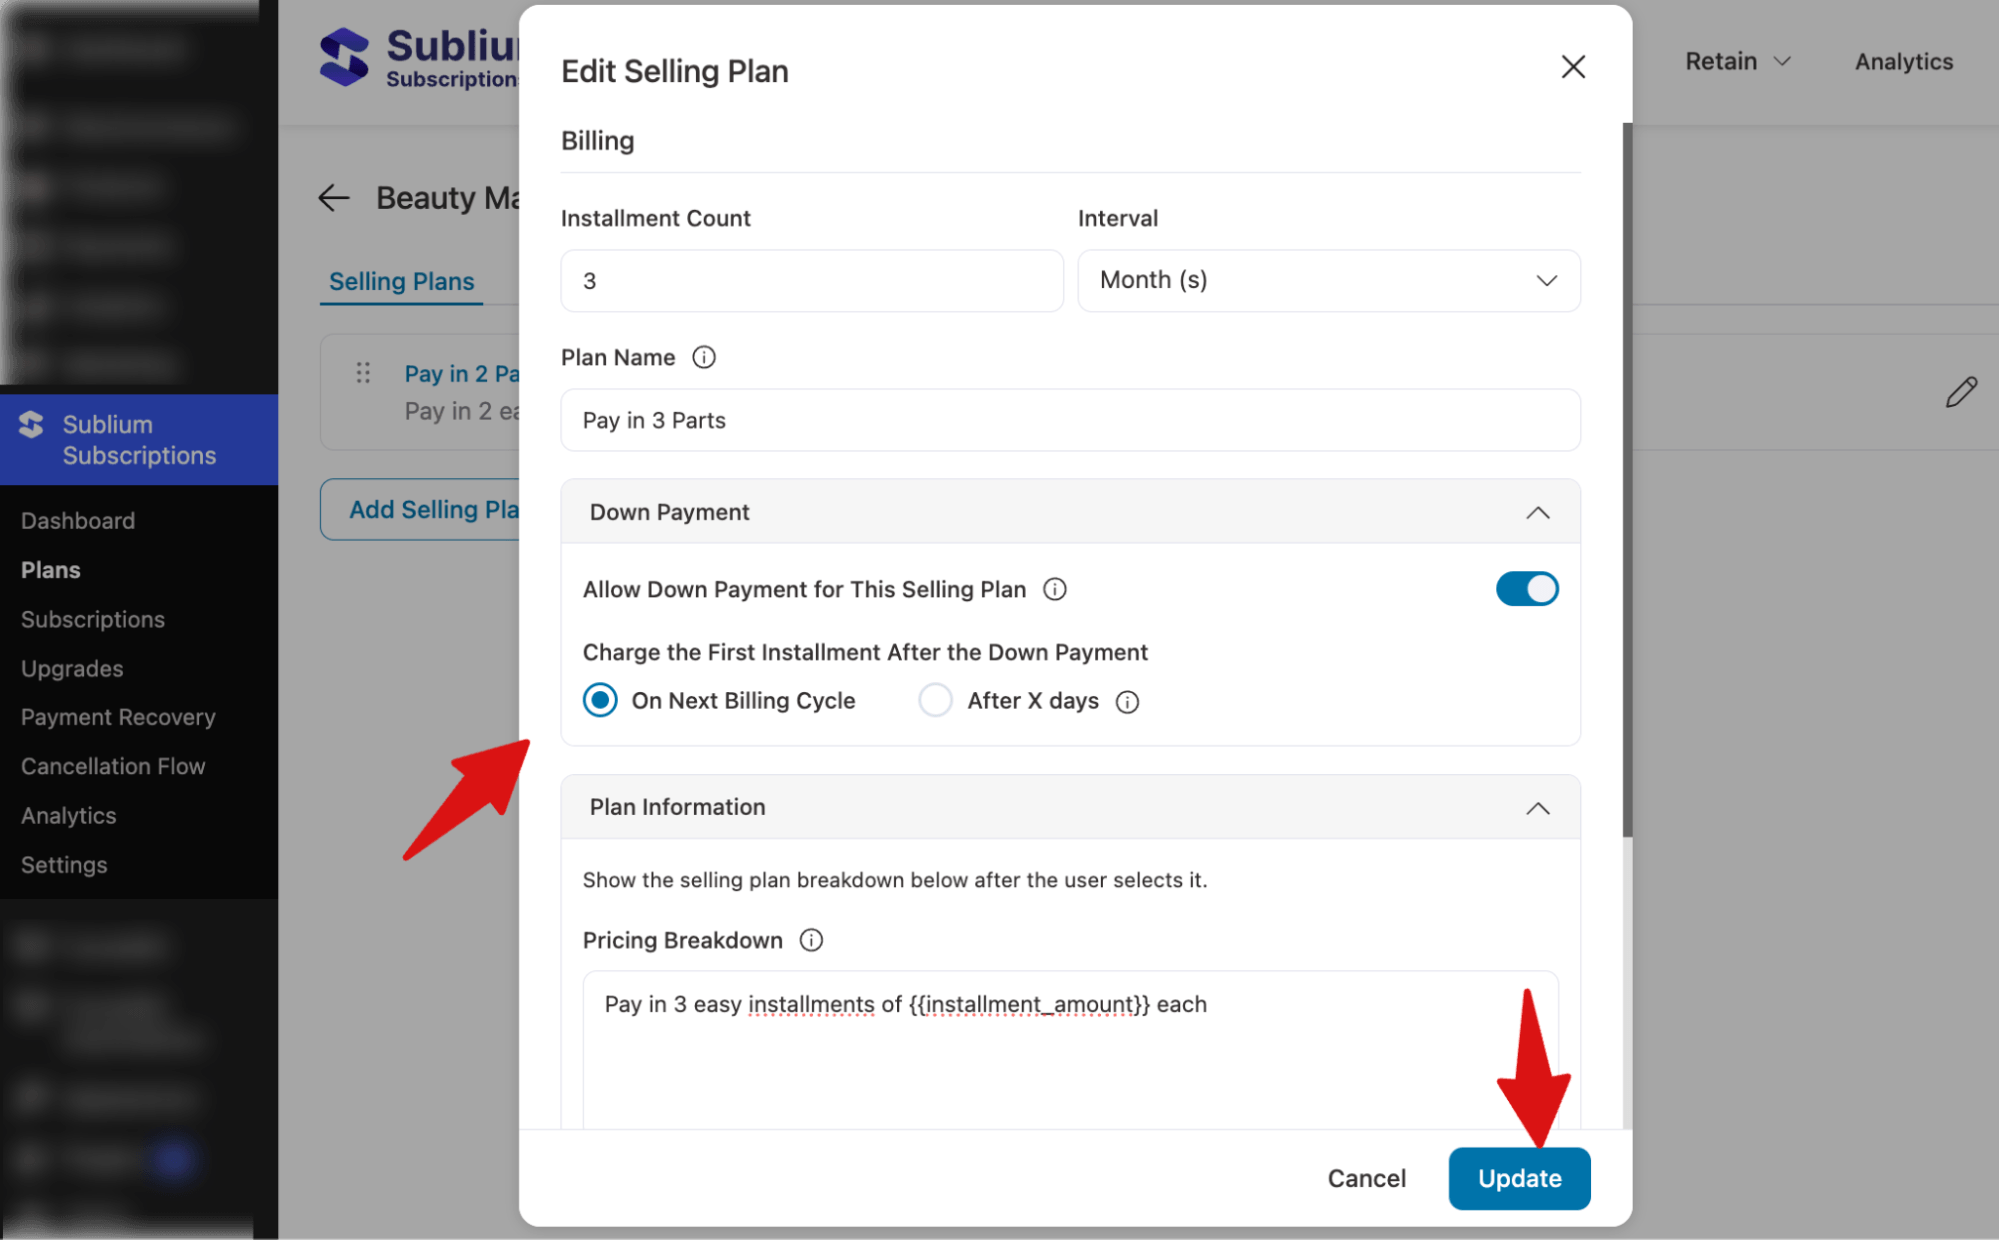
Now, configure the installment plan using the following options:
- Installment Count: Set the total number of payments. In this example, we’re setting it to 3 months (3 installments), but you can choose any number based on your plan.
- Interval: Choose how often each payment is charged. Here, it’s set to 1 month for monthly billing, but you can use days, weeks, or months as needed.
- Plan Name: Give the plan a clear name so customers can easily understand it, such as Pay in 3 Months.
- Down Payment: Expand the Down Payment tab and enable ‘Allow Down Payment for This Selling Plan’ to collect an upfront fee. This amount is charged in addition to the product price and is not included within it.
Once enabled, you can configure when the first installment will be charged:
- On Next Billing Cycle: The first installment is charged on the next scheduled interval
- After X Days: Charge the first installment after a specific number of days by setting the delay
This lets you control whether customers begin paying in installments immediately or after a short delay following the down payment.
- Plan Information: Turn this on to show plan details after the customer selects the installment option.
- Pricing Breakdown: Add a clear message like: Pay in 3 easy installments of {{installment_amount}} each. You can use dynamic values like {{installment_amount}}, {{installment_count}}, and {{down_payment}} to display accurate plan details automatically.
- Additional Description: Add any extra information to explain the plan clearly to your customers.

Once done, click “Update “to save your configuration.
Then enable the installment plan by toggling the button and confirming it.
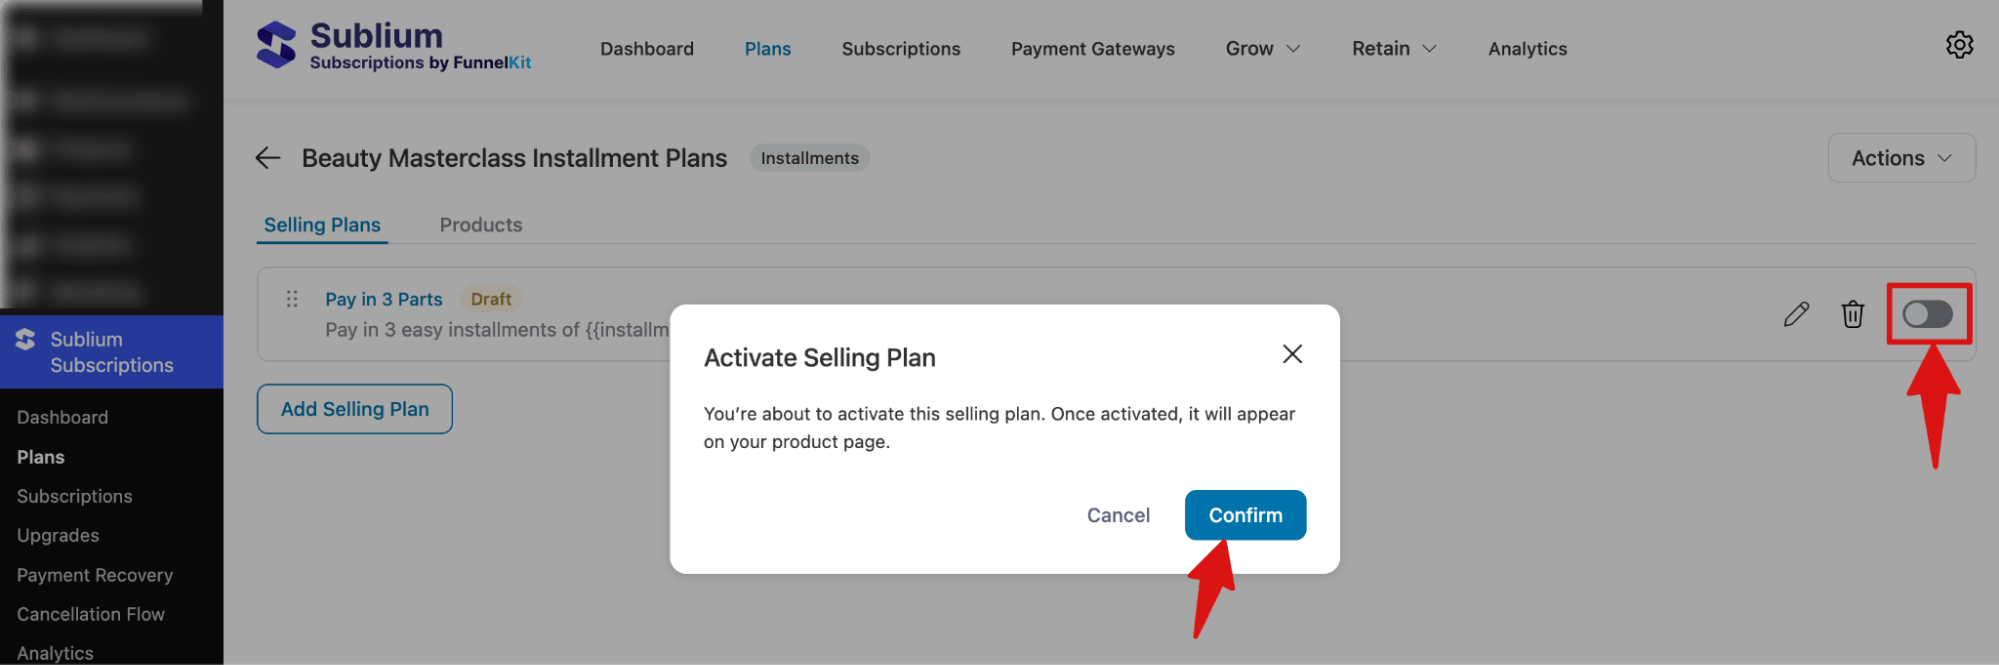
One of your installments is now ready.
Step 3: Create multiple installment plans
Now, to add more payment plans, hit the button “Add Selling Plan” and then configure it as you did in the previous text.
Here, we have a Pay-in-6 Parts installment plan.
Make sure to enable the plan as well. You can add as many installment plans as you want, following the same process.
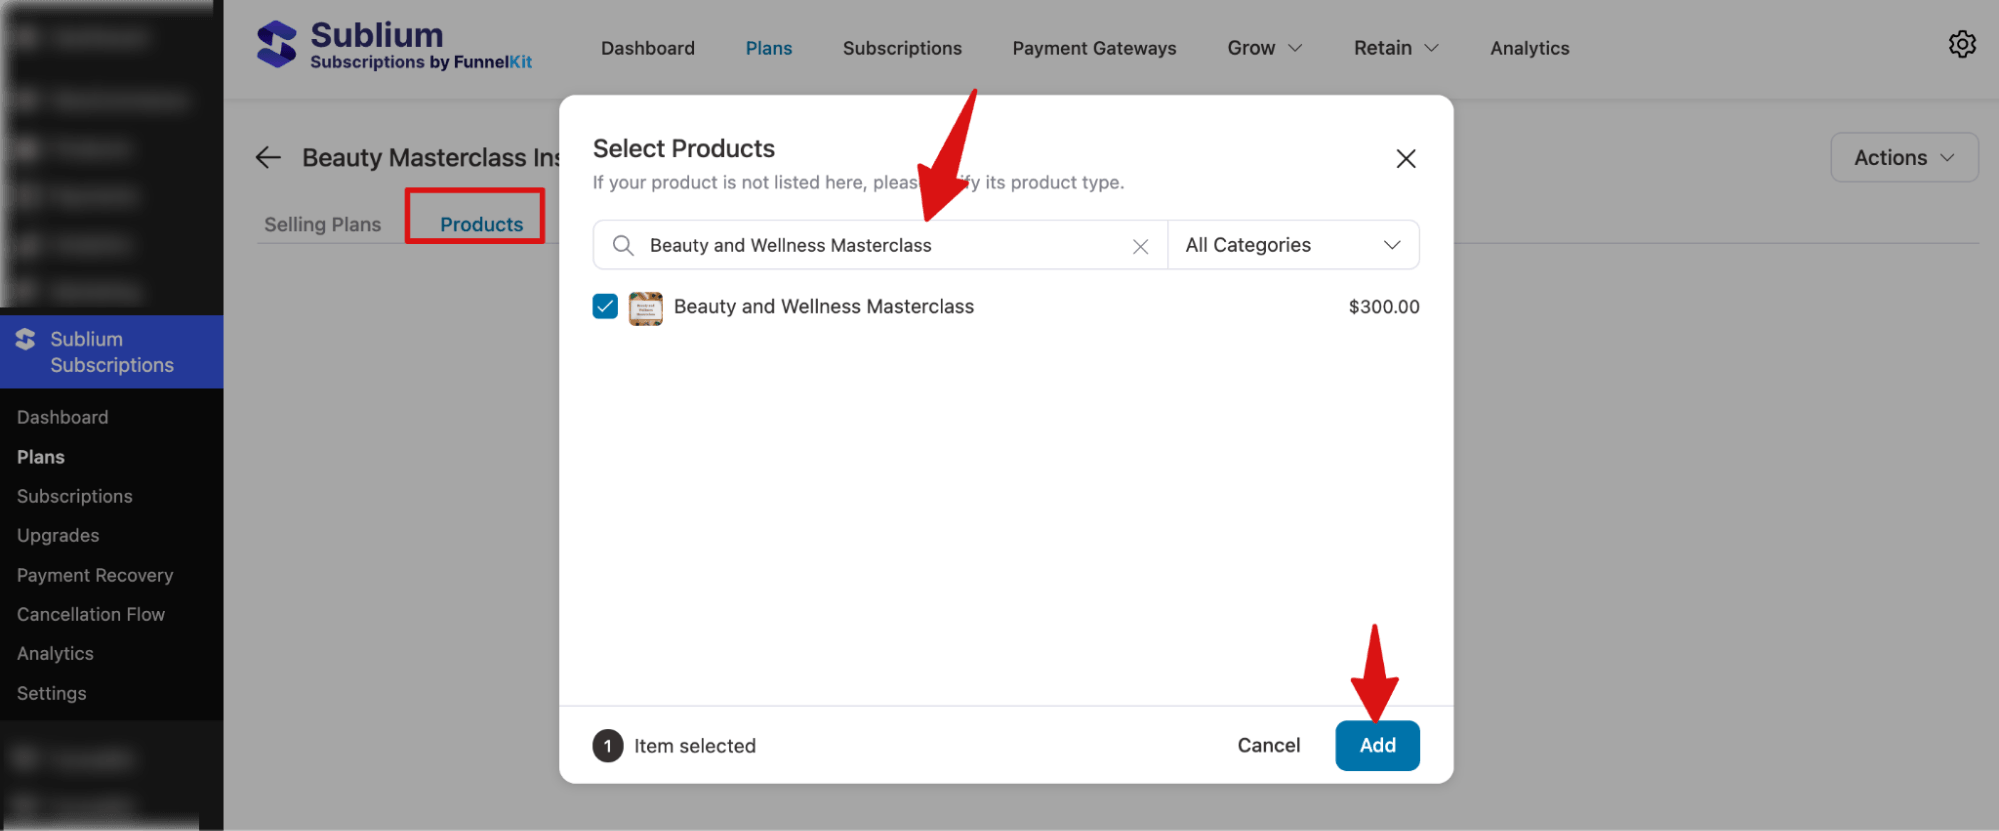
Step 4: Assign installment plans to products
Now it’s time to set the payment plan pricing for the product, in our case, “Beauty and Wellness Masterclass”.
For this, move to the “Products” tab. Click on “Add Product”. Then search for the product, select it from the dropdown, and click “Add”.
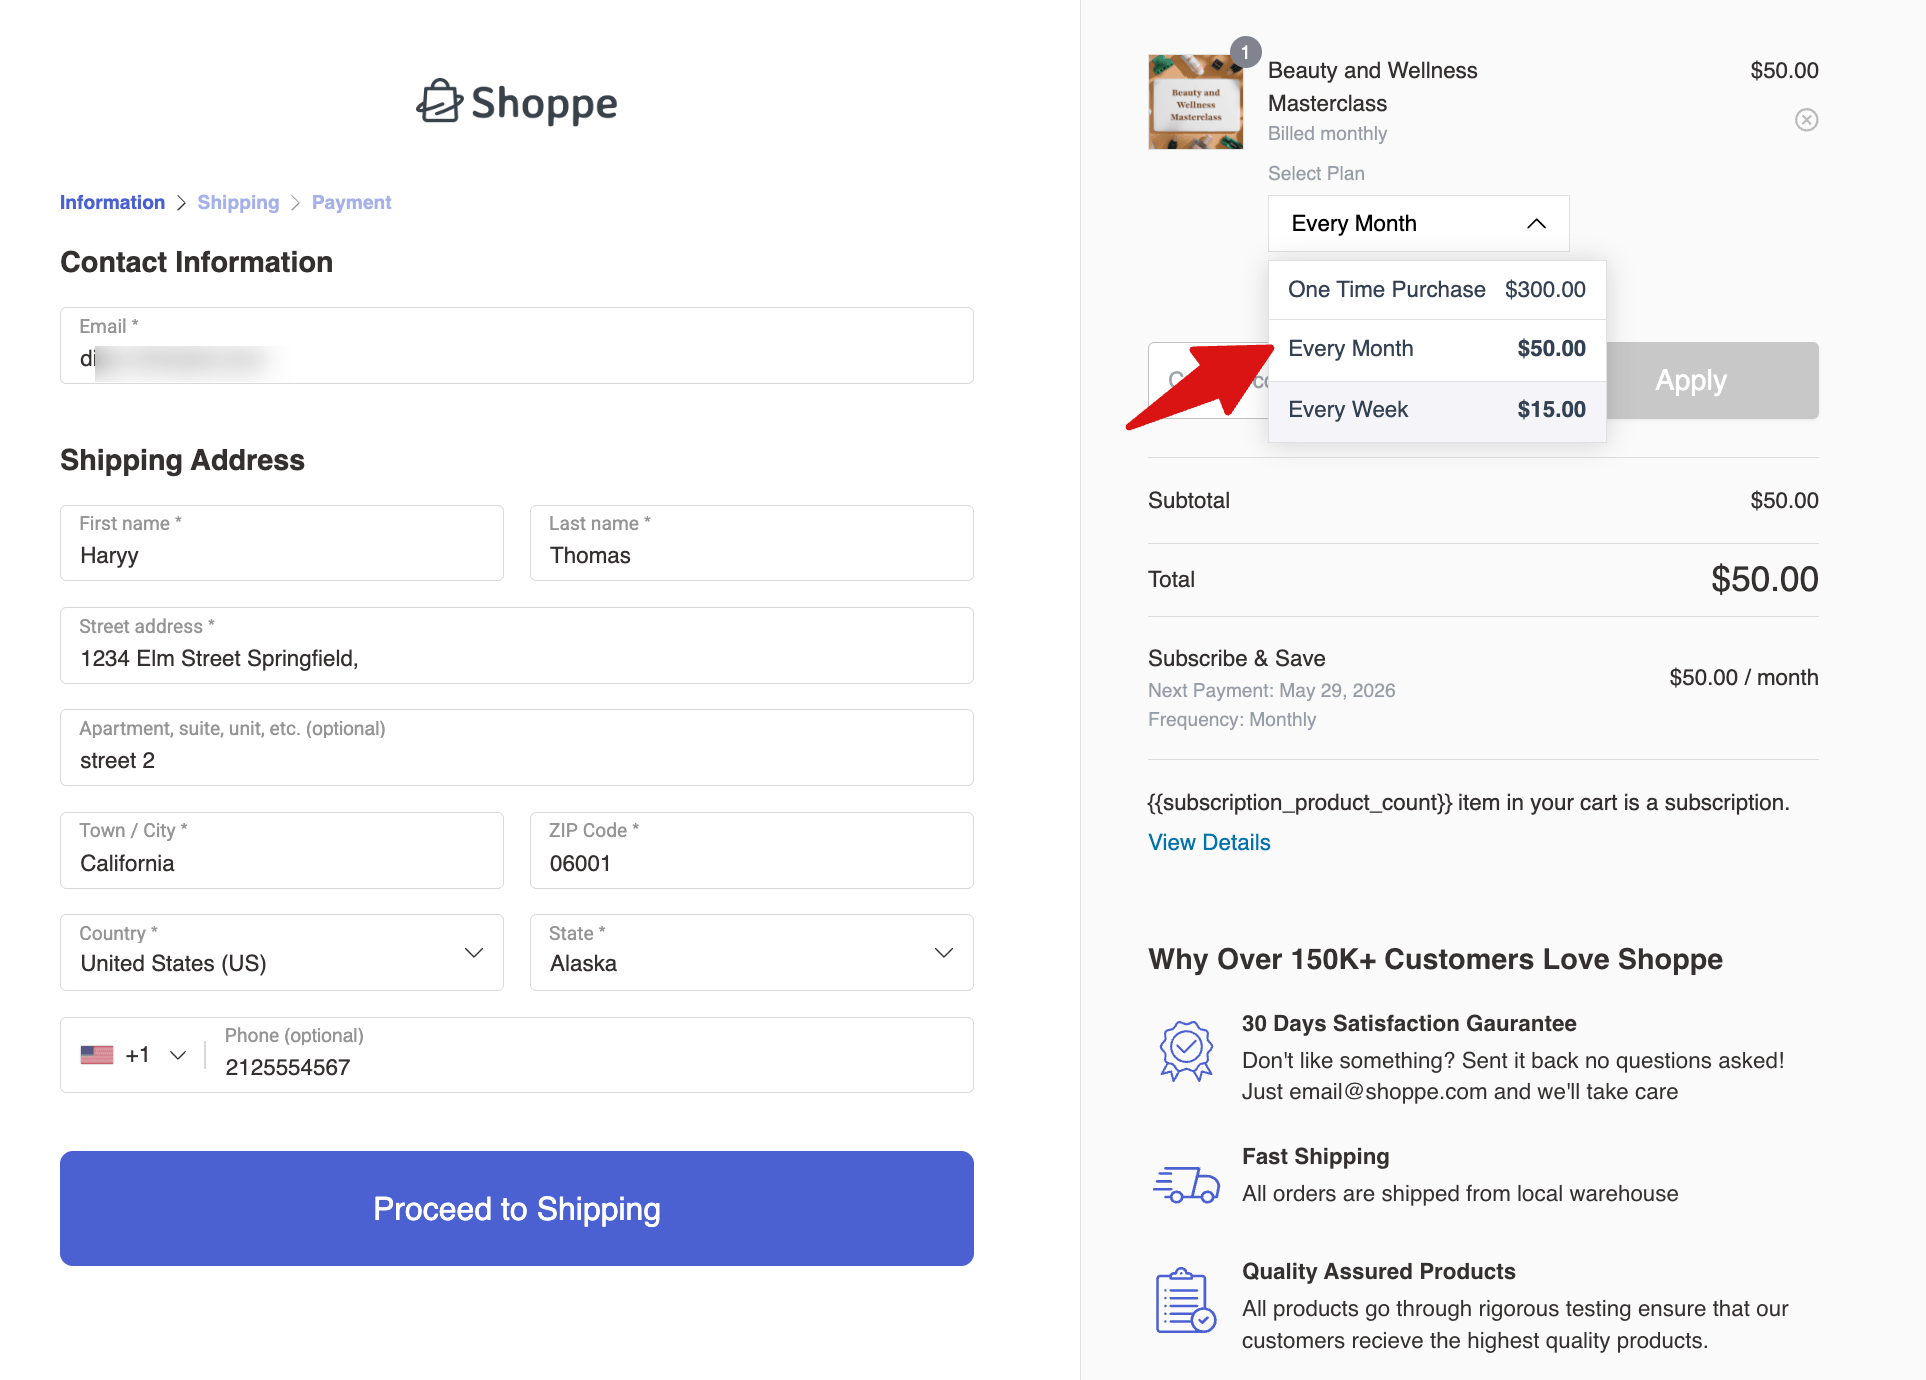
Step 5: Set the installment prices
After adding the product, configure the installment plans and one-time purchase.
All active payment plans will appear, with the ‘Price Per Installment’ auto-calculated from the base price.
You can set a ‘Down Payment’ for each plan, which will be charged as an upfront fee paid at the start of the installment plan. It is charged in addition to the product price, and the remaining balance is divided into the scheduled installments.
Note: One-time payment is active by default; to exclude this, uncheck the option “Allow One Time Purchase”. And to exclude any of the installment payment plans, check ‘Exclude Plan’ next to it.

You can apply the same payment plans to multiple products. Simply click ‘Add Product,’ search and select the product, then configure the pricing for the payment plans as shown above.
And make sure to hit “Save” to update.
That’s it. Your payment plans are ready.
How to Maximize Sales of WooCommerce Payment plans
To increase conversions and average order value, offer payment plans at the moments when customers are already in buying mode. Using FunnelKit Funnel Builder, you can do this in two ways.
1. Increase order value at checkout without adding friction
The checkout page is where the purchase decision happens in real time. Customers are already committed enough to get this far, which makes it the right place to present options.
Let customers switch between plans or adjust quantity before completing the purchase. You can do so by adding a mini cart option where users can adjust the quantity.
Add related low-value items as order bumps so customers can add with one click without interrupting checkout.
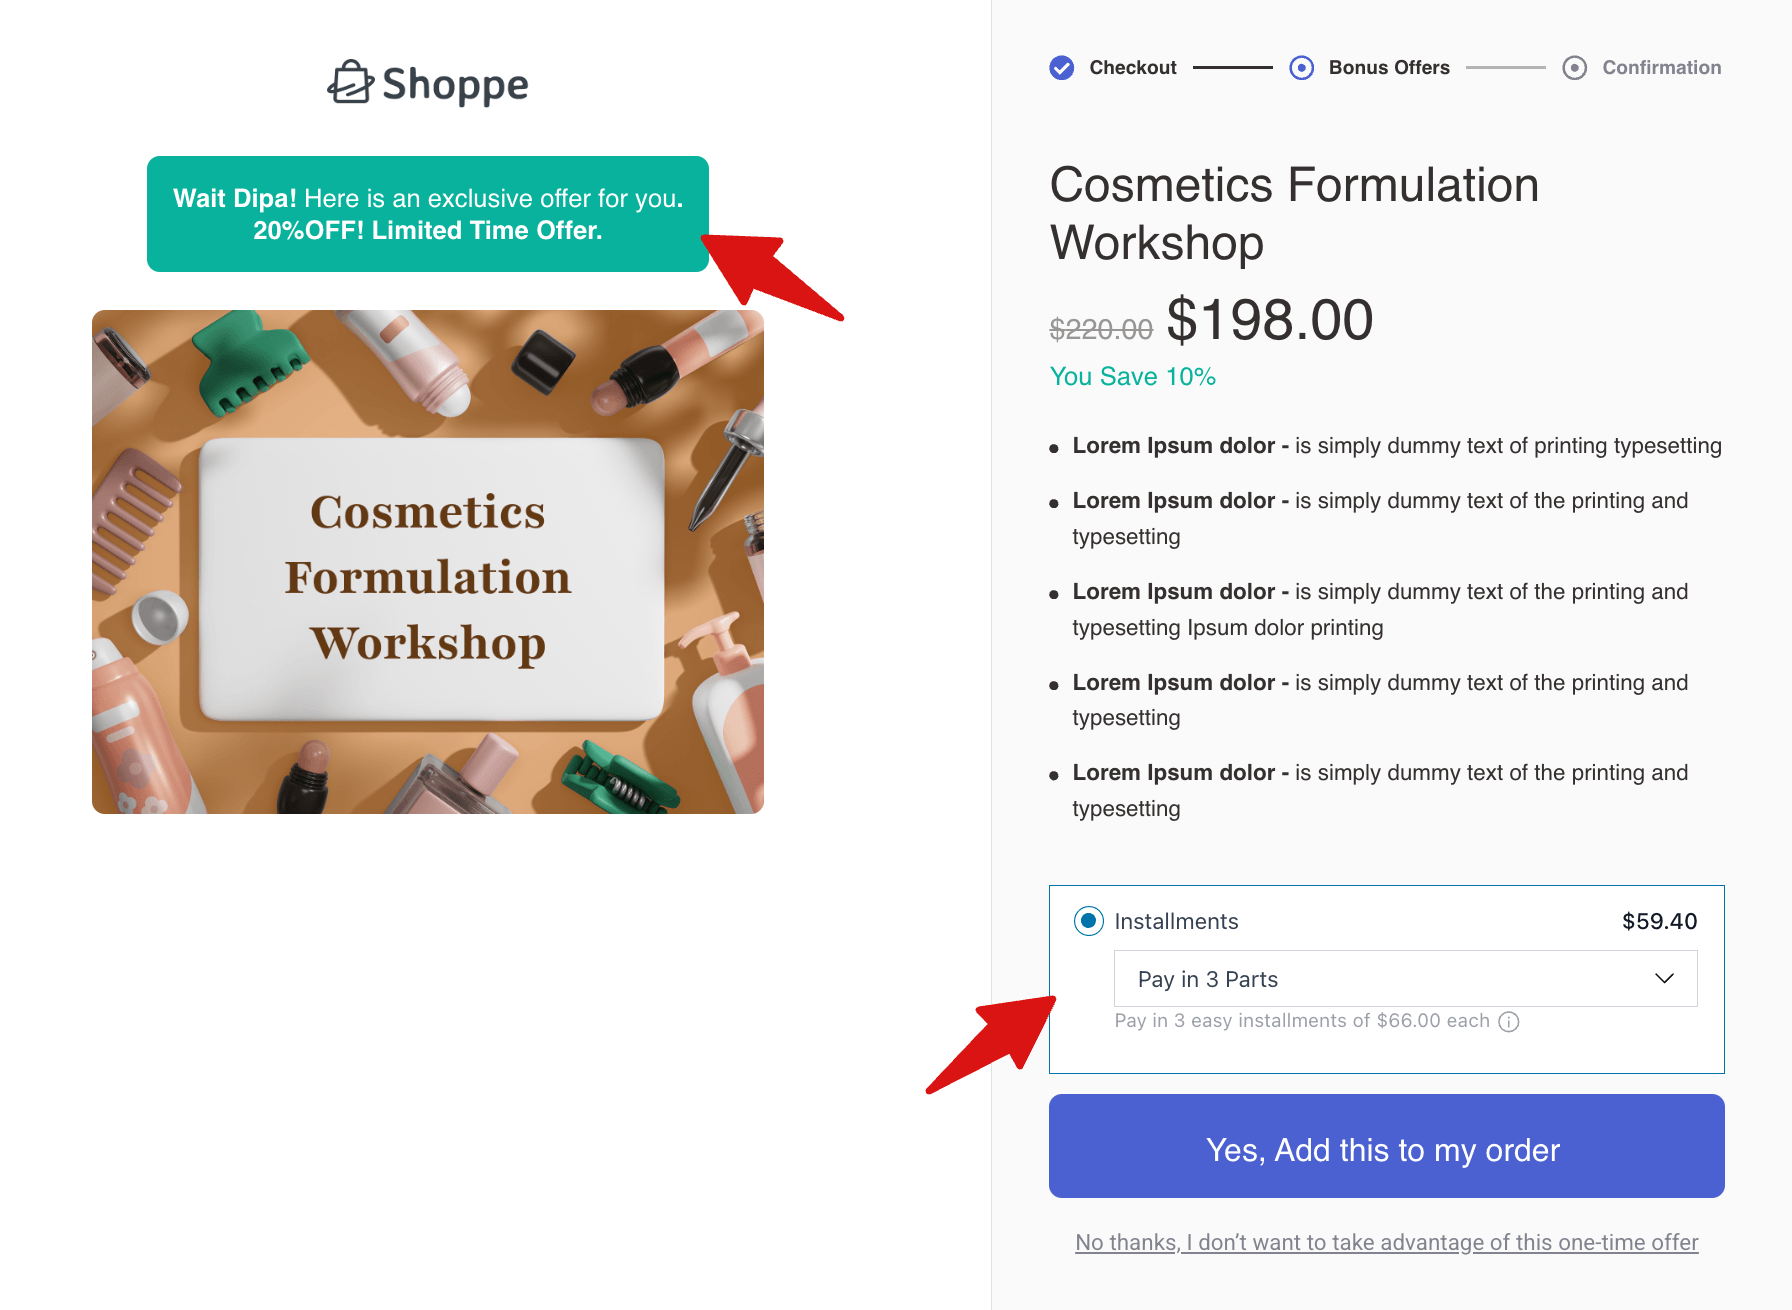
2. Capture more revenue after the sale with one-click upsells
Once a customer completes a purchase, their payment details are already in. That is why post-purchase offers tend to convert better than most other placements.
- Offer upgraded or alternative payment plans immediately after checkout
- Add a short-window discount to encourage a quick decision
No complicated setup is needed. By focusing on these two stages, your payment plans can bring in more revenue than the initial offer itself.
Ready to Set Up WooCommerce Payment Plans?
Setting up WooCommerce payment plans to offer your customers the luxury of paying in installments is an effective strategy to boost sales.
That’s because installment or tiered payment plans help you expand your audience by targeting budget-friendly customers.
The good news is that you can now offer installment plans using the reliable WooCommerce subscription.
However, to maximize your chance of getting conversions and increasing average order value, you should utilize a sales funnel and offer payment plans at different stages of the buying journey.
Using FunnelKit Funnel Builder, you can offer discounts on the fly, order bumps, and upsells to boost average order value.
So, don’t just offer one payment plan! Offer multiple WooCommerce payment plans, order bumps, and discounts to ensure a better user experience.
So, are you ready to set up WooCommerce payment plans and skyrocket your sales?

Editorial Team
July 7, 2026Are shoppers adding products to their cart and leaving before they buy? According to Baymard Institute research on checkout usability, 18% of shoppers who abandon their cart do so because...
Editorial Team
June 29, 2026Broadcast emails are one-time campaigns sent to a specific audience, ideal for sharing sneak peeks, announcing offers, or revealing major updates. You can use them to announce a sale, introduce...
Editorial Team
June 25, 2026There are two things most people get wrong about the WooCommerce order confirmation email. First, they don't realize it's the Processing order email they need to switch on and not...


