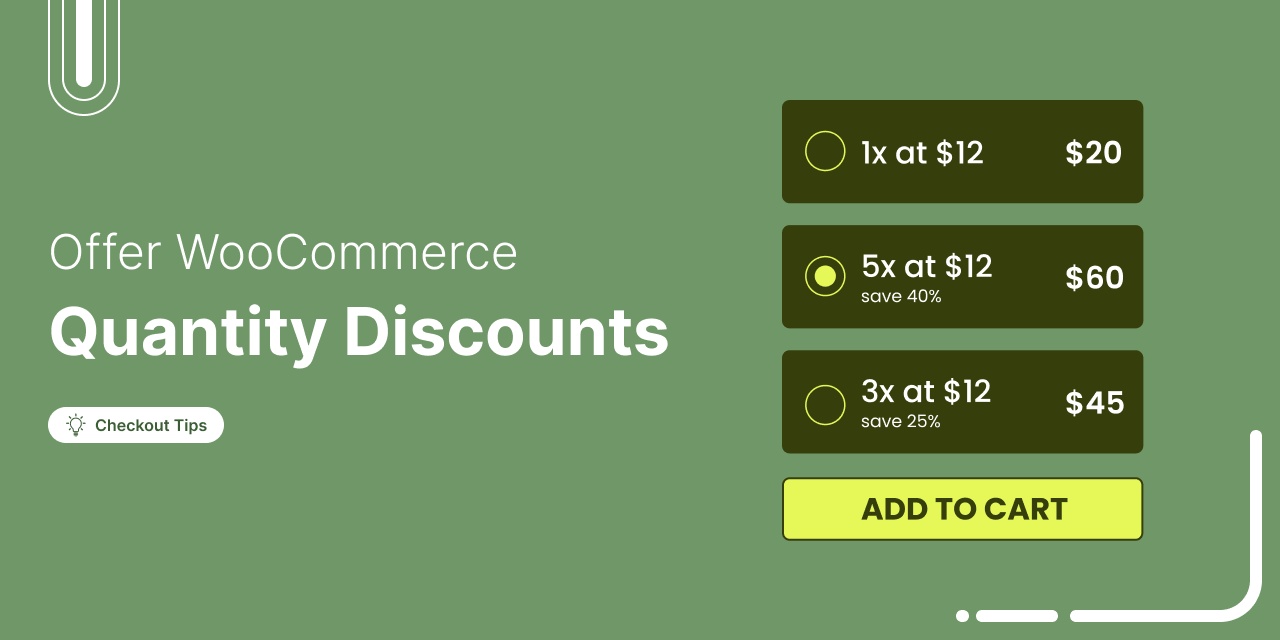
Are you taking advantage of WooCommerce quantity discounts in your store?
WooCommerce quantity discount is the concept of setting innovative pricing strategies by offering discounts on bulk items.
Offering quantity discounts can help you sell more items and quickly deplete excess stock if you have any.
By providing reduced prices for purchasing larger quantities of a product, you can encourage customers to place bulk orders and boost your average order value.
In this blog, we’ll share some of the best WooCommerce quantity discount plugins and show how you can create WooCommerce quantity discounts that drive more sales in your store.
Here’s a quick list of features that we're offering:

Table of Contents
- 1 What are WooCommerce Quantity Discounts?
- 2 Why Offer WooCommerce Quantity-Based Discounts?
- 3 Top 3 Best WooCommerce Quantity Discount Plugins
- 4 How to Offer WooCommerce Quantity Discounts?
- 4.1 Step 1: Create a sales funnel and import a pre-built template
- 4.2 Step 2: Set up the quantity discount
- 4.3 Step 3: Add the quantity discount offers to the checkout page
- 4.4 Step 4: Connect the quantity discount offers to a landing/sales page
- 4.5 Step 5: Add an order bump offer to the checkout page
- 4.6 Step 6: Add one-click upsell to boost AOV
- 5 Bonus Use Case: Use Separate Checkout for Different Quantities Discount Offer
- 6 Frequently Asked Questions (FAQs) Related to WooCommerce Quantity Discounts
- 7 Ready to Offer WooCommerce Quantity Discounts?
What are WooCommerce Quantity Discounts?
Quantity discounts are discounts you offer based on the quantity of items a customer purchases from your online store.
The discount amount varies based on the number of items or products customers buy.
For example, a store owner might set up a quantity discount rule that offers a:
- 10% discount if a customer purchases two or more units of a particular product
- 30% discount if a user purchases four or more units of items
- Buy one, get one free (BOGO), and so on.
You can offer a discount in percentage or fixed amount based on your strategy.
Offering quantity discounts can be a useful strategy to incentivize customers to buy in larger quantities and can be applied to various types of products.
To learn more about the perks of offering quantity discounts in WooCommerce, move to the next section.
Why Offer WooCommerce Quantity-Based Discounts?
WooCommerce quantity discounts are important for a few reasons. They can help increase sales and improve customer loyalty by encouraging customers to buy more.
Also, they can help you clear out inventory by offering discounts on overstocked products.
- Boost sales: Quantity-based discounts encourage customers to purchase larger quantities of products, leading to increased sales and revenue.
- Increase average order value: By offering discounts for larger quantities, businesses can motivate customers to buy more items, increasing the average order value in your store.
- Enhance customer loyalty: WooCommerce quantity discounts can enhance customer loyalty by granting significant price reductions, leading to a more gratifying and rewarding shopping experience.
- Inventory management: Businesses can use quantity-based discounts to manage inventory effectively. For instance, promoting larger purchases can help clear out excess stock.
Now that you know about the importance of offering quantity discounts on WooCommerce. Let’s learn about some of the best WooCommerce quantity discount plugins.
Top 3 Best WooCommerce Quantity Discount Plugins
As per our expert research, we have compiled a list of the best WooCommerce quantity discount plugins.
We’ve also shared some of their key features and prices that will help you set up quantity discounts in your WooCommerce store.
1. FunnelKit Funnel Builder
FunnelKit Funnel Builder is the best sales funnel builder for WordPress and WooCommerce. With this plugin, you can offer WooCommerce quantity discounts without any coding.
The good part about this plugin is it gives you full control over how the quantity discount offers will look on the checkout page.
Moreover, it also comes with AOV boosting features like order bumps and one-click upsell.
Key features:
- Create beautiful sales funnels, checkout funnels, and opt-in funnels without any coding.
- Offer bulk quantity discounts in the sales funnel
- Add a best deal label of quantity discount offer
- Display custom product descriptions for bulk discounts
- Control the placement of the quantity discount deals on the checkout page
- Offers merge tags to display discount percentage, the amount saved, quantity, etc., dynamically
- Comes with multiple prebuilt sales funnel templates
- Compatible with popular page builders such as Elementor, Divi, Oxygen, etc.
- Includes order bump and one-click upsell features that effectively boost AOV
- In-depth analytics where you can easily track sales and conversions of each page in the funnel.
Price: A free version with limited features is available. The pro version starts at $99.5/year.
2. Tiered Pricing Table for WooCommerce
Tiered Pricing Table for WooCommerce is a WordPress plugin that allows you to create pricing rules based on product quantity.
You can set rules for specific products, product categories, or a customized selection of products.
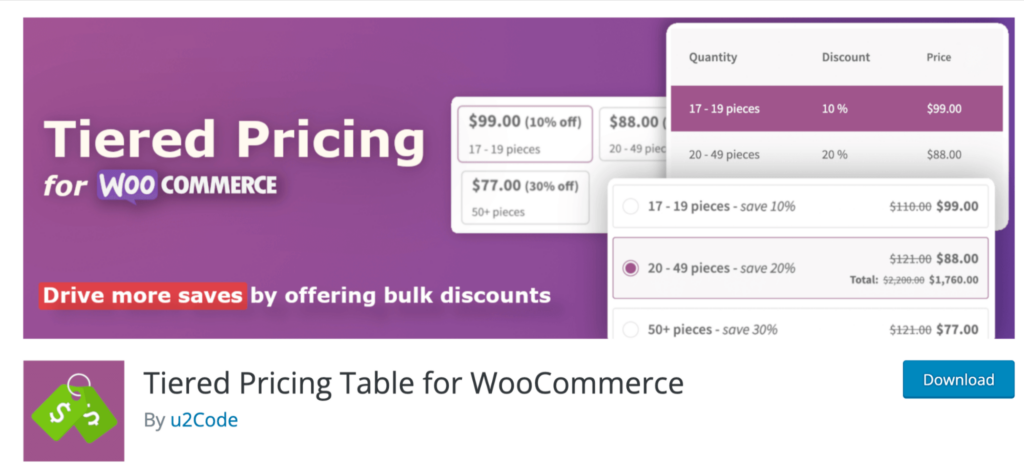
Key features:
- Set different prices for different quantities of products
- Control the minimum and maximum quantity users can purchase per product
- Set different pricing based on different user roles
- Display the bulk discount price on different places on the product page
- Show the amounts users will save
Price: You can use the basic version for free. The pro version costs $79/yearly. Just a discount quantity features; the plugins seem a little expensive.
3. Discount Rules and Dynamic Pricing for WooCommerce
Discount Rules and Dynamic Pricing for WooCommerce help you boost sales of your WooCommerce store with quantity discounts.
It comes with an easy-to-use interface that helps you create bulk discounts.
Key features:
- Add a quantity discount table on the WooCommerce product page
- Offer discounts on specific category products
- Set expiry date on discount offers
- Exclude specific products from the discount offers
Price: The free version is available on WordPress.org. The premium version costs $39 for a single site.
Among the three plugins listed, we have found FunnelKit Funnel Builder the best option.
It not only allows you to provide WooCommerce quantity discounts but also assists in boosting the average order value by offering discounts within a beautiful custom checkout page, along with order bumps and one-click upsells.
How to Offer WooCommerce Quantity Discounts?
In this section, we will share how you can offer quantity discounts in WooCommerce using FunnelKit Funnel Builder.
We will show you that you can offer a percentage discount based on different quantities of a product.
Before moving to the next section, ensure you have installed and activated FunnelKit Funnel Builder, both free and pro versions.
After activating the plugin, follow the steps below:
Step 1: Create a sales funnel and import a pre-built template
The first step is to create a sales funnel that we will use to promote the WooCommerce quantity discount offers.
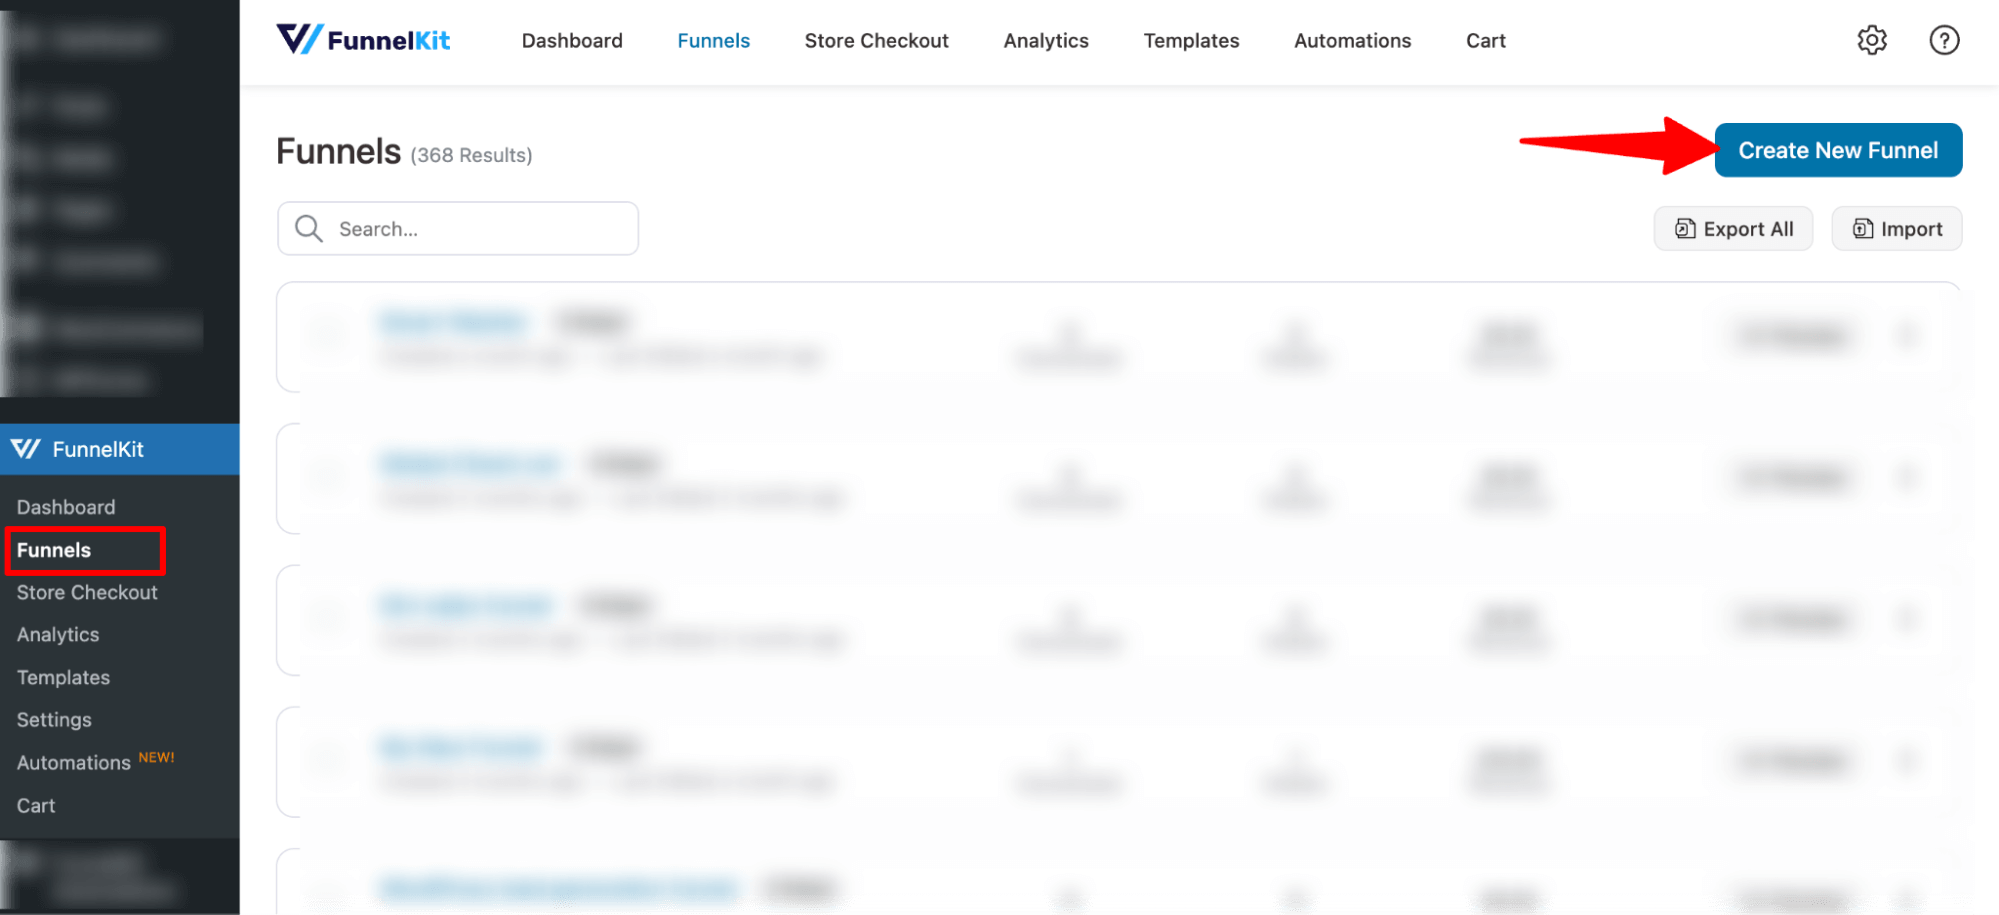
Navigate to Funnelkit ⇒ Funnels and click on “Add New Funnel.”
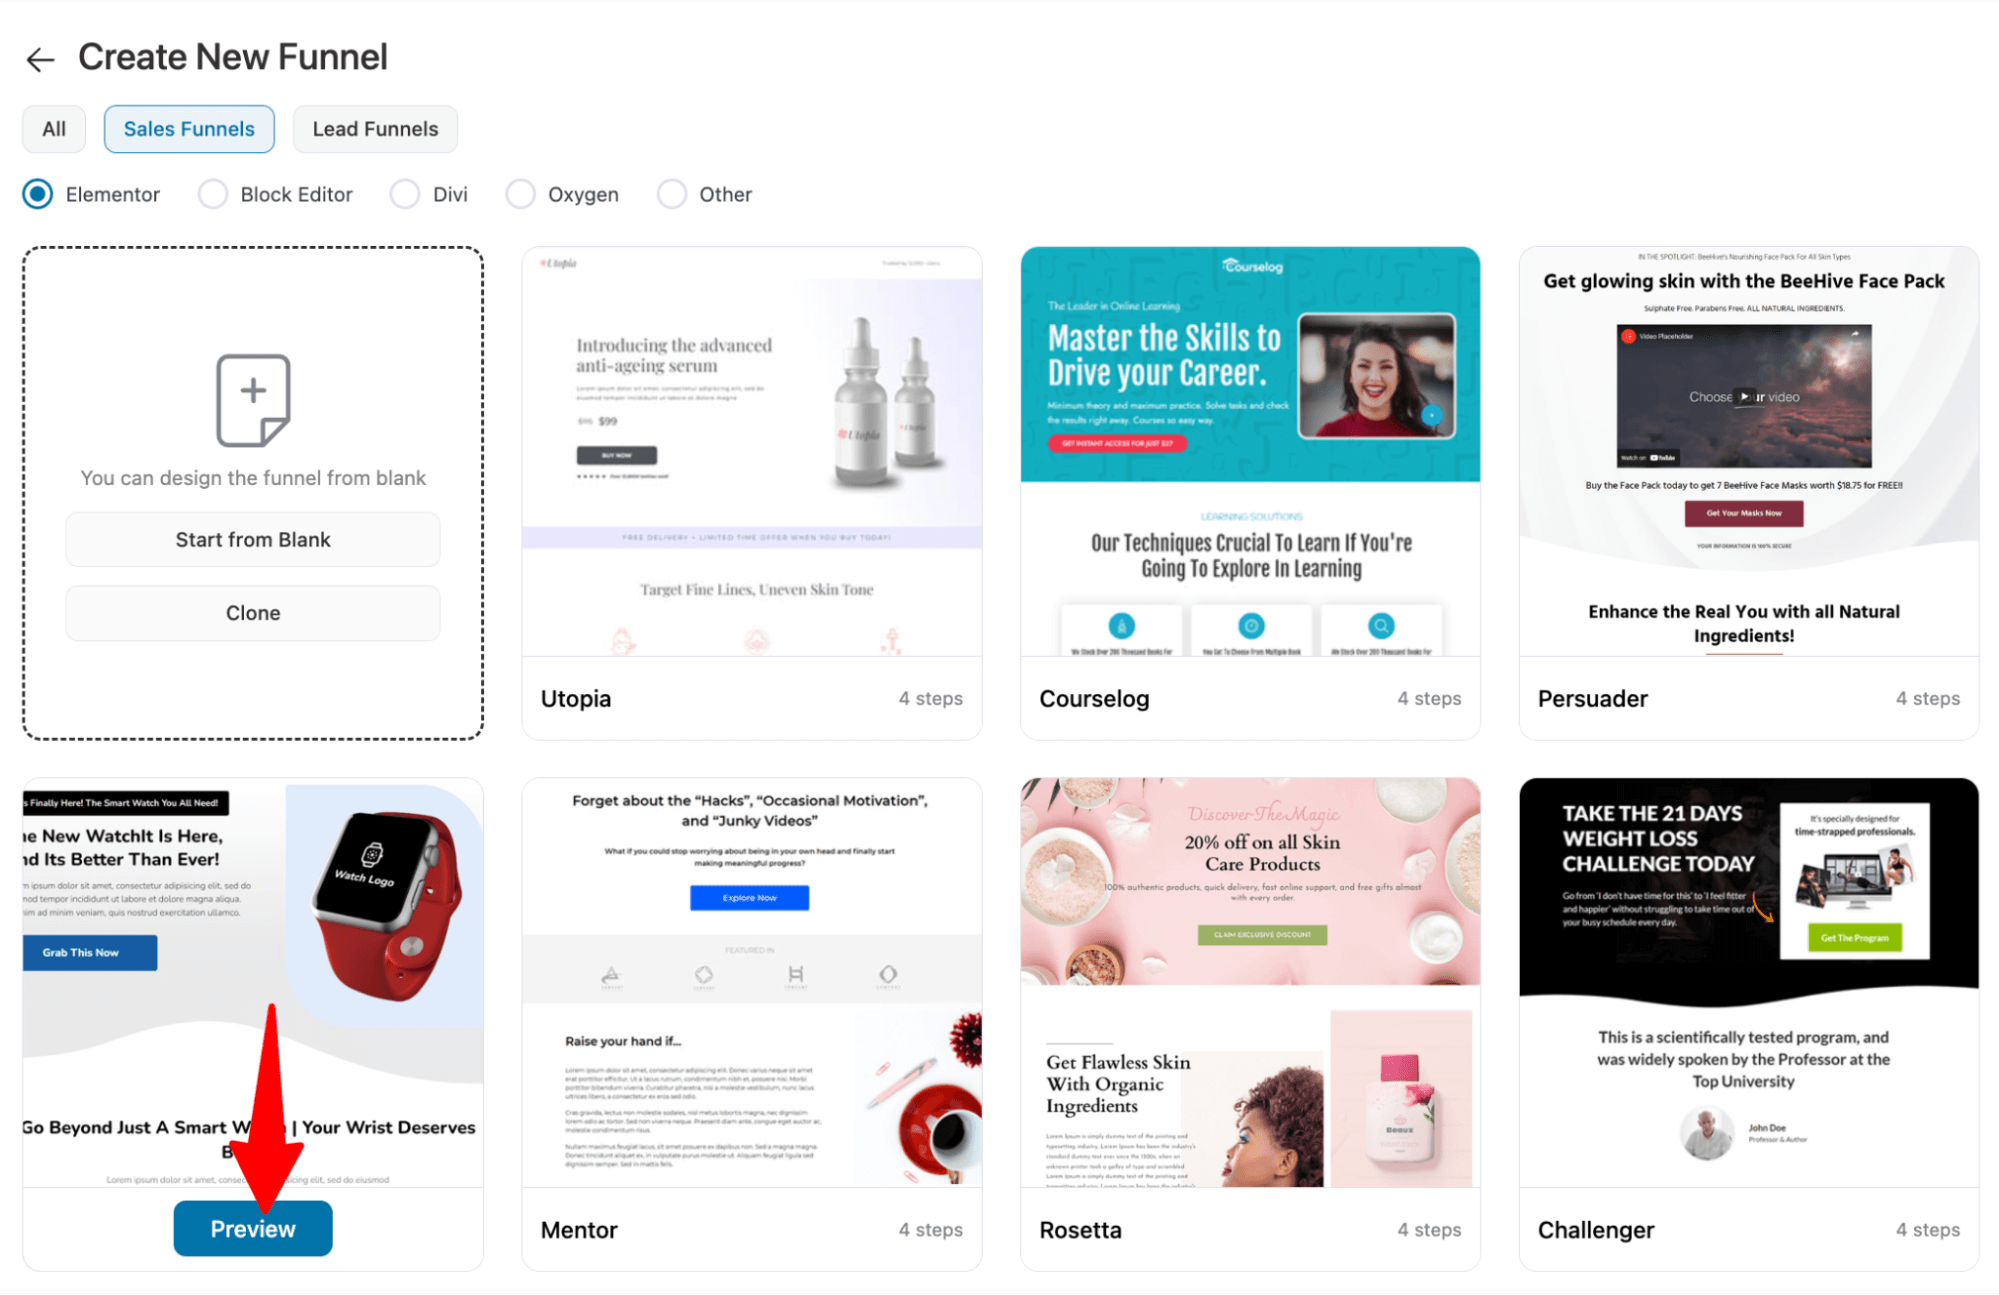
After that, you will find many pre-built templates. Choose your preferred page builder and look for the template you like.
Once you hover over any of the templates, you should see a preview button; click on the "Preview" button to check out the template.
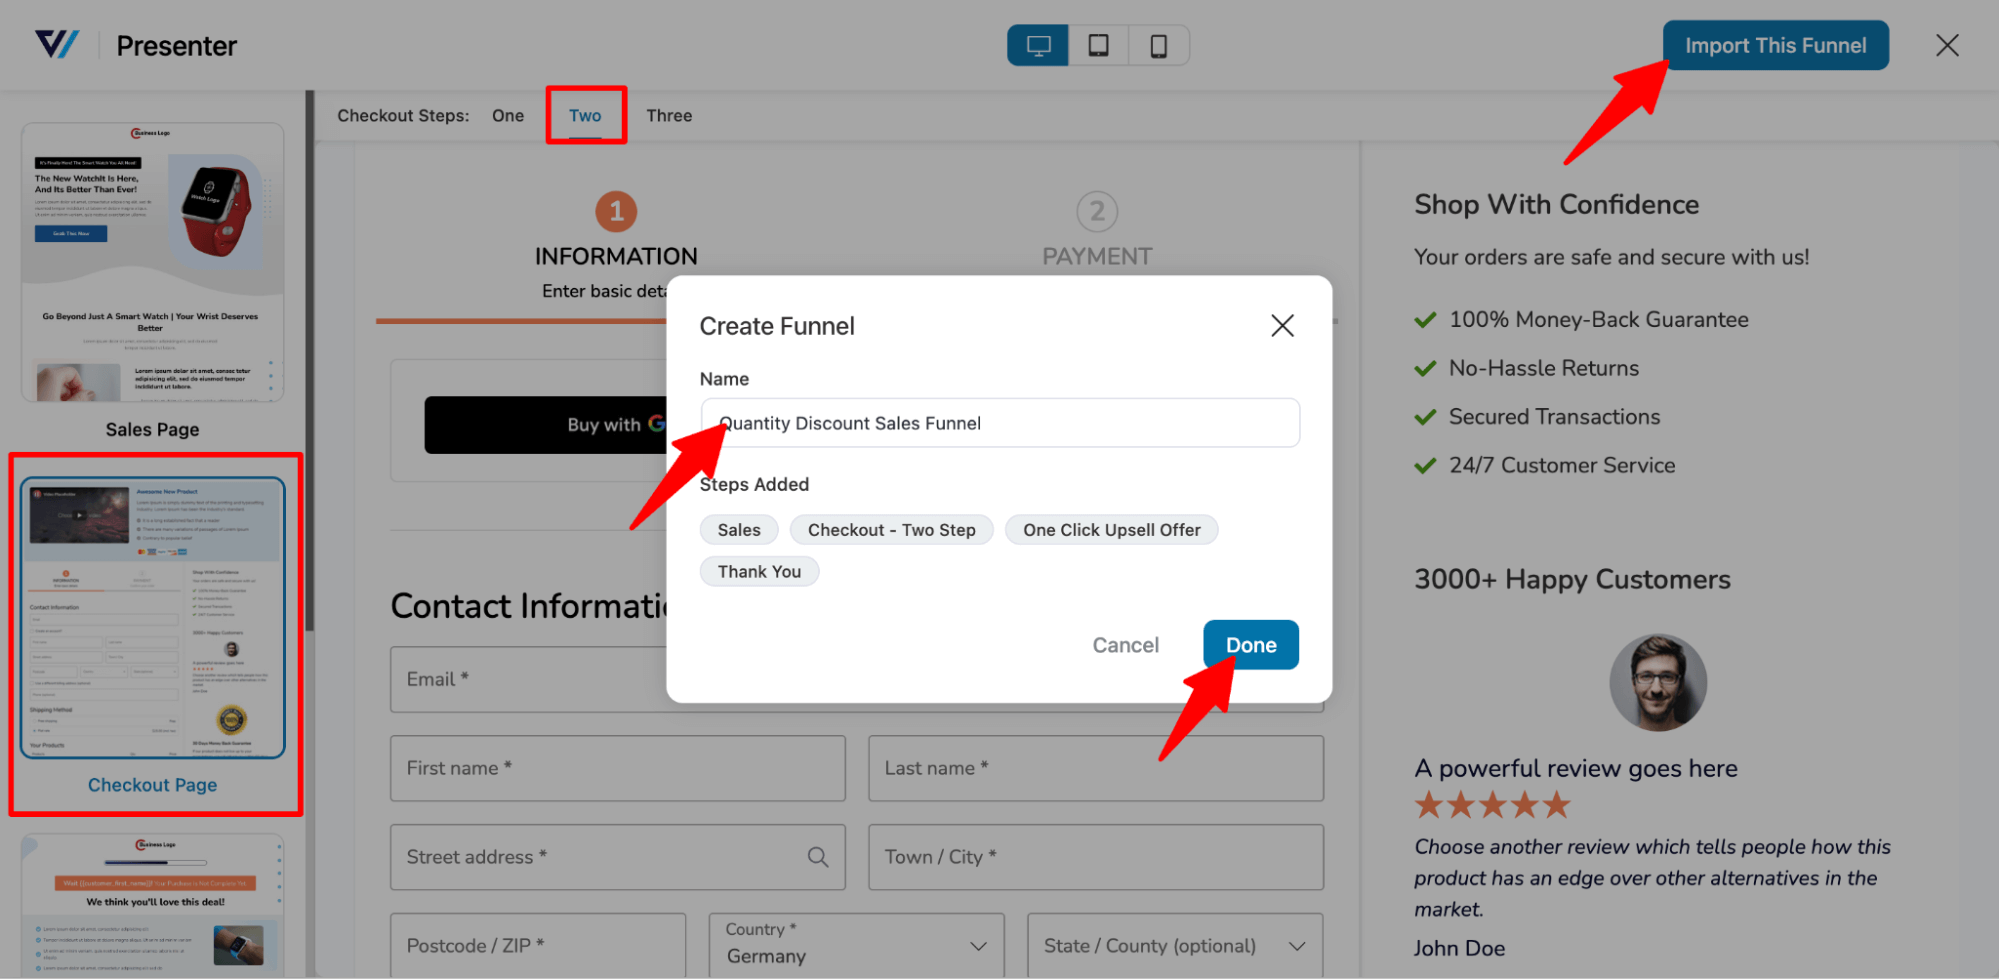
🔔 Note: We are choosing the Presenter template.
First, choose whether you want a single-page checkout or a multi-step checkout.
To import the template, click on the “Import This Funnel” button, then provide a title and click on ‘Add’ to import the checkout funnel.
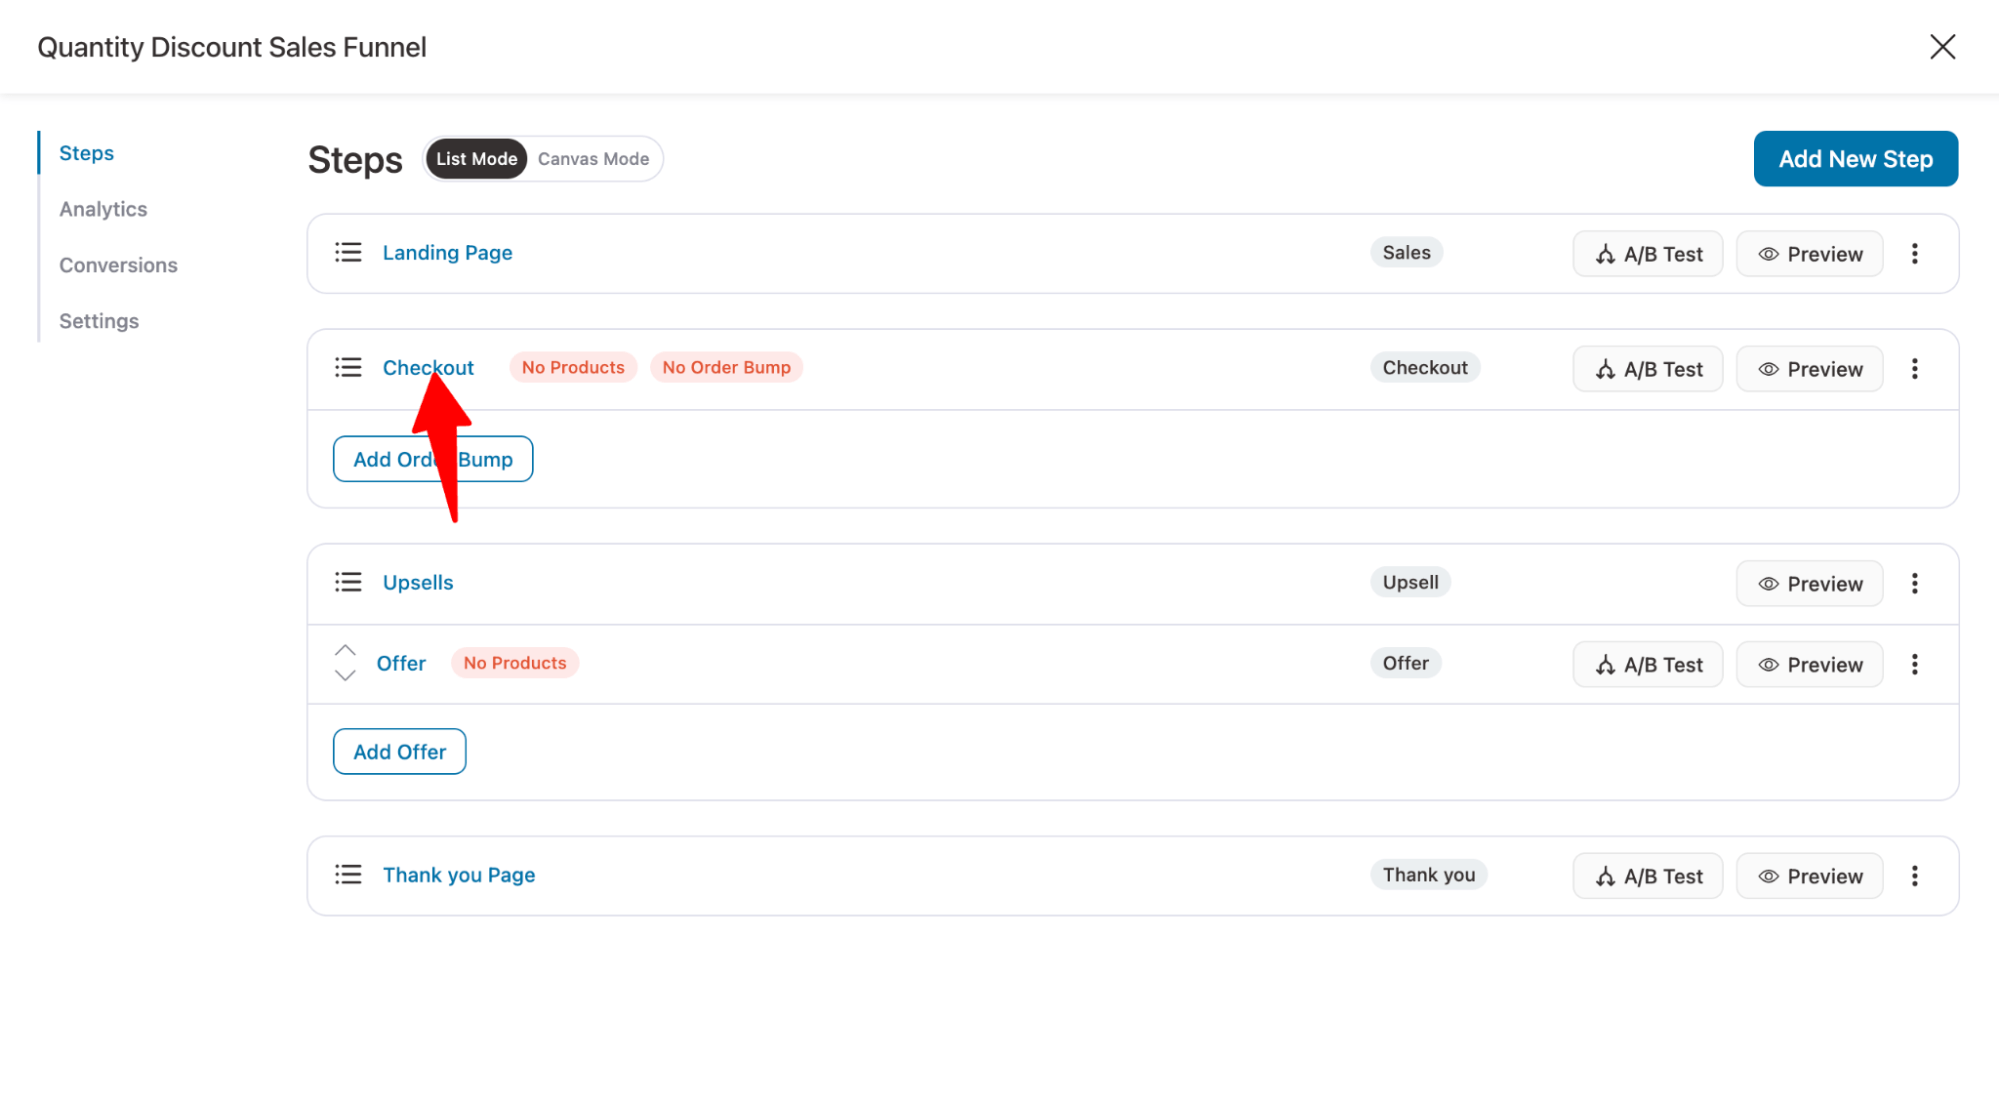
This will import a sales funnel with four steps: sales page, checkout, upsell, and thank you page.
Step 2: Set up the quantity discount
First, we will set up the WooCommerce quantity discounts and then link the discount offers to the sales/landing page.
First, you need to edit the checkout page. To edit the checkout page, click on the Checkout step.
On the design tab, you can customize the checkout page template.
To add products you want to offer discounts on, navigate to the Product tab and click Add Product. After that, search for the product you want to add and click on the Add Product button to add the product to this sales funnel.
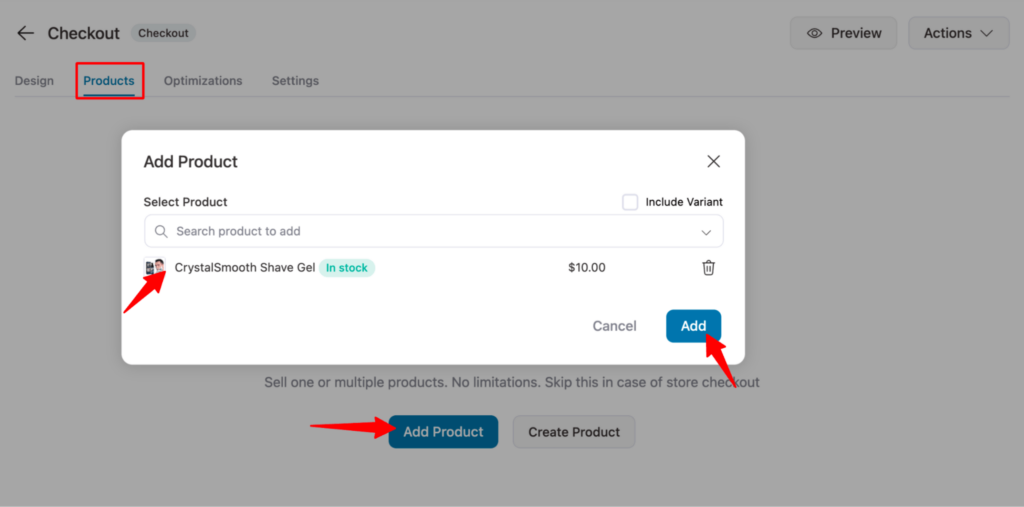
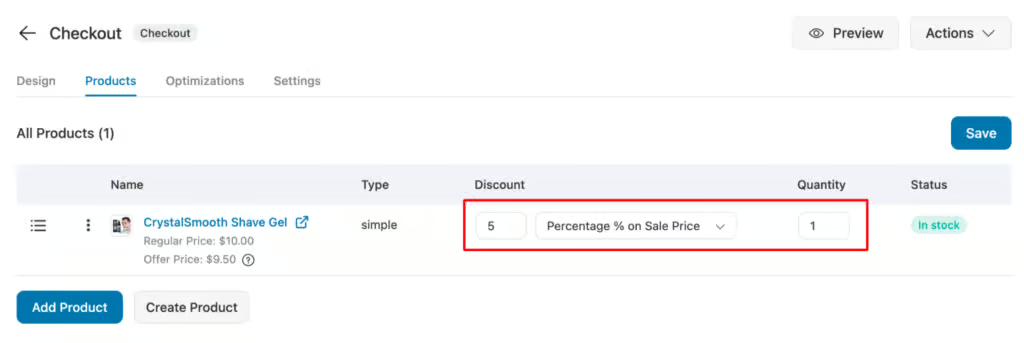
After adding the product, set the quantity discount.
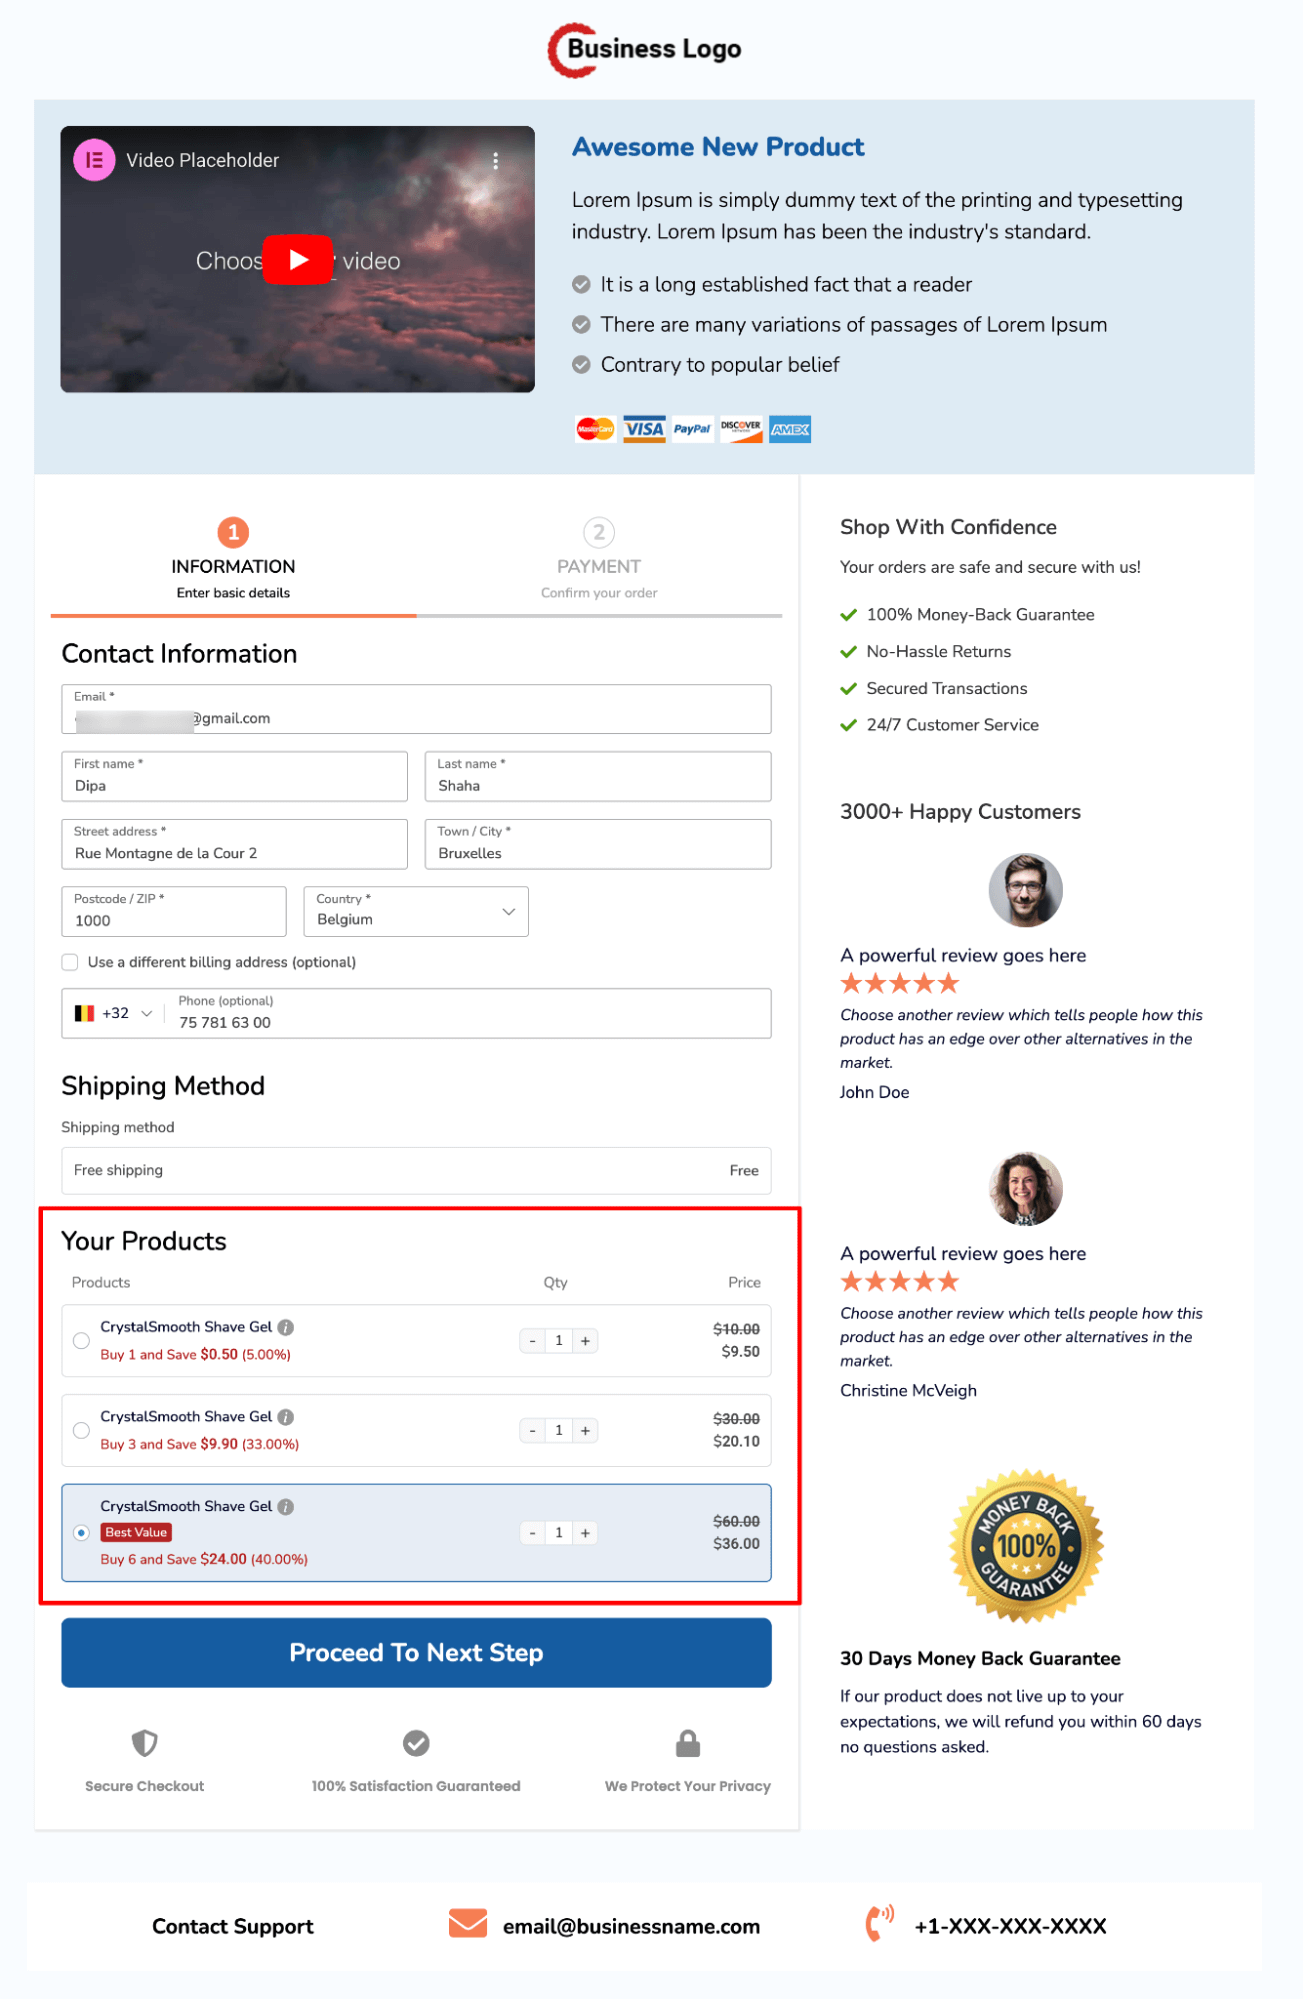
For the first product, we will offer a 5% discount for a single unit of product.
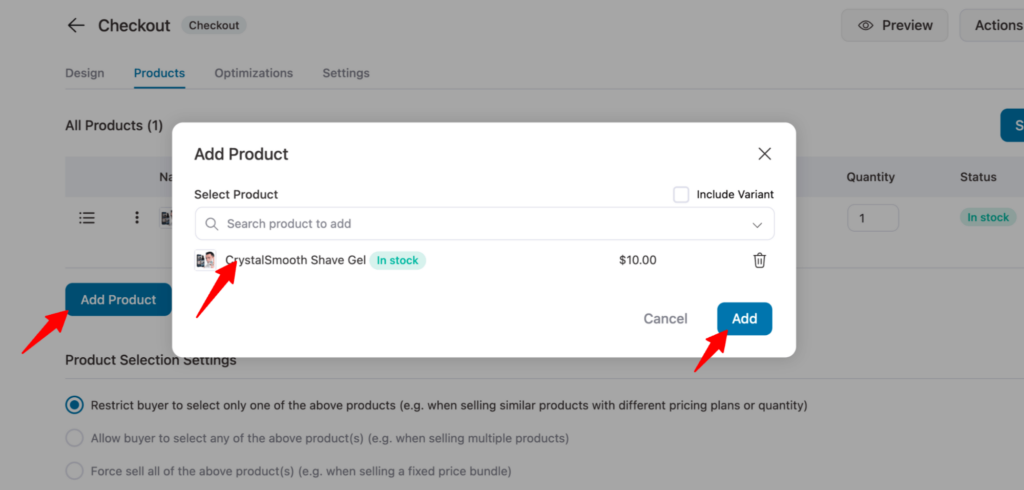
To add another offer, click on the ‘Add Product’ button. Then, search for the product and click on Add.
For the second variation, we will offer 33% on three quantities of the product.
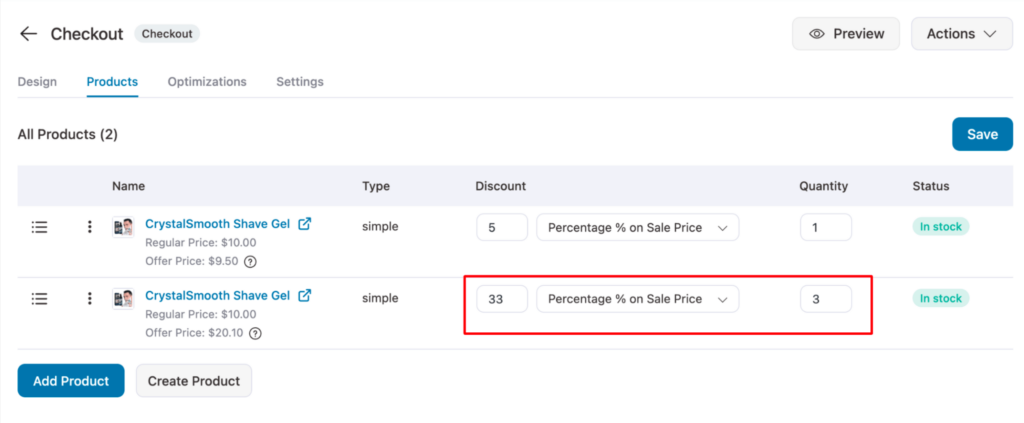
Repeat the same process to add another quantity discount. We are going to add another one. This time, we will offer a 40% discount on six units of products.
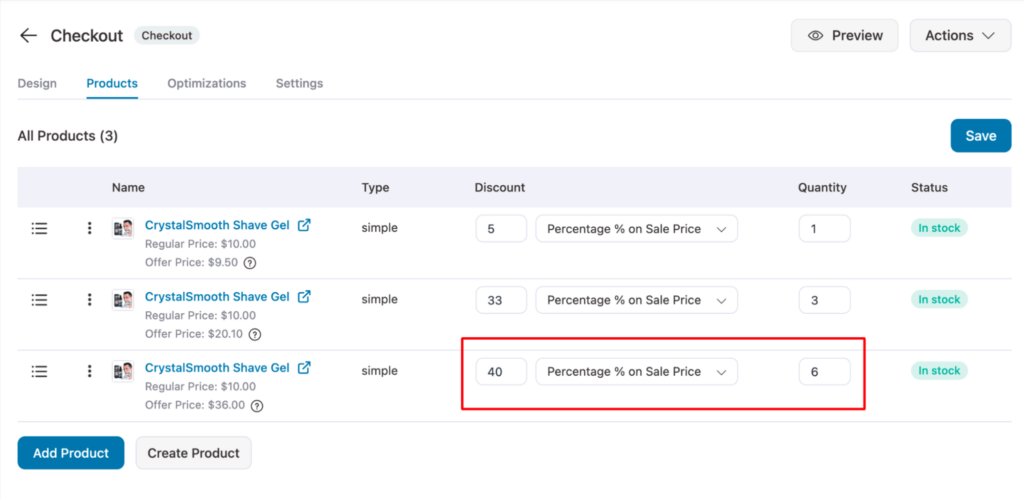
Make sure to click on Save Changes.
Step 3: Add the quantity discount offers to the checkout page
Now, we will set up how the quantity discount offers will look on the WooCommerce checkout page.
🔔 Note: If you check that the template you imported already has the Product field, then you can skip the adding section and product field step and move directly to the setups.
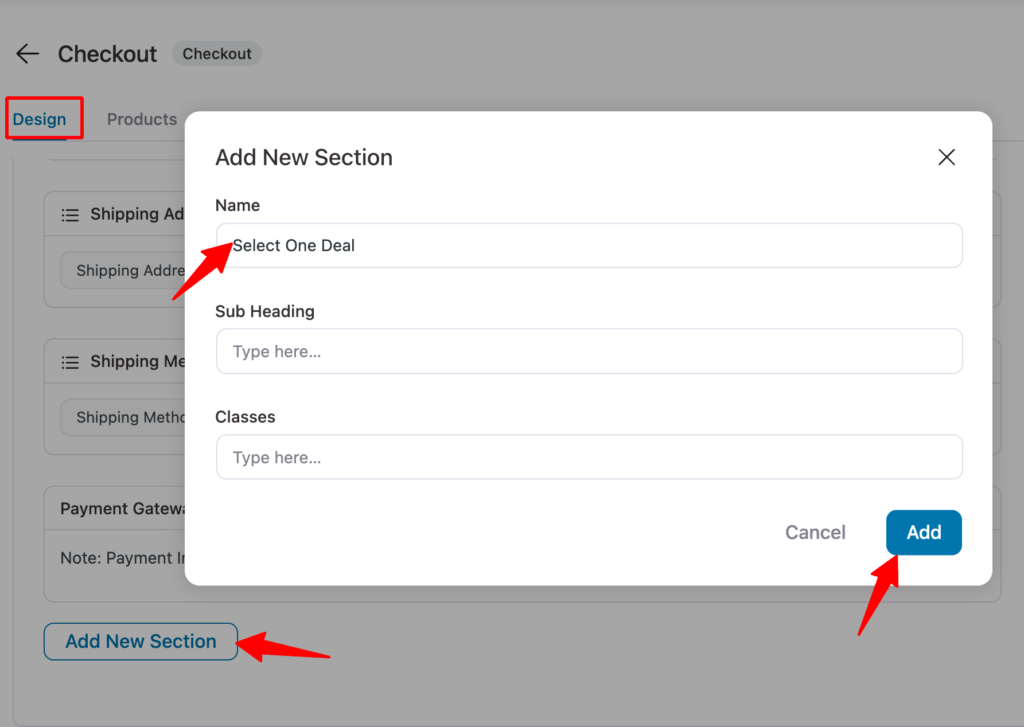
To do so, move to the Fields tab and click the "Add New Section" button. Provide a name for the section heading. You can also add subheadings and classes; however, these are optional. Click on ‘Add Section’ to add a new section to your checkout template.
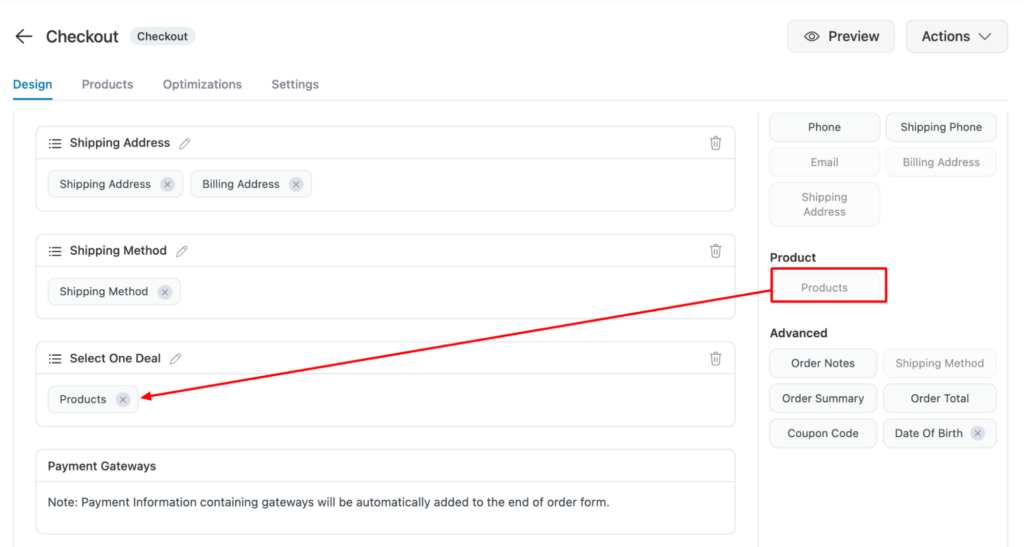
Now drag and drop the Products field to the new section.
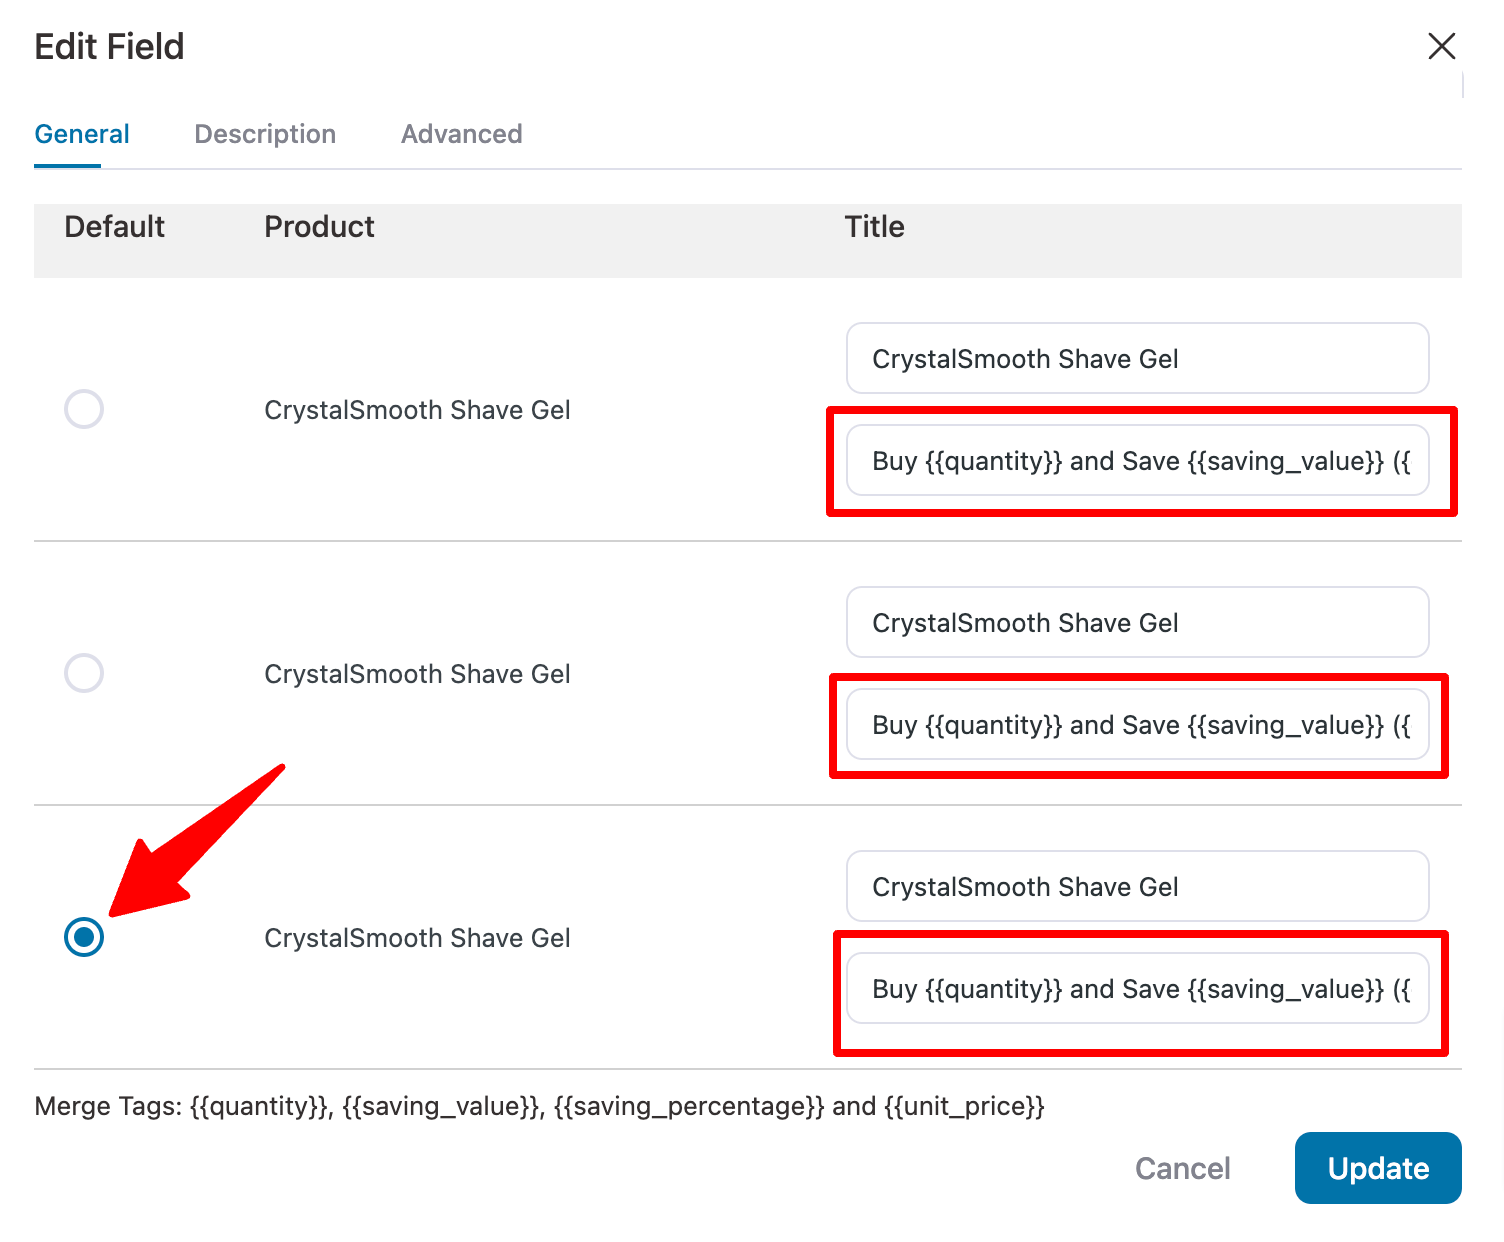
Click on the Products field. Here, you can set the default offer and customize the text that will describe each offer.
You can use merge tags to display the discounts dynamically. You can use the merge tags:
- {{quantity}}: It will display the product quantity.
- {{saving_value}}: It will show the amount users will save if they choose the deal.
- {{saving_percentage}}: Display the percentage customers will save.
- {{unit_price}}: Show the price of a single product.
On the Description tab, you can add a custom product description.
We don’t want to add any product description, so we will hide it.
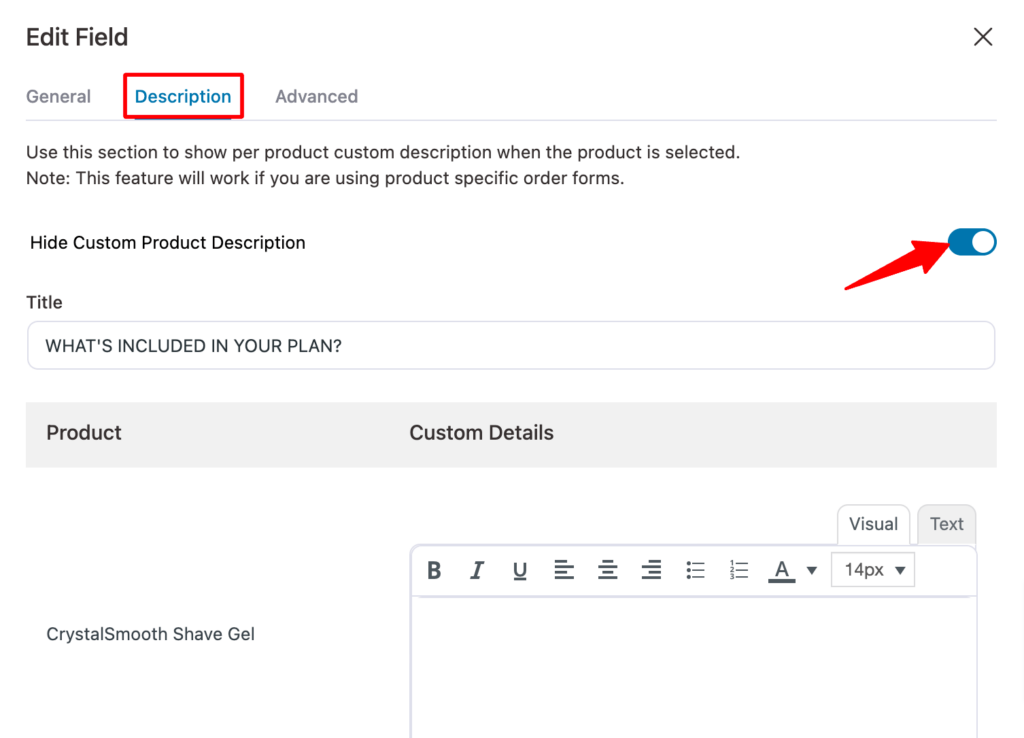
You can choose the product with the best value label on the Advanced tab.
You can choose the product, the label text, and the position where the label will appear.
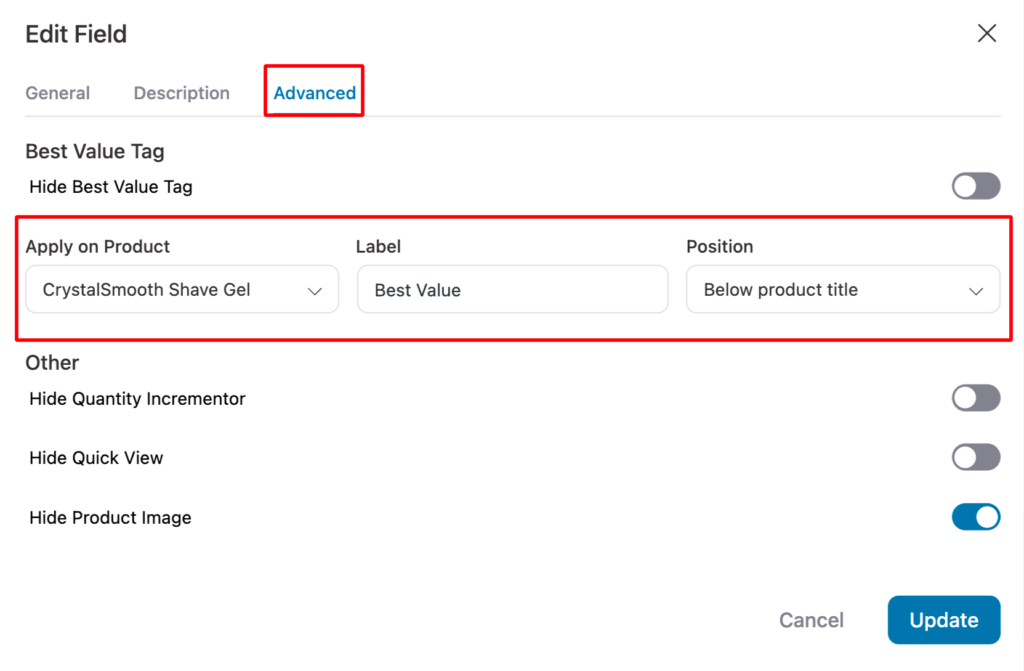
Click on “Update” to save the changes.
Here is a preview of how the WooCommerce quantity discounts will look on the checkout page.
Step 4: Connect the quantity discount offers to a landing/sales page
After you set up all the WooCommerce quantity discounts and how they will show up on the checkout page, it’s time to link these offers to your sales page.
This way, you can promote the product with all its benefits and features on the sales page and also promote the quantity discount.
🔔Note: You can get help from our blog on the WooCommerce product landing page.
While customizing the sales page, add a section highlighting all the quantity discounts you offer.
The Presenter sales page already has a product section; you can customize it to showcase your quantity discount offers as shown below:
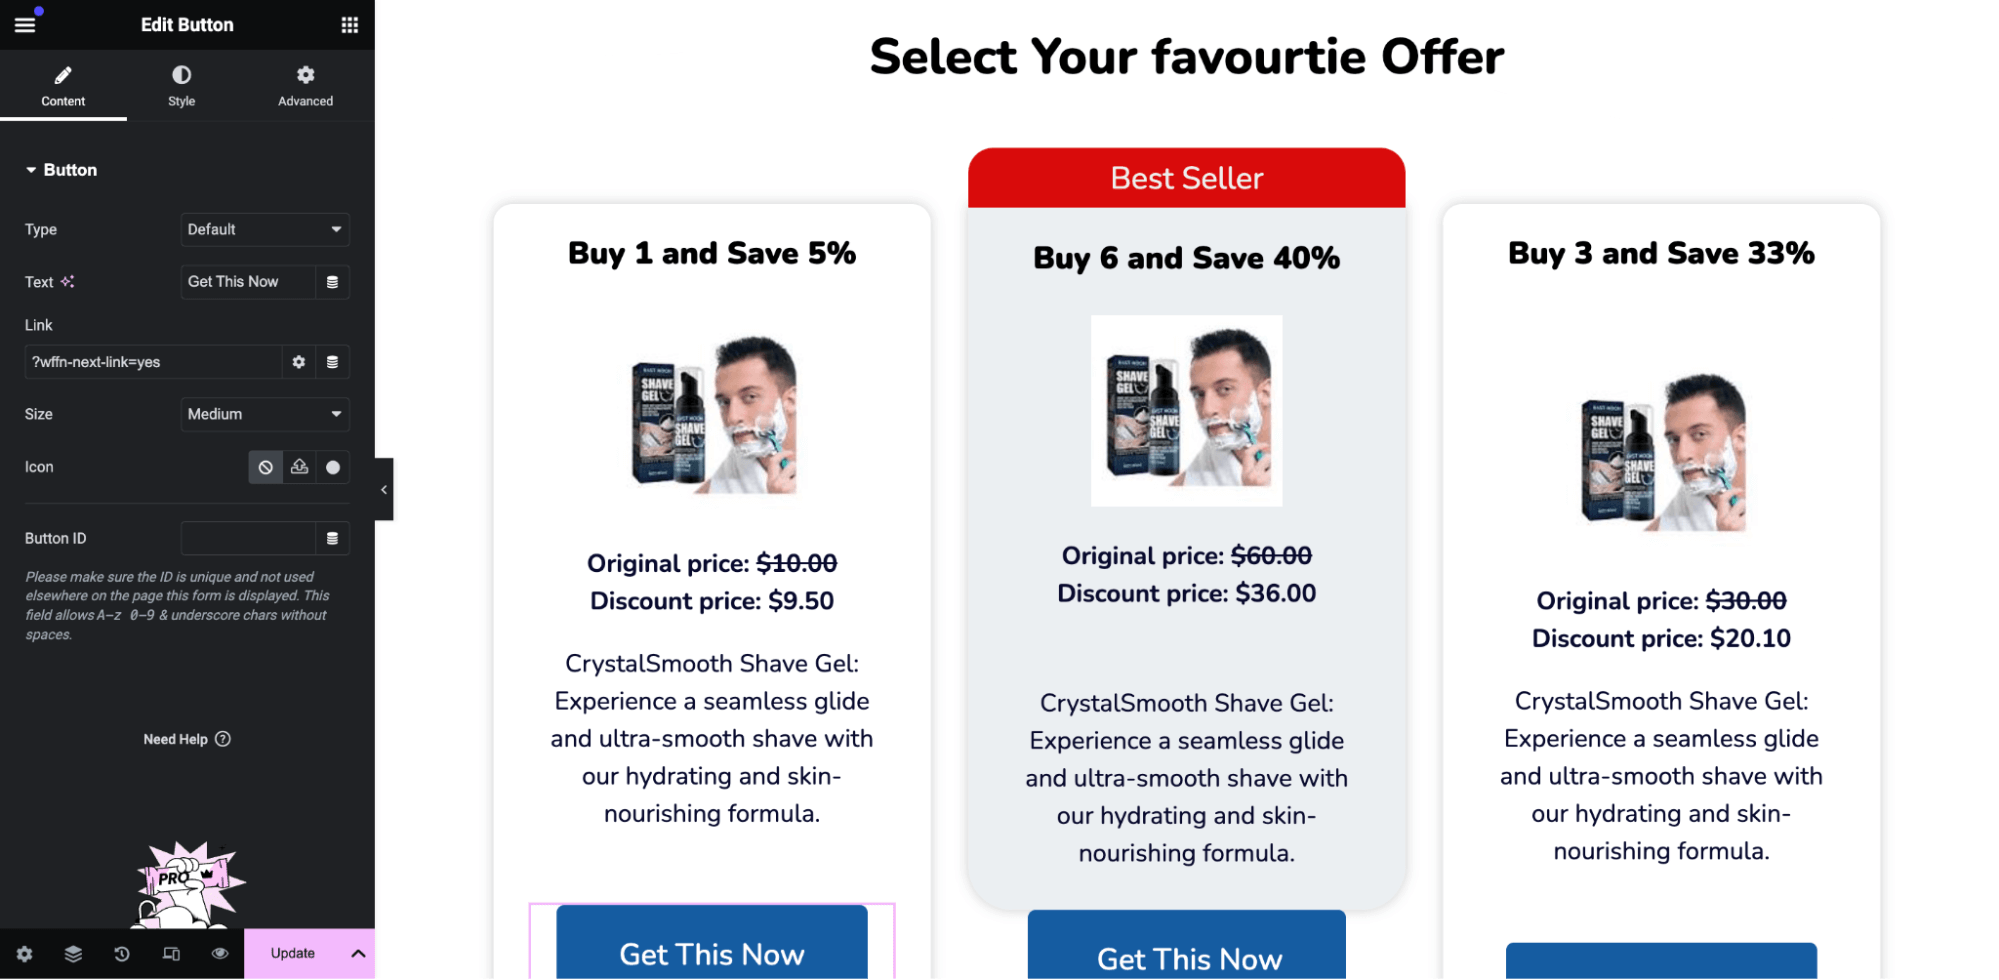
Then, connect each product to the relevant Call to Action (CTA). This way, when users click on a specific CTA to access any discount offer, the corresponding product is automatically added to their cart upon reaching the checkout page.
We will use the FunnelKit Checkout URL structure to create the CTA links. We will need the checkout URL and product sequence number for this.
To create a URL with the product parameter, append “/?aero-default=Product_Sequence_Number” to the Checkout page URL.
You can find the checkout URL on the checkout step design tab.
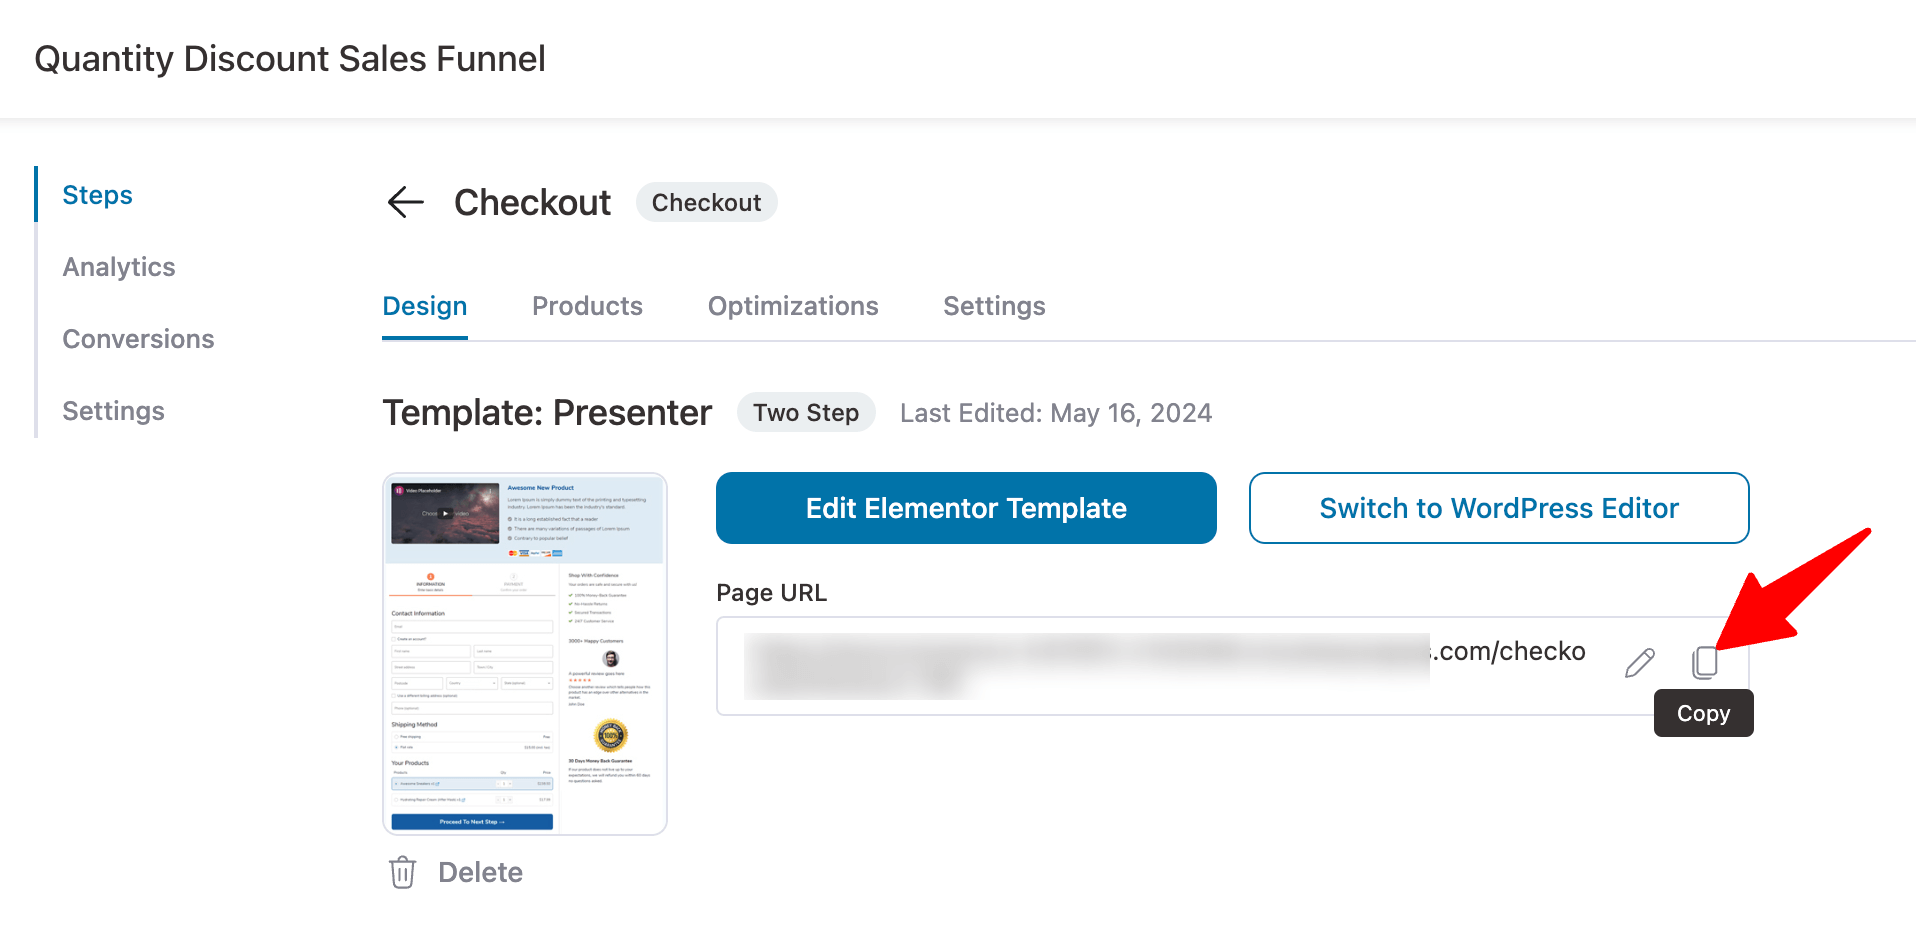
You can find the product sequence in the "Products" section of the checkout page. From the top, the sequence begins.
Therefore, the topmost product is 1, and the rest follow in sequential numerical order, like 2, 3, 4, etc.
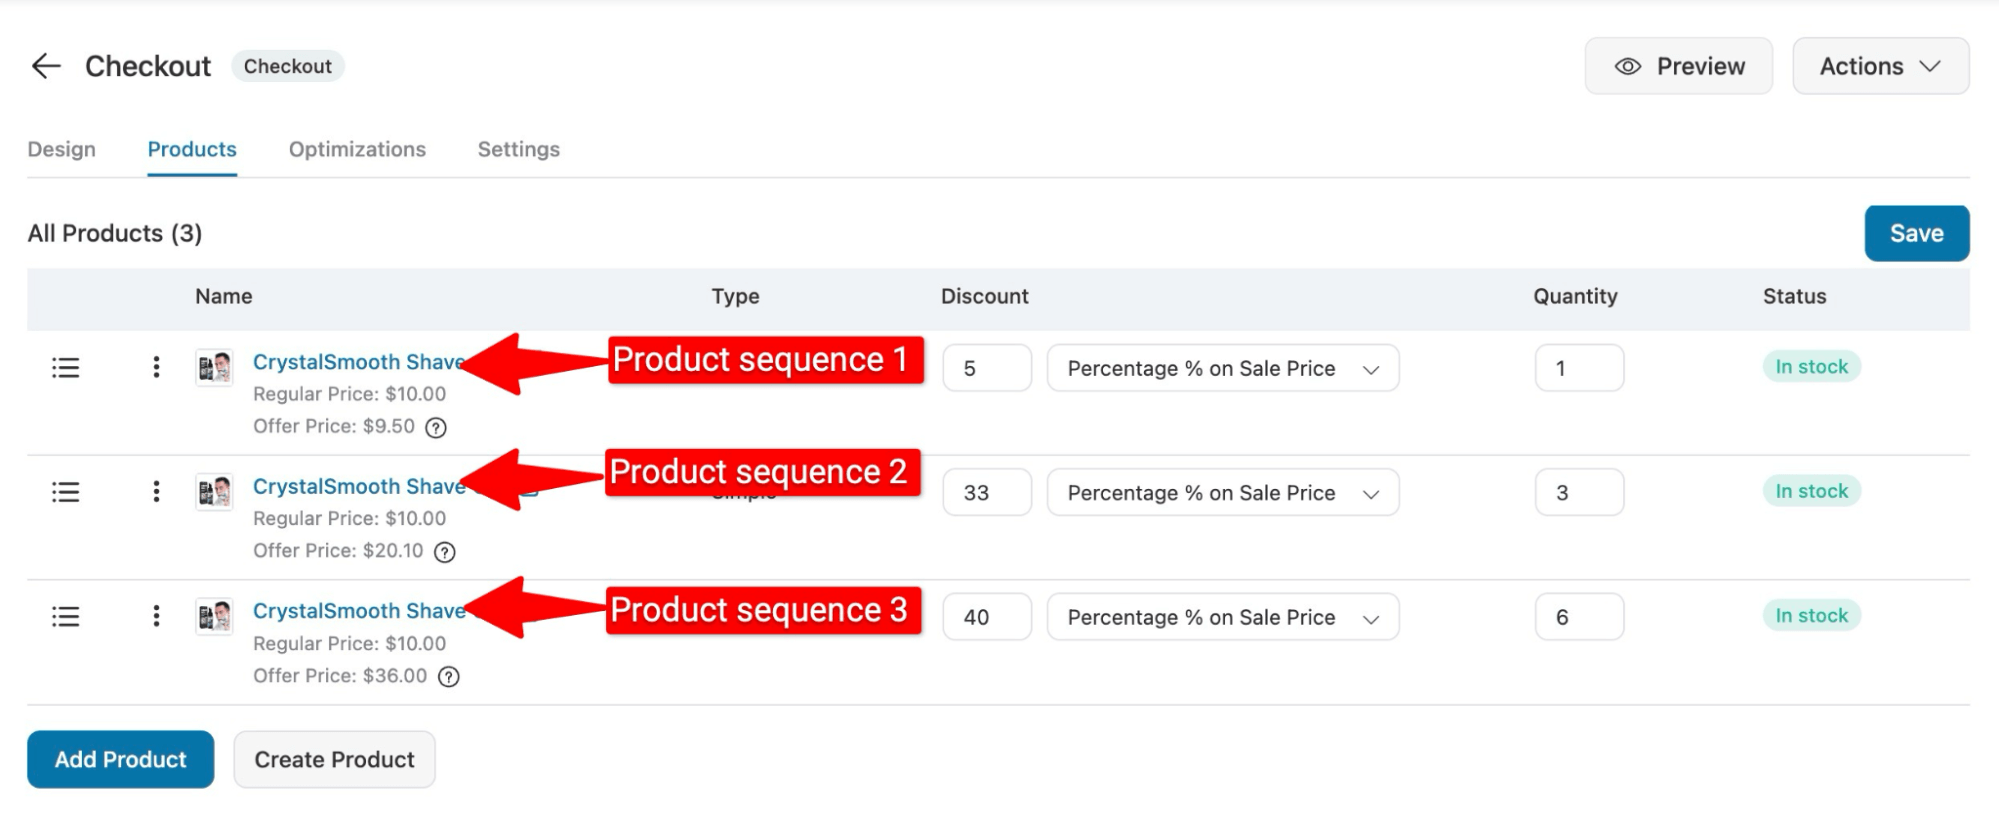
So, to connect to the first product with quaintly 1 (discount 5%), the custom URL will be👇
The second one with quantity 3 (discount 33%)👇
And the URL for the last or third one with quantity 6 (discount 40%) will be 👇
Now, all you have to do is edit the CTA of the pricing section we just added and add the URL in the Link option.
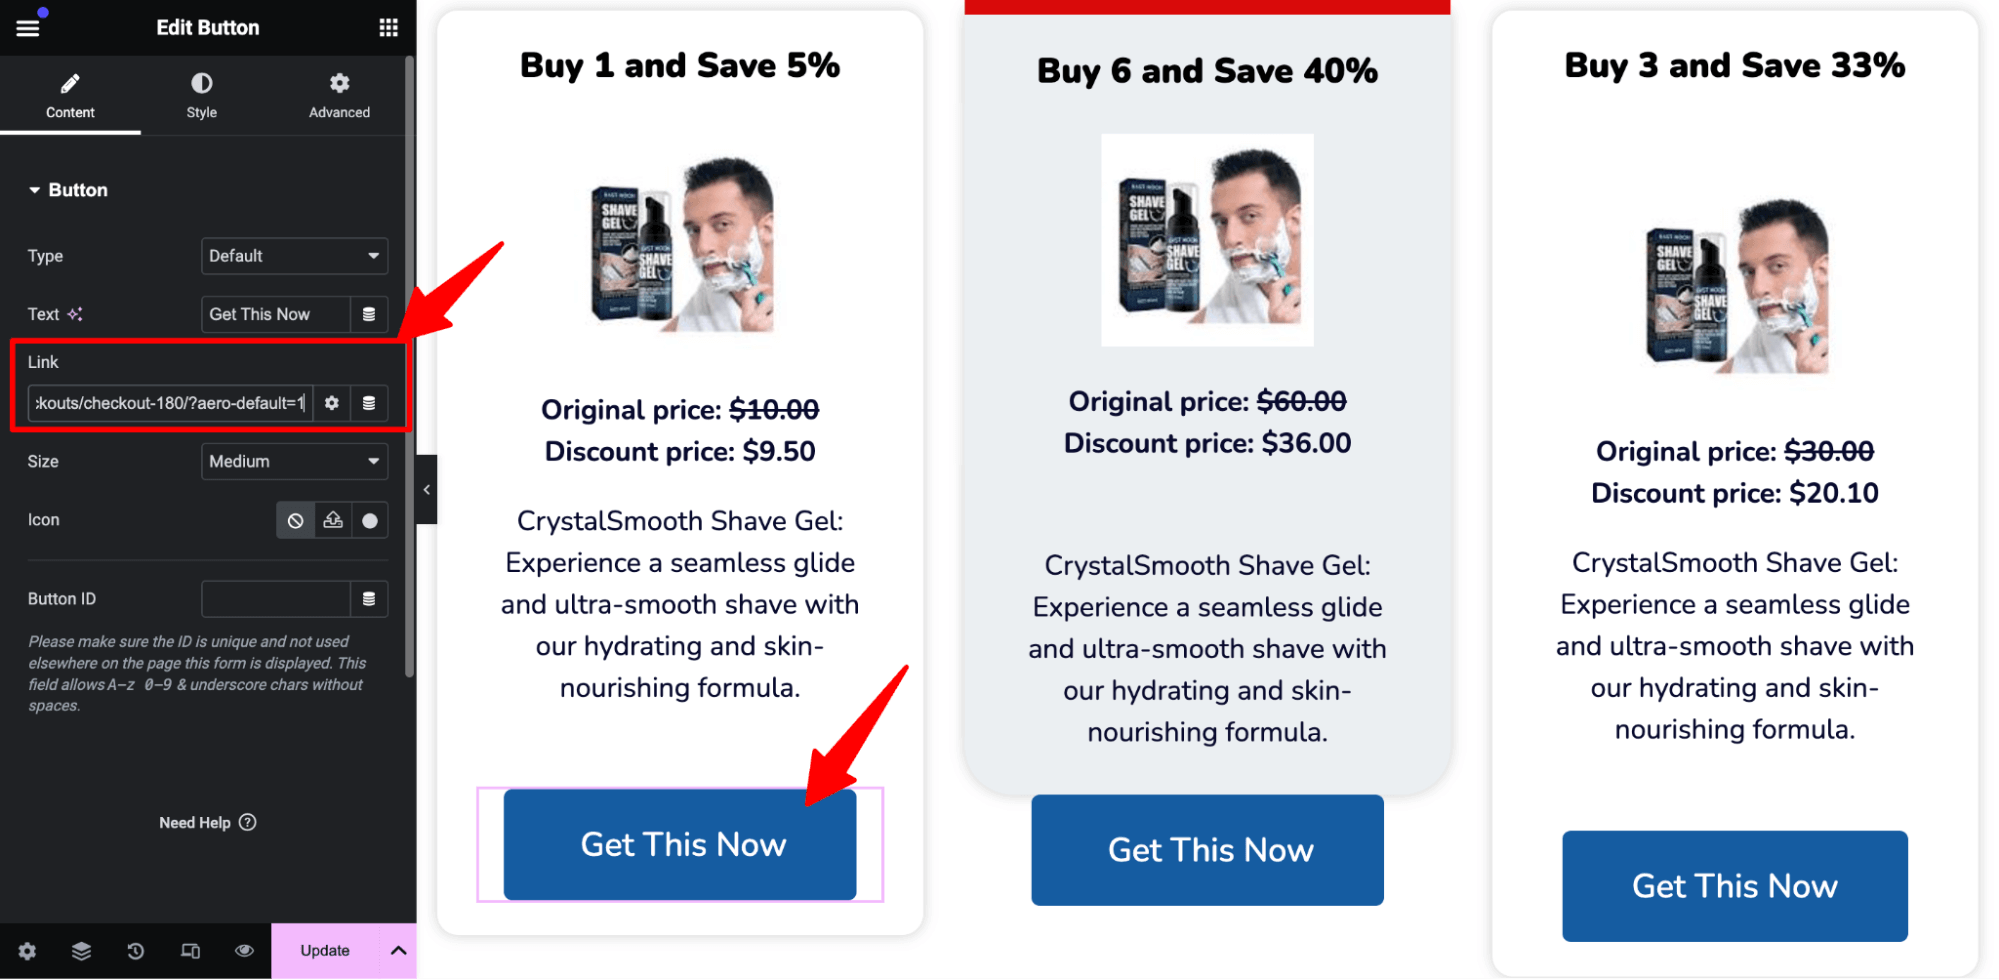
Repeat this for all the three CTAs.
And that’s it! Your sales page is now linked to the checkout page, and users can choose their favorite quantity discount on the landing page and checkout smoothly.
🔔Note: Customers can change the payment plan on the checkout page.
Step 5: Add an order bump offer to the checkout page
Now, you can offer order bumps and one-click upsell to your sales funnel to boost the average order value.
Order bump is a low-dollar deal you can offer on the checkout page that users can add to their cart with a single click.
To learn more, read our blog on how to offer an order bump using FunnelKit Funnel Builder.
Here, we are offering disposable Razors as an order bump with our bundle of shaving creams.
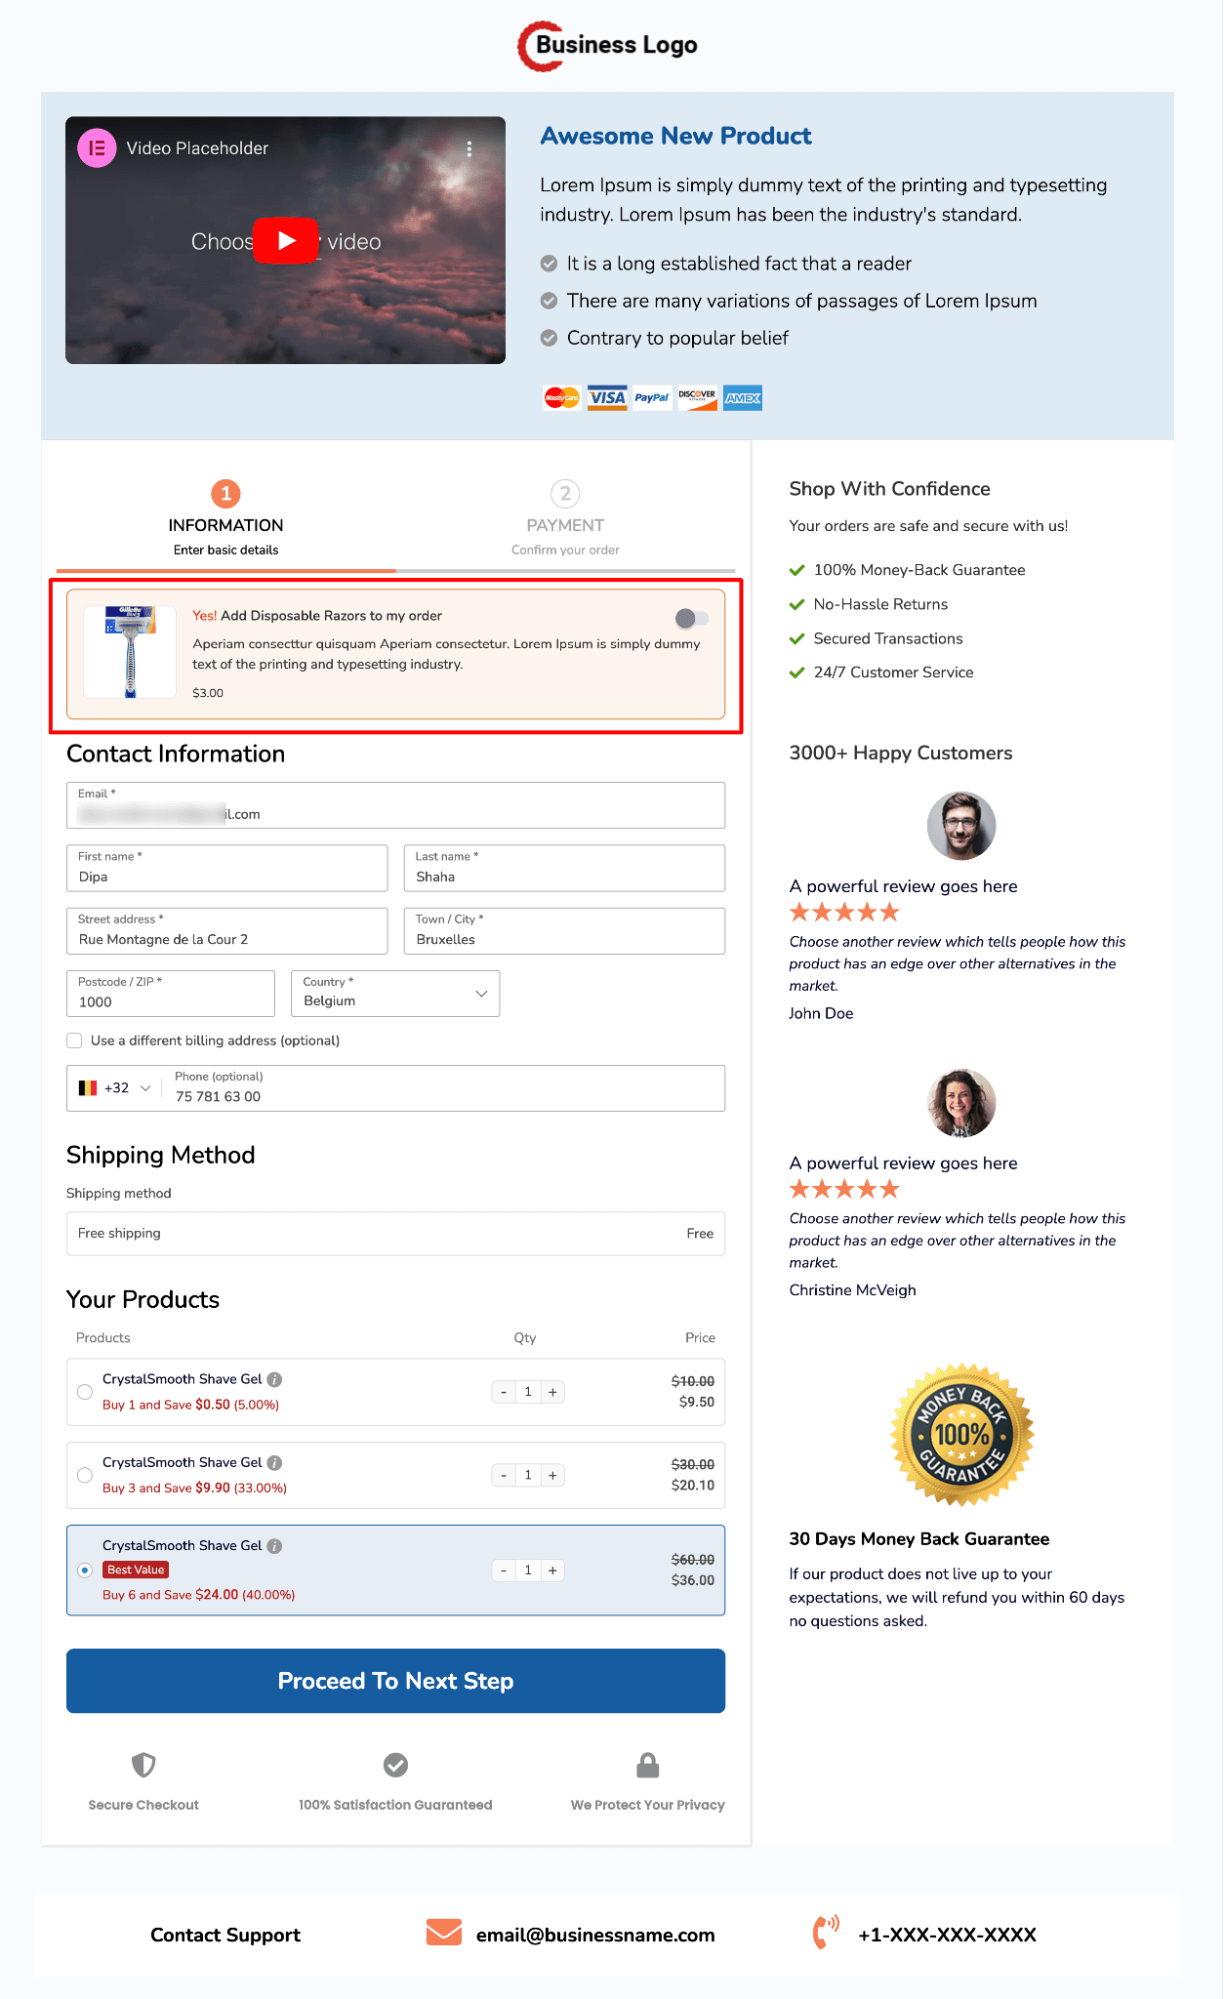
Step 6: Add one-click upsell to boost AOV
Like order bumps, you can offer one-click upsells to boost the average order value. One-click upsells are high-value deals you offer right after customers checkout.
Customers can buy these upsell offers with a single click without having to provide the customer's details again, as the system tokenizes the payment details the first time they enter them.
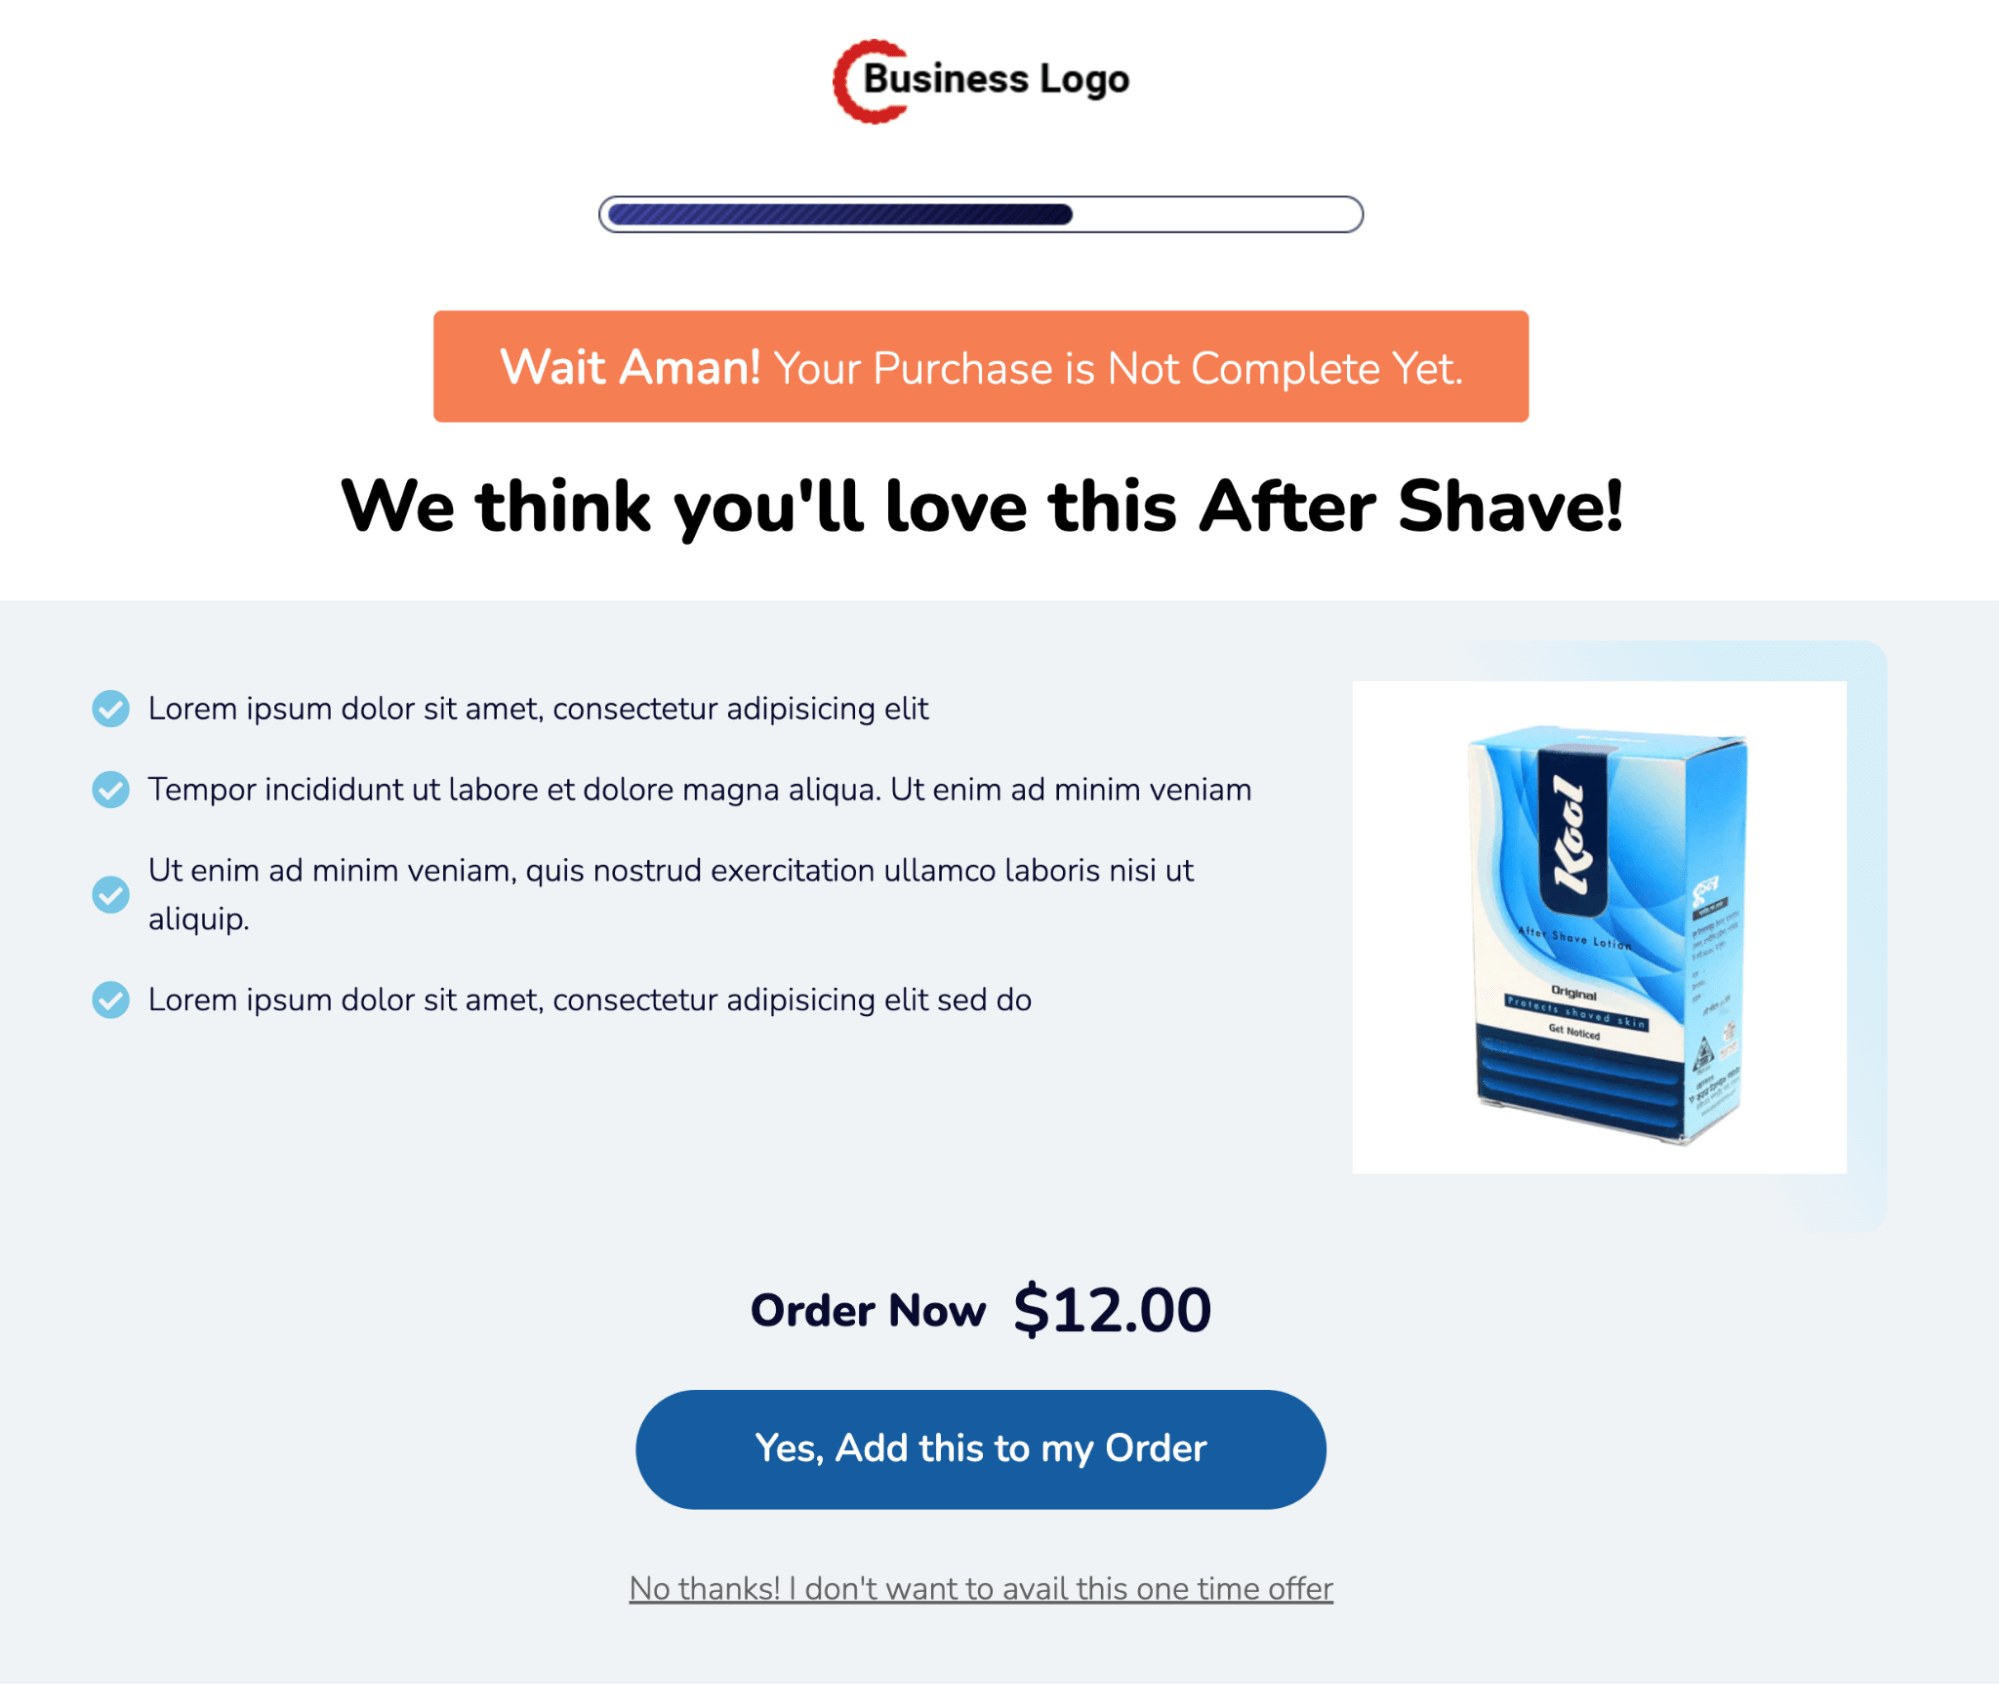
Here, we are offering Aftershave lotion as one one-click upsell.
To learn more details, check this blog on how to offer one-click upsell.
You can customize the thank you page, like you did with checkout and upsell templates above.
And that’s it! Your sales funnel with WooCommerce quantity discounts is ready.
Bonus Use Case: Use Separate Checkout for Different Quantities Discount Offer
As you have seen, when you follow the steps shown in the process above and create your sales funnel with a single checkout, customers can change the quantity discount offer on the checkout page.
Suppose you prefer not to provide the option to adjust the quantity discount offer at checkout.
Instead, you want shoppers to be directed to distinct checkouts with varying designs and content based on their chosen quantity discount. In that case, you can use separate checkout pages for each WooCommerce quantity discount.
🔔Note: You can use the same sales funnel you built in the previous section, offer the same upsell offer with the same thank you page, and still use a separate checkout page for a separate quantity discount offer.
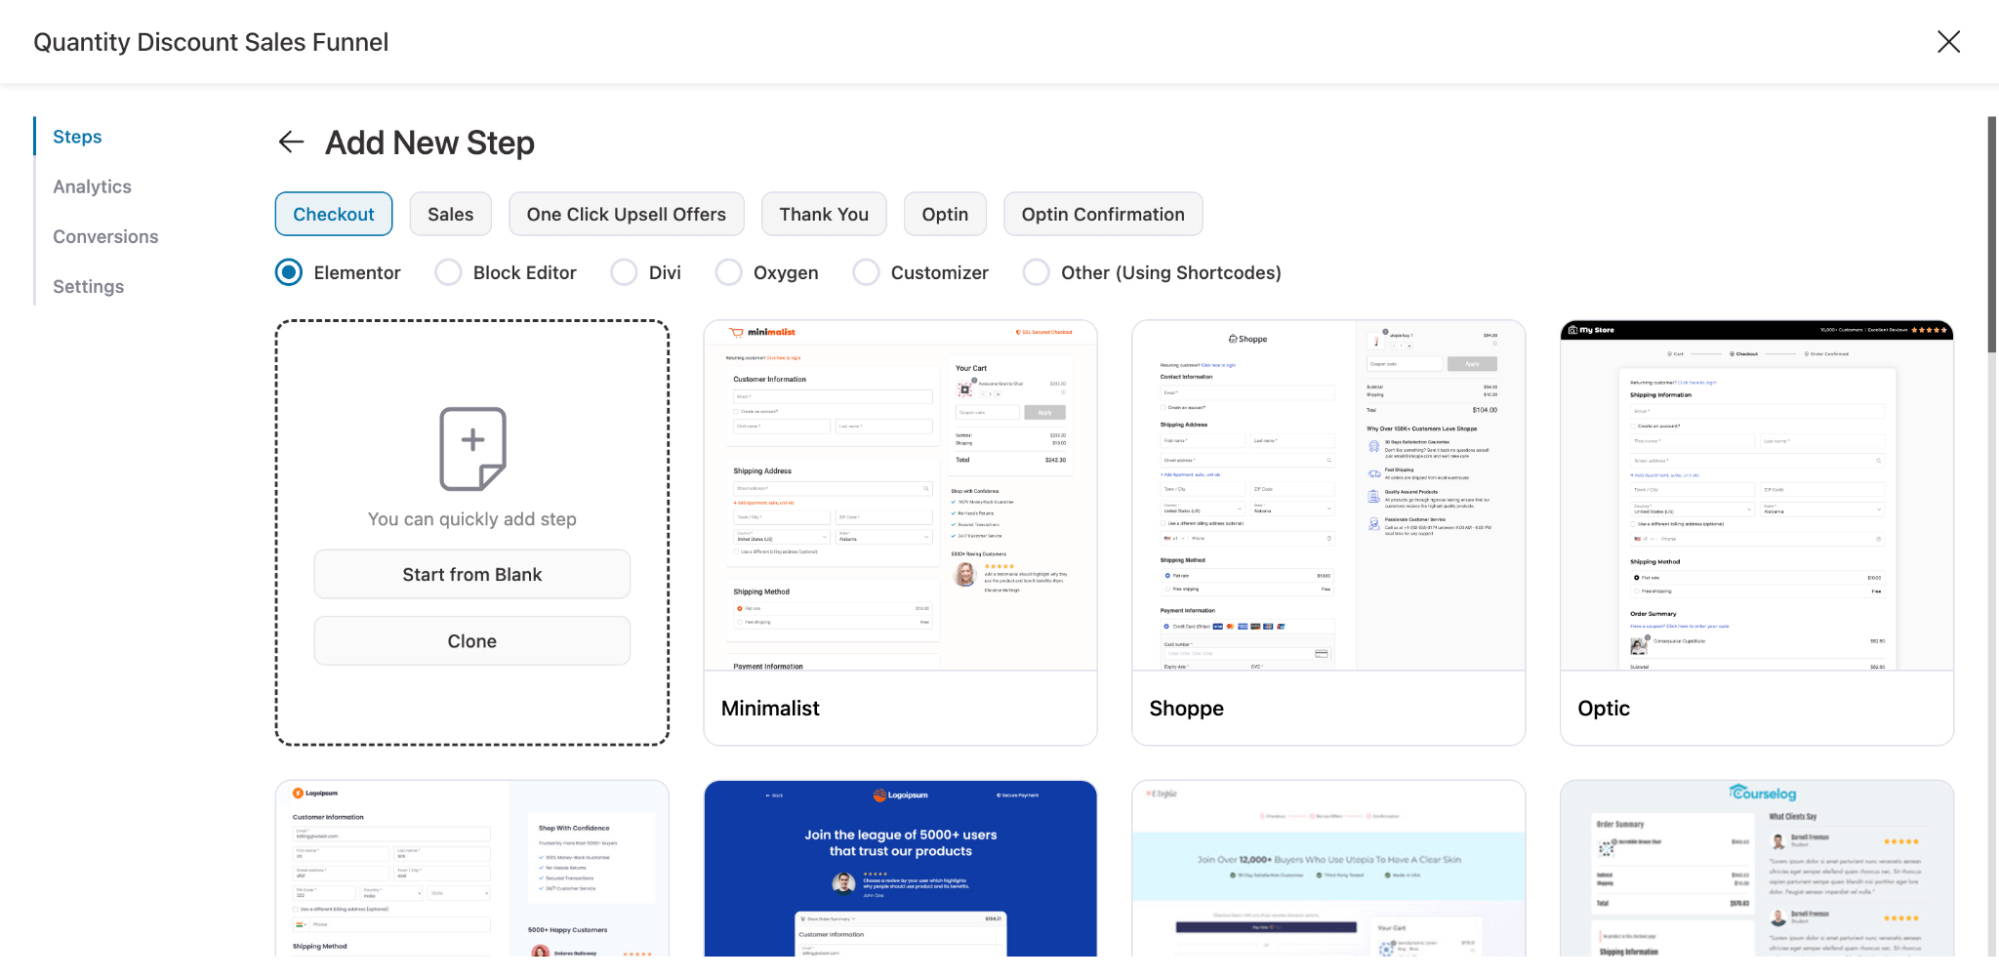
You can create a new step to add more checkout. This way, you can use different templates for different checkout pages.
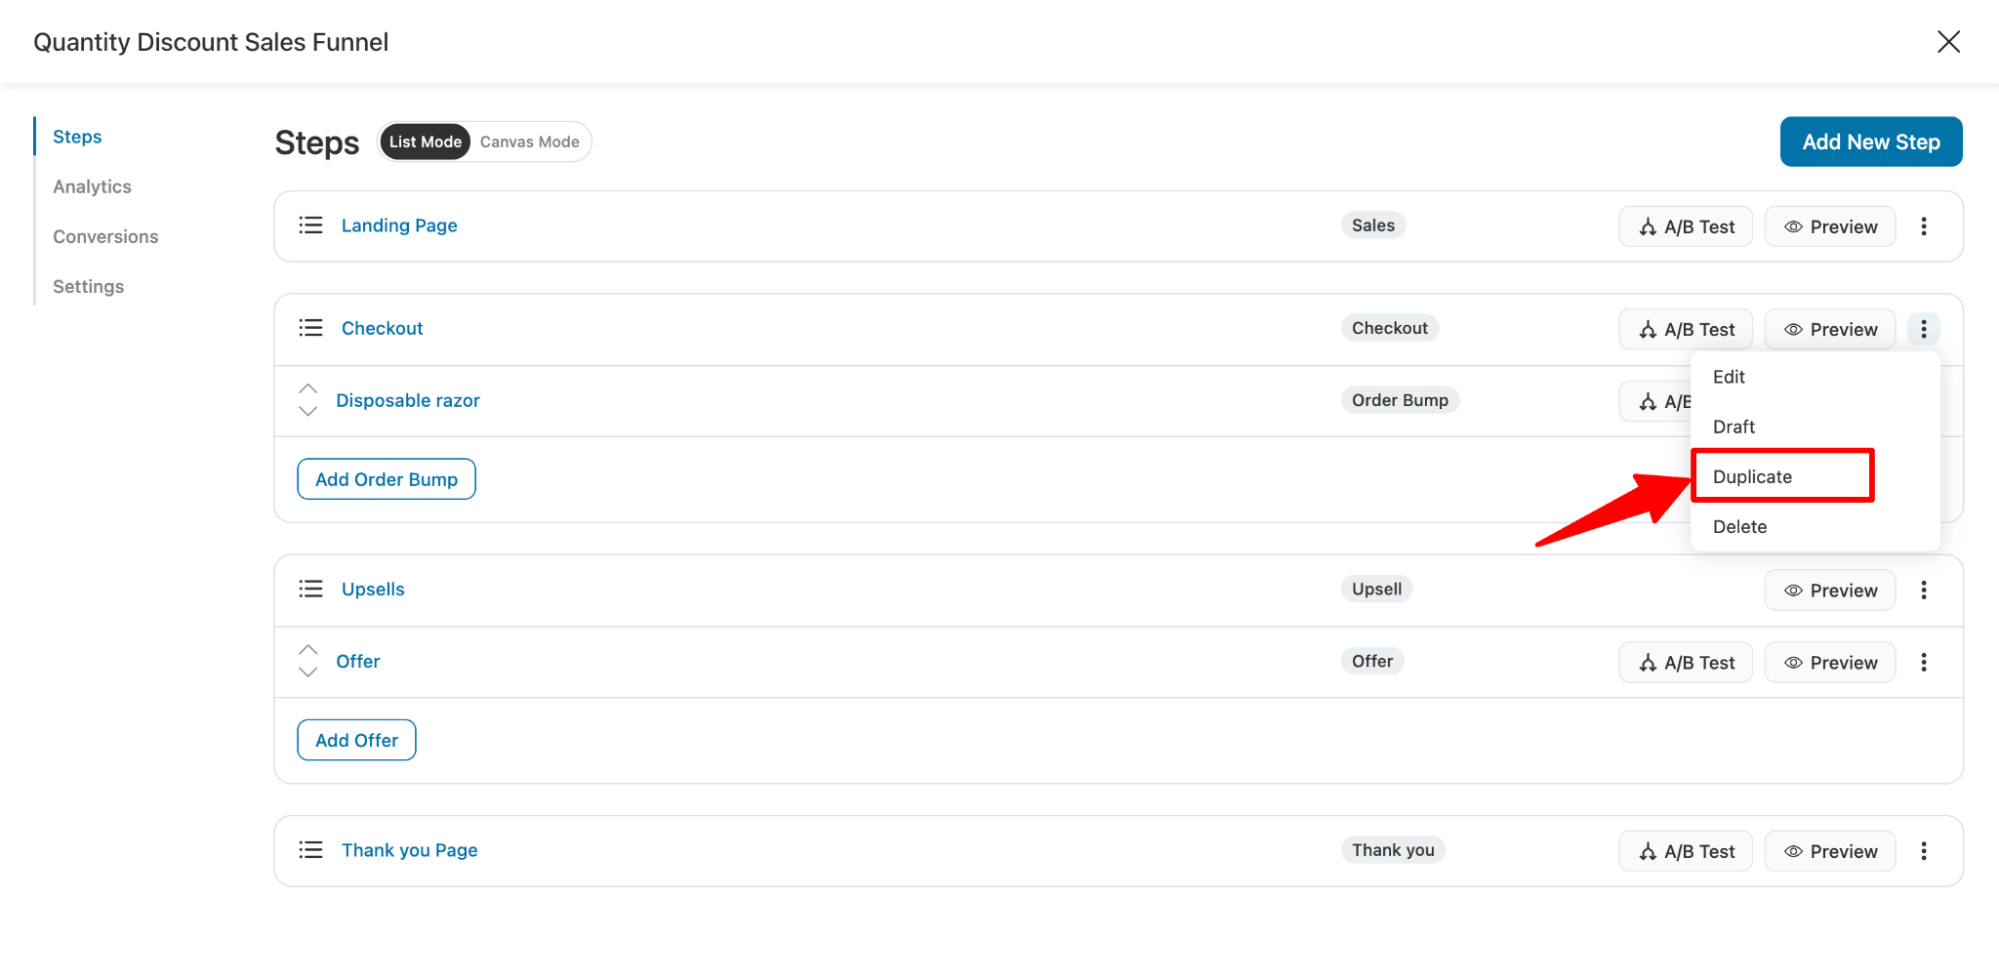
However, if you want to use the same template but different content, you can duplicate the existing checkout page.
🔔Note: When creating a separate checkout page for each quantity discount, ensure only that offer is added to that page.

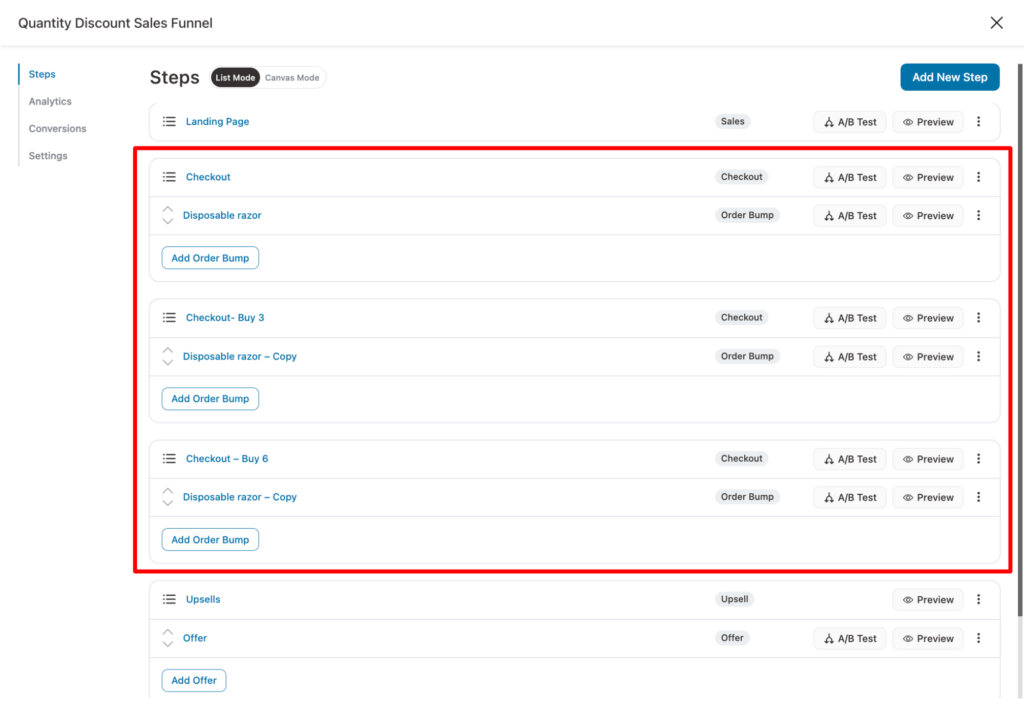
Here, we have added 3 different checkout pages for the 3 quantity discount offers and added only the relevant offer to the checkout page.
Now, you can come back to your landing page and link each product section CTA to the relevant checkout page.
No need for aero checkout URL creation. Just copy the checkout template URL from each checkout page.
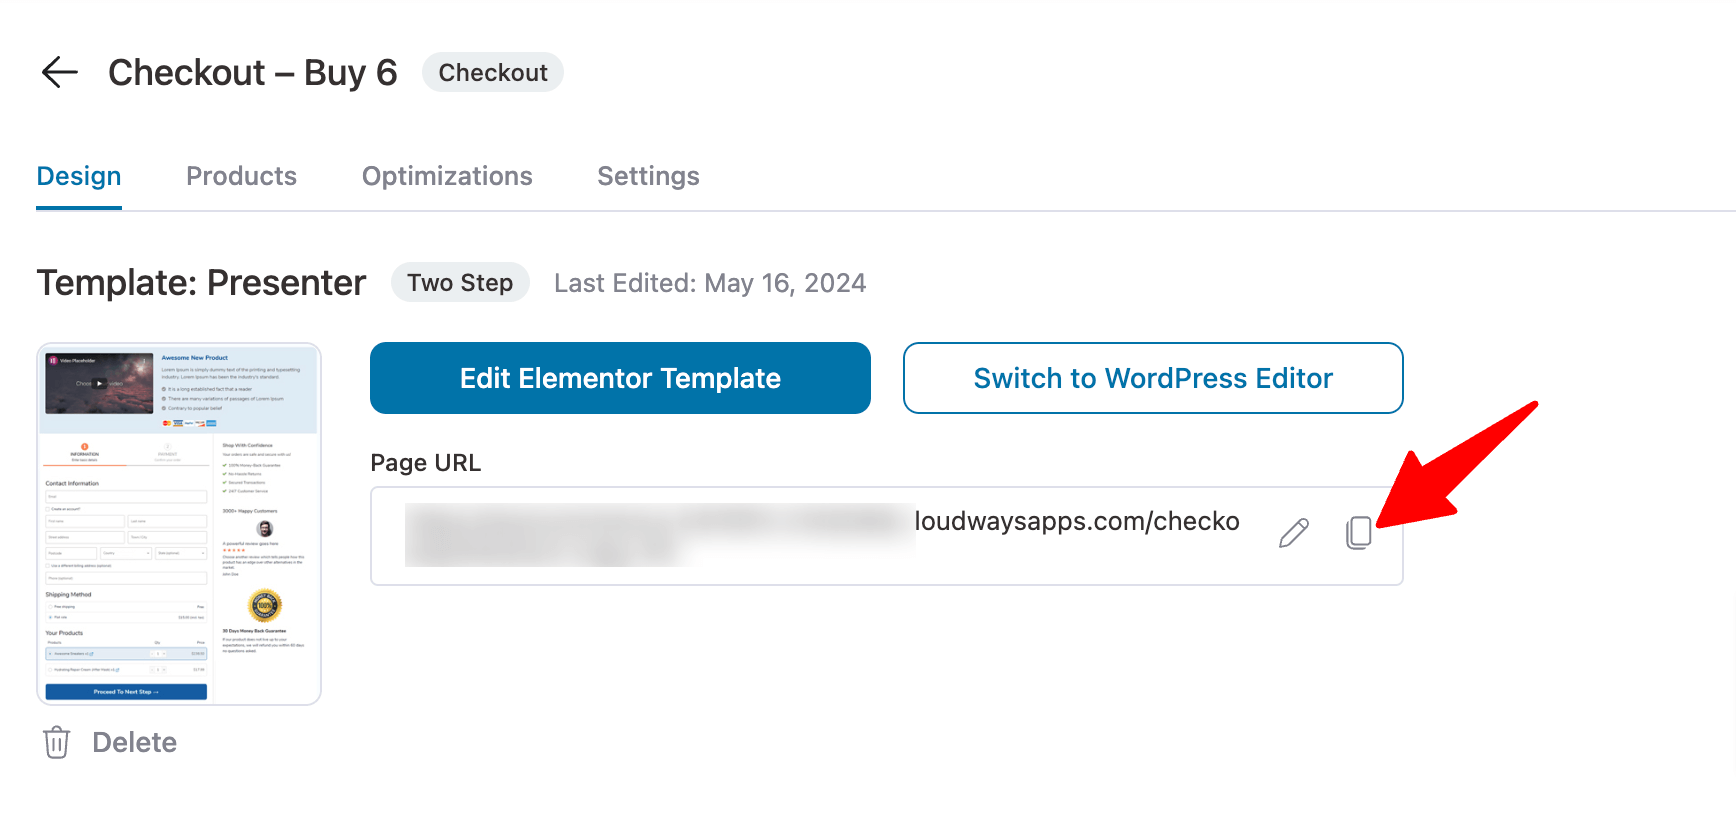
And paste it into the link option for the target CTA.
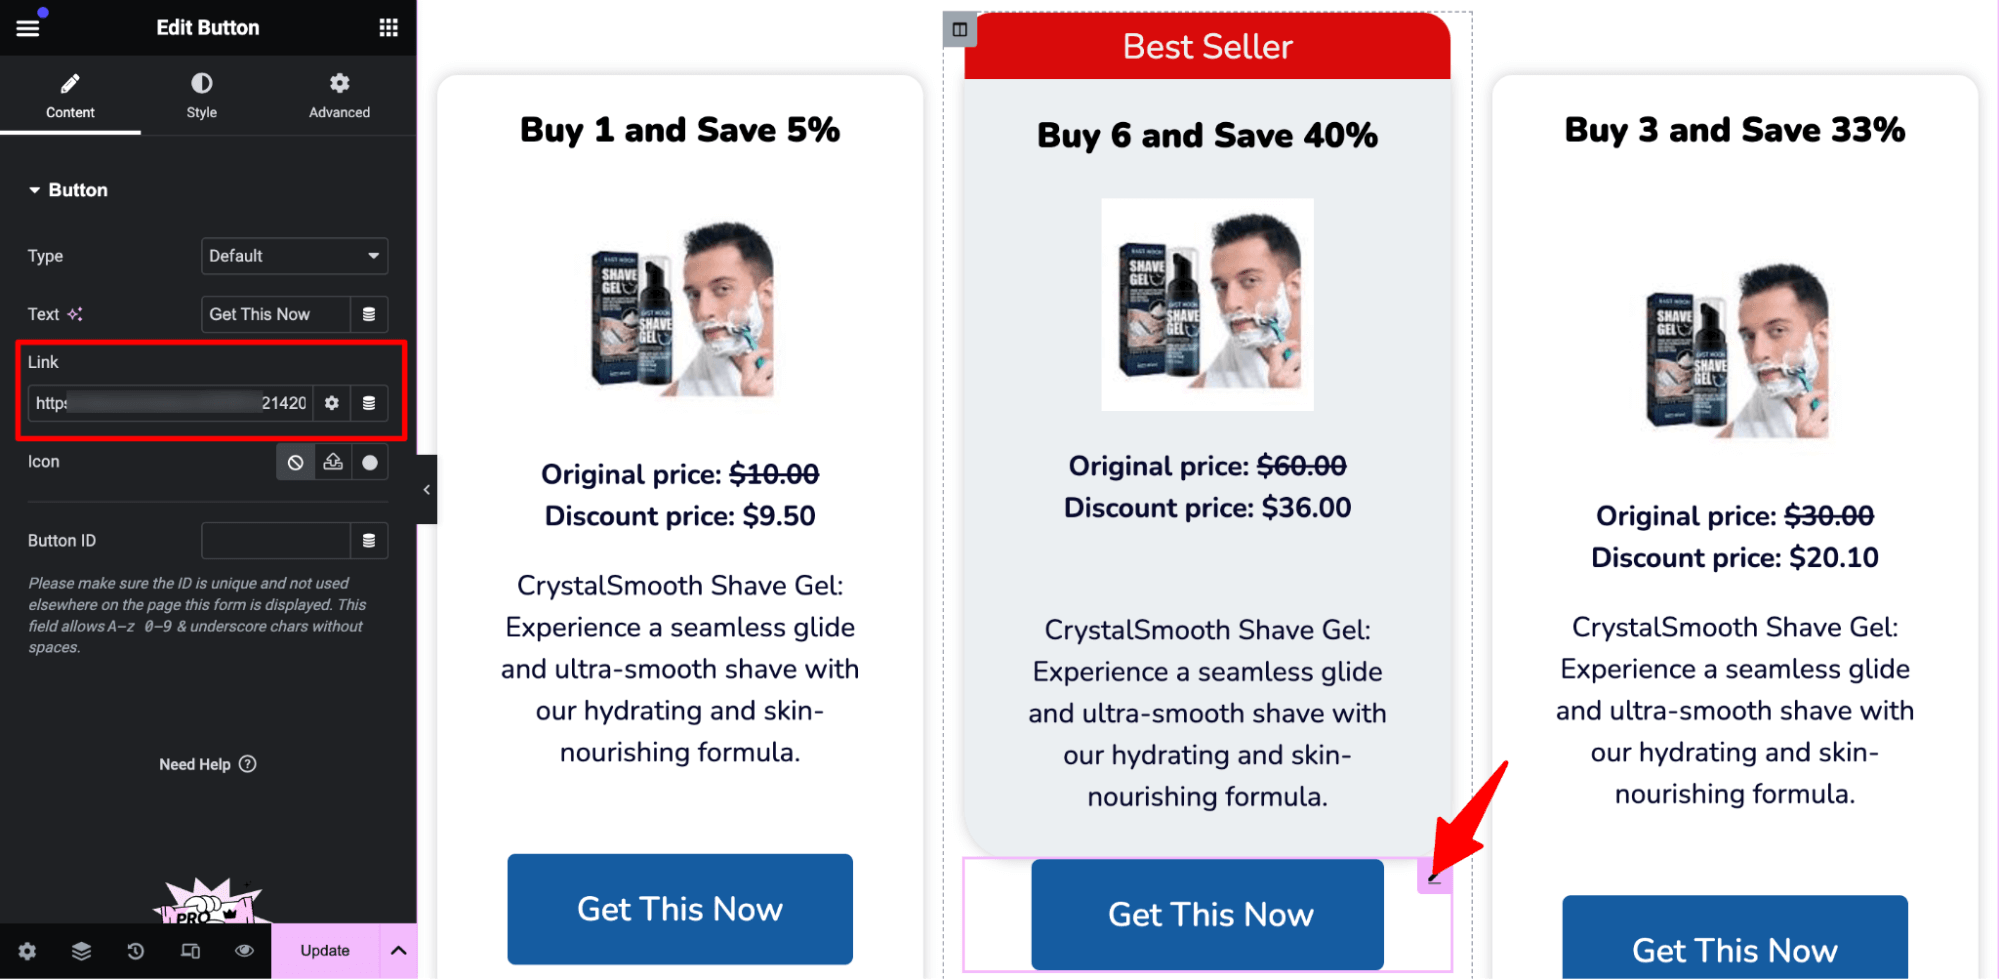
Repeat this for all the WooCommerce quantity discounts.
Now, you have a separate checkout page for each quantity discount offer. When users click on any of the CTAs, that product is added to the cart, and they are redirected to the linked checkout page.
🔔 Note: this way, only a single product will be on the checkout page, and users won’t be able to change the offer.
Here is how it works:
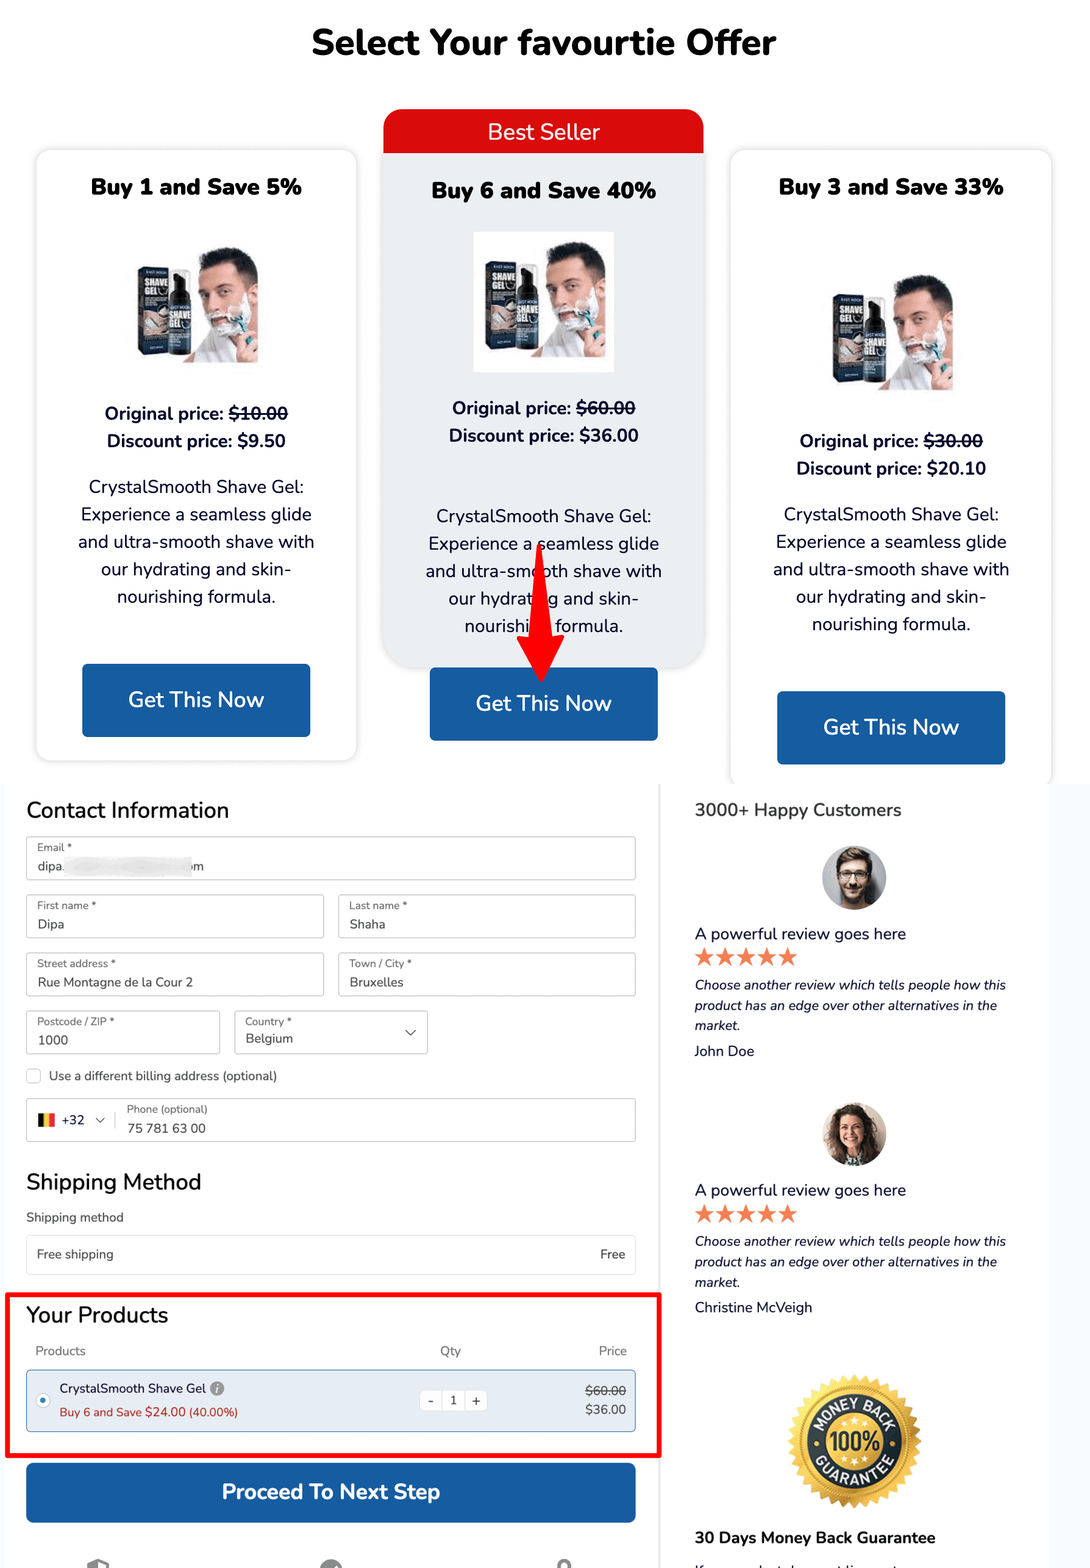
Based on your requirements, direct users to different checkout pages according to the quantity discount they choose.
Frequently Asked Questions (FAQs) Related to WooCommerce Quantity Discounts
Have a look at some of the common questions regarding offering quantity discounts:
1. What products are best suited for quantity discounts?
Products with higher profit margins, items with large inventory or perishable goods, and bundled products are best suited for quantity discounts.
Offering discounts on more profitable items helps the business make money while encouraging customers to buy more.
If there's a lot of a product or it can go bad, giving discounts for buying in bulk helps sell them quickly and avoids waste.
2. Can quantity discounts be combined with other offers?
Yes, you can combine quantity discounts with other offers, such as free shipping, a discount over a certain amount, etc.
3. What steps can you take to prevent abuse of quantity discounts?
You can set a purchase limit on how many products users can buy at a quantity discount.
When you get the maximum amount of product each person can buy, you can prevent the abuse of quantity discounts.
Ready to Offer WooCommerce Quantity Discounts?
Leveraging WooCommerce quantity discounts can help you efficiently clear excess stock, attract new customers seeking value, and cultivate lasting loyalty.
However, you need to be strategic about bulk discount pricing to make a profit even when offering discounts. Don’t forget about the long-term benefits like customer satisfaction, which will result in repeat customers.
As we have shown, using FunnelKit Funnel Builder makes offering WooCommerce quantity discounts attractively an easy task.
Plus, you have the option to use different checkout pages for different offers. Besides, you can also incorporate other AOV-boosting features like order bumps and one-click upsells.
So, are you ready to offer WooCommerce quantity discounts?
Editorial Team
February 13, 2026WooCommerce shipping allows you to charge customers for delivery when they purchase from your store. You create different delivery areas, called shipping zones, and then decide how much to charge...
Editorial Team
February 12, 2026Have you ever noticed the cart icon at the top of many online stores? It’s more than just a design choice. It can greatly improve your customers' experience. A cart...
Editorial Team
February 6, 2026With increasing competition and rising ad budgets, acquiring new customers is difficult. Forbes reports that the conversion rate for new customers is just 5%-20%. On the other hand, repeat customers...


