


WooCommerce Zapier is the difference between a $180 order sitting quietly in your dashboard at 11:40 p.m. and that same order showing up in your spreadsheet, CRM, and accounting software before you even wake up.
Without an integration, someone on your team has to open WordPress the next morning, copy the order number, billing name, email, and total into a spreadsheet, paste the email into Mailchimp, and then enter the line items into QuickBooks.
That takes about four minutes, give or take.
Now do that 500 times a month. You’re looking at roughly 33 hours of repetitive copy-paste work.
And every time someone types or pastes customer data, there’s another opportunity for something to go wrong, like a mistyped email address.
Zapier can handle the same workflow in seconds. And unlike a person, it doesn’t get tired after order #400.
The problem is that WooCommerce doesn’t automatically send your order data to all the other apps your business uses.
WooCommerce knows when an order is paid, but your CRM, accounting software, spreadsheet, or fulfillment system doesn’t automatically know about it.
That’s where Zapier comes in.
Think of Zapier as the wiring between WooCommerce and your other tools. It connects your store to thousands of apps and lets you move data between them without writing code.
In this guide, we’ll show you three ways to connect WooCommerce to Zapier, explain what the integration can actually cost as your order volume grows, and walk through the five automations worth setting up first.
Furthermore, we'll also look at alternatives if Zapier’s task-based pricing doesn’t make sense for your store.
Let’s get into it.
Table of Contents
- 1 How Does WooCommerce Send Data to Zapier?
- 2 Two Ways to Connect WooCommerce to Zapier
- 3 Method 1: The Official Zapier Integration Plugin for WooCommerce
- 4 Method 2: Send WooCommerce Data to Zapier With Webhooks
- 5 How Much Does the WooCommerce Zapier Integration Cost?
- 6 5 WooCommerce Automations Worth Building First With Zapier
- 7 The Best WooCommerce Zapier Alternatives
- 8 Frequently Asked Questions
- 9 Ready to Automate Your WooCommerce Store From Checkout to Follow-Up?
How Does WooCommerce Send Data to Zapier?
Zapier listens for something happening in your store (the trigger), then does something in another app (the action).
One trigger plus its actions is called a Zap, and you don't need a developer.
There are two ways your store data reaches Zapier, and the difference shows up in how fast your automations run:
- Webhooks (push): WooCommerce fires an HTTP request the instant the event happens. Best for order alerts, fulfillment, and CRM sync, or anything where a delay is a problem.
- Polling (pull): Zapier checks your store on a schedule, every 1 to 15 minutes depending on your plan. Fine for reporting, backups, and non-urgent syncs.
The official WooCommerce Zapier plugin uses webhooks.
The usual REST API connections often fall back to polling, which is why people complain that their Zaps run 15 minutes late.
Two Ways to Connect WooCommerce to Zapier
| Method | Cost | Setup time | Best for |
|---|---|---|---|
| Official Zapier integration plugin | $129/year | ~8 minutes | Most stores. Instant triggers plus two-way sync and Subscriptions support |
| FunnelKit Automations webhook | $99.50/year | ~5 minutes | Cart, funnel, and lifecycle events WooCommerce doesn’t expose at all |
Throughout this guide, we’ll build the same automation so you can see the pattern instead of memorizing the clicks.
Every paid order lands as a new row in a Google Sheet with the order number, date, customer, line items, and total. It’s the Zap most stores set up first.
Once it runs, every other Zap on the list is the same three moves pointed at a different app.
Method 1: The Official Zapier Integration Plugin for WooCommerce
The official plugin powers instant triggers for orders, customers, products, coupons, subscriptions, memberships, and bookings.
It also supports two-way sync, so Zapier can create and update data inside your store instead of only reading from it.
Step 1: Install and activate the plugin
The plugin costs $129/year. After you purchase it, download the ZIP from your WooCommerce account.
Next, go to Plugins ⇨ Add Plugin in your WordPress dashboard, upload it, and activate it.
You’ll find it under WooCommerce, where the Task History log records every event sent to Zapier.
Bookmark that screen. It’s the first place to look when a Zap misbehaves.
Step 2: Create a Zap and connect your store
Log in to Zapier and click Create ⇨ Zaps.
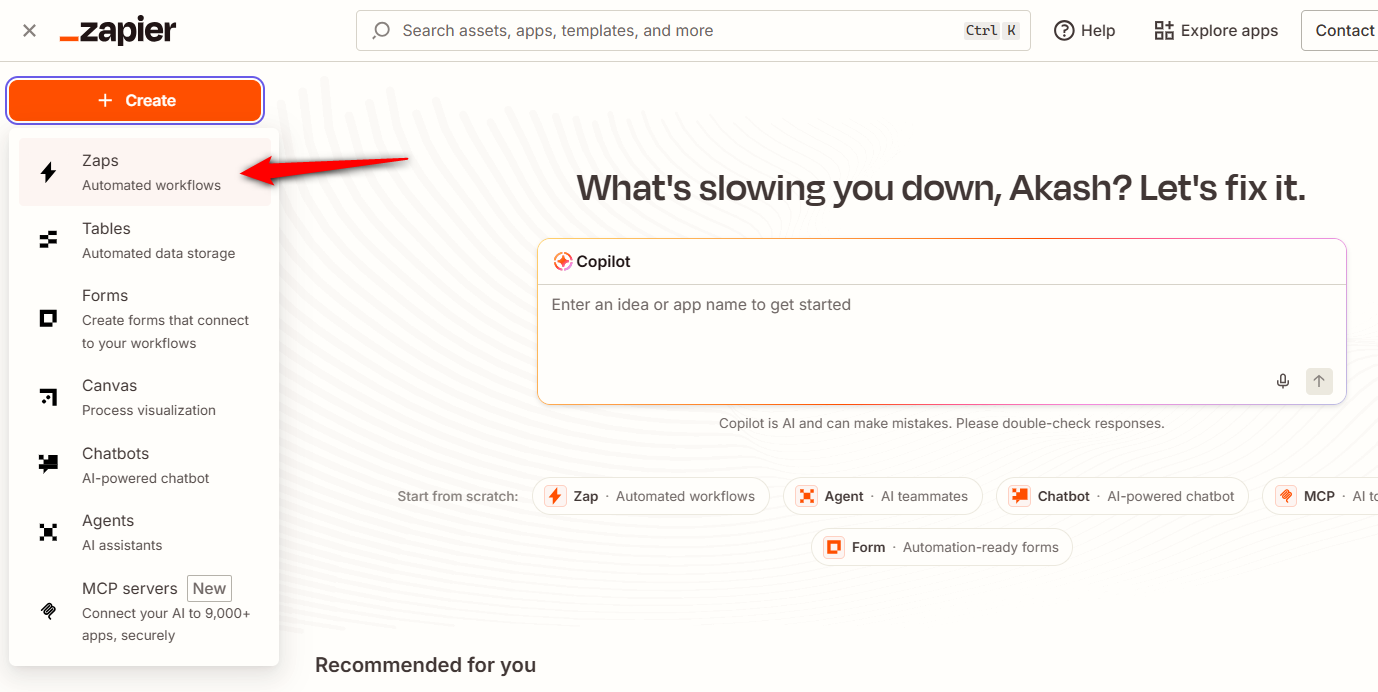
In the trigger step, search for WooCommerce and select it. Pick the trigger you want.
The plugin is granular here, with rules like order created, order paid, order status changed, and low product stock.
Next, connect your store by entering your site address starting with https, your WordPress administrator username, and your password.
Hit Connect and Zapier will link to your store.
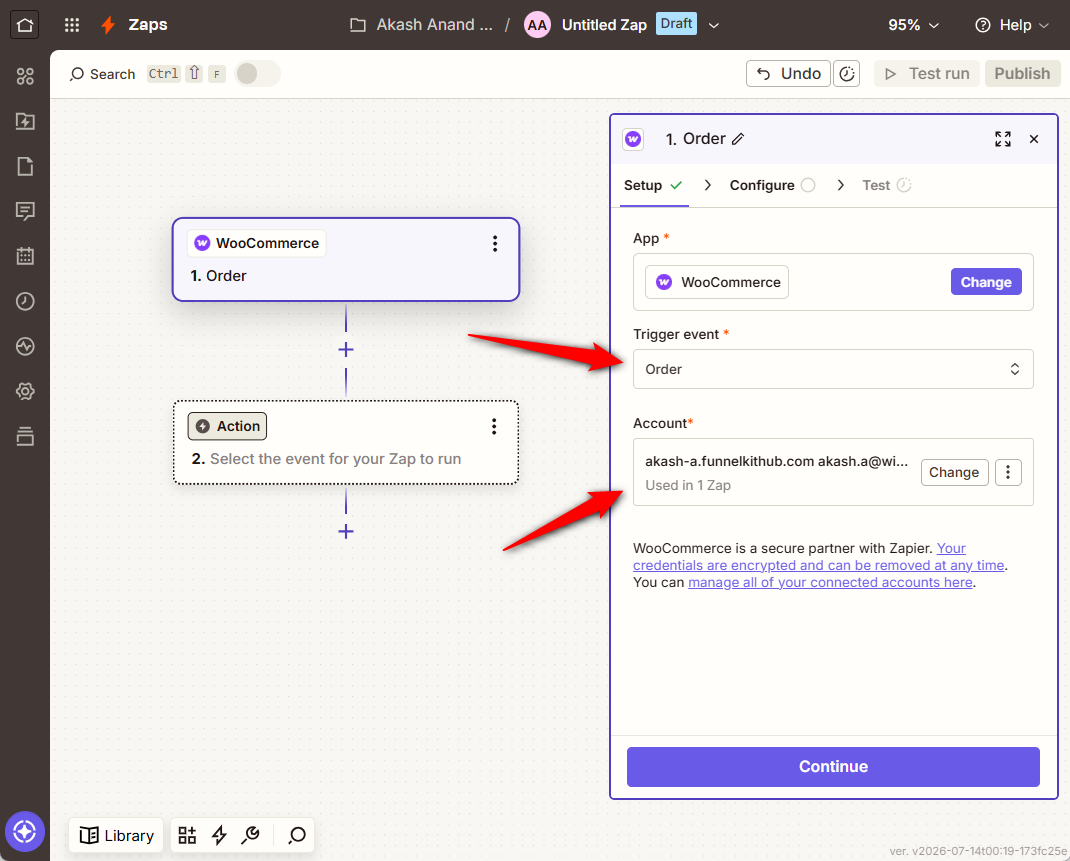
Next, configure the trigger. Here, we’ve selected the 'Order created' event.
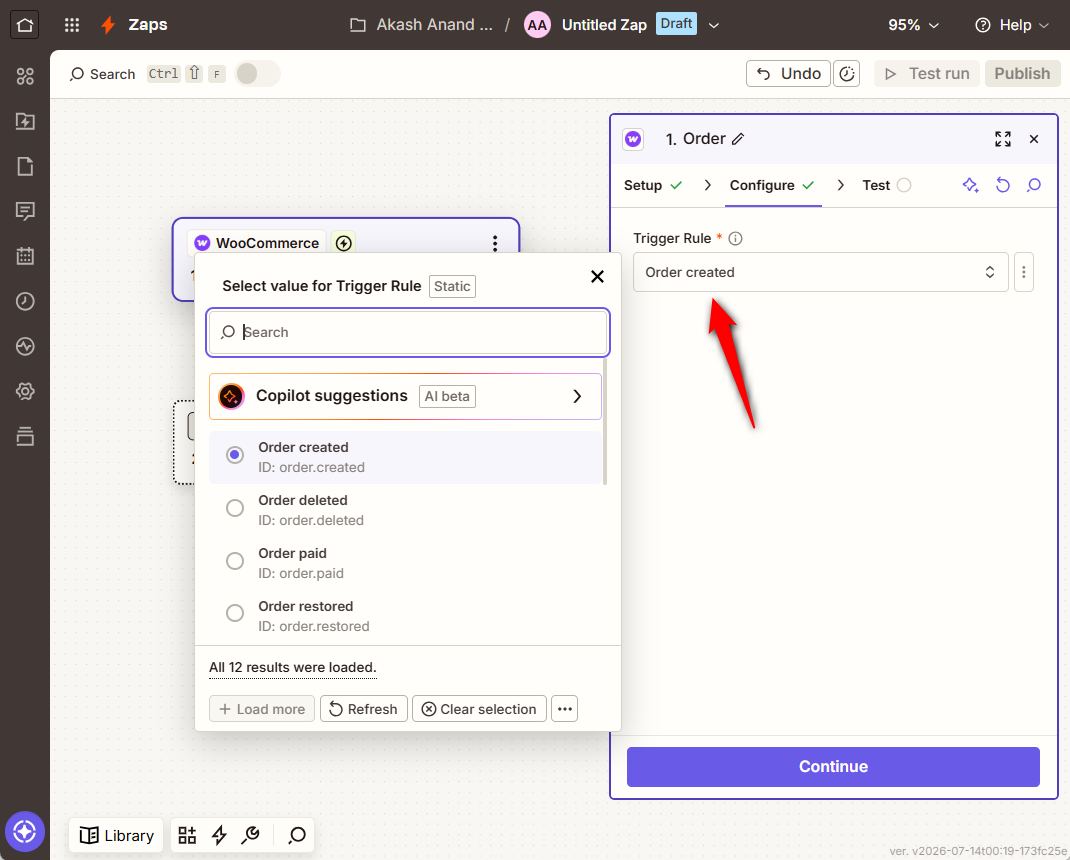
Click 'Continue' to test the trigger and pull a recent order from your store.
Step 3: Add the action and map your order data
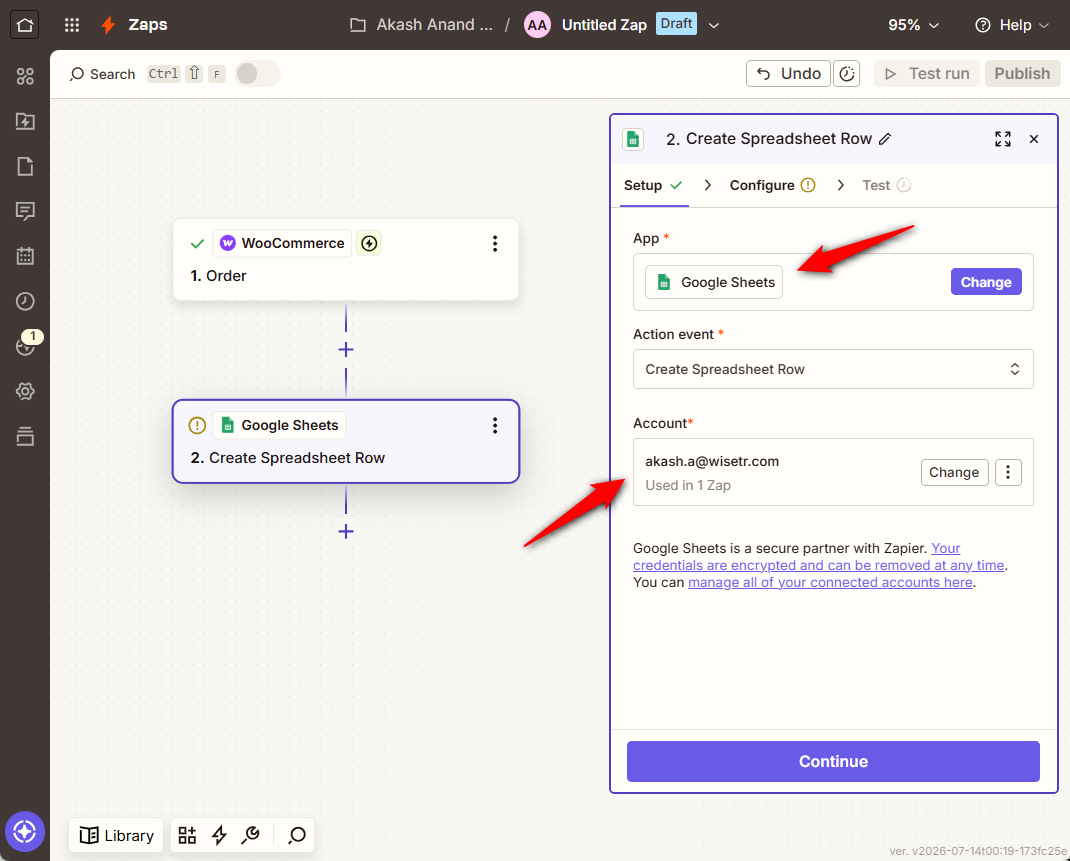
Now choose what happens with the data. Search for your action app and pick an action event.
For this example, let's use Google Sheets with the Create Spreadsheet Row action, which gives your team and your accountant a live sales record without anyone touching the WordPress admin.
Sign in with your Google account.
Select your drive, spreadsheet and worksheet, then map the fields: order number, order date, billing name, email address, line items, and order total.
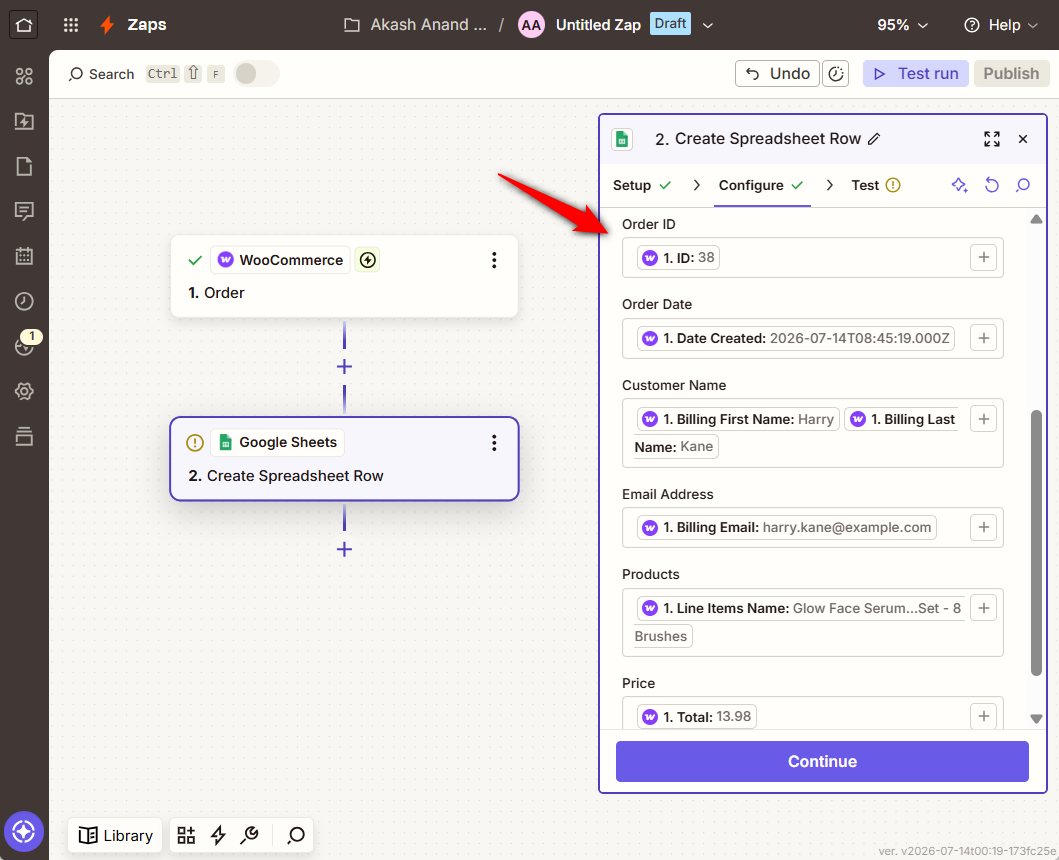
Line items arrive as a single list inside one order.
If you’d rather have one row per product, switch your trigger back in Step 2 to Line Item in an Order.
That creates a separate task for each product in the order, which also means it burns a task per product.
Google Sheets is only one destination. The other pairing most stores set up is Mailchimp with Add or Update Subscriber: choose the audience, map the billing email and first name, and every buyer joins the list the moment they pay.
The same mapping pattern works for any email platform or CRM.
Custom checkout fields also come through in the order data. If you collect an opt-in checkbox or a gift message at checkout, you can map those values straight into your CRM.

Click the plus icon to insert a Filter step ahead of your action.
A filter that continues only when the order total clears a set amount helps you build high-value order alerts without spamming the channel.
Filters don’t count toward your Zapier task limit, though Zaps with more than two steps do require a paid Zapier plan
Step 4: Test your Zap and enable it
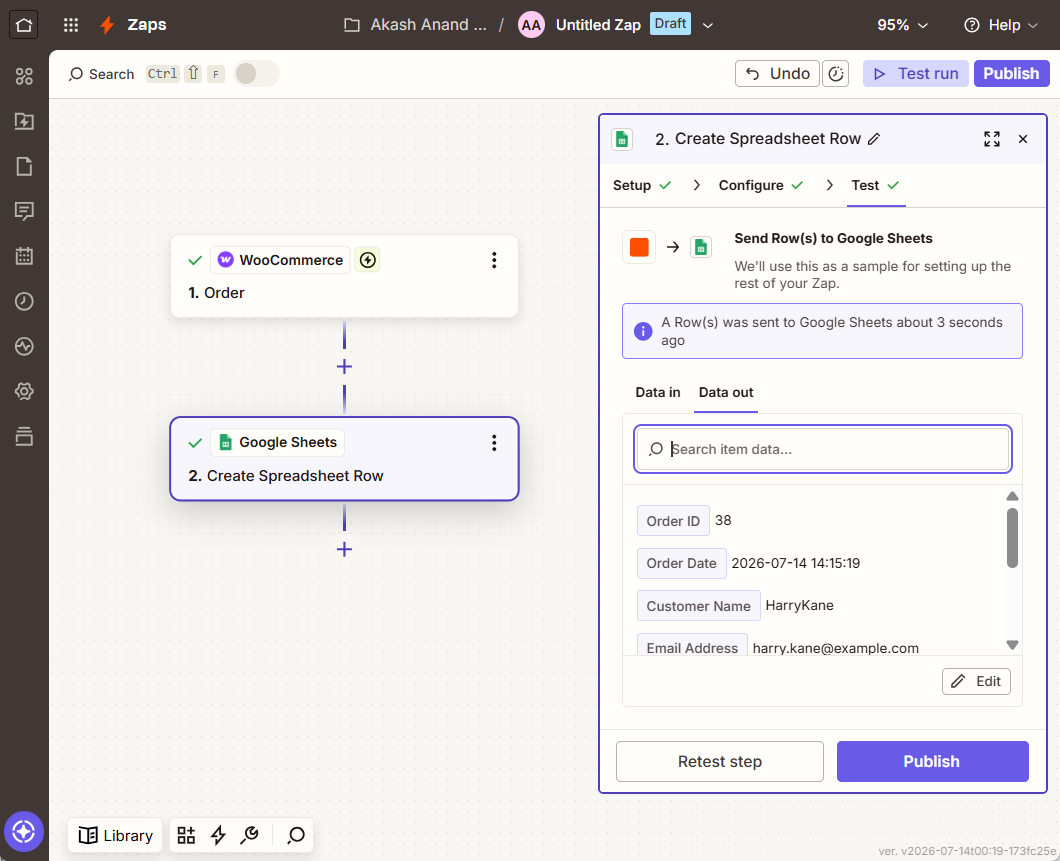
Click Test step to run the workflow. Orders should appear in your Google Sheet.
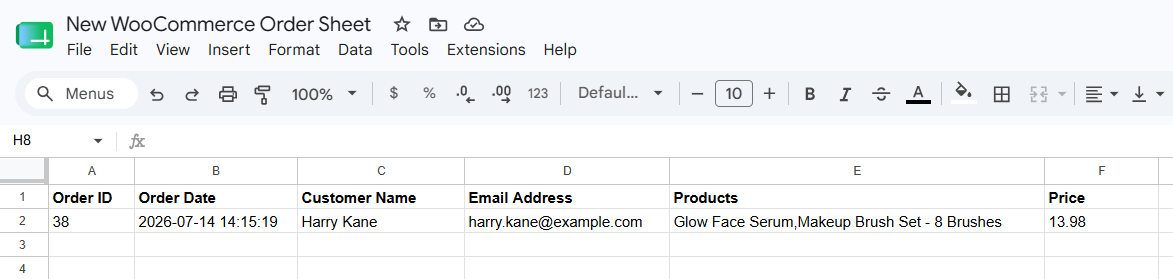
If the row looks right, hit Publish.
Then run a real test on the storefront: open a product page, add it to the cart, go through checkout, and place a live order.
Within seconds, the Zap should fire, and the data should land in the connected app.
Run a direct WooCommerce Google Sheets integration from our step-by-step guide here.
Method 2: Send WooCommerce Data to Zapier With Webhooks
Core WooCommerce only fires on orders, customers, products, and coupons. There is no event for an abandoned cart, a submitted form, a funnel step viewed, or a contact tagged as a repeat buyer.
If you want those in Zapier, something on your site has to track them first.
That matters more than it sounds, because abandonment is where stores leave the most revenue on the table.
Cart abandonment averages around 70% across ecommerce, according to the Baymard Institute.
And this is certainly the most valuable event you could send to a CRM - the one core WooCommerce can’t tell you about.
FunnelKit Automations tracks those events natively and forwards any of them to Zapier with a Send Data to Zapier action.
The webhook action is part of FunnelKit Automations Pro, which starts at $99.50 per year for one site.
Step 1: Get your Catch Hook URL from Zapier
Create a Zap, choose Webhooks by Zapier with the Catch Hook event, and copy the URL.
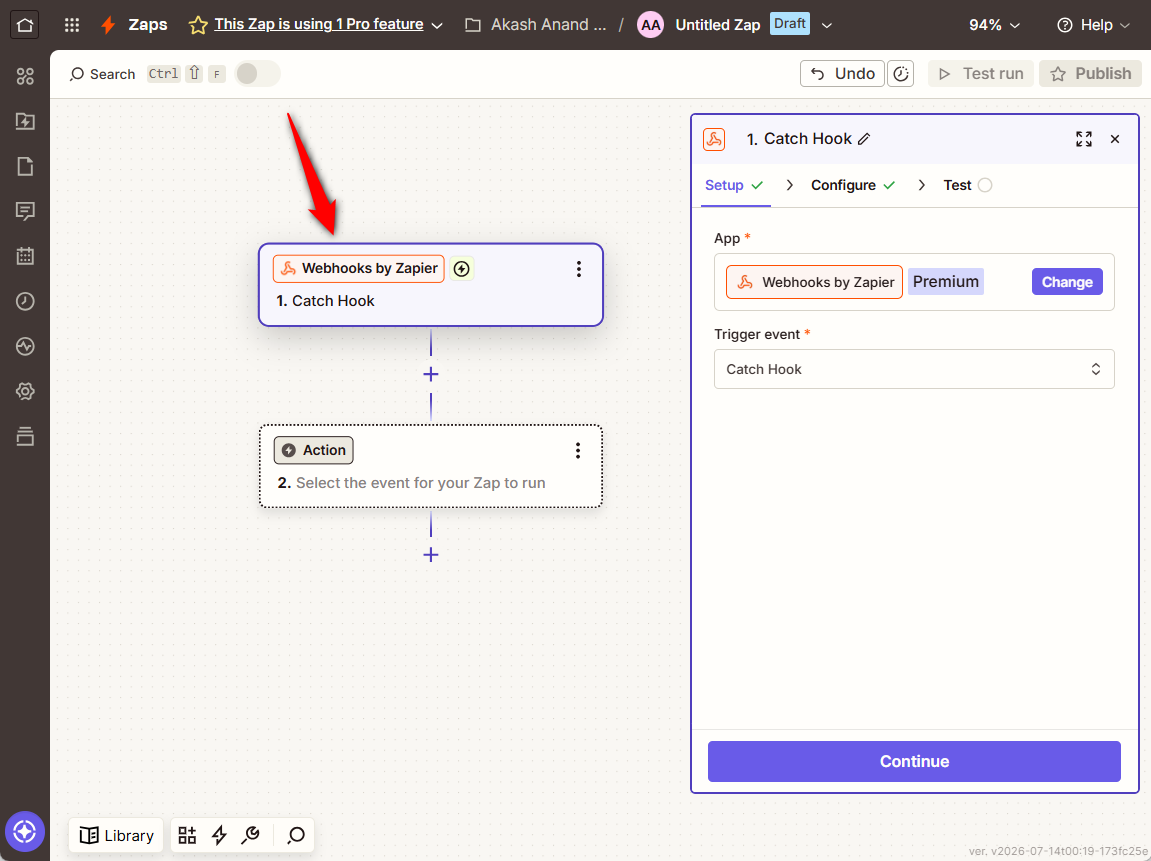
Webhooks by Zapier is a premium app, so this method requires a paid Zapier plan.
Step 2: Build the automation and add the Zapier action
In your WordPress dashboard, go to FunnelKit Automations and create a new automation.
Choose a trigger such as Order Created, Cart Abandoned, or Form Submitted.
Add the Send Data to Zapier action, paste your Catch Hook URL, and pick the fields to send: contact email, cart items, order total, whatever the receiving app needs.
Use the dynamic merge tags to pull in shopper values like name, email, cart contents and price.
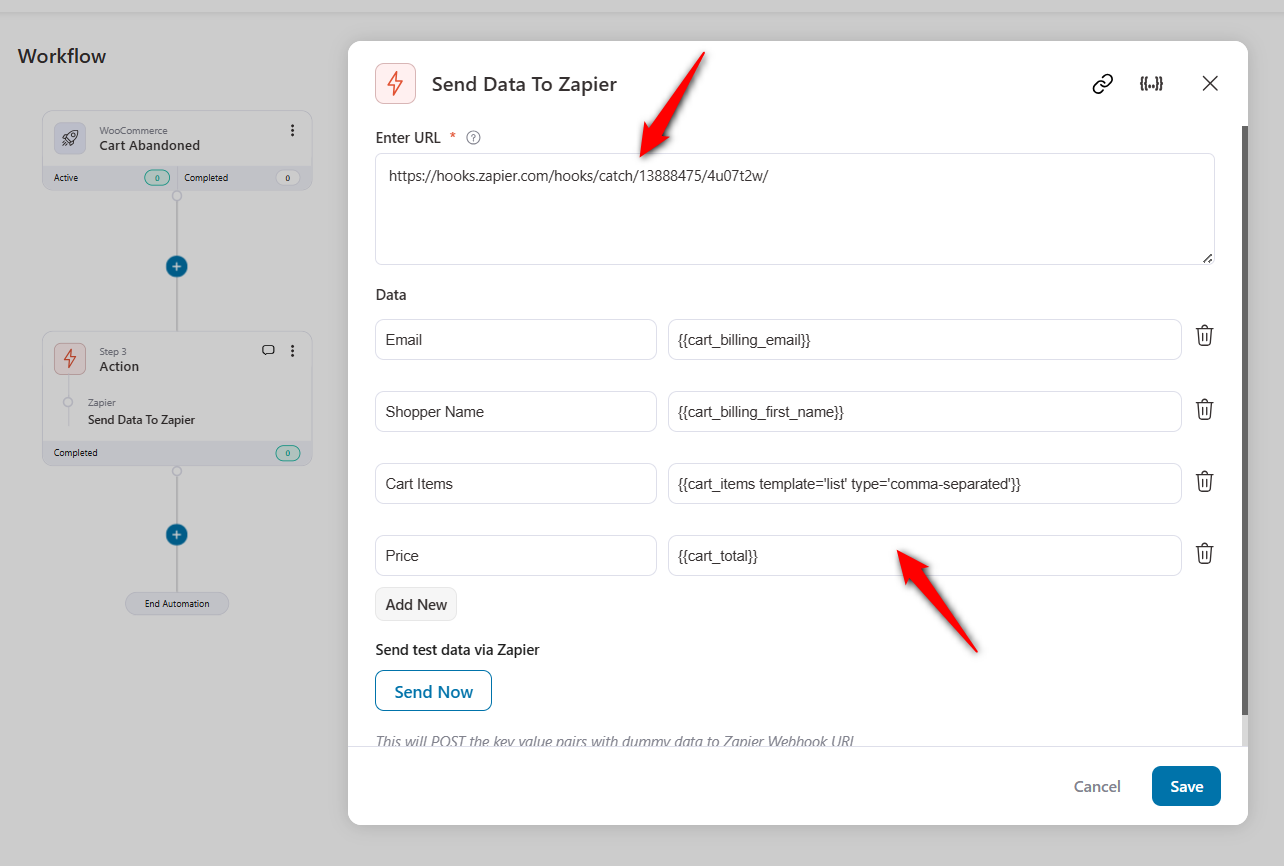
Click 'Send Now' to fire a test event.
Step 3: Catch the data and map your action
Back in Zapier, your test cart-abandonment event should be sitting in the trigger step.
Click Continue with selected record, then choose your action and map the fields exactly as you did in Method 1: the same Google Sheet, or a HubSpot task so a salesperson can personally pick up the abandoned cart.
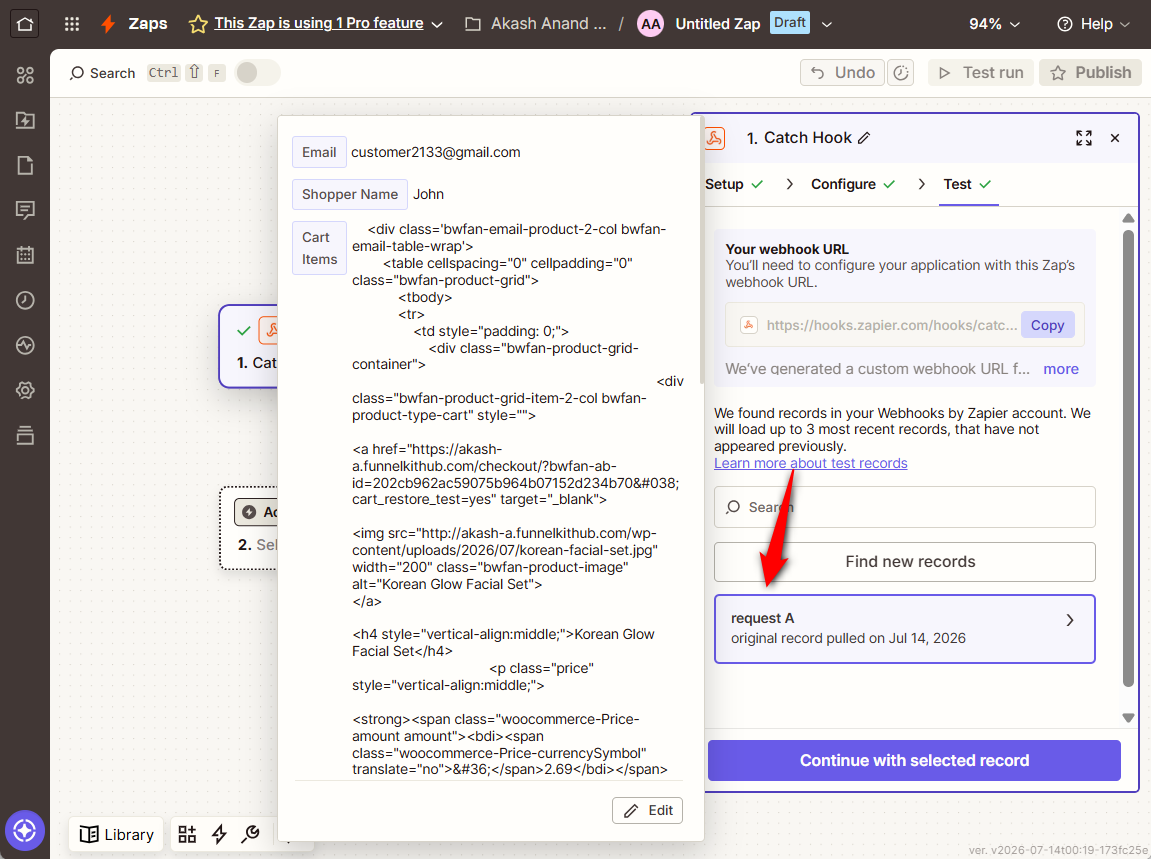
Activate the workflow in both places. A live Zap paired with a paused automation is the most common reason this setup silently does nothing.
For the full recovery sequence rather than a single alert, see our WooCommerce abandoned cart recovery guide.
How Much Does the WooCommerce Zapier Integration Cost?
The official plugin is $129 per year on the WooCommerce marketplace, with a 20% discount on the two-year plan.
That’s the part people budget for. The Zapier plan is where the real cost lives.
The free plan gives you 100 tasks per month and two-step Zaps, which is enough to prove the integration works on a low-volume store.
The Professional plan starts at $19.99 per month billed annually and includes 750 tasks with multi-step Zaps.
Here’s the arithmetic that catches people out.
Every successful action counts as one task, so the meter tracks your actions rather than your orders.
Two actions on every order double your order count before you’ve added a second Zap.
Do that multiplication before you commit to a plan. It’s the number that surprises people in month two.
5 WooCommerce Automations Worth Building First With Zapier
Here are the five most important Zapier automation ideas for your WooCommerce store.
1. Log every paid order in Google Sheets
The one we built above. A live sales log your team and your accountant can open without a WordPress login, doubling as a plain-text backup of your order data.
If the sheet is the only reason you’re paying Zapier, note that FunnelKit Automations writes rows to Google Sheets directly, no Zapier task meter involved.
2. Push new buyers to your email list or CRM
Send buyers to Mailchimp, Klaviyo, HubSpot, ActiveCampaign, or Salesforce the moment they pay.
The step most stores skip is mapping the purchased product into a tag or list.
Without it, you have one undifferentiated list. But with it, you can segment every campaign by what each customer actually bought, which is the difference between a newsletter and a relevant offer.
For the sequences worth sending once they’re segmented, see our guide to WooCommerce email marketing automation.
3. Create invoices in QuickBooks or Xero automatically
Turn every paid order into an invoice or sales receipt in your accounting software, and log refunds the same way.
This eliminates month-end data entry and keeps your books reconciled as sales happen, not three weeks later from memory.
4. Alert your team on high-value orders
Use a filter so orders above a set total post instantly to a Slack or Microsoft Teams channel.
Extend the same trigger to open a Trello card or Asana task for fulfillment.
Filters are free, so this one costs you a single task per big order.
5. Sync subscription events to your support tools
When a renewal payment fails, open a help desk ticket or flag the contact in your CRM for personal follow-up.
When someone cancels, add them to a win-back list so the relationship doesn’t end at the cancellation screen.
Better still, catch the churn before it becomes a Zap.
Sublium Subscriptions handles cancellation flows and failed-payment recovery inside WooCommerce, so the alert you’re routing to Zapier is for the cases that genuinely need a human.
The Best WooCommerce Zapier Alternatives
Zapier is the most connected automation platform, but it isn’t the only way to automate a store.
Store owners switch for one of two reasons: task-based pricing that grows with order volume, or a preference for automation that runs inside WordPress rather than in the cloud.
| Tool | Best for | Pricing model | Free version |
|---|---|---|---|
| Zapier | Widest app coverage (9,000+) with two-way WooCommerce sync | $129/year plugin plus per-task Zapier plans | Yes, 100 tasks/month |
| Make | Complex, multi-branch scenarios at a lower per-operation cost | Per-operation monthly plans | Yes |
| FunnelKit Automations | WooCommerce email, SMS, and marketing automation that runs natively in WordPress | Flat annual plans, no per-task fees | Yes (Lite on WordPress.org). Pro from $99.50/year |
| Uncanny Automator | Connecting WordPress plugins to each other, with light external app support | Free core plugin with paid Pro plans | Yes (Lite on WordPress.org). Premium from $300/year |
| Pabbly Connect | Budget workflows with one-time payment options | One-time and monthly plans | From $168/year |
| n8n | Developers who want open-source, self-hosted workflows | Charges per workflow execution, self-hosted or n8n-hosted | From $240/year for 2,500 executions |
The comparison that actually decides it isn’t feature-by-feature. It’s this: does the automation need to leave your store at all?
A post-purchase follow-up email, a cart recovery sequence, a one-click upsell, tagging a buyer by what they bought. None of that involves an outside app.
Paying a per-task fee to push that data out of WordPress and pull the result back in is paying rent on a round trip to nowhere.
Those workflows belong on your site.
FunnelKit Automations runs order-triggered sequences, cart recovery, win-backs, and contact tagging natively, with unlimited emails and SMS, no cap on automations, and full order and customer data already in context.
And as Method 2 showed, the Send Data to Zapier action pushes those same events out when you genuinely need them elsewhere.
Because the conditions run in WordPress first, only the events that matter ever touch Zapier’s task meter.
Frequently Asked Questions
Not really. Zapier’s free plan includes 100 tasks per month, but the official plugin costs $129/year, and the no-plugin route through Catch Hook relies on Webhooks by Zapier, which is a premium app.
The genuinely free version is a low-volume store on the Zapier free plan using a polling connection, and you’ll feel the delay.
No, you don’t need a plugin to connect WooCommerce to Zapier.
The built-in WooCommerce webhooks send data to a Zapier Catch Hook. Just map your fields, and you’re done.
Yes, on current plugin versions. Update the plugin before you enable High-Performance Order Storage, not after.
Not with core WooCommerce, which has no abandoned cart event. You need something tracking carts first.
FunnelKit Automations captures checkout abandonment in real time, and its Send Data to Zapier action posts the cart to a Catch Hook, where you can route it to a CRM, a sales task, or a retargeting audience.
Yes. The official plugin exposes instant subscription triggers for created, renewed, renewal failed, status changed, switched, and cancelled events.
The WooCommerce Subscriptions plugin has to be installed and active for those triggers to appear.
Four usual suspects: a security plugin blocking the REST API, permalinks set to Plain, an expired connection, or WP Cron not running.
Reconnect the account in Zapier, then open the Task History screen under WooCommerce for the exact error code.
That screen tells you which of the four it is in about ten seconds.
Ready to Automate Your WooCommerce Store From Checkout to Follow-Up?
The split that works in practice is simple. Zapier handles anything that has to leave your store: accounting, CRM, spreadsheets, team alerts.
FunnelKit Automations handles everything that stays in it: cart recovery, post-purchase sequences, win-backs, and tagging.
Set it up that way and the task meter only ever sees events that genuinely need an outside app, which is both the cheaper way to run it and the faster one.
The discipline is in deciding which events deserve to leave your store at all.
Get that right and it matters more than the plan tier you’re paying for.
Editorial Team
October 2, 2026A WooCommerce invoice email gives customers a clear record of what they bought, what they paid, and how they paid. WooCommerce can send one out of the box, but only...
Editorial Team
October 1, 2026Want to drive more sales and customer loyalty with WooCommerce coupons? From simple percentage discounts to auto-applied deals, free gifts, and personalized offers, coupons give shoppers a reason to buy...
Editorial Team
September 25, 2026WooCommerce product recommendations are your store's way of saying, "This goes well with that." Someone viewing a laptop sees a sleeve right under it. A bag of beans in the...






