
Without a file upload option at checkout, WooCommerce stores risk losing sales and frustrating customers.
I once worked with a print shop where customers had to email their designs after placing an order.
The result was missed files, endless back-and-forth communication, and frustrated buyers who often gave up.
The core issue is that WooCommerce’s default checkout does not include a file upload option.
Once file upload fields were added to checkout, the process became seamless.
Customers could attach their designs while placing the order, which reduced errors and saved hours of manual follow-up.
And this is not just a one-off case. Many businesses, from print-on-demand services to custom gift shops, have streamlined their checkout process and improved customer satisfaction by adding a file upload field to WooCommerce's checkout.
In this blog, I will share two proven methods for adding a file upload field to your WooCommerce checkout form.
Short on time? Watch the video

Why Add a File Upload Field to WooCommerce Checkout Page
Adding a file upload option directly in WooCommerce checkout simplifies the process for customers and reduces manual follow-up, making it a must-have feature for many businesses.
- Product customizations
- Print products: Customers can upload designs for t-shirts, business cards, photo books, etc.
- Personalized items: Custom jewelry, calendars, or phone cases tailored to submitted designs.
- Customer verification
- Age verification: Upload IDs for 18+ products.
- Documentation: Submit prescriptions or medical certificates for glasses, contact lenses, or other medical products.
- Service-Based Businesses
- Project details: Share briefs, guidelines, or references for design, content, translation, or consulting projects.
- Document submissions: Contracts, financial records, agreements, or legal documents for review, editing, or tax purposes.
- Compliance and Regulations
- Upload certifications, licenses, or permits required to purchase certain products.
Adding a file upload field to WooCommerce checkout improves customer experience, enables personalized orders, streamlines communication, reduces errors, and boosts conversions.
Table of Contents
- 1 Two Proven Methods to Add a File Upload Field to WooCommerce Checkout (Free vs. Premium)
- 2 Method 1: How to Add a File Upload Field to WooCommerce Checkout Using a Drag & Drop Plugin
- 2.1 Step 1: Create a store checkout
- 2.2 Step 2: Create a file upload field to add to the WooCommerce checkout
- 2.3 Step 3: Drag and drop the file upload field to checkout
- 2.4 Step 4: Add conditions for the file upload field (optional)
- 2.5 Step 5: Activate your store checkout and test the file upload field
- 2.6 Step 6: Test the WooCommerce checkout file upload feature
- 3 How to Manage Uploaded Files From WooCommerce Orders
- 4 Method 2: Add a File Upload Field To the WooCommerce Checkout Page For Free (Limited Feature)
- 5 7 Best Practices for Implementing a File Upload Field on WooCommerce Checkout
- 6 Frequently Asked Questions About Adding a File Upload Field to WooCommerce Checkout
- 7 Add a File Upload Field to WooCommerce Checkout and Elevate Your Store’s Experience
Two Proven Methods to Add a File Upload Field to WooCommerce Checkout (Free vs. Premium)
In this blog, I will show you both a premium and a free method for adding a file upload field to your WooCommerce checkout.
Whether you want full control over your checkout experience or just need a quick and simple solution, there is an option that fits your needs.
Here's a quick comparison to help you pick the right method:
| Feature | Method 1 (Premium) | Method 2 (Free) |
| Cost | Paid | Free |
| Multiple upload | Yes | No |
| Drag and drop placement control | Yes | No |
| Conditions/rules | Yes | No |
Method 1: How to Add a File Upload Field to WooCommerce Checkout Using a Drag & Drop Plugin
In this section, I will use FunnelKit Funnel Builder to create a conversion-optimized checkout page with a file upload option.
With this premium plugin, you can place the file upload field anywhere on the checkout form, allow multiple file uploads, support various file types, and even set conditions for when the file upload should appear on the checkout page.
For this method, we will need FunnelKit FunnelKit Builder (both free and pro versions).
Make sure you install and activate the plugins before moving to the main process.
Step 1: Create a store checkout
First, let’s replace the default WooCommerce checkout with a custom, high-converting checkout using FunnelKit Funnel Builder’s prebuilt templates and flexible customization options.
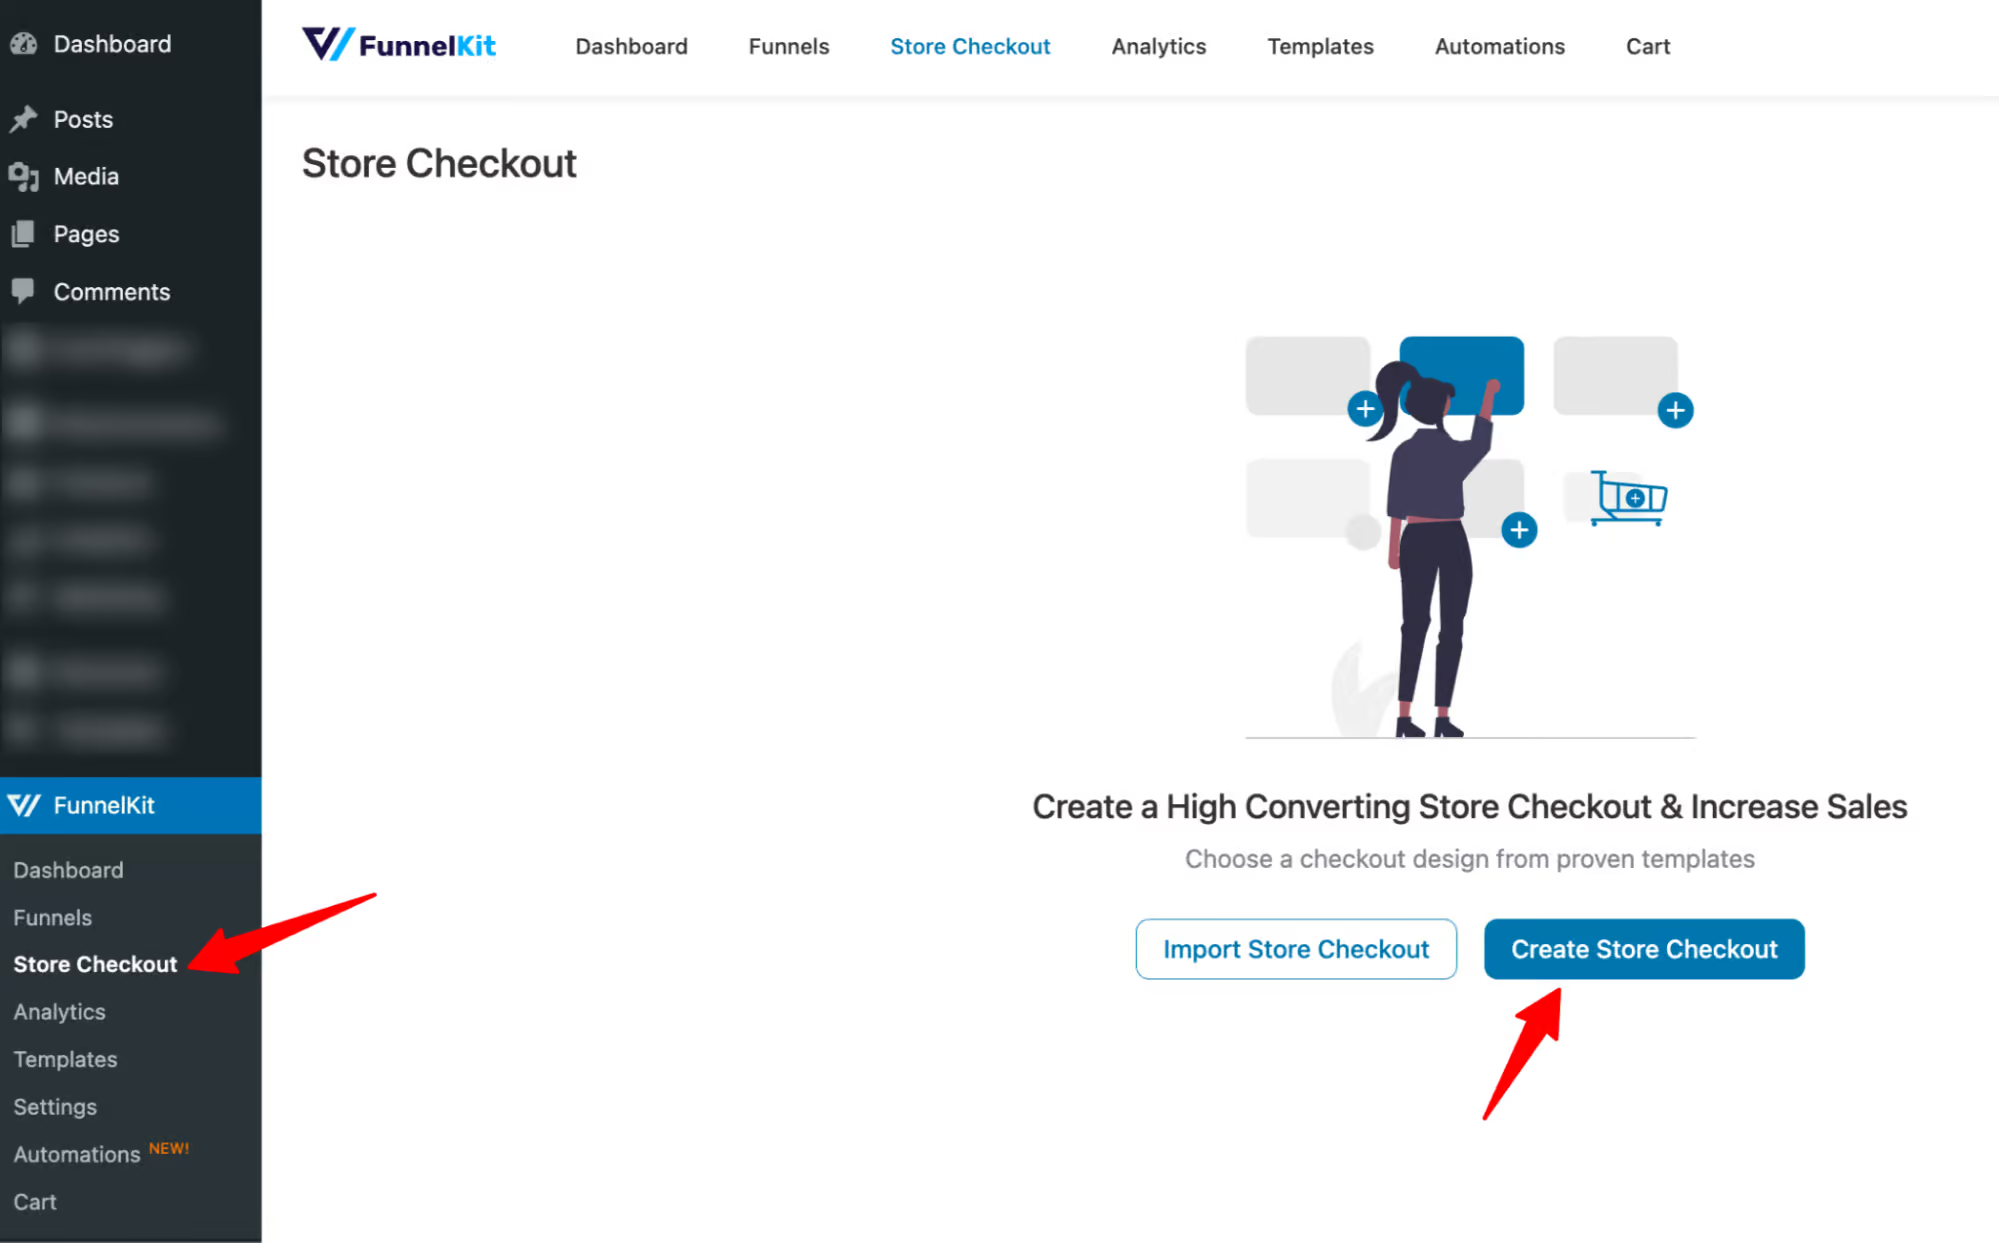
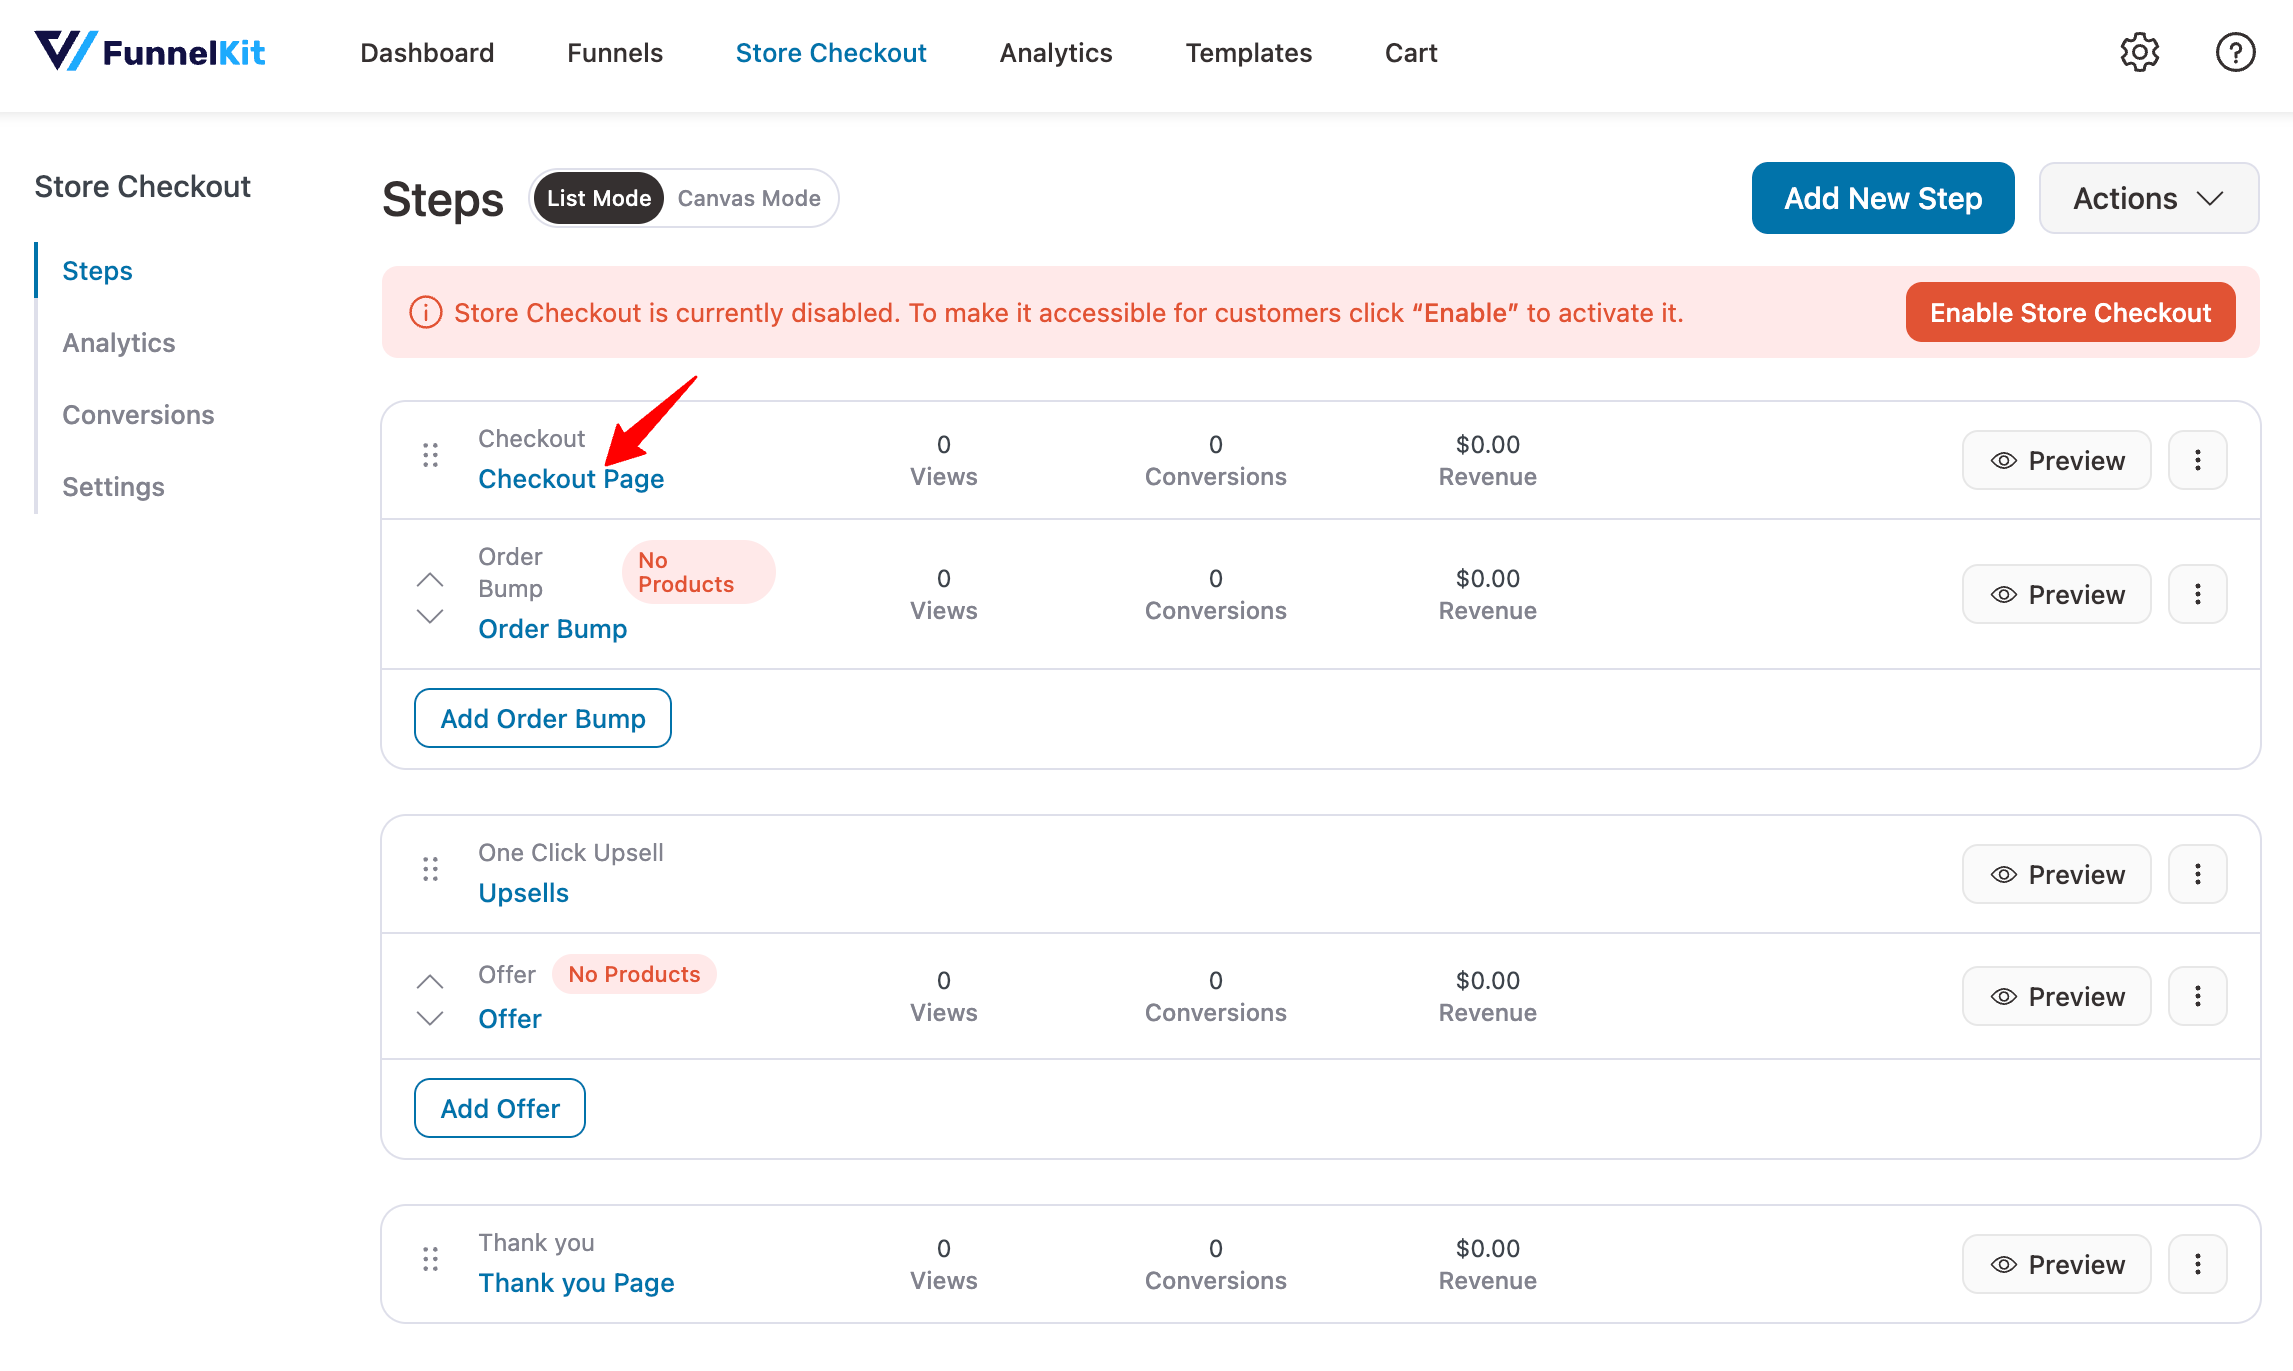
To begin, navigate to FunnelKit ⇨ Store Checkout and click on the ‘Create Store Checkout’ button.
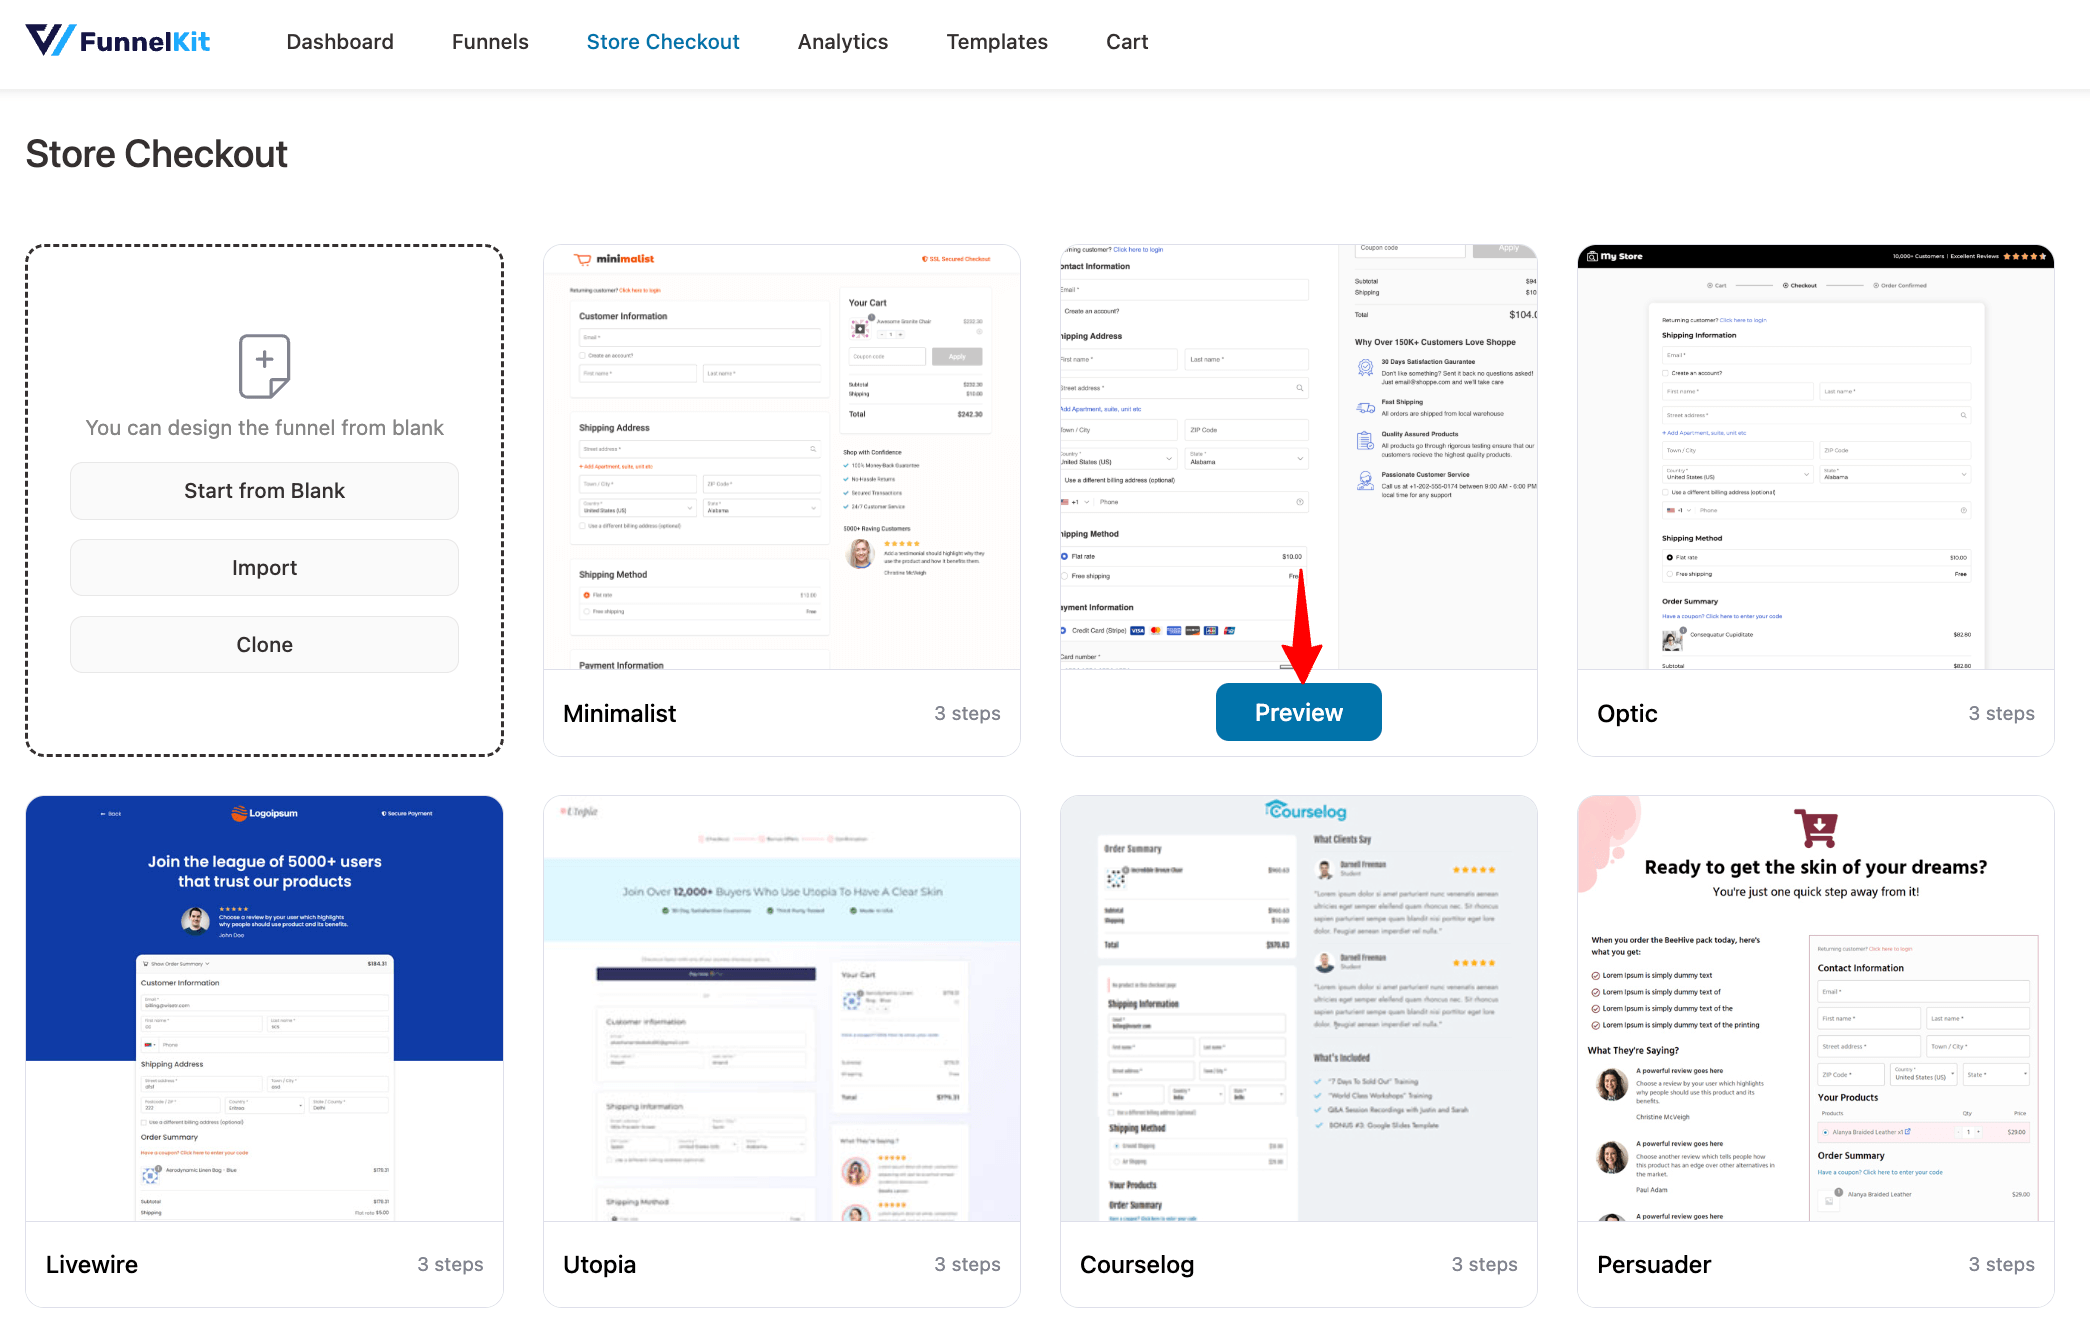
Next, select a store checkout template from the list of pre-designed templates provided by FunnelKit.
To select one, hover on the template you like and click on Preview. I am choosing the Shoppe here.
Now, choose whether you want a one-page checkout or a multi-page checkout.
After that, click on ‘Import This Funnel’, provide a name, and click on Add to import this funnel as your default checkout.
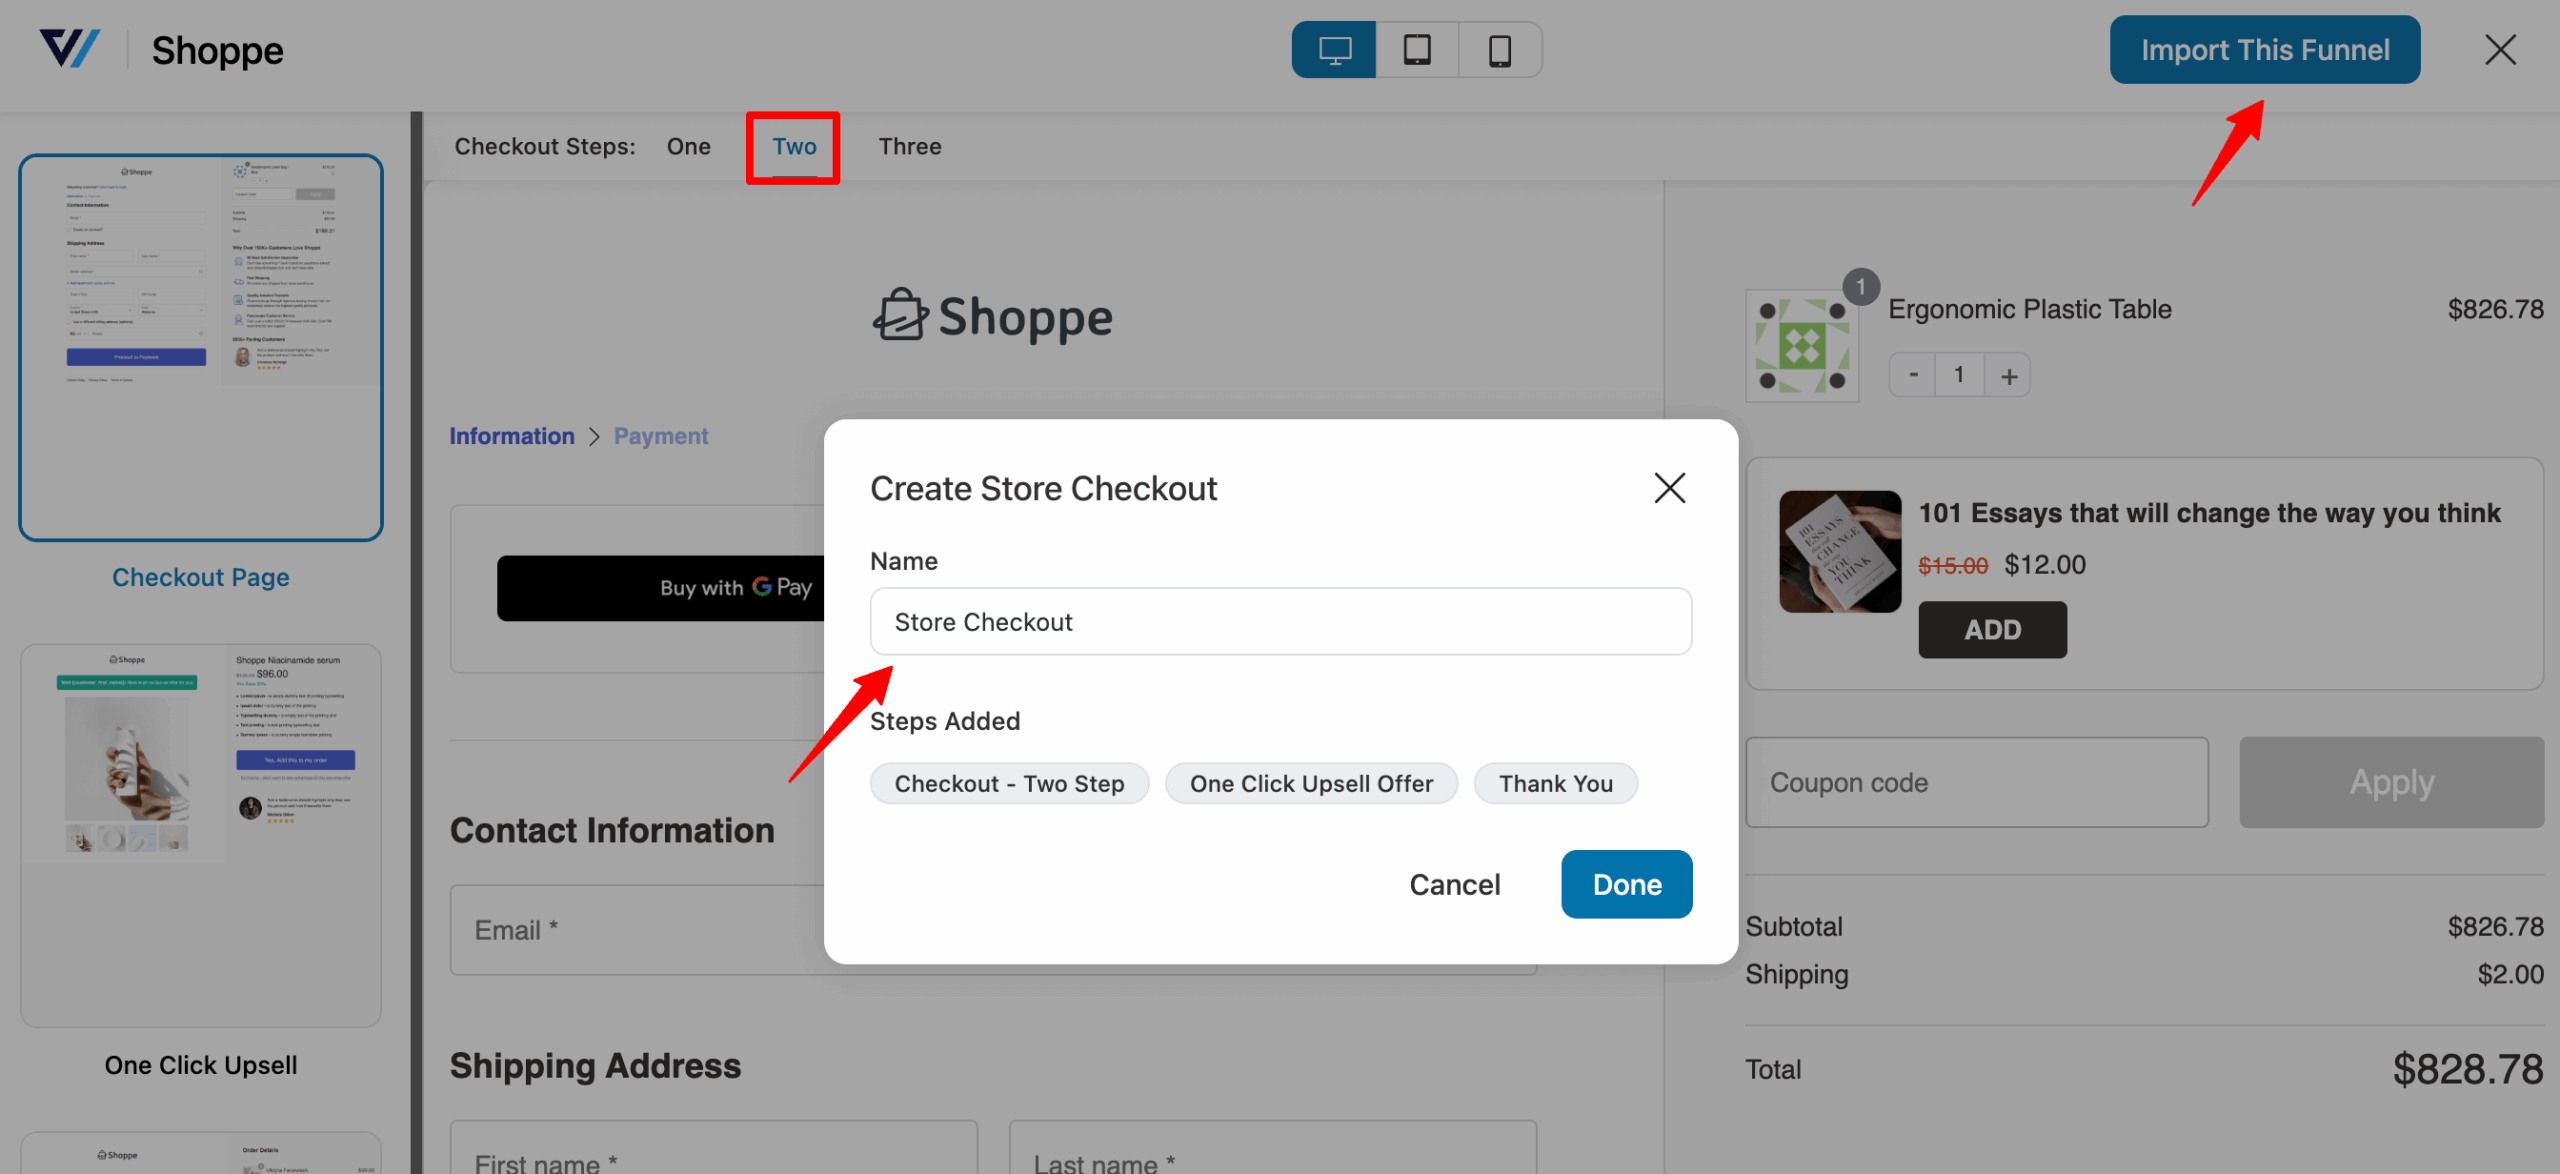
This will import your store's checkout funnel, consisting of three steps: checkout, one-click upsells, and a thank-you page.
Step 2: Create a file upload field to add to the WooCommerce checkout
Now it's time to edit the checkout template and add the file upload field you created earlier to the checkout page.
For that, click on the checkout page template.
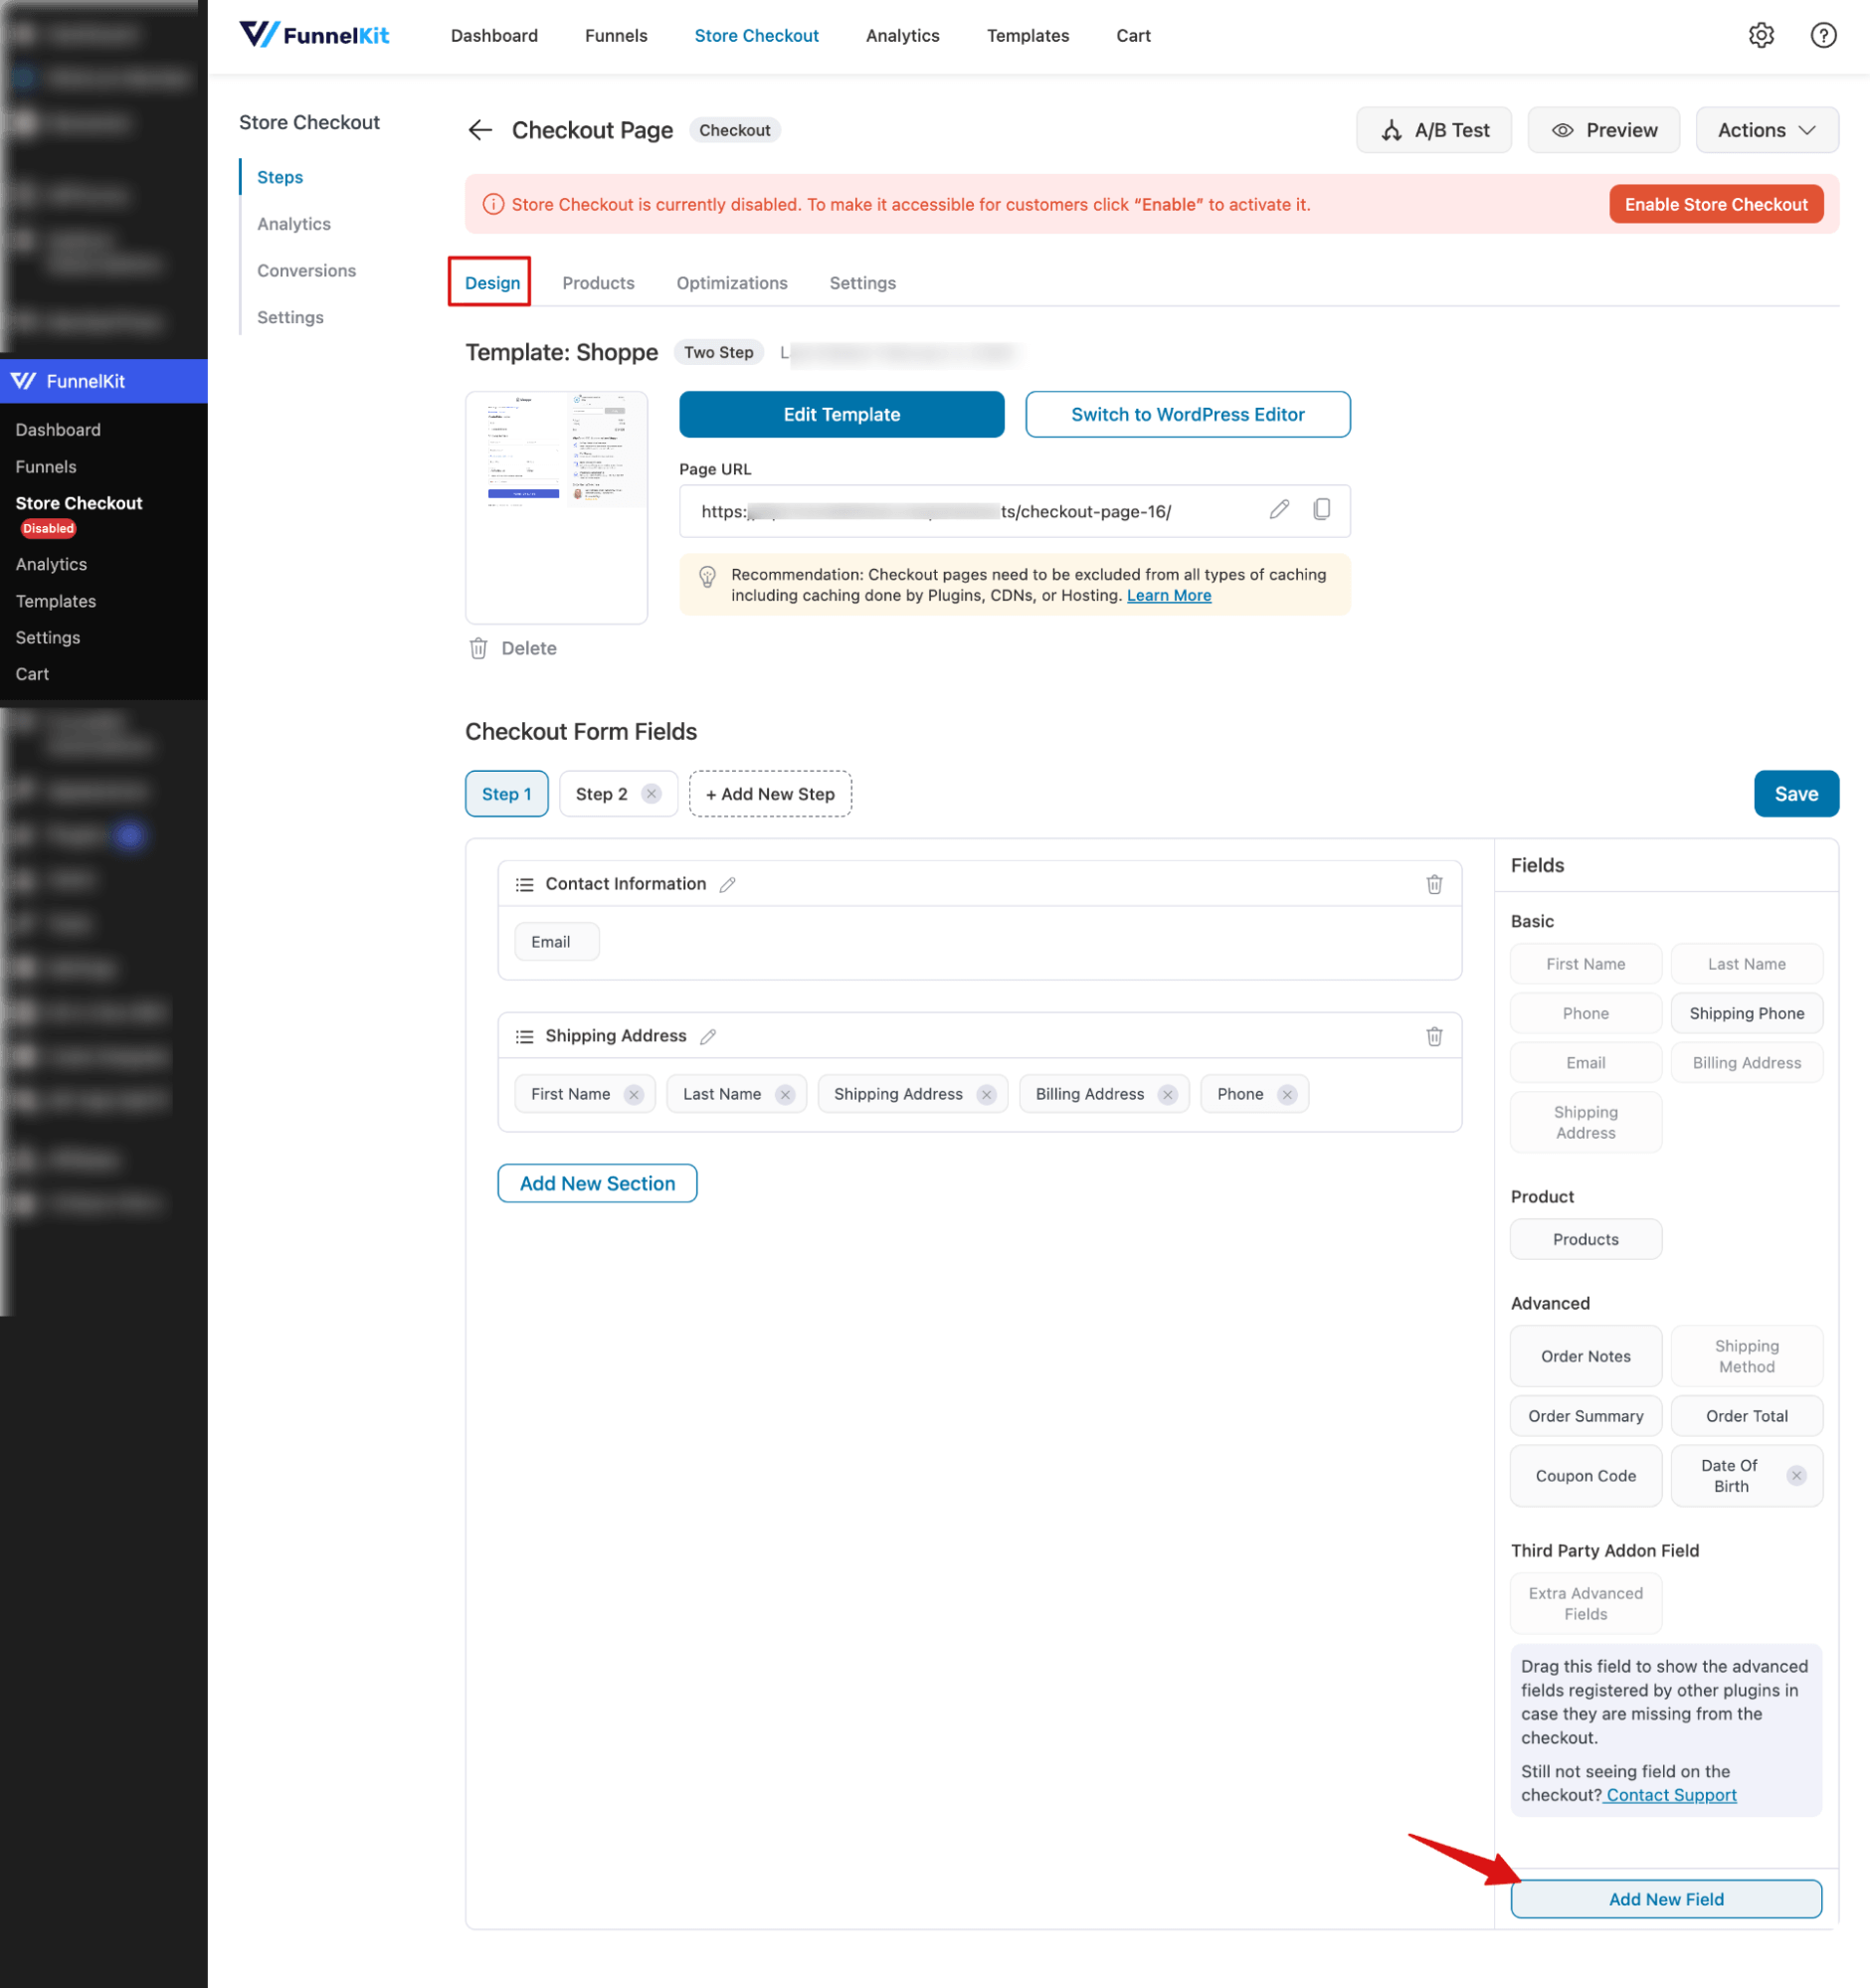
On the Design tab, you can customize the design and content of the checkout template by clicking on the ‘Edit Template’ option.
To create a file upload field, first scroll down to the checkout form fields section. Next, go to the Advanced section and click ‘Add New Field’.
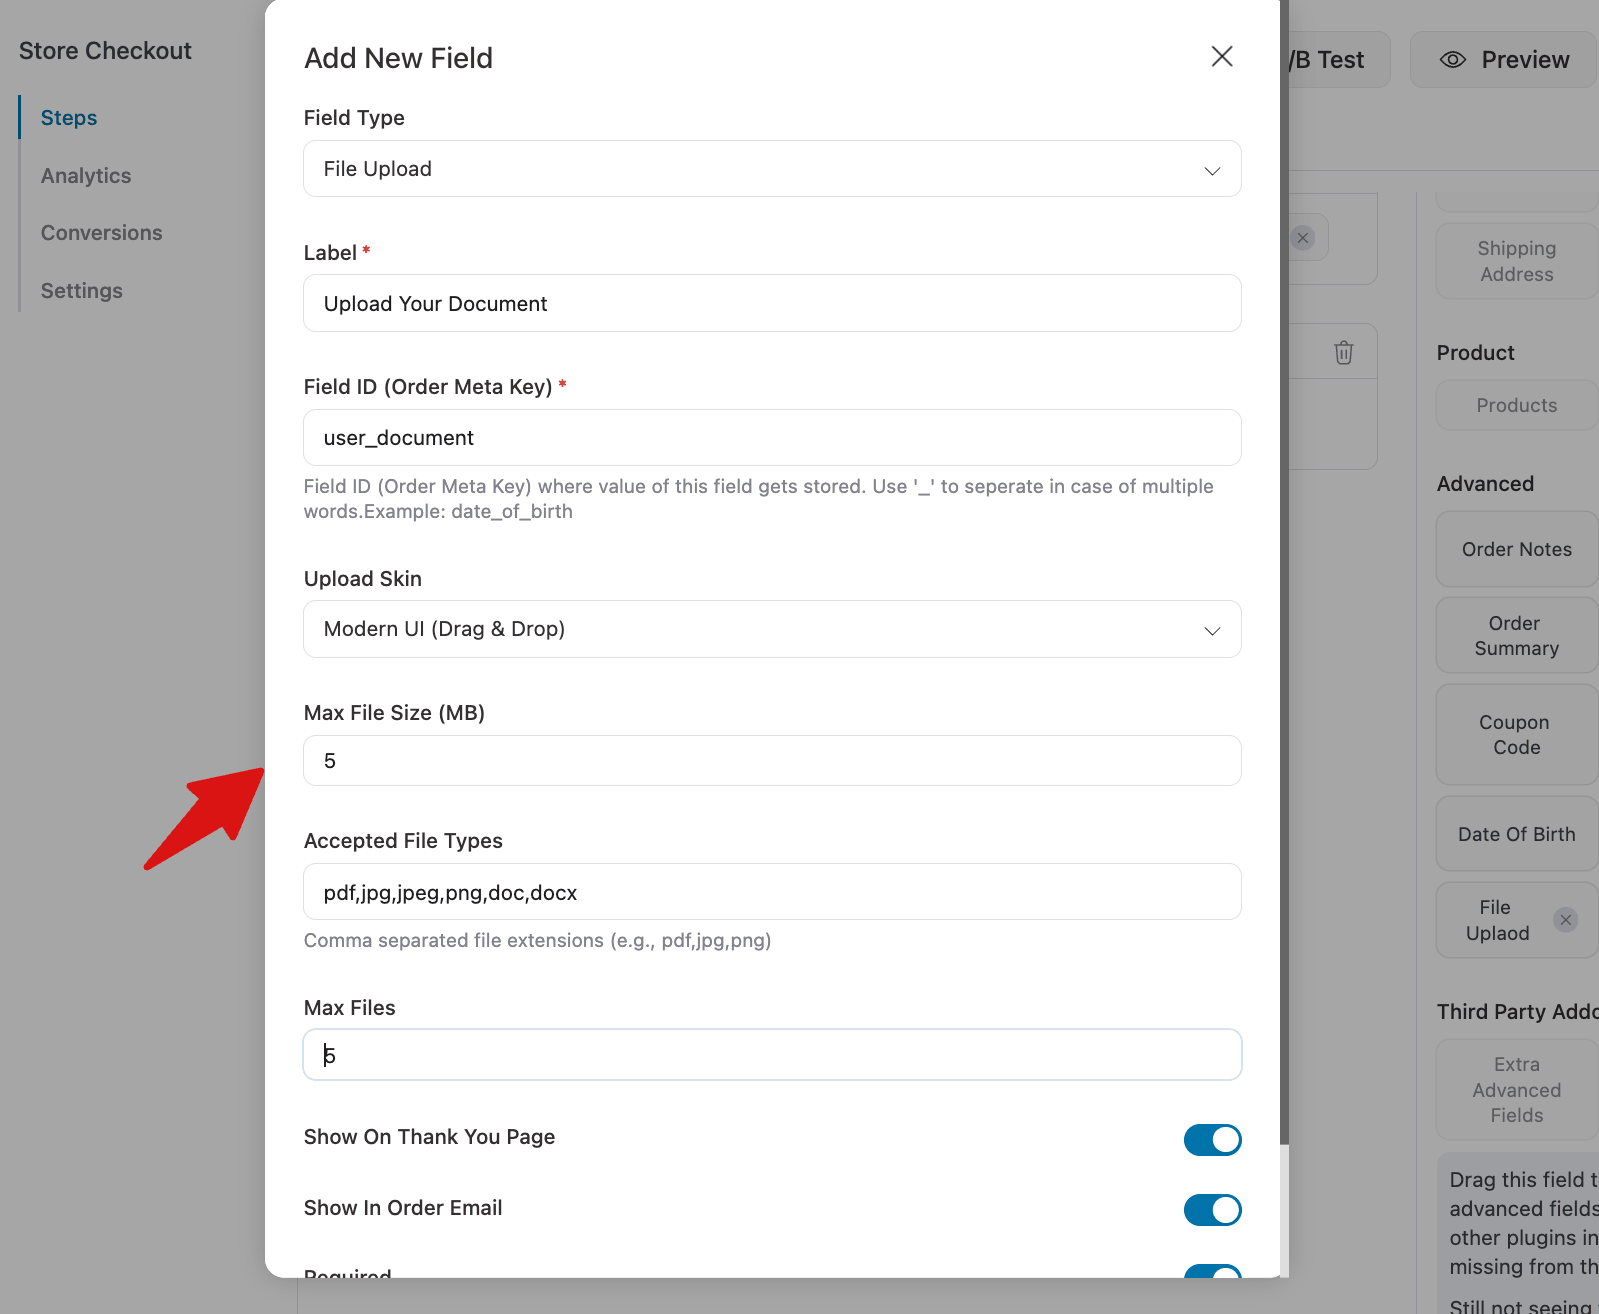
To add a file upload field at checkout, configure the following settings:
- Add New Field: Click to create a new custom checkout field.
- Field Type: Select File Upload.
- Label: Enter a label for the field. Example: “Upload Your Document”.
- Field ID (Order Meta Key): Add a field ID where the uploaded file value will be stored. Example:
user_document(use underscores if using multiple words). - Upload Skin: Choose the style or skin for the file upload field. You get two options: Modern UI (drag-and-drop) and the Upload button.
- Max File Size (MB): Set the maximum allowed file size. Example: 5 MB.
- Accepted File Types: Specify allowed file types, separated by commas. Example:
pdf,jpg,jpeg,png,doc,docx. - Max Files: Set the maximum number of files the customer can upload. Example: 5.
- Show On Thank You Page: Enable to display the uploaded file on the order confirmation page.
- Show In Order Email: Enable to include uploaded files in order emails using merge tags.
- Required: Enable if this field must be filled by the customer. In this case, it’s optional.
Finally, click Add to create the custom file upload field on your WooCommerce checkout page.
Step 3: Drag and drop the file upload field to checkout
The new file upload field will appear in the Advanced section. To add it to the checkout form, simply drag and drop it into the desired section.
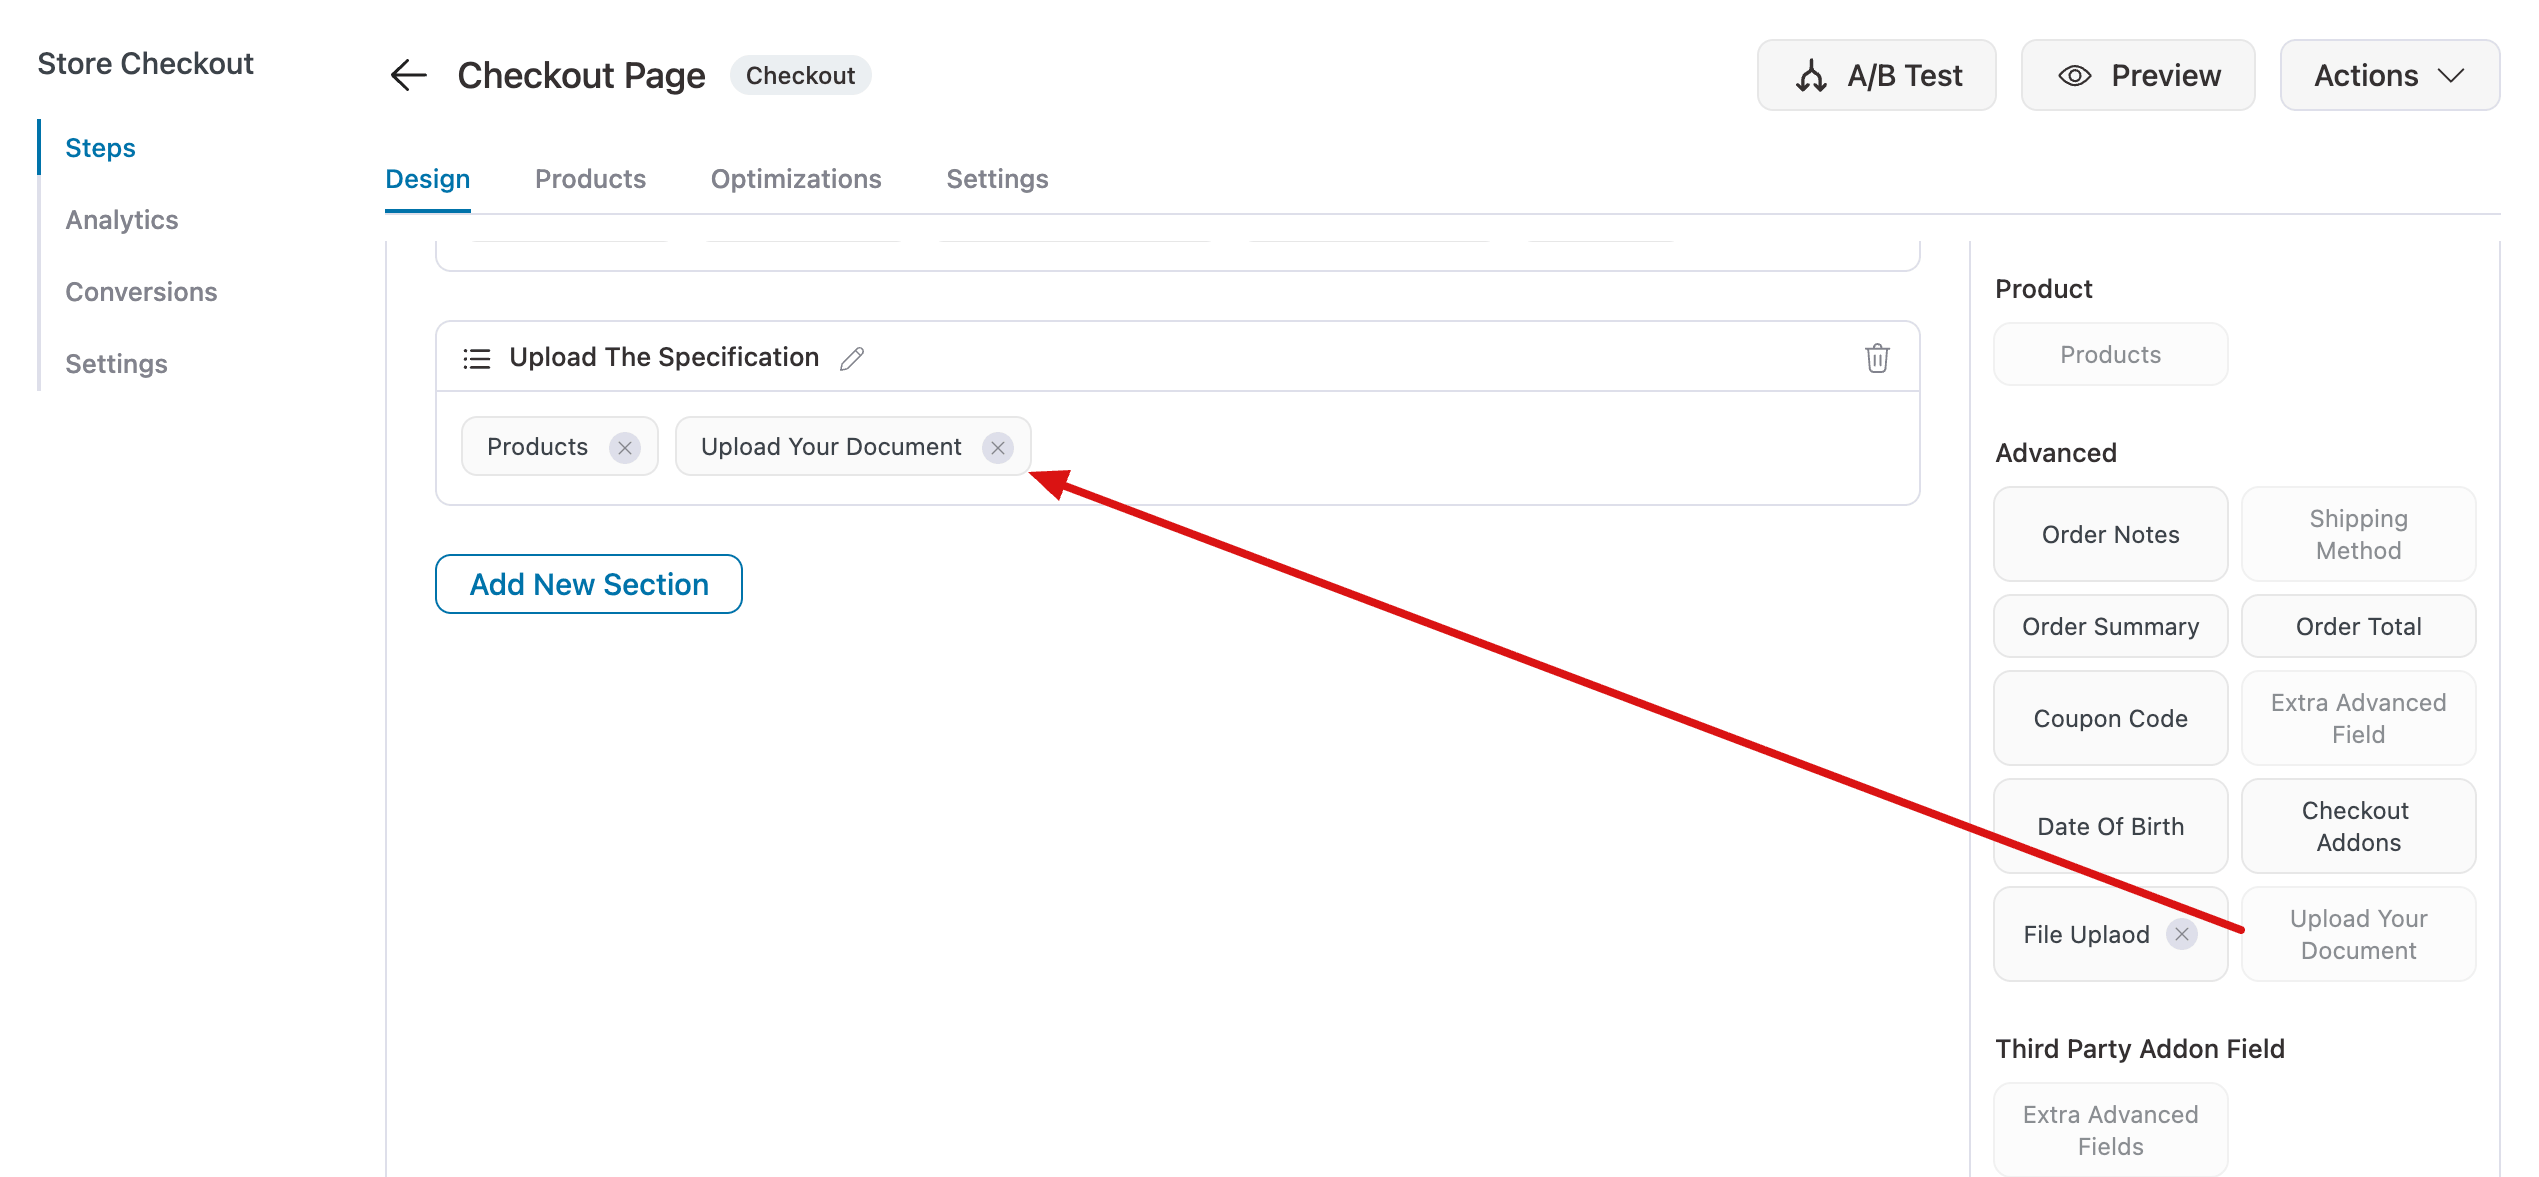
Make sure to hit Save changes.
Step 4: Add conditions for the file upload field (optional)
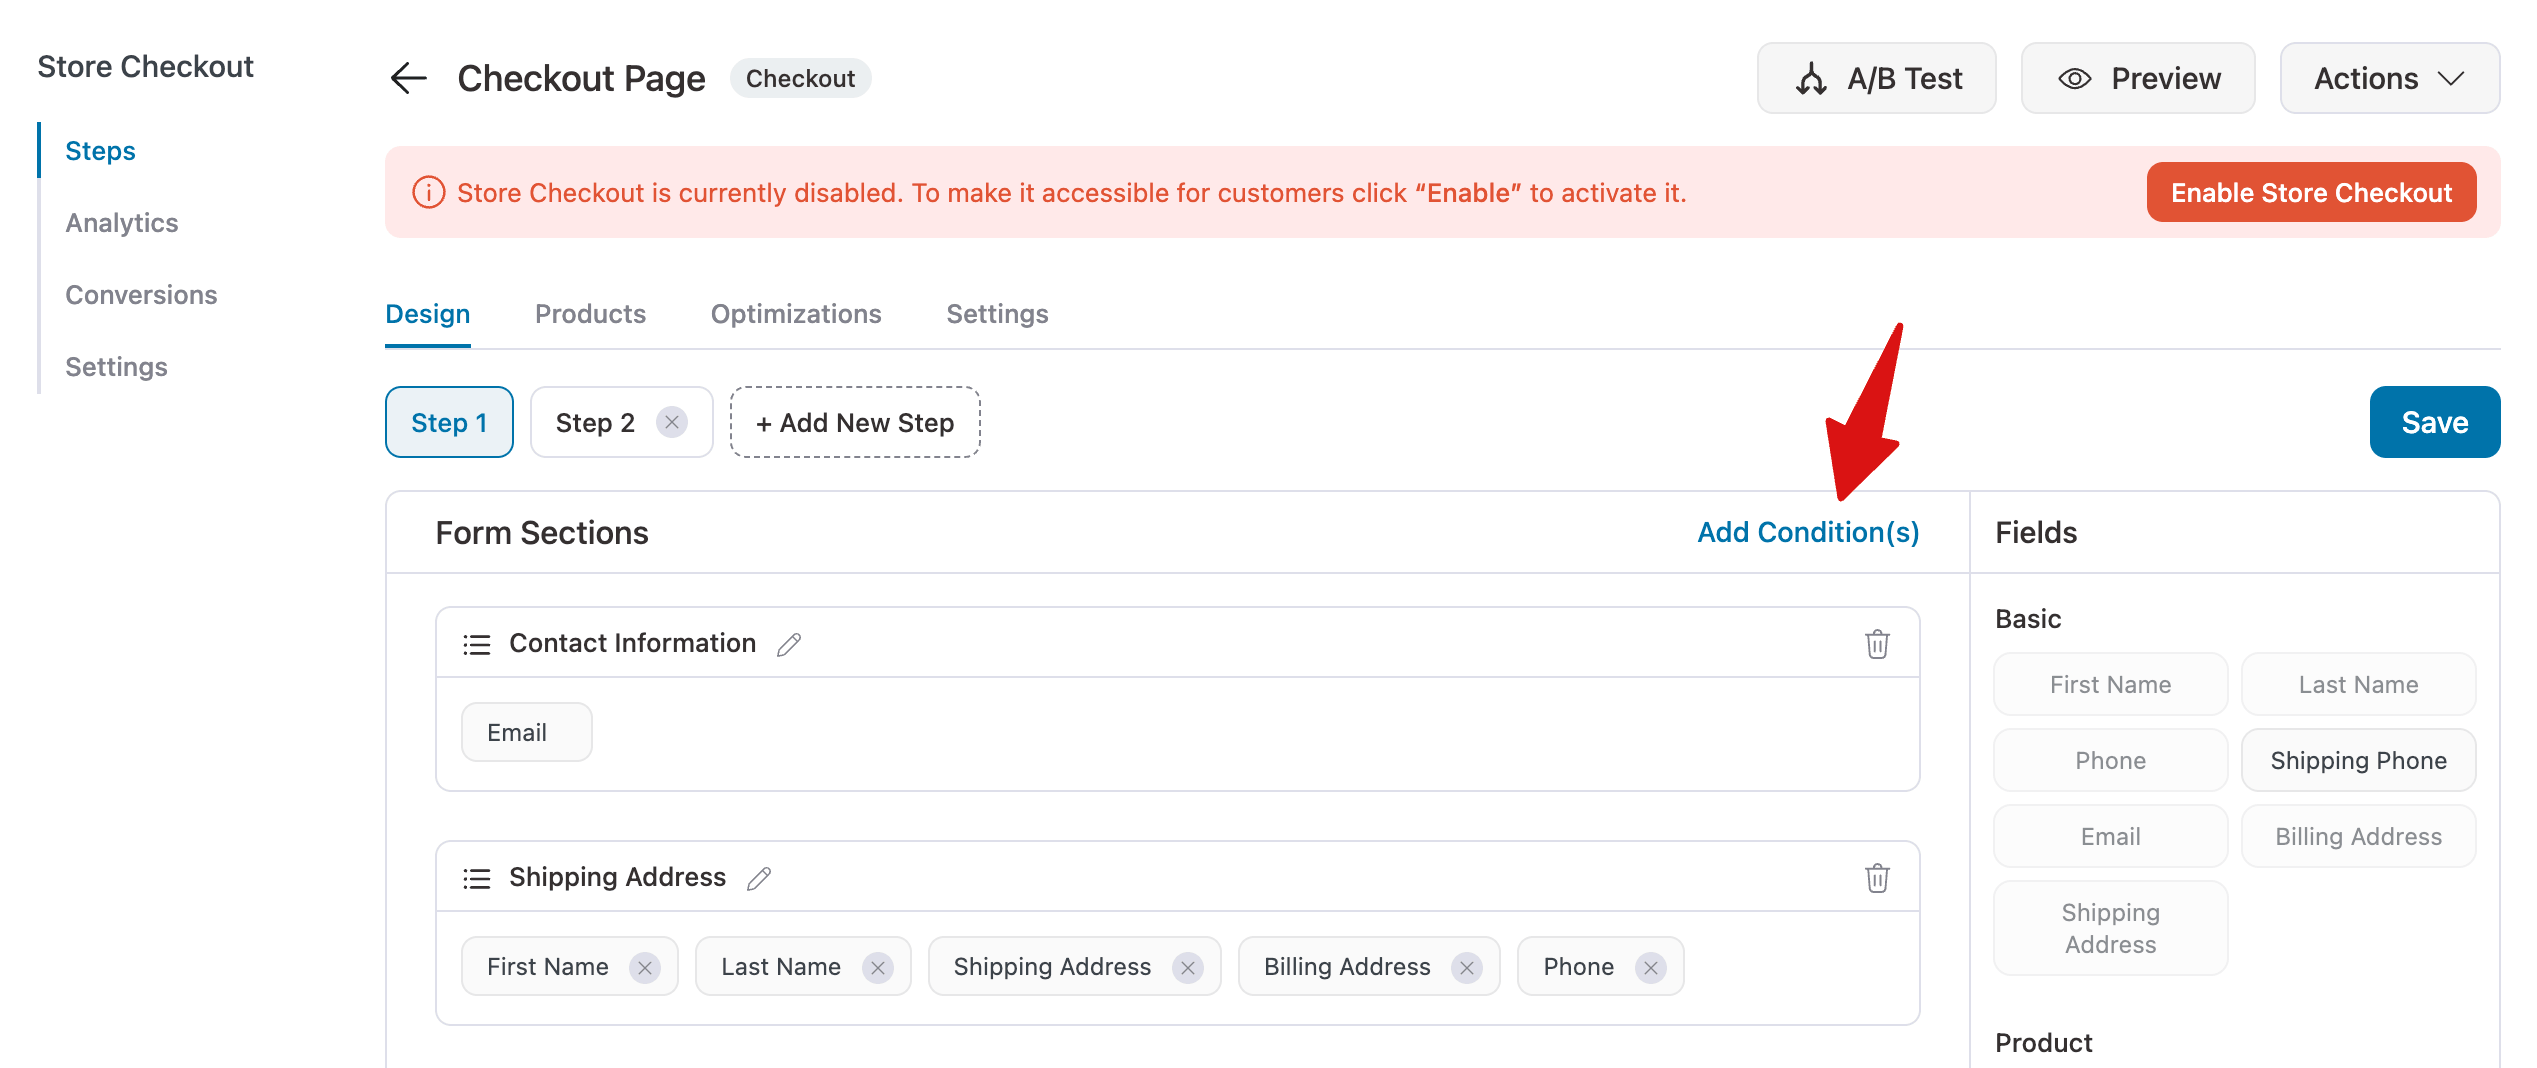
Now, you can add conditions for the file duplicate field. For this, scroll up and hit "Add Condition(s)".
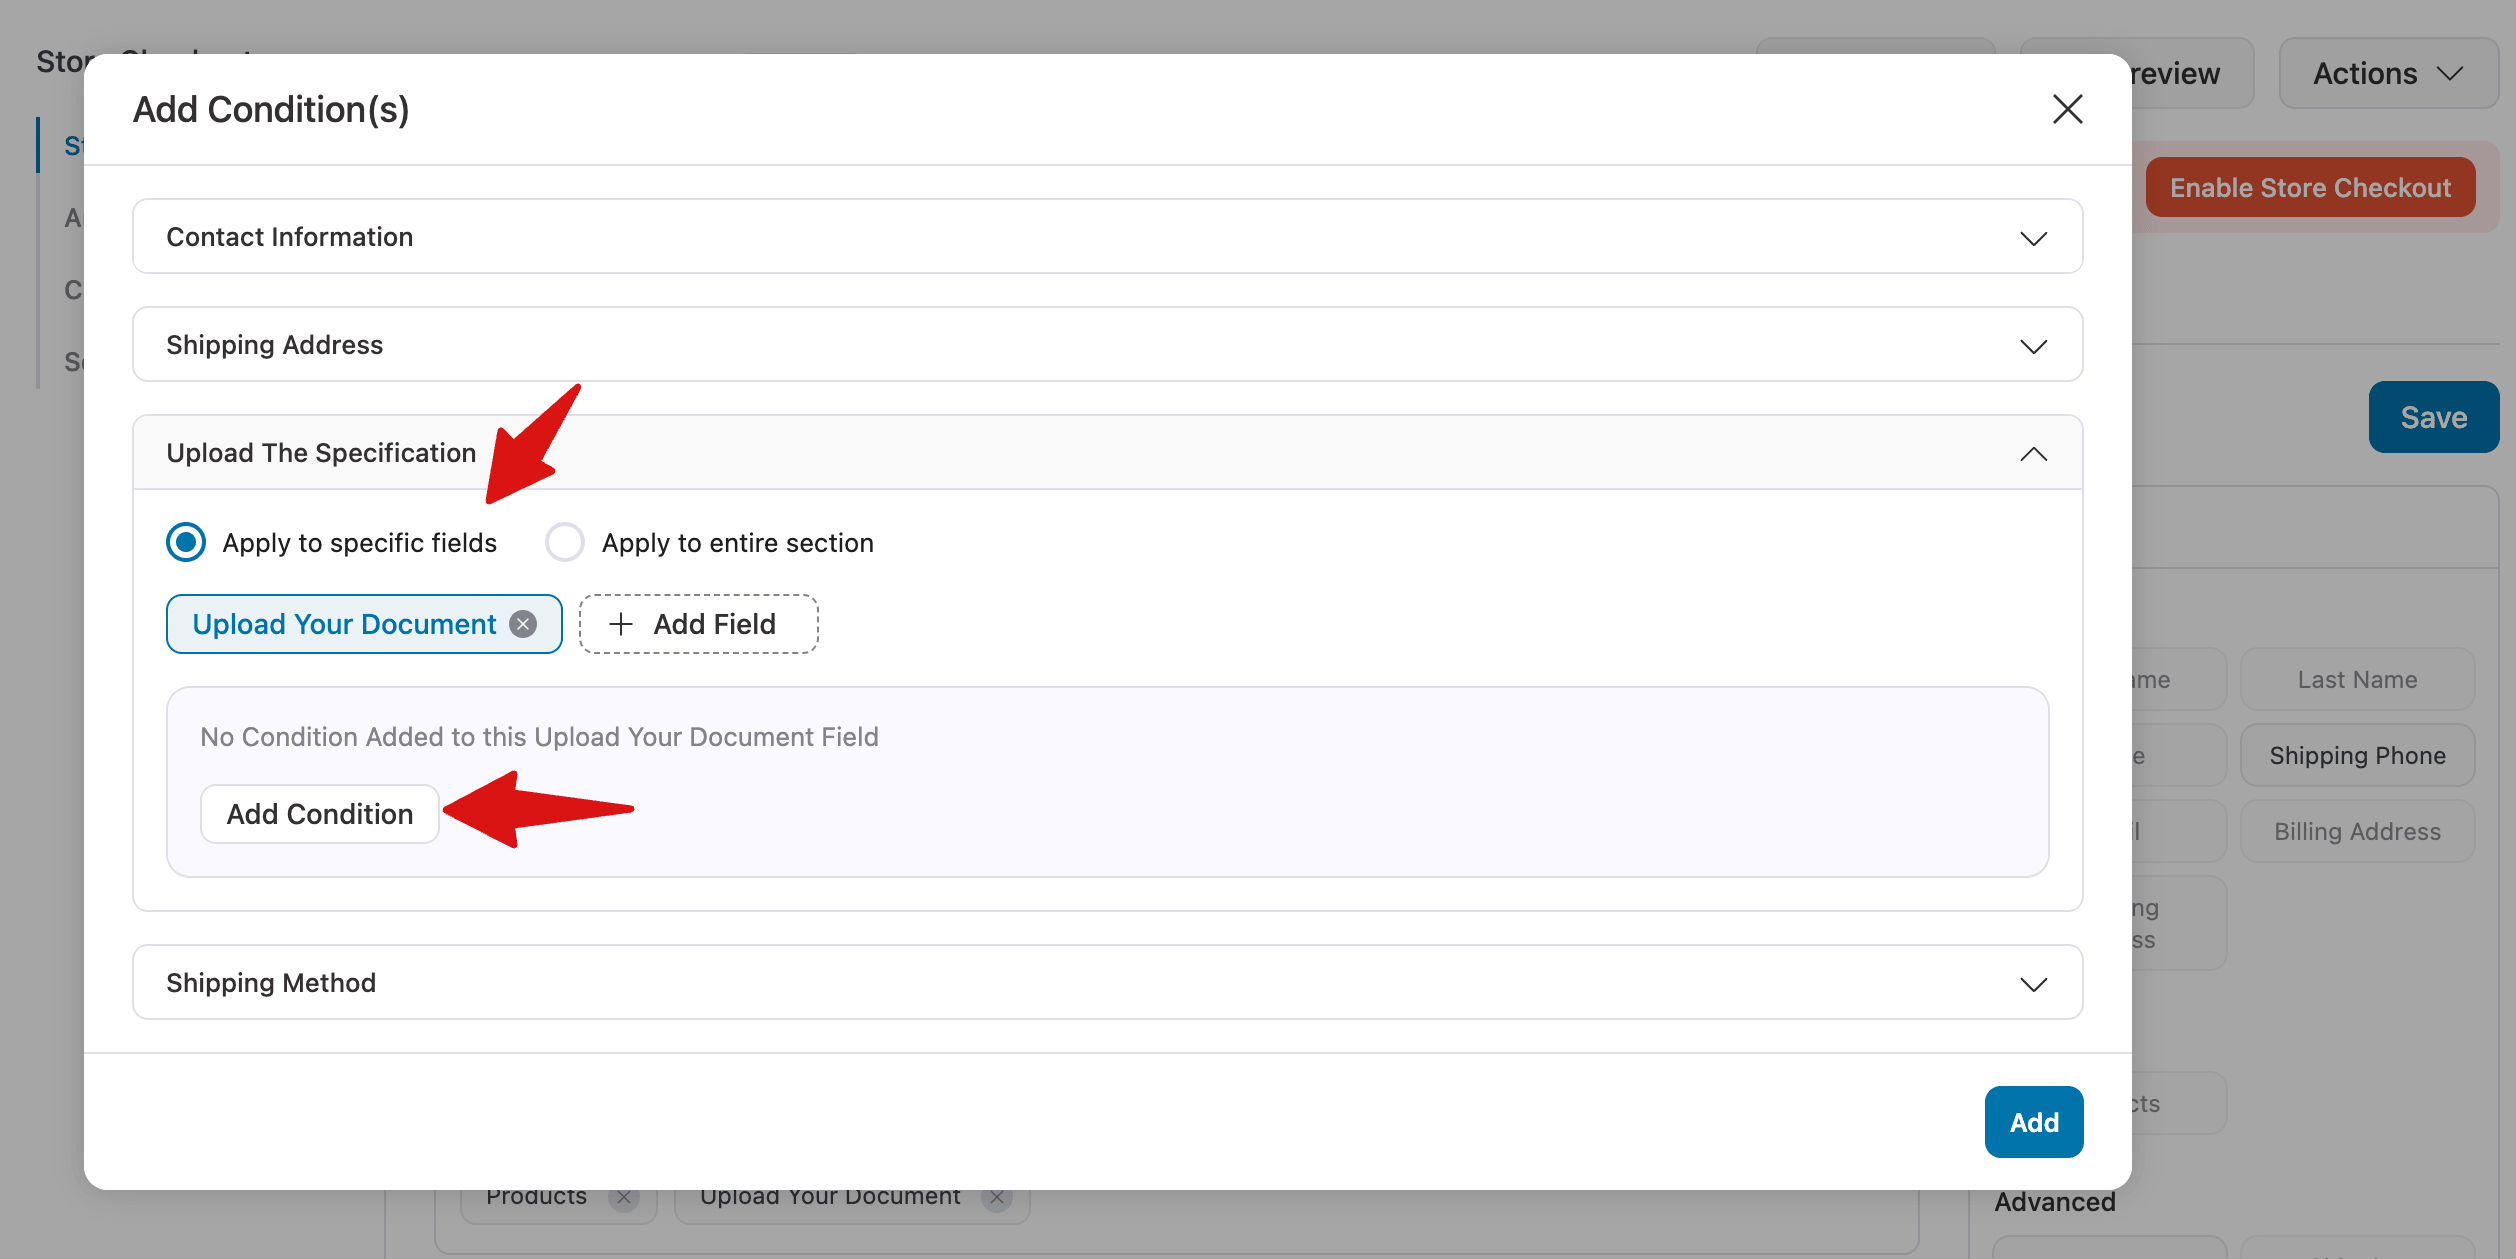
Next, expand the section in which you added the file upload field. Select the option "Apply to specific fields" and choose the file upload field. Now, to add a condition, hit "Add Condition".
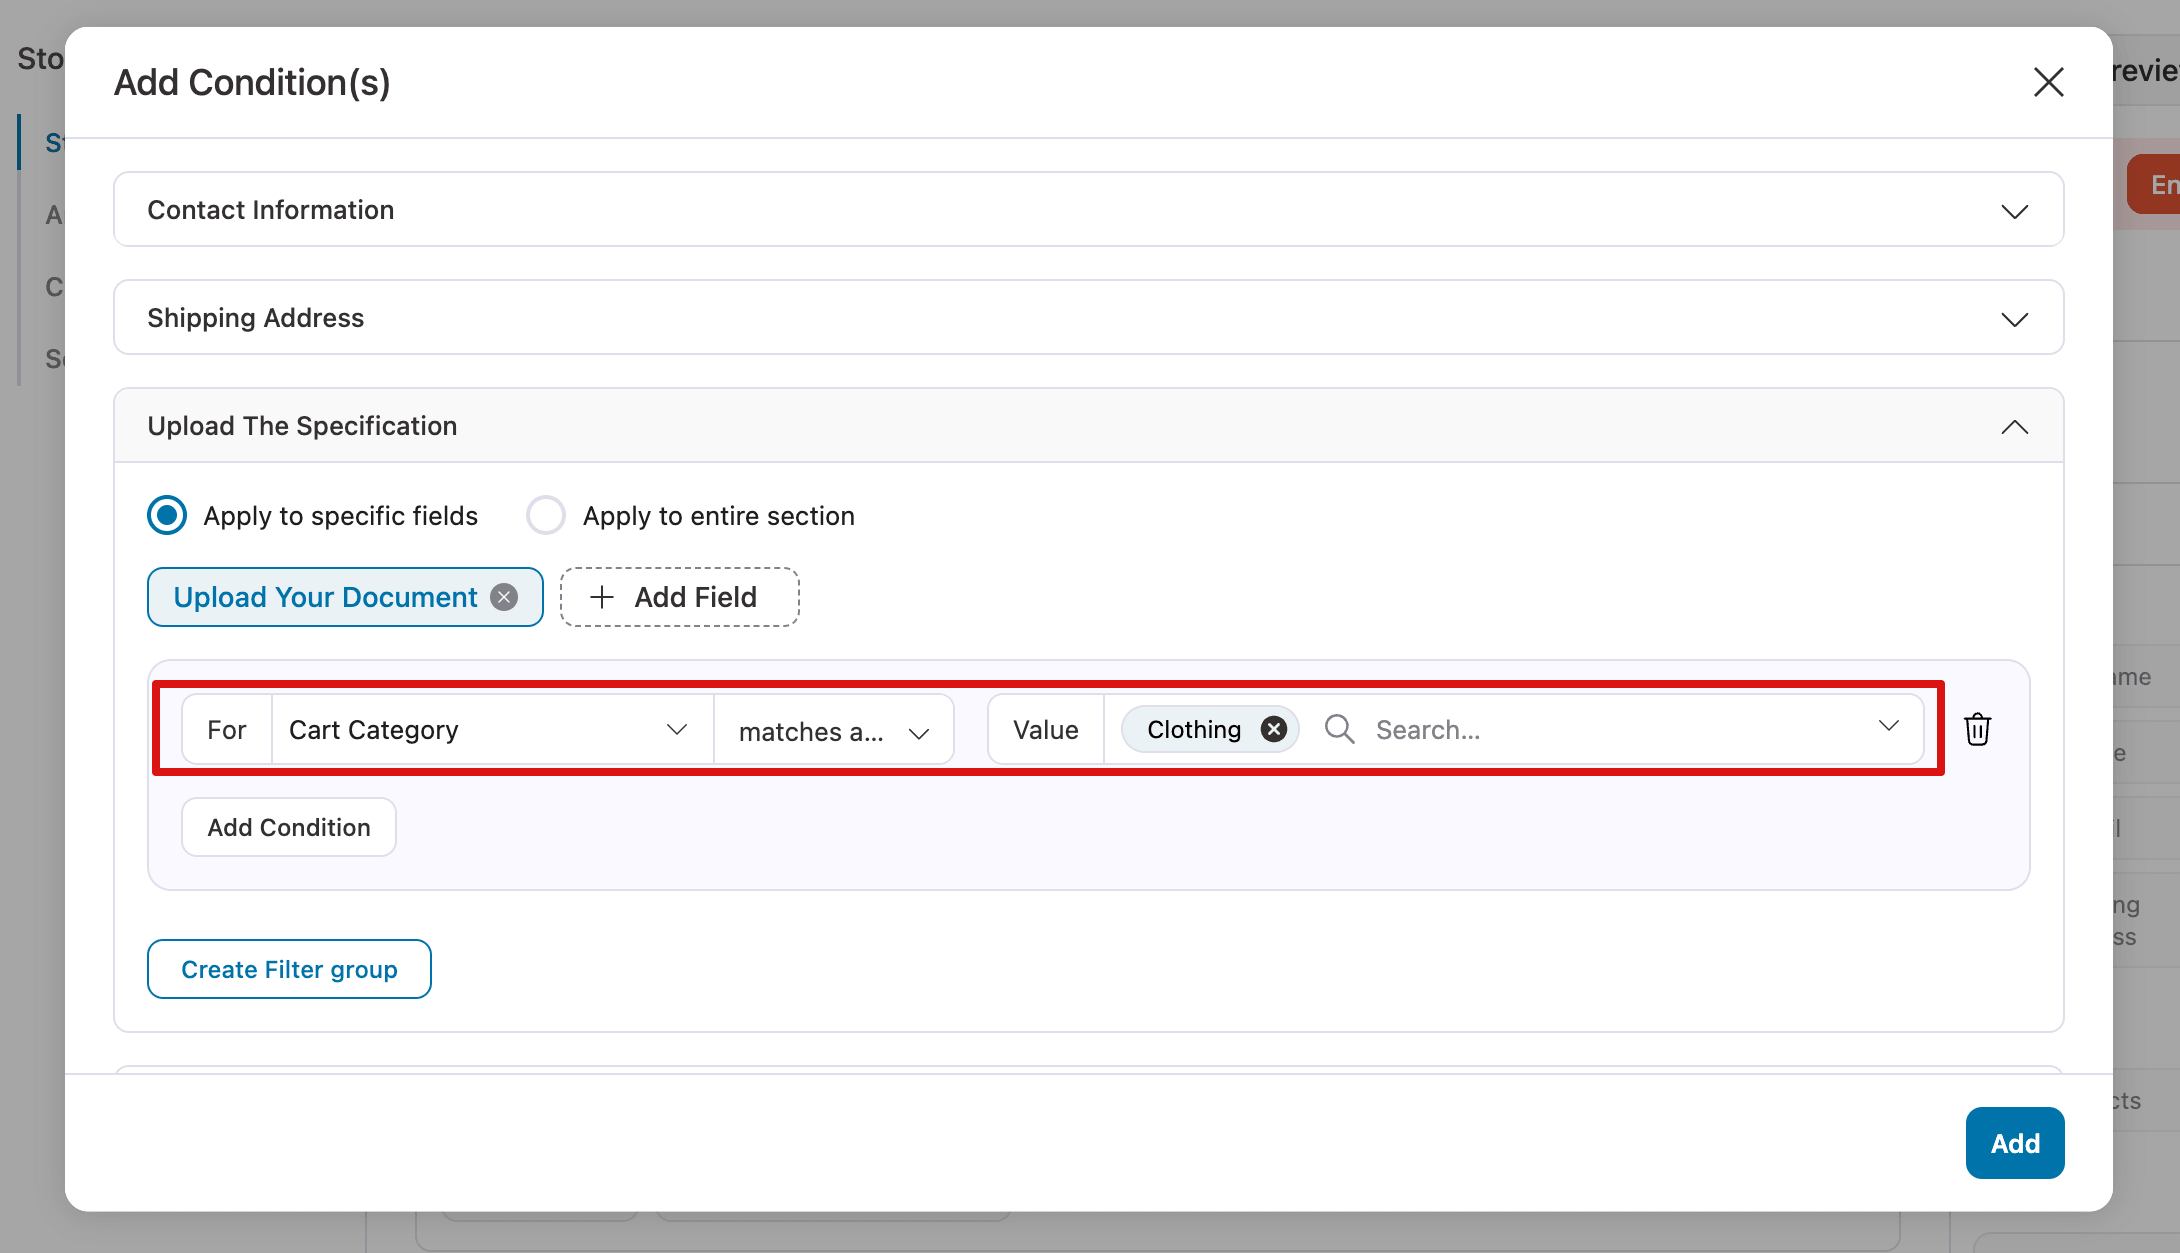
Now you can set conditions based on different criteria, such as:
- User: You can use the user role and user status.
- Cart: You can use Cart Total, Cart Items, Cart Category, Cart Tag, Cart Item Count, Cart Coupons, and whether the cart is virtual.
- Field: You can use any of the available fields on your WooCommerce checkout form.
To add a condition, select a value and then define the rule. For example: Cart Category matches a certain category.
You can also add multiple conditions under the same group or across different groups.
Hit "Add" to add the condition.
Step 5: Activate your store checkout and test the file upload field
Finally, you need to activate the store checkout. For that, turn on the ‘Enable Store Checkout’ button.
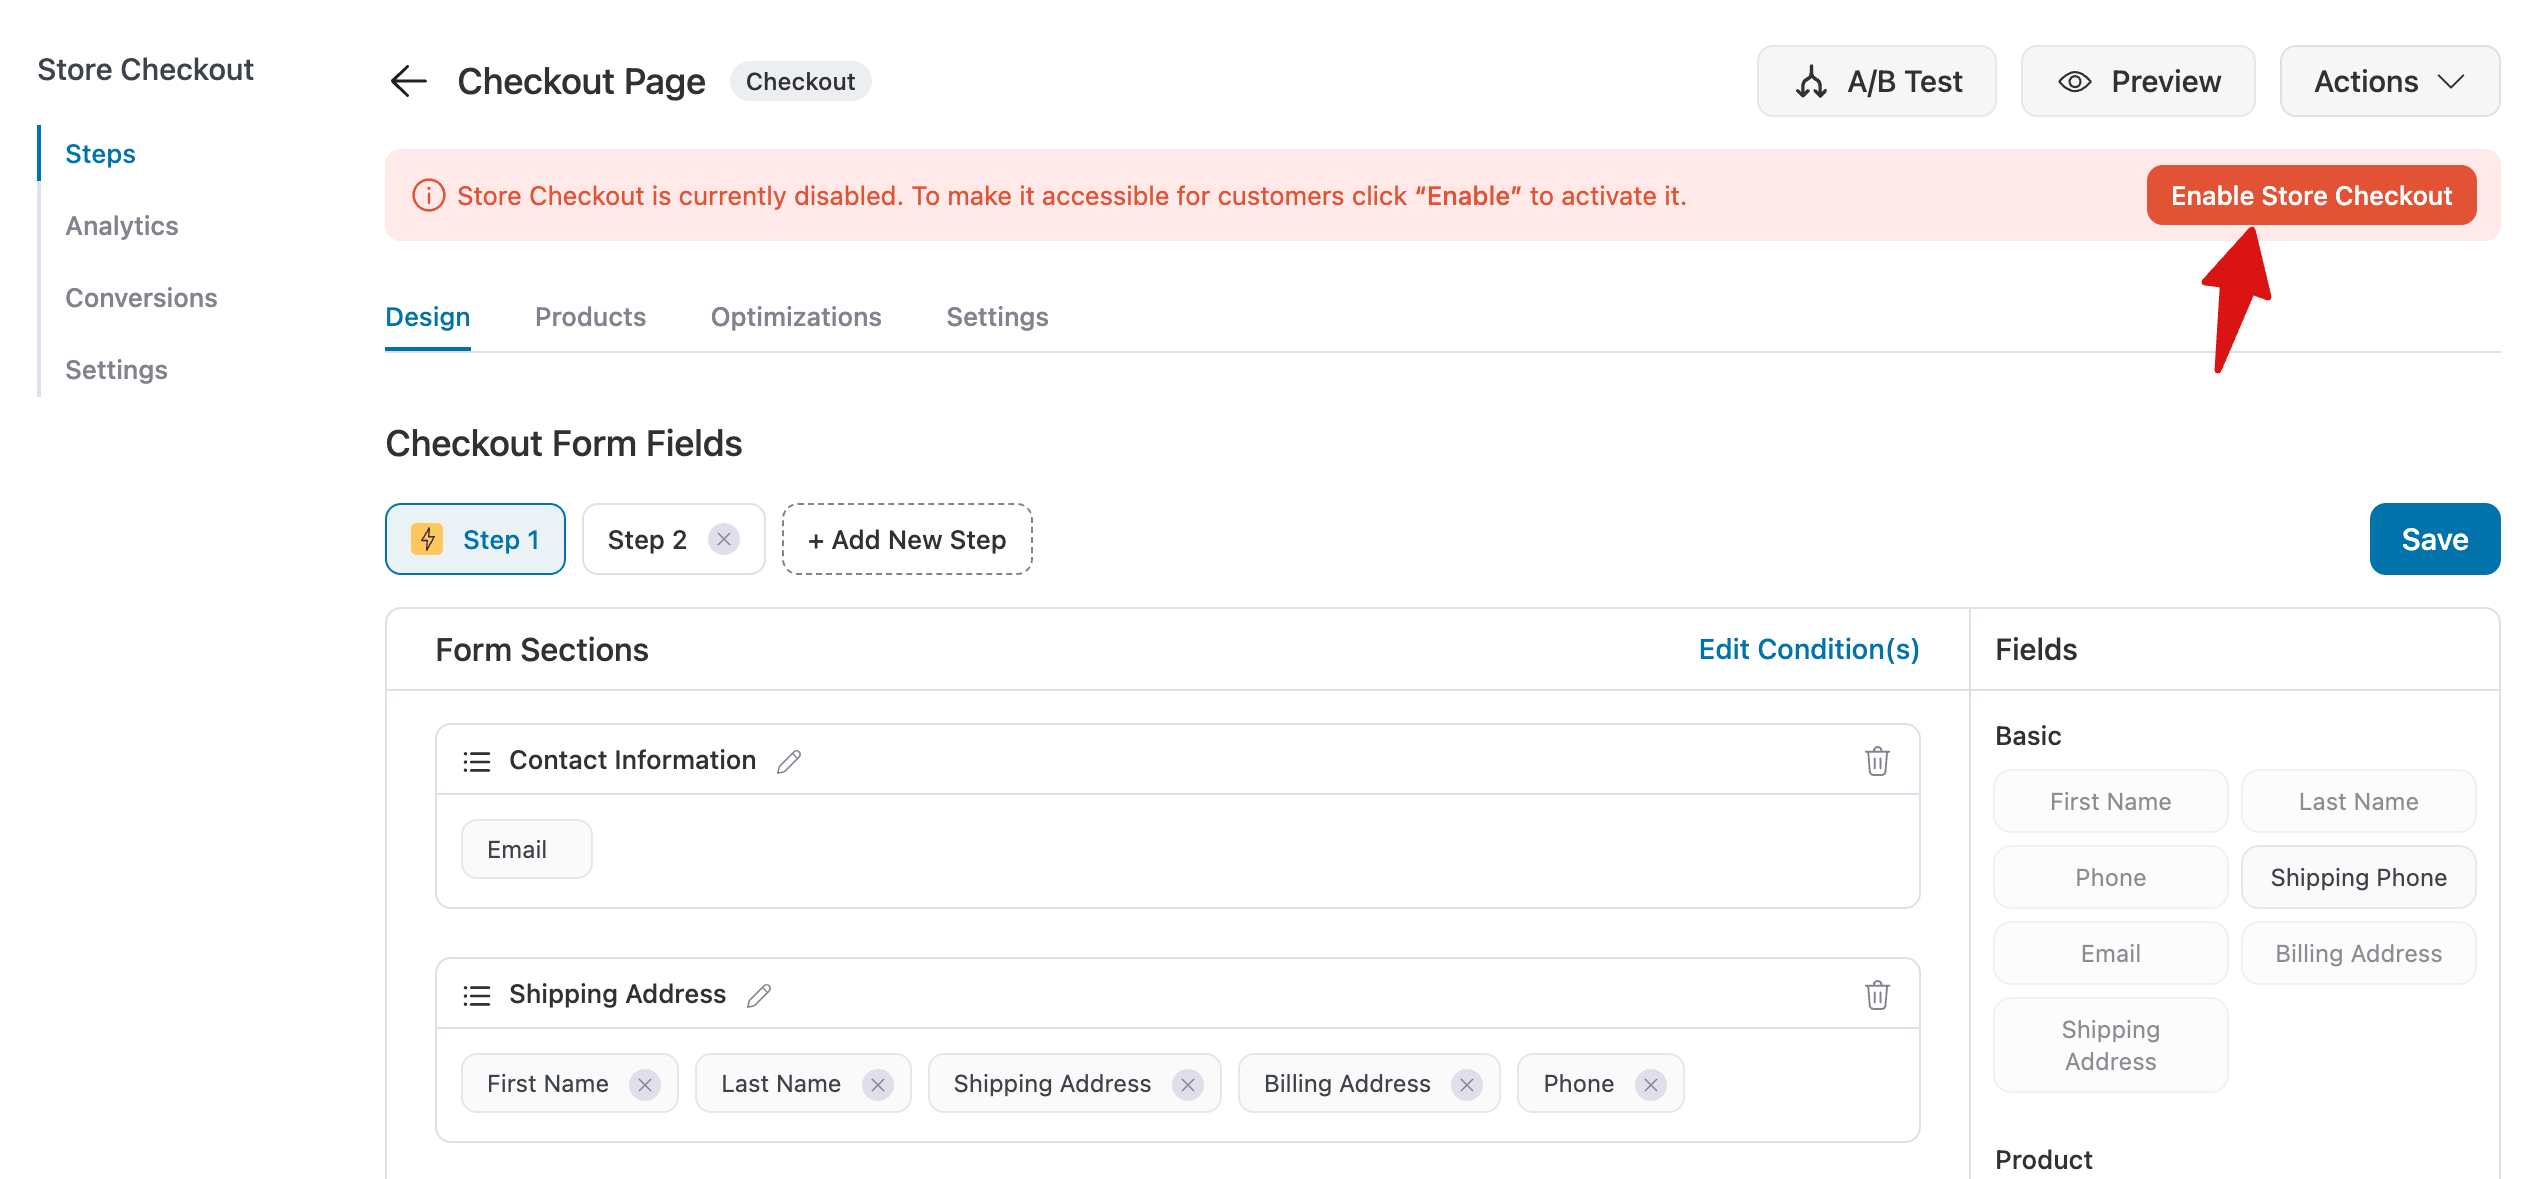
This will make your store checkout active on your website.
Step 6: Test the WooCommerce checkout file upload feature
Test the file upload feature by placing a test order and ensuring it functions smoothly on your WooCommerce checkout.
If you have set conditions, the file upload field will appear only when those conditions are met. Additionally, if the field is set as required, an error message will be shown if the customer tries to proceed without uploading a file.
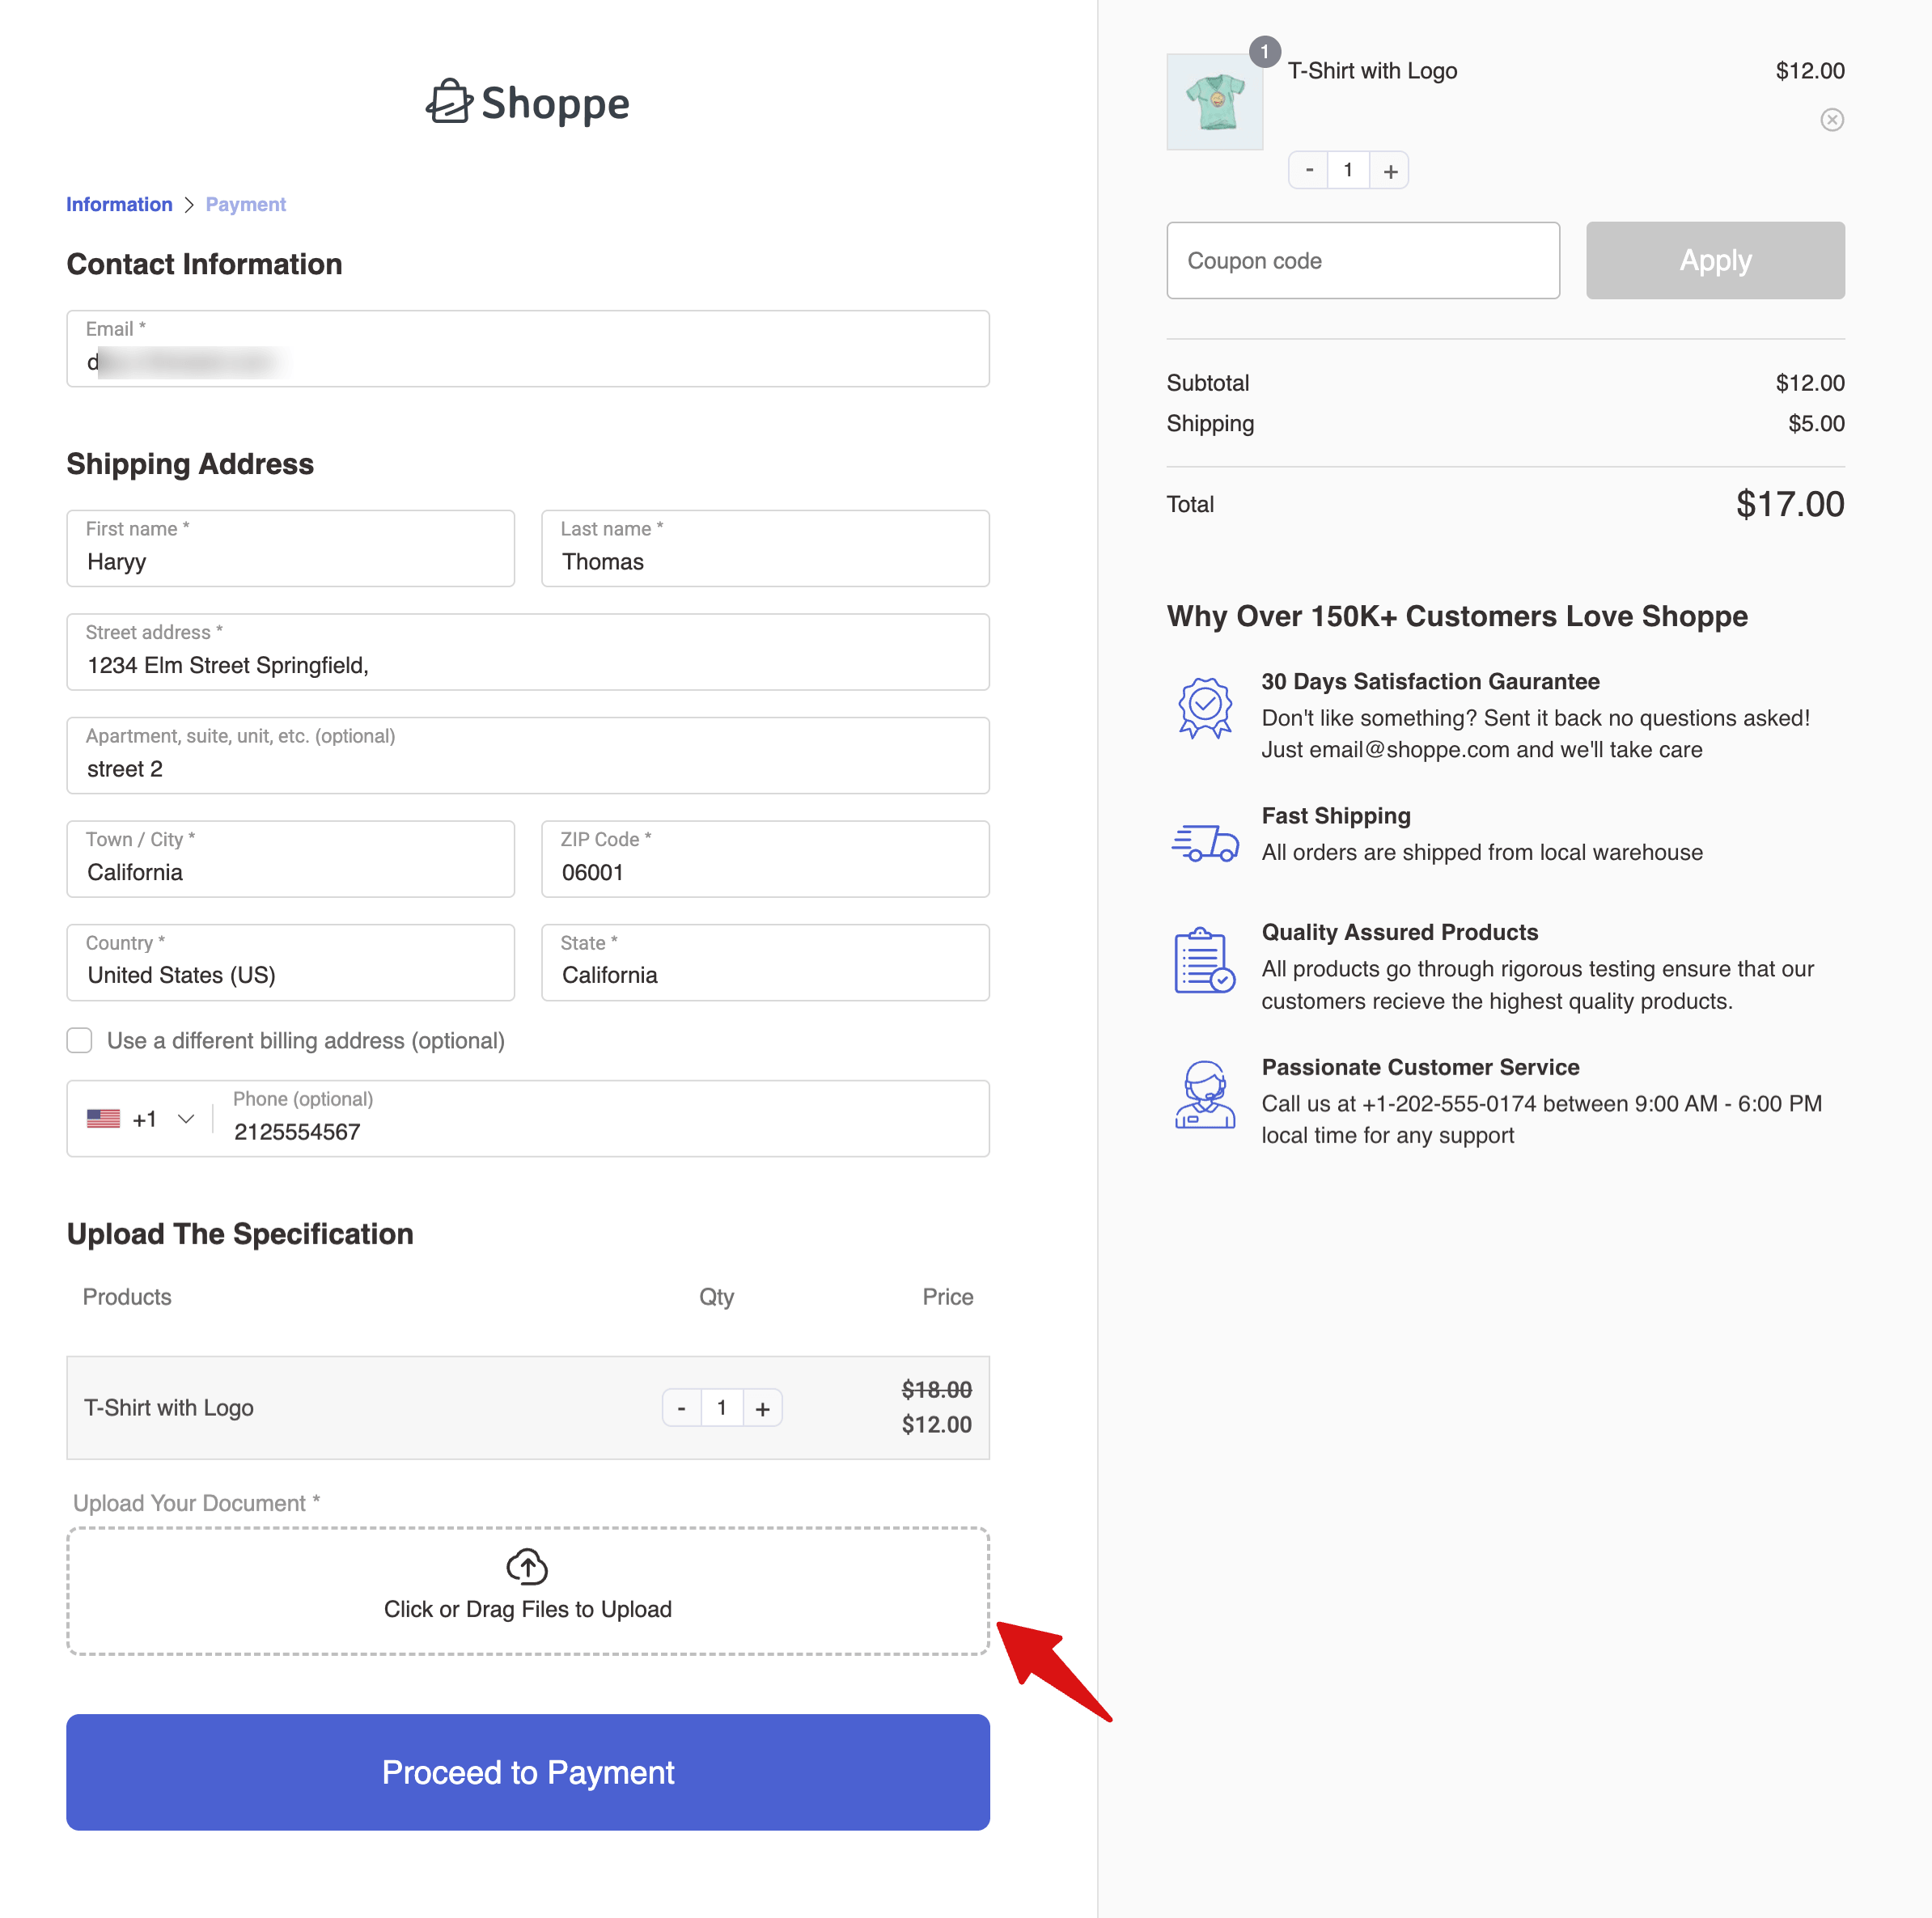
This is how easily you can add a file upload and make a stunning checkout page.
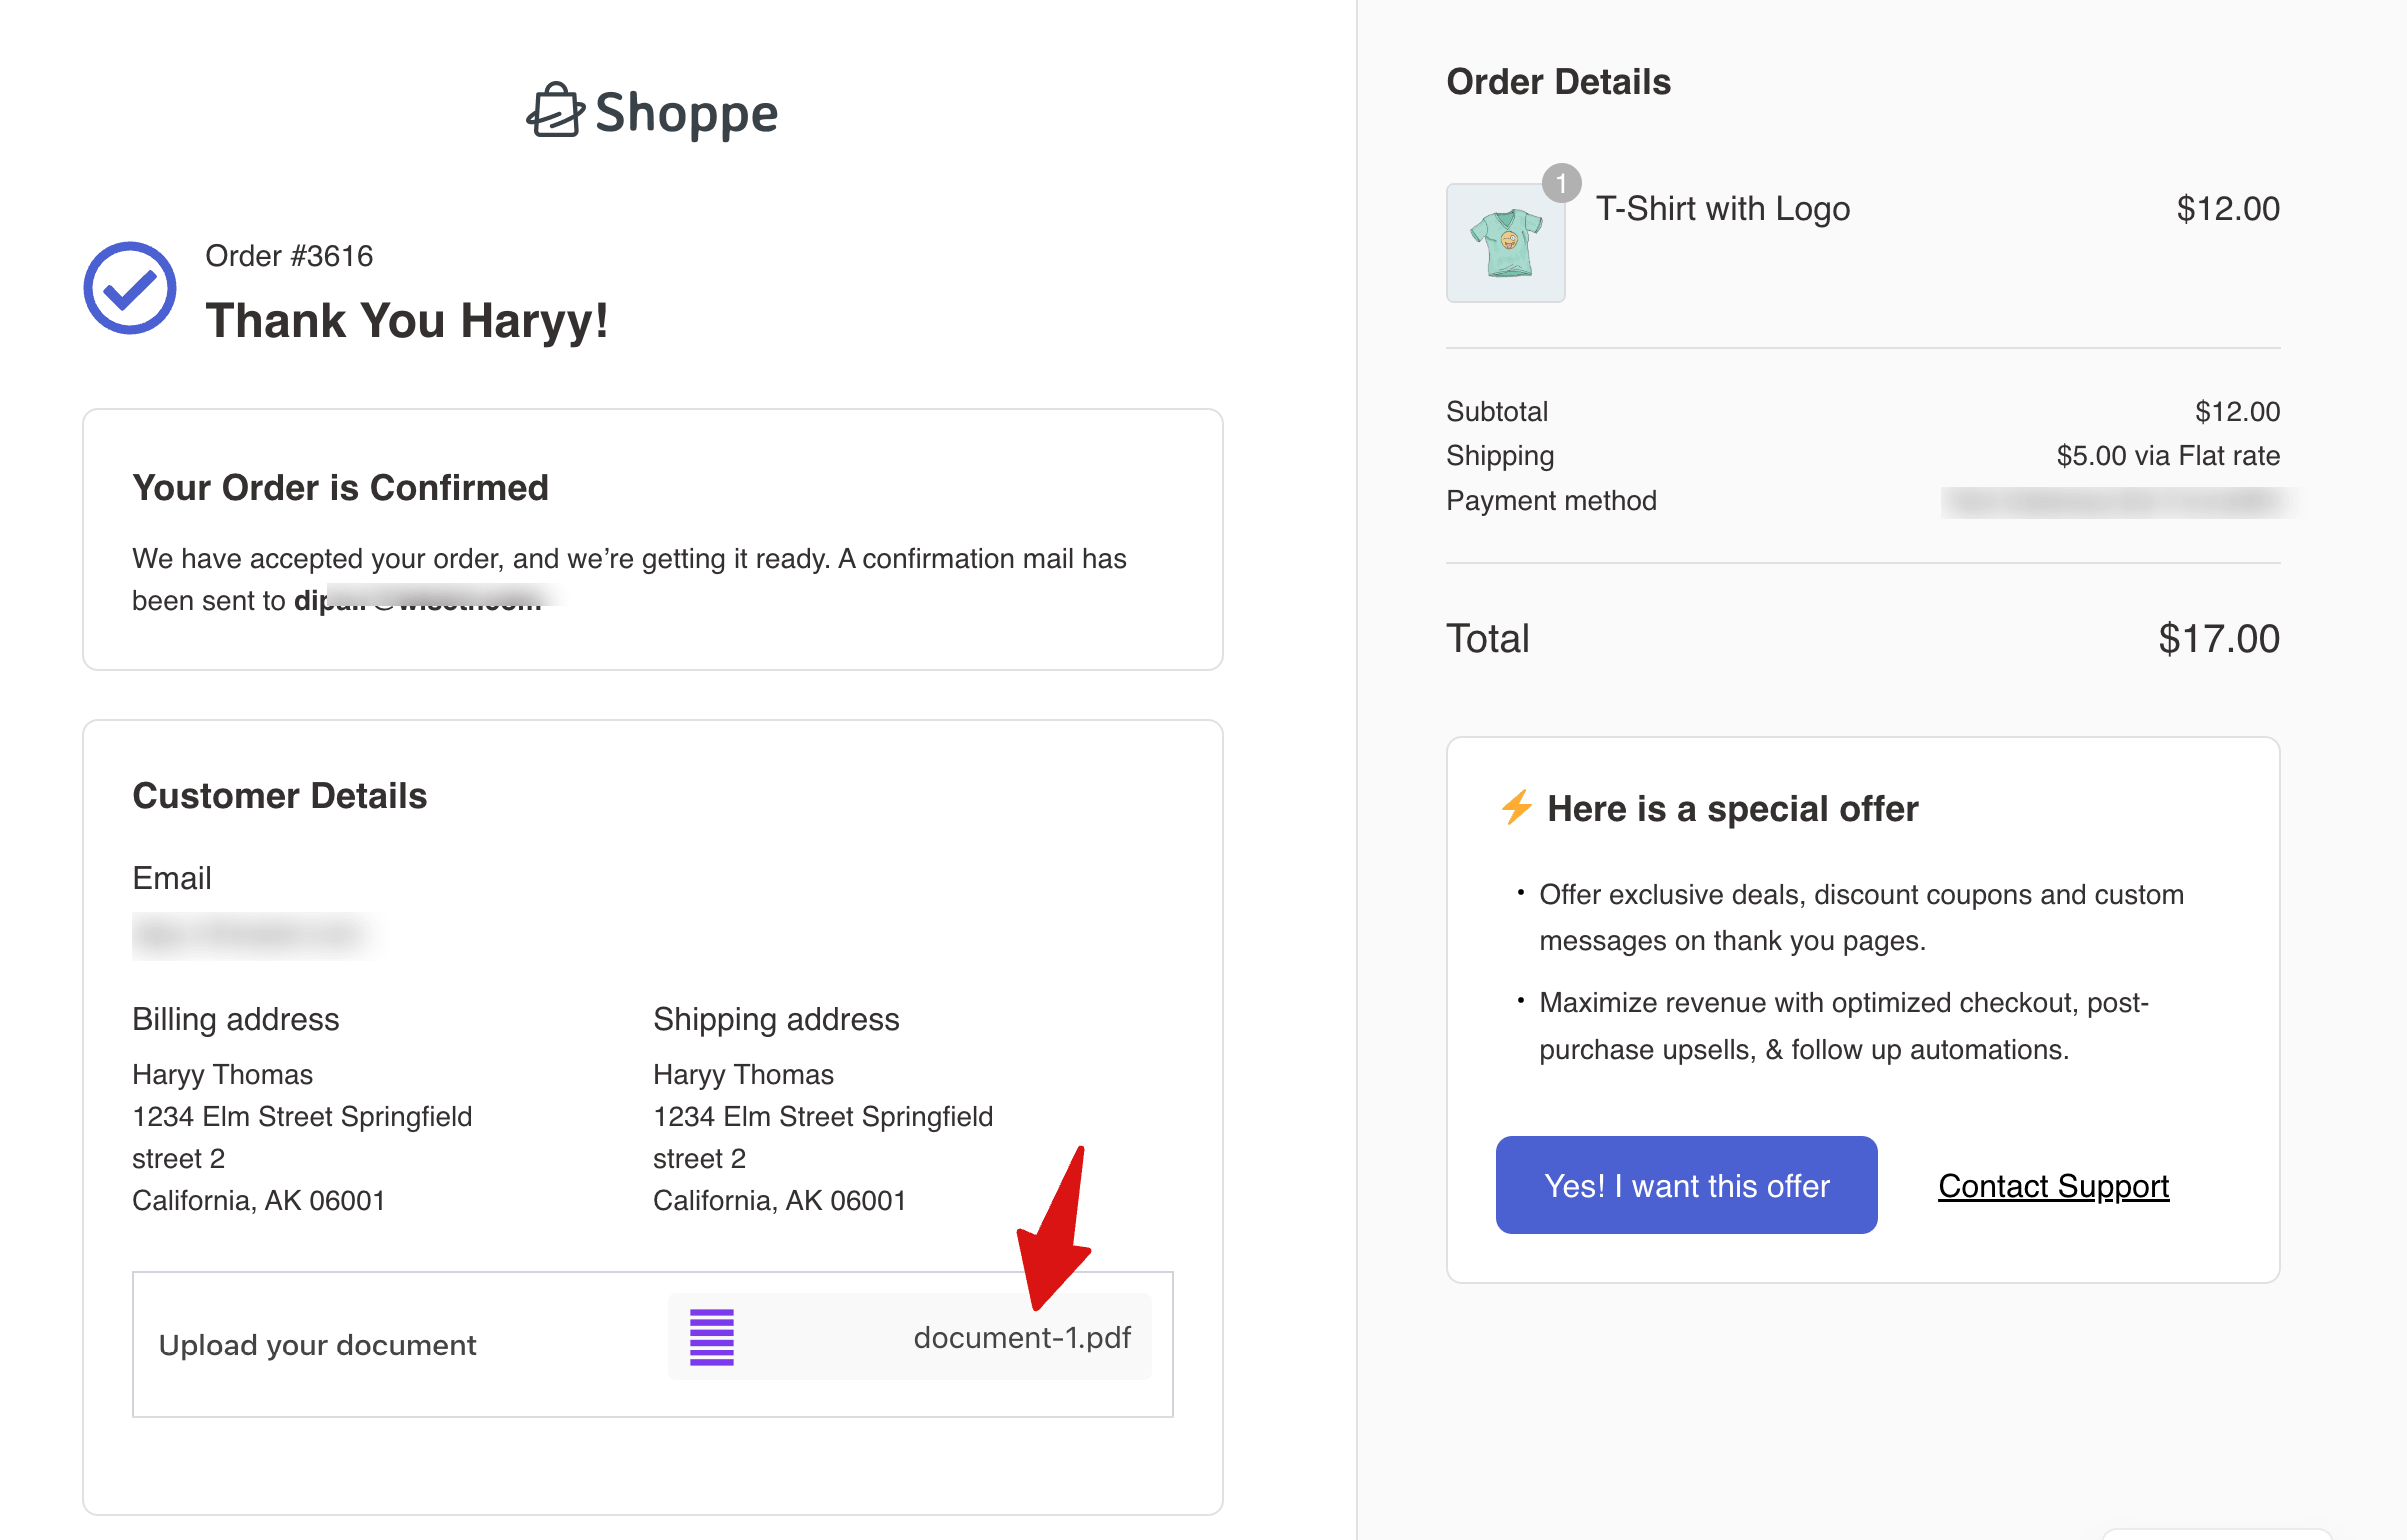
This is how the uploaded file appears on the thank you page. Customers can easily download to check if the file is correct.
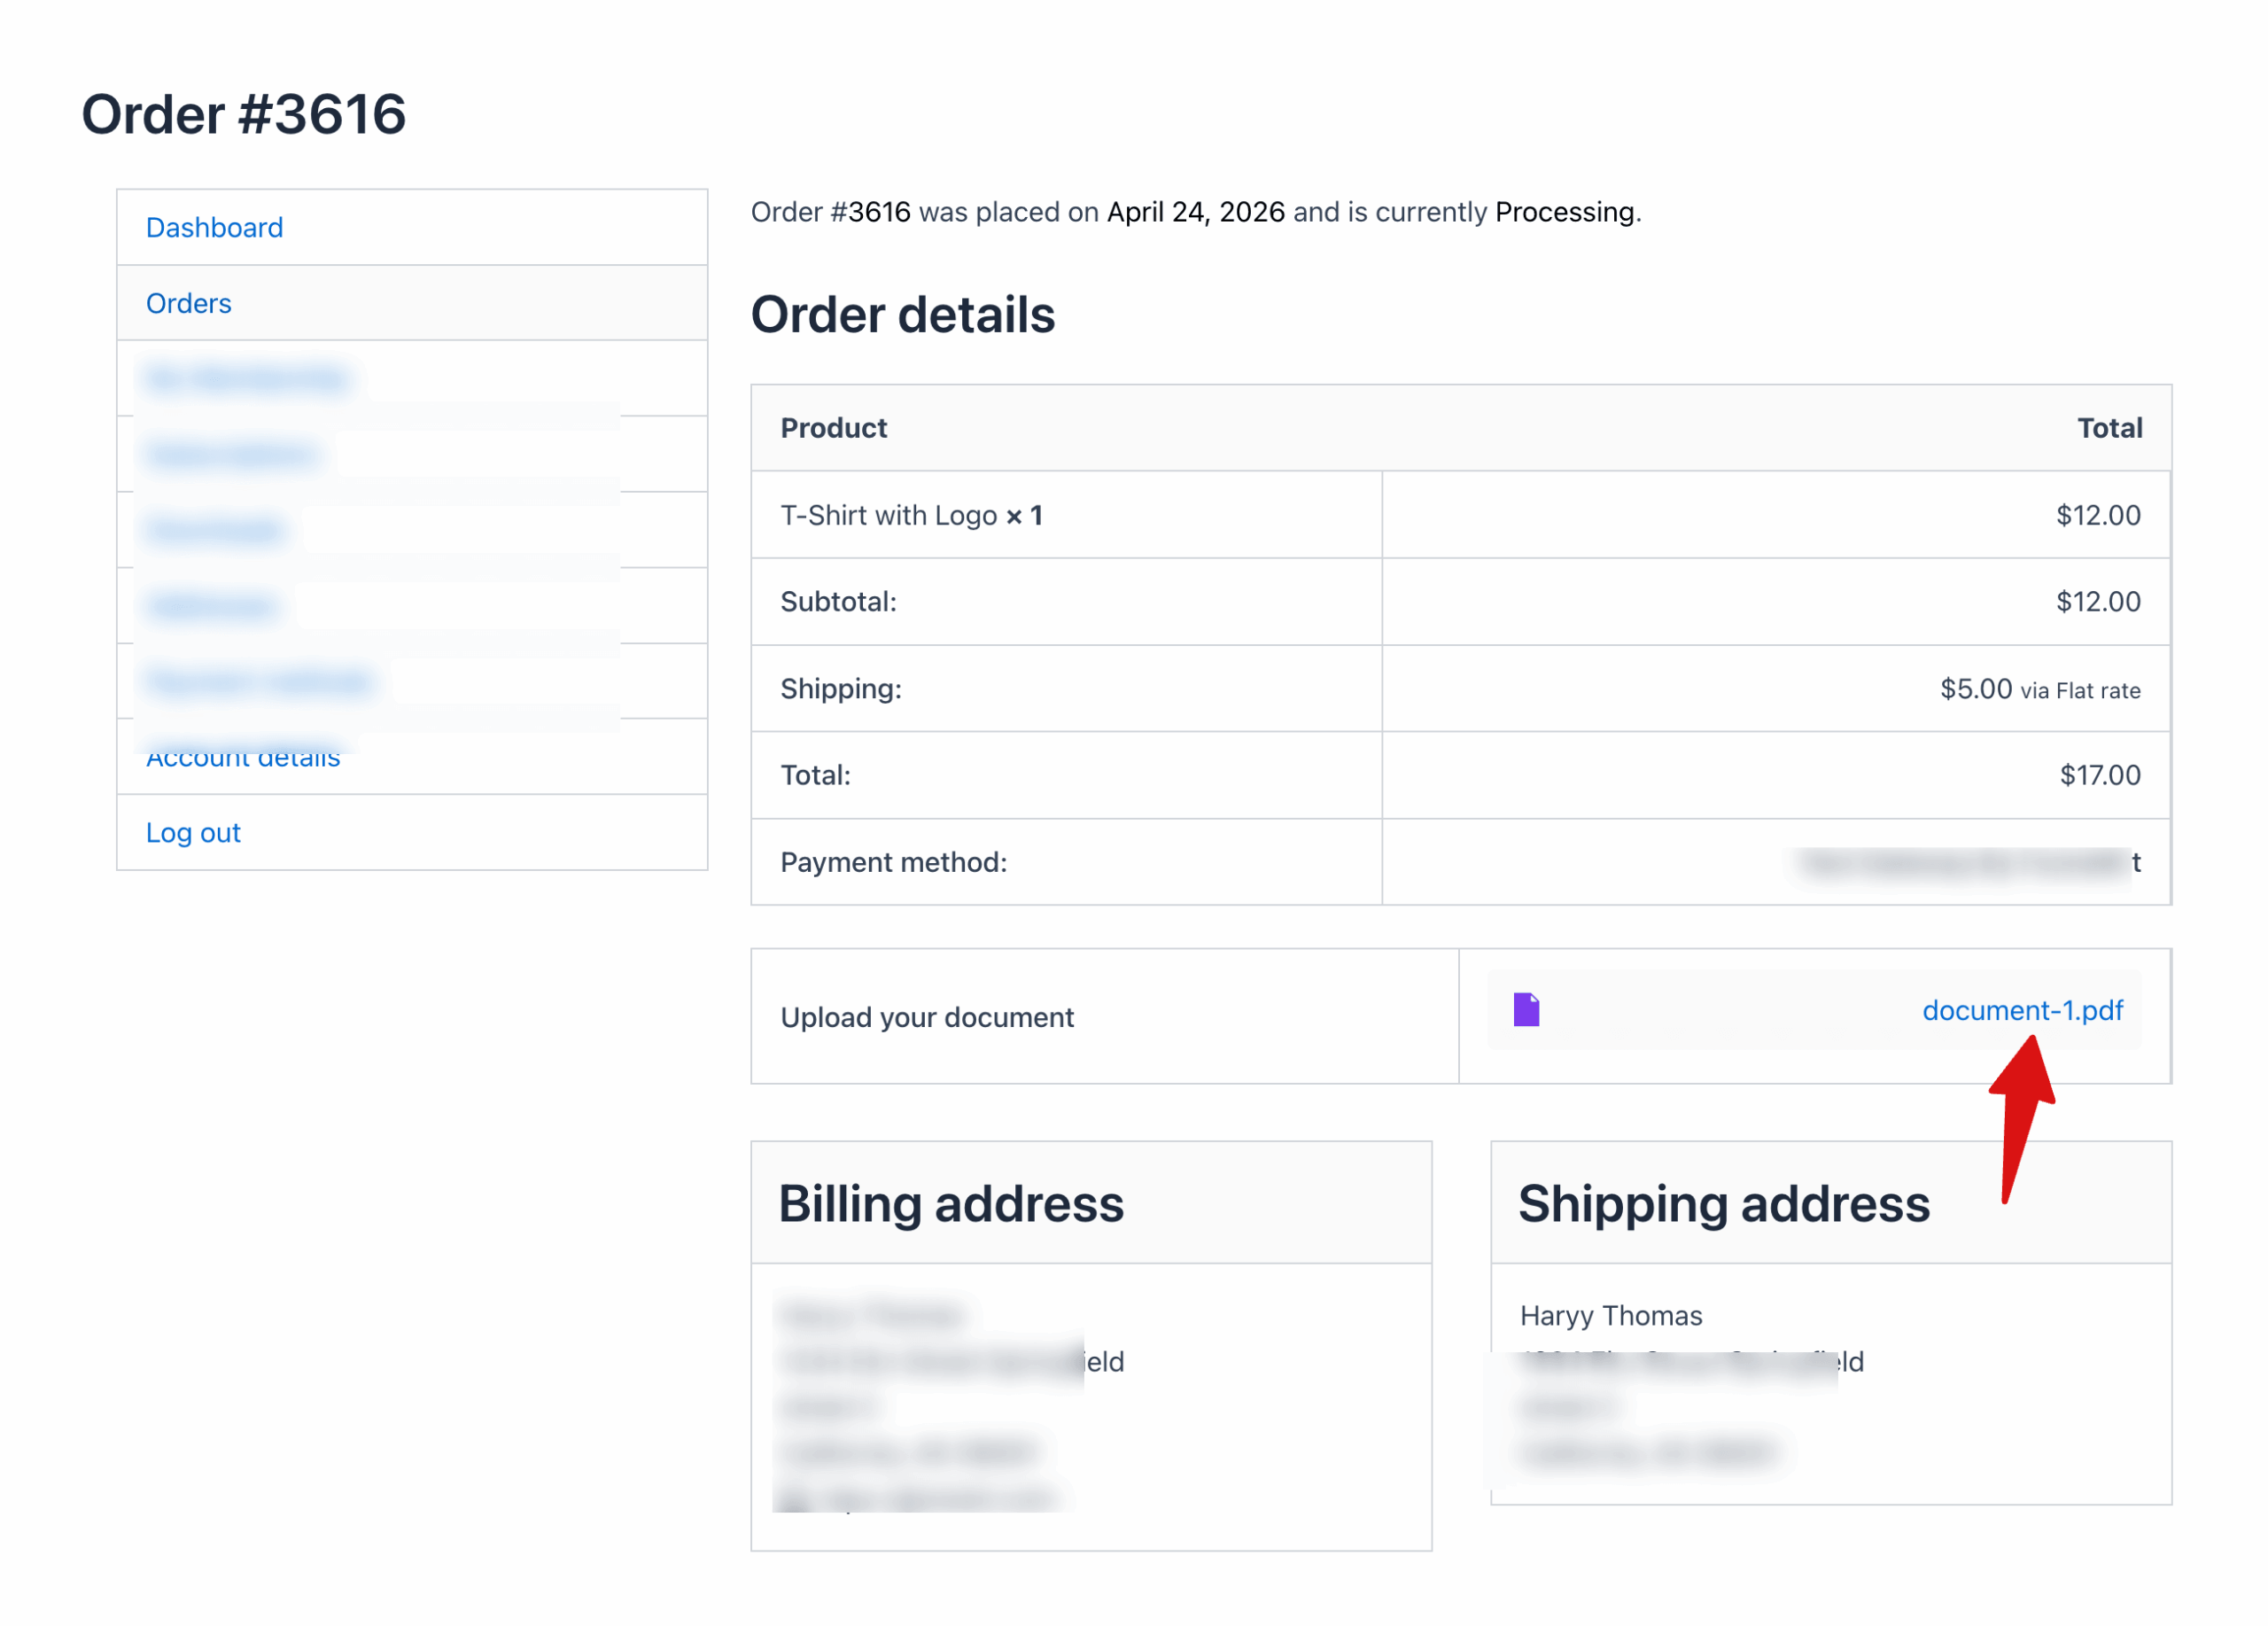
Customers can also view the uploaded file from my account page under the order details section.
How to Manage Uploaded Files From WooCommerce Orders
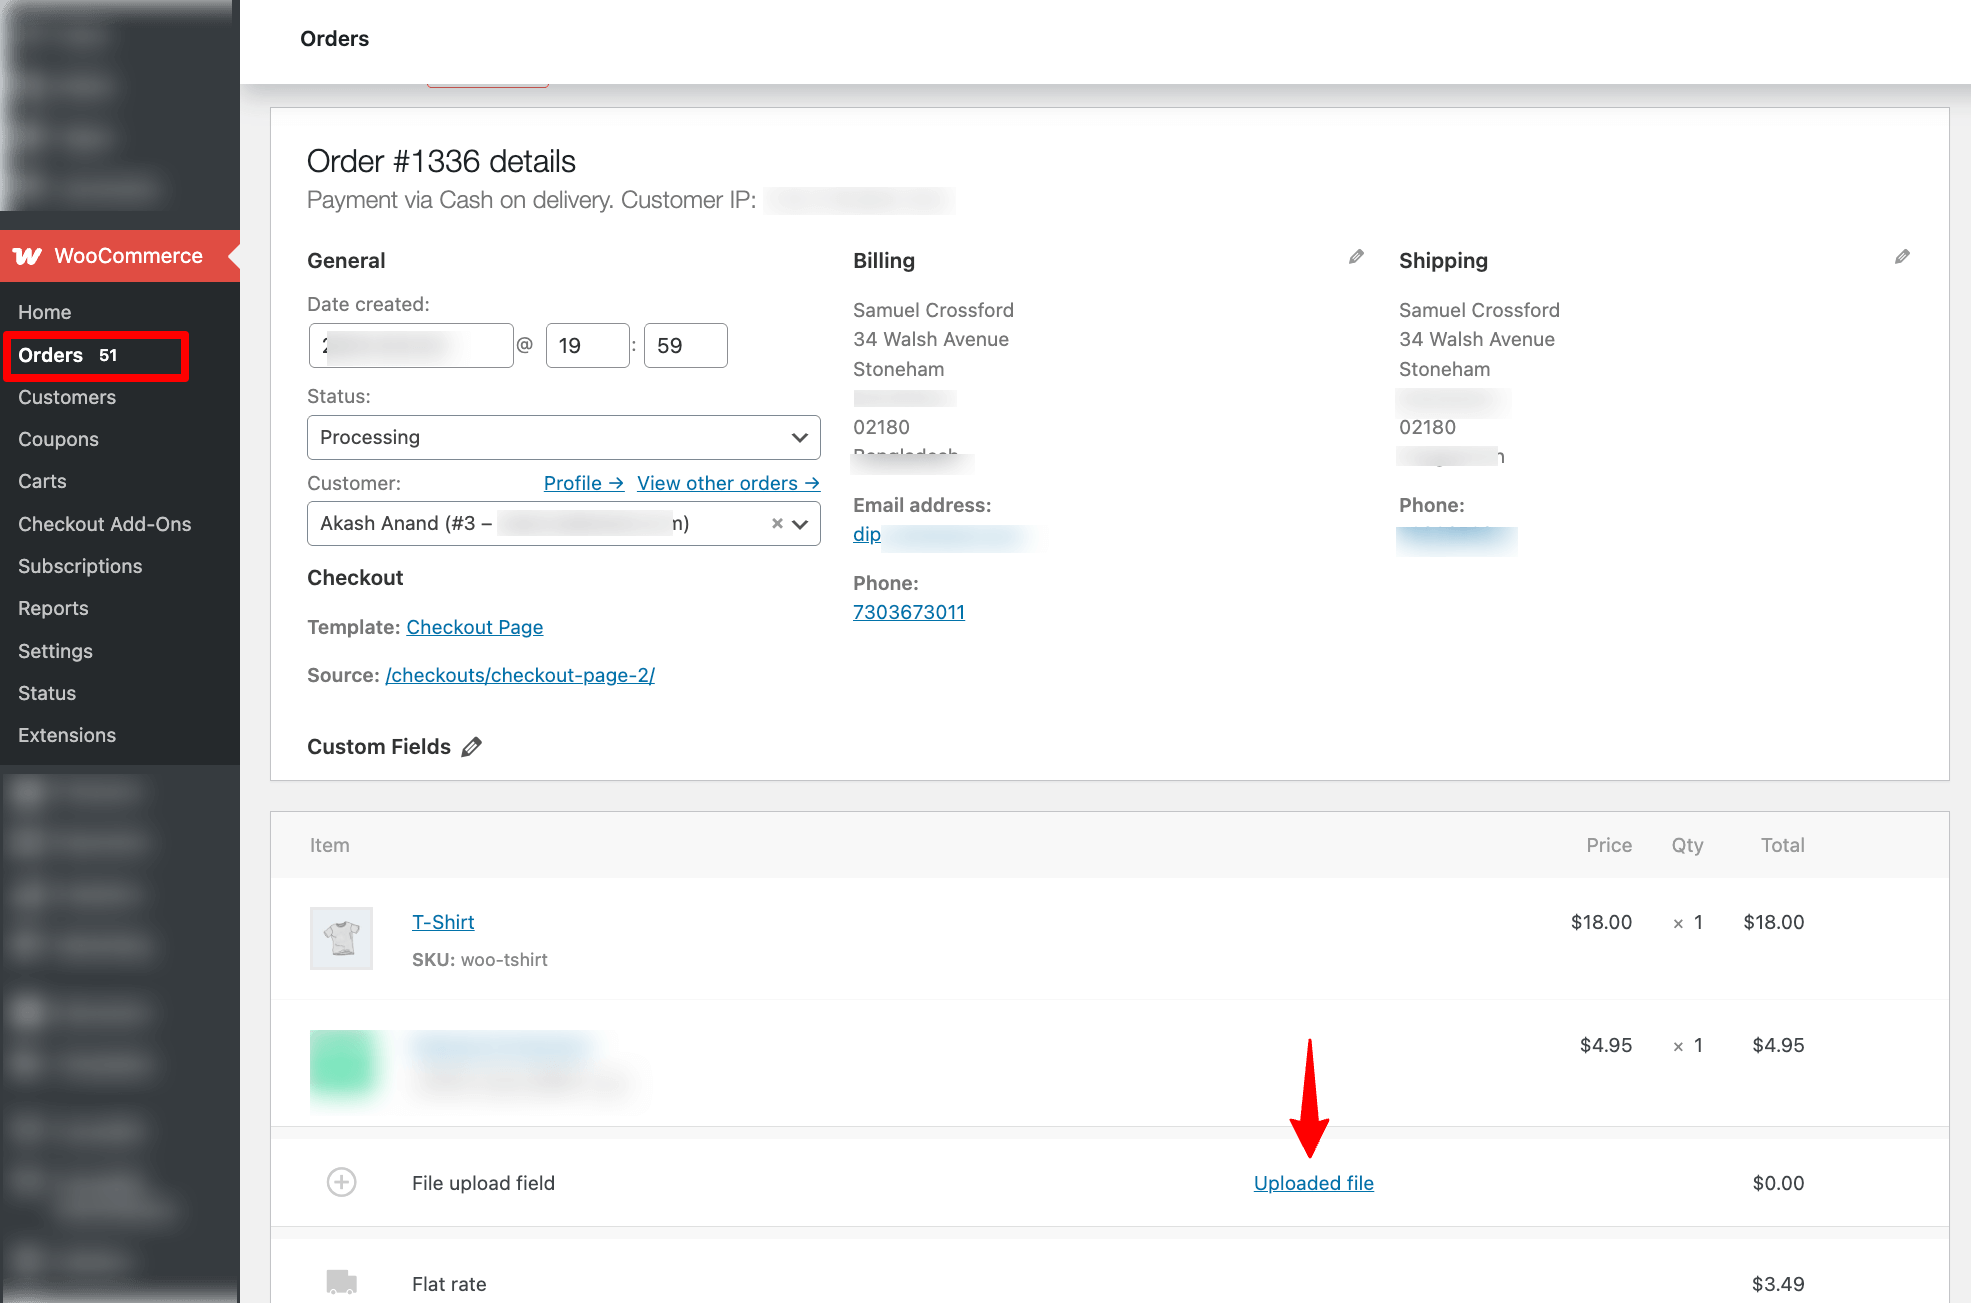
You can easily manage uploaded files directly from WooCommerce orders.
To do this, go to WooCommerce ⇒ Orders, then click on the order you want to review.
On the order details page, you’ll see a link to the uploaded file stored in your media library. Click the Uploaded File link to open a quick preview before processing the order.
Method 2: Add a File Upload Field To the WooCommerce Checkout Page For Free (Limited Feature)
In this section, I’ll show you how to add a file upload field to the WooCommerce checkout using a free plugin.
While this option is quick and simple, it comes with some limitations. You can’t control the field’s placement on the checkout page or add conditions to it. Plus, users can't check the file on the thank you page; they can only see the file name.
Once your checkout page is ready, follow these steps to add a file upload field in WooCommerce:
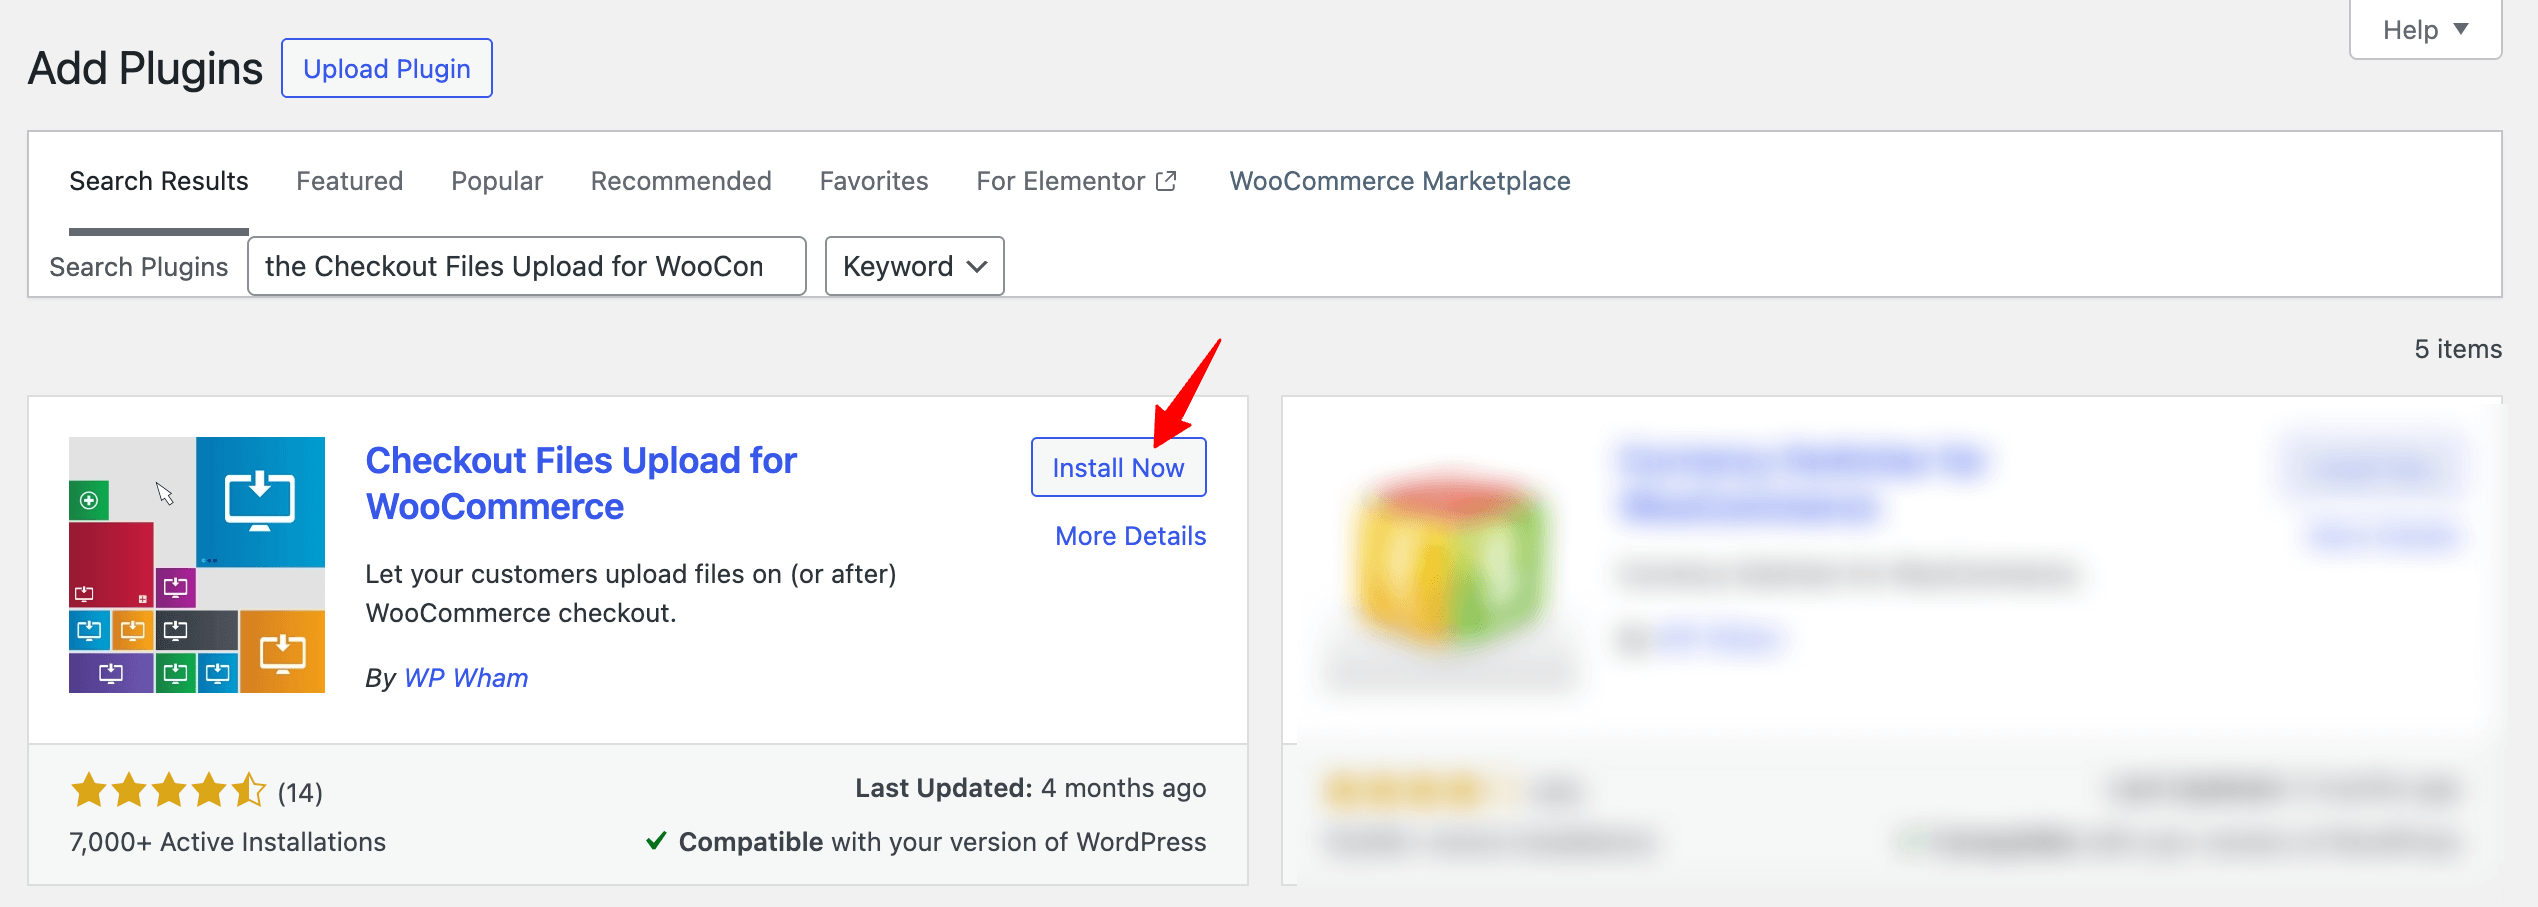
Step 1: Install the Checkout Files Upload for WooCommerce plugin
Make sure to install and activate the Checkout Files Upload for WooCommerce by WP Wham plugin on your WordPress website.
Step 2: Enable and configure the file upload options
After activating the plugin, navigate to WooCommerce ⇨ Settings ⇨ Checkout Files Upload.
And configure the following options:
- WooCommerce Checkout Files Upload: Check the enable plugin option.
- Total file uploaders: With the free version, you can only allow customers to upload one file with each checkout, so leave it as it is.
- Form extras: Check the form extra options, such as progress bar, alerts on successful file upload and removal, etc., to enhance the user experience when uploading the file.
- Max file size: Set the maximum file size a user can upload.
- Reset settings: Reset all the settings if you want.
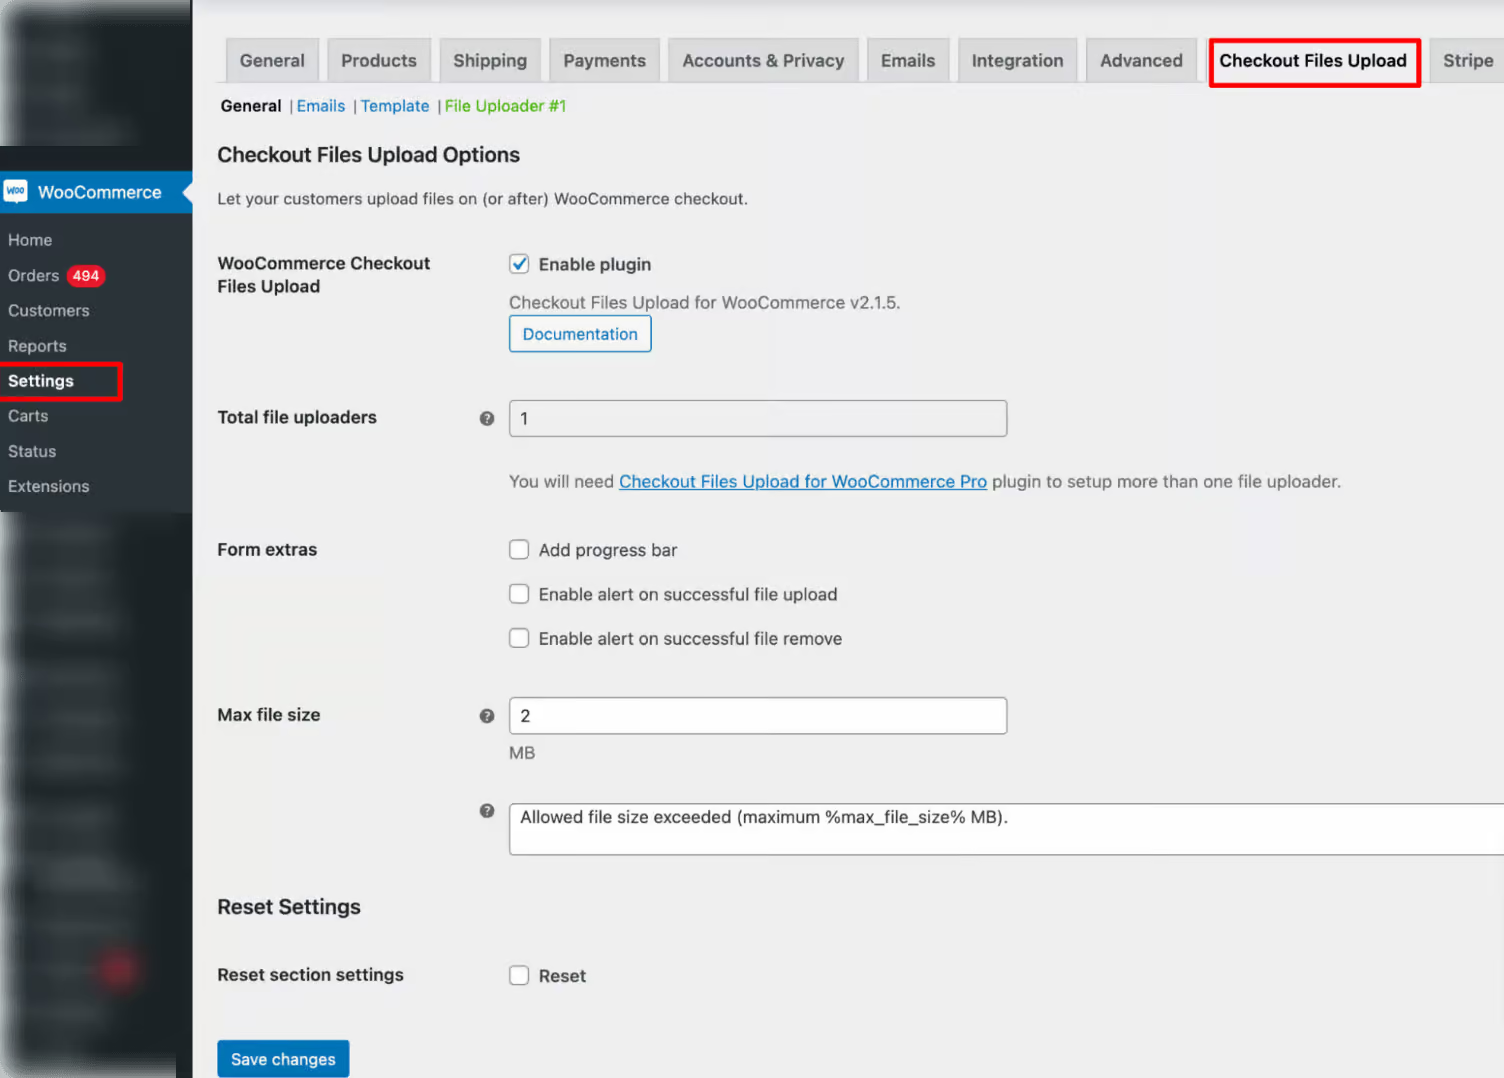
Finally, click on the ‘Save Changes’ button to update the settings.
Step 3: Configure the file upload field options
Next, move to the " File Uploader #1" tab to configure important settings related to the file upload field.
Here are the settings:
- Enable/Disable – Turn the file upload field on or off for the checkout page.
- Required – Make the file upload mandatory. If enabled, customers must upload a file before completing their order.
- Allow Multiple Files – Allows customers to upload more than one file at once. This feature is available in the Pro version.
- Accepted File Types – Specify which file formats customers are allowed to upload, such as .jpg, .jpeg, .png, or .pdf.
- Validate Image Dimensions – Set rules for image size (width and height) to ensure uploaded images meet specific dimension requirements.
- Positions – Choose where the file upload field appears on the checkout page. Before checkout form or after checkout form are the only two options.
- Position Order (Priority) – Control the order in which the upload field appears relative to other checkout fields.
- "Thank You" Page Option – Display the uploaded file information on the order confirmation (Thank You) page.
- "My Account" Page Option – Allow customers to view or access uploaded files from their My Account → Orders section.
- Label – Set the text label shown above the file upload field (for example, “Please select a file to upload”).
- Upload Button (Single) – Customize the text shown on the upload button for single file uploads.
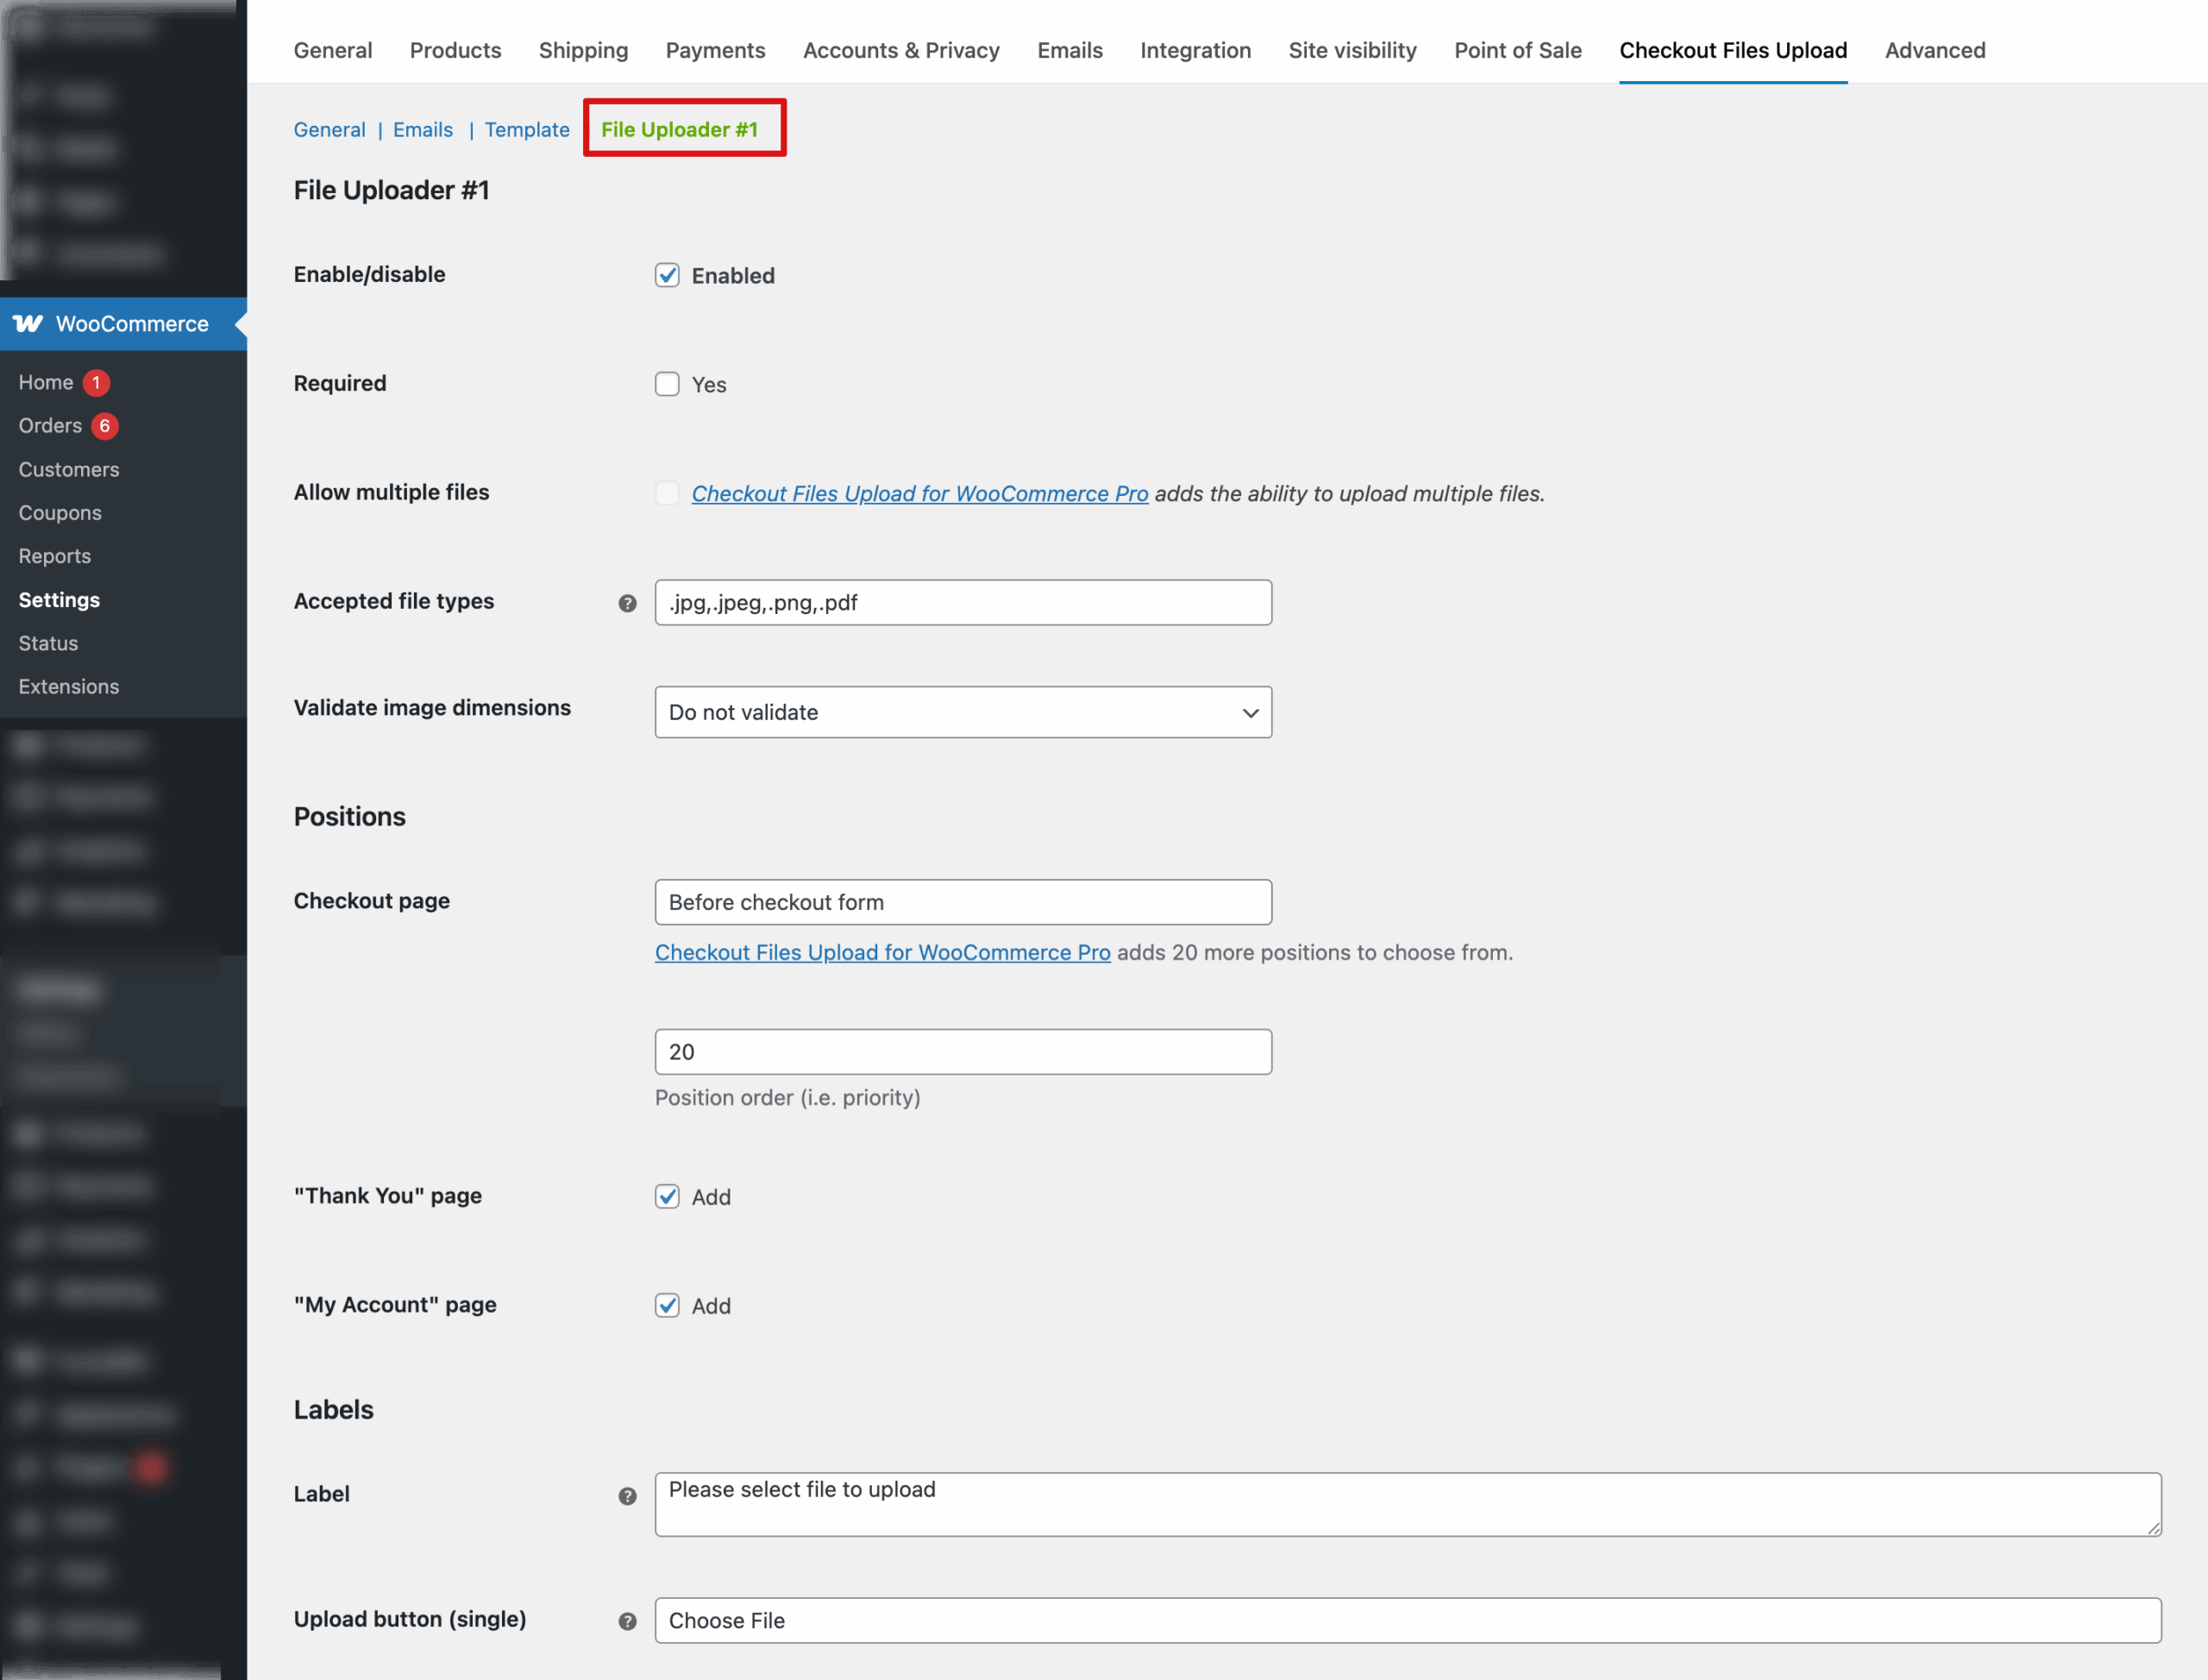
Save the changes you make.
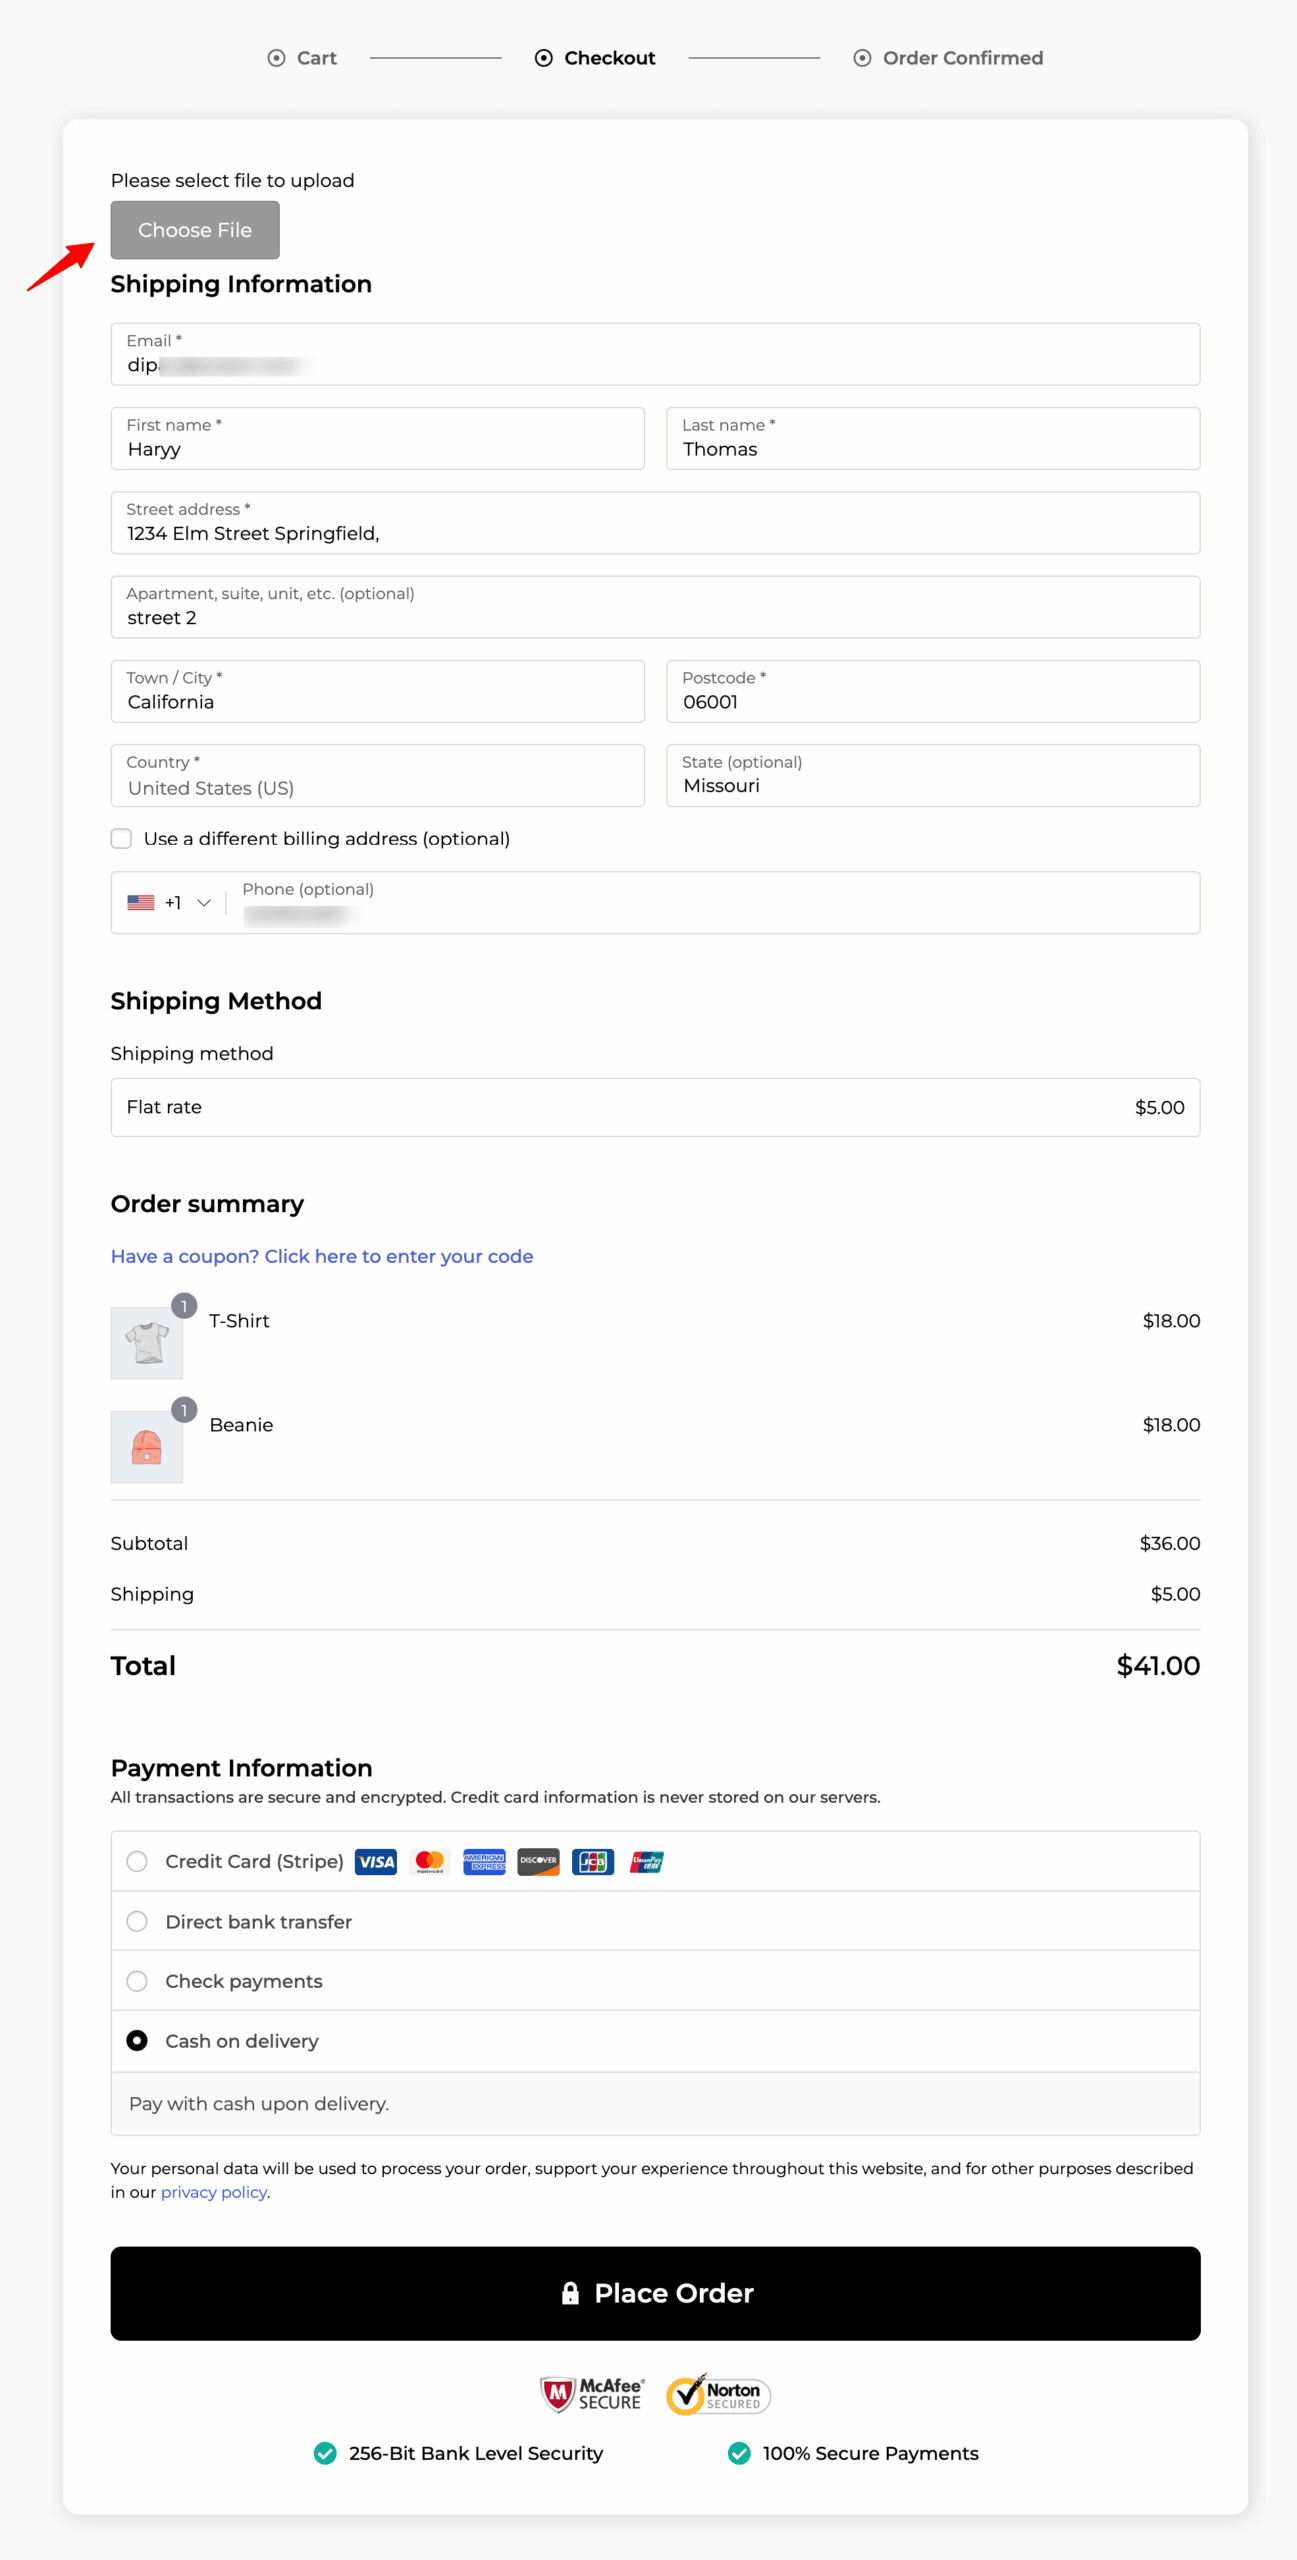
Step 4: Test the file upload option on the WooCommerce checkout page
Now, it’s time to test your checkout page and place a test order.
You’ll see a field to upload a file on checkout:
7 Best Practices for Implementing a File Upload Field on WooCommerce Checkout
Here are some effective best practices to follow when offering a file upload option on your WooCommerce checkout page:
1. Limit the size of files
Set up limitations on the size of files (in KBs or MBs) that users can upload to avoid server overload and potential denial of service attacks.
It’s important that you clearly communicate to users about the maximum file size they can upload to avoid frustration and ensure compliance.
2. Set restrictions on file types
Allow only a certain file type to be uploaded, such as .jpg, .png, .pdf, .docx, etc. This reduces the risk of malicious files being uploaded.
Always ensure that the extension of the uploaded file matches its MIME type to avoid spoofing.
3. Accept a reasonable number of files
It’s crucial to determine whether drag-and-drop single or multiple file uploads are necessary. Make sure to set a balance, like setting a reasonable limit of 3-5 files, which is recommended to avoid any performance issues.
These limits should be flexible and adjustable based on your user’s feedback and usage patterns.
4. Provide clear instructions
Offer users clear instructions on how to upload files, including supported formats, size limits, and any specific requirements.
Incorporate tooltips or help text to guide users through the file upload process.
5. Handle errors and provide feedback
Provide clear error messages for any issues encountered during the file upload process on the checkout page. It could be because of an unsupported file type, a file too large, etc.
You can also use inline validation to immediately inform users of any issues before they attempt to hit the WooCommerce place order button.
6. Enforce security measures
Enforce robust security measures like server-side validation to check uploaded files and prevent the acceptance of unauthorized or malicious files.
Adopt secure file naming conventions to prevent unauthorized access and reduce predictability.
Additionally, scan all uploaded files for malware or viruses using automated solutions or third-party services to mitigate potential threats.
7. Automate file handling
If the uploaded files require approval or processing, you can automate notifications to inform your team when a new file is uploaded.
Frequently Asked Questions About Adding a File Upload Field to WooCommerce Checkout
Let’s quickly look at some commonly asked questions and their answers from our experts.
You can add a file upload option to your WooCommerce checkout by using plugins like Checkout Files Upload for WooCommerce or Customer Upload Files for WooCommerce. These plugins allow customers to upload their files during checkout, improving the order process.
Yes, you can add a file upload field to WooCommerce checkout using custom code. By adding a lightweight AJAX script, you can allow customers to upload files directly without needing a plugin. This method gives you full control over file types and placement.
You can work with a lightweight code that utilizes Ajax to enable file uploads on the WooCommerce checkout page.
With this Ajax-supported code, you can restrict the file size, limit the option to accepted file types only, check if the file has already been uploaded, and more.
First, you need to add this lightweight code to a folder, like checkout_uploads.php.
Once done, add an upload file field with this code:
add_action( 'woocommerce_after_order_notes', 'add_custom_checkout_field' );
function add_custom_checkout_field($checkout) {

    echo '<div class="woocommerce-additional-fields__field-wrapper">';

    woocommerce_form_field('certificate', array(
        'type'      => 'file',
        'class'     => array('form-row-wide'),
        'label'     => __('Upload Certificate', 'woocommerce'),
        'required'  => false,
        'max_size'  => '3072', // in ko (here 3 Mo size limit)
        'accept'    => '.img,.doc,.docx,.rtf,.txt', // text documents and pdf
    ), '');

    echo '</div>';
}
This will add an upload field option after the order notes section on the classic checkout.
Next, you can use validation for the required file:
/ Required upload field validation
add_action( 'woocommerce_checkout_process', 'checkout_required_upload_validation' );
function checkout_required_upload_validation() {
    $checkout_upload = WC()->session->get('checkout_upload');
    if( empty( $checkout_upload ) ) {
        wc_add_notice( __('Uploading your file is required in order to checkout.', 'woocommerce'), 'error' ); // Displays an error notice
    }
} // Save the uploaded file URL and name (array
add_action( 'woocommerce_checkout_create_order', 'save_checkout_uploaded_file', 10, 2 );
function save_checkout_uploaded_file( $order, $data ){
if( $checkout_upload = WC()->session->get('checkout_upload') ) {
$order->update_meta_data( '_checkout_upload', $checkout_upload ); // Save
}
WC()->session->__unset('checkout_upload'); // Remove session variable
}This is how you can add a file upload field to WooCommerce checkout by using hooks or code snippets and without any plugin.
After a customer uploads a file during checkout, you can easily view and manage the files in WooCommerce orders. Simply go to the WooCommerce Orders section, select the relevant order, and access the uploaded file from the order details page.
You can restrict file uploads to specific file types in WooCommerce checkout, such as JPG, PNG, PDF, DOCX, and more. This ensures that only accepted file formats are uploaded, improving security and compatibility.
You can set a maximum file size for uploads using plugin settings or custom code. This helps prevent server overload and ensures smooth file handling for large files.
With premium plugins like Checkout Add-Ons for WooCommerce, you can set conditions to show the file upload field only for specific products or based on the cart total. This makes the file upload feature relevant only when necessary.
Yes, using premium plugins like FunnelKit, you can easily drag and drop the file upload field to your desired position on the WooCommerce checkout page. This allows you to control the field’s placement and ensure it aligns with your store’s design.
You can add a file upload to the WooCommerce product page by installing and activating the Customer Upload Files for WooCommerce plugin.
This plugin lets shoppers quickly preview their uploaded documents to ensure that the customizable product looks good with the design or to ensure all information is accurate.
You can drag and drop or upload images or files on the product and cart pages from your device.
Add a File Upload Field to WooCommerce Checkout and Elevate Your Store’s Experience
A file upload option on the WooCommerce checkout page can be a game-changer for both store owners and customers.
It allows customers to provide their specifications more seamlessly and helps store owners fulfill the requested specifications correctly.
I have shared two methods for offering a file upload option on the checkout page.
If you have budget constraints, you can opt for the free method. However, if you want more control over offering the file upload option and creating a visually appealing checkout page, I recommend the first method with the premium plugin.
No matter which method you choose, I recommend using FunnelKit Funnel Builder for creating targeted sales funnels and optimized store checkouts that drive customers to complete their purchases.
With the Pro version, you can further boost your average order value (AOV) by adding order bumps and one-click upsells to encourage extra purchases.
So, are you ready to add file uploads to the WooCommerce checkout page?

Editorial Team
July 3, 2026Sometimes, the difference between a visitor leaving and placing an order comes down to something surprisingly small, like a better headline, a cleaner checkout, or a more compelling offer. That's...

Editorial Team
July 1, 2026Are you leaving money on the table by not fully leveraging your customers’ shopping behavior? Many store owners don’t realize that every time a customer adds a product to the...
Editorial Team
June 30, 2026Imagine having a simple link that takes your customers directly to the checkout page, with their products already in the cart. This is exactly what a WooCommerce checkout URL allows...


