Want to customize the coupon field on your WooCommerce checkout page?
Whether you're looking to add, remove, or relocate it, this guide will help you make the changes.
By default, WooCommerce places the coupon field at the top of the checkout page. You can adjust its position to better suit your store's layout.
Whether you want to remove the coupon field entirely or move it to a different location, a simple checkout manager plugin can make this process easy.
In this guide, I’ll walk you through the steps to customize the coupon field on your WooCommerce checkout page to better suit your store's needs.
Quick Answers: WooCommerce Checkout Coupon:
- How to Add a Coupon Field: Go to WooCommerce → Settings → General → Enable Coupons.
- How to Move the Coupon Field: Use a checkout plugin to drag and drop or follow the custom hooks below.
- How to Hide the Coupon Field: Disable in WooCommerce settings or remove from custom checkout pages.
- How to Auto-Apply a Coupon: Use a checkout coupon URL generator.
What Is the WooCommerce Checkout Coupon Field?
A WooCommerce coupon field lets customers apply discount codes on the cart and checkout pages to receive percentage discounts, fixed amounts off, or free shipping.
Adding the coupon field directly to the checkout page makes the checkout process easier. Customers can apply discounts seamlessly before completing their purchase, which reduces friction and minimizes cart abandonment.
Table of Contents
- 1 How to Add a Coupon Field to WooCommerce Checkout (With Default Option)
- 2 Top 3 Plugins to Improve the Checkout Coupon Experience
- 3 How to Add and Move Coupon Field In The Checkout Page in WooCommerce (With a Free Plugin)
- 4 How to Hide/Remove Coupon Field From WooCommerce Checkout Page?
- 5 How to Create a WooCommerce Checkout Coupon URL?
- 6 Frequently Asked Questions About WooCommerce Checkout Coupon
- 7 Ready to Boost Checkouts with Smart Coupon Placement in WooCommerce?
How to Add a Coupon Field to WooCommerce Checkout (With Default Option)
To add a checkout coupon to the WooCommerce checkout, follow these steps:
Step 1: Navigate to WooCommerce settings
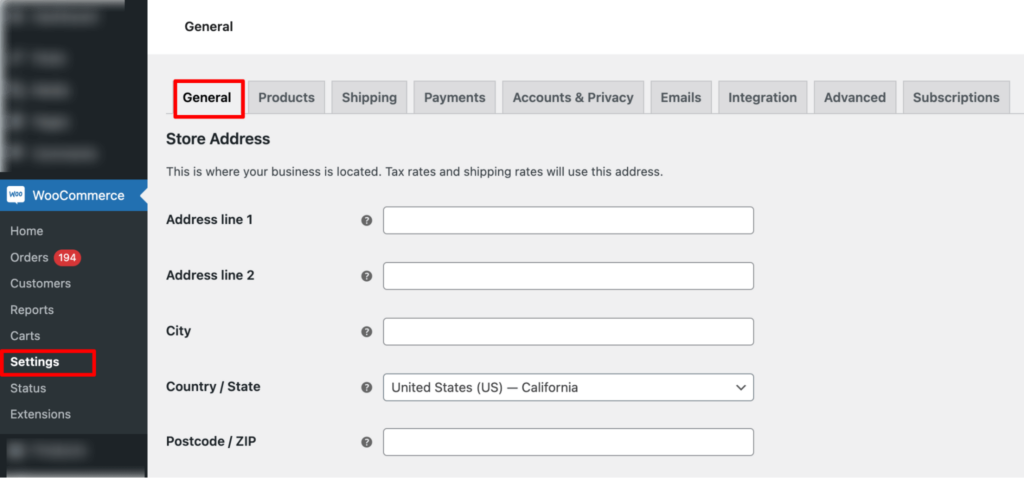
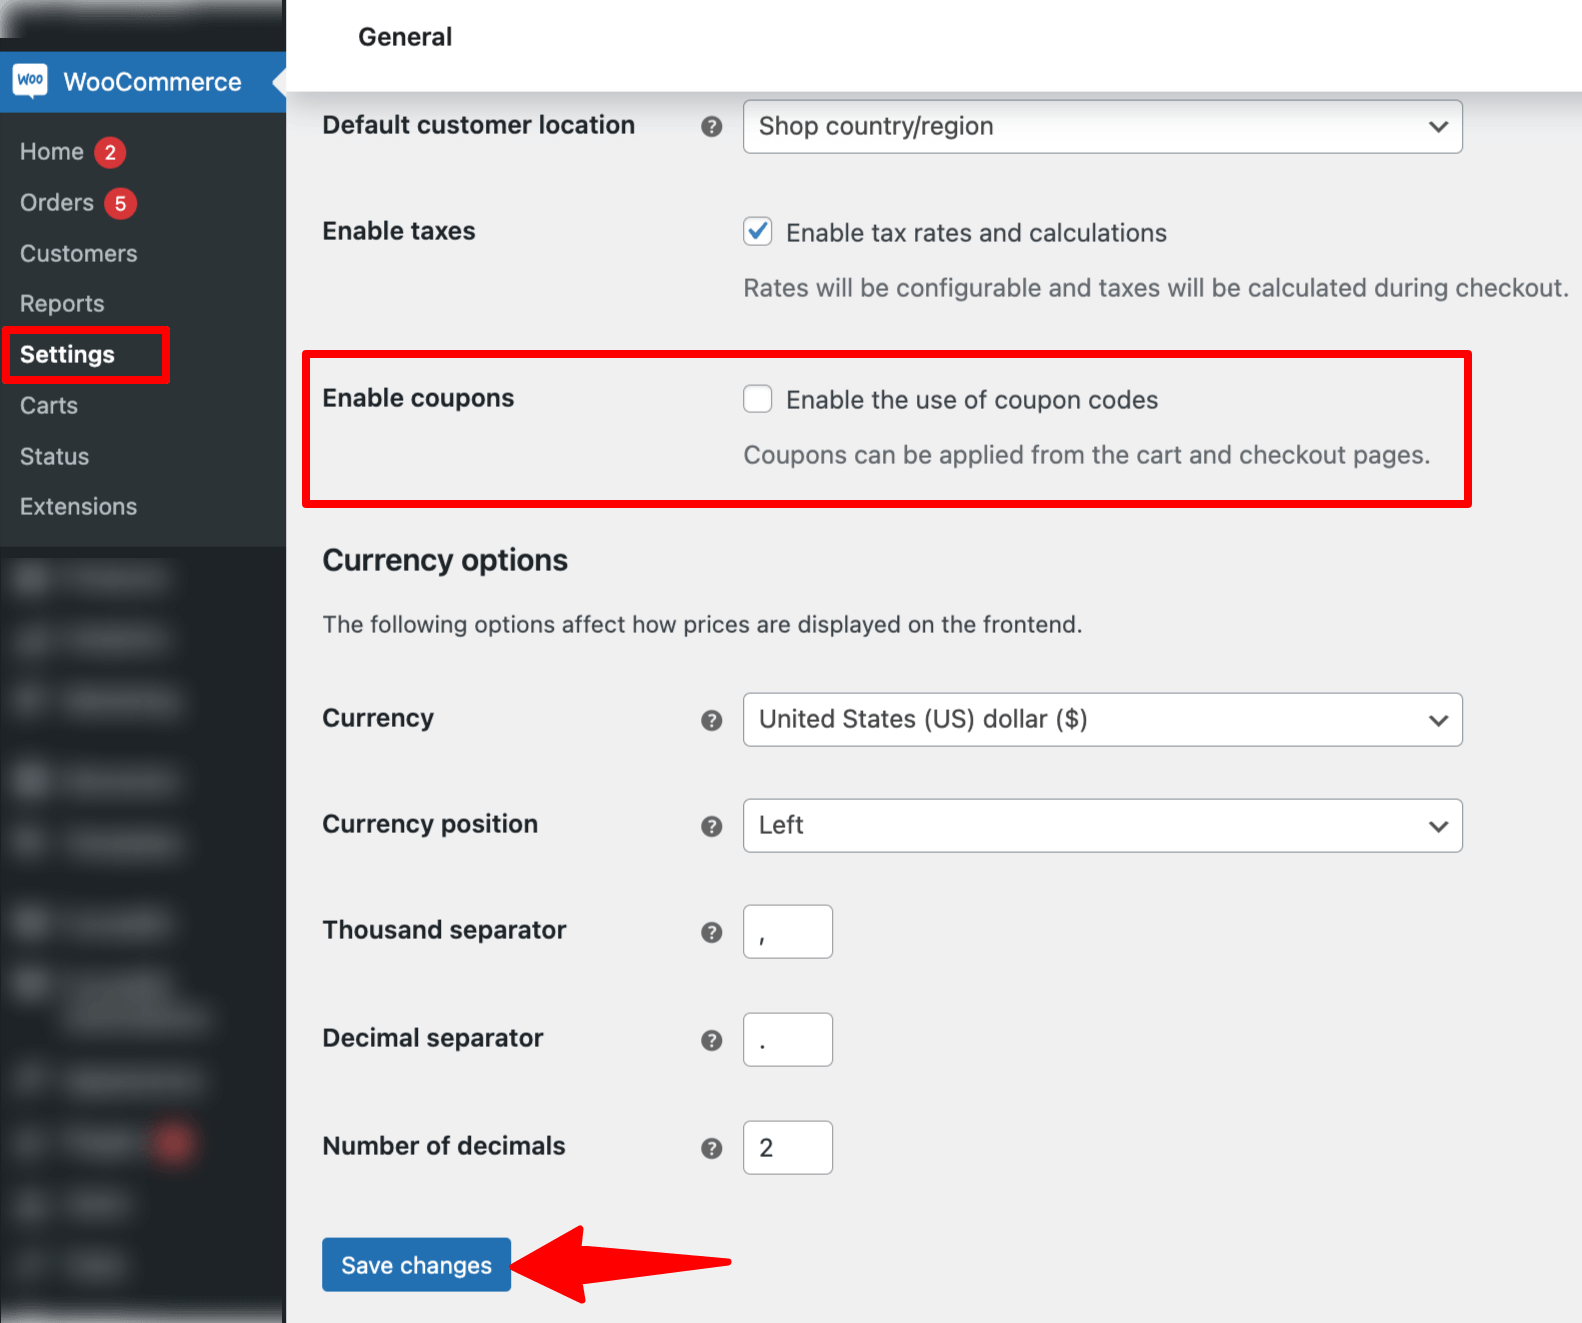
From the WordPress dashboard, navigate to WooCommerce ⇒ Settings and make sure you are on the General settings tab.
Step 2: Enable the use of coupon codes on the checkout
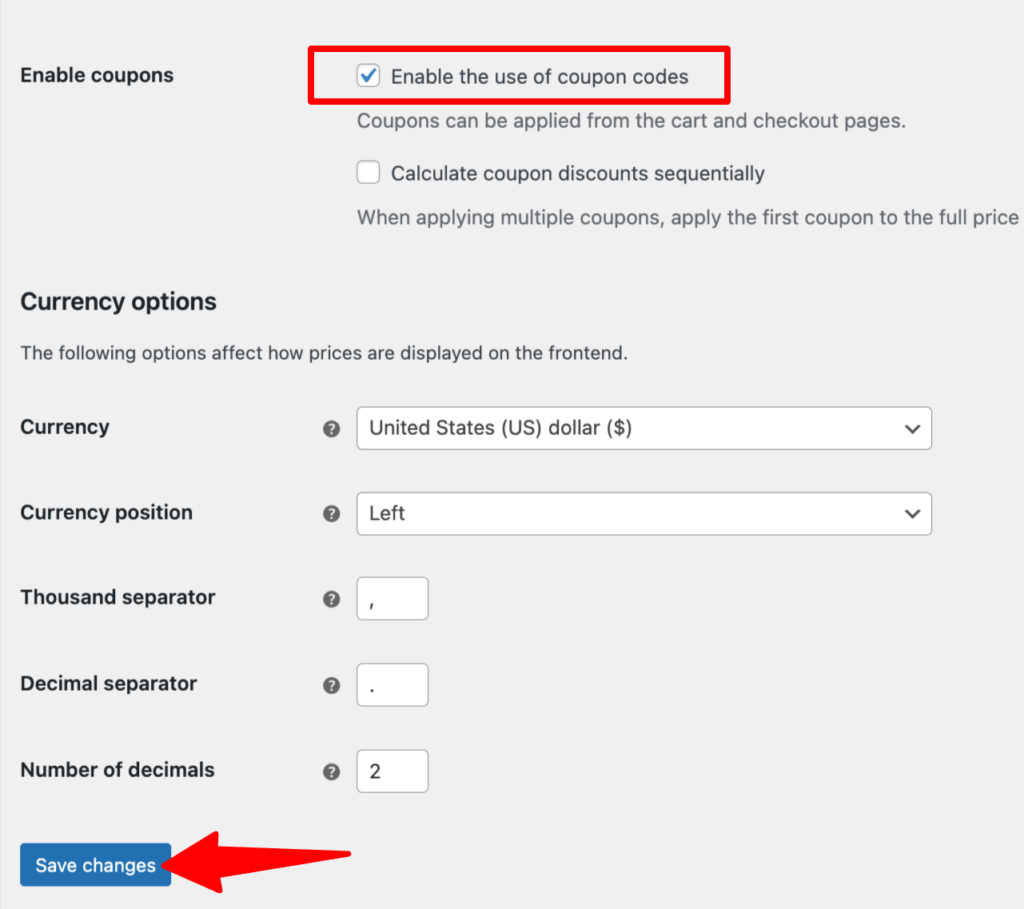
Now, scroll down and check the option “Enable the use of coupon codes.”
Click on “Save Changes” to update the settings.
Step 3: Test the checkout page with the coupon field
Now, try placing an order, and on the checkout page, you should see a coupon field at the top.
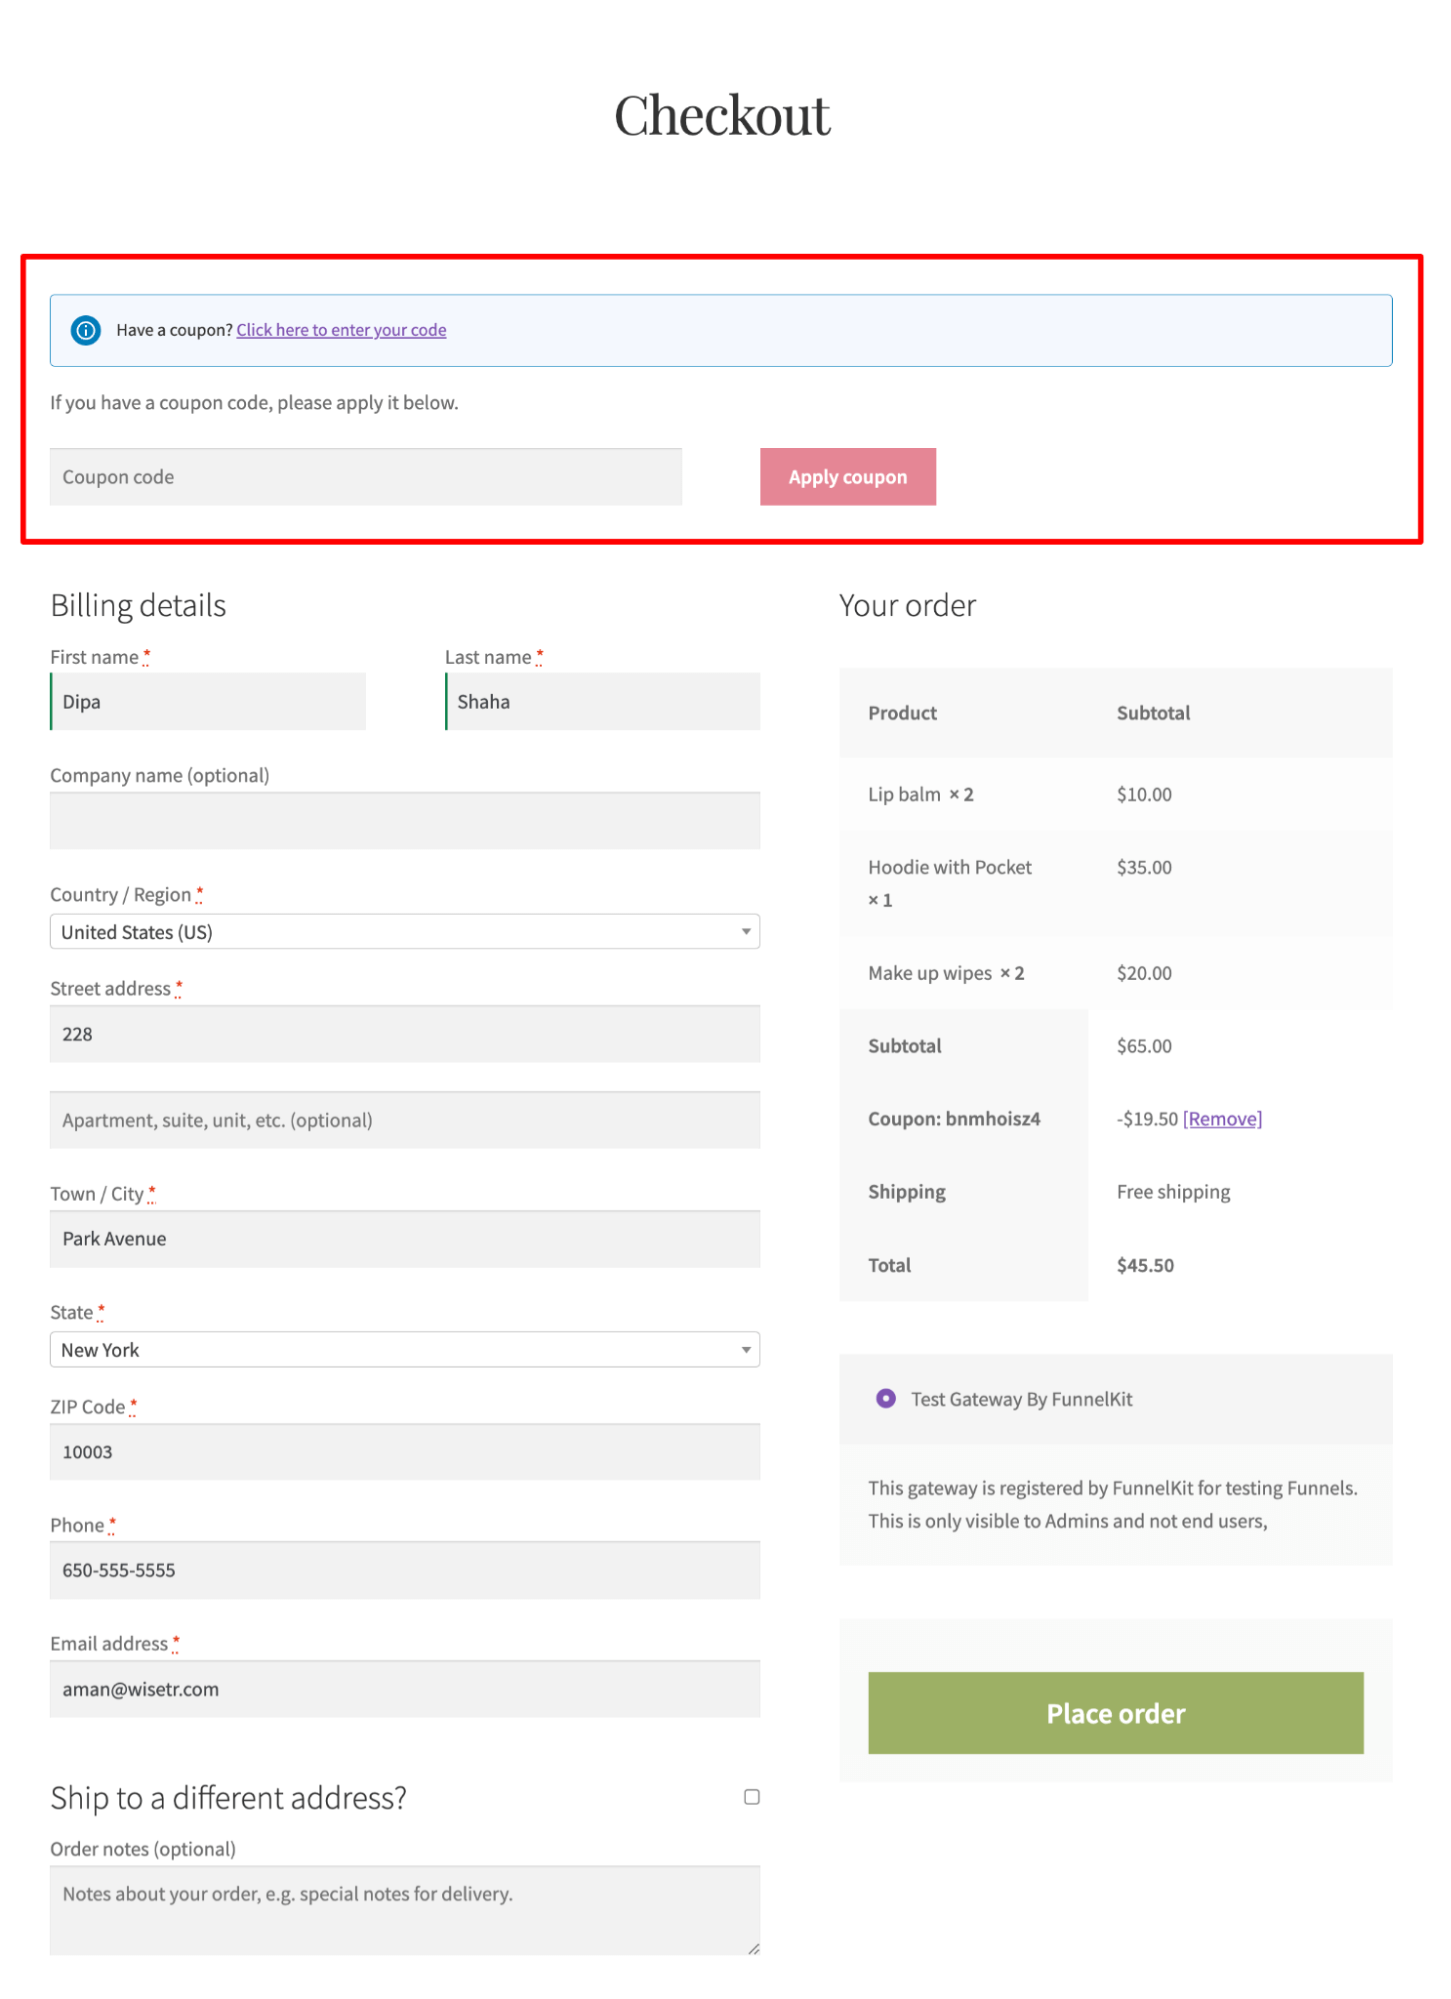
This is how you can add a coupon field to your checkout page with the default option.
While it gets the job done, it lacks flexibility, such as the ability to reposition the coupon field. Additionally, the default position at the top of the page isn’t the most user-friendly. After applying a coupon, customers must scroll down to see the discount, which can cause friction during checkout.
With additional plugins, you can easily customize the location of the coupon field and improve the user experience. These plugins offer far more flexibility and enhance the overall checkout experience, ensuring discounts are applied smoothly without unnecessary scrolling.
In the next section, I will share the top 3 WooCommerce plugins that you can use to enhance the coupon experience on the checkout page.
Top 3 Plugins to Improve the Checkout Coupon Experience
Here are the top 3 WooCommerce checkout coupon plugins for adding a coupon field to your WooCommerce checkout and maximizing profits with coupon codes:
1. FunnelKit Funnel Builder
FunnelKit Funnel Builder is the best WooCommerce sales funnel builder. It allows you to create conversion-optimized checkout pages. You can easily change the location of the WooCommerce checkout coupon field by dragging and dropping.
This plugin aims to enhance users’ shopping experiences while increasing your store's average order value by offering pre- and post-purchase upsells within a sales funnel.
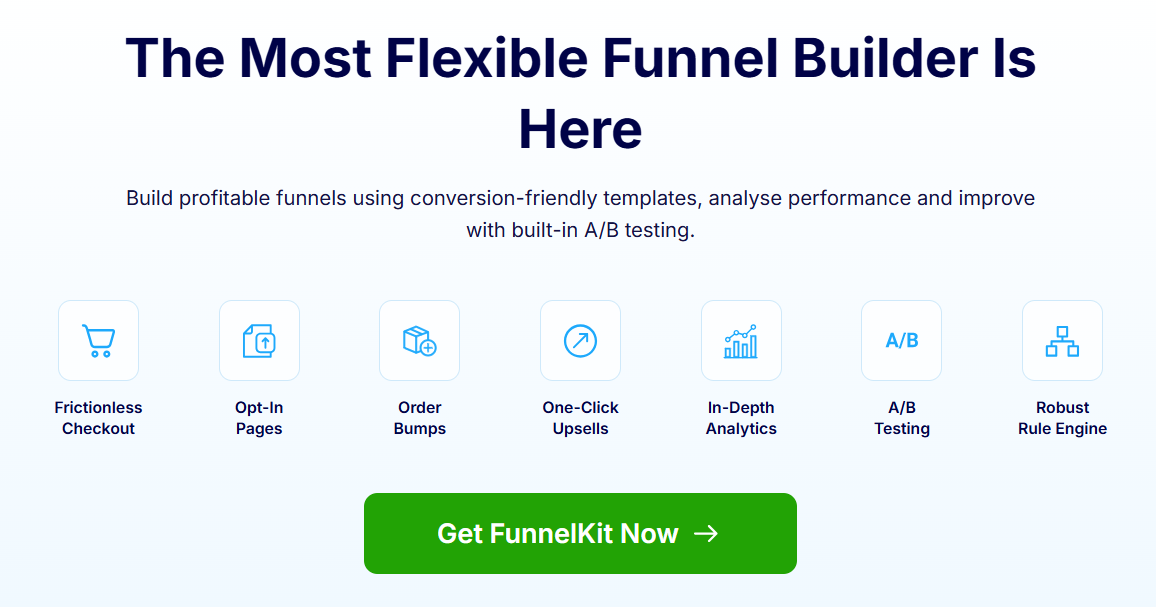
Here are the key features:
- Coupon field integration: You can arrange the coupon field in your WooCommerce checkout anywhere you want with a simple drag-and-drop. You can also hide it.
- Mini cart with coupon field: FunnelKit Funnel Builder lets you add a mini cart to your checkout page, including a coupon field, order summary, and quantity adjustment options for cart items. This is a great location to place the WooCommerce checkout coupon field.
- Conversion-optimized checkout page: Create a conversion-optimized checkout page that’s either one page or multi-step. You can also optimize other impact aspects like Google address autocomplete, one-click express checkout, enhanced phone field, etc.
- AOV Boosting features: Provide AOV boosting features such as a pre-purchase order bump on the checkout page and a one-click upsell after checkout. You can easily customize the look of these order bumps and one-click upsell offers.
- Prebuilt templates: FunnelKit Funnel Builder offers 30+ prebuilt sales funnel and lead generation templates, including opt-in pages, opt-in confirmation pages, sales pages, checkout pages, upsell pages, and thank you pages.
- Compatibility with popular page builders: Enjoy seamless compatibility with all major page builders, allowing easy customization and integration into your existing website design.
Price: A free version of FunnelKit Funnel Builder is available. However, with this plugin, you would need the pro version to add a coupon field to the checkout page. The premium version starts at $99.5/year.
2. Advanced Coupon
The Advanced Coupon plugin lets you create smart coupons that users can apply on the checkout page to claim various discounts and offers.
This invaluable plugin allows you to create different coupons, like WooCommerce coupons, store credits, gift cards, loyalty programs, BOGO Coupons, and discount rules.
You can use FunnelKit Funnel Builder to create a beautiful checkout page with a coupon field and an Advanced Coupon to create smart coupons that customers can apply on the checkout page.

Here are some of the key features:
- Flexible coupon rules: Create advanced coupon rules based on factors such as product attributes, cart subtotal, user roles, and more.
- BOGO Deals (Buy One Get One): Support for creating buy one, get one (BOGO) deals, including variations like buy X, get Y at a discount, or buy X, get Y free.
- Scheduled coupons: Schedule coupon activation and expiration dates. This allows you to run promotions for specific time periods automatically.
- Usage limits: Set usage limits per coupon or customer to control how many times a coupon can be redeemed.
- Coupon exclusions: Exclude specific products, categories, or sale items from coupon discounts, providing more control over which products are eligible for discounts.
Price: It’s a freemium plugin. The premium version starts at $119.00 for a single site.
3. FunnelKit Cart
FunnelKit Cart replaces the cart page with a modern sliding cart that users can use to view and update the cart items.
With this side cart, users can apply coupon codes directly from the cart and proceed to the checkout page without visiting the cart page.
The best part about this sliding cart is that it streamlines the shopping experience by eliminating the cart page step and helps boost average order value by offering in-cart product recommendations and a milestone-based reward system.
Here are some of the key features:
- A modern side cart: This plugin adds a modern side cart to the WooCommerce store that users can access from anywhere on the website. Users can view, update, or delete cart items.
- Replace the cart page: You can replace the cart page with a side cart and reduce the number of steps a customer takes to place an order. This ensures a smoother shopping experience.
- In-cart coupon field: FunnelKit Cart also offers a coupon field that users can use to apply coupons to claim discounts or offers before moving to the checkout page.
- In-cart product recommendation: You can offer upsell and cross-sell products inside the cart that users can easily add with a single click.
- Smart milestone-based rewards: Offer three types of rewards: free shipping, discounts, and free gifts based on different milestones users reach by increasing their order total.
Price: The basic version of FunnelKit Cart is free to use. You can buy the pro version with the FunnelKit Funnel Builder Plus and the above package, which starts at $99/year.
My recommendation
I highly recommend FunnelKit Funnel Builder for its powerful checkout customization options, including the ability to place the coupon field wherever you choose.
In addition, it boosts order value with order bumps, allowing customers to add more items and meet the minimum requirement to redeem discount coupons, all without extra steps.
How to Add and Move Coupon Field In The Checkout Page in WooCommerce (With a Free Plugin)
In this section, I will share how you can replace the default WooCommerce checkout page with a more attractive one.
Plus, control the placement of the coupon field to make it more convenient for your customers.
Let's use the free version of FunnelKit Funnel Builder.
🔔 You can refer to the documentation on how to install and activate FunnelKit Funnel Builder.
Step 1: Set up your store checkout
Now let’s create a custom checkout for your WooCommerce store. For that, navigate to FunnelKit ⇒ Store Checkout.
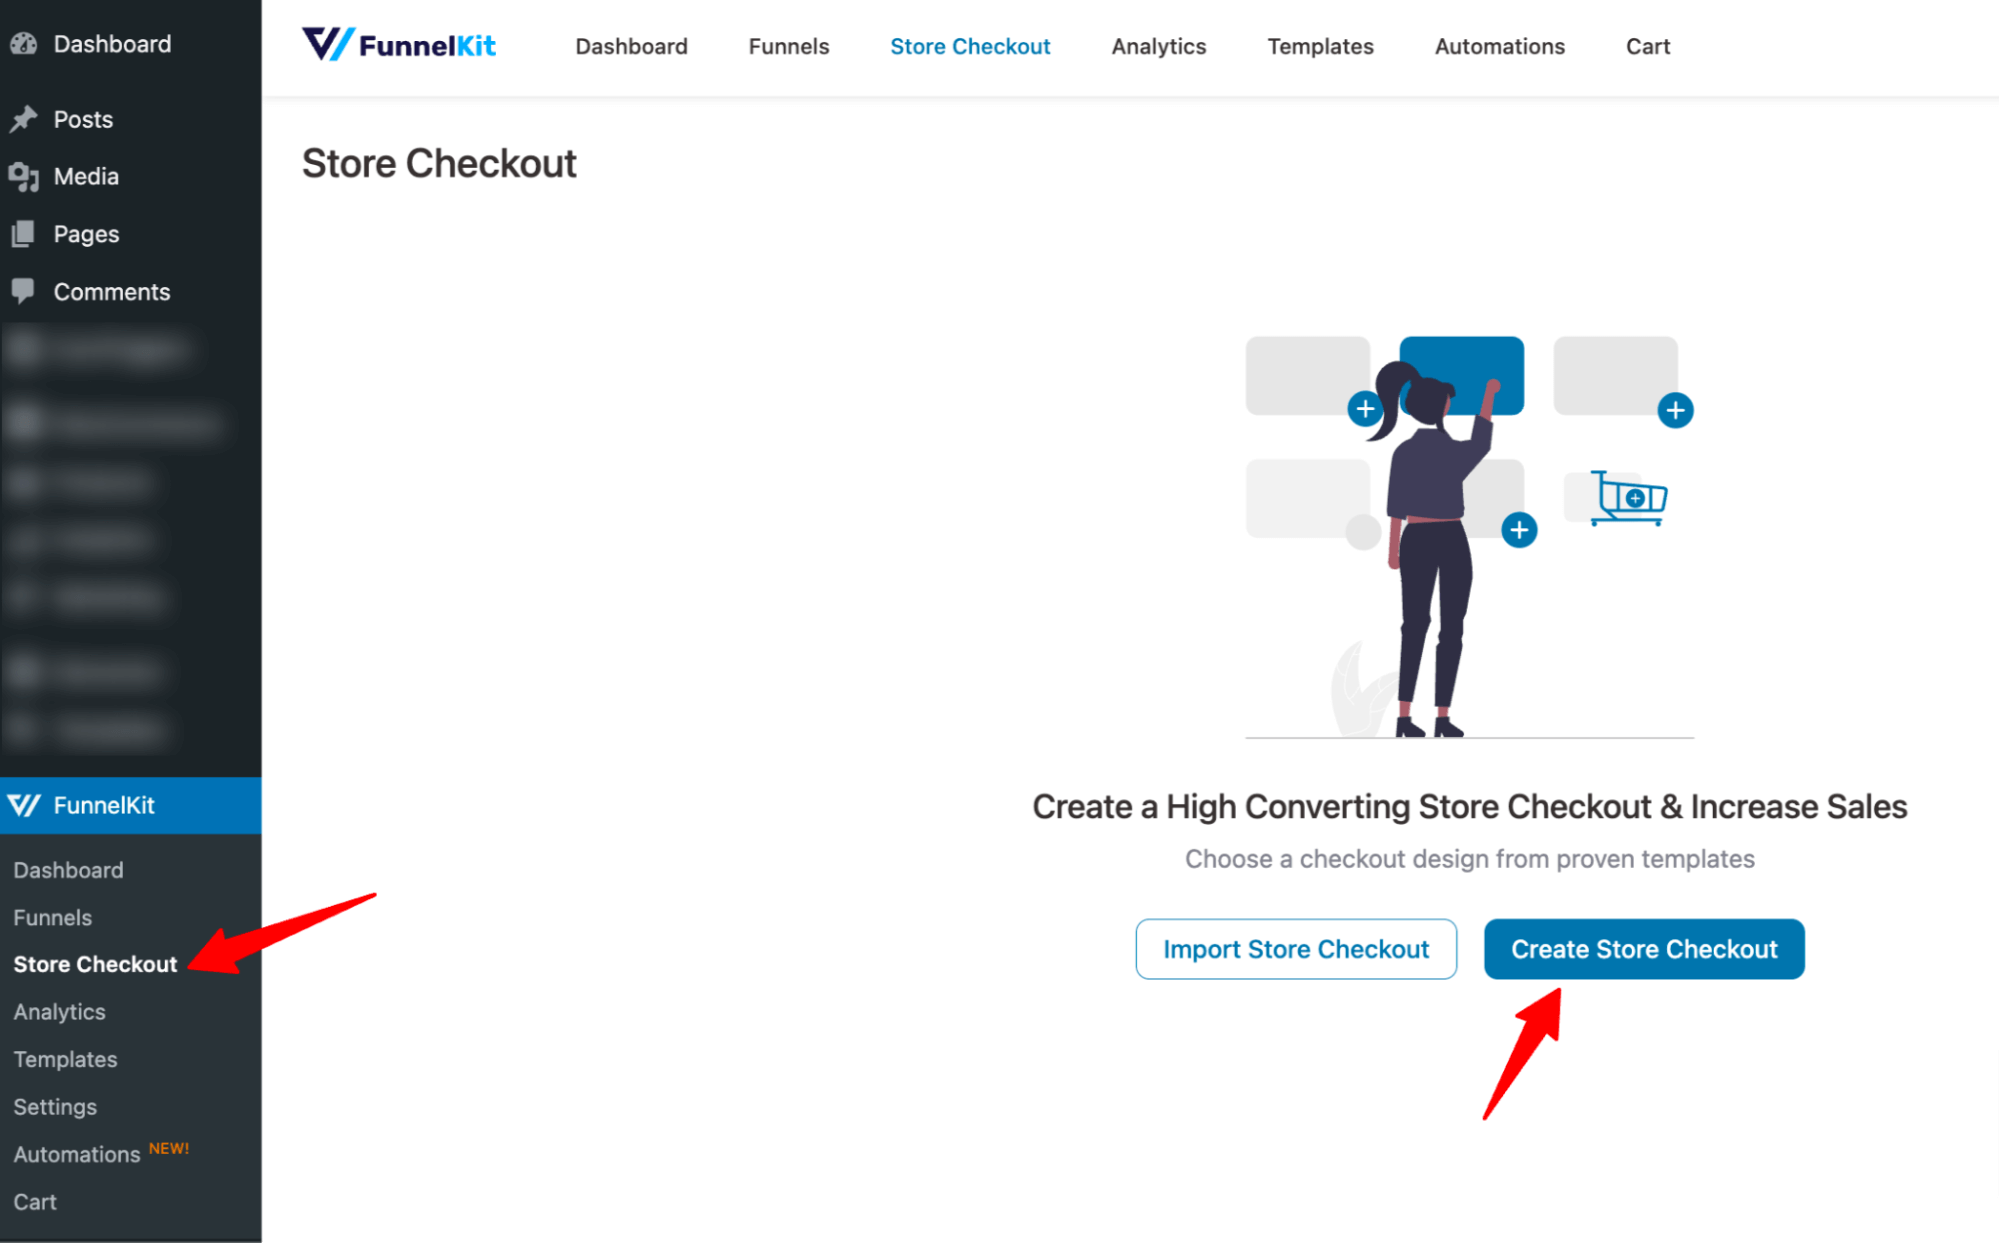
Now, choose your preferred page builder and the template you like. I am choosing Hific.
After that, choose a page builder to filter the sales templates. To check any template, hover on it and click on the preview button.
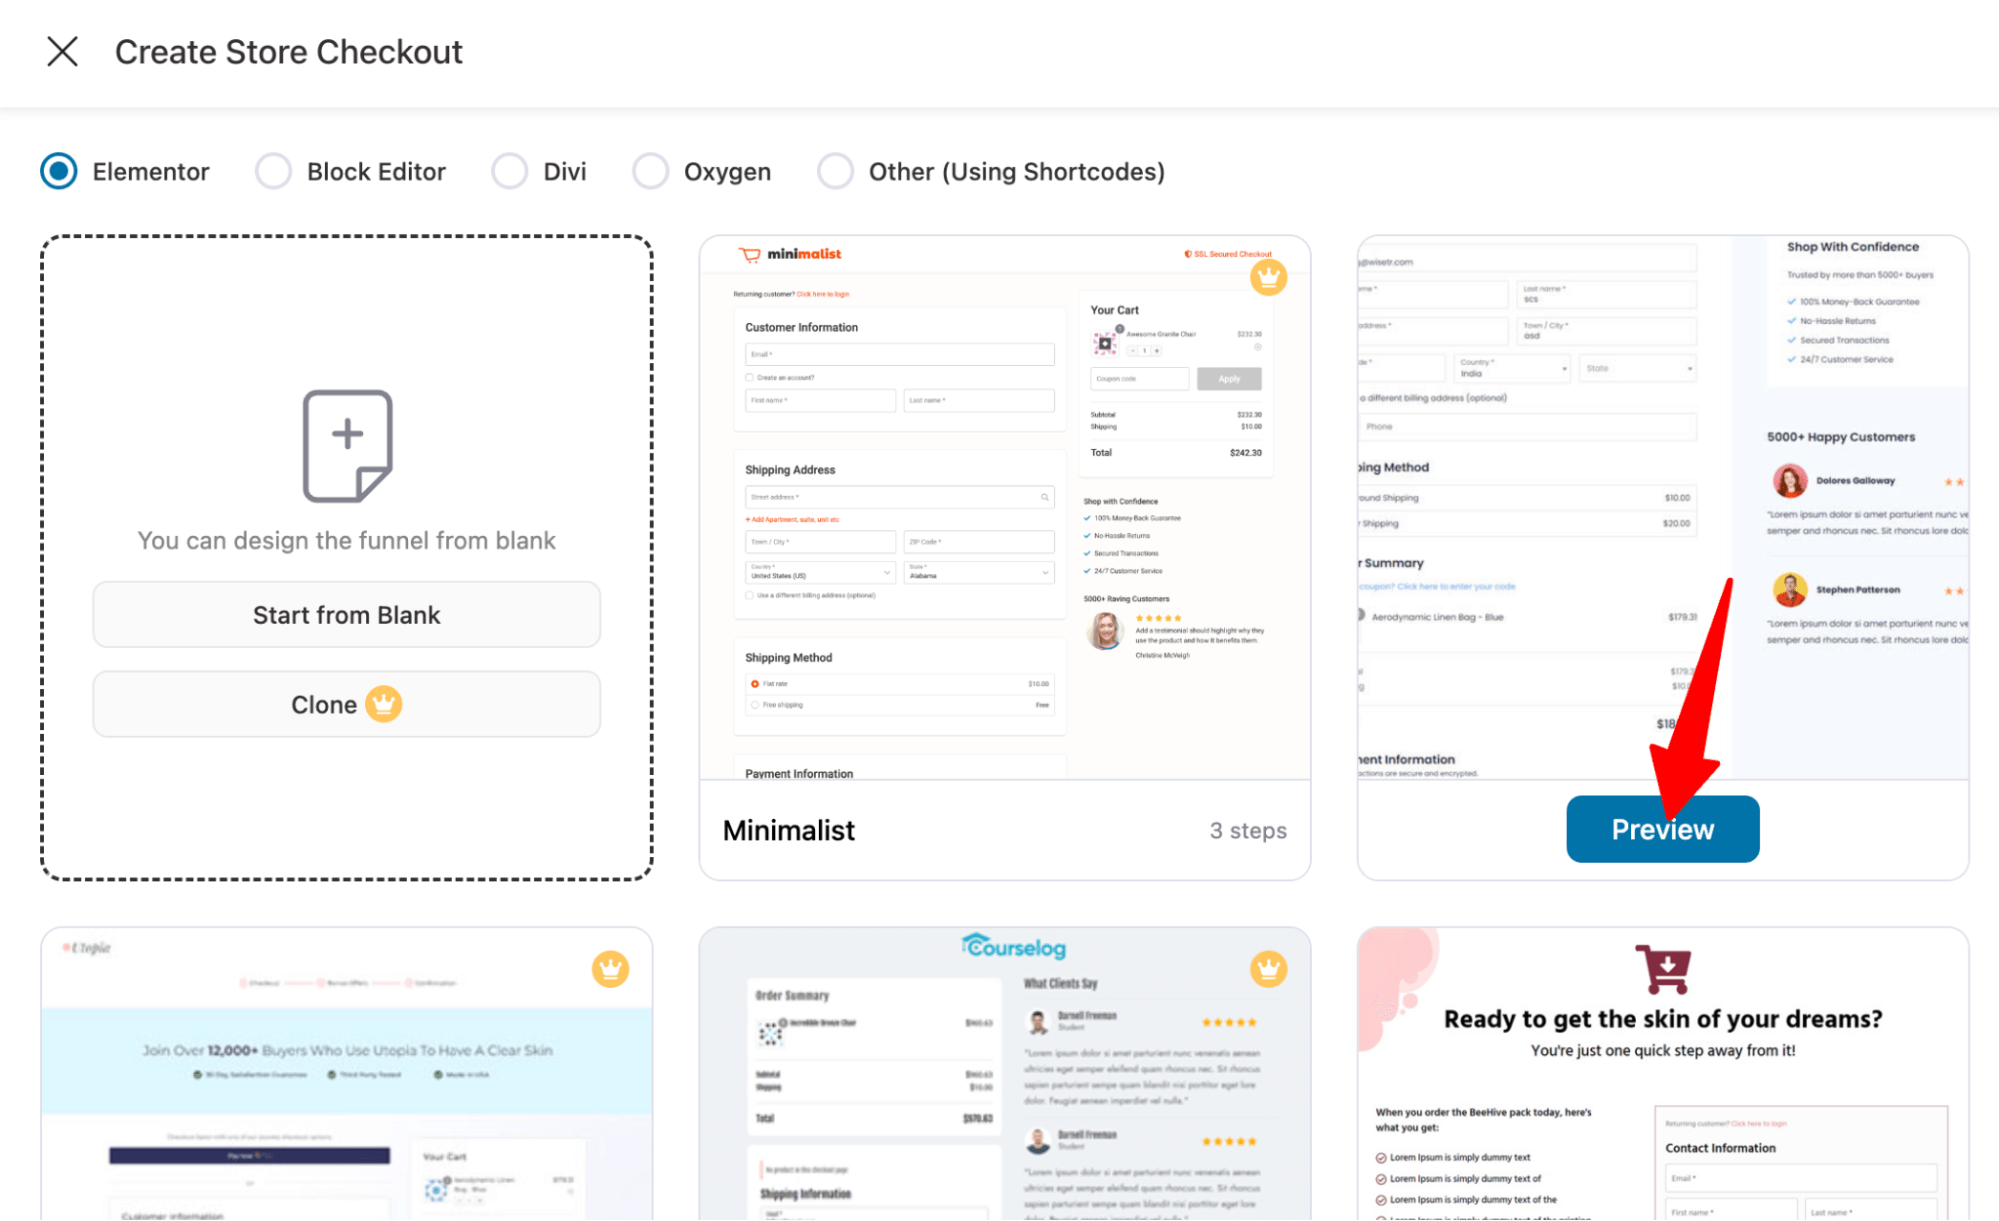
With the free version of FunnelKit Funnel Builder, you can only create a single-page checkout.
However, if you opt for the pro version, you can create a multi-page checkout that’s more conversion-optimized.
Now, to import, click on the “Import this Template” button. After that, provide a store checkout name.
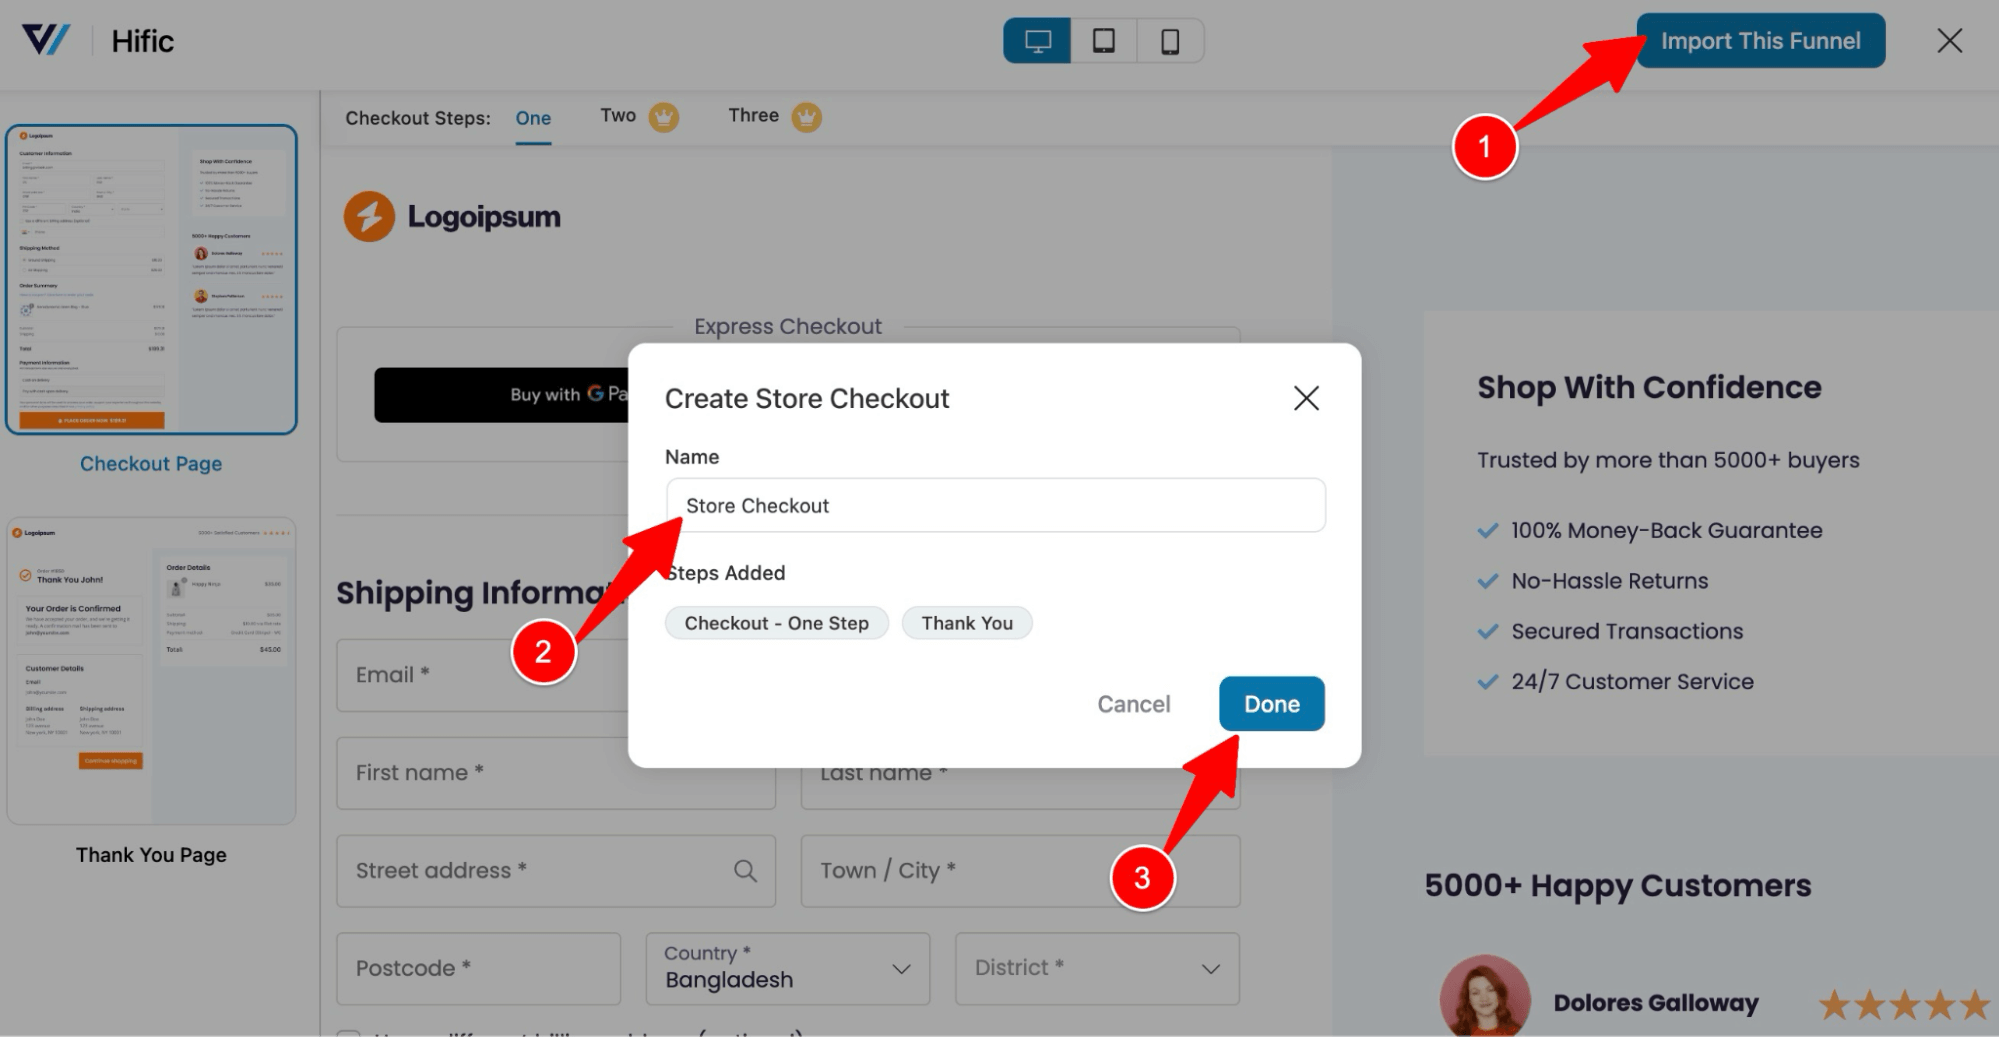
This will import two templates: checkout and thank you page.
Step 2: Edit the checkout page to customize the coupon field
Next, you need to edit the checkout page. To do so, click on the checkout page option.
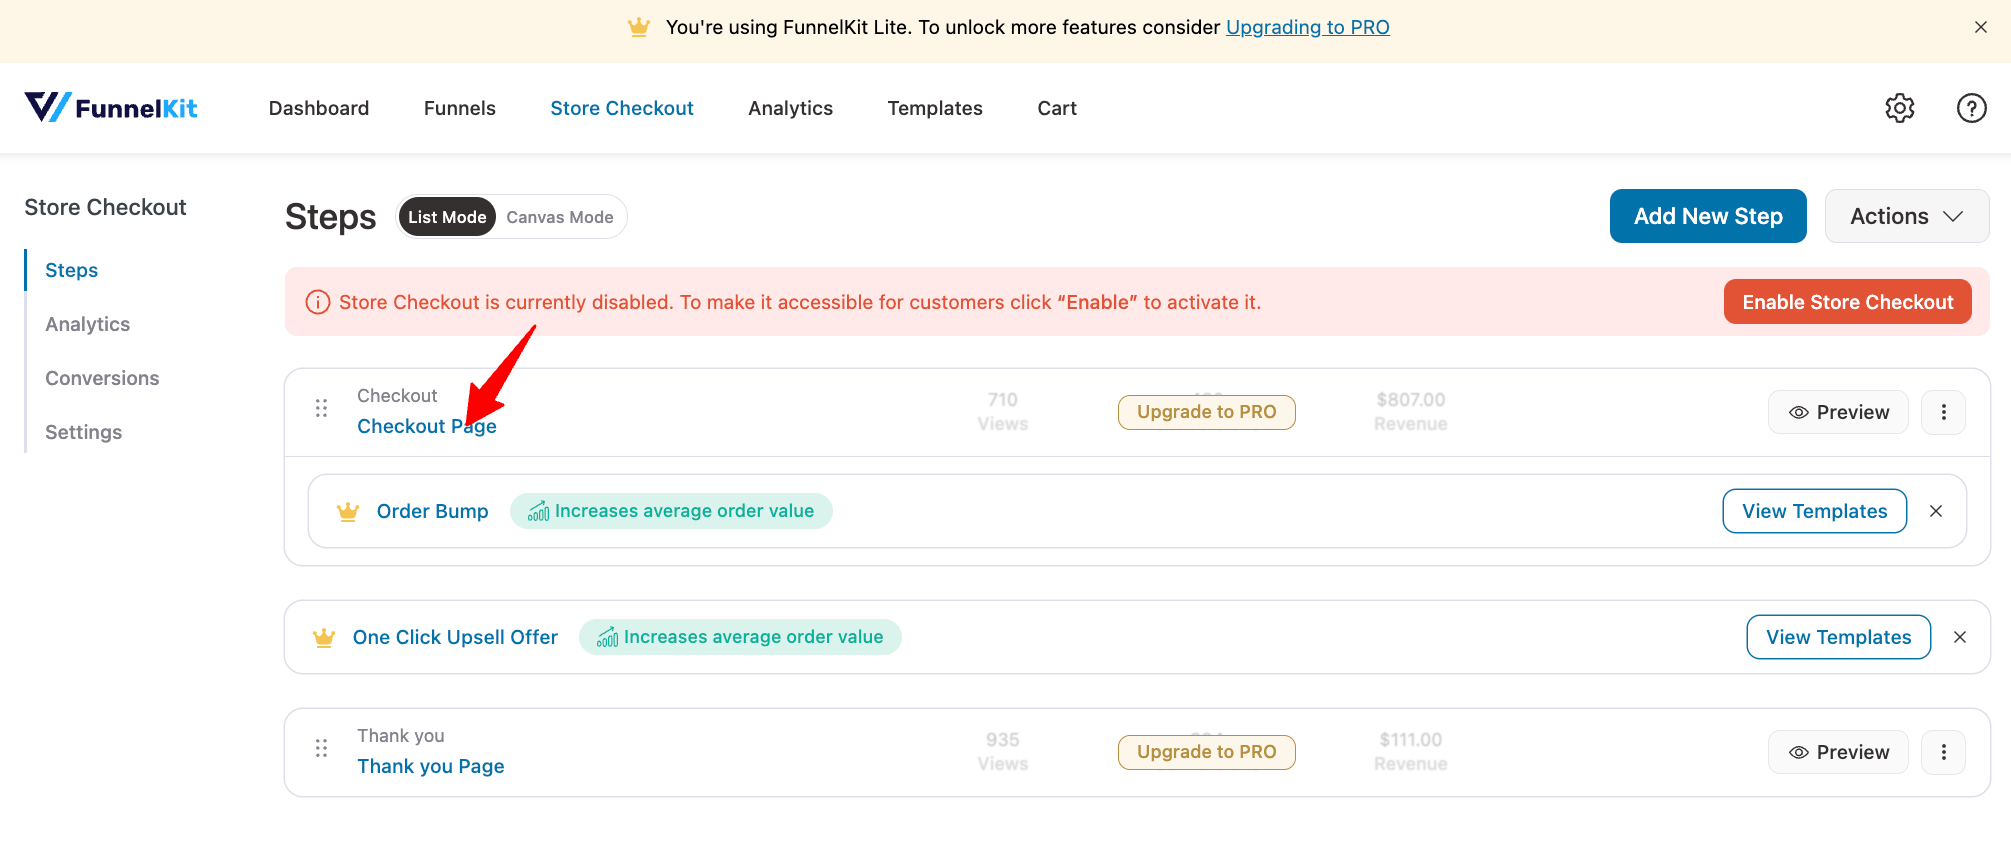
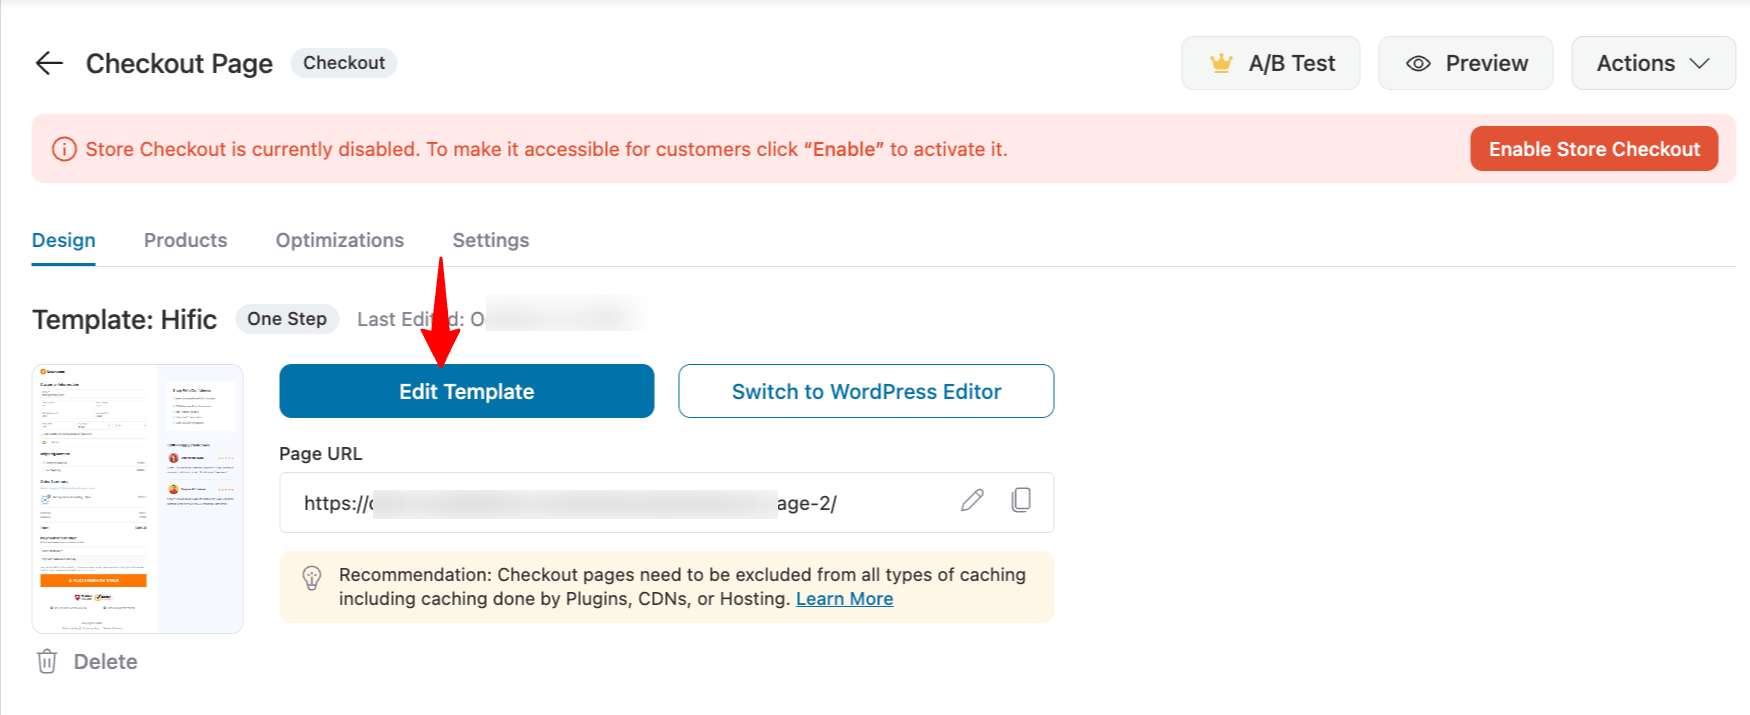
Now, you can edit the checkout page design and content with your chosen page builder.
So, click on the “Edit Template” option to customize the checkout page.
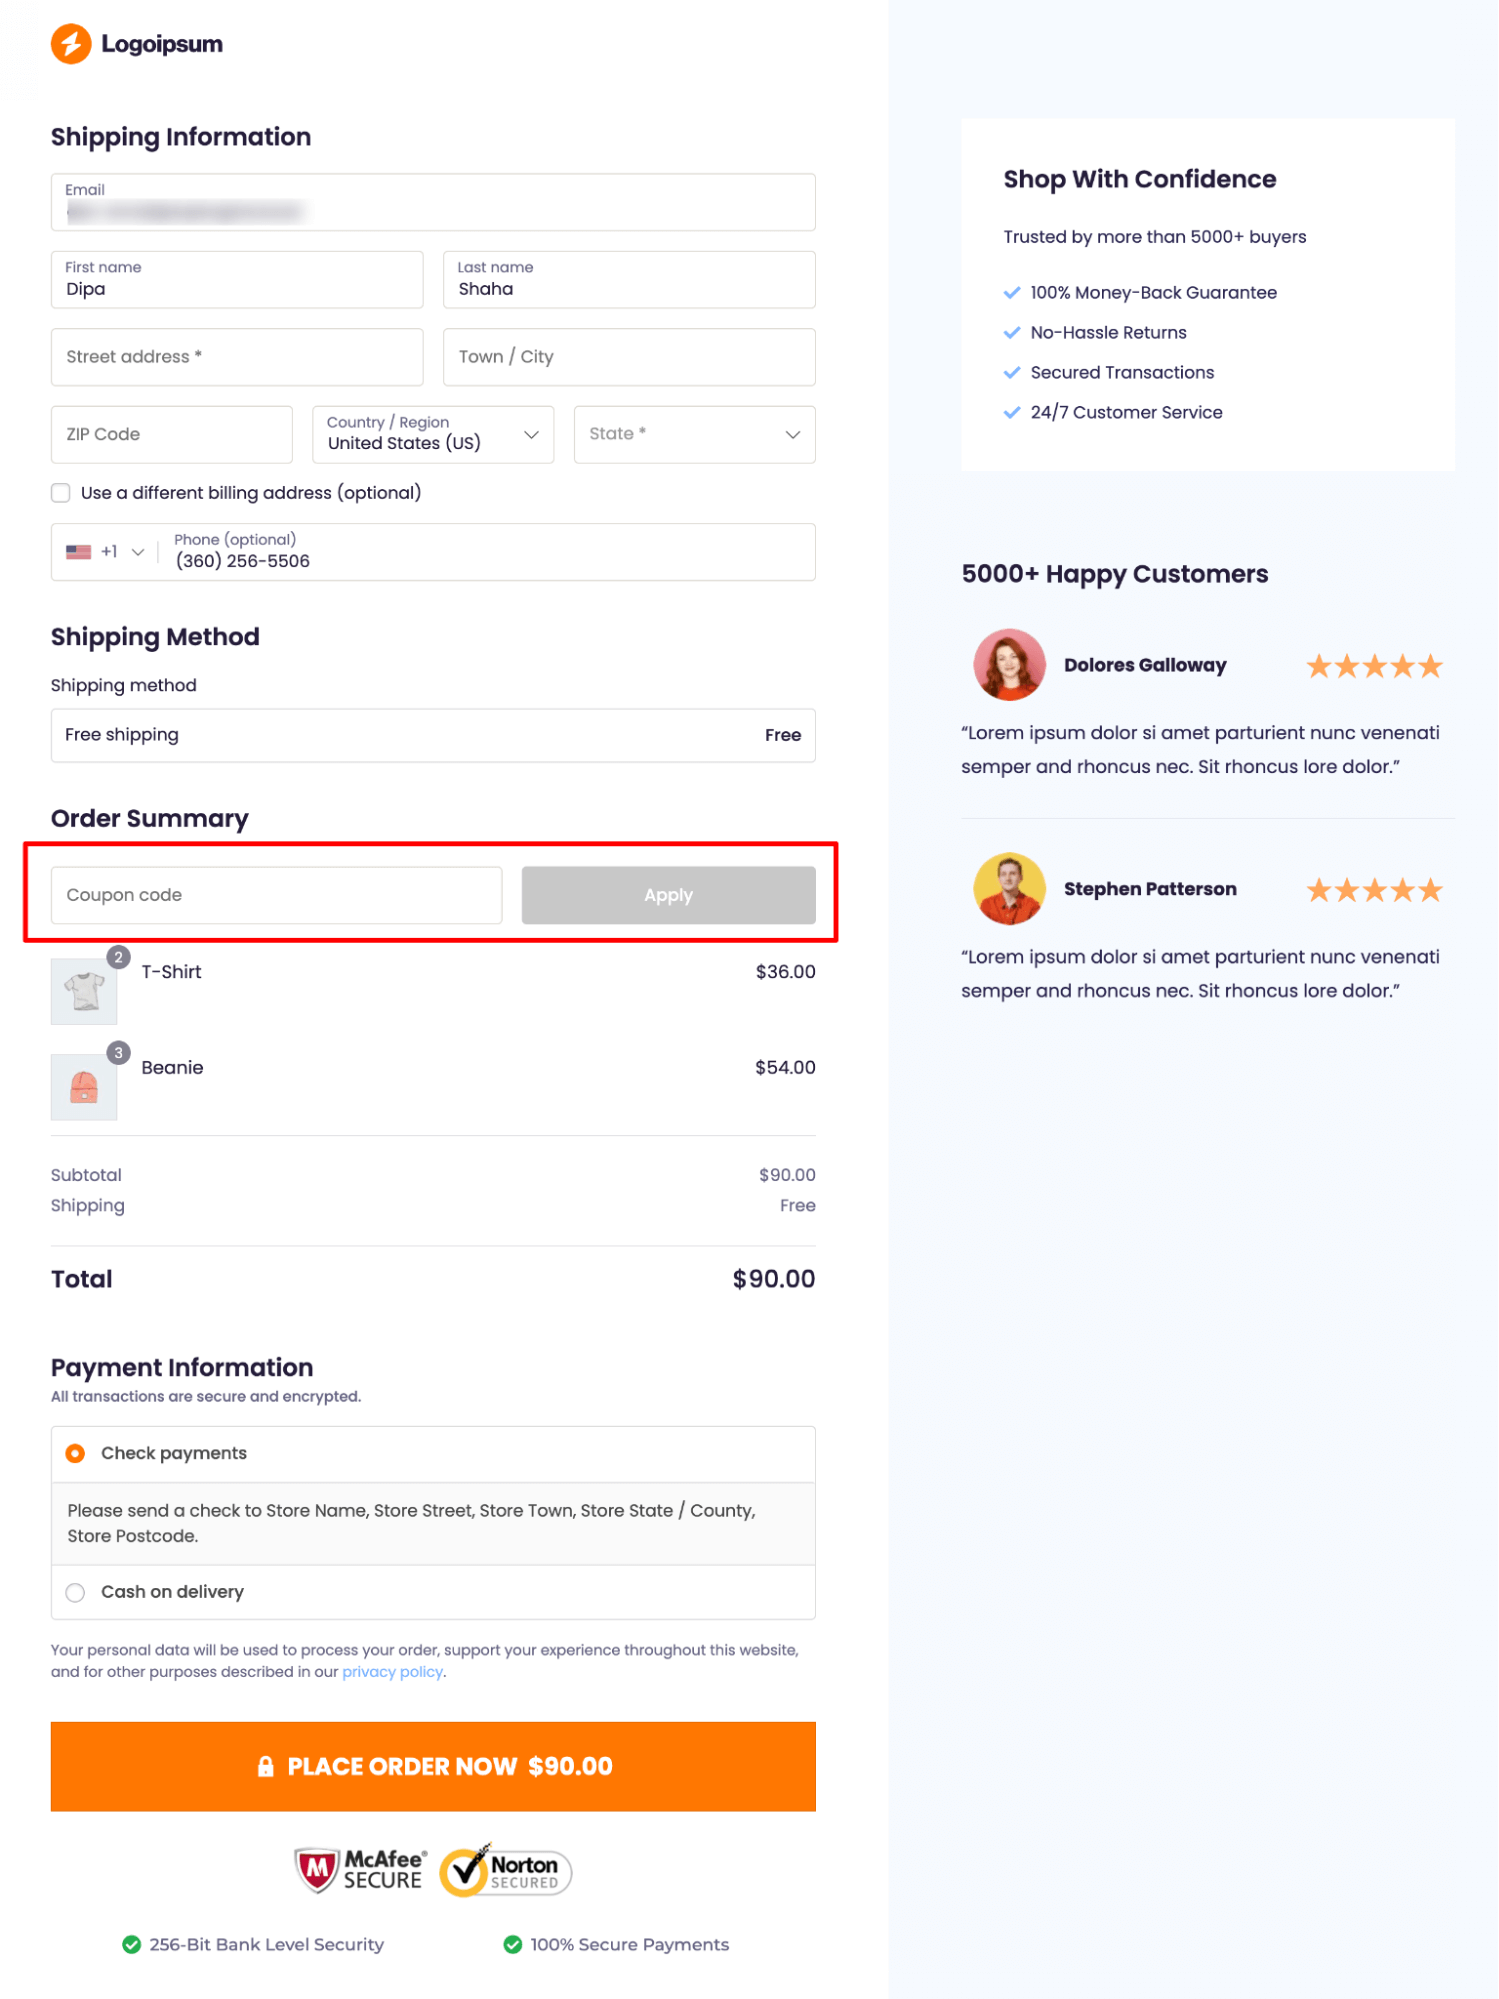
After customizing the content, scroll down to the checkout Form Fields section. Here, you should see the Coupon code placed right before the order summary section.
This is a great placement, as users can see how the coupon code affects the order details right below the coupon field.
Here is a preview of the coupon field:
Customize the coupon field.
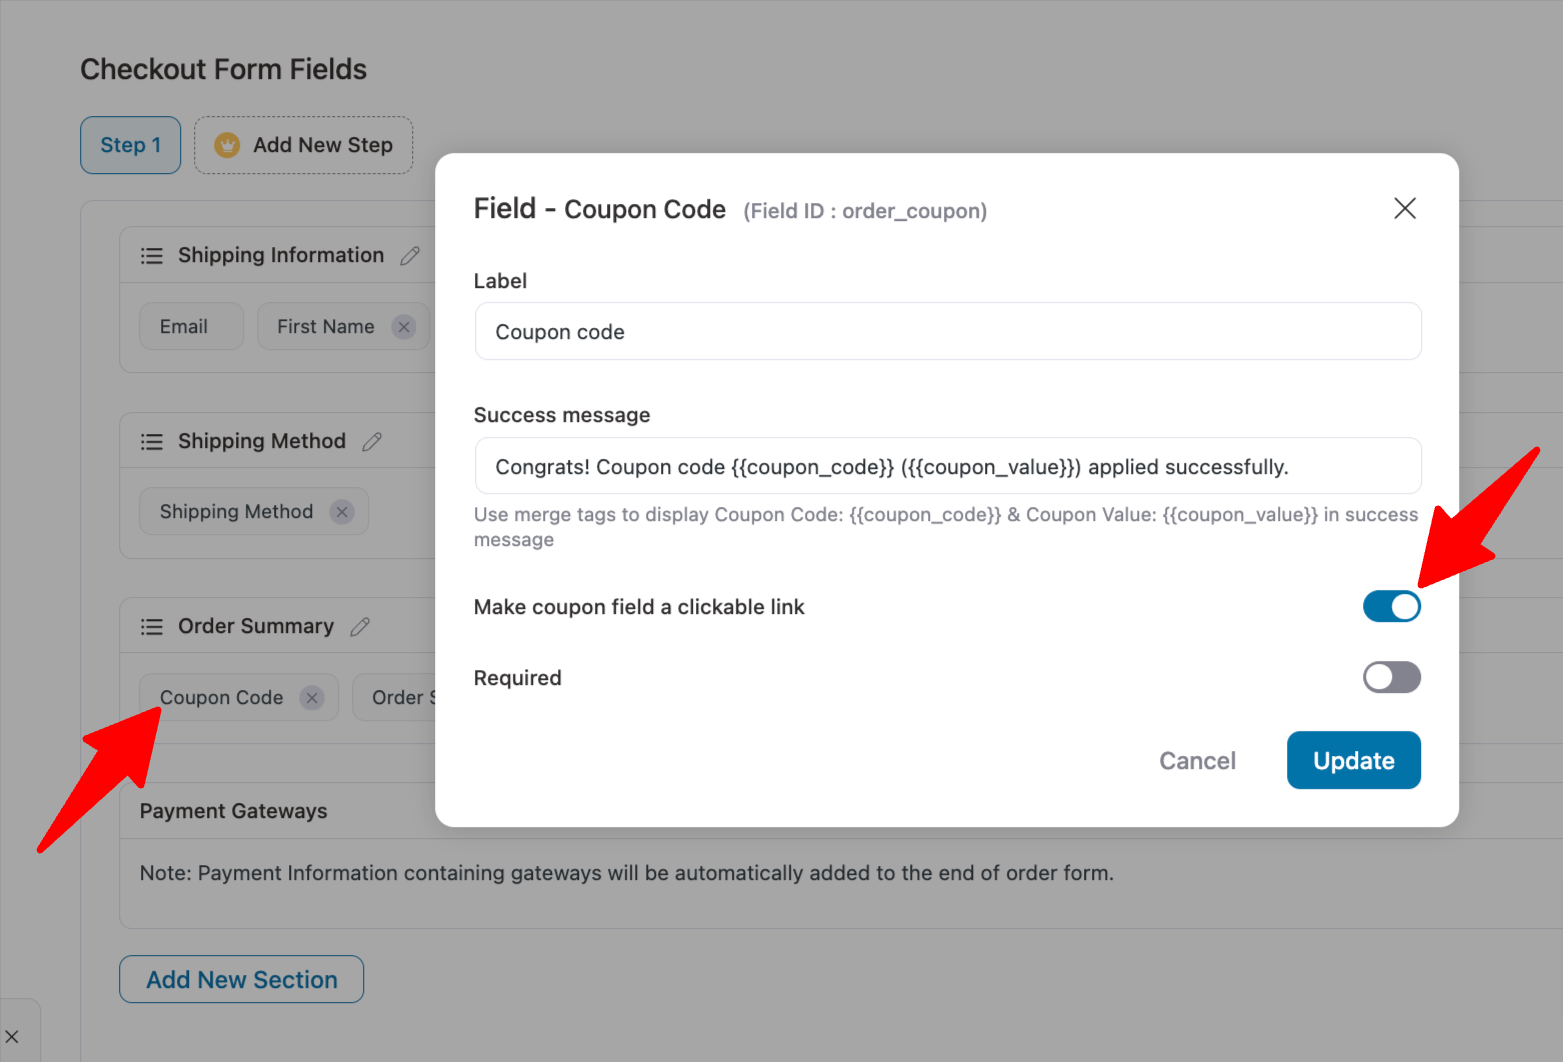
As you can see, the coupon field is basic. However, you can make it a clickable link. To do so, click on the Coupon Field and turn on the option ”Make Coupon Field a Clickable Link.”
You can also update the Label and make it required if you want.
Make sure to click on ‘Update’ to save the changes.
🔔 Note: If you want to change the color, padding, border, etc of the checkout coupon field, you can do so while editing the checkout page with your preferred page builder.
Here is what the clickable coupon field looks like:
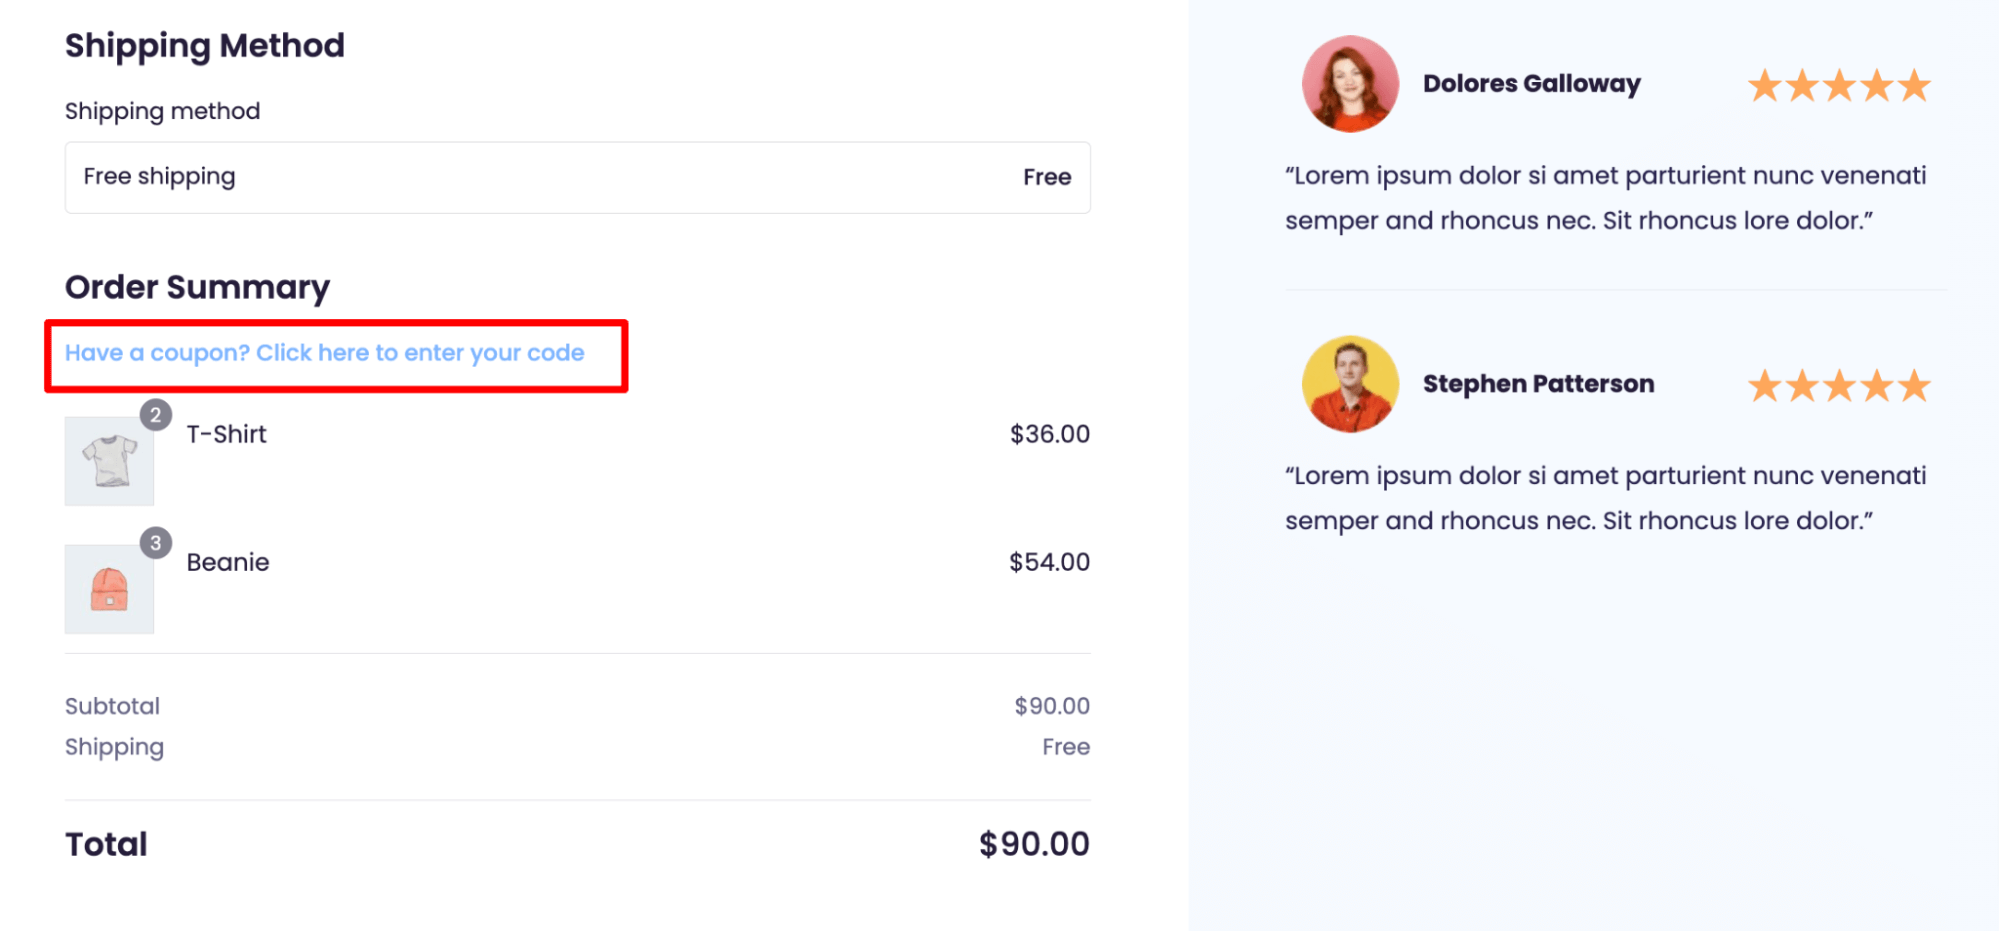
Step 3: Move the coupon field to a different location (optional)
If you have a question like, “How do I move the WooCommerce coupon field on the checkout page?” The answer is simple.
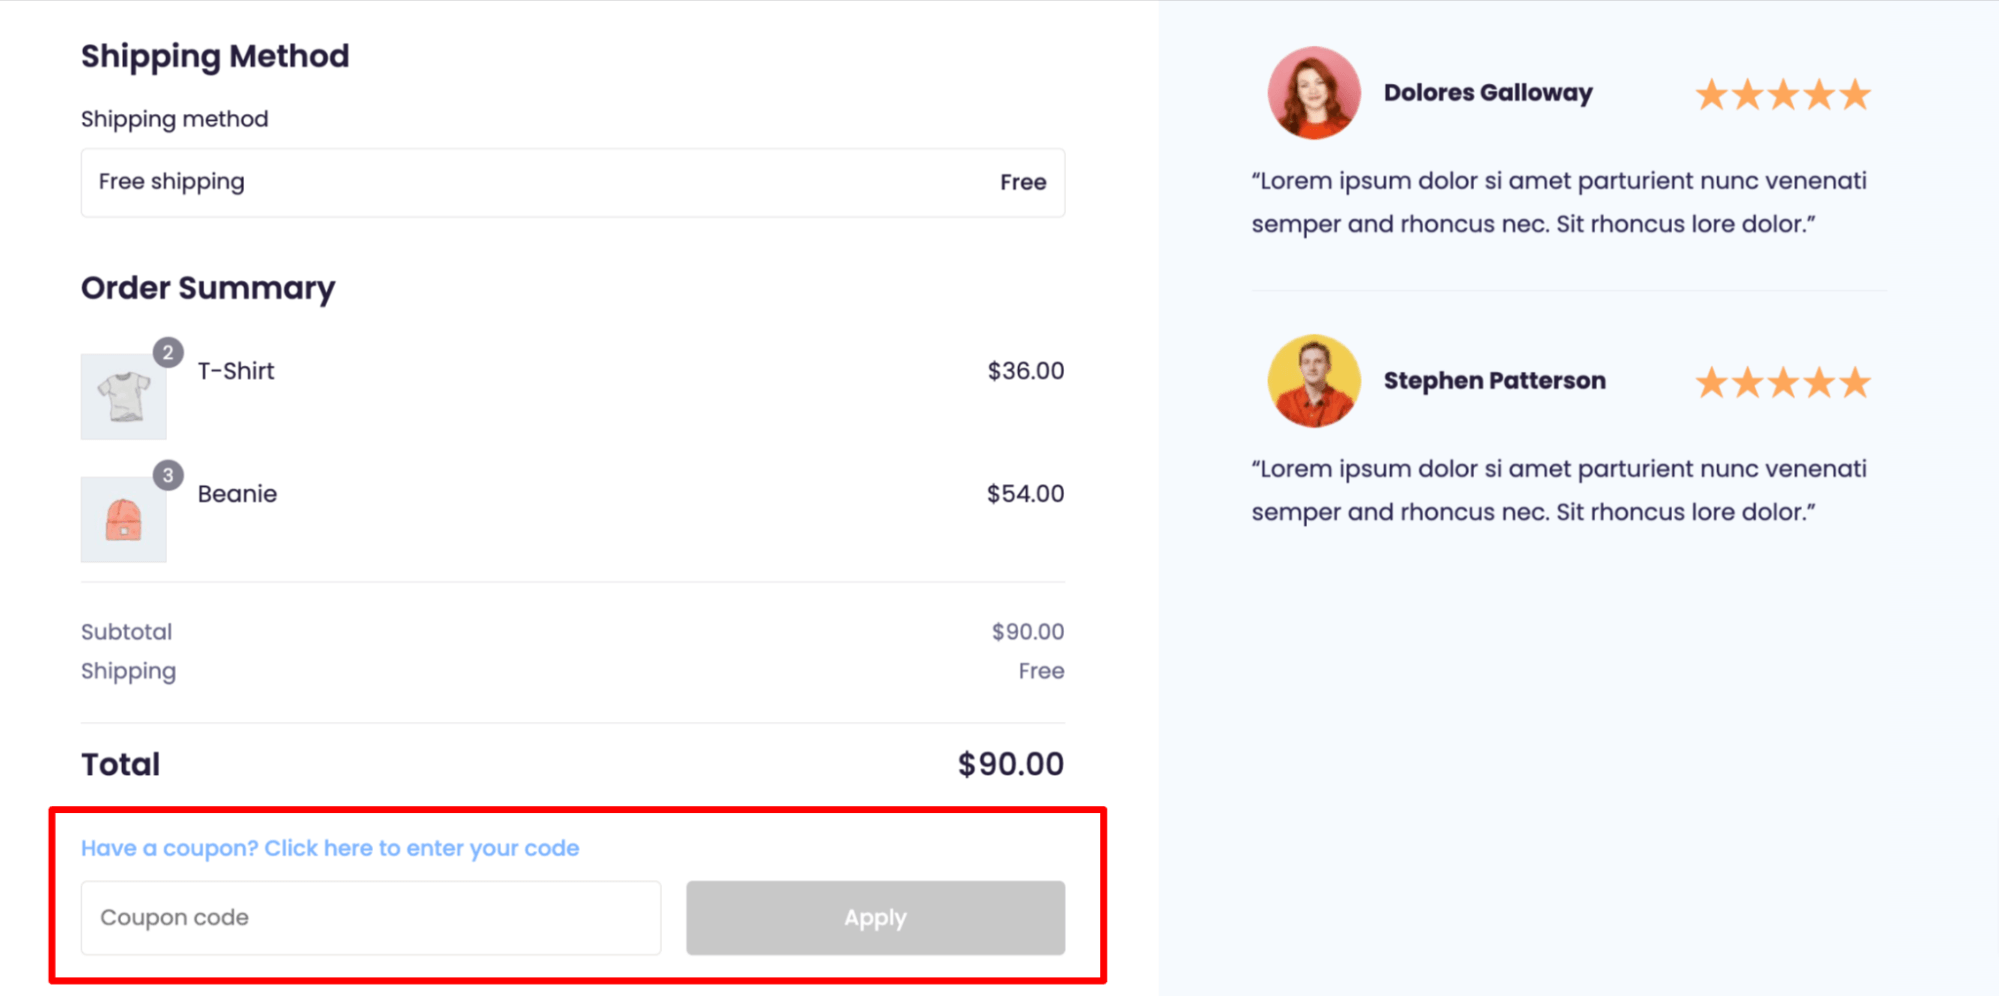
To change the order of the coupon form field, all you have to do is drag and drop the coupon field to the desired location.
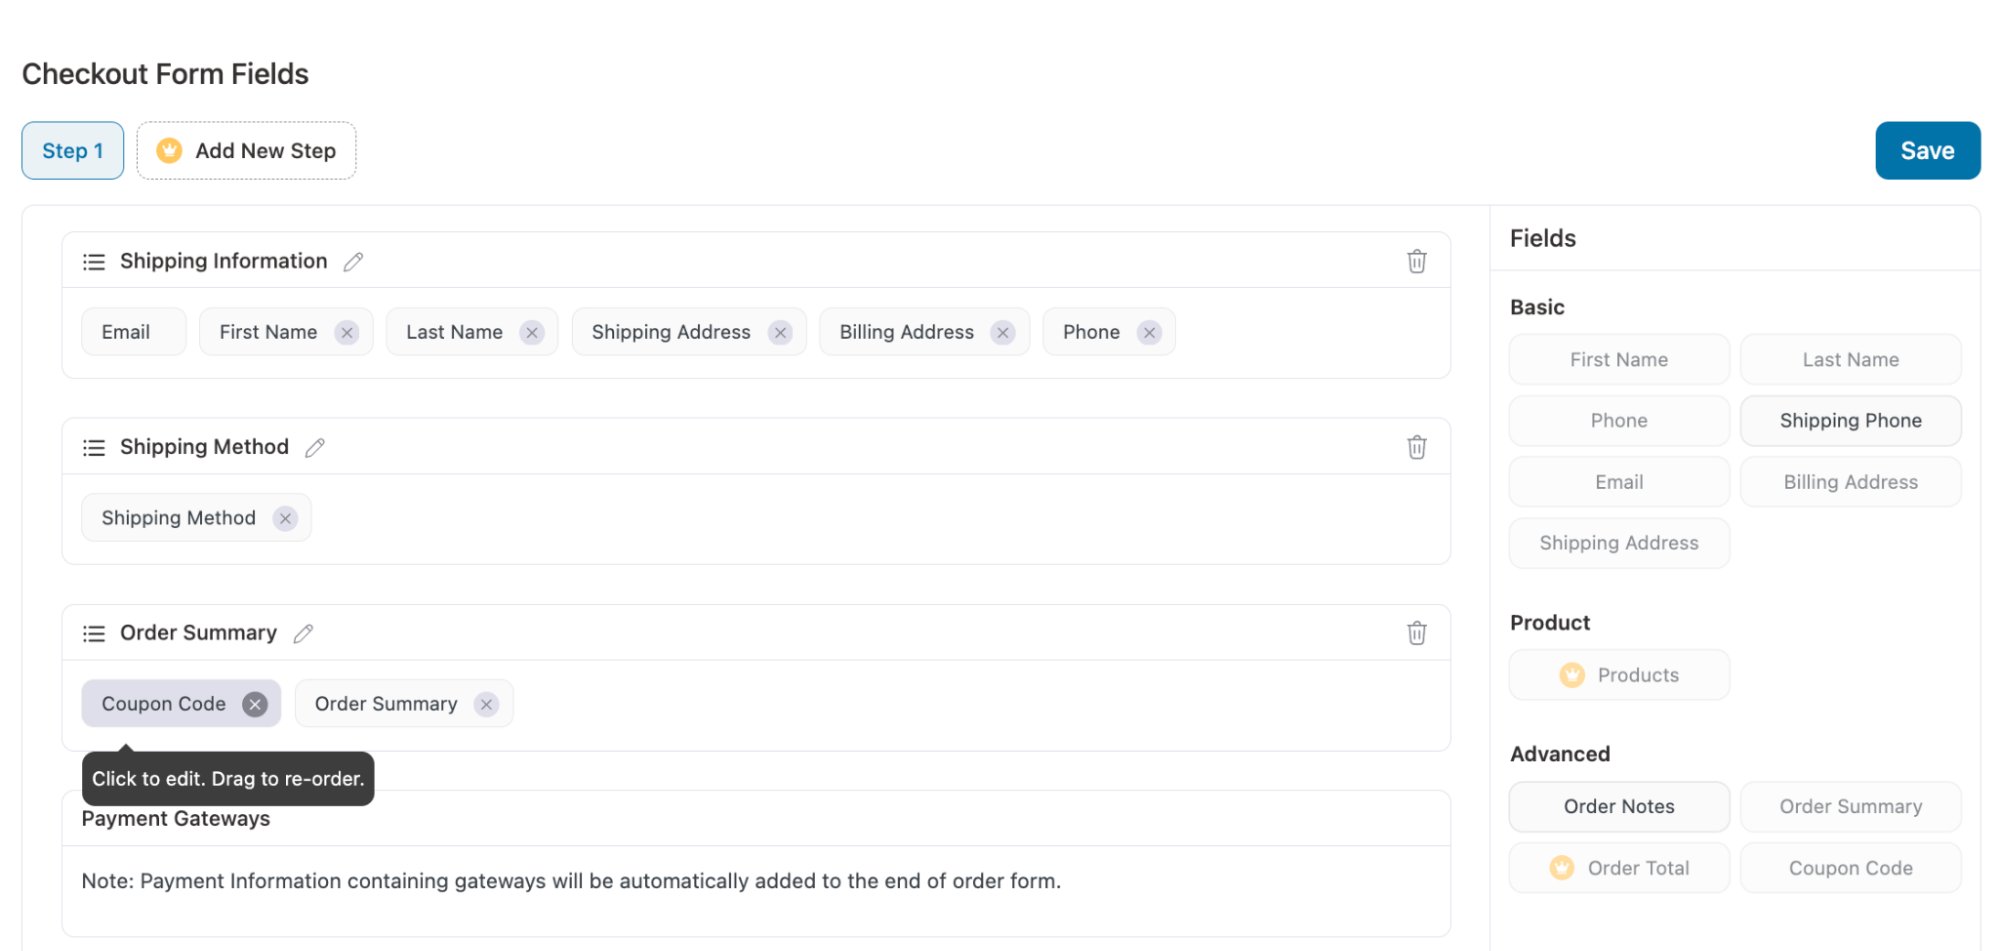
For instance, move the coupon code field to after the order summary.
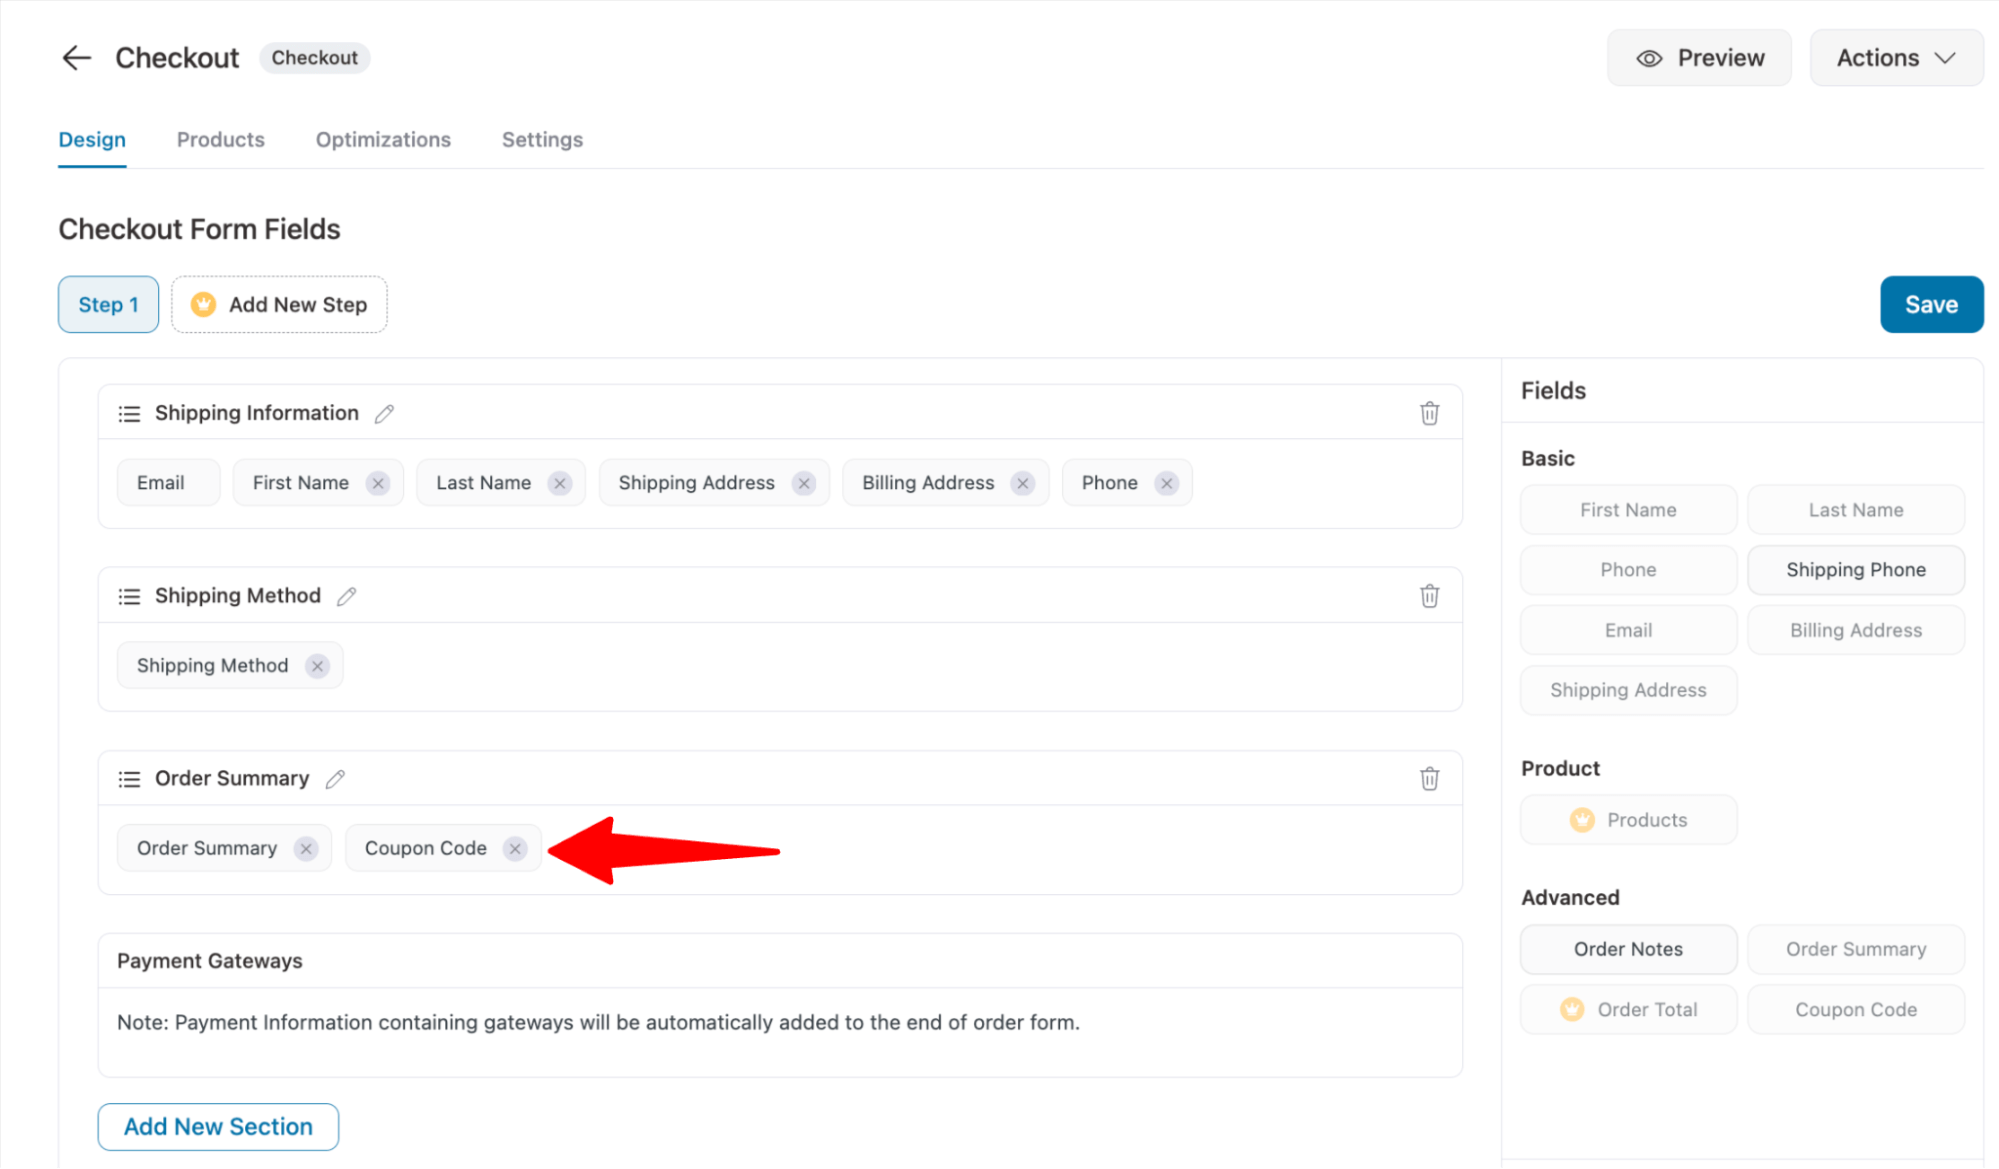
Make sure to click on ‘Save’ to update the changes.
Here is the preview of the coupon field in a new location:
Step 4: Enable the store checkout
Lastly, click on the "Enable Store Checkout" button to activate the store checkout.
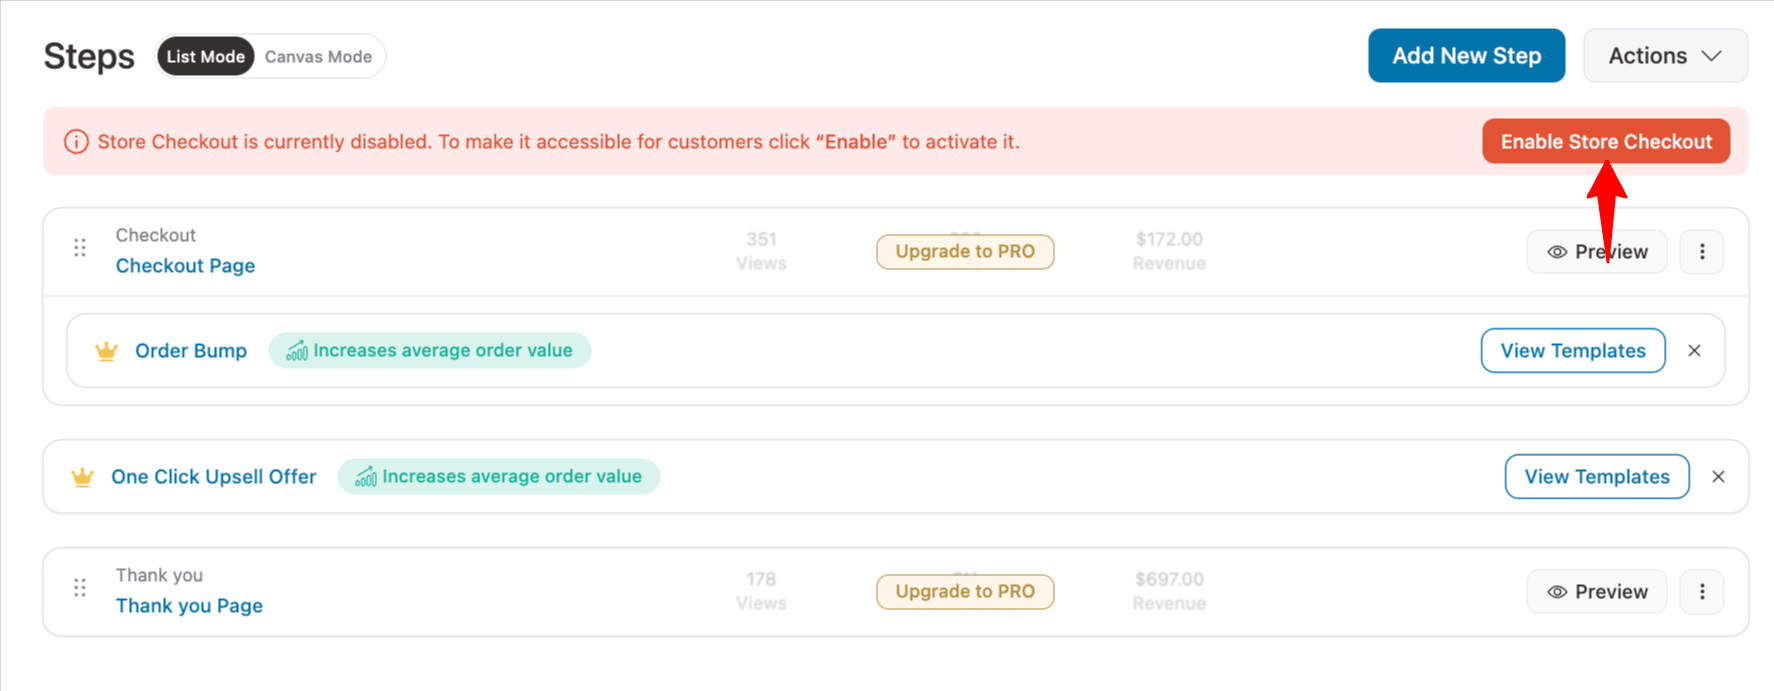
This is how you can add a checkout coupon field to the WooCommerce checkout and place it wherever you want.
How to Hide/Remove Coupon Field From WooCommerce Checkout Page?
Here, I will share two ways to remove or hide the coupon field from the WooCommerce checkout page:
1. Using WooCommerce default settings
To use this method, navigate to WooCommerce ⇒ Settings ⇒ General and uncheck the option “Enable the use of coupon codes.” Make sure to click on Save Changes to update.
🔔 Note: Enabling this option will add a coupon field to both the cart page and checkout page.
However, you can solve this problem by eliminating the cart page and replacing it with a sliding cart using FunnelKit Cart.
2. Using a custom checkout with FunnelKit Funnel Builder
If you are using FunnelKit Funnel Builder to create your checkout page and add a coupon field, then removing the coupon field is way easier than you think.
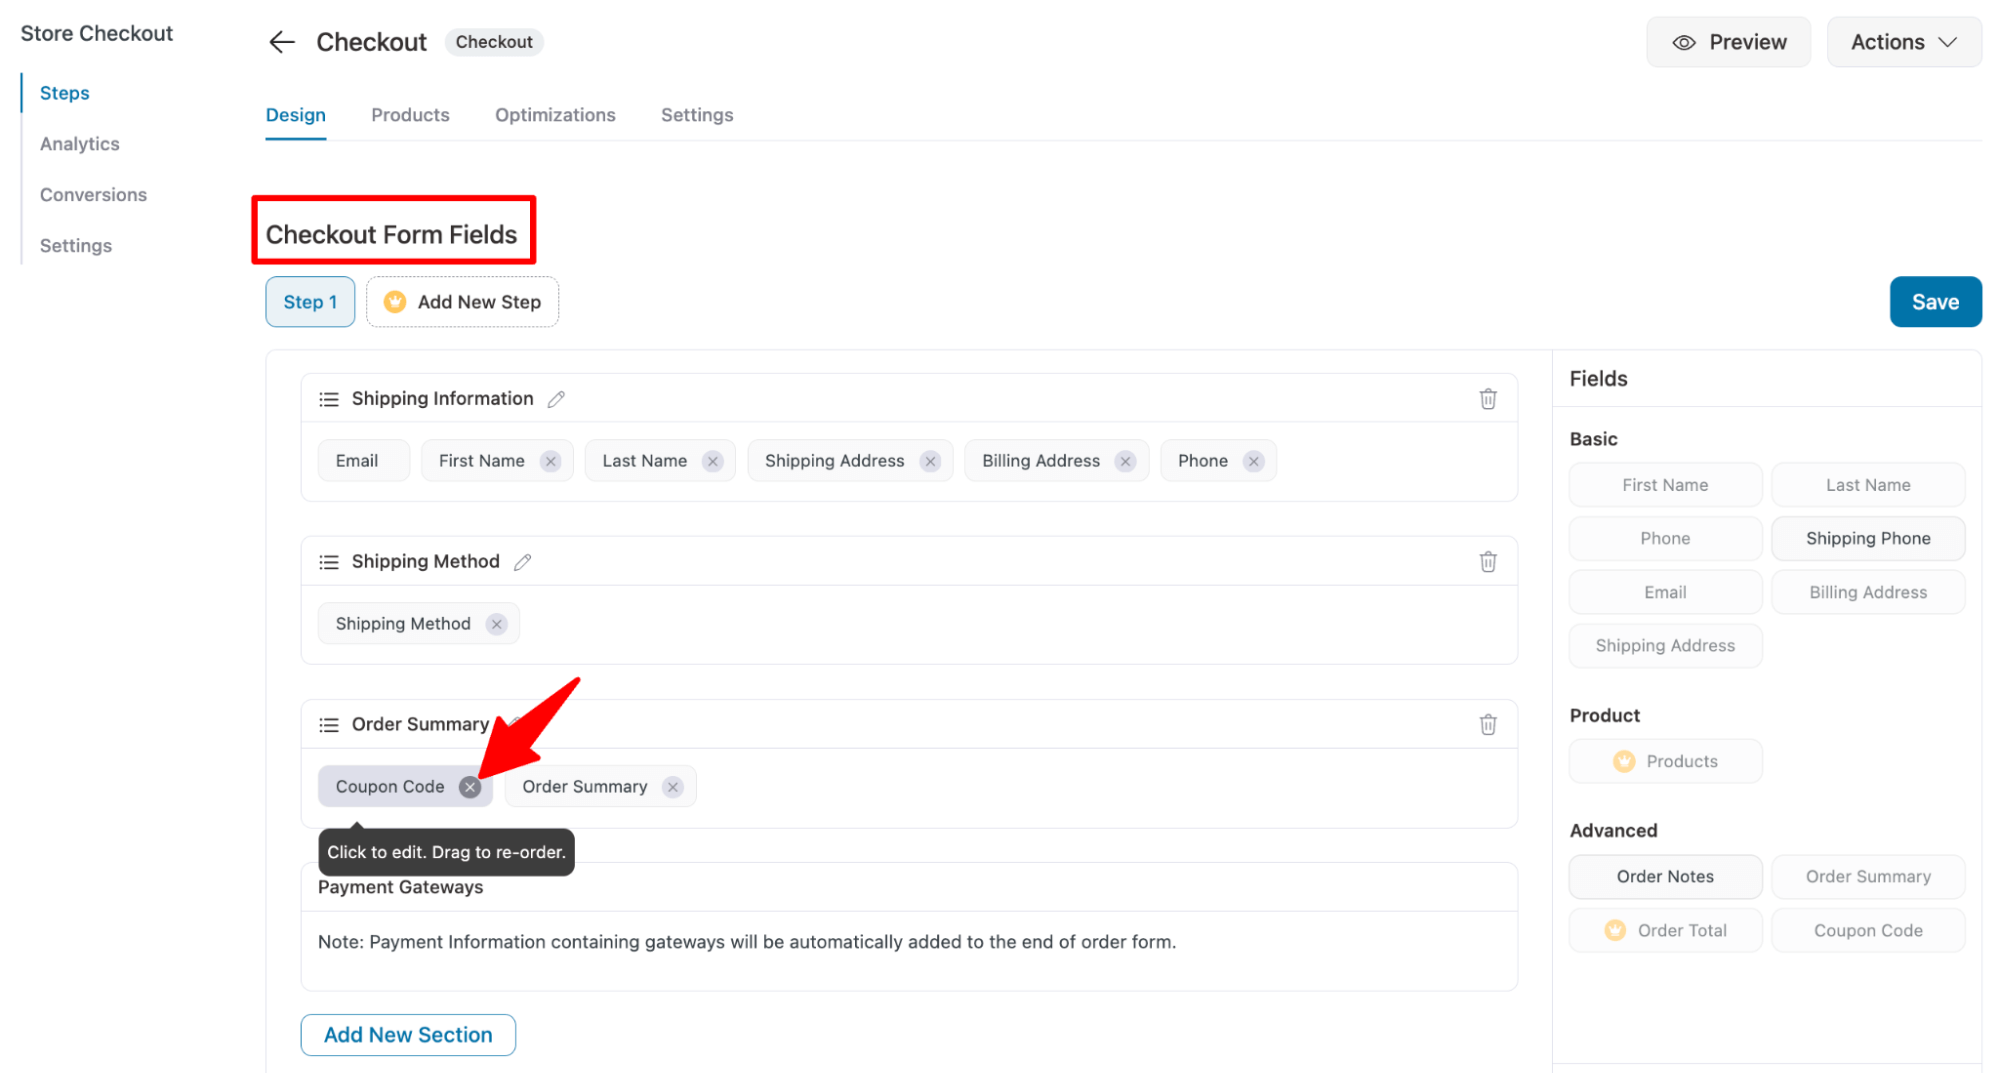
To remove the coupon field from your WooCommerce checkout page, edit the checkout page, scroll down to the Checkout Form Fields section, hover over the Coupon field, and click on the ‘X’ icon.
Make sure to click on Save to update the changes.
These were two ways of removing the WooCommerce checkout coupon. Depending on the method you use to add one, follow the relevant process to remove it.
How to Create a WooCommerce Checkout Coupon URL?
A WooCommerce checkout coupon URL is a URL that directs users directly to the checkout page, where specific products are added to the order details, and automatically applies a preset coupon code.
This is quite effective if you want to run a special discount offer for a specific group of people, as you can share the URL with only those people.
With FunnelKit Funnel Builder, you can easily create a WooCommerce checkout coupon URL. To do this, you need to have the premium version of FunnelKit Funnel Builder.
After that, edit the checkout and move to the Optimization tab. Here, scroll down to the “Generate URL to populate checkout” section and expand the section. Then, set the following values:
- Product: Add the Product IDs separated by commas that will be added to the cart when users hit the URL.
- Quantity: Provide the quantity of the products separated by commas. Make sure to follow the same sequence you used in the product IDs.
- Coupons: Add the coupon you want to apply to the cart when customers use this URL.
After providing the URL, you will find the WooCommerce Checkout Coupon URL in the field “Coupon URL”.
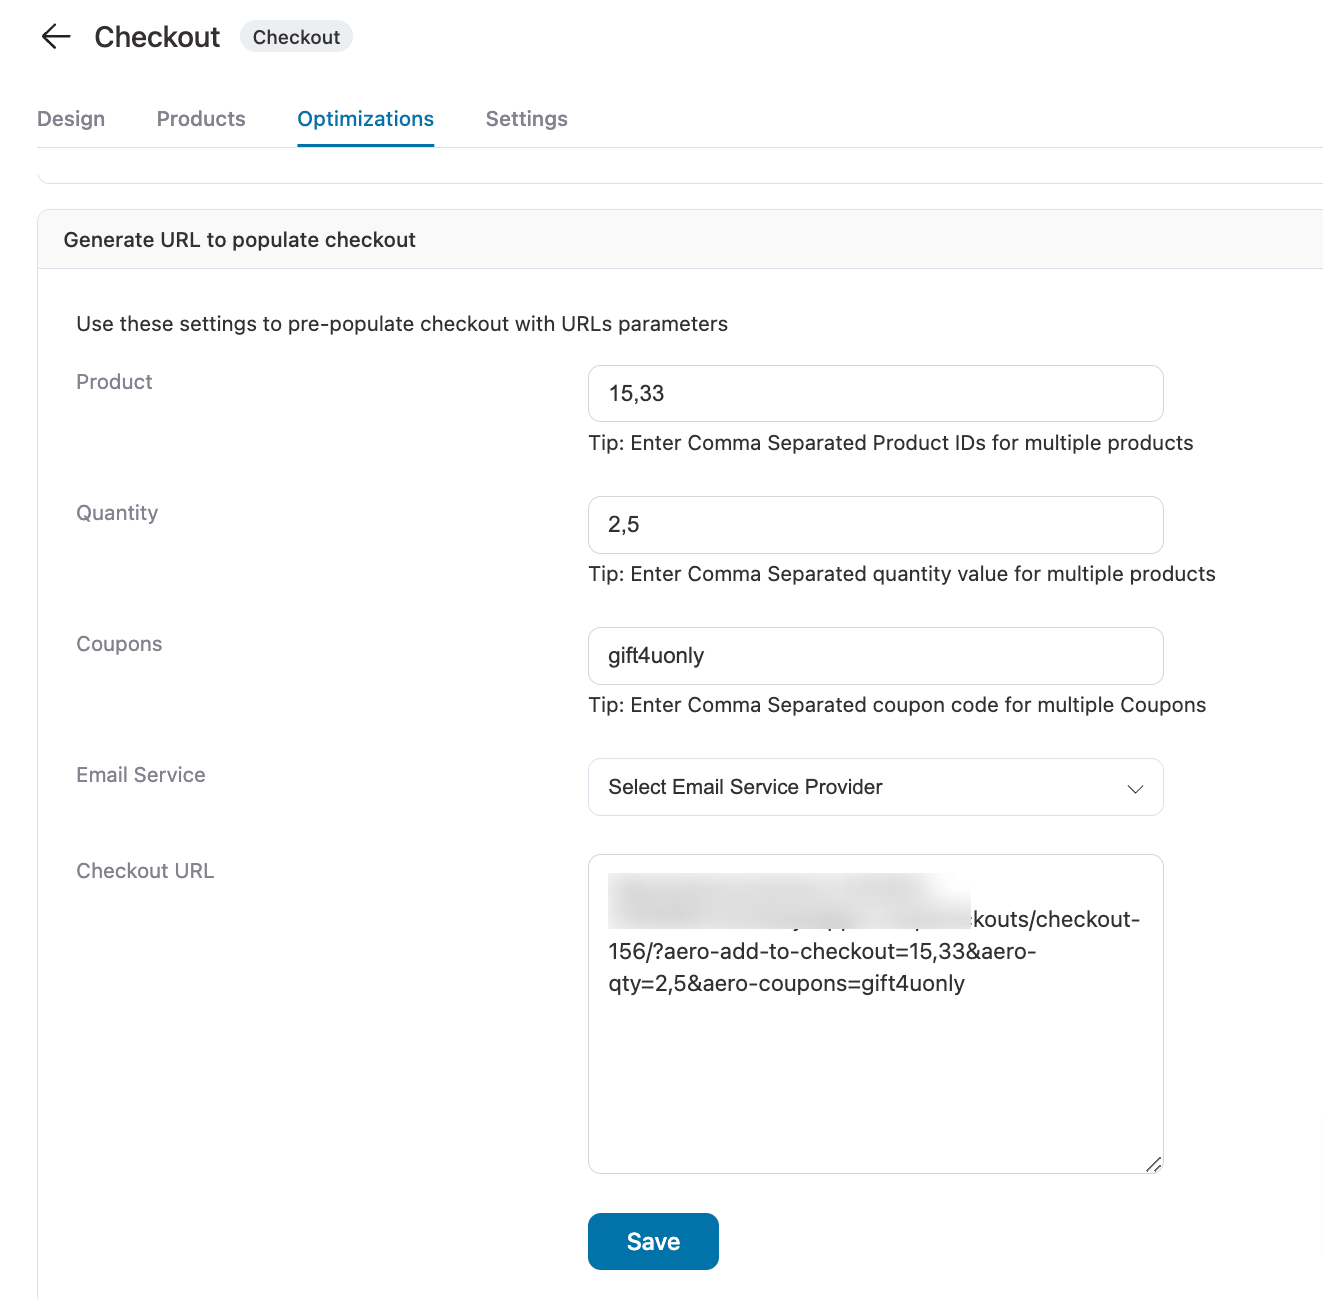
Make sure to hit Save.
Now, you can share this WooCommerce Checkout Coupon URL with the target audience via social or broadcast SMS and email campaigns.
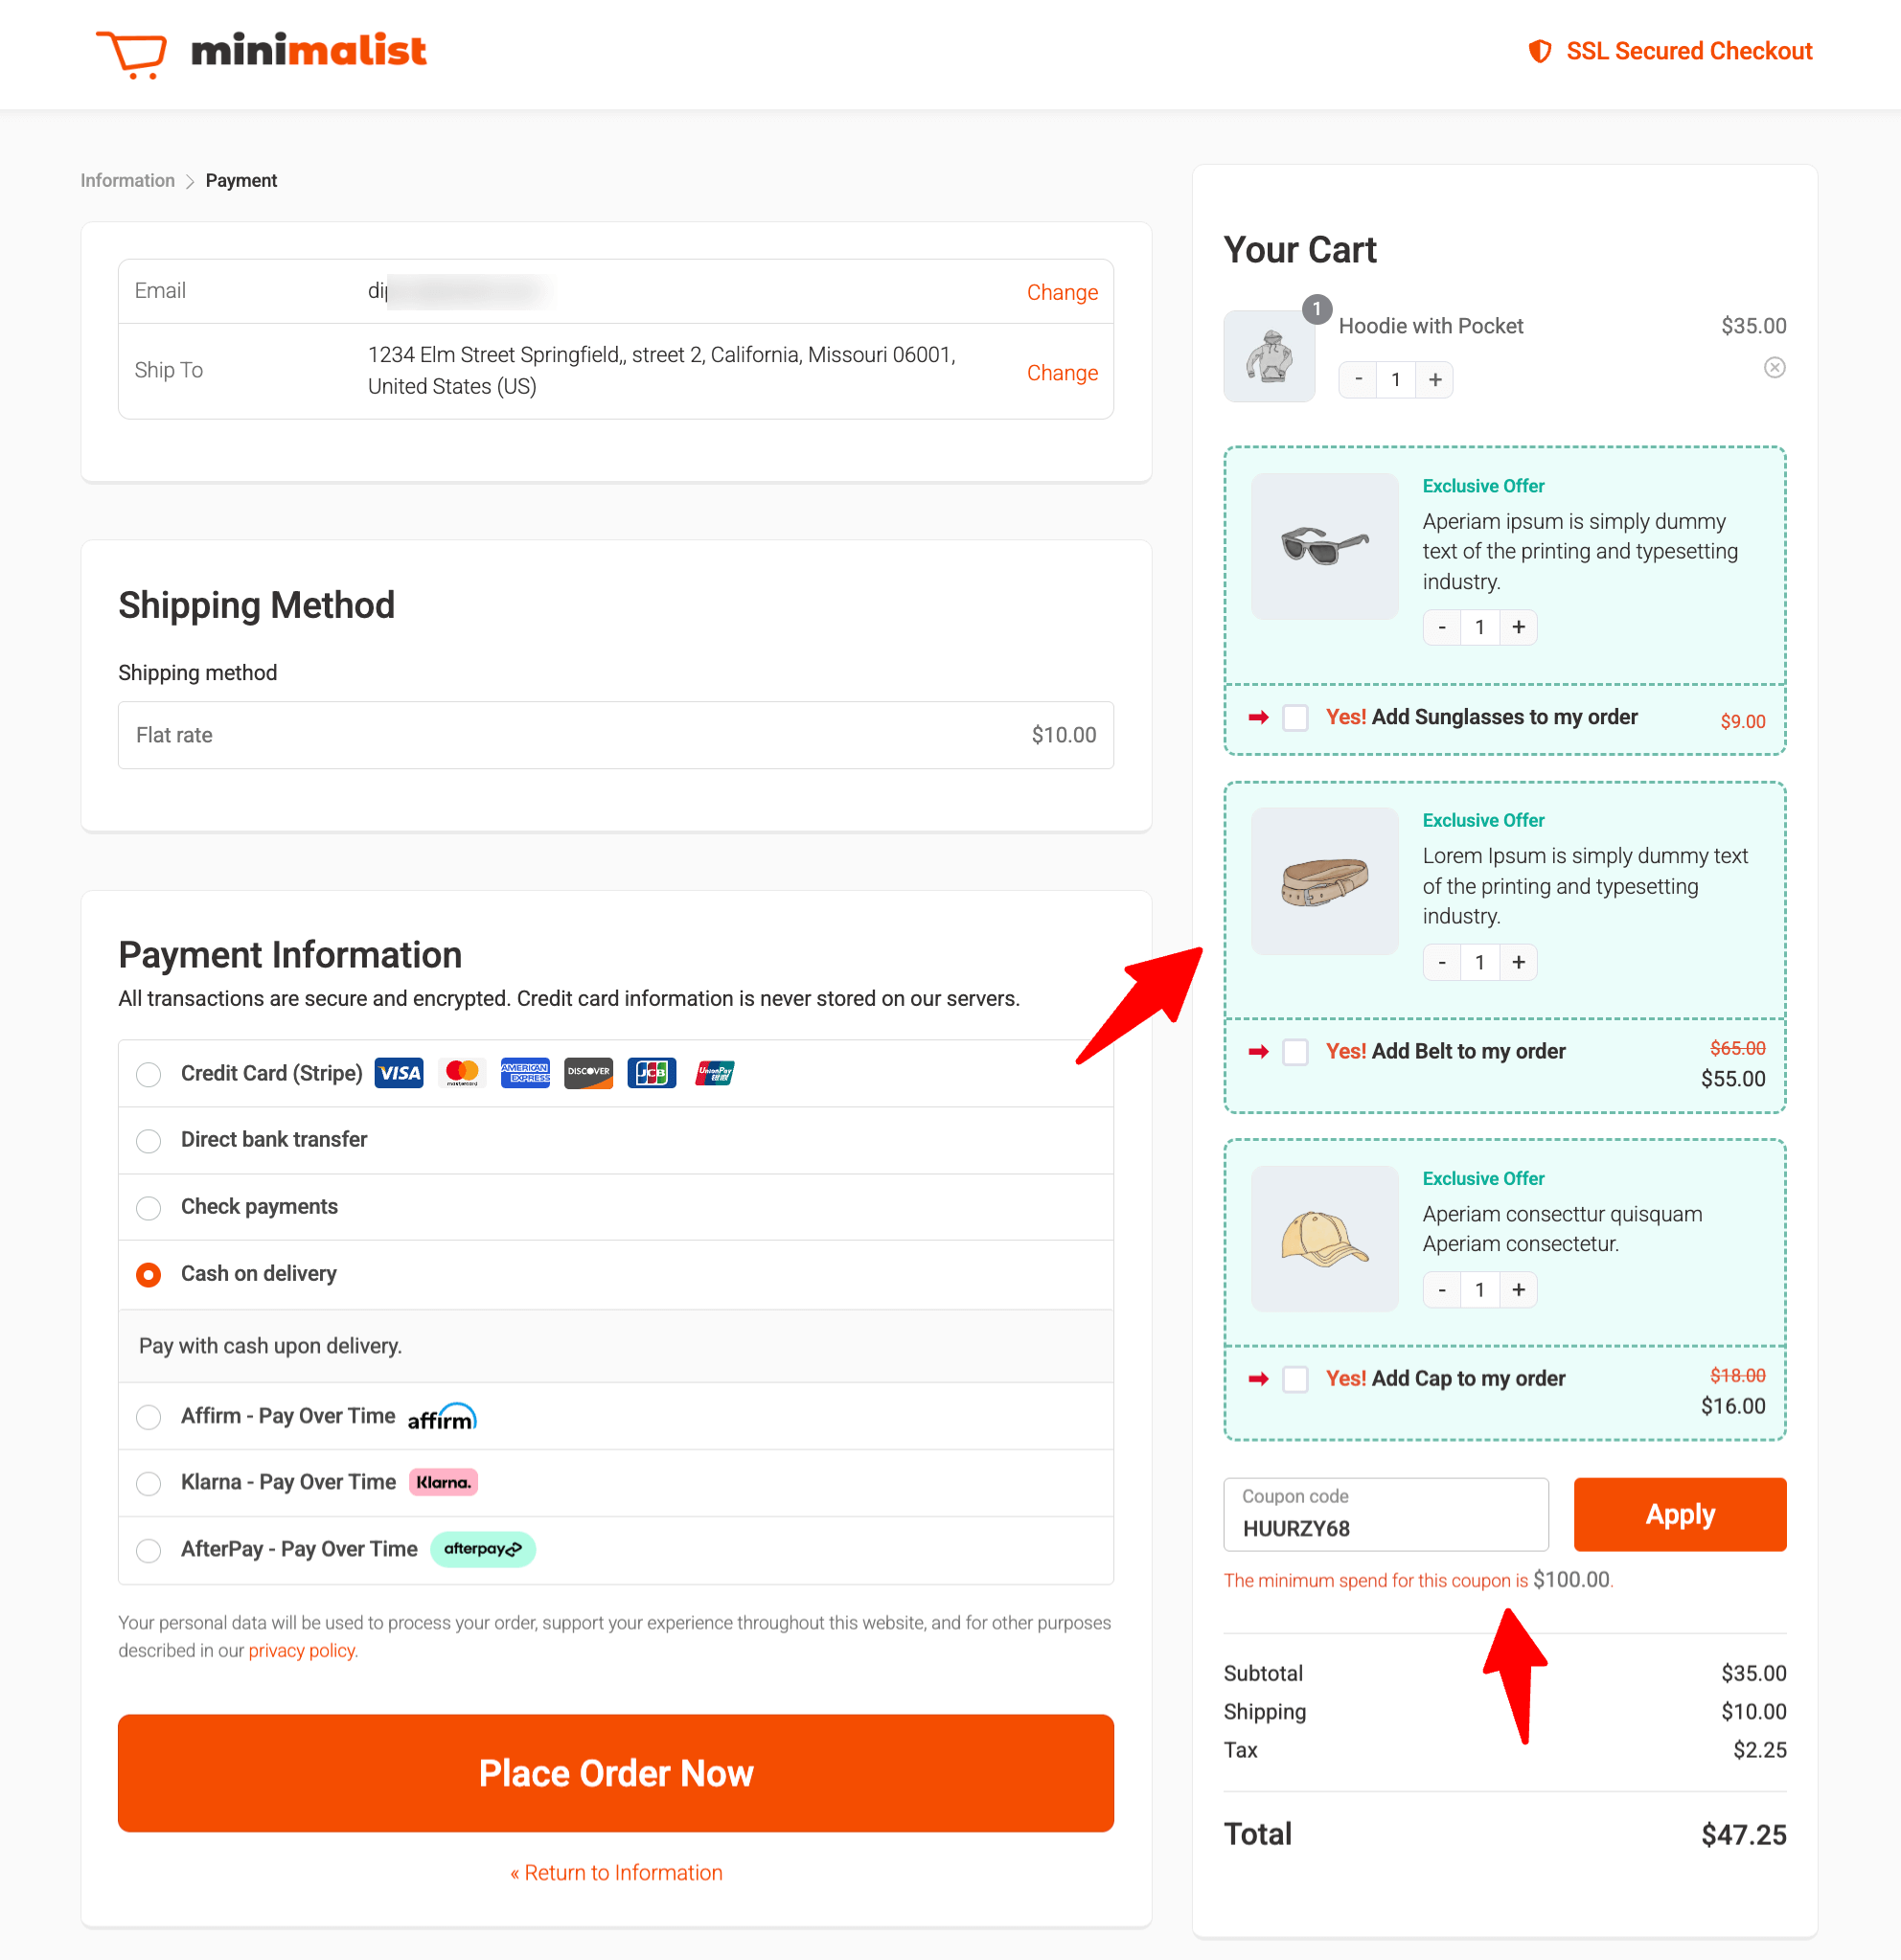
Here is a preview of the WooCommerce checkout coupon URL:
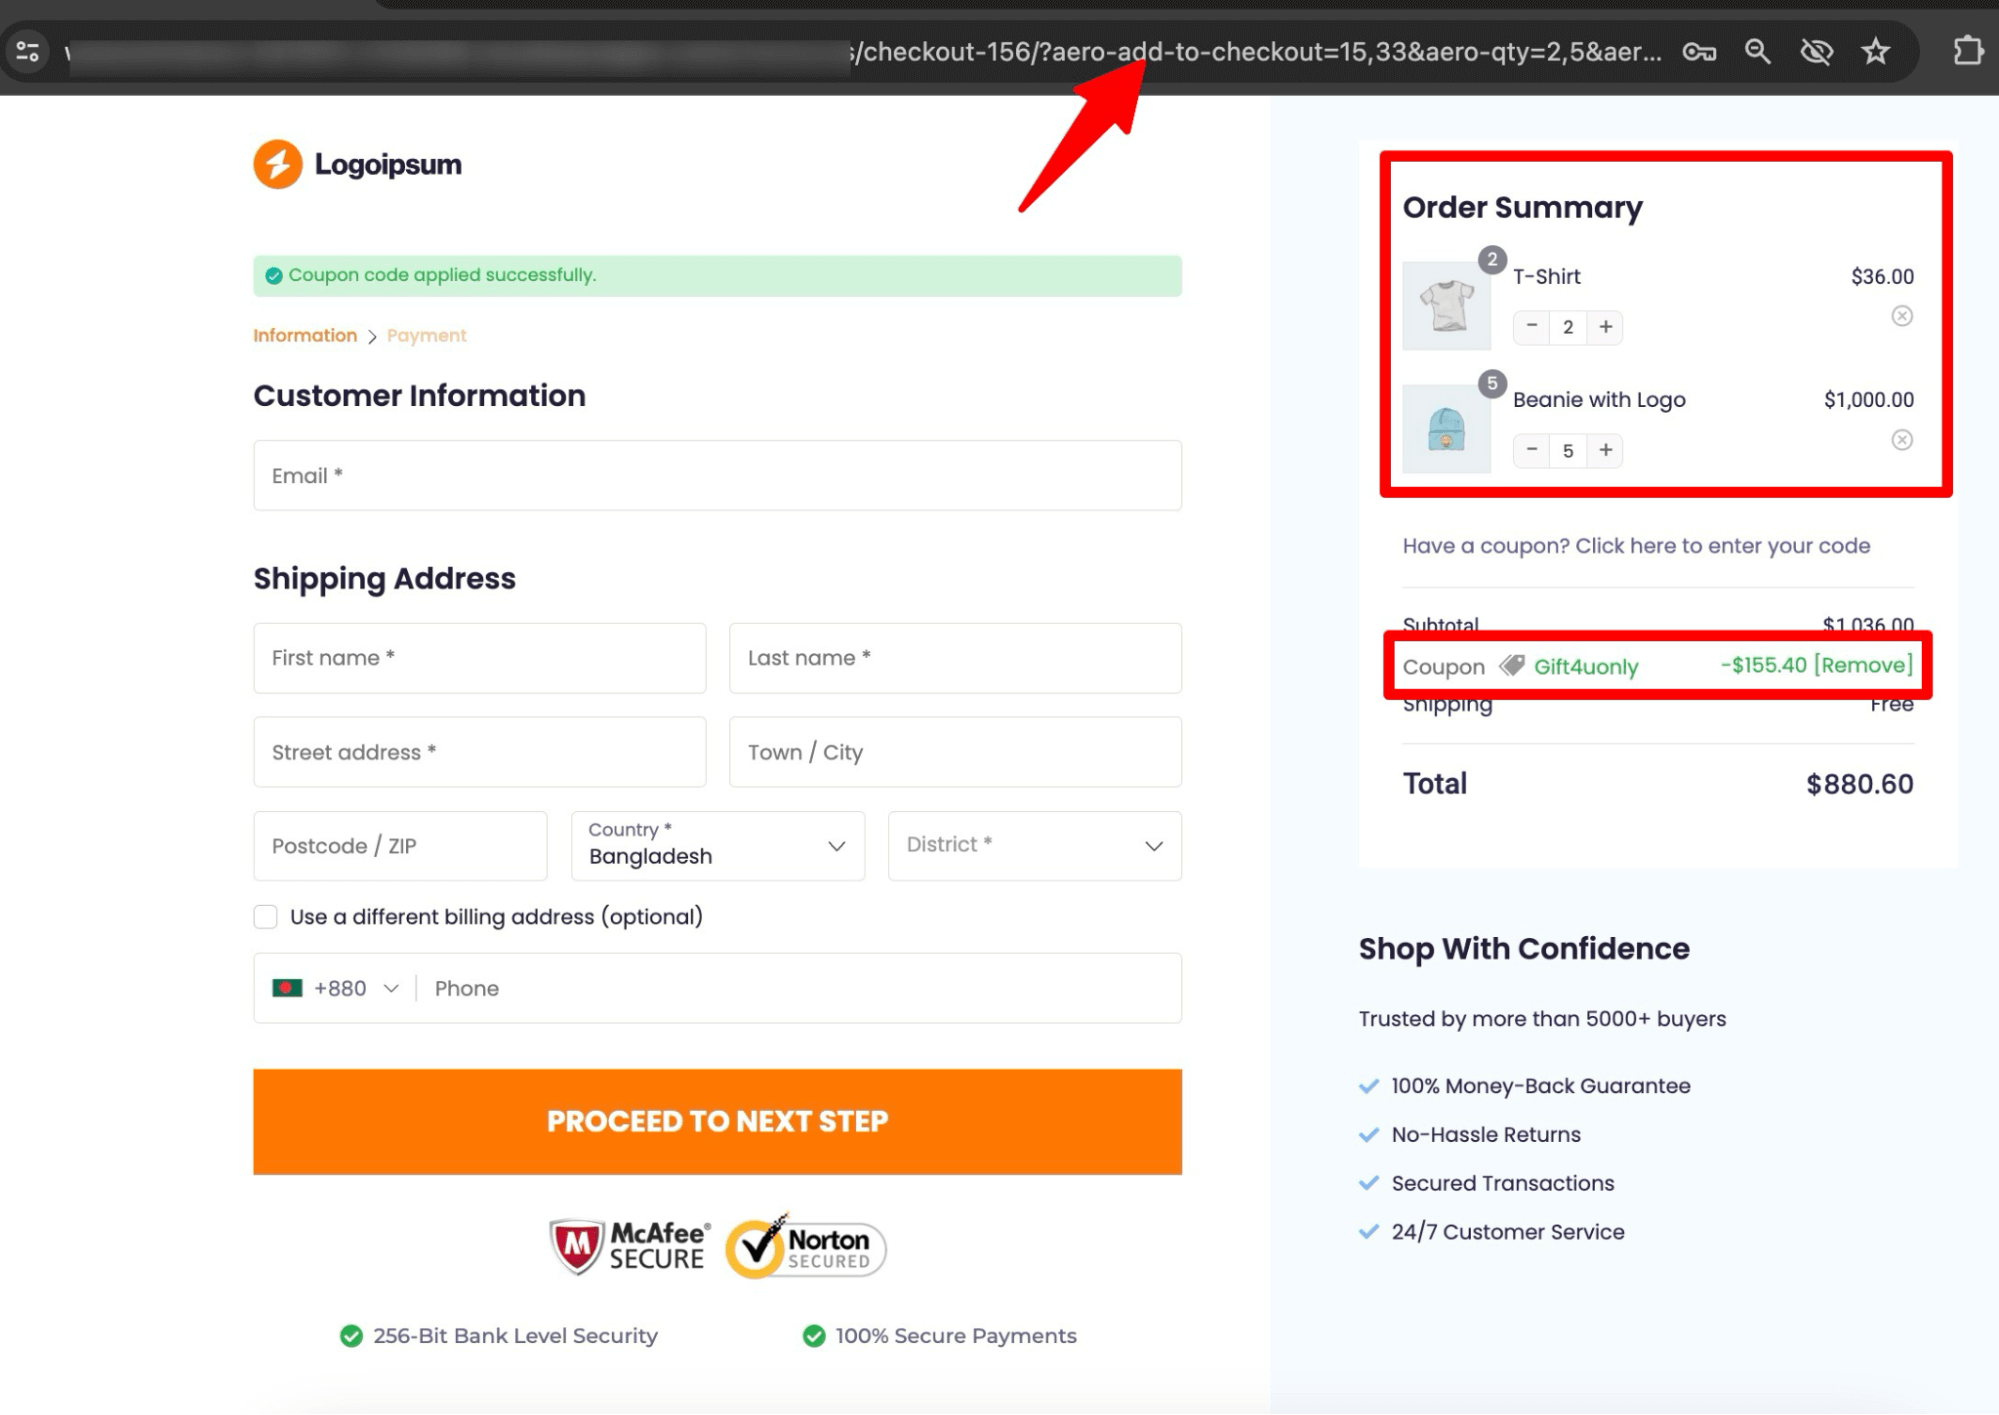
The above multi-step checkout is built with FunnelKit Funnel Builder’s Hific template. This is a premium template available with FunnelKit Funnel Builder. As you can see, it also has a beautiful mini cart, and the checkout coupon field is set just below it, making it convenient for users.
Note: You can also auto-apply a coupon code to the checkout page using FunnelKit Funnel Builder.
Frequently Asked Questions About WooCommerce Checkout Coupon
Here are some common questions people ask about WooCommerce checkout coupons:
Yes, adding a coupon field to your WooCommerce checkout simplifies the process by letting customers apply discounts without returning to the cart. This improves the checkout flow, reduces friction, and boosts customer satisfaction. It also promotes specific offers, clears inventory, and increases order value, especially when upsells are included.
You can’t limit coupons with guest checkout using the WooCommerce default option. Instead, you can rely on a plugin like Advanced Coupon, which restricts coupons based on user roles.
With FunnelKit Funnel Builder, you can easily move the coupon field from the default top place and relocate it anywhere on the checkout page form.
By default, WooCommerce doesn’t let you bulk create coupons. You can only edit existing ones in WooCommerce → Coupons using the bulk actions dropdown. T
o bulk create or generate coupons, you’ll need a plugin like Advanced Coupons, which lets you generate multiple unique codes and set discounts, limits, and expiry dates at once.
If your WooCommerce coupon isn’t working, common reasons include:
- The coupon has expired or reached its usage limit.
- The coupon is not enabled in WooCommerce settings.
- Restrictions on shipping methods, user roles, or product categories are preventing it.
- Conflicts with other plugins or discounts.
To fix it, check the coupon’s settings, verify restrictions, ensure it’s active, and temporarily disable other plugins to identify conflicts.
Ready to Boost Checkouts with Smart Coupon Placement in WooCommerce?
Offering discounts serves as the push users need to place an order. If you’re considering offering a discount coupon, you should present it on the checkout page.
Why? Because the checkout page represents a crucial stage in which many users abandon their carts. By offering a WooCommerce checkout coupon, you can motivate users to complete their purchases.
It's crucial to position your WooCommerce checkout coupon strategically to maximize its effectiveness. With FunnelKit Funnel Builder, you can easily achieve this. Additionally, keep in mind that you can enhance your store's average order value with order bumps and upsell offers.
I highly recommend replacing the cart page with a slide-in cart provided by FunnelKit Cart, as it streamlines the entire shopping experience.
So, are you ready to harness the power of WooCommerce checkout coupons to drive sales effectively?
More WooCommerce Guides to Explore:
- How To Create Coupons in WooCommerce
- How to Create and Share WooCommerce Birthday Coupons
- WooCommerce Discounts: The Complete Guide
- How to Increase Repeat Sale With WooCommerce Dynamic Coupons
- How to Use WooCommerce Free Gift Coupon
Editorial Team
January 20, 2026Ever clicked the checkout button and suddenly felt unsure? Did I add the right items? Am I being overcharged? The same uncertainty is costing you sales. Shoppers expect full transparency...
Editorial Team
January 19, 2026A customer is ready to buy. They hit your checkout page, can't pick a delivery date, and leave. Cart abandonment is a major ecommerce challenge, with the average rate sitting...
Editorial Team
January 13, 2026Increasing your average order value (AOV) is one of the fastest ways to grow your WooCommerce store’s revenue without spending more on ads or chasing new traffic. That’s exactly where...


