
Have you ever lost an order because your spreadsheet wasn't up to date?
Manually tracking WooCommerce orders in Google Sheets is a time-consuming nightmare and one small error can cost you sales and customer trust.
Instead of constantly updating Google Sheets by hand, why not let automation do the heavy lifting?
Businesses that automate order tracking process orders faster and more accurately, giving them more time to focus on growth.
Hooking up WooCommerce with Google Sheets makes it super easy to manage, update, and track your order details as they come in.
In this guide, we’ll show you how to connect WooCommerce to Google Sheets effortlessly and share some top ways to use this integration to help your eCommerce business thrive.
Table of Contents
- 1 Why Sync WooCommerce Orders to Google Sheets?
- 2 How to Set Up and Connect Google Sheets with WooCommerce?
- 3 6 Effective Use Cases of WooCommerce Orders to Google Sheet Integration
- 3.1 Use case #1: Push WooCommerce orders data to Google Sheets (two methods)
- 3.2 Use case #2: Send low-stock WooCommerce product data to Google Sheets
- 3.3 Use case #3. Collect specific order meta to Google sheets
- 3.4 Use case #4. Track customers who refunded
- 3.5 Use case #5. Track customers with failed order payments
- 3.6 Use case #6. Send order notes to Google Sheets
- 4 WooCommerce Orders to Google Sheets: Frequently Asked Questions (FAQs)
- 5 Streamline Your WooCommerce Business with Google Sheets
Why Sync WooCommerce Orders to Google Sheets?
Unlike other spreadsheets that can be a bit tricky for handling complex data, Google Sheets is super popular and easy for anyone to use.
More than 900 million people use Google Sheets every month, highlighting its widespread trust and reliability. [Source: Earthweb]
When you connect your WooCommerce store to Google Sheets, you’ll get timely updates on everything orders, shipment details, inventory records, revenue, purchase history, customer information, and more.
Plus, you won't have to worry about manual edits or human errors. Everything runs automatically, so your data stays error-free.
What’s more?
Let’s see how this integration will facilitate your WooCommerce order data management:
1. Centralized data management
Google Sheets is a tool we all know and love, and it’s super easy to use. It brings everything together in one place.
For instance, you can handle team collaboration, keep communication smooth, and make all sorts of important decisions right here.
2. Instant data updates
One of the cool things about Google Sheets is that it gives you instant updates on your data without any delays or lag.
Therefore, if something happens with your store, like new orders, payments, product updates, failed payments, refunds, and so on, you’ll know about it right away.
3. Enhanced team collaboration and communication
Google Sheets makes sharing a breeze. You can easily share your details with your team, coworkers, or anyone else you need to.
Plus, your team can comment, view, and give feedback right on the same page, so you can quickly address any improvements needed.
4. Data security
As a store owner, you probably don’t want to share your login details or sensitive info with your team.
That’s where Google Sheets comes in. You can use it to give your team access to your store details without sharing credentials.
Hence, they can make decisions, update information, and handle various tasks, all without needing direct access to your store’s backend.
Cool thing, isn’t it?
5. Data analysis and reporting
Google Sheets comes packed with tools and features for presenting your data. Once you’ve got your store info, you can visualize it for better understanding and analysis.
You can also filter, search, and import/export data instantly. It’s like having everything you need in one spot.
6. Order tracking and insights
The default WooCommerce order dashboard can be a bit overwhelming for many store owners.
However, connecting it with Google Sheets makes everything much simpler and easier to manage. With this setup, you can dig deeper into your store’s activities.
For instance, you can track order IDs, best-selling products, stock levels, customer behavior, and payment status.
You get all the valuable insights you need in one spot to make smart decisions.
How to Set Up and Connect Google Sheets with WooCommerce?
Let’s now follow the steps to connect and set up Google Sheets to your WooCommerce store.
Before you start, do make sure to install and activate FunnelKit Automations on your WordPress site.
But wait, why FunnelKit Automations?
FunnelKit Automations is a total game-changer for marketing and CRM on WordPress and WooCommerce.
Over 20,000+ stores are already using it to automate their business tasks and engage with their customers more effectively.
Let’s get started:
Step 1: Enable the Google Sheet connector
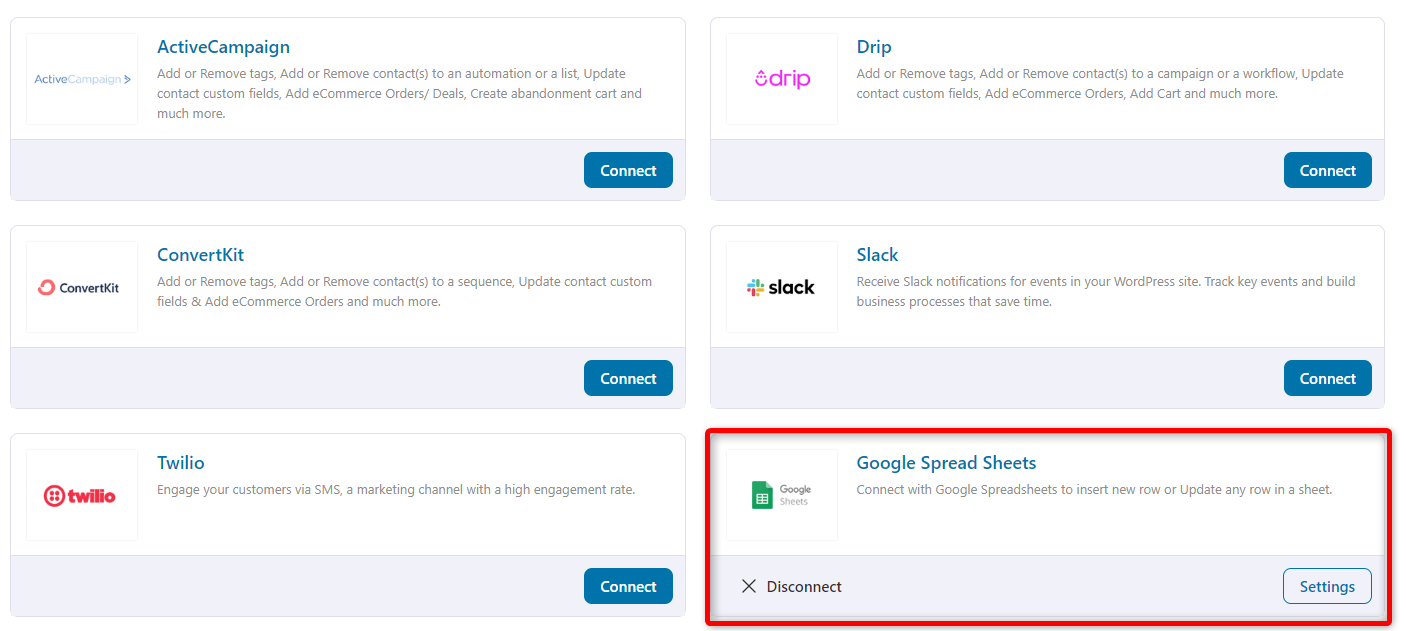
First, navigate to the FunnelKit Automations dashboard. Tap on the tool and find the connectors.
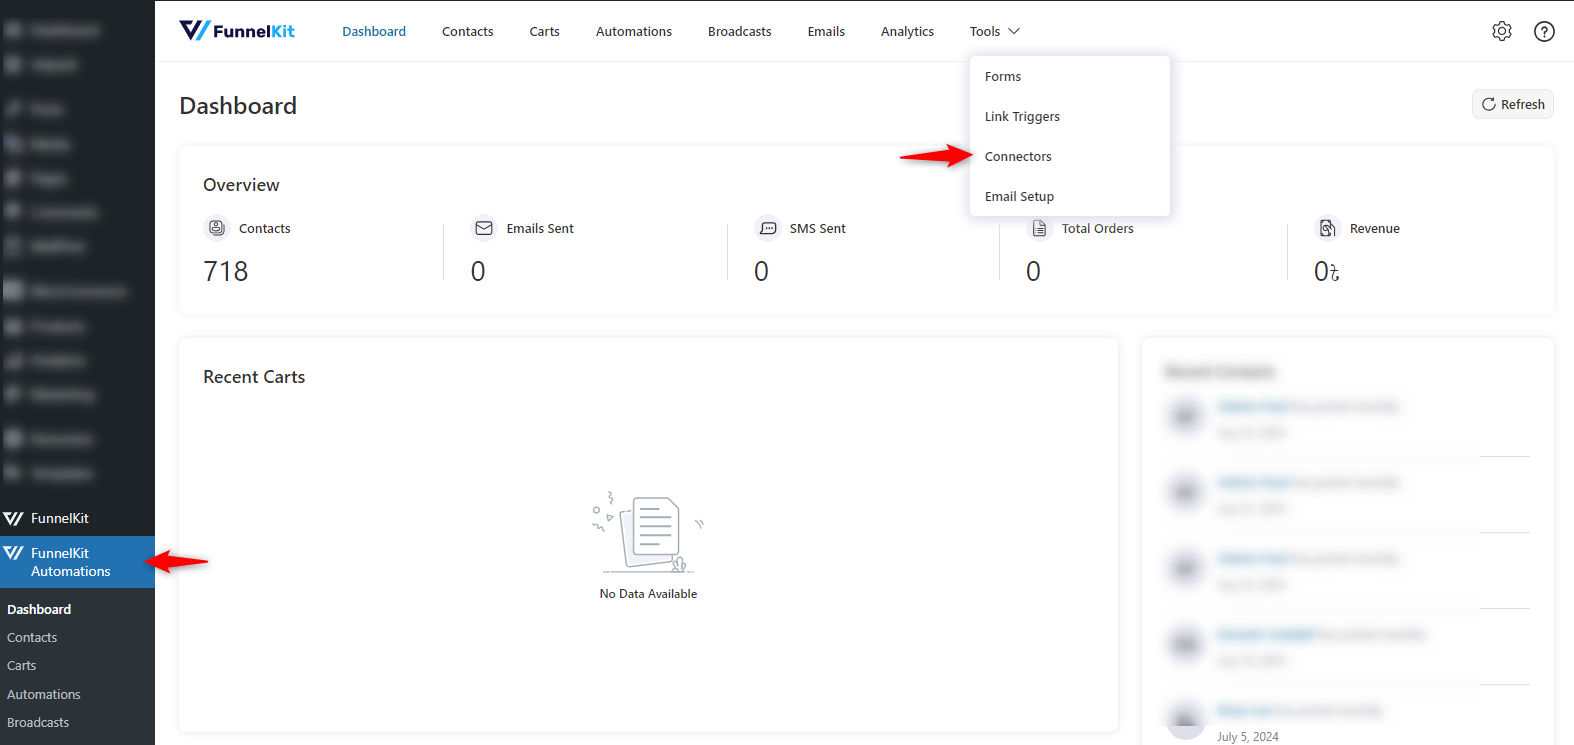
Slightly scroll down and you’ll find Goole Spread Sheets.
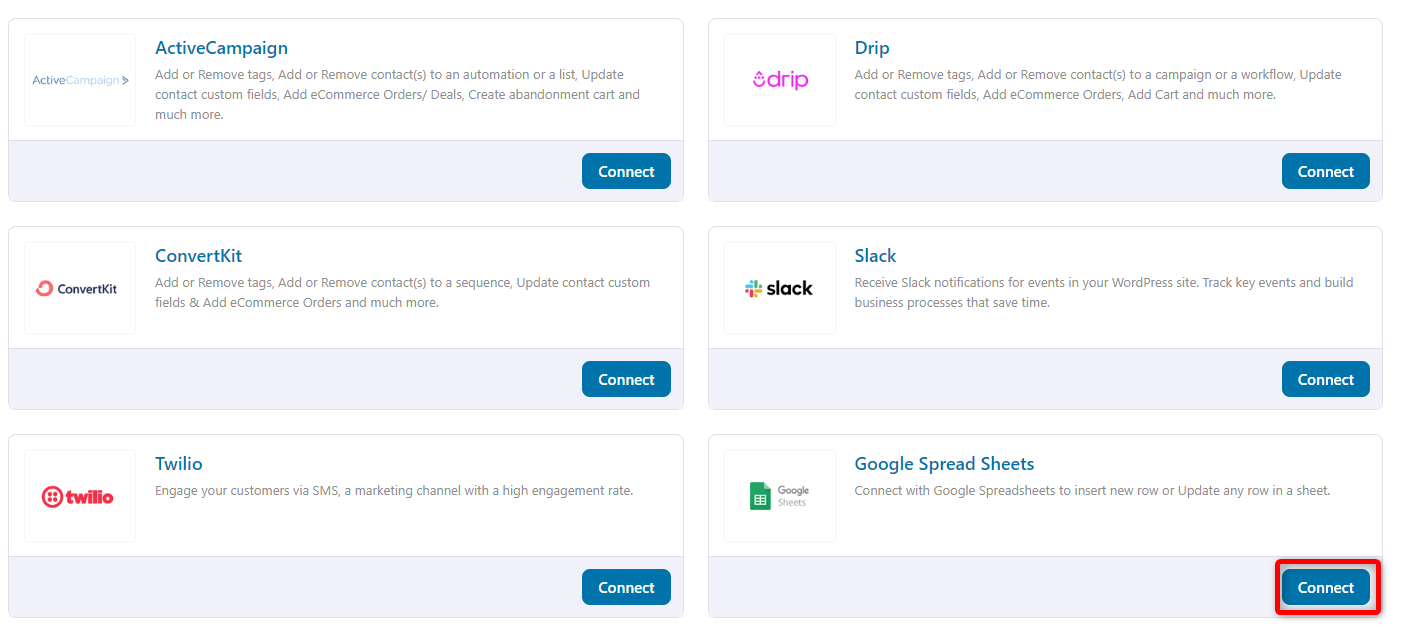
You’ll be asked to sign in with your Google account.
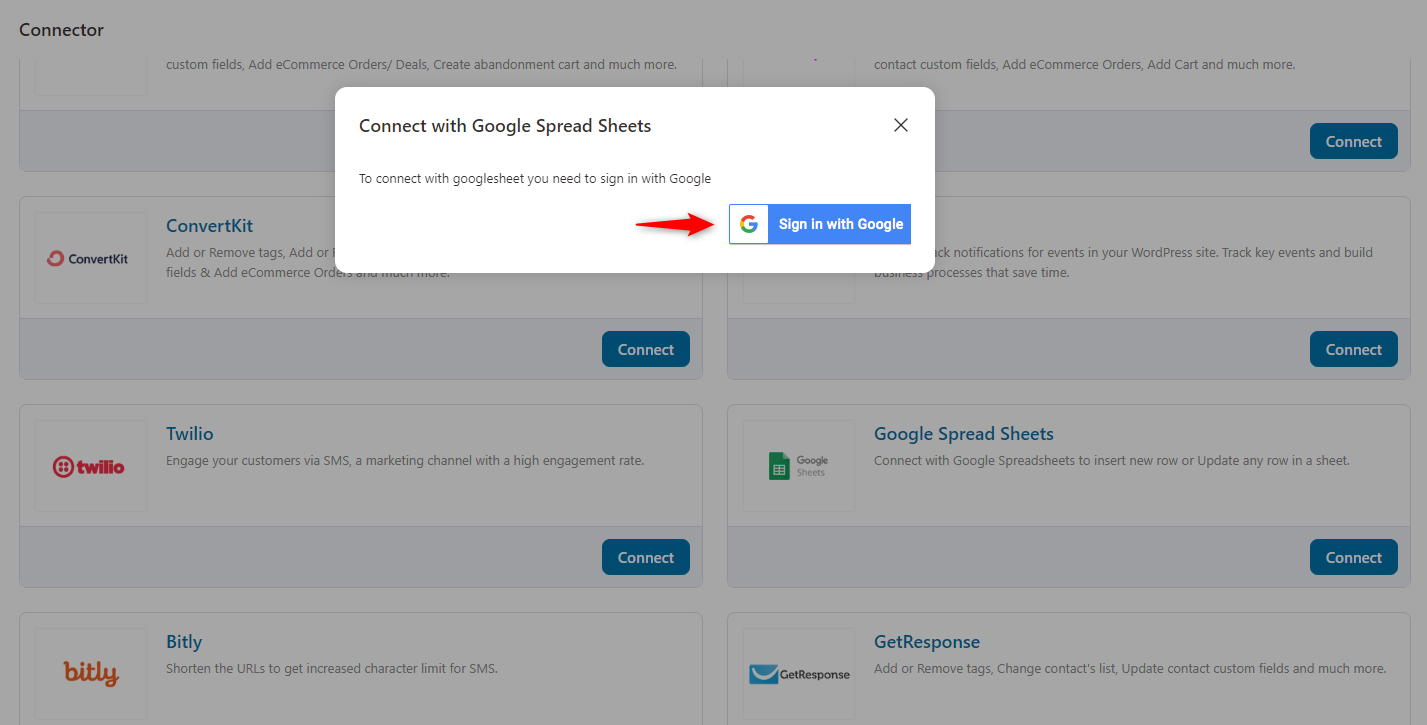
Step 2. Authenticate the connection
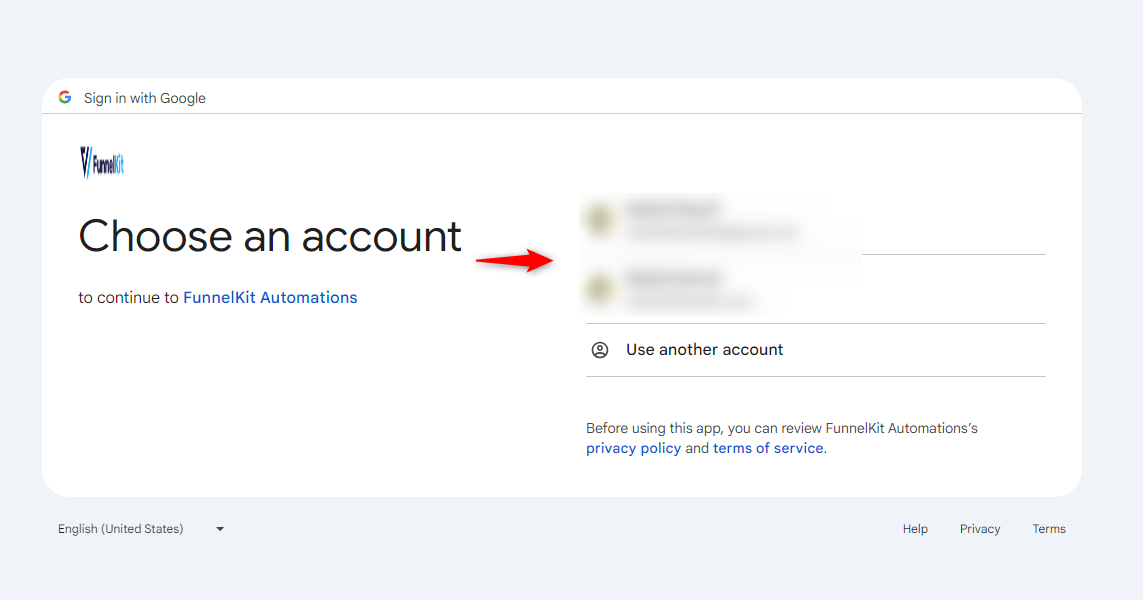
Click on the “Sign in with Google” button to continue.
Choose your preferred Google Account to make the connection successful.
On the next screen, Google will take your permission to connect FunnelKit Automations Connector with your account.
Hit the “Continue” button.
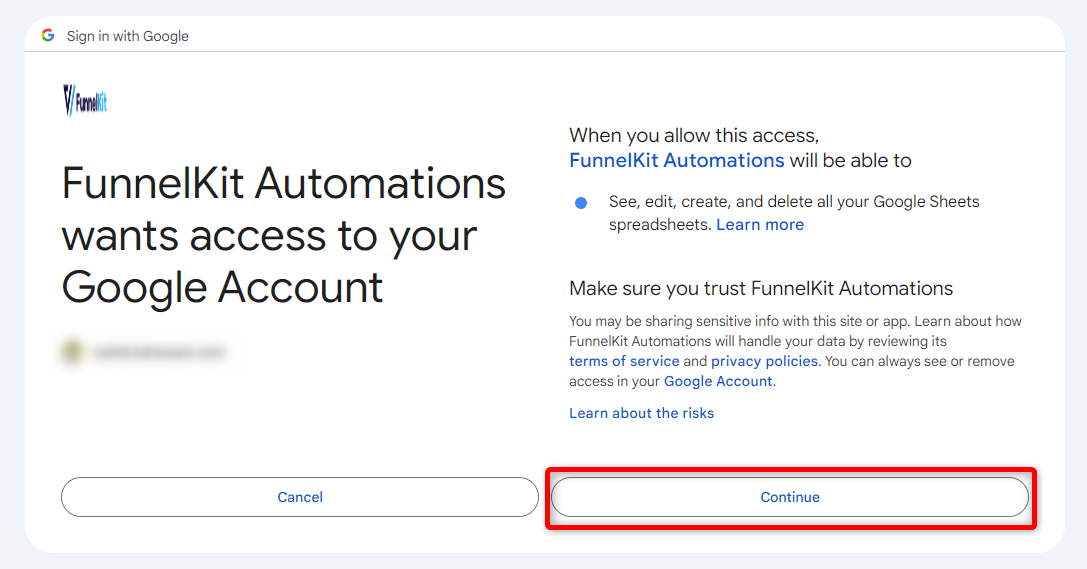
That’s all. It will automatically redirect you to the connector page. You will notice the connection was successful.
So now you have connected Google Sheets with your WordPress site via FunnelKit Automations.
6 Effective Use Cases of WooCommerce Orders to Google Sheet Integration
It’s time to dive into how the Google Sheets connector can give you all the order info you need from your WooCommerce store in one place.
We’ll walk you through six handy use cases that’ll help you organize and get real-time data right in your Google Spreadsheet.
Let’s begin:
Use case #1: Push WooCommerce orders data to Google Sheets (two methods)
In this automation, you can directly push your order data to Google Sheets.
Here, we’ll show two different ways that you can send order details to Google Sheets:
1. Send all order data to Google Sheets
2. Send per-product details to Google Sheets
Method one: Send all order data to Google Sheets
So first, we’ll send all order details to Google Sheets.
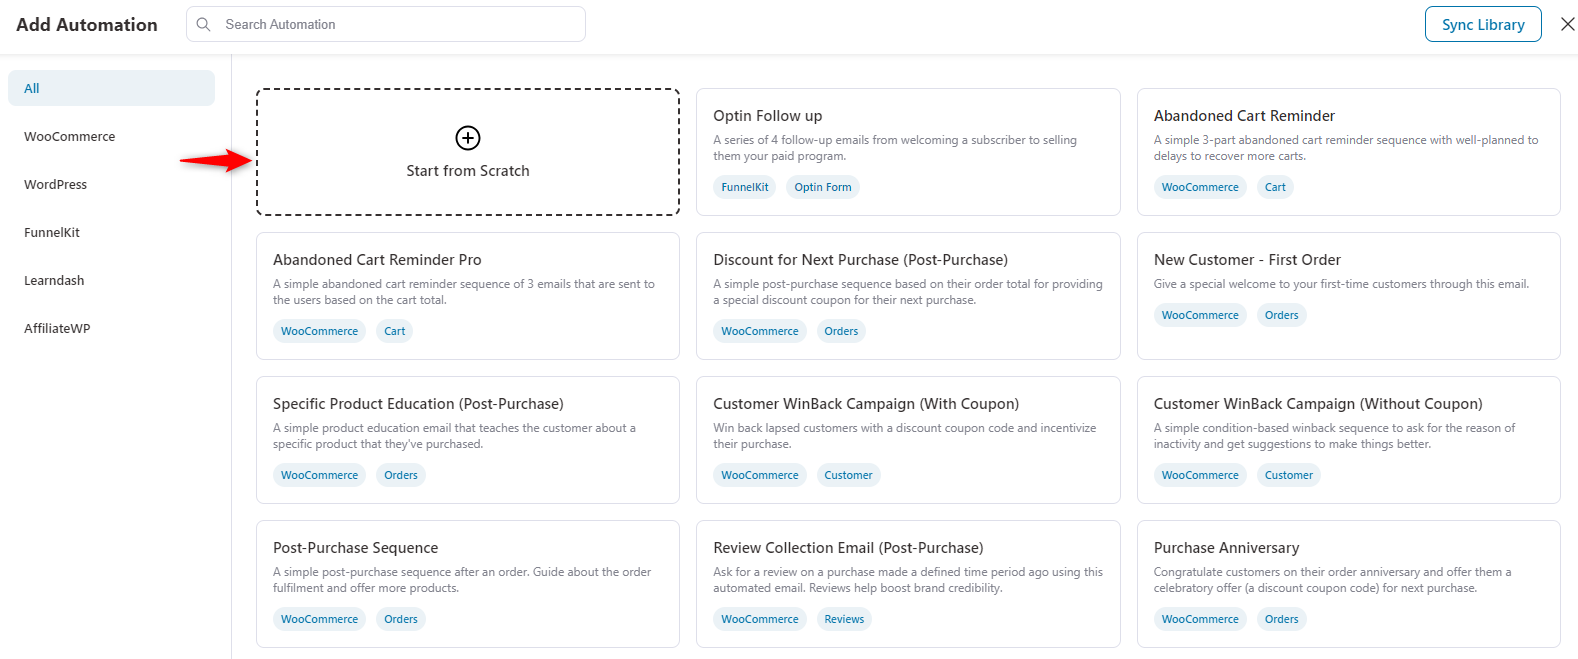
Navigate to the automation page. And then, hit the “Create Automation” button.
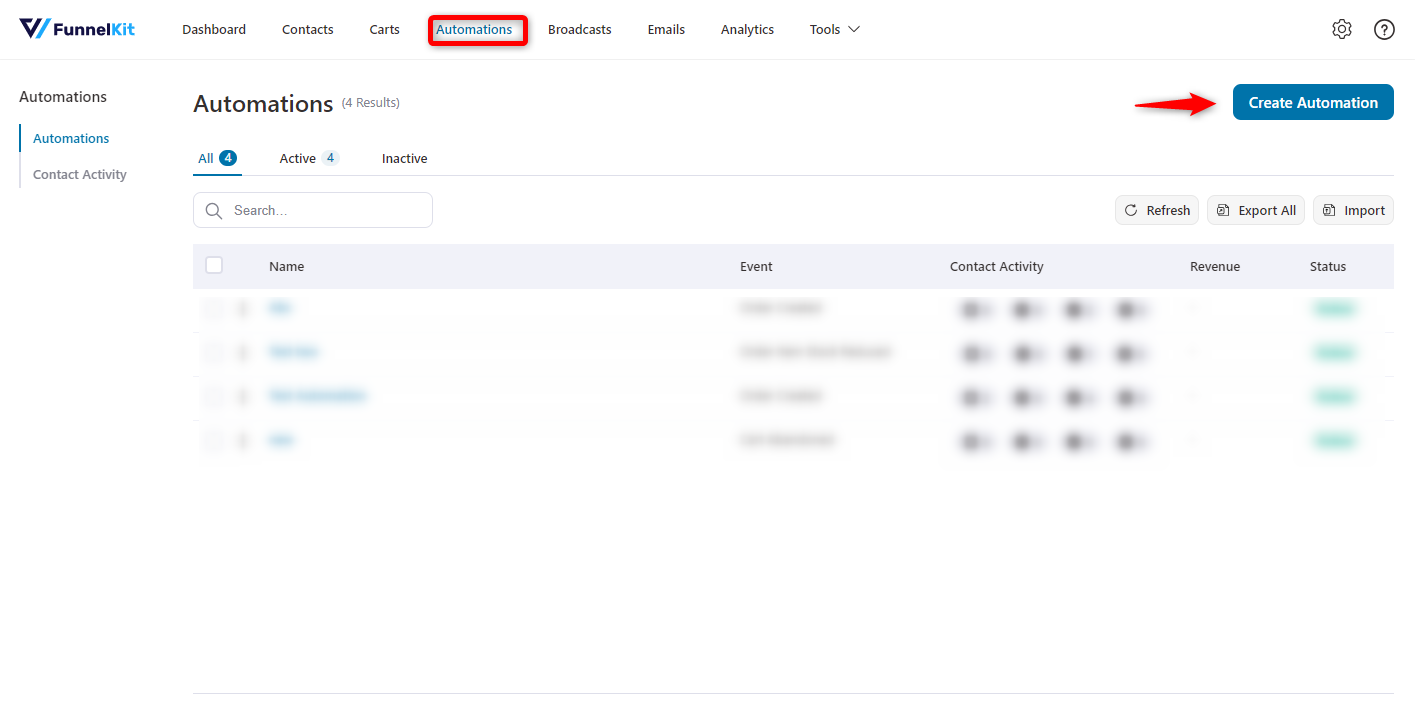
Then you’ll see several automation templates to get started. For now, we’ll go with “Start from Scratch”.
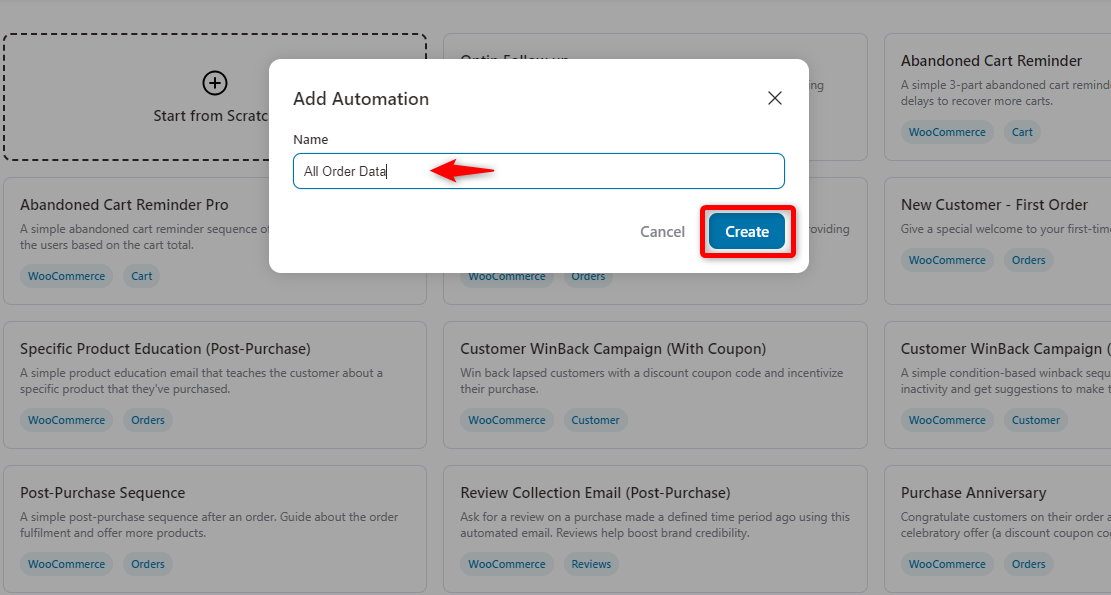
Enter your automation name here and hit the “Create” button.
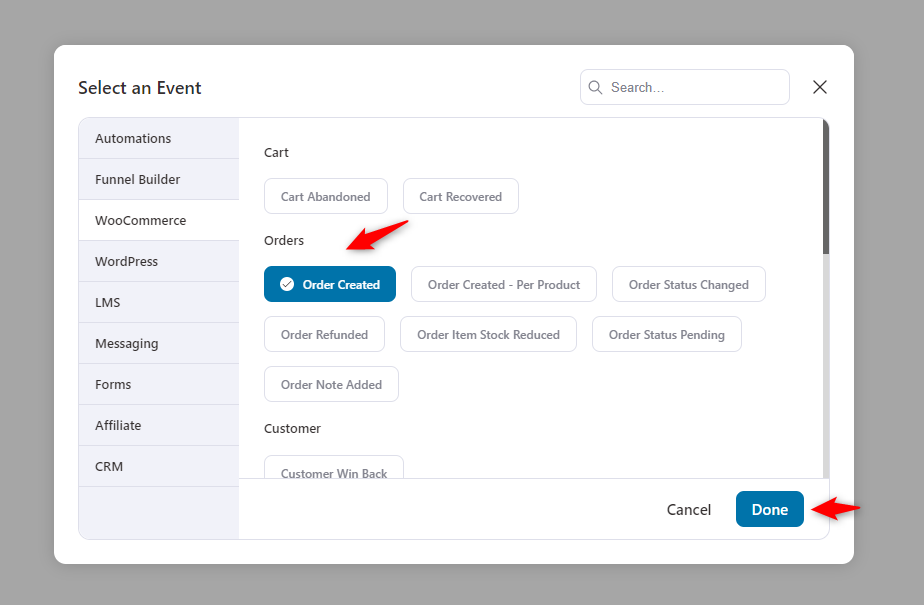
Next, you need to select your event. Under the WooCommerce tag, you’ll find the “Order Created” event.
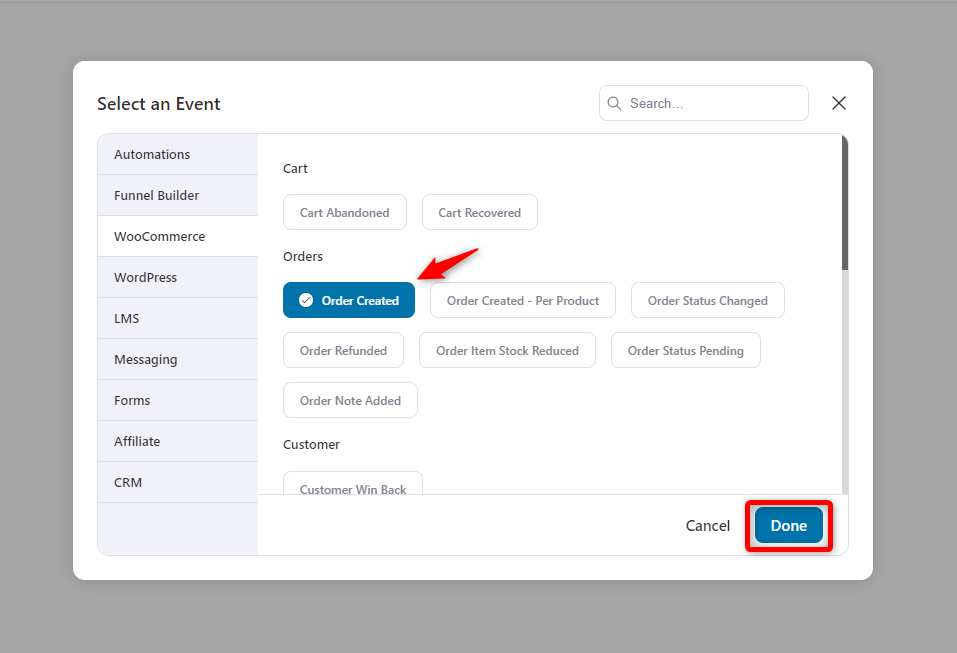
We’re looking to fetch all order-related information from Google Sheets. That’s why we’re selecting all of them.
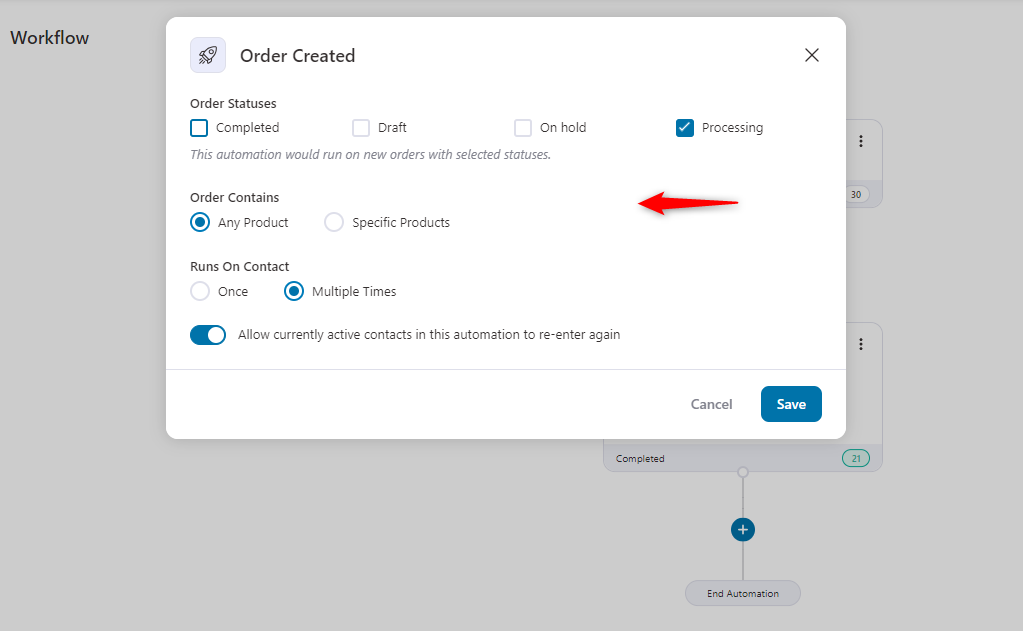
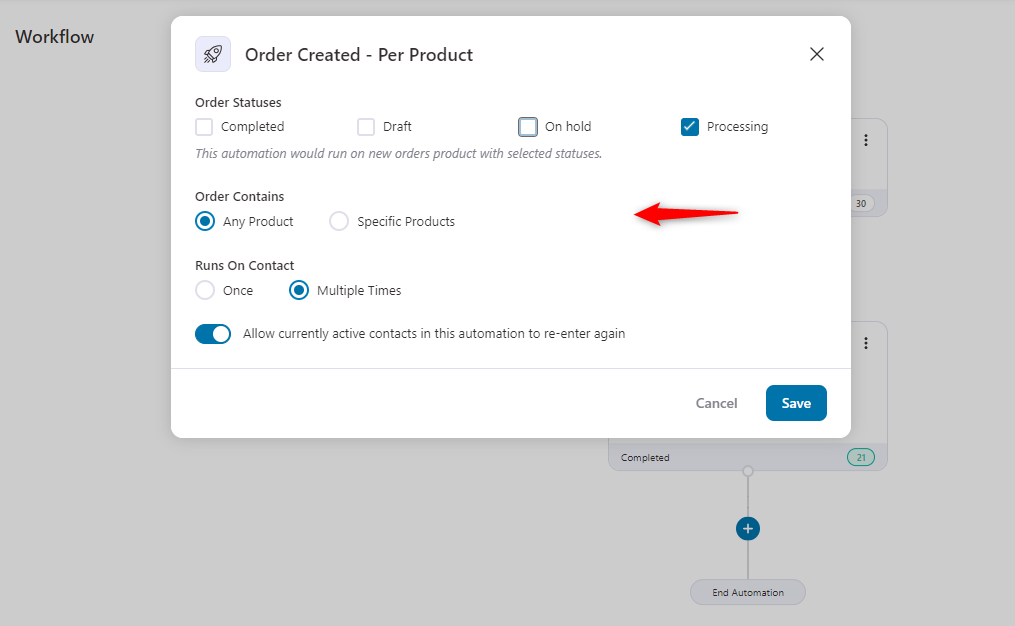
After a user creates an order, depending on the order status (completed, draft, on hold, processing), it will store data.
You can use this for any product in your store or just one specific product. Set it up to run once or multiple times, and it’ll work with your current active contacts.
Once, you’re done, click on the “Save” button.
Next, you need to create an action. It will be activated after a user places any orders.
For that, click on the (+) icon. And then “Action”.
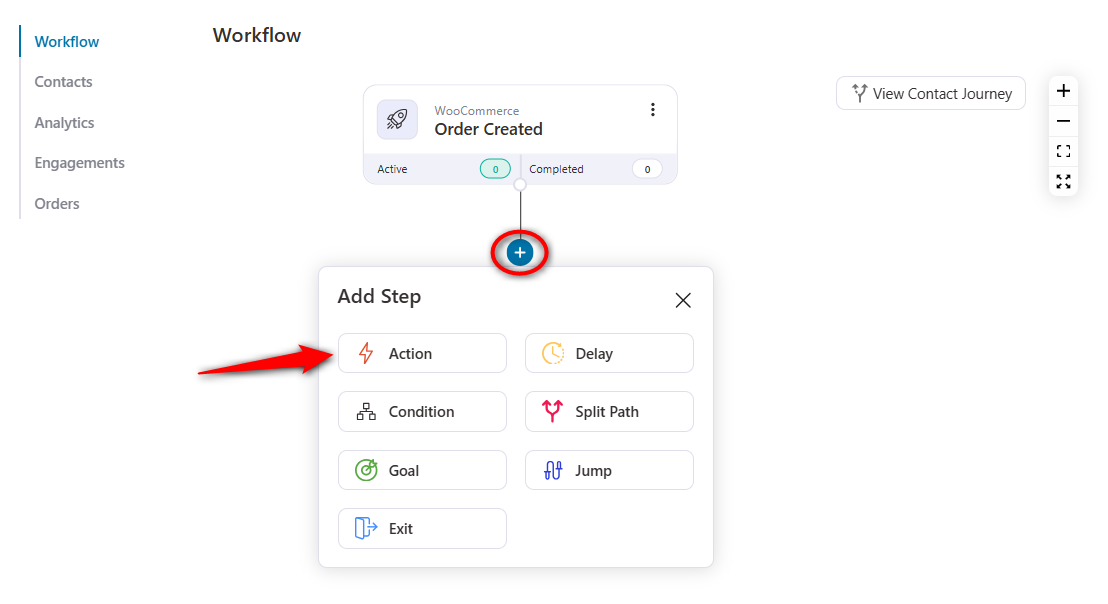
Under the “Send Data” section, scroll down and choose “Insert Row.”.
And then hit the done button.

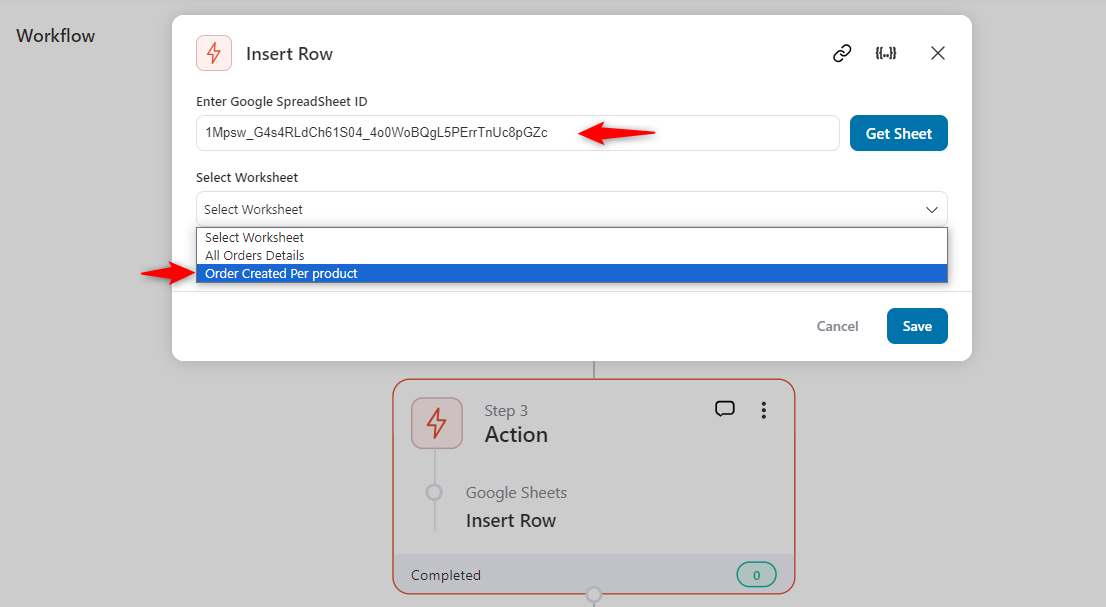
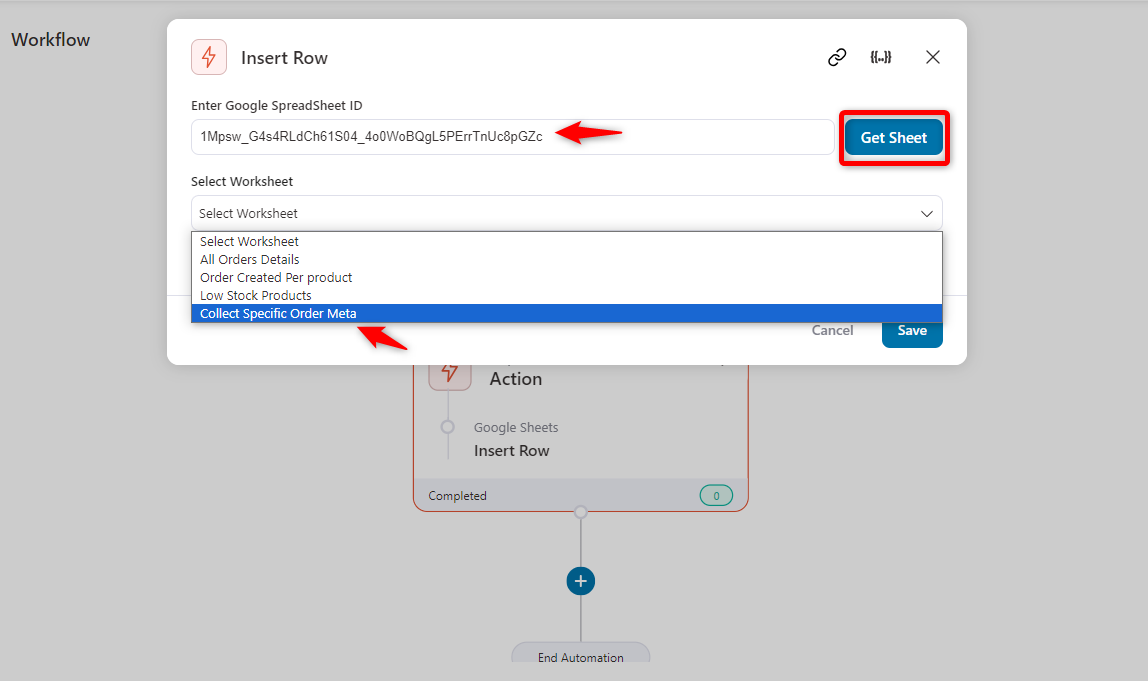
After that, you need to provide your Google Spreadsheet ID.
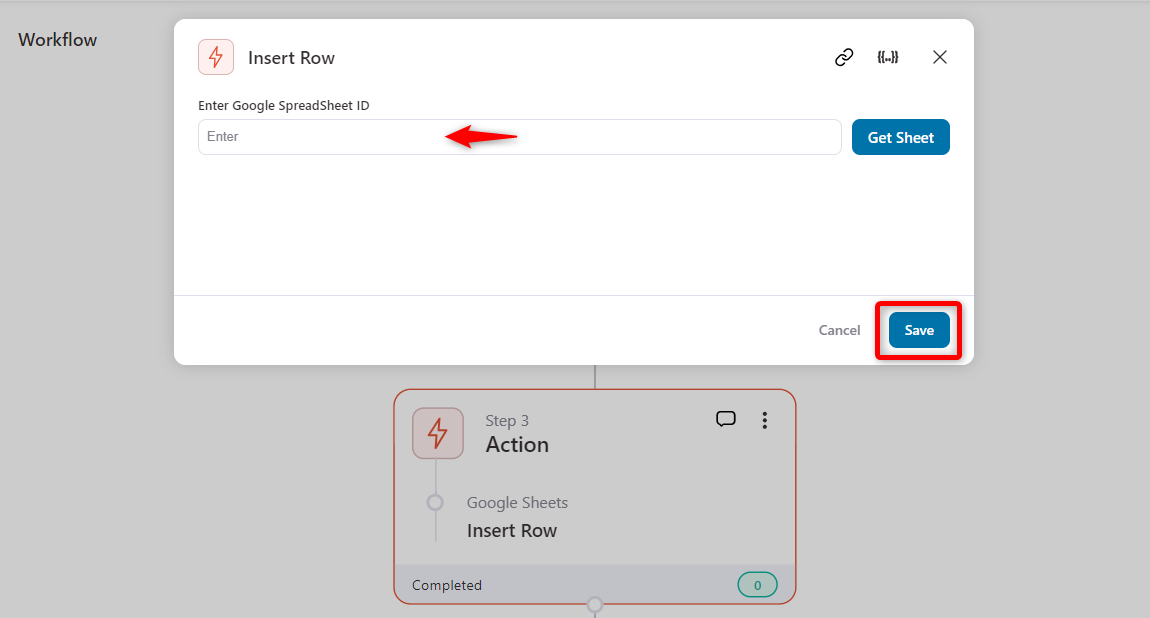
Create a Google Sheet and then copy the ID of the sheet.
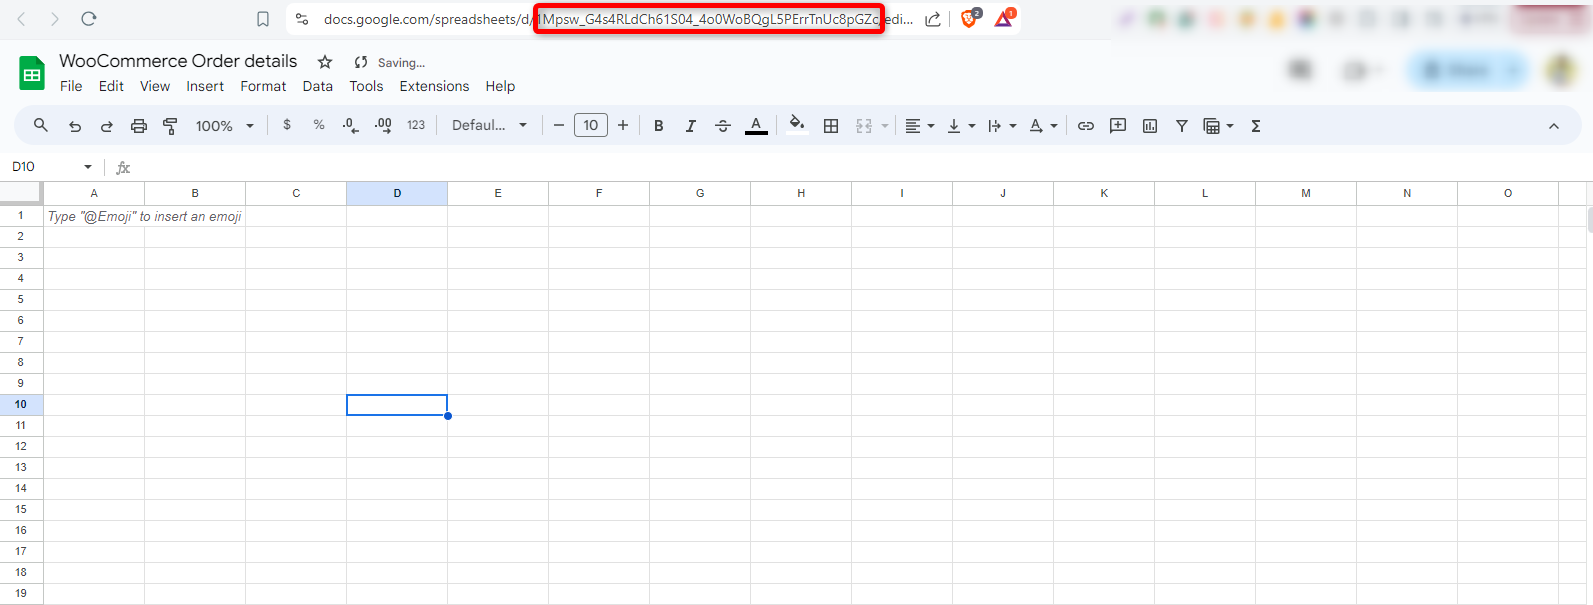
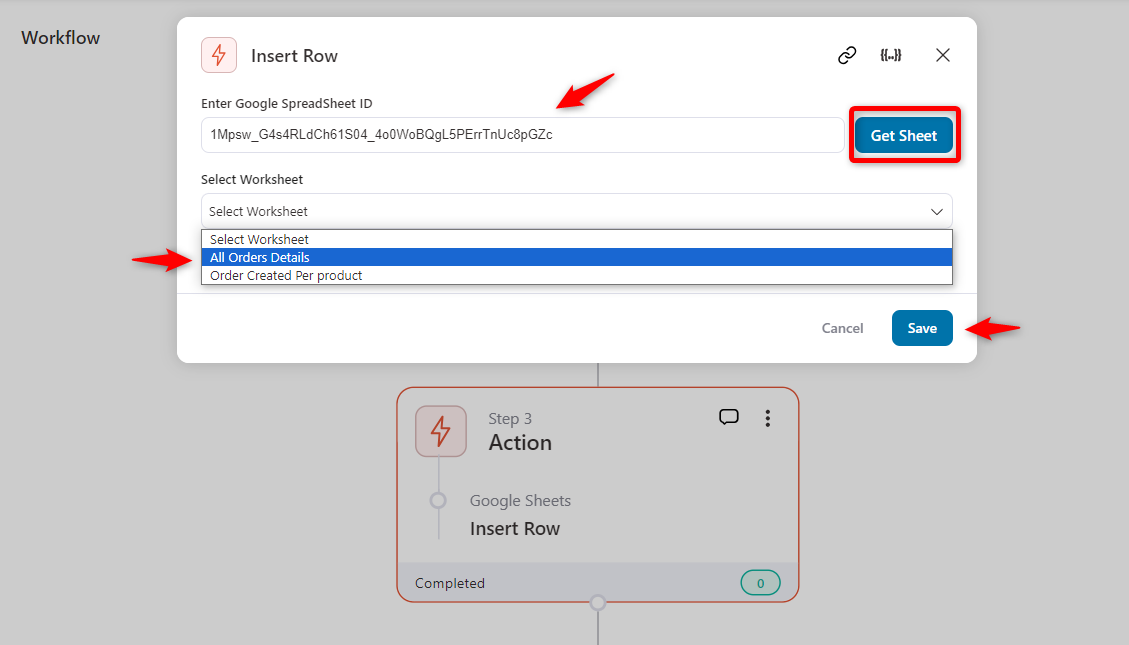
Paste the ID here and click on the “Get Sheet” button.
You’ll get a list of your currently active tabs on your Google Sheet here. Just choose the preferred one and hit the save button.
Here, we’re choosing “All Order Details” as we’re looking to sync all WooCommerce orders to Google Sheets.
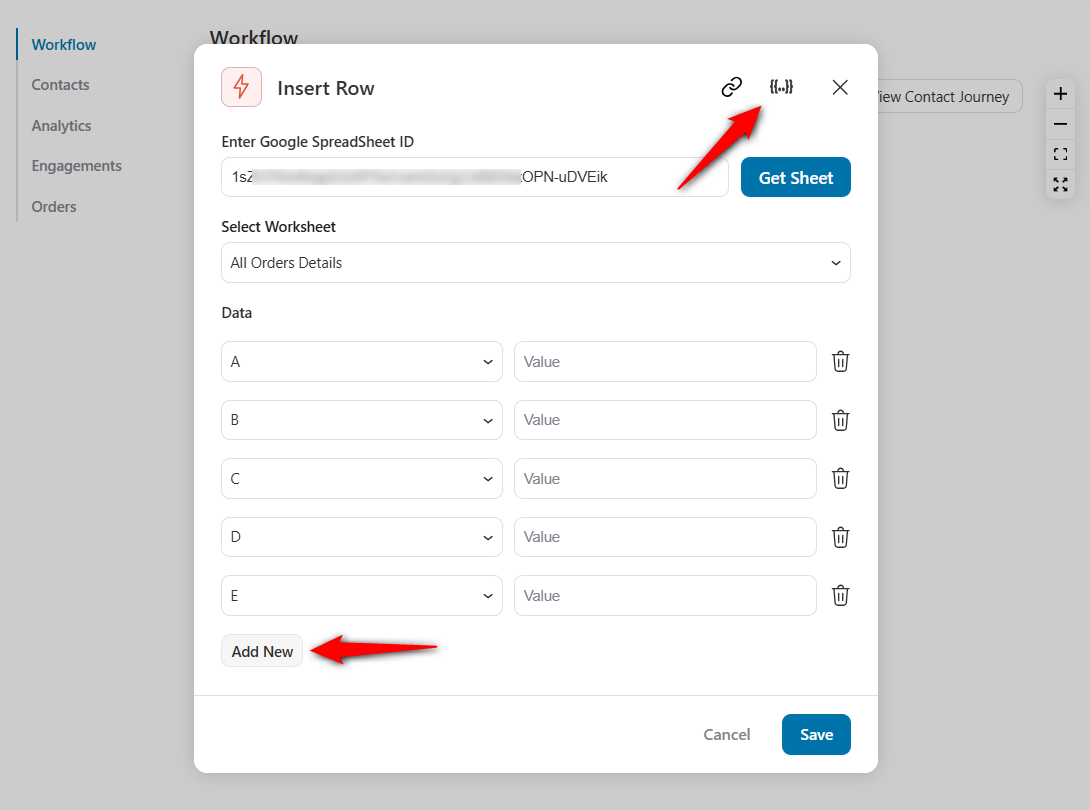
You’ll get an “Add New” button to add columns one after another.
You can define the details you want to sync from your WooCommerce store for each column. Also, you can use the merge tag icon {{..}} to set the rules for it.
Let’s see how to do it.
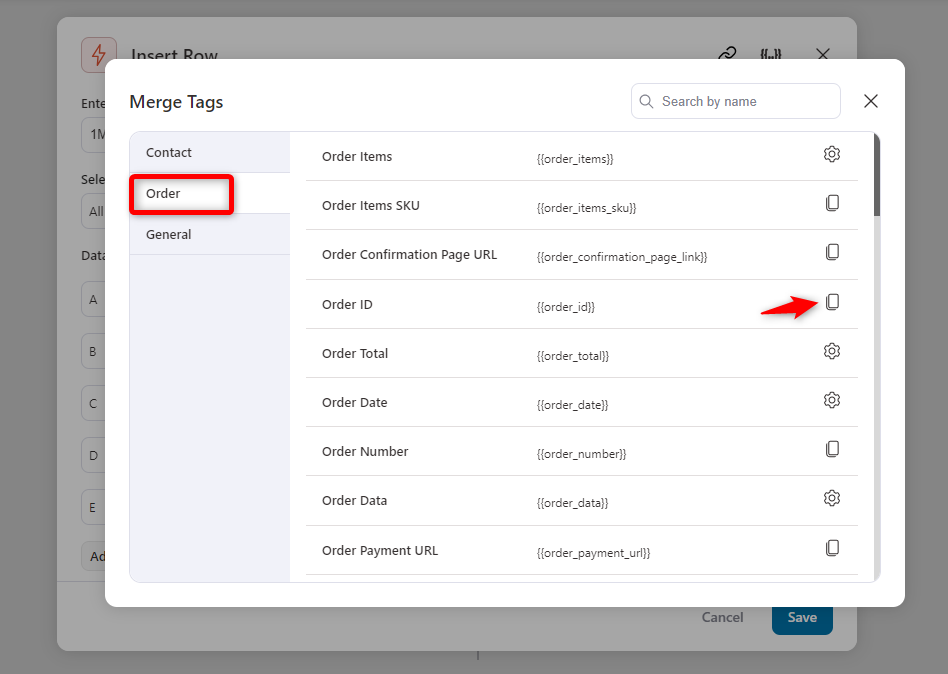
Let’s say, we want to add the “order ID” in column A. For that, click on the merge tag icon {{..}} and find the related tag for it.
And then paste the merge tag icon {{.}} here. See, it’s appearing here.
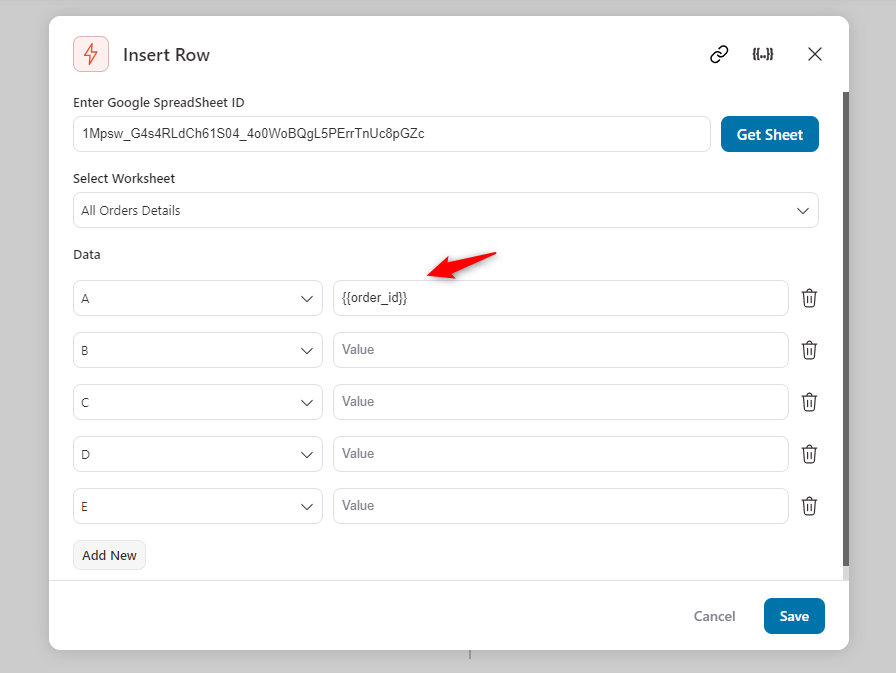
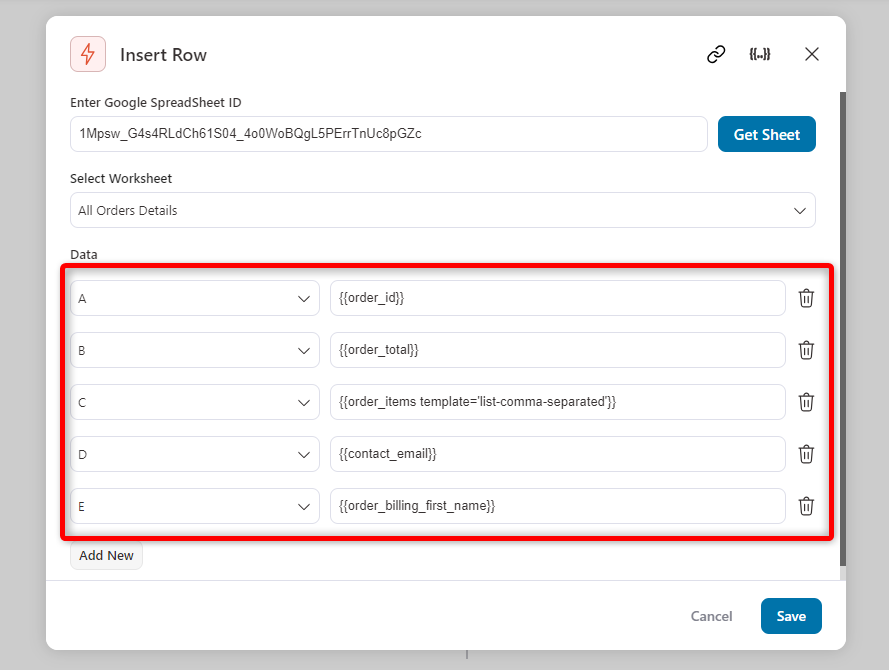
Similarly, add the preferred merge tag icon {{..}} in each field.
Once you’re happy with that, click on the “Save” button.
You’re all set. After a customer places an order, depending on the criteria we set, it will automatically sync the information.
On the contacts tab, you’ll see who has recently placed an order.
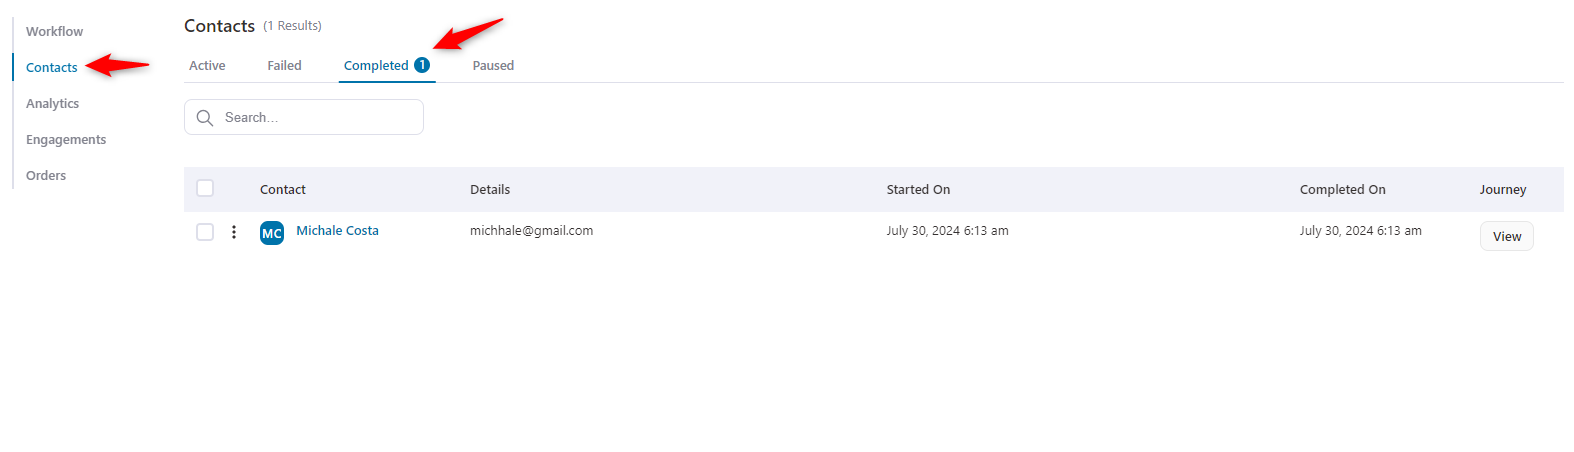
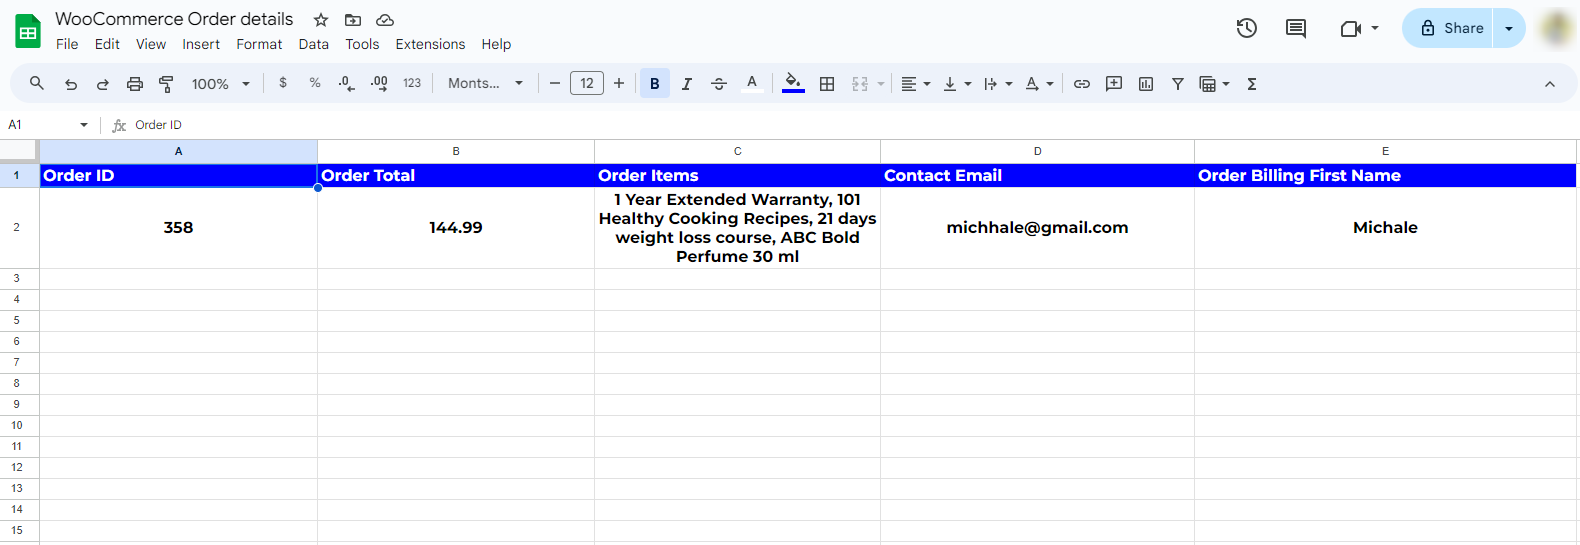
If you see the Google Sheets, you can find the details of your orders.
Method two: Send per-product details to Google Sheets
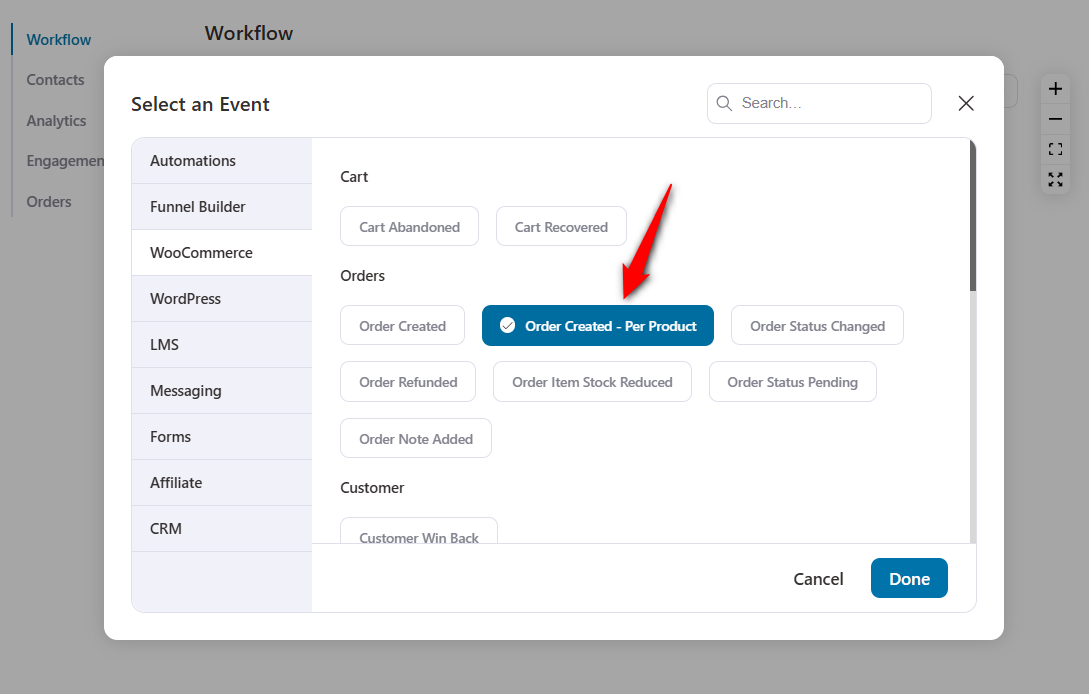
Follow the same instructions for the initial steps. After you land on the workflow page, select the event “Order Created - Per Product”.
Hit the “Done” button.
However, this event will run through every product in the order. Then keep the settings as before in this case.
Hit “Save” once you’re done.

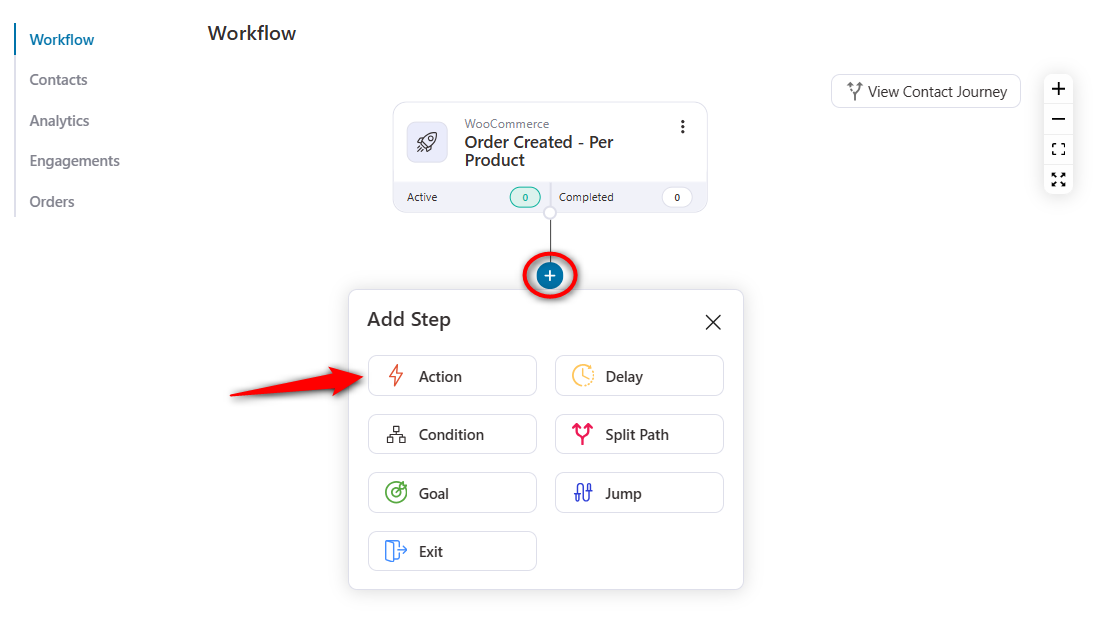
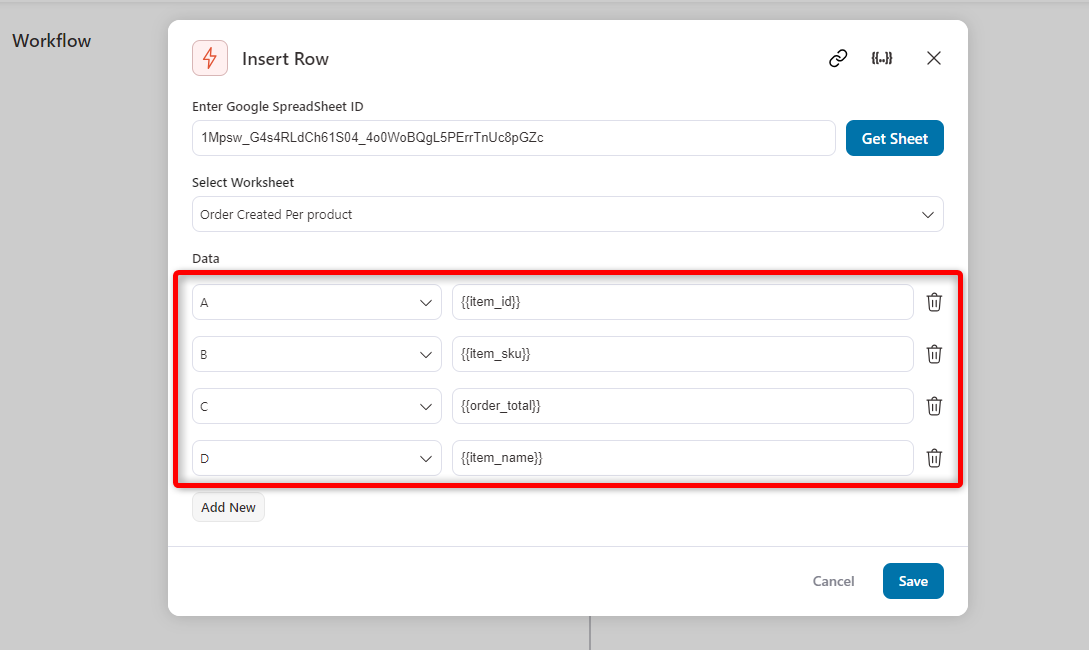
Similarly, click on the (+) icon to set the action. Then, choose the “Insert Row” option under the Send Data tab.
Under the same Google Spreadsheet we created earlier, just paste the ID here. And you’ll see it here.
Now choose the tab if you have a different one.
Define the column with the relevant tags. Either you can follow this flow or you can enter a different tag to fetch data from your Google Sheets. Hit “Save” once everything is done.
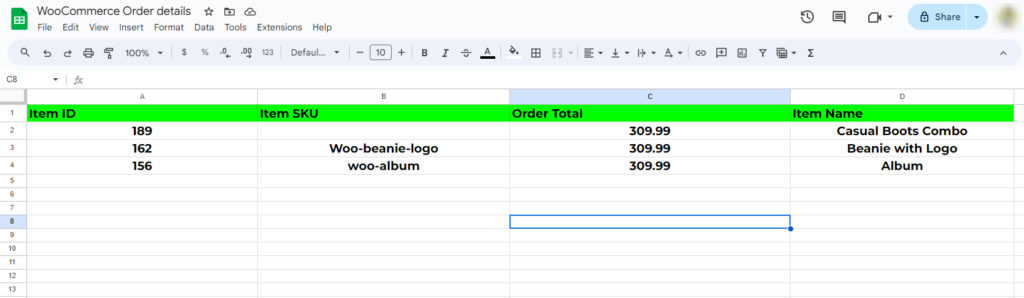
So now, if a user places an order, it will sync all the related information to the Google Sheet.
Use case #2: Send low-stock WooCommerce product data to Google Sheets
Sending low-stock product information means automatically moving details about low-inventory products from your WooCommerce store to a Google Sheets spreadsheet.
This process helps you keep track of products that need restocking in a more organized and accessible way.
Let’s see how to do it.
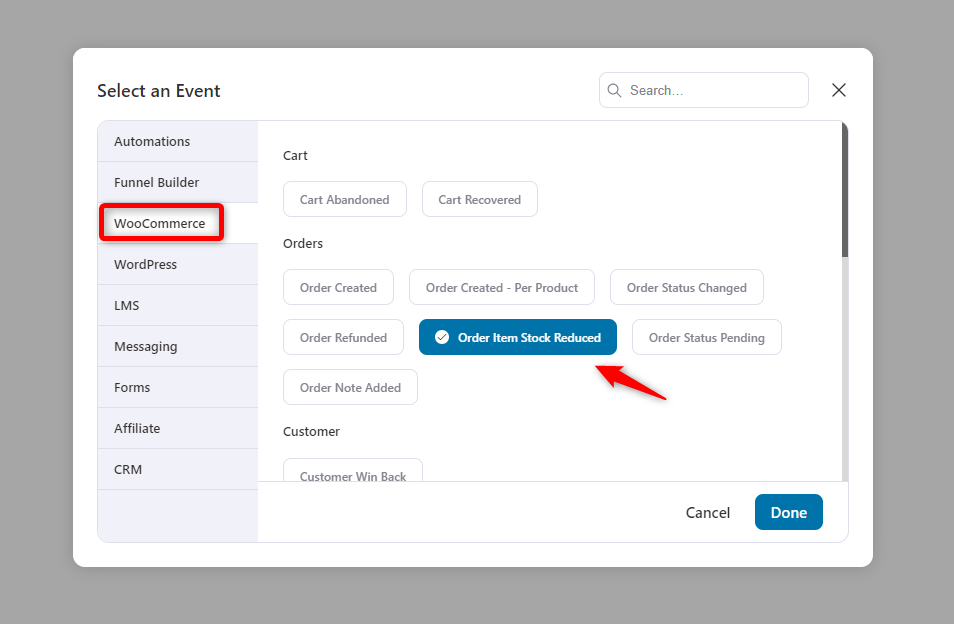
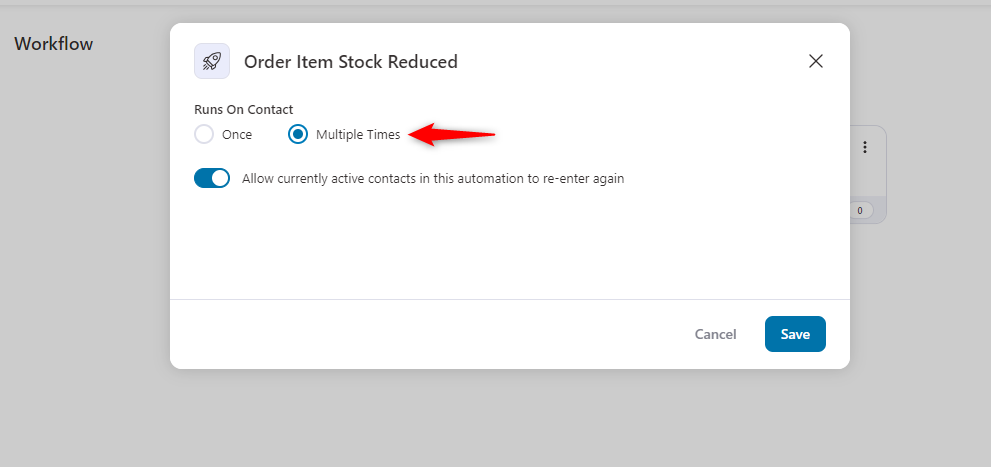
Select the event “Order Item Stock Reduced”.
Then customize its settings. Determine the event running times to be multiple. And tick mark the option to run this event for active contacts.
Hit “Save” once you’re done.
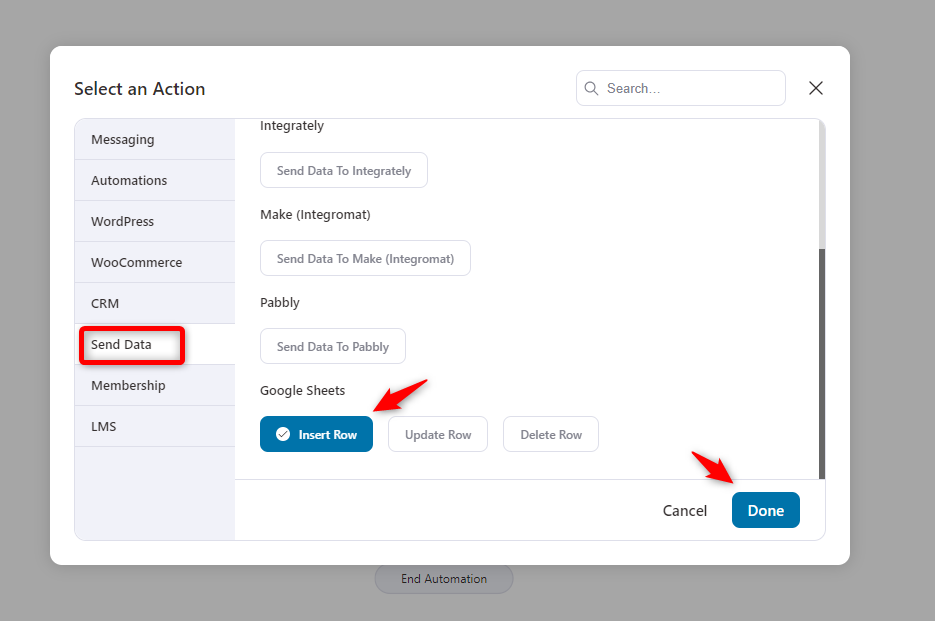
After that, you’ll need to set action for it. For instance, click the (+) icon and then “Action”.
Next, under the “Send Data” tab, select the “Insert Row” option. And then hit the “Done” button.
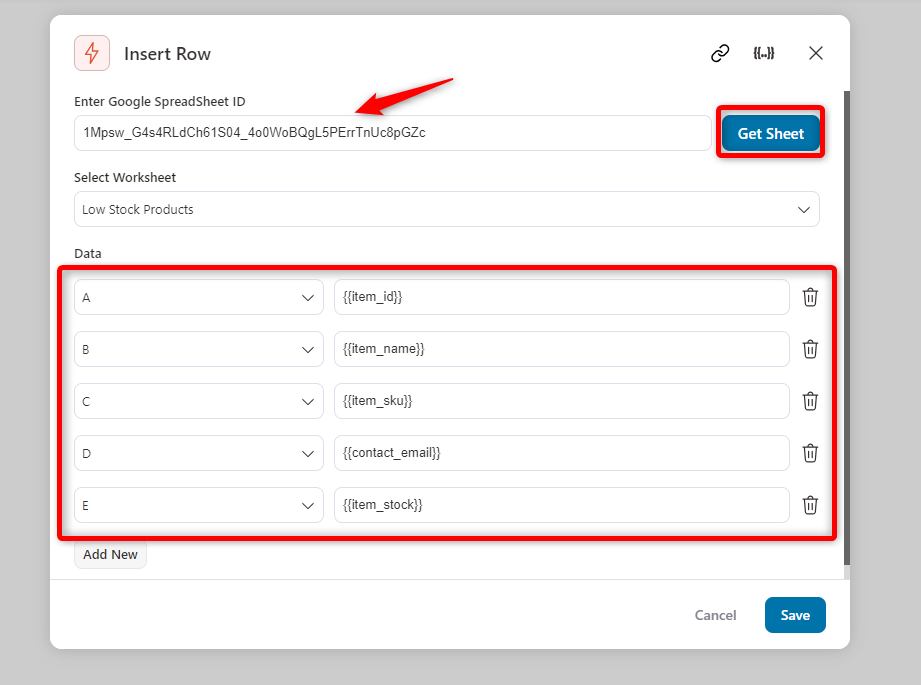
Similarly, paste your Google Sheets ID here and choose your preferred tab.
Then add these rows with the related merge tags from this icon {{.}}. Once you’re done, hit the “Save” button.
Now when a customer places an order, Google Sheet will automatically sync data to your preferred tab.
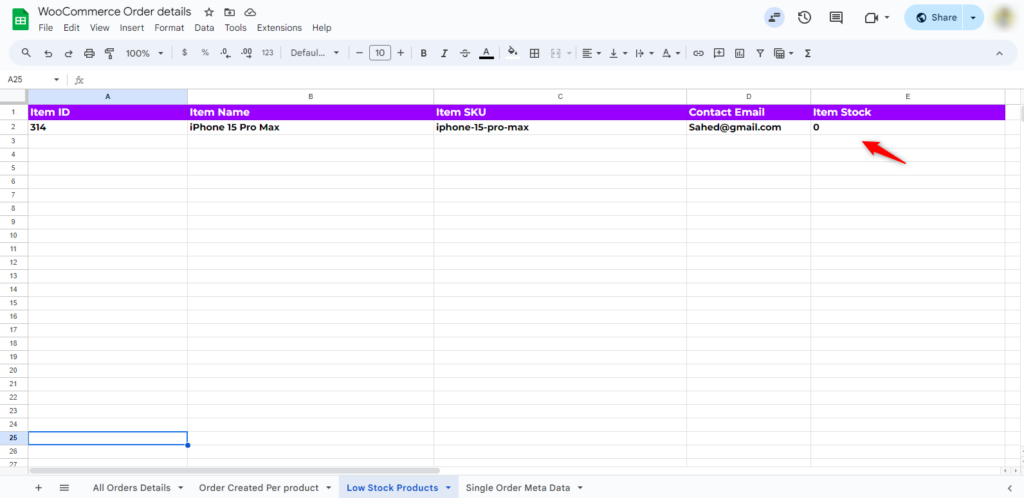
You can see that the purchased product stock is zero. That means the product’s stock was only one. It will help you increase your product stock immediately.
Use case #3. Collect specific order meta to Google sheets
As you can see, this integration syncs almost every detail of your order details, items, total revenue, SKU, and other stuff.
But if you want to fetch specific details about your order, you can do that through order metadata.
For instance, we’ll show how you can do that using FunnelKit Automations. Let’s say you want to add a field where you expect users to share their shopping journey shortly.
To do that, you can add a simple custom field to your checkout page to capture that data.
Now create an event in the automation.
Select the “order created” event and hit done.
Keep the settings as it is and hit save.
Set an action through the (+) icon. Similarly, choose the “Insert row” option under the Send Data tab.
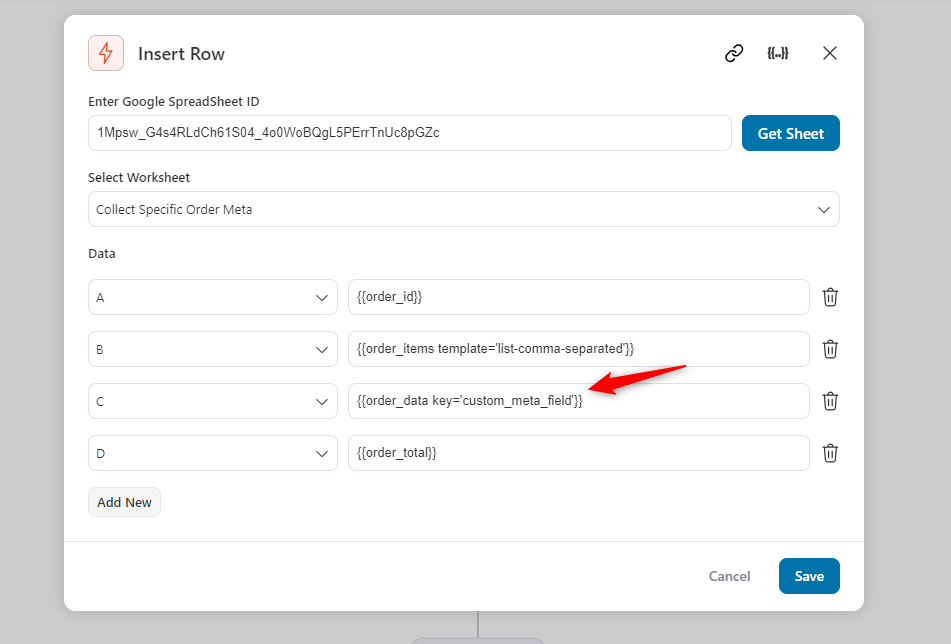
Then, paste the Google Sheet ID. Also, choose your preferred tab, as shown below.
Now define the column with the related merge tags from this icon {{..}}.
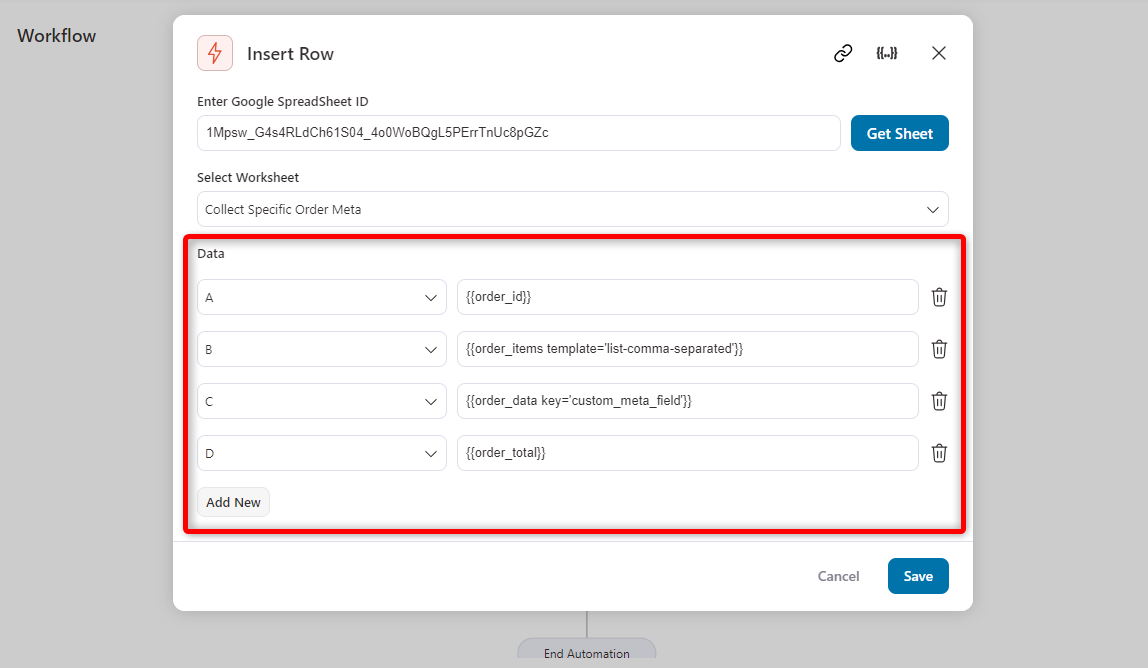
Open a custom field on the checkout page, and copy the metadata.
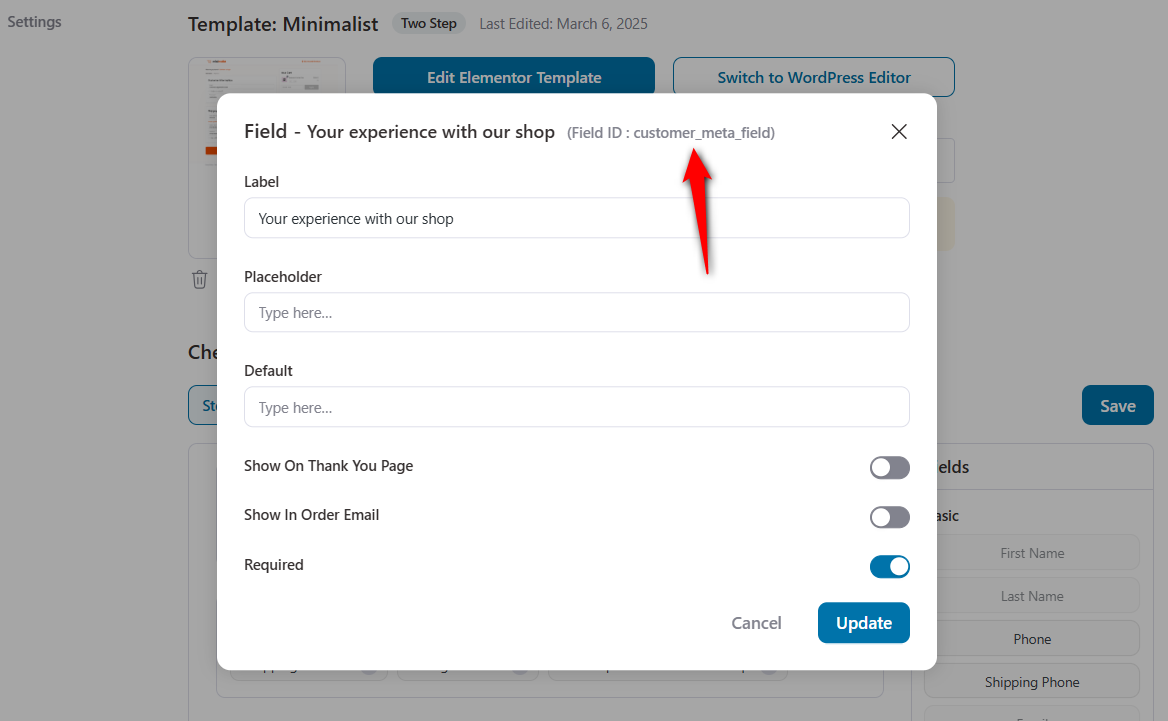
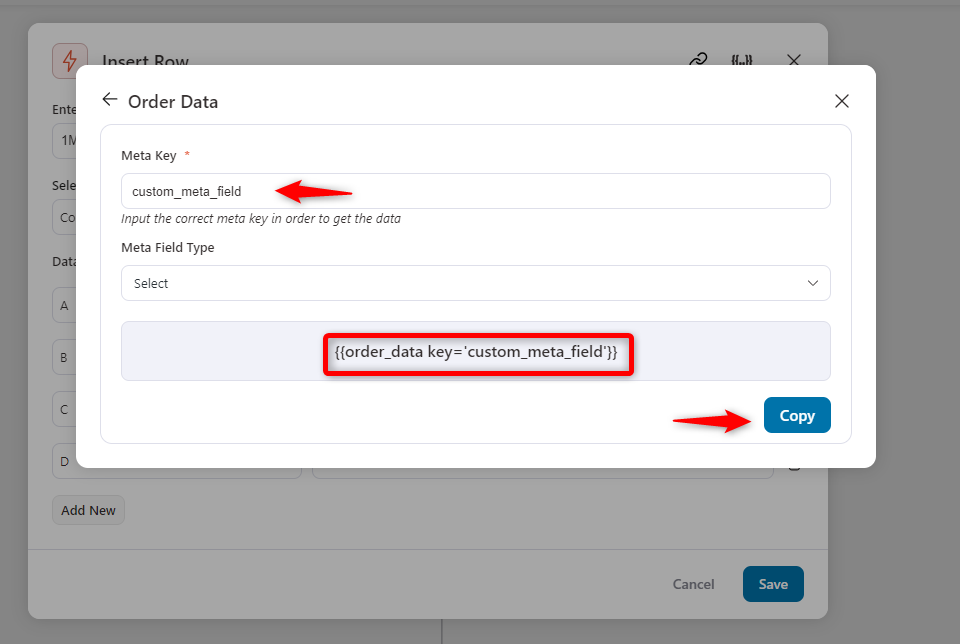
Click on the merge tag icon {{..}} and search for the “Order Data” tag. After that, paste the metadata you copied from the checkout customization page.
You’ll get refined order data as shown below. Copy it and paste it into the field.
So this is how it works. Now it’s time to see how the data passes through it and send to the Google Sheet. Hit save once you’re done.
Now when a customer places an order, you’ll get the data for it.
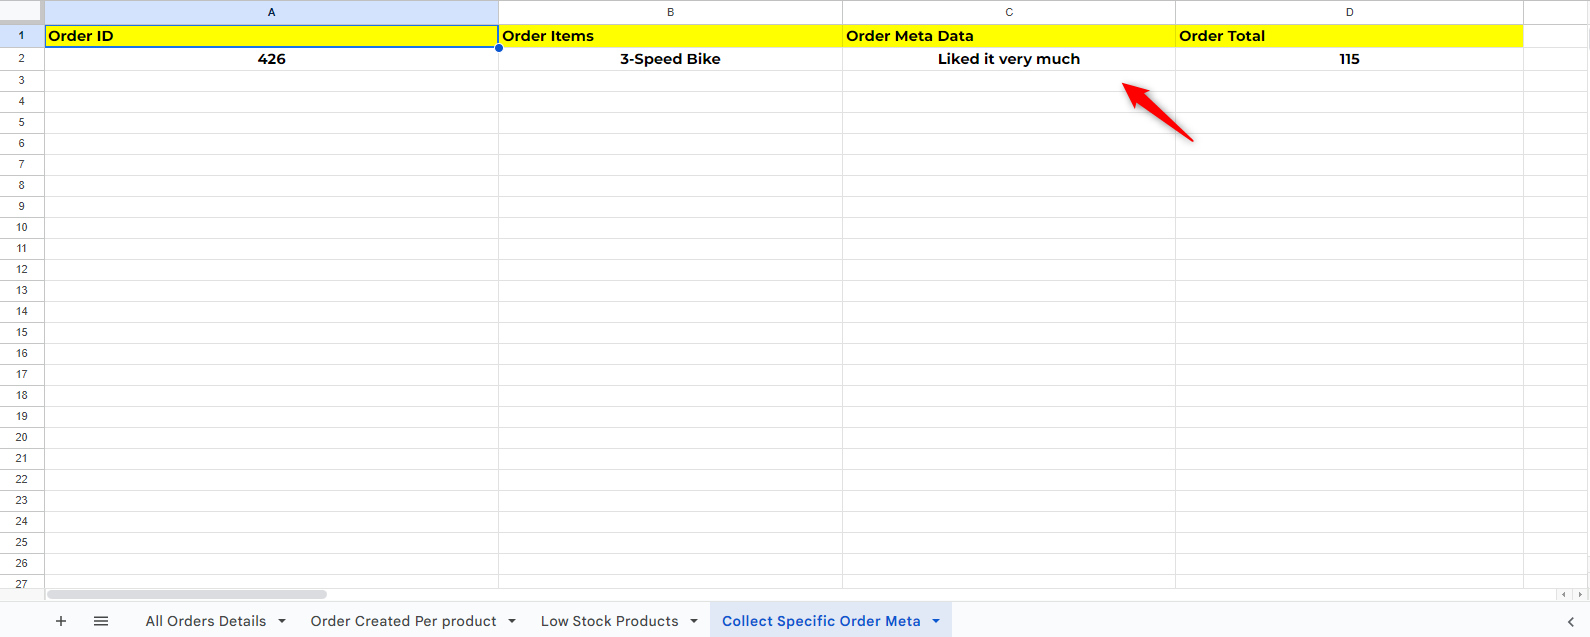
So this is how you can collect specific order metadata to Google Sheets.
Use case #4. Track customers who refunded
You can track the data of your refunded customers and send it through to Google Sheets.
It’ll help you to analyze why they have refunded and what should be the next step to reduce that.
Let’s see how to do it easily with FunnelKit Automations.
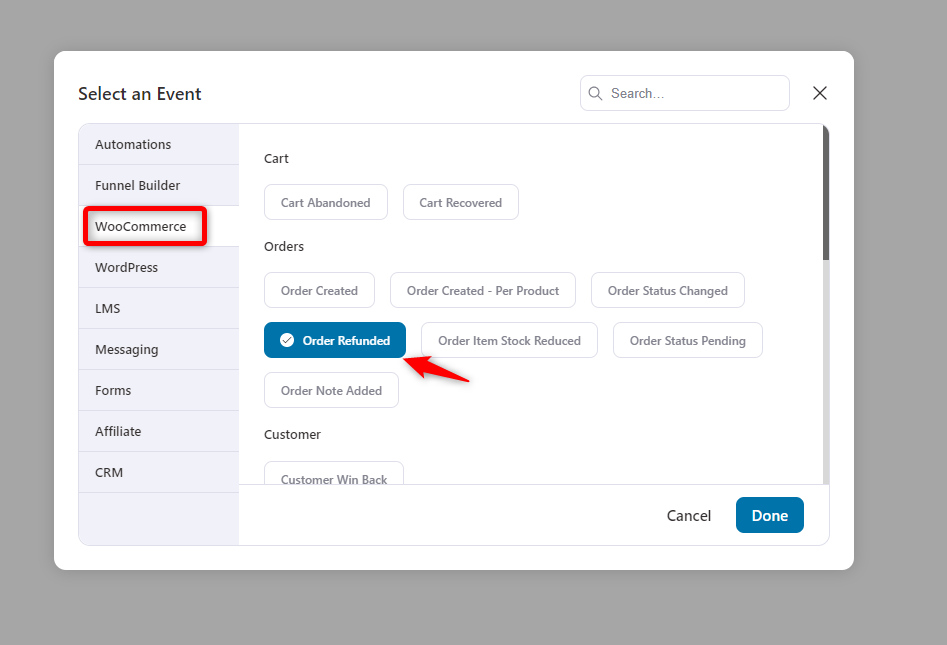
Choose the event “Order Refunded” under the WooCommerce. And then hit done.
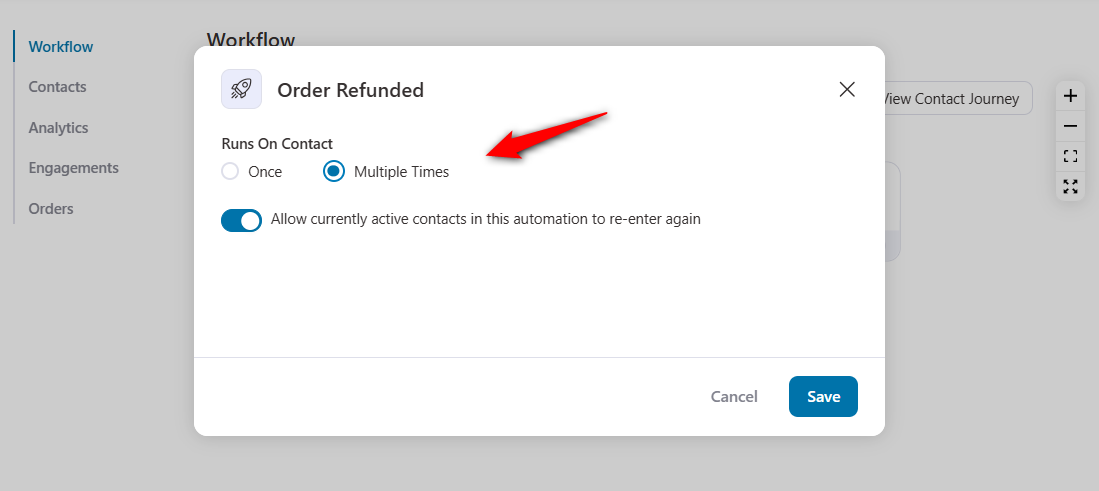
Keep the settings as it is. And hit save.
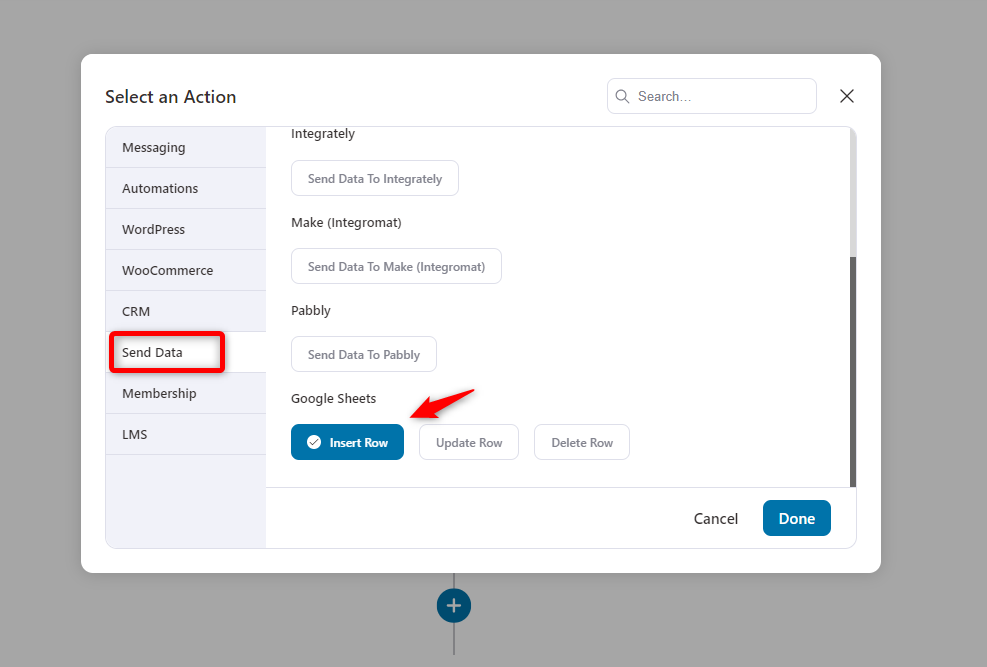
Similarly, choose an action and select “Insert row” under the send data tab. Then hit done.
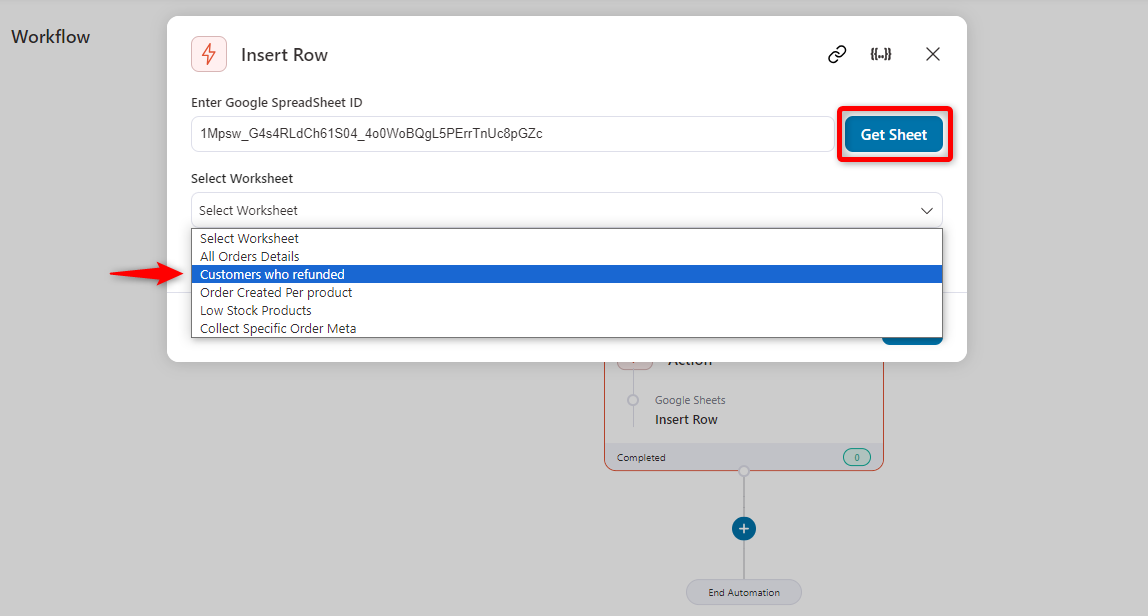
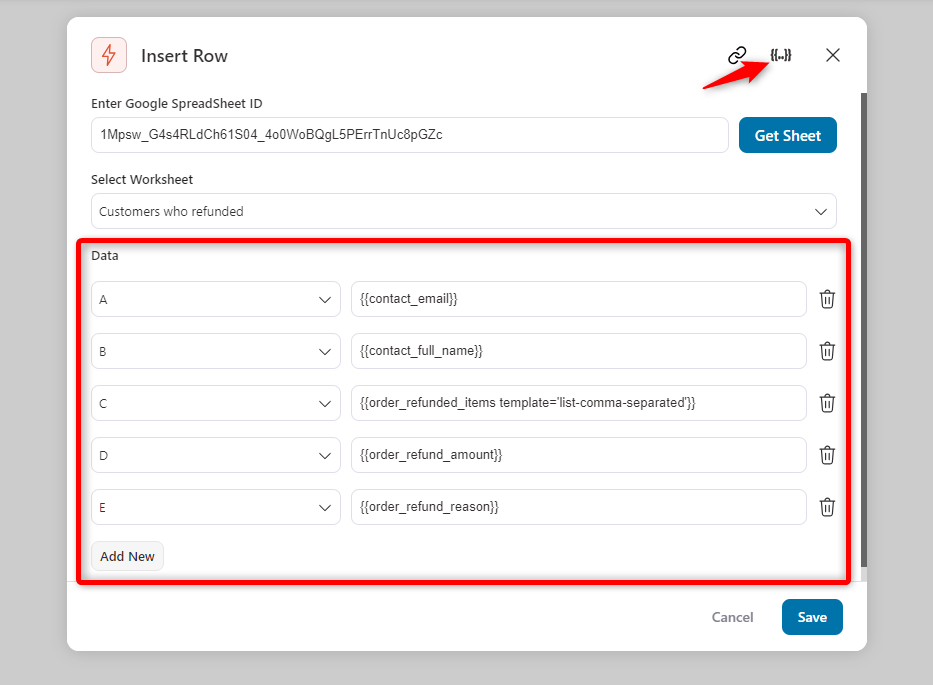
Paste your Google Sheet’s URL and select the preferred tab from the list.
Then map the field with the relevant merge tags. You can find more tags from the merge tag icon {{.}} below.
Here we’re expecting to get these data:
- Contact email
- Contact full name
- Refunded items
- Refund total
- Refund reasons
Now, once a customer claims a refund, this data will automatically be added to your Google Sheet.
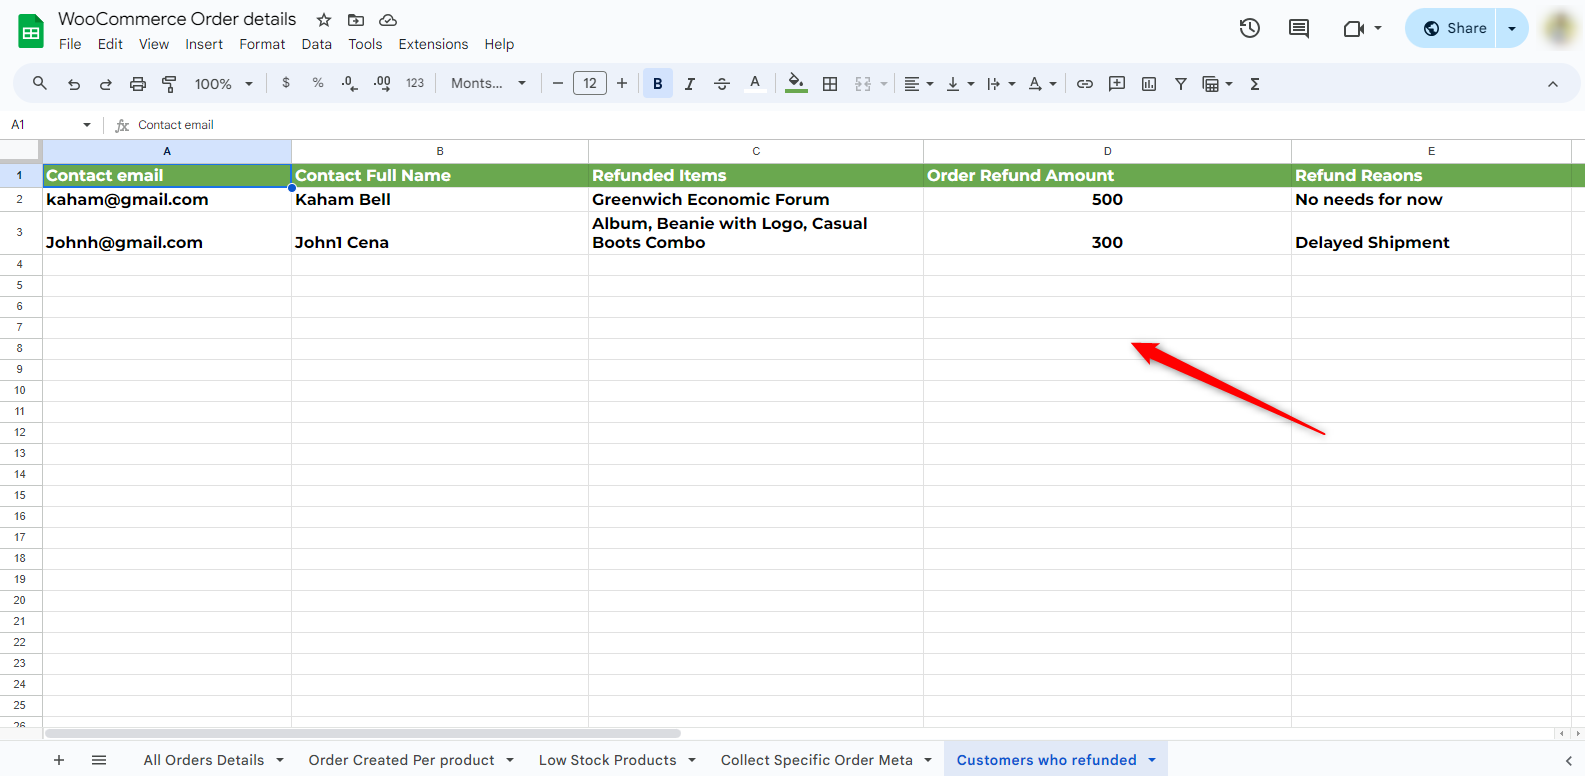
So this is how you can track and analyze the customers who refunded.
For further marketing, you can reach out to them and send a discount email with personalized coupons, or something else.
Use case #5. Track customers with failed order payments
FunnelKit Automations lets you track customers with failed order payments. You can see the order details, the payment URL, and customer details to take further action.
Let’s see how to do that easily.
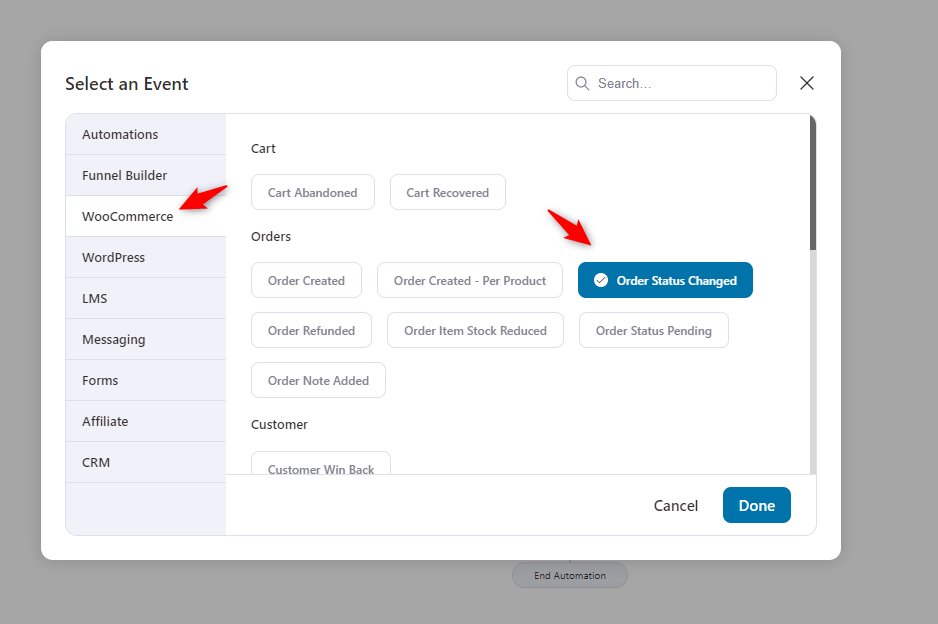
First, choose the event “Order Status Changed” under the WooCommerce tab. Click on the “Done” button.
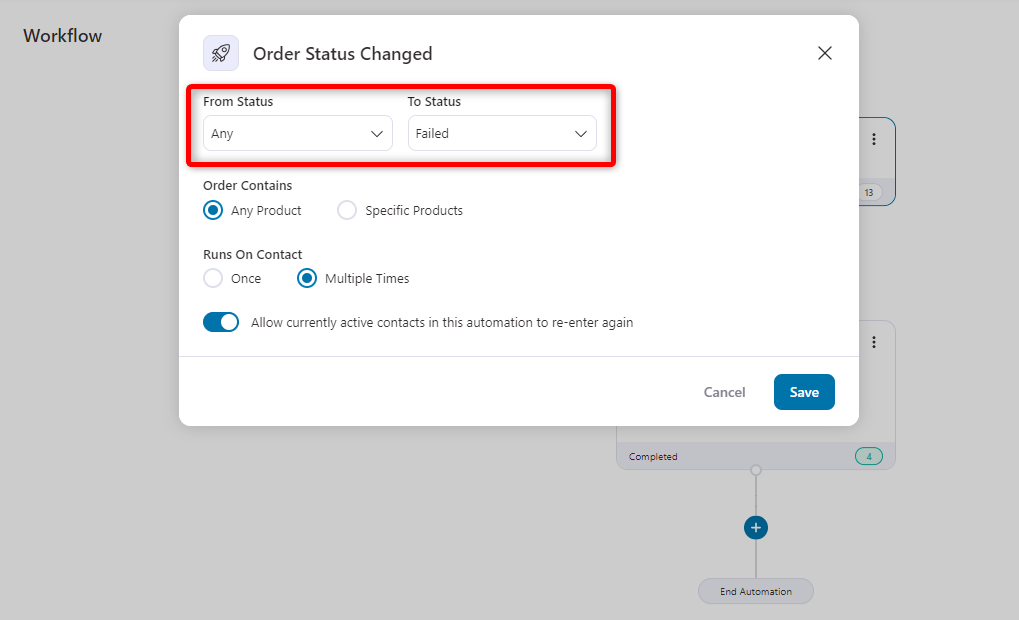
Next, choose the status from “any” to “failed”. Hit save.
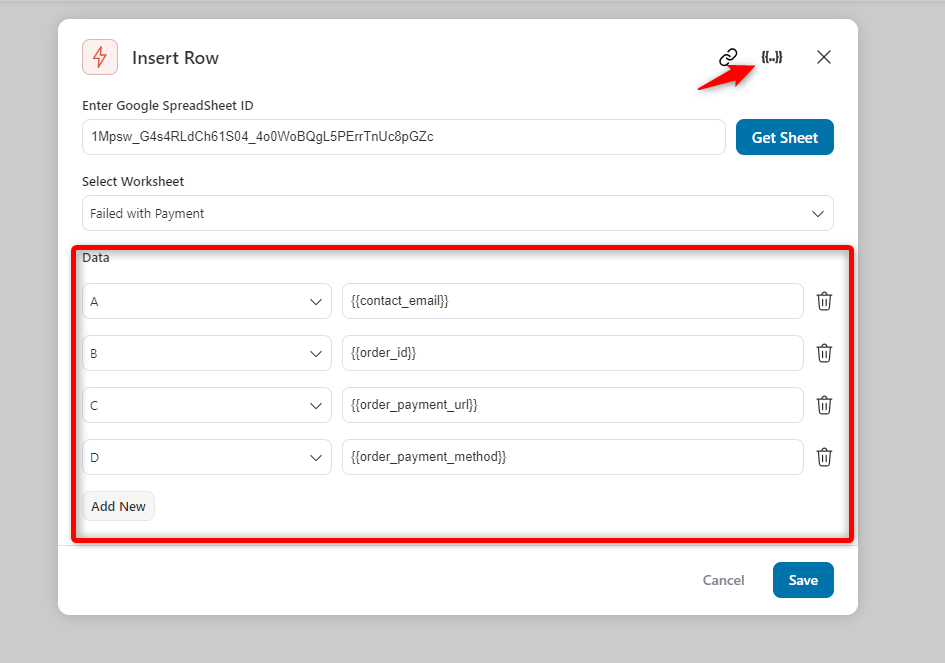
Next, paste the ID of the Google Sheet and select the tab from the dropdown option.
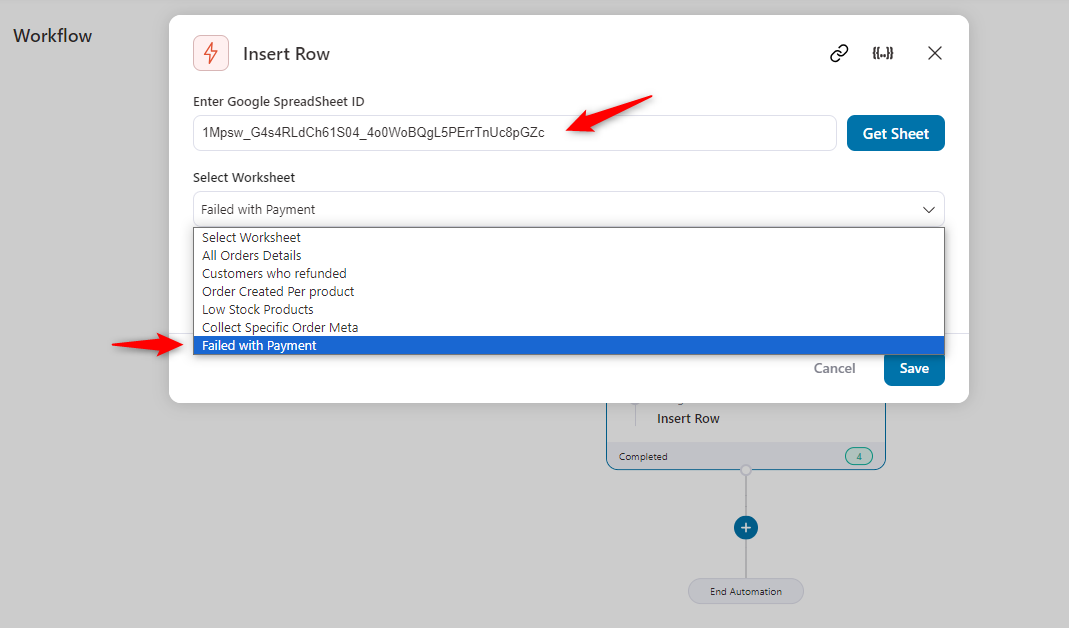
Using the merge tag icon {{..}}, fill out the field with relevant tags as shown below. Depending on these tags the event will trigger the automation.
Once your customers fail to make their payment, you’ll get details of the WooCommerce orders sent to Google Sheets.
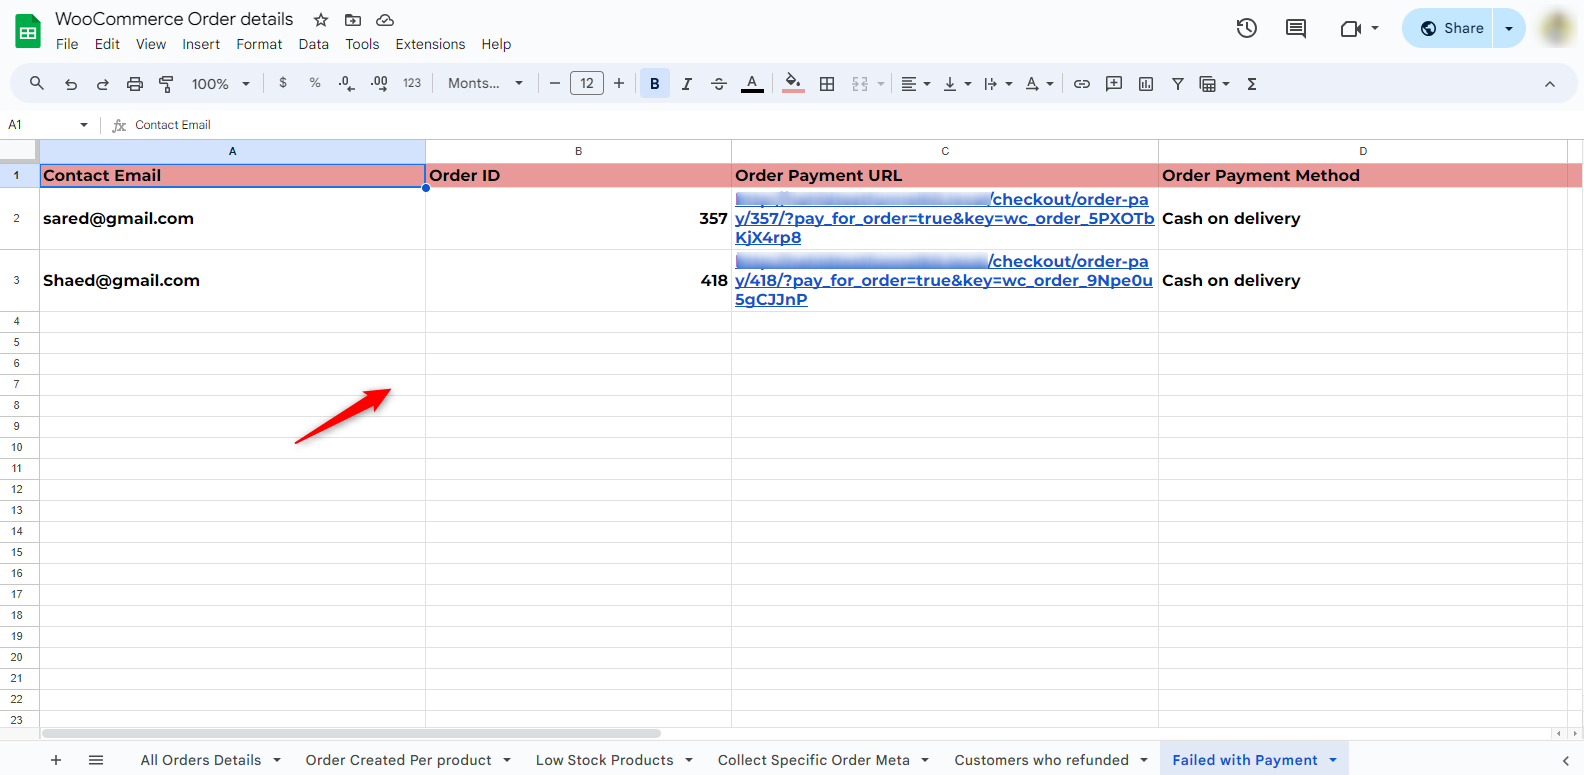
So in this way, you can easily track and sync data of every failed payment created by customers.
Use case #6. Send order notes to Google Sheets
Order notes facilitate communication between the customer and the store owner. Also, it captures the order history from both customers and store owners.
Through order notes, customers can leave special instructions or requests when placing their orders. It will specify their needs and requirements.
However, FunnelKit Automations lets you do it smartly and swiftly.
Let’s see how to do it:
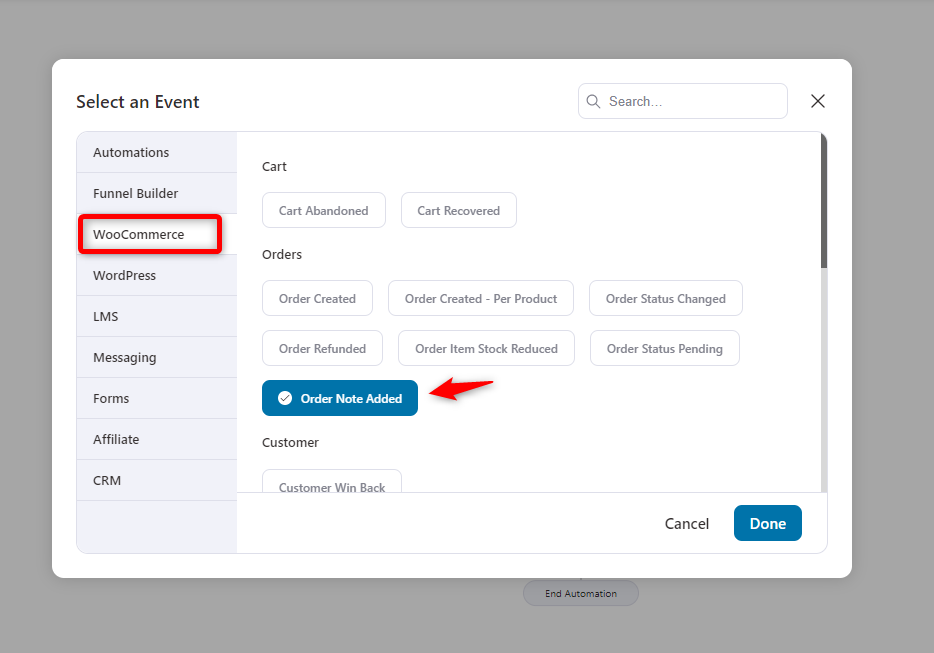
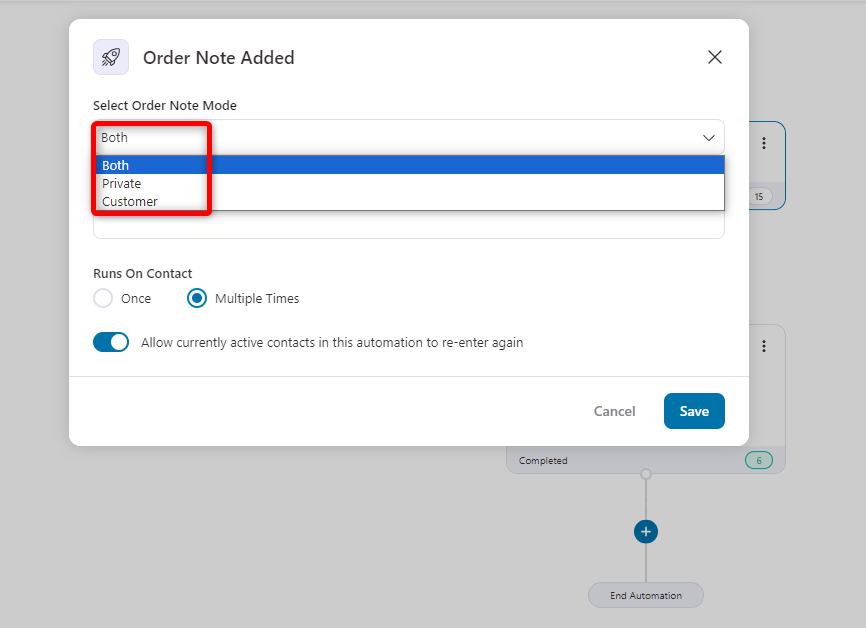
Choose the “Order Note Added” event under the WooCommerce tab. Hit the done button.
Select the order mode. You can set it for the customer, private, or both. And keep the other settings as default.
Hit 'Save' when you’re done.
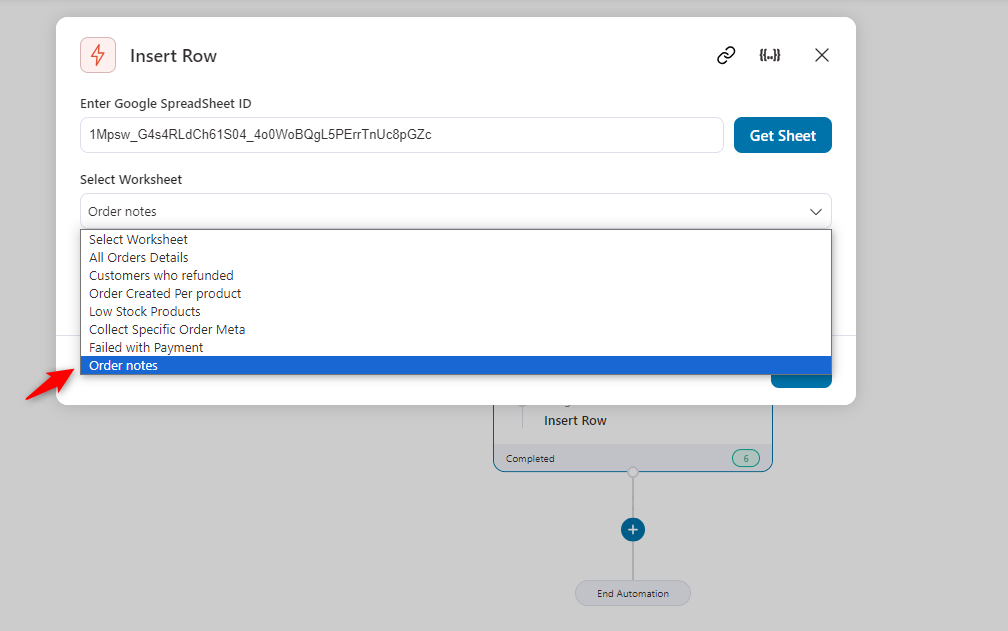
Similarly, add an action, fetch your Google Sheet, and choose the tab you prefer.
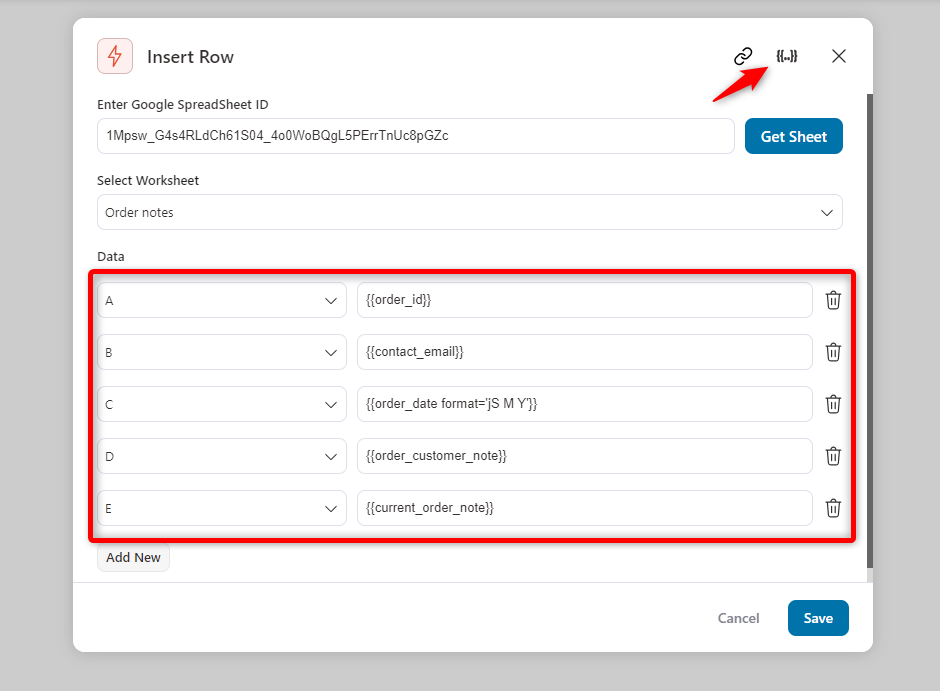
Now, define the columns with related merge tags. You can find more merge tags in the {{..}} icon.
Hit save once you’re happy with the settings.
So when your customers place an order and add a note to it, FunnelKit Automations will fetch the data to Google Sheets.
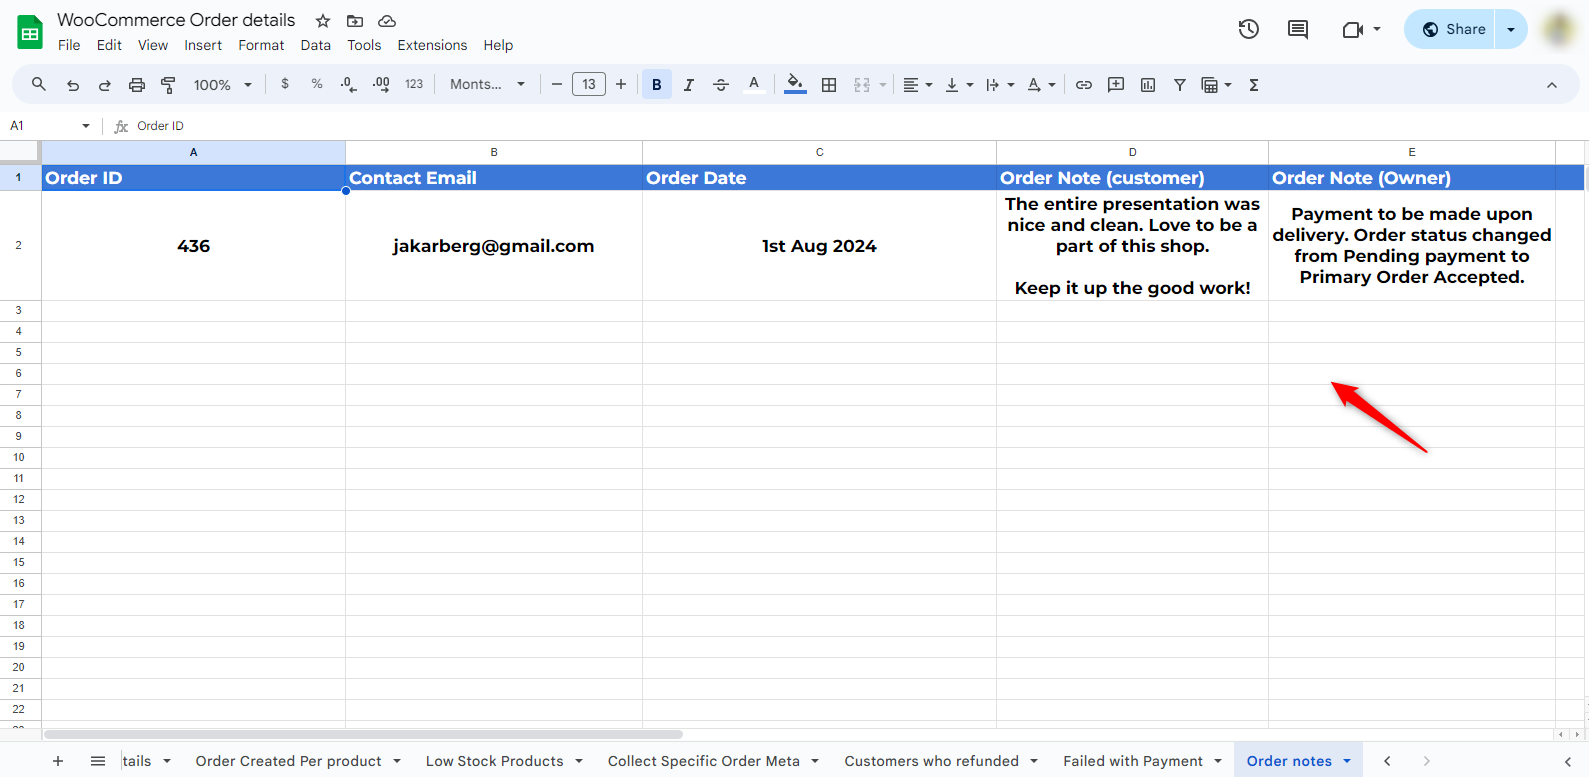
This is how you can sync WooCommerce order notes to Google Sheets using FunnelKit Automations.
These are the six WooCommerce order-related use cases that you can find in FunnelKit Automations.
But you can further explore and execute more automations like updating order statuses, sending abandonment cart data, managing subscription cancellations, and more.
For that, you can have a look at this use case blog on WooCommerce Google Sheets.
WooCommerce Orders to Google Sheets: Frequently Asked Questions (FAQs)
Find answers to common asked questions regarding WooCommerce orders to Google Sheets:
1. How do I export WooCommerce products to Google Sheets?
Yes, you can easily do that. Just navigate to WooCommerce>Products>Export and then click on the CSV file. You’ll get a CSV file to save on your computer or device. Then just upload it to Google Drive and open it in Google Sheets.
2. How do I connect WooCommerce to Google products?
FunnelKit Automations has an option called Connectors. Through the connectors, you’ll see the Google Sheets options. Just click on it and follow the instructions.
3. How do I get all order details in WooCommerce?
By default, WooCommerce has a separate section for orders. But to get more insights and details, FunnelKit Automations can help.
However, FunnelKit Automations has different events to capture WooCommerce-related data to Google Sheets, such as all order details, refund data, low-stock product data, order notes, order status, and per-product orders.
Plus, you’ll get different merge tags to trigger these events for better and deeper insights into your orders.
4. Does it connect the same Google Sheets to two different sites? Which one will work?
Yes, you can either add your Google account to a single site or more than one; both will work and give you the data.
But you have to use Google Sheets from the account you connected.
For example, you have an account at [email protected]. And you have connected this to the FunnelKit connectors to add Google Sheets. A spreadsheet from this account will connect and work.
But a different spreadsheet from a different Gmail account will not work and will send an error.
Streamline Your WooCommerce Business with Google Sheets
Syncing WooCommerce orders to Google Sheets in real-time is a game-changer for managing your data and boosting your business.
With FunnelKit Automations handling the heavy lifting, you get instant updates, smoother workflows, and better insights.
Follow this guide to easily link your WooCommerce store to Google Sheets, making your data super accessible and your decision-making a breeze for your entire team.
Editorial Team
June 12, 2026AutomateWoo gets the job done, but switching away from AutomateWoo is becoming increasingly common among WooCommerce store owners. If you're looking for the best AutomateWoo alternative for your WooCommerce store,...
Editorial Team
April 24, 2026Have you ever had a customer ask about their order details right after purchase? A well-crafted invoice email can instantly clear things up, minimizing the customer's queries. This email includes...
Editorial Team
April 23, 2026Want to drive more sales and customer loyalty with WooCommerce coupons? From simple percentage discounts to advanced offers like auto-applied deals, cart-based rules, and personalized promotions, coupons are one of...


