A seamless checkout experience is vital for driving sales and reducing cart abandonment in your online store.
But what if you could take it further by gathering valuable customer insights while boosting conversions?
Requiring customers to log in before checkout is a smart strategy that does just that.
It helps create a more personalized shopping experience, gathers valuable customer data, and reduces abandoned carts.
In this article, we’ll show you how to force customers to log in before checkout in WooCommerce.
We’ll review this approach's benefits and challenges and provide simple steps to implement it using custom code and WooCommerce settings.
Table of Contents
- 1 What Does “WooCommerce Forces Login Before Checkout” Mean?
- 2 Why Do Store Owners Encourage Users to Login Before Checkout?
- 3 How to Implement WooCommerce Force Login Before Checkout?
- 4 Method 1: Using Custom Code
- 5 Method 2: Using WooCommerce Settings
- 6 Optimization Tip: Use FunnelKit Funnel Builder’s Smart Login Feature for Streamlined Checkout
- 7 WooCommerce Login Customization Tips for a Better User Experience
- 8 Possible Challenges and How to Overcome Them
- 9 Wrapping Up: Improving Your Store’s Checkout Experience
What Does “WooCommerce Forces Login Before Checkout” Mean?
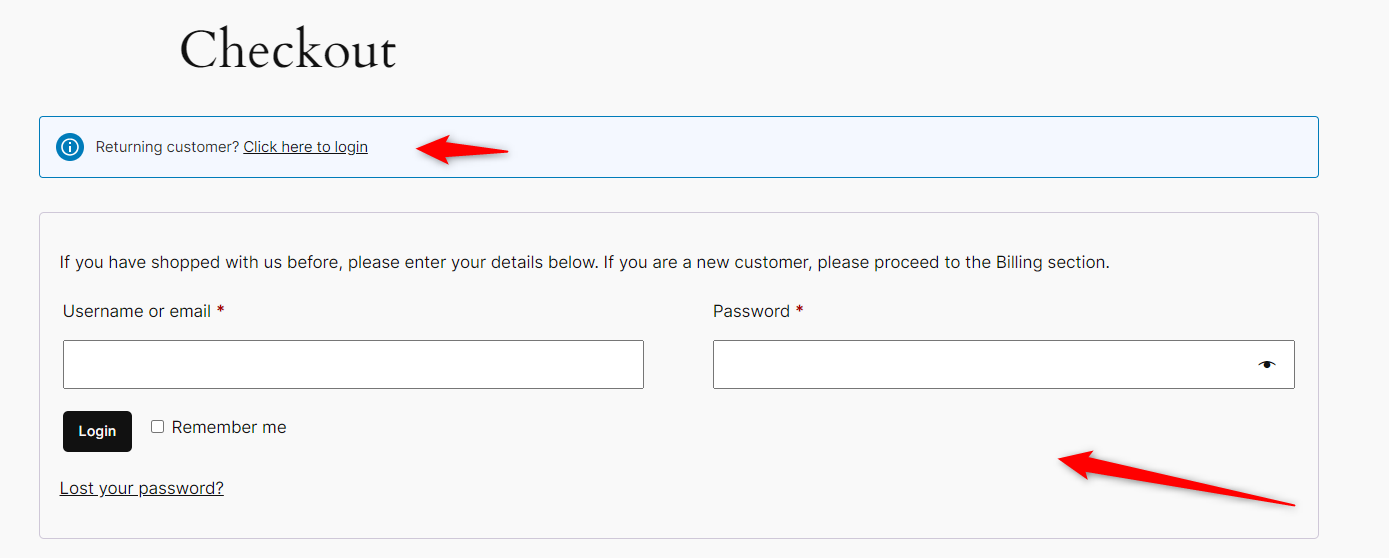
When we say, "WooCommerce forces login before checkout," customers must log in to their account before purchasing.
This feature ensures that only registered users can proceed with the checkout process.
For example, if customers try to purchase without logging in, they’ll be prompted to sign in first. Once they log in, they can proceed with the checkout.
This feature helps store owners collect important customer details. Also, it makes it easier to track orders and offer personalized services. Plus, you can also improve security and reduce the risk of fraud.
It ensures that only registered users can make purchases. It also encourages customers to create accounts, which benefits both the store and the shoppers.
Why Do Store Owners Encourage Users to Login Before Checkout?
Store owners often encourage customers to log in before checkout to collect real-time customer information and improve the overall shopping experience.
But there’s more to it than just data collection.
Let's dive into the key reasons and benefits behind this strategy:
- Better customer data management
By having customers log in before checkout, store owners can collect essential information such as addresses, payment methods, and order history. It makes it easier to manage orders and provide personalized services.
- Enhanced security and fraud prevention
Requiring users to log in adds a layer of security. It helps prevent test or fake purchases by ensuring that only verified customers can make orders. It also enables store owners to track suspicious activities more effectively.
- Streamlined future purchases
Forcing customers to log in before checkout encourages them to create an account if they haven’t already. This can lead to faster checkouts on future purchases, as their details will be saved, creating a more convenient shopping experience.
- Personalized shopping experience
Logged-in users can receive personalized product recommendations, discounts, and offers based on their previous browsing and shopping behavior. This helps build a stronger connection with the customer and can increase sales over time.
- Improved customer support and order tracking
When customers are logged in, store owners can easily track orders and offer better support. Customer accounts also ensure that all information is available for quick resolution if any issues arise, such as returns or exchanges.
Therefore, encouraging customers to log in before checkout helps store owners manage their business more efficiently and provides users with a better and safer shopping experience.
How to Implement WooCommerce Force Login Before Checkout?
Let’s now check how to implement forced login before checkout in your WooCommerce store.
- Method 1: Using Custom Code
- Method 2: Using WooCommerce Settings
Let’s see them one by one:
Method 1: Using Custom Code
Implementing WooCommerce force login before checkout using custom code is a simple process.
This method ensures that customers must log in to their accounts before they can complete a purchase.
Follow the steps below to add custom code to your WooCommerce store:
Step 1: Backup your website
Before making any changes to your website, it is important to create a backup. This ensures you can restore your site in case something goes wrong. You can use a WordPress backup plugin or your hosting provider's backup tools.
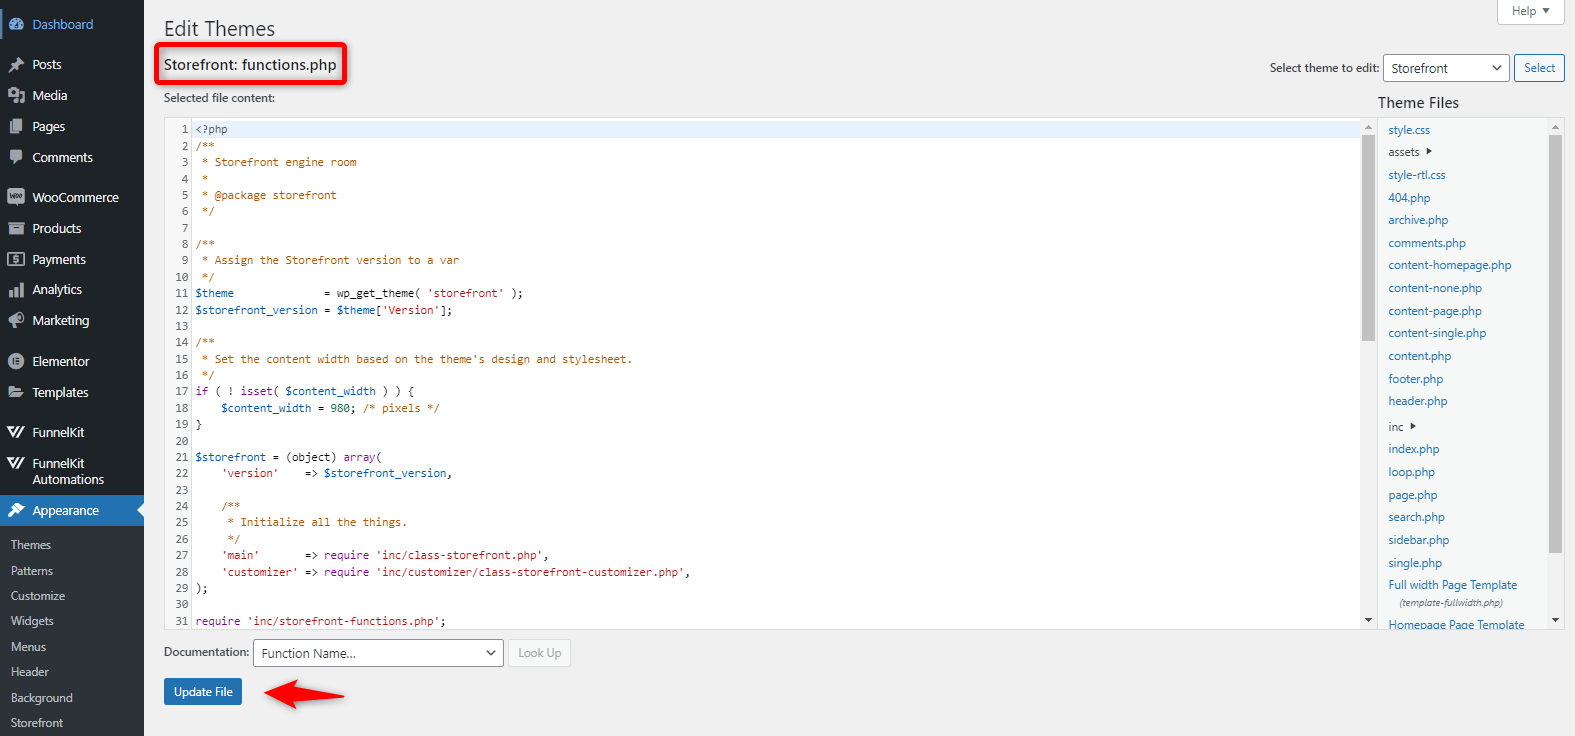
Step 2: Access your theme's functions.php File
The code to force login before checkout will be added to your theme’s functions.php file. To access it:
- Go to your WordPress admin dashboard.
- Navigate to Appearance > Theme Editor.
- On the right side, find and click on the functions.php file under your active theme.
Step 3: Add the Custom Code to functions.php
Add the following code snippet to the bottom of the functions.php file:
add_action( 'template_redirect', 'redirect_to_login_if_not_logged_in' );
After adding the code, click the Update File button to save the changes.
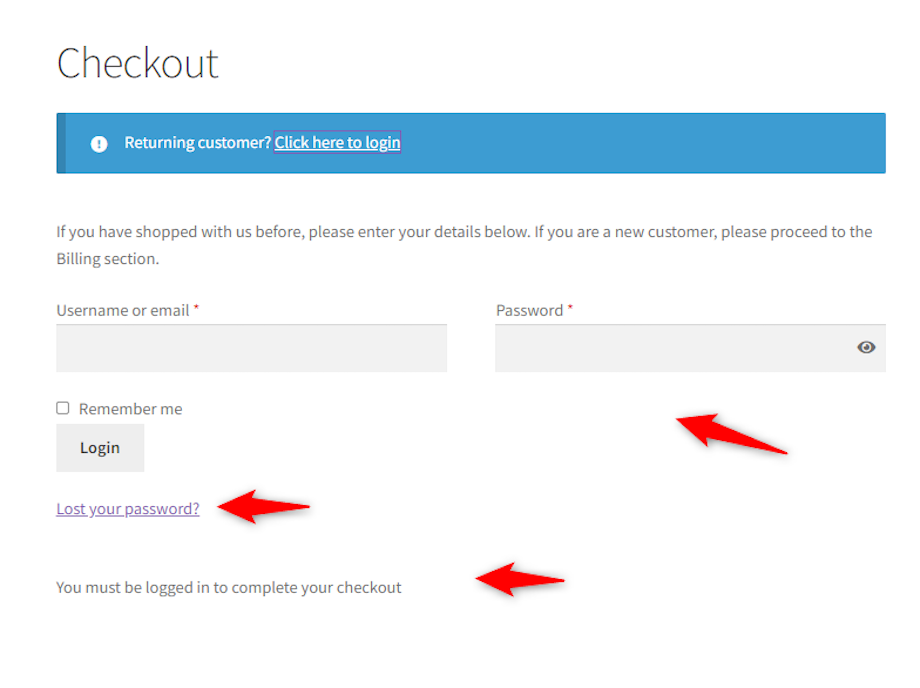
Step 4: Test the forced login
Once the code is added, it's important to test the login flow:
- Log out of your WordPress account.
- Go to your WooCommerce store and add an item to the cart.
- Try to proceed to the checkout page. You should be redirected to the login page if you're not logged in.
Method 2: Using WooCommerce Settings
Implementing WooCommerce force login before checkout settings is an easy method to require customers to log in before they can complete their purchase.
WooCommerce provides an option within the settings to manage this behavior without writing any custom code.
Here's how you can do it step-by-step:
Step 1: Backup your website
As always, before making any changes to your WooCommerce settings, it is best to create a backup of your site. You can use a WordPress backup plugin or a backup tool provided by your hosting provider.
Step 2: Access WooCommerce settings
To implement the WooCommerce force login before checkout using the general settings, follow these steps:
- Go to your WordPress admin dashboard.
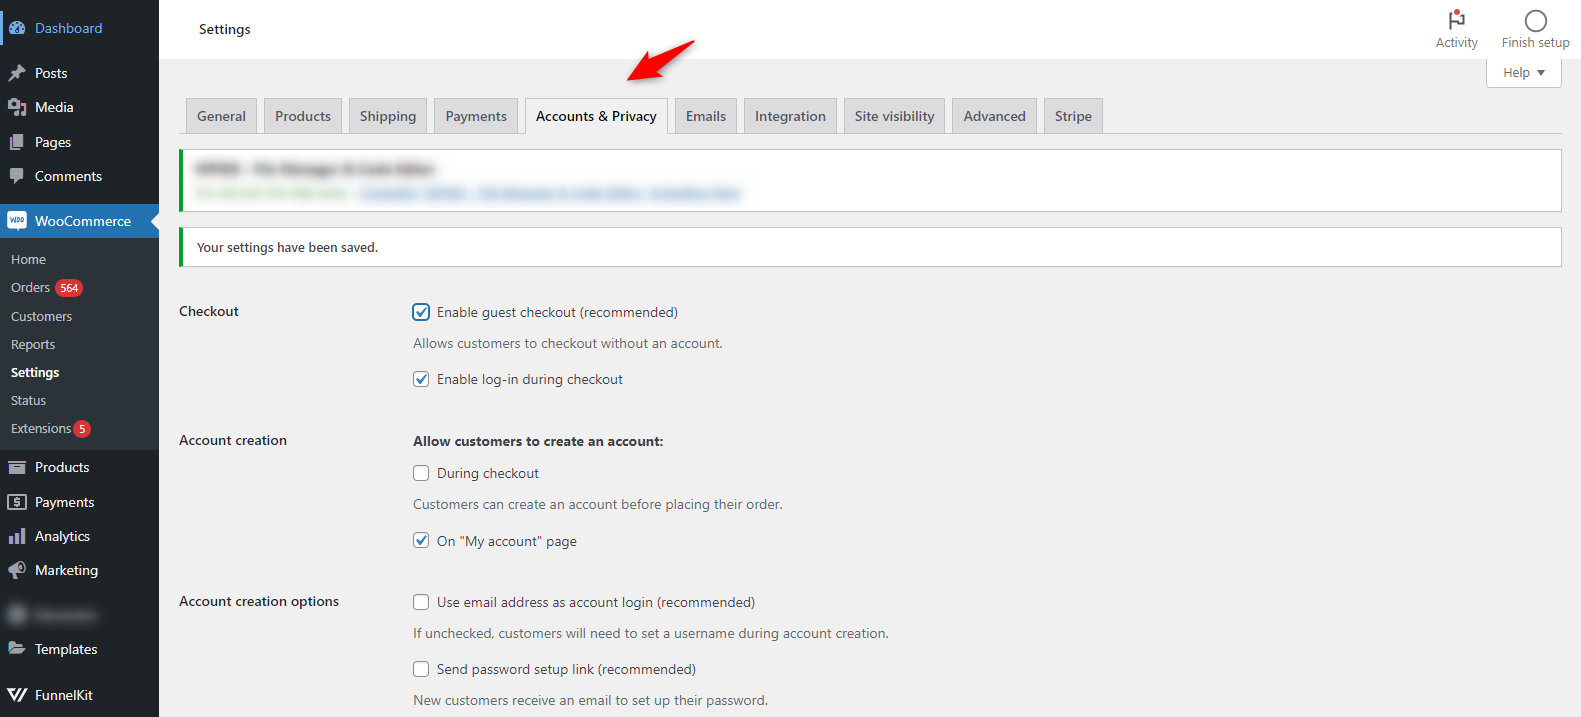
- In the left sidebar, navigate to WooCommerce > Settings.
- And then move to the “Accounts and Privacy” tab
Step 3: Disable the guest checkout option
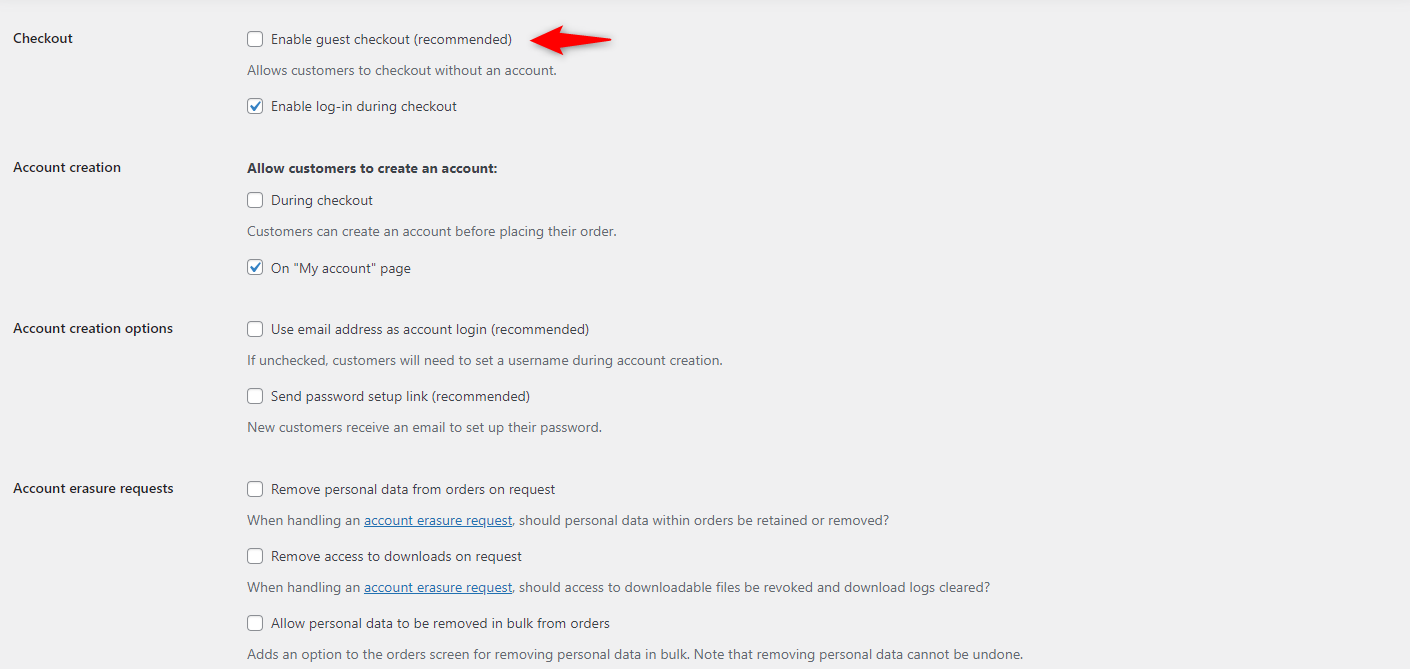
To force customers to log in before checkout, disable the "Allow customers to place orders without an account" option.
Step 4: Test the forced login feature
Now that you've configured the settings to force login before checkout, you should test the feature to ensure it works correctly:
- Go to your WooCommerce store and add an item to the cart.
- Try to proceed to the checkout page. You should be prompted to log in before continuing with the checkout process.
- After logging in, you should be able to complete your purchase.
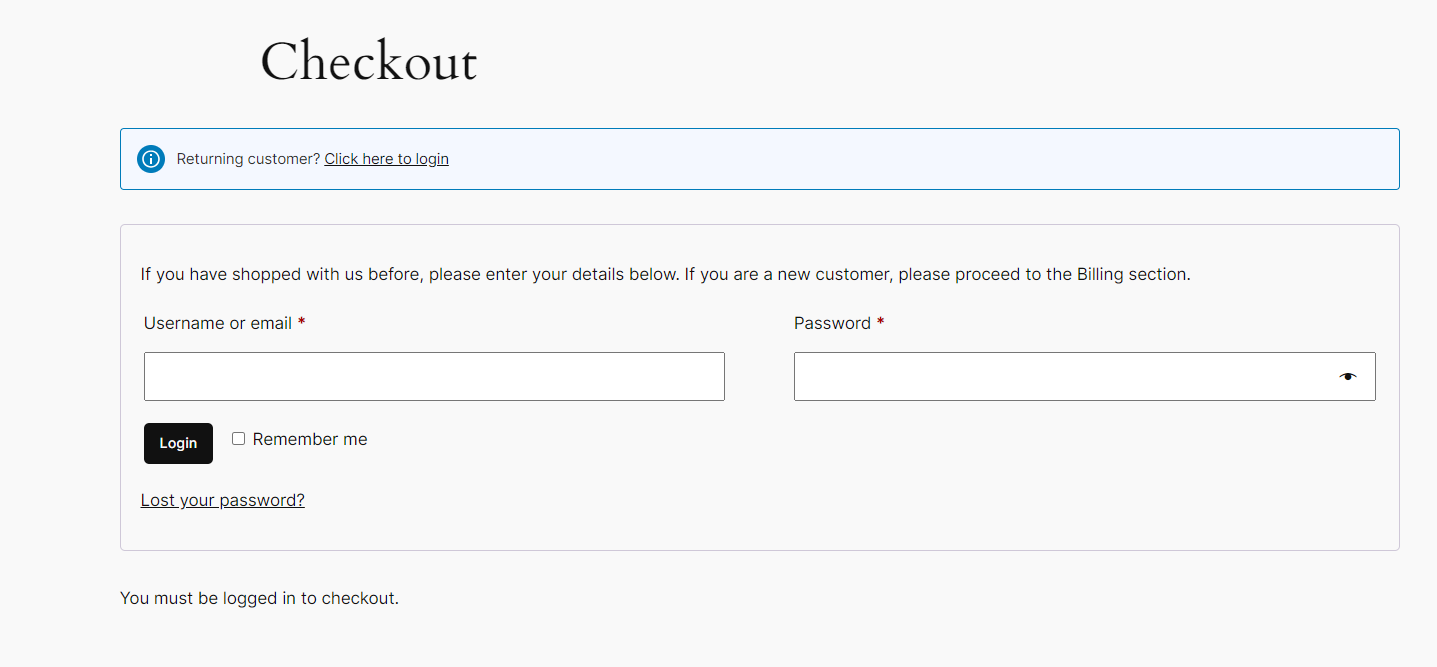
This way, you can enable the force login in the WooCommerce store using the general settings.
If you want your checkout page to be more professional and engaging, we have something else for you.
Optimization Tip: Use FunnelKit Funnel Builder’s Smart Login Feature for Streamlined Checkout
FunnelKit Funnel Builder enables users to create and optimize checkout pages, upsells, cross-sells, order bumps, etc.
Talk about FunnelKit’s smart login feature and how it differs from default WooCommerce. Discuss all the points here in the beginning.
Apart from these, it can also help you optimize your checkout page with many awesome options.
So join the party and start building your checkout page with FunnelKit Funnel Builder
Now, let’s get started:
Step 1: Create a store checkout
First, you need to create a store checkout page to get started.
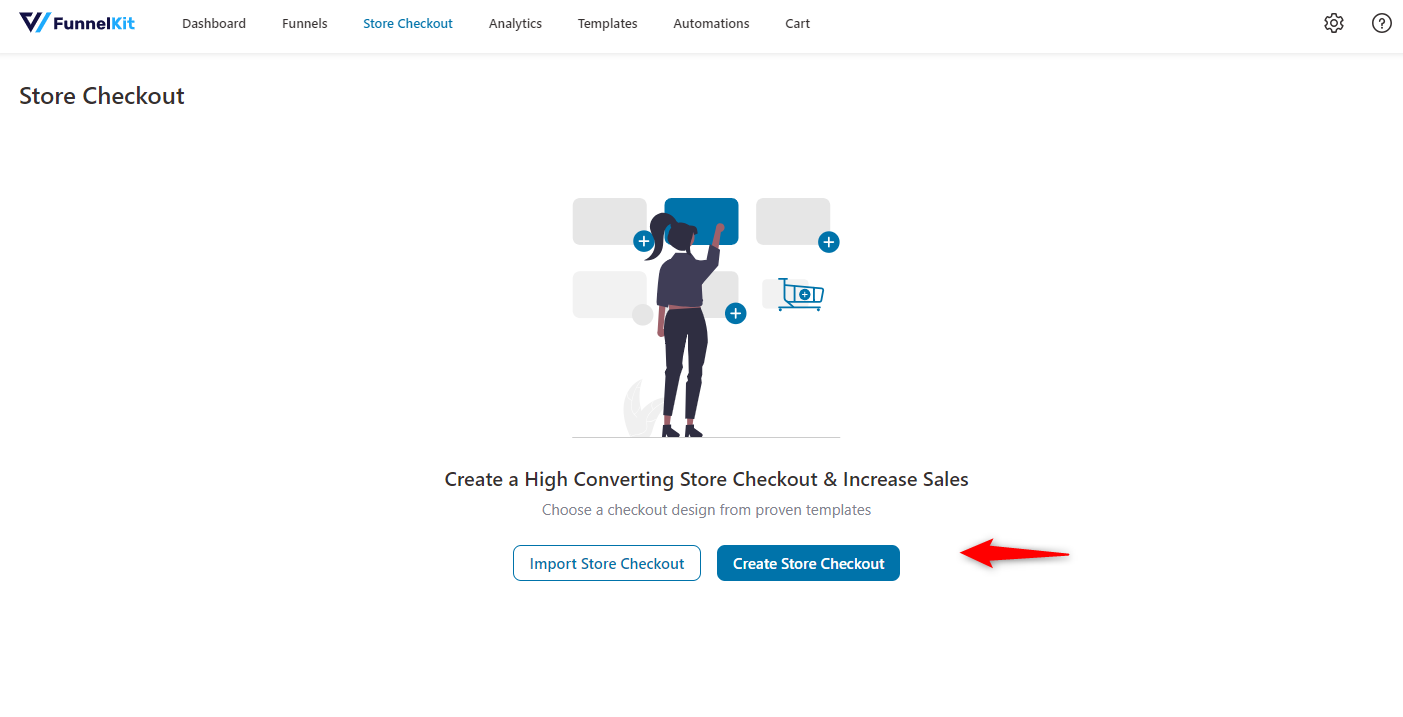
To do so, navigate to FunnelKit > Store Checkout and click the “Create Store Checkout” button.
Step 2: Choose a template and import it
Next, you need to choose a template for your checkout page. FunnelKit supports page builders like Elementor Block Editor, Divi, Oxygen, Bricks, and shortcodes.
Choose the preferred one and then move ahead with the template.
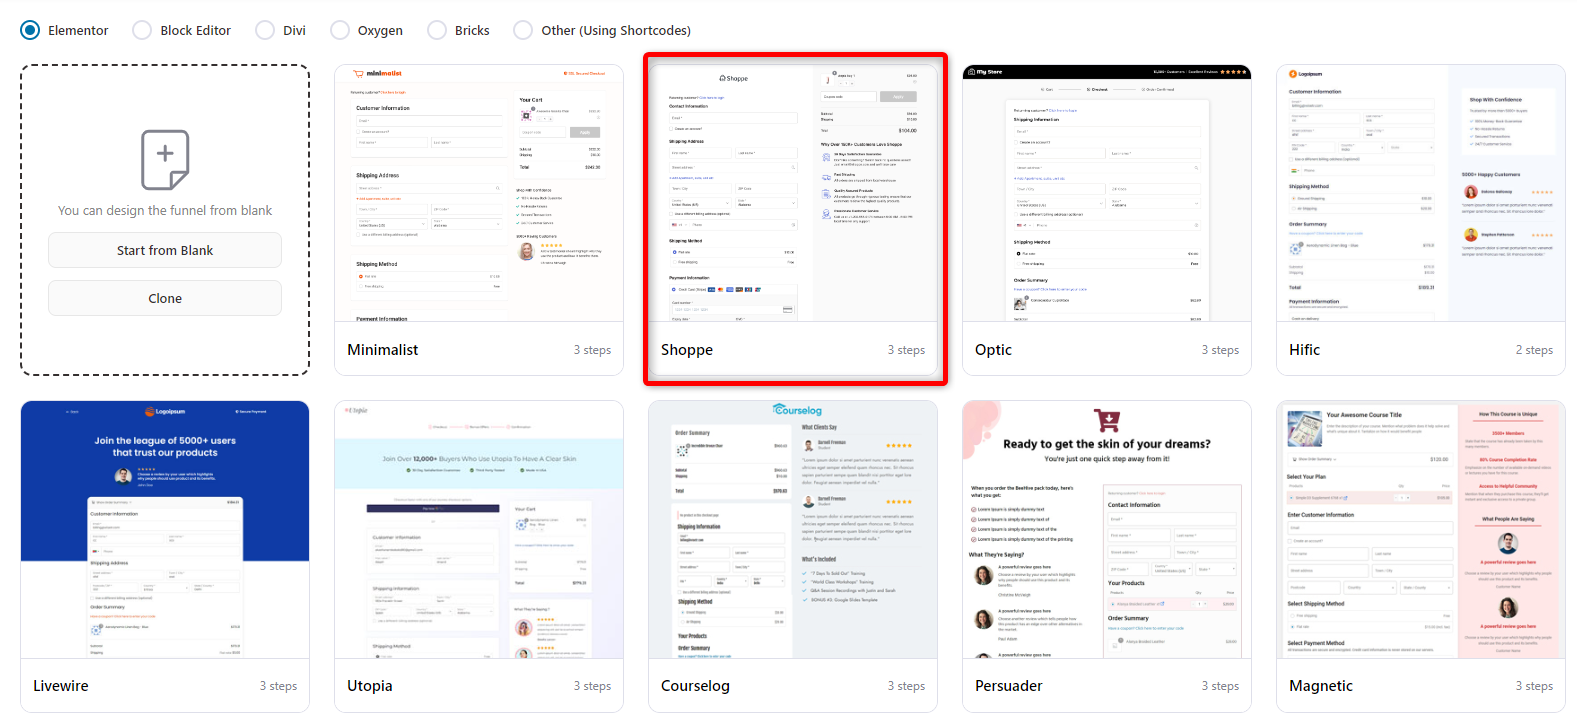
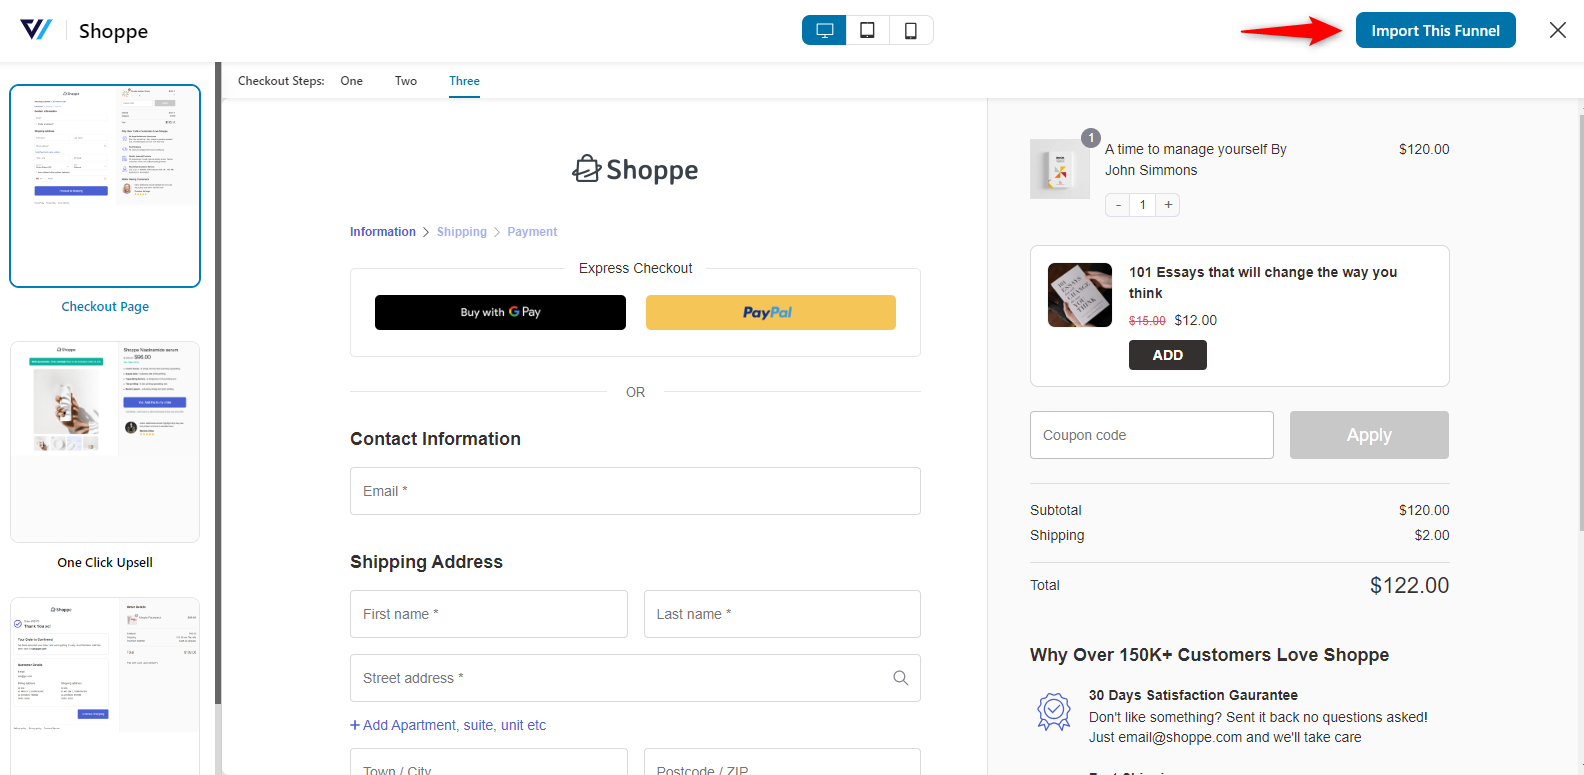
Then, select the number of steps you want on your checkout page and click ‘Import This Funnel’.
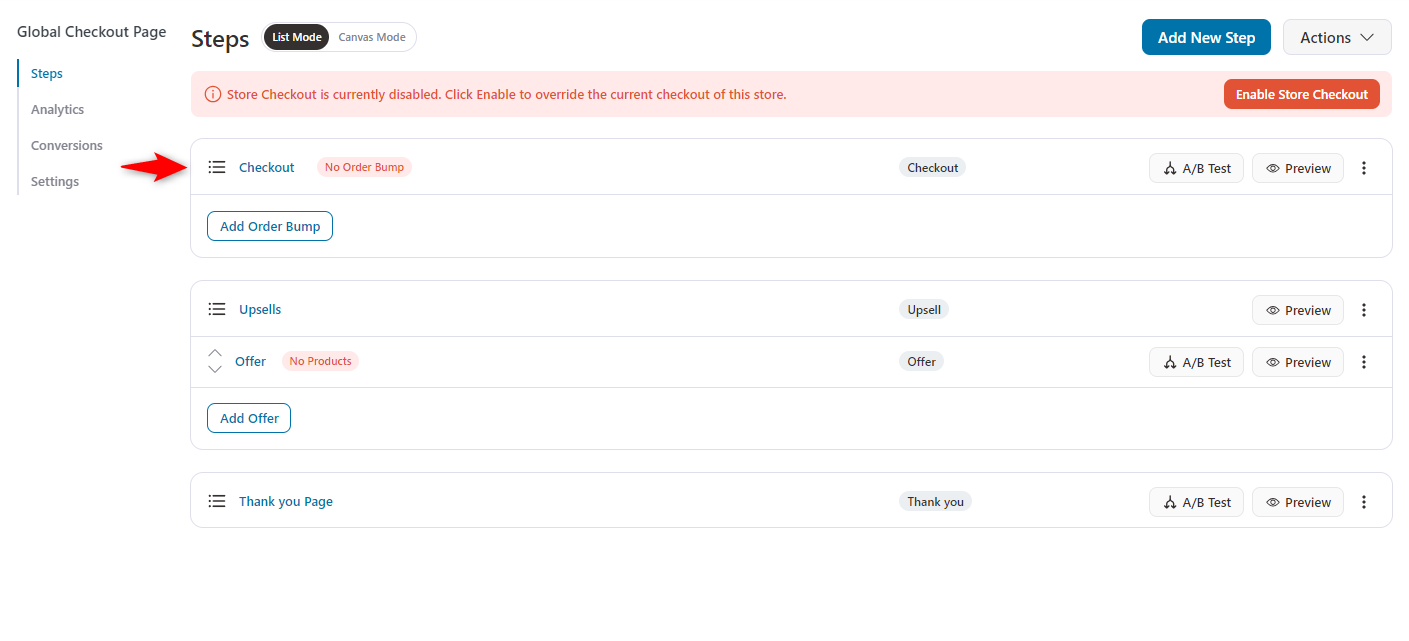
After importing, navigate to the customization page of the checkout page.
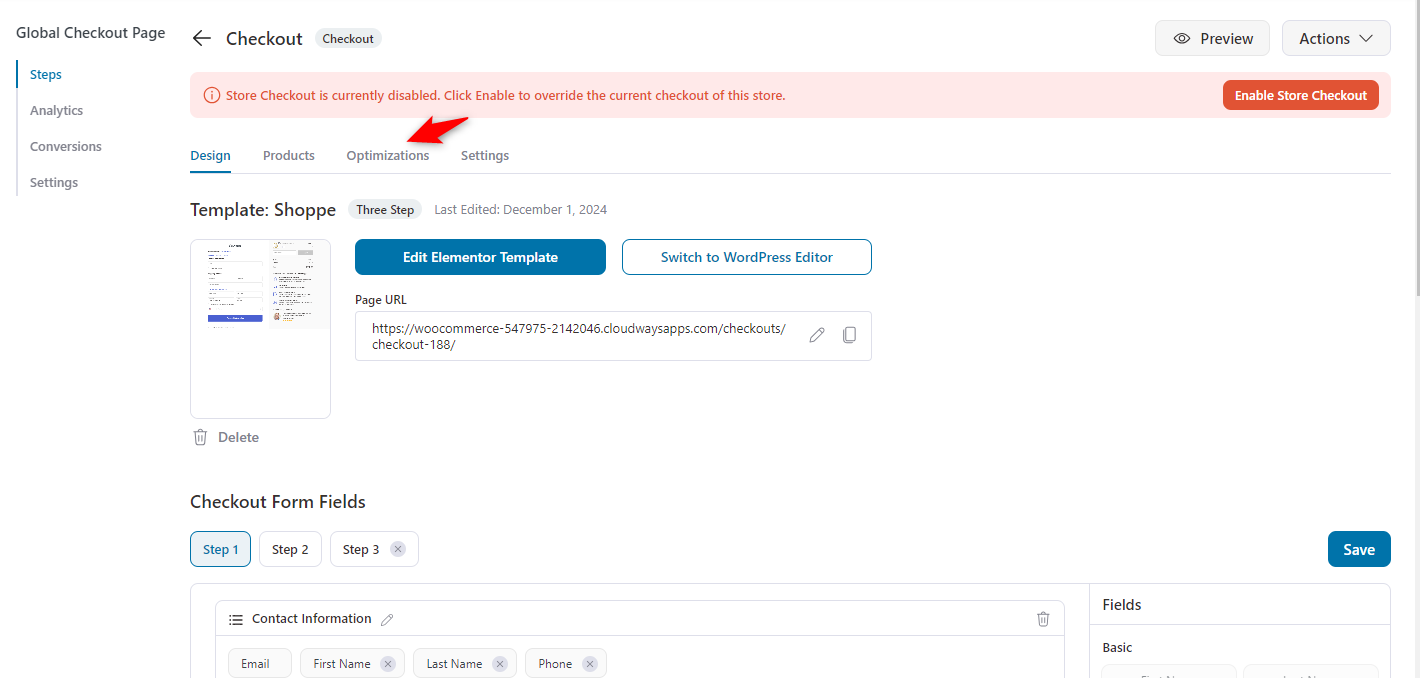
Step 3: Checkout page optimization
Now, tap on the “Optimization” from the menu.
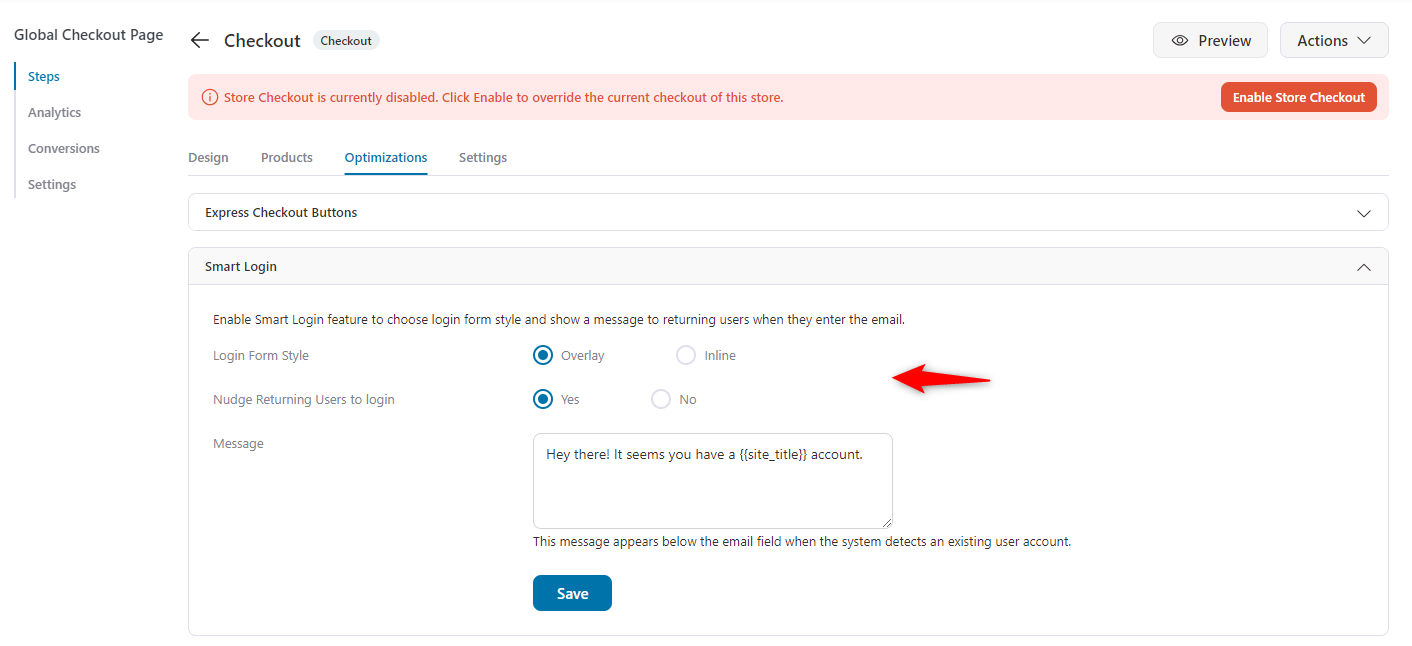
Select the option in the screenshot below under the “Smart Login” section.
- Login form style: You can choose between two styles for the login form:
- Overlay: The login form appears in a pop-up overlay on the page.
- Inline: The login form appears directly within the page content.
- Nudge returning users to login: This option controls whether to prompt returning users to log in. The settings allow you to show a message if a user’s email is already associated with an account.
- A custom message can be displayed to returning users when the system detects an existing account linked to their email. For example, it might say: "Hey there! It seems you have an account with us."
Step 4: Configure settings on WooCommerce
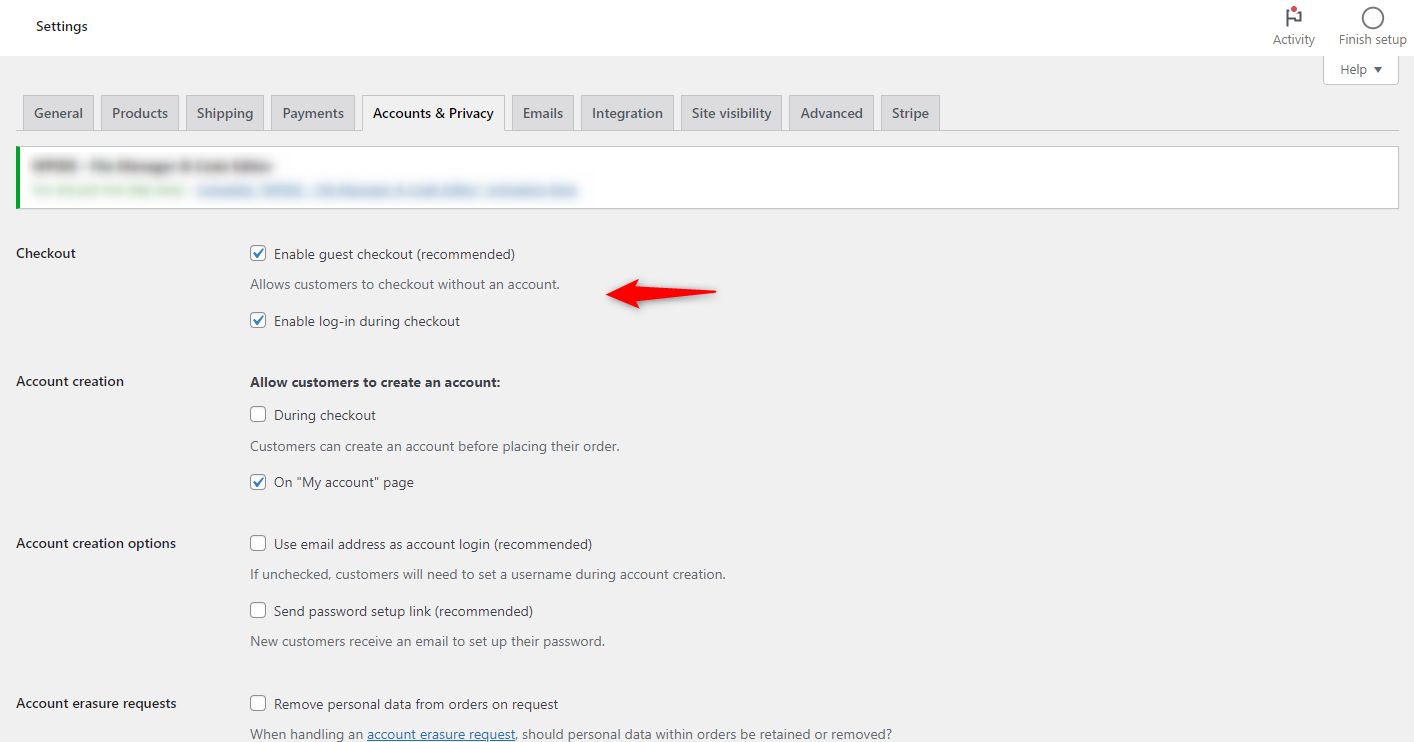
Return to the WooCommerce>Settings>Accounts & Privacy page and enable the guest checkout option.
If it’s disabled, the checkout page (created by FunnelKit) will not appear.
Step 5: Enable the store checkout
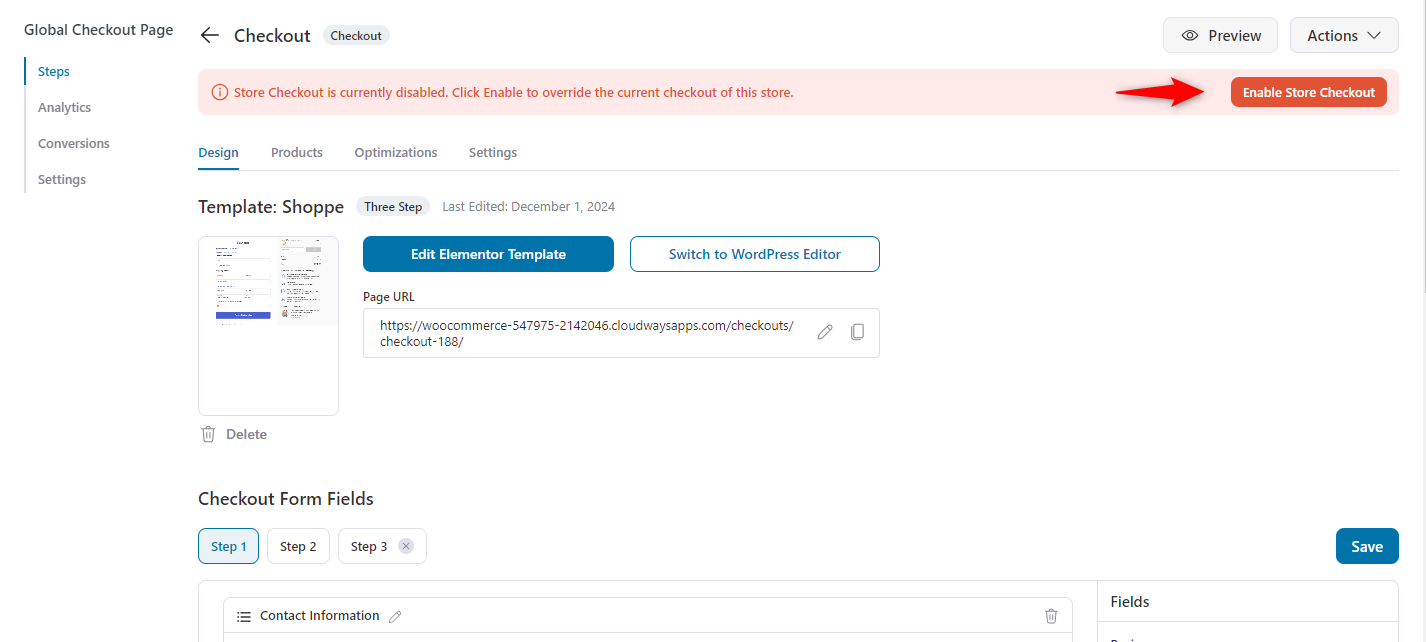
Once you’re done, the next step is to enable the store checkout from here.
Step 6: Test the workflow
It’s time to test the checkout page to see if it’s working.
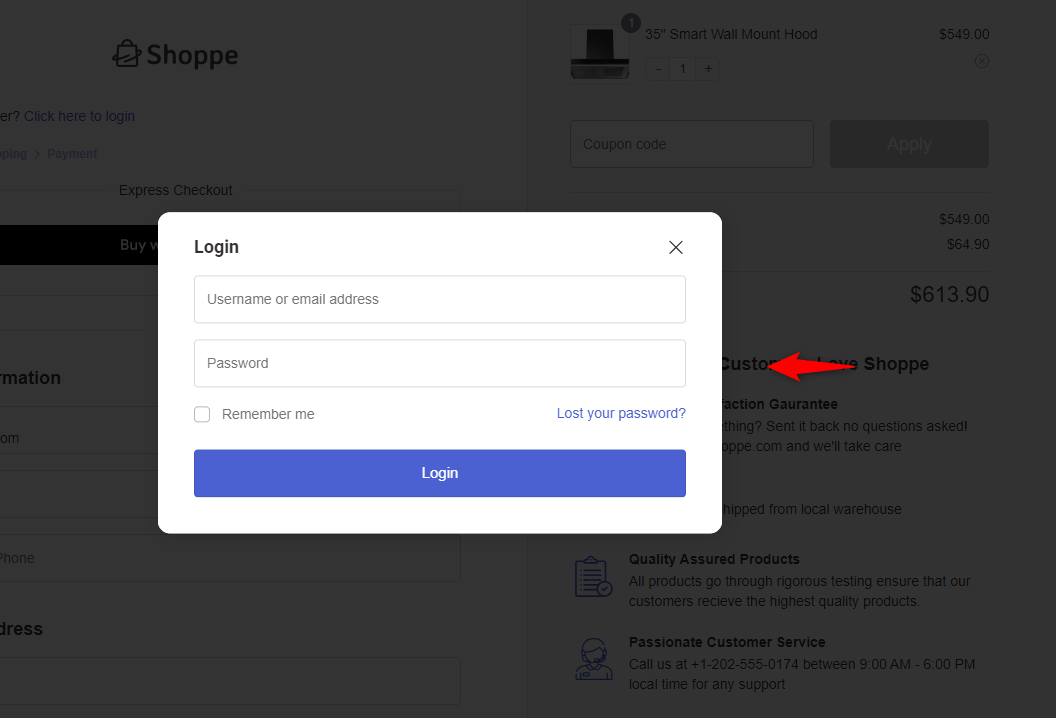
This is the checkout page. A nudge message tells returning users to log in, and a button to log in is at the top of the page.
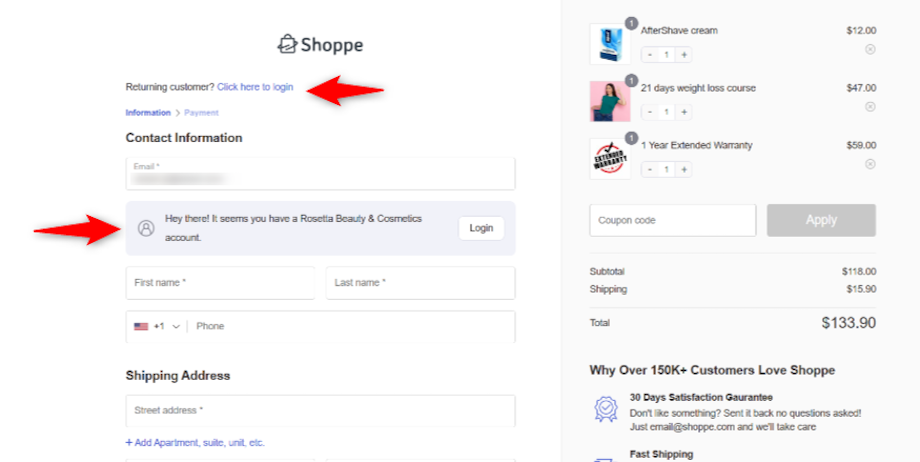
If you click the button, it will provide an overlaid login window for logging.
WooCommerce Login Customization Tips for a Better User Experience
Customizing the login page for your WooCommerce store can significantly improve the overall user experience.
A seamless login process encourages more users to complete their purchases without frustration.
Here are some simple and practical tips to help you enhance your customers' login experience.
- Make login seamless
Make it as easy as possible for customers to log in. Offer options like social media logins using plugins such as FunnelKit Funnel Builder.
This way, users don’t have to remember another password and can log in quickly without leaving the page.
- Consider the checkout page design
The login page's design should match the overall look of your checkout page.
A clean and simple design will make the process more intuitive. Avoid clutter and ensure the login form is easy to find and use.
- Smartly handle the error messages and redirects
When a customer enters incorrect login details, provide a clear, helpful message. Avoid technical jargon. Instead, say something like, “Oops! That password doesn’t match. Try again or reset your password.”
Also, after login, ensure the customer is redirected to the checkout page, not the homepage.
- Using modal popups
Consider using modal popups instead of redirecting customers to a separate login page.
These popups allow customers to log in without leaving the checkout process, keeping them focused on completing their purchases.
- Test user experience
Before making any changes live, test the login process. Try logging in as a new customer, a returning customer, and a guest.
Ensure the process is smooth and hassle-free for all users. Look for any friction points where users might drop off and fix them.
- Check mobile responsiveness
Many customers shop on mobile devices. Ensure the login page and the checkout process are fully responsive on all screen sizes.
The forms should be easy to fill out, and the buttons should be large enough to tap without frustration.
- Monitor analytics
Use analytics tools to track how users interact with the login page. Look at bounce rates and where users are abandoning the process.
If many users drop off after trying to log in, this could be a sign that the login process needs improvement.
These simple, practical steps will help you create a smoother, more efficient login process. Making the login experience as easy and user-friendly as possible can increase conversions and improve overall customer satisfaction.
Possible Challenges and How to Overcome Them
Store owners might face challenges implementing the "WooCommerce force login before checkout" strategy.
Here are the most common ones and how to overcome them:
1. Cart Abandonment
Some users may leave their carts behind if they have to log in first. They might prefer to check out as guests.
How to overcome:
- Offer social logins: Add social login options like Google or Facebook. This makes logging in faster and easier.
- Show the benefits of logging in: Explain the advantages, such as faster checkout and order tracking.
- Guest checkout option: Allow users to checkout as guests. Make sure the login isn’t the only way to complete a purchase.
2. User Frustration
Some users may get frustrated with a complicated login process or if they forget their login details.
How to overcome:
- Keep the login simple: Make the login form clear and easy. Only ask for the basics.
- Clear error messages: If a user enters incorrect information, show a helpful error message.
- Password recovery: Make it easy for users to reset their passwords if they forget them.
By solving these challenges, you can improve the user experience and keep your checkout process smooth.
Wrapping Up: Improving Your Store’s Checkout Experience
Forcing customers to log in before checkout can transform your online store’s performance.
It boosts average order value (AOV) and provides valuable insights into customers buying behavior.
A user-friendly and efficient login process can reduce cart abandonment and encourage more customers to complete their purchases.
To improve your checkout experience, consider using tools like FunnelKit Funnel Builder. It offers powerful features to optimize your checkout pages, allowing you to create seamless sales funnels and improve conversions.
With FunnelKit, customizing your checkout process becomes simple, enabling you to offer your customers a smoother, more enjoyable shopping journey.
Why wait? Download FunnelKit Funnel Builder today and create a checkout experience that drives results!
Editorial Team
January 20, 2026Ever clicked the checkout button and suddenly felt unsure? Did I add the right items? Am I being overcharged? The same uncertainty is costing you sales. Shoppers expect full transparency...
Editorial Team
January 19, 2026A customer is ready to buy. They hit your checkout page, can't pick a delivery date, and leave. Cart abandonment is a major ecommerce challenge, with the average rate sitting...
Editorial Team
January 13, 2026Increasing your average order value (AOV) is one of the fastest ways to grow your WooCommerce store’s revenue without spending more on ads or chasing new traffic. That’s exactly where...


