


Sending WooCommerce orders to Google Sheets automatically copies your store's order data into a live spreadsheet.
Every time a customer checks out, the order details are added to a new row. There are no manual CSV exports or copy-and-paste.
The problem is that WooCommerce has no built-in way to do this. The default orders dashboard keeps your data locked inside WordPress. That slows reporting, fulfillment, and team collaboration.
There are five reliable ways to send WooCommerce orders to Google Sheets: a dedicated connector plugin, an automation plugin like FunnelKit, Zapier, Make, or a free Google Apps Script.
The right one depends on whether you need real-time sync, two-way editing, or just a scheduled export.
In this guide, we'll walk you through all five methods and show you real use cases (refunds, failed payments, low stock, order notes) so you sync exactly the order data your team needs.
Table of Contents
- 1 Quick Comparison: Which Method Should You Use?
- 2 Method 1: Automate With FunnelKit Automations
- 3 Method 2: Google Apps Script + WooCommerce REST API
- 4 Method 3: Dedicated Google Sheets Connector Plugin
- 5 Method 4: Zapier, Make, n8n & Pabbly (No Code)
- 6 6 Effective Use Cases of WooCommerce Orders to Google Sheet Integration
- 7 Troubleshooting: Orders Not Syncing, Duplicates and Auth Errors
- 8 Frequently Asked Questions (FAQs)
- 9 Start Sending WooCommerce Orders to Google Sheets Automatically!
Quick Comparison: Which Method Should You Use?
| Method | Cost | Real-time | Two-way sync | Multi-product rows | Best for |
|---|---|---|---|---|---|
| Apps Script (free) | Free | Scheduled | No | Manual | Developers, zero budget |
| Connector plugin (GSheetConnector, WPSyncSheets, FlexOrder) | Freemium | Yes | Yes | Yes | Pure order/data sync, editing in Sheets |
| FunnelKit Automations | Paid | Yes | One-way push | Yes (per-product event) | Stores wanting sync plus marketing automation |
| Zapier | Paid | Yes | No | Limited | Quick no-code, low volume |
| Make / n8n | Paid / Freemium | Yes | No | Yes (iterator) | Complex multi-product flows |
Use the free Apps Script method if you want a free method and are comfortable with code.
If you need to edit orders in Sheets and push changes back to WooCommerce, use a connector plugin, as only connectors support true two-way sync.
Want order sync alongside abandoned-cart emails, SMS, and broader automation? Use FunnelKit Automations.
Use Zapier if you want fast no-code with a few hundred orders a month.
If you have high-volume or multi-product orders that require one row per line item, use Make (or n8n) with an iterator.
Method 1: Automate With FunnelKit Automations
FunnelKit Automations is the right pick when you want order sync to live inside a broader automation engine.
It lets you fire your abandoned-cart sequences, post-purchase SMS, and win-back campaigns, and it also pushes orders to Sheets.
It's a one-way push (WooCommerce ⇨ Sheets) built on event triggers, enabling the advanced use cases below.
Over 20,000+ stores are already using it to automate their business tasks and engage with their customers more effectively.
Follow the steps below to connect Google Sheets with WooCommerce.
Step 1: Enable the Google Sheet connector
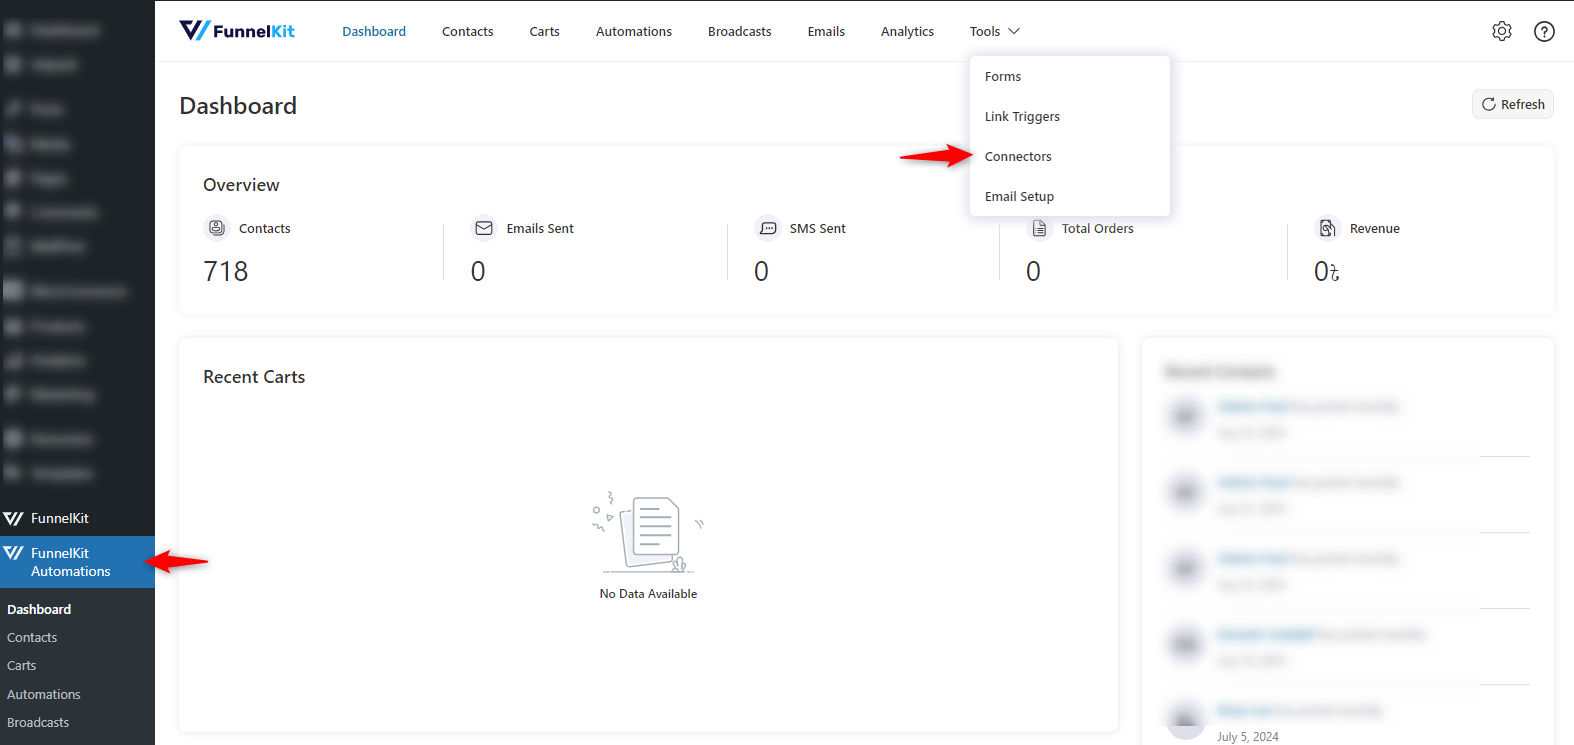
First, navigate to the FunnelKit Automations dashboard. Tap on the tool and find the connectors.
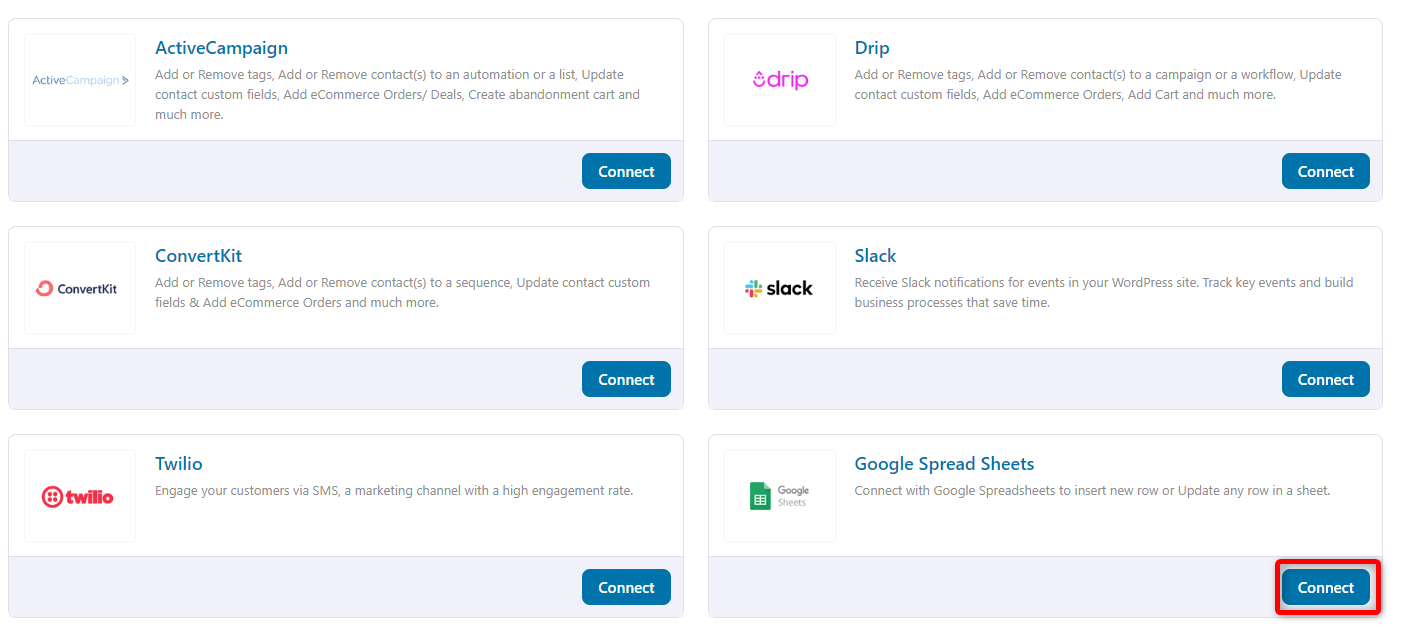
Slightly scroll down, and you’ll find Google Spreadsheets.
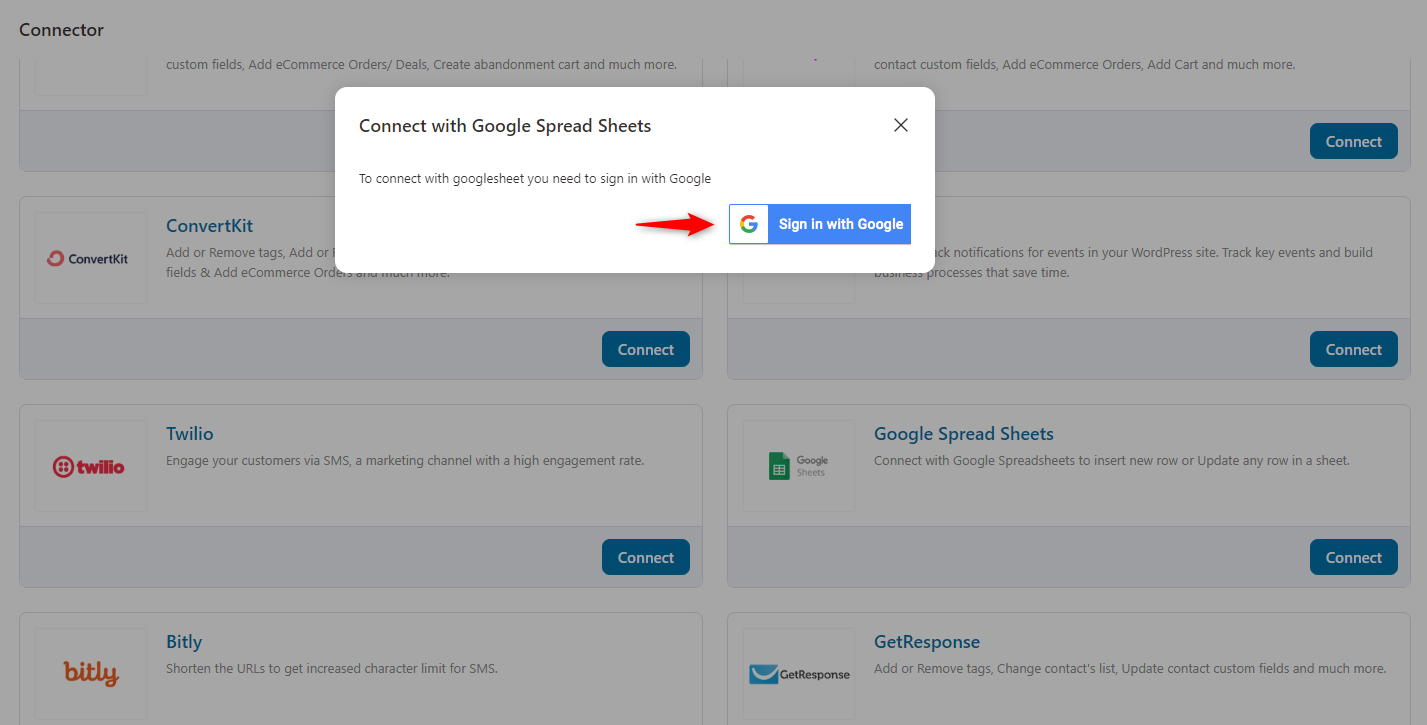
You’ll be asked to sign in with your Google account.
Step 2: Authenticate the connection
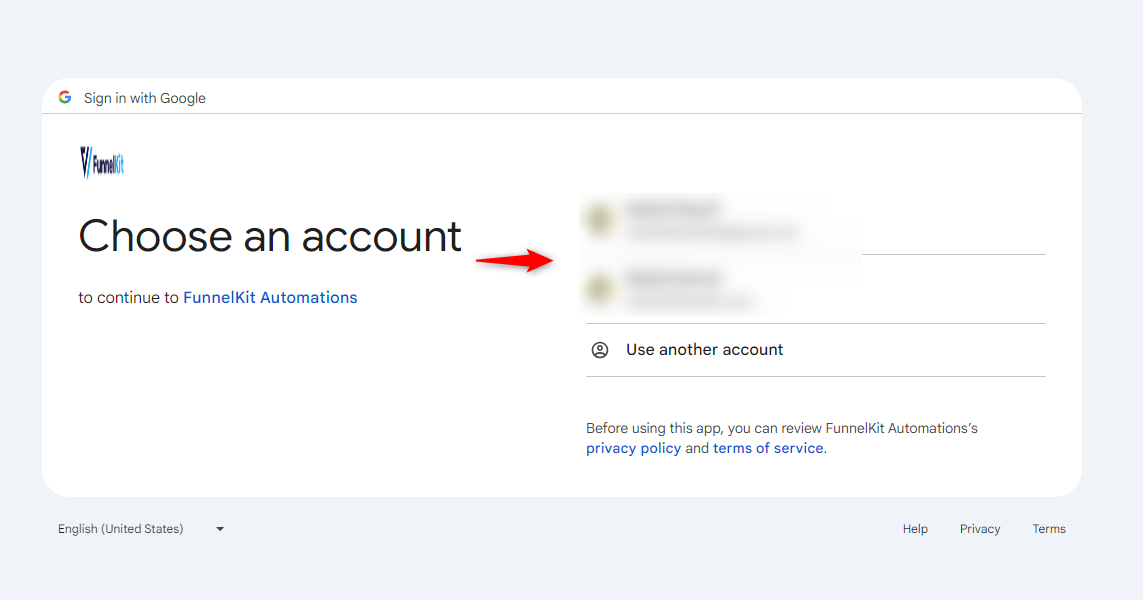
Click on the 'Sign in with Google' button to continue. Choose your preferred Google Account to complete the connection.
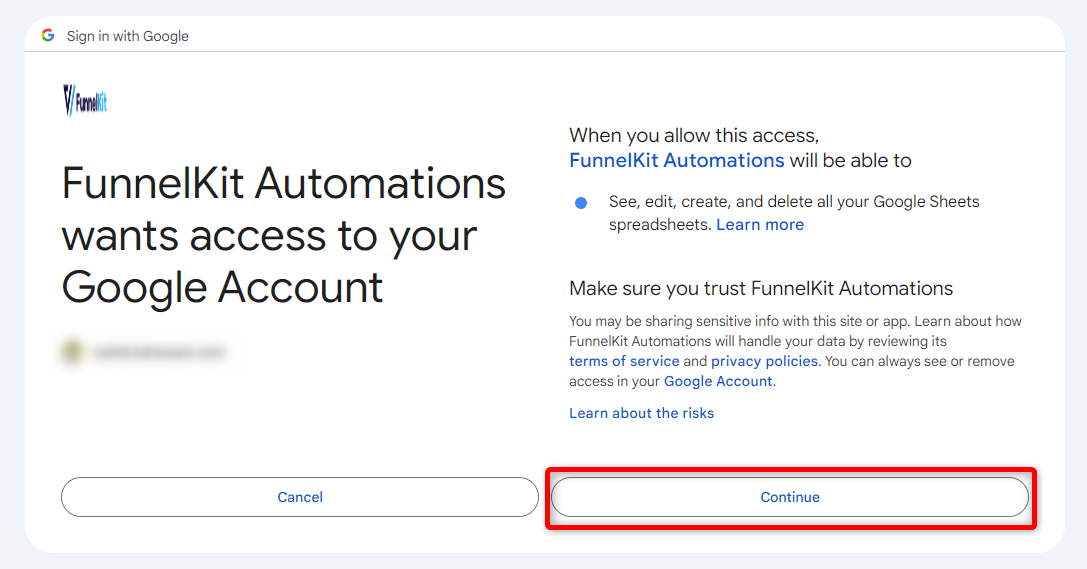
On the next screen, Google will ask for your permission to connect FunnelKit Automations Connector with your account.
Hit the 'Continue' button.
That’s all. It will automatically redirect you to the connector page. You will notice the connection was successful.
Step 3: Create the automation with the order-completed event
Go to Automations and click on the 'Create Automation' button.
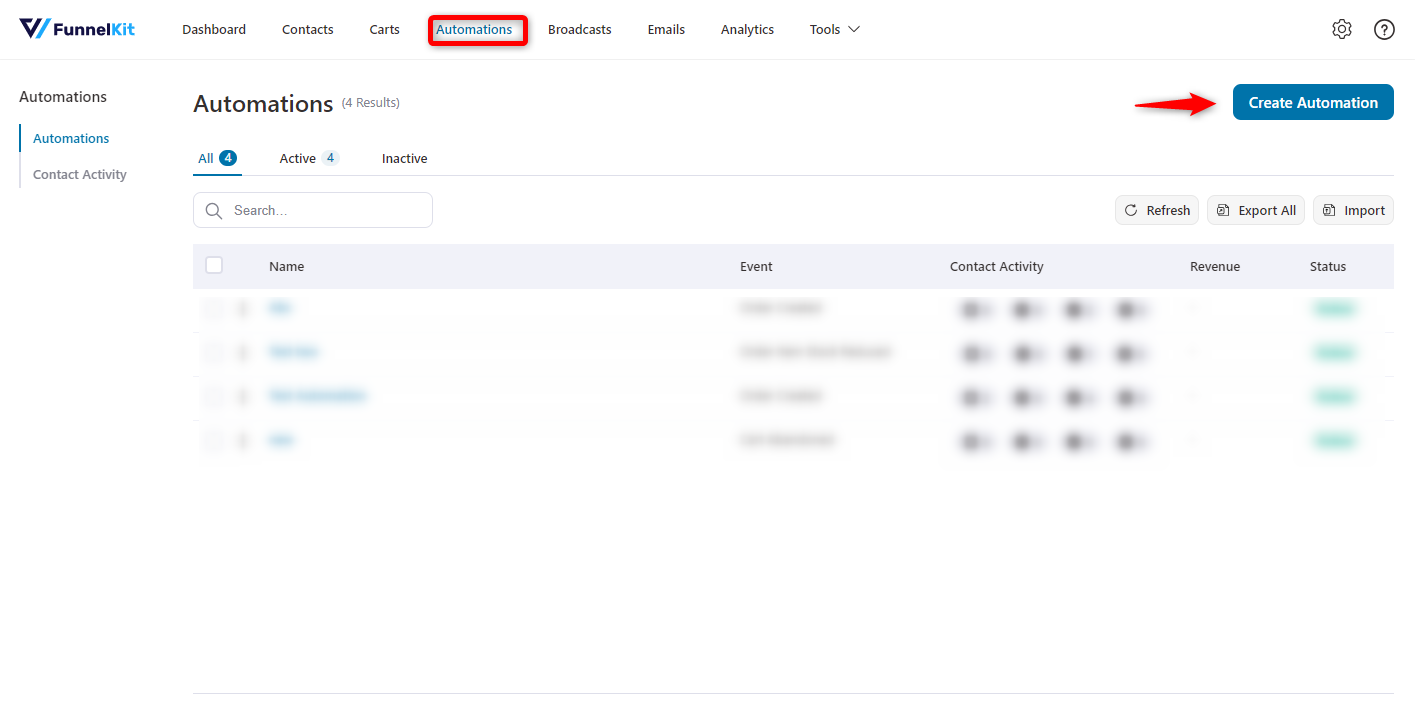
Then you'll see several automation templates to get started. For now, we'll go with 'Start from Scratch'.
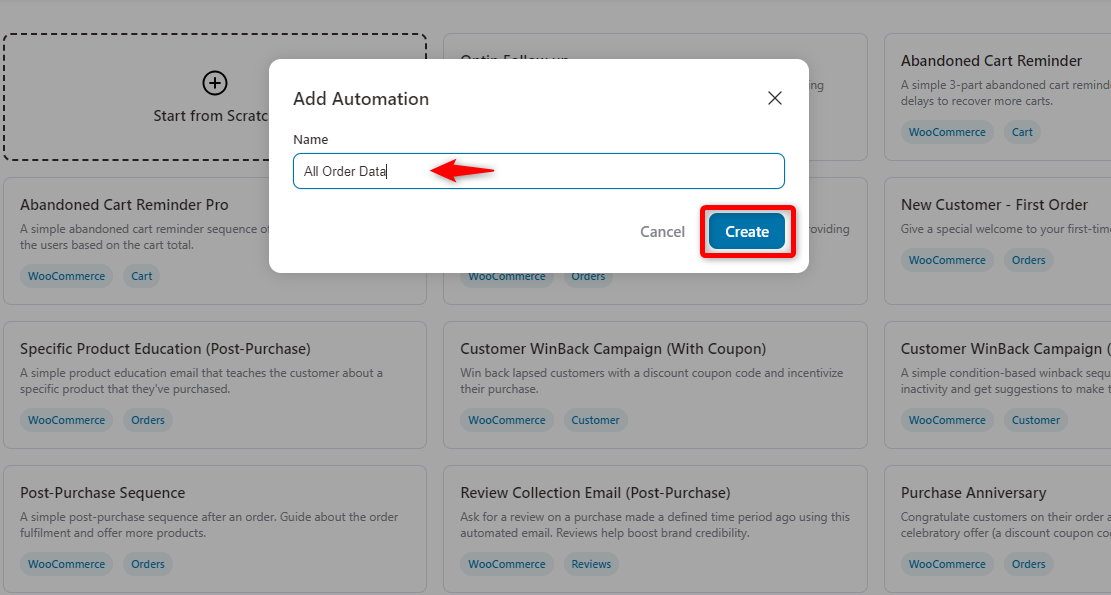
Enter your automation name here and hit the 'Create' button.
Next, select your event. Under WooCommerce, find the 'Order Created' event.
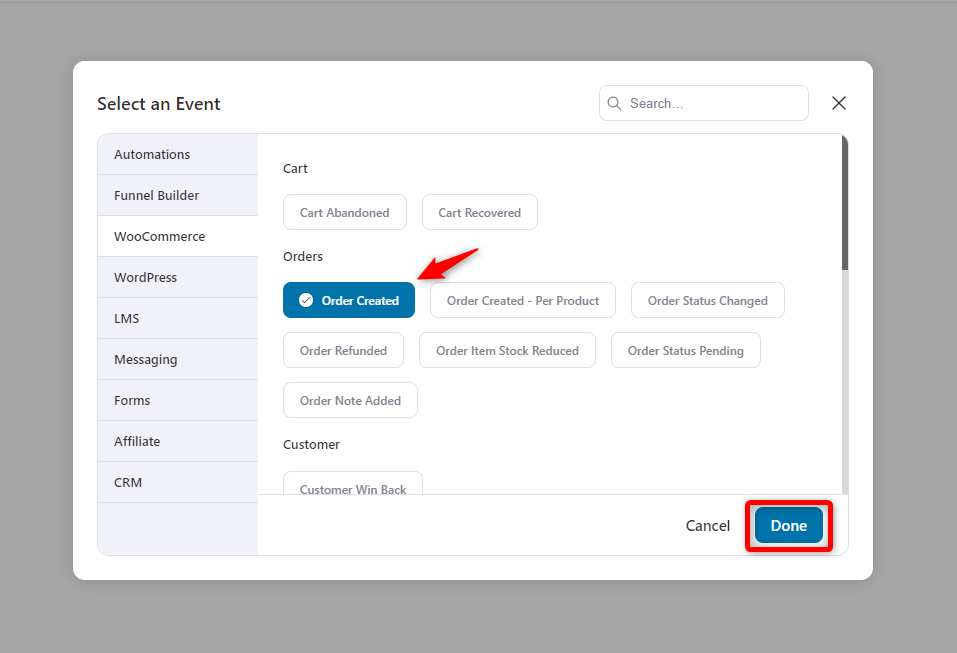
After a user creates an order, the system stores data depending on the order status (completed, draft, on hold, processing).
You can use this for any product in your store, or for a specific product. Set it up to run once or multiple times, and it'll work with your current active contacts.
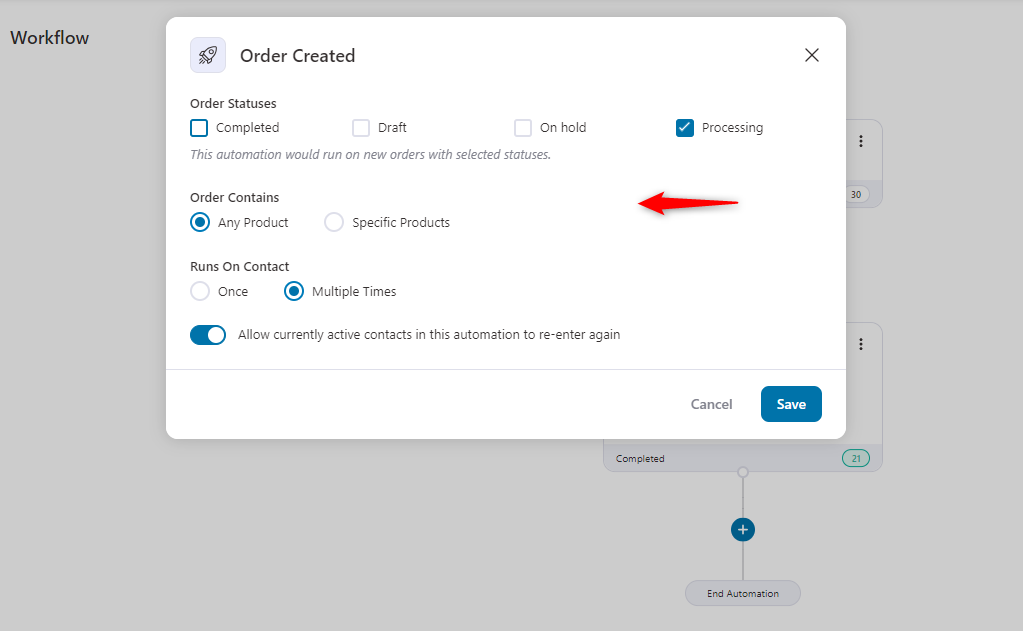
Once you're done, click on the save button.
Step 4: Specify the send data action
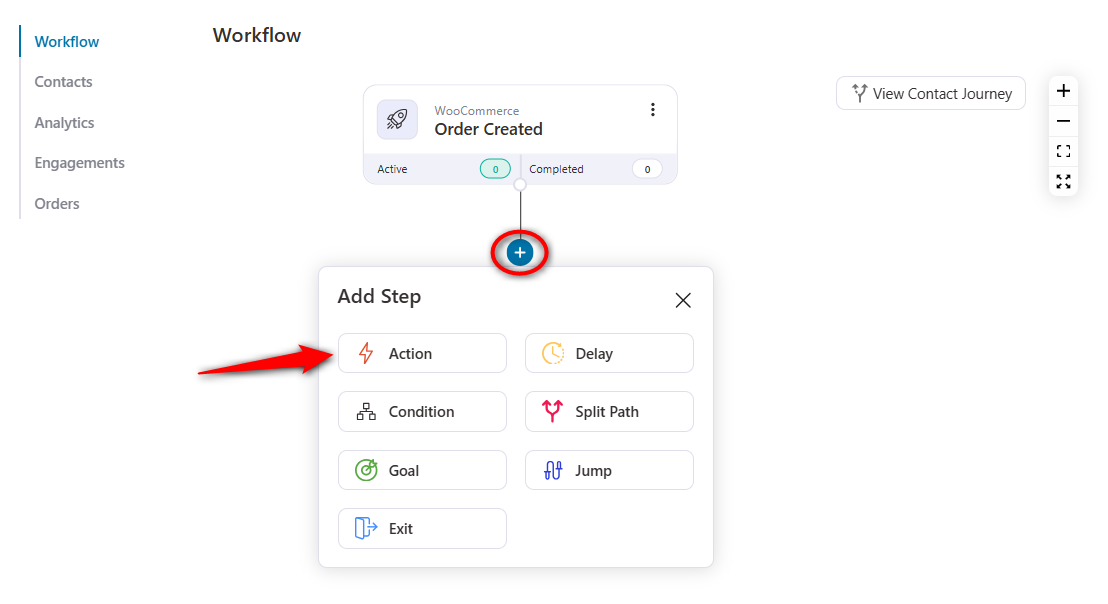
Click on the (+) icon and add 'Action'.
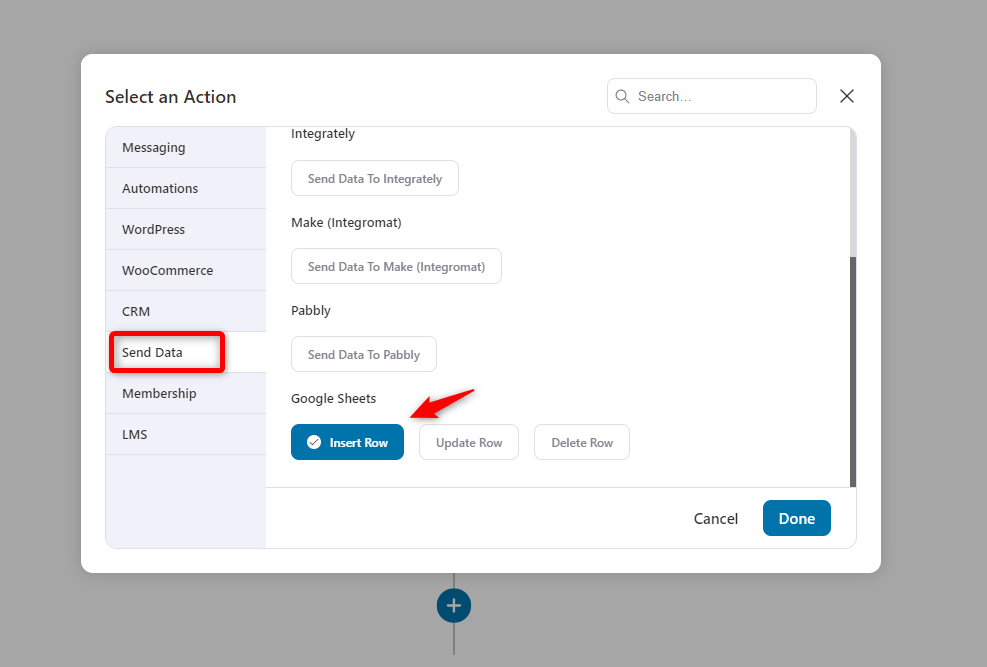
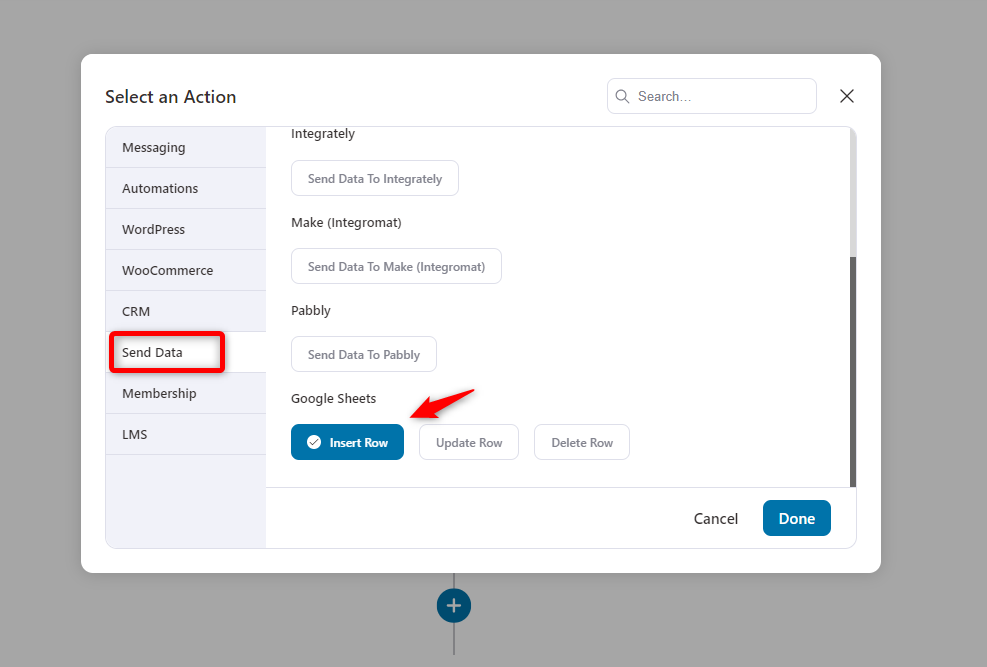
Under the Send Data section, scroll down and choose the 'Insert Row' option.
After that, you need to provide your Google Spreadsheet ID.
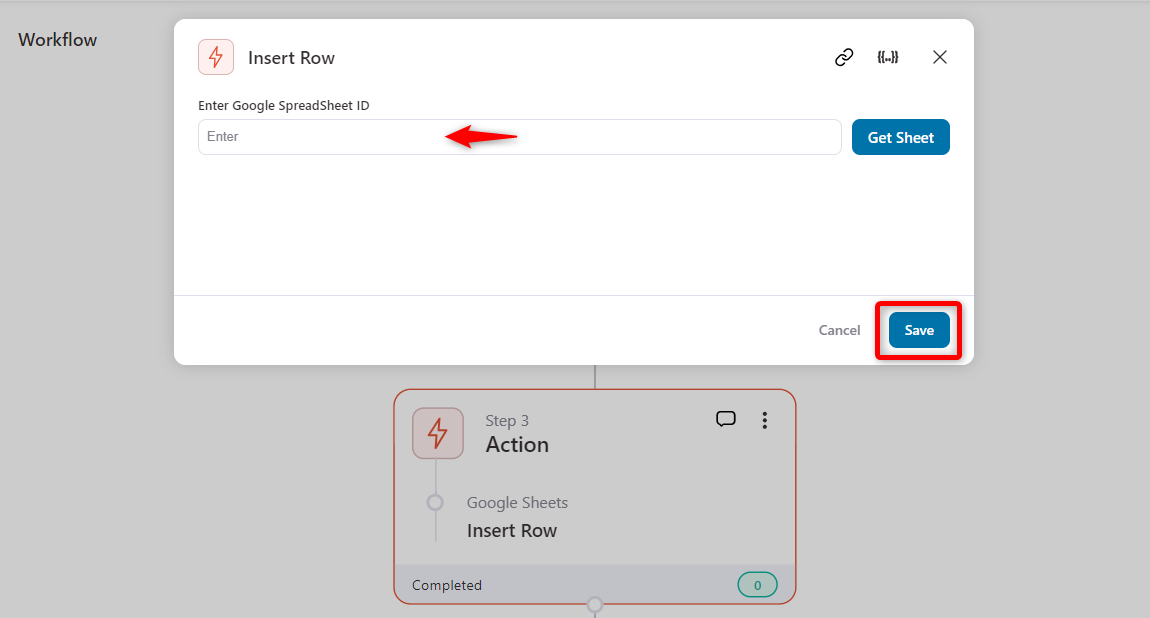
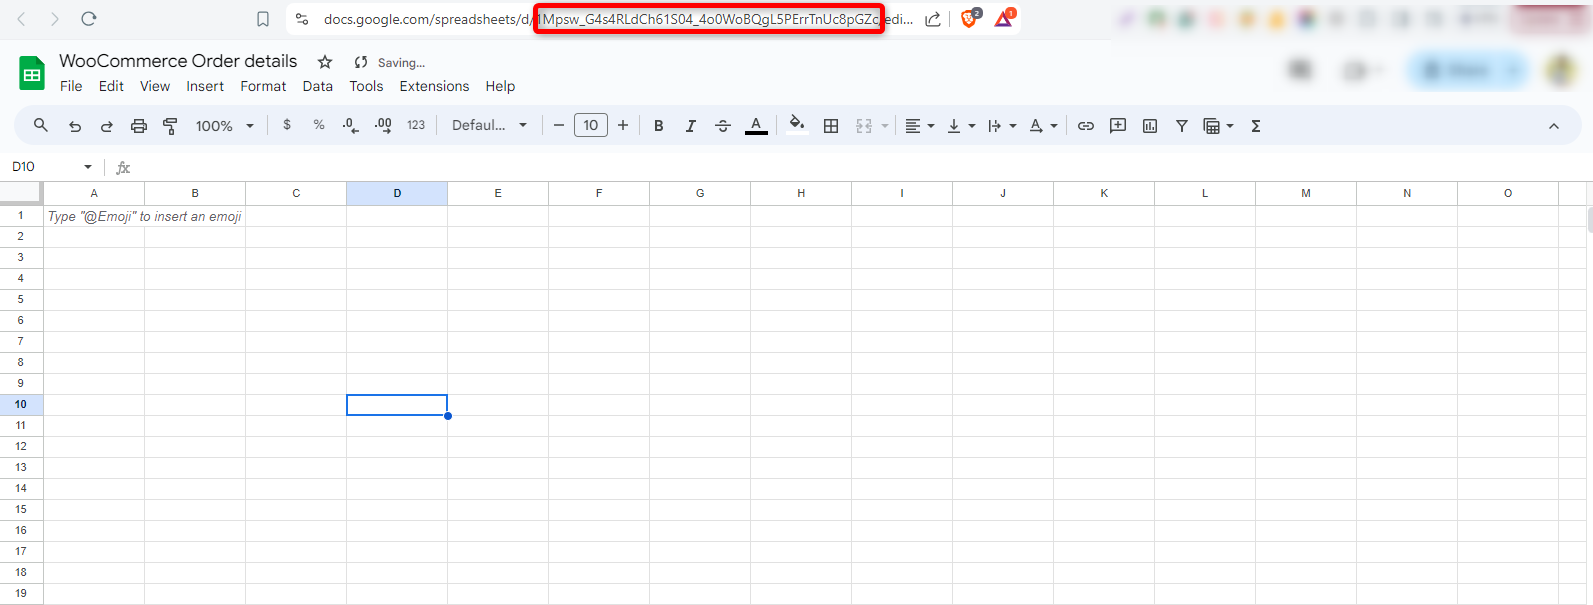
Create a Google Sheet and then copy the ID of the sheet.
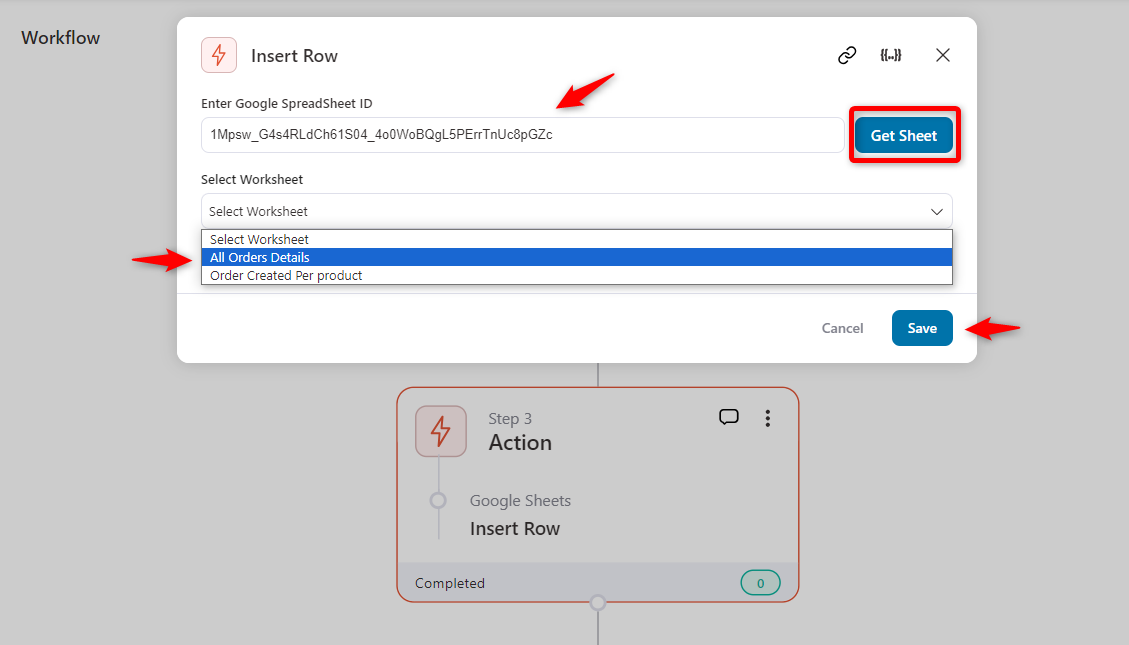
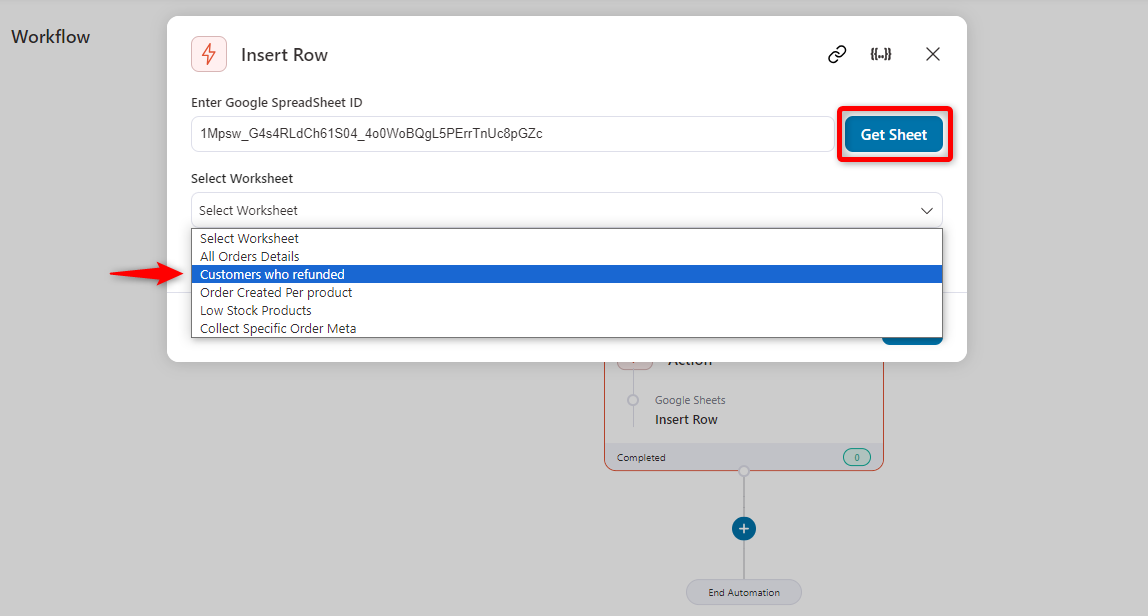
Paste the ID here, then click the 'Get Sheet' button.
You’ll get a list of your currently active tabs on your Google Sheet here. Just choose the preferred one and hit the save button.
Here, we’re choosing “All Order Details” as we’re looking to sync all WooCommerce orders to Google Sheets.
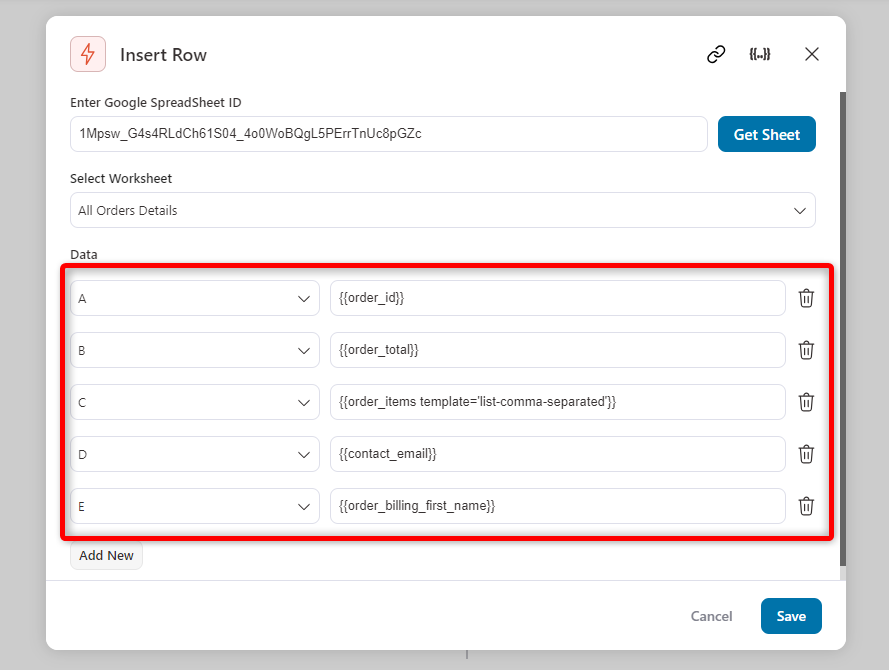
Insert the order ID, order total, products purchased, email, and first name using merge tags.
Well done! This is how you can send automated WooCommerce orders to Google Sheets.
Method 2: Google Apps Script + WooCommerce REST API
This method uses WooCommerce's built-in REST API to push order data into a sheet via a small script without a paid plugin or a third-party platform.
You generate WooCommerce REST API keys, then run a Google Apps Script (on a time-based trigger, for example, every 15 minutes) that fetches recent orders and appends them as rows.
Follow these steps:
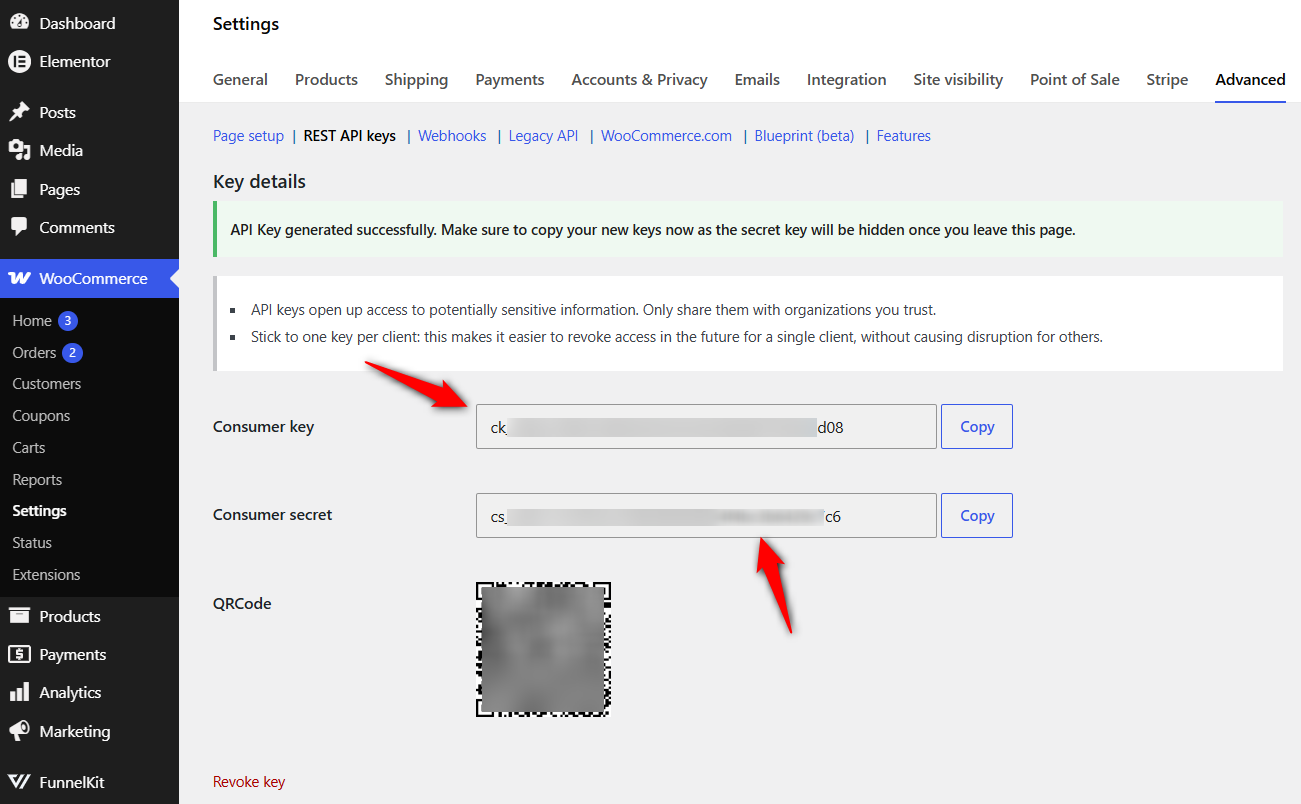
Step 1: Copy the consumer key and secret
In WooCommerce, go to Settings ⇨ Advanced ⇨ REST API and click on 'Generate API Key'.
Set permissions to Read and copy the Consumer Key and Consumer Secret.
Step 2: Paste the script with your keys into the Google Sheet
Create a new Google Sheet, then open Extensions ⇨ Apps Script.
Paste a script that calls https://yourstore.com/wp-json/wc/v3/orders with your keys, parses the JSON, and appends each order’s fields (ID, date, customer, total, status, line items) to the sheet.
This is the script:
function syncWooOrders() {
  const url = 'https://yourstore.com/wp-json/wc/v3/orders?after=' +
    getLastSync() + '&per_page=50';
  const auth = 'Basic ' + Utilities.base64Encode('CONSUMER_KEY:CONSUMER_SECRET');
  const res = UrlFetchApp.fetch(url, { headers: { Authorization: auth } });
  const orders = JSON.parse(res.getContentText());
  const sheet = SpreadsheetApp.getActiveSheet();
  orders.forEach(o => {
    sheet.appendRow([o.id, o.date_created, o.billing.first_name + ' ' +
      o.billing.last_name, o.total, o.status,
      o.line_items.map(i => i.name + ' x' + i.quantity).join(', ')]);
  });
  if (orders.length) setLastSync(orders[orders.length - 1].date_created);
}
Set a time-driven trigger (Triggers → Add Trigger → time-based) to run the function on your chosen interval.
Store a "last synced order ID" so you only append new orders and avoid duplicates.
Please note that it pushes orders on a schedule (no real-time), has no two-way sync, and requires manual handling for multi-product orders unless you expand the script.
Make sure your store is served over HTTPS so the API can authenticate.
Method 3: Dedicated Google Sheets Connector Plugin
If you want to order data flowing in both directions and edit orders in Sheets, a dedicated connector is the right category for you. The main options are GSheetConnector, WPSyncSheets, and FlexOrder.
These plugins lead with:
- Two-way sync: FlexOrder offers real-time two-way sync, so editing order status or billing/shipping details in Sheets updates in WooCommerce. GSheetConnector advertises bi-directional sync with automatic status-based tabs.
- Status-based tabs: Orders auto-route into separate sheet tabs by status (processing, completed, refunded, etc.).
- Multi-product line items: Each product on its own row, handled natively.
- Order creation from Sheets: WPSyncSheets lets you create a WooCommerce order directly from a Google Sheets row.
Follow these steps.
Step 1: Connect your Google account (OAuth)
Install the connector plugin and activate it on your WordPress website.
Next, connect your Google account (OAuth).
Step 2: Create the target spreadsheet and map order fields
Select or create the target spreadsheet. Map WooCommerce order fields to columns.
Choose sync direction (one-way or two-way) and trigger (real-time on order events or scheduled).
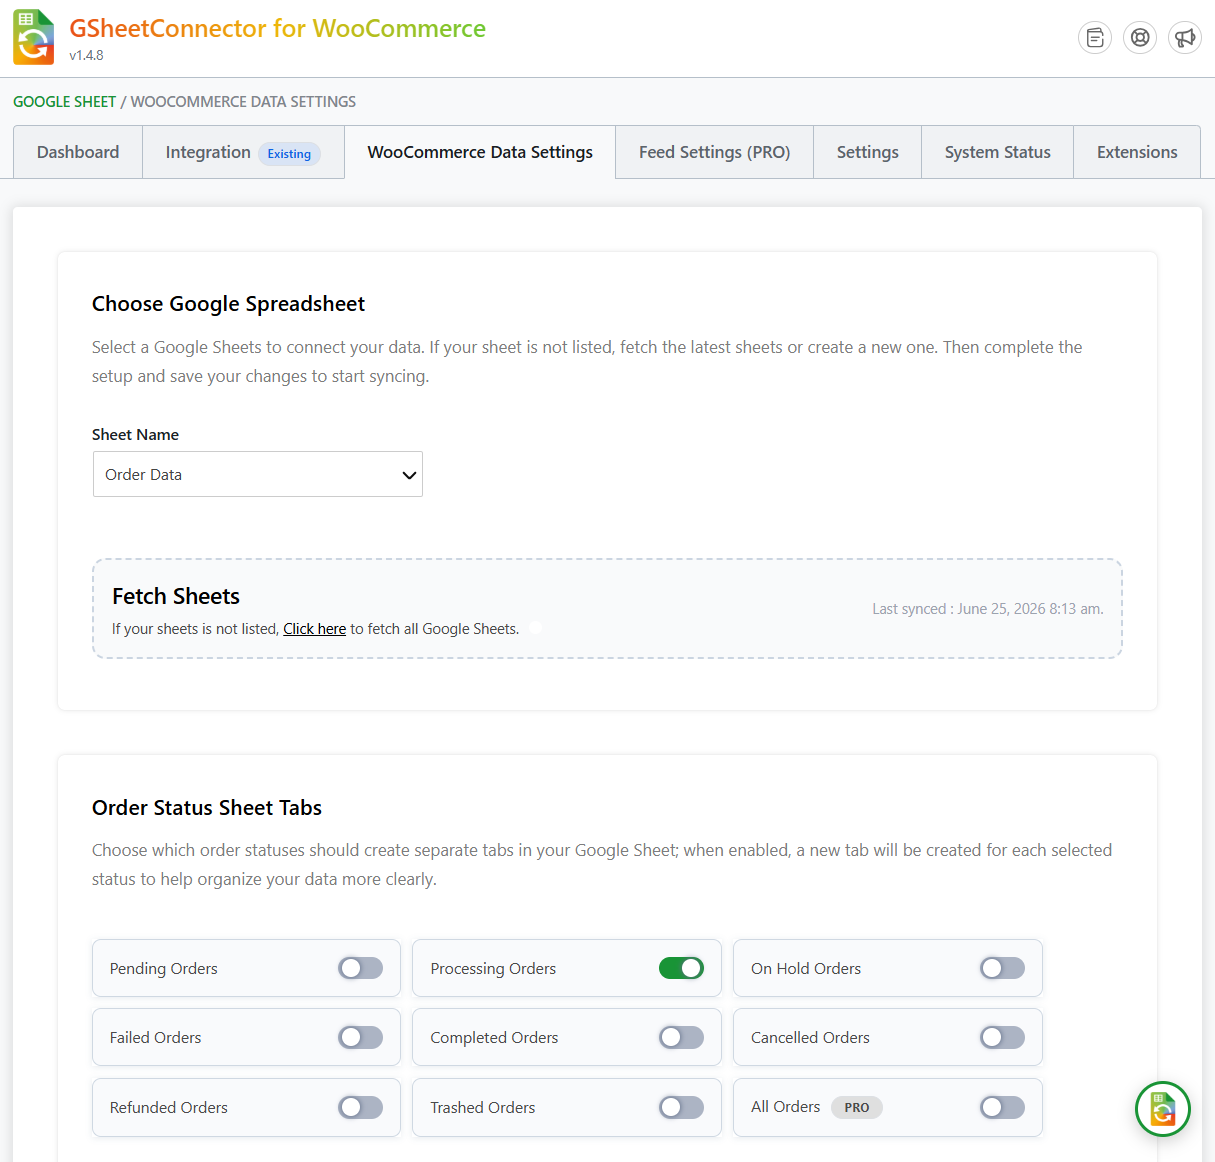
Enable status-based tabs or filters if you only want certain order statuses.
Click on 'Save Settings' once done.
This method is best for stores whose primary need is clean, bidirectional order/data sync and spreadsheet-based order management, without a broader marketing automation layer.
Method 4: Zapier, Make, n8n & Pabbly (No Code)
No-code platforms connect WooCommerce to Google Sheets using a visual builder, with no plugin code required. They differ mainly in their price models and how they handle multi-product orders.
- Zapier: Easiest to set up. Trigger on New Order → action Create Spreadsheet Row. Pricing is task-based, so it gets expensive at high order volume, and multi-product handling is limited.
- Make: more powerful for complex flows. Its iterator splits a multi-product order into a separate row for each line item, which Zapier struggles with. Operations-based pricing is cheaper at volume.
- n8n: Open-source and self-hostable; effectively free if you run your own instance, with the same iterator-style flexibility as Make.
- Pabbly Connect: Flat-rate pricing (not per-task), which makes it attractive for high-volume stores wanting a predictable cost.
Here is the setup (taking Zapier as the example):
- Create a Zap with the WooCommerce New Order trigger.
- Connect your store via the WooCommerce API keys.
- Add the Google Sheets action Create Spreadsheet Row.
- Map order fields to columns and turn the Zap on.
This method works best for teams that want no-code and already live in these platforms.
Choose Make/n8n if orders are multi-product or volume is high; Zapier for simple, low-volume sync; Pabbly for flat-rate predictability.
6 Effective Use Cases of WooCommerce Orders to Google Sheet Integration
It’s time to dive into how the Google Sheets connector can give you all the order info you need from your WooCommerce store in one place.
We’ll walk you through six handy use cases that’ll help you organize and get real-time data right in your Google Spreadsheet.
Let’s begin:
1. Push WooCommerce per-product details to Google Sheets
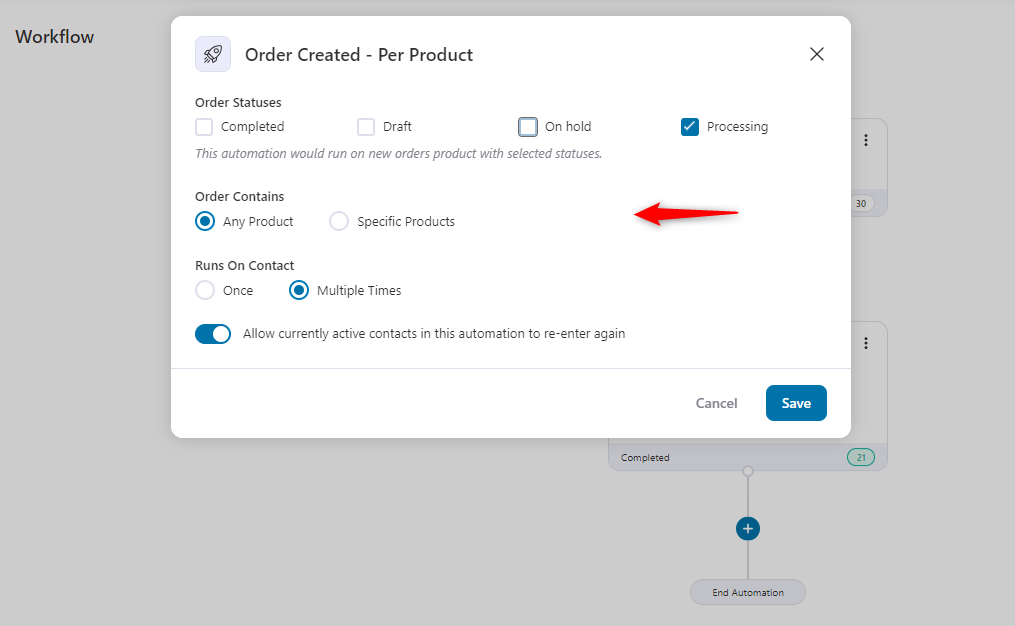
Follow the same instructions for the initial steps. After you land on the workflow page, select the event “Order Created - Per Product”.
Hit the “Done” button.
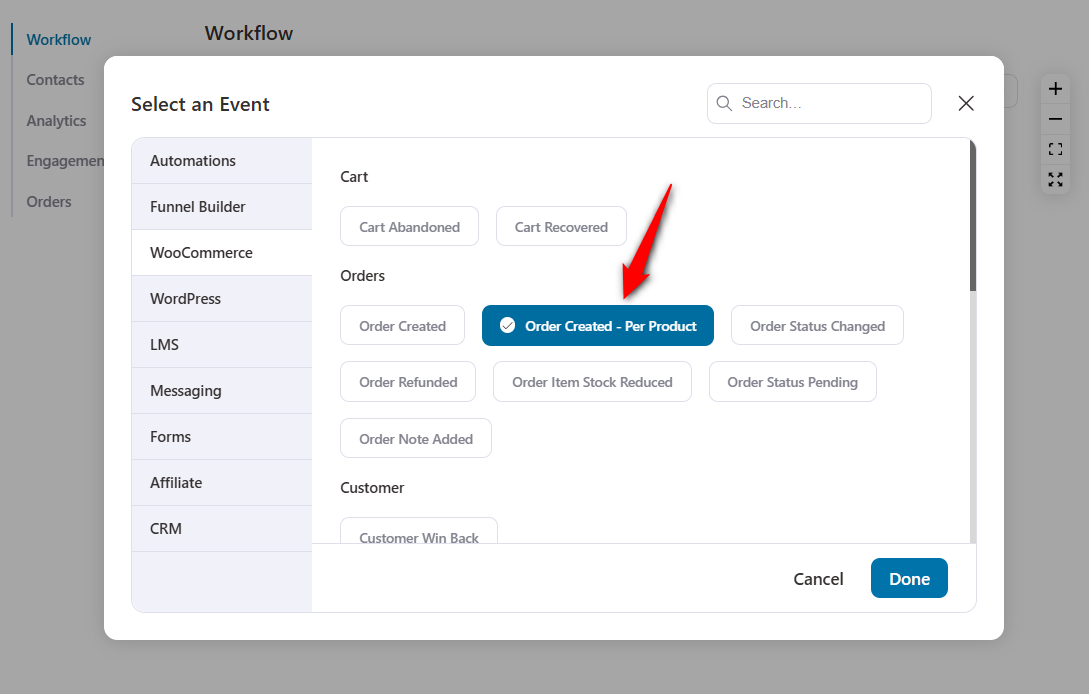
However, this event will run through every product in the order. Then keep the settings as before. Hit 'Save' once you’re done.
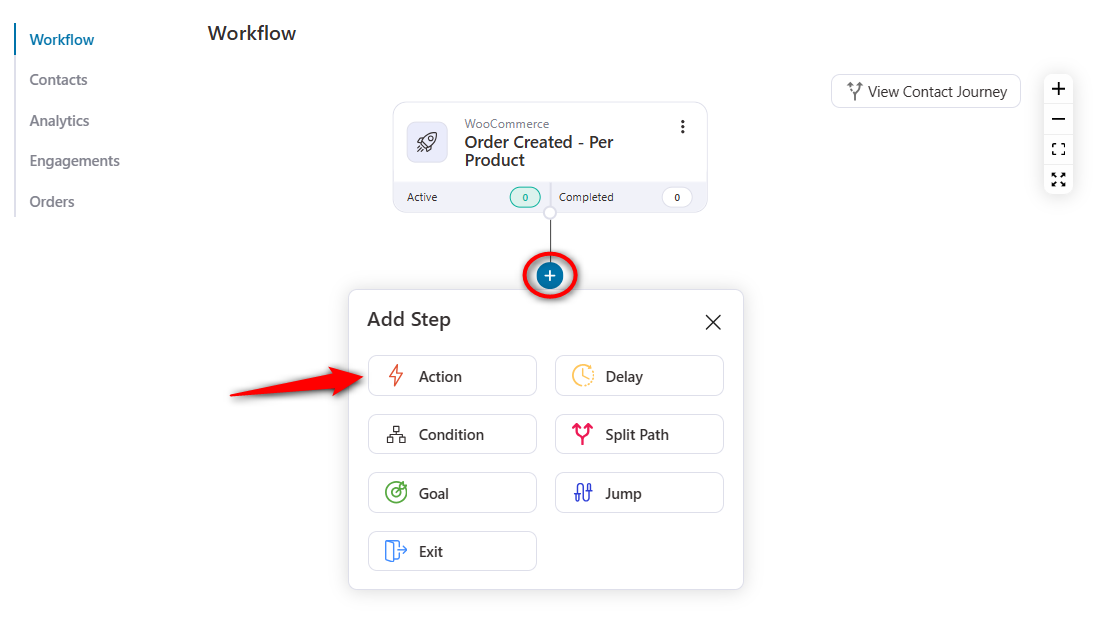
Similarly, click on the (+) icon to set the action. Then, choose the 'Insert Row' option under the Send Data tab.
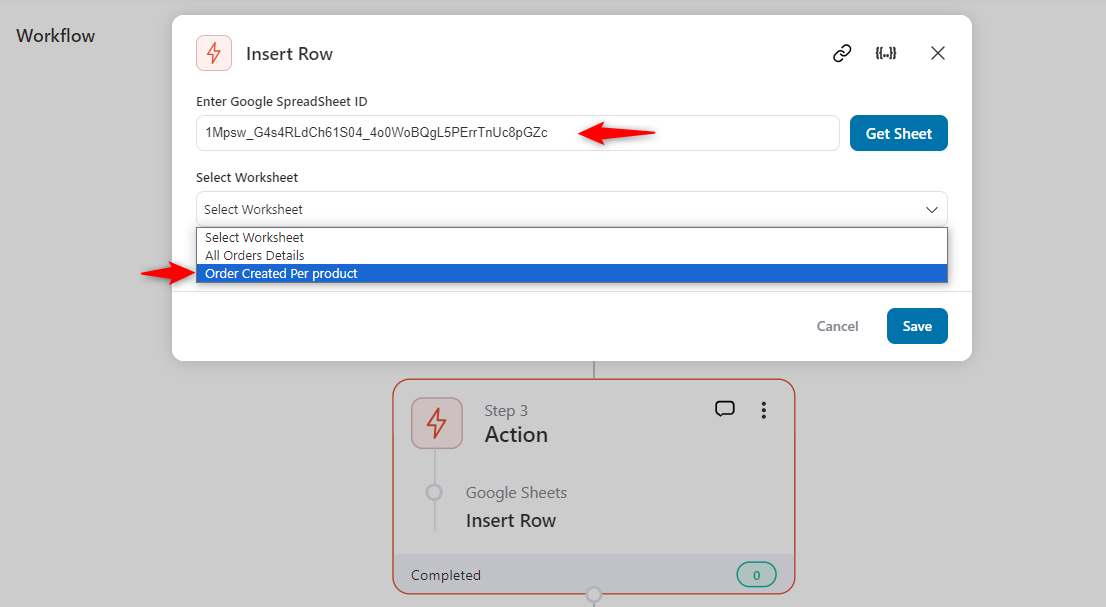
Under the same Google Spreadsheet we created earlier, just paste the ID here. And you’ll see it here.
Now choose the tab if you have a different one.
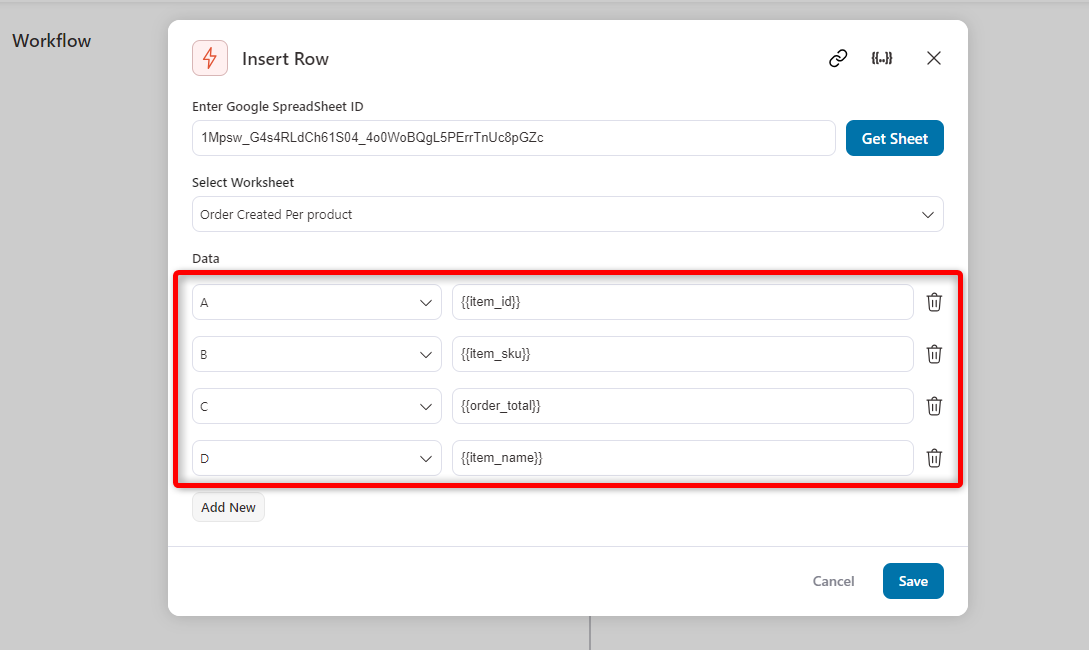
Define the column with the relevant tags. Either follow this flow or enter a different tag to fetch data from your Google Sheets.
Hit 'Save' once everything is done.
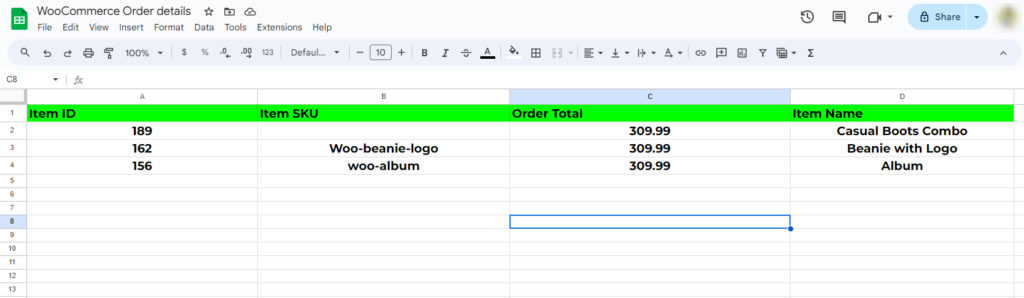
So now, if a user places an order, it will sync all the related information to the Google Sheet.
2. Send low-stock WooCommerce product data to Google Sheets
Sending low-stock product information means automatically moving details about low-inventory products from your WooCommerce store to a Google Sheets spreadsheet.
This process helps you keep track of products that need restocking in a more organized and accessible way.
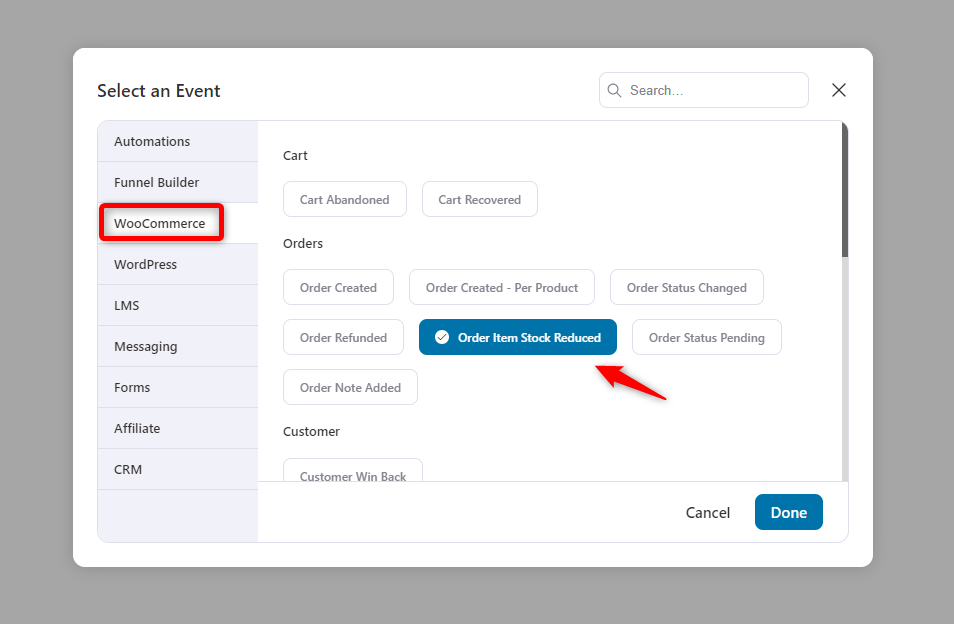
Select the event “Order Item Stock Reduced”.
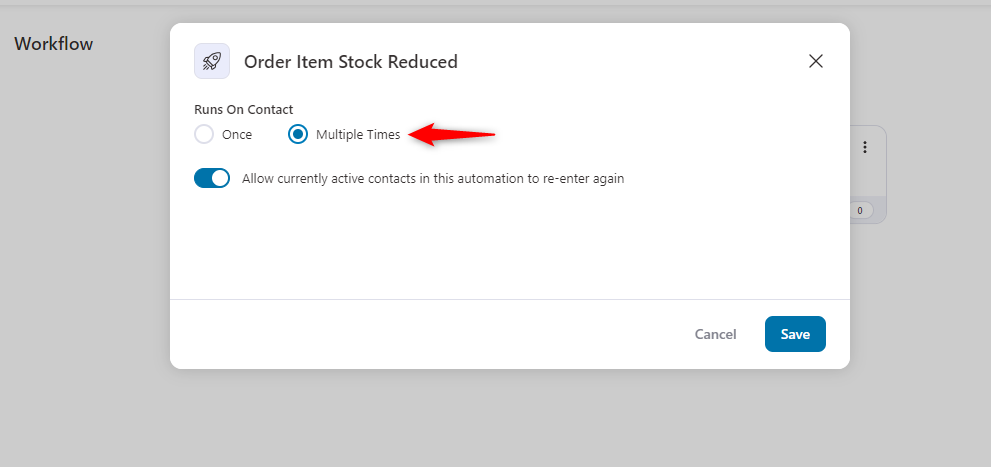
Then customize its settings. Determine that the event running times are multiples. And tick the option to run this event for active contacts.
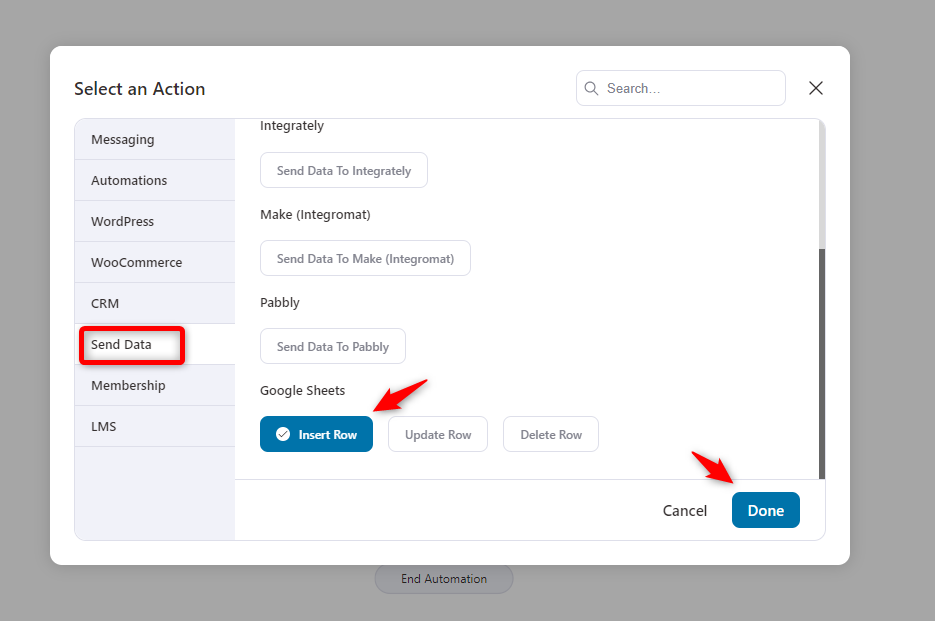
Specify the 'Insert Row' action under the Send Data tab and hit the 'Done' button.
Similarly, paste your Google Sheets ID here and choose your preferred tab.
Then add these rows with the related merge tags from this icon {{.}}. Once you’re done, hit the “Save” button.
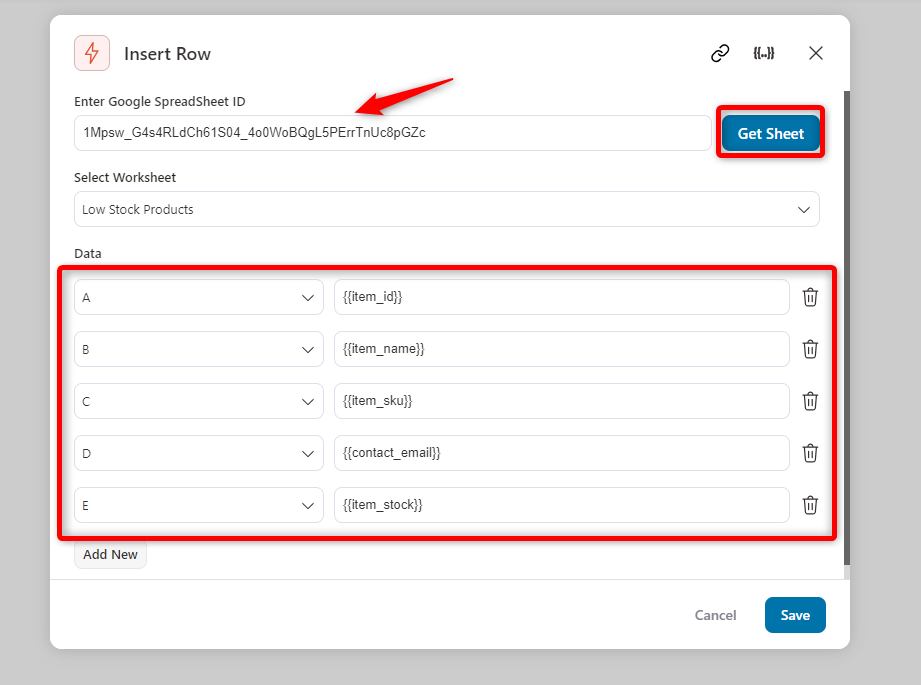
Now, when a customer places an order, Google Sheet will automatically sync data to your preferred tab.
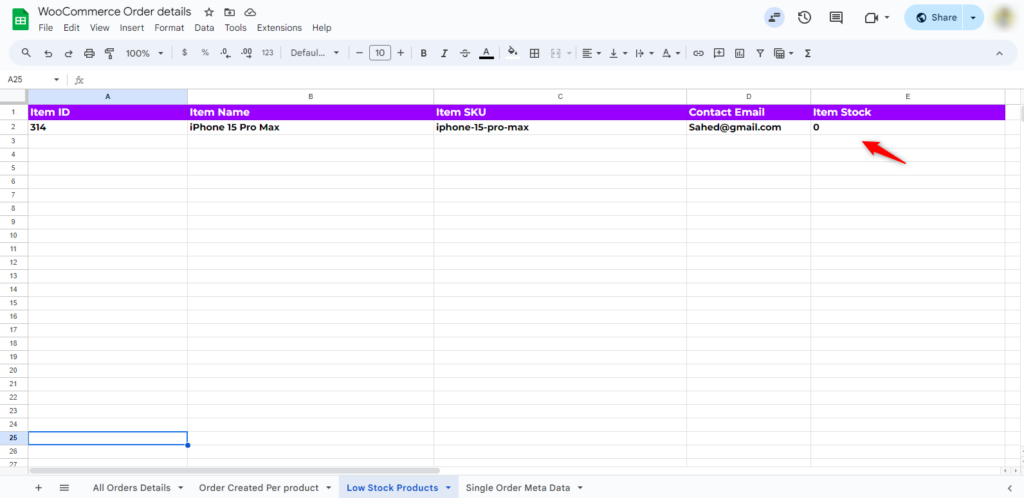
You can see that the purchased product stock is zero. That means the product’s stock was only one. It will help you increase your product stock immediately.
3. Collect specific order meta to Google Sheets
As you can see, this integration syncs almost every aspect of your order, including items, total revenue, SKUs, and more.
But if you want to fetch specific details about your order, you can do that through order metadata.
For instance, we’ll show how you can do that using FunnelKit Automations. Let’s say you want to add a field where users can share their shopping journey shortly.
To do that, you can add a simple custom field to your checkout page to capture that data.
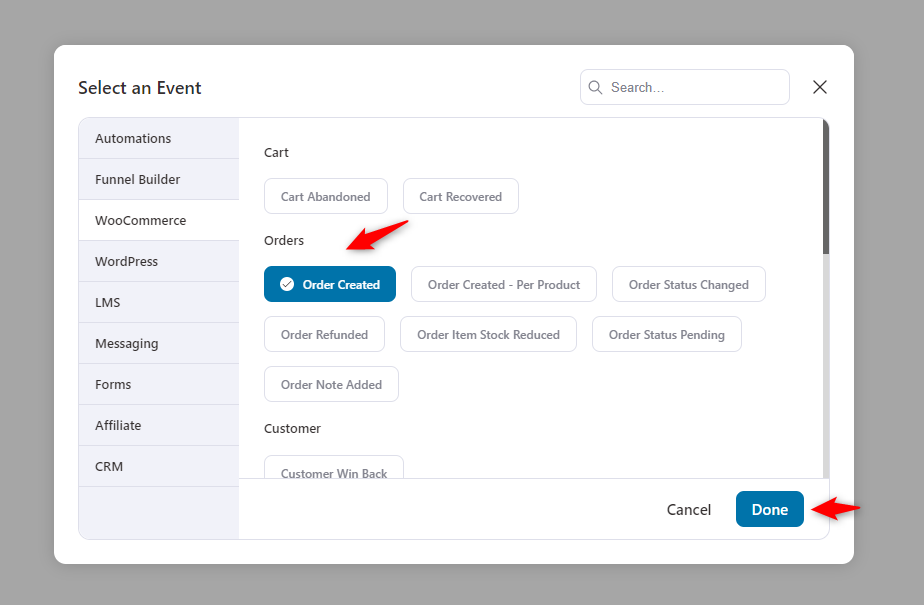
Now, create an event in the automation with the 'Order Created' event.
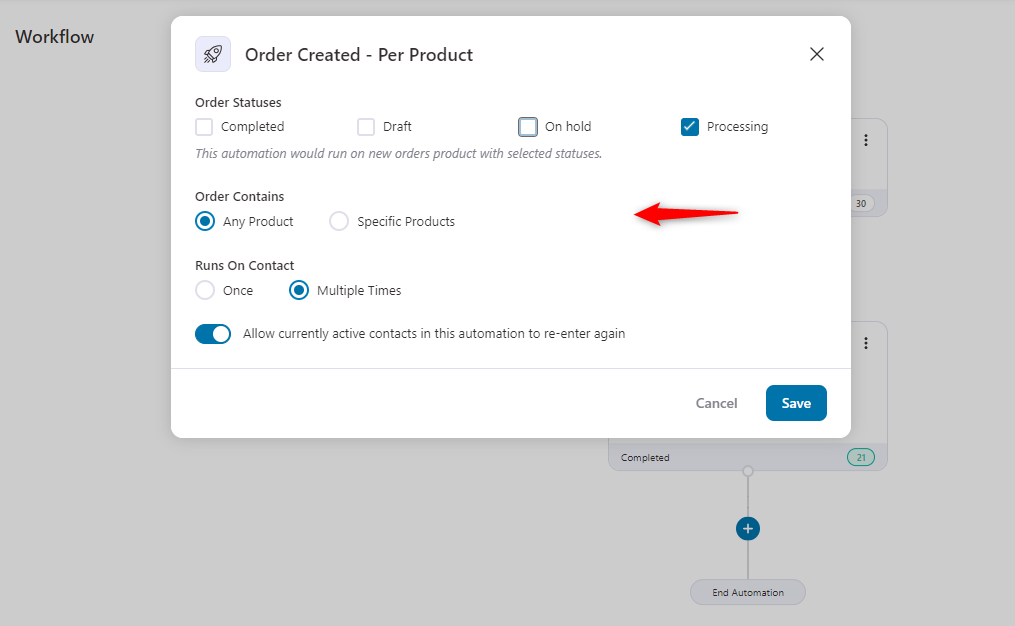
Keep the settings as they are and hit save.
Set an action through the (+) icon. Similarly, choose the “Insert row” option under the Send Data tab.
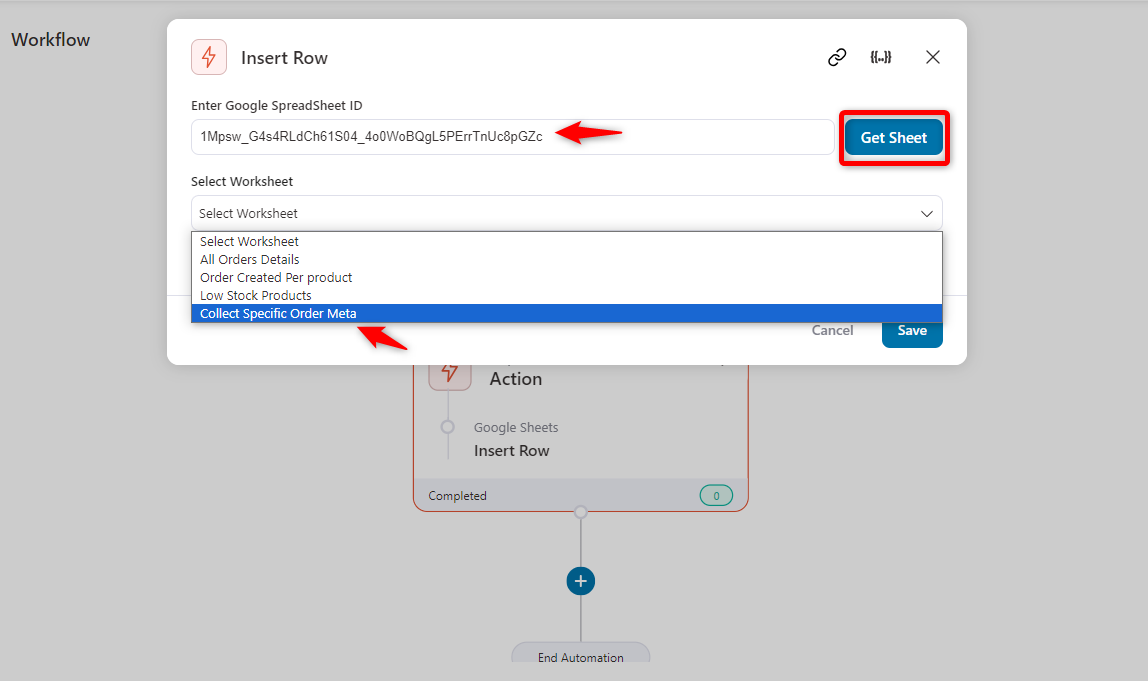
Then, paste the Google Sheet ID. Also, choose your preferred tab, as shown below.
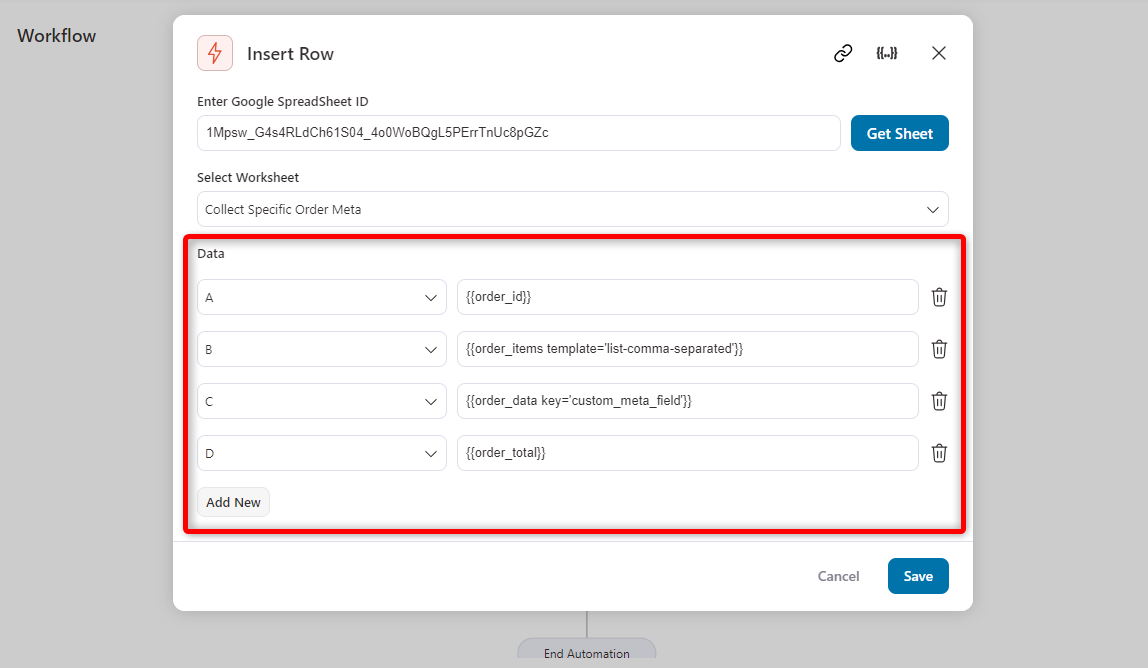
Now define the column with the related merge tags from this icon {{..}}.
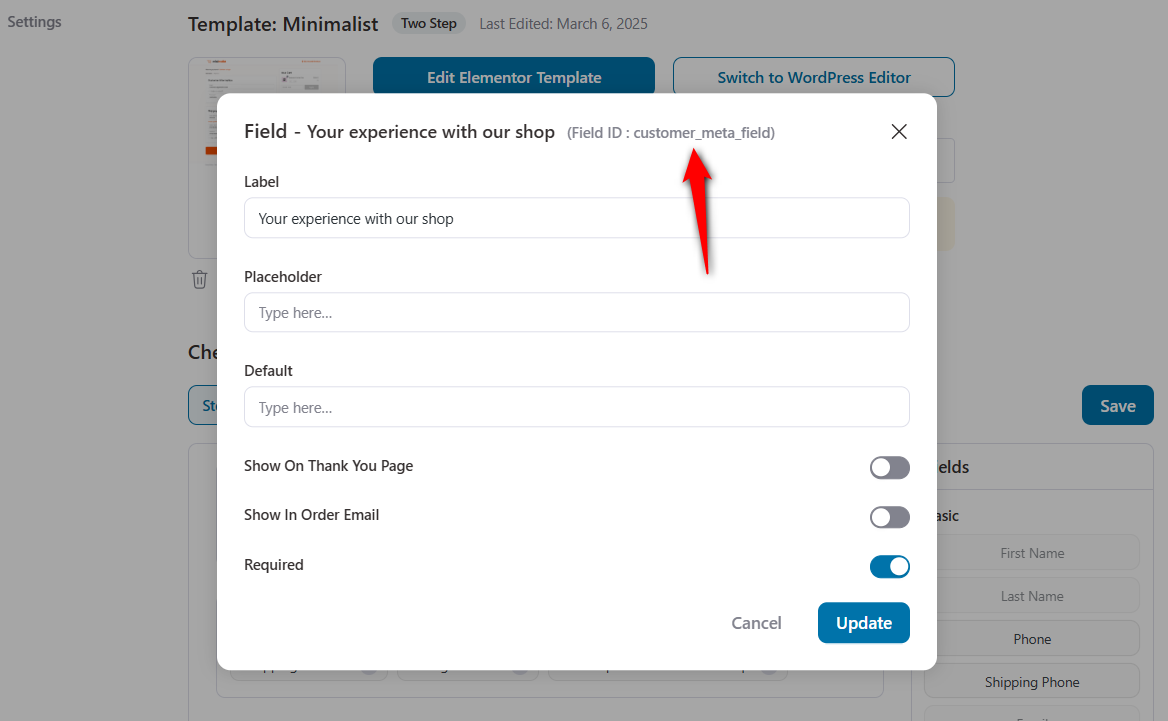
Open a custom field on the checkout page, and copy the metadata.

Click on the merge tag icon {{..}} and search for the “Order Data” tag. After that, paste the metadata you copied from the checkout customization page.
You’ll get refined order data as shown below. Copy it and paste it into the field.
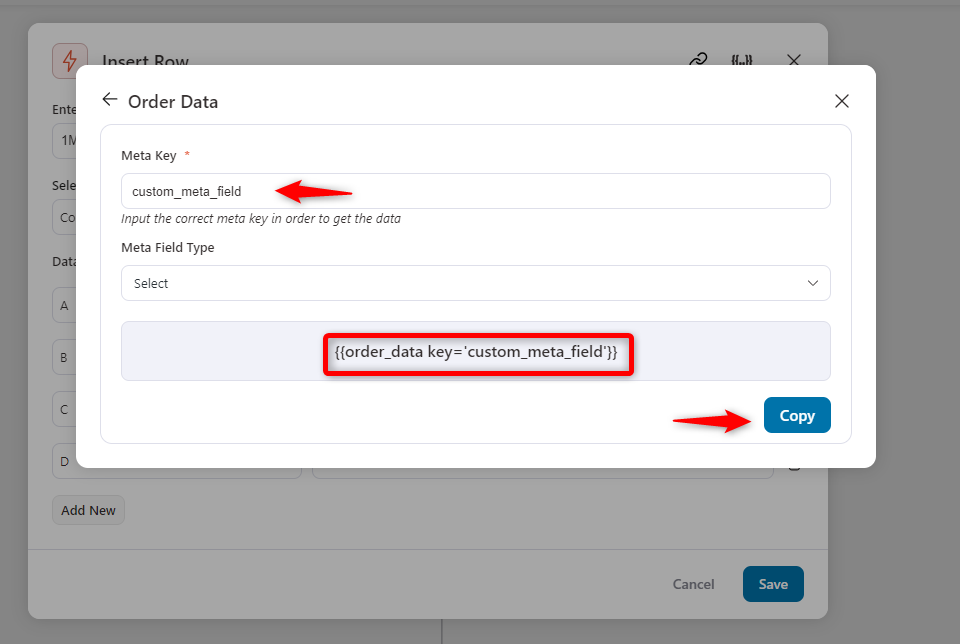
See how the data passes through it and send it to the Google Sheet. Hit save once you’re done.
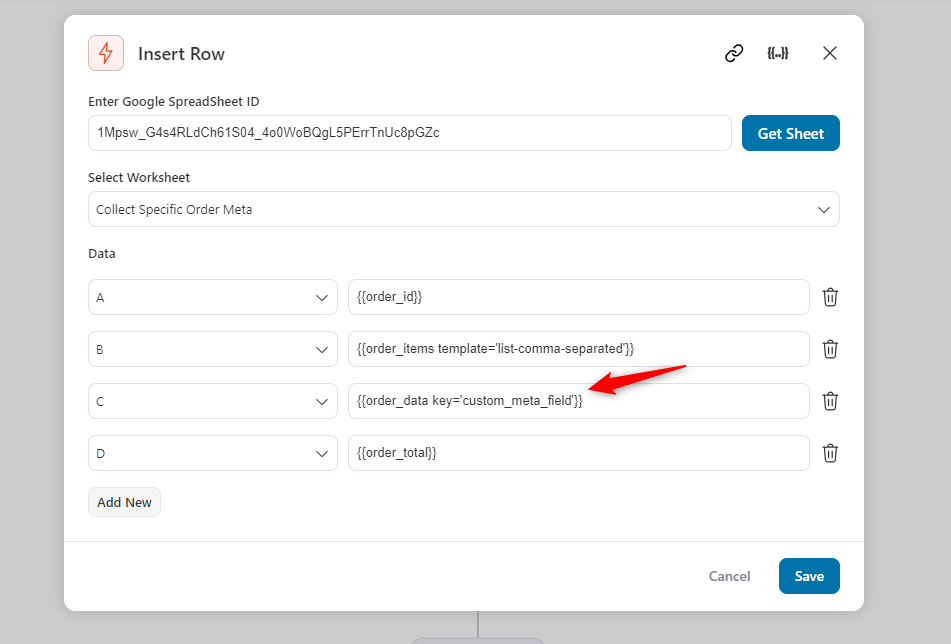
Now, when a customer places an order, you’ll get the data for it.
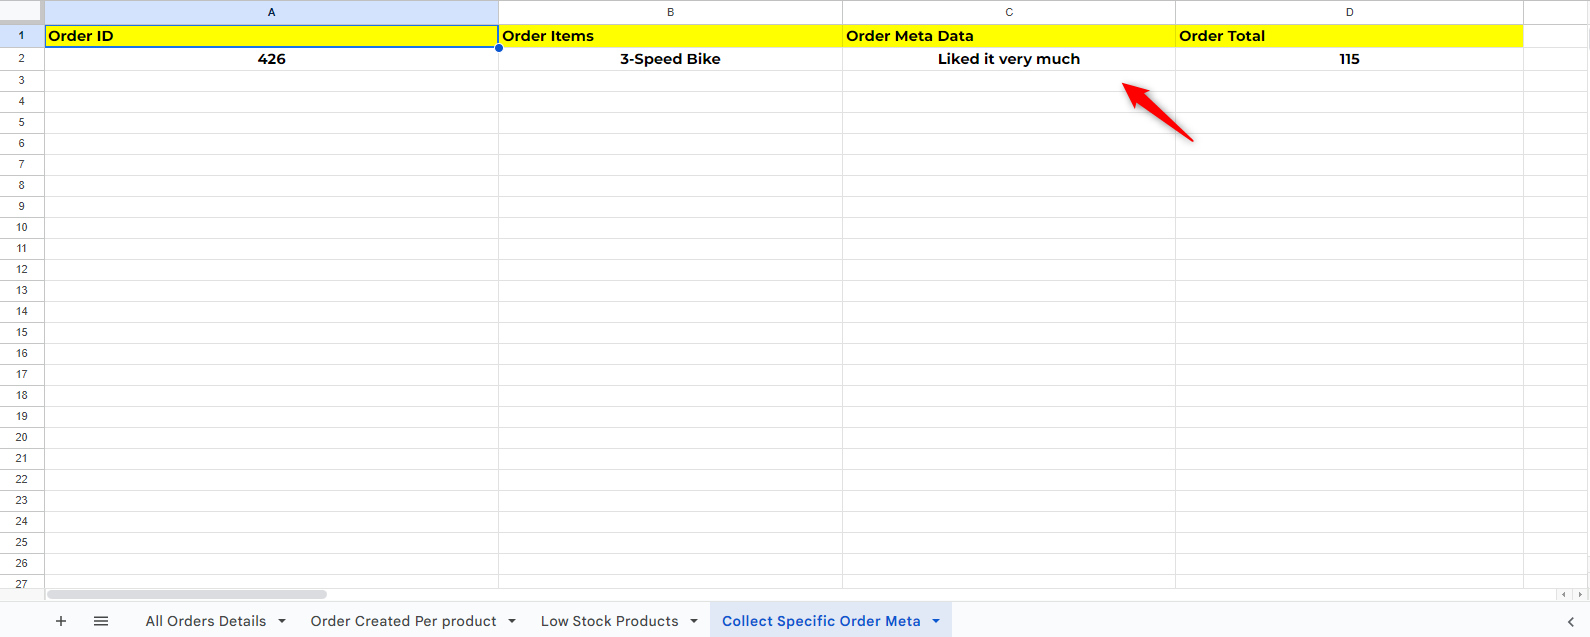
So this is how you can collect specific order metadata to Google Sheets.
4. Track customers who refunded
You can track your refunded customers' data and export it to Google Sheets. It’ll help you analyze why they refunded and what the next step should be to reduce it.
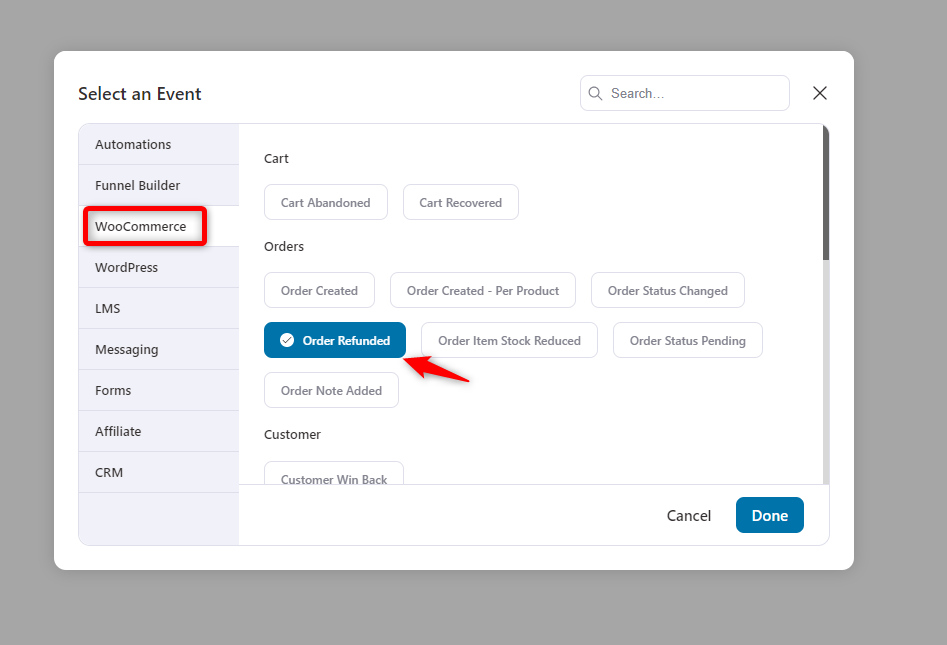
Choose the event “Order Refunded” under WooCommerce. And then hit done.
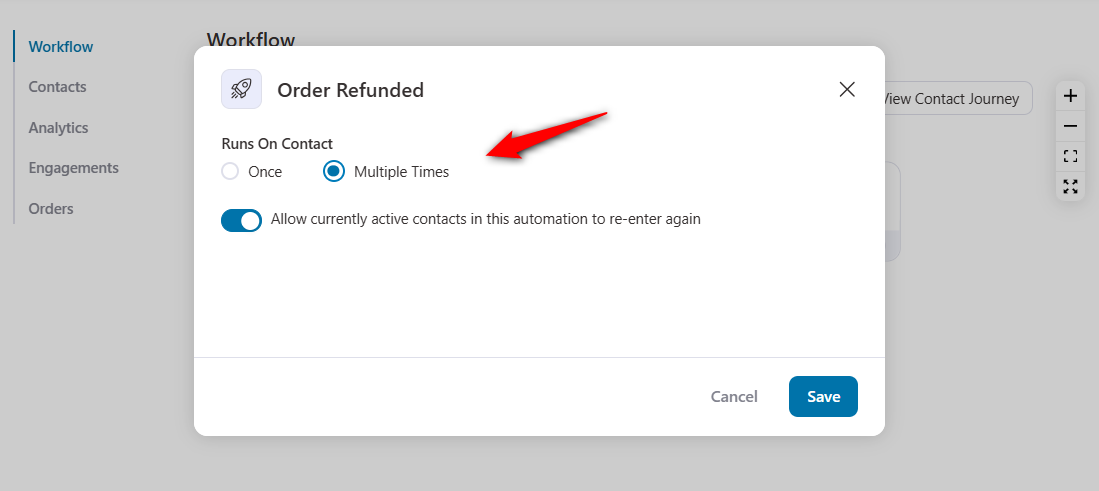
Keep the settings as they are. And hit save.
Similarly, choose an action and select “Insert row” under the send data tab. Then hit done.
Paste your Google Sheet’s URL and select the preferred tab from the list.
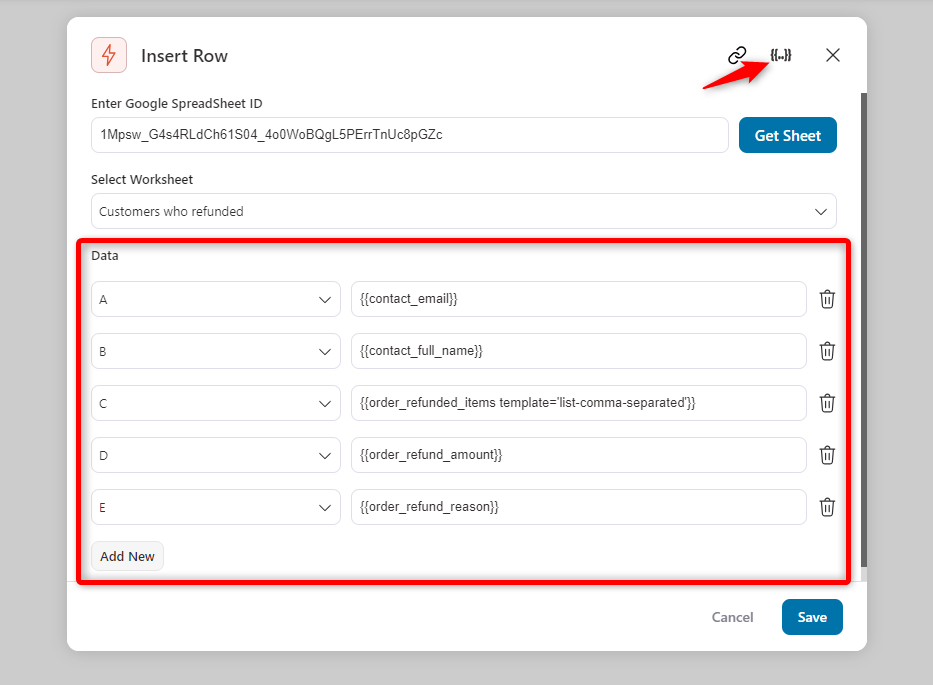
Then map the field with the relevant merge tags. You can find more tags from the merge tag icon {{.}} below.
Here we’re expecting to get this data:
- Contact email
- Contact full name
- Refunded items
- Refund total
- Refund reasons
Now, once a customer claims a refund, this data will automatically be added to your Google Sheet.
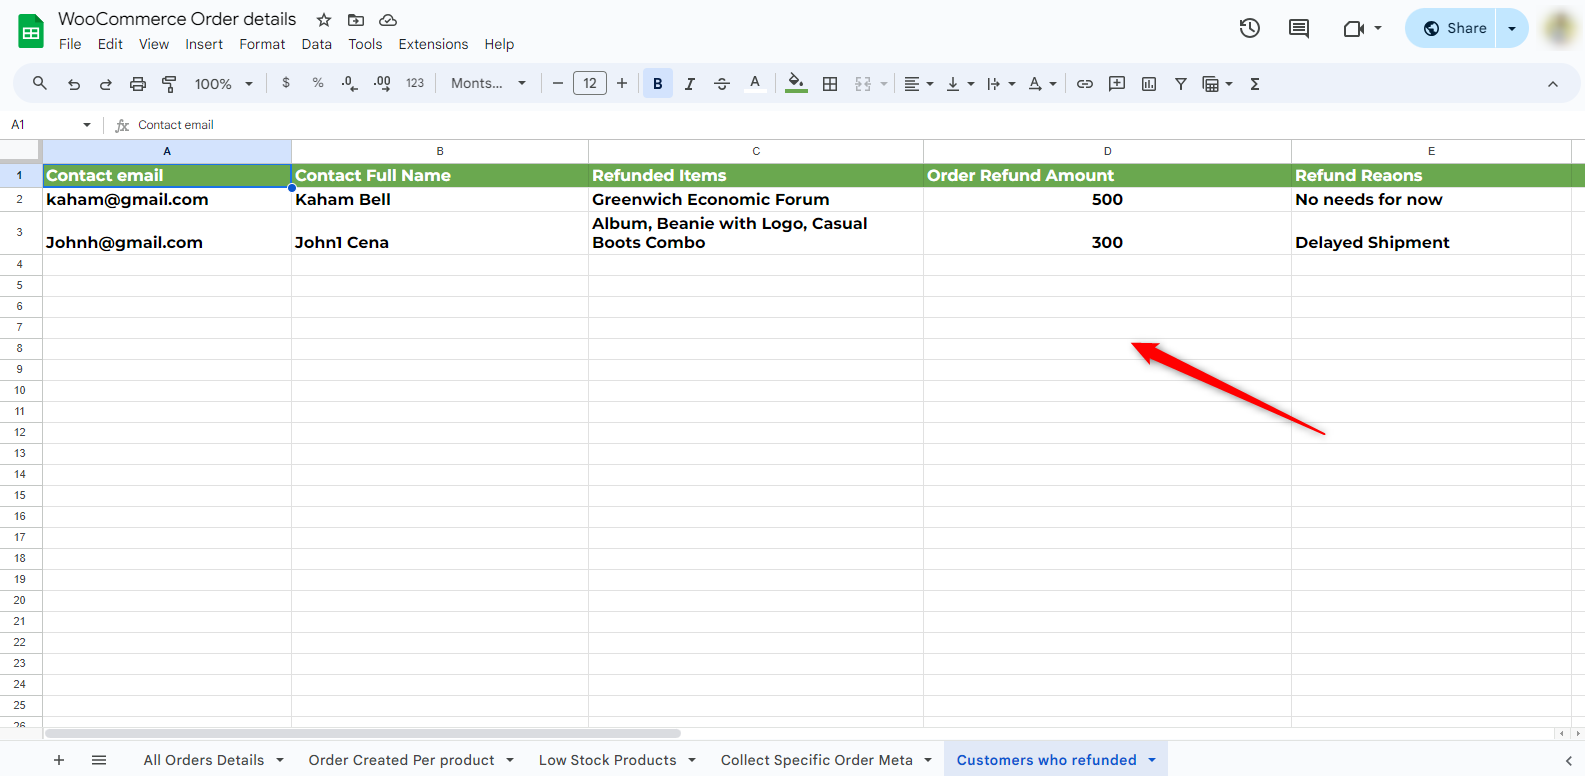
So this is how you can track and analyze the customers who refunded.
For further marketing, you can reach out to them and send a discount email with personalized coupons, or something else.
5. Track customers with failed order payments
FunnelKit Automations lets you track customers with failed order payments. You can see the order details, the payment URL, and customer details to take further action.
First, choose the event “Order Status Changed” under the WooCommerce tab. Click on the “Done” button.
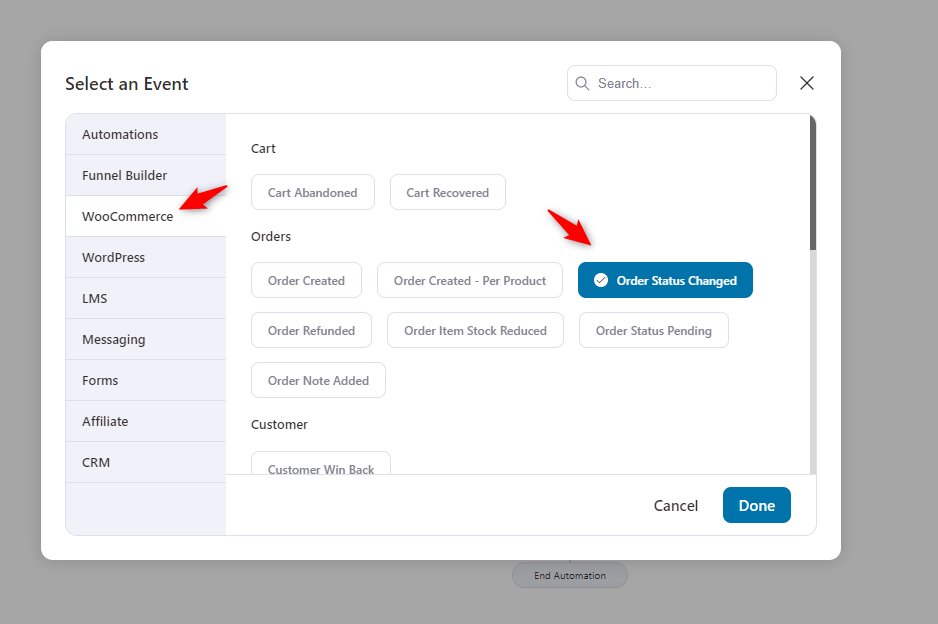
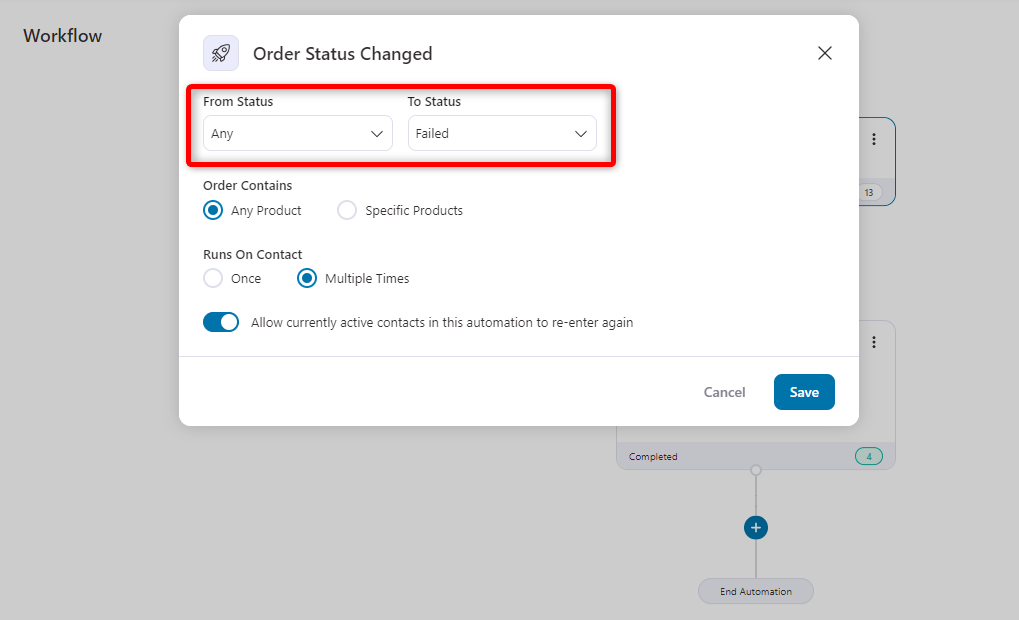
Next, choose the status from “any” to “failed”. Hit save.
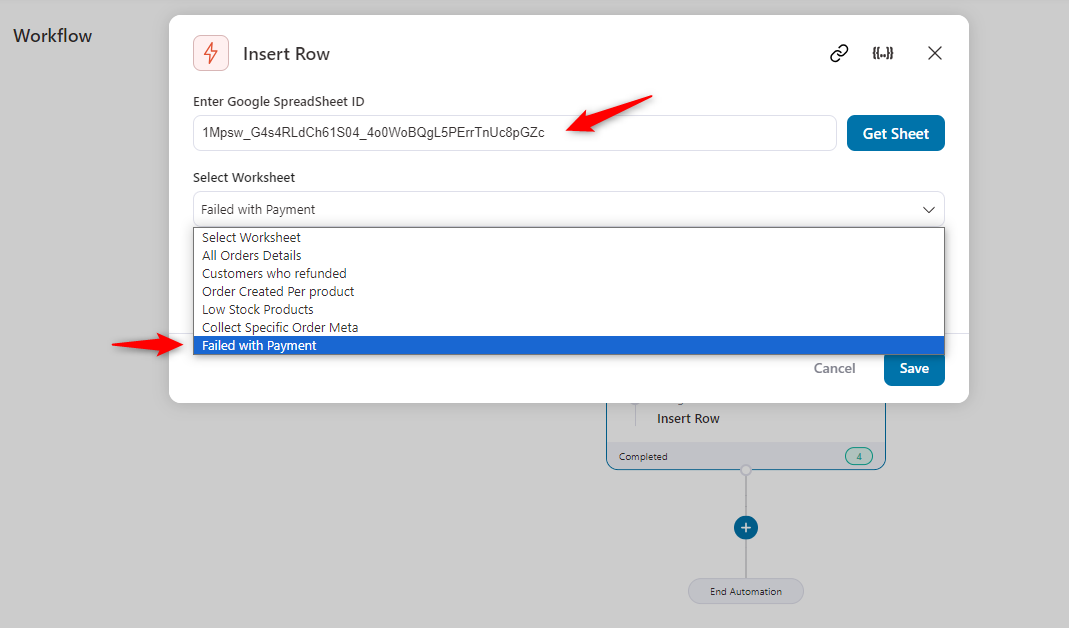
Next, paste the Google Sheet ID and select the tab from the dropdown.
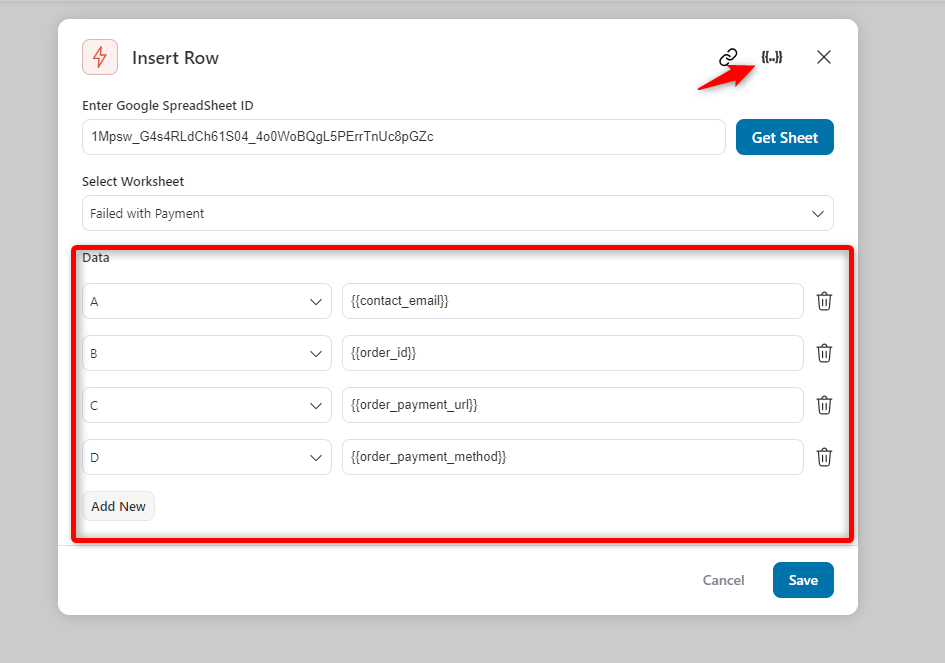
Using the merge tag icon {{..}}, fill out the field with relevant tags as shown below. Depending on these tags, the event will trigger the automation.
Once your customers fail to make their payment, you’ll get details of the WooCommerce orders sent to Google Sheets.
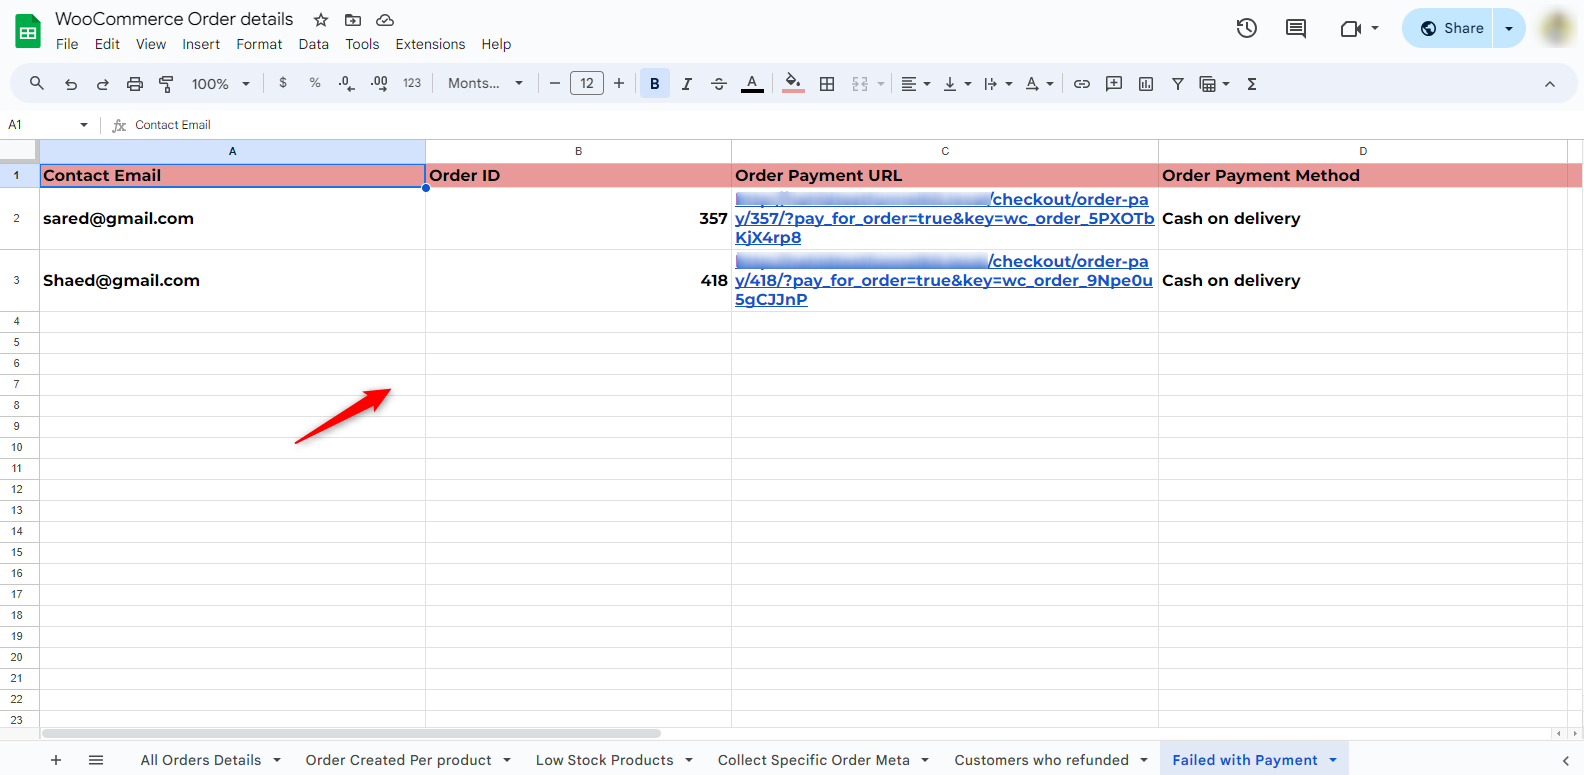
In this way, you can easily track and sync data for every failed payment created by customers.
6. Send order notes to Google Sheets
Order notes facilitate communication between the customer and the store owner. It also captures order history for both customers and store owners.
Through order notes, customers can leave special instructions or requests when placing their orders. It will specify their needs and requirements.
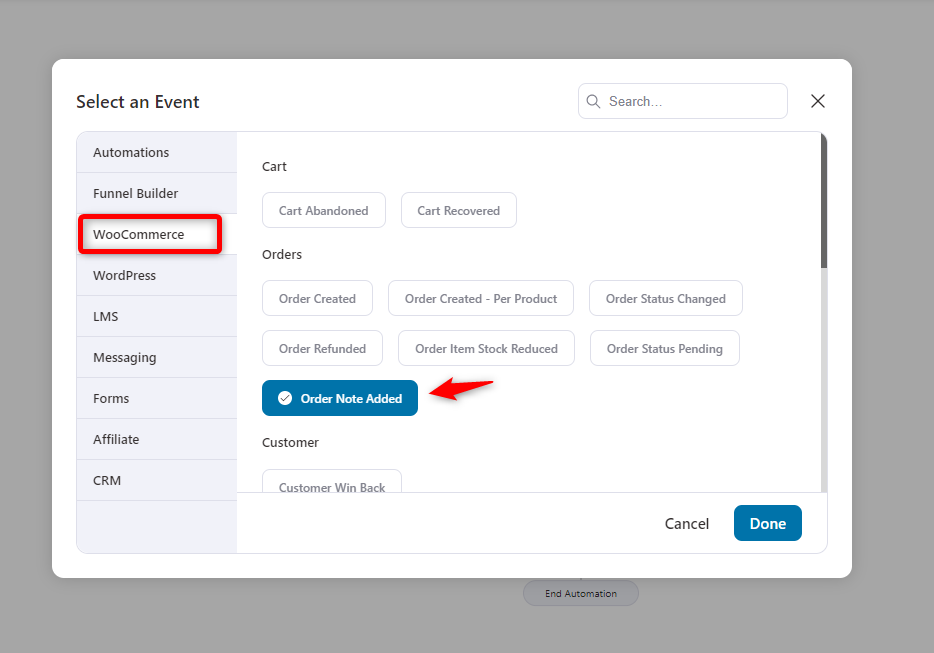
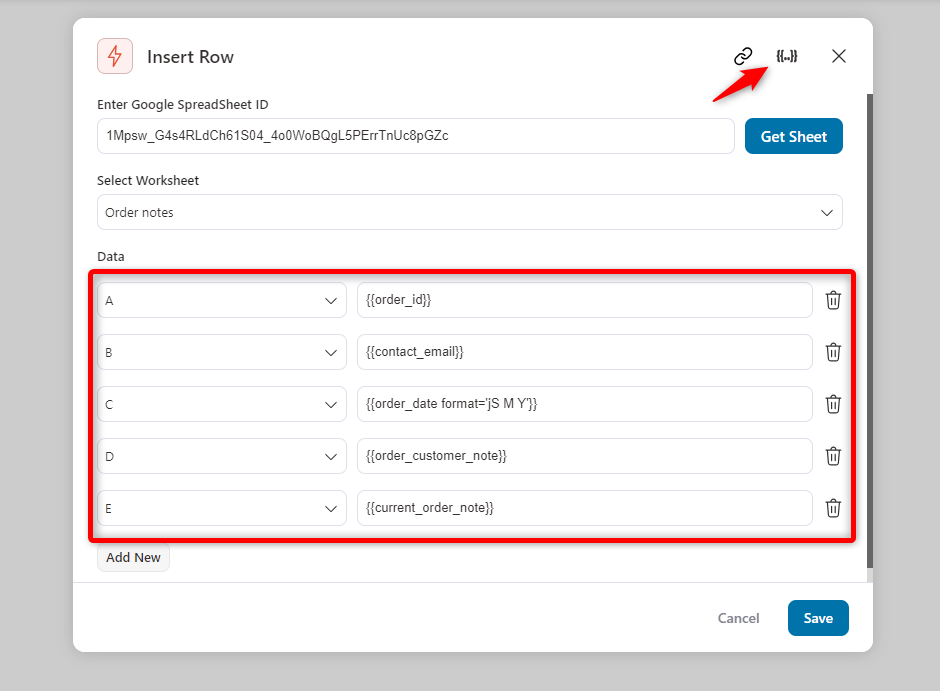
For this, choose the “Order Note Added” event under the WooCommerce tab. Hit the done button.
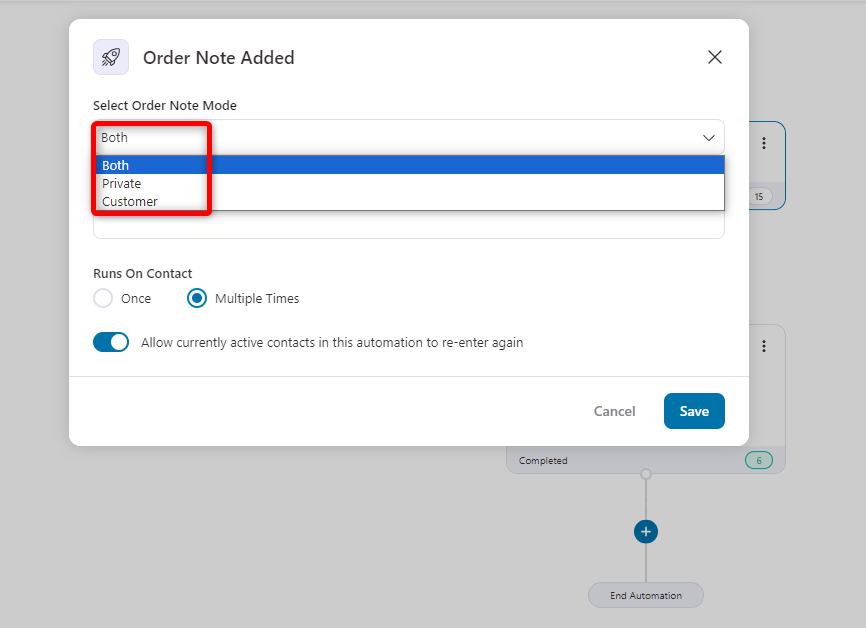
Select the order mode. You can set it for the customer, private, or both. And keep the other settings as default.
Hit 'Save' when you’re done.
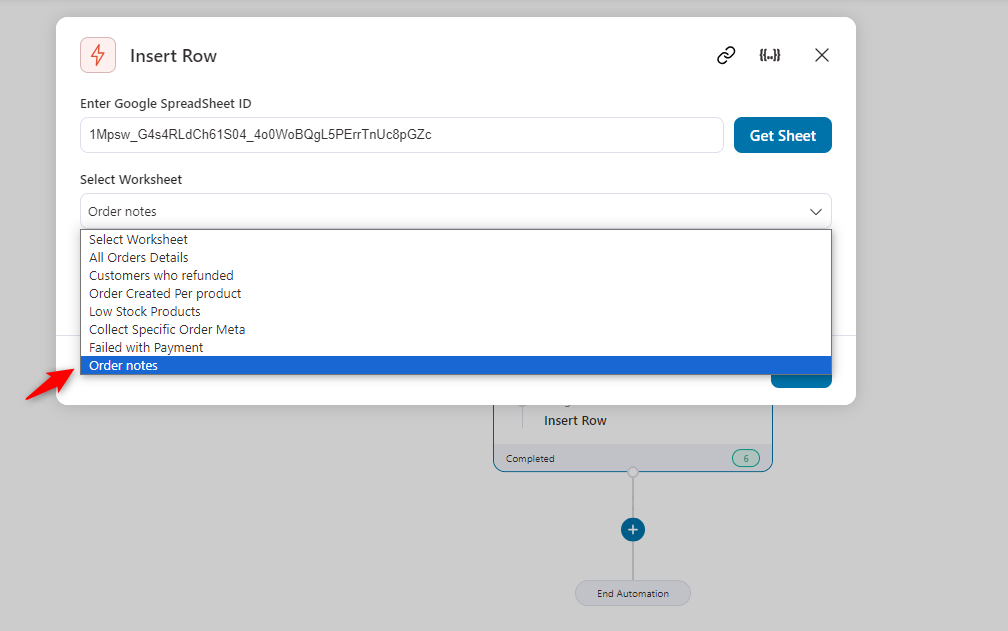
Similarly, add an action to fetch your Google Sheet and choose the tab you prefer.
Now define the columns with their corresponding merge tags. You can find more merge tags in the {{..}} icon.
Hit save once you’re happy with the settings.
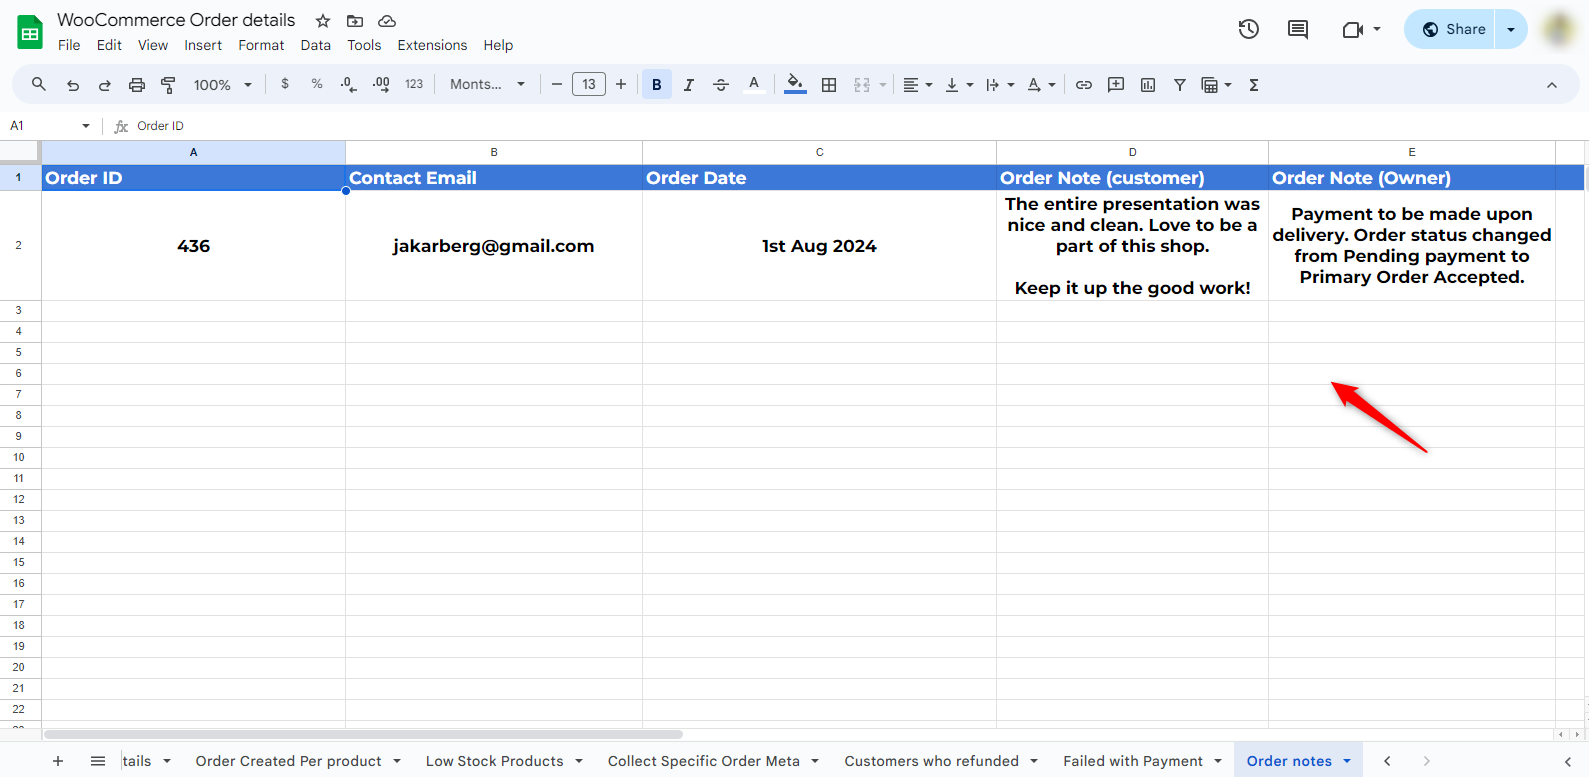
So when your customers place an order and add a note to it, FunnelKit Automations will fetch the data to Google Sheets.
But you can further explore and implement more automations, such as updating order statuses, sending abandoned cart data, managing subscription cancellations, and more.
For that, you can have a look at this use-case blog post on WooCommerce Google Sheets.
Troubleshooting: Orders Not Syncing, Duplicates and Auth Errors
- Orders are not syncing at all
Most often an expired or revoked Google OAuth connection, or wrong WooCommerce REST API keys.
Reconnect the Google account and regenerate keys with the correct read/write permissions.
- Wrong sheet
The spreadsheet or worksheet ID changed (renaming a tab can break a hard-coded reference).
Re-select the target sheet in your tool’s mapping.
- Duplicate rows
Your job is to re-process the same orders. Track a “last synced order ID” (Apps Script) or enable de-duplication / update-existing-row logic in your connector.
- Auth error / 401
This happens because keys lack permission, or your store isn’t on HTTPS.
The WooCommerce REST API requires HTTPS for key-based auth; fix the SSL/HTTPS setup.
- Line items not showing
Single-row mapping collapses multi-product orders. Use a per-product event (FunnelKit) or an iterator (Make/n8n) to get one row per line item.
- Only want certain orders
Filter by order status (completed, refunded, failed) at the trigger to avoid syncing everything.
Frequently Asked Questions (FAQs)
The best way to send WooCommerce orders to Google Sheets depends on your order volume and budget. Use the comparison table above: free Apps Script for zero-budget, a connector plugin for two-way sync, FunnelKit for sync plus automation, and Make/n8n for high-volume, multi-product orders.
1. Centralized data management
With Google Sheets, you can handle team collaboration, keep communication smooth, and make all sorts of important decisions right here.
2. Instant data updates
If something happens with your store, like new orders, payments, product updates, failed payments, refunds, and so on, you'll know about it right away.
3. Enhanced team collaboration and communication
Google Sheets lets you share your details with your team, coworkers, or anyone else you need to.
Plus, your team can comment, view, and provide feedback right on the same page, so you can quickly address any needed improvements.
4. Data security
As a store owner, you probably don’t want to share your login details or sensitive info with your team. You can use it to give your team access to your store details without sharing credentials.
5. Data analysis and reporting
Google Sheets comes packed with tools and features for presenting your data. Once you’ve got your store info, you can visualize it to better understand and analyze it. You can also filter, search, and instantly import/export data.
6. Order tracking and insights
The default WooCommerce order dashboard can be a bit overwhelming. Connecting it with Google Sheets makes everything much simpler and easier to manage. For instance, you can track order IDs, best-selling products, stock levels, customer behavior, and payment status.
Yes, you can sync WooCommerce orders to Google Sheets for free. Google Apps Script plus the WooCommerce REST API costs nothing. The trade-off is no real-time push (it’s scheduled) and no two-way sync, and you maintain the script yourself.
Use a connector plugin or an automation tool (like FunnelKit) that fires on the Order Created event in real time. The other method, App Script, polls on a schedule, so it isn’t truly real-time.
Yes, you can add your Google account to a single site or multiple sites; both will work and give you the data. But you have to use Google Sheets from the account you connected.
For example, you have an account at [email protected]. And when you connect this to Google Sheets, a spreadsheet from this account will connect and work.
But a different spreadsheet from a different Gmail account will not work and will send an error.
Start Sending WooCommerce Orders to Google Sheets Automatically!
Syncing WooCommerce orders to Google Sheets in real-time is a game-changer for managing your data and boosting your business.
We covered three ways to send WooCommerce orders to Google Sheets: a no-code plugin, a free Google Apps Script method, and no-code platforms like Zapier and Make.
We also compared the leading connectors and walked through six order use cases, from multi-product line items to failed payment recovery.
For most stores, we recommend FunnelKit Automations because it syncs orders in real time and lets the same workflow trigger emails, SMS, and cart recovery from one place.
You can get started with FunnelKit Automations here and have your first orders flowing into Google Sheets in minutes.
Editorial Team
October 6, 2026The WooCommerce checkout coupon field is where shoppers enter a discount code before they pay. Once coupons are turned on, WooCommerce adds it to both the cart and the checkout...
Editorial Team
October 2, 2026A WooCommerce invoice email gives customers a clear record of what they bought, what they paid, and how they paid. WooCommerce can send one out of the box, but only...

Editorial Team
October 1, 2026Want to drive more sales and customer loyalty with WooCommerce coupons? From simple percentage discounts to auto-applied deals, free gifts, and personalized offers, coupons give shoppers a reason to buy...






