
If you run a WooCommerce store, a single promotional email is not a strategy.
Setting up an email drip campaign in WordPress is how you automatically turn one-time buyers into repeat customers.
Instead of chasing leads manually, you build a sequence that sends the right message at the right moment, nurtures trust, and converts without you lifting a finger once it's set up.
The numbers back it up. Drip campaigns generate 80% higher open rates than one-off emails, and Forrester Research found they can lift sales by up to 50%.
In this guide, you will learn exactly how to set one up from your WordPress dashboard, with real examples you can model from day one.
Short on time? Watch the video

Table of Contents
- 1 What is an Email Drip Campaign
- 2 4 Types of Email Drip Campaigns You Can Create in WordPress
- 3 How to Create an Email Drip Campaign in WordPress
- 4 5 Email Drip Campaign Best Practices
- 5 More Questions About WordPress Email Drip Campaign
- 6 How many emails are in a drip campaign?
- 7 How do I start an email drip campaign?
- 8 What is a drip campaign vs an email sequence?
- 9 Why is it called a drip campaign?
- 10 Is Drip an email marketing platform?
- 11 What is the difference between a drip campaign and a broadcast email?
- 12 Ready to Create Your Email Drip Campaign in WordPress?
What is an Email Drip Campaign
Email drip campaigns are automated email campaigns that are sent to users over a specified period of time based on their interaction with your website. The timing of the emails is usually based on the action or behavior of the user.
Companies use drip marketing to stay in touch with an audience in a targeted manner. Such communications are based on certain actions users take. A drip campaign can be set on customer behavior, such as when they
- Sign up for newsletters
- Abandon the shopping cart
- Place an order
- Do not place an order for some time
- Only use the free version of your product and so on.
Note: The Drip campaign differs from broadcast emails in that it is sent to a specific audience segment based on their interactions with the site, without human intervention. Since drip campaigns are automated, they ensure efficiency without requiring human resources to do repetitive manual work.
4 Types of Email Drip Campaigns You Can Create in WordPress
Let's have a look at some examples of drip email campaigns to take inspiration from:
1. Onboarding email campaign
The onboarding drip campaign targets new users who have recently signed up for your newsletter or bought your product.
In WordPress, you can trigger this automatically when a user registers or completes their first order in WooCommerce.
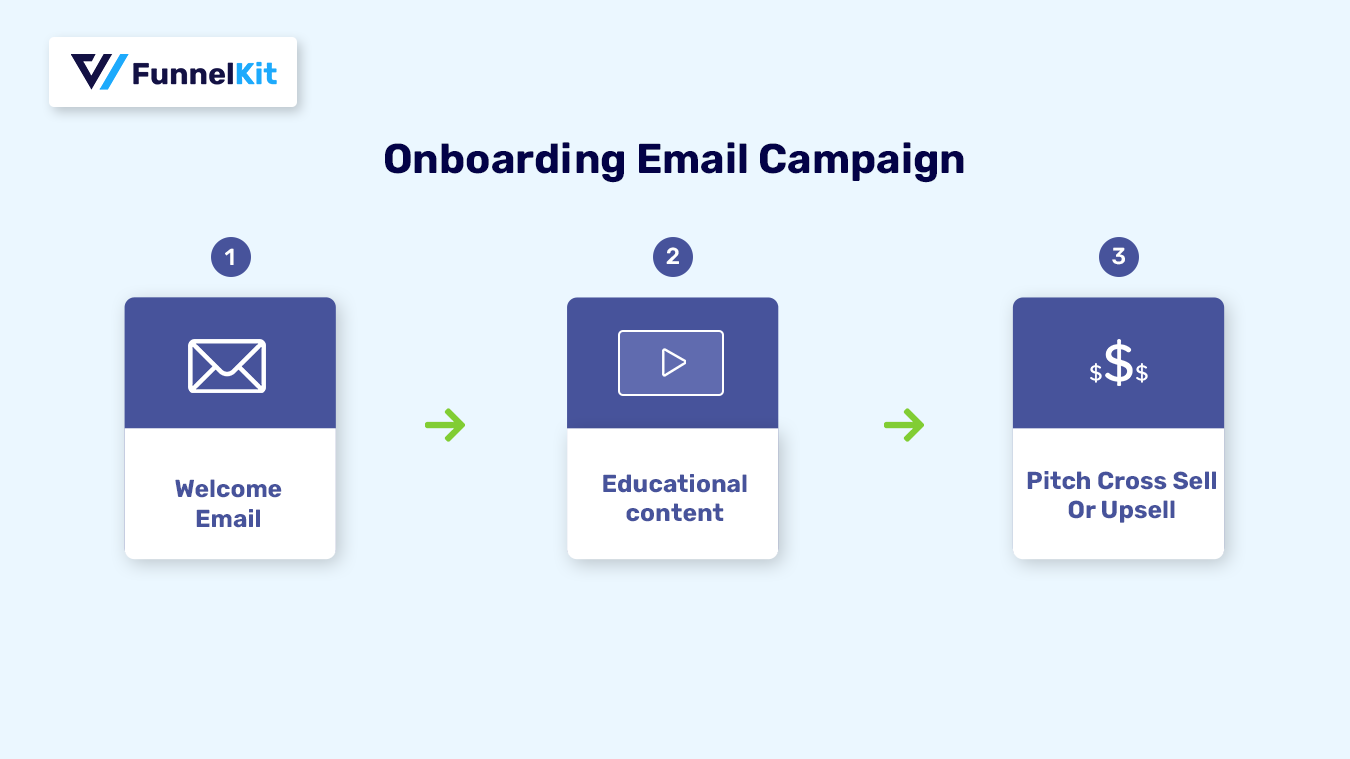
You can send a sequence of emails to new users that include
- Warm welcome greeting with social media profiles
- Instructions on how to use the product they bought
- Cross or upsell on the product
- Resources that will answer any questions they may have.
Look at the welcome email of a drip marketing campaign from Just Eat.
It’s a sweet and simple welcome email. The main attraction is the quirky GIF of fries and cookies, waving hands to the users! Moreover, it gives users a CTA to navigate to the account and engage with the shop.
2. Cart abandonment campaign
Almost 70% of customers abandon their carts. A cart abandonment drip campaign can help bring back those customers to complete the order. Sometimes, users need little reminders or incentives to complete an order.
With WooCommerce in WordPress, these emails can be triggered automatically when a user leaves checkout without completing payment.
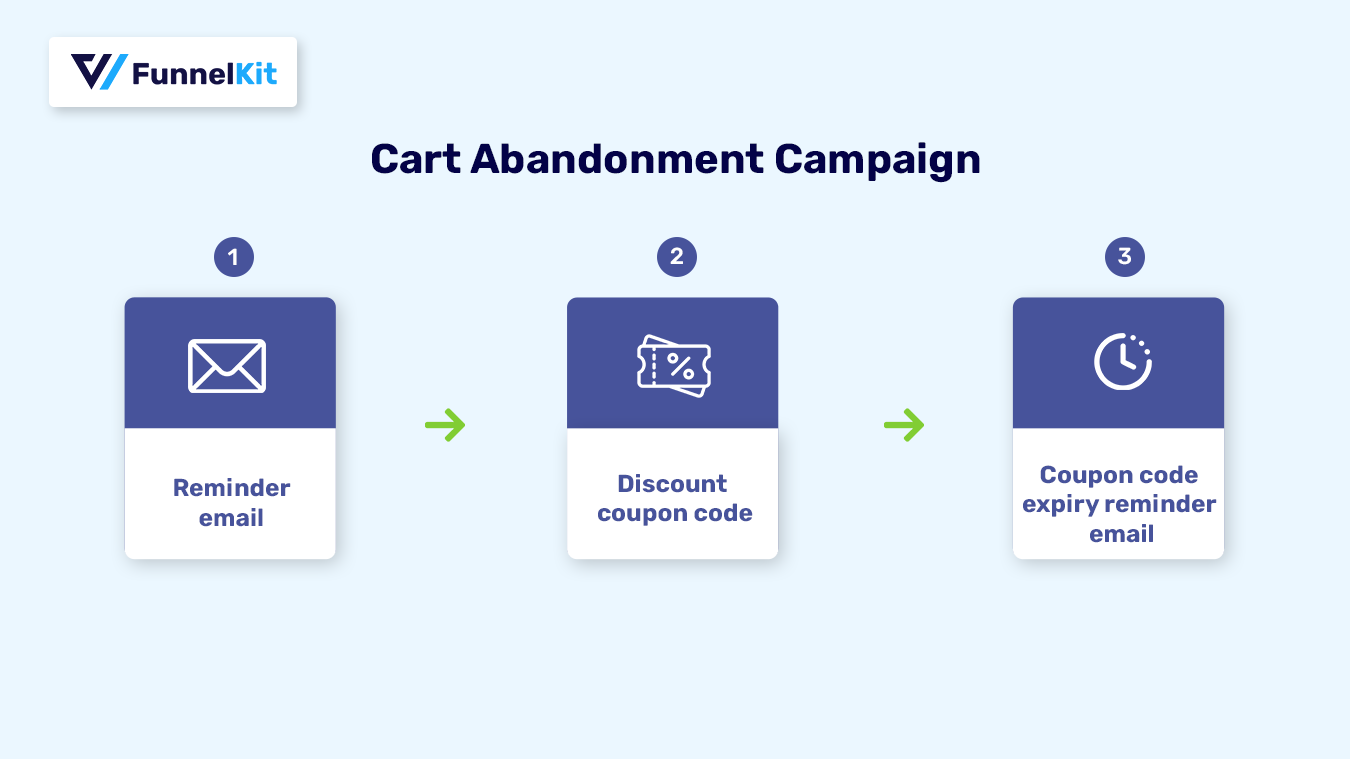
In your cart abandonment campaign, your email sequence can include
- Reminder for users to come back to complete the order
- An incentive for a limited time to complete the purchase
- A message stating stock is running out
- One-time free shipping offer, and so on.
Look at the initial email with the example of Casper's cart abandonment drip campaign.
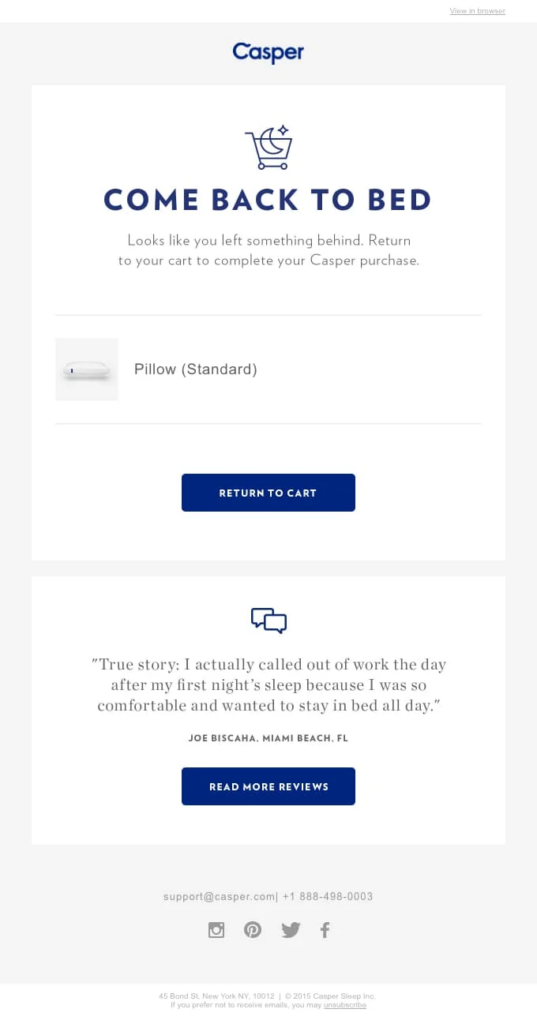
This is a brilliant first email for a cart abandonment drip campaign, as it gently reminds the target audience to complete the order. And to remind users why they put the product in their cart in the first place, they also add reviews from other users.
This is a well-thought-out first email, as you don’t want to offer incentives in the first email of your cart abandonment campaign. You can do so for the people who don’t convert after the first email.
3. Re-Engagement email campaign
Re-engagement email campaigns are meant to bring back those users who have not interacted with your site for a while.
In WordPress, you can automate this by targeting inactive users based on their last purchase or last activity in WooCommerce.
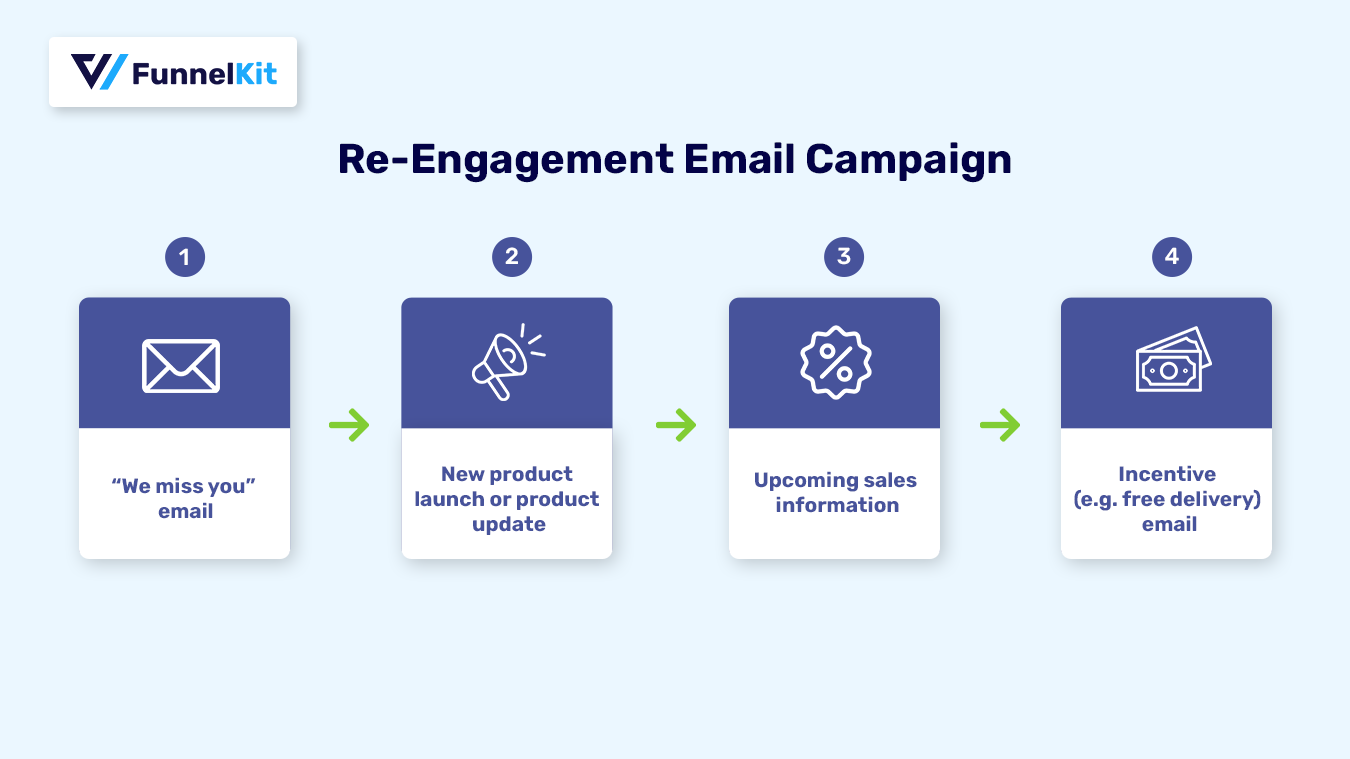
In your re-engagement email, you can include
- A sweet message asking users to visit your site because it’s been a while
- News about the newest product or updates
- Announcement of the upcoming sales
- A discount coupon, free delivery on the purchase anniversary, and so on.
Have a look at the re-engagement drip campaign emails from Lowe’s.
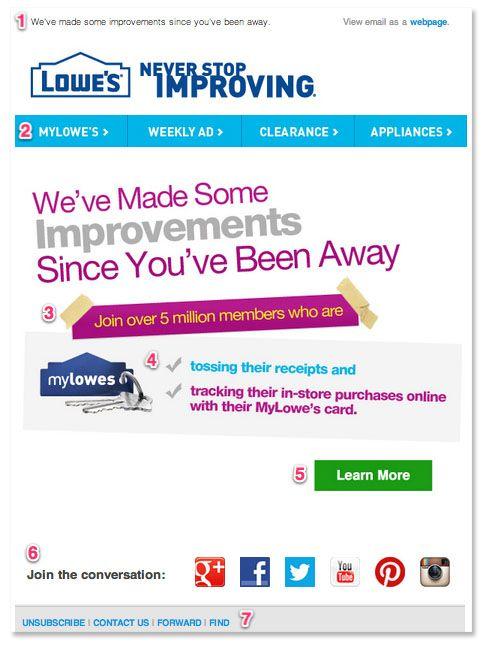
This is a simple email that works to get customers’ attention by highlighting the improvements they made in recent times. It’s an effective way to offer a sneak peek into what’s been up at your store lately.
4. Free to Pro user drip campaign
Free-to-pro user drip campaigns are designed to convert free users into paying customers through a structured sequence of emails. This type of email drip campaign is widely used in the software industry, especially by businesses that offer a freemium model.
In a WordPress setup, you can automate this process by tracking user activity and engagement, then sending targeted emails that highlight premium features, benefits, and upgrade opportunities at the right time. This makes it a powerful form of lead nurturing that gradually moves users from free usage to paid adoption.
Note: Freemium is a business model where users get access to a basic version of a product for free, while advanced features and capabilities are reserved for a paid premium plan.
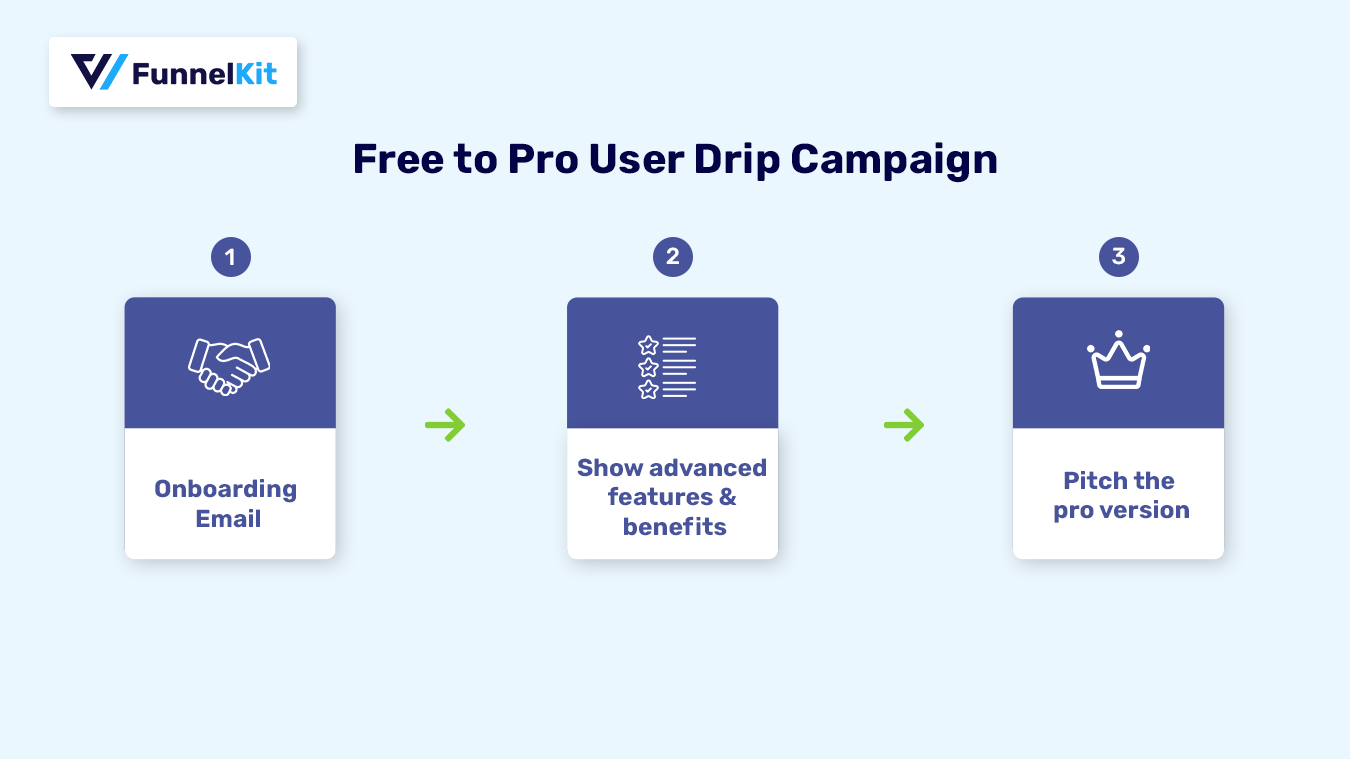
In your Free to Pro User Drip Campaign emails, you can share
- The process to get started with the free product
- Resources that highlight the features of the pro version
- The benefits they will receive if they switch to the paid version
- Pitch the paid version at a discounted offer for a limited time, etc.
Look at the last email of the Free to Pro User Drip Campaign by Canva.
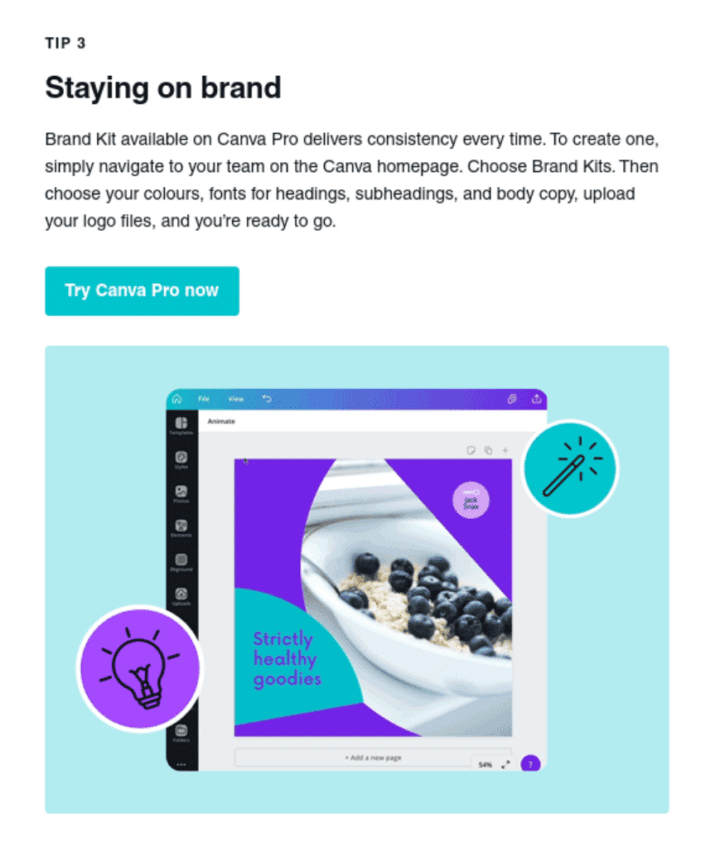
The platform Canva targets users who sign up for weekly design tips to help them make the most of this design tool. This is the third email on the list in which Canva shares tips on how to ace the design task.
In this last email, they pitched the pro version. This is an excellent approach because clients already know which design tips to apply and how the pro version can help them implement them
Why Use a WordPress Plugin Over a SaaS tool for Drip Campaigns?
The main advantage is how triggers work. A plugin that lives inside WordPress responds directly to WooCommerce events like first orders, abandoned carts, and newsletter signups without going through an external service. That removes a layer of latency and a potential point of failure from every automated email you send.
The second is cost. SaaS tools charge per subscriber, so fees grow as your list does. A WordPress plugin is a one-time or flat annual cost regardless of list size, which makes it significantly cheaper at any meaningful volume.
The third is consolidation. Templates, visual editors, analytics, and sending all sit in one place with no syncing between your store and an outside platform.
SaaS tools are worth considering if you send across multiple platforms or need advanced segmentation that a plugin cannot match. For most WooCommerce stores running drip campaigns, a WordPress-native plugin covers everything at lower cost and with fewer dependencies.
How to Create an Email Drip Campaign in WordPress
To create an email drip campaign in WordPress, you need a marketing automation plugin. In this guide, we will use FunnelKit Automations to set up the drip campaign directly from the WordPress dashboard.
It comes with pre-built drip sequences, a visual email builder, in-depth analytics, and native WooCommerce triggers, so you are not starting from scratch or stitching together multiple tools.
We will walk through building a drip campaign that targets customers who just completed their first purchase, one of the highest-converting sequences any WooCommerce store can run.
Note: You can repeat the same process to create other types of drip campaigns.
So, let’s start the process.
Step 1: Install and activate FunnelKit Automations
First, you need to install and activate FunnelKit Automations, both free and pro versions. Please note that FunnelKit is available in both the free and premium versions.
Step 2: Add a new automation
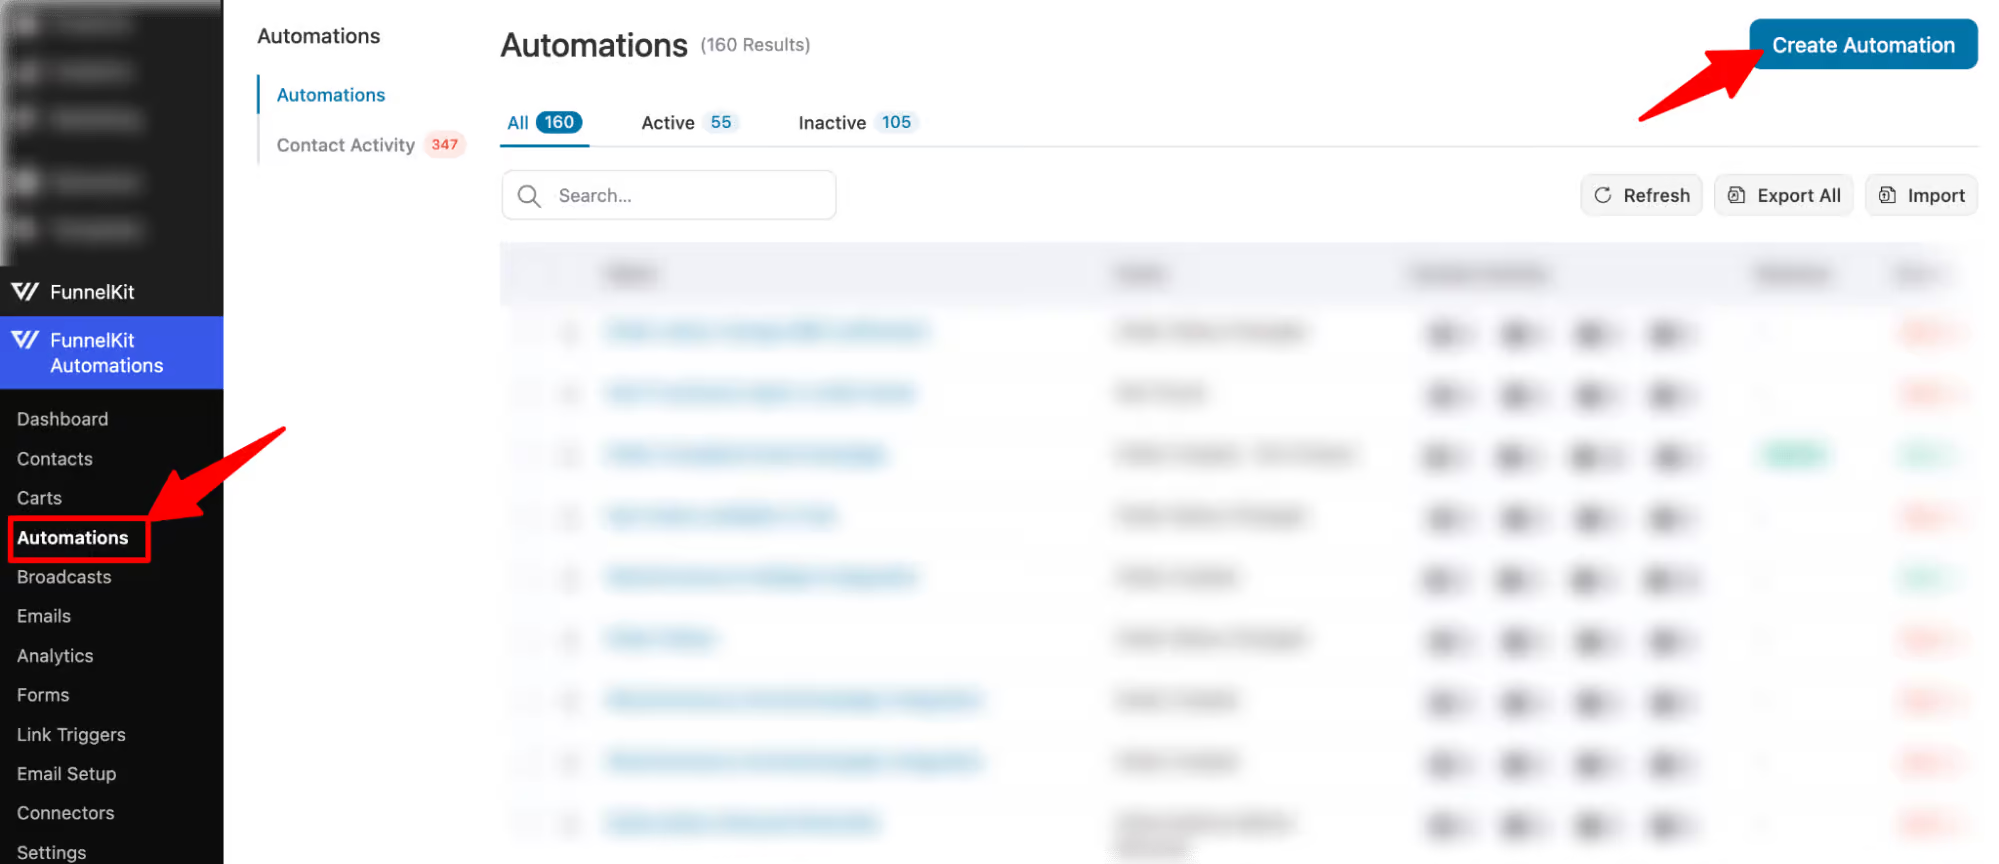
The first step is to create a new automation. To do that, navigate to FunnelKit Automations ⇒ Automations and click on "Create Automation."
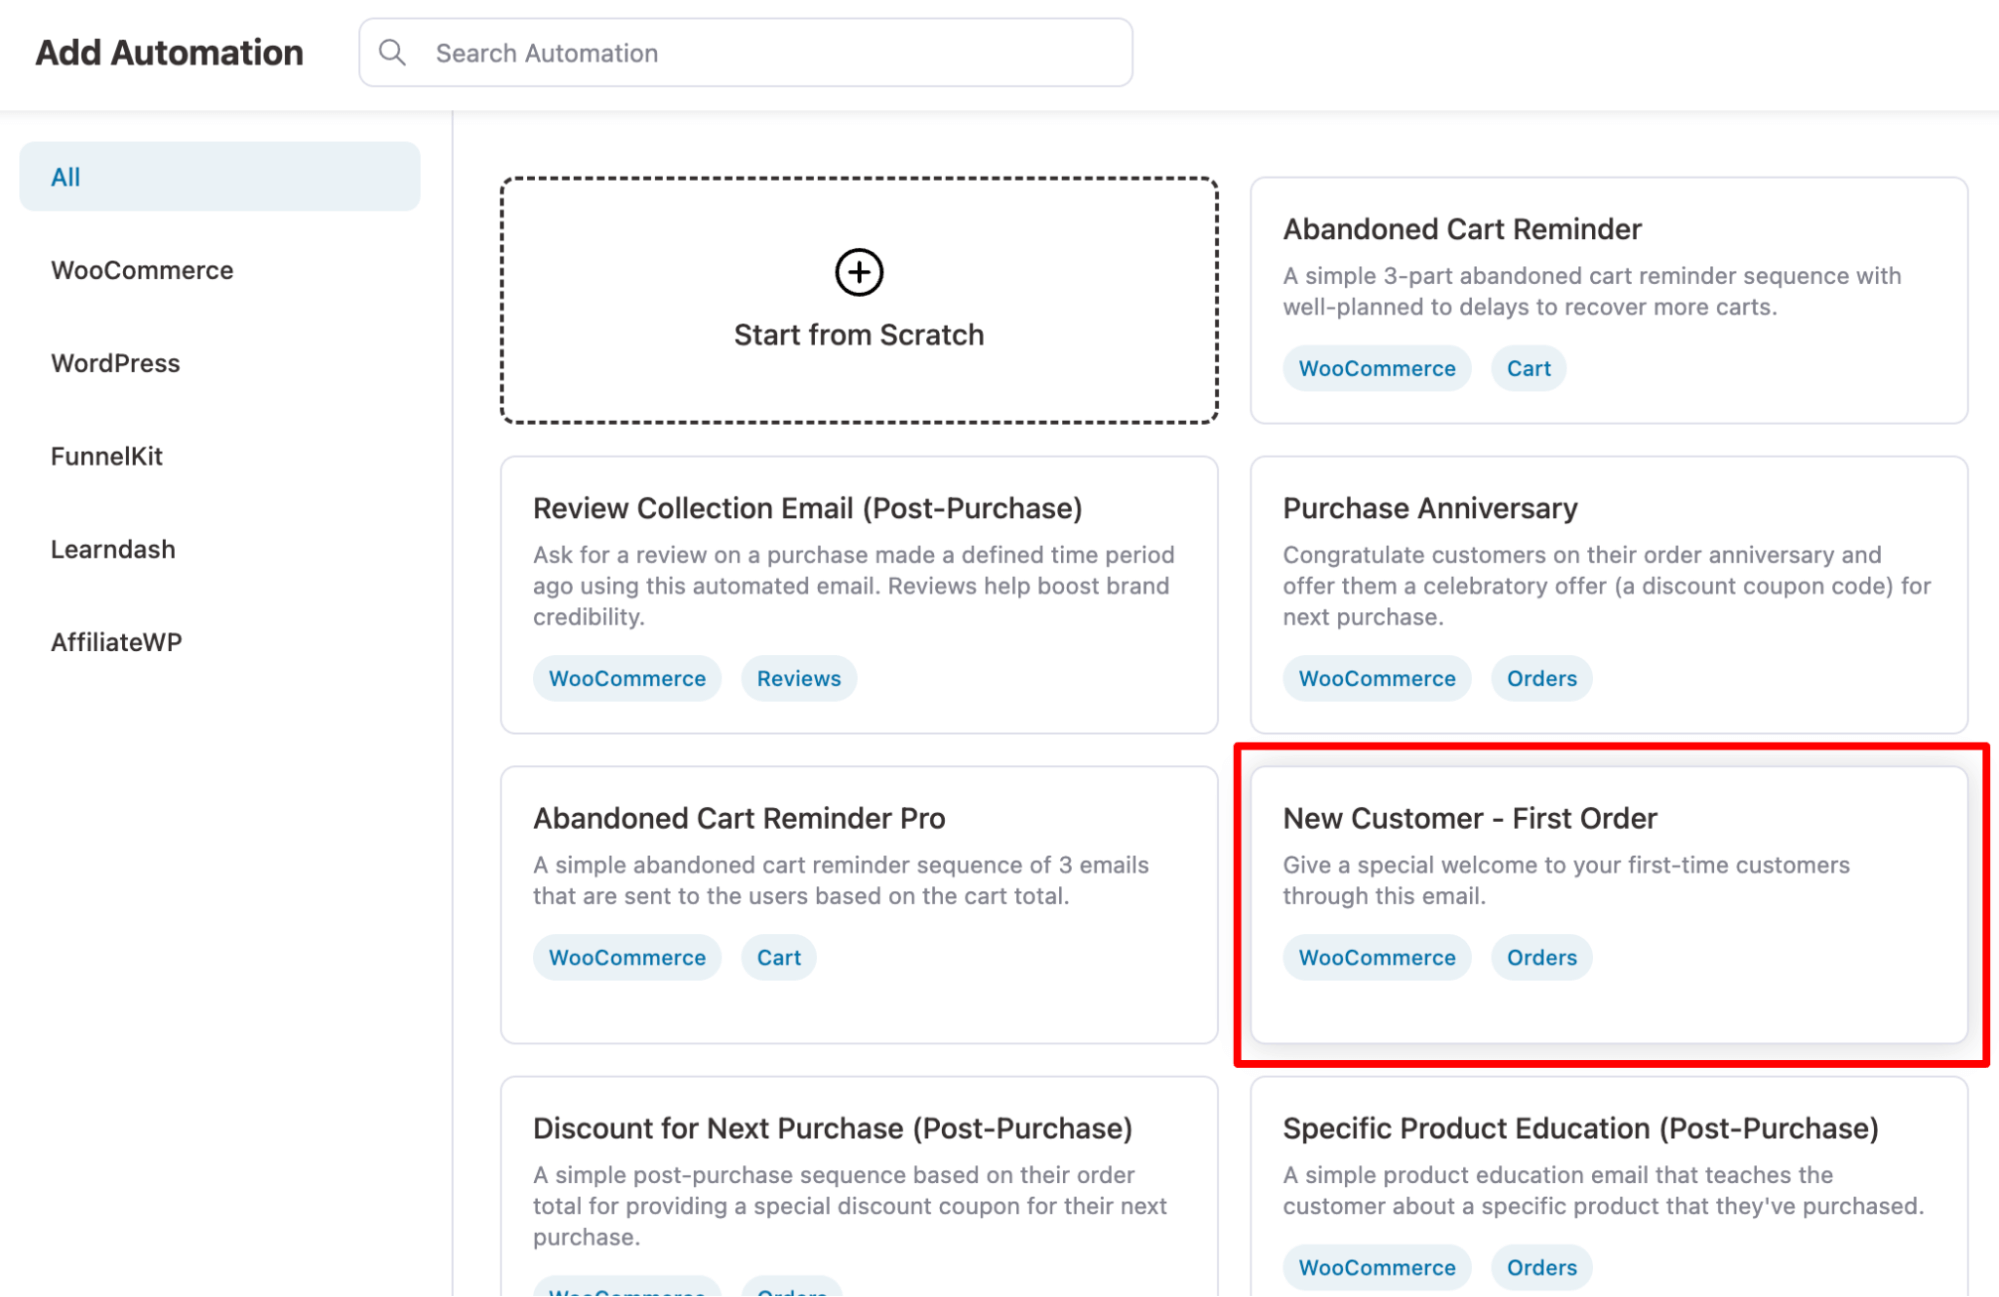
Since we will build a drip campaign to engage the new customers, look for the “First Order” prebuilt recipe and click on it.
Now you can see the whole workflow. Here is a preview of the workflow.
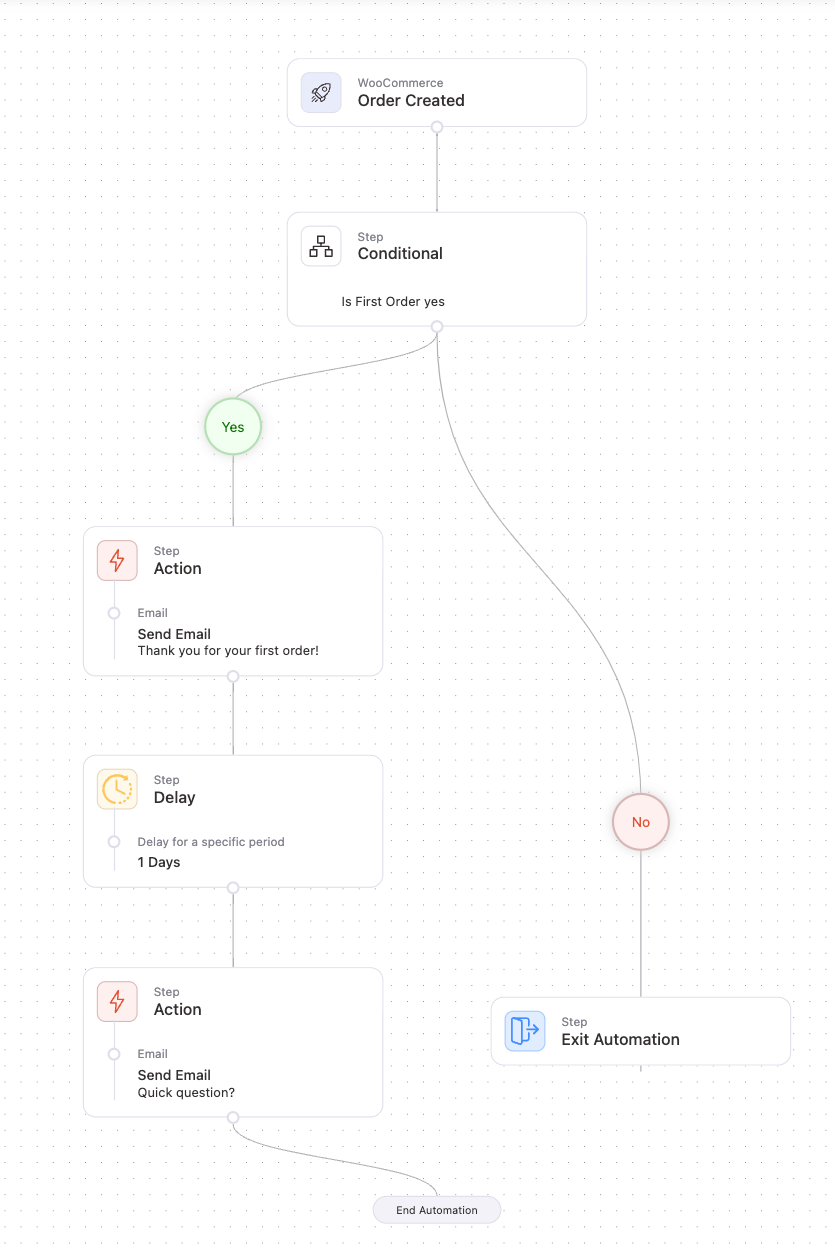
Here are the steps of the drip campaign:
- Order created: The campaign will get triggered each time someone orders on your WooCommerce store.
- Conditional: It checks whether the order made is the first order by that customer. If it’s not the first order, the campaign doesn’t continue for that specific customer.
- Send Email: If this is the first order (yes), the campaign sends its first thank you email.
- Delay: After that, it is delayed for one day
- Send Email: After the delay, a second email will be sent to engage customers with the brand.
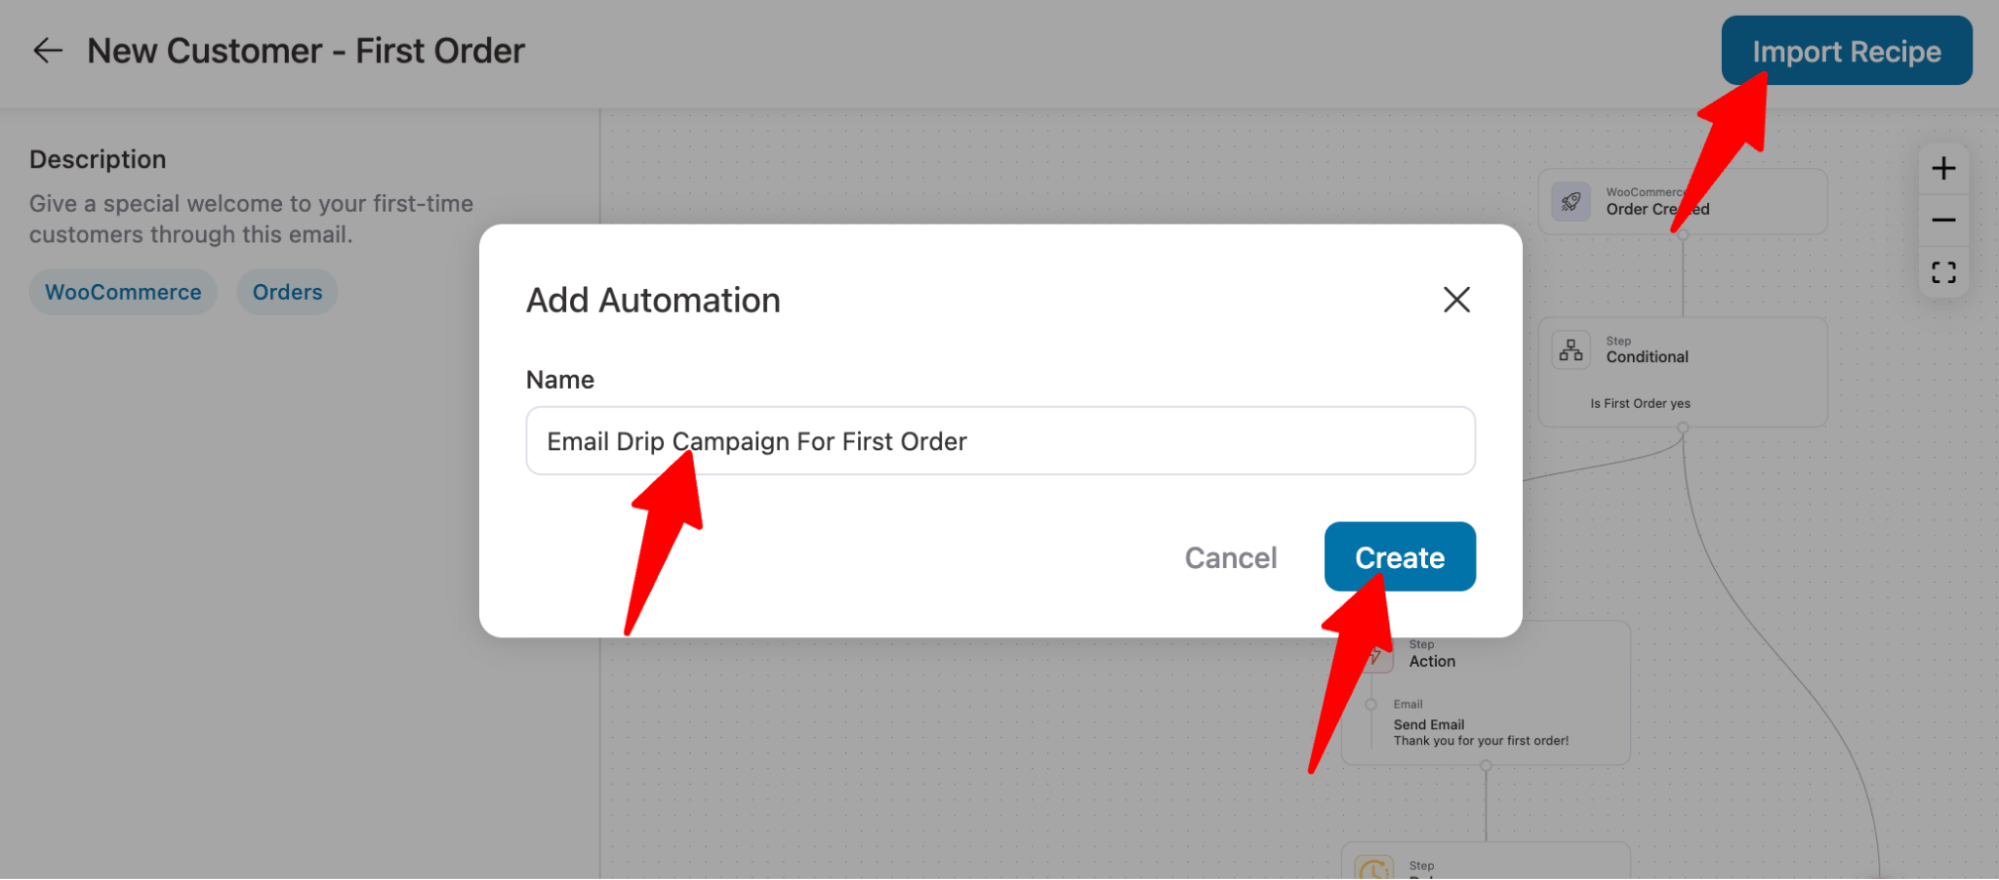
To import the recipe, click the “Import” button in the top right corner. After that, provide the name and click on Create to import the recipe.
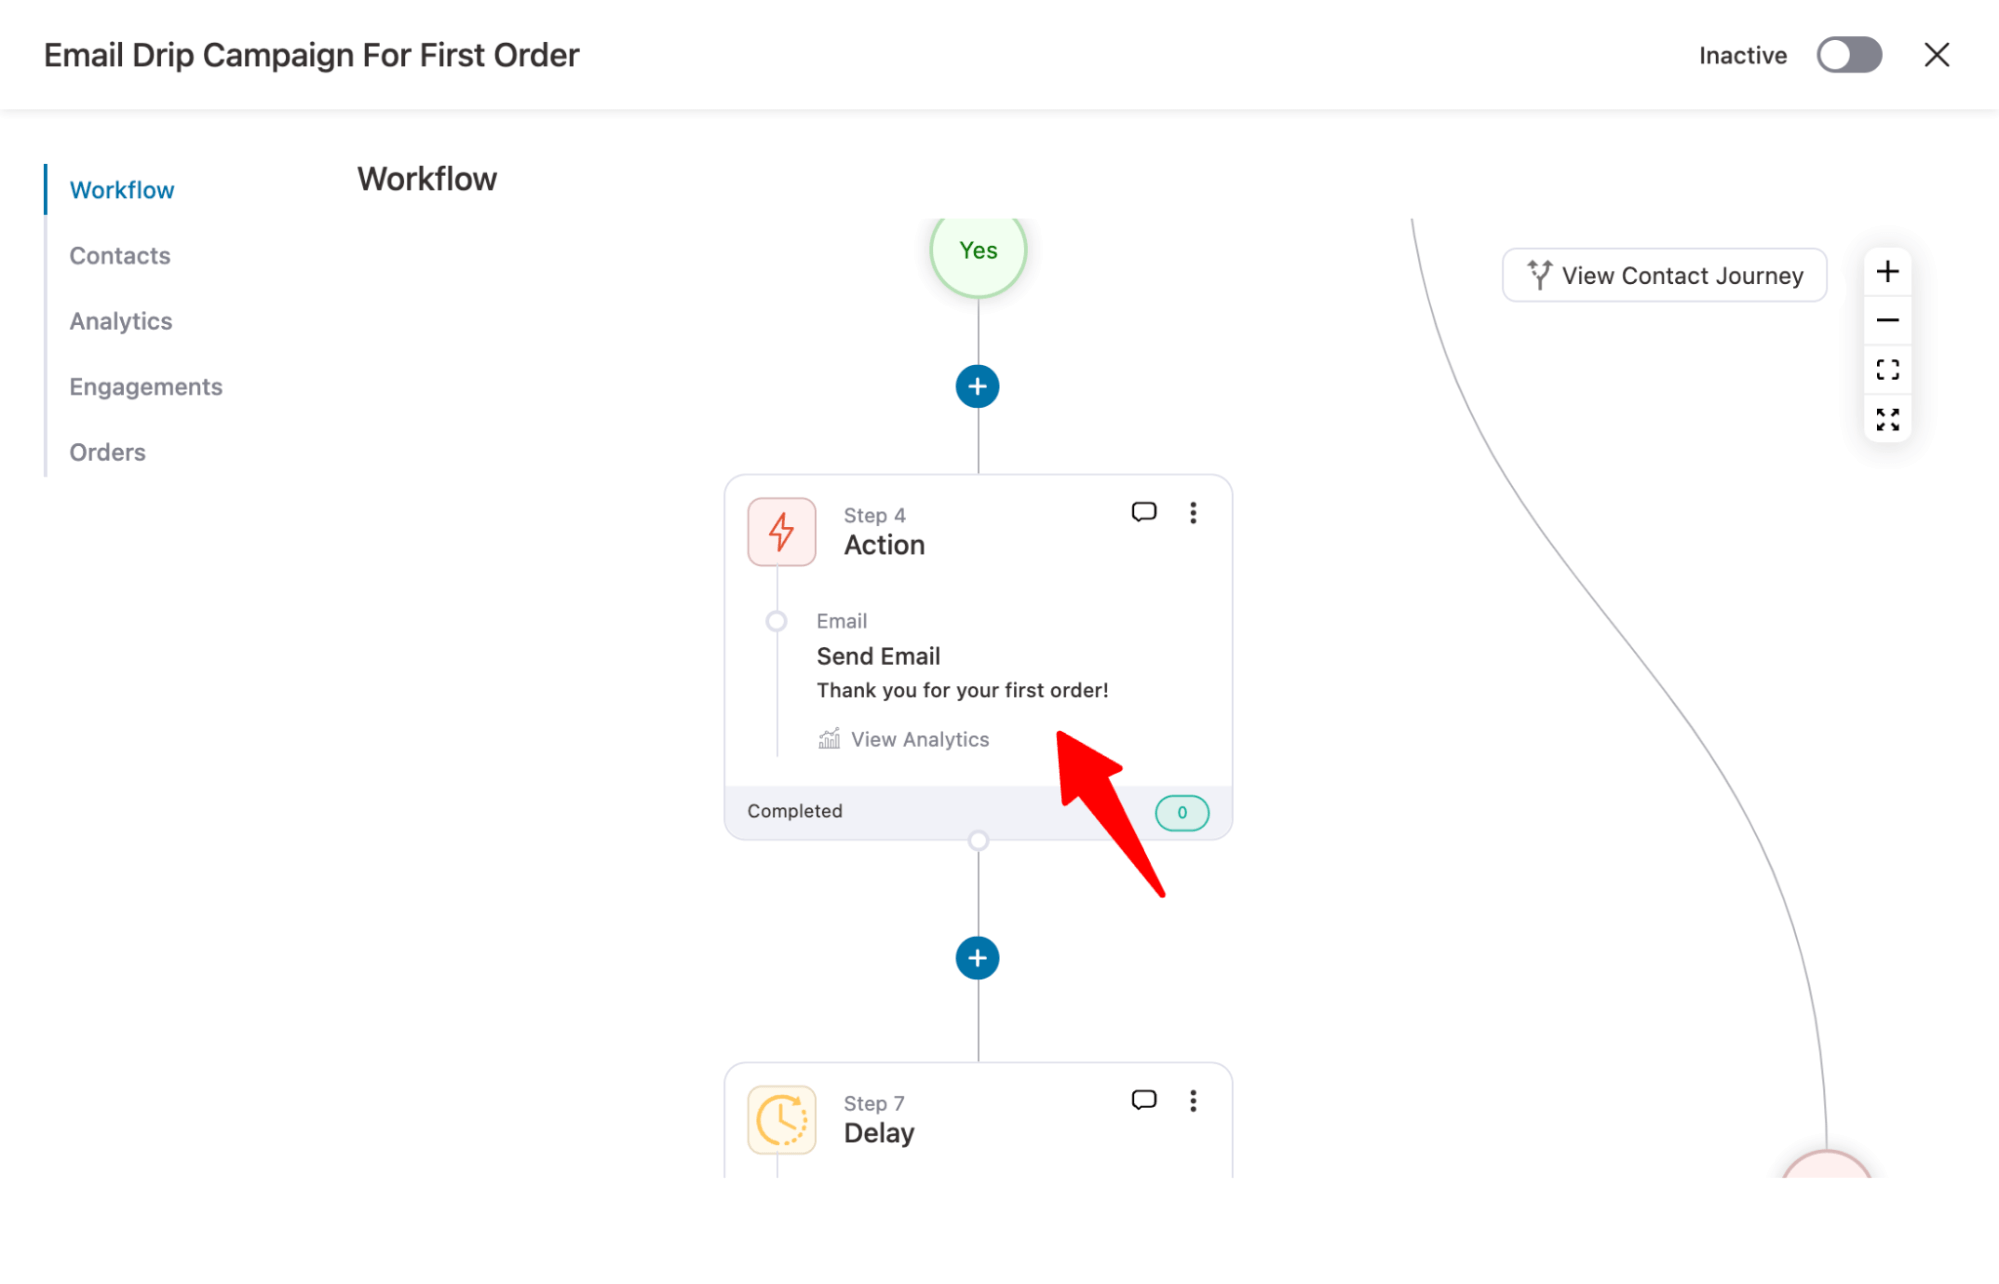
Step 3: Customize the first email
Now, let’s customize the first email that the campaign will send to users. To do so, click on the “Send Email” action.
Now, you can alter the email line, preview text, and body according to your preference.
FunnelKit Automations comes with an amazing feature called Merge tag. Using this option, you can personalize your email content by adding dynamic information such as customer name, order ID, order details, etc.
To add a merge tag, click on the {{..}} icon, then look for the merge tag. Once you find it, copy and paste the tag into your email.
Here, we have added
- {{contact_first_name}} in the email subject line
- {{order_id}} in the email subject preview
- And {{order_summary}} in the email body.
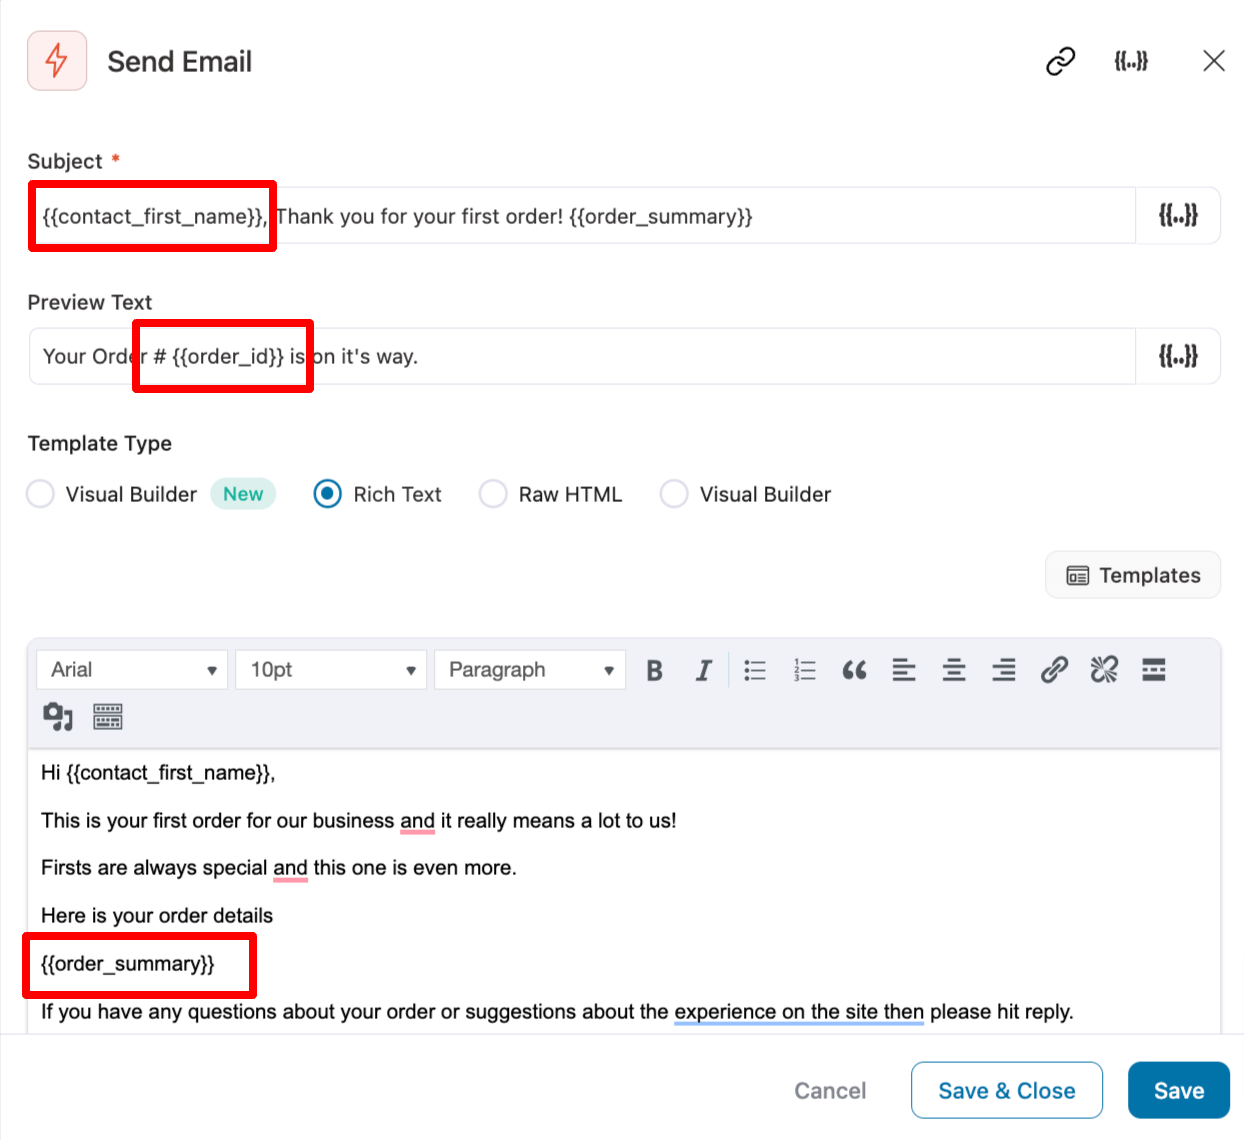
The default email you get with the first-order automation recipe is built using Rich Text.
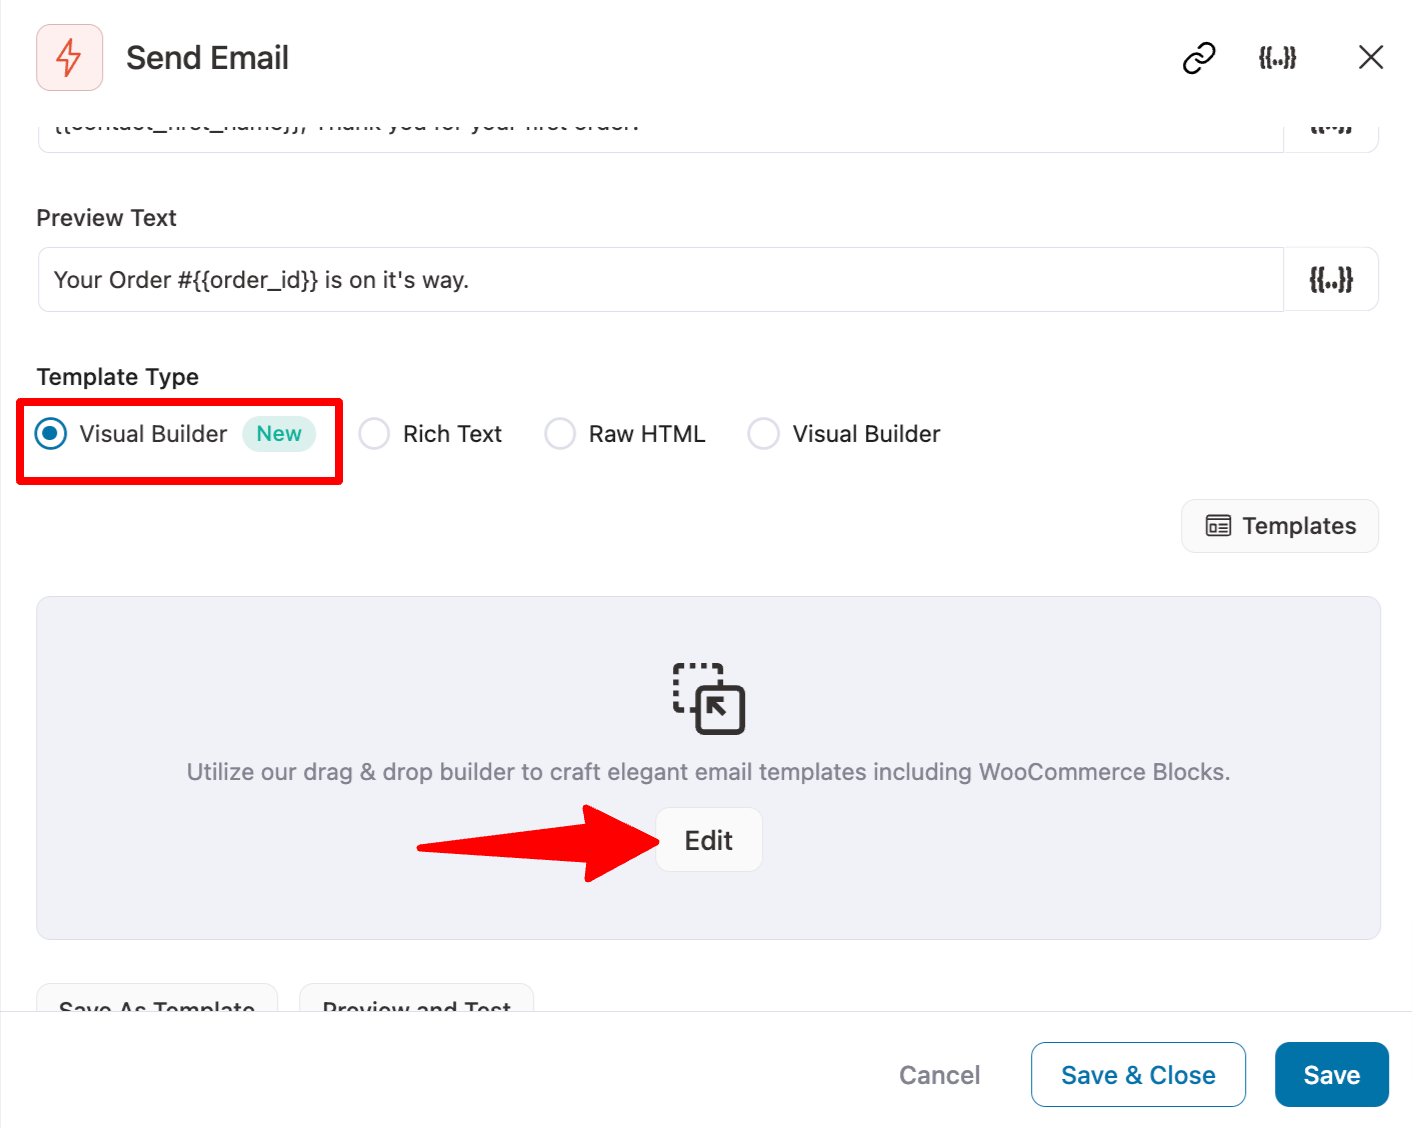
If you find this email too plain, you can also design it with a Visual Builder (New). Our experts recommend using Visual Builder (New) to design the email body.
Design an email using the visual builder
To use the Visual Builder (New), choose the option and click on Edit.
With the Visual Builder (New), you get a set of prebuilt templates you can import to design your drip emails.
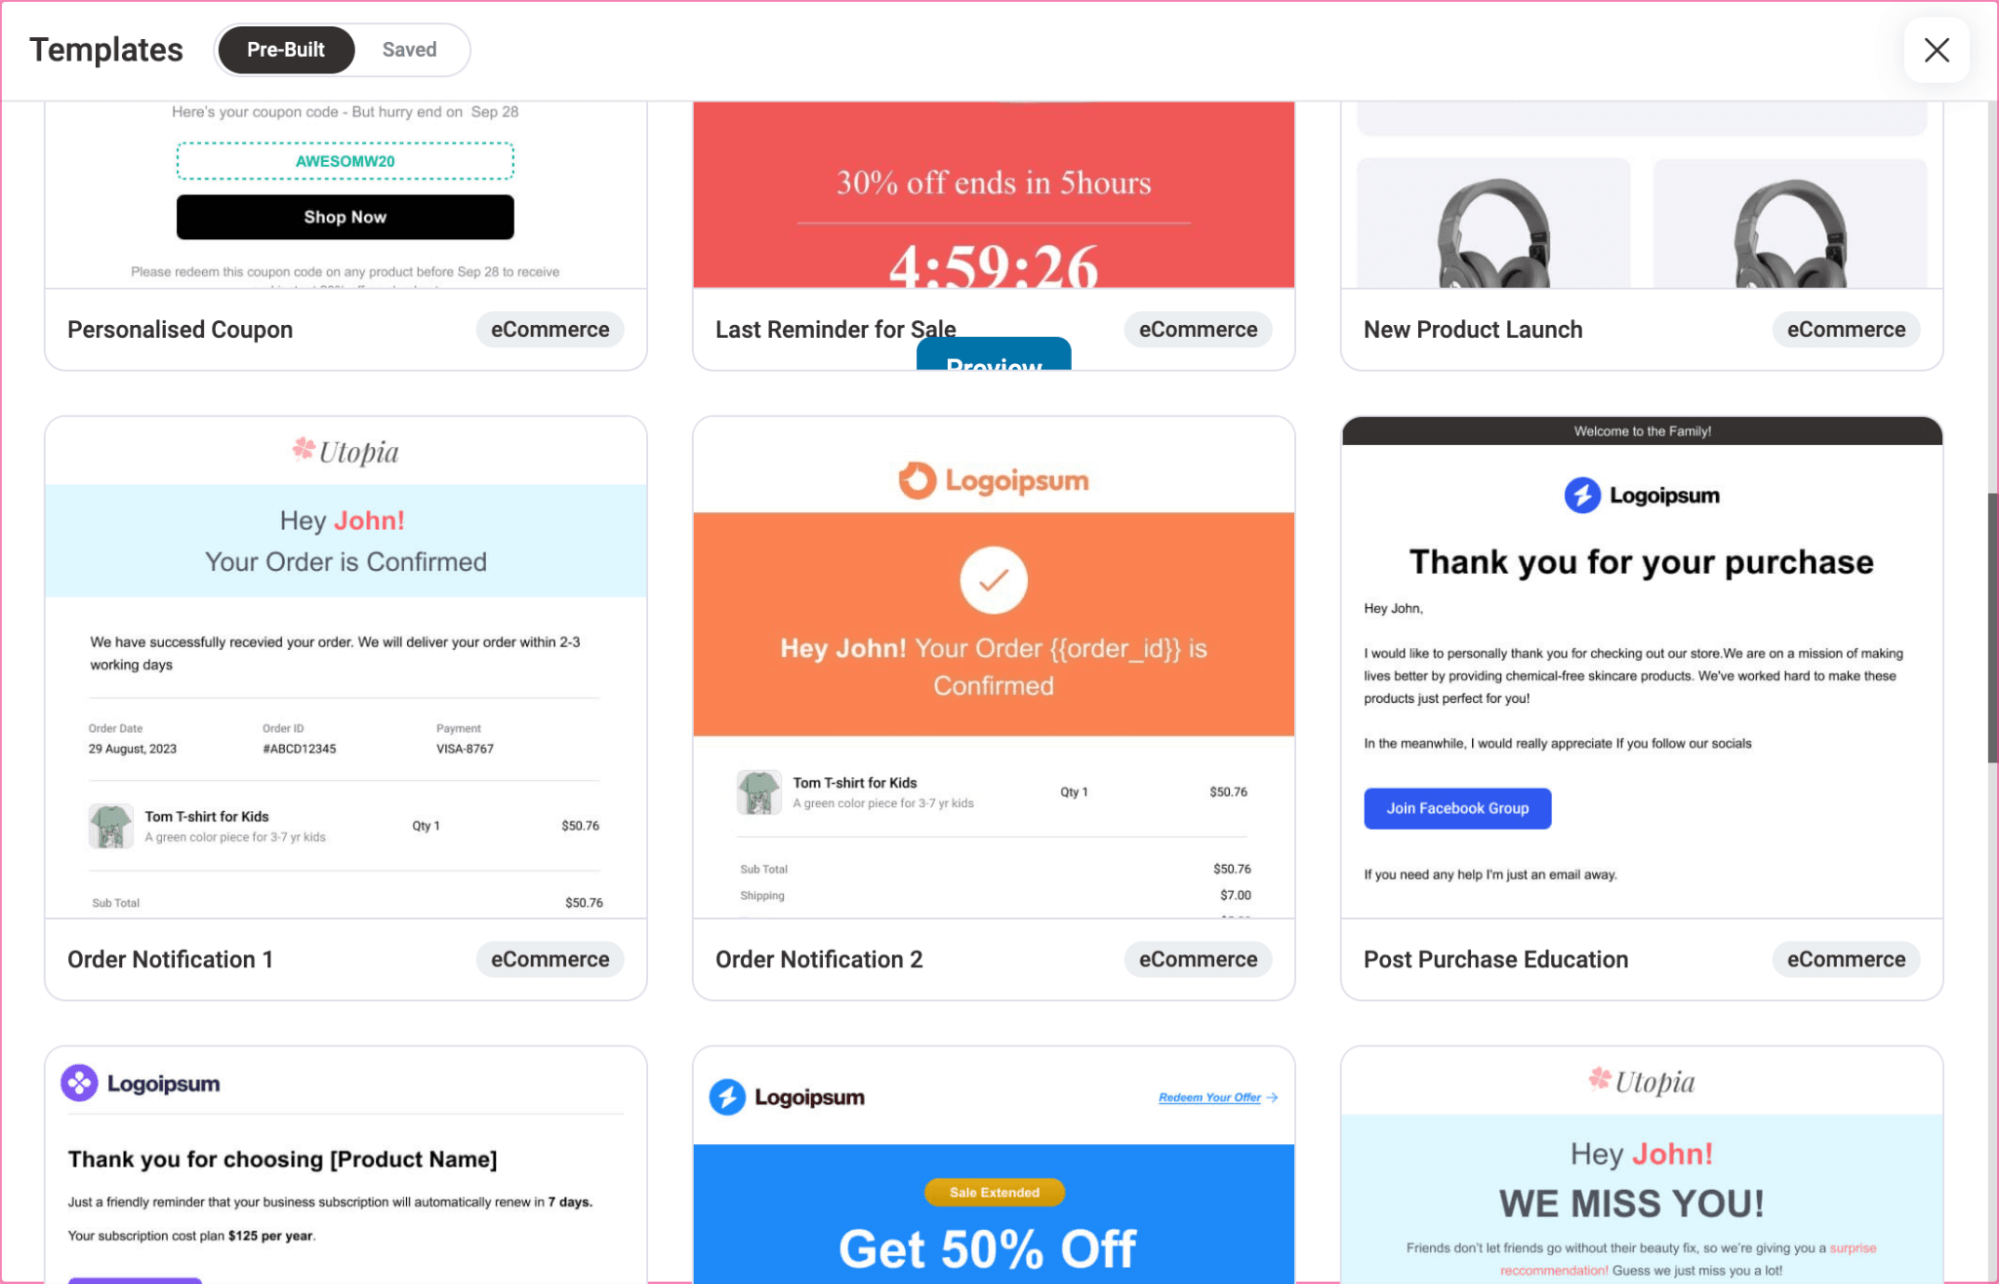
Here, we will customize the post-purchase education template. To import, hover over the template and click Preview.
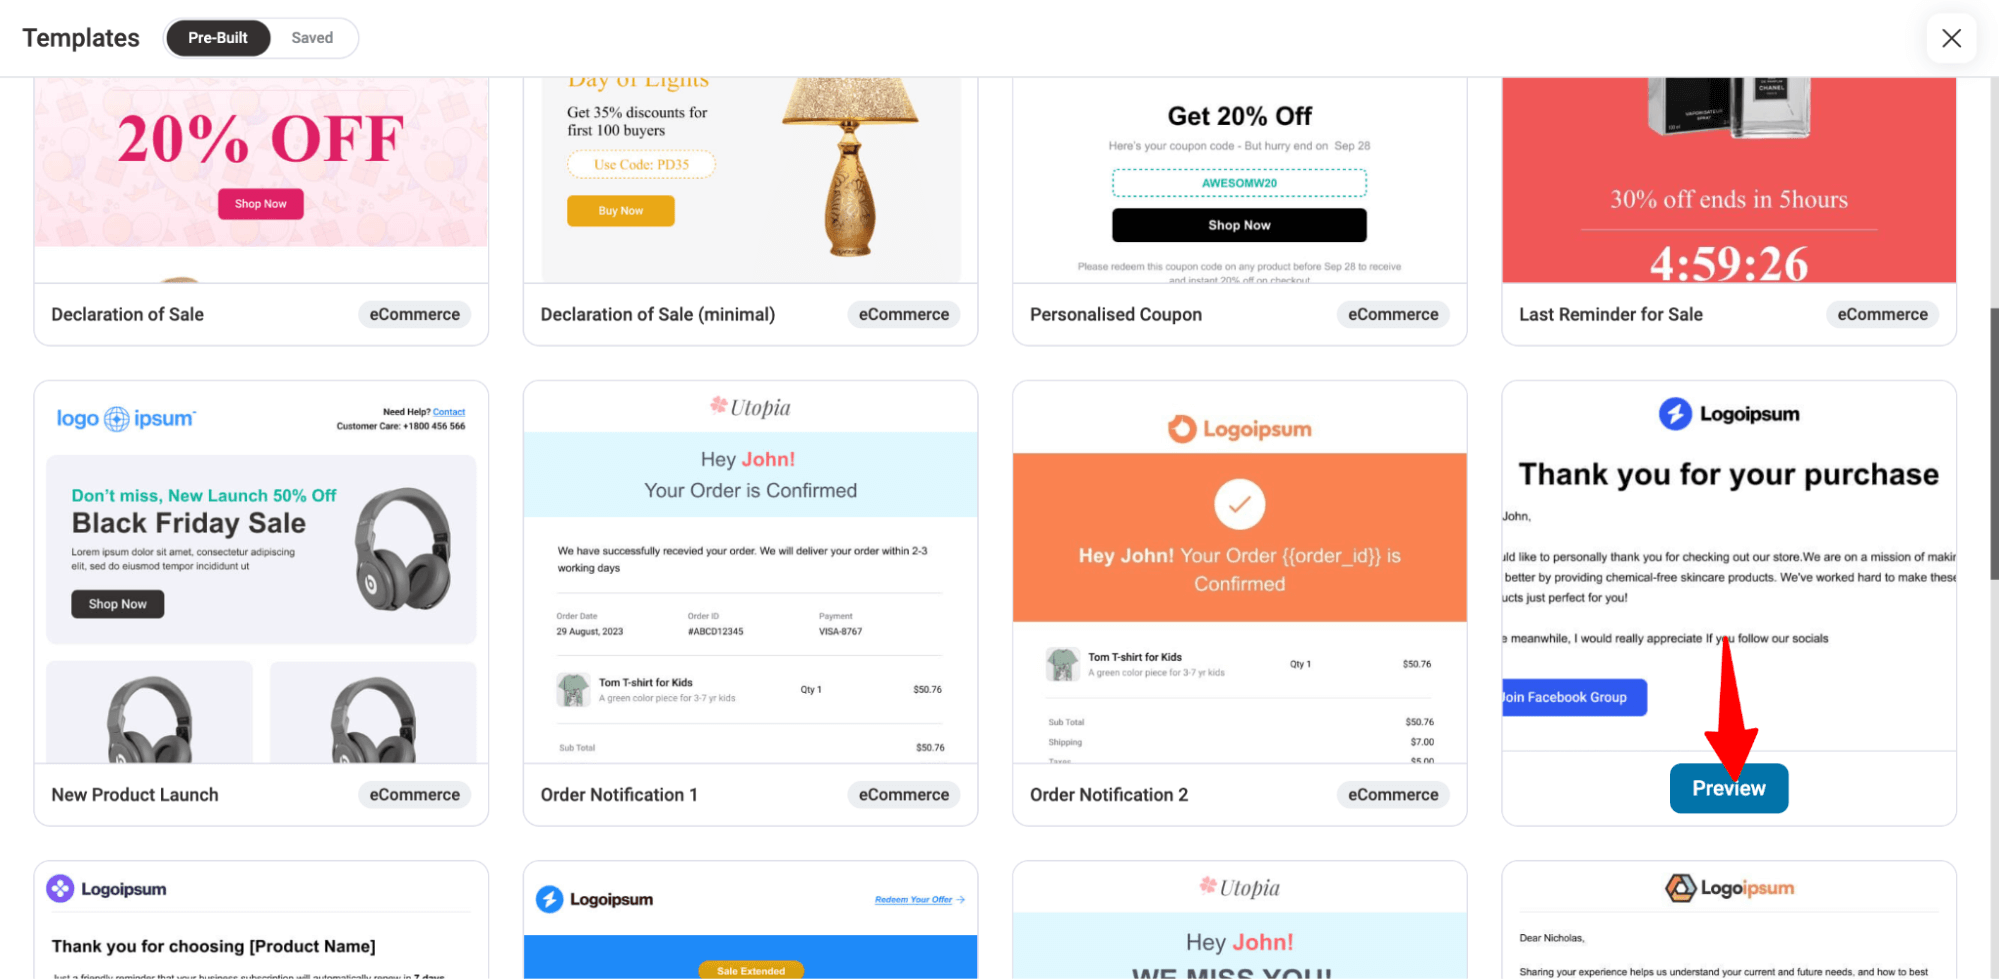
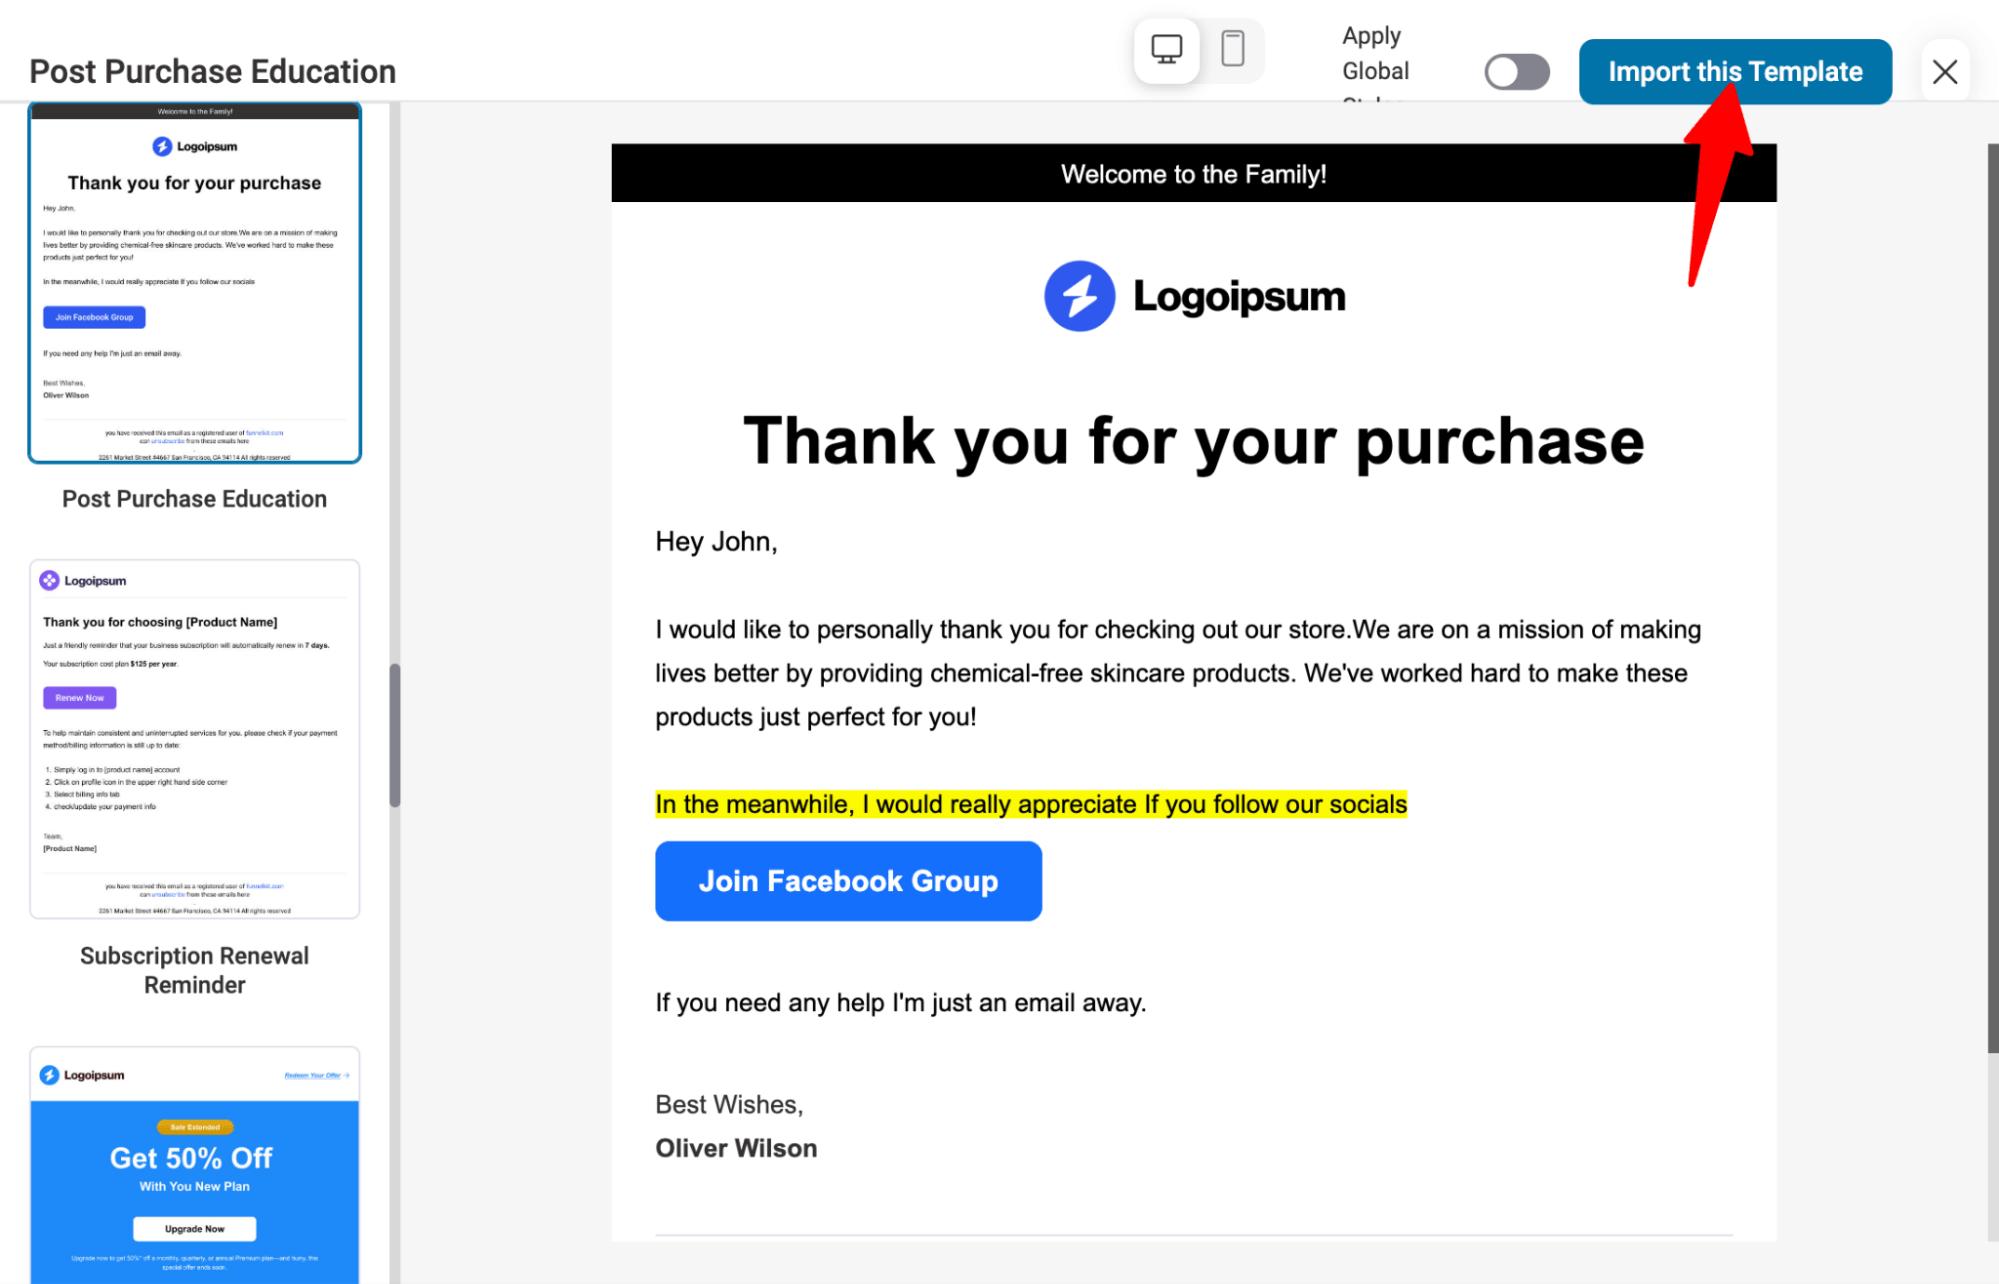
Then click on Import This Template.
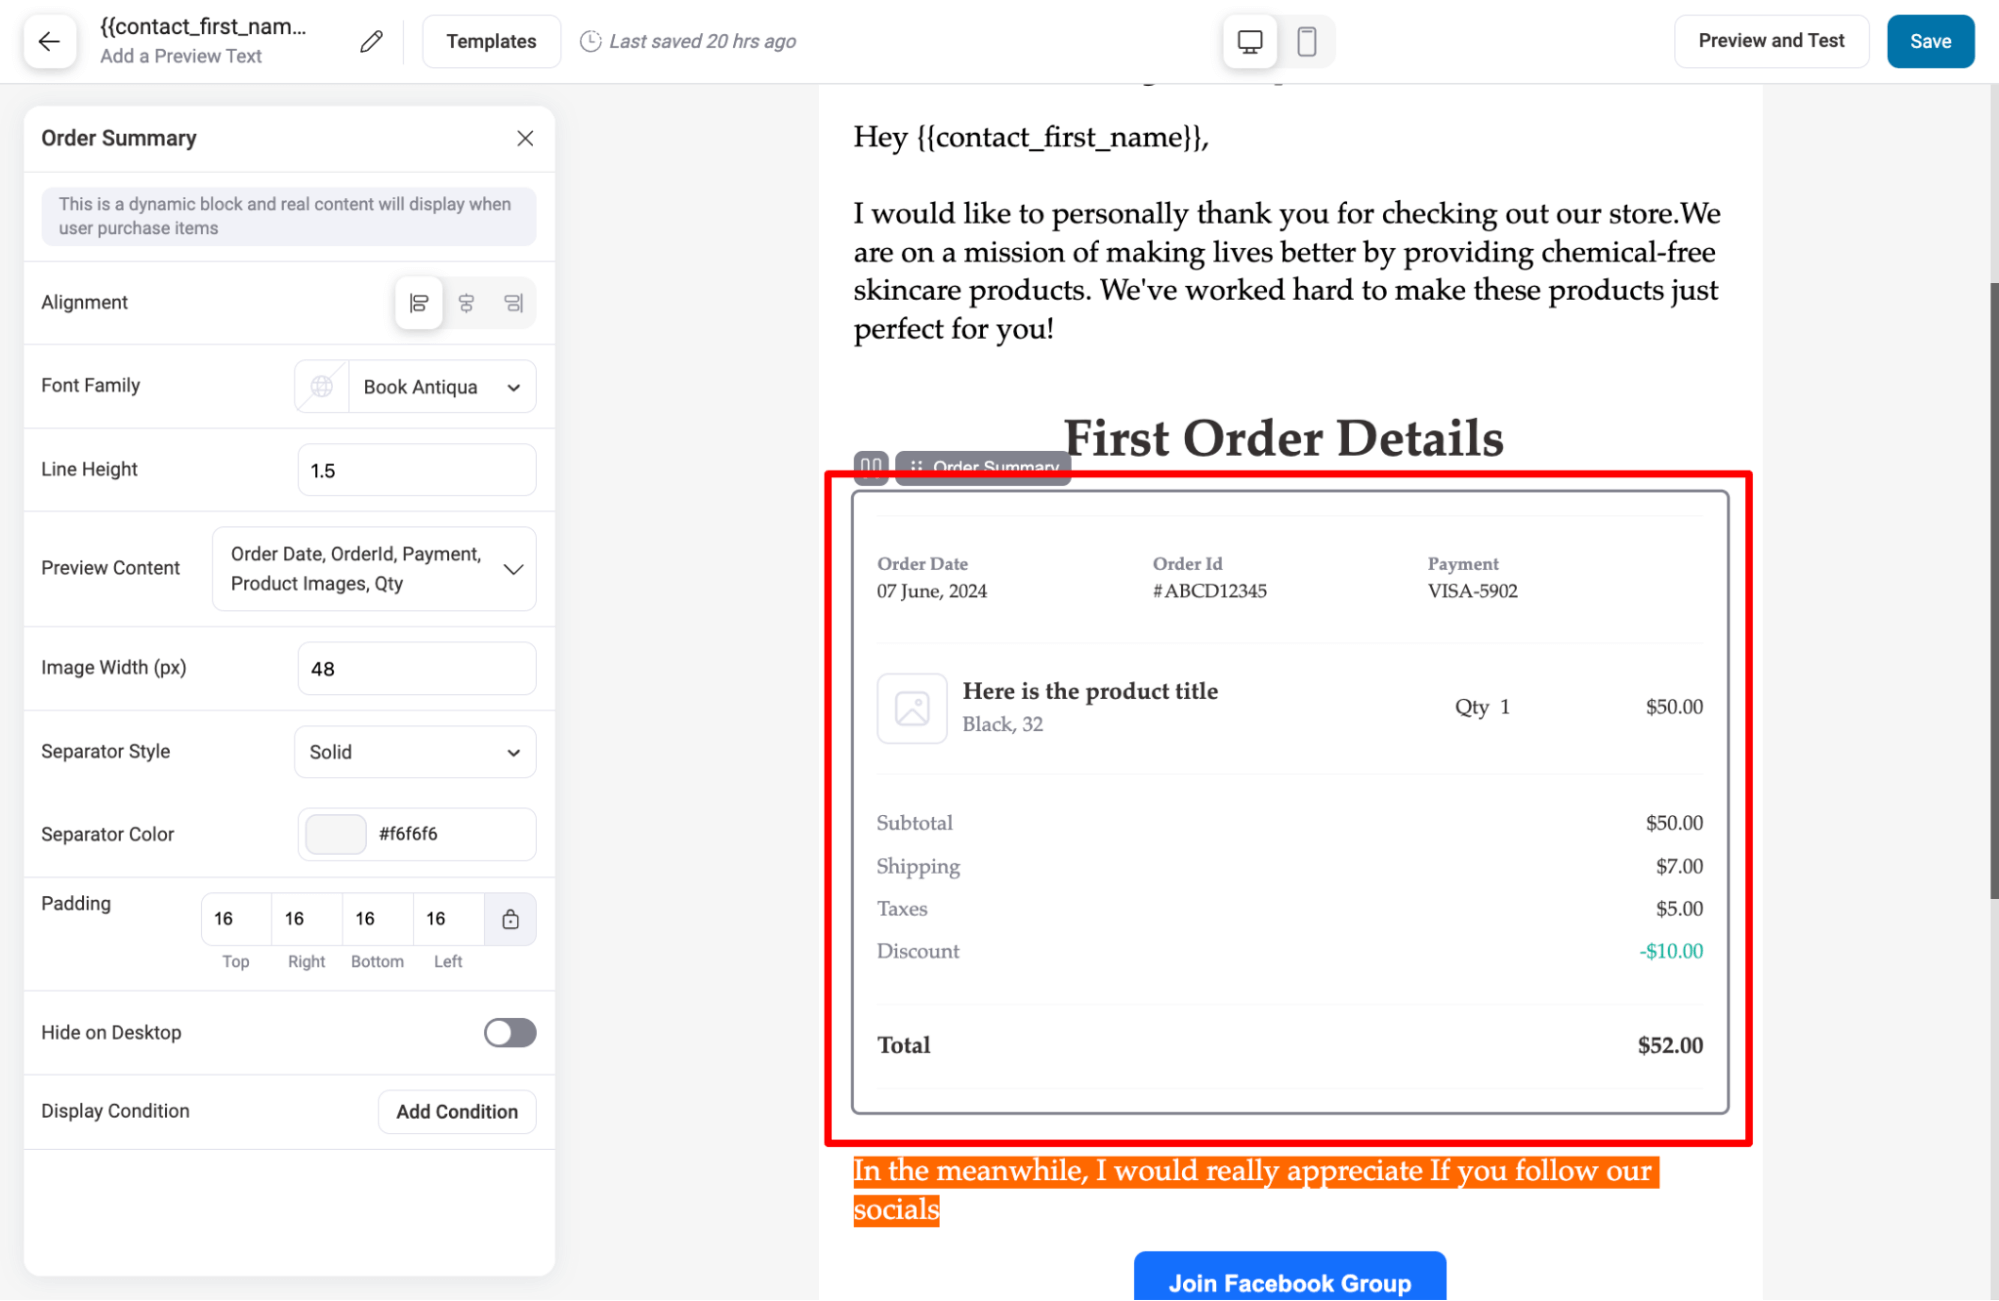
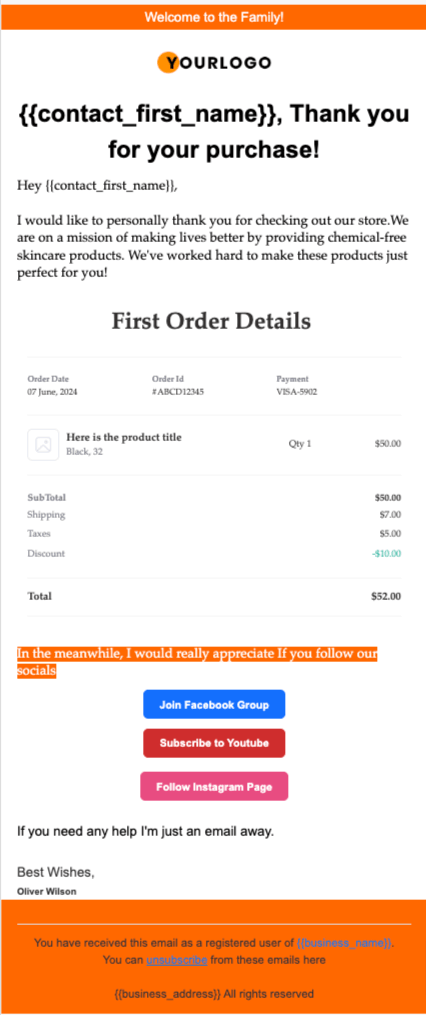
After importing, you can customize the email template. You can change the logo, text, CTAs, etc. You can also add detailed order information using the different WooCommerce blocks if you want.
For instance, we have used the "Order Summary" block to add the order details in the email body.
When happy with the email design, save and close the email editor.
Here is a preview:
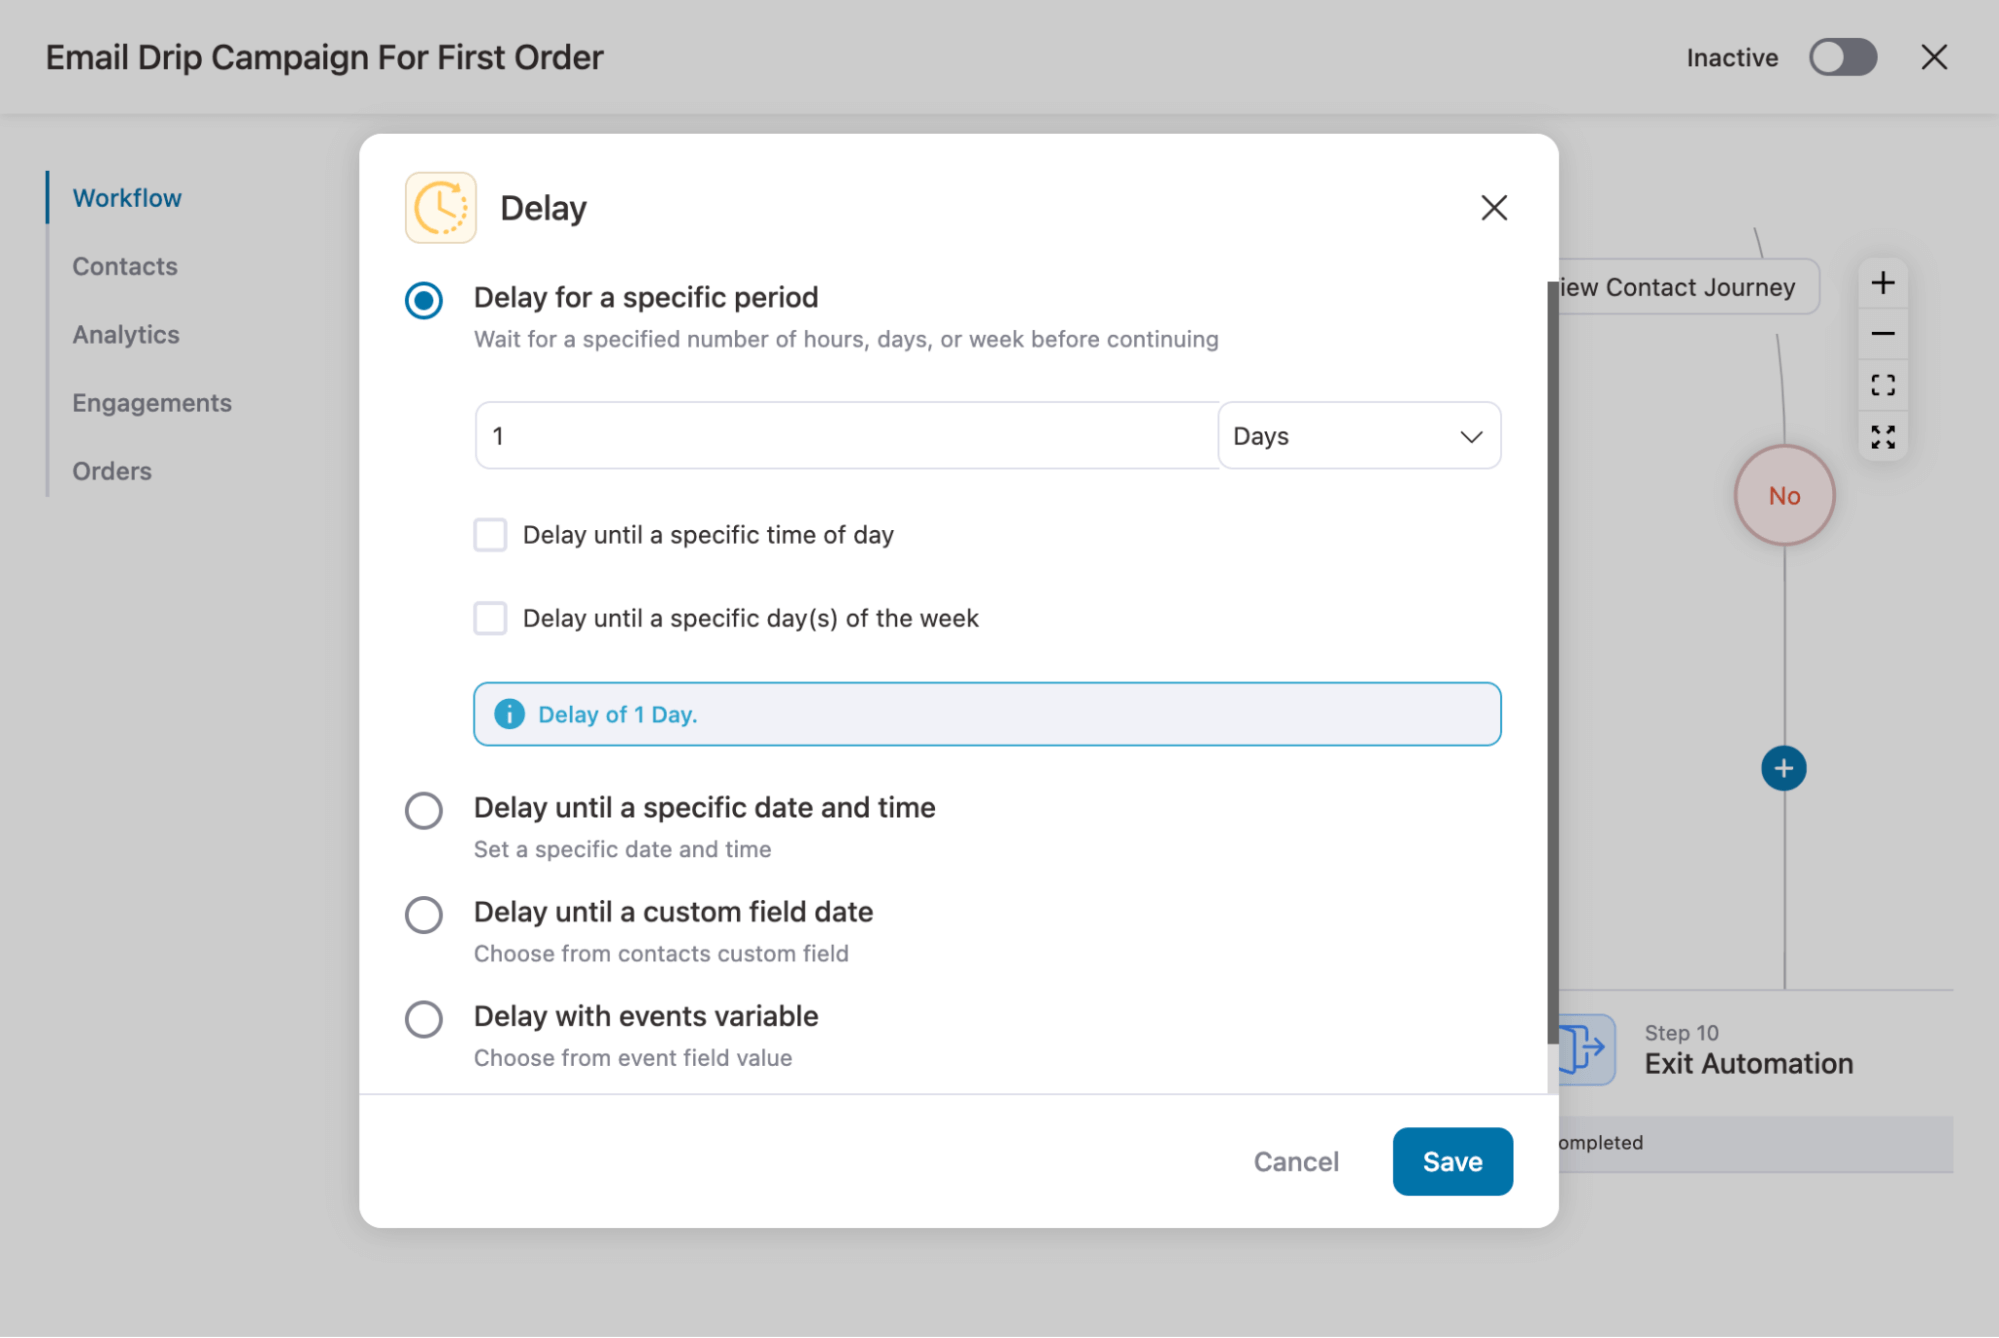
Step 4: Adjust the delay.
The workflow was delayed by one day before the second email. To change the delay duration, click on the “Delay” step.

Now, you can add a delay in days, hours, weeks, and months. You can also add a delay until a specific time of the day or days of the week.
After the delay, you can alter the second email just as you did the first one in Step 3.
Here is the email we designed using Visual Builder (New). We shared a discount coupon to encourage users to make another purchase.
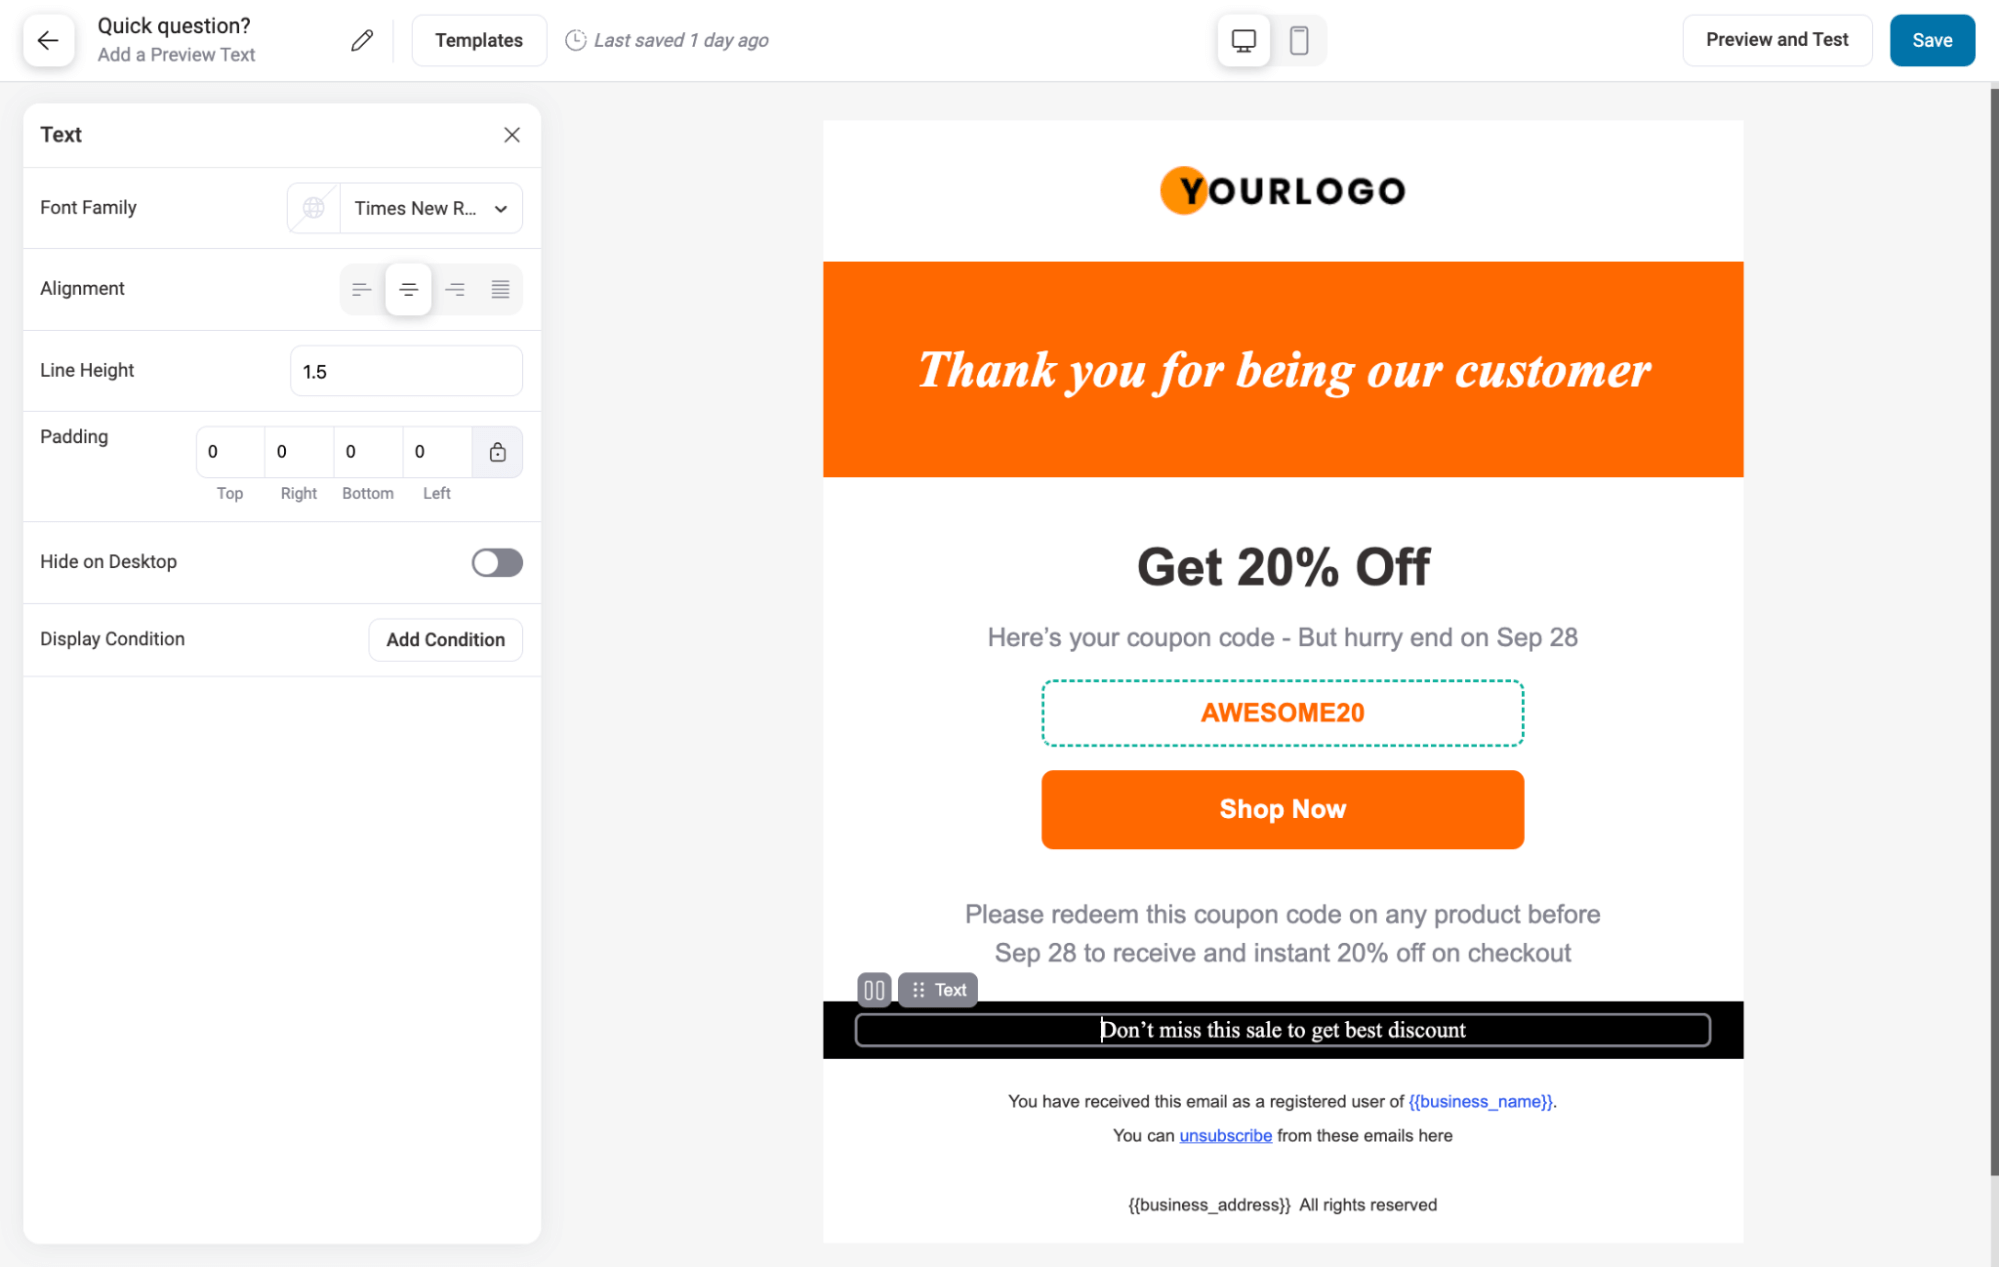
Note: According to your drip campaign strategy, you can add another delay followed by a third email to the email sequence.
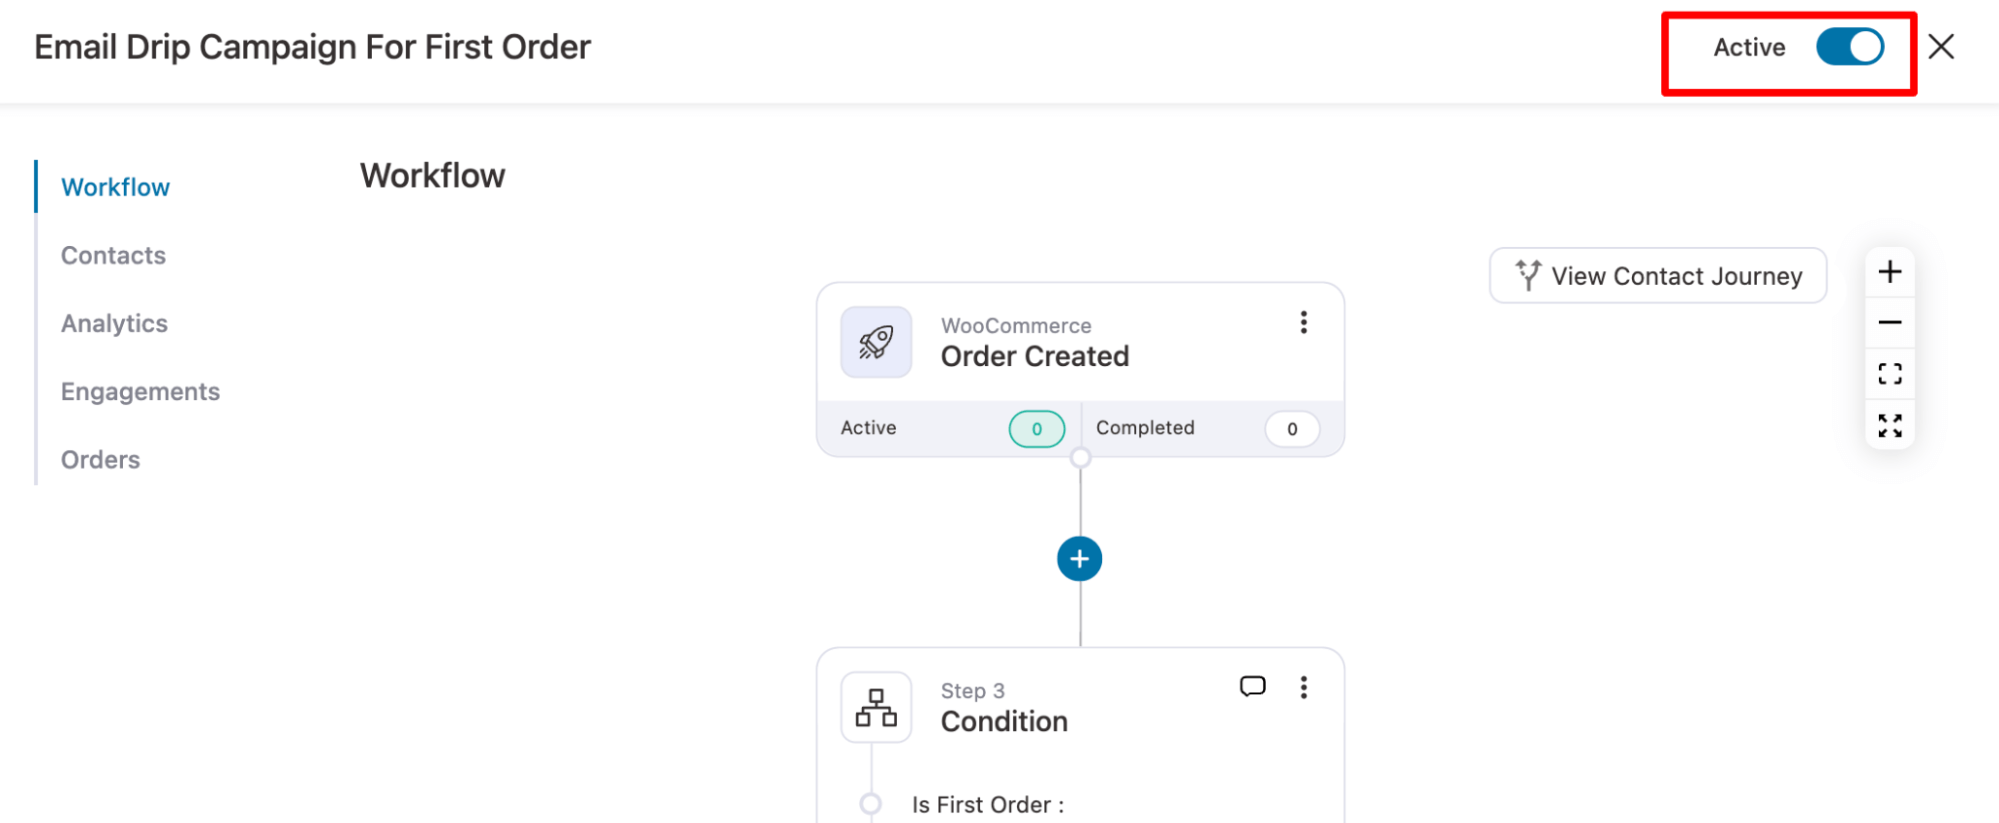
Step 5: Activate the email drip campaign
Finally, come to the workflow page and turn on the toggle at the top to activate the email marketing campaign.
5 Email Drip Campaign Best Practices
Follow the best practices to create a successful drip email marketing campaign and ensure optimal results.
1. Be informative but brief.
While your drip email content should be informative, you shouldn't make lengthy ones. The goal should be getting users to click the CTA button fast.
However, in certain cases, you can make your email lengthy—for example, emails in which you demonstrate to users how to use your product.
2. Include a CTA button or question at the end of every email.
Always include a CTA button at the end of every email. Users should know what they should do at the end of every message.
Your CTAs should be action-driven and tell users about the specific action you want them to take. For example, buy a product, sign up for the newsletter, read the latest blog post, etc.
3. Get the email timing right.
Getting the email timing right is crucial because the open rate heavily depends on the timing. Research by Campaign Monitor demonstrates that Fridays have the highest open and click-through rates at 18.9% and 2.7%, respectively.
In addition, the research suggests you should avoid sending emails on Saturdays. However, based on previous data and research, you should decide the timing based on what works for your audience.
4. Track open rates, click-through rates, and click-to-open rates.
Always keep track of email open rates, click rates, and click-to-open rates. This last one is particularly relevant because it indicates the percentage of people who clicked through after reading the email.
Monitoring this data determines the optimum time and day to deliver your emails. Also, it will help you decide whether your email and CTA's content is working.
5. Send a follow-up sequence after no response
You shouldn't stop sending drip emails because users didn't respond once or twice. Always remember that you are offering them value with an email and not annoying them for no reason.
However, you should stop sending emails if users don't engage after 3 to 4 emails. If you stop emailing, you can send them a last email asking why they didn't respond and how you can improve the experience.
More Questions About WordPress Email Drip Campaign
Here are the frequently asked questions about sending an email drip campaign from a WordPress website, with answers:
How many emails are in a drip campaign?
A drip campaign typically consists of 4 to 11 emails. You can decide the number depending on your audience and marketing strategy.
How do I start an email drip campaign?
To start an email drip campaign, define your goals, segment your audience, create engaging content, set up an automation tool, and schedule the emails.
What is a drip campaign vs an email sequence?
A drip campaign is a series of automated emails sent based on specific triggers, while an email sequence is a set of emails sent in a particular order.
Why is it called a drip campaign?
It is called a drip campaign because the emails are "dripped" out over time, similar to how water drips slowly and steadily.
Is Drip an email marketing platform?
Yes, Drip is an email marketing platform. However, if you want to run an email automation campaign from your WordPress dashboard, experts recommend integrating Drip with FunnelKit Automations.
What is the difference between a drip campaign and a broadcast email?
A drip campaign is sent automatically to a specific audience segment based on their interactions with your site. Broadcast emails are one-time messages sent to a broader audience. Drip campaigns save time and ensure efficiency by running without manual effort.
Ready to Create Your Email Drip Campaign in WordPress?
You now have everything you need to build a working email drip campaign directly from your WordPress dashboard. From setting up the first-order trigger to customizing emails and adjusting delays, the process is straightforward once you know the steps.
The four campaign types cover onboarding, cart abandonment, re-engagement, and free-to-pro. Each one targets a different moment in the customer journey, and all of them can be built using the same process you just walked through.
With FunnelKit Automations, you can launch any of these without stitching together multiple tools or managing a growing SaaS bill. Everything runs natively inside WordPress, your data stays on your server, and built-in analytics keep you informed on what is working.
The first-order sequence is the best place to start. Set it up once, and it runs on its own from there.
Editorial Team
March 31, 2026When it comes to lead funnel vs sales funnel, most marketers mix them up, which ends up costing them customers and revenue. Understanding the difference between the two is the...
Editorial Team
March 23, 2026Does your WooCommerce store offer enough payment options? If not, you could be losing up to 13% of sales. [According to Baymard]. WooCommerce’s default payment options don’t always meet customer...

Editorial Team
March 10, 2026A WooCommerce mini cart is a compact cart summary that displays product details, quantities, and totals without sending shoppers to a separate cart page. You can set it up as...


