
Let’s say you’ve done the hard part by building the site, adding your products, and setting up Stripe. But what if your customer clicks “Pay Now” after providing details on the checkout page, and nothing happens?
Such payment issues can cost you sales and ruin your store’s reputation. Even minor problems, such as Stripe JS not loading, errors caused by conflicting themes or plugins, or customers’ payment data not being saved, etc., can significantly impact your conversions without warning.
That’s why testing your Stripe payments in WooCommerce is crucial.
Based on our experience working with numerous stores, we have created this comprehensive and actionable guide to outline the exact steps for testing Stripe payments.
We’ll share how to test the payments from the frontend to the backend, covering various payment methods and automating the handling of each payment outcome without any coding.
Table of Contents
- 1 Integrating Stripe with WooCommerce
- 2 Setting Up the Stripe Testing Environment in WooCommerce
- 3 How to Test Stripe Payments in WooCommerce?
- 4 How to Test Stripe Payments for Different Scenarios?
- 5 Final Step: Go Live and Test Real Stripe Transactions
- 6 4 Tips and Best Practices for Testing Stripe Payments Effectively
- 7 Are You Ready to Test Stripe Payments?
Integrating Stripe with WooCommerce
Stripe is a popular payment processing platform for eCommerce websites and mobile applications. It supports over 135 currencies and offers multiple payment methods.
It’s PCI-DSS compliant and 3D secure, making it one of the safest payment options available.
With this plugin, you can set up:
- One-click webhook integration
- Credit and debit card payments
- Auto-integrated API keys
- Express checkout methods like Google Pay and Apple Pay
- Buy now, pay later option with Affirm, Klarna, and Afterpay
- Local payment methods, such as SEPA, Bancontact, P24, iDEAL, etc.
- Smart admin only testing mode
It also makes integrating Stripe with WooCommerce effortless, and setting it up takes less than two minutes.
Setting Up the Stripe Testing Environment in WooCommerce
Now that you’ve set up Stripe in WooCommerce, there is no need to find or copy your Stripe API keys manually.
1. Enable the Stripe test mode
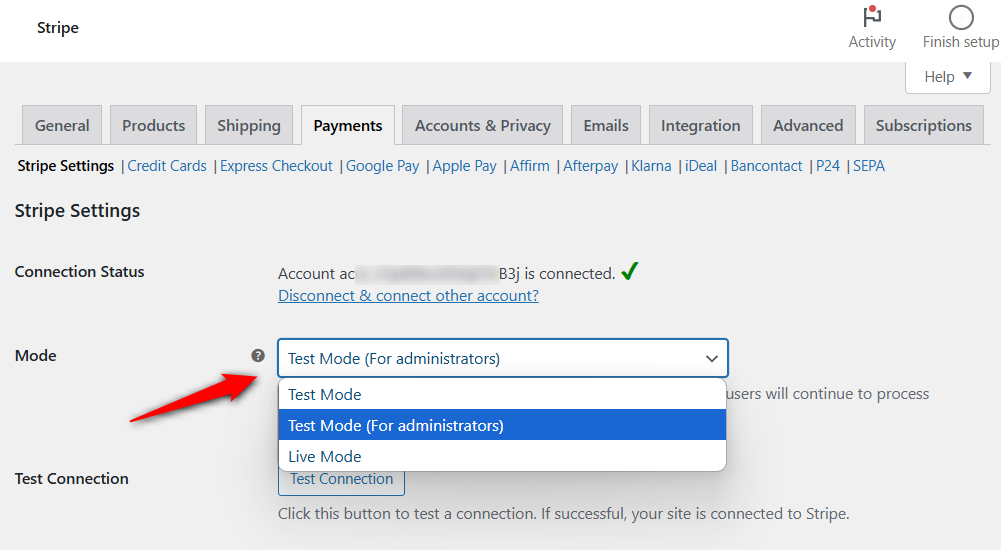
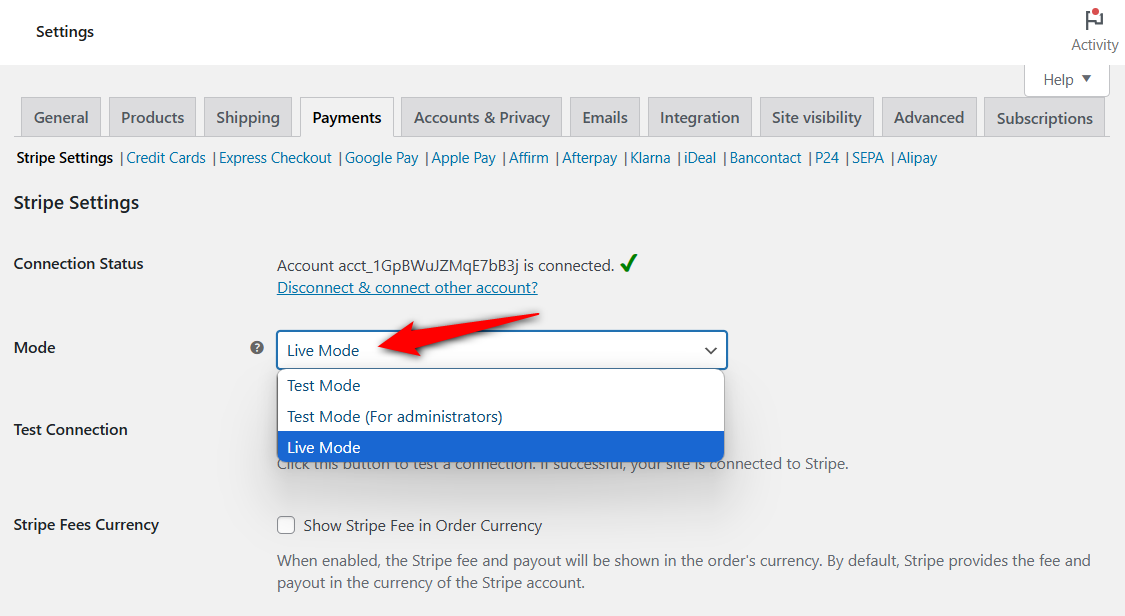
To enable the test mode, navigate to WooCommerce ⇨ Settings and click on the Stripe tab.
Our WooCommerce Stripe gateway plugin offers three modes:
- Test Mode: Simulates transactions using test API keys
- Test Mode (for administrators): Allows only admins to test Stripe checkout while showing Live mode to shoppers
- Live Mode: Process real payments with live API keys
Make sure to select the ‘Test Mode’ or ‘Test Mode (For administrators)’.
Hit ‘Save changes’ when done.
This is how you can enable the test mode. From here, you can easily switch between test and live mode.
2. Enable logging in Stripe
Logs help you diagnose specific issues, verify API requests and webhooks, and track user actions to enhance your checkout flow and resolve payment errors.
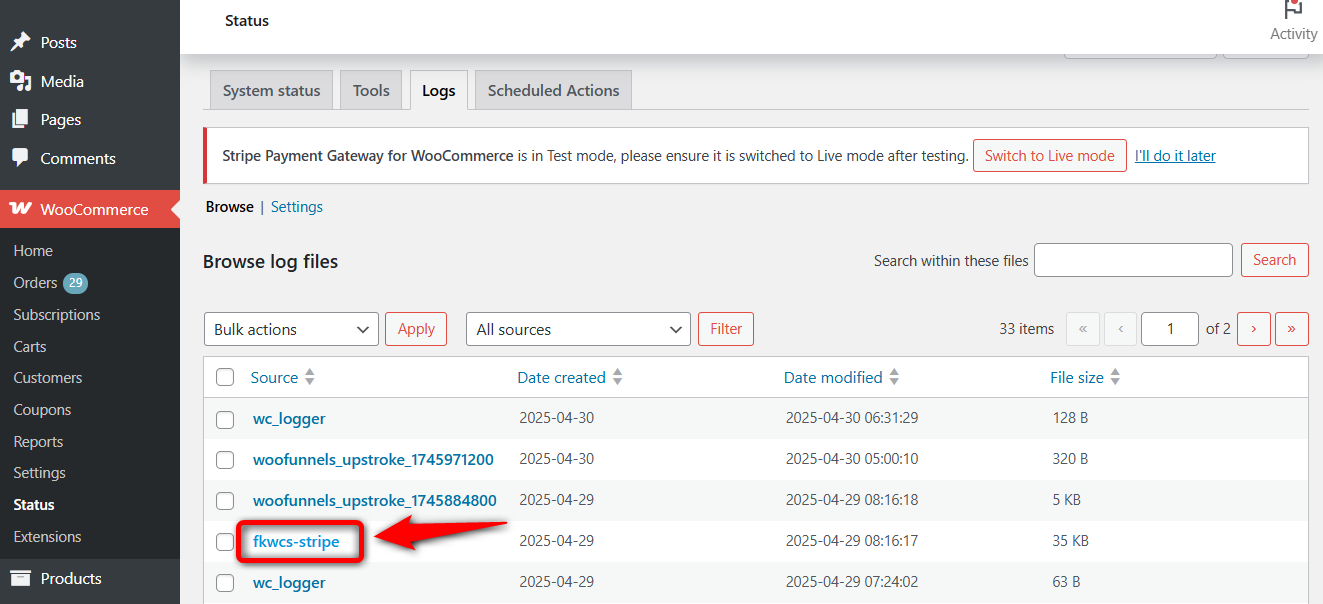
Navigate to WooCommerce ⇨ Stripe and enable the Log debug messages option.

Make sure to hit ‘Save Changes’ when done.
You can find these logs by name starting with fkwcs-stripe under WooCommerce Status Logs.
How to Test Stripe Payments in WooCommerce?
Testing Stripe payments ensures everything works perfectly before customers make real transactions on the checkout page.
Let’s look at how you can test the WooCommerce Stripe payments.
Step 1: Testing payments using credit or debit cards
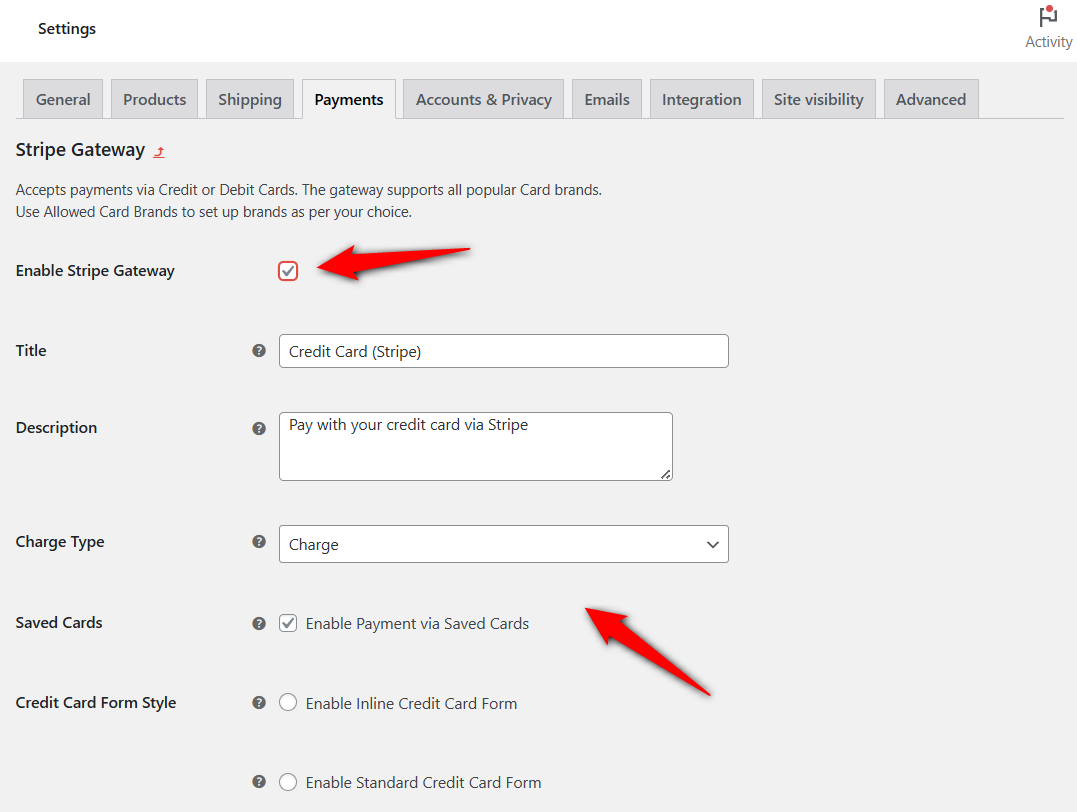
Make sure you’ve enabled the Stripe gateway to accept credit or debit card payments. For that, go to WooCommerce payment settings and click on ‘Manage’ next to Stripe Gateway.
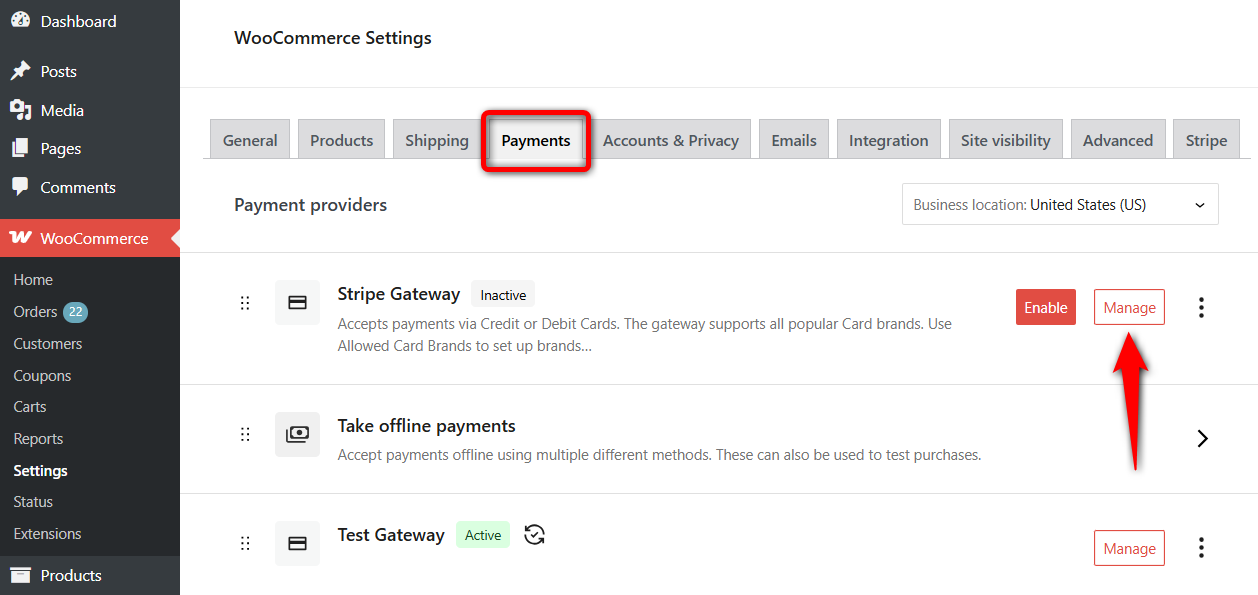
Make sure the gateway is enabled from here.
Configure additional card settings, such as title, description, charge type, form style, allowed card brands, Stripe Link authentication, and more.
Now to test, navigate to the shop page of your WooCommerce store and add some products. Then, head to the checkout page.
For the payment details, choose credit card and use Stripe’s test credit card number to place the order:
- Card number: 4242 4242 4242
- Expiration date: Any future date
- CVV: Any three digits

Click the checkout button and verify that the order has been successfully placed.
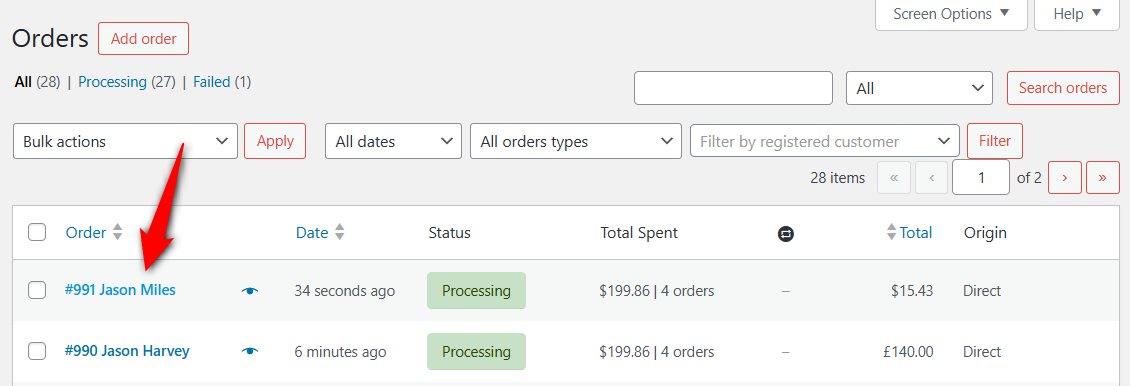
To see the order placed, go to the Payments section of your Stripe dashboard. Or, you can go to WooCommerce orders and check the details:
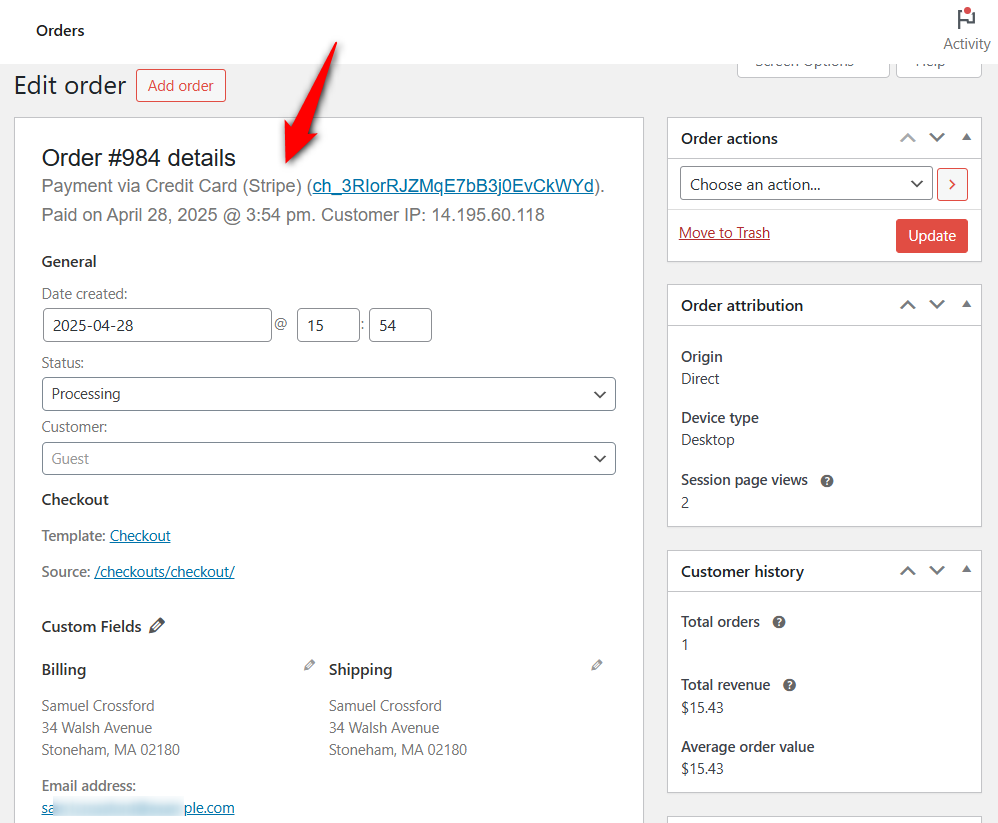
This is how you can test the credit/debit card payments in WooCommerce. We will discuss error handling and various scenarios later in this post.
Step 2: Testing Stripe payments with Apple Pay and Google Pay express checkout
By setting up express one-click checkout payments, you streamline the buying process, as customers can make purchases with Apple Pay and Google Pay without having to fill out the checkout fields.
To set this up, navigate to WooCommerce settings, click on the Stripe tab, and go to the Express Checkout section:
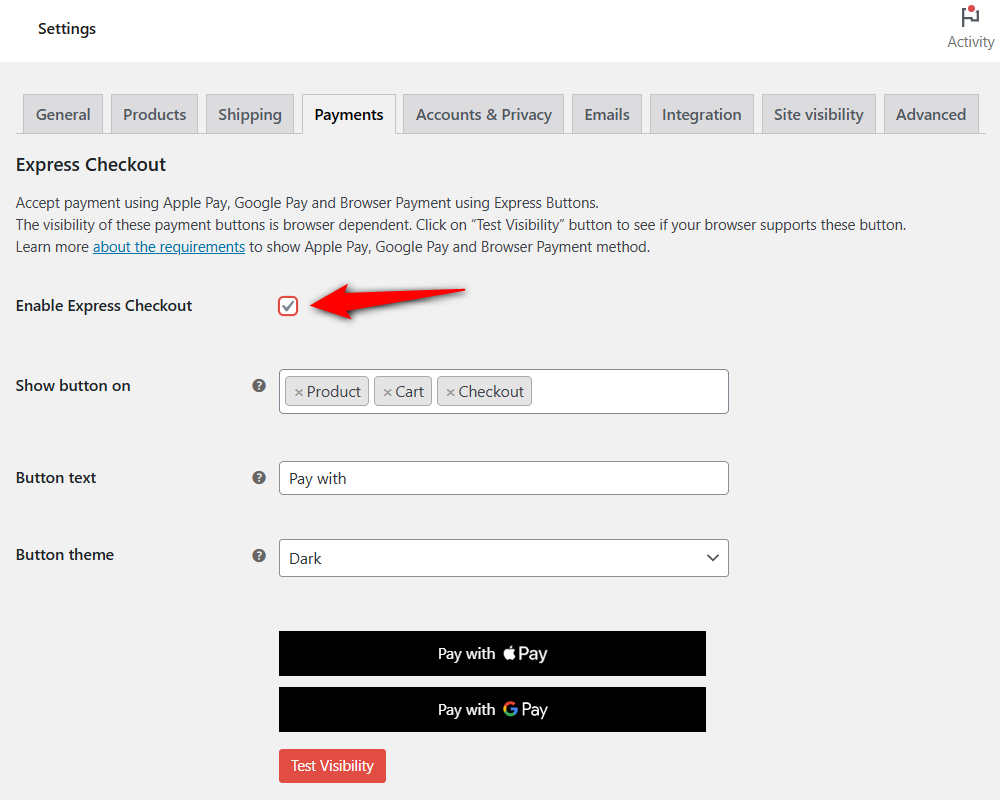
Enable the express checkout button and configure the button visibility:
- Set up pages to show on the payment button
- Modify text for the express checkout button
- Theme of the express payment button
- Product, cart, and checkout page options
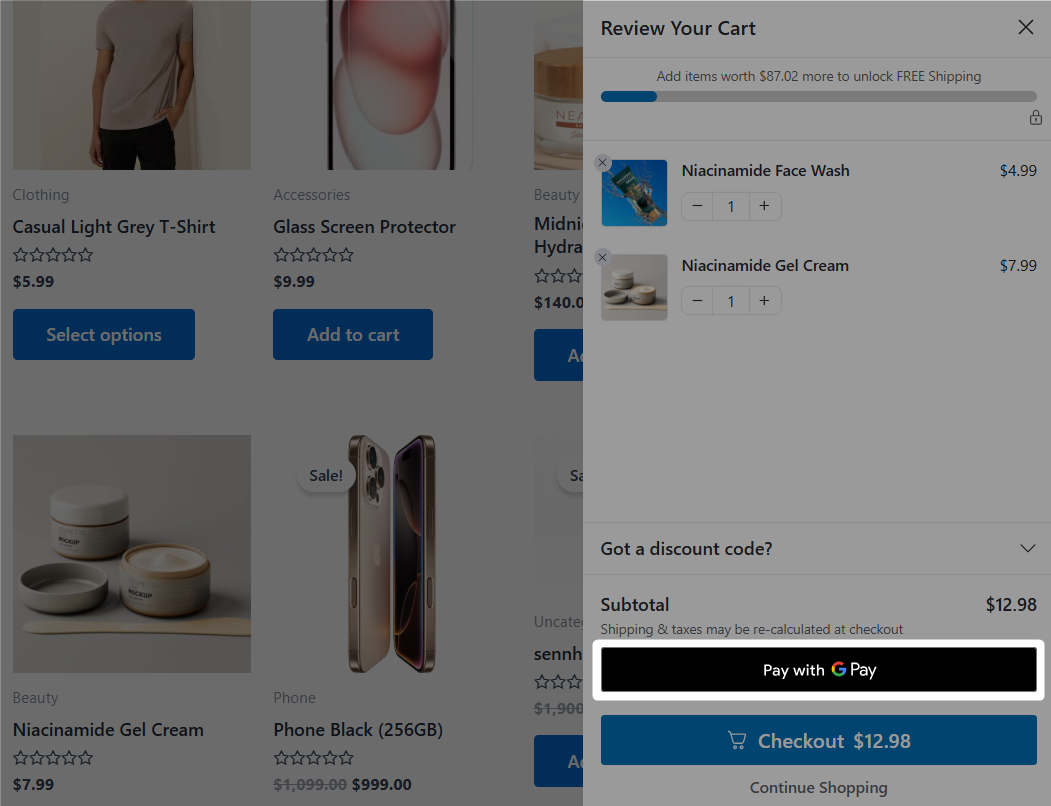
Your express checkout button will be displayed on the checkout page:
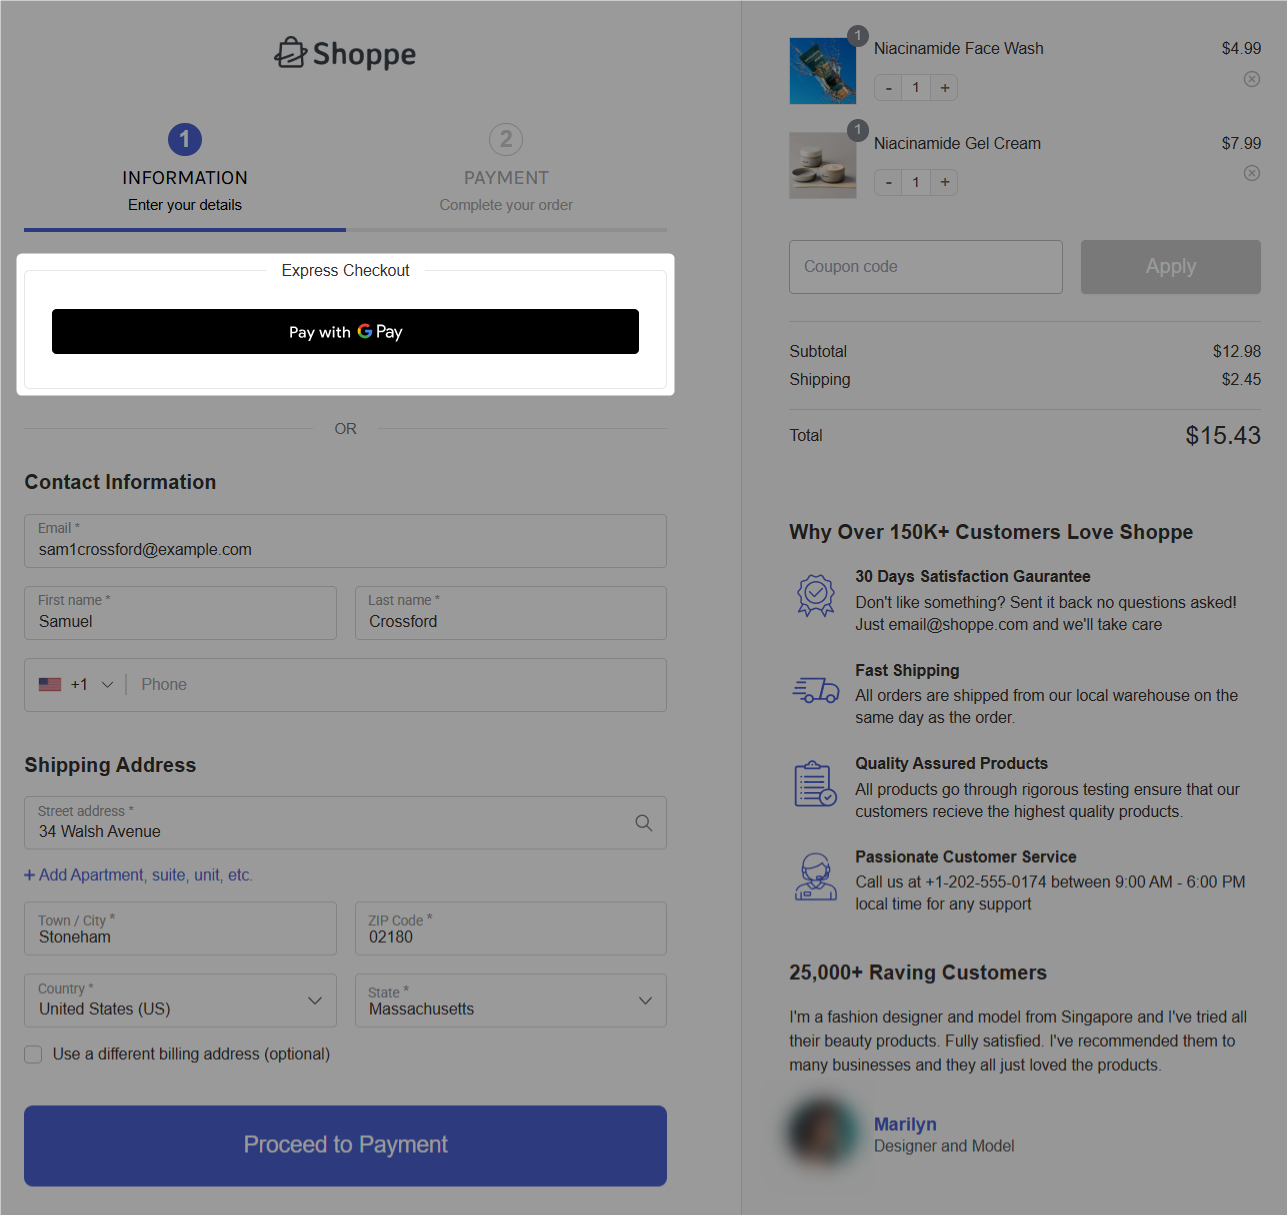
By default, Express Checkout appears at the top of the checkout page. However, FunnelKit Funnel Builder allows you to adjust the position of express pay buttons on your checkout page.
If you use FunnelKit Cart, you can activate express one-tap buttons there too:
Log in to your Google account and use Stripe’s test card to place your order.
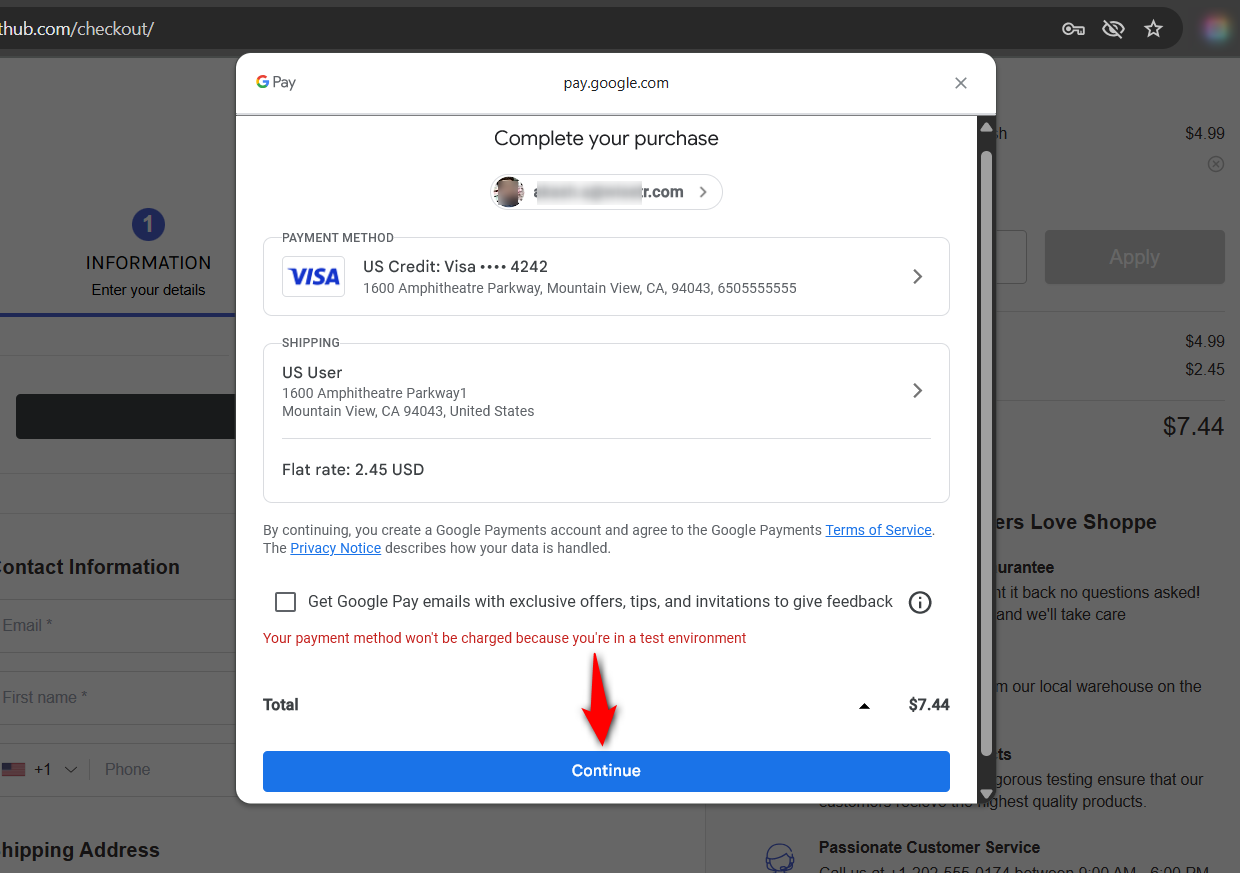
This is how you can test Stripe Express payments in WooCommerce.
Step 3: Testing payments using buy now, pay later (BNPL) options
Buy now, pay later (BNPL) payments provide a convenient option for budget-conscious shoppers, enabling them to make purchases without immediate full payment. Instead, they can pay for their purchases over time in installments.
Use Affirm, Klarna, or Afterpay to offer BNPL payment options to your customers.
Go to the BNPL payment method, such as Affirm, and enable it:
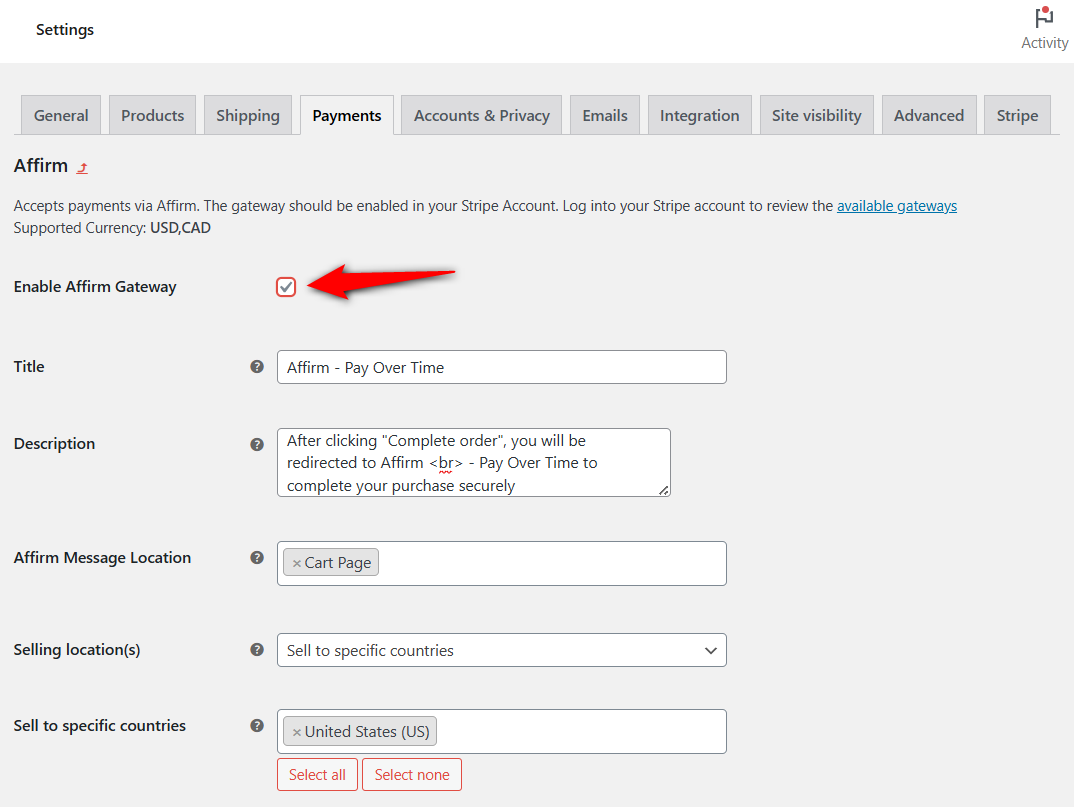
Once done, you’ll be able to see the Affirm method for BNPL payments on the checkout page.
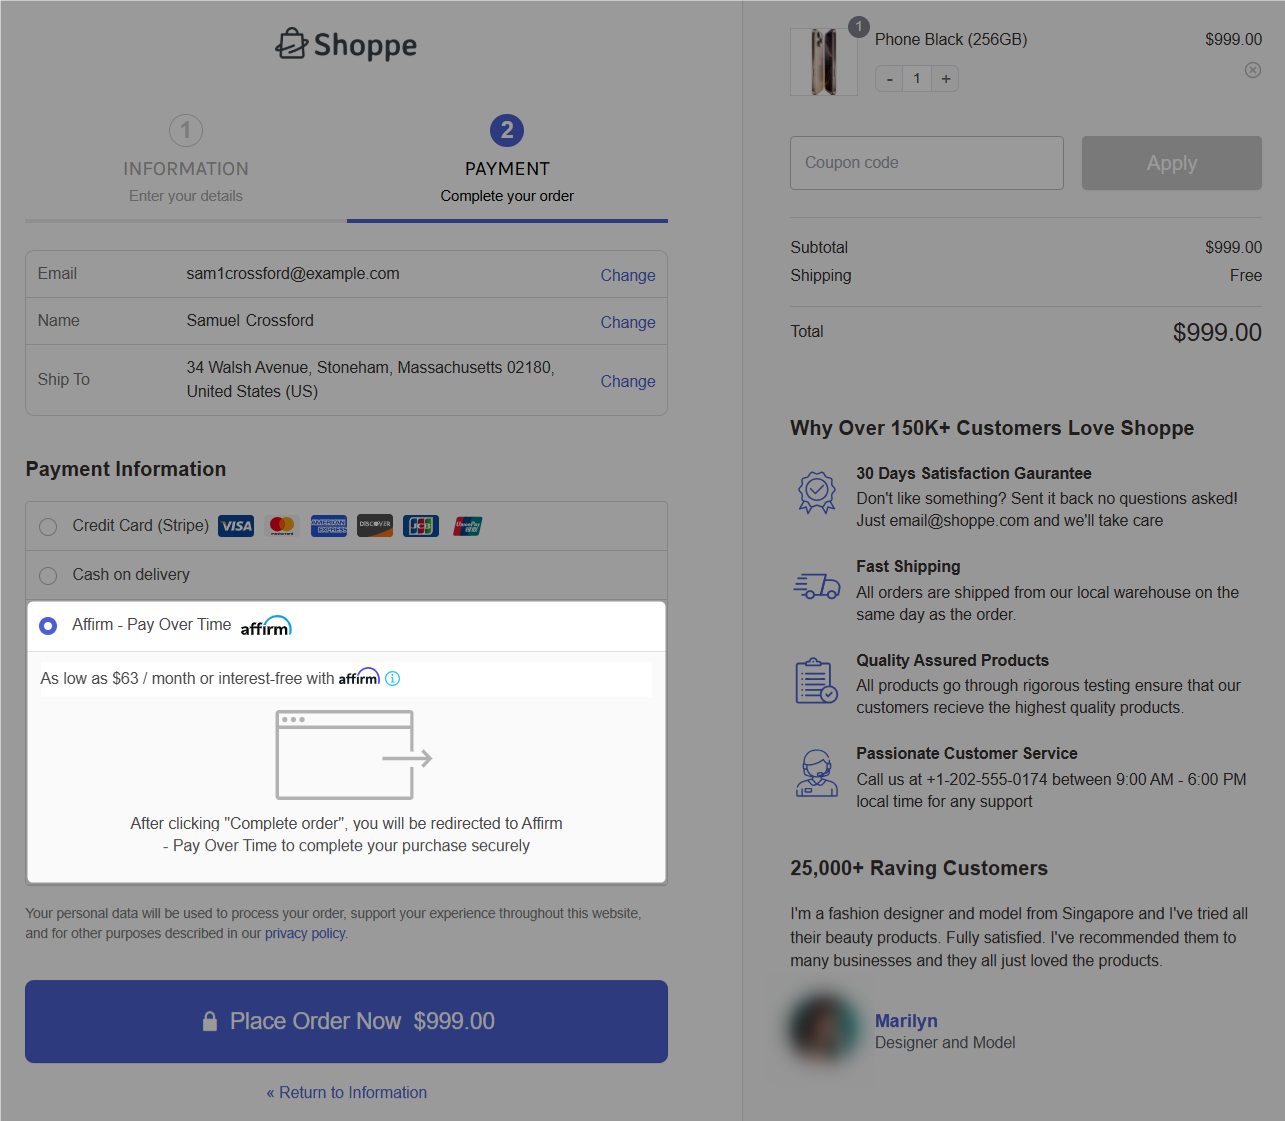
Clicking ‘Place Order Now’ will take you to check your loan eligibility or purchasing power (use Affirm testing methods).
Once you’re verified, select your preferred payment plan and review your installment plan with an option to autopay:
You’ll be asked to review your installment plan with an option to autopay:
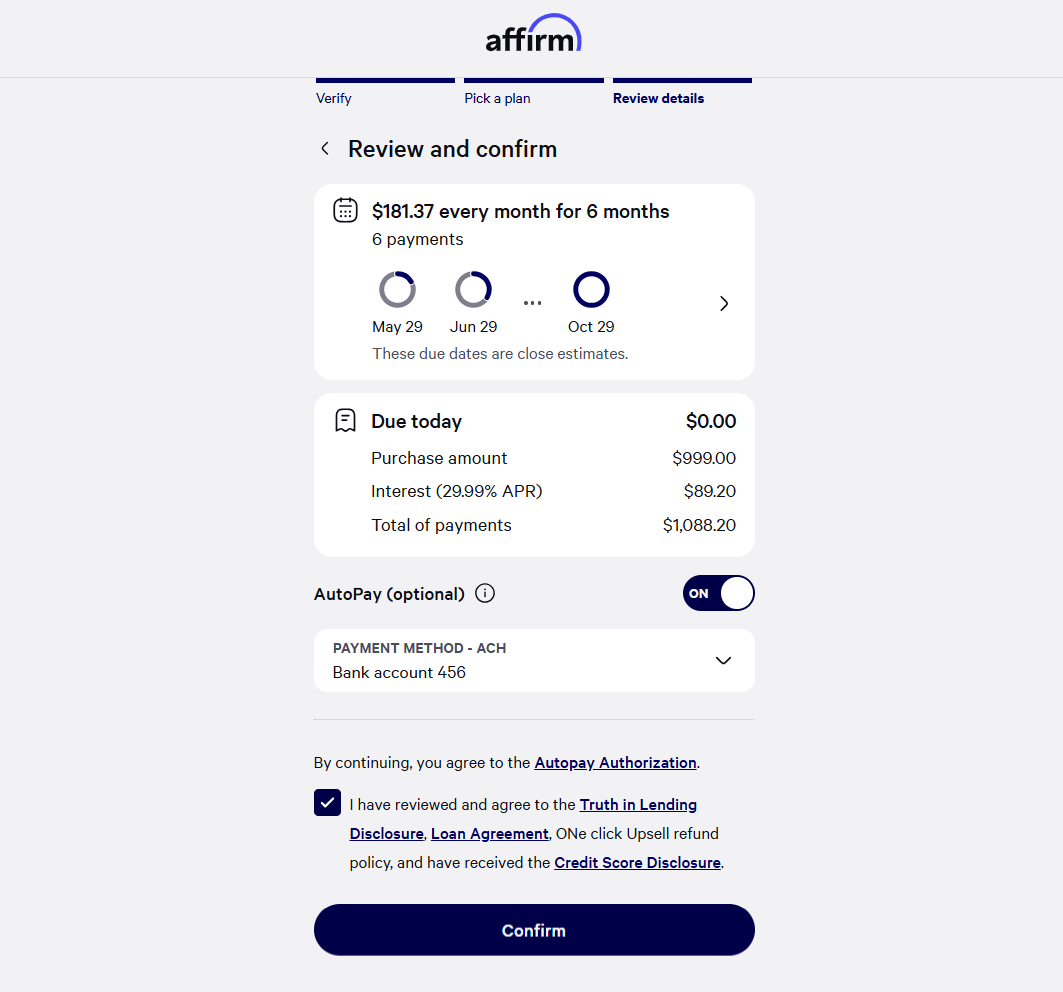
Clicking on Confirm will successfully direct you to the thank you page with the order placed.
Step 4: Testing payments with local methods like SEPA, P24, iDEAL, and Bancontact
Local payment methods cater to region-specific preferences, making it easier for customers to pay using familiar and trusted channels.
SEPA is widely used for bank redirect transfers across Europe, while P24 is popular in Poland for real-time payments through local banks.
iDEAL dominates the Netherlands with its seamless bank-to-bank transactions, and Bancontact is a go-to option for Belgian shoppers.
To enable this option, navigate to WooCommerce Stripe settings and enable the local payment option (using SEPA Direct Debit as an example).
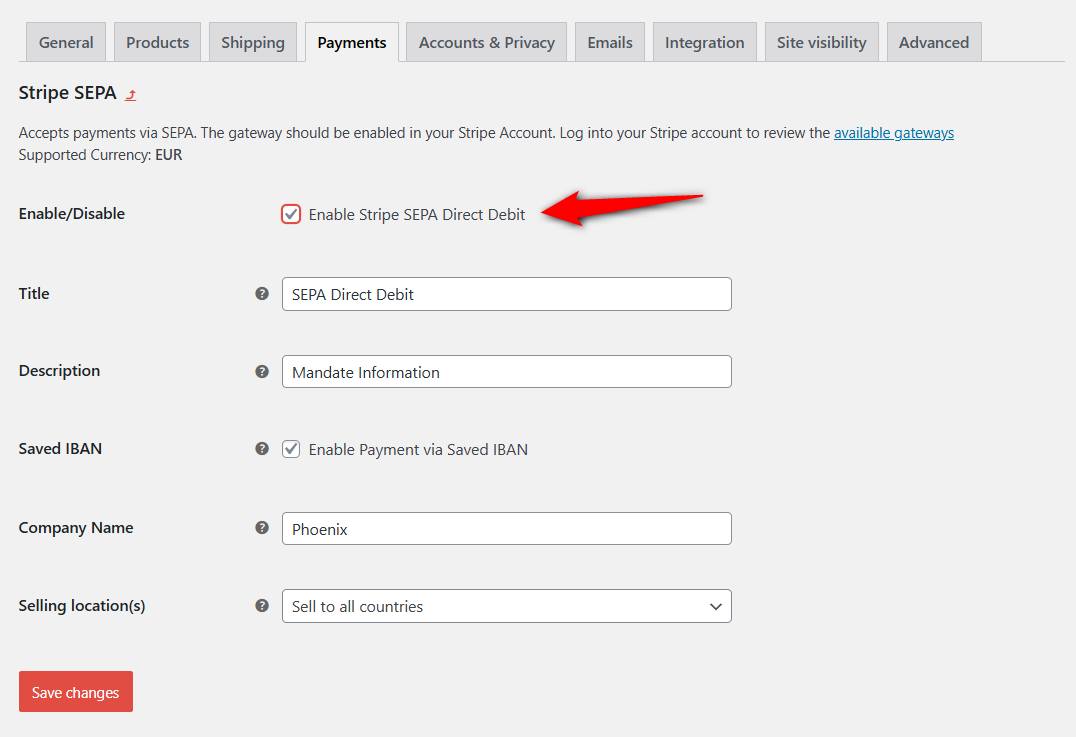
Make sure your store currency is EUR, and you’ll see this payment option on your checkout page:

Test run the SEPA payment by entering your IBAN and place your order from here. Here, we took the IBAN of Germany: DE89370400440532013000 as an example.
This is how you can test your Stripe payment for local or bank redirect methods.
How to Test Stripe Payments for Different Scenarios?
Testing various Stripe payment scenarios ensures your system is prepared for real-world transactions.
We’ve already tested the successful payment scenario in the above section. Let’s go through the next.
1. Declined or failed transactions
Simulate failure scenarios using Stripe’s test cards:
| Scenario | Card Number | Result |
| Insufficient funds | 4000 0000 0000 9995 | Payment fails with the card declined error |
| Expired card | 4000 0000 0000 0069 | Shows the card expired error |
| Incorrect CVC | 4000 0000 0000 0127 | Payment fails due to incorrect CVC |
| Generic decline | 4000 0000 0000 0002 | A generic decline error appears |
| Lost card decline | 4000 0000 0000 9987 | Payment declined because the card was reported lost |
| Stolen card decline | 4000 0000 0000 9979 | Payment declined because the card was reported stolen |
Go through the checkout page and test these card numbers.
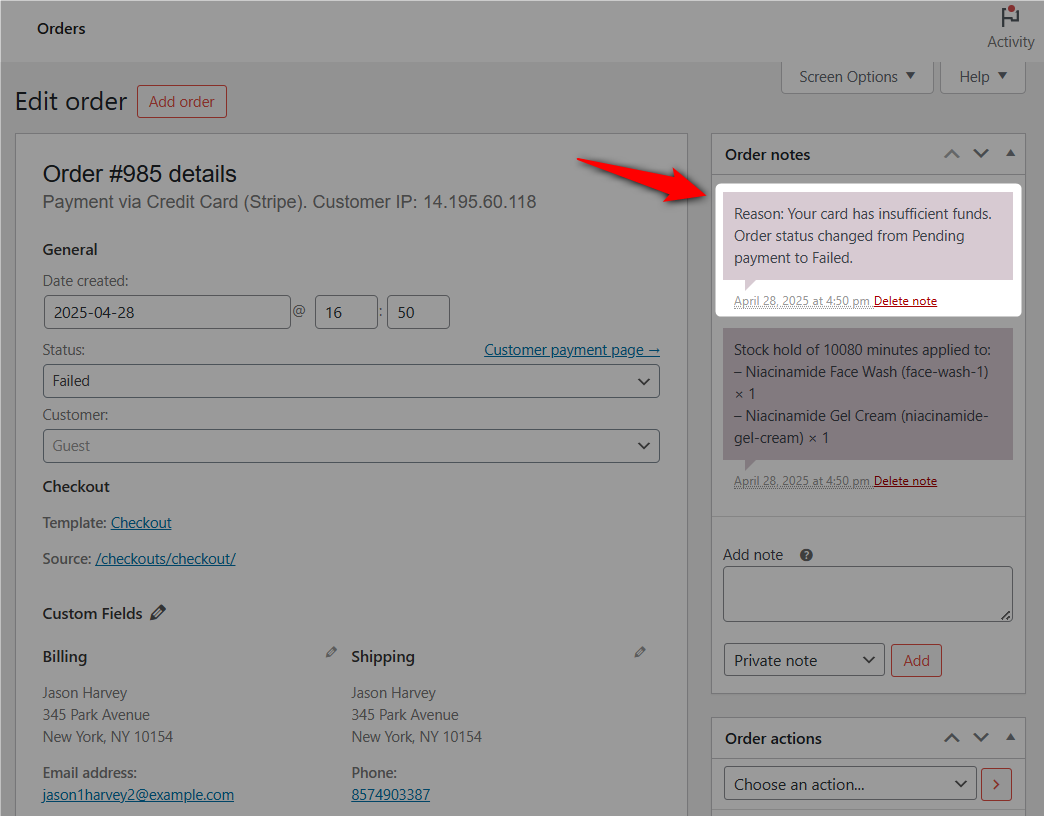
You’ll be able to see the reasons for payment errors in your WooCommerce orders.
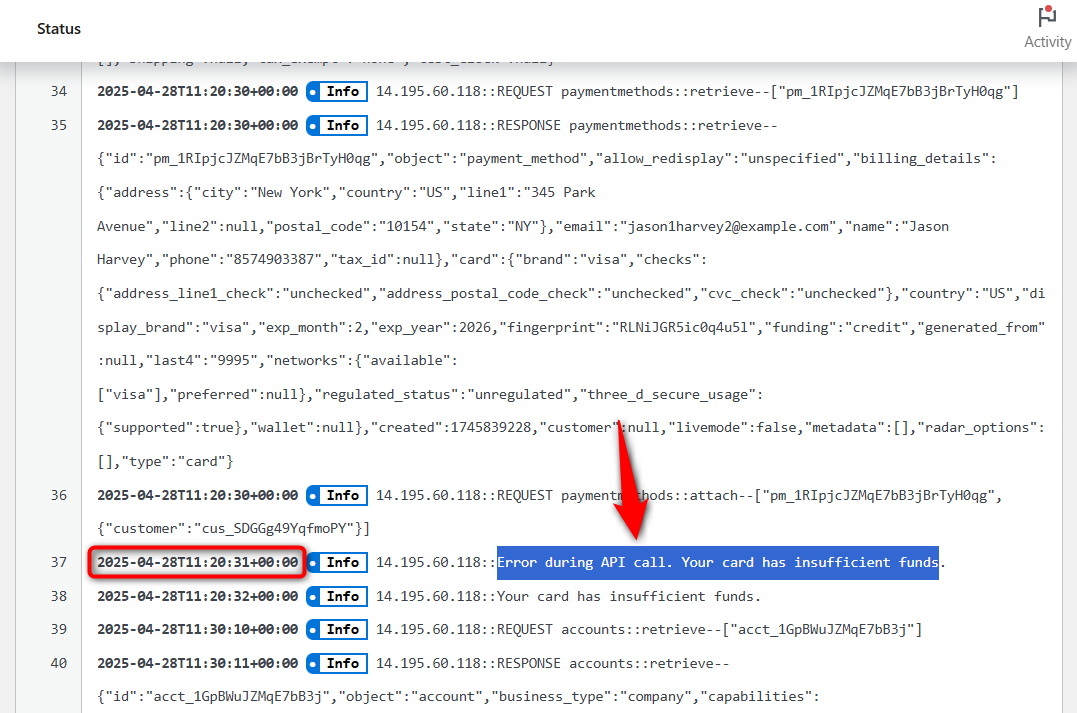
Further, navigate to WooCommerce ⇨ Status ⇨ Logs and click on the fkwcs-stripe logs for the particular date.
You can even see the error during the Stripe API call and the reason for the failed payment in the logs.
This is how you can test Stripe payments for declined transactions.
2. 3D Secure Authentication
3D Secure is mandatory in most regions under Strong Customer Authentication (SCA) regulations.
To test Stripe 3D secure payments:
- Use this card number: 4000 0027 6000 3184
- Expiry: Any future date
- CVC: Any 3-digit number
Clicking on the checkout button with these details will trigger a 3D secure authentication window.
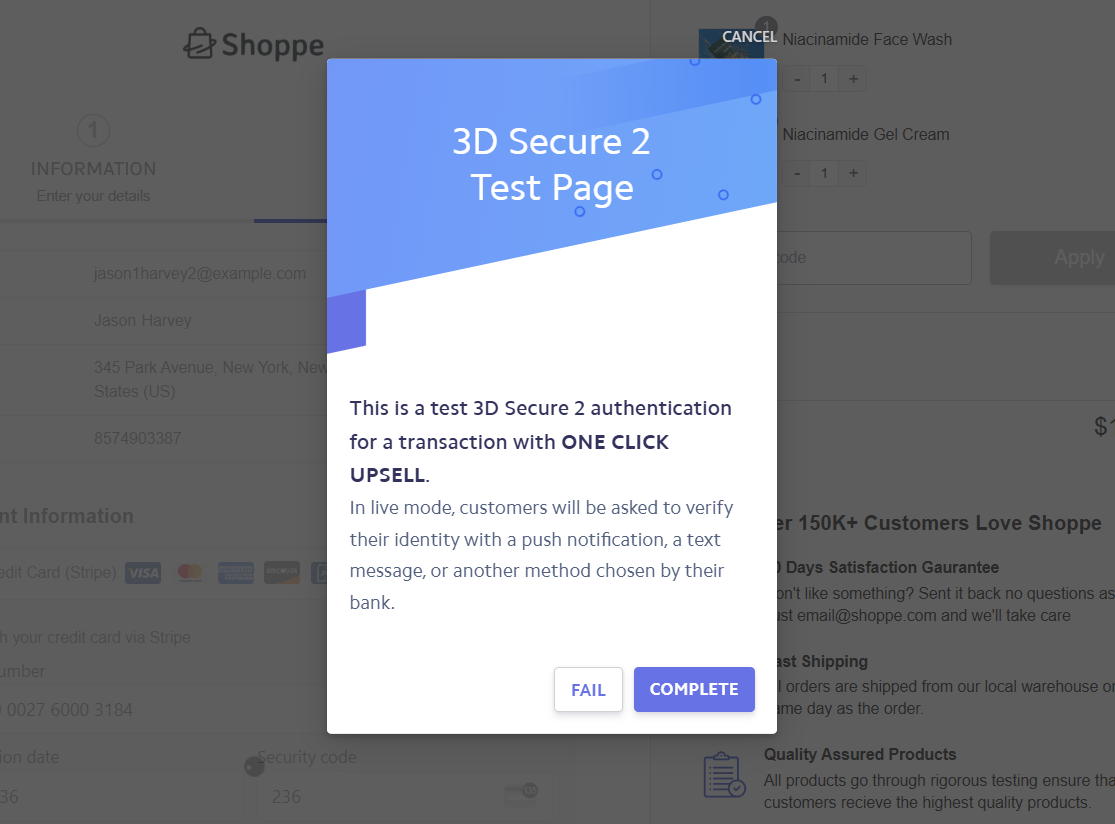
Here, you’ll be asked to “Complete” or “Fail” to test your Stripe payment authentication with the 3D Secure transaction.
3. Recurring (Subscriptions) payments
Use WooCommerce Subscriptions to create a product subscription in your store.
Subscriptions have signup fees and charge customers on a recurring basis, such as daily, weekly, monthly, or yearly.
Ensure to test-run Stripe payments to simulate both successful and failed transactions.
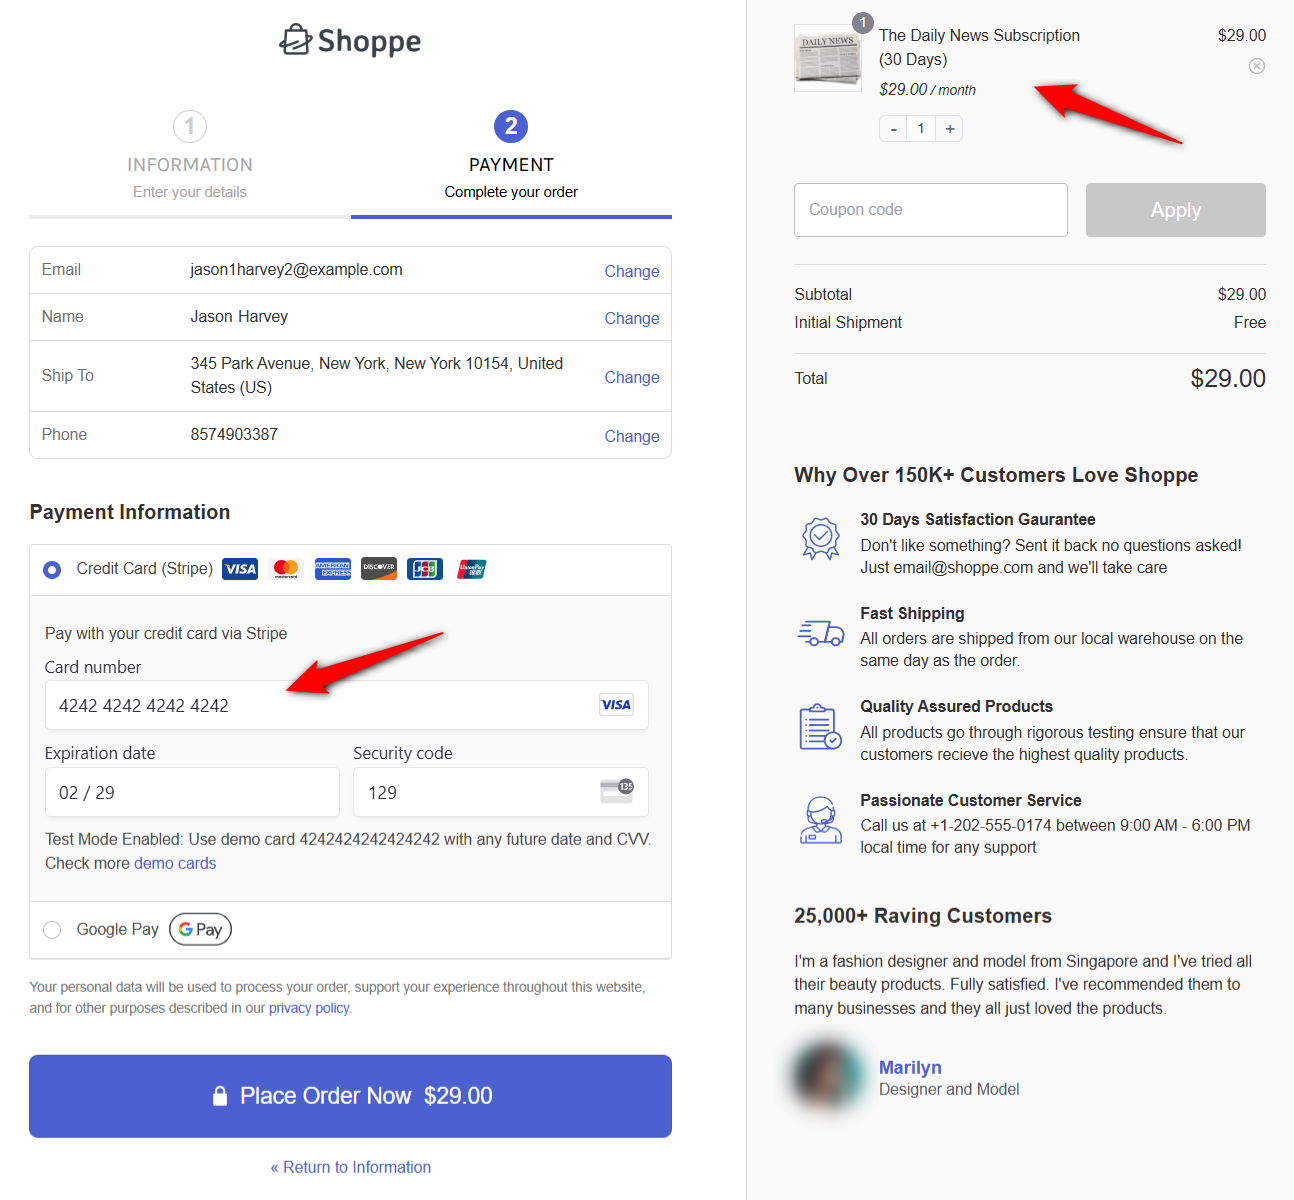
You can view the order status in WooCommerce.
Further, use the test card 4000 0000 0000 0341 for failed subscription renewals.
4. International transactions
To ensure your store is ready for global customers, it’s essential to simulate international transactions.
Use Stripe’s test cards to:
- Test payments with different currencies (like EUR, GBP, INR, etc.)
- Simulate purchases from different countries
- Validate exchange rates, taxes, and shipping charges.
This way, you can identify potential issues such as currency mismatches, address formatting errors, and unsupported cards, ensuring a smooth experience for your international buyers.
Stripe offers test cards for various countries in South and North America, Europe, the Middle East, and Asia Pacific.
Here, we’ve tested the Stripe payment for the store currency GBP with the test card of Portugal:
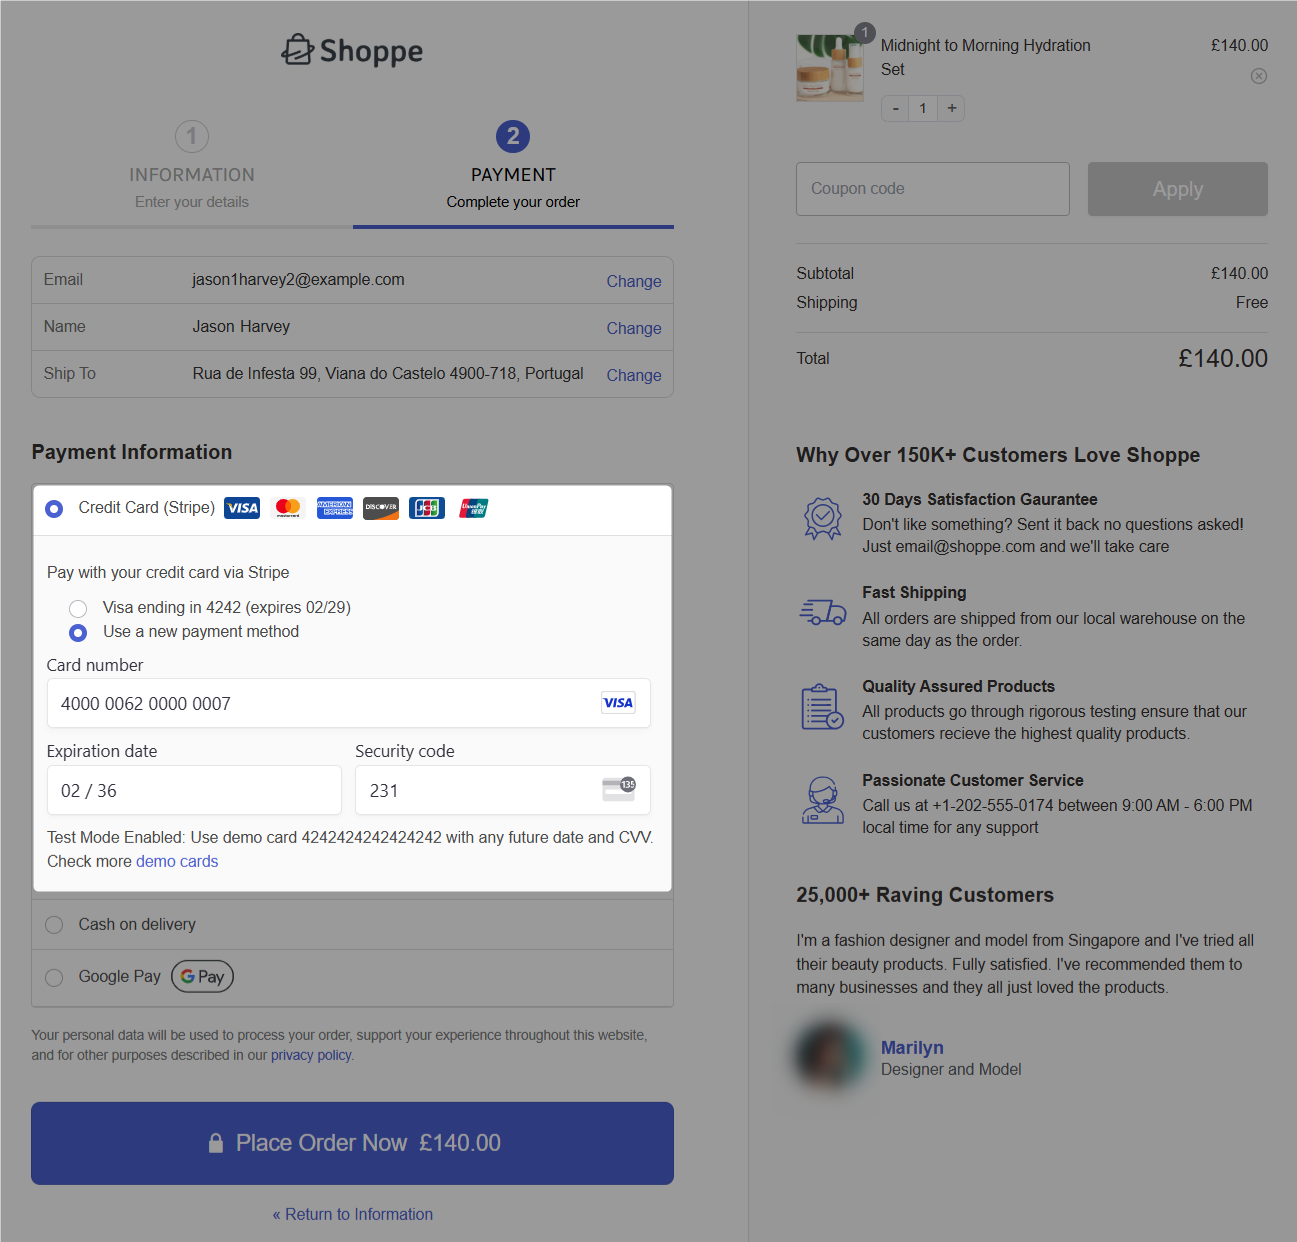
This is how you can test Stripe international payments.
5. Refunds (Both full and partial)
Refunds are a crucial part of the post-purchase process.
To test refunds, go to WooCommerce orders and click on a test order.
Scroll down and hit ‘Refund’ under the Items section.
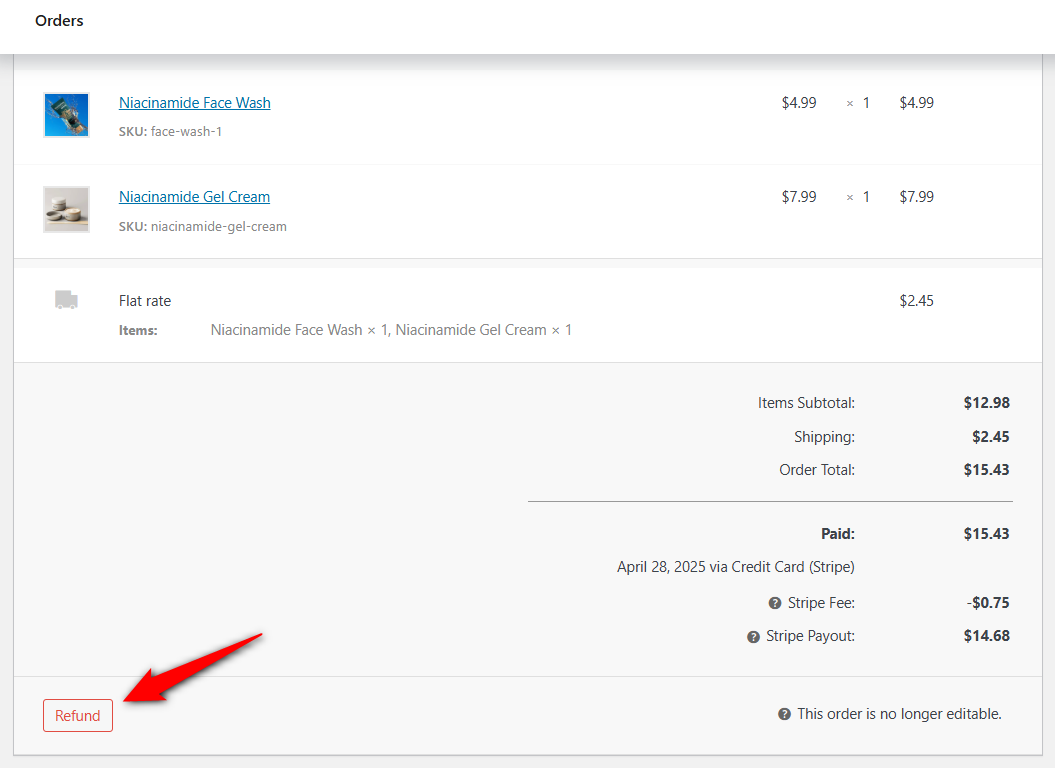
Enter the refund amount and reason. Once done, click on the ‘Refund via Stripe Gateway’ button to complete the refund.
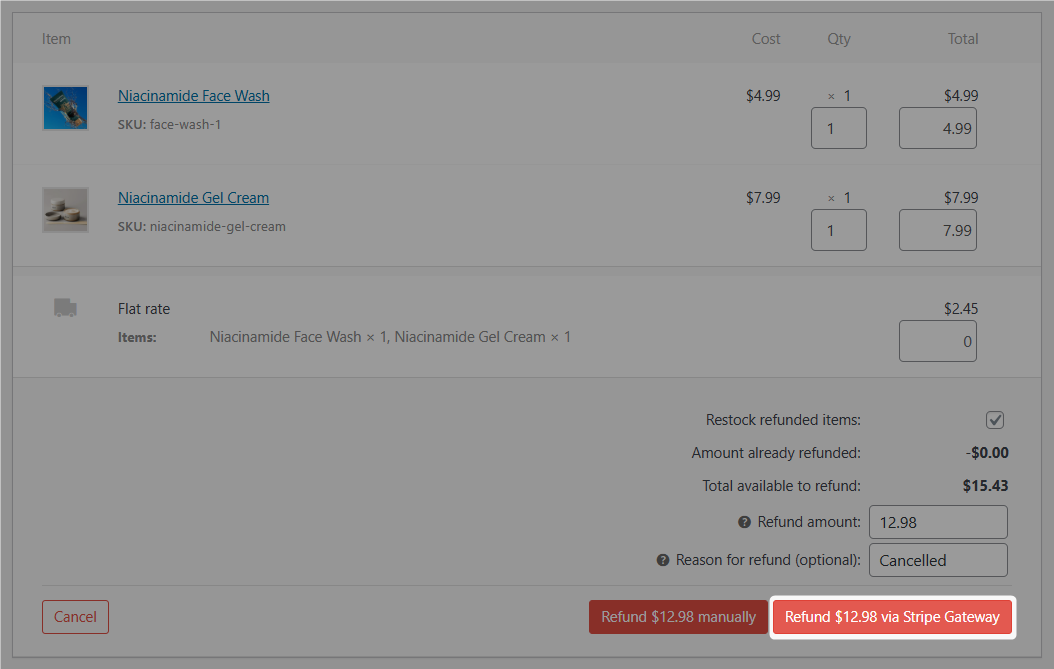
You can also try this with partial refunds.
Final Step: Go Live and Test Real Stripe Transactions
Going to live mode helps verify live Stripe payments from your WooCommerce store. We recommend testing real transactions if you’re the store owner or website administrator.
Ensure that you test your Stripe payments on the checkout page using a real card.
Once the order is successfully placed, test the refunds.
The refund process may take 2-3 days, depending on your bank. You will need to wait to receive a refund for the order amount.
4 Tips and Best Practices for Testing Stripe Payments Effectively
Here are the most effective tips and practices for testing Stripe payments, which will help you identify hidden issues, streamline your workflows, and deliver a seamless experience to your customers.
1. Always use Stripe’s test mode first
With Stripe, you can enable a Sandbox environment to run transactions without spending real money.
Always ensure to put your website under ‘Test’ or ‘Admin Only Testing’ mode to check your payment flows.
This way, you keep your customer data safe and avoid accidental charges.
2. Test on different browsers and devices
Not everyone makes purchases from desktops. In fact, over 60% of traffic on eCommerce sites comes from mobile devices.
That’s why it’s essential to test checkout fields and Stripe payments on mobile phones, tablets, and multiple desktop browsers, such as Chrome, Safari, Firefox, etc.
Make sure each payment field and checkout element is fully responsive and touch-friendly.
3. Send automated order email notifications
WooCommerce automatically sends transactional emails to customers based on the order statuses.
However, there are limited customizations available. You cannot structure your emails, change layout, add images, and more.
Therefore, experts recommend using email customizer plugins, such as FunnelKit Automations, to design beautiful and engaging emails, including both transactional and marketing emails.
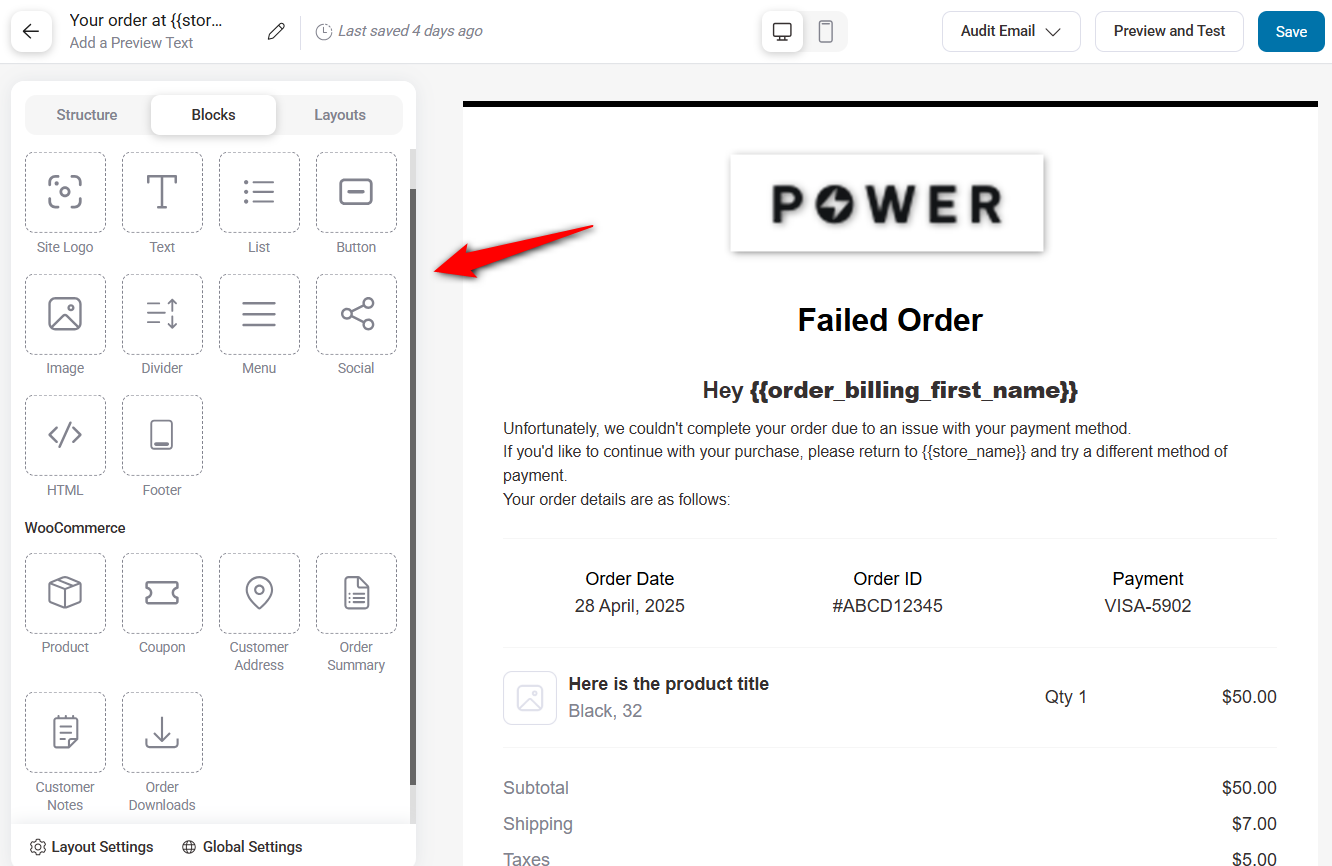
Simply drag and drop the content blocks to customize them as you want.
Here’s an example of a failed order email with a retry payment link designed with FunnelKit Automations:

Once you’ve set up your emails, WooCommerce will automatically send them based on the payment and order status.
Ensure that you’ve set up the following notifications in your store:
- Order confirmation emails
- Payment receipts
- Refund confirmation emails
- Order cancellation emails
- Failed order emails
- Subscription notifications
- Completed order confirmation emails
Ensure that you use a WordPress SMTP plugin to guarantee that your emails are delivered to customers, are well-branded, and contain accurate details about the order and payment.
4. Clean up test data before going live
Stripe allows you to easily delete test customers, payments, products, and more. Navigate to Developers ⇨ Overview and click on ‘Review test data’ under the Test Data section.
It’ll open up your test data. Click on 'Delete test data' to clear all the test data. For more details, refer to the official Stripe document on how to delete test data.
You can also delete test orders from WooCommerce by moving them to the trash and permanently deleting them from there.
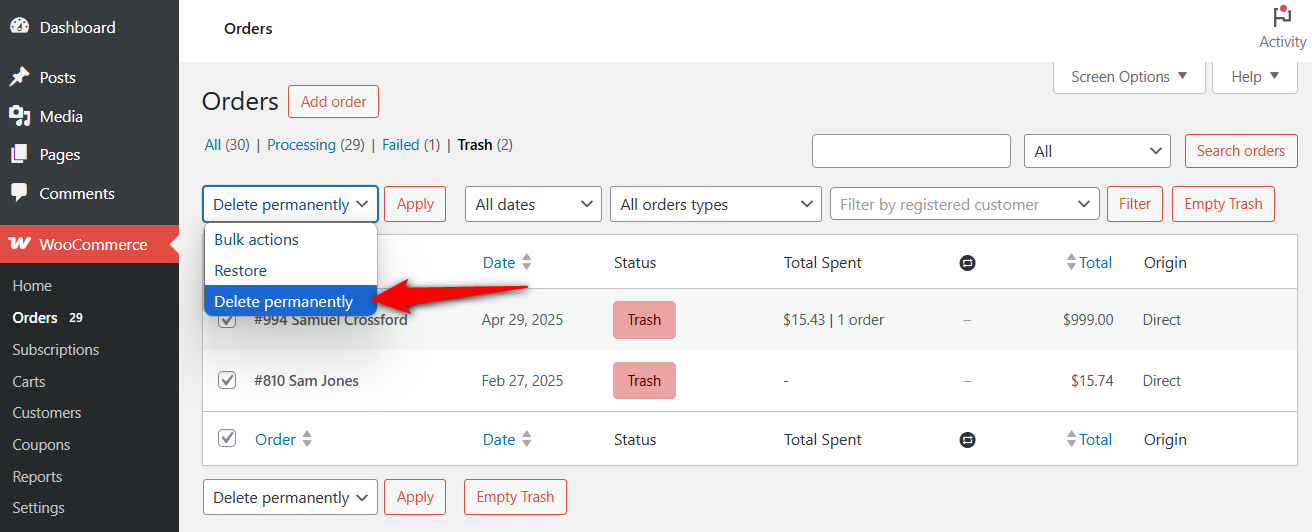
If you use FunnelKit Funnel Builder to enhance your checkouts and sales funnels, the conversion data will be automatically deleted after you’ve permanently removed them from WooCommerce.
Clean up your test data to prevent it from being mixed with real transactions.
Are You Ready to Test Stripe Payments?
Testing your Stripe payments is a crucial step in delivering a secure and seamless buying experience for your customers.
From setting up your Stripe testing modes to validating frontend forms, different payment scenarios, and error handling, each part ensures everything works flawlessly.
If you top it off with FunnelKit checkouts, you're on your way to streamlining your shoppers’ buying experience.
Not only that, FunnelKit Automations can become your automated right-hand, helping you effortlessly handle each payment outcome through email notifications.
So if you want to pair your Stripe payment setup with a high-converting checkout and beautiful emails, FunnelKit is definitely worth exploring.
Editorial Team
March 6, 2026You did everything right by setting up Apple Pay, enabling it in your WooCommerce settings, and even double-checking your Stripe configuration. But at checkout? No Apple Pay button in sight....

Editorial Team
January 5, 2026Stripe is one of the most trusted payment gateways worldwide, powering over 3.5 million websites globally. With 90% of U.S. adults having made a purchase from businesses using Stripe (Source:...
Editorial Team
December 24, 2025Your customer finds the perfect product. Adds it to the cart. Reaches checkout and sees a wall of form fields. Name. Email. Address. City. State. Zip. Card number. Expiry. CVV....


