
Have you ever noticed the cart icon at the top of many online stores?
It’s more than just a design choice. It can greatly improve your customers' experience. A cart icon on the menu bar lets users access their cart with a single click, reducing anxiety about their order total and making shopping more convenient.
By allowing customers to monitor their cart throughout their shopping journey, it also speeds up checkout and makes the entire process smoother.
In this post, we will show you two easy ways to add a cart icon to your WooCommerce menu:
- Appending the cart icon directly to a menu
- Using a shortcode to add the cart icon
Let’s get started!
Short on time? Watch this video 👇
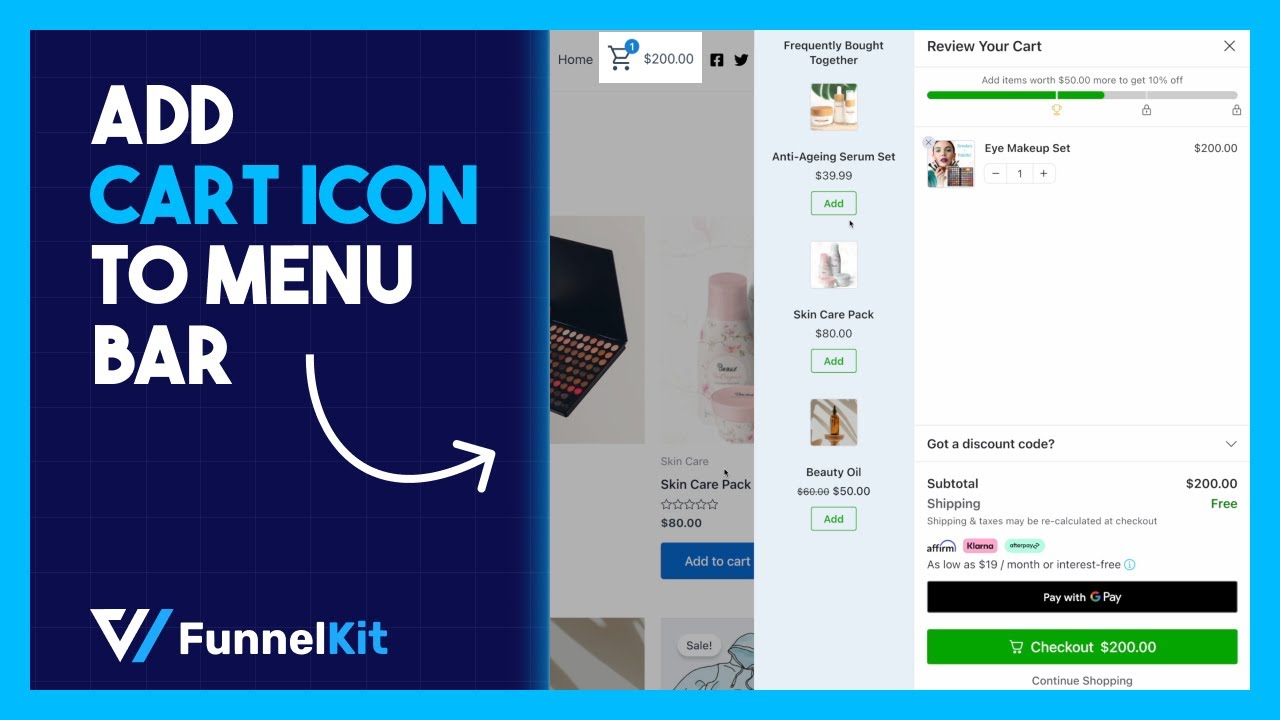
Table of Contents
- 1 What is a WooCommerce Shopping Cart Icon?
- 2 How to Add WooCommerce Cart Icon to the Menu Bar?
- 3 Alternative Method: Use Shortcode to Add the WooCommerce Cart Icon to the Menu
- 4 4 Best Practices to Follow When Adding WooCommerce Cart Icon to Menu
- 5 More Questions About WooCommerce Cart Icon to Menu Bar
- 6 How can I hide the cart item count when the cart is empty in the menu bar?
- 7 How do I show the total cart amount in the WooCommerce menu bar cart icon?
- 8 Ready to Add a Cart Icon to the Menu in WooCommerce?
What is a WooCommerce Shopping Cart Icon?
A WooCommerce shopping cart icon is a visual element typically displayed on your e-commerce website using the WooCommerce platform.
The shopping cart icon usually appears in the website’s header menu or main navigation area and serves key functions:
- Quick access and review - It allows users to quickly view the contents of their shopping cart by clicking on the icon. Users can review and modify the items in the shopping cart.
- Visual indicator - It shows the shopping cart icon with a numbered bubble on its side that indicates the number of items added.
- Navigation - It often provides a link to the checkout page where users can buy their cart items.
The WooCommerce shopping cart icon can be customized based on the design, size, and placement to fit the aesthetics of your brand.
Here’s an example of the shopping cart icon on the menu header:
The cart icon in the top-right corner shows 4, indicating there are 4 items in the cart.
When you click on it, you can either go to the cart page or access a mini shopping cart, depending on the plugin you use.
In case you access a mini cart, you can:
- View the cart items
- Update the item quantity or remove any content
- Check the cart total
- Apply the coupon code
- Directly go to the checkout page, skipping the default WooCommerce cart page
- Buy with express checkout payment methods like Apple Pay and Google Pay
This lets you access your cart anytime, no matter which page you are on.
Why Add WooCommerce Cart Icon to Menu or Website Header?
Adding a mini cart icon to the WooCommerce menu bar or website header is a strategic move with several benefits for your online store. Here’s why:
- Enhanced user experience: A mini shopping cart icon provides a quick and convenient way for users to check the contents of their shopping cart. It streamlines the user experience, allowing customers to see what items they've added without navigating to a separate page.
- Easy access to cart information: Placing the cart icon in the menu bar ensures that users can access their cart information from any page on your site. This accessibility is crucial for customers who want to review their selections before purchasing.
- Encourages shopping convenience: The mini cart icon simplifies the shopping process. Customers can easily view and manage their cart items, making the overall experience more user-friendly and encouraging them to continue exploring your products.
- Streamlined checkout process: Having the cart readily available in the menu bar reduces the number of steps customers need to take to review their selections. This streamlined process can contribute to higher conversion rates as it minimizes potential obstacles in the buyer's journey.
- Real-time updates: The WooCommerce cart icon can display the items in the cart, keeping users informed as they shop. They can make adjustments to the cart items in real time.
- Enhanced design and branding: The cart icon can be customized to match the website’s design and branding, contributing to a cohesive and professional look. You can set up interactive elements like mini carts or slide-out carts for a more intuitive and engaging shopping experience.
Adding a mini cart icon to the WooCommerce menu bar is a smart strategy to help improve the overall shopping experience, increase user convenience, and boost conversion rates.
How to Add WooCommerce Cart Icon to the Menu Bar?
We’ll use FunnelKit Cart to add a cart icon to your WooCommerce menu or header.
This mini-cart plugin lets users view, update, or remove items, see order details, get product suggestions, and earn rewards.
We’ll be using the free version, so make sure it’s installed and activated first.
Step 1: Enable the mini cart option on the WooCommerce store
First, you need to enable the WooCommerce sliding cart option.
For that, navigate to FunnelKit ⇨ Cart, turn the toggle to the ‘Enable Cart’ button, and click on Save.
After enabling the cart option, you can set the icon's visibility to decide which pages the mini cart appears on.
You get three options: Entire Website, WooCommerce pages, and None.
By default, FunnelKit Cart displays the mini cart icon at the bottom of the website, either on the left or right.
However, since we will add the cart icon to the header menu, we don’t want to display it at the bottom of the website, as having two icons may confuse customers.
So, here we are going to choose ‘None’.
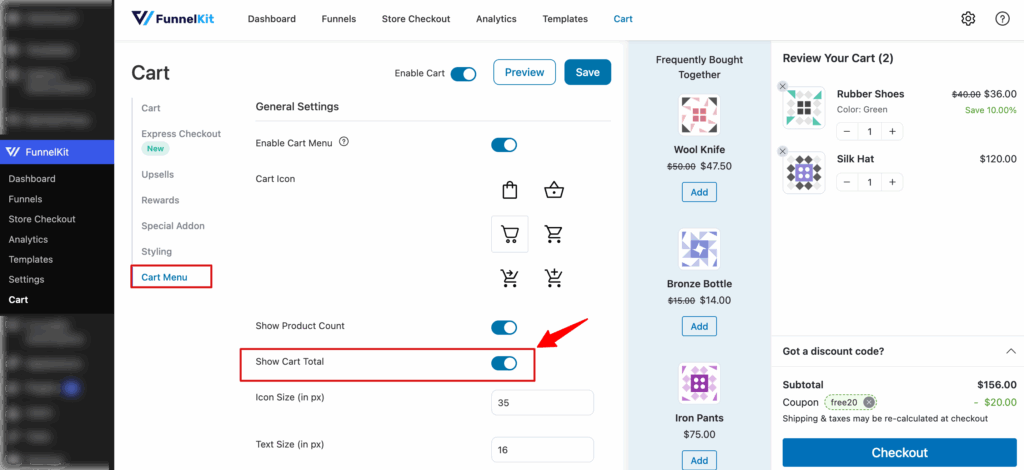
Step 2: Enable the WooCommerce cart menu
Now, to add the cart icon to the menu, move to the Cart Menu tab.
Here, first, turn on the ‘Enable Cart Menu’ option.
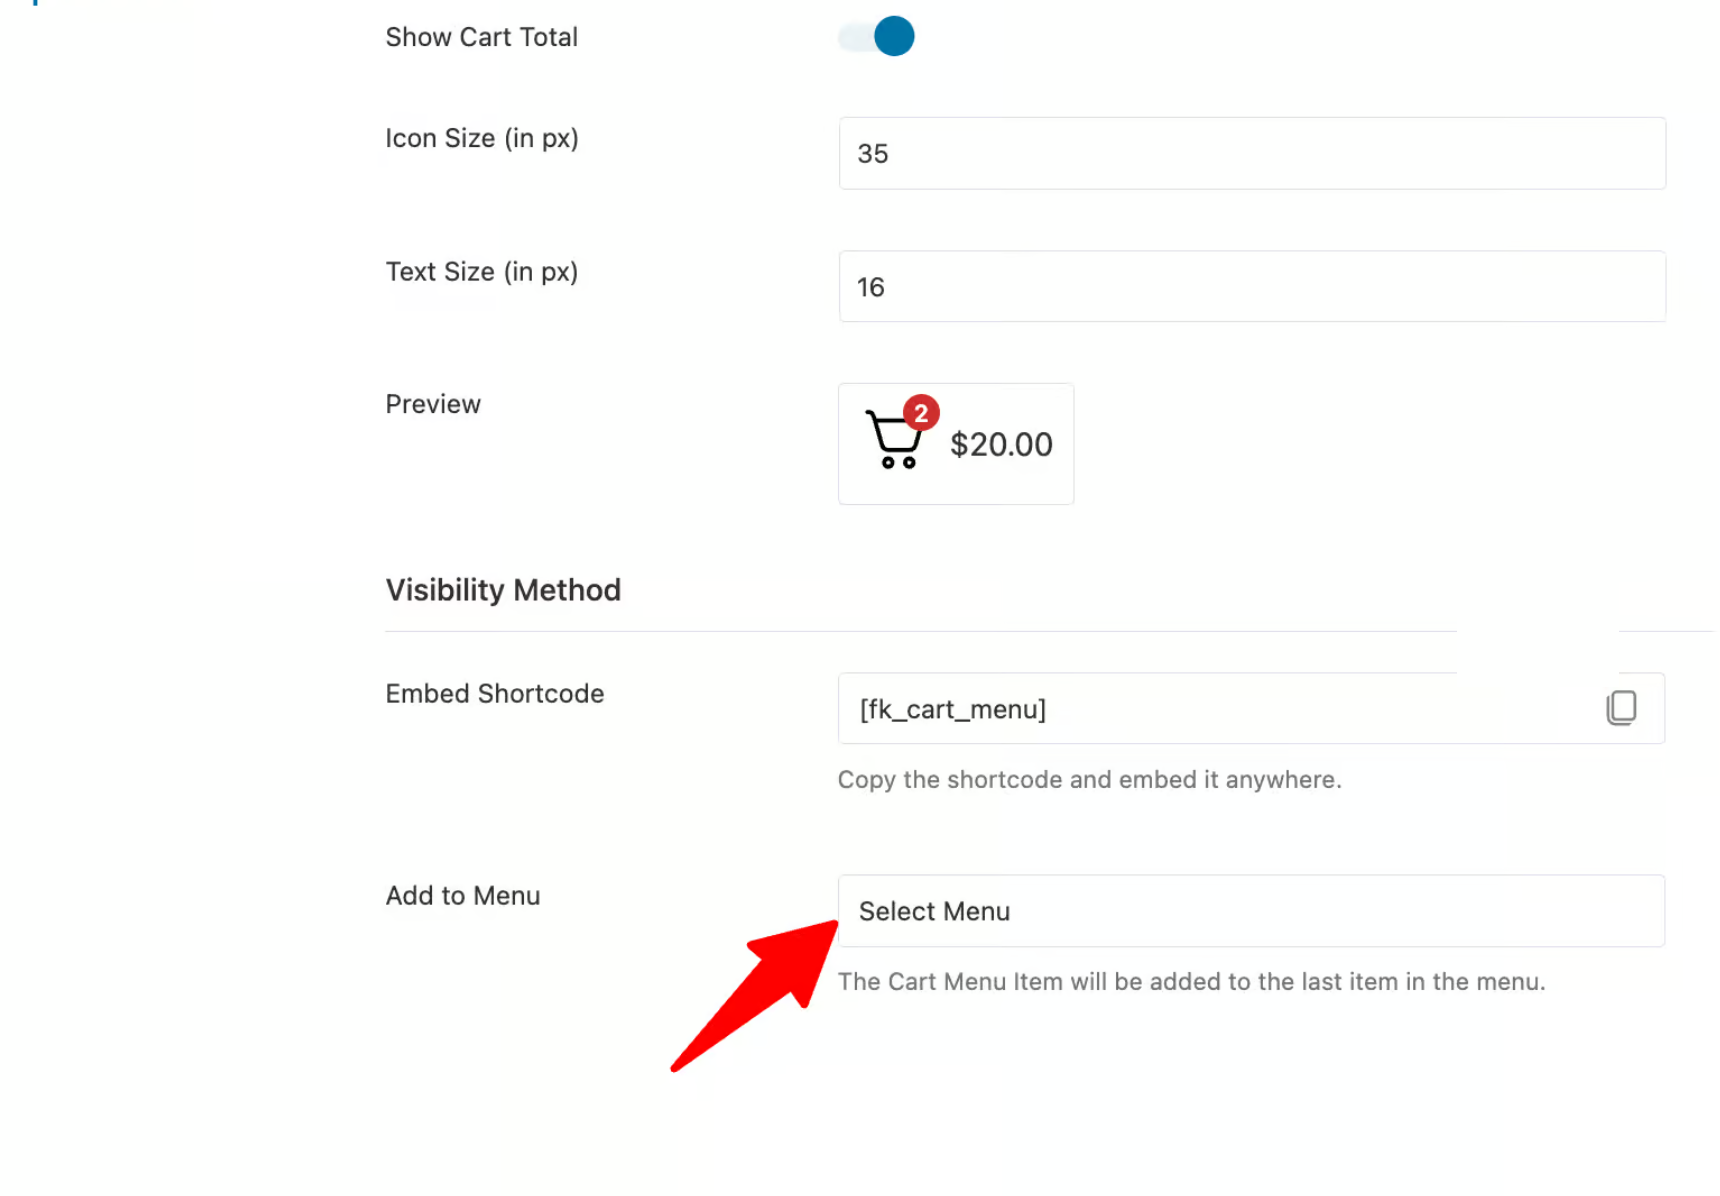
Step 3: Customize the look and content of the cart icon
You get the following customization options to set how the cart icon will look:
- Cart Icon: FunnelKit Cart offers six different cart icon options. Choose the one you like.
- Show Product Count: If you want to show the product count, enable this option.
- Show Cart Total: Enable this option to show the cart total along the cart icon.
- Icon Size (in px): Specify the size of your WooCommerce sliding cart icon.
- Text Size (in px): Set the text size of the cart total here.
Step 4: Add the cart icon to the primary menu using the built-in method
For this option, on the “Add to Menu” option, select the menu (primary menu) you have created for your WooCommerce store.
You can also embed the cart shortcode to any page of their woocommerce website from the embed shortcode option.
Finally, click on the ‘Save’ button to update the changes.
Now, if you check the front end, you should see a cart icon in the menu.
If users click on the icon, they can view their order details and update items.

This is how you can add the WooCommerce cart icon to the menu using the built-in append method.
Alternative Method: Use Shortcode to Add the WooCommerce Cart Icon to the Menu
Here are the steps to follow if you want to use a shortcode to add the cart icon to your WooCommerce menu.
Step 1: Choose “Select Menu”
Follow the same steps as above, but choose “Select menu” under “Add to Menu”, meaning no menu will be selected.
Step 2: Copy the cart shortcode
Copy the Embed Shortcode value: [fk_cart_menu] and click Save to update the new settings.
Step 3: Add the shortcode to the WooCommerce menu
Now, you need to install and activate the Shortcode in Menus.
After activating the plugin, go to Appearance ⇒ Menu and choose the menu where you want to add the cart icon using the shortcode.
If the suggested Shortcode plugin is activated on your site, you should see a new option to add a shortcode to the menu.
To add a shortcode, click on the Shortcode option.
Then provide a title and, for the value, paste the WooCommerce cart icon shortcode you copied earlier.
After that, click on “Add to Menu” to add the shortcode to the menu, and then click on Save Menu to update the menu.
Step 4: Test and preview the cart Icon
Now, if you check the front end, you will see the cart icon has been added to the menu.
If you add items to your cart, you’ll see the cart icon with the product count and cart total.
Now, if you click on the cart icon, a side cart will appear with the product details. Here, you can update the product quantity or remove any item.
4 Best Practices to Follow When Adding WooCommerce Cart Icon to Menu
Here are some effective best practices to follow when adding a cart icon to the WooCommerce menu or website header.
1. Strategic placement
Place the cart icon in the top-right corner of the menu for maximum visibility and accessibility.
This conventional location ensures users can easily find the shopping cart.
Position the cart icon close to the search bar, as users frequently use the search function and are likely to notice the cart nearby.
2. Size and clarity
Ensure the size of the cart icon is perfectly balanced—not too small, which might get overlooked, or too large, which can be visually overwhelming.
Use contrasting colors for the cart icon to enhance visibility, making it stand out against the background and other items.
FunnelKit Cart offers all the design options you need to customize your cart icon size to your requirements.
3. Design consistency
Match the cart icon’s design with the overall site branding. Use consistent colors and styles to maintain a professional look and reinforce the brand identity.
Make sure to customize the WooCommerce cart menu icon that fits your brand’s aesthetics, whether it’s minimalist, playful, or modern.
Consistency in design elements enhances the user experience, and FunnelKit Cart has all the styles you need.
4. Mobile responsiveness
Ensure the cart icon adapts well to different screen sizes. FunnelKit Cart lets you adjust the width, animation speed, border radius, and more for a seamless mobile experience.
In addition, this icon can be easily tapped on mobile devices, maintaining usability across all devices.
More Questions About WooCommerce Cart Icon to Menu Bar
Find quick answers to common questions about customizing the WooCommerce cart icon, improving visibility, and enhancing the shopping experience from your website’s menu bar.
How can I hide the cart item count when the cart is empty in the menu bar?
With FunnelKit Cart, you can hide the cart item count when the cart is empty by adding a small CSS snippet. Go to FunnelKit → Cart → Styling, scroll to the Custom CSS section, paste the CSS code that targets the zero item count, and save your changes.
div#fkit-floating-count[data-item-count="0"], #fkcart-mini-toggler .fkcart-shortcode-count.fkcart-item-count[data-item-count="0"] { display: none; }
For more details, check this document.
How do I show the total cart amount in the WooCommerce menu bar cart icon?
Yes. Go to FunnelKit → Cart → Cart Menu, and make sure to enable the option "Show Cart Total".
Ready to Add a Cart Icon to the Menu in WooCommerce?
Adding a WooCommerce cart icon to your menu bar makes shopping more convenient for users.
With FunnelKit Cart, you can either add the icon directly to your menu or use a shortcode to place it wherever you want.
Both methods let customers view and update their cart without leaving the page, creating a smoother shopping experience.
With the free version, you can get started immediately, and the pro version adds features like product recommendations and milestone-based rewards to encourage more purchases and increase your store’s average order value.
Get started with FunnelKit Cart today and make shopping easier for your customers.

Editorial Team
July 7, 2026Are shoppers adding products to their cart and leaving before they buy? According to Baymard Institute research on checkout usability, 18% of shoppers who abandon their cart do so because...

Editorial Team
July 7, 2026You’ve built your WooCommerce store, polished your product pages, and invested in marketing, but sales aren’t coming. Visitors browse, some add items to their cart, and most vanish before completing...
Editorial Team
July 3, 2026Discover how a canceled order doesn't have to mean a lost customer, and how the right WooCommerce canceled order email can turn it into a second chance. WooCommerce canceled order...


