
If you are shipping physical goods, setting up a WooCommerce delivery note is one of those small things that makes a real big difference.
It helps your orders feel more professional when they arrive.
WooCommerce does not generate delivery notes out of the box.
You will need a plugin to generate them, but the good news is that there are several solid, free, and paid options, and the setup is straightforward once you know what to look for.
In this blog, we will share how to create and print delivery notes in WooCommerce for free in a step-by-step guide.
Table of Contents
- 1 What Is a WooCommerce Delivery Note?
- 2 Delivery Note vs. Invoice vs. Packing Slip: What Is the Difference?
- 3 How to Set Up and Print WooCommerce Delivery Note For Free
- 4 How to Bulk Print Delivery Notes in WooCommerce
- 5 What Should a WooCommerce Delivery Note Include?
- 6 More Questions About WooCommerce Delivery Note
- 7 Is a delivery note the same as an invoice in WooCommerce?
- 8 Can I email delivery notes to customers automatically?
- 9 How do I add my logo to a WooCommerce delivery note?
- 10 What is the difference between a packing slip and a delivery note in WooCommerce?
- 11 Set Up WooCommerce Delivery Notes and Ship With Confidence
What Is a WooCommerce Delivery Note?
A WooCommerce delivery note is a document that accompanies a customer's order, confirming what was packed and shipped.
Its job is to confirm to the customer that what they ordered is what they received. It is a physical record of the fulfillment, not the transaction.
Because it is not a financial document, a delivery note typically does not include prices, taxes, or payment details. What it does include is the order number, shipping address, a list of products with quantities, and sometimes SKUs or product codes.
Some stores also add a customer-facing note, return instructions, or a thank-you message.
Note: WooCommerce’s Customer Note (found under WooCommerce → Orders → Order) sends a message to the customer by email. It does not create a printable delivery note. This difference often causes confusion.
Delivery Note vs. Invoice vs. Packing Slip: What Is the Difference?
These three documents are related but serve different purposes, and mixing them up leads to real problems at fulfillment time.
Here is what each one does:
- A delivery note is customer-facing and confirms what was shipped.
- An invoice is a financial record of the transaction.
- A packing slip is an internal document your team uses to verify a package before it goes out the door.
The table below breaks down exactly how they differ.
| Topic | Delivery Note | Invoice | Packing Slip |
| Audience | Customer | Customer | Your team |
| Travels with package | Yes | Sometimes | Yes |
| Shows prices | No | Yes | No |
| Shows taxes | No | Yes | No |
| Legal/financial record | No | Yes | No |
| Purpose | Confirms what was received | Records the transaction | Verifies contents before shipping |
Does WooCommerce Generate Delivery Notes Automatically?
No, it does not. WooCommerce handles order management, payment processing, and email notifications natively, but it has no built-in document generation for delivery notes, invoices, or packing slips.
For actual delivery note generation, you need a plugin. The section below covers the best options depending on your store's needs.
How to Set Up and Print WooCommerce Delivery Note For Free
We will use Print Invoice & Delivery Notes for WooCommerce by Tychesoftwares to set up a delivery note. Make sure to install and activate the plugin.
Next, follow the steps below:
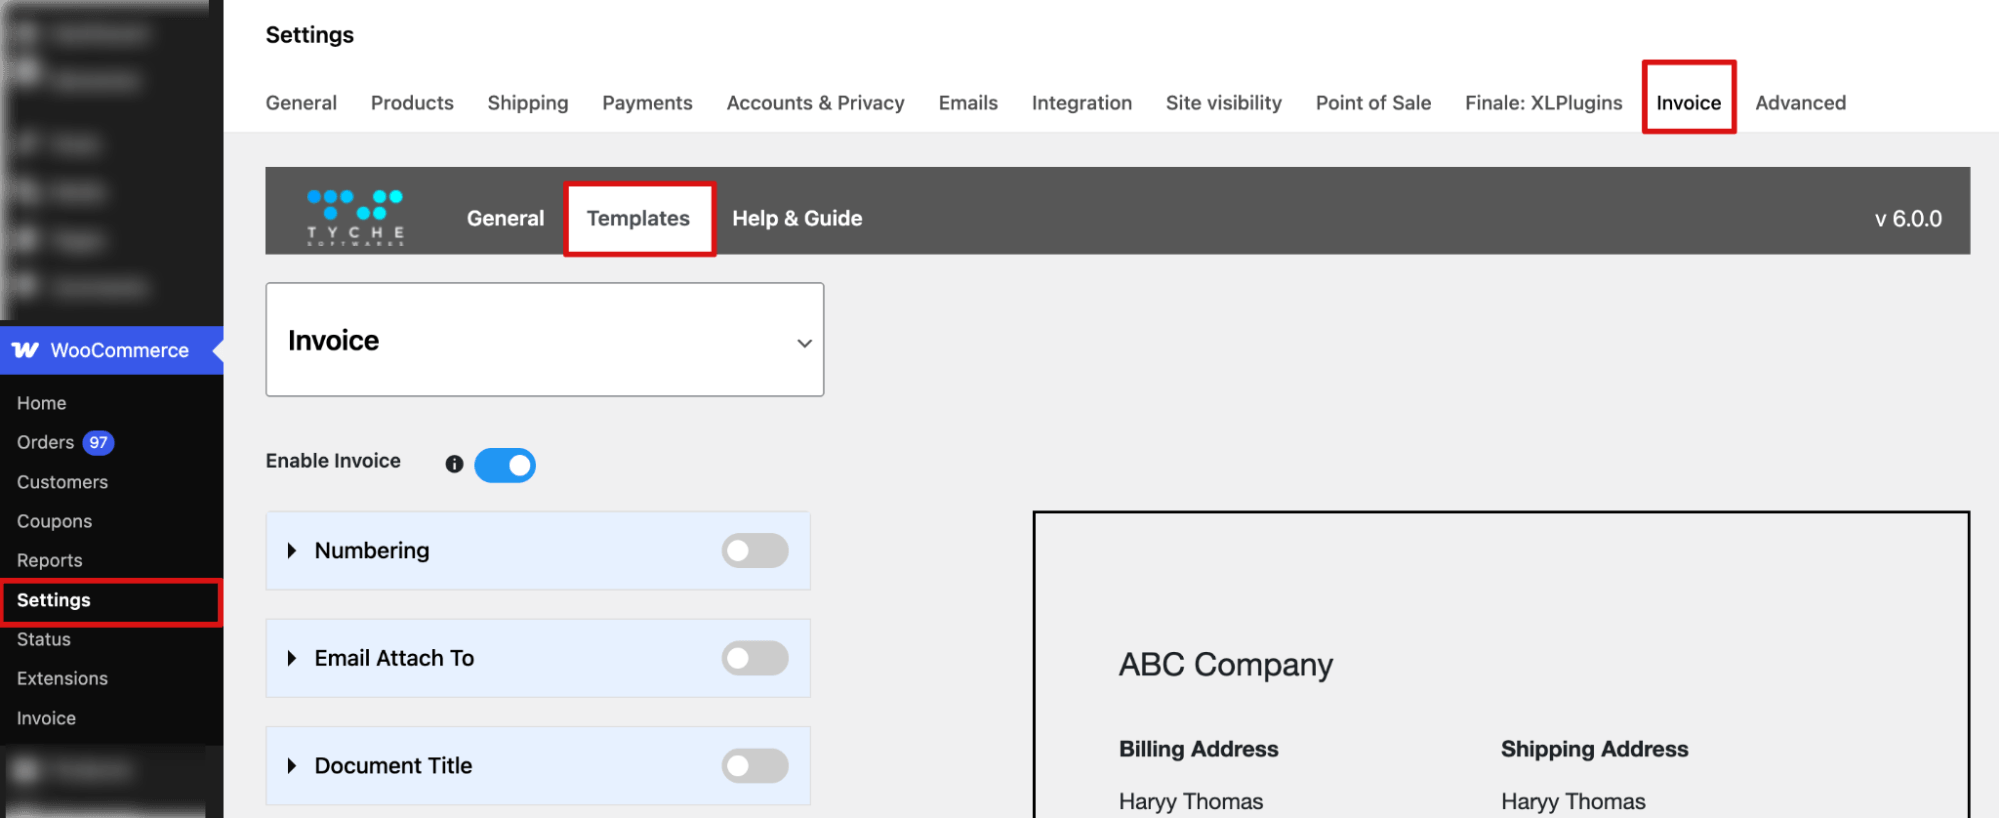
Step 1: Navigate to the Delivery Note settings
Go to WooCommerce ⇒ Settings ⇒ Invoice and move to the Templates tab.
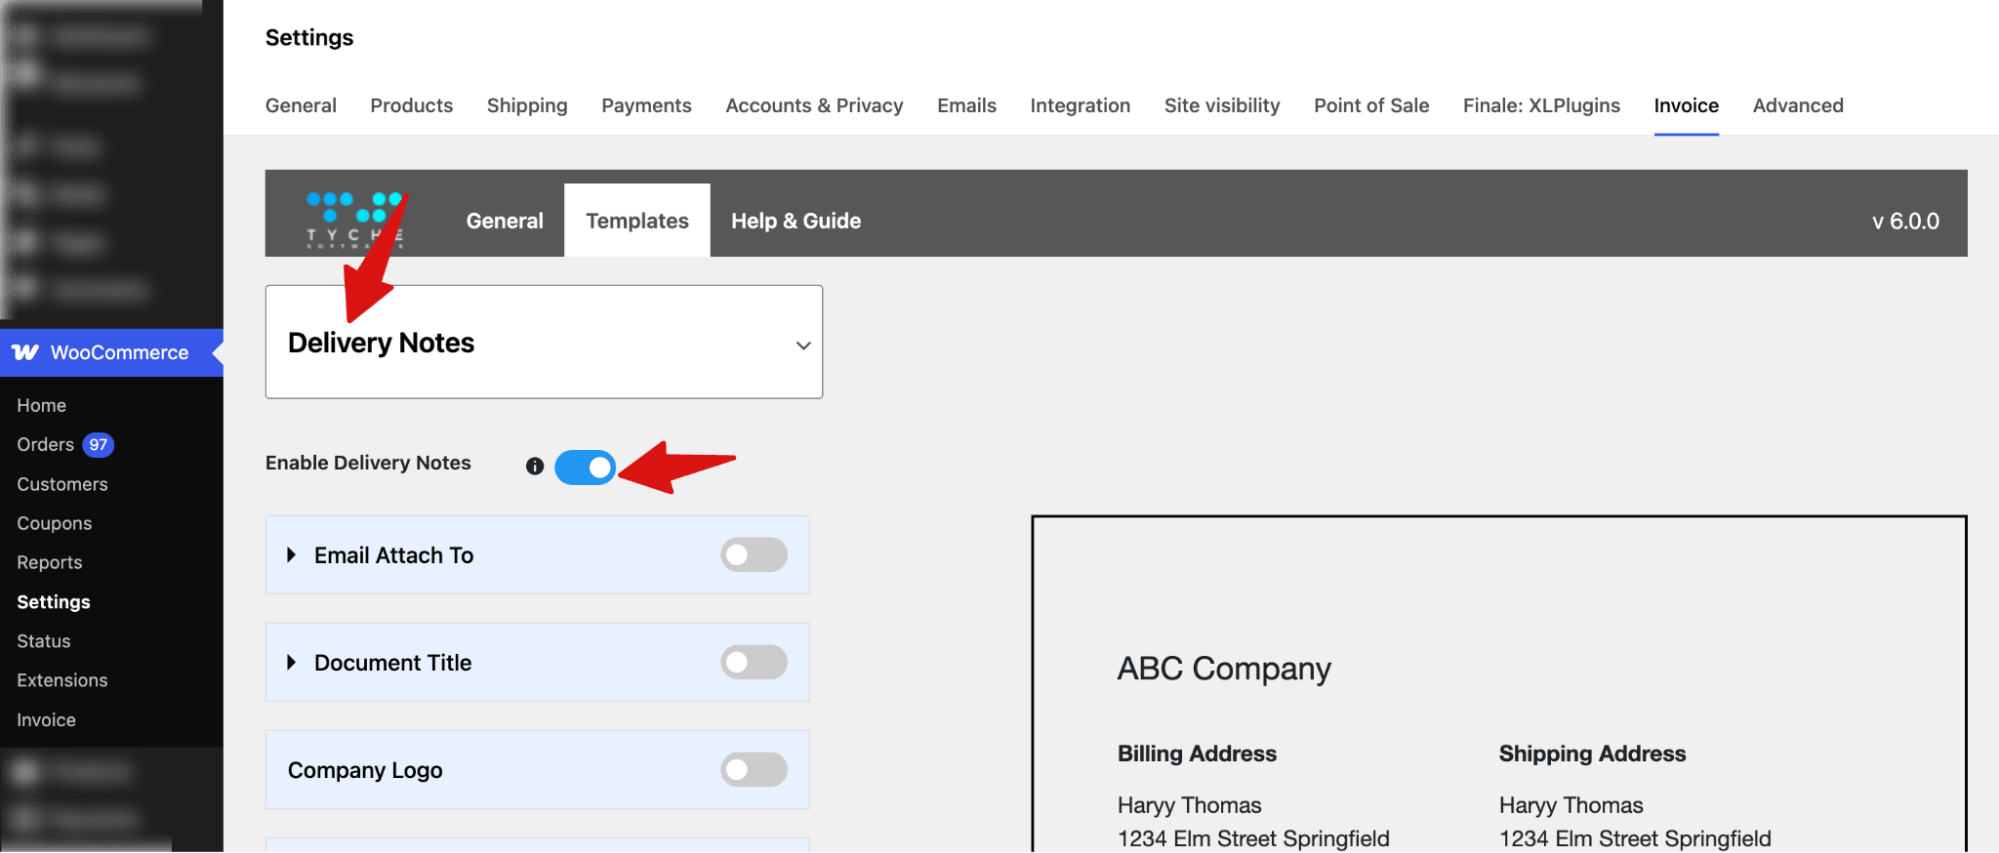
Step 2: Enable delivery notes
Next, choose “Delivery Notes” from the top dropdown, then toggle “Enable Delivery Notes” to enable it.
Step 3: Configure the delivery note
Next, set the following options:
- Email Attach To: Add the emails to which you want to attach the digital version of the delivery note.
- Document Title – Enter the title of the delivery note (e.g., “Delivery Notes”) and choose font size, text alignment, and text color.
- Company Logo – Enable and upload your company logo to appear at the top of the delivery note.
- Company Name – Enable and enter your company name, set font size, text alignment, and text color.
- Company Address – Enable and add your full company address, adjust font size, text alignment, and text color.
- Invoice Number – Enable to display the invoice number, set font size, choose bold style, and text color.
- Order Number – Enable to show the order number with font size, bold style, and text color.
- Order Date – Enable to display the order date with a customizable font size, bold style, and text color.
- Billing Address – Enable to add the customer’s billing address, set as a title with text alignment and text color.
- Shipping Address – Enable to add the customer’s shipping address, set as a title with text alignment and text color.
- Email Address – Enable to optionally display the customer’s email address.
- Phone Number – Enable to optionally display the customer’s phone number.
- Display Price in Product Details Table – Enable to show prices for each product in the table.
- Customer Note – Enable to include a section for customer notes, set font size, and text color.
- Complimentary Close – Enable to add a closing remark (e.g., “Thank you”), customize font size, and text color.
- Policies – Enable to include your store policies, set font size, and text color.
- Footer – Enable to configure footer text with the desired font size and text color.
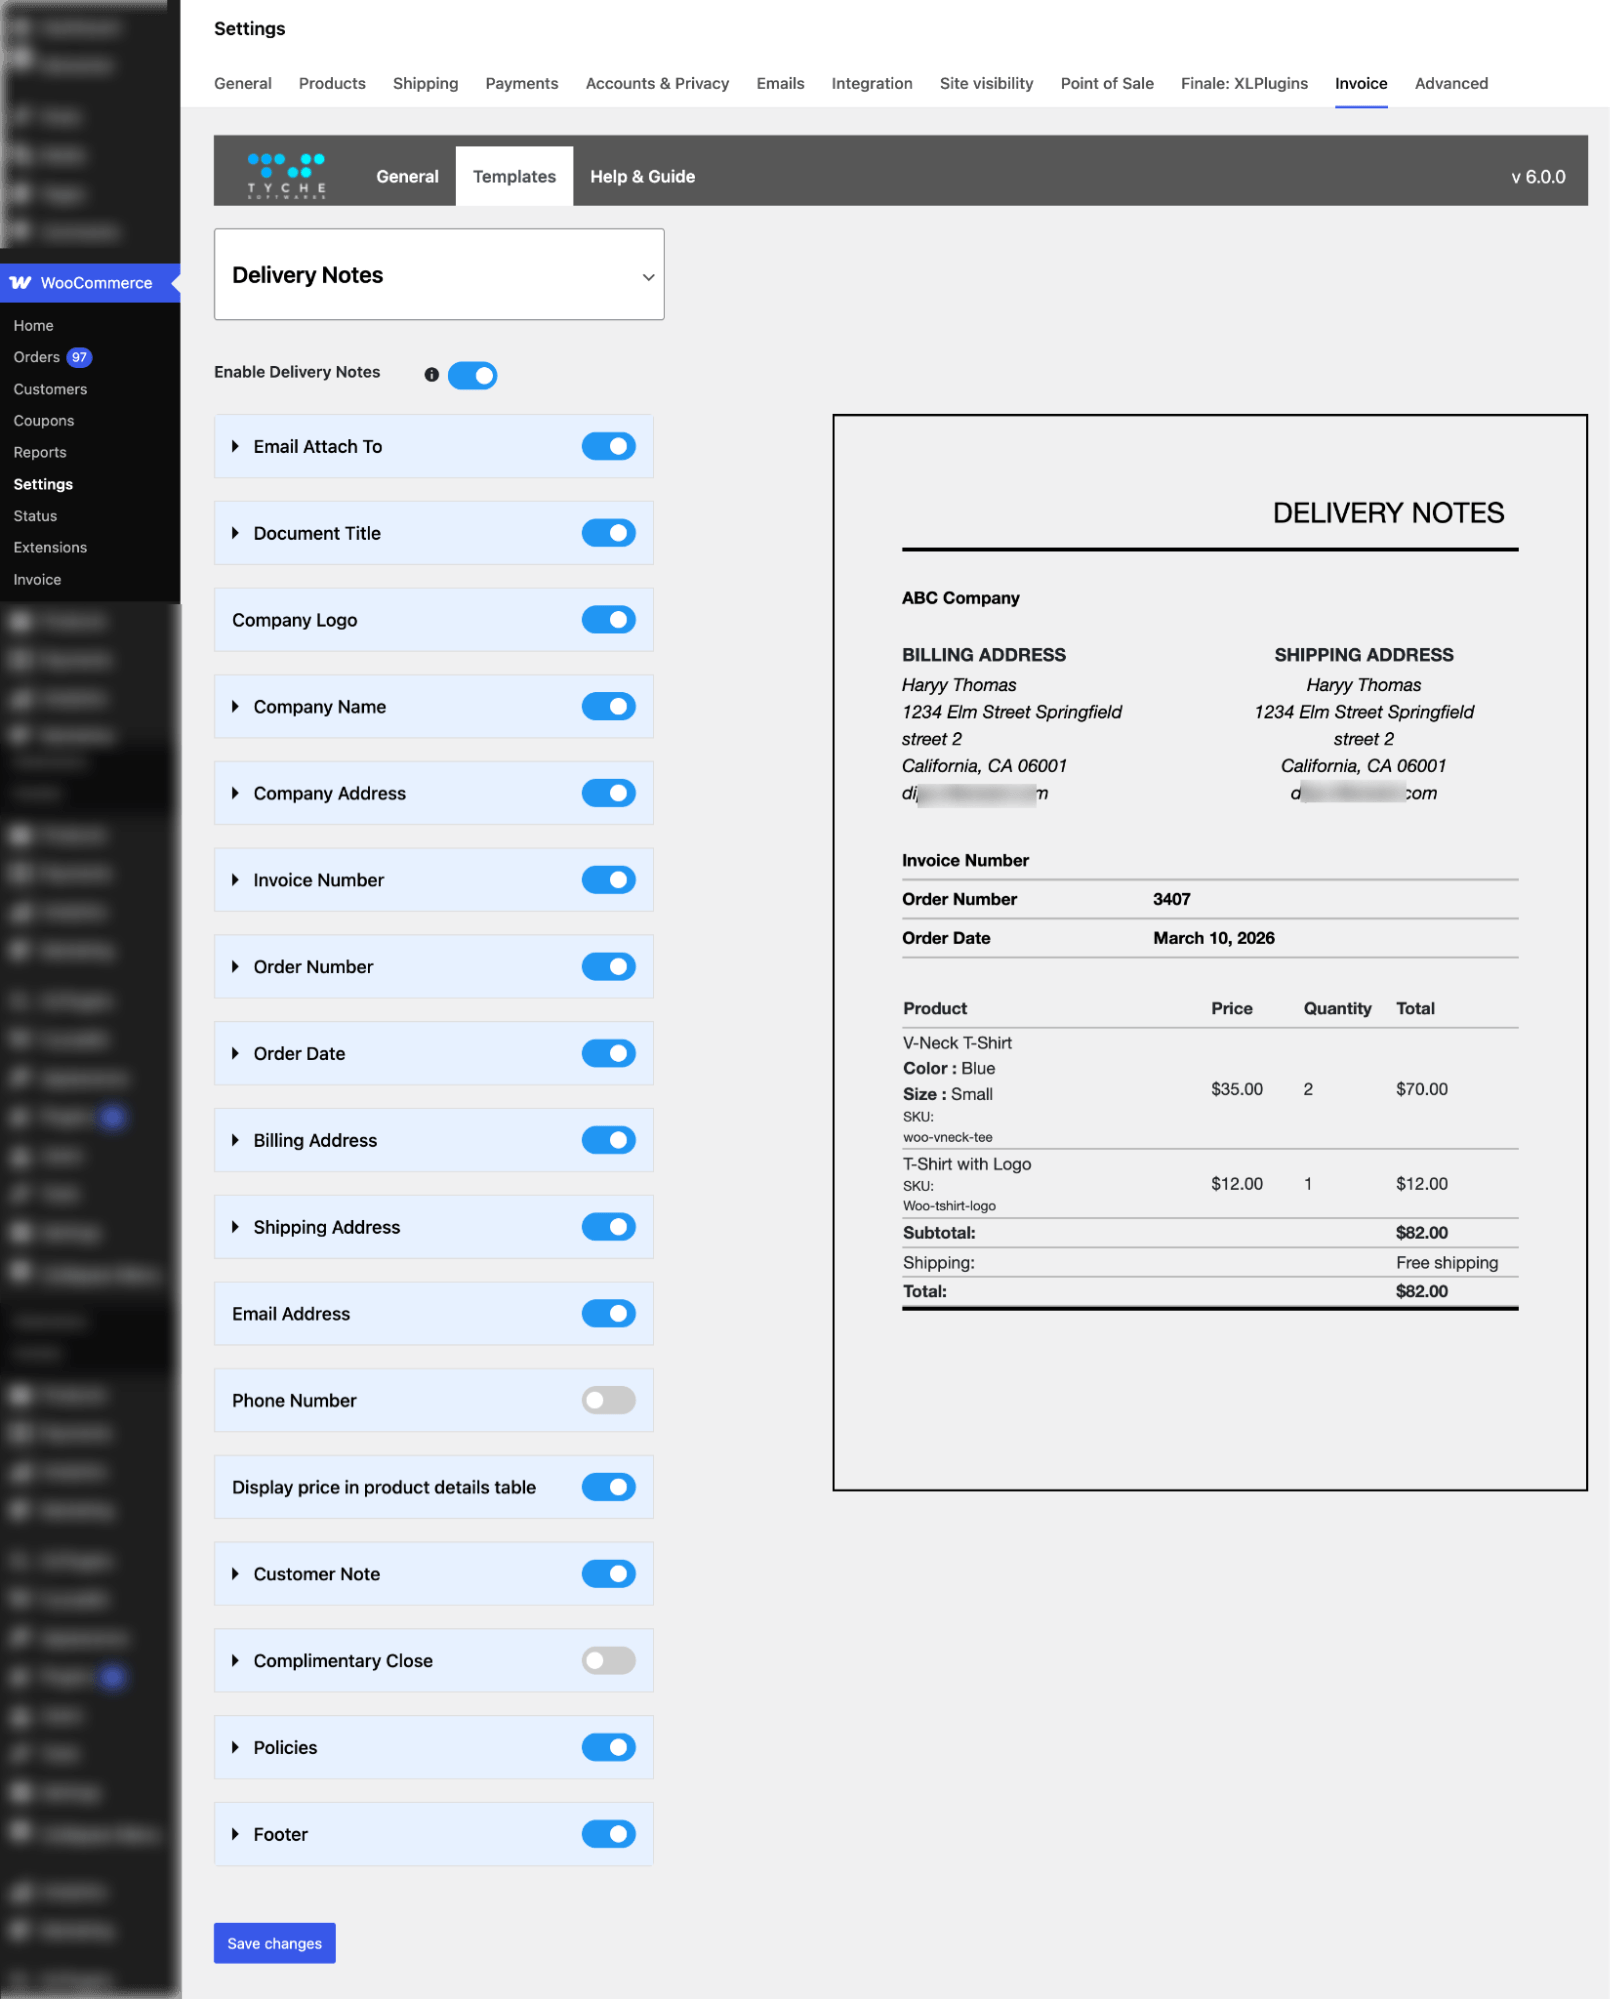
Make sure to save changes.
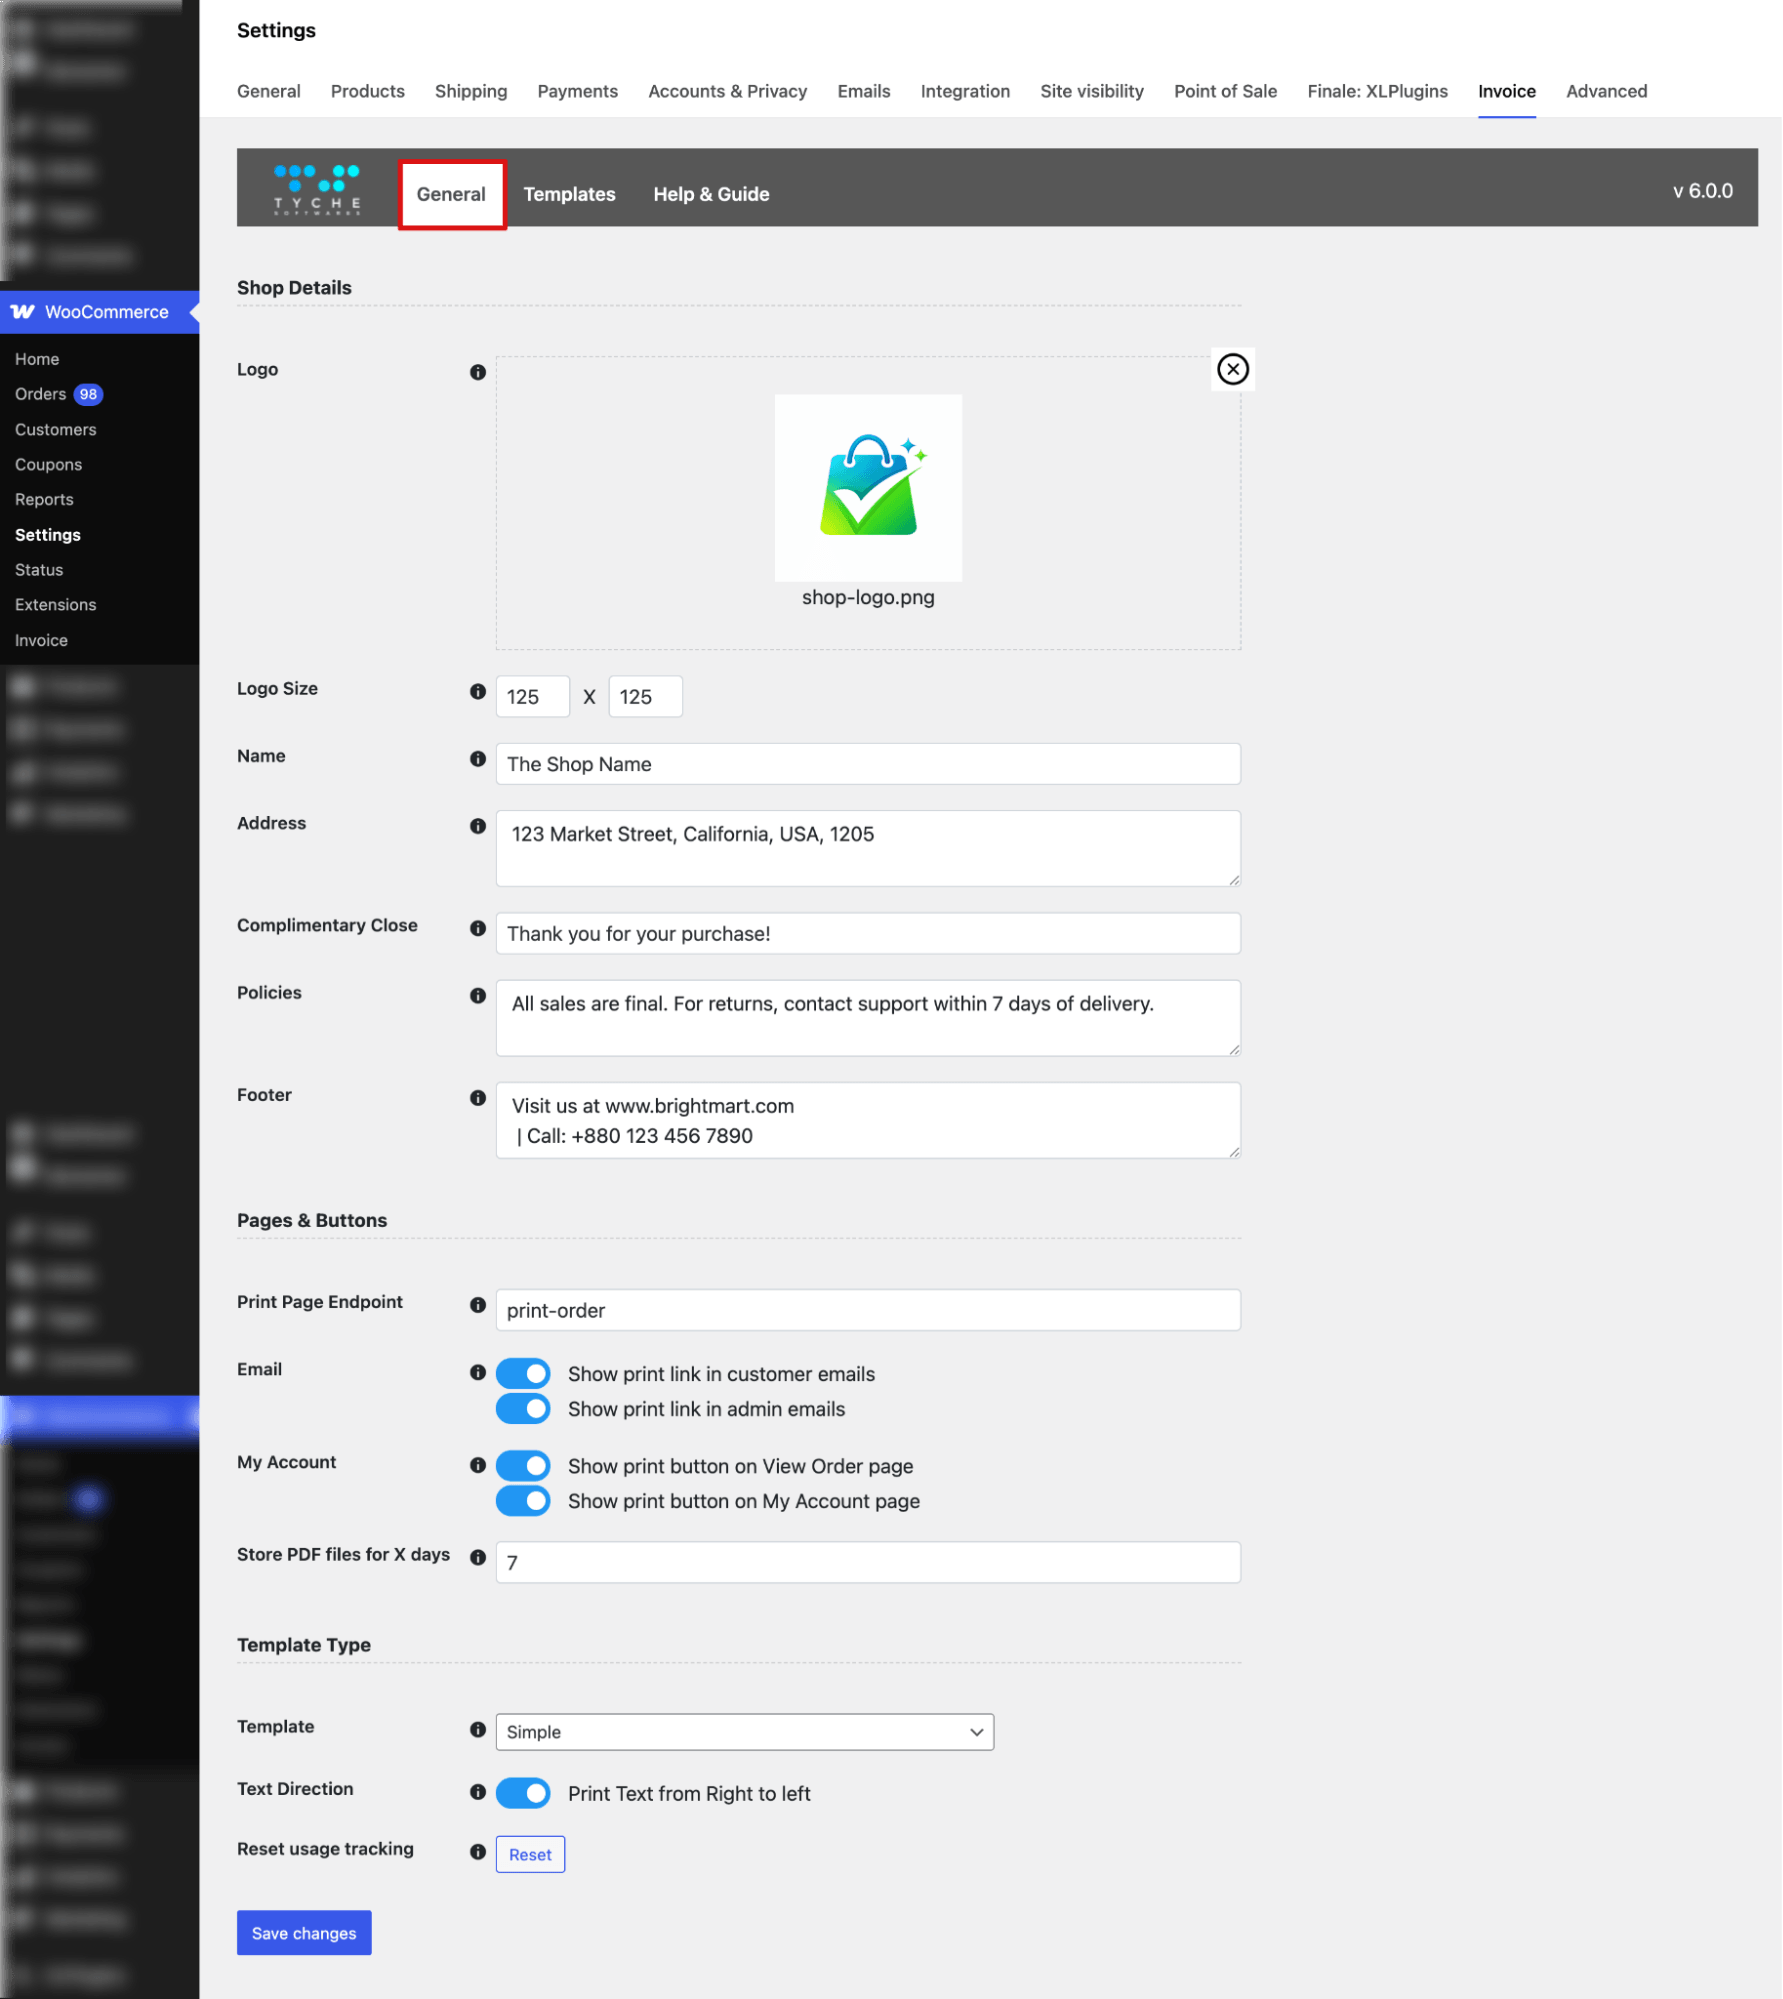
Step 4: Configure general info and delivery note settings
Now switch to the general tab and set the following:
- Logo – Upload your logo image and set the size to 125 × 125 px.
- Name – Enter your shop name (e.g., “The Shop Name”).
- Address – Enter your full company address (e.g., 123 Market Street, Dhaka, Bangladesh, 1205).
- Complimentary Close – Enter a closing remark (e.g., “Thank you for your purchase!”).
- Policies – Enter your store policies or return guidelines (e.g., “All sales are final…”).
- Footer – Enter website and contact info.
- Print Page Endpoint – Set the endpoint for printing orders (e.g., print-order).
- Email Options (Toggle) – Enable to show print link in customer emails and/or admin emails.
- My Account Options (Toggle) – Enable to show print button on “View Order” page and/or My Account page.
- Store PDF Files – Enter the number of days to store generated PDFs.
- Template Type (Dropdown) – Select template type from the dropdown. Options are simple and default.
- Text Direction (Toggle) – Enable to print text from right to left if needed.
- Reset Usage Tracking – Optional: click to clear template usage statistics.
Ensure to save all updates to your delivery note setup.
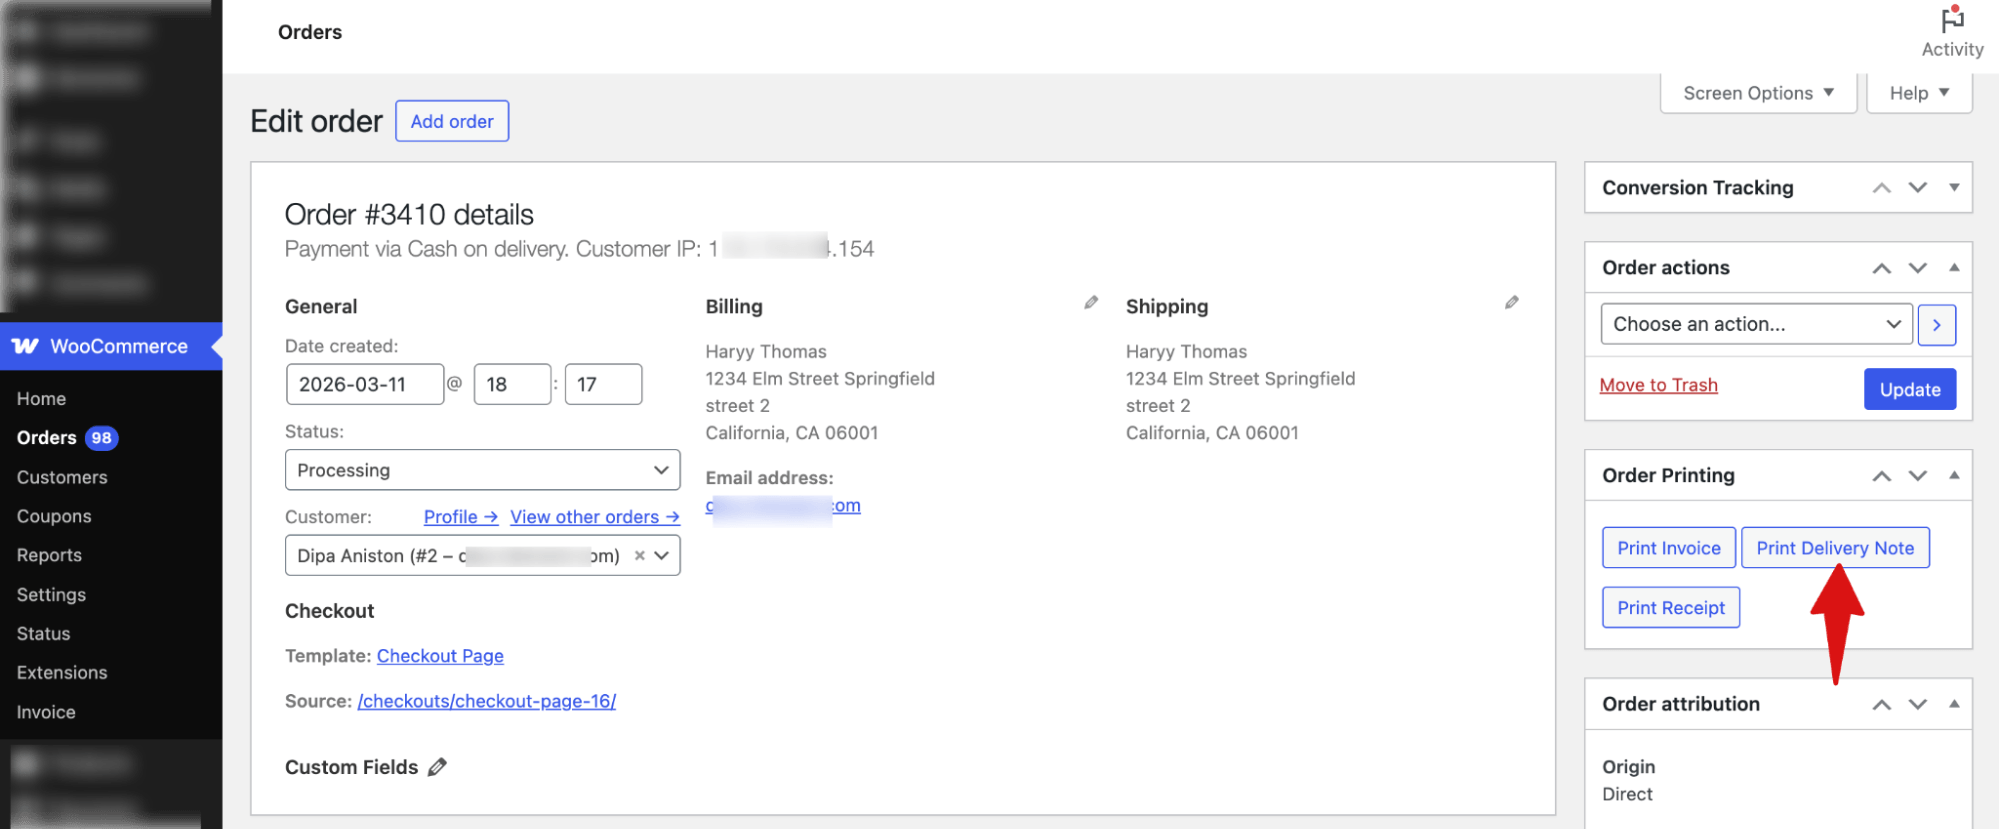
Step 5: Print a WooCommerce delivery note to test
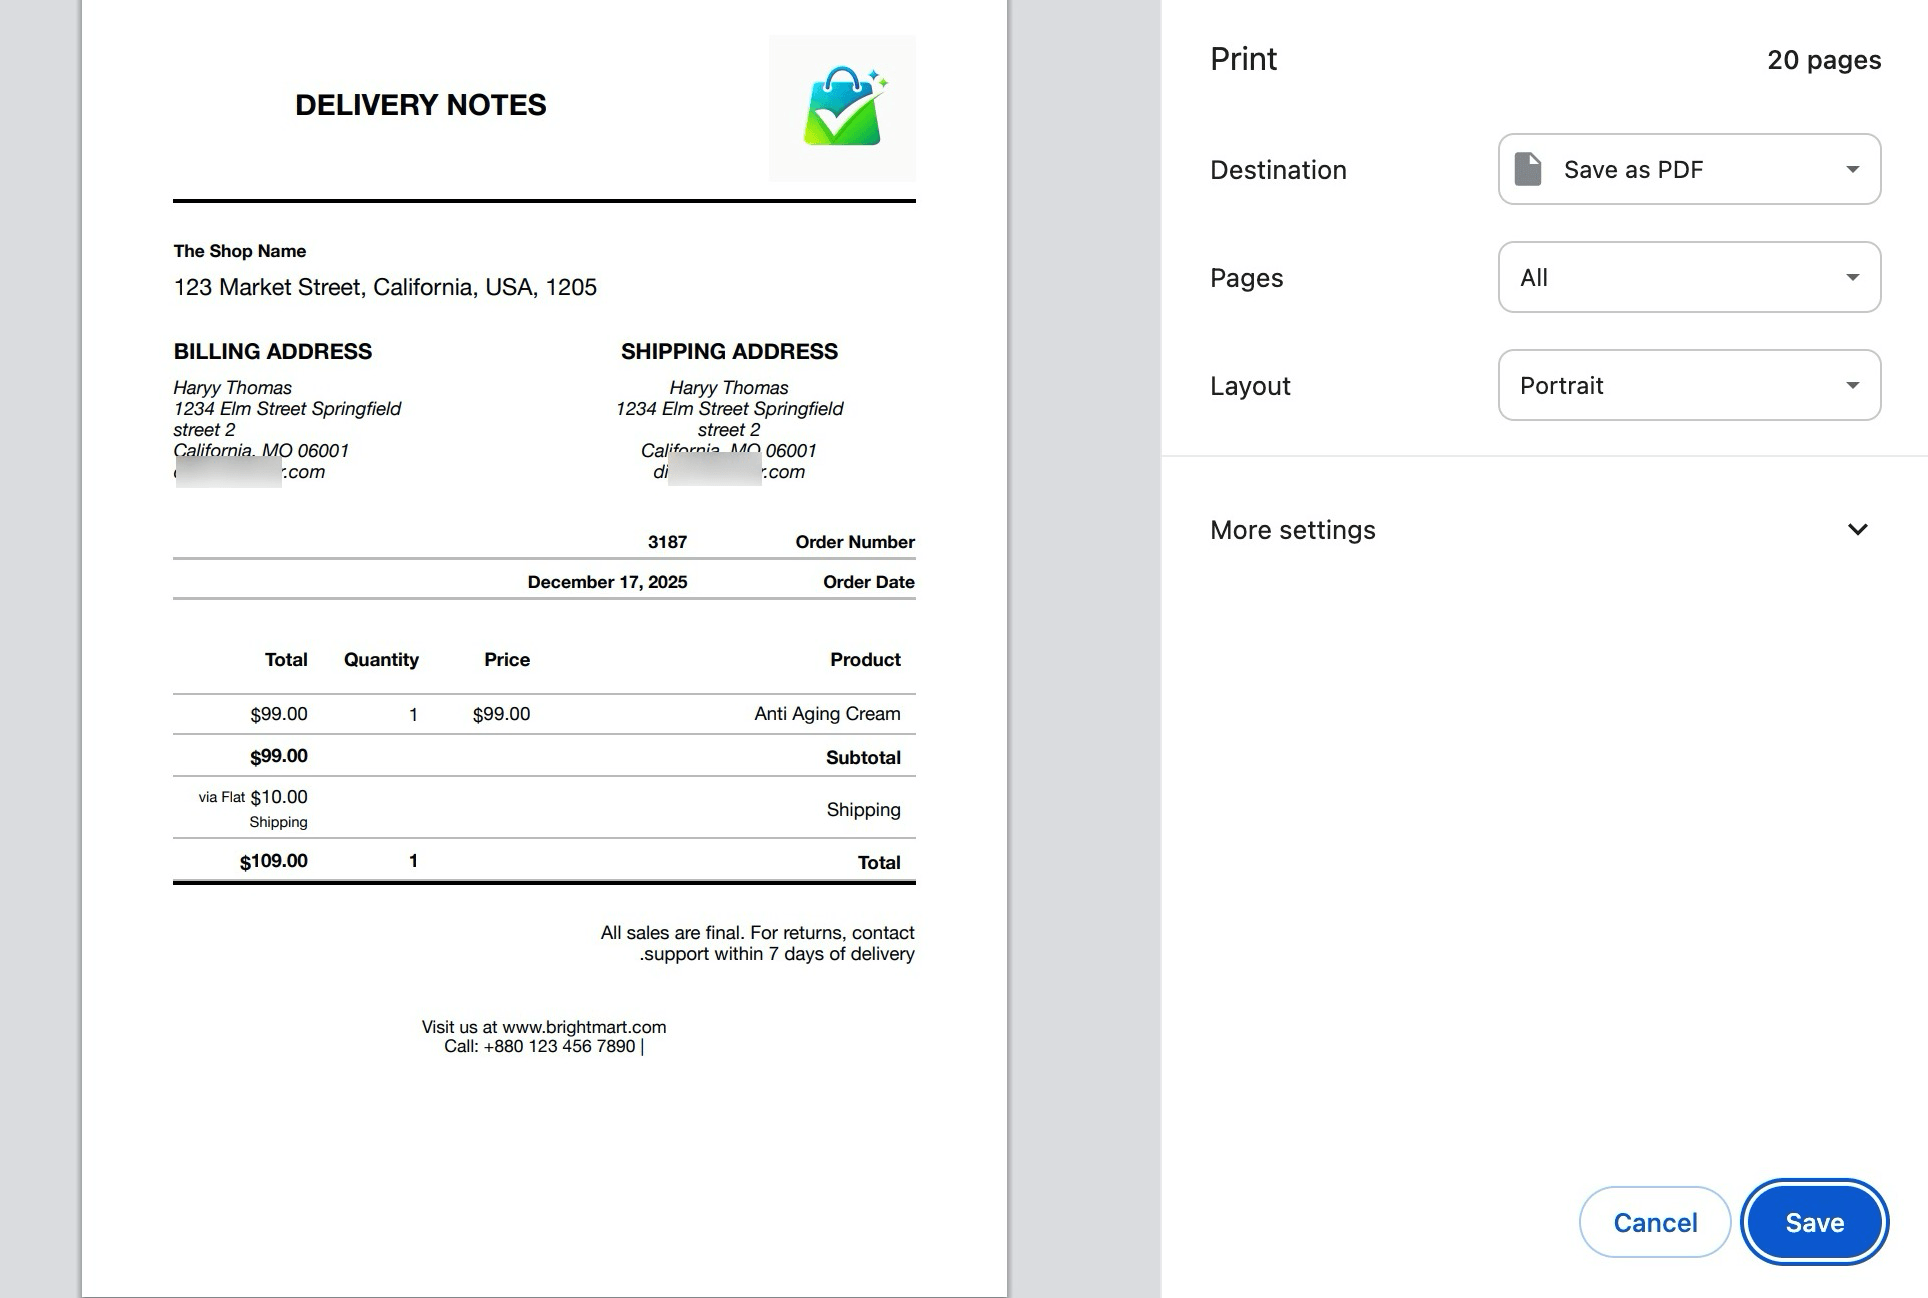
To test, open any order and, in the “Order Printing” section on the right, click “Print Delivery Note” to generate it.
Next, select destination, pages, and layout, and hit Save.
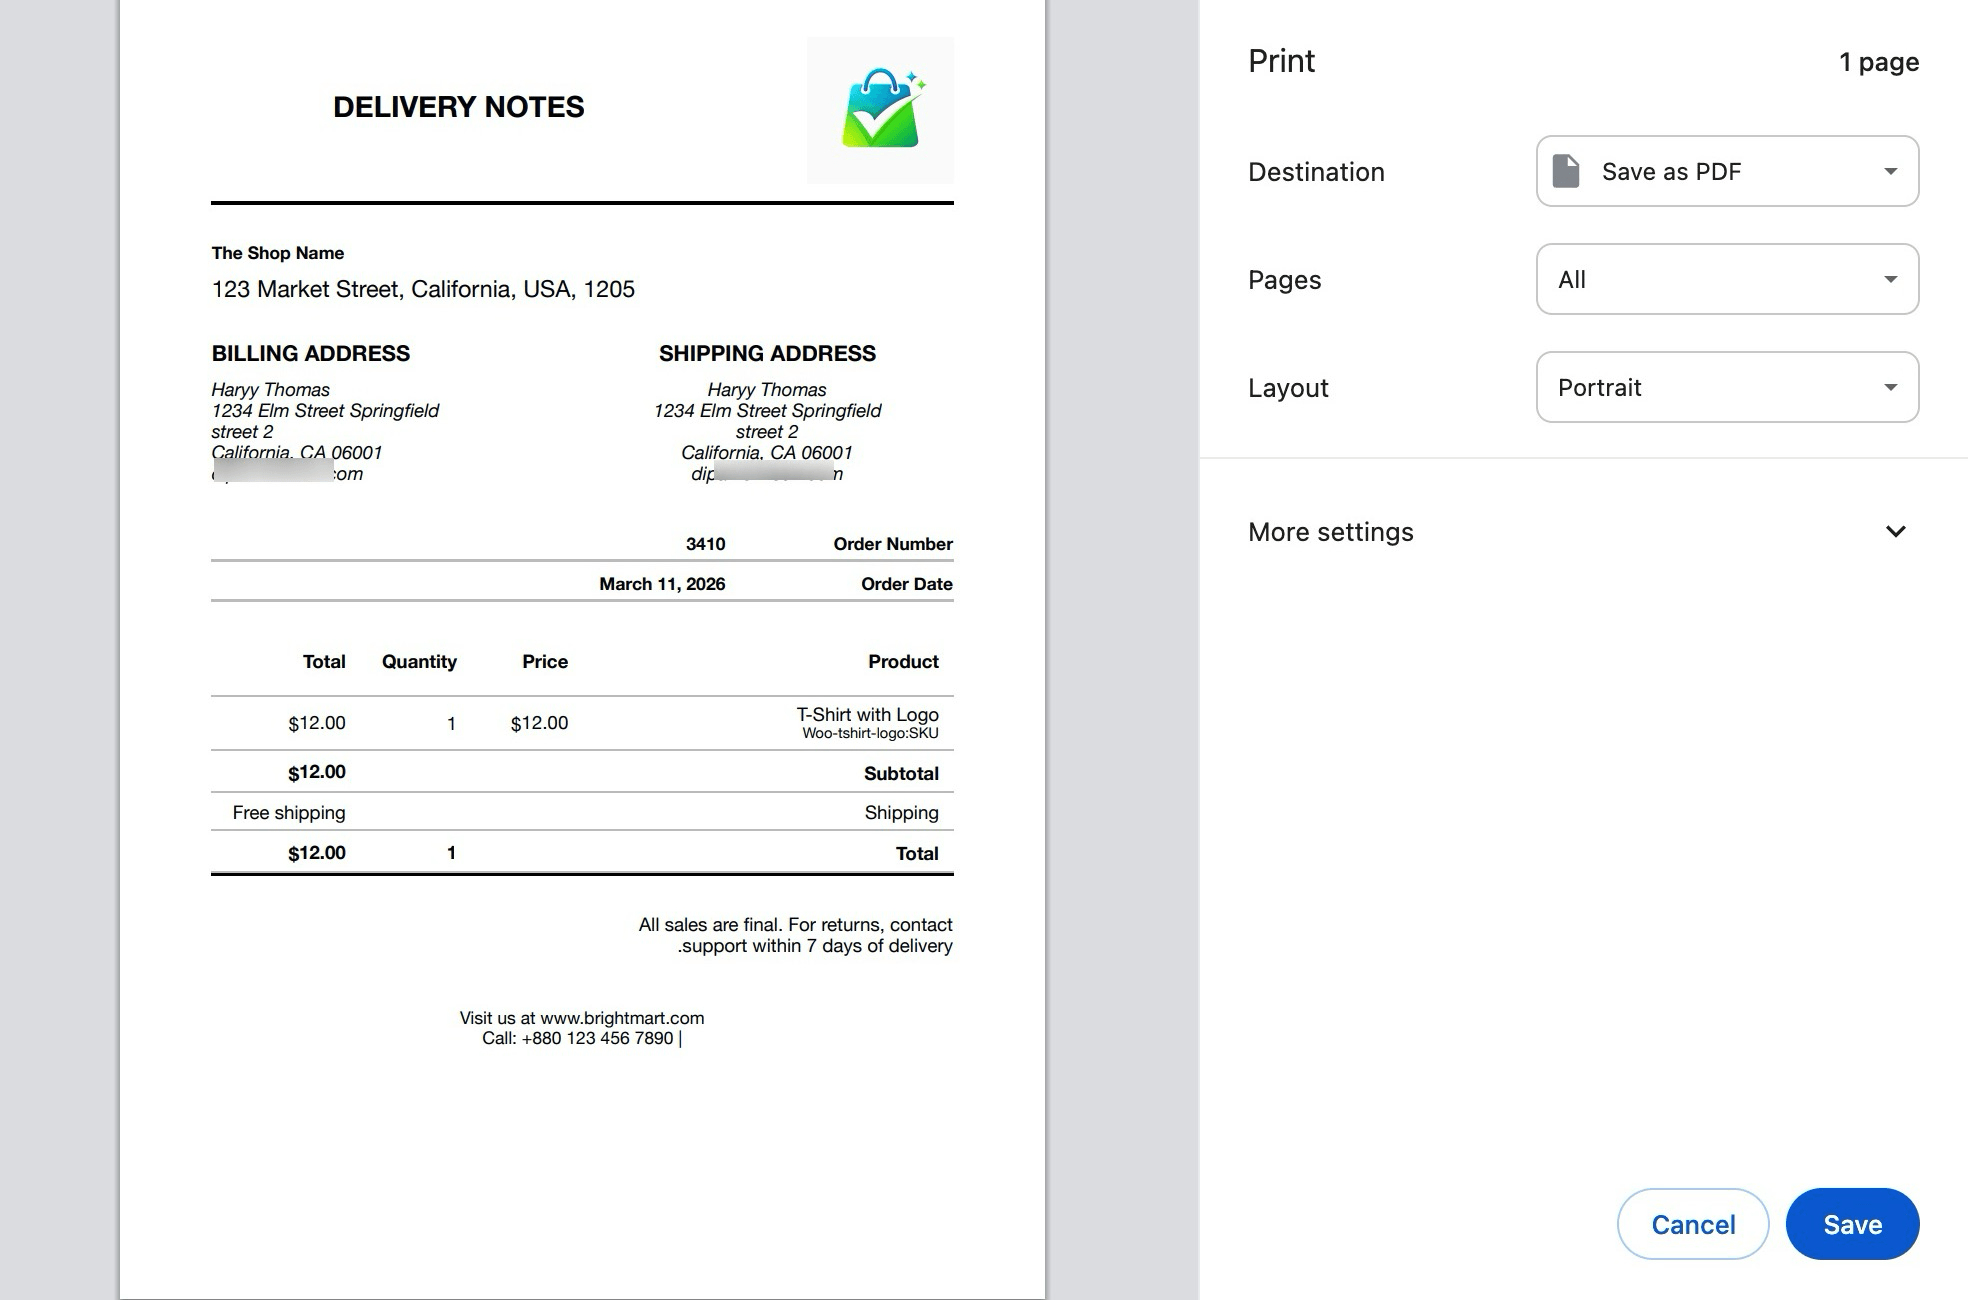
That’s it. This is how you can set up and print a WooCommerce delivery note for free.
How to Bulk Print Delivery Notes in WooCommerce
If you are processing a high volume of orders, printing delivery notes one at a time is not practical.
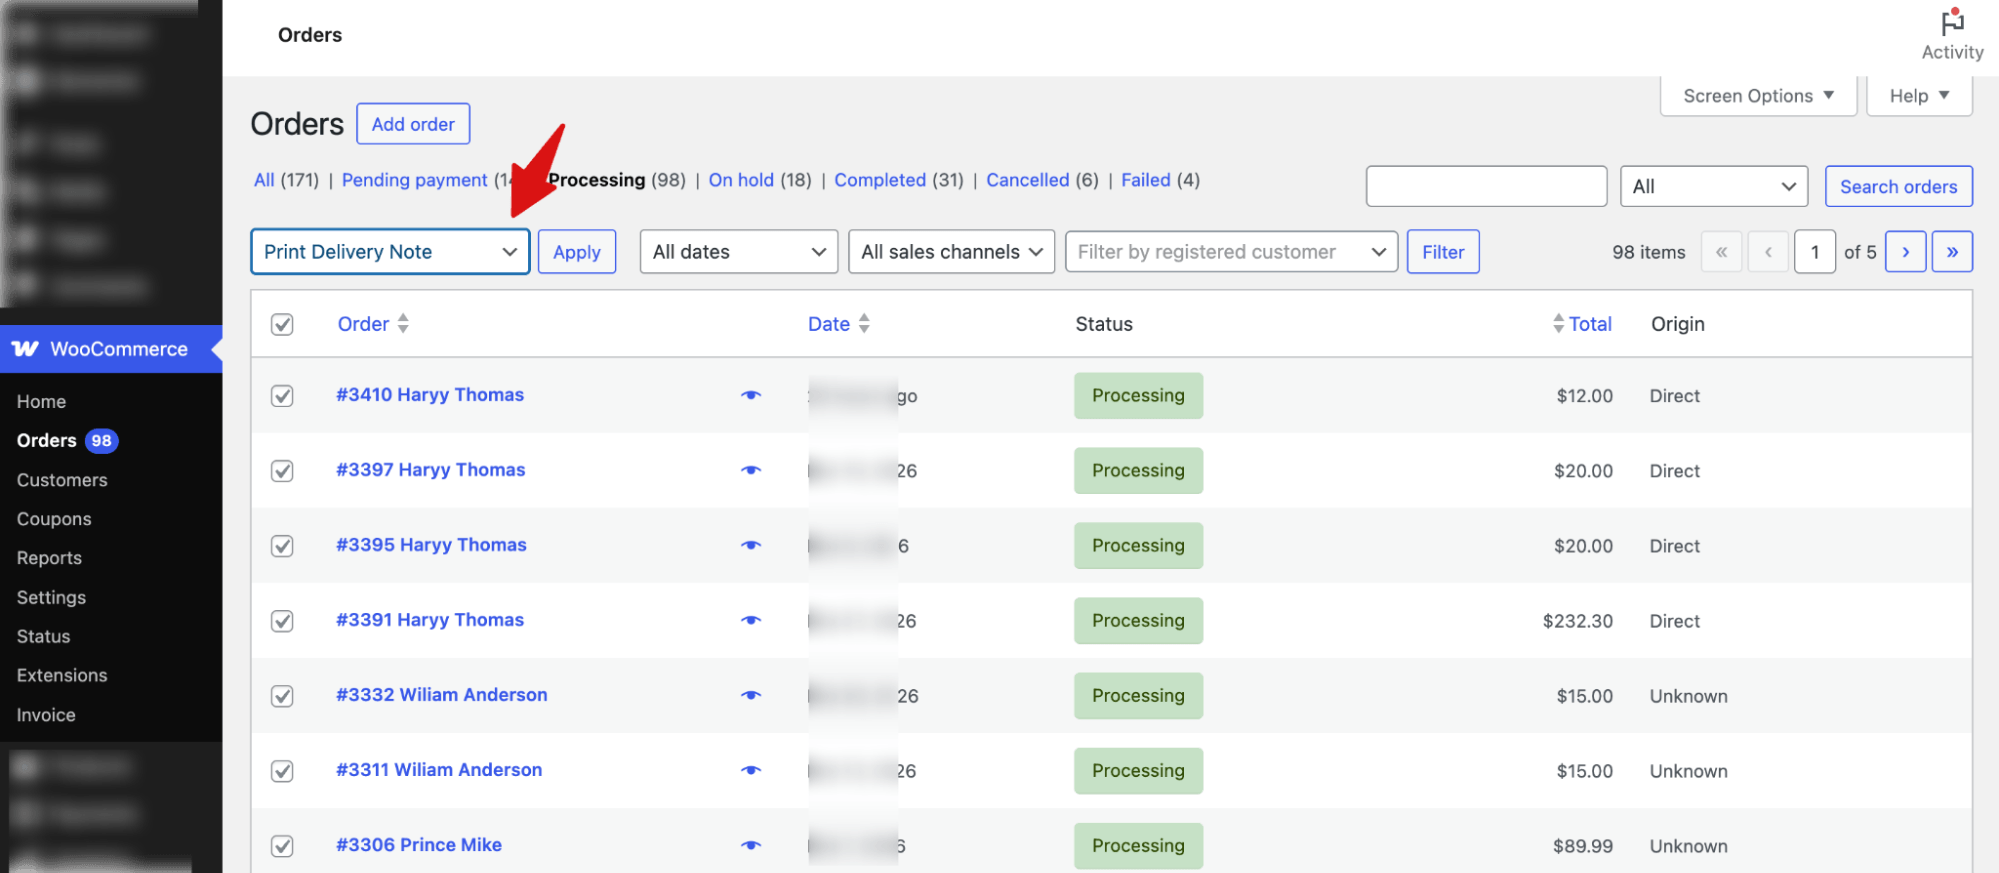
To bulk print delivery notes, go to WooCommerce > Orders.
Next, you can filter by the order status you want, typically Processing or Completed. Or select the orders you want using the checkboxes on the left.
After filtering or selecting the orders, open the “Bulk Actions” dropdown at the top and select “Print Delivery Note” and hit “Apply” next to it.
Next, to confirm, hit “Print” on the pop-up.
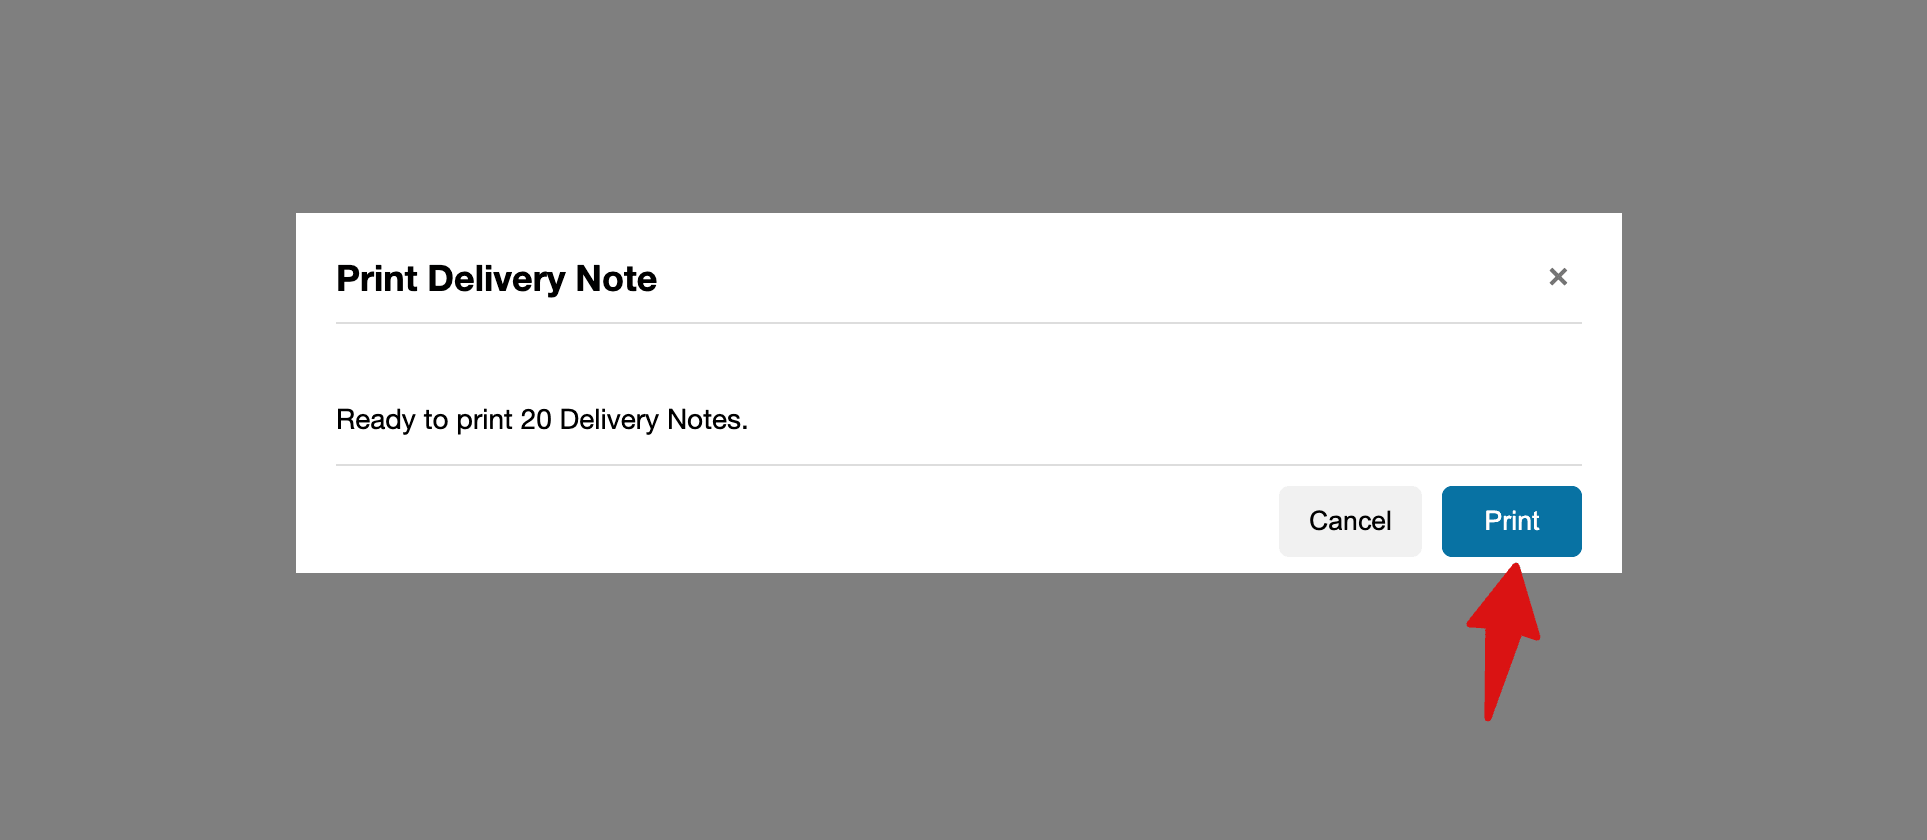
Finally, choose the printing details like destination, layout etc. and hit Save to bulk print order delivery notes.
This replaces the one-by-one workflow entirely. For stores processing hundreds of orders weekly, this is the difference between a 10-minute task and a two-hour one.
What Should a WooCommerce Delivery Note Include?
There is no universal legal requirement for what a delivery note must contain, but there is a practical standard that most stores follow.
The essentials every delivery note should have:
- Order number
- Order date
- Shipping address
- List of products with quantities
- Store name and contact details
These fields give the customer everything they need to verify their order and contact you if something is wrong.
Nice to have, consider adding these depending on your store:
- SKUs or product codes (useful for B2B customers and returns)
- Shipping method
- Customer-facing order note, if one was added at checkout
- Return instructions if your store has a returns policy
Note: Keeping prices off is especially useful if the order is a gift.
More Questions About WooCommerce Delivery Note
Is a delivery note the same as an invoice in WooCommerce?
No, they are different documents. An invoice includes pricing, taxes, and payment details and is a financial record. A delivery note confirms what was shipped, but does not show prices. Some plugins generate both from the same order, which keeps the workflow clean.
Can I email delivery notes to customers automatically?
Yes, with an additional plugin, you can attach delivery notes with emails for different order statuses.
How do I add my logo to a WooCommerce delivery note?
With a plugin like Print Invoice & Delivery Notes for WooCommerce by Tychesoftwares, you can easily add a logo to the delivery note.
What is the difference between a packing slip and a delivery note in WooCommerce?
A packing slip is an internal document used by your team to verify what goes into a package before it ships. A delivery note is included with the package and confirms what the customer received. They often contain similar information, but the intended audience is different. Some plugins use the terms interchangeably, so check what fields each document type includes in the plugin you choose.
Set Up WooCommerce Delivery Notes and Ship With Confidence
A delivery note is a small detail that carries real weight. When a customer opens their package and finds a clean, accurate delivery note confirming exactly what they ordered, it builds confidence in your store. It reduces support queries, makes returns smoother, and leaves a professional impression that encourages repeat purchases.
Once your delivery notes are set up, every order that leaves your store looks and feels professional without any extra effort on your end.
And if you want that same level of professionalism at the start of the order journey, FunnelKit Funnel Builder helps you build a WooCommerce checkout that converts better, reduces abandonment, and gives every customer a smooth path from shop page to confirmation.
More WooCommerce Resources
- How to Generate WooCommerce PDF Invoices and Packing Slips in Your Store
- WooCommerce Order Management: How to Set Up and Streamline It
- How to Set Up Automated WooCommerce Follow-Up Emails to Boost Sales
- How to Set Up WooCommerce Shipping (Complete Guide)
- WooCommerce Order Status: The Complete Guide to Managing Orders Like a Pro
Editorial Team
April 6, 2026Almost every store owner needs to export WooCOmmerce orders sooner or later. Maybe you need to send order data to your accountant, move records to a new site, or pull...

Editorial Team
April 6, 2026Want to turn one-time buyers into customers who keep coming back using WooCommerce? Then you need to find a WooCommerce subscription plugin. These plugins will help you automate billing, manage...

Editorial Team
March 30, 2026Discover how to boost sales and customer loyalty with three smart ways to offer free gifts in your WooCommerce store. Want to boost WooCommerce sales and delight your customers? Offer...


