


A WooCommerce flash sale works because it puts a deadline in front of shoppers.
A discount that ends tonight gets a decision today. One that runs for months gets saved for later.
For a basic sale, WooCommerce's built-in settings are enough. Ending it at an exact hour or showing a live countdown, though, takes a plugin.
In this blog, we will share the quick built-in option. After that, this guide walks through a full setup with a countdown timer and a sticky sale banner, plus the planning and promotion that help your discount bring in more than it costs you.
Table of Contents
- 1 What is a Flash Sale in WooCommerce?
- 2 When to Run Flash Sales (And Why It Works)
- 3 5 Things To Plan Before You Set Up Your Flash Sale
- 4 Can You Set Up a WooCommerce Flash Sale Using Default Settings?
- 5 How to Set Up a WooCommerce Flash Sale (Step-by-Step)
- 6 How To Promote WooCommerce Flash Sale
- 7 5 Flash Sale Best Practices for WooCommerce Stores
- 8 Frequently Asked Questions About WooCommerce Flash Sale
- 9 Start Driving More Sales with WooCommerce Flash Sales
What is a Flash Sale in WooCommerce?
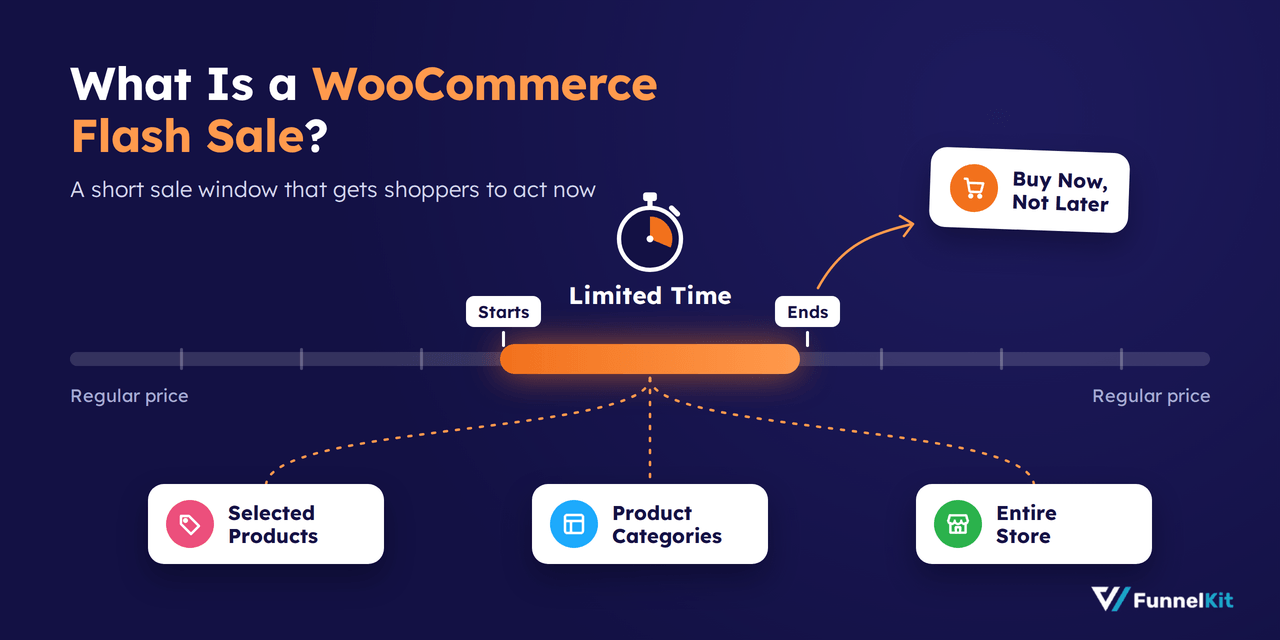
A WooCommerce flash sale is a limited-time discount event applied to selected products, categories, or even your entire store.
Because the offer is available for only a short time, it creates urgency that encourages customers to purchase immediately rather than delay their decision, thereby increasing sales.
When to Run Flash Sales (And Why It Works)
Flash sales are not just random discounts. When timed strategically, they can solve specific business challenges and drive measurable growth.
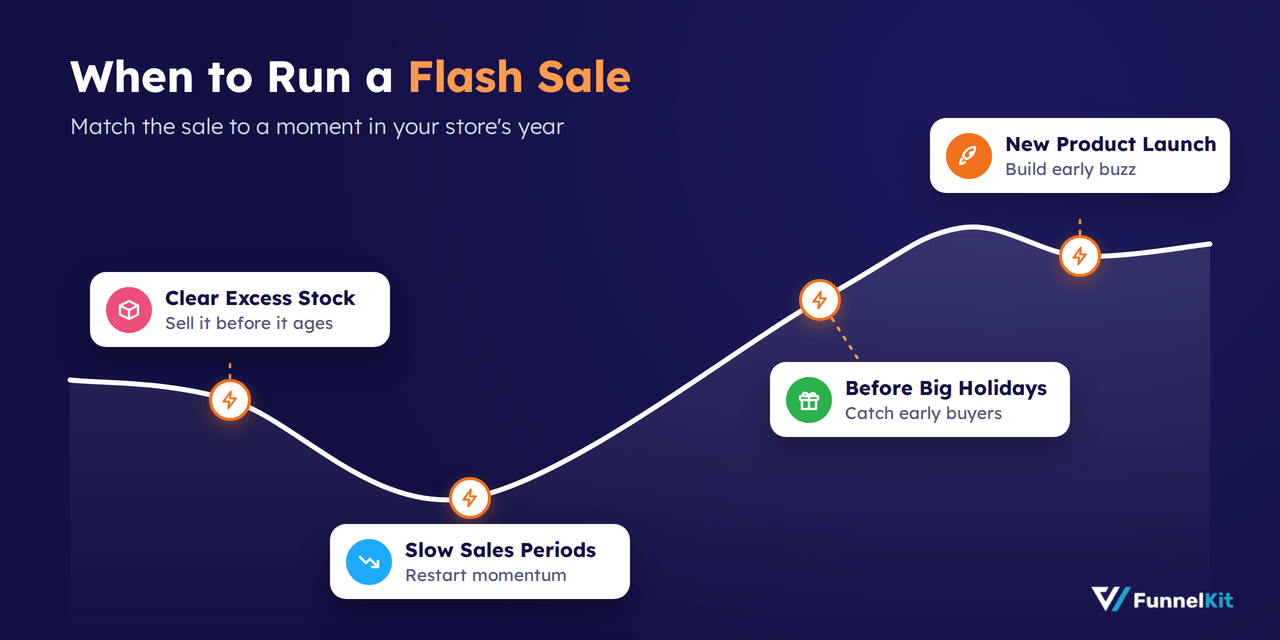
1. To Clear Excess Stock
If you have overstocked items or seasonal products nearing the end of their cycle, a flash sale can help move inventory quickly.
Why it works: The limited-time discount motivates customers to purchase immediately instead of comparing alternatives. This frees up warehouse space, improves cash flow, and helps you avoid heavy long-term discounting later.
2. During Slow Sales Periods
Every store experiences dips in sales throughout the year. A flash sale can inject momentum when revenue slows down.
Why it works: A short, high-impact promotion grabs attention and creates excitement even when demand is low. This generates quick revenue, maintains steady cash flow, and keeps your store active without relying on major holidays.
3. Before Holidays or Major Events
Running a flash sale shortly before major shopping events can build anticipation and attract early buyers.
Why it works: Customers are already in buying mode, and urgency pushes them to act faster. This helps you capture early shoppers, increase overall seasonal revenue, and stand out from competitors.
4. When Launching New Products
A limited-time introductory offer can create immediate traction for a new product.
Why it works: Customers feel they are getting early access to a special deal. This generates buzz, encourages early reviews, and builds momentum for the product launch.
5 Things To Plan Before You Set Up Your Flash Sale
Don't touch your WooCommerce settings yet. The difference between a flash sale that moves product and one that just burns your profit margin comes down to the decisions you make before the sale starts.
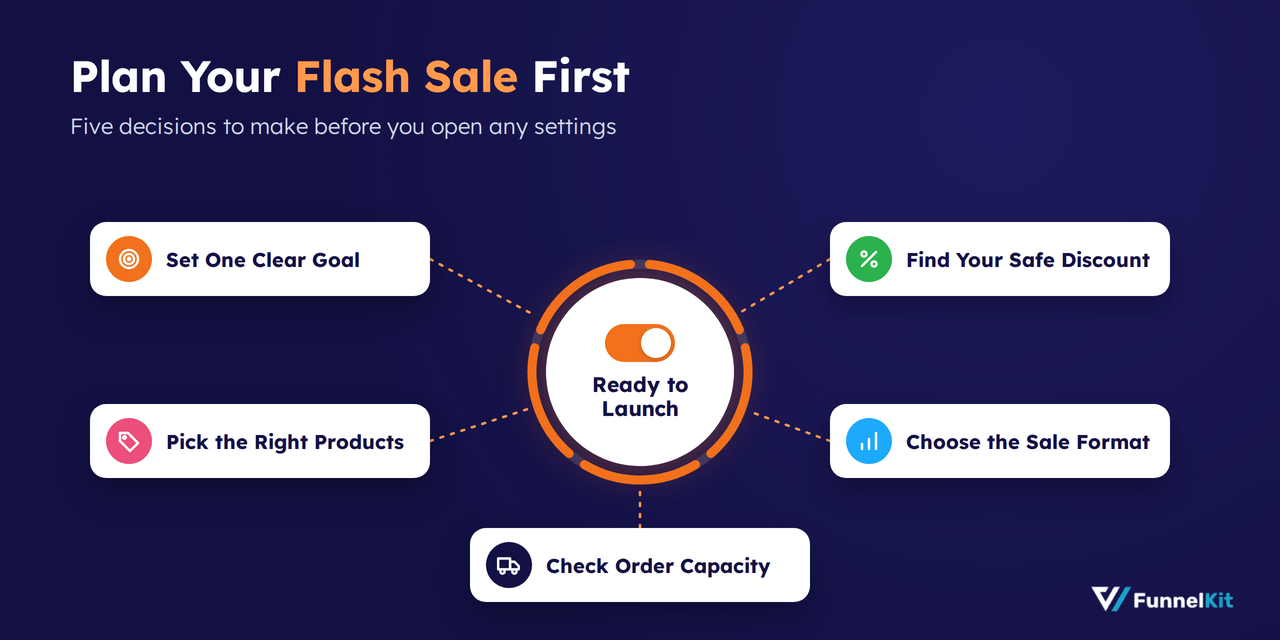
1. Decide on the goal of your flash sale
Flash sales can do many things, such as clear inventory, attract new buyers, boost revenue, or increase order values, but you can't optimize for everything at once.
Be specific. Are you trying to move seasonal stock before your next shipment? That requires different products and pricing than if you're trying to convert more first-time buyers.
2. Pick products that benefit both your customers and your store
Not every product needs to go on a flash sale. Some items naturally create urgency, while others won’t move even with a discount.
- For inventory management: Feature items that need to clear space but still appeal to your audience. Pair slow-moving products with popular items in bundles to boost overall sales.
- For attracting new customers: Highlight your best-reviewed or hero products. These show the value of your store, encouraging first-time buyers to explore more.
- For profitability: Focus on high-margin products that can handle a 15–20% discount without hurting your bottom line.
By choosing the right mix, customers feel, “I need this now,” while your store meets sales, margin, and inventory goals.
3. Calculate a discount that guarantees profit
To run a profitable flash sale on many products, first calculate each product’s minimum sale price using:
Minimum Sale Price = Cost of Goods Sold / (1 − Desired Profit Margin)
Then, compare this to the regular price to find the maximum discount per product:
Max Discount (%) = (Regular Price − Minimum Sale Price) / Regular Price × 100
For a sale across your catalog, the highest safe discount is the lowest max discount among all products. Optionally, you can use tiered discounts for higher-margin items to make the sale more attractive.
4. Decide how you will present the flash sale
The way you present your discount matters as much as the discount itself.
Flat discounts are simple and easy for customers to understand.
Tiered discounts (for example, 5% off orders over $100, 10% off orders over $150) encourage higher cart values.
Spend thresholds work the same way, nudging customers to spend a bit more to unlock bigger savings. Flat discounts are simple but may leave potential revenue on the table, while tiered or threshold-based discounts can drive higher average order values.
5. Check if you can actually handle the order volume
Many stores skip this step and end up regretting it. If you put a product with only 30 units on sale and 150 people try to buy it, you’ll run out of stock, which can lead to refunds, unhappy customers, and bad reviews.
On top of that, if your daily orders jump from 15 to 200, can you actually pack and ship them on time? Flash sale shoppers expect fast delivery, and delays can hurt your store’s reputation.
Can You Set Up a WooCommerce Flash Sale Using Default Settings?
Yes, with limits. WooCommerce can discount products and coupons without a plugin, but scheduling works by date only, and nothing on the page shows shoppers a countdown.
Option A: Discount products with a sale price
You can discount items individually for custom schedules or update multiple items at once for site-wide promotions.
Discount individual products
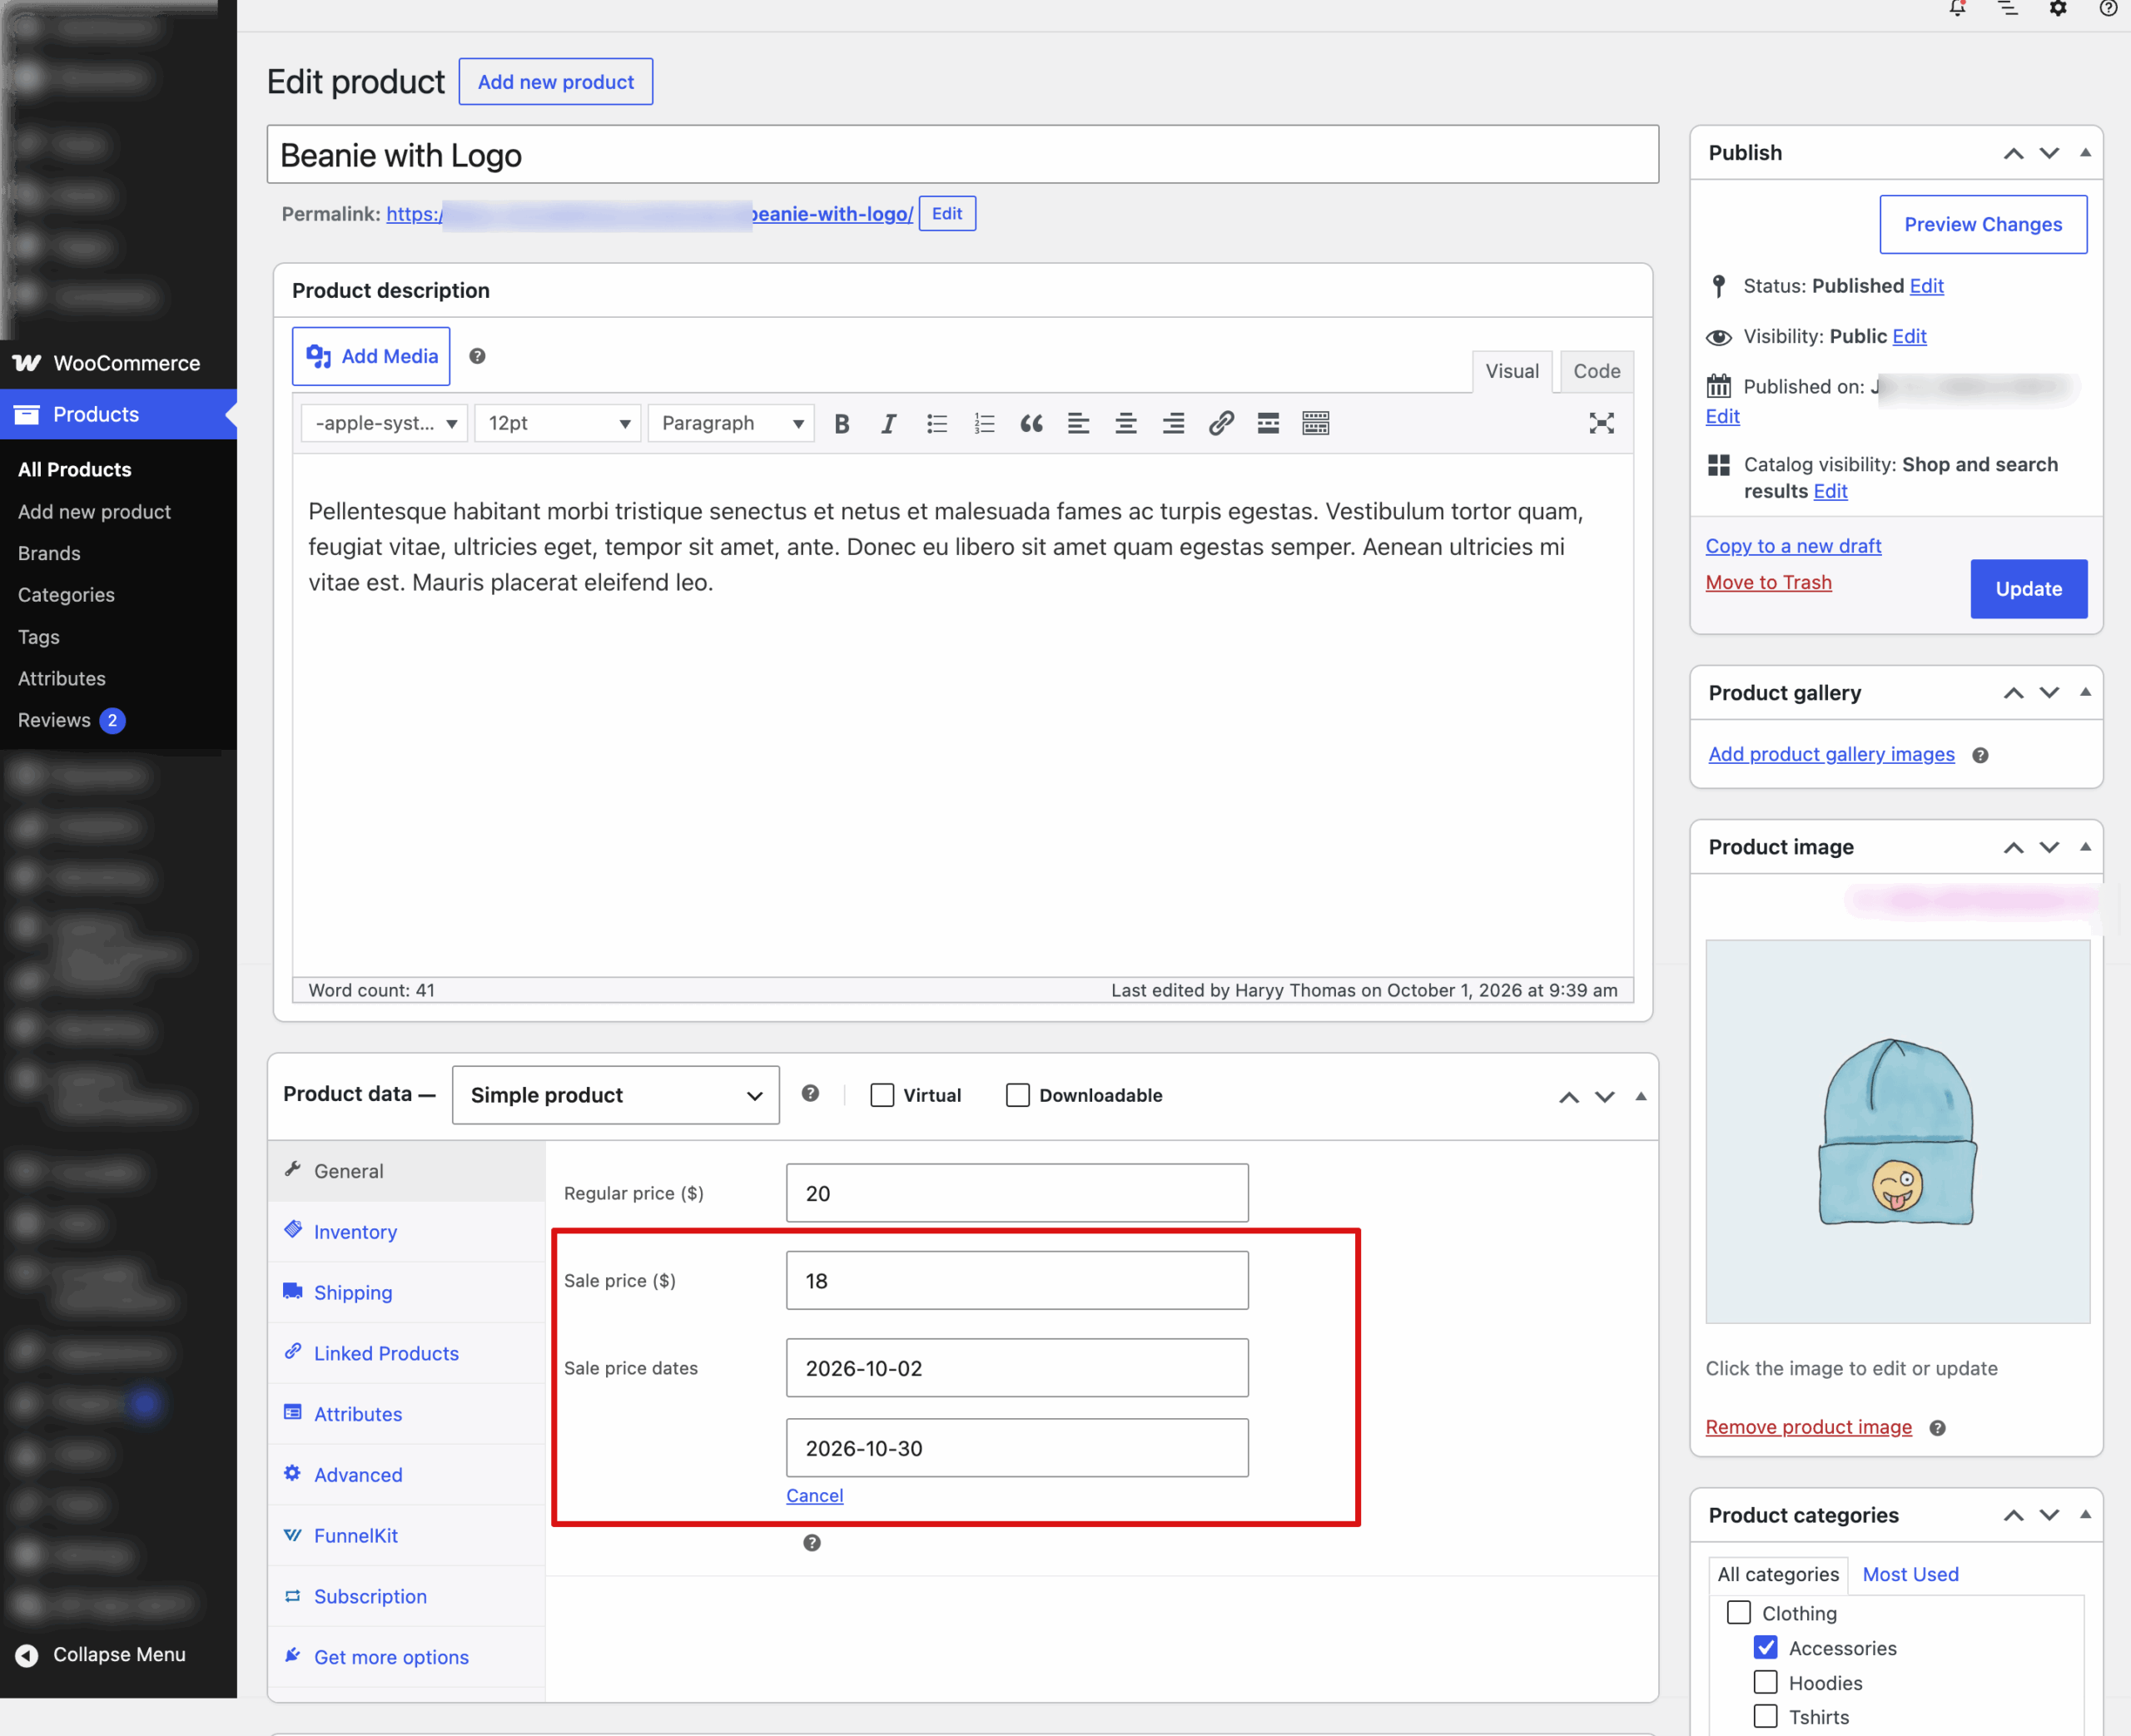
Navigate to Products > All Products and open the item you want to edit. In the Product data > General section, enter the Sale price, select Schedule to choose your start and end dates, and click Update.
The discount goes live on the start date and ends automatically at 11:59 PM on the end date.
Discount multiple products in bulk
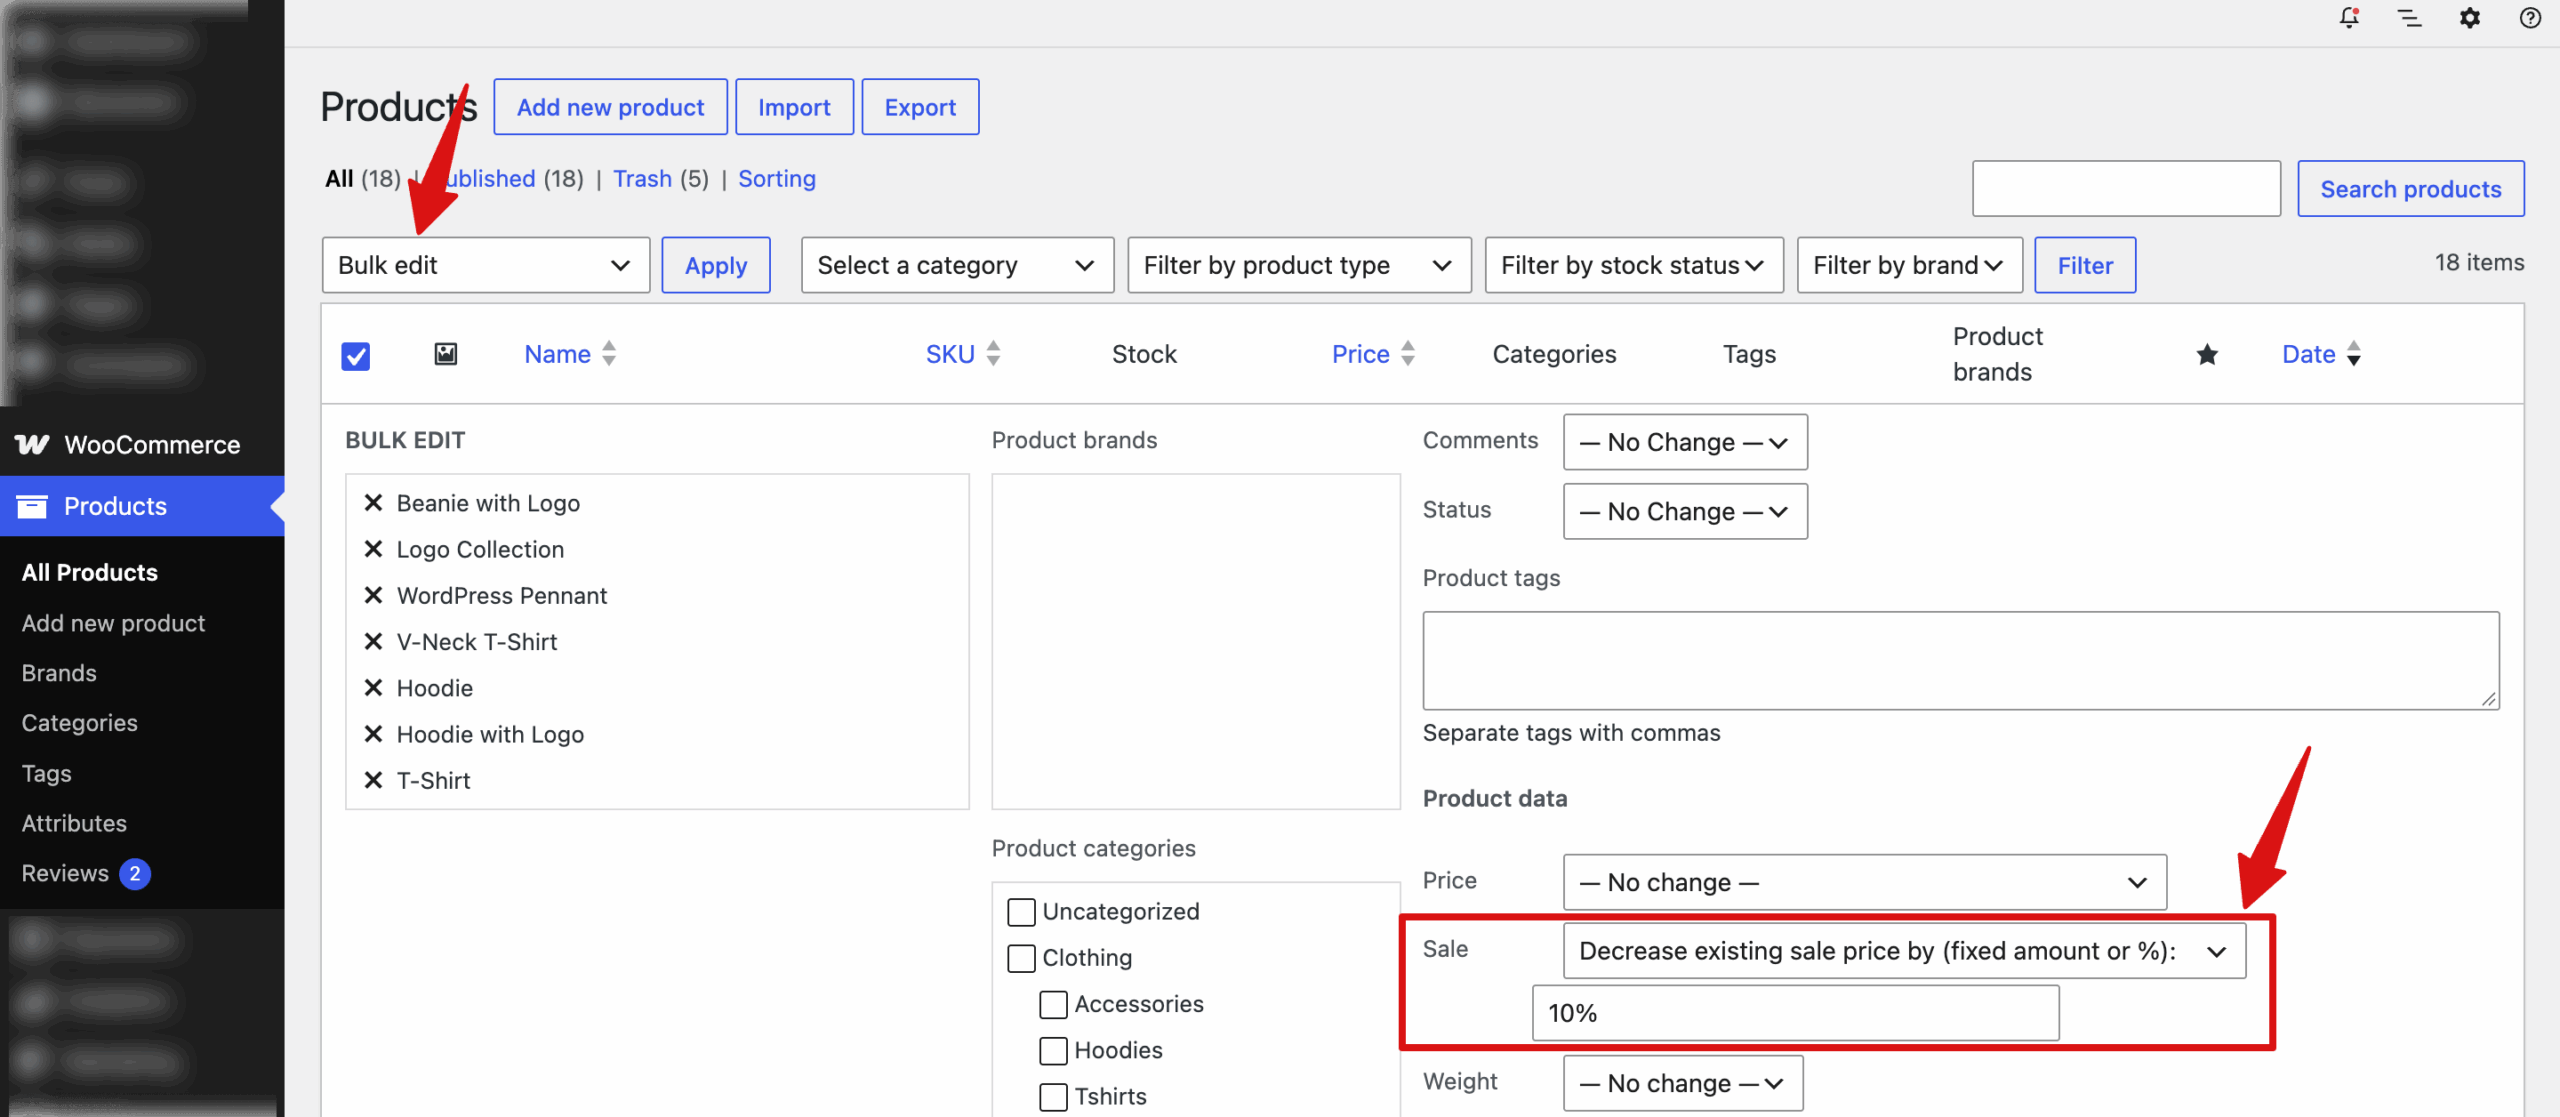
Go to Products > All Products, check the items for your sale, choose Edit from the Bulk actions menu, and hit Apply.
In the Product data panel, set the Sale dropdown to Set to regular price decreased by (fixed amount or %) or Decrease existing sale price by... if items are already discounted. Enter your discount amount (like 20%) and click Update.
Option B: Schedule a coupon for a flash sale
To create one, go to Marketing > Coupons > Add coupon and enter a code, such as FLASH20.
In the General tab, select your discount type and amount, then set the Coupon expiry date. Under Usage restriction, select the specific products or categories included in the sale, or leave it blank for a storewide discount.
Once configured, click Publish (or Update) to activate the coupon immediately.
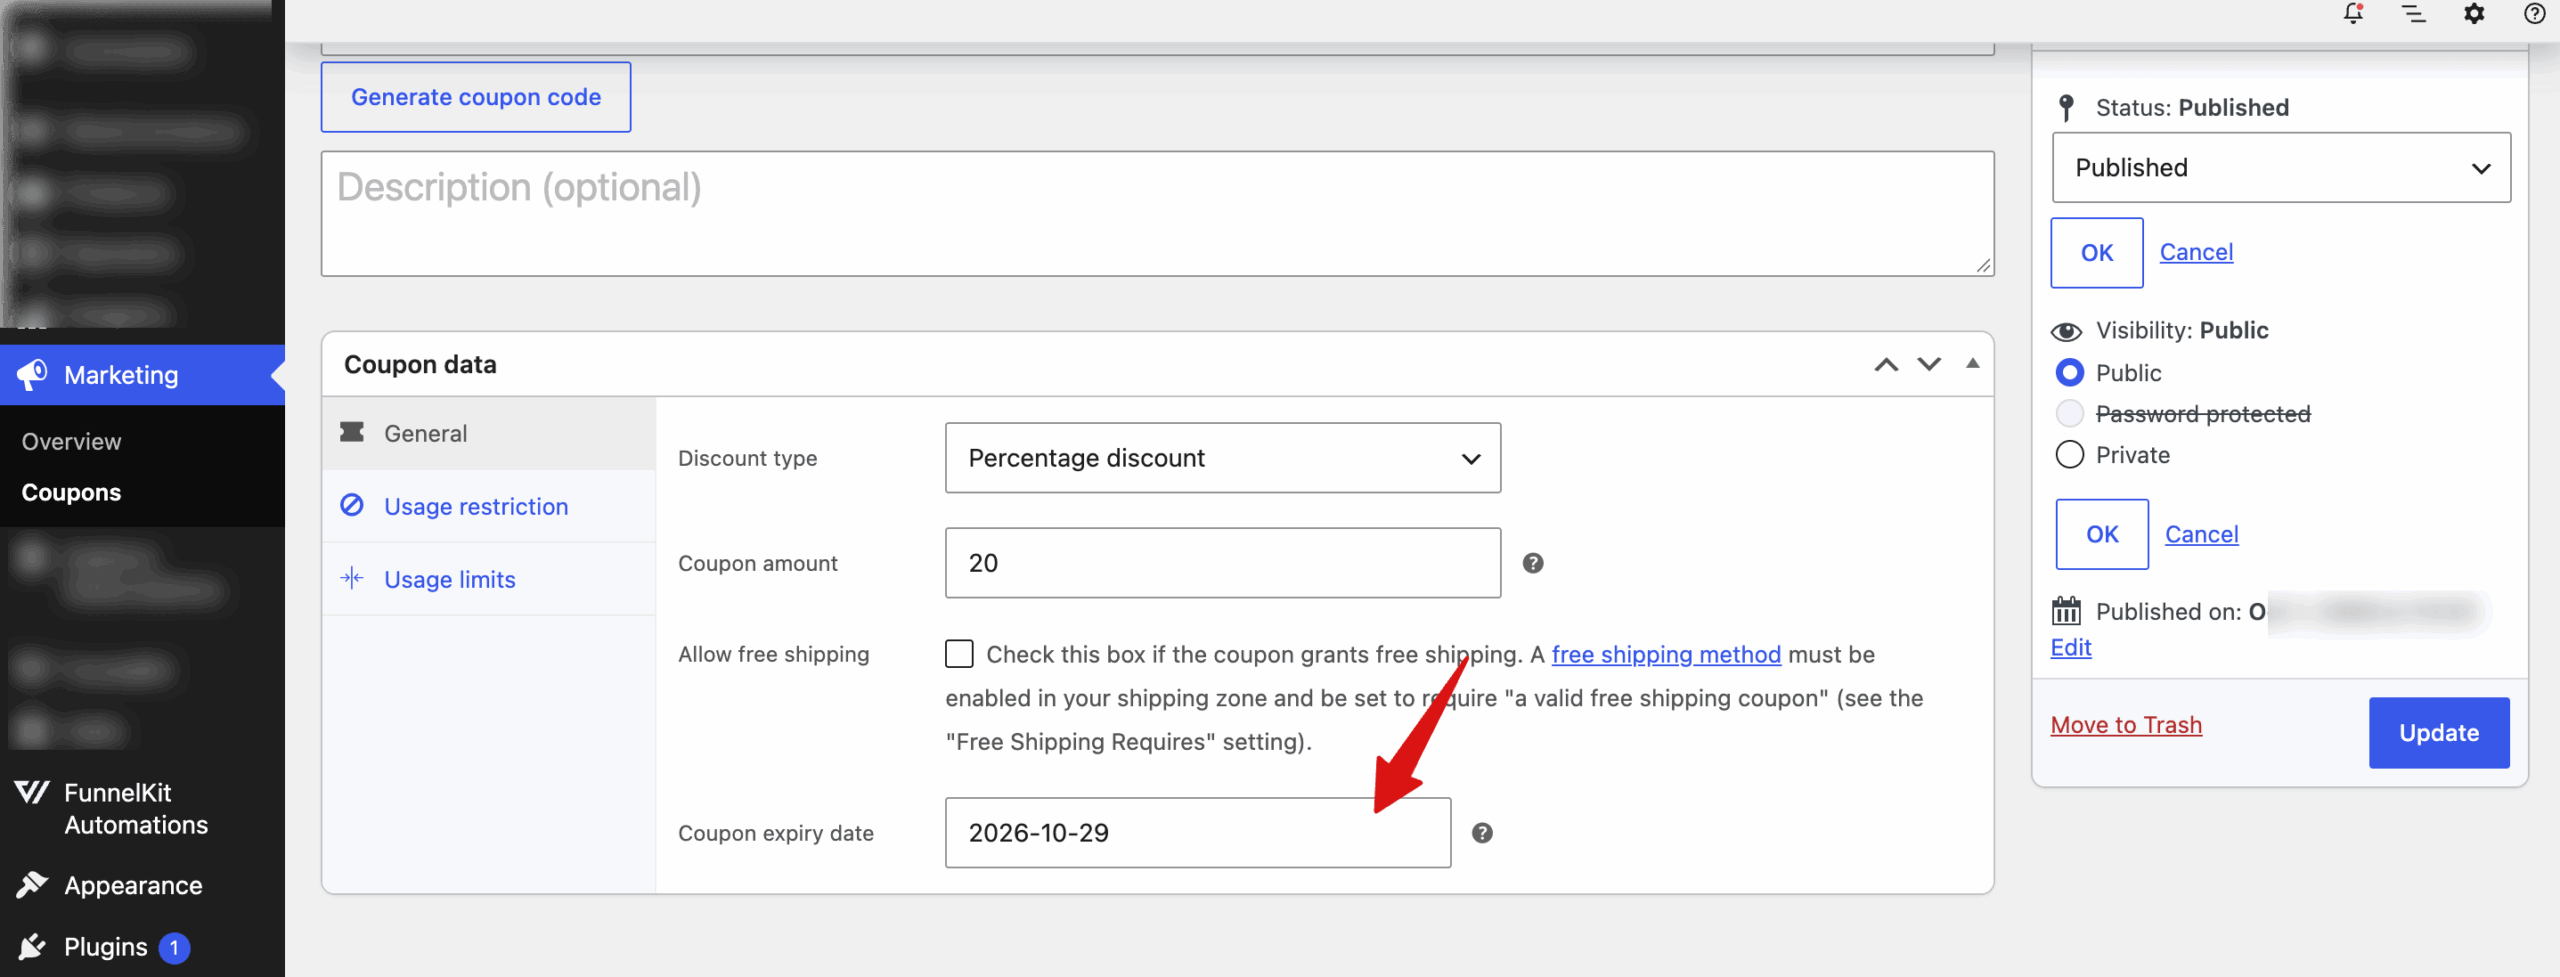
Keep in mind that coupons stop working at 00:00 (midnight) on the selected expiry date so for a sale running through Friday, set the expiry date to Saturday.
Coupons must also be enabled under WooCommerce > Settings > General, and because shoppers have to enter the code at checkout, make sure to share it in your promotional emails or apply it automatically.

How to Set Up a WooCommerce Flash Sale (Step-by-Step)
To set up a WooCommerce flash sale, we will use the Finale WooCommerce Sales Countdown Timer Discount by XLPlugins.
This plugin lets you schedule flash sales, add a countdown timer, and place sticky notifications in multiple locations to inform visitors about the flash sale.
We will need both the free and premium versions of this plugin.
Step 1: Create a new campaign
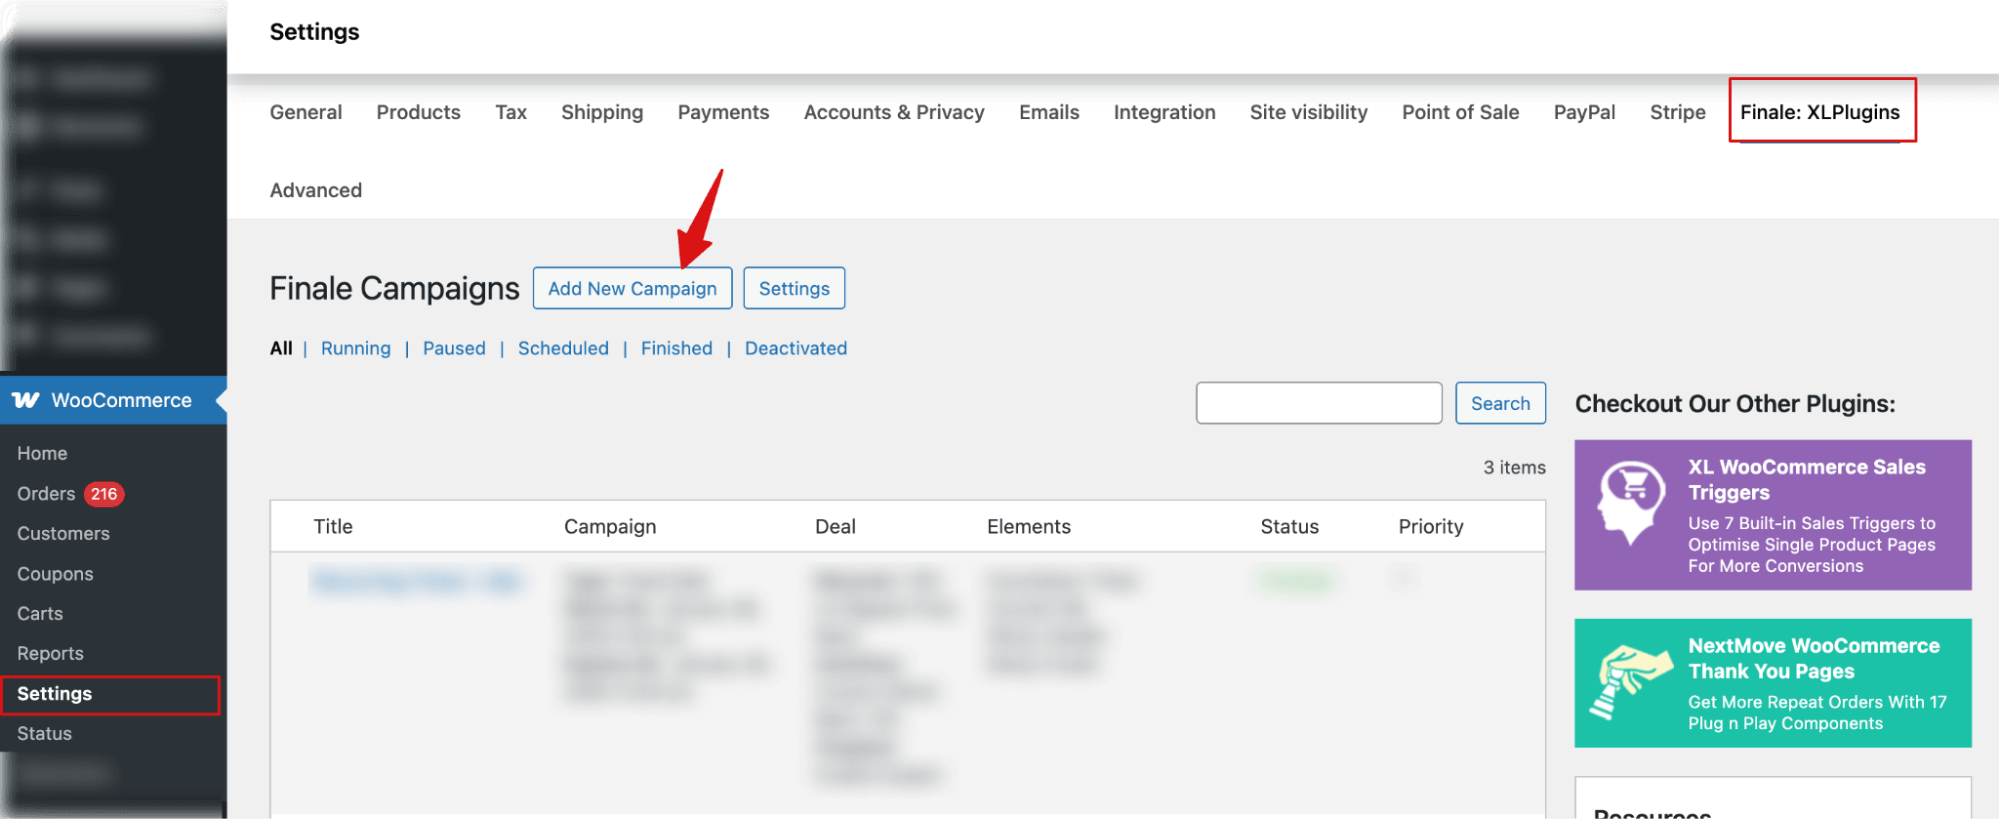
In your WordPress dashboard, navigate to WooCommerce ⇒ Settings ⇒ Finale: XLPlugins. Next, hit “Add New Campaign”.
Next, provide the name of your campaign.
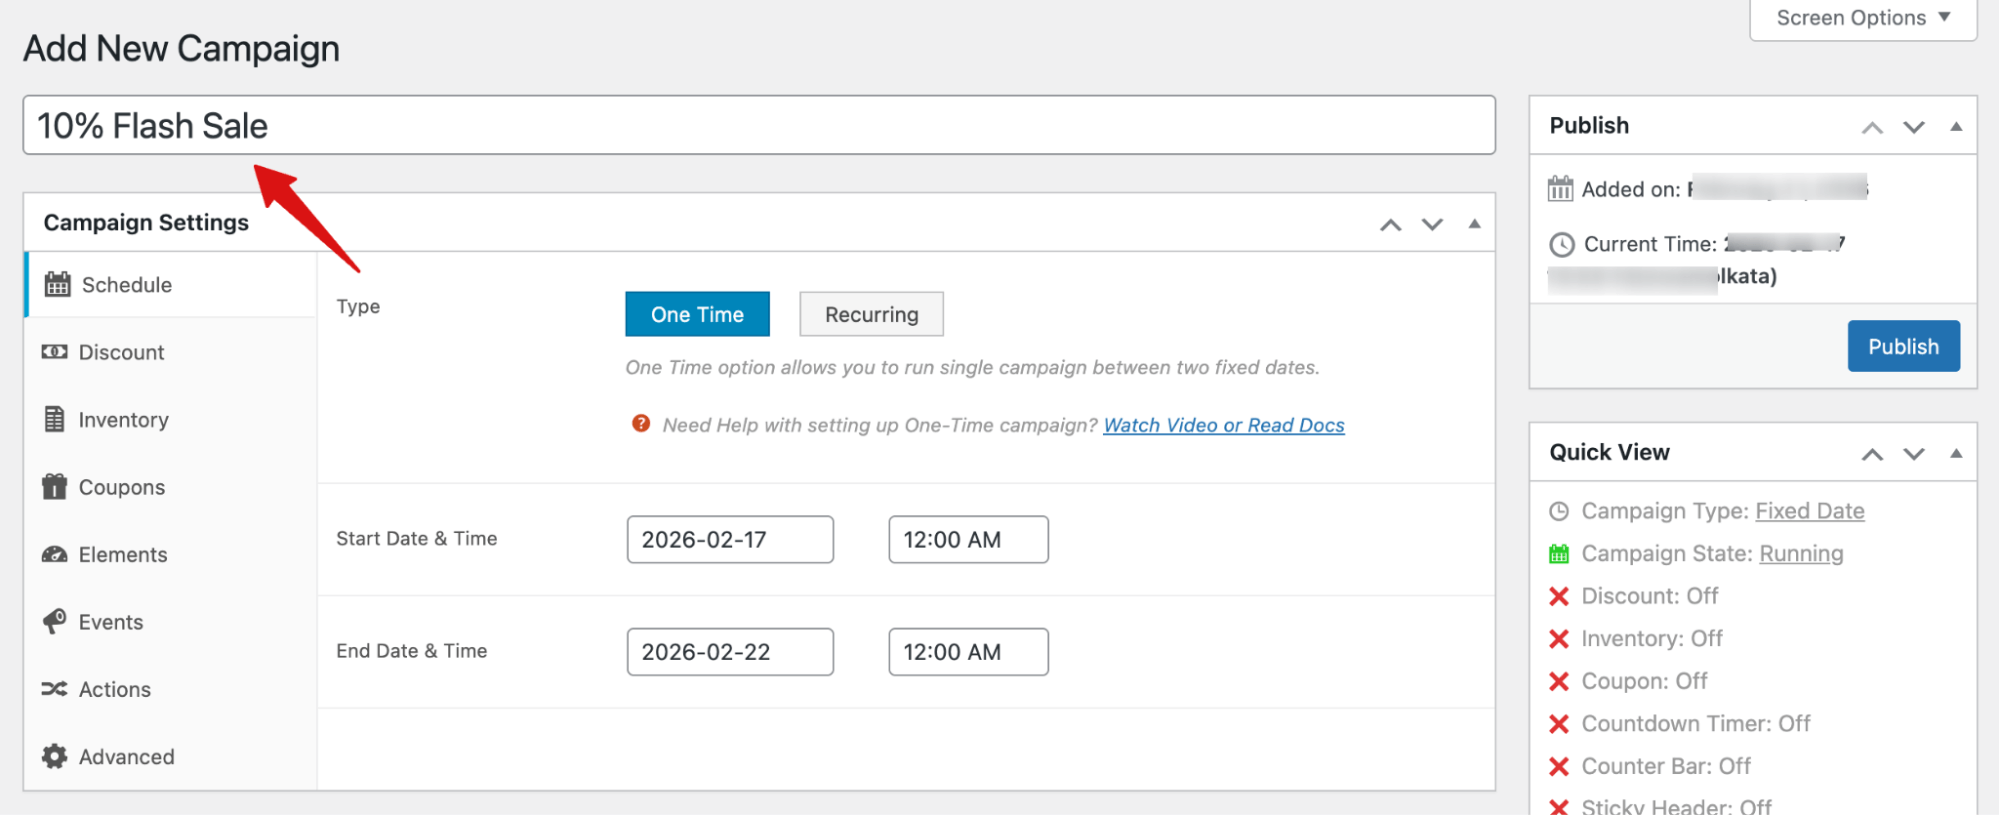
Step 2: Schedule the WooCommerce flash sale
You can set the type as one-time or recurring.
Here, we will show how to set up a one-time WooCommerce flash sale.
Next, to schedule the flash sale, set “Start Date & Time” and “End Date & Time”.
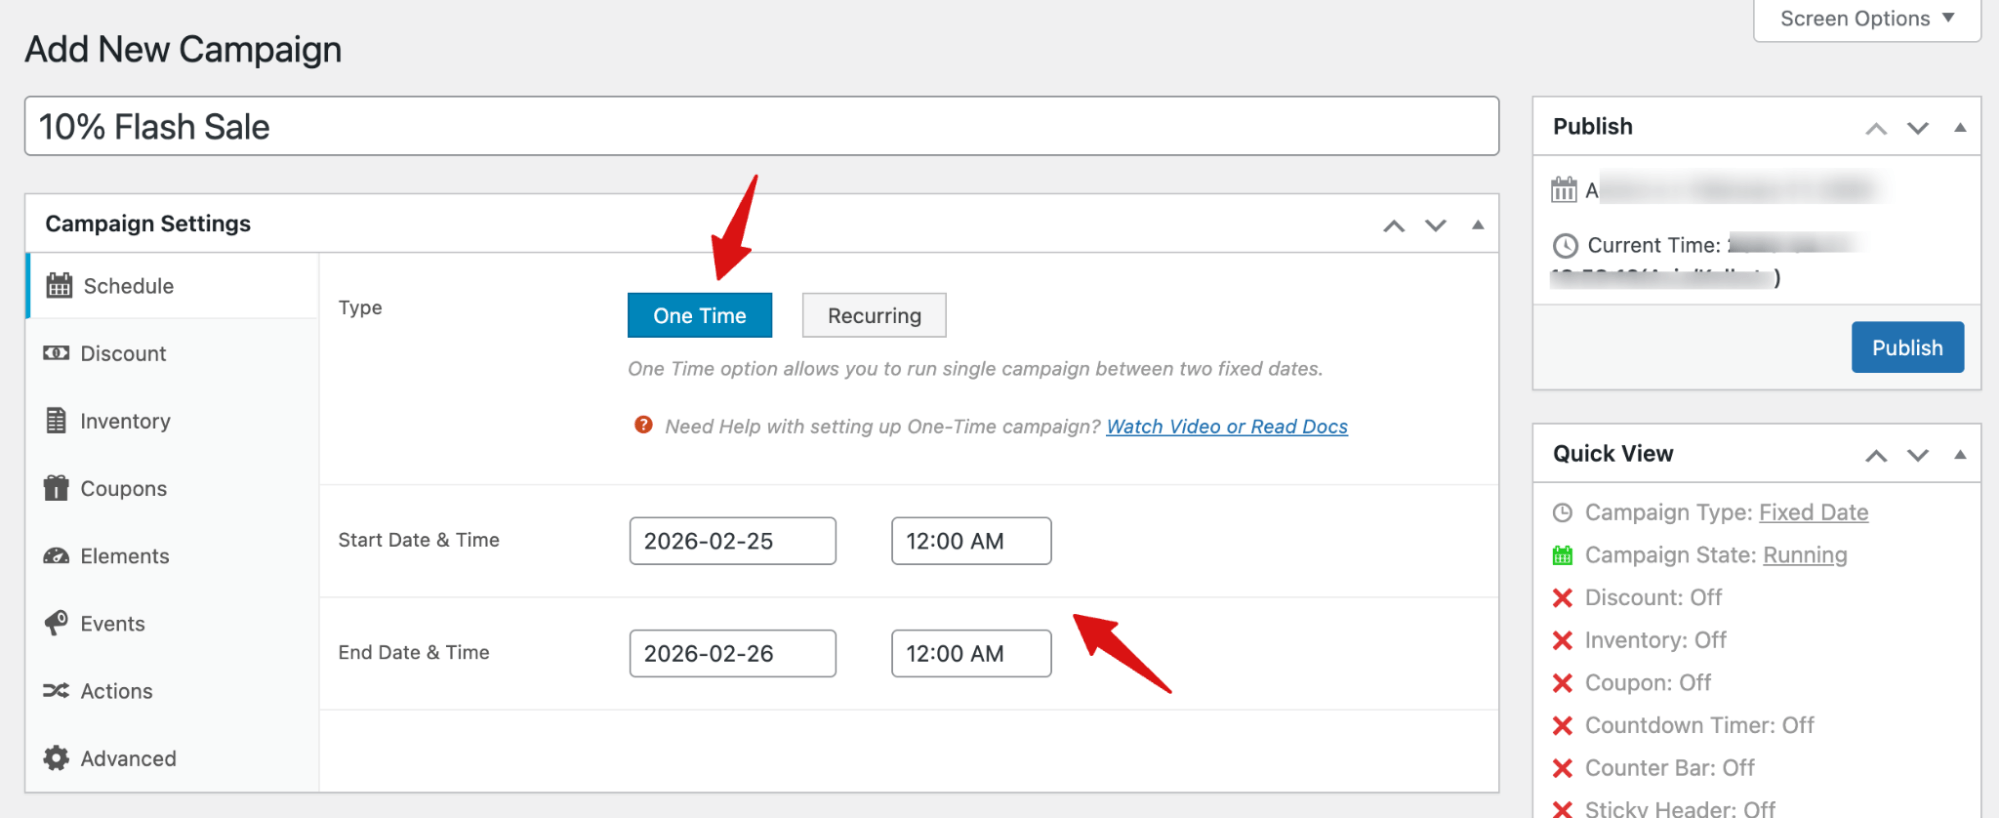
Step 3: Set the discount for the flash sale
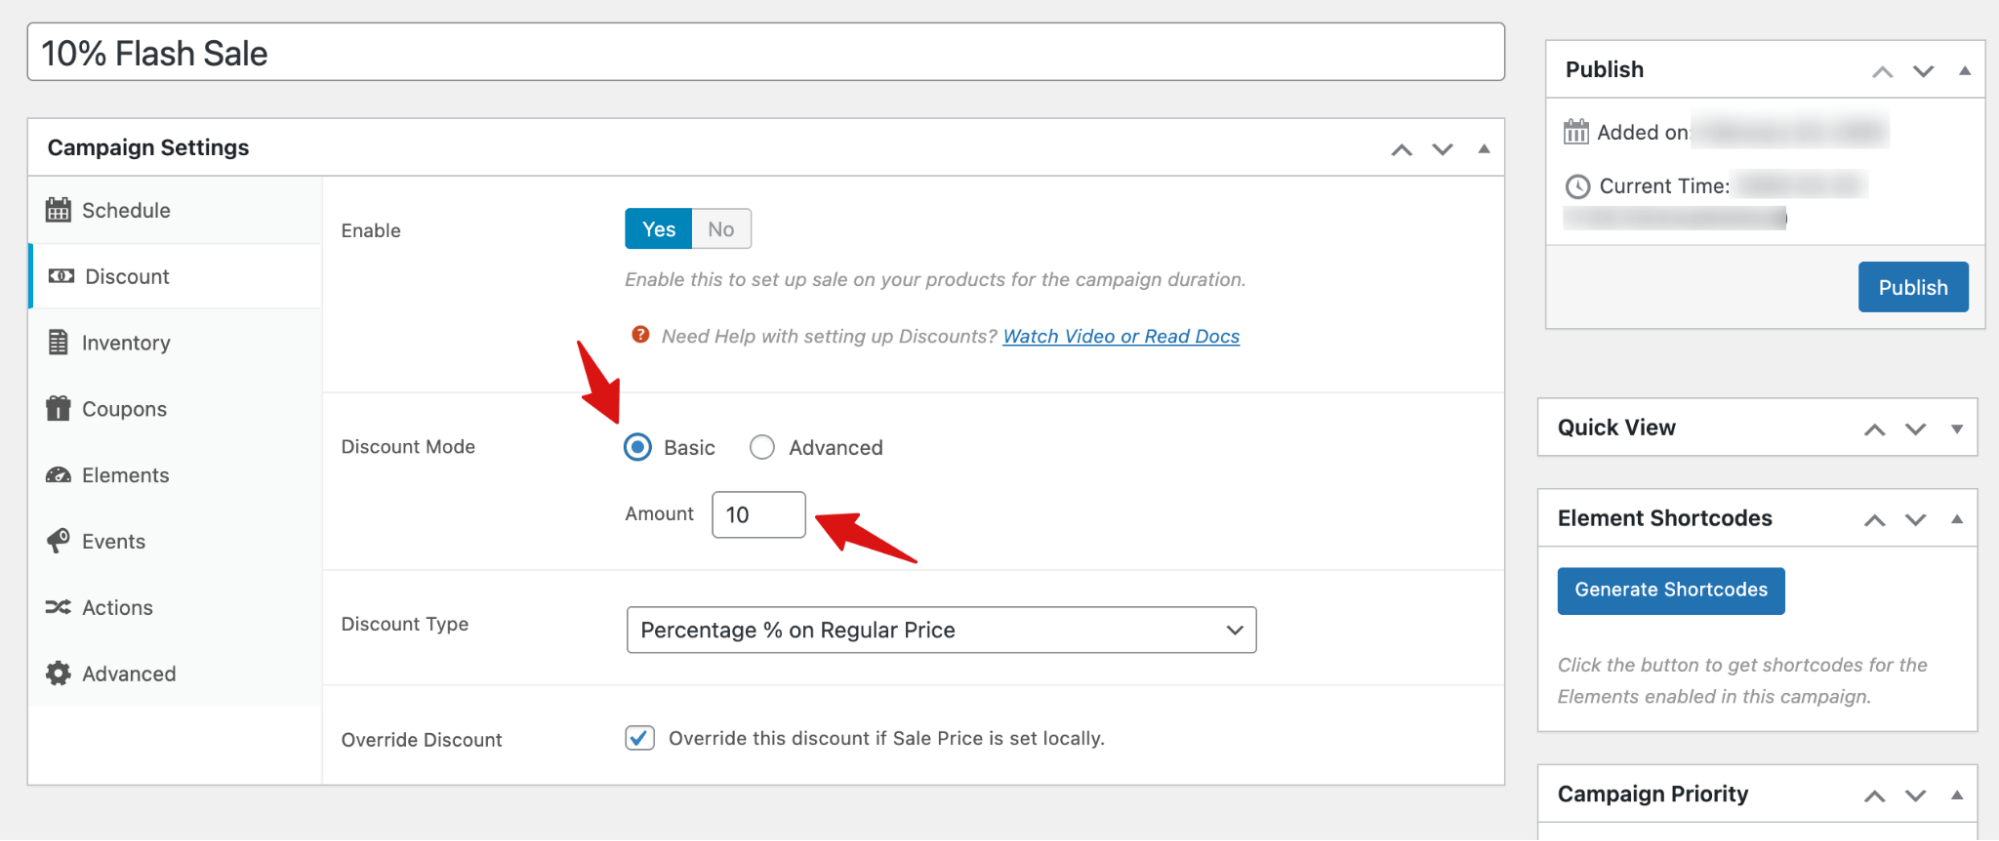
To set the discount, select "Yes" for the Enable toggle. Then, configure the discount mode and discount type.
Discount Mode:
You can set the discount mode as basic or advanced.
For a simple discount, choose Basic and set the amount.
If you want to set advanced discounts based on product price range, you can configure different discount percentages for different regular price brackets.
For example:
- From regular price 1 to 100 → Discount is 5
- From regular price 101 to 300 → Discount is 10
- From regular price 301 to 500 → Discount is 15
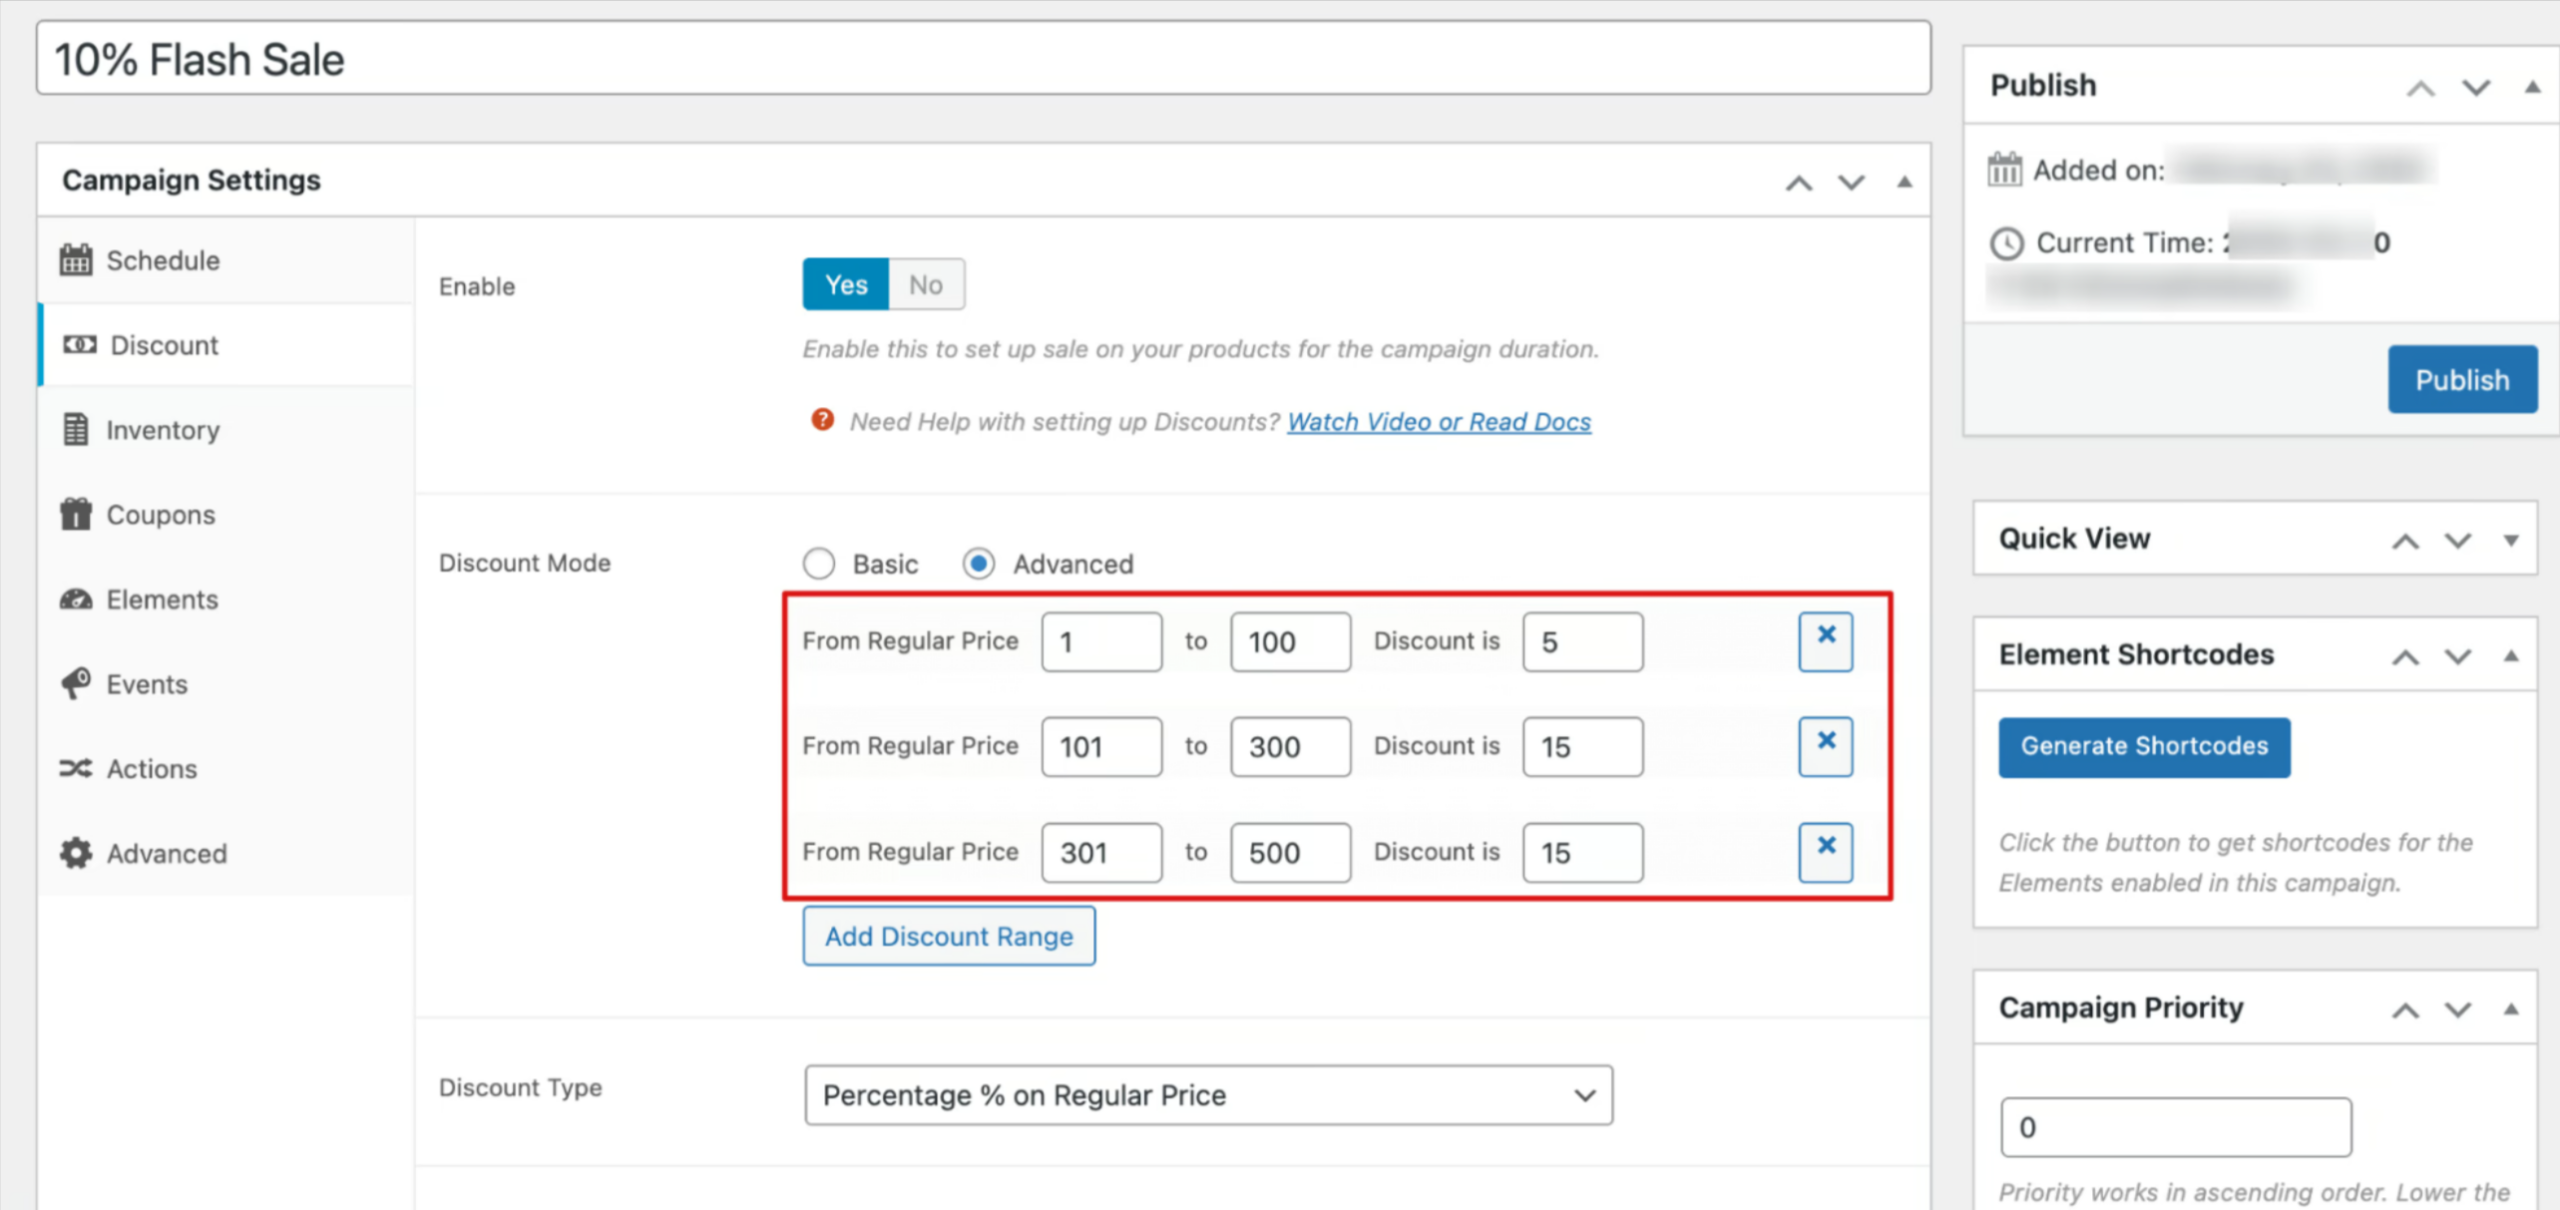
These price ranges are only examples. You can define your own ranges and discount percentages based on your store’s pricing strategy.
We are offering a basic discount on all products.
Discount Type
Next, set the “Discount Type”. You can set the discount type to
- Percentage % on Regular Price
- Percentage % on Sale Price
- Fixed Amount $ on Sale Price
- Flat Amount $
We are going with the percentage % on the Regular Price.
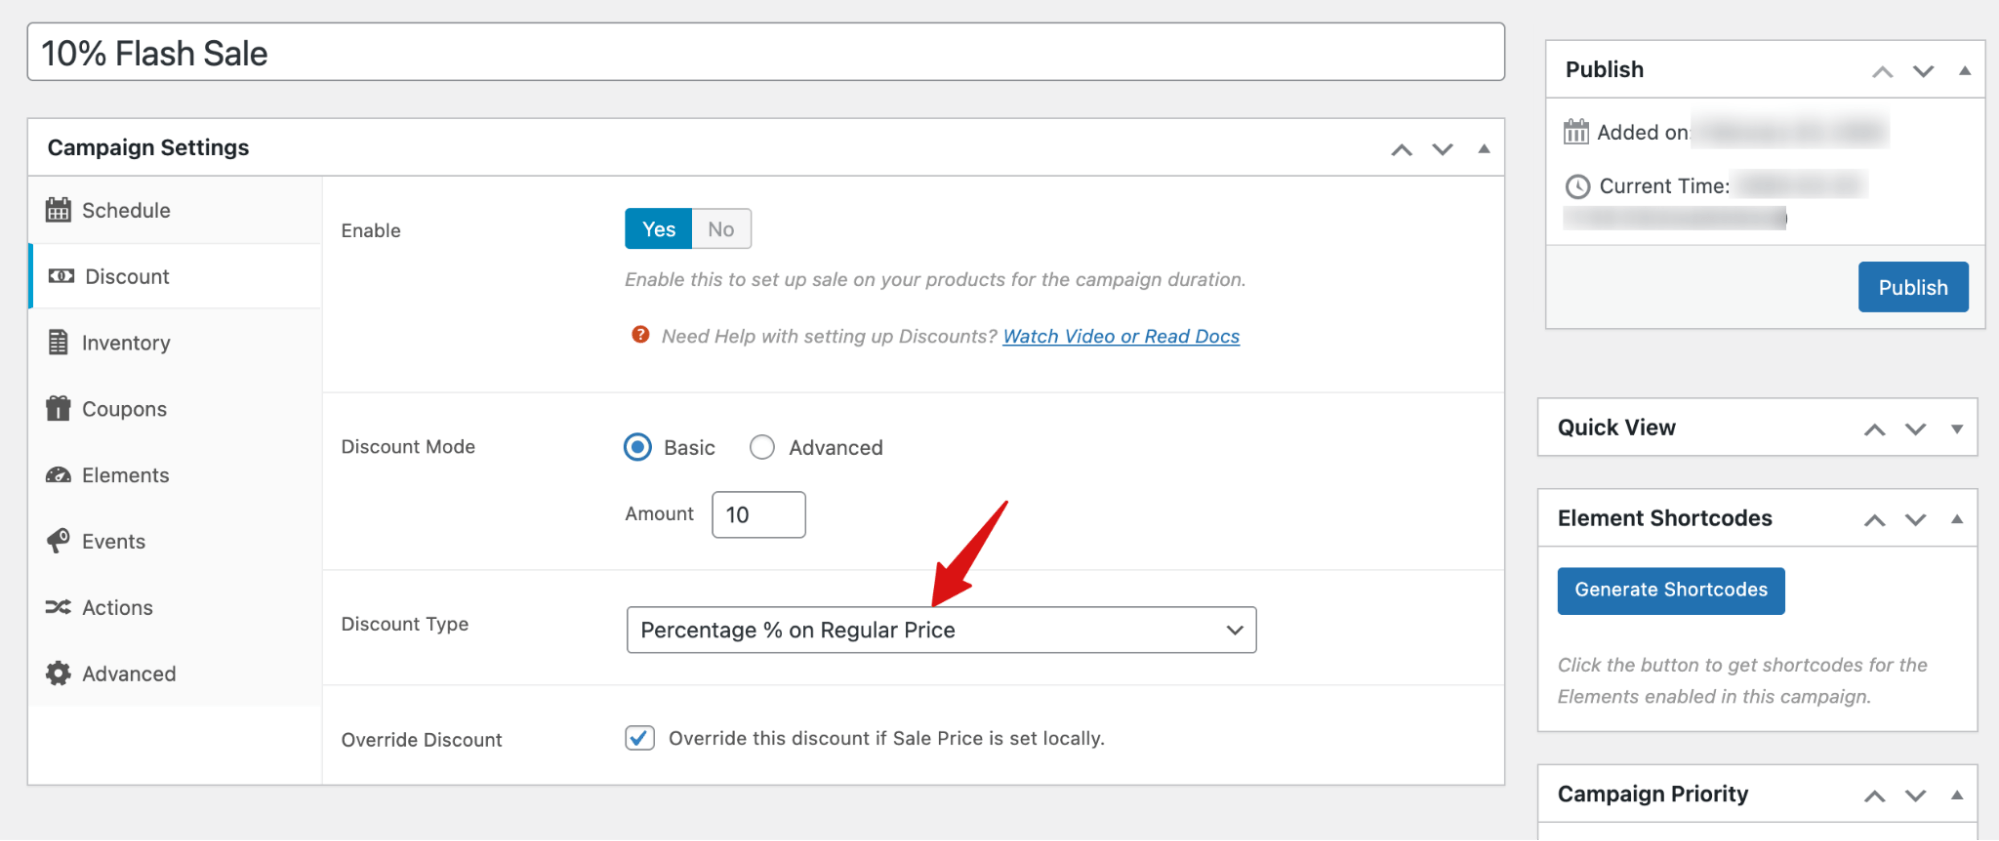
Note: Check the “Override Discount” option if you want the locally set Sale Price to take priority.
Step 4: Add a countdown timer
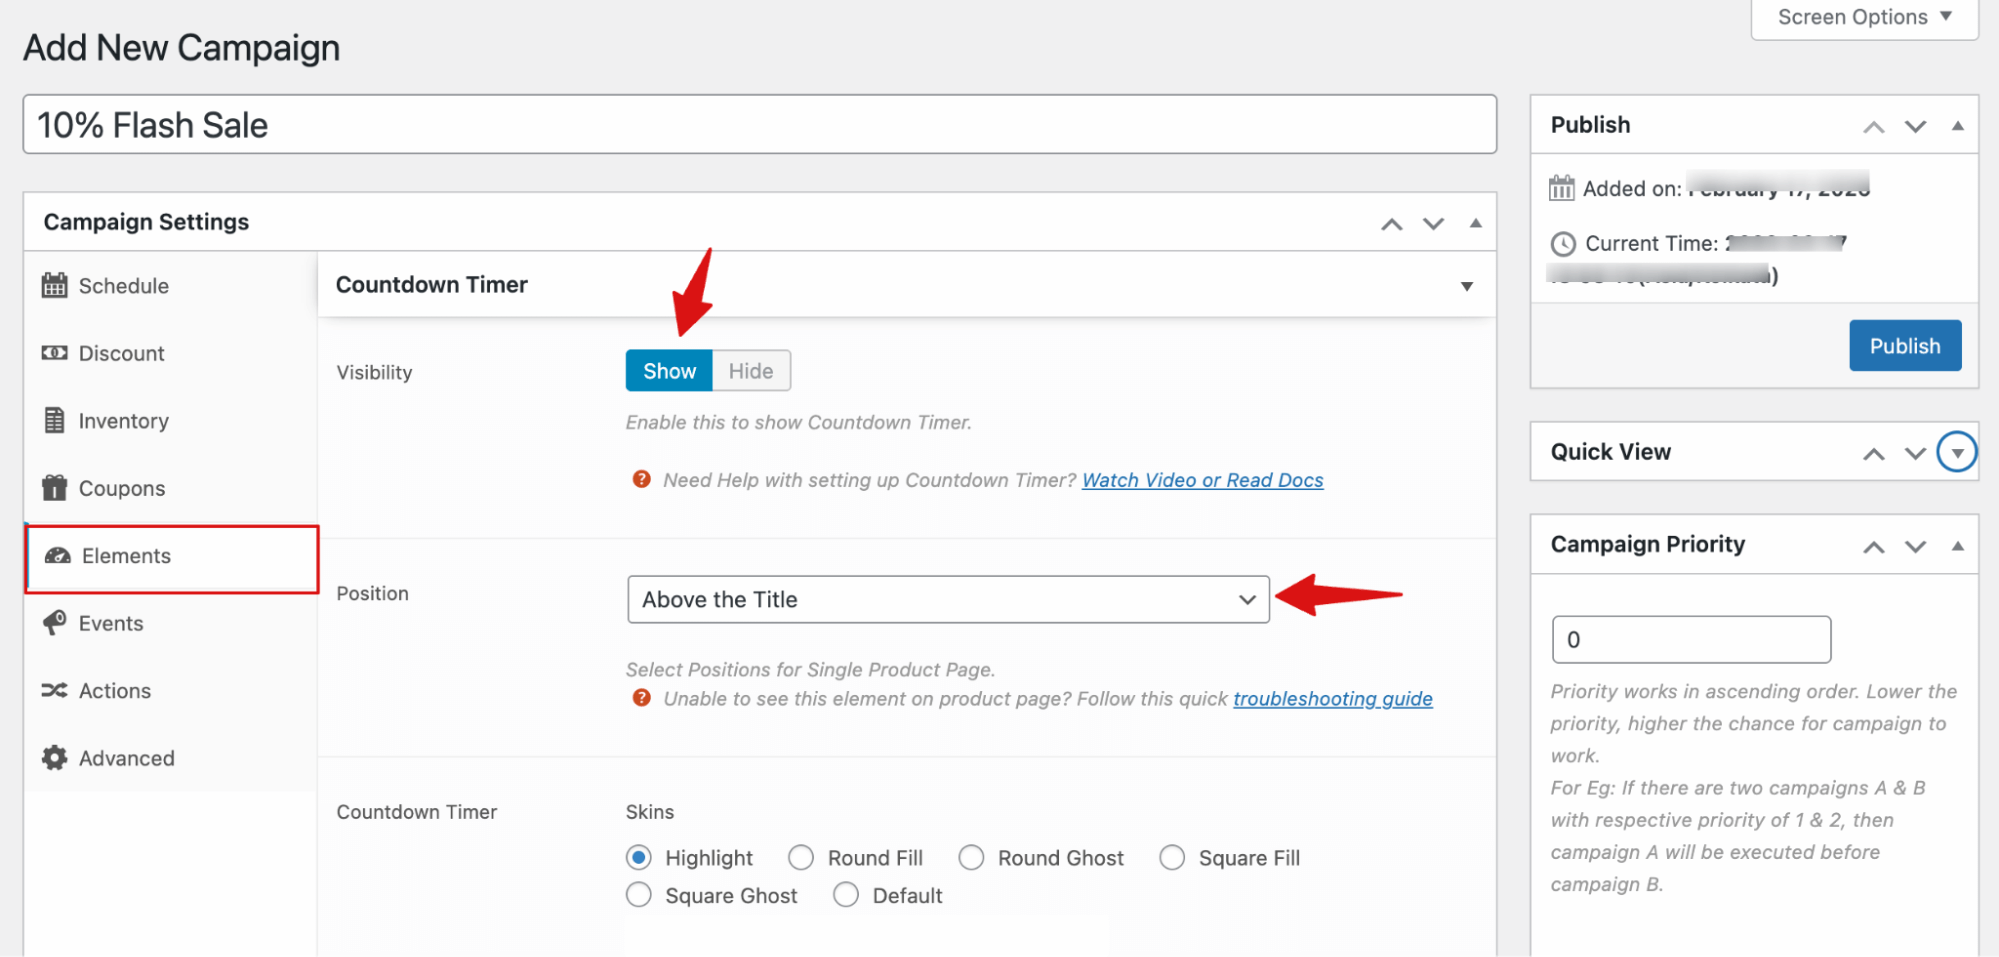
To add a countdown timer to product pages, go to the “Elements” tab and set visibility to “Show”.
Position
Set the position of the countdown timer on the product page. Here are the available options:
- Above the Title
- Below the Title
- Below the Review Rating
- Below the Price
- Below Short Description
- Below the Add to Cart Button
We are going with “Above the Title”.
Countdown Timer Skins
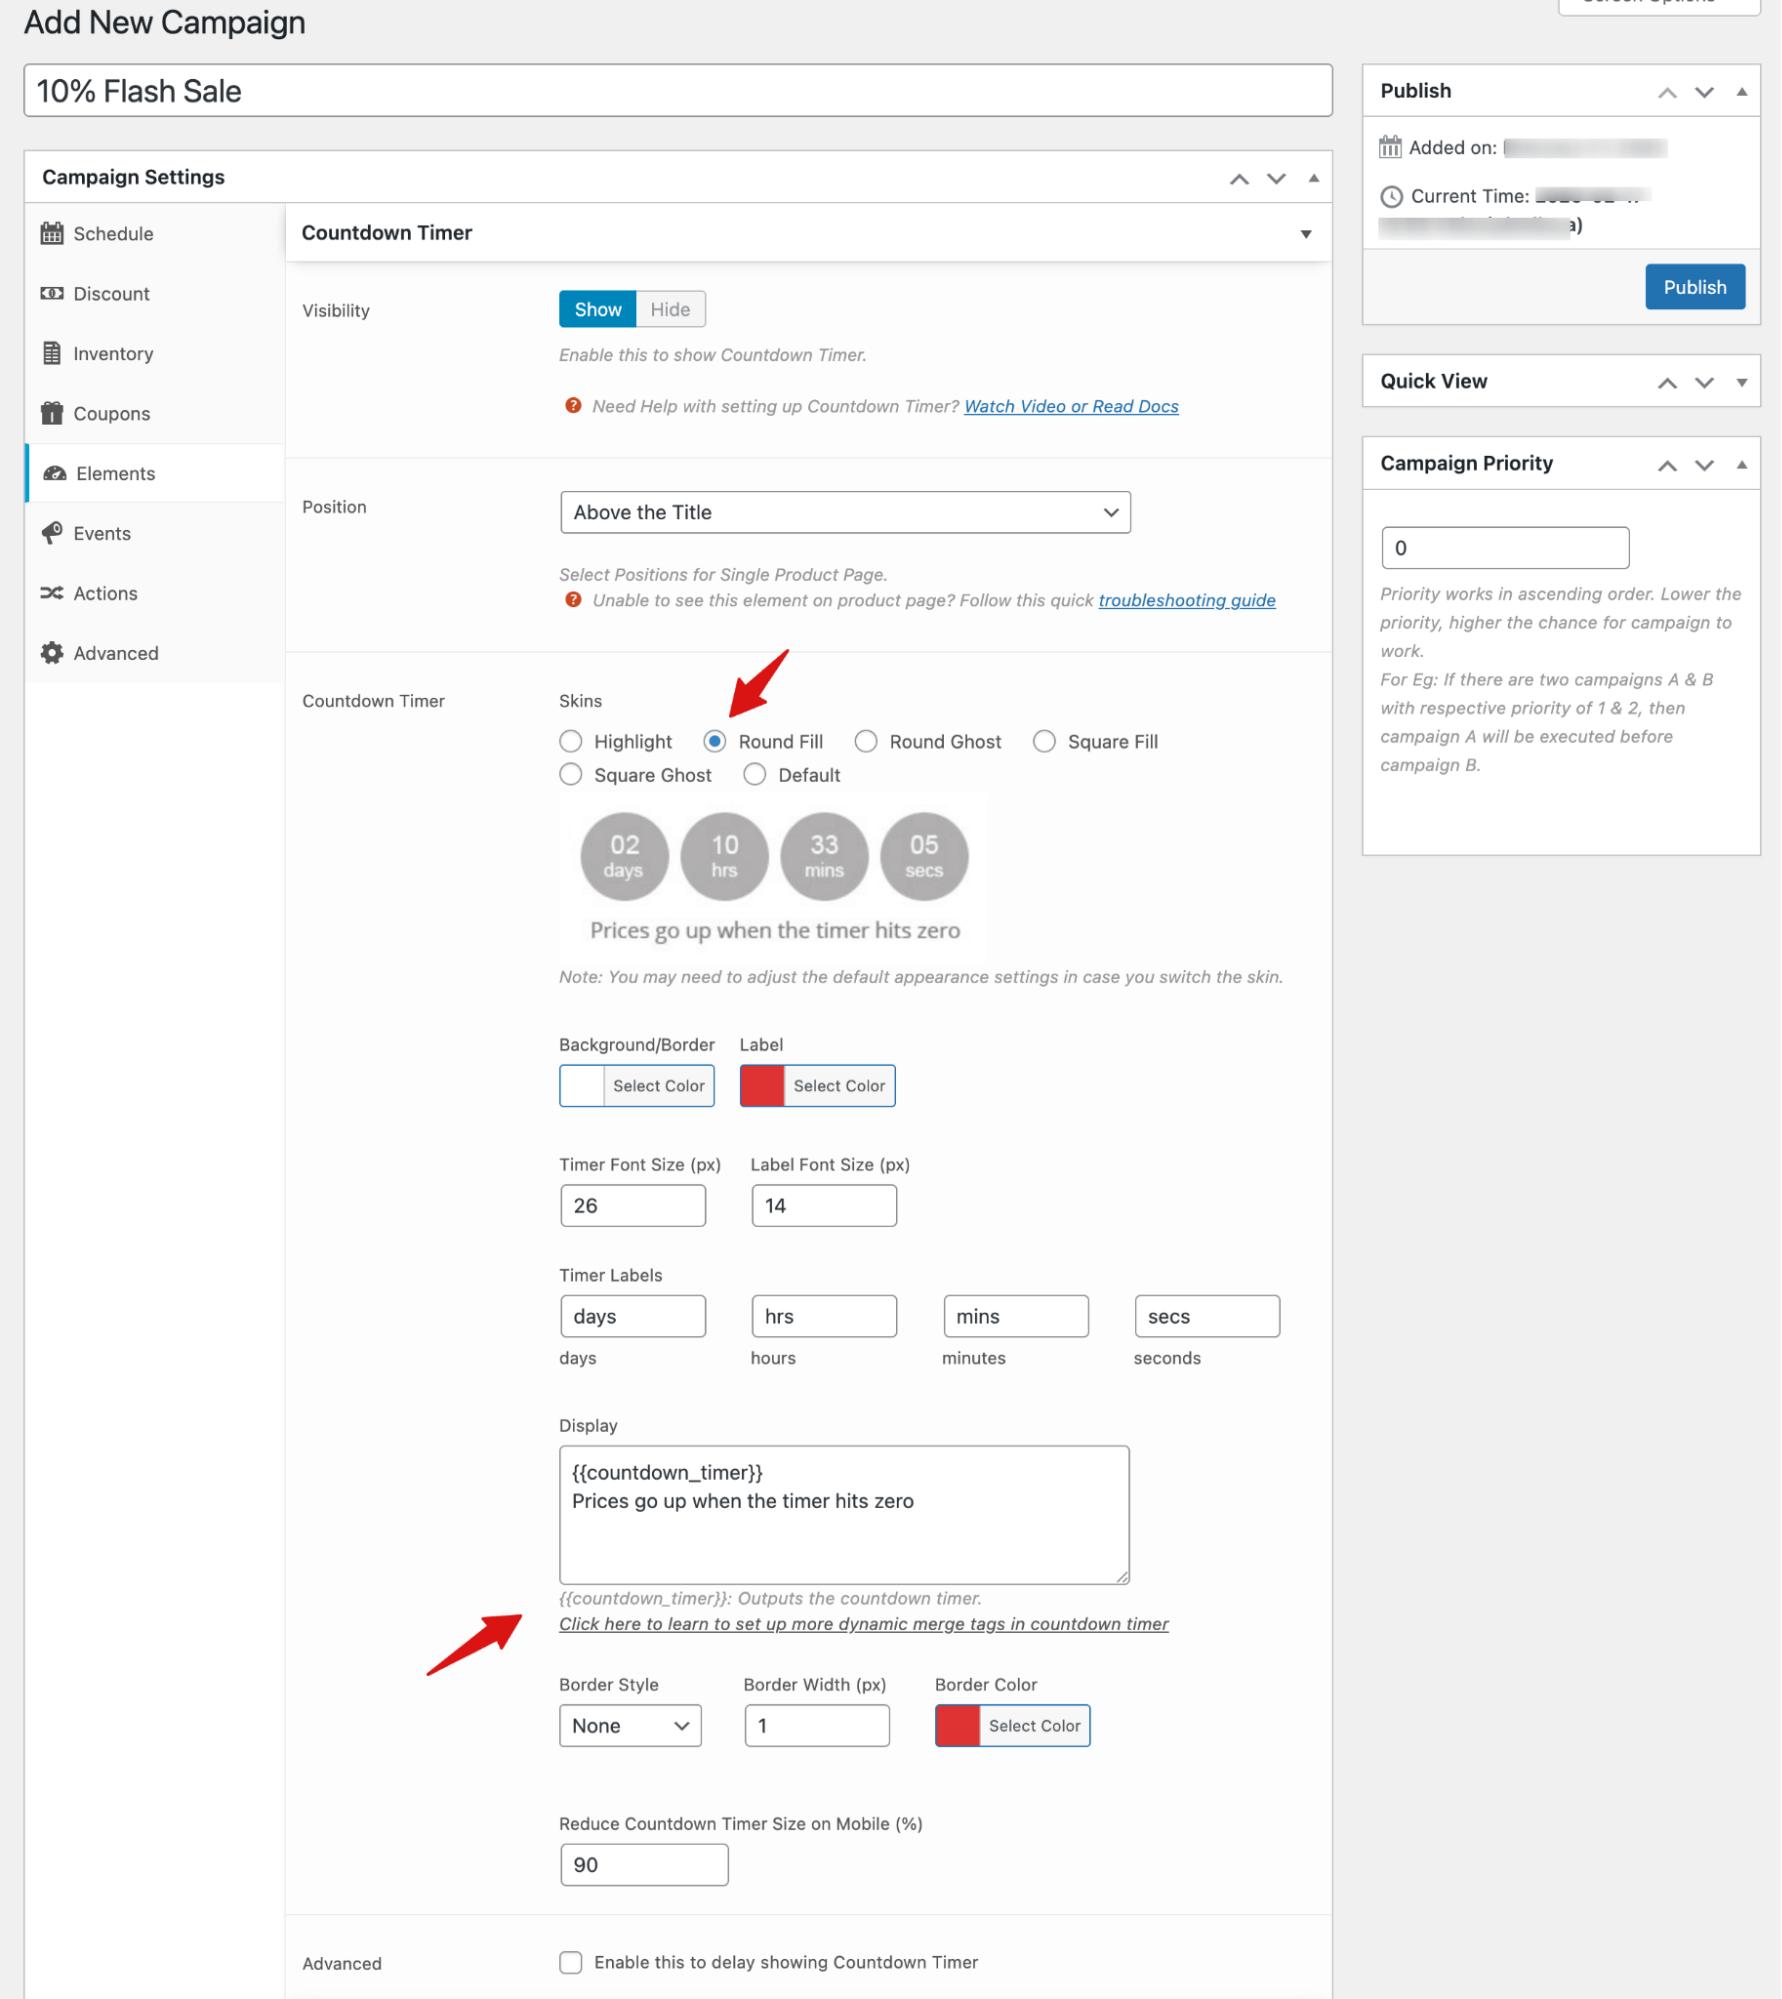
After the position, choose the Skins. Here are the available options: Highlight, Round Fill, Round Ghost, Square Fill, Square Ghost, or Default.
Next, you can set the following:
- Background/Border: Choose the background or border color of the timer.
- Label: Set the color of the timer’s text labels.
- Timer Font Size (px): Set the font size of the countdown numbers (e.g., 26px).
- Label Font Size (px): Set the font size of the time unit labels (e.g., 14px).
- Timer Labels: Customize the text for each time unit (days, hours, minutes, seconds).
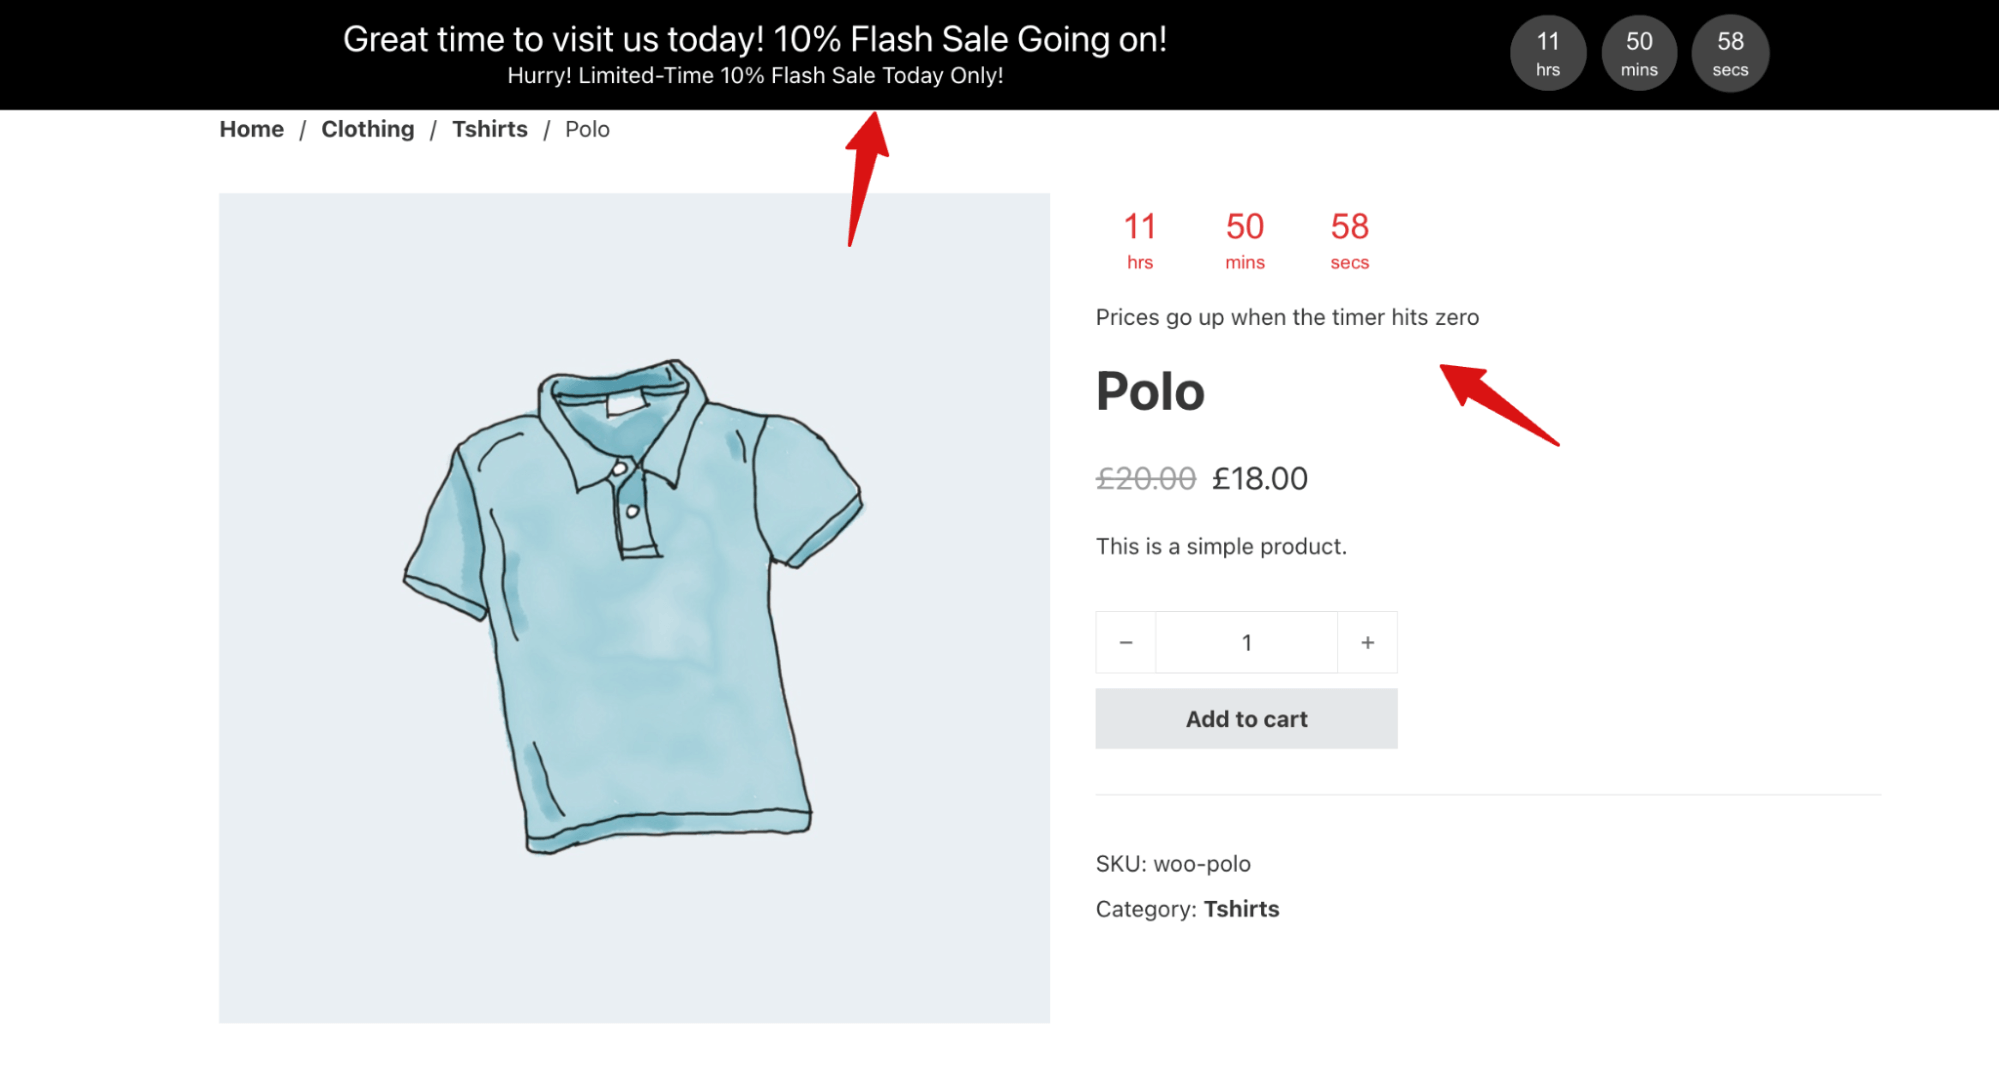
- Display: Outputs the countdown timer wherever the merge tag {{countdown_timer}} is placed. You can add custom text, such as “Prices go up when the timer hits zero”.
- Border Style: Choose the style of the border (e.g., none, solid, dashed).
- Border Width (px): Set the thickness of the border in pixels (e.g., 1px).
- Border Color: Choose the color of the border.
- Reduce Countdown Timer Size on Mobile (%): Scale the timer down on mobile devices. Default is 90%.
Step 5: Add a sticky notification of the WooCommerce flash sale
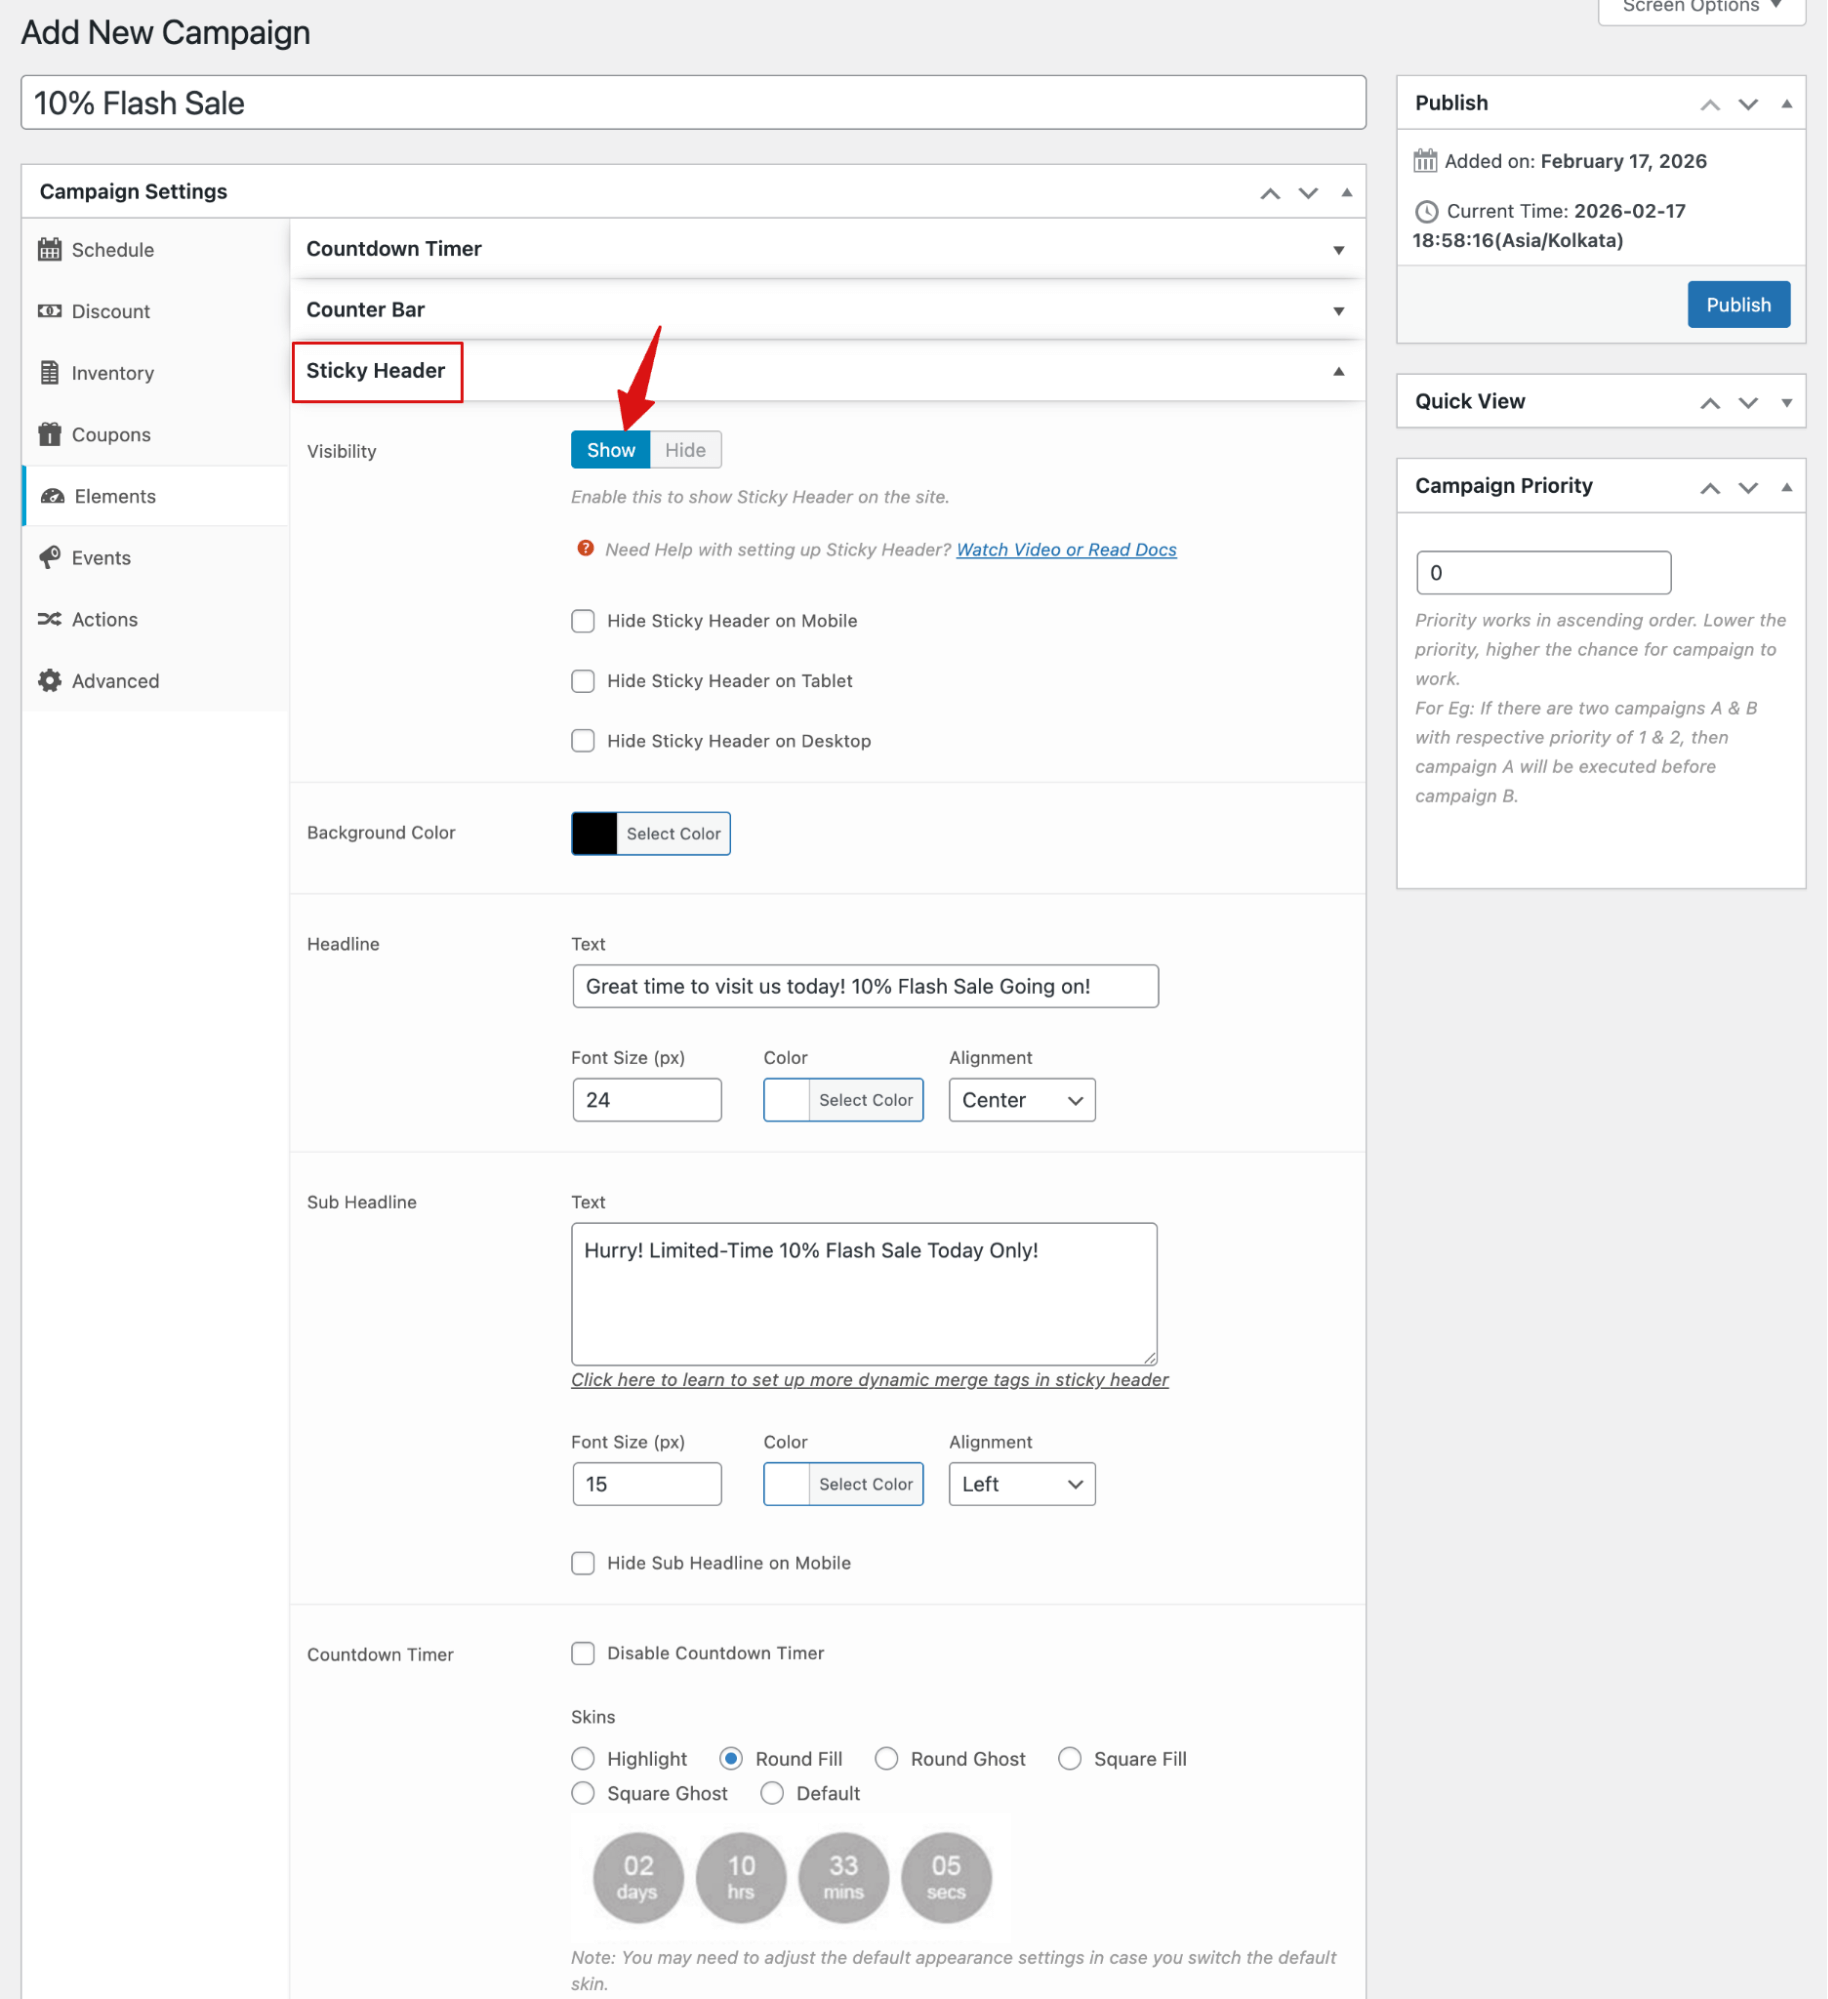
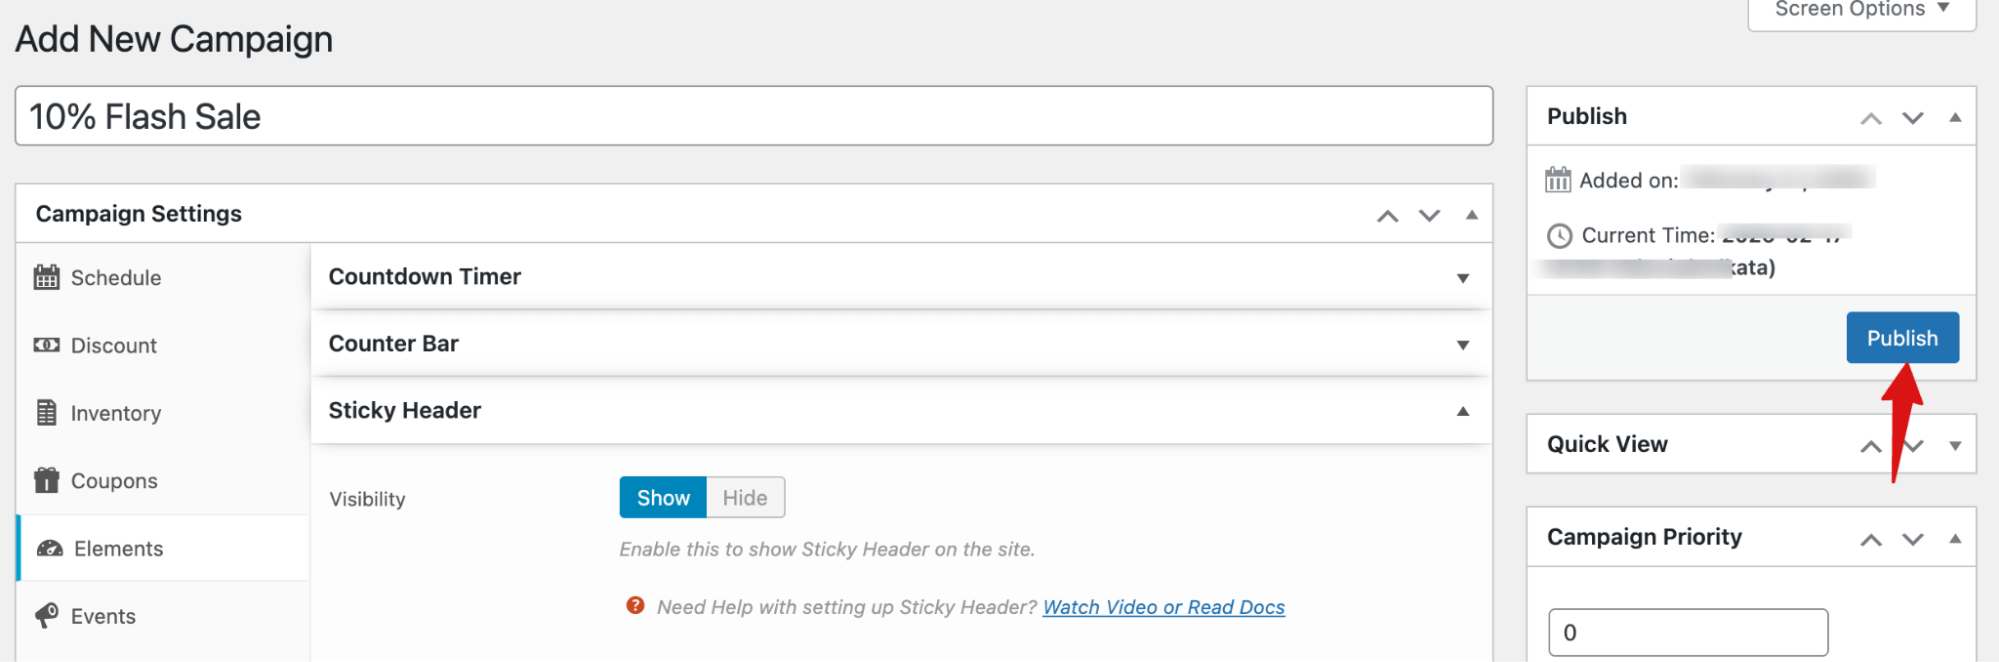
To add a sticky header of WooCommerce flash sales, expand the “Sticky Header” section and choose “show” for “Visibility”.
Next, you can choose to hide this notification on either mobile, tablet, or desktop.
Then set the following:
- Background Color: select a background color
- Headline: Add the text heading that will show up as a sticky notification. Next, set the font size, color, and alignment for the heading.
- Sub Headline: Here, you can set the subheading text. Also, set the font size, color, and alignment.
Note: You can disable the countdown timer on the sticky notification. To add and customize it, use the same steps shown in Step 4.
You can also add a sticky notification at the footer.
Finally, make sure to hit the "Publish" button on the right side.
That’s it. Your WooCommerce flash sale will automatically go live on the configured date and time.
This is how the flash sale notification countdown timer and text look on the product page.
How To Promote WooCommerce Flash Sale
Promoting a flash sale effectively helps you reach your audience and drive quick sales. Key strategies include:
1. Email Campaigns
Send a launch email when the sale starts and a final-hours reminder to encourage quick action.
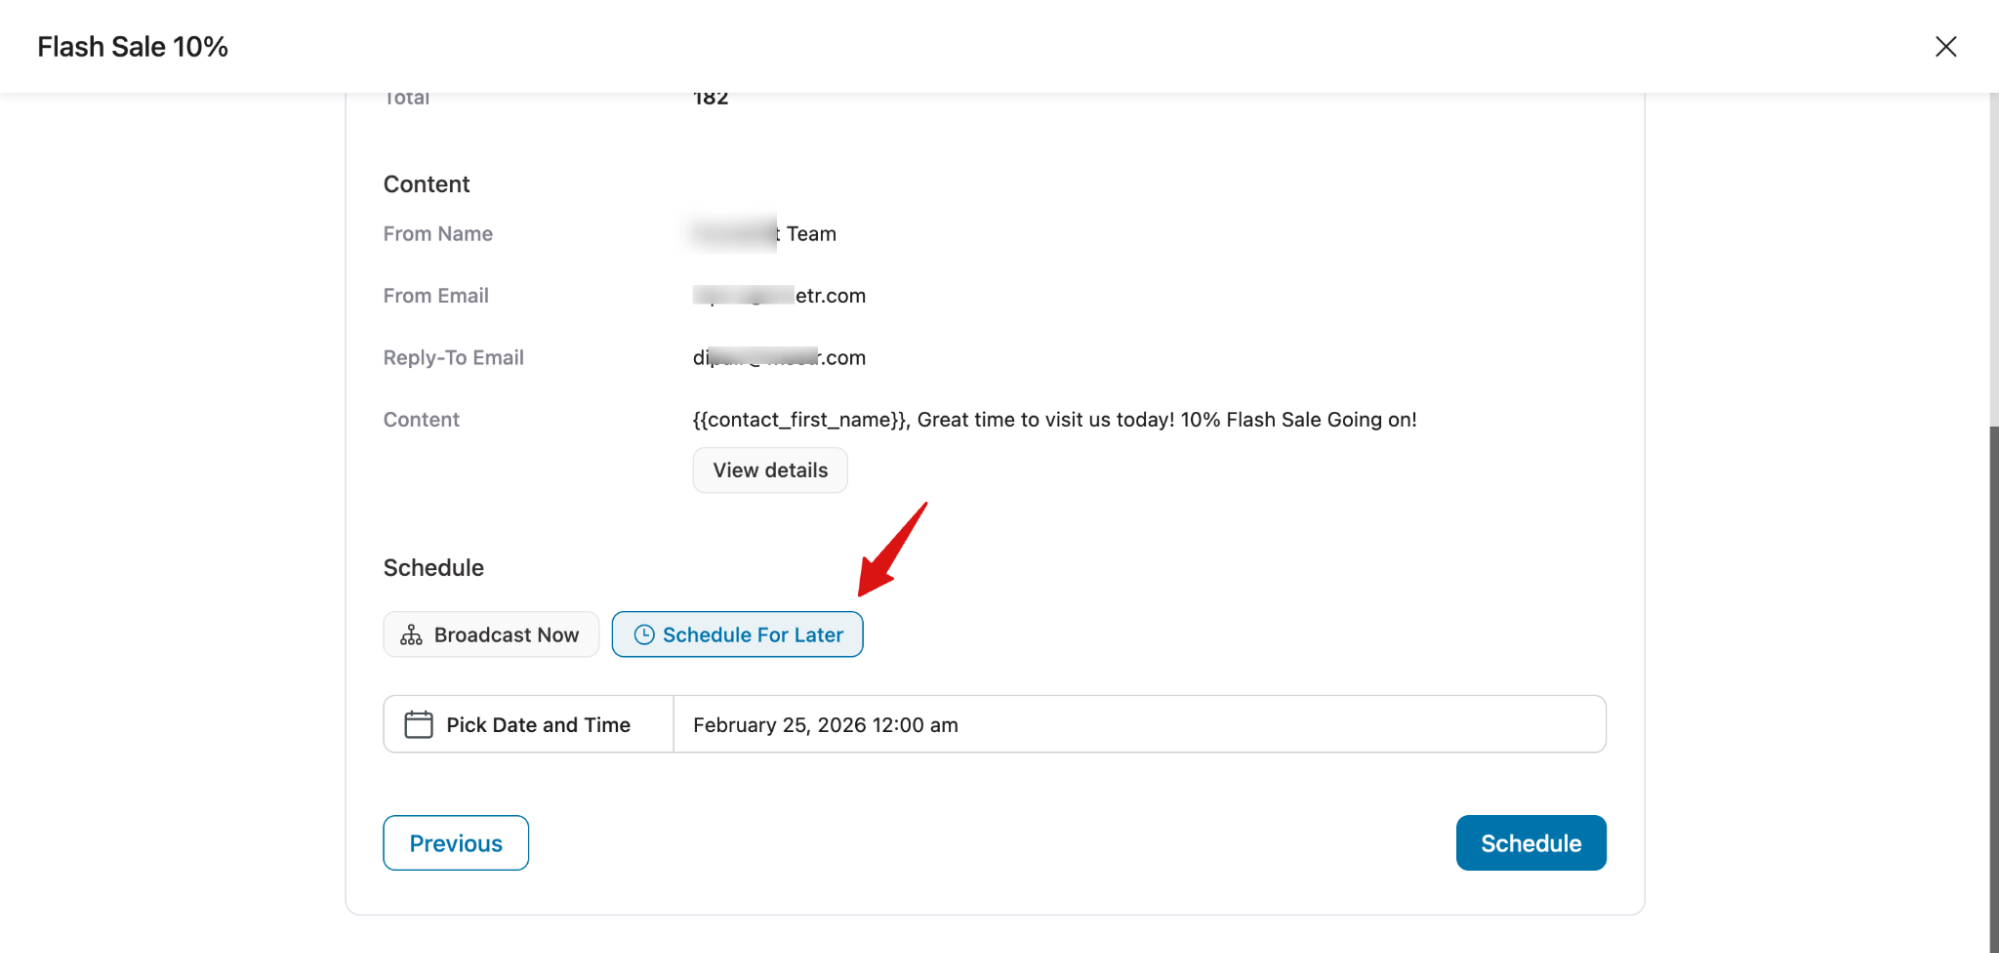
You can use FunnelKit Automations to schedule a broadcast that sends an email notification about the flash sale to your entire audience.
2. SMS Alerts
Notify customers instantly about limited-time offers to boost participation. SMS messages have higher open rates than emails, making them perfect for driving immediate action.
Just like email campaigns, you can schedule SMS broadcasts using FunnelKit Automations, personalize messages, and target specific customer segments for maximum impact.
3. Paid Promotions
Run targeted ads on Facebook, Instagram, or Google to reach new customers and drive traffic fast. Always pair paid promotion with organic posts to engage your existing followers.
By combining email, SMS, and paid promotions, your flash sale will get maximum visibility and results.
5 Flash Sale Best Practices for WooCommerce Stores
- Promote early: Send a teaser email or SMS 24 hours before the sale to build anticipation.
- Add countdown timers: Display on product, cart, and checkout pages to reinforce urgency.
- Focus your products: Limit flash sales to 5–20 items to increase perceived value and improve conversions.
- Offer free shipping strategically: Set free shipping slightly above your average order to boost cart size.
- Send final-hours reminders: A “Last 2 Hours” message can generate a significant revenue spike.
Frequently Asked Questions About WooCommerce Flash Sale
Still have questions about running a flash sale in WooCommerce?
We've answered the most common ones below to help you get started with confidence.
Most flash sales work best between 4 and 24 hours. Under 4 hours may miss your audience; over 24 hours reduces urgency. For email or SMS promotions, 12 hours lets you send a launch and final reminder.
Yes, with the right plugin, you can schedule a flash sale to run automatically in WooCommerce. We shared the detailed process in this blog.
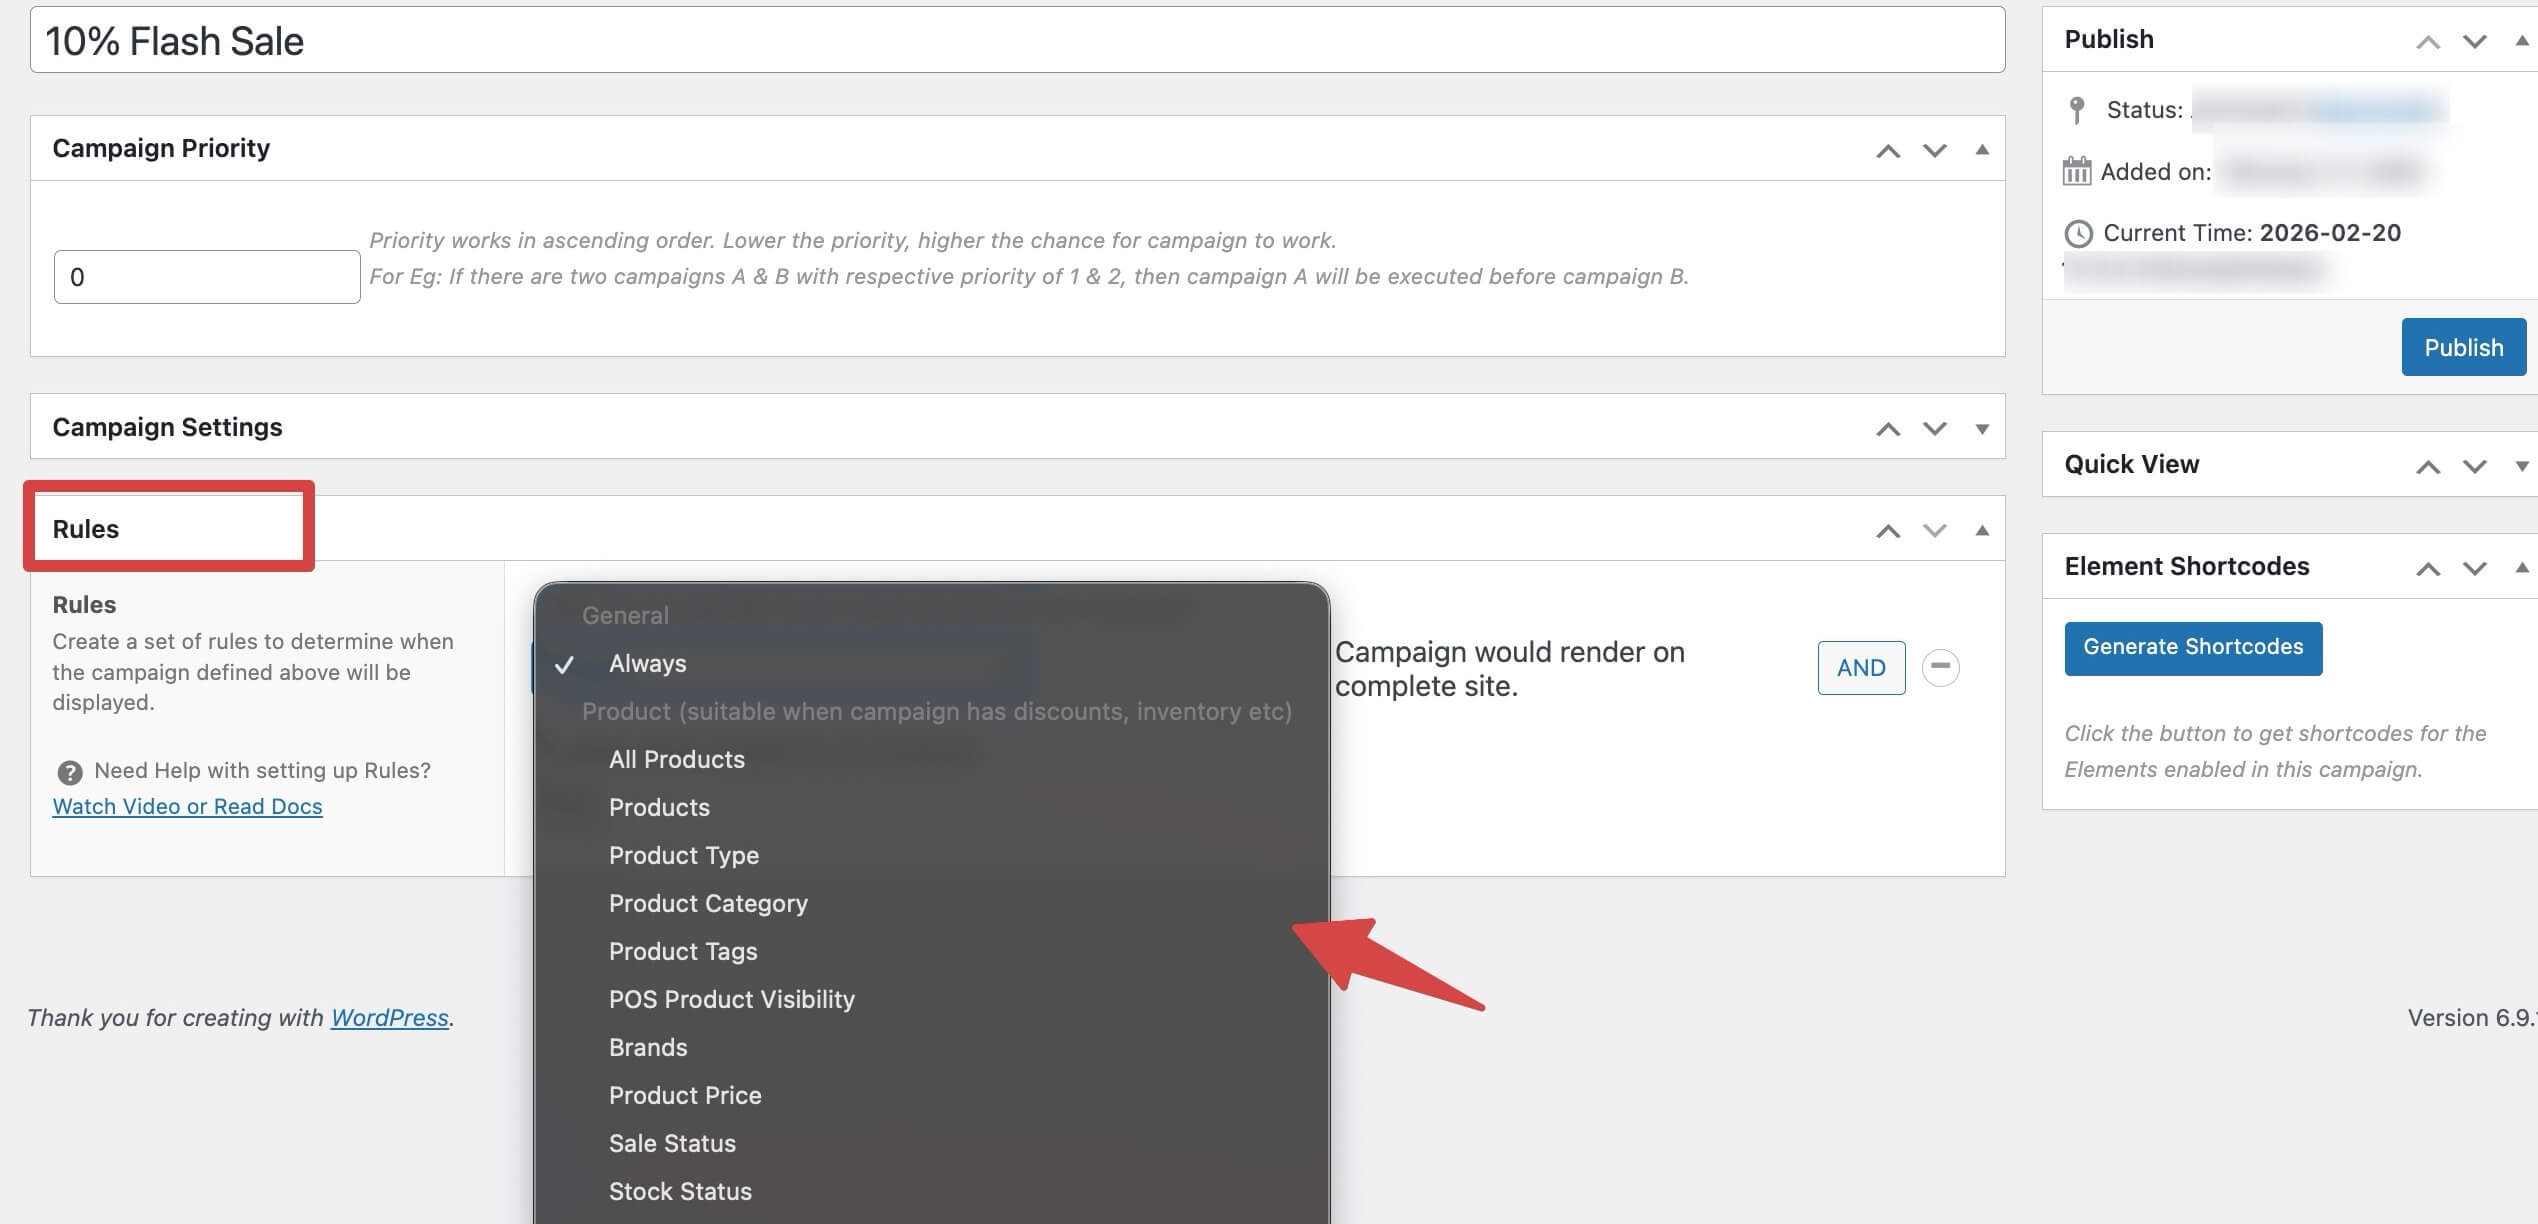
Yes. Most WooCommerce flash sale plugins allow you to target specific products, categories, or your entire catalog. With Finale WooCommerce Sales Countdown Timer and Discount, you can set rules to apply a flash sale only to specific products.
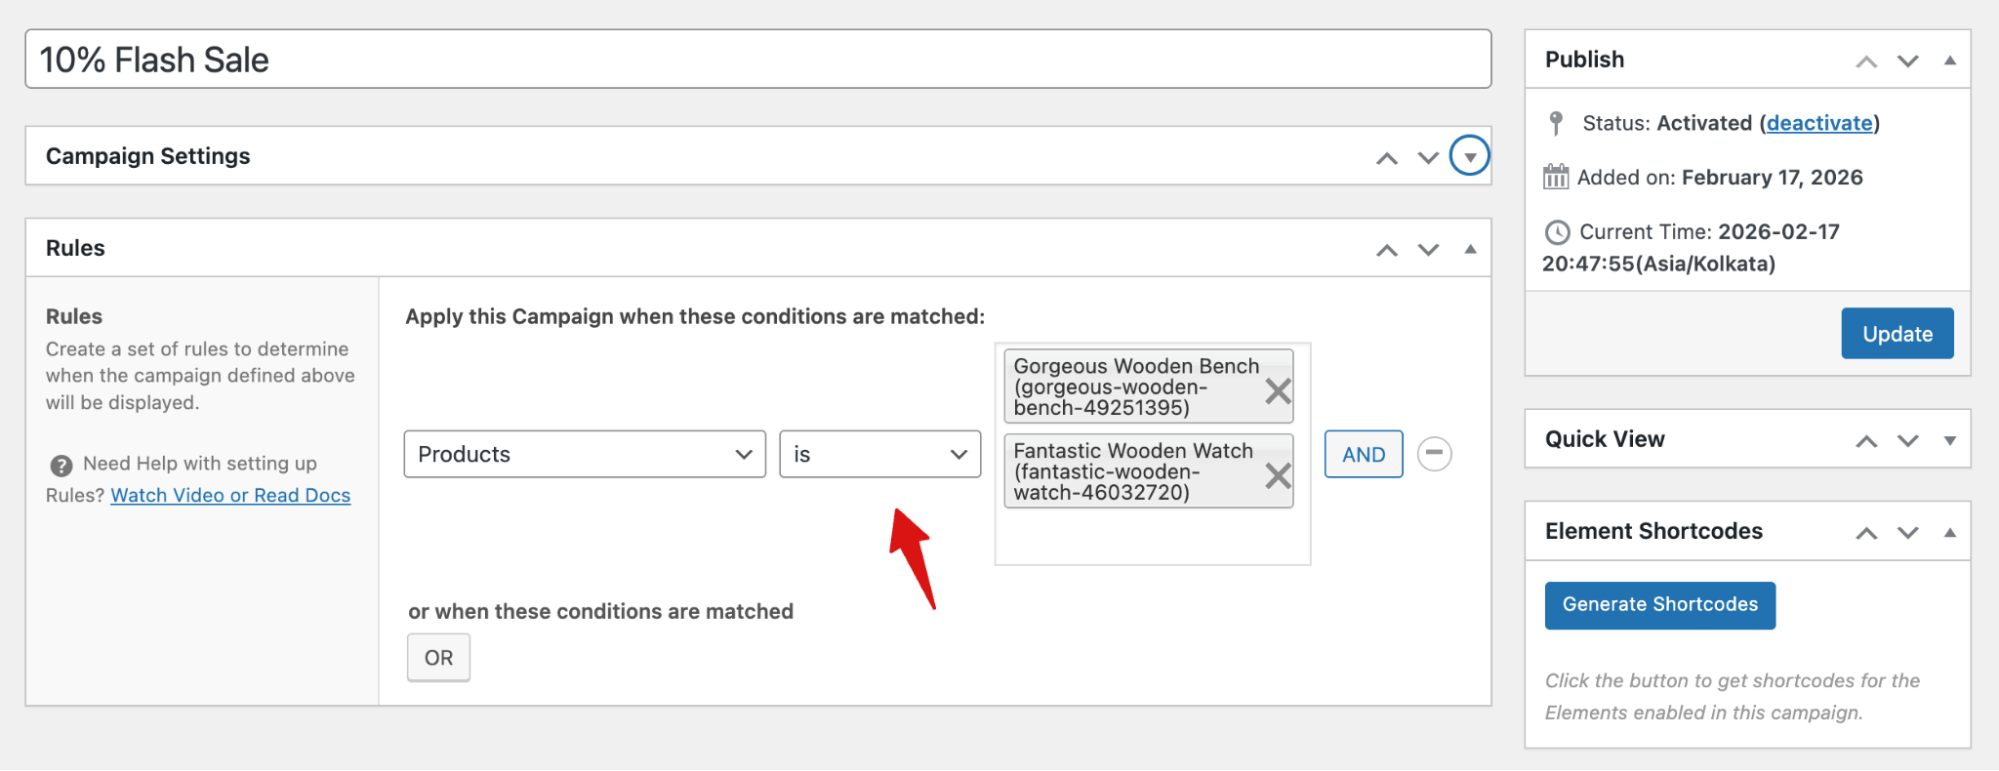
Additionally, you can apply flash sales to specific categories, product stock levels, etc.
With the Finale WooCommerce Sales Countdown Timer Discount, you can easily add a countdown timer on the top notification, on the product page, and on the bottom notification. We shared the whole process in the blog above.
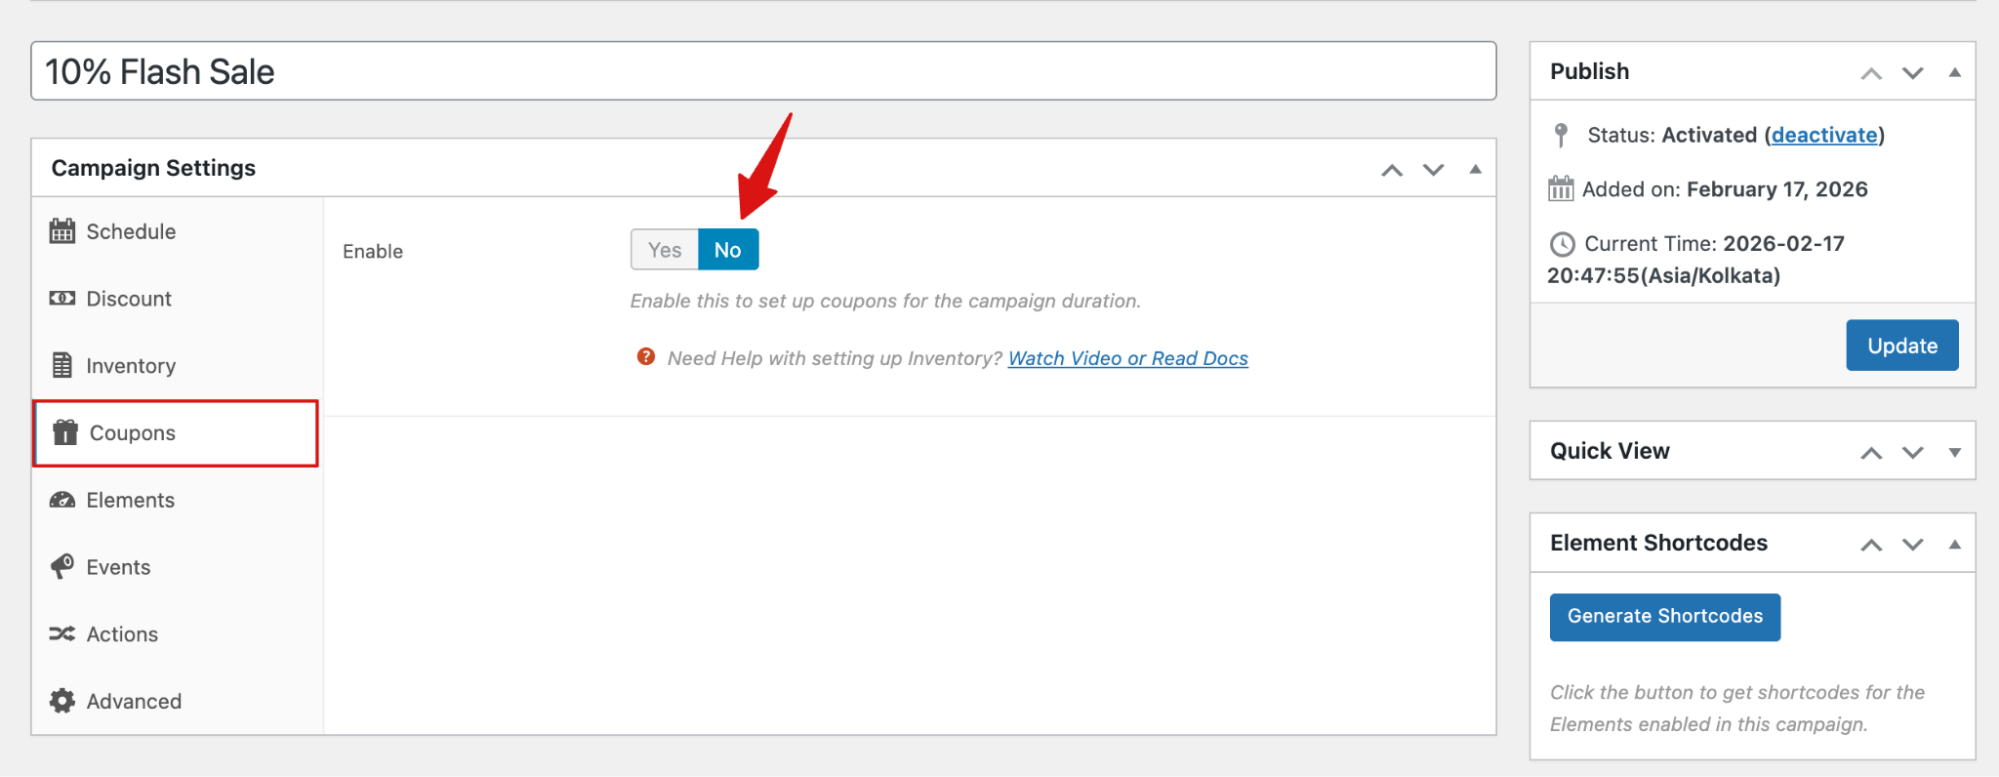
Move to the “Coupon” tab and make sure the Enable option is set to “No”.
If your flash sale isn't appearing, it's usually due to configuration issues. Check your start and end time, ensure the sale price is applied correctly, verify the right products are included, and clear any caching plugins or server cache.
Yes. Whether you apply flash sales to all products or specific variable products, flash sales will work.
Flash sales can help clear inventory, attract new customers, boost revenue, and increase average order value. They create urgency that encourages shoppers to buy quickly.
Yes, if discounts are too deep or you don’t account for costs, inventory, and profit margins, you could sell at a loss. Planning discounts carefully helps avoid this.
Start Driving More Sales with WooCommerce Flash Sales
Running a flash sale in WooCommerce is one of the most effective ways to drive quick revenue, clear excess inventory, and re-engage your customer base.
While WooCommerce's native features lack the tools needed, plugins like Finale WooCommerce Sales Countdown Timer Discount bridge that gap by giving you scheduling, automated discounts, and countdown timers all in one place.
The key to a successful flash sale isn't just the discount itself. It's the combination of the right timing, strategic email and SMS promotion, and urgency-driven elements like countdown timers and sticky notifications that keep shoppers moving toward checkout.
Whether you're running a one-time clearance event or a recurring seasonal promotion, the setup is straightforward once you know the steps.
If you haven't run a flash sale yet, there's no better time to start.
Set your schedule, configure your discount, add your countdown timer, and let the urgency do the selling for you.
More WooCommerce Resources
- Best WooCommerce Plugins To Boost Your Store Sales
- How to Use WooCommerce Free Gift Coupon To Boost Sales
- WooCommerce Discounts: The Complete Guide to Boost Sales and Conversions
- How to Send Individual Bulk Marketing Emails in WooCommerce
- How to Set Up Buy One Get One Offers In WooCommerce
Editorial Team
October 7, 2026WooCommerce upsells are products you recommend in place of the one a shopper is viewing, usually a better or higher-priced version of it. WooCommerce has a built-in upsell field for...
Editorial Team
October 6, 2026WooCommerce taxes start with a rate table you set up yourself. If you leave a state out of that table, orders going there can pass through with no tax. Say...
Editorial Team
October 5, 2026A WooCommerce Shopify checkout recreates the parts of Shopify’s checkout that shoppers already know. It includes a logo-only header, email first, express payment options at the top, address autocomplete, a...






