
Want to set up WooCommerce Mailchimp integration and supercharge your email marketing?
Email remains one of the most powerful channels for driving sales, but without proper automation, you’re leaving money on the table.
By integrating WooCommerce with Mailchimp, you can automatically sync customer data, segment your audience, and send highly targeted emails without any manual effort.
With the right integration, you can track customer behavior, recover abandoned carts, and nurture relationships that lead to repeat purchases.
And the best part? Setting it up is easier than you think.
In this post, we’ll walk you through how to seamlessly integrate WooCommerce with Mailchimp.
Plus, we’ll explore seven essential automation use cases to help you maximize conversions and grow your store effortlessly.
Table of Contents
- 1 WooCommerce Mailchimp Integration: Possible Solutions
- 2 How to Set Up WooCommere Mailchimp Integration (Step-by-Step)
- 3 Setting Up an Automation for WooCommerce Mailchimp Integration
- 4 7 Irresistible Use Cases for WooCommerce Mailchimp Integration to Set Up in Your Store
- 4.1 Use Case #1: Recover lost sales with rule-based abandoned cart sequences
- 4.2 Use Case #2: Send post-purchase follow-up emails
- 4.3 Use Case #3: Win back inactive customers with re-engagement emails
- 4.4 Use Case #4: Send reminders about subscription renewals
- 4.5 Use Case #5: Update contact fields for WooCommerce customers in Mailchimp
- 4.6 Use Case #6: Send welcome emails based on enrolled courses
- 4.7 Use Case #7: Reward loyal customers with exclusive VIP offers
- 5 Common WooCommerce Mailchimp Issues and How to Fix Them
- 6 7 Best Practices to Get More Revenue From Your WooCommerce Mailchimp Integration
- 7 Frequently Asked Questions (FAQs)
- 8 Unlock the Full Potential of WooCommerce Mailchimp Integration Today!
WooCommerce Mailchimp Integration: Possible Solutions
Mailchimp is a popular marketing platform that empowers businesses to engage with their audiences through email marketing and other channels.
By integrating Mailchimp with WooCommerce, you can harness the power of email marketing to engage your customers and boost sales in your store.
That’s where you need a plugin that helps you integrate WooCommerce and Mailchimp.
As per our expert research, there are two plugins available to do this job:
- Mailchimp for WooCommerce
- FunnelKit Automations
Let’s go through their pros and cons quickly.
Mailchimp for WooCommerce
The Mailchimp for WooCommerce plugin automatically syncs your customers and their purchase data with your Mailchimp account.
This WordPress plugin handles basic automations for your WooCommerce store.
Pros
- Free plugin: It’s a free plugin that syncs your WooCommerce store with the Mailchimp account.
- Marketing automations: Set up marketing automations to remind your audience about the items left in their carts or products viewed in your store, follow up with them post-purchase and win back lapsed customers.
Cons
- Limited options: You cannot add delays in automated sequences or set up WooCommerce-related conditional workflows. Plus, you can’t track sales and user interactions on your website in real time.
- Cannot send data to multiple services: You cannot send your WooCommerce data directly to automation hubs such as Pabbly, Zapier, or Integrately using the Mailchimp for WooCommerce plugin. This completely rules out the best innovations that you can have on your website.
FunnelKit Automations
FunnelKit Automations is an all-in-one marketing automation and broadcast CRM for WordPress and WooCommerce.
It offers tons of features to help you grow your business and integrate WooCommerce with your Mailchimp account.
Pros
- Perfect automation solution: It’s quite flexible in integrating your WooCommerce store with Mailchimp. You can automate your WooCommerce processes by setting up rule-based automations. For example, create a product-specific audience list, send rule-based discount coupons, and more.
- Workflows with no limitations: You can add any number of delays, conditions, goals, and actions to your automations, as needed.
- Unlimited automations and emails: It allows you to set up all kinds of automations in your WooCommerce store. These include cart abandonment, re-engagement campaigns, product recommendations, welcome emails, post-purchase workflow, and more.
- Connect with plugins, CRMs, and apps: Send your WooCommerce data to automation apps such as Pabbly, Zapier, Make (Integromat), and Integrately to set up advanced automated workflows.
Cons
- Premium plugin: It starts at $149.50 annually and lets you go beyond the traditional WooCommerce Mailchimp integration. FunnelKit Automations’ free version is limited to setting up basic cart abandonment and post-purchase workflows.
However, with the pro plugin, you can easily recover the cost with 2-3 effective automation use cases.
How to Set Up WooCommere Mailchimp Integration (Step-by-Step)
To connect your WooCommerce store to Mailchimp, you need FunnelKit Automations Pro.
FunnelKit Automations comes in two versions - Free version and Premium version.
The Free version comes with essential prebuilt automations that you can import with one click. Import abandoned cart recovery sequence, review collection emails, winback email campaigns, and more.
The Pro version unlocks limitless automation possibilities with advanced event triggers and premium pre-built automation.
Also, the ability to connect your WooCommerce store to various eCommerce plugins.
Click on the button below to get your copy of FunnelKit Automations.
Refer to our documentation on installing FunnelKit Automations on your website.
Follow the steps below to integrate your WooCommerce store with your Mailchimp account.
Step 1: Log in to your Mailchimp account
Navigate to the Mailchimp account page.
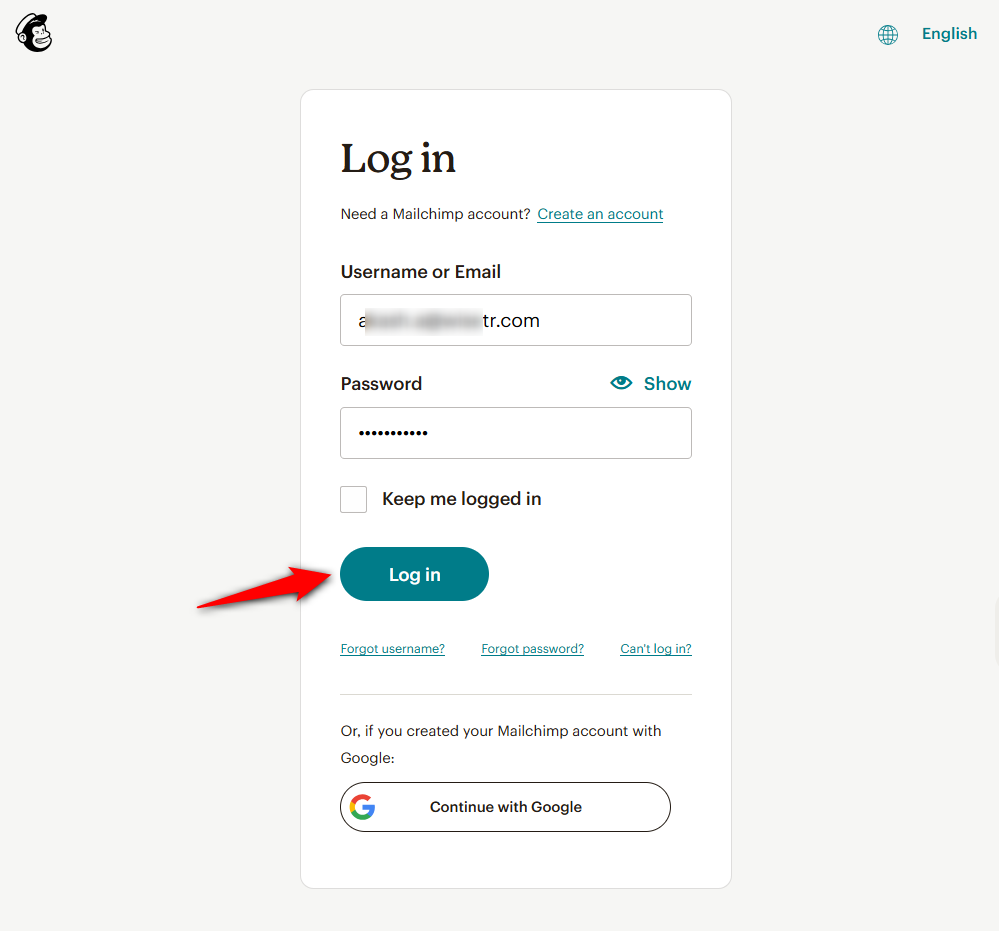
After entering your username/email and password, click on the Log in button.
You can even sign in with your Google account.
Step 2: Copy the Mailchimp API key
Once you’ve logged in to your Mailchimp account, go to Profile.
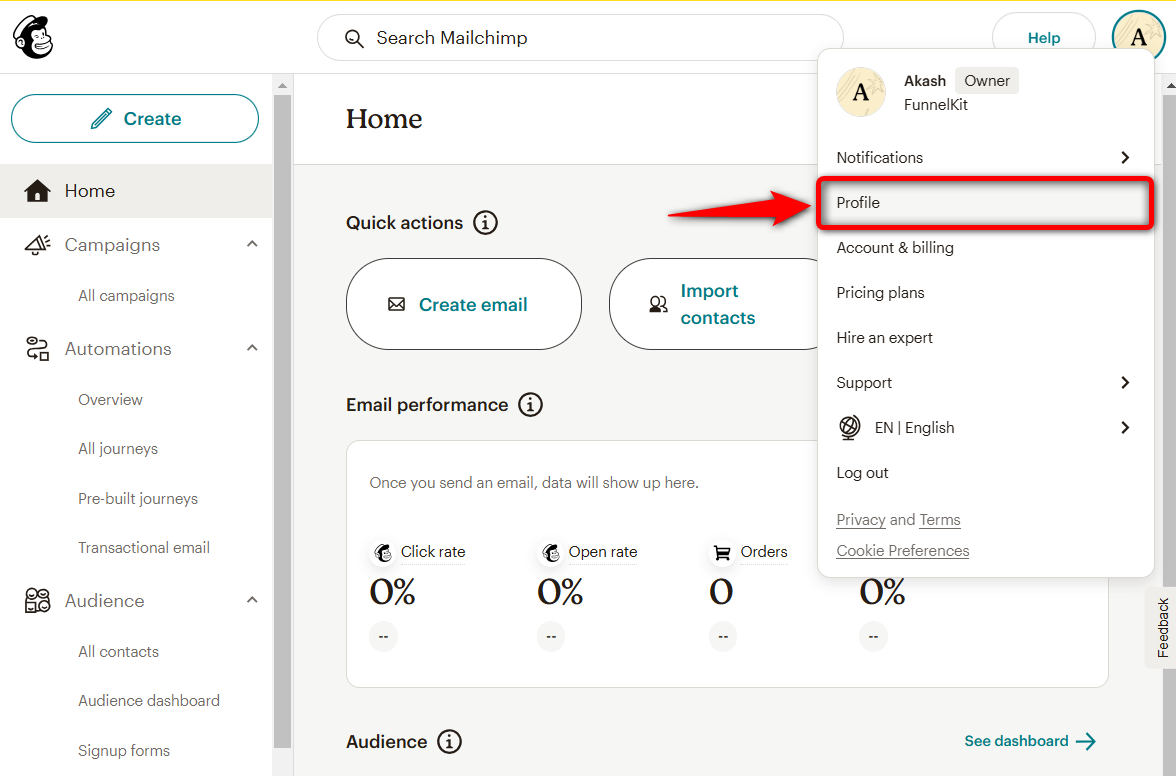
Then, navigate to Extras ⇨ API keys.
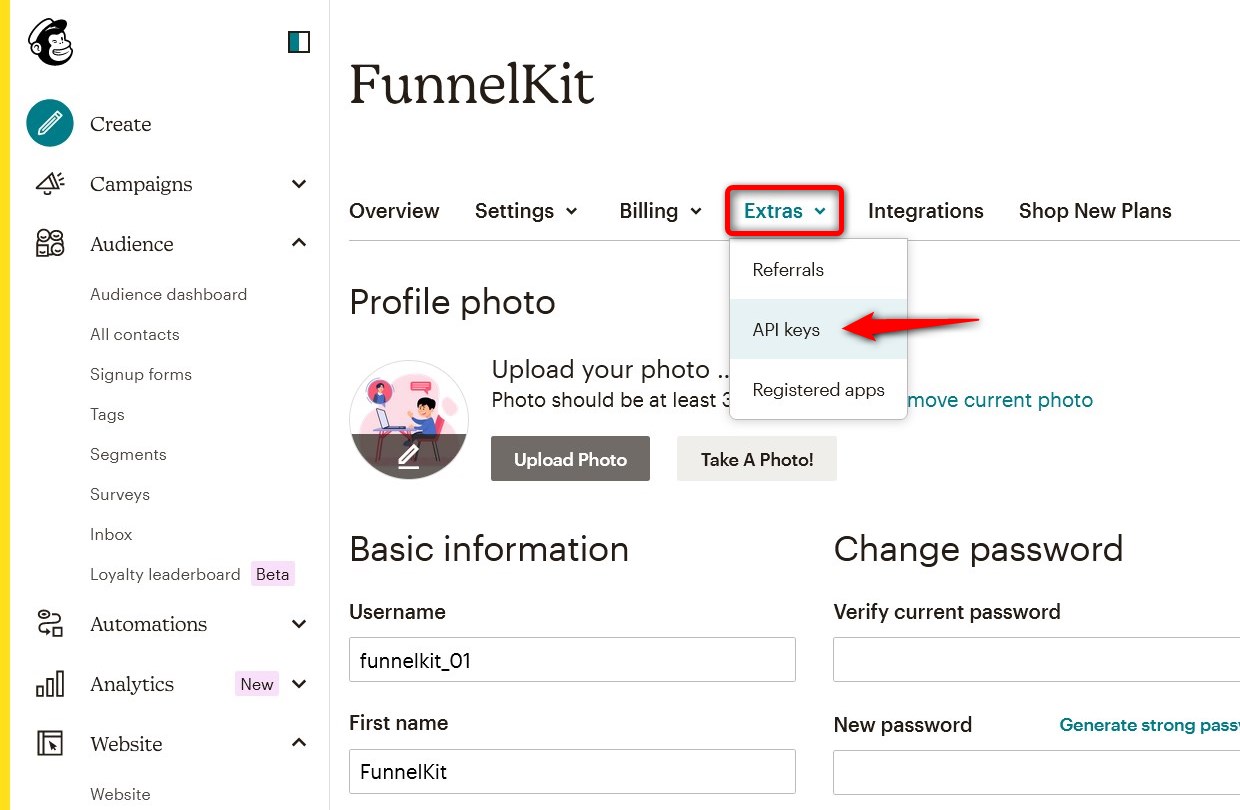
Here, you’ll find your API key.
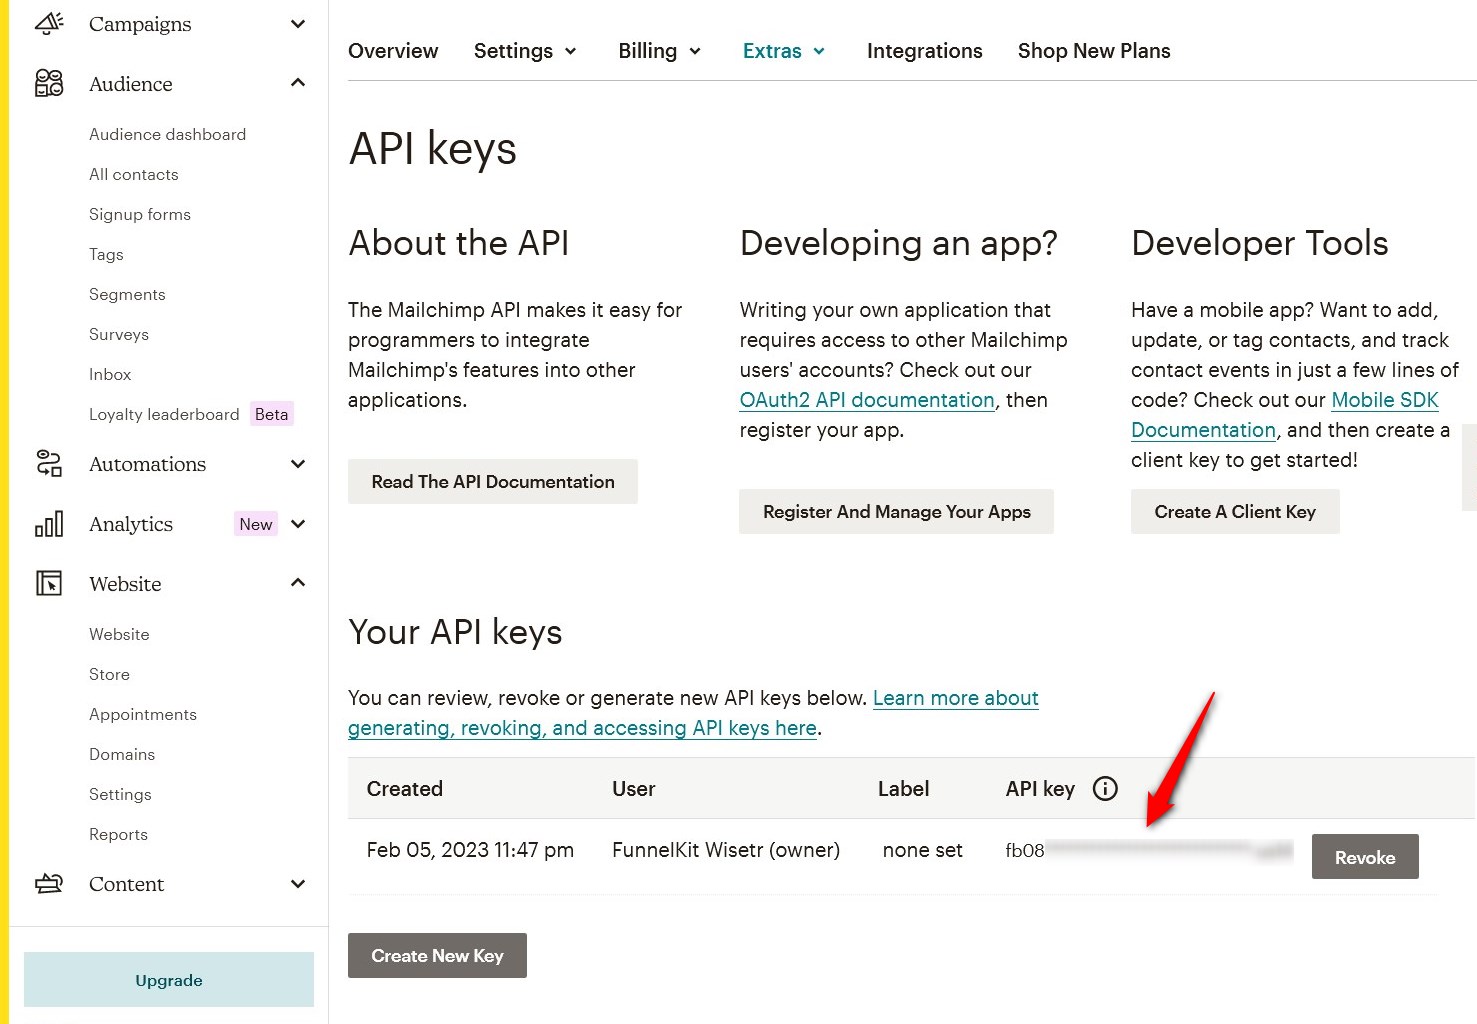
You can either create a new key or copy the one you created earlier.
Step 3: Paste the API key and connect
Go to the Tools ⇨ Connectors section inside FunnelKit Automations. You’ll find different apps you can connect with.
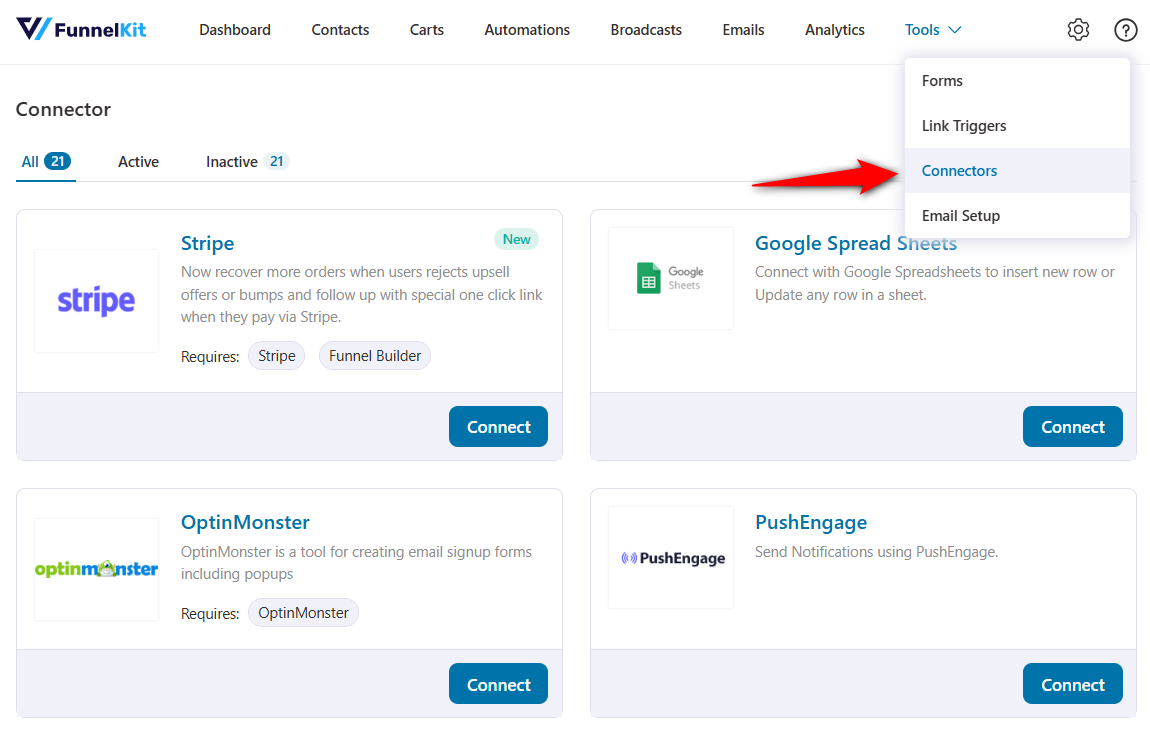
Click on ‘Connect’ under the Mailchimp section.
Paste the API Key into the field, then select the list in Mailchimp.
Your audience data will display the list you choose here.
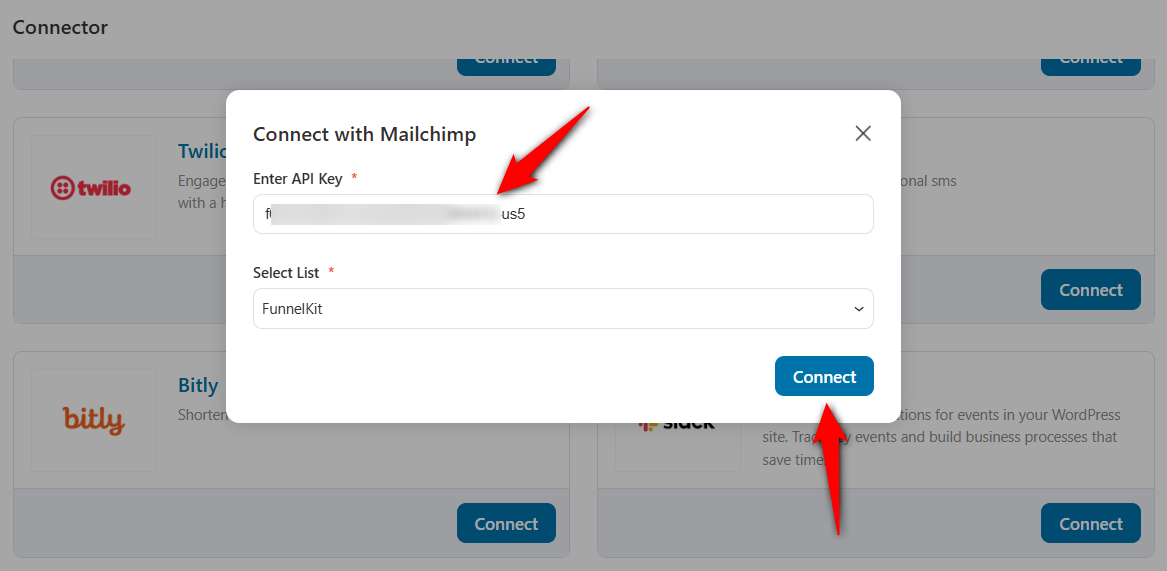
Clicking on ‘Connect’ will integrate your Mailchimp account with the WooCommerce store.
Setting Up an Automation for WooCommerce Mailchimp Integration
In this section, we’ll set up a basic automation in FunnelKit Automations. Here, we’ll add a tag when a customer makes a purchase from the WooCommerce checkout page.
Follow these instructions to create WooCommerce - Mailchimp automation:
Step 1: Create a new automation
Go to the Automations section and click on the ‘Create Automation’ button.

You’ll see various pre-built automation recipes here. You can import these recipes and customize them the way you want to be used in your WooCommerce store.
But we’ll click on the ‘Start from Scratch’ option and name your automation: WooCommerce Mailchimp Integration.
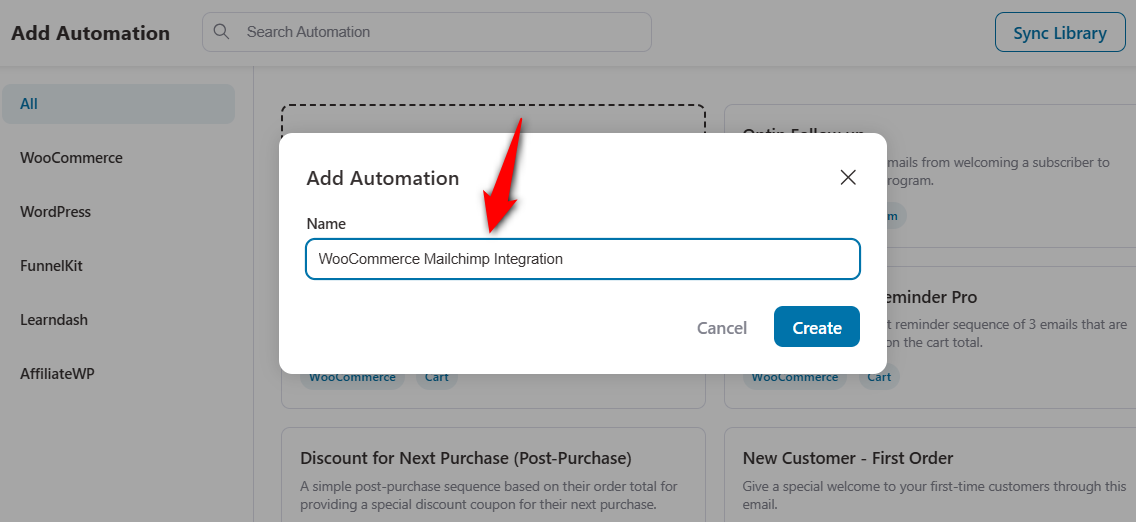
Clicking ‘Create’ adds a new automation.
Step 2: Add an event trigger
In the workflow section, hit the ‘Select an Event’ and choose the ‘Order Created’ event under WooCommerce.
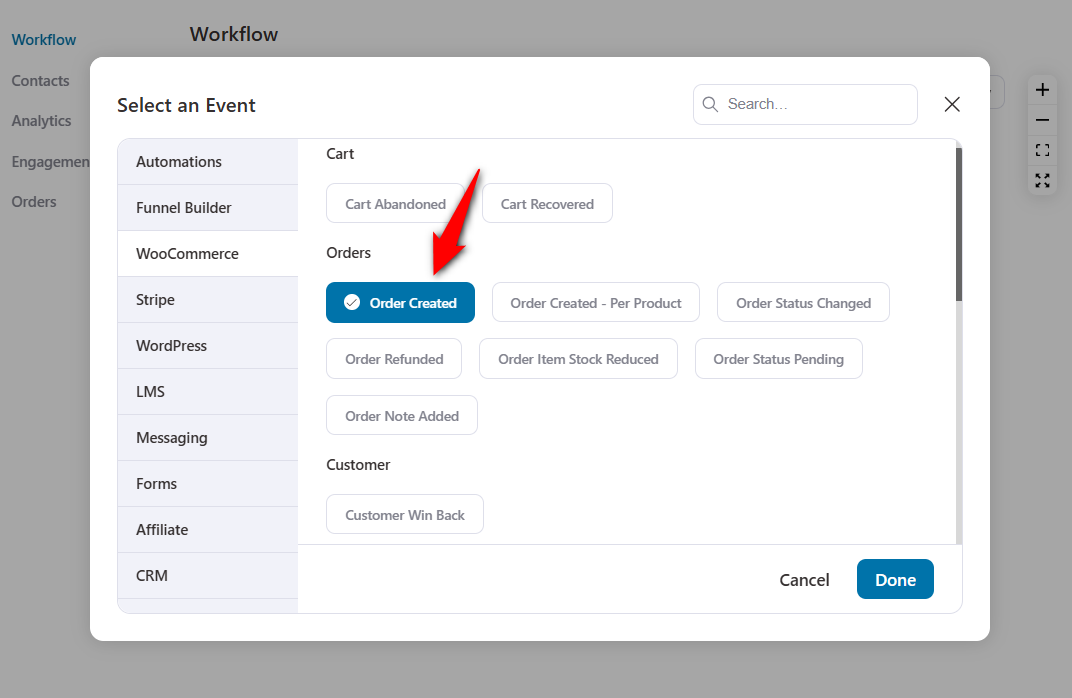
Configure your event by specifying the order status, the product ordered, and the automation that runs on a contact.
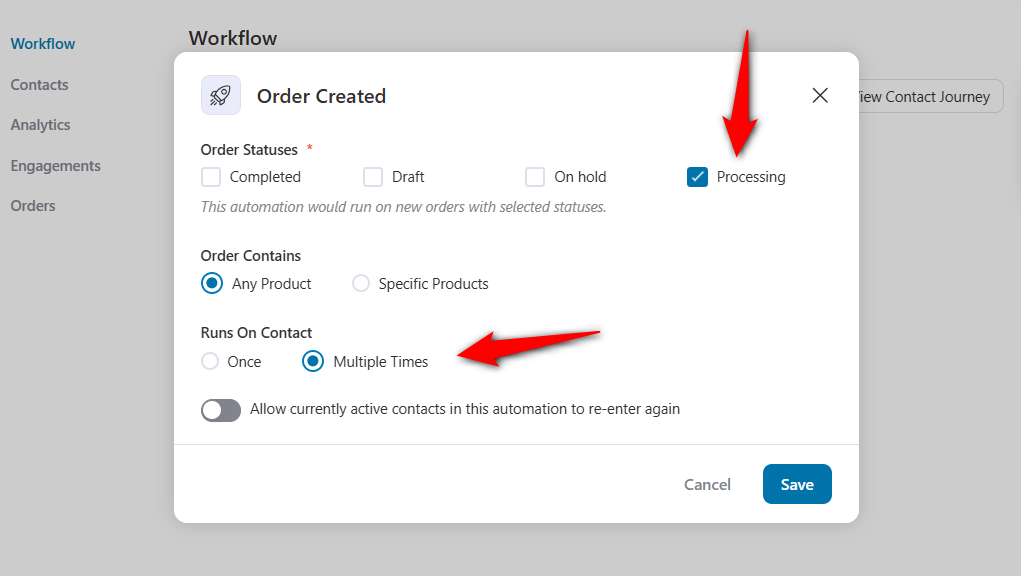
Click on ‘Save’ once done.
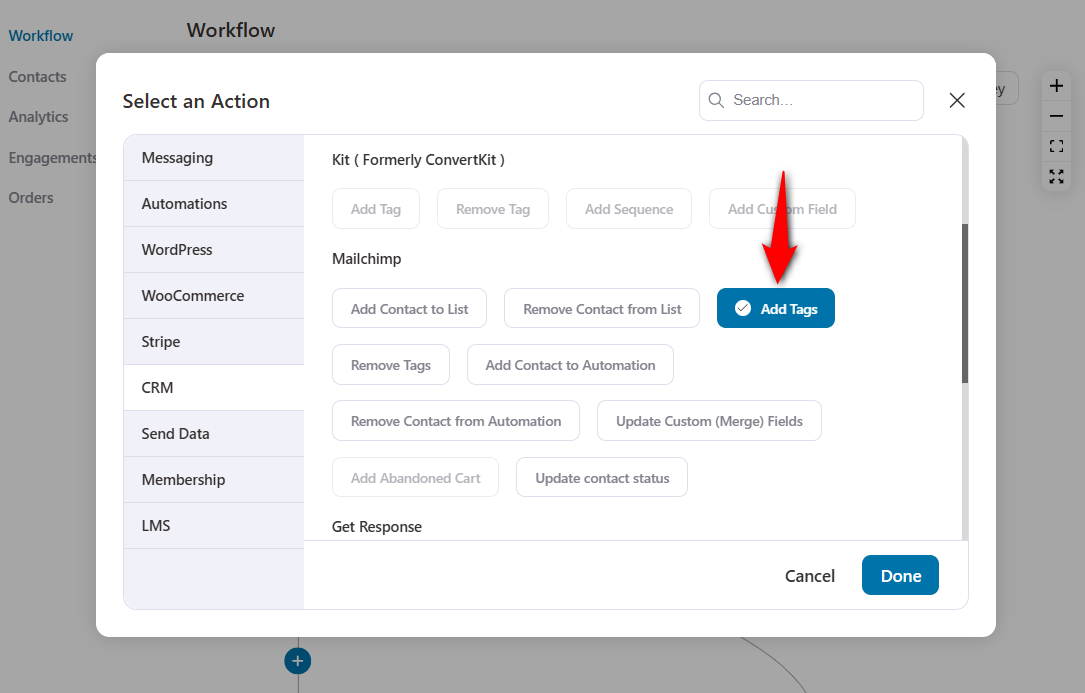
Step 3: Specify the ‘Add Tags’ action
Next, hit the plus icon and add an Action.
Then, specify the ‘Add Tags’ action under the Mailchimp CRM section.
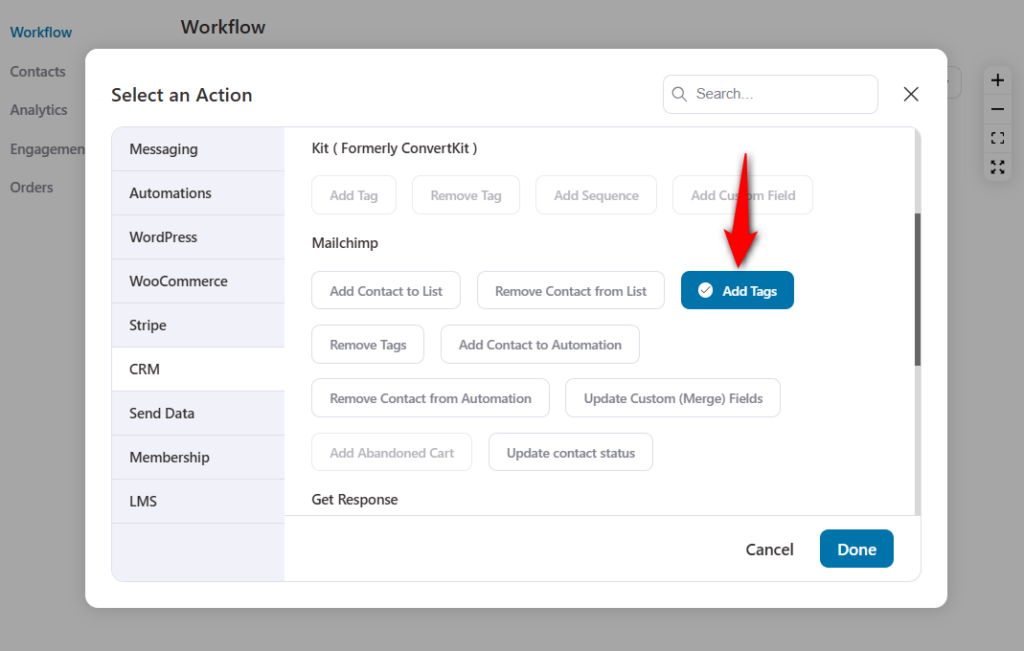
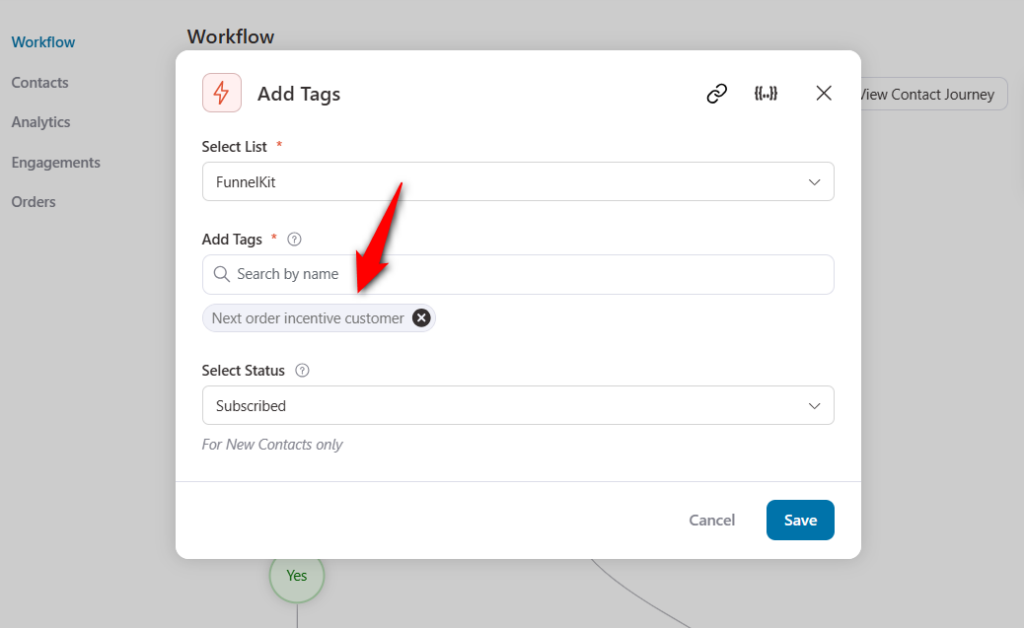
Then, select the list and add a specific tag you want to create within your Mailchimp account.
Make sure to specify the contact status for new customers.
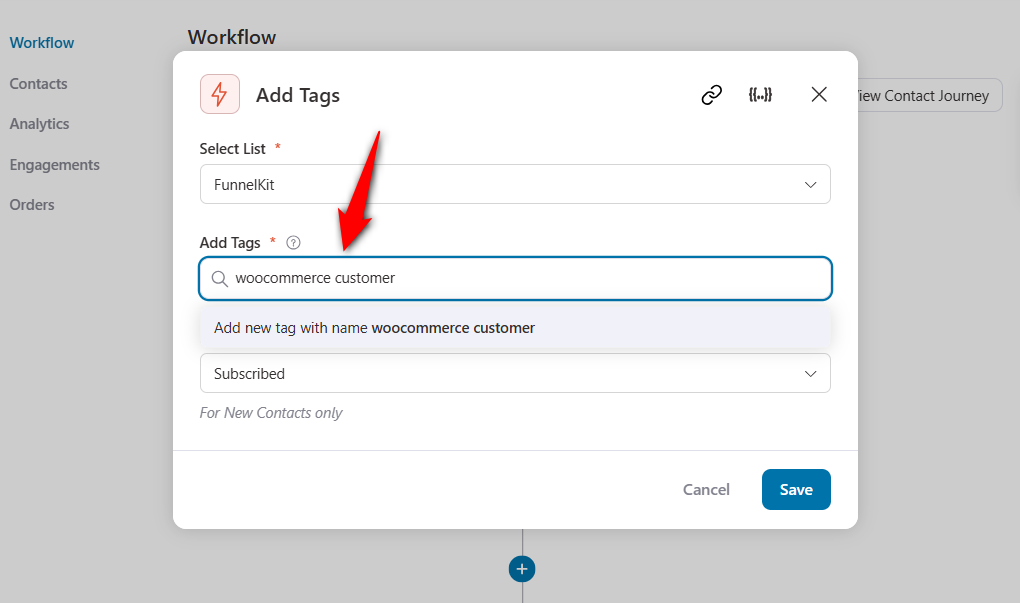
You can further personalize your tags with merge tags by adding the names of products or any other data, too.
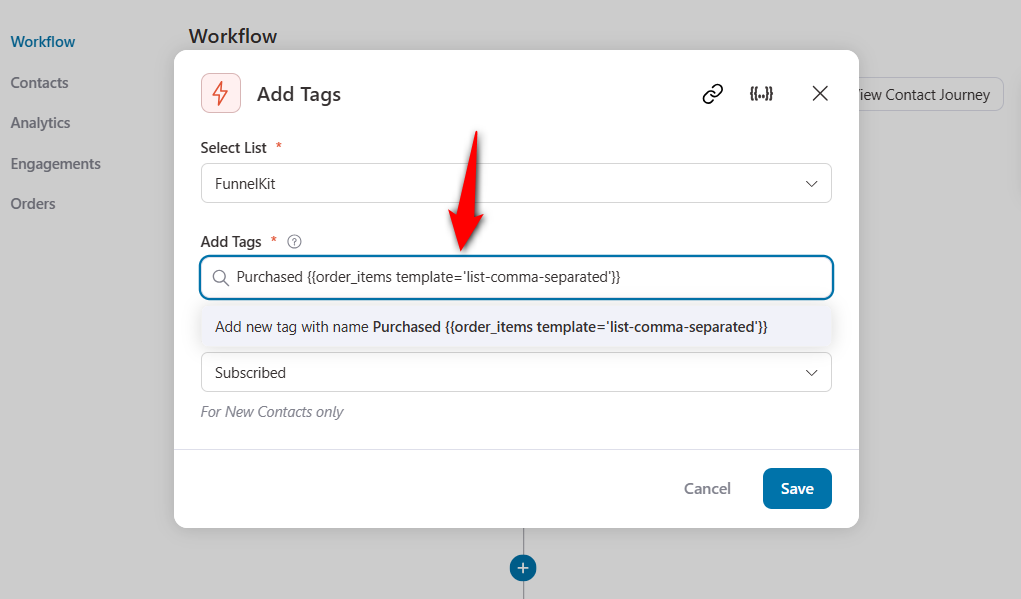
Now, this tag will appear as "Purchased Hoodie" or "Shoes", depending on the items a user purchases.
Once everything is done, hit the ‘Save’ button.
Step 4: Activate your automation
Now activate your automation by turning the toggle to ‘Active’.
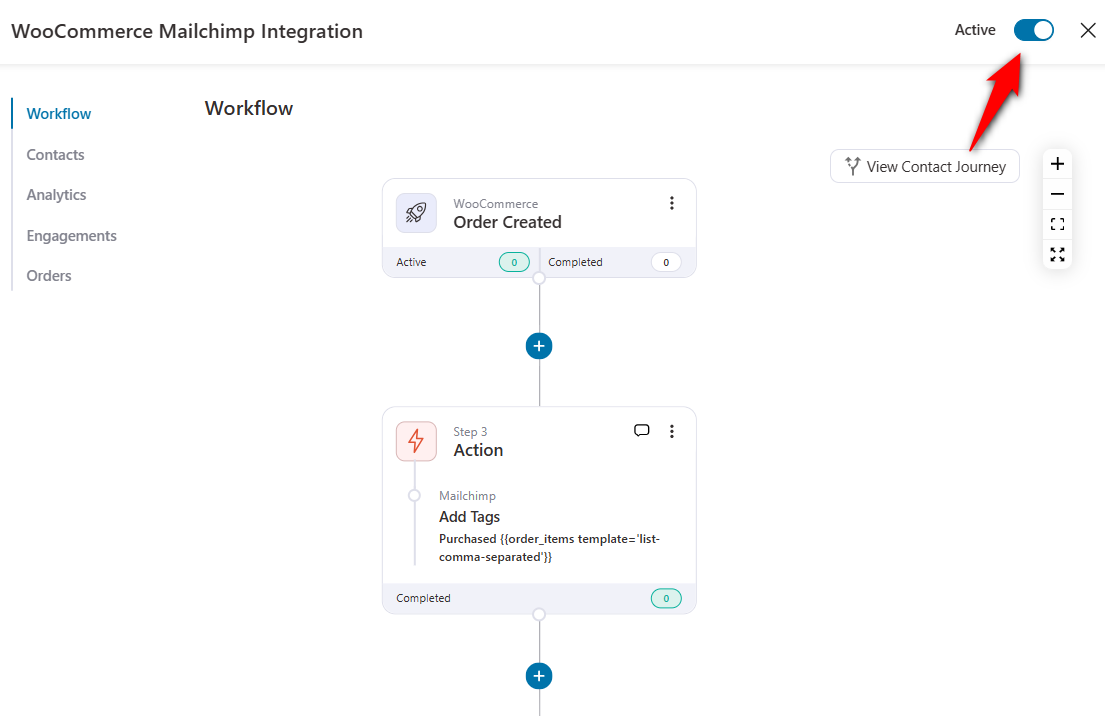
This will make your automation go live on your WooCommerce website.
Now, you are ready to use this integration in various use cases. Let’s see a few.
7 Irresistible Use Cases for WooCommerce Mailchimp Integration to Set Up in Your Store
Integrating WooCommerce with Mailchimp opens up a world of automation that can boost sales, recover lost revenue, and build lasting relationships.
Let’s explore seven powerful WooCommerce Mailchimp automation use cases you can implement in your store today.
From abandoned cart recovery to post-purchase follow-ups, these strategies will help you turn first-time buyers into loyal customers.
Use Case #1: Recover lost sales with rule-based abandoned cart sequences
Mailchimp does allow you to send abandoned cart emails, but you get limited delay options. You get delay options in minutes, hours, days, weeks, and months.
According to studies, the first email sent 10 to 30 minutes after the initial email yields the best conversions.
FunnelKit Automations lets you trigger your abandoned-cart recovery emails within minutes.
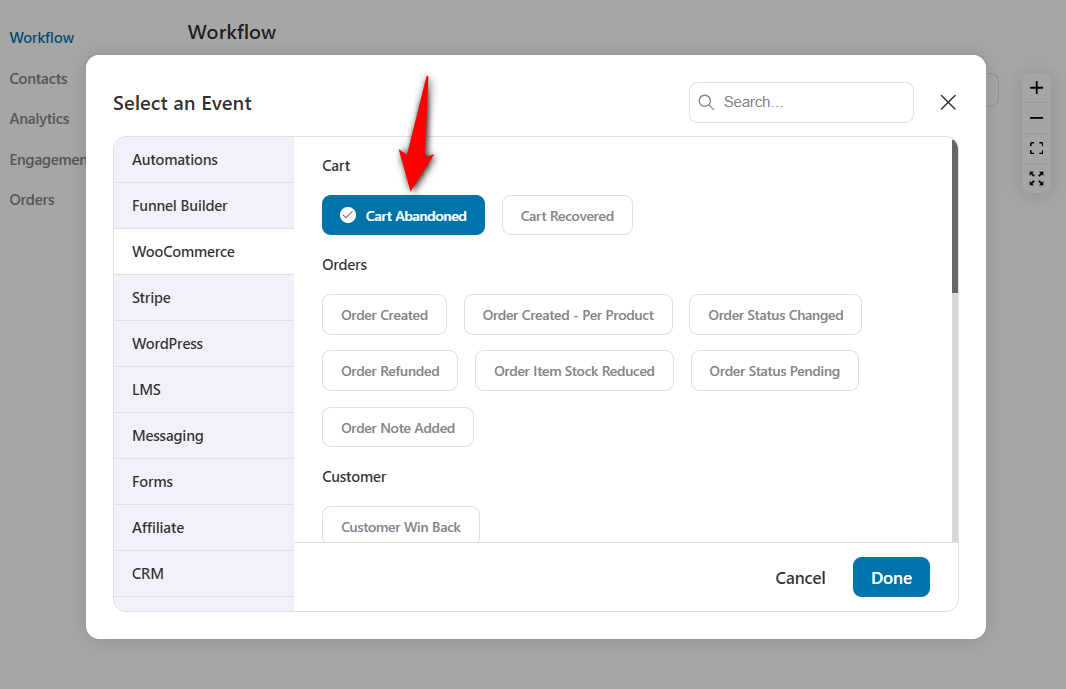
Create a new automation and select the event as ‘Cart Abandoned’ under WooCommerce.
Now, click on the “+” icon and add a Delay.
Let’s send an email after 15 minutes of delay here.
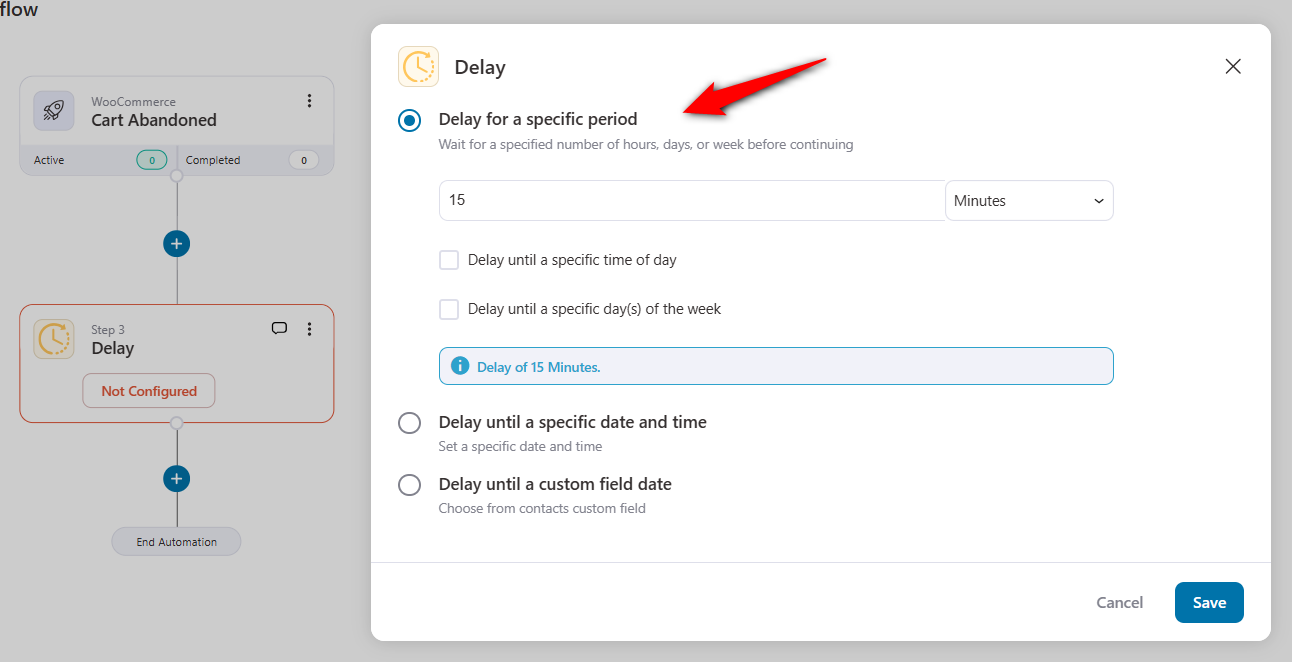
You can also delay until a specific date and time or even until a custom field is filled on your opt-in form.
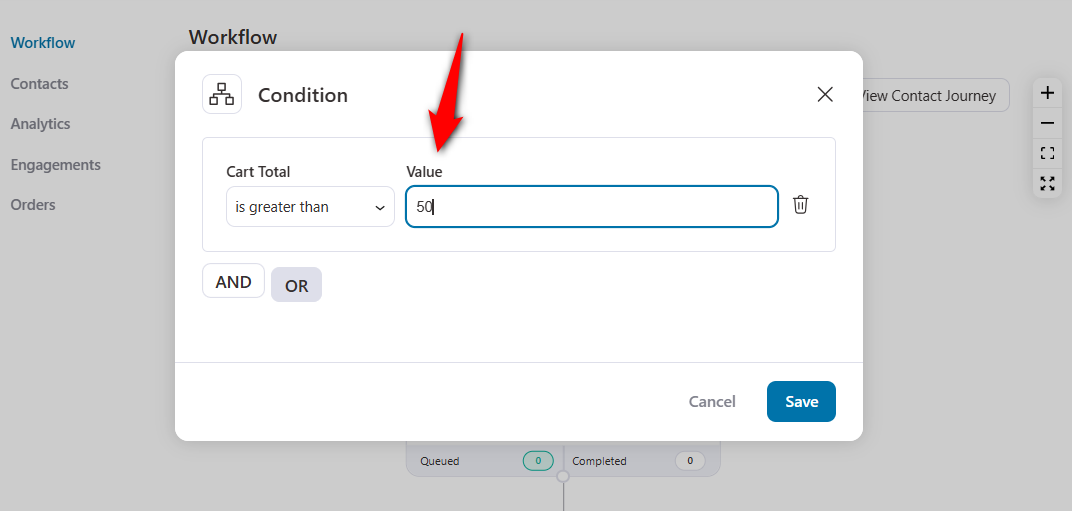
Click on the “+” icon and add a Condition.
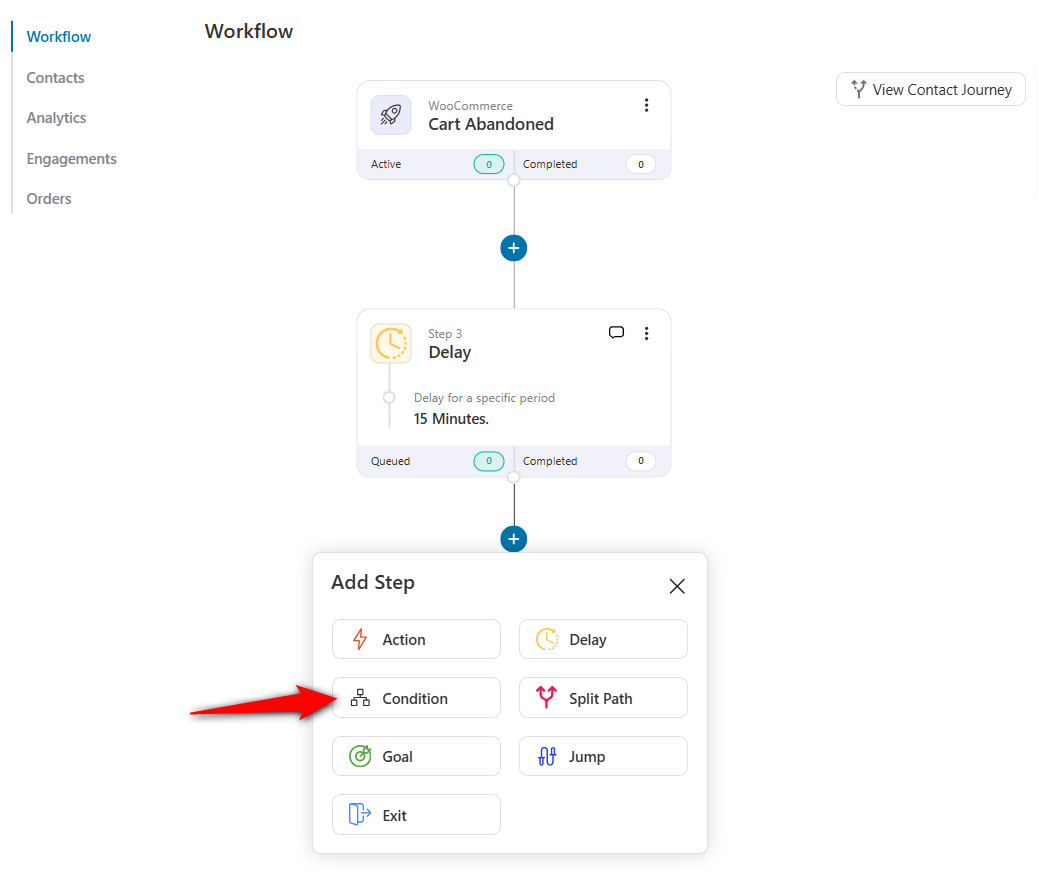
Follow this path 👉 click on ‘Add New Condition’ and hit Cart >> Cart Total >> Is Greater Than $50.
Now, click on the “+” icon and add an action to add your contact to a specific automation in your Mailchimp account.
Just specify the name of the automation that emails your abandoned contacts with a cart value greater than $50.
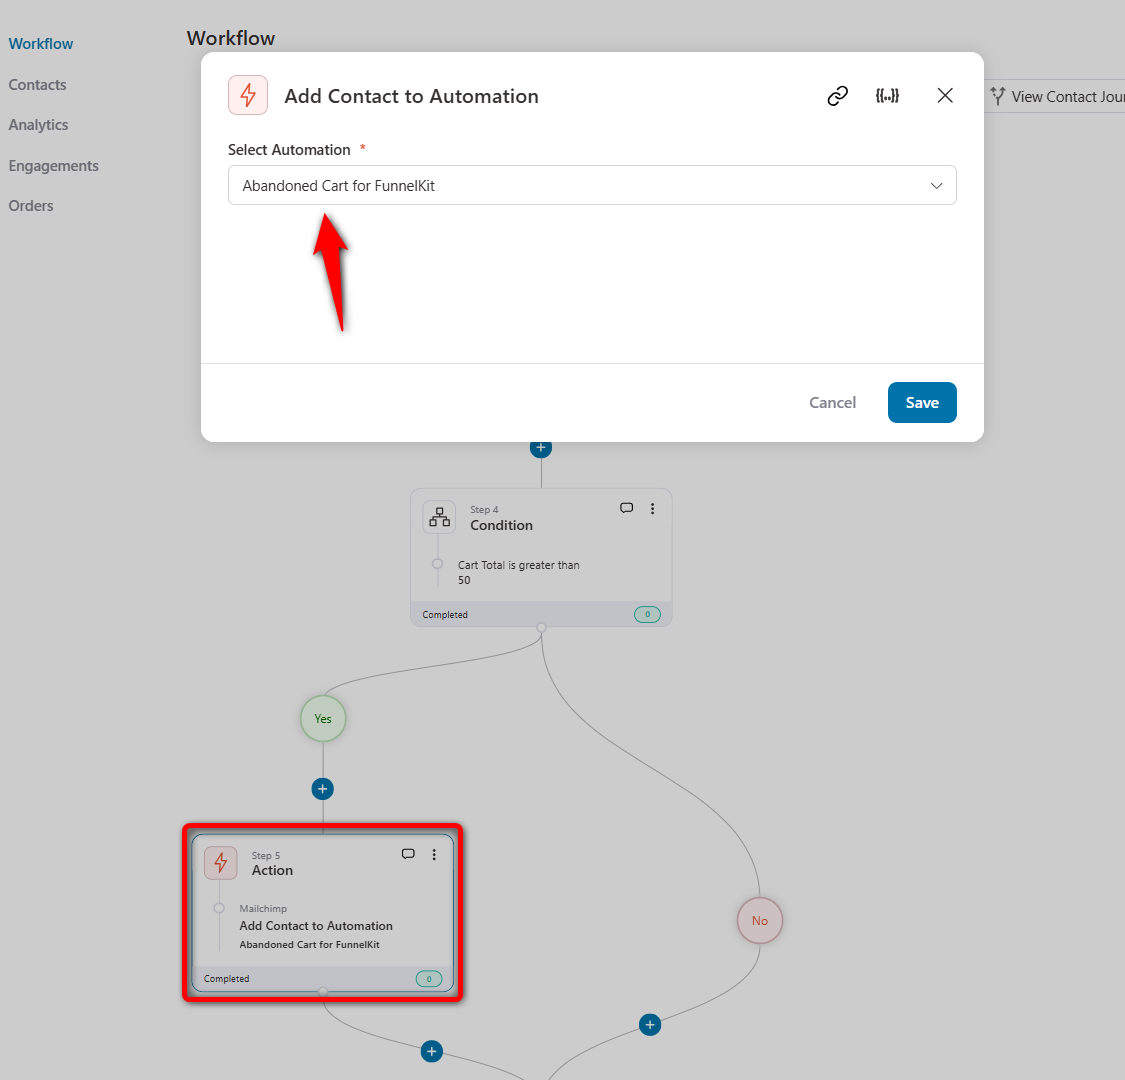
Add the conditions to create a separate sequence for those whose cart value is less than $50.
So now users will be added to your Mailchimp sequences based on their cart values. This way, you can send separate coupon codes to users based on their cart values.
Furthermore, you can send a 20% OFF coupon to users with a cart value over $50. And a 10% OFF coupon for users with a cart value between $30 and $50.
Use Case #2: Send post-purchase follow-up emails
You can easily create automated follow-up sequences to:
- Thank them for their purchase
- Share product setup guides or care tips
- Upsell complementary products
- Send next-order discount coupons
Let’s say you want to reward your customers who have exceeded the total cart value of $200 with a 20% discount.
First, set up the condition of a total cart value greater than $200.
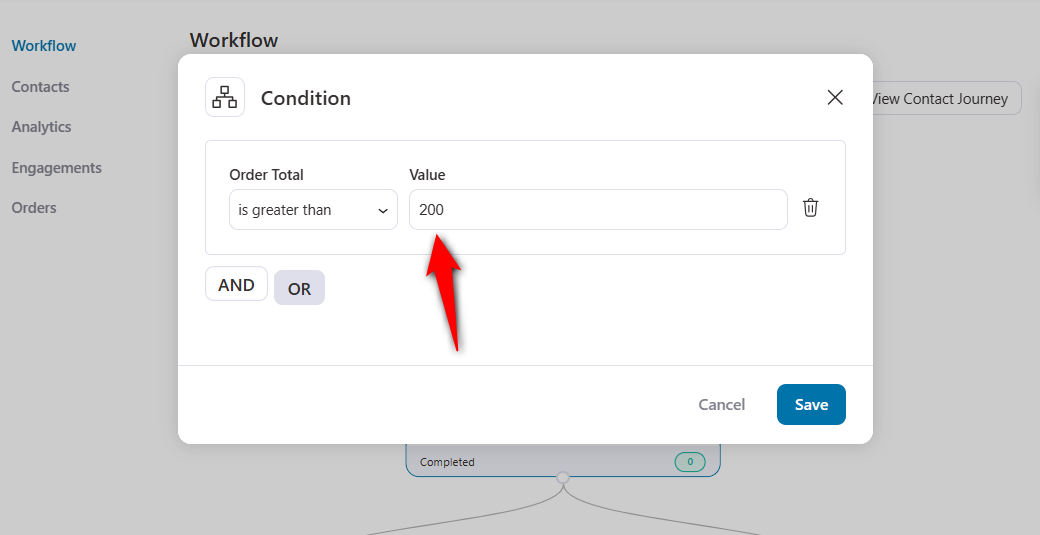
Then, add these contacts to the Mailchimp tag by specifying the action.
Now, select the list and enter the tag name you want to add.
This will add all the contacts who purchased items worth over $200 from your WooCommerce store.
Now that you’ve added the tags, you can send emails from your Mailchimp account.
Use Case #3: Win back inactive customers with re-engagement emails
Some customers may stop engaging with your brand over time.
Use WooCommerce Mailchimp integration by FunnelKit Automations to bring lapsed customers back with a reminder about their past purchases or time-sensitive discounts.
Configure the customer winback automation by specifying the inactivity period:
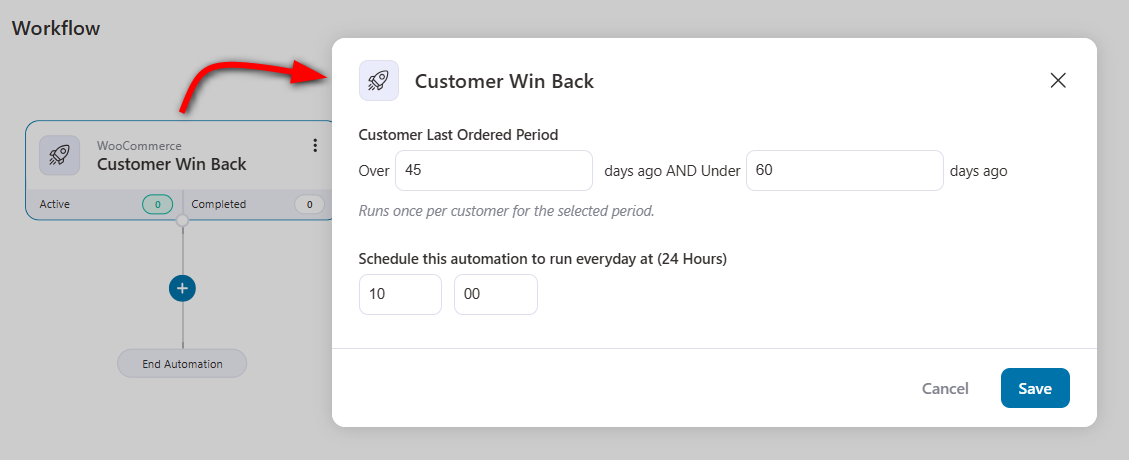
This automation will trigger for customers who haven’t purchased anything in about 45-60 days.
Add these contacts to the “Inactive Customers” list.
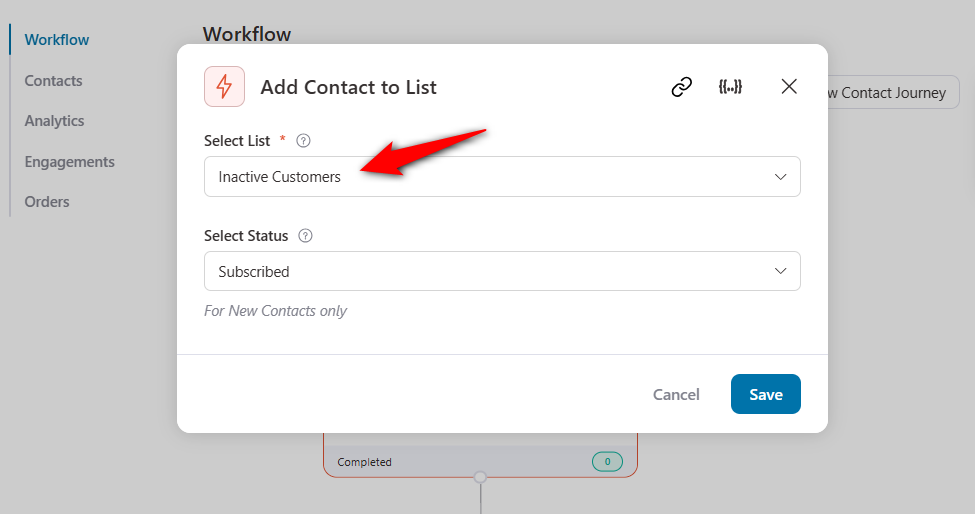
The next thing you need to do is offer them a 10-15% discount on their next purchase.
You can do this by sending emails from your Mailchimp account.
Well done! This is how you can send re-engagement emails to your inactive customers.
Use Case #4: Send reminders about subscription renewals
Sending subscription reminders to your customers is crucial in generating recurring revenue in your business.
While WooCommerce Subscriptions helps you manage subscription products, FunnelKit Automations helps you send email reminders for them.
You can easily send subscription reminders, subscription renewal payment failure updates, etc.
For that, choose the ‘Subscriptions Before Renewal’ event:
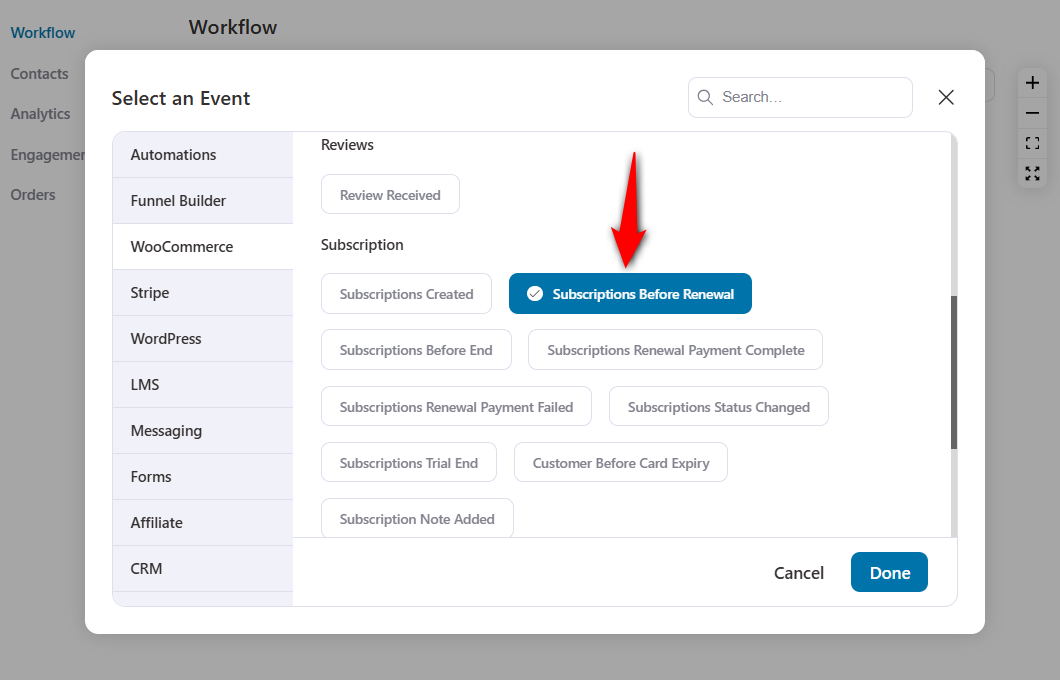
Specify the number of days before your contacts' subscription renewals you want to be reminded.
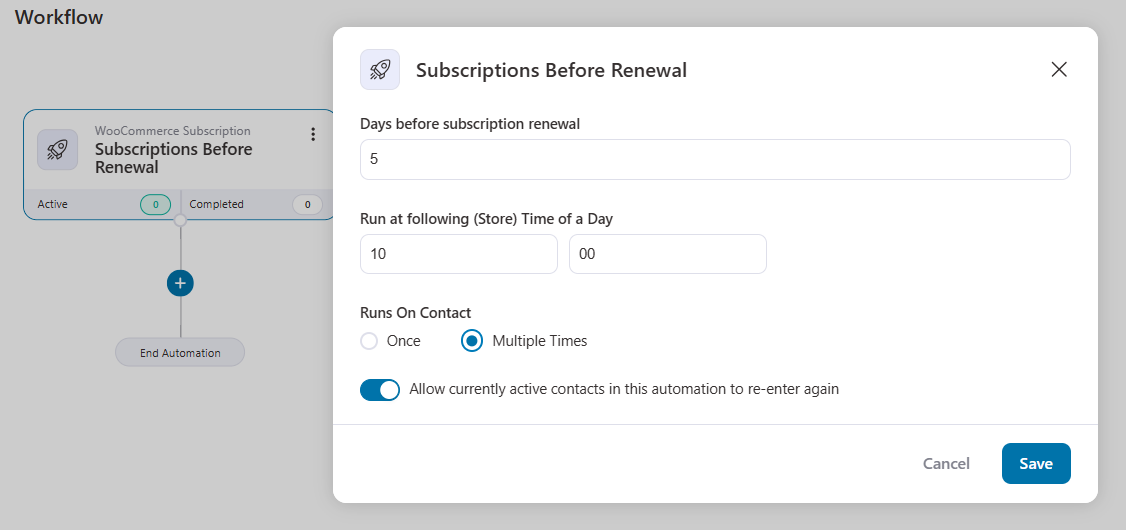
Then add the triggered contacts to an automation in your Mailchimp account.
Use Case #5: Update contact fields for WooCommerce customers in Mailchimp
Let’s suppose you want to collect phone numbers for your SMS marketing campaign.
You can create a form for your users to submit their responses. You can also pick up phone numbers from the orders your users place on the WooCommerce website.
For that, set up the WooCommerce order created event trigger.
Then, update the custom fields within your contacts’ profiles.

When the customer places an order, their phone number field will be updated in your Mailchimp account.
Now your store is SMS marketing ready!
Use Case #6: Send welcome emails based on enrolled courses
If you sell courses on WooCommerce, you are bound to have various courses that serve different students.
Hence, you need to have separate welcome email sequences for each course. This way, you will send only relevant emails to the students based on their course enrollment.
To do that, create a new automation in the FunnelKit Automations dashboard.
Add the ‘User Enrolled into a Course’ event trigger under the LMS section.
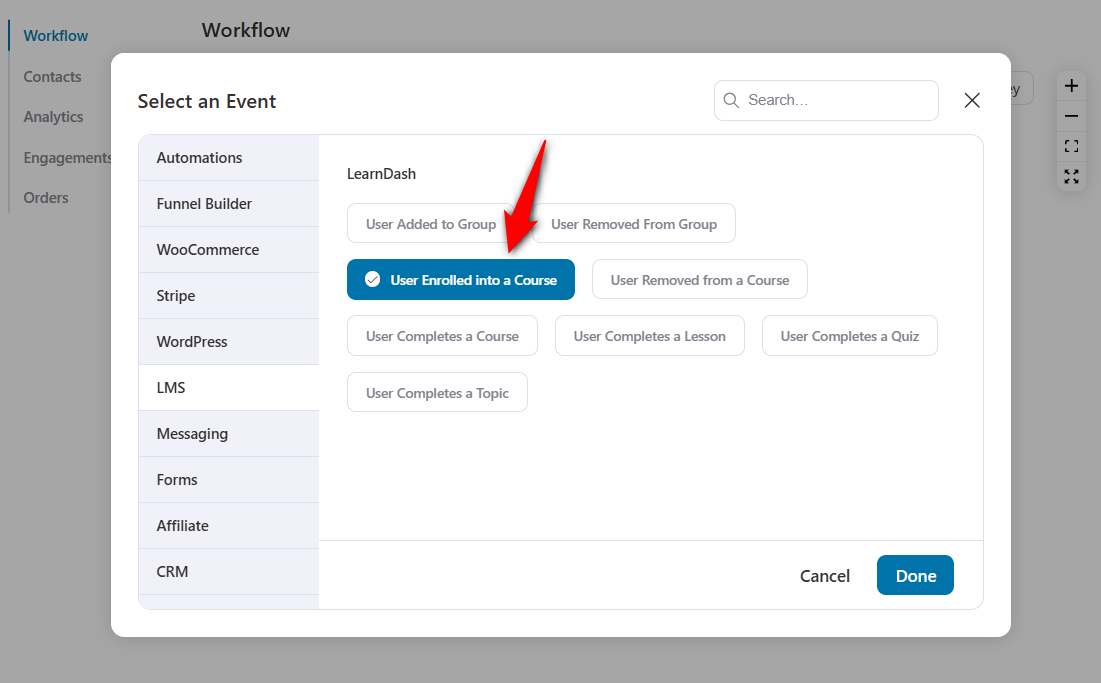
Ensure that you configure these settings by clicking on the User Enrolled into a Course event.
Choose a specific course and add the course to the field.
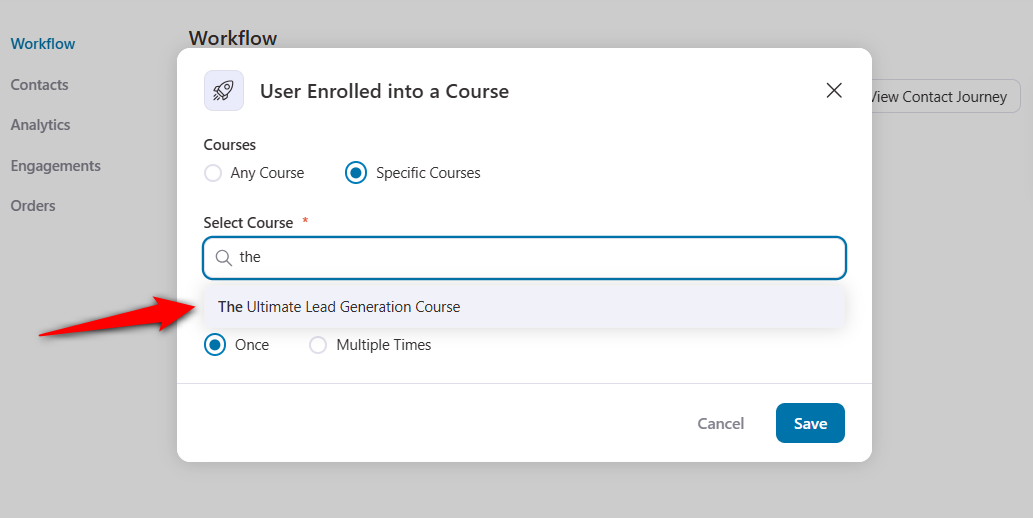
Now, click on the “+” icon and add an Action.
Under CRM, select the action - Add Contact to Automation.
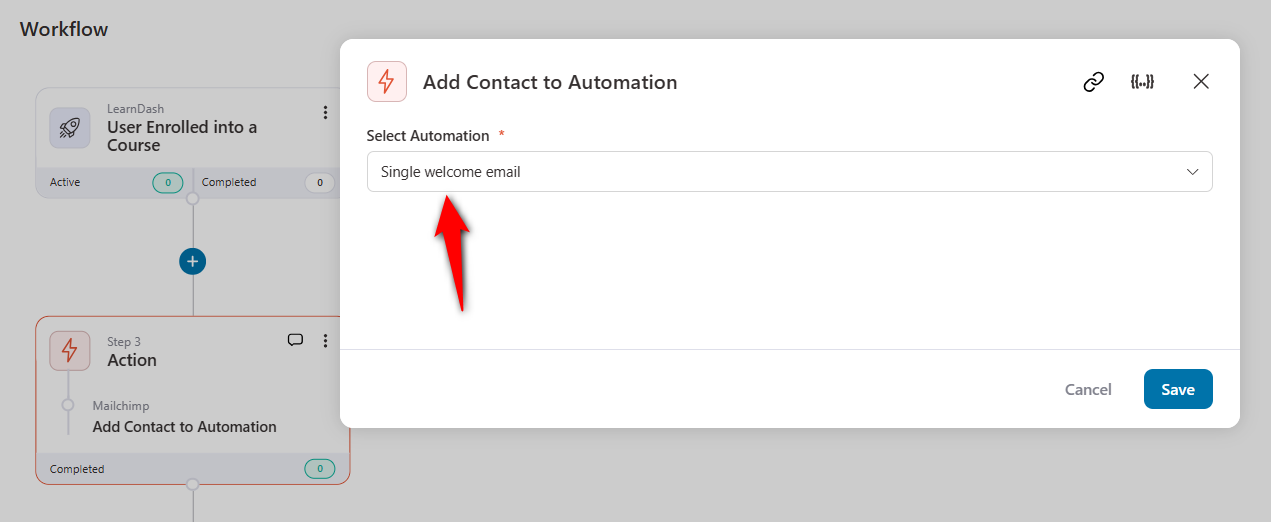
From now on, anyone who enrolls in your Lead Gen course will get a unique welcome email sequence made specifically for that course's students.
You can even give your customers a personalized experience with more subscription-based reminders.
Use Case #7: Reward loyal customers with exclusive VIP offers
Your top customers deserve VIP treatment.
Use FunnelKit Automations segmentation features to identify the most engaged and high-spending customers and send them exclusive perks.
Add conditions of total orders of more than five or revenue spent over $250 in your store.
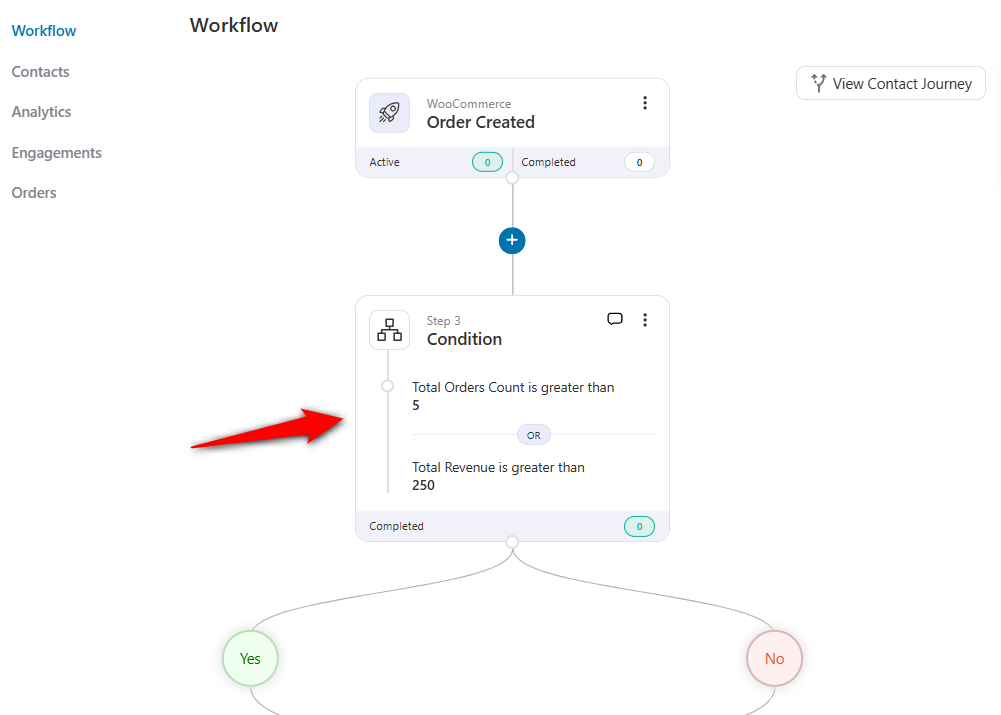
Next, add them to a Mailchimp automation that offers members-only deals to encourage loyalty.
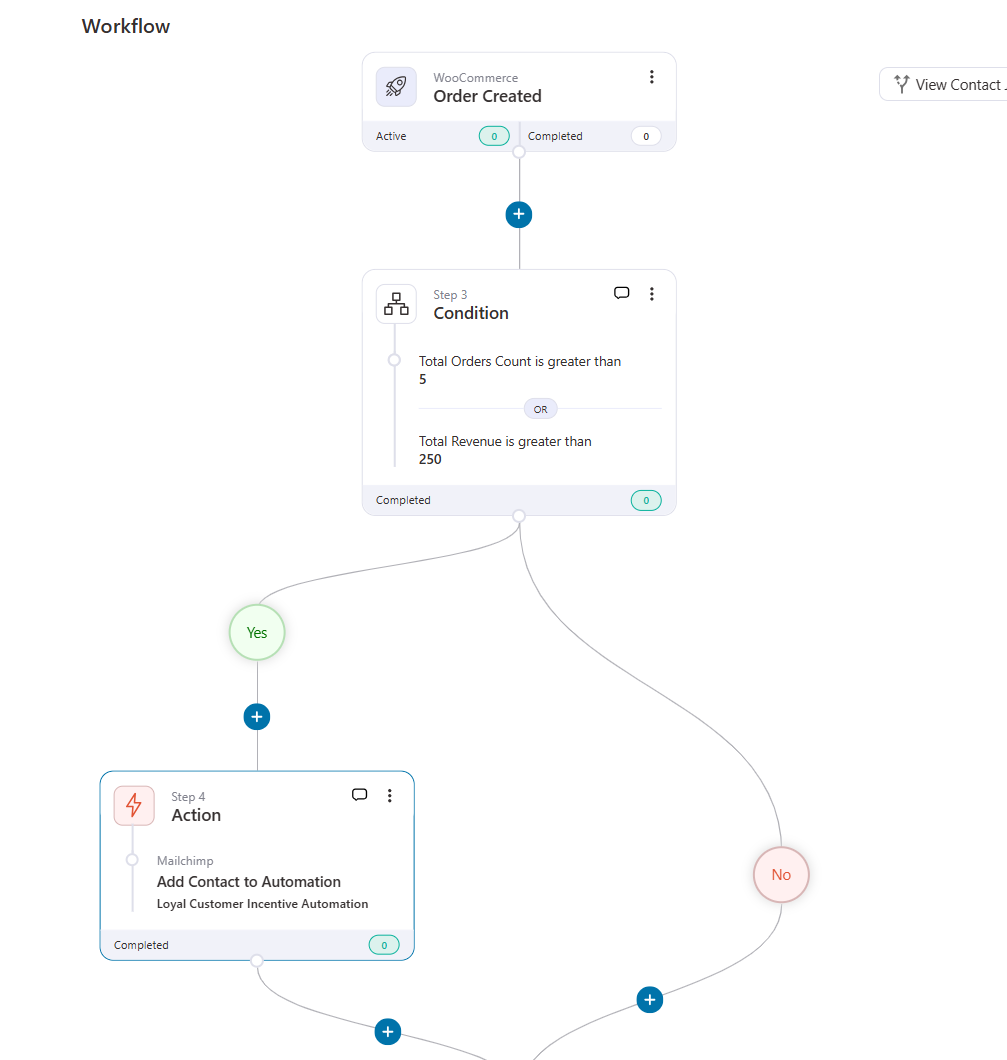
You can also create personalized dynamic coupons with FunnelKit Automations, store them in separate fields in Mailchimp, and use them in email campaigns.
Besides this, you can achieve tons of WooCommerce Mailchimp integration use cases with FunnelKit Automations.
Common WooCommerce Mailchimp Issues and How to Fix Them
Even with a clean setup, the integration can run into quick troubles. Here are the issues store owners most often run into and the fixes that work.
- Sync is stuck or stalls partway through
The initial sync sometimes stalls on larger stores, usually due to low PHP memory or max execution time.
Increase your WordPress memory limit to 256MB, increase max_execution_time to 300 seconds in php.ini, and disable aggressive caching plugins during the sync.
If it still stalls, try disconnecting and reconnecting the store in the plugin settings to restart the sync cleanly.
- Customers not appearing in Mailchimp
Check the subscription status. If a customer did not tick the opt-in checkbox, they are added as a transactional contact, which is not visible in the default audience view.
Go to Audience > All Contacts and filter by “Non-subscribed” to see them. To make them subscribers, you will need explicit opt-in.
- Abandoned cart tracking not firing
The most common causes are a caching plugin stripping the tracking cookie or a conflict with a pop-up/exit-intent plugin that intercepts the abandonment event.
Whitelist Mailchimp’s cookies in your caching settings and temporarily disable pop-up plugins to test.
That's why you should use a proper abandoned cart recovery plugin to recover lost revenues.
- Duplicate contacts after sync
This typically happens when a customer places orders using slightly different email addresses (for example, with or without a +tag, or with different capitalization).
Mailchimp treats these as separate contacts. Use Mailchimp’s “Find duplicates” tool under Audience > Manage Contacts to merge them.
- The store keeps disconnecting
Repeated disconnections usually trace back to a security plugin blocking outbound API calls or to SSL certificate issues on your site.
Whitelist *.api.mailchimp.com in your firewall, confirm your SSL is valid, and check the plugin logs under Mailchimp > Logs for specific error codes.
- Products are not syncing or showing the wrong data
Force a product resync from the plugin settings. If specific products still refuse to sync, check that they have a valid price, image, and are marked as “published” rather than draft or private.
Variable products sometimes need a stock status set on at least one variation for Mailchimp to pick them up.
7 Best Practices to Get More Revenue From Your WooCommerce Mailchimp Integration
Getting the integration running is just the start. Here's how to get the most out of it once everything is connected.
1. Clean your contact list regularly
Archive or remove subscribers who have not opened an email in six months. Mailchimp bills by contact count, so inactive subscribers waste budget and drag down deliverability.
2. Launch a welcome series for new subscribers
Welcome emails have the highest open rates, as compared to other email types. Trigger the first email within minutes of signup and follow up two to three days later with social proof or a starter offer.
3. Use segmentation instead of mass blasts
Send different campaigns to first-time buyers, repeat customers, and high-value customers. Segmented campaigns consistently outperform broad sends on open rate, click rate, and revenue per email.
4. A/B test subject lines on your top-traffic campaigns
Test one variable at a time, send to at least 1,000 recipients per variant, and apply the winner going forward. A/B testing can lift email ROI by roughly 28%, according to Litmus research.
5. Use product recommendation blocks in broadcasts
Mailchimp's product blocks pull images and prices directly from WooCommerce. Featuring related products in newsletters lifts click-through rates without any extra design work.
6. Track revenue per campaign to identify winners
Mailchimp's e-commerce reports show revenue generated per campaign. Review this monthly and double down on the subject lines, offers, and segments that drive the most sales.
7. Pick single or double opt-in based on your market
Single opt-in grows your list faster and shows roughly 80 percent higher ROI, according to Litmus, but double opt-in is often required in the EU under GDPR. Match your choice to the region you sell into.
Frequently Asked Questions (FAQs)
The WooCommerce Mailchimp integration connects your WooCommerce store to your Mailchimp account, syncing customer data, order history, and product information in real time. Once connected, Mailchimp can use that data to power targeted email campaigns, marketing automations, and audience segmentation, all without you having to manually import or export anything.
Here's why you should integrate Mailchimp with WooCommerce:
- Automated cart recovery by capturing abandoned carts and triggers recovery emails without manual work.
- Customer segmentation from real store data, such as products purchased, order value, order frequency, and signup source. Targeted segments drive higher open rates and more revenue per email than generic broadcasts.
- Trigger welcome series for new subscribers, thank-you emails after orders, and re-engagement campaigns for lapsed customers.
- Pull product images, prices, and descriptions directly from WooCommerce into Mailchimp emails. This lets you send cross-sell, upsell, and product-recommendation campaigns using your live catalog.
- Mailchimp tracks which emails drive orders in your store and reports revenue per campaign. See exactly which subject lines, segments, and automations generate the most sales.
Yes. Mailchimp offers an official, free plugin called Mailchimp for WooCommerce that connects your store directly to your Mailchimp account. However, you can use FunnelKit Automations for seamless integration. It automatically syncs customer data, order history, product catalog, and promo codes, and supports key e-commerce automations, including abandoned cart emails, product recommendations, and SMS campaigns.
You can sync customer data, such as email addresses, names, purchase history, order details, and abandoned cart data, from WooCommerce to your Mailchimp account.
Yes, you can send automated WooCommerce abandoned cart emails using Mailchimp. Make sure you’ve set up WooCommerce Mailchimp integration with FunnelKit Automations. Just enable the cart tracking feature, create an abandoned cart automation in FunnelKit Automations, and add the triggered contacts to Mailchimp automation.
Mailchimp doesn’t natively support WooCommerce Subscriptions, but you can use a good connector plugin like FunnelKit Automations to send new subscription emails, renewal reminders, trial period ends, card expiry, renewal payment failed, subscription status notifications, and more.
Mailchimp offers a free plan but has limitations on the number of contacts you can store (up to 500), the number of emails you can send, and access to advanced automation options.
Two types of Mailchimp integrations include:
First-party integrations are built and maintained by Mailchimp itself. First-party integrations usually offer the deepest sync (products, orders, customers, abandoned carts), are free to install, and get updated alongside Mailchimp’s core platform. This is the path most WooCommerce stores take.
Third-party integrations are built by external developers, platforms, or plugin companies. These include tools such as YITH WooCommerce Mailchimp, Zapier, and custom integrations via the Mailchimp API. These tools typically offer more flexibility or a focus on a specific use case (such as custom opt-in rules or multi-app workflows), but they may sync less data by default and rely on a separate company for support.
Unlock the Full Potential of WooCommerce Mailchimp Integration Today!
Seamlessly integrating Mailchimp with WooCommerce isn’t just about syncing data. It’s about creating powerful automations that drive conversions.
By leveraging customer insights, targeted campaigns, and behavioral triggers, you can personalize every interaction and turn one-time buyers into loyal customers.
But why stop there? FunnelKit Automations takes it further by offering greater flexibility, advanced segmentation, and deep automated workflows tailored to WooCommerce.
Whether it’s cart recovery, post-purchase upsells, or customer winback sequences, you gain unparalleled control over your marketing strategy in one platform.
The best brands don’t follow trends; they lead the competition with data-driven decisions.
Get FunnelKit Automations and watch your WooCommerce store thrive with high-impact workflows.
Editorial Team
July 7, 2026You’ve built your WooCommerce store, polished your product pages, and invested in marketing, but sales aren’t coming. Visitors browse, some add items to their cart, and most vanish before completing...
Editorial Team
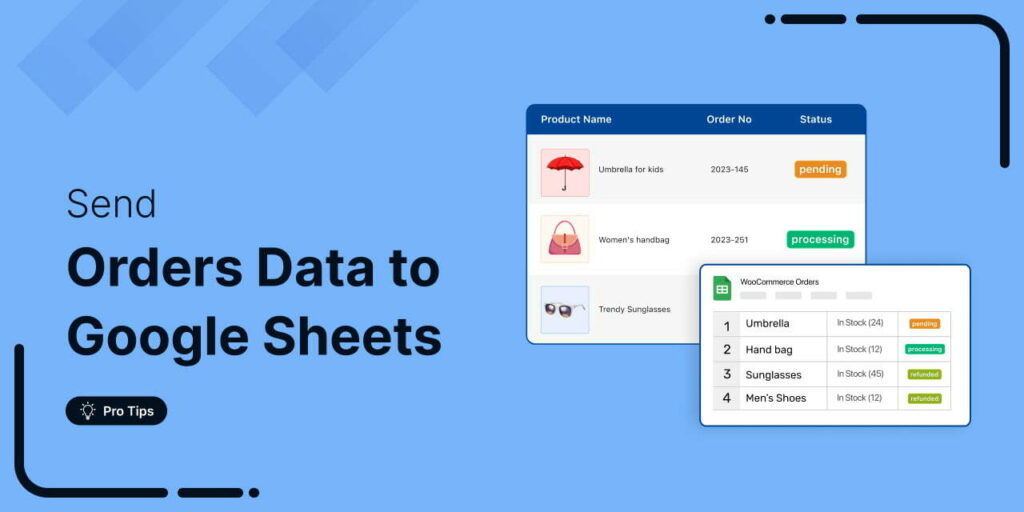
June 25, 2026Sending WooCommerce orders to Google Sheets automatically copies your store's order data into a live spreadsheet. Every time a customer checks out, the order details are added to a new...
Editorial Team
June 24, 2026Discover the best WooCommerce plugins to recover abandoned carts and boost your sales. Losing sales to abandoned carts? It’s more common than you realize. Around 70% of shoppers leave without...


