
WordPress auto login lets registered users access your site by clicking a single link, no username, no password required.
And yet, most sites still make people stop and manually enter their credentials every single time.
Be it accessing a course, viewing premium content, renewing a subscription, downloading a digital product, or simply landing on their account page after clicking an email, there's unnecessary friction at every step.
That friction costs you. The more steps between a user and their goal, the more people drop off.
What if instead, a single click from their email logged them straight in and dropped them exactly where they needed to be?
That's exactly what FunnelKit Automations makes possible with auto login as a built-in complement to link triggers.
Dive in to learn more about this auto login feature.
Table of Contents
- 1 Why Offer Auto Login?
- 2 5 Important Use Cases of Auto Login
- 3 How to Set Up WordPress Auto Login & Send It via Email?
- 3.1 Step #1: Create a form and embed it on a page
- 3.2 Step #2: Create a link trigger with auto login enabled
- 3.3 Step #3: Build the automation with the event "form submitted"
- 3.4 Step #4: Add conditional action 'If WordPress user then enroll in the course'
- 3.5 Step #5: Add conditional action 'If not a WP user, then add as WP user'
- 4 More Questions About WordPress Auto Login
- 5 What IS WordPress Auto Login?
- 6 Is WordPress auto login secure?
- 7 What happens when an auto-login link expires?
- 8 Can I use WordPress auto login without a plugin?
- 9 Does the user need to already exist in WordPress for auto login to work?
- 10 What happens if an auto login link is clicked more than once?
- 11 All Set to Make the Login Process Friction-Free?
Why Offer Auto Login?
You can limit the number of hours, days, or months for which the auto-login link remains active. After it expires, people will have to manually log in for security reasons. But for as long as it's active, it's a completely frictionless experience.
To generate an auto-login link, you must register them as users if they aren't already, and then they'll be able to use the auto-login link successfully.
Let's look at some of the use cases of this feature that we think you'll love.
5 Important Use Cases of Auto Login
Now, let’s discuss some situations where auto login would come in handy and improve the customer experience.
#1: Take up a Free Course
Are you offering a LearnDash course? Then, auto-login is the perfect way to make students view the contents without signing in.
So after someone fills out a form, you can check if they're a WordPress user already. If they are, enroll them in the course through automation and send them the auto login details.
Can you imagine how many more people would actually finish your courses just because you've eliminated friction through this smart process?
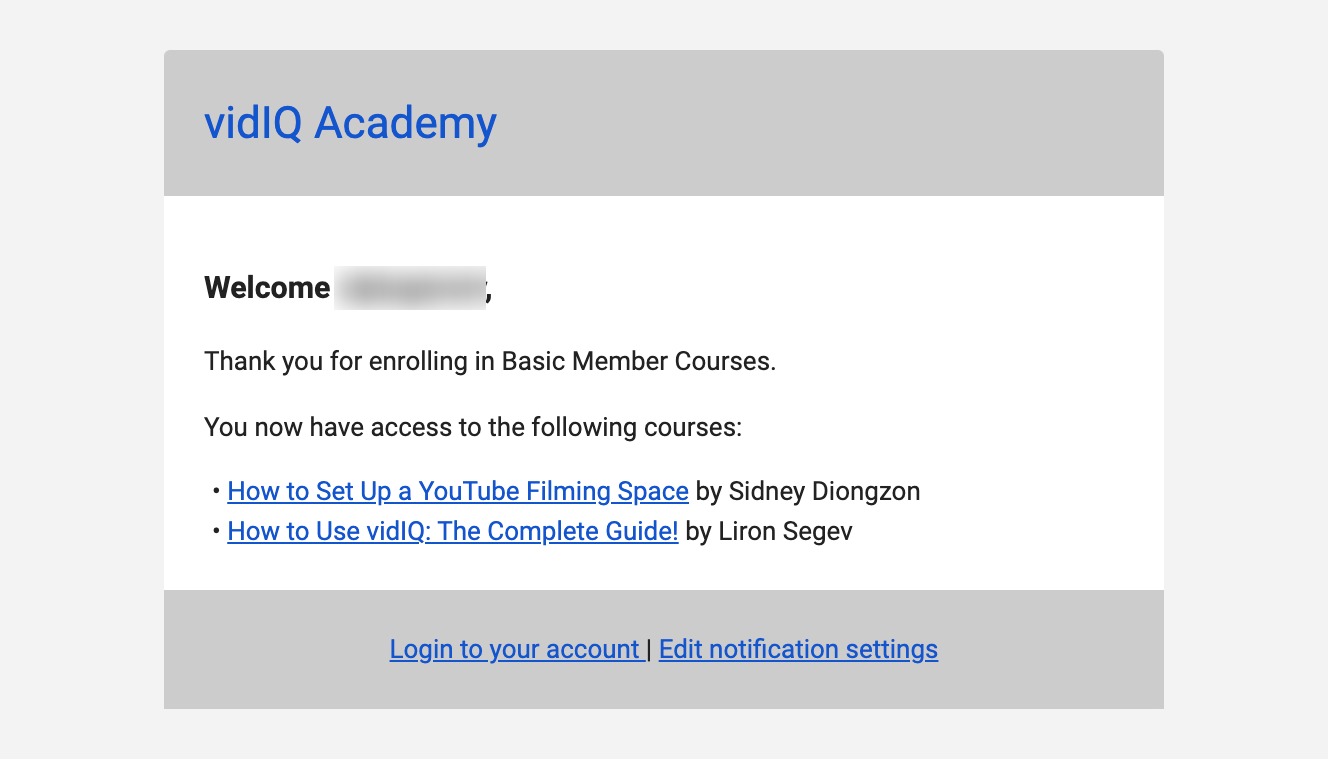
This email from VidIQ sends its enrolled students the links to access their Basic Member Course. The recipient can simply click on the link and start taking up the course:
#2: To Renew a Subscription
Cards expire, and payments fail all the time. As a company that sells subscription-based products, you've got to have a process in place to send out timely emails notifying subscribers about payment failures.
You can go a step further with these emails and make the process of logging in to renew the subscription automatic. It will make it easier for people to complete their payments without any hassles.
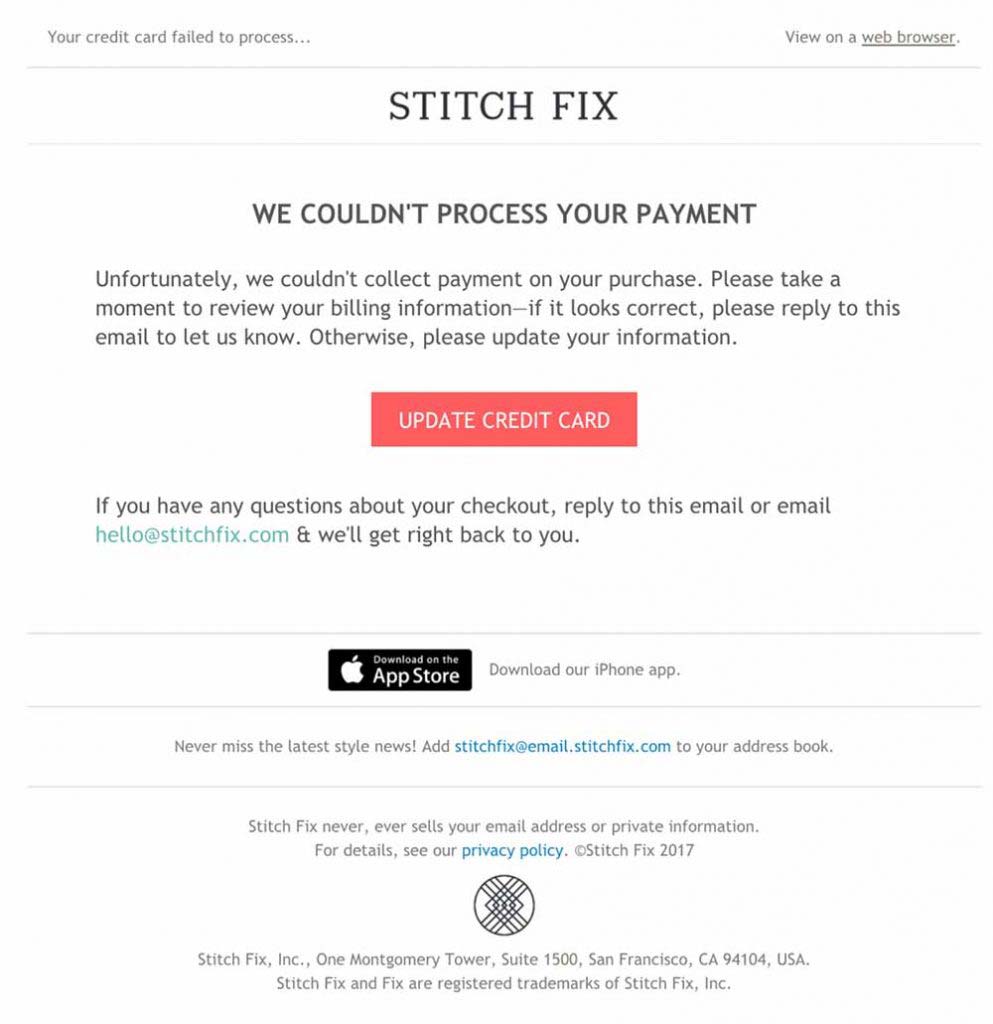
This Dunning email from Stitch Fix is a perfect example. Once the user clicks the “Update Credit Card” button, they can update their payment details without logging in.
Convenient, isn’t it?
#3: To Offer Access to Premium Content
If you own a membership site, you must know how important it is for your members to keep coming back to consume content. They will only renew their membership if they are regularly visiting your site and getting value out of your content.
Pro marketers regularly update their membership site with content like:
- New videos or tutorials
- Interactive activities/quizzes
- Q&A sessions
- Live events / Webinar replays
What if every time you sent an email to have them view your latest release, the members didn't have to log in with their username and password?
When a user clicks on the link provided in the email, they can view the premium content.
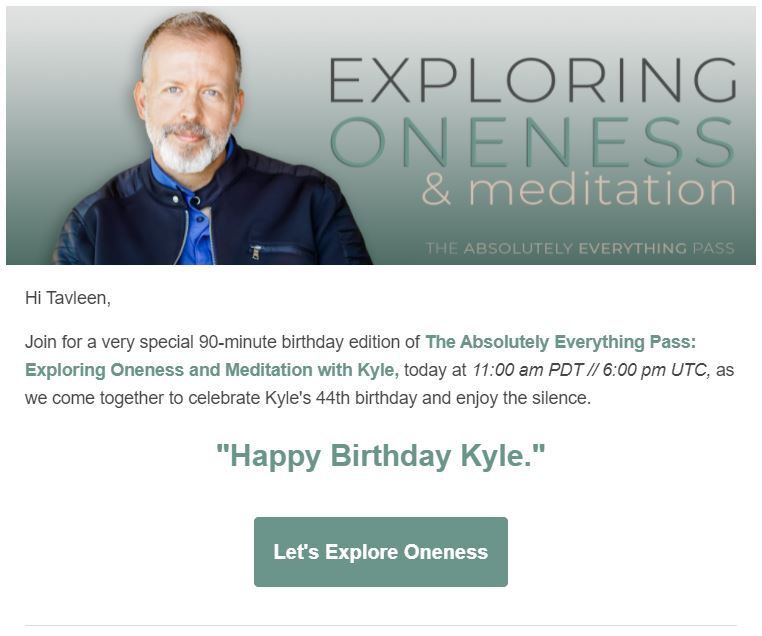
We love this example from Kyle Cease on the same. He introduces the new webinar replay and urges you to explore it with him. And when you click on the button, you're inside the membership site ready to view the content!
#4: Auto Login After Purchase
You've just converted a new customer. They've paid, they're excited, and then they hit a login wall.
If your WooCommerce store sells digital products, course access, or membership plans, the post-purchase moment is one of the highest-intent moments in the entire customer journey.
Making someone create and remember a password right after buying is unnecessary friction. It drives up support tickets and kills first-session engagement before it starts.
Auto login fixes this cleanly. Your post-purchase confirmation email includes a direct link that logs the customer in and drops them straight onto the download page, course dashboard, or member area. No password prompt.
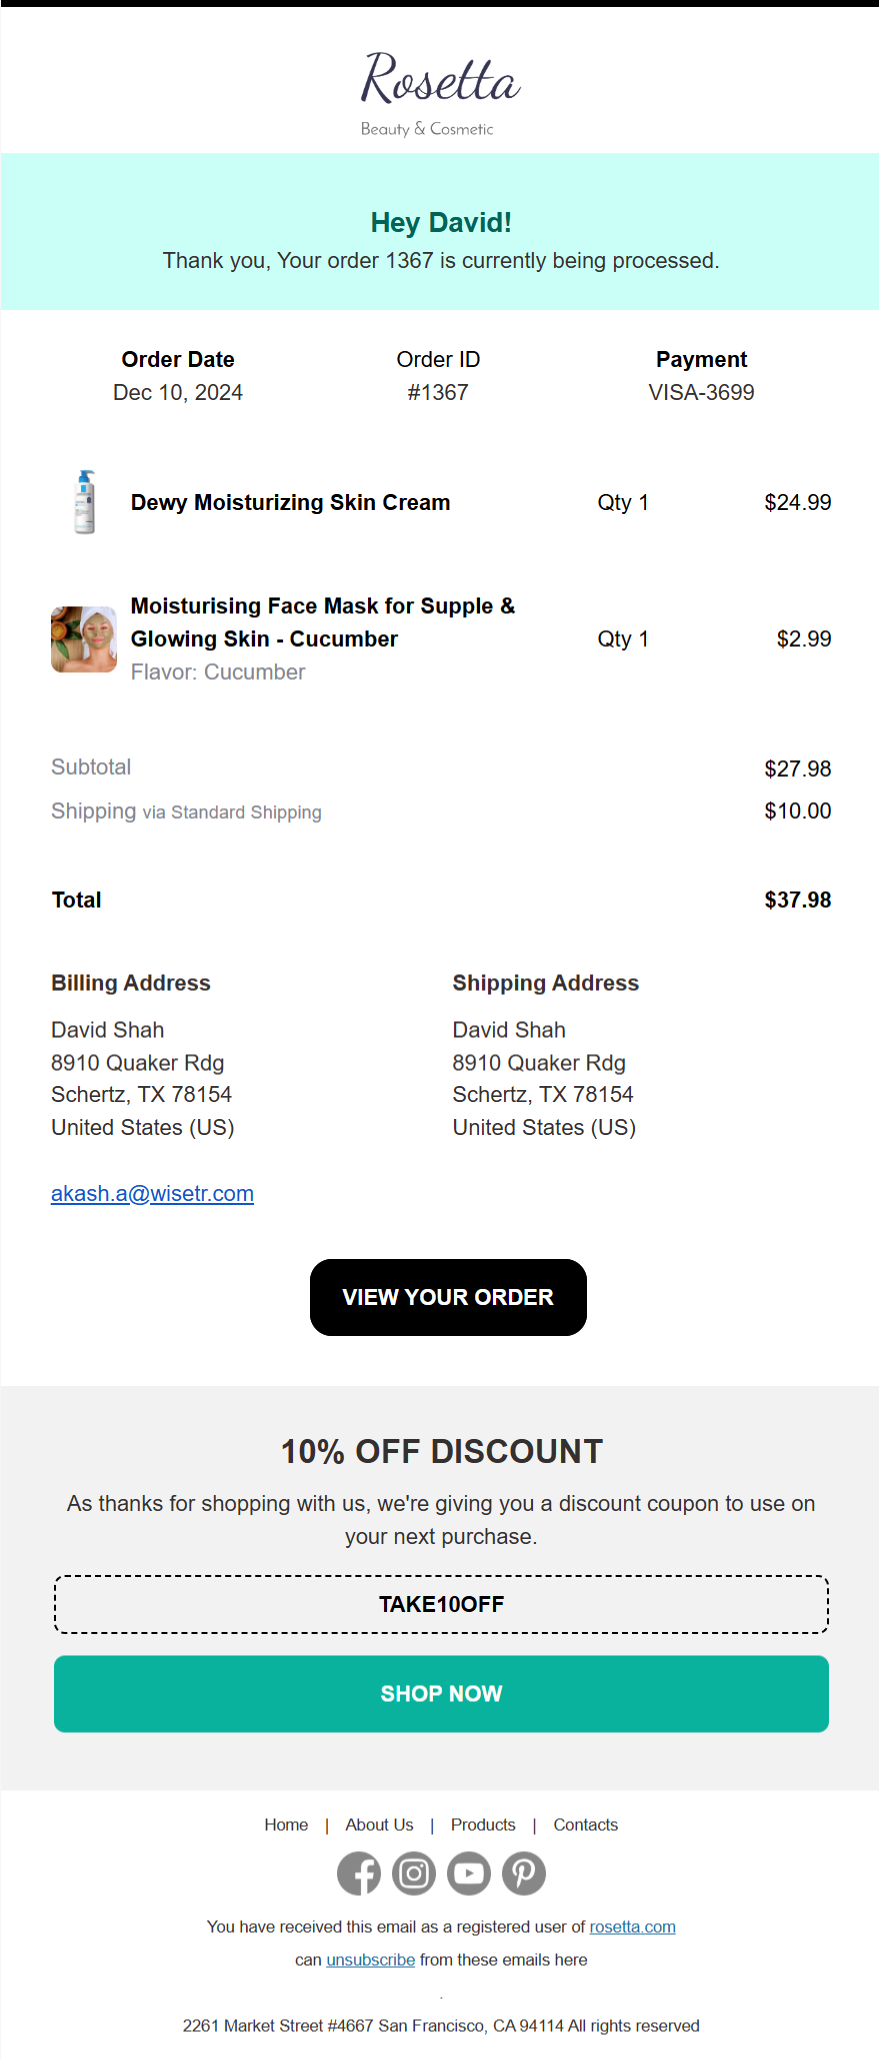
The example above from a digital product store shows exactly this. The customer gets their receipt and a single "Access Your Purchase" button. One click, they're in.
The payoff is straightforward: higher activation rates, fewer "I can't log in" emails in your inbox, and a first impression that actually matches the quality of what they just bought.
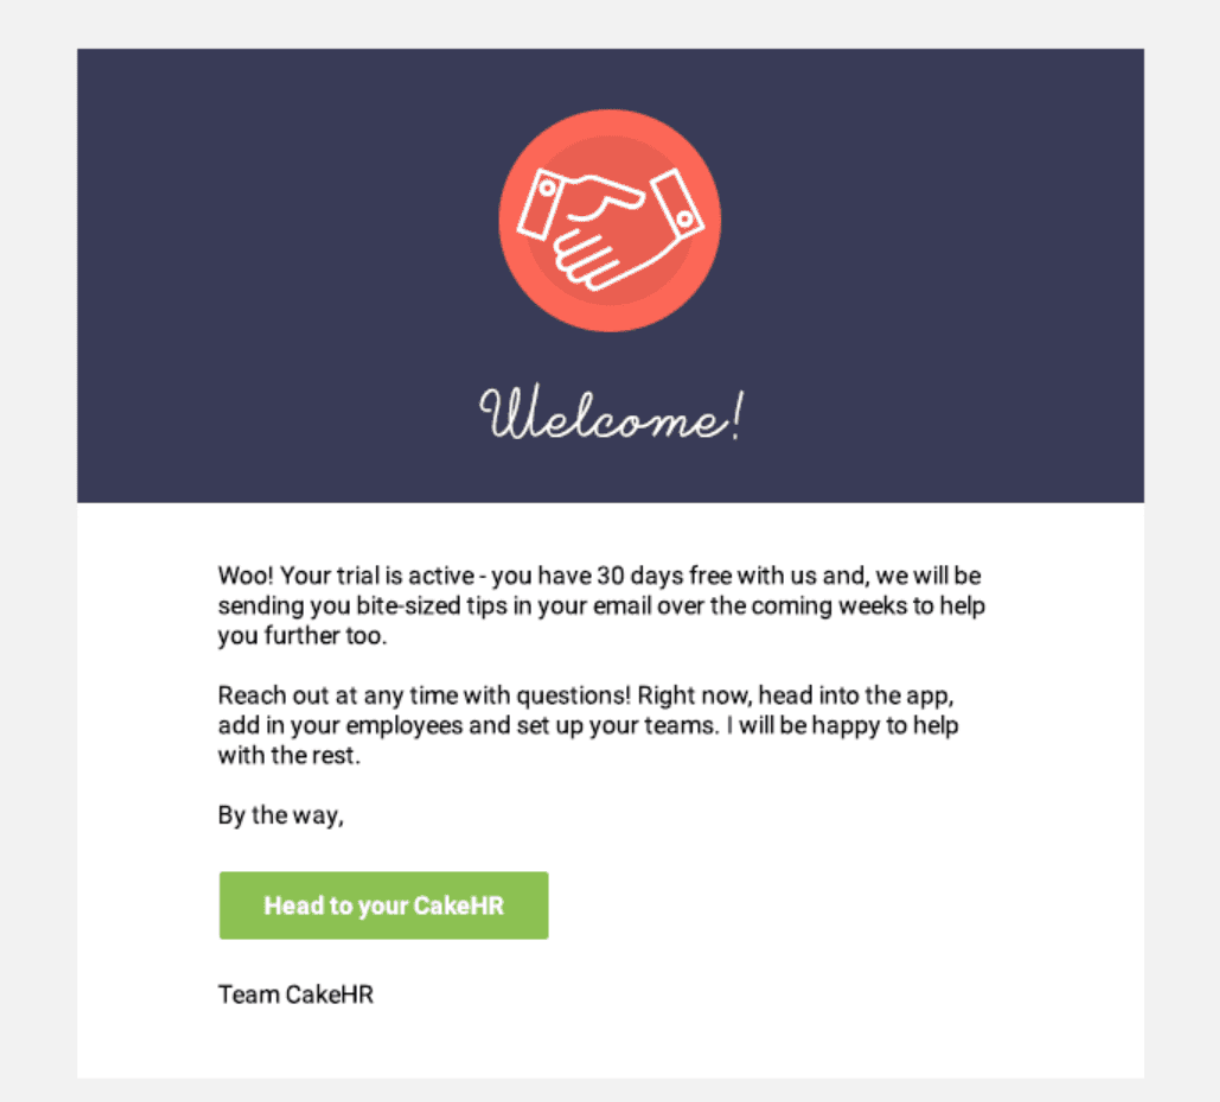
#5: Onboarding Welcome Email for New Members
The moment someone joins your membership site or creates an account, you have their full attention. Welcome emails get opened more than almost anything else in the entire customer lifecycle. Most sites waste that with a generic "thanks for signing up, here's your login link."
With auto login in your welcome email, you skip "go log in and find your way around" entirely. The email becomes the first step of actual onboarding, not a gateway to it.
This cuts down what's usually called "time to first value," the gap between signing up and actually experiencing what they paid for. That gap matters more than most people realize. Users who hit value quickly are significantly more likely to stick around and renew.
The welcome email is your best shot at making that happen quickly, and auto-login is what lets you do it without asking them to jump through hoops first.
These are just some of the ways auto login can remove friction from your user experience. The common thread across all of them is simple: the fewer steps between your user and their goal, the more likely they are to take action, stay engaged, and come back. Auto login is one of the most straightforward ways to make that happen.
How to Set Up WordPress Auto Login & Send It via Email?
To show you how auto-login works in practice, we'll walk through the process of automatically enrolling users into a course and sending them an auto-login link via email.
Note: We'll use course enrollment as our example here, but the same workflow applies to any of the use cases covered above.
For this process, we will use FunnelKit Automations, a WordPress Marketing Automation plugin that allows you to send custom broadcasts and automated campaigns.
We'll use it to create a link trigger with auto-login enabled.
Here, we'll assume you've already created a LearnDash course and want to auto-enroll users in it and send them the auto-login link!
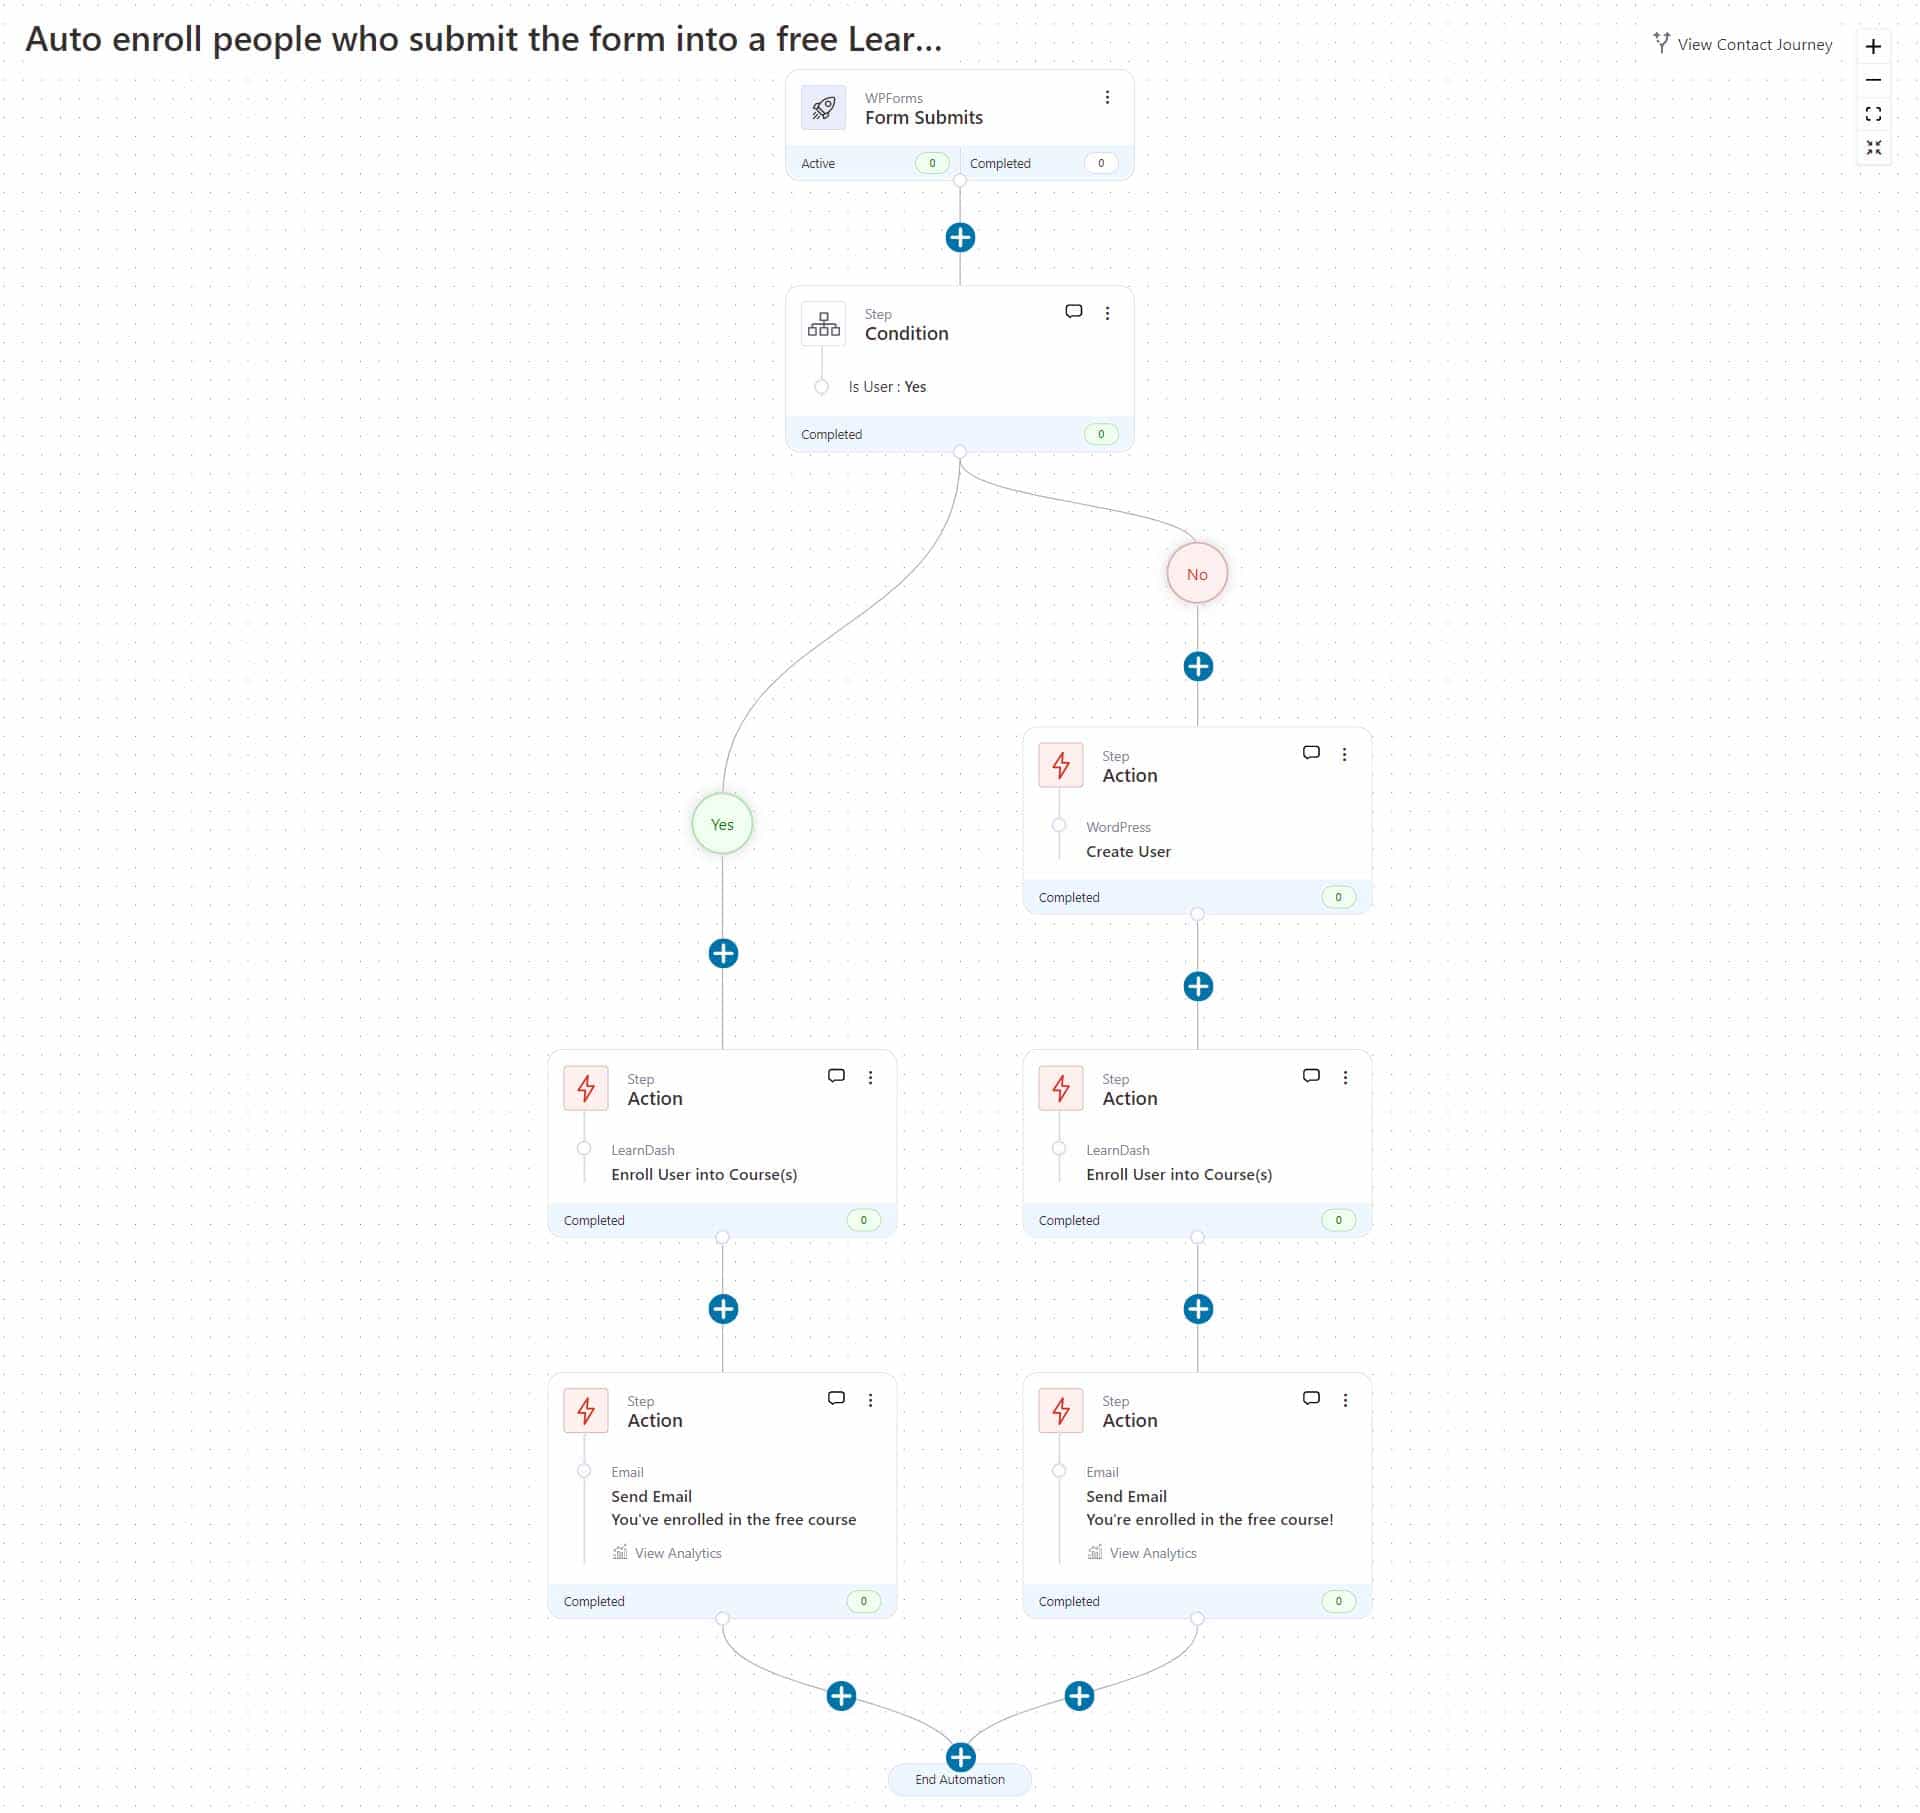
Take a look at what we'll be building:
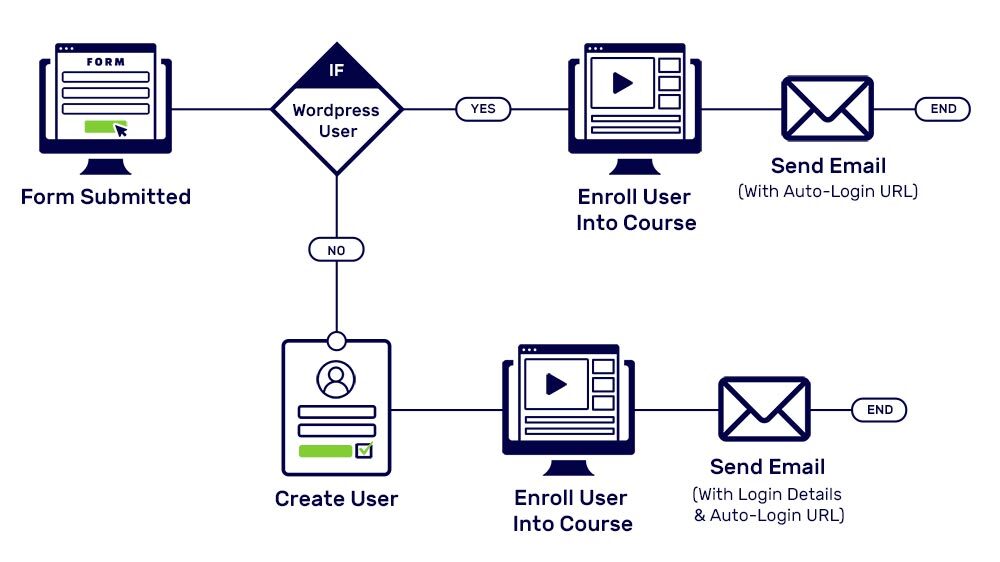
So let's get building.
Step #1: Create a form and embed it on a page
This automation begins with the form being submitted on your site. We'll enroll the user in our course after they submit the form and share their details.
To build a form, you can use any of your favorite form builders that FunnelKit Automations is also compatible with.
It integrates well with WPForms, Elementor Forms, Ninja Forms, Gravity Forms, Opt-in forms built with FunnelKit (formerly WooFunnels), and more.
For this post, we are using WPForms to build a form with only two fields: name and email.
After creating the form, simply embed it on a new page, add the page title, and publish.
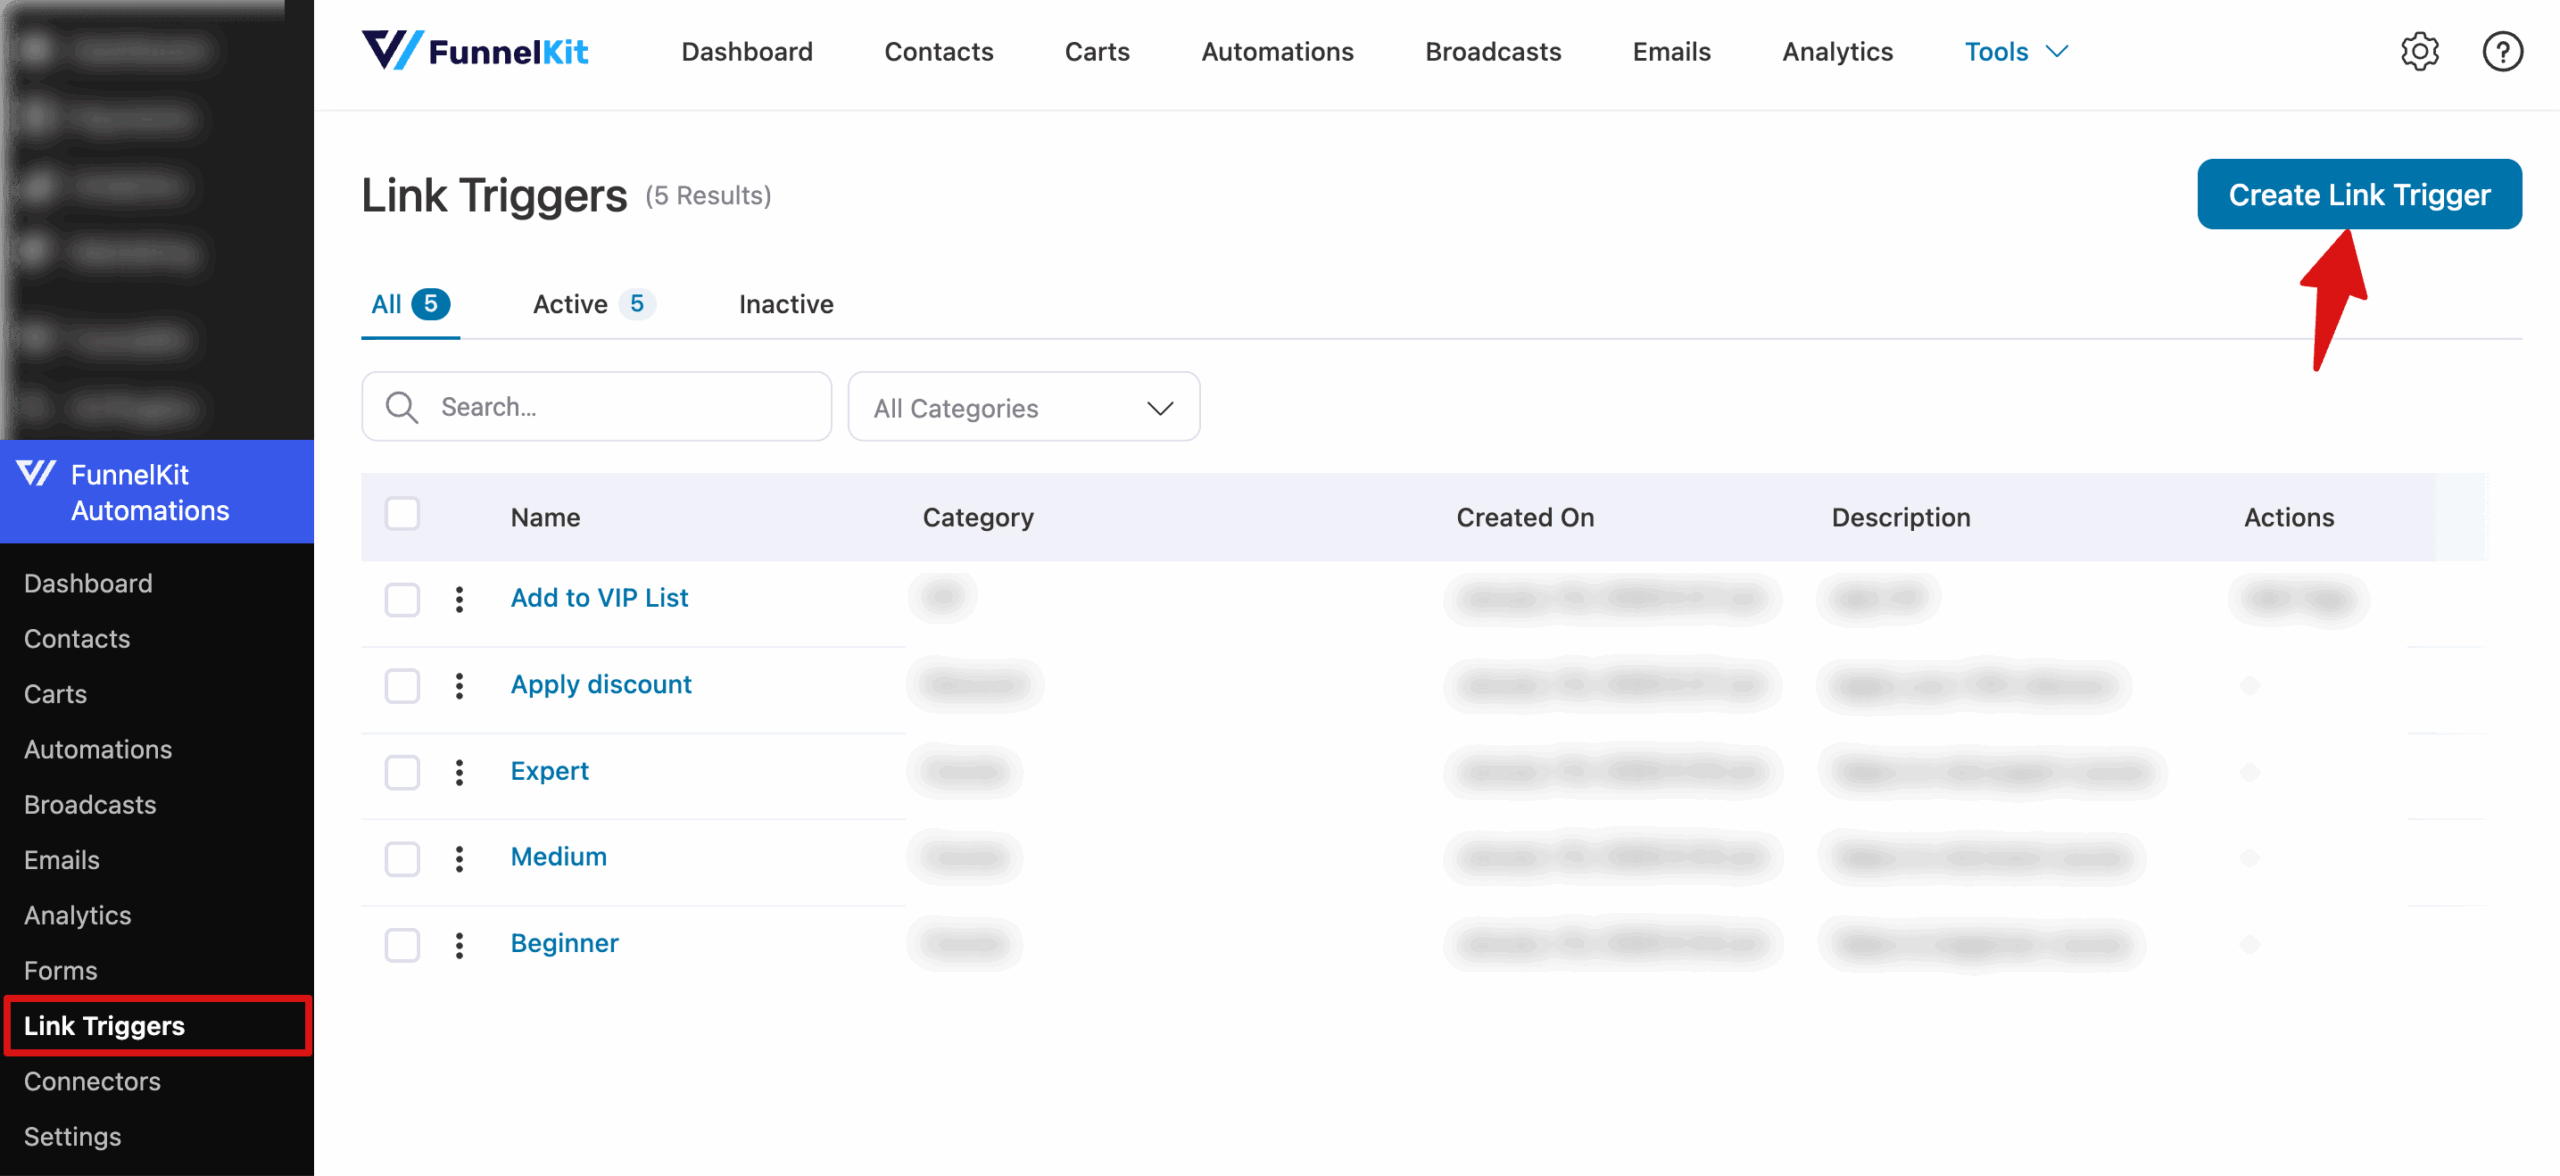
Step #2: Create a link trigger with auto login enabled
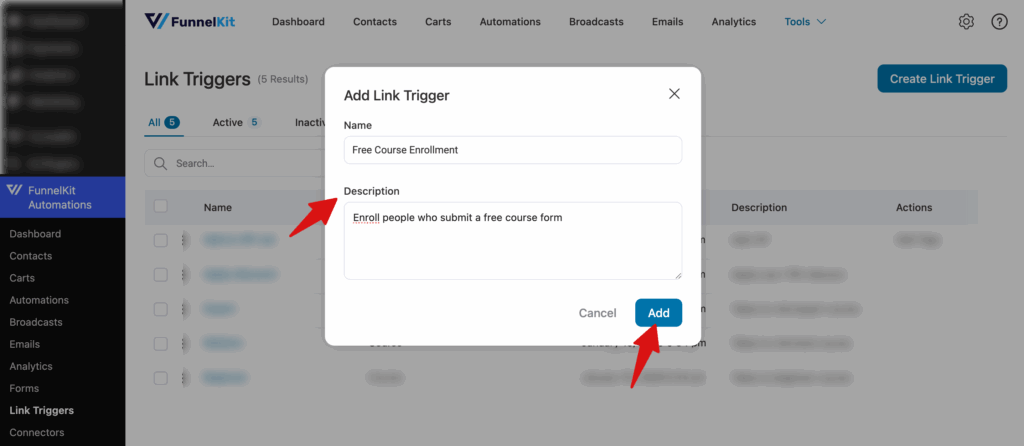
Creating a link trigger will give us a URL that we can use in our email. Click on the 'Create Link Trigger' button on the side.
Next, simply name the link trigger, add a description, and click "Add" to create it.
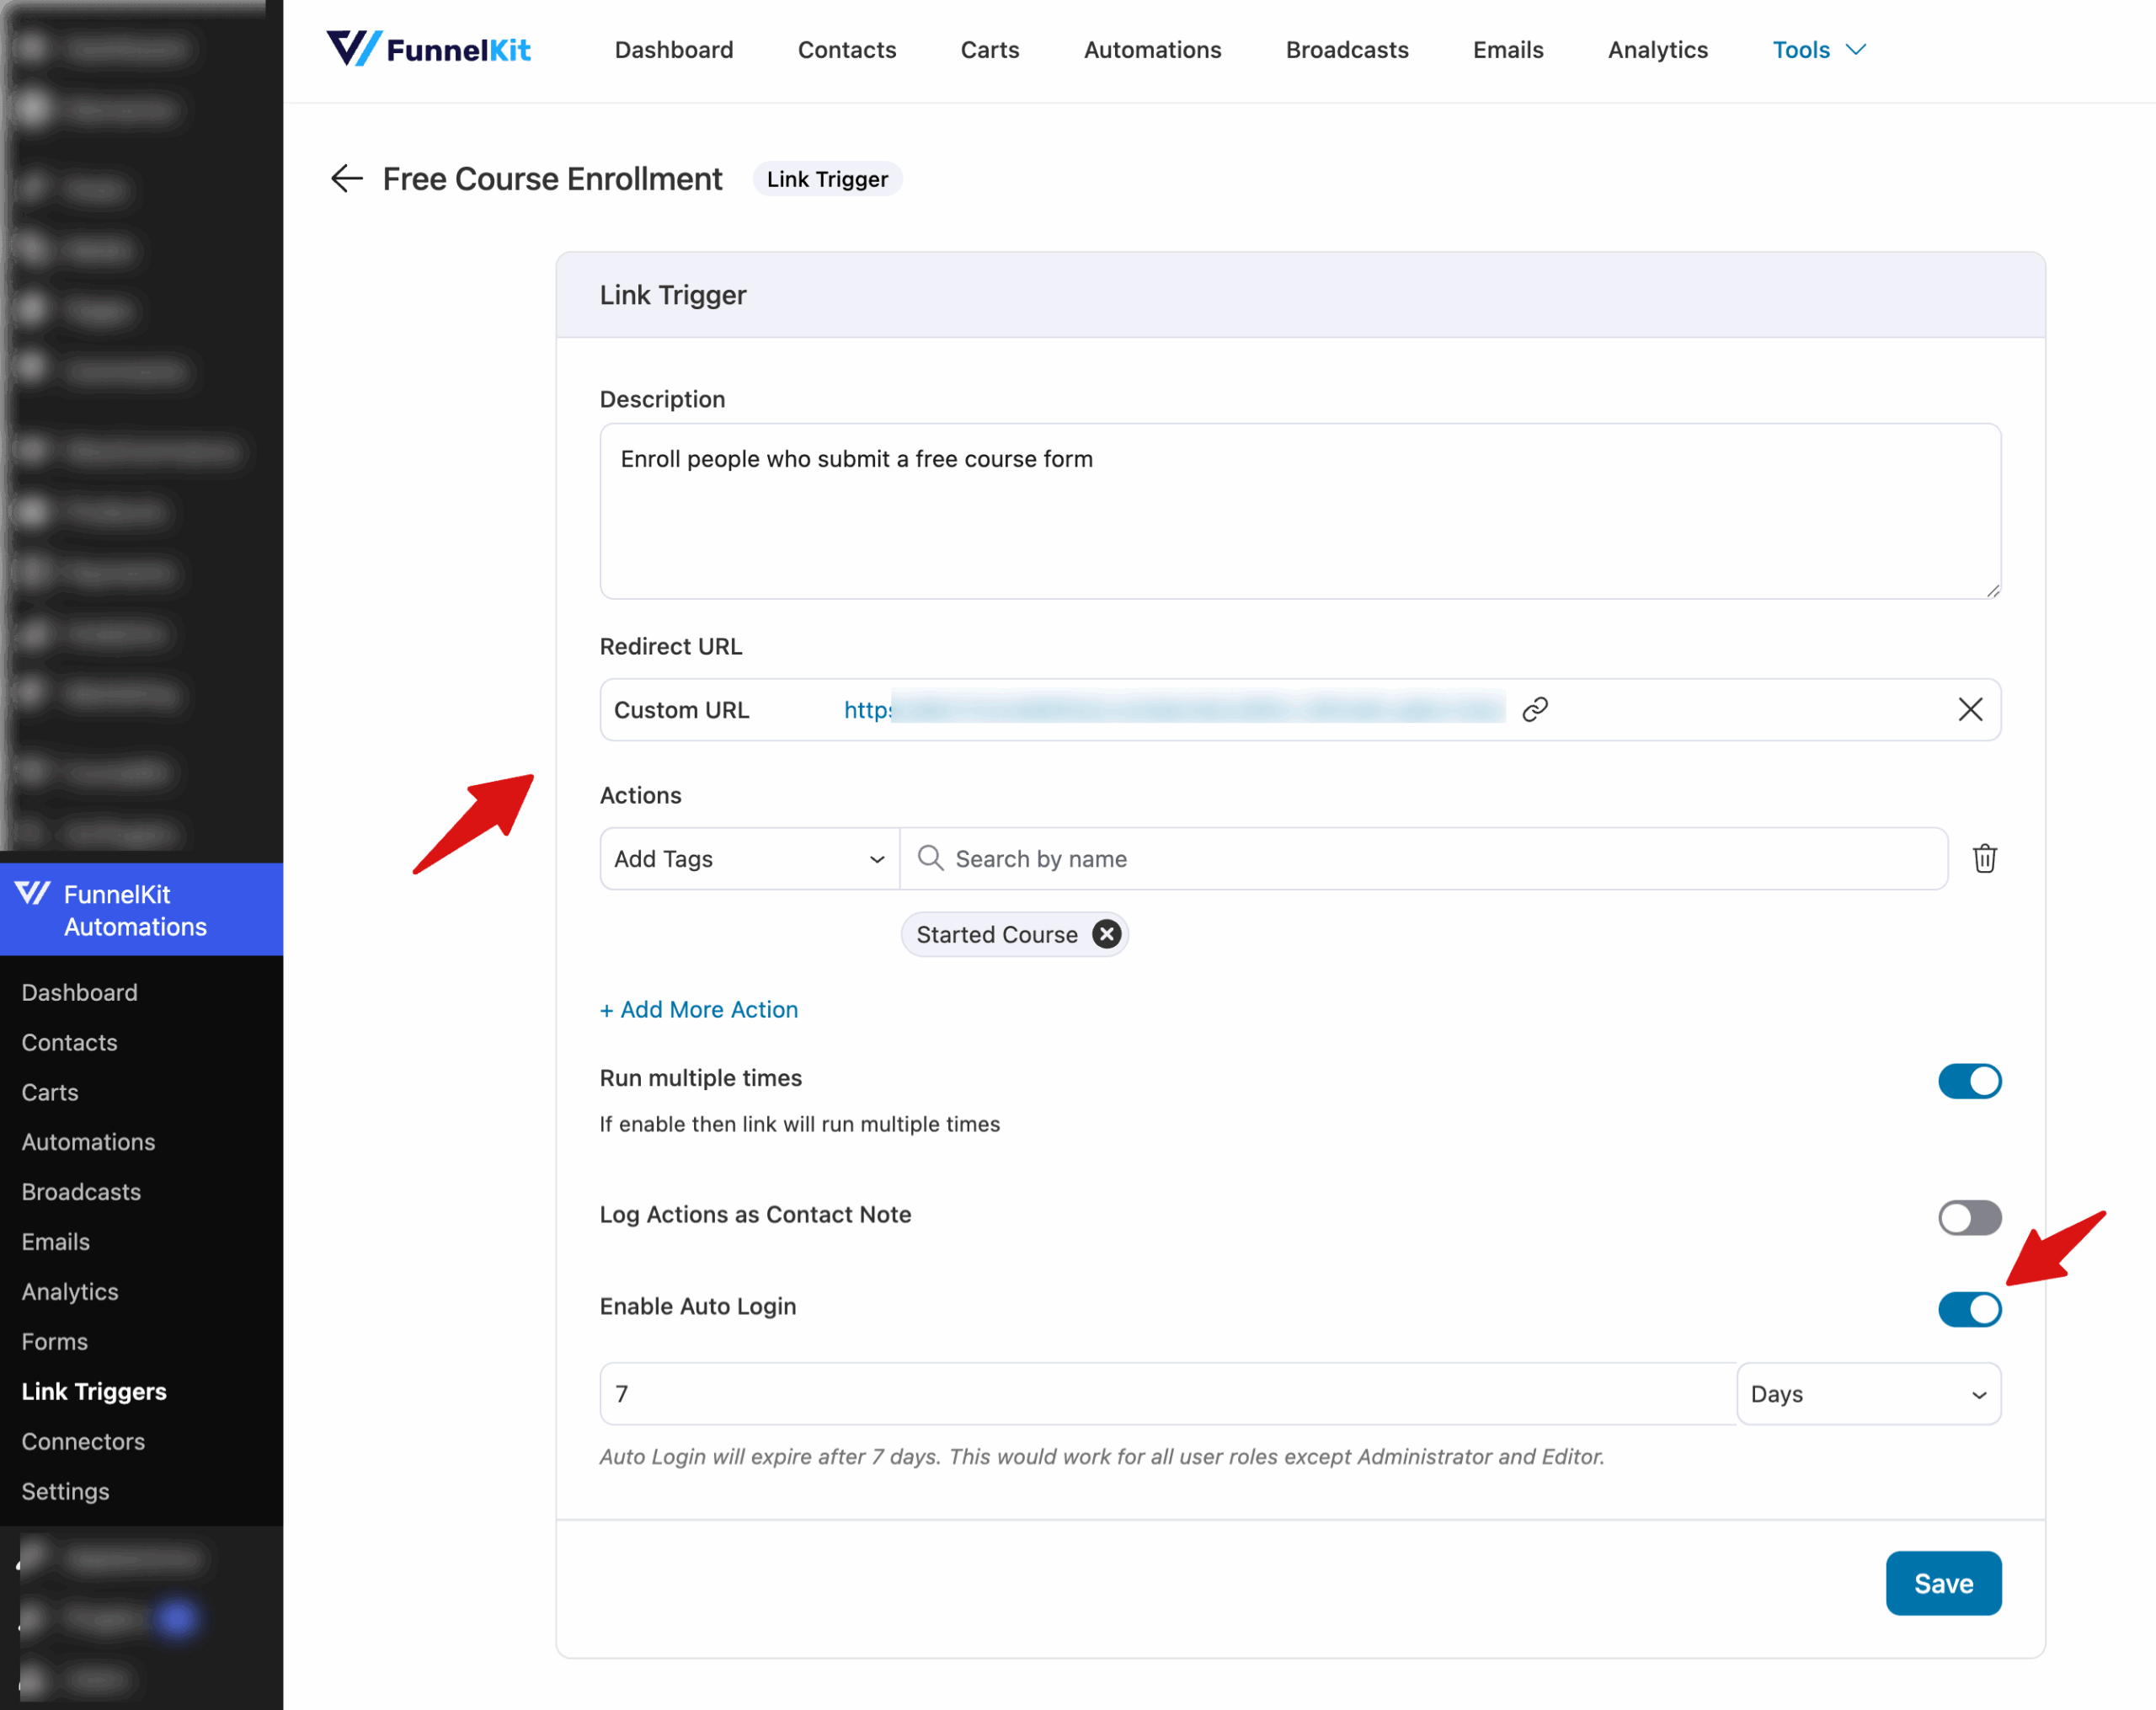
- Re-direct URL: Select the URL of the LearnDash course you've created and paste it here. This is where you'd like them to go after they click on the link in your email.
- Actions: You can choose one or more actions from adding a tag, adding to a list, updating a custom field, removing from automation, and more. Adding action is optional.
- Log actions as contact notes: This will let you check the action(s) performed on any particular contact.
Finally, make sure to hit Save.
Link Trigger Overview
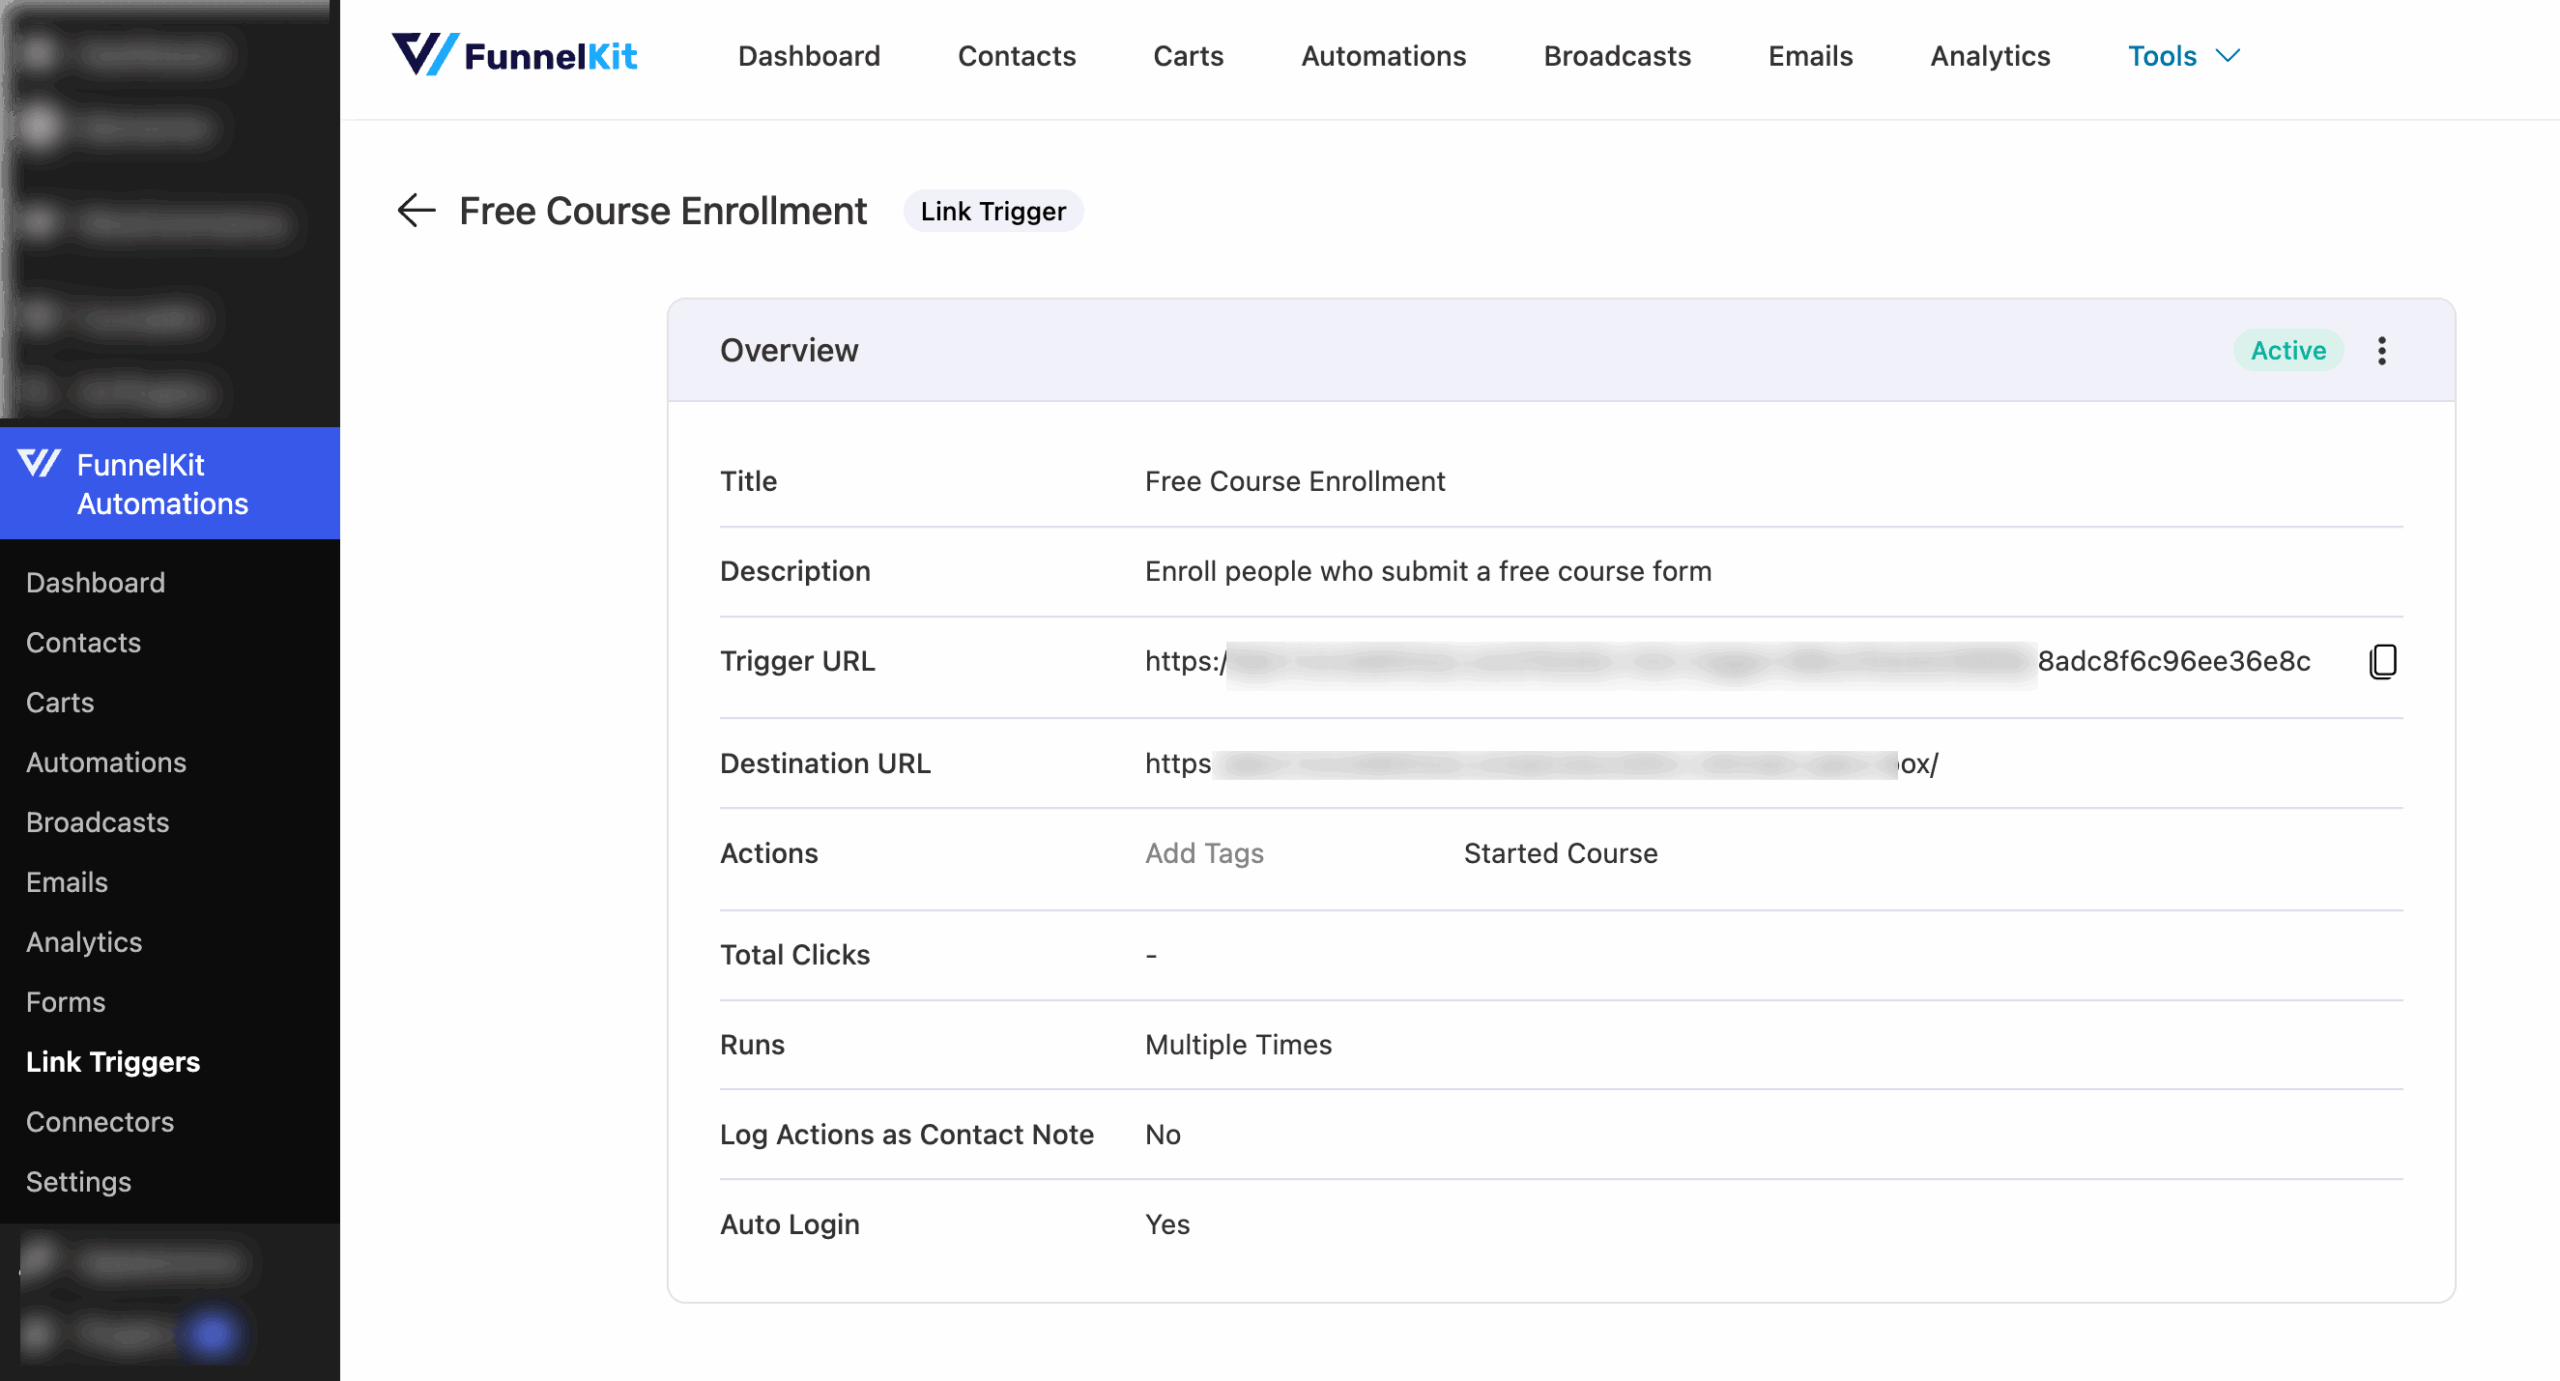
Here are options you'll see:
- Trigger URL: The URL that needs to go in the email. When a user clicks on it
- Destination URL: The URL where people should be directed when they click on the trigger URL.
- Total Clicks: Here, you can track the number of clicks your link trigger got.
Step #3: Build the automation with the event "form submitted"
The next step for us is to add a new automation. For that, click on the add new button, and you'll see the option to build a new automation.
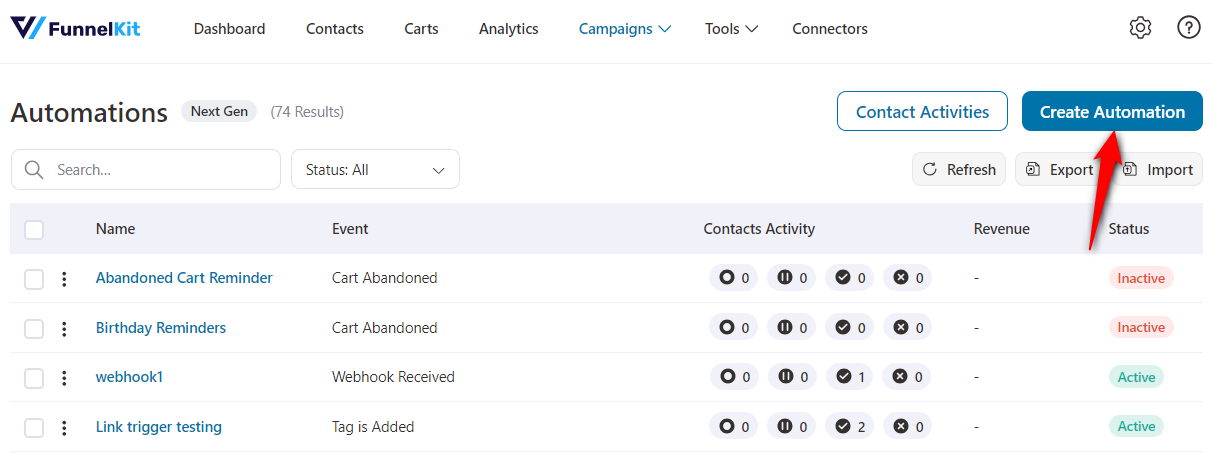
After you click on add new, you can build a new automation from scratch, and you'll see a blank canvas.
Simply select the event under 'Start When?'.
Here, the event that you need to select is under forms --> WPForms (form submits). As we mentioned, FunnelKit Automations speaks to many form builders, and WPForms is just one of them.
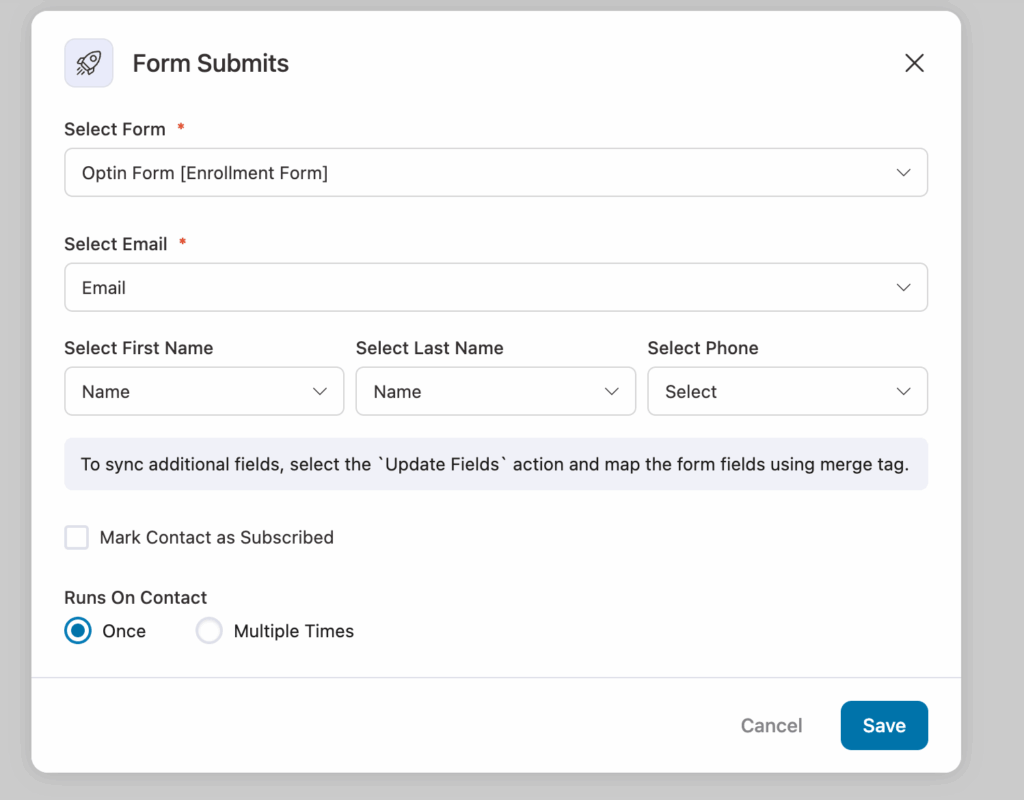
After you select the event, as the form submits, you'll see the option to select the form name and map the email field. Simply select those from the drop-down, and you're good to go!
Step #4: Add conditional action 'If WordPress user then enroll in the course'
We must now add a conditional action, i.e., if the person who submitted the form is a WordPress user or not.
If they are a WordPress user, then all we have to do is enroll them in the LearnDash course. Assuming that you already have a course, you simply have to select 'LearnDash --> Enroll User into Course(s)' from the actions.
And then select the course that you want to auto-enroll them in.
Take a look at the automation built so far:

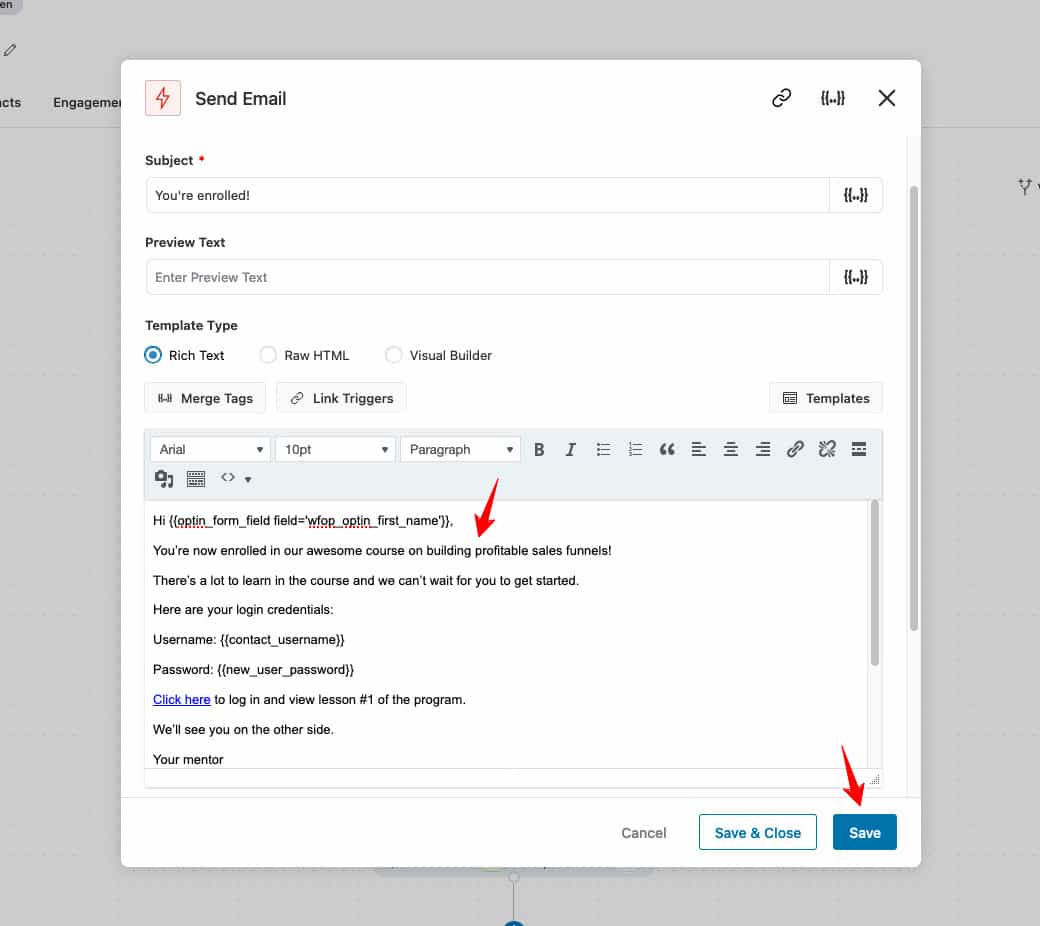
After enrolling the user in the course, we shall send the email. Now, let's draft the email that we need to send out to the existing WordPress users who fill out the form.
Here we will place the Link Trigger enabled with the auto login feature.
Here's the email:
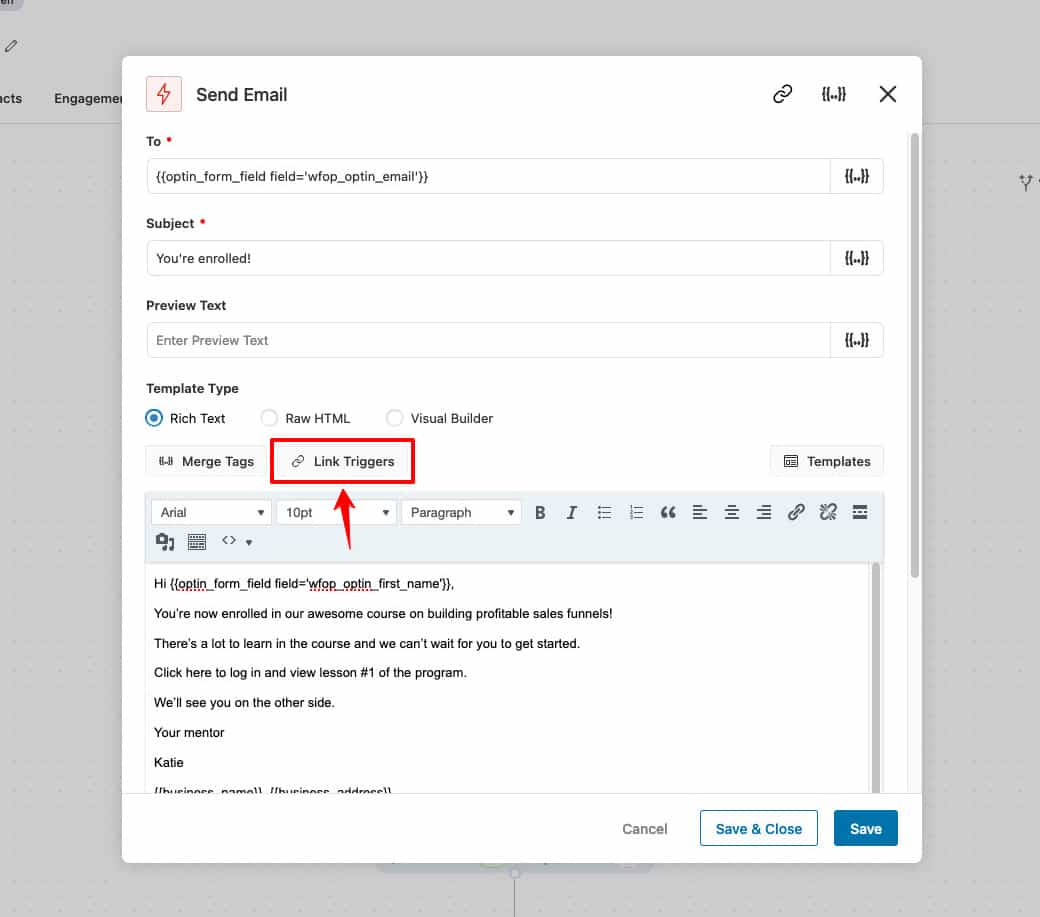
As you can notice, there's the option to add link triggers at the top. When you select it, you'll be able to see all the link triggers that you've created using FunnelKit Automations.
Here they are:
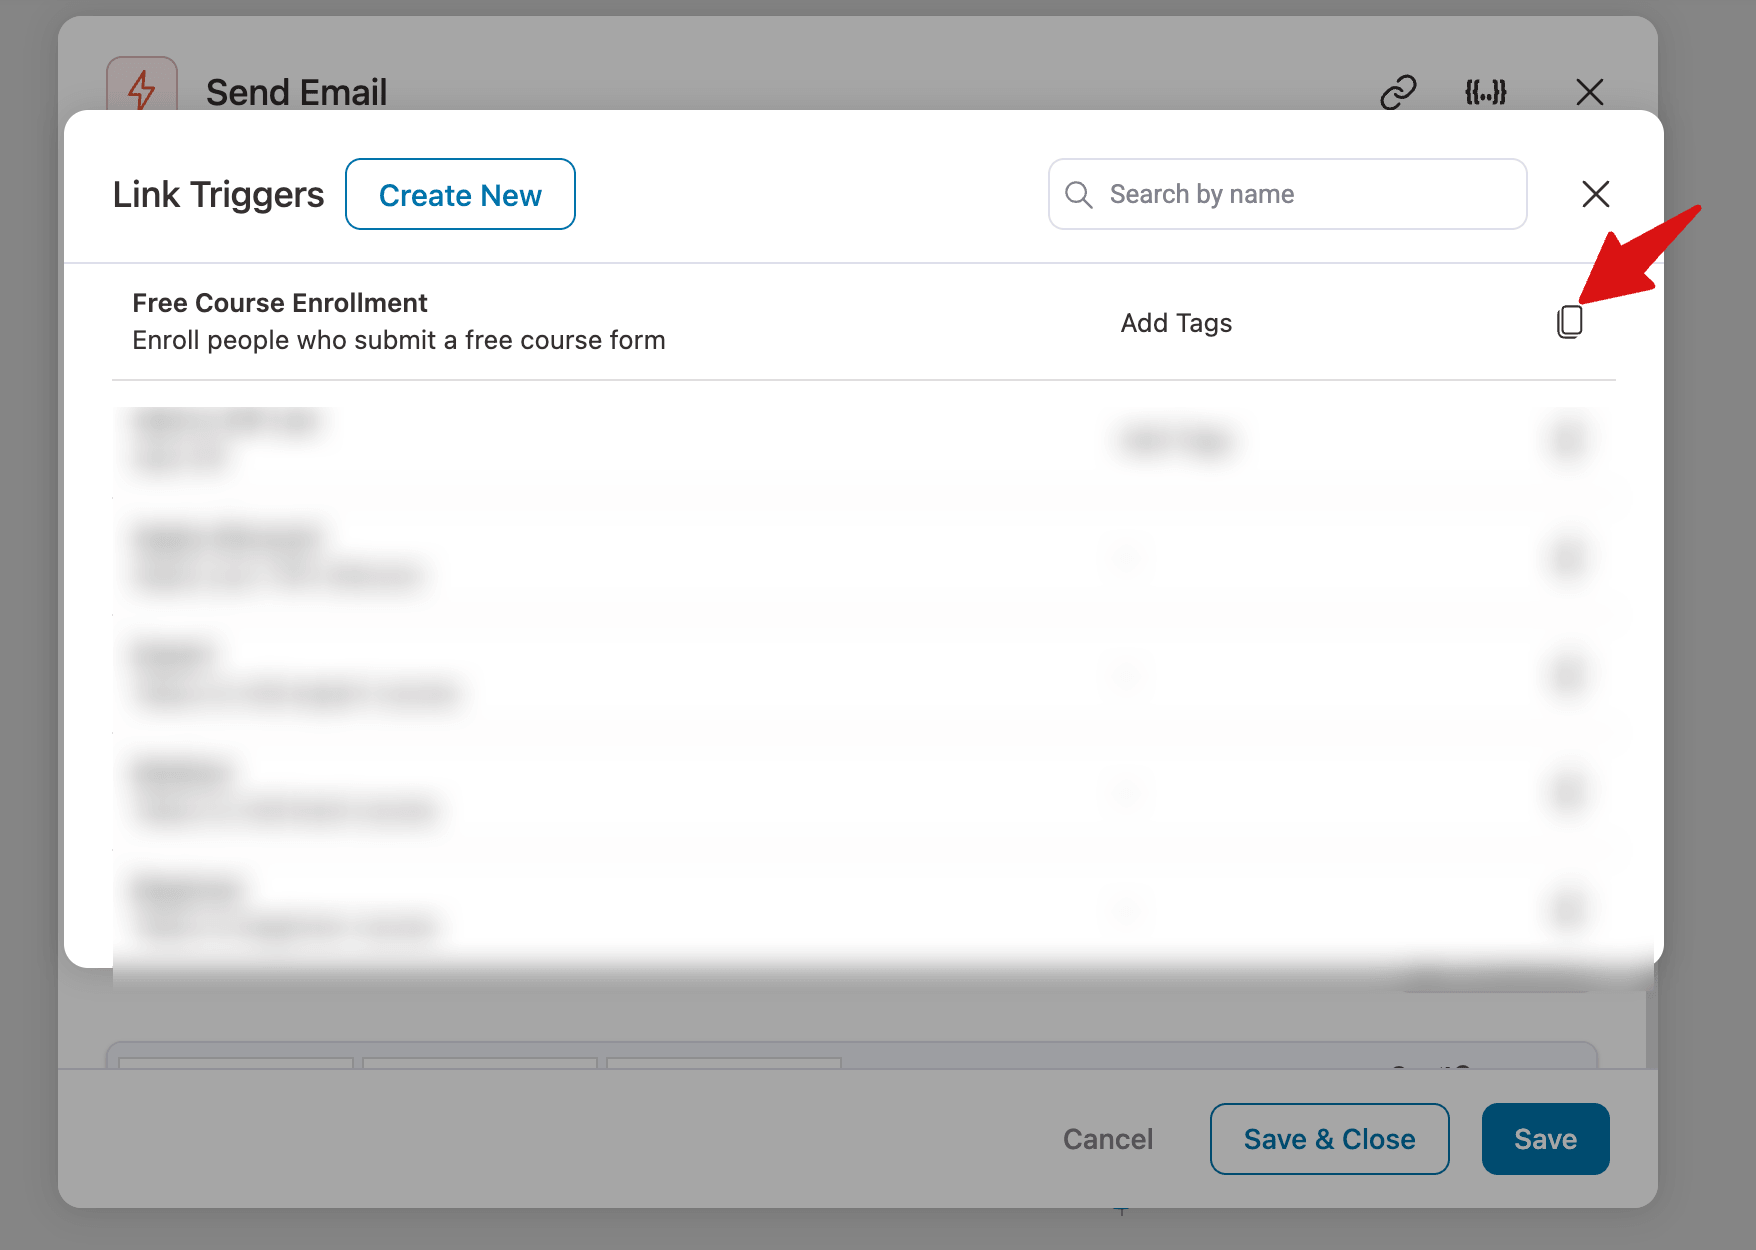
Copy the one specifically created for this automation and paste it on 'Click here' in your email. Upon clicking the link, the user will be automatically logged in.
The auto-login will last for the defined period.
Step #5: Add conditional action 'If not a WP user, then add as WP user'
The next step is to add people who submitted the form as WordPress users.
To get started, select WordPress, then Add User to create their account. Once that's done, enroll them in the LearnDash course by selecting the specific course they should be added to.
Once the user is enrolled in the course, we can send them an email with:
- Login details (username and password)
- Auto-login link
Take a look at the email:
More Questions About WordPress Auto Login
Have a look at the frequently asked questions with answers:
What IS WordPress Auto Login?
WordPress auto login is a mechanism that lets registered users access your site by clicking a link without typing their username or password.
When the link is clicked, WordPress authenticates the user in the background using functions like wp_set_current_user() and wp_set_auth_cookie(), then redirects them to the destination page already logged in. You can use a WordPress plugin to set up auto-login for different use cases.
Is WordPress auto login secure?
It can be, if implemented correctly. Because the link itself acts as a credential, you should always:
- Serve links over HTTPS only to prevent interception
- Set a short expiry time so old links can't be reused
- Make links single-use where possible
- Avoid sending links to shared inboxes
- Never store login tokens as plain text in the database. They should be hashed
An auto-login link that never expires and is forwarded to someone else effectively gives that person full account access.
What happens when an auto-login link expires?
Once the expiry period passes, clicking the link will no longer log the user in automatically. Ideally, they should be redirected to the standard WordPress login page with a message explaining the link has expired. The recommended expiry depends on use case for course enrollment or welcome emails, 7–30 days is common; for subscription renewal or dunning emails, 48–72 hours is safer.
Can I use WordPress auto login without a plugin?
Yes. Developers can add a PHP snippet to their functions.php file that hooks into the wp action, checks for a specific page or URL parameter, and then calls wp_set_current_user() and wp_set_auth_cookie() to authenticate the user programmatically. This approach gives full control but requires manual handling of token generation, expiry, and security. For most site owners, a plugin or automation tool like FunnelKit Automations is a faster and safer path. However, it's not recommended unless you are a seasoned programmer.
Does the user need to already exist in WordPress for auto login to work?
Yes, auto login authenticates an existing WordPress user account. It does not create users on the fly. If someone fills out a form and isn't yet a WordPress user, you need to first create their account (either manually or via automation) before the auto login link will work for them. FunnelKit Automations handles this automatically in the same workflow.
What happens if an auto login link is clicked more than once?
This depends on the implementation. If the link is set to single-use, the second click will fail and the user will be redirected to the login page. If it's time-based (not single-use), every click within the expiry window will log the user in. For sensitive pages like payment or account management, single-use is strongly recommended.
All Set to Make the Login Process Friction-Free?
That brings us to the end of this post!
We looked at how you can auto-enroll people in your LearnDash course and send an email with the auto-login URL.
Being able to let users log in easily and return to consume content without re-entering their username and password is indeed convenient.
FunnelKit Automations helps you create link triggers with the auto-login option in a few simple steps. You can build automation to send emails with all the details to your users.
So what are you waiting for?
Upgrade yourself to the latest version of FunnelKit Automations and start enjoying the latest feature today!

Editorial Team
March 26, 2026Do you want to send WooCommerce subscription emails to keep your customers informed and engaged with timely follow-ups? Every subscription business lives or dies by its emails. Those automated messages...
Editorial Team
March 24, 2026Customizing pre-designed WooCommerce email templates is one of the most effective ways to create visually appealing, brand-consistent emails for your customers. Every WooCommerce order triggers a chain of emails, such...
Editorial Team
March 5, 2026Want to turn one-time buyers into loyal customers? Studies show that 50% of sales happen after the fifth follow-up email, yet most businesses give up way too soon. That’s a...


