


WooCommerce failed order emails to customers do the job a barista does in about four seconds.
The card gets declined, they ask if you want to try another one, you tap it, the sale completes. Nobody loses anything.
Online, that same declined card plays out very differently.
The buyer sees a vague error, closes the tab, and assumes something is broken.
You find a failed order in the dashboard hours later. Neither of you ever speaks to the other.
Run the arithmetic on your own store. Five hundred orders a month at a 5% payment failure rate is 25 dead orders.
At an $80 average order value, that is $2,000 a month sitting untouched in the Failed tab, or $24,000 a year you have already paid to acquire.
Recover a third of it and you have added $8,000 without buying a single extra click.
The gap exists because WooCommerce defaults leave revenue on the table here, the same as everywhere else.
The failed order notification does get sent. It just does not go to the one person who could fix the payment.
In this guide, we will show you who actually receives that default notification, three ways to get a payment failure email in front of the buyer, and how to follow up with a coupon on the orders that still do not convert.
We will also cover what to check when the email never lands.
Table of Contents
- 1 What WooCommerce Sends When an Order Fails?
- 2 Failed, Cancelled or Abandoned? They’re Three Different Things
- 3 Method 1: Turn On the Native Notification (and What It Can’t Do)
- 4 Method 2: Send a Branded Payment Failure Email
- 5 What if Customers Don’t Complete the Order After the Emails?
- 6 Why the Pay Now Link Is the Whole Email
- 7 Method 3: A Free Snippet That Adds a Retry Link
- 8 Timing the Follow-Up Discount Coupon
- 8.1 Step 1: Create a new email automation
- 8.2 Step 2: Configure failed order event
- 8.3 Step 3: Add a delay
- 8.4 Step 4: Check if the order status is still completed
- 8.5 Step 5: Generate a dynamic coupon
- 8.6 Step 6: Send an email with a follow-up discount coupon
- 8.7 Step 7: Enable the email automation with a discount code for failed orders
- 9 How to Track Analytics for Failed Orders in WooCommerce?
- 10 Failed Order Email Not Reaching the Customer? 7 Fixes
- 11 Frequently Asked Questions
- 12 Start Recovering Failed Payments This Week!
What WooCommerce Sends When an Order Fails?
There are two classes in core, not one. This is the entire source of the confusion.
| Parameter | Store notification | Customer notification |
|---|---|---|
| Email ID | failed_order | customer_failed_order |
| Who gets it | Your chosen recipient(s) | The order’s billing email |
| Recipient field in settings | Yes, defaults to the admin address in Settings ⇨ General | No, it always uses the billing email |
| Fires when the order moves | Pending ⇒ Failed, or On-hold ⇒ Failed | Any status ⇨ Failed |
| Default heading | “Order Failed: #{order_number}” | “Sorry, your order was unsuccessful” |
| Template | emails/admin-failed-order.php | emails/customer-failed-order.php |
Let's understand the two most important things here.
- The customer notification has no recipient field, because it doesn’t need one. It reads the billing email off the order.
If you’ve been pasting a customer’s address into the recipient box hoping to reach buyers, you’ve been adding them to the admin email, which shows internal order data and no way to pay.
That misunderstanding is the subject of an open bug report in WooCommerce’s own repository from a store owner who did exactly that, comma-separated, no space, and watched nothing arrive.
- The two emails trigger on different transitions
The store version only fires from Pending or On-hold. The customer version fires on any move into Failed.
So a gateway that flips an order from Processing to Failed after a delayed webhook will email the buyer and tell you nothing.
The subject line on the customer email is “Your order at {site_title} was unsuccessful”.
Search your test inbox for that string before you conclude your store sends nothing.
For the full status map (pending, on-hold, failed, cancelled, and what triggers each), see our WooCommerce order statuses guide.
Failed, Cancelled or Abandoned? They’re Three Different Things
Stores conflate these constantly, and the wrong label sends the wrong email.
Failed means a payment was attempted and didn’t complete: a declined card, a rejected 3D Secure challenge, a gateway timeout, an AVS mismatch. The order exists. The buyer wanted to pay.
Cancelled means the order was called off: by you from the Orders screen, by the customer, or automatically when your Hold stock (minutes) window expires on an unpaid pending order. Nobody’s money was declined.
Abandoned means there’s no order at all. The shopper left before submitting checkout, so there’s nothing to retry. That’s a different recovery flow entirely, and we cover it in our abandoned cart recovery guide.
Only the first one deserves an email that says “your payment didn’t go through, here’s how to finish.”
Why payments fail in the first place
Insufficient funds and expired cards are the obvious ones. The less obvious ones are worth knowing, because they change what your email should say:
- 3D Secure drop-off. The buyer gets bounced to their bank’s verification screen and closes the tab. Nothing was wrong with the card.
- Gateway configuration. Wrong API keys, test mode left on, or a webhook URL your host is blocking.
- AVS and postcode mismatches. Common with international billing addresses.
- Card testing attacks. A burst of failed orders in minutes from varied addresses is usually fraud probing, not lost customers. Don’t email those.
When you go to WooCommerce ⇒ Orders, you can find such orders with the status “Failed”. You can also move to the Failed tab to find all the failed orders.
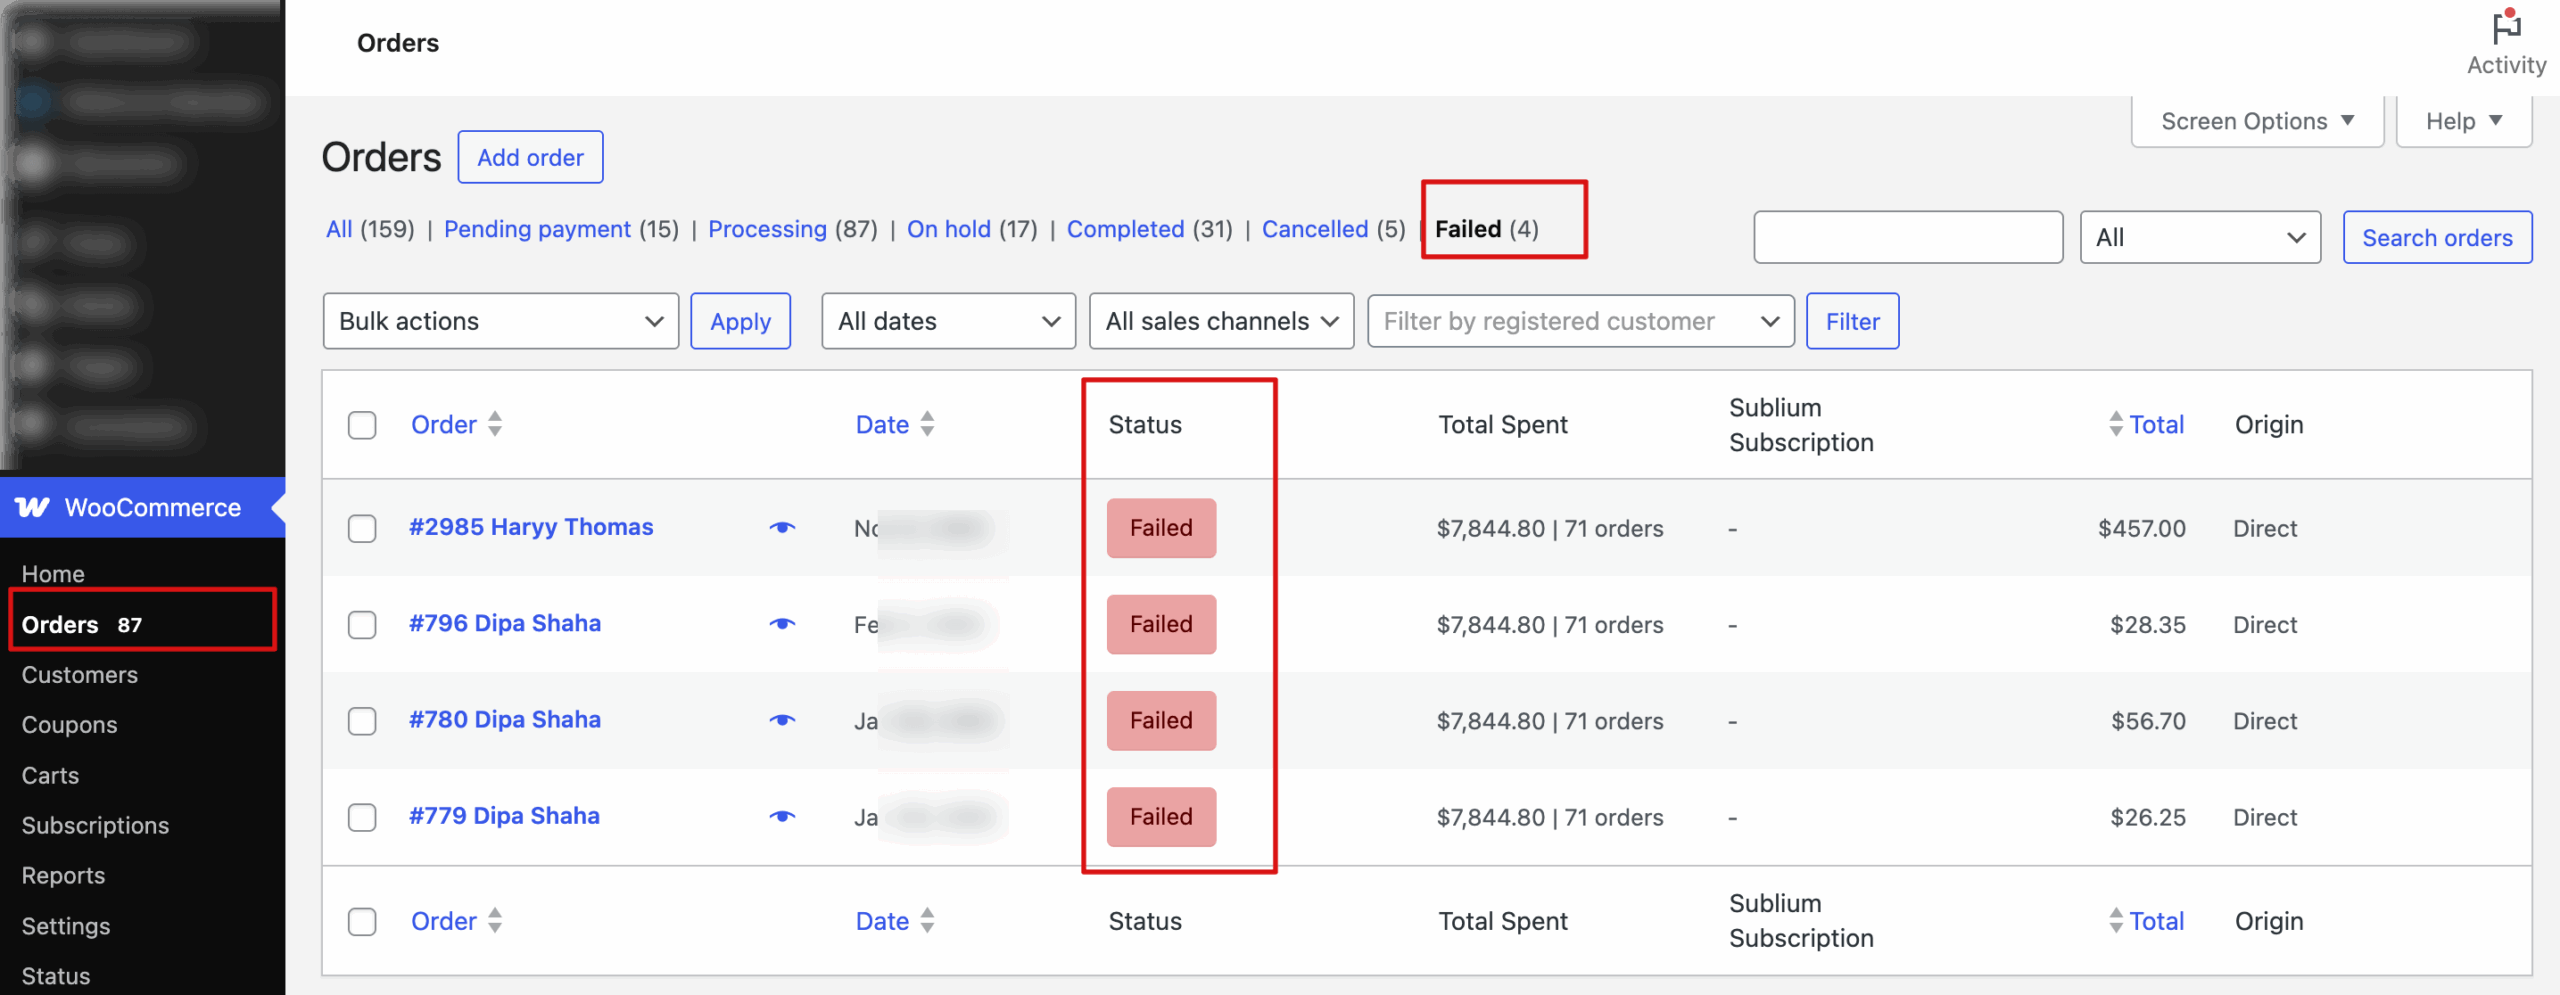
Now, if you open the order, you can find the reason for the failed order in the order note.
Method 1: Turn On the Native Notification (and What It Can’t Do)
In this section, we will share how to customize and manage both the failed order emails in WooCommerce using the default settings.
Step 1: Navigate to WooCommerce default emails
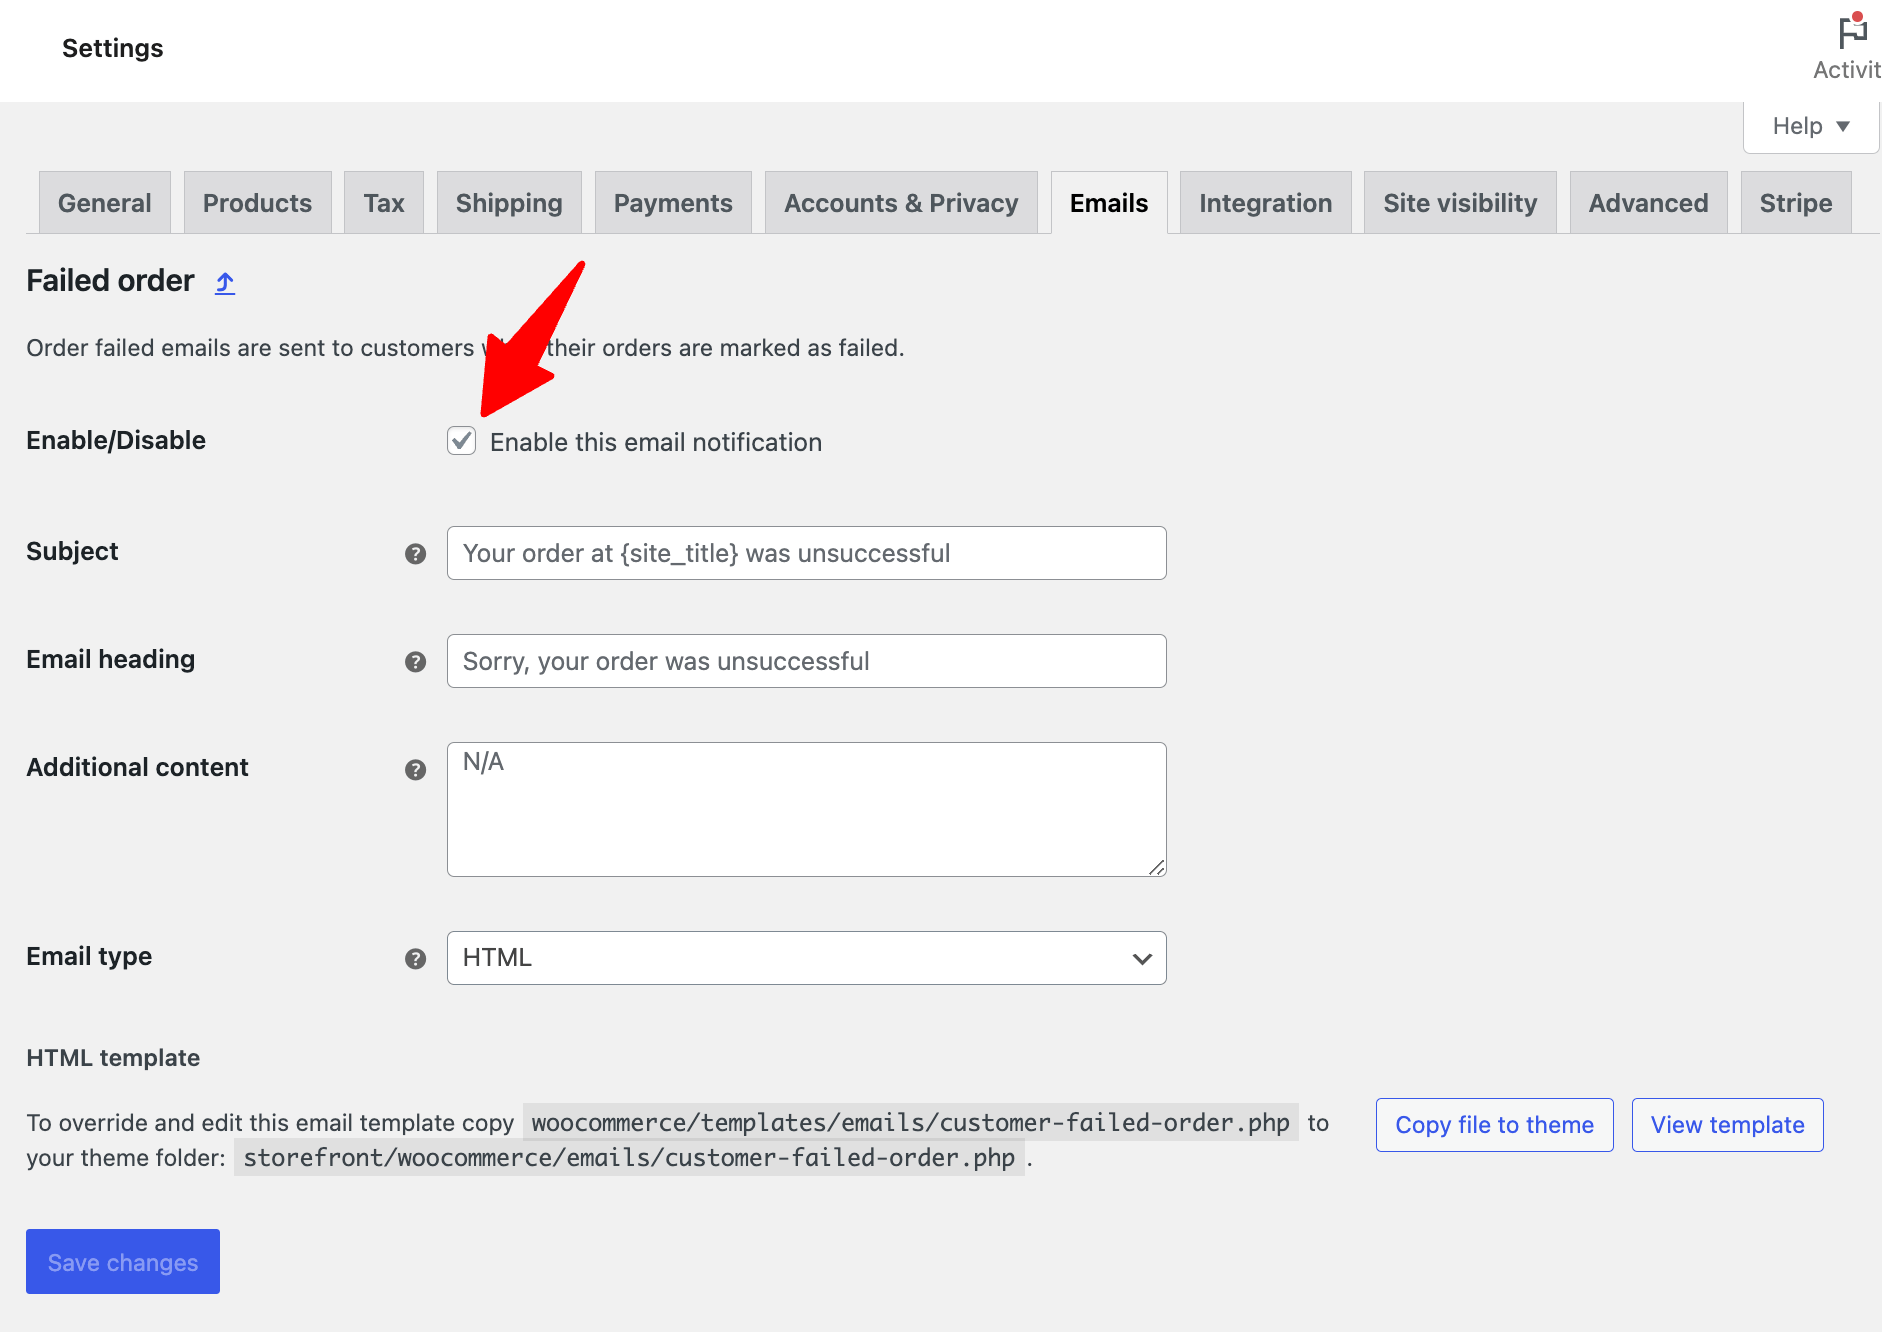
Firstly, navigate to WooCommerce ⇒ Settings ⇒ Emails. Here, you will find the failed order in the list of transactional emails.
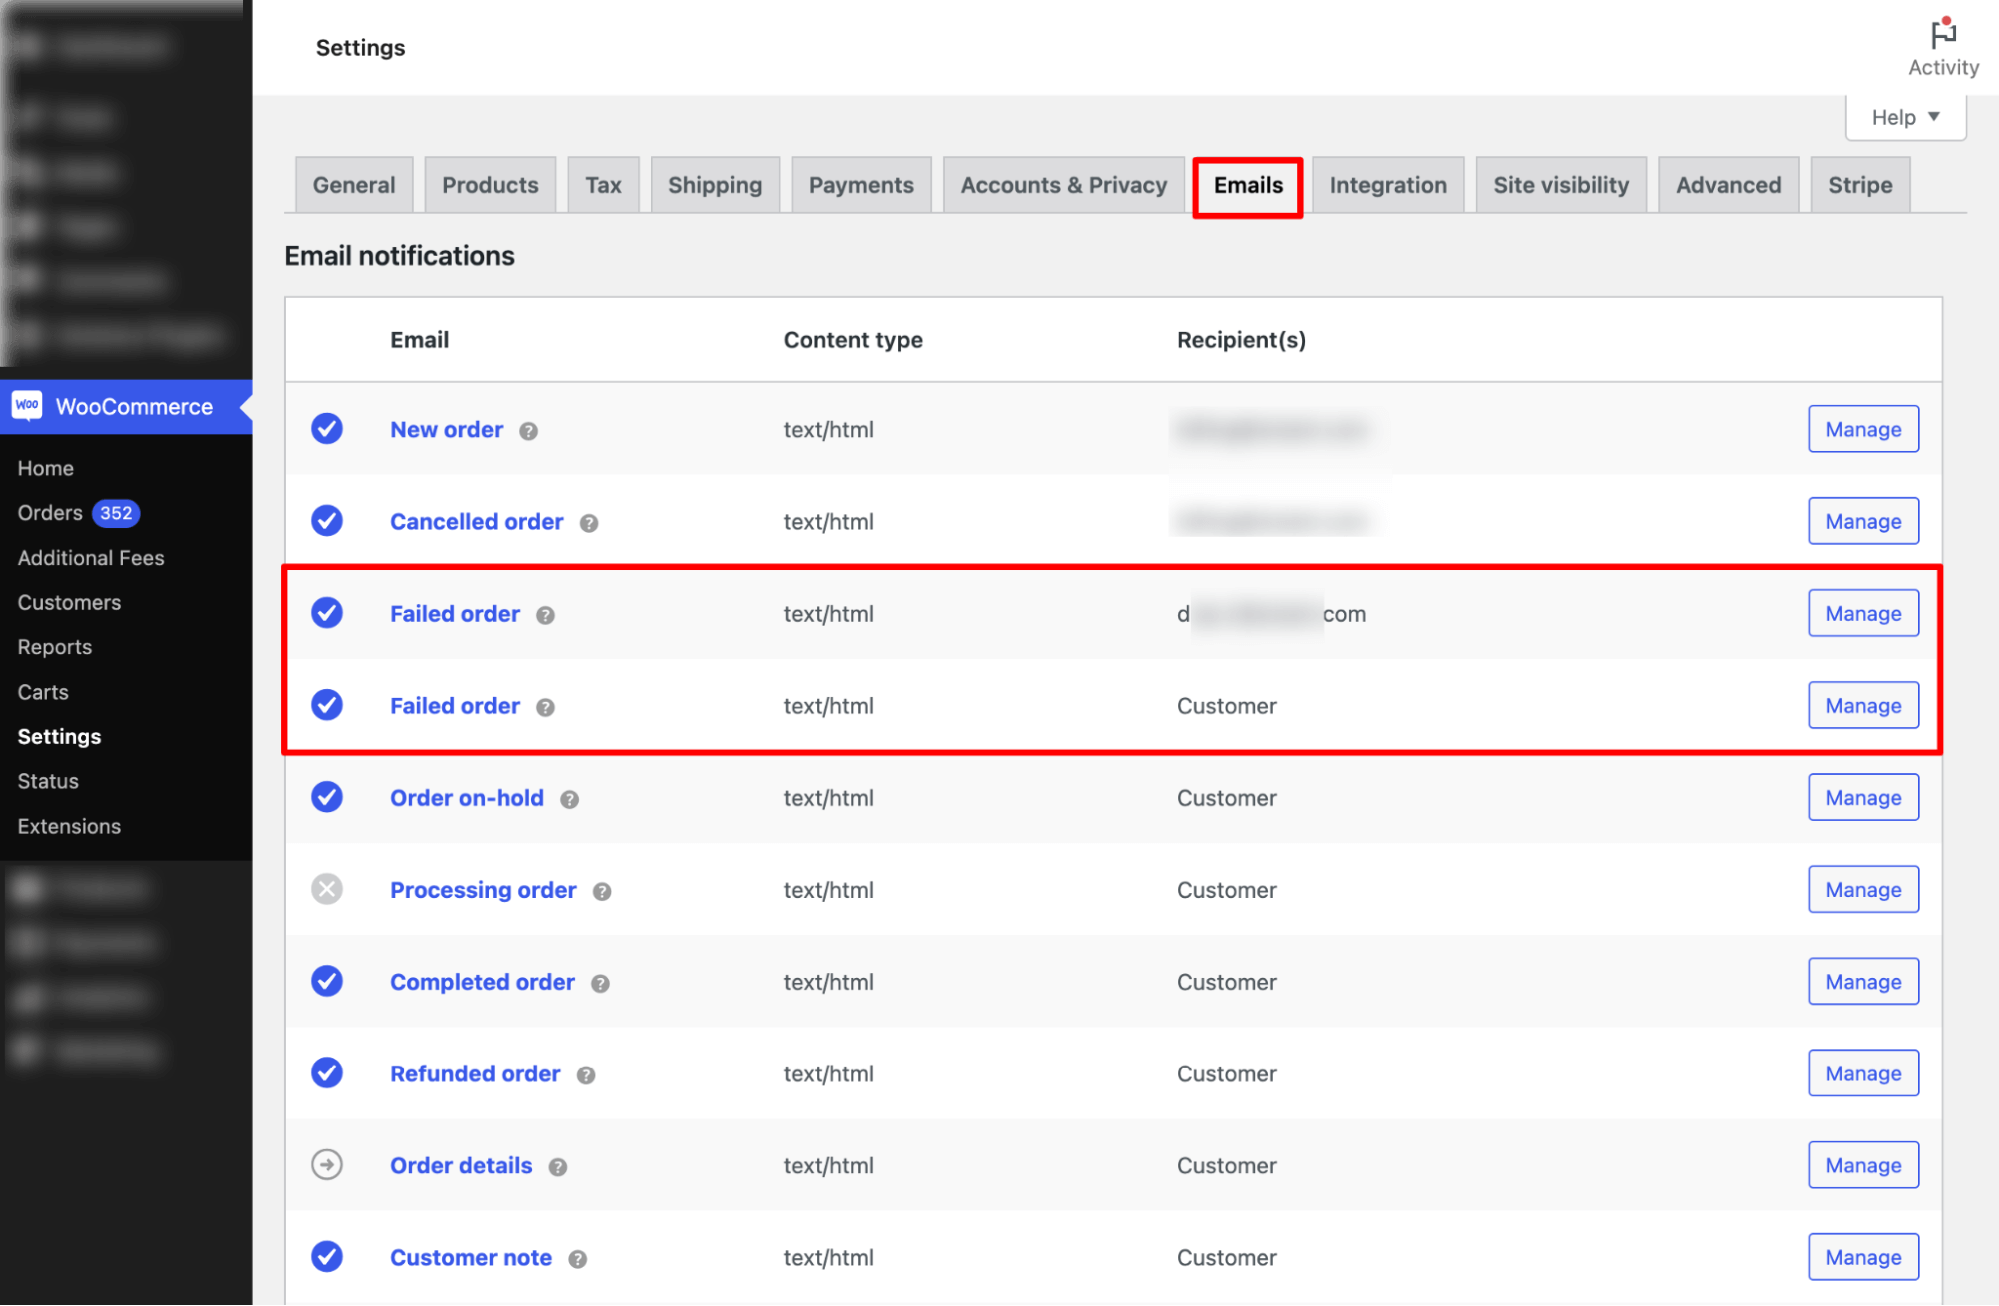
Step 2: Enable WooCommerce failed order email to customers
For this, hit the ‘Manage’ option next to the email notification.
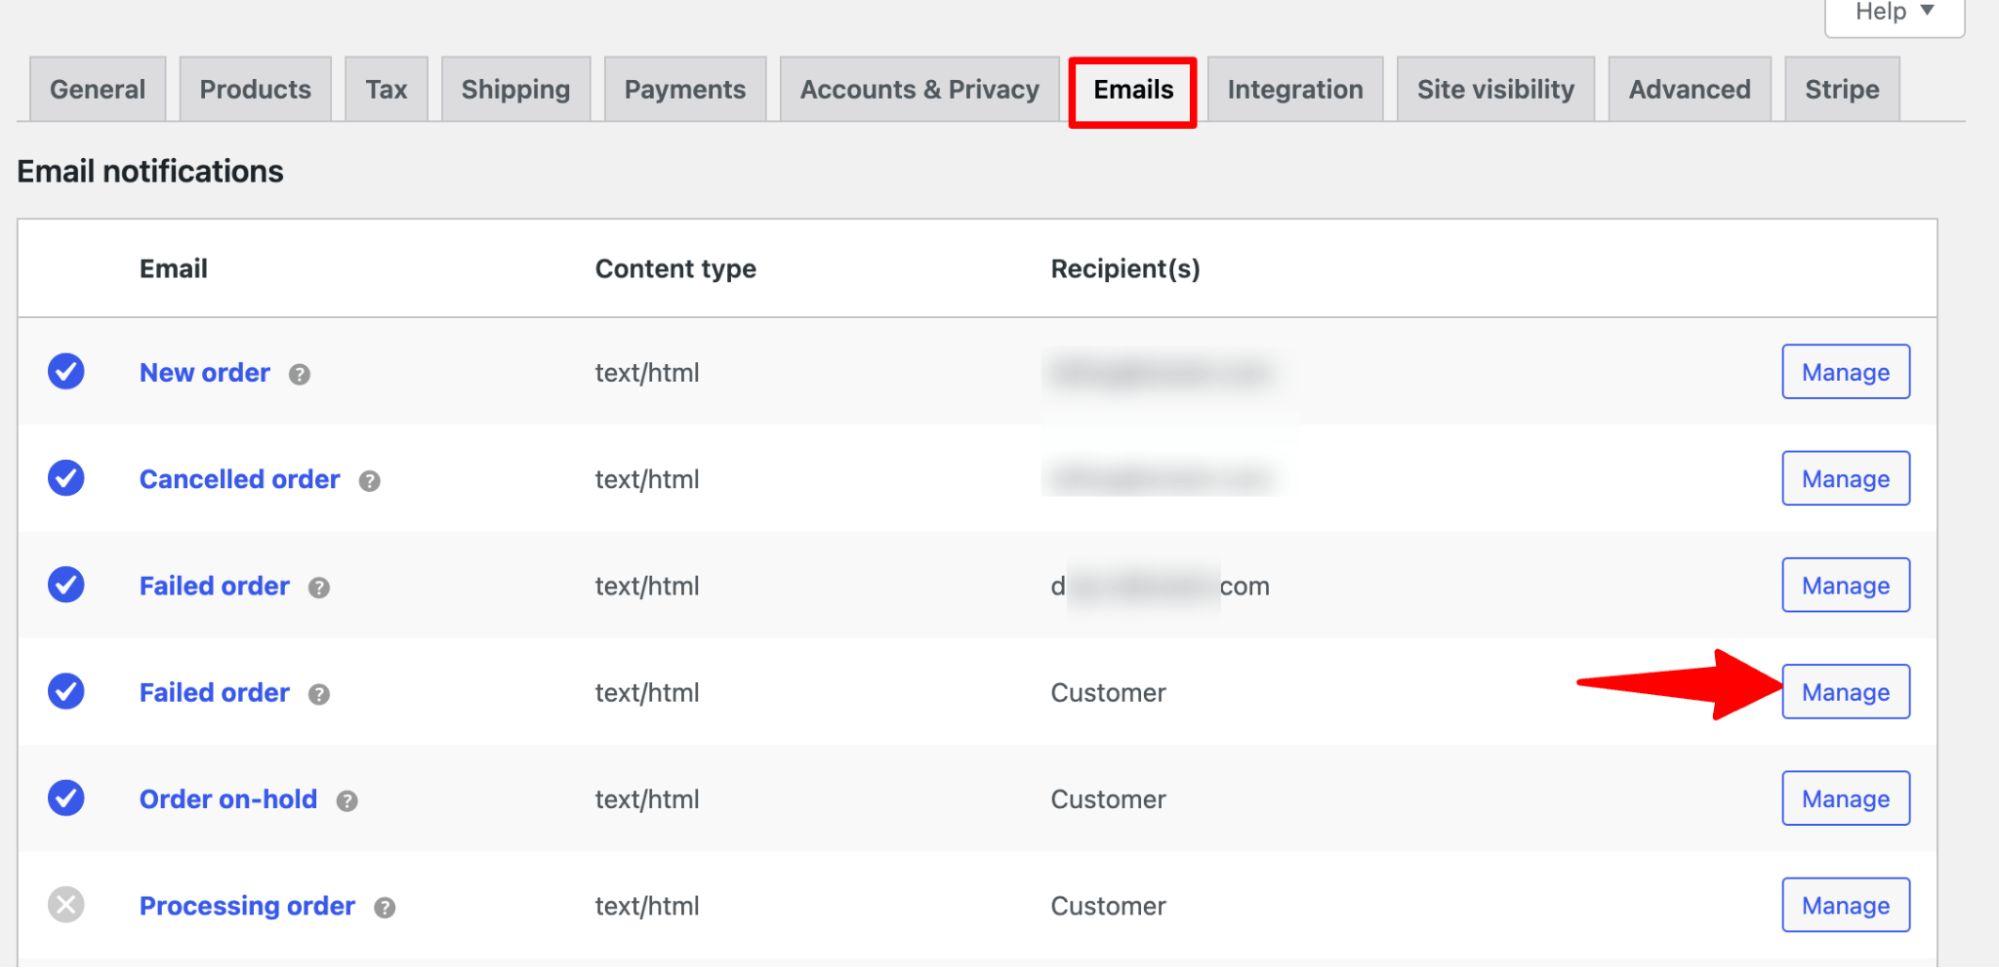
Now, turn on the “Enable this email notification” option to ensure users receive the email when their order fails.
Step 3: Customize email content
In this section, you can also customize other sections, such as subject, email heading, additional content, etc.
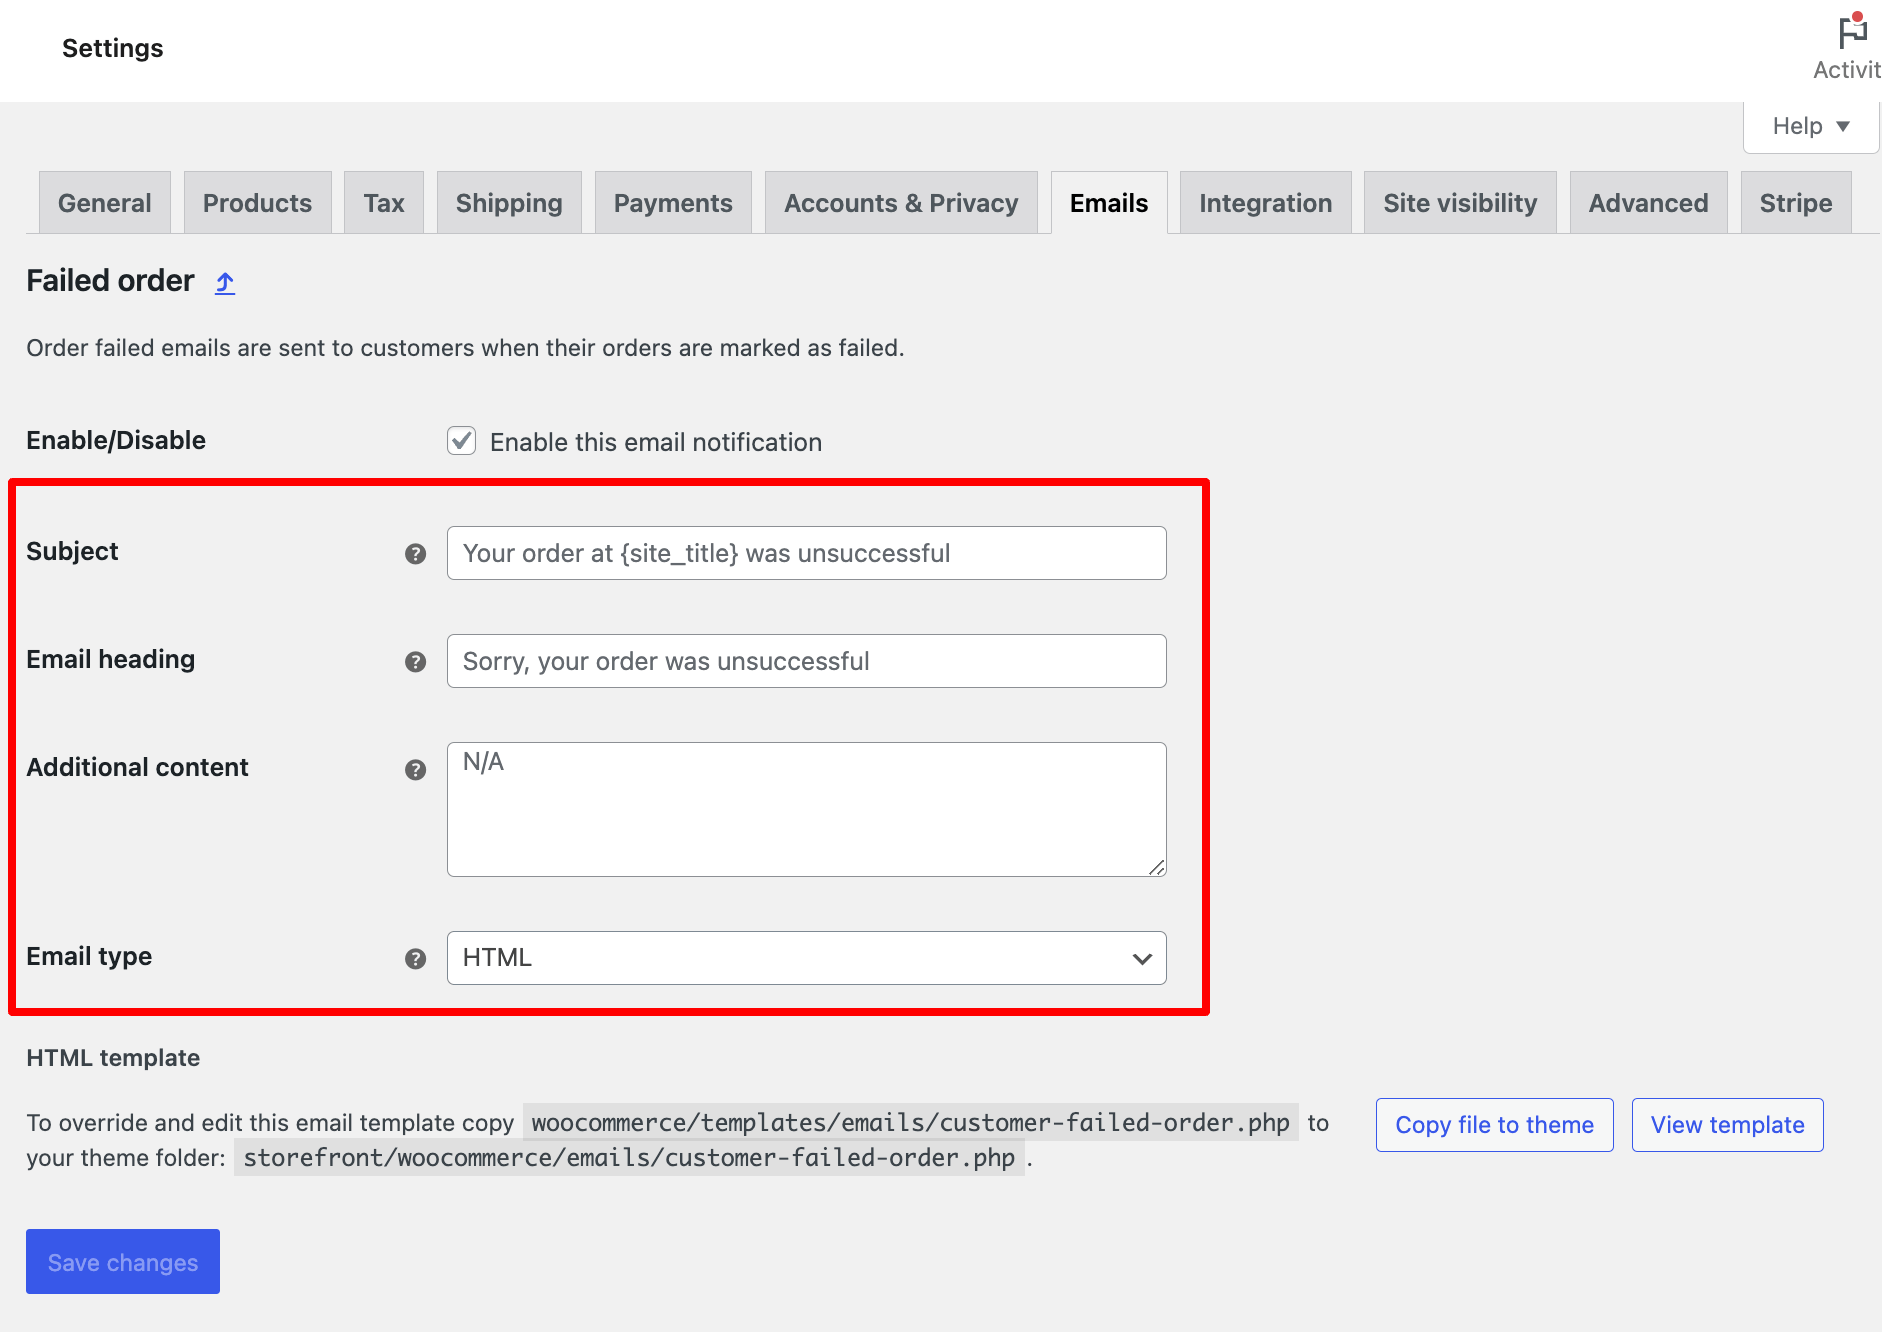
Make sure to save the changes.
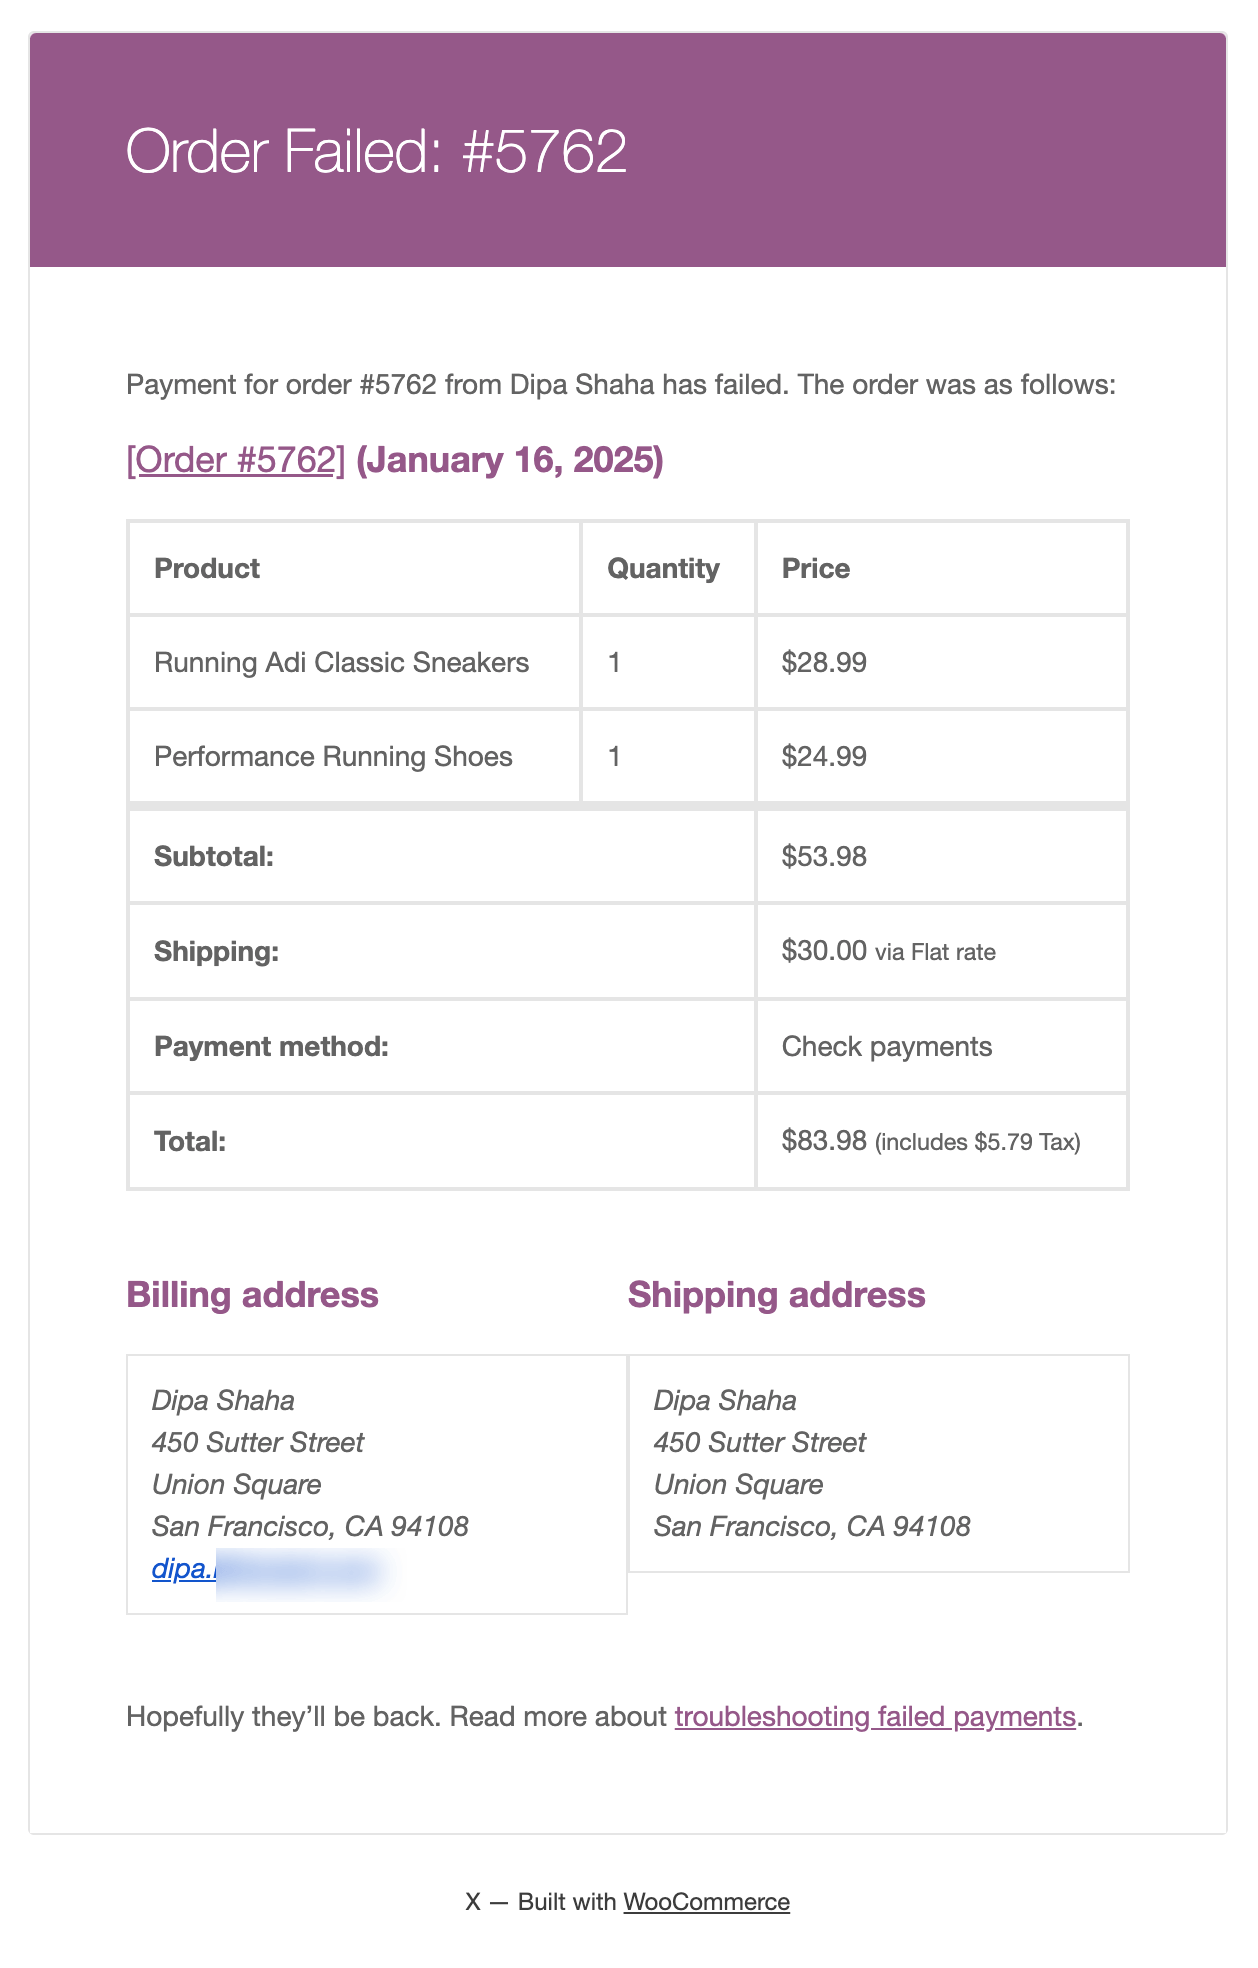
Here is a preview of the customer email for failed orders.
What this method cannot do:
- No payment retry button: The default customer template explains the order was unsuccessful. It doesn’t hand them a one-click way to pay.
- Absence of timing control: It sends the instant the status flips, including for orders your gateway resolves a minute later.
- No follow-up: One email, no second attempt, no incentive.
- No filtering: Card-testing bursts get emailed the same as real buyers.
For a store doing a handful of failed orders a month, that’s enough. Past that, the retry link is where the money is.
Just imagine sending a custom email like this one instead:
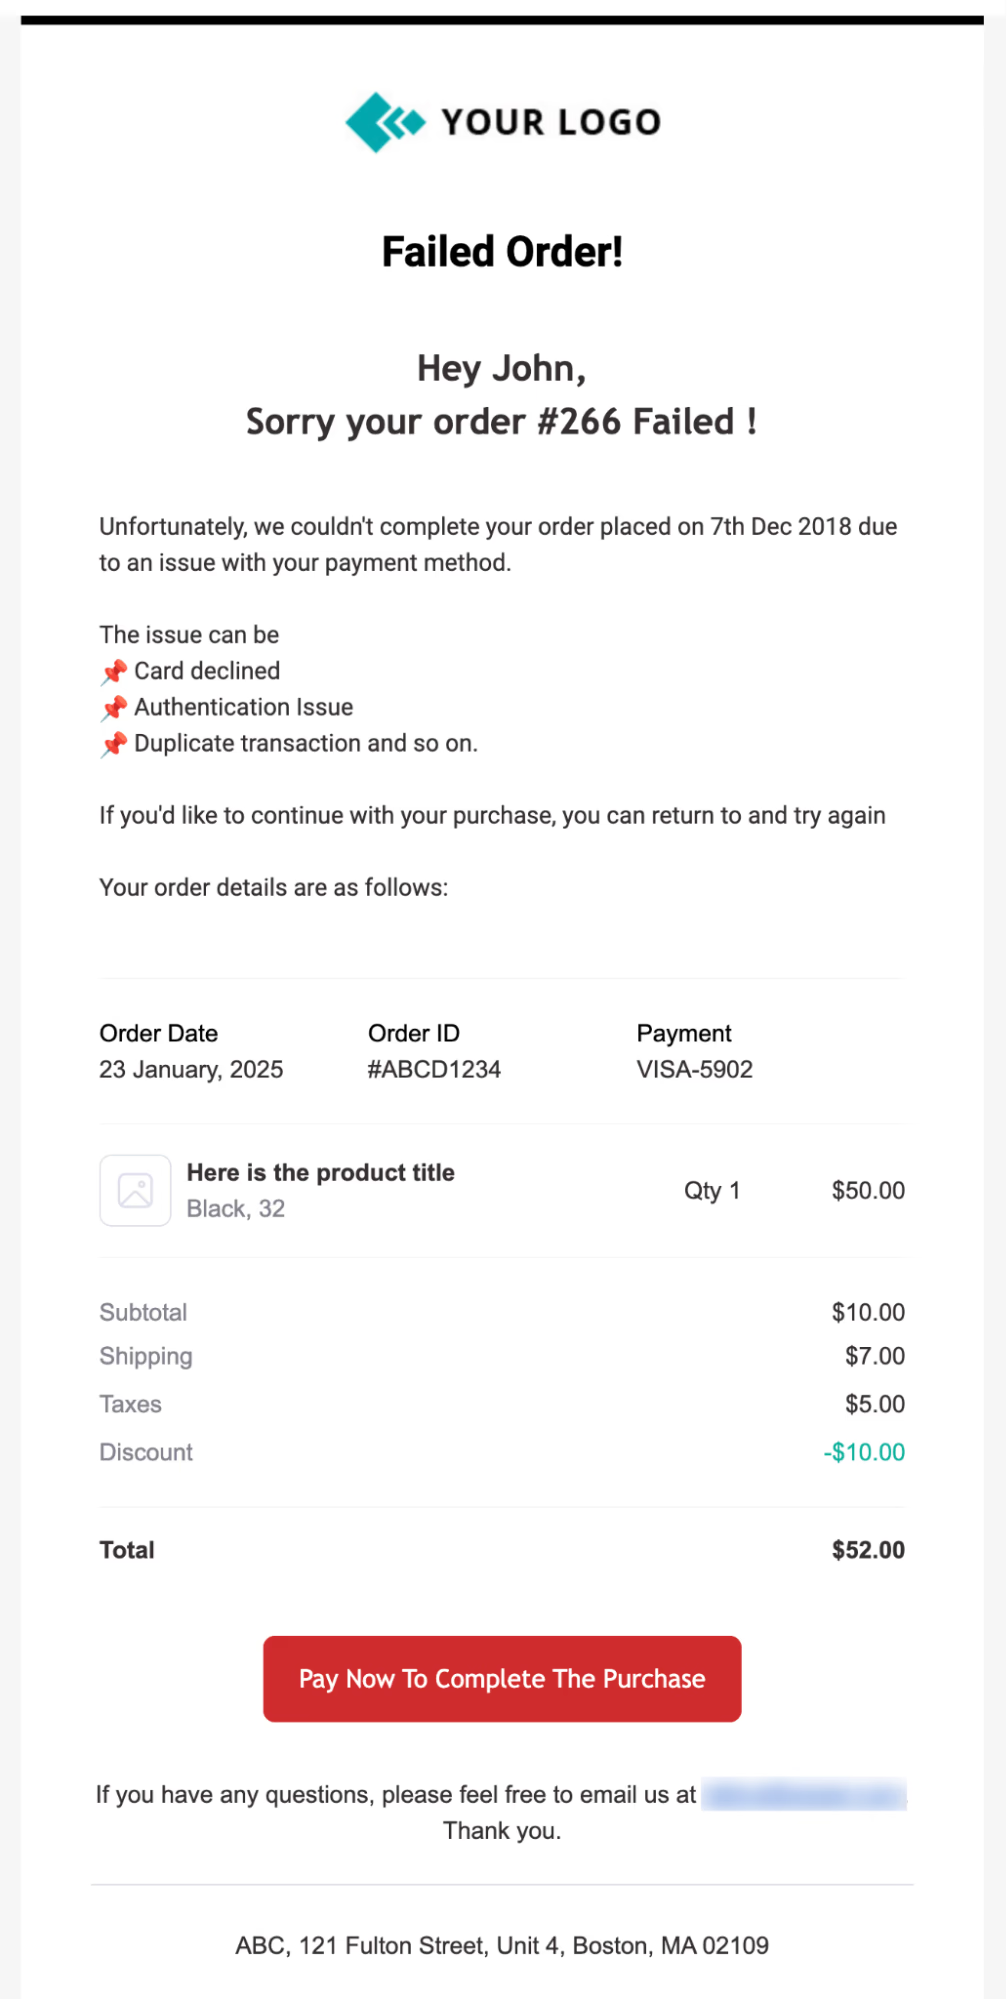
This email template is fully on-brand, with personalized messaging that highlights the failed order details and includes the essential "Pay Now" CTA.
To create this or a similar custom WooCommerce failed order email for customers, move to the next section.
Method 2: Send a Branded Payment Failure Email
To send customized WooCommerce failed-order emails to customers, we will use FunnelKit Automations.
This is the ultimate email marketing solution for users, allowing you to send customized, personalized transactional emails.
Plus, you can send different marketing emails based on different events in a WooCommerce store, such as follow-up emails, post-purchase emails, and more.
Make sure to install and activate FunnelKit Automations before we move on to the main process.
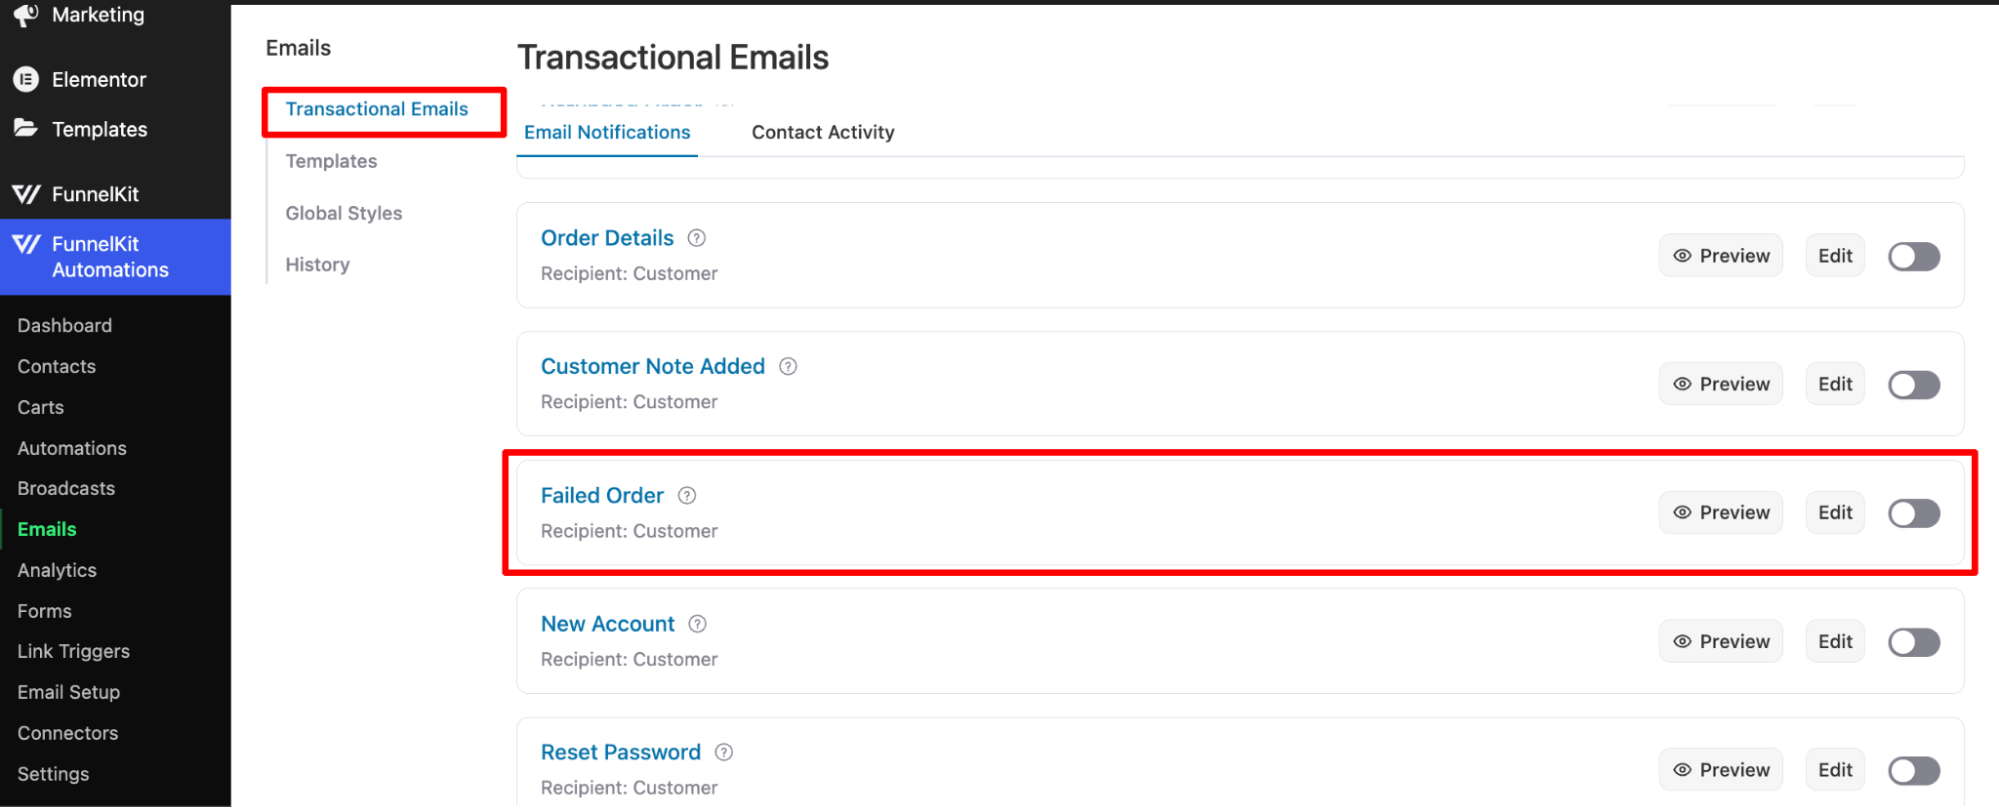
Step 1: Navigate to the transactional emails section
Navigate to FunnelKit Automations ⇒ Transactional Emails and look for the failed order email for customers.
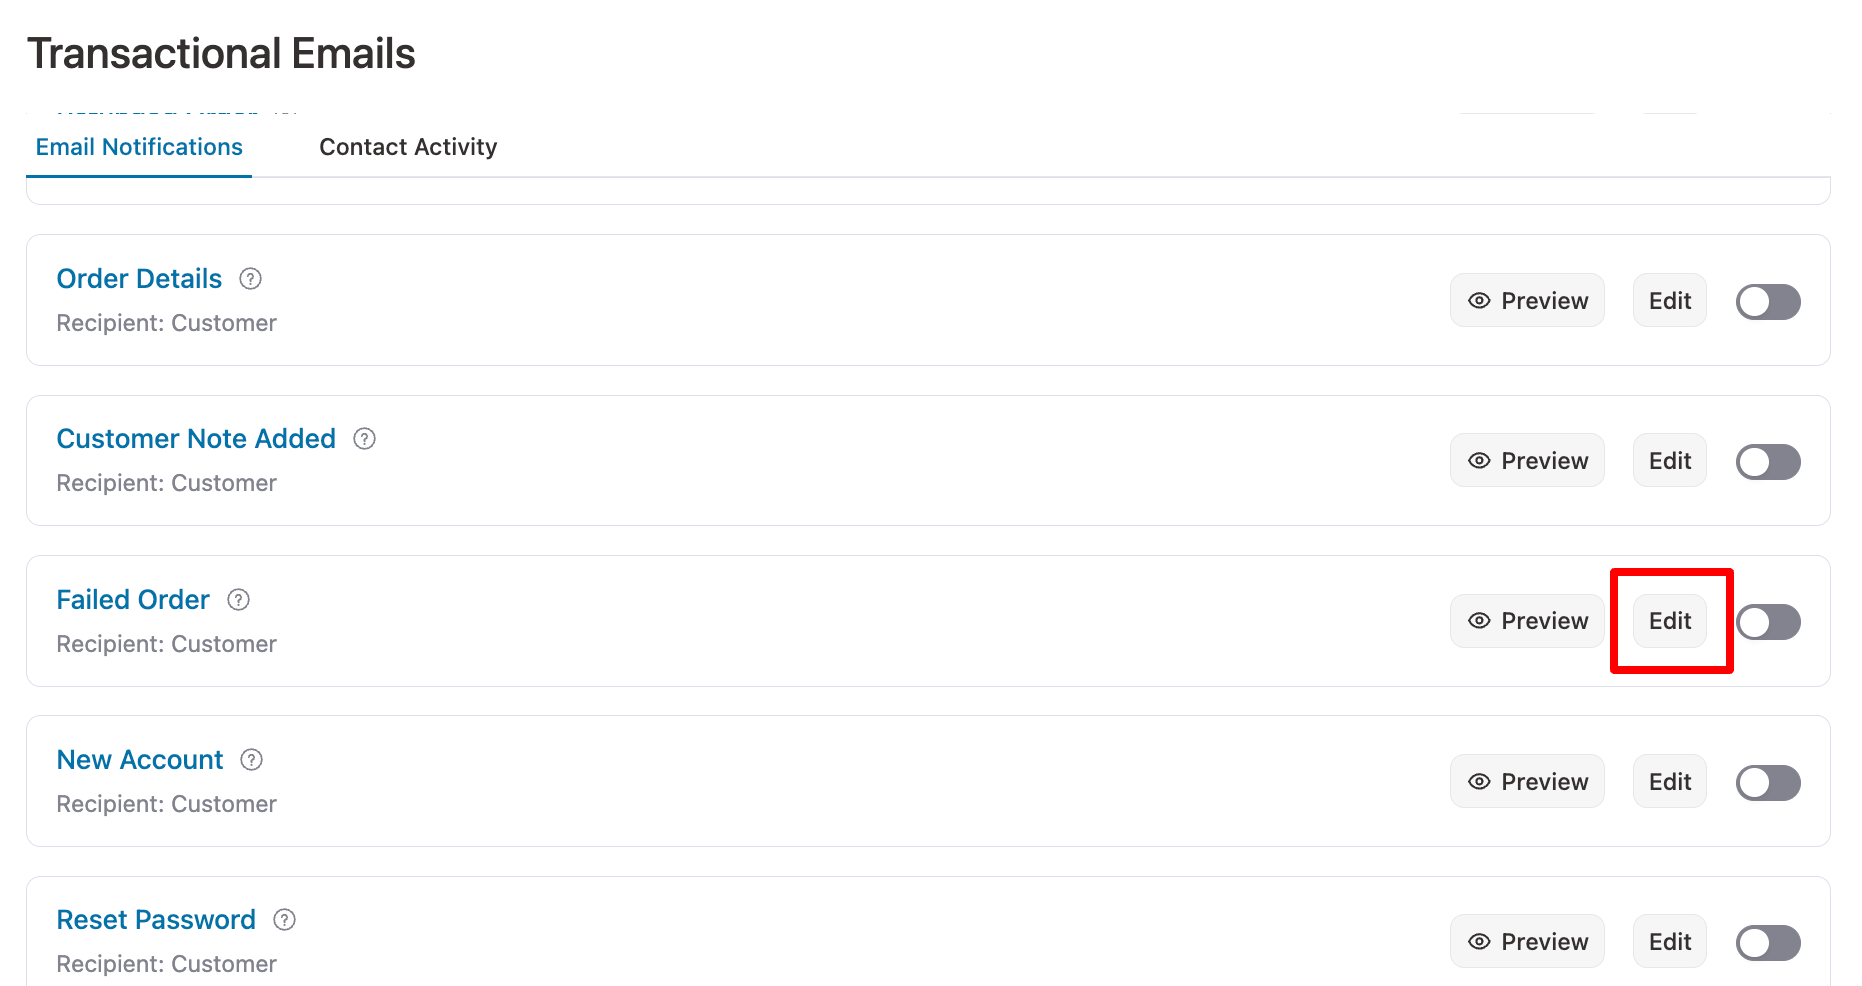
Step 2: Edit the custom failed order email
Now, hit the Edit line to start customizing the failed order email for WooCommerce.
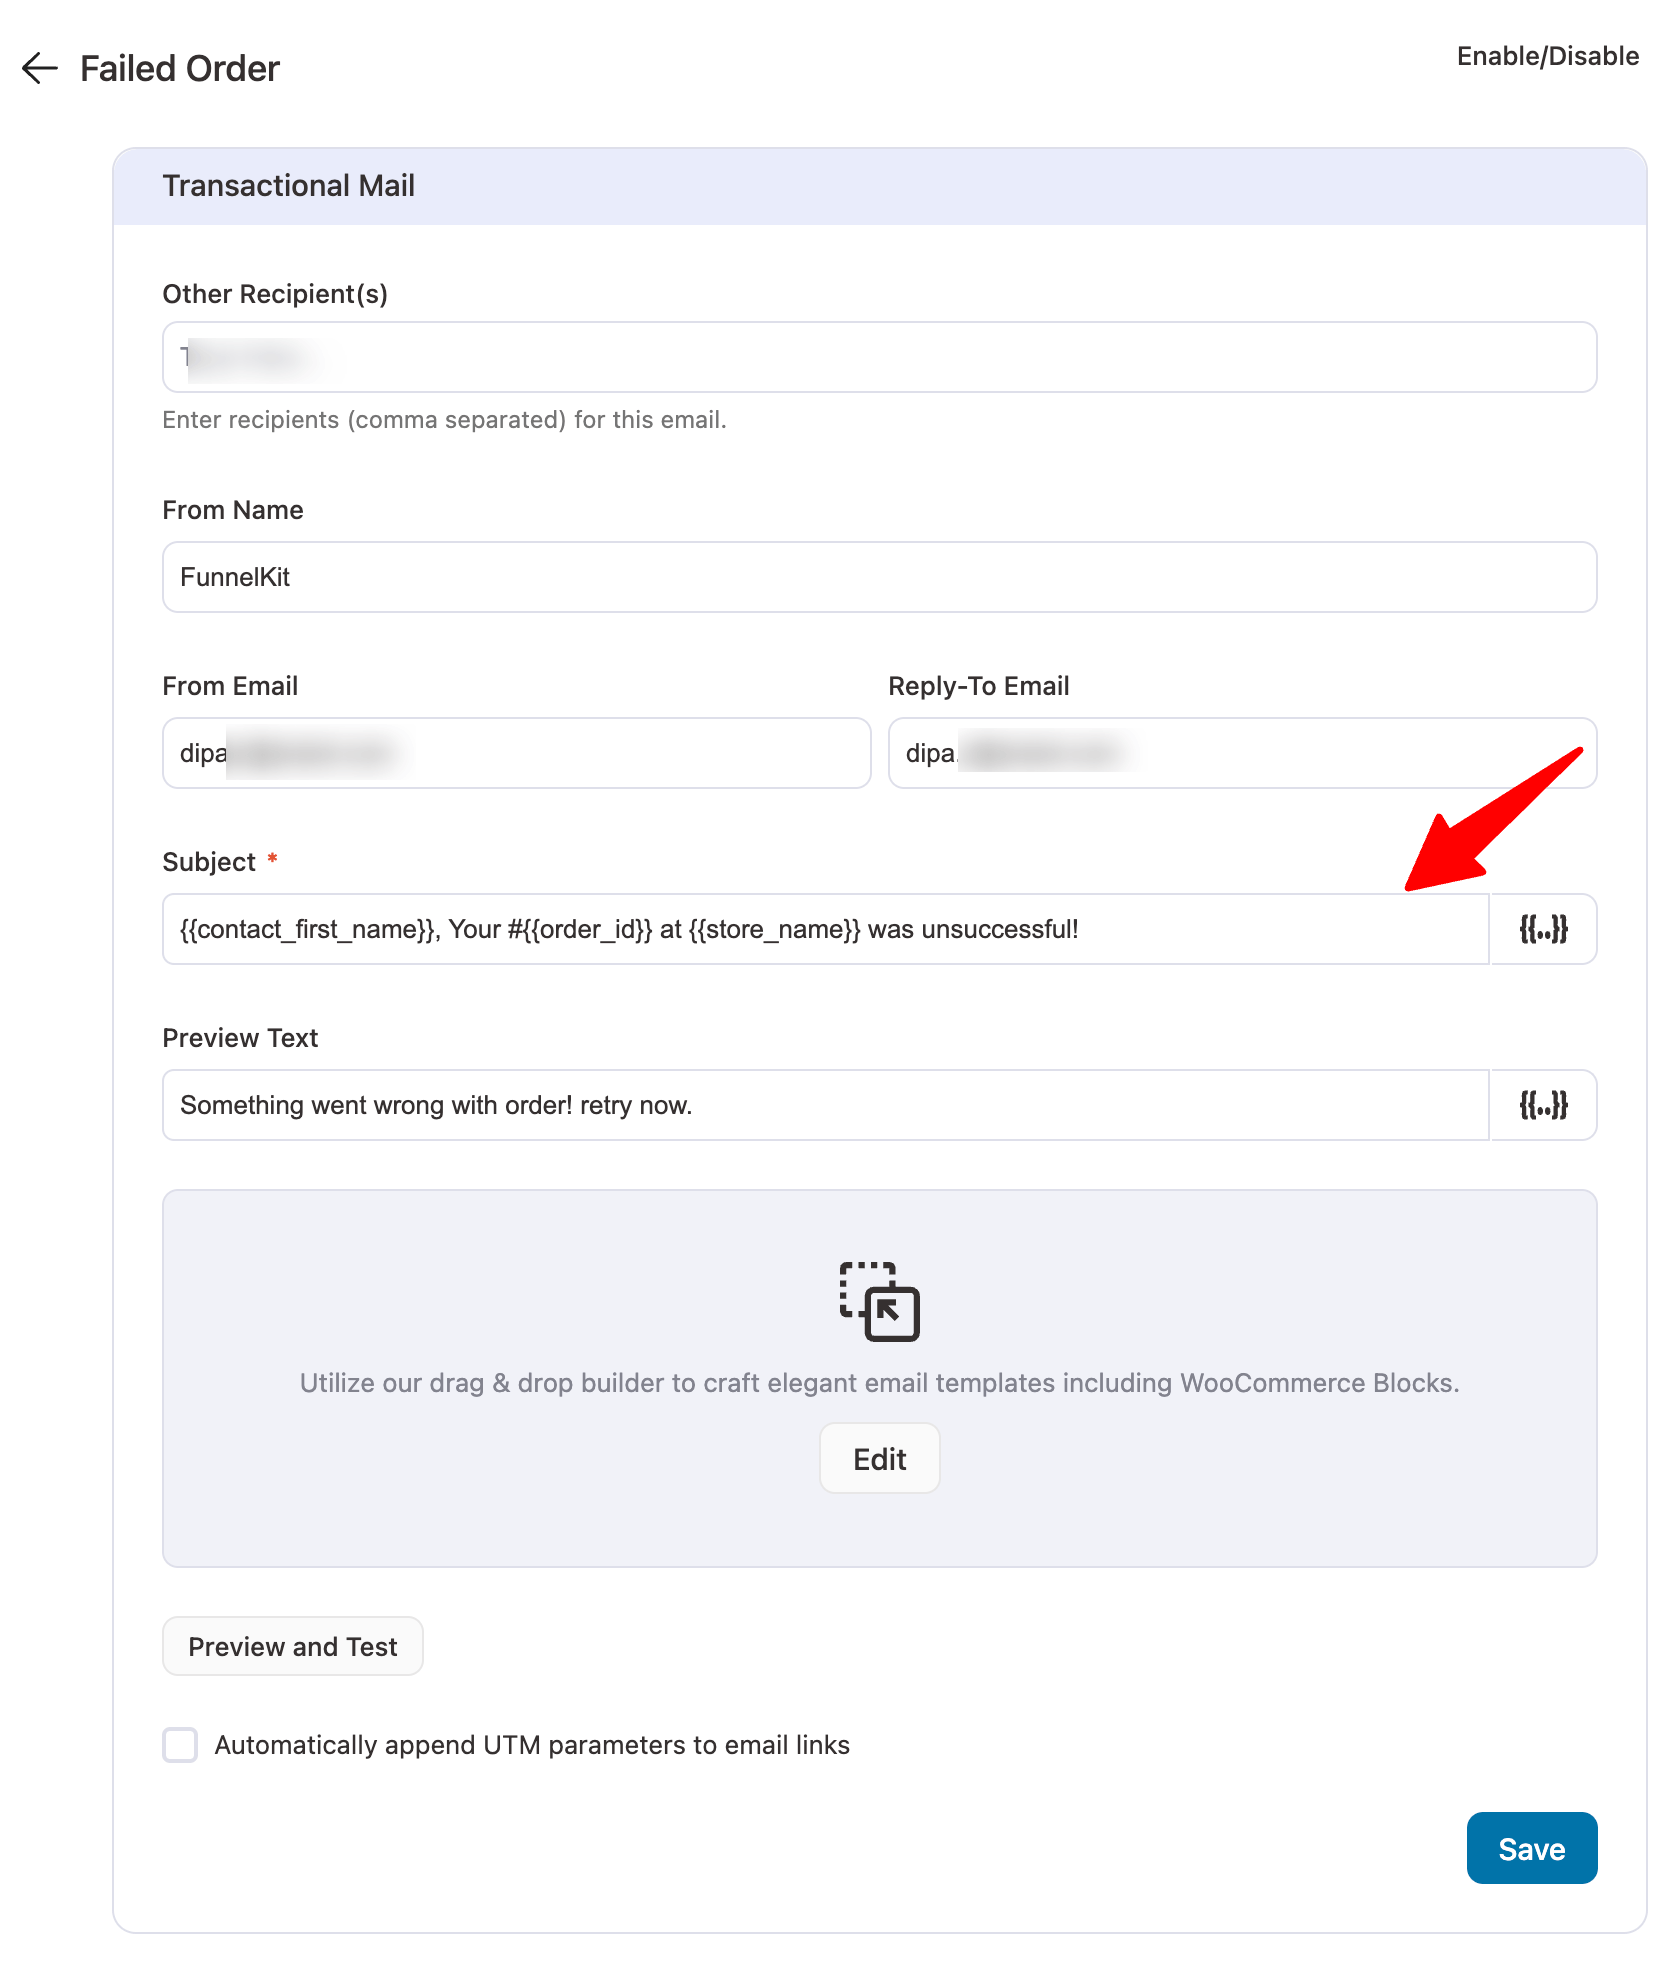
Here, you can set other recipients along with the customer: from name, from email, and reply to email.
Next, provide the subject and preview text. It’s always a good idea to personalize the failure of an order.
So, instead of saying, “Hey! Your order failed,” you can address the customer by name and add the order ID in the email subject line.
FunnelKit Automation offers different merge tags to add dynamic information to your email content. You can access the merge tags by clicking on the “{{..}}” sign.
For example, here we are using “{{contact_first_name}}” to address the customer by name and “{{order_id}}” to print the order ID that failed.
Like the subject line, add a proper preview text.
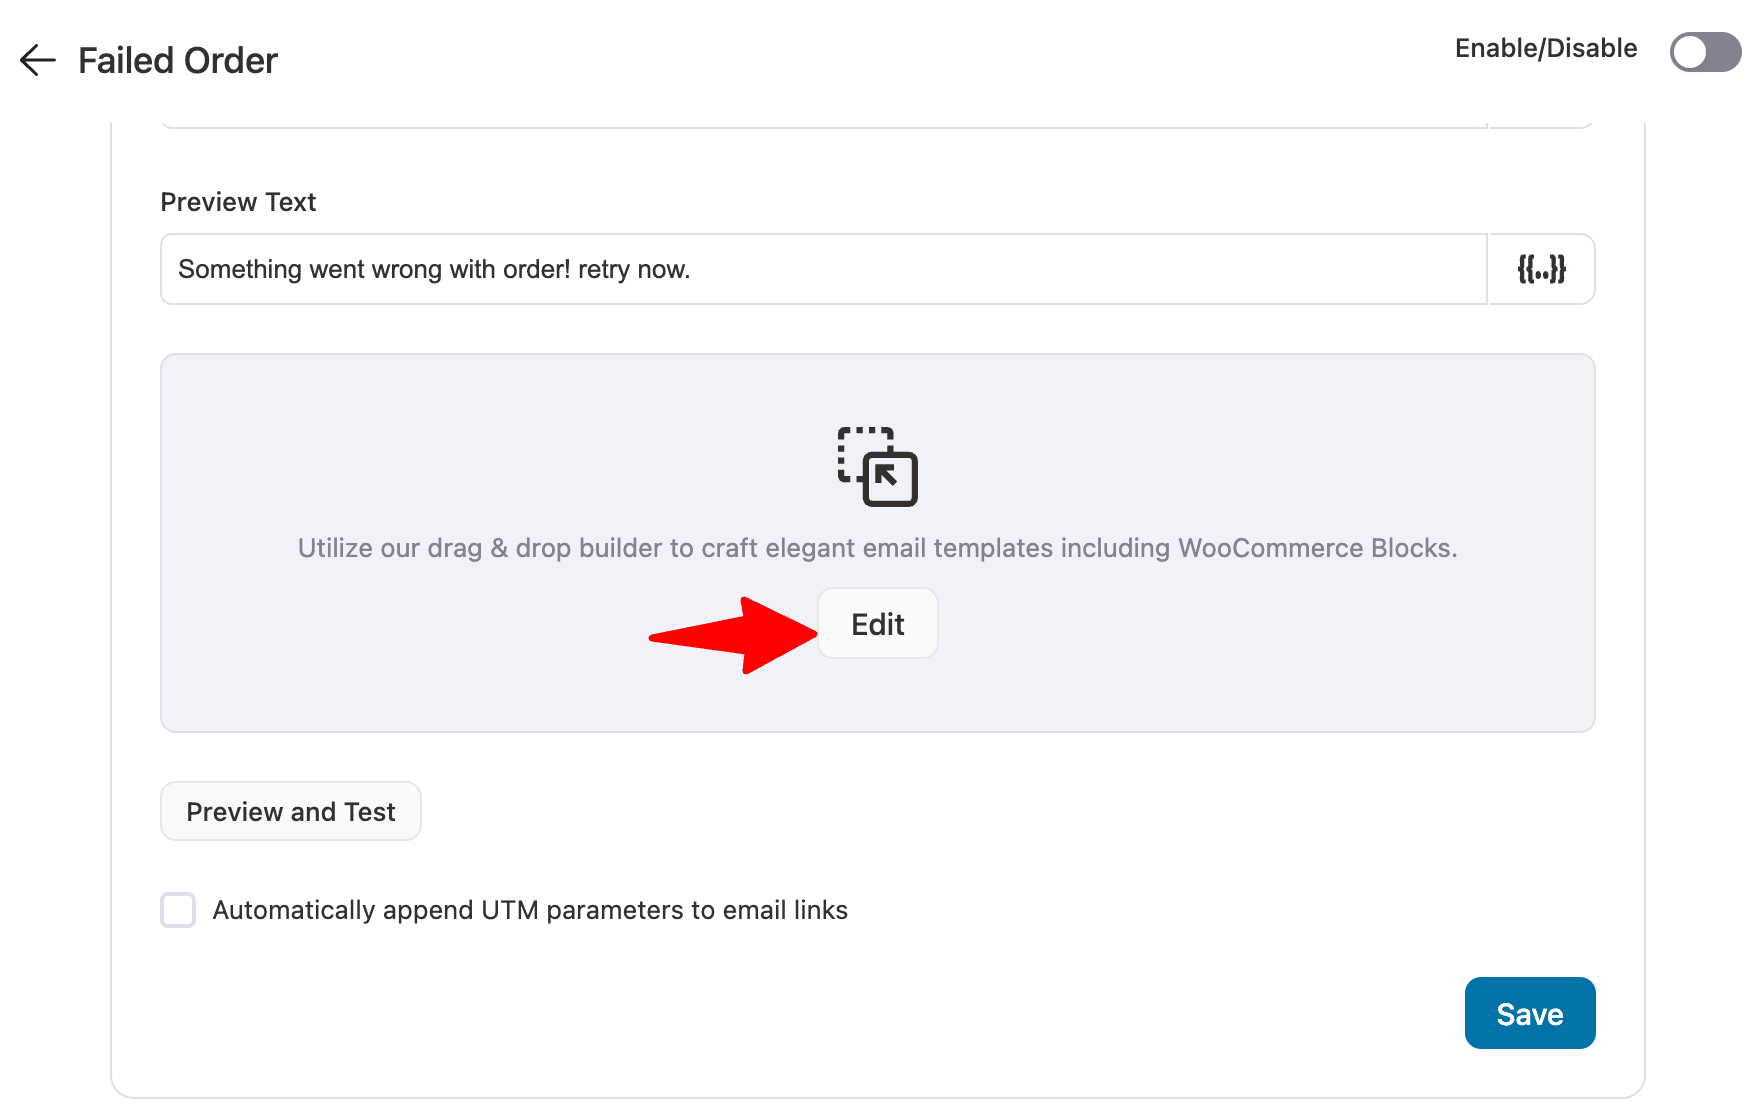
Step 3: Customize the failed order email content
Next, you need to customize the body of the email. For this, hit the edit option.
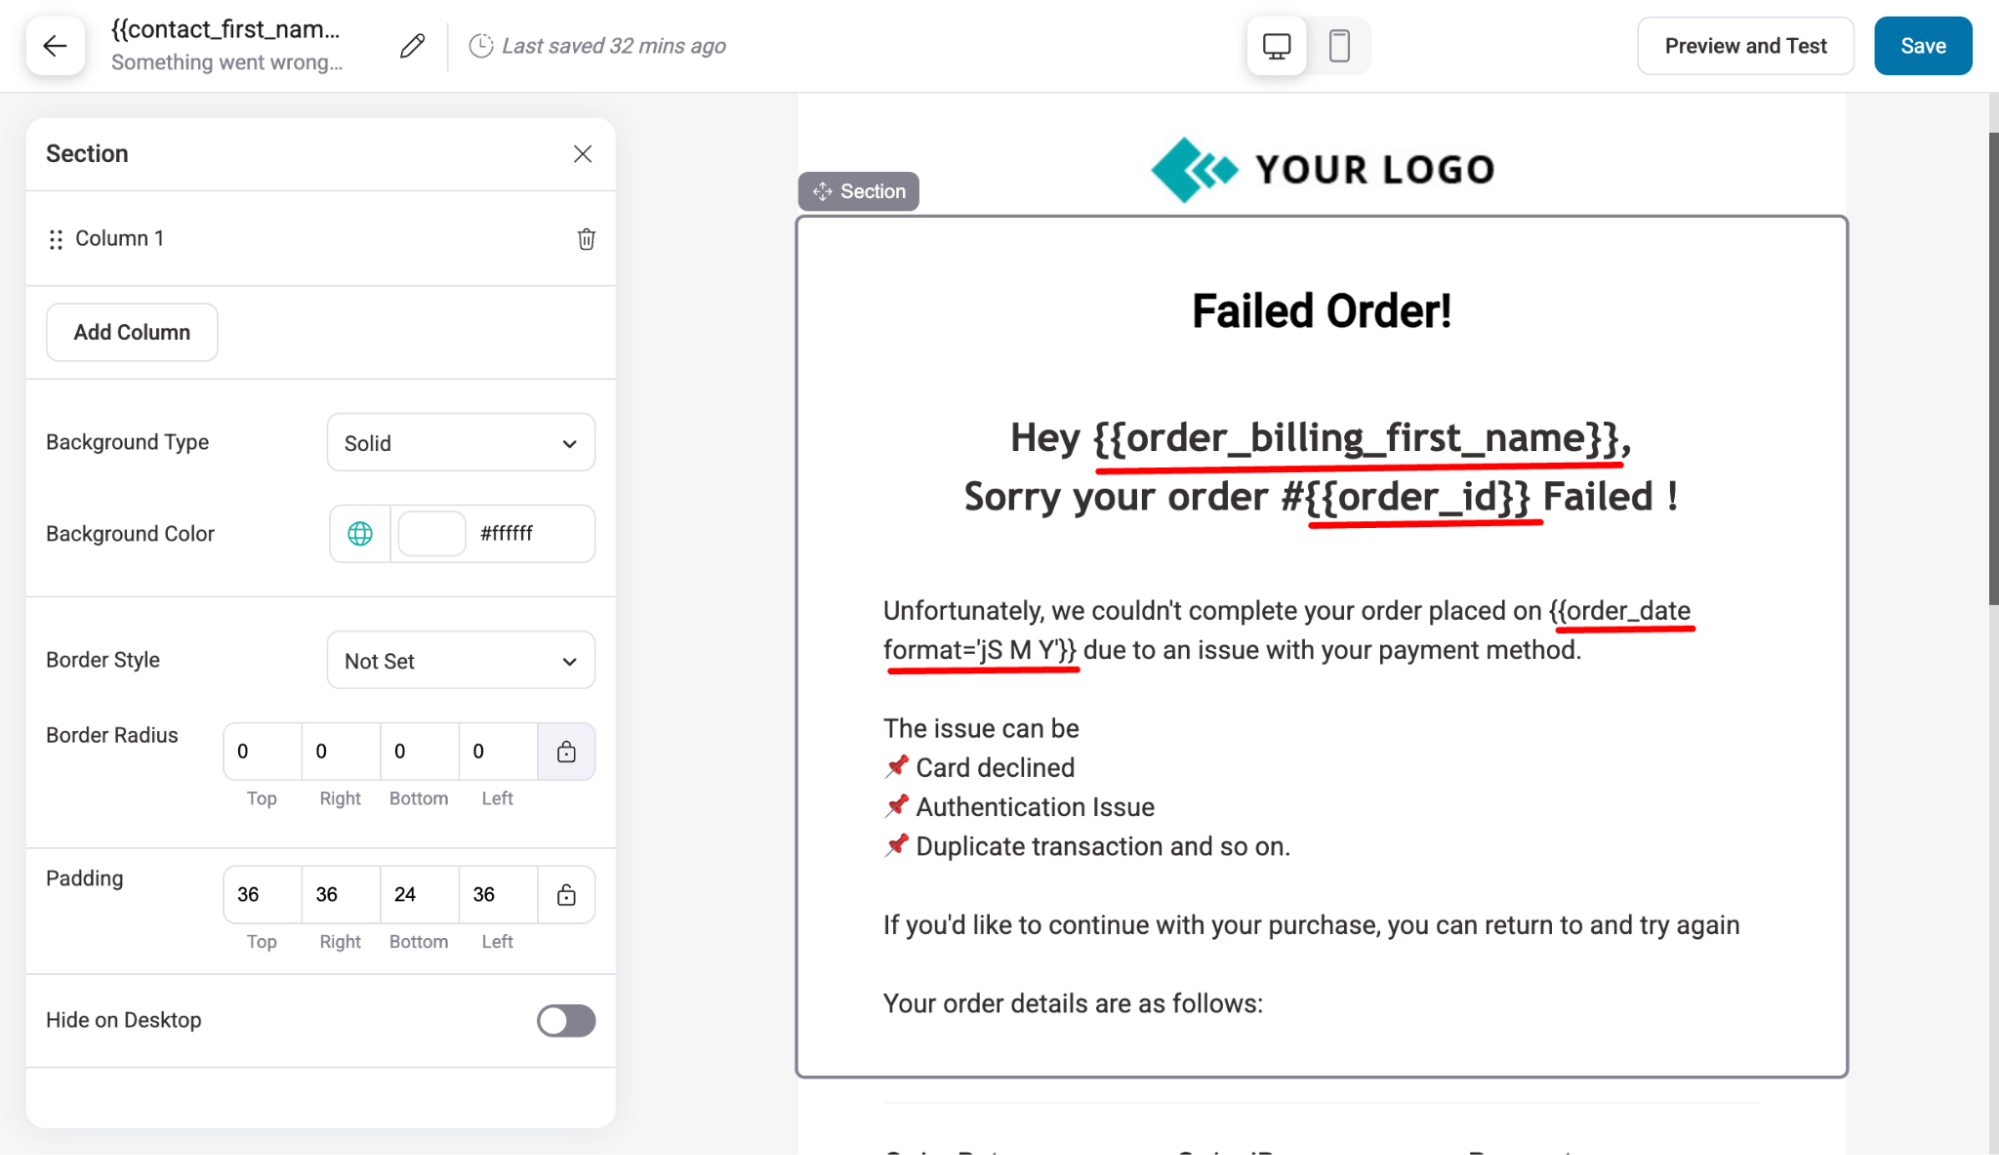
Now, you can customize the email template according to your preference.
For instance, change the logo and heading to match the email content of the failed order.
You can use the following merge tags to display dynamic information:
- {{contact_first_name}}: Display customer first name
- {{order_id}}: Display the customer ID
- {{order_date}}: Displays the date on which the order was placed.
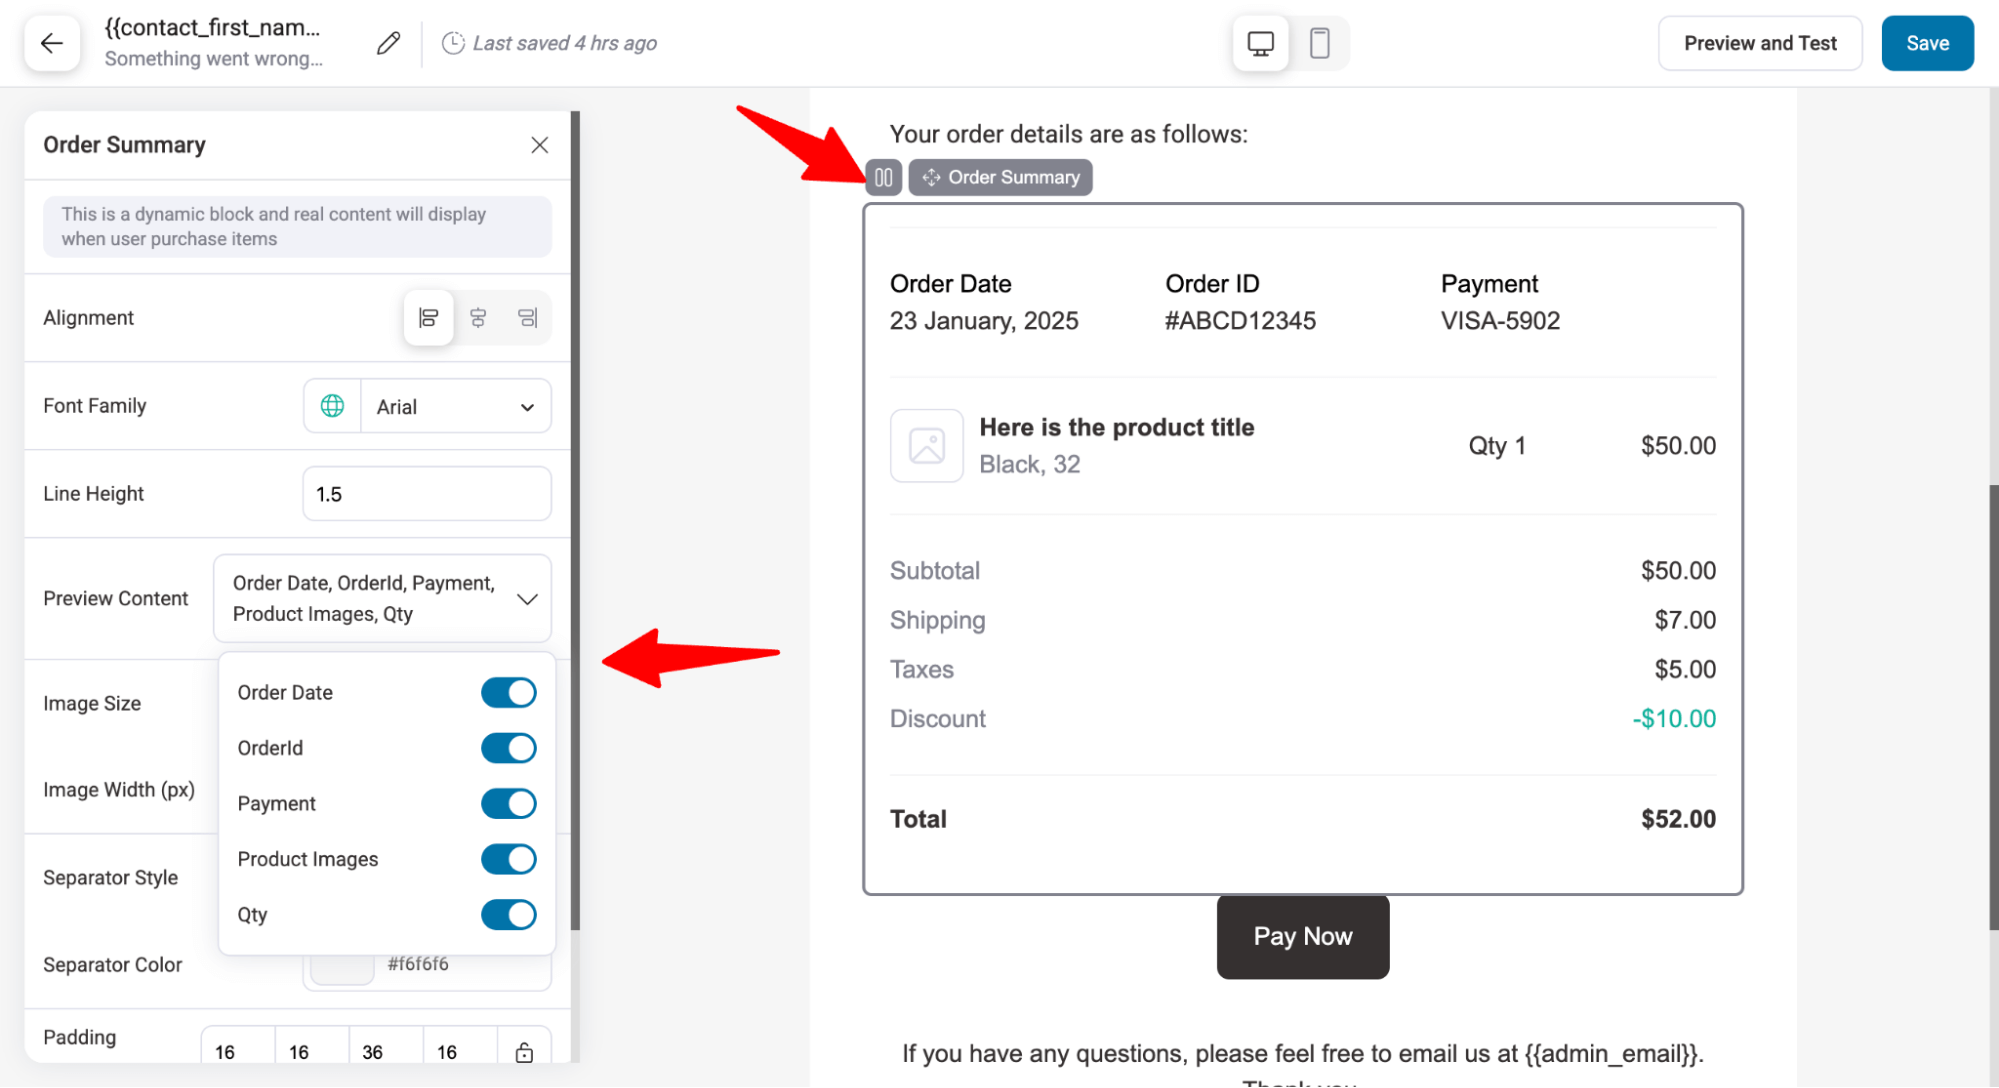
This template already has an Order summary block that you can use to show or hide the Order Date, Order ID, Payment, Product Images, and Quantity.
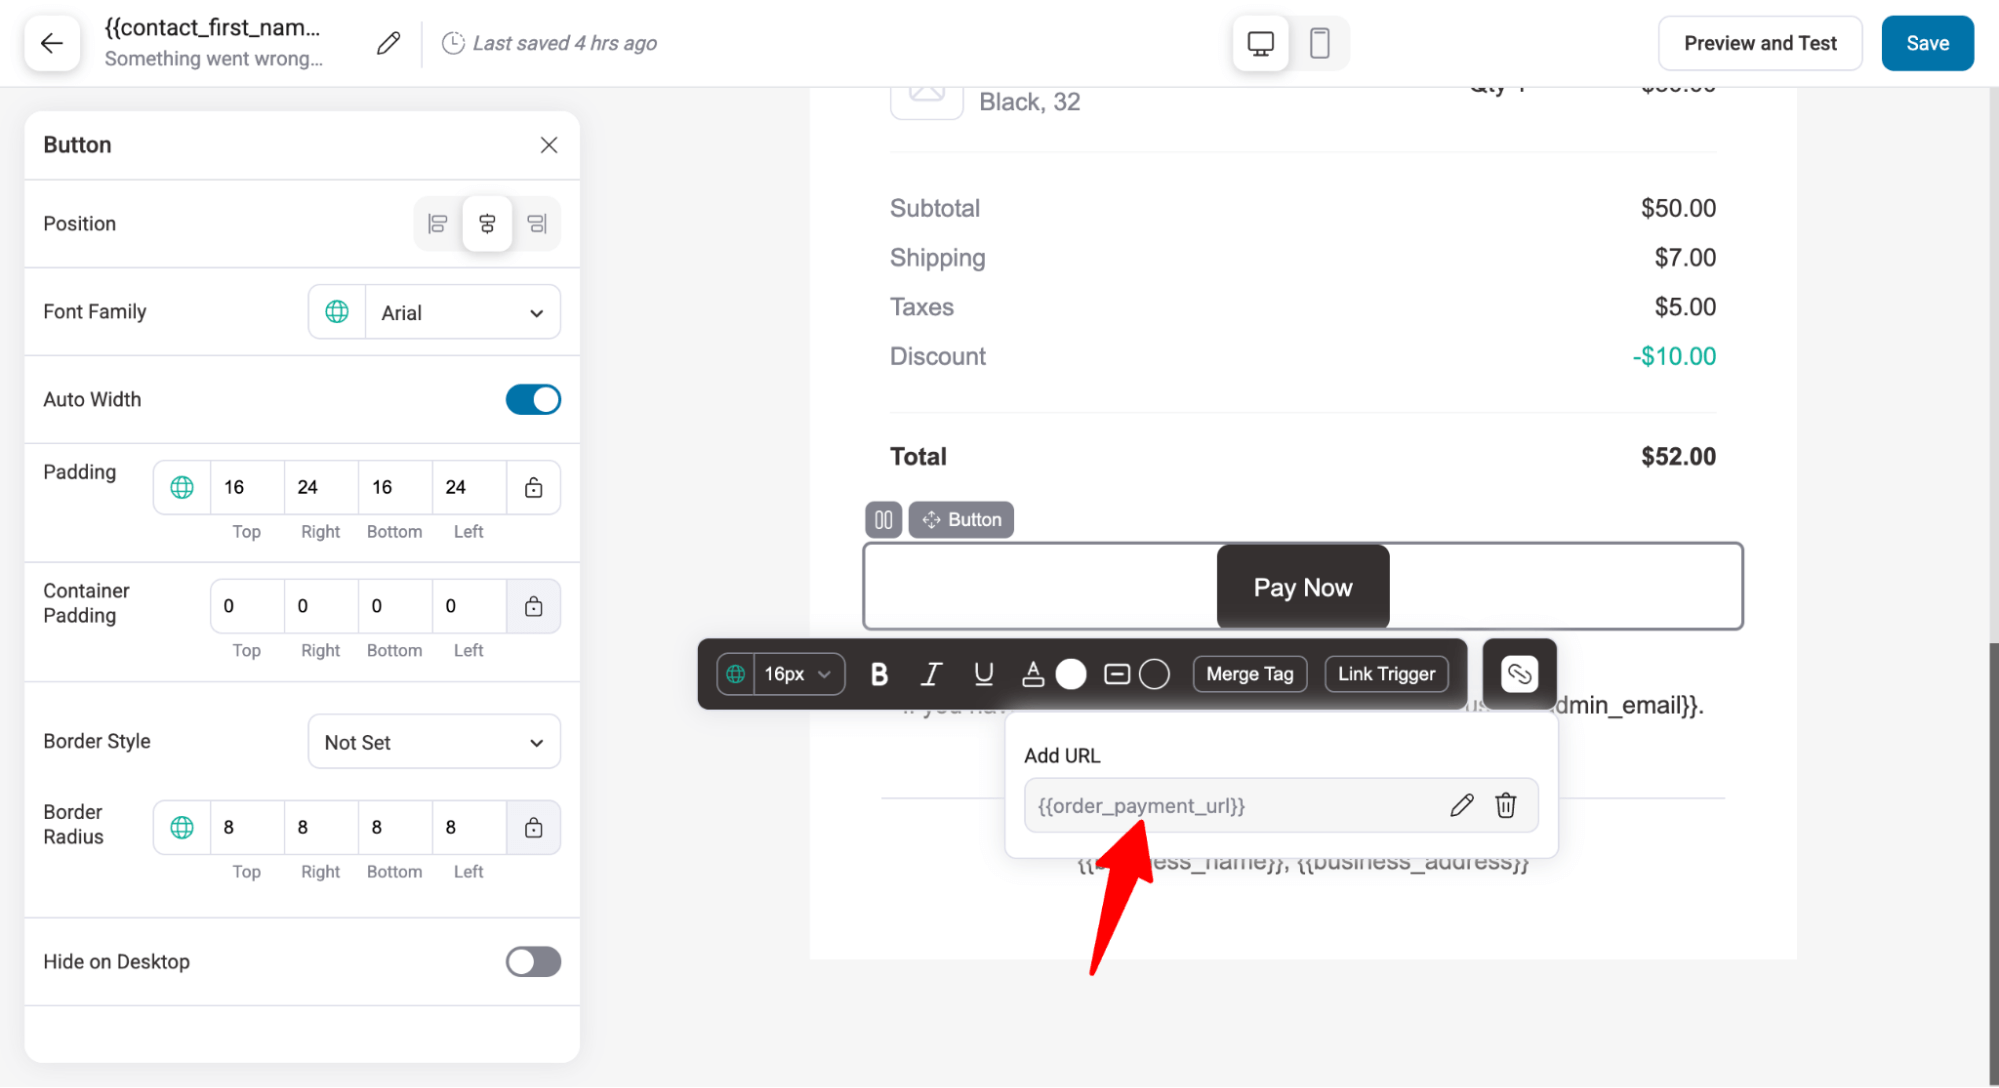
It is important to offer users an option to easily return to the WooCommerce store and complete the failed order.
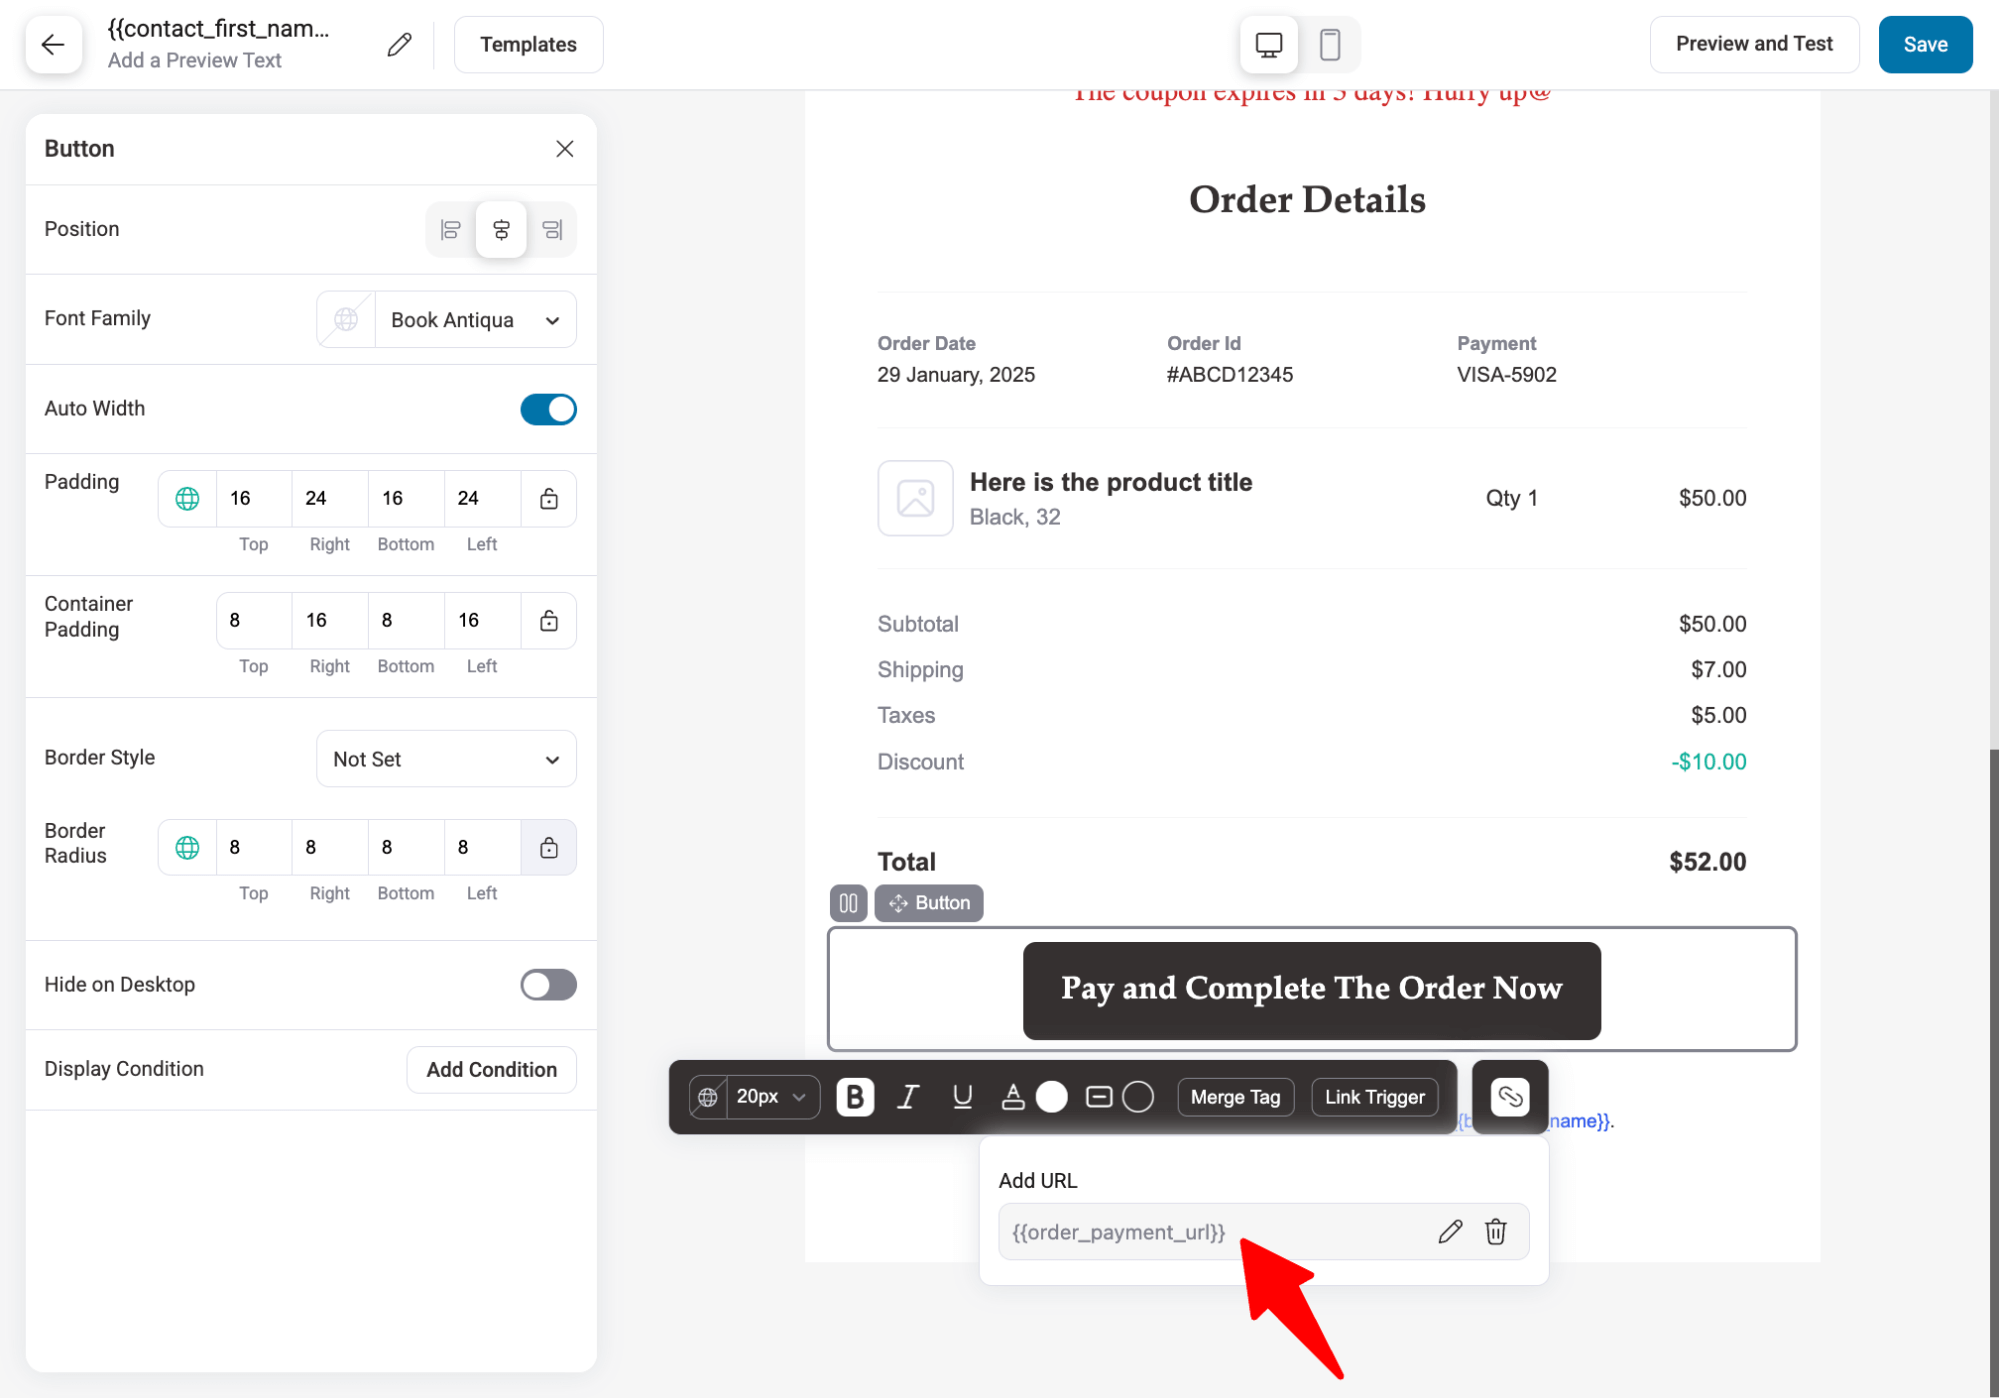
This template has a pay now button, which uses the merge tag {{order_payment_url}} to send users to the order page where they can complete the transaction.
You can change the CTA text and style as well.
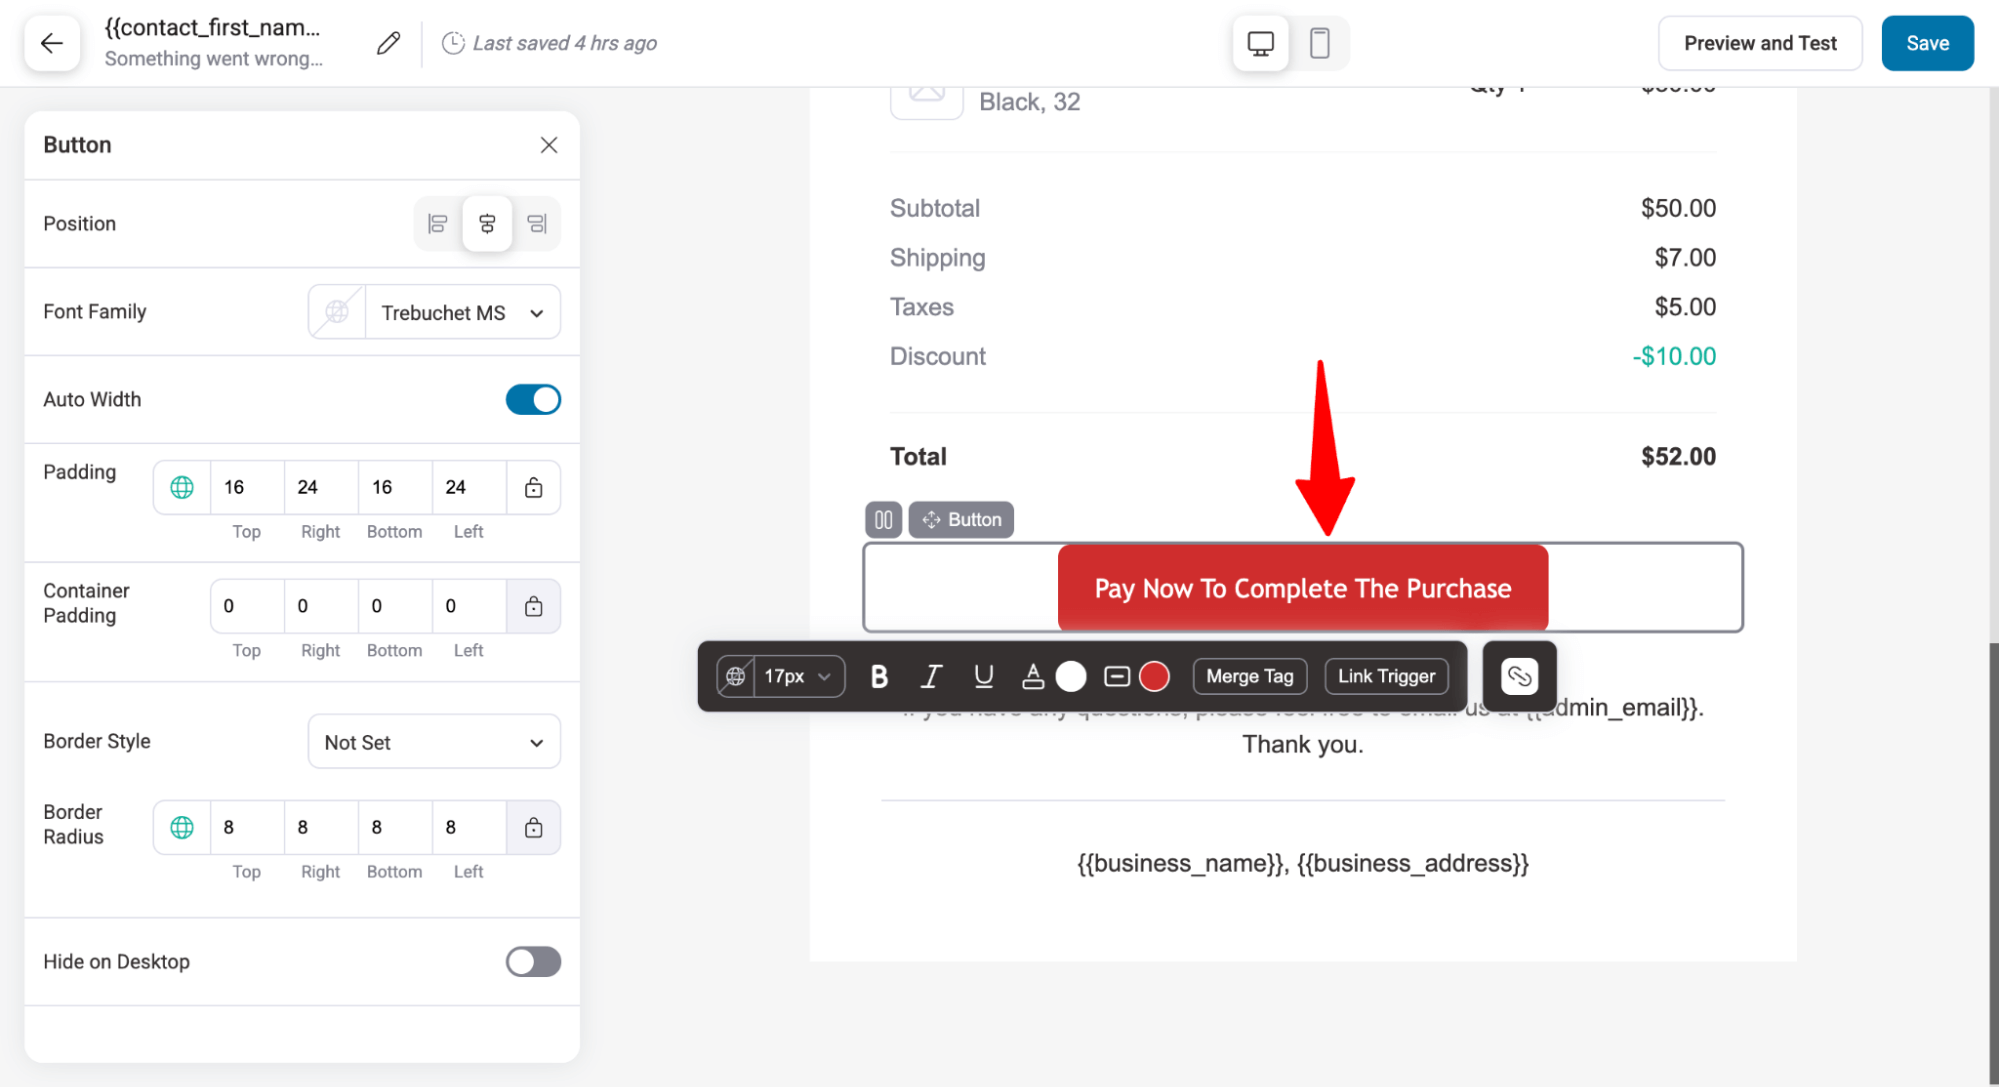
After making the changes, make sure to hit ‘Save’ to update.
Step 4: Audit email to ensure quality checks
Next, you can preview how the email will look and, more importantly, audit it to make it user-friendly and compliant with all laws and regulations.
For this, hit the “Preview and Test” button at the top. Then, hit the “Start Now” button under Audit Email.
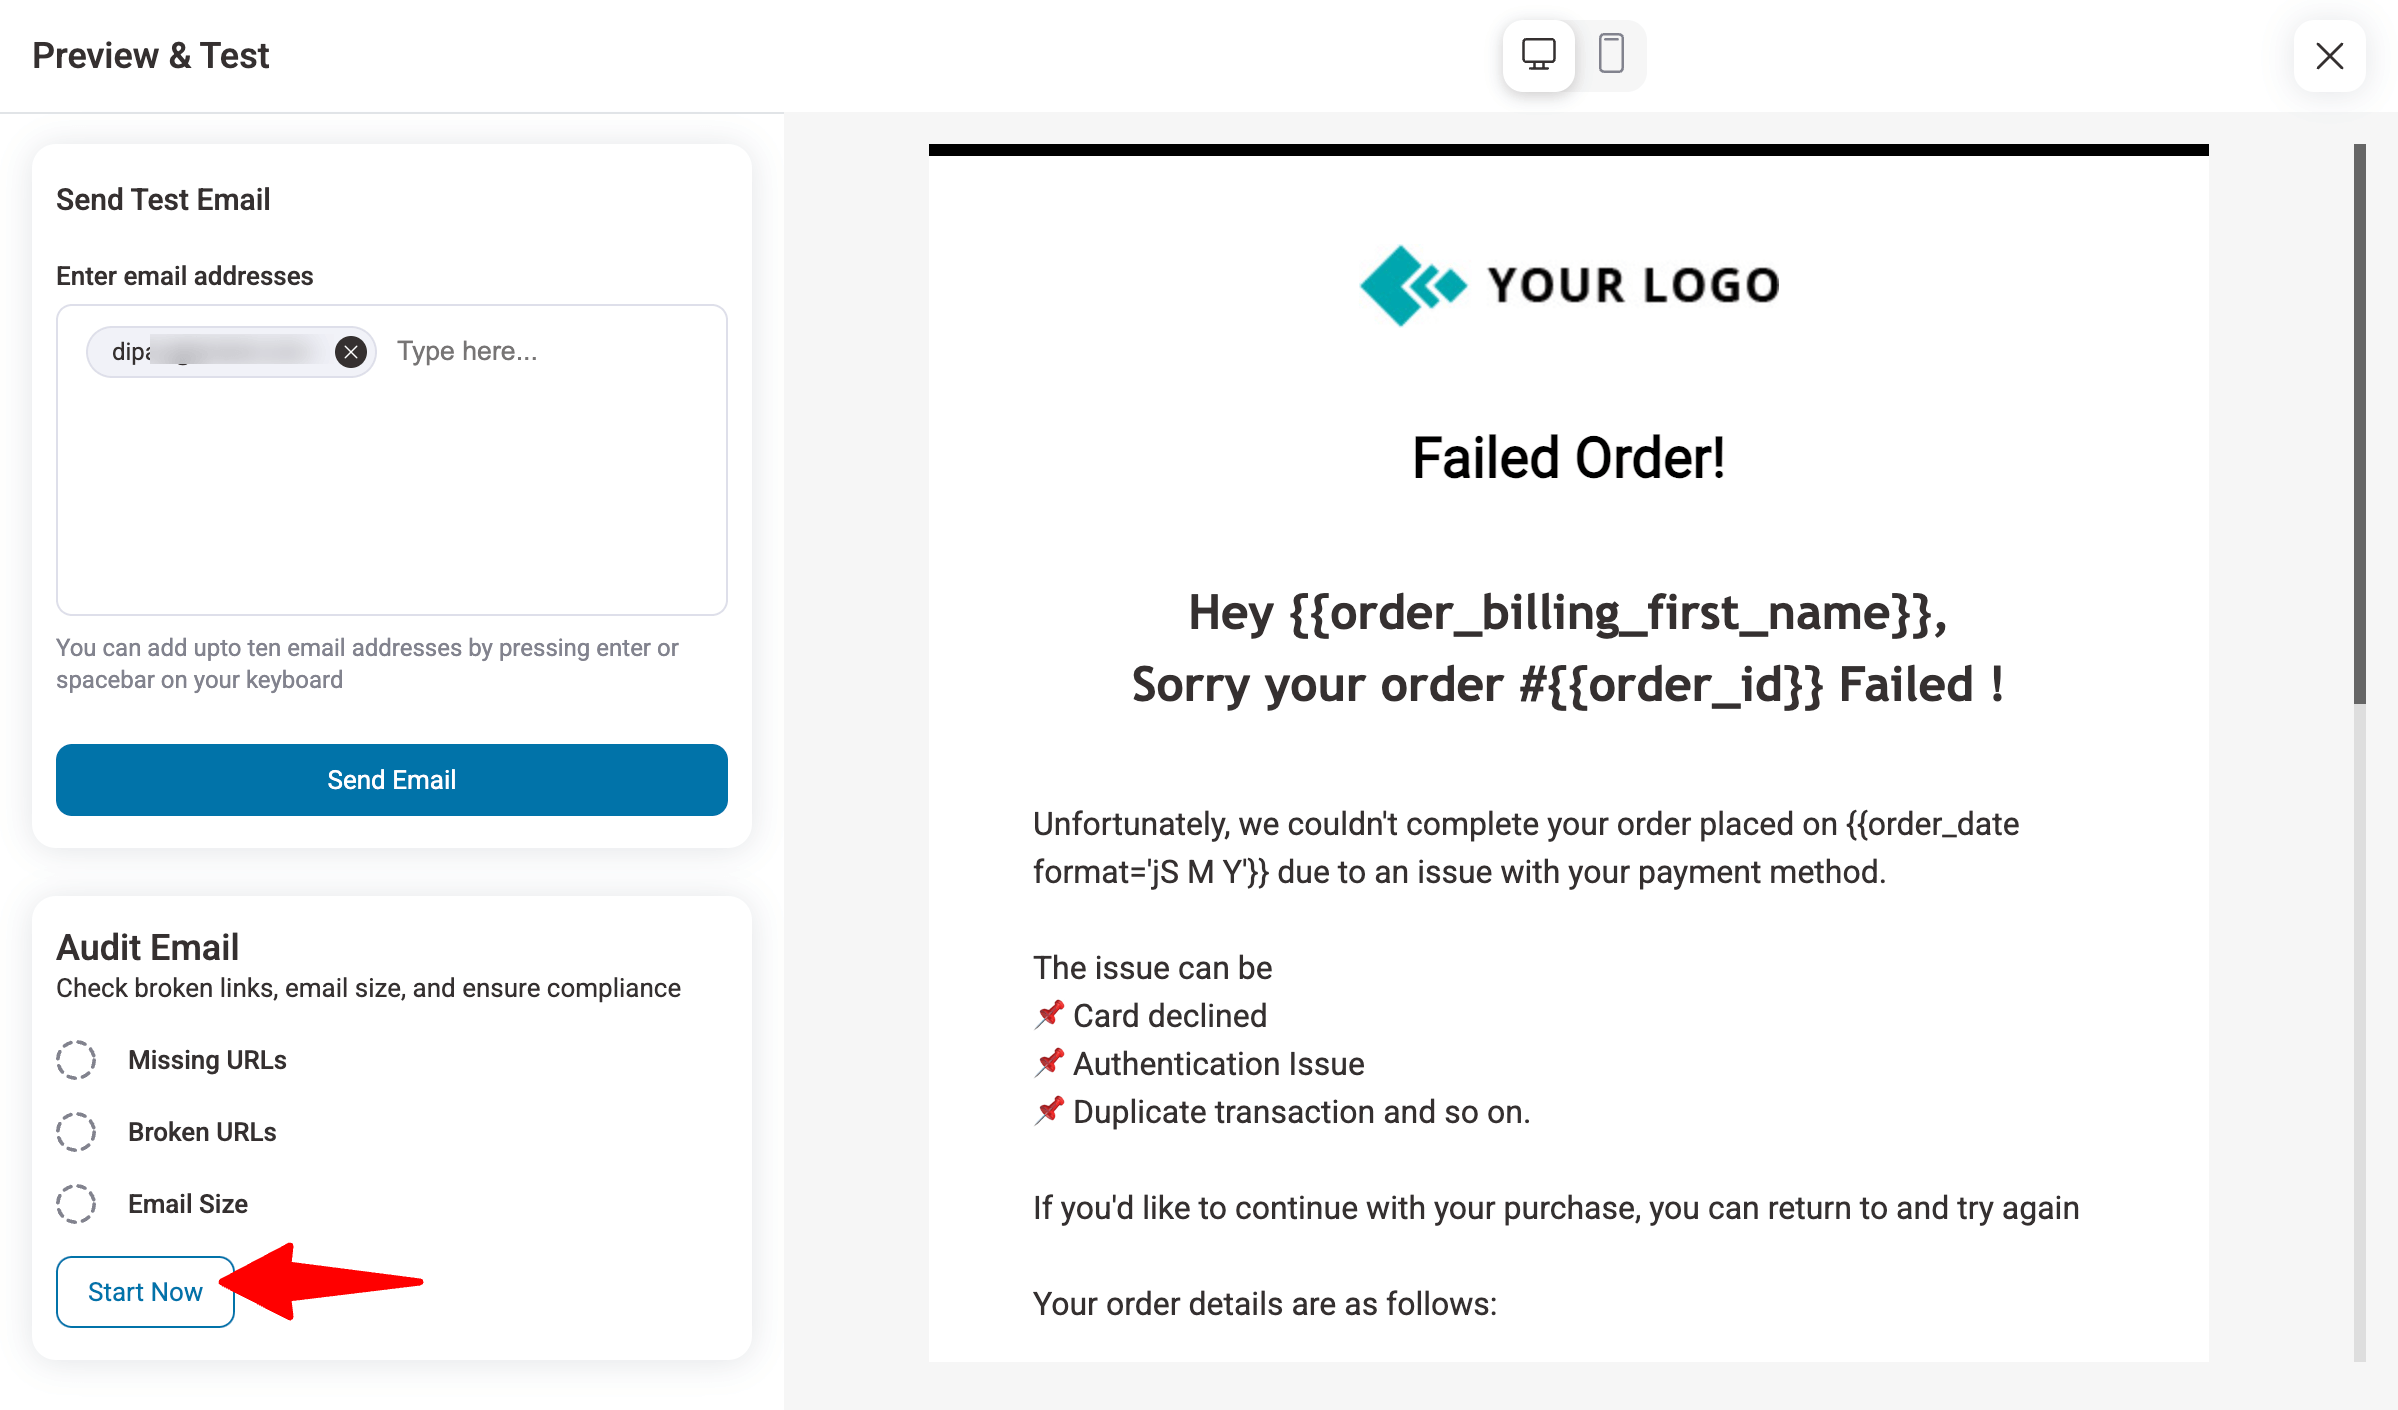
This will show you any missing URLs, broken URLs, and email size.
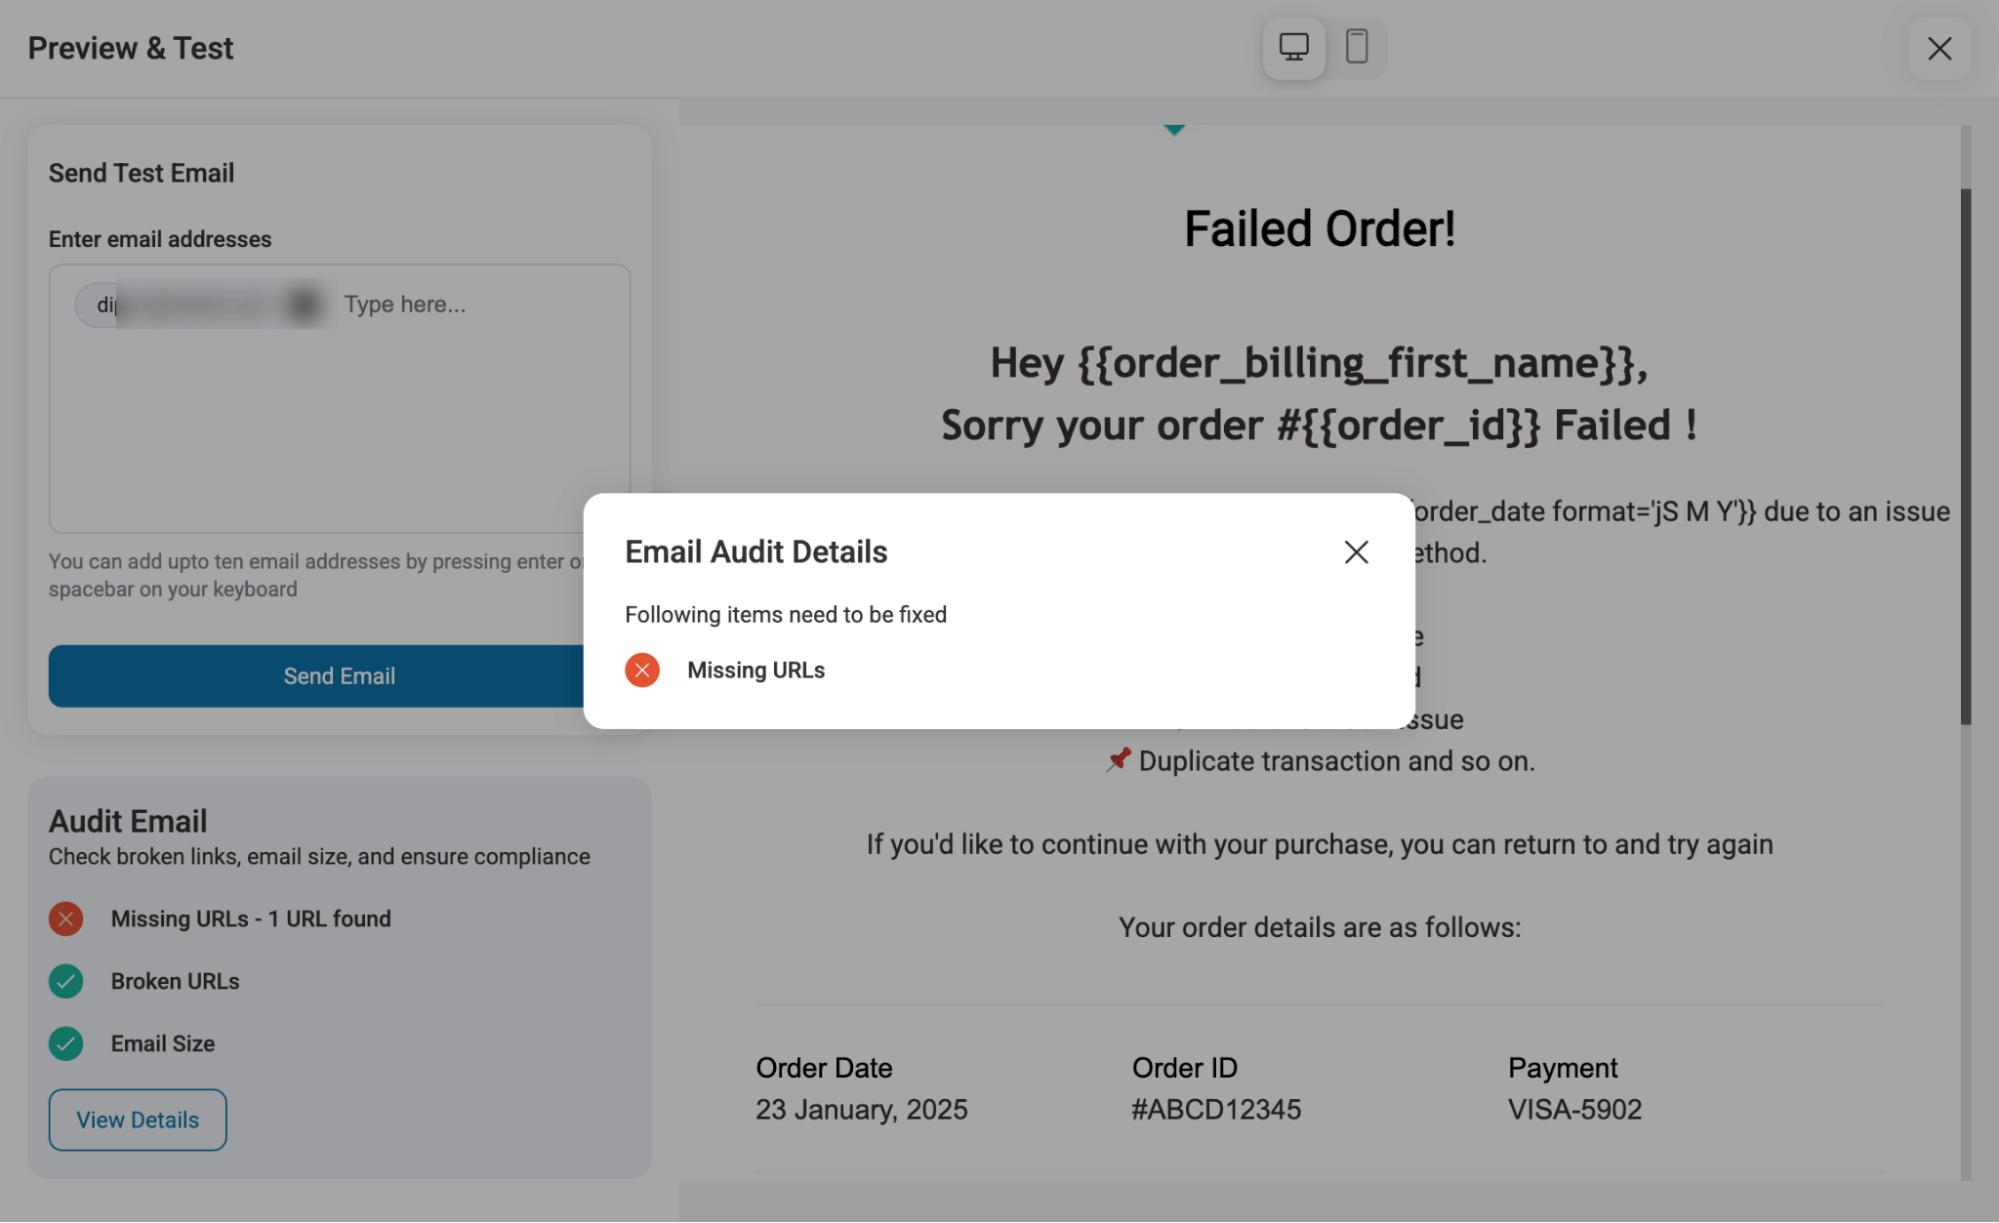
If there is any issue, fix it.
Step 5: Activate the email and test run it
The last step is to activate the failed order email. For this, turn on the toggle button.

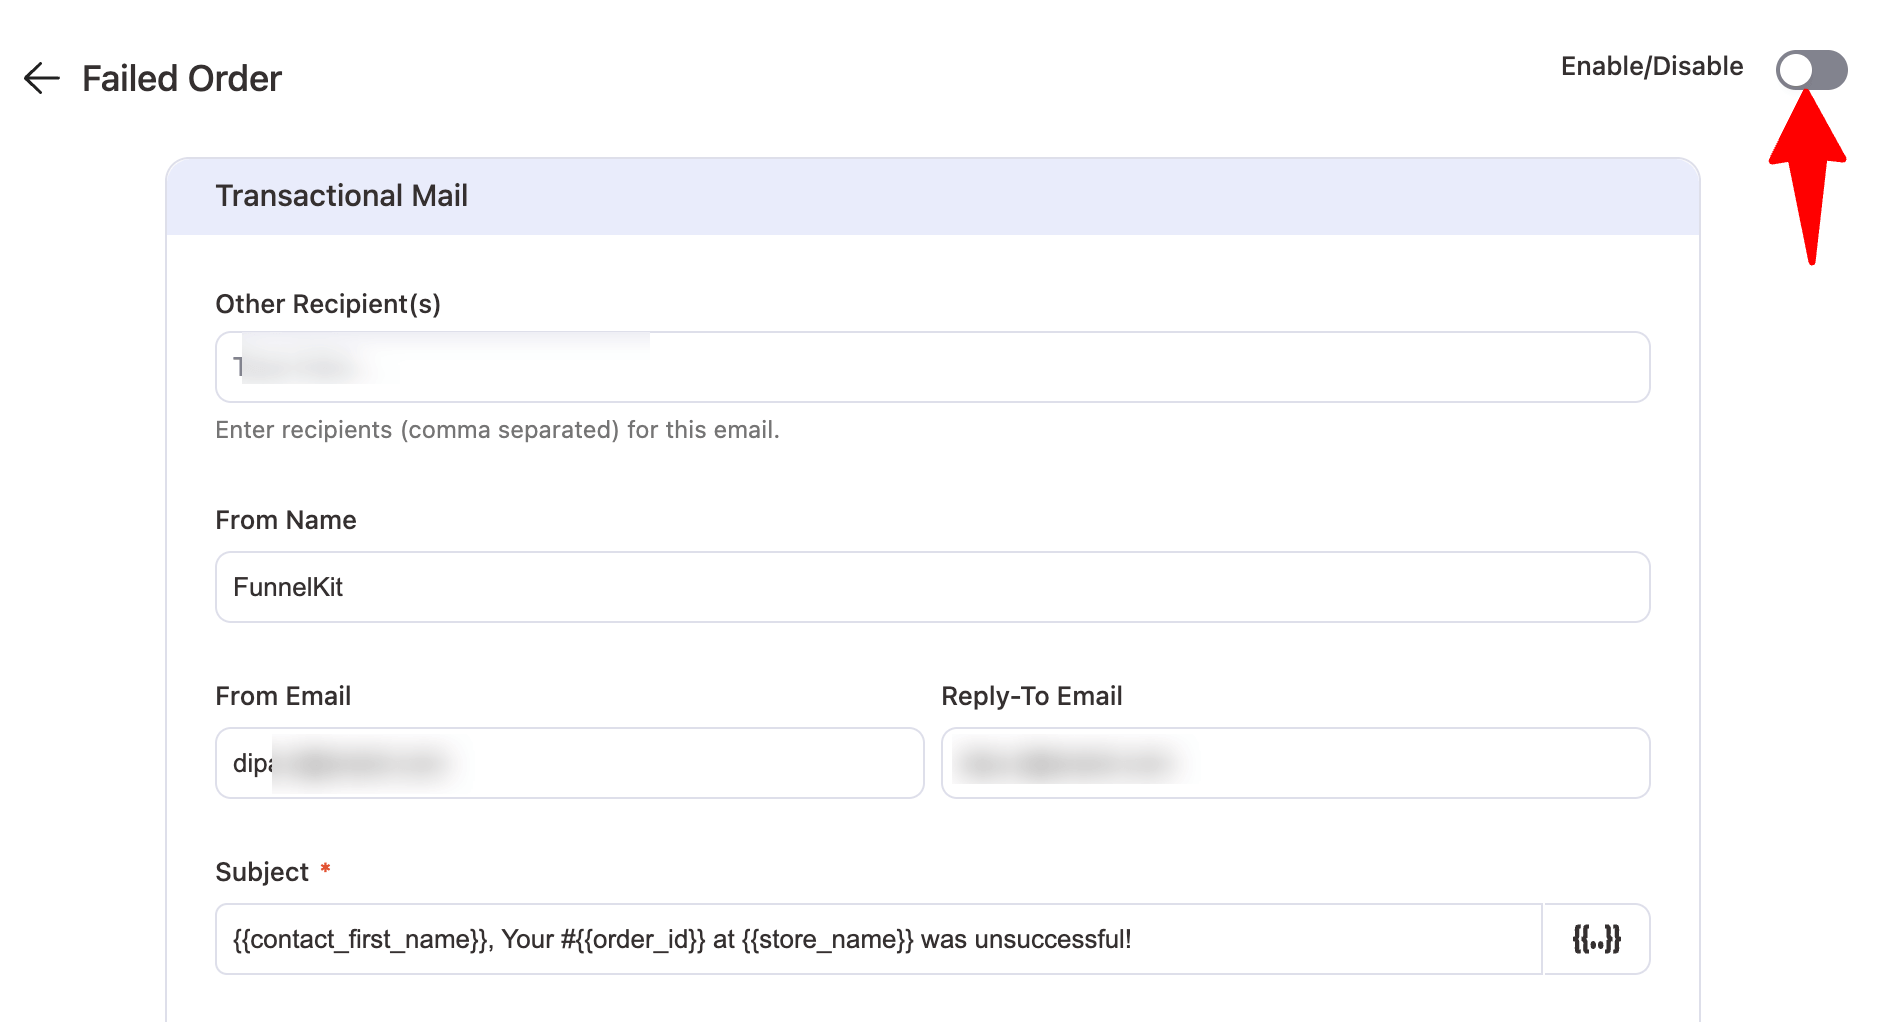
And that’s it. Your automation to send a custom WooCommerce failed order email is ready!
Here is what the failed order email looks like:
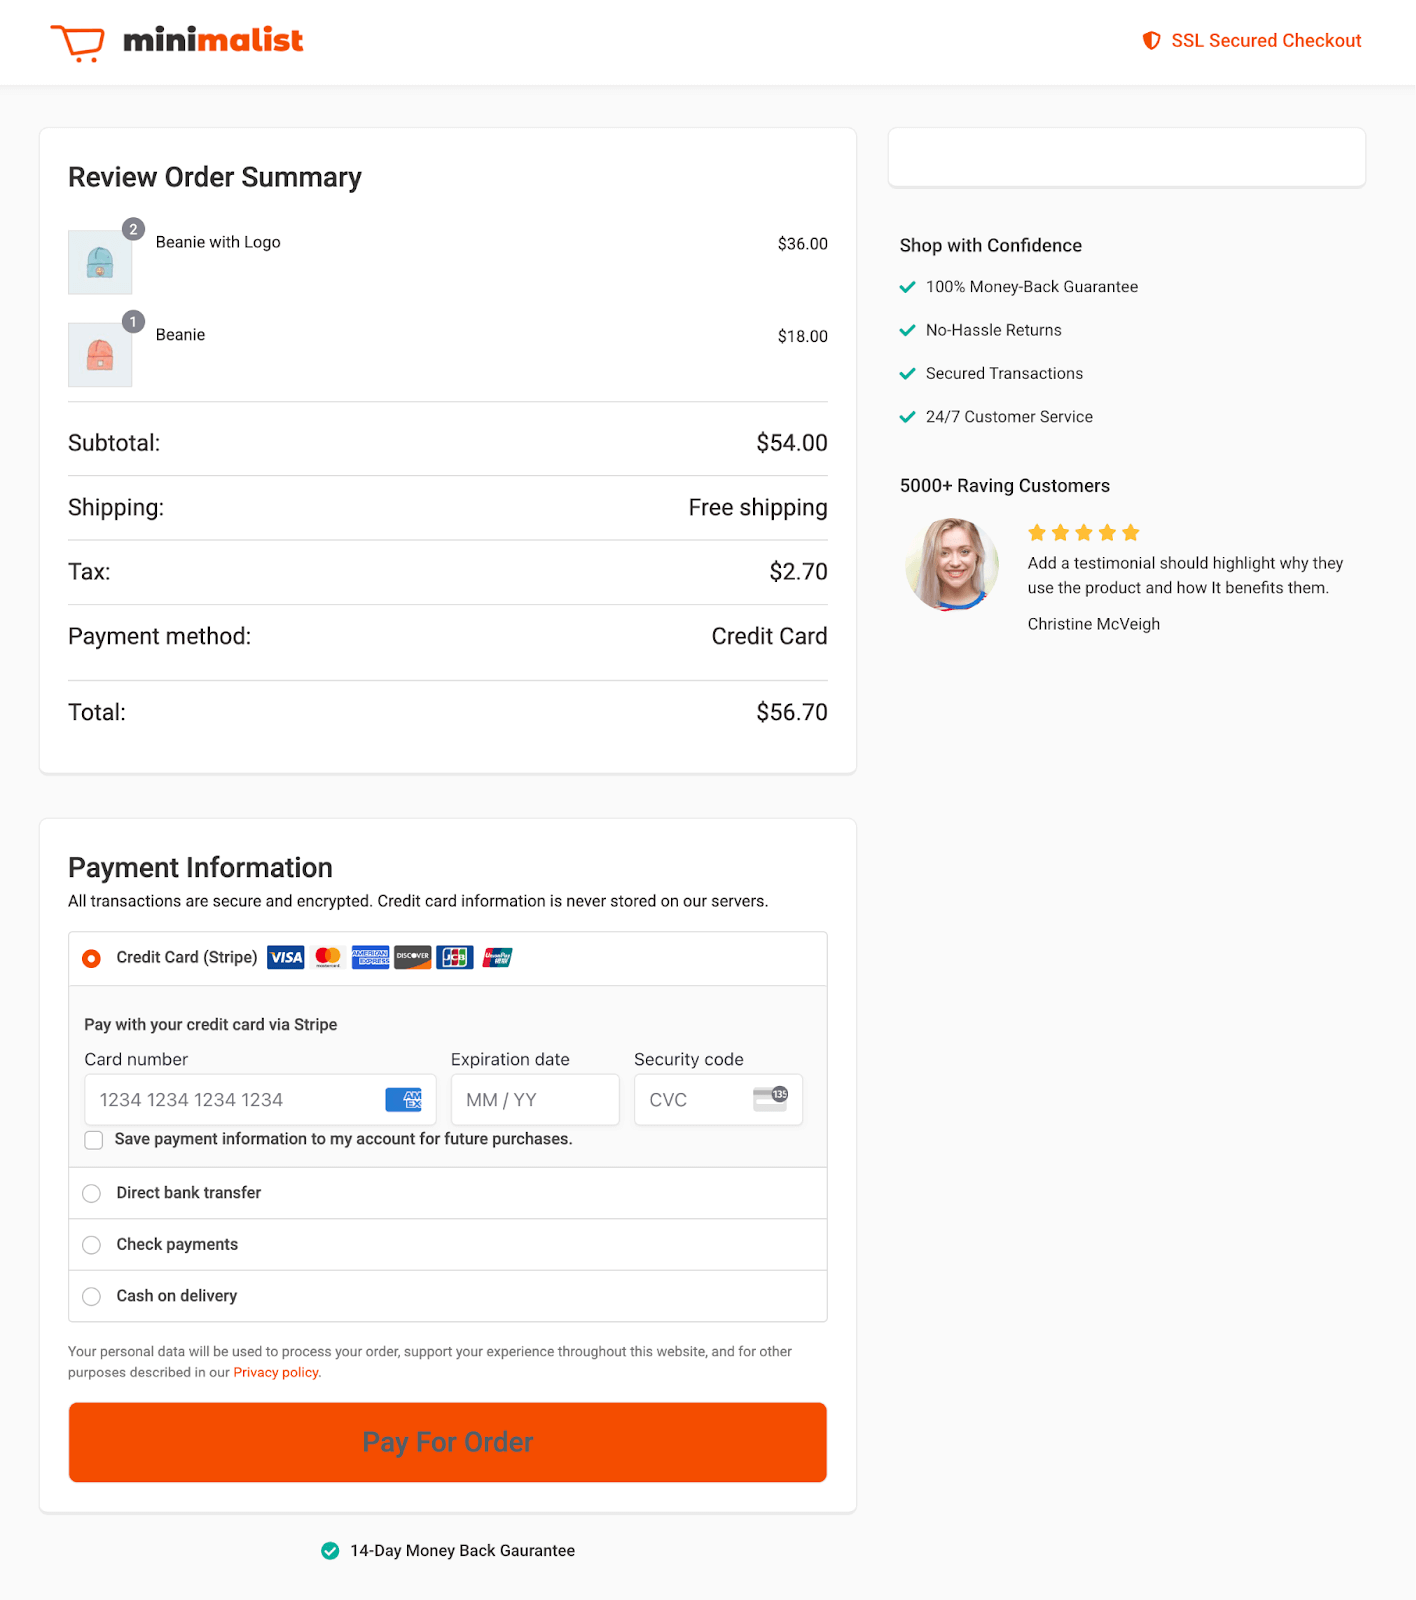
Once users click the Pay Now button, they will be directed to the pre-populated checkout page, and all they have to do is provide payment details and hit the Place Order button.

What if Customers Don’t Complete the Order After the Emails?
While sending an email is often enough to get a user to complete the purchase, sometimes they can miss it, right?
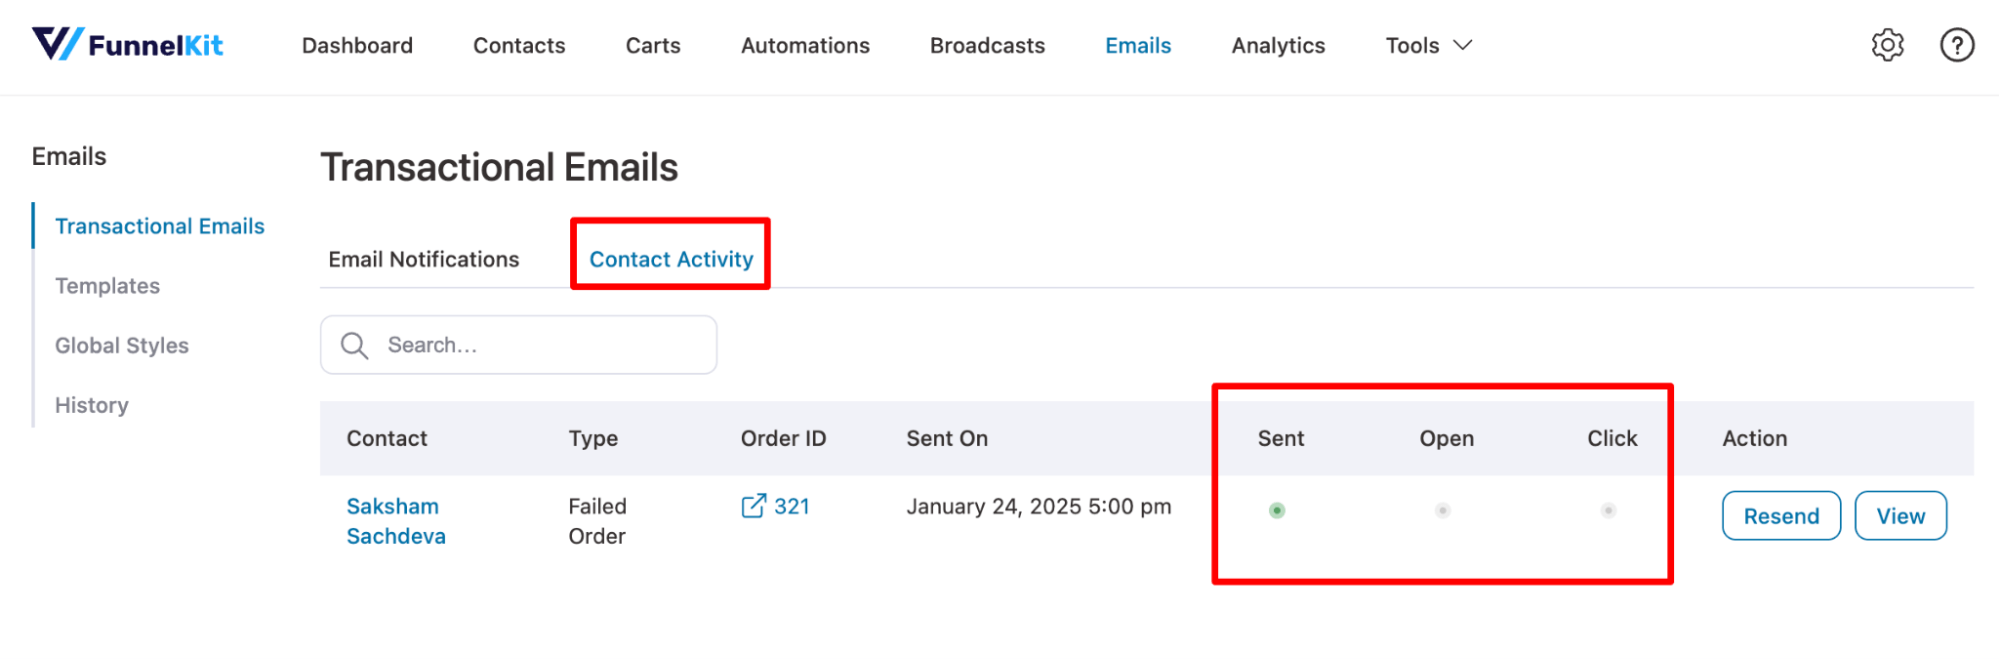
With FunnelKit Automations, you can check whether users have already opened or clicked the email.
For this, move to the Contact Activity tab, and for each email, you will find data on whether the email was sent, opened, and clicked. You can also view the sent email by hitting the View button.
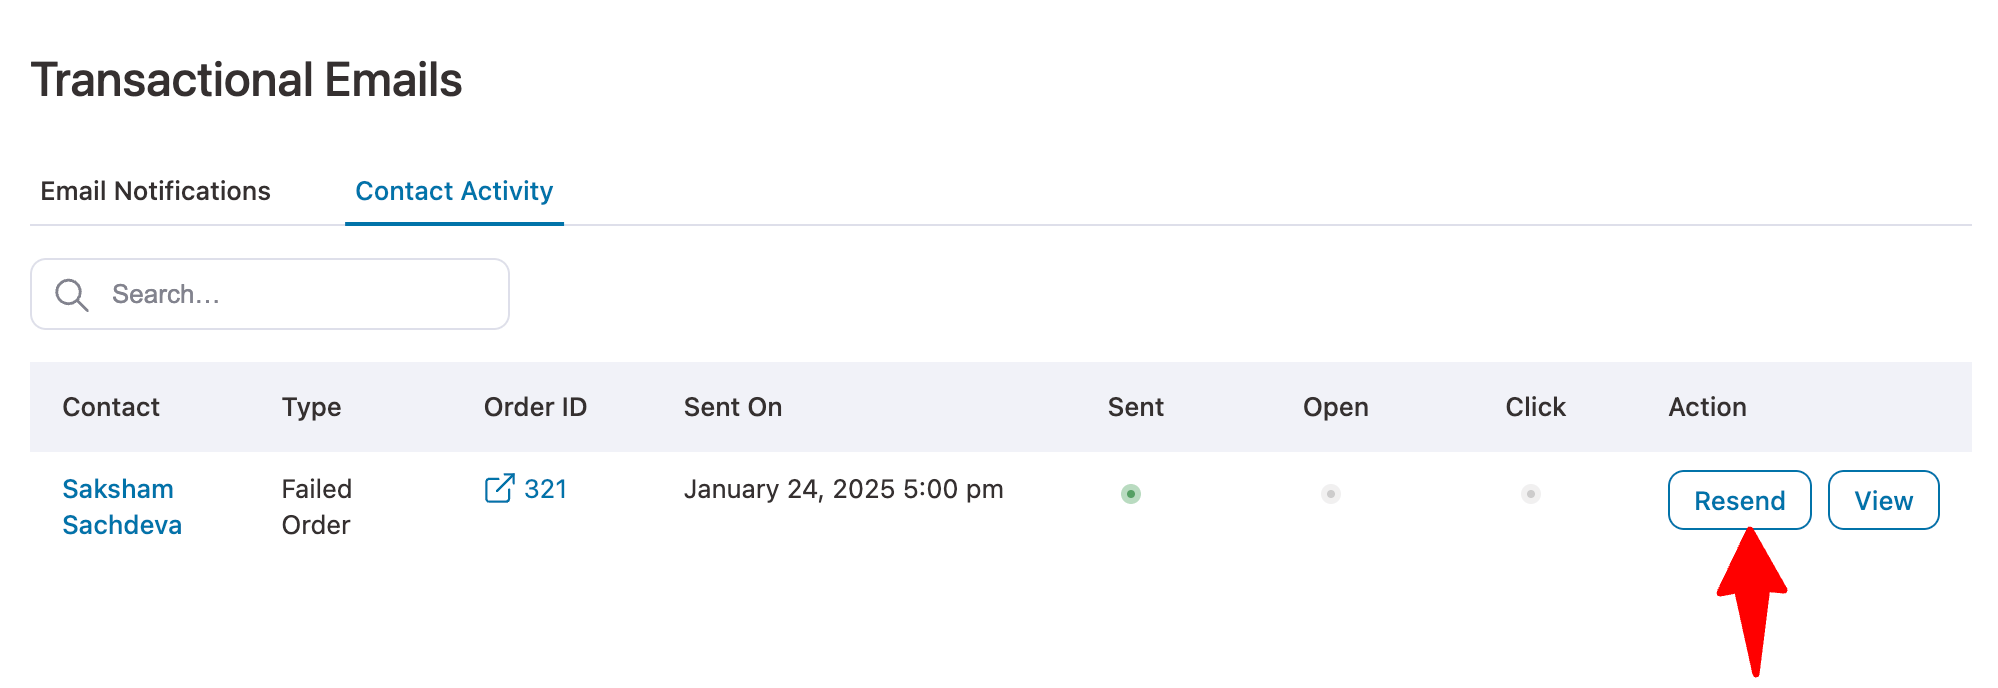
In case the email is opened but not clicked through, you can resend the email by hitting the Resend button.
Why the Pay Now Link Is the Whole Email
The order-pay URL is the difference between an email that informs and an email that recovers, so it’s worth understanding what it actually does.
It loads the checkout for that specific order, with the line items, addresses, and totals already attached, and an order key in the URL that authorizes access without a login.
The buyer picks a payment method and pays. No cart rebuild, no re-entering an address, no hunting for the product again.
Three constraints to design around:
- The link stops working once the order leaves an unpaid status
That’s a feature, since a paid order can’t be paid twice, but it does mean a stale link in an old email shows an error page rather than a checkout.
- Guest orders are accessible to anyone holding the URL
Don’t put it in an SMS you’d forward, and don’t publish it anywhere.
- The page uses your checkout template
If you’ve heavily customized checkout, load a real pay-for-order URL and look at it before you send a thousand of them.
Method 3: A Free Snippet That Adds a Retry Link
Two snippets, both verified against the WooCommerce 11.0 source on PHP 8.2.
Put them in a code snippets plugin or a child theme’s functions.php.
- Add a pay now button to the customer notification in the default email:
add_action( 'woocommerce_email_before_order_table', 'fk_failed_order_retry_link', 10, 4 );

function fk_failed_order_retry_link( $order, $sent_to_admin, $plain_text, $email ) {
	if ( $sent_to_admin || empty( $email->id ) || 'customer_failed_order' !== $email->id ) {
		return;
	}

	$pay_url = $order->get_checkout_payment_url();

	if ( $plain_text ) {
		echo "\n" . esc_url( $pay_url ) . "\n";
		return;
	}

	printf(
		'<p style="margin:0 0 24px;"><a href="%s" style="background:#7f54b3;color:#fff;padding:12px 24px;border-radius:4px;text-decoration:none;display:inline-block;">Complete your payment</a></p>',
		esc_url( $pay_url )
	);
}
get_checkout_payment_url() returns that order’s pay-for-order URL with its key attached. Nothing is retyped.
- Add the buyer to the store notification: Use this one only if you’re on an older release with no customer-facing email and can’t upgrade yet.
add_filter( 'woocommerce_email_recipient_failed_order', 'fk_cc_buyer_on_failed_order', 10, 2 );

function fk_cc_buyer_on_failed_order( $recipient, $order ) {
	if ( ! $order instanceof WC_Order ) {
		return $recipient;
	}

	$billing_email = $order->get_billing_email();

	return $billing_email ? $recipient . ',' . $billing_email : $recipient;
}
Here, the buyer receives the admin template, which is written for you, not them. So it’s a stopgap, not a customer experience.
Timing the Follow-Up Discount Coupon
The first email exists to remove friction. The second exists to overcome hesitation.
Sending both in the same hour wastes the second one.
Wait 24 to 48 hours. Long enough that someone who genuinely intended to pay has already done it through email one, short enough that the purchase is still live in their head.
Generate a unique single-use code rather than reusing a public one, cap it at a percentage that survives your margin, and expire it inside three days so it creates a reason to act now.
You can recover failed orders by sending follow-up emails with discount coupons using FunnelKit Automations.
Simply set up a separate email automation to trigger when an order fails.
Step 1: Create a new email automation
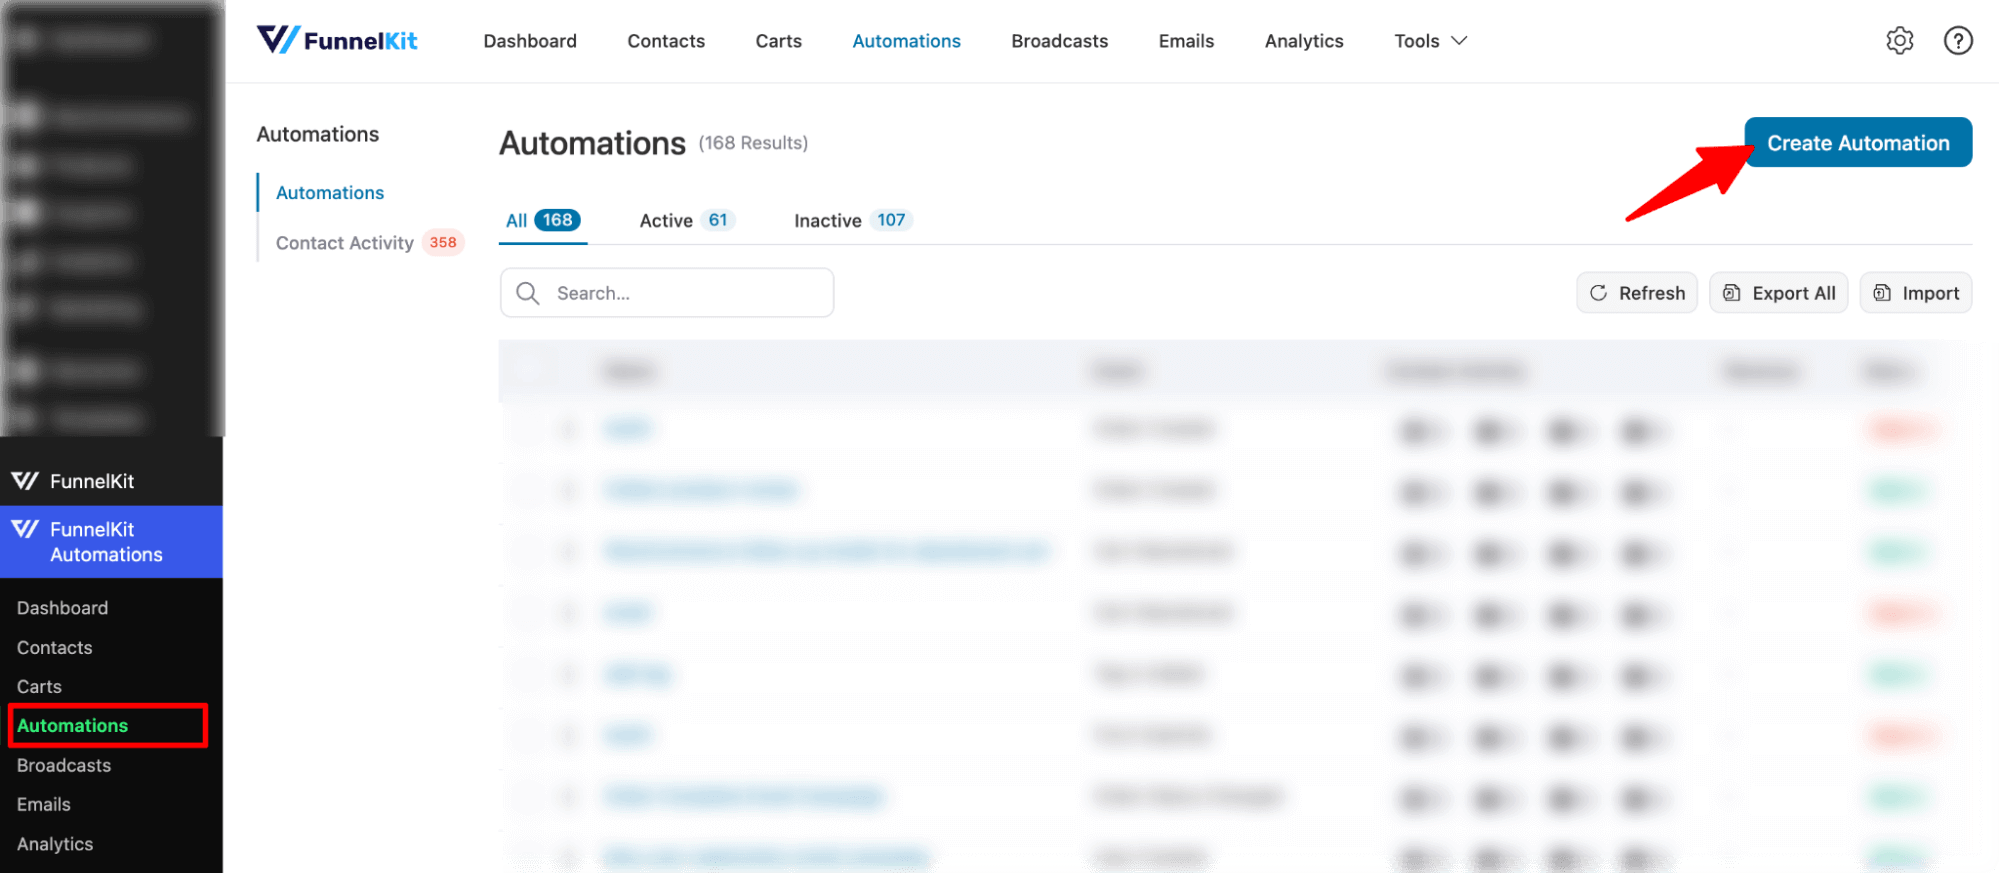
Navigate to FunnelKit Automations ⇒ Automations and then click on ‘Create New Automation’.
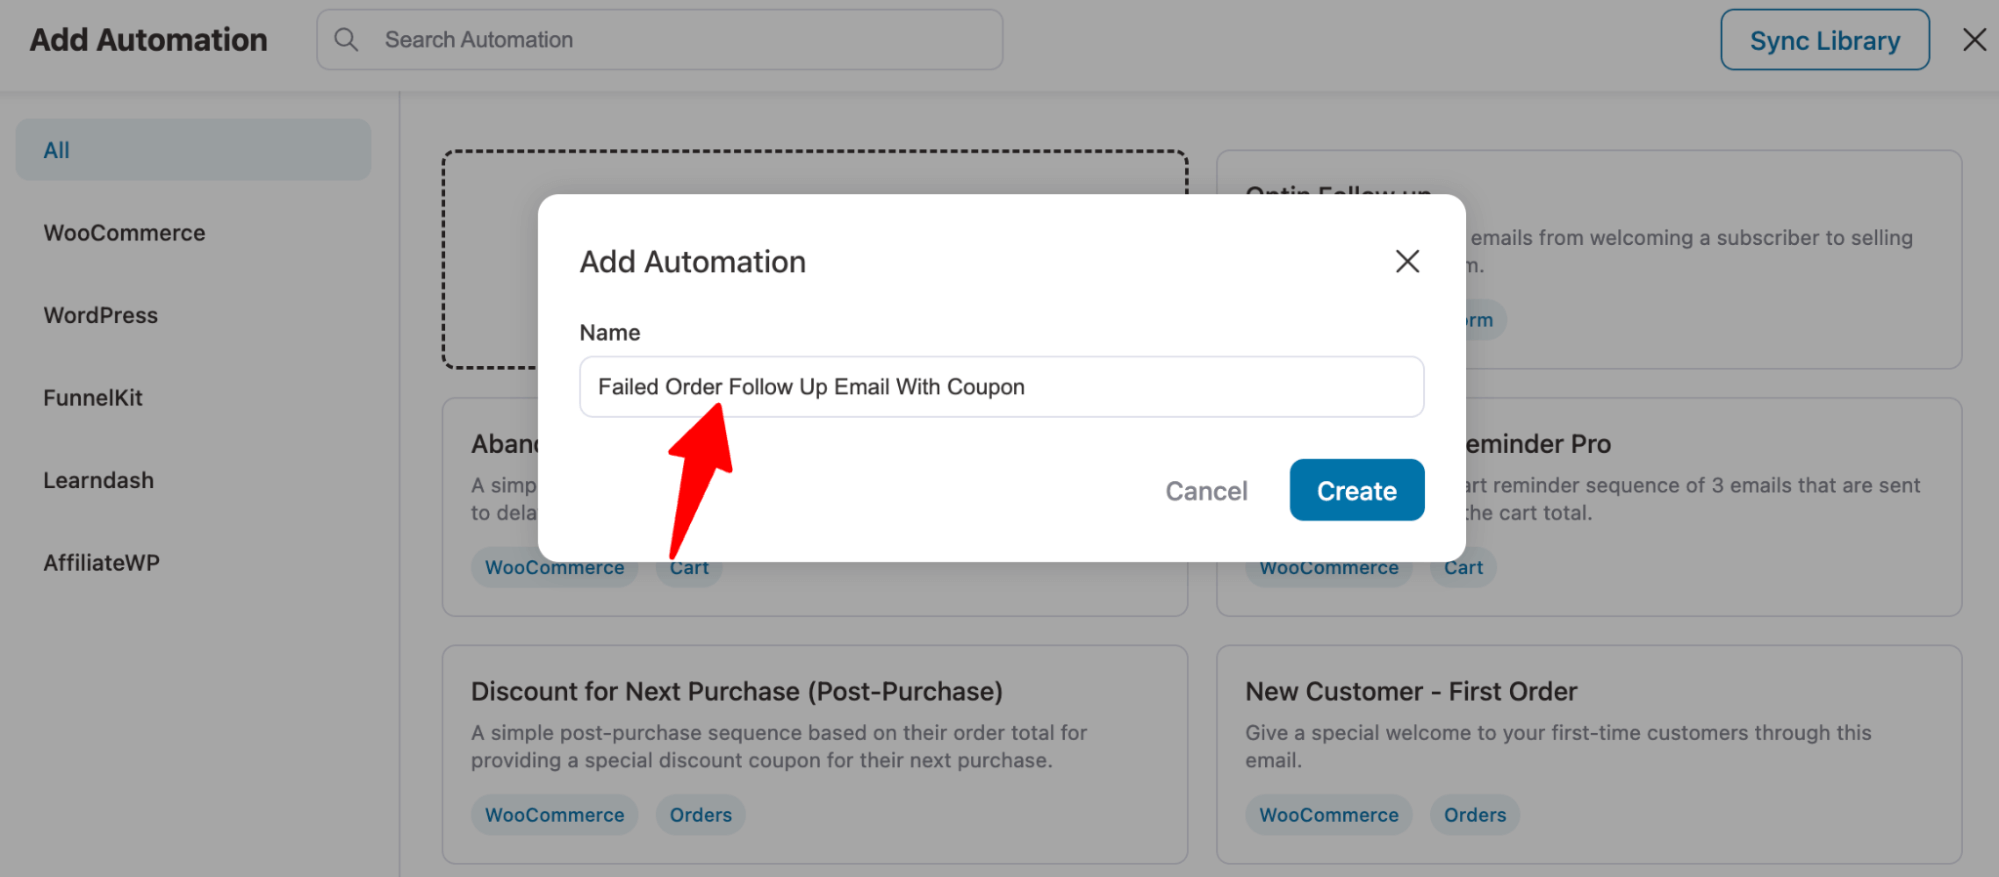
FunnelKit Automations provides various pre-built automation recipes. Here, we will create one from scratch.
Step 2: Configure failed order event
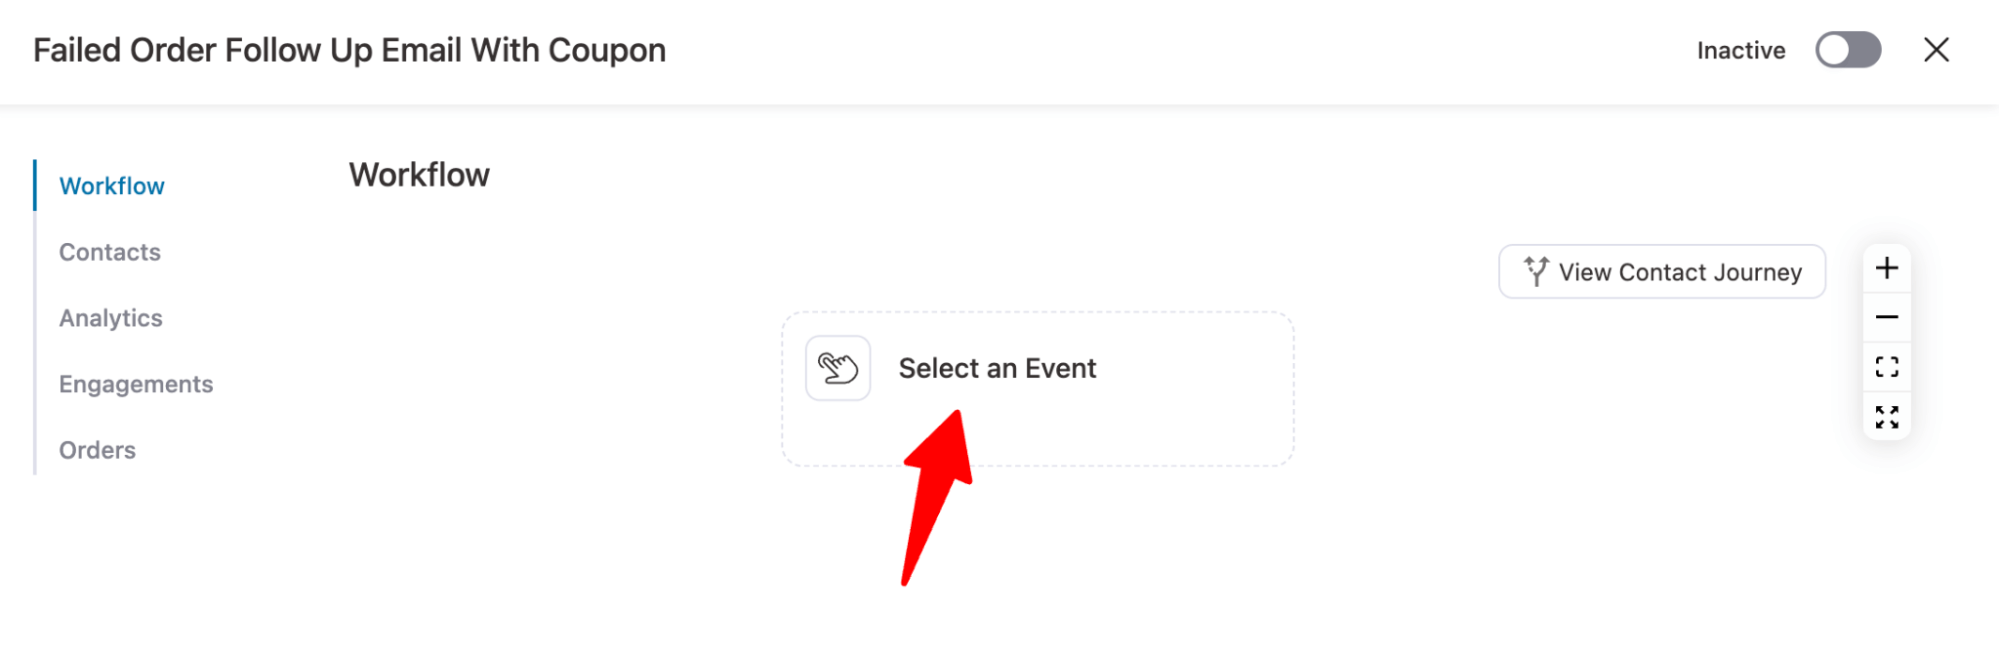
Next, we need to create and add the trigger for the failed order. For this, hit “Select an event”.
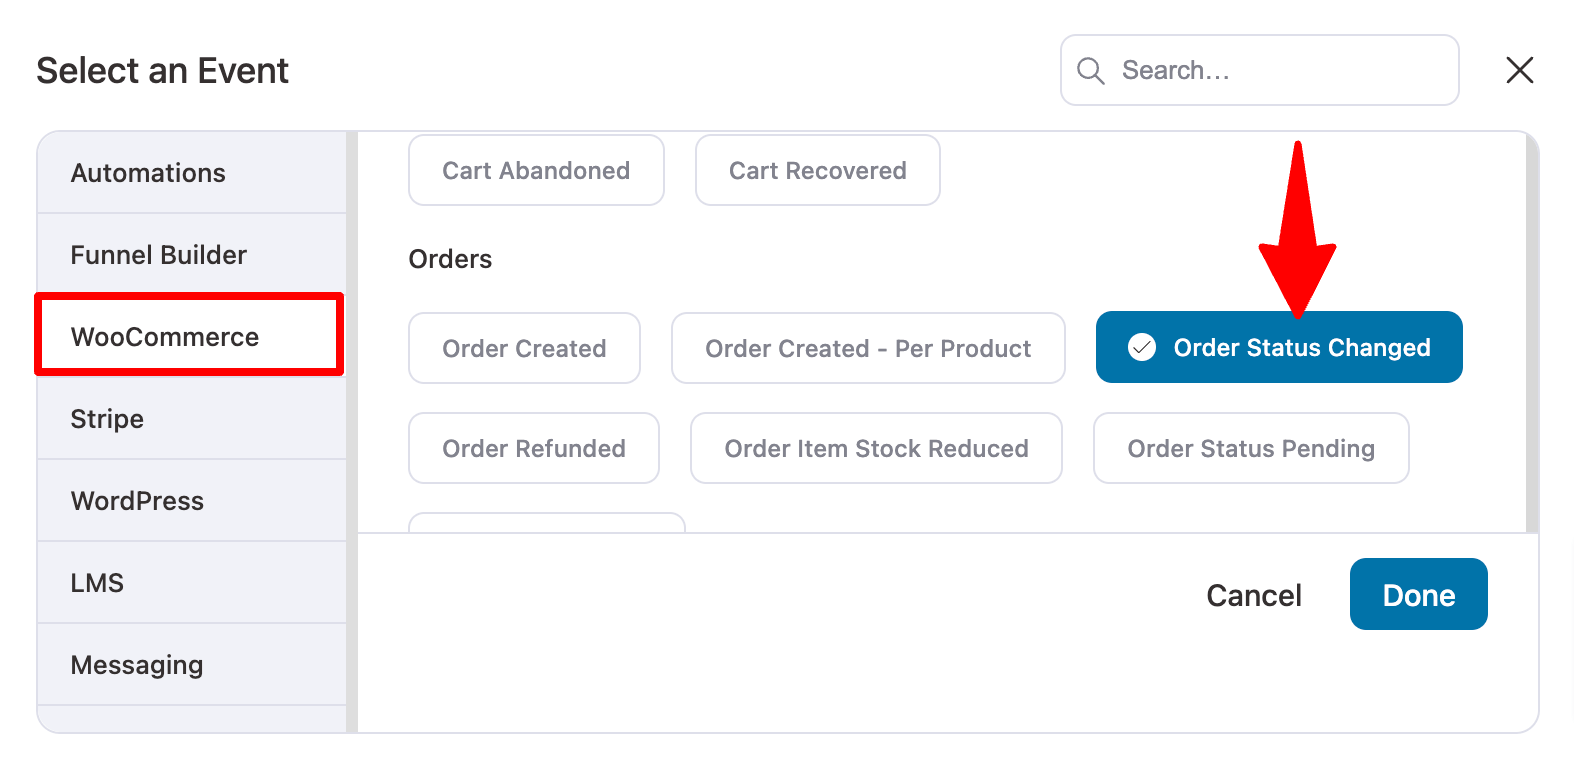
Next, under WooCommerce, select “Order status changed”.
Configure it to get triggered when the order status changes from processing to failed due to payment issues. Make sure it runs for any product and multiple times for any contact.
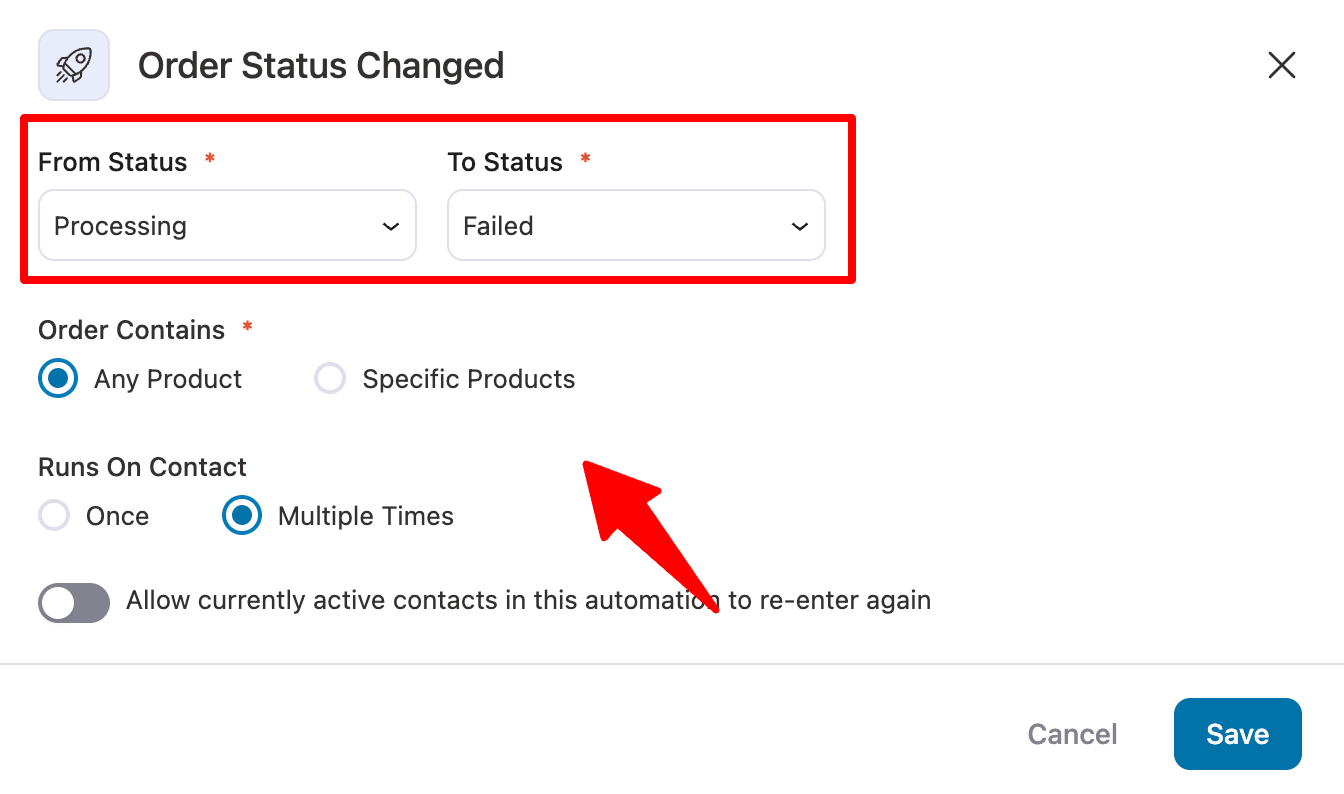
Make sure to save the settings.
Step 3: Add a delay
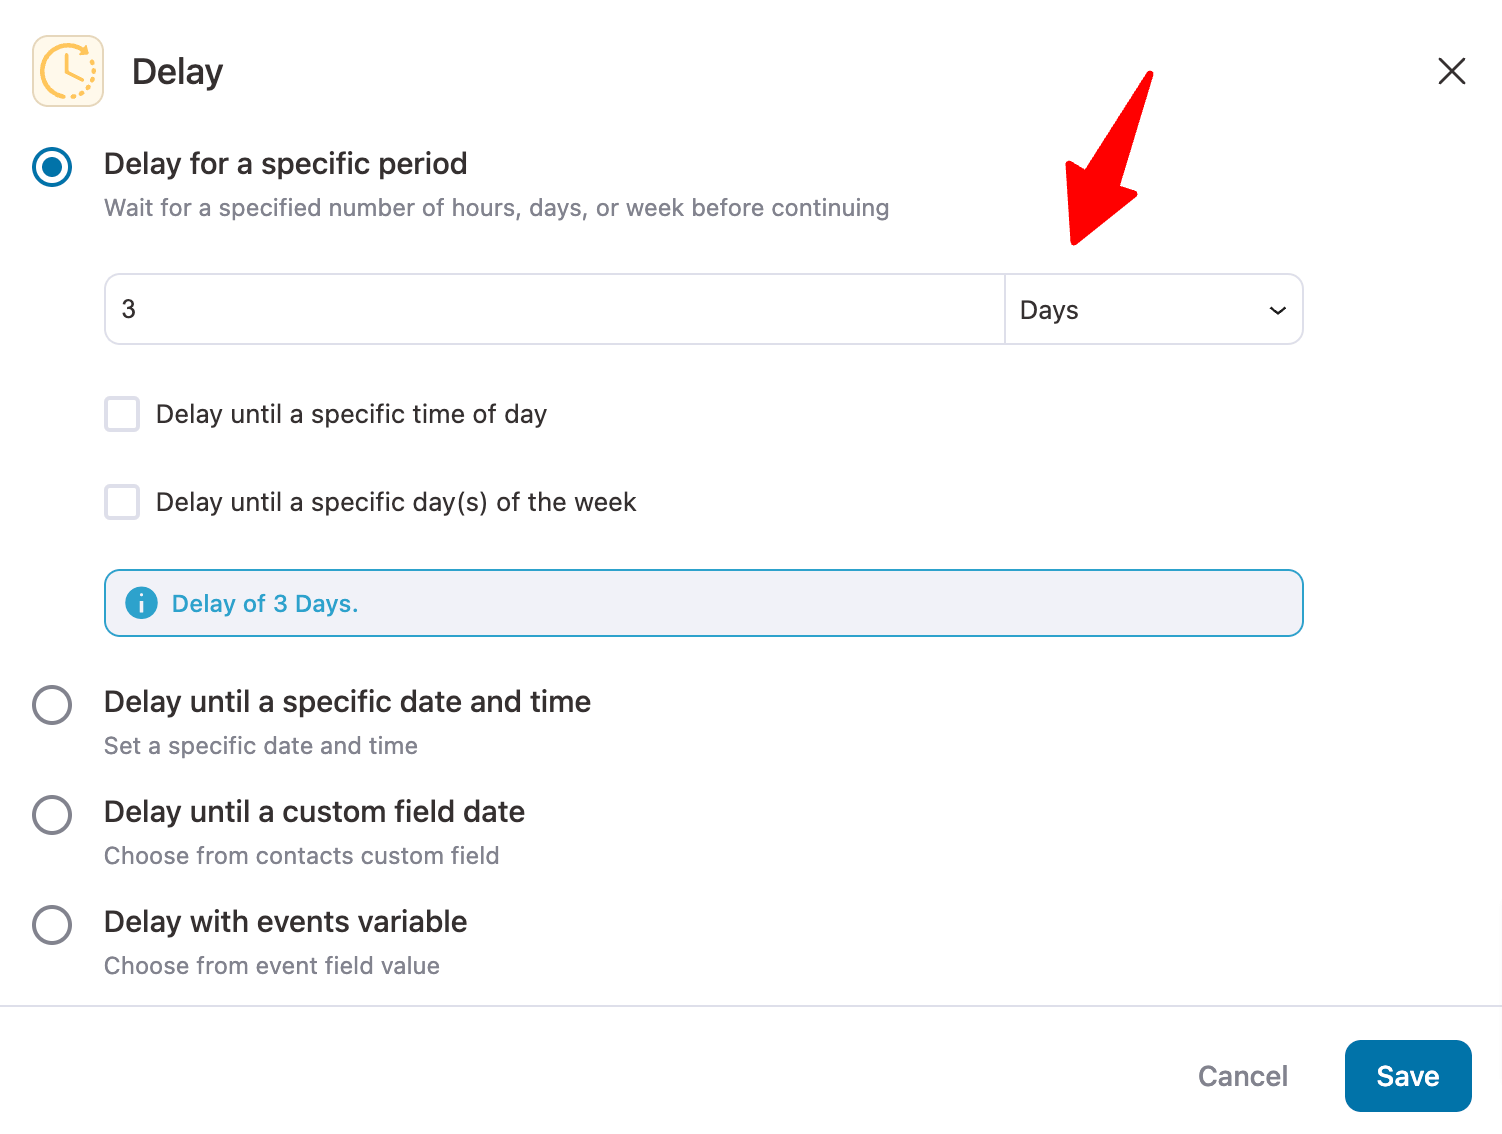
It’s a good idea to give users time to complete the order after the reminder. So, before sending the email, you should wait around 3 days.
To add a delay, hit the “+” icon and choose Delay.
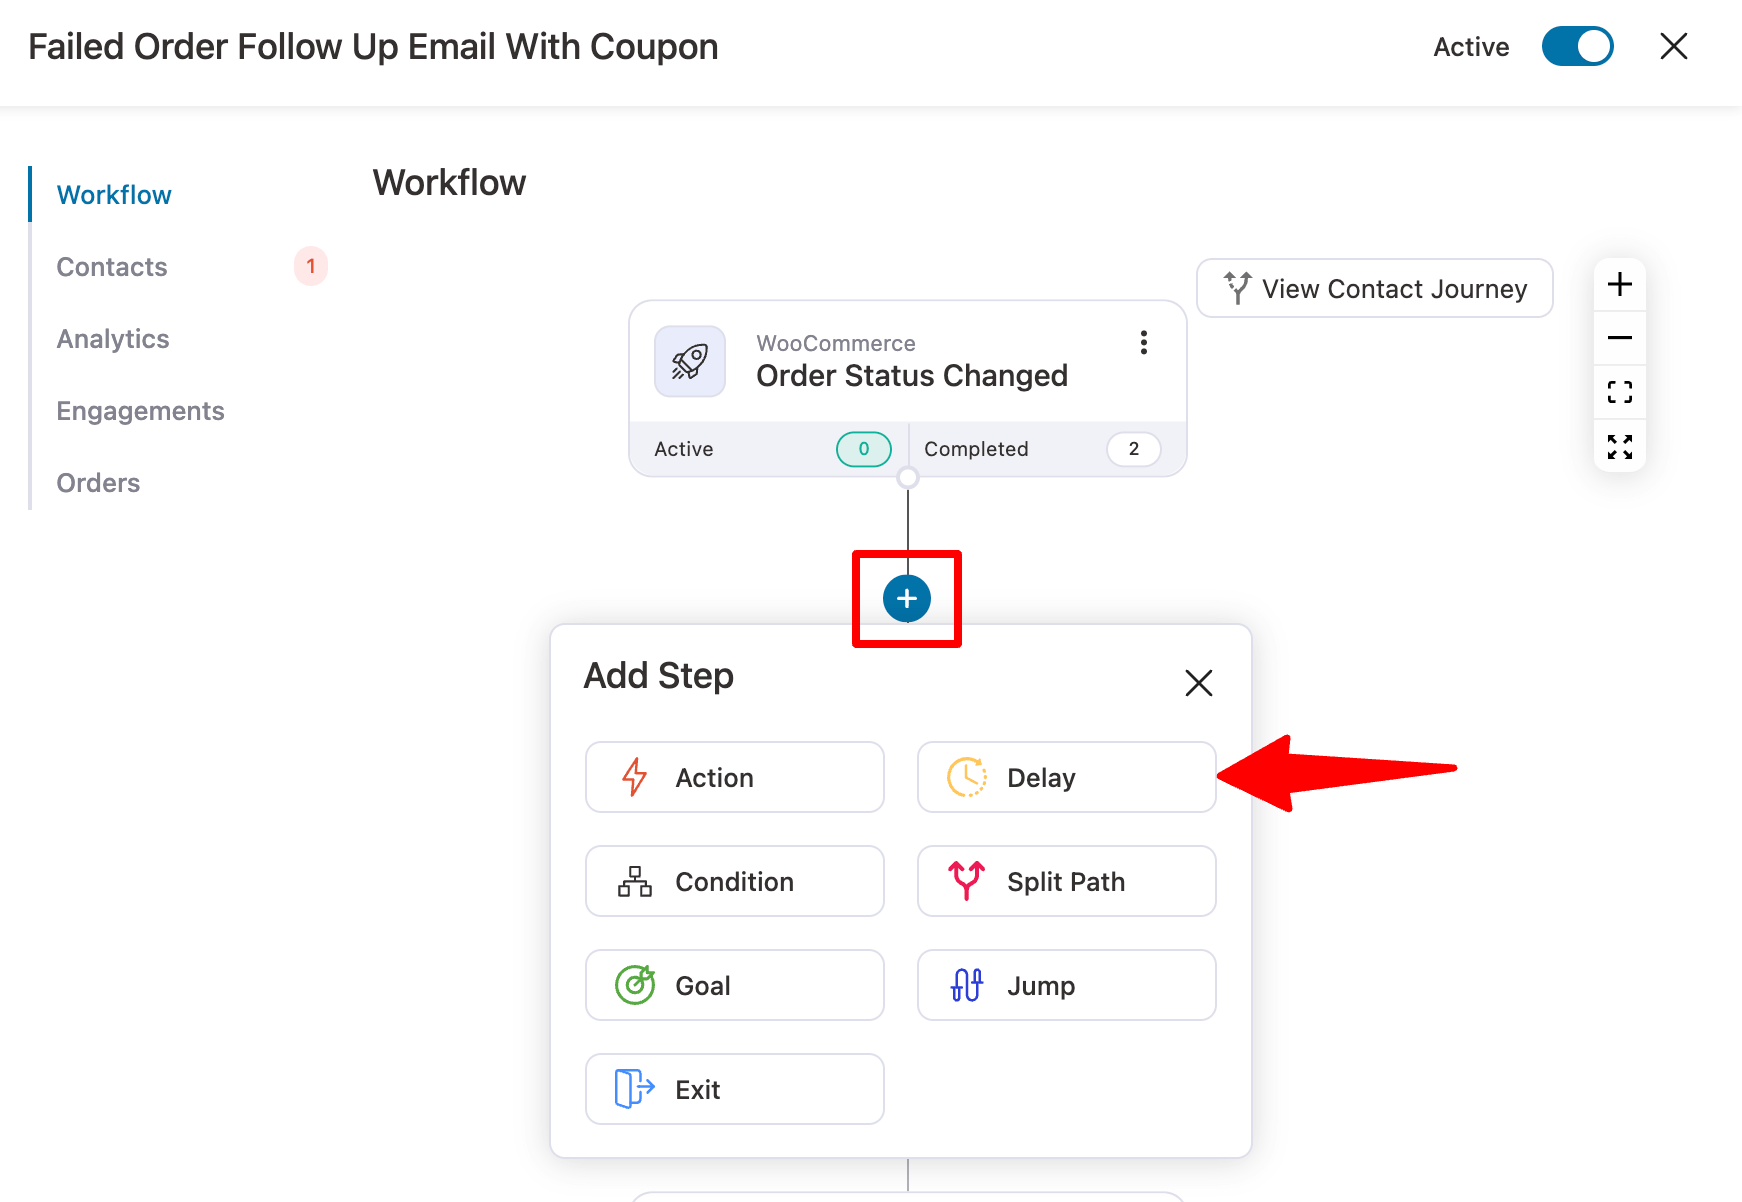
Next, add 3 days of delay and hit Save.
Step 4: Check if the order status is still completed
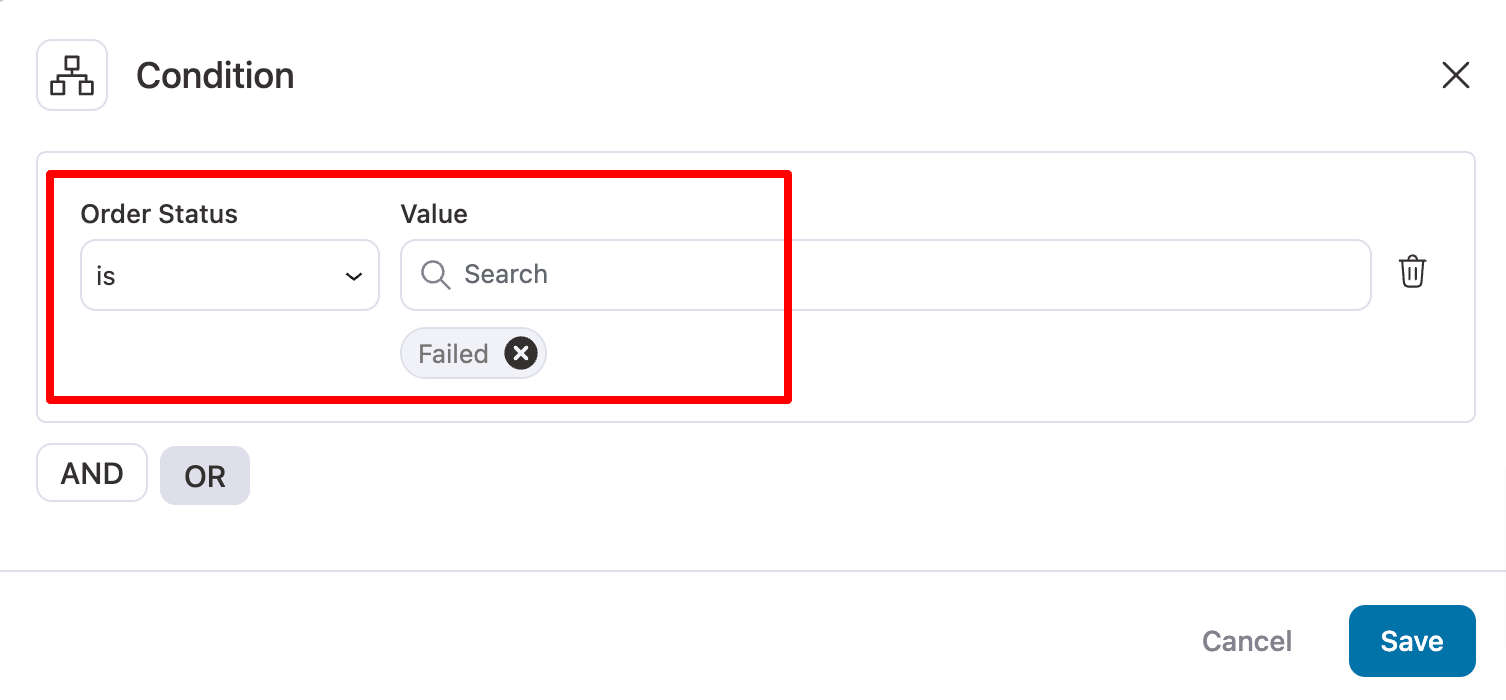
Again, hit the “+” icon and choose Condition. Under “Current Woo Order,” select the value “Order Status” and check if the current status is failed.
Step 5: Generate a dynamic coupon
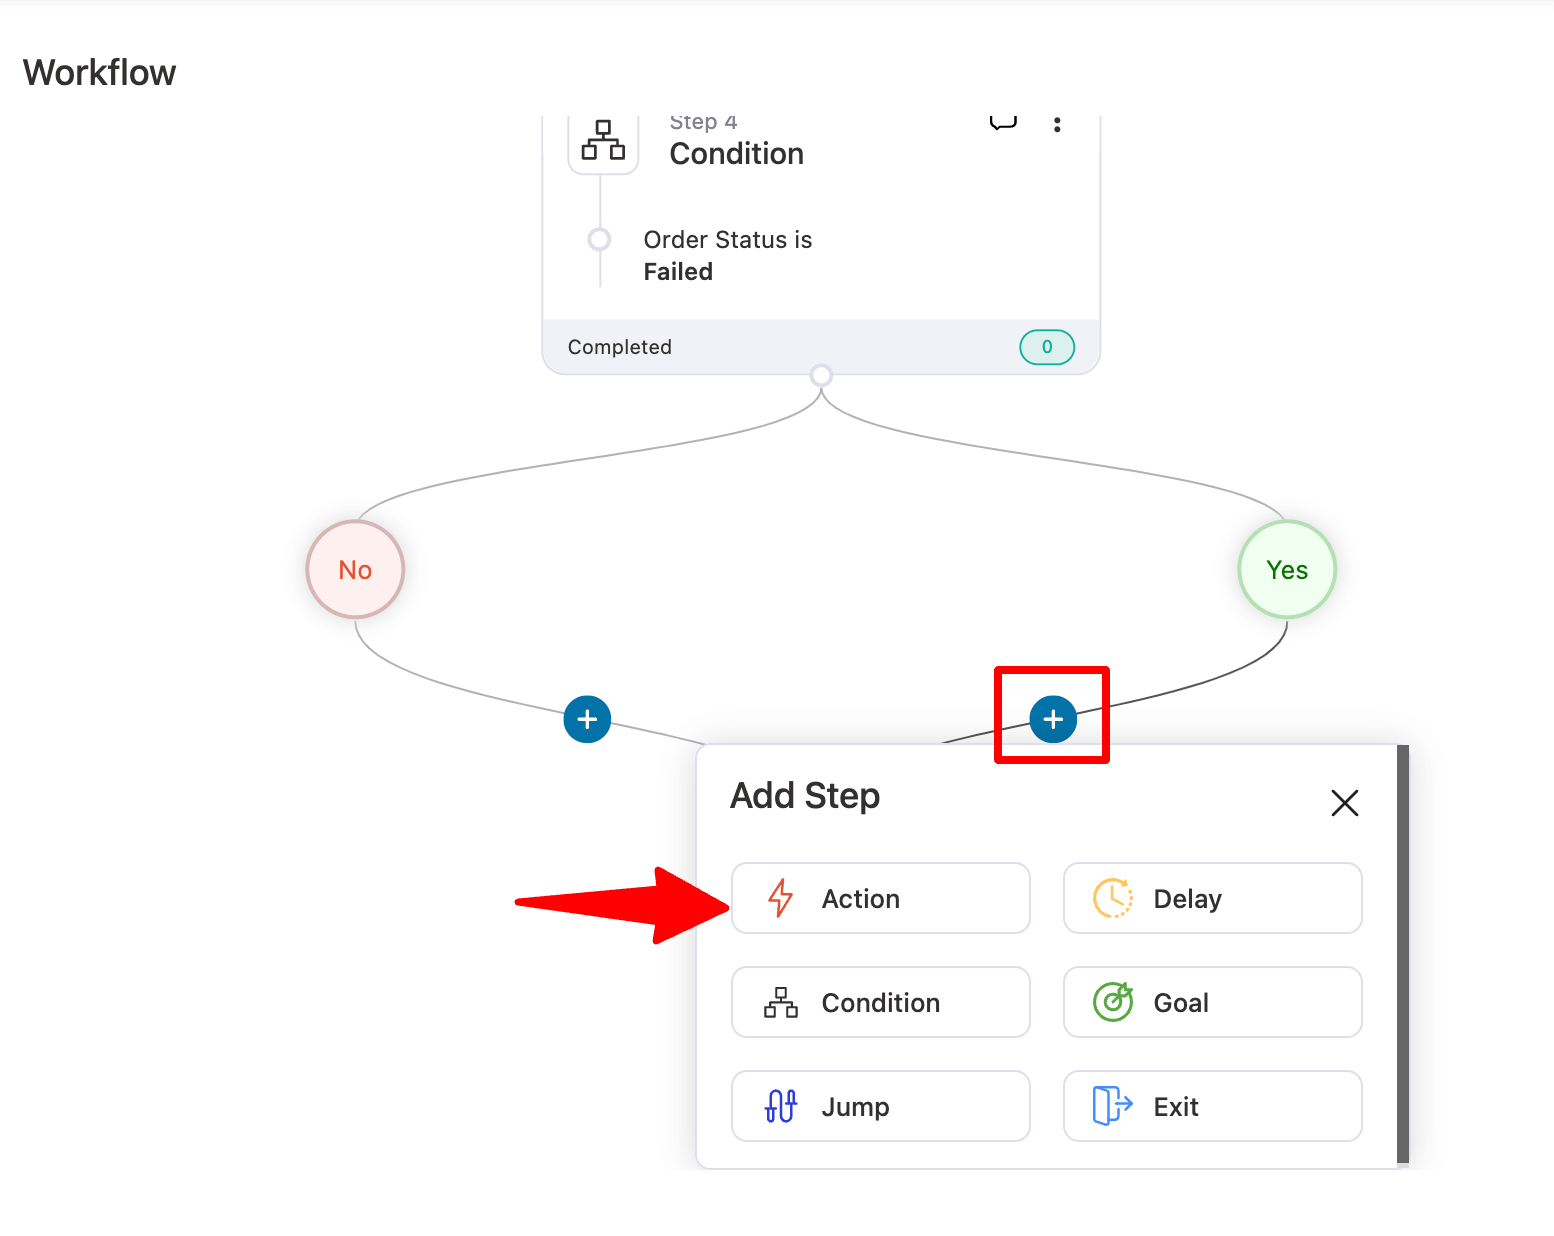
Next, on the condition tree, for yes, add another action.
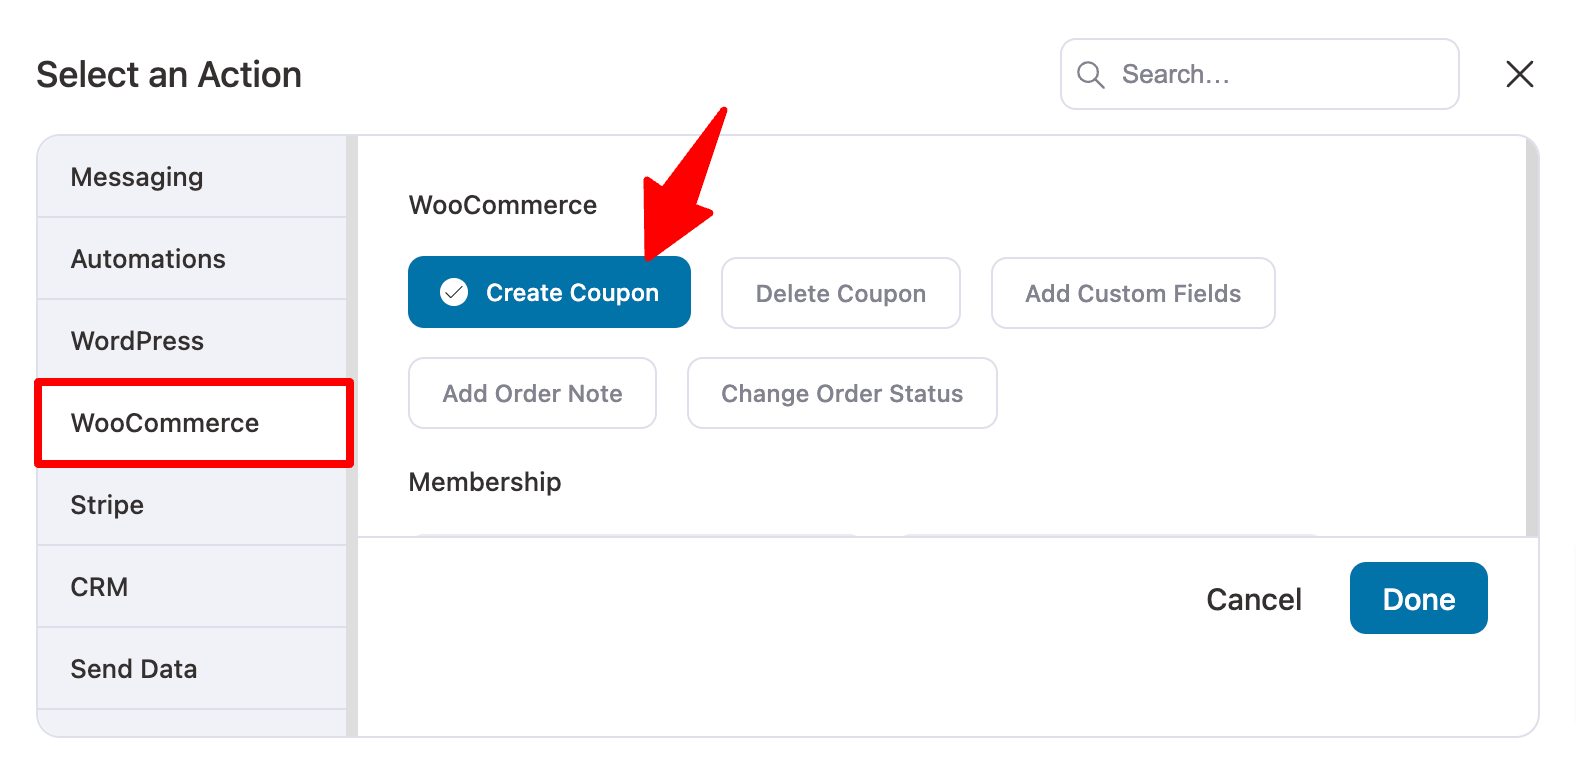
Then, choose the action “Create Coupon” under the WooCommerce tab.
Next, set the coupon. You can use the merge tag to add dynamic information in the coupon code prefix. Make sure to add a coupon expiration date to create urgency.
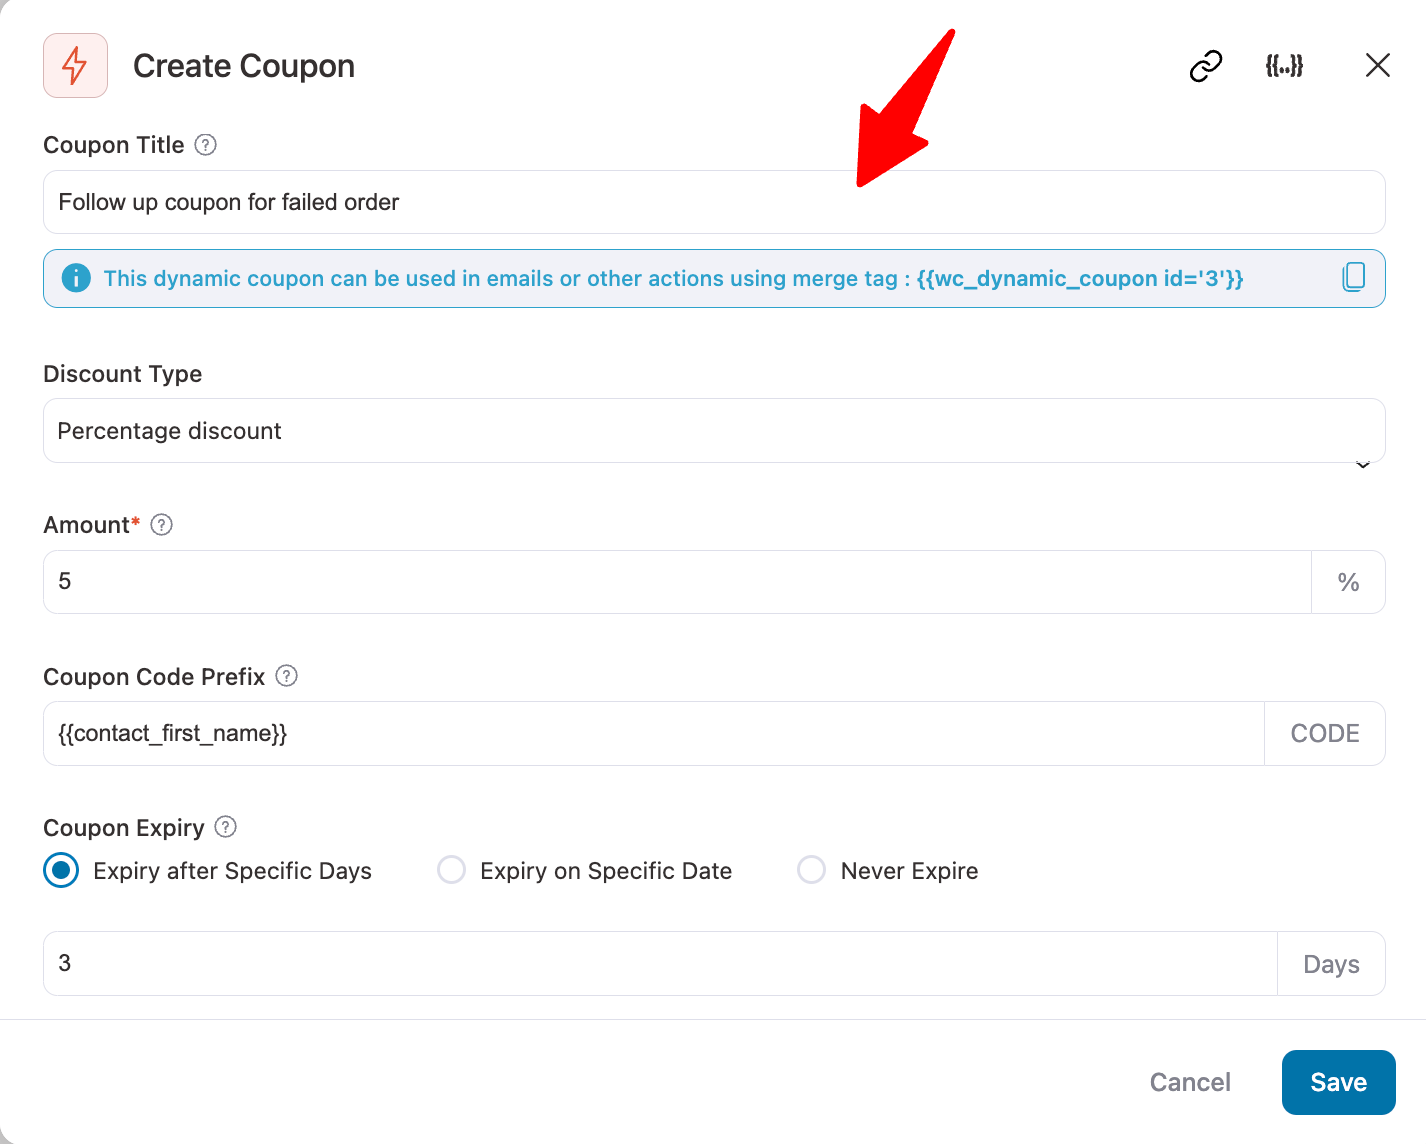
Hit Save to make changes.
Step 6: Send an email with a follow-up discount coupon
Again, after the Generate Coupon action, add a Send Email action.
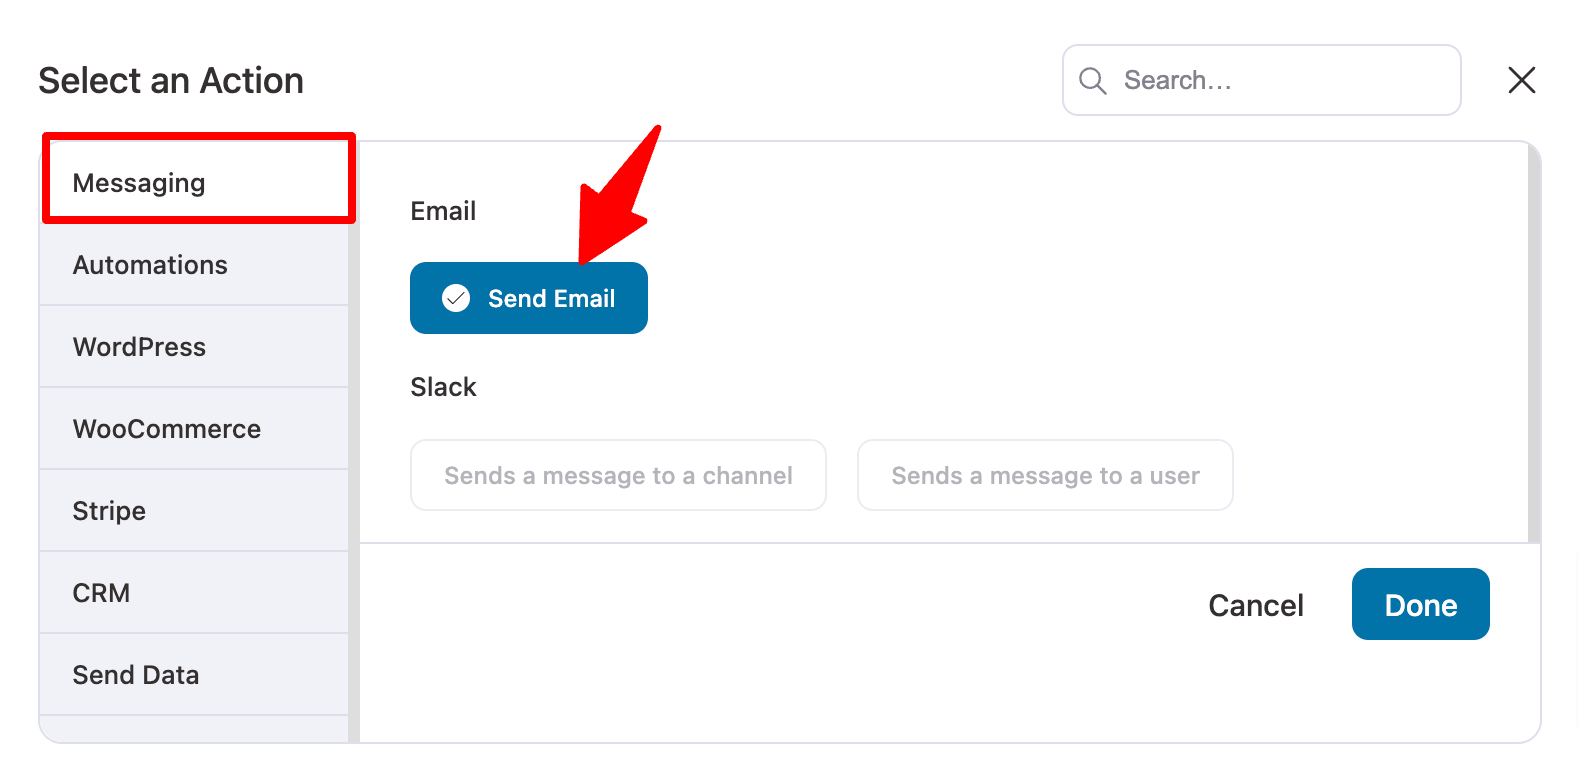
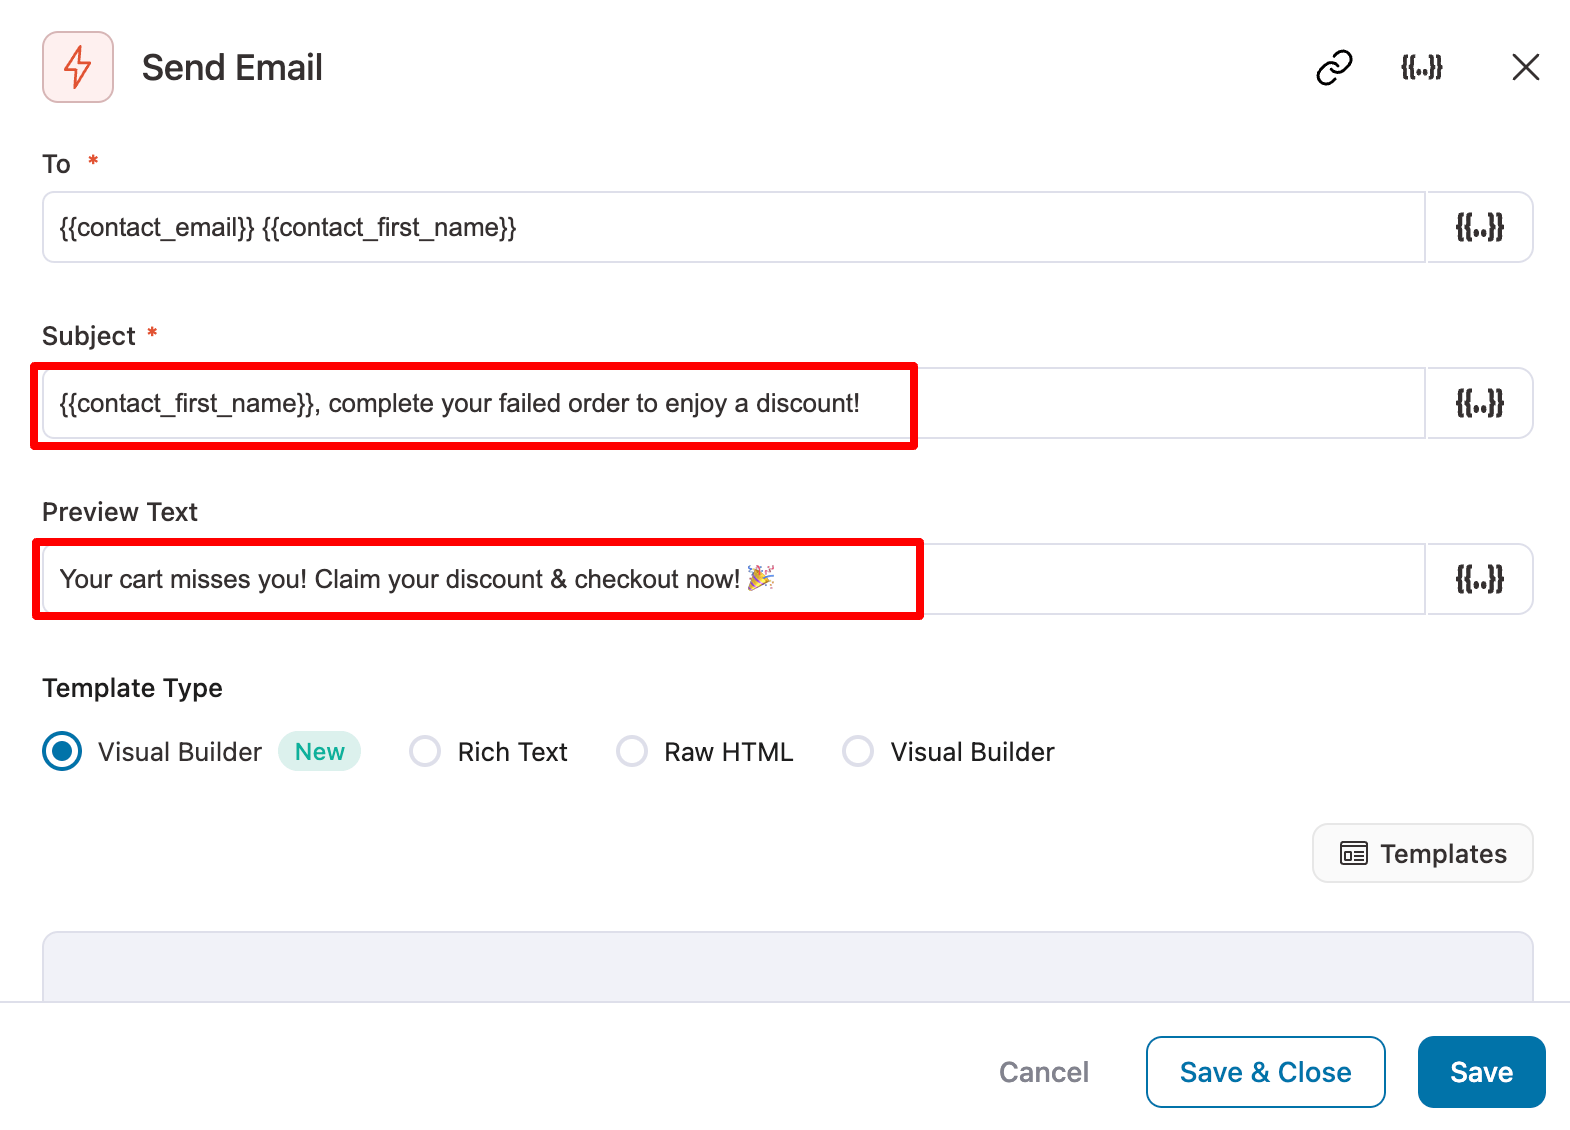
Write an engaging subject & preview text. Click {{..}} to copy merge tags for personalization.
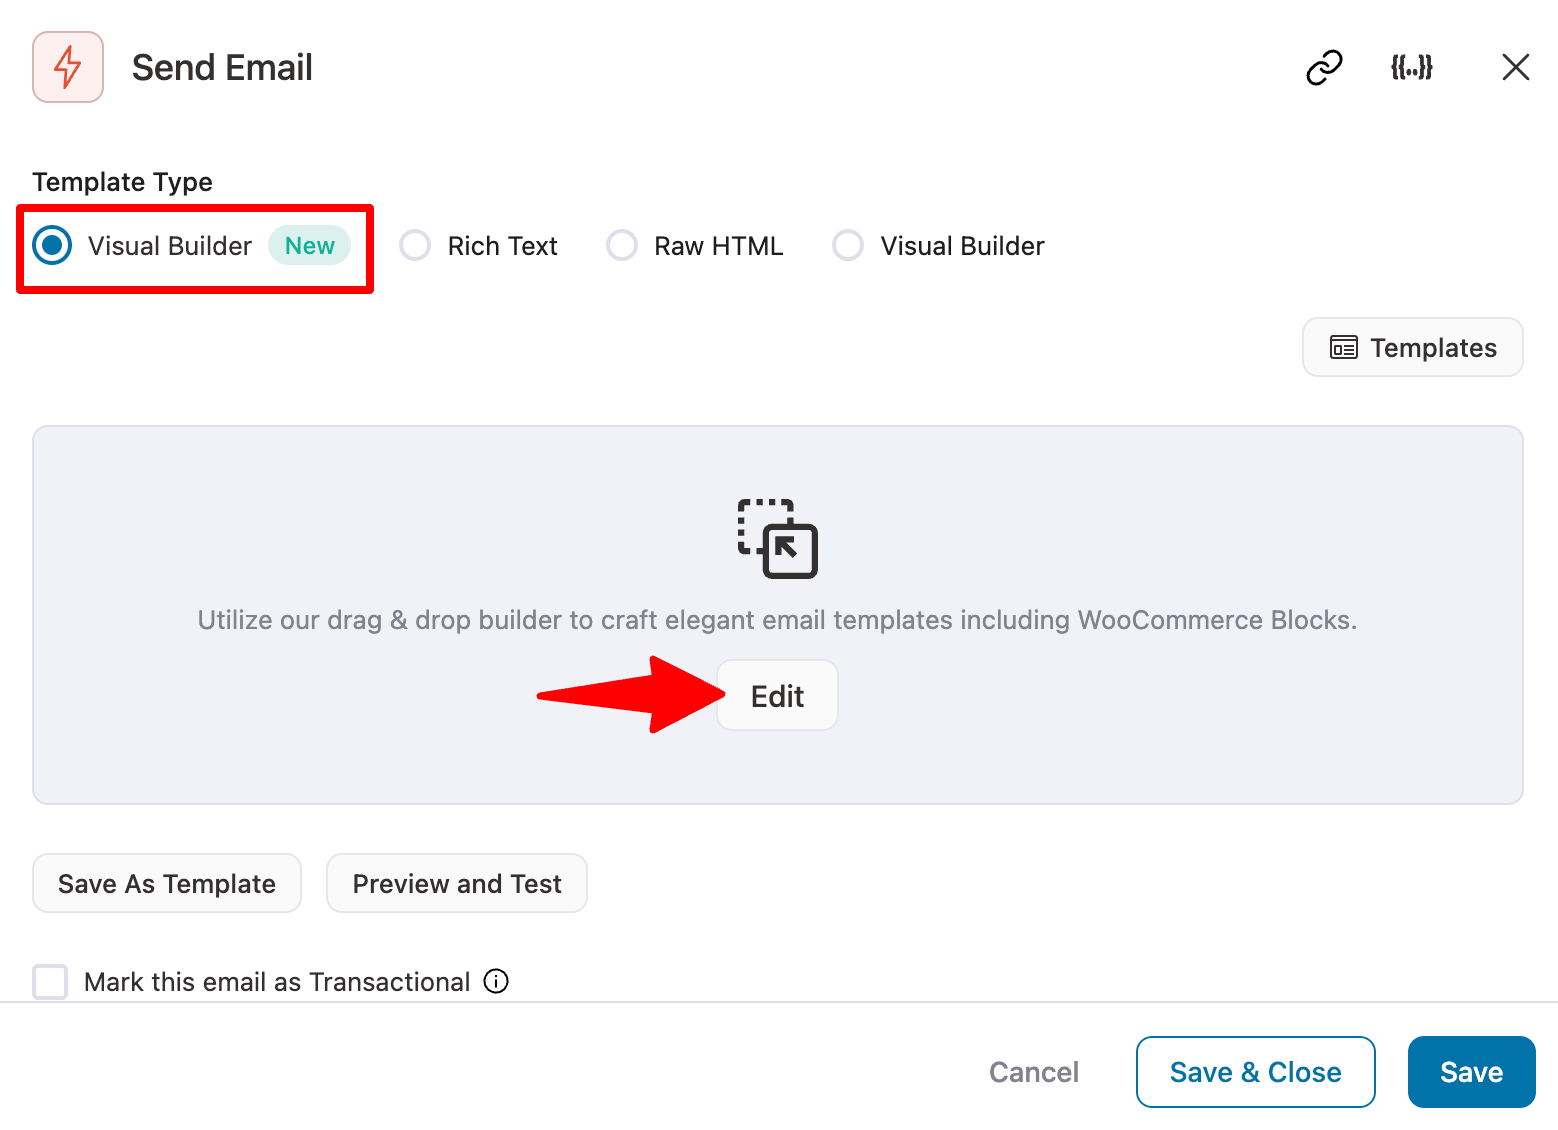
Use Visual Builder (New) to customize the email template, then click Edit.
Now, you will find a list of prebuilt email templates. Import the template “Personalized Coupon” template.
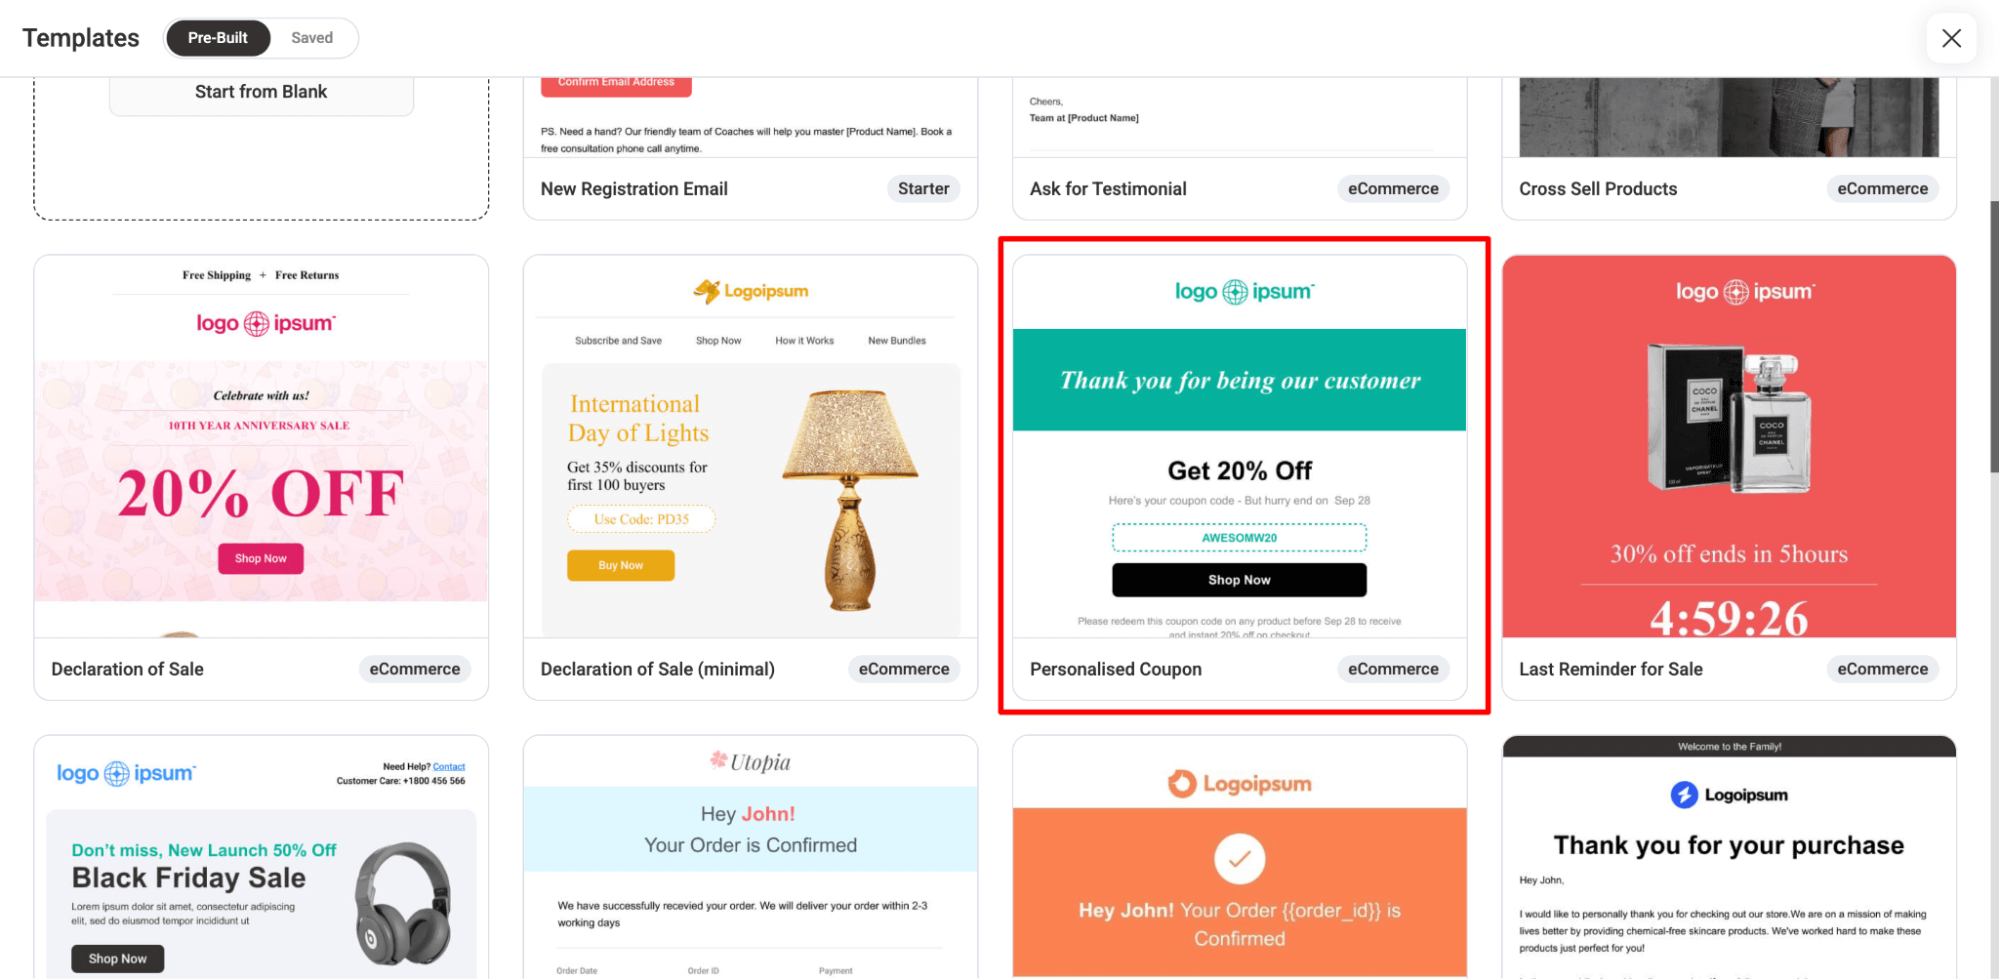
Preview and hit Import.
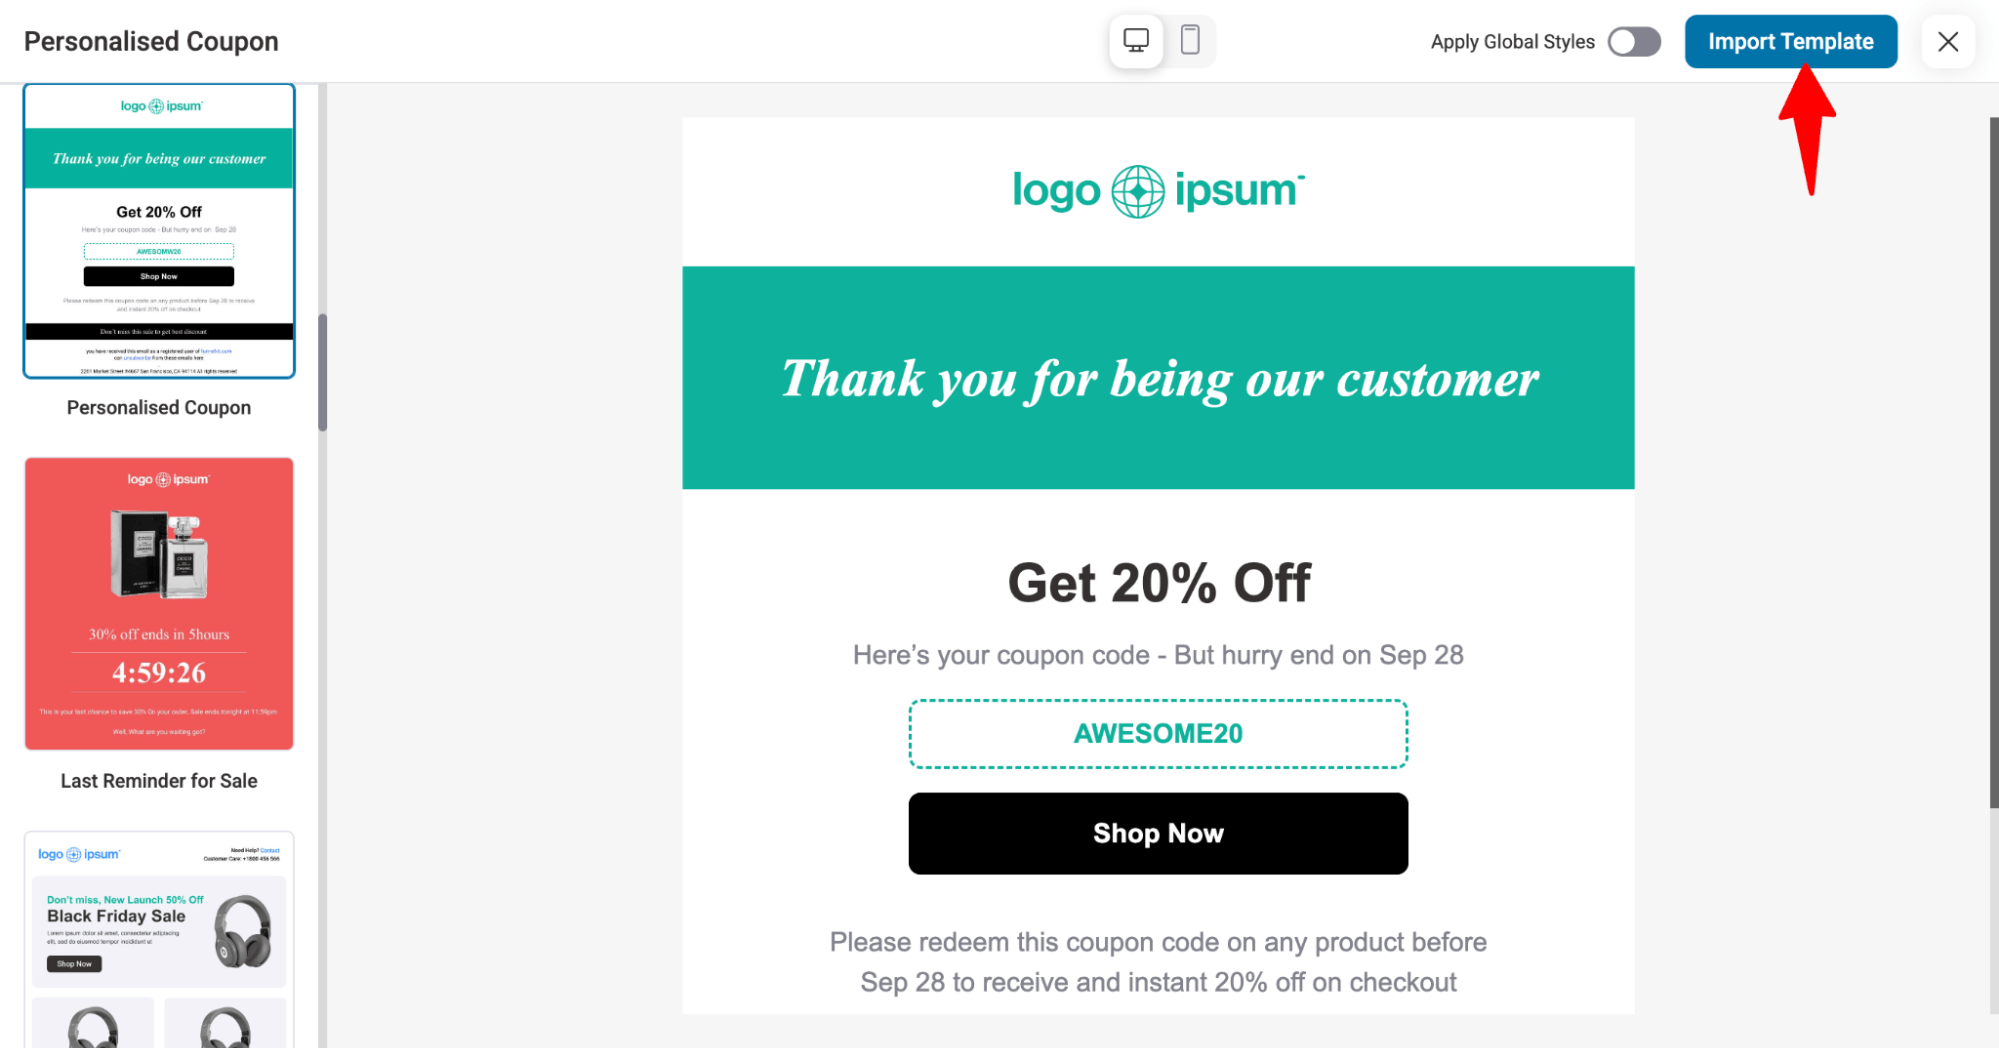
Next, start customizing the template by customizing the logo, messaging, etc.
🔔 Note: Use the merge tag where needed to add dynamic values.
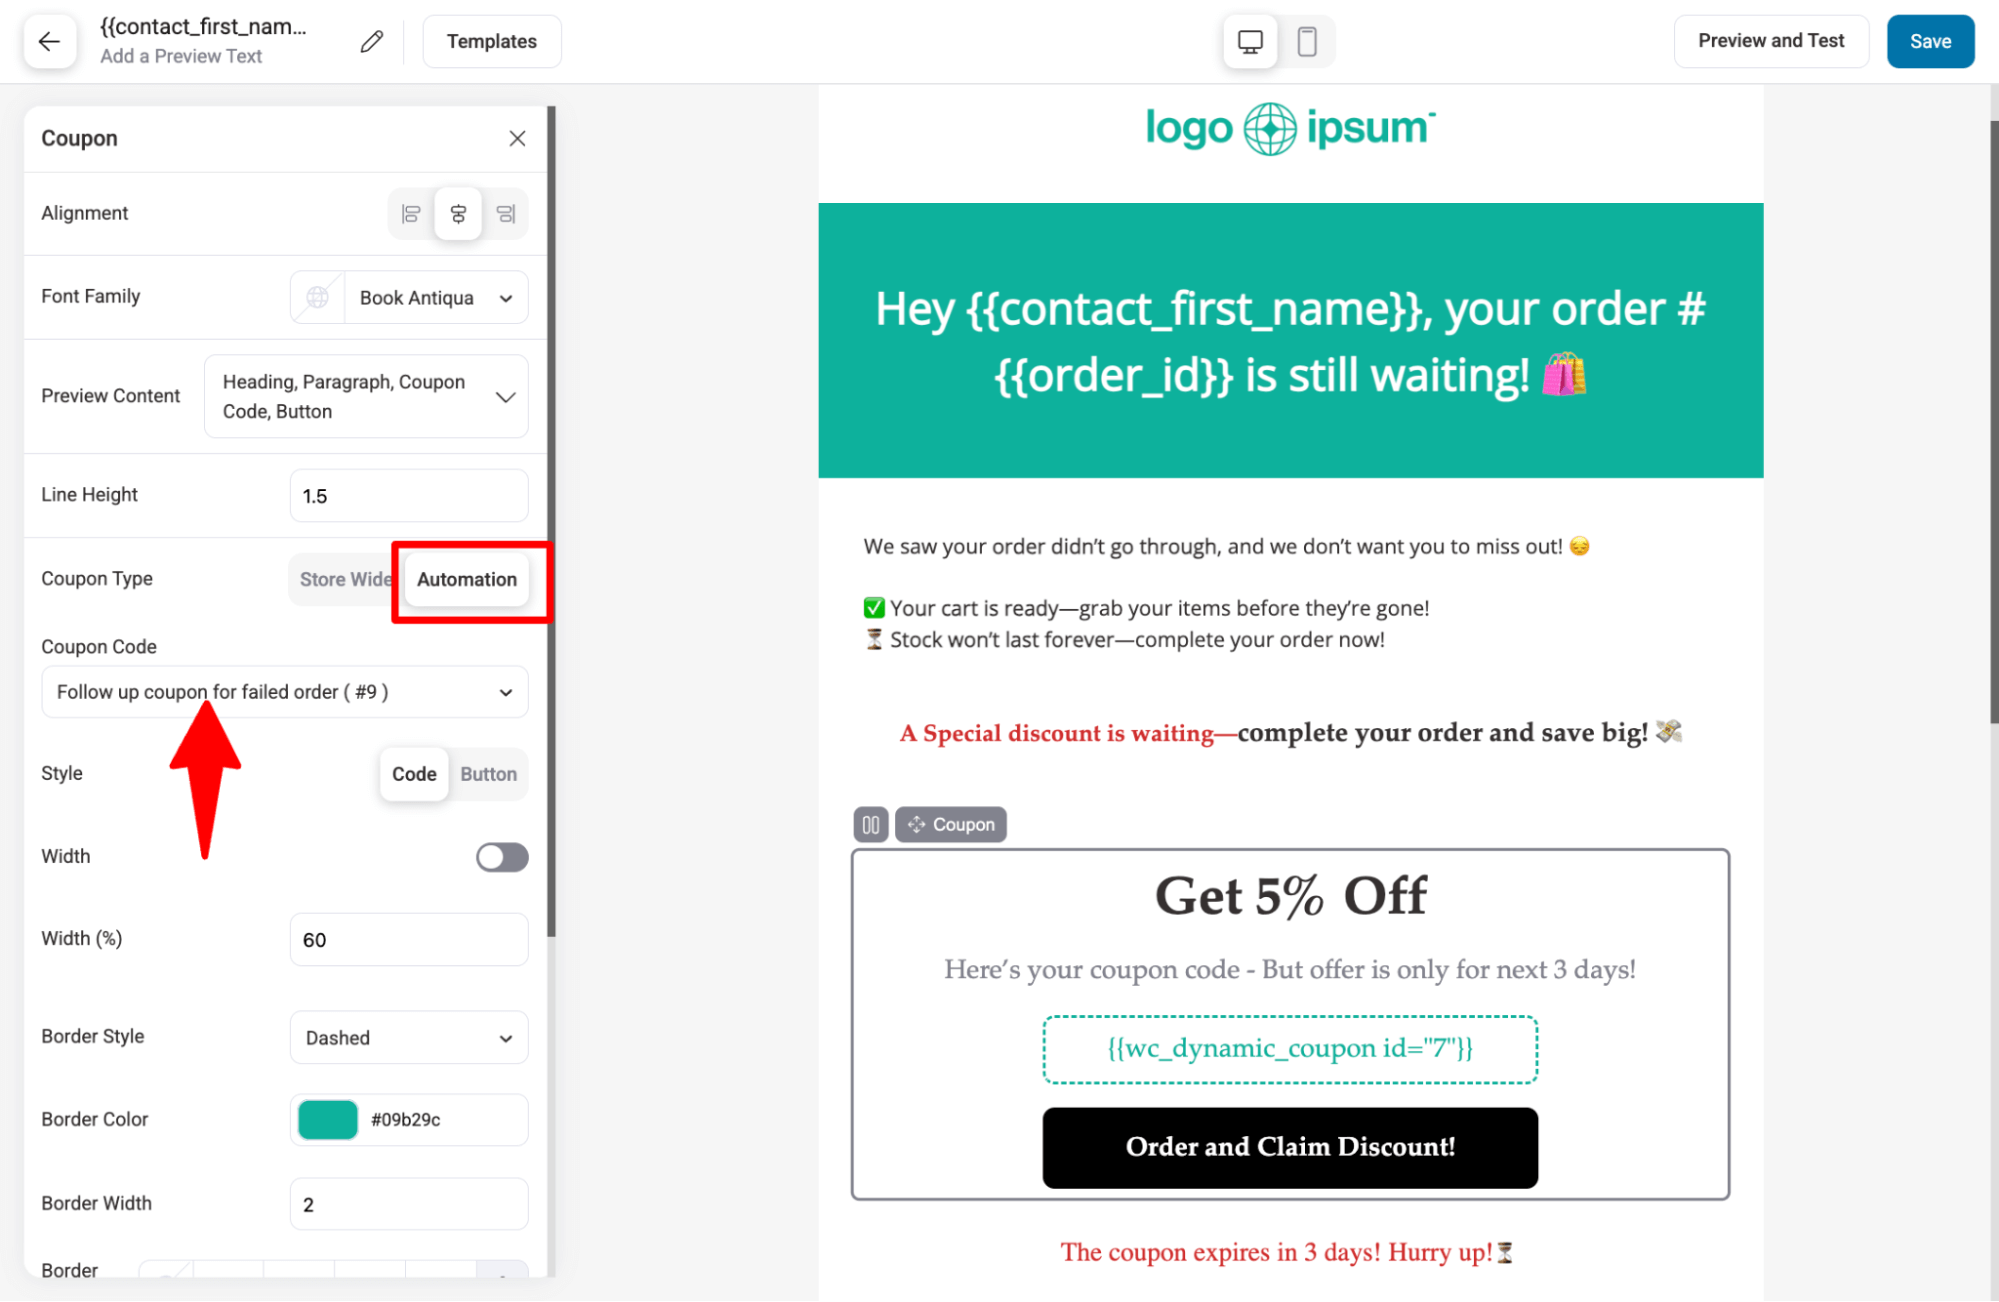
On the Coupon block, choose the dynamic coupon under automation. Also, adjust the coupon details on the email template.
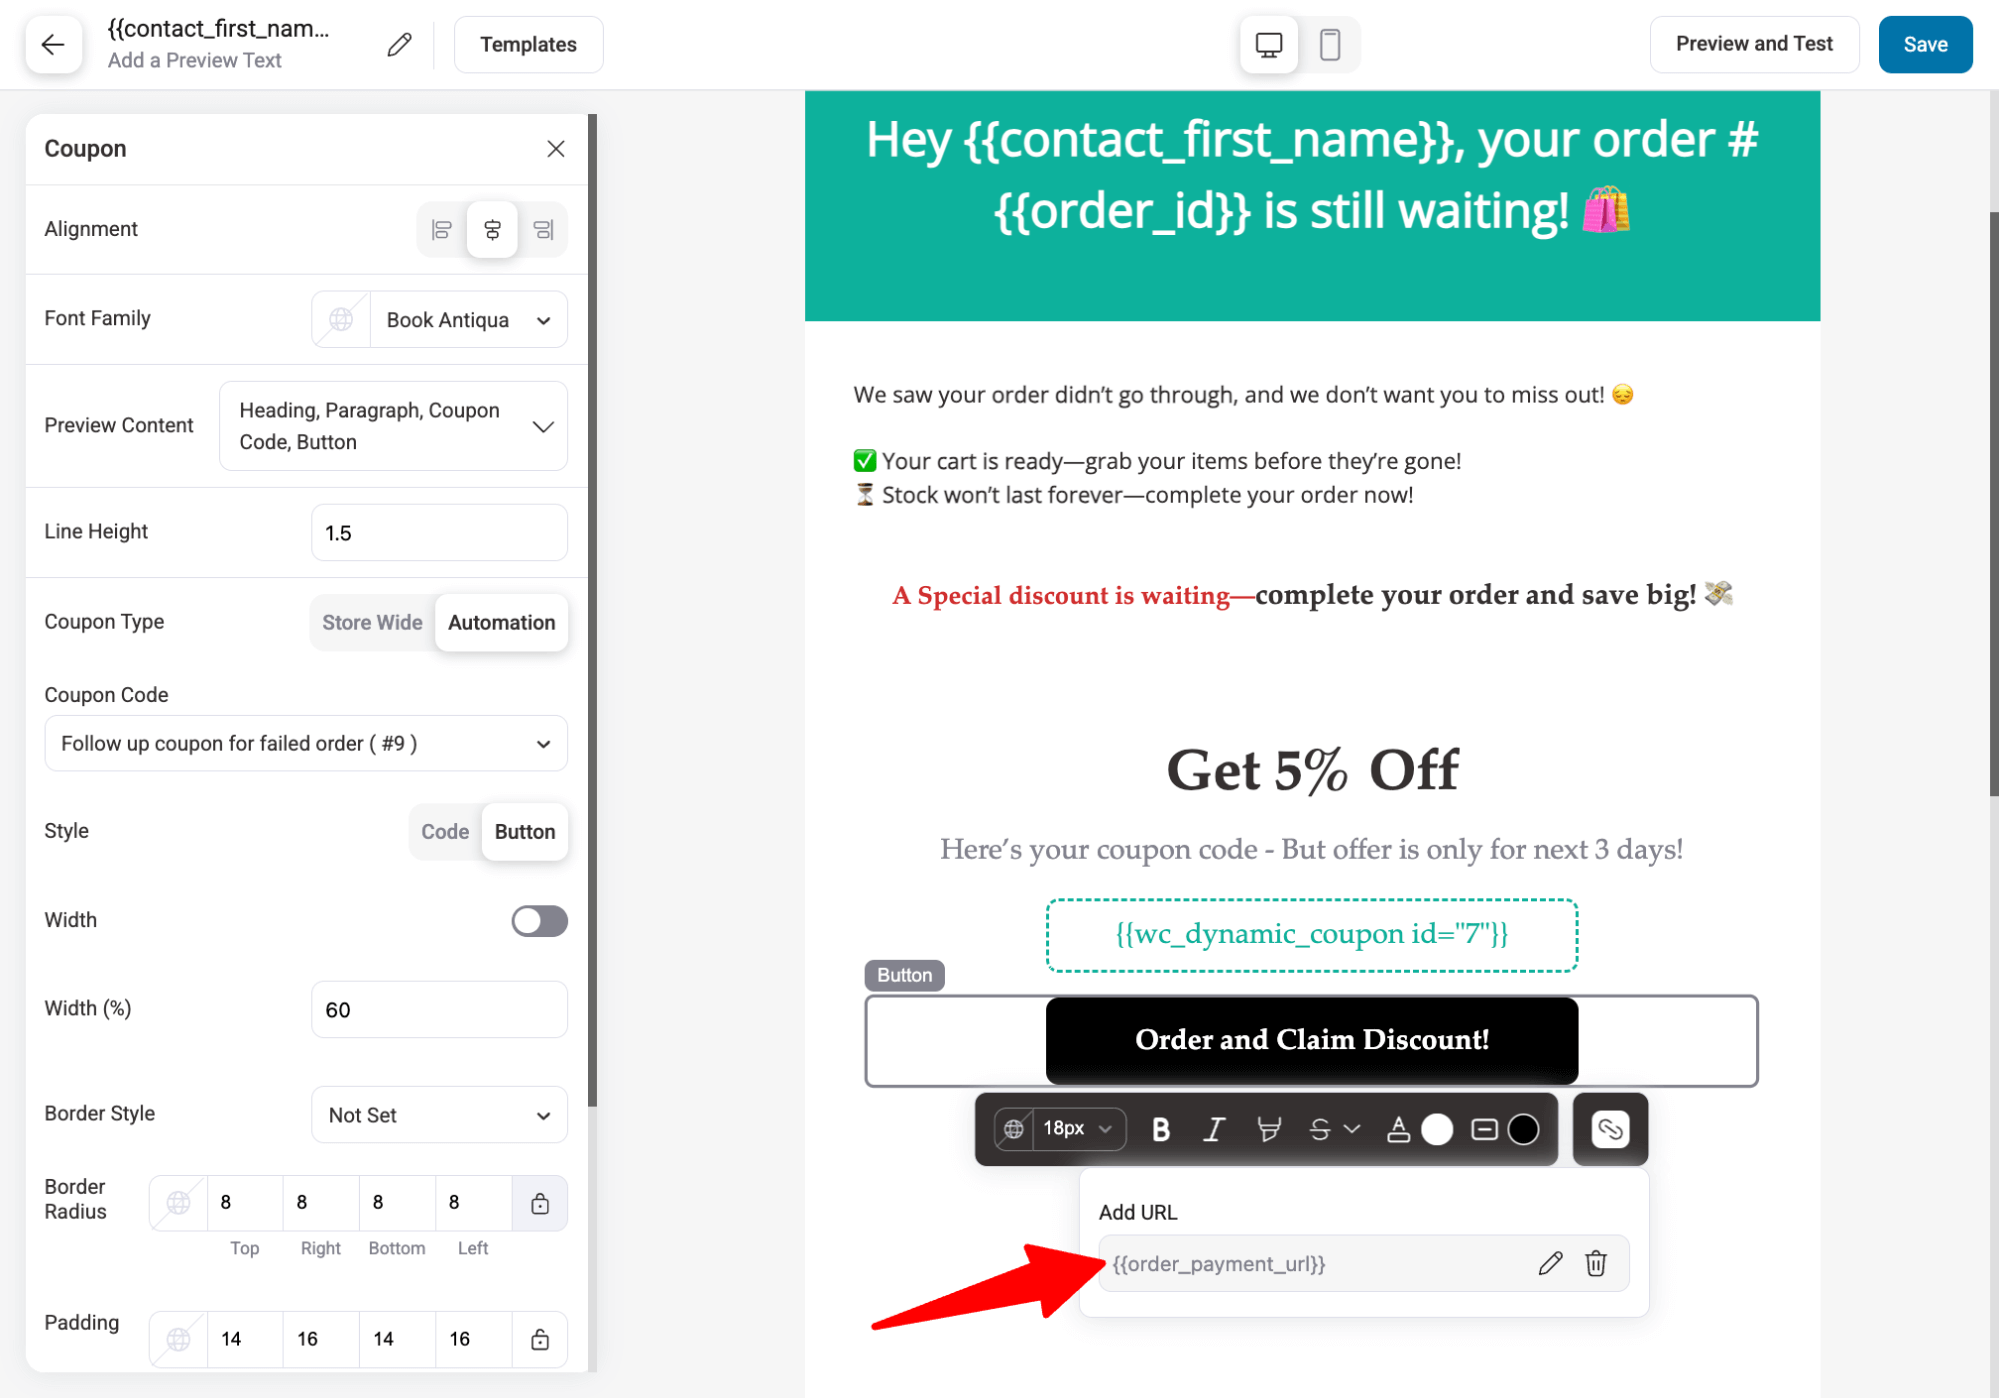
Customize the Coupon Block CTA and add the merge tag {{order_payment_url}} to direct users to the order page where they can complete the transaction.
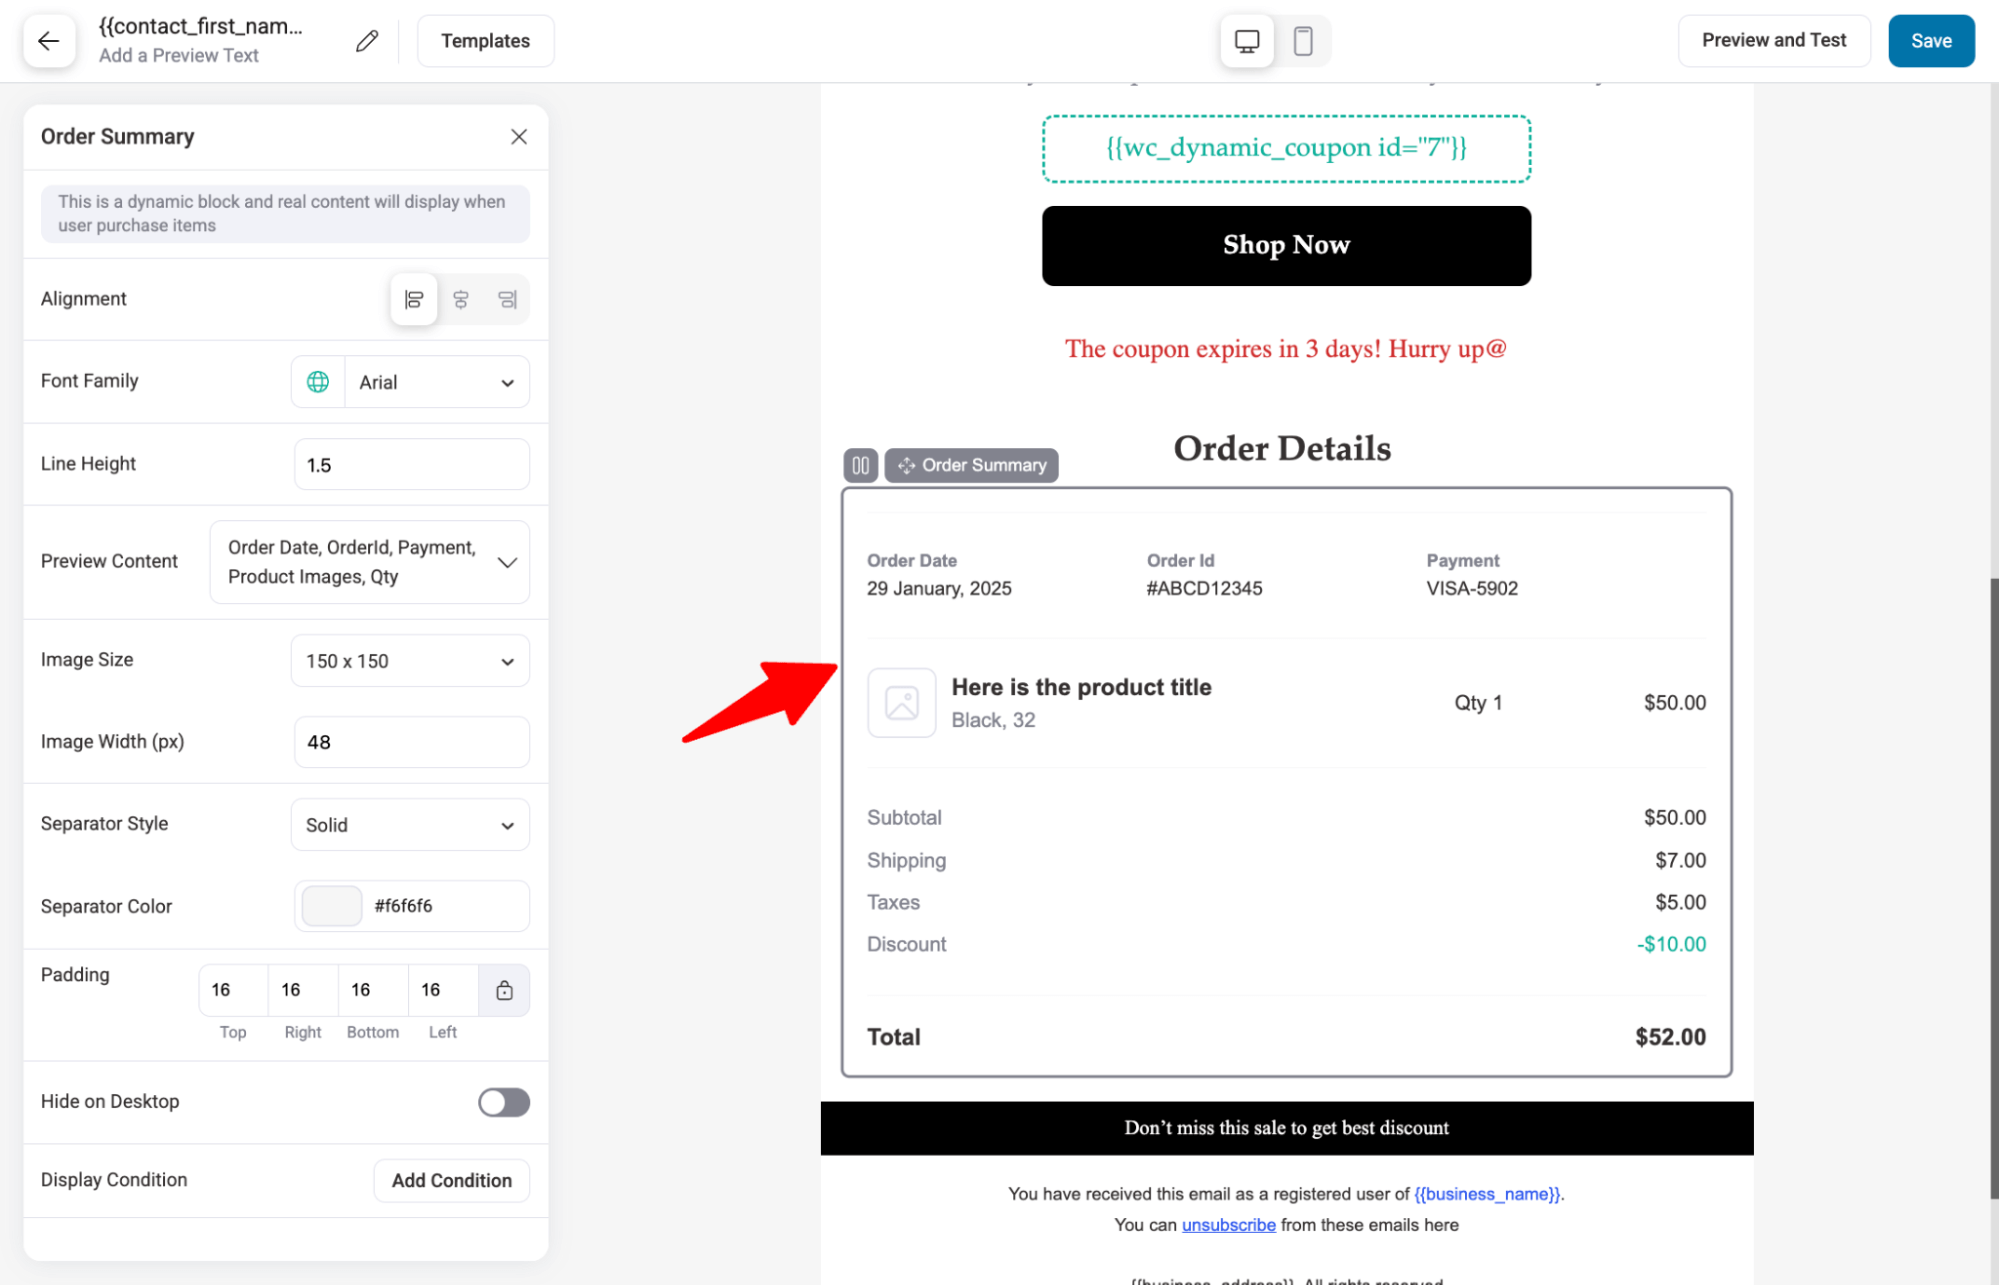
Next, you can also include the order details of the failed order in the email using the Order Summary block.
You can add a final CTA at the end that's directed to the order summary page as well.
Feel free to make any customizations you want. Hit Save to update.
Step 7: Enable the email automation with a discount code for failed orders
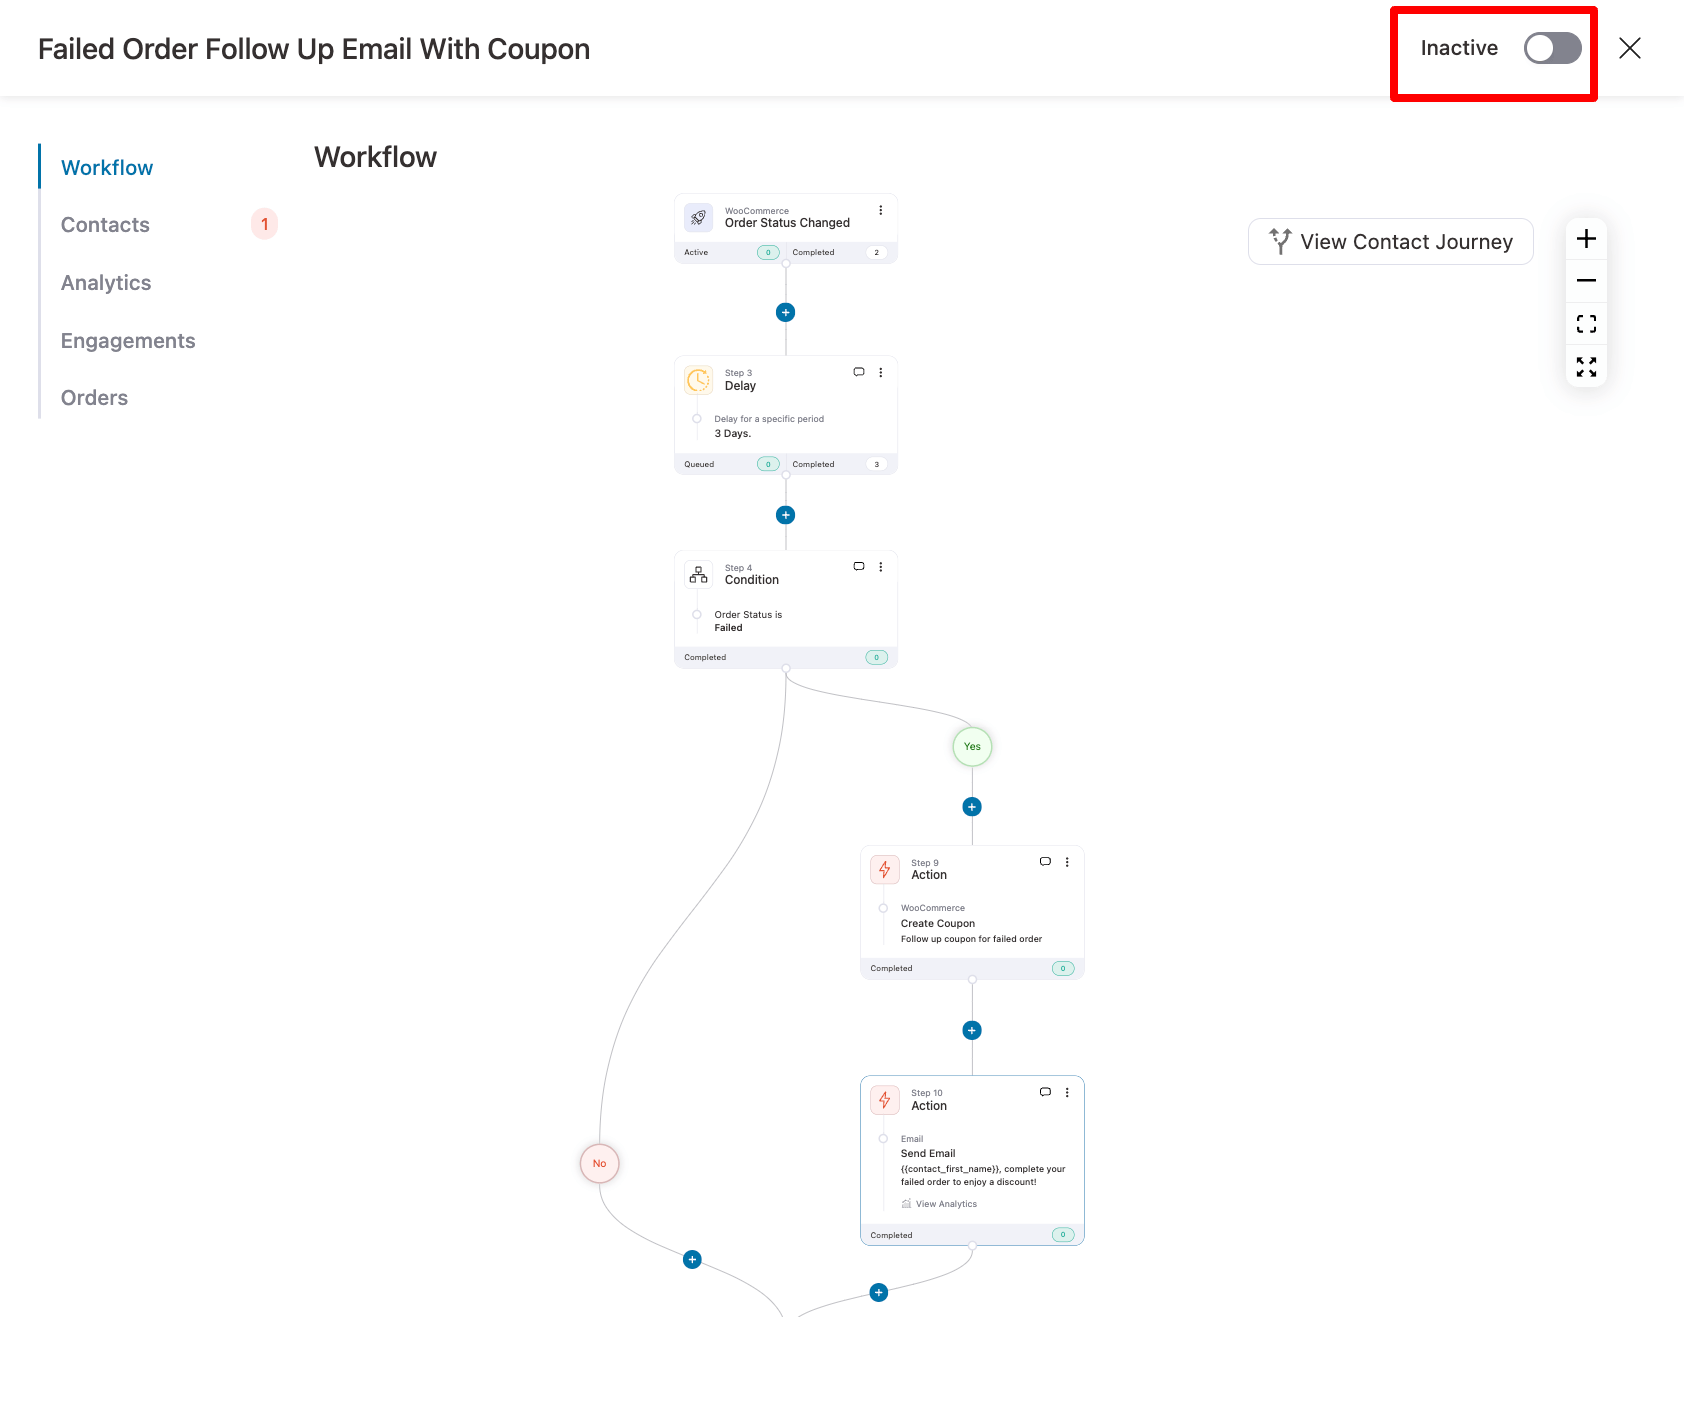
Lastly, you must enable the automation by turning the toggle on the top right corner.
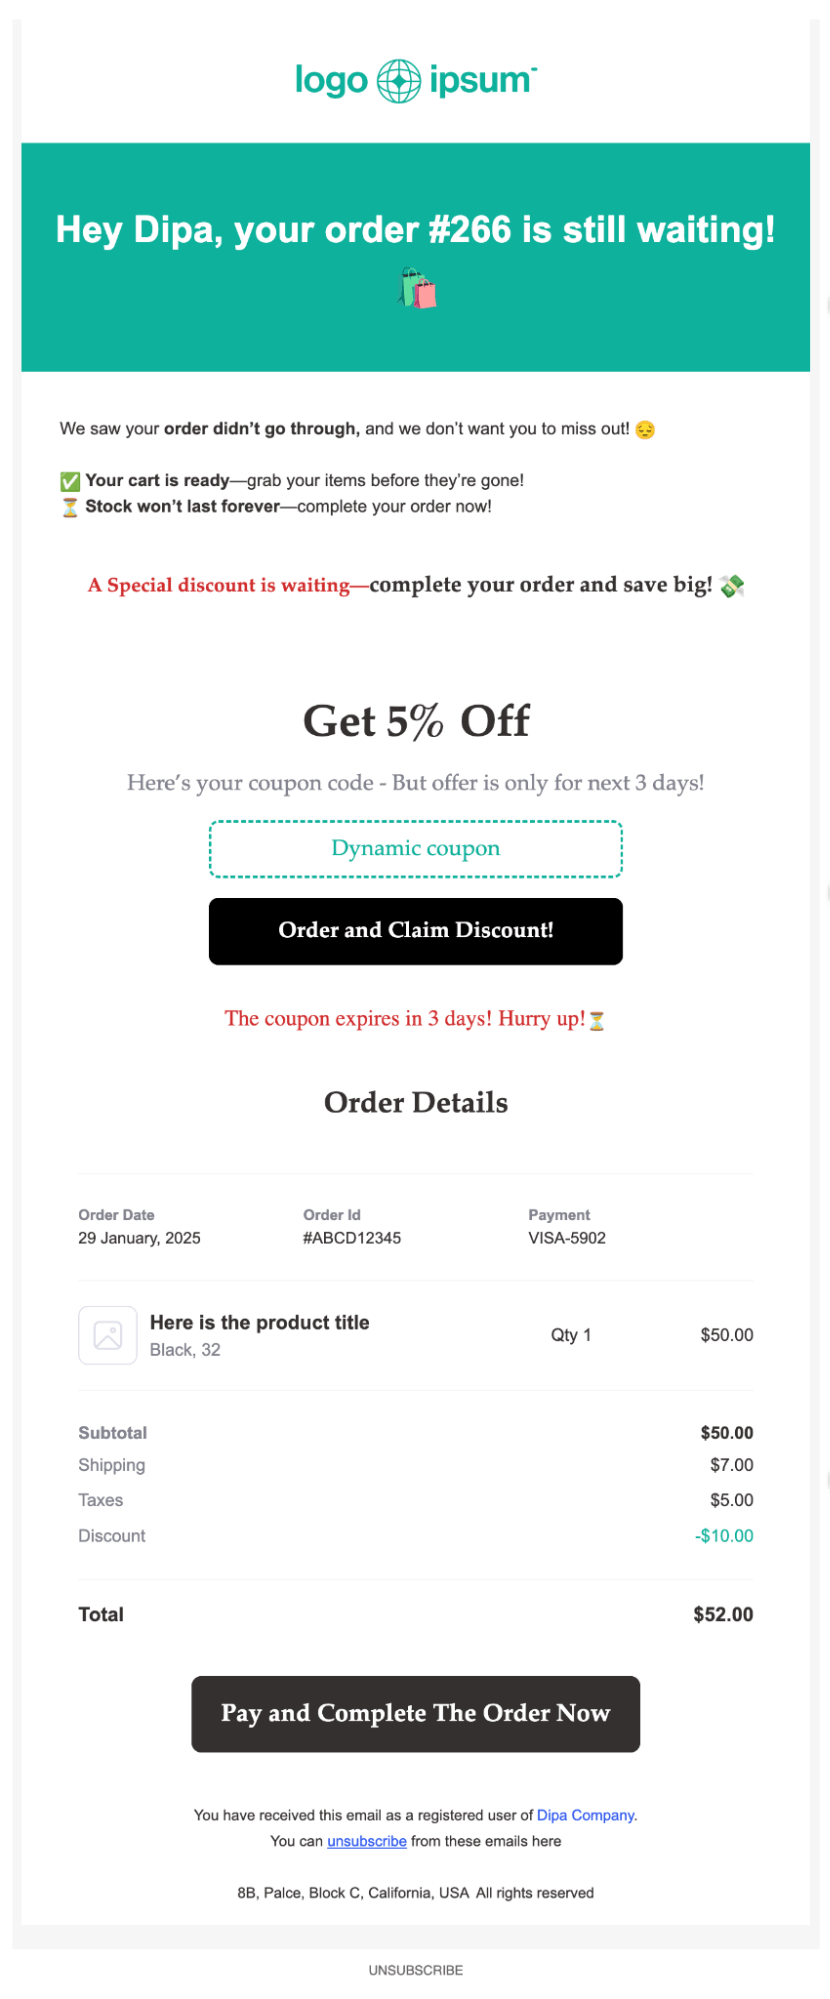
Here is a preview of the failed order with a follow-up discount coupon code:
How to Track Analytics for Failed Orders in WooCommerce?
With FunnelKit Automations, you can track the performance of all the failed order emails, default reminders, and follow-ups.
- Track the first reminder failed order emails
Under the History tab, you can find all the failed order emails sent with details like Sources, Type, Subject, Sent On, Status, and Details.
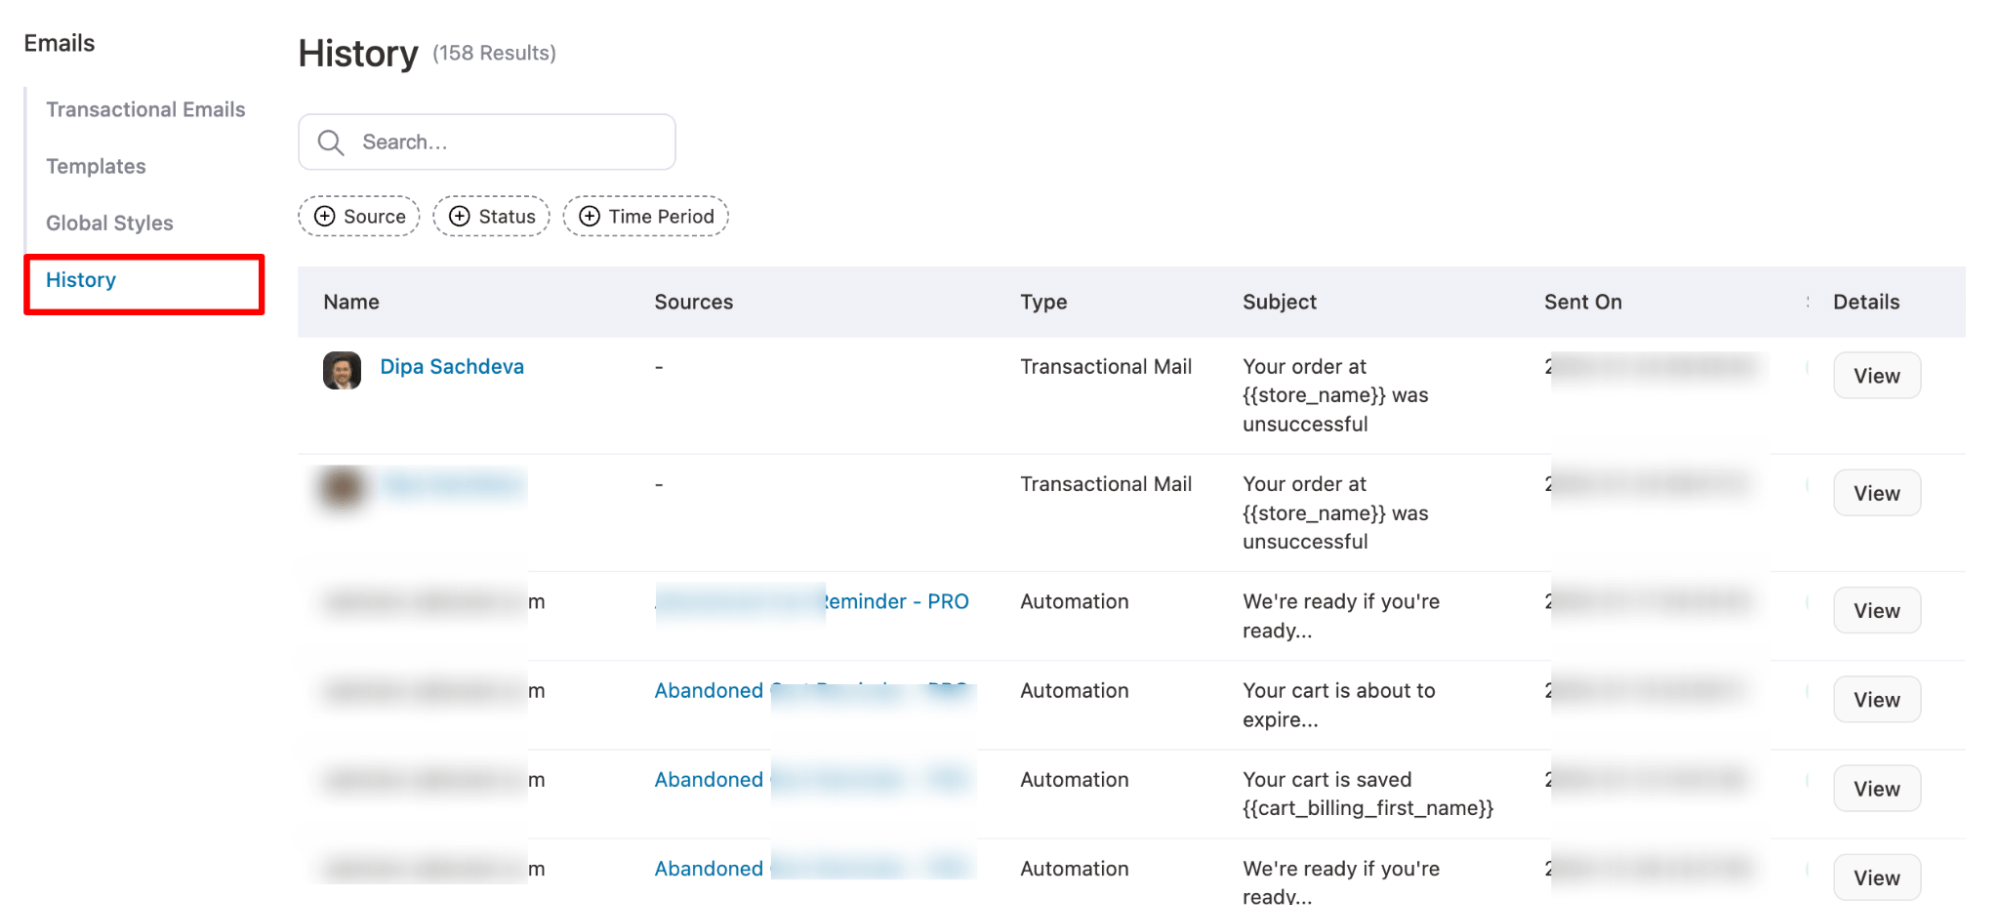
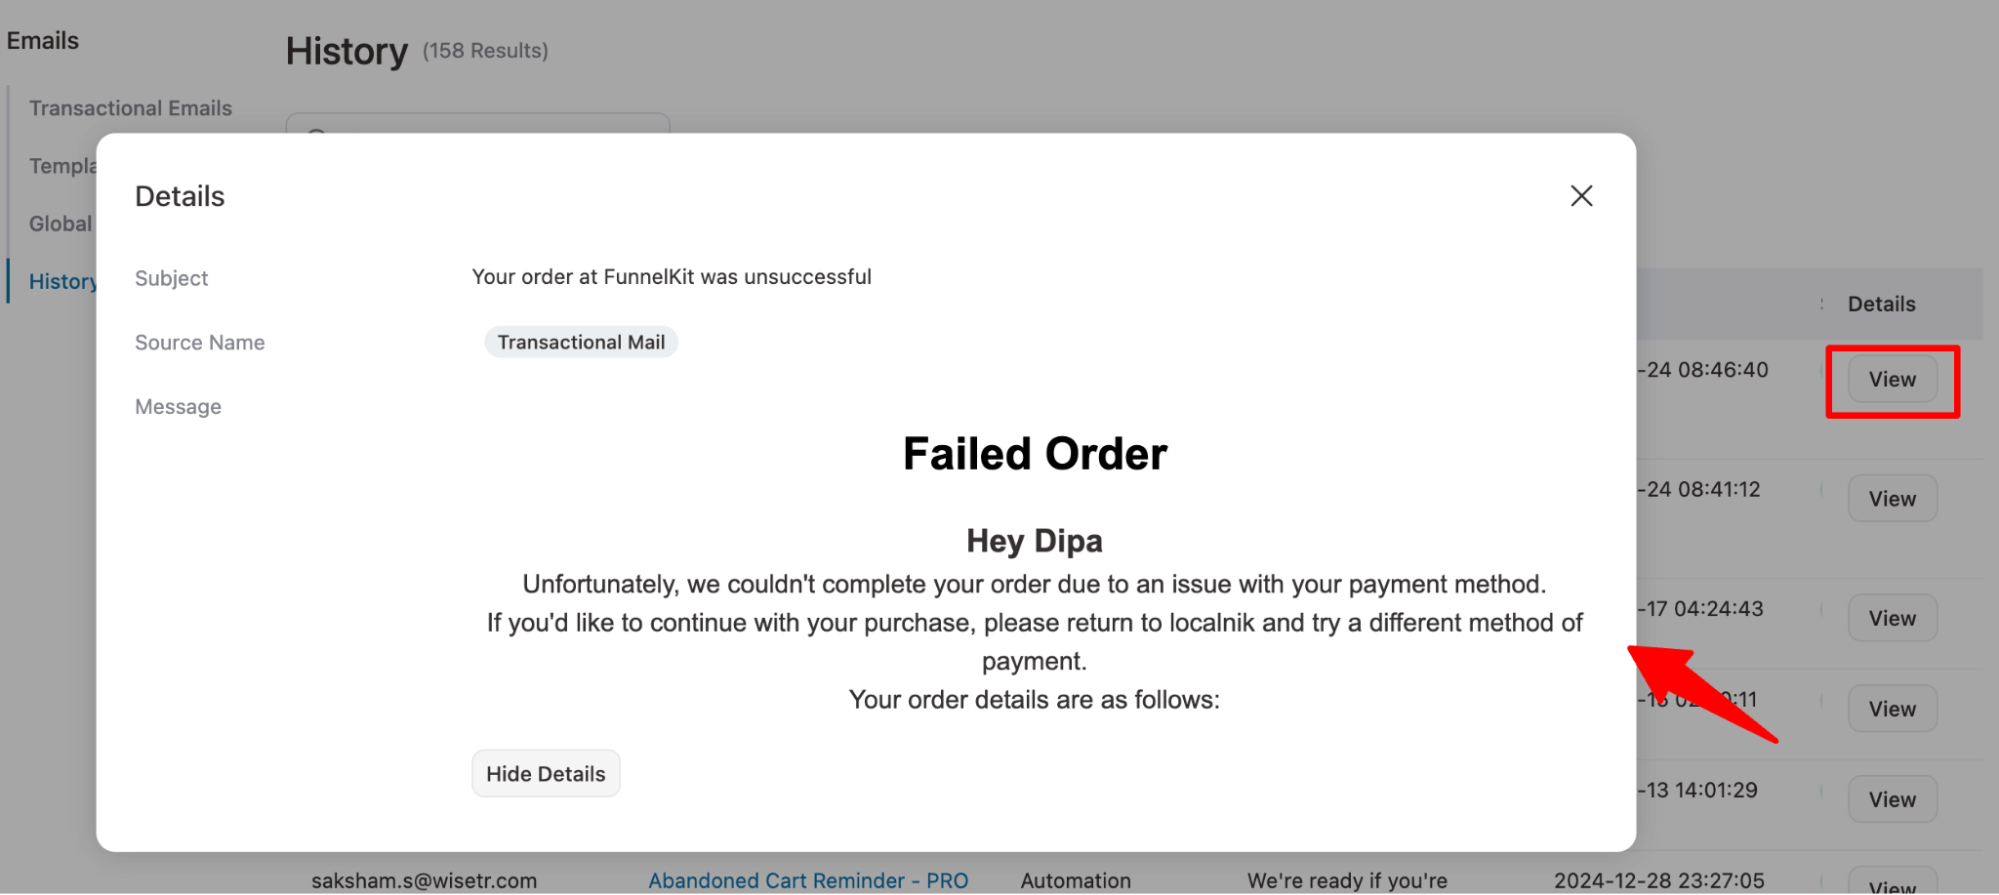
You can hit the View button on the details column to see more details, such as the subject, source name, and the whole email message sent to the customers.
- Track the follow-up email with the discount code
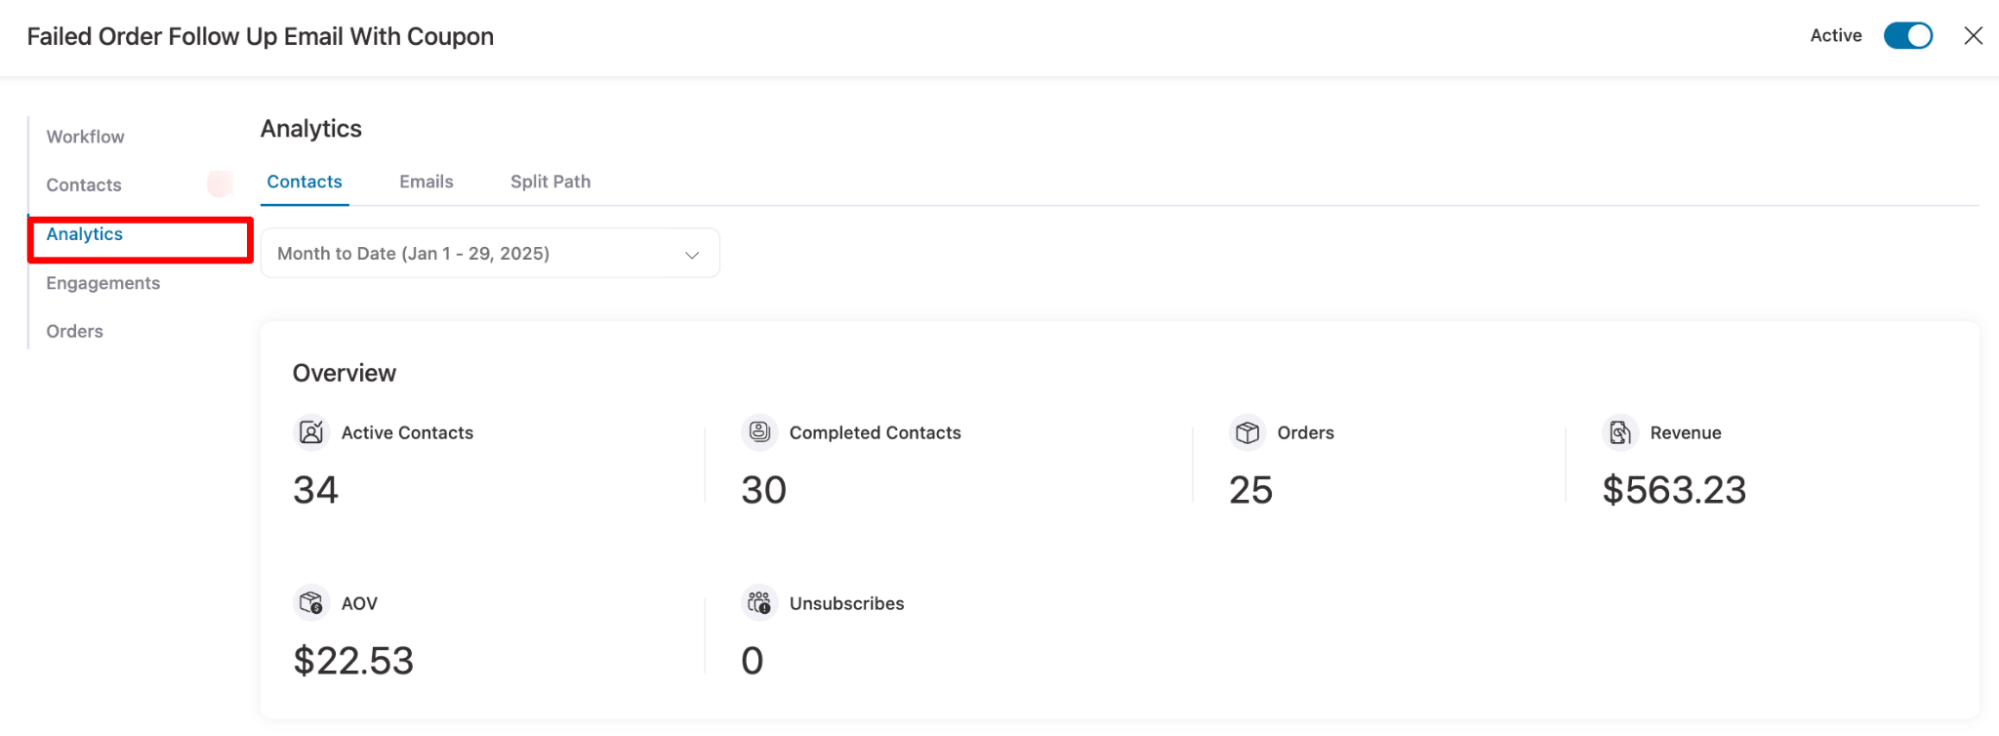
To track analytics for the email automation with follow-up emails, go to the automation and switch to the Analytics tab. Here, you can find the completed orders, revenue, AOV, etc.
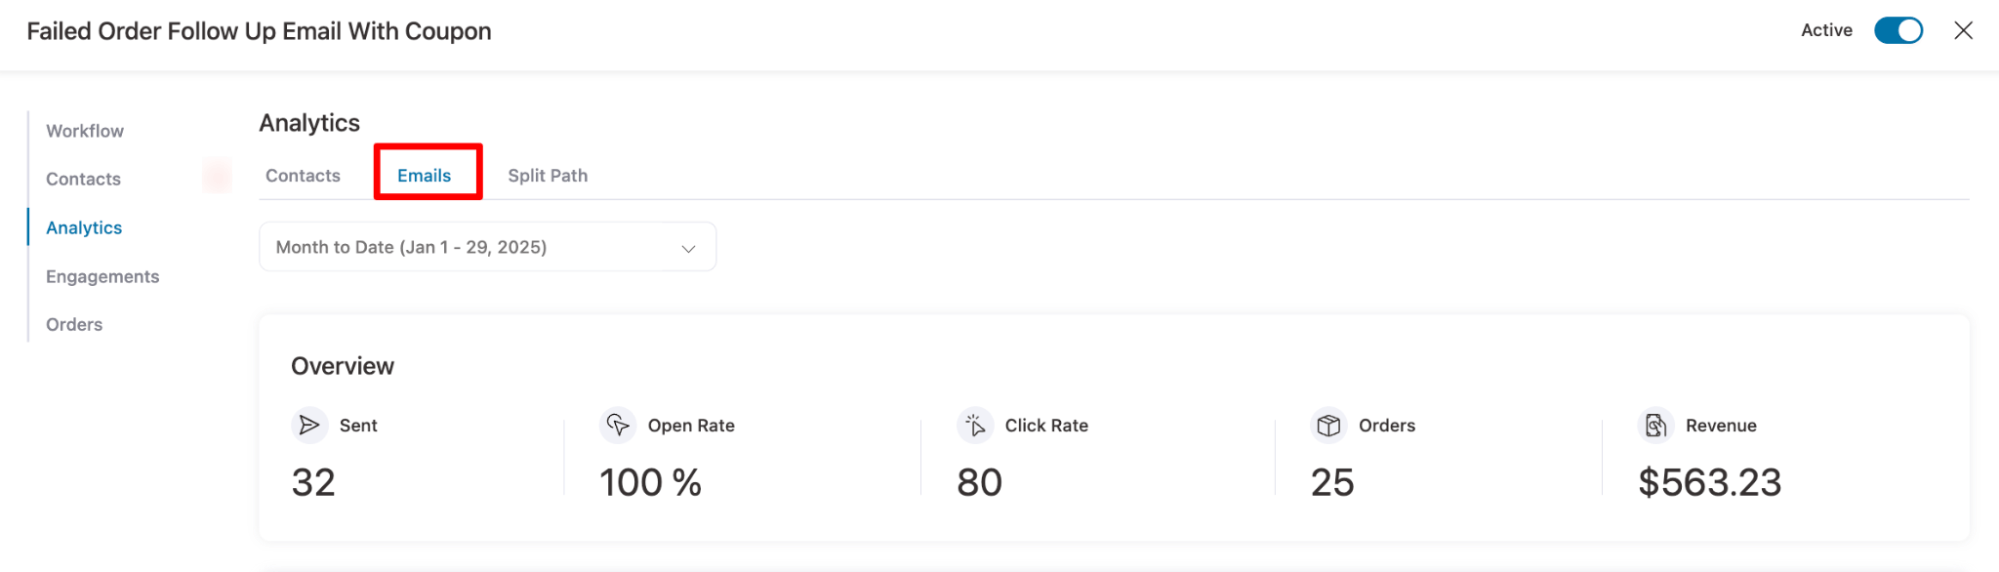
Under Analytics, move to the Email tab to find out the email sent rate, open rate, click rate, orders, etc.
Failed Order Email Not Reaching the Customer? 7 Fixes
Work these in order. The first three solve most cases.
1. Confirm which of the two emails you enabled
Both are called Failed order. Enabling one and testing for the other is the single most common version of this problem.
Two rows in the settings table, two separate Enable checkboxes.
2. Fix the recipient formatting
This applies to the store notification only. Multiple addresses go in comma-separated form with no spaces.
[email protected], [email protected] can fail to parse where [email protected],[email protected] works.
And remember the customer notification ignores this field entirely.
3. Read the transactional email log
WooCommerce logs the outcome of every transactional email, and almost nobody looks.
Go to WooCommerce ⇒ Status ⇒ Logs and find the entry for the email and order in question. Per WooCommerce’s email troubleshooting documentation, each entry records one of four outcomes:
- Sent: WooCommerce handed the message to your mail system successfully. Logged at INFO. If the buyer says it never arrived, the problem is spam filtering, or their provider.
- Failed: The send attempt returned an error. Logged at WARNING, usually with the reason.
- Disabled: The email type is switched off in settings.
- Skipped: A required condition was missing, such as no recipient.
Sent and failed attempts for order emails are also written as private order notes, so you can check a single order without leaving it.
However, if you see no entries at all, check Logs ⇒ Settings in case your level threshold is hiding INFO and NOTICE, and don’t expect raw email addresses, because WooCommerce redacts them for privacy.
4. Stop using PHP mail
If your site sends through wp_mail() and your host’s PHP mail, delivery is a coin flip.
Install an SMTP plugin and authenticate through a real sending service.
Port 587 with TLS or 465 with SSL covers nearly every provider.
This one fix resolves the majority of “WooCommerce not sending emails to customers” reports. The full sequence is in our guide to WooCommerce not sending emails.
5. Align your From address and authentication records
Set the “From” address in Settings ⇒ Emails to an address on your own domain. Then publish SPF, DKIM and DMARC records for that domain.
Sending as @gmail.com from your server’s IP is the fastest way to land WooCommerce order emails in spam, and Gmail and Yahoo now enforce authentication on bulk senders rather than merely preferring it.
6. Check whether the order ever reached Failed status
If the order is sitting on Pending payment, no failure notification exists to send, because nothing triggered it.
That usually means the gateway’s webhook or IPN never reached your site.
Check the gateway dashboard for delivery failures, and check whether a security plugin or firewall is blocking the callback URL.
Remember too that the store notification only fires from Pending or On-hold, so a Processing ⇒ Failed transition emails the buyer and skips you.
7. Rule out conflicts and stale template overrides
Deactivate everything except WooCommerce, switch to a default theme, and place a test order. If the email arrives, reactivate one at a time.
While you’re there, open WooCommerce ⇒ Status and look for template overrides flagged as out of date.
A theme shipping its own admin-failed-order.php from three years ago is a real failure mode.
Frequently Asked Questions
There are three likely causes if your failed order email is only going to the admin:
- The customer-facing notification is disabled
- Your version predates it
- You added the buyer’s address to the store email’s recipient field and the message didn’t parse
That field needs comma-separated addresses with no spaces, and it only controls the admin notification.
Check whether WooCommerce Subscriptions’ automatic retry system is already handling it, since it sends its own emails on a set schedule.
If it’s off, or you want a branded message, trigger an automation on the renewal order reaching Failed status, and add a card-expiry reminder ahead of the renewal date.
Yes, on the store notification. Add each address to the Recipient(s) field, comma-separated, no spaces.
The customer notification has no recipient field. It always uses the billing email on the order.
Almost always sender authentication. Send from an address on your own domain, publish SPF, DKIM and DMARC records for it, and keep the From address consistent across your store.
If the transactional log says Sent but nothing arrives, this is where to look.
No. Once the order leaves an unpaid status, the pay URL stops resolving to a checkout.
That’s intentional, and it’s why a stale link from an old email shows an error rather than charging someone twice.
Start Recovering Failed Payments This Week!
Declined checkouts are the closest thing to free revenue your store has. These are people who chose a product, filled in their details, and pressed the button.
You have already paid to get them there. The only thing missing is a message telling them what happened.
The defaults are functional, and Core now tells the buyer something happened, but they leave the recovery on the table.
A branded email with a Pay Now button reaches them while they still want the thing, which is the only version that reliably turns a failed order into a paid one.
Ship the first email this week and leave it running. It will not transform your store on its own, because almost nothing does.
But recovering a quarter of your declined payments is a small, permanent lift that stacks with every other one you make, and it costs twenty minutes and no ad spend.
So, don’t lose out on sales due to failed orders; send them a custom email and turn them into sales today!
Editorial Team
October 7, 2026WooCommerce upsells are products you recommend in place of the one a shopper is viewing, usually a better or higher-priced version of it. WooCommerce has a built-in upsell field for...
Editorial Team
September 30, 2026WooCommerce makes it pretty simple to create and sell digital products like eBooks, software, and online courses etc from a single WordPress store. You don't need anything complex to get...

Editorial Team
September 23, 2026A tripwire funnel is one of the most powerful tools in digital marketing, and also one of the most misunderstood. In our experience helping thousands of WordPress businesses build sales...






