


WooCommerce product recommendations are your store's way of saying, "This goes well with that."
Someone viewing a laptop sees a sleeve right under it. A bag of beans in the cart brings up a grinder. Three days after the order, an email suggests the refill they'll need soon.
It's the online version of the barista asking, "Anything to eat with that today?" One small question, asked at the right moment, grows an order the customer was already placing.
Out of the box, WooCommerce gives you some of this for free. Upsells and related products show on the product page, and cross-sells show in the cart. There's no targeting, no reporting, and nothing at checkout or after purchase.
This guide walks through seven placements step by step, starting with the free ones. You'll also find a shortcode method for showing recommended products anywhere without a plugin.
Let's get into it.
Table of Contents
- 1 What Are Product Recommendations in WooCommerce?
- 2 Which Product Recommendation Setup Do You Need?
- 3 Placement 1: Product Page - Related Products and Upsells (Free)
- 4 Placement 2: Cart Page Cross-Sells (Free)
- 5 Placement 3: Slide-In Cart Suggestions
- 6 Placement 4: Checkout Order Bumps
- 7 Placement 5: One-Click Post-Purchase Offers
- 8 Placement 6: Exit Intent Recommendation Popups
- 9 Placement 7: Post-Purchase Email Recommendations
- 10 6 Best Practices to Get More Revenue From WooCommerce Product Recommendations
- 11 Display Recommended Products with Shortcodes and Hooks (No Plugin)
- 12 Frequently Asked Questions (FAQs)
- 13 Start Turning Product Recommendations Into Revenue!
What Are Product Recommendations in WooCommerce?
Product recommendations are automated suggestions shown to shoppers based on what they’re viewing, what’s in their cart, or what they’ve bought before.
Different types of recommendations do different jobs, and the best stores run several at once.
These recommendations also highlight popular, seasonal, or sale items, making it easier for customers to discover new products and enhance their shopping experience.
By strategically displaying the right products at the right time, you can significantly boost average order value (AOV) and improve overall store performance.
Here are the types that matter:
| Type | What It Shows | Why It Works |
|---|---|---|
| Related products | Items similar or complementary to the product being viewed, like a laptop bag with a laptop | Surfaces items shoppers would otherwise never find |
| Cross-sells | Complementary items based on cart contents, like headphones with a smartphone | Adds relevant products at the decision moment |
| Upsells | A better version of the selected product, like a premium smartwatch over the basic model | Moves shoppers toward higher-value purchases |
| Frequently bought together | Bundles other customers purchased in the same order | Real purchase data makes the suggestion trustworthy |
| Recently viewed | Products the shopper looked at earlier in the session | Recalls interest and shortens the path back to purchase |
| Best sellers and top rated | Popular or highly reviewed items across the store | Social proof lowers hesitation for undecided shoppers |
| Personalized suggestions | Items based on past purchases or browsing history | Relevance is what makes shoppers act |
Each of these product recommendation types helps to optimize your WooCommerce store’s performance by encouraging customers to add more items to their cart.
By tailoring recommendations based on customer behavior, you can create a personalized shopping experience that enhances both engagement and sales.
Which Product Recommendation Setup Do You Need?
The types above tell you what to recommend. The next question is where to show them. This guide covers seven placements across the buying journey, from the product page to the inbox. Here's how they compare, so you can pick the ones that fit your store and jump straight to those steps.
| Placement | Where shoppers see it | Tool needed |
|---|---|---|
| 1. Related products and upsells | Product page | WooCommerce (built in) |
| 2. Cross-sells | Cart page | WooCommerce (built in) |
| 3. Slide-in cart suggestions | Side cart, right after add to cart | FunnelKit Cart |
| 4. Order bumps | Checkout page | FunnelKit Funnel Builder |
| 5. One-click upsells | Right after payment | FunnelKit Funnel Builder |
| 6. Exit-intent popups | When a visitor tries to leave | OptinMonster |
| 7. Recommendation emails | Inbox, days after purchase | FunnelKit Automations |
New store or small catalog? Start with Placements 1 and 2. They're free and take very little setup.
Ready to go further? A slide-in cart (Placement 3) puts suggestions in front of shoppers the moment they add an item, instead of waiting for them to open the cart page. From there, the checkout and post-purchase placements (4, 5, and 7) reach shoppers who have already decided to buy.
Exit-intent popups (Placement 6) work best as a last step, once your other placements are running and you want one final shot at visitors who are leaving.
Comparing more tools, including AI engines and rule-based plugins?
Our WooCommerce product recommendation plugins guide covers the full list.
Placement 1: Product Page - Related Products and Upsells (Free)
The product page is where discovery happens, so it’s the natural home for upsells and related items.
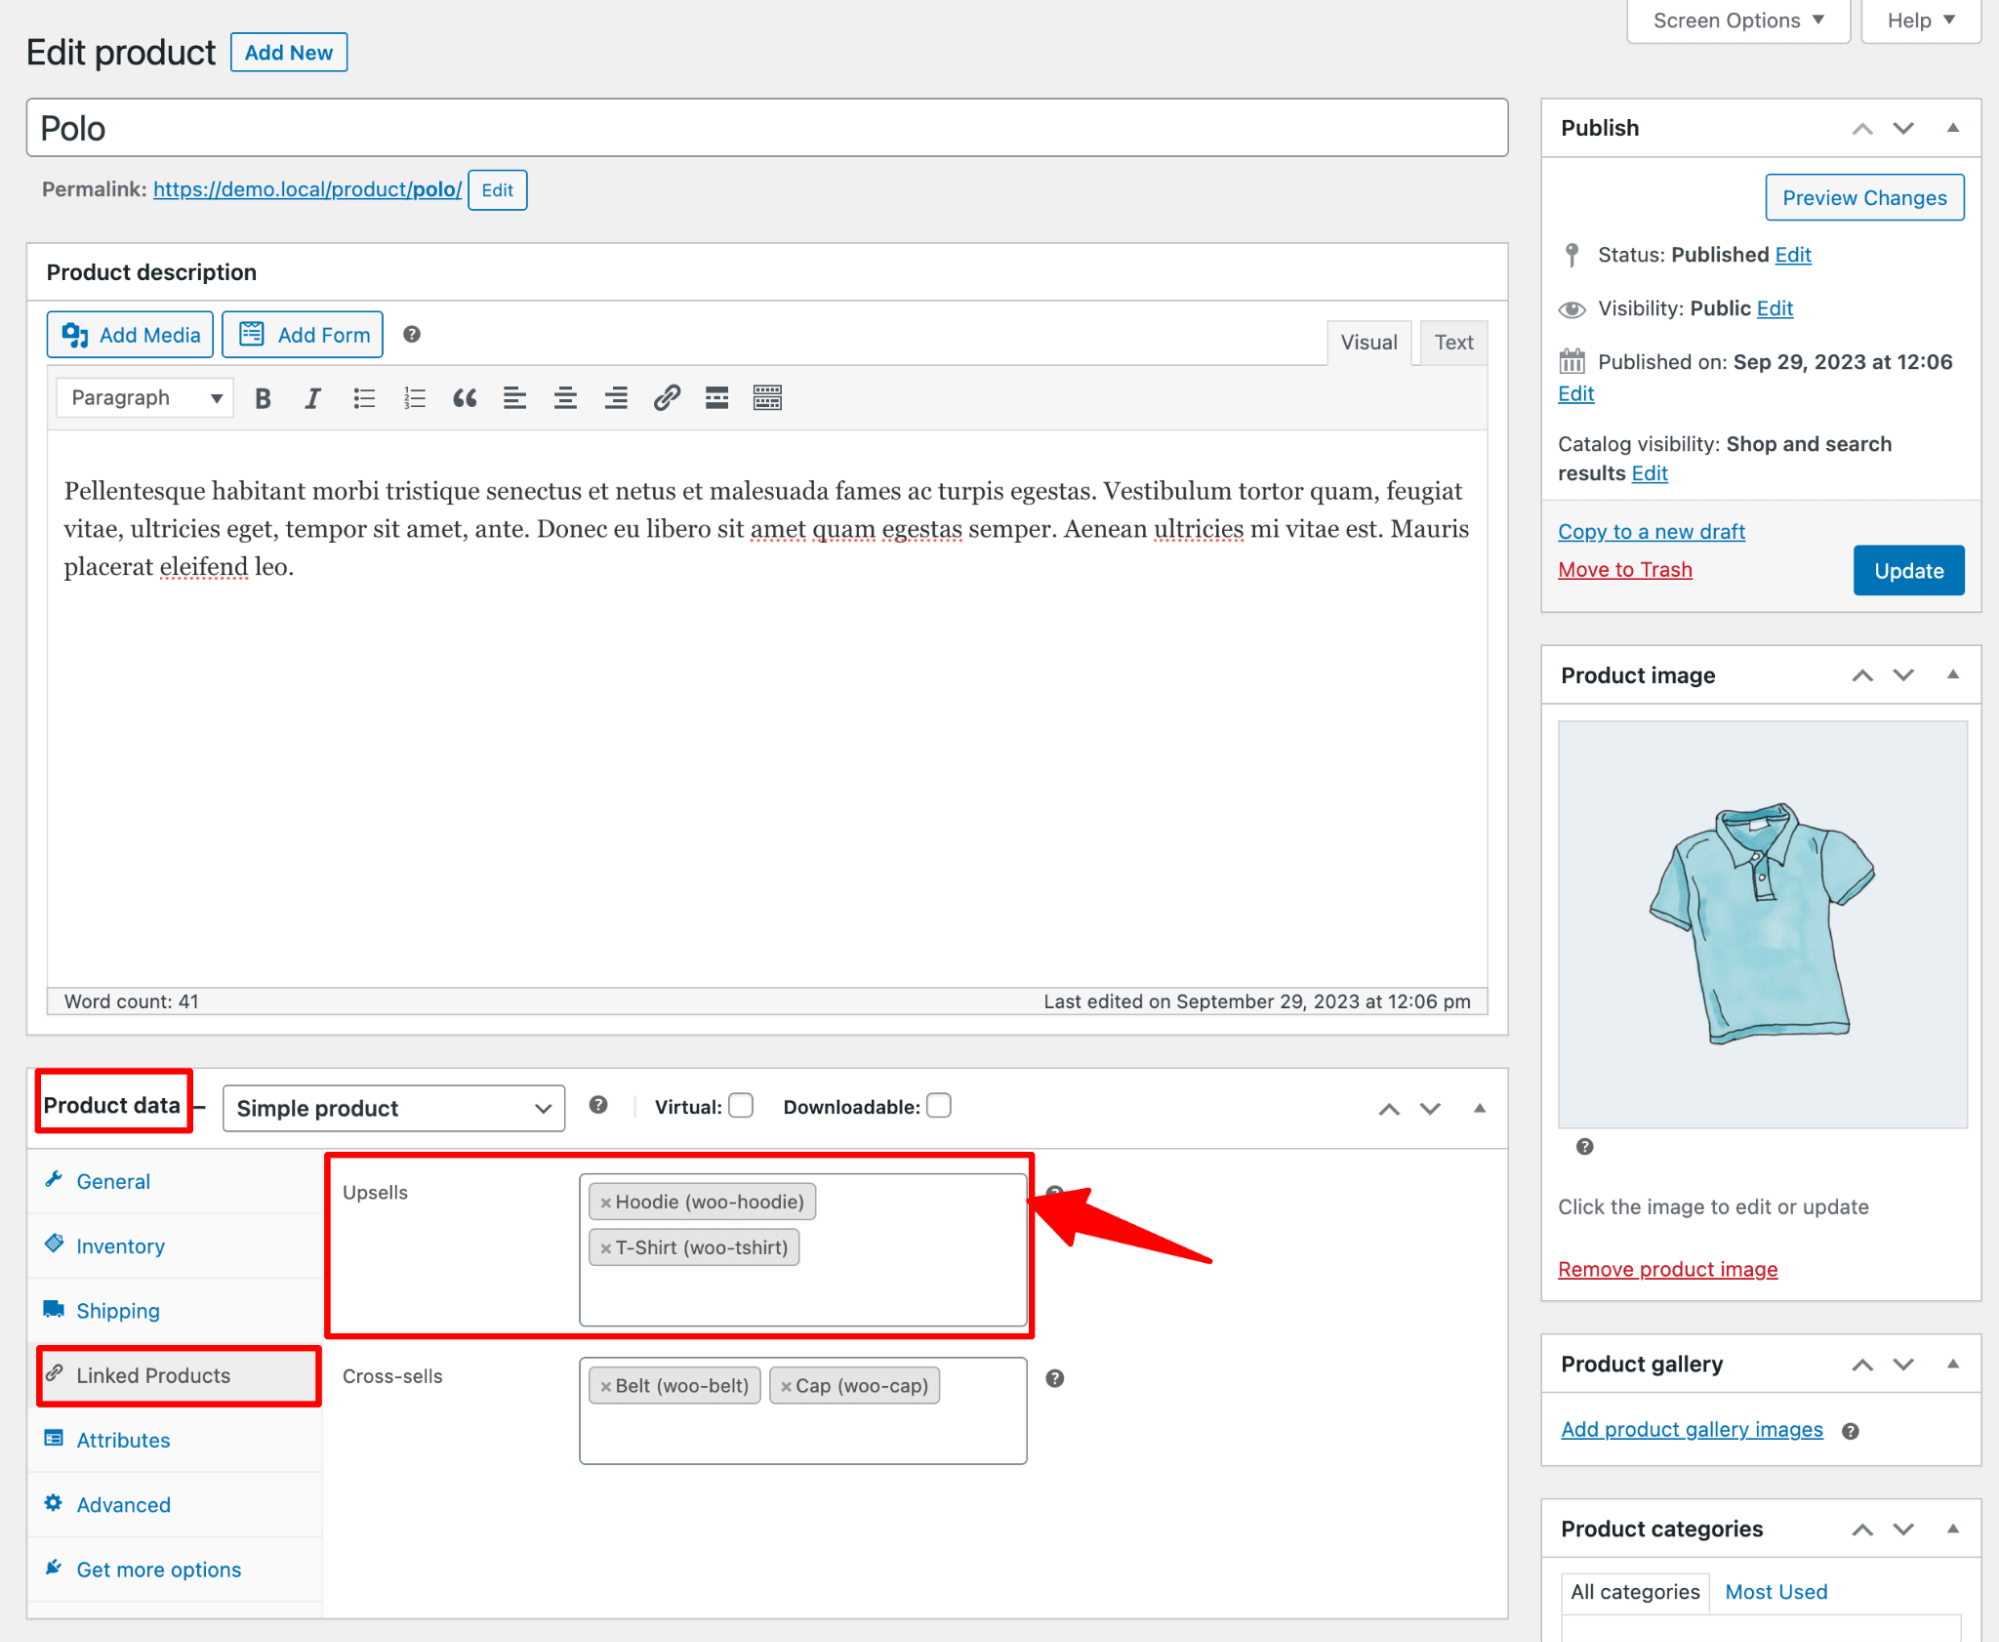
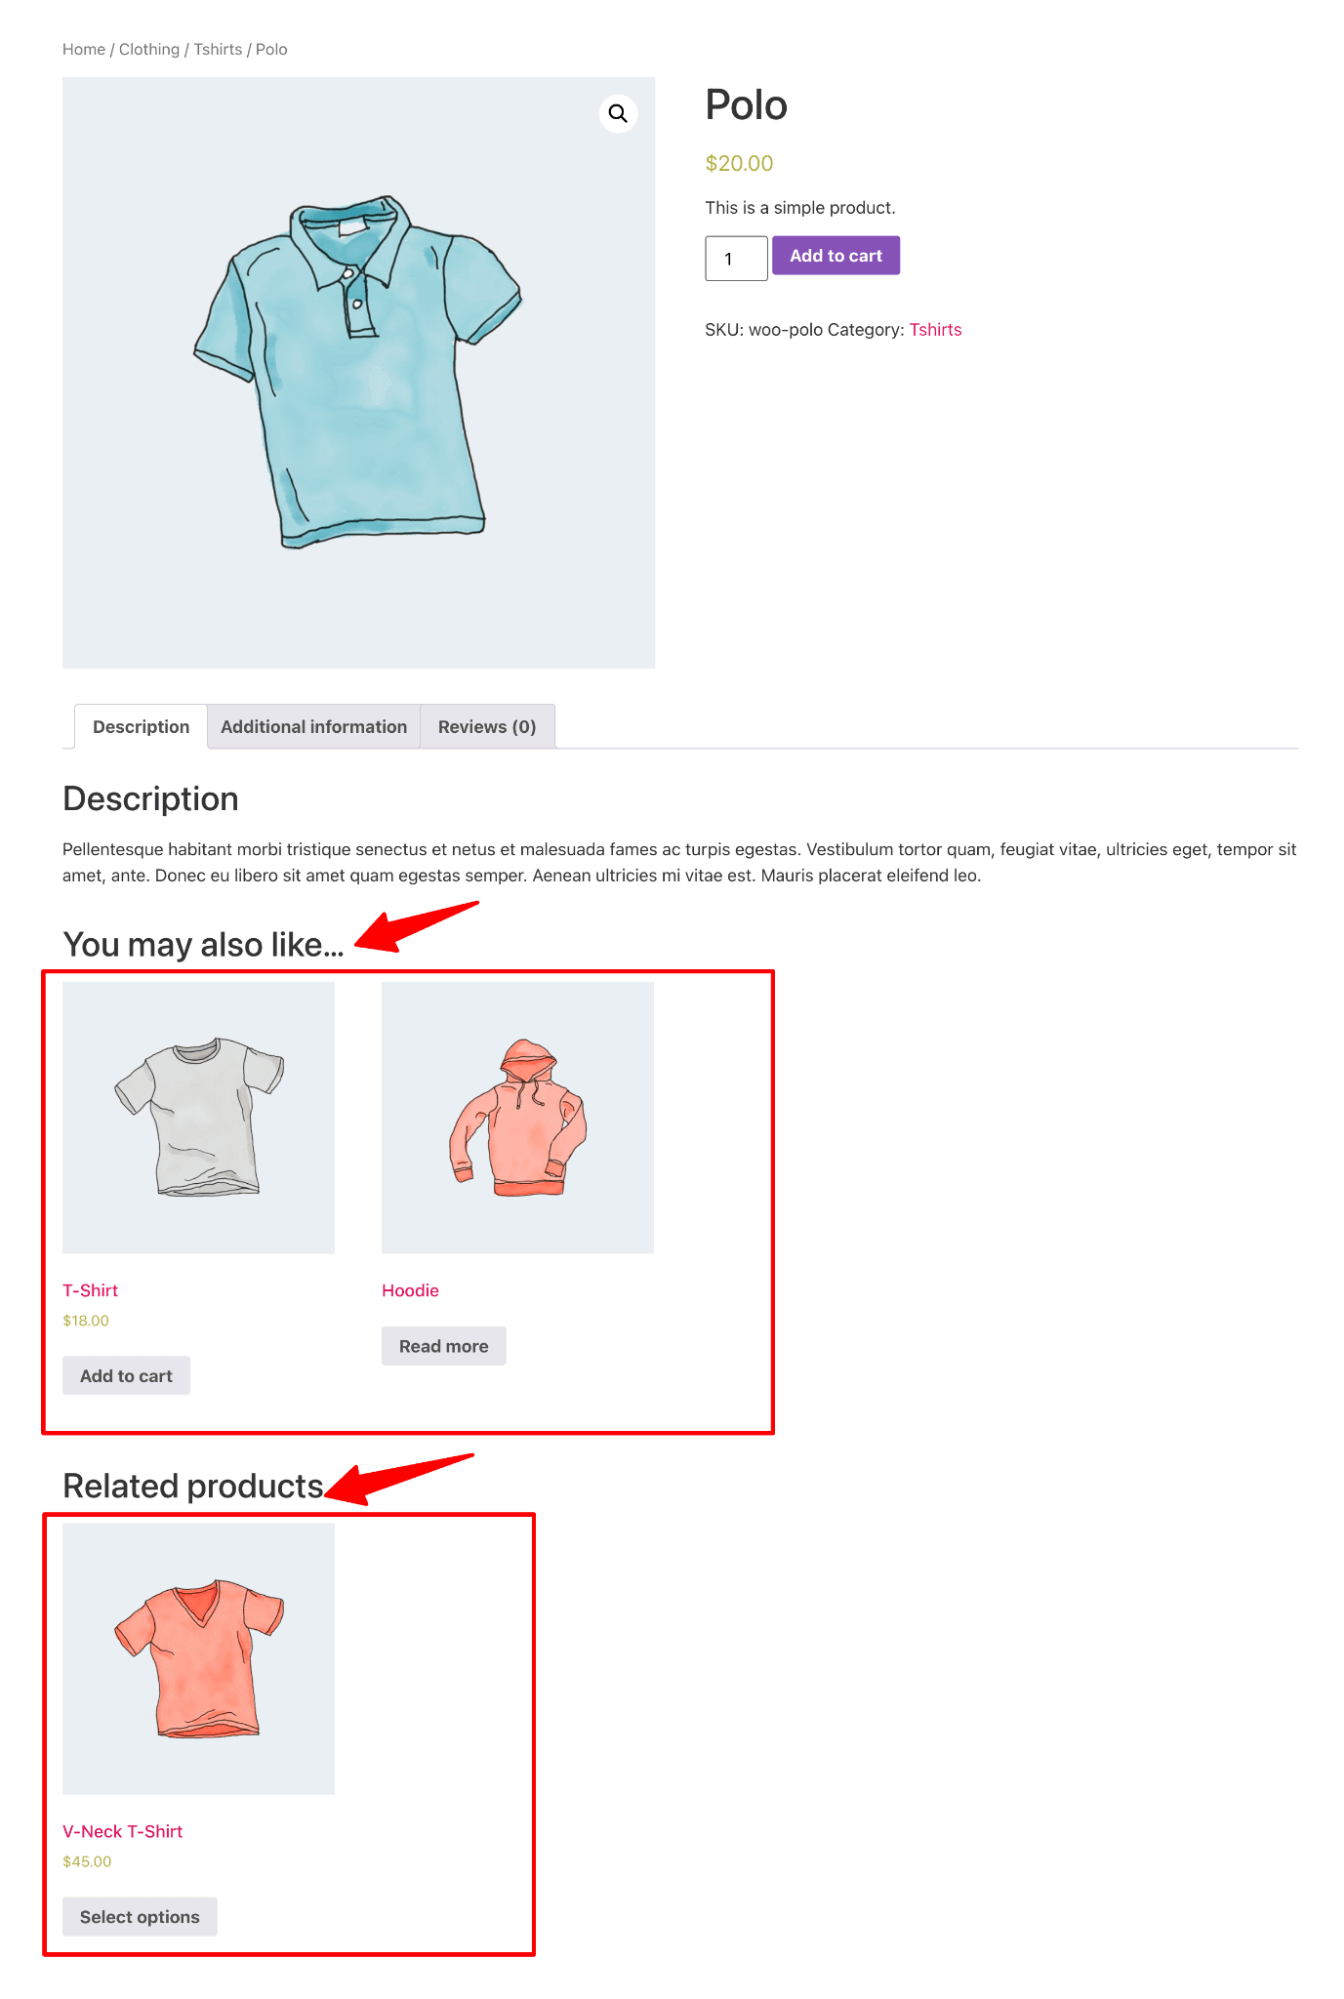
WooCommerce shows upsells in a "You may also like" section on the product page. Here's how to add them:
- Go to Products ⇒ All Products and click Edit on the product.
- Scroll down to the Product data box and open the Linked Products tab.
- In the Upsells field, search for the product you want to suggest and select it.
- Click Update to save.
Along with upselling products, WooCommerce automatically recommends products from the same category in the “Related products” section using shared categories and tags.
You can’t hand-pick these without code or a plugin; we cover both routes later in this guide.

Placement 2: Cart Page Cross-Sells (Free)
On the cart page, shoppers pause to review the order. WooCommerce uses that pause to show cross-sell products under “You may be interested in”.
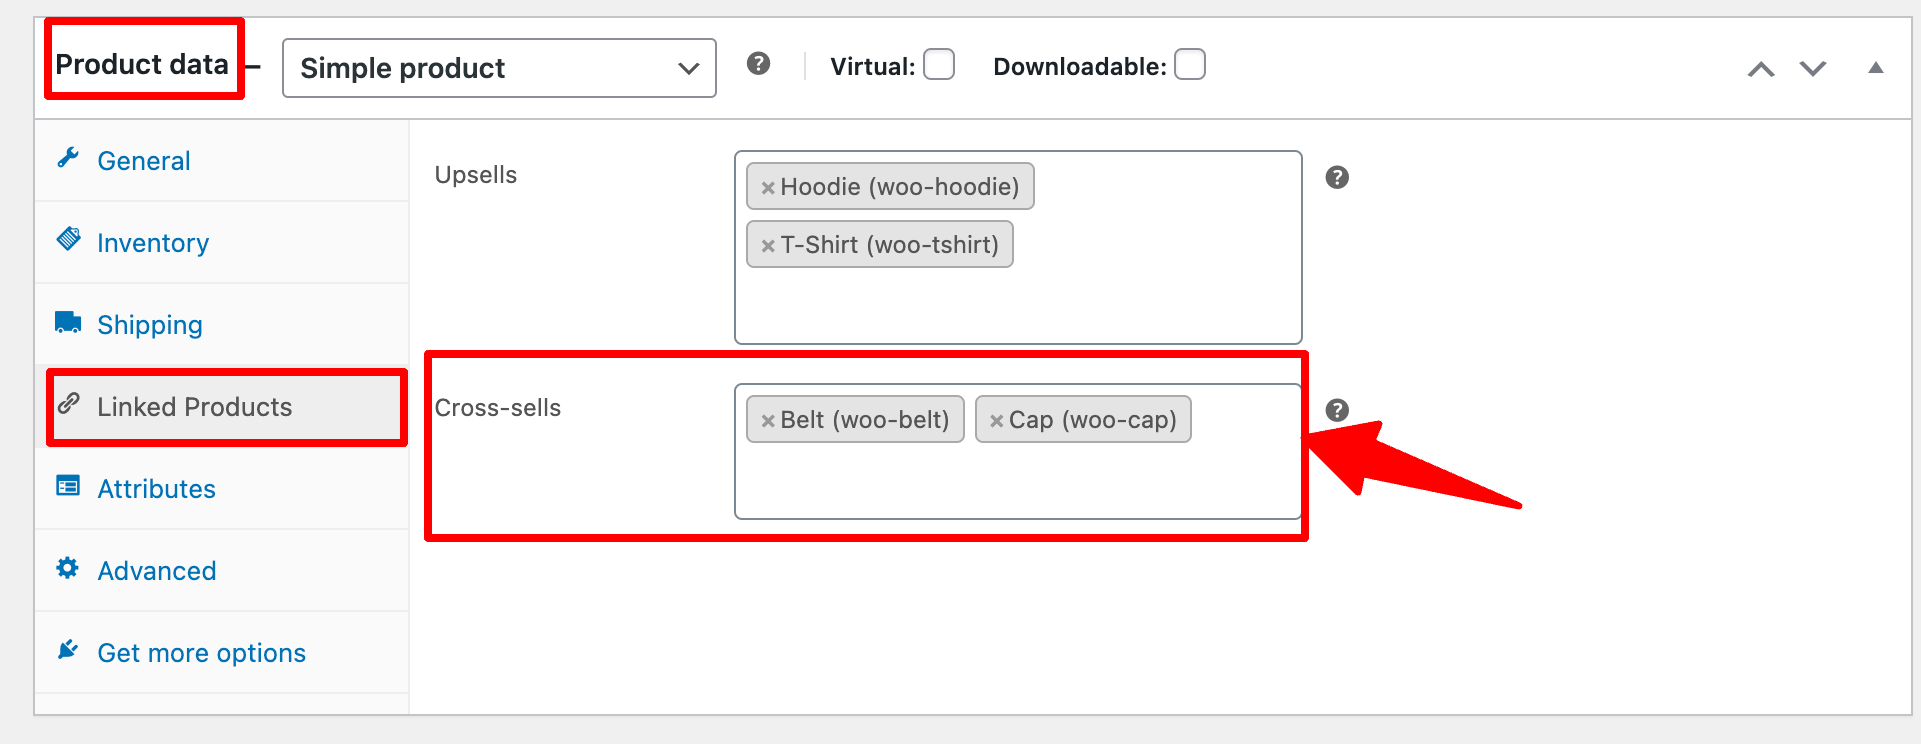
Cross-sells live in the same Linked Products tab. Open the product, search for the complementary items in the Cross-sells field, and click Update.
Whenever that product is in a shopper's cart, your picks show up on the cart page.
Here is what the cross-sell recommendation looks like on the default cart page:
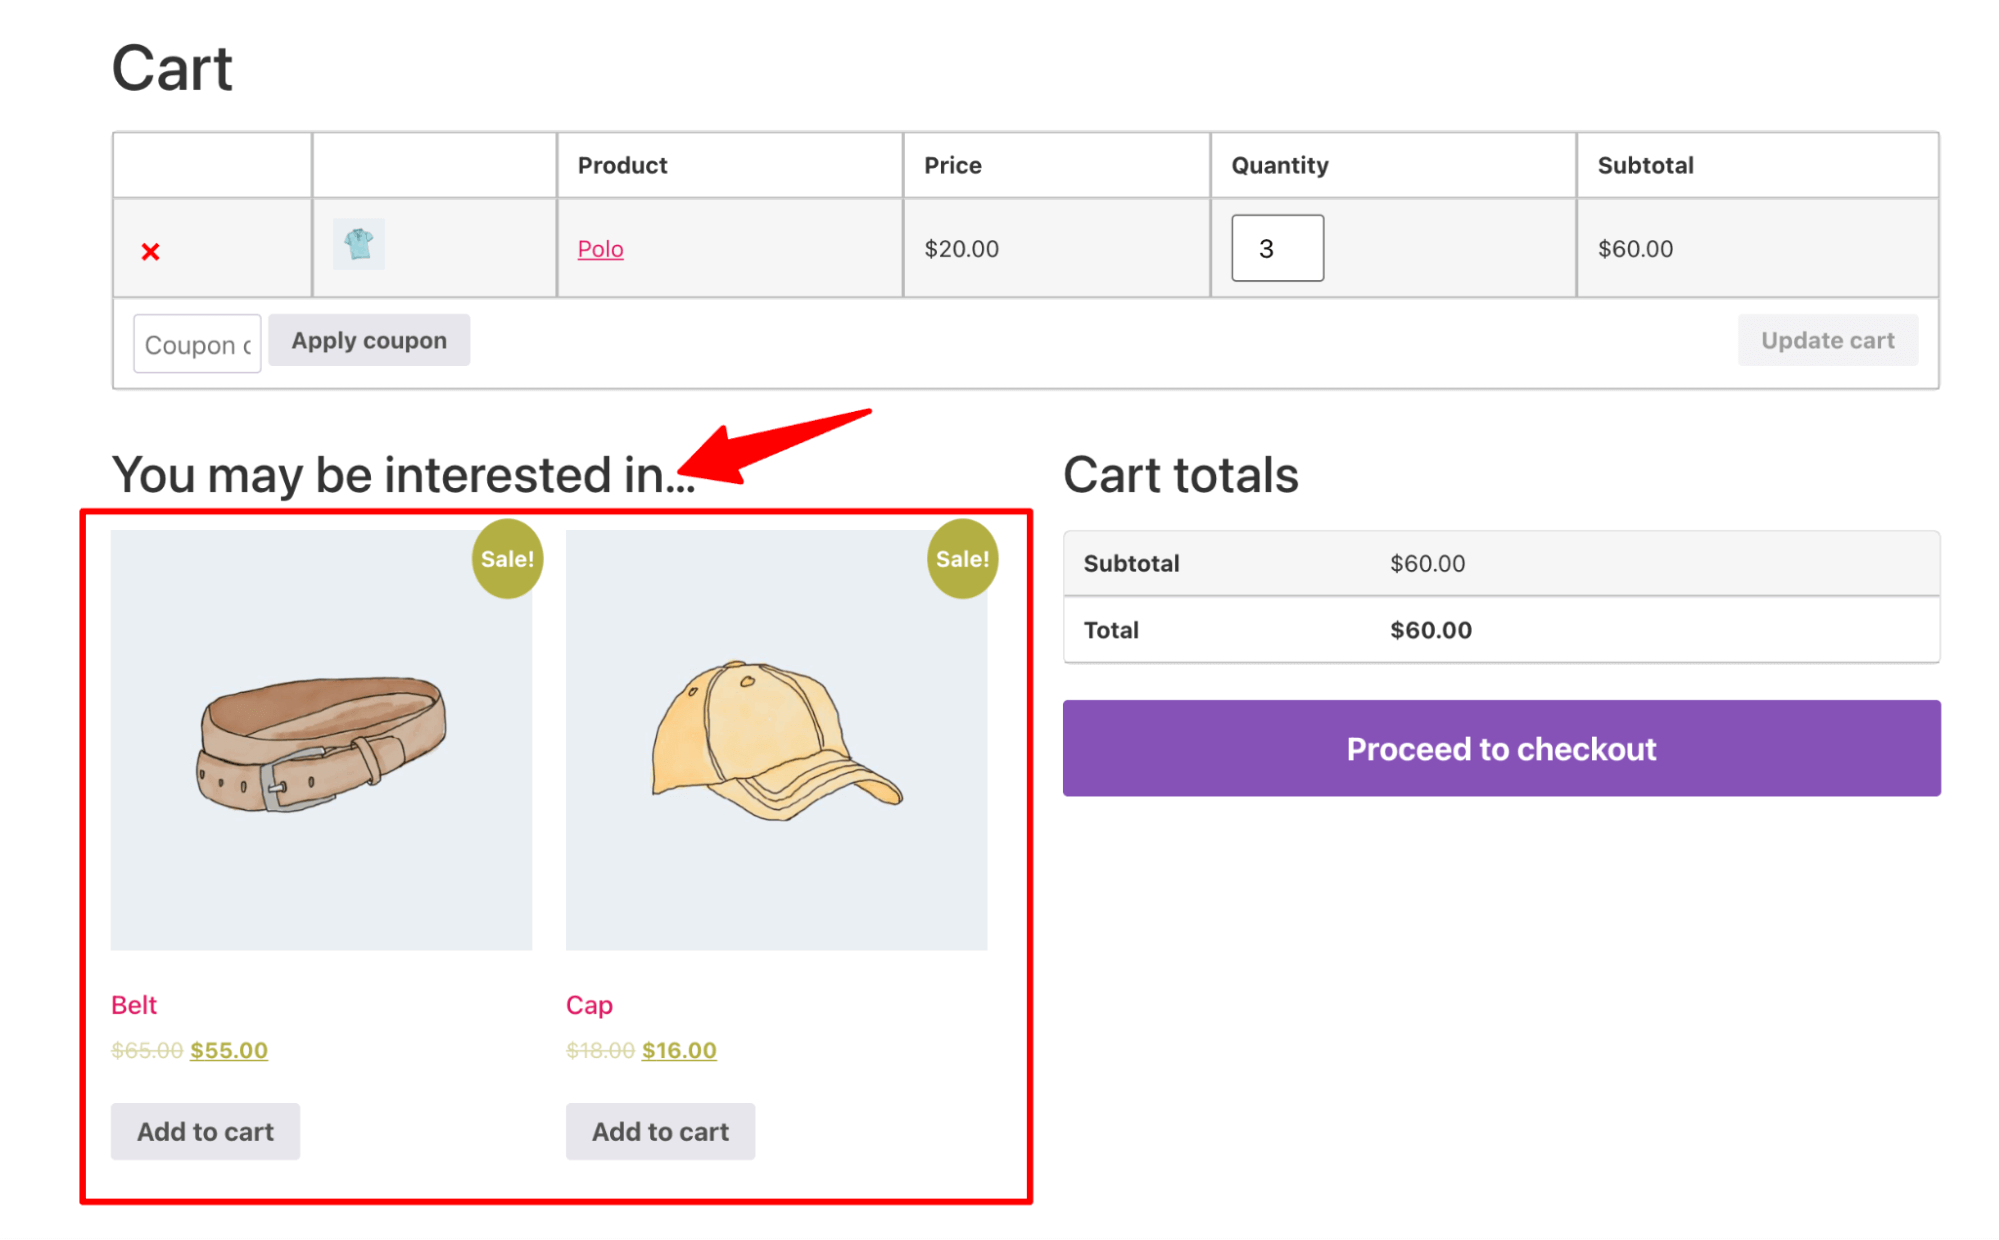

So, these are the two options available by default in WooCommerce for product recommendations. To fully leverage the power of product recommendations, you’ll need additional plugins that offer advanced techniques.
You need additional plugins to use more recommendation techniques. The following section lists the best WooCommerce product recommendation plugins.
Placement 3: Slide-In Cart Suggestions
The default cart page is one extra step in your shopping journey and certainly the reason why shoppers leave your store.
A side cart fixes that by sliding in when the shopper adds an item to their cart, putting the offer in front of them at peak intent (captures the add-to-cart moment, not five clicks later).
FunnelKit Cart handles this with a side panel that opens on Add to Cart, carries the cross-sell offers inside it, and includes the free-shipping progress bar. UpsellWP’s free tier covers cart-page upsells if you’d rather not add a cart plugin.
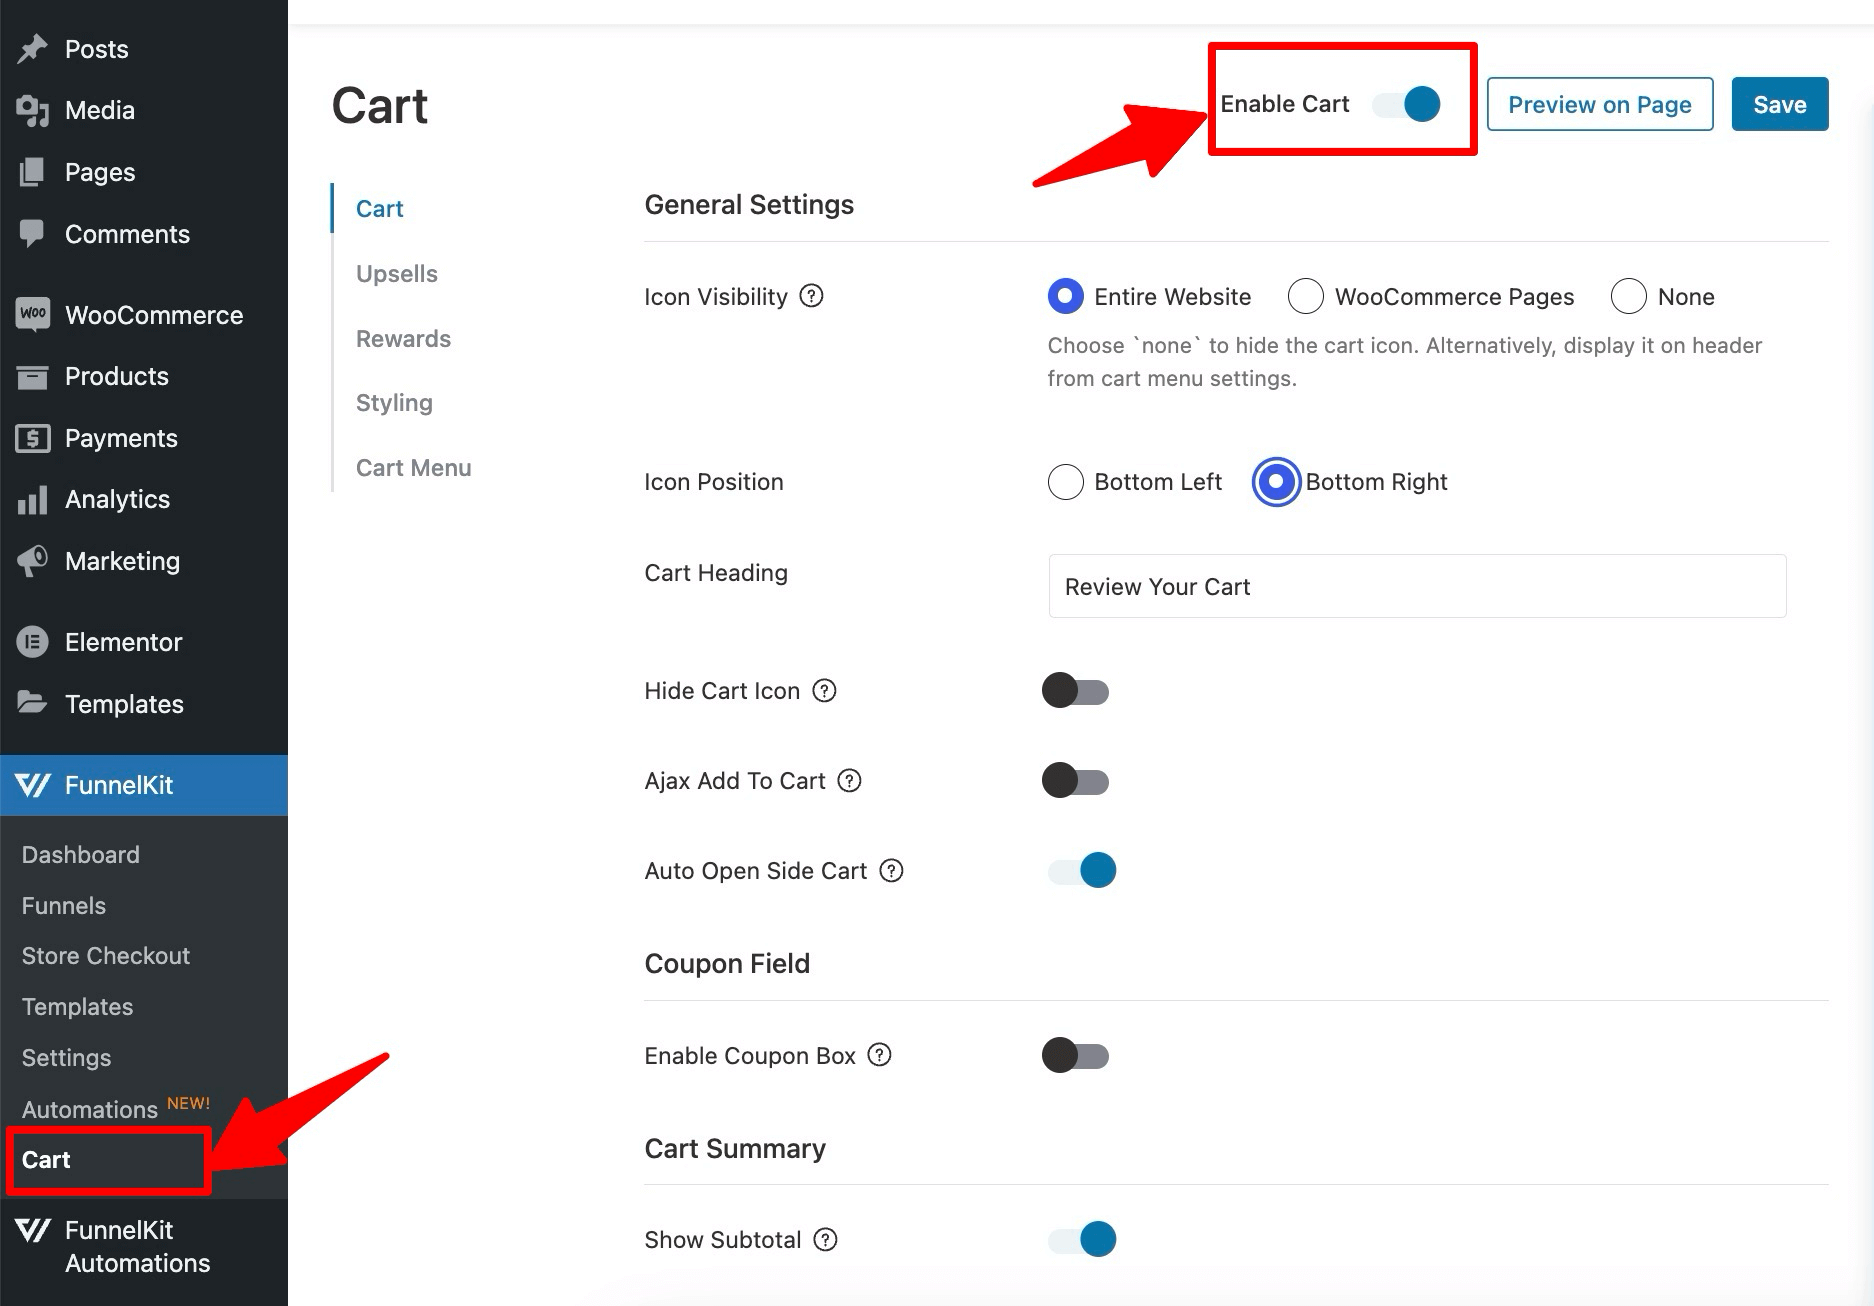
Step 1: Enable the slide-in cart
Navigate to FunnelKit ⇒ Cart and turn on the “Enable Cart” toggle button.
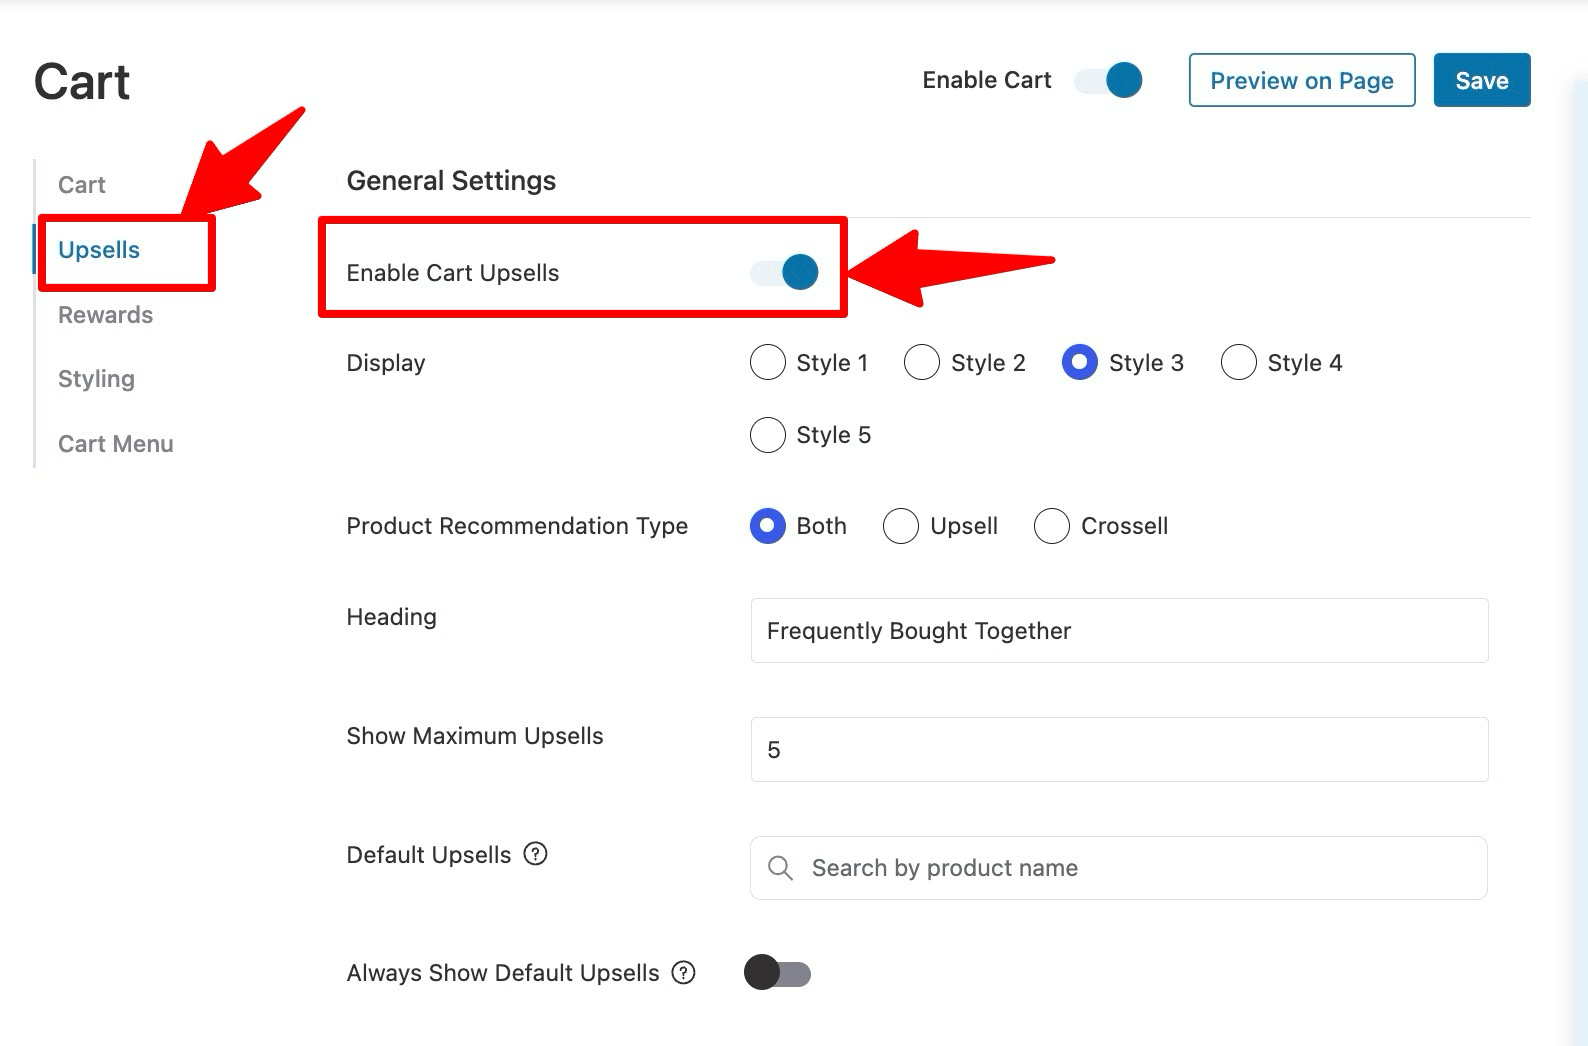
Step 2: Turn on upsells and choose how suggestions display
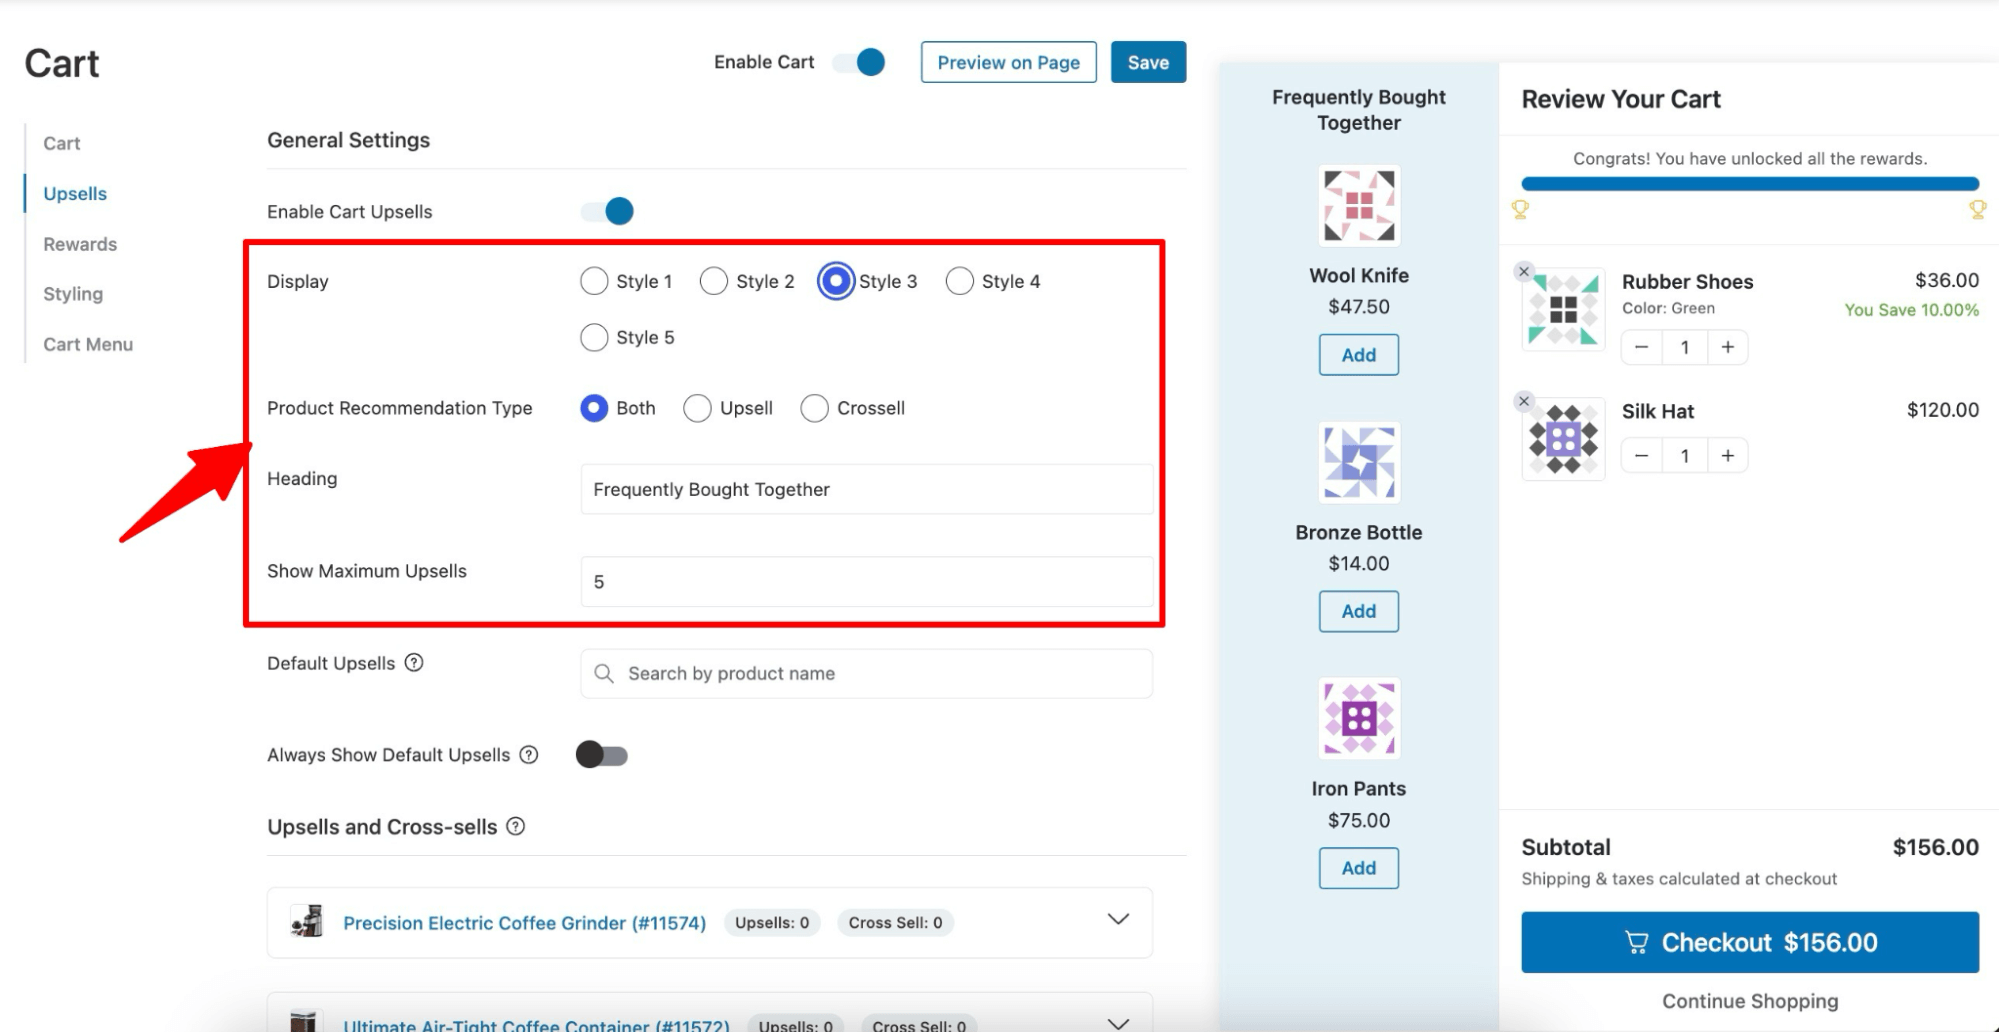
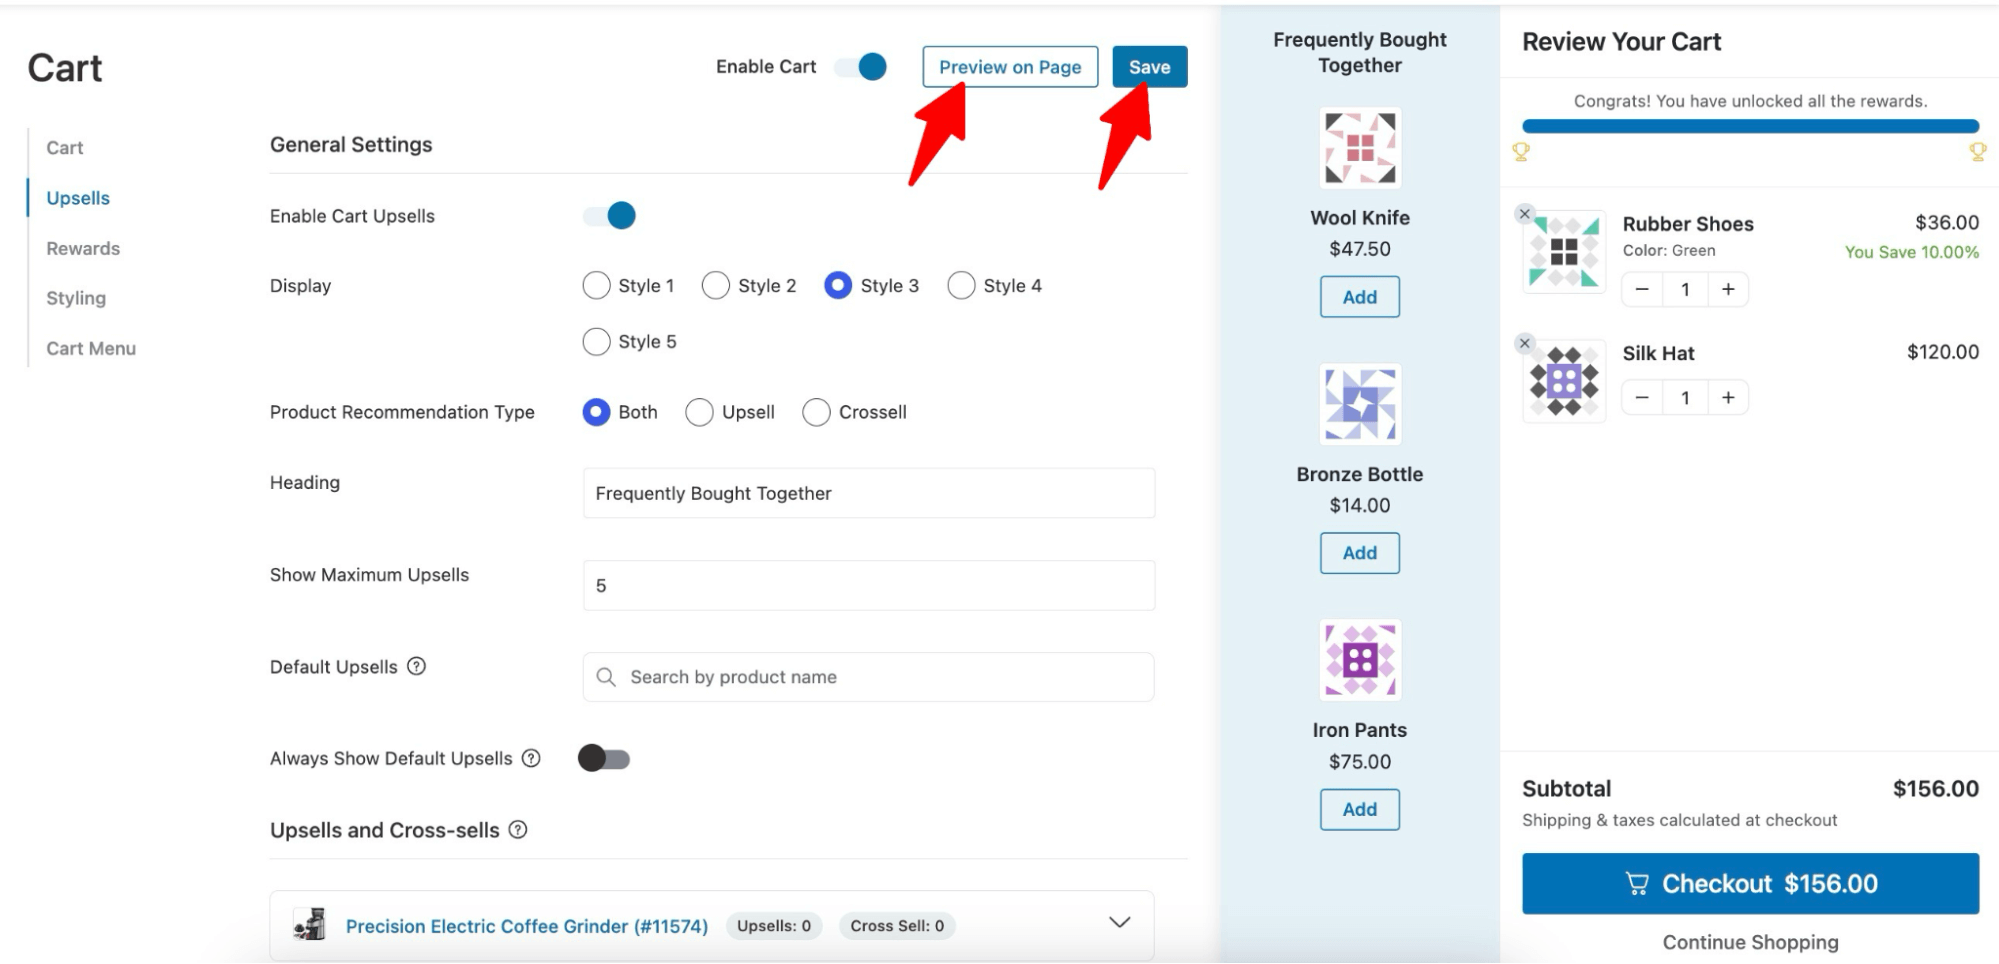
To enable the Upsells option, go to the Upsells tab and turn on the 'Enable Cart Upsells' option.
Now, choose the five display styles to select:
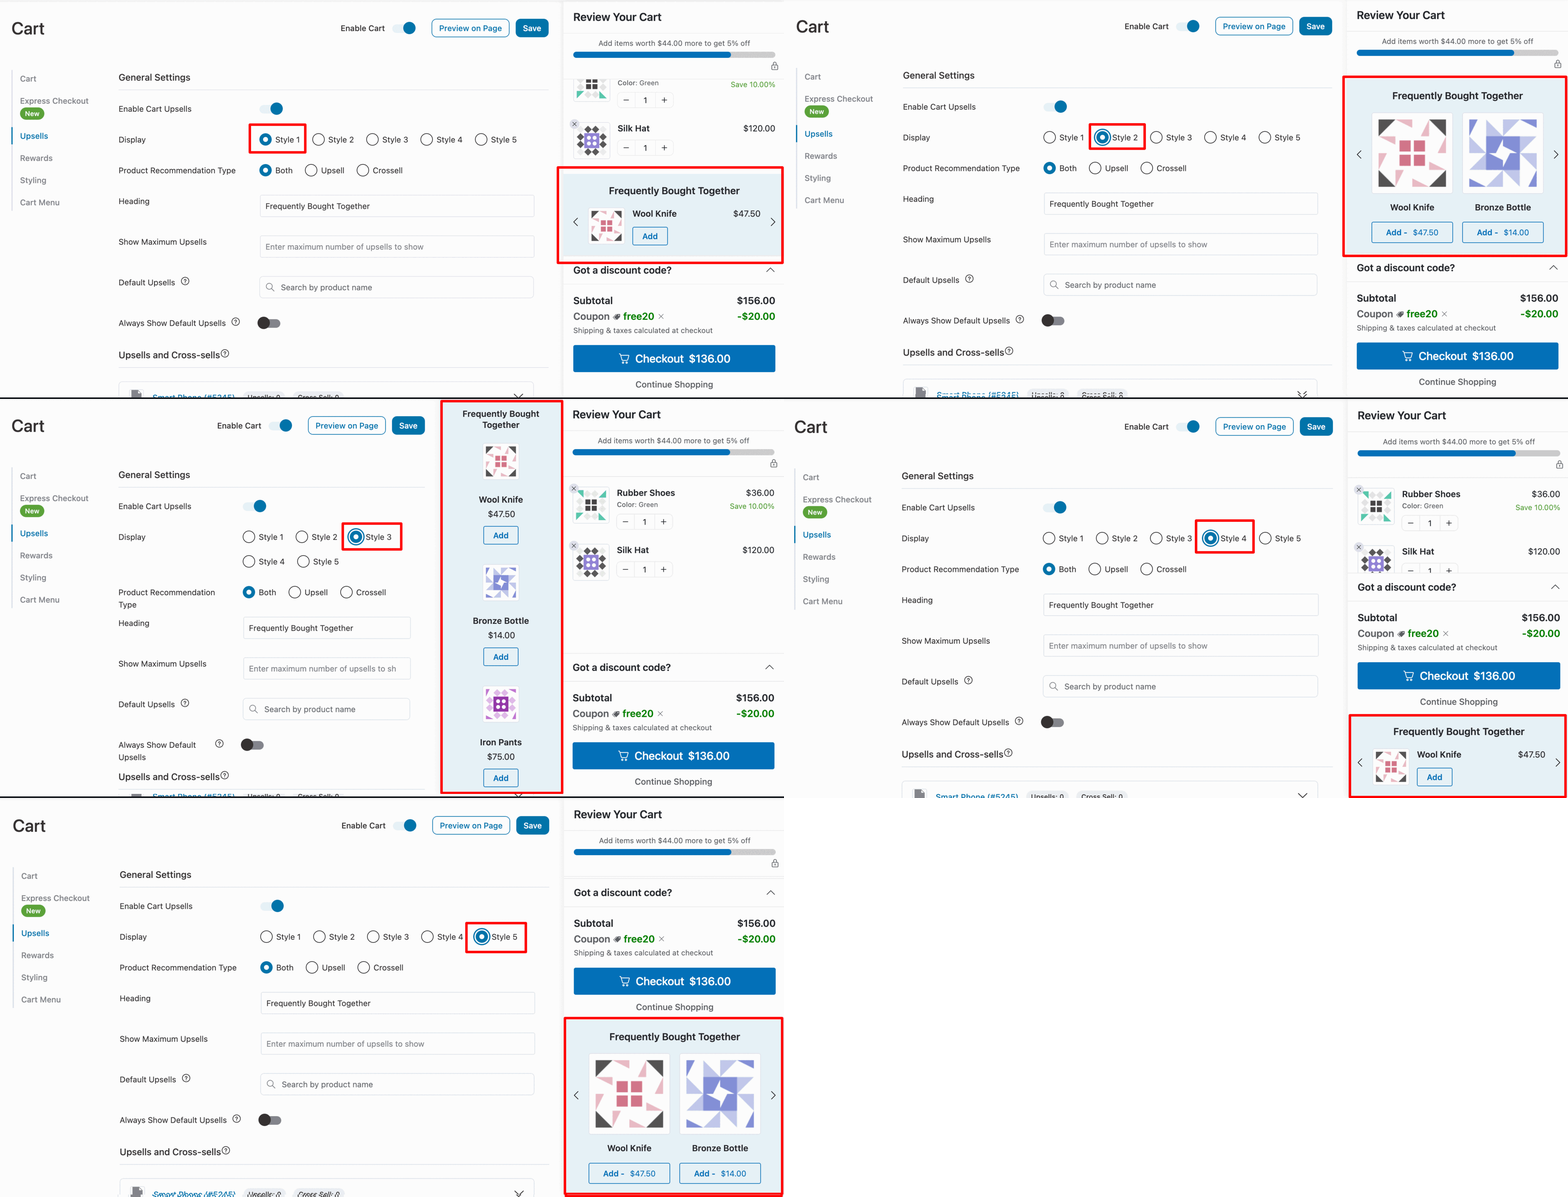
After choosing how you want to display your recommended products, customize the following:
- Product Recommendation Type: Recommend product upsells, cross-sells, or both. Experts recommend choosing both.
- Heading: Provide the heading that will show up above the product recommendation section. The default option is "Frequently Bought Together".
- Show Maximum Upsells: Specify the maximum number of products you want to display as upsells
Step 3: Add default upsells
Default upsells appear whenever cart items have no specific suggestions assigned, so the slot never sits empty.
You can search products by name and add them to the default upsell in WooCommerce.
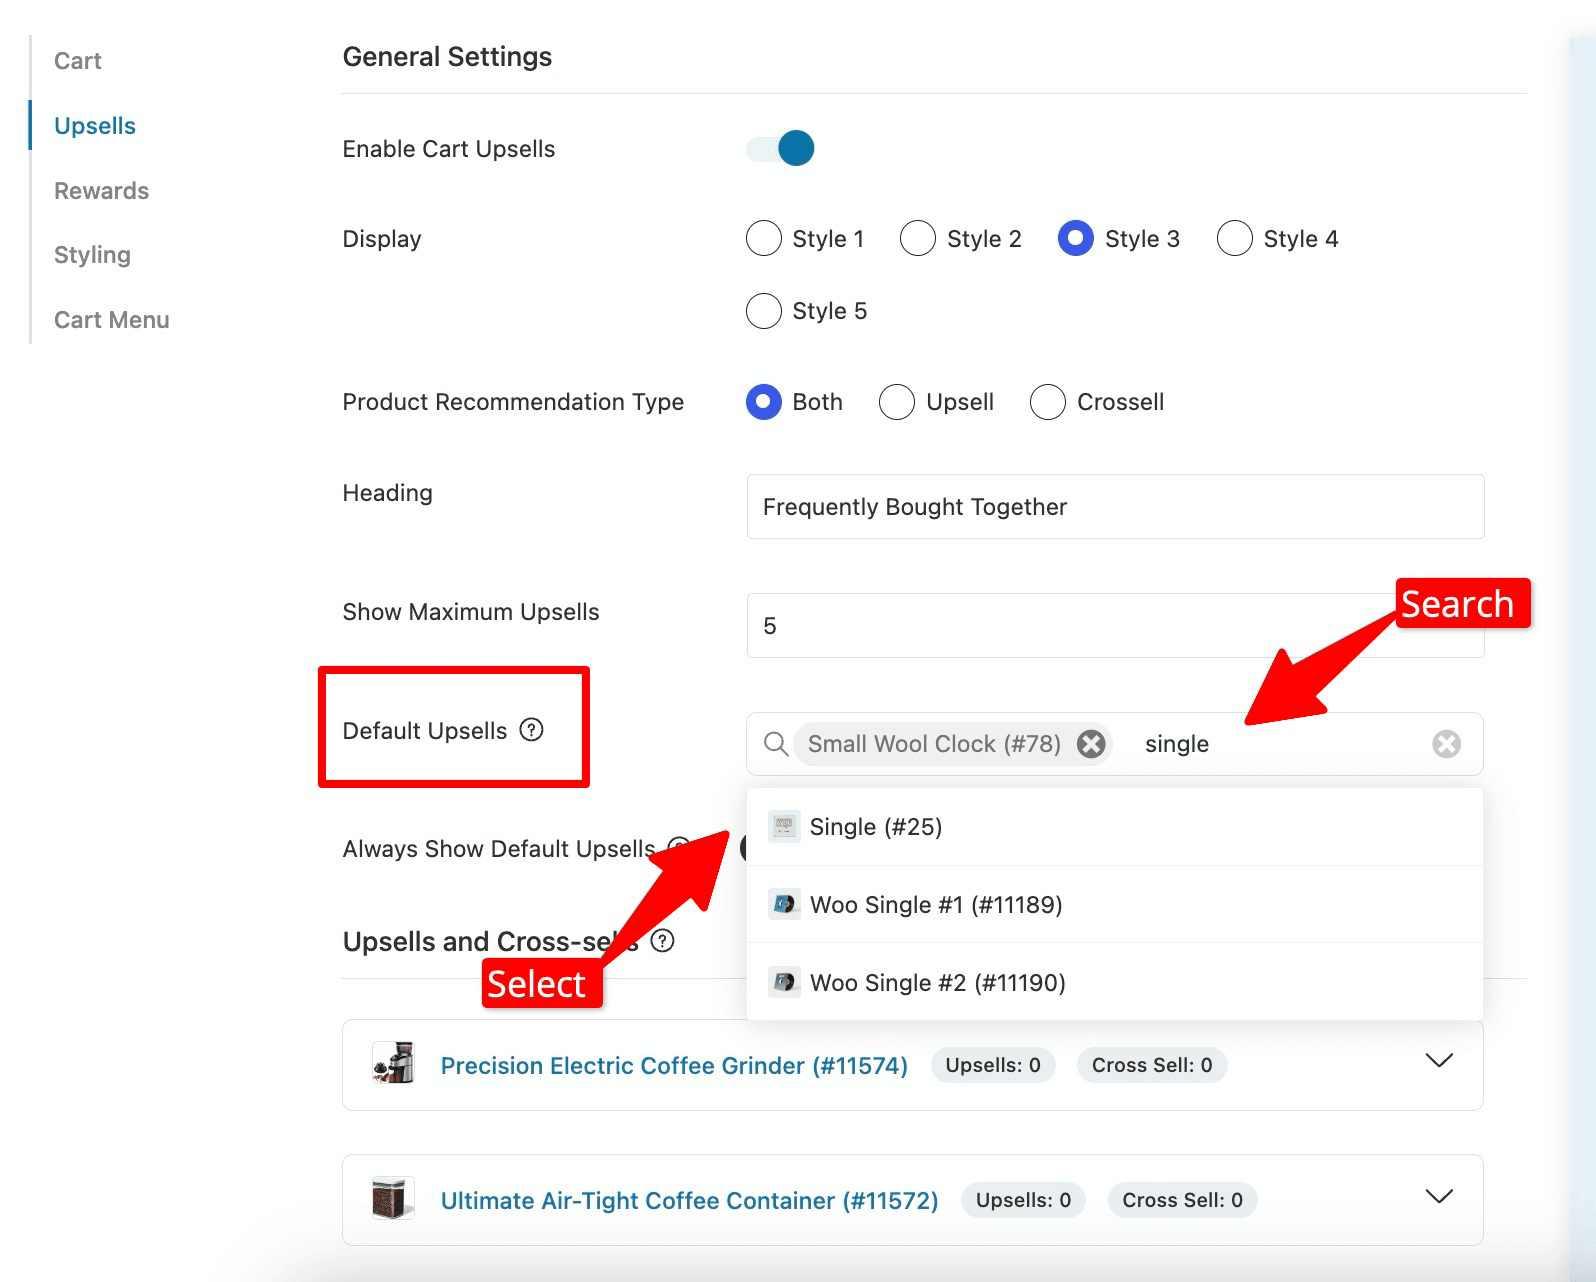
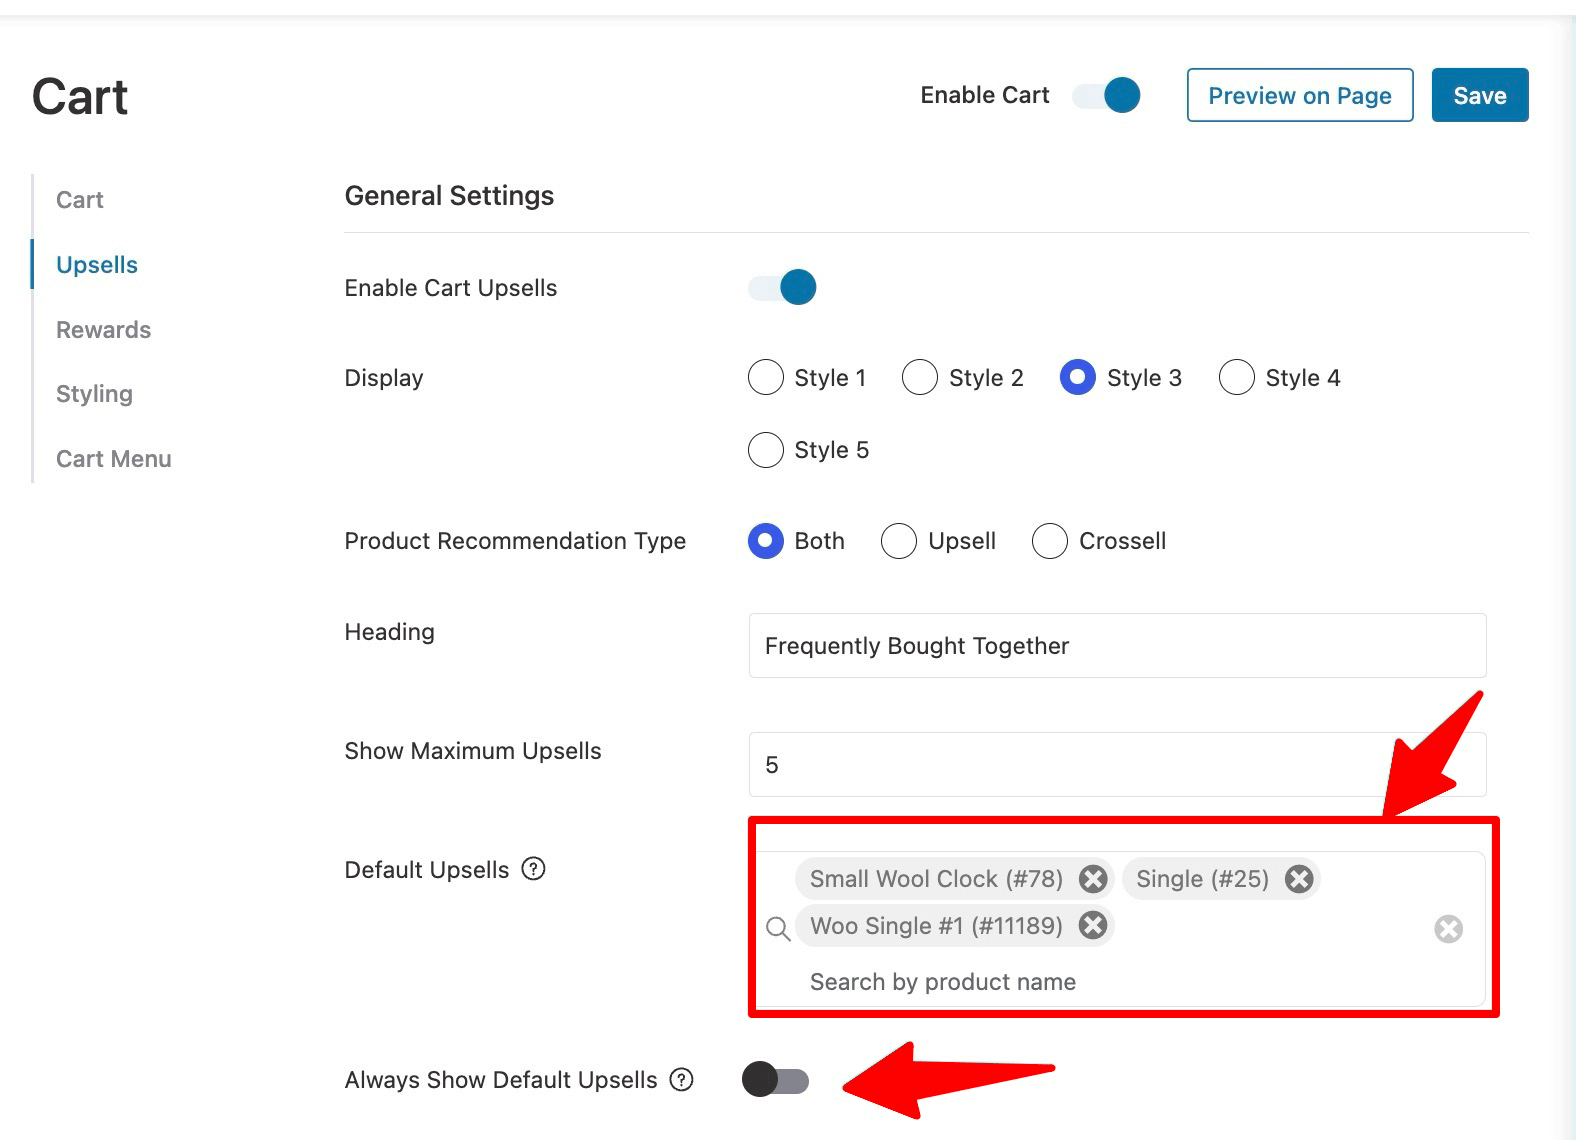
You can add as many upsell products as you want, but the 'show maximum upsells' option will limit the number of items on the front end.
Note: Turn on the “Always Show Default Upsells” option to always recommend the default upsell products.
Step 4: Assign product-level suggestions
Click 'View All Products' to manage every product’s upsells and cross-sells from a single screen.
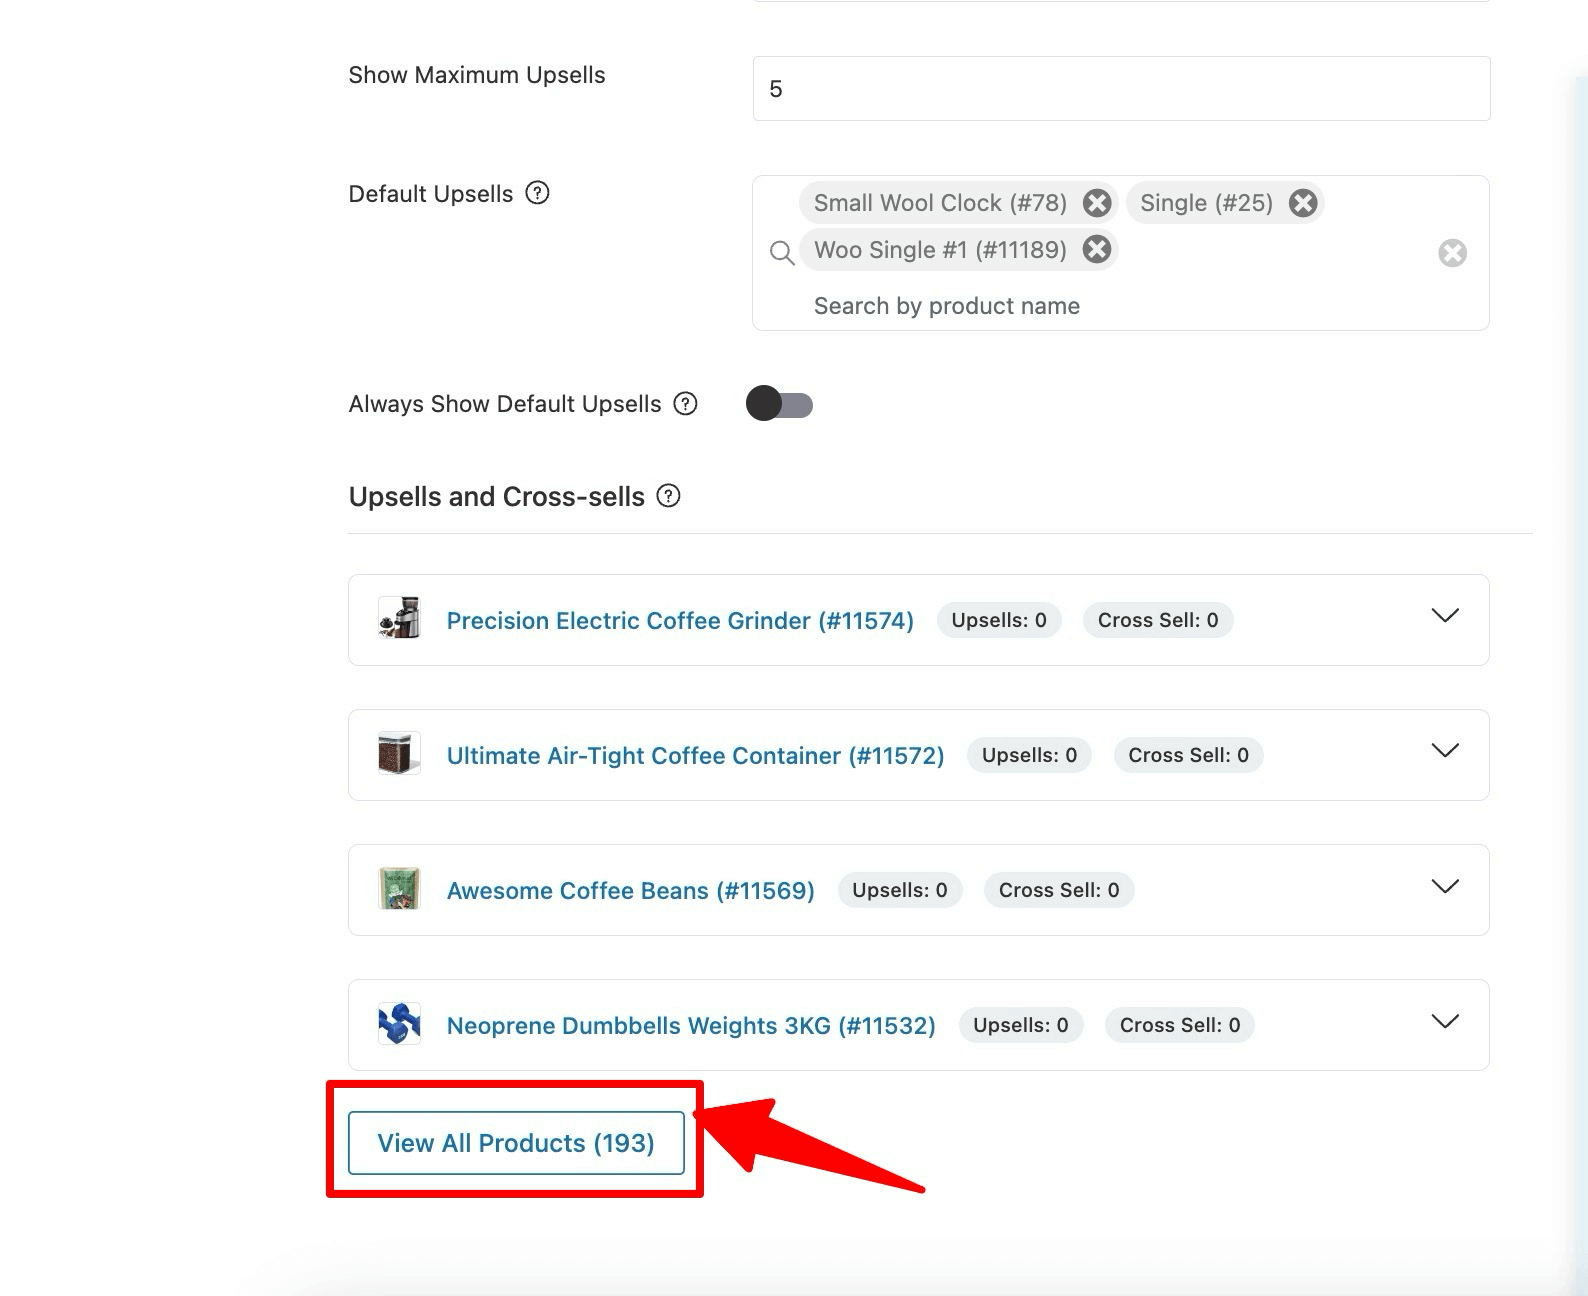
Next, you'll see a sleek interface that allows you to scroll through products or use the search bar. Expand the product section to add an upsell. If a product already has upsells or cross-sells assigned, you'll see them here.
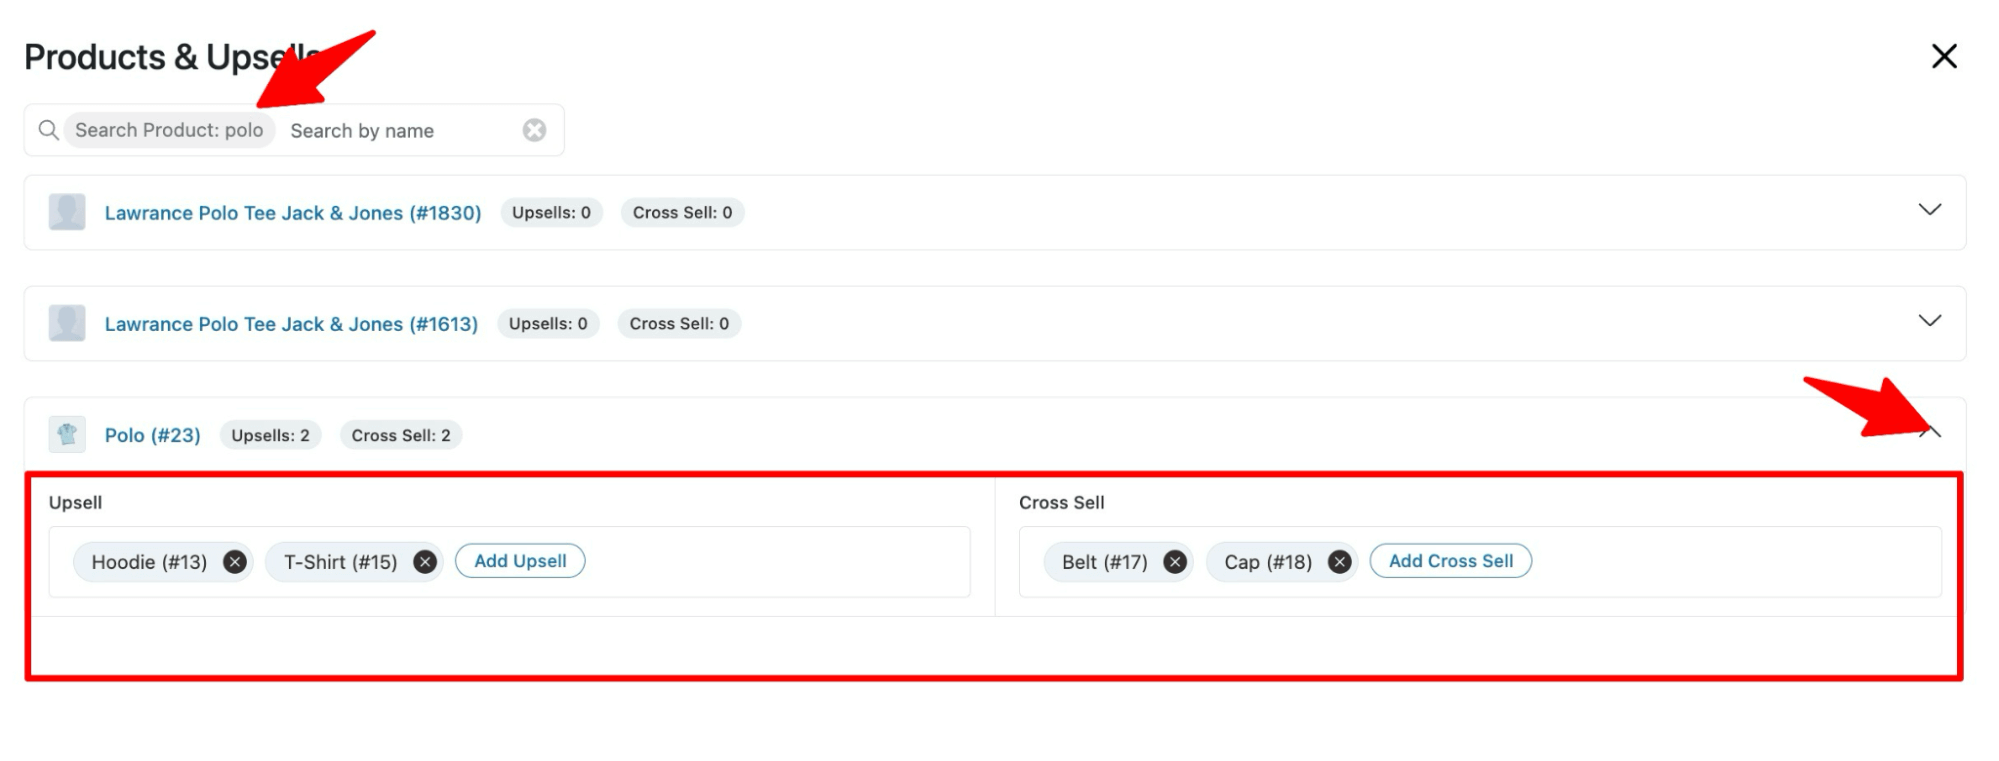
To add a new upsell, click 'Add Upsell', search for the product, and select it from the dropdown. Then, click “Add” to confirm.
Follow the same steps to add a cross-sell.
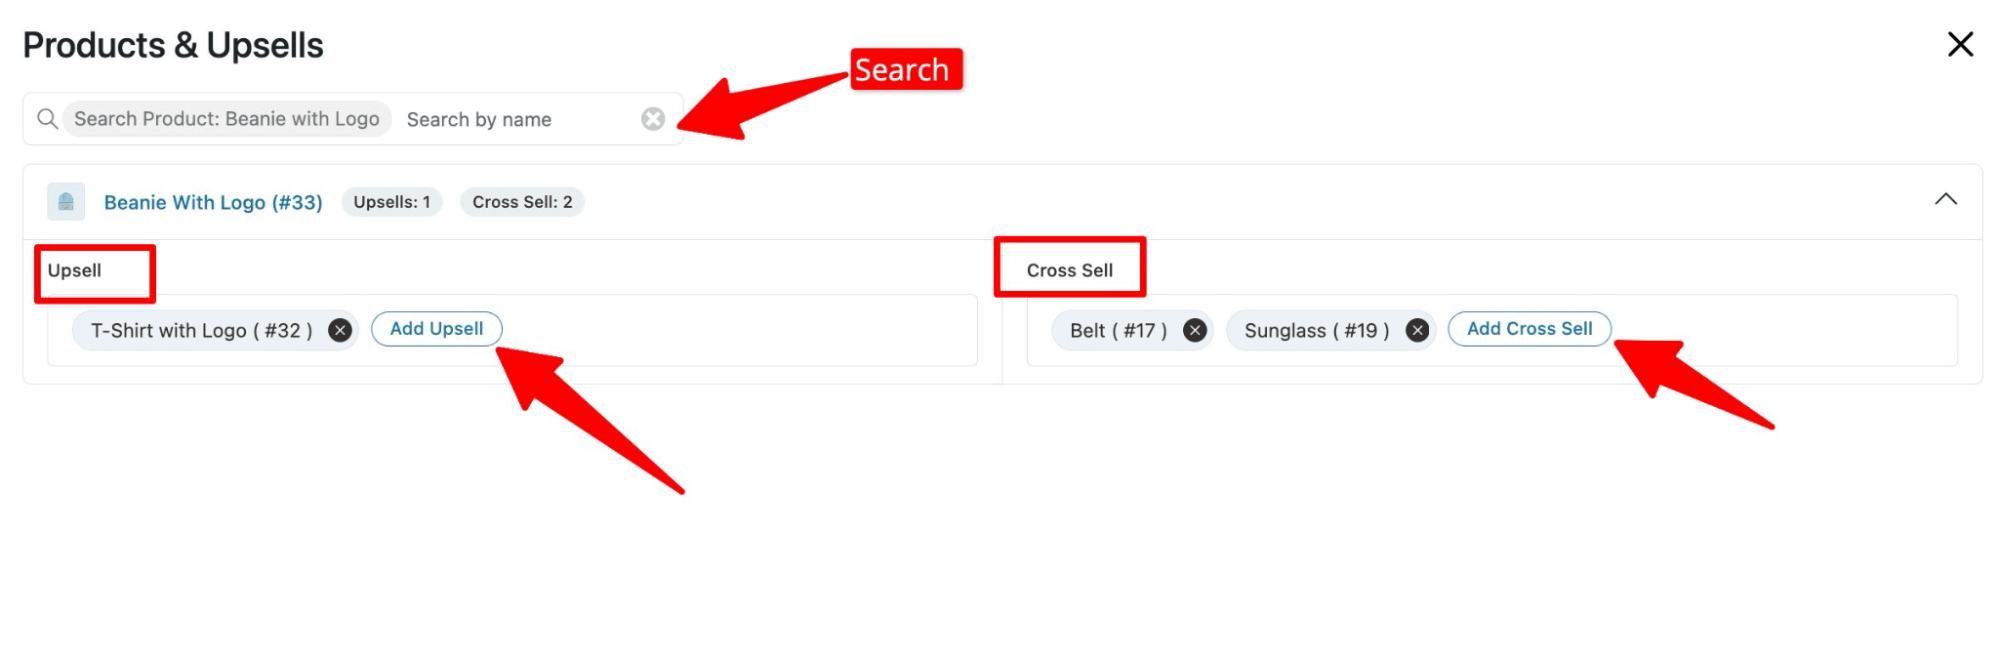
🔔 Note: Variable products work here too, so shoppers can choose variations directly from the cart.
Once you've added your product recommendations, click Save to update your changes. You can then click Preview on Page to see how your cart upsells look in action.
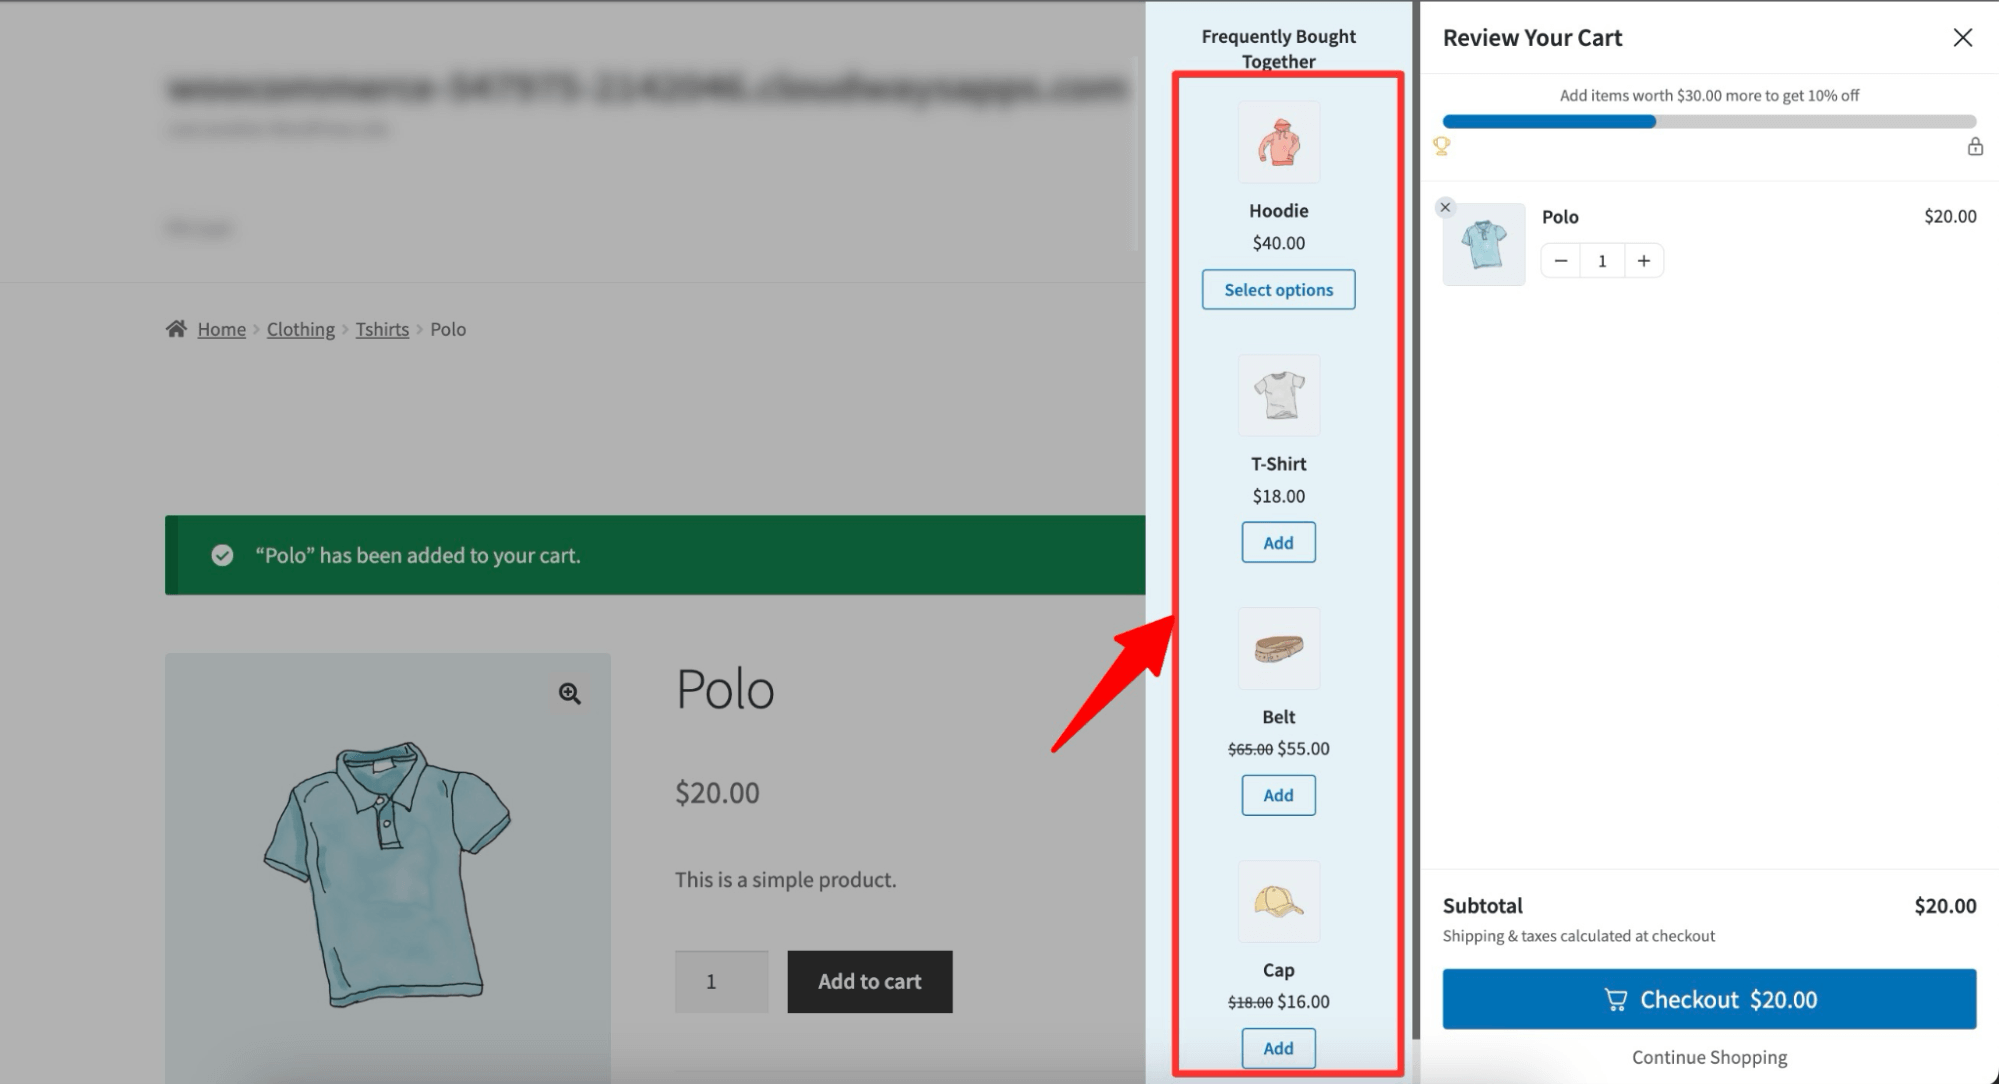
Here is a preview of how the product recommendation in the Woocommerce slide cart will look:
Placement 4: Checkout Order Bumps
An order bump is a checkbox inside the checkout offering one add-on with one click to accept.
It’s the highest-converting recommendation slot in most stores because the friction is close to zero and the shopper is already mid-payment.
In FunnelKit Funnel Builder, bumps are built under the checkout step, such as adding the tablets as the offer product, setting the discount, writing the headline, and targeting the bump to carts.
UpsellWP’s free tier and CartFlows both do checkout bumps, if you’re already running one of them.
You need to install and activate both FunnelKit Funnel Builder (free) and FunnelKit Funnel Builder Pro.
After activating the plugins, follow these steps:
Step 1: Create your store checkout
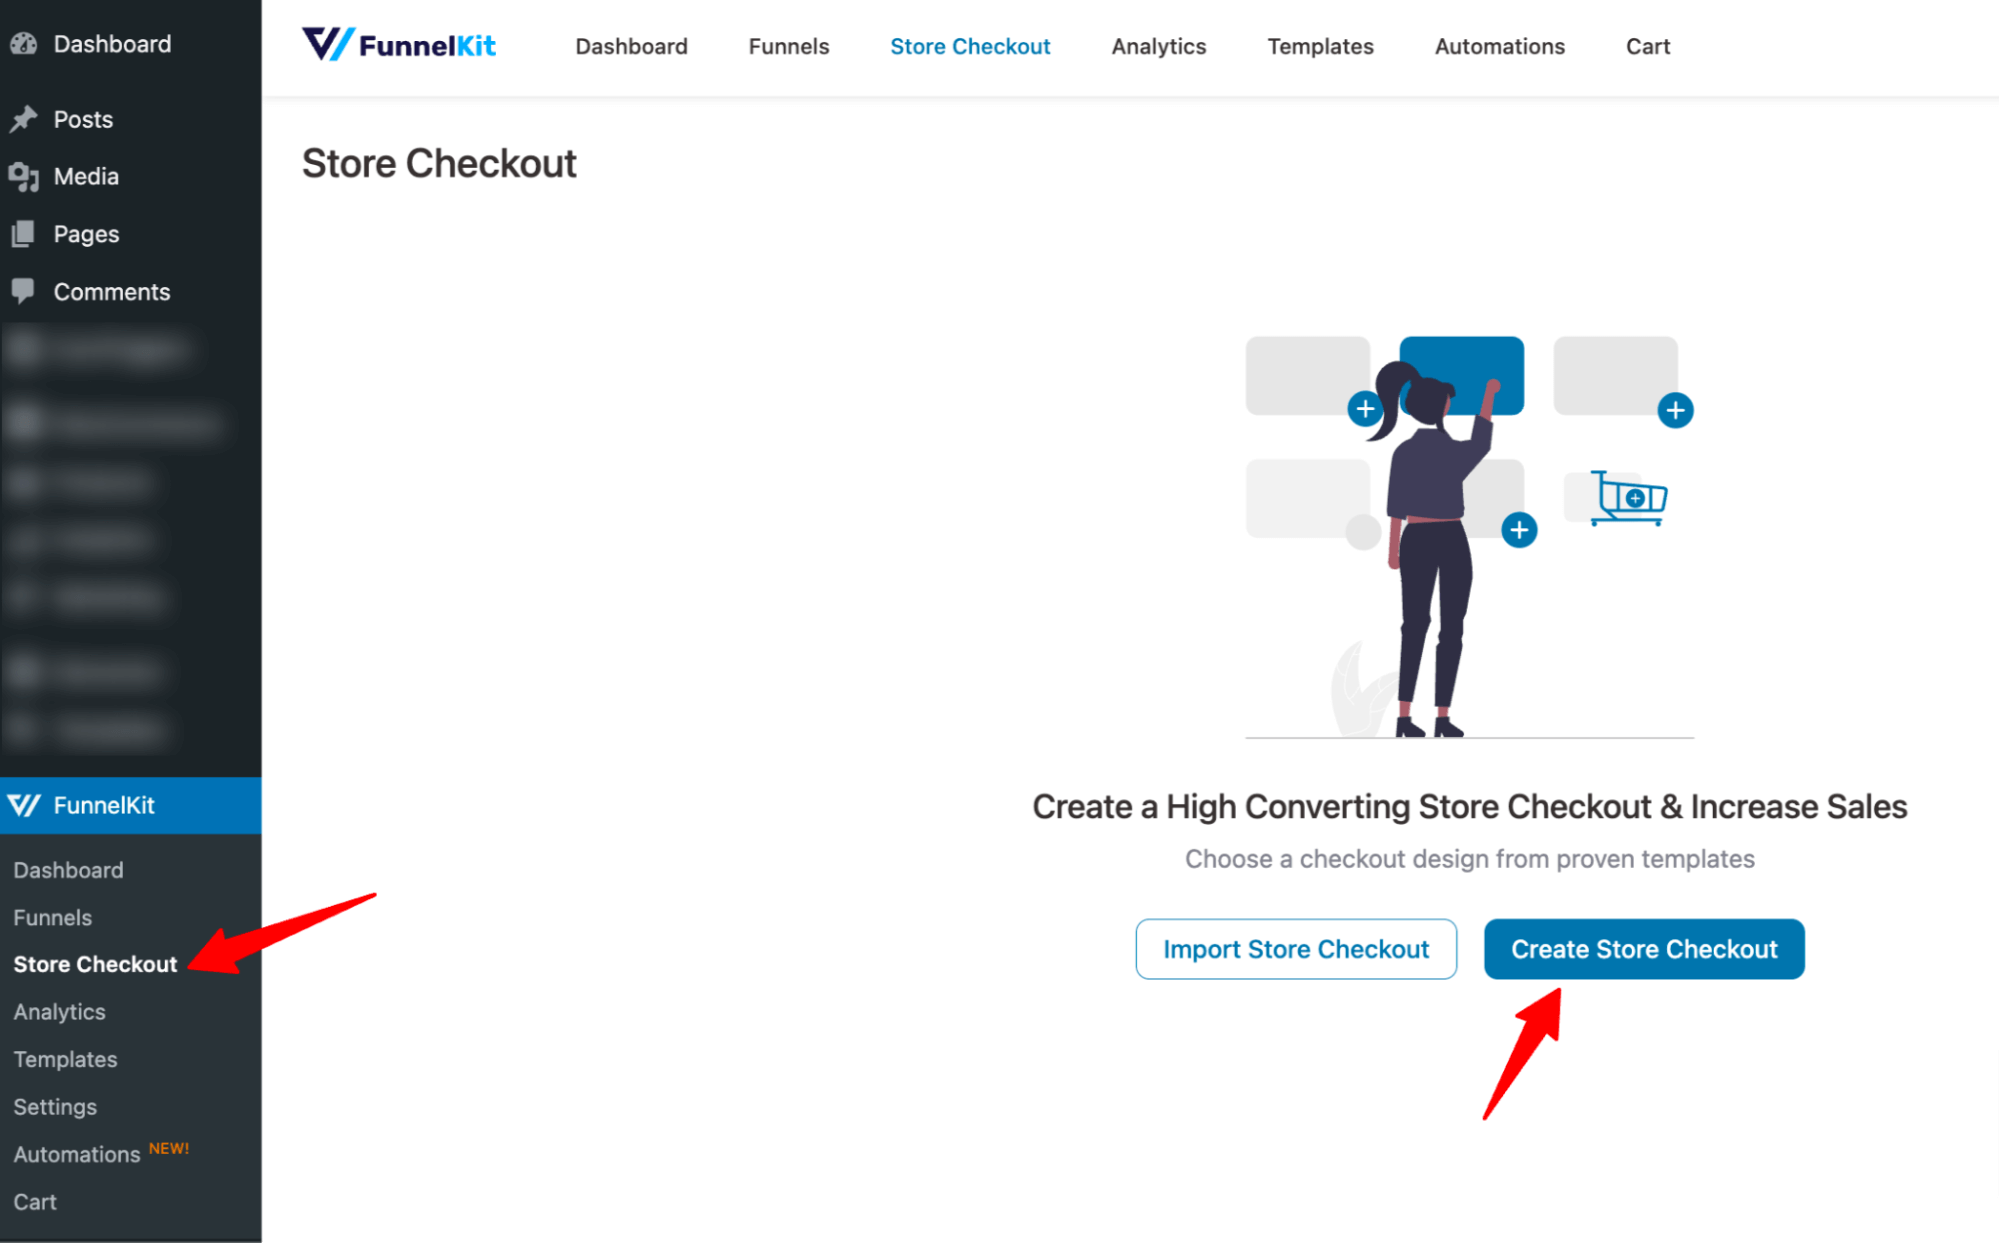
Go to FunnelKit ⇒ Store Checkout and click on 'Create Store Checkout'.
Choose a prebuilt FunnelKit checkout template, preview it, select single-page or multi-page checkout, and then import it as your default store checkout.
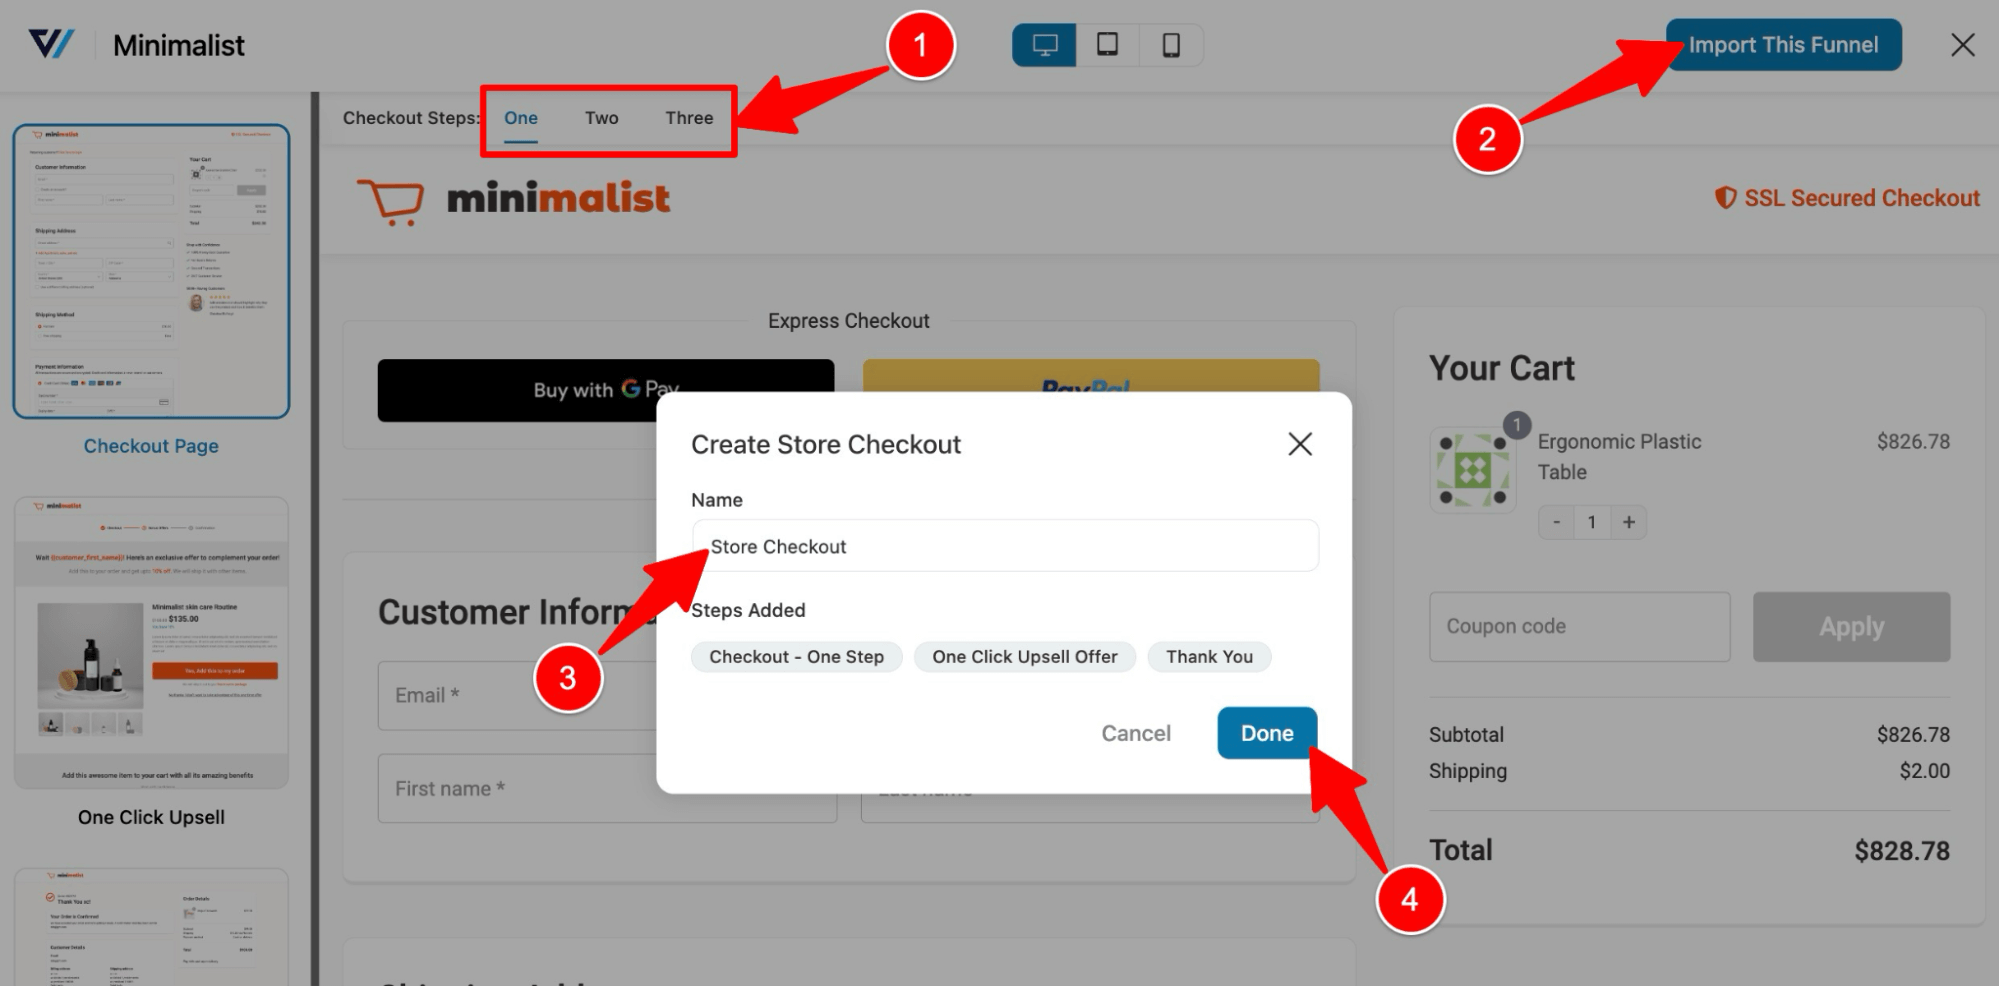
This will import a store checkout with three steps: Checkout, One-click upsell, and Thank you page.
Step 2: Add the order bump offer and pick a skin
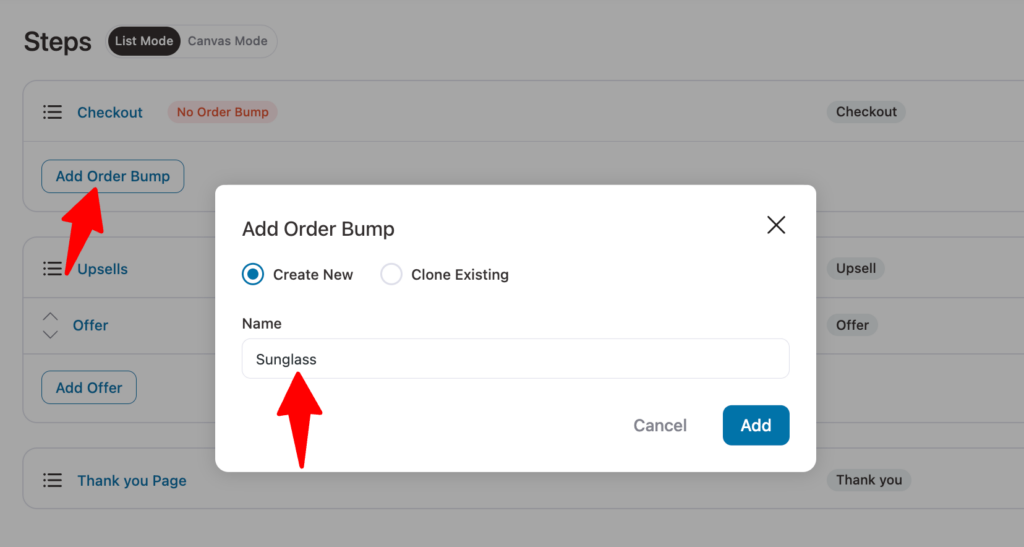
On the checkout page, you must add a new step to offer an order bump. To do so, click Add Order Bump, provide a title, and click 'Add'.
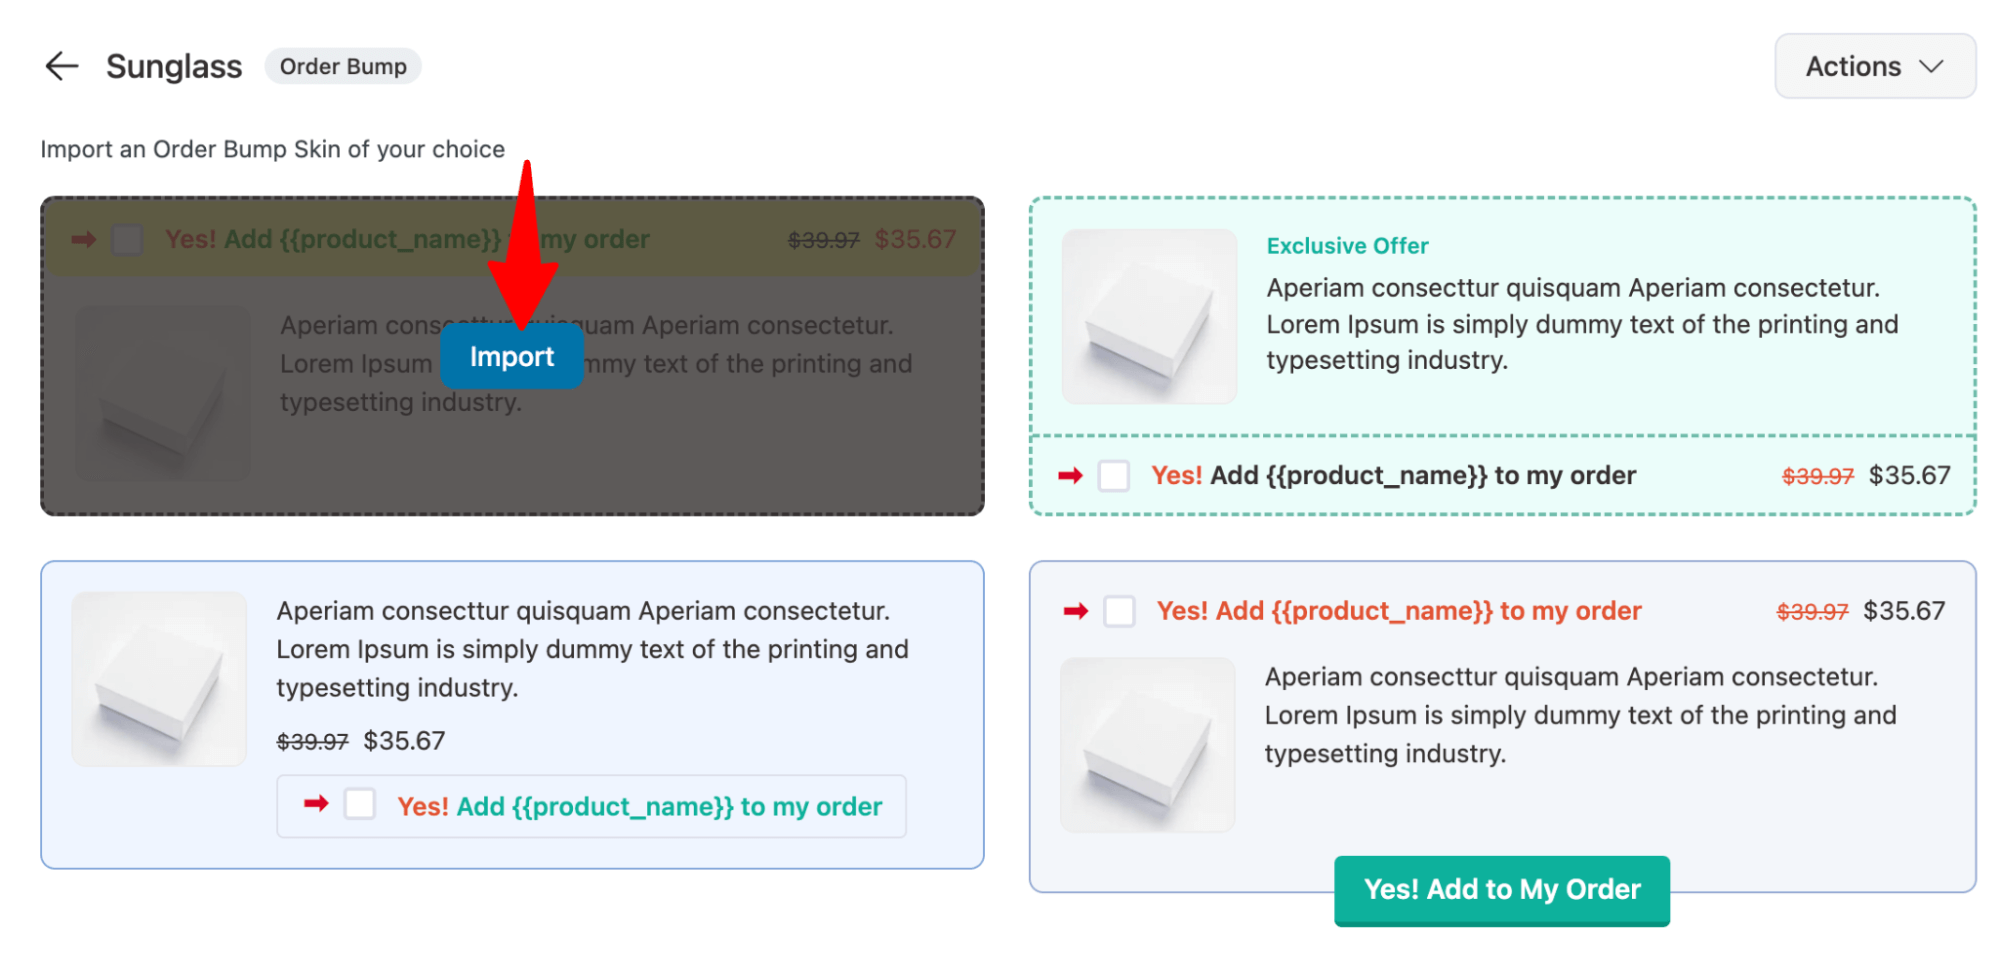
After that, choose an order bump skin. Hover over the skin you like and click on Import.
Now, search for the product and click on ‘Add’.
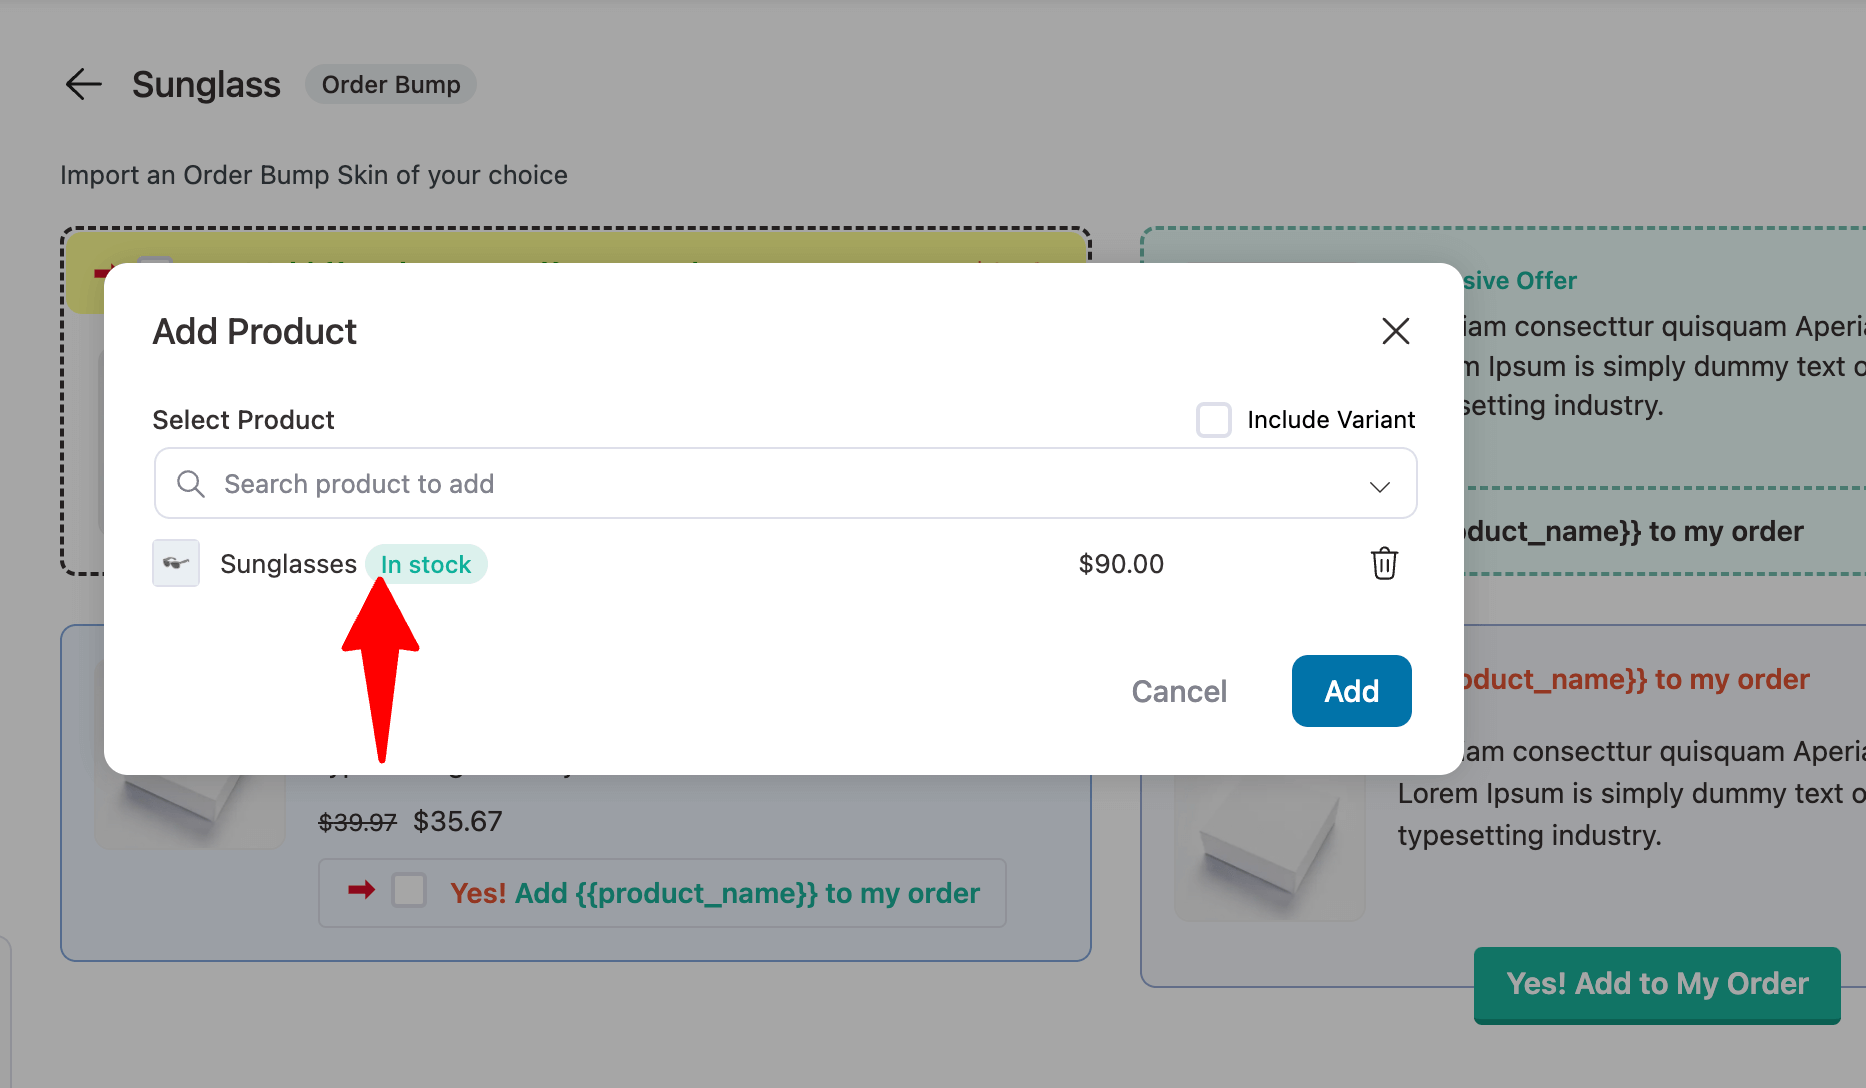
This will add an order bump step to your store checkout funnel.
Step 3: Customize the content and style of order bump offers
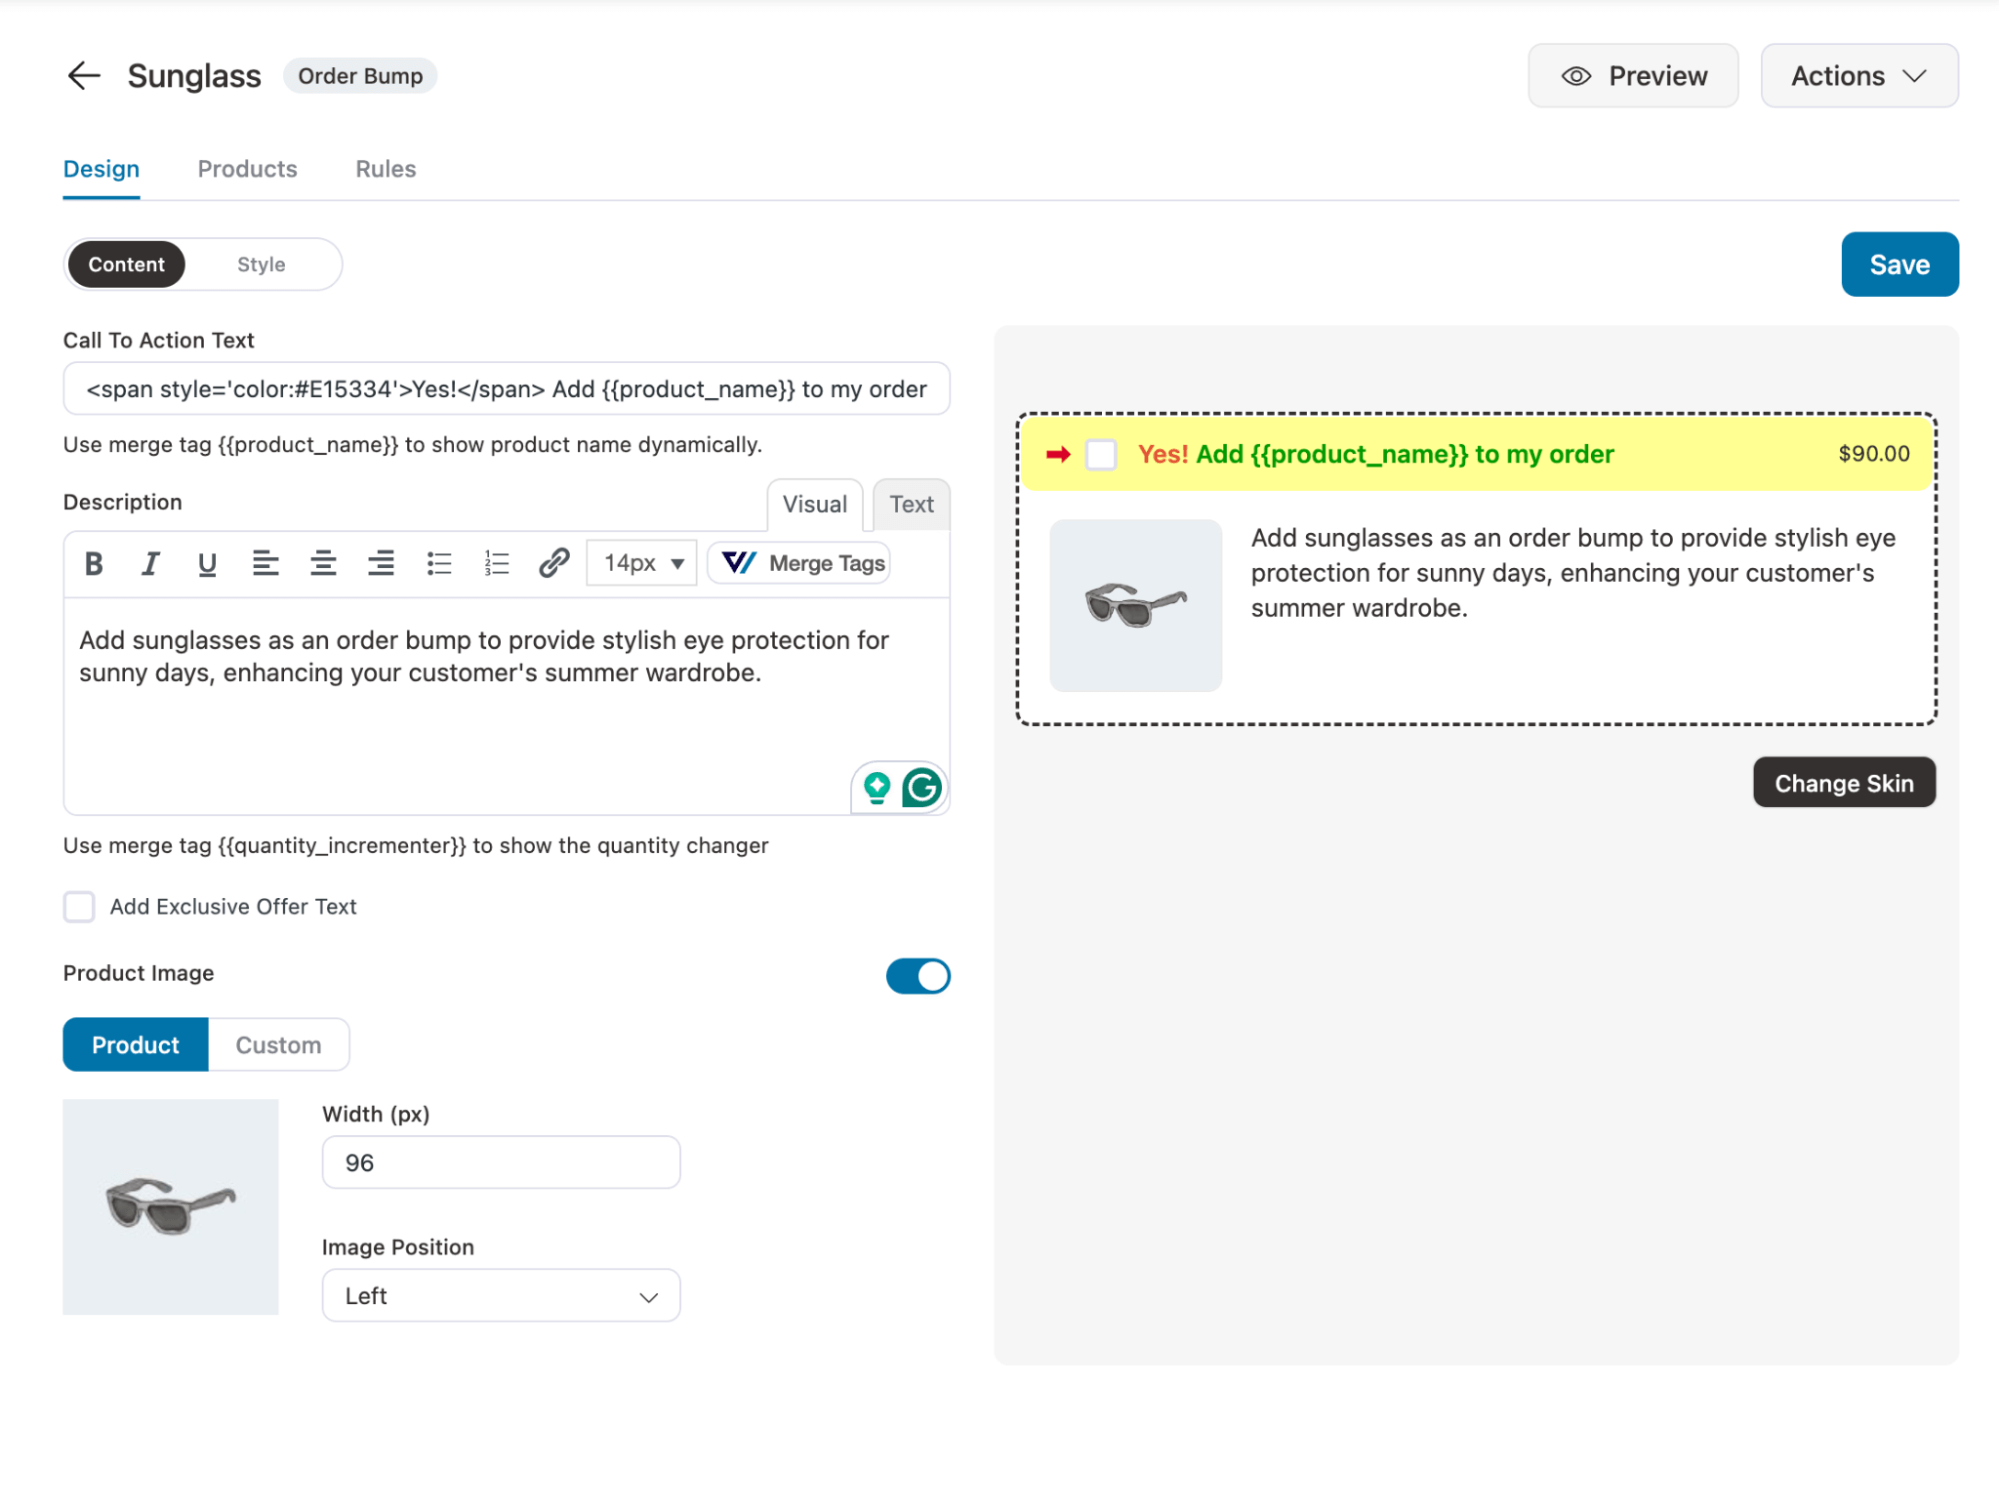
Set the call-to-action text and description that will show up on the checkout page.
Move to the Style tab. Here, you can choose the position where the order bump will show up on the checkout page.
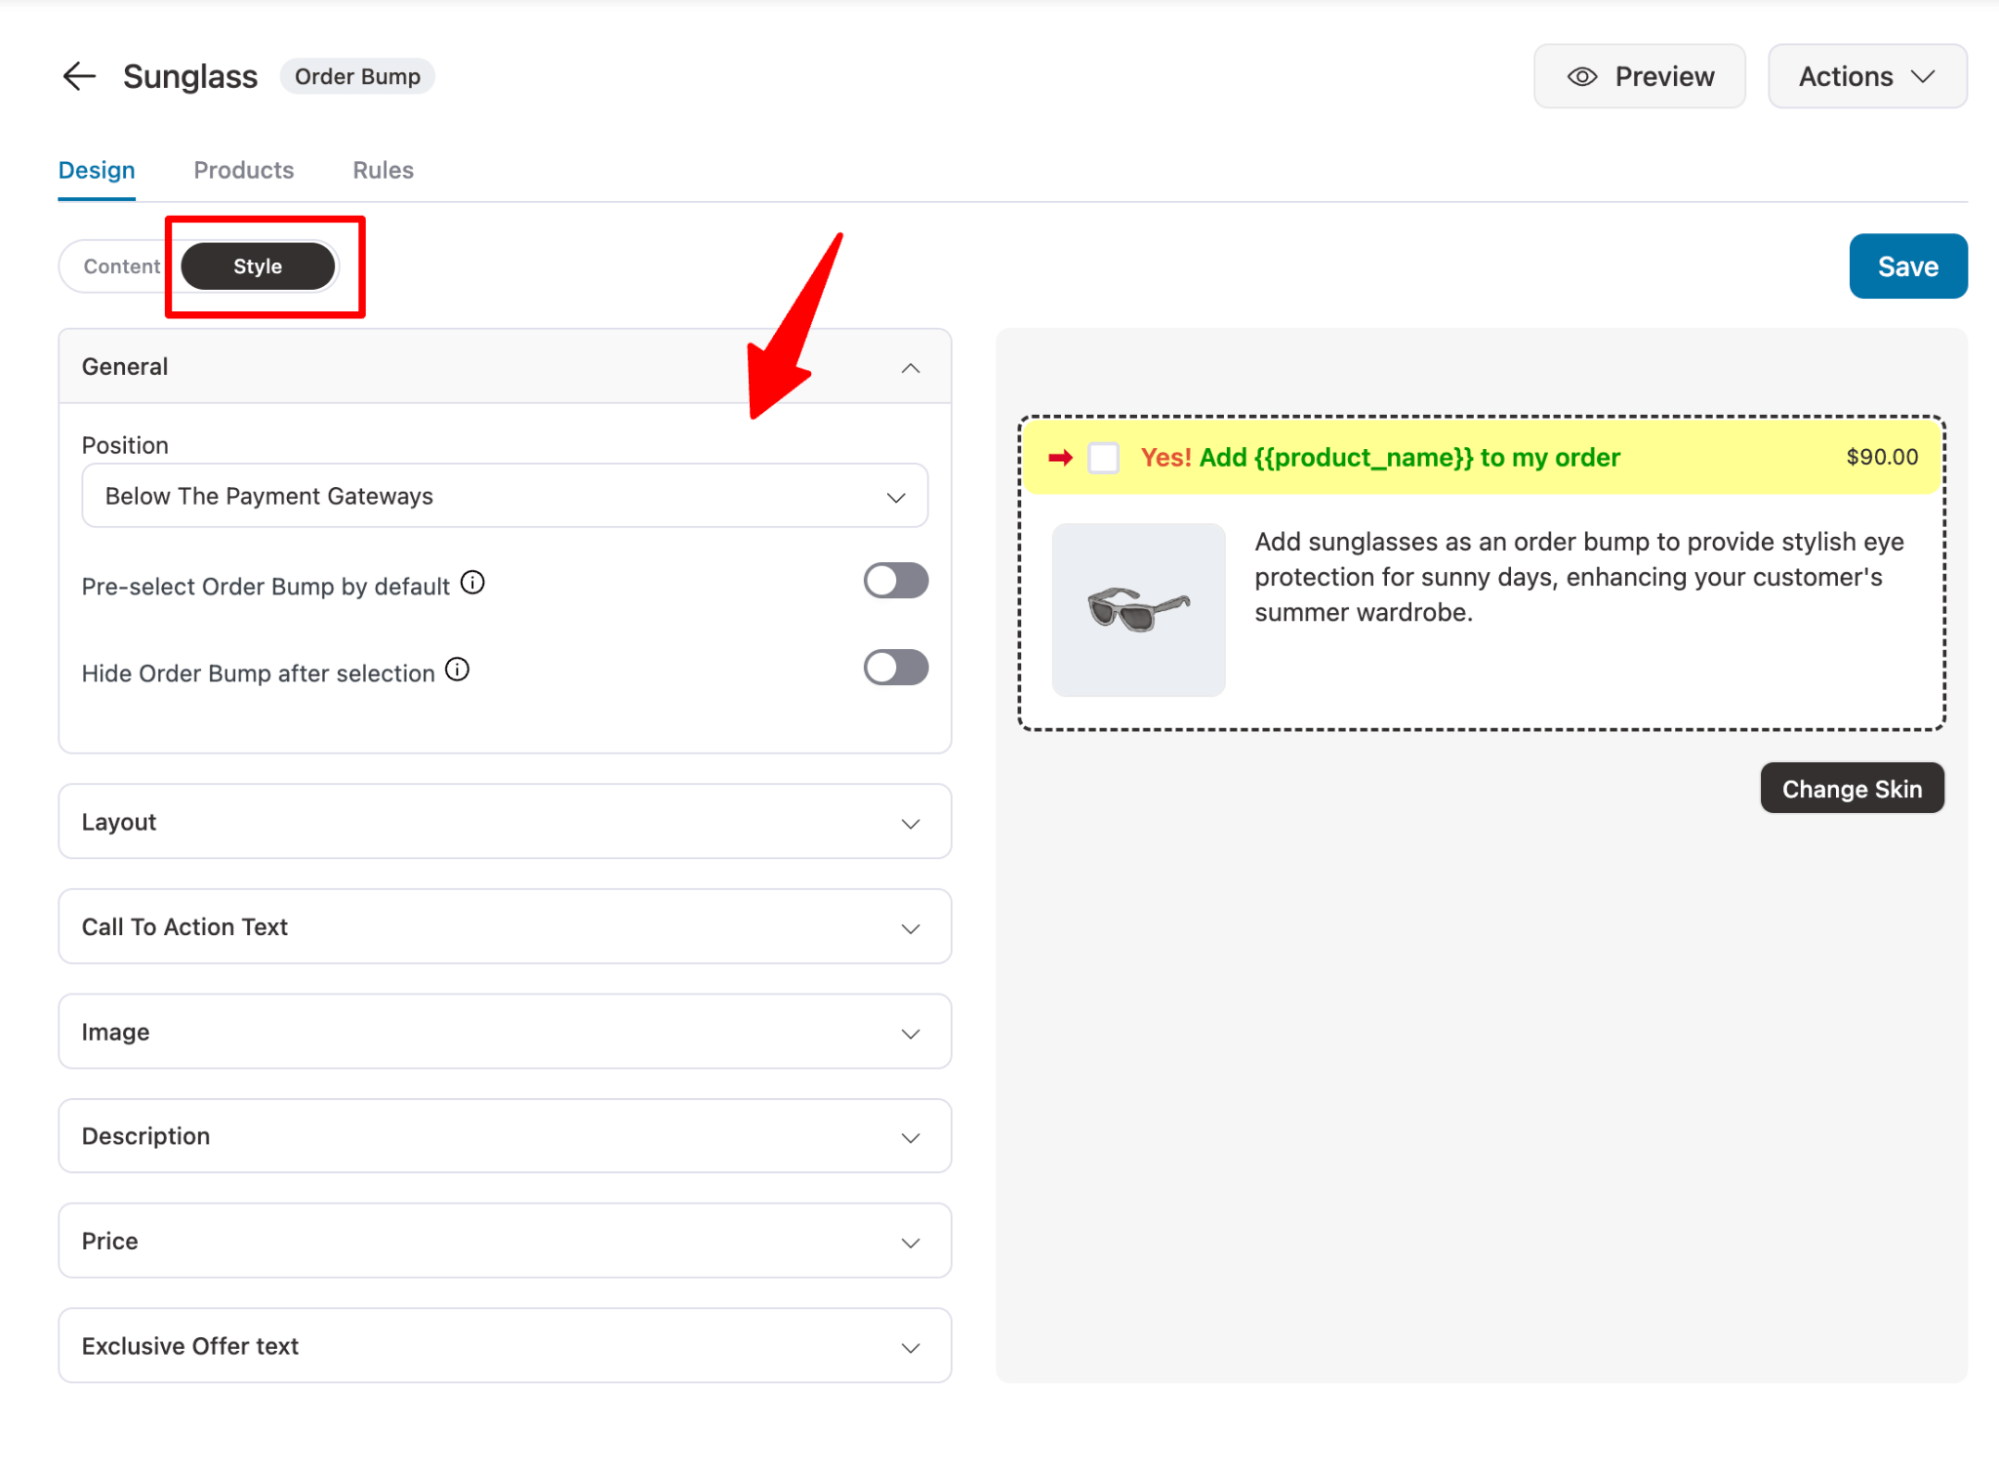
Make sure to click on 'Save' to update the changes.
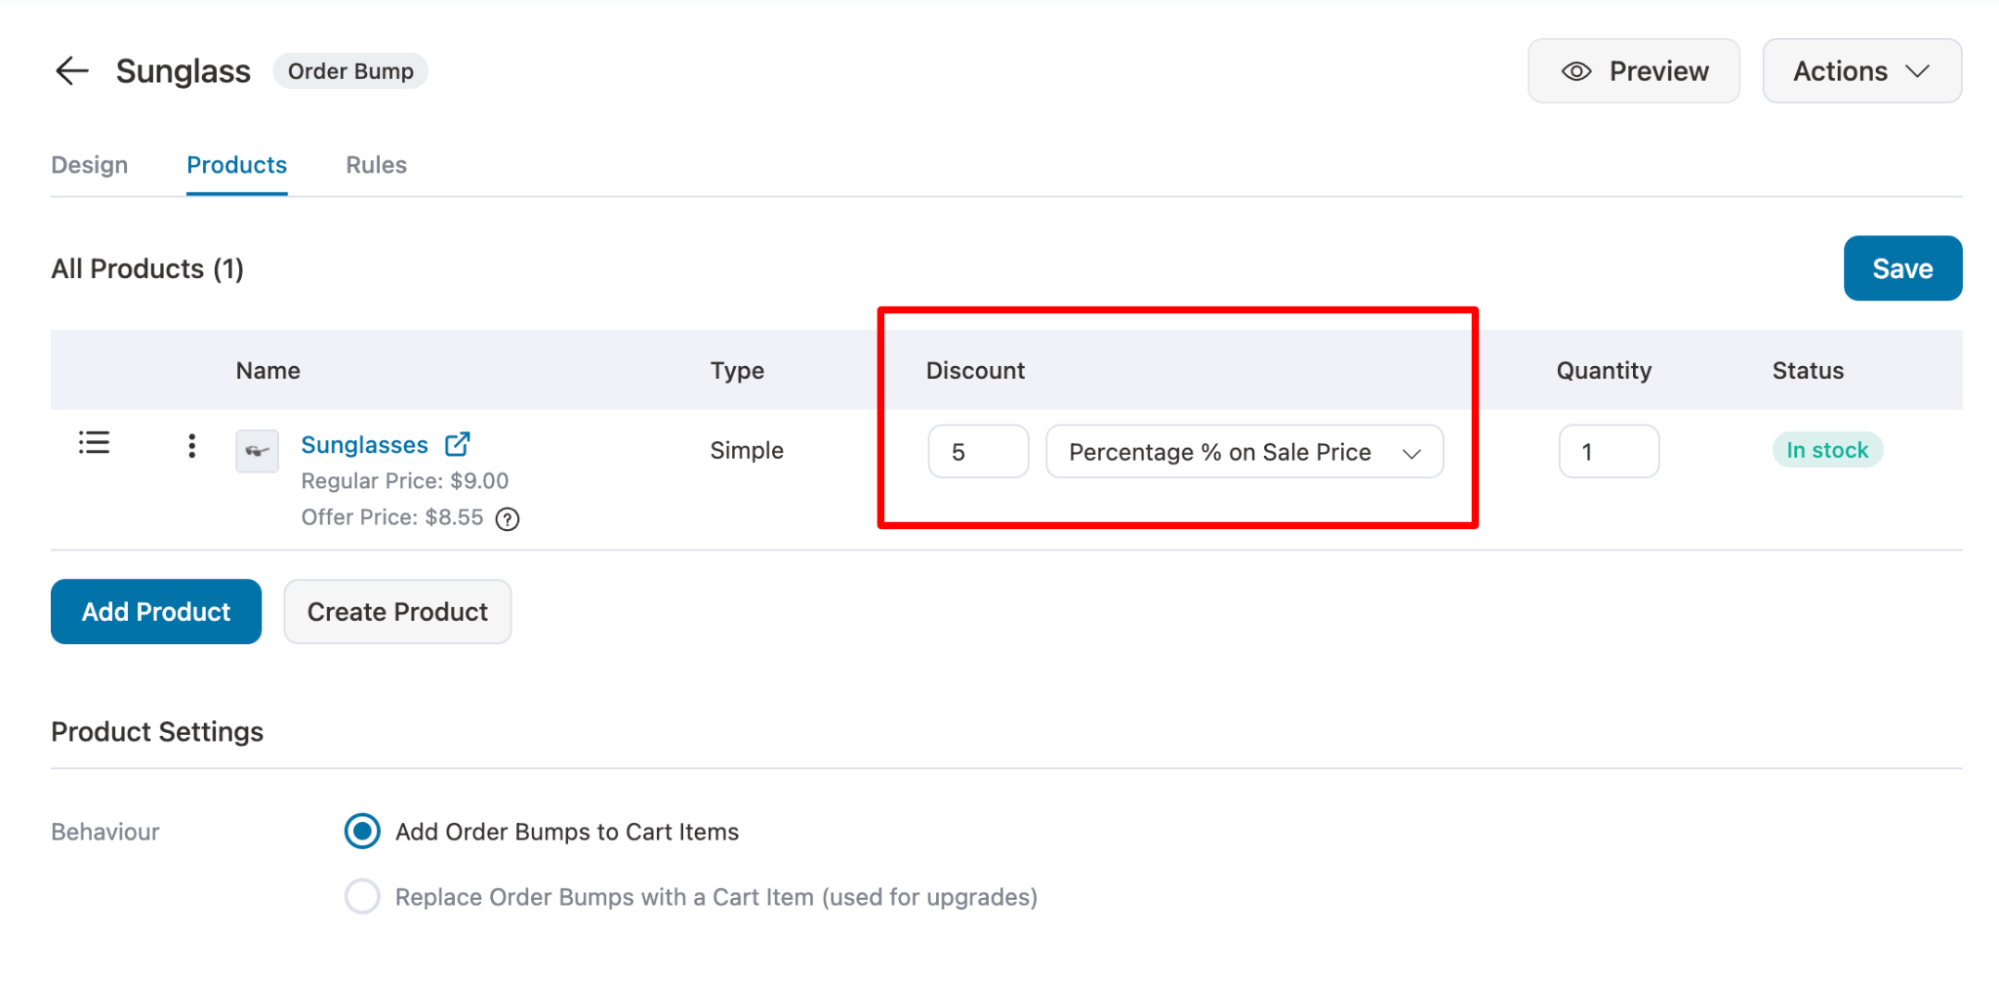
Once you have added the offer, you can discount the order bump and specify a quantity. You can also select the display behavior and placement on the checkout page.
Step 4: Add targeting rules
Offering the same order bumps for every order may not always lead to conversions.
To ensure a higher conversion rate for your checkout order bumps, provide relevant offers that align with each customer's needs and preferences.
For example, if someone buys from the summer clothing category, you can offer sunglasses as a complementary product that enhances the customer's purchase experience and increases the likelihood of conversion.
To do so, move to the Rules tab and click on “Add Rules”. Next, select the "Cart Category(s)" rule, set the condition to 'matches any of', and add the categories.
This will trigger the order bump only if someone buys from the preset category.
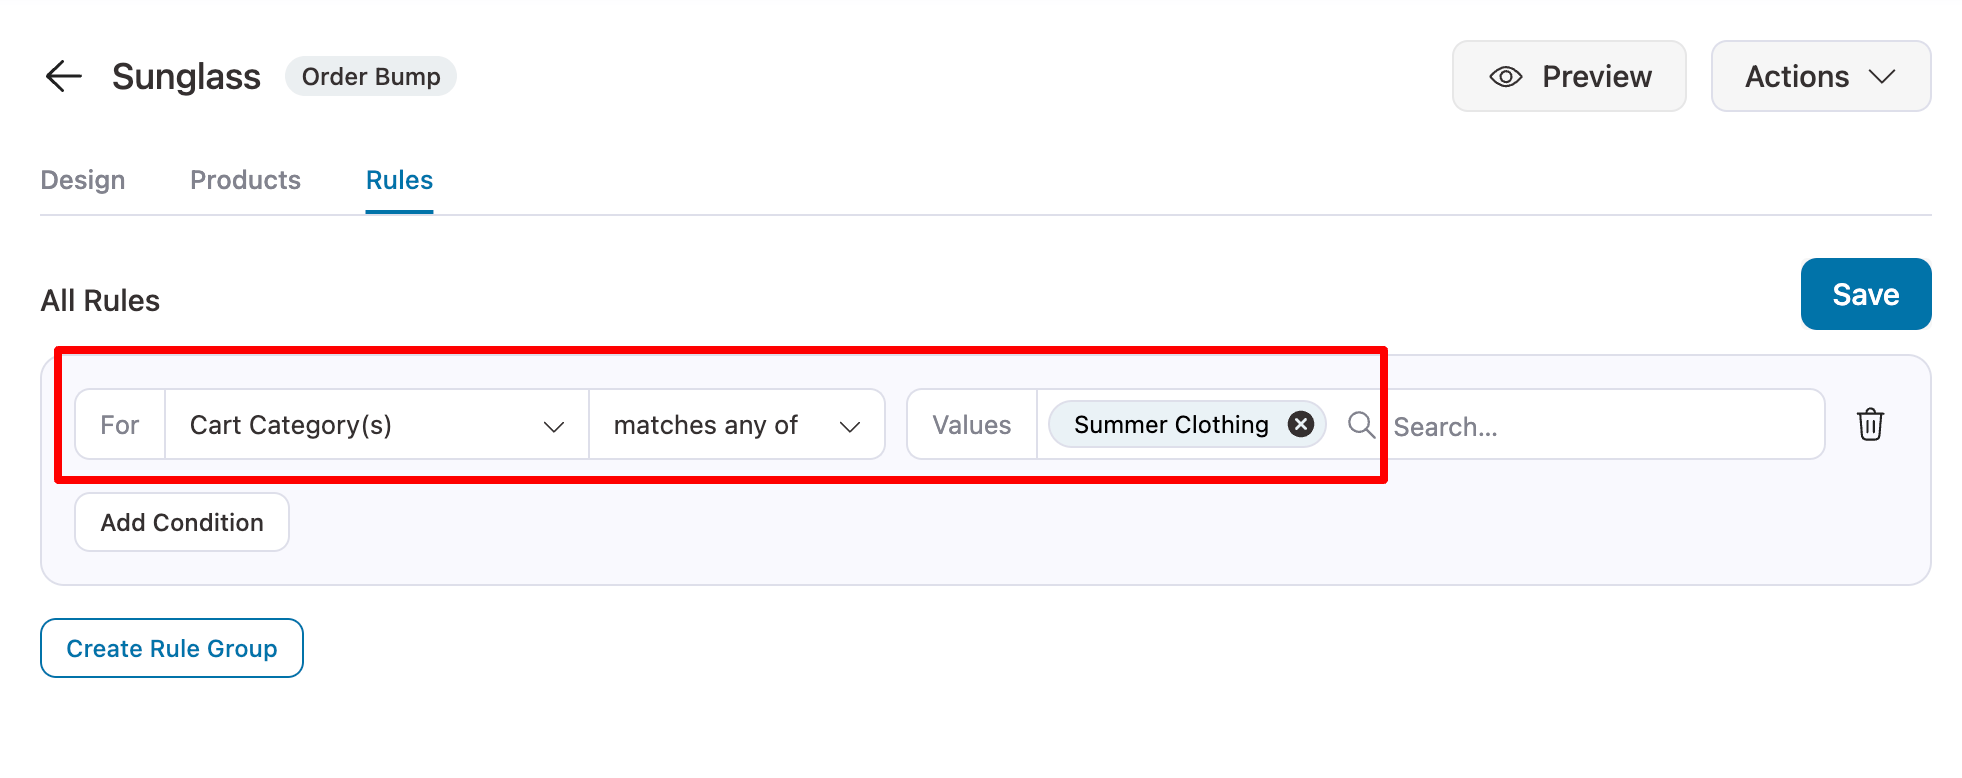
Make sure to click on Save.
Similarly, you can create another order bump; for instance, offer a makeup wipe if someone purchases from the beauty category.
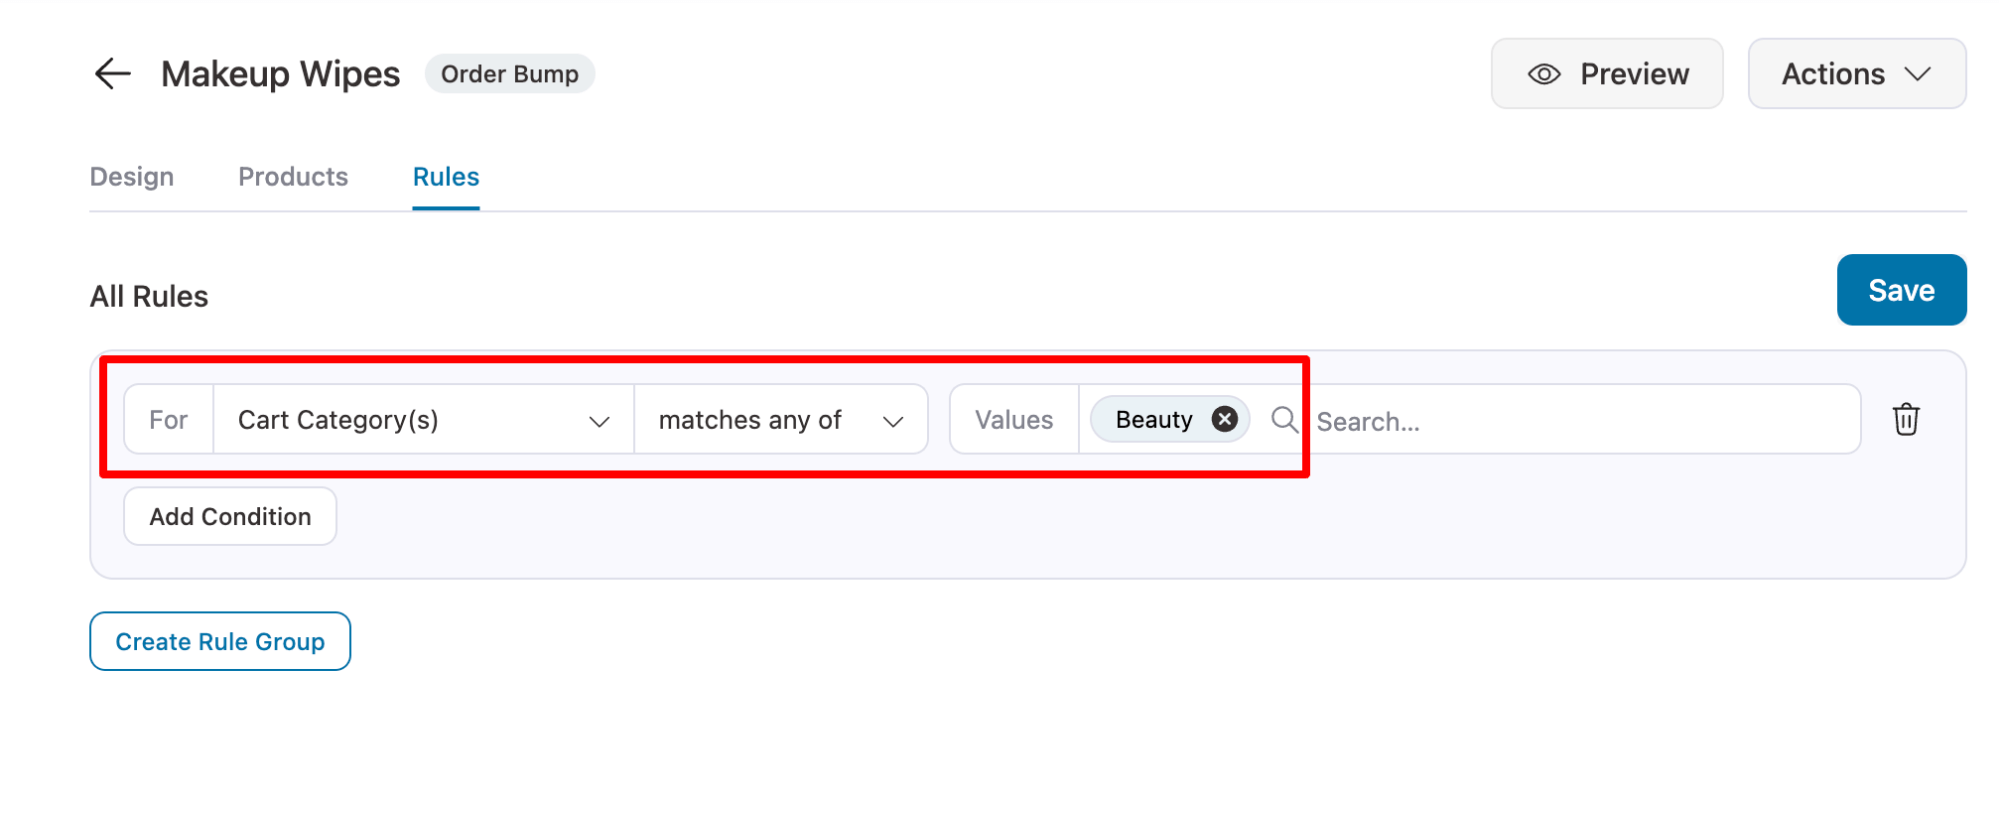
Add as many order bumps as you want and use criteria like cart items, order details, customer history, geography, and more to tailor your offers.
Step 5: Activate the store checkout
After setting up the personalized product recommendations as order bumps, it is time to activate the store checkout.
To do so, enable the “Enable Store Checkout” option.
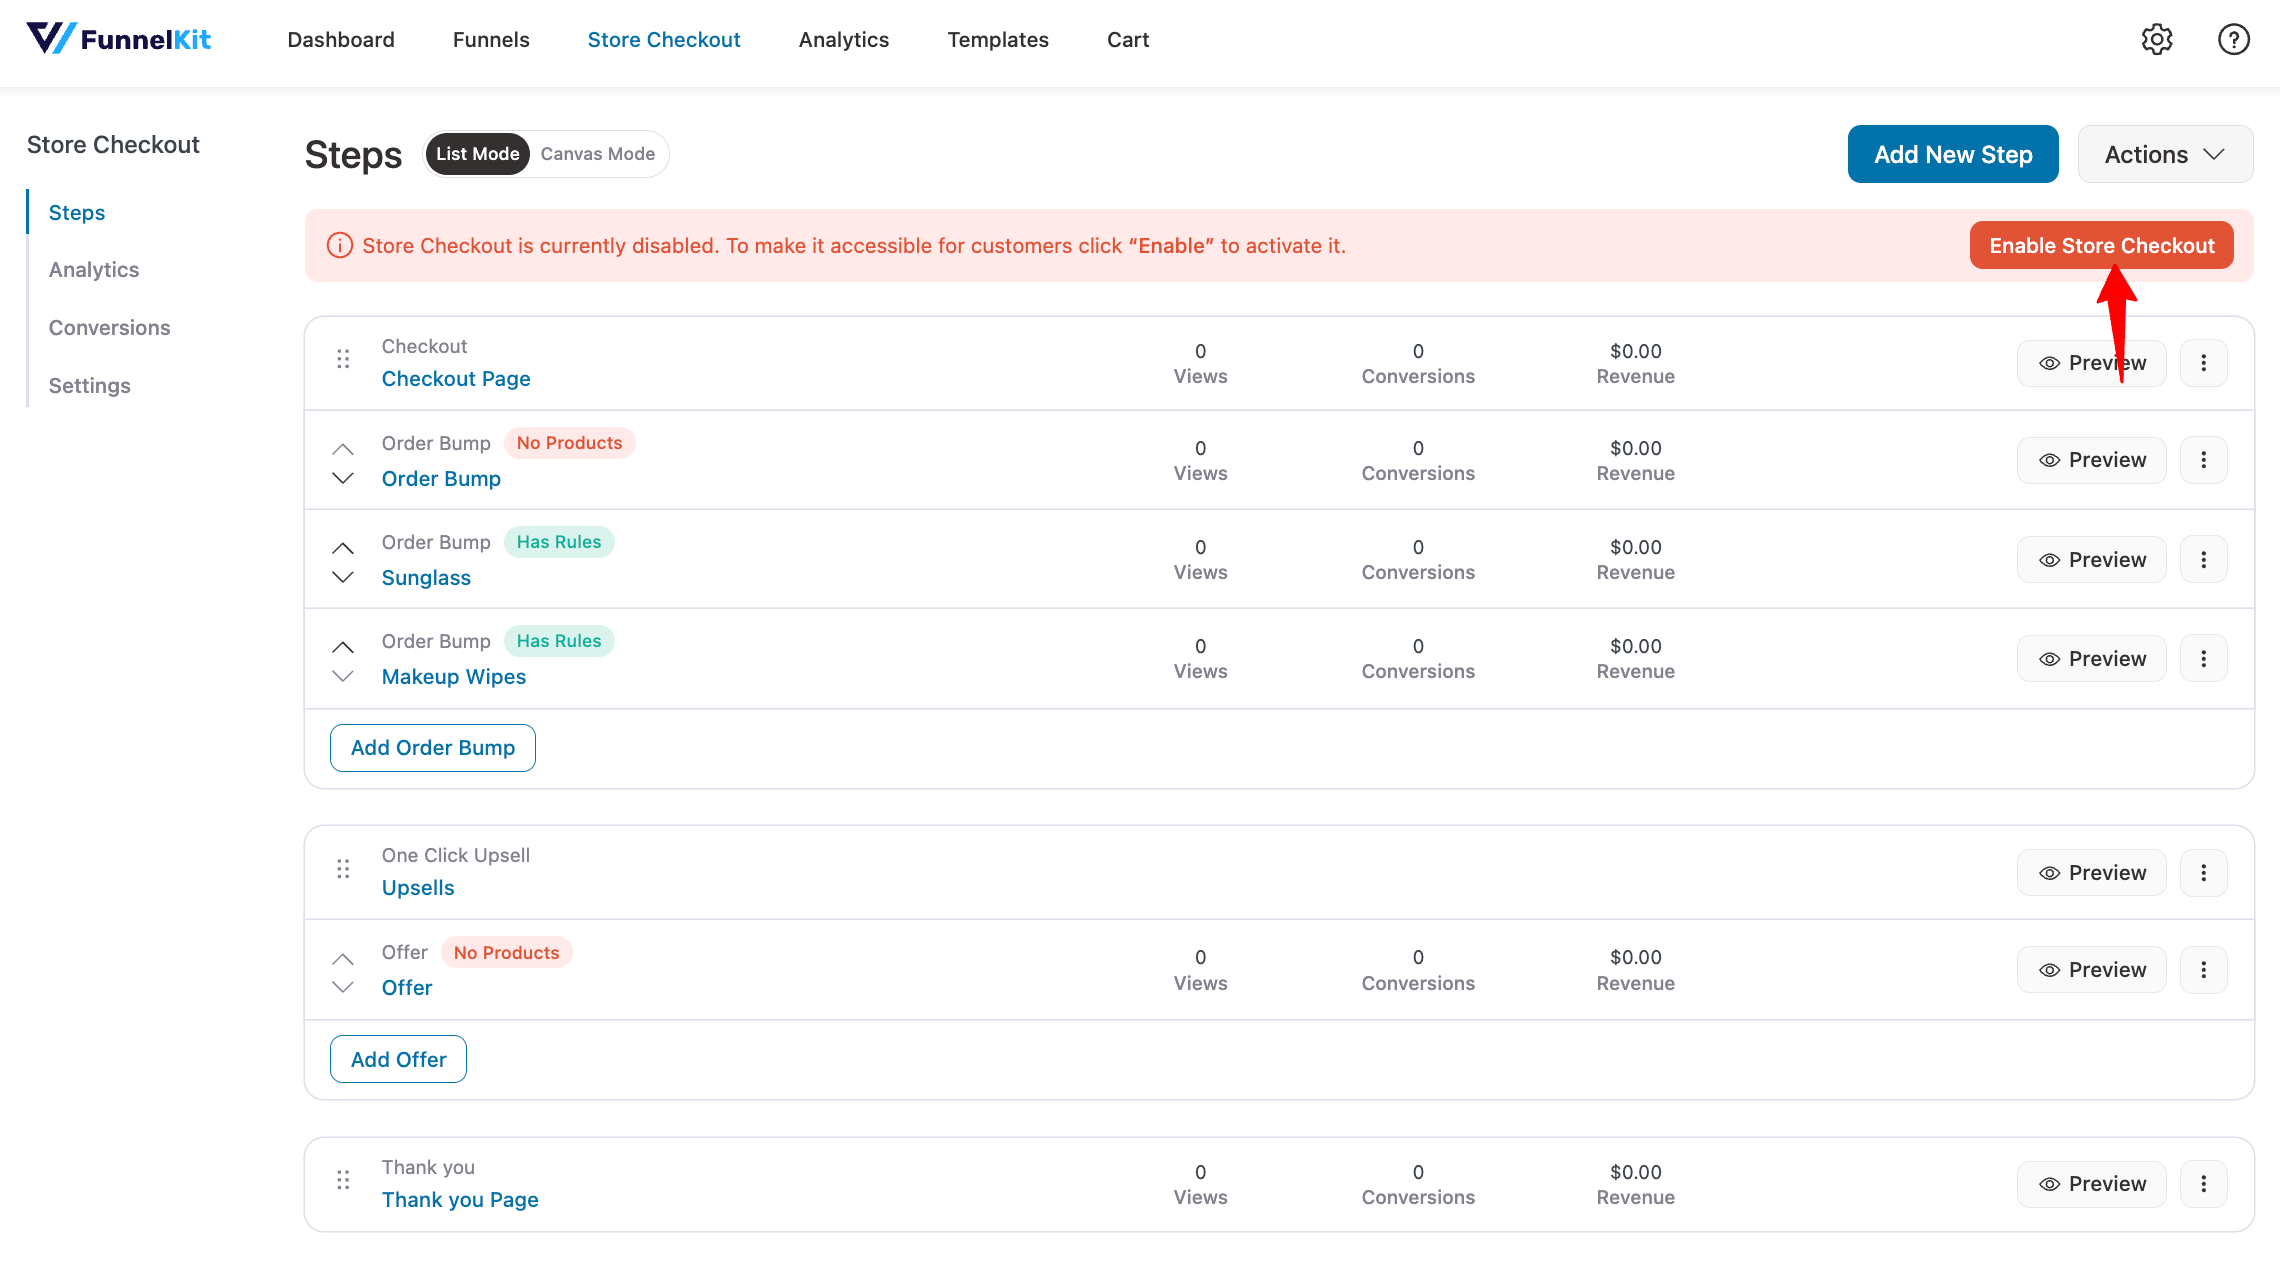
Here is a preview of what an order bump looks like on the checkout page:
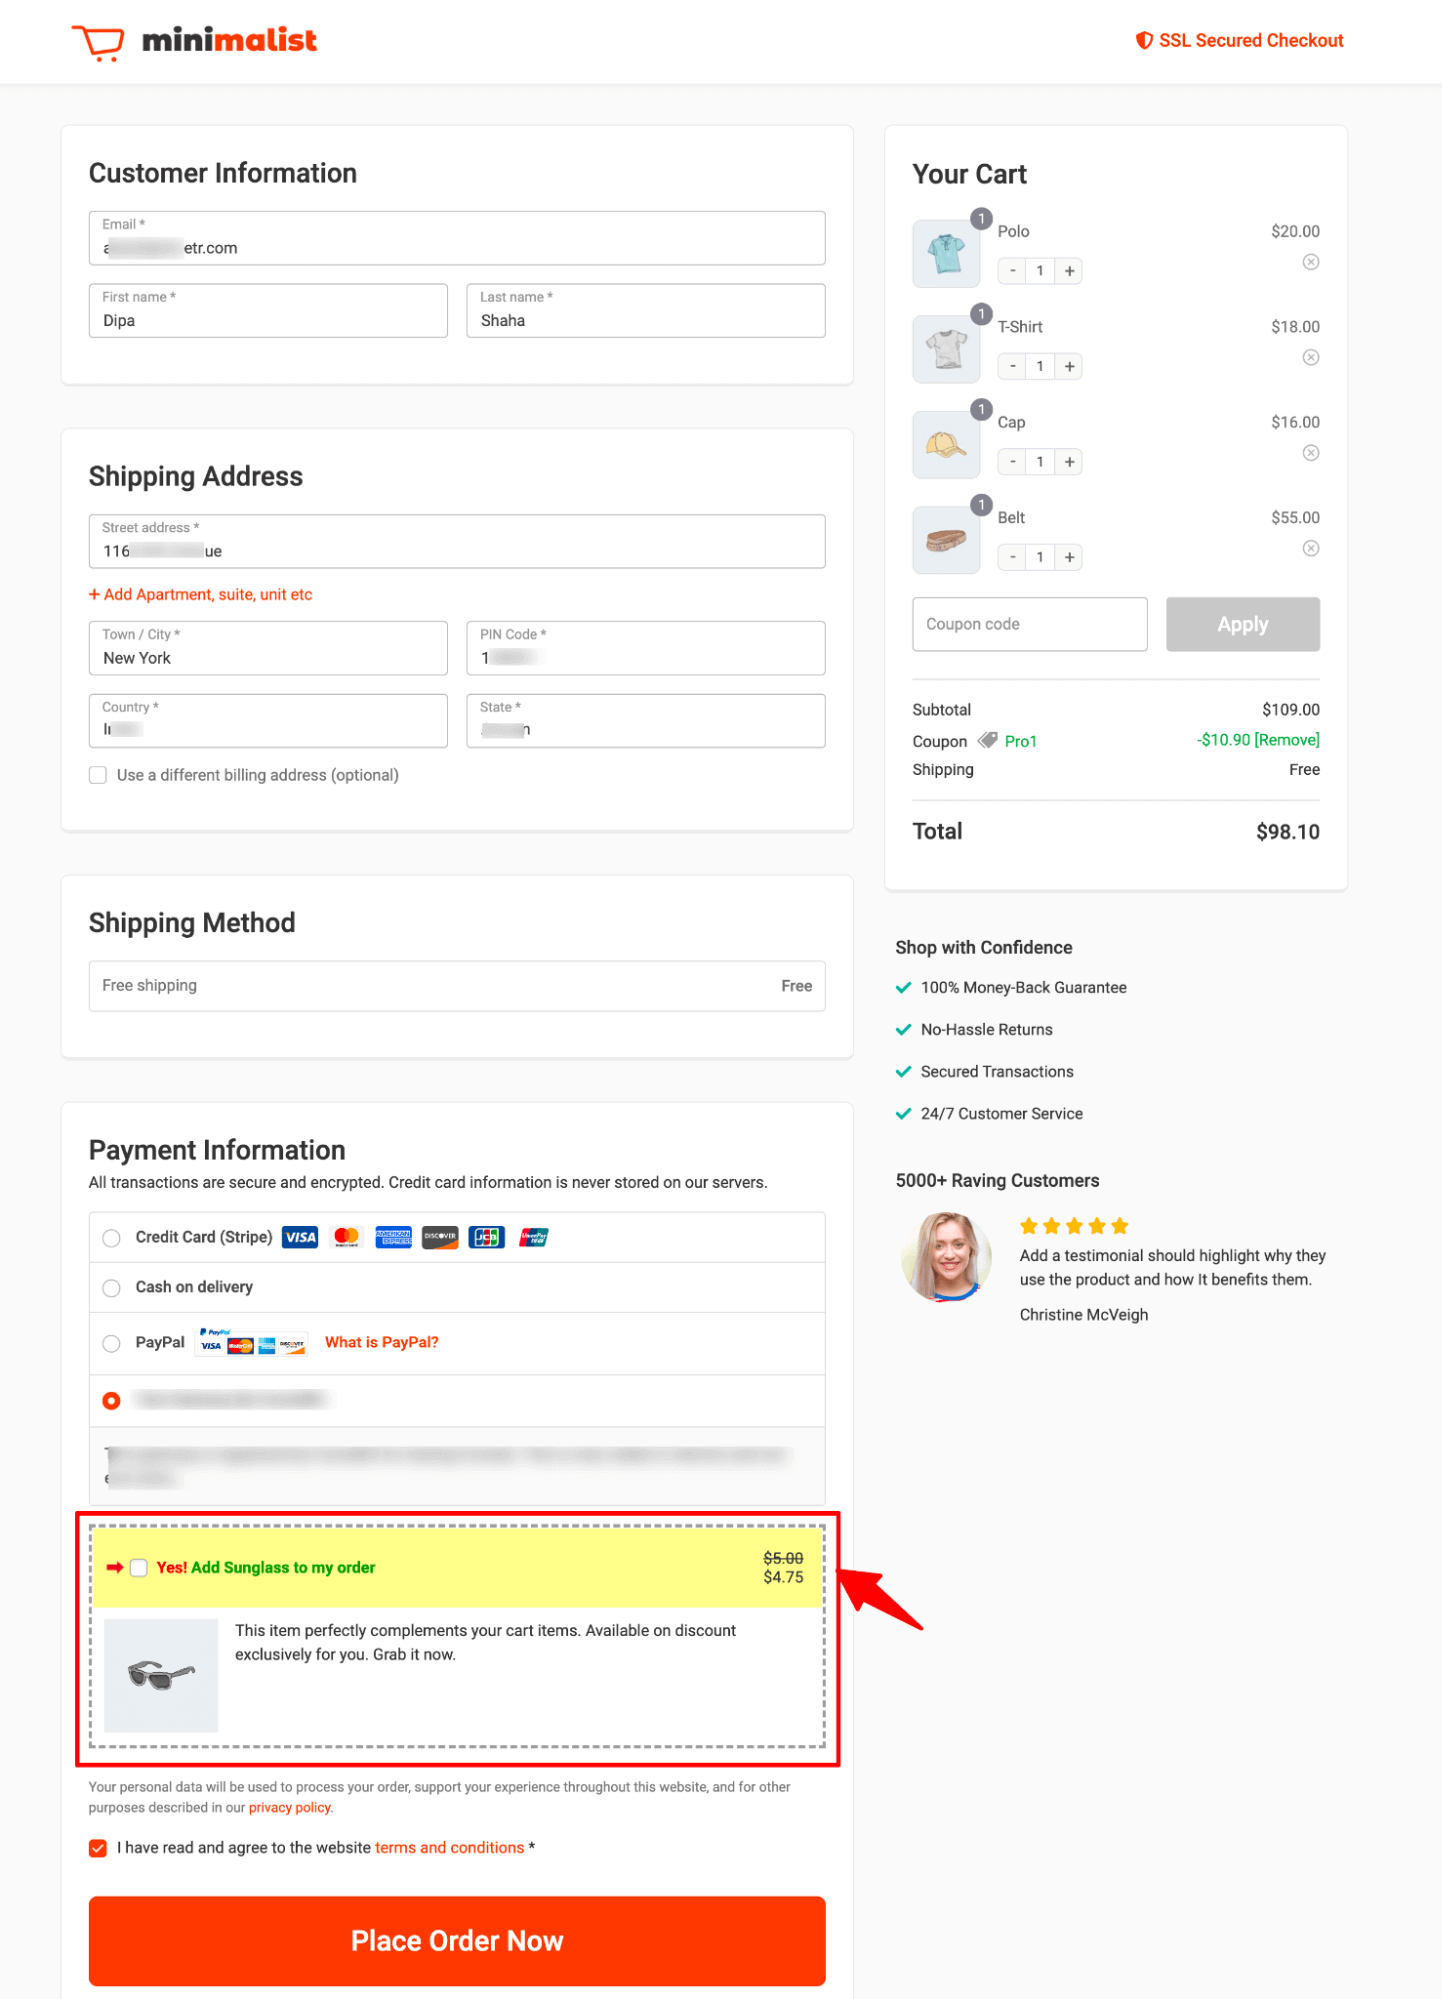
Placement 5: One-Click Post-Purchase Offers
The moment after payment is when a second offer risks nothing.
The order is already placed, so you can’t lose the original sale, and the customer’s payment method is tokenized. They can accept a follow-up recommendation with a single click and no re-entry of card details.
The offer step in the store checkout you just built handles this:
Method 1: Add the offer product
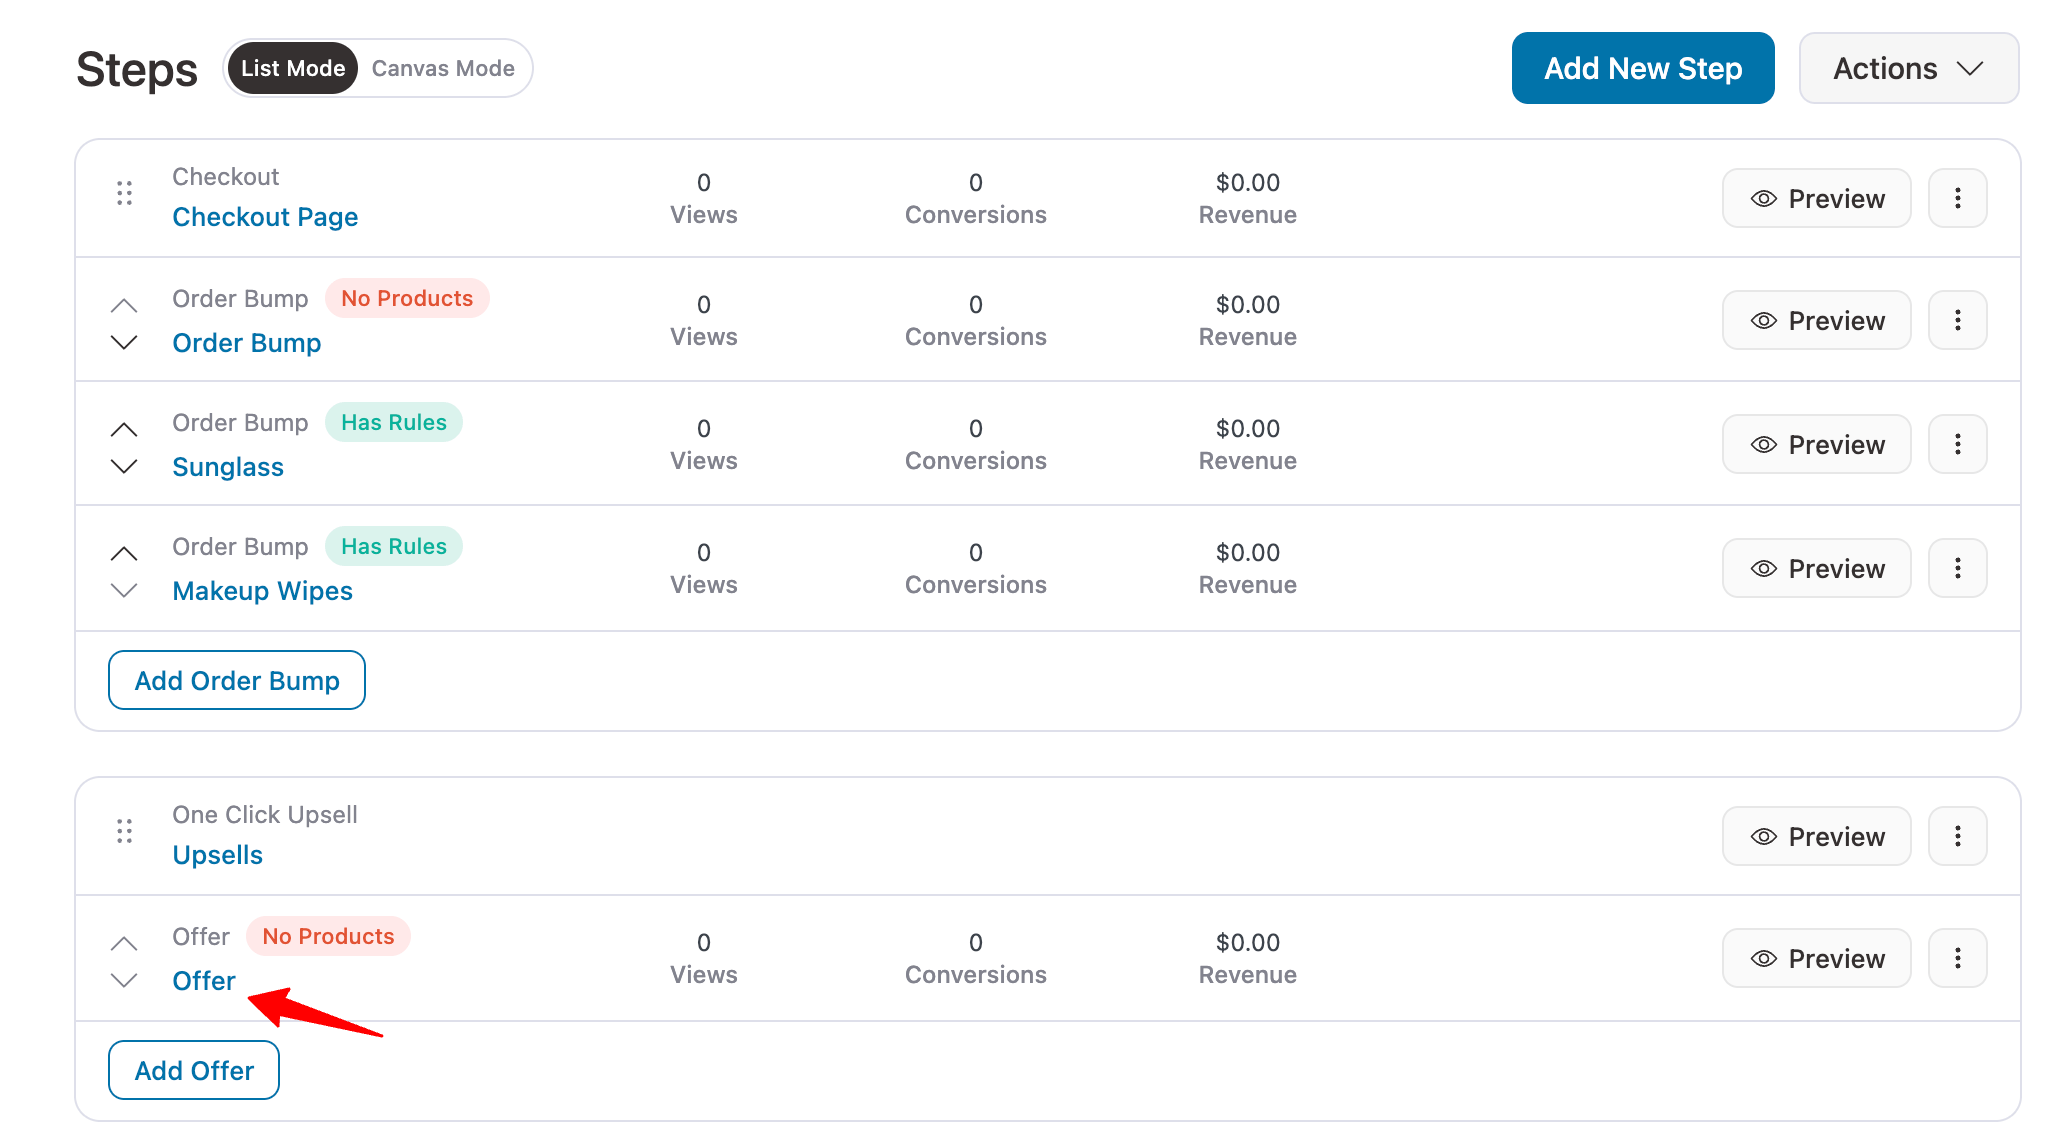
Click on the Offer step.
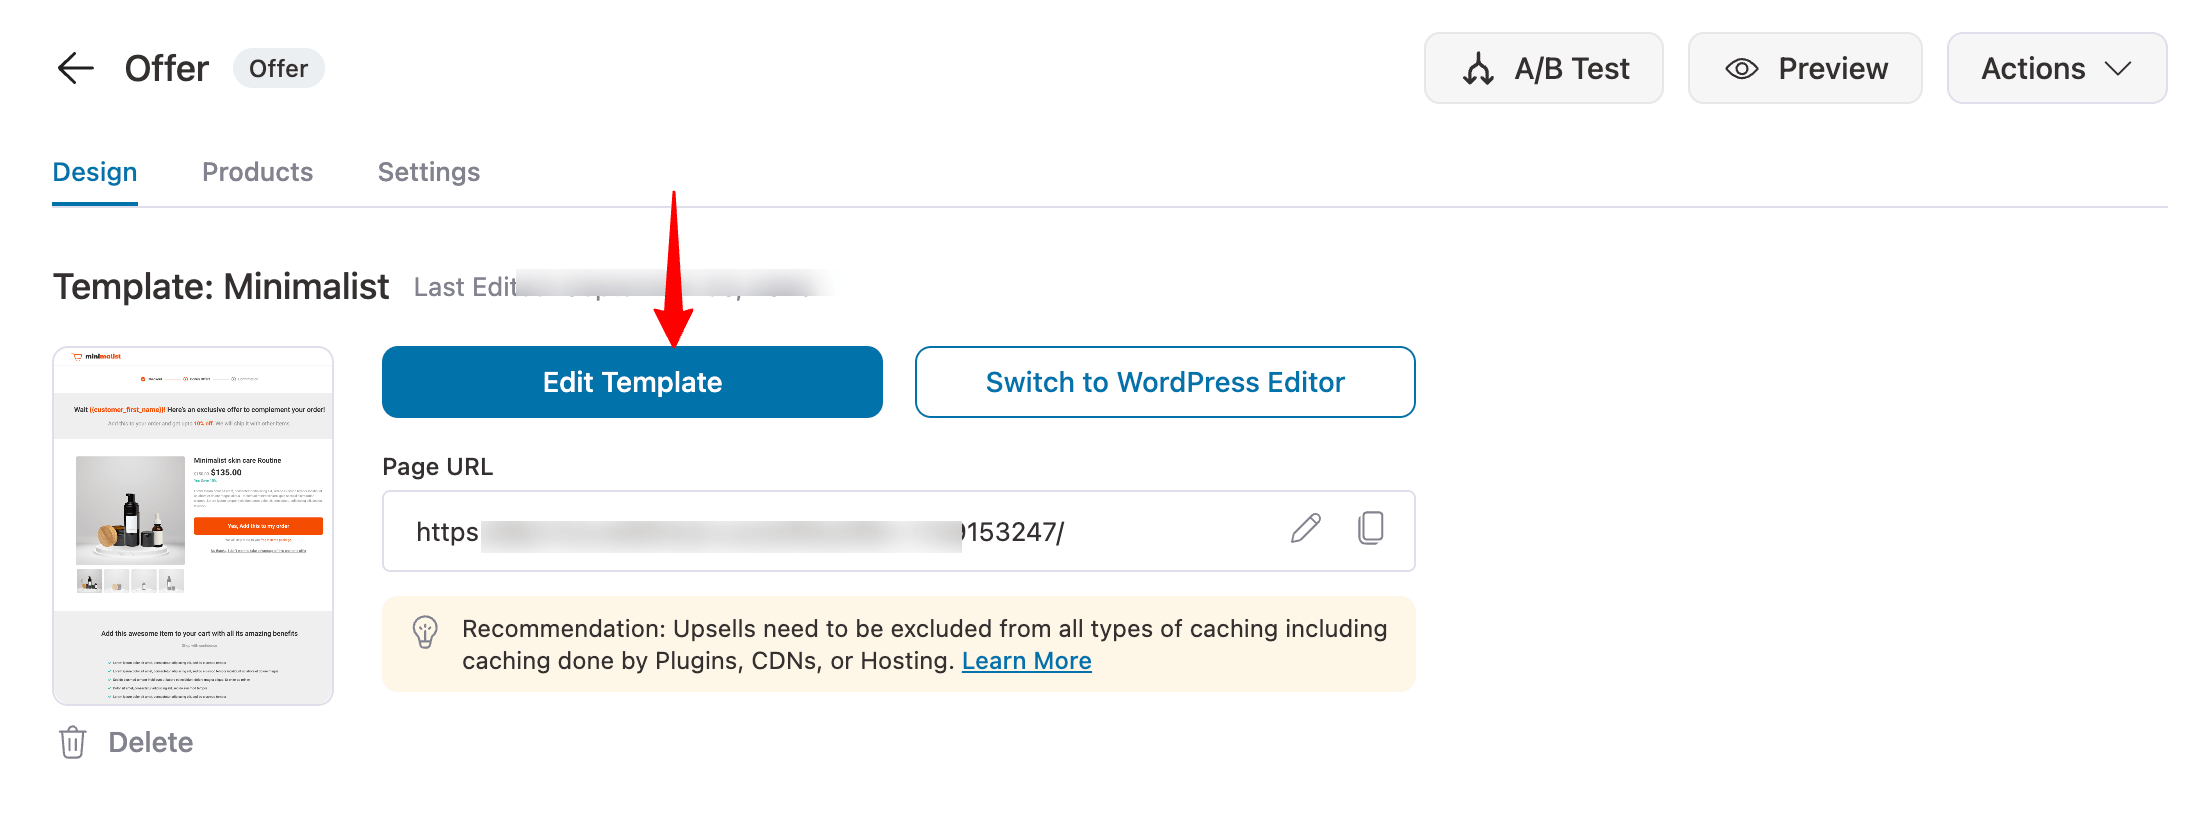
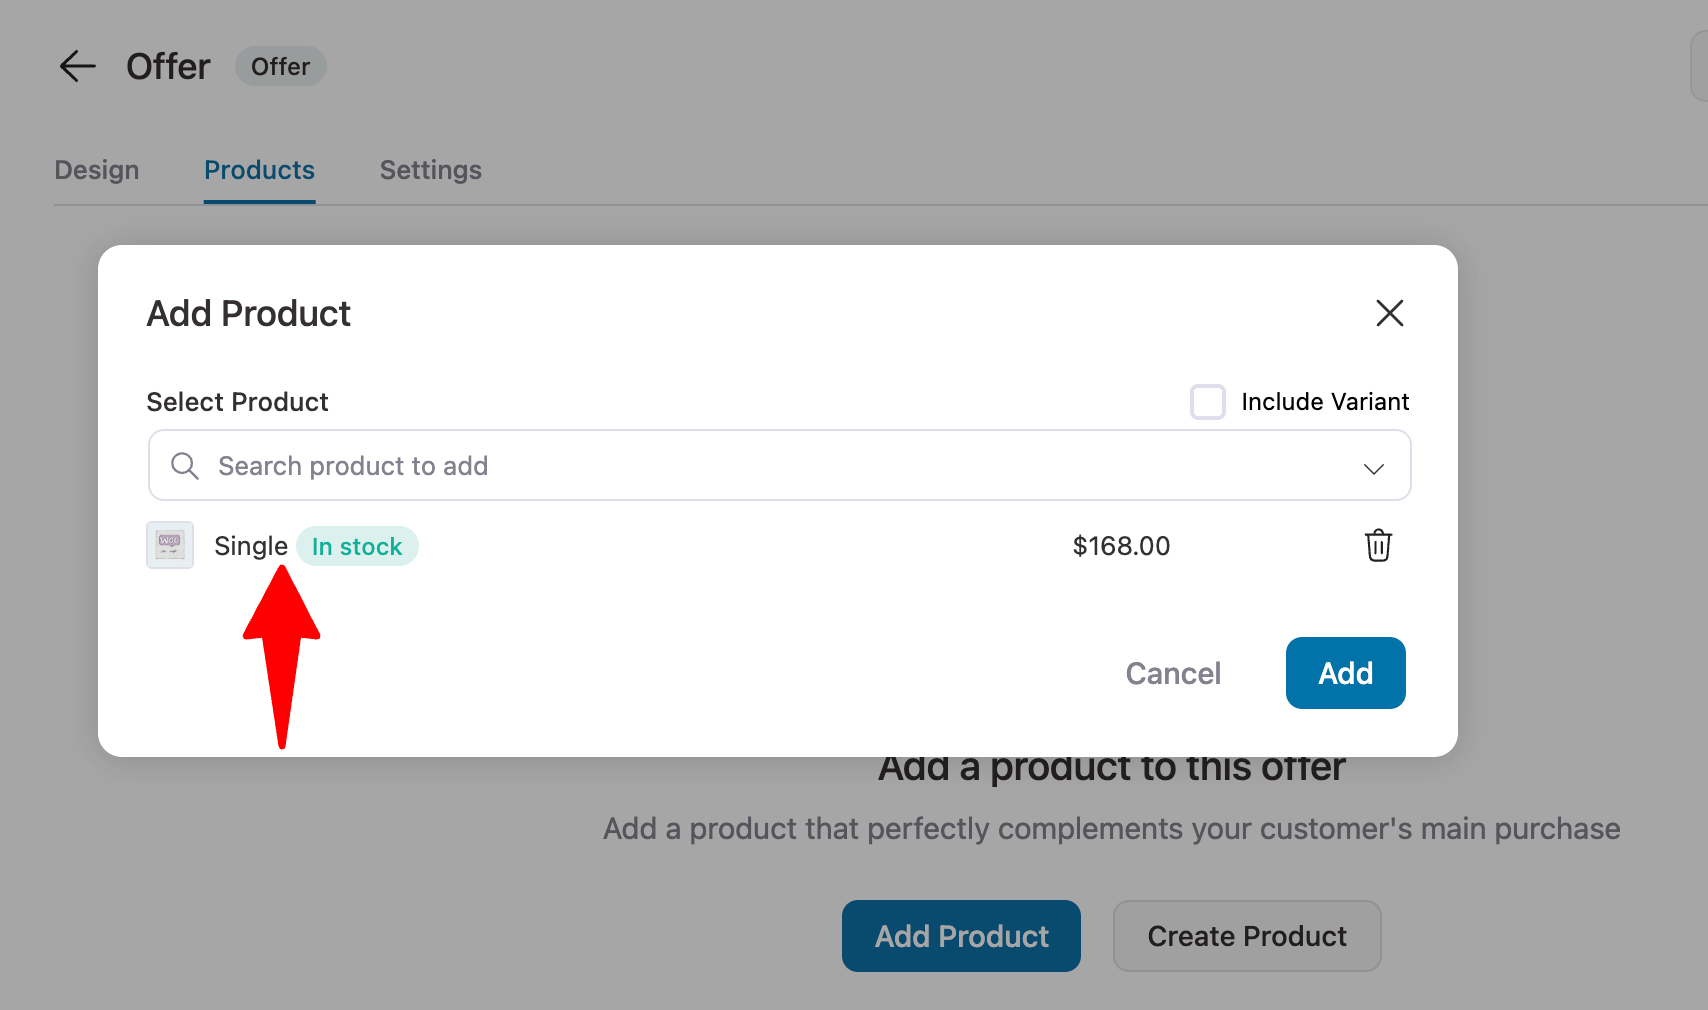
Go to the Products tab, click 'Add Product', search for the product, select it from the dropdown, and click "Add" to set it as an upsell offer.
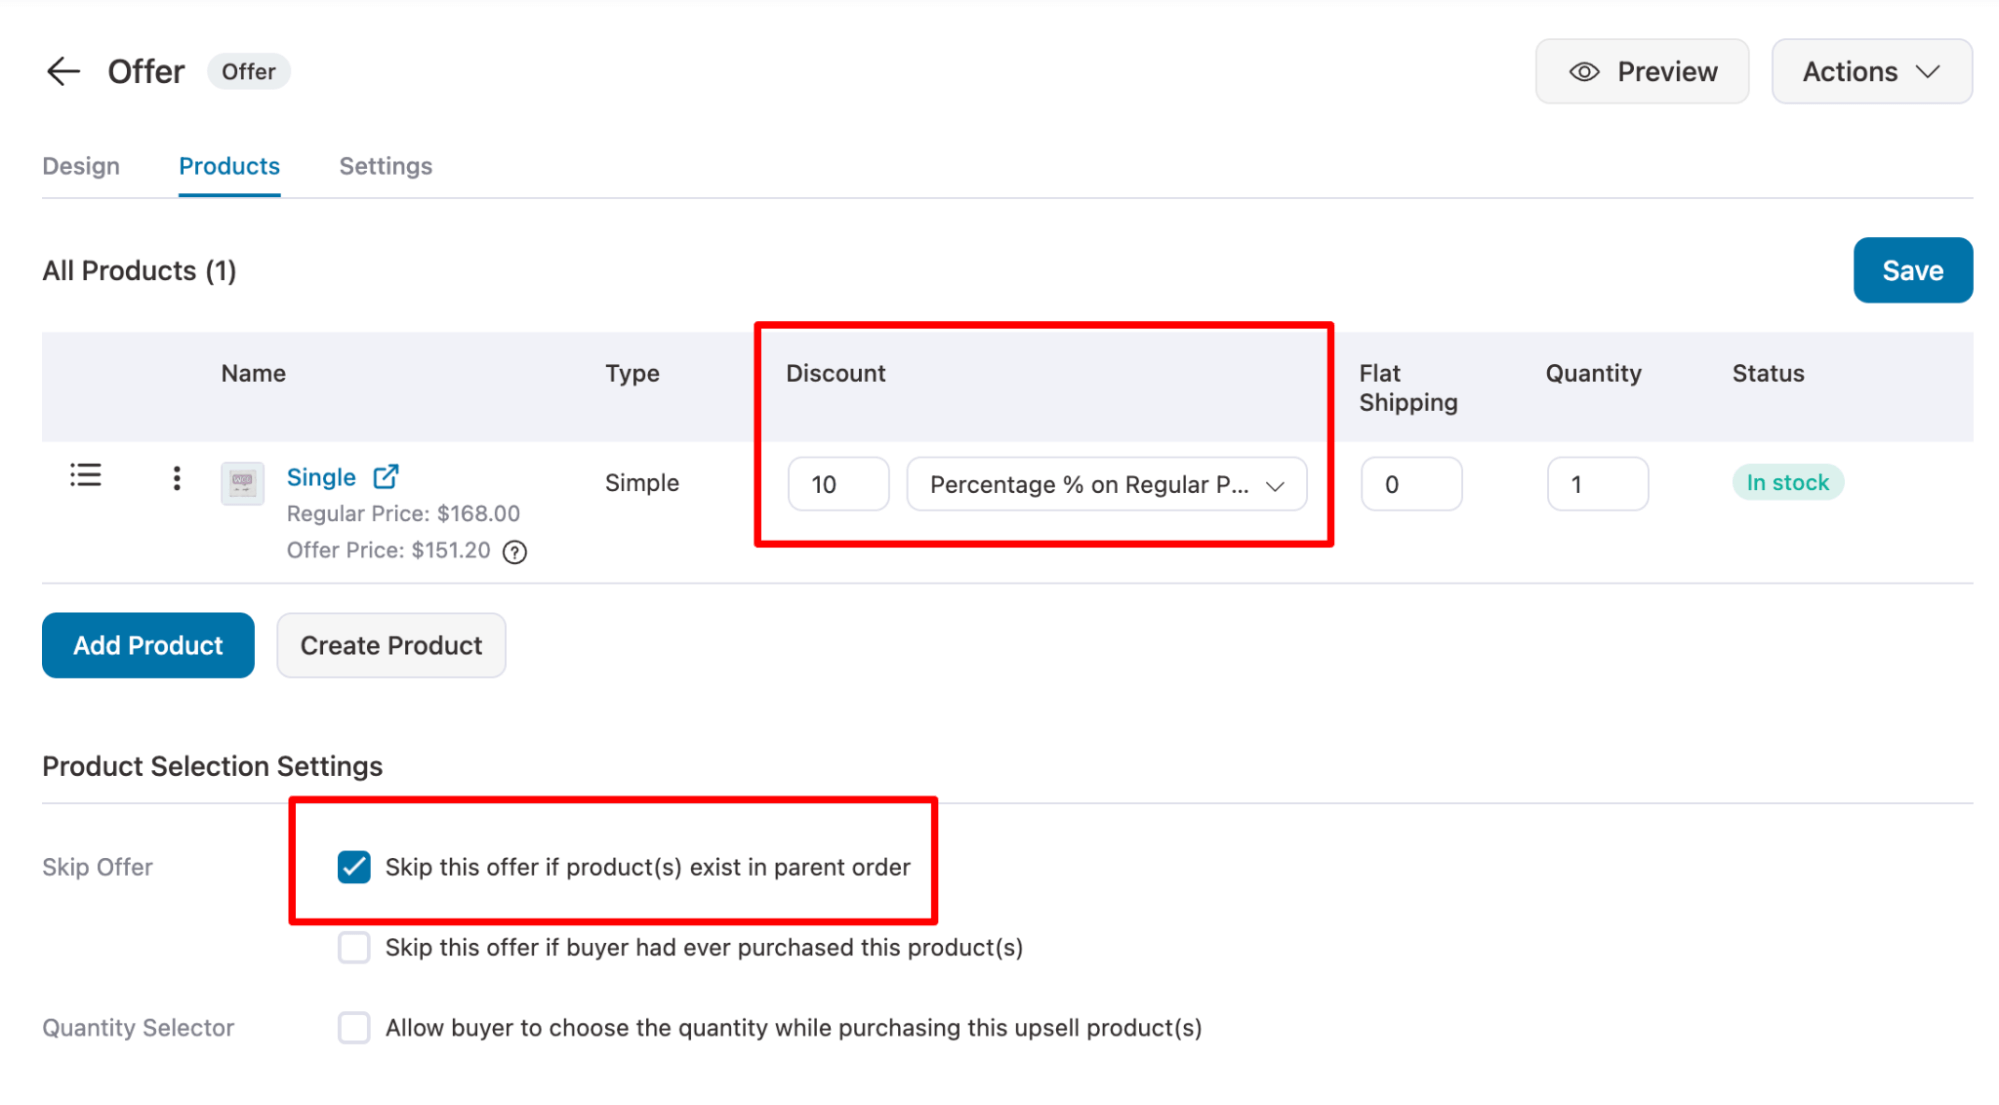
You can offer discounts on the upsell offer to make it more lucrative and customize the settings.
We recommend that you check the option “Skip this offer if the product(s) exist in parent order”.
Make sure to click on Save to update.
Method 2: Add conditions
Target the upsell with rules based on order total, items purchased, or customer history. This way, you present the right products to the right customers at the right time.
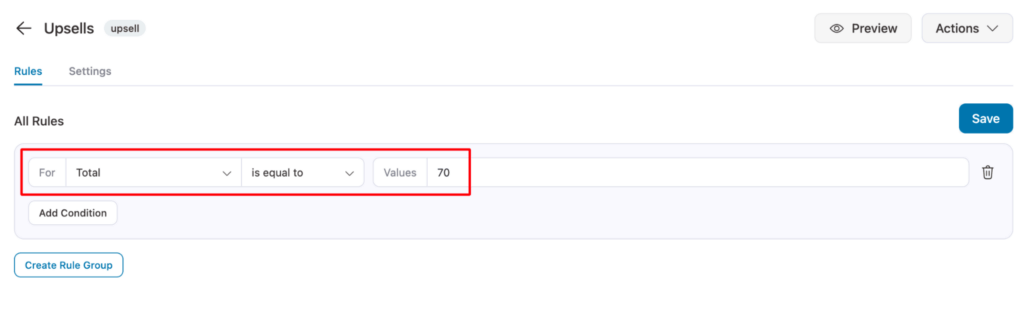
Make sure to click on the 'Save' button when done.
Here is what your upsell template will look like:
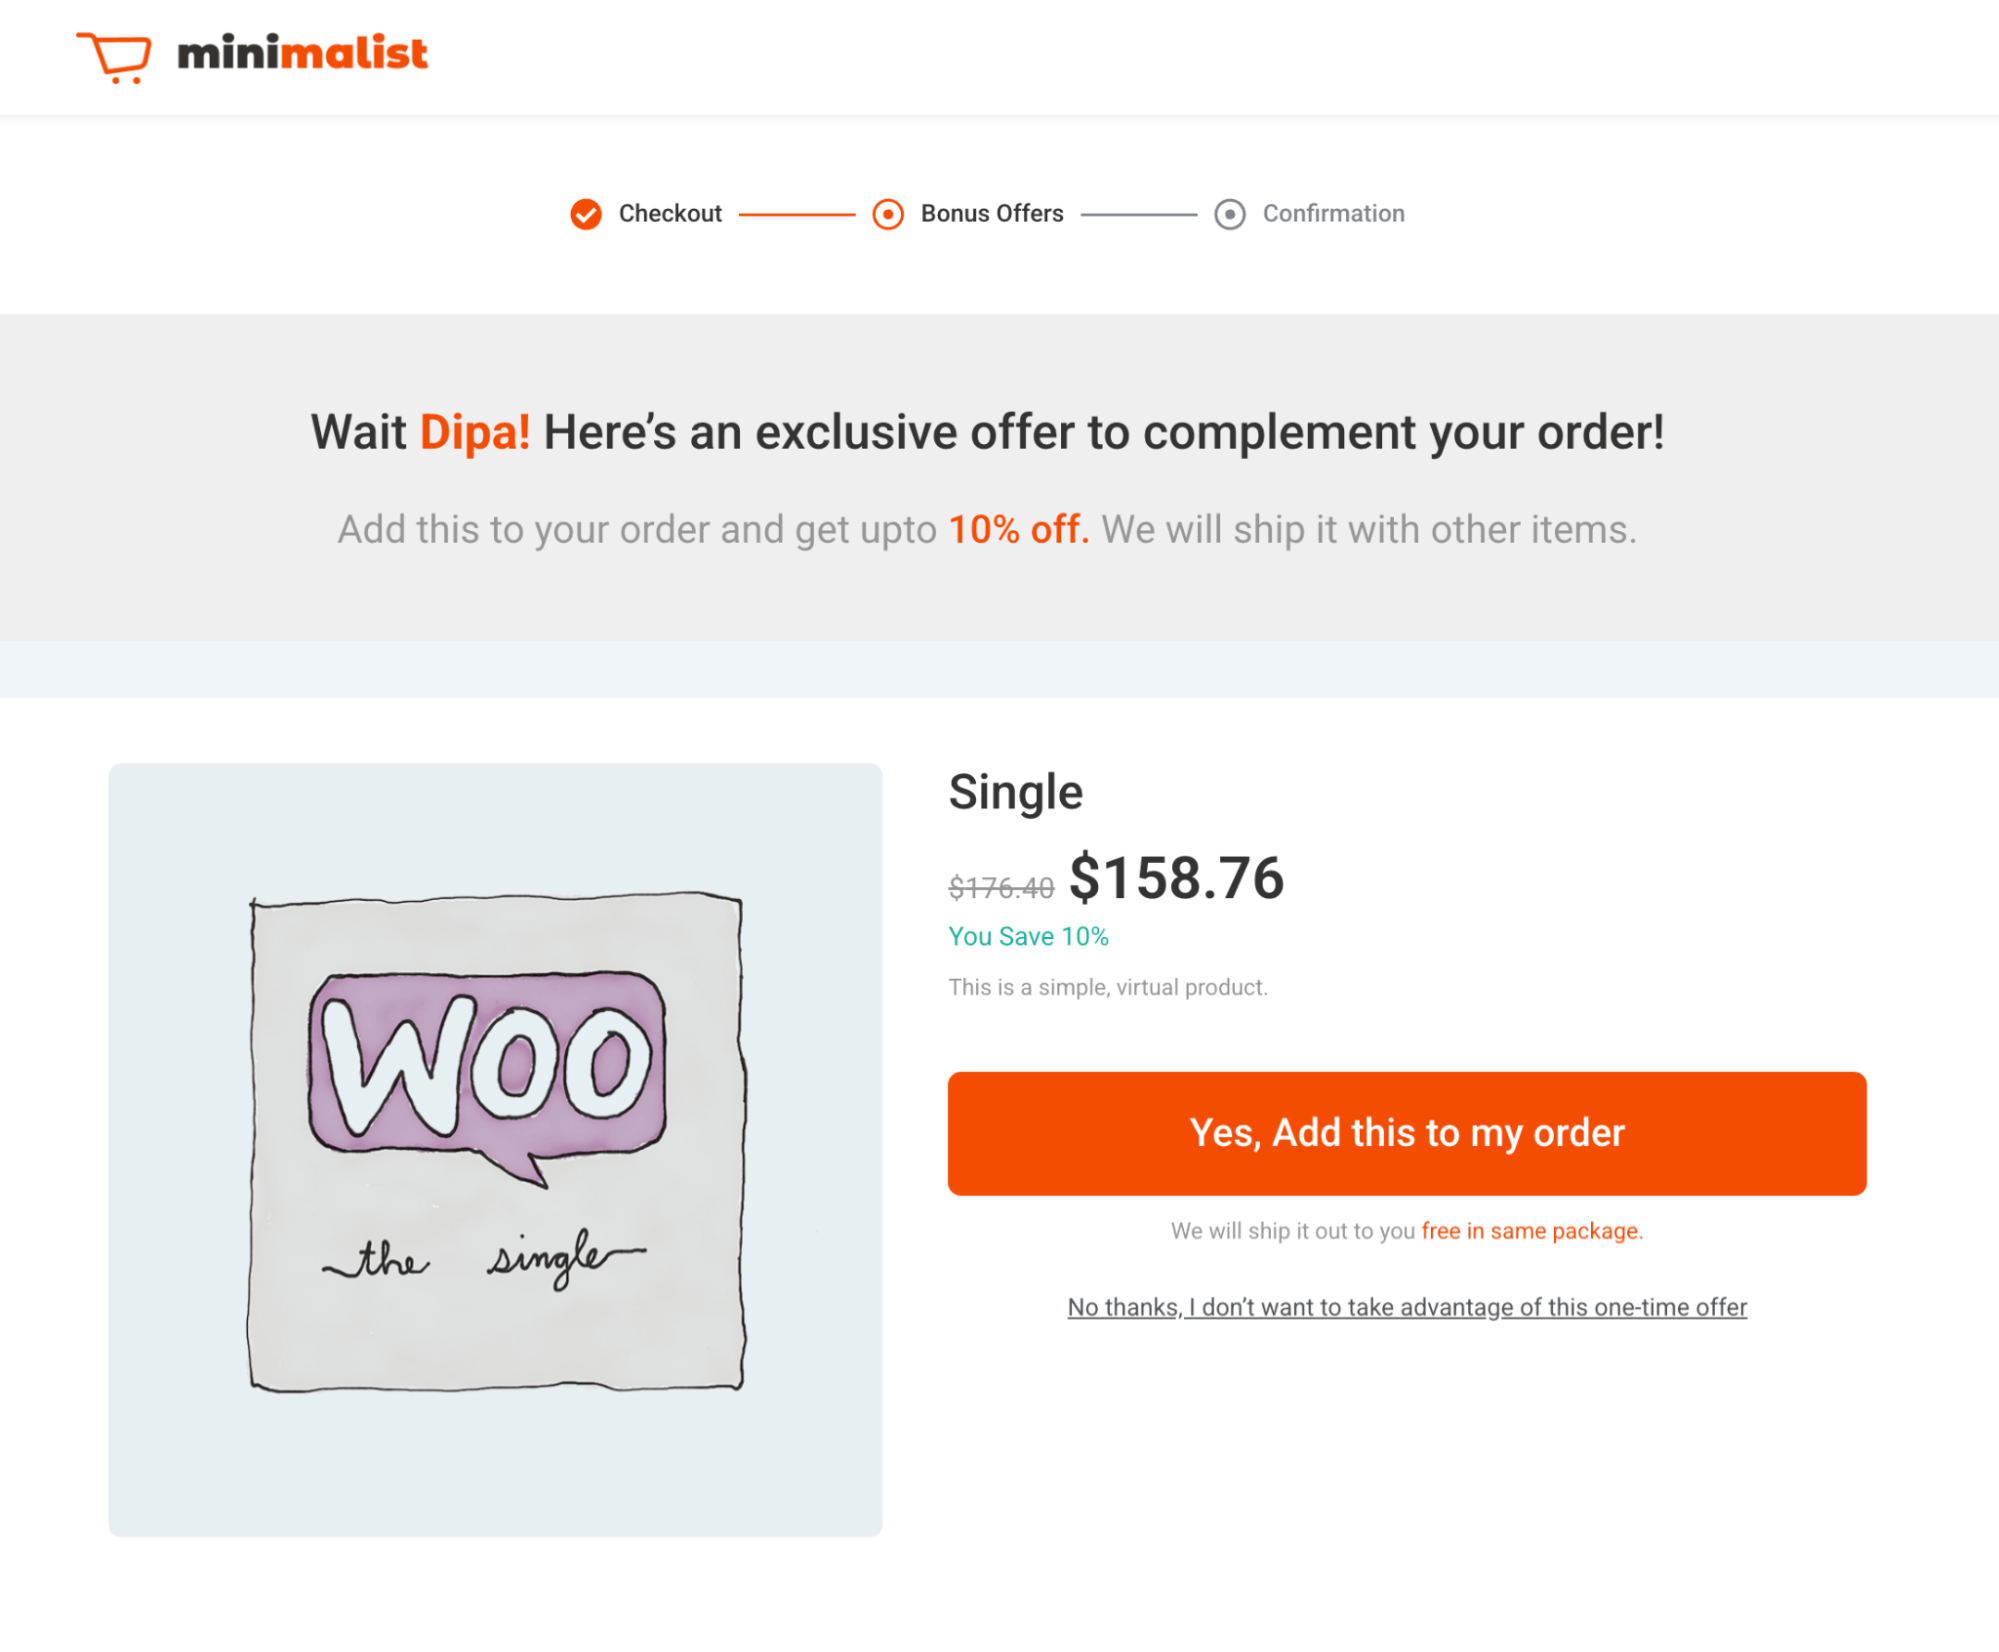
Placement 6: Exit Intent Recommendation Popups
When a visitor moves to leave without buying, an exit popup gives you one last chance to recommend a best seller before they go.
For this placement, we'll use OptinMonster, a lead generation tool with exit-intent targeting.
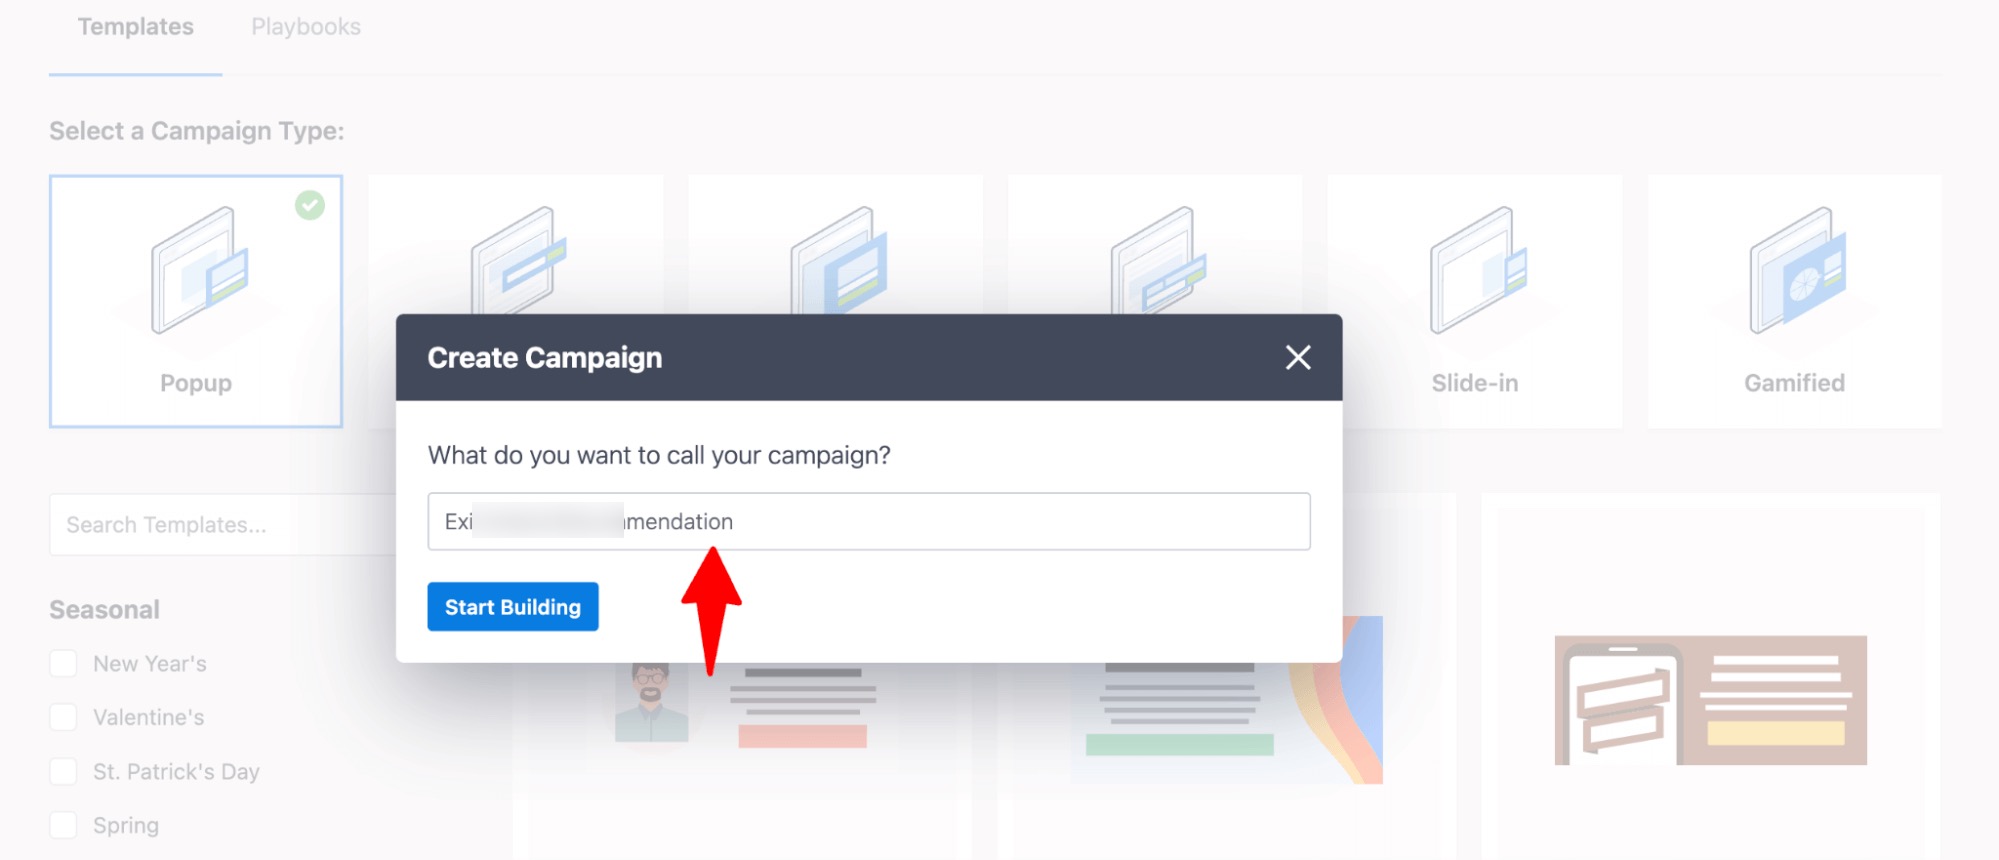
Step 1: Create a campaign
Navigate to OptinMonster ⇒ Campaigns and click on the 'Create Your First Campaign' button.
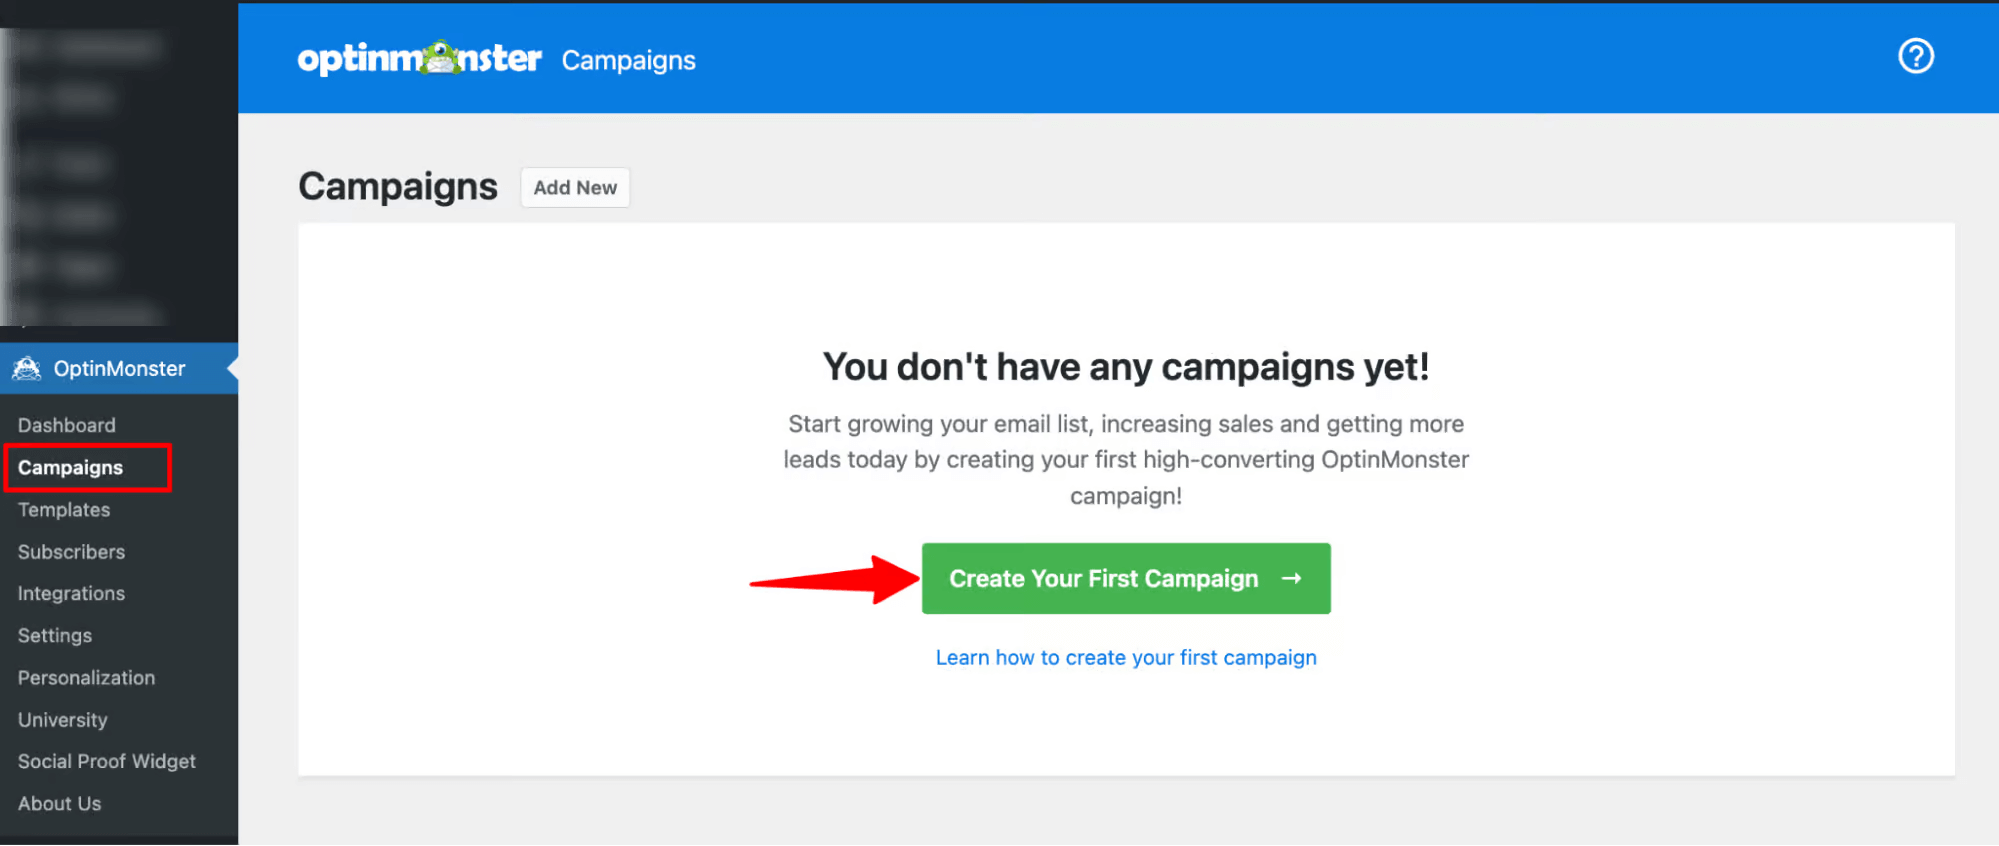
Next, choose a template.
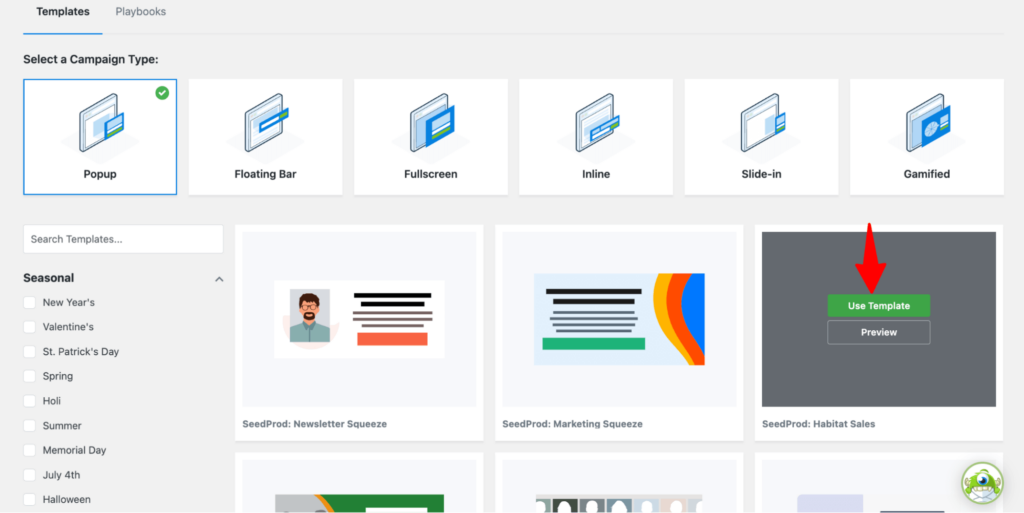
Provide a name and start building your campaign.
Step 2: Build the offer
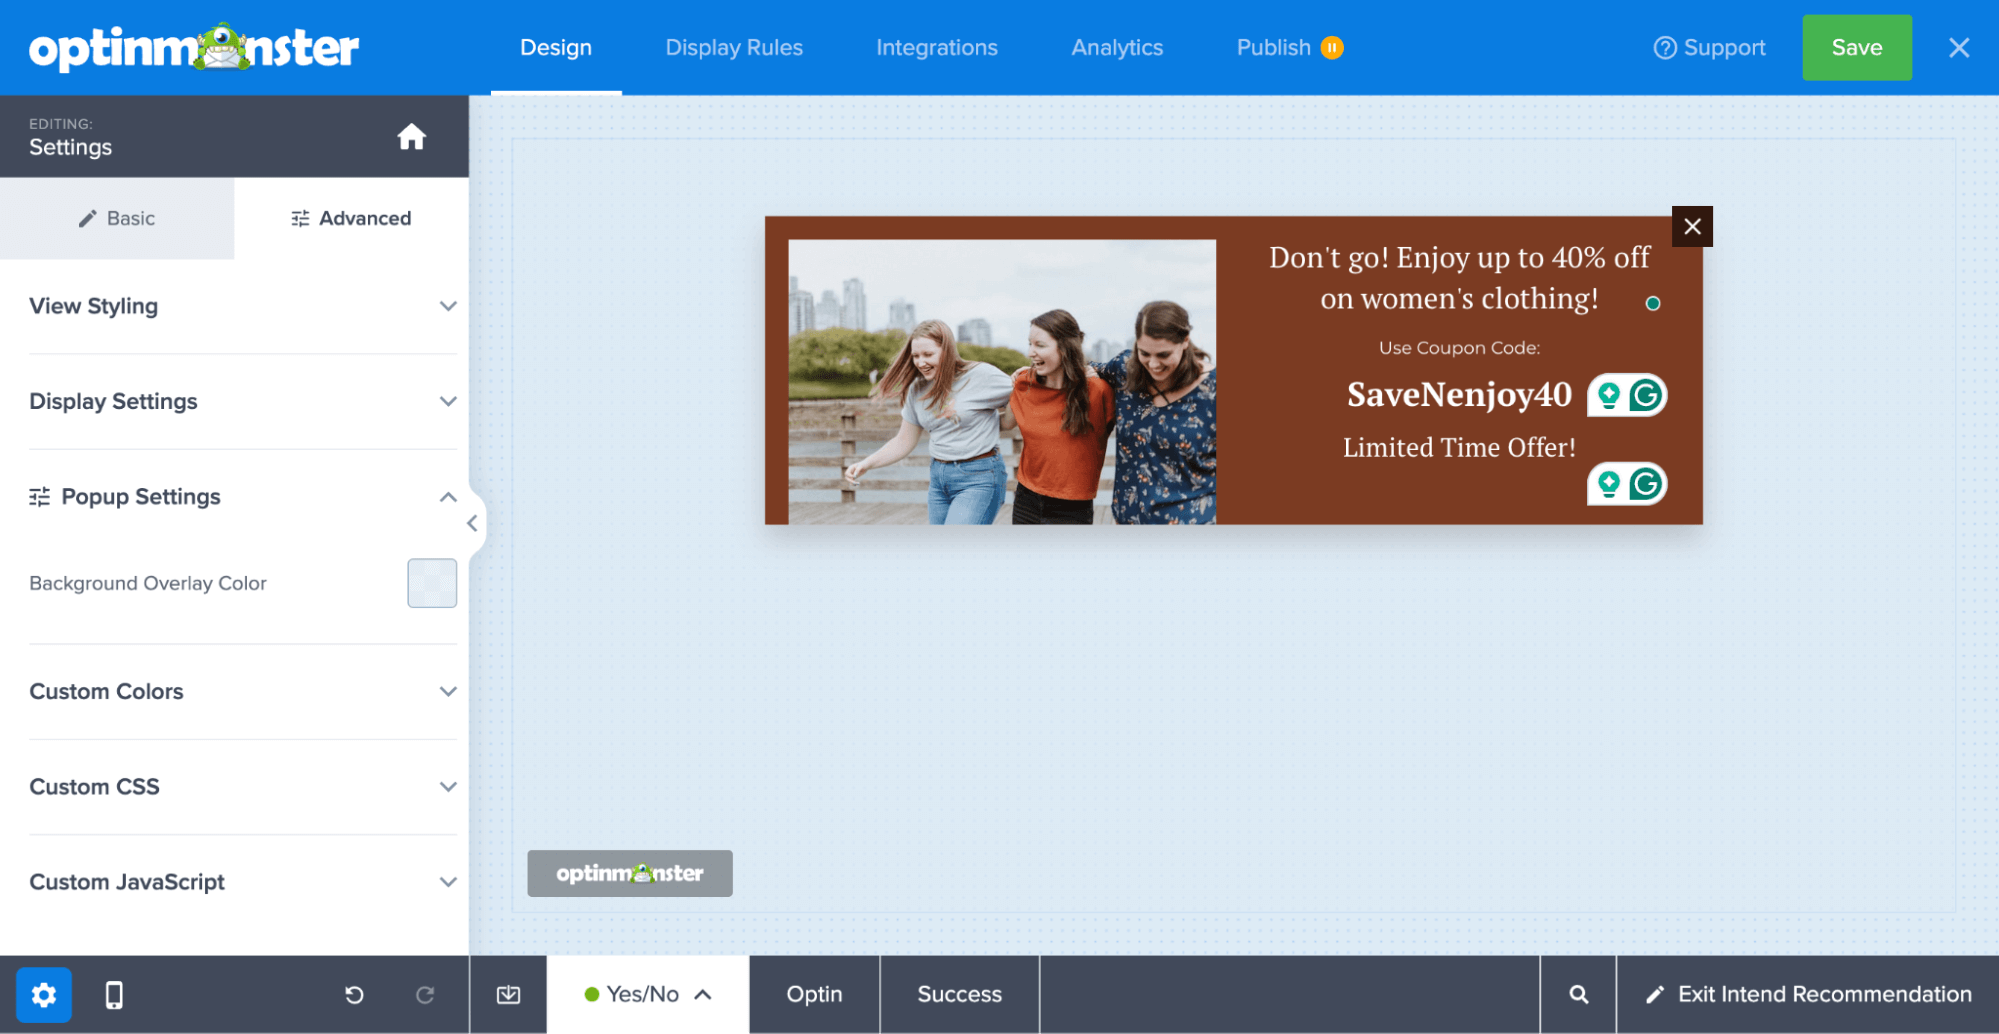
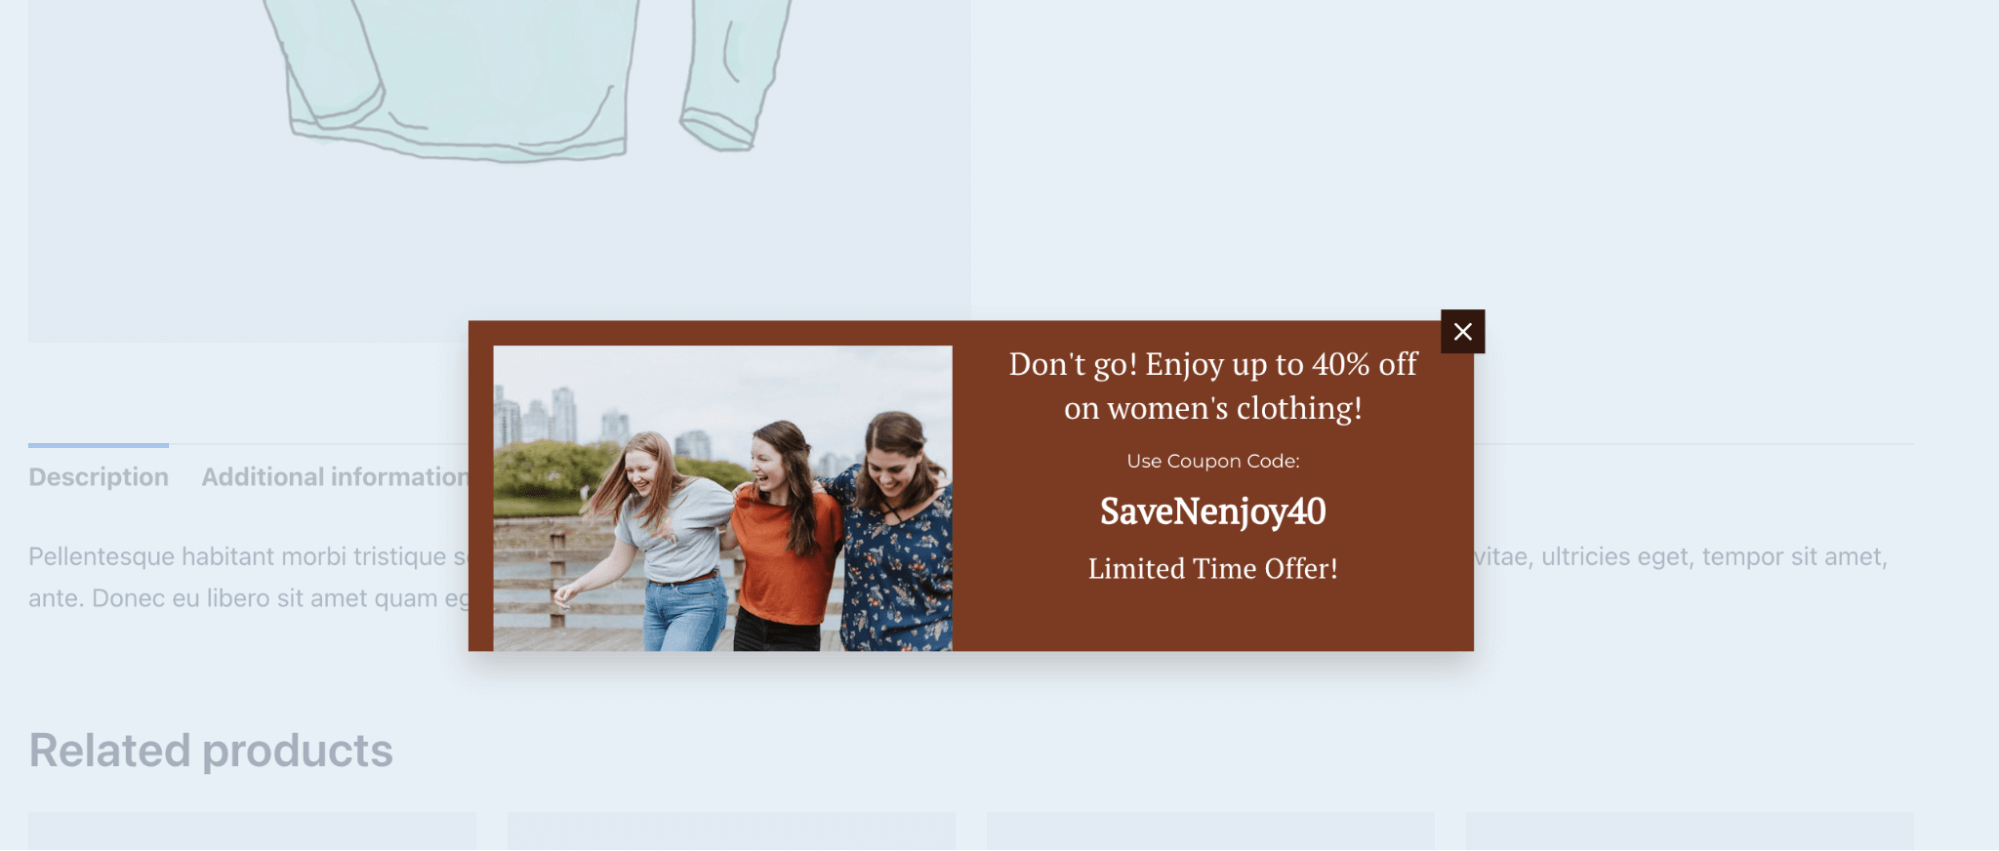
Next, customize your campaign to highlight products that are likely to engage customers. For instance, you could offer a 40% sale on women's clothing and a limited-time discount to seal the deal.
Step 3: Set the exit trigger to show recommendations
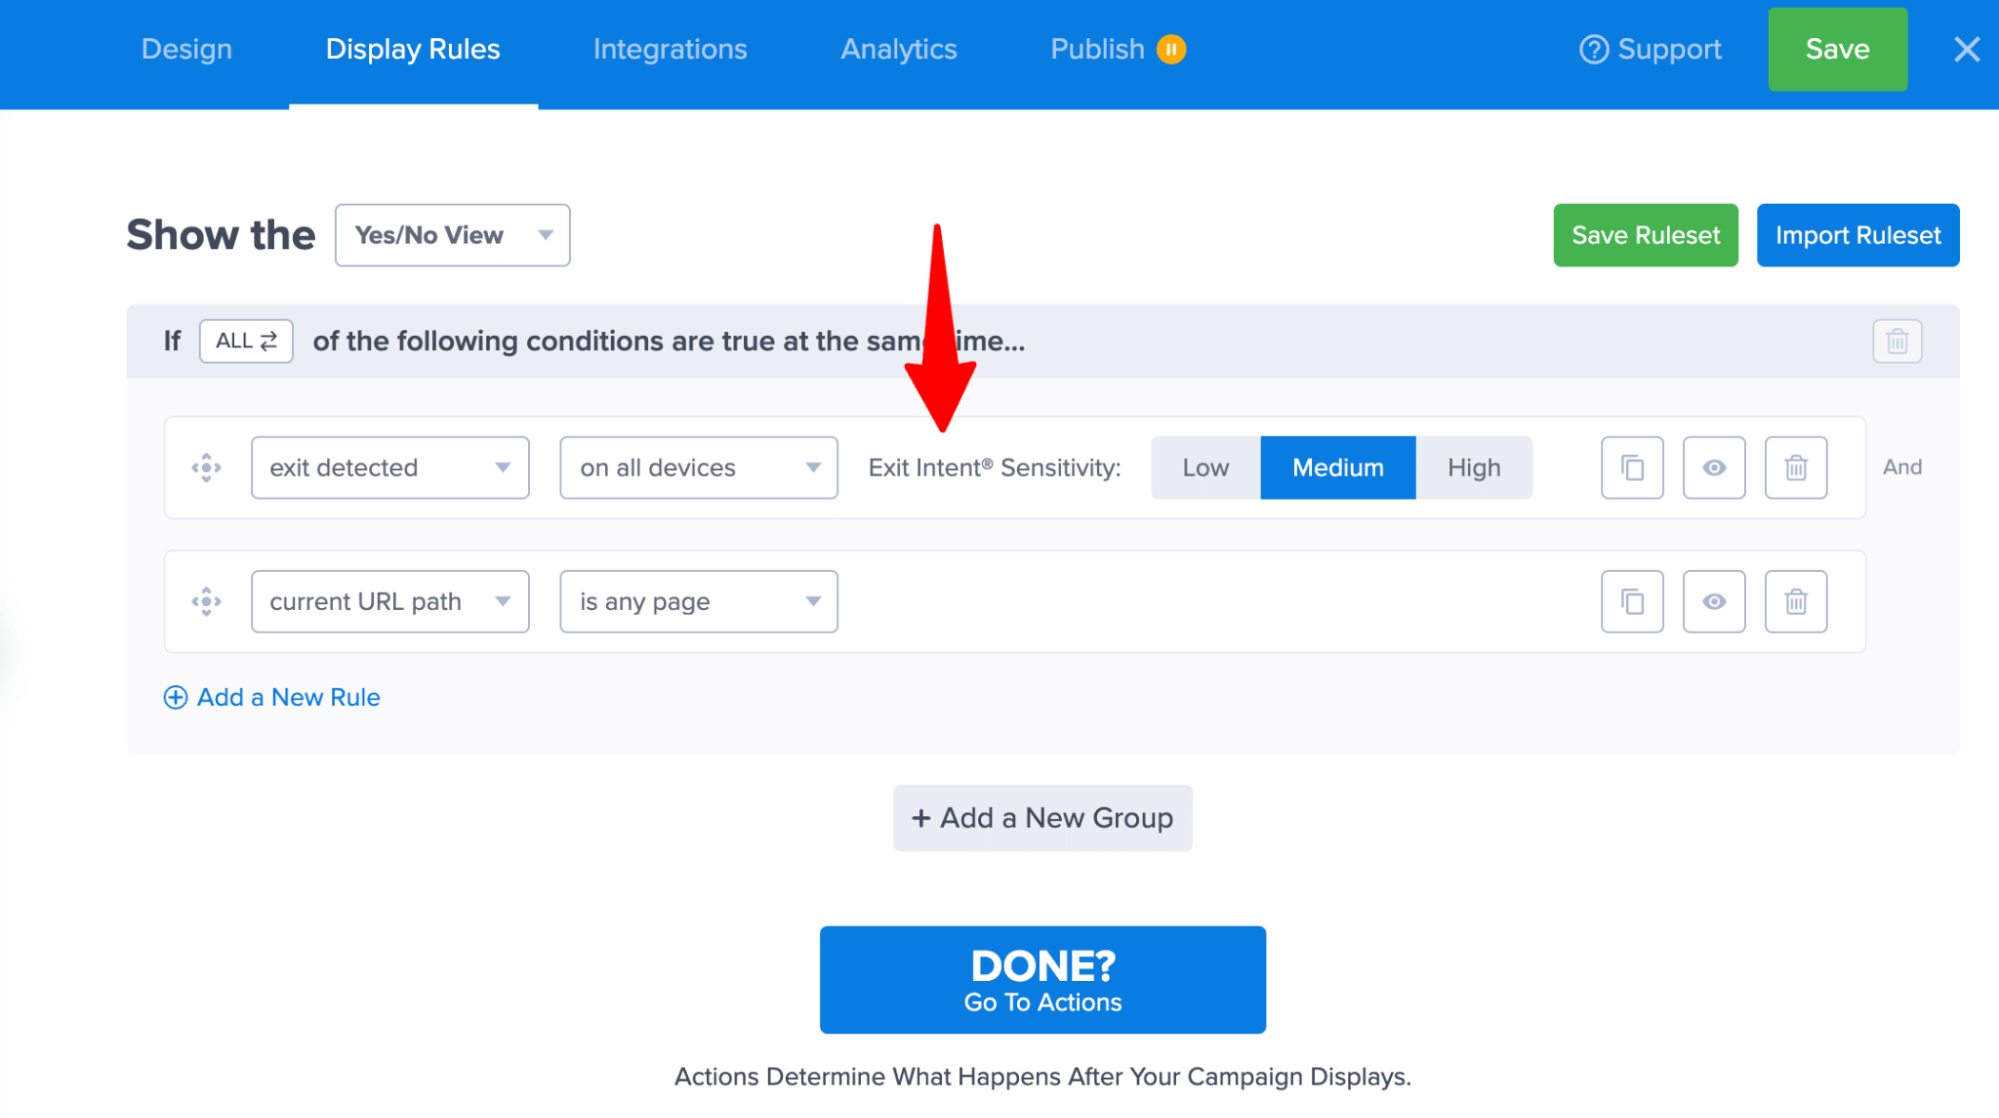
Move to the Display Rules tab and make sure the 'Exit Intent' trigger is selected.
Step 4: Publish the campaign
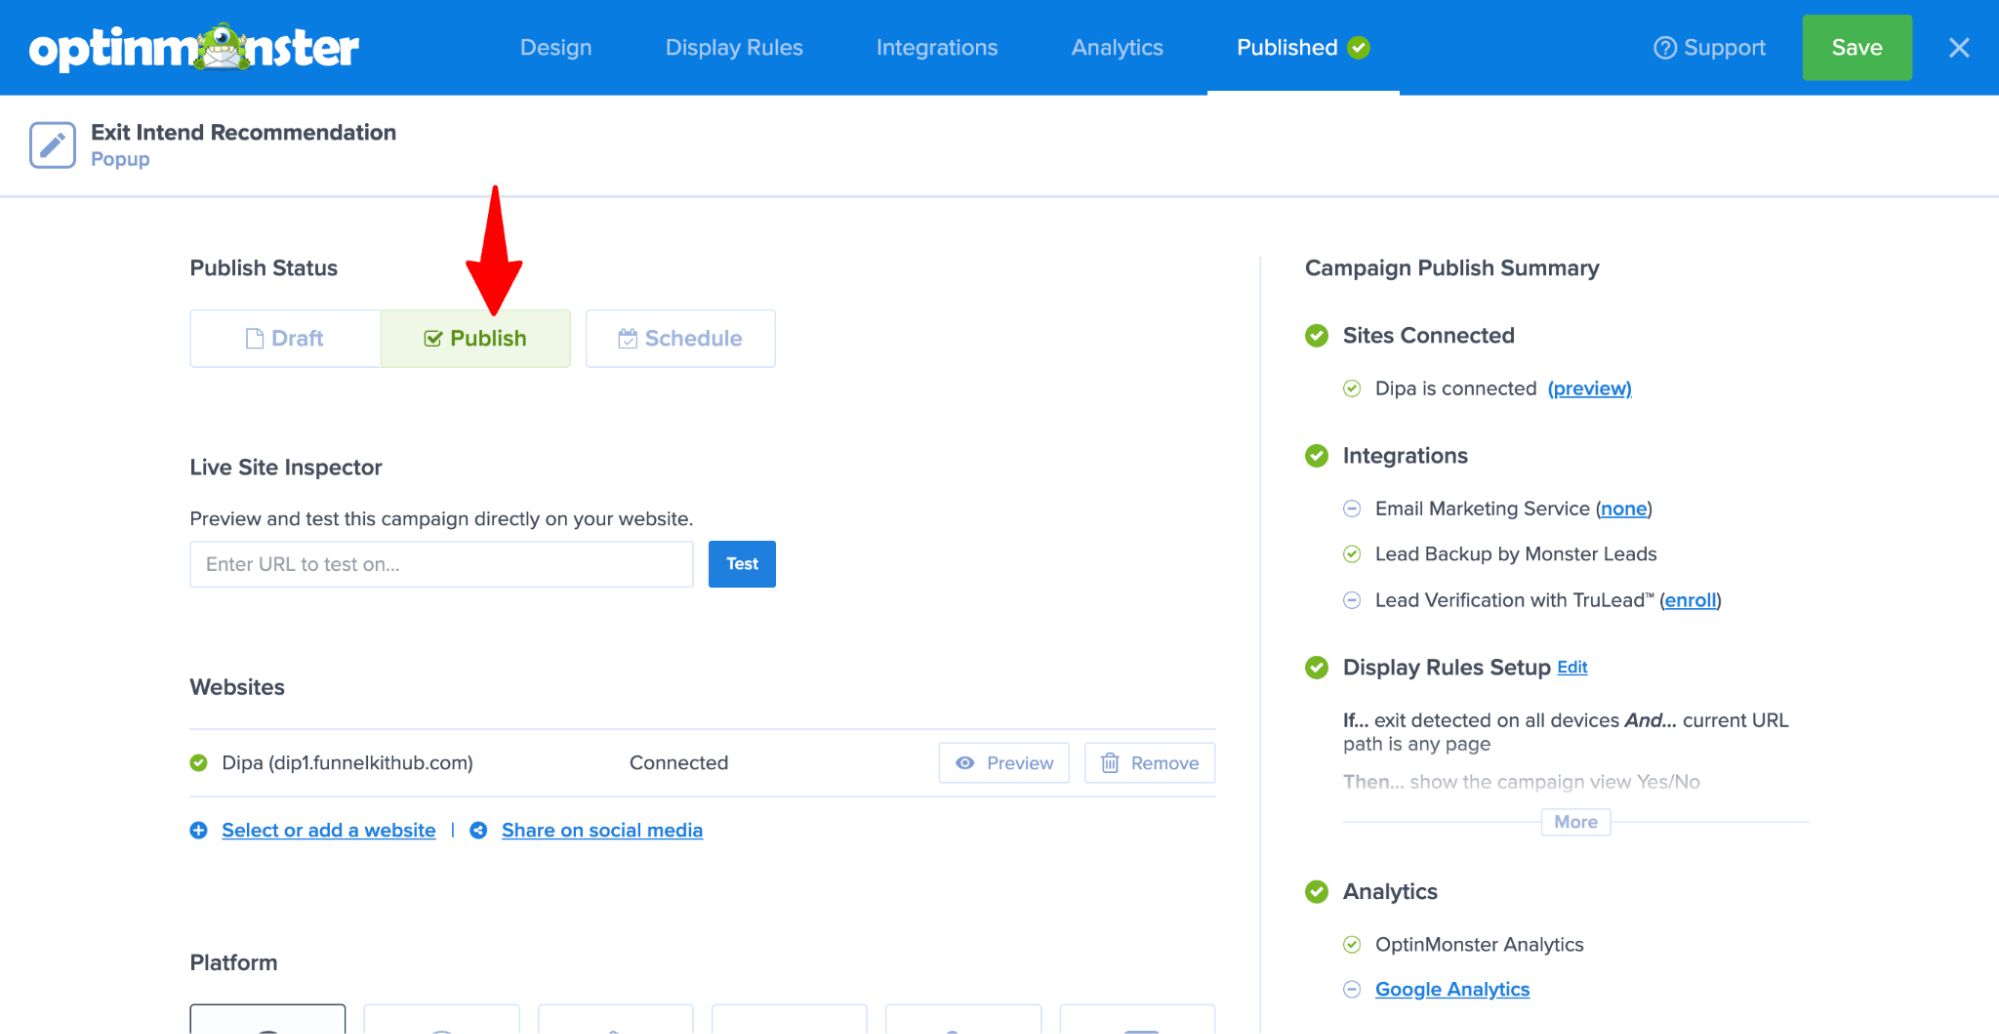
Move to the Publish tab, choose the Publish Status as “Publish”, and hit Save.
Here is what the pop-up recommendations look like:
Placement 7: Post-Purchase Email Recommendations
Email suggestions run on information no on-site block has: the complete order, the delivery window, and the consumption cycle of what was bought. Timing does the work here.
FunnelKit Automations handles this placement. It’s a marketing automation plugin for WordPress with a free version and a Pro plan starting at $99.50 per year.
Ensure you have installed and activated FunnelKit Automations before moving on to the main process.
Step 1: Create a new automation
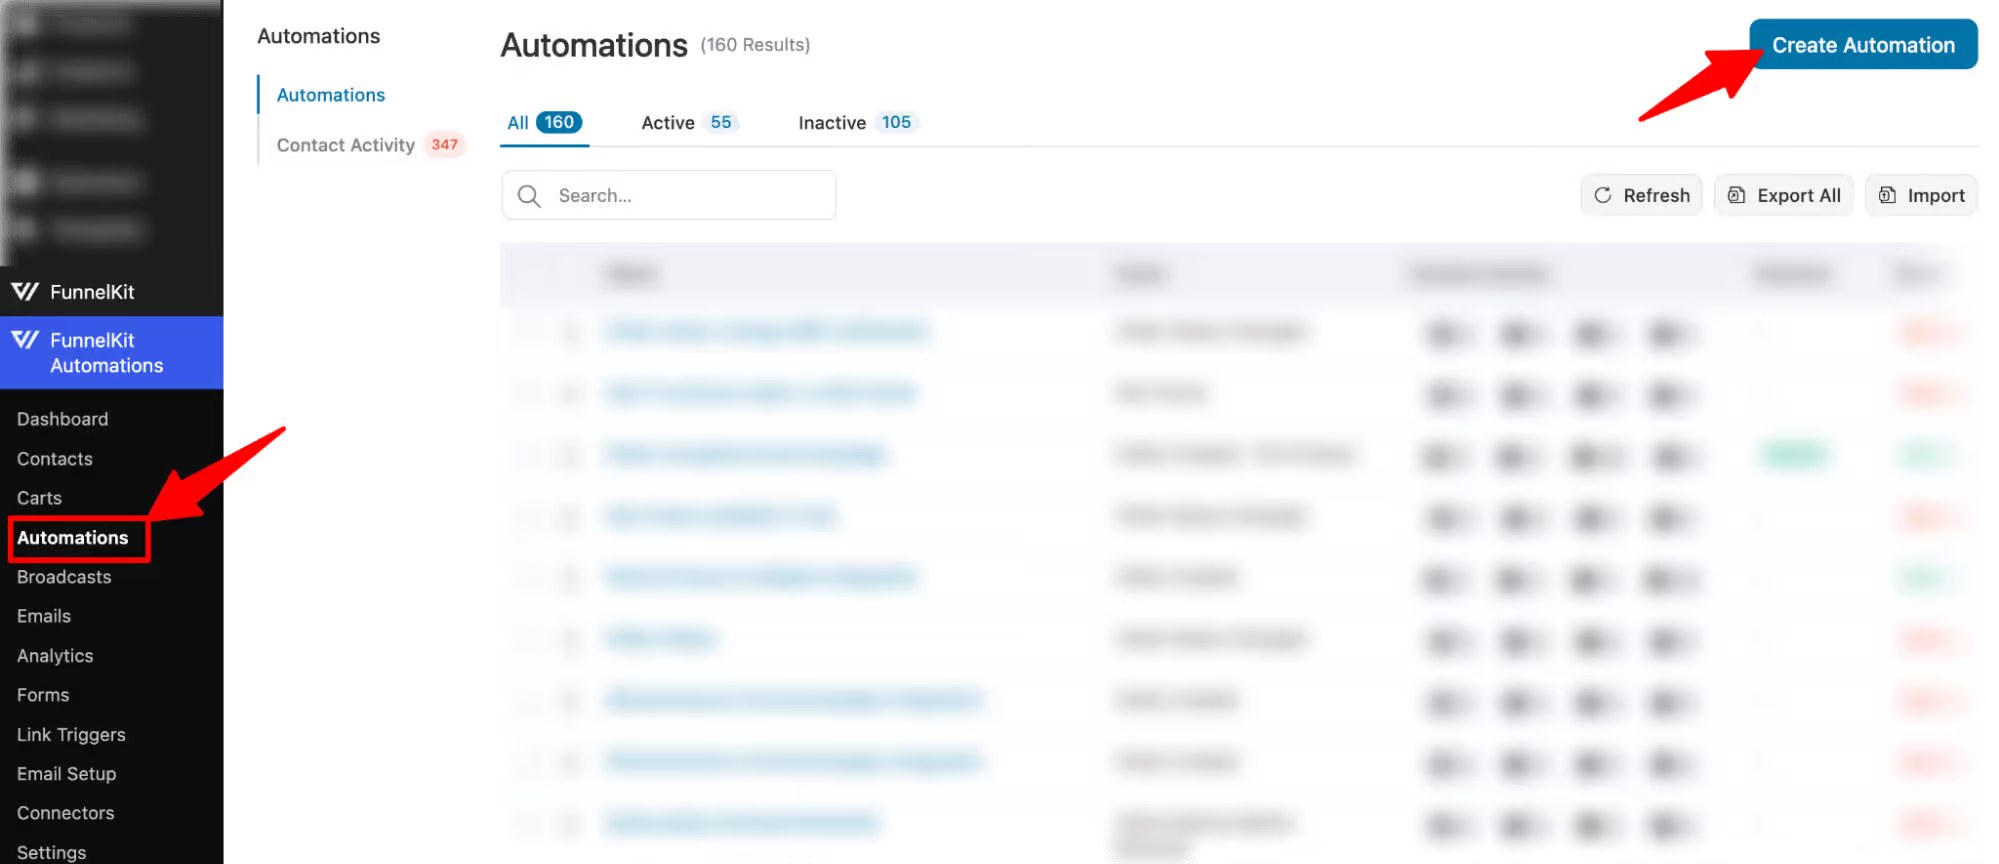
The first step is to create a new automation. For that, navigate to FunnelKit Automations ⇒ Automations and then click on Create New Automation.
Select the blank template, provide a name, and click on Create.
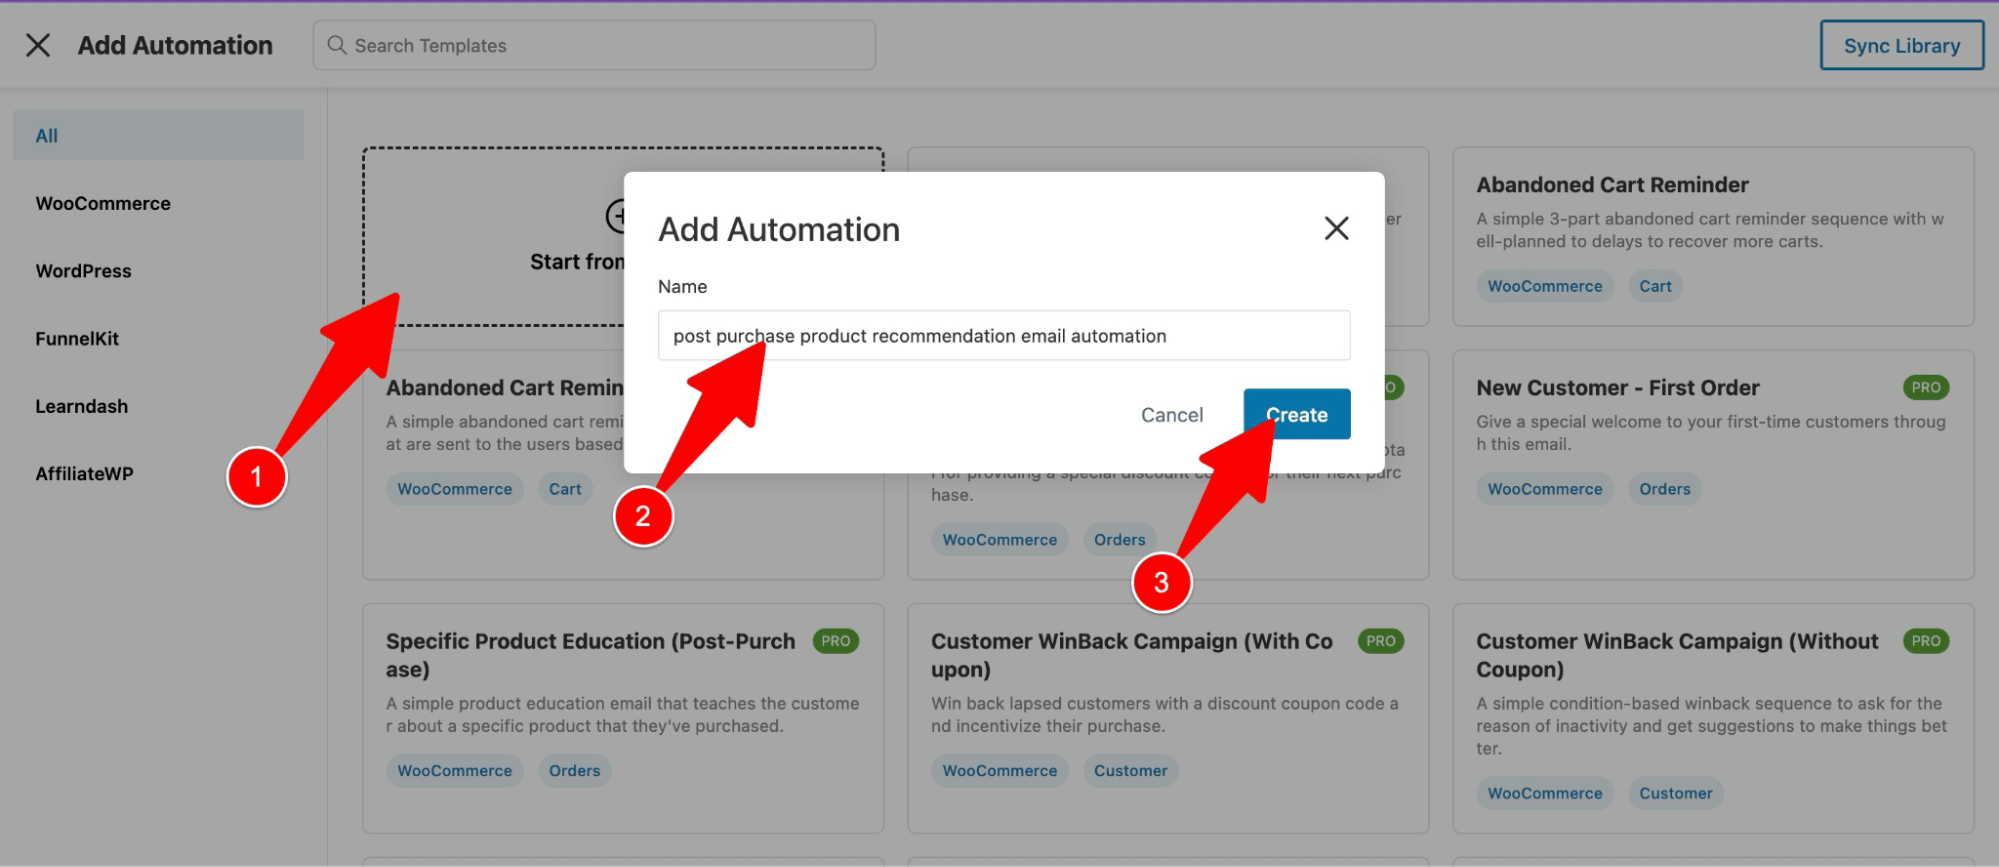
This will add a blank automation to your workspace.
Step 2: Select the order created event trigger
Now, it’s time to select a trigger. To do so, click on the 'Select an Event' option.
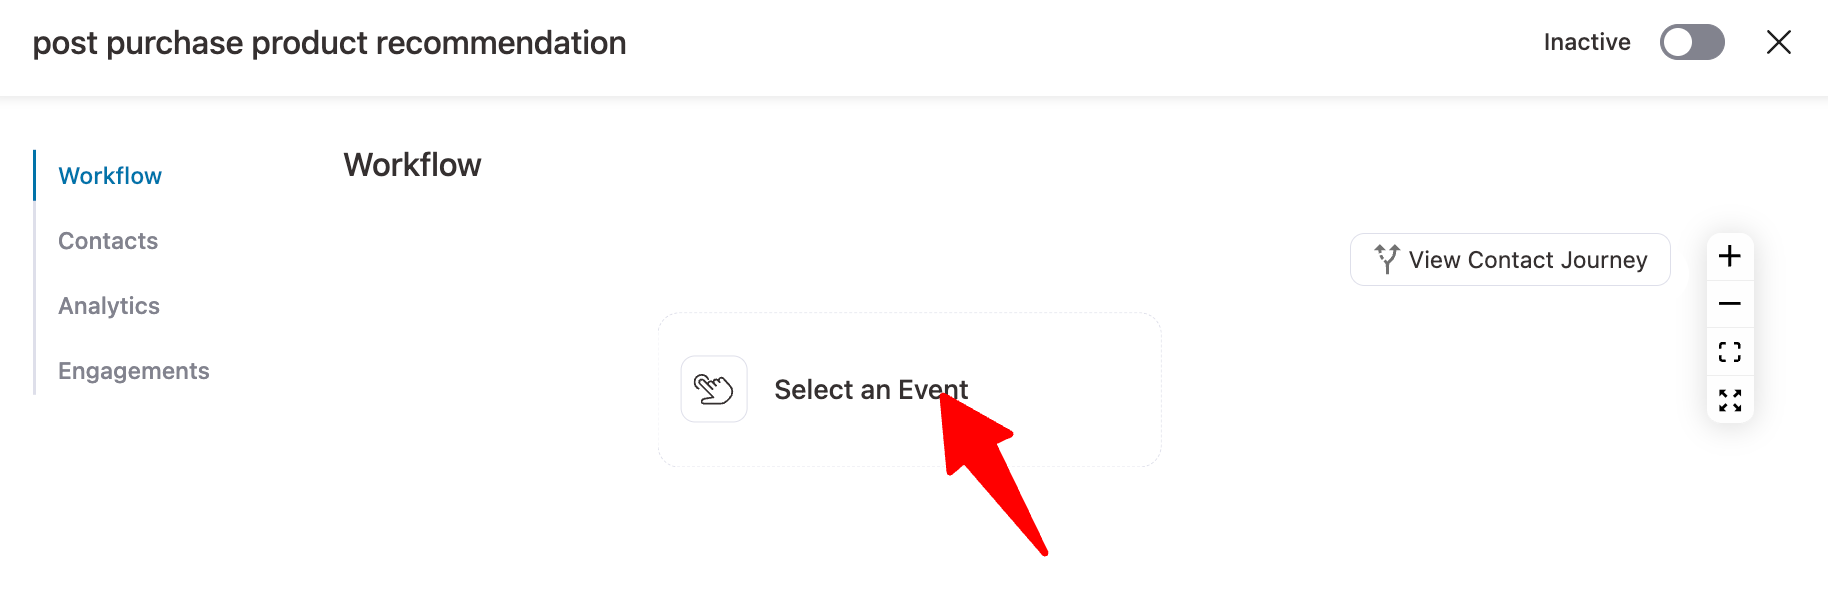
On the WooCommerce tab, select the 'Order Created' event to trigger this automation once someone orders on your store.
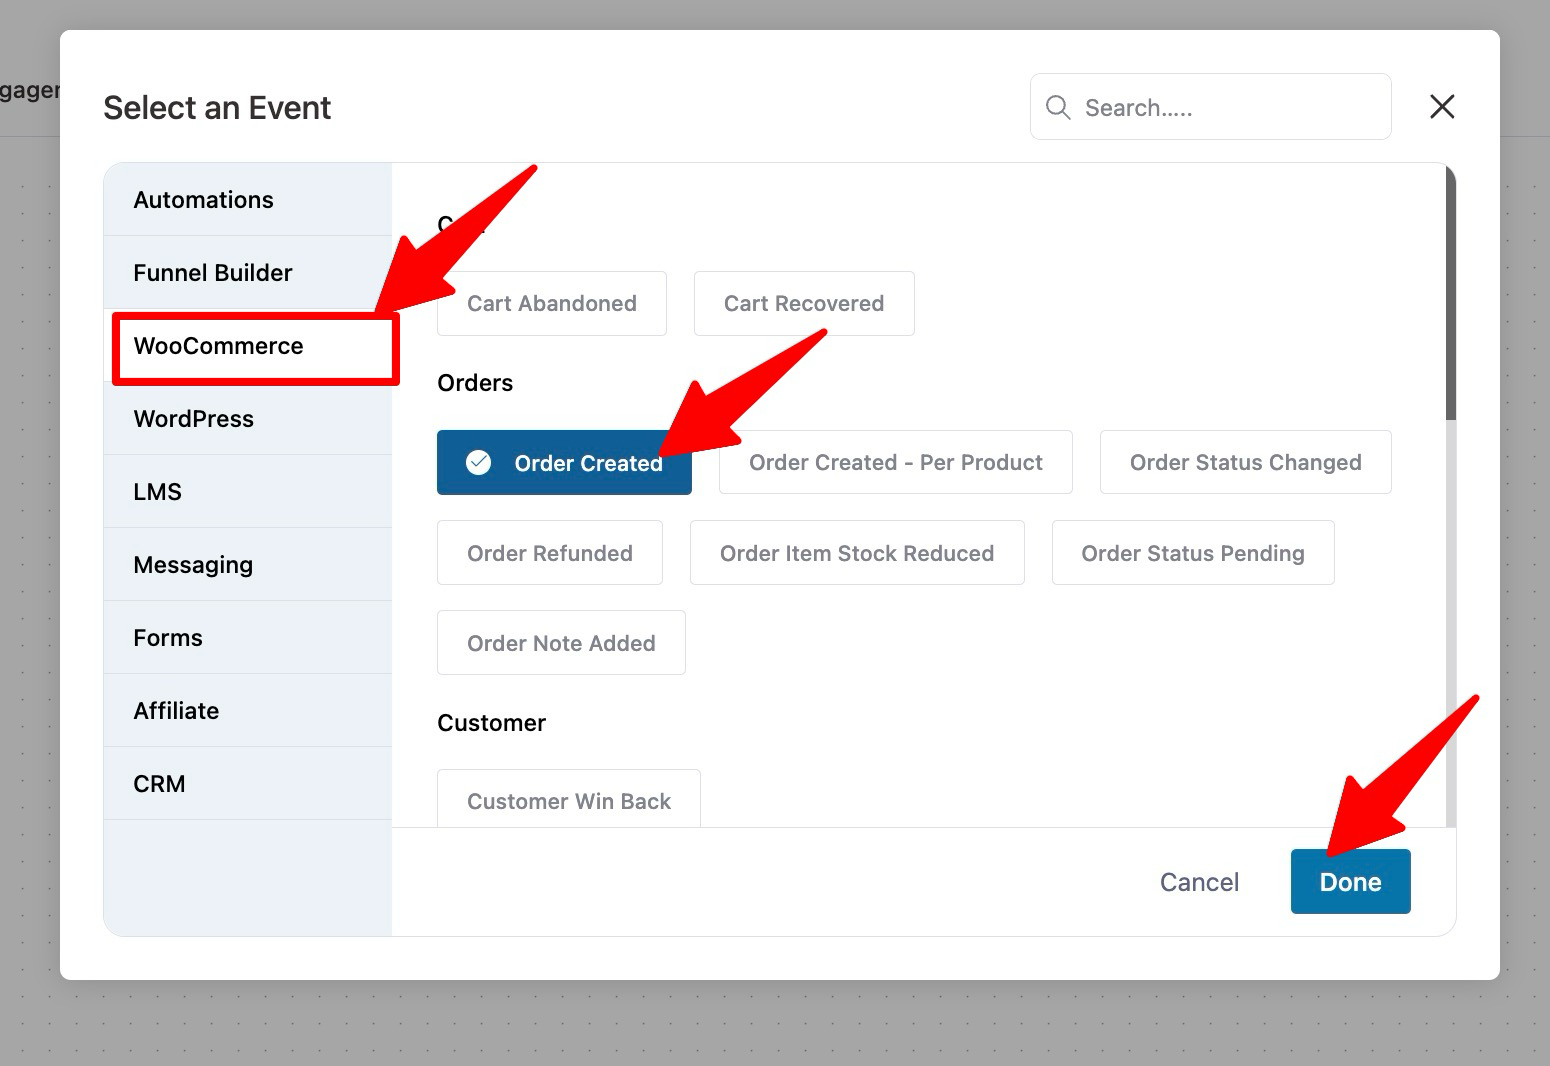
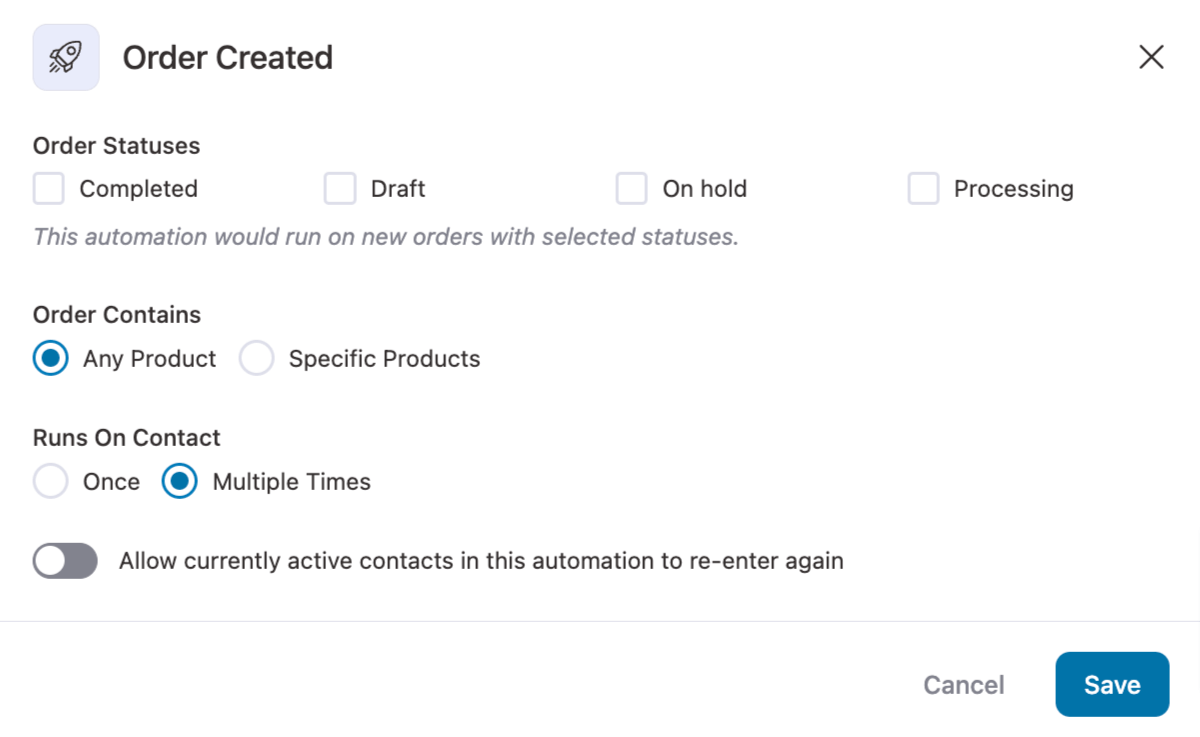
Choose the order statuses for which you want this automation to trigger.
Choose 'Multiple times' for runs on contact to send recommendations to customers every time they place an order.
Step 3: Add a delay
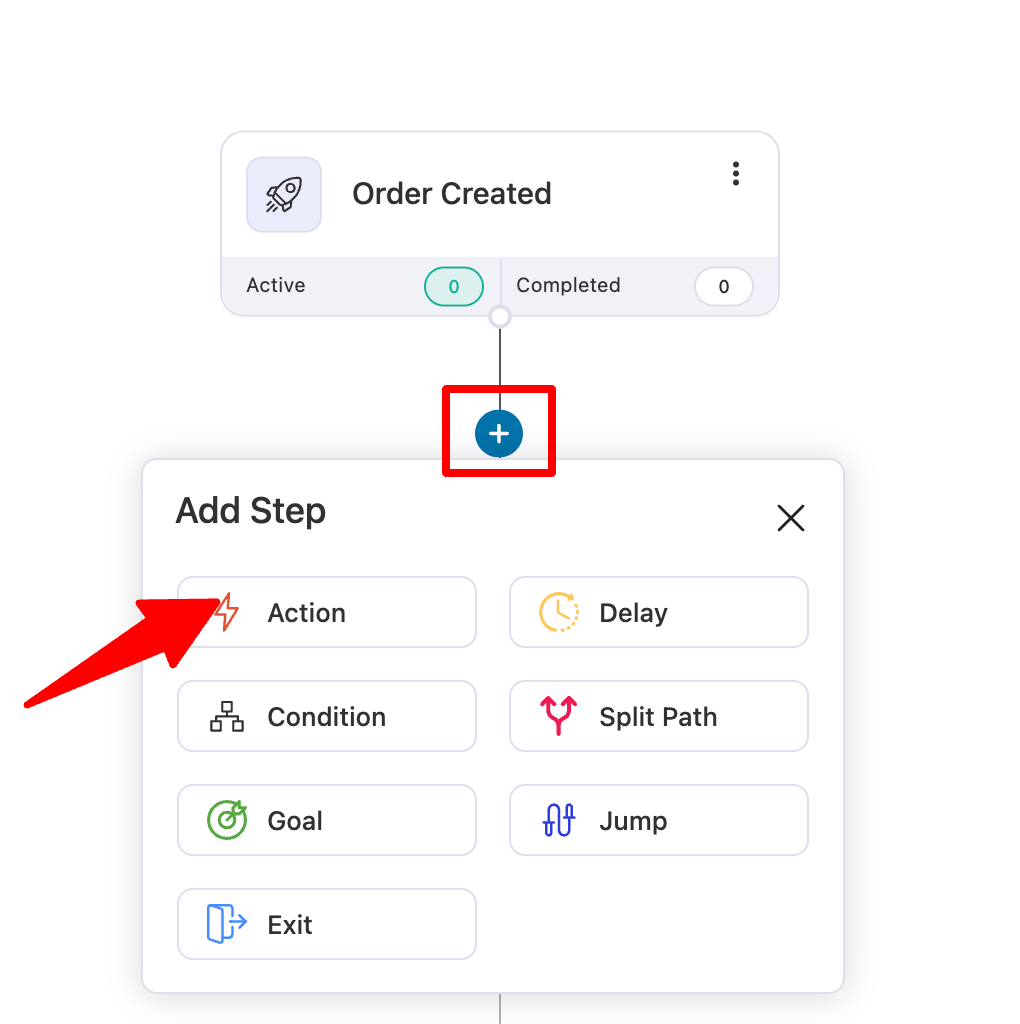
Now, add a delay to avoid overwhelming the user immediately after they place an order. You should recommend their product after a gap of time.
To do so, click the + icon and then select Delay.
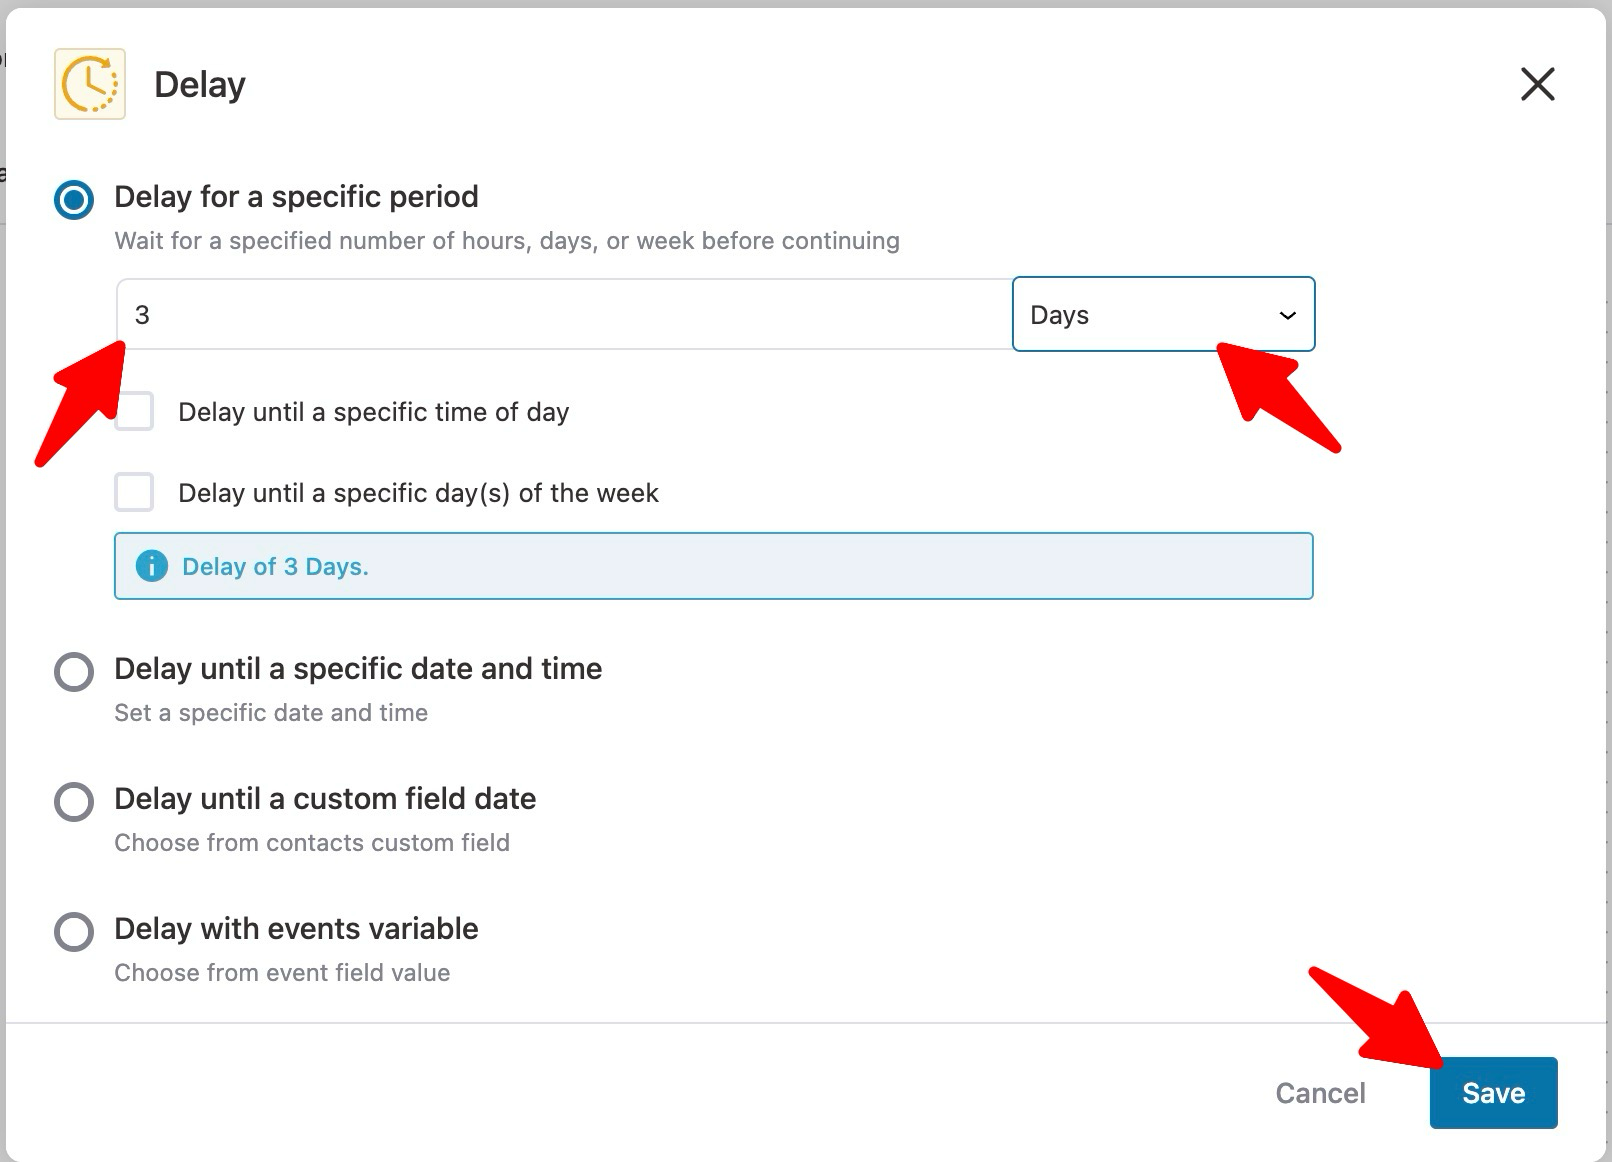
After that, add a delay and click on Save changes. We've added a 3-day delay here.
Step 4: Add send email action
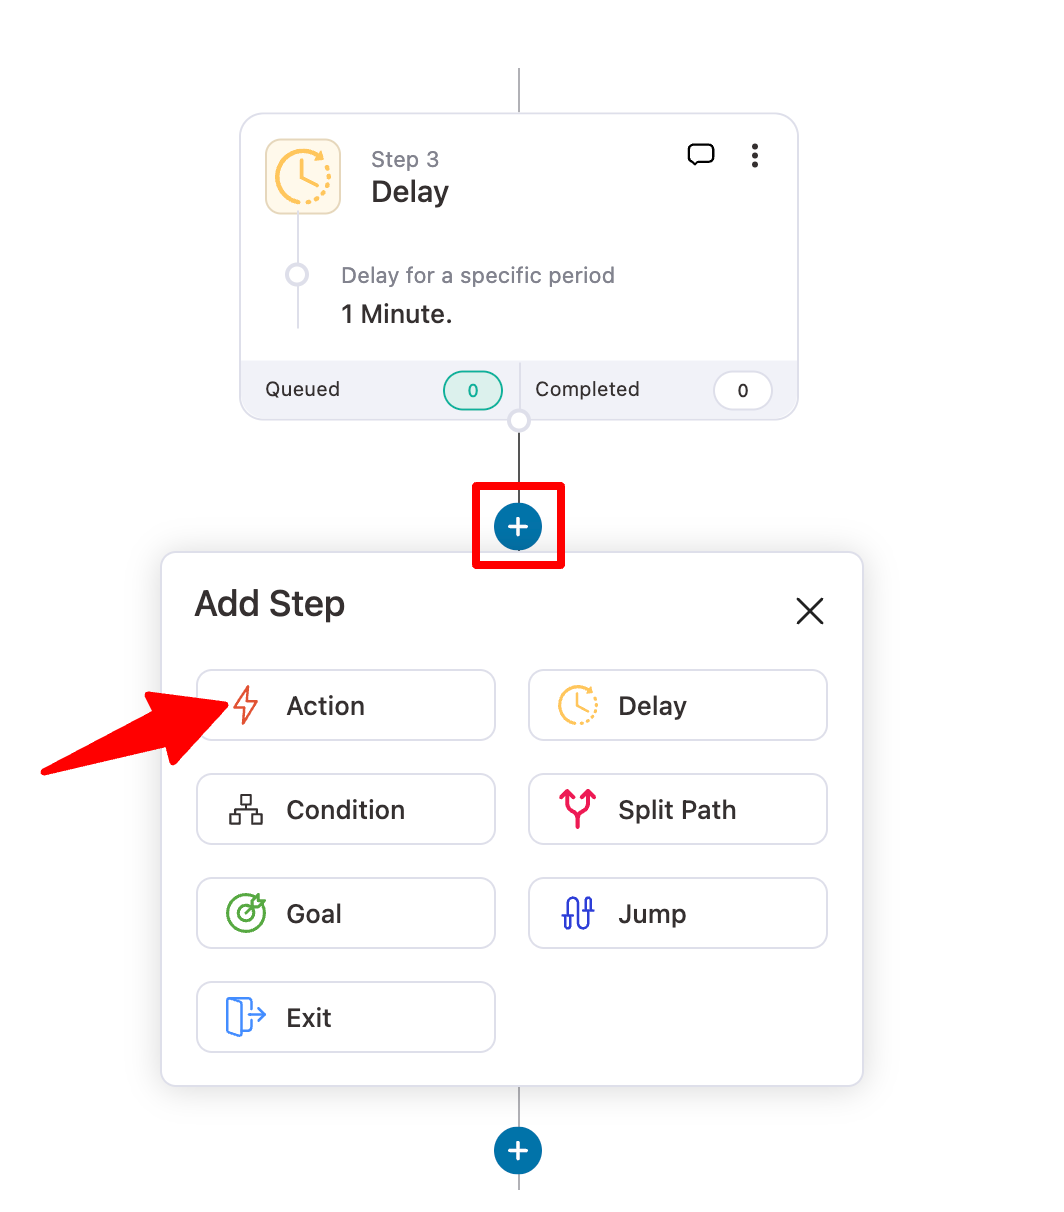
Now, you need to add another action that will send the email. To do so, click on the + icon and then select Action.
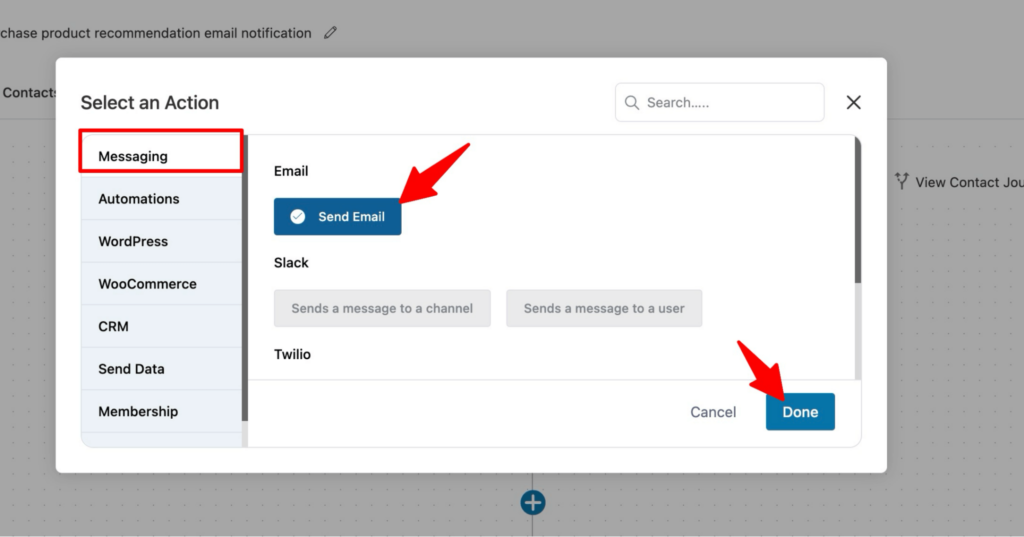
After that, from the Messaging tab, choose the “Send Email” action and click on Done to add the action.
Step 5: Design the product recommendation email
First, provide the email subject and preview text.
Use merge tags to add dynamic data values like customer names that help personalize your emails.
To add any merge tag, click {{..}}, search for it, copy it, paste it into the email subject line, and preview the text as needed.
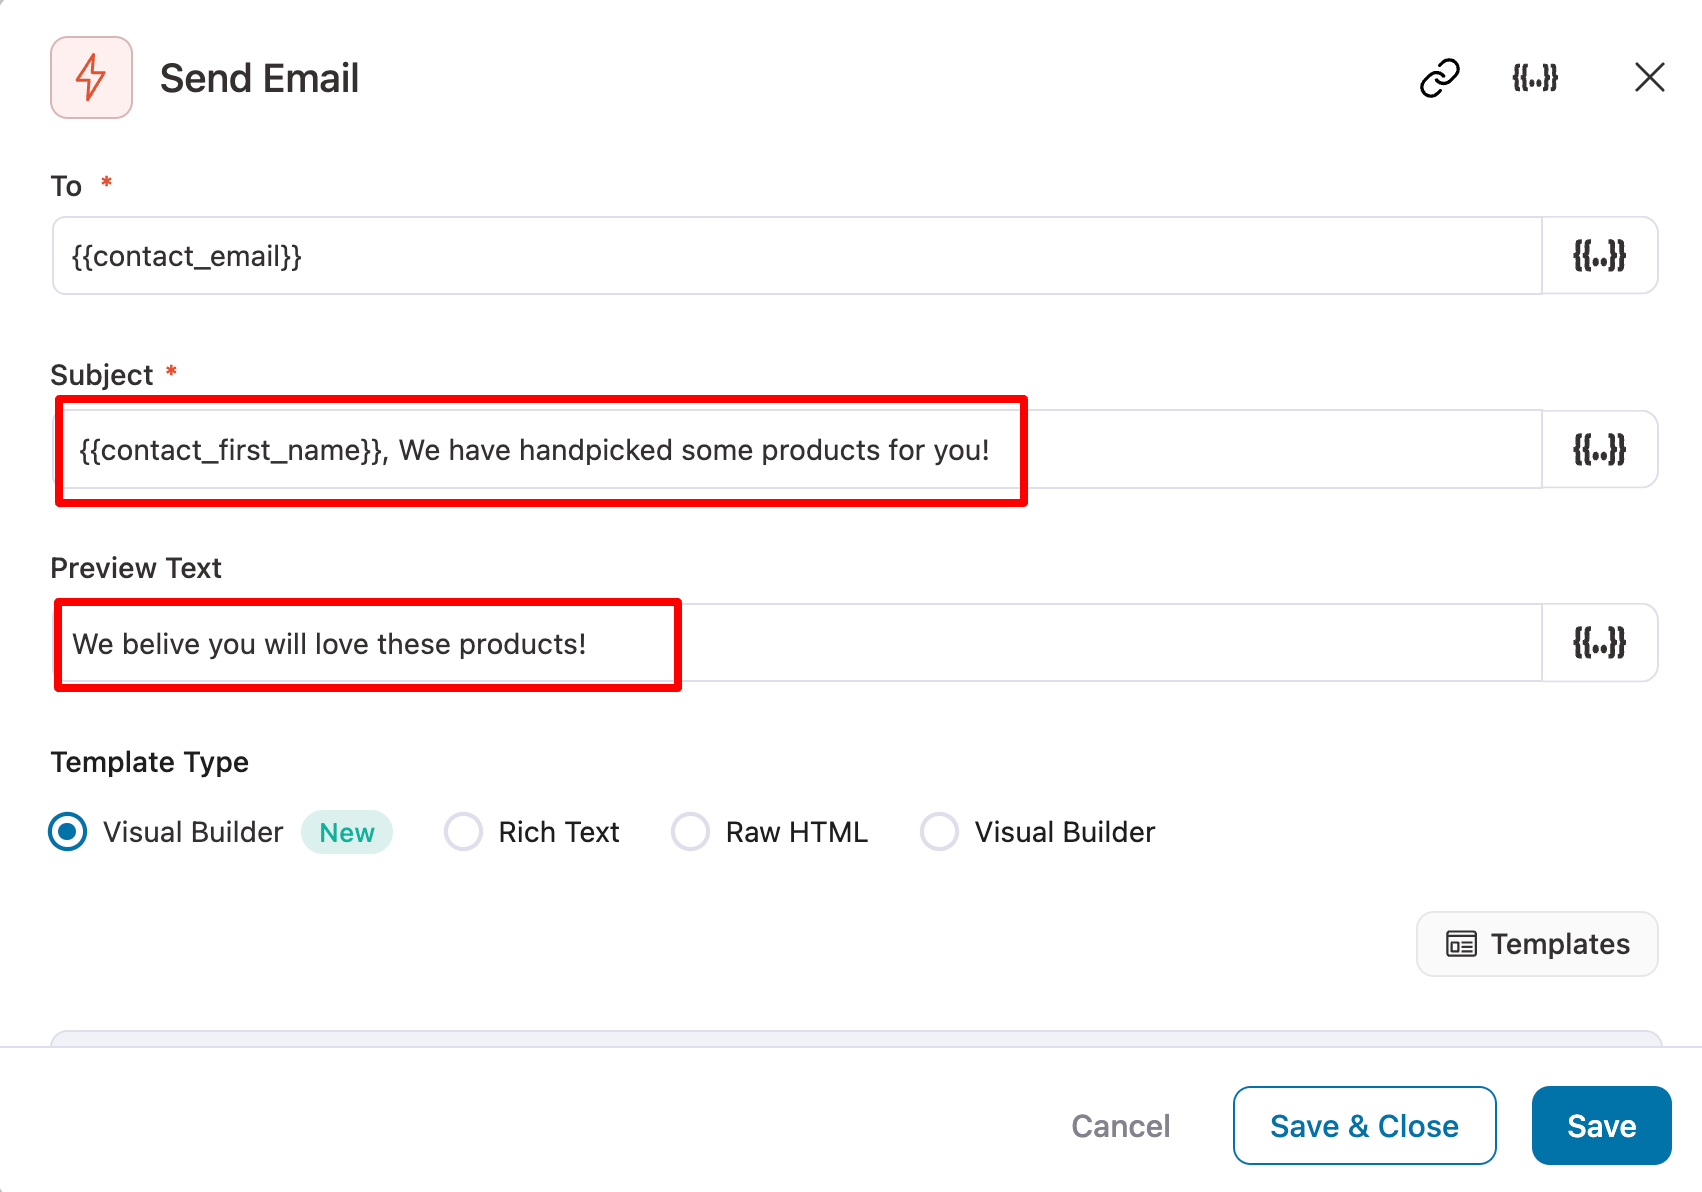
As per the email body, you can design in three ways: Visual Builder, Rich Text, and Raw HTML.
Choose “Visual Builder (New)” and click ‘Edit’ to design beautiful emails.
After that, you can choose any of the prebuilt templates. Let's choose “Cross-Sell Products Template”. For this, hover over the template and click Preview.
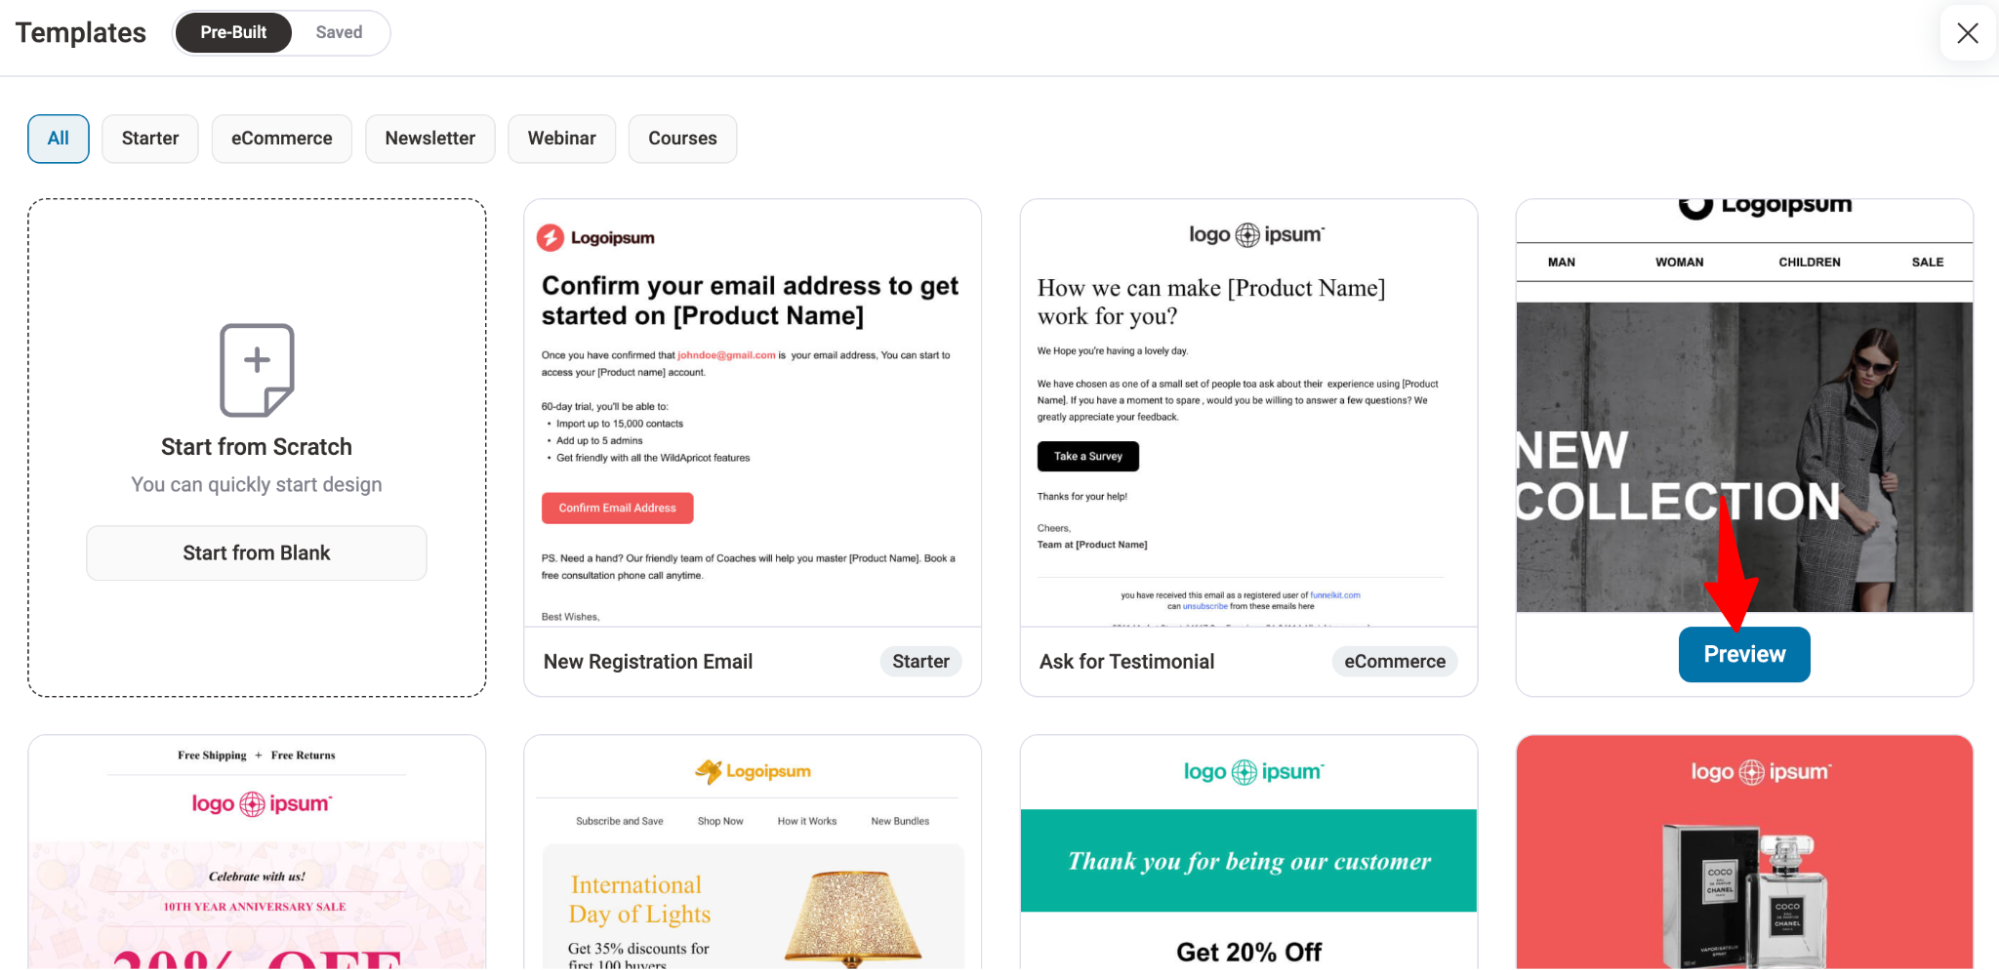
Now, hit “Import This Template” to import.
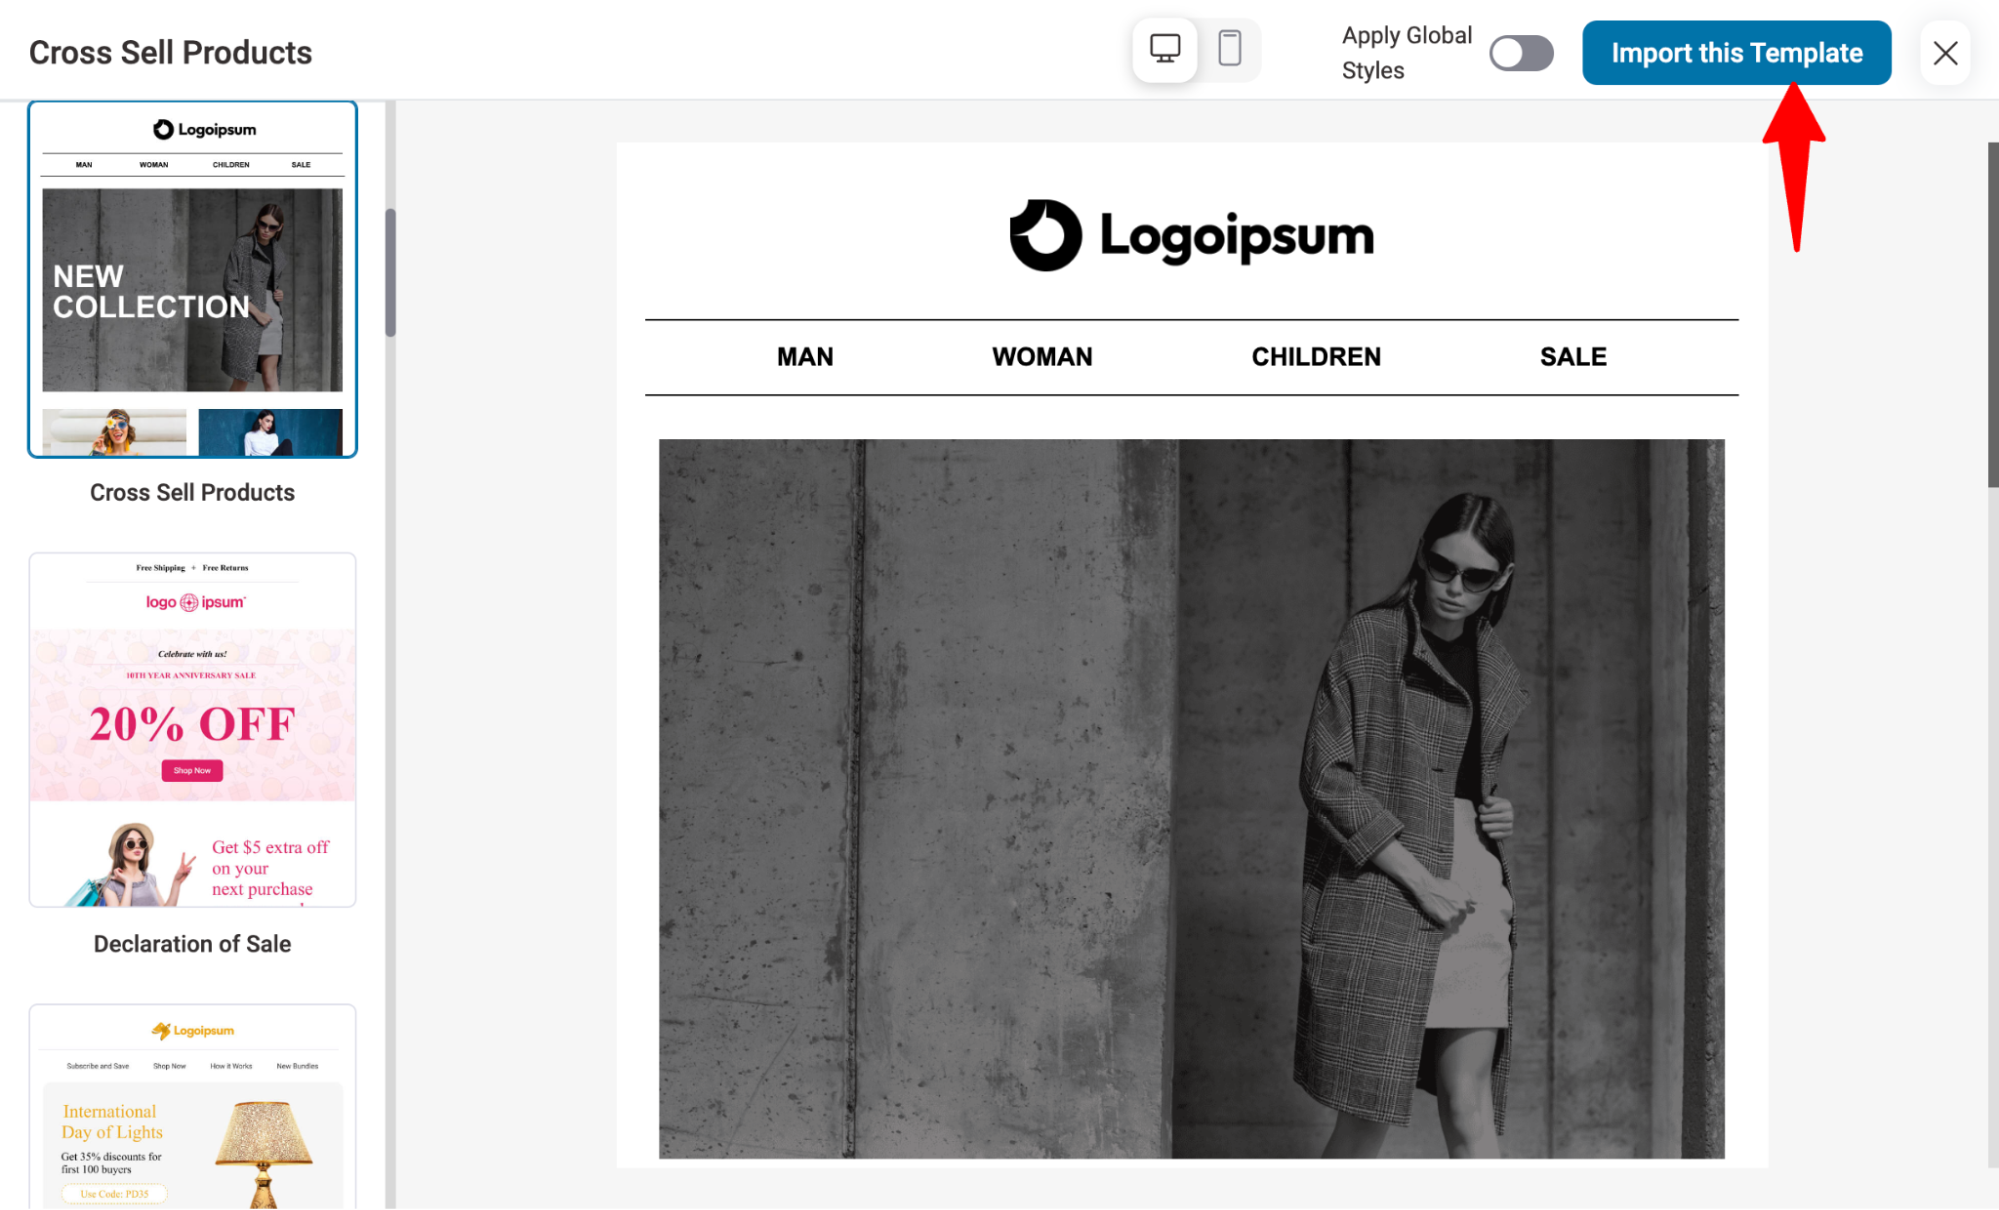
You can customize the template according to your needs, like changing the logo, updating the menu, adding a new banner, etc.
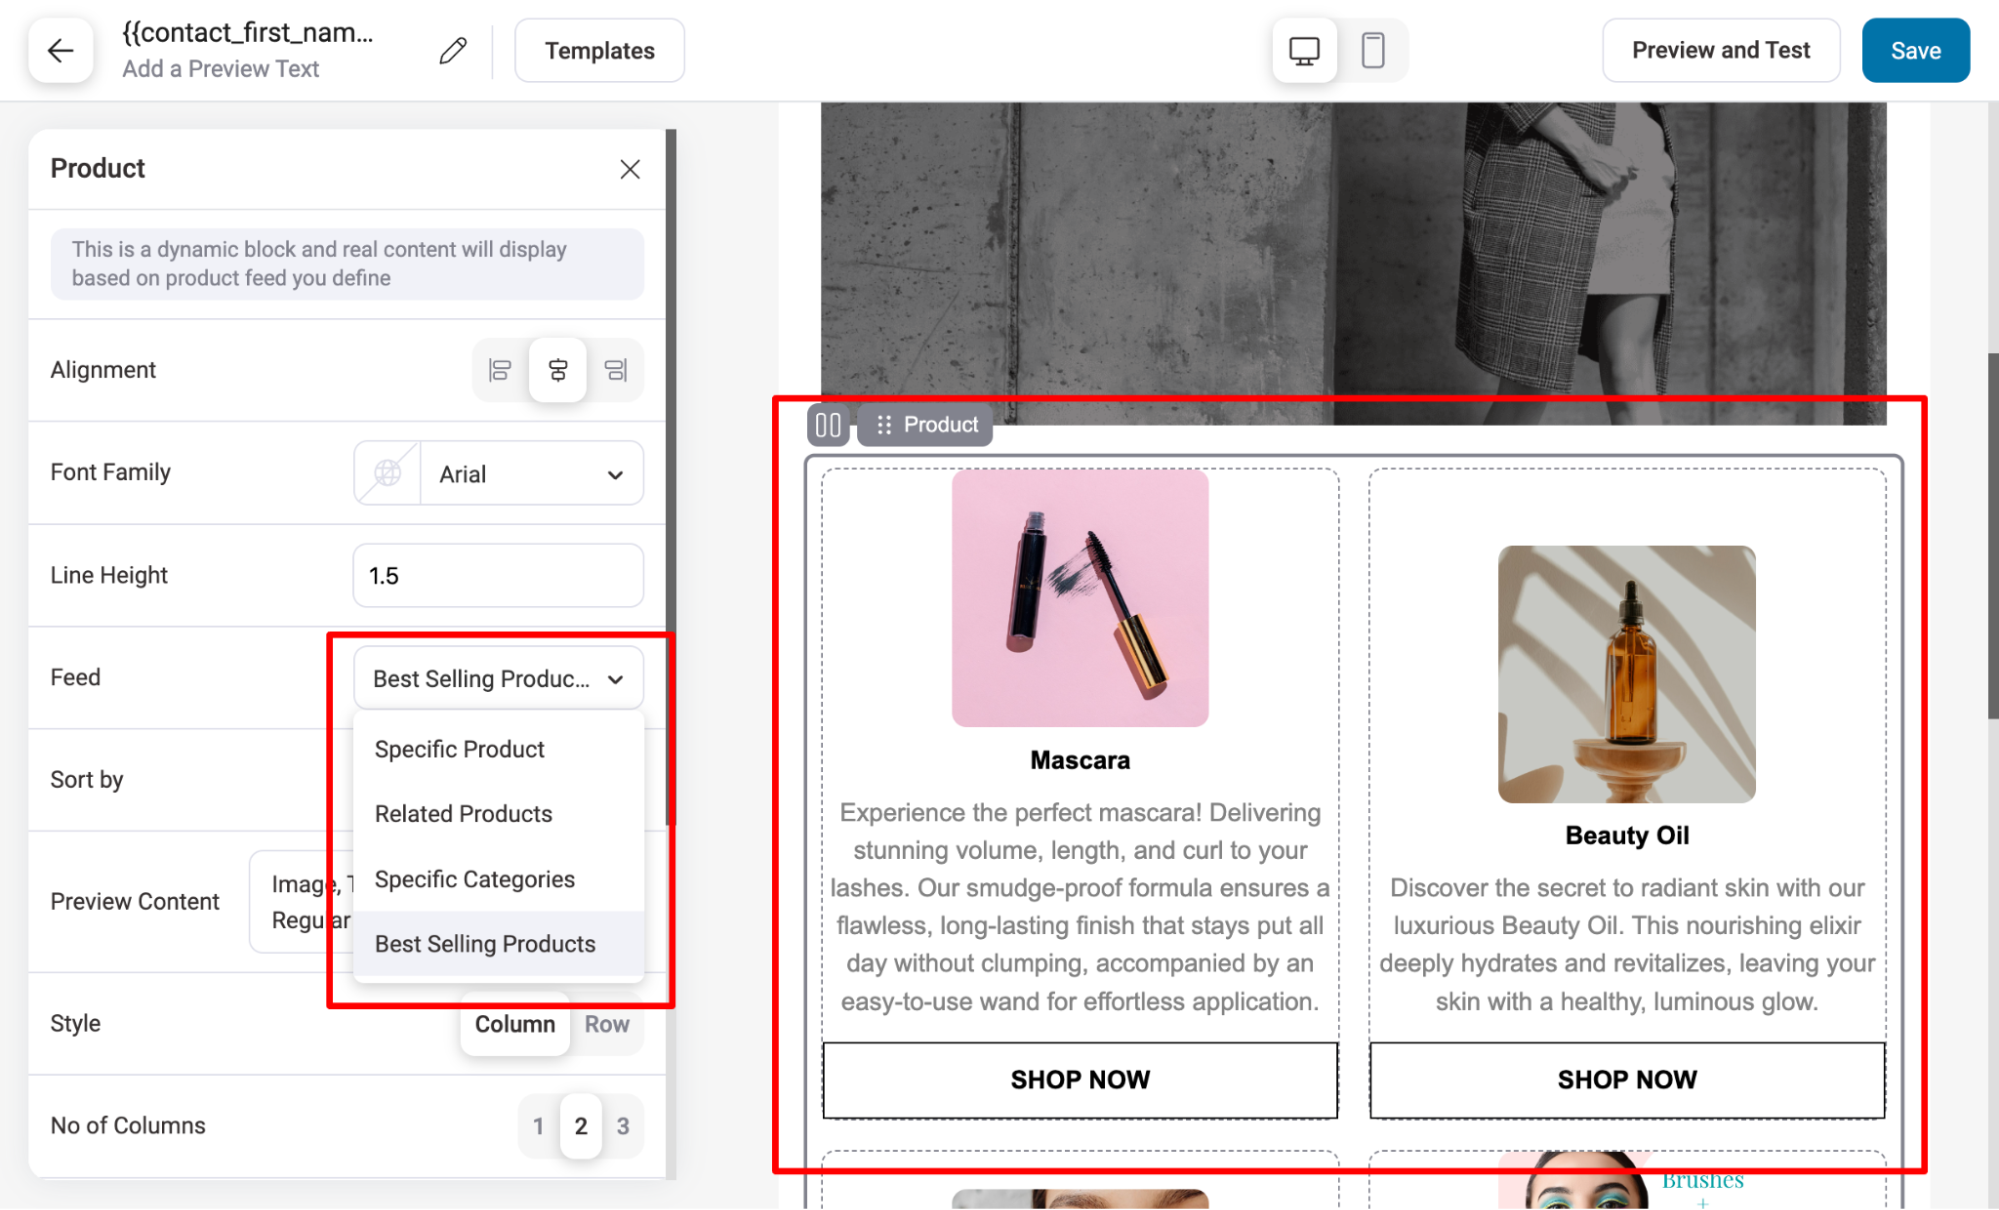
As per the product recommendation section, the template already includes a built-in feature. Here, you can choose whether to share related products (upsell, cross-sell, or both), best-selling products, or specific products if desired.
Depending on the option you select, the email will populate with the corresponding products from your WooCommerce store.
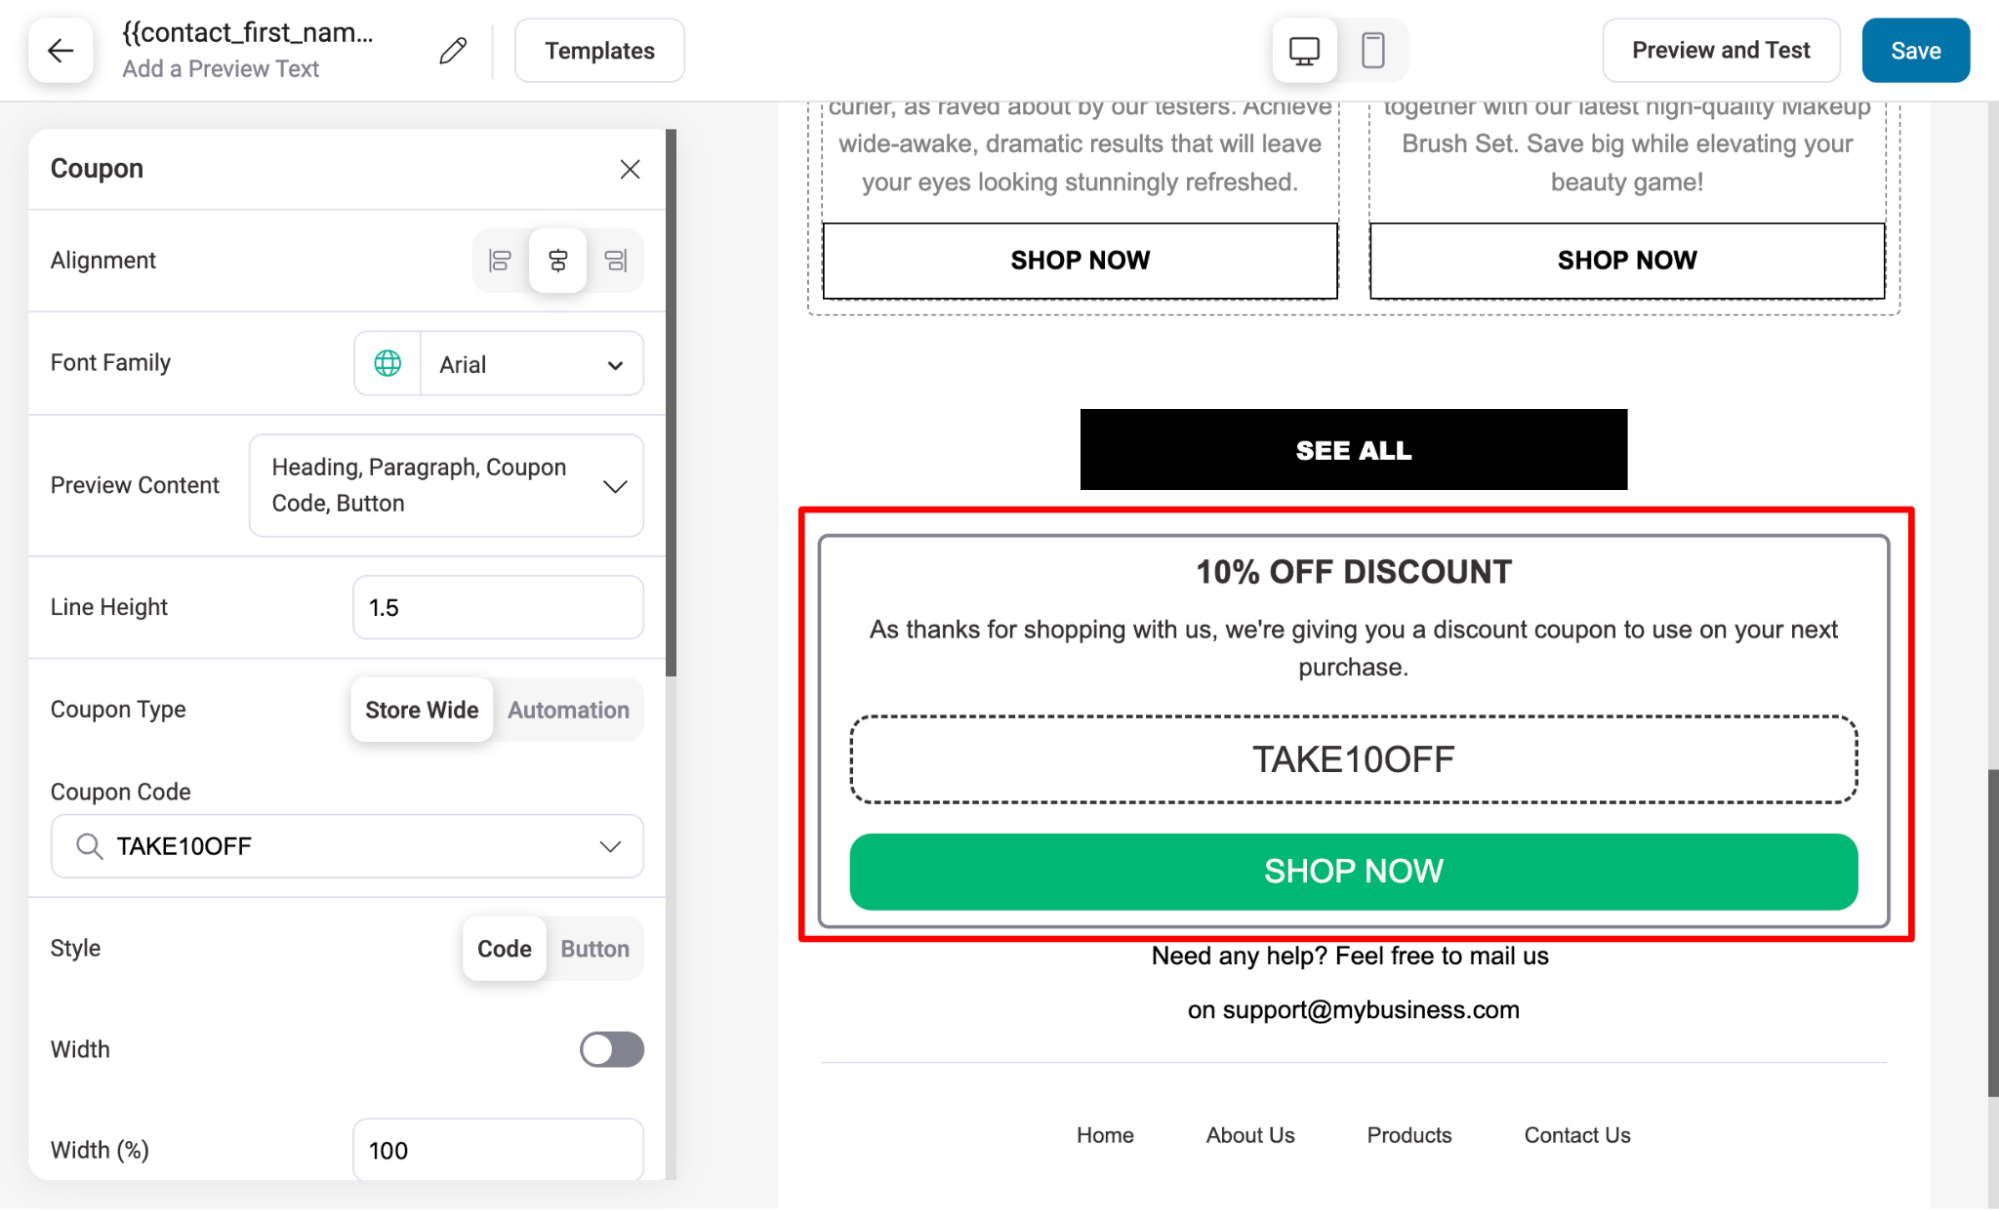
You can also offer a discount coupon in your product recommendation email to incentivize your next purchase. You can easily add a discount section using the Coupon block by FunnelKit Automations.
For more details, read our blog on how to use dynamic coupons in email.
Step 6: Send a test email
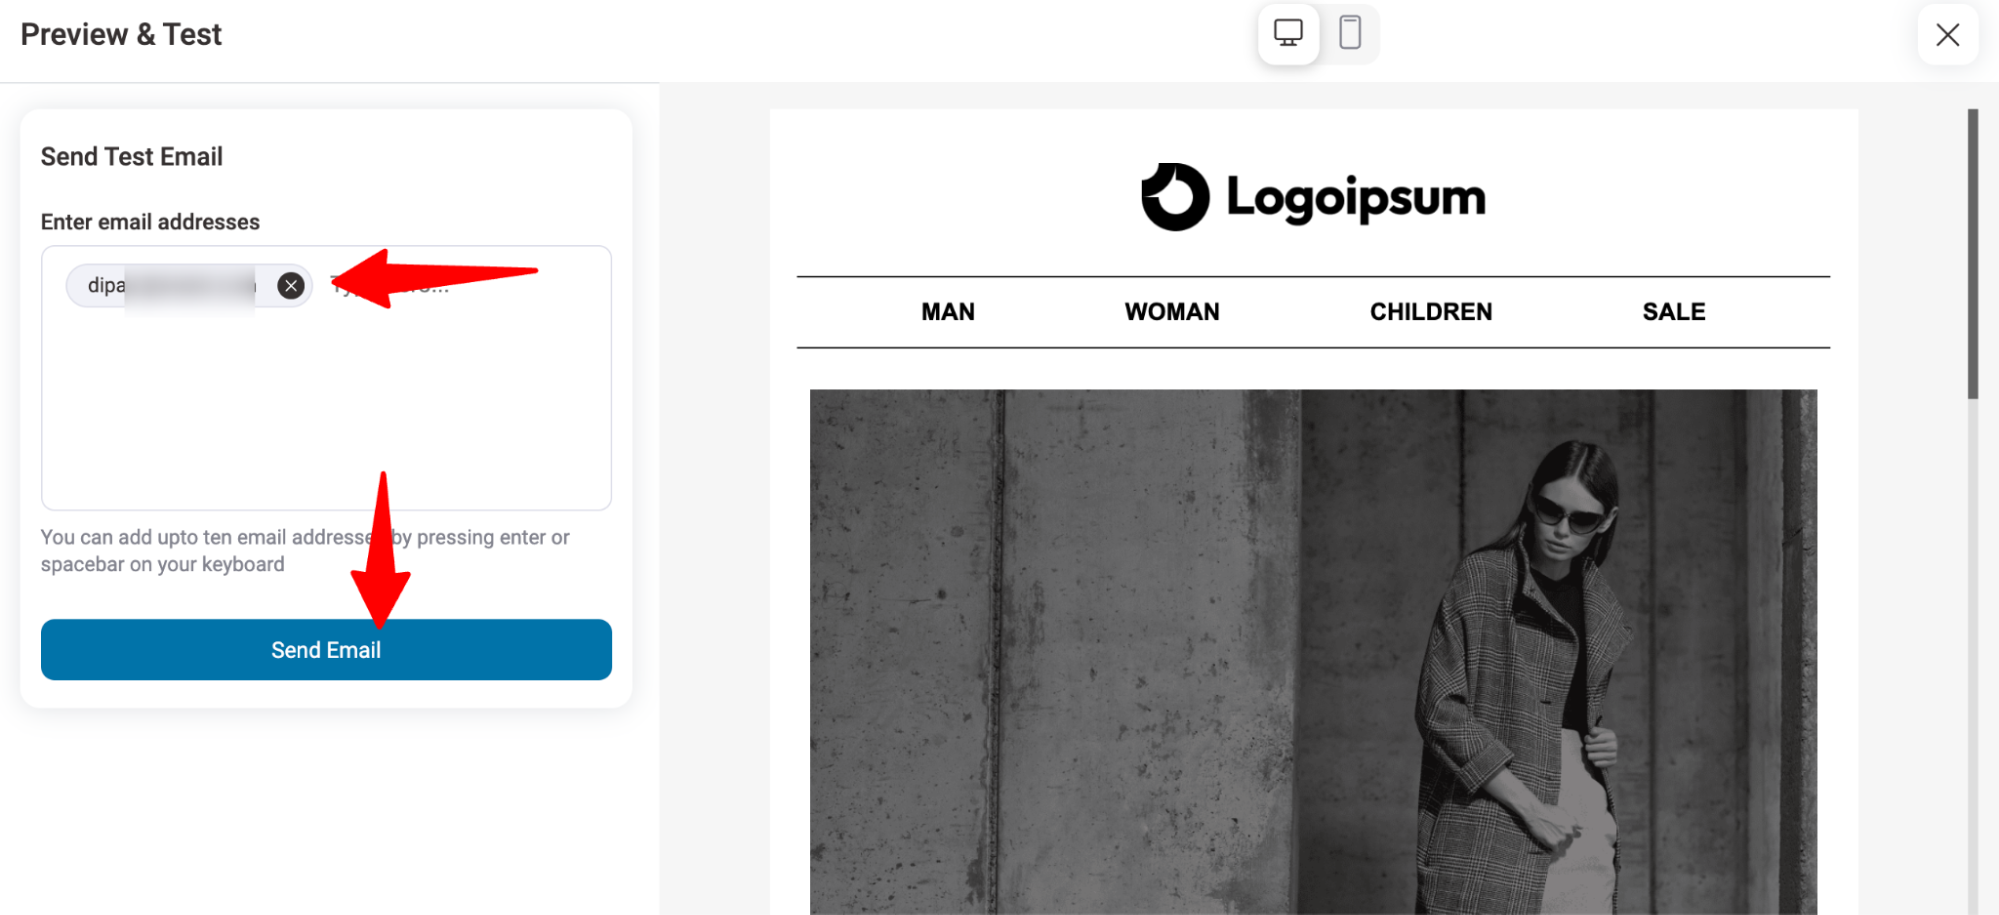
Sending a test email allows you to thoroughly review the email's content and layout, ensuring that it appears as intended to your recipients.
To send a test email, click on “Preview and Test”. Then, provide the recipient email and hit “Send Email”.
Here is what the email we created looks like :
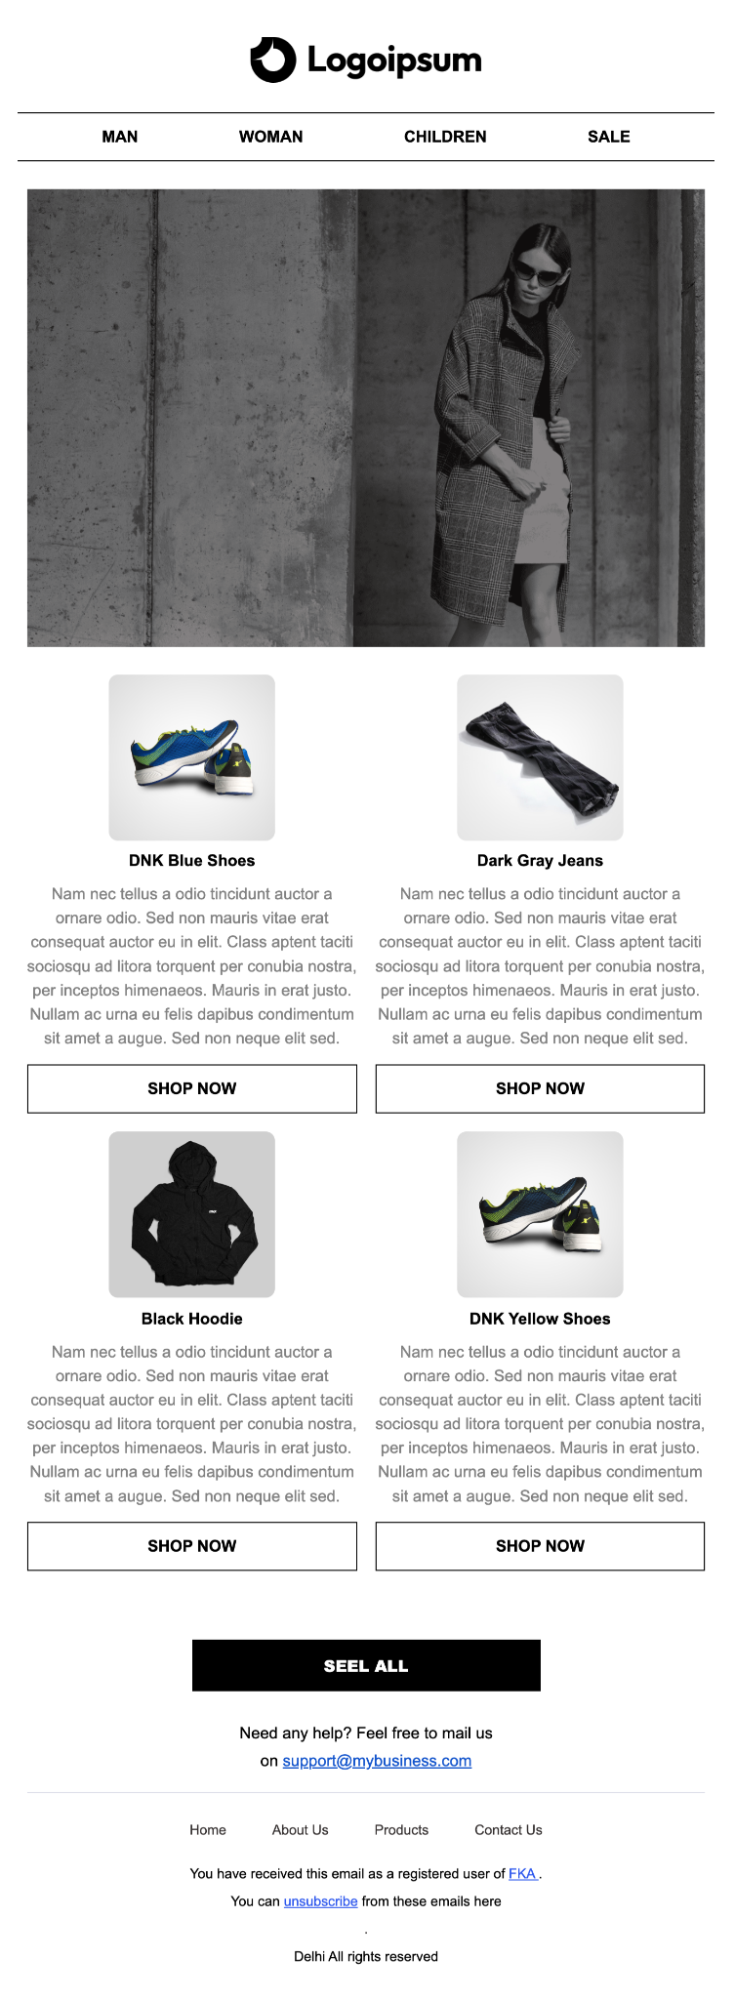
Step 7: Activate the WooCommerce product recommendation automation
Here is what the automation looks like:
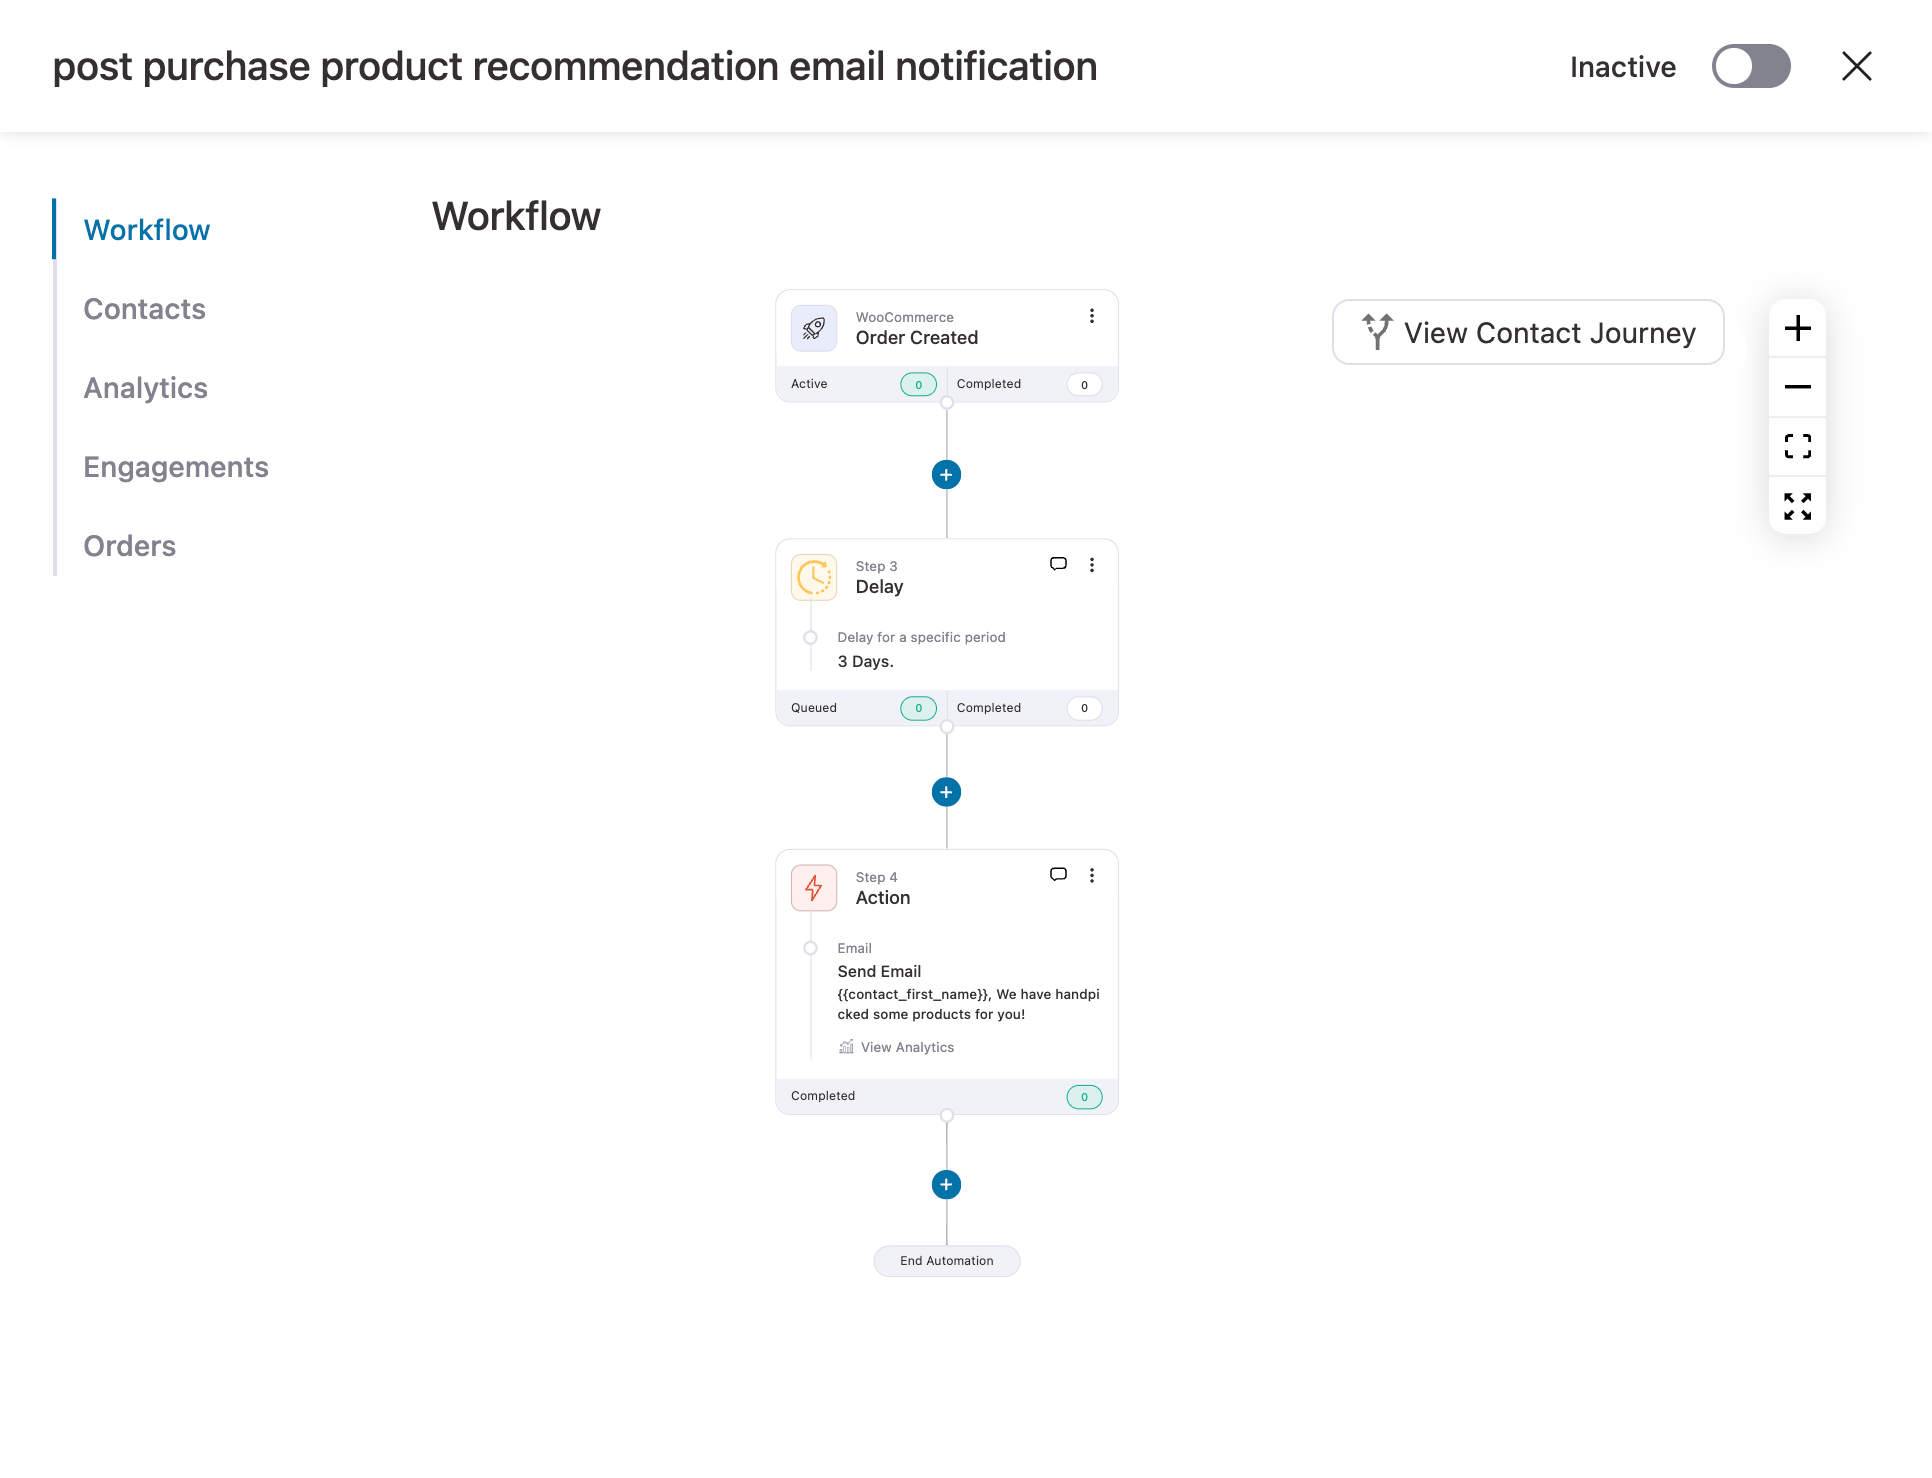
The final step is to activate the automation so your users receive emails with WooCommerce product recommendations after the set delay. To do that, return to the automation page and turn on the toggle button at the top right center.
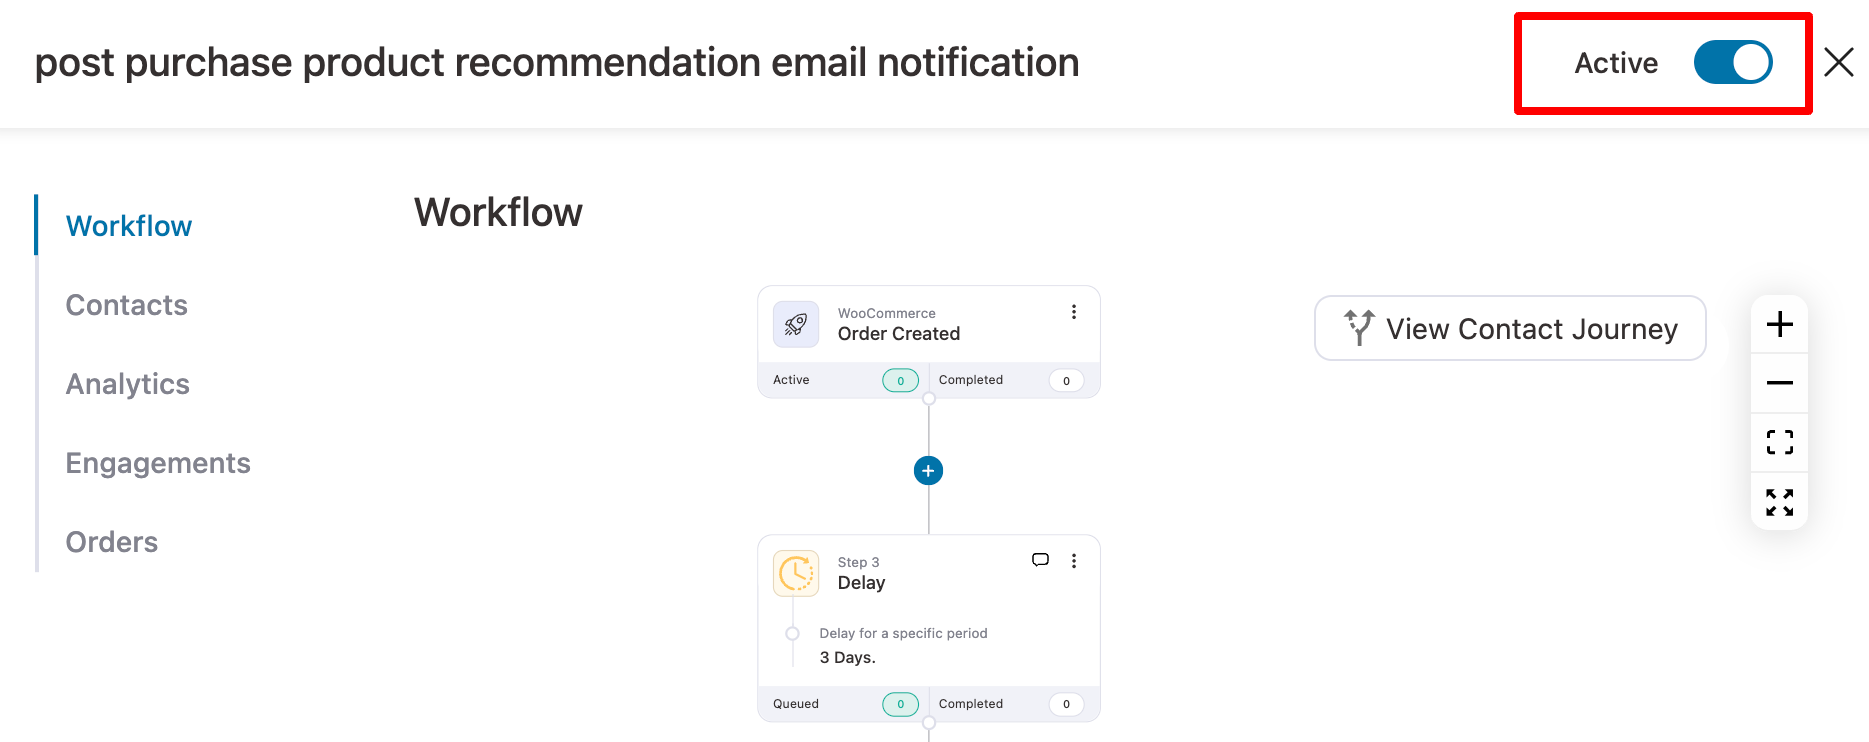
This will make your automation go live. From here, every completed order queues a personalized recommendation email on its own.
6 Best Practices to Get More Revenue From WooCommerce Product Recommendations
Here are some tips to follow for boosting revenue generated from product recommendations:
- Cap visible suggestions at 3 to 5 items
More options create analysis paralysis and lower click-through on every item shown. Therefore, you should cap your suggestions at 3-5 items at a time.
Also, price your bump and upsell offers at 20 to 50% of the main purchase. Offers in that range feel like additions.
- Ensure product recommendations are relevant and useful
Don’t offer the same products to all your customers. Use segmentation to ensure your recommendations are relevant and useful based on their behavior, preferences, and purchase history.
Refresh suggestions seasonally. A bump that converted in summer will underperform in December, so review offers each quarter.
- A/B testing your recommendations offers to find out what works
You can conduct A/B tests to experiment with different recommendation strategies, such as order bumps, one-click upsells, and follow-up emails.
Test one element at a time. Change the product, the discount, or the position separately, so you know what actually moved the numbers.
- Ensure product recommendations are engaging and visually appealing
Present your product recommendations in a visually attractive way that grabs attention and invites customers to explore more.
Use clean layouts, high-quality images, and concise copy to make the recommendations stand out.
Check every placement on mobile. Most impulse adds happen on phones, and a bump that renders below the fold effectively doesn’t exist.
- Track analytics to monitor performance and improve your strategy
You should track analytics to see how your product recommendations are performing.
Analyze reports in different matrices such as click rate, conversion rate, revenue generated, average order value, etc.
- Promote product bundles with a "bundle and save" strategy
Offer discounts on product bundles by grouping related items together. This encourages customers to purchase more items at a reduced price, effectively increasing the average order value while driving higher sales overall.
Display Recommended Products with Shortcodes and Hooks (No Plugin)
If you’d rather not install anything, WooCommerce ships with enough shortcodes and filters to place suggestions manually that give you exact control over what appears where, at the cost of maintaining it yourself.
Shortcodes you can drop into any page, post, or block:
[products limit="4" columns="4" best_selling="true"]
[products limit="4" columns="4" on_sale="true"]
[products ids="112,148,203" columns="3"]
[related_products limit="4" columns="4" orderby="rand"]
Don’t combine best_selling, on_sale, and top_rated in a single [products] shortcode because WooCommerce documents these as conflicting attributes, and the block will render empty.
Older installs used per_page instead of limit; both still resolve, but limit is the current attribute.
Change how many related products show, and in how many columns:
add_filter( 'woocommerce_output_related_products_args', 'fk_related_products_args', 20 );
function fk_related_products_args( $args ) {
    $args['posts_per_page'] = 4; // number of related products
    $args['columns']        = 4; // products per row
    return $args;
}
Match related products by tag only, ignoring categories
This is how you can fix irrelevant suggestions for a broad category:
add_filter( 'woocommerce_product_related_posts_relate_by_category', '__return_false' );
add_filter( 'woocommerce_product_related_posts_relate_by_tag', '__return_true' );
Place a hand-picked block directly under the add-to-cart button:
add_action( 'woocommerce_after_add_to_cart_form', 'fk_bought_together_picks', 15 );
function fk_bought_together_picks() {
    echo do_shortcode( '[products ids="112,148,203" columns="3" limit="3"]' );
}
Add these to a child theme's functions.php or a code-snippets plugin (never to a parent theme).
Please note that orderby="rand" fights page caching, and every extra [products] block is another database query on a page you want fast.
Frequently Asked Questions (FAQs)
Still have questions about setting up product recommendations in WooCommerce? Here are answers to the most common ones.
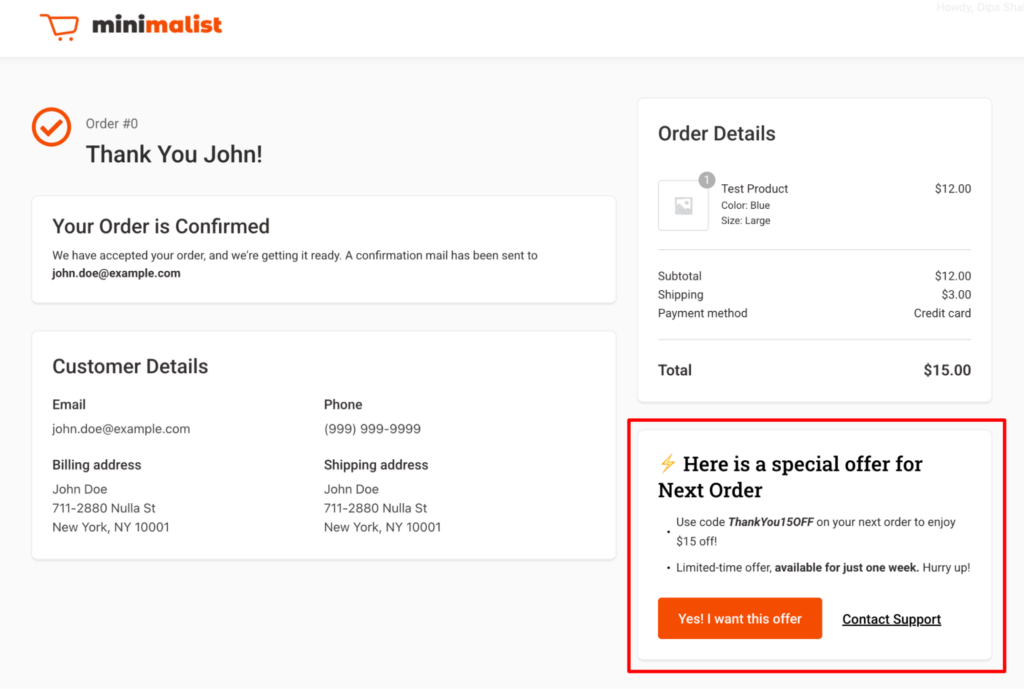
If you're offering order bumps and upsells, avoid recommending additional products on the thank you page to prevent overwhelming customers. Instead, offer a discount coupon for their next purchase to encourage repeat business.
You can easily do that with FunnelKit Funnel Builder’s custom thank you page templates.
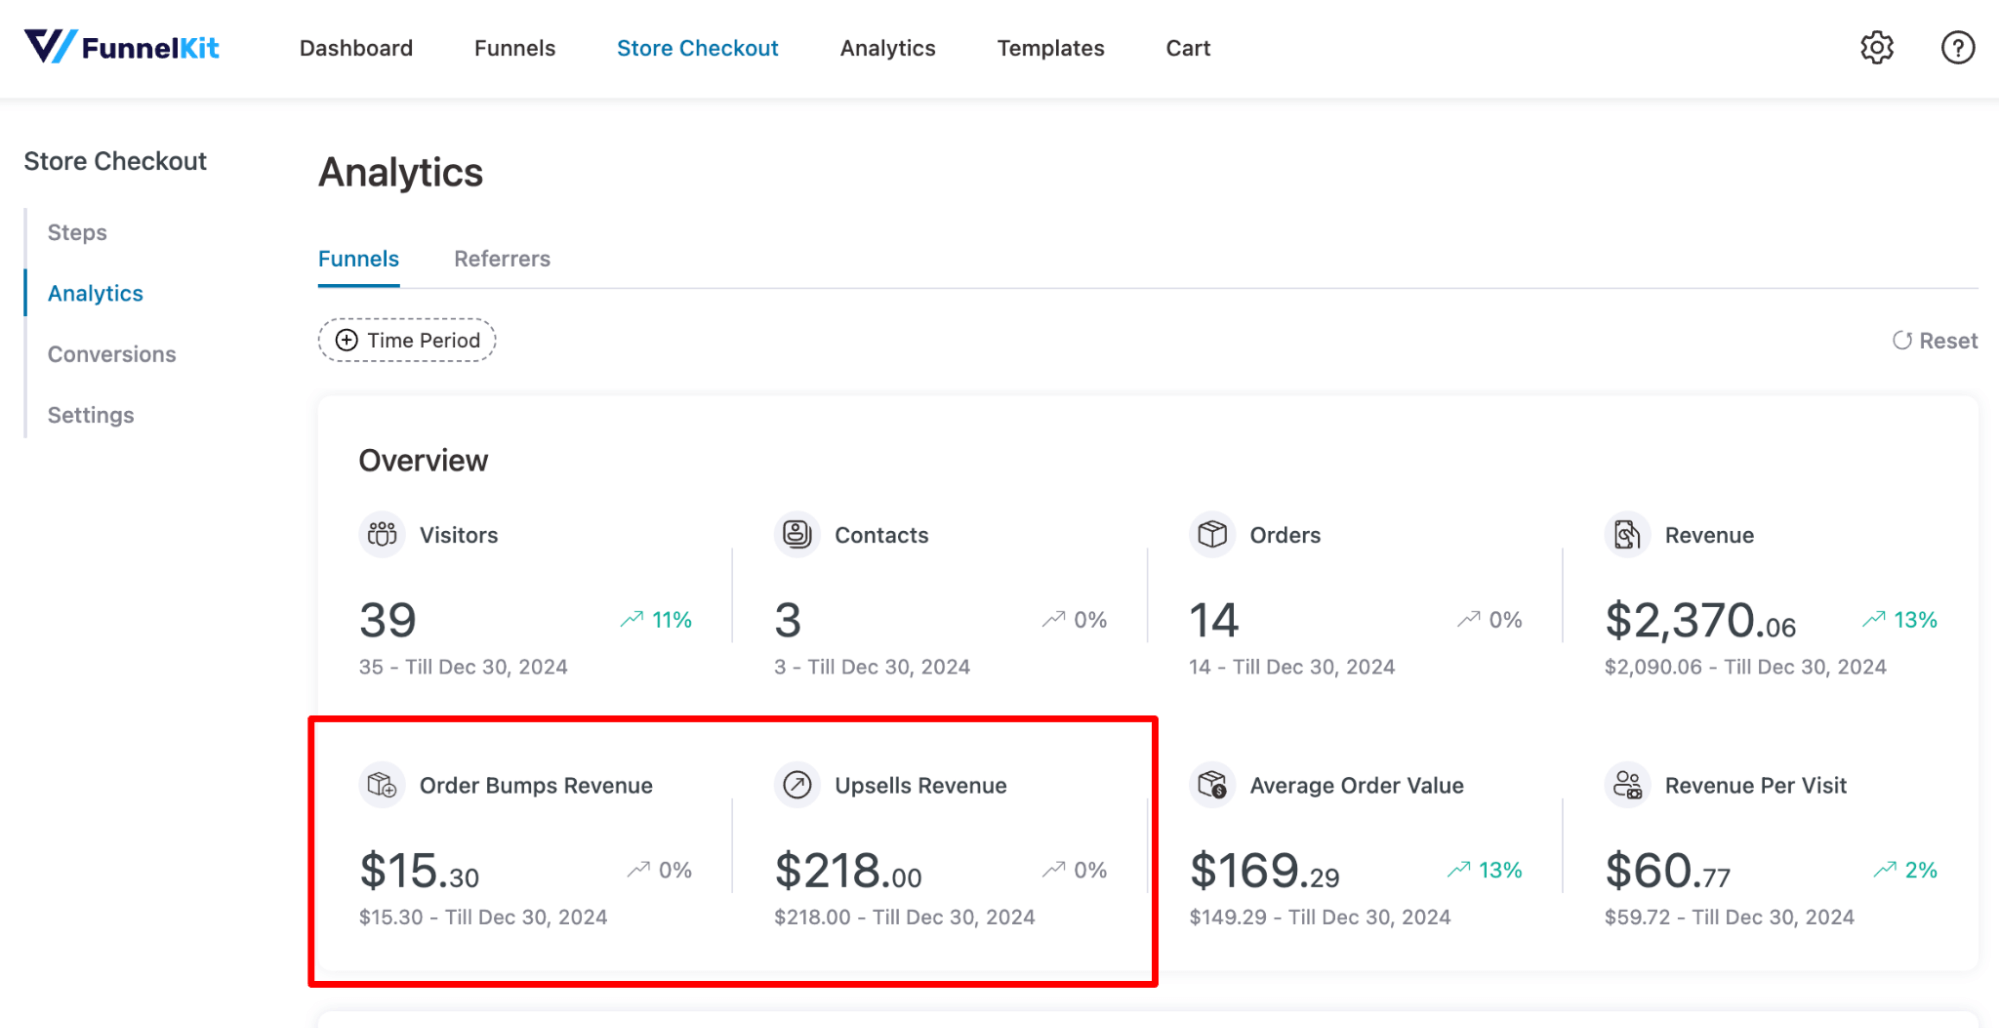
With FunnelKit, you can easily track the revenue generated from order bumps and one-click upsells and filter the data for any specific time period.
Upsells are when you suggest a better version of what the customer is already buying like offering a premium smartwatch instead of the basic one. Cross-sells are complementary products you suggest alongside their purchase, like recommending headphones when they’re buying a smartphone.”
The top plugins for upselling and cross-selling are FunnelKit Funnel Builder, FunnelKit Cart, FunnelKit Automations, OptinMonster, and Product Recommendations for WooCommerce. They help suggest related or premium products to boost sales.
Rule-based means you write the logic once (example, show accessories under $30 when a machine is in the cart) and it runs identically for everyone.
AI-driven means the engine reads your catalog, orders, and browsing behavior, then picks per shopper without the rule.
Rules win when:
- Your catalog is under a few hundred SKUs, and you know the pairings yourself.
- Margin matters more than click-through. Rules let you steer suggestions toward high-margin items; a model optimizing for conversion won’t.
- Your order volume is low. Behavioral models trained on a few hundred orders produce noise dressed up as personalization.
- Compliance, safety, or compatibility constrains what can be sold together.
AI wins when:
- Your catalog has grown past a few hundred SKUs, and maintaining rules has become its own job.
- Demand is seasonal or trend-led and hand-written rules go stale within weeks.
- You have enough repeat customers for browsing history to mean something.
- Your catalog has long-tail products that rules never surface.
The AI Product Recommendations extension on the WooCommerce marketplace generates picks through OpenAI in real time and keeps customer data out of the request unless you enable sharing. Make sure to read closely before installing anything that ships store data off-site.
Several plugins marketed as AI are running weighted rules under the label. Check whether the vendor describes a model or a rule set.
1. Related products aren’t appearing at all.
The block only renders when other published products share a category or tag with the current one, and it excludes out-of-stock and hidden items.
Check for at least one category with two or more in-stock siblings, and catalog visibility set to "Shop and search results".
Some block themes drop the template entirely. Make sure to check the single-product template in the site editor before blaming WooCommerce.
2. The wrong items are showing
This issue always occurs because of a taxonomy problem. A catch-all category makes every product related to every other.
So ensure you narrow your categories, or use the relate_by_category / relate_by_tag filters above to control which taxonomy drives the match.
For genuine precision, replace automatic related products with manual upsells.
3. Recommendations slow the page down
Each block is a separate query, and dynamic ones can’t be cached like static HTML.
Therefore, cap the blocks to four products, avoid orderby="rand" on cached pages, and exclude cart, checkout, and side-cart fragments from full-page caching so offers stay accurate without forcing the whole page to bypass cache.
4. Sold-out or irrelevant products keep appearing
Turn on WooCommerce ⇒ Settings ⇒ Products ⇒ Inventory ⇒ Hide out of stock items from the catalog.
If suggestions still look stale after that, clear any transient or object cache.
Make sure the related-product queries are cached, and a purge is often the whole fix.
Yes, WooCommerce can handle recommendations for 10,000+ products, but with some limits.
Native related products scale fine for a taxonomy query, but relevance collapses at that catalog size, and rule-based engines need well-maintained categories and attributes to stay useful.
This is the range where AI engines earn their cost, and where object caching and query performance stop being optional.
Start Turning Product Recommendations Into Revenue!
You don’t need all seven placements running to see a difference. Product-page upsells and cart cross-sells cost nothing but an afternoon of linking, and they’re the sensible starting point for a small catalog.
Past that, the checkout is where the numbers move. An order bump reaches a shopper who has already decided to pay you, and a post-purchase offer reaches one who already has.
Our coffee store never sold anything the shopper hadn’t already implicitly asked for. It worked for the same six products, placed where each one made sense.
A few percentage points of acceptance at each stage compound into a materially different average order value by the end of a quarter.
If checkout and post-purchase offers are the gap in your store, FunnelKit Funnel Builder adds order bumps and one-click upsells to the WooCommerce checkout you already run.
Get FunnelKit today and start growing your store’s sales.
Editorial Team
October 6, 2026The WooCommerce checkout coupon field is where shoppers enter a discount code before they pay. Once coupons are turned on, WooCommerce adds it to both the cart and the checkout...
Editorial Team
October 2, 2026A WooCommerce invoice email gives customers a clear record of what they bought, what they paid, and how they paid. WooCommerce can send one out of the box, but only...
Editorial Team
October 1, 2026Want to drive more sales and customer loyalty with WooCommerce coupons? From simple percentage discounts to auto-applied deals, free gifts, and personalized offers, coupons give shoppers a reason to buy...






