
In WooCommerce, related products are the items shown near the bottom of a product page that WooCommerce picks automatically based on the tags and categories a product shares with others in your catalog.
You can't hand-select them by default, but you can control how many appear, the order and layout, and even turn them off completely.
In this guide, we'll cover exactly how this feature works, how it differs from upsells and cross-sells, and how to customize, disable, or fix related products using the shortcode, a few lines of code, or a plugin.
Whether you're a store owner who wants cleaner product pages or a developer who needs the right filter, you'll find the specific method here without any guesswork.
Table of Contents
- 1 What Are Related Products in WooCommerce?
- 2 Related Products vs Upsells vs Cross-Sells
- 3 How to Add Upsells and Cross-Sells (Linked Products)
- 4 How to Customize Related Products?
- 5 How to Hide or Disable Related Products?
- 6 Going Beyond Native Related Products: Cart, Checkout, and Post-Purchase Offers
- 7 Related Products Not Showing? Common Fixes
- 8 Frequently Asked Questions
- 9 Take Full Control of Your WooCommerce Related Products
What Are Related Products in WooCommerce?
Related products are an automatic recommendation block that WooCommerce renders on the single product page.
WooCommerce decides which products to show by matching the shared tags and categories of the product being viewed against the rest of your catalog, then displays a randomized selection of the matches.
Three things define the native feature:
- You can't manually choose related products in the WooCommerce admin (unlike upsells and cross-sells, which you set per product).
- Shared product categories and tags are the only signals. No browsing history, no AI, no purchase data.
- Your theme's template controls whether the block appears at all, and how it looks. Some themes can even hide or restyle it.
By default, WooCommerce shows related products in a randomized order, so the block changes on each page load (cache permitting).
Related Products vs Upsells vs Cross-Sells
These three are WooCommerce's product recommendation types, and they're constantly confused. Here's the difference at a glance:
| Type | What it is | Where it shows | Who picks the products | Auto or manual |
|---|---|---|---|---|
| Related products | Items sharing the same tags/categories | Single product page (below the product) | WooCommerce, automatically | Automatic |
| Upsells | A better/pricier alternative to this product | Single product page (above related products) | You, per product | Manual |
| Cross-sells | Complementary add-ons | Cart page | You, per product | Manual |
How to Add Upsells and Cross-Sells (Linked Products)
Both upsells and cross-sells in WooCommerce are configured using the Linked Products tab inside each product’s settings.
Go to Products ⇒ All Products in your WordPress dashboard. Hover over the product you want to edit and click Edit.
Scroll down to the Product Data section. Click the Linked Products tab. In the Upsells field, select higher-end or premium alternatives.
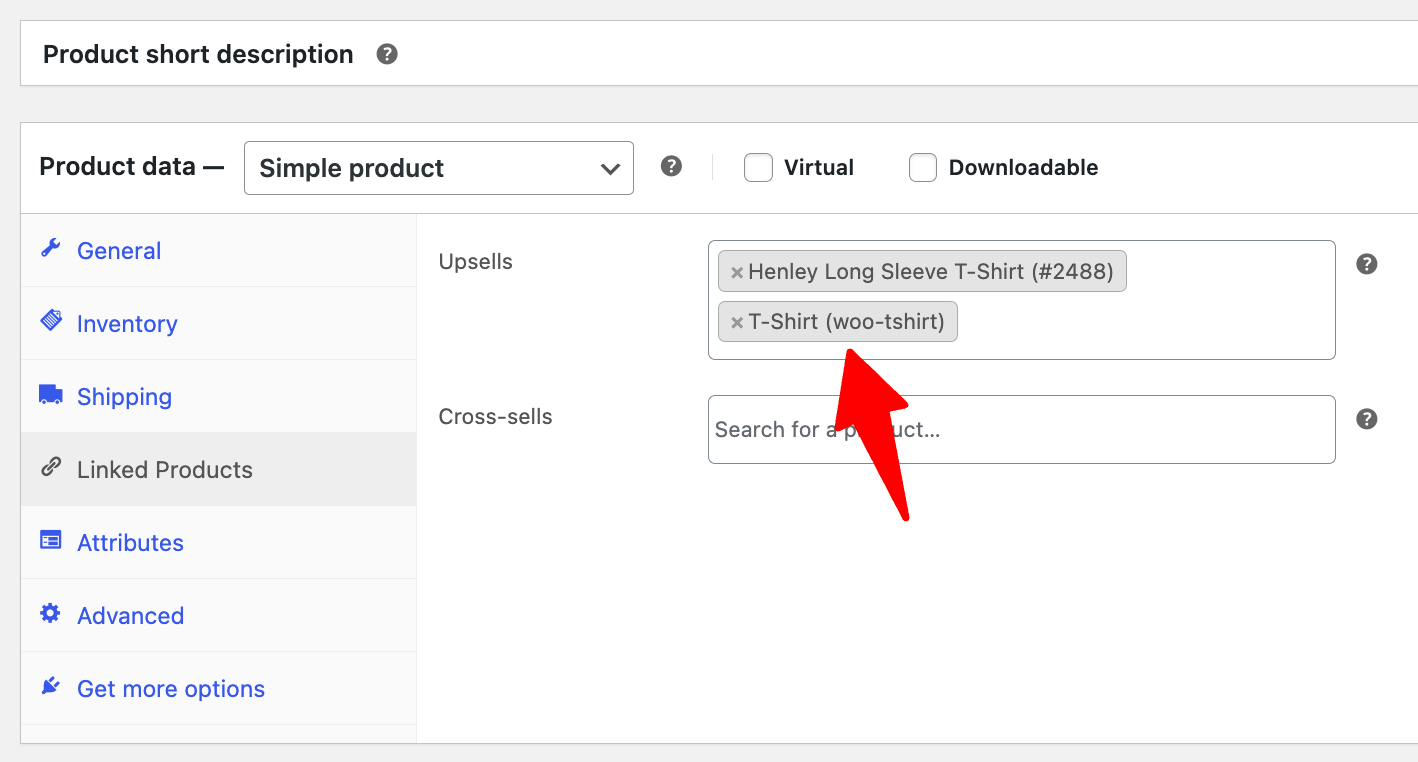
In the Cross-sells field, select complementary products for the cart page.
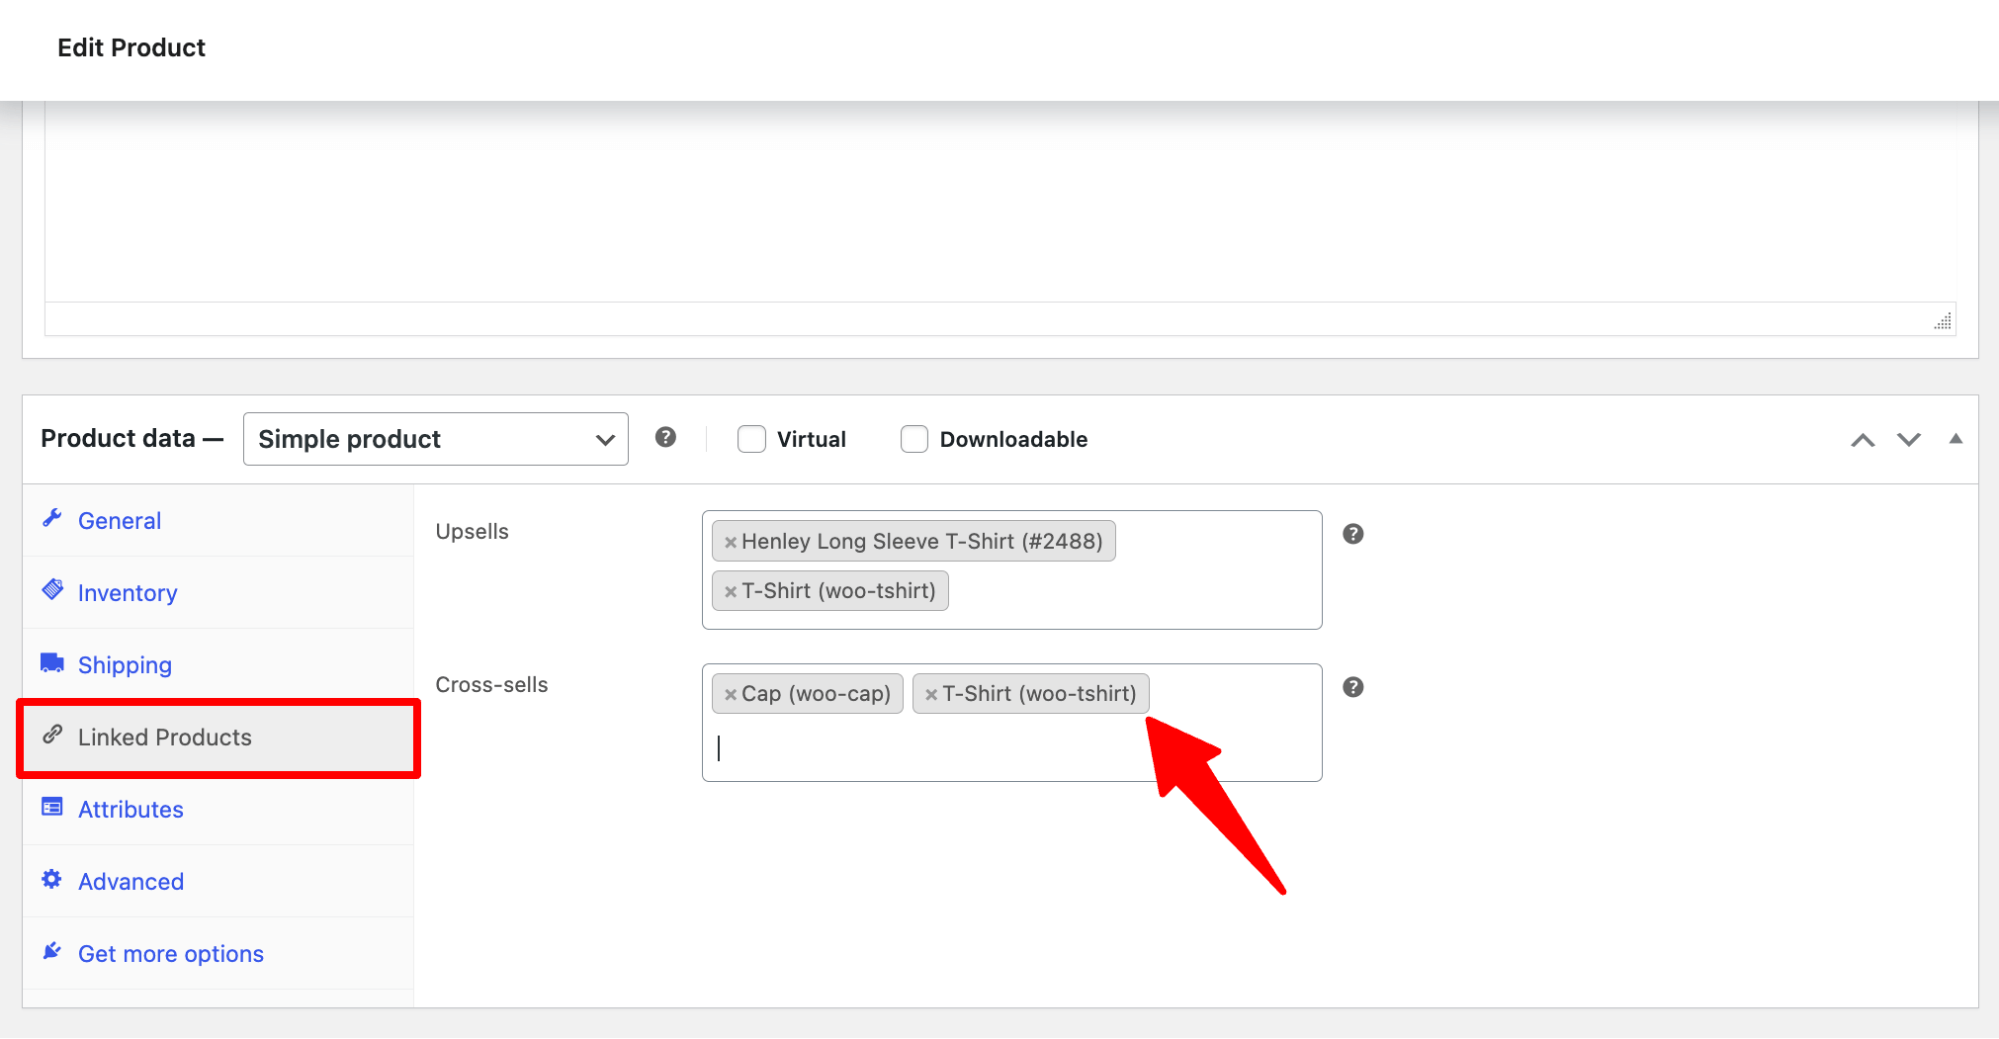
Upsells appear on the product page (typically labeled "You may also like…"), and cross-sells appear on the cart page. This is your hand-curated layer; related products automatically run alongside it.
How to Customize Related Products?
You have three levers, including the shortcode (for placing the block on other pages), a code filter (for changing the count and layout site-wide), and filters that change which products qualify as related.
Using the [related_products] shortcode
WooCommerce ships a dedicated shortcode that outputs the related products block wherever you place it. It accepts three attributes:
- limit: Number of related products to show
- columns: Number of products per row
- orderby: Sort order (price, title, or rand)
For example, you can use this as:
[related_products limit="4" columns="4" orderby="rand"]This is useful when you've moved or removed the default block and want to re-insert it somewhere specific, for example, inside a page-builder layout or a custom product template.
Please note that the shortcode's randomized output, like the native block, may be affected by page caching.
Change the number and columns with code
To change the related products count and layout site-wide, hook into woocommerce_output_related_products_args. Add this to your child theme's functions.php or a code-snippets plugin:
add_filter( 'woocommerce_output_related_products_args', 'custom_related_products_args', 20 );

function custom_related_products_args( $args ) {
    $args['posts_per_page'] = 4; // show 4 related products
    $args['columns']        = 4; // arrange them in 4 columns
    return $args;
}
Change posts_per_page to set how many products appear per page, and columns to set the grid width. A priority of 20 helps the filter run after the theme's own setup.
Some themes lock the column width in CSS, so if products don't reflow into the new column count, you may also need a small CSS rule targeting .related.products.
Show related products by category or tag only, or exclude items
By default, WooCommerce relates products by both categories and tags. To relate by categories only (ignore tags), disable tag matching:
add_filter( 'woocommerce_product_related_posts_relate_by_tag', '__return_false' );To do the reverse, relate by tags only, disable category matching:
add_filter( 'woocommerce_product_related_posts_relate_by_category', '__return_false' );To change which products are considered related (for example, to exclude specific products or apply your own logic), filter the final list with woocommerce_related_products:
add_filter( 'woocommerce_related_products', 'custom_related_products', 10, 3 );

function custom_related_products( $related_posts, $product_id, $args ) {
    // $related_posts is an array of product IDs.
    // Remove specific IDs, e.g. 42 and 57:
    $exclude = array( 42, 57 );
    return array_diff( $related_posts, $exclude );
}
WooCommerce caches related-product results in transients. After changing any of these filters, clear your transients (WooCommerce → Status → Tools → Clear transients), or you may see no change.
How to Hide or Disable Related Products?
There are two clean ways to remove the related products block.
Option 1: Code (recommended for performance)
Remove the template hook that outputs the block. Add this to your child theme's functions.php:
remove_action( 'woocommerce_after_single_product_summary', 'woocommerce_output_related_products', 20 );This stops WooCommerce from querying and rendering related products entirely, which is better for page speed than hiding them with CSS.
Option 2: Plugin
If you'd rather not touch code, a lightweight plugin, such as a related-products manager or a snippets plugin, can toggle the block off (and often per product).
This is the safer route for non-developers, since a typo in functions.php can break the site.
CSS hiding (.related.products { display: none; }) works visually but still loads the query, so prefer the code or plugin method.
Going Beyond Native Related Products: Cart, Checkout, and Post-Purchase Offers
Everything above is a native, automatic feature. It's great for keeping shoppers browsing, but it only appears on the product page; it can't be handpicked, and it does nothing when a customer is actually deciding to buy.
If your goal is to lift average order value rather than just aid discovery, that happens at the cart, checkout, and post-purchase stages, which the native feature doesn't touch.
This is the monetization layer that sits on top of related products, and it's what FunnelKit is built for:
With FunnelKit, you can replace rigid logic with real-time intelligence, behavior-based offers, and a seamless shopping experience from start to finish.
1. Slide-in cart with live product recommendations
The side cart displays relevant add-ons as soon as an item is added, without sending the shopper to a separate cart page.
2. In-checkout order bumps
One-click order bumps at checkout, so a complementary product can be added without re-entering payment details.
3. Post-purchase one-click upsells
Post-purchase upsells on the thank-you page, where a shopper can accept a follow-up offer after they've already bought, with zero added friction.
These aren’t just features but conversion multipliers. And they’re designed to work seamlessly with your existing store, even if you’re not a techie or marketer.
Step 1: Install and activate the FunnelKit Funnel Builder
- Go to your WordPress dashboard → Plugins → Add New
- Search for FunnelKit Funnel Builder. and install the free version
- Click Activate
- If you want access to advanced features, such as order bumps and post-purchase upsells, upgrade to Funnel Builder Pro.
Step 2: Set up the slide-in cart with product suggestions
The FunnelKit slide-in cart replaces the default WooCommerce cart page with a smarter, faster experience and gives you space to show contextual product nudges.
To set it up, go to FunnelKit ⇒ Cart and hit the 'Enable Cart' toggle button to turn on the FunnelKit Cart.
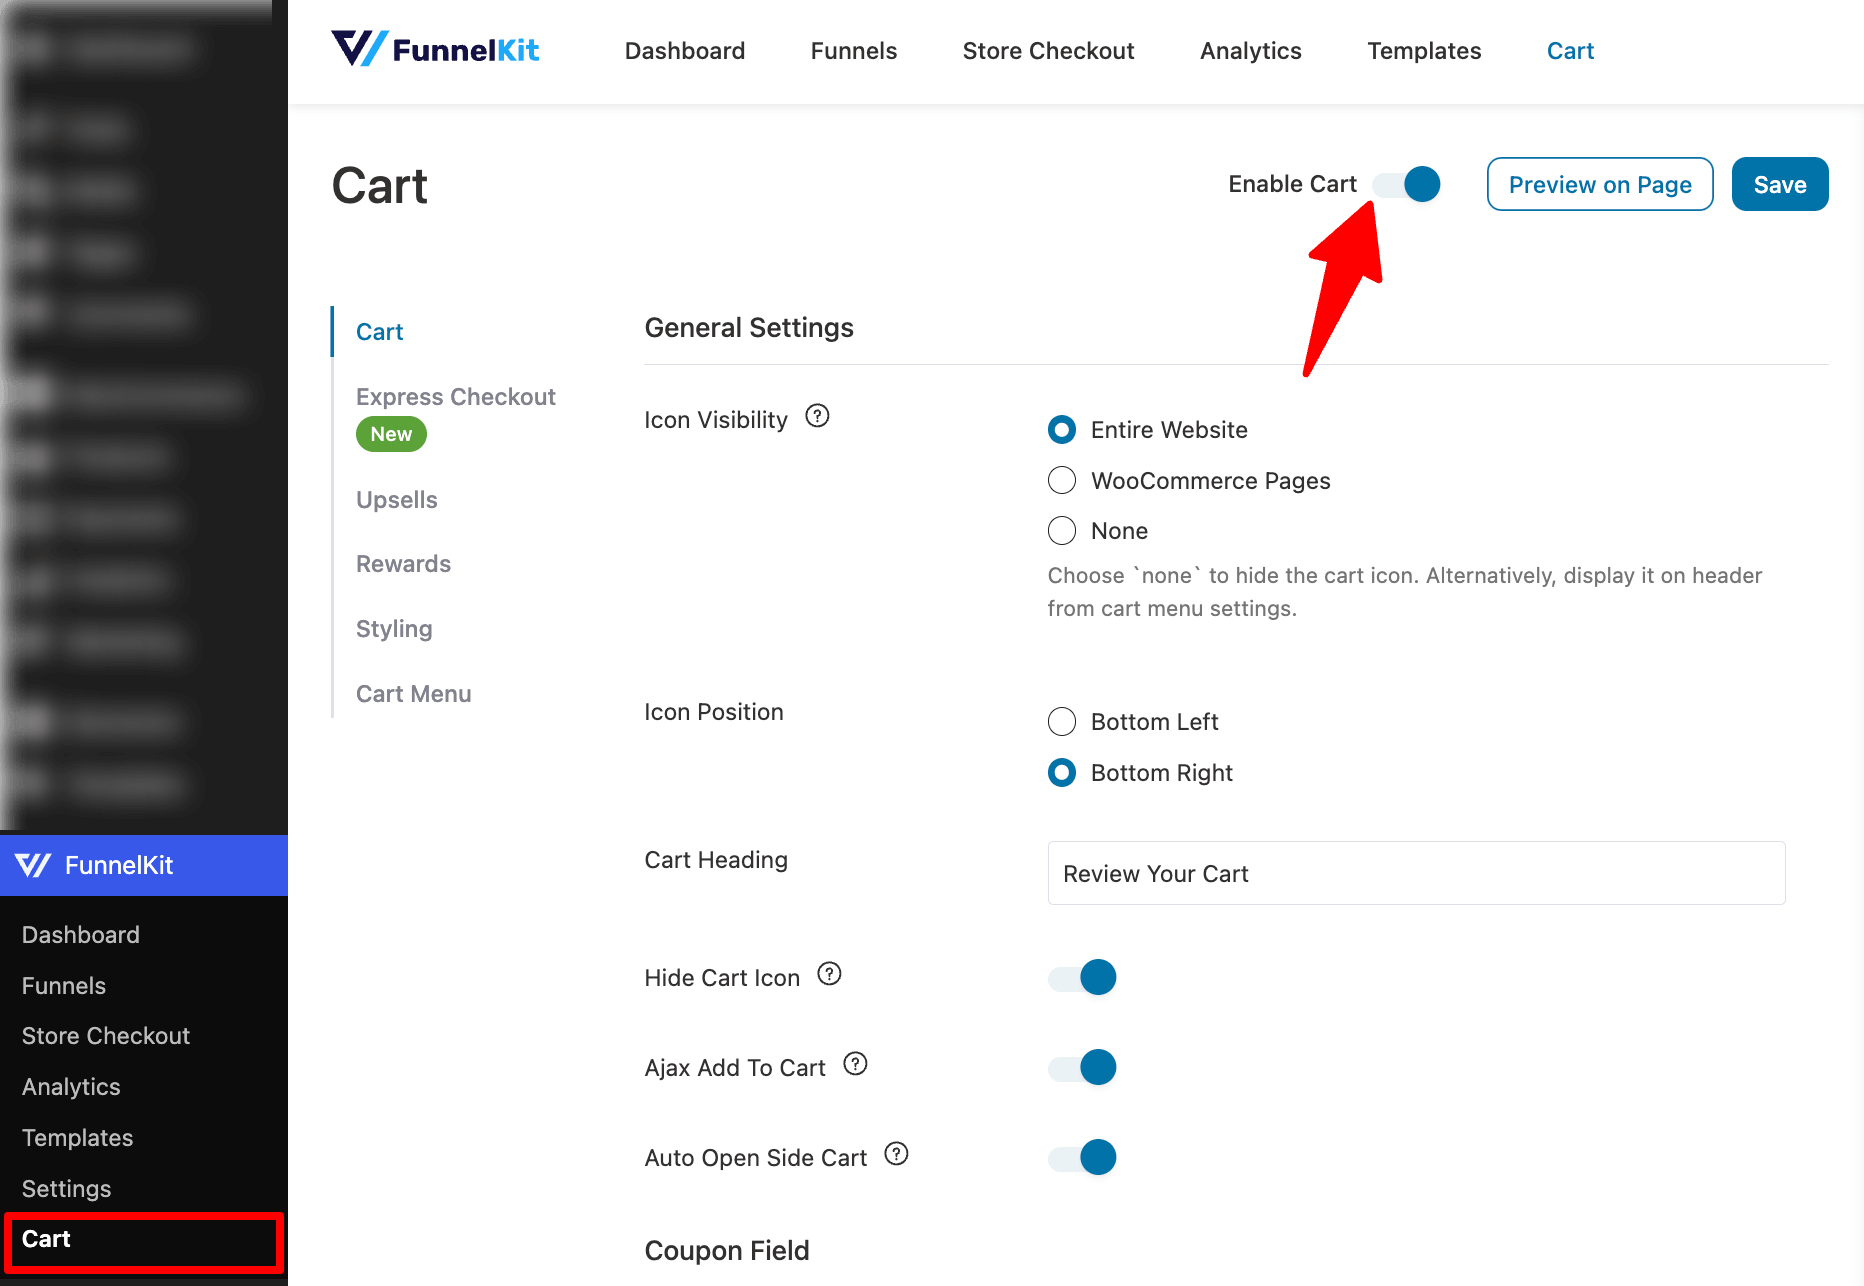
Go to the Upsells tab and select the 'Enable Cart Upsells' option.
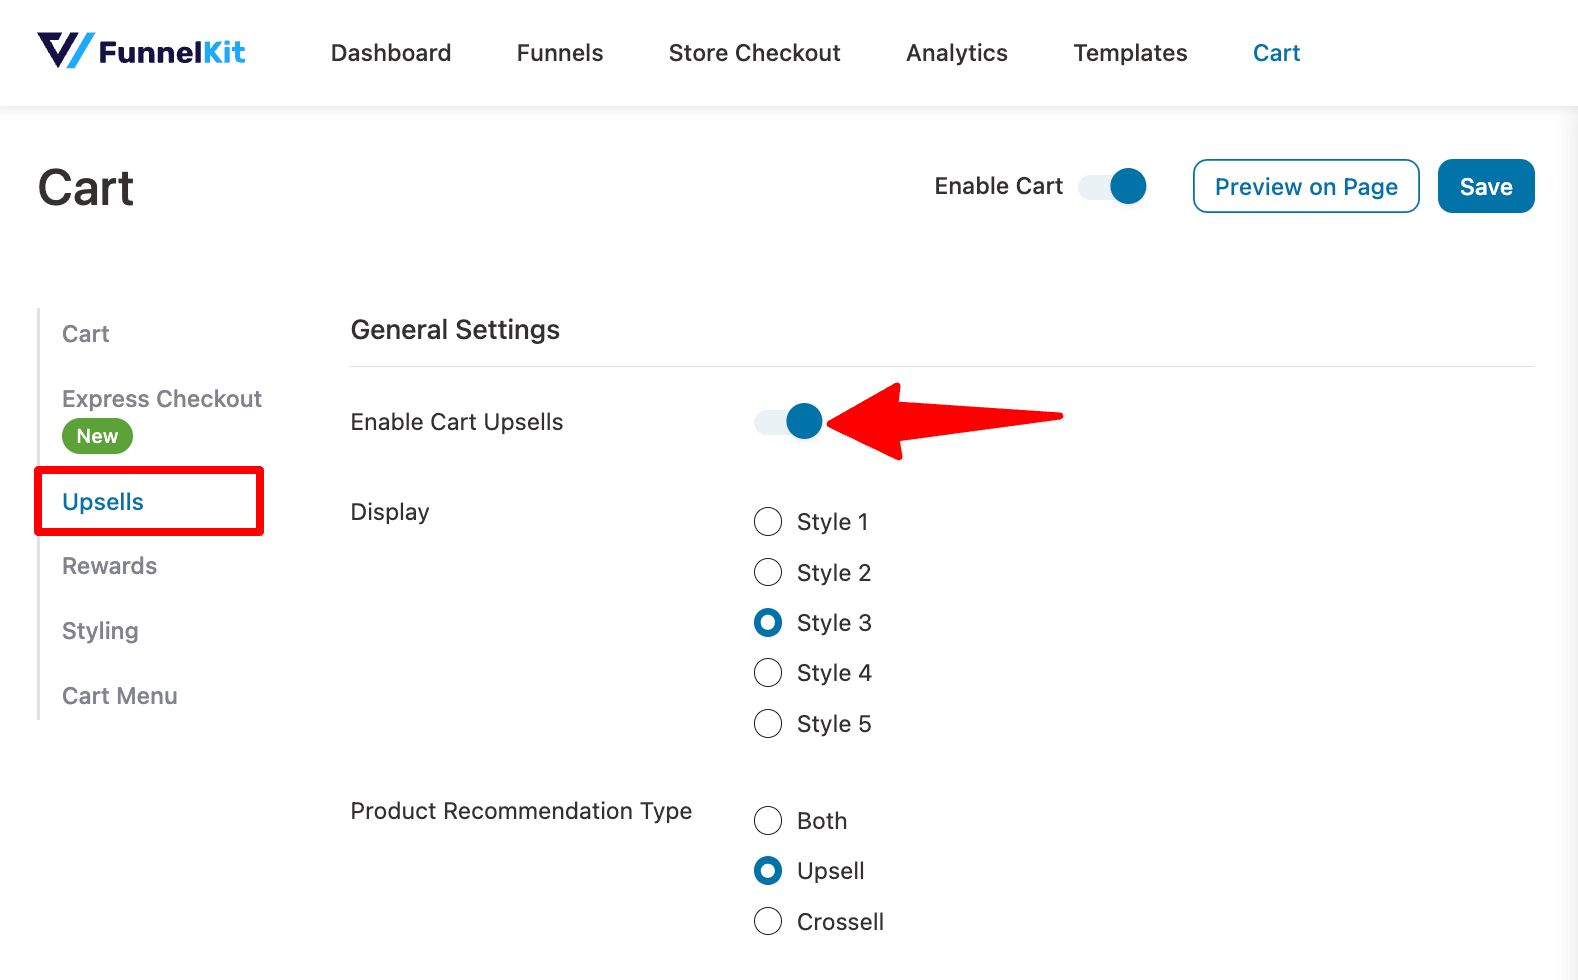
Use the 'Default Upsells' option to show fallback product recommendations when no upsells are set for cart items.
You can add multiple products, limit how many display, and choose to always show them.
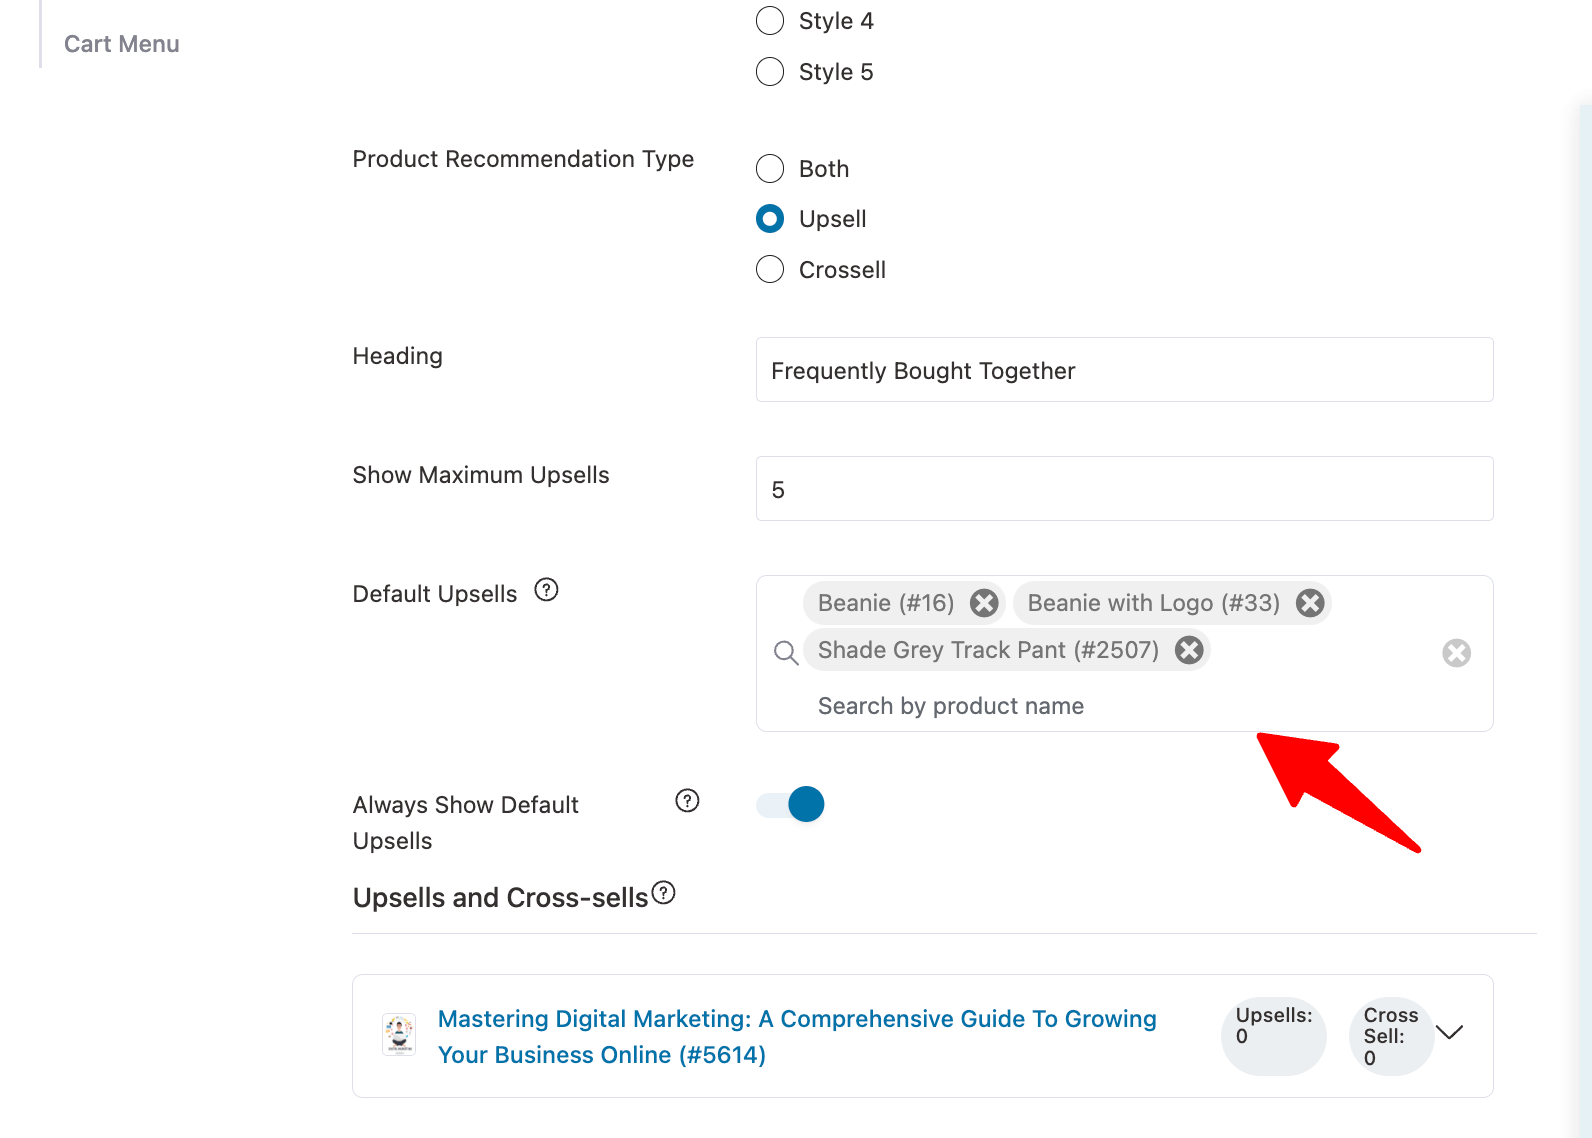
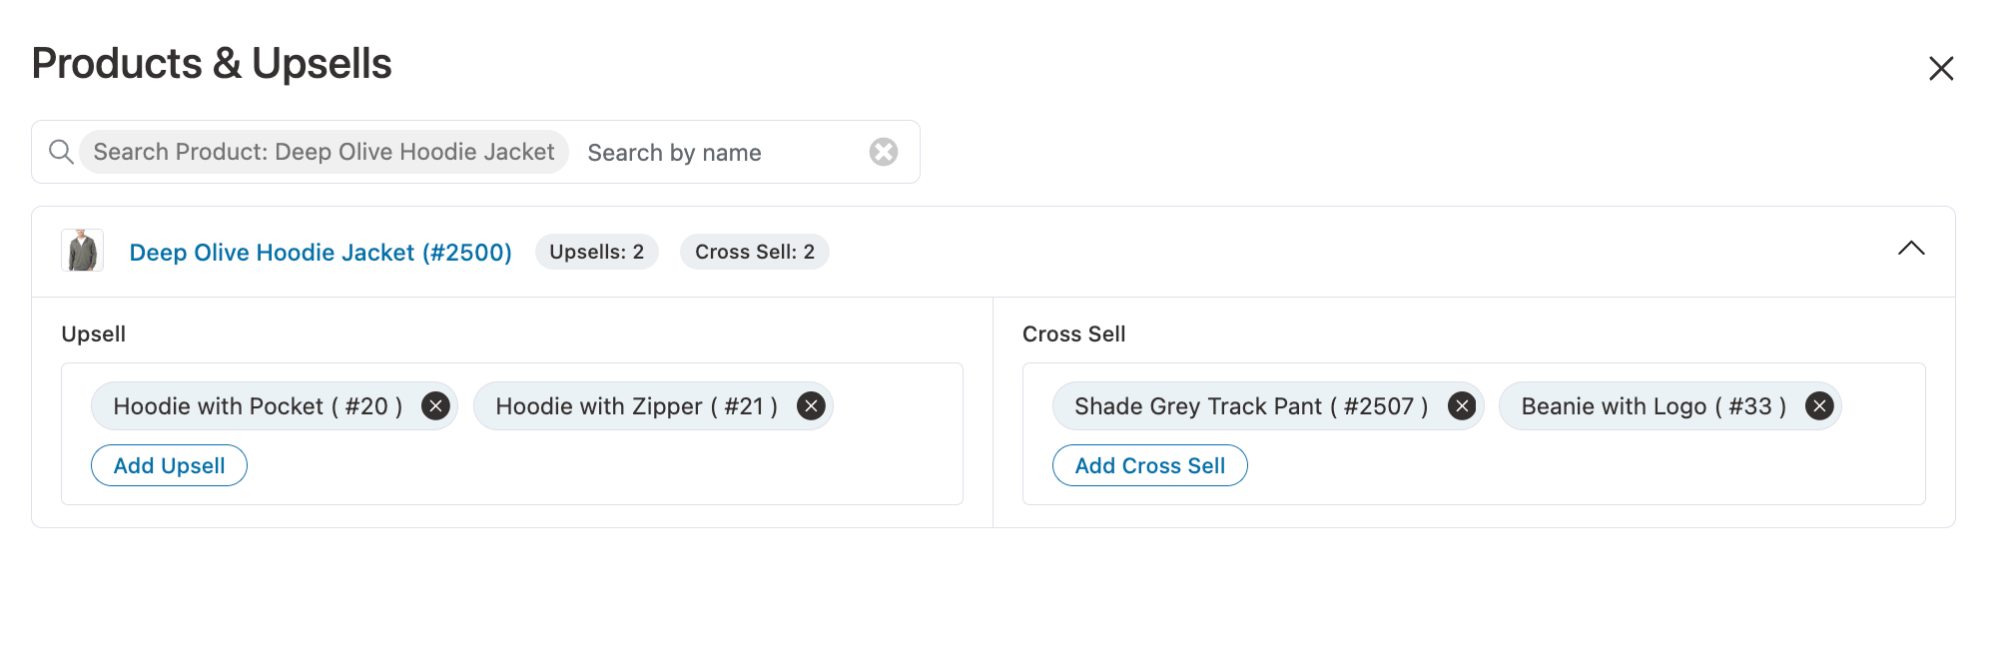
For per-product upsells and cross-sells, click View All Products, choose your item, and add related products; no need to edit each WooCommerce product manually.
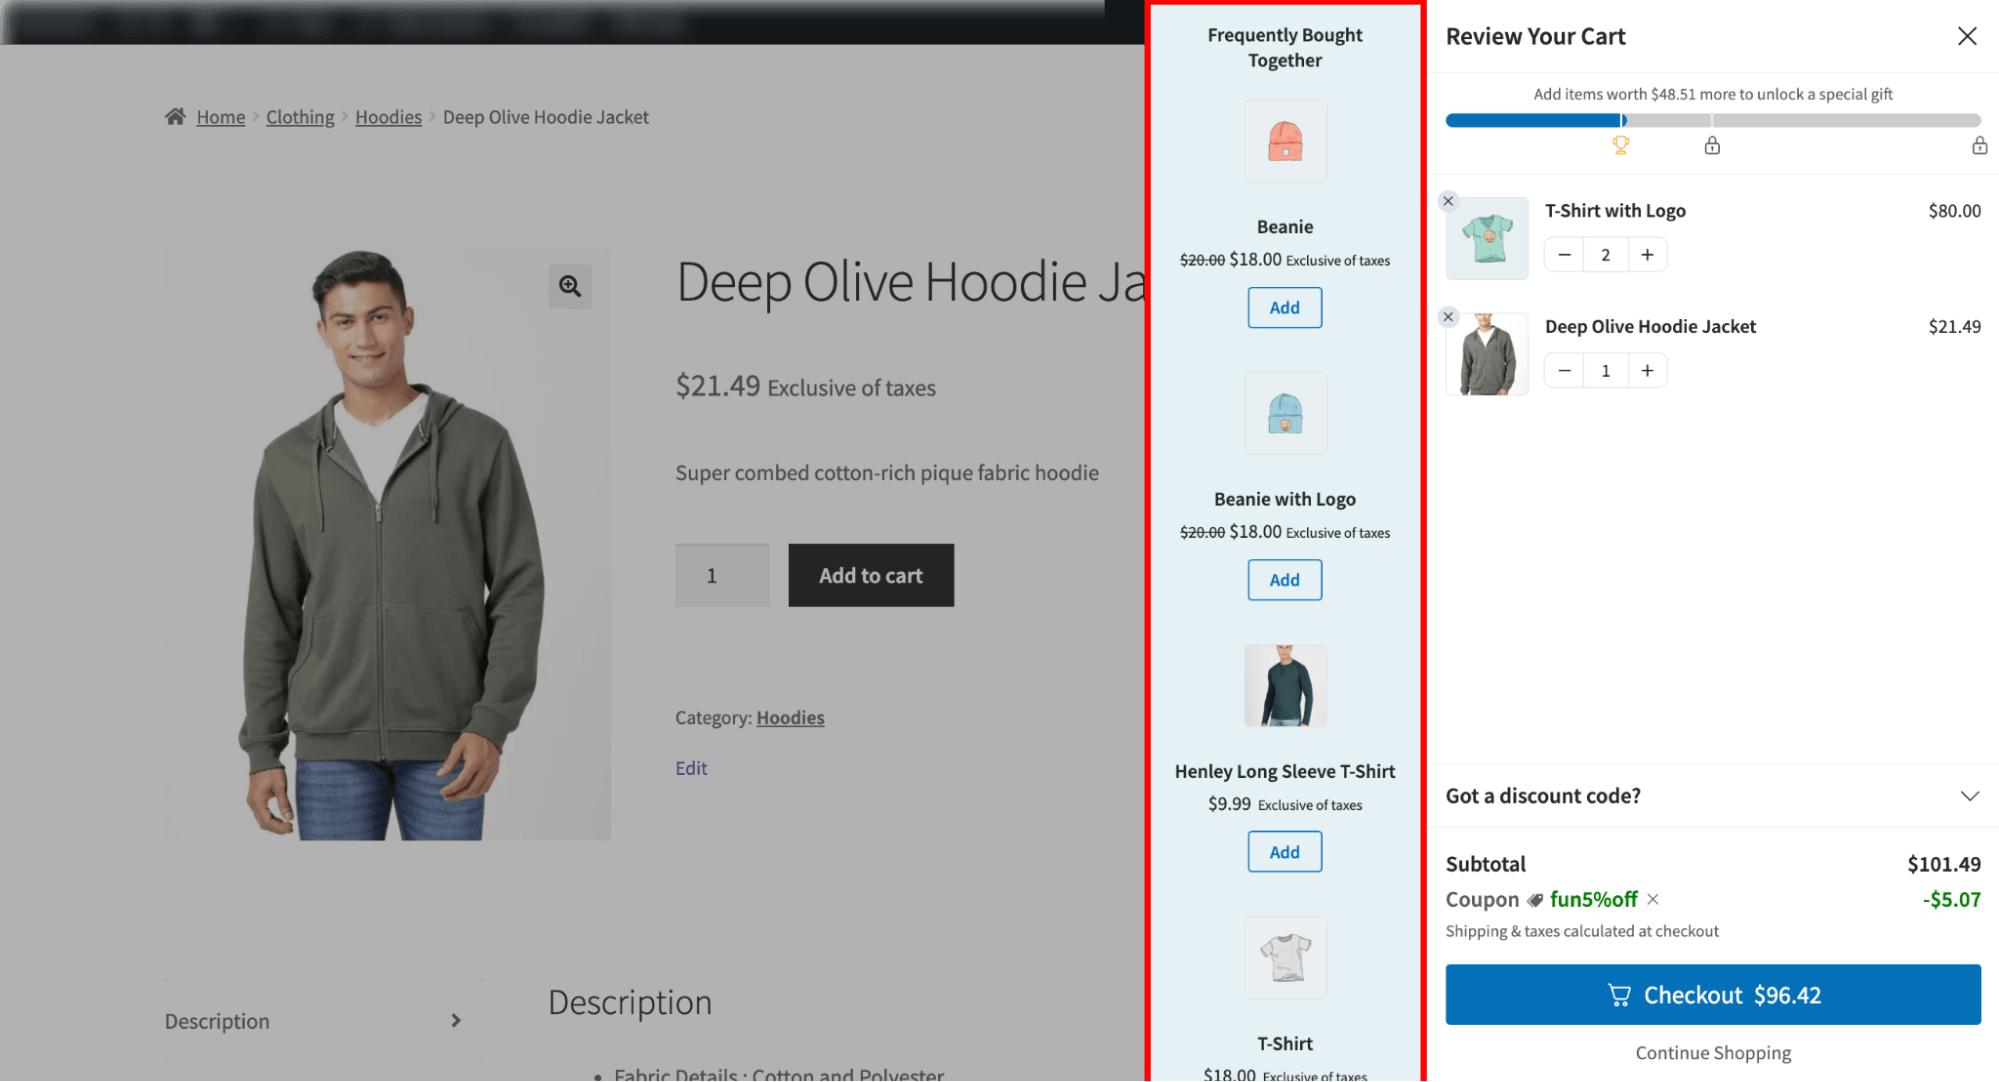
Now, when people add an item to their cart, a slide-in cart will appear with in-cart product recommendations.
You can even show milestone-based rewards to encourage users to add more items, as shown in the image below:
Step 3: Create checkout page order bumps
Order bumps appear on the checkout page as one-click add-ons, perfect for quick wins.
Now, it’s time to configure the order bump offer. To do that, click 'Add Order Bump', provide a title, and click 'Add'.
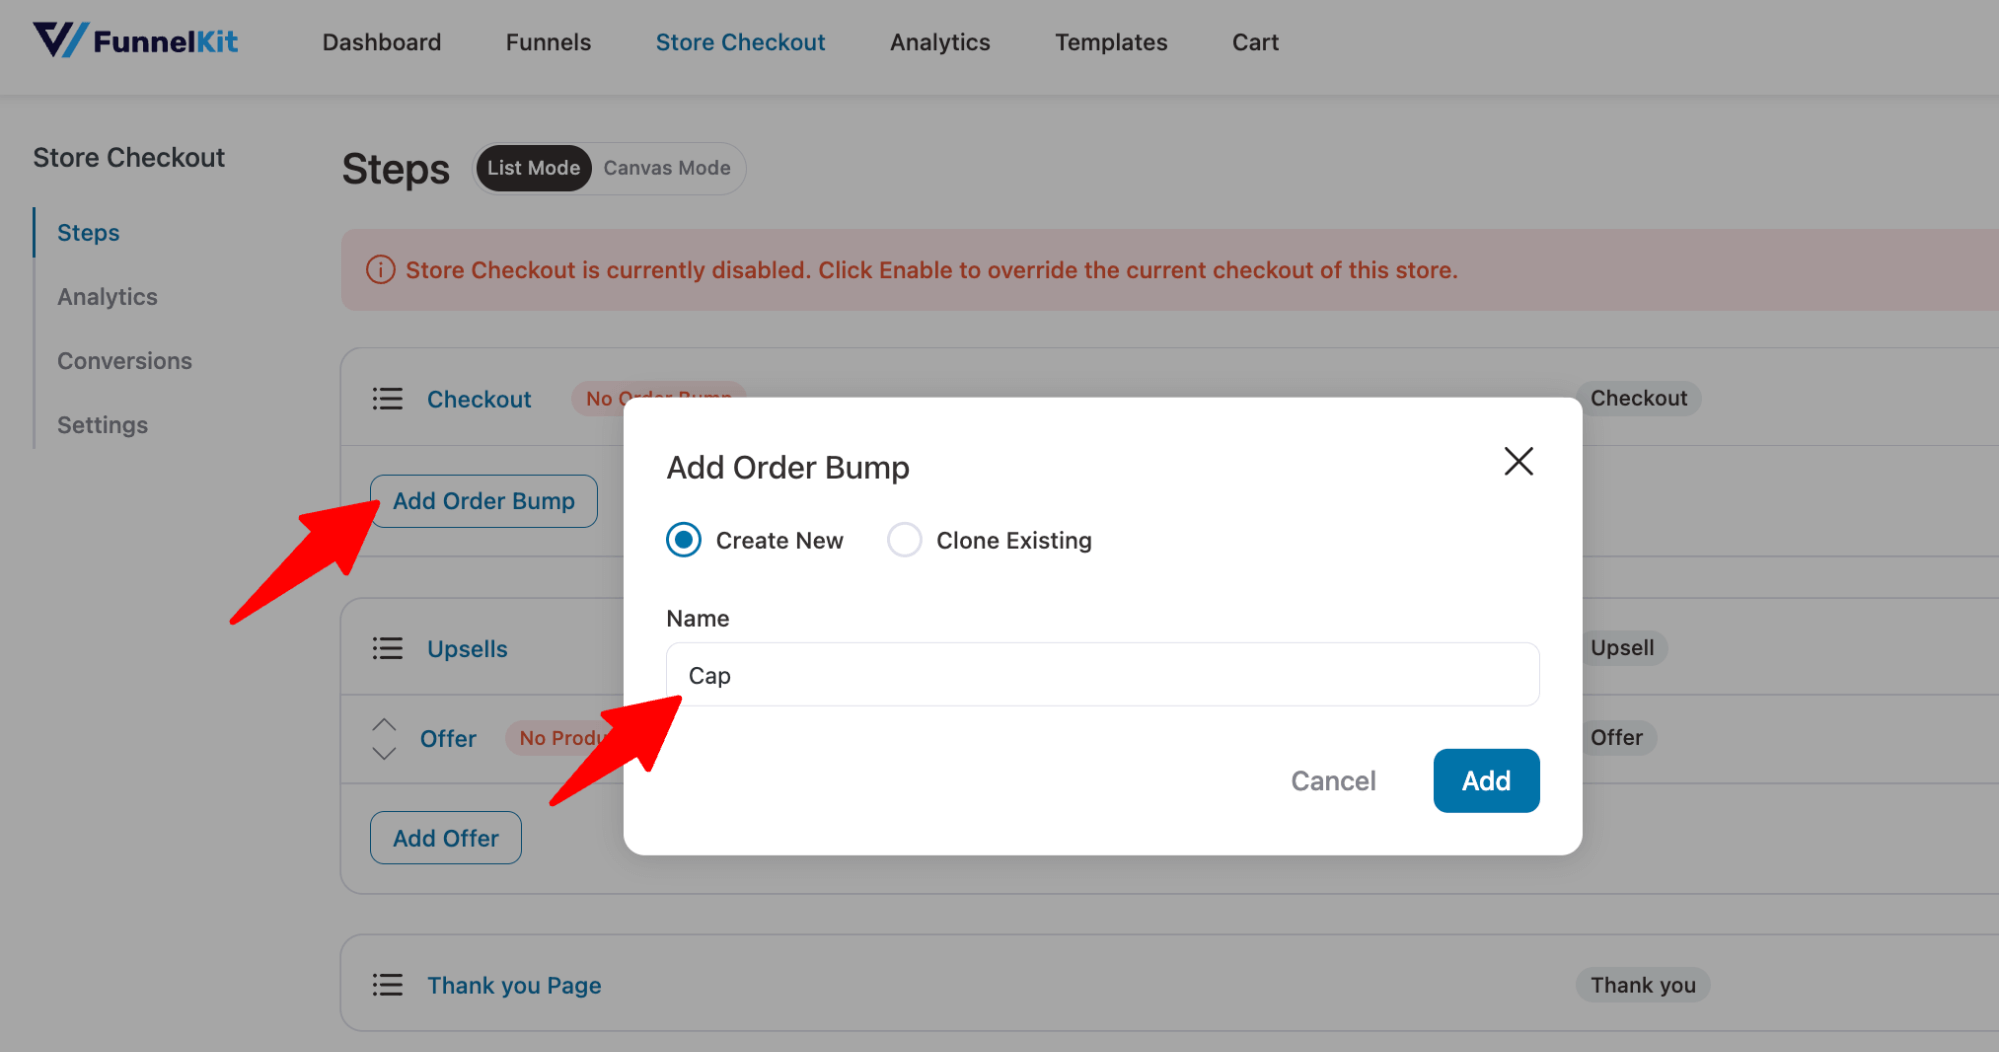
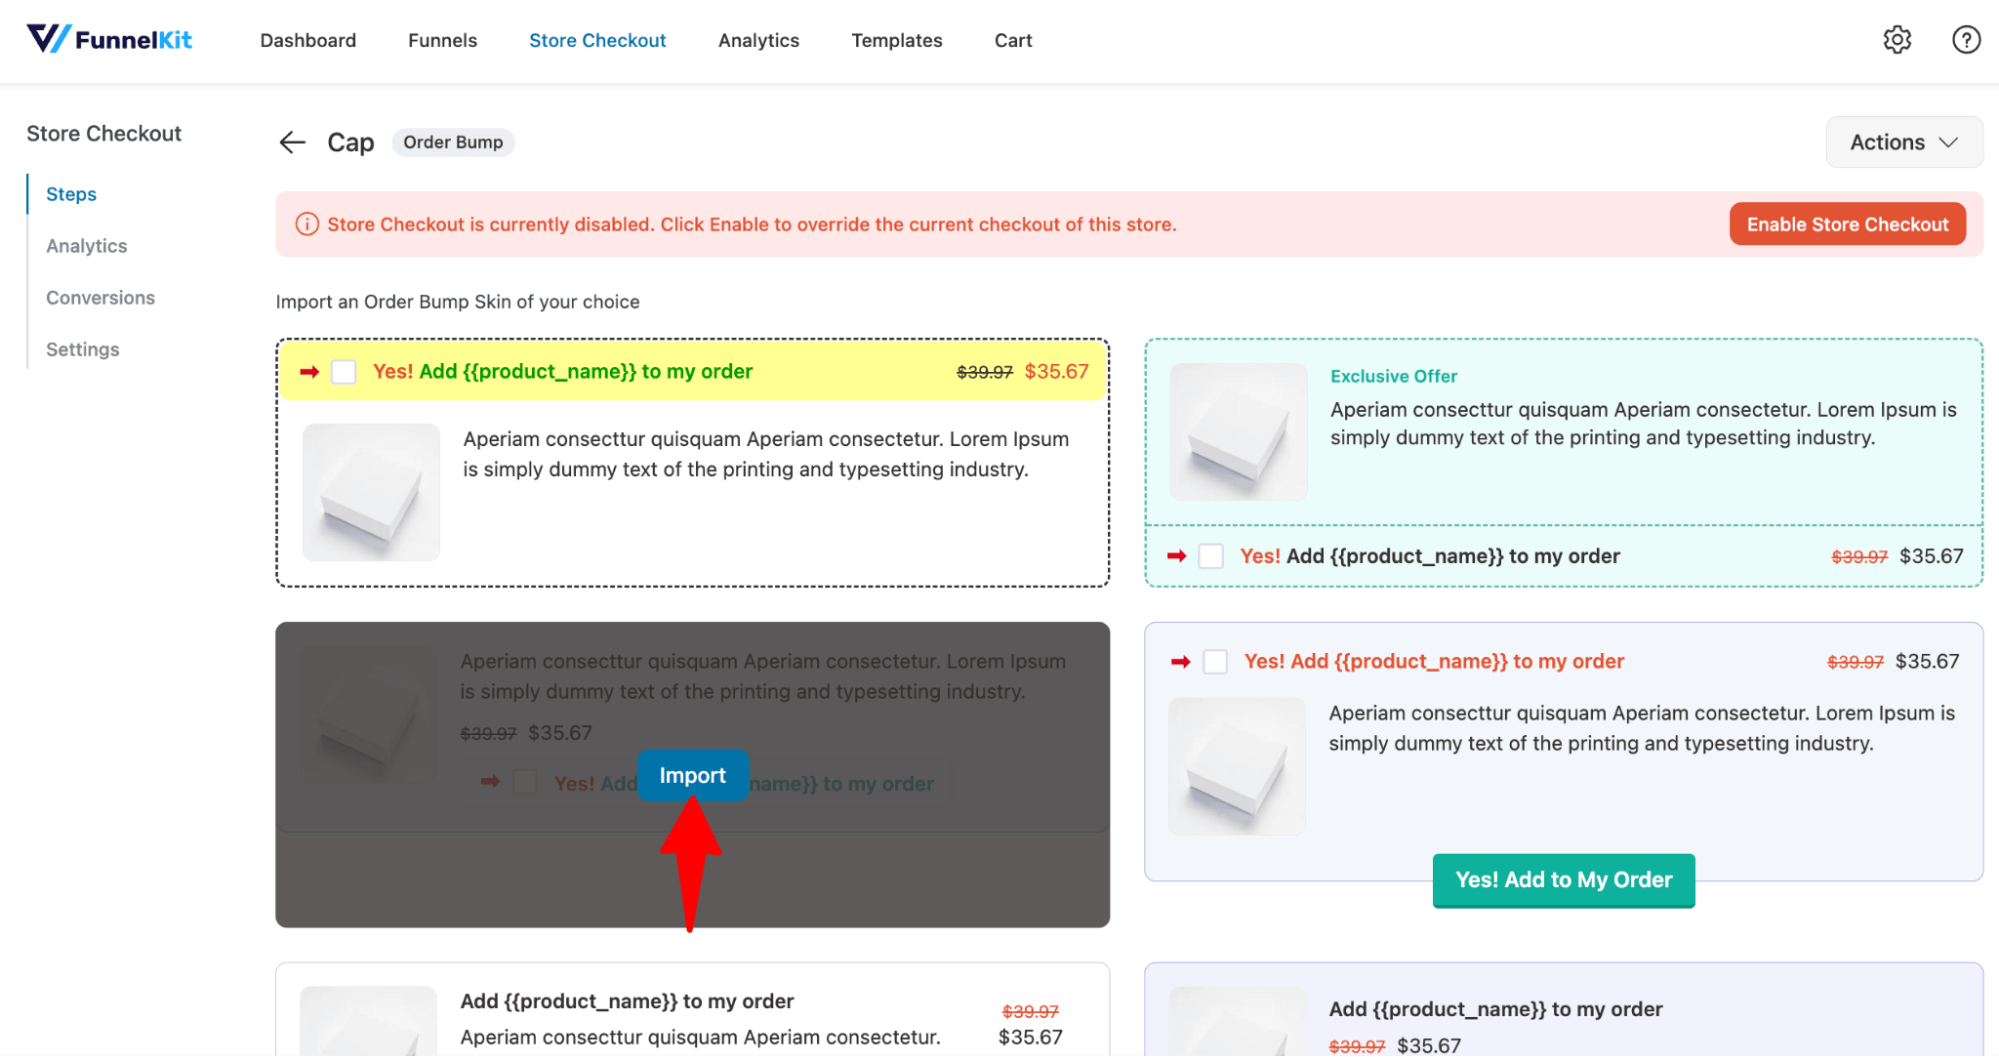
After that, choose an order for bump skin.
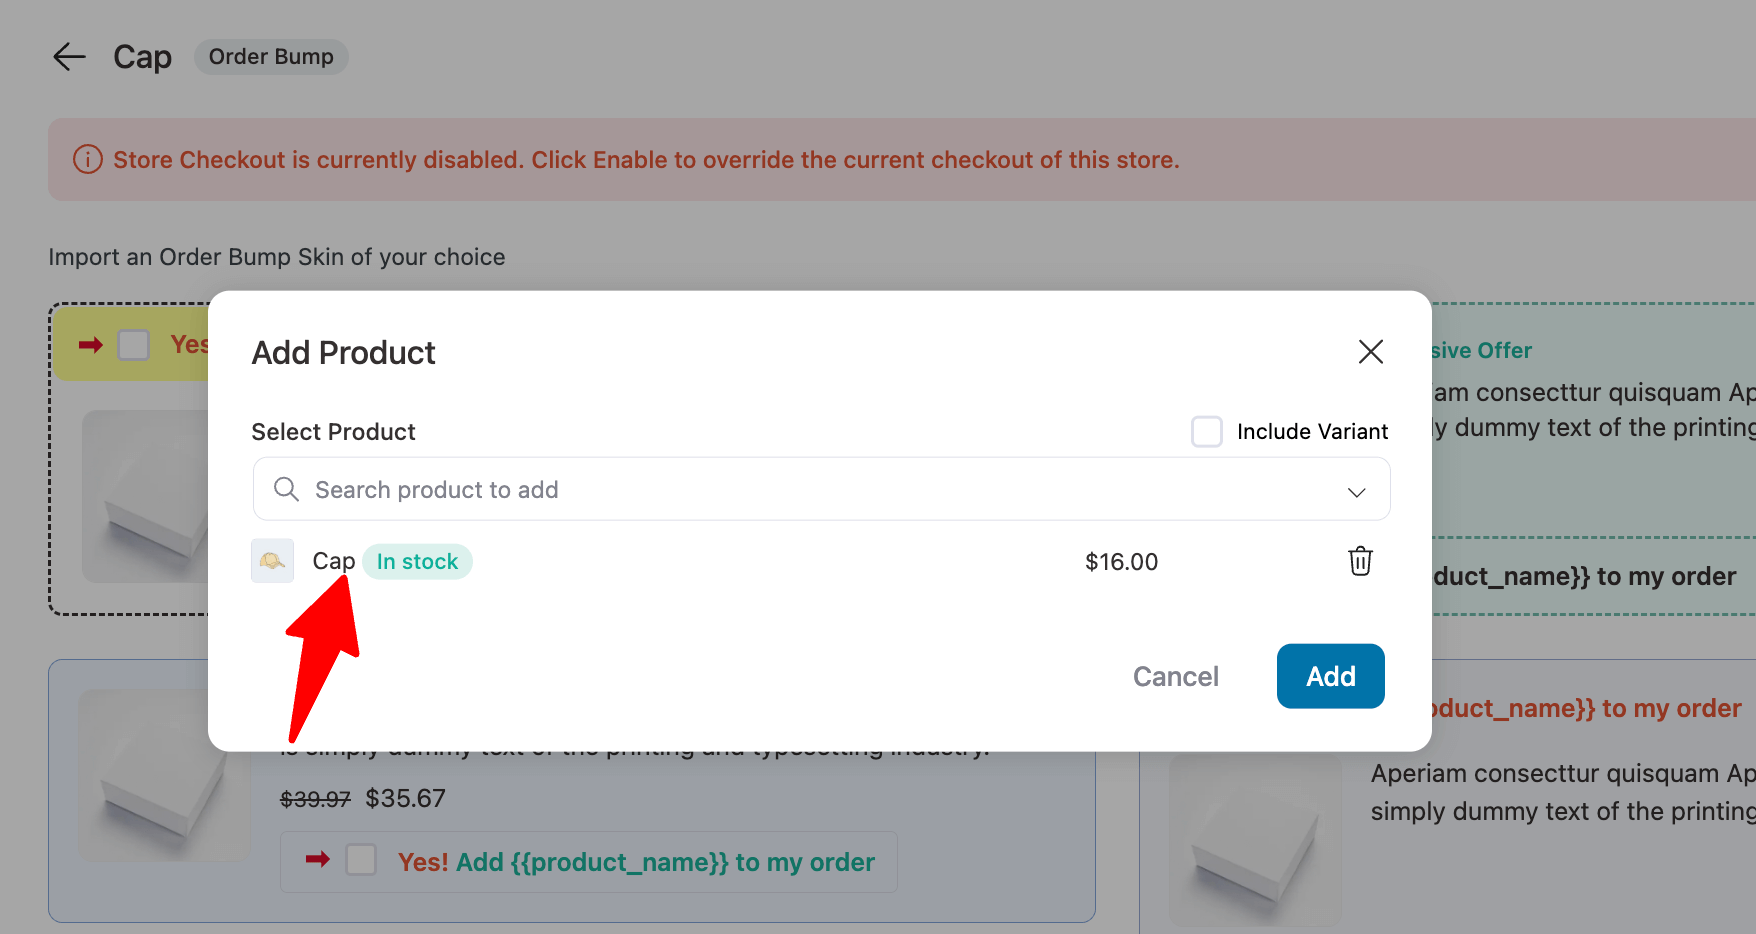
Now, search for the product and click 'Add'.
This will add an order-bump step to your store's checkout funnel.
Next, set the call-to-action text and description that will show up on the checkout page.
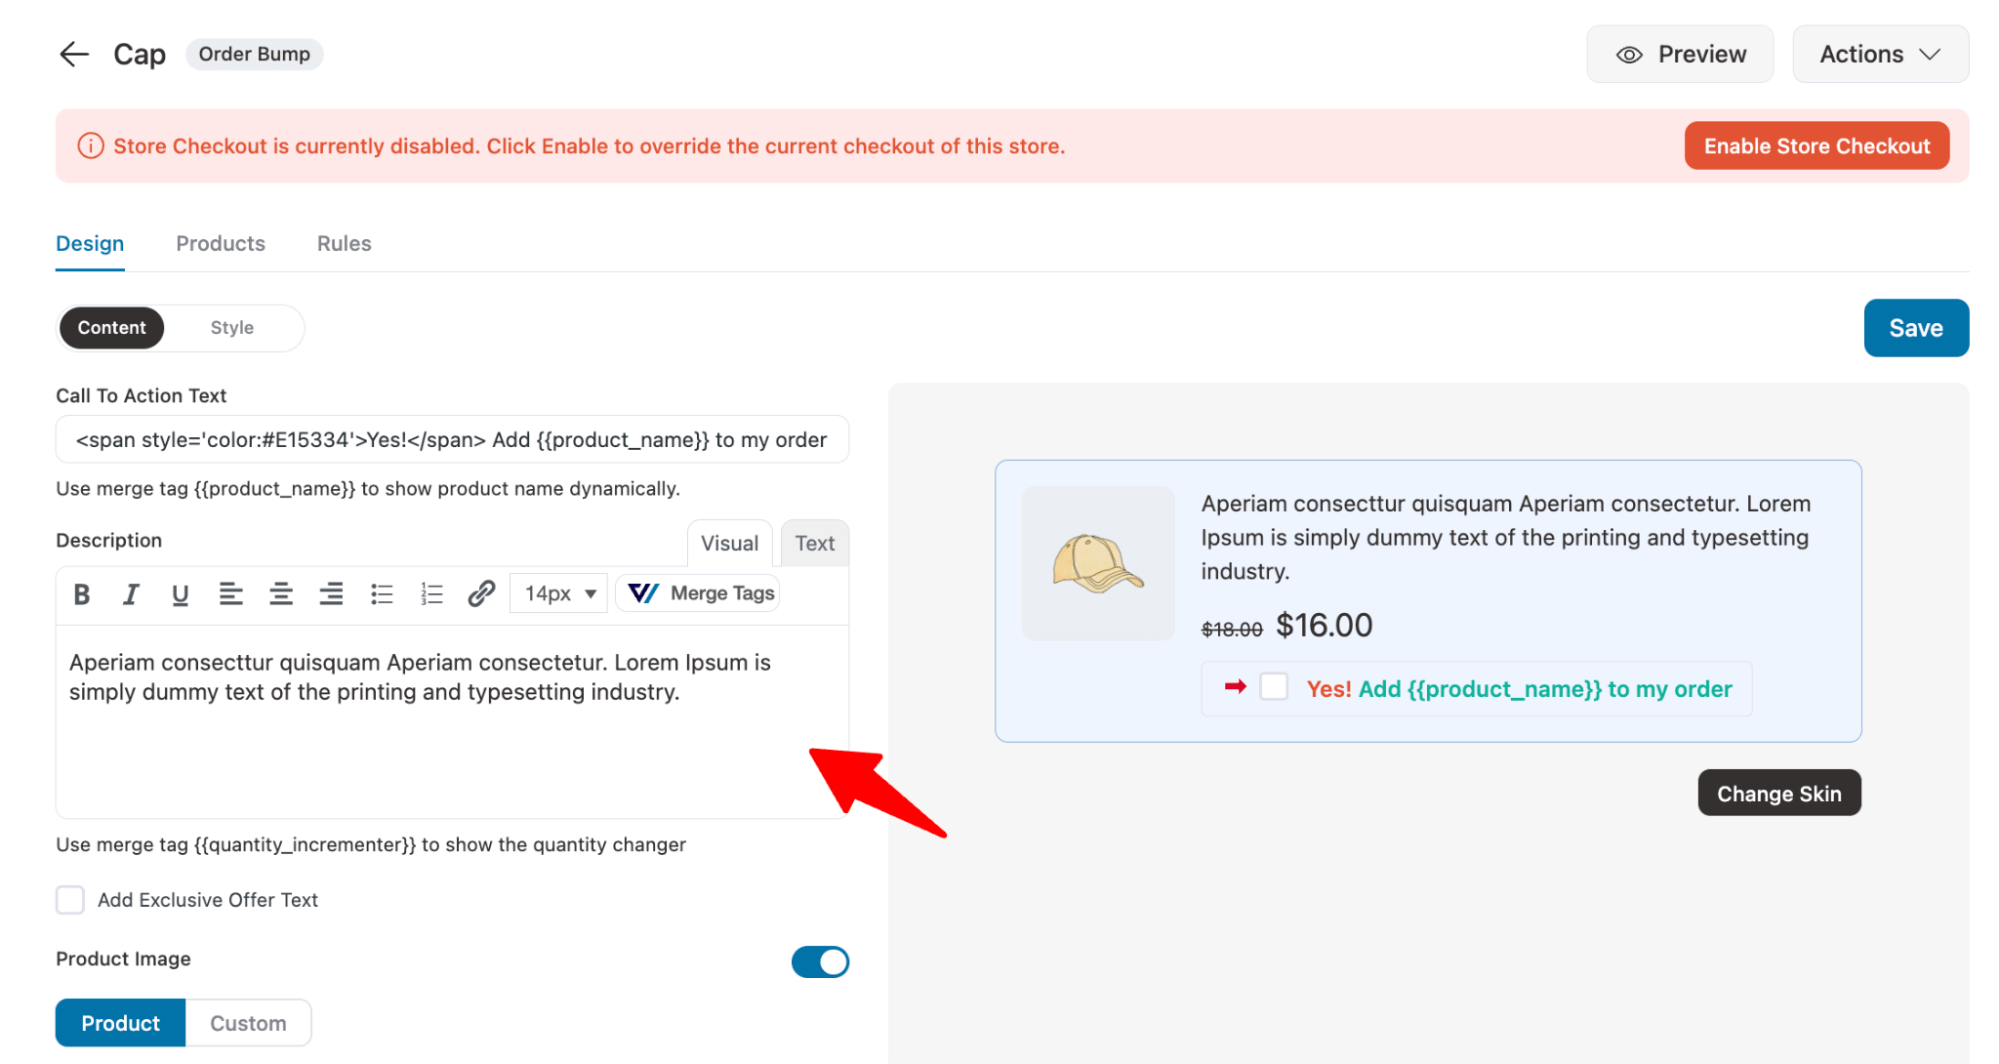
Move to the Style tab. Here, you can choose the position where the order bump will appear on the checkout page.
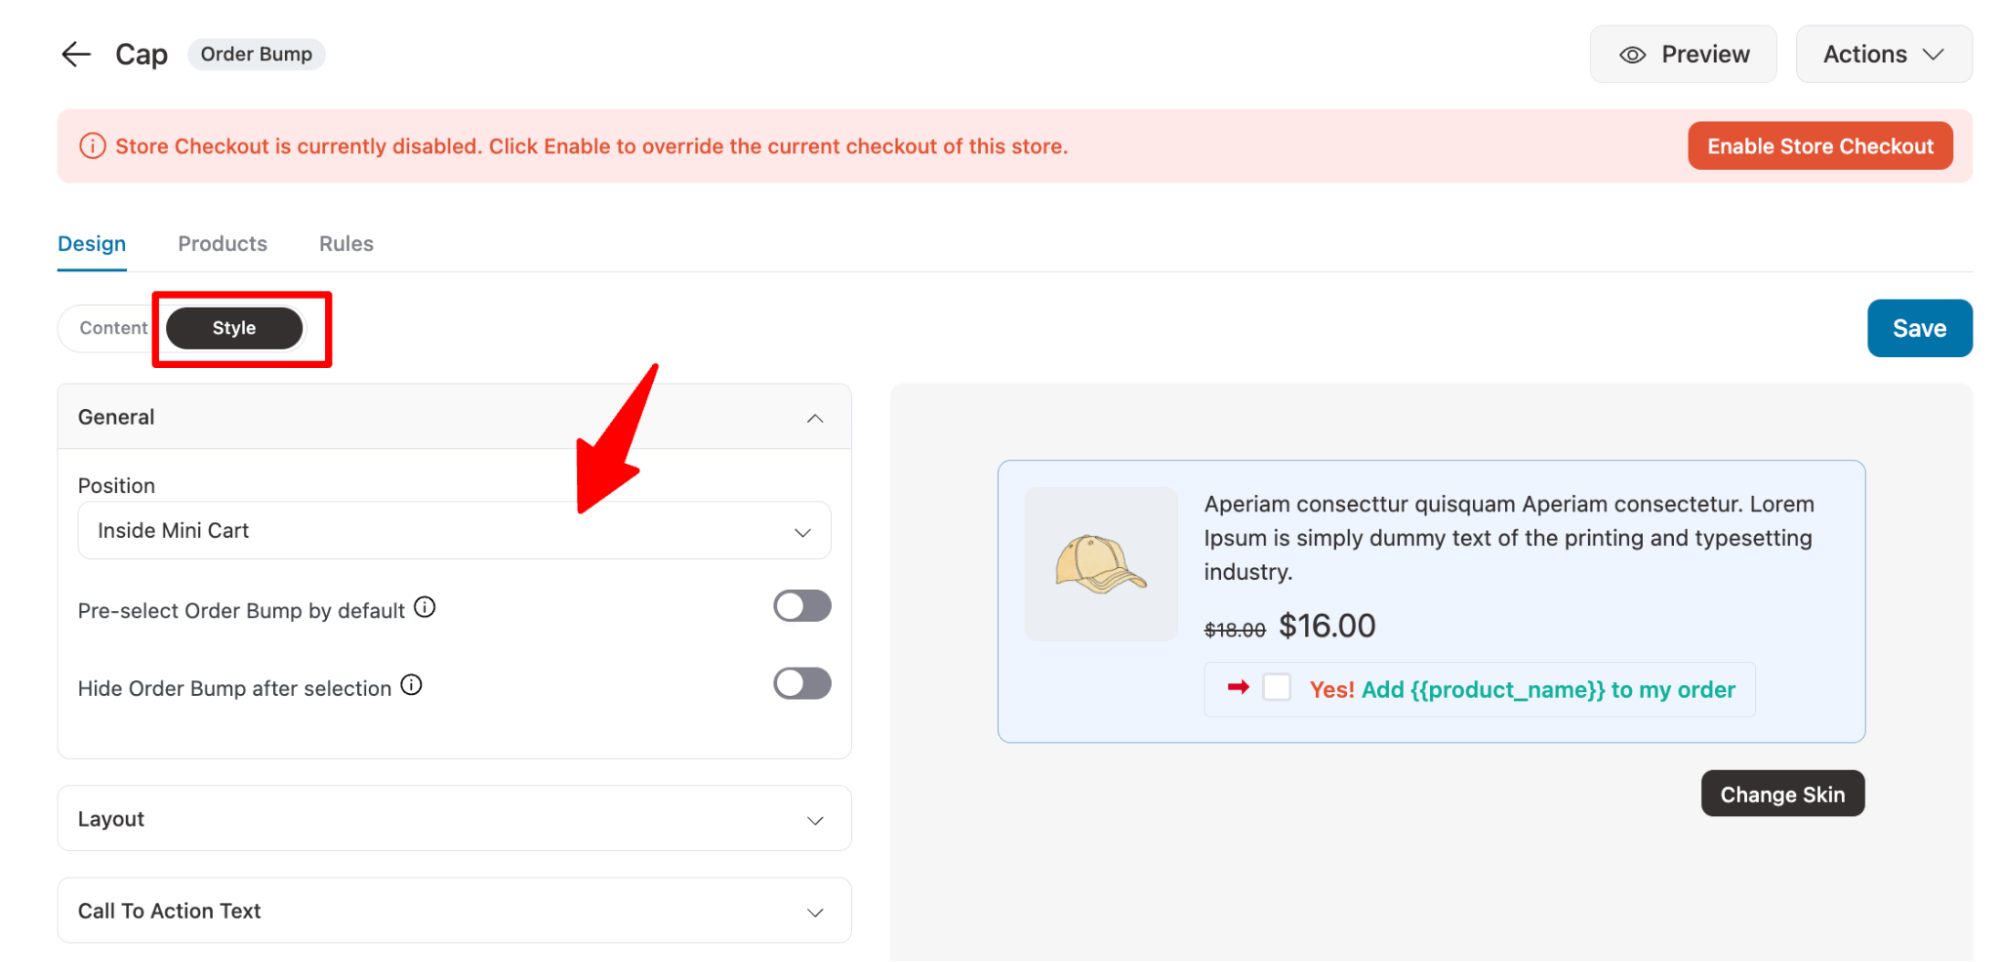
You can A/B test different order bump placements, and make sure to click 'Save' to apply the changes.
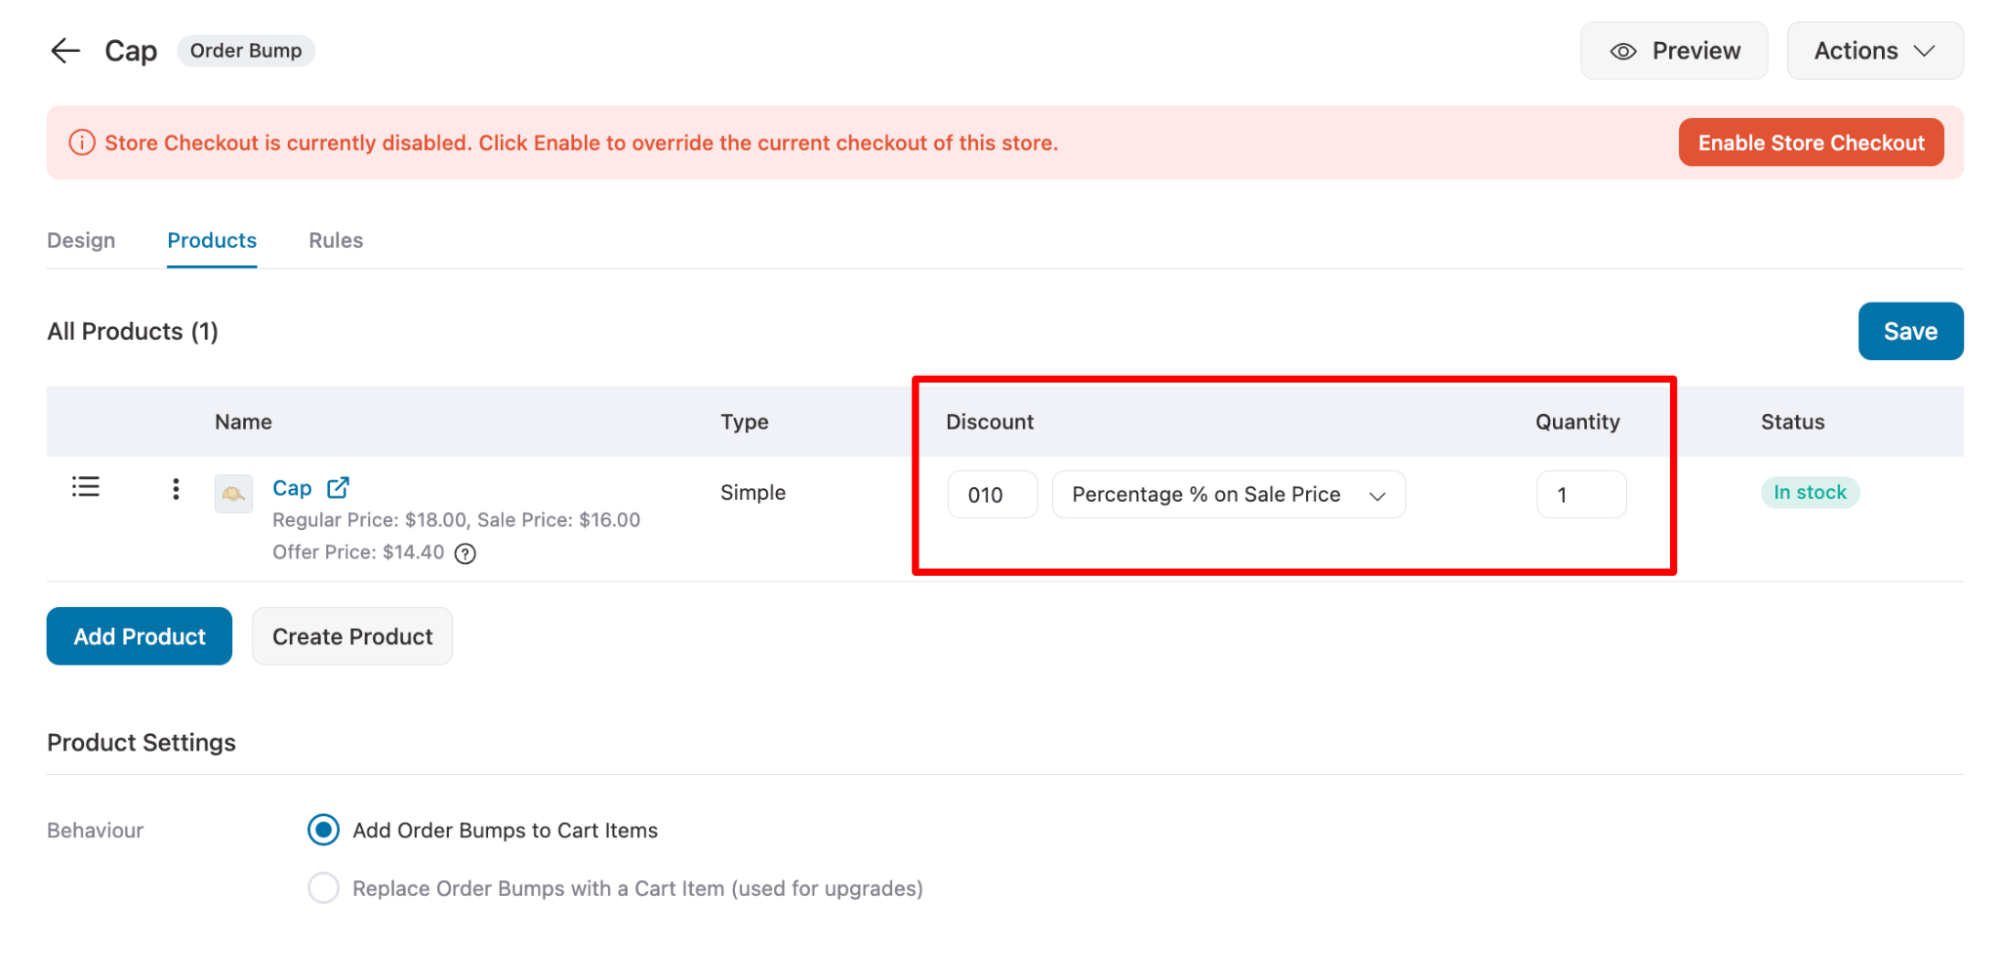
Next, move to the products tab to set the quantity and discount.
You can set different conditions using the Rules Engine to make the related product offer more relevant.
For example, trigger order bumps for customers who purchase from a specific category or have previously purchased a particular item.
To do so, move to the Rules tab and click 'Add Rules'. Next, select the parameter, condition, and value. Add multiple rules based on your strategy.
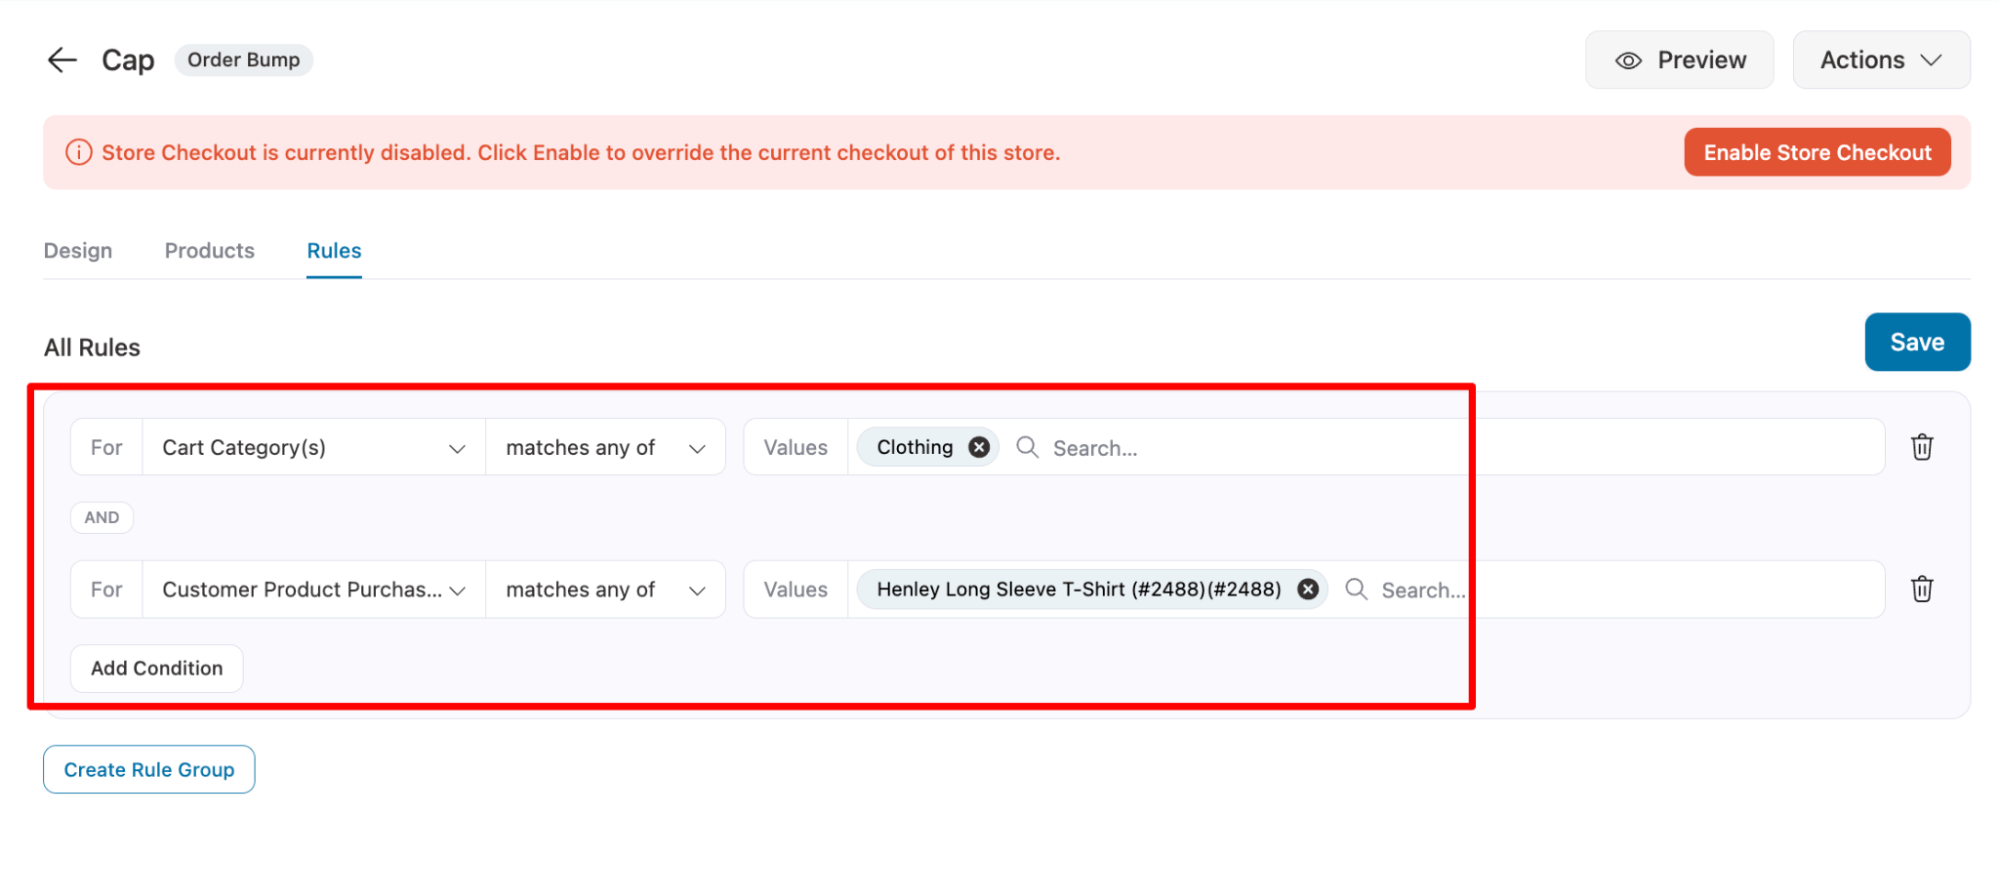
Make sure to click on Save.
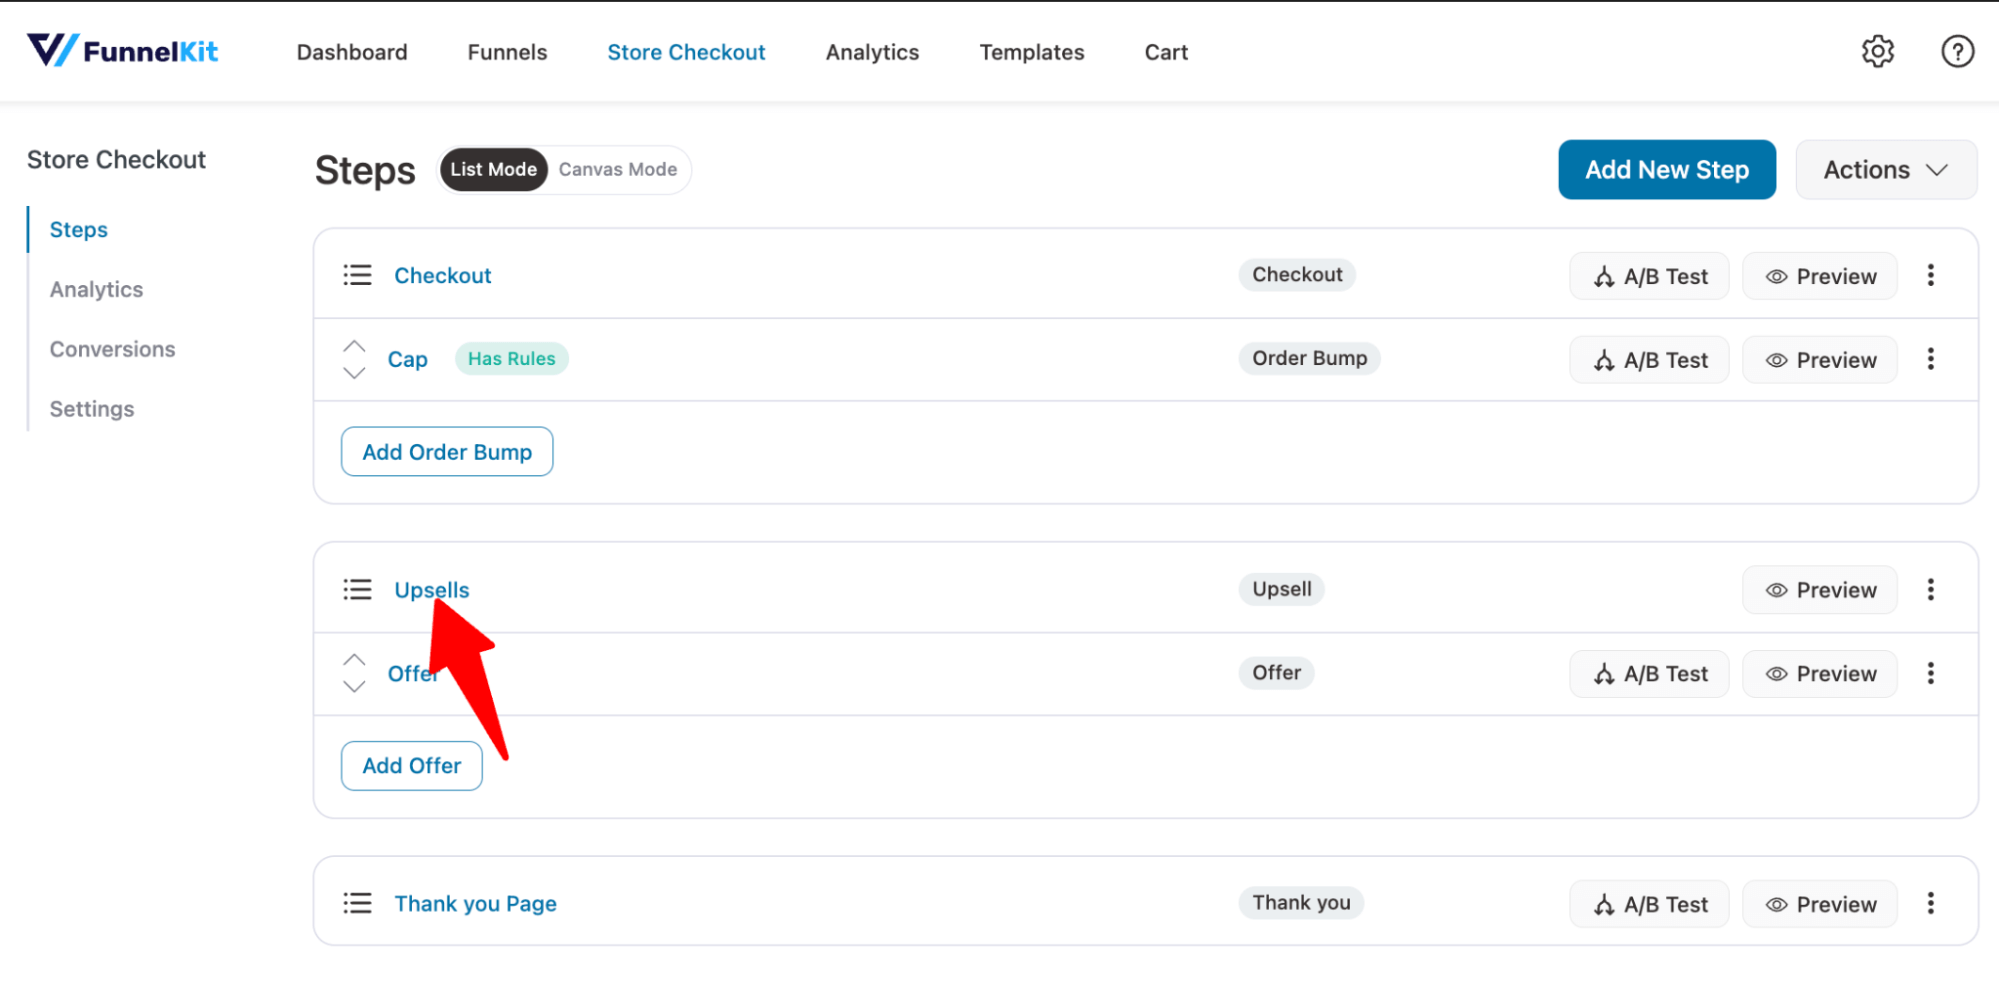
Step 4: Set up one-click post-purchase upsells
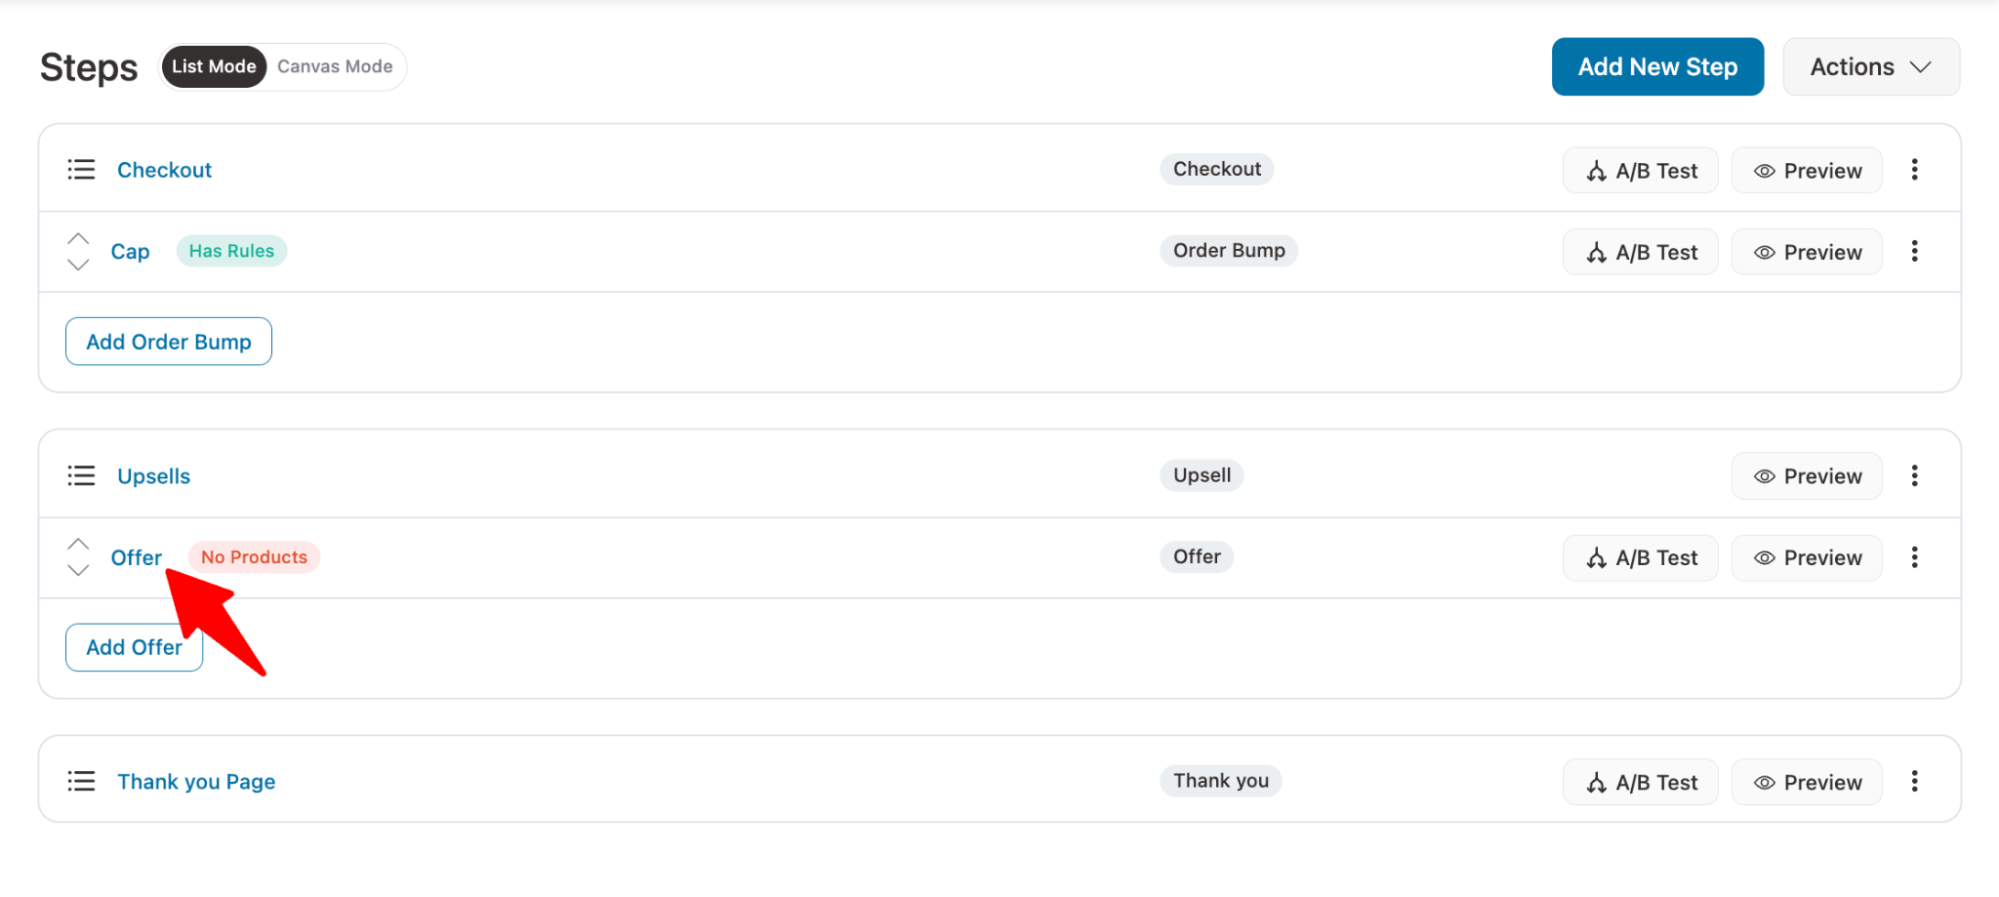
To offer a one-click upsell, hit the 'Offer' step.
On the design tab, you can customize the content and look of the upsell template.
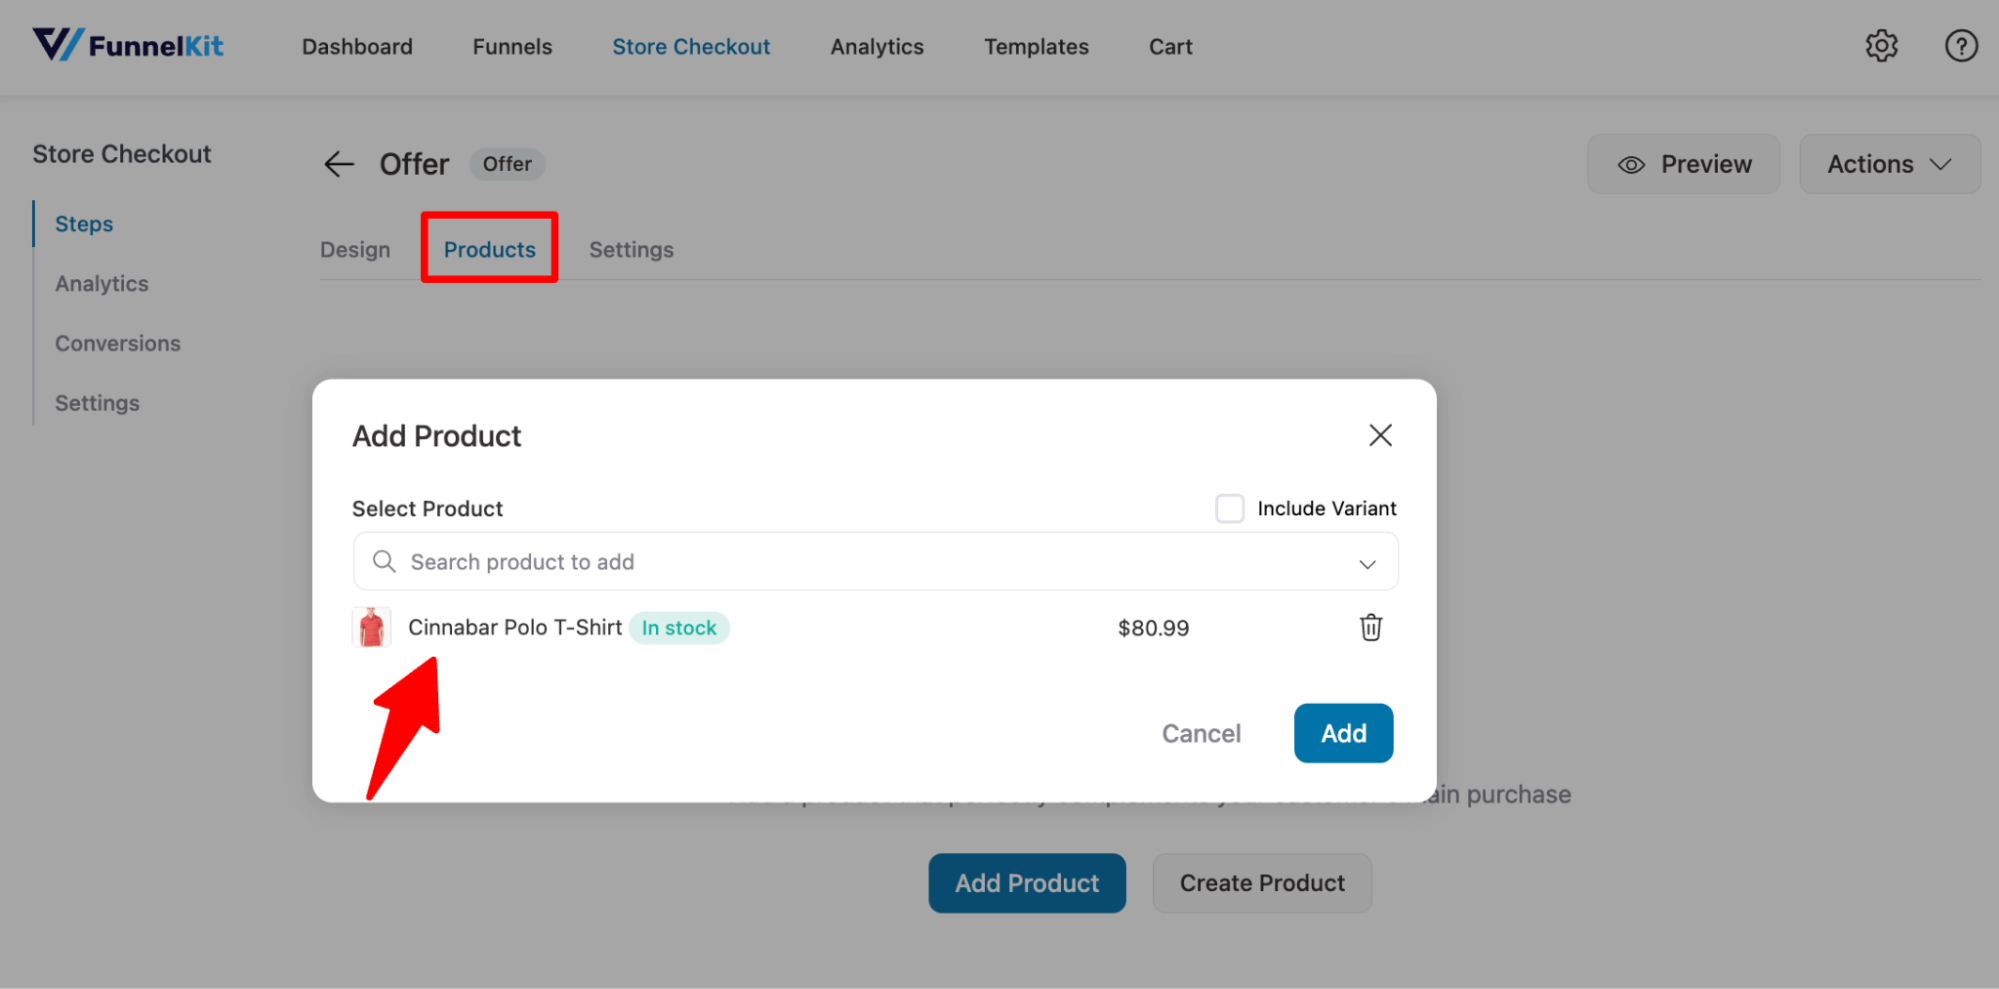
Now, move to the Products tab. Click on 'Add Product', search for the product, and select it from the dropdown.
After that, click the "Add" button to add the product as an upsell offer.
Add a discount if you want. We recommend checking the 'Skip this offer if the product(s) exist in the parent order' option. You can also allow users to choose the quantity.
You can set flat shipping also if needed.
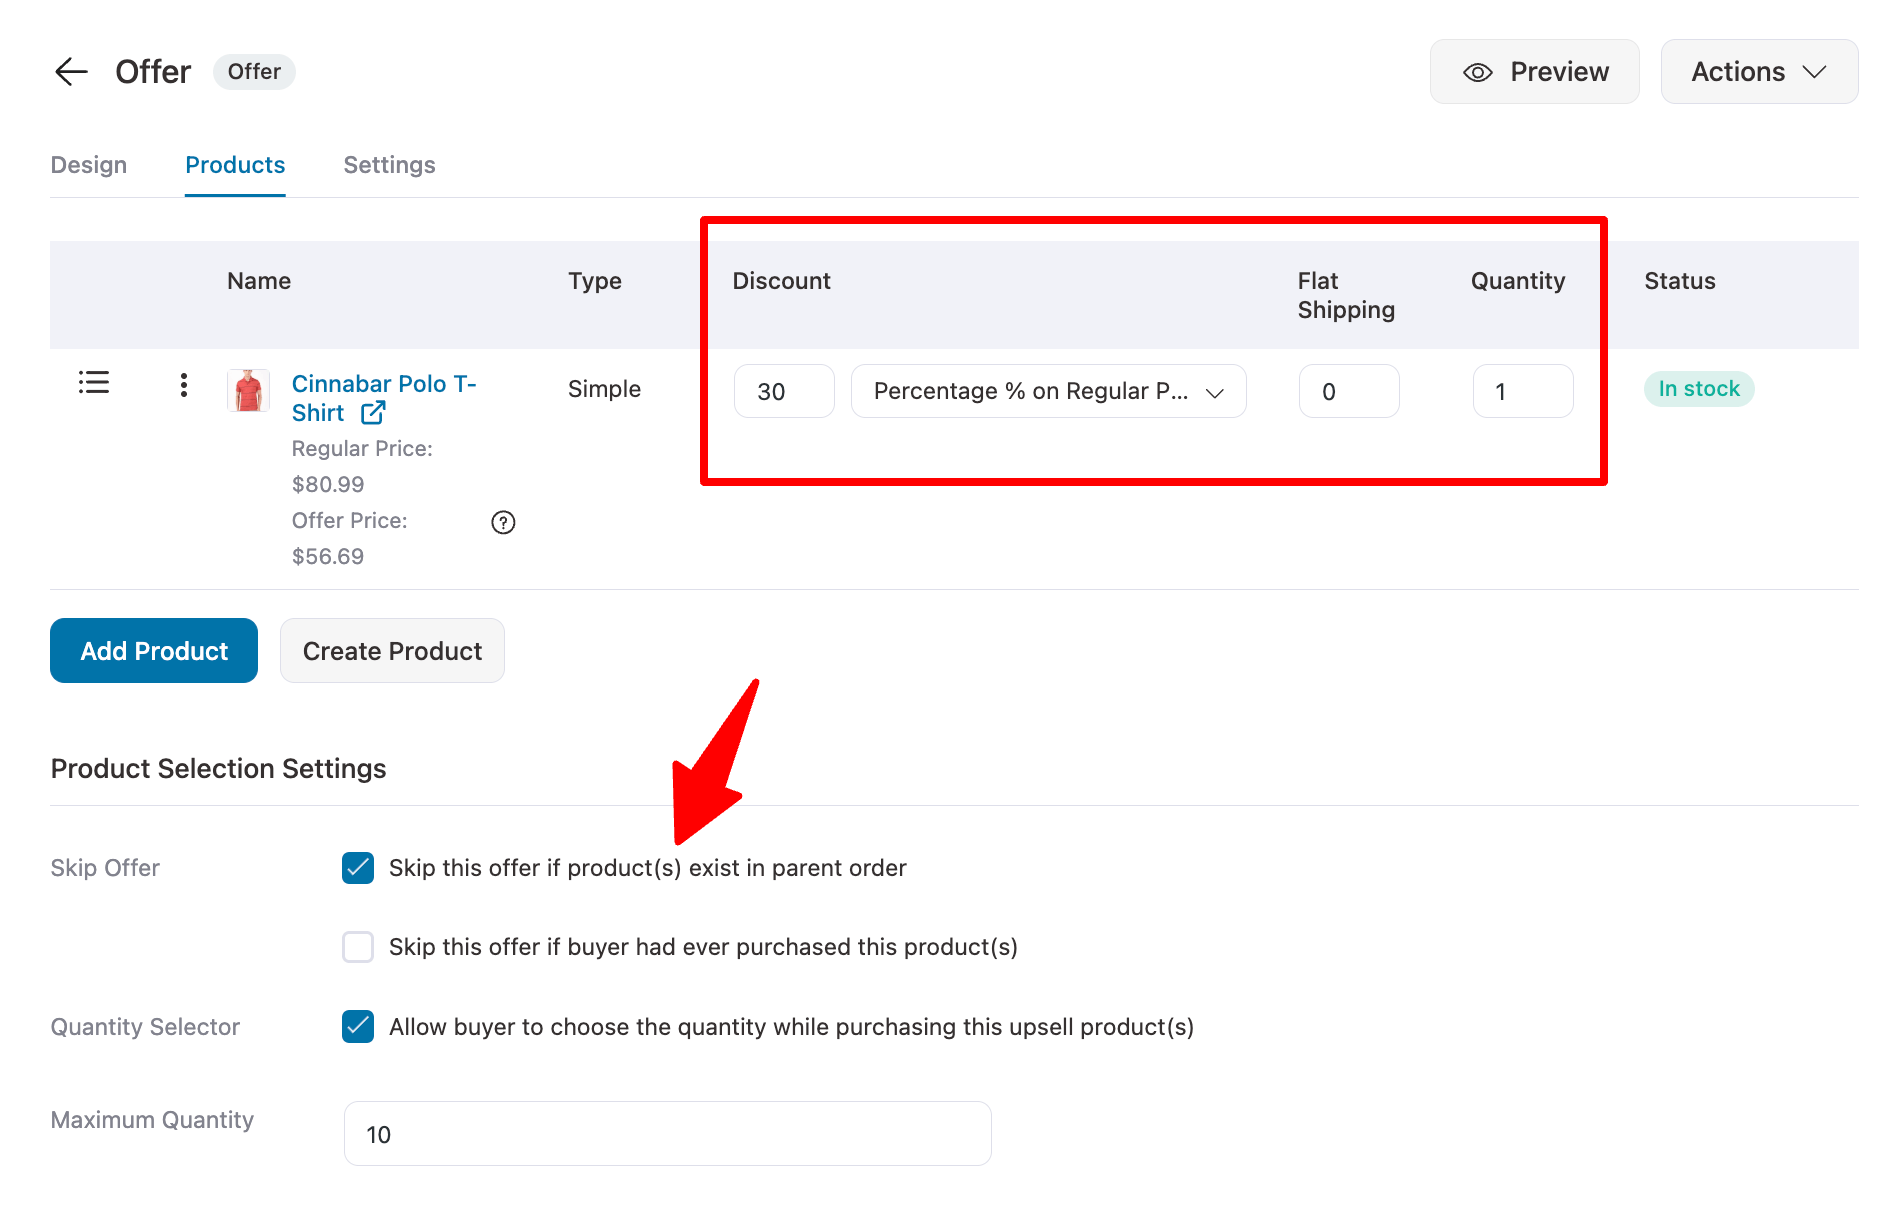
Make sure to click on 'Save' to update.
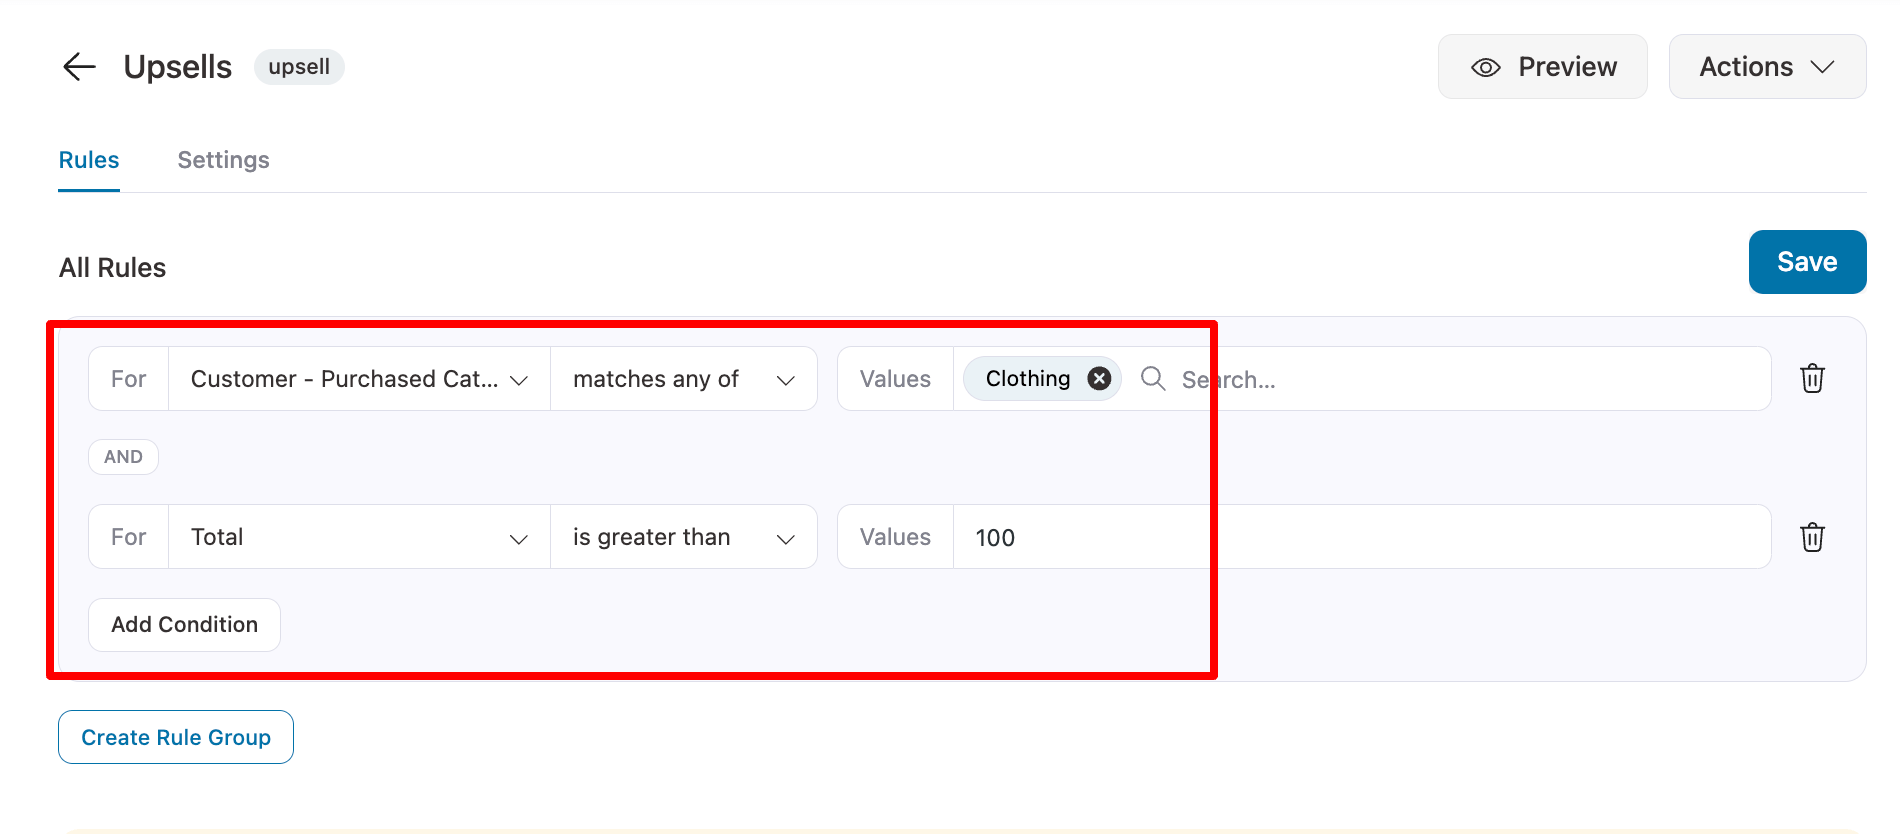
To make the offer more effective, you can apply rules similar to those used with the order bump. To do so, click on the Upsell step.
Next, navigate to the Rules tab and click Add Rules. Then, set the conditions. To make the offer more relevant, you can add a condition, such as requiring that a customer have previously purchased in the same category.
Additionally, you can only offer to VIP customers or to customers with items worth over $100, as they are more likely to accept a high-value offer after completing their purchase.
Make sure to click on the 'Save' button when done
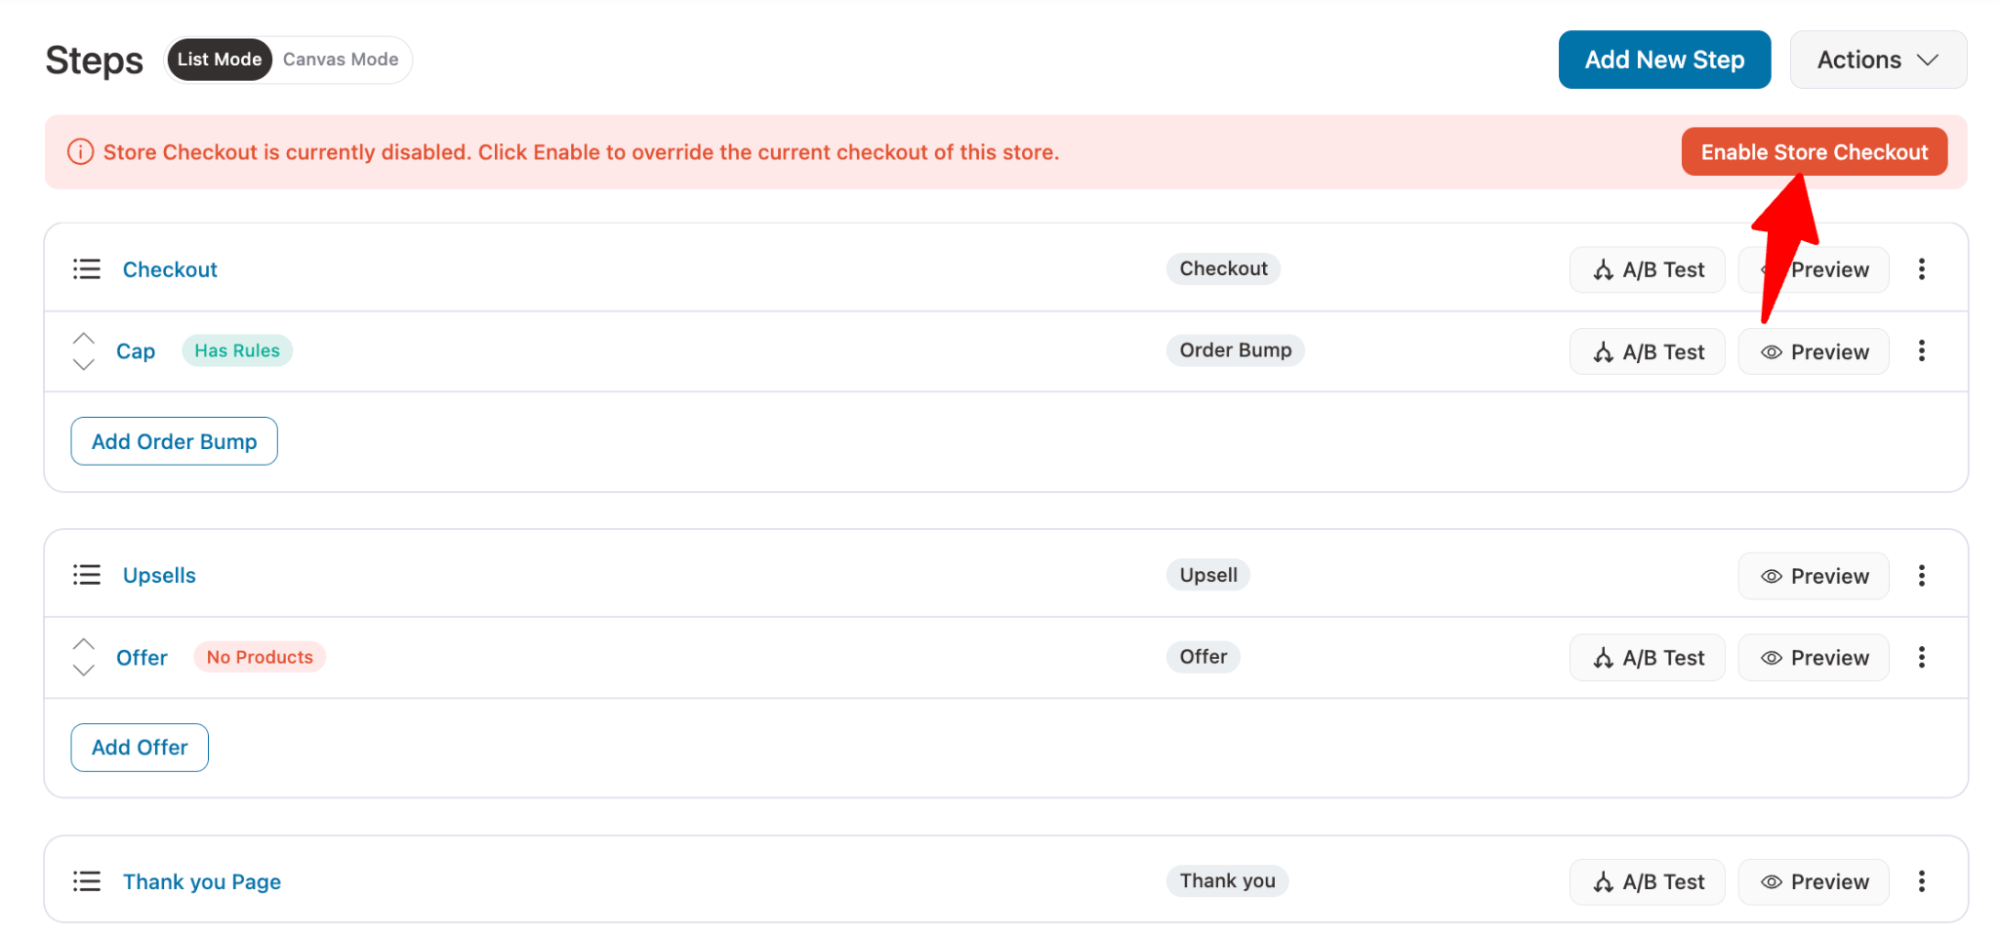
Step 5: Activate the store checkout
Lastly, enable the 'Enable Store Checkout' option.
Related Products Not Showing? Common Fixes
If the block is missing or showing the wrong items, work through these in order:
- No shared tags or categories
If a product doesn't share a category or tag with any other product, there's nothing for WooCommerce to relate it to. Add or align categories/tags.
- Your theme doesn't output the block
Some themes (and page-builder single-product templates) remove or override the related products hook.
Test with a default theme like Storefront to confirm, then re-add it in your theme or via the [related_products] shortcode.
- Caching is serving a stale block
WooCommerce stores related products in transients, and page/object caching can freeze the output. Clear transients (WooCommerce → Status → Tools) and your caching plugin/CDN cache.
- Too few qualifying products
Out-of-stock products (when hidden) and draft/hidden products don't count. If most matches are out of stock, the block shrinks or disappears.
Custom code changed the count to 0, or a filter is excluding everything. Re-check any woocommerce_output_related_products_args or woocommerce_related_products snippets.
Frequently Asked Questions
WooCommerce builds the related products list from your product taxonomy:
- It looks at the categories and tags assigned to the current product.
- It finds other published, in-stock, visible products that share at least one of those categories or tags.
- It excludes the current product and any out-of-stock items (if you hide out-of-stock products).
- It randomizes the results and displays them by default, up to 4 products depending on your theme.
Here are two consequences to understand:
- Tags are powerful: If you overuse a generic tag like "sale" across unrelated products, WooCommerce will treat them all as related. Tag deliberately.
- Order is random by default: Related products aren’t sorted by price, popularity, or date out of the box. The orderby is set to rand, which is also why the block looks different on reload.
If the block is showing irrelevant items, the fix is almost always in your categories and tags, not in code. Clean taxonomy produces clean recommendations.
If you need manual control, handpicking related products, relating by attribute, or building sliders and “frequently bought together” blocks, a plugin is the right tool, since the native feature can’t be hand-curated. For a full breakdown of options, see our roundup of the best plugins to customize or disable WooCommerce-related products.
For broader recommendation strategies, our guide to WooCommerce product recommendation tools also covers cart, checkout, and post-purchase placements.
You can turn off related products in WooCommerce by removing the output hook with remove_action( 'woocommerce_after_single_product_summary', 'woocommerce_output_related_products', 20 ); in your child theme’s functions.php. Or you can use a plugin that disables the block. CSS hiding works visually, but still runs the query.
No, you cannot manually select related products without a plugin, because WooCommerce generates them automatically from the taxonomy. To handpick them, you’ll need the woocommerce_related_products filter or a dedicated plugin. For manual recommendations without code, use upsells and cross-sells instead.
You can show related products by category only by first disabling the tag matching with add_filter( 'woocommerce_product_related_posts_relate_by_tag', '__return_false' ); so WooCommerce relates products by shared categories only. Use the relate_by_category filter to do the reverse.
Take Full Control of Your WooCommerce Related Products
Setting up related products in WooCommerce isn’t just a checkbox task. It’s a strategic opportunity to guide buying behavior, reduce friction, and increase your average order value without needing more traffic.
Start with the native options, use upsells and cross-sells to suggest smarter choices and helpful add-ons.
For stores that want to turn product recommendations into measurable revenue, we recommend pairing a clean native setup with FunnelKit, which adds behavior-based offers at the cart, checkout, and post-purchase moments where buying intent is highest.
Always remember, stores that recommend smarter win bigger.
So whether you’re just getting started or optimizing an existing funnel, remember it’s not just about what you sell but when, where, and how you present it.
More WooCommerce Guides to Explore:
- Best WooCommerce Related Products Plugins
- Best WooCommerce Product Recommendation Plugins
- How to Offer Order Bumps on the Checkout Page
- How to Build a High-Converting WooCommerce Sales Funnel
Editorial Team
June 24, 2026Customer interactions, purchases, and support tickets happen constantly. A WooCommerce CRM gives you a centralized place to track them all on a single screen. Your store already records everything. Every...

Editorial Team
June 24, 2026Want to make your store better without spending a dime? These free WooCommerce plugins enhance sales, streamline tasks, and enhance the shopping experience. While launching a WooCommerce store is easy,...

Editorial Team
June 24, 2026Finding a WordPress sales funnel builder that actually works is harder than it looks. Most plugins on the market do one or two things well and quietly skip the rest....


