
Are you looking to add a donation feature at the checkout page of your WooCommerce store?
Loyalty isn’t built just on discount coupons. It’s built on connection and shared values.
When your WooCommerce store gives customers the chance to support a meaningful cause at checkout, it leaves a lasting impression.
Adding a donation option is a simple yet powerful way to show what your brand stands for and invite your customers to stand with you.
Whether you're raising money for a nonprofit, supporting a local community, or backing a cause that aligns with your brand, allowing customers to donate at checkout can make a real difference.
In this guide, we’ll show you how to add a donation option to your checkout page.
Table of Contents
- 1 How to Add a Donation Feature to the WooCommerce Checkout Page?
- 1.1 Step 1: Install and activate the Donation for WooCommerce plugin
- 1.2 Step 2: Configure the general settings
- 1.3 Step 3: Create a donation campaign
- 1.4 Step 4: Create a store checkout page
- 1.5 Step 5: Customize the checkout form fields
- 1.6 Step 6: Optimize the checkout page for conversion
- 1.7 Step 7: Enable the store checkout
- 1.8 Step 8: Preview and test the donation feature with the new checkout page
- 2 6 Tips to Follow When Adding a Donation at a Checkout Page
- 3 Frequently Asked Questions About WooCommerce Donation Plugin
- 4 Final Thoughts on Adding Donations at Checkout
How to Add a Donation Feature to the WooCommerce Checkout Page?
WooCommerce, by default, does not offer the option to add a donation option at checkout.
However, with additional WooCommerce donation plugins, you can accept custom or preset amounts, add donation fields at checkout, enable one-time or recurring contributions, and track donations with built-in reports.
We will use two plugins to add donations to the WooCommerce checkout for successful fund collection.
The donation plugin for WooCommerce makes it easy for stores to accept donations at checkout. Customers can choose how much they want to donate from the customizable options. It makes it suitable for supporting causes or fundraising. Plus, it’s a simple way to boost donations through your WooCommerce store.
FunnelKit Funnel Builder helps you create appealing checkout templates that showcase donation options and enhance the user experience. Unlike the default WooCommerce setup, FunnelKit offers customizable checkout styles, including one-page, multi-step, and Shopify-style options.
This means the panel is entirely under your control and has 100% flexibility and scalability.
The combination ensures that your donation feature functions smoothly and looks professional and inviting, creating a better customer experience and potentially increasing contributions.
Let’s get started:
Step 1: Install and activate the Donation for WooCommerce plugin
First, navigate to the page where you need to purchase the plugin.
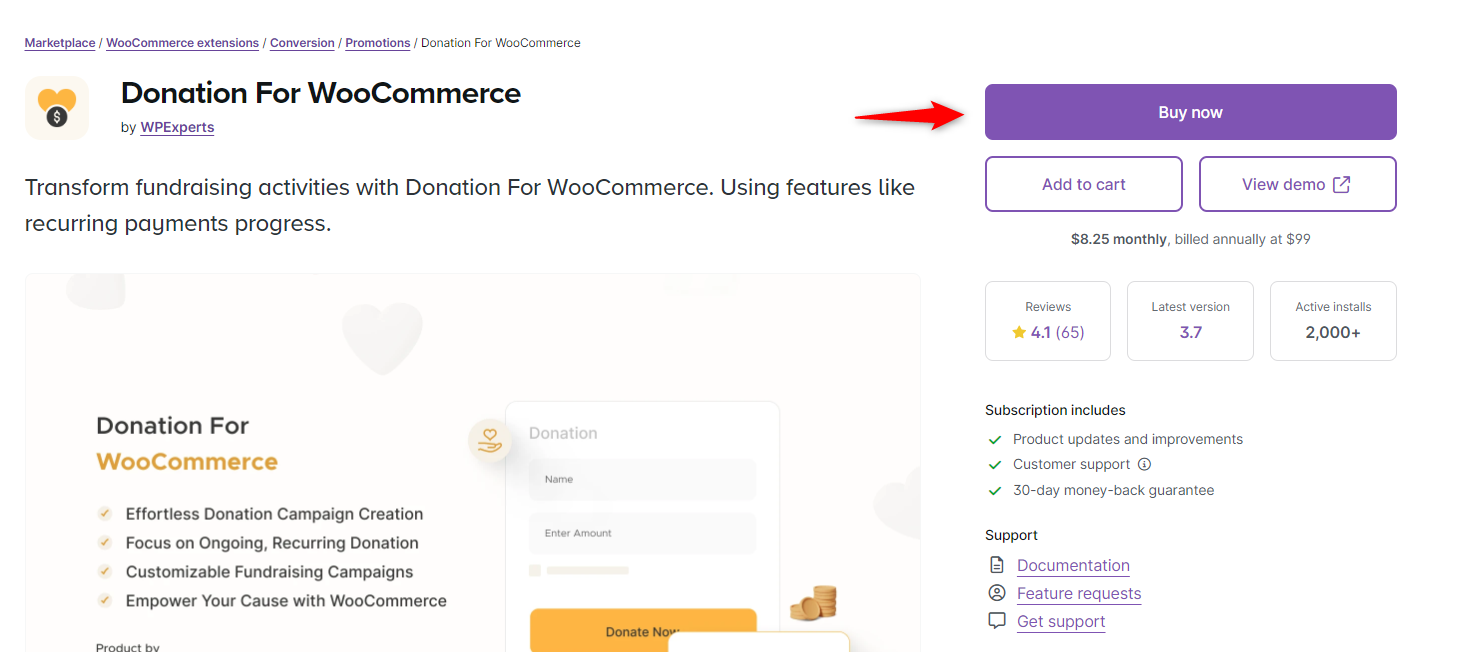
Then, you’ll get a zip file to use. Go to your dashboard plugin area, upload the file, and install the plugin.
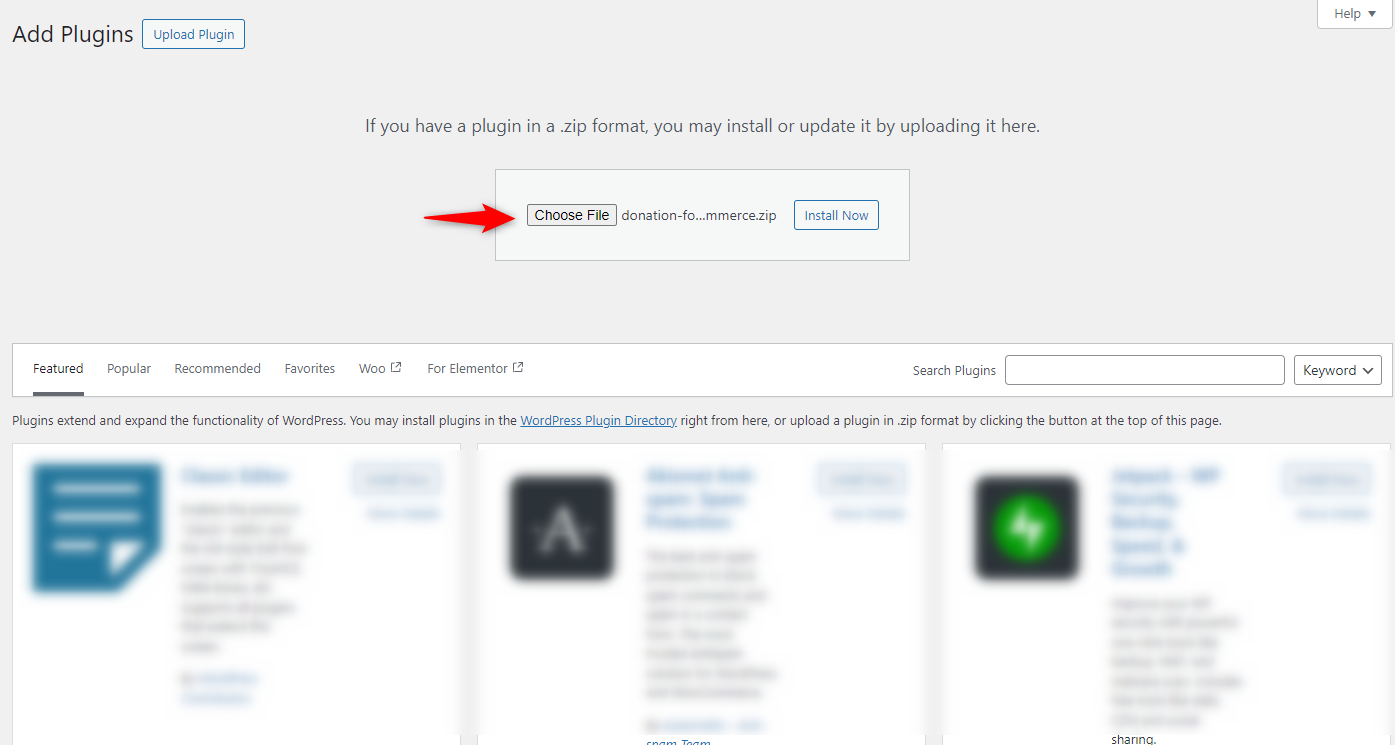
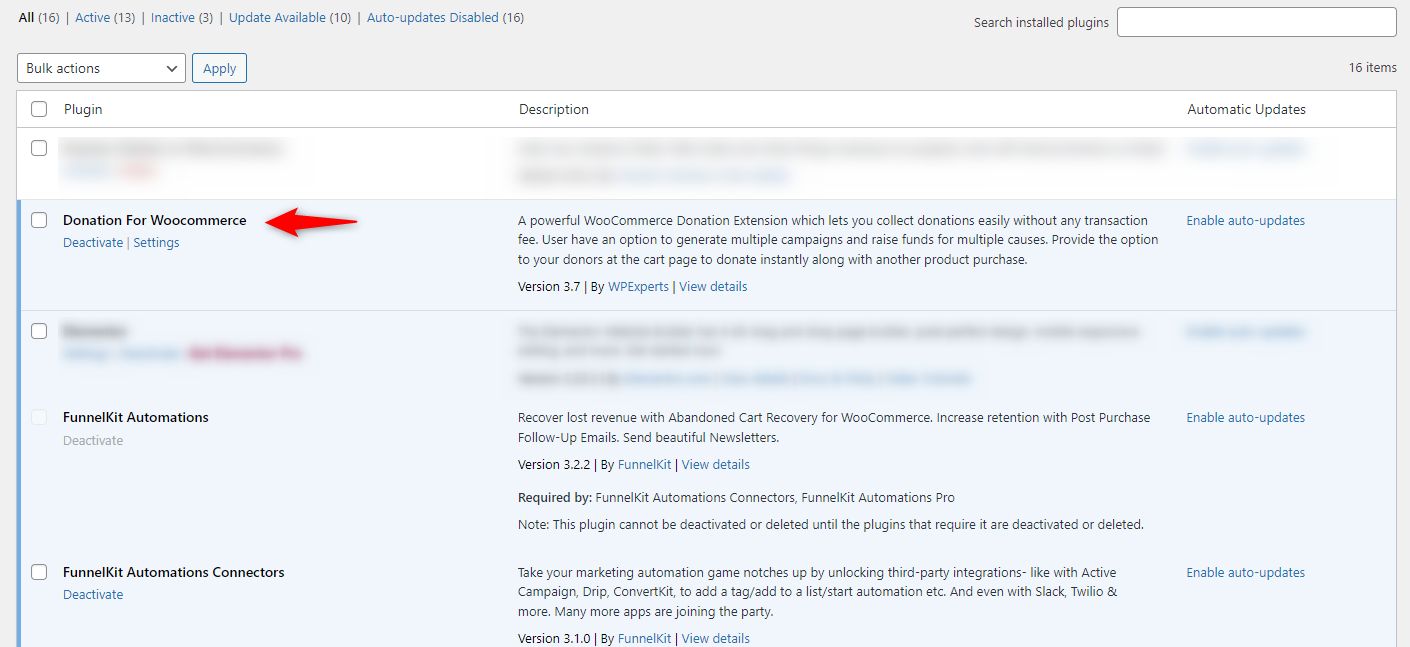
We have already installed the plugin. But from your end, you need to activate the plugin.
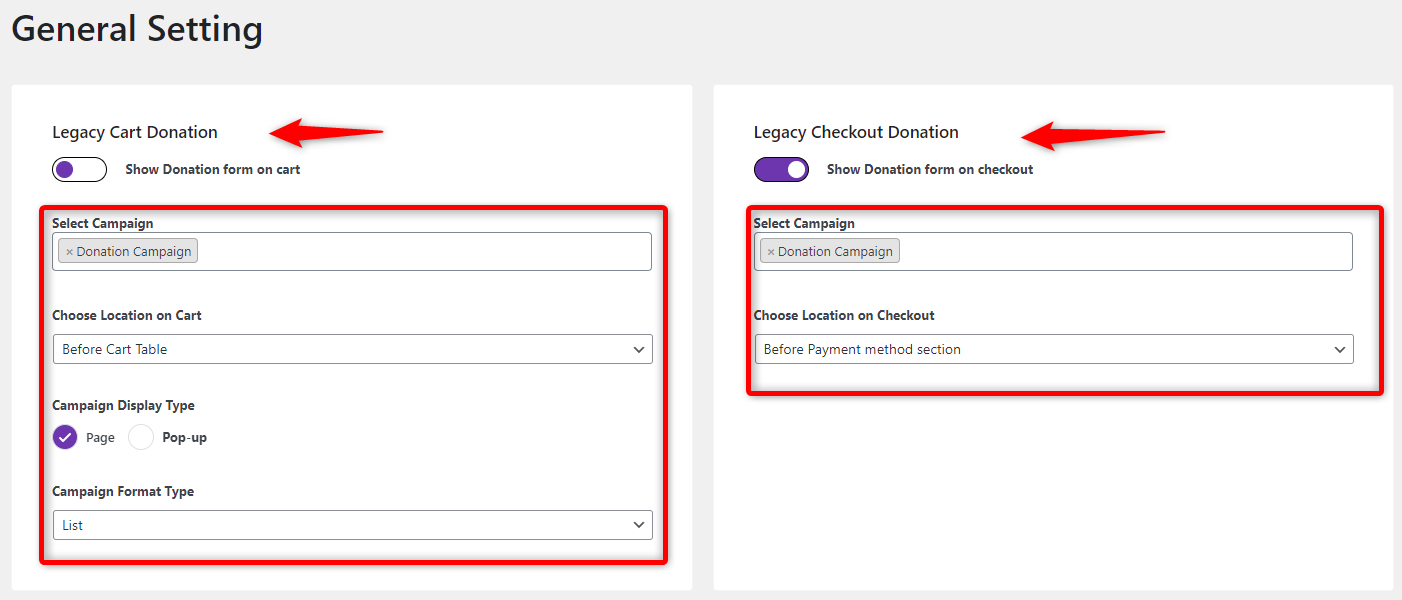
Step 2: Configure the general settings
It’s time to configure the plugin's general settings.
Navigate to its general settings page and configure these options.
- Legacy cart donation means showing a donation campaign on the cart page
- Legacy checkout donation means showing the donation campaign on the checkout page
- Select the campaign that you want to show
- Determine where you want to show the donation (both on the cart and checkout page)
- The format and the position
We're enabling the option since we want to show it on the checkout page.
Once you’re done, save the changes.
Step 3: Create a donation campaign
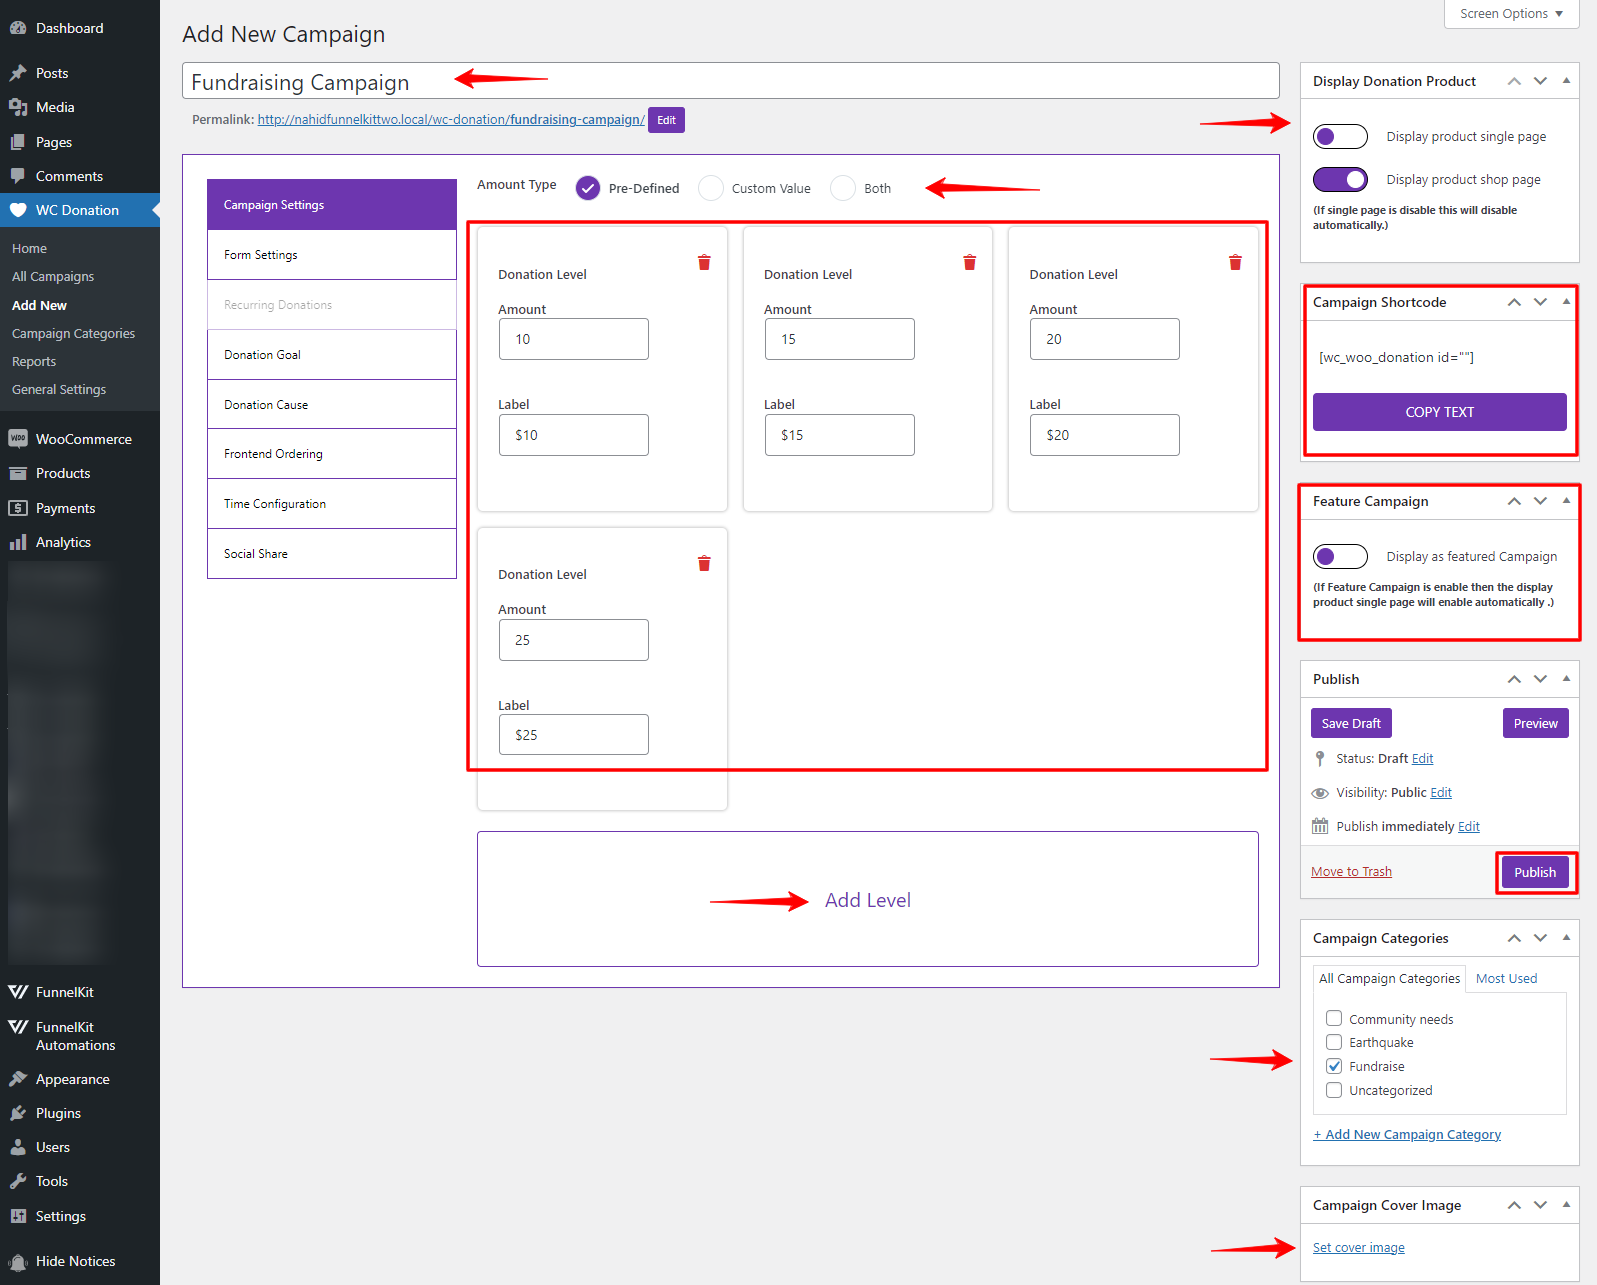
The next step is to create a campaign. To do that, navigate to WC Donation>Add New.
Here you need to configure these things.
- Enter a campaign title
- Select the amount type
- You can choose from three different types of donation amounts:
- Pre-defined: Set specific amounts that users can choose from.
- Custom value: Allow users to enter any donation amount of their choice.
- Both: Provide users with the option to select from predefined amounts or enter a custom amount.
- You can choose from three different types of donation amounts:
- Add levels to add different donation levels or amounts for pre-defined values. For example, you could set multiple levels, such as $10, $20, or $50, each representing a specific contribution level.
- Custom range: Set a minimum and maximum amount to restrict the range of custom donation values.
- Display donation products to showcase the donation campaign on the single product and/or shop pages.
- Campaign shortcode
- It provides a shortcode [wc_woo_donation id="”] that you can copy and place on different pages to display this donation campaign.
- Feature campaign
- Toggle this option to display the campaign as featured
- Set campaign categories to help organize and filter it. Categories like “Community Needs,” “Earthquake,” “Fundraise,” etc., can be selected or added.
- Set a campaign cover image and then use the Publish button to make the campaign live.
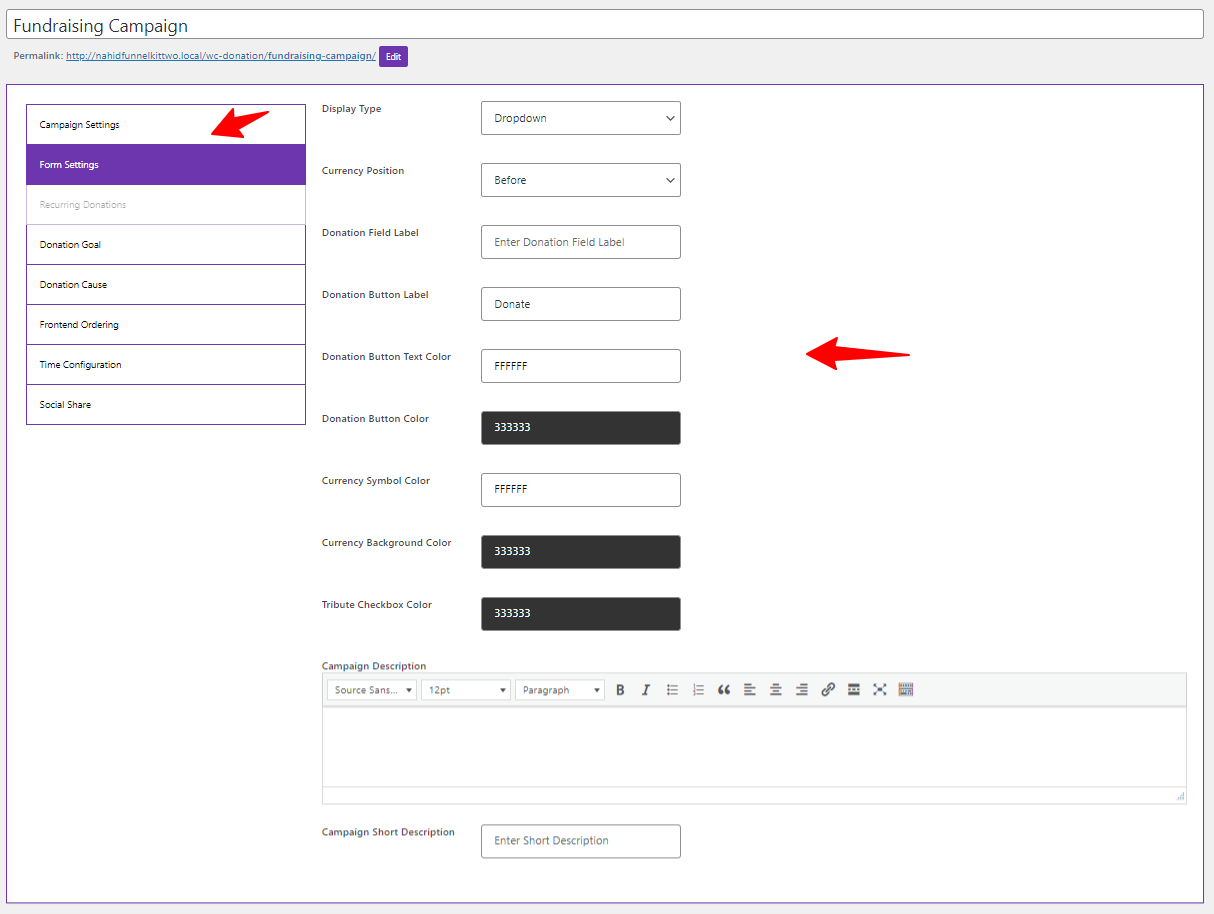
On the left side of the screen, tap on the form settings and configure these settings.
- Display type: Choose a dropdown or other display styles for the donation field.
- Currency position: Set whether the currency symbol appears before or after the amount.
- Donation field label: Customize the placeholder text for the donation field.
- Donation button label: Set the text for the donation button.
- Donation button text color: Choose the text color on the donation button using a hexadecimal color code.
- Donation button color: Customize the background color of the donation button.
- Currency symbol color: Select the color for the currency symbol displayed in the donation field.
- Currency background color: Define the background color for the currency field.
- Tribute checkbox color: If enabled, set the color for any additional checkbox elements in the form.
- Campaign description: Here, you can add a detailed description of the campaign, explaining the purpose and importance of the donations.
- Campaign short description: This field allows you to enter a brief description of the campaign, which can be displayed on the checkout or product pages to give customers a quick overview of the cause.
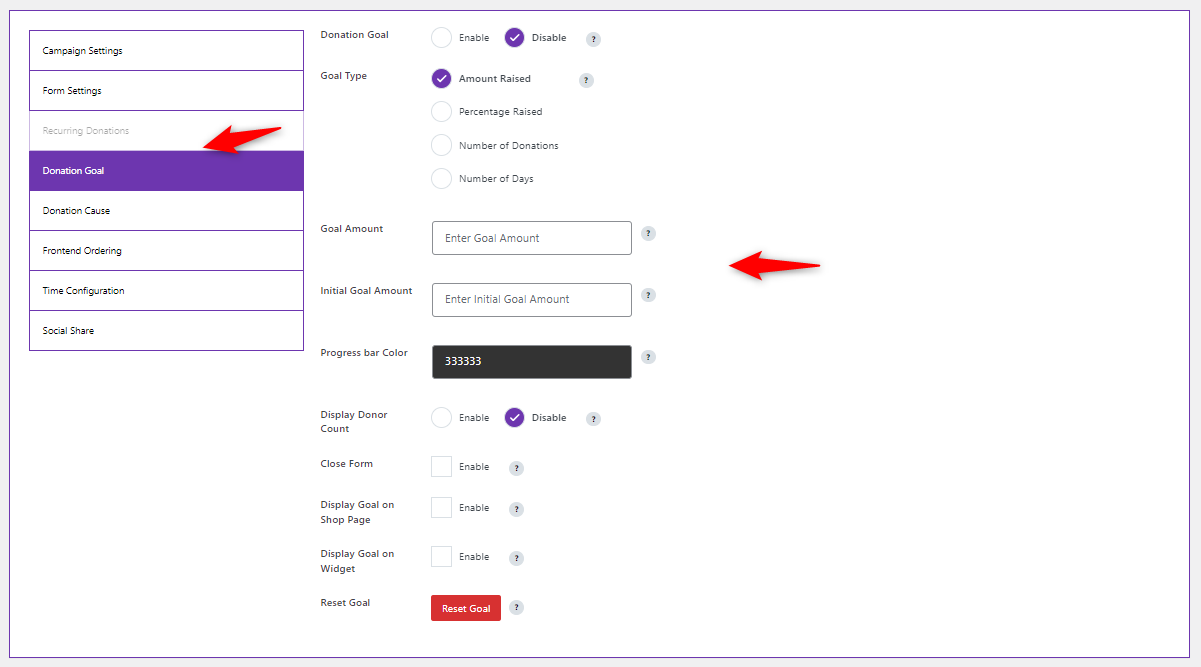
Tap on the donation goal to define the target amount for your campaign.
Also, configure these settings:
- Donation goal toggle: This toggle allows you to enable or disable the donation goal feature for this campaign. If enabled, A visible goal will show contributors the campaign’s progress toward a specific fundraising target.
- Goal Type
- Amount raised: Track the total dollar amount raised.
- Percentage raised: Display progress as a percentage of the target amount.
- Number of donations: Count the total number of individual contributions received.
- Number of days: Show how many days remain for the campaign or track a time-based goal.
- Goal amount: This field allows you to set the specific target amount you aim to raise for this campaign. Enter the total dollar amount here.
- Initial goal amount: This field sets the campaign's initial starting amount. If the campaign raised some funds before launching online, you can enter that amount here to reflect accurate progress.
- Progress bar color: This option allows you to customize the color of the progress bar to visually show how close the campaign is to reaching its goal. Enter a hexadecimal color code to match your brand’s design or desired color scheme.
- Other options include Display Donor Count, Display Options, Display Goal on Widget, and Reset Goal.
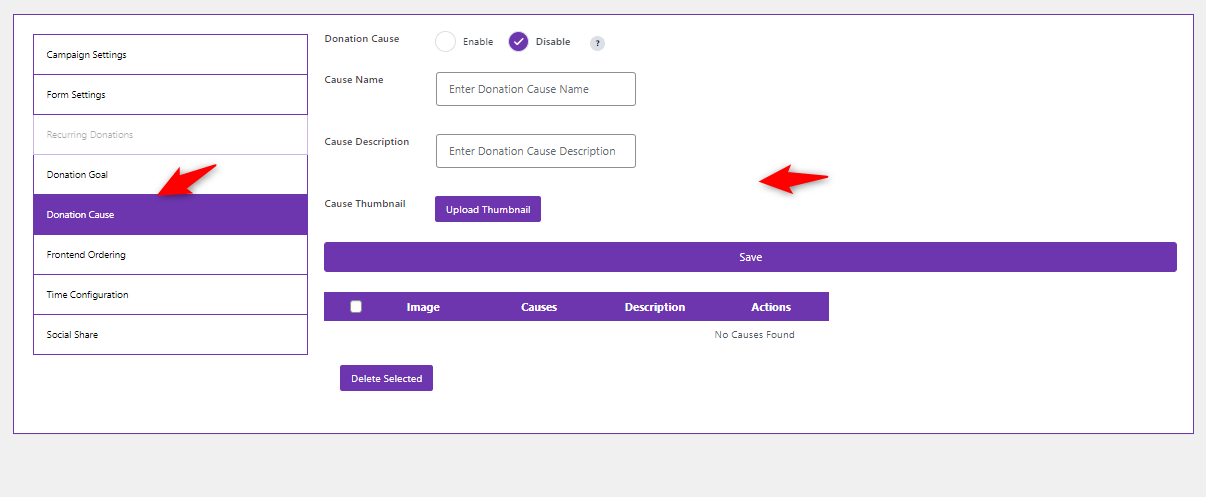
Set the donation cause: Specify the purpose of the campaign.
- Enable or disable the donation cause
- Donation cause name and description
- Use the Upload Thumbnail button to add an image representing the cause, which helps visually engage donors
- This section displays all added causes and allows you to manage them. You can select causes and delete them if needed.
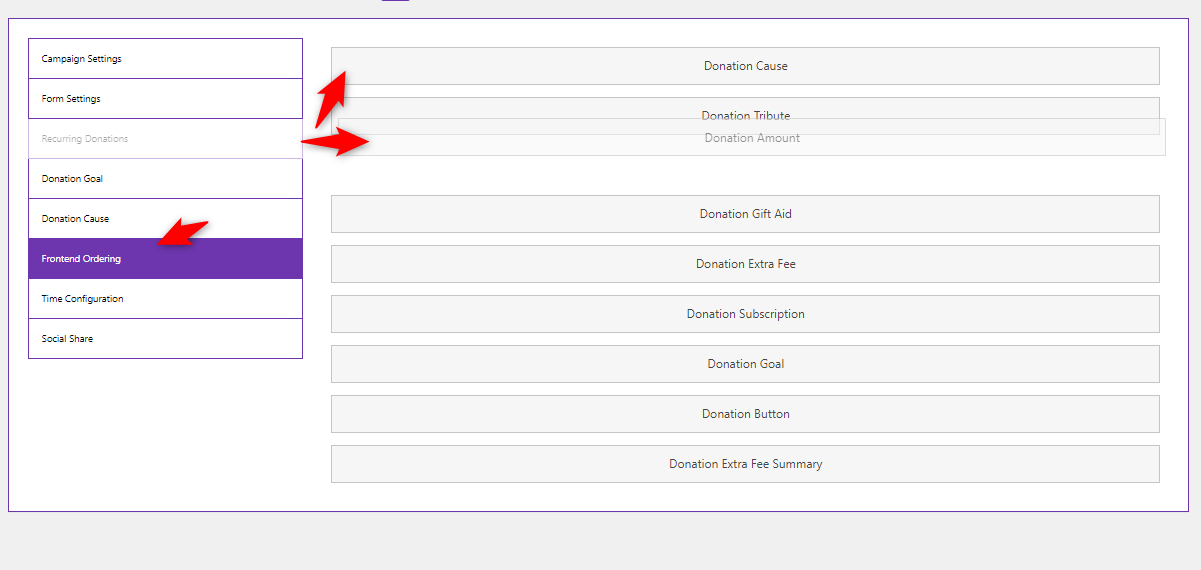
Frontend Ordering: Control the display order of donation levels on the front end.
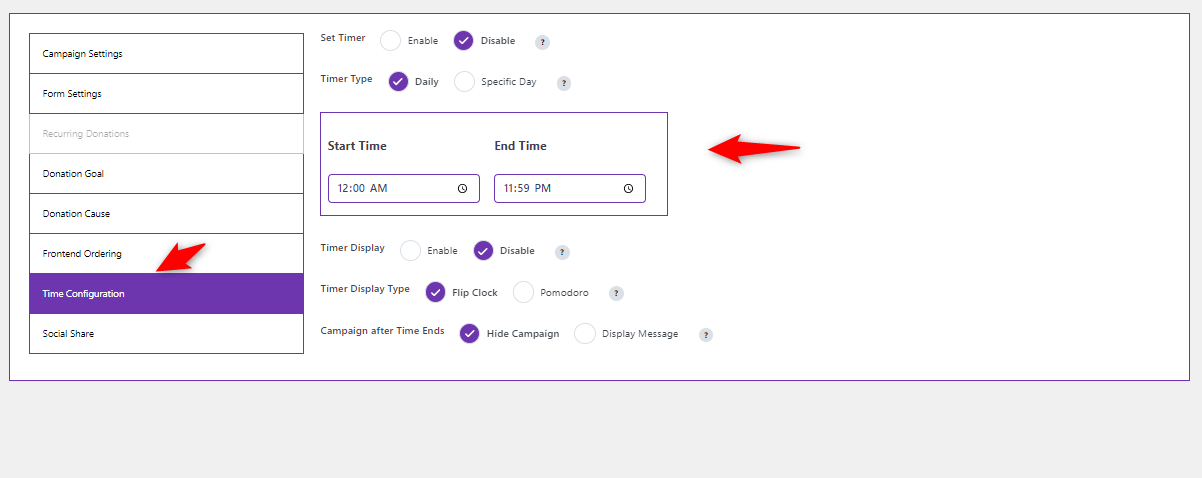
Tap on the time configuration.
- Set timer: Toggle to enable or disable a timer for the campaign, setting a time limit for donations.
- Timer type: Choose a daily or a specific day for when the campaign will be active.
- Start and end time: Set the start and end times for the campaign, controlling when donations are accepted each day or on specific dates.
- Timer display and type: Enable the timer display and choose between Flip Clock or Pomodoro style to show countdown time to users.
- Campaign after time ends: Select whether to hide the Campaign or display a Message when the timer expires.
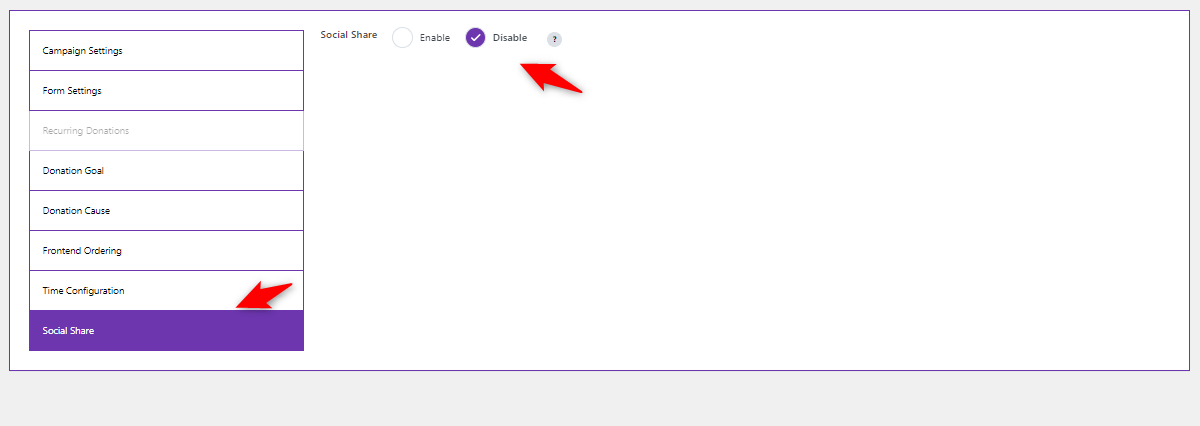
Social Share: Add social sharing options to increase campaign visibility. By default, it’s disabled. But you can enable it from here. Once you’re done, hit the publish button to make your donation live.
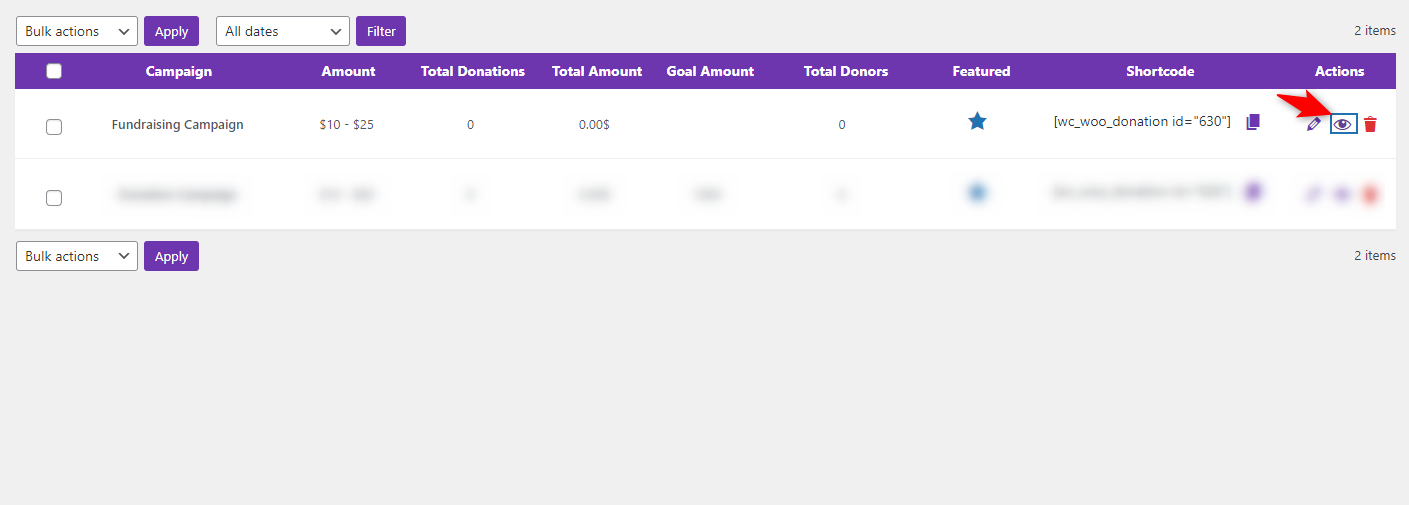
You’ll get an individual URL for the donation. You can find them on the “All Campaigns” page. You can preview, edit, or delete them.
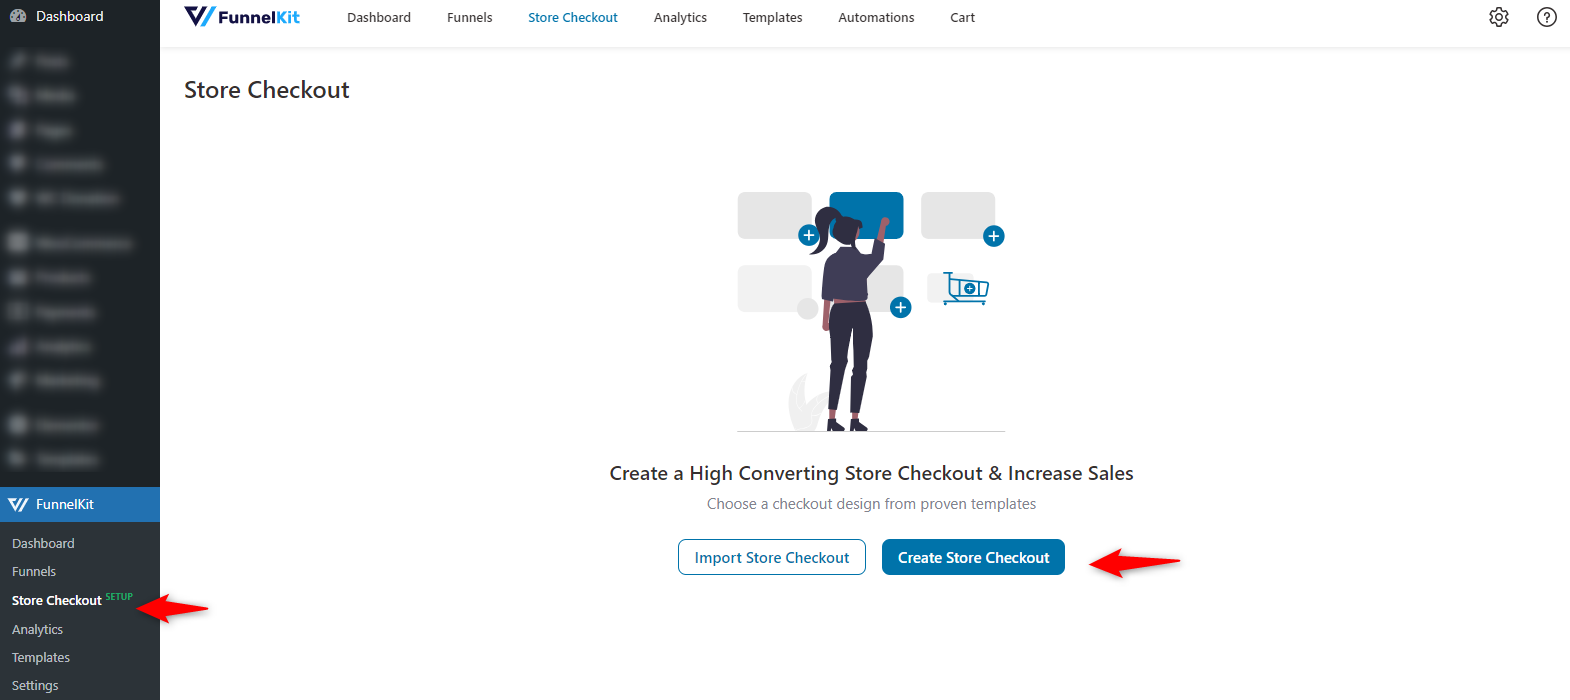
Step 4: Create a store checkout page
Now, we’ll create a dedicated checkout page with FunnelKit Funnel Builder to test the donation feature.
To do so, navigate to FunnelKit > Store Checkout and click the “Create Store Checkout” button.
Additionally, there's an option for Other (Using Shortcodes) to add more flexibility. These integrations allow you to create visually appealing and user-friendly checkout pages that match your brand's style to improve customer experience and engagement.
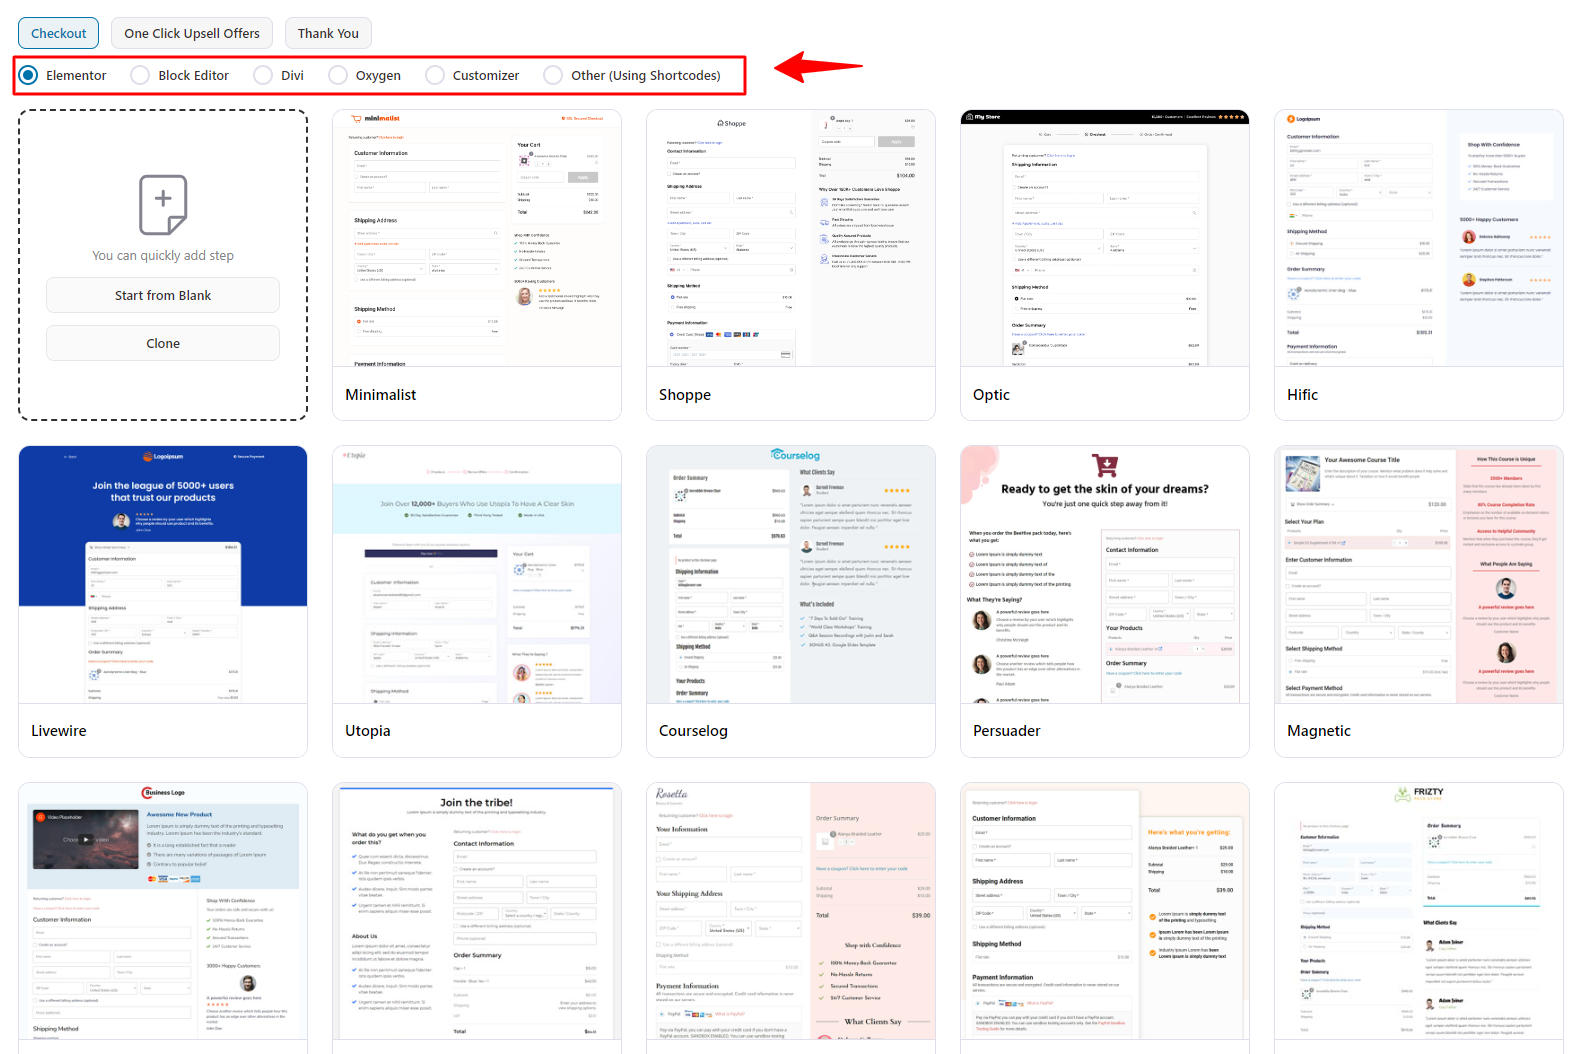
Now, choose your preferred checkout template. We’re selecting the “Classic” template.
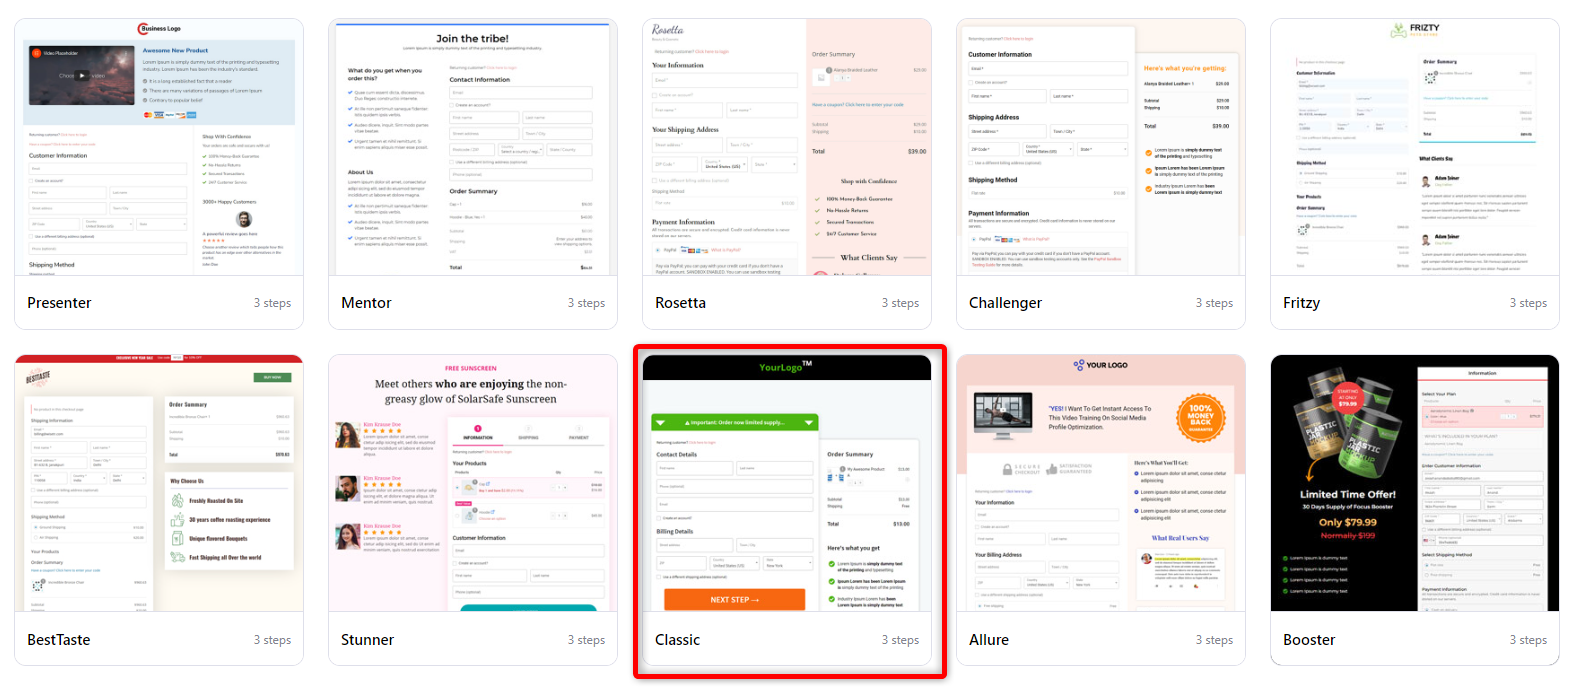
You can check the template details here. After you have done so, you can click “Import This Funnel.”
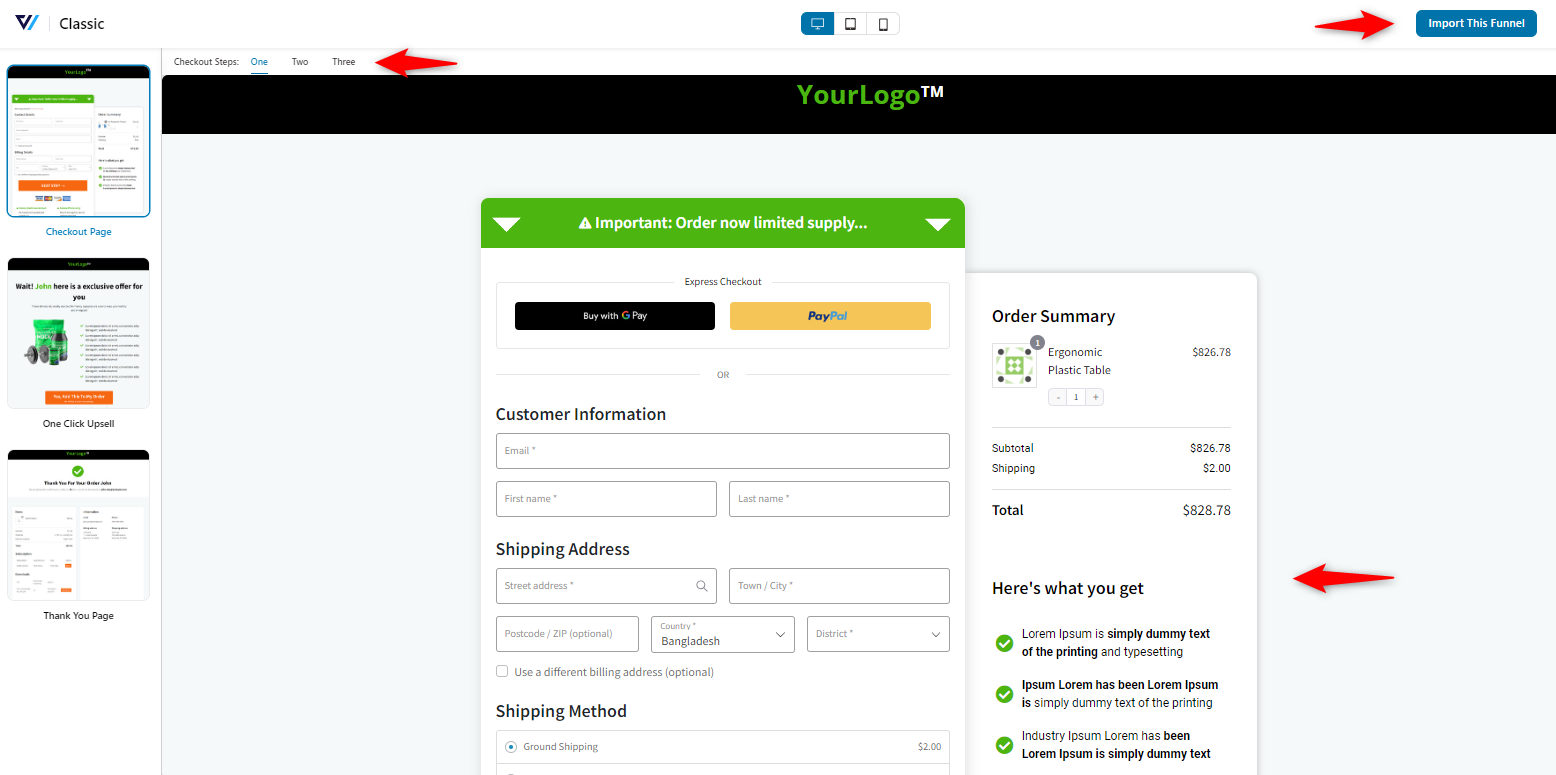
Then, provide the name of your store's checkout.
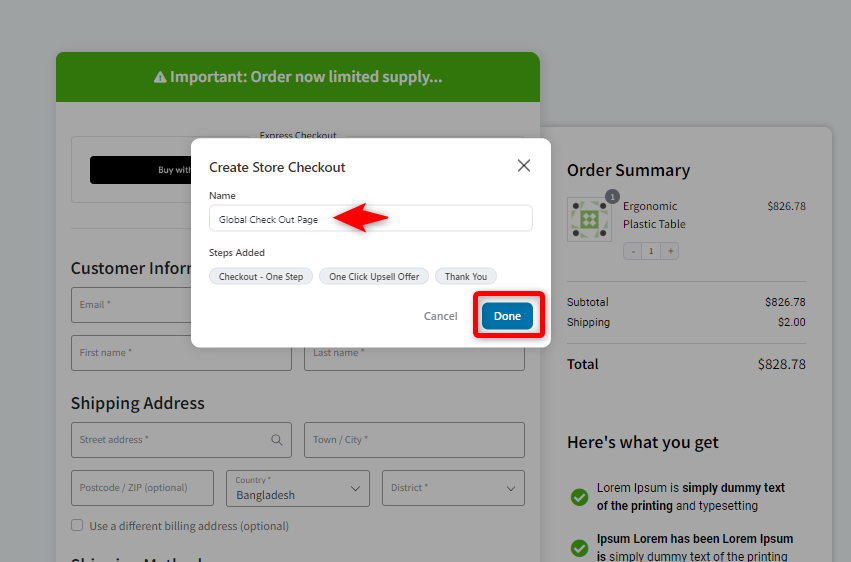
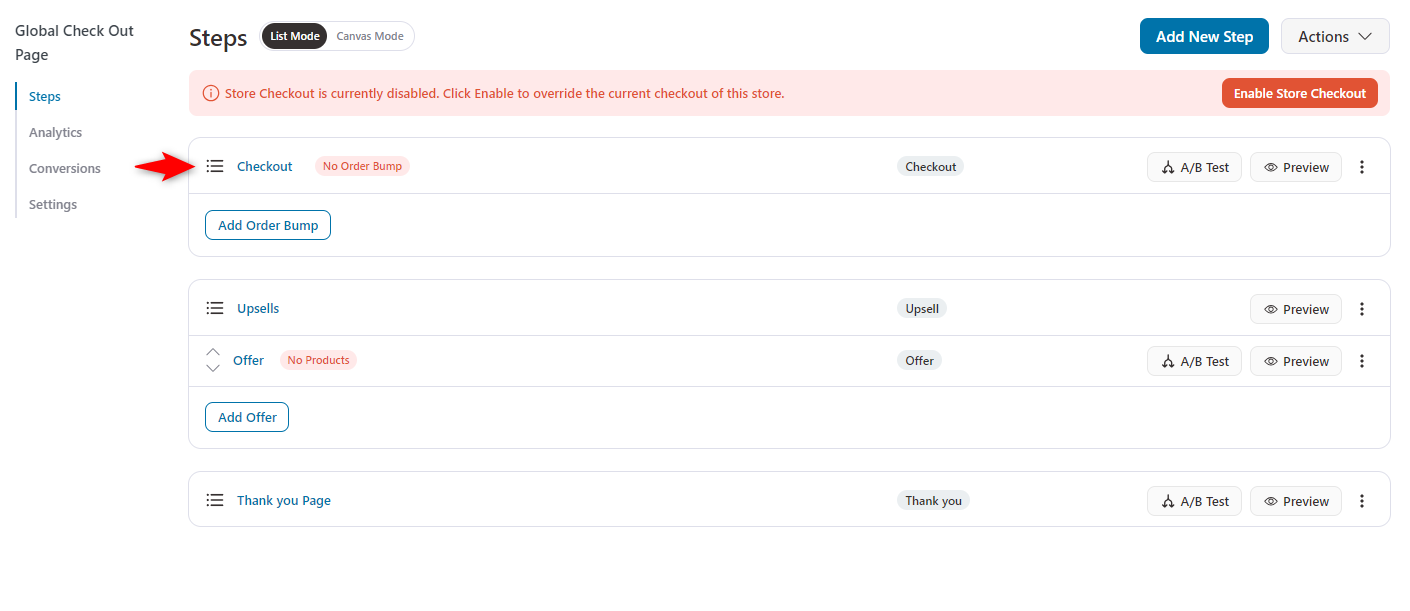
Here are the stages on your checkout page. Click on the checkout page to customize the checkout form.
Step 5: Customize the checkout form fields
After entering the checkout page, you can see the available checkout fields in the form.
You can edit the page, add or remove the checkout fields, or make essential changes.
Add, edit, rearrange, or delete any fields and sections within your checkout form.
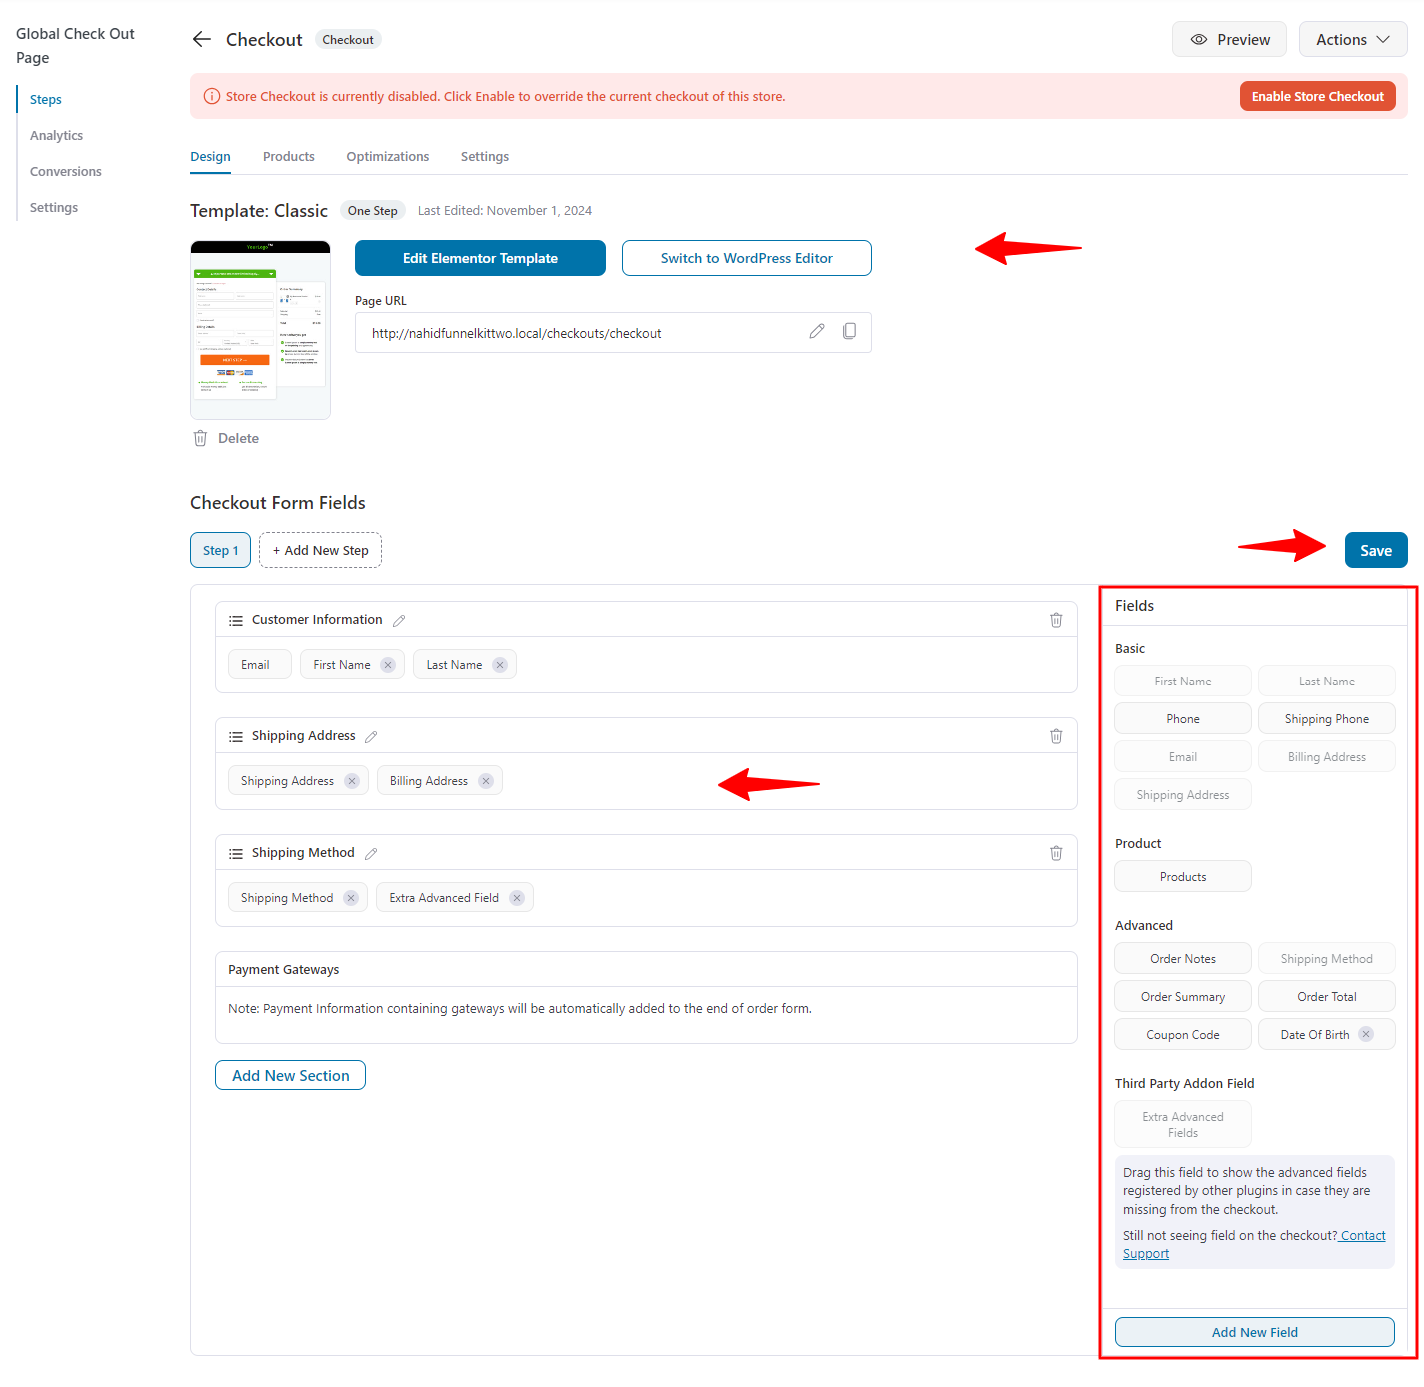
Hit save when done.
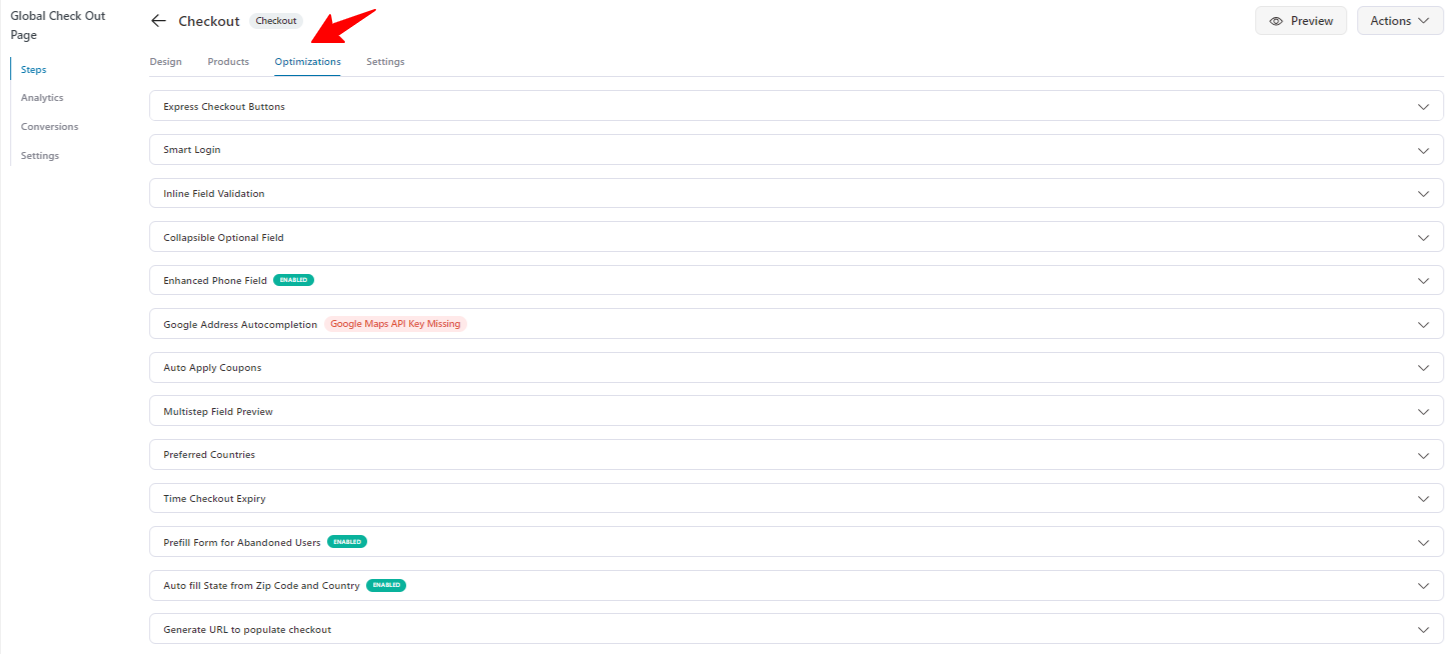
Step 6: Optimize the checkout page for conversion
FunnelKit optimizes your checkout page to perform better, increasing conversions in time.
You will have options to optimize your checkout page on the optimization tab.
Here are the optimizations available under this tab:
- Enable express checkout buttons to show smart buttons for Stripe Apple Pay, Stripe Google Pay, PayPal Express, and Amazon Pay for express checkout.
- Smart login systemizes the login process for returning customers.
- Inline field validation helps you prevent errors by validating form fields in real-time.
- The collapsible optional field allows optional fields to be hidden until needed, reducing clutter on the checkout page.
- Enhanced phone field adds improved formatting and validation for phone numbers (if enabled).
- Google address autocompletion auto-fills address fields using Google Maps (requires API key).
- Auto apply coupons to the cart at checkout.
- Multistep field preview provides a preview of fields across multiple steps in the checkout process.
- Preferred countries let you prioritize certain countries depending on your needs.
- The checkout expiry time sets a time limit for completing the checkout process to avoid cart abandonment.
- The prefilled form for abandoned users automatically fills in details for users returning to complete a purchase (enabled).
- Auto-fill state from ZIP code and country fill state information based on the ZIP code and country provided (enabled).
- Generate a URL to populate checkout and create a custom URL to pre-populate the form for a smoother experience.
Here's the video to get a full overview of how to optimize a checkout page with FunnelKit.
You can add order bumps and one-click upsells to boost your store's average order value.
In addition, FunnelKit Funnel Builder lets you create highly engaging custom thank you pages for a great impression.
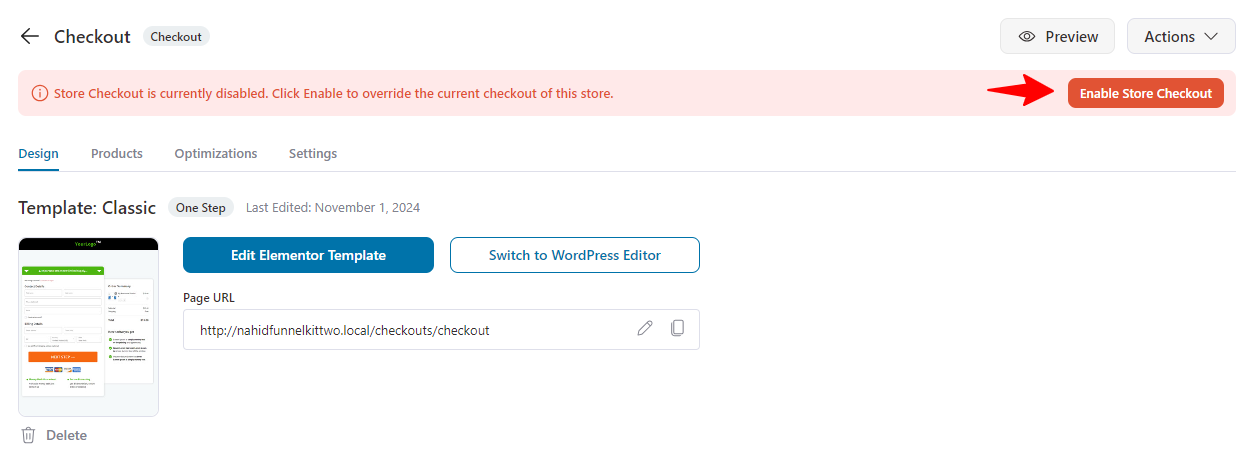
Step 7: Enable the store checkout
Next, you need to enable the checkout page. Click on the “Enable Store Checkout” button.
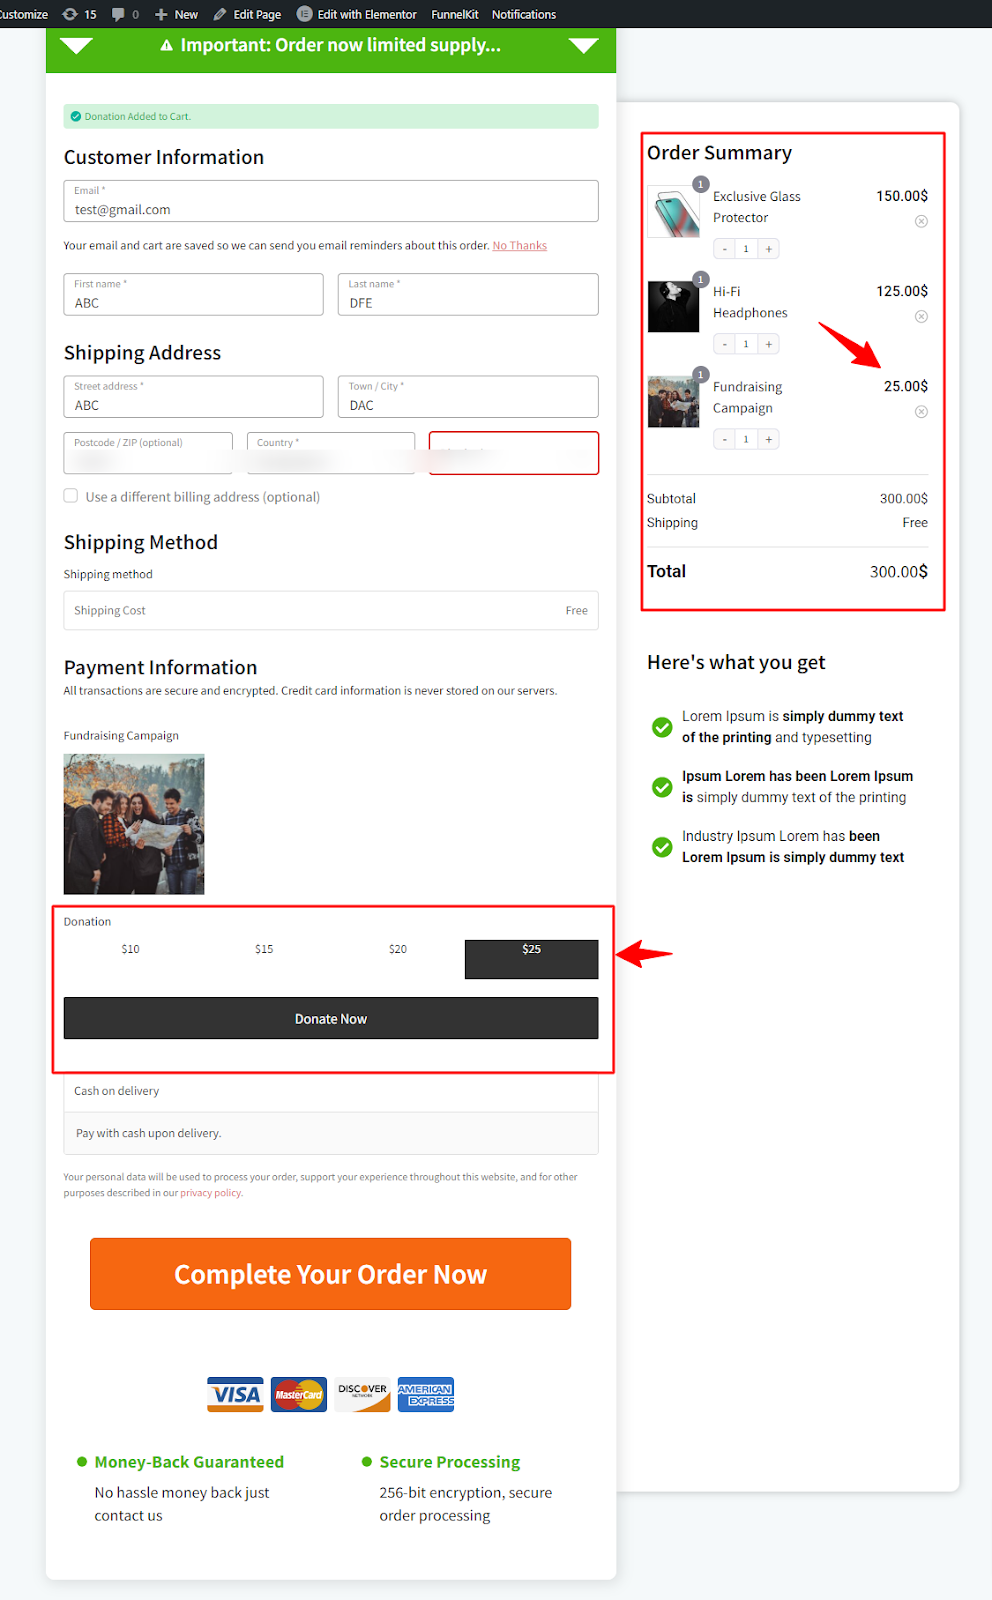
Step 8: Preview and test the donation feature with the new checkout page
Here you can see the donation feature on the checkout page. Select the amount you want to donate, then click the button to move forward.
The donation amount is on the order summary. This means it will be automatically added to the cart after you add the amount from here.
Here’s an additional preview of how the donation feature works on the cart page.
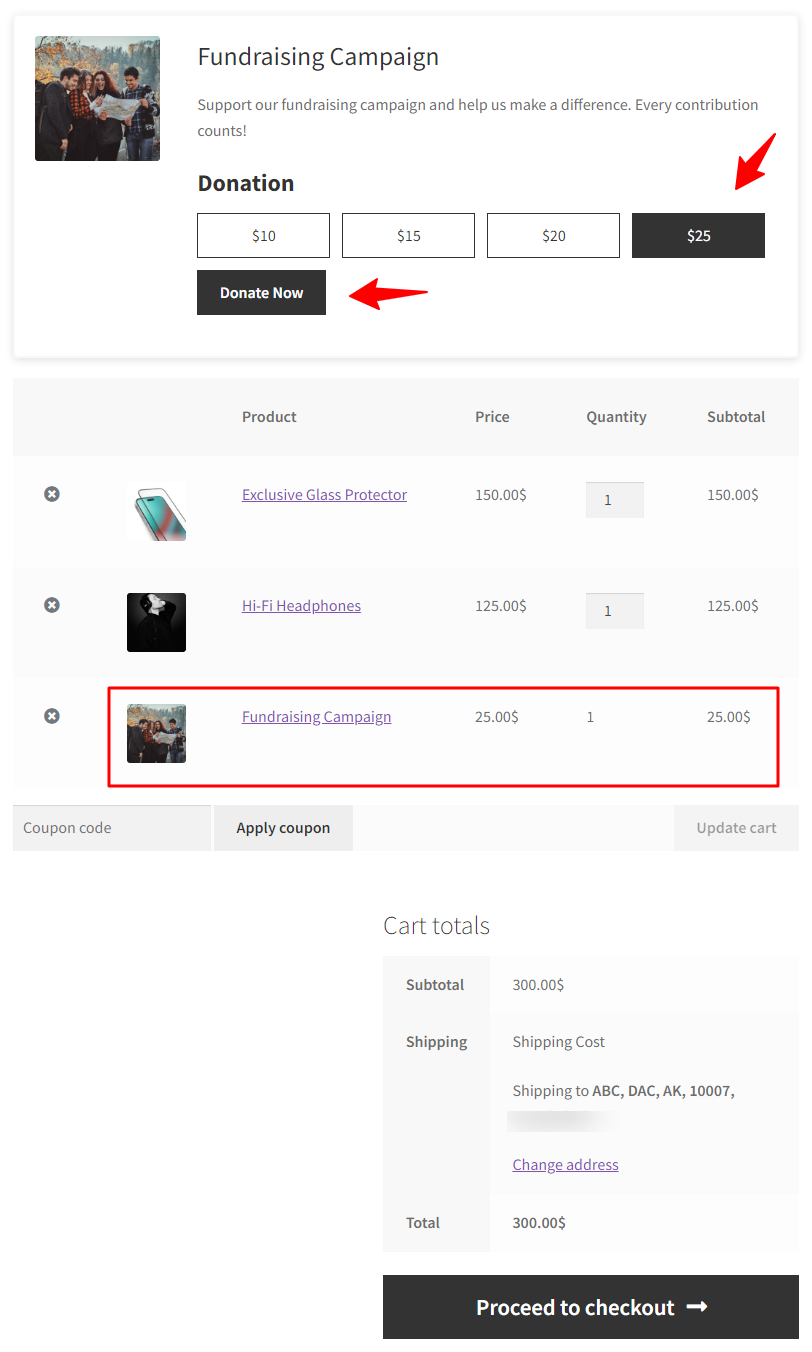
You can combine WC donation with FunnelKit Funnel Builder to showcase your donation campaign and increase awareness.
6 Tips to Follow When Adding a Donation at a Checkout Page
Adding a donation option at checkout is a great way to invite customers to support a meaningful cause.
However, it’s essential to implement it thoughtfully to ensure a positive experience and encourage contributions.
Here are six practical tips when setting up a donation feature on your WooCommerce checkout page.
1. Keep the donation option optional
Customers should feel invited, not obligated, to donate. Making the donation option optional creates a positive experience by giving customers the freedom to choose.
Therefore, if customers feel pressured, it could lead to frustration or even cart abandonment. A voluntary donation option is more likely to encourage contributions and foster goodwill.
2. Use clear, simple language
Explain the purpose of the donation in straightforward terms, using just a sentence or two.
Customers should be able to understand the cause at a glance without needing to read through lengthy descriptions.
For example, use language like "Support disaster relief efforts" or "Help provide education supplies for kids."
The more precise and concise the message, the more accessible it is for customers to connect with the cause and feel motivated to donate.
3. Offer suggested donation amounts
Providing preset donation amounts, such as $5, $10, or $20, can help customers make a quick decision.
Consider adding a “Custom Amount” field for those who wish to contribute a different amount in addition to these options.
This approach gives customers flexibility while guiding them toward manageable contributions, making them more likely to take action.
4. Position the donation option prominently
Place the donation option in a noticeable spot on the checkout page, ideally near the payment information.
The goal is for customers to see it naturally during checkout without feeling out of place or disruptive.
A well-placed donation option will make it easy for customers to add a contribution without complicating their experience.
5. Test for a smooth checkout experience
Before going live, thoroughly test the donation option to ensure it doesn’t disrupt the checkout flow. Ensure it works seamlessly across devices (desktop, mobile, and tablet) to provide a smooth user experience.
If your setup includes AJAX, check that adding a donation does not cause the page to reload or redirect unexpectedly. A seamless experience increases customers' likelihood of completing their donation and purchase.
6. Thank donors
A simple thank-you message on the confirmation page goes a long way. After customers complete their purchase and add a donation, show your appreciation with a quick note like, “Thank you for your donation! Your support truly makes a difference”.
It’s a small gesture but leaves a positive impression, making them feel good about their contribution and more likely to donate again.
Frequently Asked Questions About WooCommerce Donation Plugin
- What is a WooCommerce donation plugin?
A WooCommerce donation plugin lets your store accept donations from customers. It works with your checkout and payment system, offering options for customers to donate, set up recurring donations, and track the donations made.
- Why should I add a donation feature at checkout?
Adding a donation option at checkout lets customers support a cause while shopping. It can help build customer loyalty, increase revenue, and improve your brand’s image by showing that you care about meaningful causes.
- Will asking for donations harm my store and push customers away
Asking for donations won’t push customers away if you give them the choice to donate what they feel comfortable with, especially when it’s for a good cause. Allowing customers to choose the amount makes it easy for them to contribute without feeling pressured. With a good WooCommerce donation plugin, you can easily offer preset amounts while also allowing customers to choose a custom donation amount.
Final Thoughts on Adding Donations at Checkout
Adding a donation option at checkout effectively enhances your store’s positive impact and fosters a deeper connection with customers.
With a powerful donation plugin like Donation for WooCommerce, you can easily enable contributions, allowing customers to support essential causes as they complete their purchases.
With the proper setup and implementation, you can create a checkout experience that motivates customers to contribute to a cause they care about.
FunnelKit Funnel Builder makes it easy to build beautiful, customized checkout pages that look professional and engagingly showcase donation options, encouraging higher conversion and support for your fundraising goals.Ready to elevate your WooCommerce checkout experience?
Try FunnelKit Funnel Builder today to design impactful, conversion-friendly checkout pages that make a difference!
Editorial Team
June 16, 2026Utilizing the power of the WooCommerce sales funnel can boost your online sales and revenue. That means a product page that builds desire, an in-cart upsell, a checkout with an...
Editorial Team
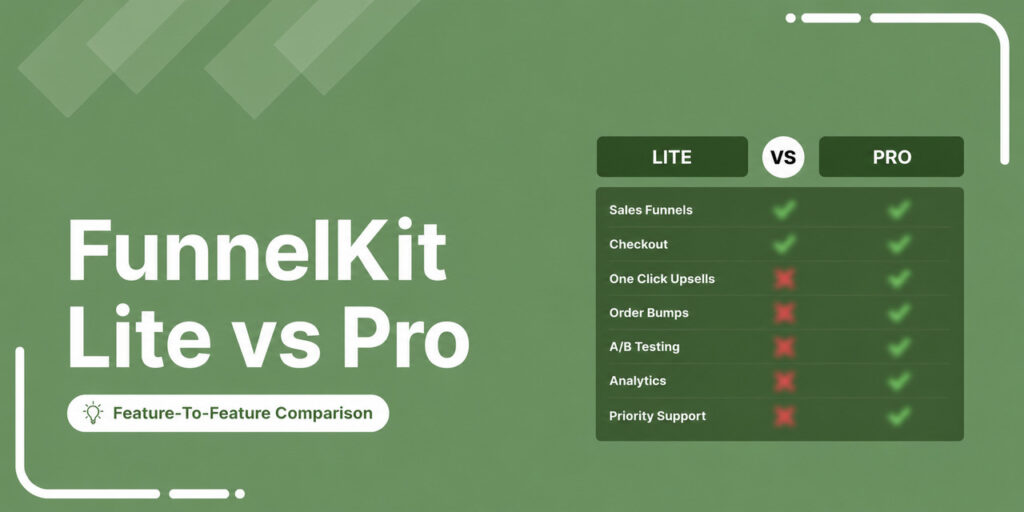
June 15, 2026If you run a WooCommerce store, you've almost certainly come across FunnelKit. FunnelKit is a suite of three separate products, each with its own Lite (free) and Pro versions: FunnelKit...
Damanjeet Singh
June 12, 2026Hi, I'm Damanjeet, co-founder and CEO of FunnelKit. For the last 15 years, I've helped WooCommerce stores solve one expensive problem, which is that the default checkout wasn't built to...


