
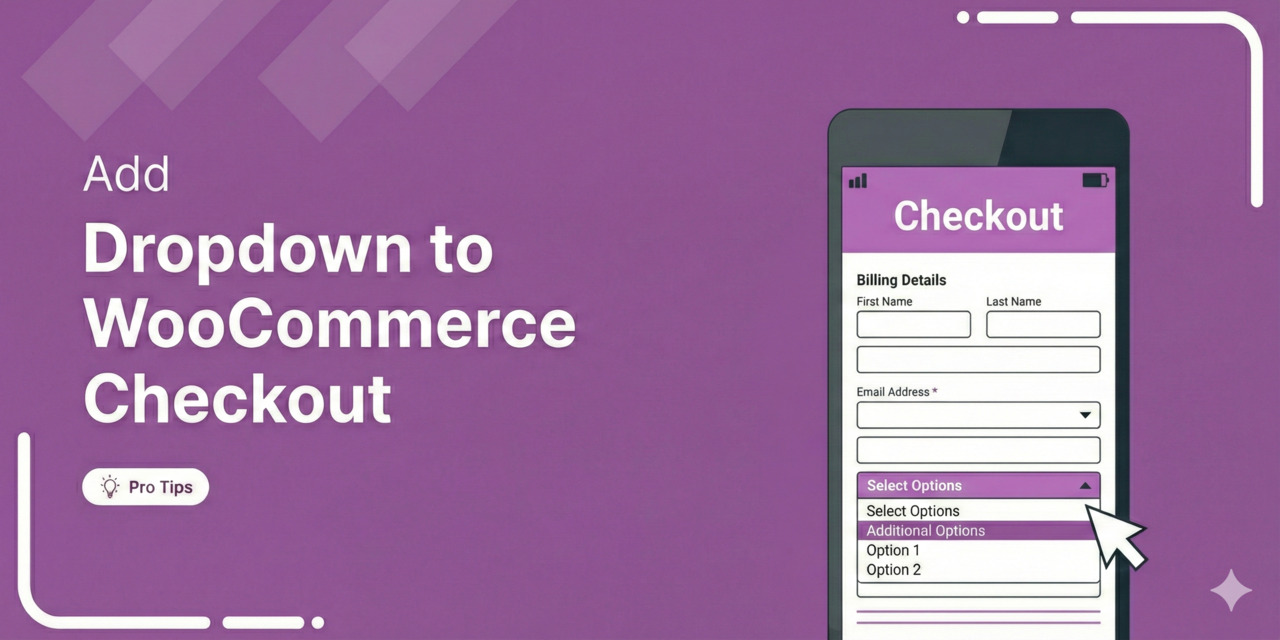
Adding a dropdown list to WooCommerce checkout lets you collect structured information from customers instead of relying on messy order notes.
Whether you need delivery preferences, gift options, or marketing attribution data, custom dropdown fields give you clean, actionable data that integrates directly with your fulfillment workflow.
The default WooCommerce checkout includes dropdowns for Country and State, but does not provide a built-in way to add custom select fields without plugins or code.
In this guide, we will show you two methods for adding dropdown fields to your WooCommerce checkout: one without code and one using custom PHP.
We’ll also cover practical use cases to help you decide which dropdowns are actually worth adding to your WooCommerce store.
Why Add Custom Dropdown Fields to Checkout?
Checkout is where conversions happen or fall apart.
According to Baymard Institute, 18% of online shoppers abandon their carts specifically because the checkout process is too long or complicated.
The problem gets worse when you rely on free-text order notes to collect customer preferences.
Customers write the same information in dozens of different ways, such as “morning delivery”, “AM please”, “before noon”, “early”, and someone on your team has to interpret each one manually.
Custom dropdown fields address this by providing customers with predefined options.
Instead of typing whatever comes to mind in a text field, they select from a structured list that your systems can process automatically.
Here are a few reasons why dropdown fields matter for your store:
- Eliminates interpretation errors: When customers select “Morning (8 am - 12 pm)” from a dropdown, there is no ambiguity about their selection. Your fulfillment team gets clear, consistent data every time.
- Enables automation: Structured dropdown data can trigger email sequences, route orders to specific fulfillment workflows, or segment customers in your CRM. This is not possible with overwhelming free-text notes.
- Reduces support tickets: When customers can clearly specify their preferences upfront, you spend less time following up to clarify orders and dealing with mistakes caused by miscommunication.
- Improves data quality for business decisions: If you want to know how people found your business, a “How did you hear about us?” dropdown gives you clear information.
But you have got to be strategic about which dropdowns you add. Every extra box a customer has to fill out is a chance for them to abandon their checkout.
Table of Contents
- 1 When to Add Custom Dropdowns to WooCommerce Checkout?
- 2 Method 1: Add a Dropdown to WooCommerce Checkout Without Code
- 3 Method 2: Add a Dropdown to WooCommerce Checkout With Custom Code
- 4 5 Practical Use Cases for Checkout Dropdowns
- 5 6 Best Practices to Implement in WooCommerce Checkout Dropdowns
- 6 Frequently Asked Questions (FAQs) on WooCommerce Checkout Dropdown Fields
- 7 Start Collecting Better Data with WooCommerce Checkout Dropdowns
When to Add Custom Dropdowns to WooCommerce Checkout?
Custom dropdown menus are better than open text boxes when you need structured information. Instead of letting customers type anything, you give them a specific list of choices to ensure the data is clean and useful.
Add a dropdown to WooCommerce checkout when you:
- Get inconsistent responses in order notes that require manual interpretation
- Offer service add-ons at different price points (such as gift wrapping, expedited processing, etc.).
- Need data for automation (example, CRM segmentation, fulfillment routing, etc.)
- Want marketing attribution tracking (“How did you find us?”), and more.
Method 1: Add a Dropdown to WooCommerce Checkout Without Code
To add a dropdown to the WooCommerce checkout page without writing any code, we’ll use FunnelKit Funnel Builder.
It comes with a visual, drag-and-drop field editor that lets you create custom dropdown options in a few clicks.
Everything is handled visually, so it’s beginner-friendly and quick to set up.
FunnelKit has a free version available. Pro plans start at $99.50/year and include advanced features such as multi-step checkouts, optimization, and A/B testing.
Follow the step-by-step instructions below:
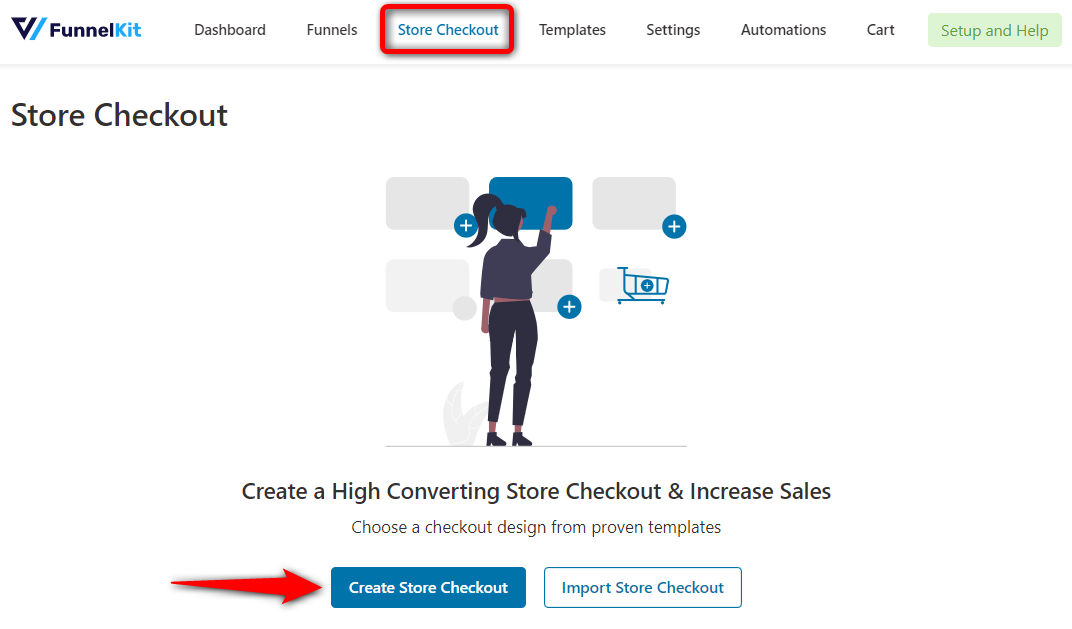
Step 1: Create your store checkout
Navigate to FunnelKit ⇨ Store Checkout and click ‘Create Store Checkout’.
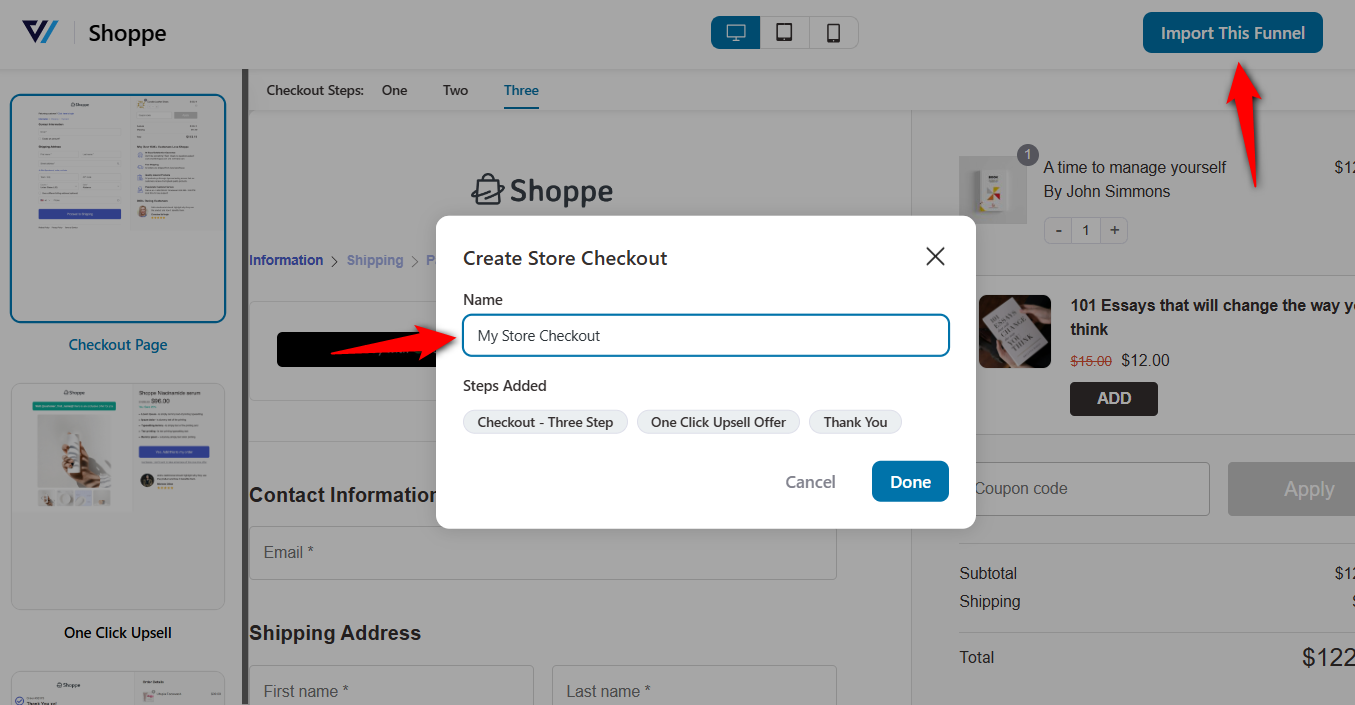
Choose a template that matches your store’s design.
FunnelKit provides a wide variety of conversion-optimized templates that you can easily customize with your favorite page builders to fit your needs.

Once you’ve selected your store checkout template, select the number of steps you want on your checkout page.
Next, click on 'Import This Funnel', enter the name and finally hit ‘Done’.
Step 2: Open the built-in checkout field editor
Click on the step to start customizing your WooCommerce checkout page.
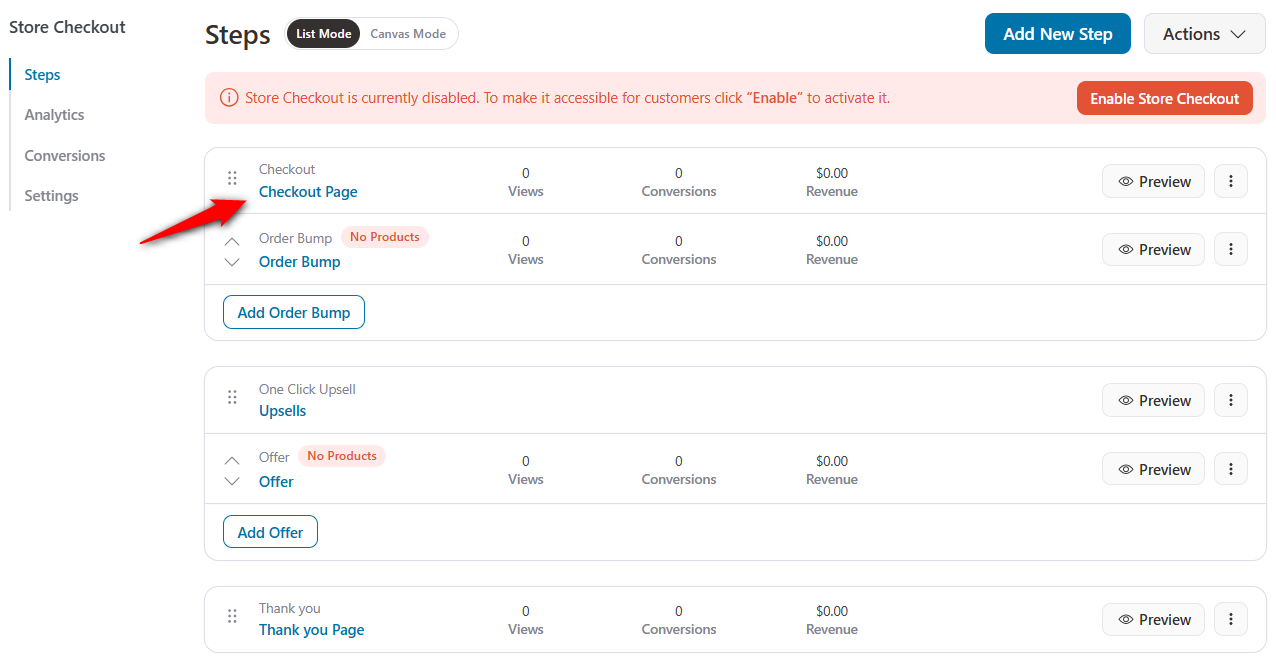
Scroll down and you’ll see the Checkout Form Fields.
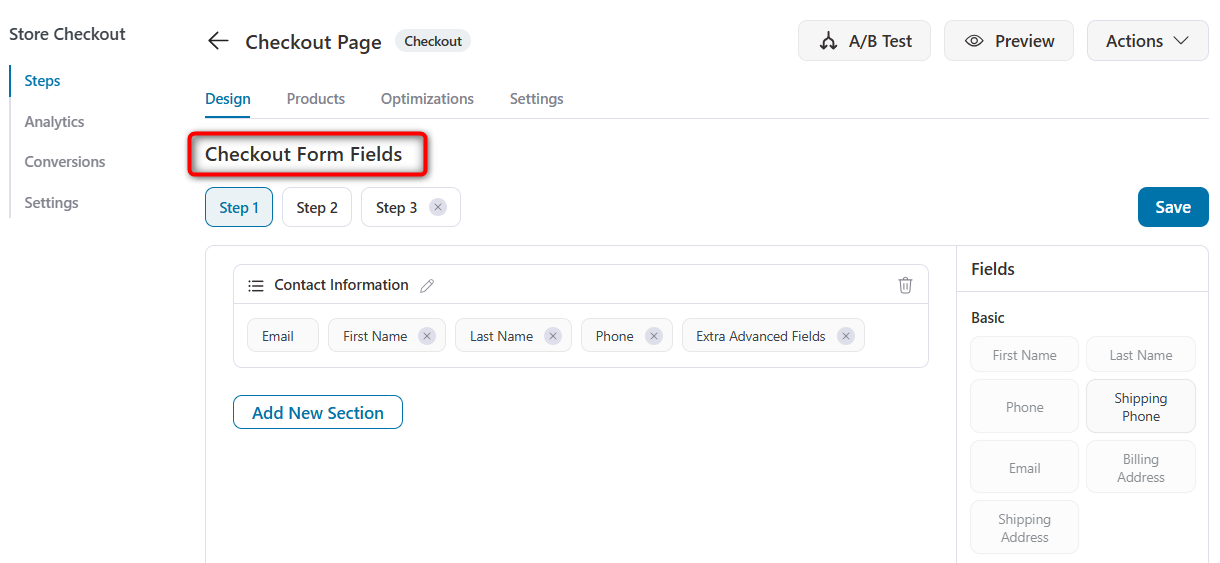
Here, you can see your existing checkout fields organized by sections, such as information, shipping, and additional information.
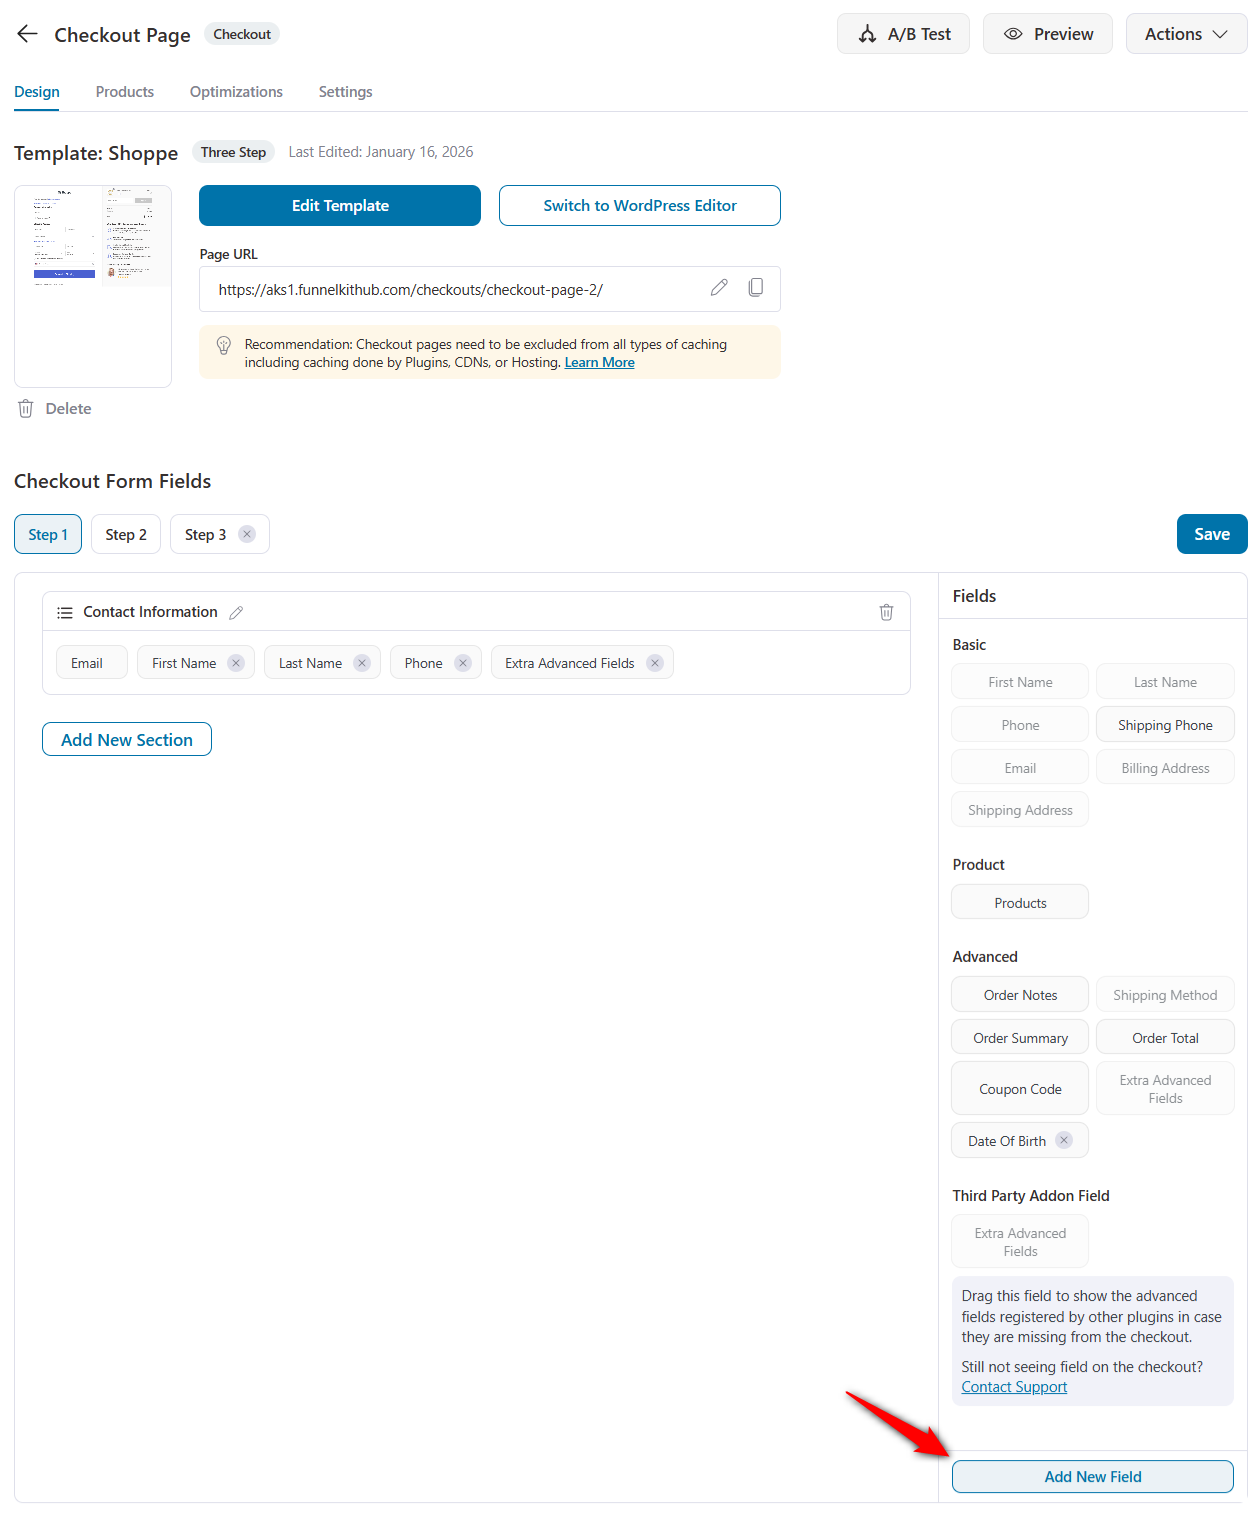
Step 3: Create the custom dropdown field
Click on the ‘Add New Field’ button. This will help you add custom fields to your WooCommerce checkout page.
Select ‘Dropdown’ and set up your field as:
- Label: How did you find us? (or any label of your choice)
- Field ID: This is the order meta key, where the value of this custom field gets stored. Use ‘_’ to separate multiple words. For example, attribution_data.
- Options: Add each option, separated by ( | ) for multiple dropdown lists:
- Google Search
- Friend Referral
- Others
- Default: Select the option that should be chosen by default (optional)
- Placeholder: Text shown before the customer selects an option (example, Select an option)
- Show On Thank You Page: Enable to display the selected value on the order confirmation page after checkout.
- Show In Order Email: Enable to include the value in order emails
- Required: Turn this on or off if you want to make this field required or optional.
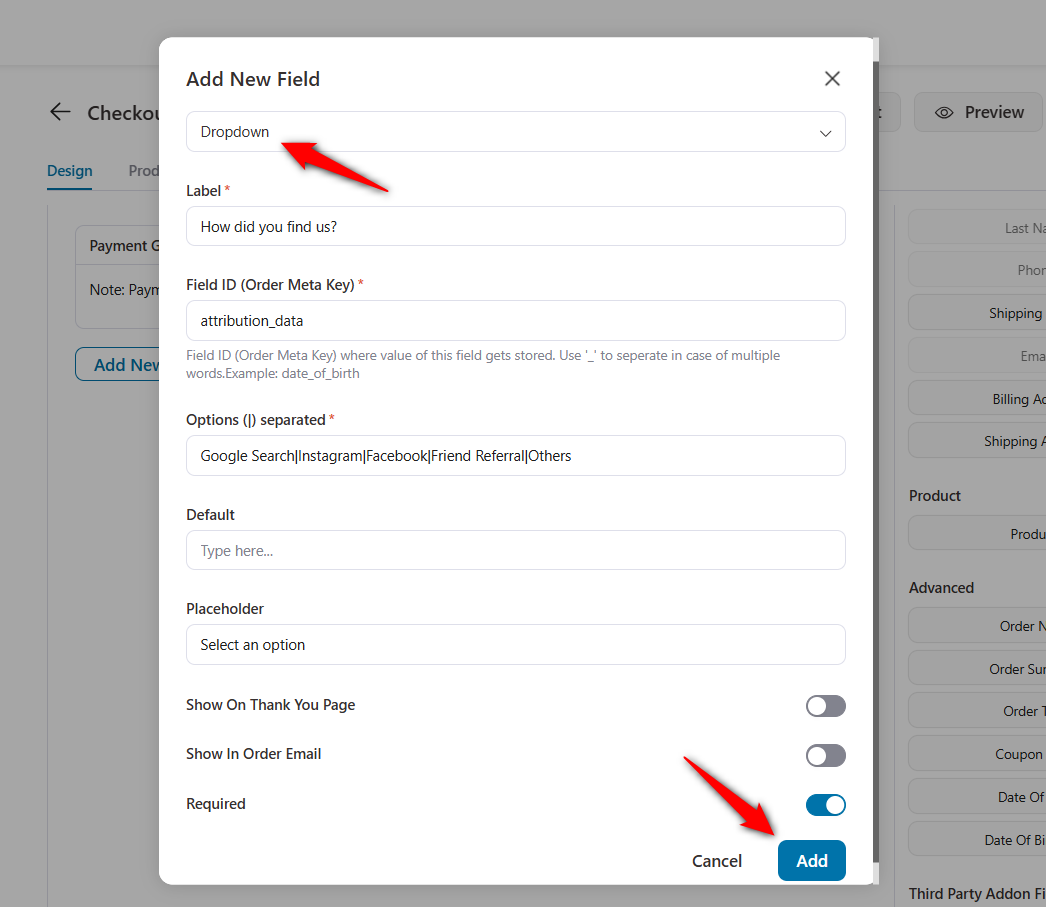
Once done, click on the ‘Add’ button. This will create your custom dropdown field.
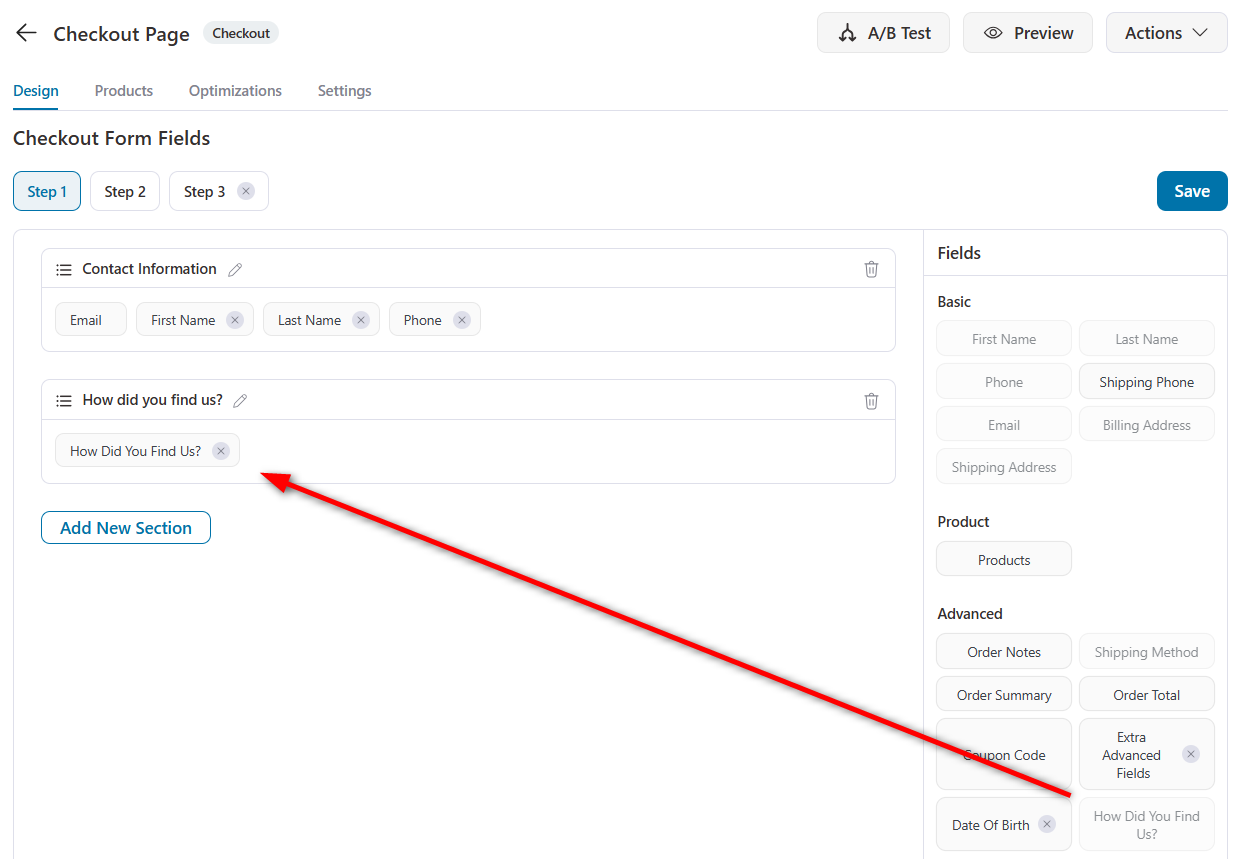
Step 4: Add the dropdown field to the WooCommerce checkout form
Drag and drop your custom dropdown field into the checkout form.
You can either add it to the existing section or create a new one based on your requirements.
This way, you can control your field positioning on the checkout page.
Well done! This is how you can add a dropdown to your WooCommerce checkout page.
Make sure to activate your store checkout.
Preview your WooCommerce checkout page
Click ‘Save’ and preview your checkout on both desktop and mobile.
As you can see, the dropdown integrates seamlessly with your checkout design:
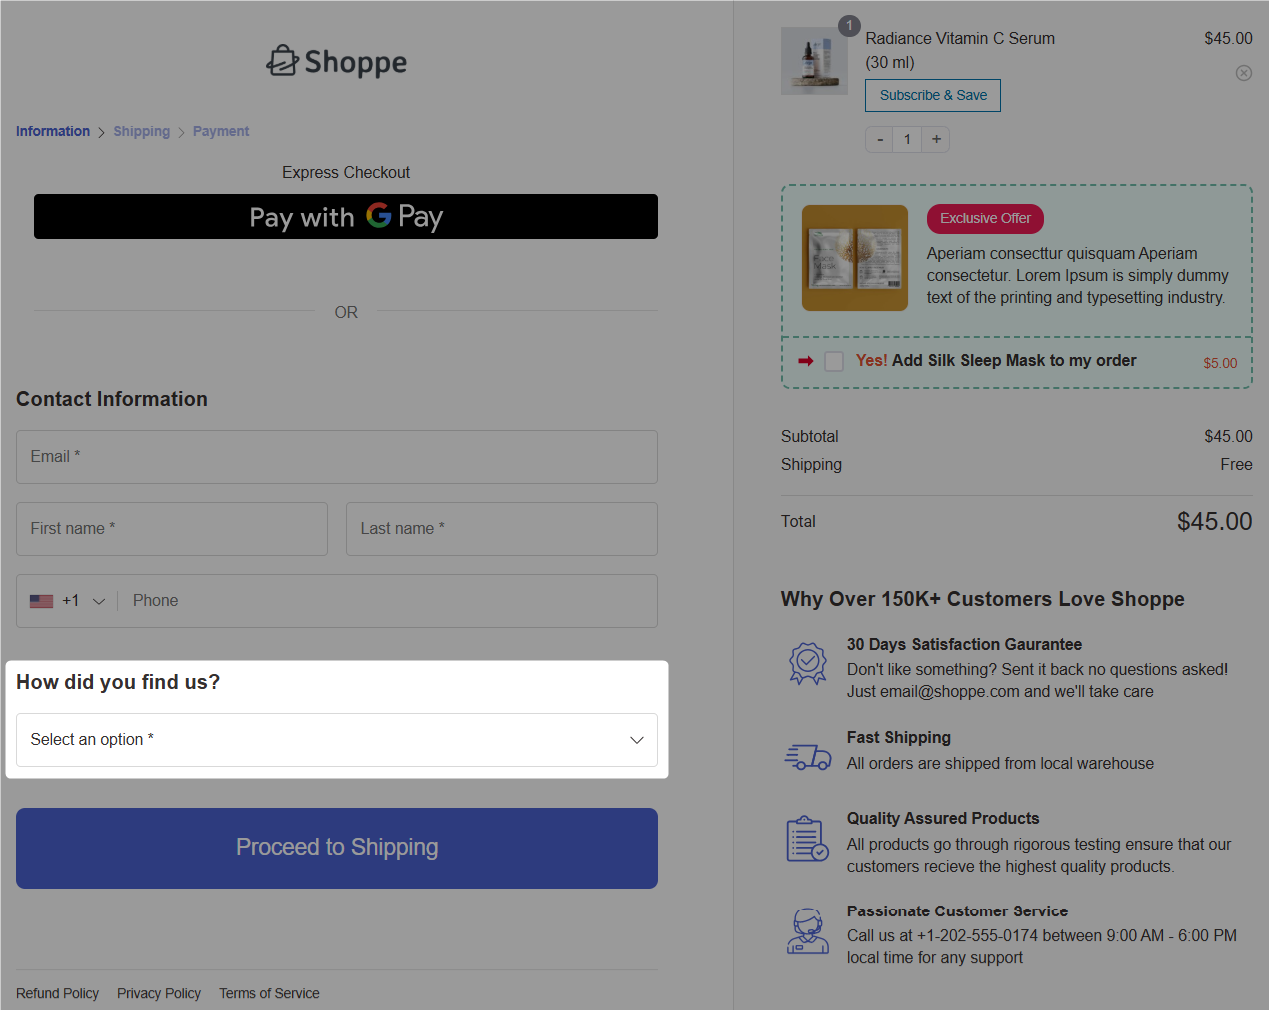
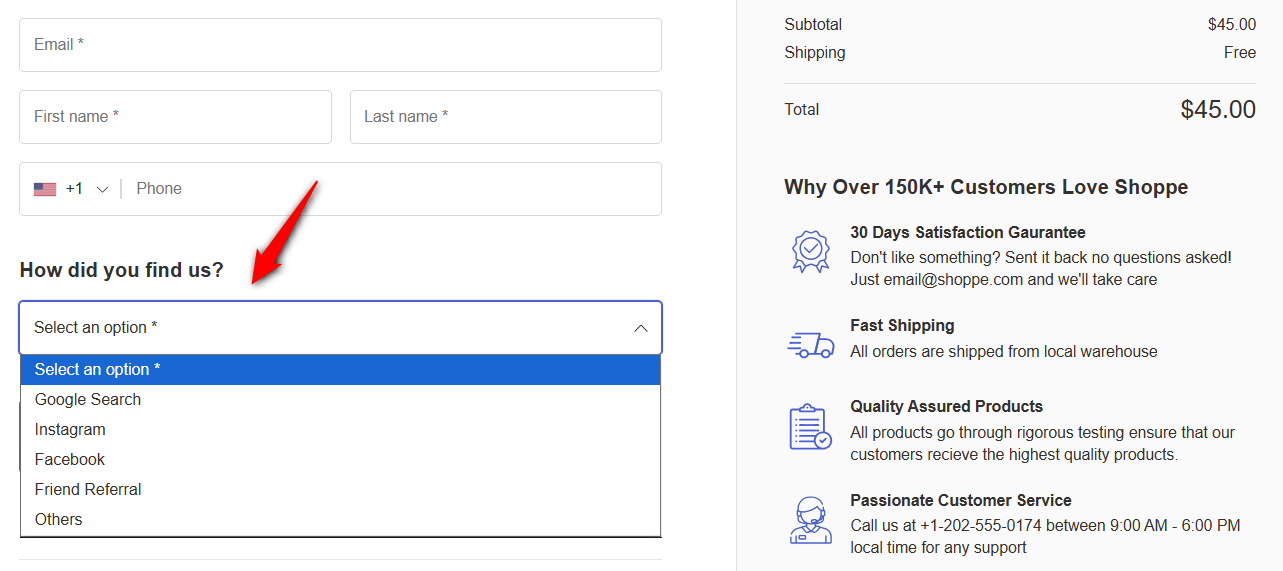
On clicking the dropdown, it shows different options to select:
On mobile devices, the dropdown automatically opens the native iOS or Android picker, providing a familiar, touch-friendly experience for smartphone users.
Test place an order and you’ll see the custom field value in WooCommerce order details:
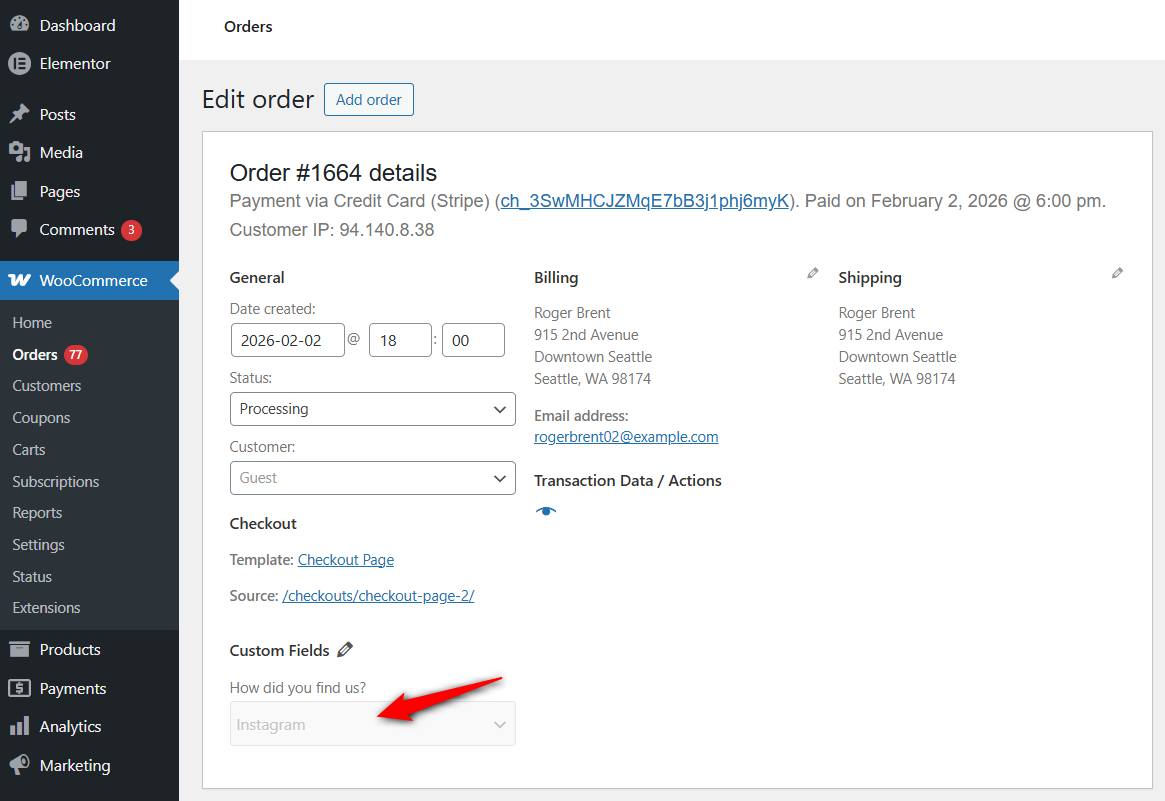
This means the dropdown field works perfectly!
Method 2: Add a Dropdown to WooCommerce Checkout With Custom Code
If you’re comfortable with coding, WooCommerce lets you add custom dropdown fields using built-in hooks and filters.
Always add custom code to your child theme’s functions.php file or use a code snippets plugin.
We recommend that you never edit the parent theme files because version updates will overwrite your changes. Always ensure you’ve tested everything on a staging site before going live.
Key parameters:
- 'type' => 'select' - creates a dropdown field
- 'required' => false - makes your dropdown field optional (set to true if it’s required)
- 'priority' => 120 - controls where the field appears on the checkout page (Higher value indicates the field to appear lower on the checkout form)
Limitations of custom code:
- No visual editor to see changes in real time. Every change must be made in PHP.
- Conditional logic needs extra JavaScript work.
- Requires ongoing maintenance with WooCommerce updates.
5 Practical Use Cases for Checkout Dropdowns
Checkout dropdowns help you collect clean, structured data and reduce confusion. Find out the most effective ways to use them.
1. Marketing Attribution (“How did you find us?”)
This is the most common and useful dropdown. It tells you which marketing channels actually lead to purchases, not just clicks.
This is something many analytics tools miss.
Example options can be Google Search, Instagram, Facebook, TikTok, Friend Referral, Podcast, and Others.
2. Delivery Time Preferences
Perfect for stores that offer scheduled deliveries. A dropdown removes guesswork caused by vague order notes like “morning” or “before noon”.
Example options: Morning (8 AM - 12 PM), Afternoon (12 PM - 5 PM), Evening (5 PM - 8 PM)
3. Gift Wrapping Options
Allows customers to select gift services clearly and see pricing upfront. You can also show a gift message field only when gift wrapping is selected.
Example options: No gift wrapping, Standard wrap (+$4.99), and more.
4. B2B Account Type
Ideal for stores selling to both individuals and businesses. Use fields like Company Name or VAT Number for a business.
Example options: Individual, Small Business, Enterprise, Non-profit, and more.
5. Product Specifications
Great for customizable products where free text can cause errors during fulfillment, such as device models, sizes, or configurations.
Example options: iPhone17, iPhone 17 Air, iPhone 17 Pro, etc.
6 Best Practices to Implement in WooCommerce Checkout Dropdowns
Follow these best practices when adding dropdowns to your WooCommerce checkout:
#1: Limit custom fields to 1 or 2
Research from Baymard Institute shows that the average checkout has 14+ form fields, but the ideal is only 7-8.
Each additional field increases the likelihood that customers will abandon their checkout. Therefore, each dropdown needs to provide a clear value to justify its presence.
#2: Use clear and distinct options
Avoid similar-sounding choices that confuse customers.
Instead of rush delivery or express shipping, use specific labels such as Standard (5-7 days) and Express (2-3 days) for an additional $4.99.
Clear wording reduces hesitation and mistakes.
#3: Never pre-select an option
Always use a neutral placeholder, such as “Please select…”.
Pre-selecting an option can lead to accidental selections, support tickets, and order errors.
#4: Clearly mark optional fields
Add “(optional)” in the field label if the dropdown data isn’t required.
Customers usually assume every checkout field is mandatory, so clear labeling reduces friction.
#5: Test thoroughly on mobile devices
Mobile cart abandonment can reach 85.65%, compared to about 70% on desktop (Source: Barilliance)
Make sure the dropdown opens the native mobile selector, all options are easy to read, and no horizontal scrolling is needed on small screens.
#6: Confirm data is saved correctly
Place a test order and verify the dropdown value appears in WooCommerce order admin, order confirmation emails, or connected tools like your CRM or fulfillment system.
Frequently Asked Questions (FAQs) on WooCommerce Checkout Dropdown Fields
Yes, you can add multiple dropdowns to your checkout, but it’s best to limit them to one or two. Fewer fields mean fewer drop-offs during checkout.
If you need more information, use conditional logic to show fields only when relevant, or collect extra data after purchase using surveys or follow-up emails.
No. A basic dropdown has almost no impact on page speed.
Problems only occur if the dropdown loads data dynamically (via AJAX) or uses heavy JavaScript for styling. Keep it simple, and your checkout will stay fast.
With FunnelKit, you can add order bumps and offer add-ons, and the cart total updates automatically when you select them.
With custom code, you’ll need to add fees using the woocommerce_cart_calculate_fees hook based on the selected option. This requires PHP and some JavaScript.
FunnelKit works with both classic checkout and block-based checkout.
For custom code, the woocommerce_checkout_fields hook applies only to the classic checkout. For block checkout, you must use woocommerce_register_additional_checkout_field(). The block checkout uses different syntax and rules.
By default, no. FunnelKit has a simple 'Enable' option to show fields on order emails and thank-you pages.
For custom code, you need to hook into woocommerce_email_after_order_table and output the saved value manually.
Start Collecting Better Data with WooCommerce Checkout Dropdowns
Adding dropdown fields to your WooCommerce checkout is easy and can be done in two ways.
Use FunnelKit to set up dropdown fields visually with a simple drag and drop, no coding required.
Or use custom code for full control over functionality, but you’ll need developer skills to implement and maintain it.
We recommend starting with one dropdown that solves a real problem. The most popular choice is Marketing Attribution (“How did you find us?”), because it gives valuable insights.
Test its impact first before adding more fields to keep your checkout fast and friction-free.
So what are you waiting for? Get access to FunnelKit for a seamless WooCommerce checkout experience.
Editorial Team
April 1, 2026The WooCommerce place order button on your checkout page is literally where the money changes hands. However, most store owners leave it completely untouched. You aren't stuck with the default...
Editorial Team
March 25, 2026Running a WooCommerce store without the Facebook Pixel is like pouring money into ads while blindfolded. You're spending, but you have no idea what's actually working. Every abandoned cart, every...

Editorial Team
March 24, 2026Every WooCommerce store needs a reliable way to generate PDF invoices and packing slips. Hand-typing order details into a Word template results in misspelled addresses, missing tax IDs, and a...


