
Tired of answering the same shipping questions over and over?
Many WooCommerce store owners face this problem. Repeated inquiries about delivery times, shipping costs, and potential delays can take up a lot of time and disrupt the flow of business operations.
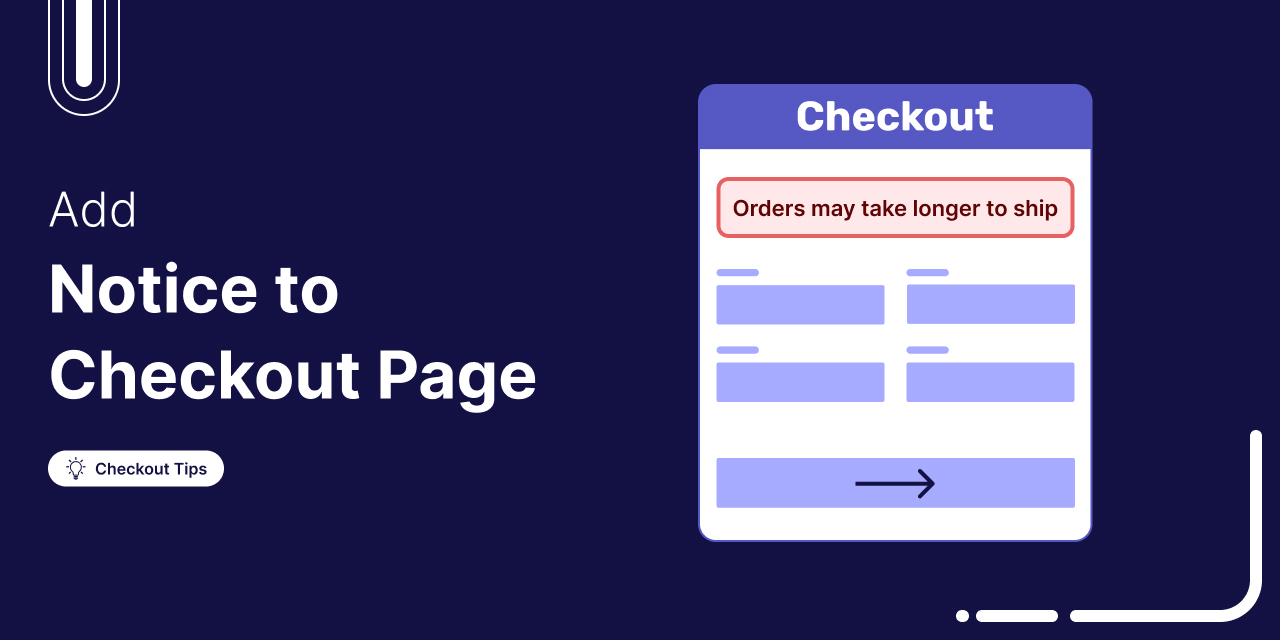
Here’s the trick: A shipping notice on your checkout page can drastically reduce those repetitive questions.
By adding a notice on the checkout page, you can provide your customers with clear delivery times and potential delays before they complete their order. You set proper expectations and eliminate confusion.
In this blog, we'll show you how to add notices to your WooCommerce checkout page, keeping customers informed about offers, delays, and other relevant information, thereby saving you time and enhancing the customer experience.
Table of Contents
- 1 When Should You Add a Notice to Your Checkout Page in WooCommerce?
- 2 Method 1: Add Notice to Checkout Using Default Settings [Visible Store-wide]
- 3 Limitation of Default WooCommerce Notice
- 4 Method 2: Add Notice to WooCommerce Checkout Page Only [Free, No Coding Solution ]
- 5 4 Examples of Checkout Page Notice For Effective Communication
- 6 Add Custom Notice to the WooCommerce Checkout Page For Better Customer Communication!
When Should You Add a Notice to Your Checkout Page in WooCommerce?
For many reasons, a WooCommerce store owner may feel the need to add a notice to the checkout page. Here are some of the situations when adding a notice on the checkout page:
- Holiday shipping delays: If you’re heading into a busy season like the holidays, shipping times may be longer than usual. A notice on the checkout page can inform customers of potential delays before they even place their order, preventing frustration later.
- Limited-time offers or flash sales: During promotions, you may want to inform customers that certain products are part of a limited-time offer or sale. Adding a notice on the checkout page helps them see the discount or offer clearly before they confirm their purchase.
- Free shipping thresholds: If you’re offering free shipping on orders over a certain amount, a checkout notice can remind customers that they’re close to qualifying, encouraging them to add more to their cart.
- Auto-apply coupon limit notice: If you offer automatic coupon application on your checkout page, include a notice informing customers about the minimum requirement to receive the coupon discount.
- International shipping or customs Fees: For international orders, you should inform customers about any applicable customs fees, import duties, or restrictions, ensuring there are no surprises once the order is placed.
- Address validation or shipping restrictions: If certain shipping options aren’t available in specific regions or zip codes, a checkout notice can notify customers upfront, reducing cart abandonment due to shipping issues.
- Exceptional circumstances: If your shipping times are affected by an external factor (like a pandemic or weather event), a notice can help manage customer expectations and prevent complaints.
Next, we will share how to add notice to the WooCommerce checkout in 2 different methods.
Method 1: Add Notice to Checkout Using Default Settings [Visible Store-wide]
This is a default method that WooCommerce offers that you can use to add a notice on the checkout page.
Step 1: Navigate to store notice settings
From the WordPress dashboard, go to Appearance ⇒ Customize.
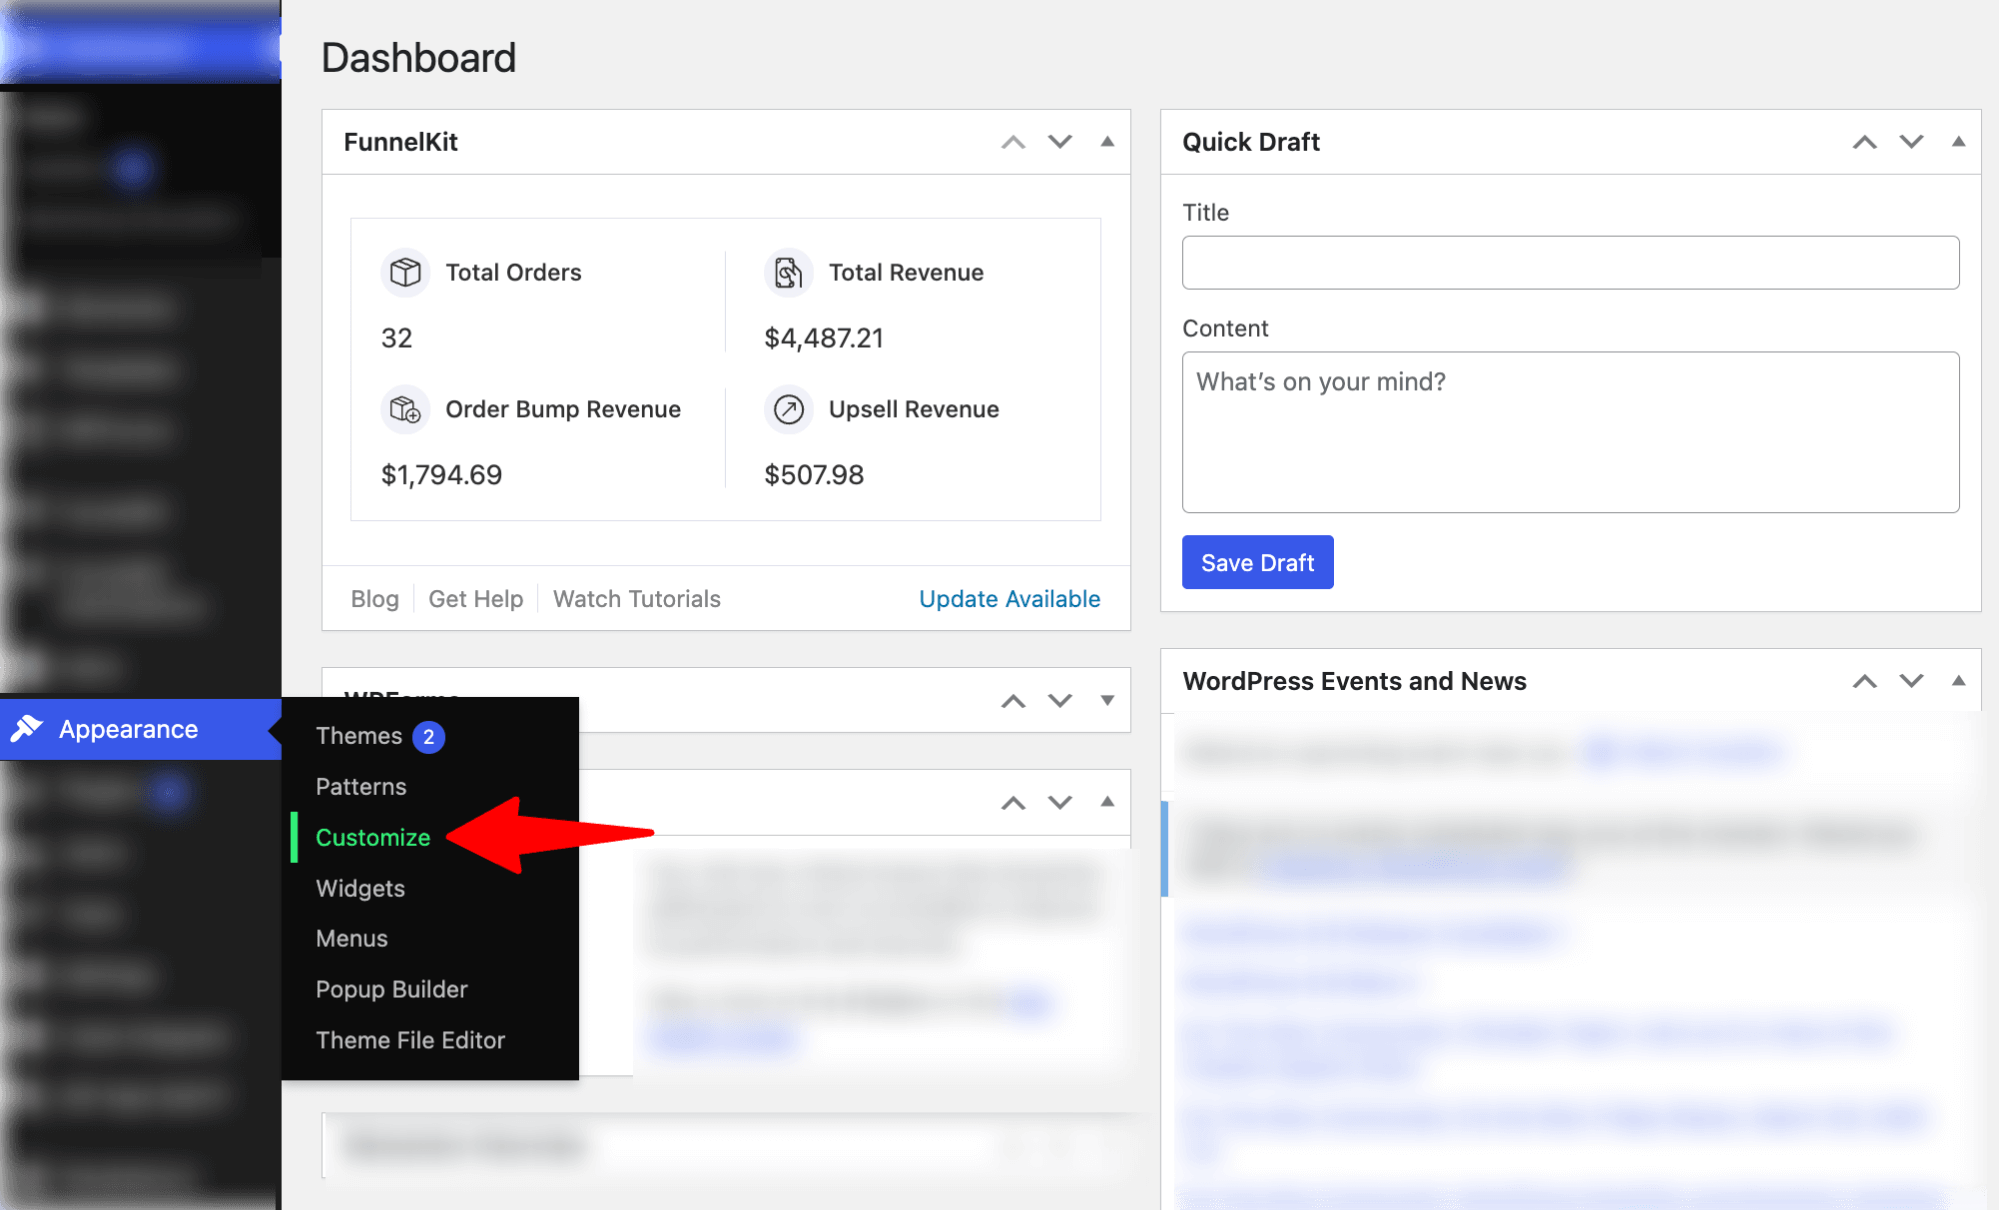
Next, hit WooCommerce.
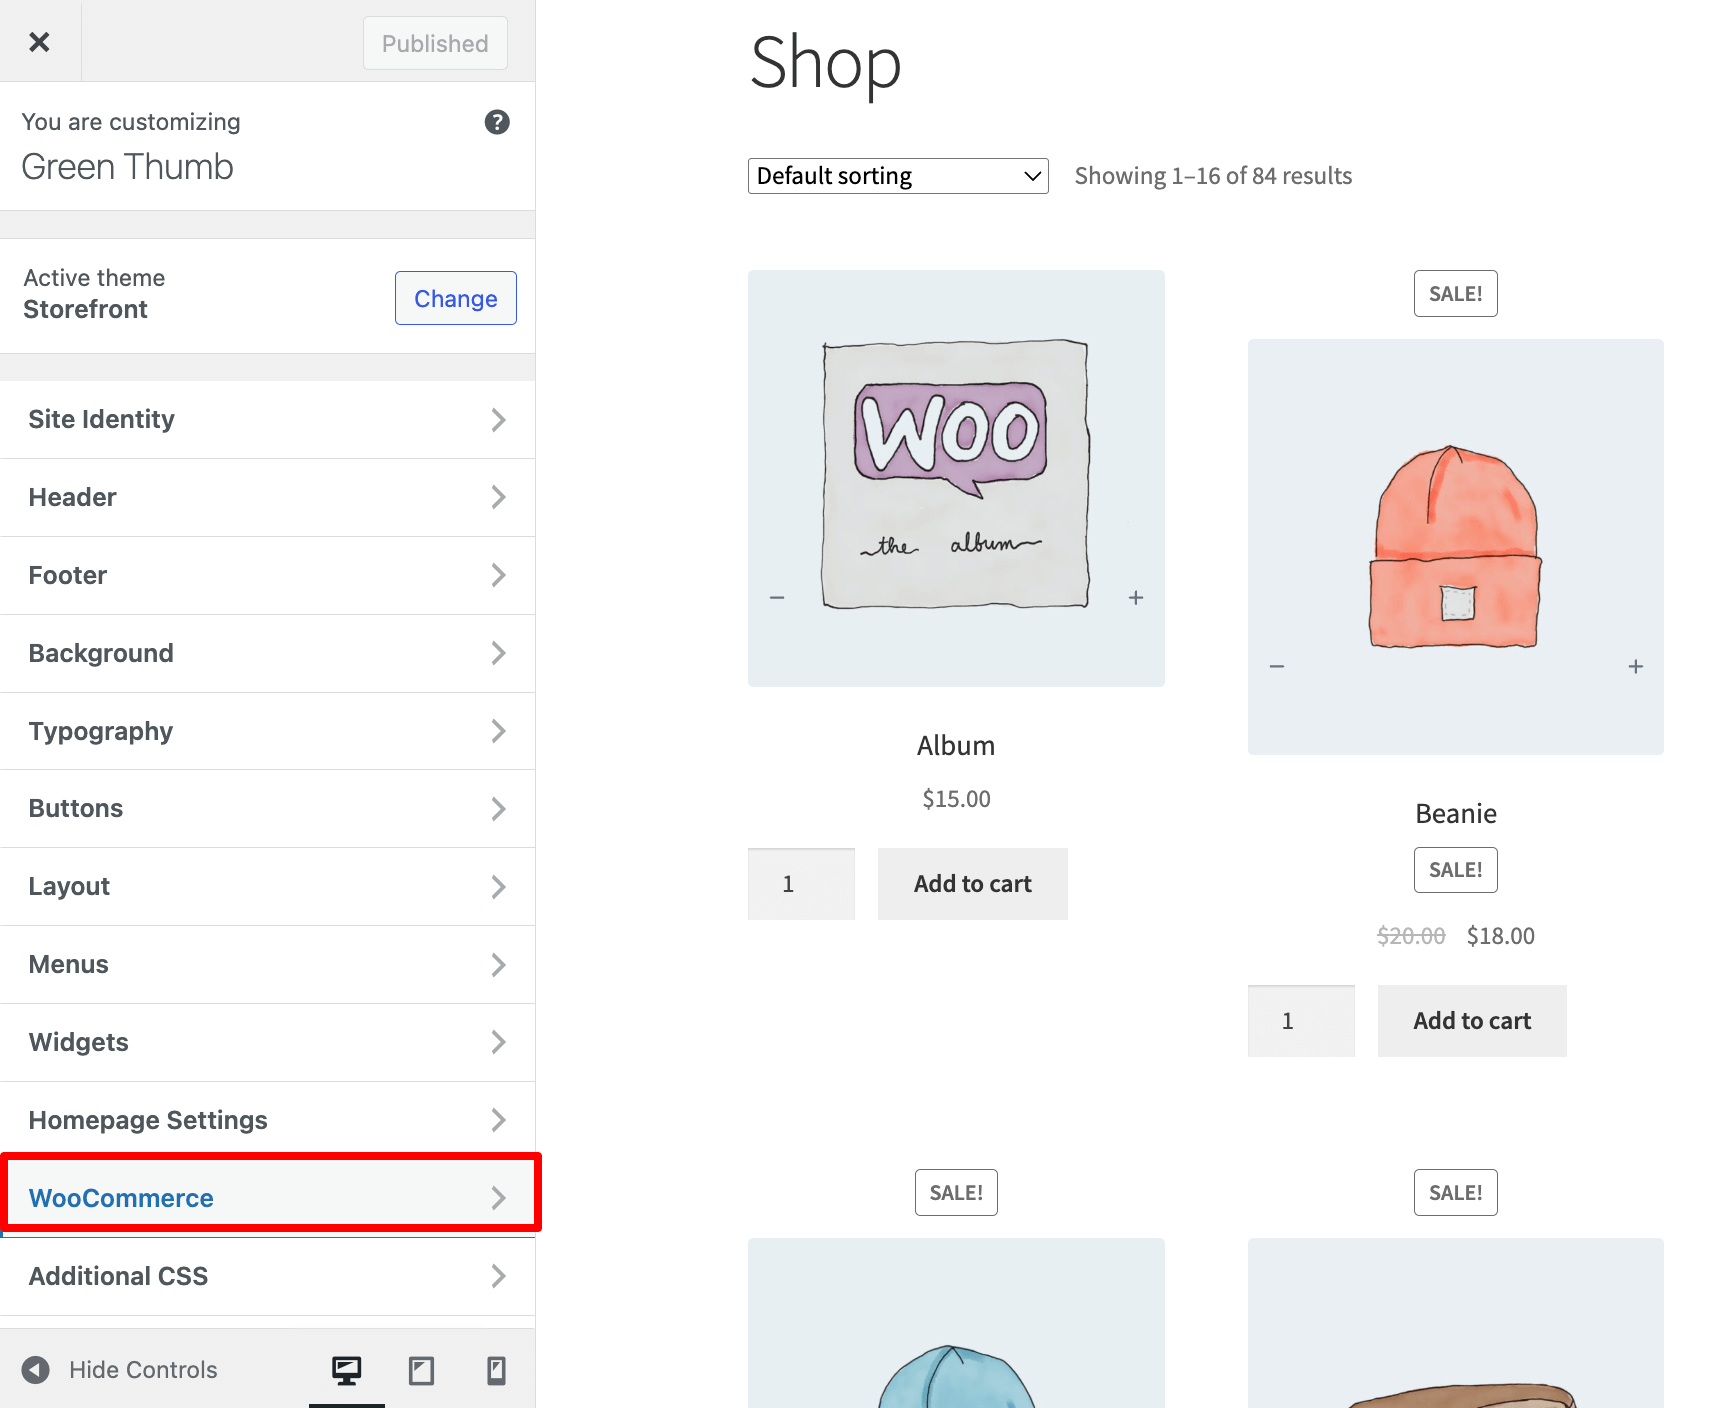
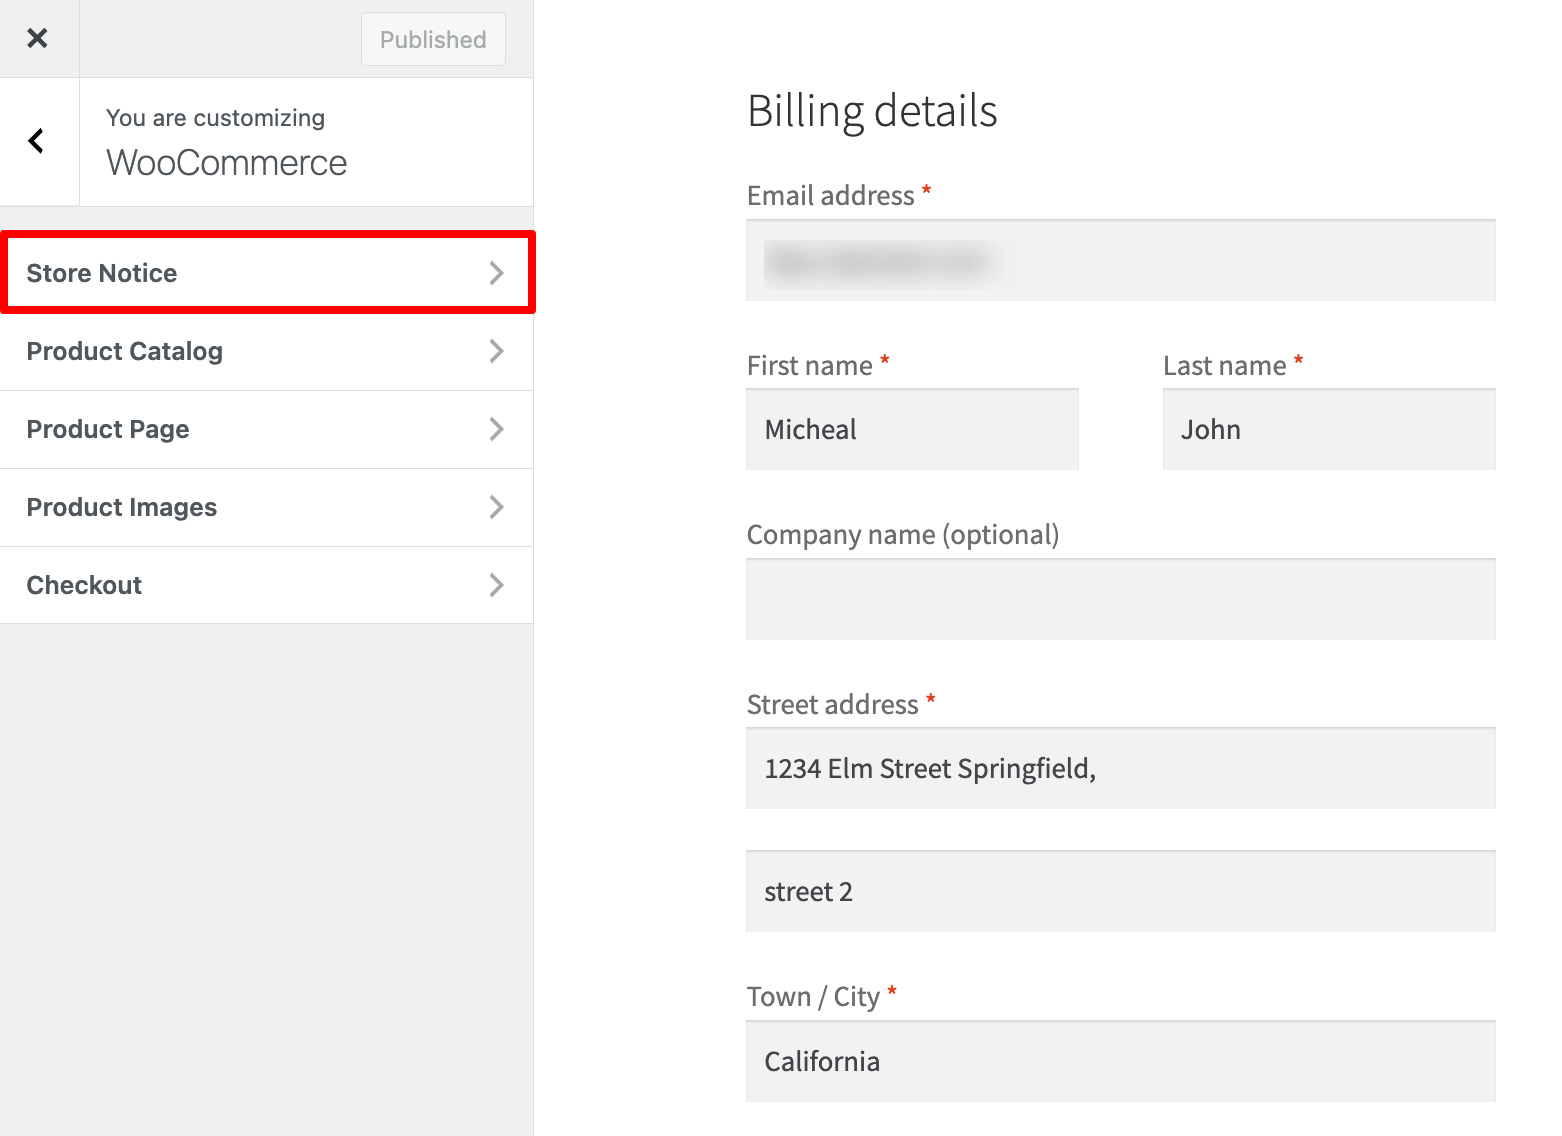
Now hit Store Notice.
Step 2: Add notice and enable it
Next, add the notice you want to show on the checkout page. And make sure to check the option “Enable store notice”.
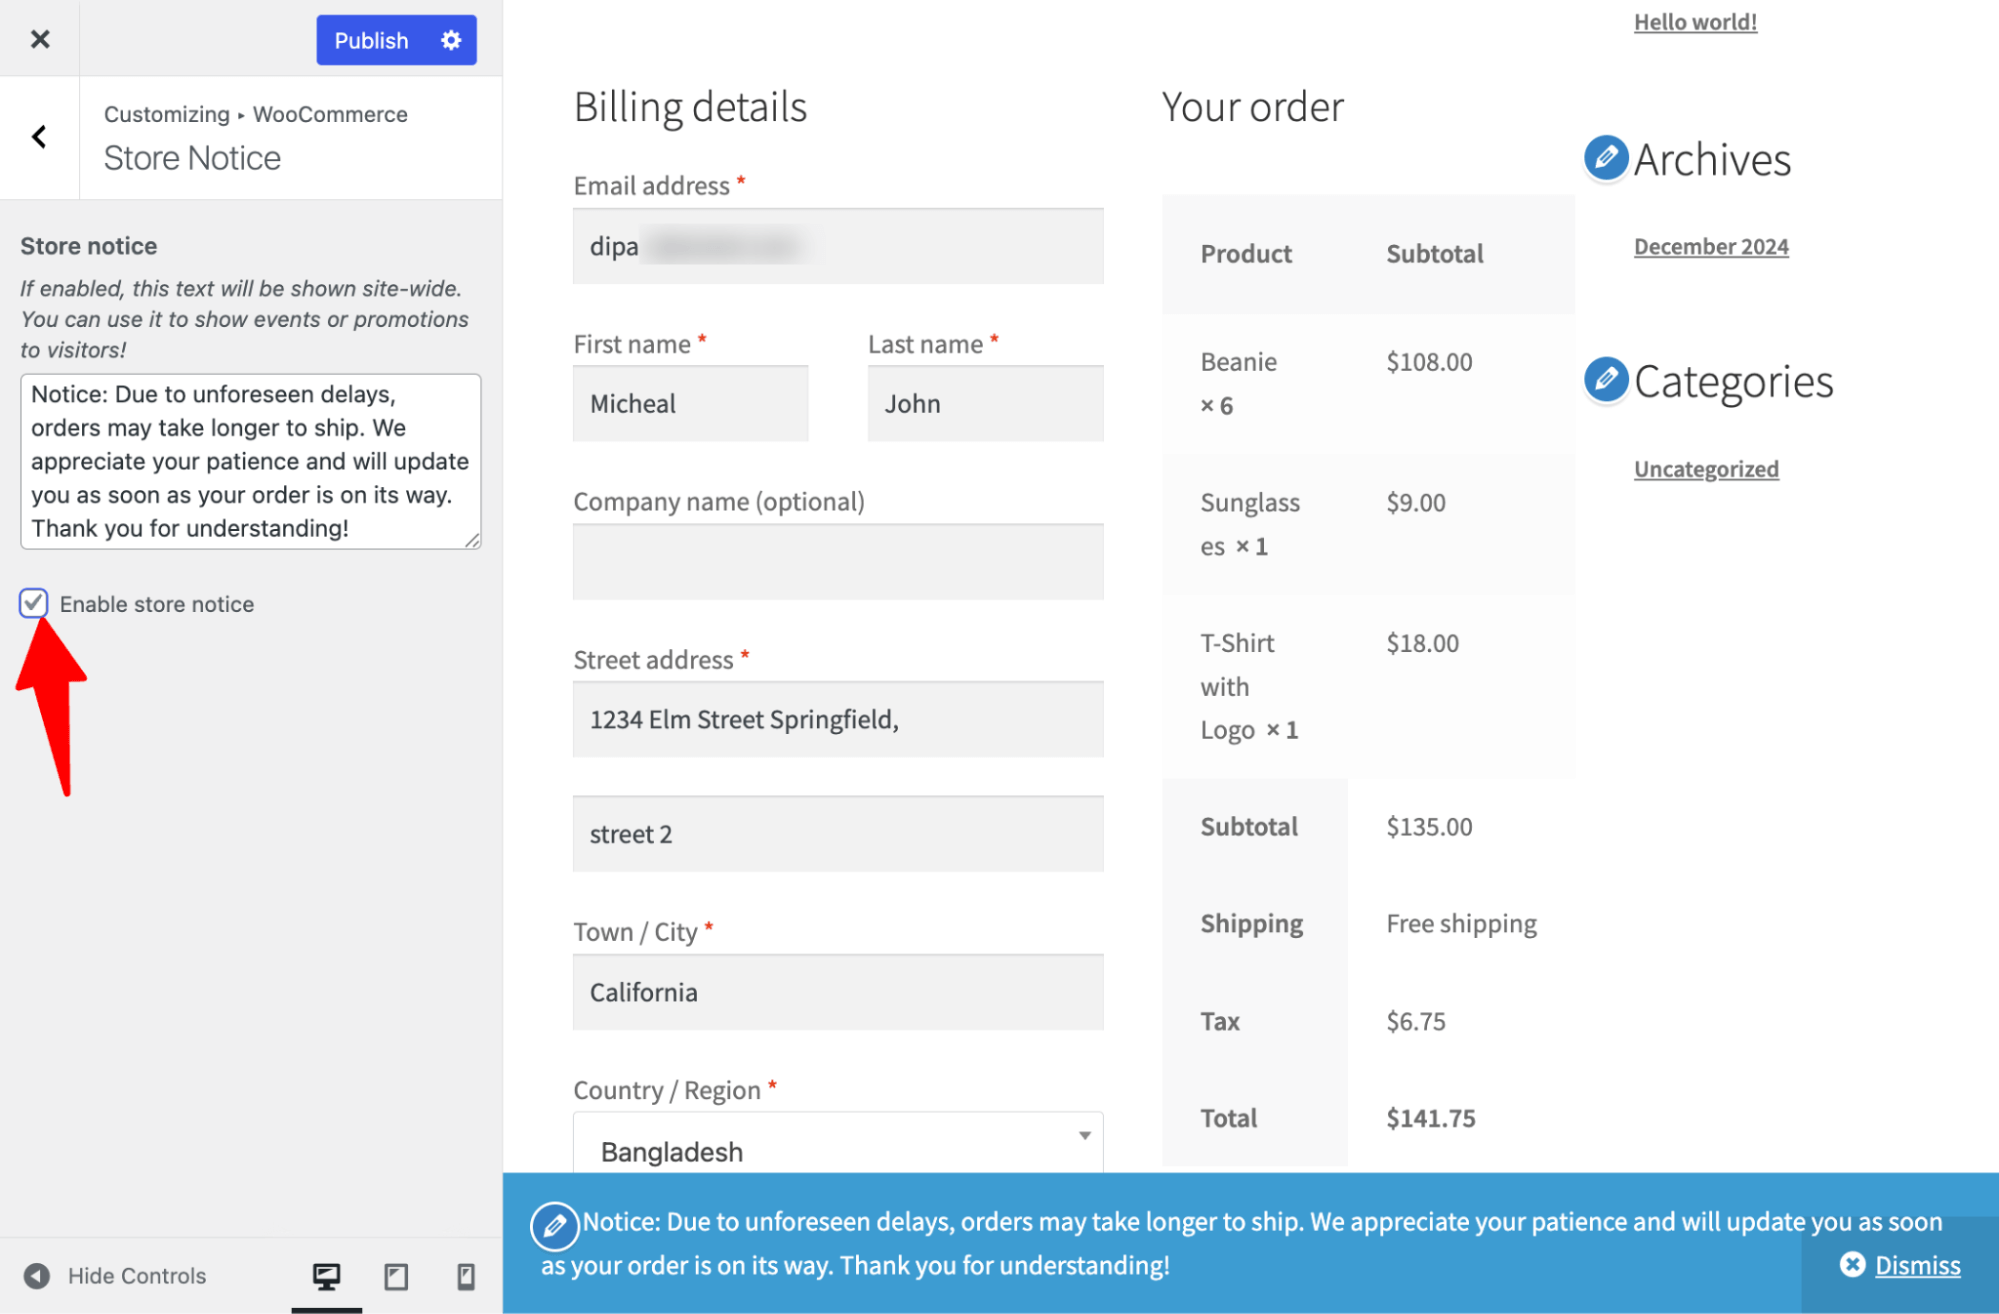
Step 4: Publish and test
Next, hit the Publish button and add the notice to your checkout page.
Here is how it will look:
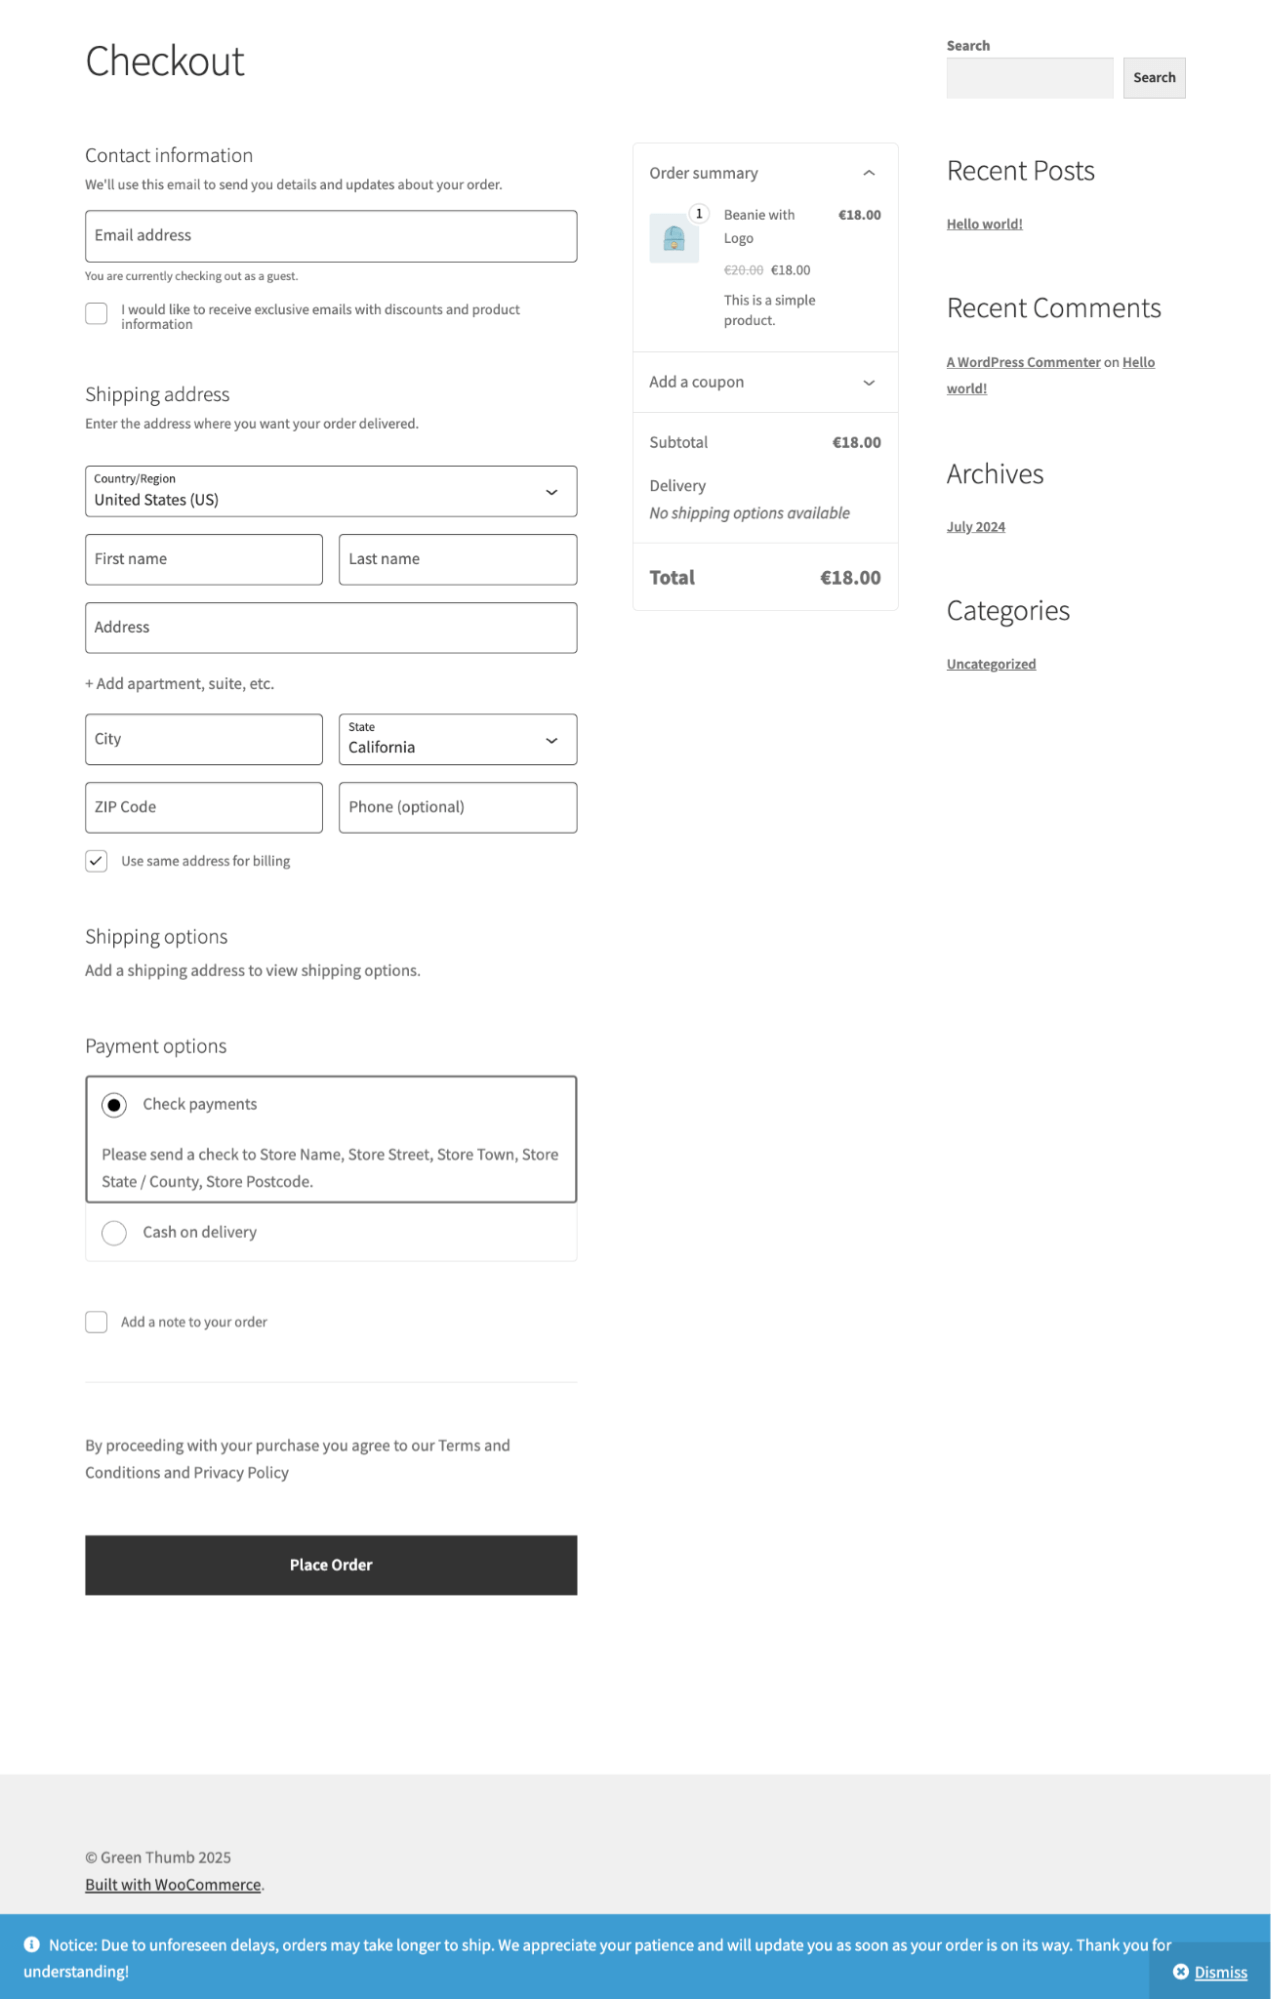
Limitation of Default WooCommerce Notice
First of all, the design is not standard; it’s on the bottom, which is not the right location to draw the user’s attention. Plus, you don't get any customization options.
Especially when it comes to shipping delay notices, it won’t work. Because if the shipping delay notice is visible across all pages, it might discourage users from completing their purchase, as they could leave the site without even checking the products.
Ideally, the shipping delay notice should only be displayed on the checkout page, where it is most relevant to customers finalizing their orders.
The default checkout page is also not optimized for conversion. In the next section, we will share a free, no-coding option for replacing the default checkout page with a conversion-optimized one and also add a notice that will be visible only on that page.
Method 2: Add Notice to WooCommerce Checkout Page Only [Free, No Coding Solution ]
For this method, we will use FunnelKit Funnel Builder - a checkout page customizer plugin that lets you replace the default layout with an optimized design for higher conversions.
The best part is that it requires no coding knowledge. All you need to do is import the prebuilt checkout page and then customize it according to your needs and add a notice.
To customize the checkout page and add anotice, you can use any of the popular drag and drop page builders like Elementor, Divi, Bricks, etc.
The free version is enough. So make sure you install and activate the plugin.
Next, follow these steps:
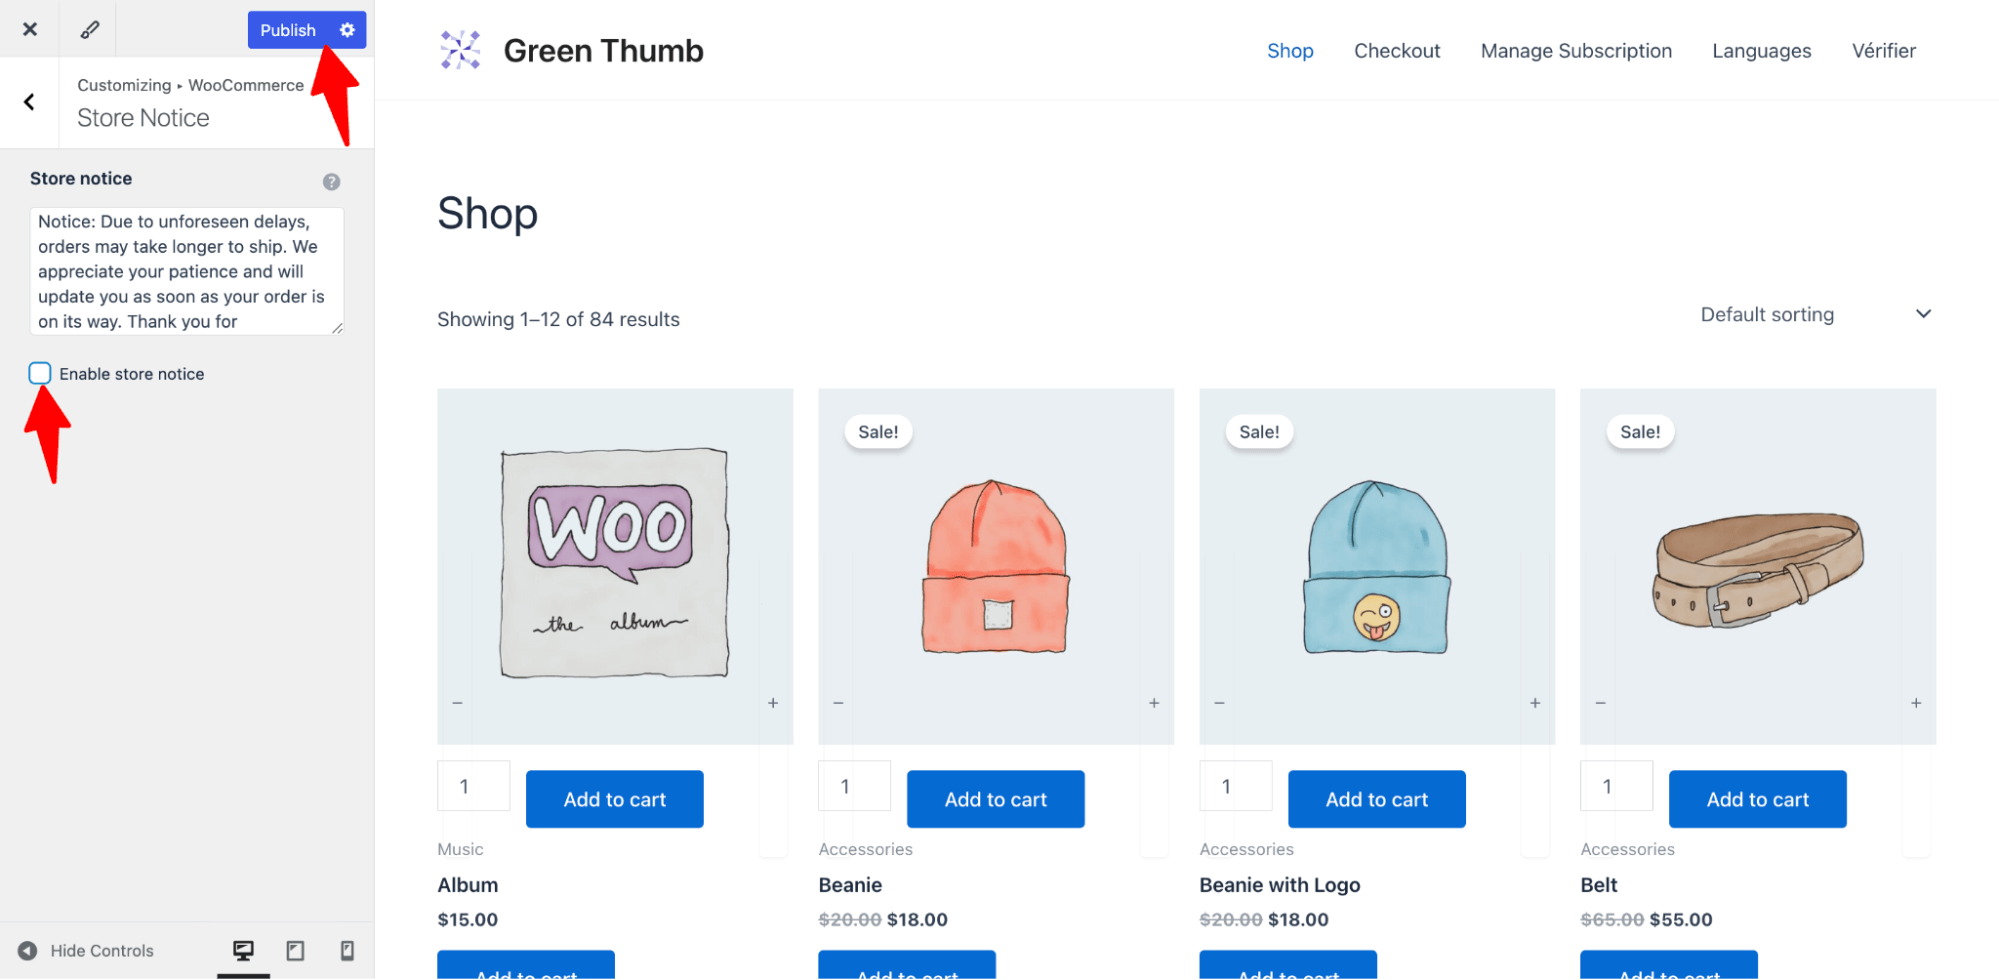
Step 1: Disable default store notice
The first step is to ensure there is no default notice enabled in your WooCommerce store. So, make sure to uncheck the “Enable Store Notice” option and hit ‘Publish.
Step 2: Create a store checkout
Now, we need to create a store checkout that will replace the default WooCommerce checkout page.
For that, navigate to FunnelKit ⇒ Store Checkout and click on the ‘Create Store Checkout’ button.
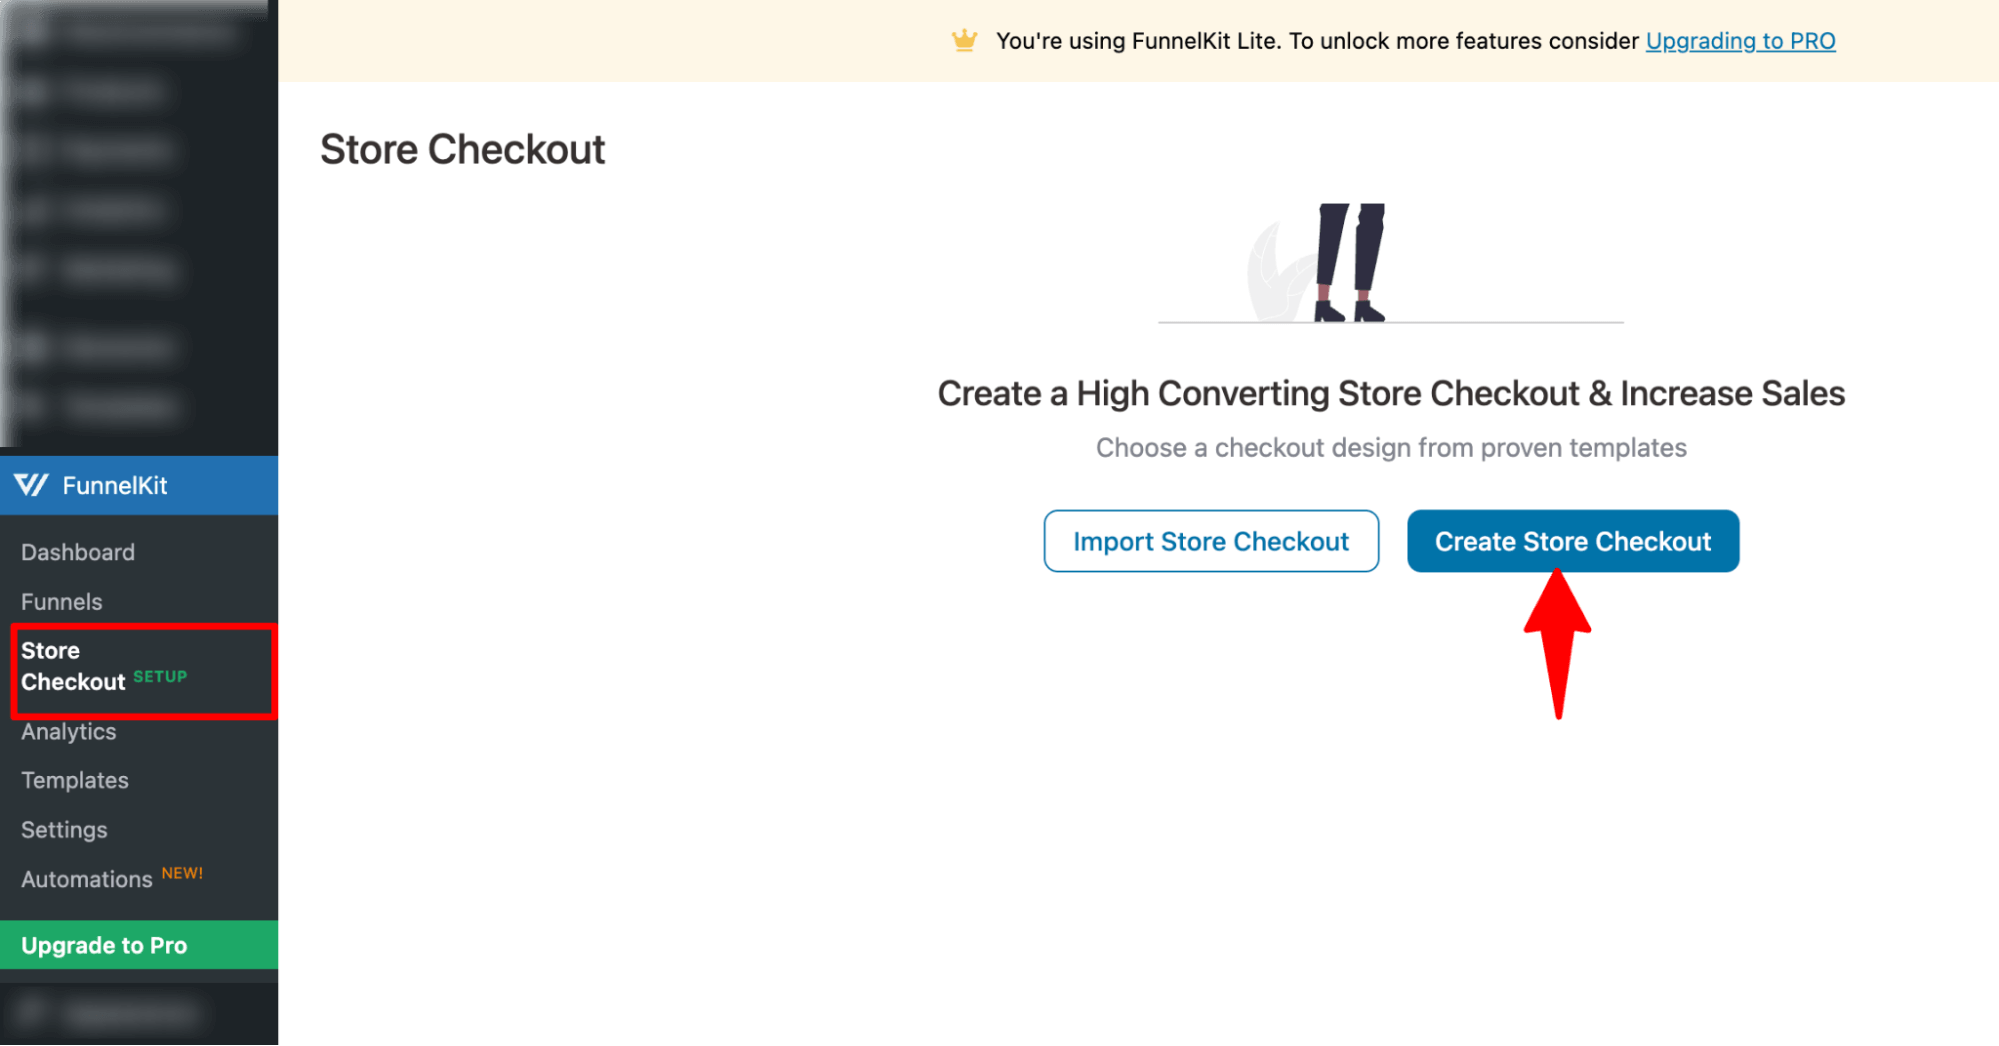
After that, select your favourite page builder and choose a template from the prebuilt checkout templates that FunnelKit provides.
Feel free to choose your favorite page builder, like Elementor, Divi, Gutenberg, Oxygen, etc, or use shortcodes with any builder you want.
To select one, hover on the template you like and click Preview. Here, we choose the Elementor page builder and the Optic template.
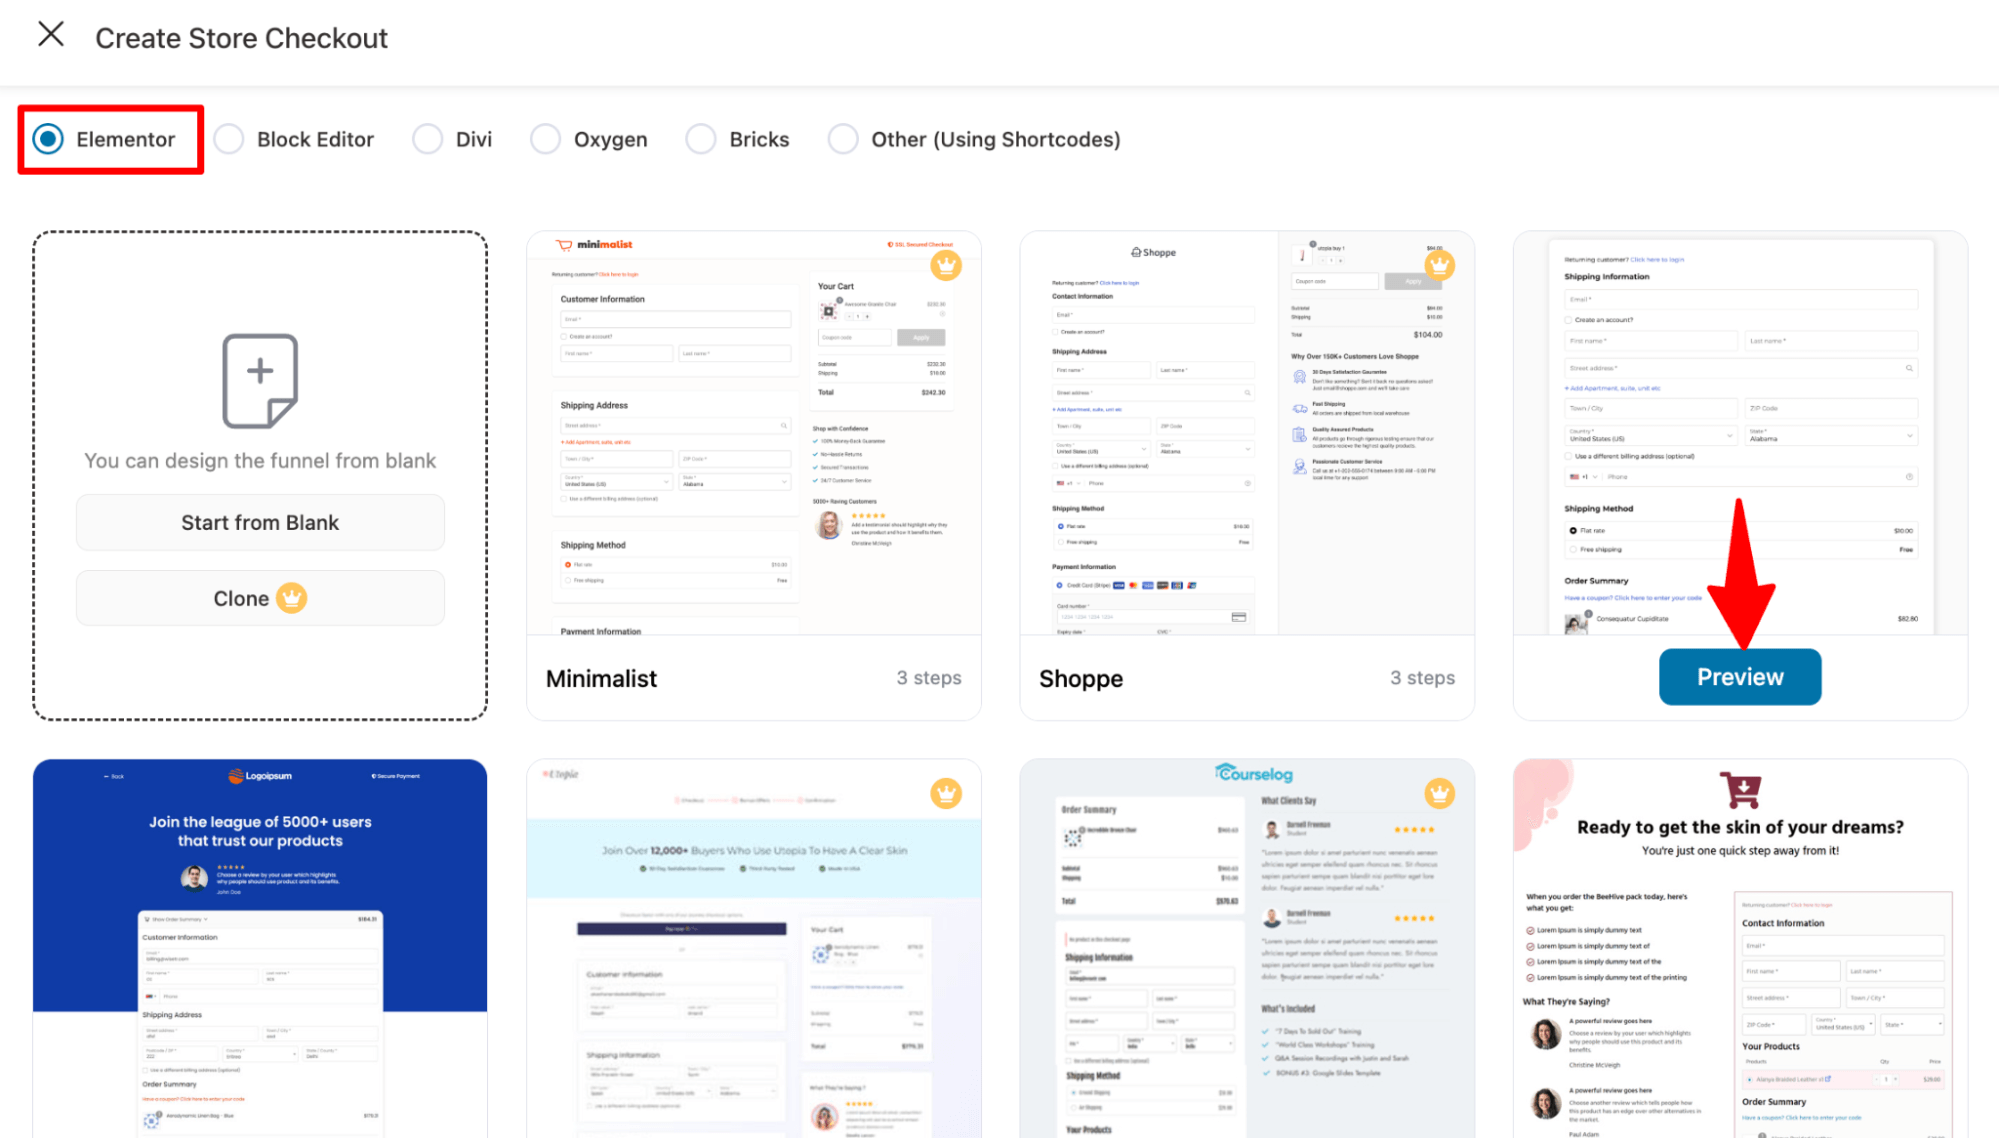
We are going with a single-page checkout. Please note that the multi-page checkout option is only available for the pro version.
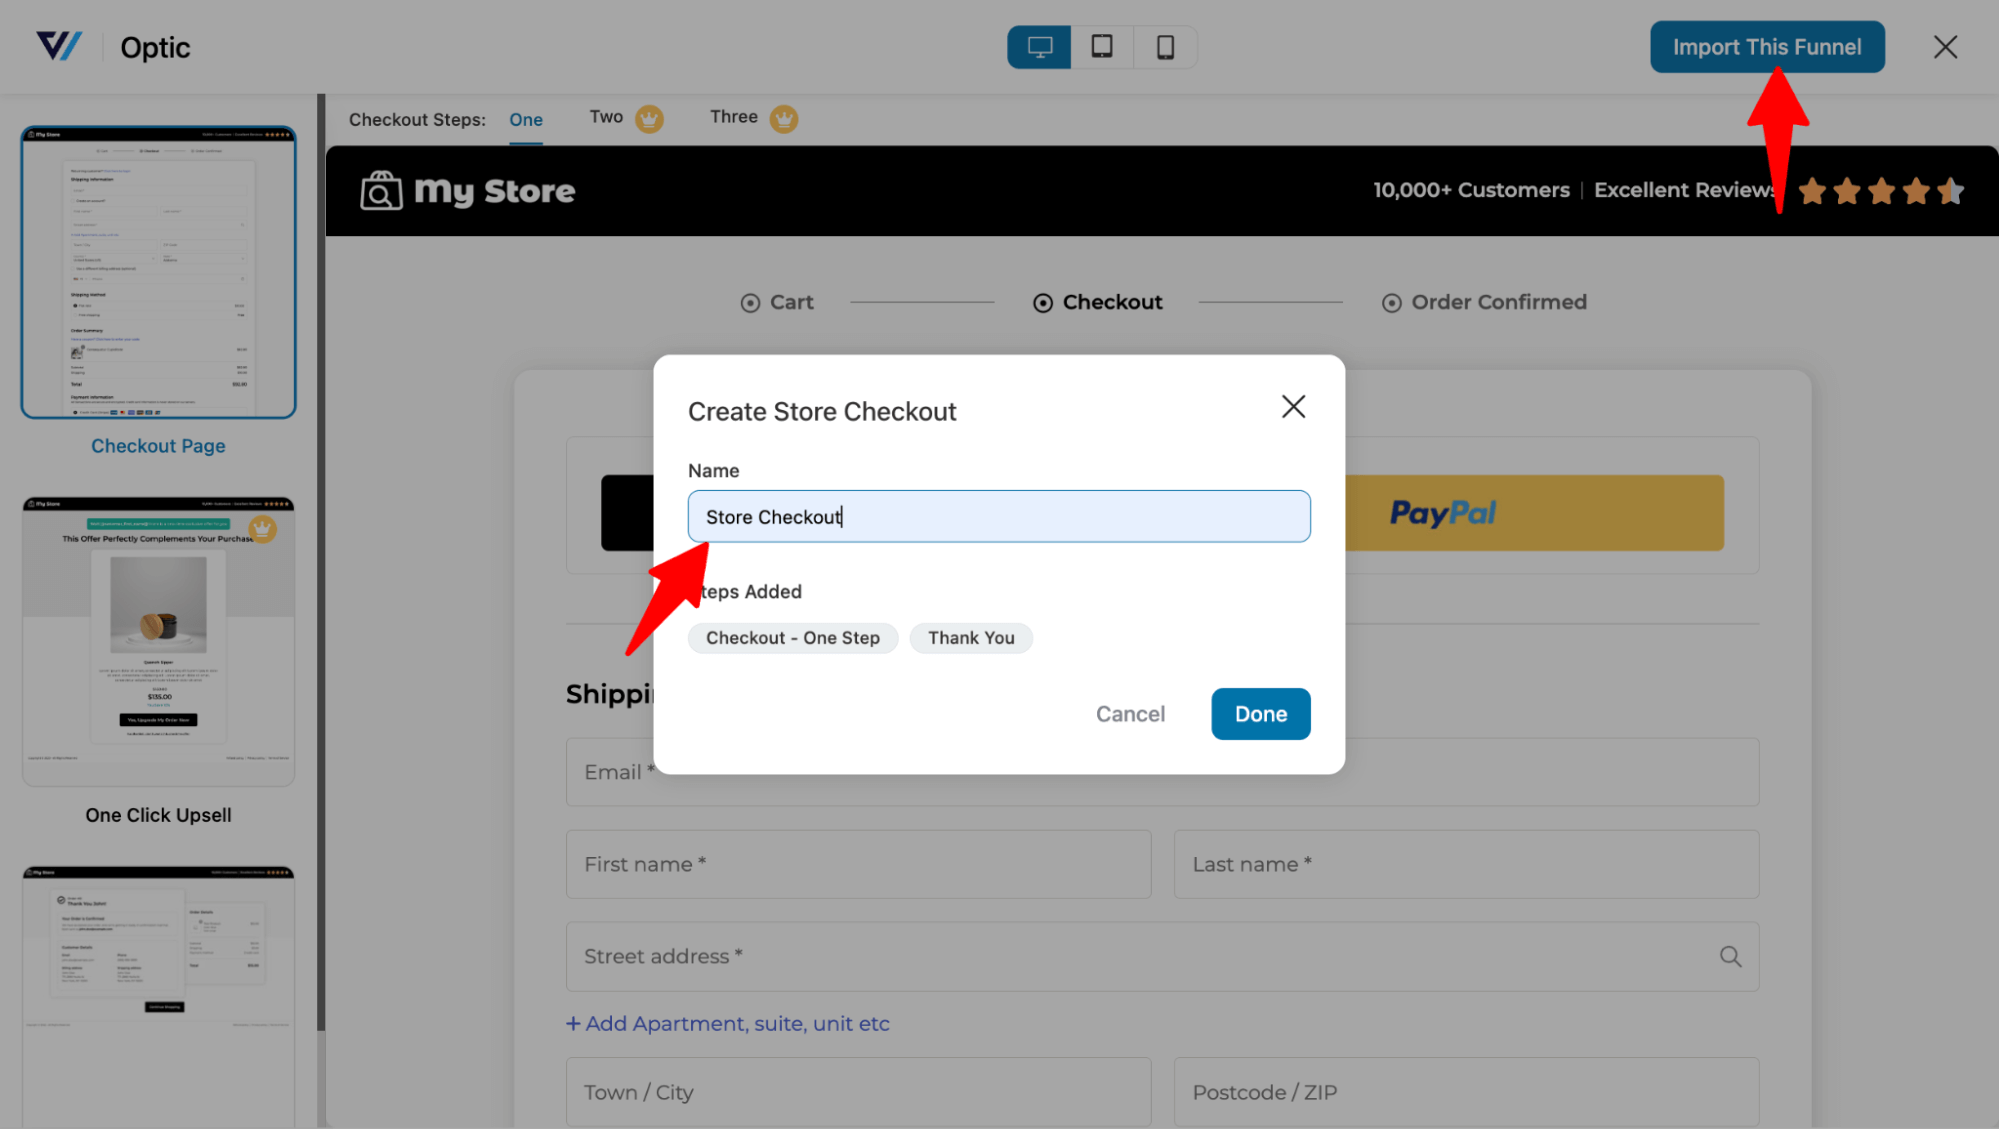
After that, click on “Import This Funnel,” provide a name, and hit the Add button to import your store checkout funnel.
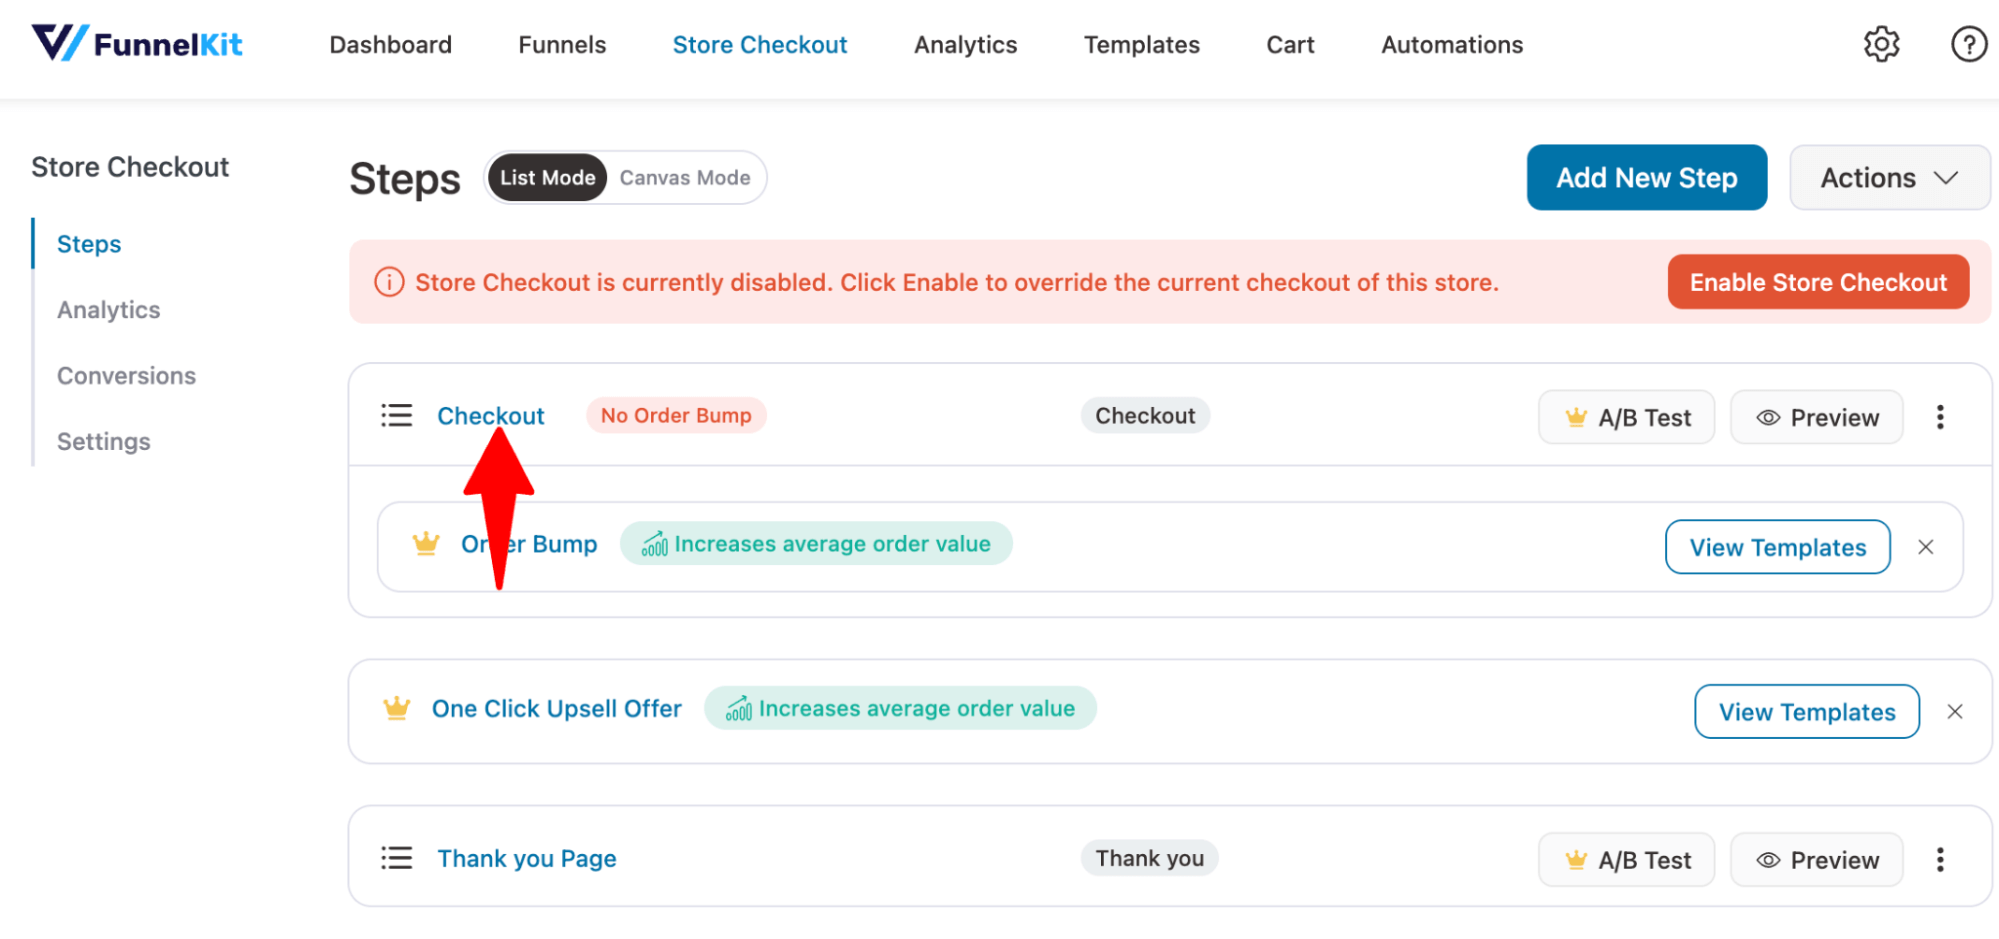
Step 3: Add notice to checkout page
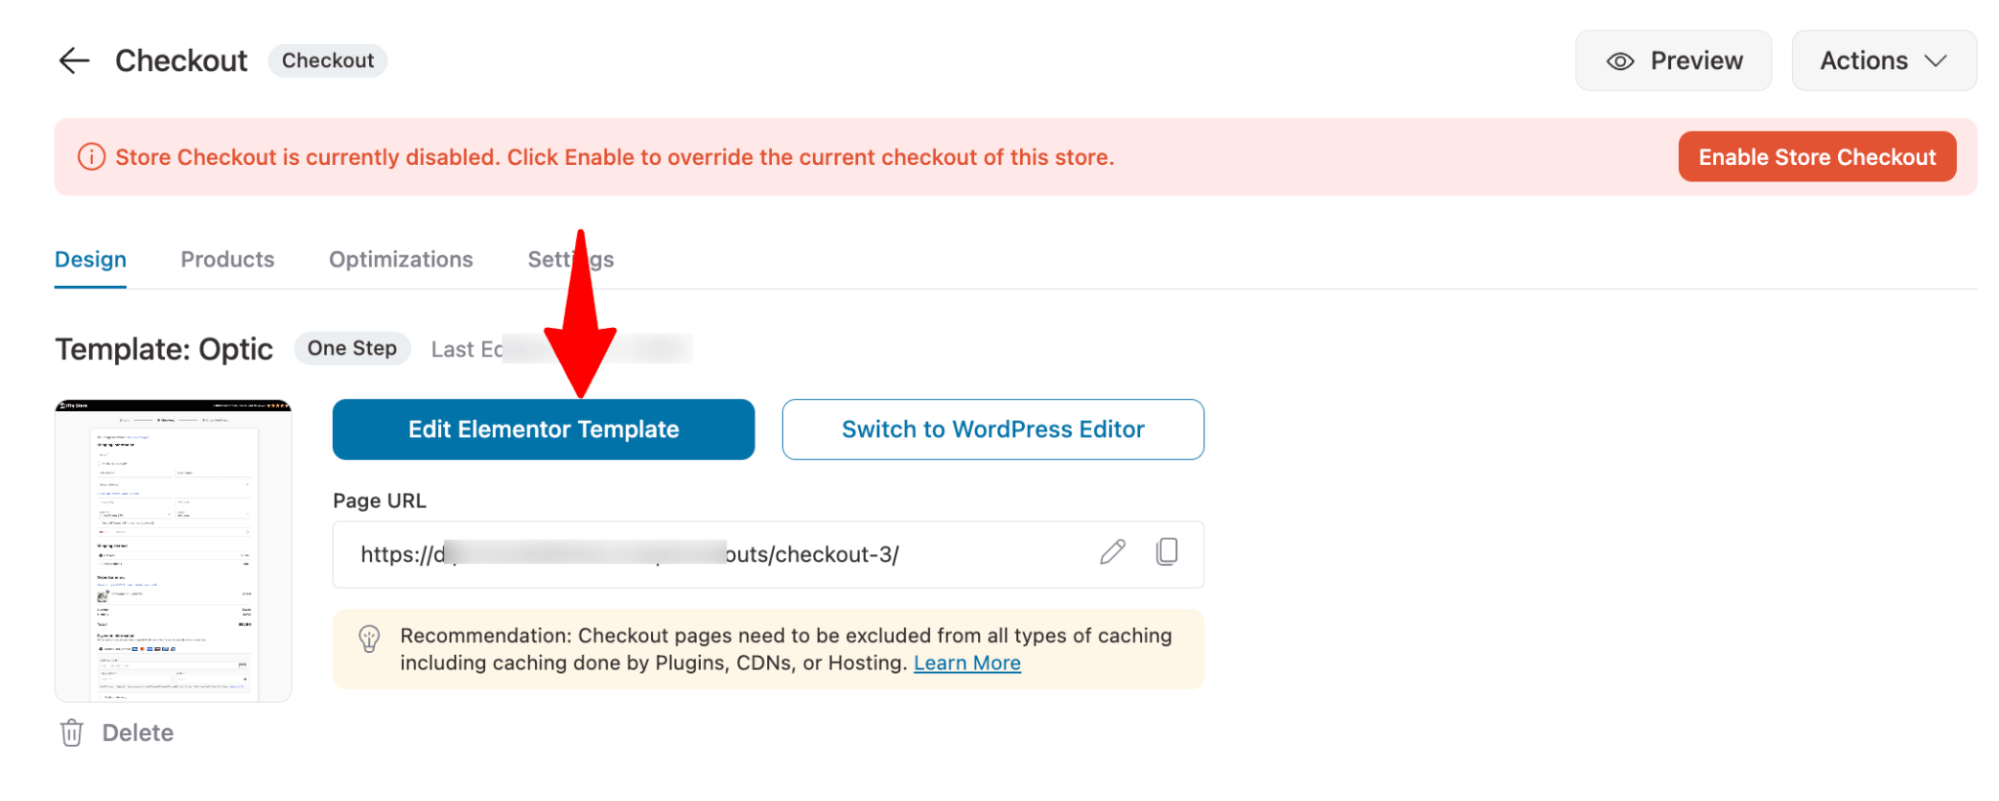
To customize the checkout page template, click on the checkout step.
Here, you can customize the design and content of the checkout page with the selected page builder and add a new section.
For that, click on the “Edit Template” option.
Next, add a container on top of the logo row.

Move to the Style tab and add a background color so the notice gets the attention it needs.
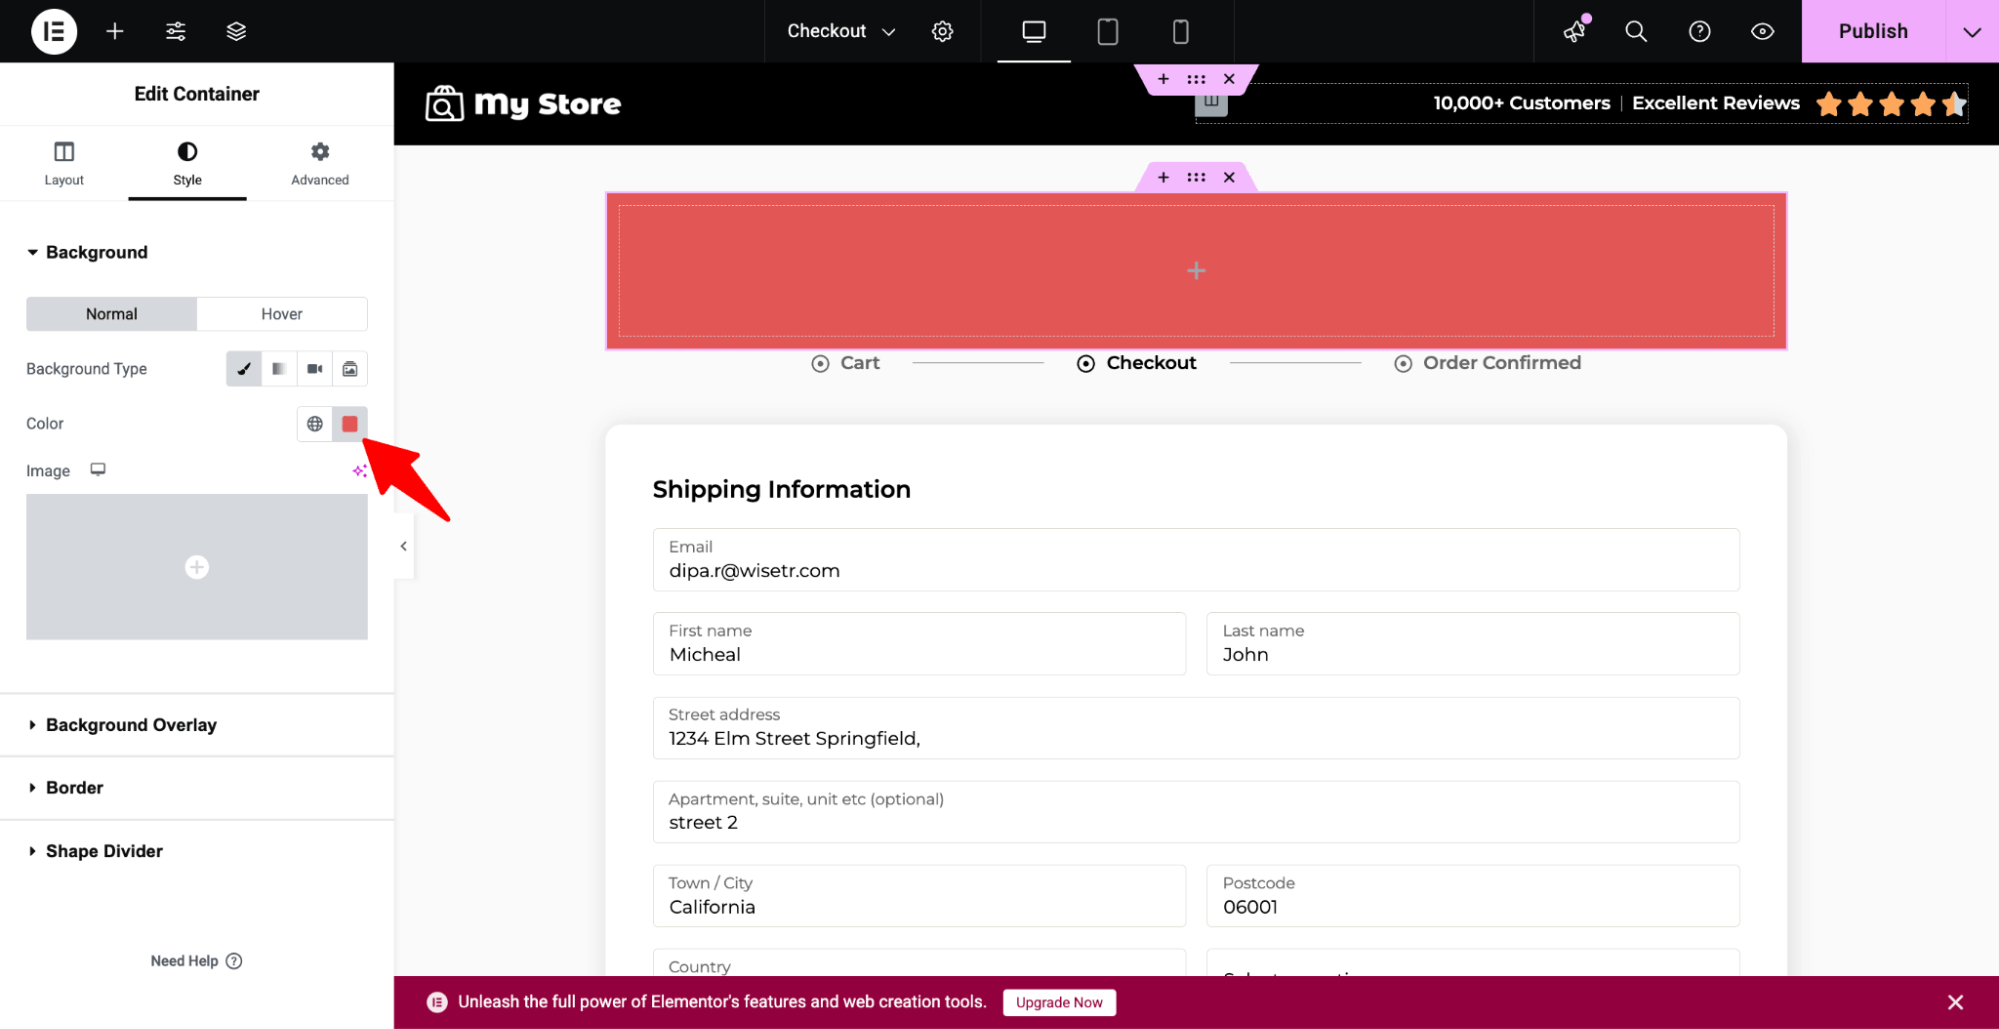
Add a border radius.
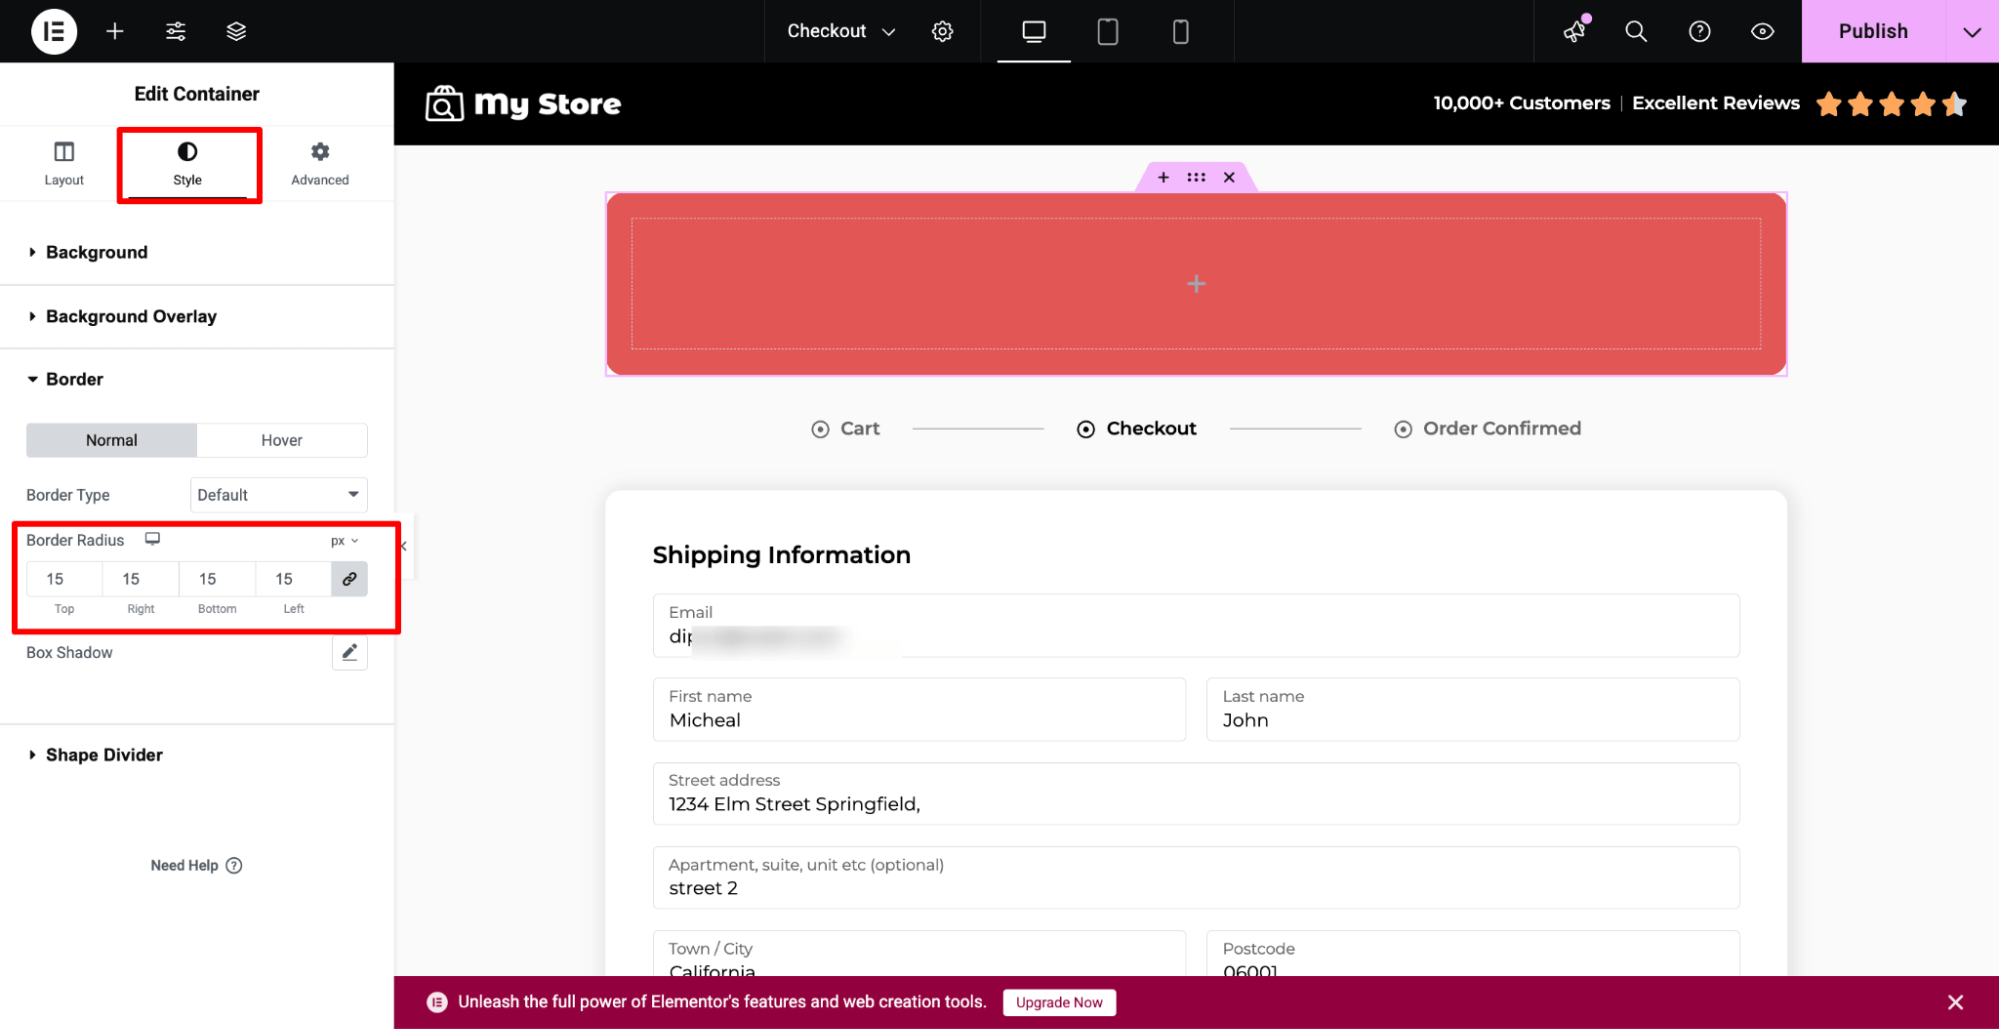
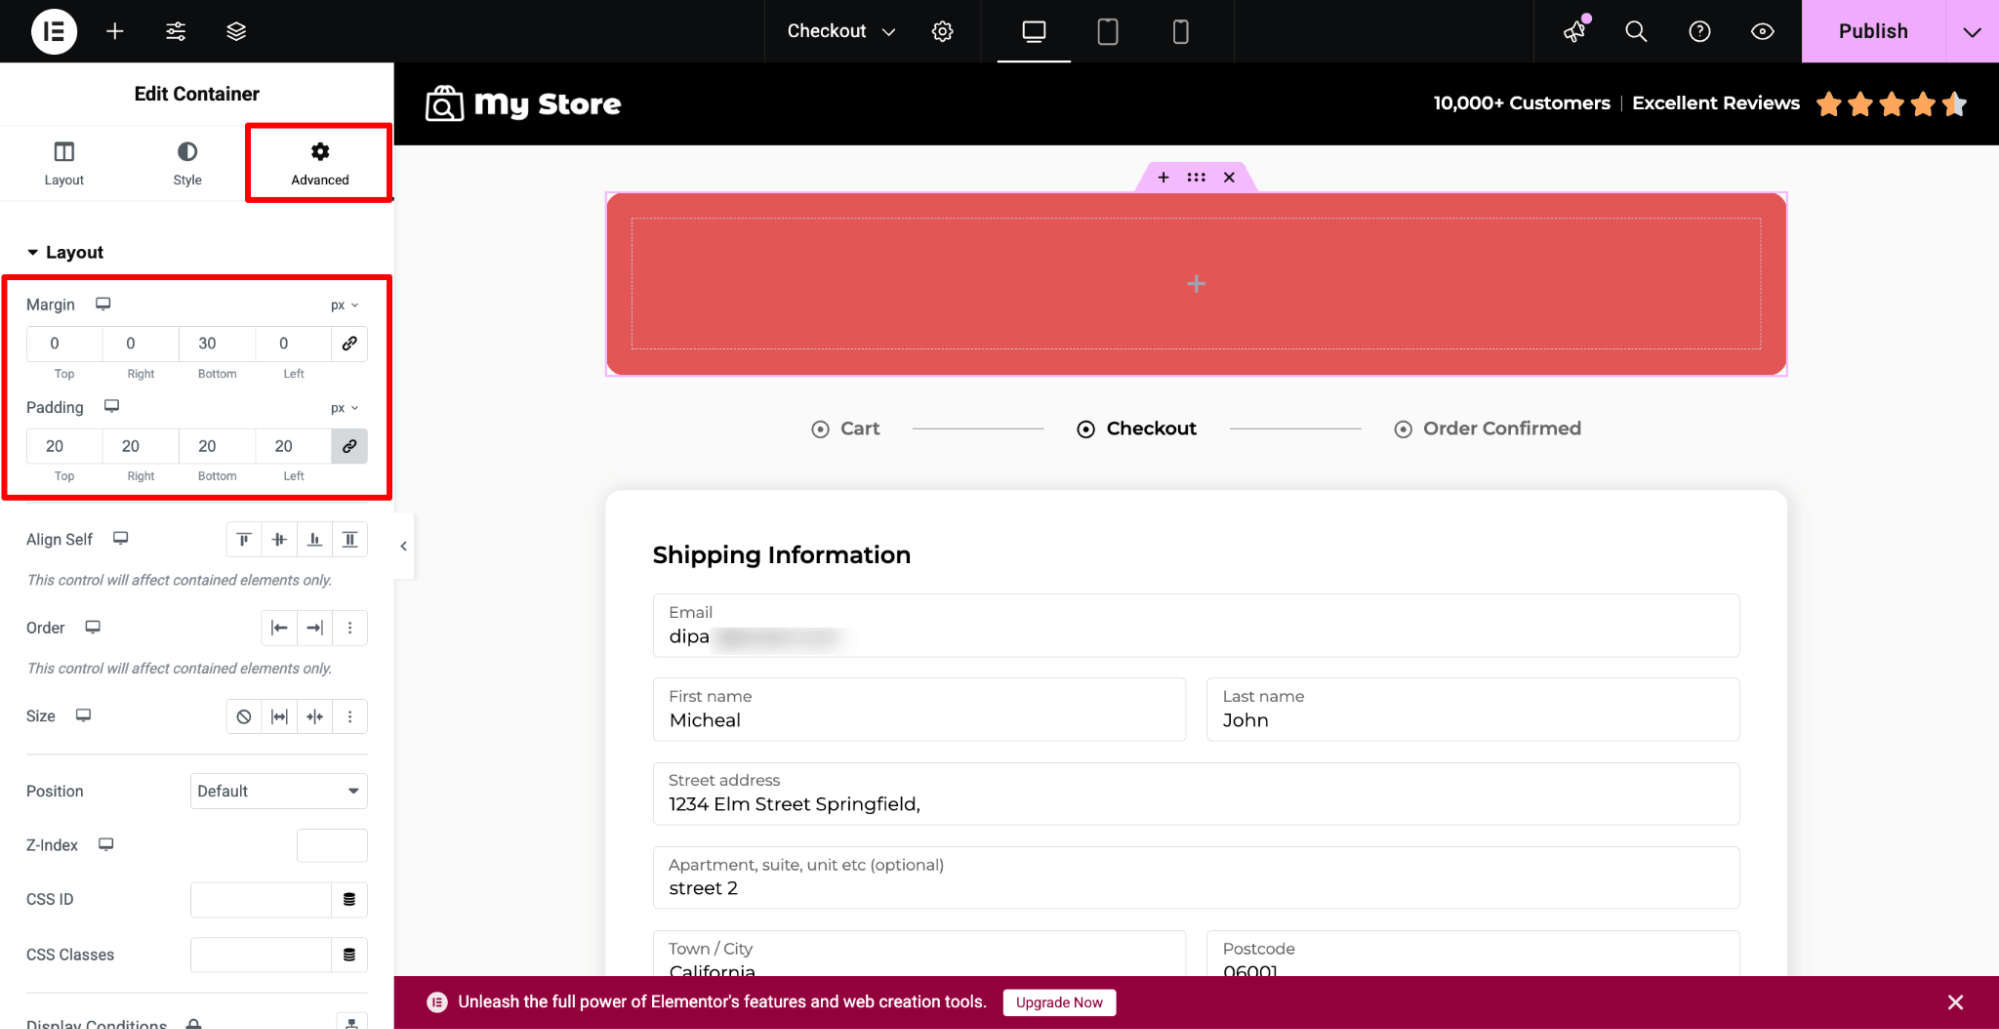
Note: We also added a margin on the bottom and padding around the container to enhance the appearance.
Now that our container is ready, it’s time to add the notice. For this, drag and drop a text editor on the container you just added.
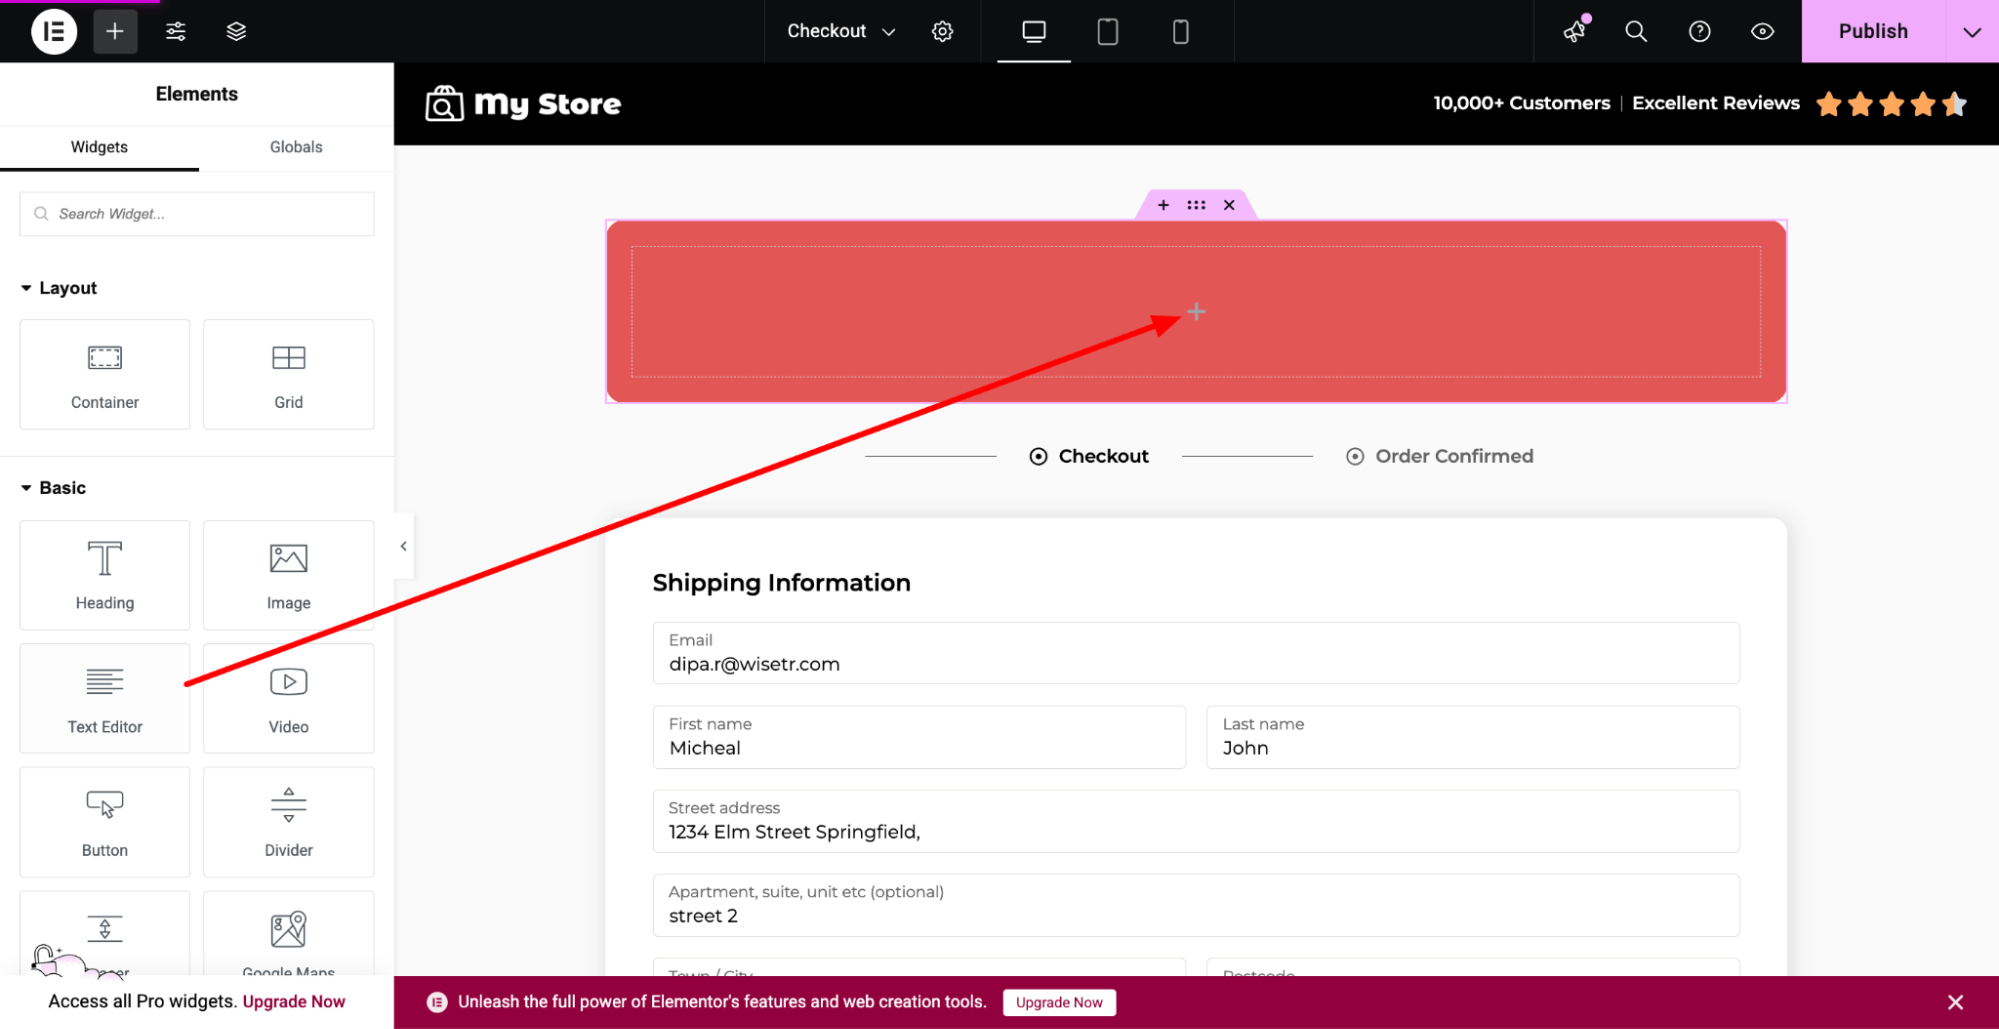
Then add the notice.
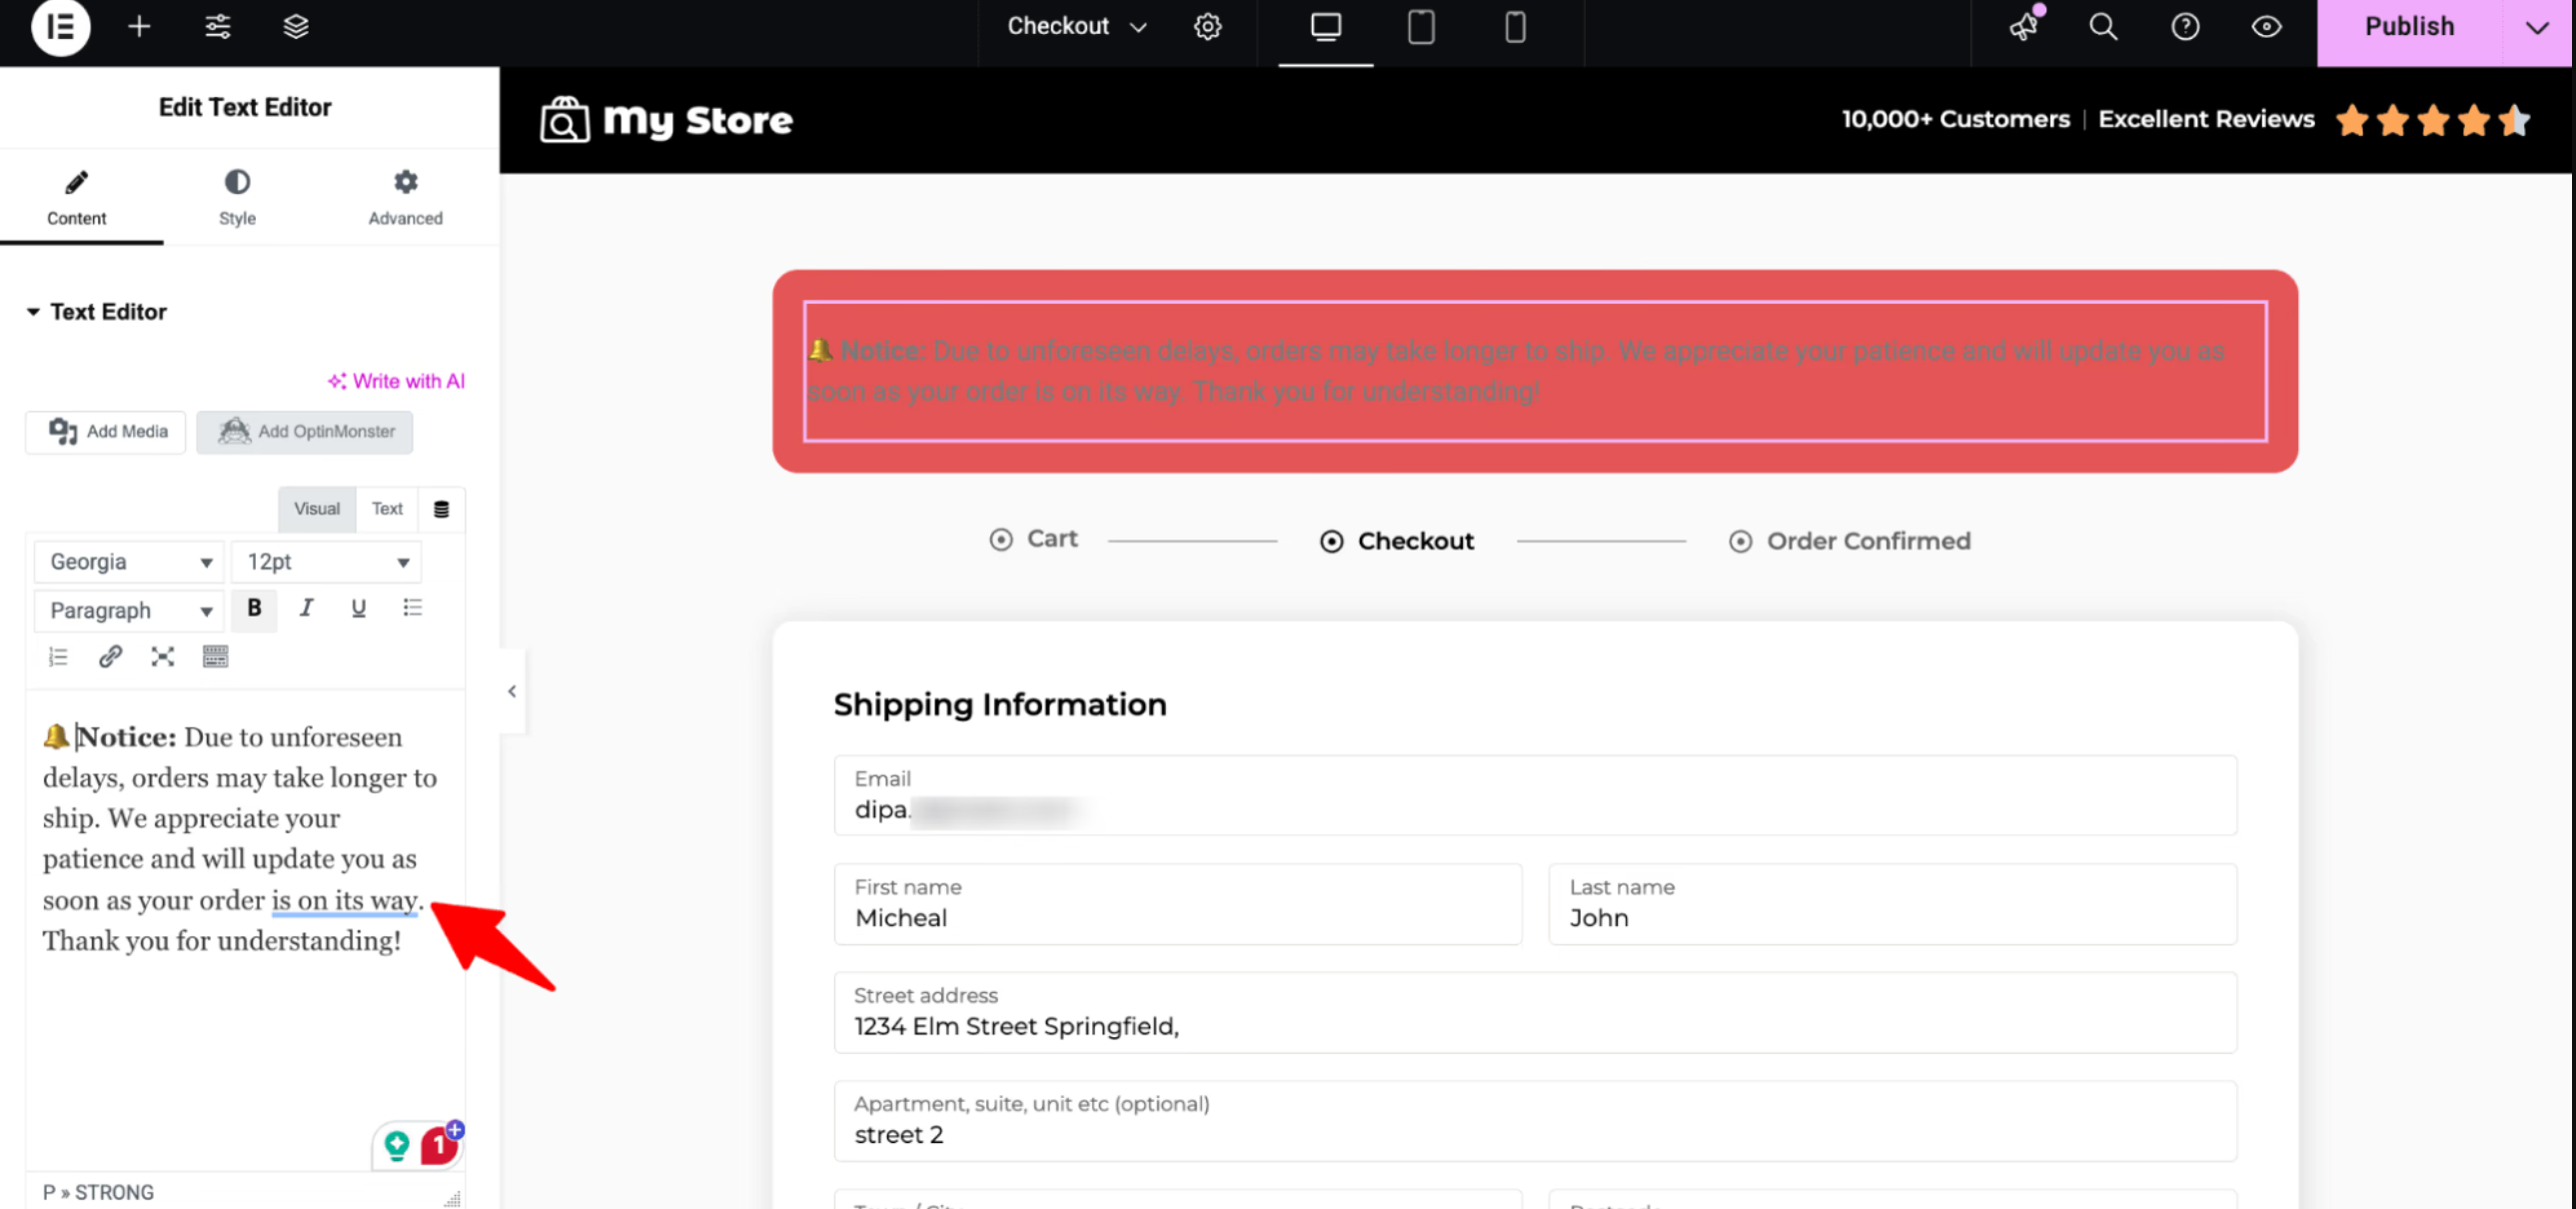
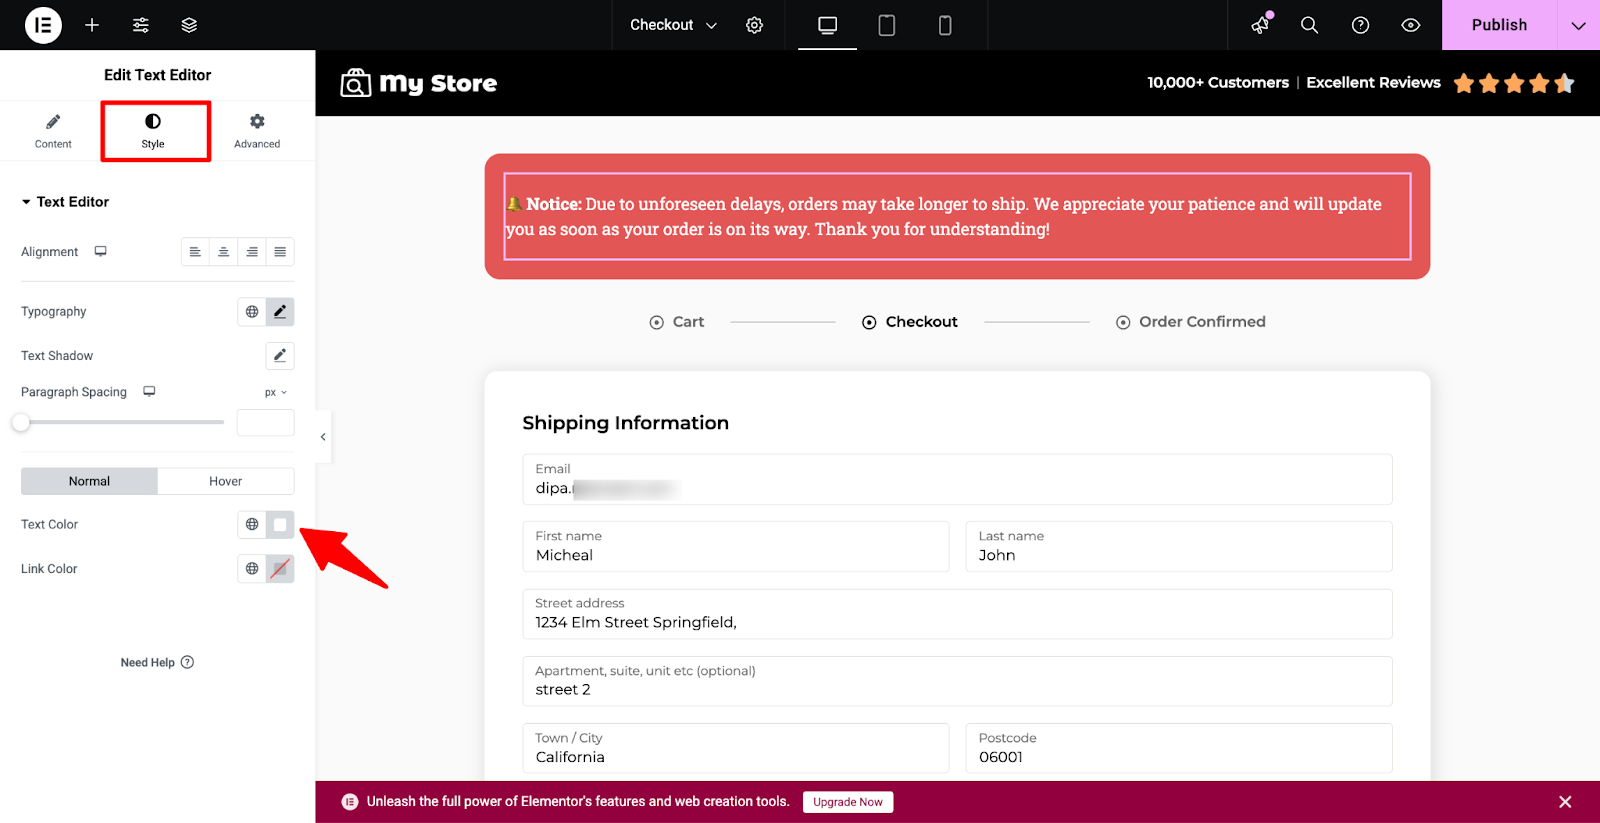
Next, move to the Style tab, where you can customize the notice text color, typography, etc.
Once you are done adding the notice to the checkout page template, make sure to hit Publish to save the changes.
Step 4: Enable the store checkout
The last step is to enable the store checkout.

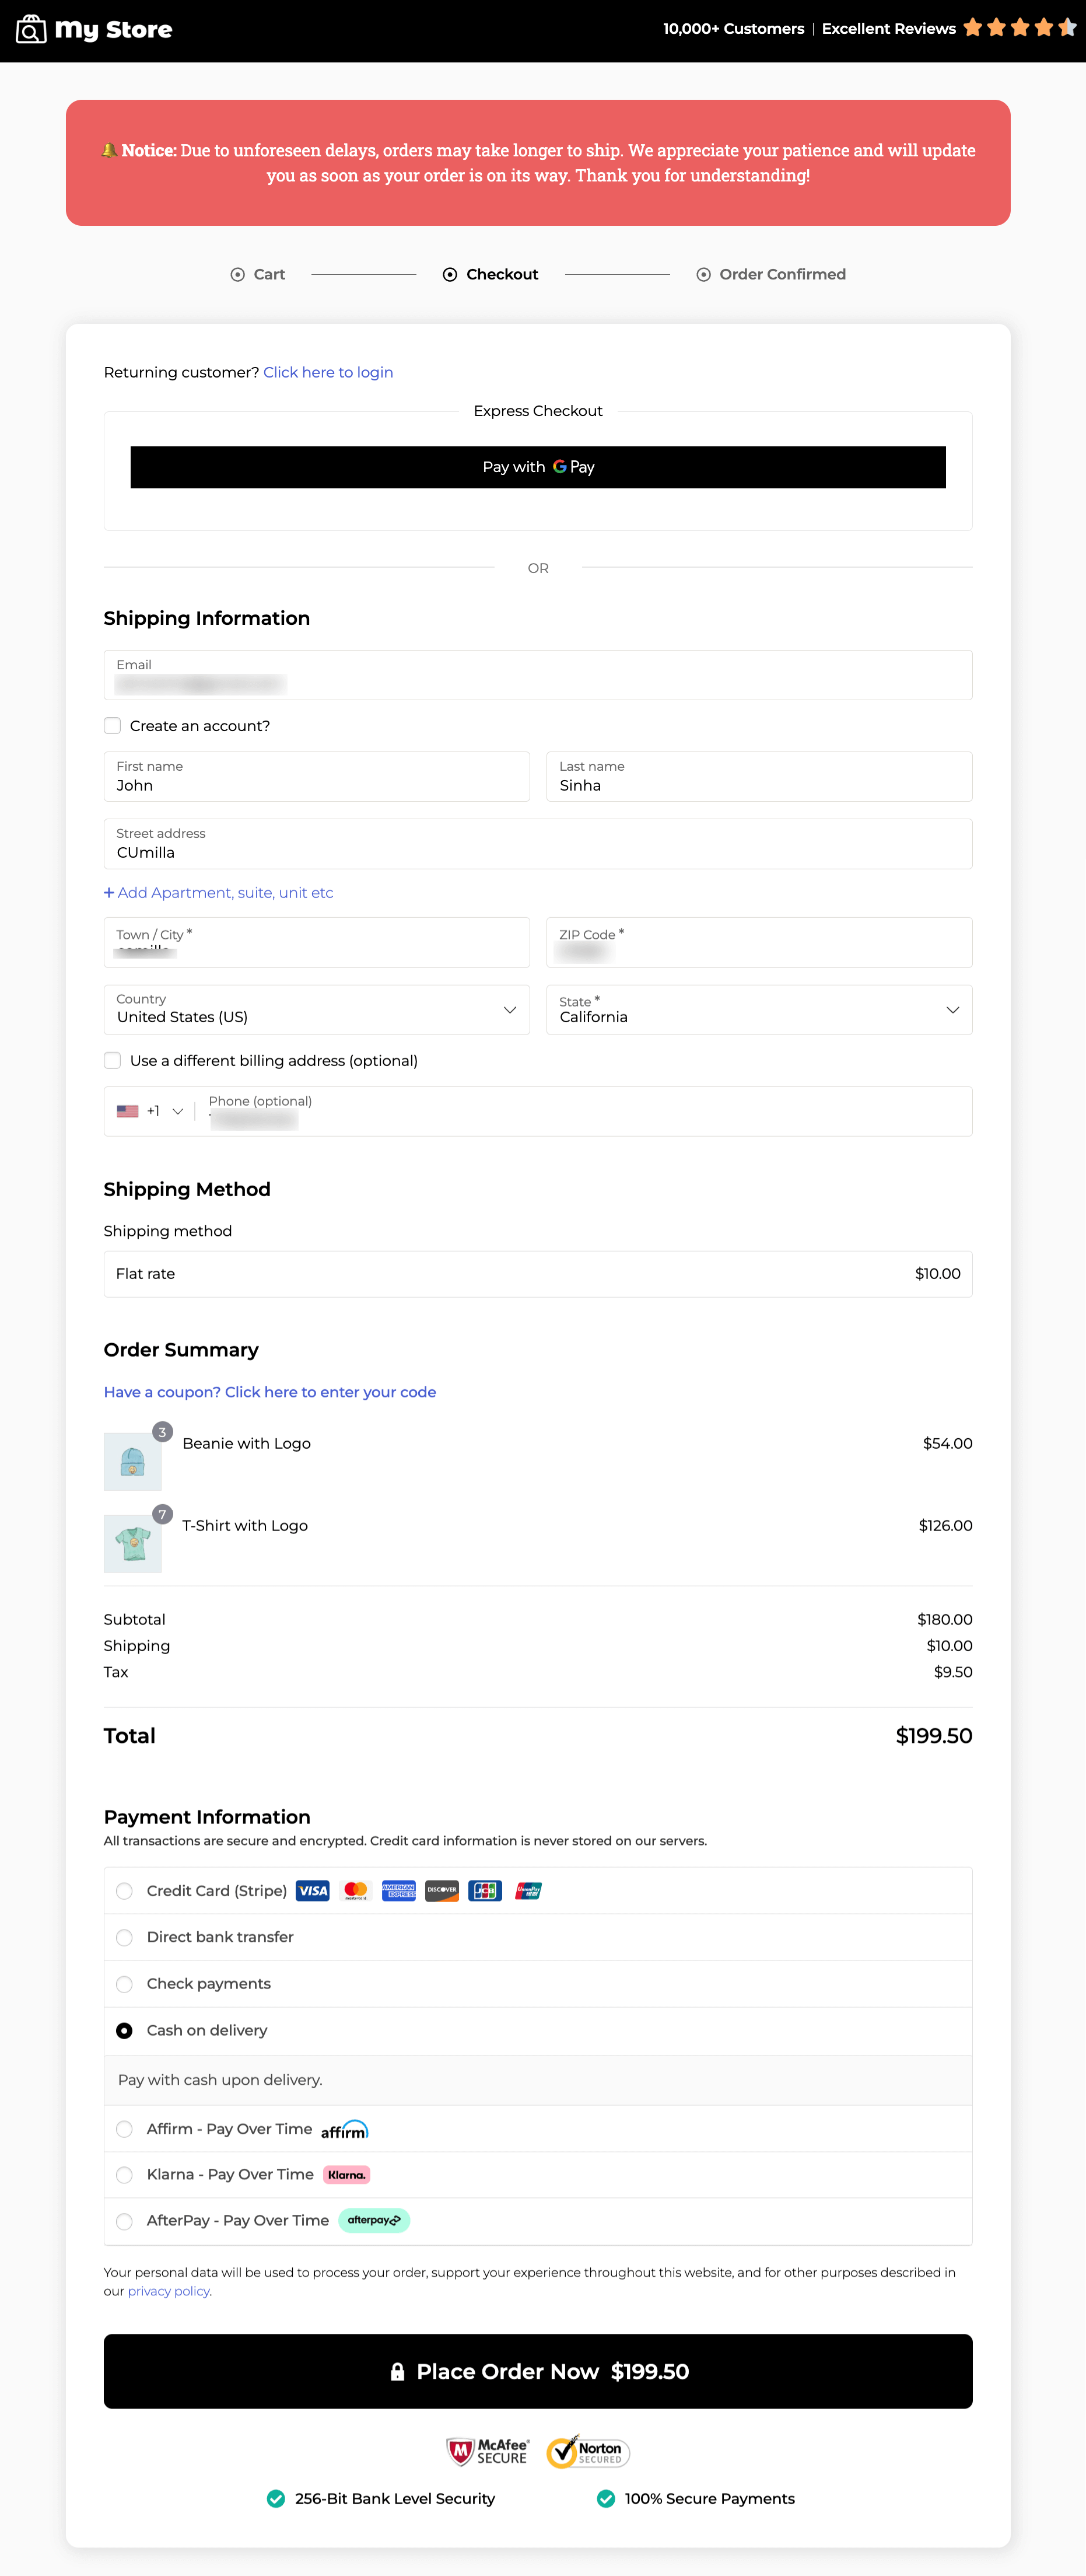
Now, only the checkout page will show the notice to customers like this.
4 Examples of Checkout Page Notice For Effective Communication
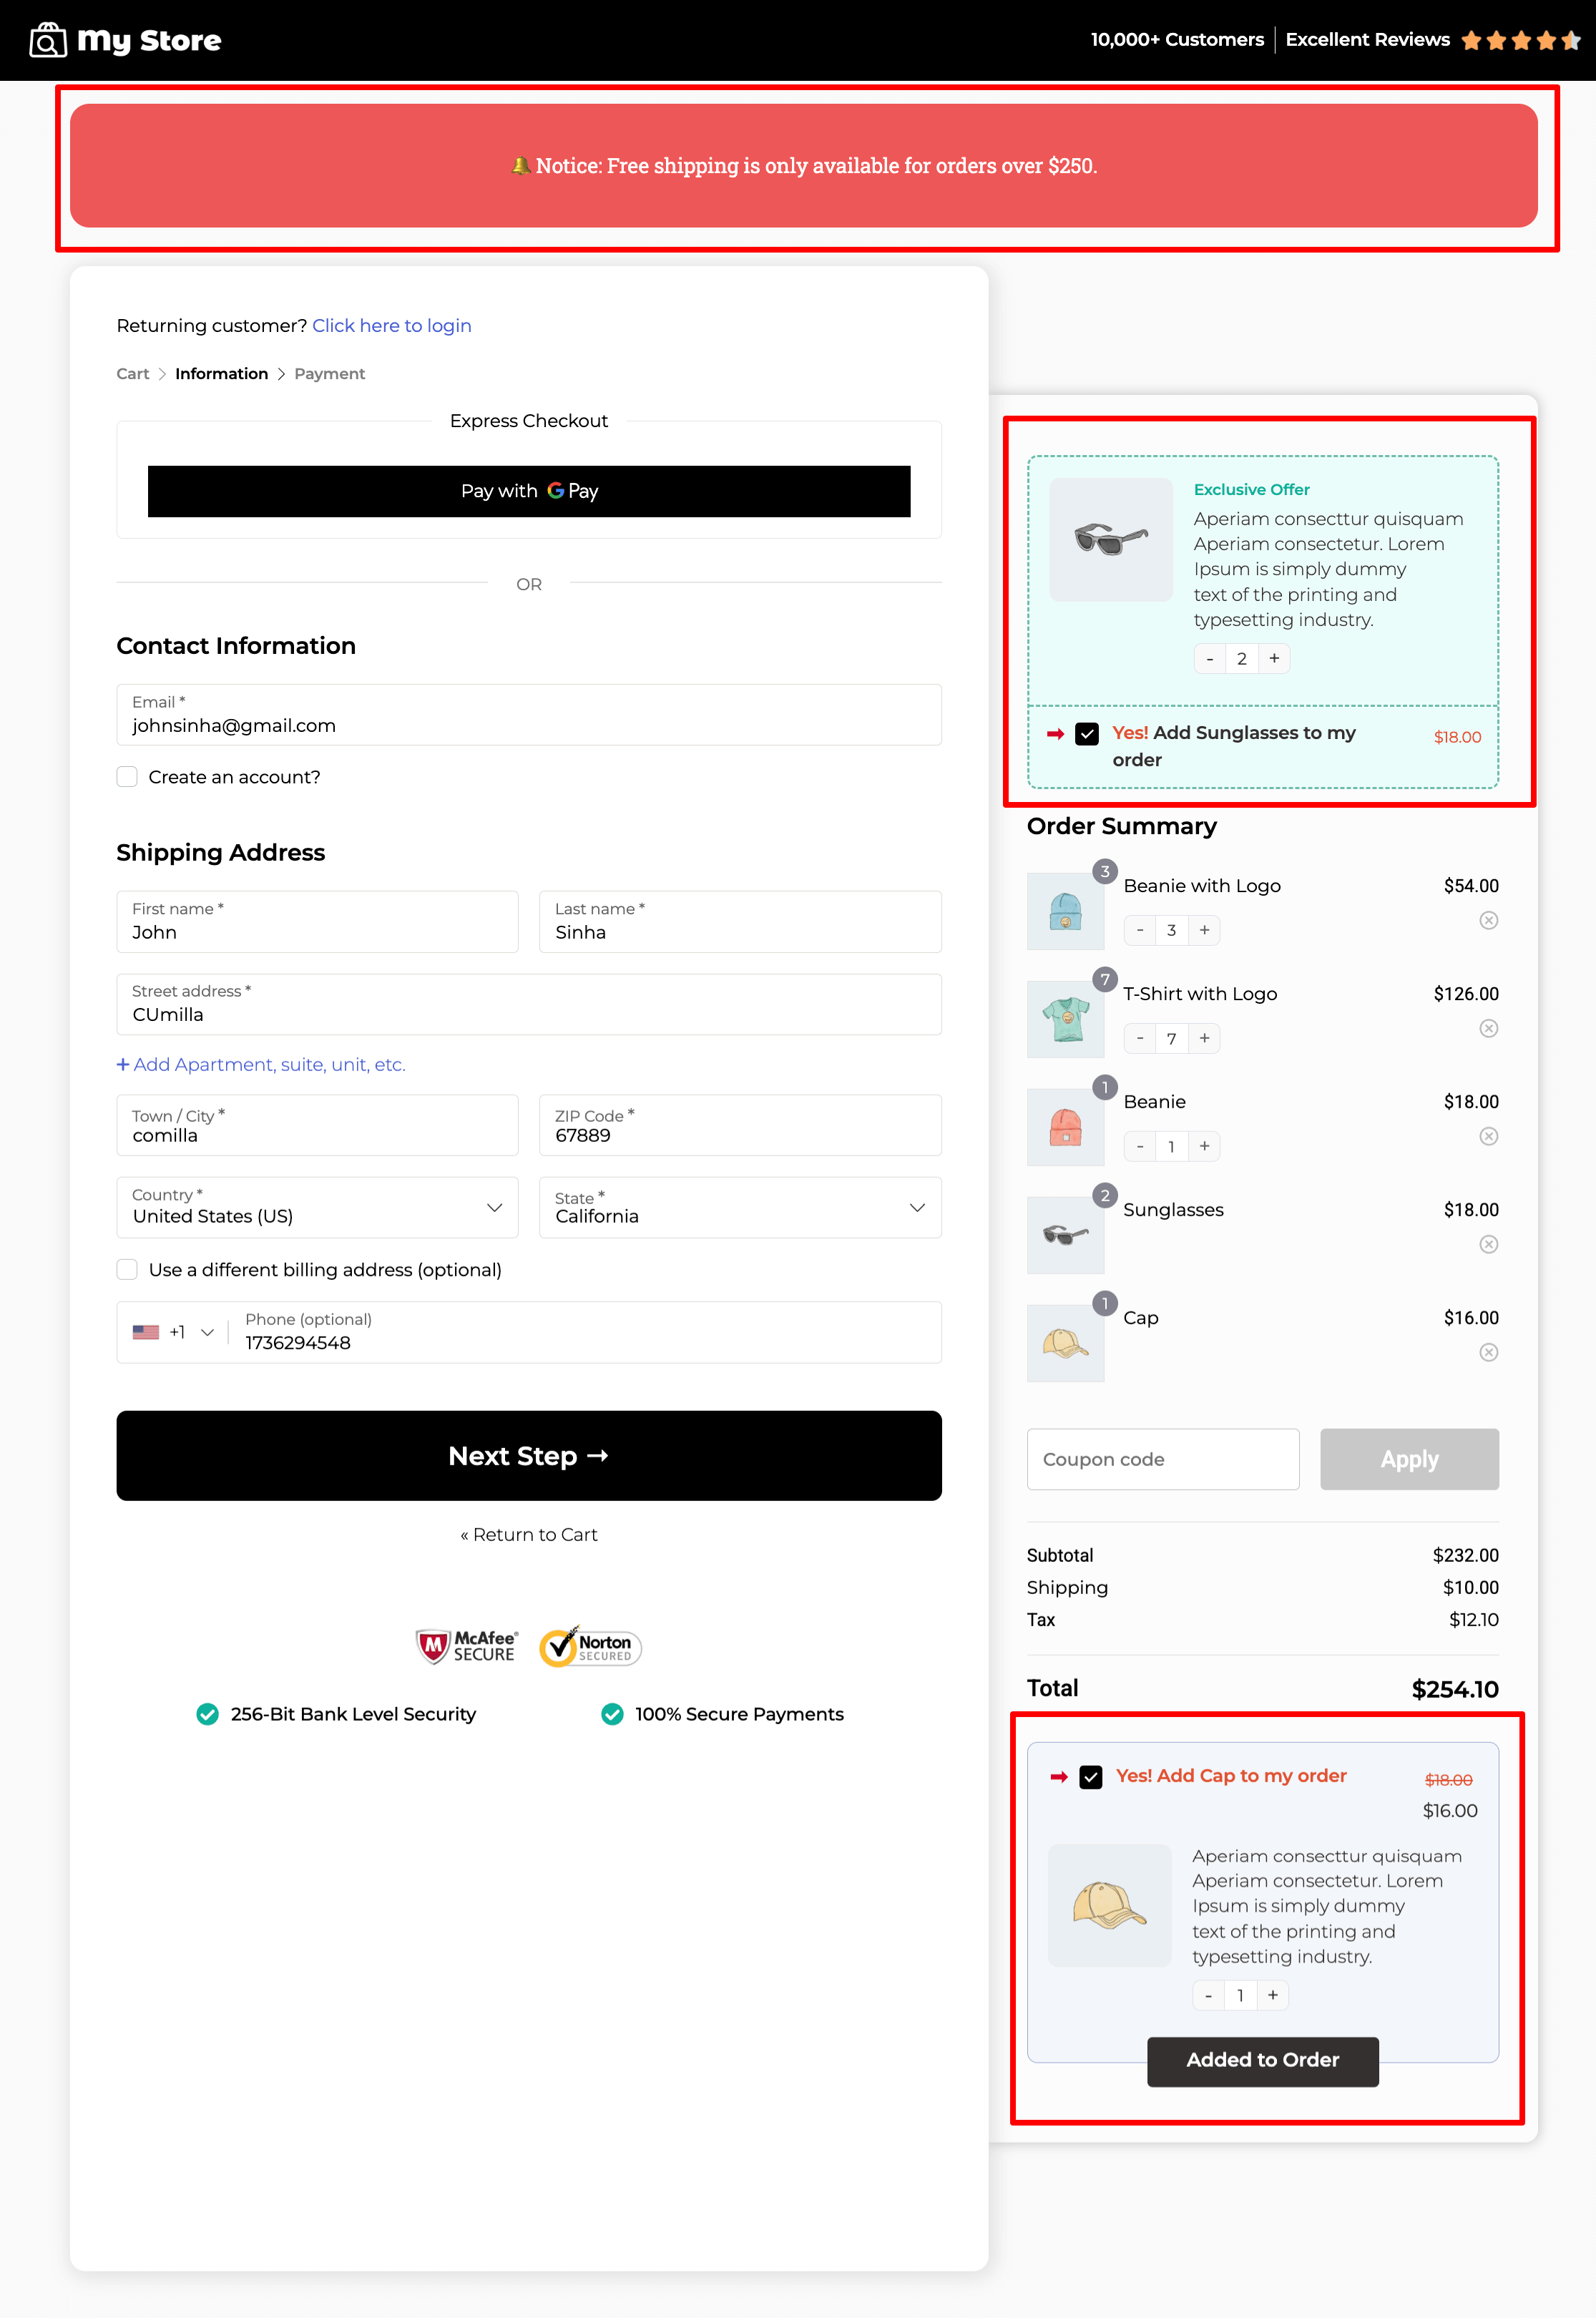
1. Show minimum order required for free shipping coupon
People love free shipping and, in most cases, are likely to increase order value to avail of the free shipping. A notice helps them understand how much more they need to add to their cart.
Example notice:
Free shipping is only available for orders over $50.
This encourages customers to increase their order value while reducing abandoned carts caused by confusion over coupon eligibility.
With FunnelKit, you can easily allow customers to increase the value at the checkout page with order bump offers. This way, users can add items to their cart with a single click. Plus, they can change the quantity as well:
2. Restrict certain shipping methods to specific areas
Certain shipping options may not be available in all locations due to carrier restrictions or company policies. If customers aren’t informed early, they might select an unavailable option and get stuck at checkout.
Example notice:
Express shipping is currently available only for select cities (USA, Canada, and Mexico). If your address is outside the eligible locations, please choose standard shipping to proceed with your order.
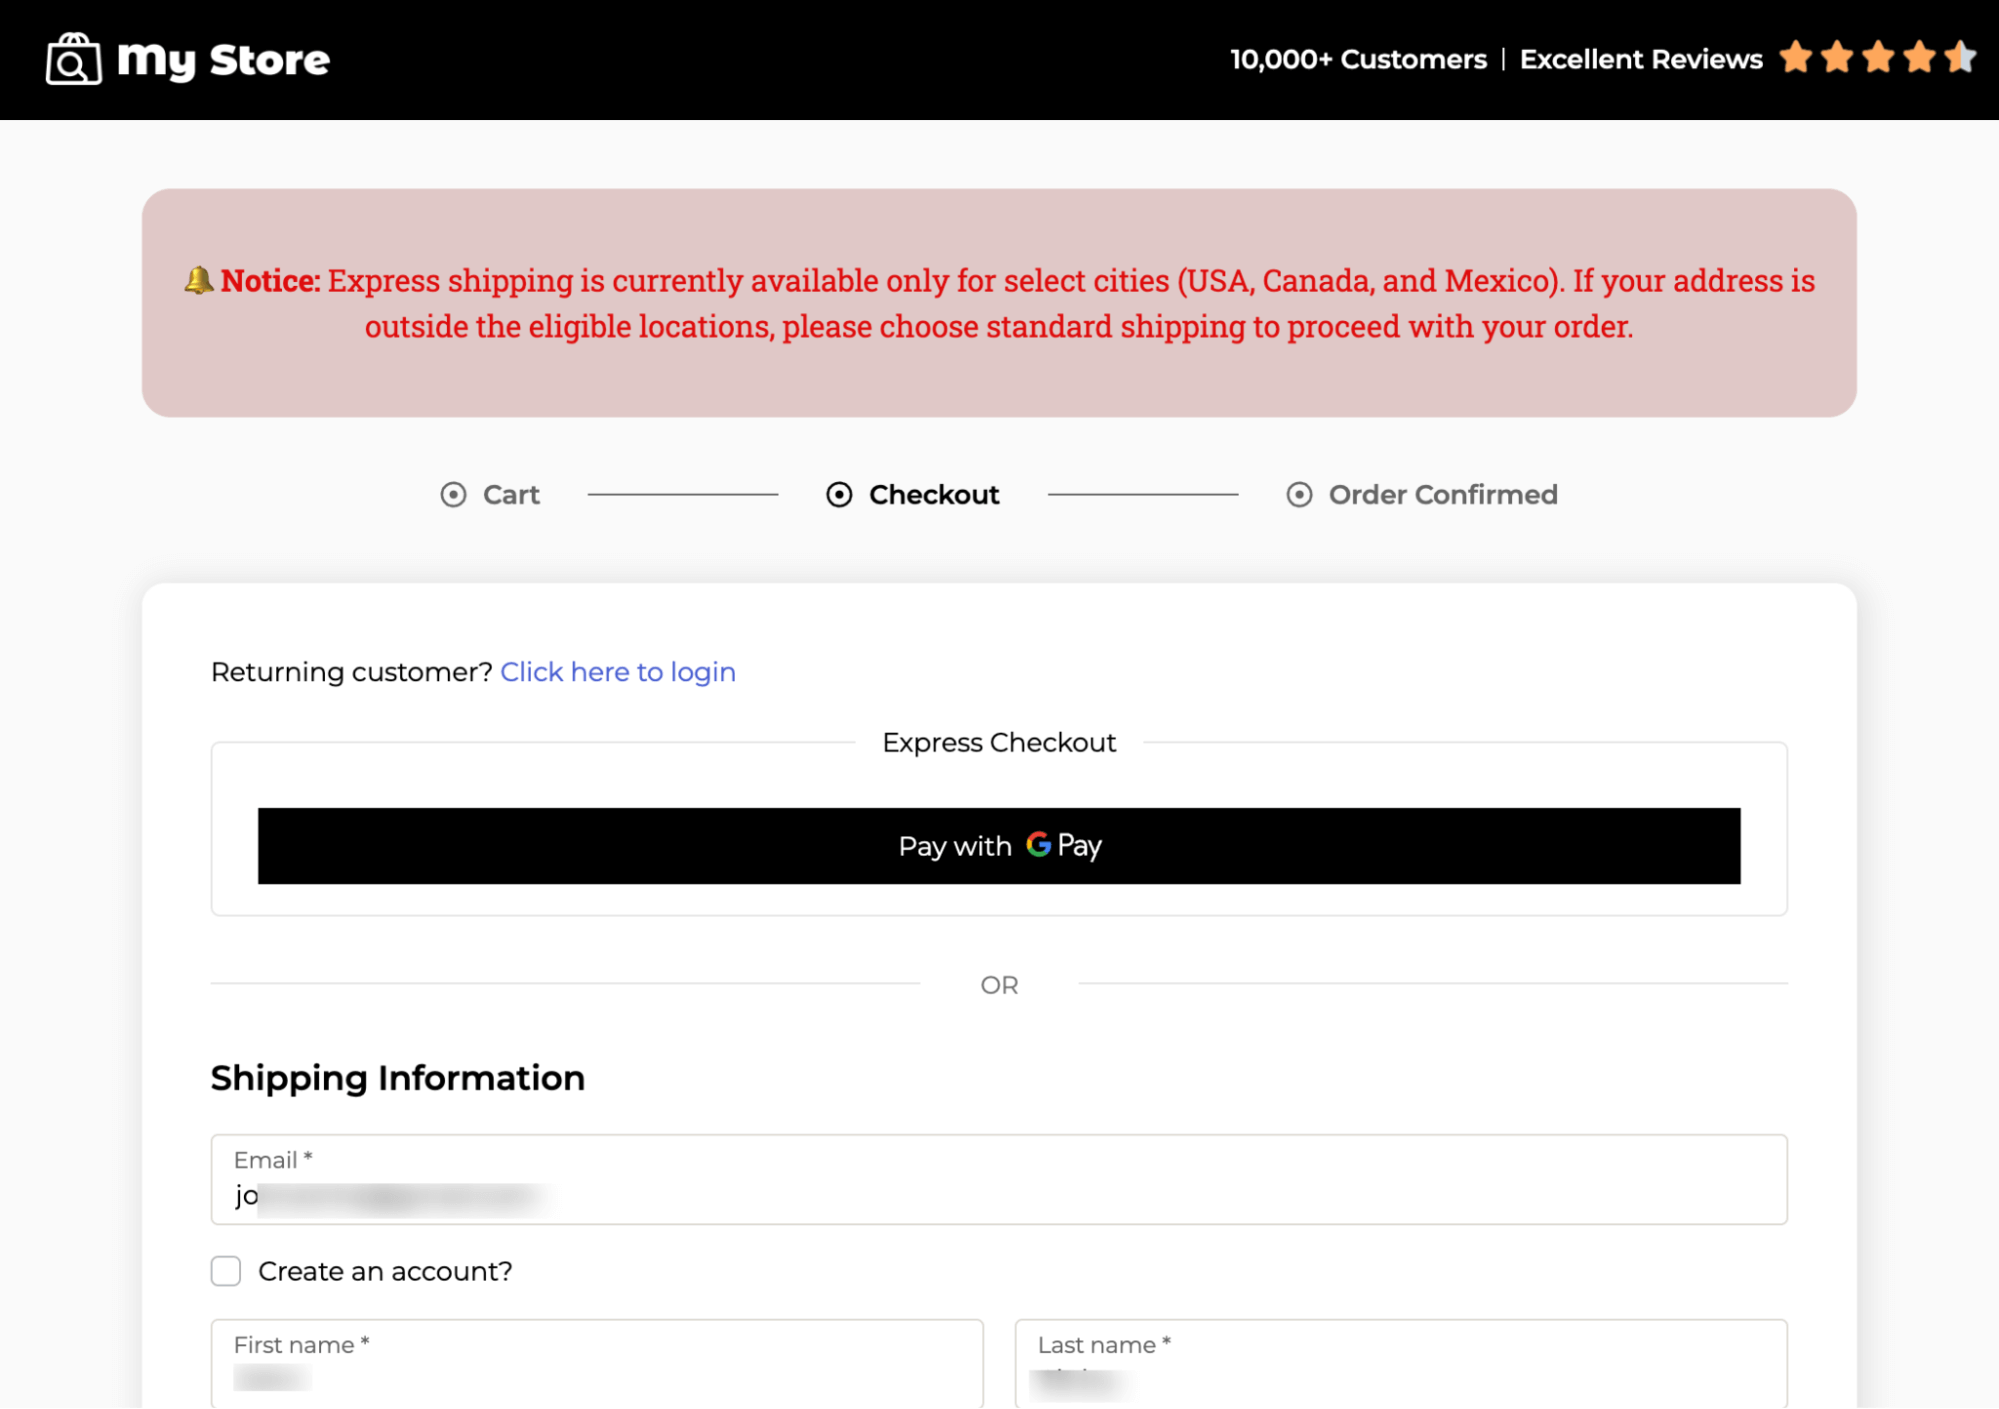
This prevents checkout errors, reduces customer complaints, and ensures customers select the correct shipping method from the start.
3. Notify customers about holiday or processing delays
During busy seasons or unexpected disruptions, processing and shipping times may be longer than usual. If customers are unaware, they may place an order expecting fast delivery and later feel disappointed.
Example notice:
Due to high demand, order processing times may take an additional 2–3 business days. We are working hard to fulfill your order as quickly as possible. Thank you for your patience and understanding.
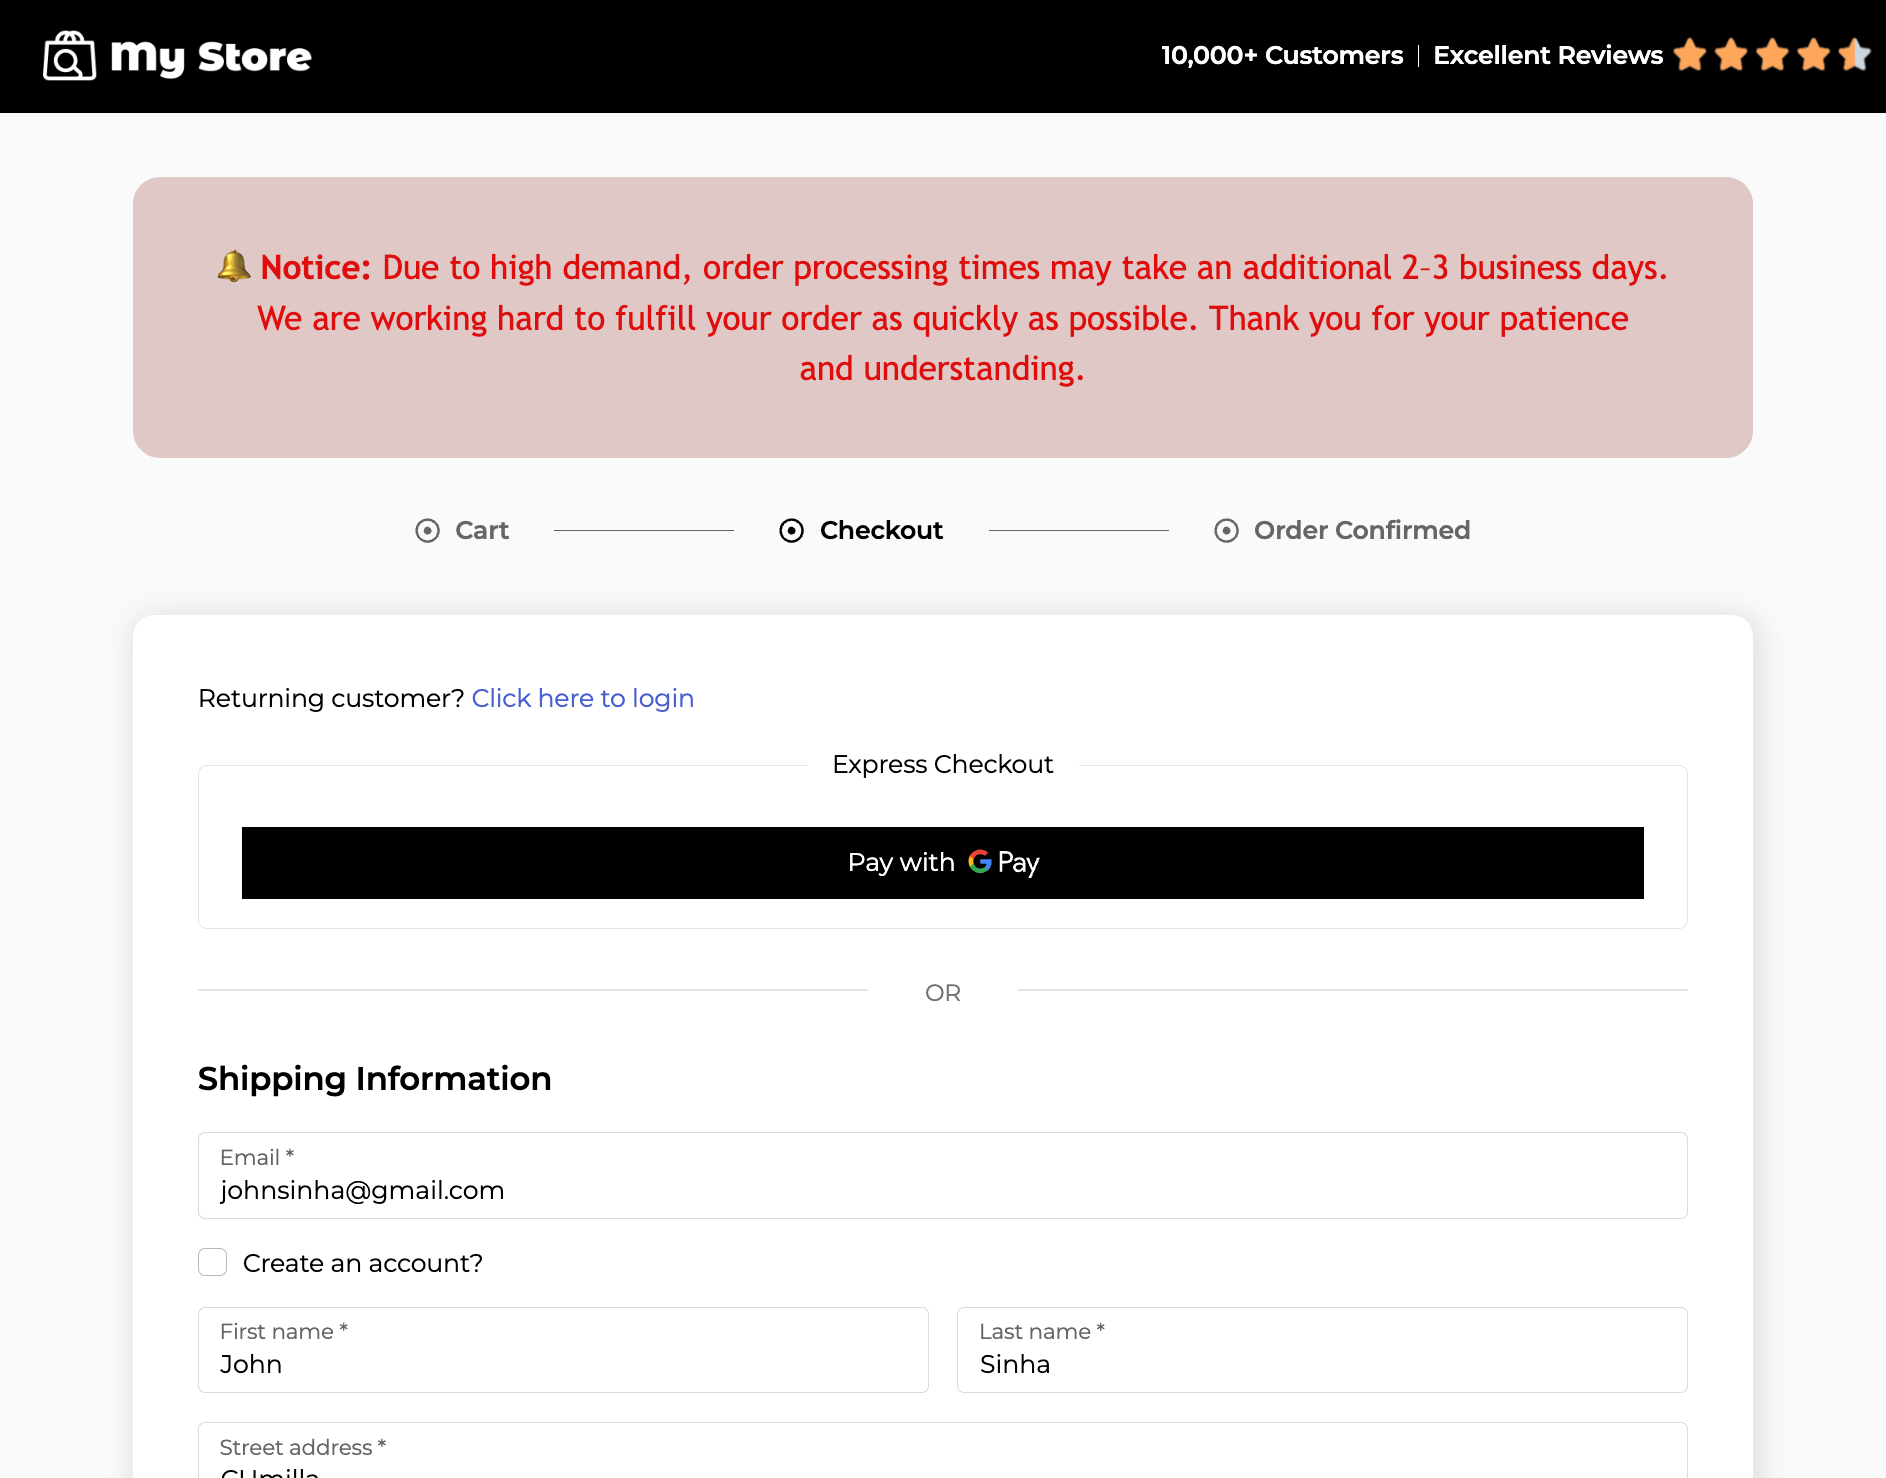
This manages customer expectations, reduces post-purchase frustration, and decreases inquiries about order delays.
4. Highlight special payment method restrictions
Some payment methods, like cash on delivery, may not be available in certain regions. Without clear information at checkout, customers may try to proceed with an unavailable payment method, leading to failed transactions.
Example notice:
Cash on delivery is only available inside the USA.
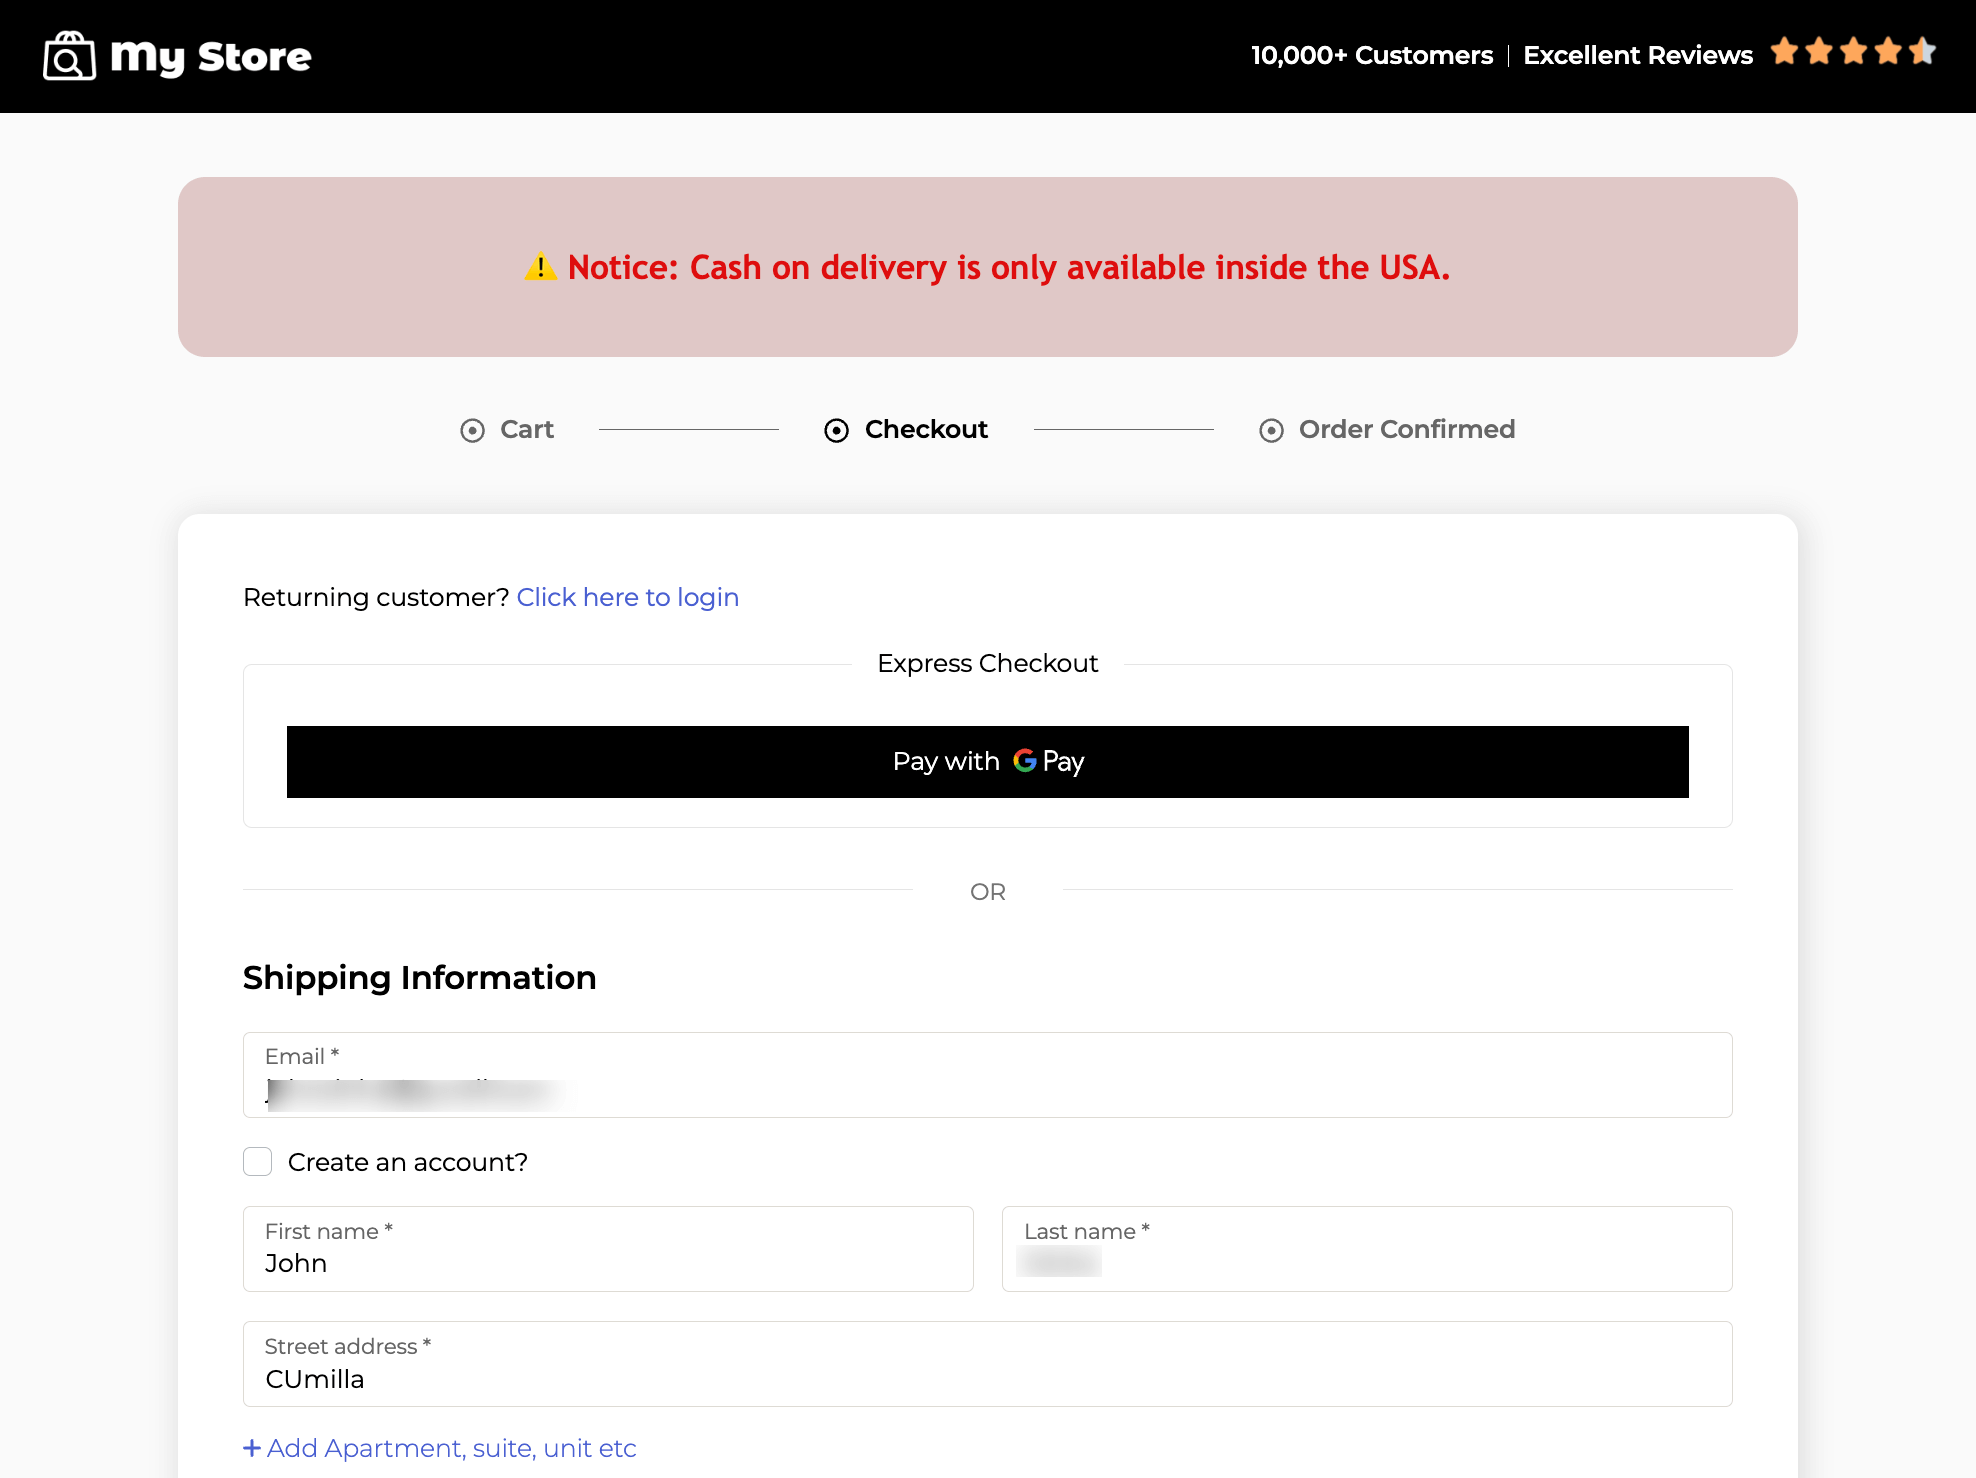
This prevents failed checkouts, reduces cart abandonment, and ensures a smooth payment process.
Add Custom Notice to the WooCommerce Checkout Page For Better Customer Communication!
Default WooCommerce checkout messages have no customization options and often blend into the page, making them easy to miss. Customers may overlook important details like free shipping eligibility, payment limits, shipping restrictions, etc, leading to confusion, frustration, and abandoned carts.
A custom notice ensures customers get the right information at the right time, making checkout smooth and stress-free.
With FunnelKit Funnel Builder, you can easily add custom notices to your checkout page for free. This checkout customizer offers full customization without any coding, making it simple to enhance the customer experience.
For even more sales, upgrade to FunnelKit Funnel Builder Pro and add extra offers to the checkout page with order bumps and post-purchase upsells to increase your revenue.
Don't leave money on the table. Get FunnelKit today and start boosting your sales!
Editorial Team
July 3, 2026Discover how a canceled order doesn't have to mean a lost customer, and how the right WooCommerce canceled order email can turn it into a second chance. WooCommerce canceled order...
Editorial Team
July 3, 2026Sometimes, the difference between a visitor leaving and placing an order comes down to something surprisingly small, like a better headline, a cleaner checkout, or a more compelling offer. That's...
Editorial Team
July 1, 2026Are you leaving money on the table by not fully leveraging your customers’ shopping behavior? Many store owners don’t realize that every time a customer adds a product to the...


