Want to drive more sales and customer loyalty with WooCommerce coupons?
With 80% of consumers willing to switch brands for a discount, offering coupons is one of the most effective ways to boost conversions.
WooCommerce makes it easy to create basic coupons.
And with the right plugins, you can unlock advanced features like free shipping and product-specific discounts.
In this complete guide, we’ll walk you through how to create various types of WooCommerce coupons, from simple discounts to powerful promotional strategies that keep customers coming back.
Let’s get started!
Table of Contents
- 1 What Are WooCommerce Coupons? Types and Benefits
- 2 How to Easily Create Coupons in WooCommerce: A Step-by-Step Guide
- 3 How To Set Up a Free Shipping Coupon in WooCommerce
- 4 How To Set Up Free Gift Coupons in WooCommerce
- 4.1 Step 1: Create a coupon with no discount applied
- 4.2 Step 2: Create a store checkout
- 4.3 Step 3: Add an order bump to offer a free gift
- 4.4 Step 4: Make the order bump totally free with a 100% discount
- 4.5 Step 5: Make the free gift redeemable only with a certain coupon
- 4.6 Step 6: Enable the store checkout
- 5 How To Create Personalized, Dynamic WooCommerce Coupons
- 6 More Questions About WooCommerce Coupons
- 7 Ready to Offer WooCommerce Coupons?
What Are WooCommerce Coupons? Types and Benefits
WooCommerce coupons are codes customers can use to get discounts, free shipping, free gifts, or other offers in your store. They’re a proven strategy to attract new buyers, increase sales, and boost customer retention.
You can create various types of coupons in WooCommerce, such as:
- Percentage or fixed amount discounts
- Product-specific or role-based coupons
- Free shipping, free gift, or BOGO offers
- Special event coupons (birthdays, first orders, abandoned carts)
All these can be customized further with conditions like minimum/maximum purchase limits, usage restrictions, or time-limited offers.
Using coupons strategically helps increase average order value, recover lost carts, and stay competitive, making them a powerful tool in your WooCommerce marketing.
How to Easily Create Coupons in WooCommerce: A Step-by-Step Guide
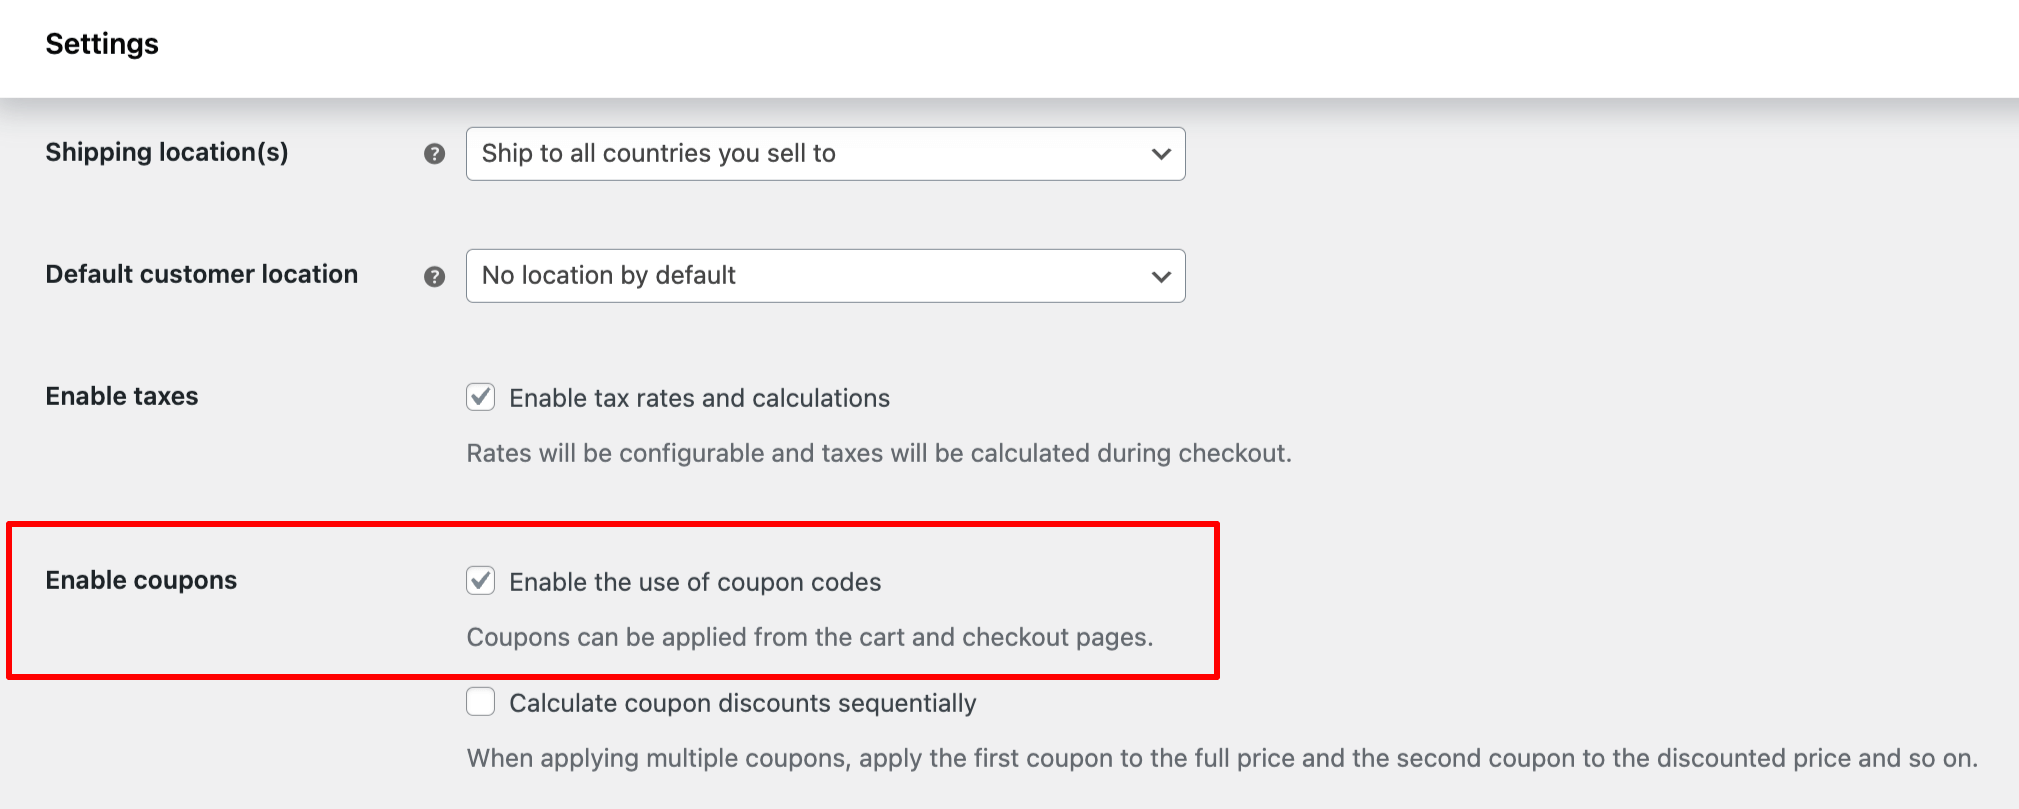
Before adding a coupon code in WooCommerce, first enable coupons by navigating to WooCommerce ⇒ Settings ⇒ General and checking the option "Enable the use of coupon codes".
Now, to offer a discount using a coupon code on your WooCommerce store, follow these steps:
Step 1: Navigate to coupons
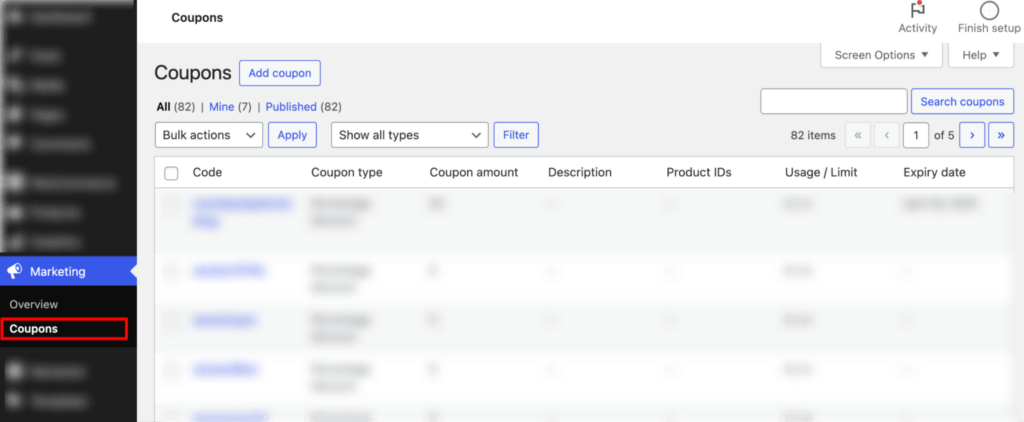
From the WordPress dashboard, go to Marketing ⇒ Coupons.
Step 2: Generate a coupon code
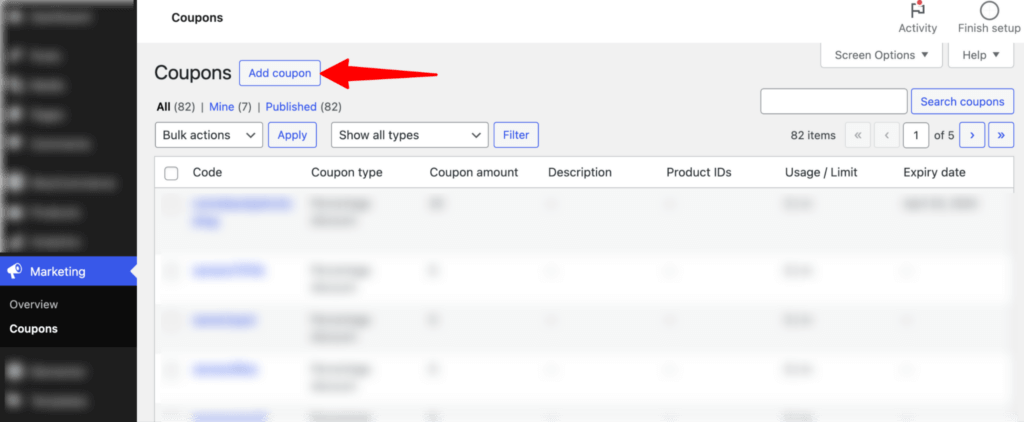
Next, click on “Add Coupon”.
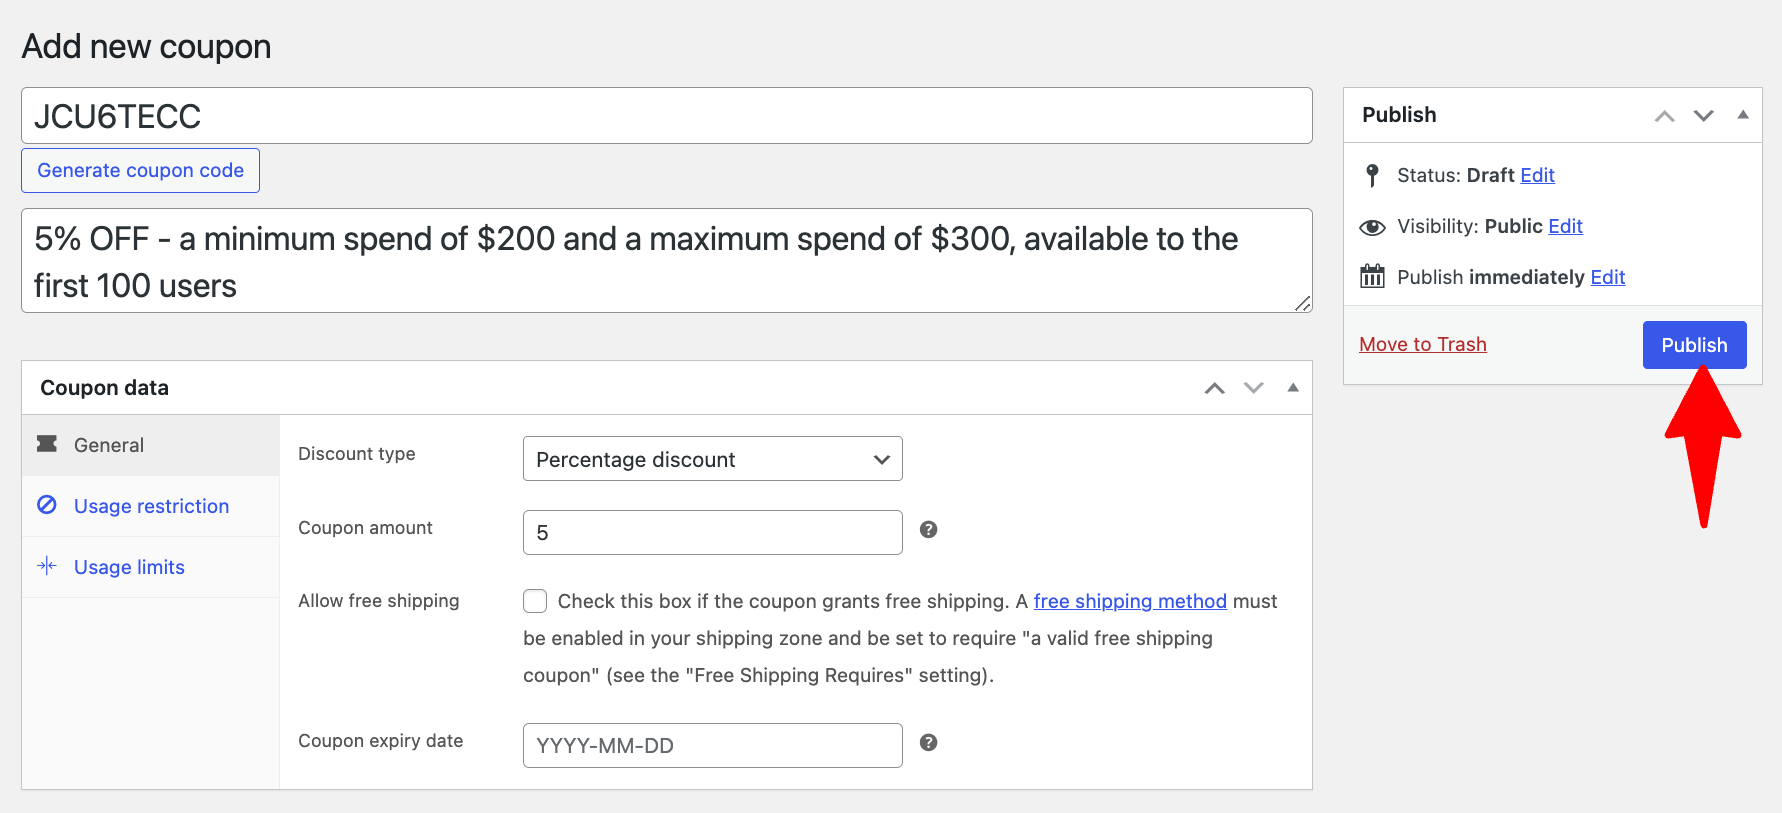
After that, you can set the coupon code or click the “Generate Coupon Code” button to generate a random coupon code. You can also add a description (optional).
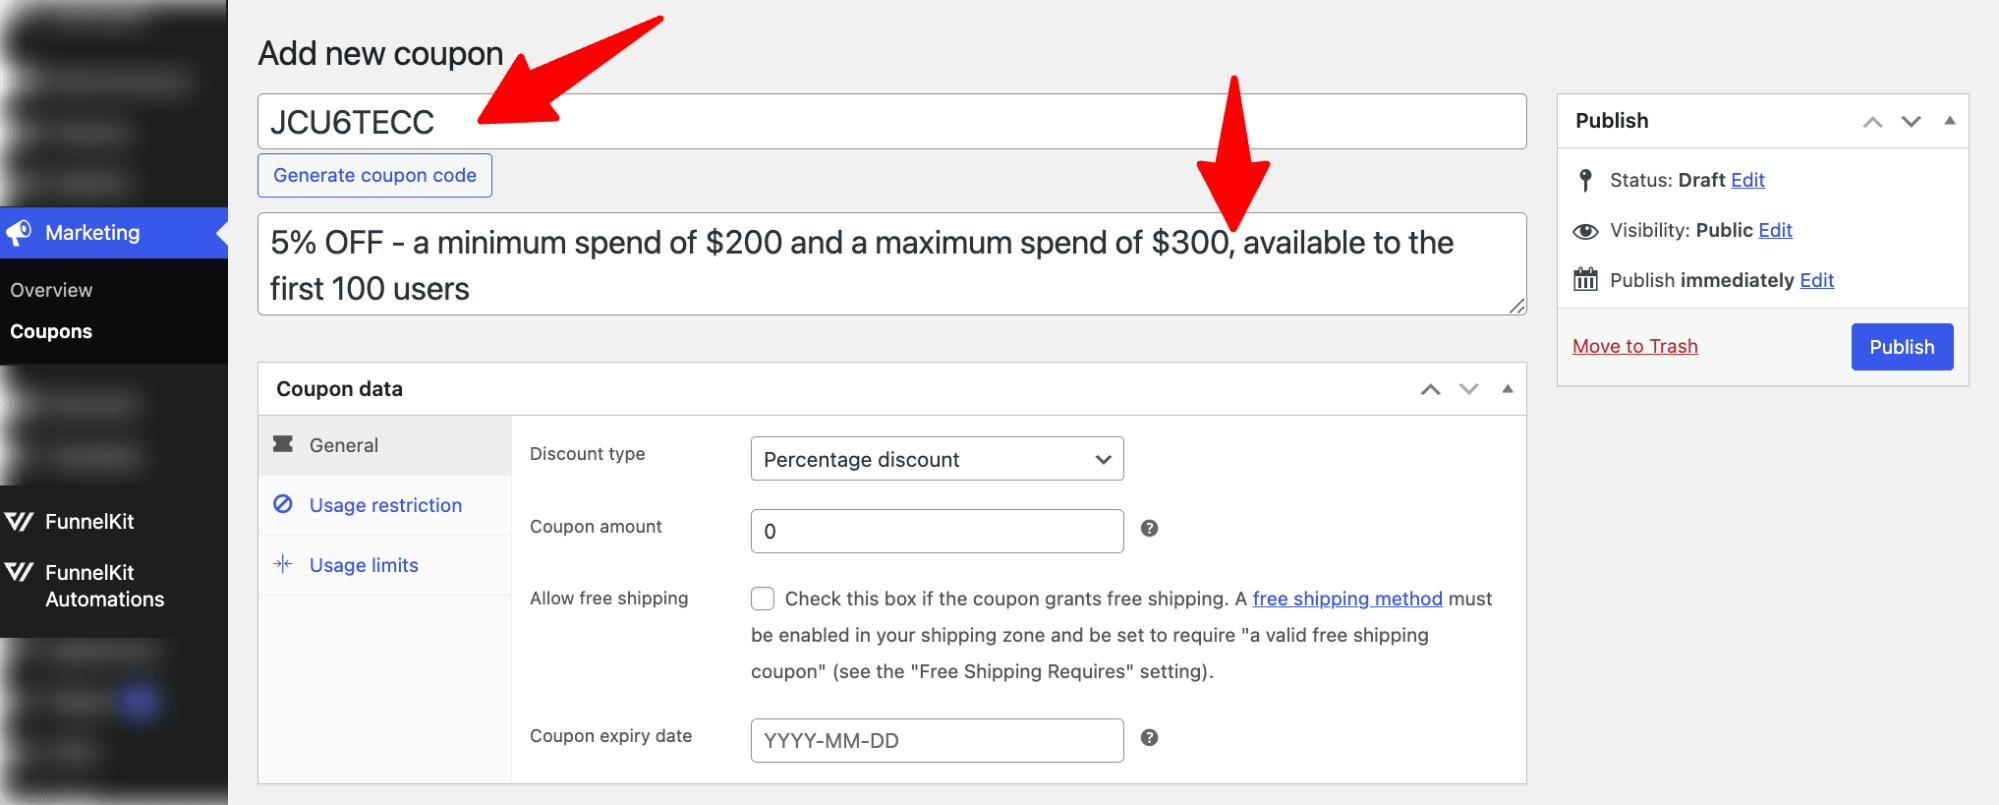
Step 3: Set up coupon details (general coupon data)
On the General tab, set up the following coupon-related information:
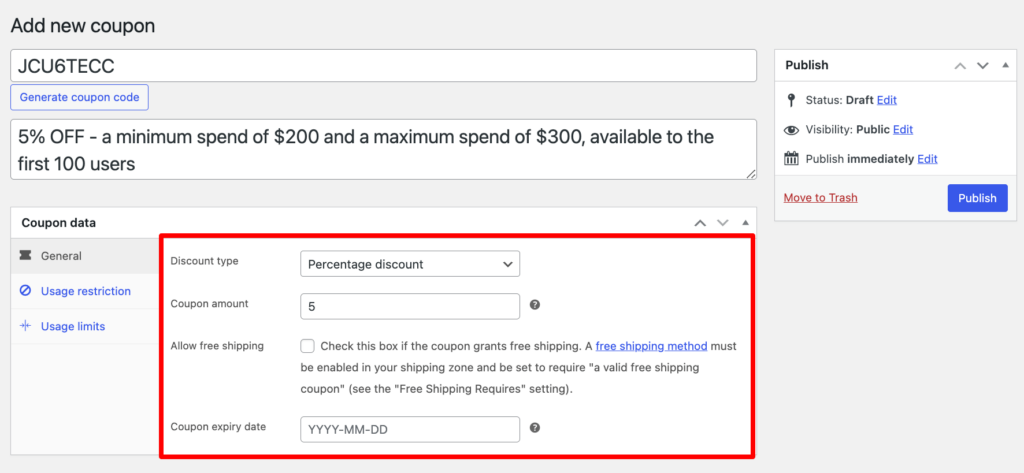
- Discount type: Choose from three types of discounts: percentage discount, fixed cart discount, and fixed product discount. Here, we’ll select a percentage discount.
- Coupon amount: Enter the discount amount. Here we are going with a 5% discount.
- Allow free shipping: Enable this option to offer free shipping with this discount coupon. We are not going to offer free shipping.
- Coupon expiry date: Set an expiration date for your coupon code.
Step 4: Configure usage restrictions
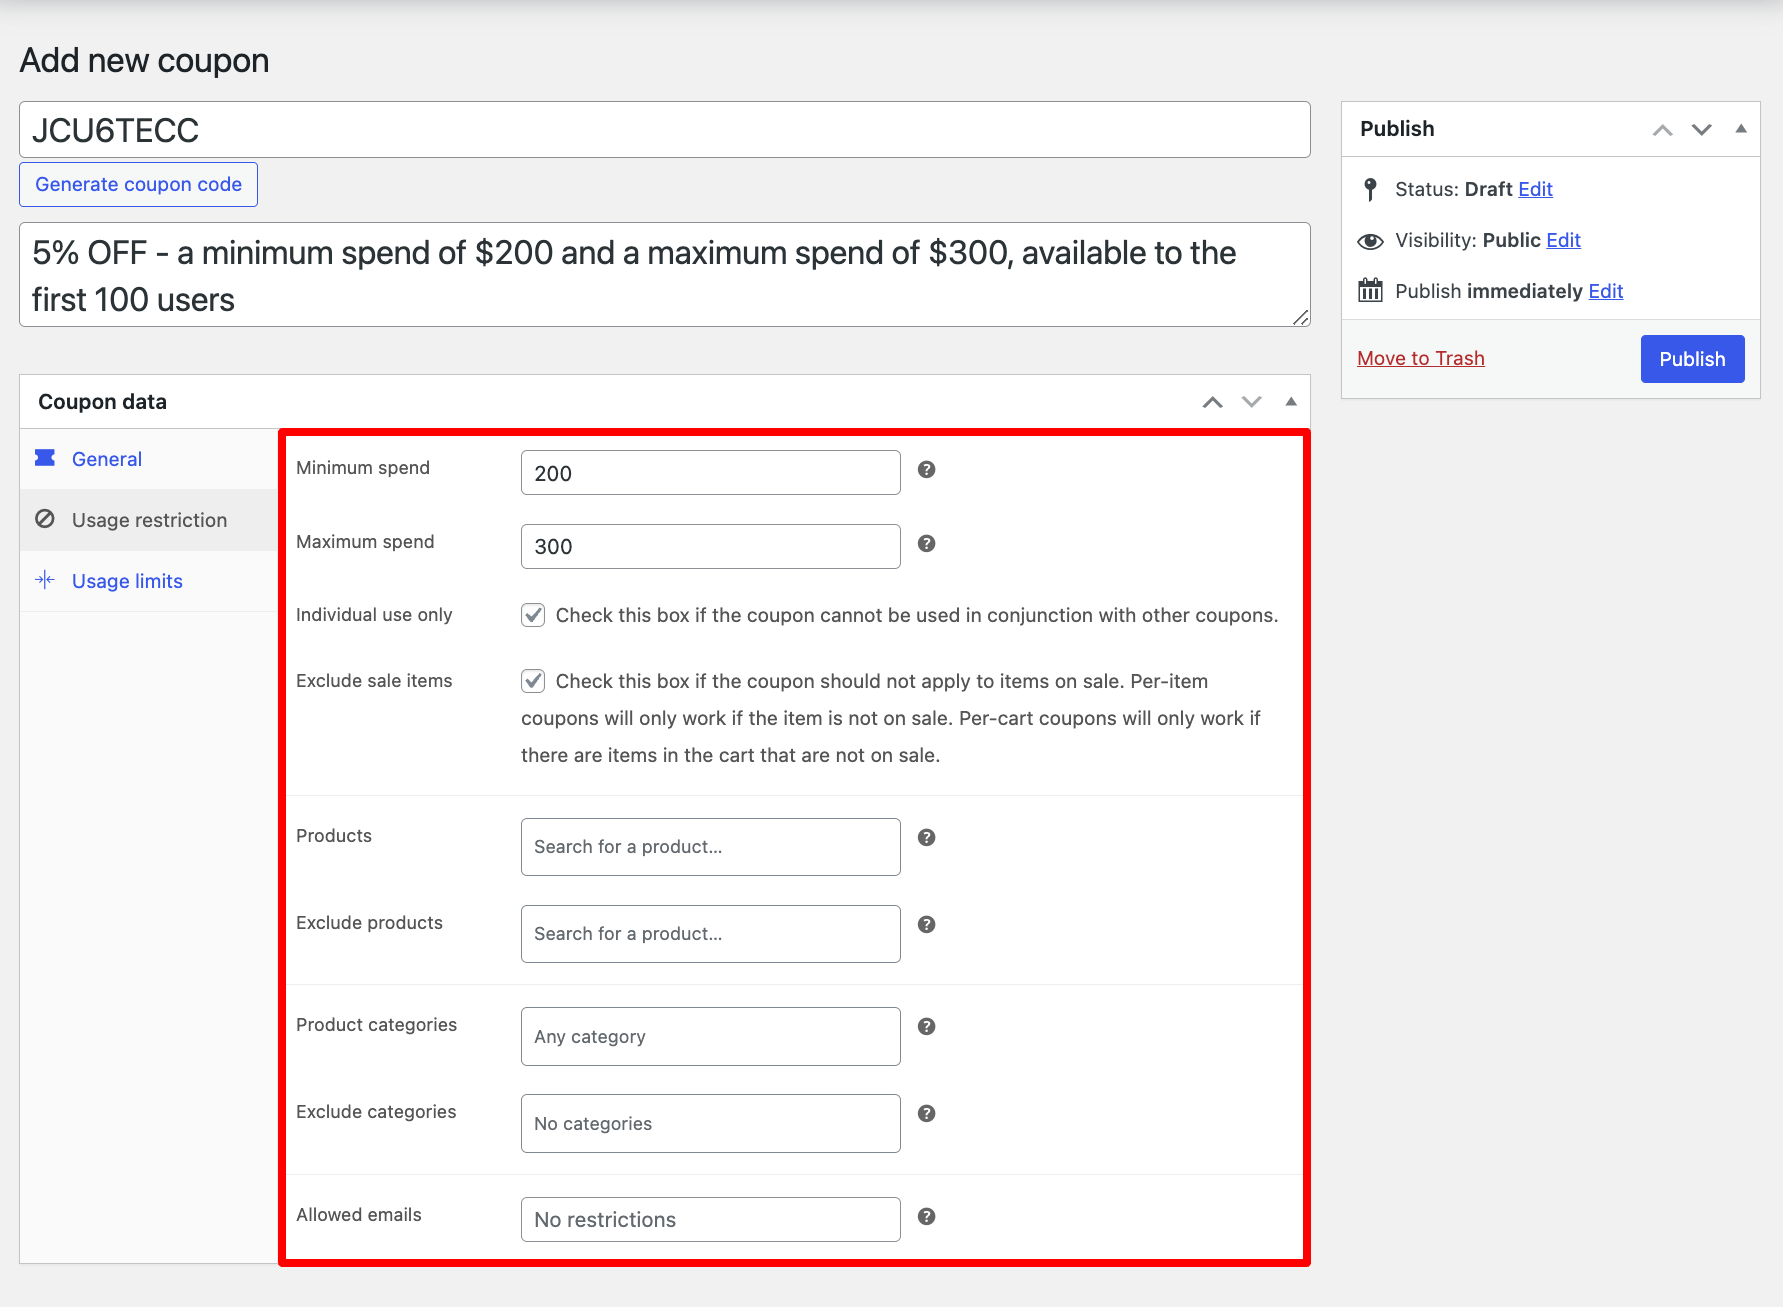
Next, move to the Usage restriction tab and set the following:
- Minimum spend: Set the minimum amount a customer needs to spend to use this WooCommerce discount coupon code. Here, we are setting a minimum spending limit of $200.
- Maximum spend: Set the maximum spend allowed when using the discount code. Here, we are setting a minimum spending limit of $300.
- Individual use only: Check this box to ensure the coupon can only be used individually, not in conjunction with other coupons.
- Exclude sale items: Check this option to exclude sale items from the WooCommerce discount. This is highly recommended, as sale items already offer a discount.
- Products: Search and add the products to which this coupon will be applied. This applies to the fixed cart discount type.
- Exclude products: Set the products to which the fixed cart discount will not be applied.
- Product categories: Choose the categories eligible for the coupon.
- Exclude categories: Set the categories excluded from the coupon application.
- Allowed emails: List of allowed billing emails to check against when an order is placed. You can separate email addresses with commas.
Step 5: Configure coupon usage limits
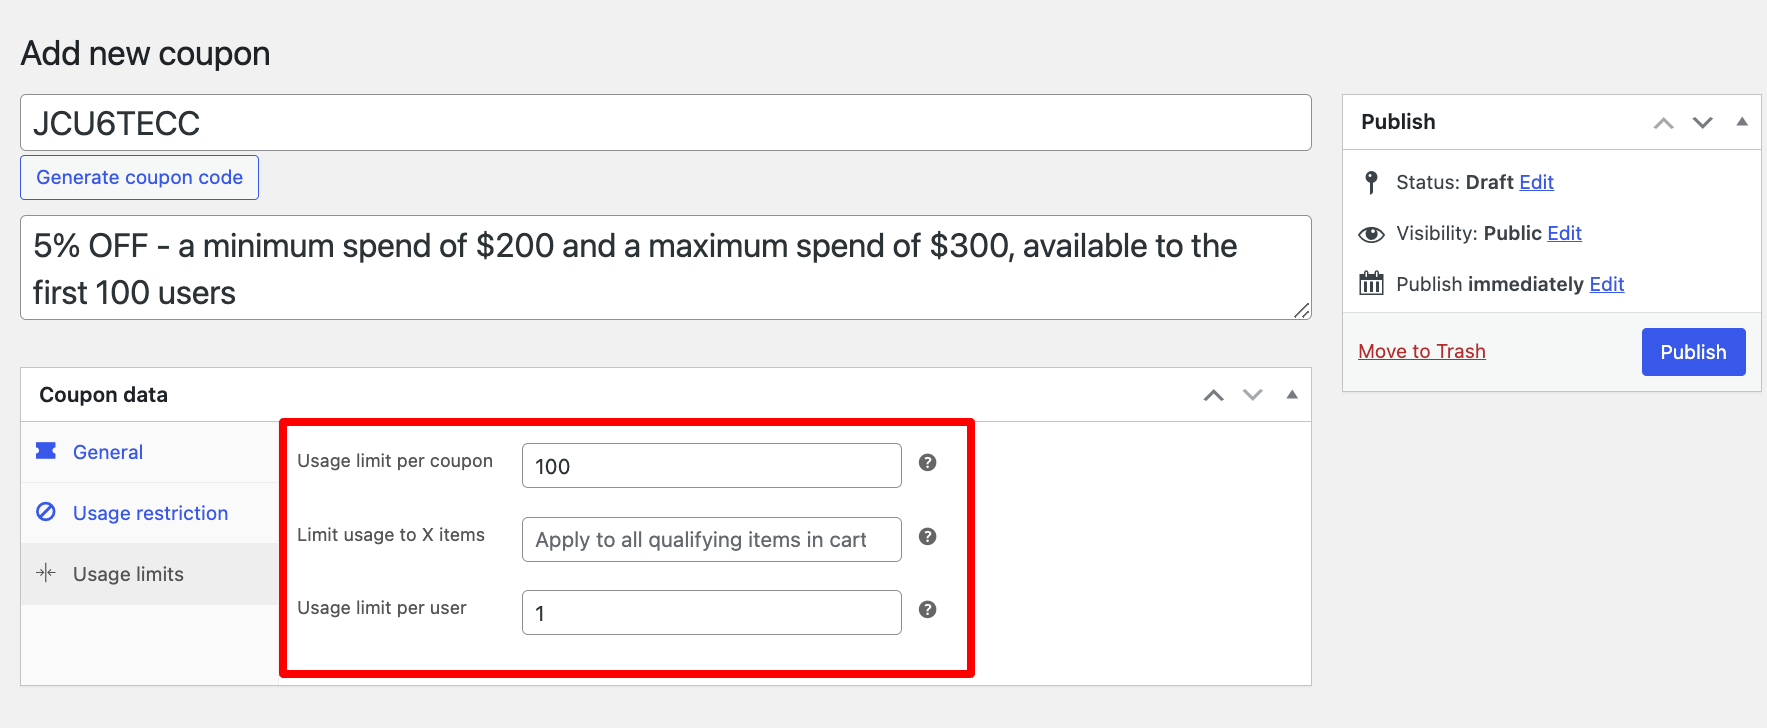
Move to the Usage Limits and set the following:
- Usage limit per coupon: Set the number of times the coupon can be used before it becomes void. We are setting it to 100 times.
- Limit usage to X items: Set the maximum number of individual items this coupon can apply to when using product discounts. Leave this blank to apply the coupon to all qualifying items in the cart.
- Usage limit per user: Set the number of times an individual can use this coupon. We are allowing each individual to use this coupon only once.
Finally, click on ‘Publish’ to create the WooCommerce discount coupon code.
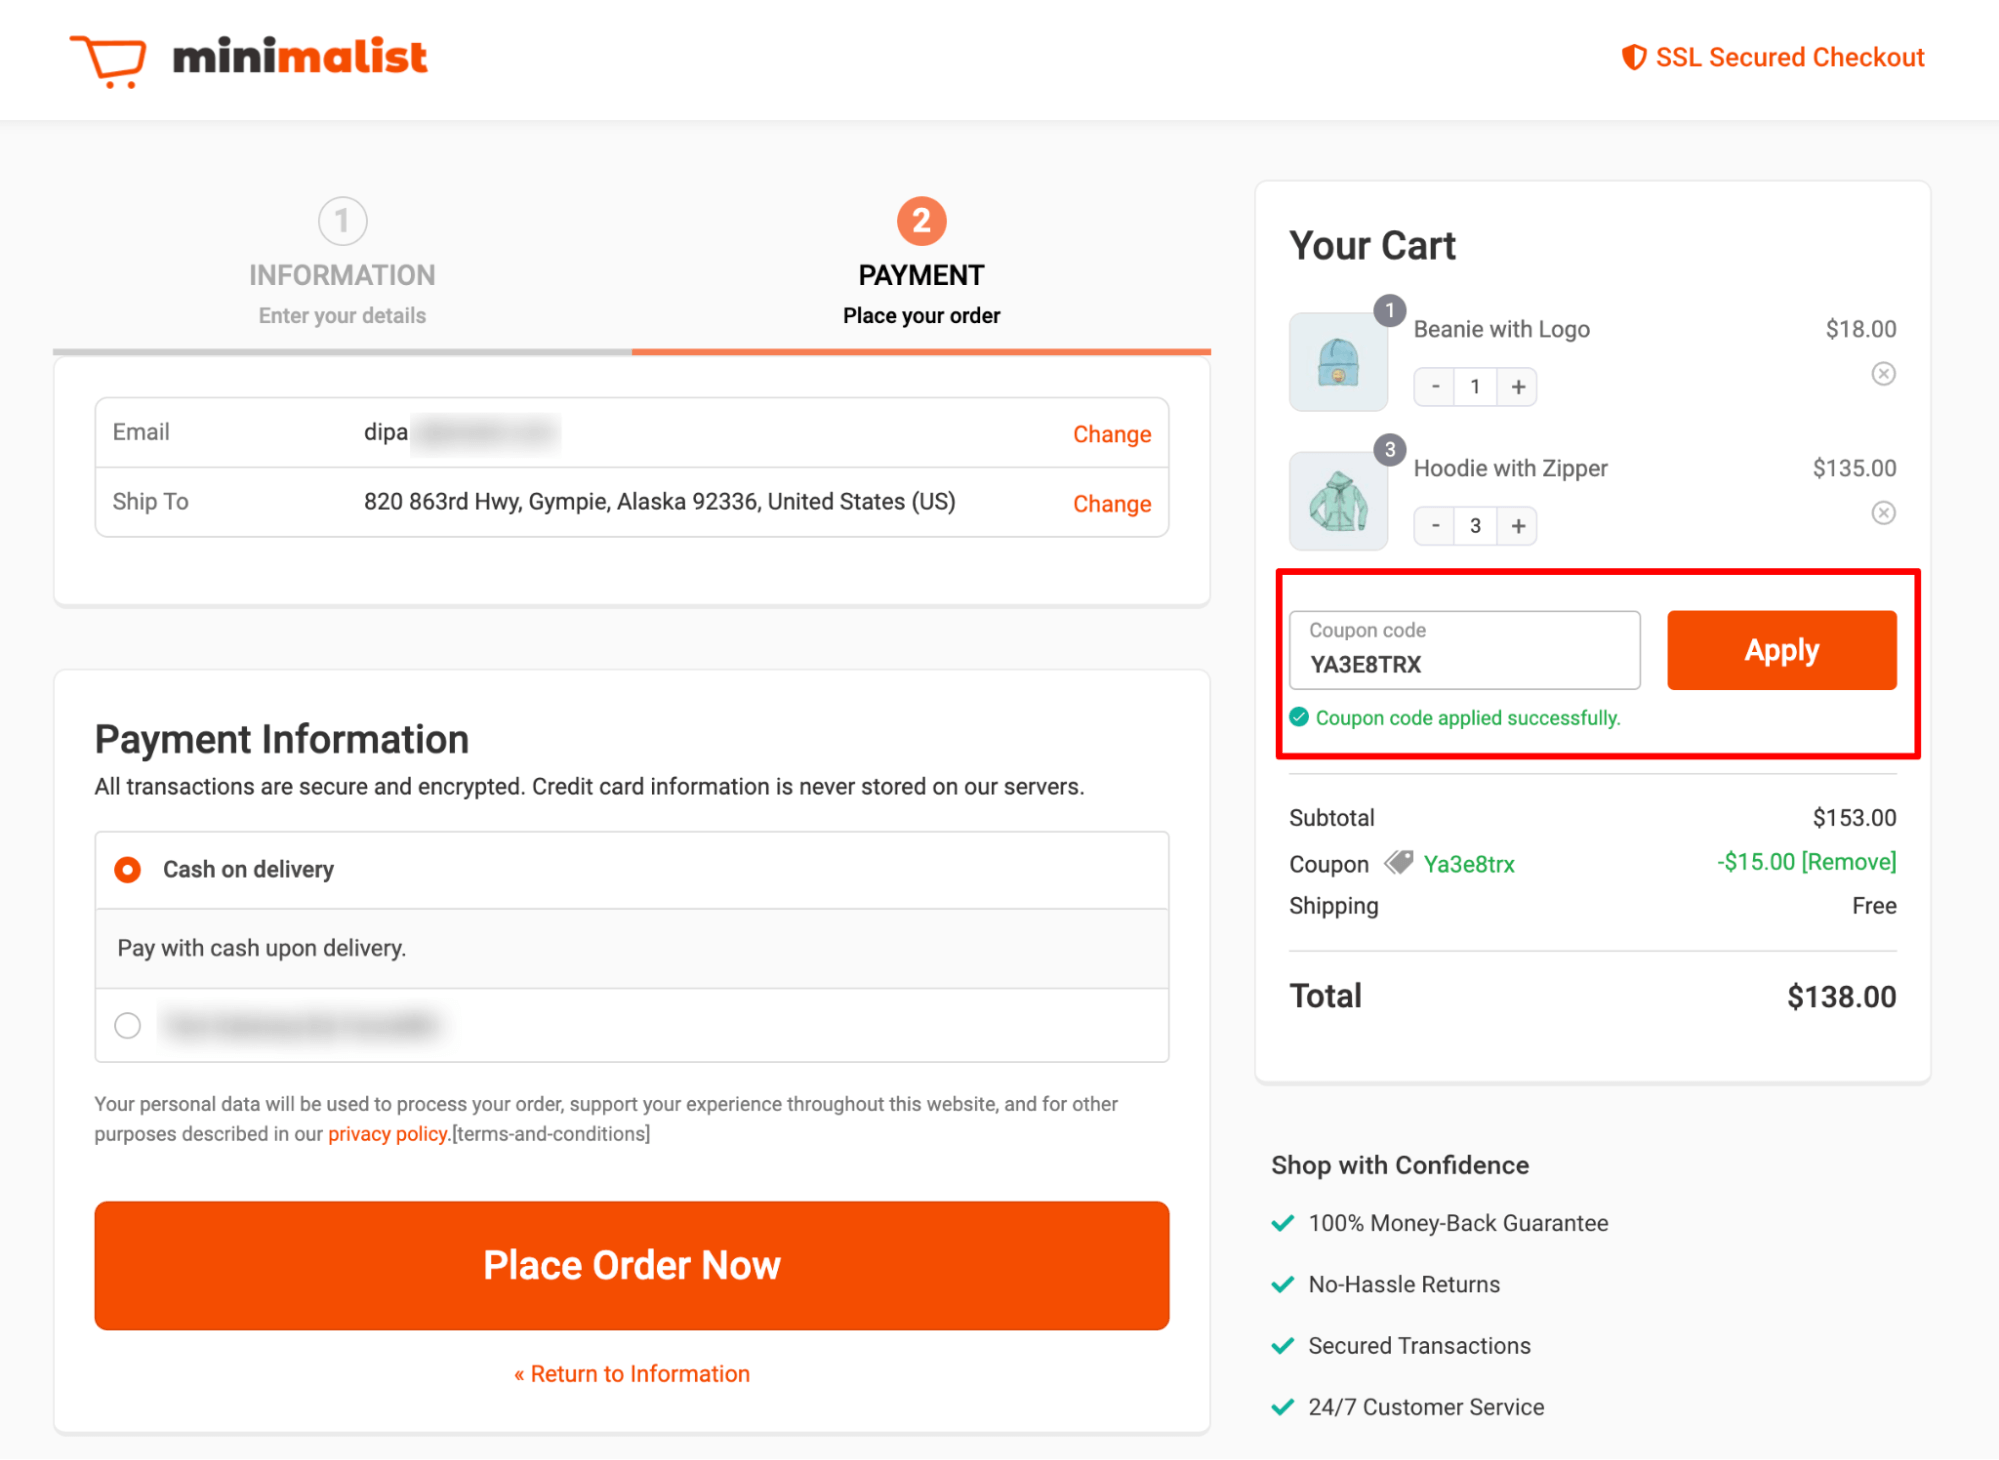
Now, your WooCommerce discount coupon is ready!
After publishing a WooCommerce coupon, it’s important to test it to ensure it works properly by placing a test order.
How To Set Up a Free Shipping Coupon in WooCommerce
According to statistics, 62% of shoppers won’t buy from a brand if it doesn’t offer free shipping. Plus. 47% of consumers will spend a minimum amount to get free shipping.
Creating a free shipping coupon is similar to creating a discount coupon. Here are the steps you need to follow:
Step 1: Create a coupon with free shipping
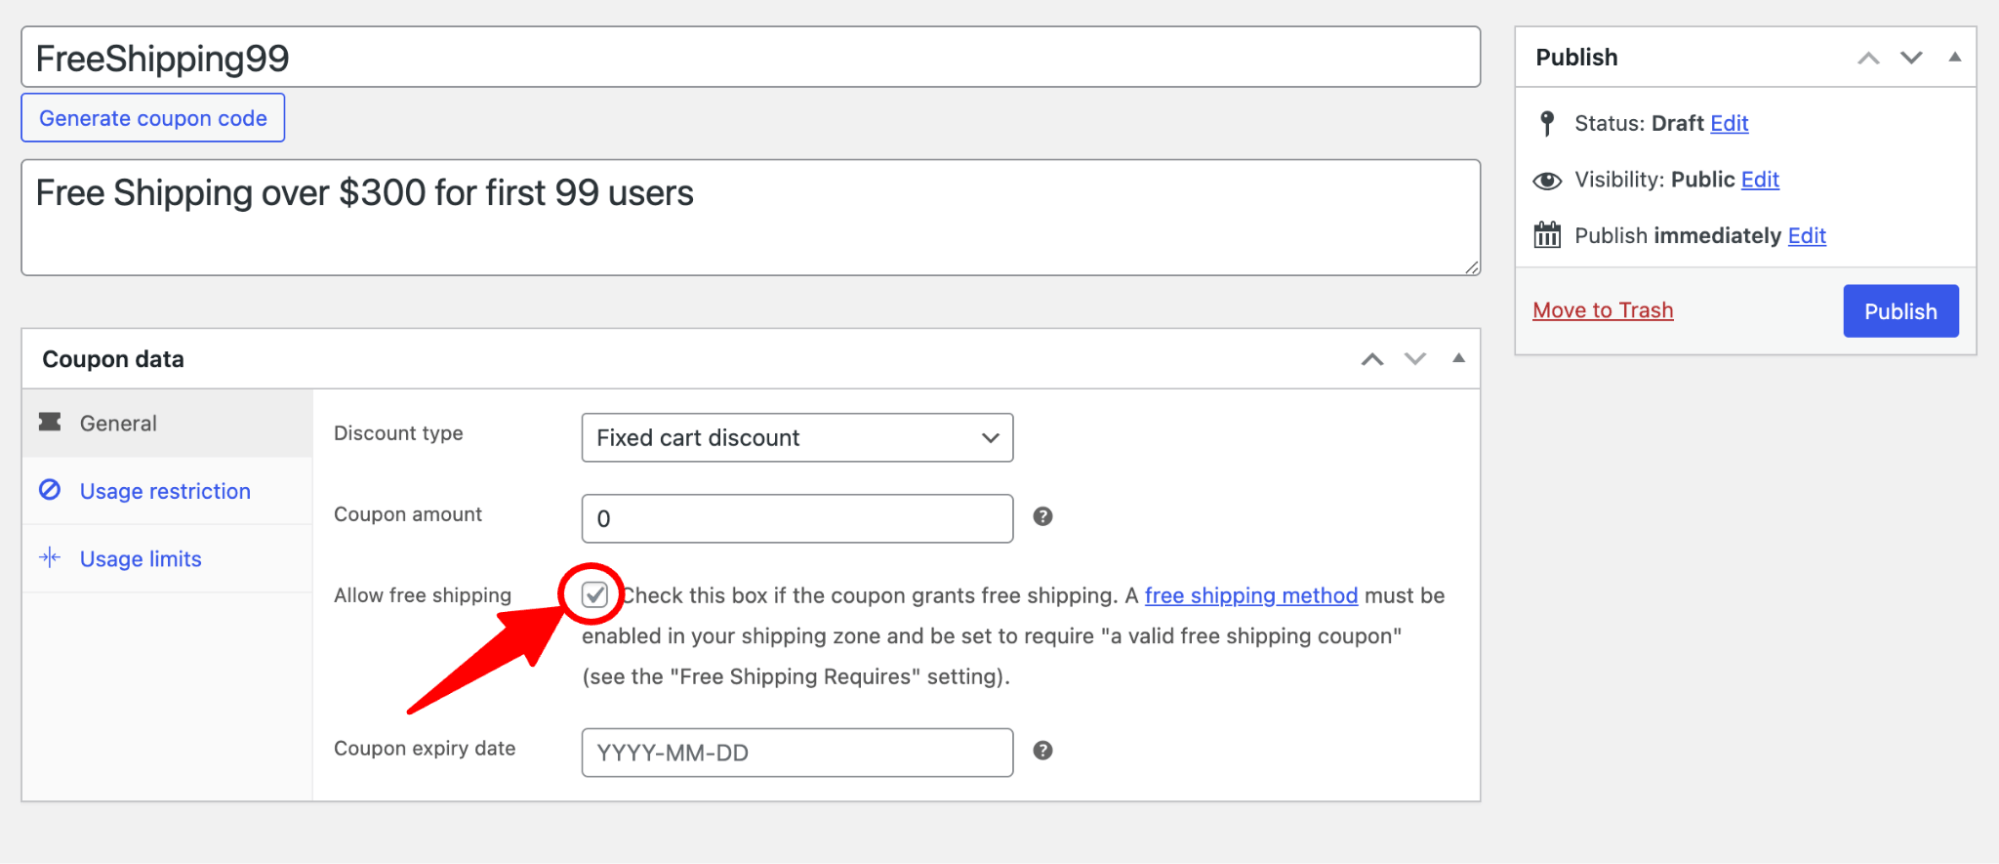
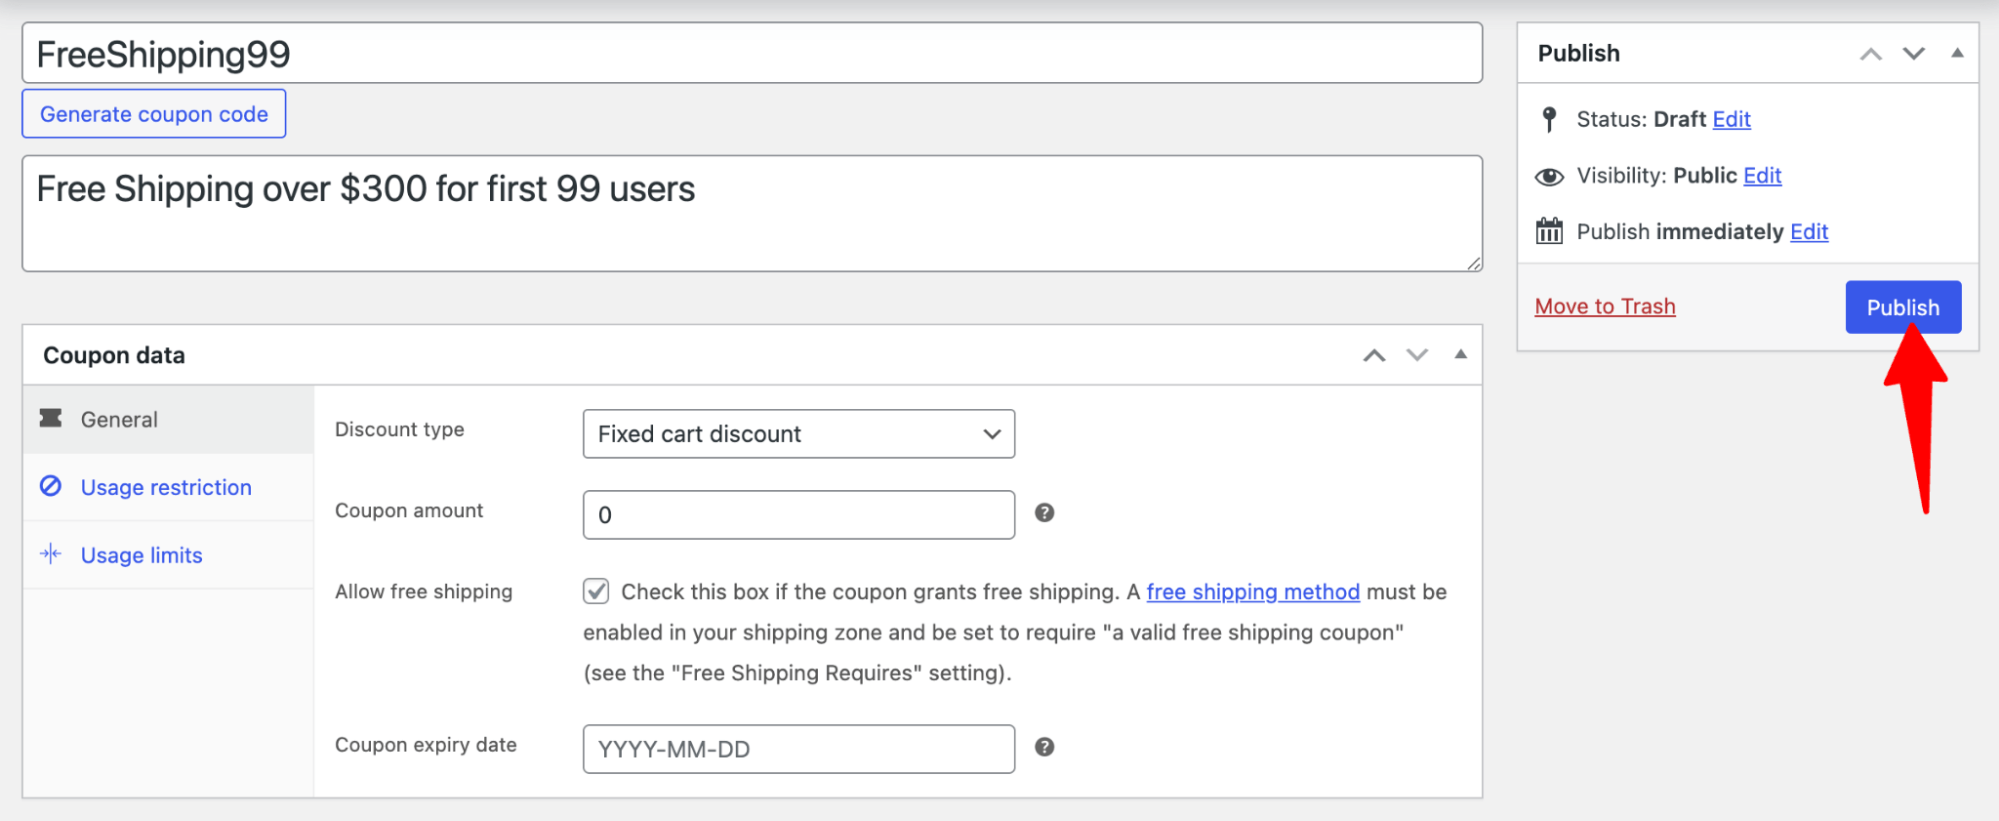
Create a coupon as we showed earlier in this blog. If you want to offer free shipping as a discount without any monetary discount, leave the coupon amount at 0; otherwise, add the discount amount.
Make sure to check the “Allow Free Shipping” option.
Here, we are creating a coupon that will offer just free shipping.
Step 2: Configure usage restrictions and coupon usage limits
Now, according to your strategy, configure the usage restriction and coupon usage limits.
Here, we are setting a minimum requirement of $300 to avail of the free shipping.
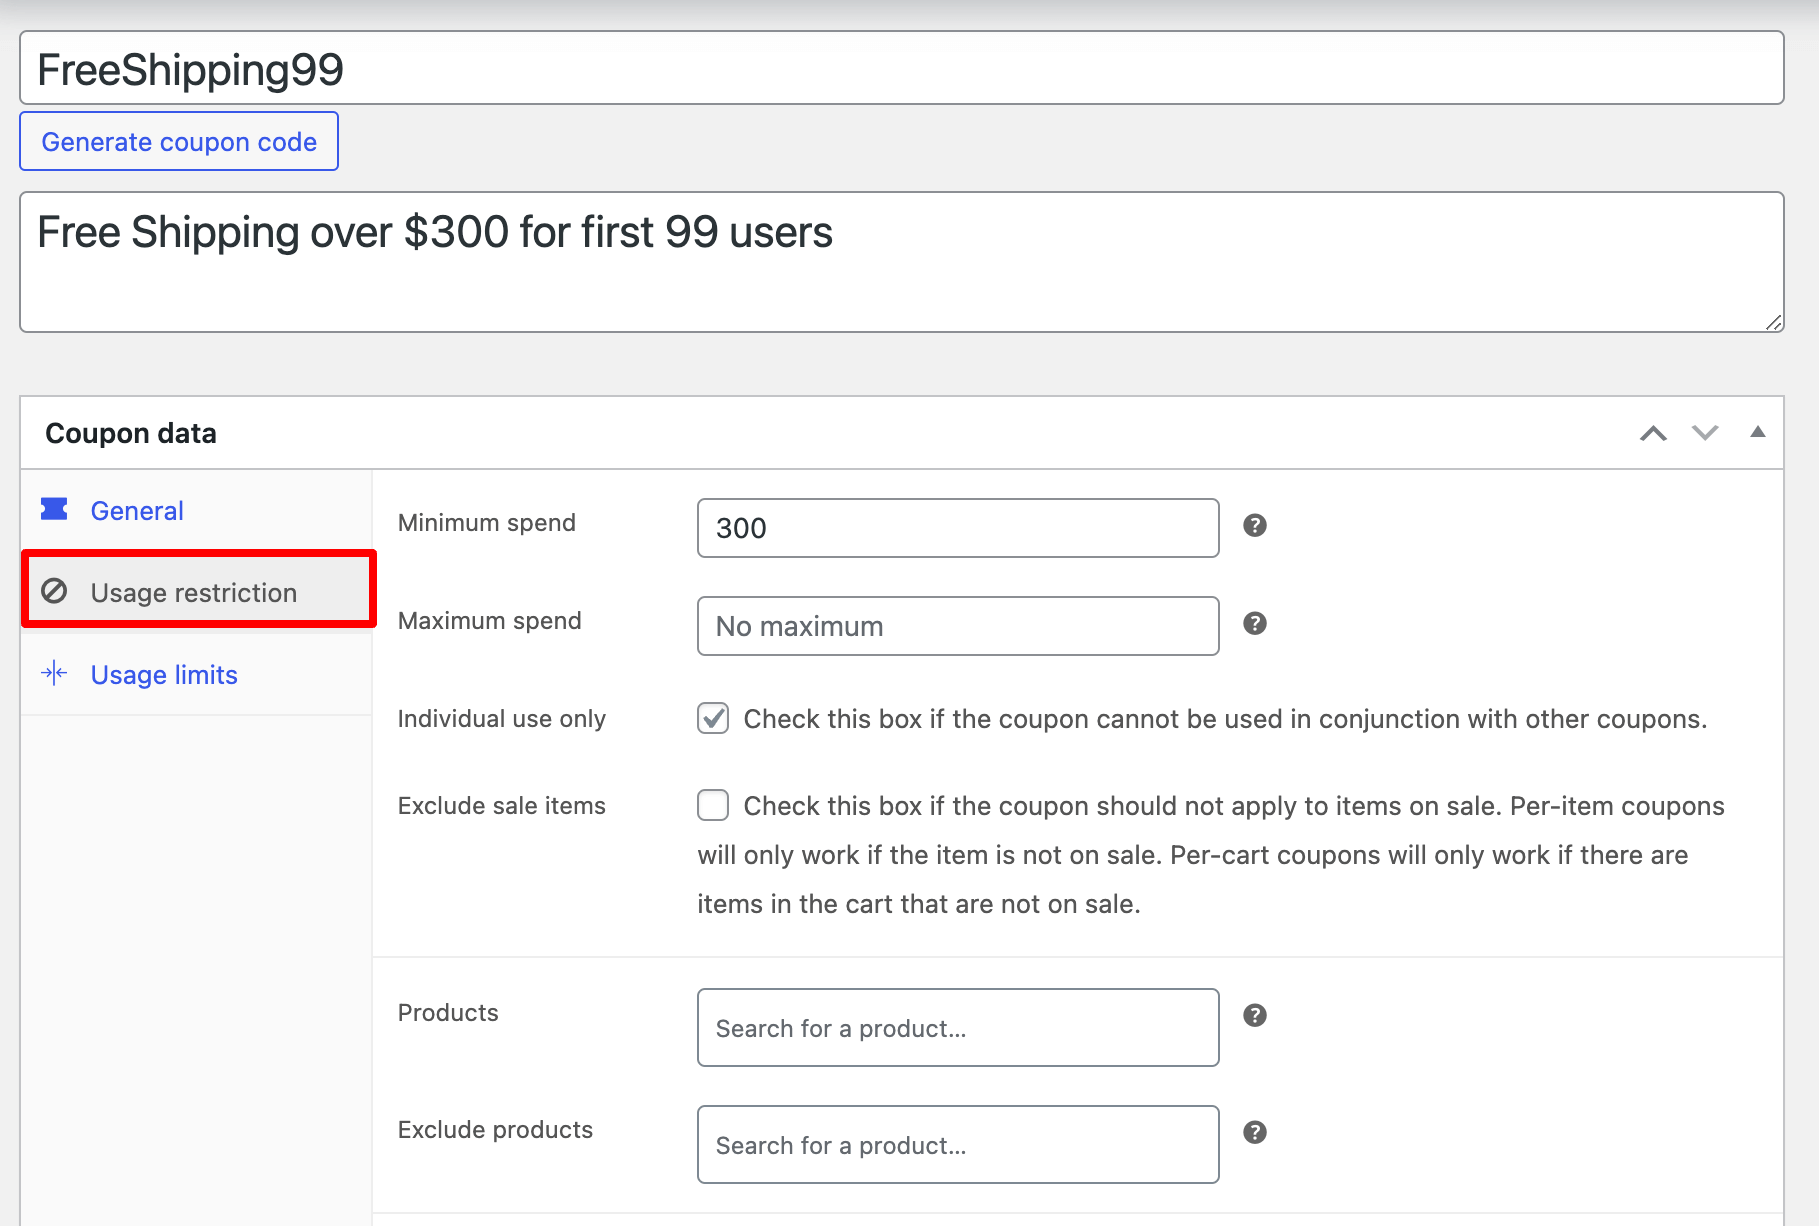
As per the usage restrictions, you only want to offer 99 free shipping, and we don’t want one person to avail this coupon more than once. You can configure the settings according to your needs.
After completing the configuration, make sure to publish the coupon.
Step 3: Set the free shipping method to require a valid free shipping coupon
This is a crucial step. After publishing the coupon, you need to go to the free shipping method for the region where you want to offer free shipping and set it to require a coupon.
To do this, go to WooCommerce ⇒ Settings ⇒ Shipping and edit the Shipping Zone for which you want to create a free shipping coupon.
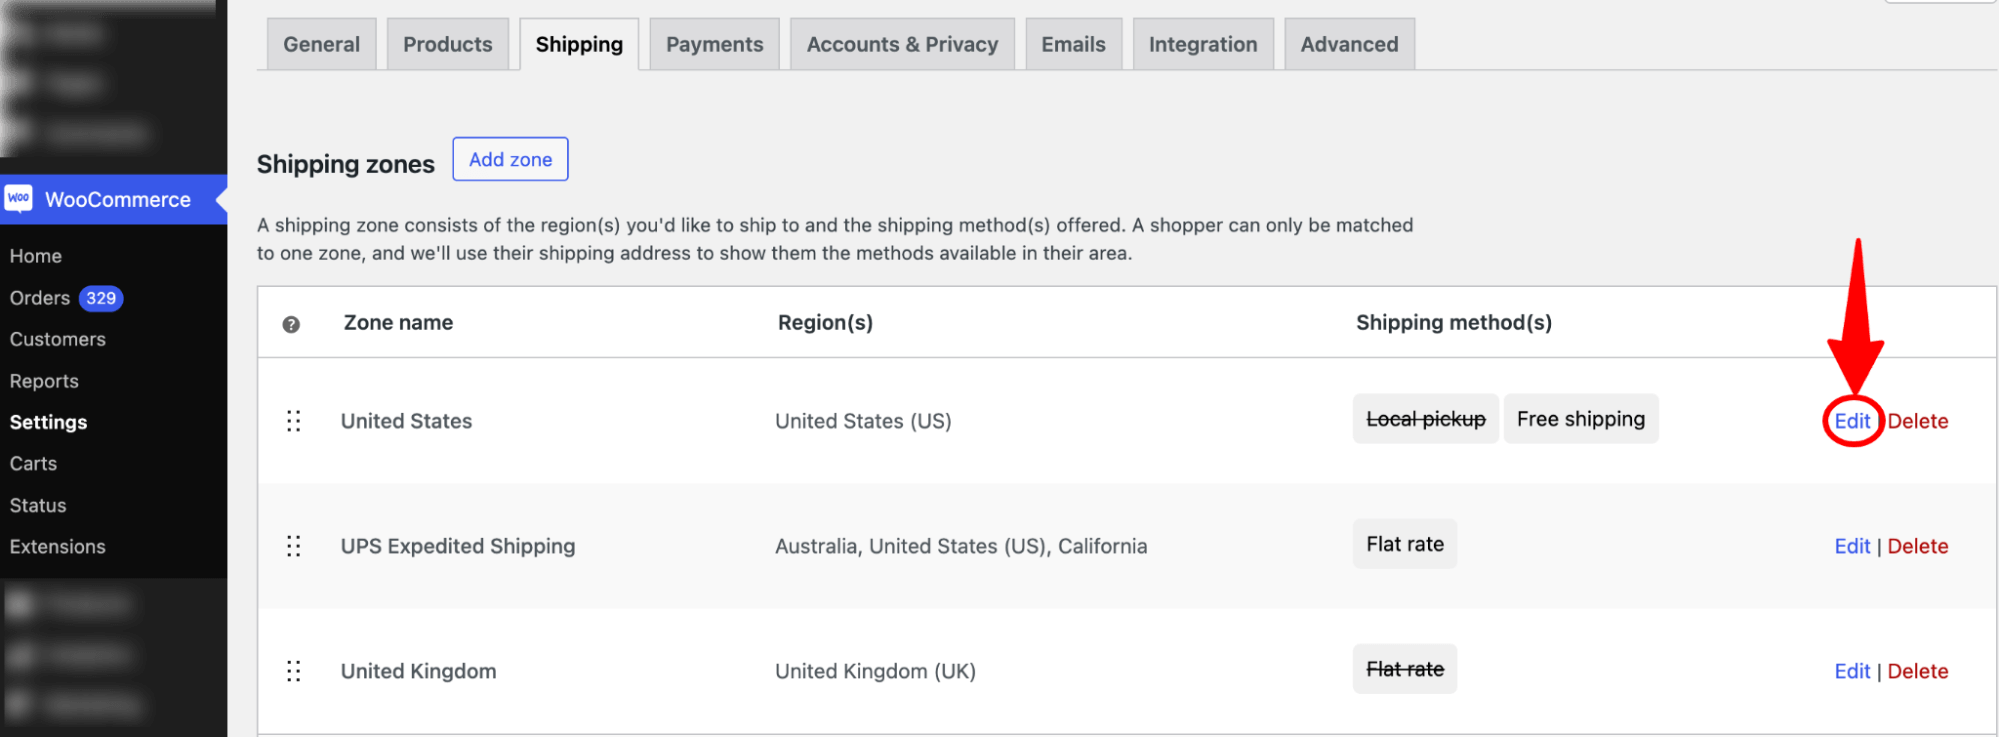
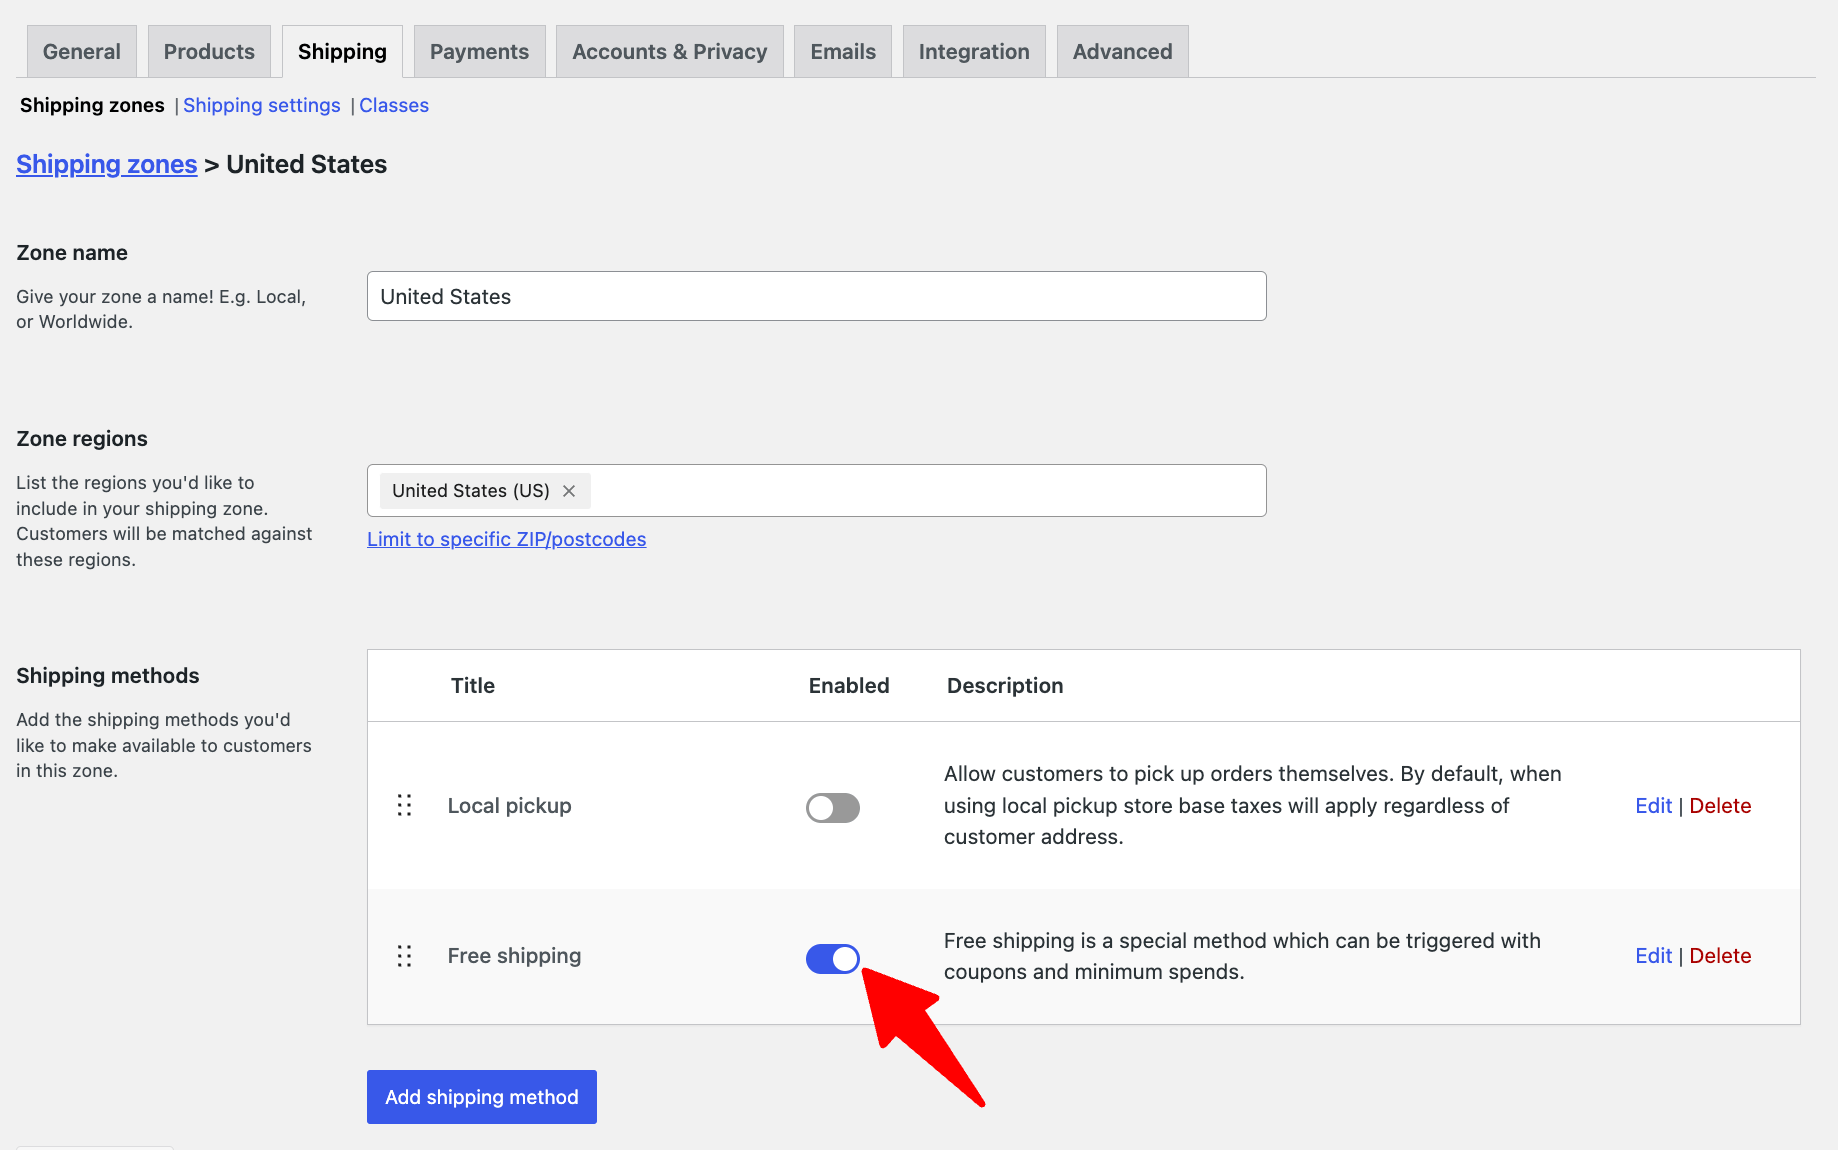
Make sure the free shipping method is turned on.
Now, edit the free shipping method and “Free Shipping Requires” option to “A valid free shipping coupon”.
After that, make sure to save it.
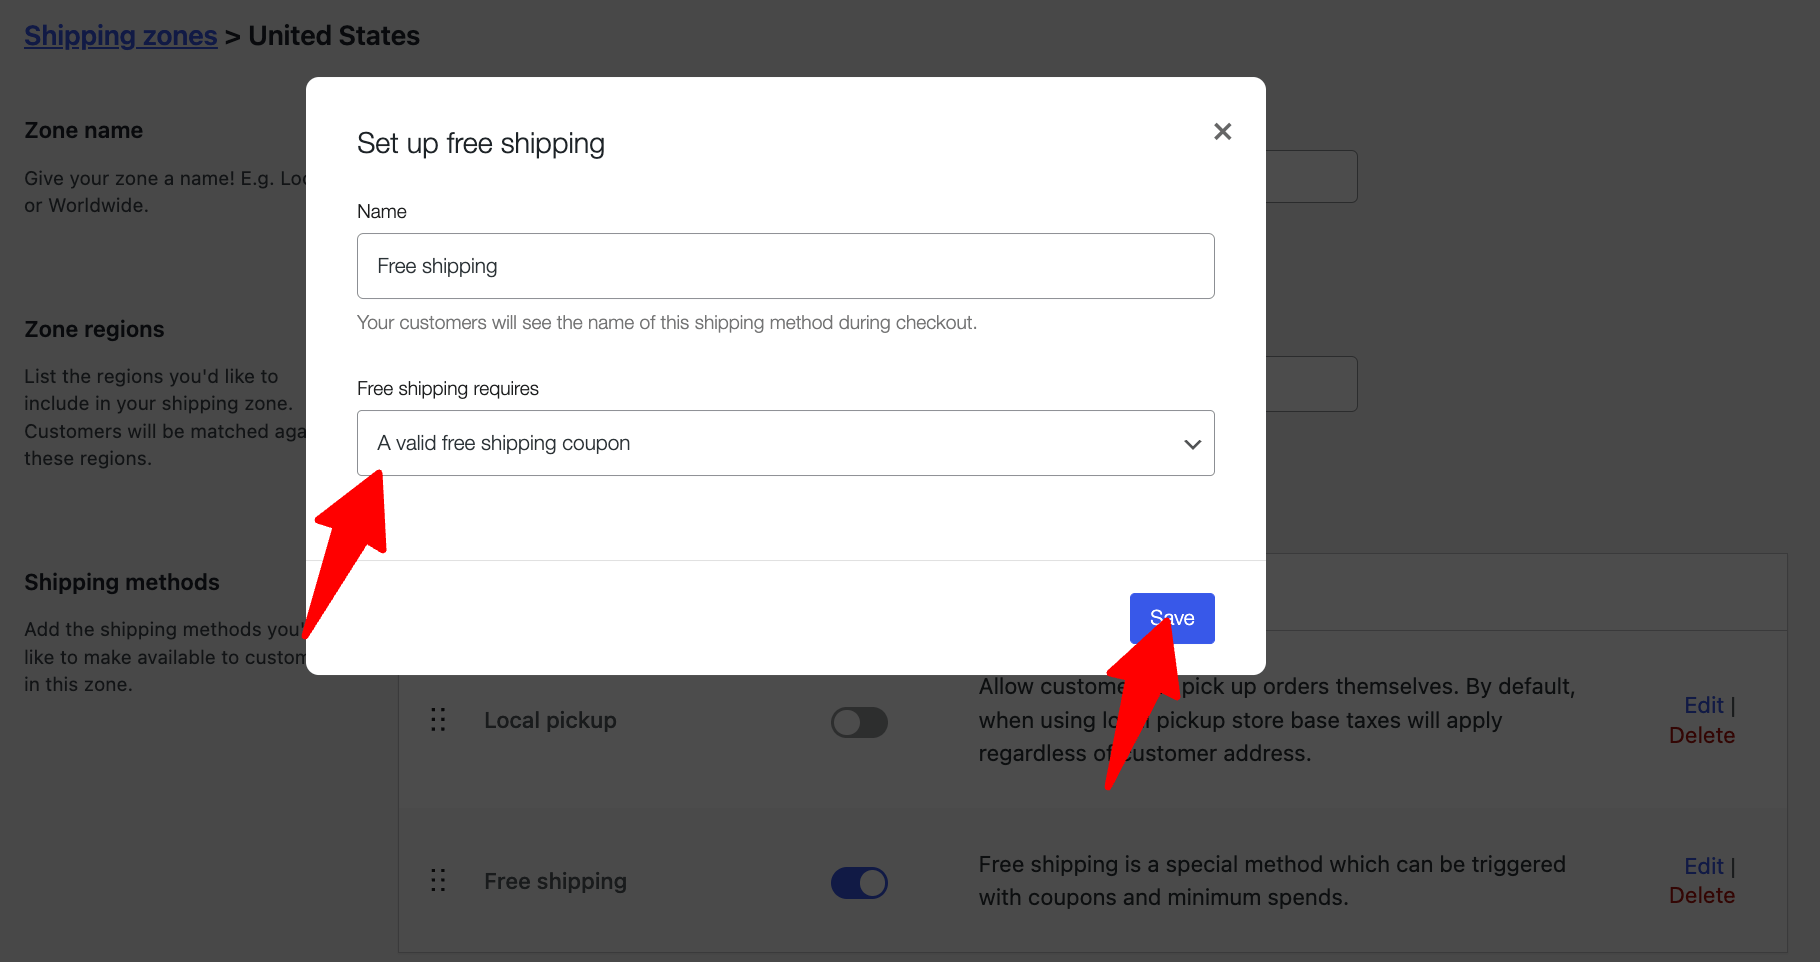
That’s it. Now your WooCommerce free shipping coupon is ready.
How To Set Up Free Gift Coupons in WooCommerce
WooCommerce doesn’t offer the option to create free gift coupons. For this, you’ll need an additional plugin.
Our experts recommend FunnelKit Funnel Builder to replace your default checkout with a high-converting one and boost order value using free gift coupons as order bumps.
For this, make sure to install and activate FunnelKit Funnel Builder. After that, follow the steps below:
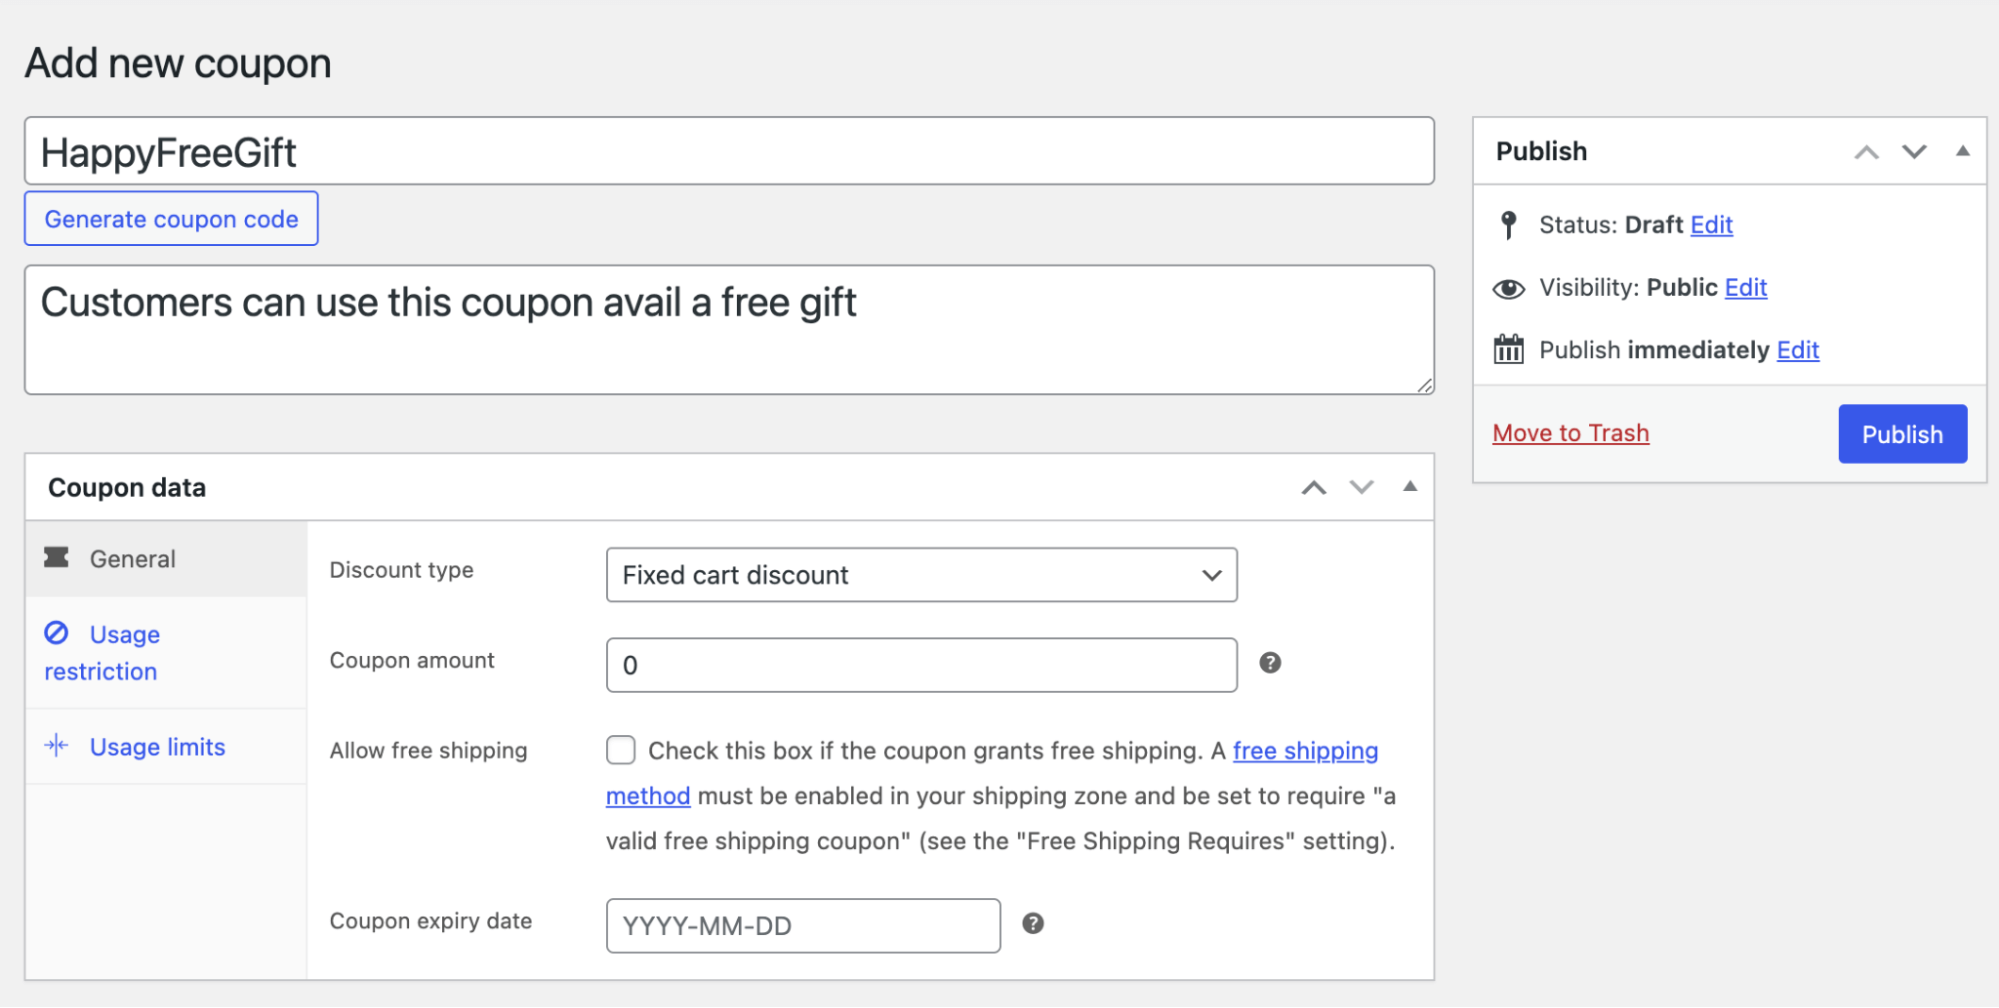
Step 1: Create a coupon with no discount applied
Create a coupon that doesn't apply a discount but allows users to receive a free gift.
There is no need to add a discount while creating the coupon; we will take care of that later.
Based on your strategy, you can add other conditions, such as a minimum or maximum requirement.
Step 2: Create a store checkout
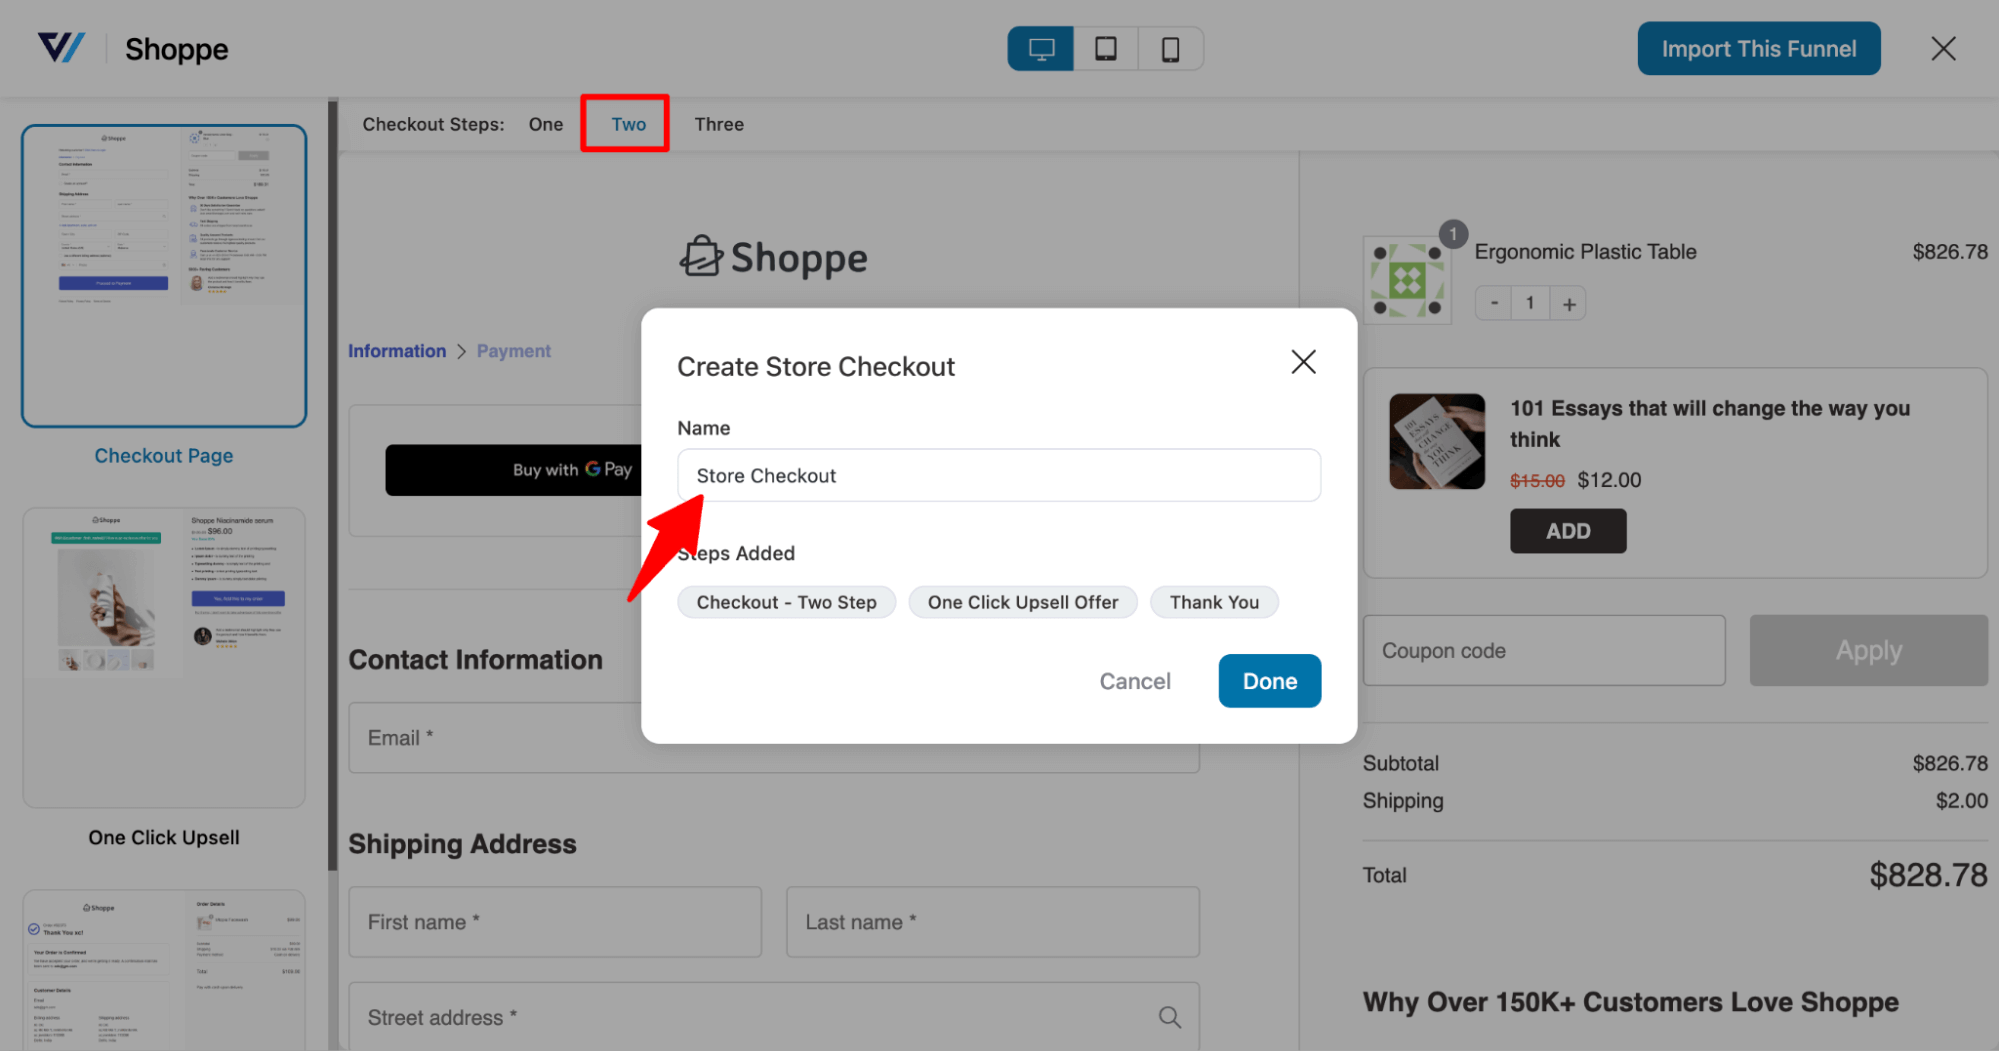
First, create a custom store checkout to replace the default WooCommerce checkout page.
So, pick your favorite page builder, import any prebuilt template to create a custom store checkout.
Step 3: Add an order bump to offer a free gift
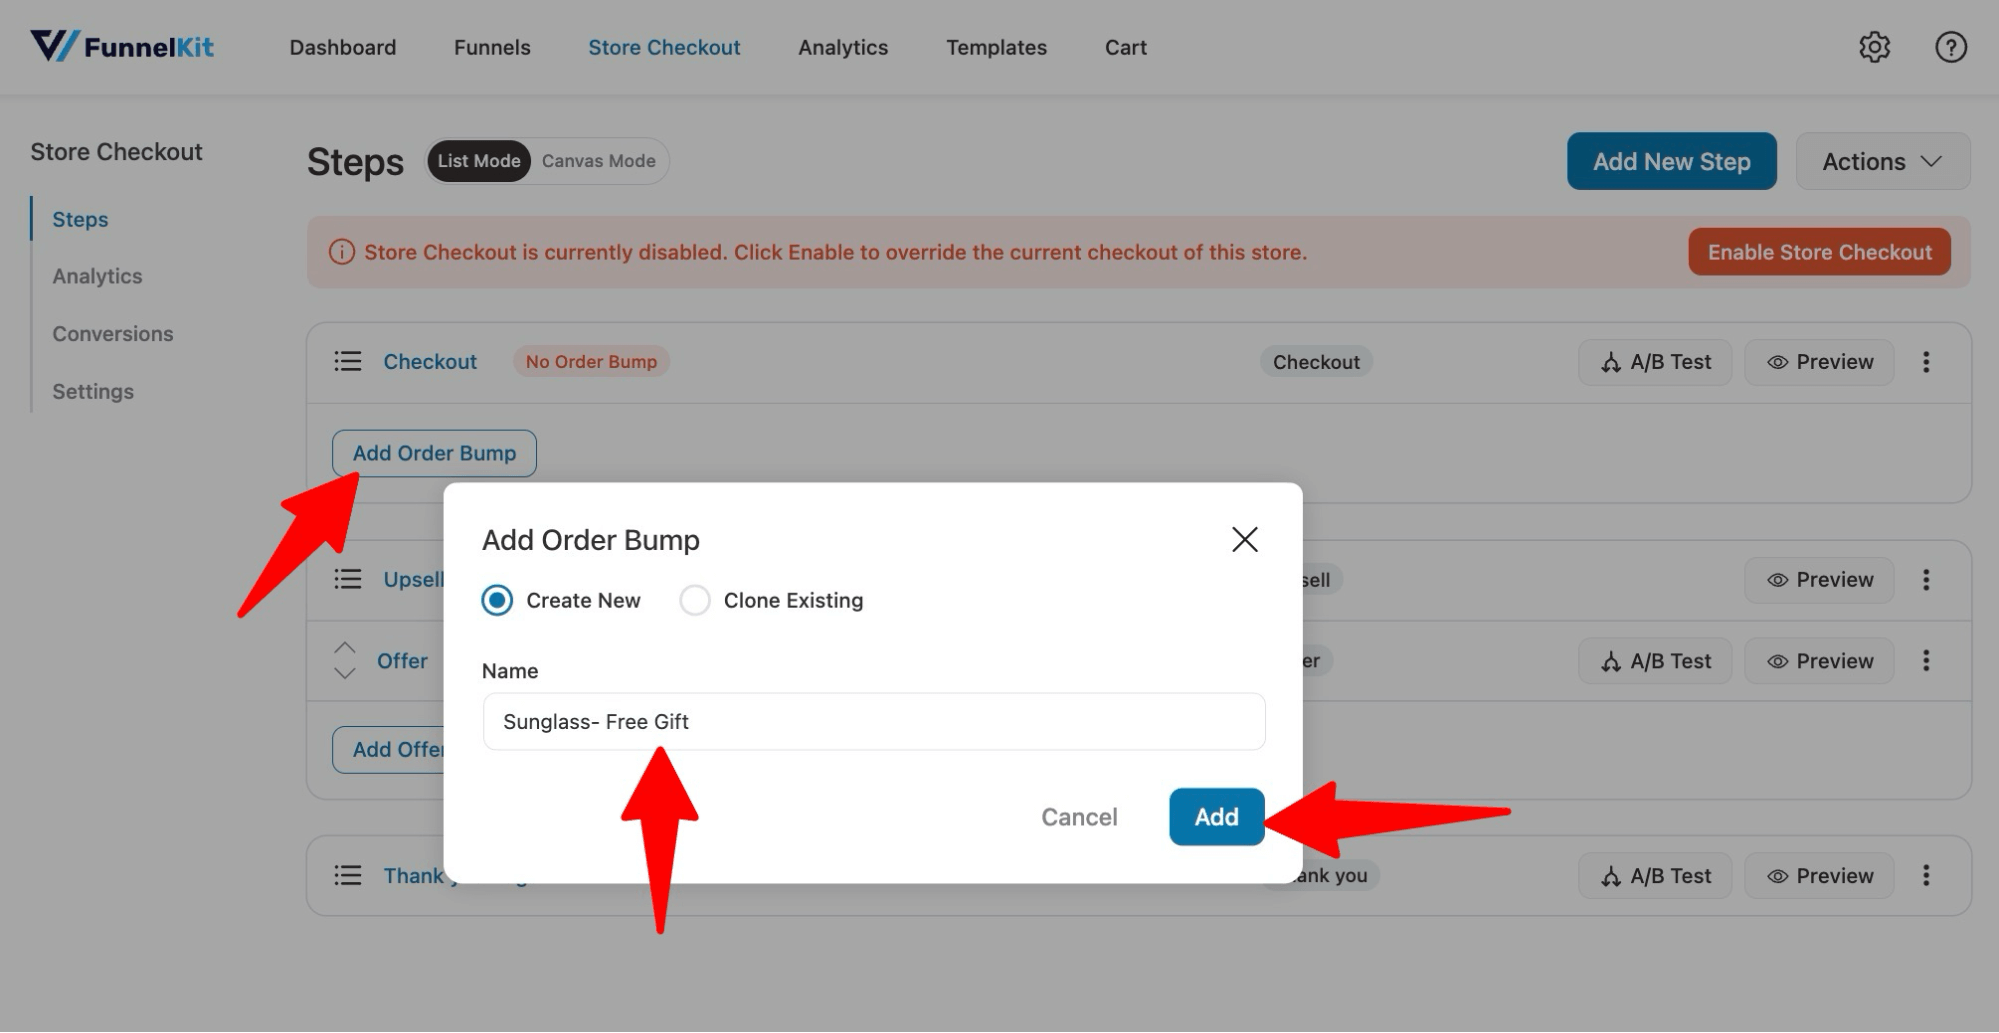
As mentioned earlier, we will offer a free gift as an order bump. So, first, you need to create an order bump.
To do so, click “Add Order Bump”, provide a name, and click on Add.
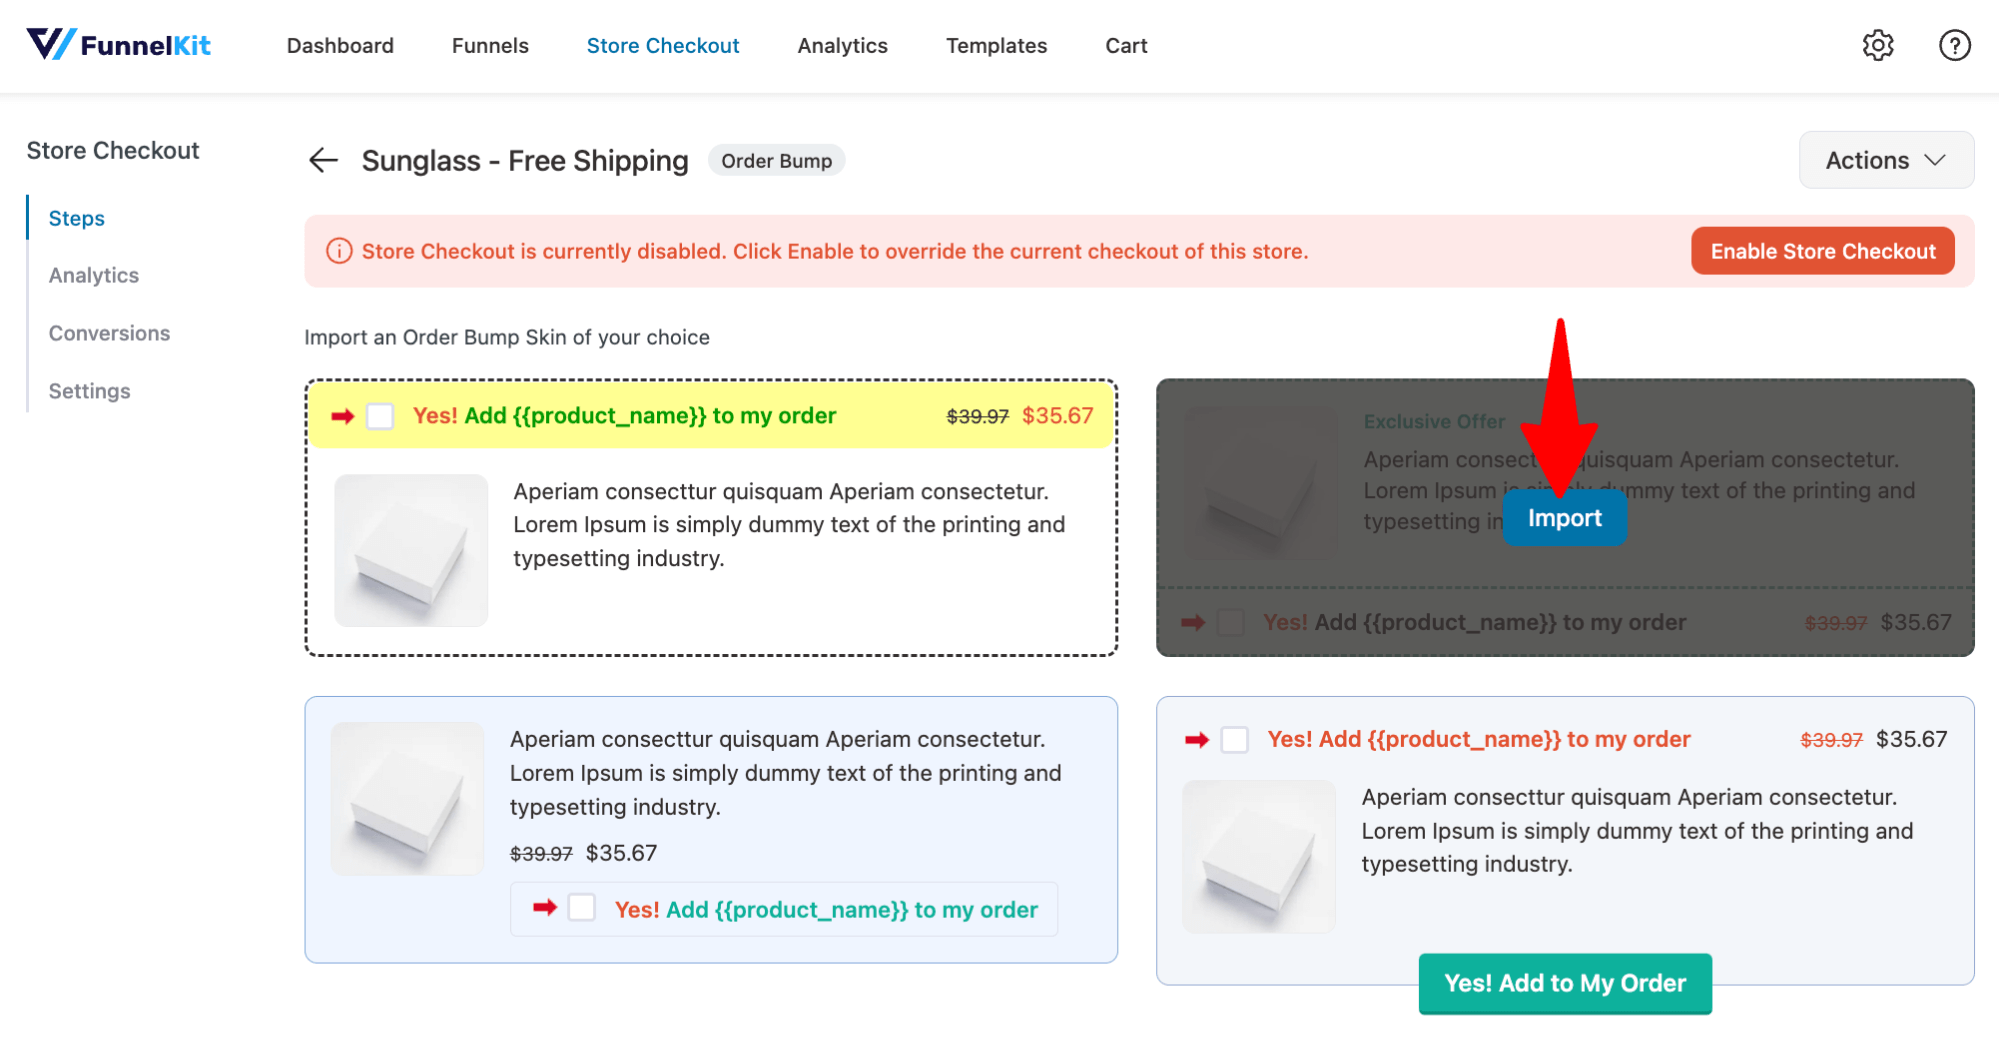
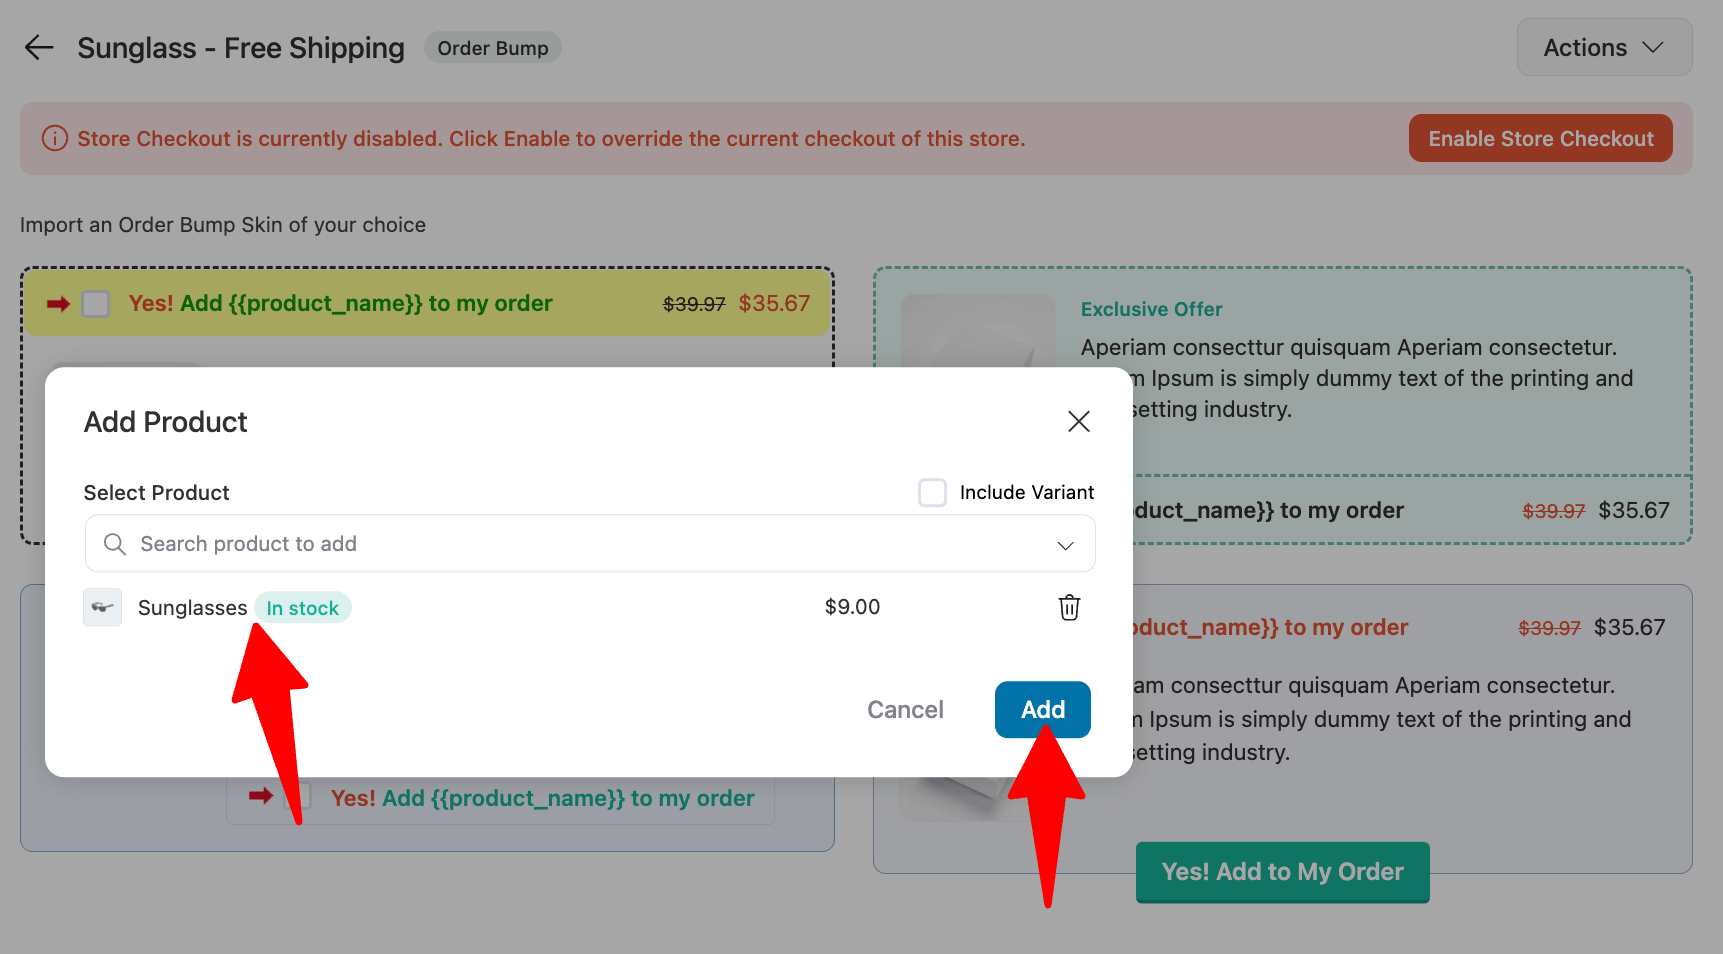
Now, choose how you want the order bump to appear on the checkout page. To select any skin, hover over it and click “Import.”
Then, search for and choose the product you want to offer for free. After that, click on Add to add the product as an order bump.
On the “Content” tab, you can customize the content of the order bump offers if you want. For style customizations, move to the Style tab.
You can choose where the order bump appears on the checkout step. To auto-add the free gift to the cart, enable “Pre-select Order Bump by default.”
If you prefer not to highlight the offer, turn on “Hide Order Bump after selection.” In this setup, we’re enabling the pre-select option but keeping the bump visible
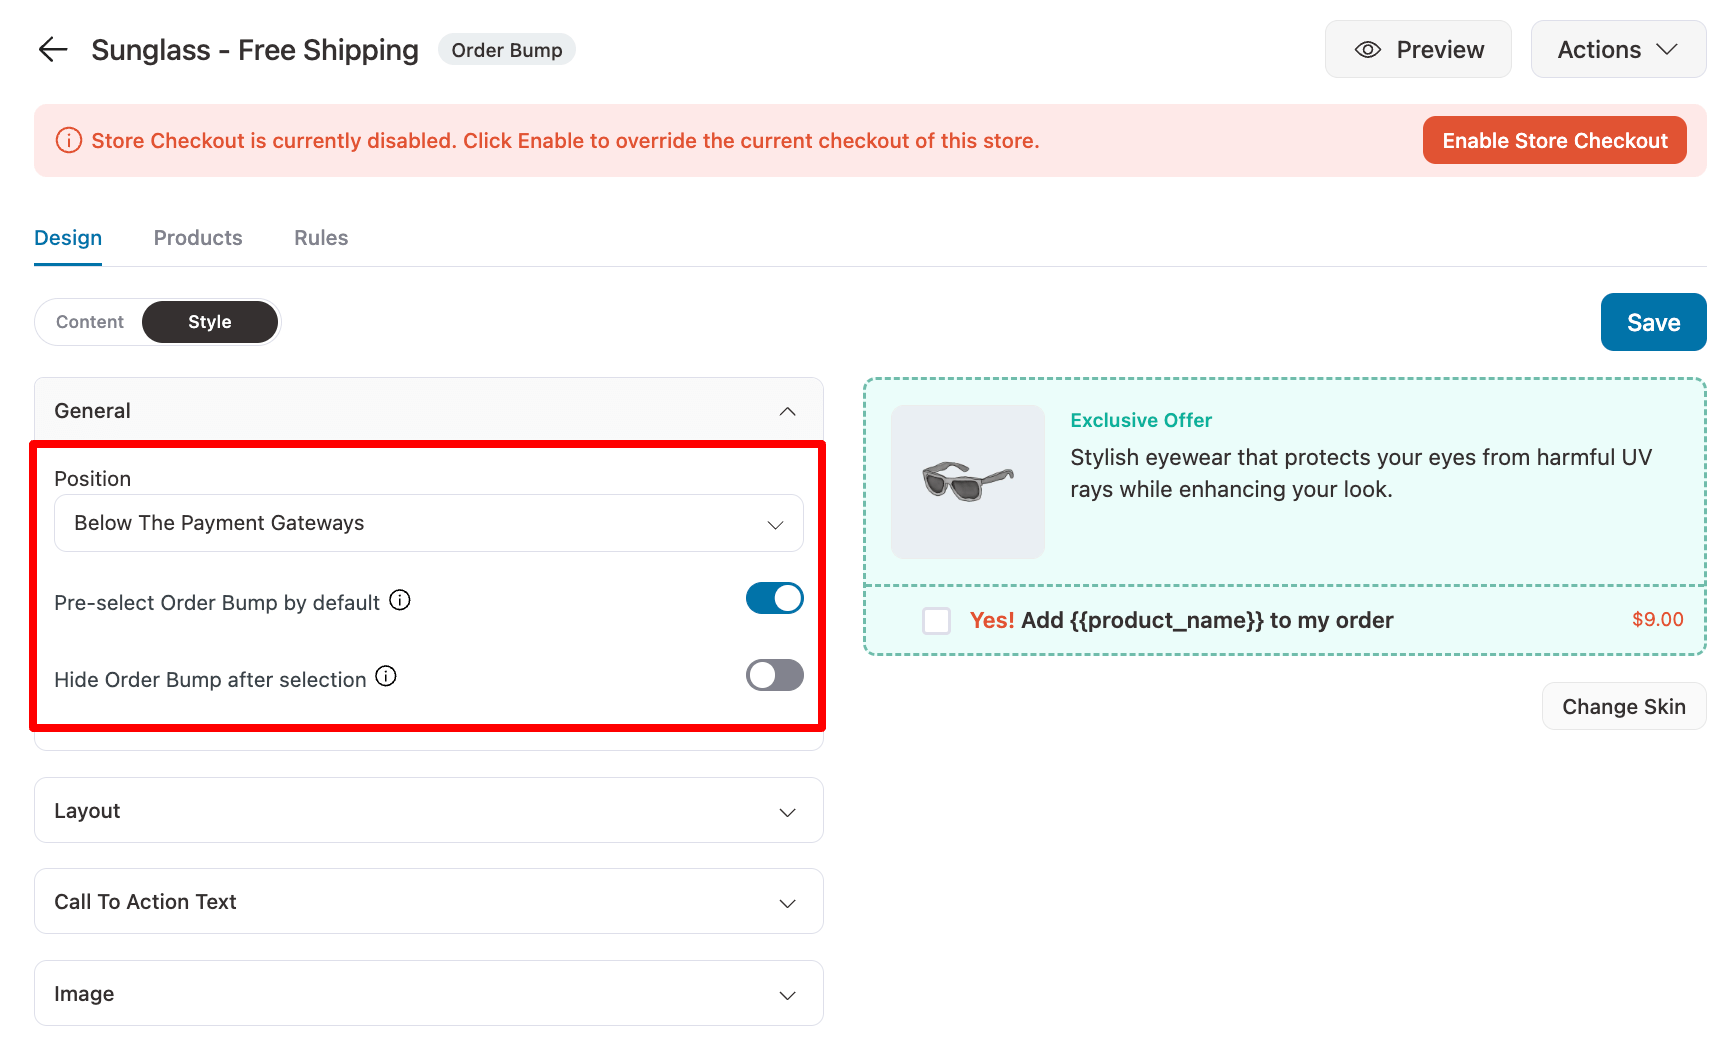
Make sure to “Save” the changes.
Step 4: Make the order bump totally free with a 100% discount
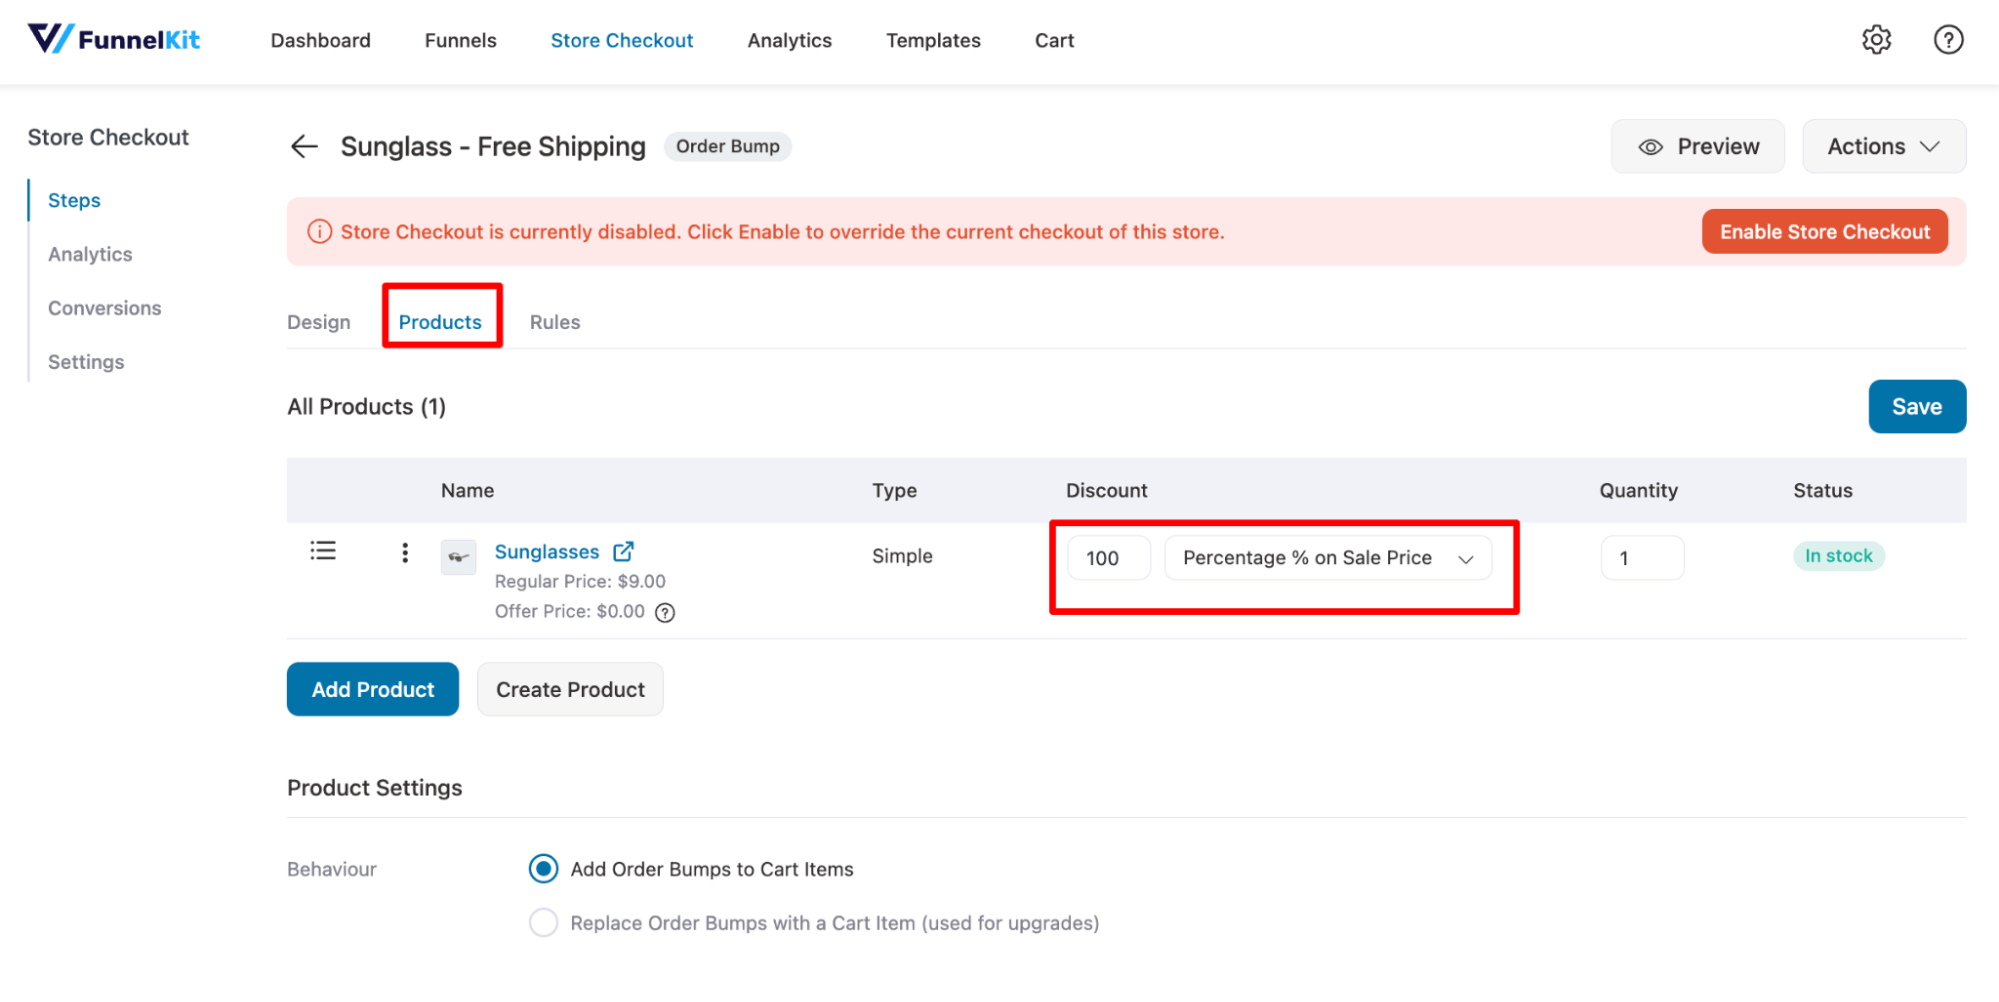
Now it’s time to make the order bump offer free, move to the “Products” tab, and set a 100% discount on the sale price. After that, click on Save to update.
Step 5: Make the free gift redeemable only with a certain coupon
Now, we will connect the free gift coupon we created in the first place with this free order bump we set.
For this, move to the Rules tab and click on “Add Rules”.
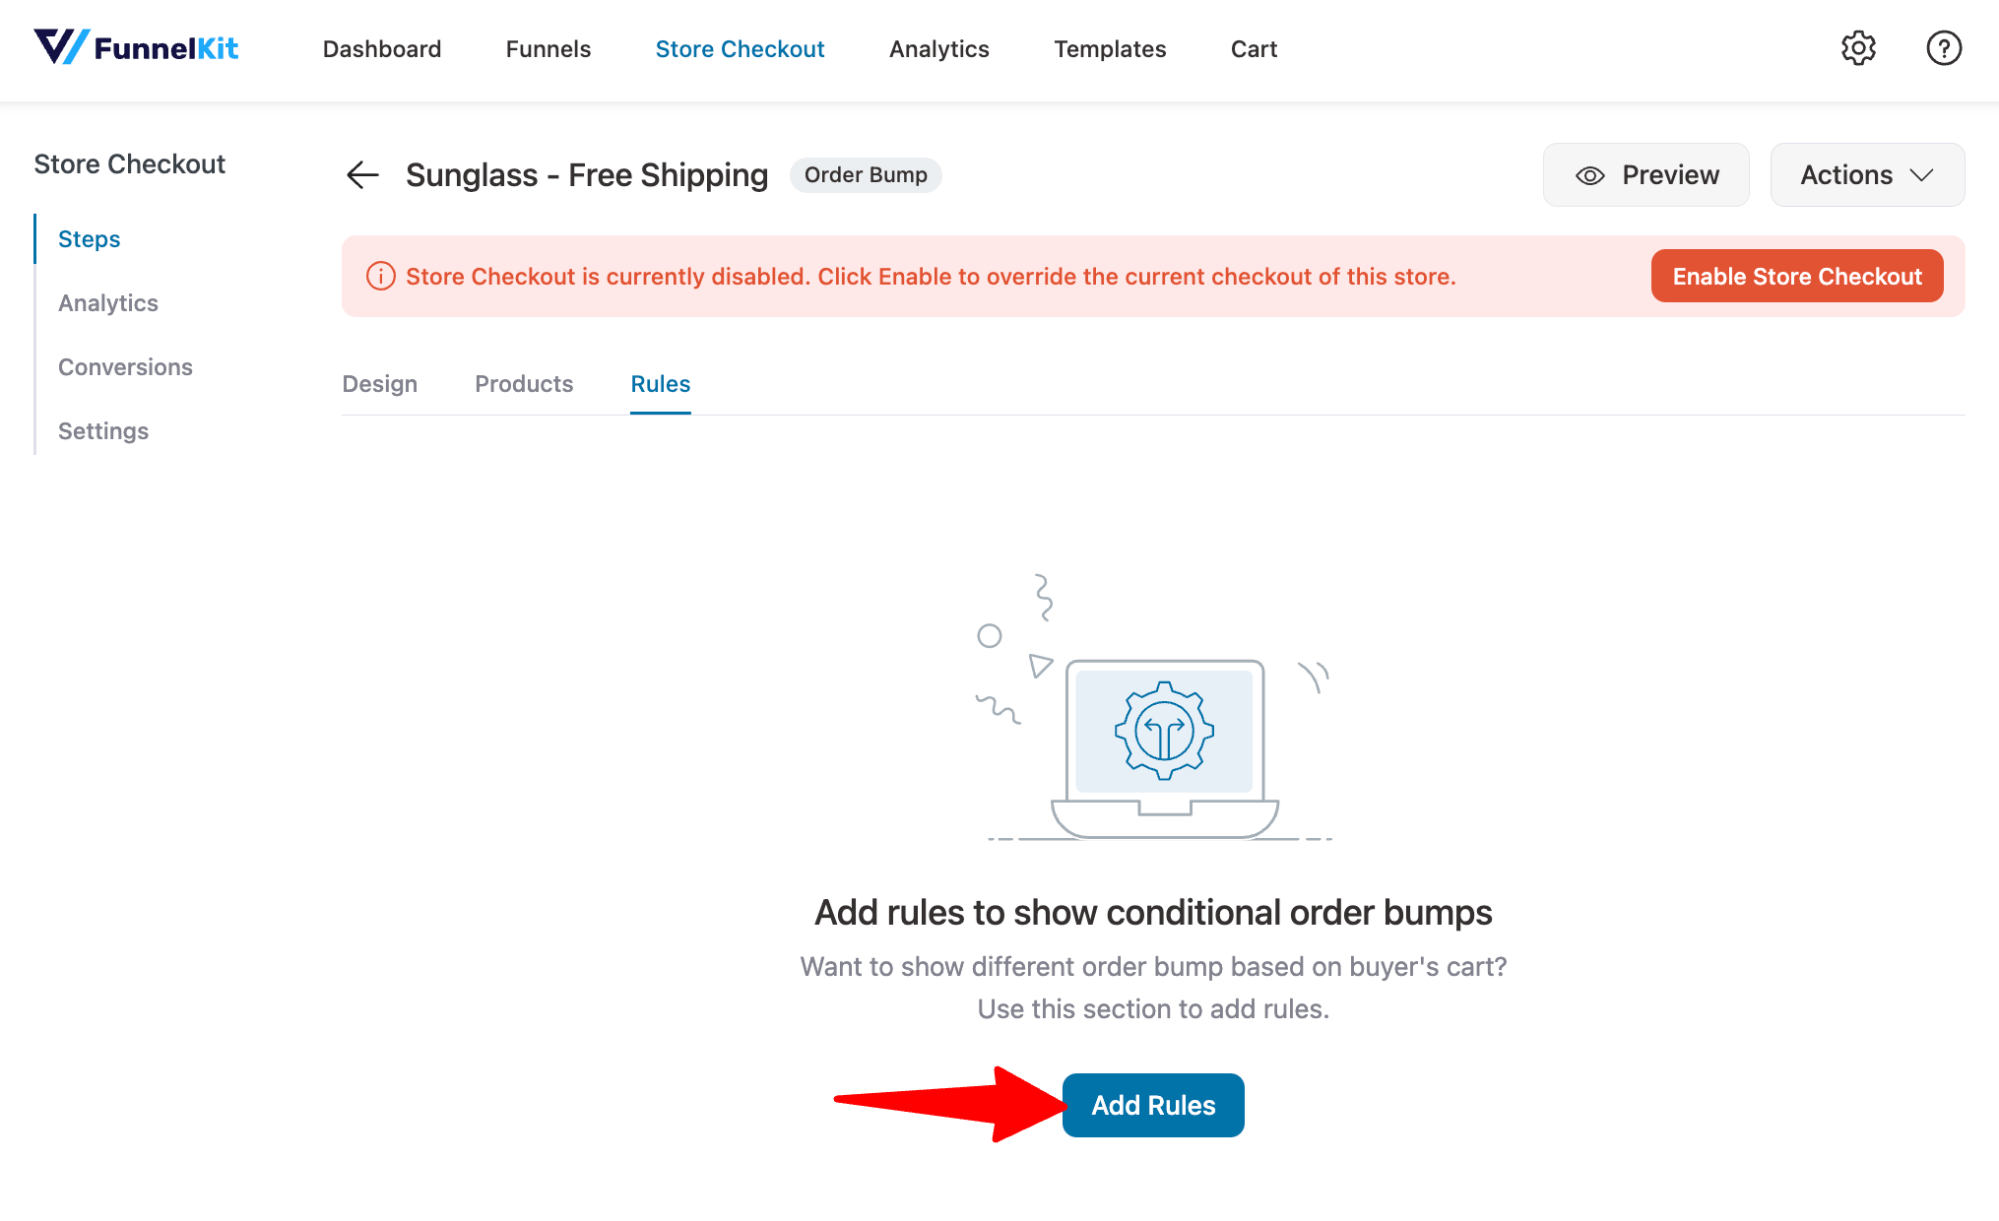
After that, set this order bump only to apply when “Car Coupons” matches the coupon you generated in the first step. Finally, save the rule.
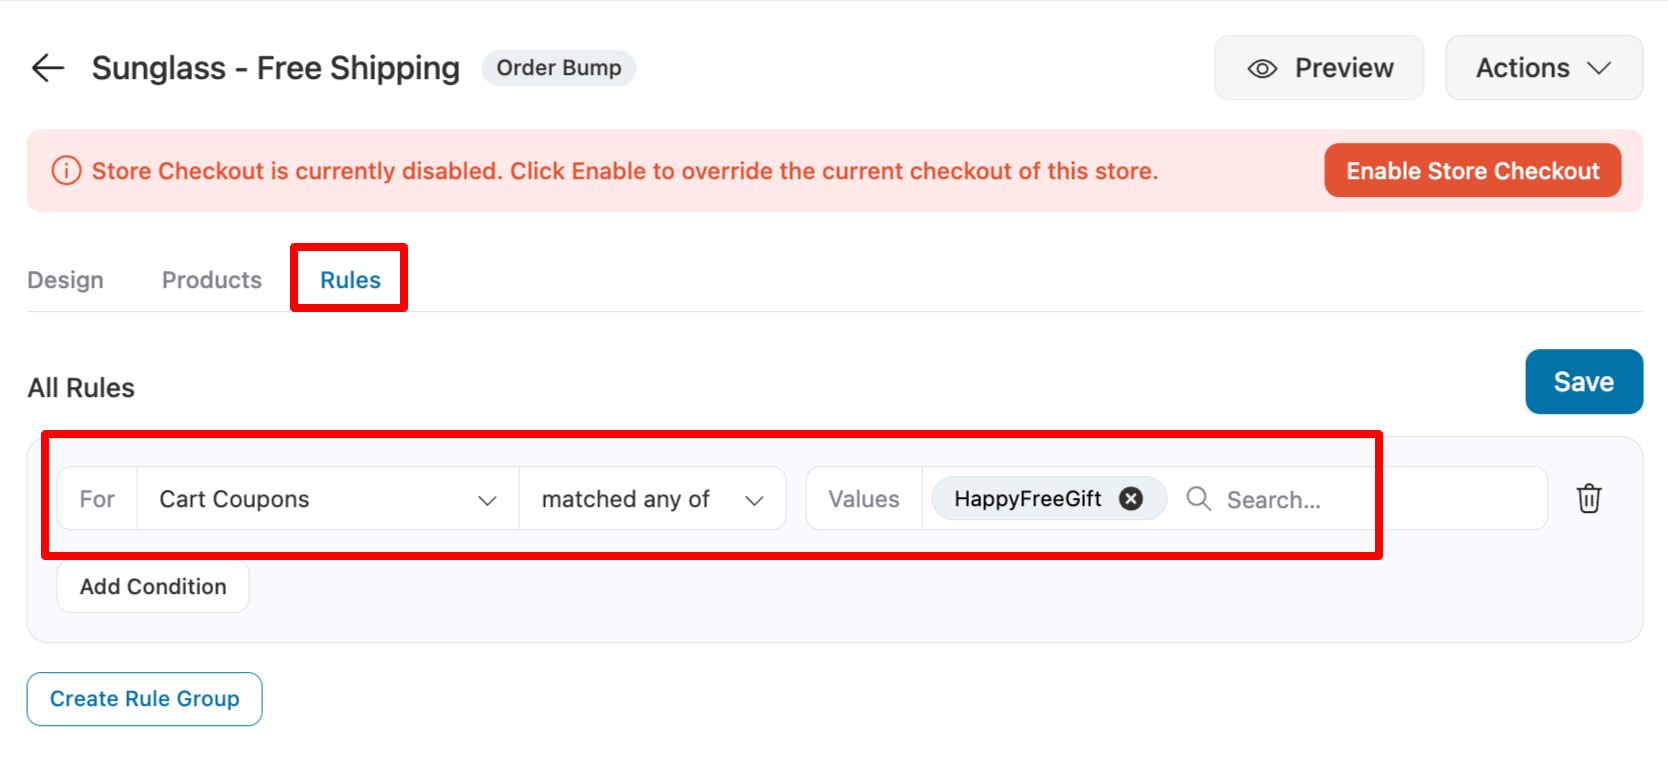
Now, users who apply this coupon to the cart can avail of this free gift.
Here is a preview of how it will work:
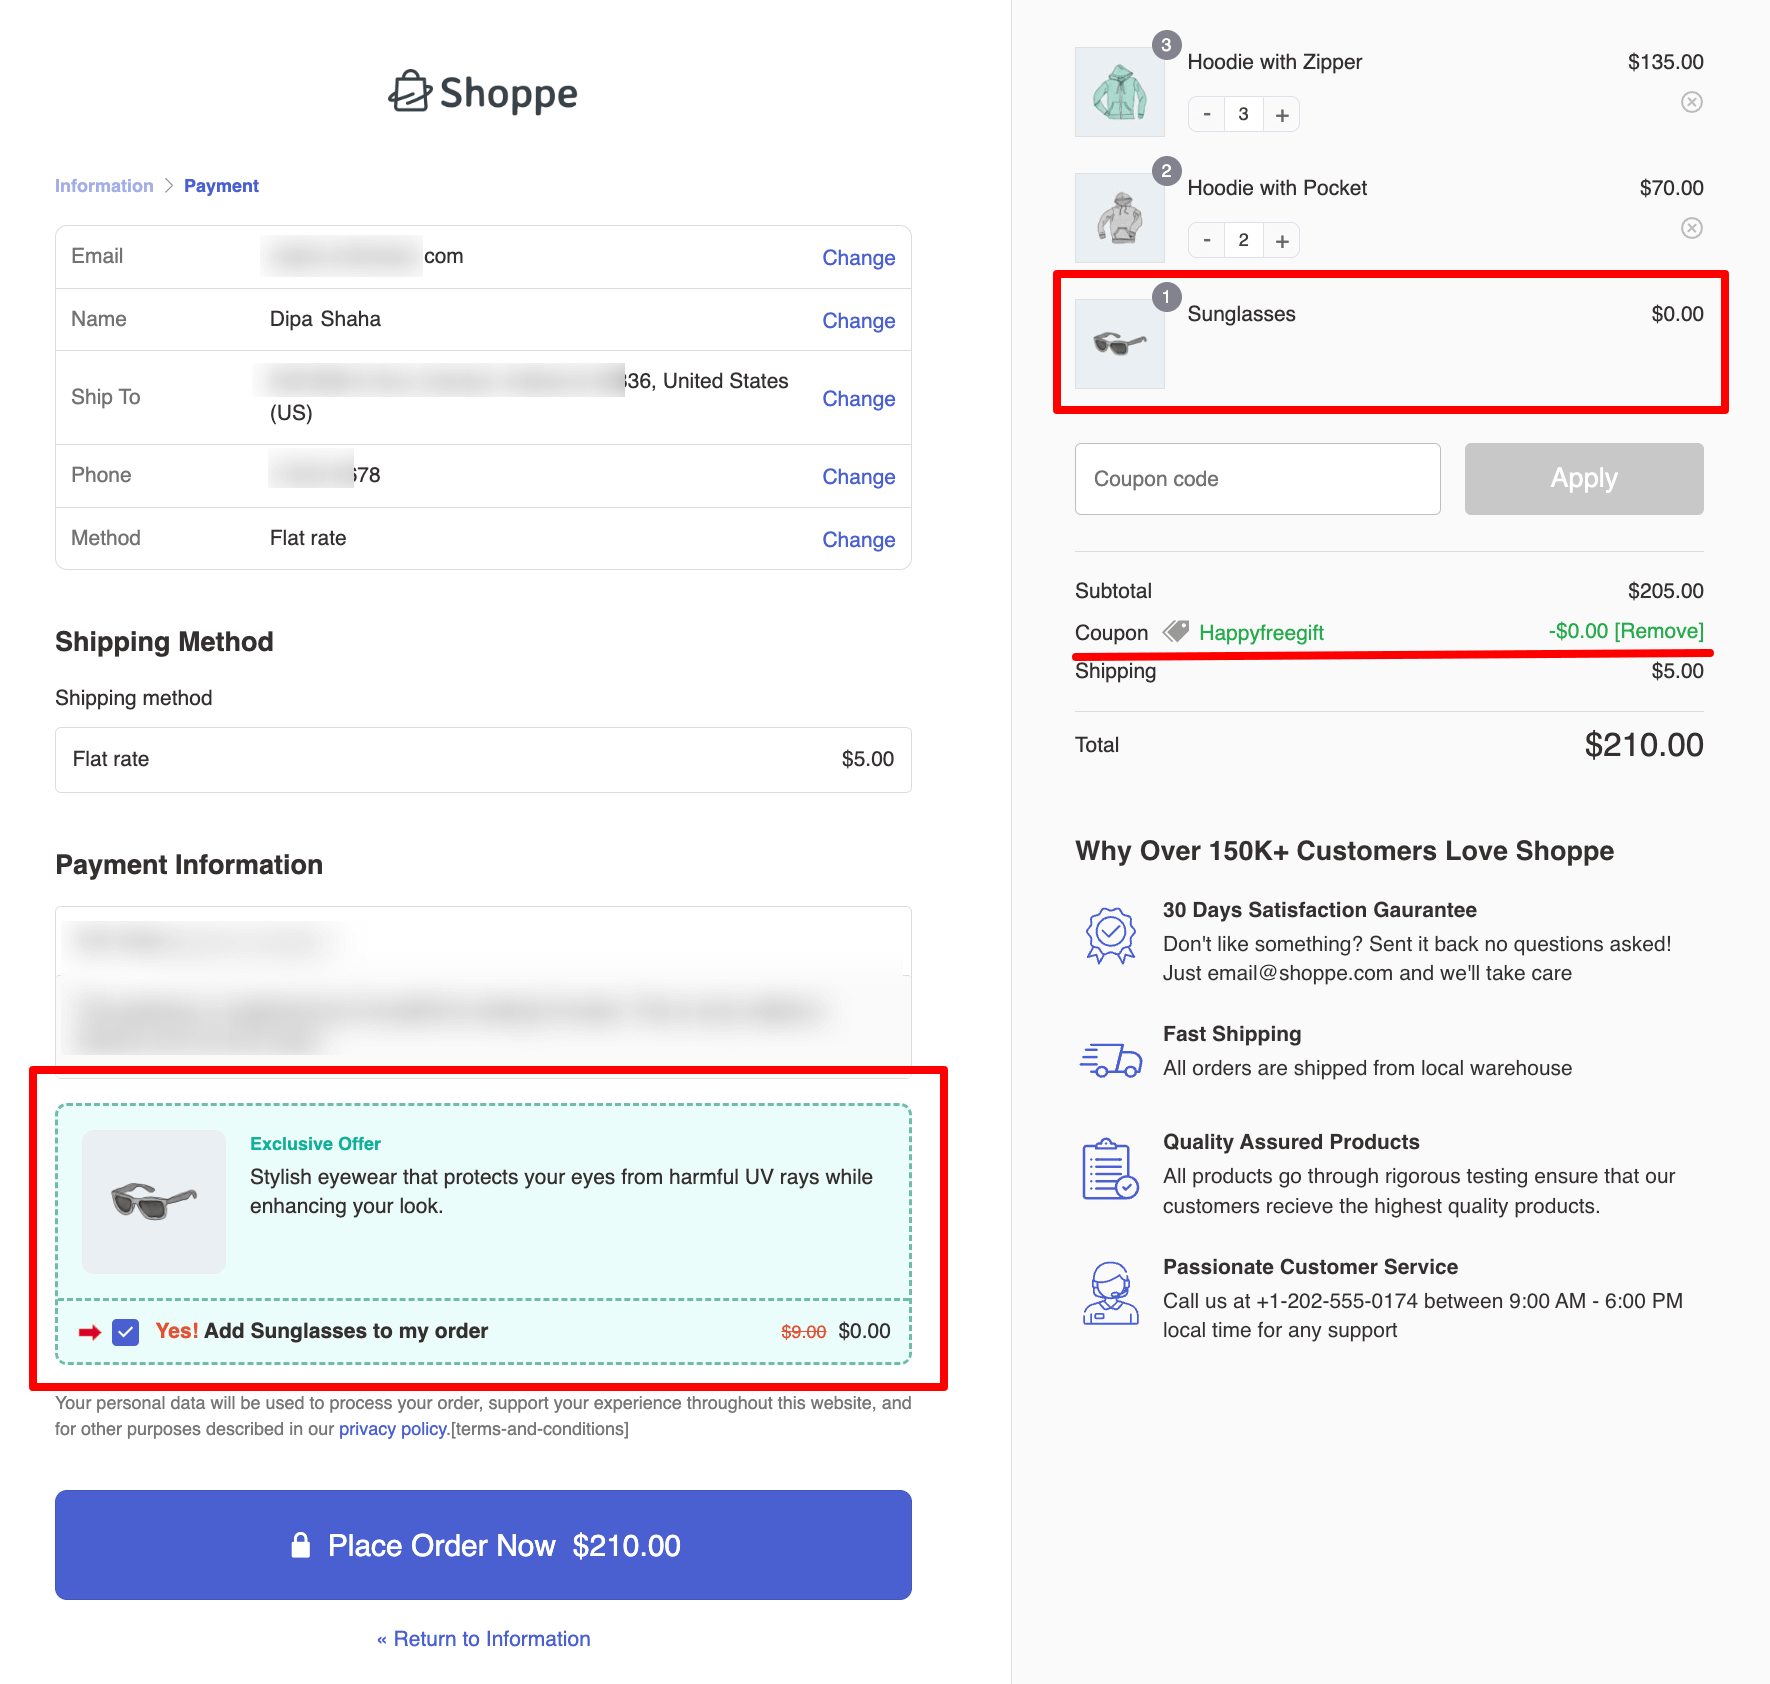
When the coupon is applied, the discount stays at zero, but the free gift is automatically added to the cart at no extra cost.
The chosen order bump skin appears under payment, allowing users to uncheck the free gift if they wish.
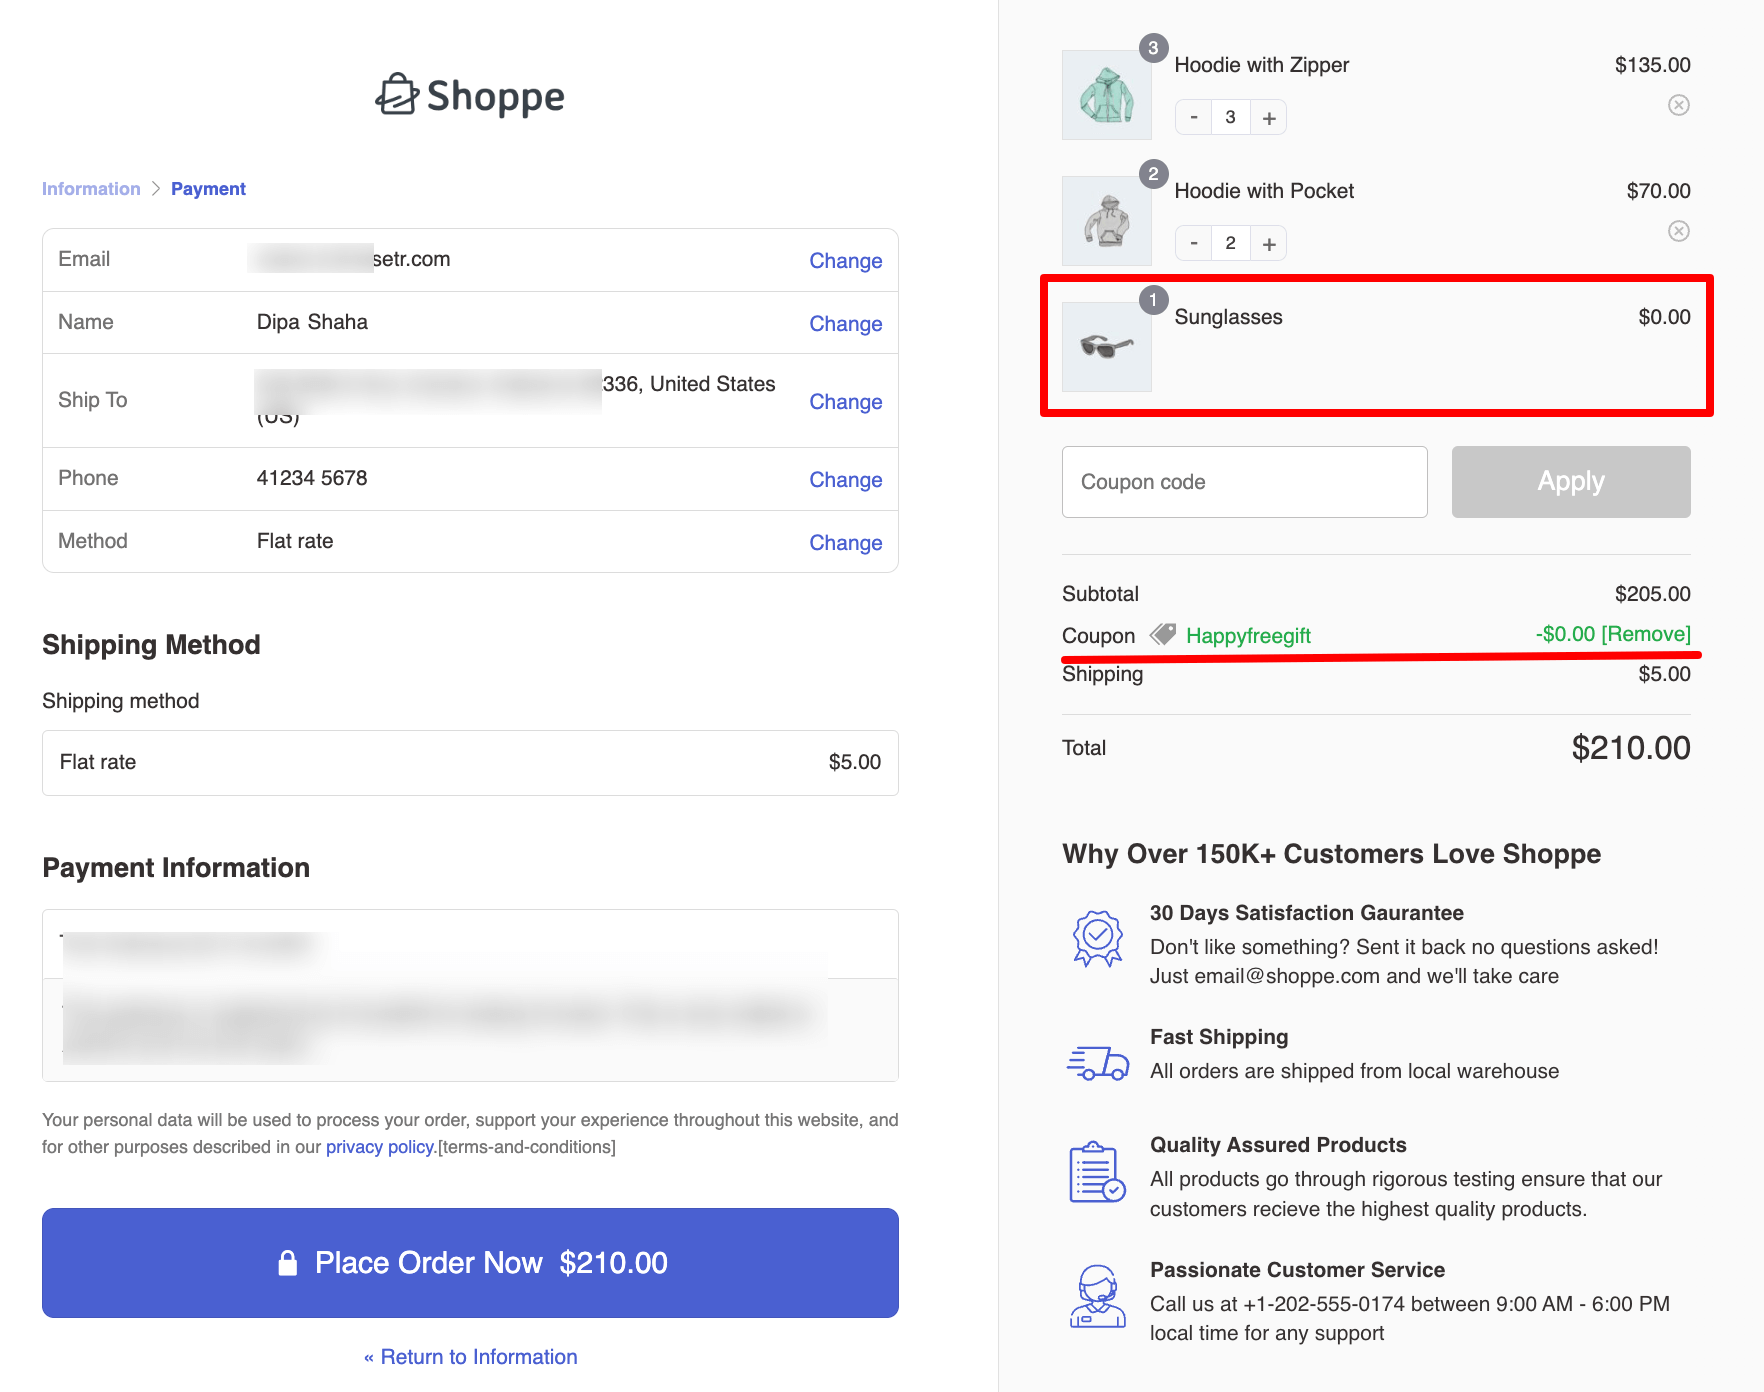
To hide this section at checkout, enable “Hide Order Bump after selection” so the gift adds silently without showing the order bump.
Here is a preview of the free gift coupon without the order bump section:
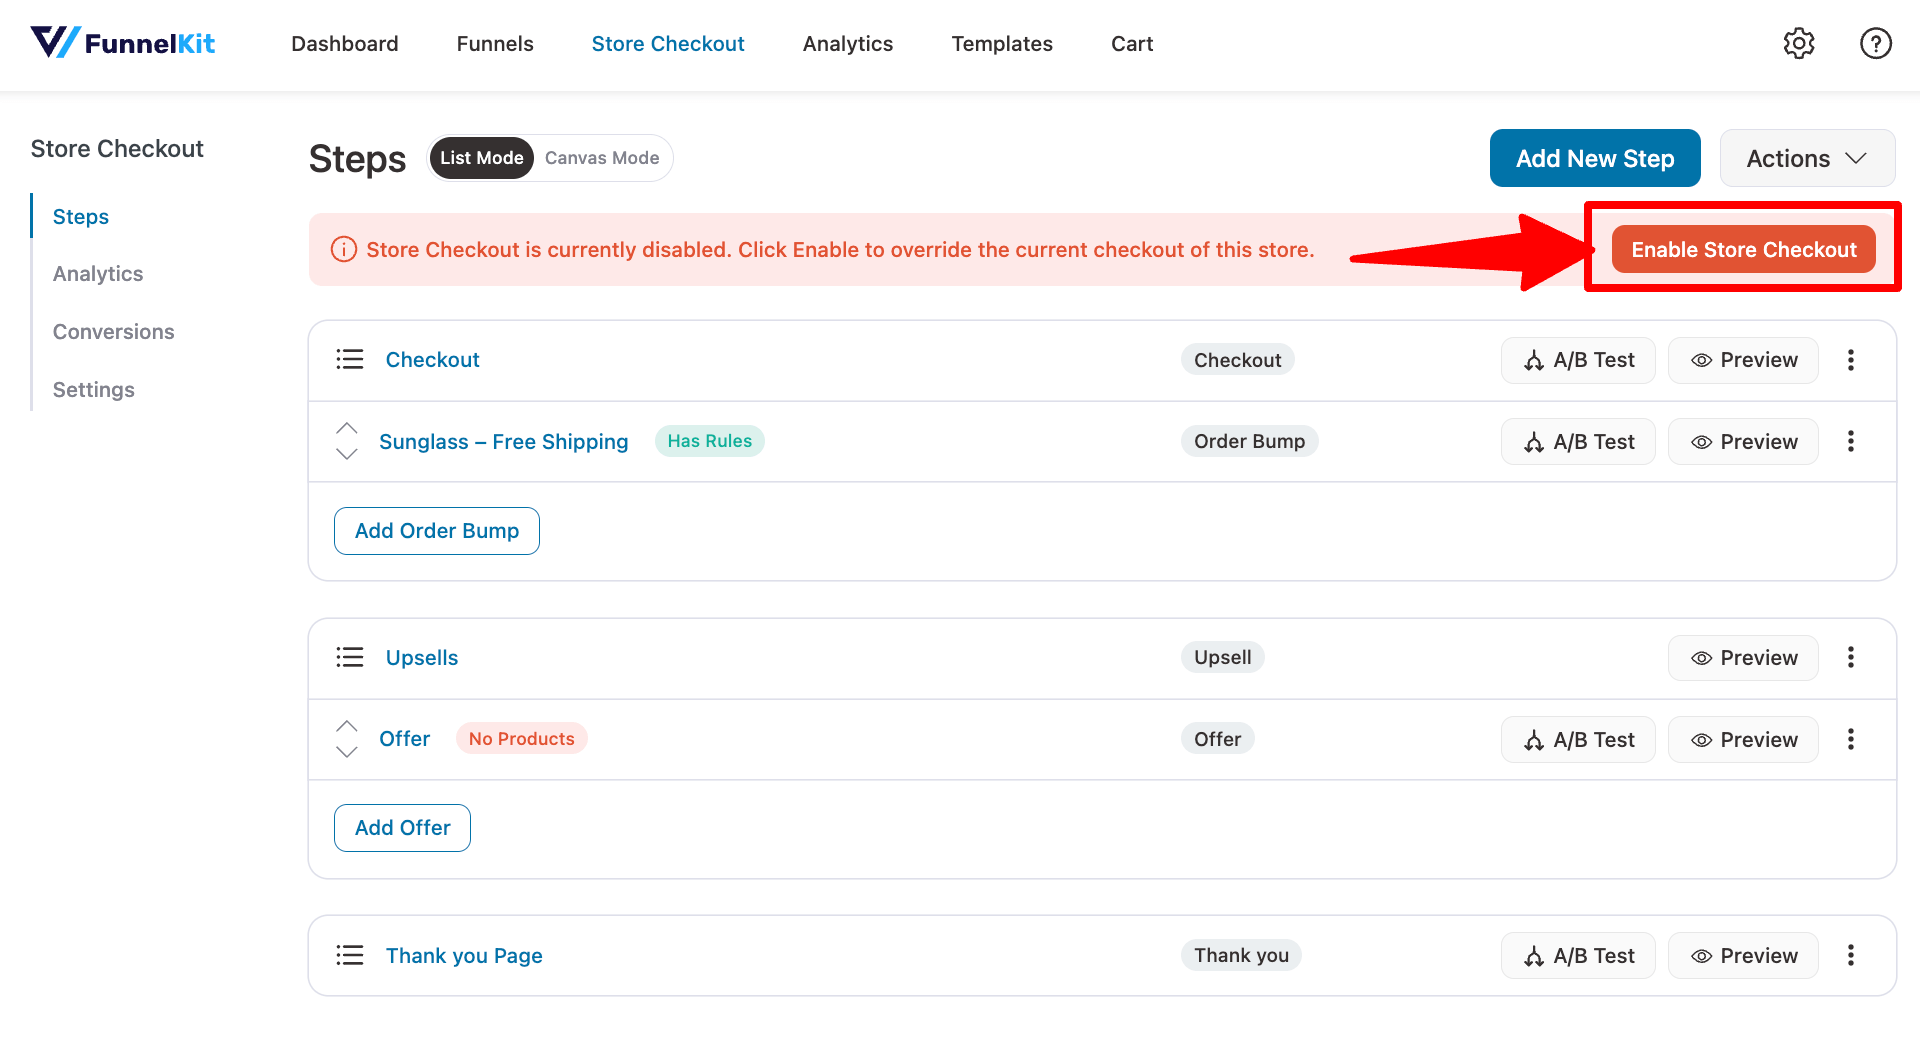
Step 6: Enable the store checkout
Finally, to make all the free gifts you set up work, you need to enable the store checkout. To do this, you just need to hit “Enable Store Checkout.”
With FunnelKit Sales Funnels, you can easily track how many people ordered using this URL coupon.
How To Create Personalized, Dynamic WooCommerce Coupons
Manually creating coupons works for promotions, but for events like cart abandonment or birthdays, automated dynamic coupons are more effective.
With tools like FunnelKit Automations, you can generate and send these coupons automatically via email or SMS based on specific triggers.
Make sure FunnelKit Automations is installed and activated.
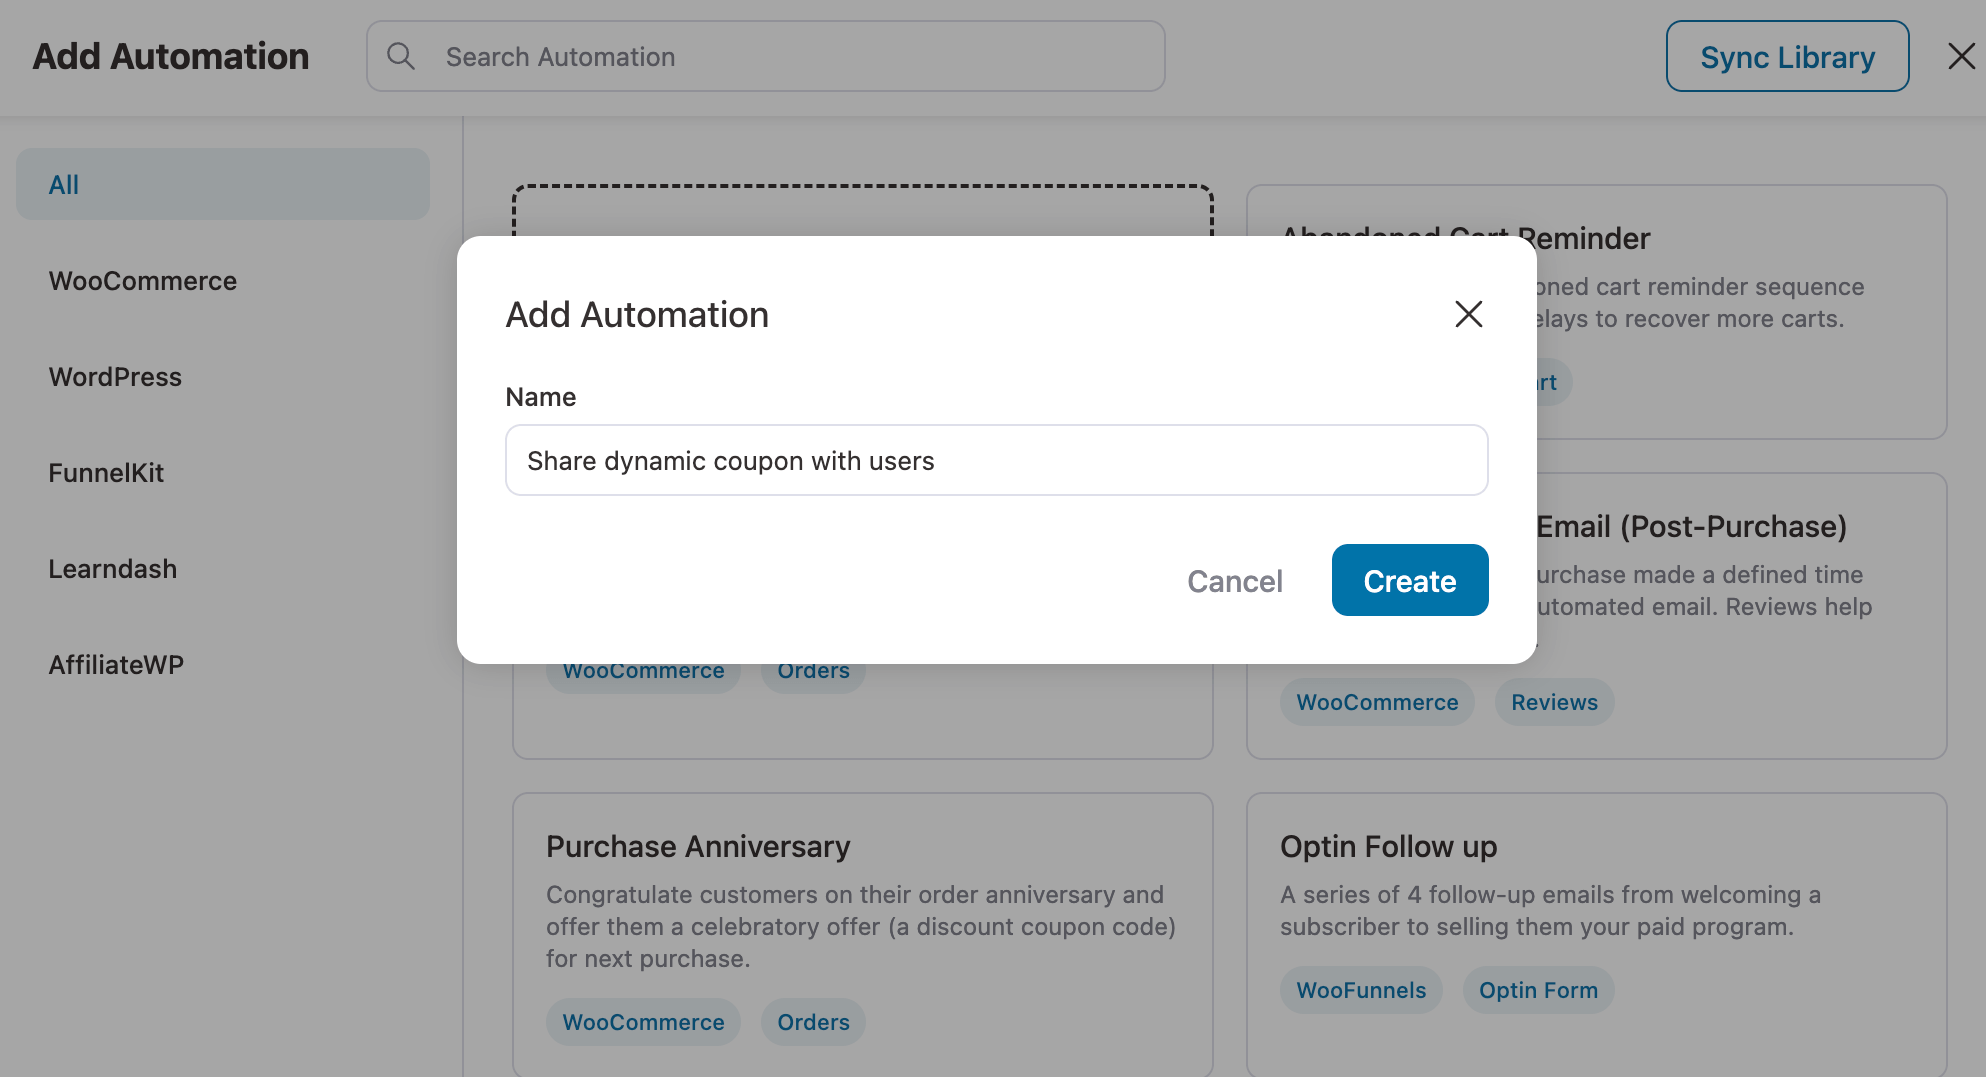
Step 1: Create an automation
First, create automation. You can create using any of the prebuilt templates or from scratch
Step 2: Choose an event trigger
As mentioned earlier, you can choose many WooCommerce-related triggers such as Cart Abandoned, Cart Recovered, Order Created, Order Status Changed, etc.
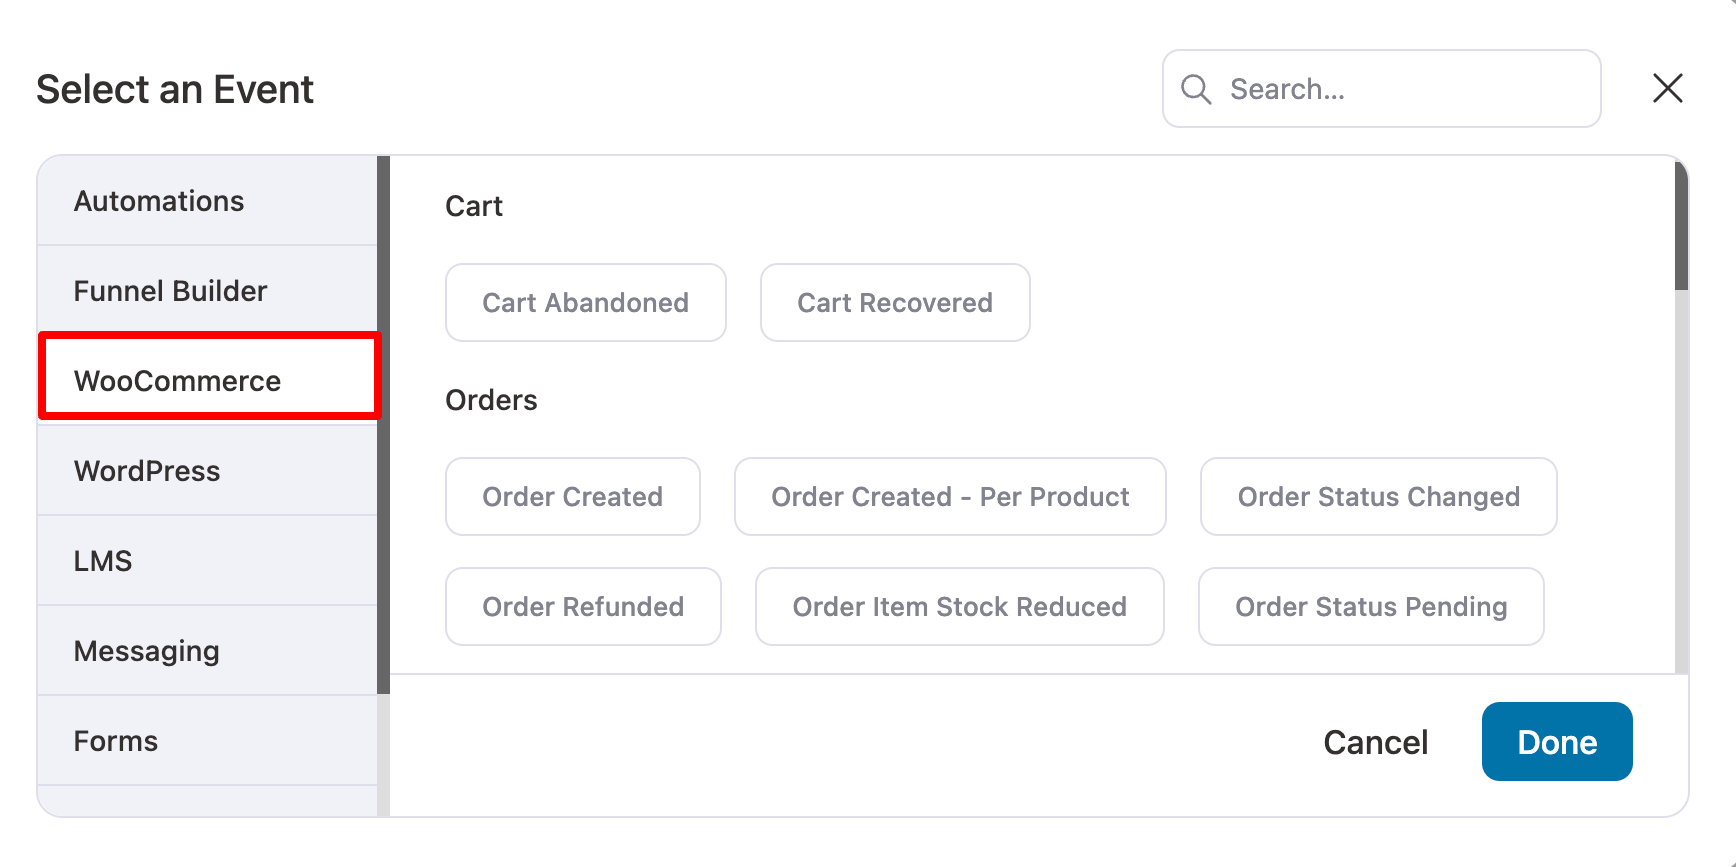
You can choose any of the events to trigger the creation of a dynamic coupon and share it with your audience.
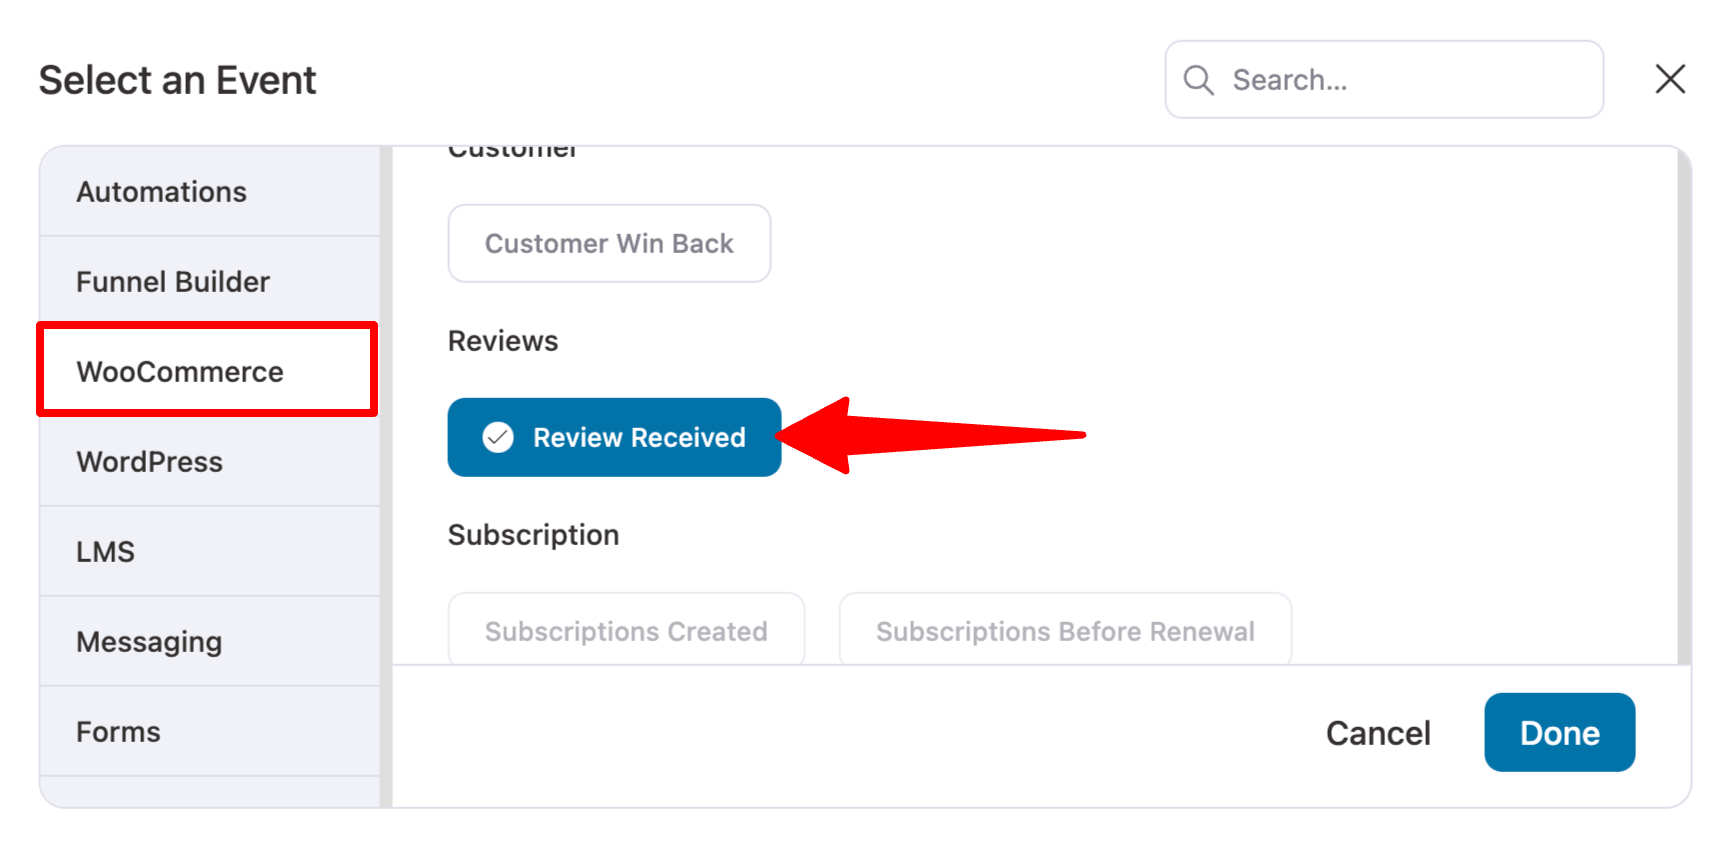
To show the purpose, here we will choose the trigger “Review Received”. Promising a discount on the next purchase if users provide a positive review is a great hack to build a strong brand.
With the review received trigger, you can share a dynamic coupon with users as a thank-you token that they can use on their next purchase.
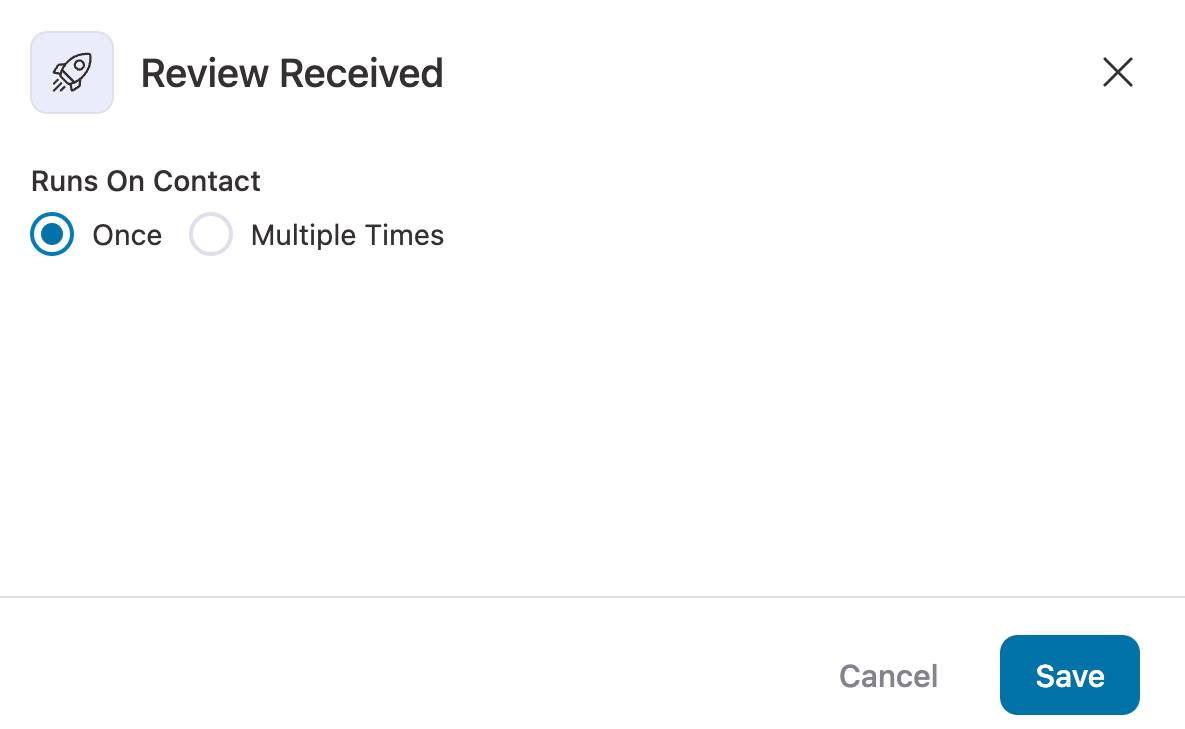
You can choose to offer this discount the very first time a user shares a view or every time. We are going with “Once”.
Step 3: Set up an action to create a dynamic coupon
Next, click the “+” icon and choose “Action”.
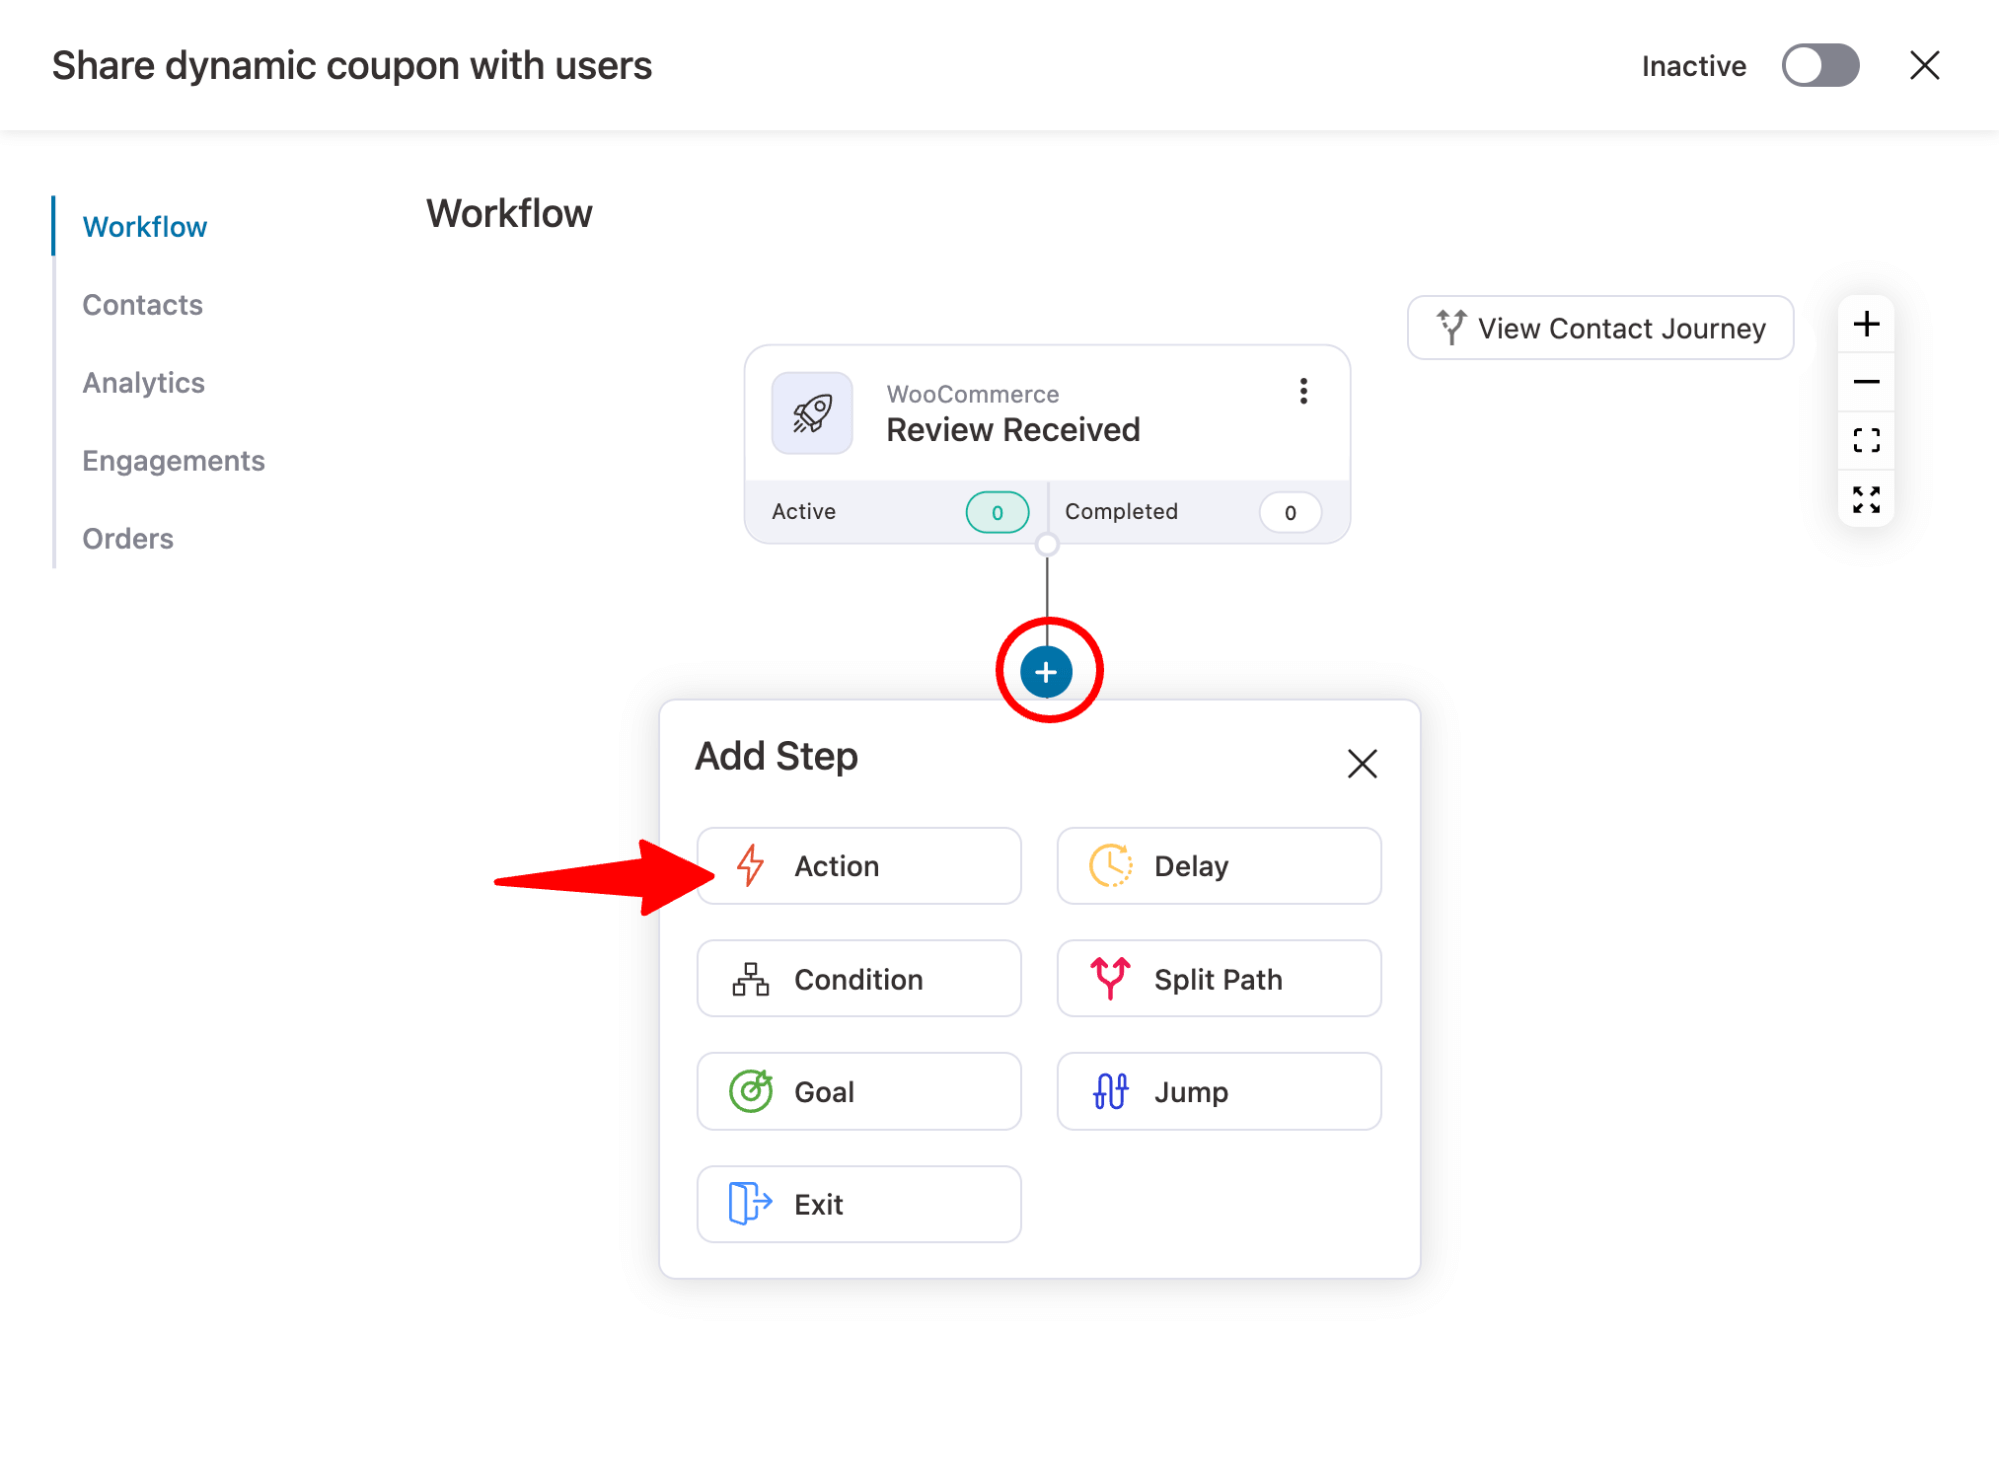
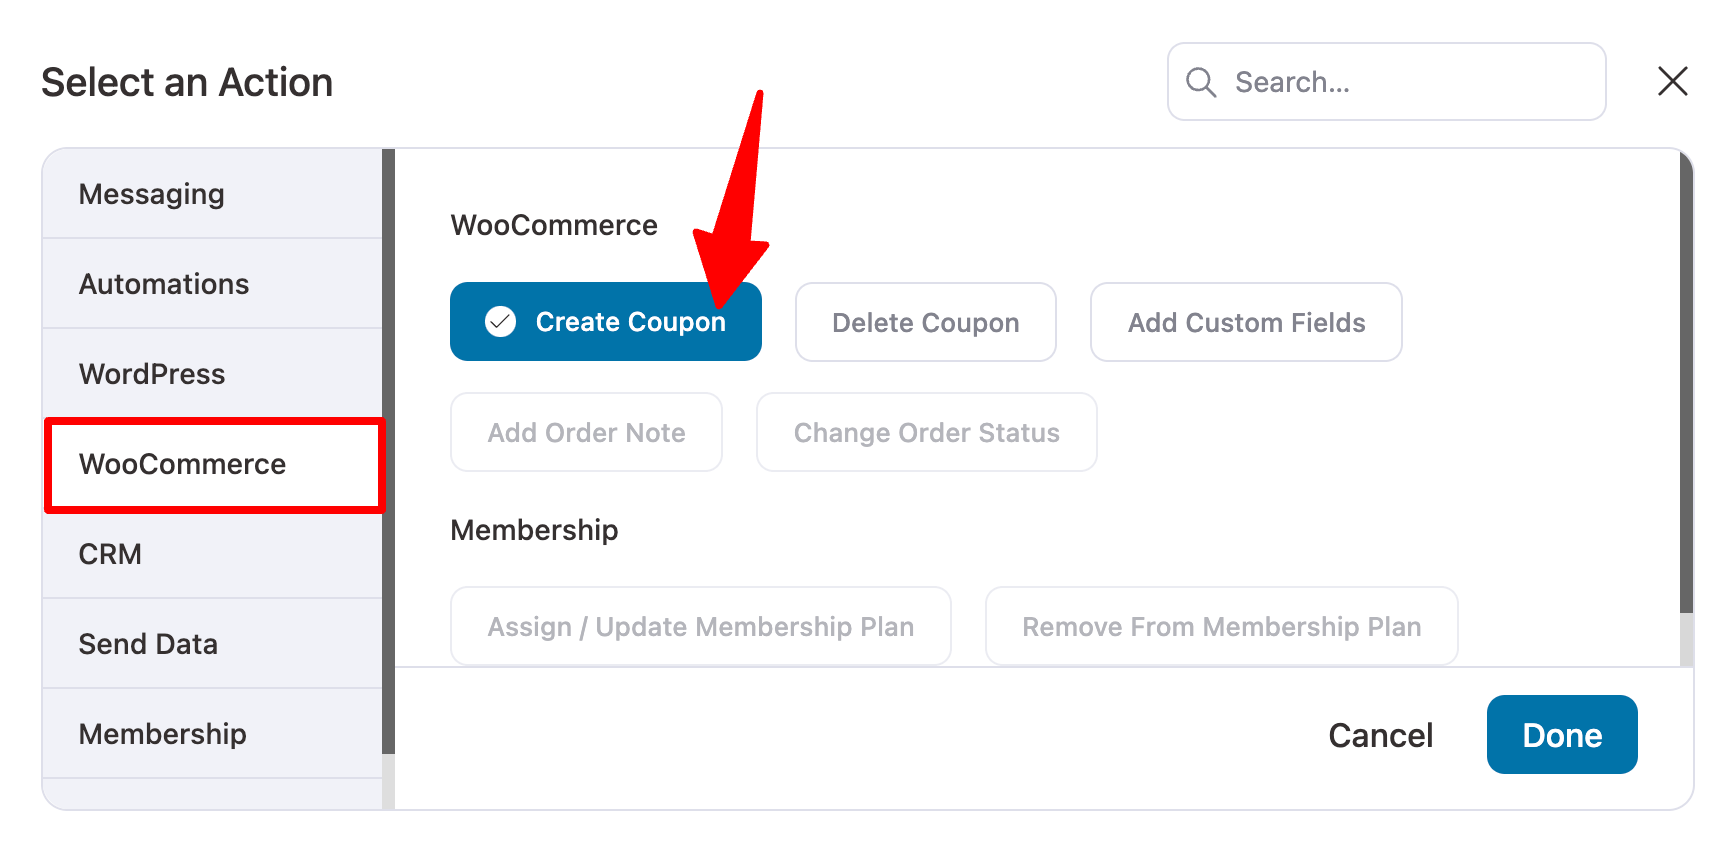
After that, select the “Create Coupon” option.
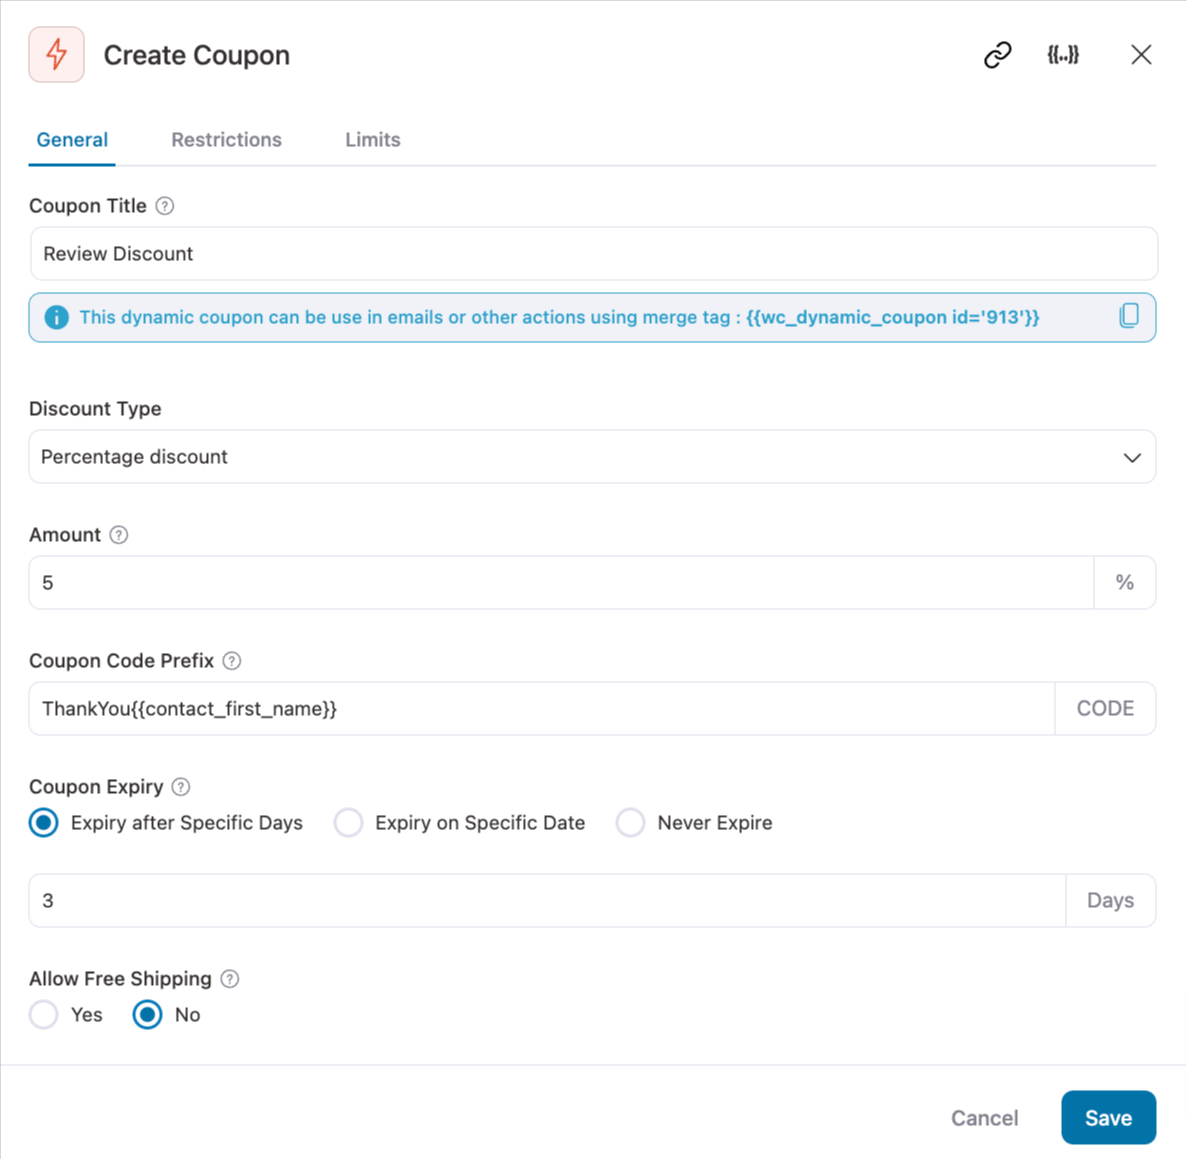
To create the coupon, add a title, select a discount type, set the amount, and optionally personalize it with the customer's name.
With FunnelKit Automations, you can also set an expiry date and enable free shipping to create urgency and drive conversions.
Step 4: Share the discount coupon via email or SMS
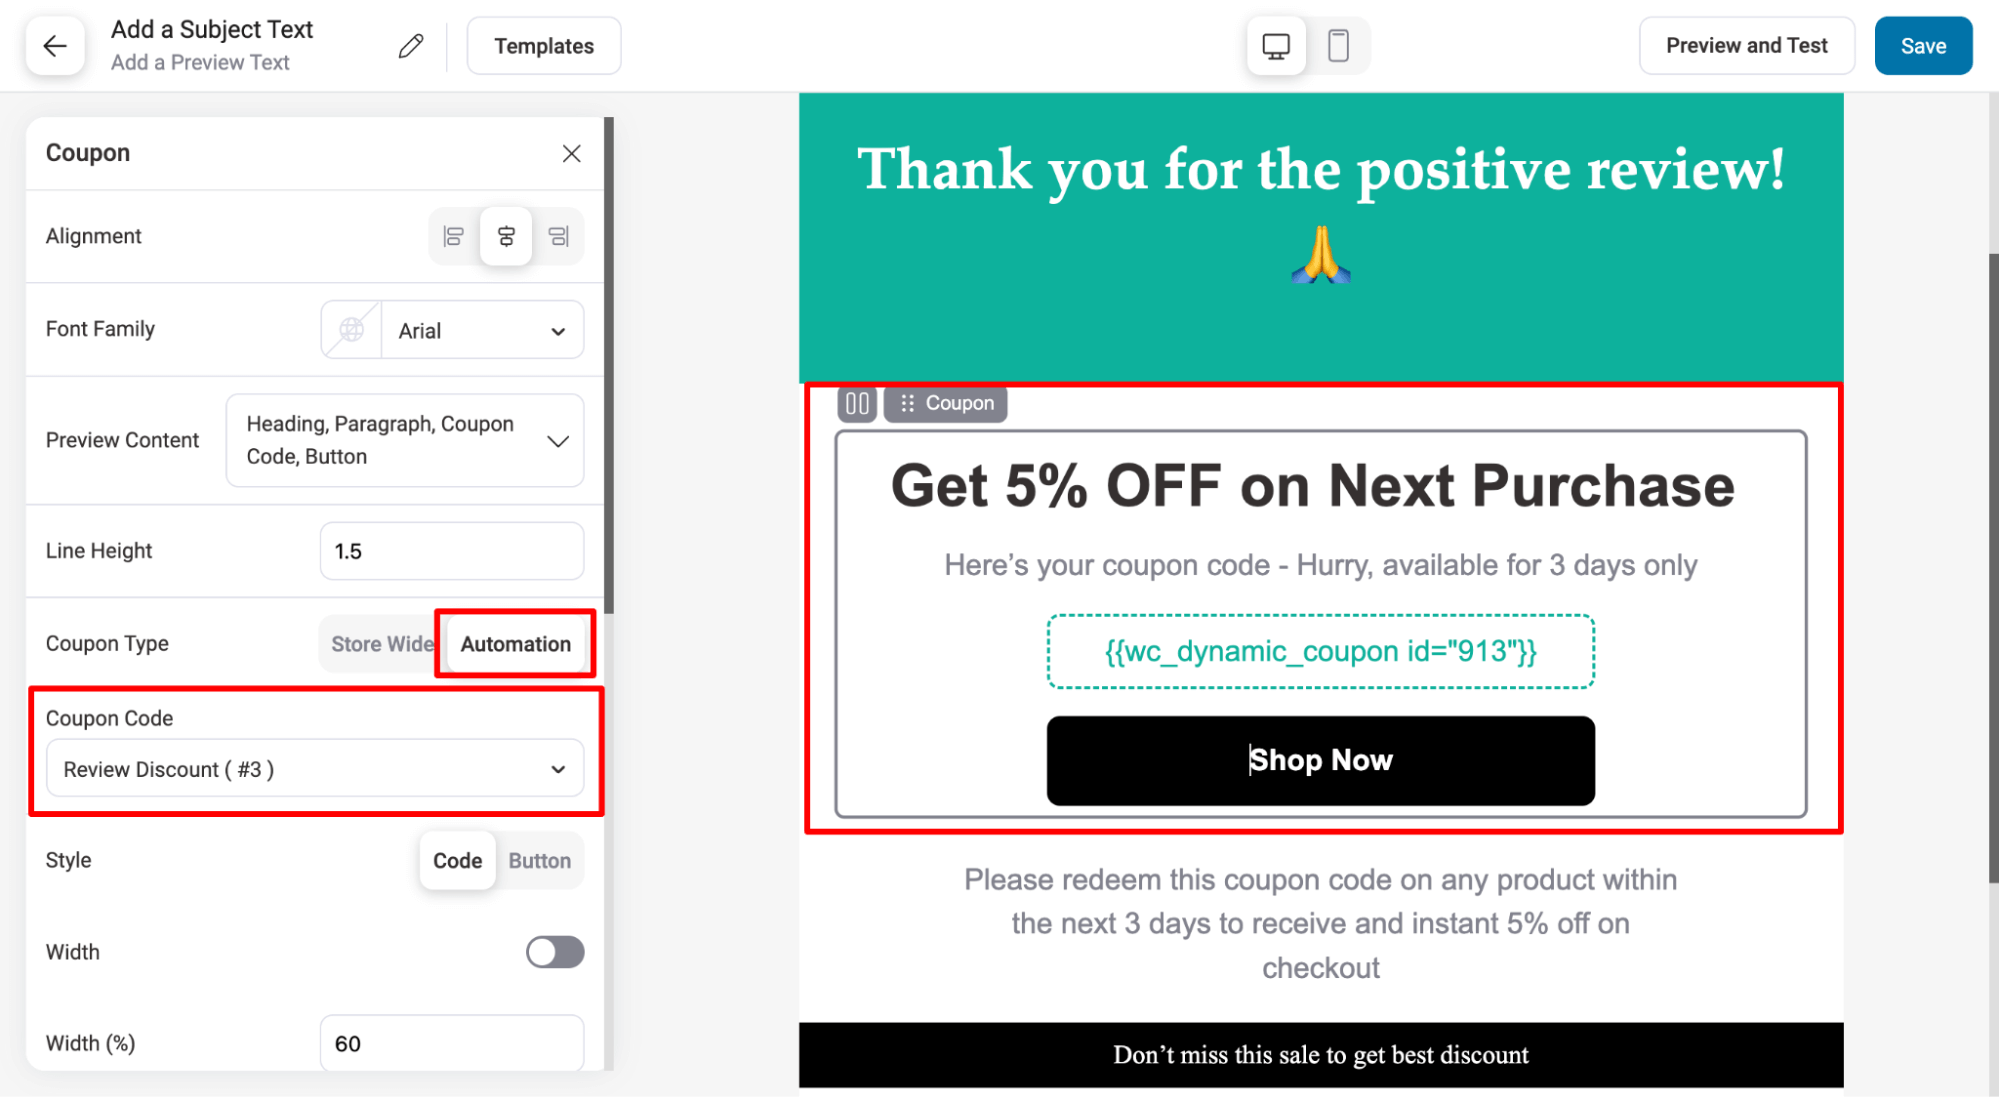
To share the dynamic coupon via email, add another action: “send email”. With FunnelKit Automations, you can design beautiful emails using an advanced visual builder.
Using its coupon block, you can easily include the dynamic coupon you’ve set up, as shown in the image below.
For more details on how to design the email with dynamic coupons, read our blog on email customizer.
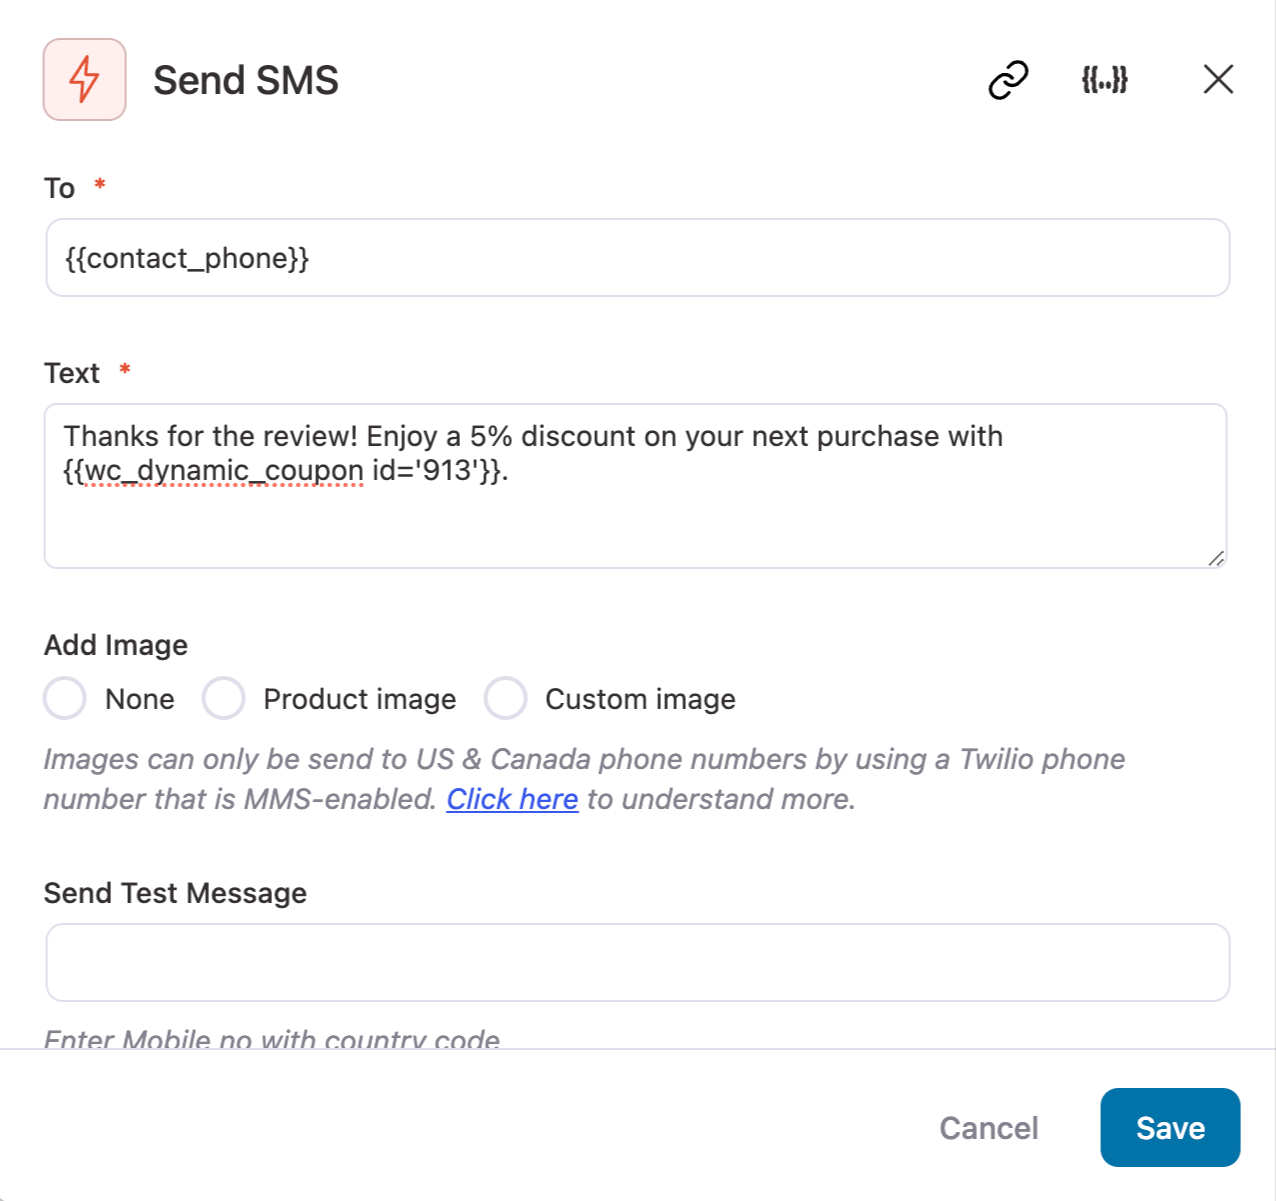
Like email, you can share the dynamic coupon using SMS. For more details, read the WooCommerce SMS notification blog.
After setting up all the steps, make sure to turn on the automation.
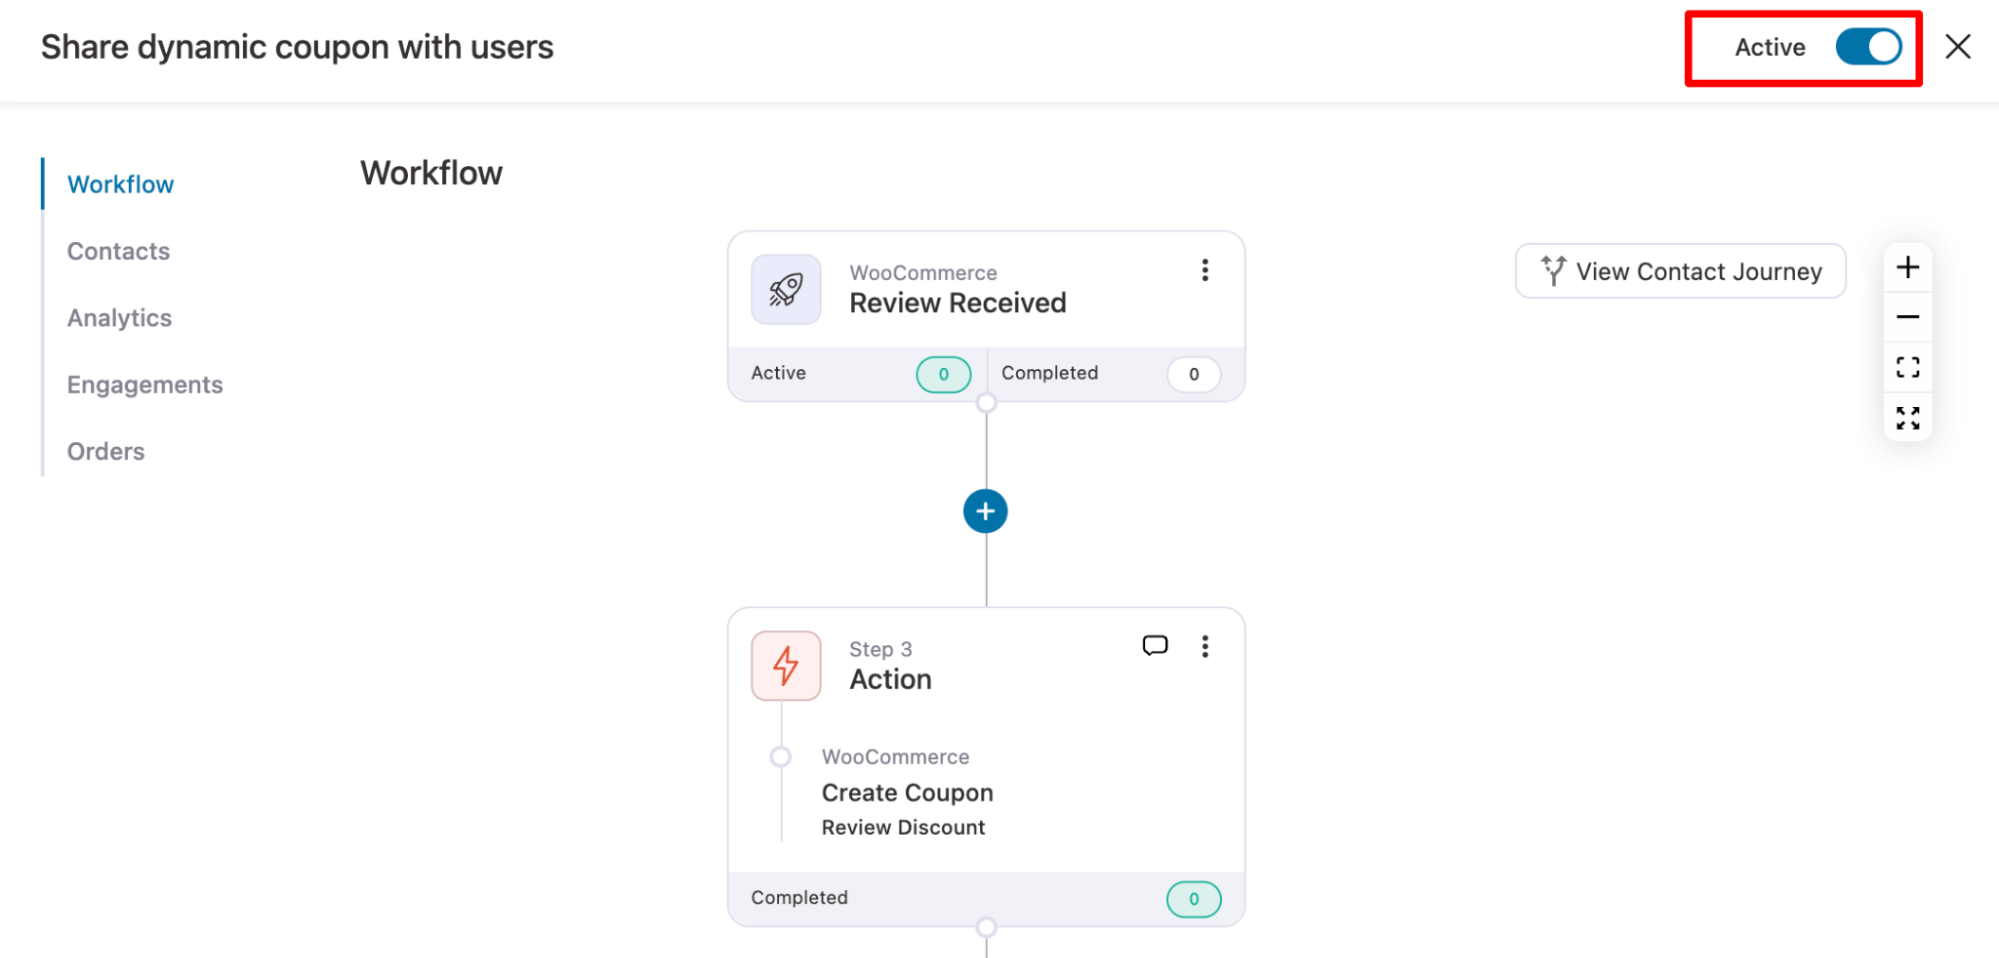
And that’s it. Now, the marketing automation will automatically share a dynamic discount coupon every time a new user leaves a review on your WooCommerce store.
More Questions About WooCommerce Coupons
Here are some of the commonly asked questions with answers:
To disable WooCommerce coupon codes, go to WooCommerce ⇒ Settings ⇒ General, and uncheck the option "Enable the use of coupon codes." Then, save the changes.
Yes, WooCommerce allows you to set a usage limit for coupons. You can define the total usage limit for all customers or set individual limits per user under the Usage Limits section when creating or editing a coupon.
In WooCommerce, you can apply coupons to specific product categories. While creating or editing a coupon, under the Usage Restrictions tab, use the Product Categories field to select the categories eligible for the coupon.
WooCommerce does not natively support BOGO offers, but you can create Buy One, Get One free (BOGO) coupons using the Advanced Coupons plugin. This plugin allows you to offer free products when customers purchase specific items.
WooCommerce coupons can apply to taxes or shipping based on your store settings. You can configure coupons to either apply before or after taxes. For shipping, free shipping can be offered with coupons, but discounts on shipping costs are not automatic unless specified.
Yes, you can create role-based coupons in WooCommerce using the Advanced Coupons plugin. This feature allows you to offer discounts to specific user roles, such as "VIP Customers" or "Wholesale," while excluding others.
Yes, you can schedule start and expiry dates for your WooCommerce coupon. In the Coupon Data section, simply set the Expiry Date to control when the coupon becomes active or expires, automating the promotion period.
To create a storewide discount, leave the Product field empty under the Usage Restrictions tab when setting up the coupon. This ensures the coupon applies to all products in your WooCommerce store, offering a blanket discount.
Ready to Offer WooCommerce Coupons?
You can boost your business by using WooCommerce coupons strategically, not just for discounts, but also for free shipping, which customers love.
Make the experience seamless with URL-based coupons, and share dynamic offers during special occasions to increase loyalty and drive more sales.
Our experts highly recommend pairing FunnelKit products with WooCommerce. This combination offers additional features to use coupons effectively.
Start leveraging the power of discount coupons to win your customers' loyalty and boost your brand.
Get FunnelKit today and grow your business with WooCommerce discounts!
More WooCommerce Guides to Explore:
- How to Create and Share WooCommerce Birthday Coupons
- How to Increase Repeat Sales With Dynamic Coupons
- How to Auto-Apply WooCommerce Coupon
- How to Add, Move & Hide checkout Coupons
- Best WooCommerce Coupon Plugins
- How to Automate Next Order Coupons
Editorial Team
January 5, 2026If you’ve ever bought a camera on Amazon and immediately added a memory card or lens case, you’ve experienced the power of “Frequently Bought Together” recommendations. They feel helpful, not...
Editorial Team
December 24, 2025Your customer finds the perfect product. Adds it to the cart. Reaches checkout and sees a wall of form fields. Name. Email. Address. City. State. Zip. Card number. Expiry. CVV....
Editorial Team
December 22, 2025Shipping setup is where many WooCommerce store owners quietly lose money. Charge too much, and customers leave. Charge too little and profit margins suffer. Research from the Baymard Institute shows...


