


Adding trust badges to your WooCommerce checkout can help remove the hesitation shoppers feel before entering their card details.
That hesitation matters because 19% of shoppers abandon checkout because they don’t trust the site with their card details. [Source: Baymard Institute Research]
With average checkout abandonment near 70%, even a small improvement can mean more completed orders.
The problem is that adding a badge isn’t as straightforward as it sounds.
WooCommerce has both classic and block-based checkout, and many snippets you’ll find online only work with the classic version. On the block checkout, they simply do nothing.
This guide covers four ways to add trust badges to both checkout types, where to place them, where to get them, and what to do when they don’t show up.
Skip to the step-by-step method below
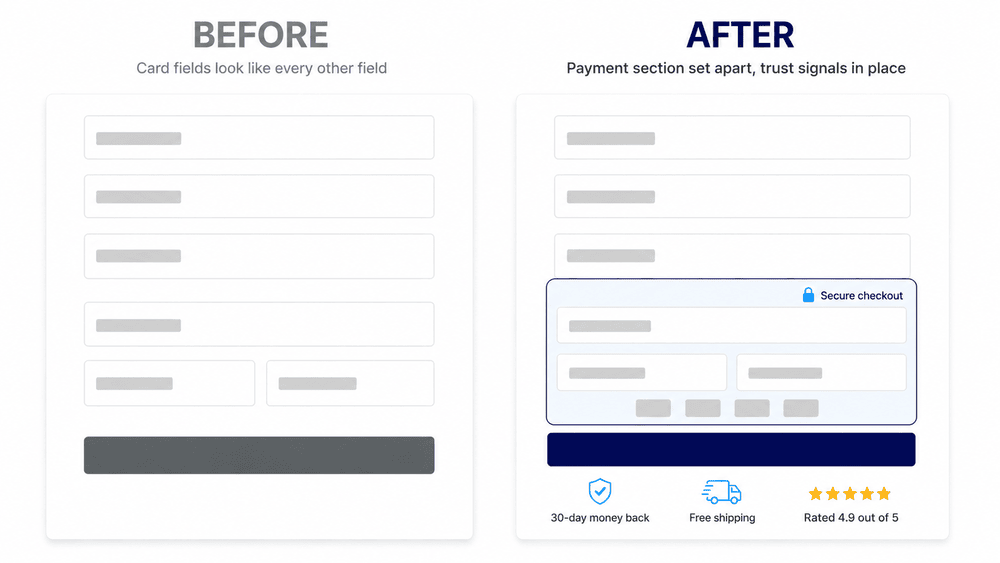
Table of Contents
- 1 What Are Trust Badges (And Different Types Of Them)
- 2 Which Method Should You Use?
- 3 Method 1: Use a Checkout Template With Trust Badges Built In (No Code)
- 4 Method 2: Add Trust Badges to the Block Checkout (No Code)
- 5 Method 3: Place Badges On the Classic Checkout With Code Snippets
- 6 Method 4: Use Hooks (For Developers)
- 7 Where to Get Trust Badge Images Legally?
- 8 Trust Badges Not Showing on Your Checkout? Here's How to Fix It
- 9 5 Best Practices to Get More Conversions From Your Trust Badges
- 10 Frequently Asked Questions
- 11 Ready to Instill Confidence in Your Buyers with Trust Badges?
What Are Trust Badges (And Different Types Of Them)
Trust badges are small icons or symbols placed on key areas of your website, like product pages, the cart, the footer, and especially the checkout page, to show that your store is secure and trustworthy.
It might show that you accept a familiar payment method, offer a guarantee, use secure checkout, or have genuine customer reviews.
But not all badges are equally useful. Some cost nothing and can be more effective than expensive security seals.
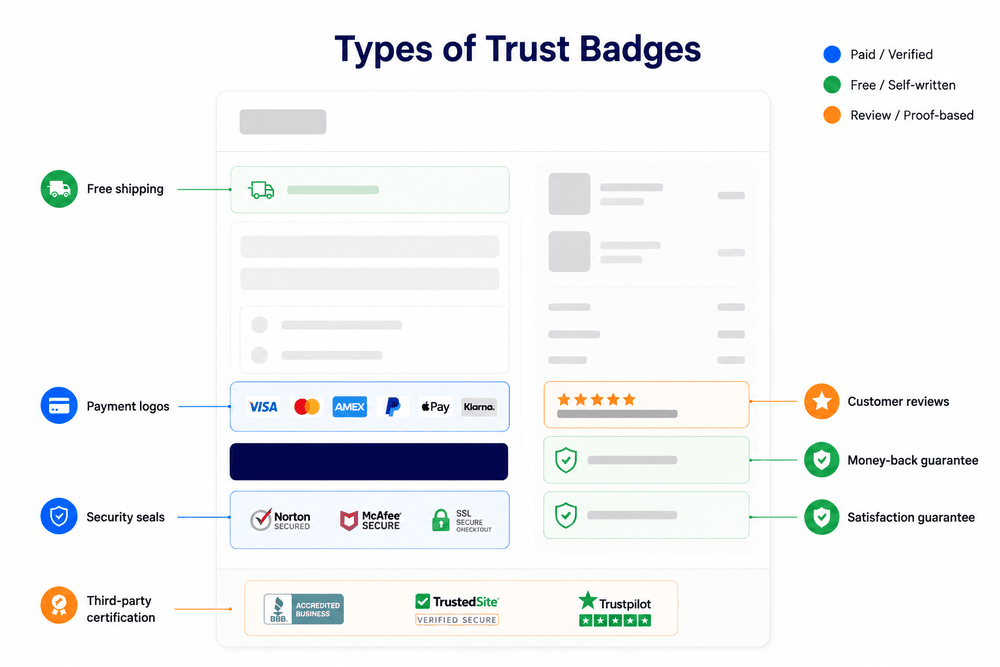
| Badge type | Examples | Cost | Best placement |
|---|---|---|---|
| Security seals | Norton Secured, McAfee Secure, SSL Secure Checkout | Paid, tied to a certificate or scan | Below Place Order |
| Payment logos | Visa, Mastercard, Amex, PayPal, Apple Pay, Klarna | Free from official brand centers | Express buttons on top of form and inline methods beside payment fields |
| Money-back guarantee | 30-Day Money-Back Guarantee, Risk-Free Purchase | Free, you write it | Under the order summary |
| Free shipping | Free Shipping on All Orders, Free Shipping over $50 | Free, you write it | Top of form |
| Third-party certification | BBB Accredited, TrustedSite Verified, Trustpilot Verified | Paid and earned | Checkout footer |
| Customer reviews | Rated 4.9/5 by 13,000+ Customers | Free if the reviews are real | Beside the order summary |
| Satisfaction guarantee | 100% Satisfaction Guaranteed, Try It Risk-Free | Free, you write it | Under the order summary |
Payment logos are usually the easiest win. They’re free, instantly recognizable, and answer a practical question: Can I pay with my preferred method?
Customer reviews can also help at checkout, especially when they’re genuine and specific about a product or store experience.
About 91.1% of shoppers read at least one review before buying a product, according to Capital One Shopping Research.
Security seals and third-party certifications are different. You can’t simply create those yourself, so we’ll cover where to get legitimate ones later.

Which Method Should You Use?
Four methods can do the job. But the right one depends on which WooCommerce checkout you’re using and how much control you need over the badge’s placement.
How to tell if you’re using block or classic checkout
Go to Pages ⇨ Checkout and open the page in the editor.
- If you see a Checkout block with panels for Contact information, Shipping address, and Payment options, you’re on the block checkout. Since WooCommerce 8.3, this is the default for new stores.
- If you see a single shortcode, [woocommerce_checkout], you’re on the classic checkout.
![If you see a Checkout block with panels for Contact information, Shipping address, and Payment options, you’re on the block checkout. If you see a single shortcode, [woocommerce_checkout], you’re on the classic checkout.](https://funnelkit.com/wp-content/uploads/2026/05/woocommerce-block-checkout-vs-classic-checkout-1.png)
Knowing your checkout matters because PHP checkout hooks don’t run inside the block checkout.
Hooks such as woocommerce_before_checkout_form and woocommerce_review_order_before_submit belong to the classic checkout and won’t fire when the block checkout is rendering the page.
That’s why a trust-badge snippet copied from an older tutorial can run without errors and still show absolutely nothing.
Method comparison
| Method | Works on which checkout | Skill needed | Checkout placements | Time |
|---|---|---|---|---|
| Checkout plugin | Both (classic and block checkout) | None, drag and drop | All, plus separate mobile placement | 10 minutes |
| Block editor | Block checkout | None | Order summary and below payment options | 10 minutes |
| Code snippets | Classic checkout | Copy and paste | All classic positions, including under the button | 15 minutes |
| Developer hooks | Both | PHP and JavaScript | All | 1 hour+ |
Let’s look into each method one by one.
Method 1: Use a Checkout Template With Trust Badges Built In (No Code)
The simplest way to add trust badges without touching code is by using a checkout customizer plugin.
FunnelKit Funnel Builder makes this easy.
It lets you import professionally designed checkout templates with pre-installed trust badges and customize them with your favorite page builders.
This way, you can create a highly optimized checkout experience in a few minutes.
Funnel Builder is available in free (lite) and premium versions. However, we recommend using the Pro version to unlock multi-step checkout templates and various optimization options.
Install and activate the FunnelKit Funnel Builder plugin on your WordPress website.
Step 1: Create a store checkout and import a template
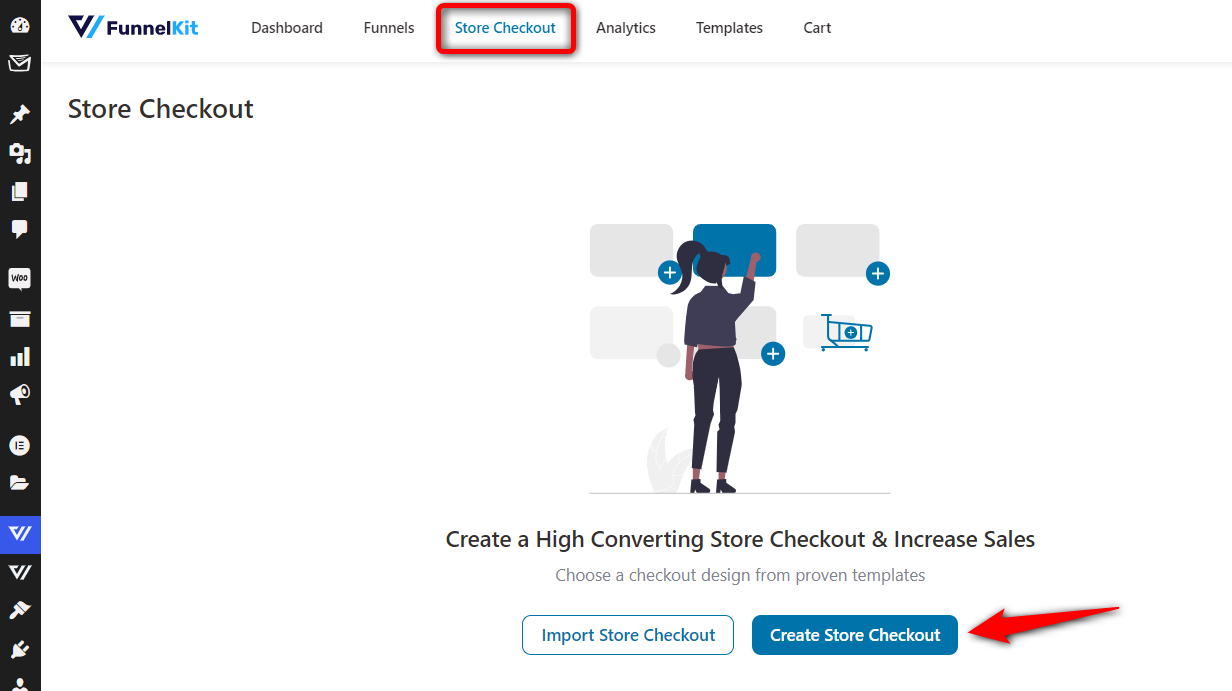
Navigate to FunnelKit ⇨ Store Checkout and click on the ‘Create Store Checkout’ button.
You’ll be directed to the FunnelKit checkout templates page. These pre-designed templates are optimized for all devices.

Choose your page builder, then hover over the store checkout template you like and hit ‘Preview’.
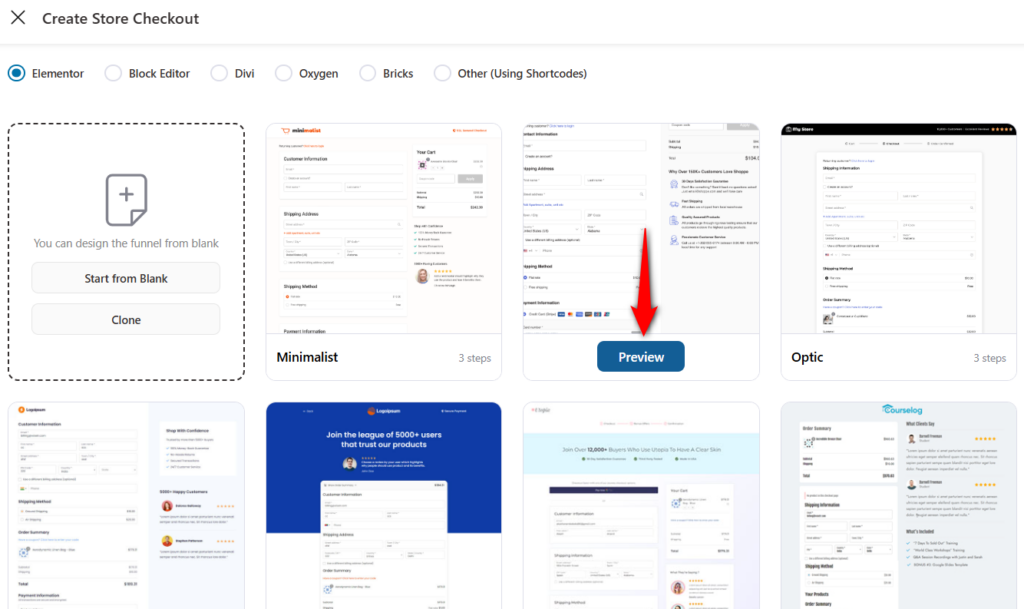
Next, select the number of steps you want on your checkout page and hit the ‘Import This Funnel’ button.
Enter the name of your store checkout.
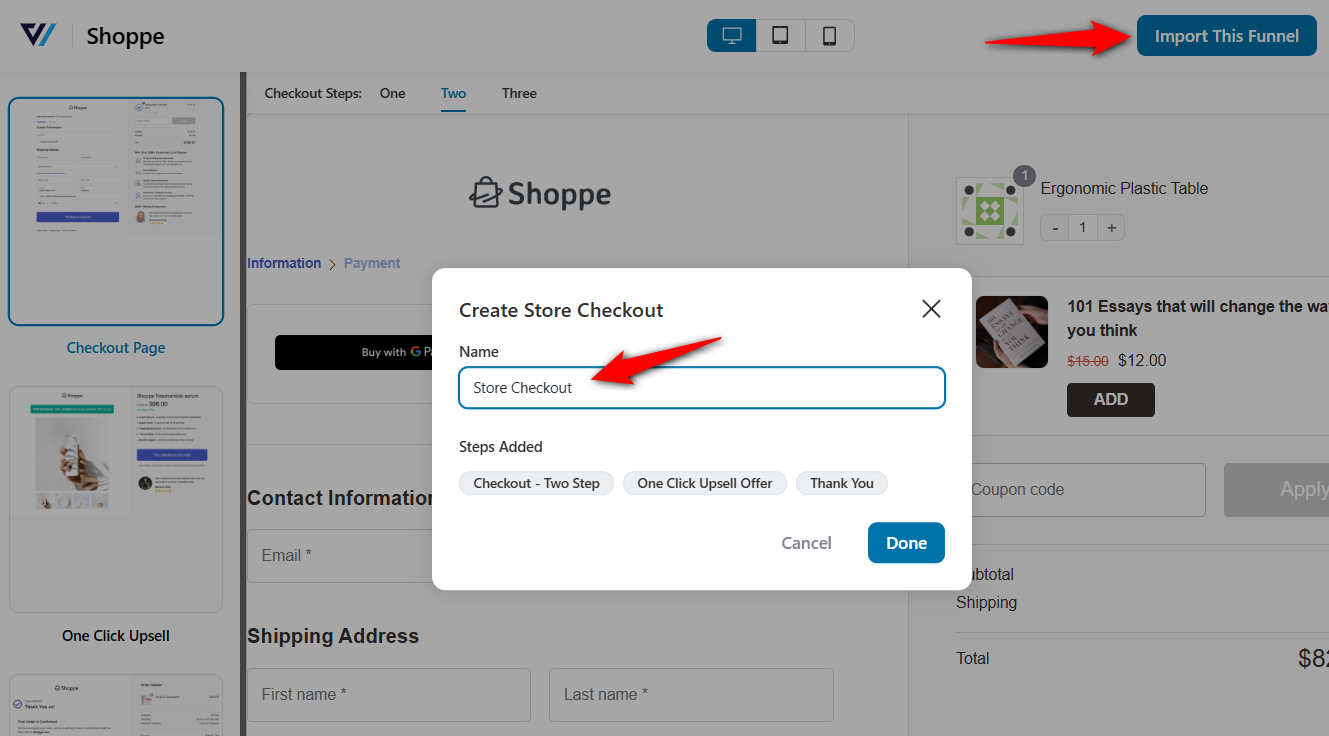
Click ‘Done’ to import the store checkout funnel.
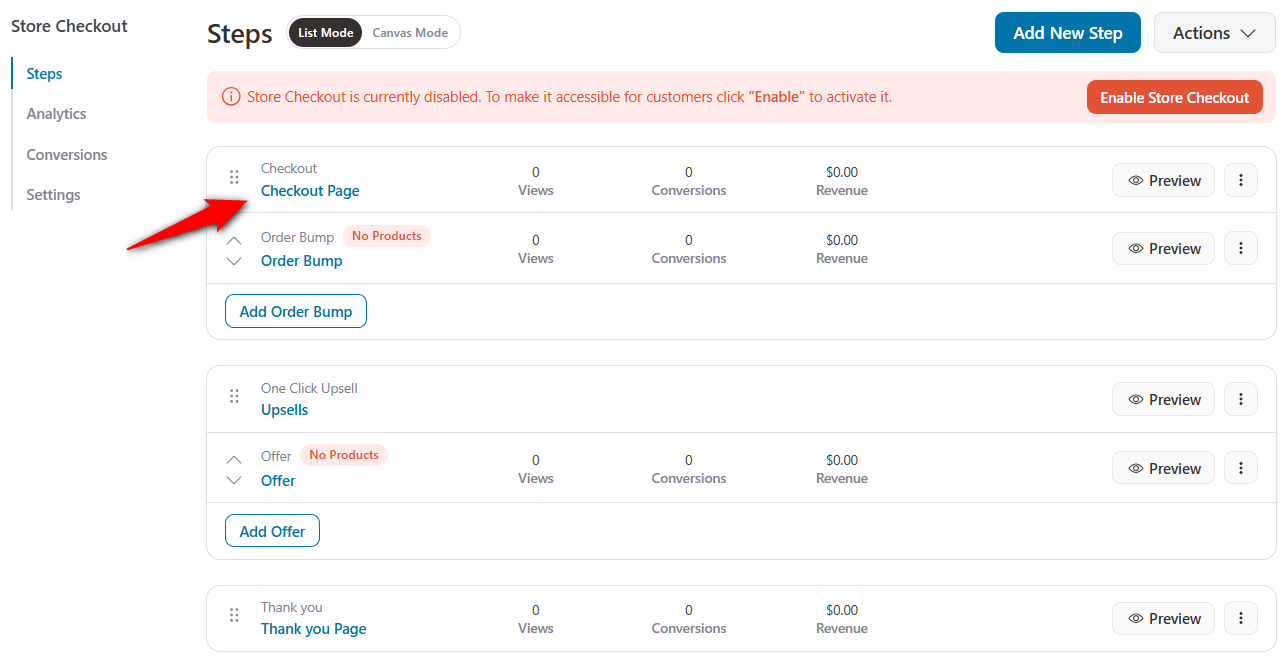
Step 2: Open the checkout step in your page builder
Click on the checkout page step in your funnel.
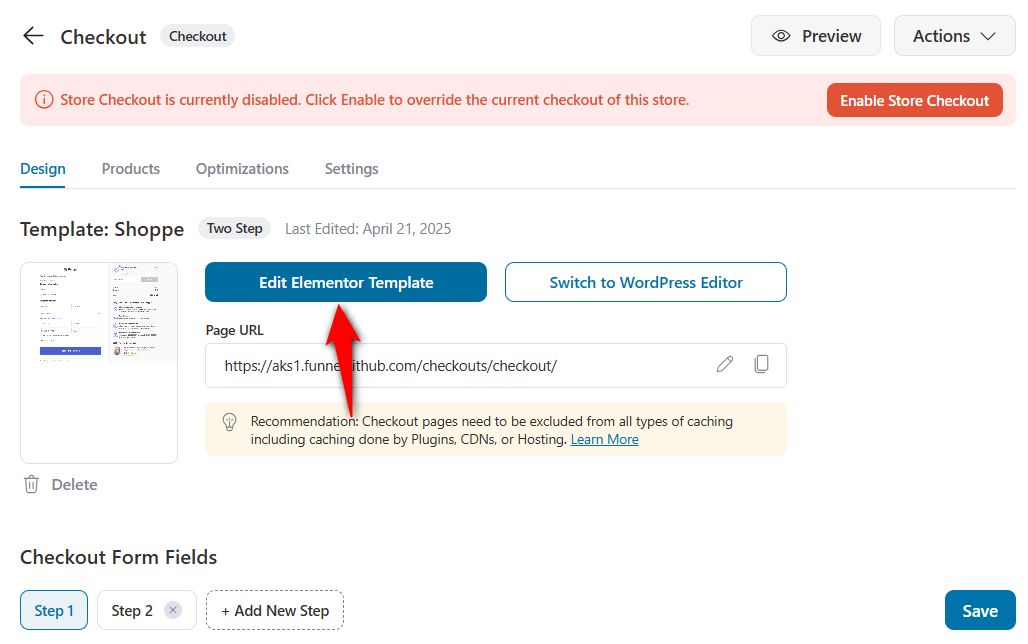
On the Design tab, click on the ‘Edit Template’ button to start customizing your checkout page.
Here, we'll be adding the WooCommerce trust badges.
As you can see, the page has loaded in Elementor (because we had chosen Elementor as our preferred page builder).
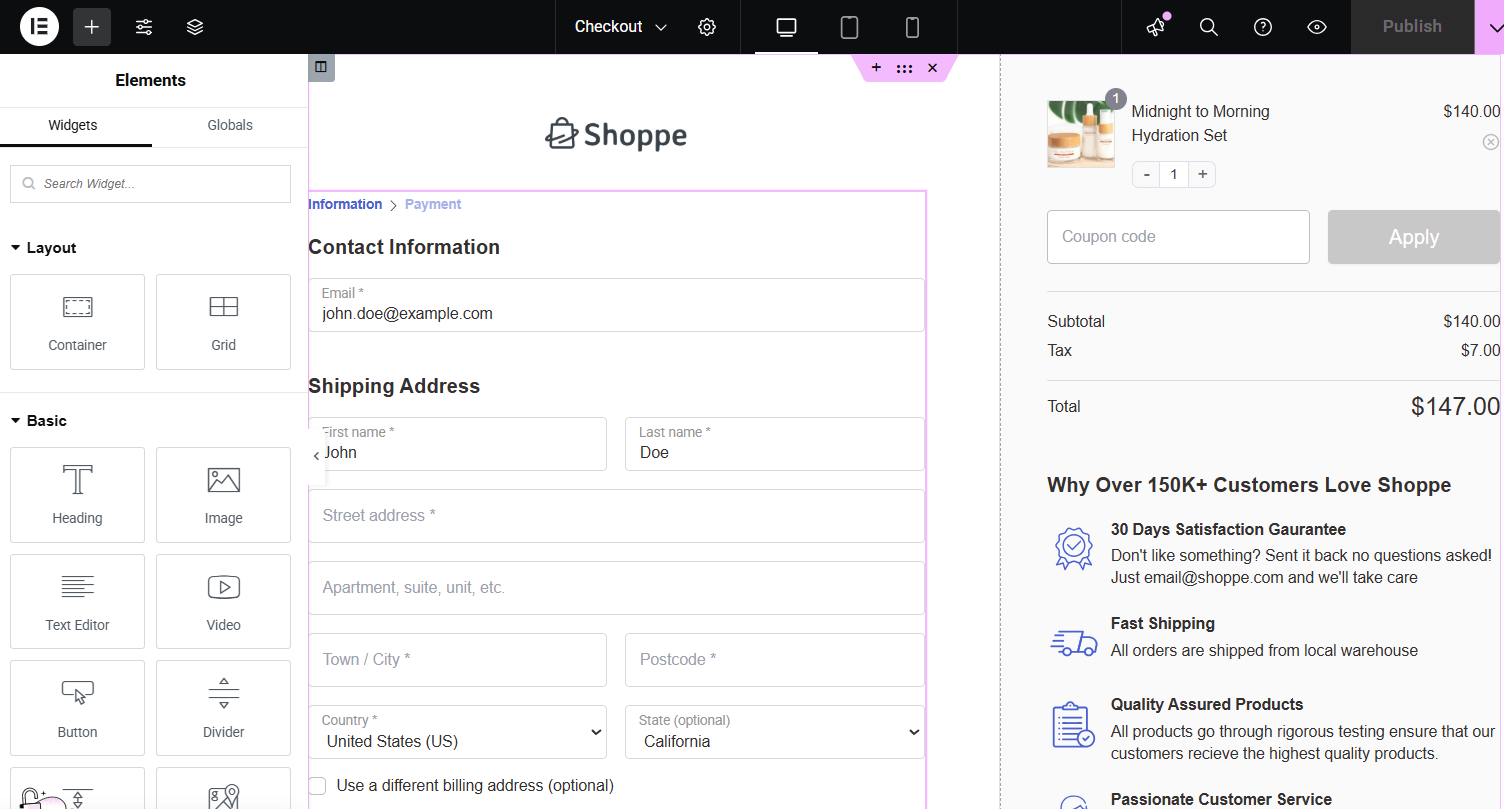
Modify your checkout page with steps, adjust the field widths, update your business logo, customize the mini cart section, and more.
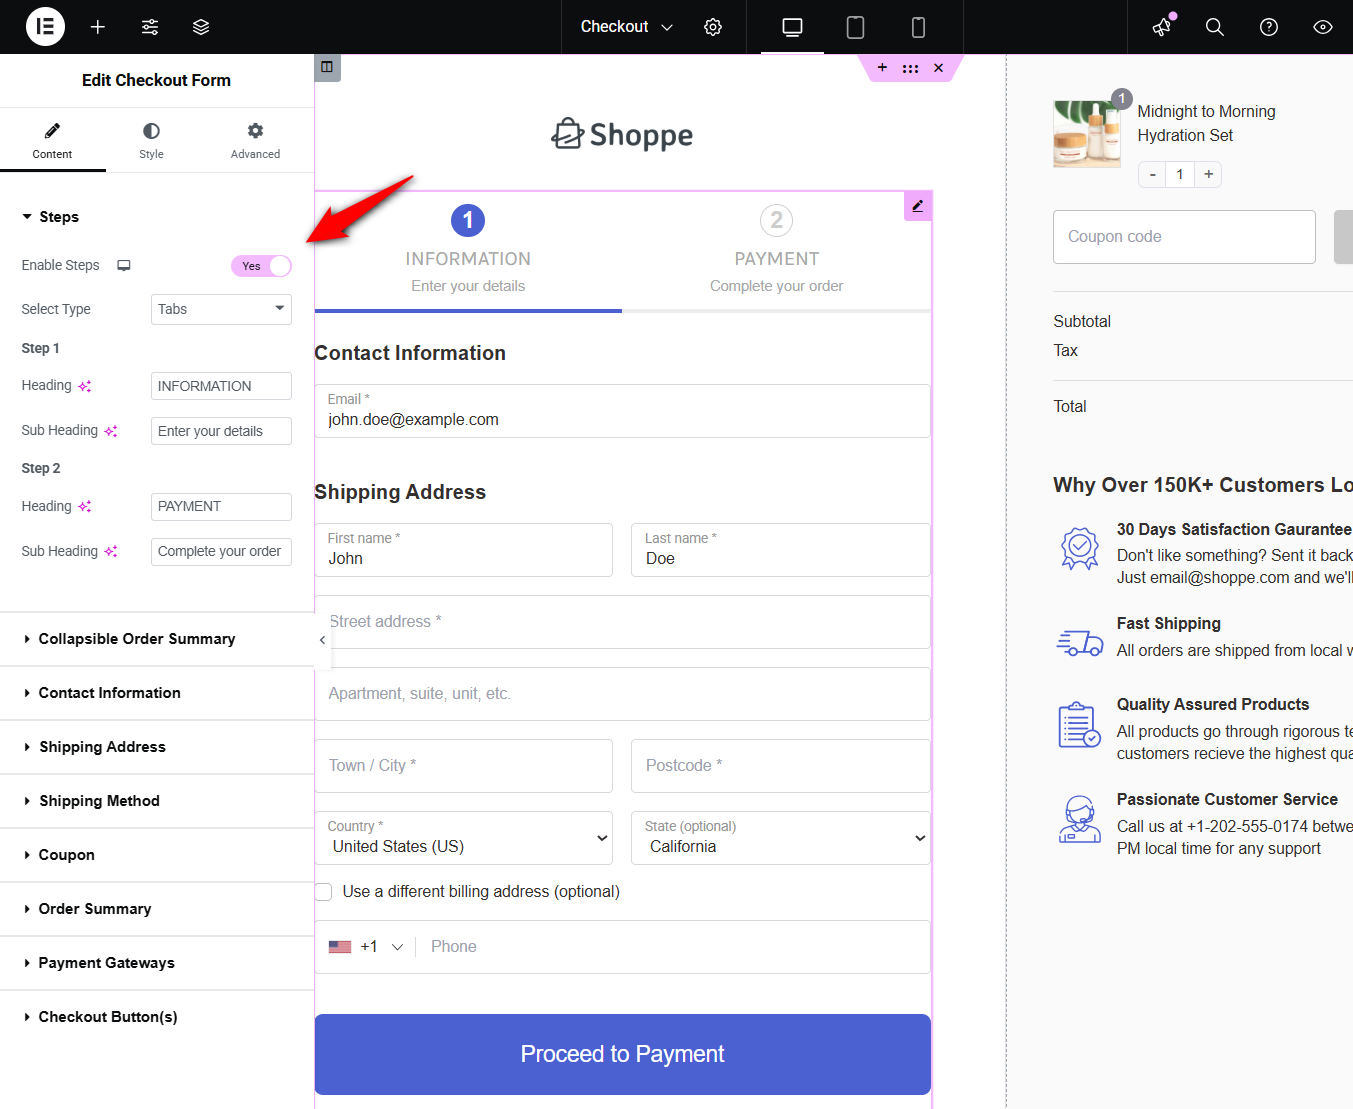
Step 3: Rewrite the existing trust elements
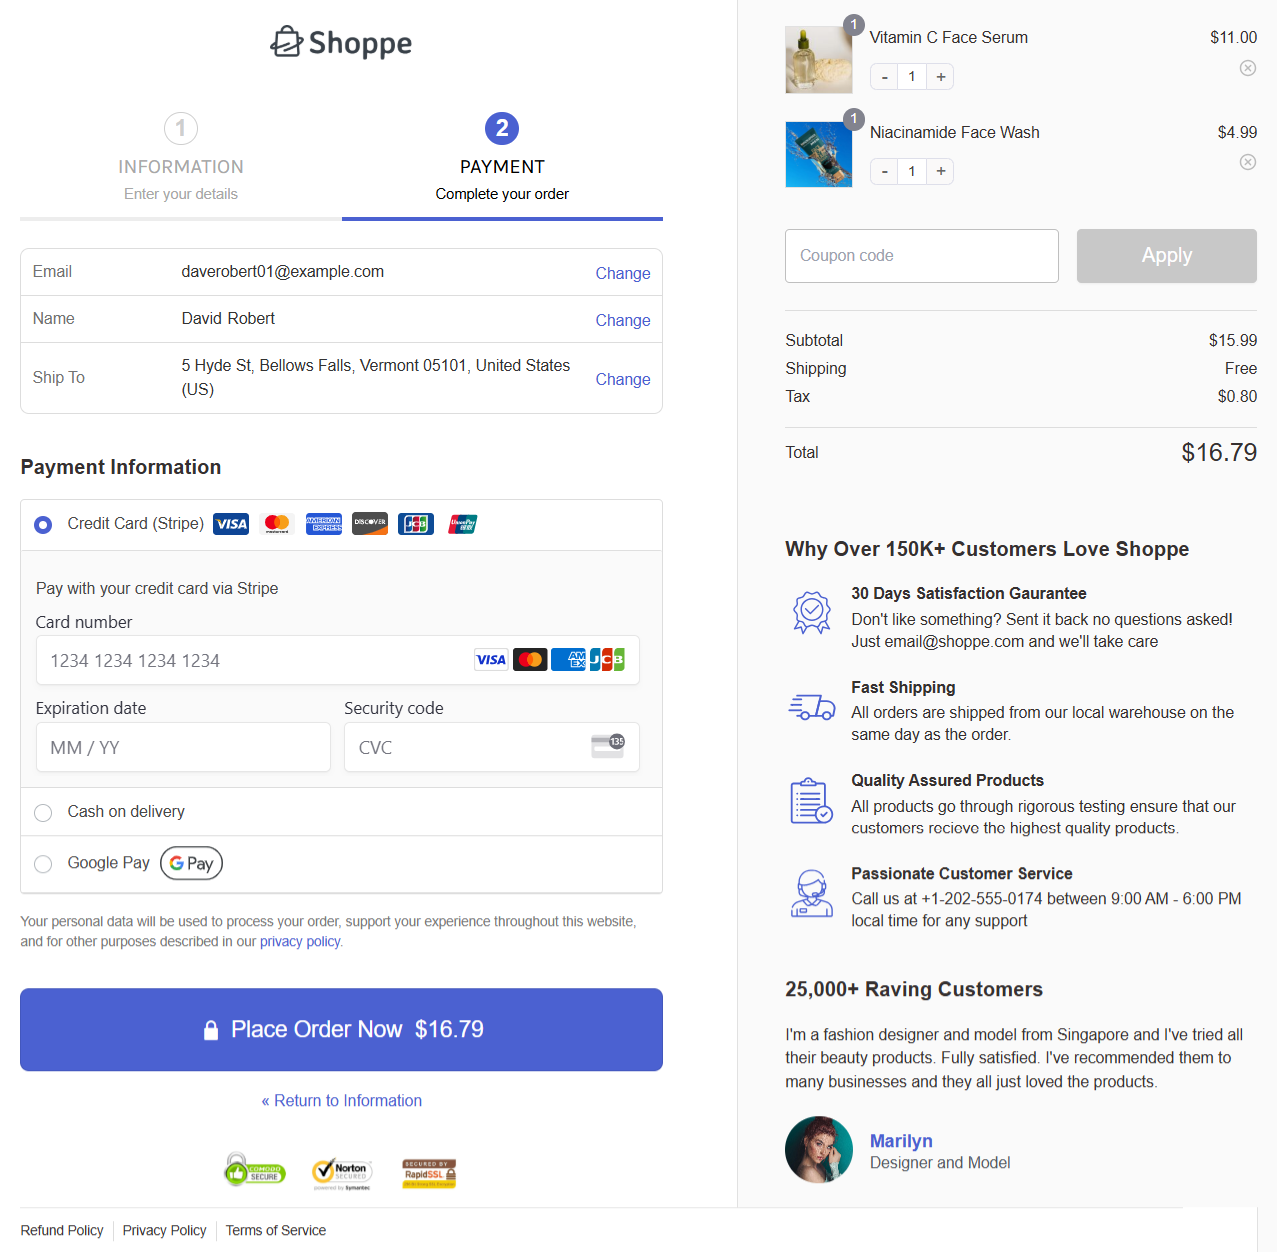
As you can see, the page already has confidence page elements:
- 30-day satisfaction guarantee
- Fast shipping
- Quality assured products
- Passionate customer service
Feel free to modify them as you see fit.
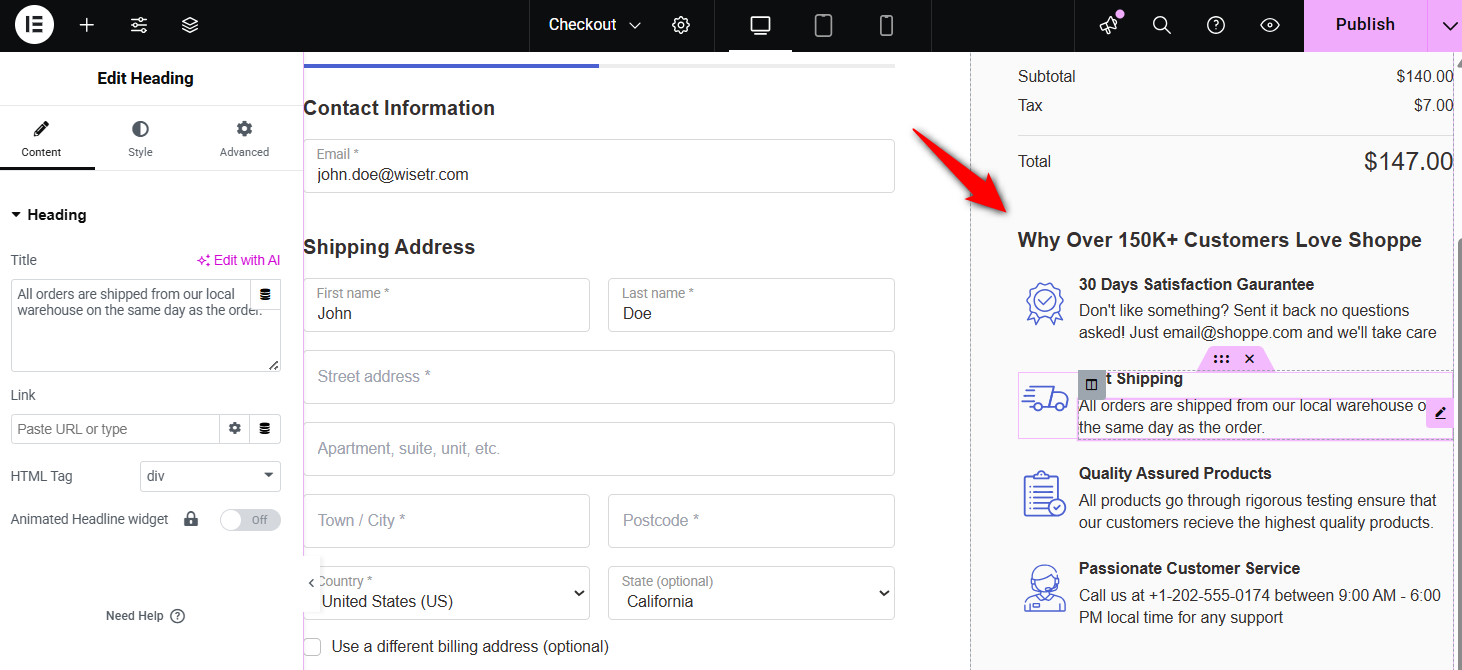
Step 4: Add the security badges and a customer review
The highest-converting spot for security badges is below the Place Order button on the checkout page.
To add a badge, add an image below the checkout button:
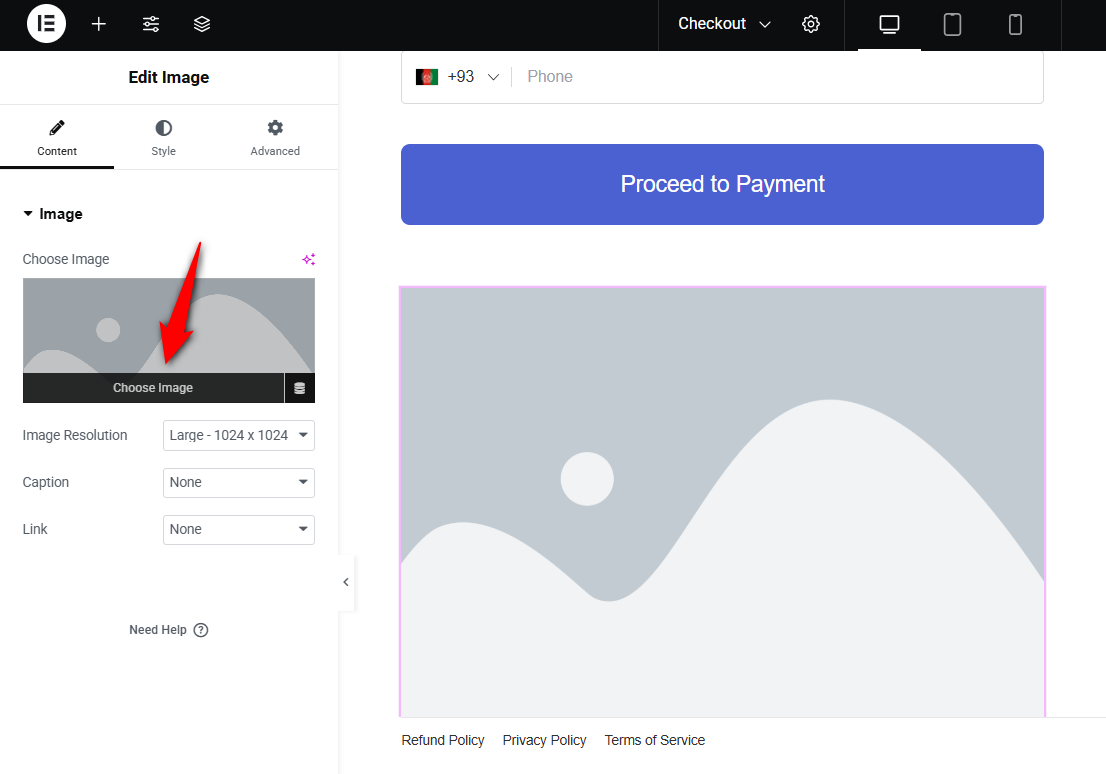
Insert the security badge you want to have here.
Ensure that you set up these badges on your website before adding the image elements. Obtain your trust badges directly from the actual company and use high-resolution images.
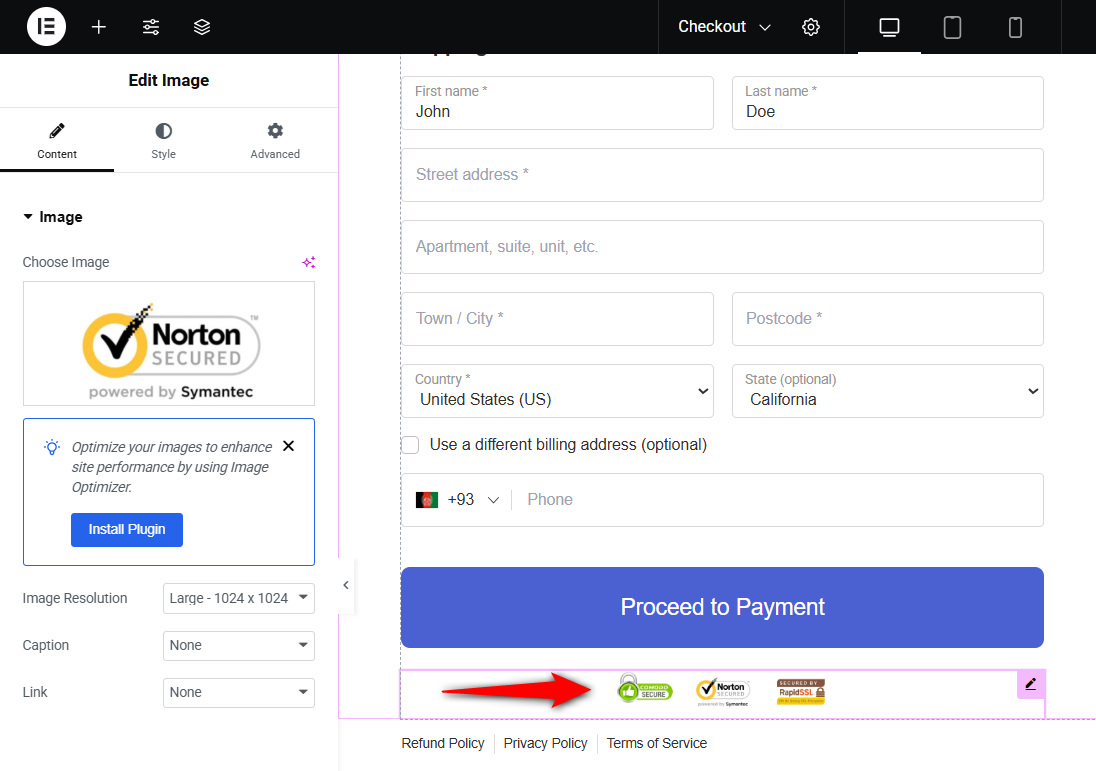
Nicely done! You’ve successfully added the security badge to the checkout page.
Next, let’s add a customer testimonial section below the confidence section on the right side.
Here, we’ve inserted the heading section to begin our customer testimonial section:
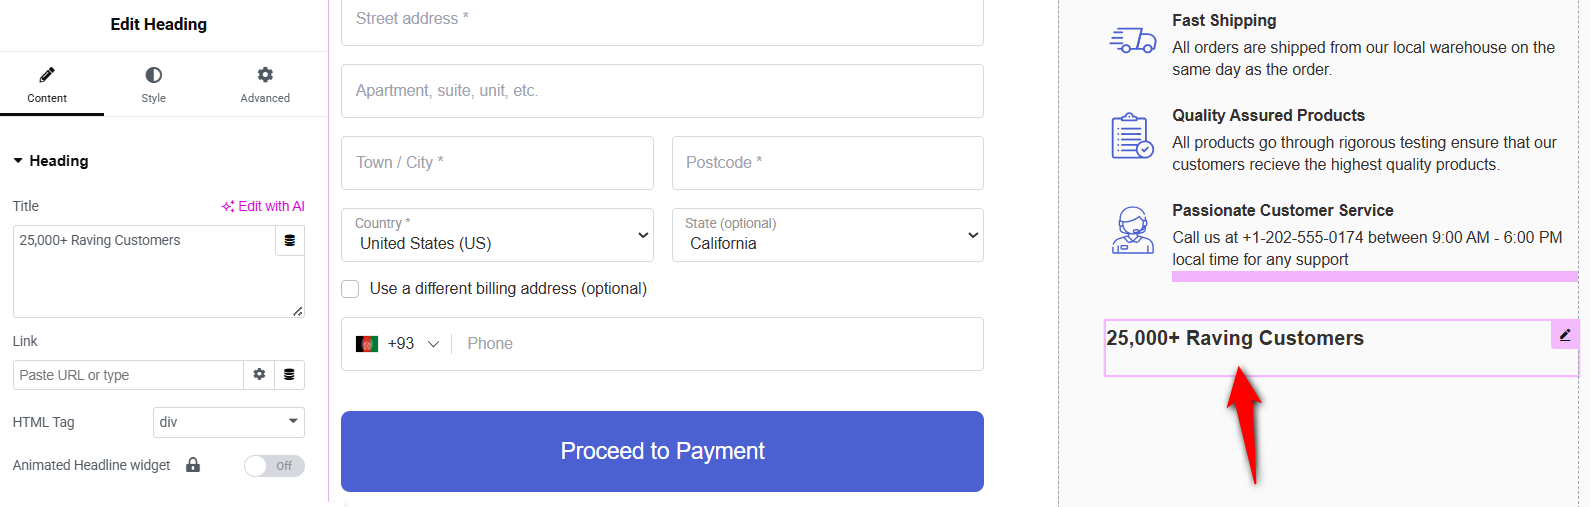
Add the testimonial widget below the heading and customize it as you like.
Here, we’ve edited the testimonial content, image file, resolution, name, title, link, image position, text alignment, and other details.
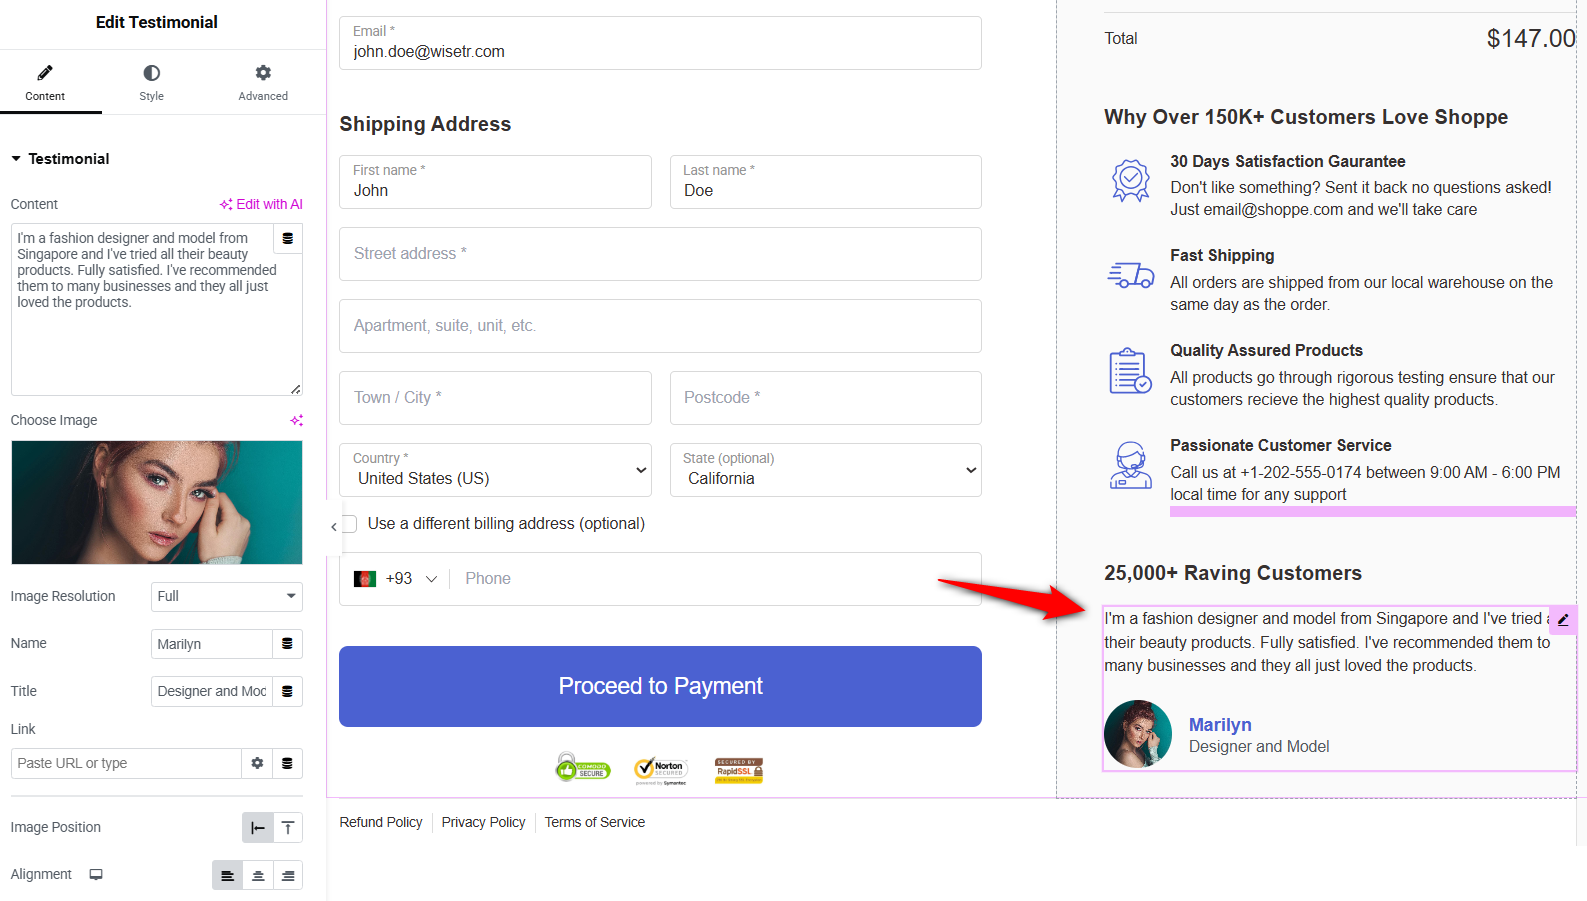
Switch to the mobile view and adjust. Once done, hit 'Publish' to save all your changes.
Step 5: Activate and place a test order
Go back to your store checkout funnel and hit the ‘Enable Store Checkout’ button.
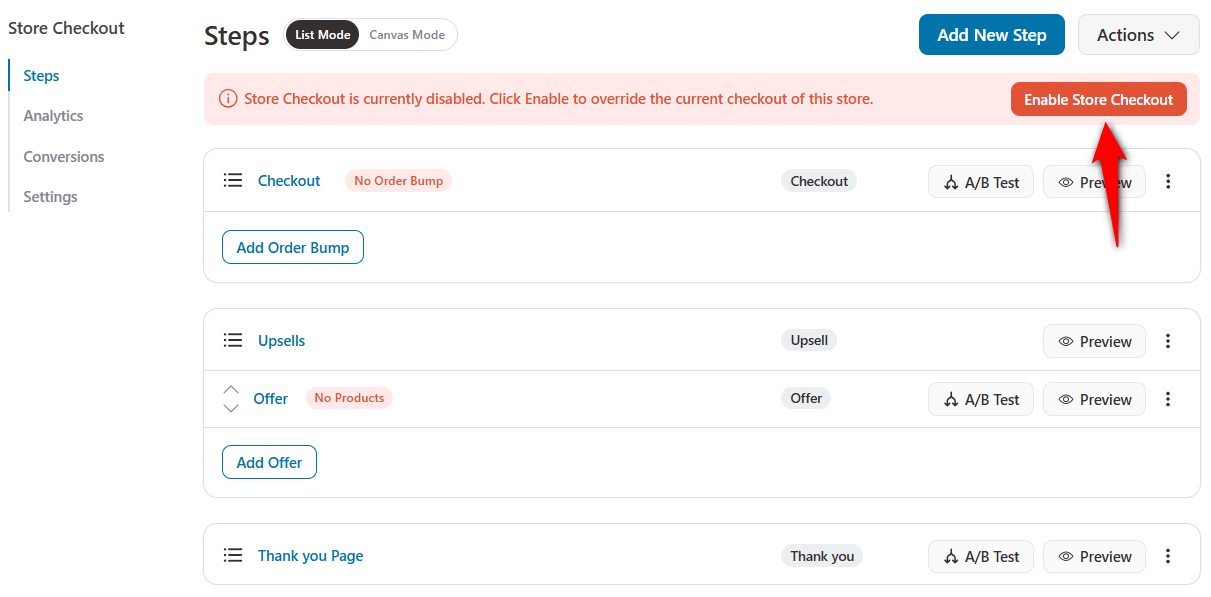
Add a product to your cart and walk through the checkout the way a customer would.
Confirm the badges load, the images are sharp, and nothing overlaps.
Repeat on a phone, where the sidebar stacks below the form and badge spacing almost always needs adjusting.
Method 2: Add Trust Badges to the Block Checkout (No Code)
This method works best if your store is using the default WooCommerce block checkout.
In most cases, you can add trust badges in just a few minutes without touching any code.
Step 1: Prepare and upload your badge images
Go to Media ⇨ Add Media File in your WordPress dashboard and upload the trust badge images you want to display.
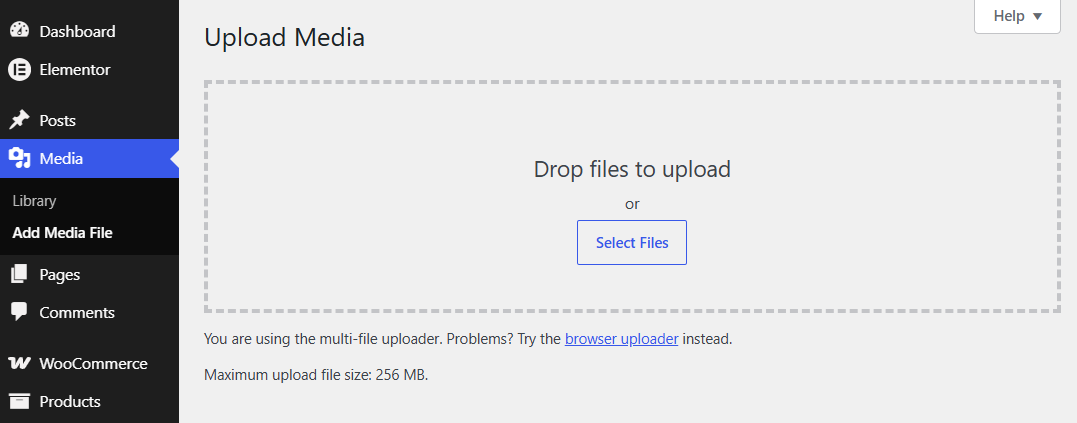
However, keep these things in mind to avoid performance issues later:
- Keep payment icons around 24-32 pixels in height. Uploading oversized images and shrinking them inside the editor only creates unnecessary downloads for mobile shoppers.
- WordPress blocks SVG uploads by default. If your badges are in SVG format, either export them as PNG or WebP, or use a trusted SVG upload plugin such as Safe SVG after confirming it sanitizes files properly.
Step 2: Add the badges to the checkout page
Go to Pages ⇨ Checkout (or Appearance ⇨ Editor ⇨ Pages ⇨ Checkout if you’re using a block theme).
Click the area just above or below the Checkout block where you want the badges to appear. Click the + (block inserter) and add an Image block for a single badge, or a Gallery block for a row of payment logos.
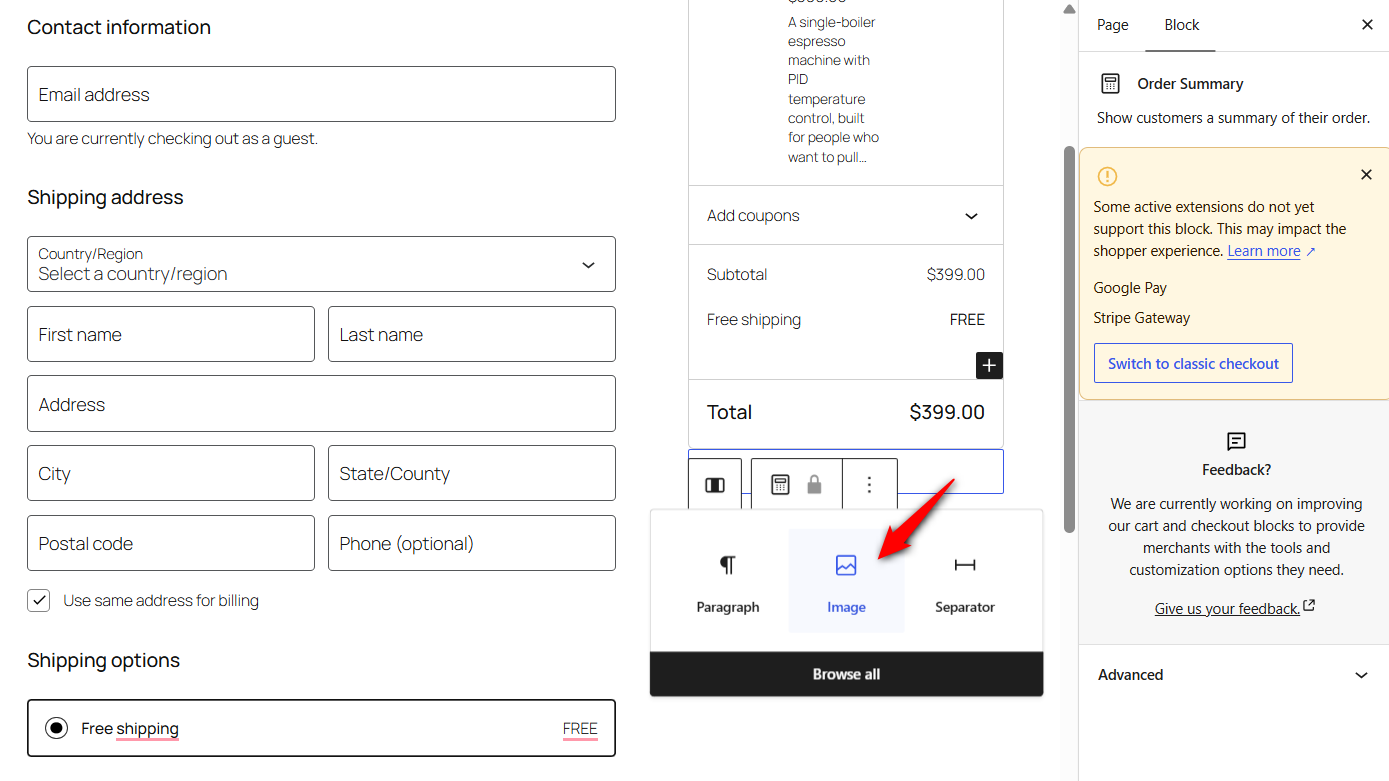
Upload your badge image and set the alignment to Center.
Also, add meaningful alt text instead of leaving it blank. For example, "Visa, Mastercard, American Express and PayPal accepted"
You can also add a Paragraph block above the badges to display a reassurance message. For example, "Your payment is encrypted. We never store card details. Enjoy our 30-day money-back guarantee."
The message does not need to be clever. Customers want a reason to trust the final click.
Step 3: Publish and test the checkout page
Once the badges are in place, click 'Update'.
Now test the checkout like a customer would:
- Add a product to your cart.
- Open checkout in a private/incognito browser window.
- Complete the checkout flow on both desktop and mobile.
The limitation of block checkout
The Block Checkout editor gives you some flexibility, but not complete control.
Most checkout inner blocks are locked, which means you cannot simply drag a trust badge directly below the Place Order button using the editor alone.
For a no-code setup, the order summary area and Place Order button are the practical locations.
If your goal is specifically to place trust badges in any other position, use either Method 1 or Method 4.
Method 3: Place Badges On the Classic Checkout With Code Snippets
The Classic Checkout gives you something the Block Checkout does not: precise control over placement.
If you want your trust badges directly below the Place Order button, near the payment section, or above the checkout form, hooks are the way to do it.
For this method, we will use WPCode instead of editing your theme files directly. A small mistake inside functions.php can break your checkout. With WPCode, we can add, disable, or edit snippets without touching the theme.
Install and activate WPCode from the WordPress plugin directory before getting started.
Step 1: Choose where your trust badges should appear
WooCommerce classic checkout provides several hooks to add content. The right hook depends on where we want customers to see the reassurance message.
| Hook | Renders | Use for |
|---|---|---|
| woocommerce_before_checkout_form | Above the entire form | Store-wide guarantee bar |
| woocommerce_checkout_before_customer_details | Above billing fields | Rarely worth it |
| woocommerce_review_order_before_payment | Above payment methods | Security line for the card section |
| woocommerce_review_order_before_submit | Directly above Place Order | Guarantee and returns |
| woocommerce_review_order_after_submit | Directly below Place Order | Payment icons and security seal |
| woocommerce_after_checkout_form | Bottom of the page | Low visibility, low impact |
For most stores, woocommerce_review_order_after_submit is the one you want.
For a complete overview of checkout positions, see our guide to WooCommerce checkout hooks.
Step 2: Add the trust badge snippet
Now we will add the code that displays our payment icons and reassurance message.
Go to Code Snippets ⇨ Add Snippet and paste this HTML, replacing the image URLs with your own:
add_action( 'woocommerce_review_order_after_submit', 'store_checkout_trust_badges' );

function store_checkout_trust_badges() {
	$badges = array(
		'visa.png'       => 'Visa accepted',
		'mastercard.png' => 'Mastercard accepted',
		'amex.png'       => 'American Express accepted',
		'paypal.png'     => 'PayPal accepted',
	);
	?>
	<div class="store-trust-badges" style="text-align:center;margin-top:16px;padding-top:16px;border-top:1px solid #eaeaea;">
		<p style="font-size:13px;color:#555;margin-bottom:10px;">
			Encrypted payment. 30-day money-back guarantee.
		</p>
		<?php foreach ( $badges as $file => $label ) : ?>
			<img
				src="<?php echo esc_url( wp_upload_dir()['baseurl'] . '/badges/' . $file ); ?>"
				alt="<?php echo esc_attr( $label ); ?>"
				width="48" height="30"
				loading="lazy"
				style="display:inline-block;margin:0 4px;vertical-align:middle;"
			/>
		<?php endforeach; ?>
	</div>
	<?php
}
Under Insertion, choose Auto Insert and run everywhere. Enable the snippet and save your changes.
A small detail matters here: add fixed width and height values to the images.
Without those dimensions, the browser has to recalculate the layout when each badge loads. That creates unnecessary movement around the checkout button exactly where customers are making their final decision.
Step 3: Test your checkout
Now check the customer experience. If the badges don't appear, clear your page cache, then continue down the troubleshooting list in this guide.
Method 4: Use Hooks (For Developers)
This method is for developers who want to add trust badges through custom code either inside a site-specific plugin or as part of a solution that needs to support both the Classic Checkout and Block Checkout.
Unlike the previous methods, this approach gives developers full control over how and where the badges are rendered.
Classic checkout
You can add the checkout hooks we discussed in Method 2 inside your own plugin instead of using a snippet manager.
This is usually the better approach when you are maintaining multiple client sites or building a custom WooCommerce solution.
The important security practices remain the same:
- Always sanitize image URLs using esc_url()
- Always escape image alt text using esc_attr()
This keeps your custom checkout output safe and follows WordPress coding standards.
Block checkout
The block checkout has no PHP hooks in its render path, but it does expose slot fills.
ExperimentalOrderMeta renders below the order summary in both the Cart and Checkout blocks:
const { registerPlugin } = wp.plugins;
const { ExperimentalOrderMeta } = wc.blocksCheckout;

const TrustBadges = () => (
	<div className="store-trust-badges">
		<p>Encrypted payment. 30-day money-back guarantee.</p>
		<img
			src="/wp-content/uploads/badges/payment-icons.png"
			alt="Visa, Mastercard, American Express and PayPal accepted"
			width="220"
			height="30"
		/>
	</div>
);

const render = () => (
	<ExperimentalOrderMeta>
		<TrustBadges />
	</ExperimentalOrderMeta>
);

registerPlugin( 'store-trust-badges', {
	render,
	scope: 'woocommerce-checkout',
} );
Register that script through your plugin, then declare block compatibility so WooCommerce does not flag your extension as incompatible:
add_action( 'before_woocommerce_init', function() {
	if ( class_exists( \Automattic\WooCommerce\Utilities\FeaturesUtil::class ) ) {
		\Automattic\WooCommerce\Utilities\FeaturesUtil::declare_compatibility(
			'cart_checkout_blocks',
			__FILE__,
			true
		);
	}
} );
The Experimental prefix is a real warning, not boilerplate. These slots can be renamed when they graduate, so pin your tested WooCommerce version and read the release notes before major upgrades.
If you would rather hand merchants editor control than hard-code the markup, the additionalCartCheckoutInnerBlockTypes filter widens the list of blocks allowed inside checkout inner block areas beyond Paragraph, Image, and Separator.
Register a custom inner block and merchants can place and configure the badge themselves.
Where to Get Trust Badge Images Legally?
Not every trust badge you see online is free to use.
A common mistake is downloading a badge from another website, as some badges are protected trademarks, while others represent certifications that a business must actually qualify for.
Using a badge you have not earned can create legal issues and damage customer trust.
The safest approach is to use official brand resources, licensed design libraries, or badges that you have genuinely earned.
Free badge generators
- Canva: Search 'trust badge' for hundreds of editable templates (free tier covers most needs).
- Freepik: Large library of payment and security icon sets, with attribution required on the free tier.
- Flaticon: Vector icons for payment methods and security symbols.
Official payment provider brand centers (free, license-compliant)
- Visa Brand Center: Official downloadable Visa logos.
- Mastercard Brand Center: Mastercard symbol and acceptance marks.
- PayPal Logo Center: PayPal brand assets.
- Stripe Brand Page: Stripe logos and "powered by" marks.
- Apple Pay marketing guidelines and Google Pay brand guidelines.
Paid certification badges (earned, not bought as images)
- TrustedSite: formerly McAfee Secure. Plans start around $30/month.
- DigiCert SSL + Norton Secured Seal: Included with EV and OV SSL certificates ($175+/year).
- BBB Accreditation: Annual fees based on business size, typically $500-$1,500/year for small businesses.
- Trustpilot: Free verified reviews; paid plans unlock the on-site widget.
Never display a certification badge you have not earned.
In the US, it is a deceptive trade practice, browser security tools increasingly flag it automatically, and one screenshot circulated on social media does more brand damage than the badge was ever going to recover.
Trust Badges Not Showing on Your Checkout? Here's How to Fix It
When trust badges don't appear at checkout, the cause is usually something simple.
In most cases, it comes down to using the wrong checkout method, caching, or a small conflict with another plugin or theme.
Here are the most common issues and how to fix them.
1. You are using a classic checkout hook on the block checkout
Classic checkout and block checkout work differently. A WooCommerce PHP hook that works perfectly on the shortcode checkout will not run inside the newer block checkout.
The solution is simple, i.e., switch to the shortcode checkout in Method 3.
2. The image URL is incorrect
If your badge image URL is wrong, the checkout has nothing to display.
A quick way to check is to copy the image URL, open it in an incognito browser window, and confirm if the image loads.
If the image does not open there, it will not appear for customers either.
3. Your cache is showing an older checkout version
Caching plugins can sometimes serve an outdated version of your checkout page.
If you recently added badges and cannot see them:
- Exclude cart and checkout pages from caching.
- Clear your website cache.
- Open checkout again in an incognito window.
Always test checkout as a logged-out customer because cached versions can behave differently for administrators.
4. Your theme CSS is hiding or changing the badge styles
Sometimes the badges are actually loading, but your theme styles are overriding them.
To check, right-click the checkout page and open 'Inspect Element'. Search for your badge container and check which CSS rule is affecting it.
Instead of immediately adding !important, create a more specific CSS selector that targets only your badge section.
This keeps your checkout styles cleaner and easier to maintain.
5. The badges are hidden on mobile
Some themes hide additional checkout content on smaller screens using media queries.
Do not rely only on resizing your desktop browser window.
Test on an actual mobile device on different screen sizes in both portrait and landscape mode.
A badge that looks perfect on desktop may accidentally disappear on mobile.
6. Another plugin is causing a conflict
Many plugins modify checkout pages, including checkout builders, payment gateways, optimization plugins, security plugins, and theme add-ons.
If everything else looks correct, temporarily disable plugins one by one.
Start with plugins that modify checkout behavior, then check whether the badges appear again.
Once you find the conflicting plugin, you can look for a compatibility fix instead of leaving it disabled permanently.
5 Best Practices to Get More Conversions From Your Trust Badges
Trust badges can reduce checkout hesitation, but adding more badges doesn't always mean more conversions.
The goal is not to make your checkout look crowded with security logos. The goal is to show customers the right reassurance when they need it.
Here are five best practices we follow when adding trust badges to WooCommerce checkout pages.
Tip #1: Keep your badges limited to three to five
It is tempting to add every possible trust signal, but too many badges can make your checkout look cluttered.
A large collection of seals can sometimes create the opposite impression; customers may wonder why the store needs so many trust signals.
Instead, choose badges that address your customers' real concerns.
Tip #2: Use badges that match your store design
Trust badges should feel like a natural part of your checkout, not something added at the last minute.
Low-quality images, inconsistent colors, or outdated graphics can reduce trust instead of increasing it.
Make sure your images are sharp, match your brand style, and look professional on both desktop and mobile.
A clean, well-designed checkout creates confidence.
Tip #3: Design your badge layout for mobile first
Most online shoppers now complete purchases from their phones.
A badge layout that looks good on desktop may fail on smaller screens. Icons may become too large, spacing may break, or customers may need to scroll sideways to view the full row.
Check the layout on an actual mobile device, keep enough spacing between icons, and make sure badges resize properly before publishing.
Tip #4: A/B test different badge placements
No single placement works for every store. Some stores see better results when badges appear directly below the place order button.
Others can work well when placed near payment options or under the order summary.
The right position depends on your customers and what objections they have before purchasing.
Therefore, we recommend A/B testing your placements and measuring the results yourself.
When running tests, change one thing at a time. This helps you understand whether the improvement came from the badge itself or from another checkout change.
Tip #5: Keep badge images lightweight
Checkout speed matters. A trust badge that slows down the payment page can create more friction than confidence.
Try to keep your total badge image size below 100KB. Use SVG files whenever possible, compress PNG or WebP images, and lazy-load badges that appear below the visible checkout area.
Frequently Asked Questions
It is a single image, so the method is the same as for any other badge.
Design or download a lockup with your payment icons and the phrase, then insert it with the Block Editor on block checkout or the woocommerce_review_order_after_submit hook on classic. Put it directly under the Place Order button.
You can even add an image anywhere you want on the checkout with FunnelKit.
Yes. Trust Badges on WordPress.org offers a pre-built badge library for WooCommerce and EDD, and WPCode handles custom HTML for free.
FunnelKit Funnel Builder has a free version on WordPress.org if you want template-based placement.
Honestly, if you only need one static image, the Block Editor already does the job without adding a plugin.
The best place to put trust badges at checkout is next to the payment fields and directly below the Place Order button.
Baymard’s research found shoppers judge security by how the card section looks relative to the rest of the form, so the same badge inside a visually distinct payment container beats one sitting in the footer.
No. The Norton Secured seal requires a DigiCert OV or EV certificate, and the McAfee Secure seal is now TrustedSite, starting around $30 a month after a certification scan.
Displaying either without holding it is misrepresentation. Payment method logos, by contrast, are free from each provider’s brand center.
Not if they are static, self-hosted images with explicit width and height attributes.
What causes problems is third-party seal JavaScript loading on checkout and unsized images shifting the layout as they load.
Run the page through PageSpeed Insights before and after.
Yes. Every WooCommerce store taking payments needs HTTPS regardless, and a security badge on a site without a valid certificate is both false and immediately visible to any browser.
Confirm the padlock in the address bar first.
Yes, and the cart is worth it. On the block-based cart, the Cart Totals area accepts an Accepted Payment Methods block plus images.
On product pages, a small badge near Add to Cart works for higher-priced items.
Keep the set consistent across pages so it reads as a store standard, not decoration.
You can, though the job is different. Post-purchase, badges reassure rather than convert, which cuts buyer’s remorse and support tickets.
A guarantee and returns reminder is more useful there than a security seal.
You can add it to your thank you page with FunnelKit.
Ready to Instill Confidence in Your Buyers with Trust Badges?
The default WooCommerce checkout is functional and completely silent on the one question shoppers are actually asking: "Is this store safe to buy from?"
That small moment of doubt can be the difference between a completed purchase and an abandoned checkout.
But as we walk you through the steps, fixing it doesn't require a complicated redesign, right?
Start by adding two to four relevant trust badges and placing them near the payment section or below the checkout button.
The right trust signals at the right moment can give customers the confidence they need to complete their purchase.
Choose the method that matches your WooCommerce checkout type and test it. You can usually add these improvements in an afternoon.
If you want to experiment with different badge placements, create separate desktop and mobile layouts, or test which checkout changes improve conversions, FunnelKit Funnel Builder gives you the flexibility to customize your checkout and run A/B tests.

Editorial Team
September 14, 2026Changing currency at WooCommerce checkout is easier to explain with a simple example: a shopper in Munich sees €169 instead of $184 for the same jacket. Nothing about the product...
Editorial Team
September 11, 2026WooCommerce gift wrap might be the easiest extra money your store can make, yet most stores never offer it. Think about a department store in December. You buy a candle,...
Editorial Team
September 7, 2026Running a WooCommerce store means juggling a lot of moving parts. Security has to stay near the top of that list. WooCommerce's popularity cuts both ways though, since the same...






