


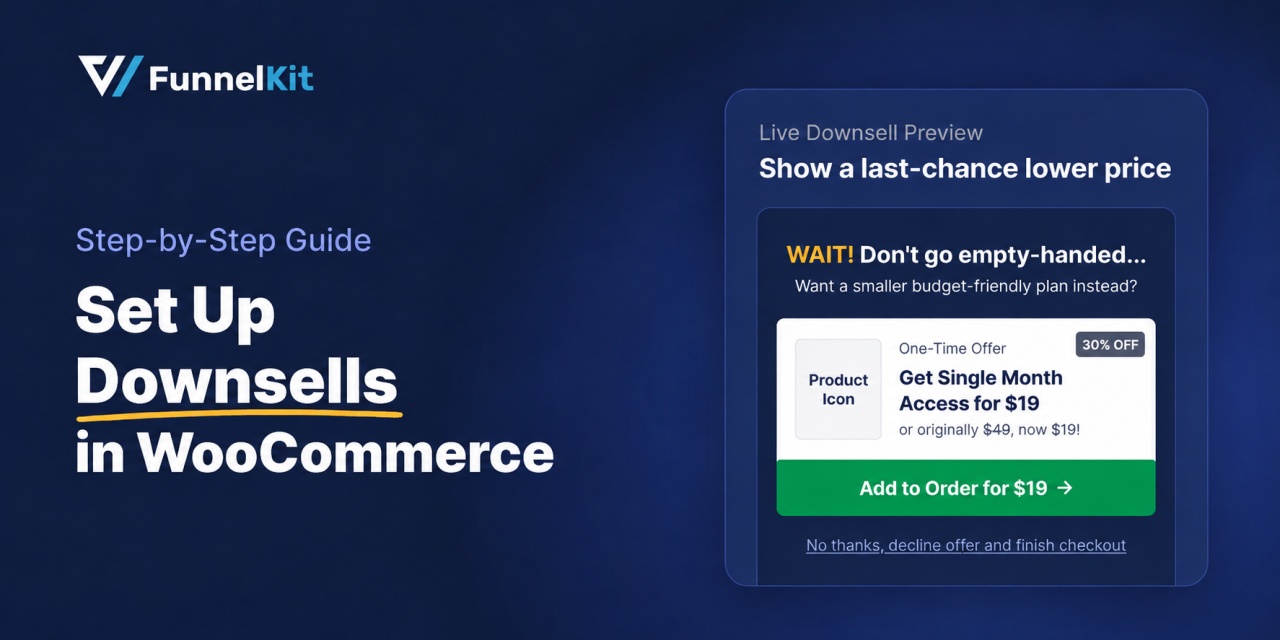
A downsell gives customers a cheaper option after they turn down your main offer. If you show it too soon, you might convince them to skip the original offer and go straight for the cheaper one.
Say you run a hair-care store and offer a $129 kit after checkout. Some customers will decline it, and that’s usually where the offer ends.
But what if you show them a $39 travel-size version instead?
Since they’ve already said no to the full kit, the smaller option gives them another reason to buy.
Every sale adds $39 to an order you’ve already secured.
In this guide, we’ll cover what a downsell is, how it differs from upsells, cross-sells, and order bumps, and seven examples you can learn from.
We’ll also look at how to price your downsell, write an offer customers want to take, and track the numbers that matter.
Finally, you’ll learn how to build a downsell funnel in WooCommerce using a WordPress plugin, with no coding required.
Table of Contents
- 1 What Is a Downsell and How Does It Work?
- 2 Downsell vs Upsell vs Cross-Sell vs Order Bump
- 3 How to Set Up a Downsell in WooCommerce Without Code
- 4 7 Downselling Examples That Work
- 5 Teardown: A Payment Plan That Saves the Sale
- 6 Where to Show the Offer: 5 Trigger Points
- 7 How to Measure Whether It’s Working
- 8 Frequently Asked Questions
- 9 Start Recovering Lost Sales With a Downsell
What Is a Downsell and How Does It Work?
A downsell is a sales technique where you offer a cheaper or smaller alternative after a customer turns down a more expensive offer.
It could be a lite version of a product, a smaller bundle, a payment plan, a starter plan, or a trial.
The idea is to give customers another option without lowering the price of your original offer.
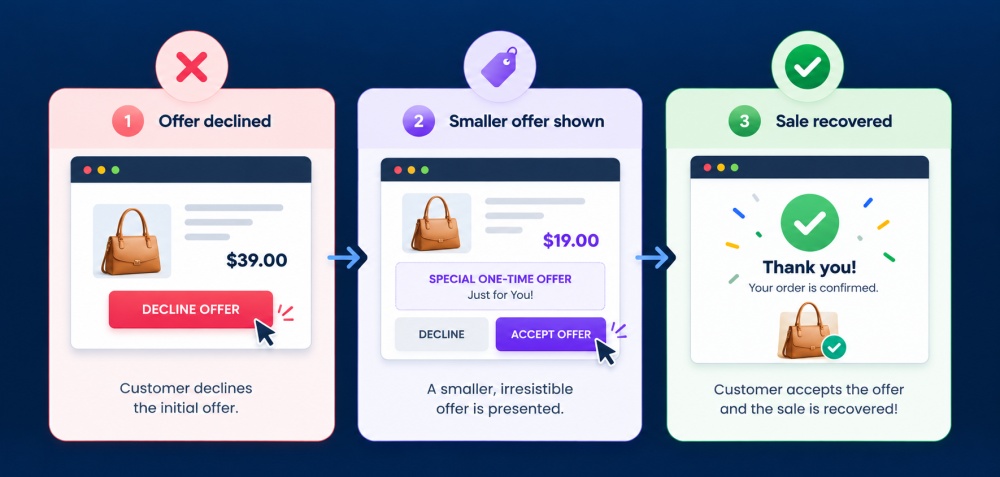
A customer declines a higher-priced offer.
You’ll find downsells at retail counters, on SaaS pricing pages, and after WooCommerce checkouts.
The three-step sequence
- The customer declines the original offer: This could be a premium product or a post-purchase upsell.
- You present a smaller alternative: The offer should address why they said no. Usually, it appears on the very next screen.
- The customer accepts or declines again: If they accept, you make an additional sale. If they don't, at least you gave them another chance to buy.
Why a smaller offer works: The door-in-the-face effect
The psychology behind this approach is similar to the door-in-the-face technique.
When someone turns down a big request, they may be more willing to agree to a smaller one that follows.
The second request feels like a compromise, making it easier to say yes.
A 1975 study by Cialdini and his colleagues tested this idea. Researchers first asked participants to counsel juvenile delinquents for two hours a week over two years.
After they declined, 50% agreed to chaperone a single trip to the zoo. Among those who were asked only about the zoo trip, just 17% agreed.
You can see a similar pattern with a downsell. After declining a $129 hair-care kit, a customer might find a $39 travel-size version more appealing.
It costs less, feels like a smaller commitment, and gives them another way to try the product.
Downsell vs Upsell vs Cross-Sell vs Order Bump
An upsell encourages customers to spend more on a premium product or a bigger package. A downsell offers a cheaper alternative after they decline.
Cross-sells and order bumps work differently: they add a complementary product rather than replace the original offer.
| Technique | When it happens | Goal | Example |
|---|---|---|---|
| Upsell | When the customer is ready to buy or has just bought | Raise order value with a bigger or premium option | A customer buys a $49 serum, and you offer a $129 complete hair care kit |
| Downsell | Only after the customer declines a higher-priced offer | Save the sale with a smaller, cheaper option | The customer declines the $129 kit, and you offer a $39 travel-size starter kit |
| Cross-sell | Alongside the main product, before or after purchase | Add a complementary item | A customer buys a laptop, and you suggest a $29 sleeve |
| Order bump | On the checkout page, as a checkbox | Add a small extra before payment | “Add gift wrapping for $4.99” at checkout |
For more examples, see our guide to cross-selling products in WooCommerce.
When to downsell instead of upsell
Use an upsell when a customer seems interested in spending more, such as after they add a product to their cart or complete checkout.
If they decline the offer, introduce a downsell.
The key is to wait for a clear no, whether that's clicking a decline button or choosing to skip the offer.
Don't show the cheaper option before they've had a chance to consider the original one.
Can you run both in the same funnel?
Yes. In fact, many post-purchase funnels use both.
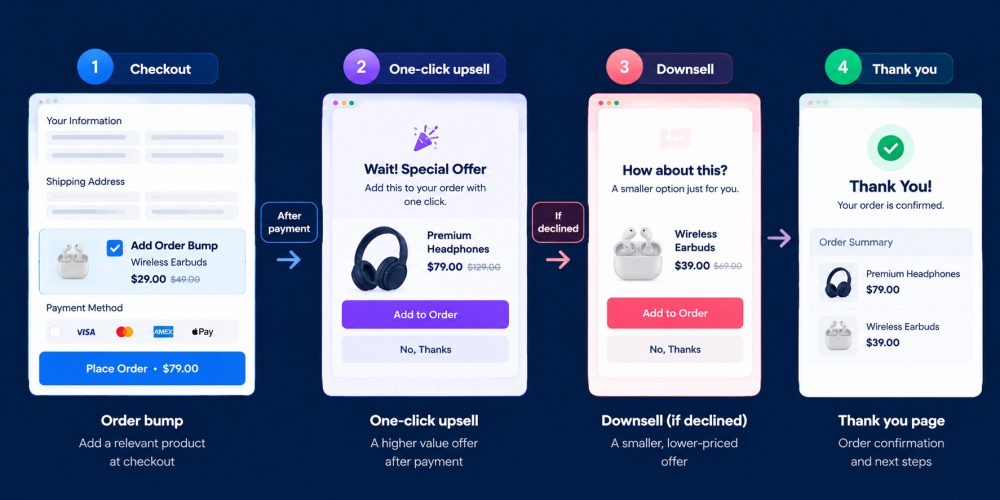
A typical WooCommerce funnel starts with an order bump on the checkout page, followed by a one-click upsell after payment.
If the customer declines the upsell, they see a downsell instead.
To learn more about the first part of this sequence, see our guide to post-purchase upsells in WooCommerce.
How to Set Up a Downsell in WooCommerce Without Code
To set up a post-purchase downsell in WooCommerce without writing any code, we will use FunnelKit Funnel Builder.
It builds the full sequence in one place: an optimized checkout, a one-click upsell, and a conditional follow-up offer that appears only when the customer declines.
FunnelKit offers a free version that includes funnel and checkout templates.
The Pro plan starts at $99.50/year and adds one-click upsells and downsells with dynamic offer paths and per-offer analytics.
Here we will build a hair care funnel: a serum as the main offer, a complete hair care kit as the upsell, and a hair growth supplement as the fallback for anyone who declines the kit.
Follow the steps below to add a downsell offer to your WooCommerce funnel:
Step 1: Create a sales funnel from a prebuilt template
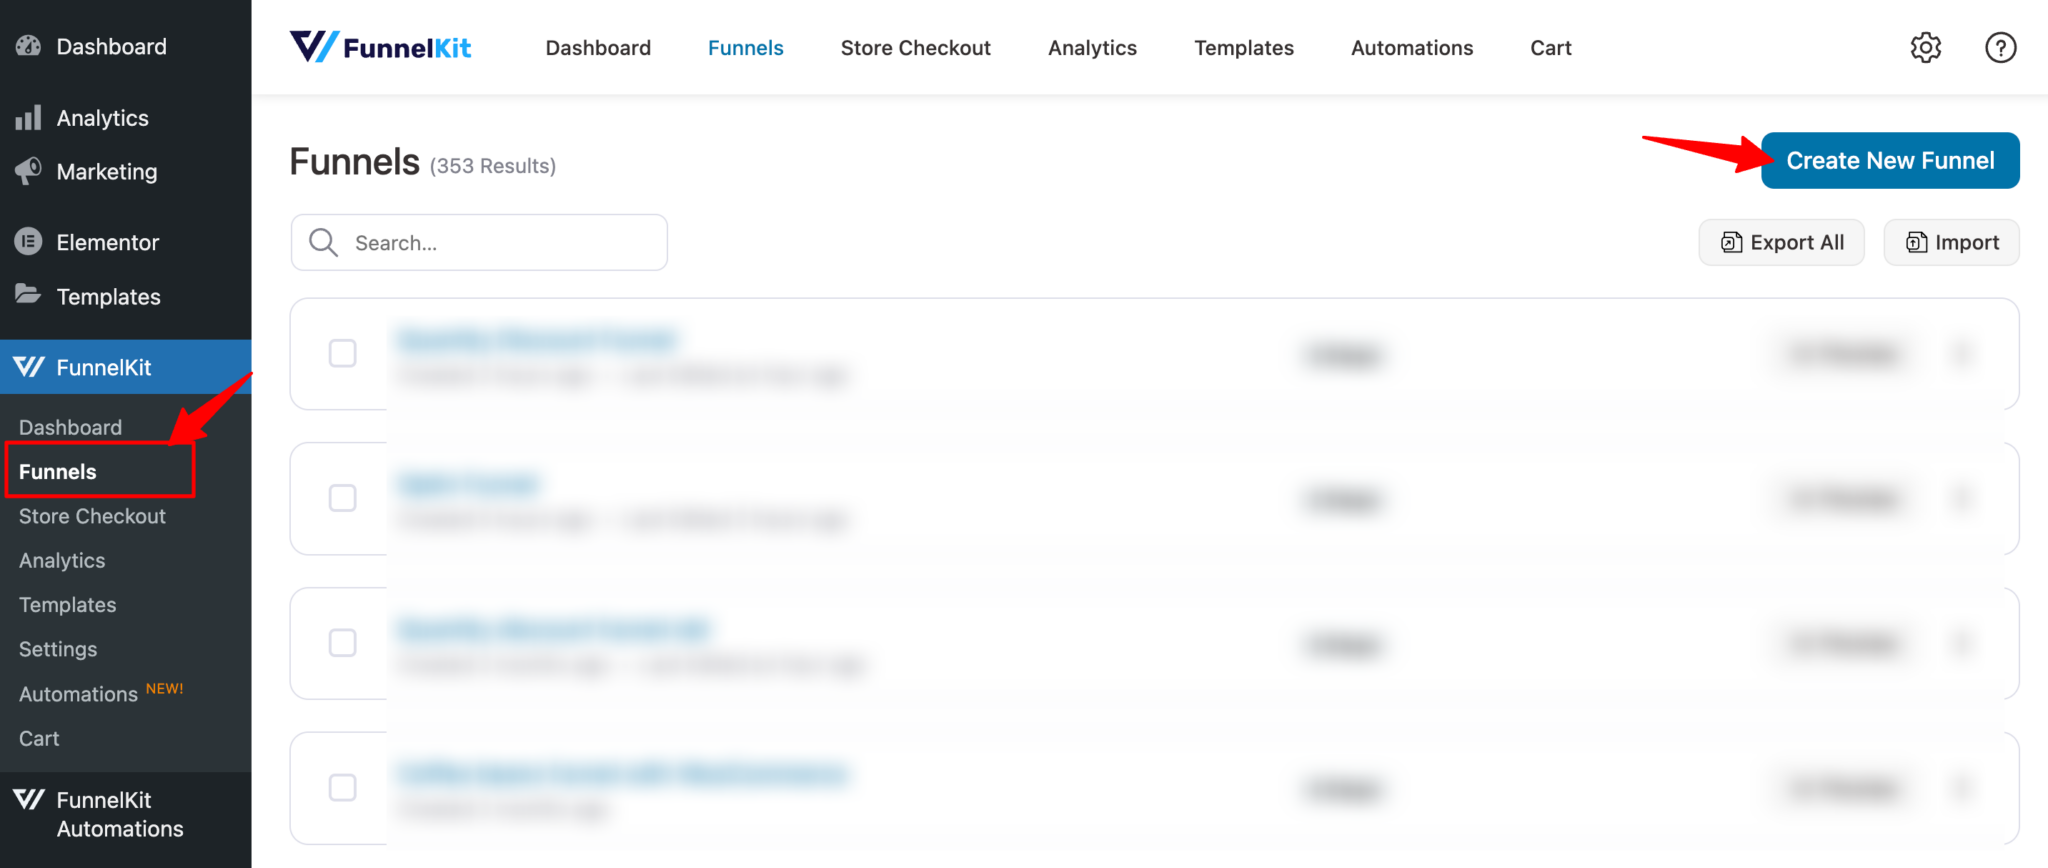
After installing and activating the plugin, go to FunnelKit ⇒ Funnels from your WordPress dashboard and click 'Create New Funnel'.
Now, choose Sales Funnel, pick your page builder (Elementor, Divi, Bricks, Gutenberg, and other major builders are supported), then preview a template and import it.
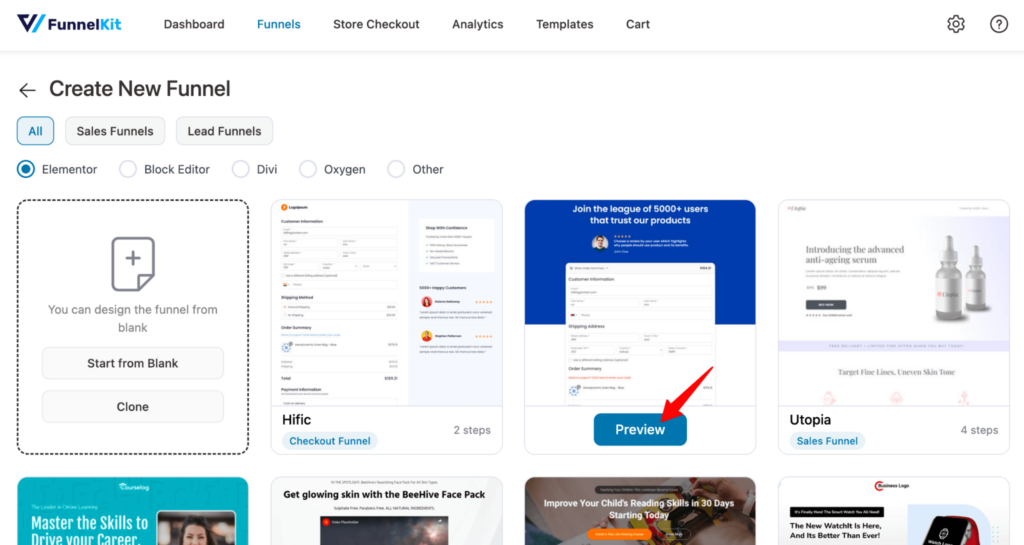
After that, choose whether you want a single-page checkout or a multi-page checkout. We are going with the simple single-page layout.
To import the template you choose, click on 'Import This Funnel', then provide a name and click on Add.
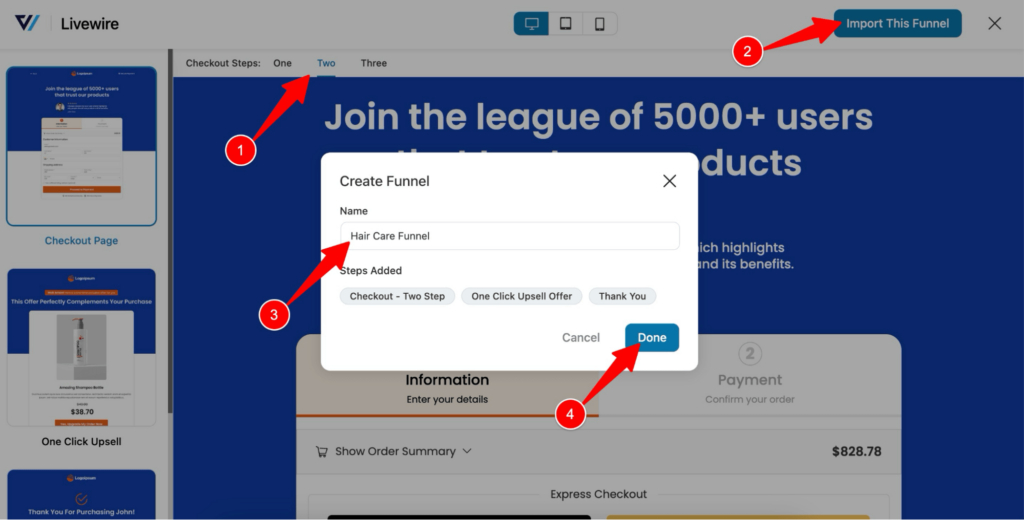
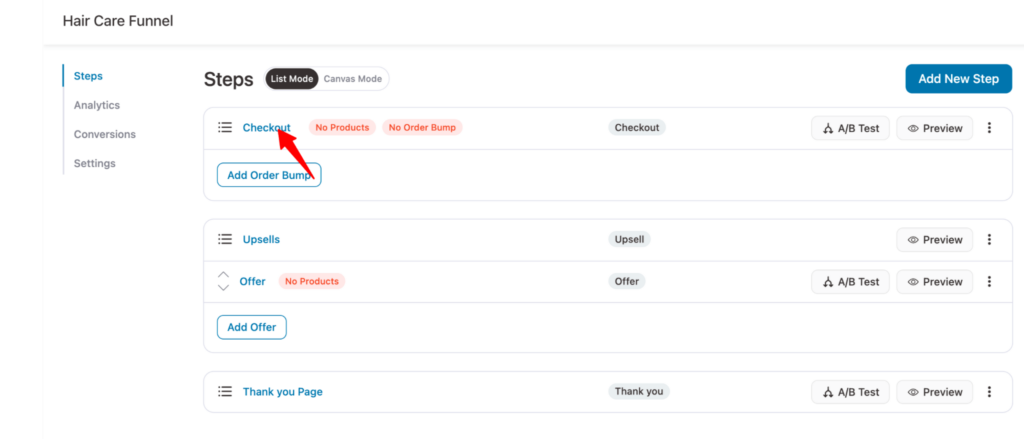
Now your sales funnel with 3 steps - checkout, upsell, and thank you should be imported.
Step 2: Add the main offer to checkout
To customize the checkout page and add the main offer, click on the “Checkout” step.
On the Design tab, you can customize the checkout page template.
For more details, check our blog “How to Customize WooCommerce Checkout Page”.
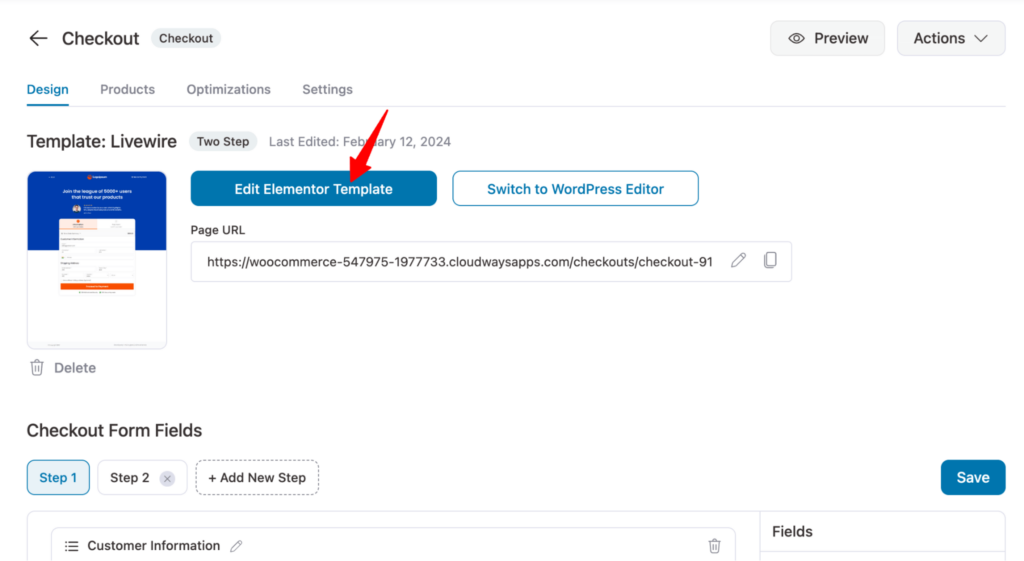
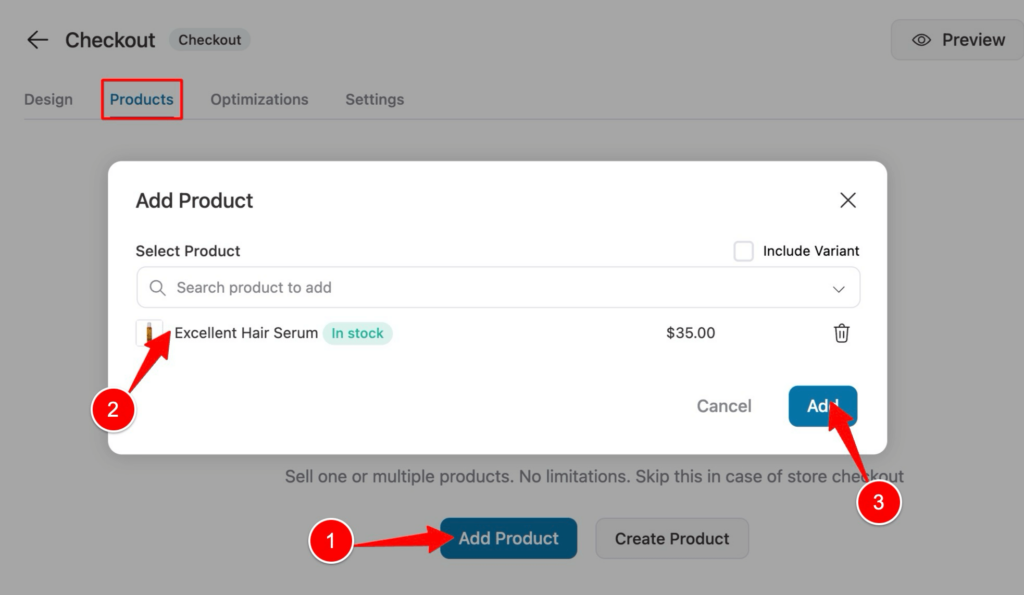
To add the main offer, move to the Products tab and click on the “Add Product” button.
Then, search and select the product you want to offer as a main offer from the dropdown. Finally, click on 'Add' to add the product to the checkout.
This means that whenever someone enters this sales funnel, the product will be automatically added to your order at checkout.
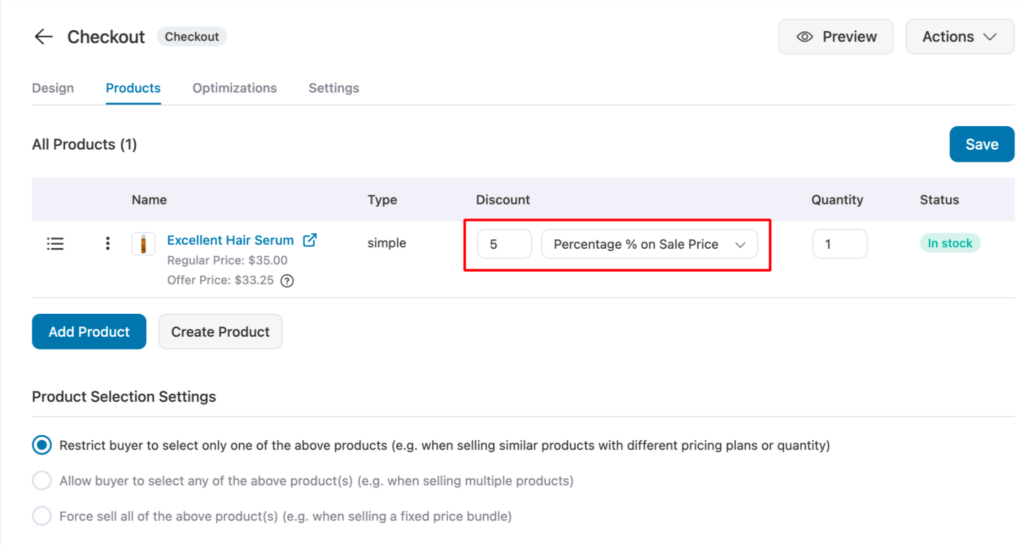
You can offer a discount on the product if you want. After adding the discount, click on “Save Changes” to update.
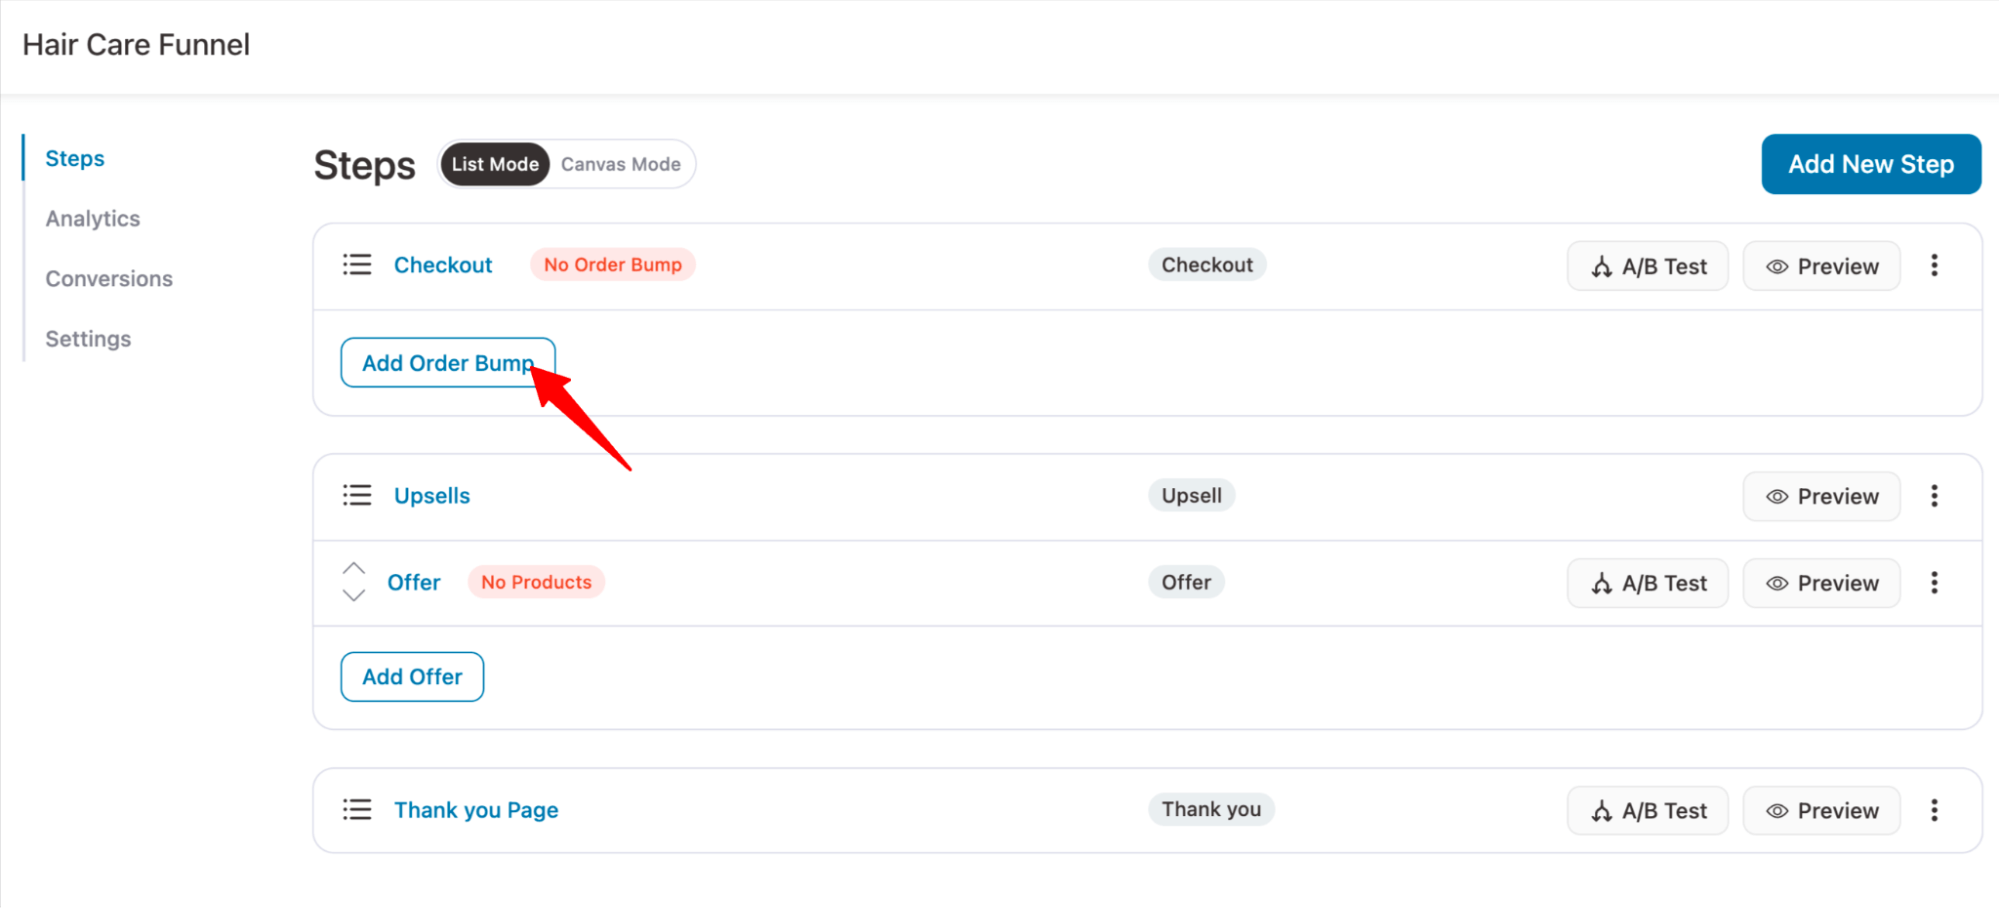
You can even offer an order bump on the checkout page to increase the average order value.
Step 3: Add the upsell offer
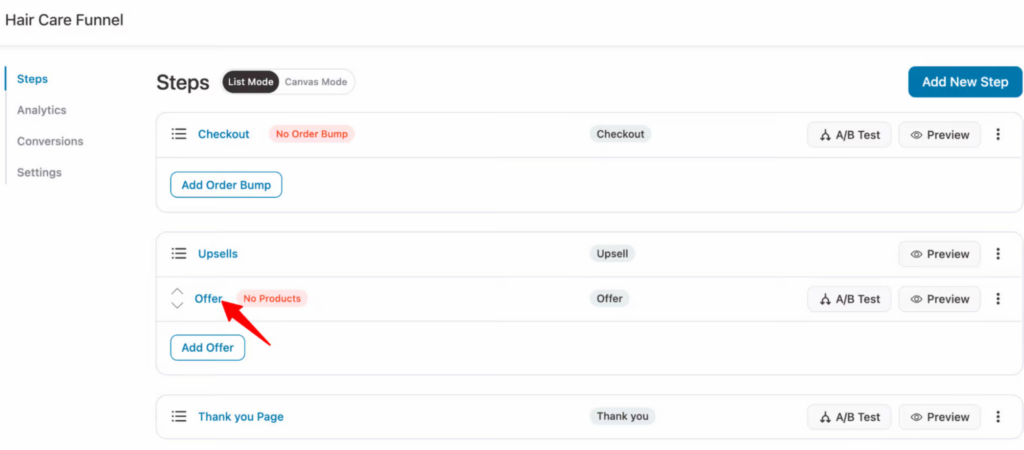
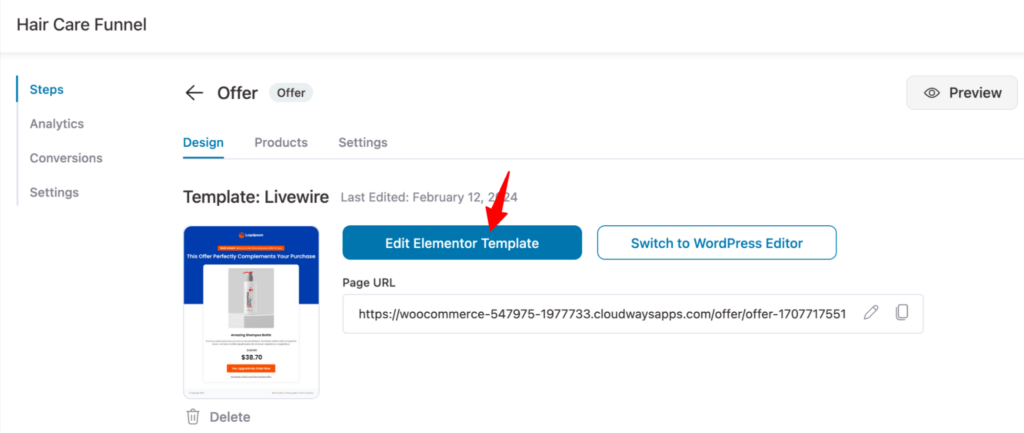
In this step, add the upsell offer that returns to the funnel page, then click the 'Offer' you imported when you imported the prebuilt template.
Now you can customize the upsell template with your chosen page builder.
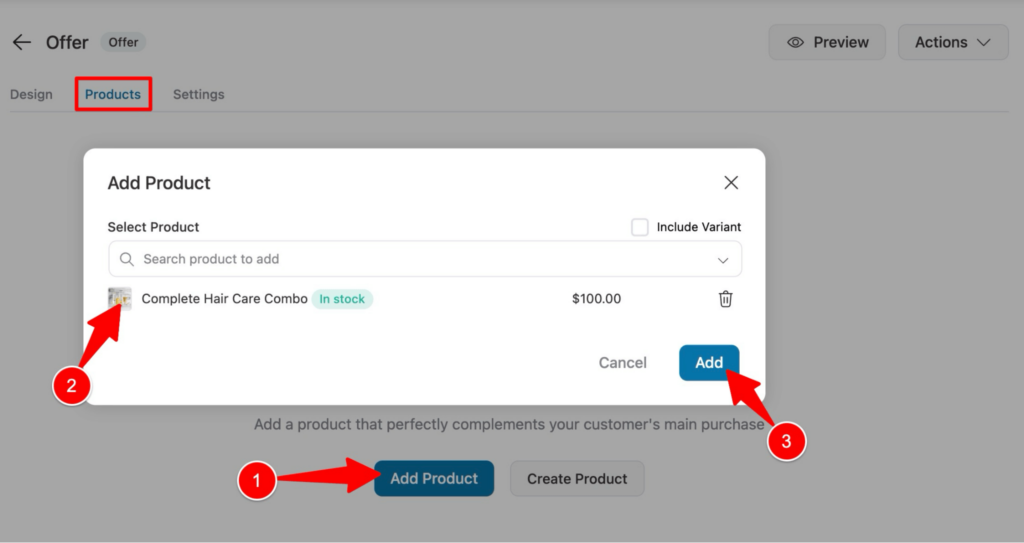
To add the upsell offer, move to the Products tab.
To do that, click on "Add Product", search for and add the product, and finally click on "Add" to add the product.
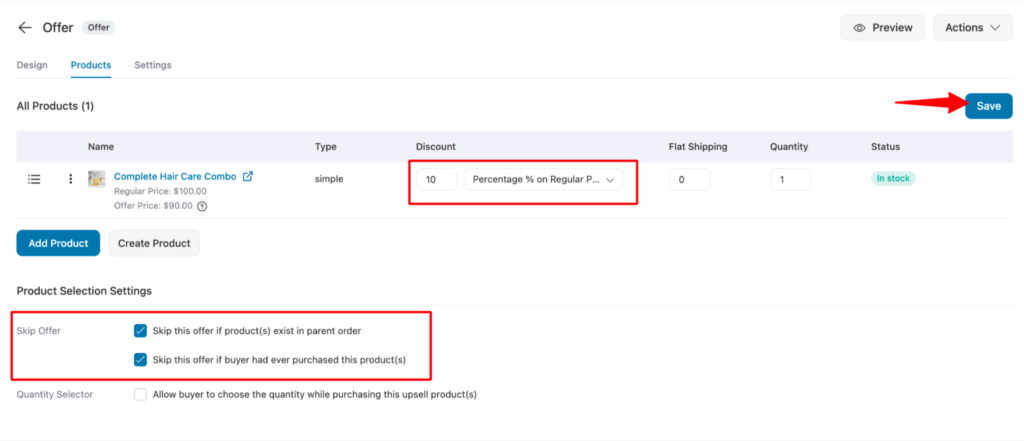
You can offer a discount on the upsell offer.
You can also check the settings to skip offering this product if the product exists in the parent order or the buyer has already purchased it.
For the full playbook on this first offer, see our guide to one-click upsells.
Step 4: Add the downsell offer and write the page
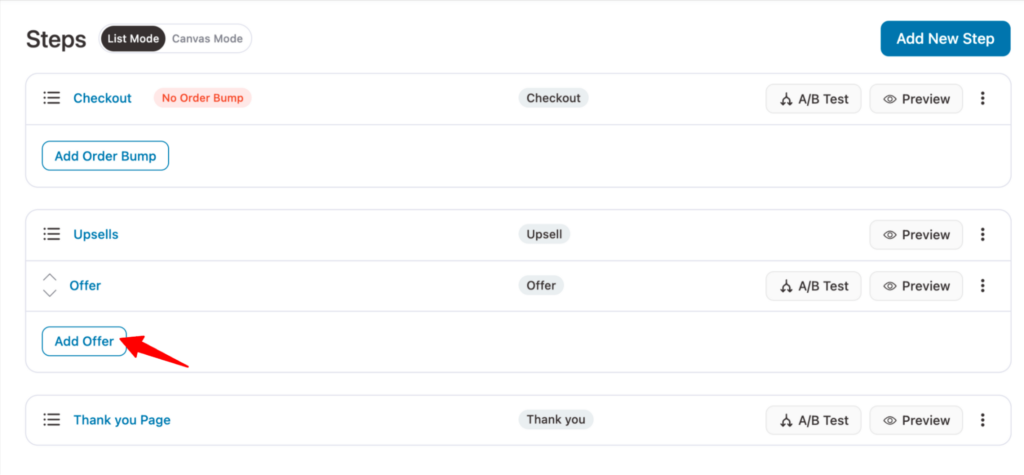
It’s time to present the downsell offer. With FunnelKit Funnel Builder, we will create another upsell offer and ensure it is presented as a downsell when users reject the initial order.
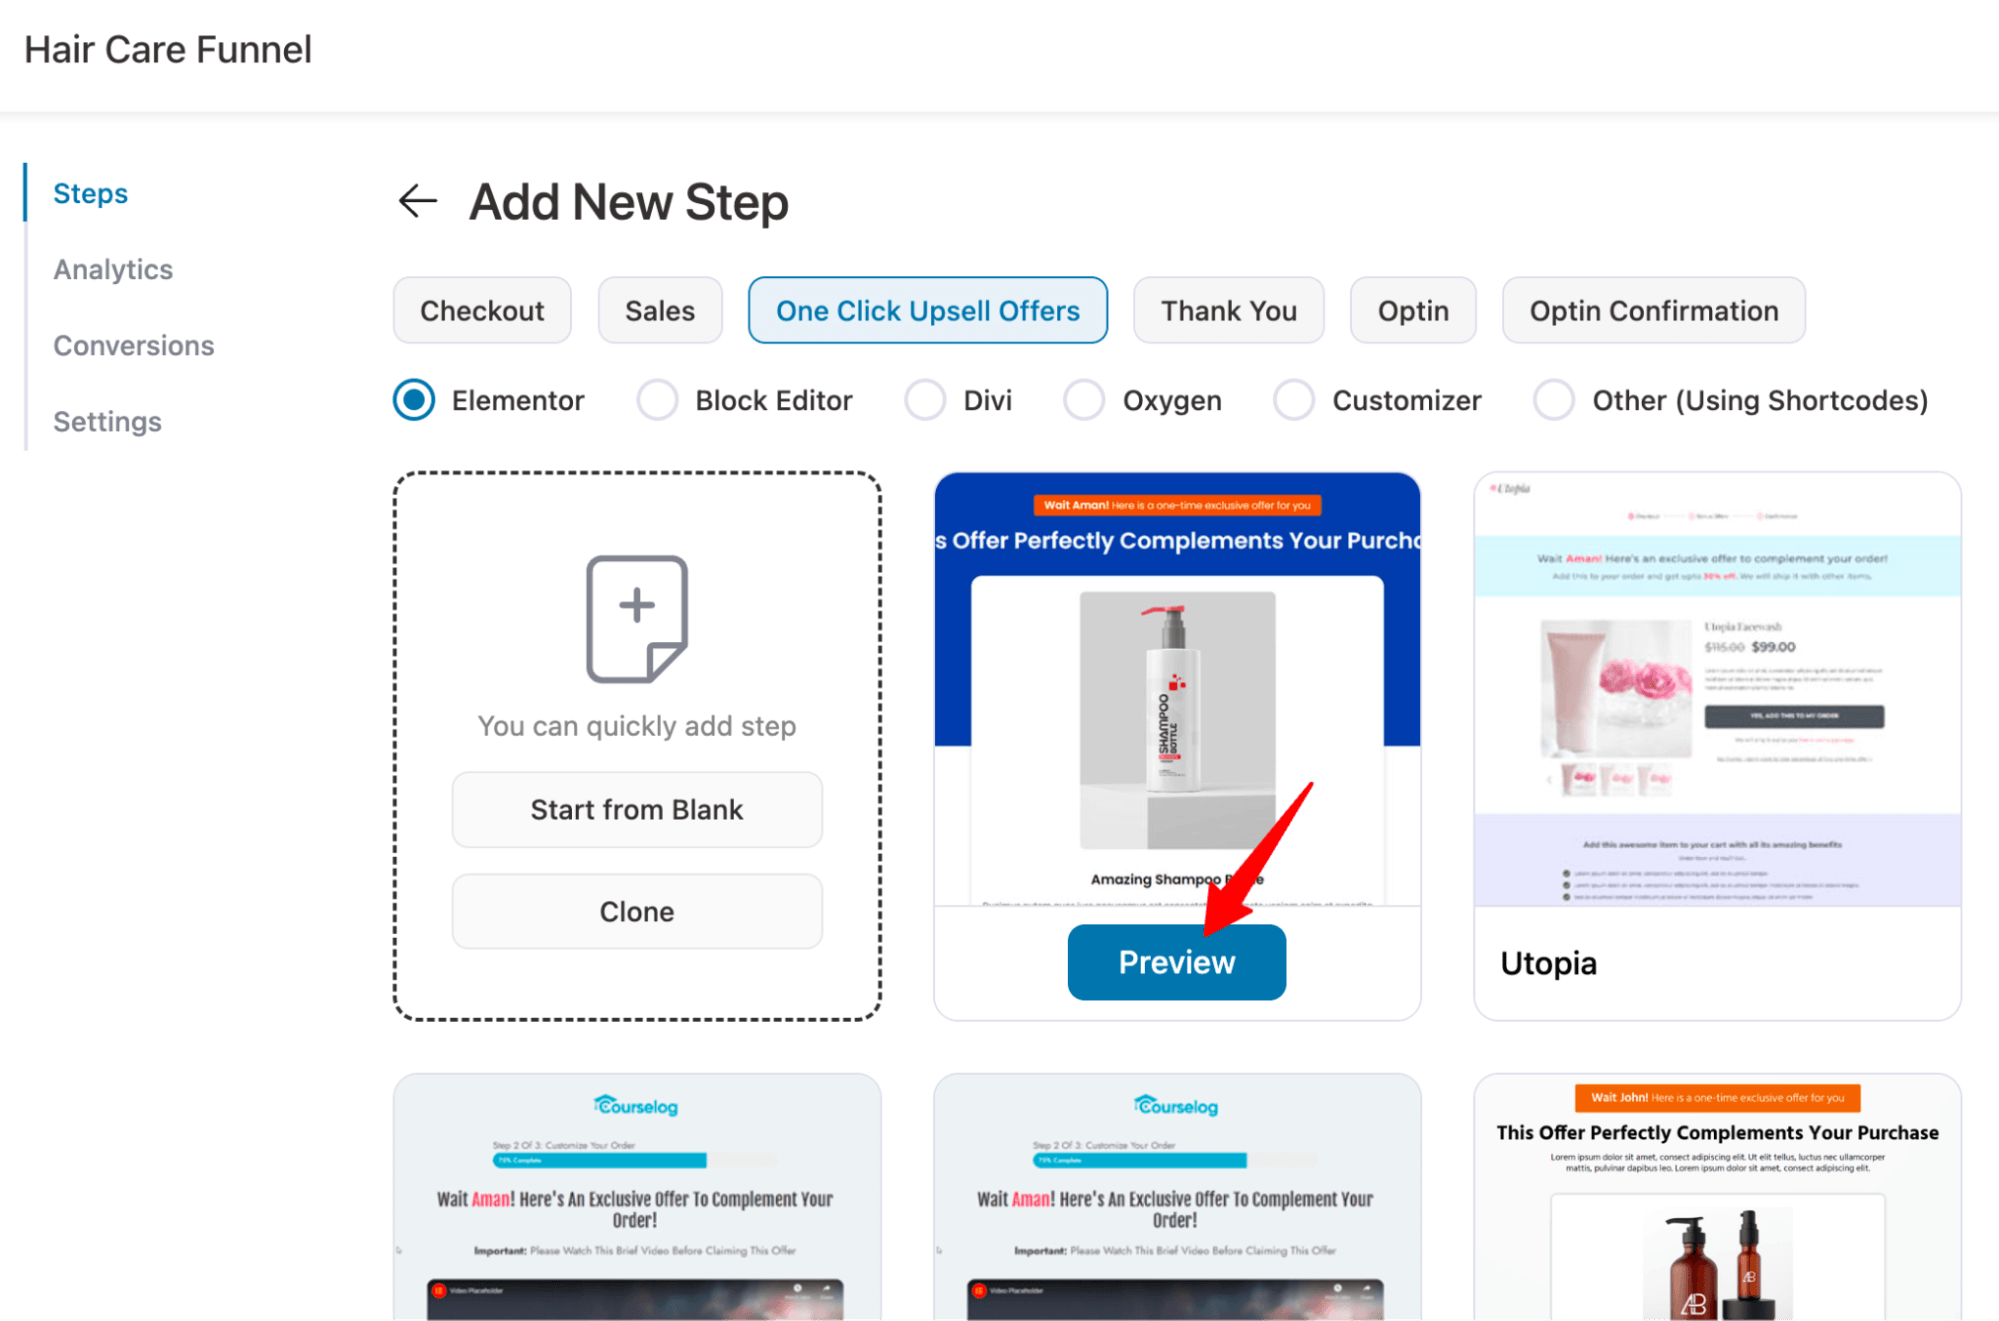
To do that, return to the sales funnel page and click on the 'Add Offer' option
Now choose an upsell template. Here, we'll use the Livewire template again.
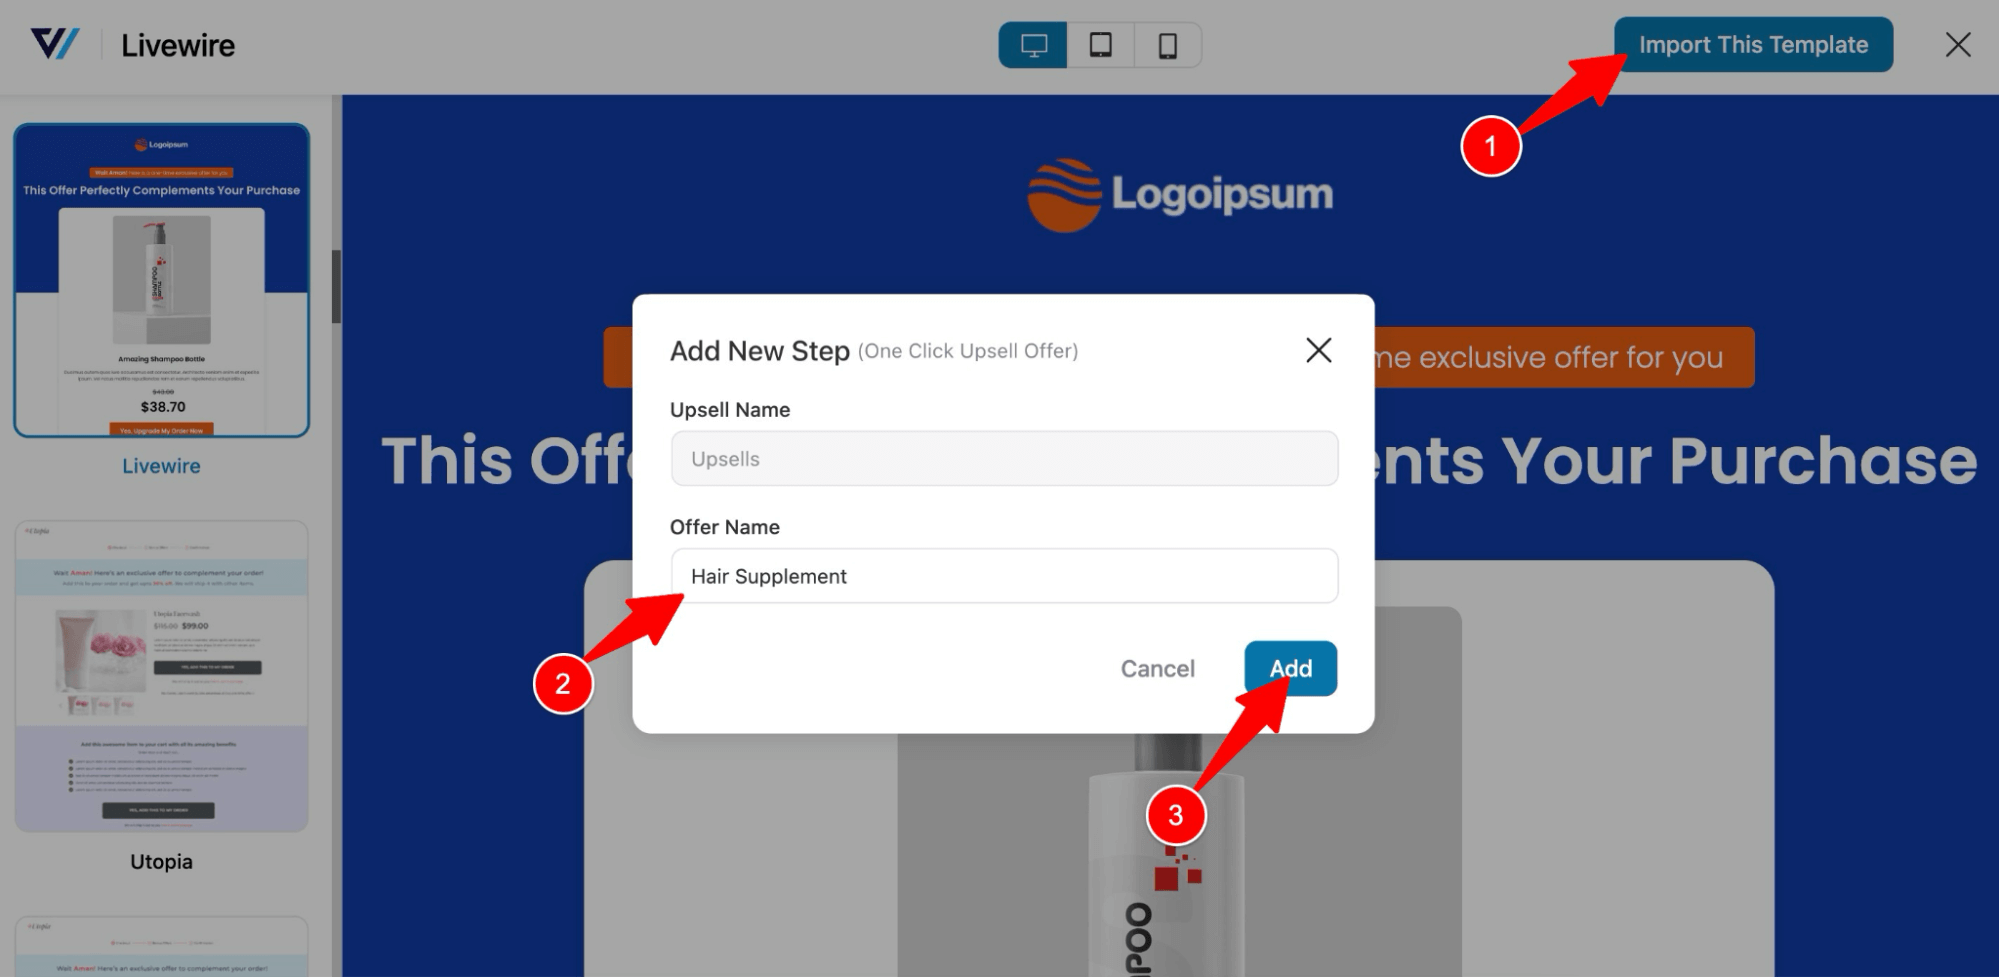
Now to import, click on "Import This Template", provide a name, and click on "Add" to add the downsell offer.
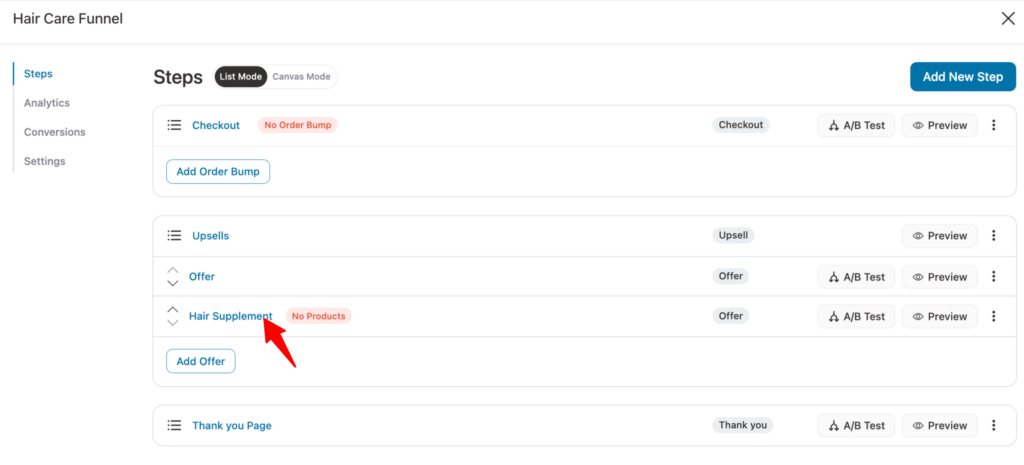
Now click on the Offer you just created.
Now you can customize the template.
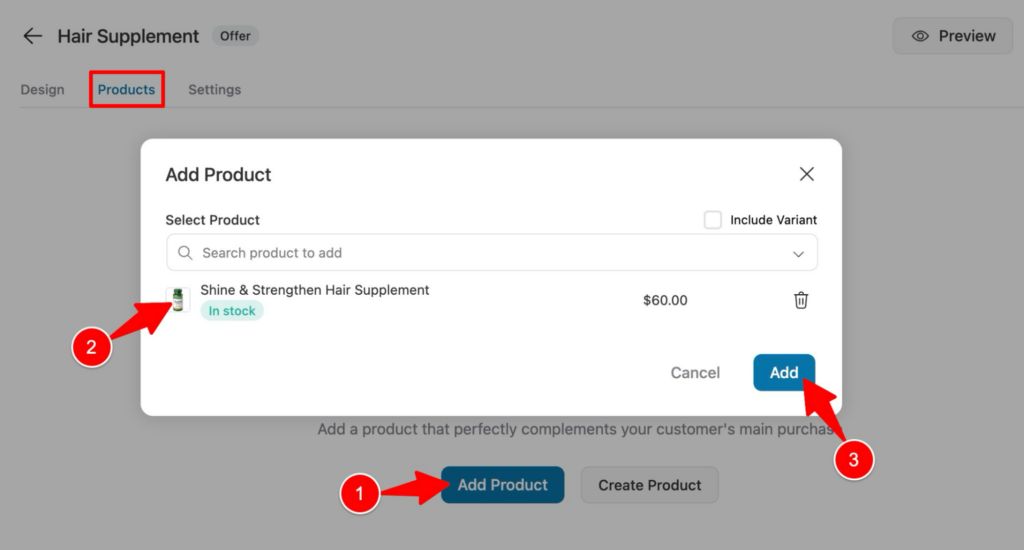
Then go to the Products tab to add the downsell offer. For that, click on “Add Product,” search add the product, and click on Add.
Keep the page to one product, one price, and one clear accept button, with a single line of social proof if you have one.
Match the offer to the reason they said no to.
| Objection | What the customer is thinking | Offer that fits | Example |
|---|---|---|---|
| Price | “It’s more than I want to spend.” | Lite version or smaller bundle | The hero serum instead of the full kit |
| Upfront cost | “I want it, but not all at once.” | Payment plan | The same product in four monthly payments |
| Commitment | “I’m not ready for a subscription.” | Trial or sample pack | A one-time sample instead of a monthly plan |
| Trust | “I don’t know if this works for me yet.” | Low-risk starter offer | A fixed-price audit before a retainer |
| Timing | “Not today.” | A later offer by email | A recovery email 24 to 48 hours later |
Price it well below the declined upsell and, ideally, below the order the customer just paid for.
The gap just needs to be big enough that saying yes feels like a different, easier decision.
Payment plans are the exception, since they keep the full price and only lower what’s due today.
Then, turn on the toggle button on the left to enable this down-sell offer. Again, set the product selection settings for a better shopping experience.
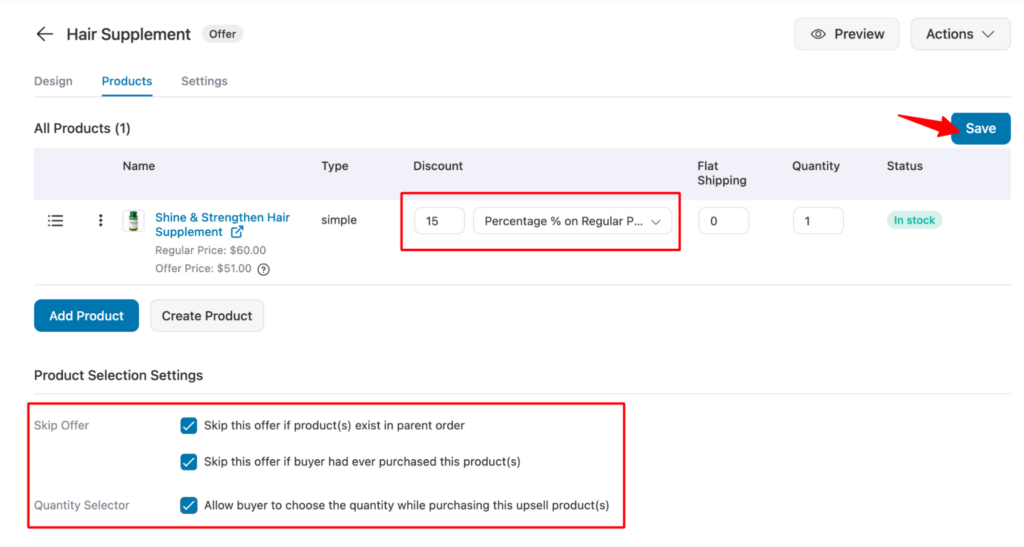
Finally, click ‘Save’ to apply all your changes.
Learn about offering product recommendations inside the side cart here.
Step 5: Set the dynamic offer path
Now, set the dynamic offer path so the downsell offer you created is offered to users when they reject the first upsell offer.
To do that, go back to the first offer. You'll now see new settings under Dynamic Offer Path.
Under the “Dynamic Offer Path” option, check “On acceptance, redirect buyers to” and choose the Thank you page option.
This means that if the user accepts the upsell offer, they will be redirected to the thank you page, not the downsell page.
Again, check the “On rejection, redirect buyers to” option and choose the downsell offer you created.
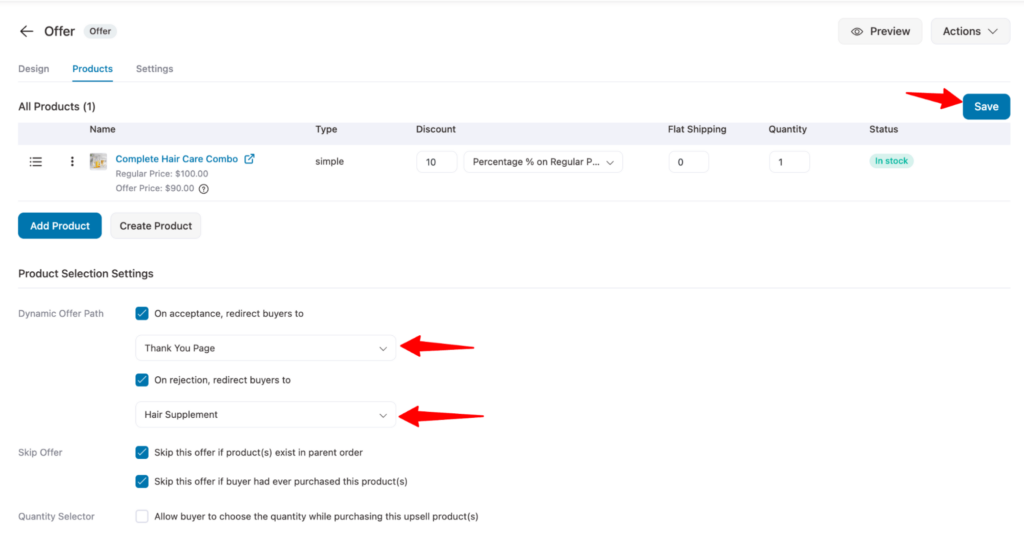
This option means that when users reject the upsell offer, they will see the downsell offer.
To update the settings, click on Save.
To test, go to a product page, add the item to your cart, proceed to checkout, and place a test order.
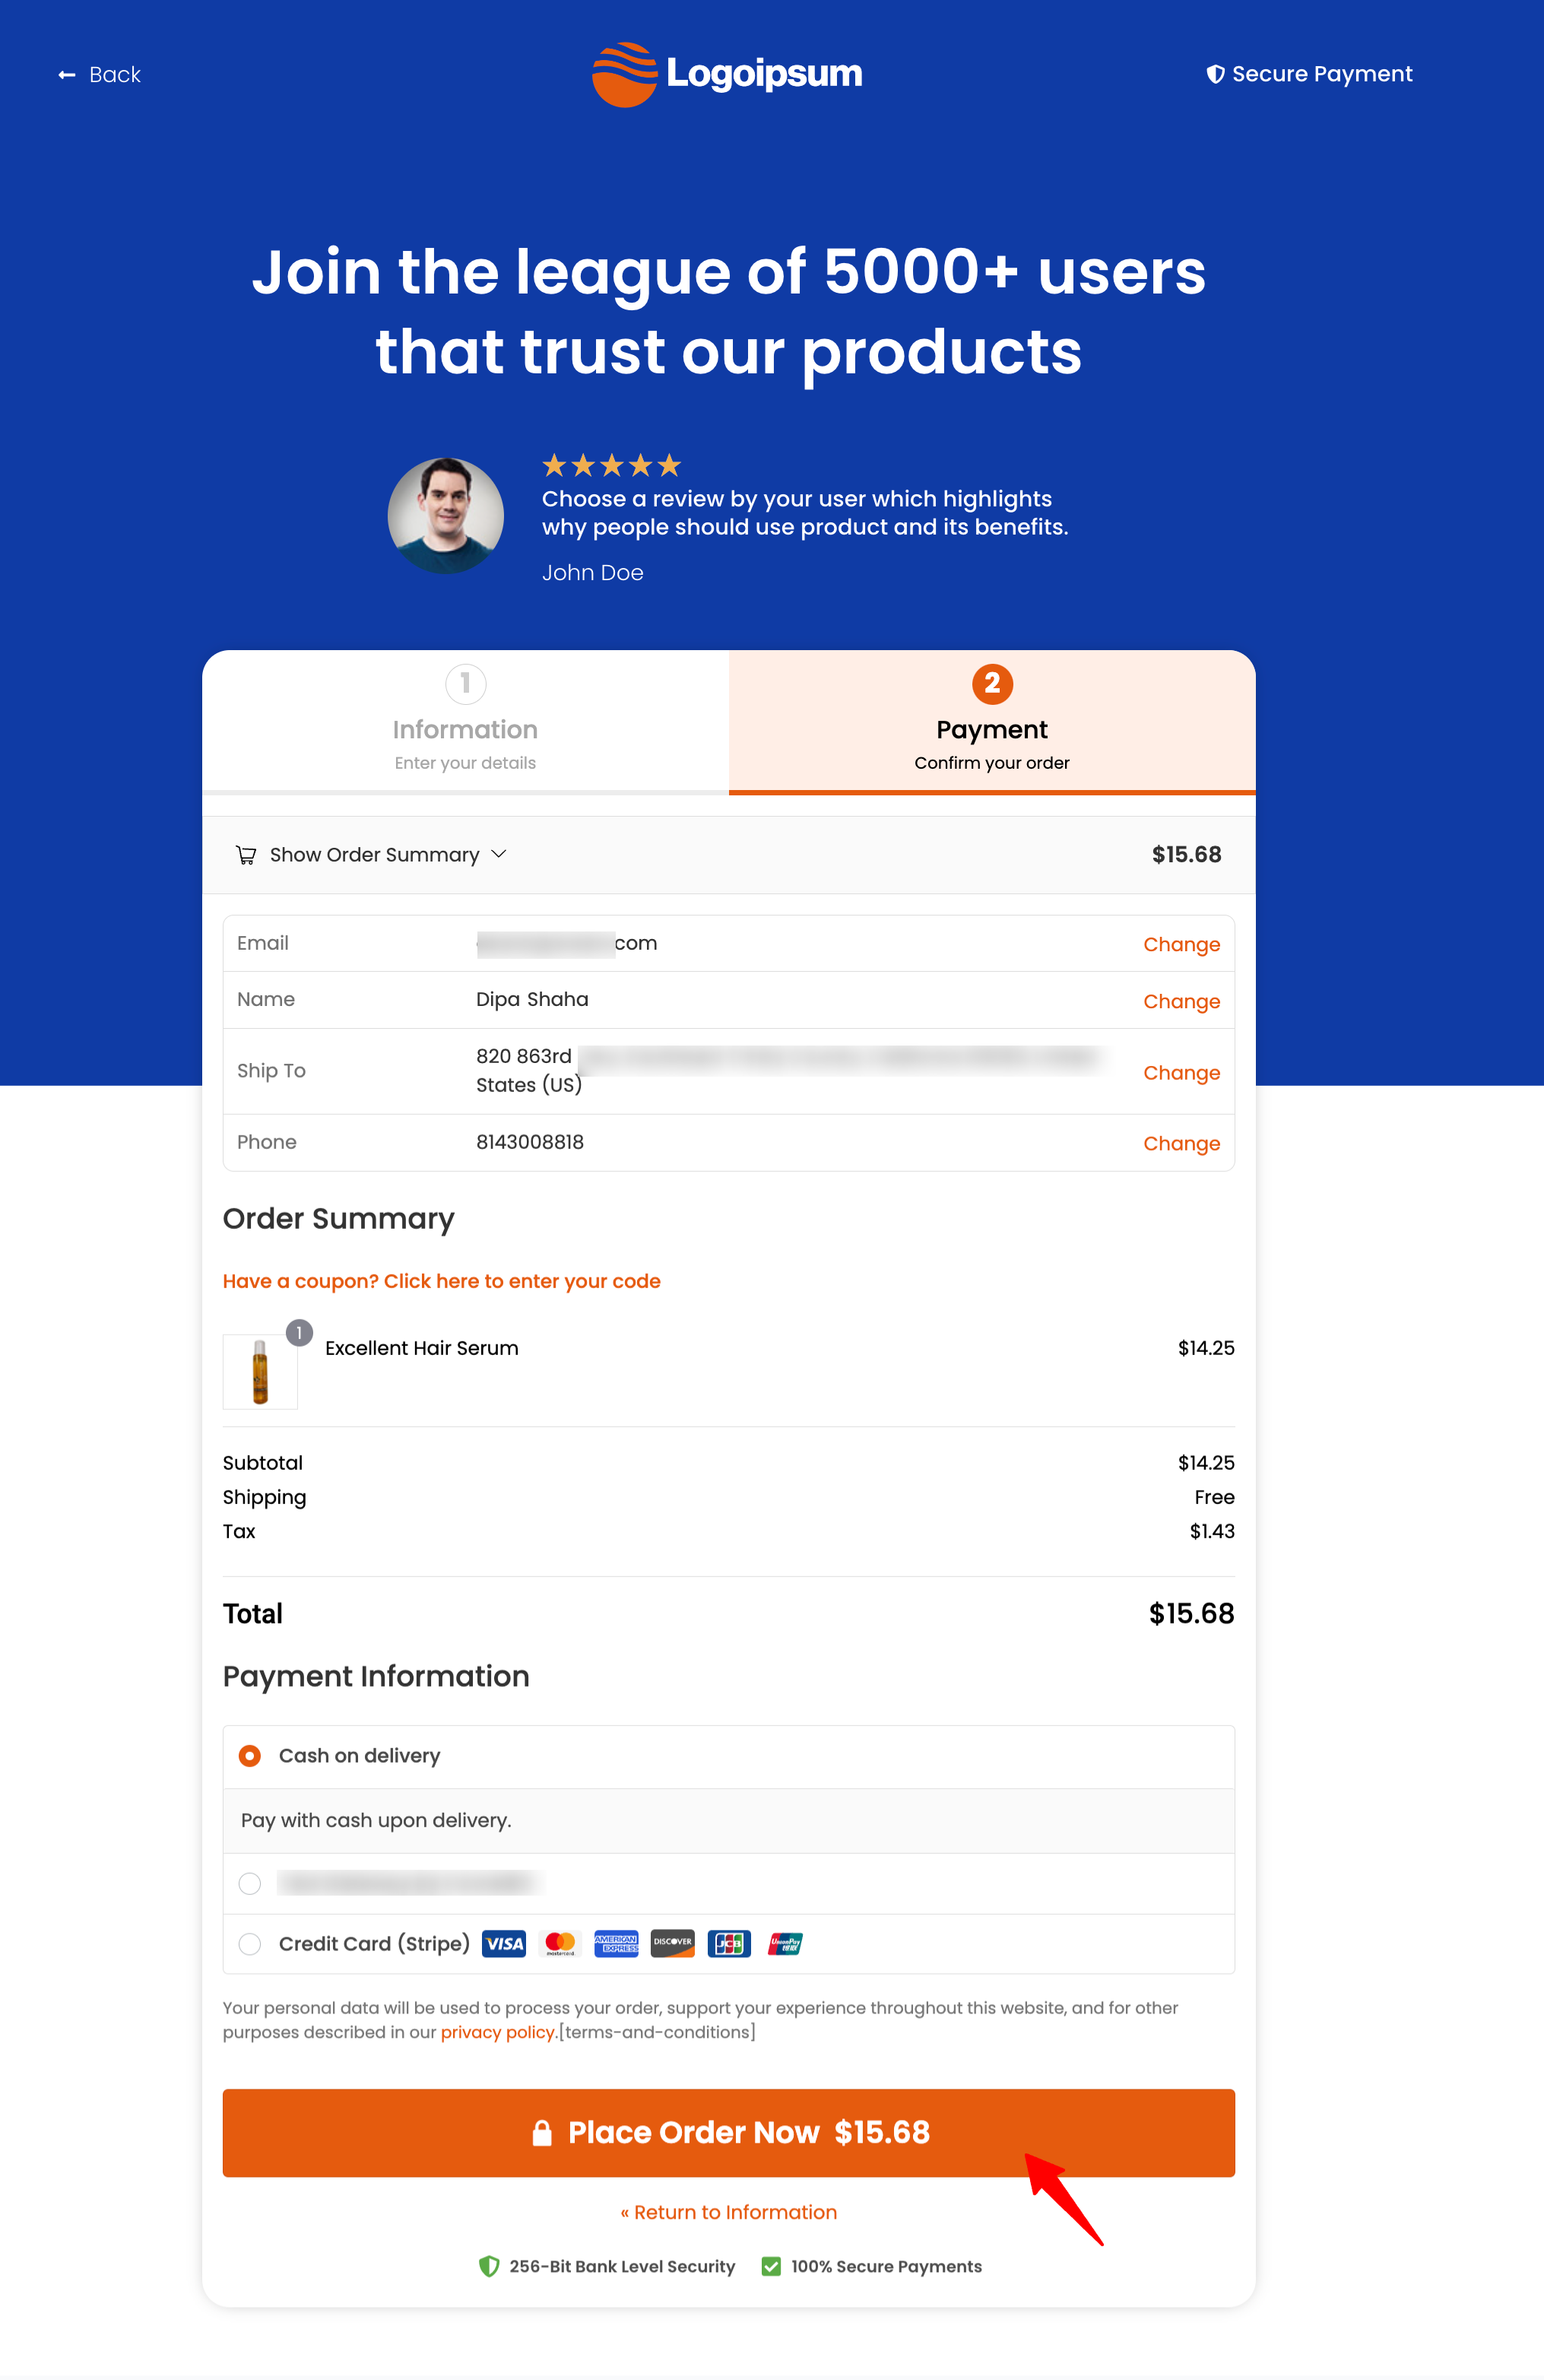
After users check out, they will see the upsell, as shown in the preview below.
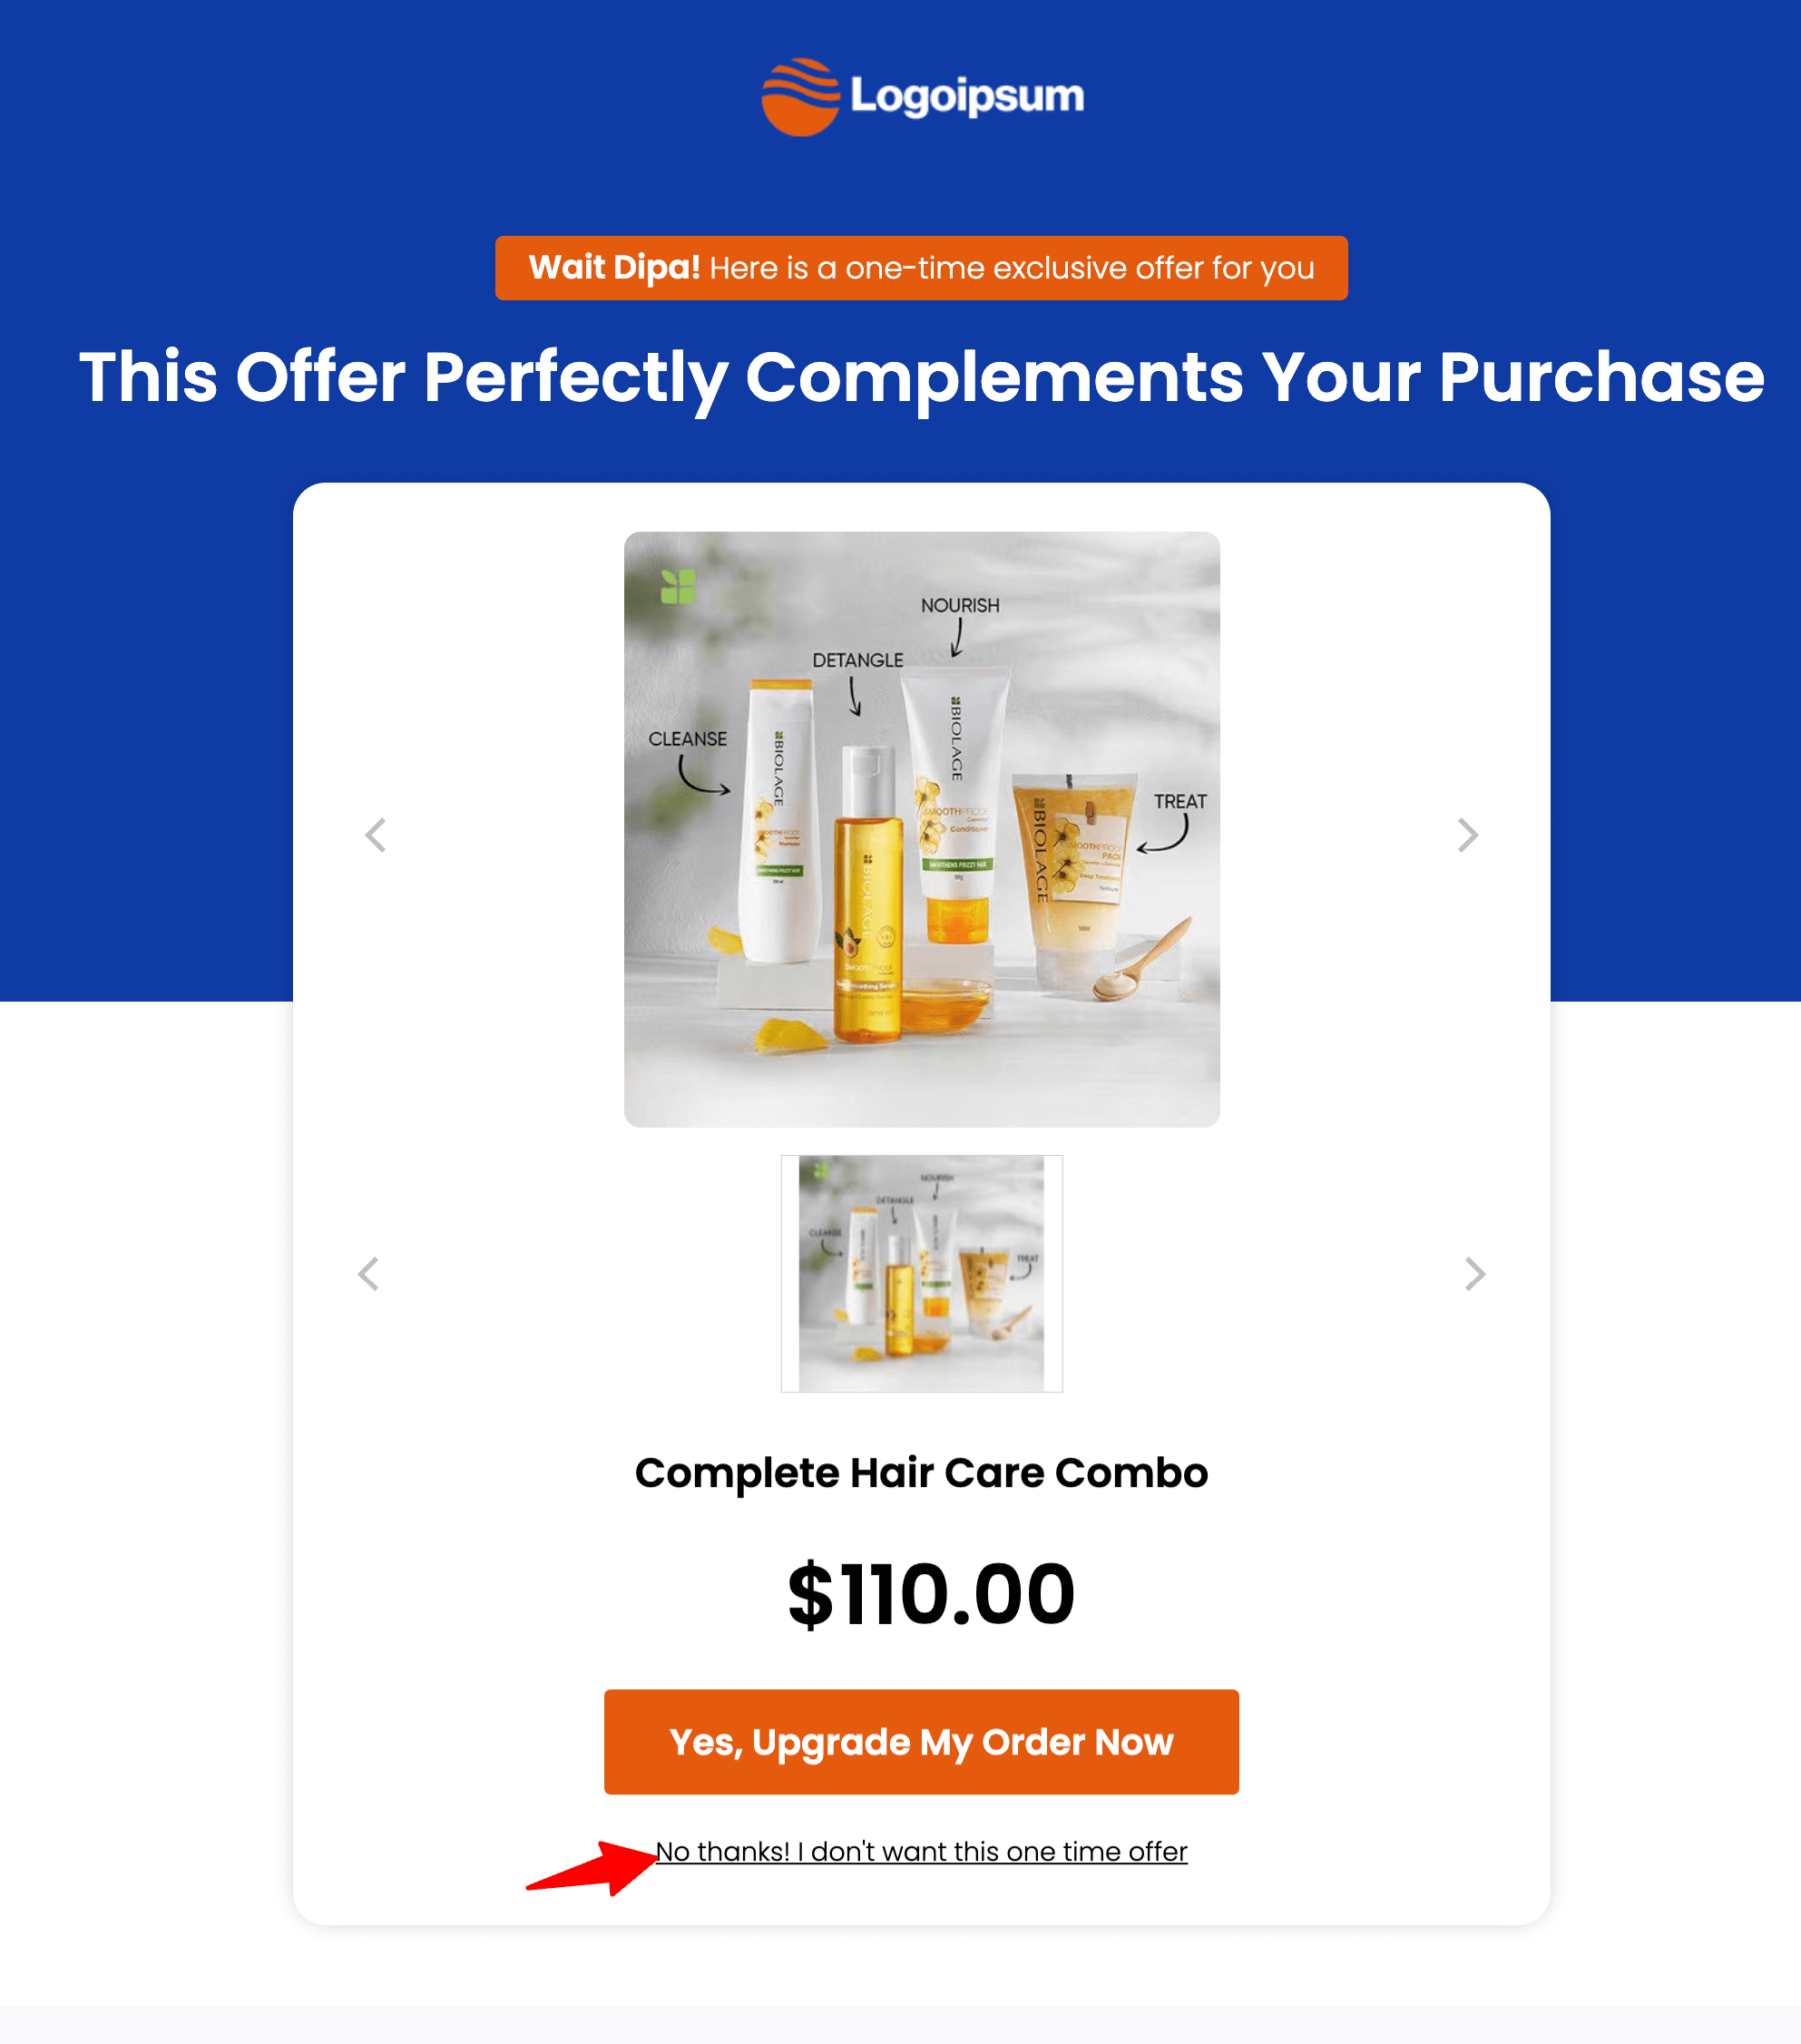
Decline the upsell and confirm the supplement offer appears, then accept it and check that the product lands on the order at the thank you page.
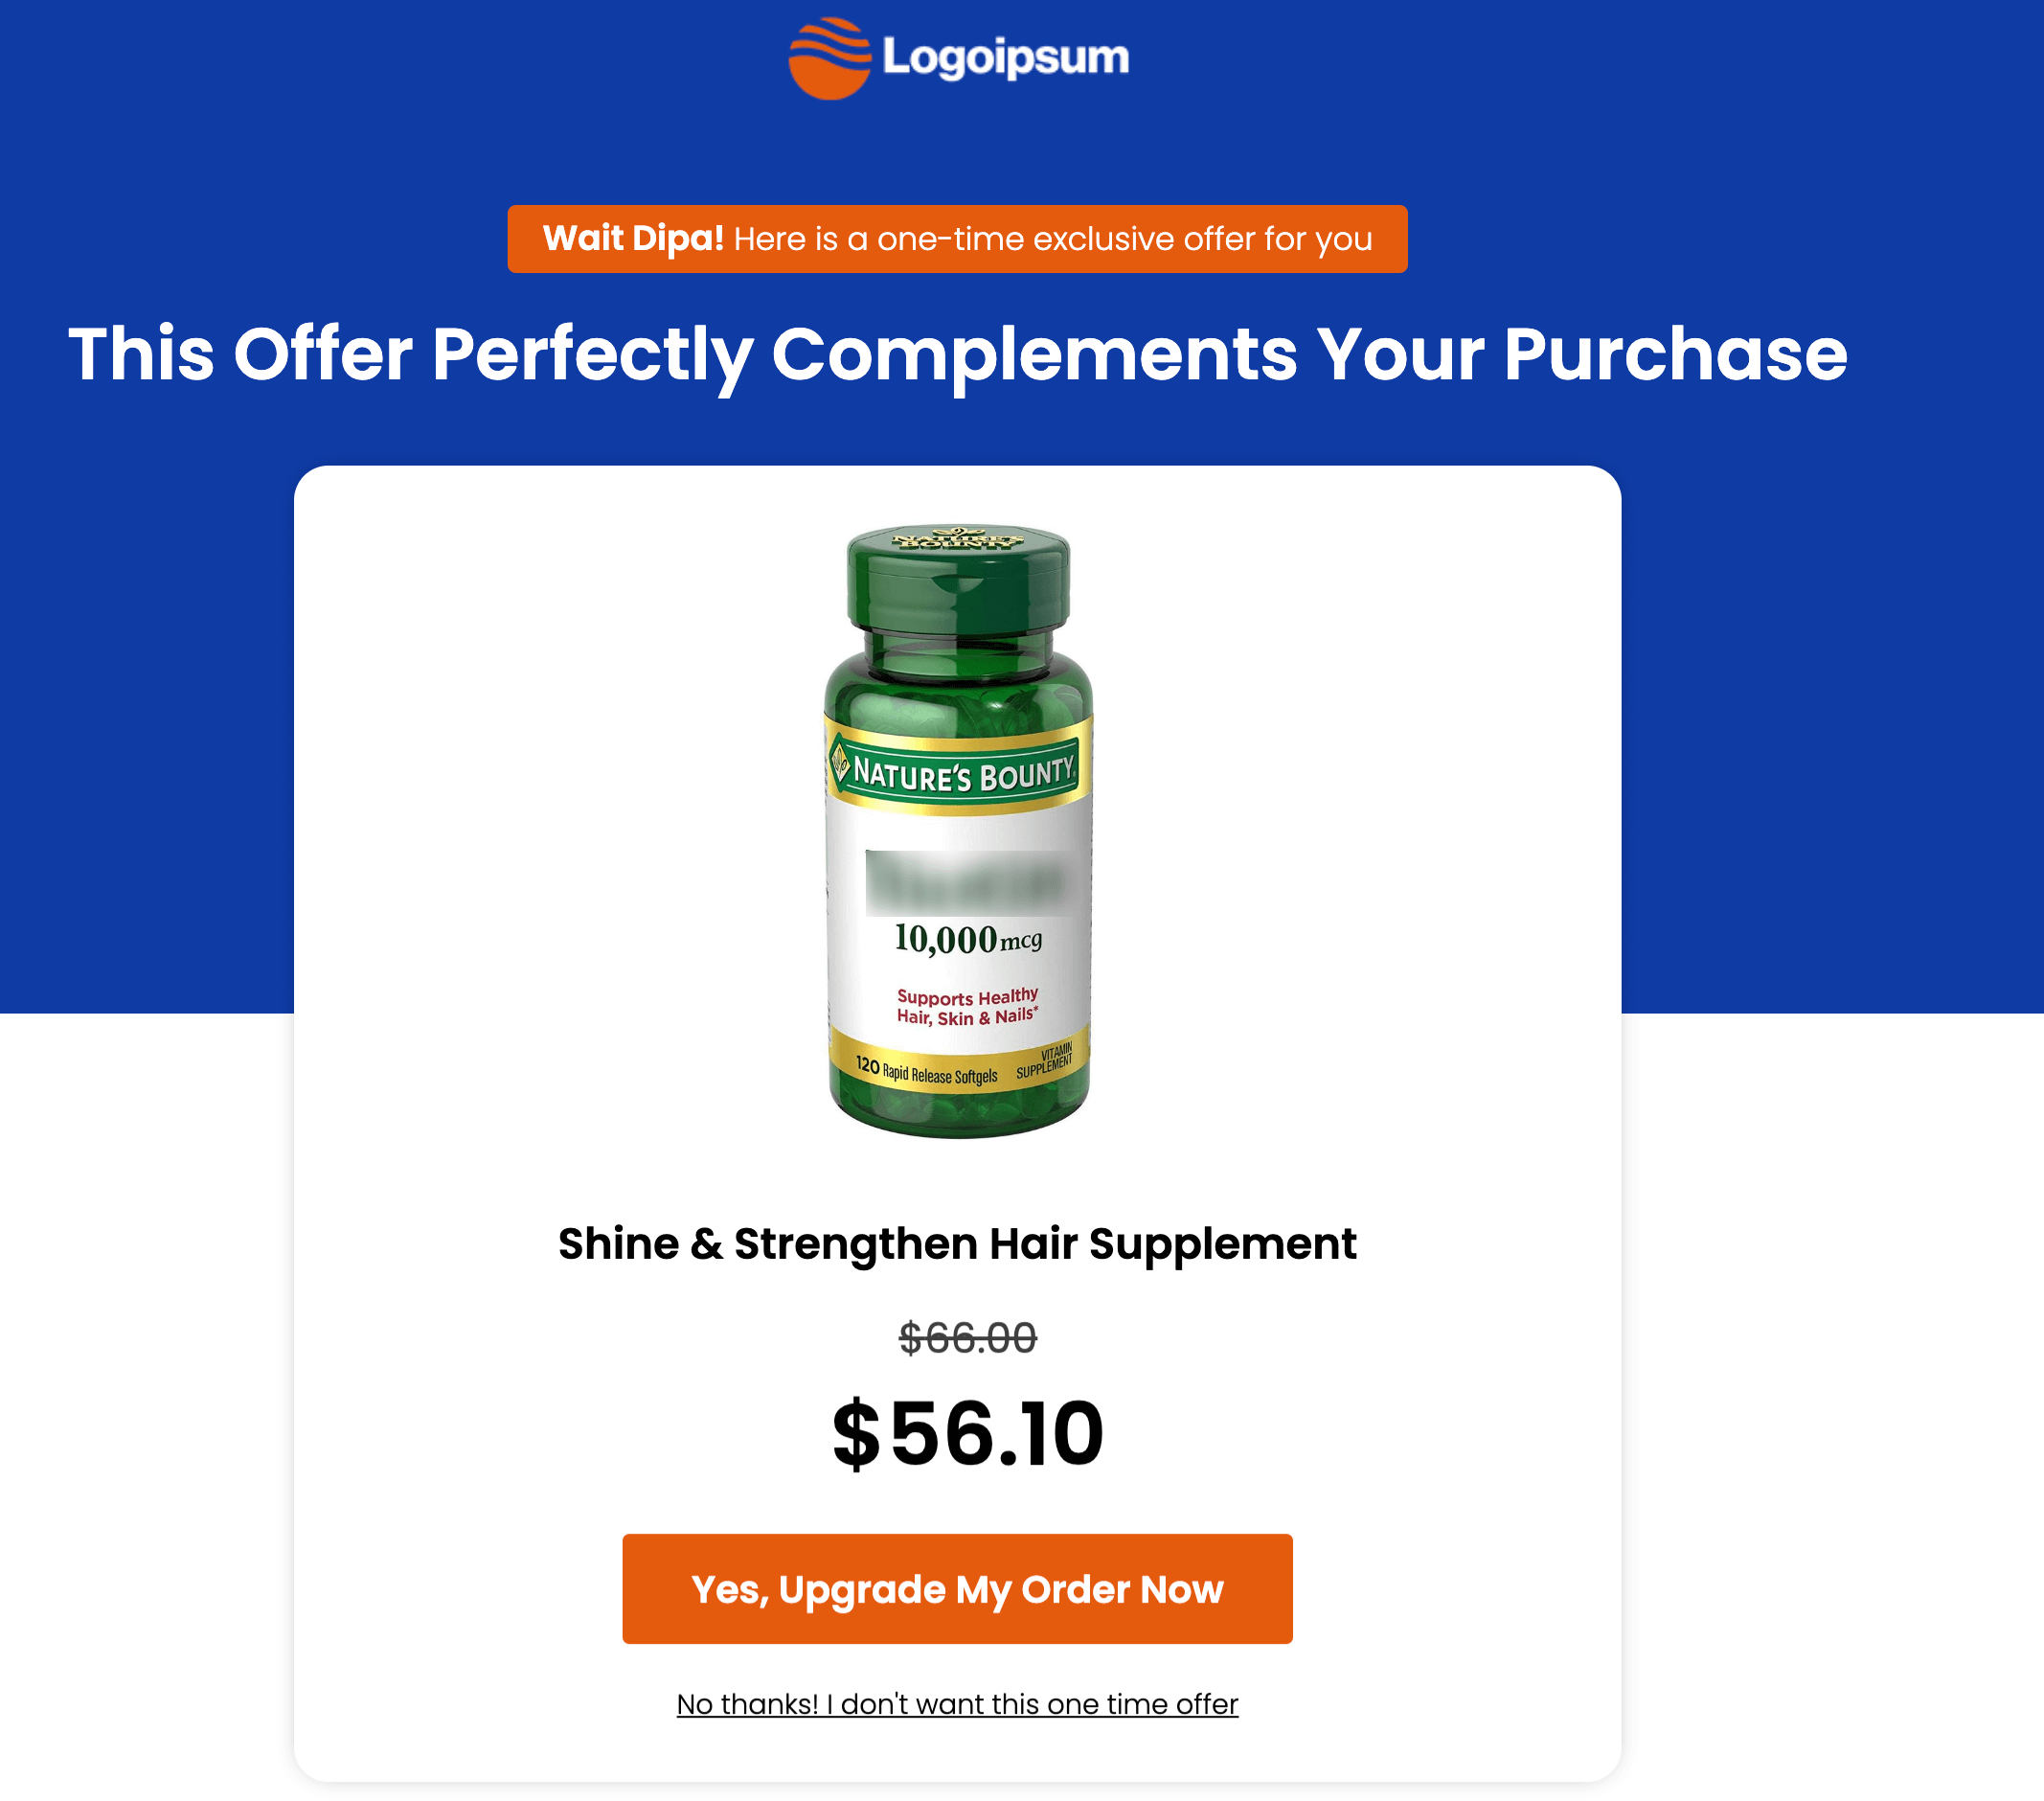
Test on desktop and mobile both, and make sure the accept button sits above the fold on a phone screen.
That is the whole downsell funnel: checkout, upsell, conditional fallback, thank you page. From here it runs on every order without you touching it.
7 Downselling Examples That Work
Here are down selling examples across business types, so you can borrow the pattern that fits your store.
1. The counter offer (in-person retail)
A cafe customer declines a $5 cake and accepts a $1.75 cookie.
Hotels run the same play at the front desk. When a guest passes on the suite, the agent offers a well-appointed standard room instead of losing the booking.
2. Payment Plans
A shopper declines a $297 course as a one-time payment, then accepts the same course at four monthly payments.
Nothing about the product changes, only the size of the commitment, which is why payment plans produce lifts like the 27% figure we cited above.
3. The starter tier (SaaS and software)
A user rejects the Pro plan because the price or feature load feels heavy.
The fallback is a Starter plan with core features only.
The customer enters your ecosystem now and upgrades once the value is obvious.
4. The lite version (eCommerce)
A customer declines a $79 skincare bundle. The smaller offer is the hero serum alone for $29.
You keep the category the customer already wanted and shrink the ask.
5. The trial or sample
A shopper declines a $ 39-per-month supplement subscription.
The downsell is a one-time $10 sample pack with no recurring commitment.
If the product delivers, the subscription sale follows naturally.
6. The value bundle (digital products)
A customer declines a $149 course.
The recovery offer is a $19 quick-start bundle: the first module, a checklist, and a template.
Digital assets cost nothing extra to deliver, so perceived value can run far ahead of price.
7. The scope-down (services)
A client declines a full agency retainer.
You counter with a fixed-price audit or a short starter engagement.
The client gets a low-risk taste of the work, and the bigger deal stays alive.
Teardown: A Payment Plan That Saves the Sale
The Webinar Lady sells a $47 course that teaches people how to build webinar slides.
After checkout, buyers see a one-click upsell for a $295 course on getting more webinar sign-ups.
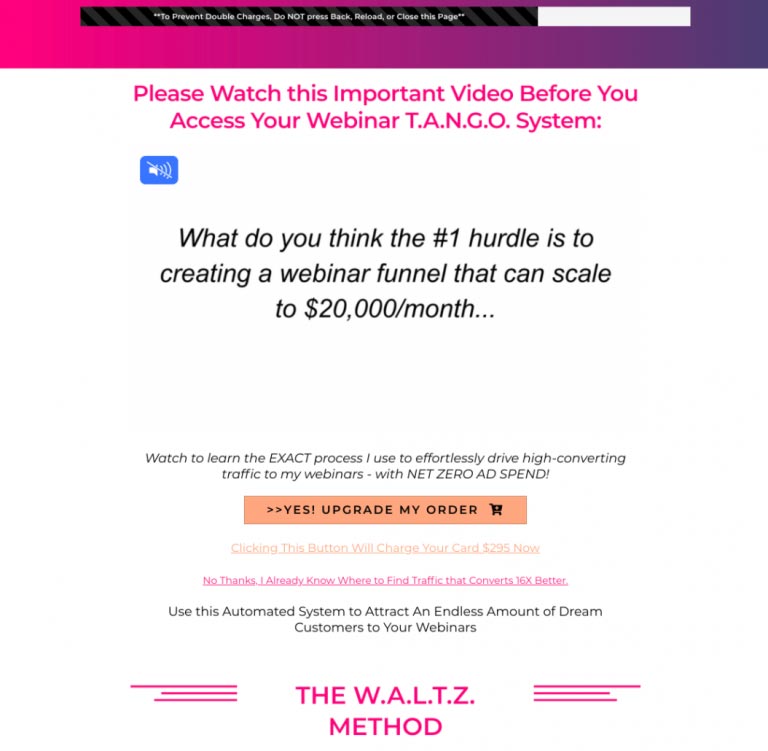
If they decline, the next offer presents the same course with five monthly payments of $79.
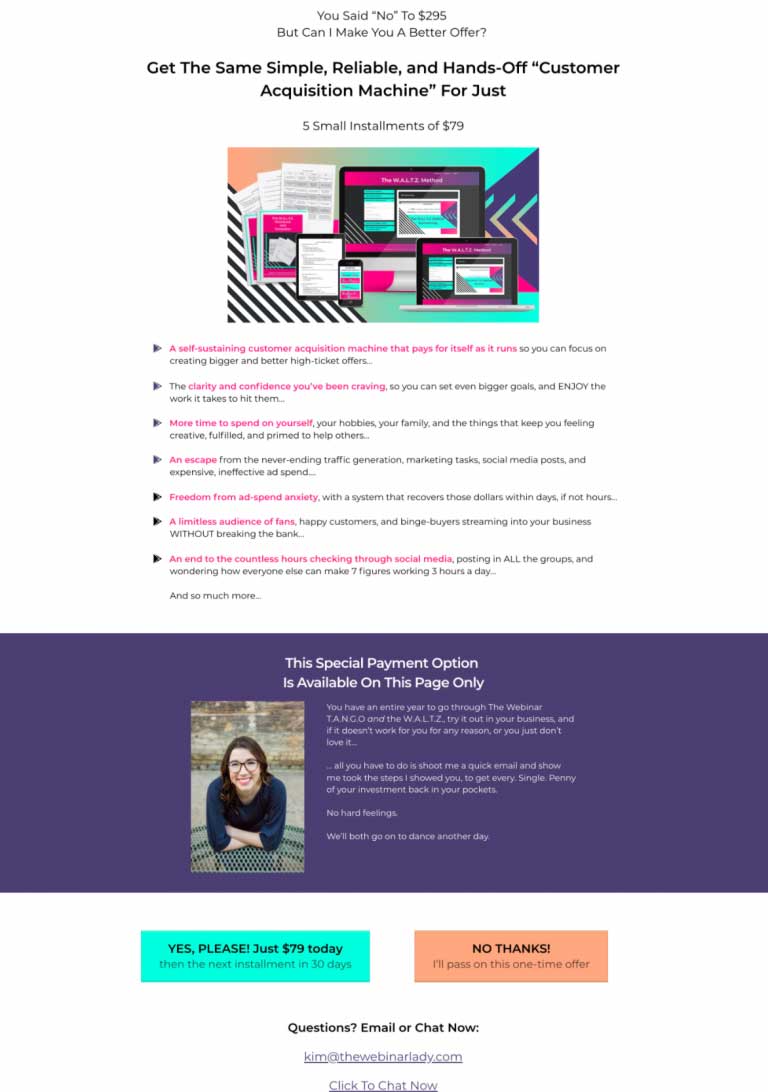
This downsell addresses two common objections: the price feels too high, or the buyer has just spent money and doesn't want another large charge.
Spreading the cost across five payments makes the offer easier to consider, even though the total comes to $395, which is $100 more than paying upfront.
Of course, not everyone will accept. Some buyers will notice the higher total and turn it down anyway. Others may simply prefer not to commit to another payment plan.
Installment payments also add extra work, including handling refund requests and following up on failed card payments.
If we were testing this funnel, we'd add another downsell: a cheaper option that includes just one course module.
That would give buyers who can't justify the full price another way to say yes.
Where to Show the Offer: 5 Trigger Points
A downsell can appear at five different points in the customer journey. The best time depends on what’s stopping the customer from buying.
1. After a declined post-purchase upsell
This is the most common setup. A customer completes their purchase, sees a one-click upsell, and declines it. You then show them a cheaper alternative.
Since the customer has already paid and their payment details are saved, accepting the downsell takes just one click.
FunnelKit Funnel Builder lets you set this up with a conditional offer path. We’ll walk through the setup later in this guide.
2. In the cart or on the product page
Sometimes, shoppers add an expensive product to their cart but hesitate before buying.
Showing them a cheaper alternative, such as last year’s model or a smaller size, gives them another option before they leave.
A side cart works well for this because shoppers can compare alternatives without leaving the page. See how to add product recommendations inside the side cart.
3. On exit intent
An exit-intent popup appears when a shopper is about to leave your store with items still in their cart.
Price is often part of the problem. According to the Baymard Institute, 40% of US shoppers who abandoned checkout for reasons other than simply browsing cited extra costs, such as shipping, taxes, and fees.
A cheaper product might bring the total within their budget and convince them to complete the purchase.
But if shipping costs are the real issue, address those directly. Offering a cheaper product won't lower the shipping fee.
4. In a recovery email
If the shopper leaves without buying, you can follow up by email.
An abandoned cart email sent 24 to 48 hours later can suggest a smaller or cheaper alternative instead of promoting the same product again.
This gives shoppers another option without asking them to reconsider the exact offer they already passed on.
5. At the cancel button
Downselling can also help with subscription retention. When a subscriber tries to cancel, you could offer a cheaper plan, a pause, or a longer billing interval to make staying more affordable.
The available options depend on your subscription plugin. You can compare the options in our guide to the best WooCommerce subscription plugins.
If you're setting up your first downsell, start with a post-purchase offer.
The customer has already completed an order. Plus, you don't need additional traffic, and accepting the offer takes just one click.
How to Measure Whether It’s Working
Four numbers tell you whether the offer earns its place in the funnel:
- Acceptance rate: The percentage of customers who see the downsell and accept it. As a rough starting point, if acceptance stays below 5% after a few hundred views, try changing the product or price.
- Revenue per view: Total revenue from the offer divided by the number of views. Use this to compare offers, such as a $5 downsell accepted by 30% of viewers earns $1.50 per view.
- AOV with and without the offer: Compare the two to see whether the downsell is increasing how much customers spend per order.
- Refund rate on the offer: If customers refund the downsell more often than your main products, the offer page might be setting the wrong expectations.
- Upgrade rate: For starter plans and sample products, track how many buyers eventually purchase the full version.
- Churn after a save offer: For subscriptions, measure how many customers who accepted a retention offer still cancel within 90 days.
There's no reliable public benchmark for downsell acceptance rates yet. Many figures shared online don't include a verifiable source.
Instead of comparing your results with an unverified industry average, test different offers against each other and use your own results as a baseline.
Estimate the opportunity before you build
You can estimate the potential revenue from a post-purchase downsell with this formula:
Monthly orders × upsell decline rate × downsell acceptance rate × offer priceThe following example uses illustrative numbers, not actual store results.
Say your hair-care store gets 1,000 orders a month. Of those buyers, 60% decline the upsell, and 15% of that group accept the $39 downsell.
That's 1,000 × 0.60 × 0.15 × $39 = $3,510 in additional monthly revenue from orders you've already secured.
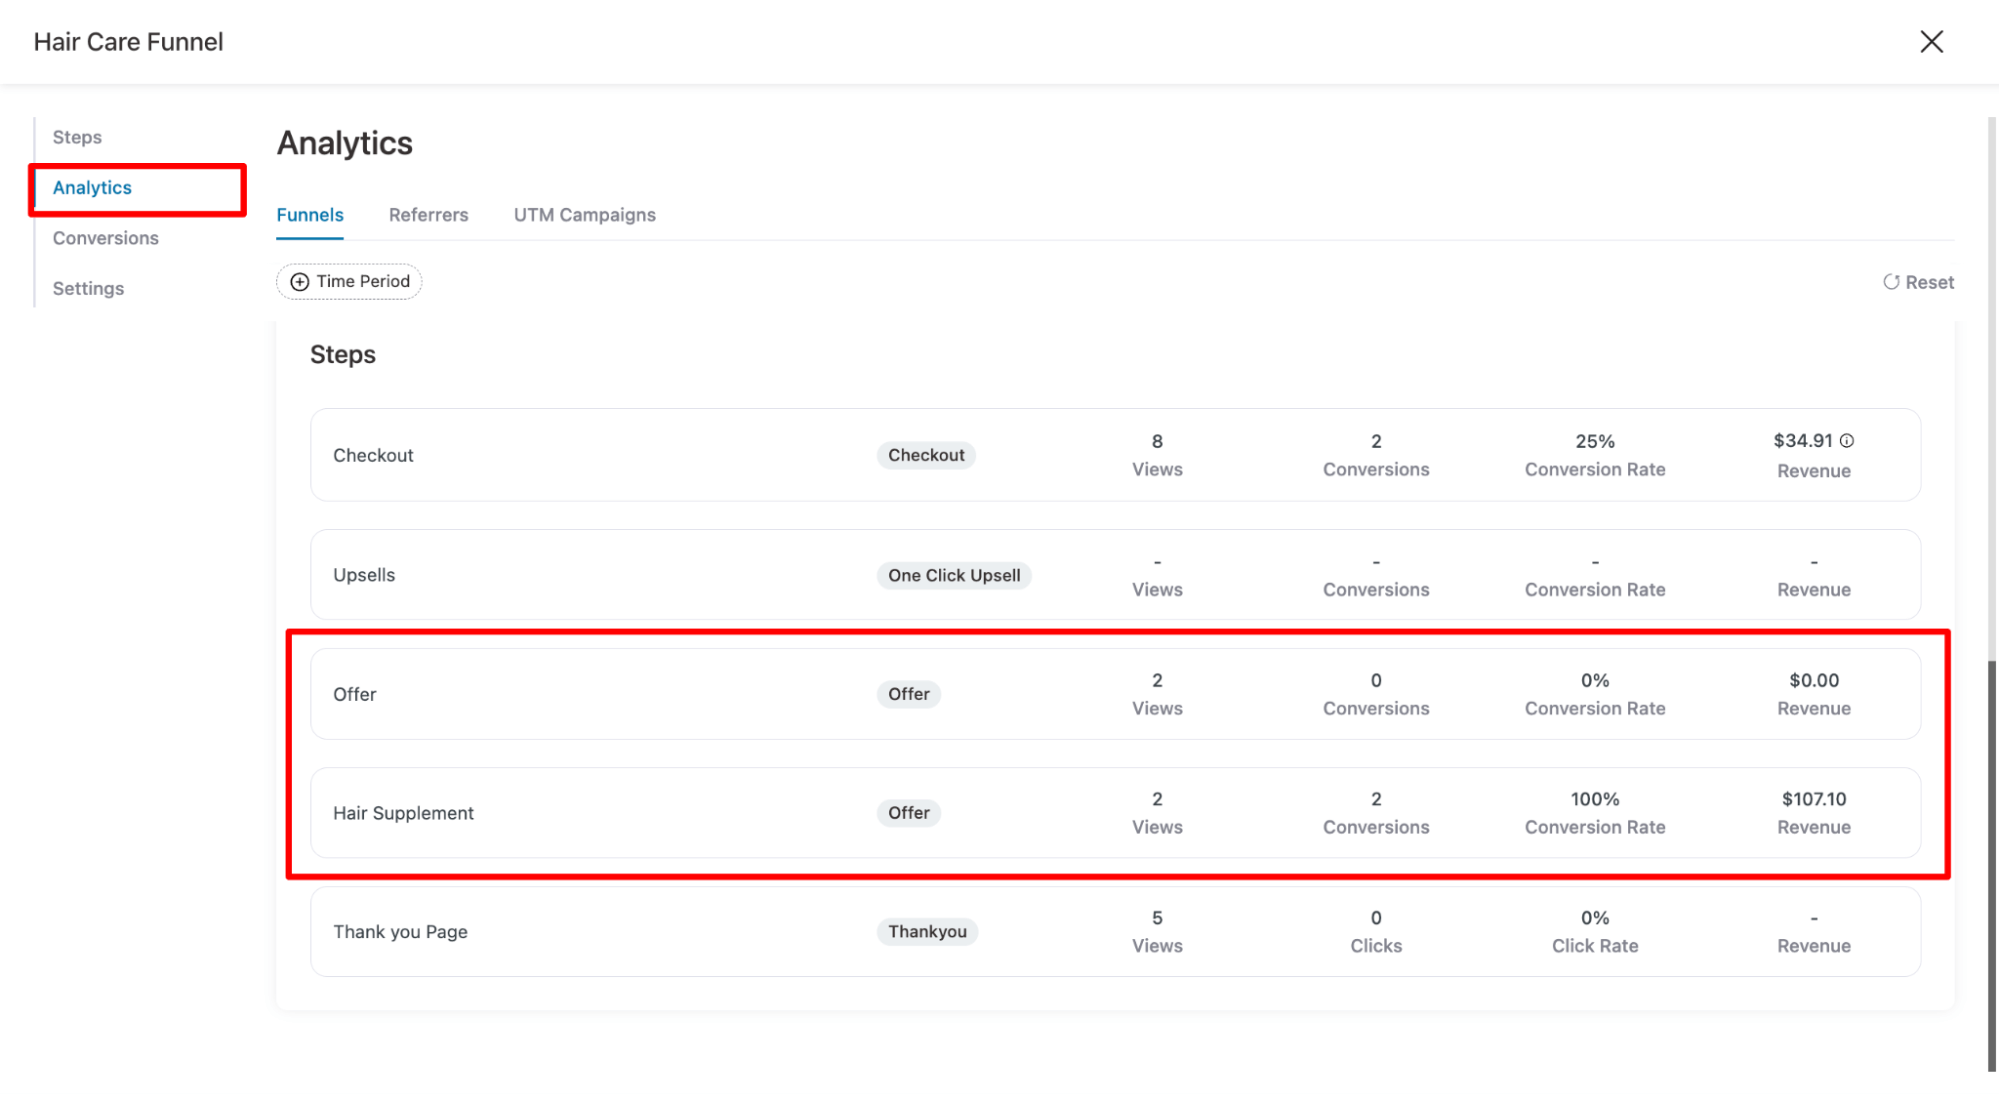
Inside FunnelKit, the Analytics tab reports views, conversions, conversion rate, and revenue for each upsell and downsell offer, so you can see each offer’s contribution without exporting anything.
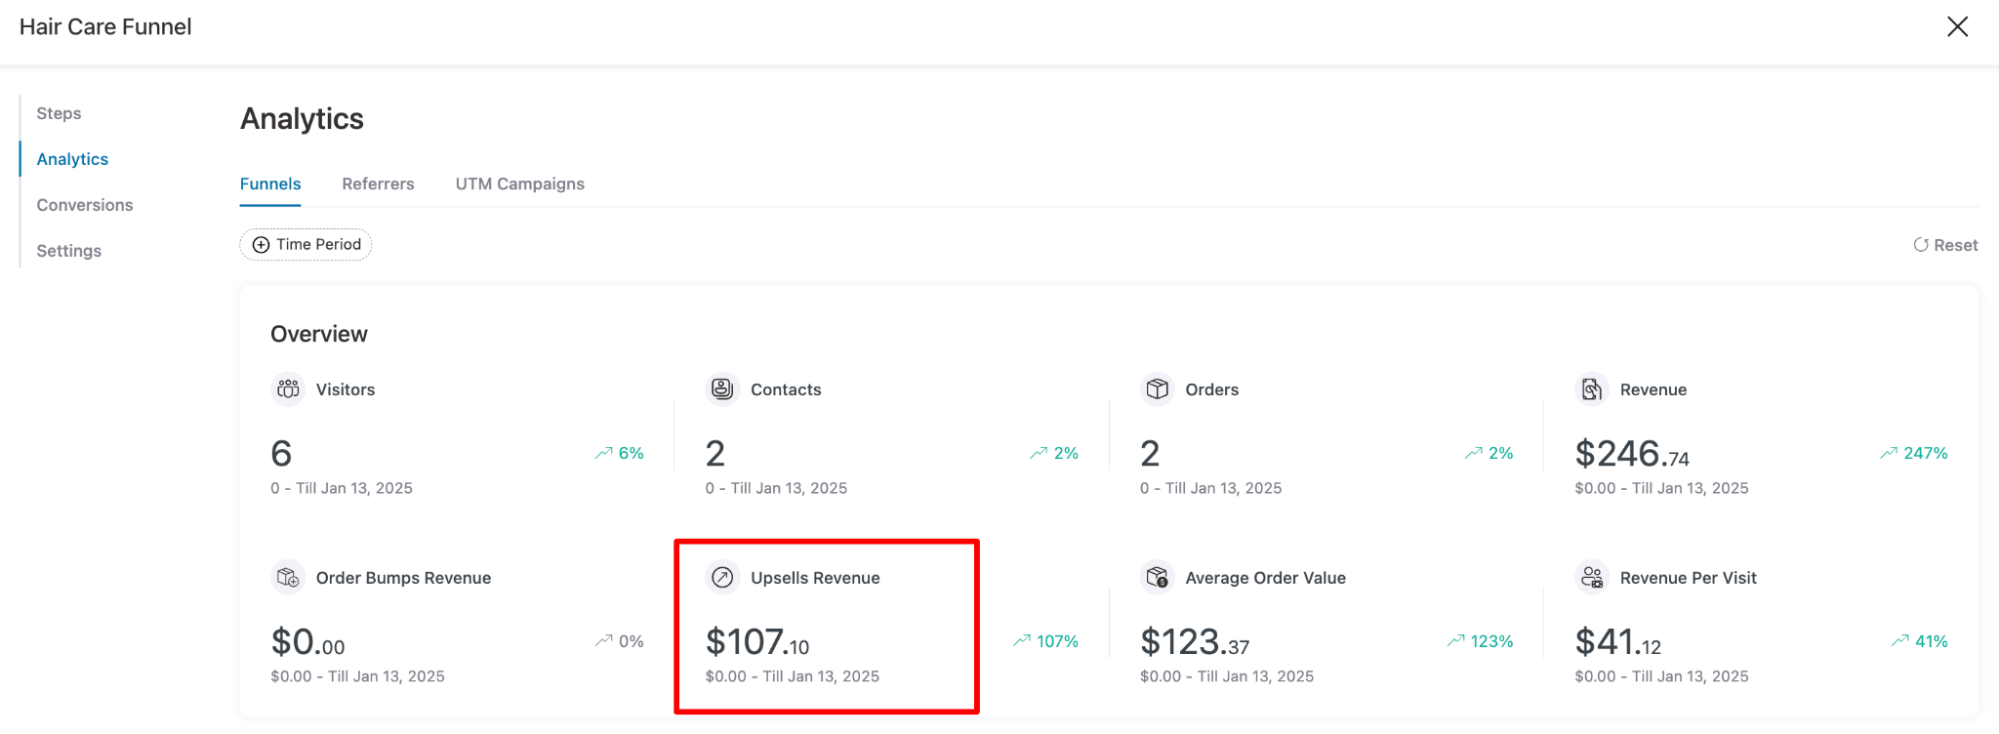
On the same page, scroll down to see data for each upsell and downsell offer, including views, conversions, conversion rate, and revenue.
Here, you can see that our upsell offer is named 'Offer', and the downsell is "Hair Supplement".
How to A/B Test the Offer
Test one element at a time, such as the price, the product, or the headline.
Since a post-purchase downsell appears only to customers who decline the upsell, fewer people will enter the test than with a checkout page test.
As a rough starting point, aim for around 100 accepted offers per version before drawing conclusions.
At a 10% acceptance rate, that means roughly 1,000 views per version. This isn't a guarantee of statistical significance, but it gives you more data than a handful of sales.
If your store only gets a few hundred upsell declines each month, reaching that sample size could take several months.
In that case, test one change at a time and compare results across similar periods, accounting for changes in traffic and sales.
You can use FunnelKit's A/B testing feature for funnel pages to compare offer pages and see which version performs better.
Frequently Asked Questions
To set up conditional upsells and downsells based on the product purchased in a sales funnel, define the main product for which you want to offer additional deals.
When the customer purchases that product, you can trigger an upsell offer. If the customer declines the upsell, a downsell offer can then be presented.
This lets you tailor offers based on the product the customer has already shown interest in.
In FunnelKit, you can easily offer upsells and downsells for all payment methods. However, you need to enable them first.
To do this, go to FunnelKit ⇒ Settings, and under the One Click Upsells tab, select all the payment gateways for which you want to offer upsells and downsells.
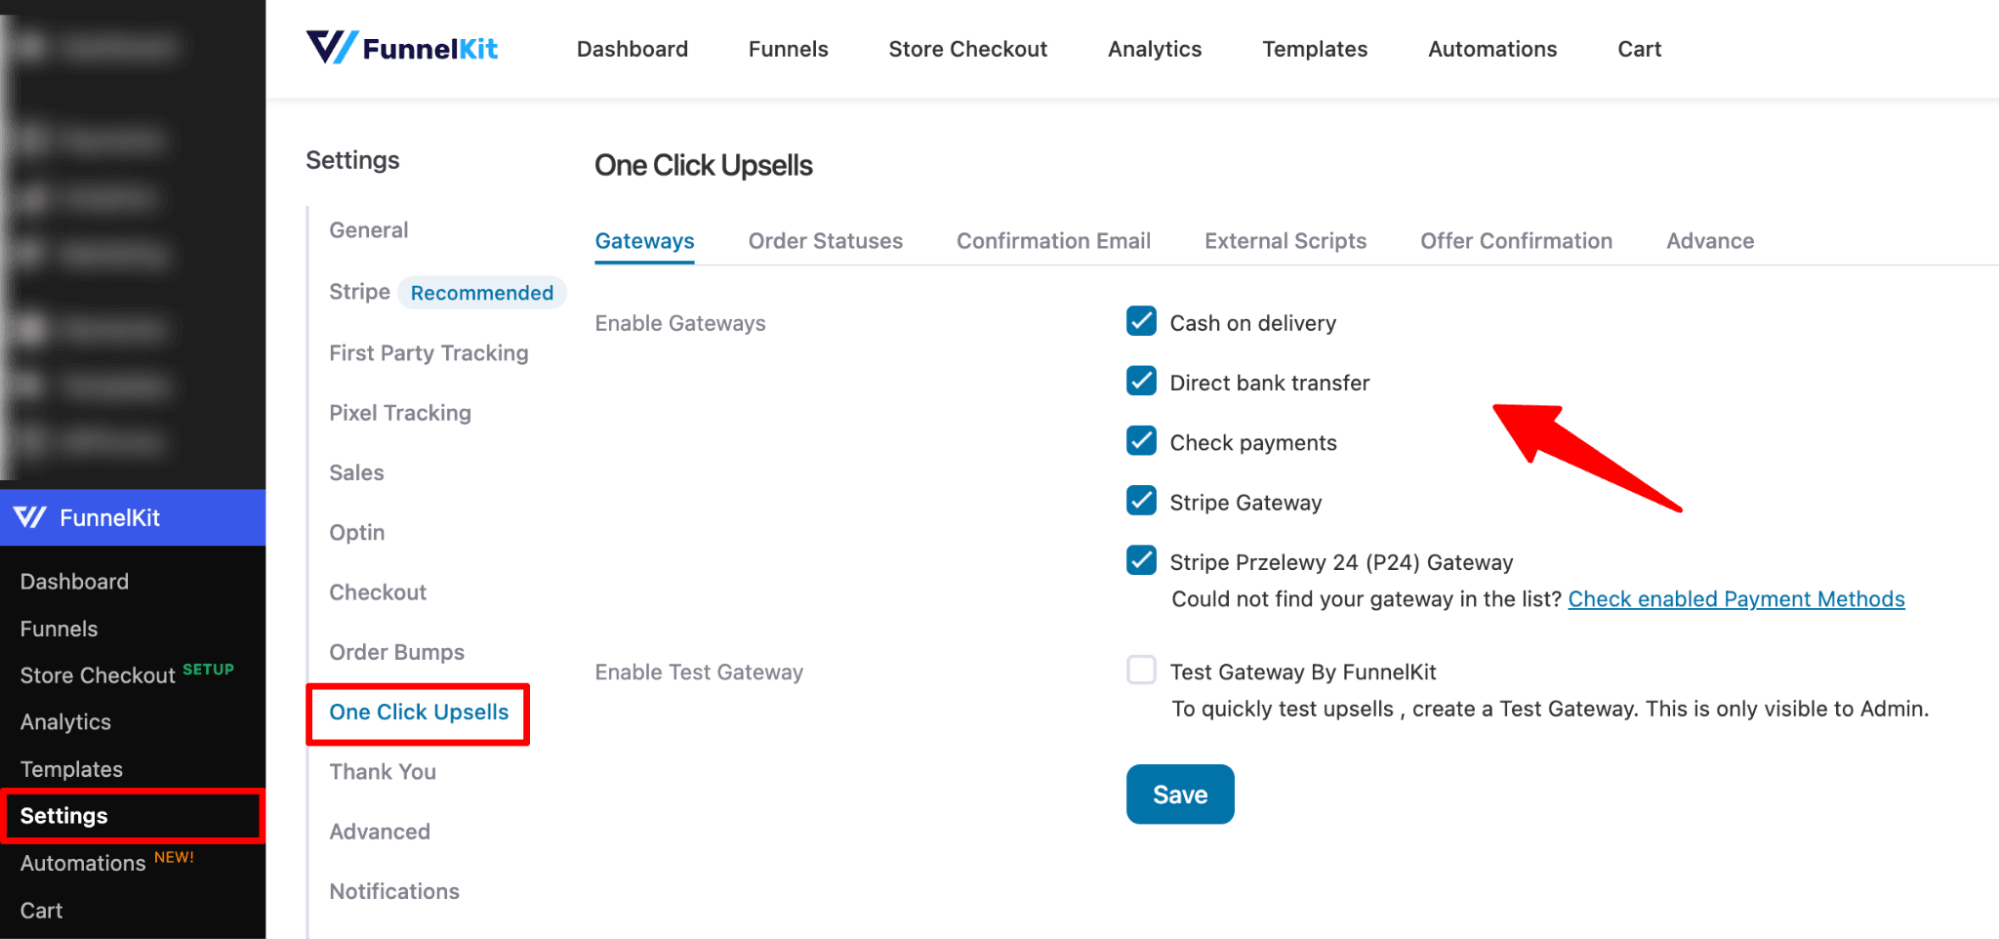
Don't forget to save.
Now, anyone who checks out with any enabled payment method will be offered an upsell, and they can accept the upsell or downsell using the same payment method.
1. Showing too many offers: Every extra offer page delays the order confirmation customers are waiting for. Stick to one upsell and one downsell per order, and use email to promote anything else.
2. Offering an unrelated product: If someone buys yoga gear, offer a smaller yoga-related product. Suggesting a kitchen gadget feels out of place and gives them little reason to buy.
3. Using guilt to push the offer or hiding the decline button: Tiny decline links and phrases like “No, I don’t want healthier hair” pressure customers into saying yes. You might get a few extra sales, but the damage to customer trust isn't worth it.
4. Hiding the total cost of a payment plan: If the installments cost more than paying upfront, show the full amount alongside the installment price. Customers should know exactly what they'll pay before accepting the offer.
5. Setting up the downsell and forgetting about it: If your offer has been converting at just 2% for months, it's time to review it. Check the metrics regularly, test a different product or price, and see if you can improve the results.
Rarely, if it’s one relevant offer and declining takes a single click. Problems start when the offers feel endless, or the decline link is hard to find.
Be careful here. If you immediately slash the price of the exact same item, you devalue your product and annoy customers who might have bought it at full price.
Instead, remove bonuses or offer a "lite" version to justify the lower price.
Yes, and digital products are often the easiest case. With no shipping or inventory costs, you can carve a single module or a template pack out of what you already sell.
Technically, yes, using WooCommerce hooks and a payment gateway that supports saved payment tokens.
You’d have to hand-build redirects and one-click charging around live payments, though. A funnel plugin is faster and far less risky.
Yes. The same product at two price points, or two different products in that slot, can produce very different acceptance rates.
Test one variable at a time and give each variant enough orders to mean something before you decide.
Downsell is one word. You will also see the hyphenated form down-sell, and the technique itself is called downselling or down selling.
All of them mean the same thing: a cheaper alternative offered after a customer declines a pricier one.
In SaaS and subscription finance, the term refers to recurring revenue lost when existing customers reduce seats, usage, or plan tier without canceling outright.
It appears alongside churn in net revenue retention reporting, a different usage from the sales technique in this guide.
A discount reduces the price of the same product or offer. A downsell gives the customer a different, usually smaller, option.
If customers learn that declining an offer gets them a lower price, they may start turning down offers on purpose.
Customers who paid full price might also feel they've missed out on a better deal.
Offering a smaller product or a payment plan gives price-sensitive buyers another option without cutting the price of your original offer.
A downsell is an offer you make to someone who declines a new purchase or upsell. A downgrade happens when an existing customer switches to a lower-tier plan.
A retention offer is designed to keep an existing customer from leaving. For example, when someone clicks the cancel button, you might offer them a cheaper plan or the option to pause their subscription.
The offers may look similar, but their timing and purpose differ: a downsell aims to recover a sale, a downgrade changes an existing plan, and a retention offer tries to prevent a customer from leaving.
Banks use the word in two ways:
- Consumer lending: A lender approves an applicant on worse terms than the best ones advertised, such as a lower credit limit. The applicant is said to be “downsold”.
- Syndicated loans: A “sell-down” is when a bank passes part of its share of a syndicated loan to another lender to spread the risk.
Start Recovering Lost Sales With a Downsell
A single downsell won't transform your store overnight. It gives customers who decline your main offer another option and brings in extra revenue from some of those orders.
Combine it with an order bump at checkout, an upsell after payment, and abandoned cart recovery emails, and those small gains can add up over time.
Start with one downsell behind your best-selling upsell. It's the easiest way to measure the results.
Run it for 30 days, then test a different price and keep the offer that generates more revenue per view.
FunnelKit Funnel Builder lets you manage the entire sequence in one funnel, from the initial upsell to the downsell shown when a customer declines.
It also supports one-click purchases and per-offer reporting, so you can track each offer's performance.
Editorial Team
October 11, 2026You can customize the WooCommerce cart page with the Cart block, a page builder like Elementor, or CSS and PHP snippets. Which method works for you depends on the cart...
Editorial Team
October 9, 2026A WooCommerce discount lowers what a shopper pays, either through a reduced product price or a code entered at checkout. Out of the box, WooCommerce gives you two ways to...
Editorial Team
October 8, 2026WooCommerce automation can tell you when a product is running low, but it won’t chase up a shopper who left something in their cart. WooCommerce handles things like order emails,...






