
According to several marketing studies, selling to a new customer is harder than selling to an existing customer.
This is not just a statement. But a FACT.
Hence, it is crucial that you welcome your new subscribers with a great first impression (a tempting welcome email), familiarize them with your brand, and, most importantly, make them buy your products or services.
But you can’t keep doing this 24/7 for every new subscriber, can you?
That is why we are going to show you how you can automate your welcome email campaign using FunnelKit Automations - the most powerful WordPress marketing automation tool.
Once set, this automation will welcome your new subscribers with engaging emails on autopilot, and the subsequent emails will push them to make their first purchase with you.
Table of Contents
- 1 Why Are Welcome Emails Important?
- 2 How to Build Your Welcome Email Campaign?
- 2.1 1. Install and Activate FunnelKit Automations
- 2.2 2. Creating a Form to Capture Leads
- 2.3 3. Import Pre-Built Automation and Customize the Trigger
- 2.4 4. Customize Delay and Double Opt-in Email Settings
- 2.5 5. Modify the Double Opt-in Email: Add Links To Your Lead Magnet
- 2.6 6. Send a Review Email to Boost Engagement
- 2.7 7. Create a Dynamic Coupon To Send In The Sales Pitch Emails
- 2.8 8. Trigger Urgency with Last Call Email
- 2.9 9. Go Live with Your Welcome Email Campaign
- 3 Get Actionable Insights On The Canvas Itself
- 4 Are You Ready to Automate Your Welcome Email Campaign?
Why Are Welcome Emails Important?
Welcome emails are sent to new customers or new email subscribers.
These emails greet them, welcome them on board, and give them an opportunity to explore your brand.
According to Omnisend’s eCommerce Statistics Report 2020, welcome emails have one of the highest open rates (31%), one of the highest click-through rates (5X more), and one of the highest conversion rates (52%).
If these reasons are not enough to convince you to start designing your welcome emails, this might: 7 out of 10 new subscribers EXPECT to receive a welcome email from you.
You can even share some of your product stories, recommend your best sellers, share your best-reviewed products, and more.
By recommending products right from the start, your welcome email can get people shopping again.
Instead of just congratulating new subscribers on joining the email list, you can welcome your new audience by sending them right back to the store with a compelling reason.
How to Build Your Welcome Email Campaign?
In this post, we are going to use FunnelKit Automations - the most powerful WordPress marketing automation tool.
It allows you to automate your welcome email campaign, abandoned cart email sequences, win-back campaigns, post-purchase email sequences, and any other campaigns as well.
In June 2022, we launched FunnelKit Automations 2.1 with a next-gen automation builder. Read all about it to know how you can revamp your marketing game today.
FunnelKit Automations comes in two versions - a free version and a pro version.
Although the free version allows you to get a headstart in eCommerce marketing automation efforts, the pro version allows you to build advanced workflows and integrate with other WordPress tools as well.
Today, we are going to use the pro version of FunnelKit Automations to illustrate how to import and customize a perfect welcome email campaign.
1. Install and Activate FunnelKit Automations
Once you purchase your pro version, you will find these files in your FunnelKit (formerly WooFunnels) account dashboard. Download the zip files of the plugins.
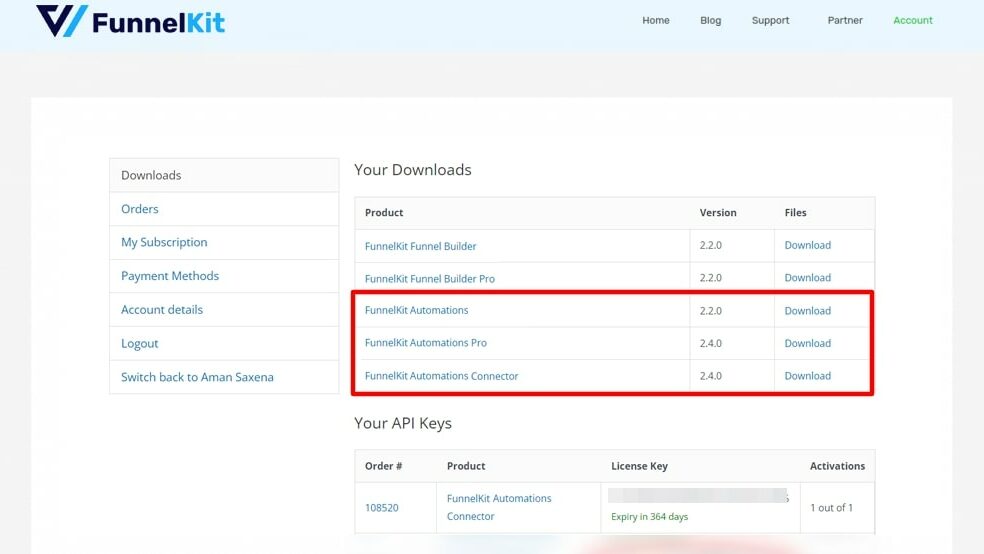
The next step is to upload the plugins. Click on plugins and select Add New.
Upload the zip files you downloaded and click on Install.
Once it gets installed, activate the plugin from here.
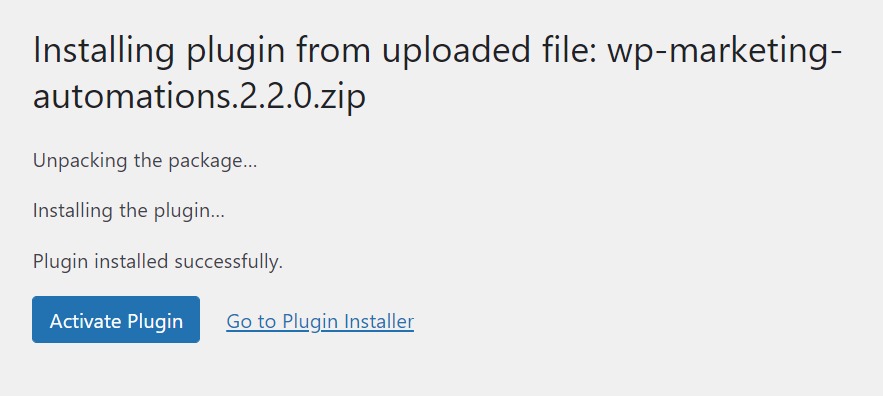
Well done! You have installed the FunnelKit Automations core plugin.
Note: Upload, Install, and Activate each plugin one by one in the same way.
To activate the license, go to your FunnelKit (formerly WooFunnels) account and copy the activation code as shown below.
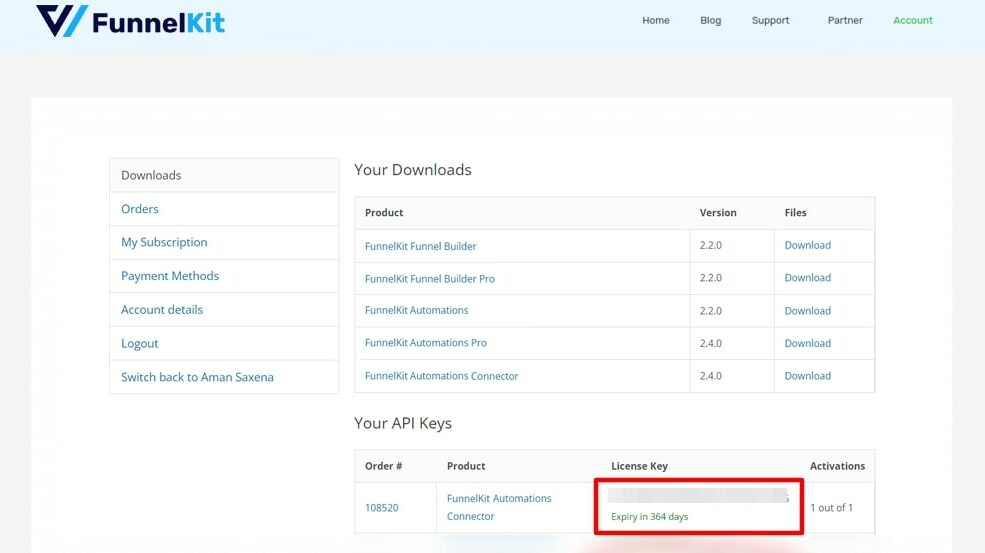
Go to FunnelKit Automations settings and paste both (FunnelKit Automations Pro and Connectors plugins) the activation codes here:

Then, click on Activate.
Once both the plugins are activated, click on the Save Settings button.
That's it! You've successfully activated the license of FunnelKit Automations.
2. Creating a Form to Capture Leads
Before you set up your welcome email campaign, you need to build a lead capture form.
This form will allow you to collect leads. These leads will be further used to scale your business.
FunnelKit Automations allows you to create beautiful forms with any of your favorite form builders - Elementor Forms, Gravity Forms, Ninja Forms, and more.
In our illustration, we are going to import a simple and quick form using WPForms.
On a side note, if you are looking to create a full-fledged opt-in page instead of an opt-in form, we have a complete guide for that too.
Navigate to WPForms on the sidebar of your WordPress dashboard, and click on Add New.
Click on the Simple Contact Form and select Use Template to import this straightforward form with just one click.
Once you import this template, you can customize it according to your needs.
In this example, we do not need the Comment or Message box. Hence, we are going to delete it as shown in the image above.
If you do need this box, then keep it, and turn off the ‘required’ toggle on the left-hand side. So, that you can collect the users’ emails without making commenting mandatory for them.
Now, embed the form on your website. You can either create an all-new page for your form or choose an existing one.
However, the best method is to embed it using the shortcode. Click on Embed and copy the shortcode.
No matter which page builder you use, they will provide you with shortcode functionality. Insert that element on the specific part of your website where you want the form, and paste the shortcode.
Creating a lead capture form is the first step of a successful lead generation funnel, but the key lies in how you nurture those leads and turn them into customers.
3. Import Pre-Built Automation and Customize the Trigger
With FunnelKit Automations's next-gen automation builder, you get 20+ pre-built workflows that you can import with just one click.
For our welcome email campaign, we are going to import the ‘Turn Subscriber to Customer (With Coupon)’ sequence.
To do that, go to the FunnelKit Automations dashboard.
Campaigns >> Automations (next-gen) >> Add New Automation
When you click on Add New Automation, you will find the sequence we want to import. Click on it and then hit Import.
You can assign a suitable name to the new automation if you want.
This is how the imported automation will look. You can tweak it as little or as much as you need.
Now, we need to sync this automation with the lead capture form that we created above. This synchronization will trigger our welcome email sequence whenever a user submits the form.
For this, click on the trigger - Form Submits
By default, this will show you forms created using FunnelKit (formerly WooFunnels). Since we created our form using WPForms, we need to configure this small setting.
For this, click on Change Event.
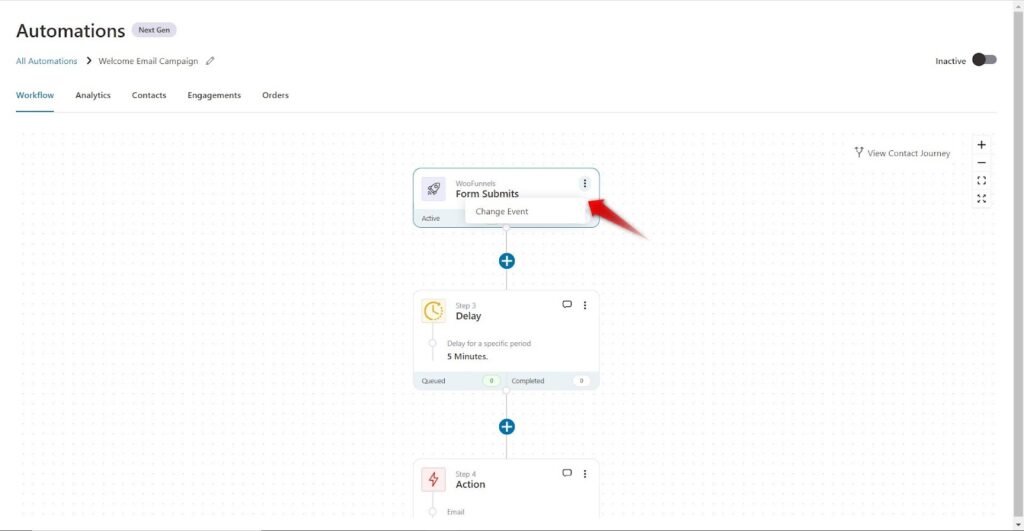
And now select Forms >> WPForms >> Form Submits
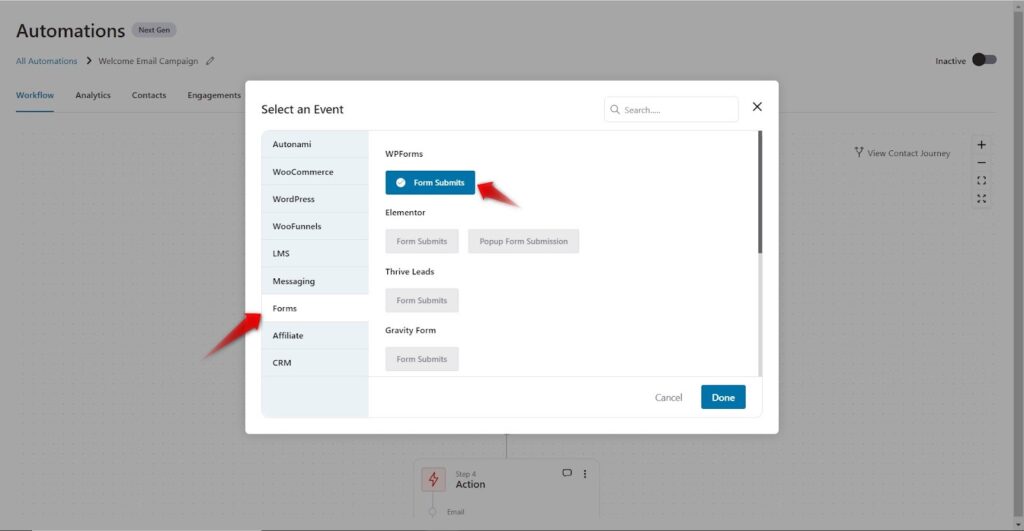
Once this setting is done, click on Form Submits, and select the form that you created.
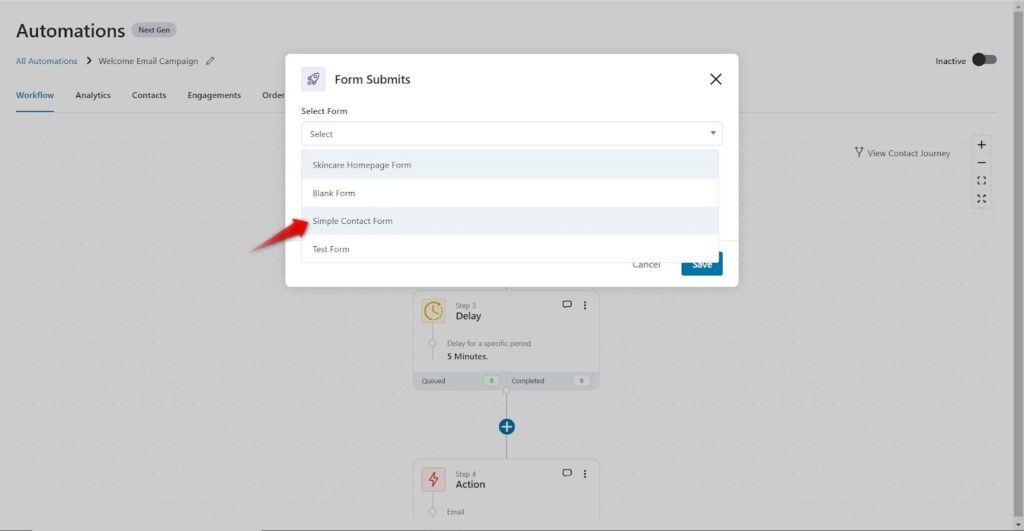
When you select the form, map the relevant fields as shown below.
Email Field -> Email
First Name -> Name
Second Name -> Name
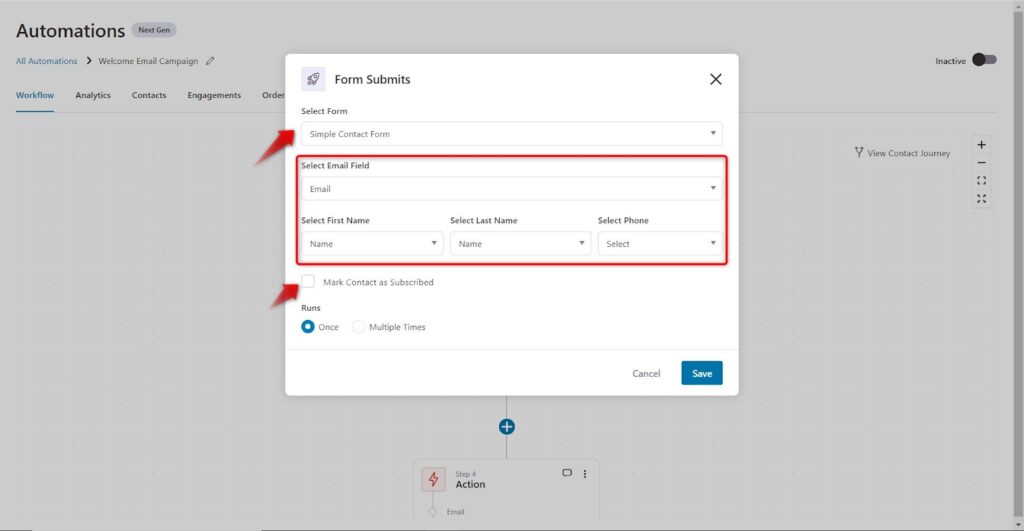
Keep “Mark the Contact as Subscribed” as unchecked.
As we are going to keep a double opt-in funnel for our welcome email campaign to keep a spam-free email list, we need to keep the option unchecked.
Once you have configured the settings, hit Save.
4. Customize Delay and Double Opt-in Email Settings
Double opt-in email allows you to get users to confirm their subscription before you send them the actual emails.
This additional step ensures you collect credible emails that won’t bounce and also by interacting with your first email your email gets whitelisted.
Once they click on that confirmation link, you can either direct them to your lead magnet or you can simply show them a thank you page to thank them for confirming their subscription.
But before you send the double opt-in email, you need to customize your delay settings and edit the email copy.
So, let’s do that first.
Click on the Delay step to open the settings and customize them.
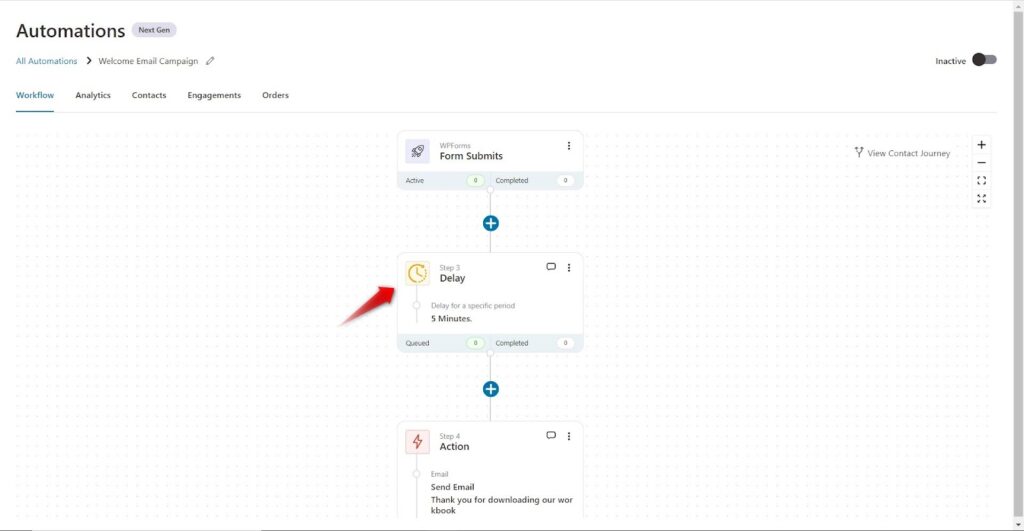
A pop-up window will open up, here you can change the delay settings. You can set the delay in minutes, hours, days, and even weeks.
You can set your delay to a specific time of the day or a specific day of the week too.

A double opt-in email has better chances of conversion when sent immediately after form submission. Hence, we are going to edit our delay from 5 minutes to 1 minute.
Once you customize, click on Save.
Now, we need to customize the email copy.
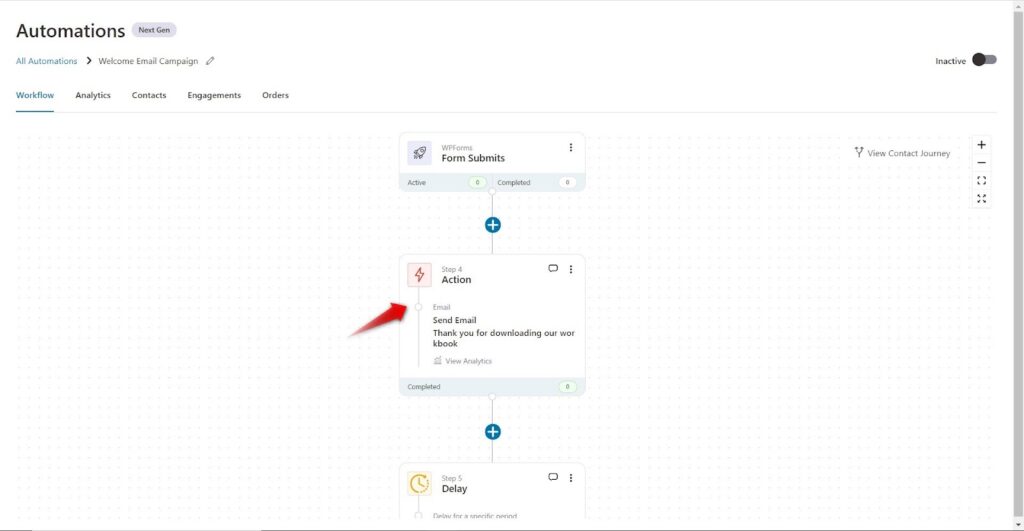
So, click on the Action - Send Email step.
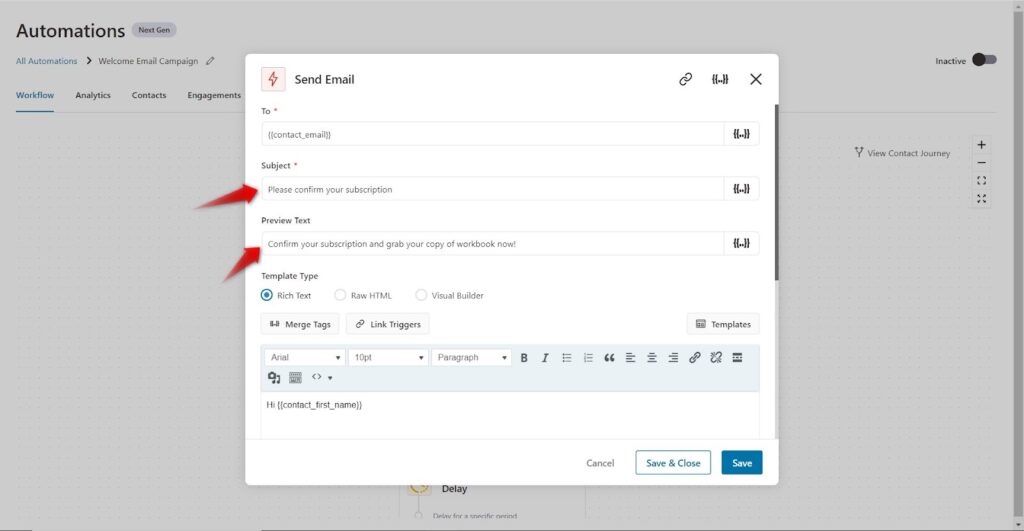
When the email settings open up, pen a subject line and an instigating preview text to drive users to your double-opt-in email and confirm their subscriptions.
5. Modify the Double Opt-in Email: Add Links To Your Lead Magnet
In the email body, you need to add a merge tag that will act as a confirmation link for your users.
When the users will click on the link - they will be automatically subscribed to the list and redirected to the actual link of the lead magnet/free offer.
- Use merge tags to generate confirmation link
For this click on Merge Tags and search for Subscribe URL.

When you click on the gear icon, a popup will appear which will allow you to insert an URL where you want your new subscribers to be redirected to i.e. your lead magnet page.
- Insert the redirect URL
Once you insert the URL, copy the merge tag and paste it into your email copy. Select the text you want to hyperlink and click on the insert link.
You can also thank your users in the email body for opting to download your lead magnet.
Your lead magnet could be a freebie, a design template, a cheat sheet, a workbook, and anything exciting that your users will benefit from.
This is what the email will look like (see below). When the user clicks on this link, they will be redirected to your lead magnet page and automatically added as a subscriber too.

6. Send a Review Email to Boost Engagement
This is an optional step, but we recommend that you keep this step in your welcome email sequence.
Add a Delay of 24 hours and send an email asking for their review on your lead magnet.
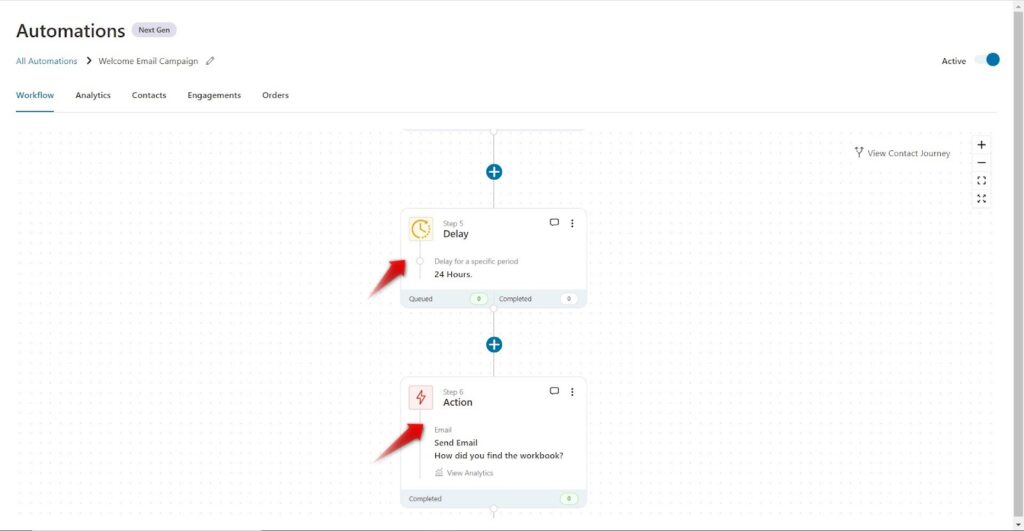
This is the email copy that you get when you import the automation. But of course, we do need to give it some personal tweaks.

And here we are, sending an email asking our subscribers for their thoughts on the workbook we sent them and building up the next email where they will receive an invitation to our paid course.

7. Create a Dynamic Coupon To Send In The Sales Pitch Emails
After a delay of 24-48 hours, you can invite your new subscribers to either buy something from your store or enroll in your paid program.
This is why a welcome email campaign is so important - it not only engages with your new subscribers but also opens an opportunity to generate sales and boost your revenues.
We are going to invite our new subscribers to join a paid course in which they will learn how to create an eCommerce store using WooCommerce.
Providing discount coupons can incentivize your customers to get into your paid course, so let’s customize our coupon settings.
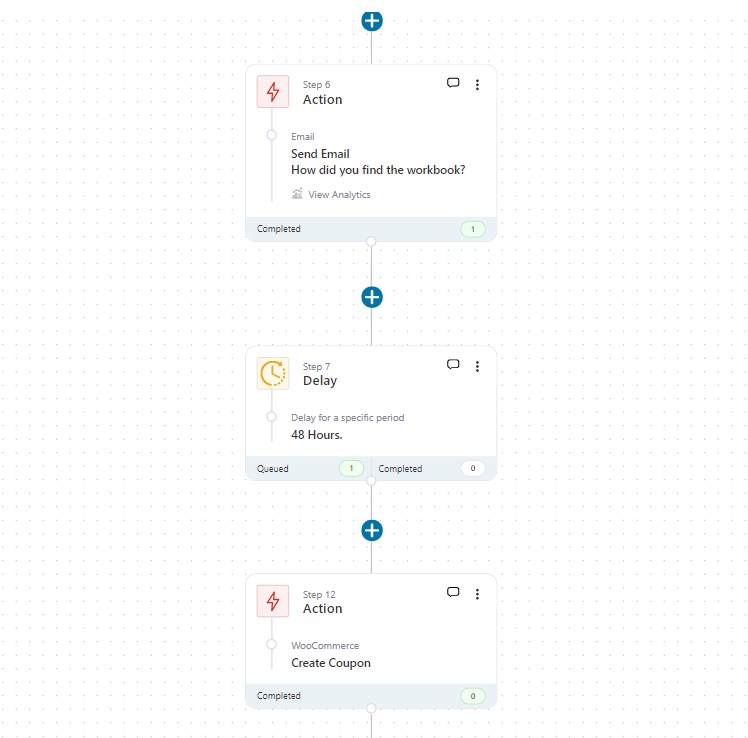
- Configure Coupon Settings
Name your coupon so you can easily distinguish it from other coupons.
Select Discount Type, we are going to give a percentage discount.
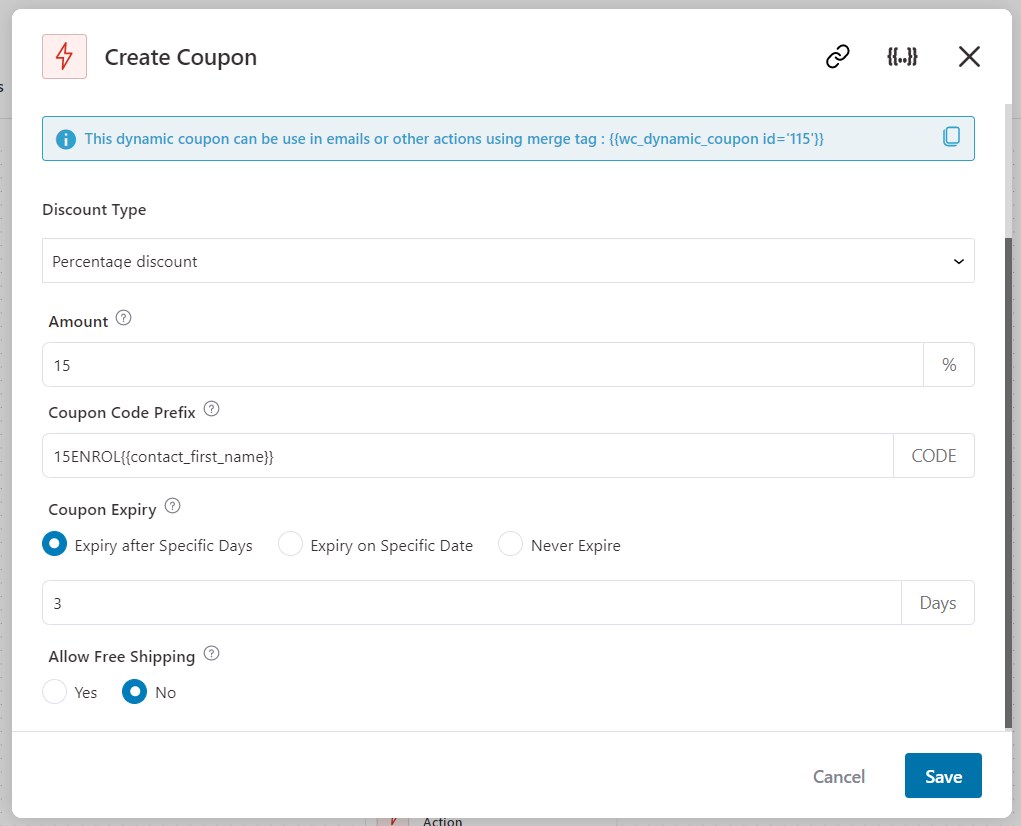
Add how much discount you want to give. We are going with a 15% discount on our paid course.
Copy a merge tag {{contact_first_name}} from the top-right corner and add it to your Coupon Code Prefix. This tag will automatically add the contact’s first name to the coupon code.
You can add a custom text before or after the merge tag, we have added ‘15ENROL’.
So, if the contact’s name is TOM, they will get a coupon code named 15ENROLTOM.
Set coupon expiration date, our coupon expires after 72 hours i.e. 3 days, this urgency will create a FOMO and persuade your contacts to take action quickly.
- Paste the coupon code
Copy the coupon code in the blue highlight and paste it into your email.

Once you create your coupon, add Action, and select Send Email.
Now configure the email settings.
Create a persuasive subject line and an instigating preview text.

Now, put your copywriting skills to the test and draft your email copy.
Insert the coupon codes in your email body.

8. Trigger Urgency with Last Call Email
After a delay of 72 hours, one last email will be sent to the contact to invite them to your paid course.
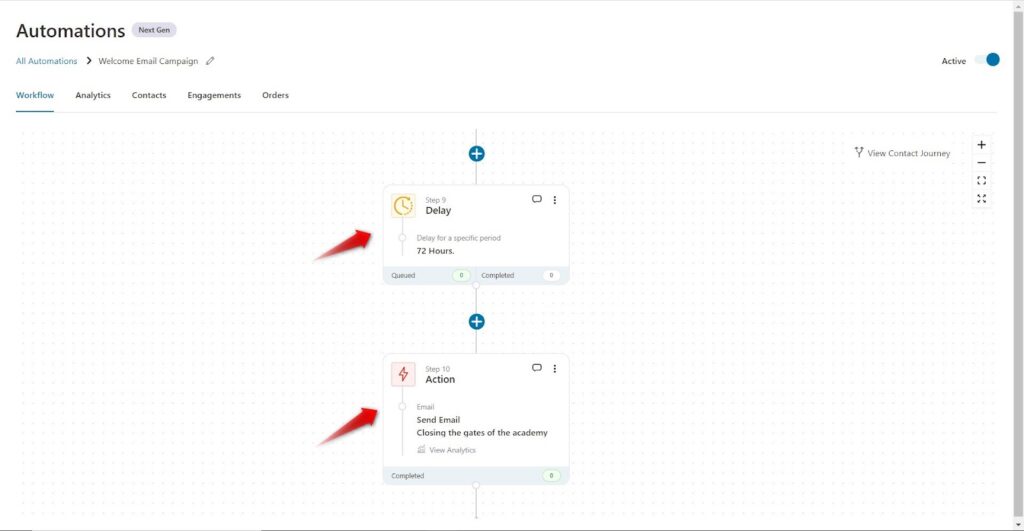
Tweak the copy of your email copy according to your needs.
This ends our welcome email campaign.
9. Go Live with Your Welcome Email Campaign
Do not forget to turn on the toggle. This will activate the automation and whenever someone submits the form, this automation will be triggered.
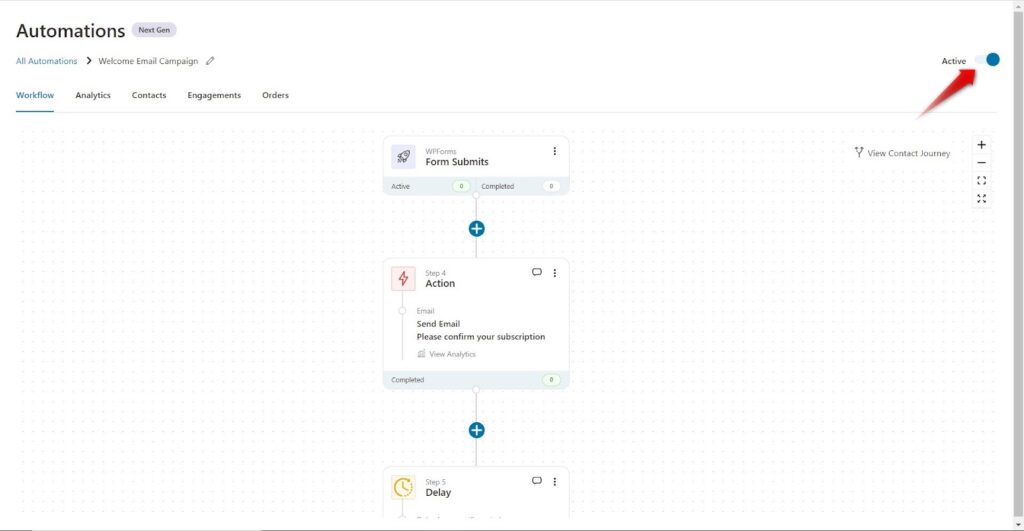
Our pre-built welcome email sequence is available for you to import and kickstart your eCommerce automation right away.
With FunnelKit Automations, you can import and modify over 20+ pre-built automations or create your new ones from the scratch.
Create coupons, insert link triggers, customize delays, and much more, without leaving your WordPress dashboard.
Get Actionable Insights On The Canvas Itself
When the data starts rolling in i.e. when people start filling out the form, the data will be collected within the workflow.
No need to navigate here and there to find workflow-related data.
With FunnelKit Automations’s inline analytics, you get all the important insights in one place.
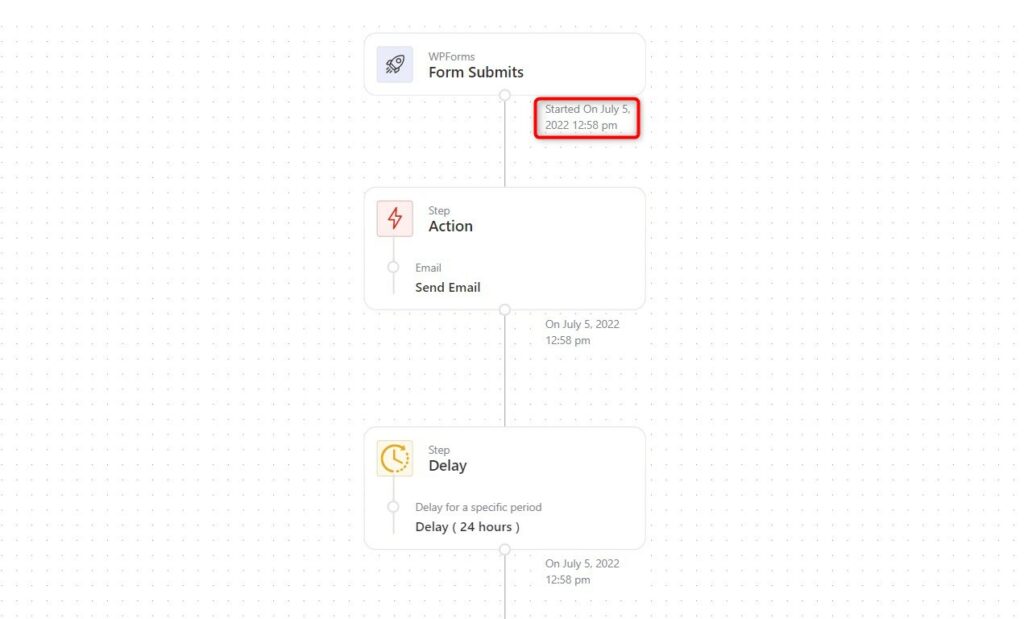
You can check information related to each step. Just click on the number next to Completed and you can see how many users have completed that particular step.
You can even check an individual contact’s journey by simply typing their name and seeing their individual journey.
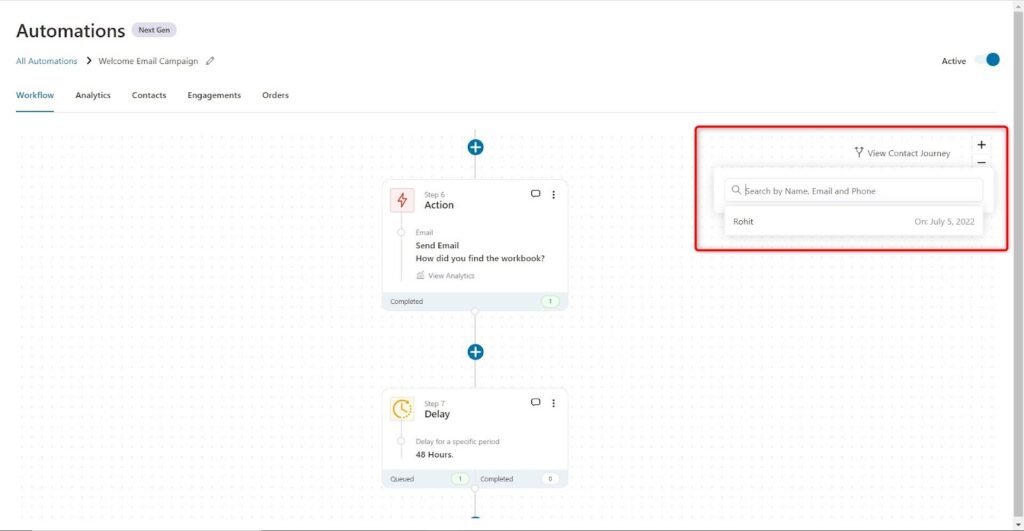
Below each step, you will find a timestamp denoting when that particular step was executed on that particular user.
Are You Ready to Automate Your Welcome Email Campaign?
So, now that you know how to create an effective welcome email sequence, what are you waiting for?
Go ahead and create your workflow, boost engagement with your new subscribers and promote them your paid programs or products right from the start.
Get started with FunnelKit Automations today!
The most powerful WordPress marketing automation engine that can handle all of your CRM needs.
Editorial Team
February 12, 2026First impressions matter, and in eCommerce, your welcome email is your first chance to shine. A WooCommerce welcome email is an automated message sent to new customers right after they...
Editorial Team
February 6, 2026With increasing competition and rising ad budgets, acquiring new customers is difficult. Forbes reports that the conversion rate for new customers is just 5%-20%. On the other hand, repeat customers...
Editorial Team
February 5, 2026Leveraging WooCommerce email marketing efficiently can help you skyrocket your sales and revenue. With over 64% of businesses already using email marketing to connect with customers, it's clear this approach...


