![How to Create a Successful Customer Winback Campaign in WooCommerce [2026]](https://funnelkit.com/wp-content/uploads/2025/01/How-to-Create-a-Successful-Customer-Winback-Campaign-in-WooCommerce.jpg)
Want to bring back customers who’ve gone cold?
Repeat customers generate 5-7× more revenue per visit than first-time shoppers. Yet most stores lose them simply because there’s no clear plan to re-engage once they stop buying.
That’s where a winback campaign comes in.
A well-timed, well-crafted winback campaign helps you reconnect with inactive customers, rebuild interest, and turn them back into paying buyers.
In this post, we’ll break down the exact steps to create a high-converting winback campaign along with proven strategies and real examples you can use right away.
By the end, you’ll know how to re-ignite customer interest and turn lapsed buyers into loyal, repeat customers.
Table of Contents
- 1 What is a Winback Campaign?
- 2 5 Essential Elements of an Effective Customer Winback Campaign
- 3 Best WooCommerce Plugin To Create a Winback Campaign
- 4 How to Set Up a Successful Winback Campaign in WooCommerce with FunnelKit Automations?
- 4.1 Step 1: Add a new automation with the prebuilt recipe
- 4.2 Step 2: Configure ‘Customer Winback’ event
- 4.3 Step 3: Set the delay period
- 4.4 Step 4: Check total revenue to segment customers
- 4.5 Step 5: Generate dynamic coupons
- 4.6 Step 6: Craft your winback campaign emails
- 4.7 Step 7: Activate the automations
- 5 How to Measure the Success of a Winback Campaign?
- 6 5 Best Win-Back Email Examples to Get Inspiration
- 7 Frequently Asked Questions (FAQs)
- 8 Do win-back campaigns work?
- 9 How many emails are in a winback campaign?
- 10 How do you run a win-back campaign?
- 11 Are You Ready to Create the Perfect Winback Campaign in Your WooCommerce Store?
What is a Winback Campaign?
A winback or re-engagement campaign is a series of targeted emails sent to your lapsed customers that encourage them to return to your store and shop again.
According to Forbes research, 65% of a company’s business comes from existing customers. It’s because there is a like and trust factor with them.
But for some reason, customers can eventually become inactive and stop buying.
Win-back emails attempt to bring those customers back to the shop. More precisely, a customer winback campaign:
- Remind shoppers of you
- Acknowledge that they haven’t shopped in a while
- Offer a solid incentive to re-engage
Guess what? 45% of email subscribers who interacted with your winback campaign will likely be opening your emails in the future, too!
So, you should definitely set up your win-back campaign emails to boost customer re-engagement and regain lost customers.
Reasons Why Your Customers Become Disengaged
There could be several reasons why your customers stopped buying and became inactive. Here are our top four reasons:
- Competitor’s impact - They may have stopped buying from you because they’ve found a competitor, i.e., someone who’s perhaps undercutting you in price, selling better products, or marketing them better.
- Budget changes - Maybe the items you sell are in the 'desire' segment, not the need segment. So when they decided to cut budgets, they just stopped using your products.
- Offline purchases - If you sell physical products, you compete with online and offline players. In case you're only selling digital - that's obviously not true for you.
- Change in priorities - The needs and preferences of customers change with time. That’s why their demands for your products may fade over time because of the changes in their priorities.
5 Essential Elements of an Effective Customer Winback Campaign
In this section, we'll look at the 5 elements of a well-written winback email campaign.
If you include all five of these, you will have a winning winback retargeting strategy in your hands that corresponds to a brilliant conversion rate.
Let’s explore all these elements one by one.
1. Segmentation and targeting
The period of inactivity depends on what you’re selling.
For example, if you’re selling daily usage products like skincare items that generally last for a month, then 3 months is a reasonable enough period of inactivity.
For items that last 3 months, you may consider 6 months without buying - a period of inactivity.
It’s important to identify and segment inactive subscribers or customers based on their last purchase, buying history, preferences, and demographics.
For instance, if their last purchase was two years ago, perhaps they’ve moved on and will never return.
But if they did buy, let’s say 6 months bac,k but not in the last 3 months - then there are still chances that they can be back!
Once you have enough information, you can tailor your message and relevant offers to increase the chances of re-engagement.
2. A catchy subject line
A catchy subject line ensures that it grabs the customers' attention in their cluttered inboxes.
As per Klaviyo.com - "It's been a while" performed excessively well and clocked an open rate of 35%, which is very impressive.
The other subject lines that perform well are - "We miss you" and "Discount included".
Here are some catchy subject lines that we recommend:
- Where have you been, <first name>?
- Just checking in, all ok?
- Frankly, we're thinking of you
- Not sure what's been keeping you busy
- Off the radar? What's up...
- <first name>, here's a li'l gift for you
- It's been a while
You'll notice that these subject lines sound pretty friendly.
Curiosity-evoking subject lines such as ‘Coupon inside’, ‘Special gift inside’, etc. are also likely to get high open rates.
3. Urgency-driven attractive offers
82.4% of online shoppers stick to a brand that offers consistent deals.
Offering irresistible deals, such as exclusive discounts, special bundles, free trials, etc., helps entice customers to return.
Create a sense of urgency by offering limited-time offers to your lapsed customers that encourage them to take immediate action.
You can even highlight the unique value proposition and make them notice how your services have improved since their last engagement.
Once you’ve made your customers feel special and valued, there’s nothing stopping them from shopping in your store again.
4. Engaging content
Keep your win-back emails short and engaging to get high click-through rates.
You can design visually appealing content that captures your customers’ attention and conveys the benefits of re-engaging with your brand.
You must do two things in your win-back emails:
- Acknowledge that they have been absent for a while
- Tell them what they're missing
Here's a brilliant example of a customer win-back email from SkillShare:
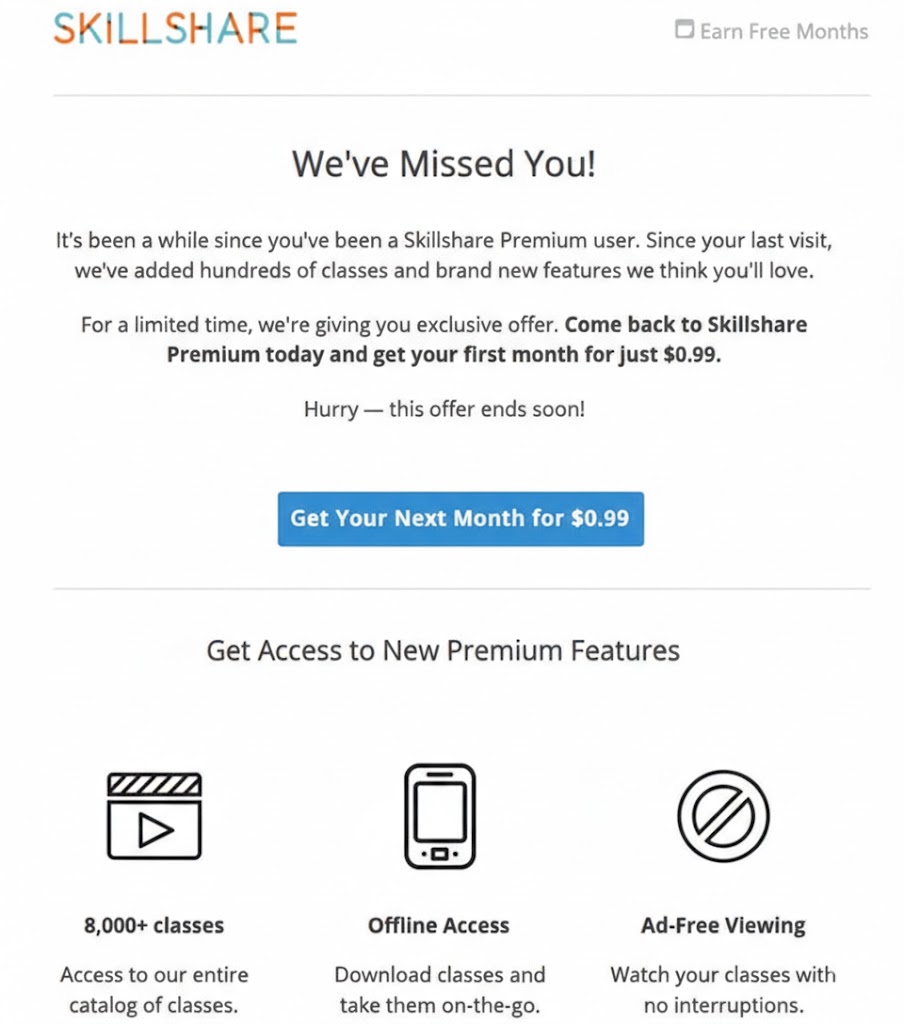
Notice the strong and bold headline 'We've missed you!'. It starts off on the right note by setting the context.
SkillShare also takes a moment to remind inactive customers what they've been missing out on.
That is followed by an incentive to return. You can also add attractive images, videos, and graphics to your content to spice things up.
Once you’ve created engaging content, don’t forget to top it off with a clear call to action button. CTAs help provide an easy and direct path for customers to re-engage.
5. Multi-channel approach
While many people think winback campaigns are purely re-engagement emails, it’s definitely not the case!
You can reach out to your customers through different channels such as social media, direct emails, SMS, and even phone calls.
Many businesses use a combination of emails and SMS to increase the chances of your message being seen and heard.
Using a multi-channel strategy in your winback campaigns maximizes the probability of capturing the customer’s attention and rekindling their interest.
Best WooCommerce Plugin To Create a Winback Campaign
FunnelKit Automations is the most powerful marketing automation engine designed for WordPress.
More than 20,000 WooCommerce users trust this plugin for their email marketing.
You can send automated email workflows and SMS-based campaigns to segmented audiences based on your use cases.
It has many pre-built automated recipes you can import and use in your marketing campaigns.
Here are other reasons that make FunnelKit Automations better than other CRMs for creating your winback campaign sequences:
1. To send customer winback emails at the right time
FunnelKit Automations lets you create automated winback campaigns and smartly execute them.
With the winback event, you can configure the number of days your customers have been inactive. Based on this configuration, your automation will get triggered.
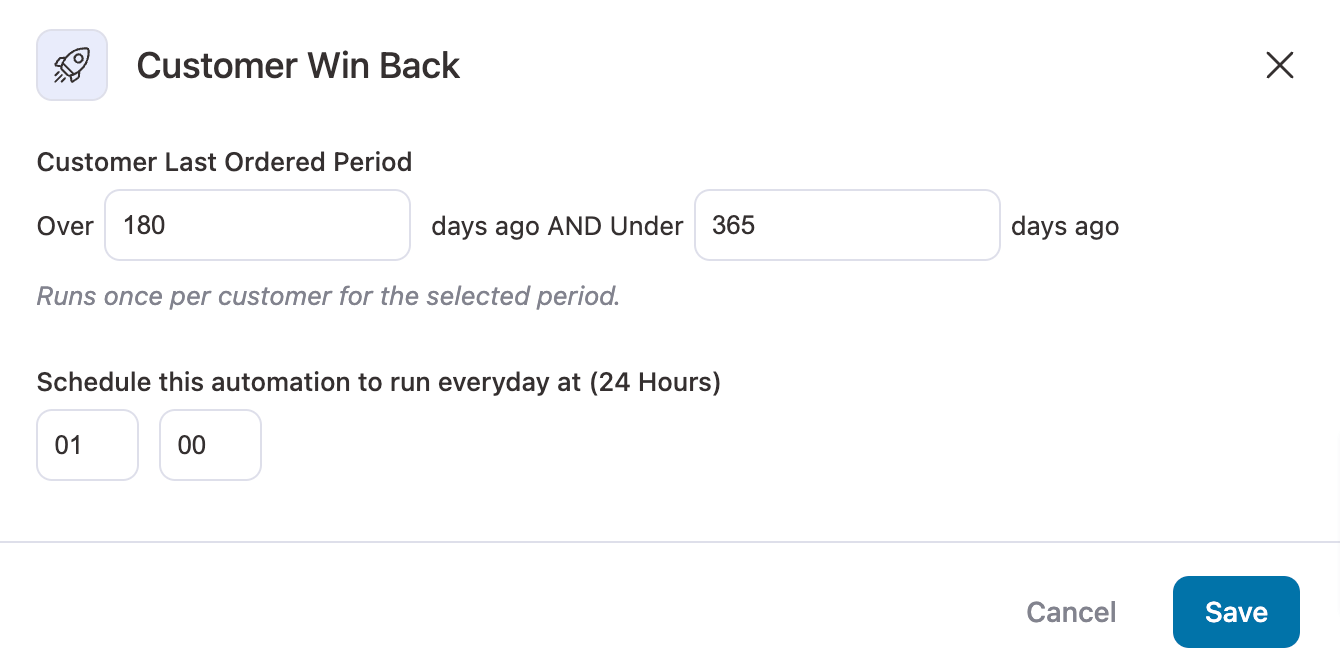
Once this event gets triggered, you can set up several actions based on your requirements.
2. To design captivating emails using the visual drag & drop builder
Want to create emails that capture your users’ attention?
You can create beautiful emails with FunnelKit Automations’ built-in visual email builder tool.
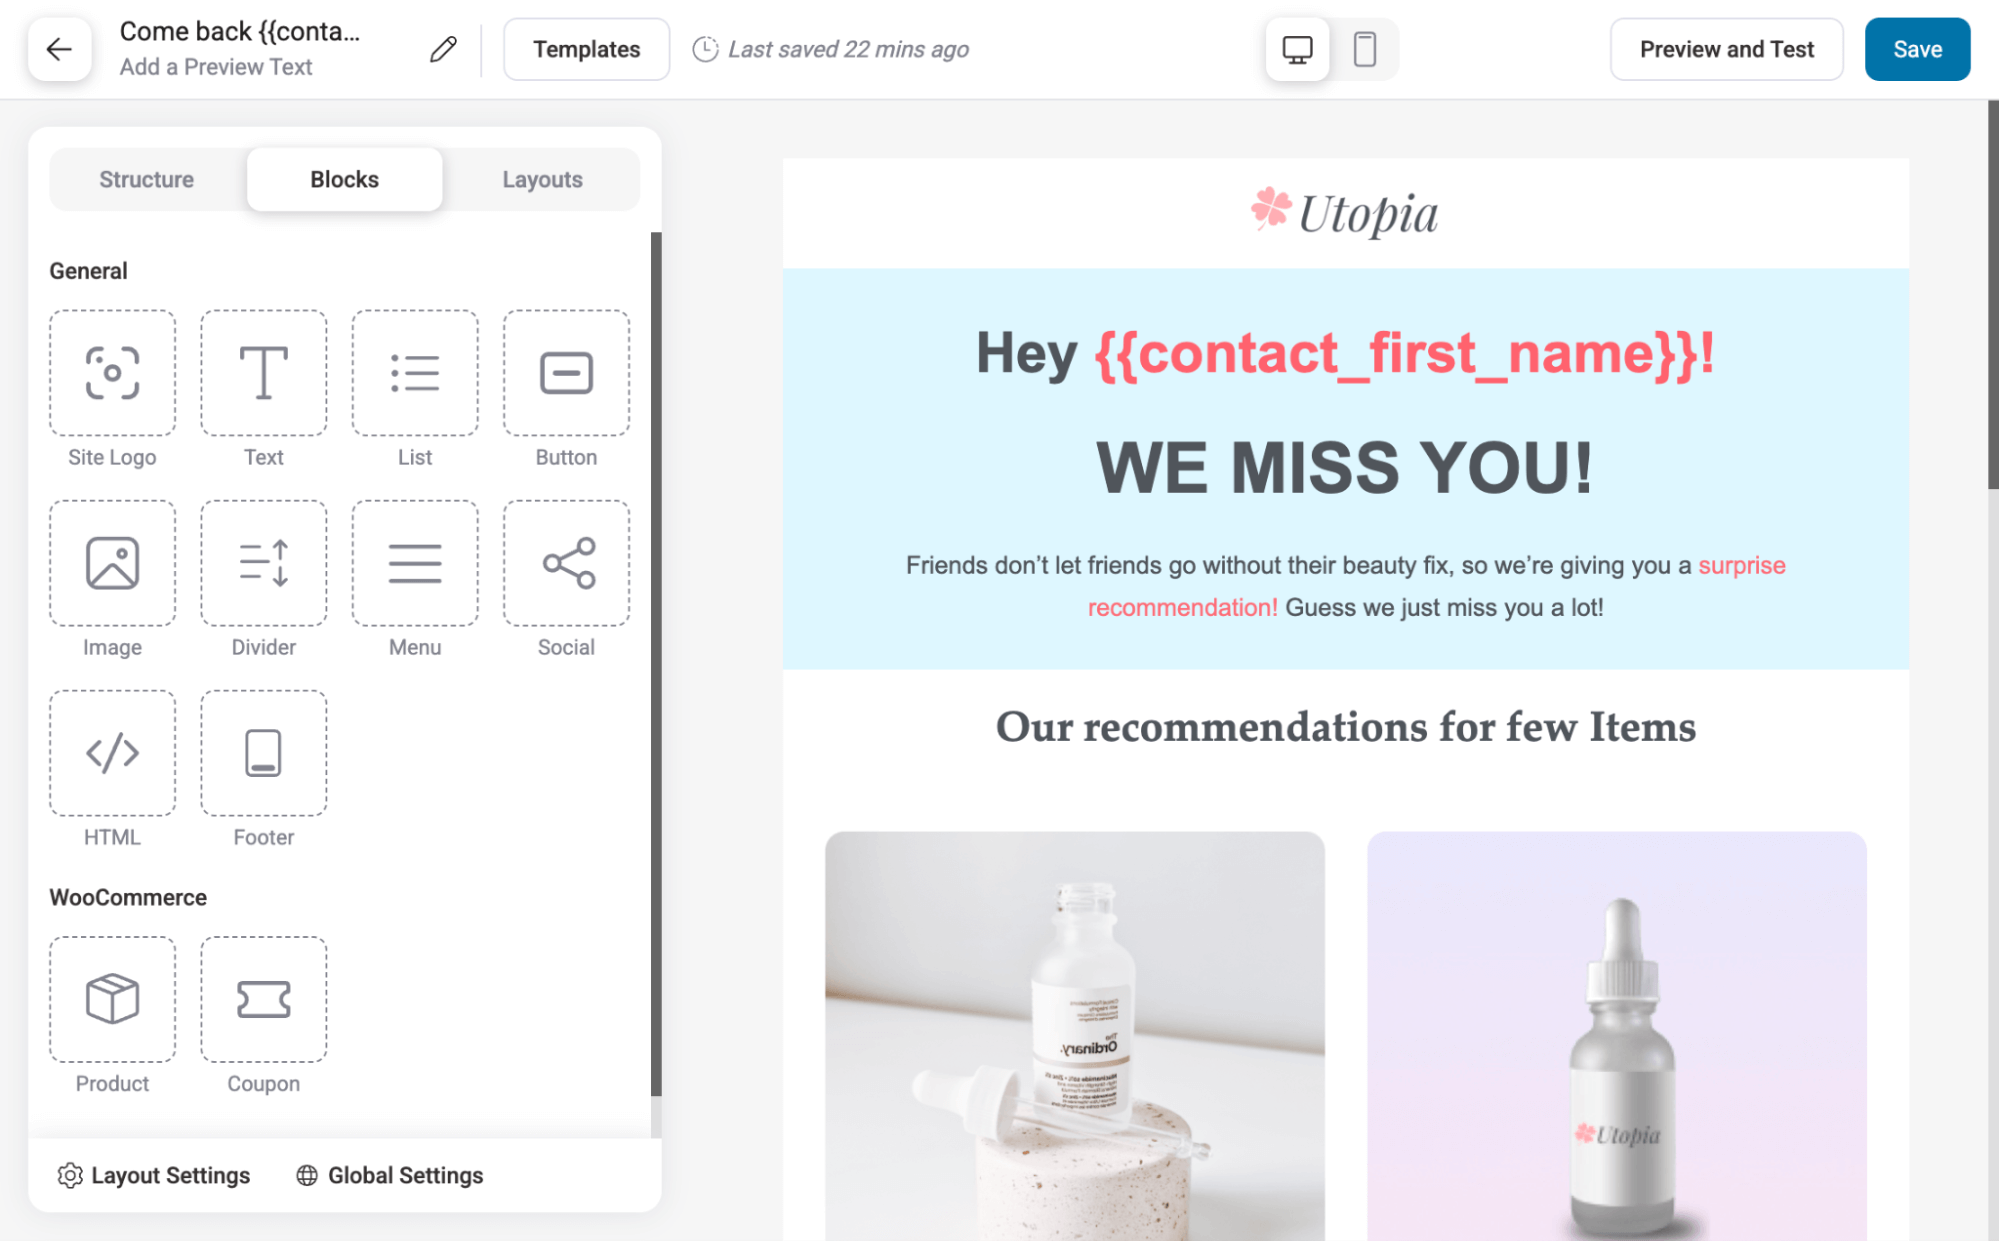
Your perfect winback email is now just a ‘drag and drop’ away!
3. To find out their reason for inactivity using link triggers
Link triggers help capture the response of your users and gauge their interests.
These are the links that, when clicked, allow you to perform an action on the backend, such as adding a tag, updating their contact fields, adding them to a list, etc.
Use link triggers in your feedback emails to know why they are absent and direct them to a particular action you want.
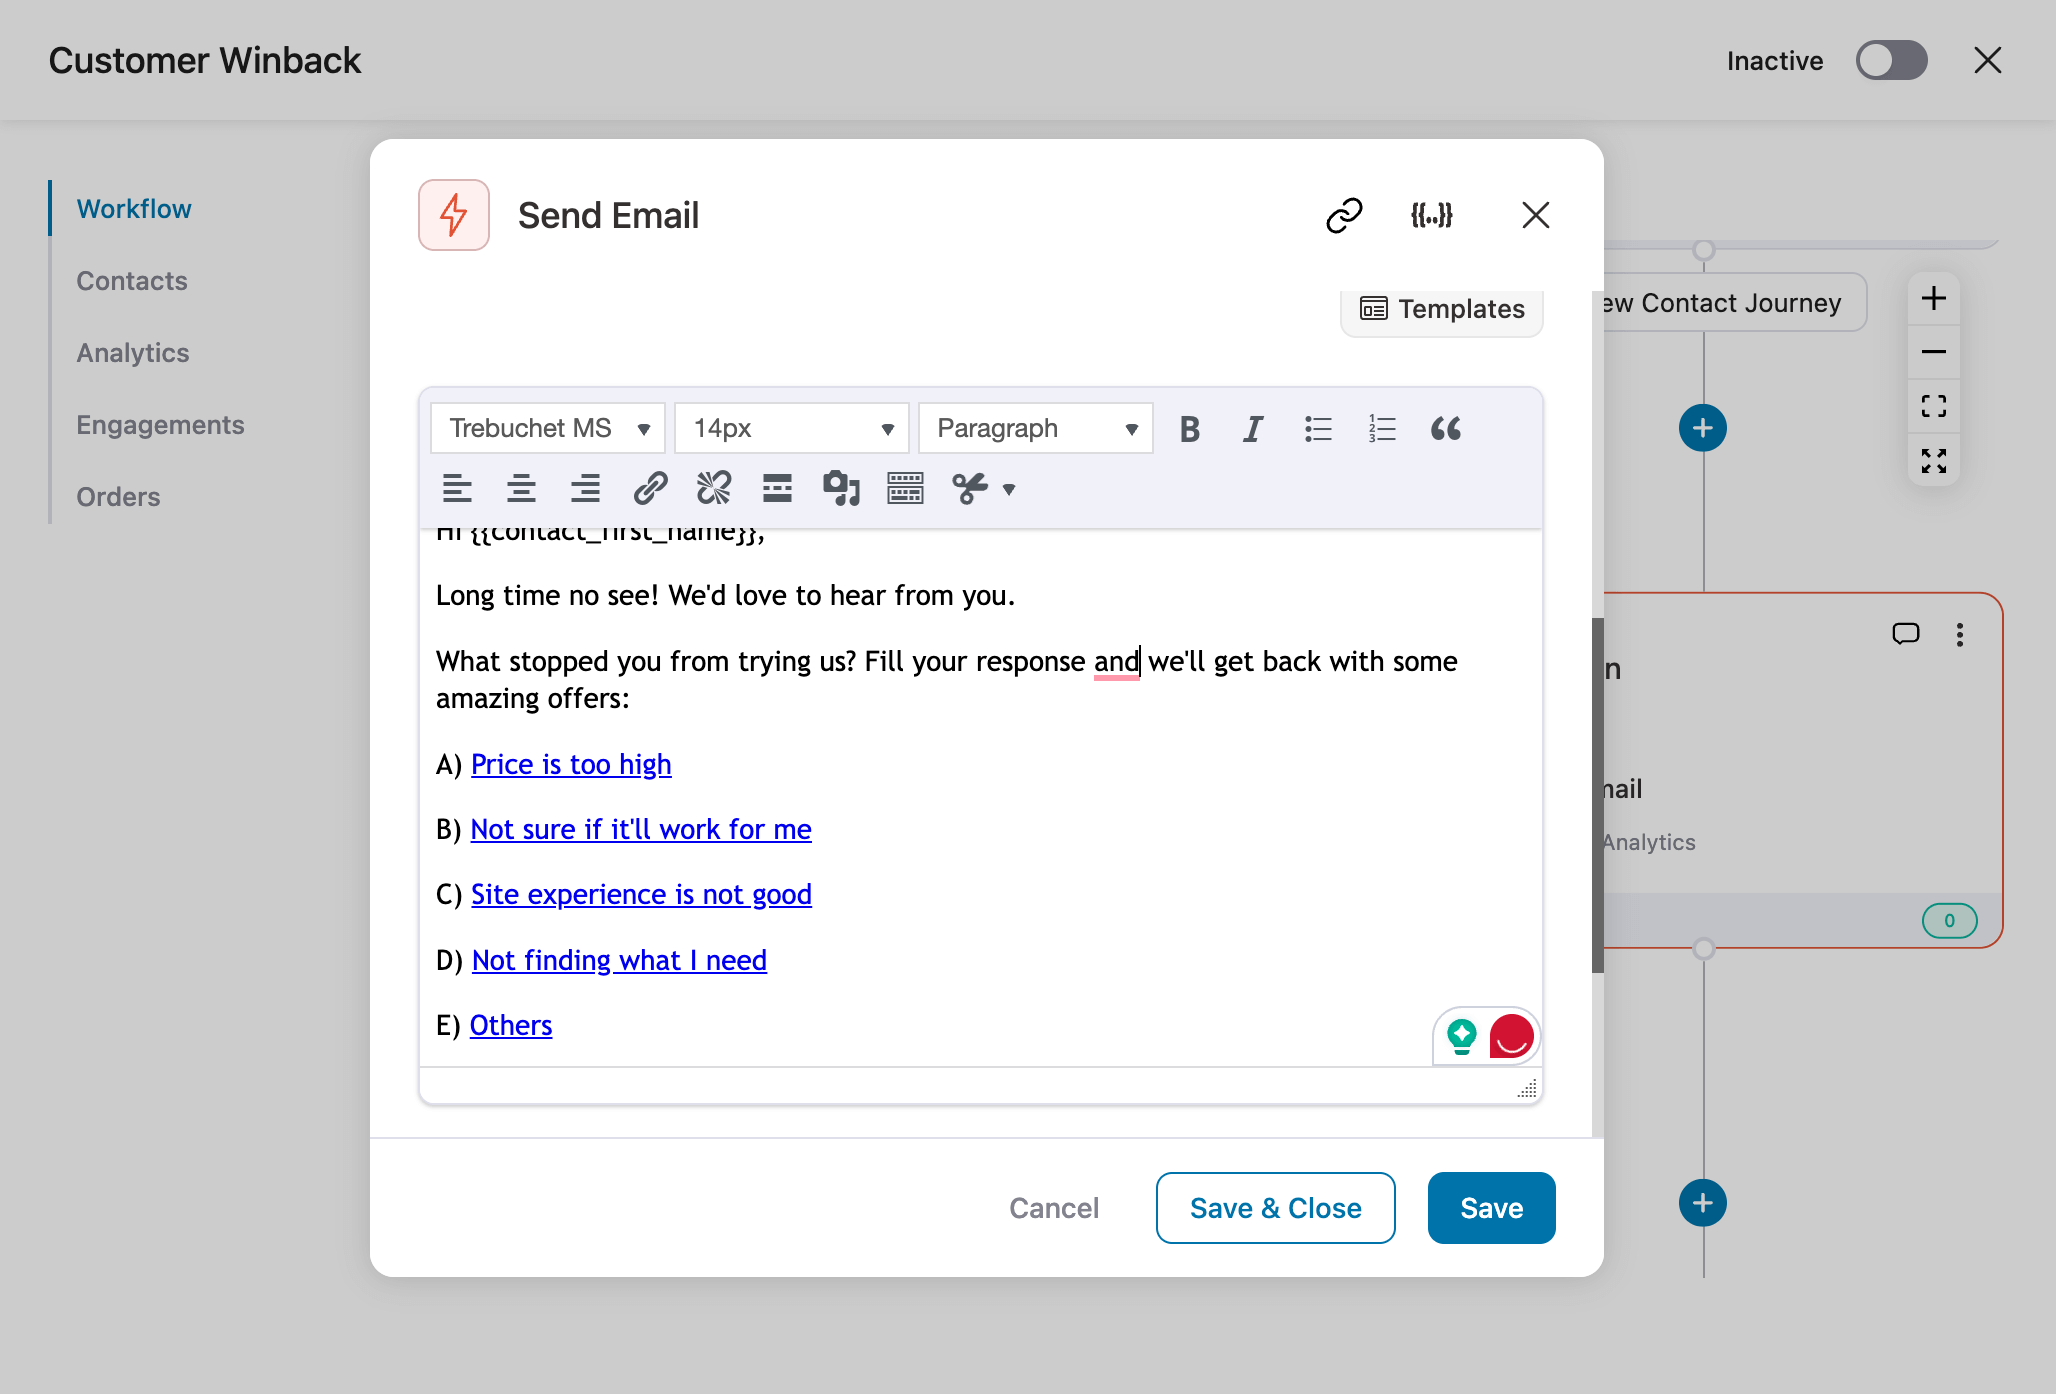
Once you’ve analyzed your link triggers, you can create better offers to rekindle your relationship with them.
4. To encourage purchases through dynamic coupon codes
We’re pretty sure everybody loves a discount.
The next thing you can do for a successful winback campaign is to add a personalized and limited-time coupon code in the sequence.
FunnelKit Automations lets you create personalized coupons that work for a specific user.
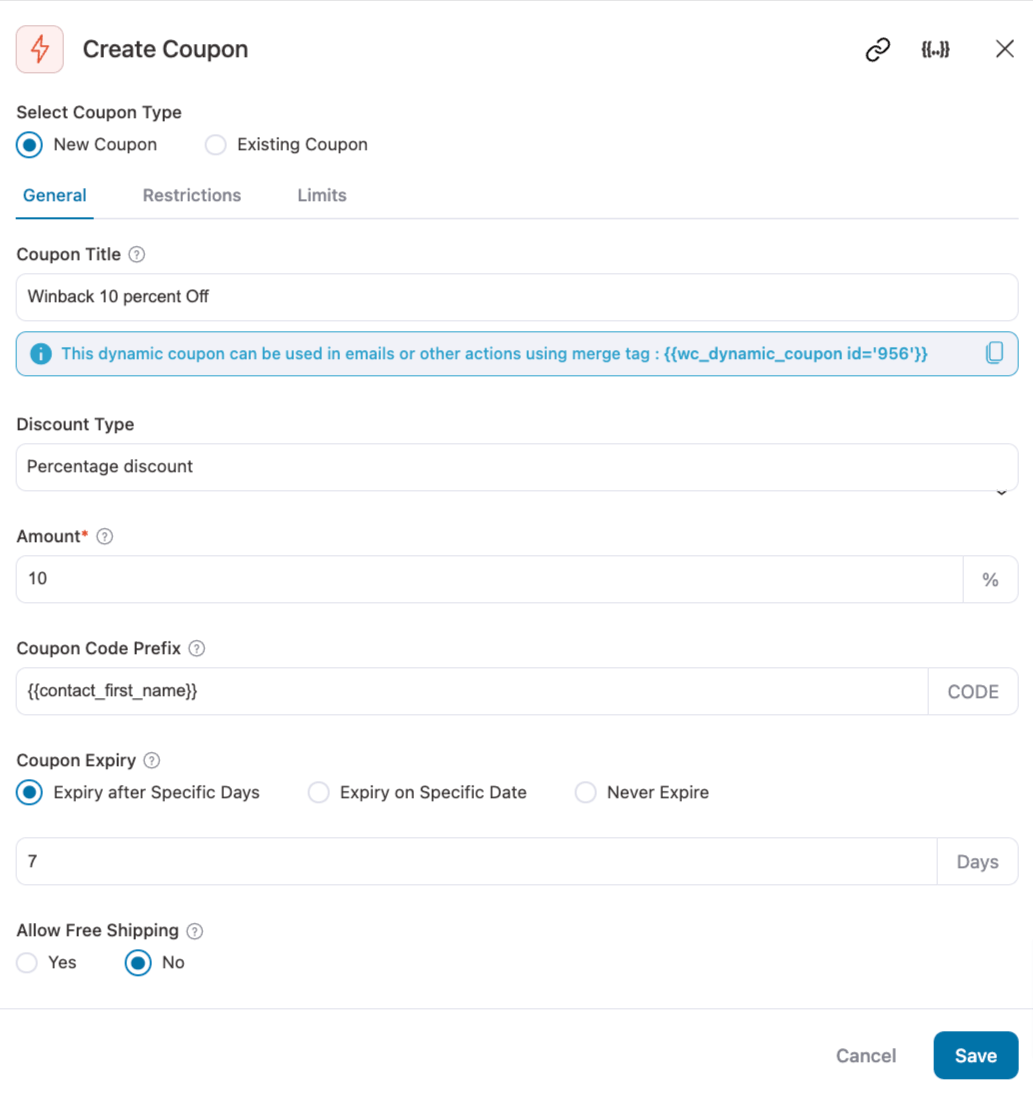
Here, we have used the “COMEBACK{{first_name}}” coupon code that’s valid for 3 days.
You can add an email action to send this coupon code to your email list.
5. To track the revenue made from your winback campaigns
View and analyze the response of your winback campaigns in FunnelKit Automations without having to leave your WordPress dashboard.
You can view the engagement and orders for your automated campaigns and take decisive actions to re-engage your customers.

Here, you can also view the orders placed, revenue generated from your winback campaign, number of unsubscribes, recoverable carts that have abandoned, and more.
Analyzing the metrics will let you make better decisions and improve the success rate of your winback campaigns efficiently.
How to Set Up a Successful Winback Campaign in WooCommerce with FunnelKit Automations?
Here, we will show you how to set up an email automation campaign with the target to winback customers.
Before starting the process to set up your winback campaign email, get a copy of FunnelKit Automations.
Please note that FunnelKit Automations also has a free version (the Lite version), but we will use the Pro version here because of its advanced features. Check out our detailed documentation to install and activate FunnelKit Automations on your WordPress website.
Step 1: Add a new automation with the prebuilt recipe
Go to FunnelKit Automations ⇒ Automations and click on the ‘Create New Automation’ button.
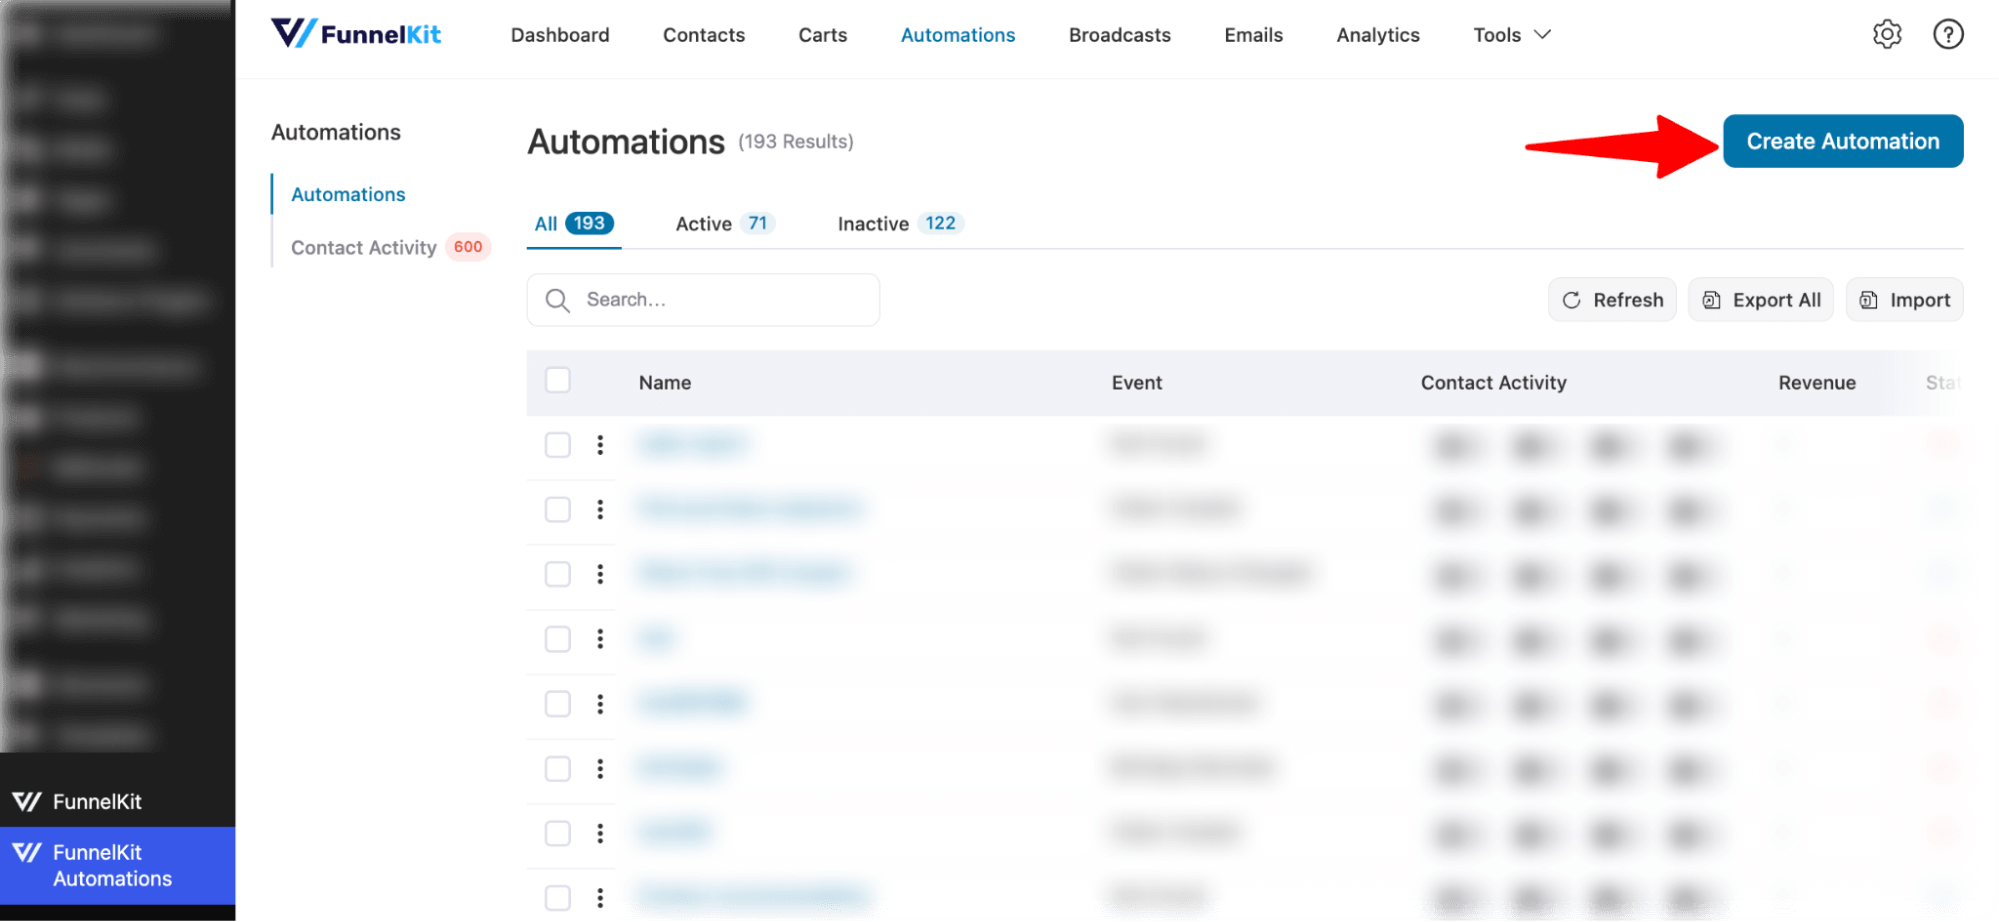
You’ll see many pre-built automated recipes that can easily be imported and customized to be used.
For winback campaigns, FunnelKit has two prebuilt automation- Customer WinBack Campaign (with coupon) and Customer WinBack Campaign (with coupon).
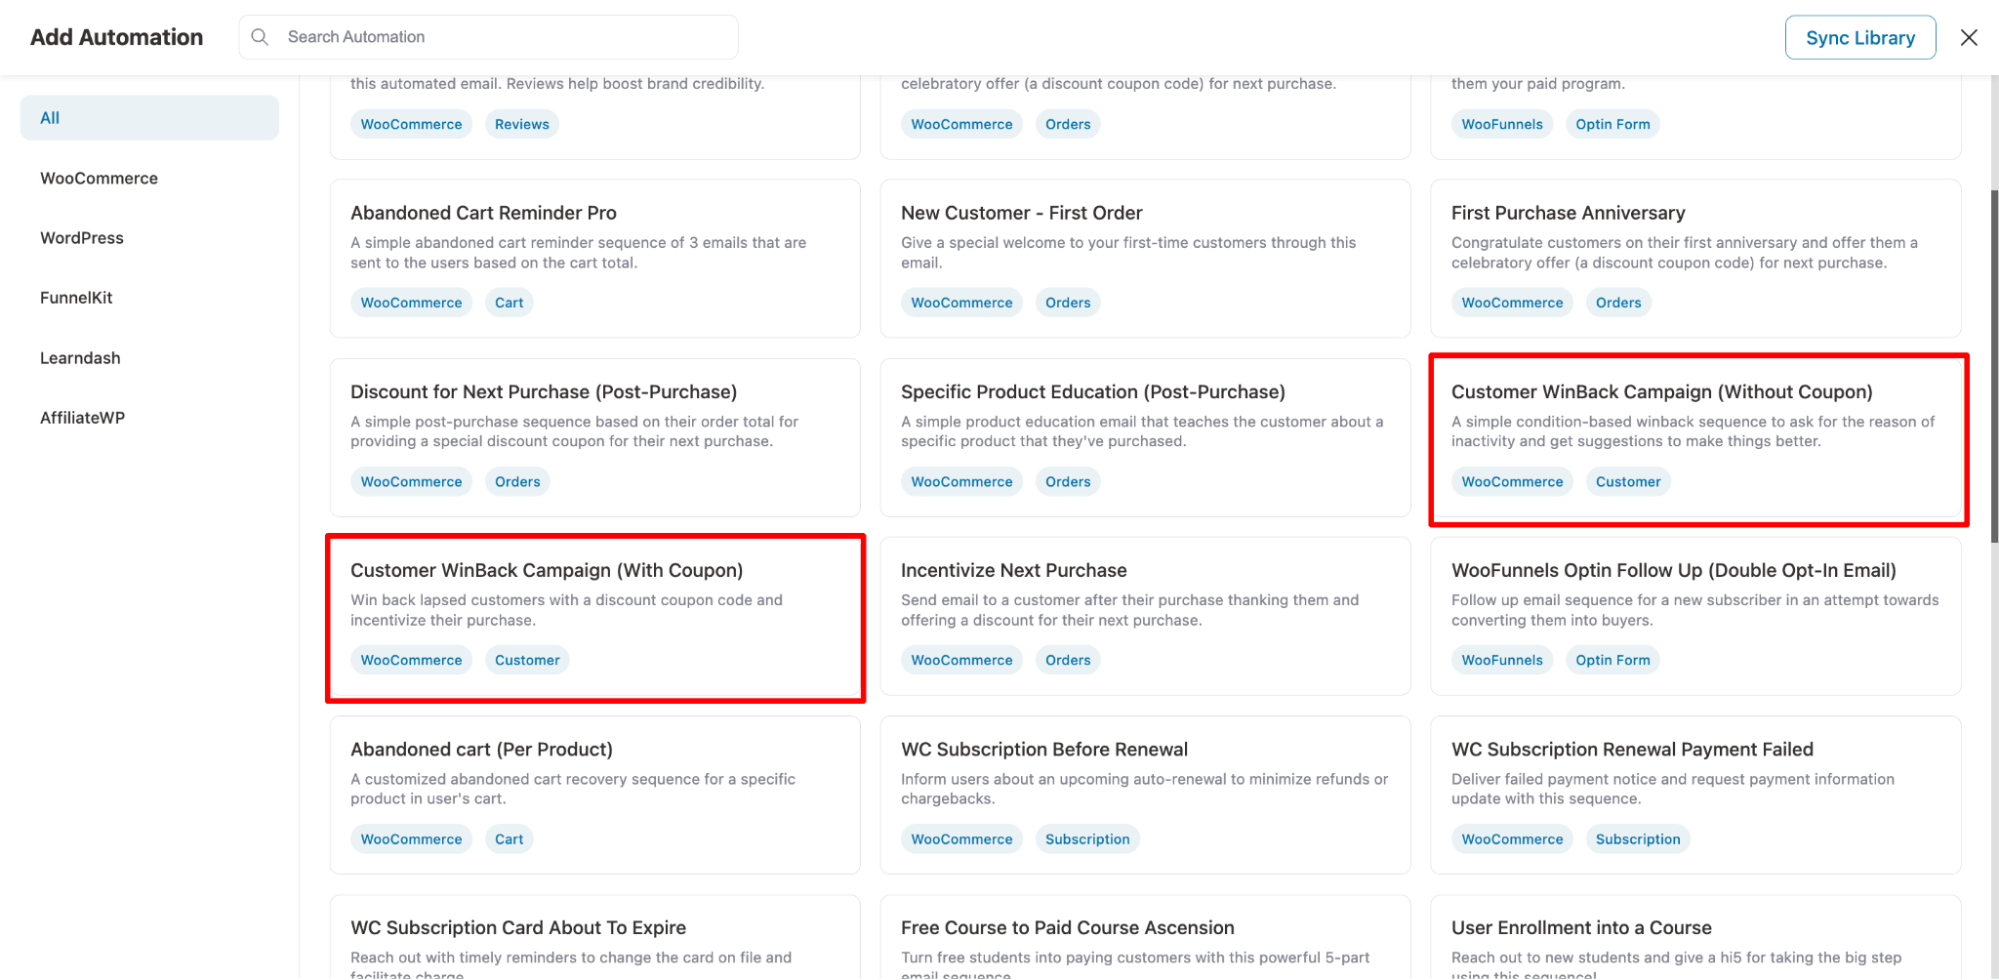
Now, to pick any of the prebuilt recipes, click on that one. Next to import. Hit the “Import This Recipe,” provide a name, and hit Create.
🔔 Note: We are going with the winback campaign that offers a discount coupon.
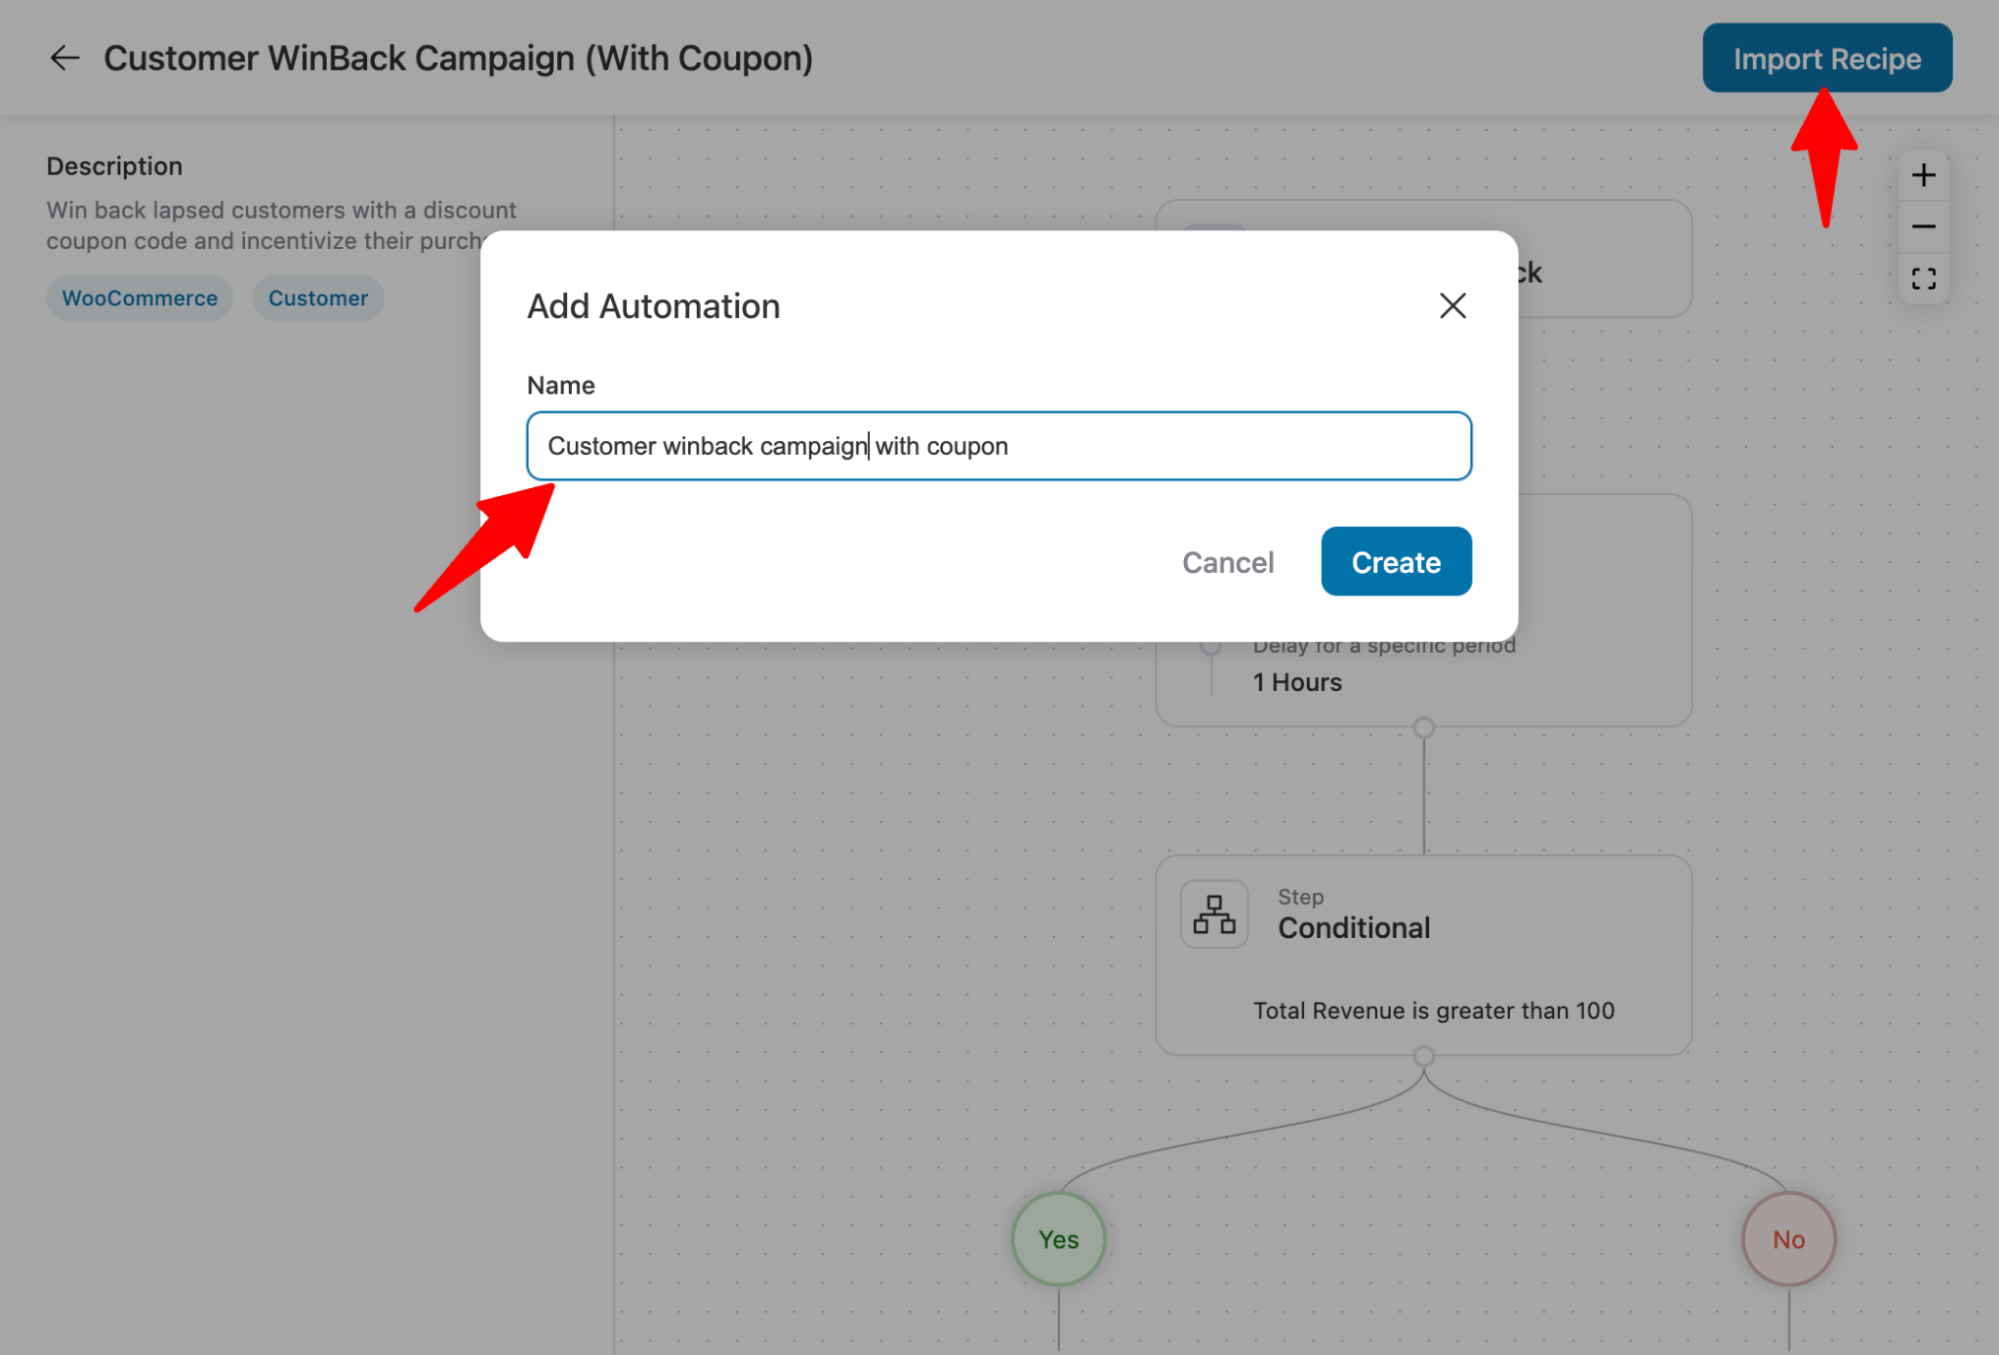
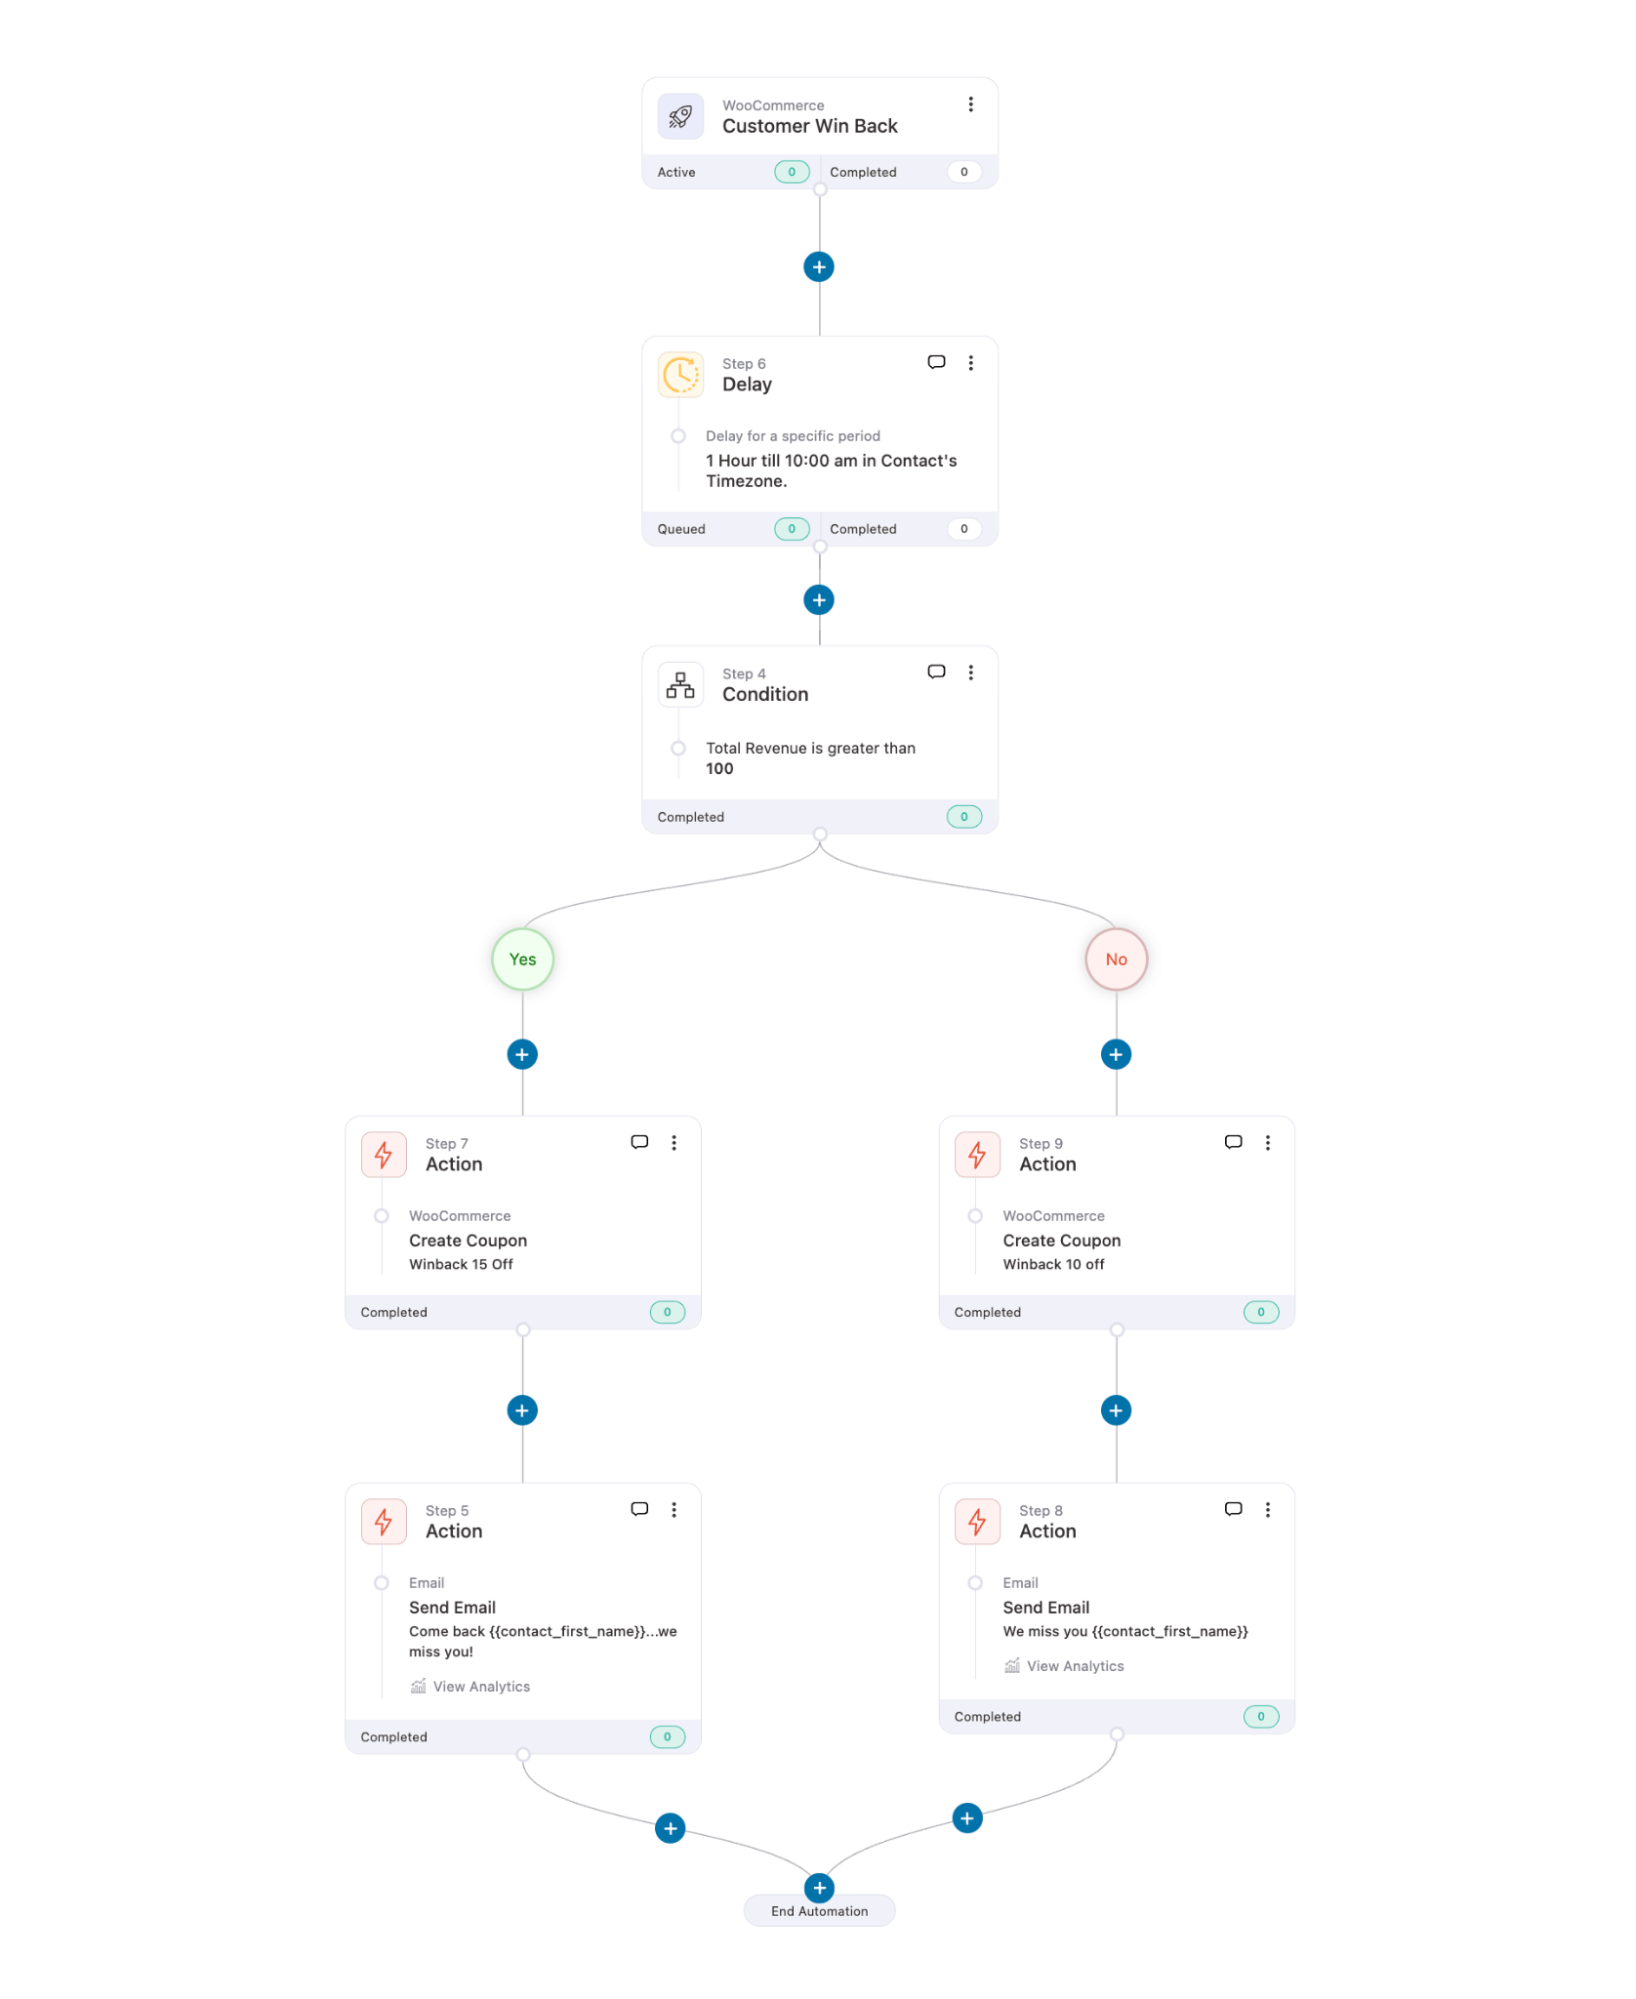
This will import a winback campaign recipe. Here is a breakdown of how the recipe works:
- Event trigger: The automation gets activated when a customer remains inactive for a specified period.
- Delay: It waits for one hour, aligned with the customer’s local time zone.
- Check total revenue: It assesses the total revenue generated by the customer and compares it against a preset threshold.
- Coupon generation: Based on the revenue analysis, the system creates two different discount coupons for two different customer segments.
- Engagement: An email is sent to both groups of customers, including relevant coupons generated in the previous step, encouraging them to return and shop again.
Step 2: Configure ‘Customer Winback’ event
Hit the 'Customer Win Back' trigger.
Configure the event and define this period to target the right customers through your winback campaign.
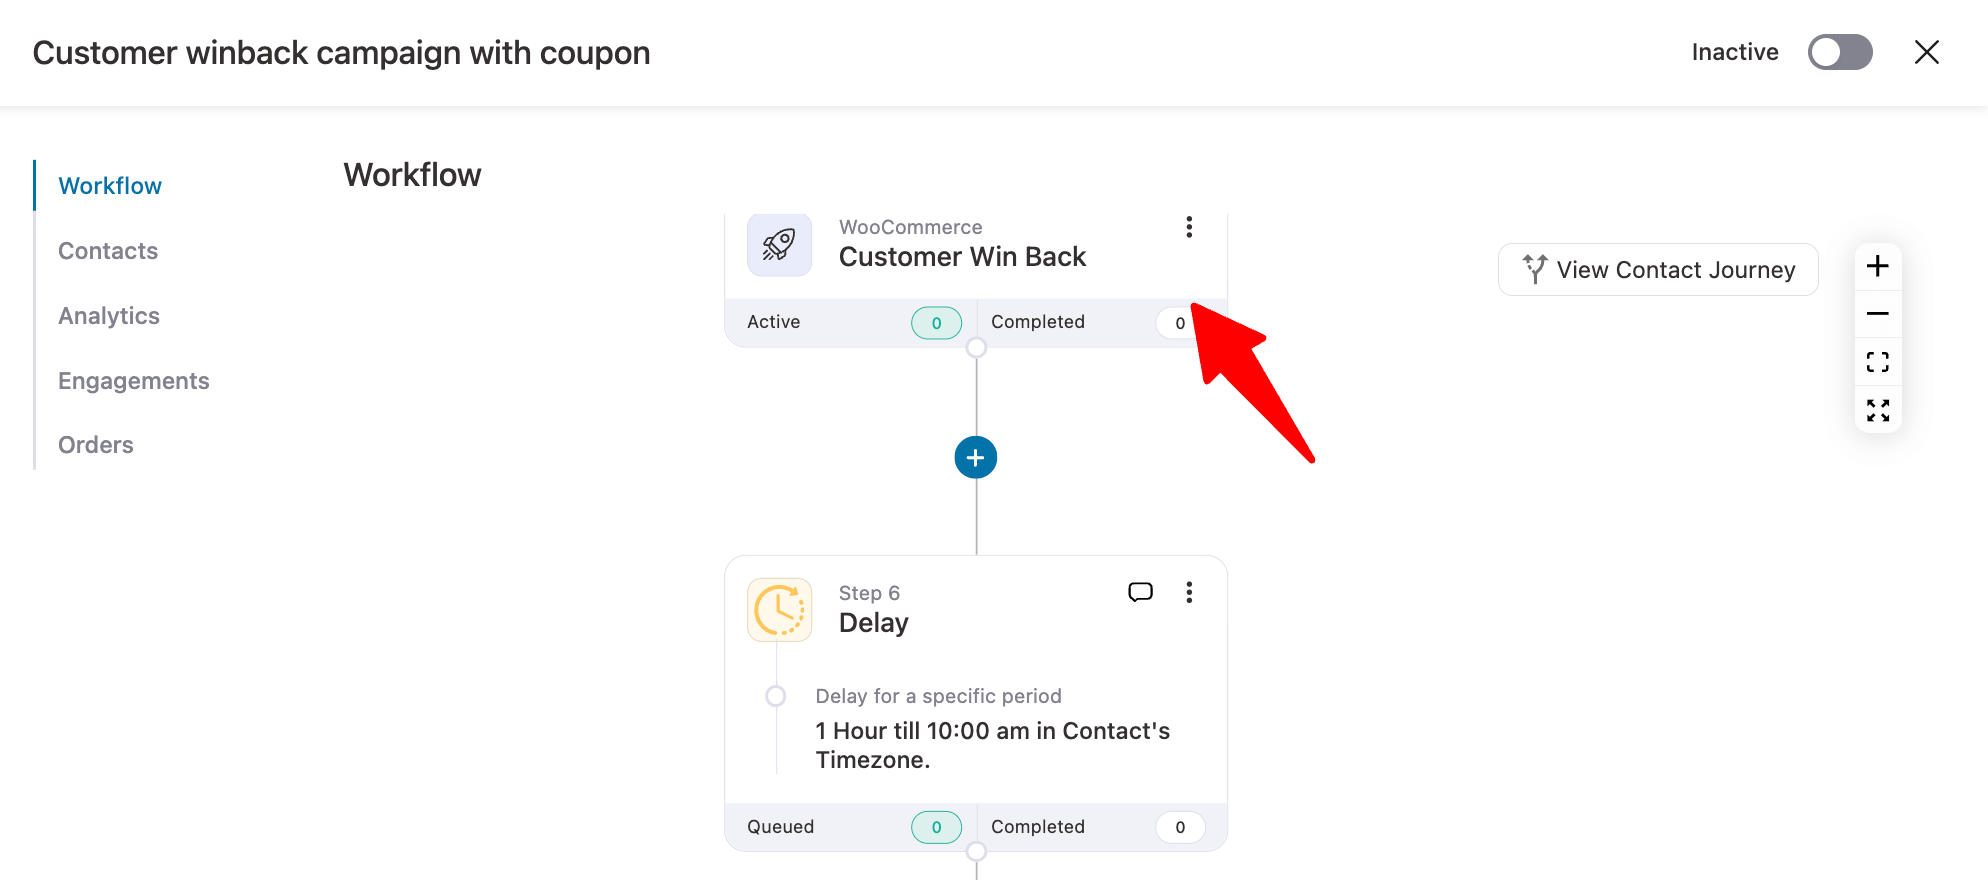
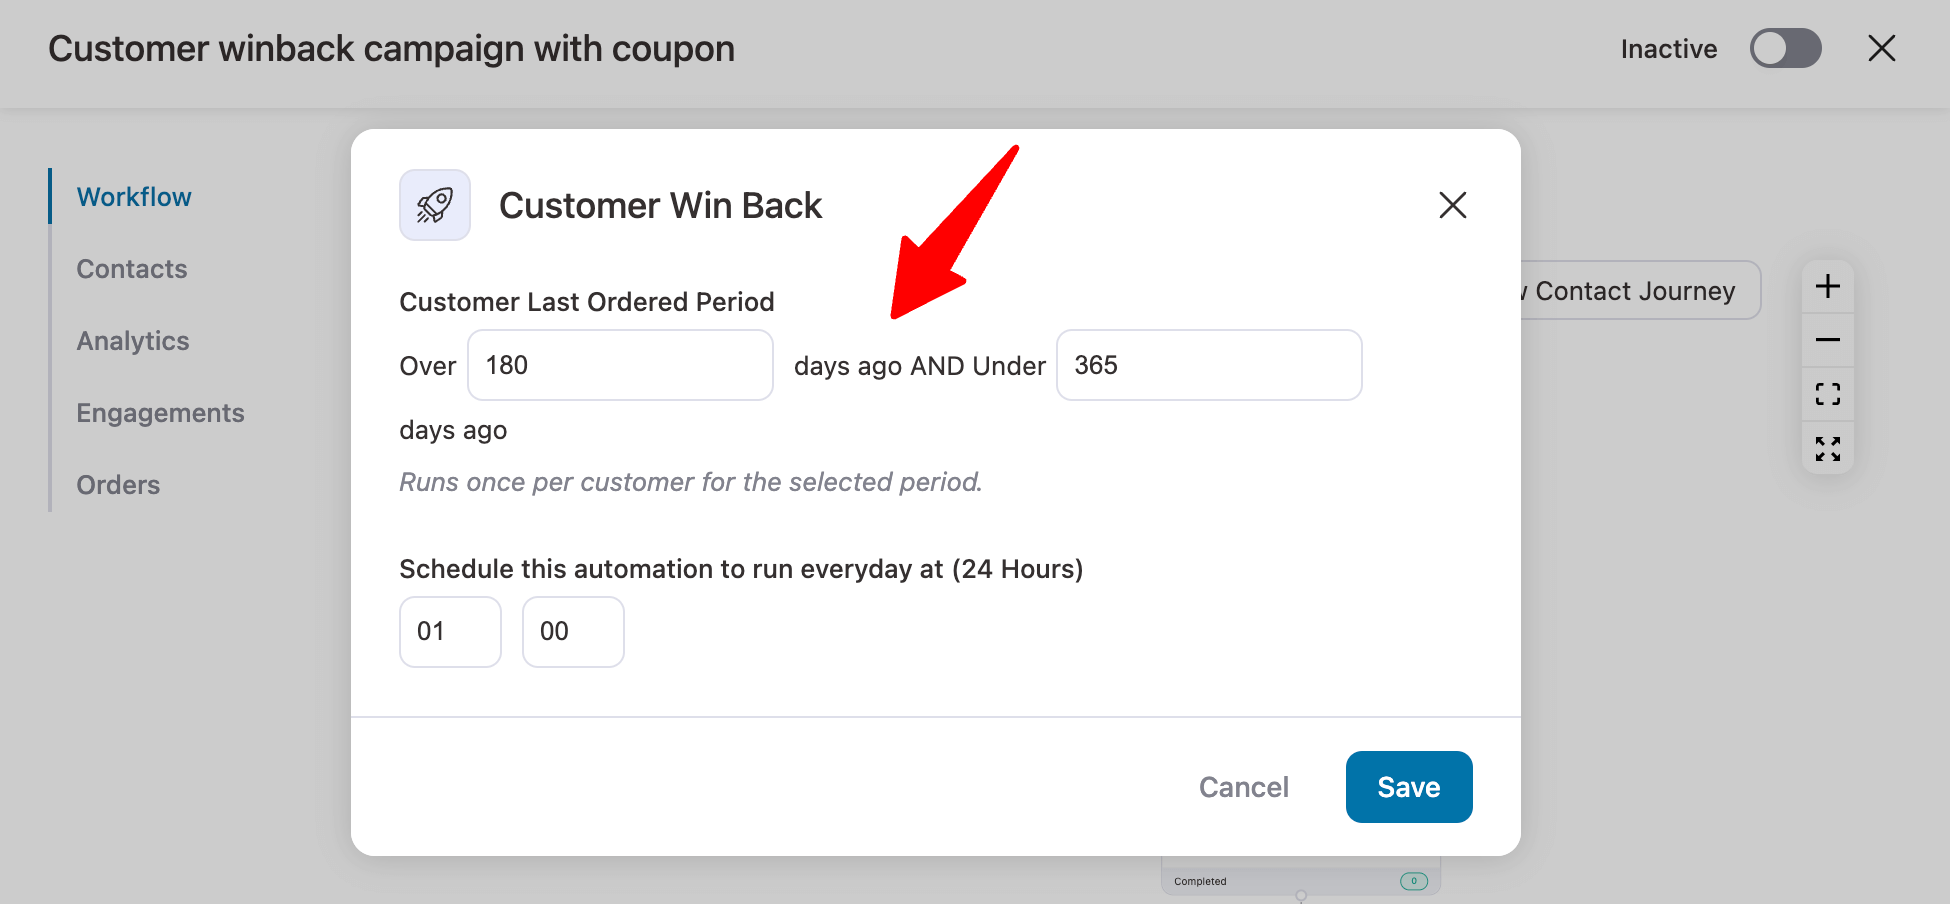
Here, set the period of inactivity for which you want this trigger to get activated. The default value is over 180 days ago and under 365 days. You can change it to anything you want.
Next, schedule your winback campaign to run every day at the defined time:
Once done, click on the ‘Save’ button.
Step 3: Set the delay period
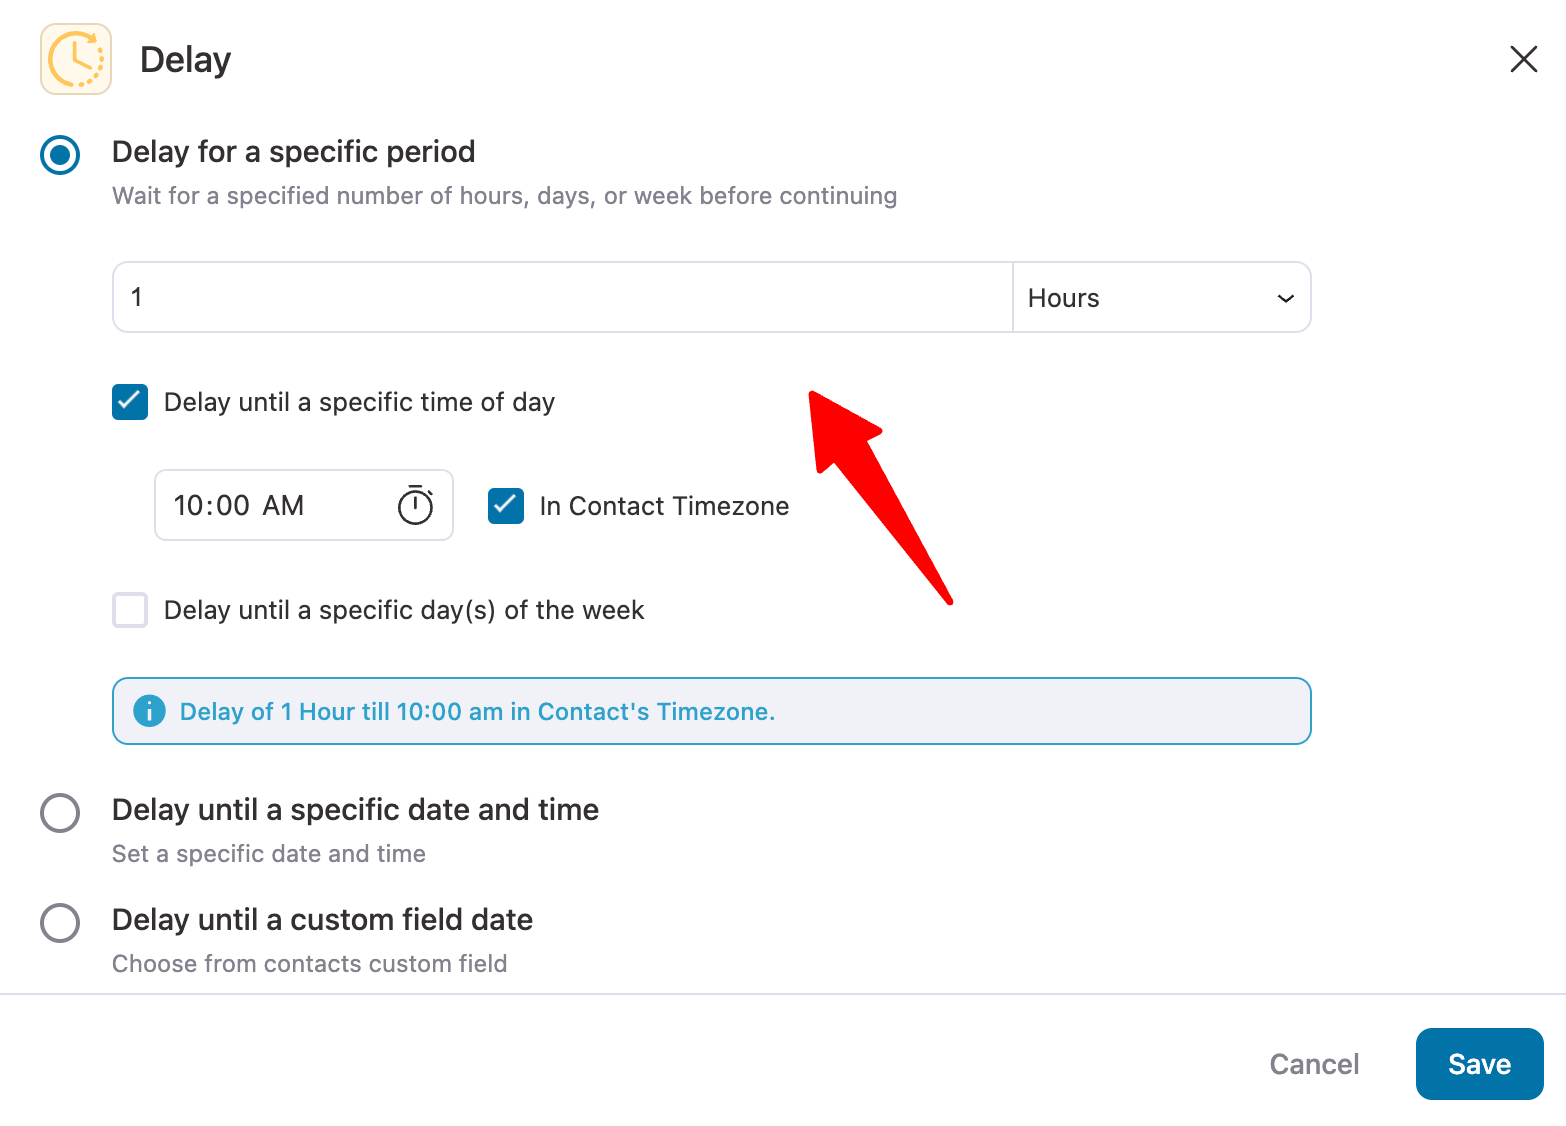
Next, set the delay period. The default is 1 hour.
Step 4: Check total revenue to segment customers
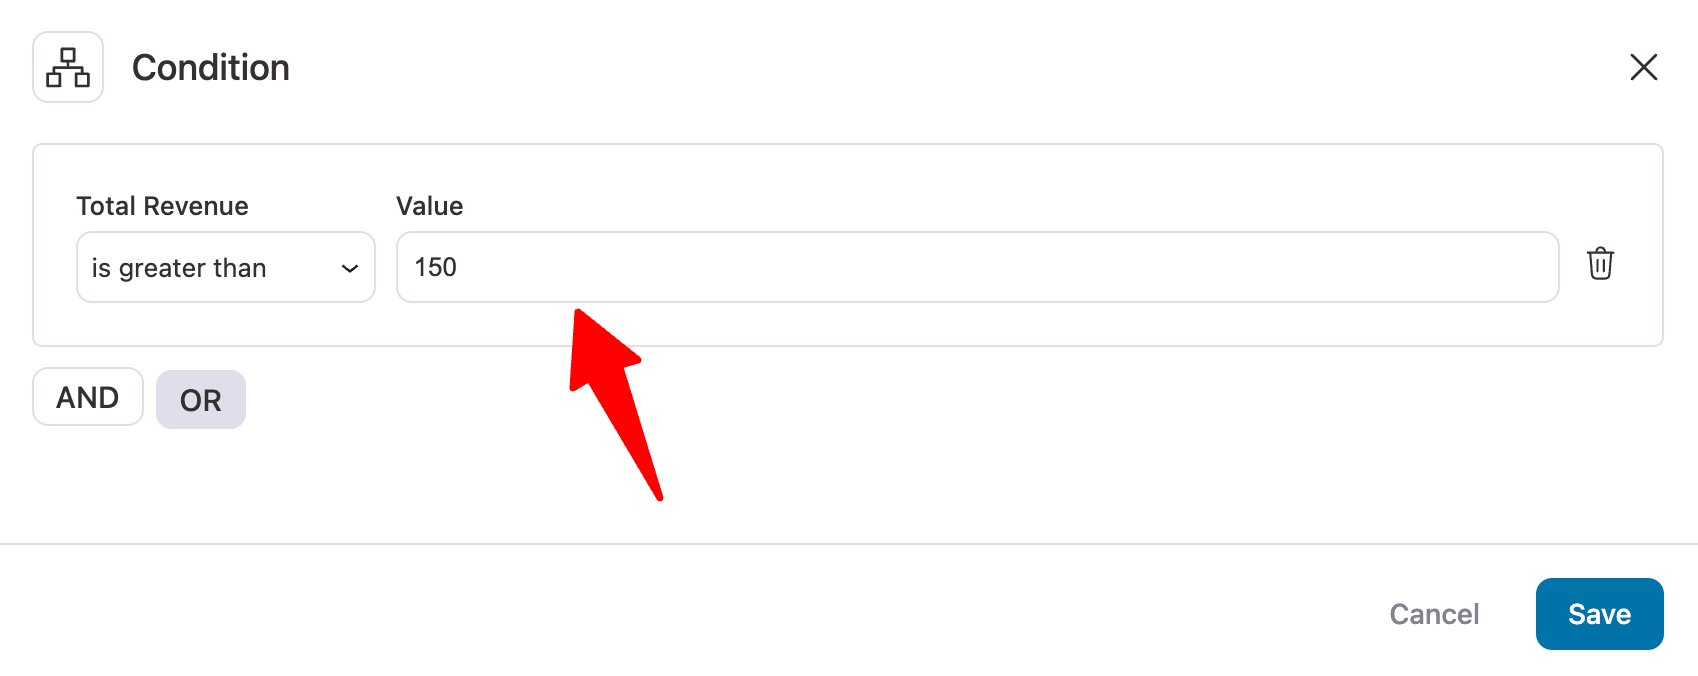
Now, let's set the condition to check whether the inactive customer’s total spent is greater than a preset threshold.
For this, hit on the condition and set the value.
Step 5: Generate dynamic coupons
Next, based on the condition, you can offer two different discounts. For instance, let’s offer 10% off for customers who meet the condition, and 5% for the remaining customers.
You can create dynamic, personalized discount coupons right from FunnelKit Automations.
To set the discount coupon, hit the Create Coupon action.
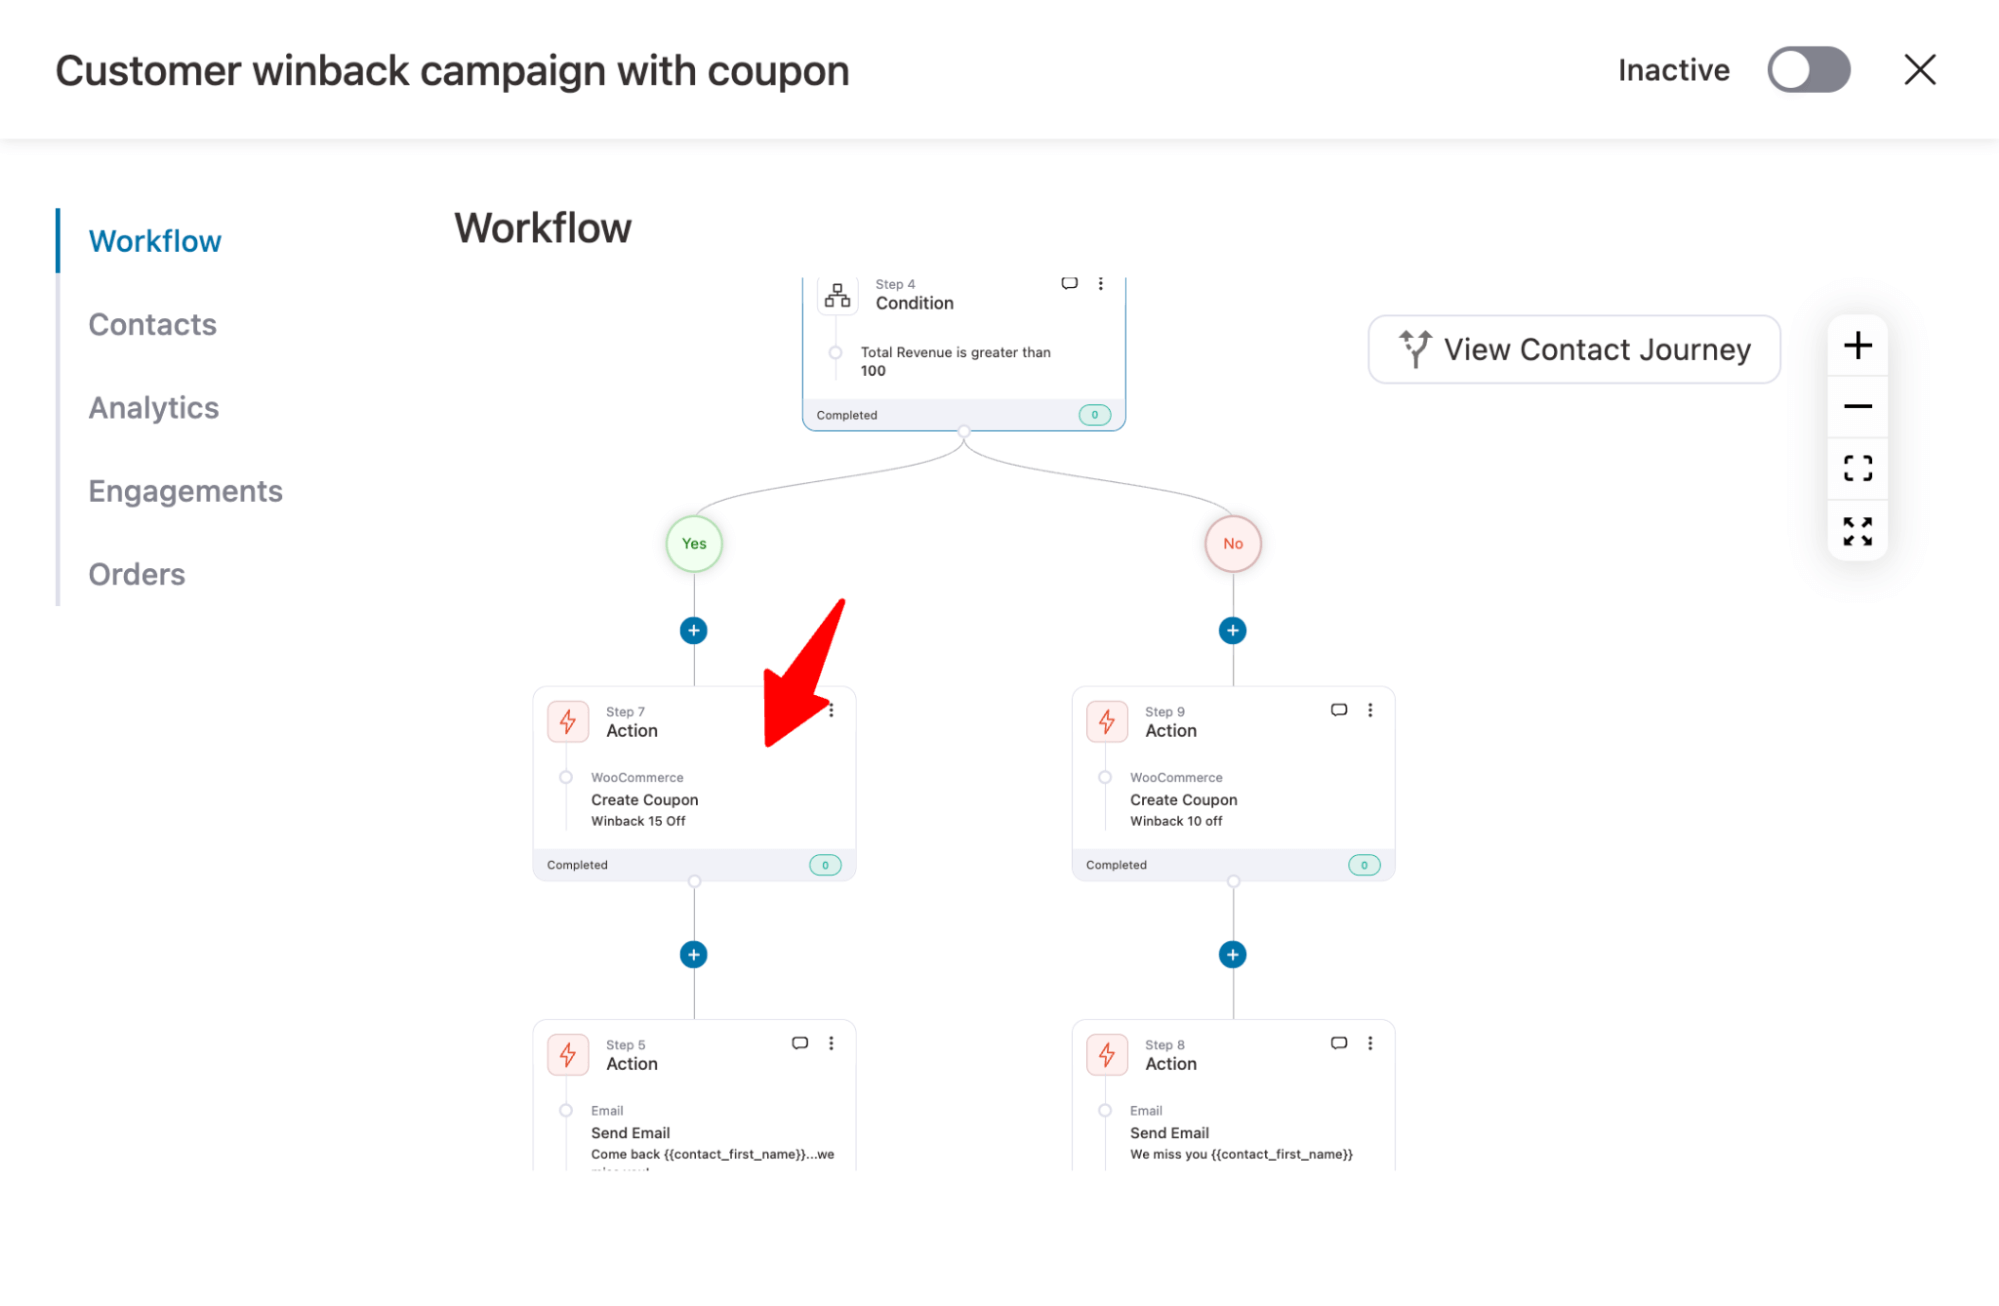
Next, configure the coupon code by setting the following parameters:
- Coupon Title - Title of your coupon code
- Discount Type - The type of discount you want to offer
- Discount Amount - The amount of discount
- Coupon Code Prefix - You can select from a range of merge tags to personalize the name of your coupon code. Here, we’ll select the ‘first name’ merge tag to personalize your coupon code:
- Coupon Expiration Date - Set an expiry (validity) for this coupon to create urgency in your campaign.
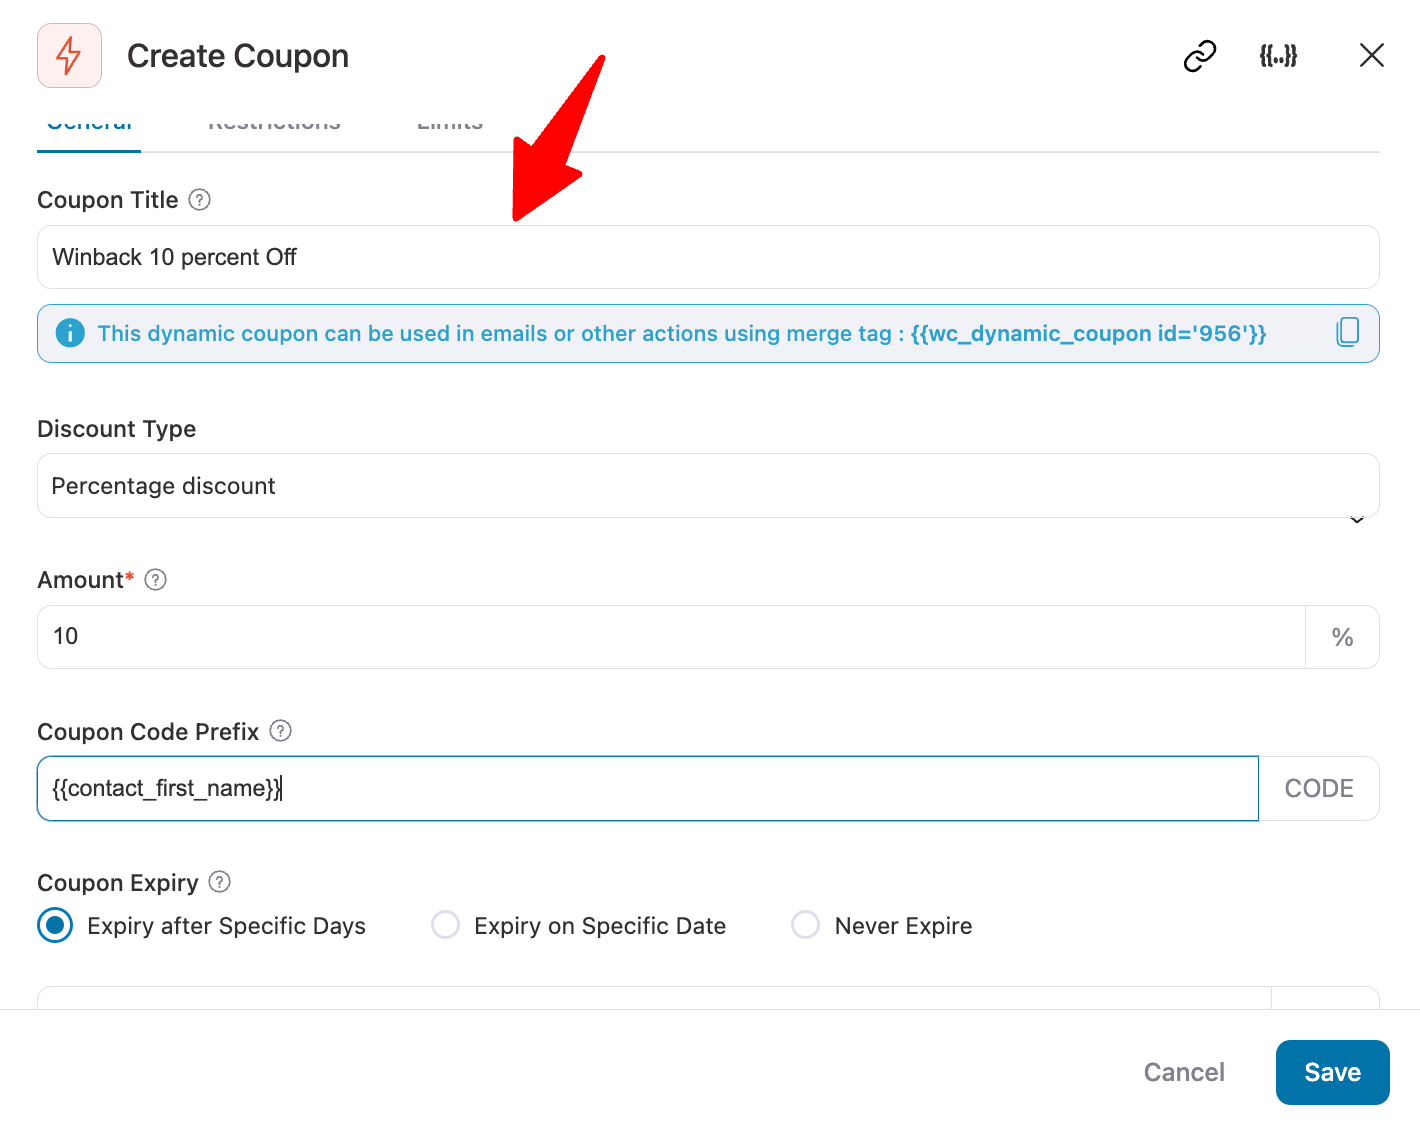
Hit Save to update the discount coupon.
🔔 Note: Repeat the same process to set the other create coupon action as well.
Step 6: Craft your winback campaign emails
Next, you need to craft both emails.
For that, hit the ‘Send Email’ action on your workflow:
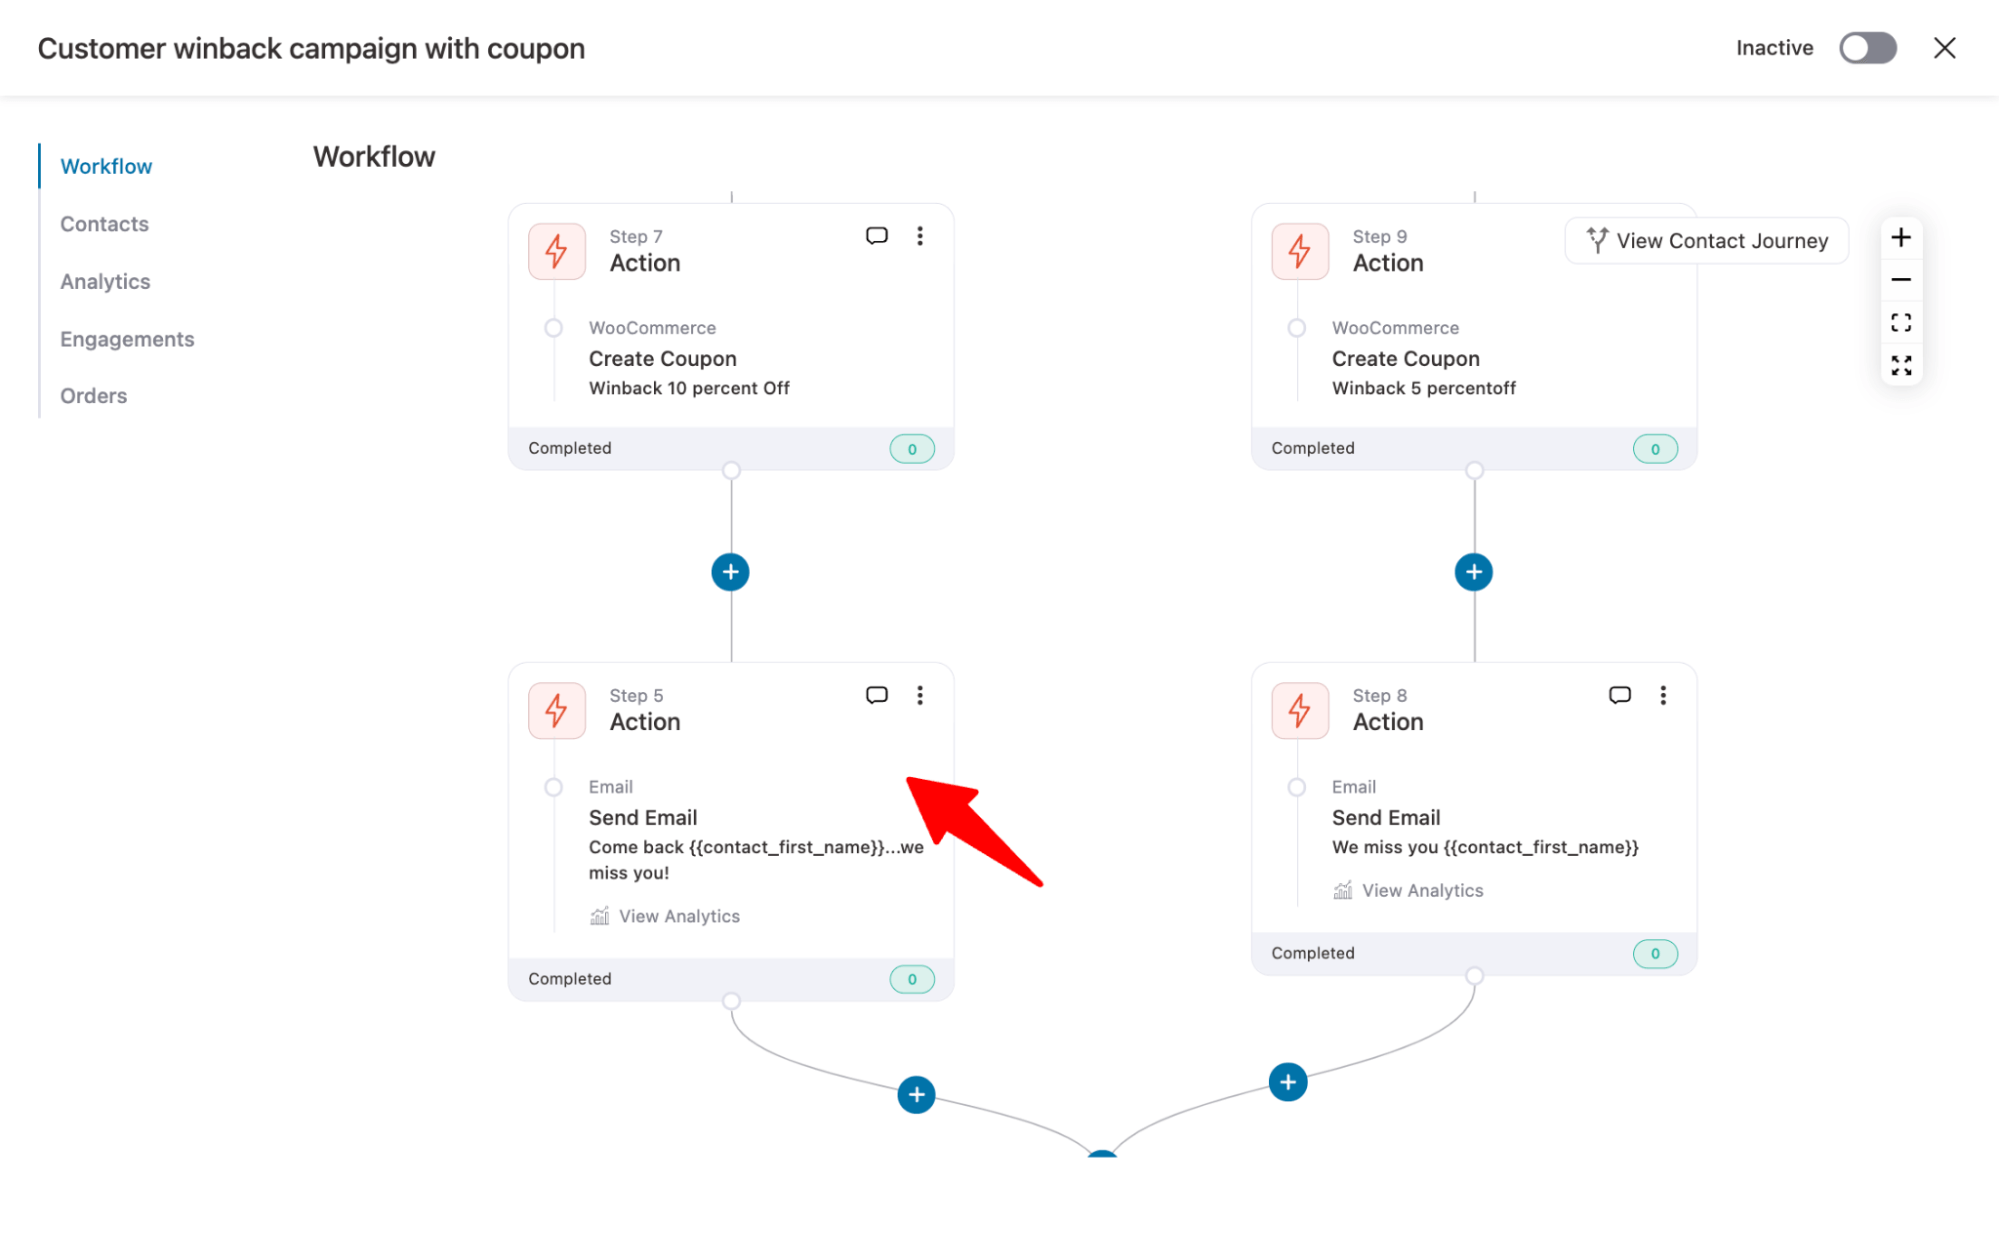
Customize the subject line and preview the text of your winback email. Use the merge tag to add a touch of personalization.
Next, you can choose four options to craft your winback campaign emails using Visual Editor (New), Rich Text Editor, and Raw HTML.
Experts recommend going with Visual Editor New as it comes with an intuitive drag-and-drop email builder, and lots of pre-built email templates are ready to use.
Select the ‘Visual Builder’ and hit Edit.
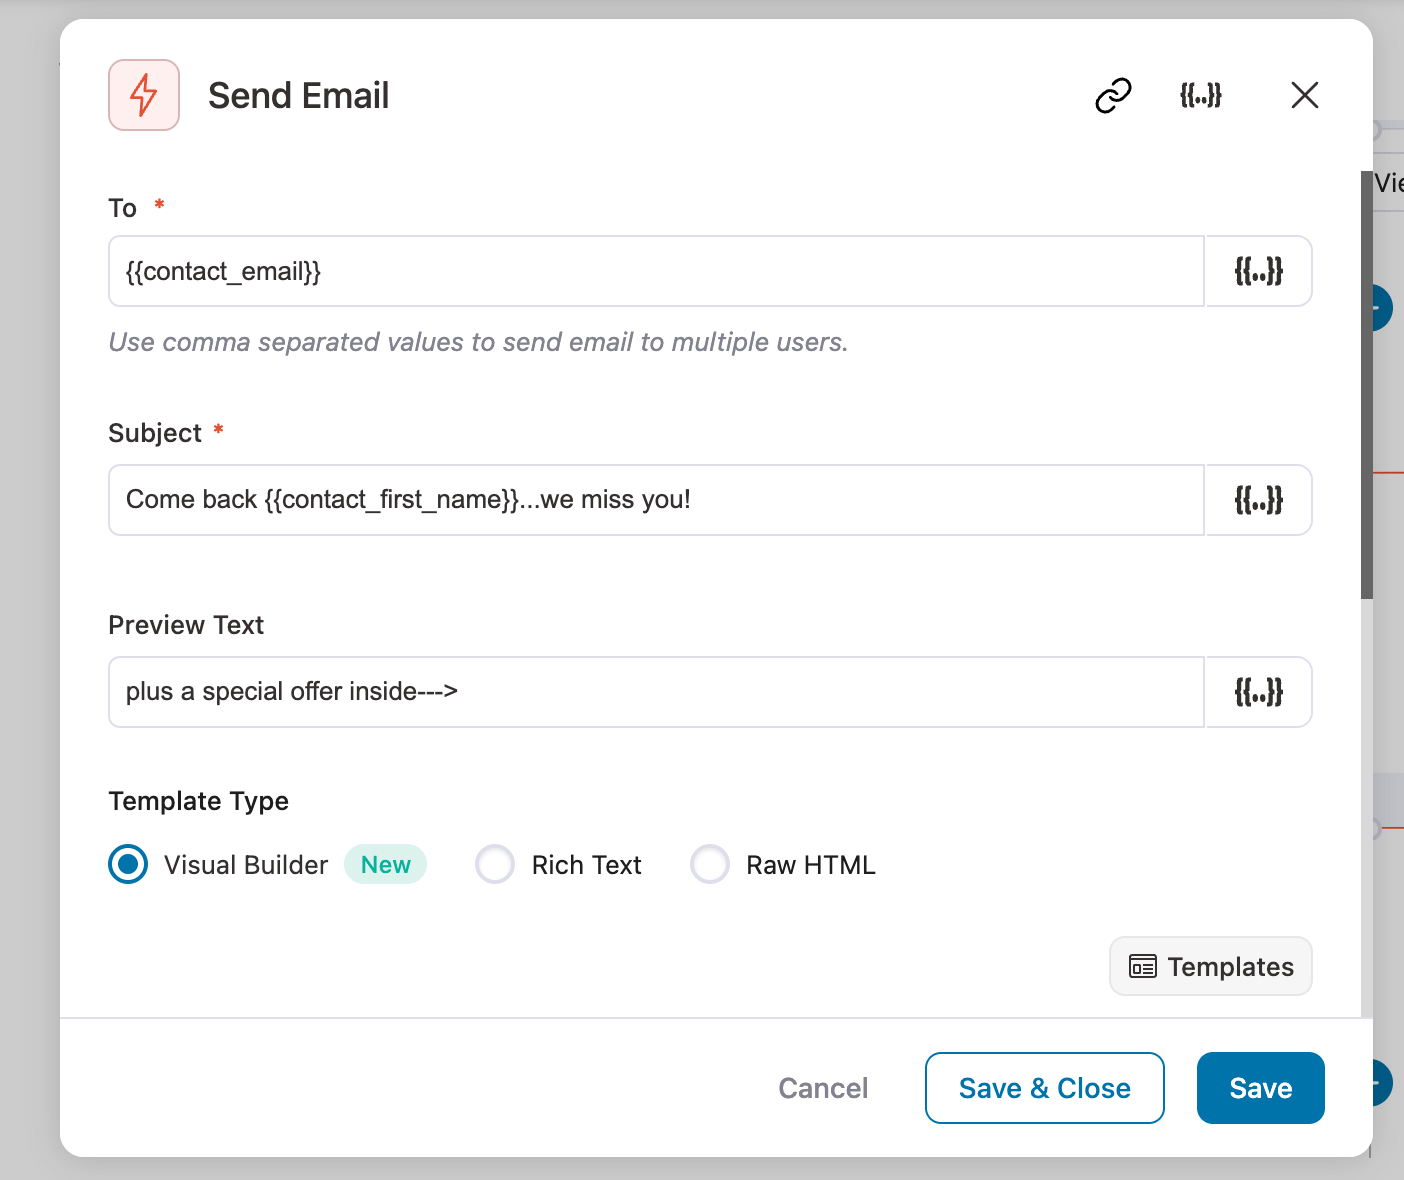
Now import the winback email template.
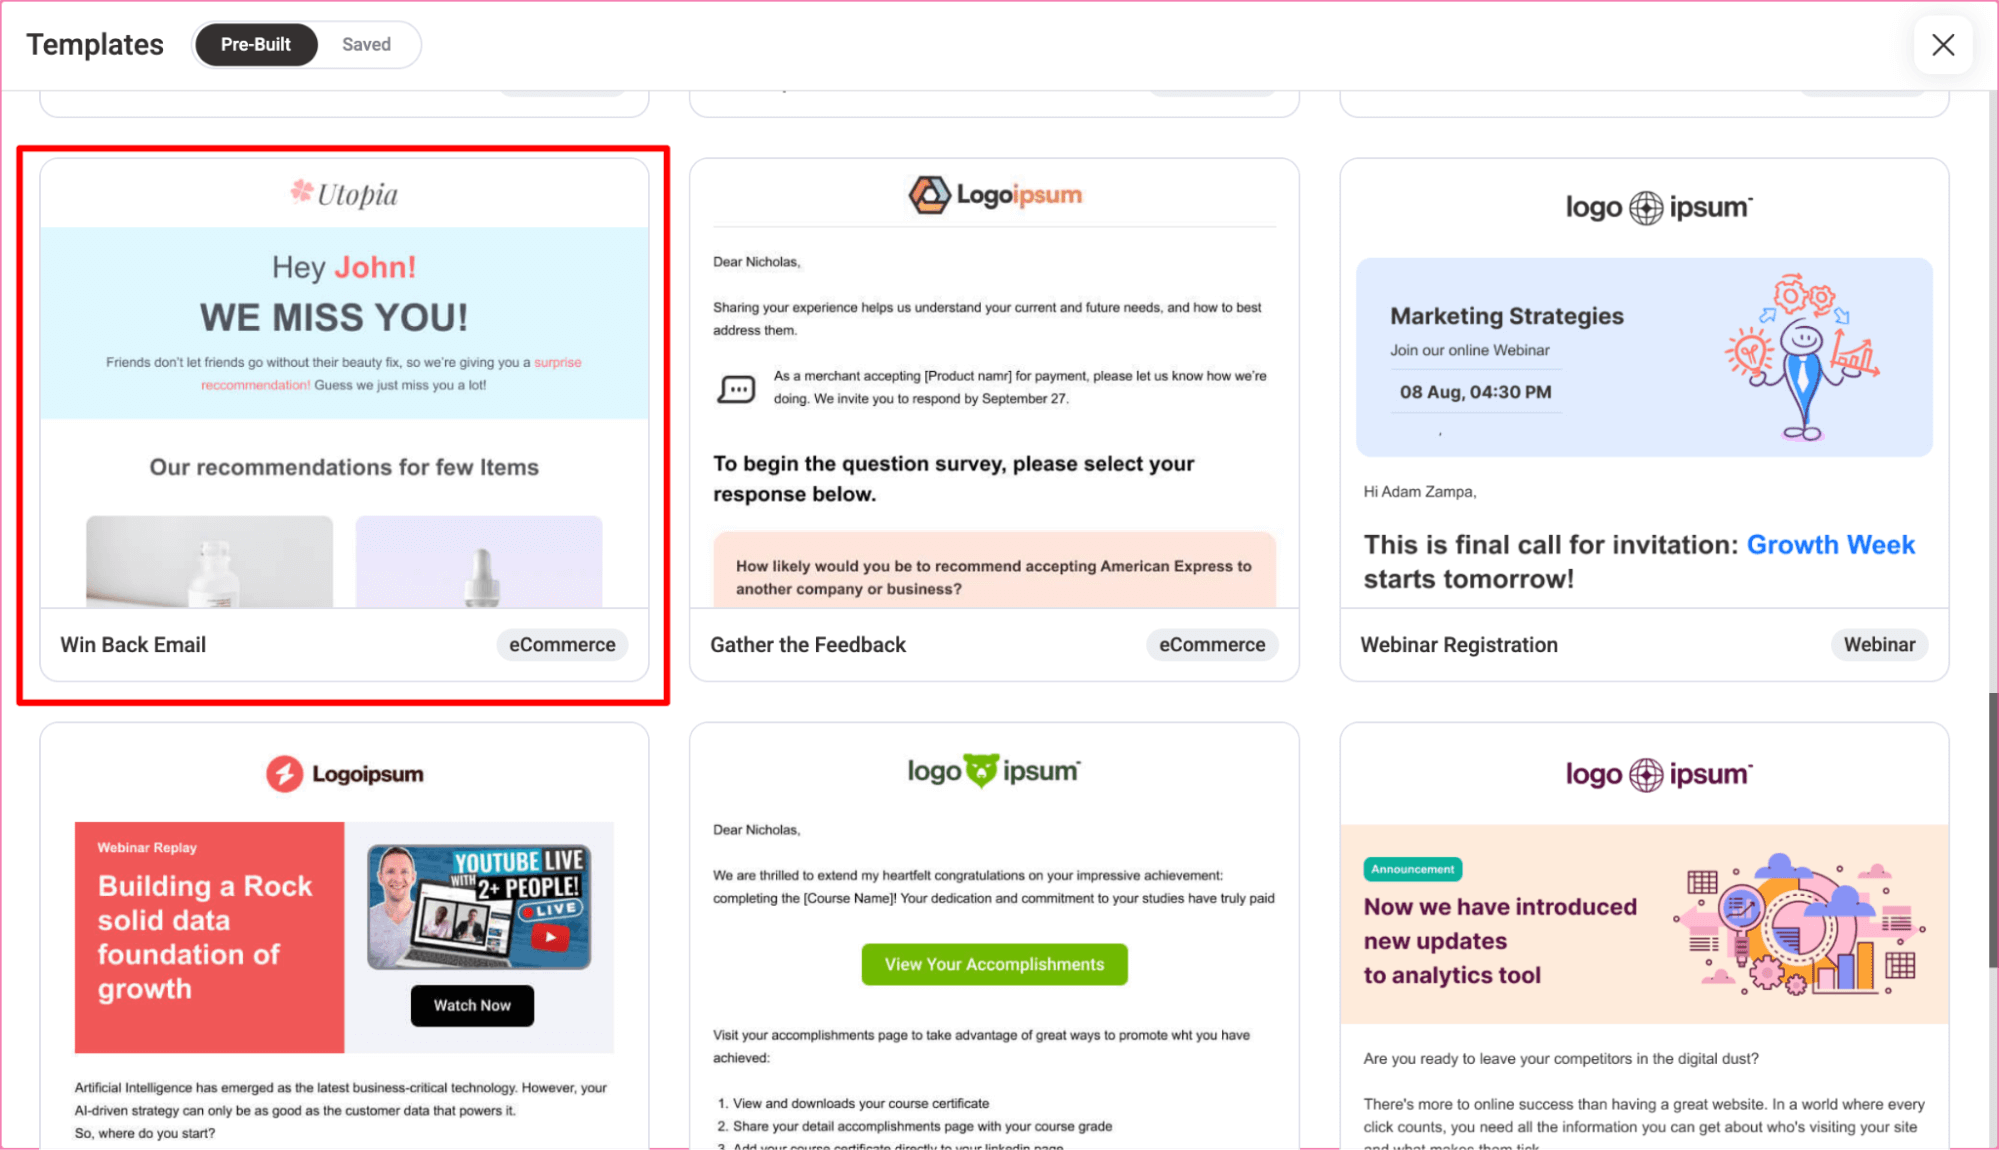
Just hover and hit preview, and then hit Import this template.
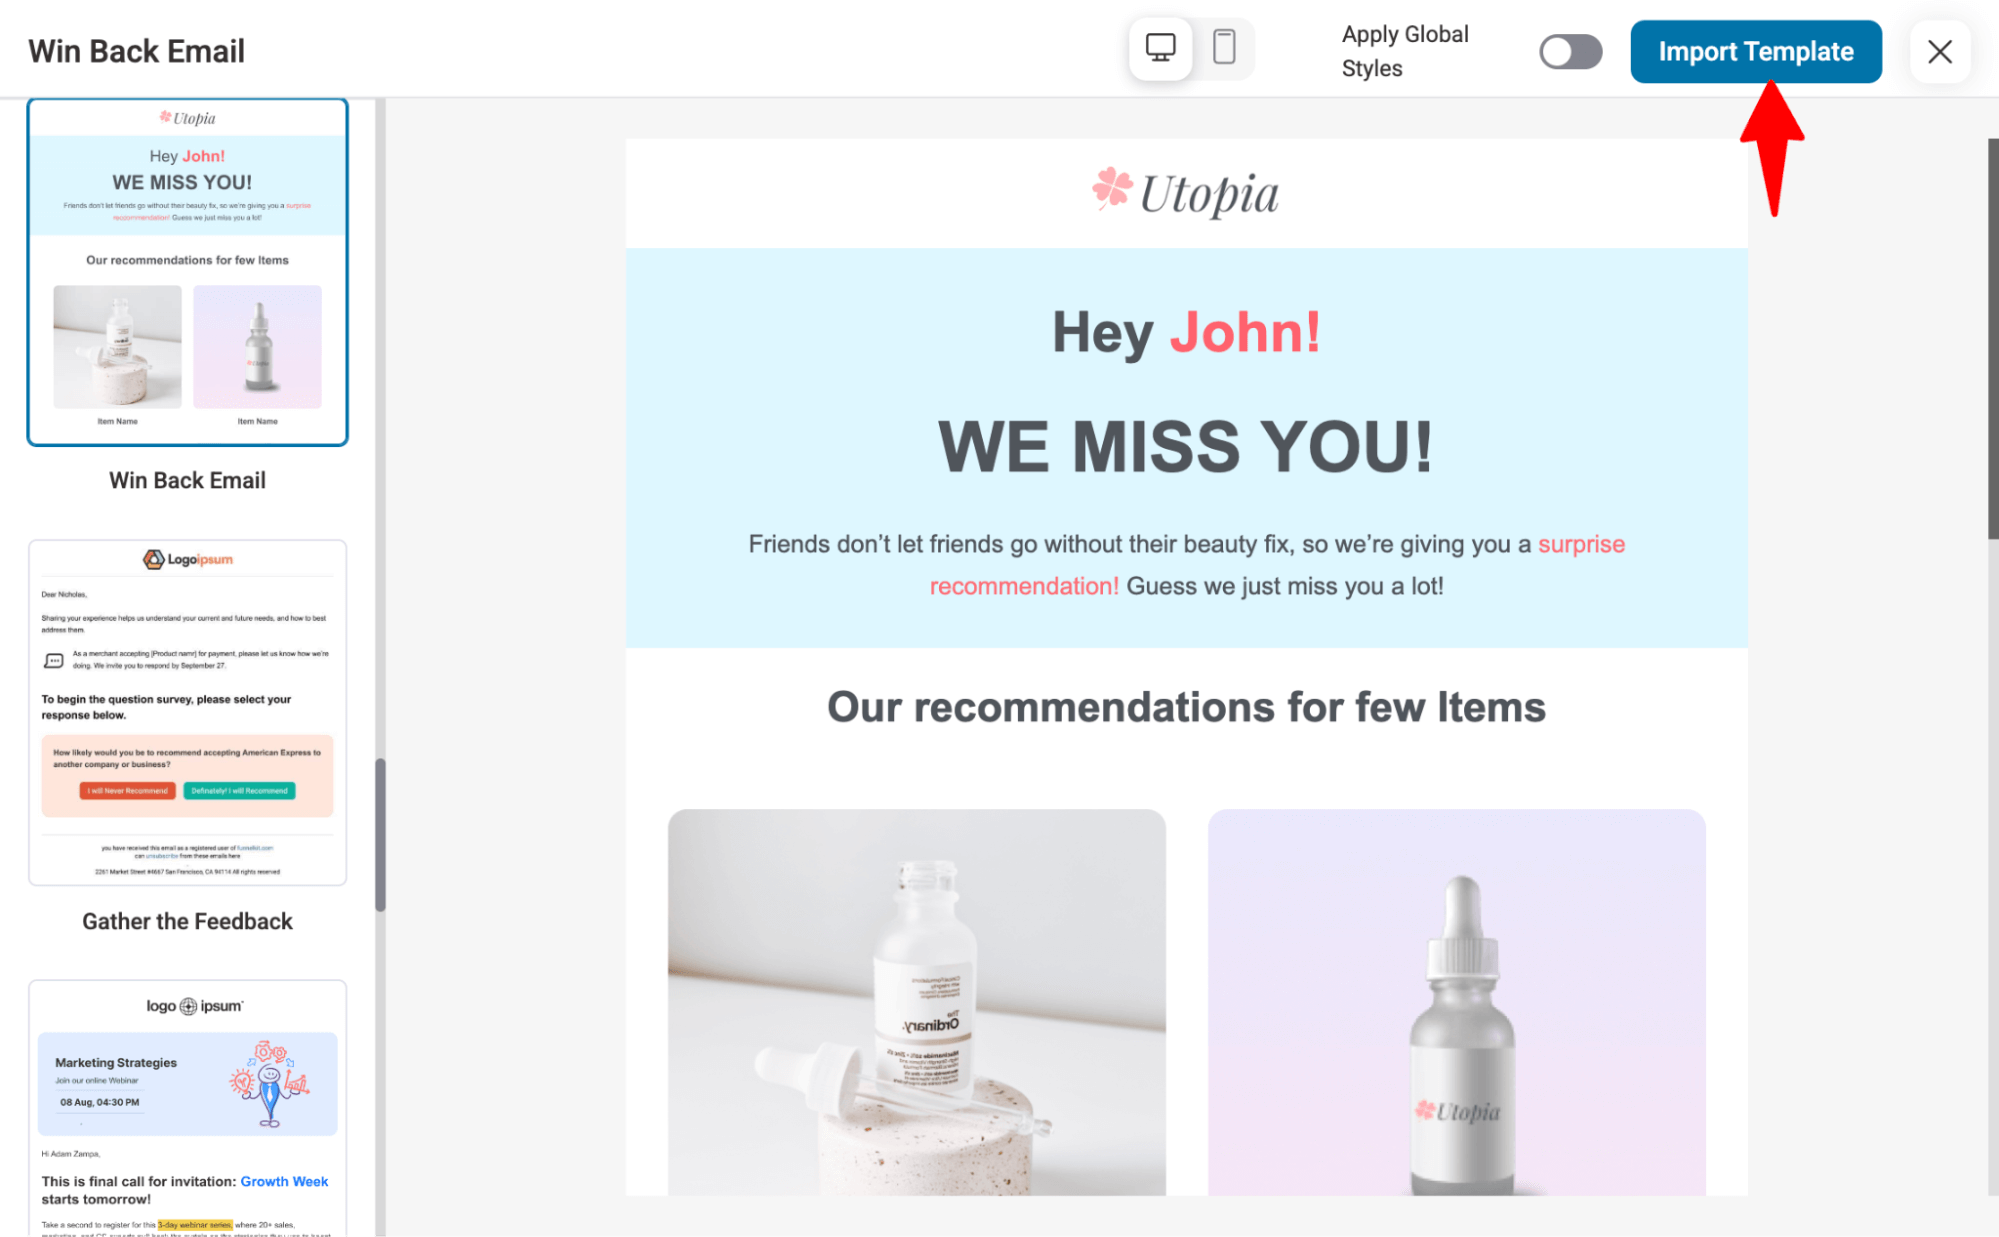
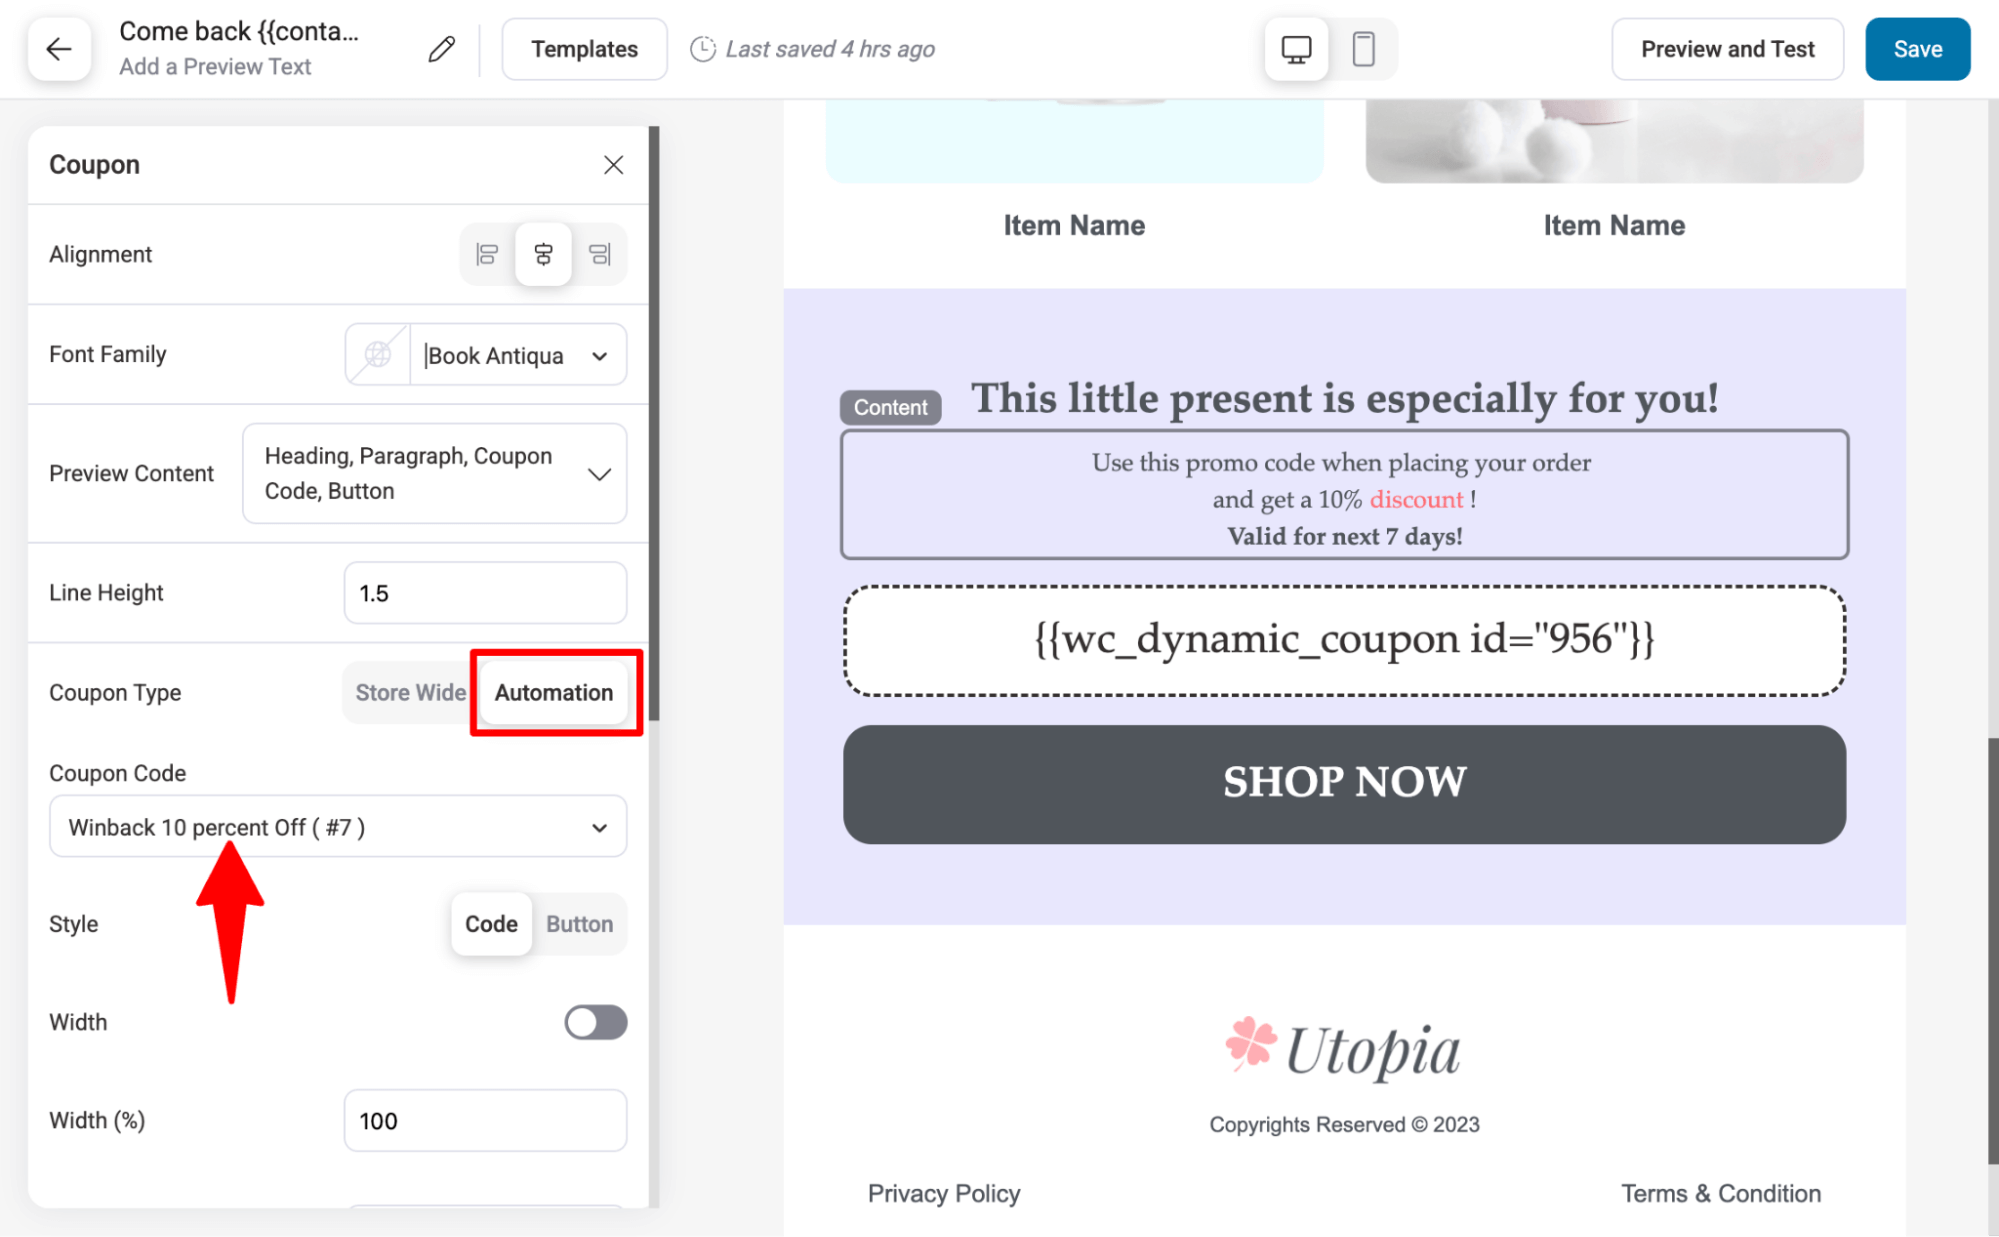
The template has some catchy text, product recommendations, and a coupon block. Make the necessary changes where you want.
To add the coupon code you generated, on the left side, for Coupon type, choose automation and then select the code.
If the template is missing a footer, you can add it using prebuilt layouts.
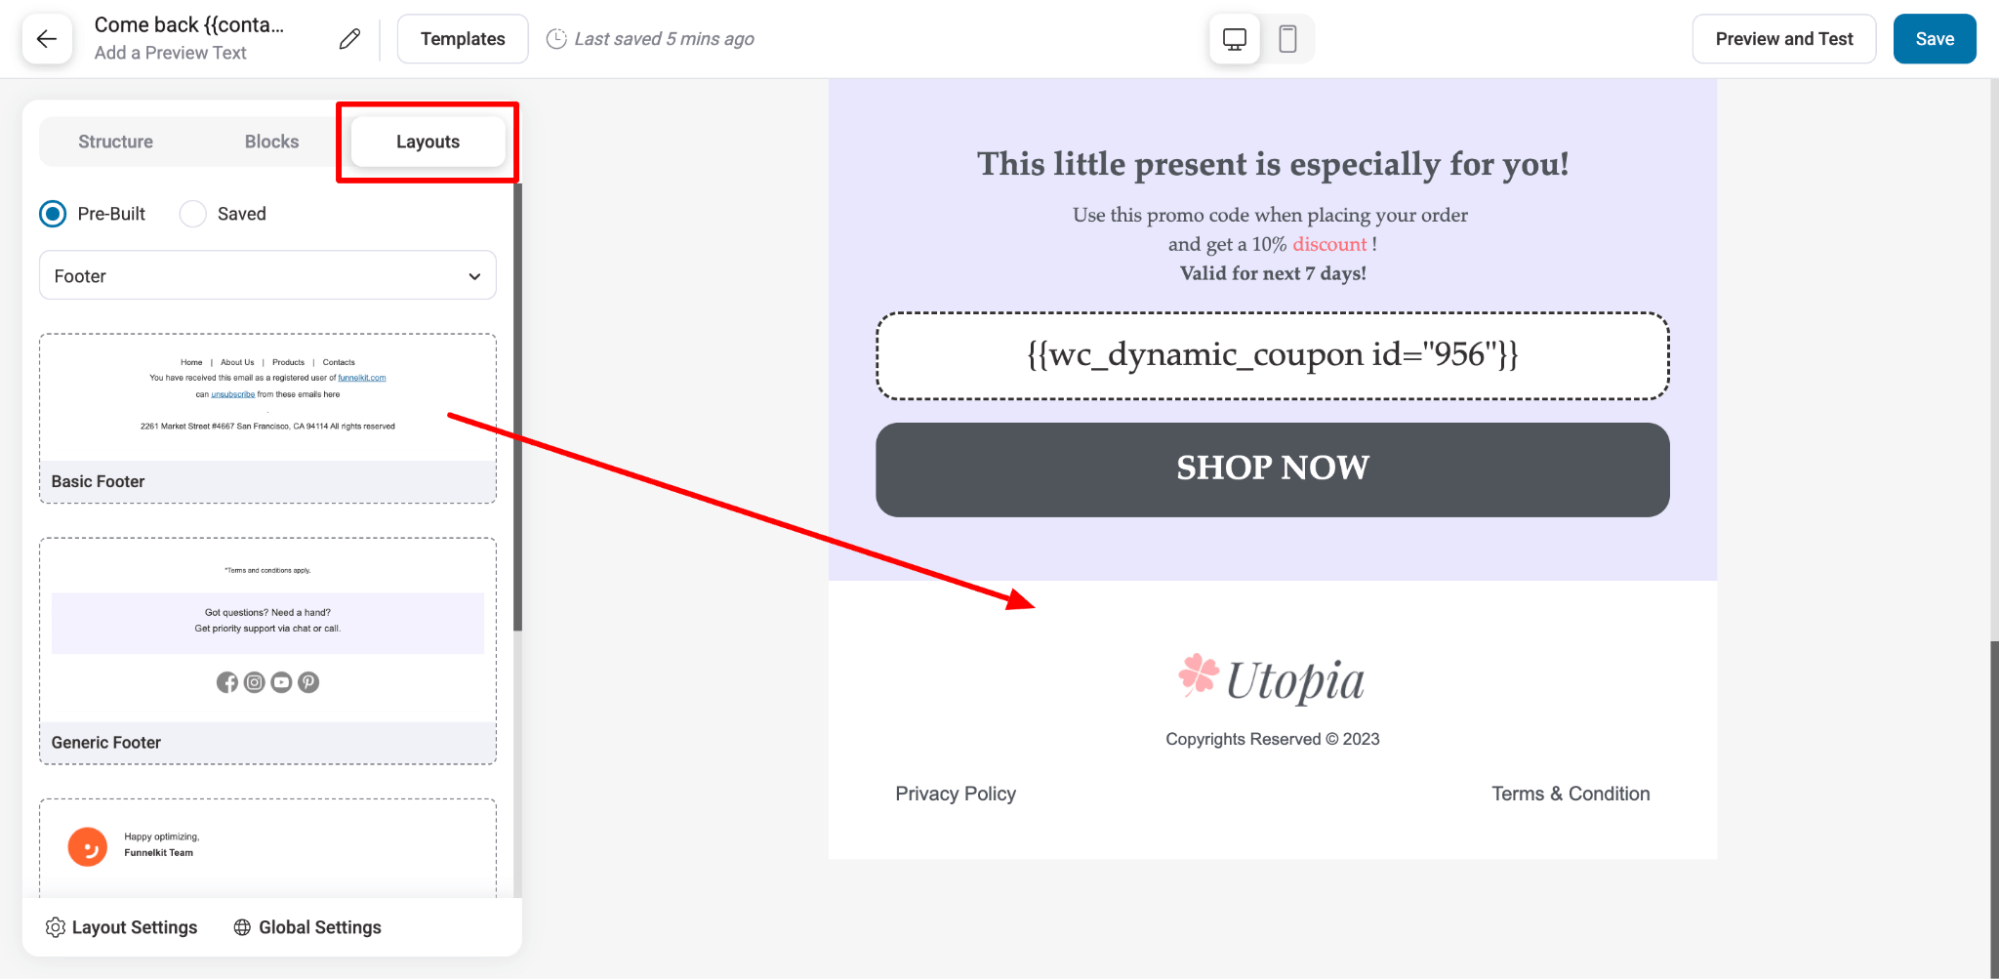
After adding, make sure to add business name and business address merge tags to comply with laws, and make sure to save the changes.
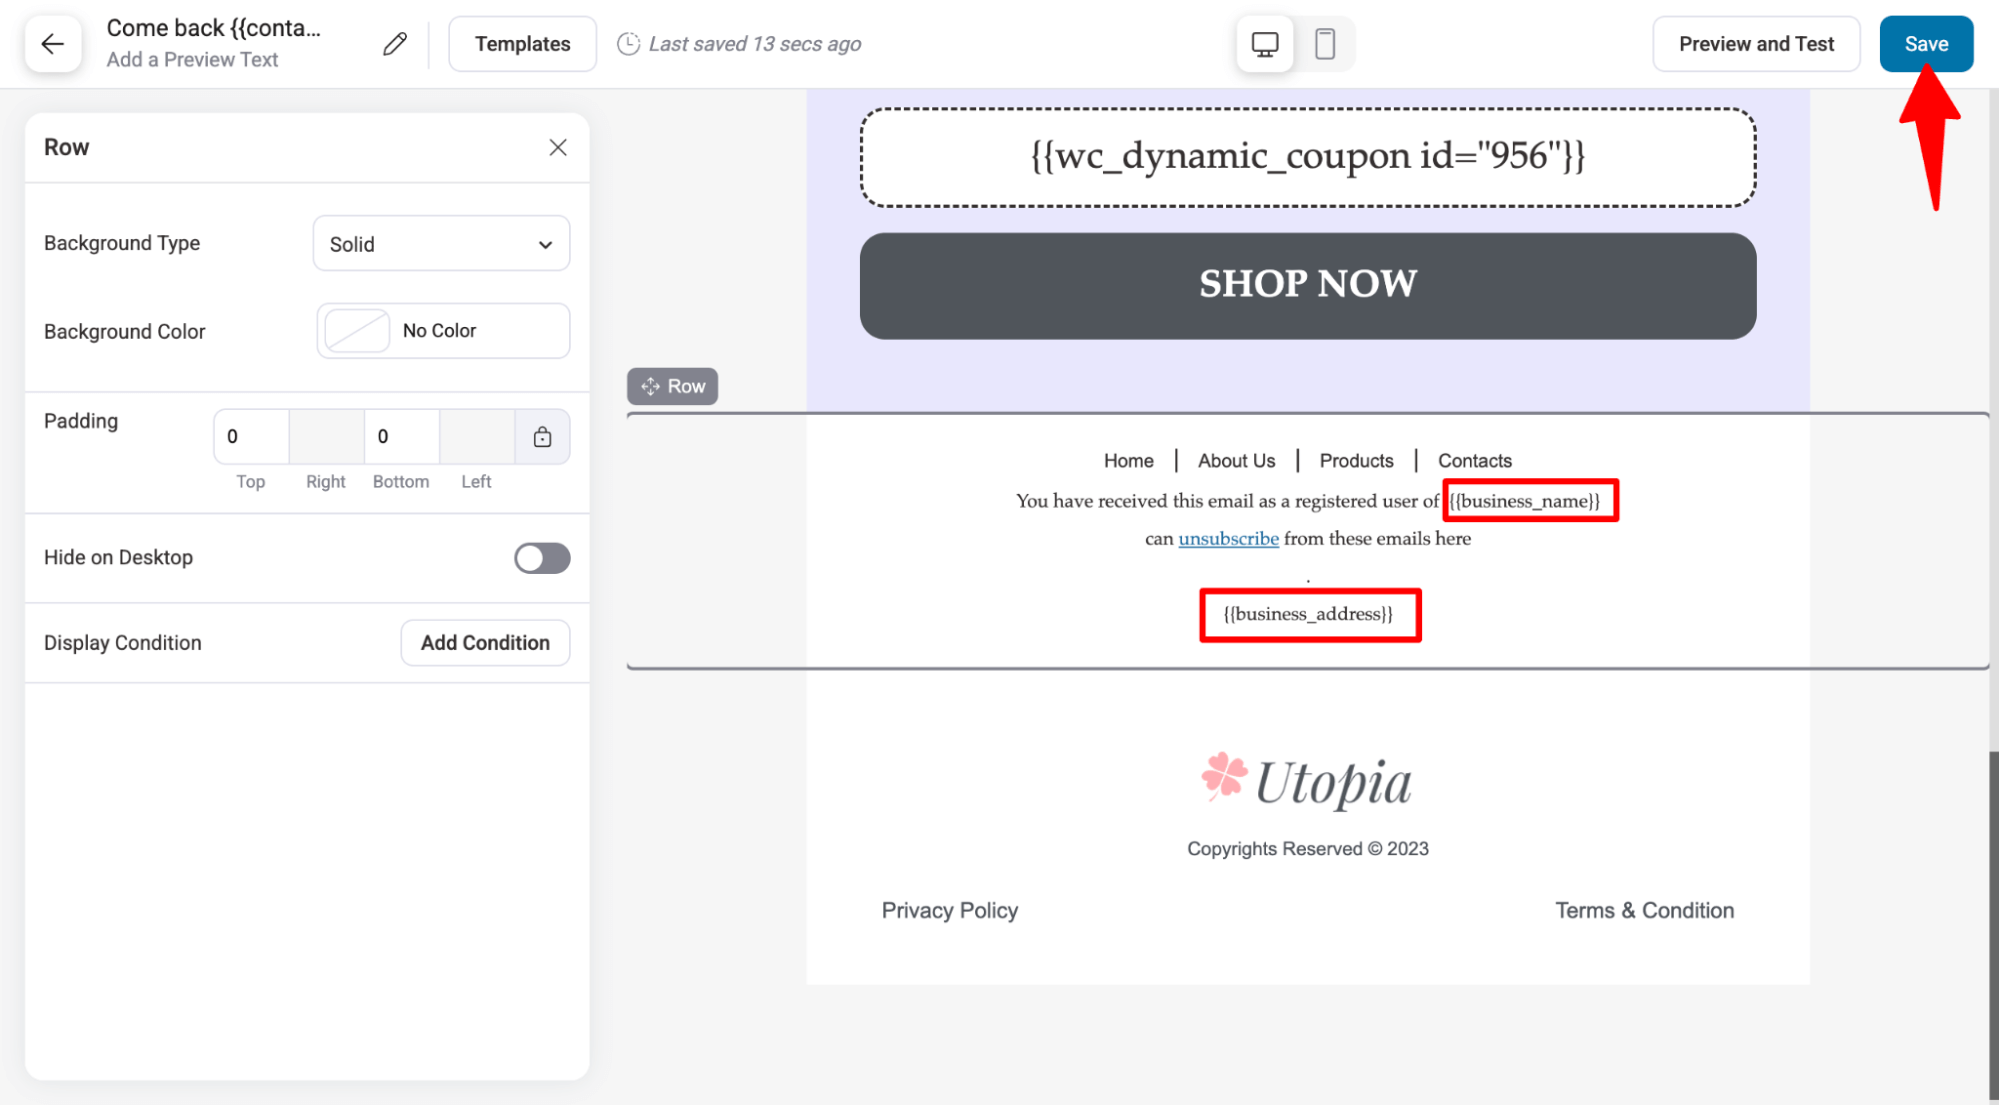
And repeat the same process to customize the other email as well.
Step 7: Activate the automations
The final step is to activate the automation to run a winback campaign on your WooCommerce customers.
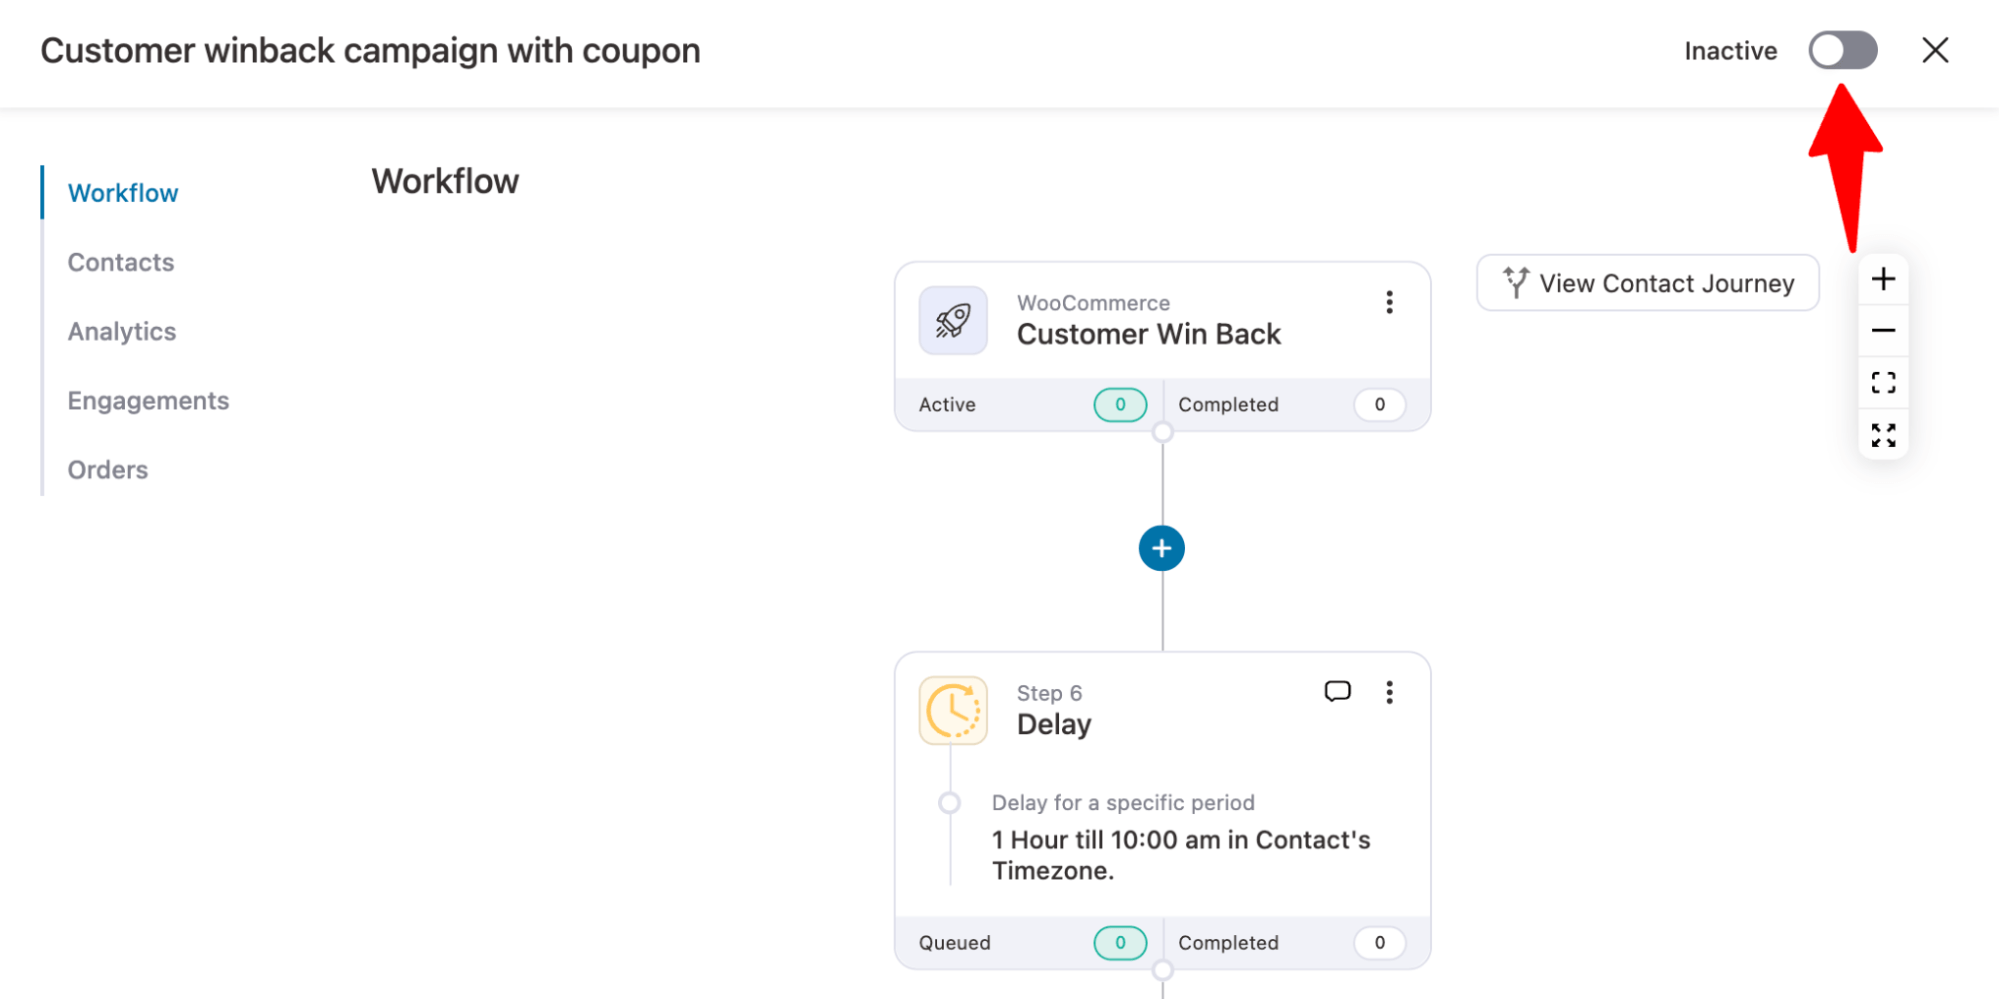
This is a simple sequence that we have set up as an example.
You can obviously add more delays and include 3-4 emails in the sequence or implement your unique winback campaign ideas into the workflow.
Add this win-back email to your marketing strategy, and you will exponentially increase your customer retention rates, turning your dormant customers into loyal customers.
How to Measure the Success of a Winback Campaign?
Once your winback automation is live and running, you can evaluate the effectiveness of your campaign through analytics.
FunnelKit Automations lets you measure the success of your campaigns in real-time.
All you have to do is go to the Analytics section.
You’ll be able to view the metrics related to your contacts, emails and SMS of your winback campaigns.
For your campaign, you’ll be able to take a quick view of:
- Active Contacts
- Completed Contacts
- Orders
- Revenue
- AOV
- Unsubscribes
Similarly, for emails and SMS, you’ll be able to see the following:
- Sent emails and SMS
- Open rate
- Click rate
- Orders placed
- Revenue generated

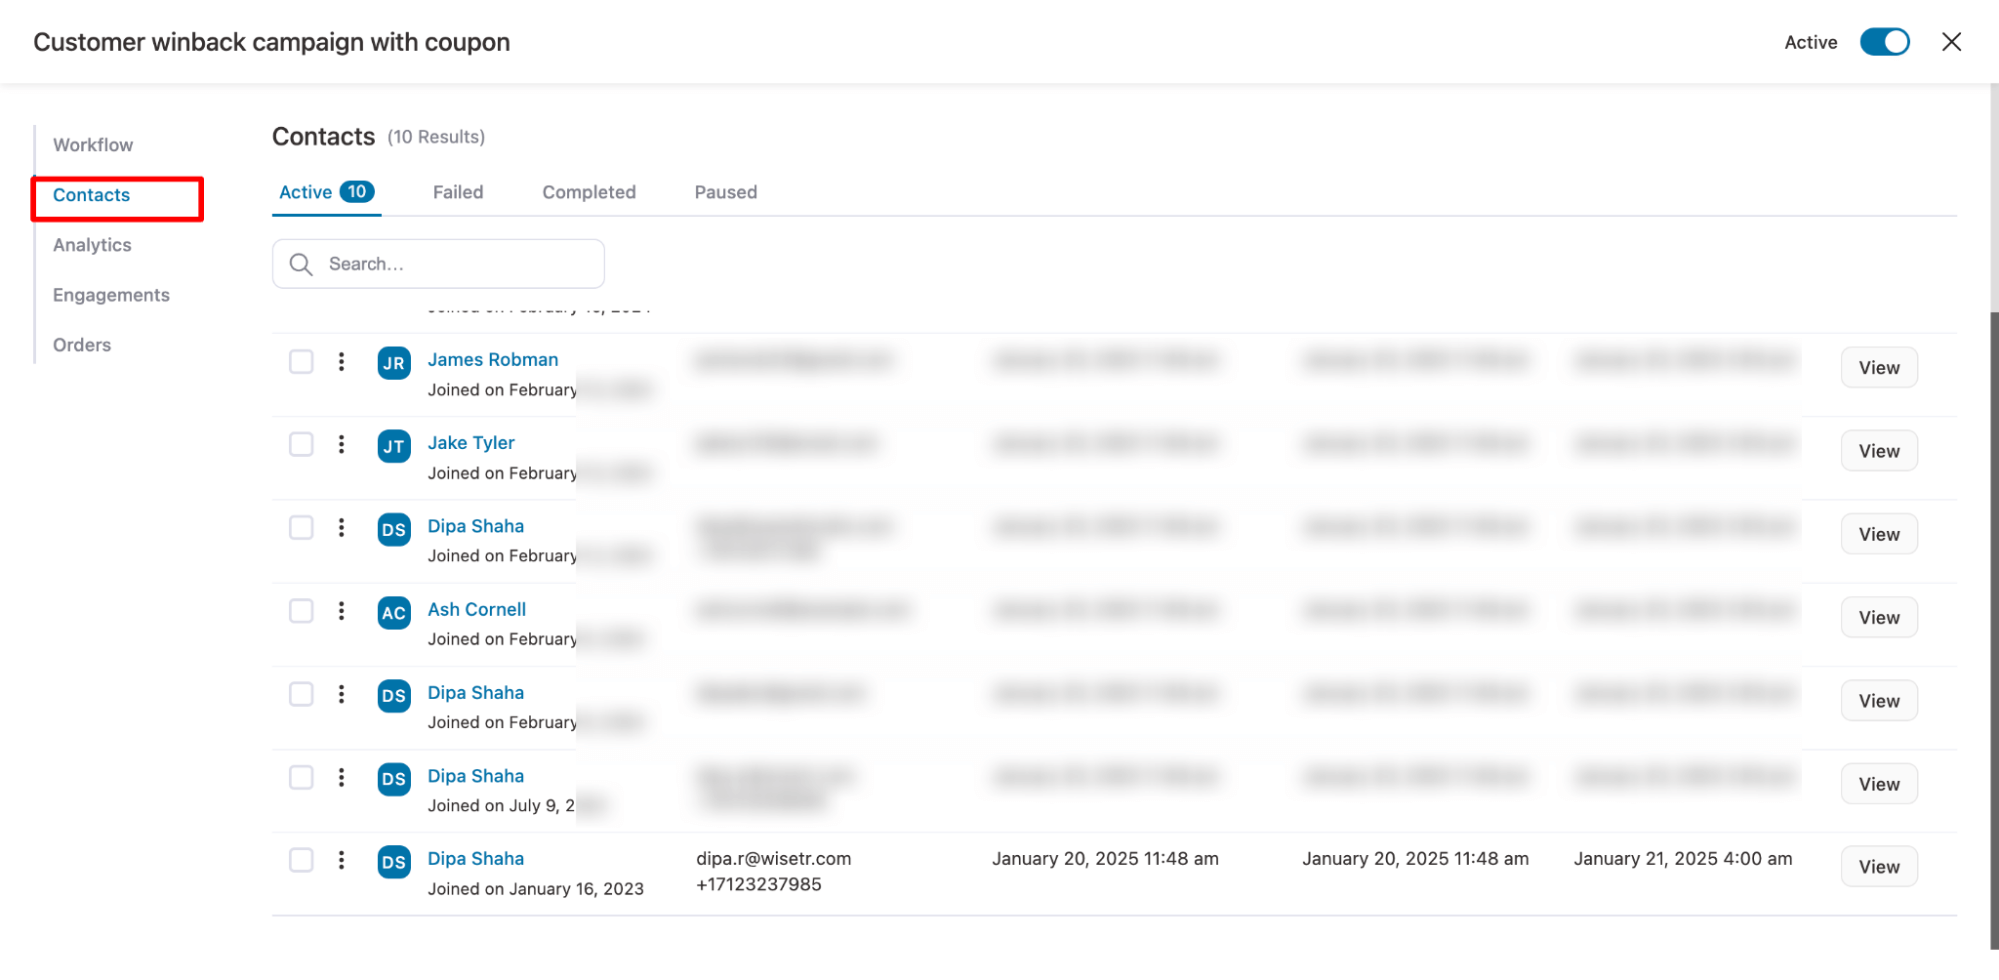
Contacts
The Contacts section gives you complete automation details of how many contacts are still active in your workflow.
Along with the active contacts, you’ll also be able to find the completed, paused, and failed contacts within your automated winback sequence.
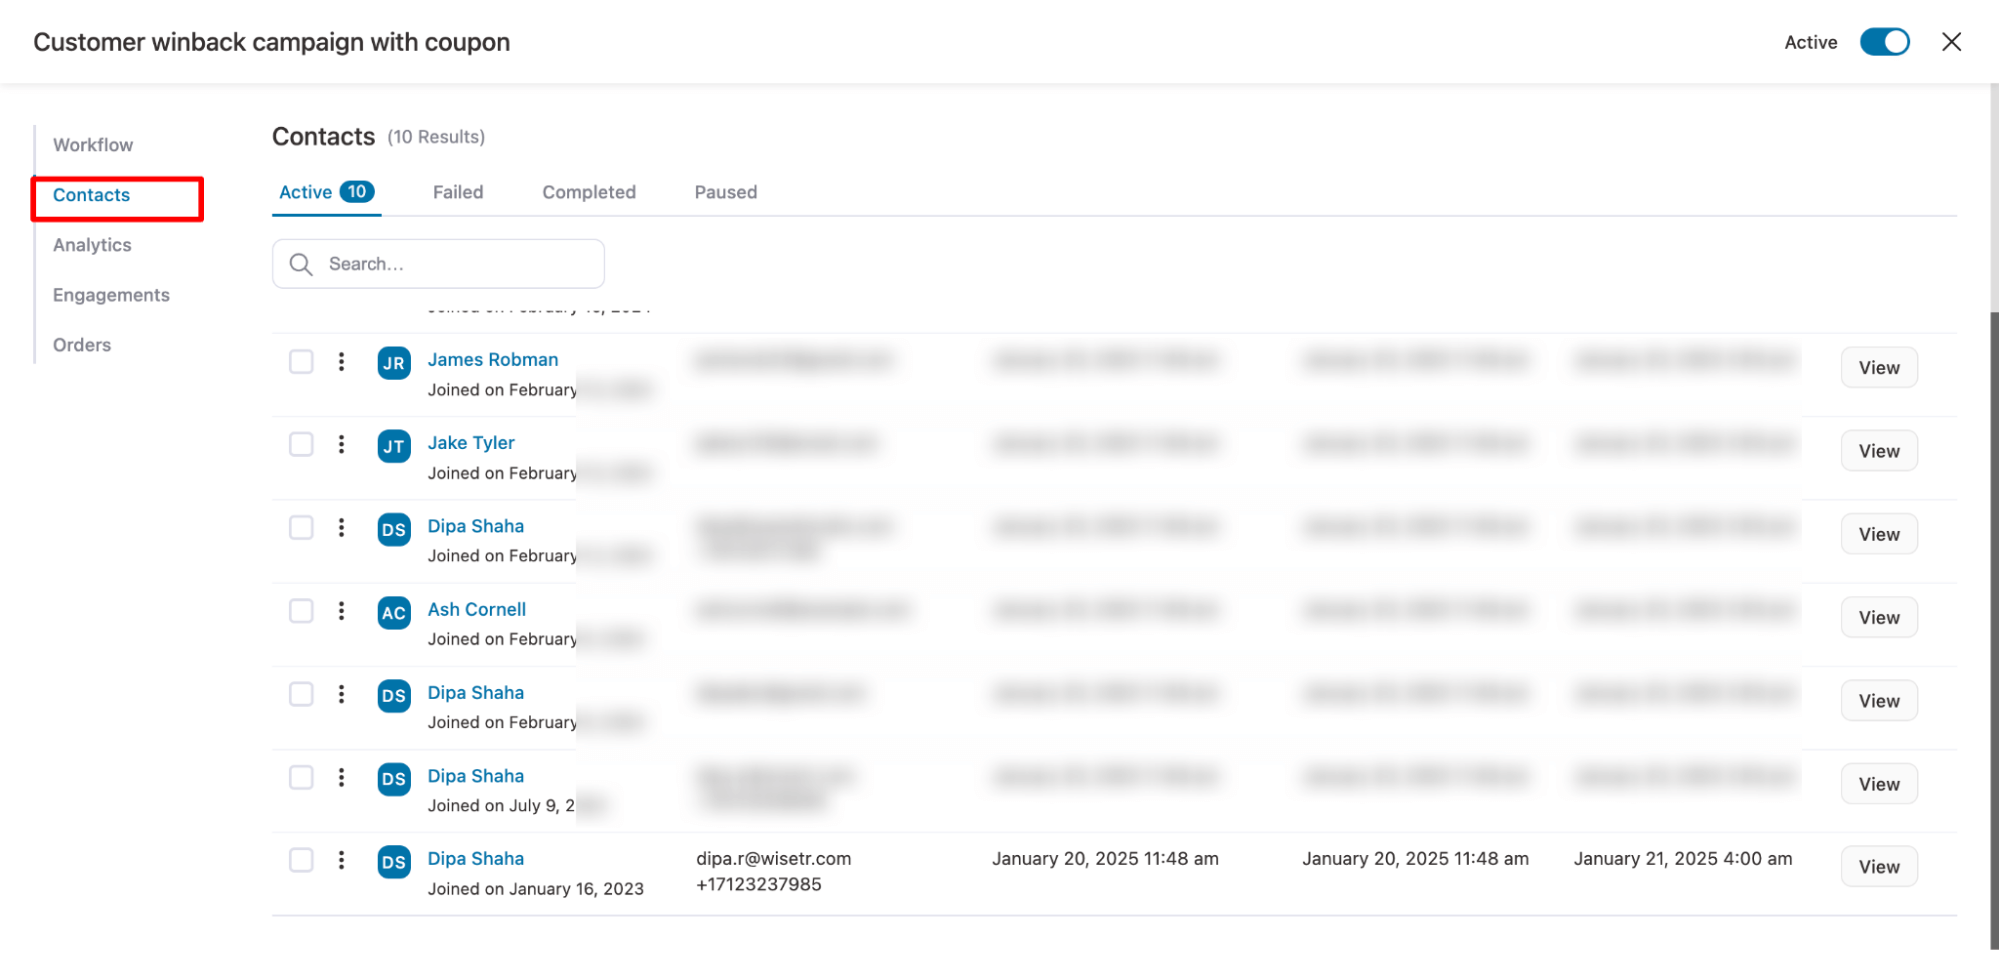
You’ll be able to track your contacts’ journeys in your winback campaign automation from the date they entered and the last run on the automation.
Engagements and Orders
Engagement shows the complete interaction journey of your winback emails from when they were sent to the actual conversion.
The green indicator represents the progress of your emails. In the screenshot below, the emails were sent to all the contacts, but one person opened, clicked, and converted with revenue.

Orders help you track the order details of the items your contacts have placed.
You’ll be able to see the order ID, the name of your contact, the purchased items, the revenue, and the date on which the order was made.

This is how you can measure the success of your winback campaign with FunnelKit Automations.
5 Best Win-Back Email Examples to Get Inspiration
Let’s now look at some incredibly well-executed examples of the winback campaign.
These examples are pretty exciting and will help us draw inspiration as we create our automated campaigns.
Example 1: The incentive winback email
Here's the first sample email to win back old customers from The Bakerista:
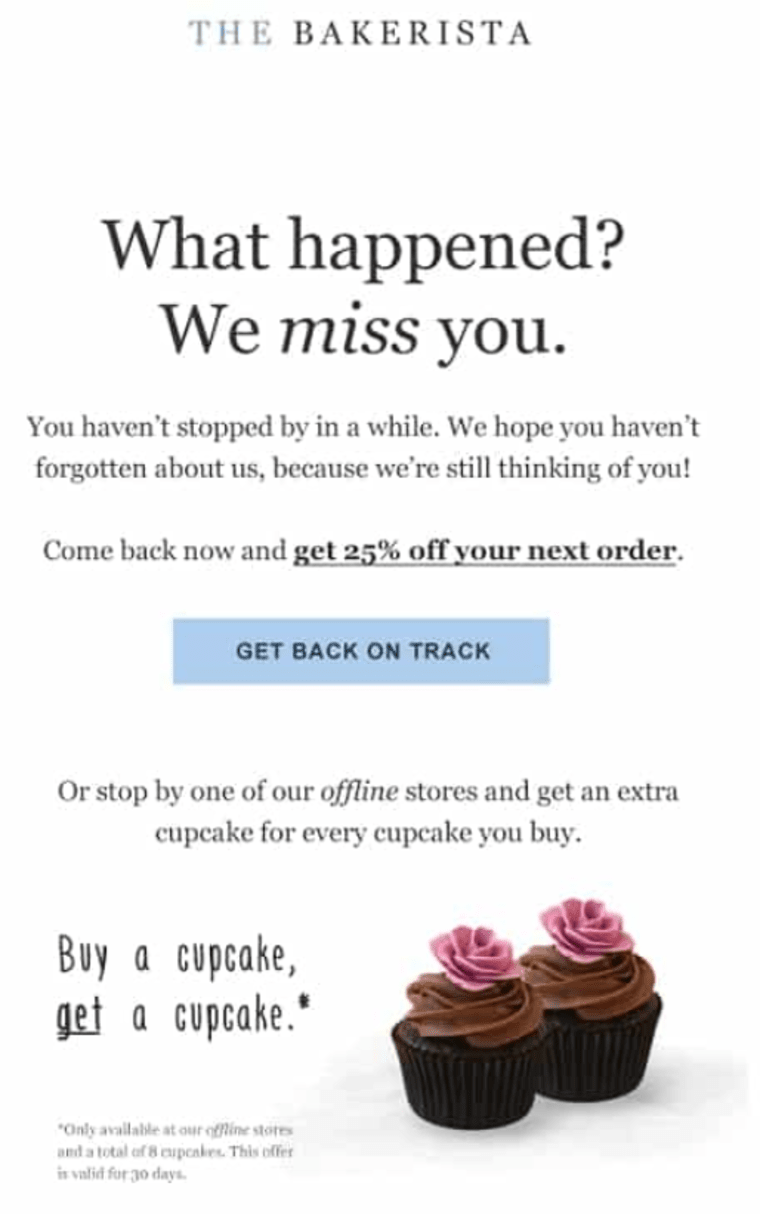
What we liked:
- The Bakerista does a fabulous job of infusing personality into the content and an even better job with the irresistible offer.
- It also addresses the fact that not all of its customers shop online, giving offline buyers an option for a BOGO deal.
Example 2: The reminder winback email
Grammarly sends out an email with the following content in its winback campaign:
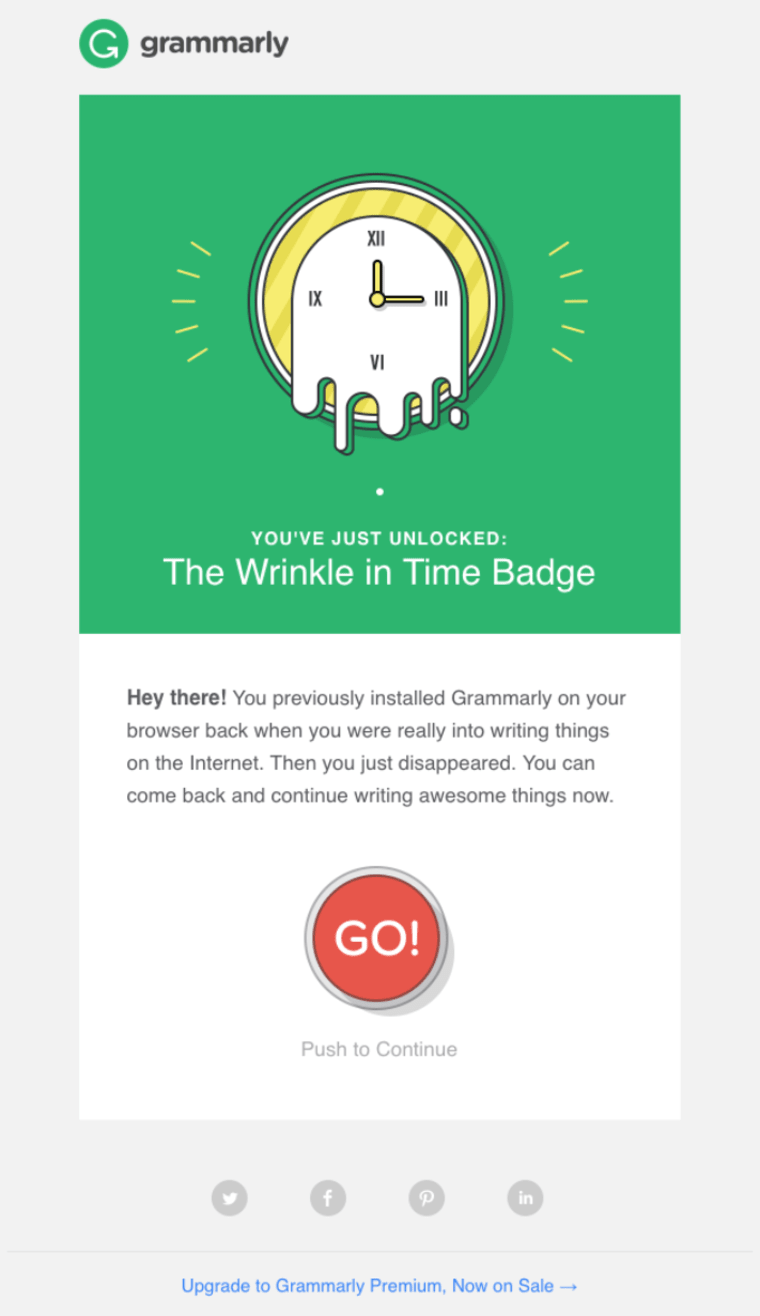
What we liked:
- Grammarly takes on a creative approach by writing personality-infused content with bold, minimalistic graphics. The CTA stands out for getting more clicks.
- They acknowledge that the customer has been inactive for a while and remind them to continue writing awesome things.
Example 3: The product recommendation winback email
Penguin Random House is a publishing company. This is another excellent example of a good winback campaign email:
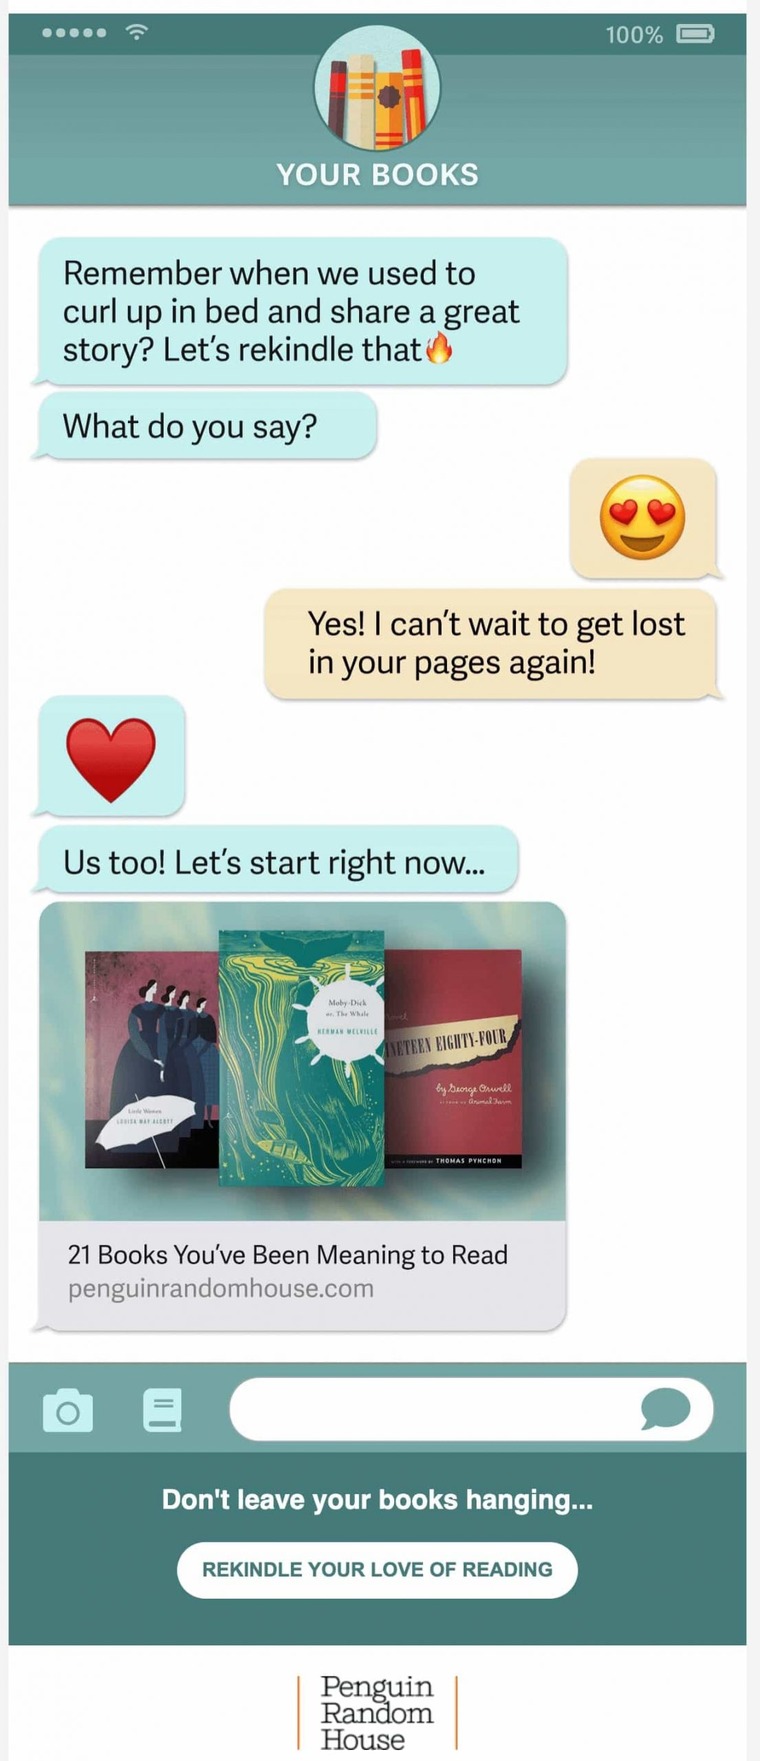
What we liked:
- The whole winback email uses the context of a text message to have a conversation with you. Further, it highlights 21 of their recommended books to check out - which is quite convincing and creative at the same time.
- It has the CTA that says - “Rekindle your love of books”. This personalized action text is a clear example of good email marketing that really knows its customers.
Example 4: The feedback winback email
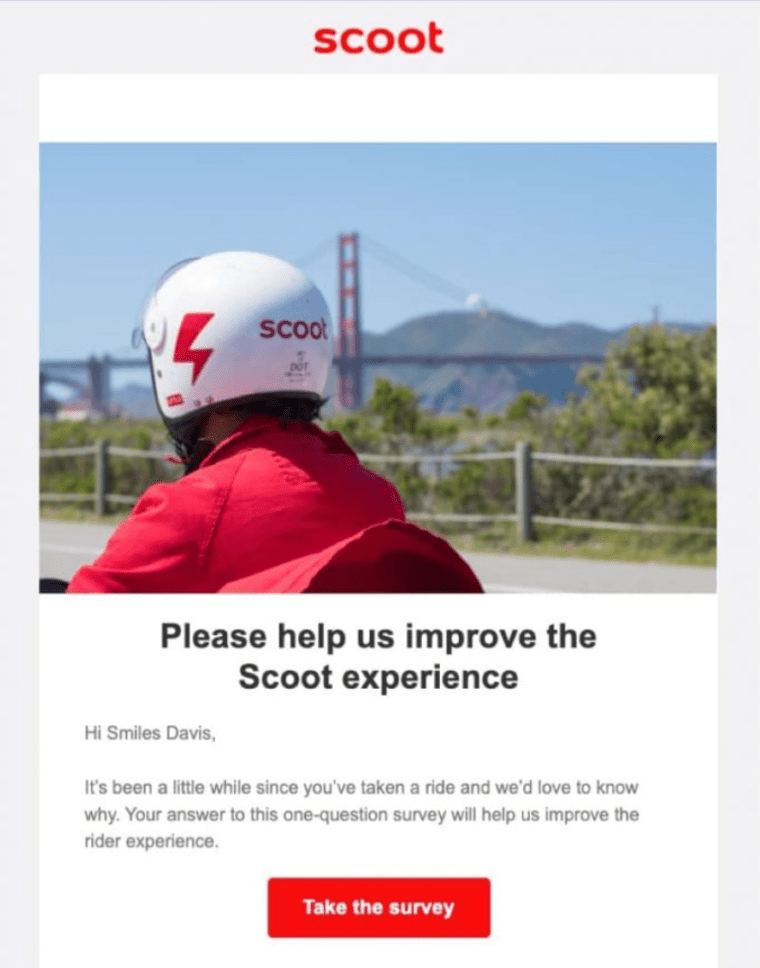
Here’s one of the best win-back email examples for feedback from Scoot:
What we liked:
- They’ve used a simple feedback email with the subject line - “We’d love your help” and a CTA button to know the reason for their customers’ inactivity.
- This copy addresses the genuine motive to improve their service experience from the feedback they’ll receive from their customers.
Example 5: The last chance clearing-out winback email
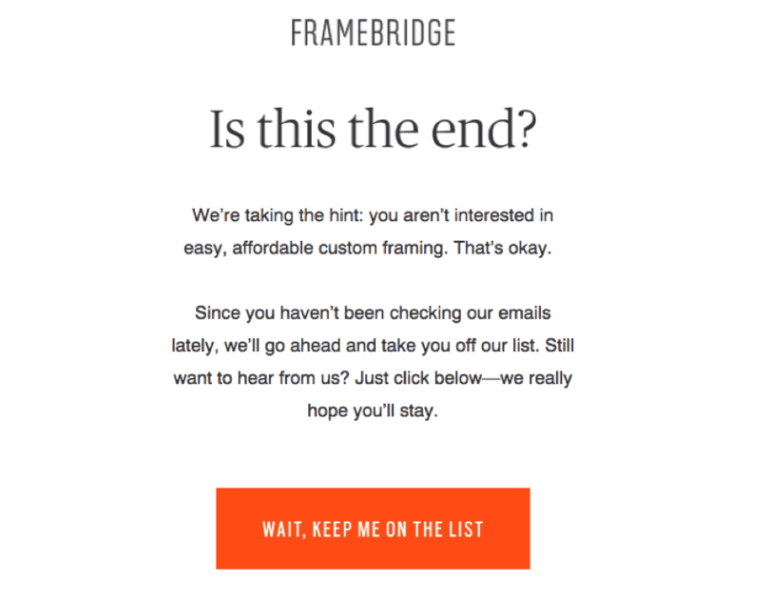
Take a look at this winback campaign email example from Framebridge:
What we liked:
- The brand has used a simple “last chance” message to check if the email subscribers wanted to remain on their list.
- The design of this email is quite simple, with a can’t-miss red CTA button - “Wait, keep me on the list”.
Frequently Asked Questions (FAQs)
In this section, we’ve answered the frequently asked questions regarding the winback campaigns:
Do win-back campaigns work?
Yes, winback campaigns indeed work. As per research, 45% of email subscribers who received a winback campaign read future emails from a brand. Out of them, 75% of re-engaged subscribers read the brand’s messages for up to 89 days. At the same time, the other 25% read their messages up to 300 days after the initial winback email.
Winback campaigns can be pretty effective to re-engage with your subscribers, but these workflows should be ongoing.
How many emails are in a winback campaign?
Once you’ve set up the inactivity period for your winback campaigns, you can work on an ideal email schedule.
For the best effective results, we recommend you consider 4-5 emails (not more than this) over a span of 5 days. If you try sending 3-4 emails within two days, you may annoy your customer and miss the re-engagement opportunity.
How do you run a win-back campaign?
The key to running a winback campaign is to act quickly and offer exciting value to your inactive customers. You’ll have to do a little research to determine why your customers lapsed.
Once that’s done, you can create an irresistible winback campaign for your customers. If you have a WooCommerce store, you must install FunnelKit Automations and follow this blog post.
Are You Ready to Create the Perfect Winback Campaign in Your WooCommerce Store?
You know the answer now that you've read our in-depth guide on setting up successful winback email campaigns.
Take inspiration from the examples and recreate the win-back customer email templates that bring back your inactive customers.
For that, you need to have a great tool that lets you set up winback triggers, create personalized coupons and design beautiful emails.
We can't think of any CRM besides FunnelKit Automations to assist in creating a winning winback strategy.
FunnelKit Automations is the most advanced WordPress plugin, letting you perform all the tasks above and go beyond them.
It has 800+ events and actions, allowing you to achieve all the use cases for your business.
So, what are you waiting for?
Set up your post-purchase sequences, including the winback campaigns with FunnelKit Automations and rekindle your relationship with your customers.
Editorial Team
February 6, 2026With increasing competition and rising ad budgets, acquiring new customers is difficult. Forbes reports that the conversion rate for new customers is just 5%-20%. On the other hand, repeat customers...
Editorial Team
February 5, 2026Leveraging WooCommerce email marketing efficiently can help you skyrocket your sales and revenue. With over 64% of businesses already using email marketing to connect with customers, it's clear this approach...
Editorial Team
February 3, 2026If you’re solely focusing on email marketing and ignoring SMS notifications, you’re leaving money on the table! WooCommerce SMS notifications let you send real-time text message updates to customers about...


