
Don’t let your customer journey end with a basic thank-you page.
Instead, turn it into a valuable opportunity to boost customer engagement, increase order value, and build brand loyalty.
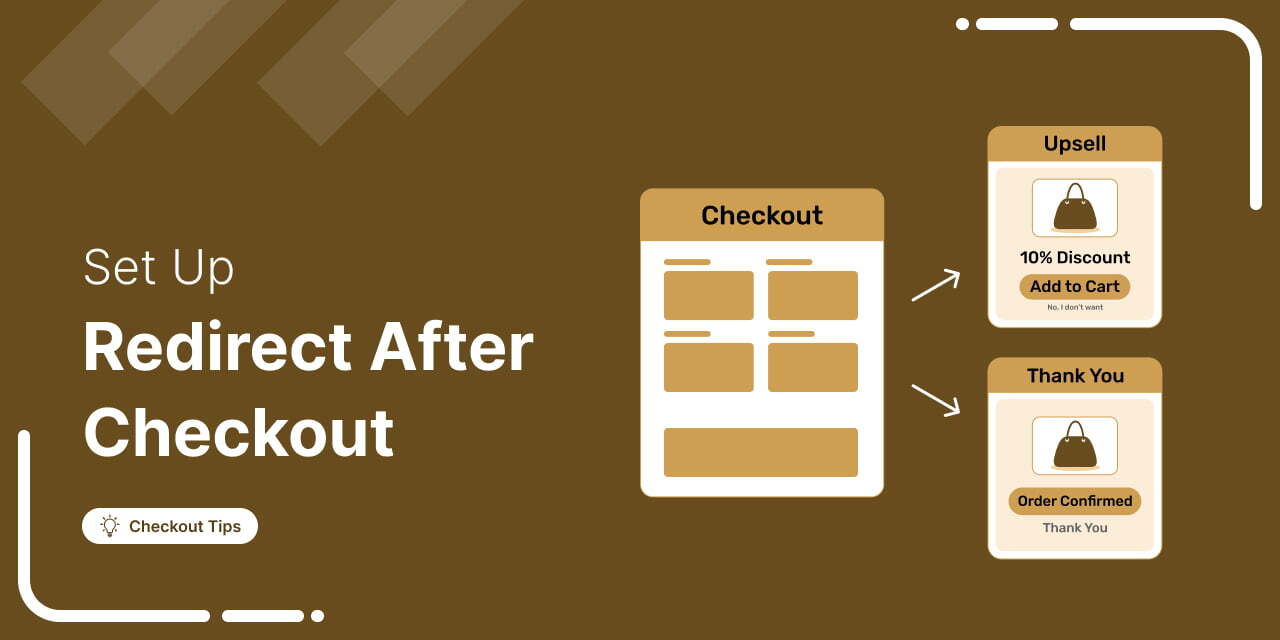
A WooCommerce redirect after checkout lets you send customers to a custom thank-you page, upsell offer, or external URL for a more personalized post-purchase experience.
This simple strategy not only improves the post-purchase experience but also enhances conversions and drives repeat sales.
If you’ve seen other stores directing customers to custom post-purchase pages and wondered how to do the same, you’re in the right place.
In this guide, I’ll show you exactly how to set up a WooCommerce checkout redirect to different pages, helping you engage customers and drive sales effectively.
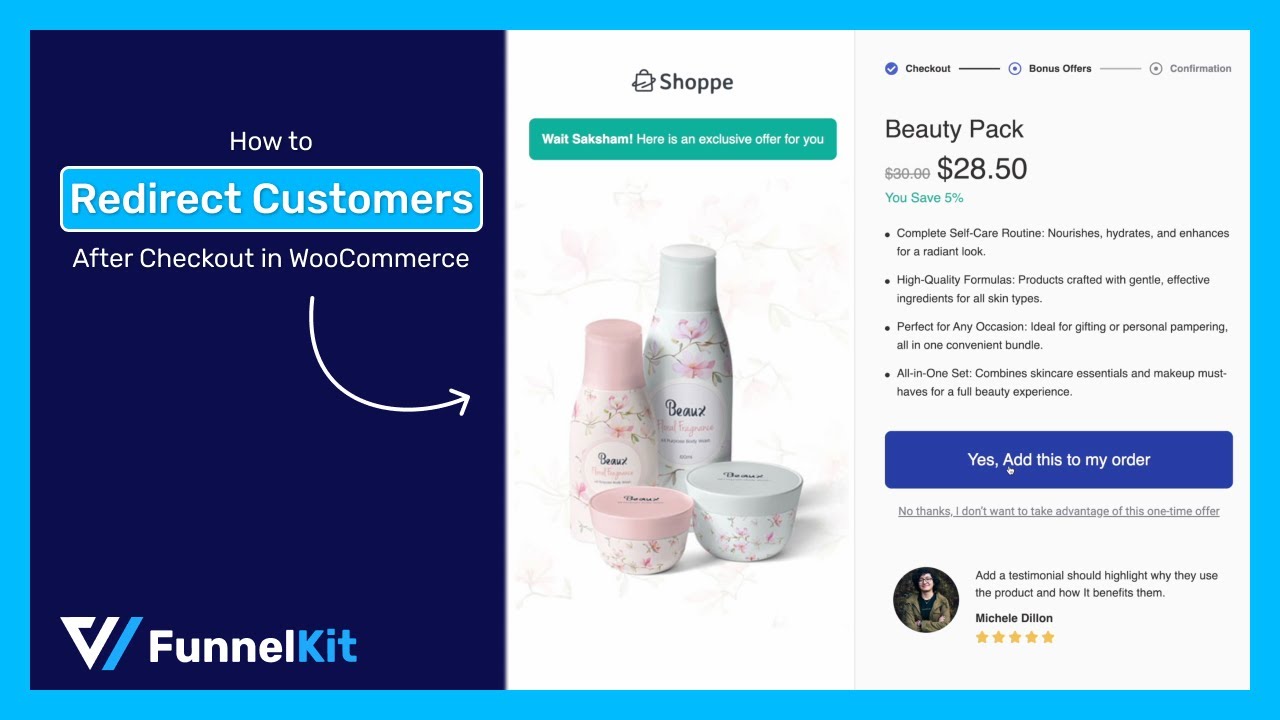
Table of Contents
- 1 What is a WooCommerce Redirect After Checkout and Where to Redirect Customers
- 2 Which Page WooCommerce Redirects to After Checkout by Default?
- 3 How to Redirect to a Custom Thank You Page After Checkout in WooCommerce?
- 4 How to Redirect to a One-Click Upsell Page After Checkout in WooCommerce To Boost Average Order Value
- 5 How to Redirect Based on Payment Method After WooCommerce Checkout
- 6 How to Redirect Based on Specific Product After WooCommerce Checkout
- 7 How to Redirect Based on Country After WooCommerce Checkout
- 8 More Questions About Custom WooCommerce Redirect After Checkout
- 9 Ready to Redirect Smarter After Checkout in WooCommerce?
What is a WooCommerce Redirect After Checkout and Where to Redirect Customers
WooCommerce redirect after checkout is a feature that allows store owners to send customers to a specific page immediately after completing a purchase.
Instead of leaving customers on the default WooCommerce "Thank You" page, you can redirect them to a custom page, an external URL, or another location based on your store’s goals.
After checkout, you can redirect customers to these pages:
- Redirect to a custom thank you page
Direct customers to a personalized "Thank You" page where you can include extra information like shipping policies, social icons, user guides/videos, etc. Additionally, you can include exclusive offers for their next purchase. This encourages repeat business and keeps customers engaged with your brand.
- Redirect to an upsell page:
Instead of sending the users to the thank you page, you can cash in on the buying momentum by selling more items to the users with a one-click upsell. This way, users can add more items to their order with a single click without having to provide payment details a second time. This is an effective way to boost the average order value of your store.
- Redirect to a custom link
If you work with partner companies, you might want to redirect customers to their sites after purchase to promote complementary products or services.
Which Page WooCommerce Redirects to After Checkout by Default?
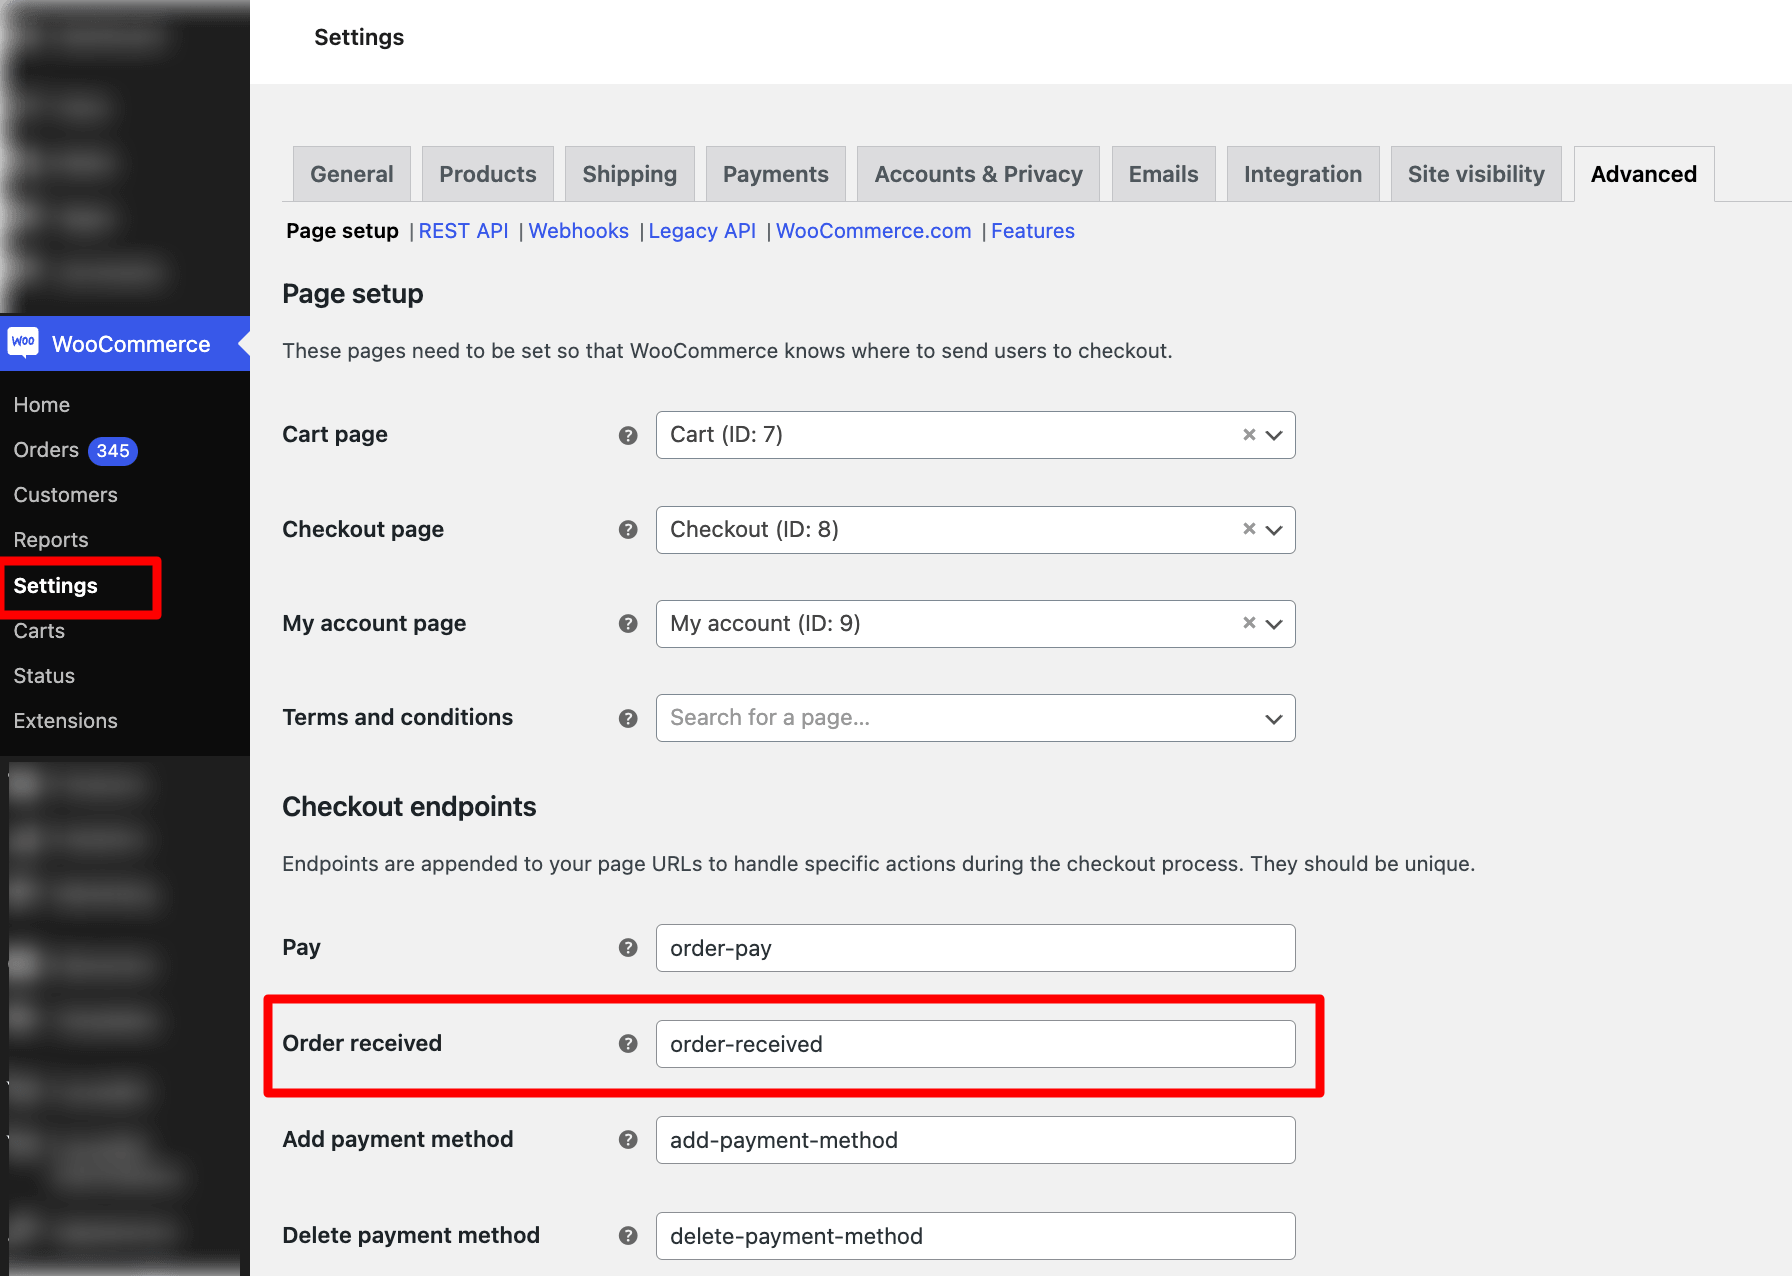
By default, WooCommerce redirects customers to the Order Received page (also known as the "Thank You" page) after checkout.
To find the settings, go to WooCommerce ⇒ Settings ⇒ Advanced tab.
Under the Checkout endpoints section, you will see the assigned Order Received page, but the URL itself isn't editable from this menu.
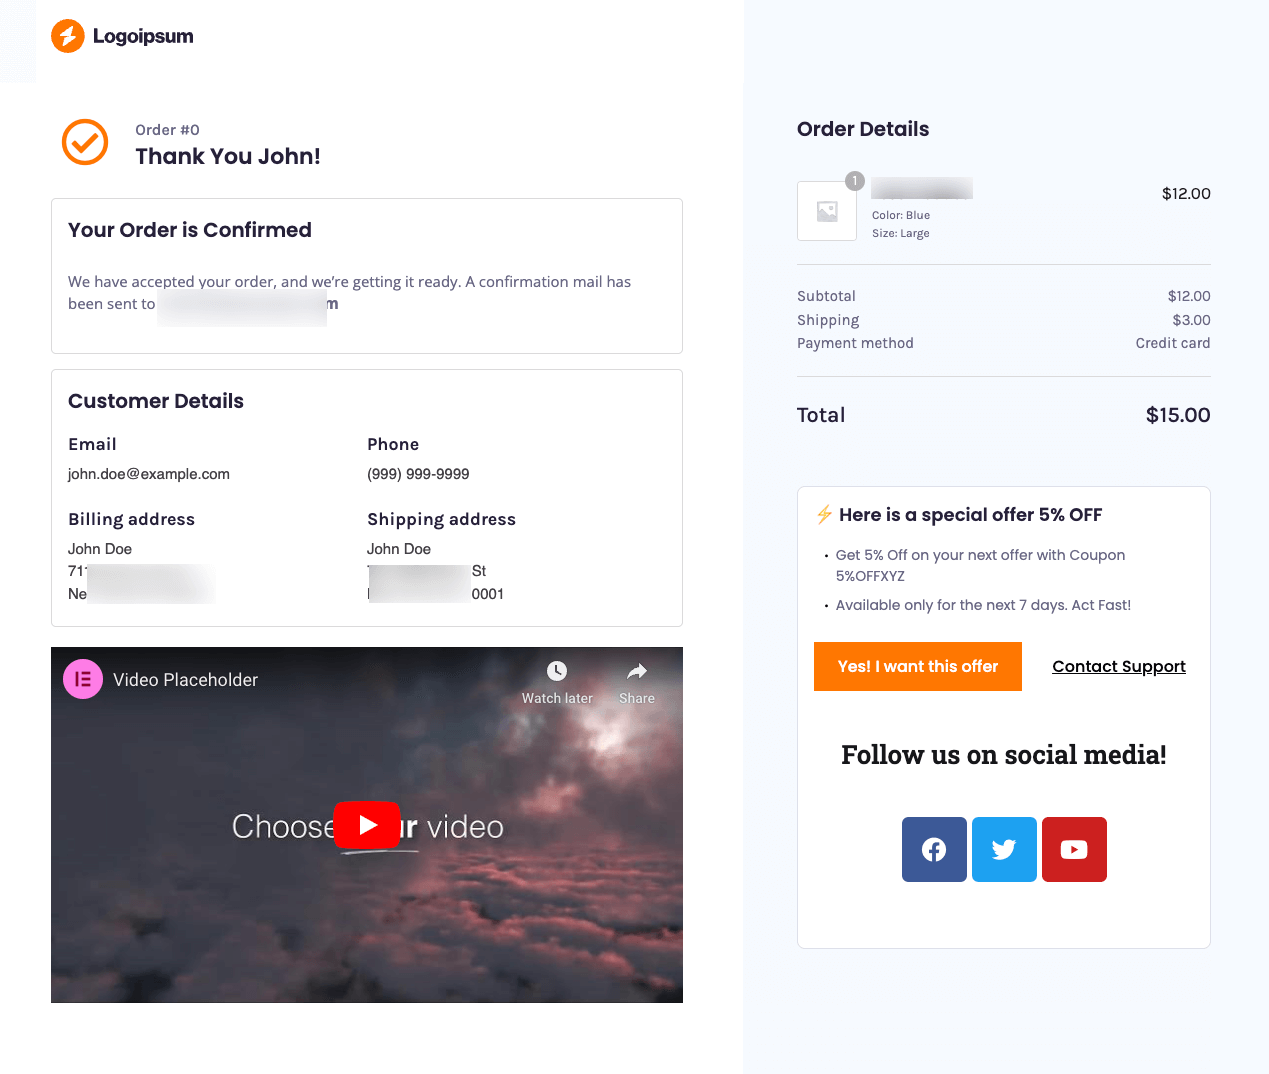
Here is the default thank you page WooCommerce redirects to after checkout:
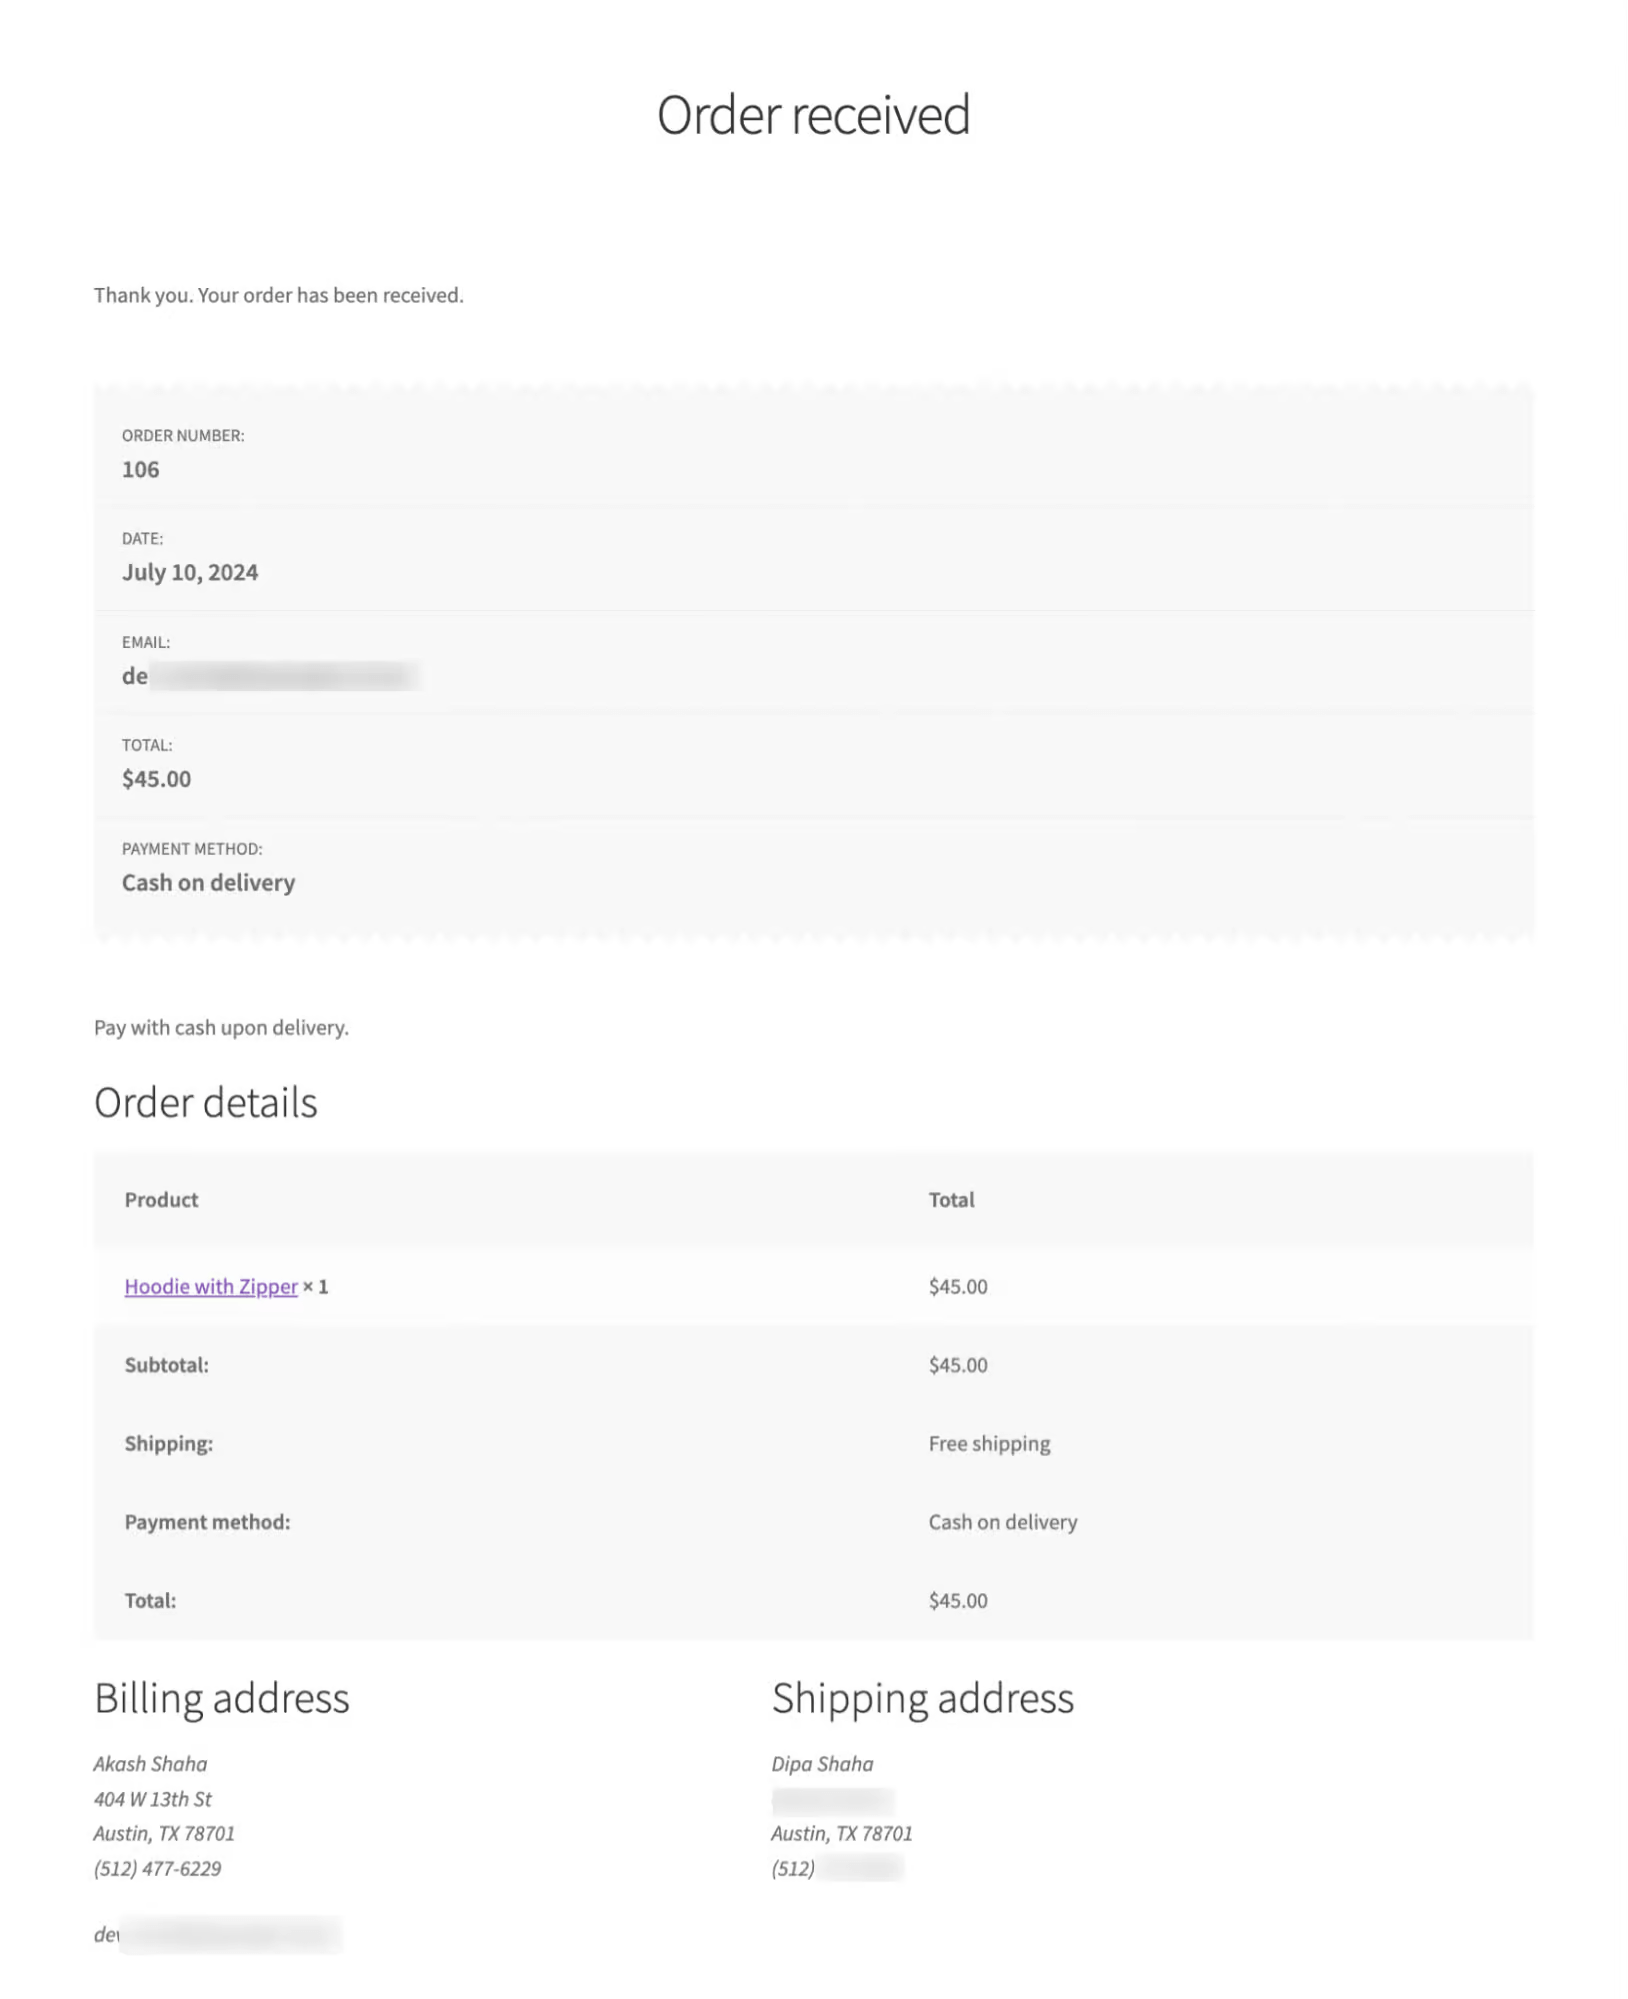
This page is very basic, and you don’t have the option to add any custom information to improve the customer experience.
However, when done right, redirecting after WooCommerce checkout improves customer experience and encourages actions like sharing, upselling, or feedback collection. It’s a smart way to boost engagement, gather insights, and increase revenue.
Move to the following sections to find out how.
How to Redirect to a Custom Thank You Page After Checkout in WooCommerce?
You can redirect users to a custom thank-you page after checkout using FunnelKit Funnel Builder.
It is the best sales funnel builder for WordPress and WooCommerce that allows you to replace the default order confirmation page with a custom one.
It gives you the flexibility to offer a custom thank-you page, replace the default checkout page with a custom one, and provide enticing one-click upsell offers.
Make sure you've installed and activated FunnelKit Funnel Builder.
Now follow these steps:
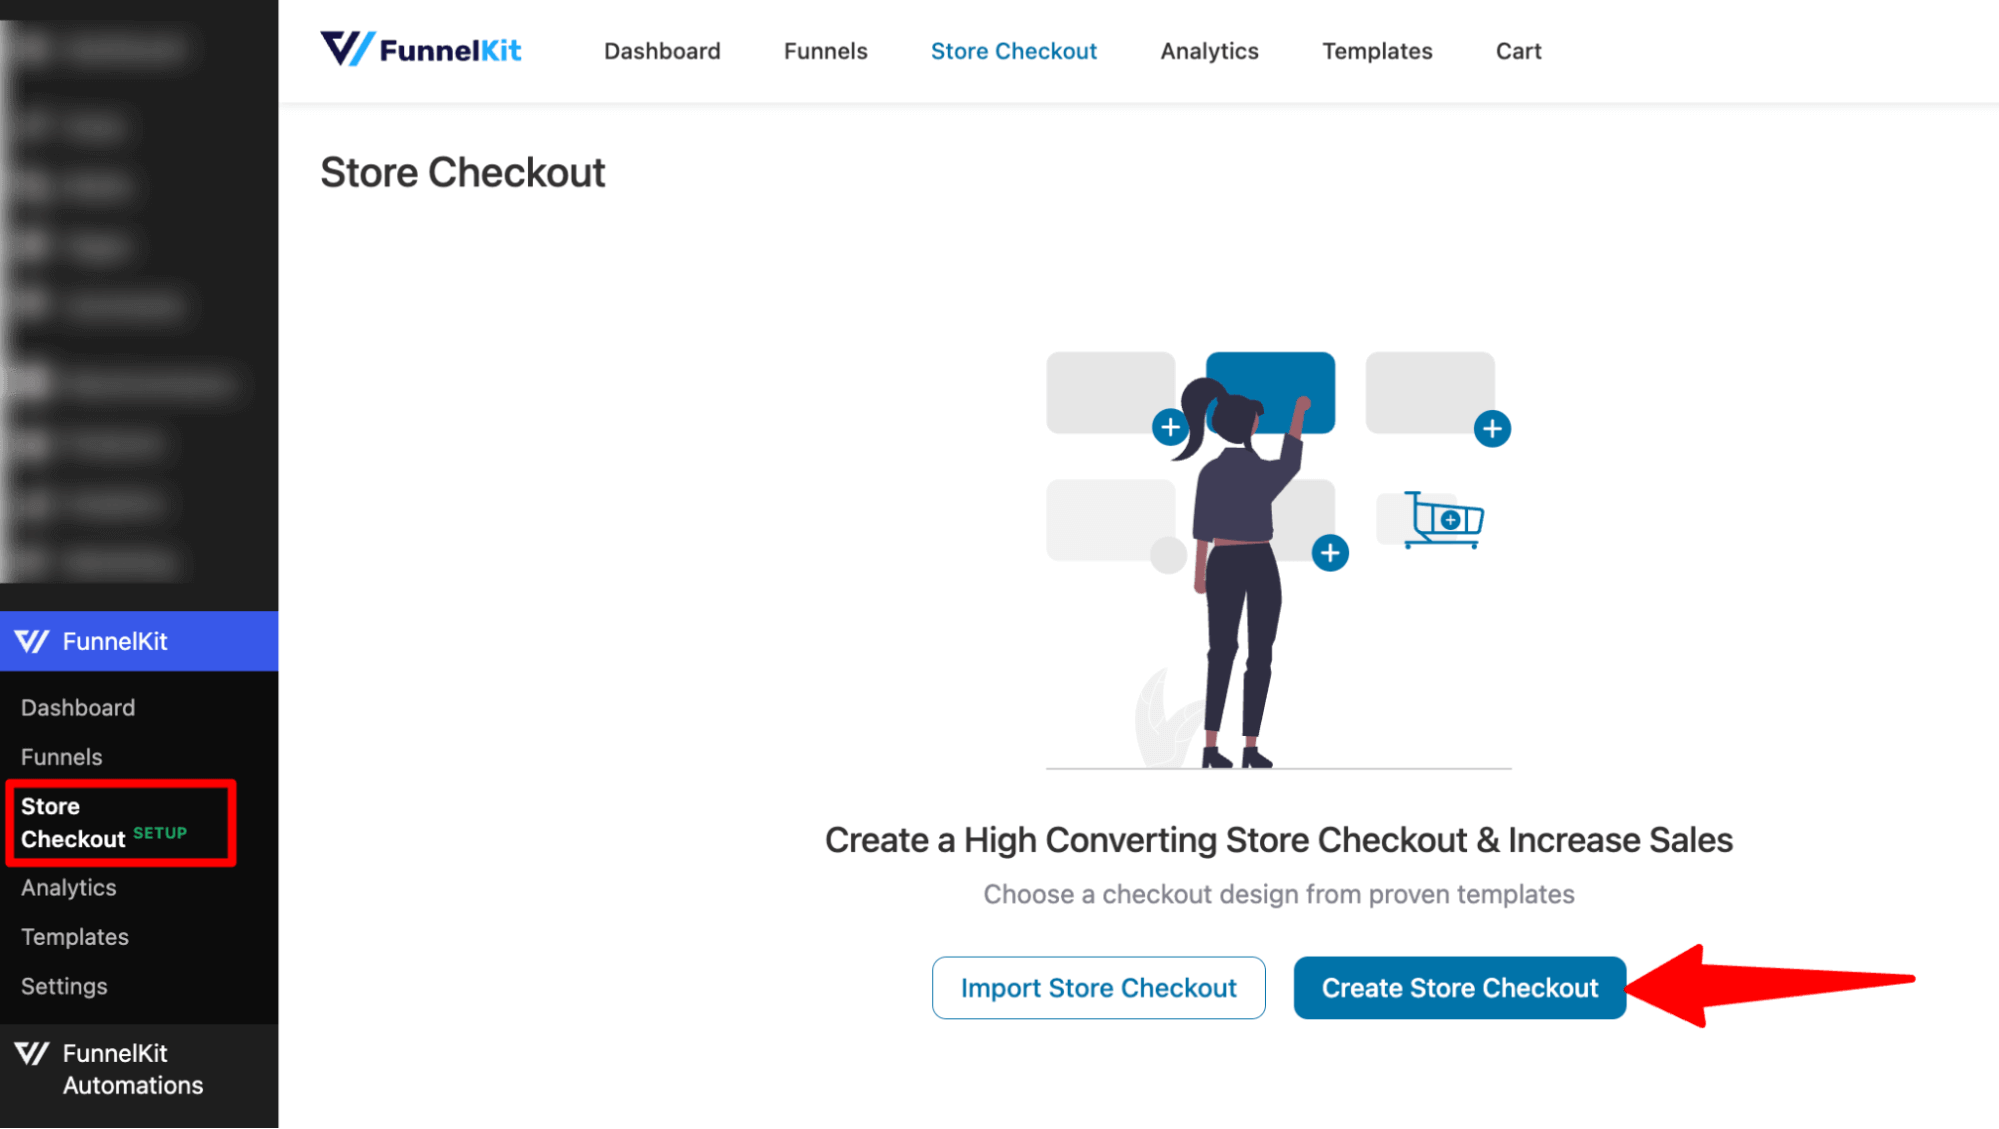
Step 1: Create a store checkout
The first step is to easily set up a checkout for your WooCommerce store.
From your WordPress dashboard, navigate to FunnelKit ⇒ Store Checkout and hit the "Create Store Checkout" button.
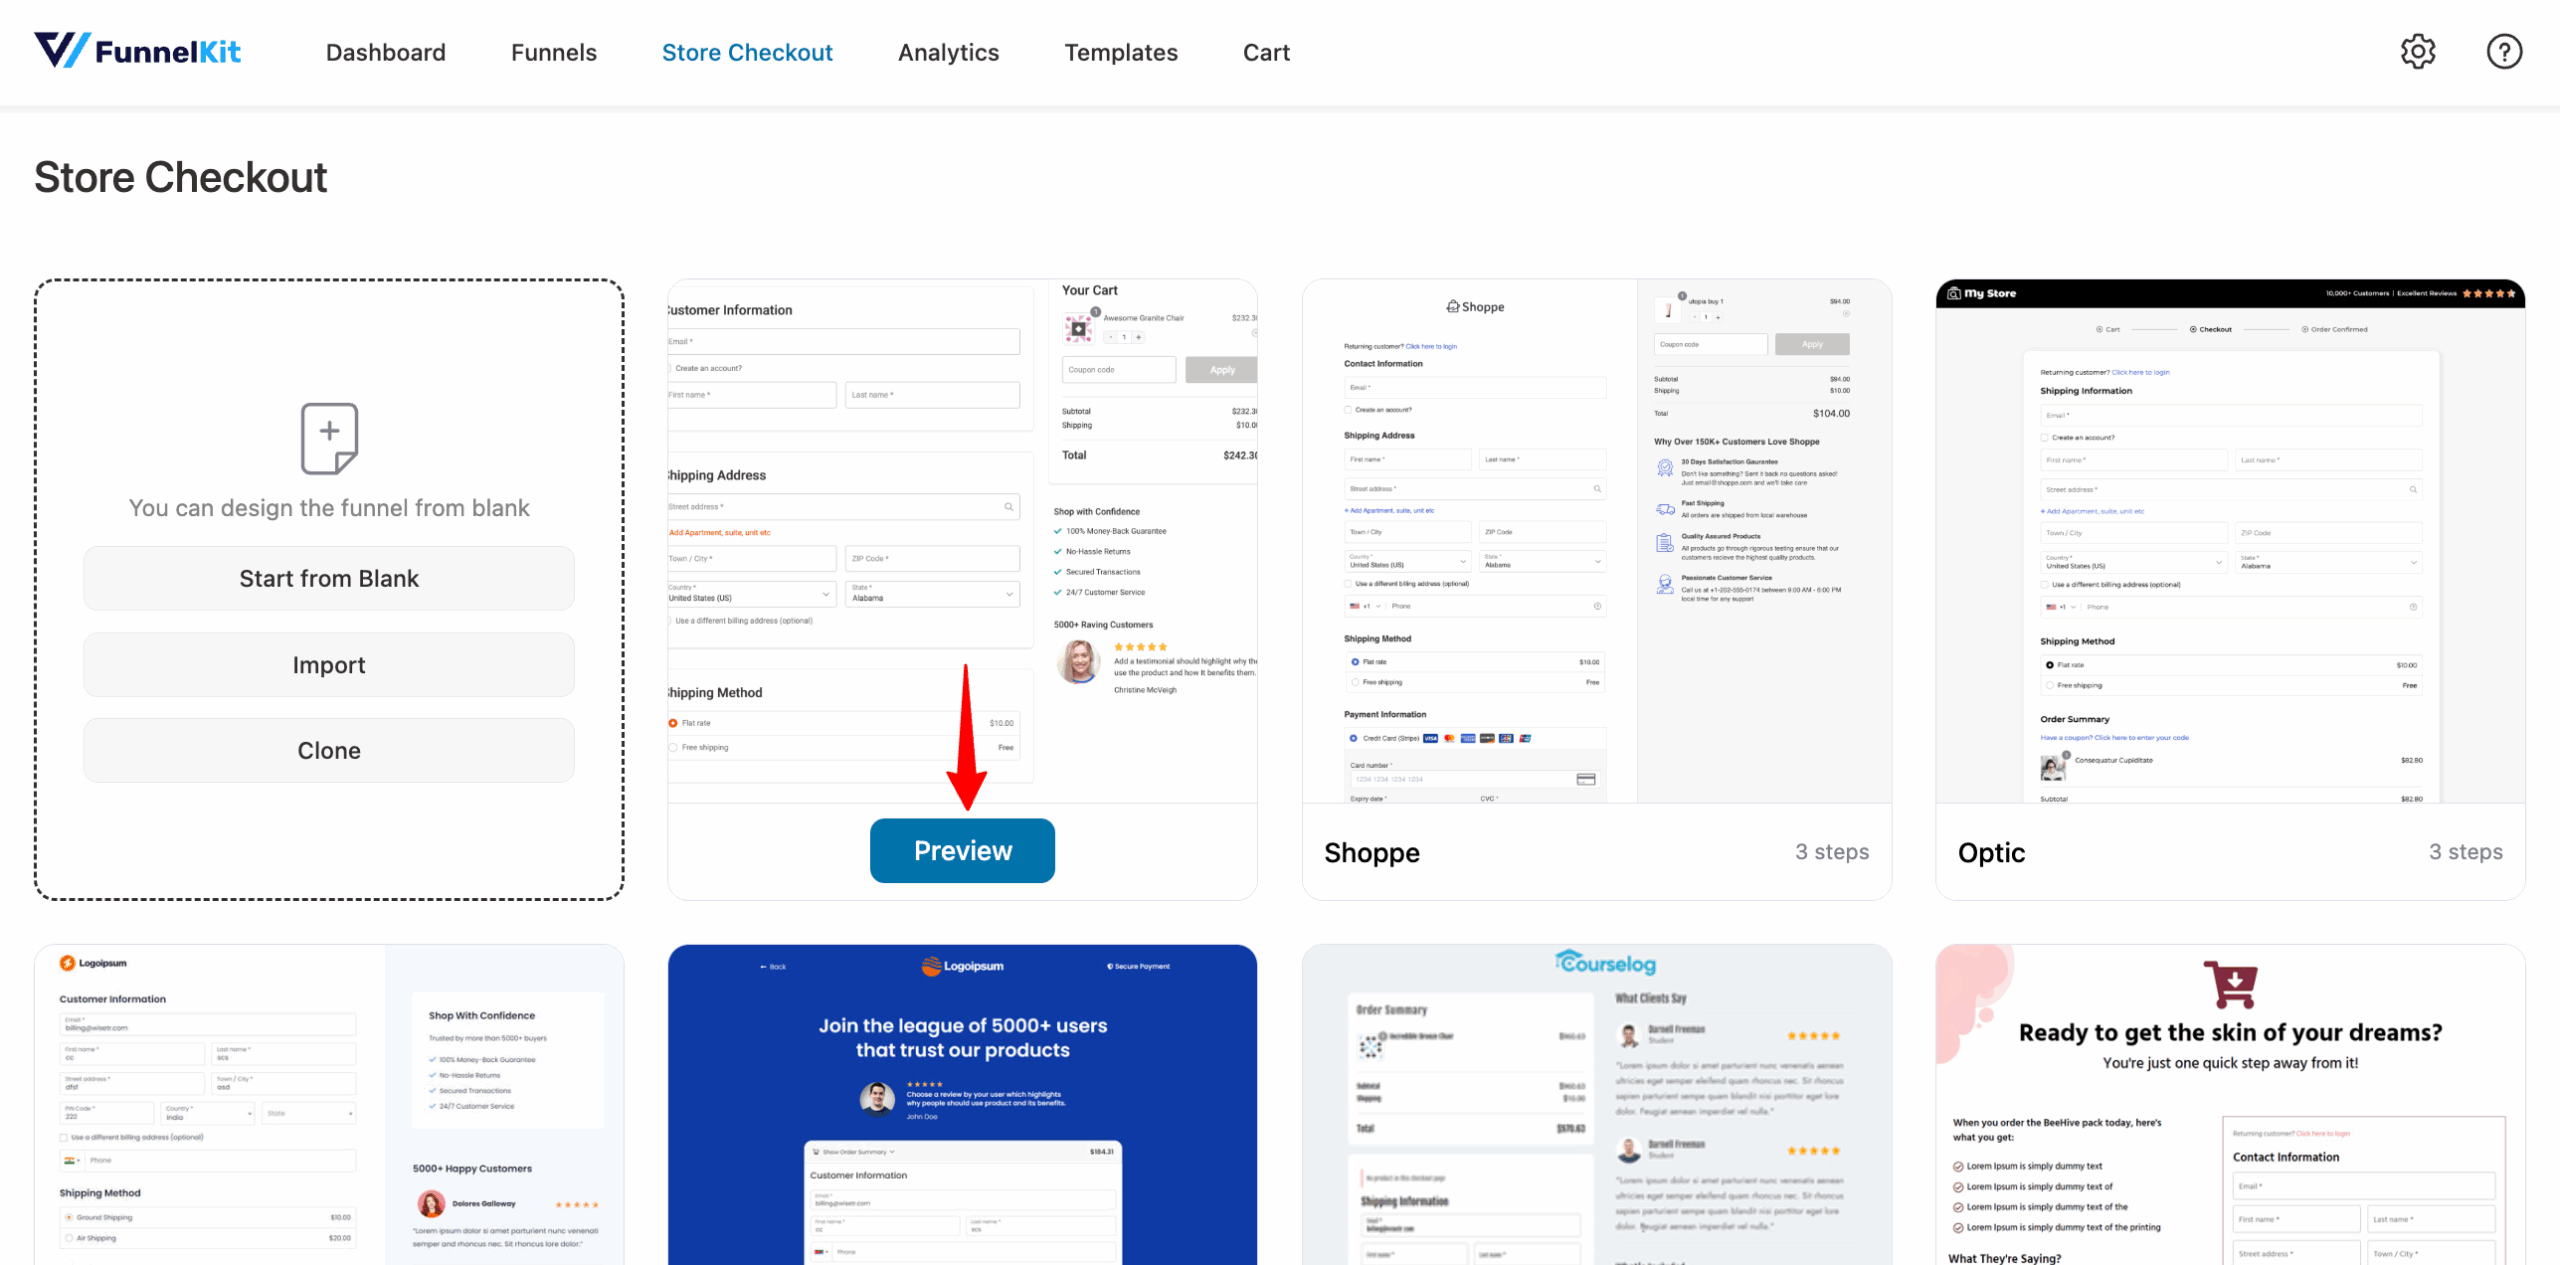
Select the template you like and hover over it to click on ‘Preview’.
Here, I am going with the Hific template.
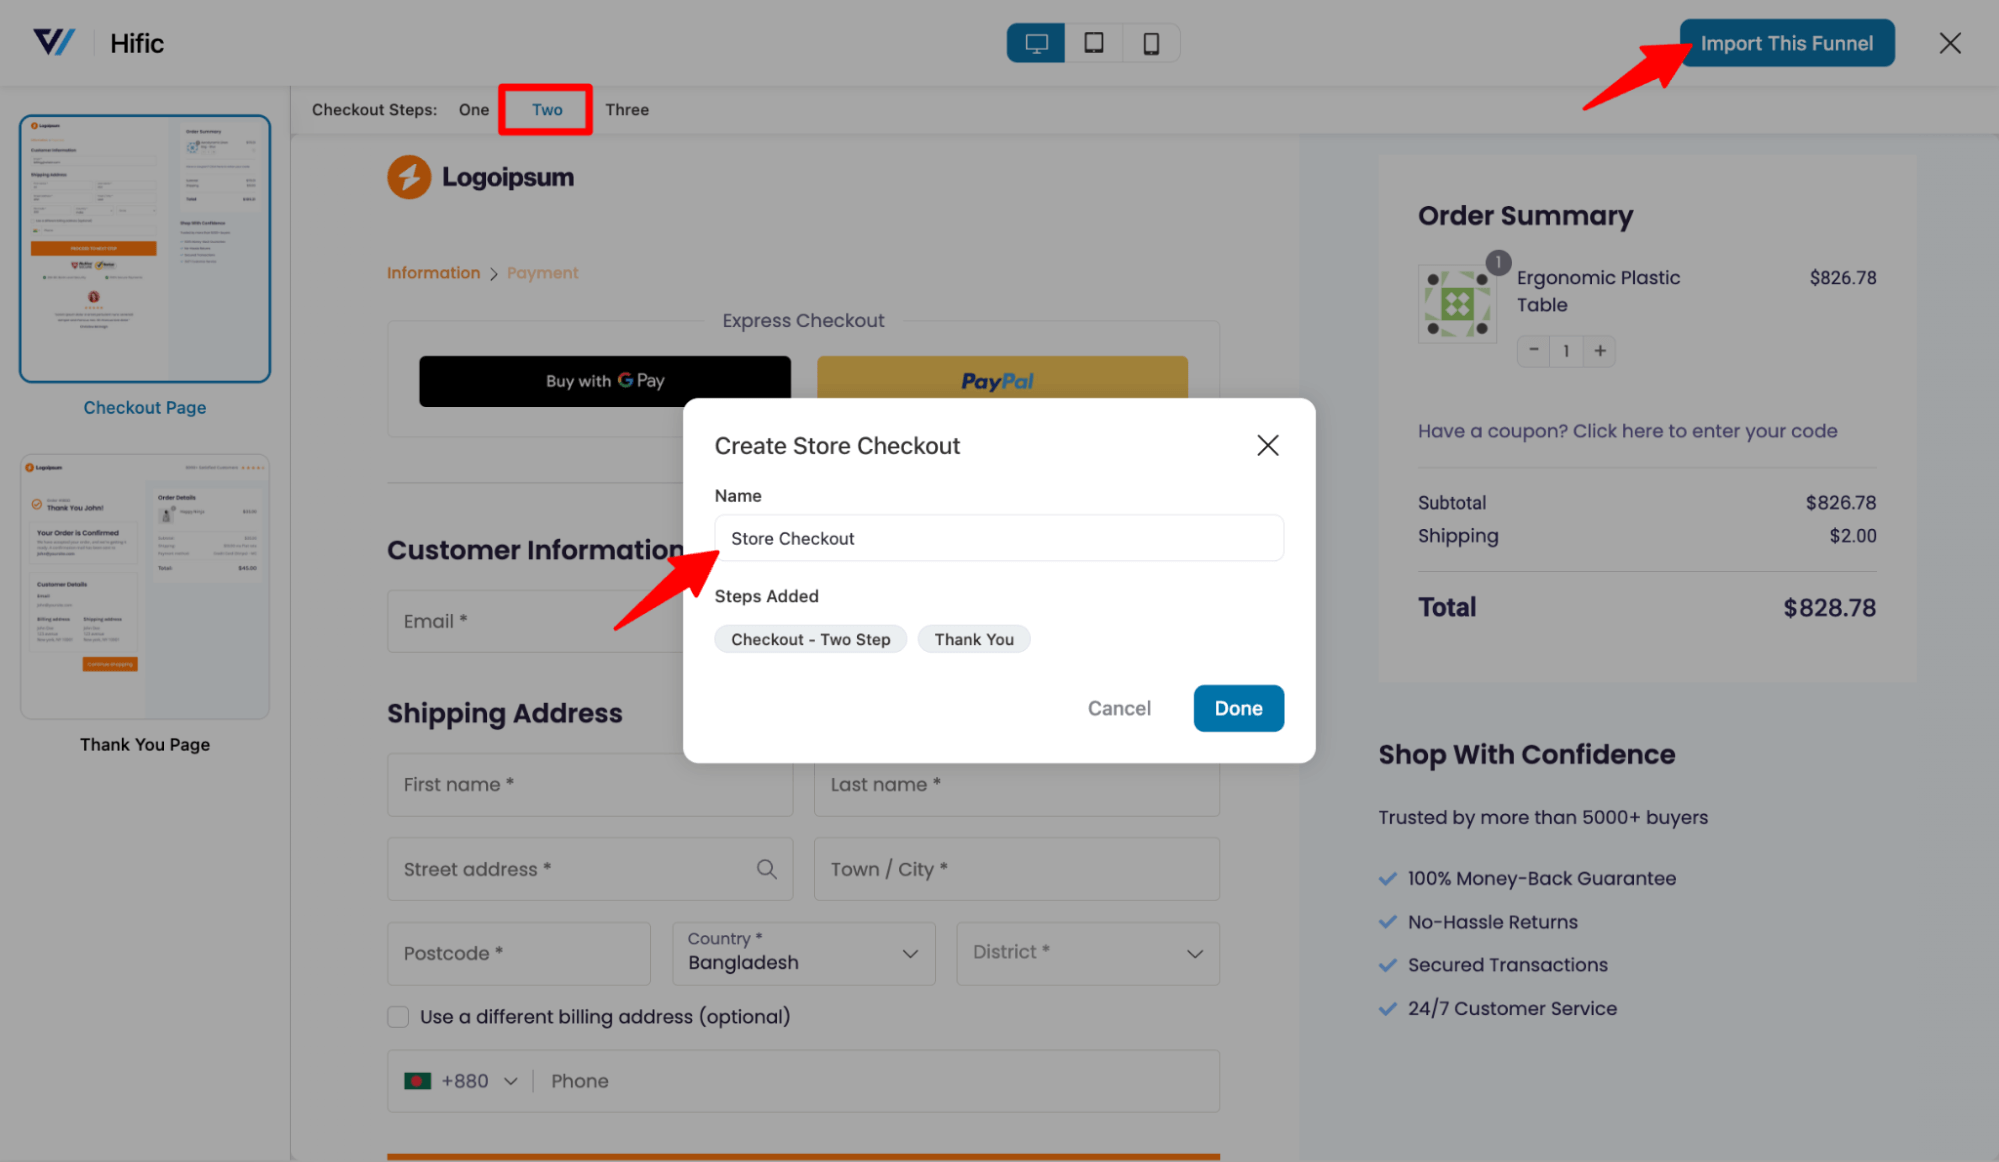
To import this template, which includes a checkout page and a thank-you page, first select the checkout page steps. Then hit Import This Funnel, provide a name, and hit Done.
Step 2: Customize the thank you page
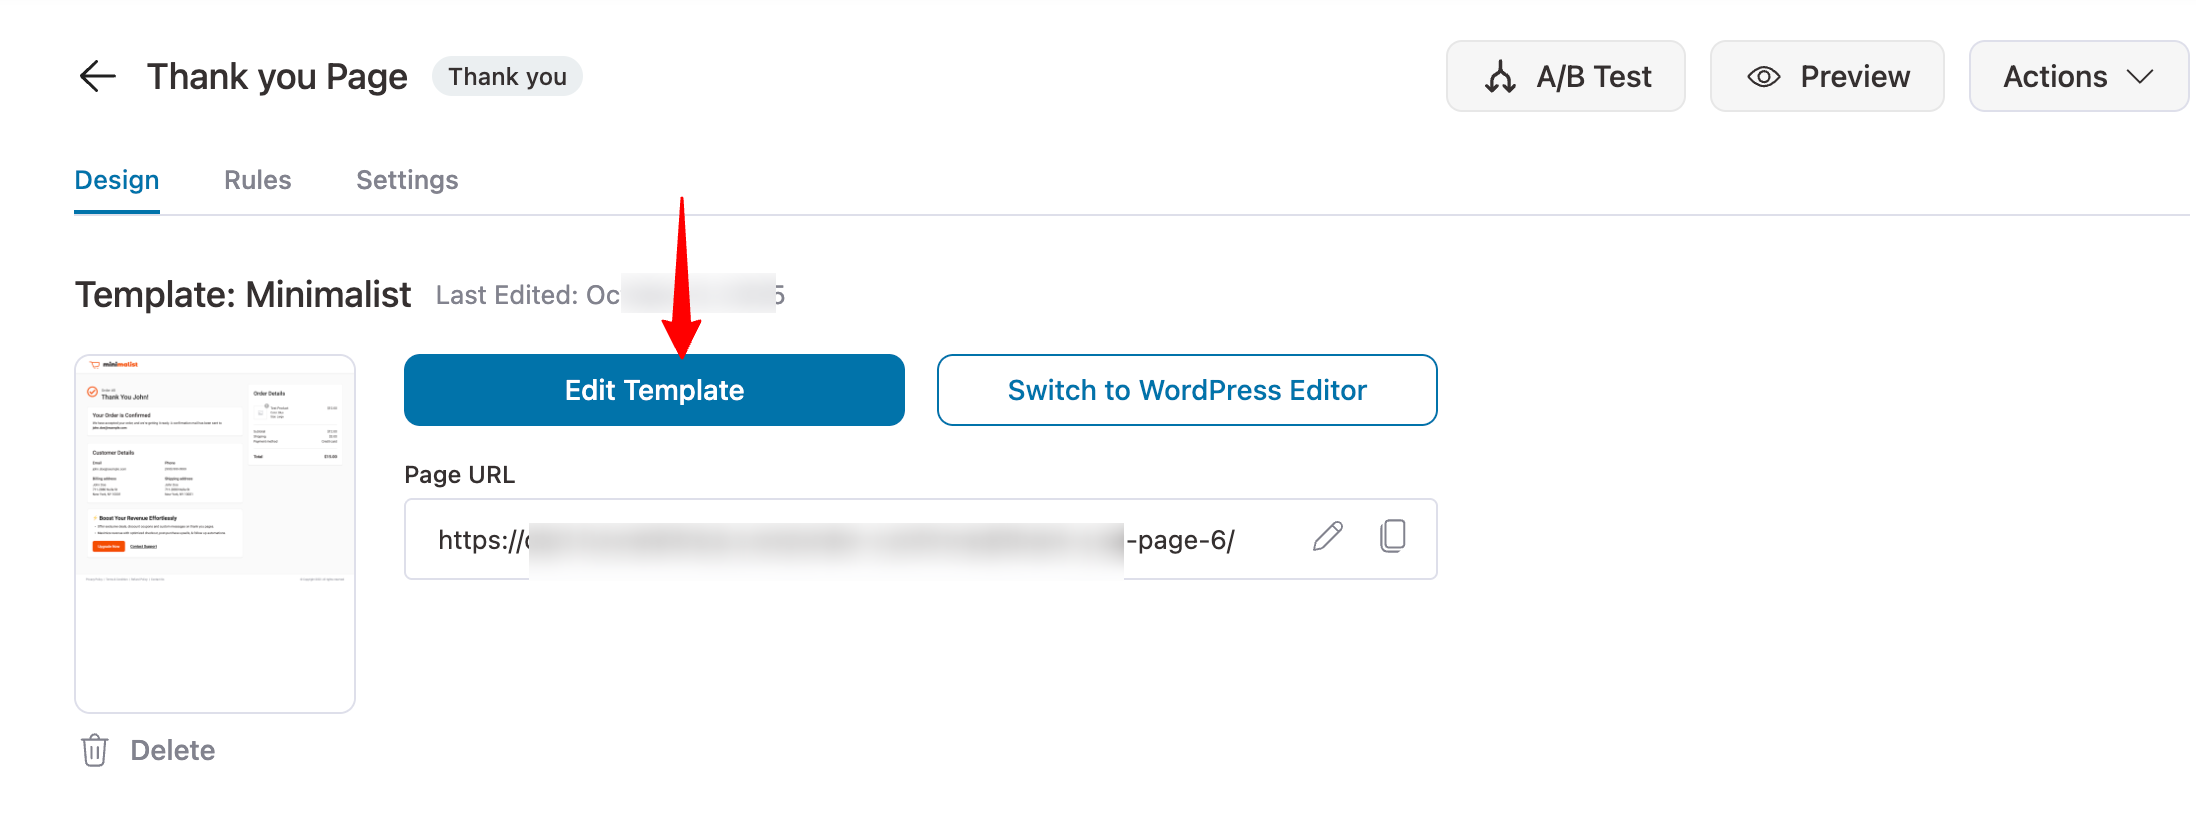
To edit the order confirmation page, click the "Thank You" page step.
Then, hit “Edit Template” to start the customization.
You can change every part of this template and add/remove any part. First, let’s customize the existing content one by one.
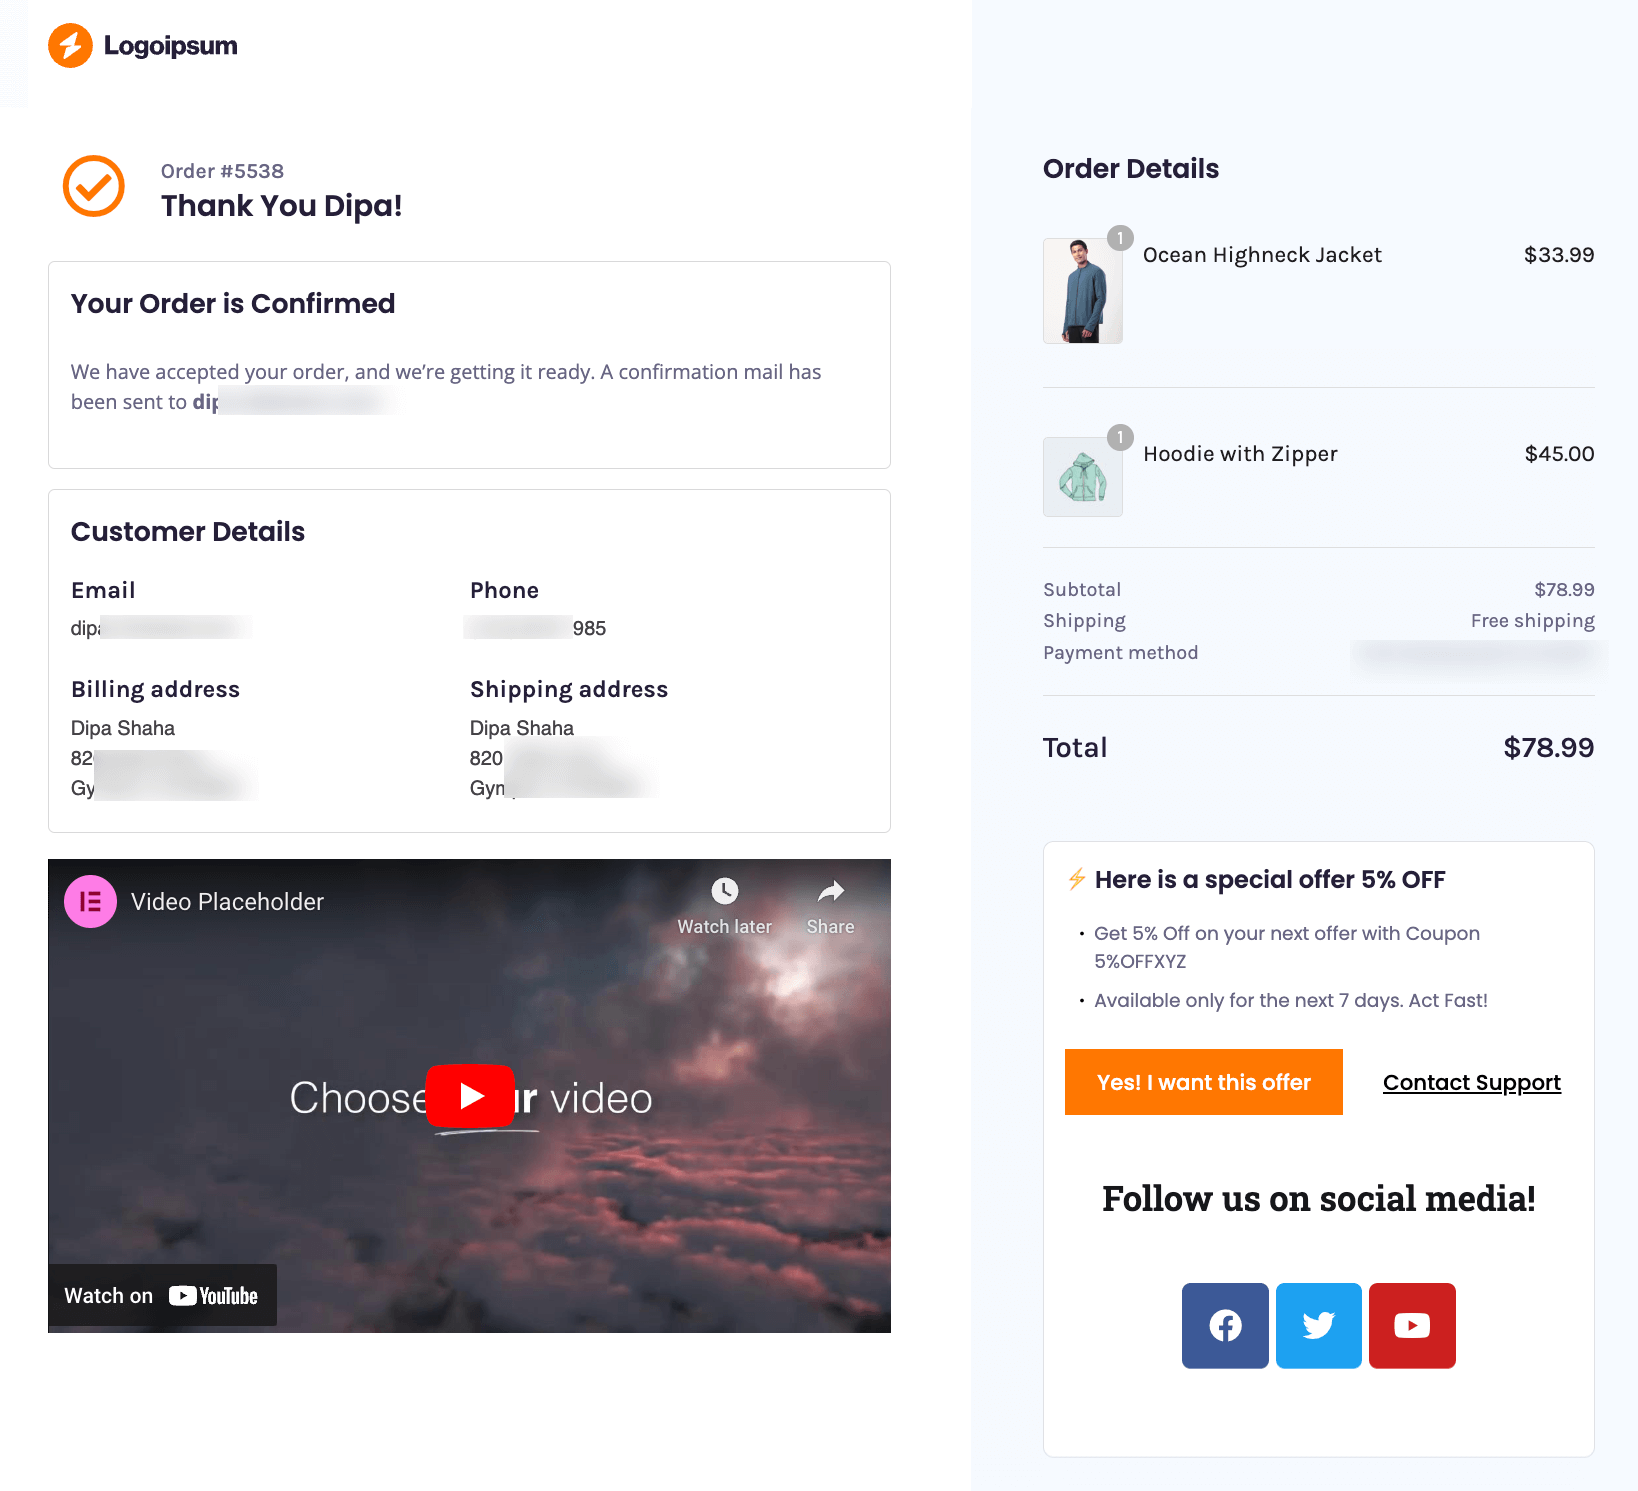
Then customize the order confirmation message. You can use the shortcode “[wfty_customer_email]” to dynamically embed the customer email.
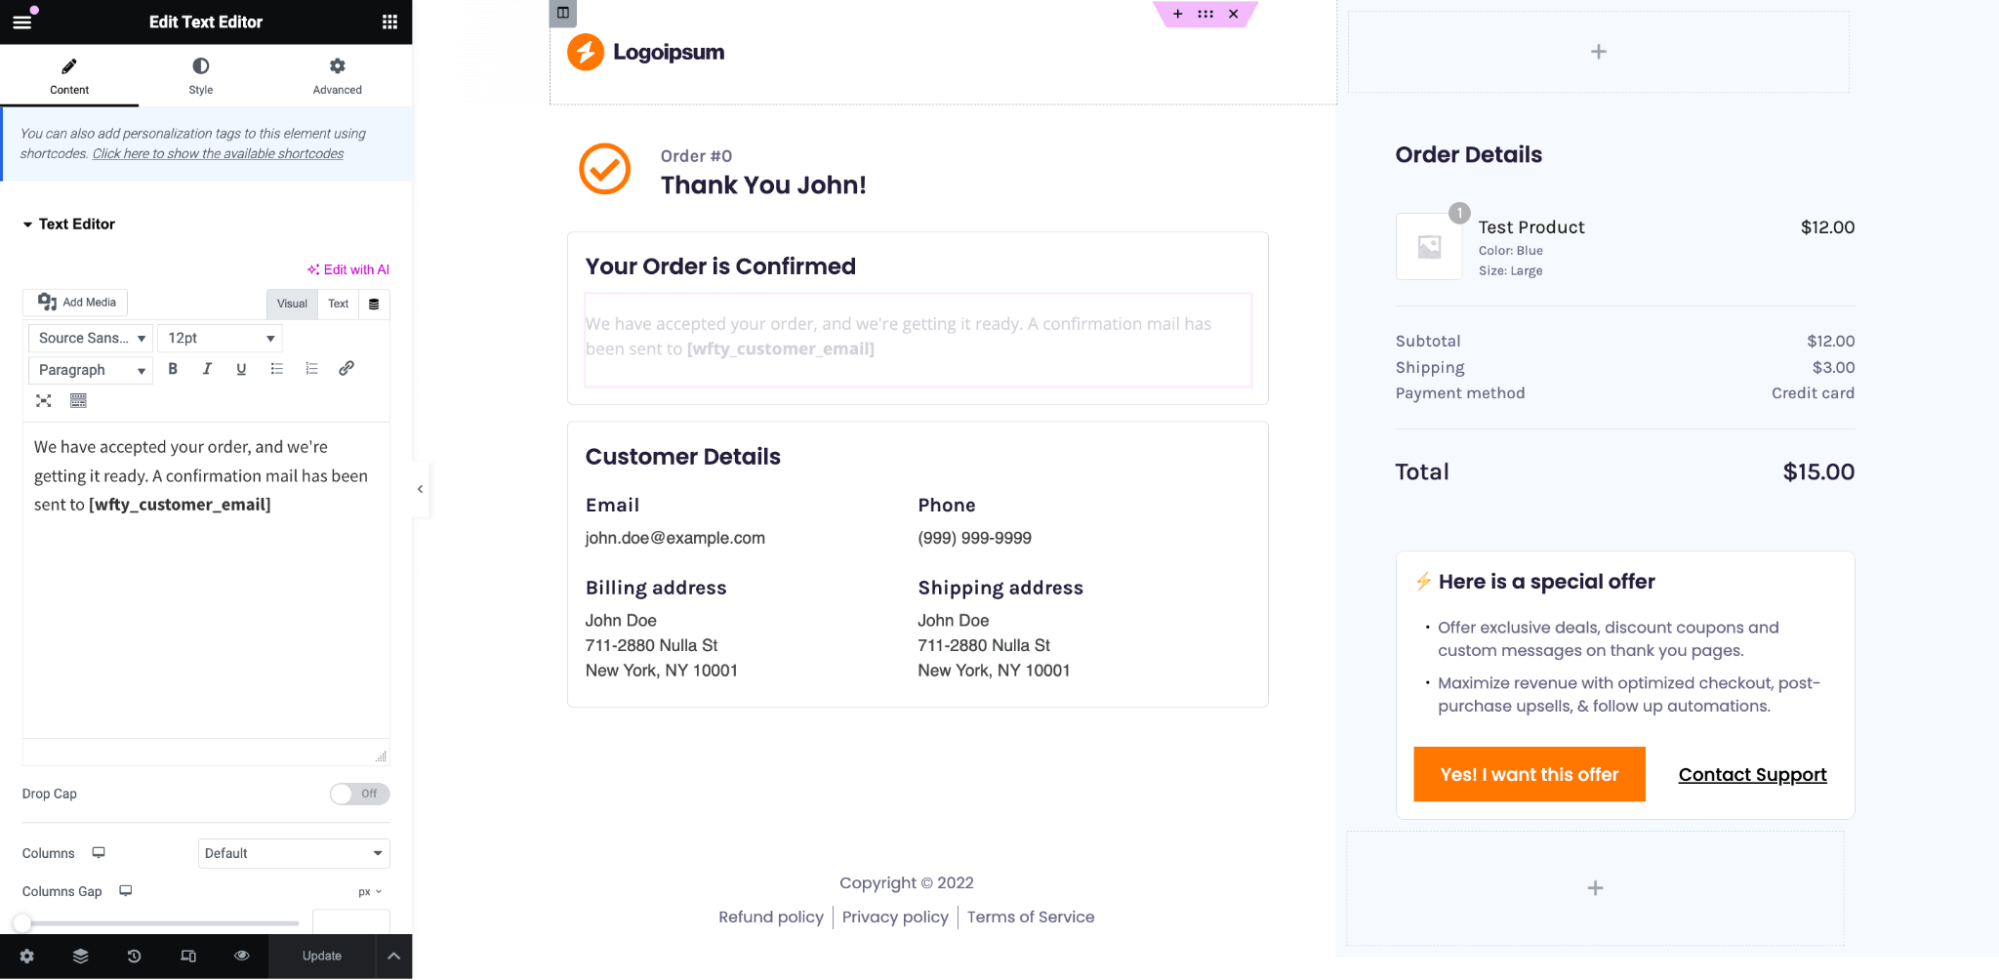
As per the customer details section, you can change the heading and structure.
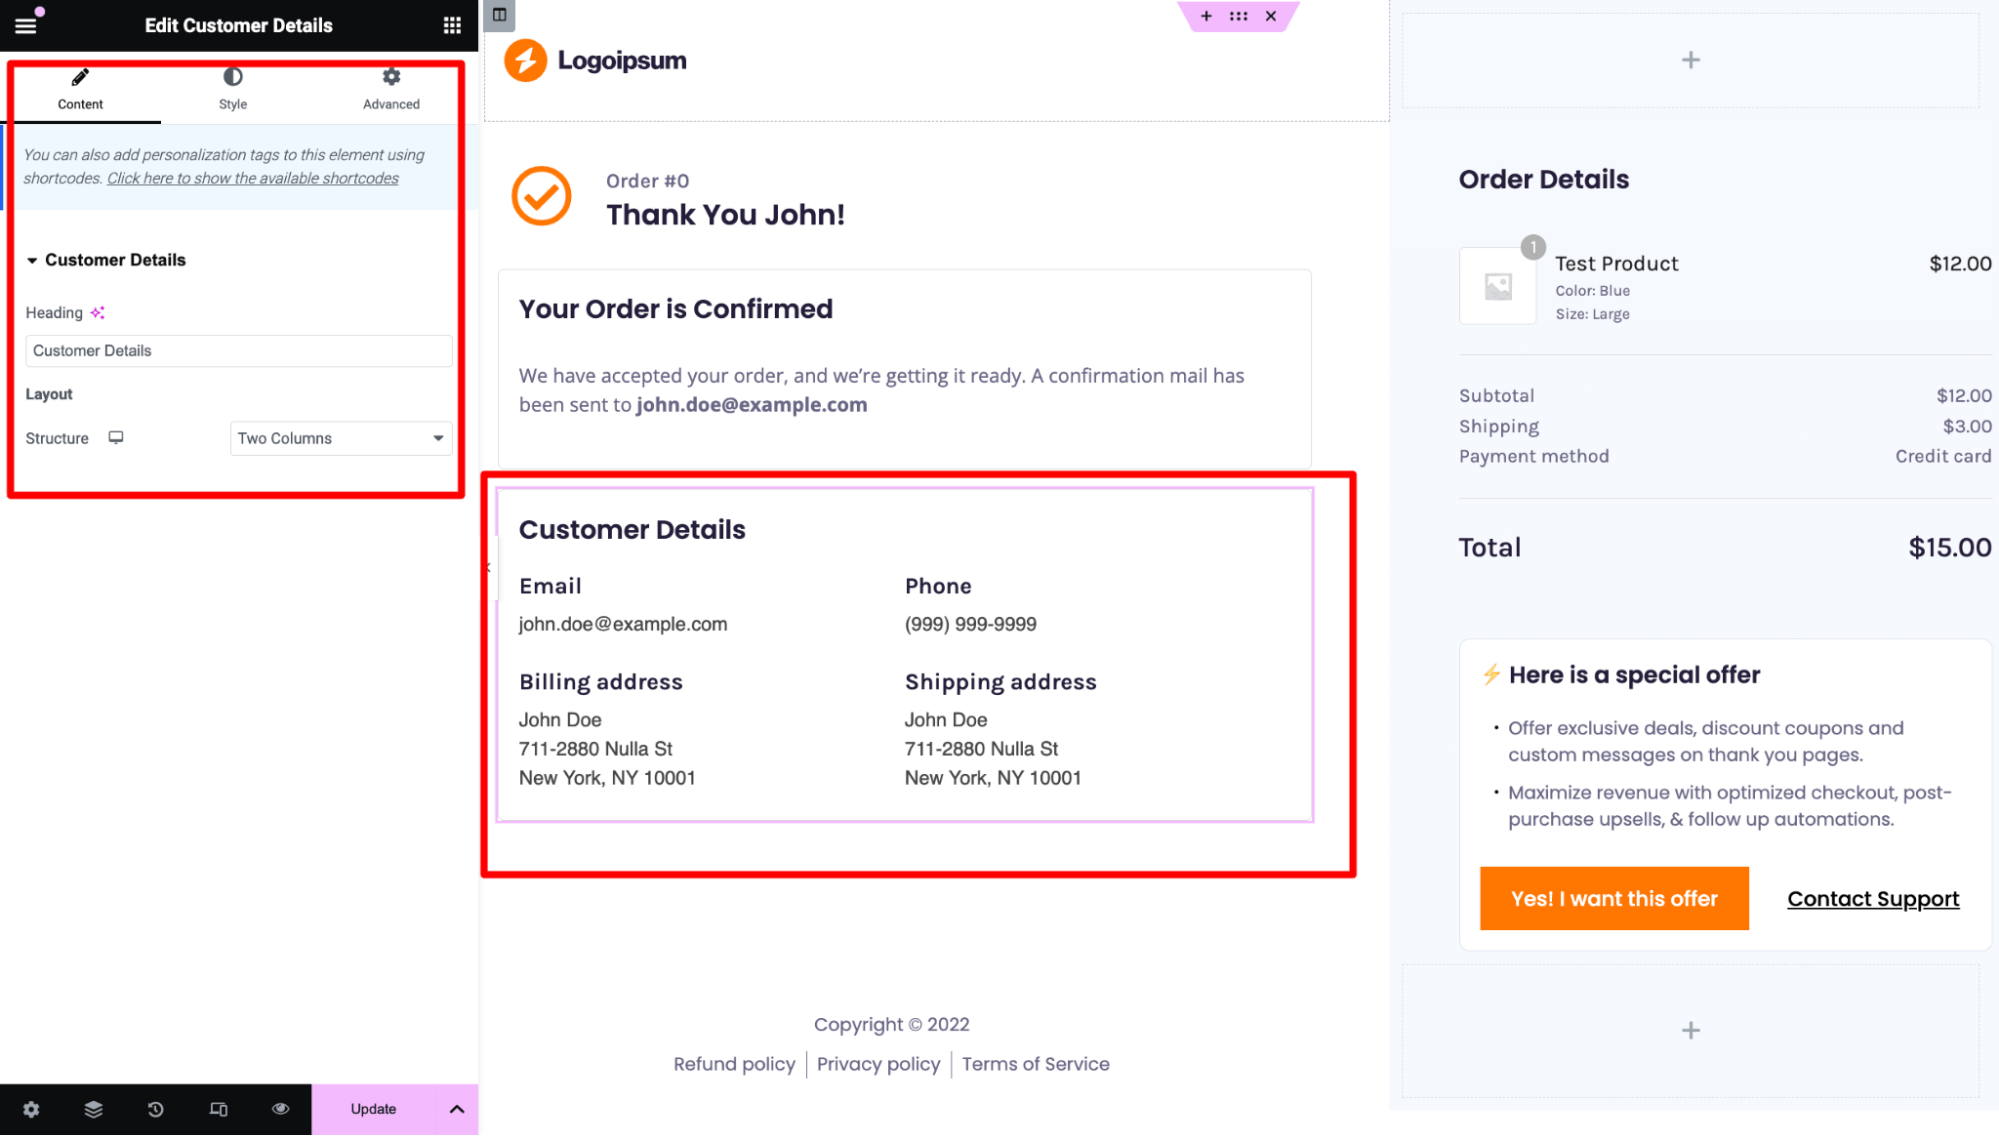
For the order details, you can change the heading. If you offer subscriptions for downloadable products, you have the flexibility to customize various options to suit your needs.
For the special offer section, you can customize the texts to set your offer.
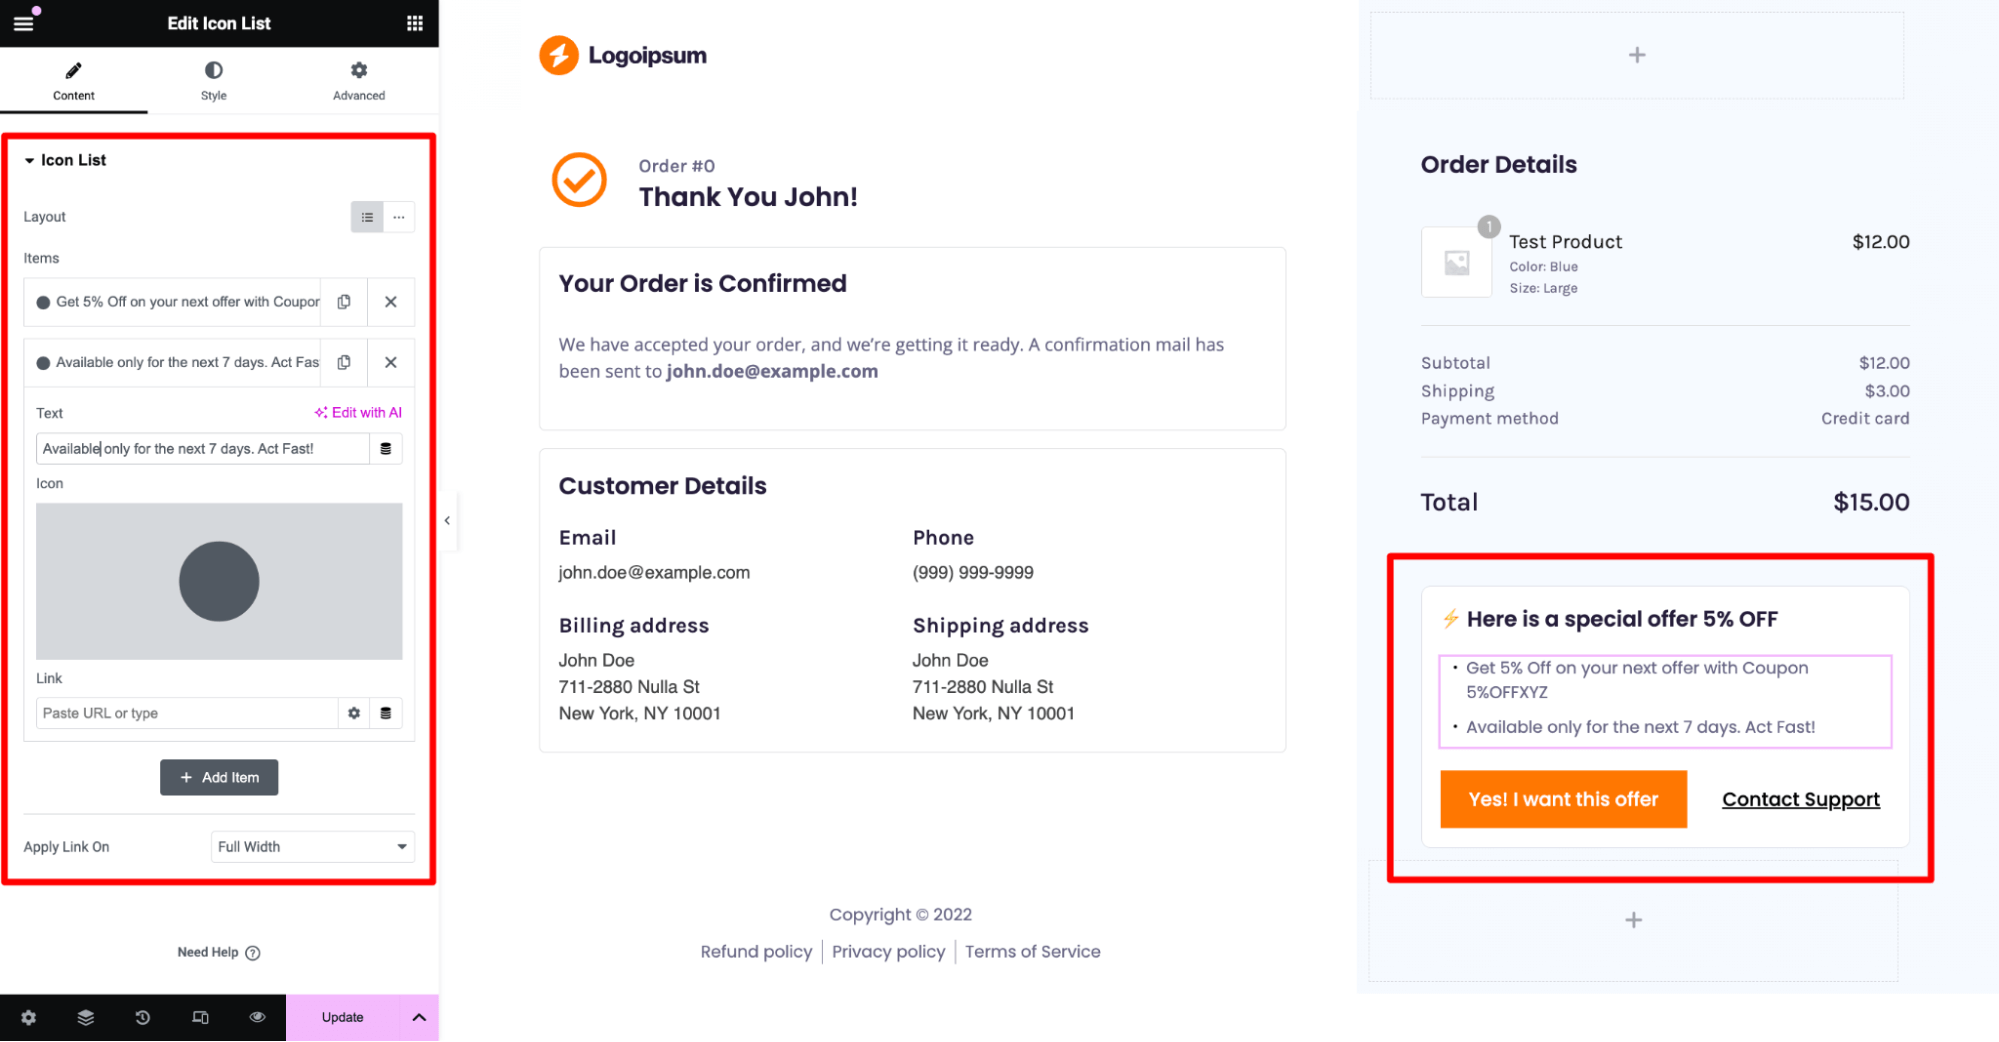
Along with template options, you can also add other new sections, like here I have added a social icon section and a helpful video section.
You can add more sections as well, depending on your needs.
After making the changes, make sure to save the custom thank you template.
Step 3: Add a rule-based thank you page (optional)
You can also apply different conditions to your thank-you page.
For instance, send users to a different thank-you page if the customer purchases from a certain category or a certain order total.
To set a rule, go to the thank you page and select the Rules tab. Click on the Add Rules button.
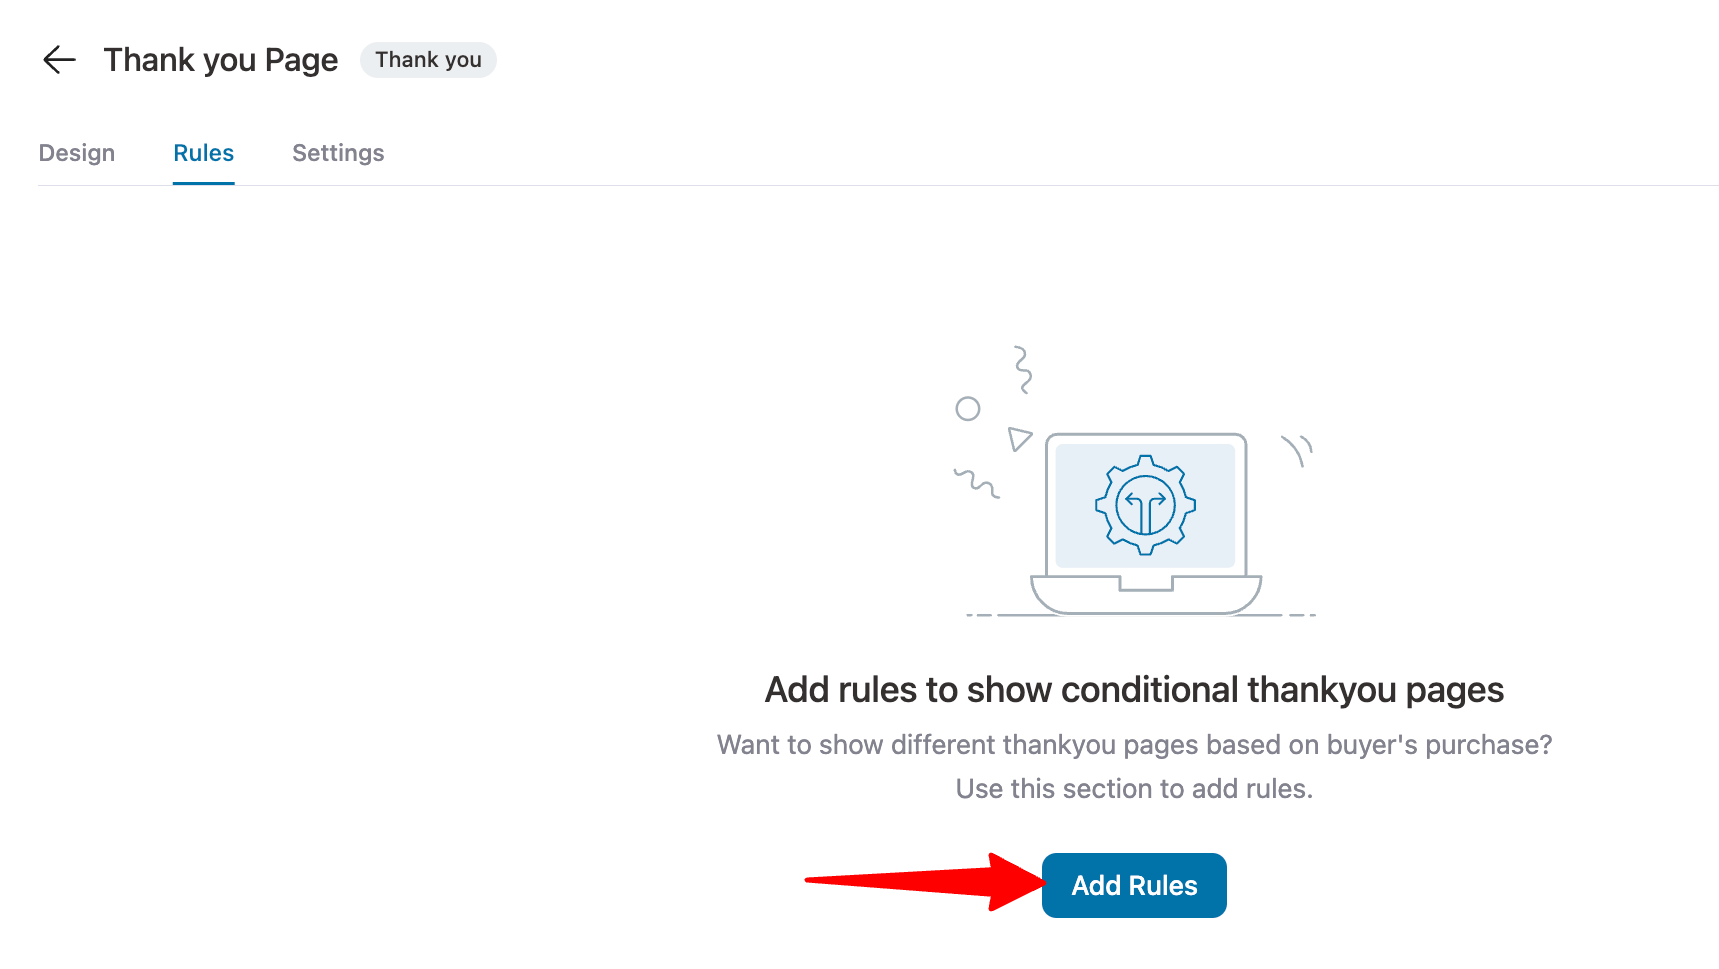
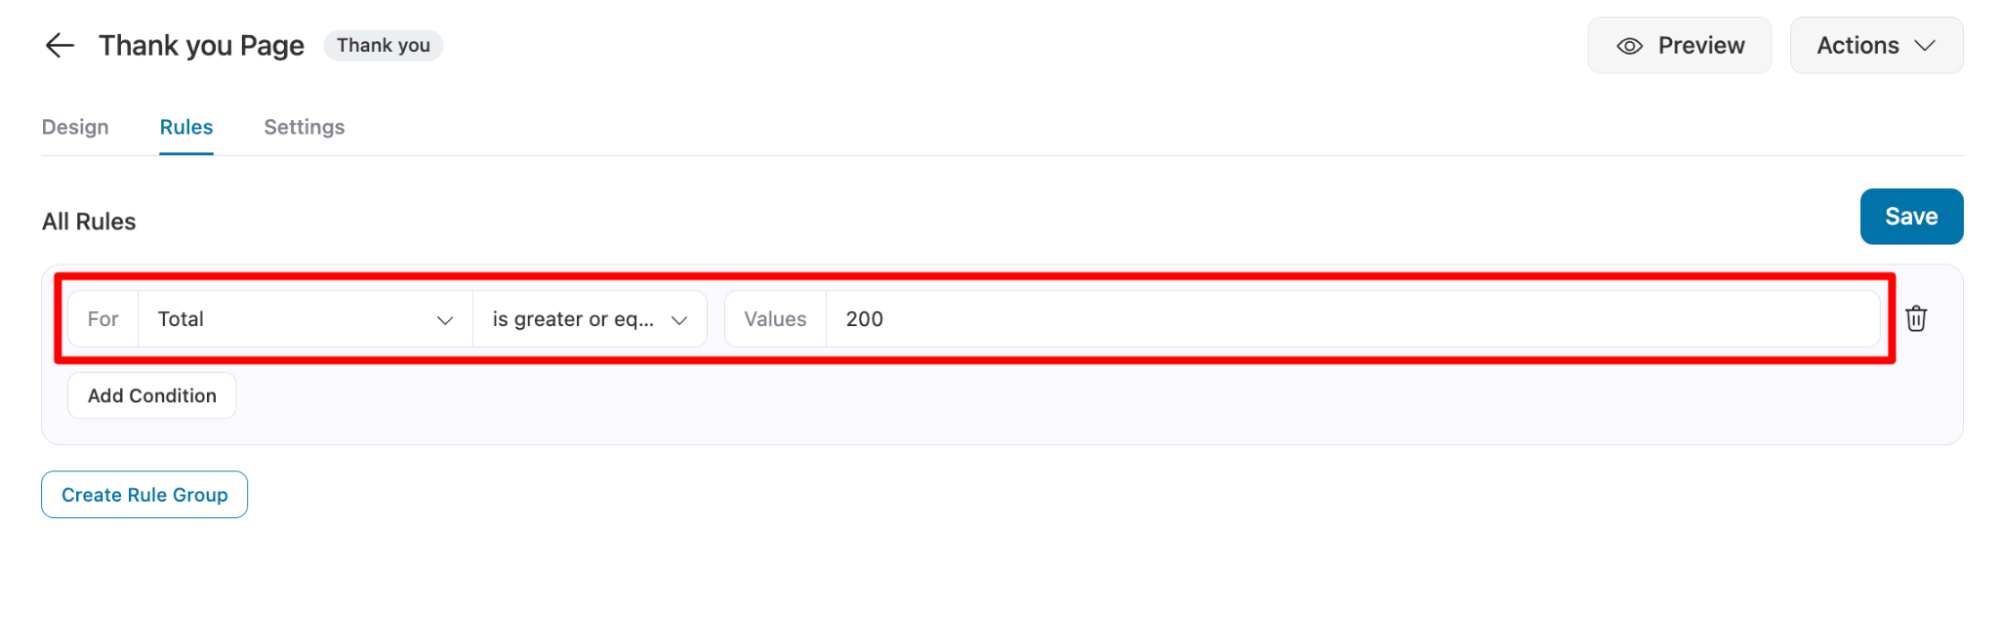
Choose a parameter based on your strategy, and then set the condition.
In this scenario, I have established a condition that directs customers who purchase products worth $200 or more to this thank-you page.
For more details on how to set a conditional thank-you page, you can read our blog on “Order confirmation page”.
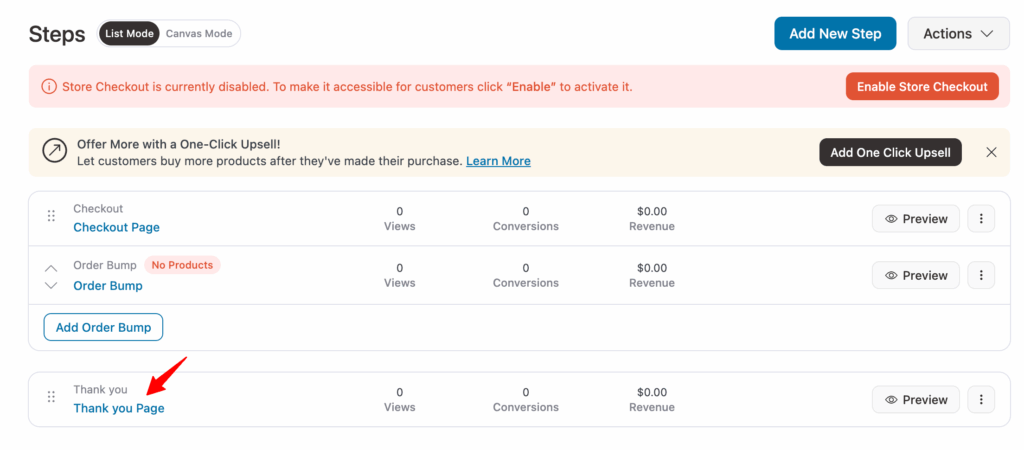
Step 4: Activate the store checkout with custom thank you page
The final step is to enable the store checkout. For this, just hit the “Enable store checkout”.
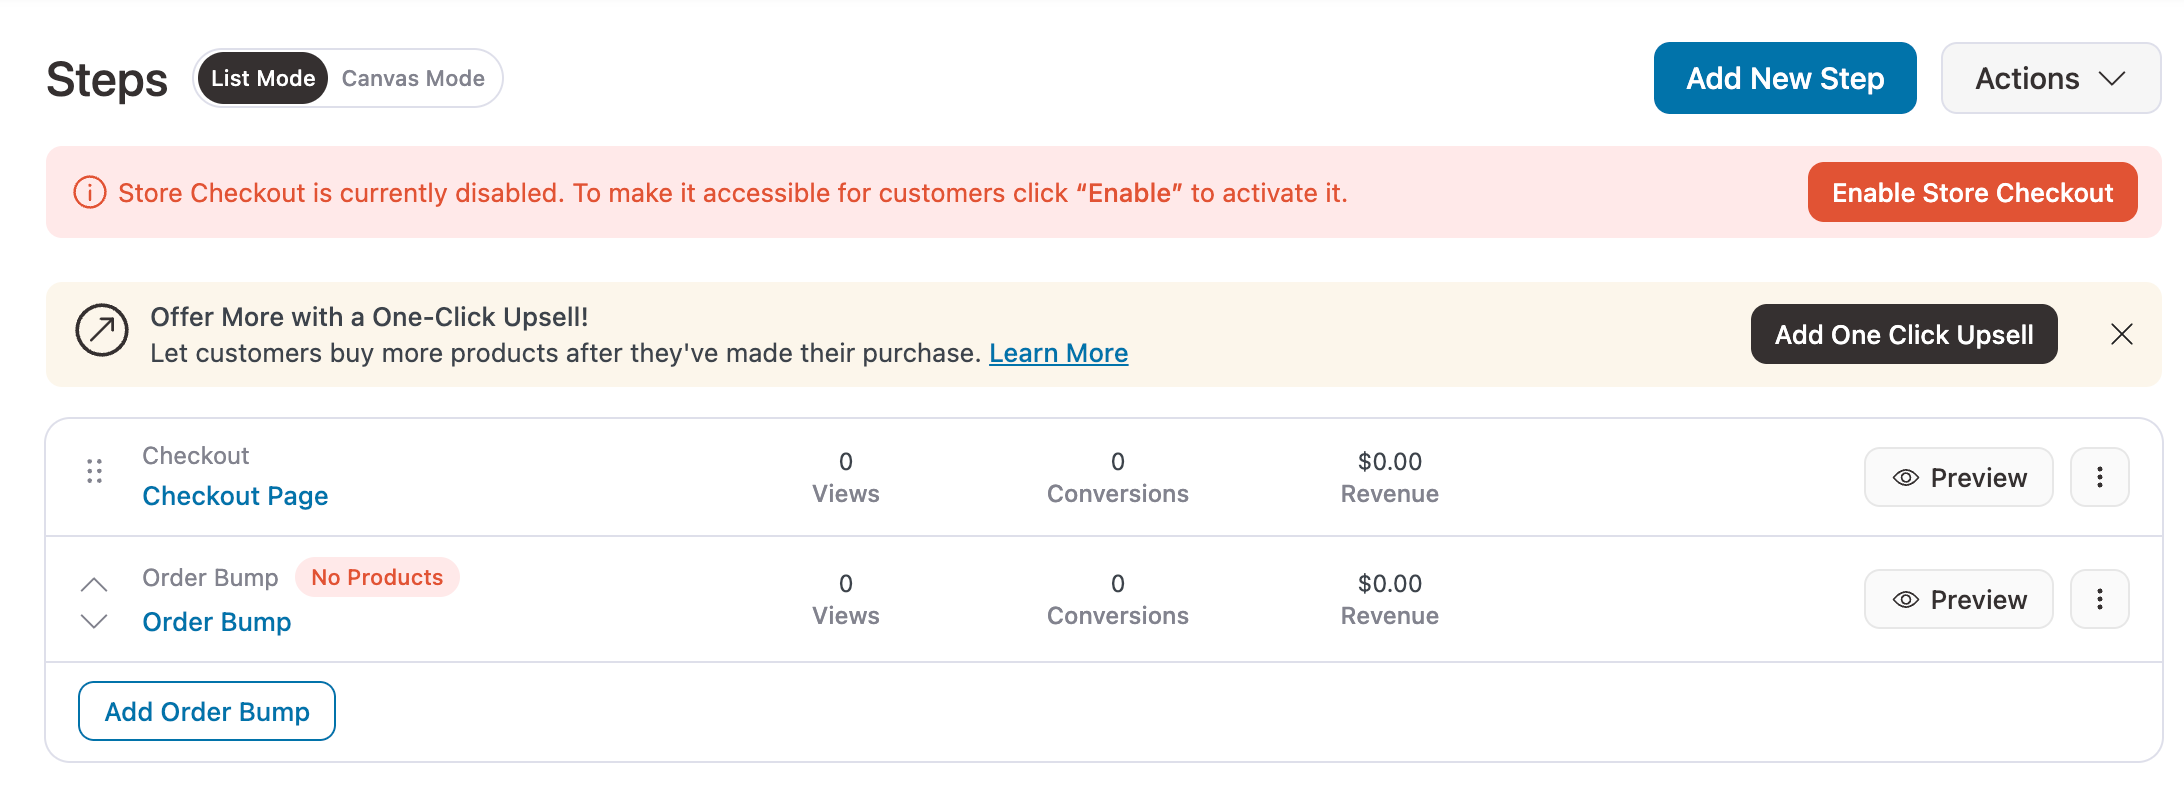
That’s it. Now your WooCommerce store will redirect customers to this beautiful custom thank-you page you just built after checkout.
Here is a preview of the thank-you page I just designed:
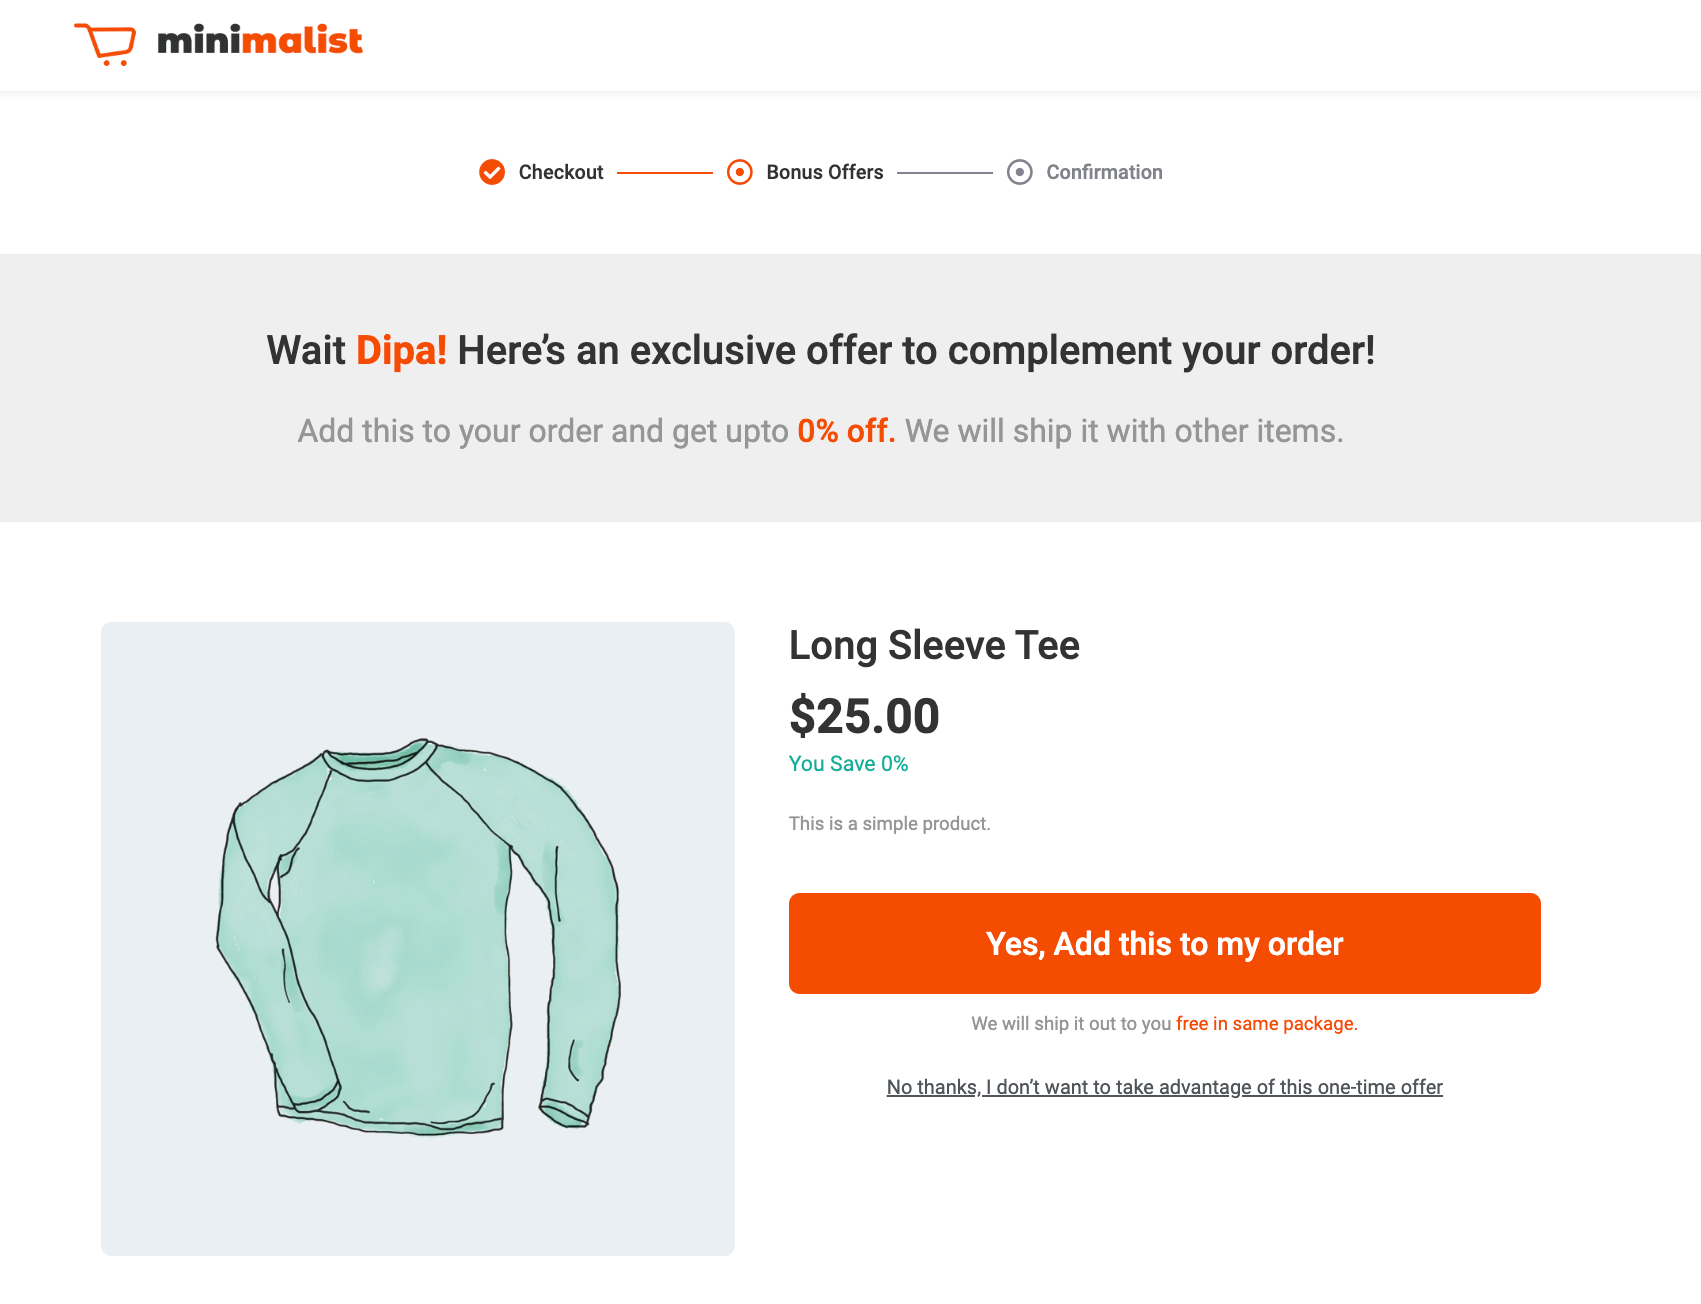
How to Redirect to a One-Click Upsell Page After Checkout in WooCommerce To Boost Average Order Value
Before redirecting to the custom thank you page, you can offer a one-click upsell to boost the order value.
With FunnelKit Funnel Builder, you can easily offer a one-click upsell. You can set up multiple upsells and offer them as a downsell if a user rejects the first upsell.
You can also tailor your upsell offers to your customers by adding numerous conditions or rules. In addition, you can also add many conditions/rules to your upsell offers to make them more targeted and relevant to your customers.
To use this one-click upsell feature, you must install and activate the pro version of FunnelKit Funnel Builder.
Once you've activated the plugin, follow these steps:
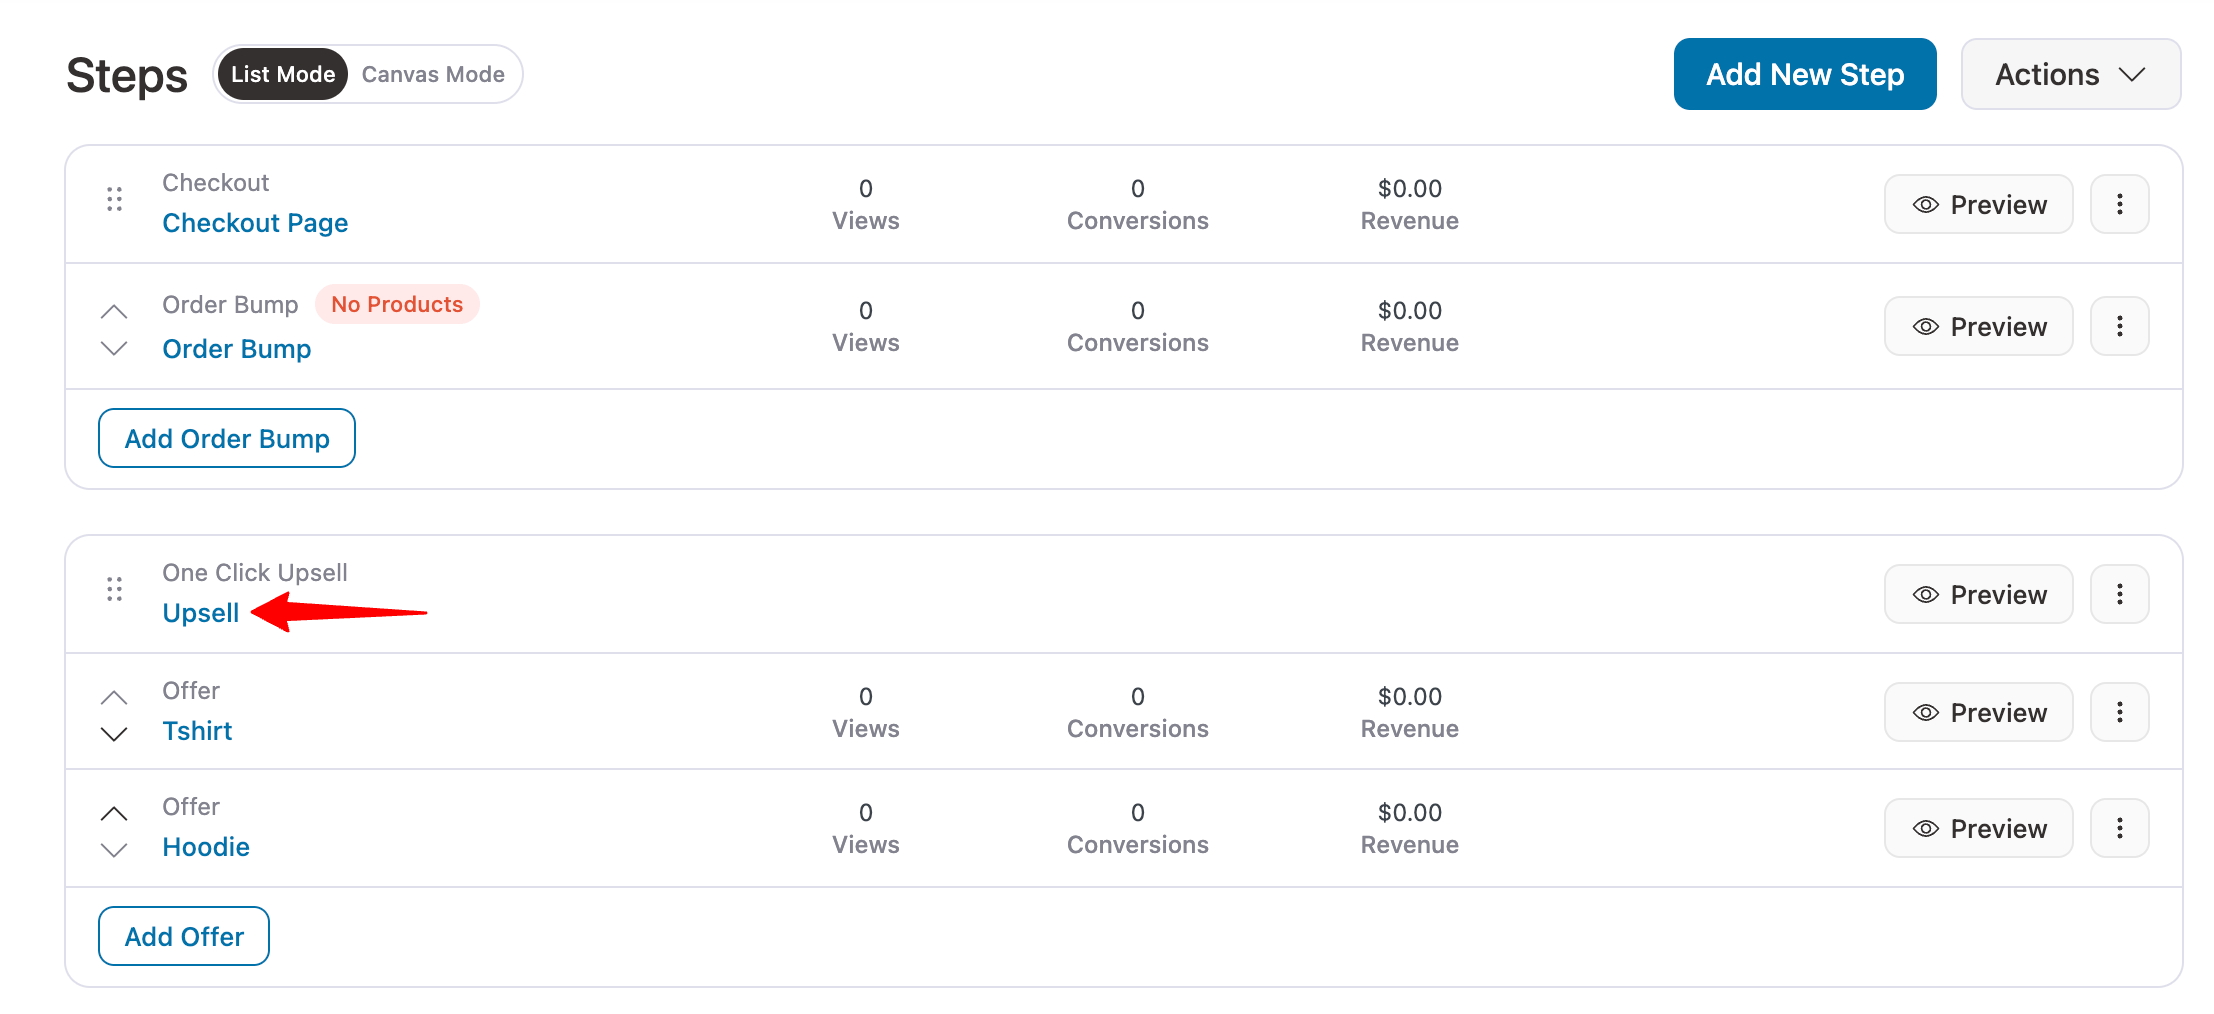
Step 1: Create a one-click upsell step
To create an upsell step, first hit the button “Add New Step.”.
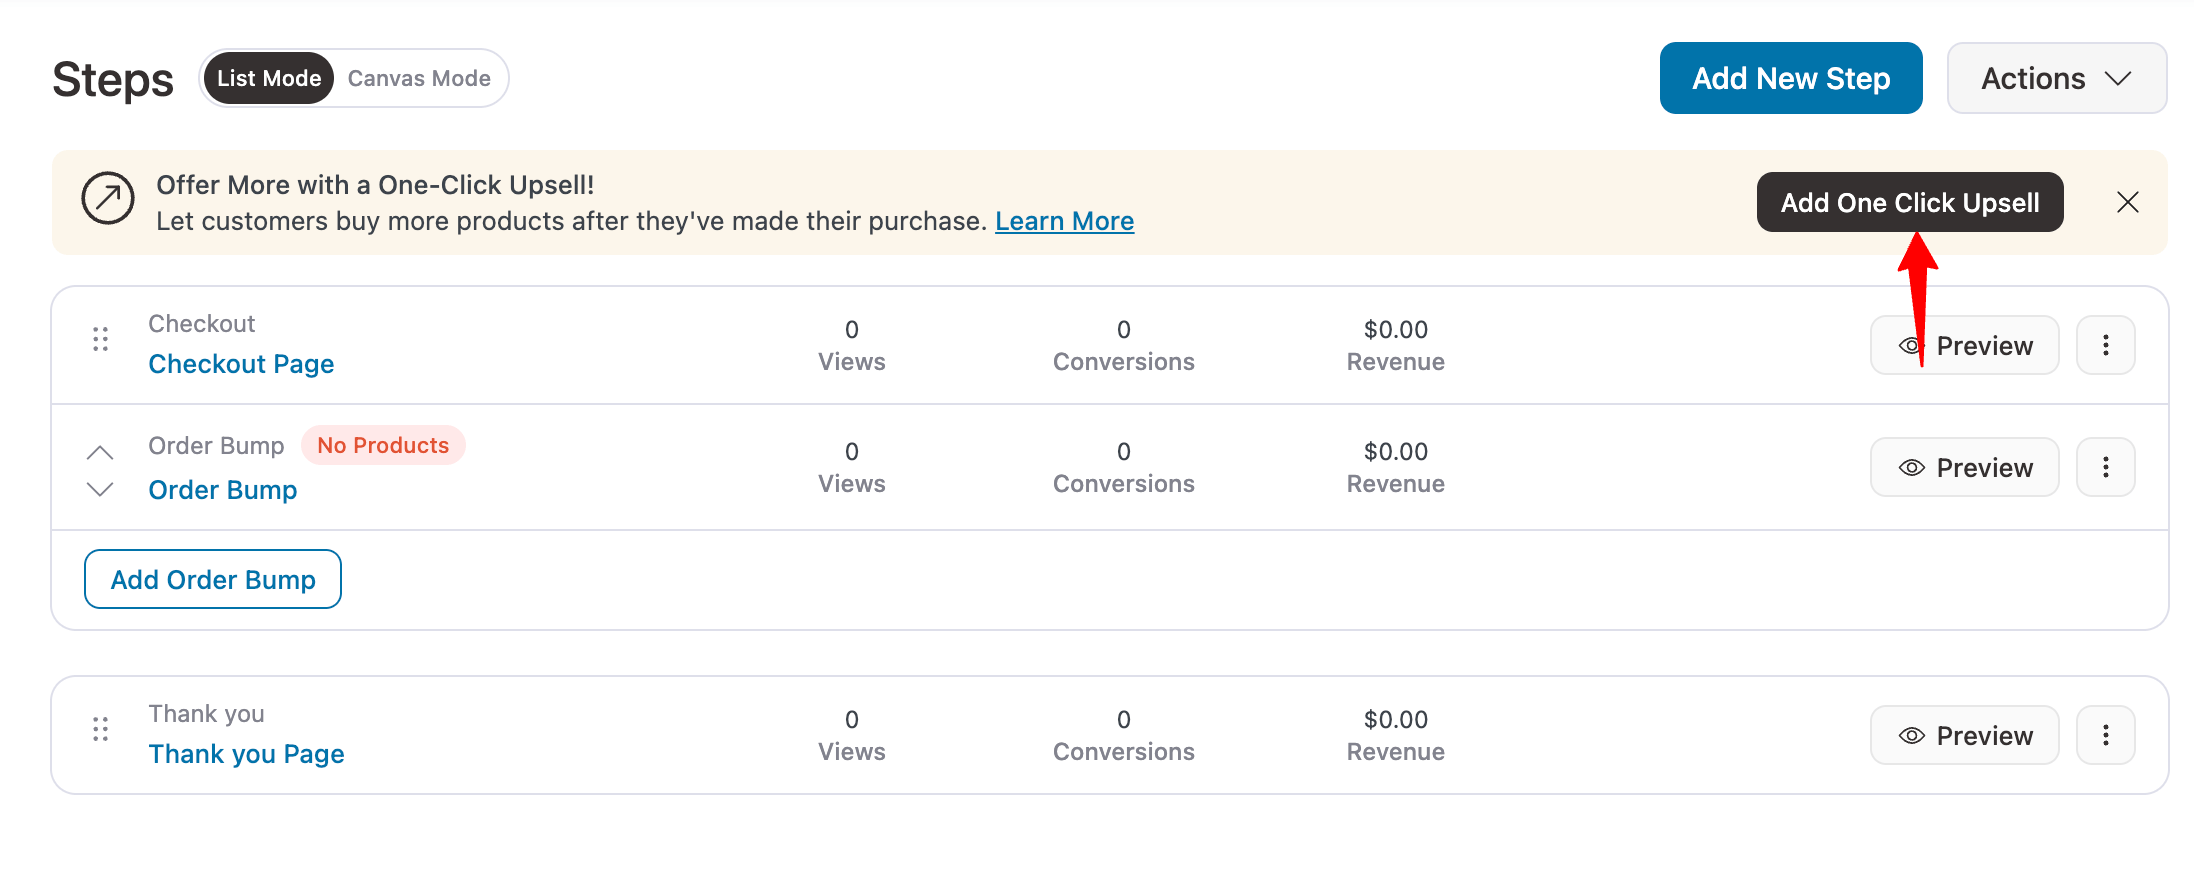
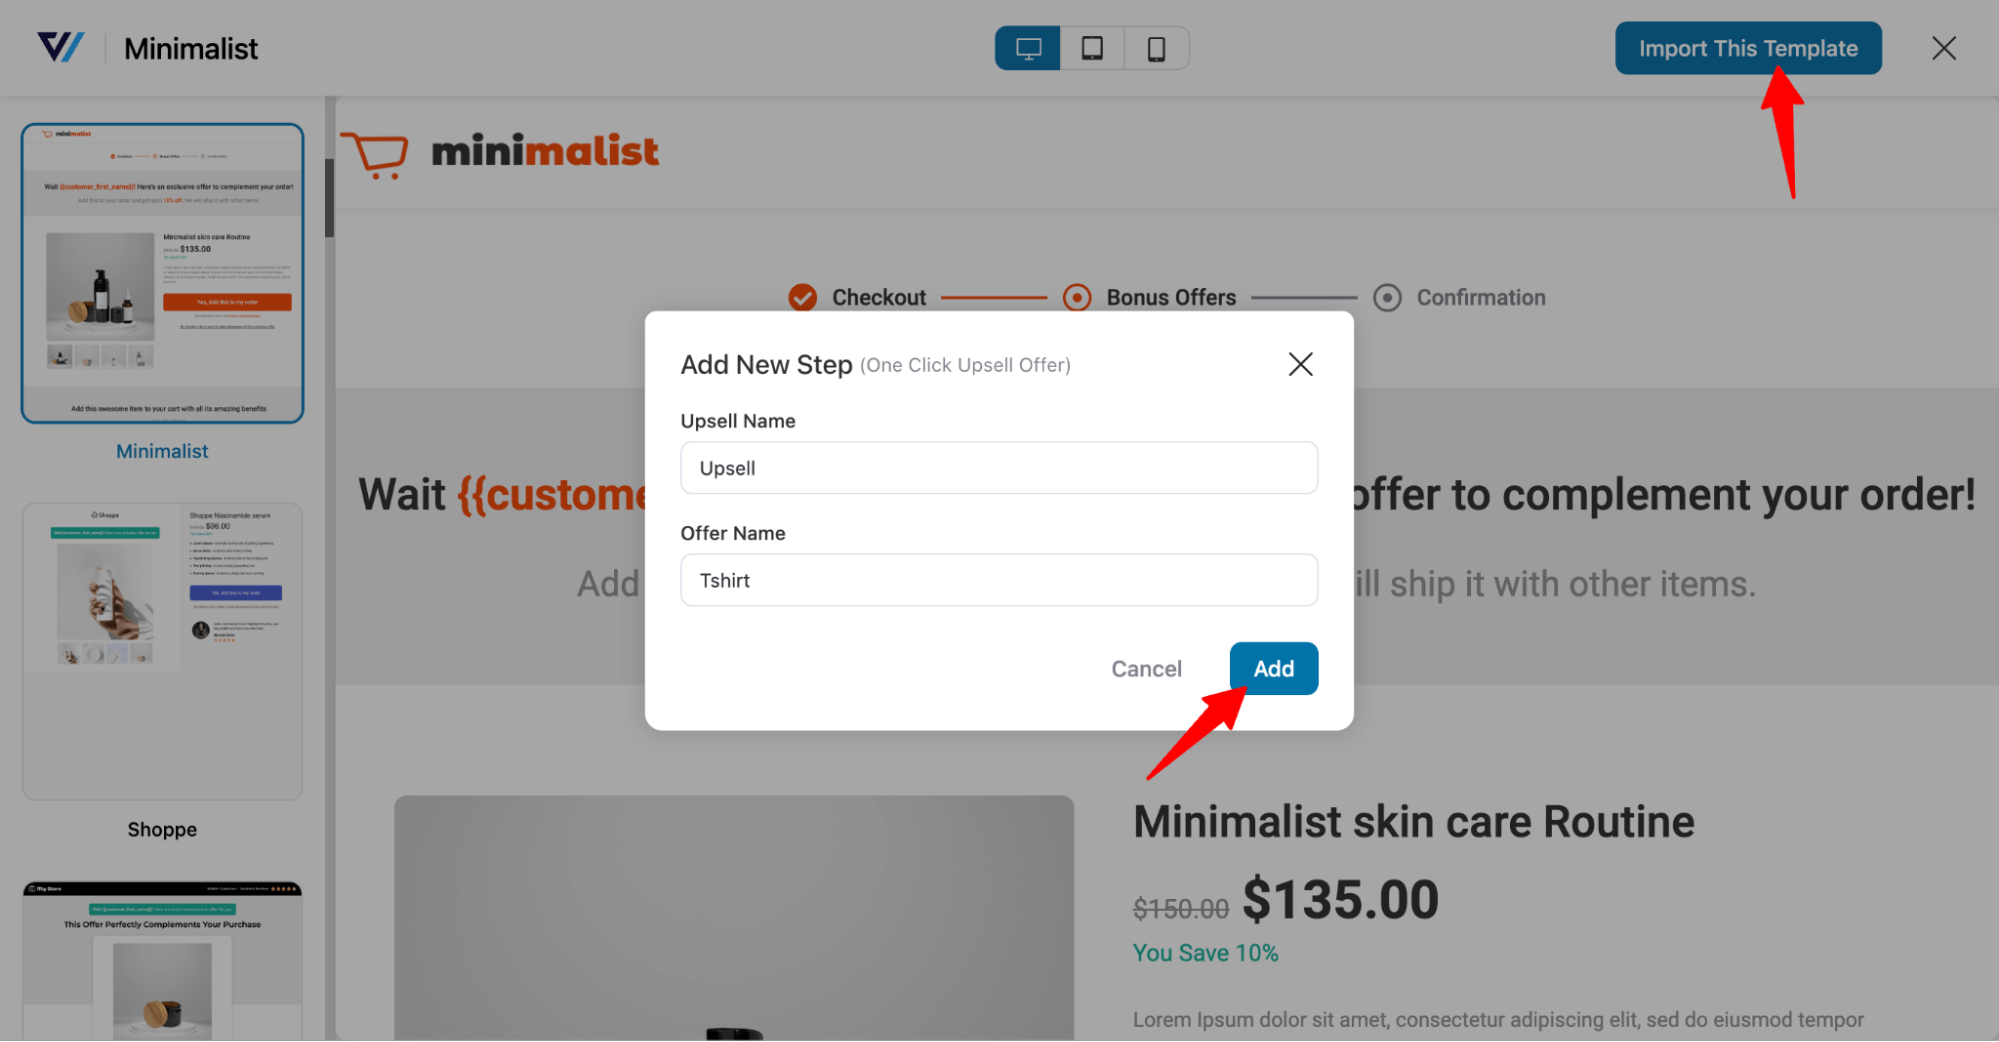
Next, choose the option “One Click Upsell Offers," then the page builder. After that, hover on the template you like and hit Preview.
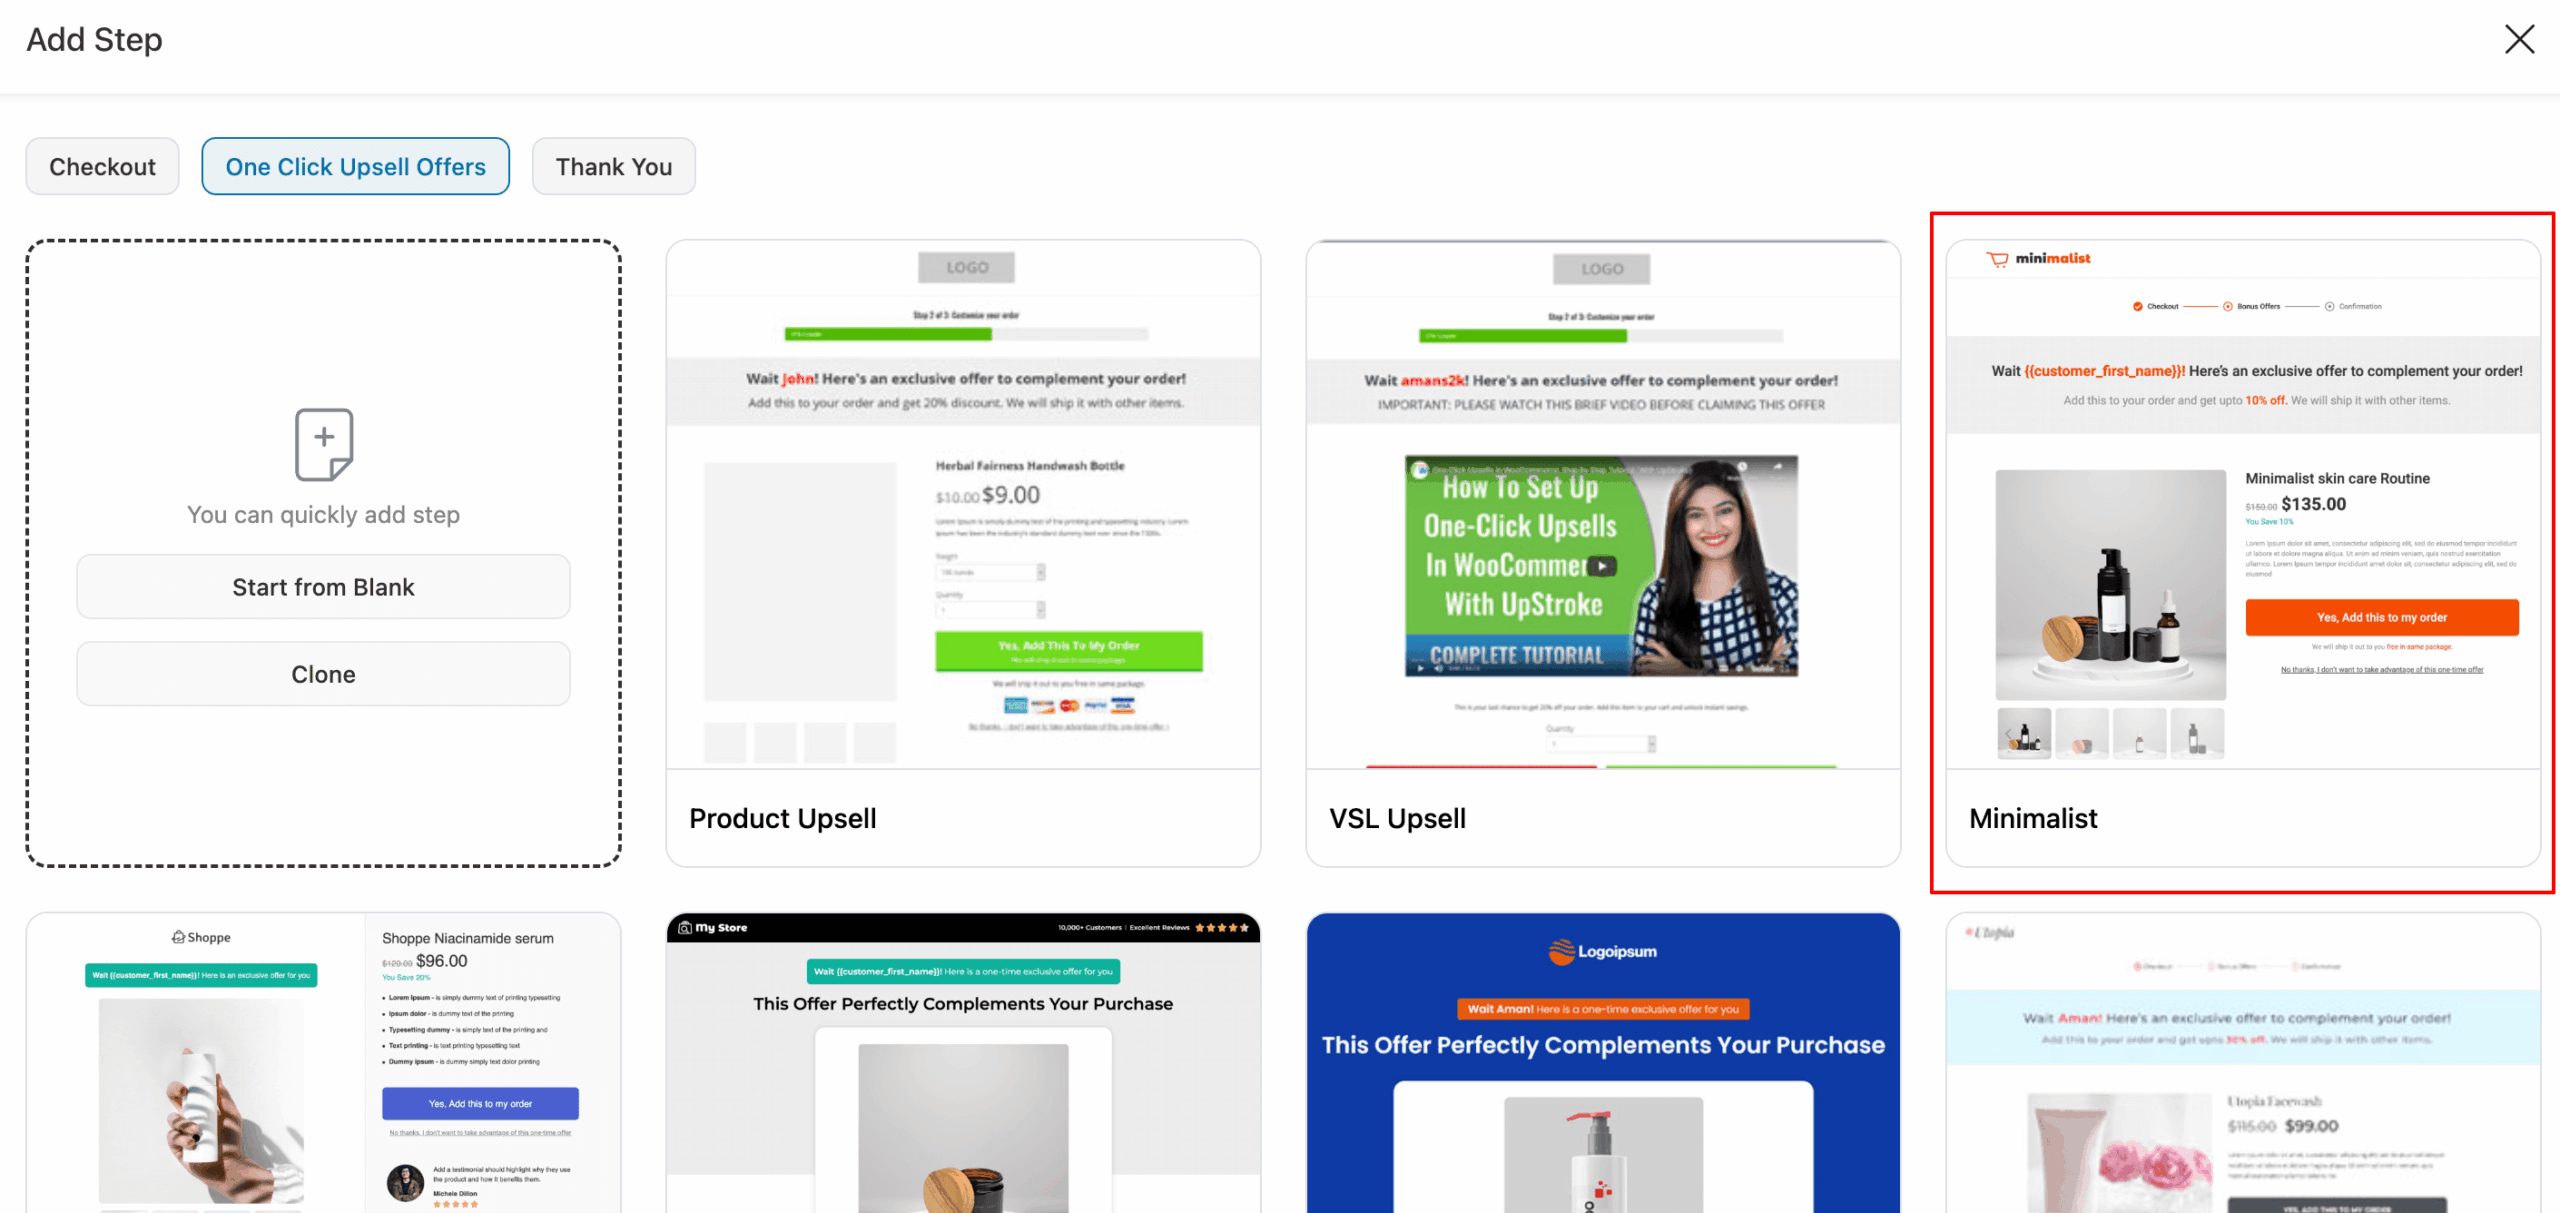
Next, hit “Import This Template," provide an upsell name and offer name, and hit Add.
Step 2: Add the upsell offer
Now, drag and drop the upsell offer to place it before the thank you page.
Click on the new offer you just created.
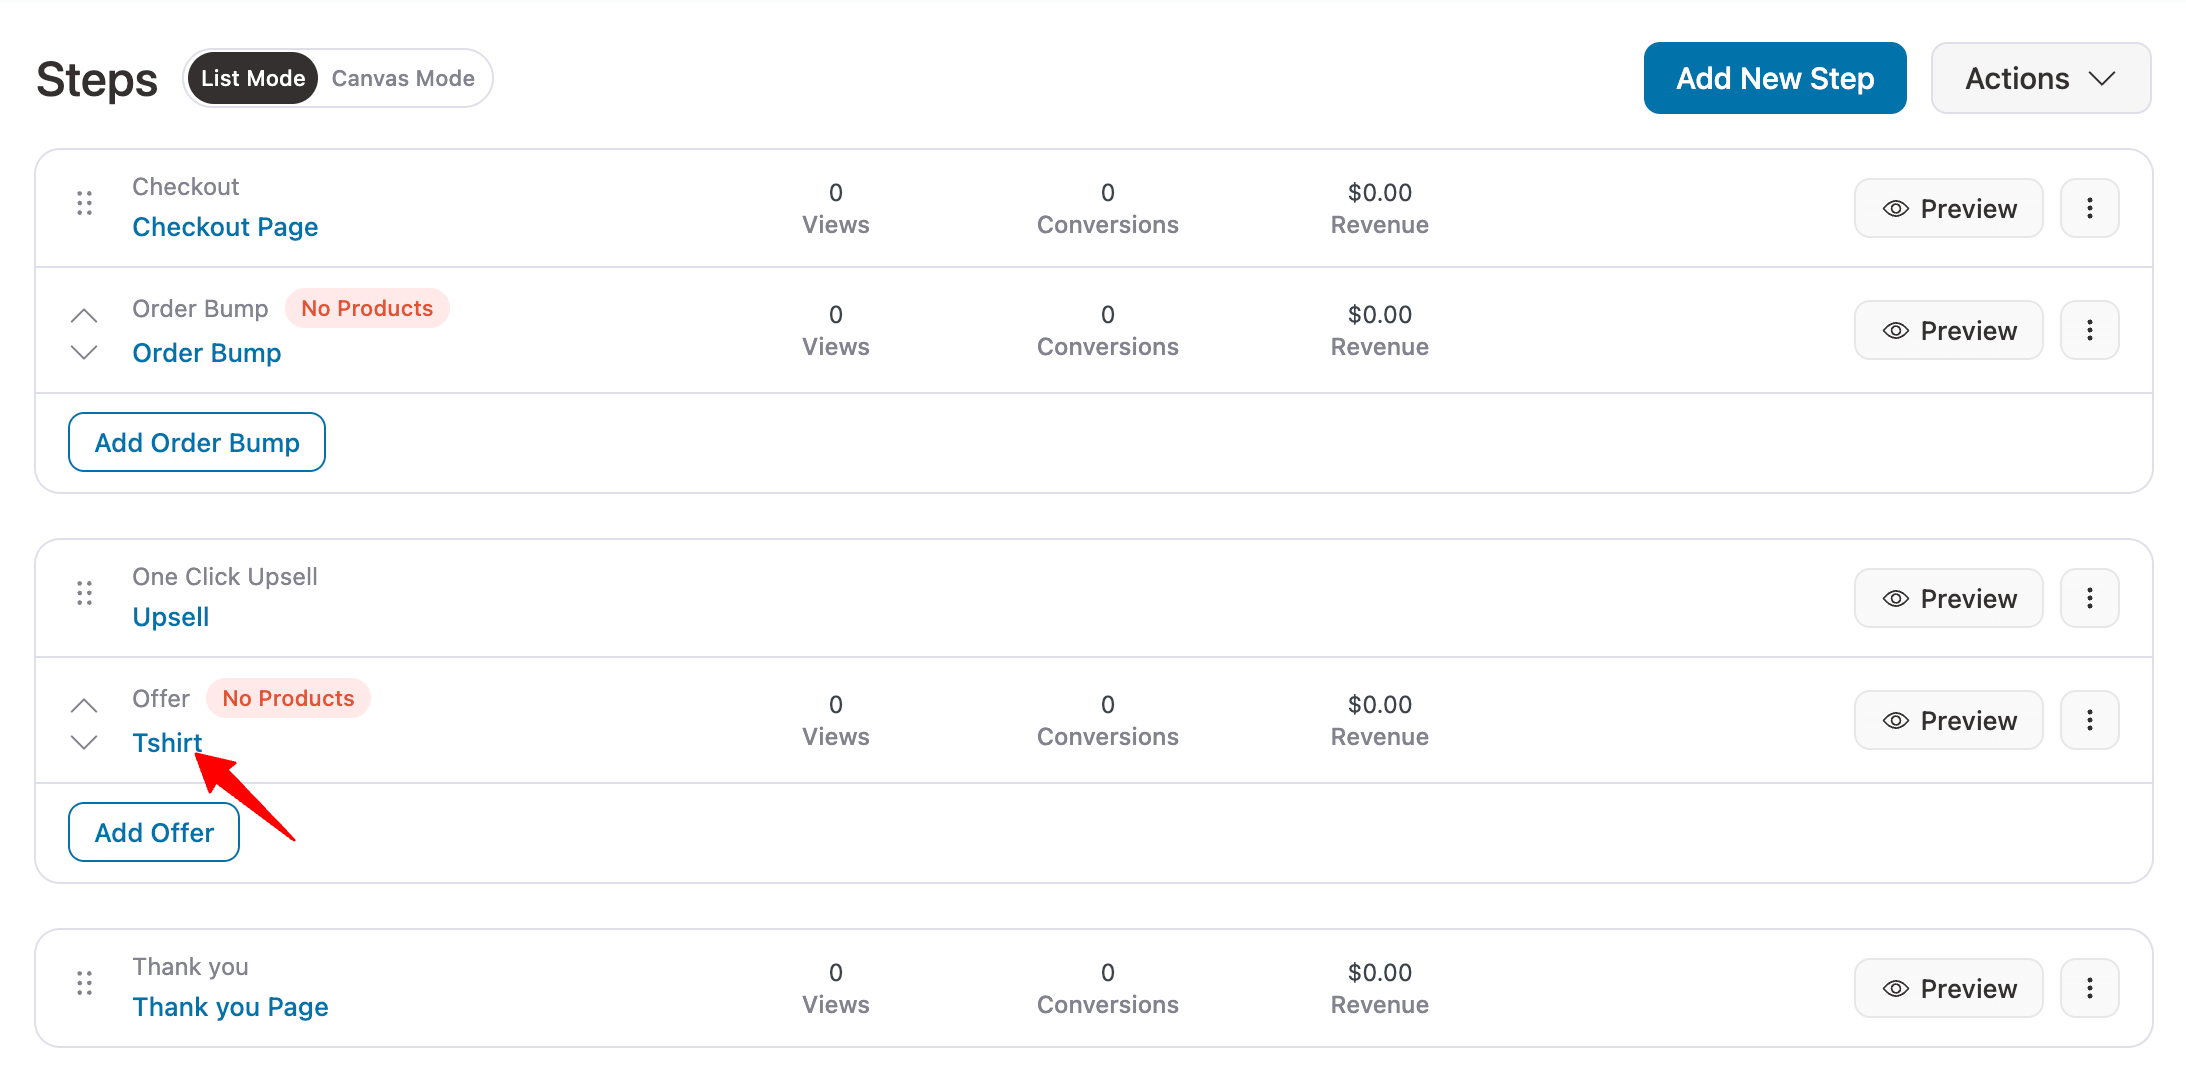
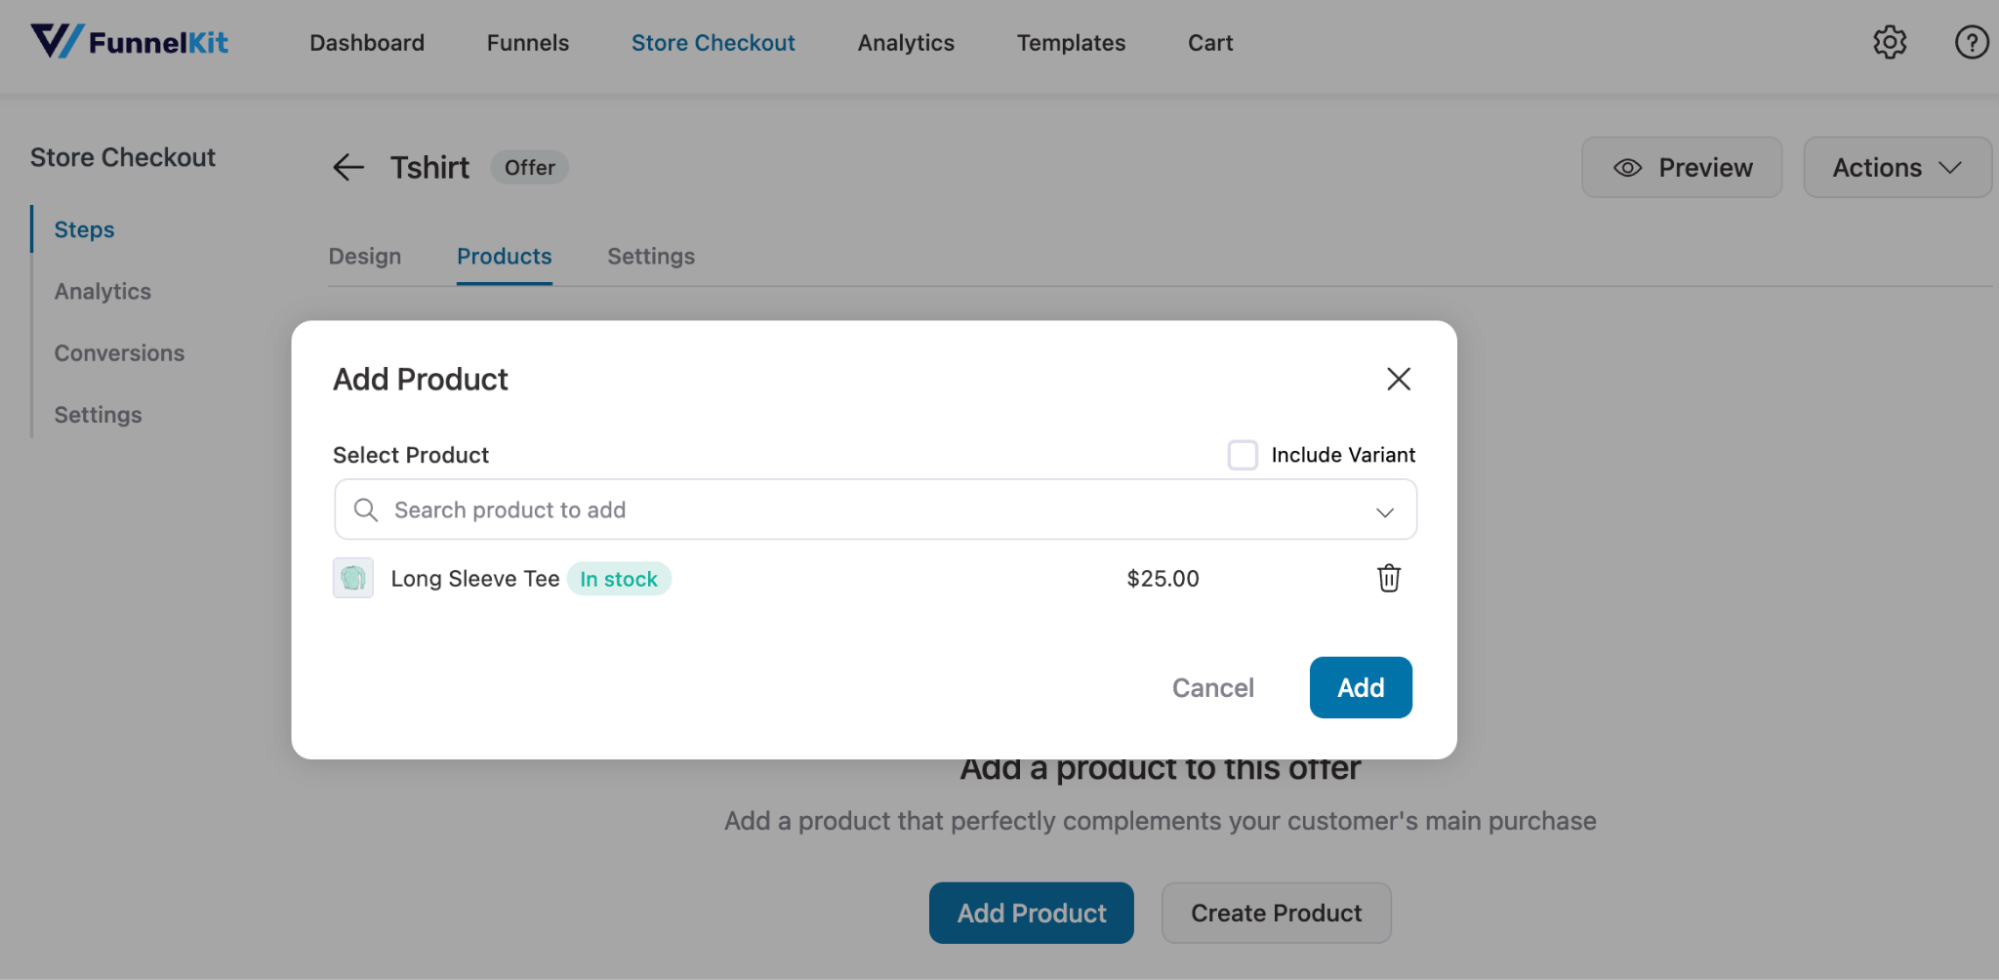
Move to the Products tab, hit “Add Product," search and add the product, and hit Add.
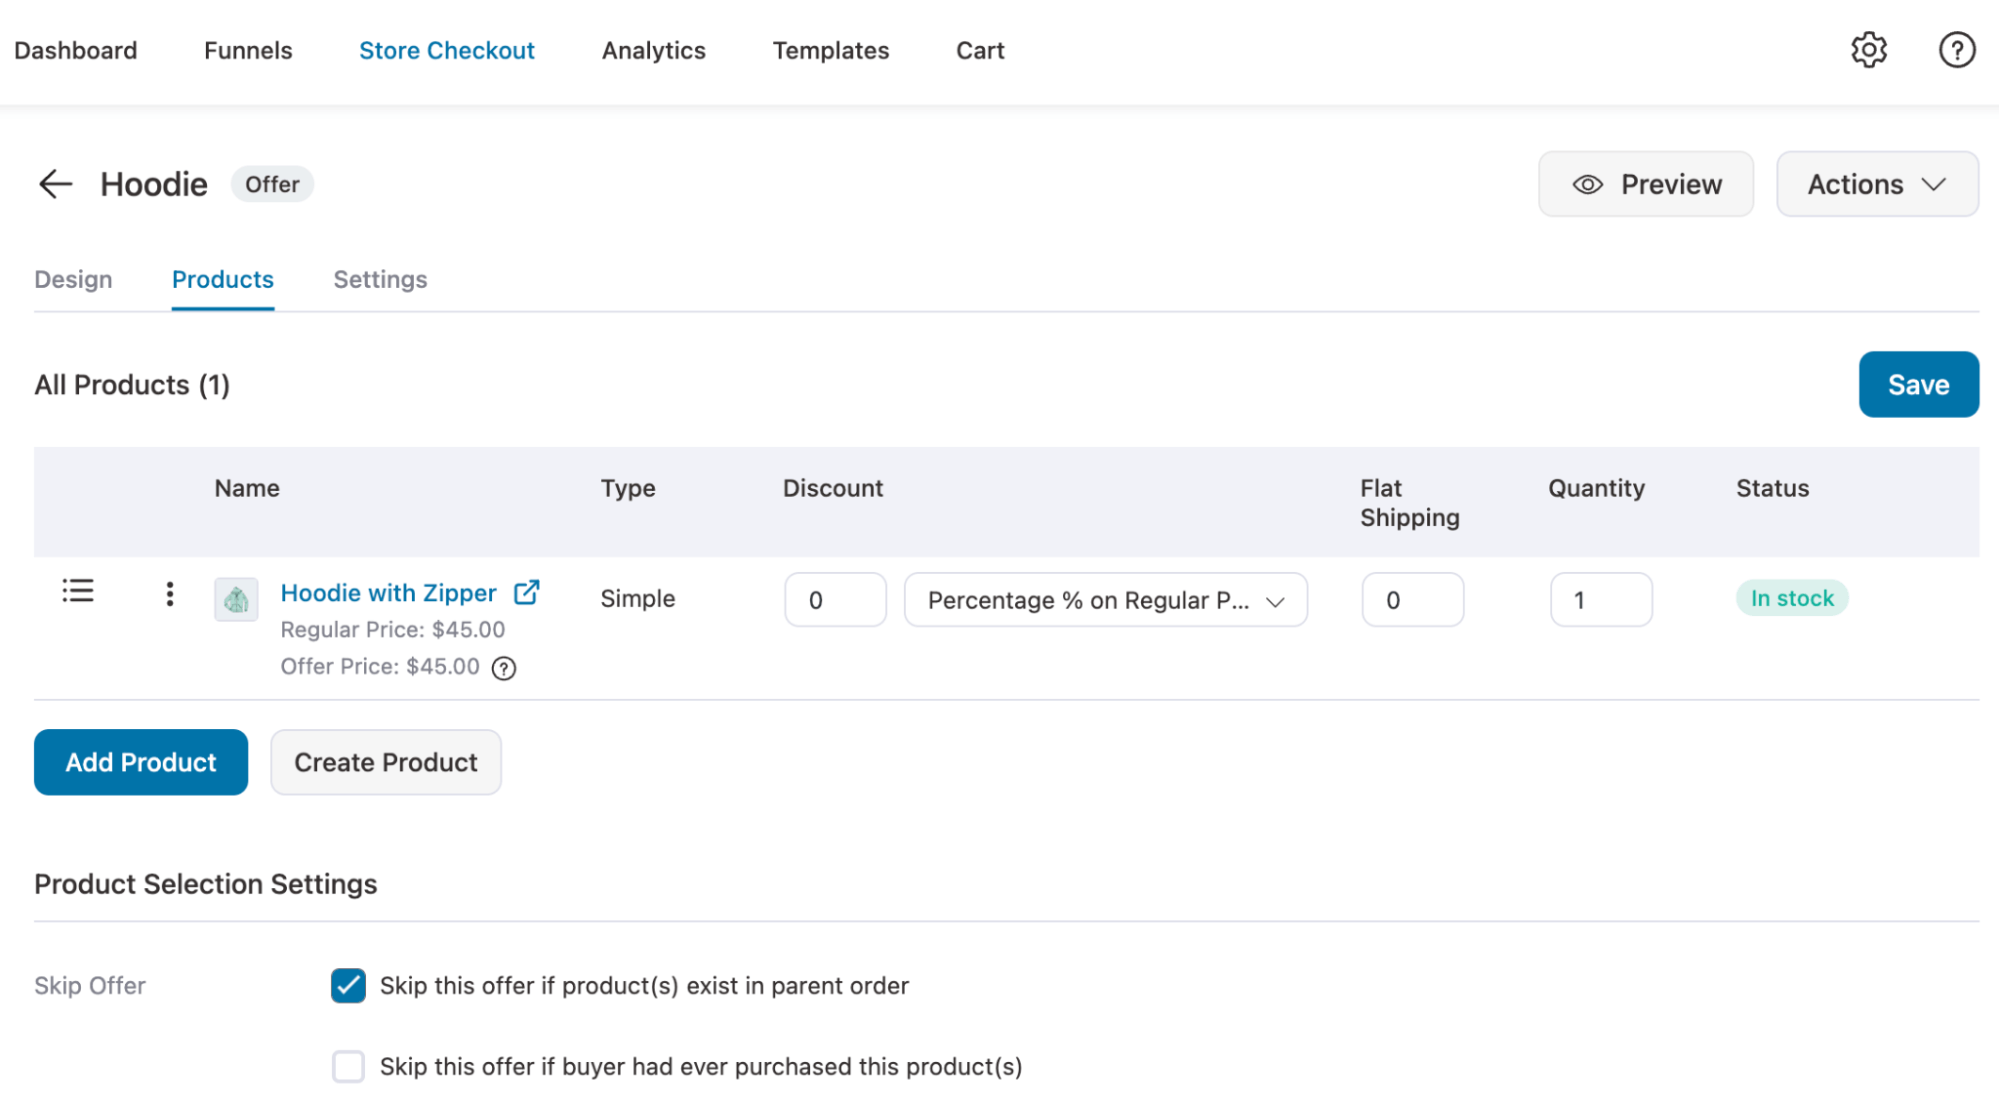
Make sure to check the option “Skip this offer if the product(s) exist in parent order” in product selection settings and hit Save to update.
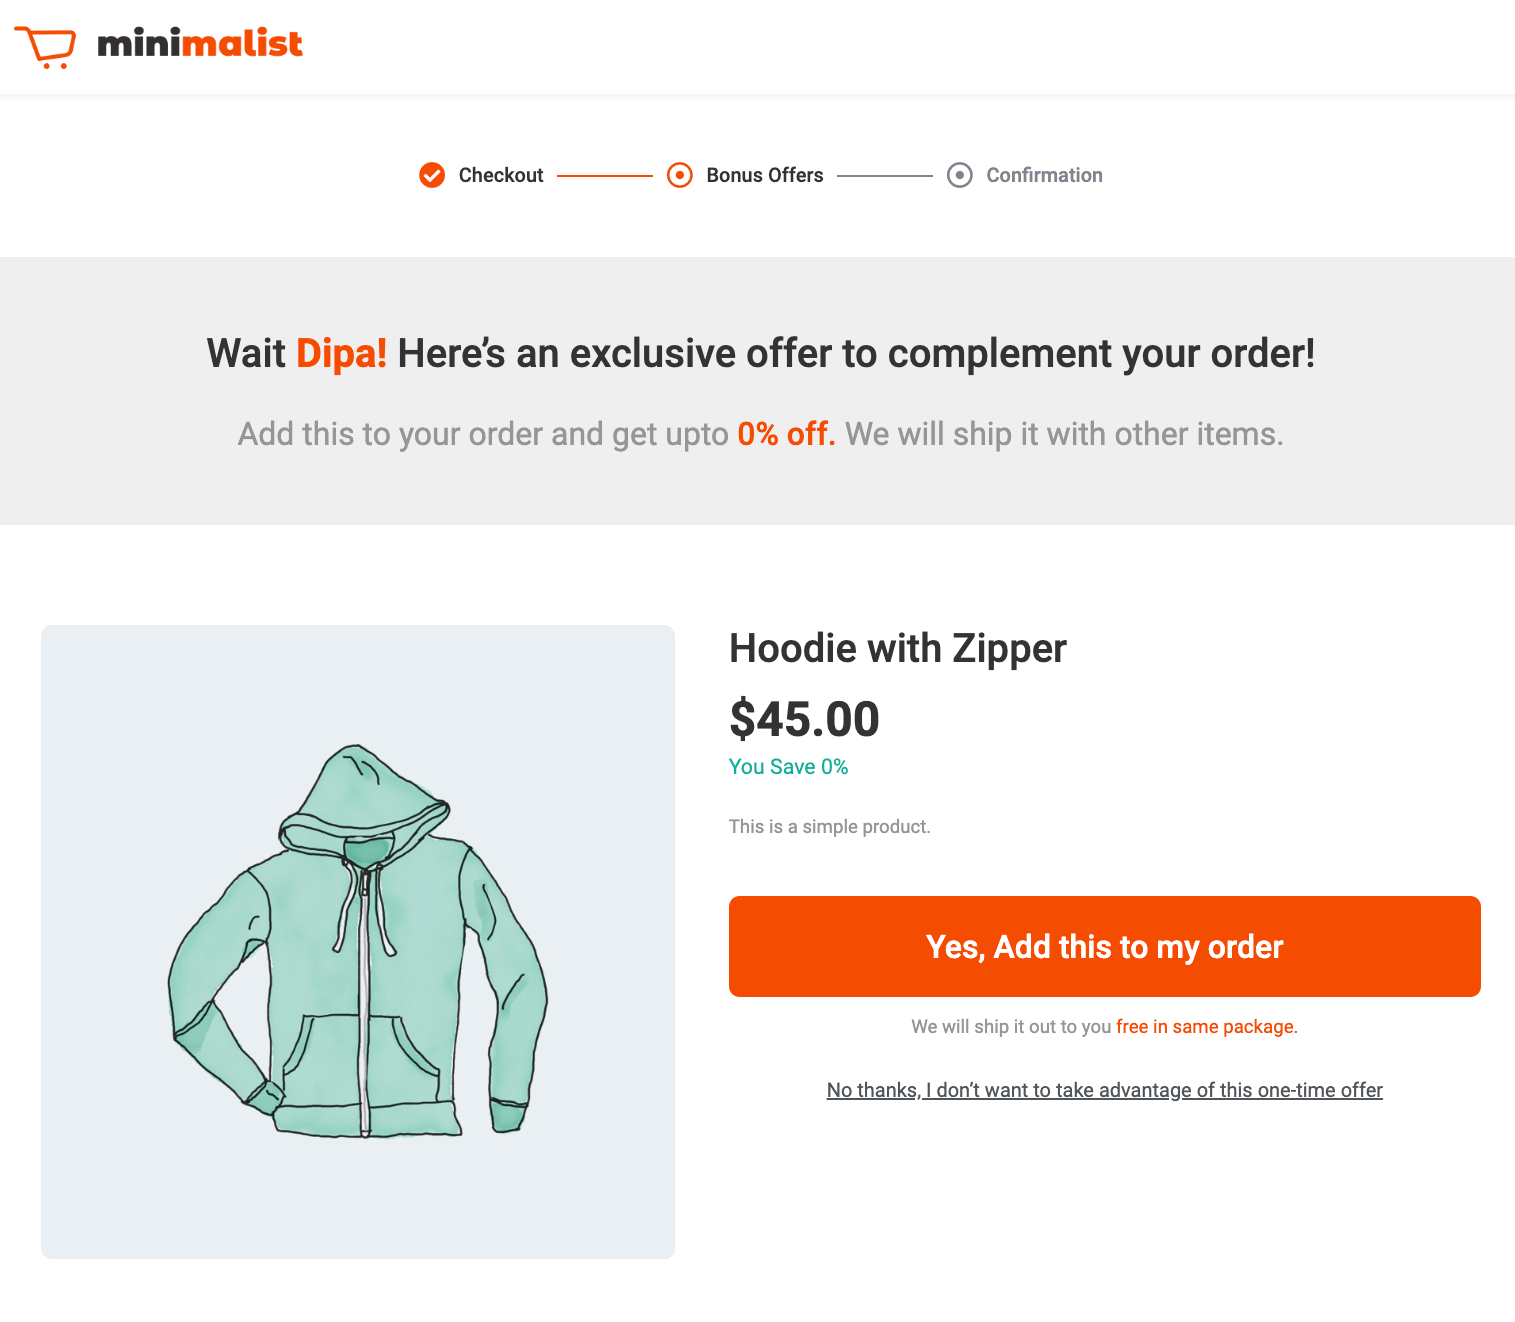
Step 3: Add a downsell offer (optional)
In case customers reject the first order, you can add another upsell. To do this, add a new offer.
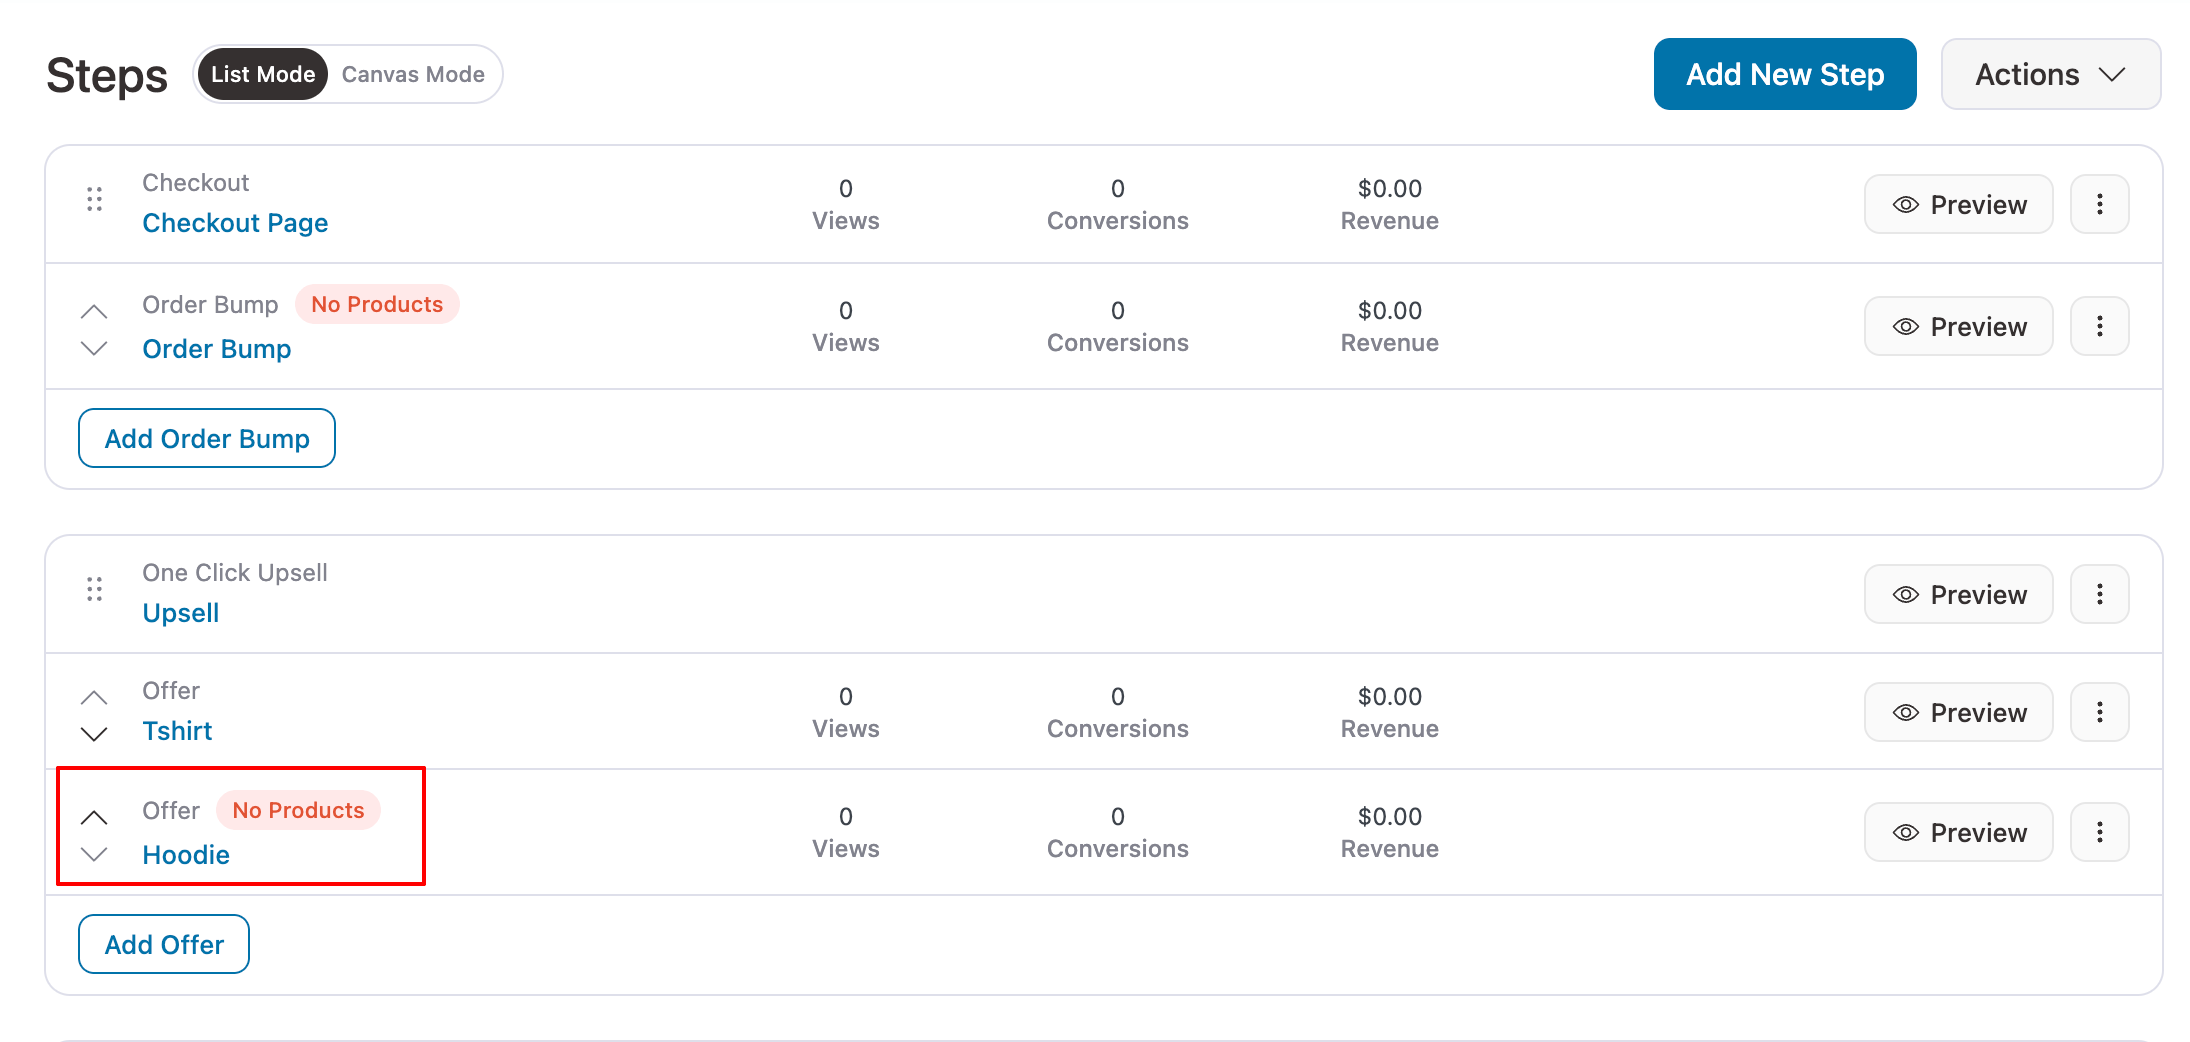
Then, as a downsell, add the product you want to offer.
Step 4: Add conditions to the upsell offer
You can set different conditions for your upsell offers. To do this, select the upsell option.
Then add the rules you want to apply. For example, I have implemented a rule that limits the display of this upsell offer to customers who have purchased clothing.
Since our upsells are also in the clothing category, the offer is highly relevant, increasing the likelihood that users will accept it.

You can add multiple rules according to your strategy.
Don’t forget to save the changes.
After checkout, your customers will now see the upsell offers.
Users will receive the second upsell offer if they decline the initial offer.
After accepting or rejecting the upsell offers, a custom thank-you page will appear.
The thank you page will present all the order details, including the accepted upsell offers.
How to Redirect Based on Payment Method After WooCommerce Checkout
You can set up a redirect after checkout based on the payment method for both thank-you pages and one-click upsells.
For example, if you want to offer an upsell only when a customer completes the main purchase by credit card, you can do so easily with FunnelKit Funnel Builder.
To set it up, go to Upsells, then open the Rules tab. Set the condition that 'Payment Gateway' is 'Credit Card' (Stripe).
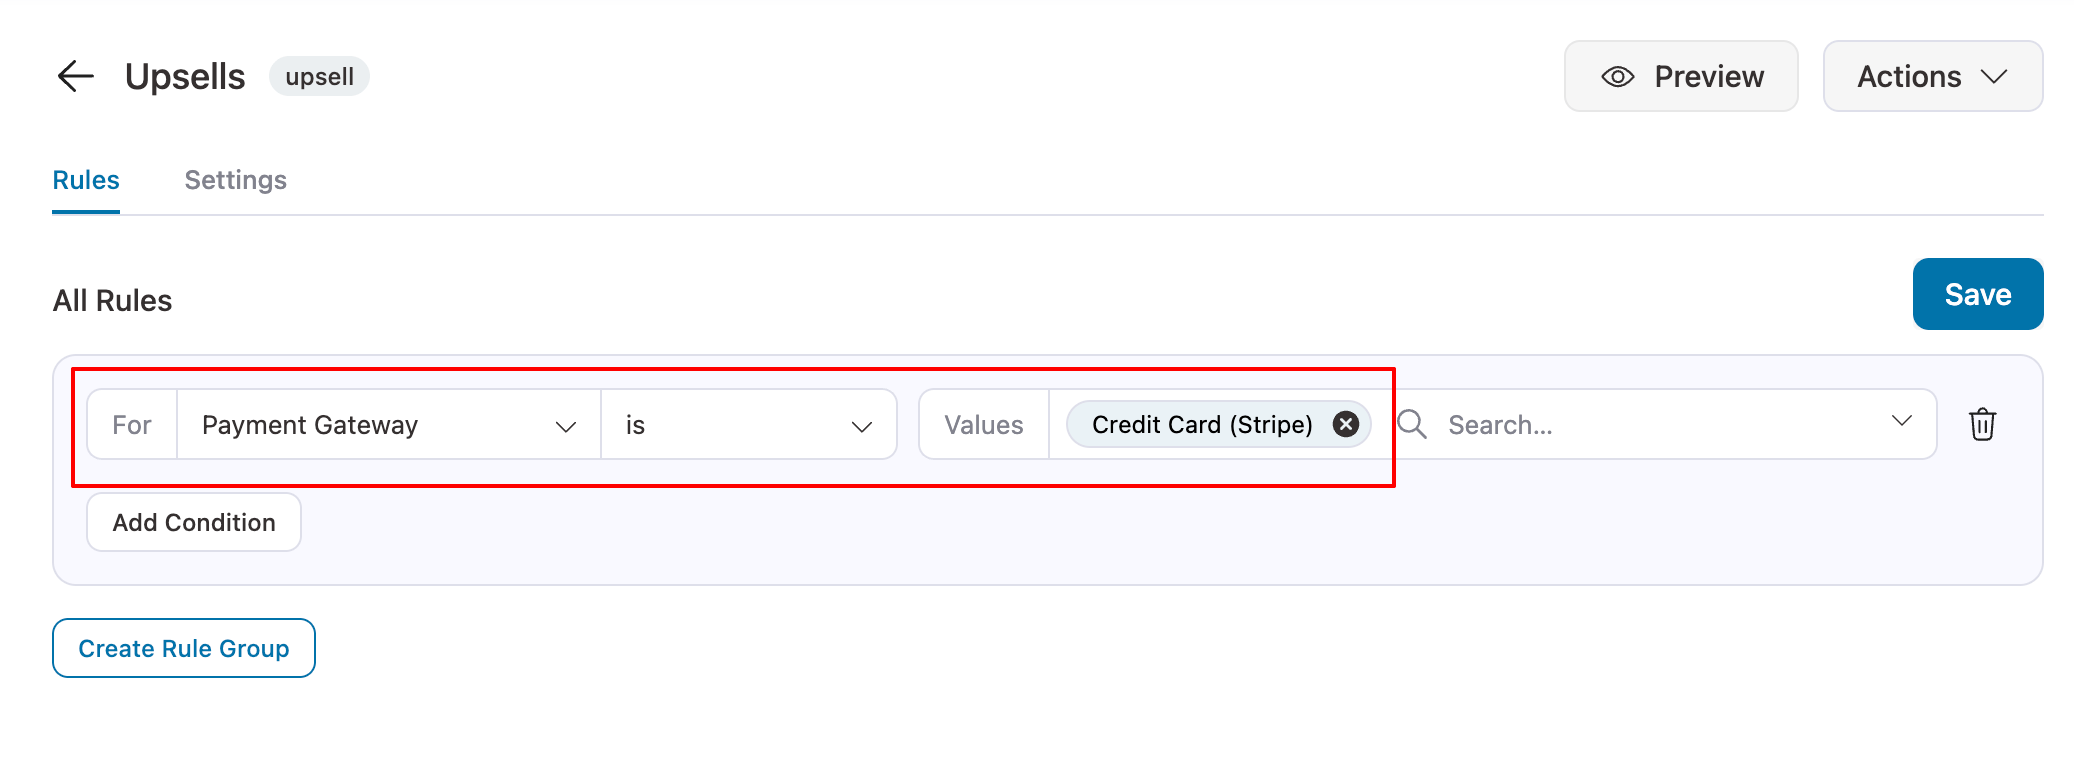
Finally, make sure to hit Save to apply the changes.
Similarly, for the thank-you page you want to display for a Credit Card, go to that thank-you page and, on the rules tab, add the condition 'Payment Gateway' equals 'Credit Card' (Stripe).
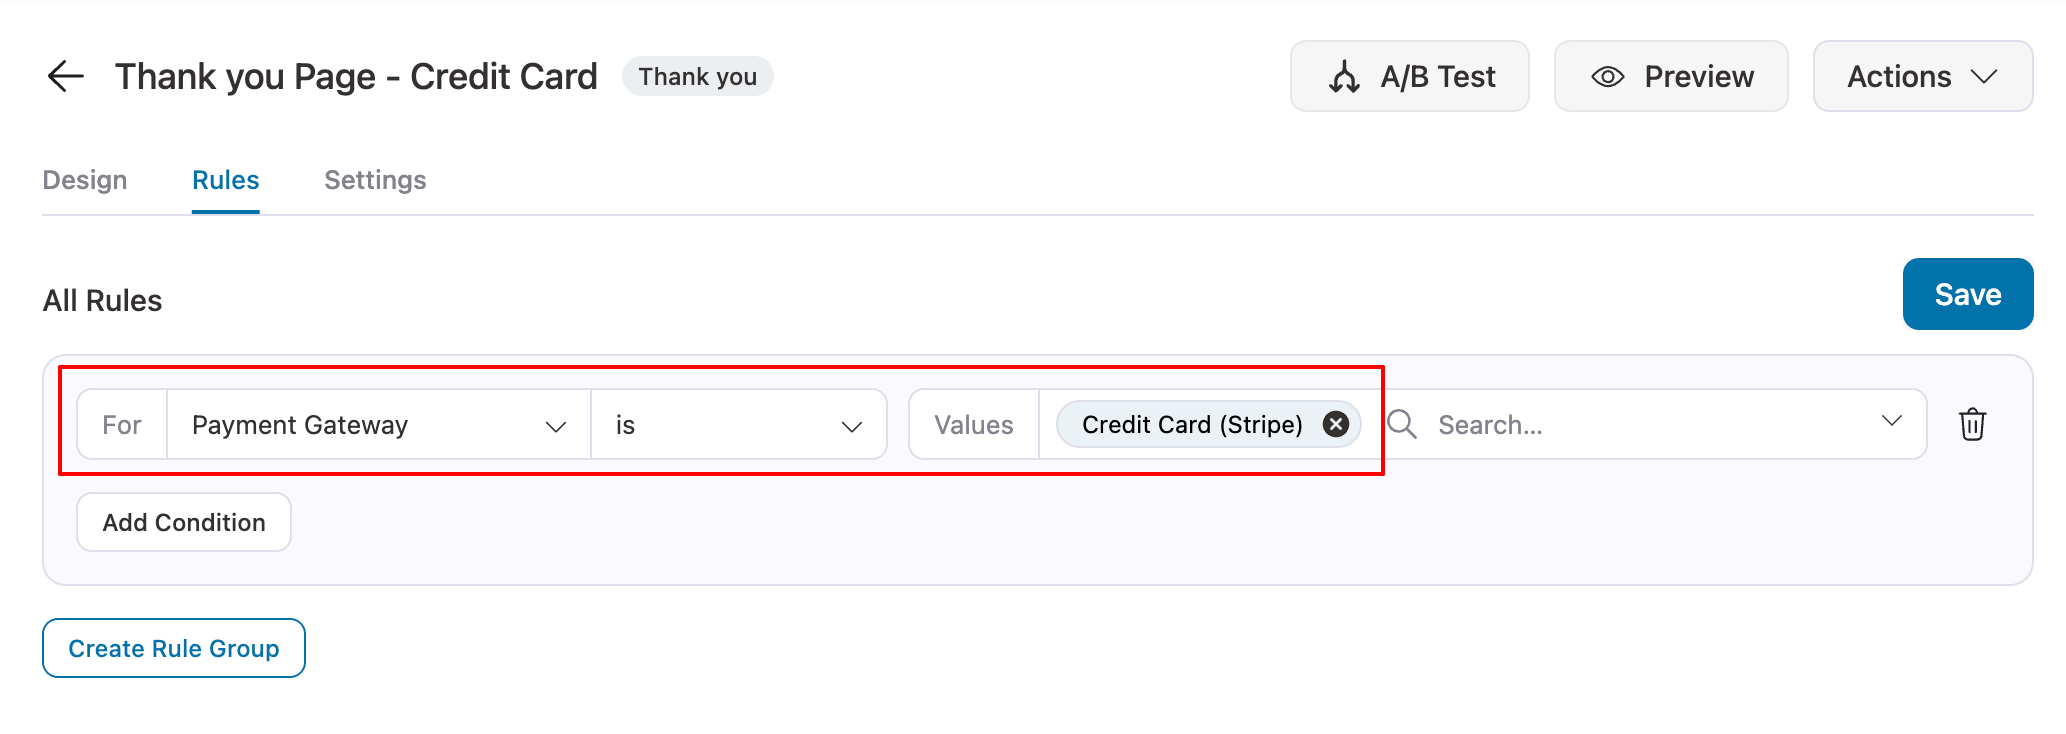
Again, make sure to save the changes.
This is how you can set up a custom redirect after checkout based on payment method in WooCommerce.
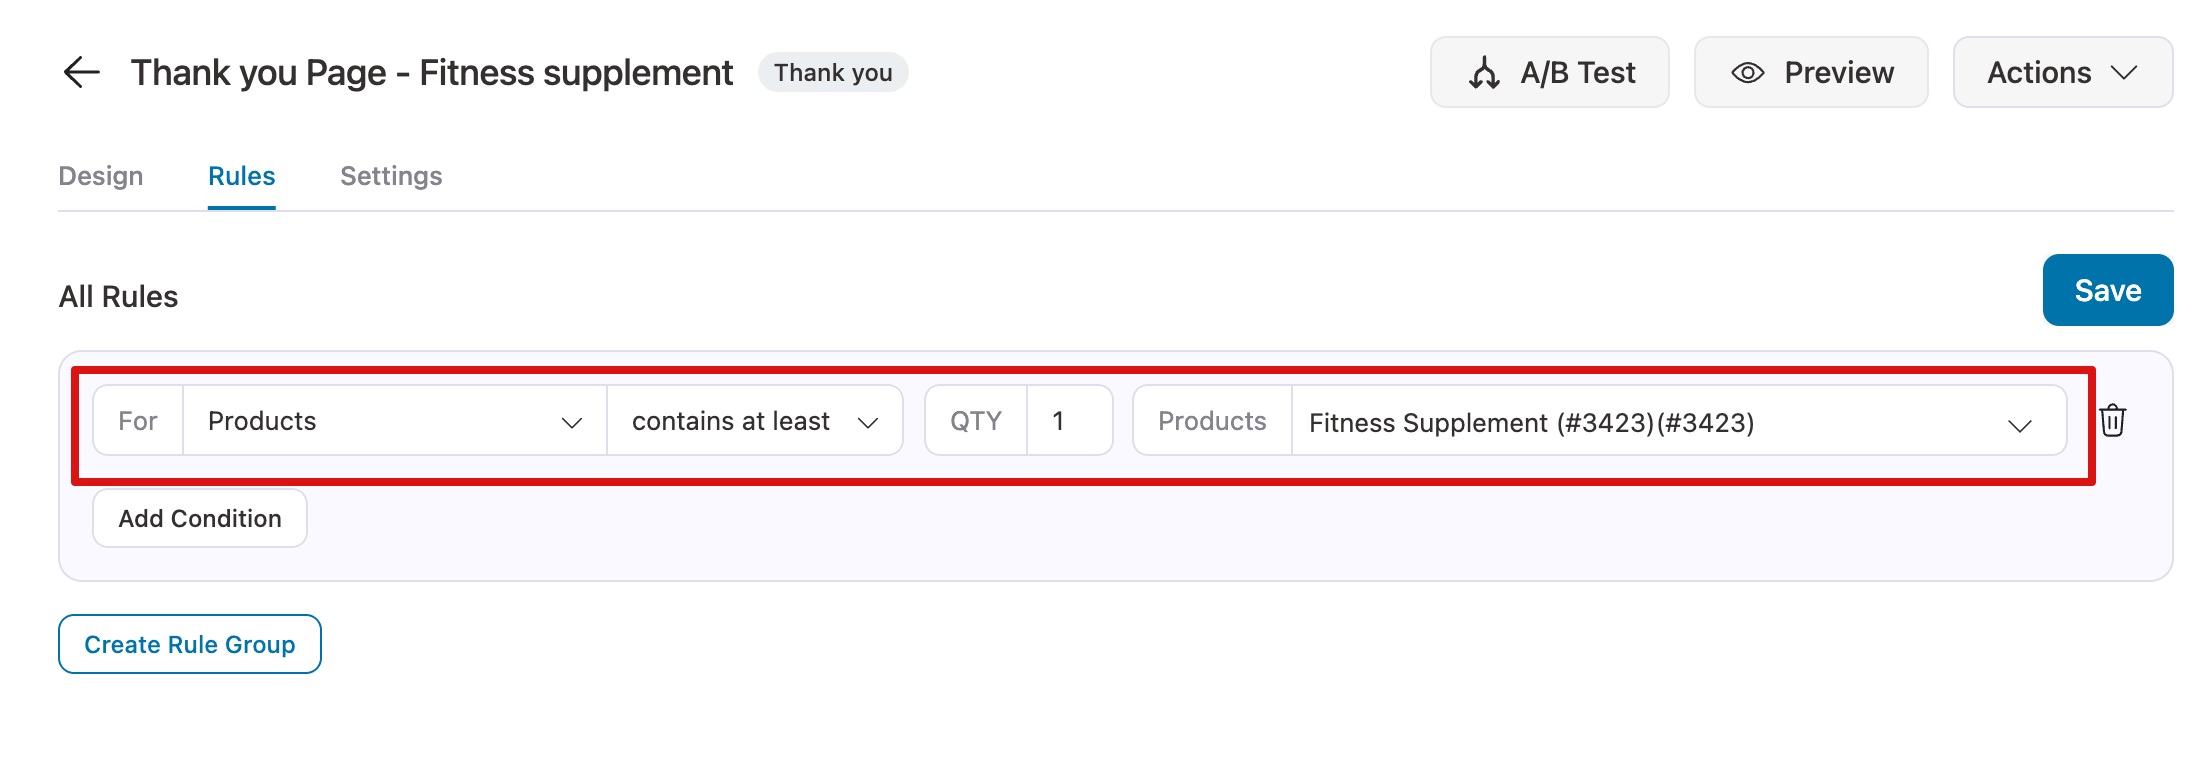
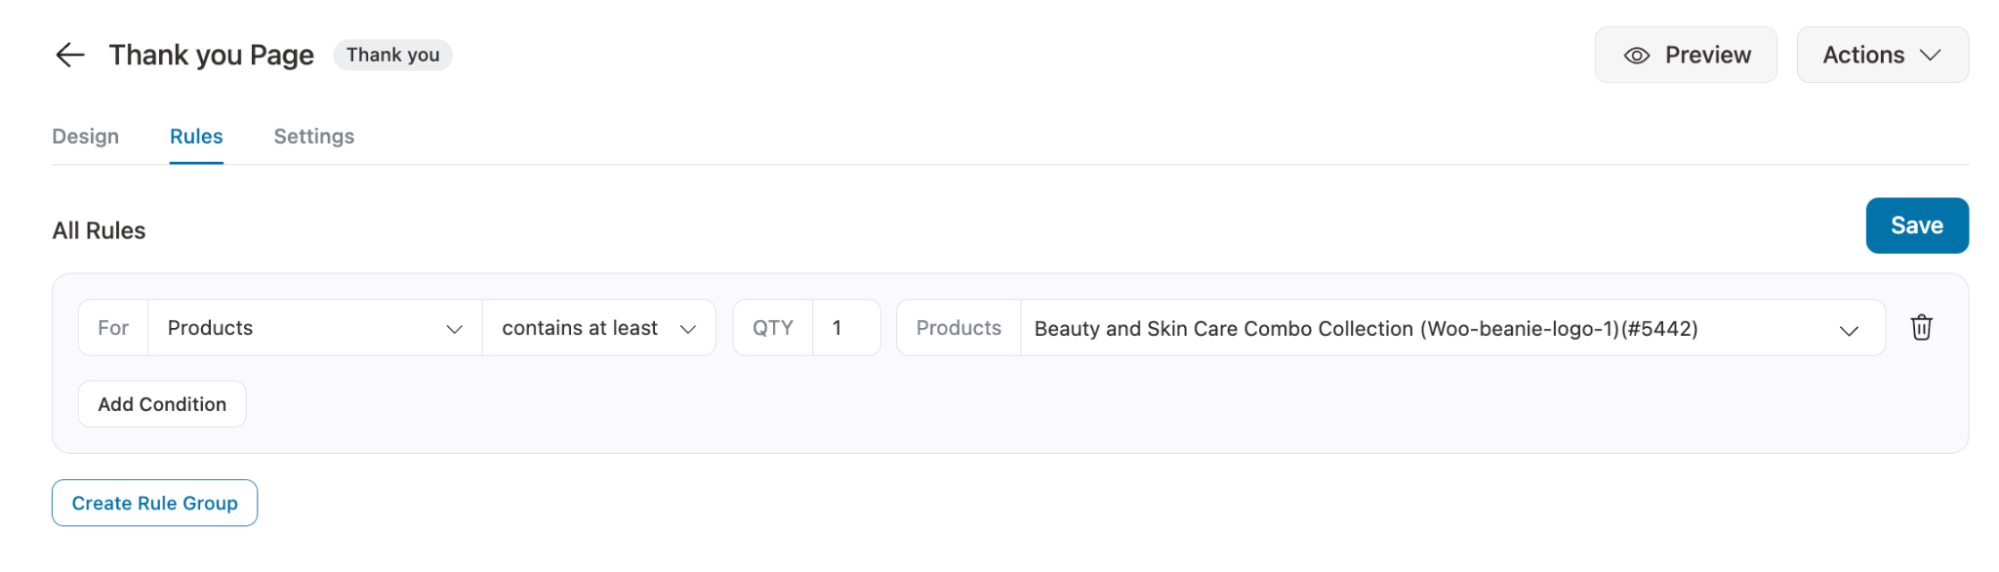
How to Redirect Based on Specific Product After WooCommerce Checkout
Want to send customers to a specific page based on the product they purchased?
This is a great way to offer relevant upsells, product-specific landing pages, or personalized thank-you experiences.
For example, if someone buys a fitness supplement, you can redirect them to a page promoting a complementary workout guide.
Set the condition that 'Product' contains at least 'Your Product Name'. You can set the product quantity if needed.
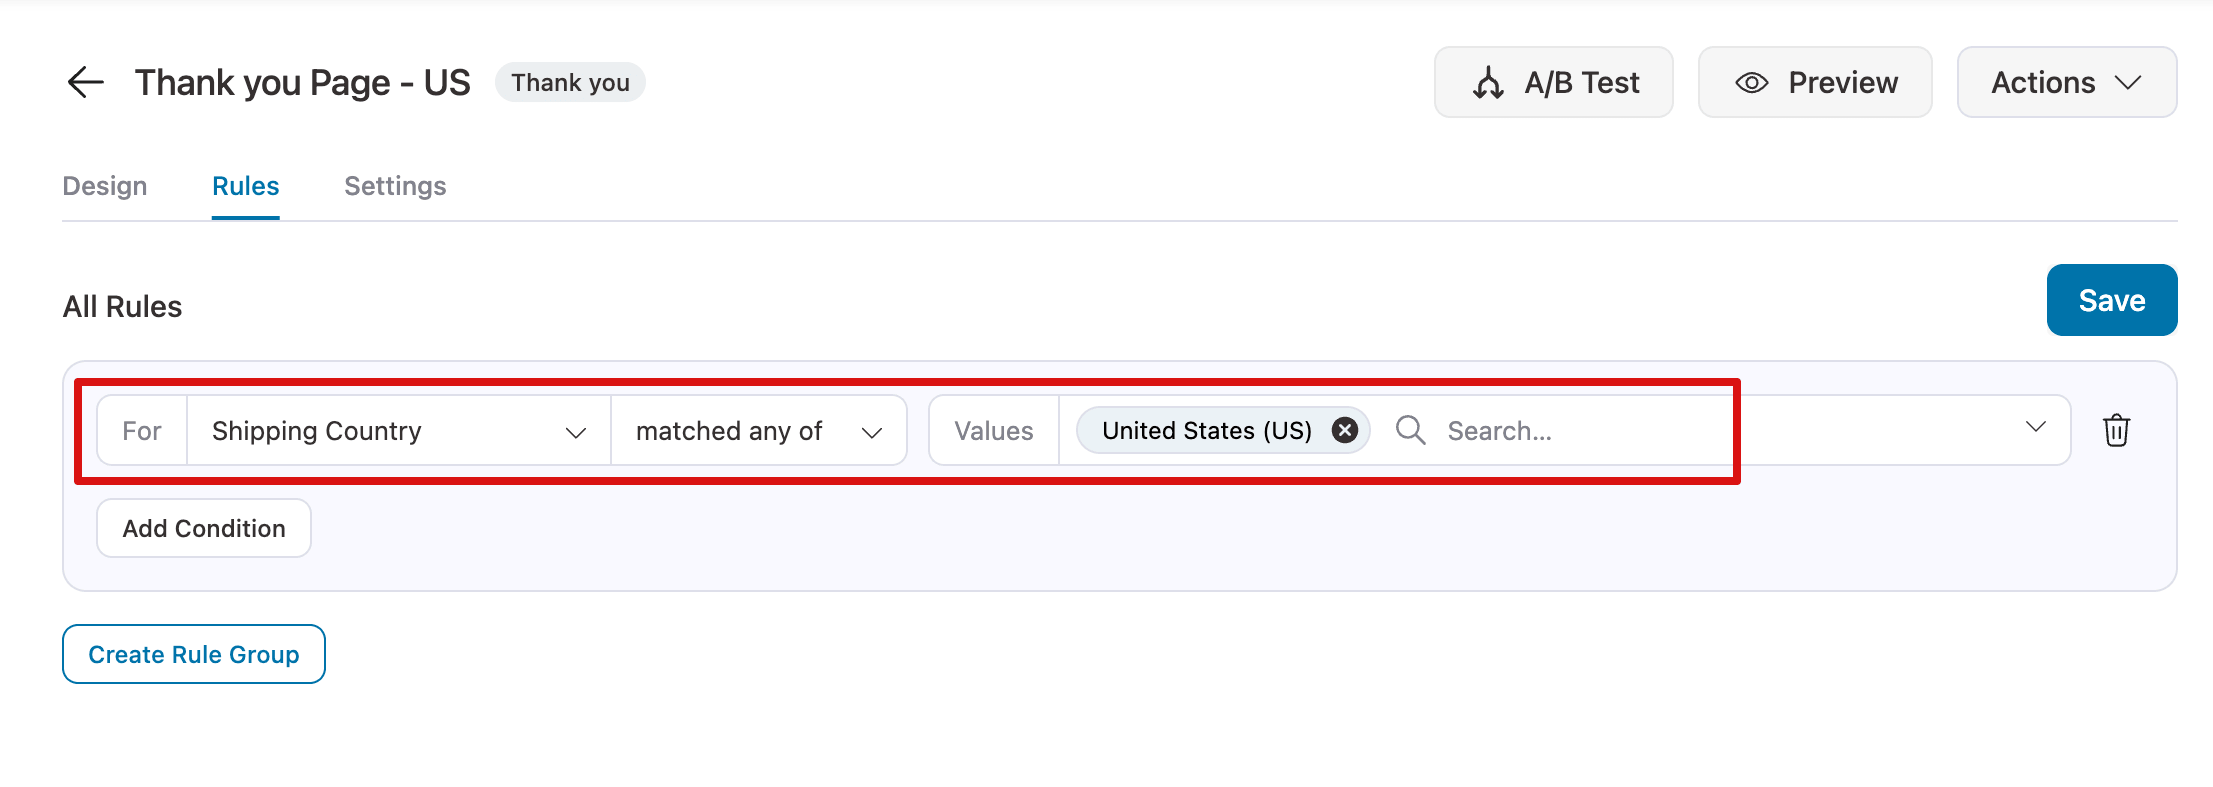
How to Redirect Based on Country After WooCommerce Checkout
If you run a multi-region store, you can redirect customers to a localized page based on their billing/shipping country. This is ideal for directing buyers to region-specific landing pages, localized offers, or language-specific content.
For example, redirect US buyers to your US thank-you page and Canadian buyers to your Canadian thank-you page, each showing relevant shipping details.
Set the condition to 'Shipping Country' matched any of 'Your Target Country'.
You can use the billing country if needed for your use case.
More Questions About Custom WooCommerce Redirect After Checkout
Here are the benefits of redirecting users to the right page after checkout in WooCommerce:
- Enhance customer experience with personalized thank-you pages.
- Encourage social media engagement by directing customers to follow or share.
- Boost AOV by showing upsell offers after purchase.
- Collect feedback via post-purchase surveys.
- Redirect to external platforms for product access or partner services.
You can set up a custom thank-you page by adding a redirect code to your theme’s functions.php file. However, experts don’t recommend it. Instead of altering the code, you can use a safe, renowned plugin like FunnelKit Funnel Builder to redirect customers to a thank-you page after checkout.
Yes, you can easily do that using rules for the thank you page in FunnelKit Funnel Builder. To do this, go to the Rules tab for the thank-you page and set the rule. I shared the whole process in this blog.
Ready to Redirect Smarter After Checkout in WooCommerce?
Redirecting customers to custom pages after checkout can significantly enhance both the shopping experience and revenue of your WooCommerce store.
A personalized order confirmation page increases engagement with your brand and fosters long-term customer loyalty.
Additionally, directing customers to targeted one-click upsells helps boost revenue without increasing acquisition costs.
Rather than relying on the default thank-you page, guide customers to strategically designed custom pages to accelerate your business growth.
Start optimizing your customer journey with FunnelKit FunnelBuilder today.

Editorial Team
July 7, 2026Are shoppers adding products to their cart and leaving before they buy? According to Baymard Institute research on checkout usability, 18% of shoppers who abandon their cart do so because...
Editorial Team
July 3, 2026Sometimes, the difference between a visitor leaving and placing an order comes down to something surprisingly small, like a better headline, a cleaner checkout, or a more compelling offer. That's...
Editorial Team
July 1, 2026Are you leaving money on the table by not fully leveraging your customers’ shopping behavior? Many store owners don’t realize that every time a customer adds a product to the...


