Removing shipping from WooCommerce checkout eliminates unnecessary fields and extra steps for stores that do not ship physical products.
Whether you sell digital downloads, offer local pickup only, or have a custom fulfillment workflow, hiding shipping options streamlines checkout and removes friction from the purchase process.
The default WooCommerce checkout page displays shipping address fields and shipping method selection for all products.
Even if you have disabled shipping zones or offer only virtual products in your store, these fields can still appear and confuse customers.
In this guide, we'll show you two methods to remove shipping from your checkout: one method is code-free and the other uses custom PHP.
We will also cover when this makes sense for your store and alternative approaches for specific scenarios.
Short on time? Watch this video:

Table of Contents
- 1 When Should You Remove Shipping Methods from WooCommerce Checkout?
- 2 Method 1: How to Remove Shipping From WooCommerce Checkout (Default Settings)
- 3 Method 2: How to Remove Shipping From WooCommerce Checkout (No Code Plugin)
- 4 Method 3: Remove Shipping from WooCommerce Checkout With Custom Code
- 5 Alternative: Hide Shipping for Specific Products
- 6 How to Hide Shipping Address Fields in WooCommerce Checkout (Offer Local Pickup)
- 7 7 Tips to Optimize WooCommerce Checkout Page for Higher Conversions
- 7.1 1. Use multi-step checkout to simplify the purchase flow
- 7.2 2. Add Google Address Autocomplete to prevent checkout errors
- 7.3 3. Collapse optional fields to streamline the checkout form
- 7.4 4. Enable guest checkout to reduce cart abandonment
- 7.5 5. Add express payment (Apple Pay or Google Pay) to speed up checkout
- 7.6 6. A/B test checkout page to identify high-converting elements
- 7.7 7. Keep the billing address for tax compliance
- 8 More Questions About Removing Shipping Address
- 9 Ready to Remove Shipping from Your WooCommerce Checkout?
When Should You Remove Shipping Methods from WooCommerce Checkout?
For businesses that don’t ship products or use local pickup, removing shipping details from checkout is essential for a faster, smoother, and more professional shopping experience.
Here are some common business scenarios that don’t need shipping information from customers on the WooCommerce checkout page:
- Sell digital products: If your WooCommerce store exclusively sells digital products, such as software, e-books, or online courses, you can remove the shipping details as you don’t need the shipping address.
- Services: Like digital products, services such as business consulting, web design, or similar services do not require a shipping address. If you offer such services on your WooCommerce store, then you can remove shipping details from your store.
- Virtual events or webinars: For businesses hosting virtual events, webinars, or online classes, collecting shipping details may be unnecessary. In such cases, removing shipping options helps to create a more straightforward and user-friendly checkout process.
- Local pickup: Your store offers local pickup or in-person delivery exclusively
- Custom fulfillment process: You handle fulfillment through a custom process of your own that does not require traditional shipping.
These are some scenarios where you can totally remove shipping from the WooCommerce checkout page.
Why Remove Shipping from WooCommerce Checkout?
Checkout friction is expensive and often leads to cart abandonment. According to Baymard Institute, 18% of online shoppers abandon their carts specifically because the checkout process is too long or complicated.
Shipping fields add unnecessary complexity when you do not actually ship products.
Customers see address fields they do not need to fill out, shipping method selections that do not apply, and extra steps between them and the purchase button.
Here is why removing shipping matters for your store:
- Reduces the number of form fields: Every unnecessary field increases cognitive load and abandonment risk. Research shows that removing unnecessary form fields can decrease checkout abandonment by 12%. If you do not ship, those fields just add friction.
- Eliminates customer confusion: When customers see shipping options for digital products or local pickup orders, they wonder if they did something wrong or if the product is not what they expected. Clear checkouts convert better.
- Speeds up checkout completion: Fewer fields mean faster checkout. Mobile users especially benefit from this, as mobile cart abandonment rates are quite high (85.65% vs. 70% on desktop), so every second matters. (Source: Barilliance)
- Prevents order fulfillment issues: If customers skip optional shipping address fields, you might receive incomplete orders. Removing these fields entirely eliminates that risk.
The ideal WooCommerce checkout should have 7-8 form fields, while the average has 14.88 (Source: Baymard Institute). Removing shipping when you do not need it gets you closer to that optimal state.
Method 1: How to Remove Shipping From WooCommerce Checkout (Default Settings)
Follow the steps below to remove shipping options and address fields from the checkout page entirely:
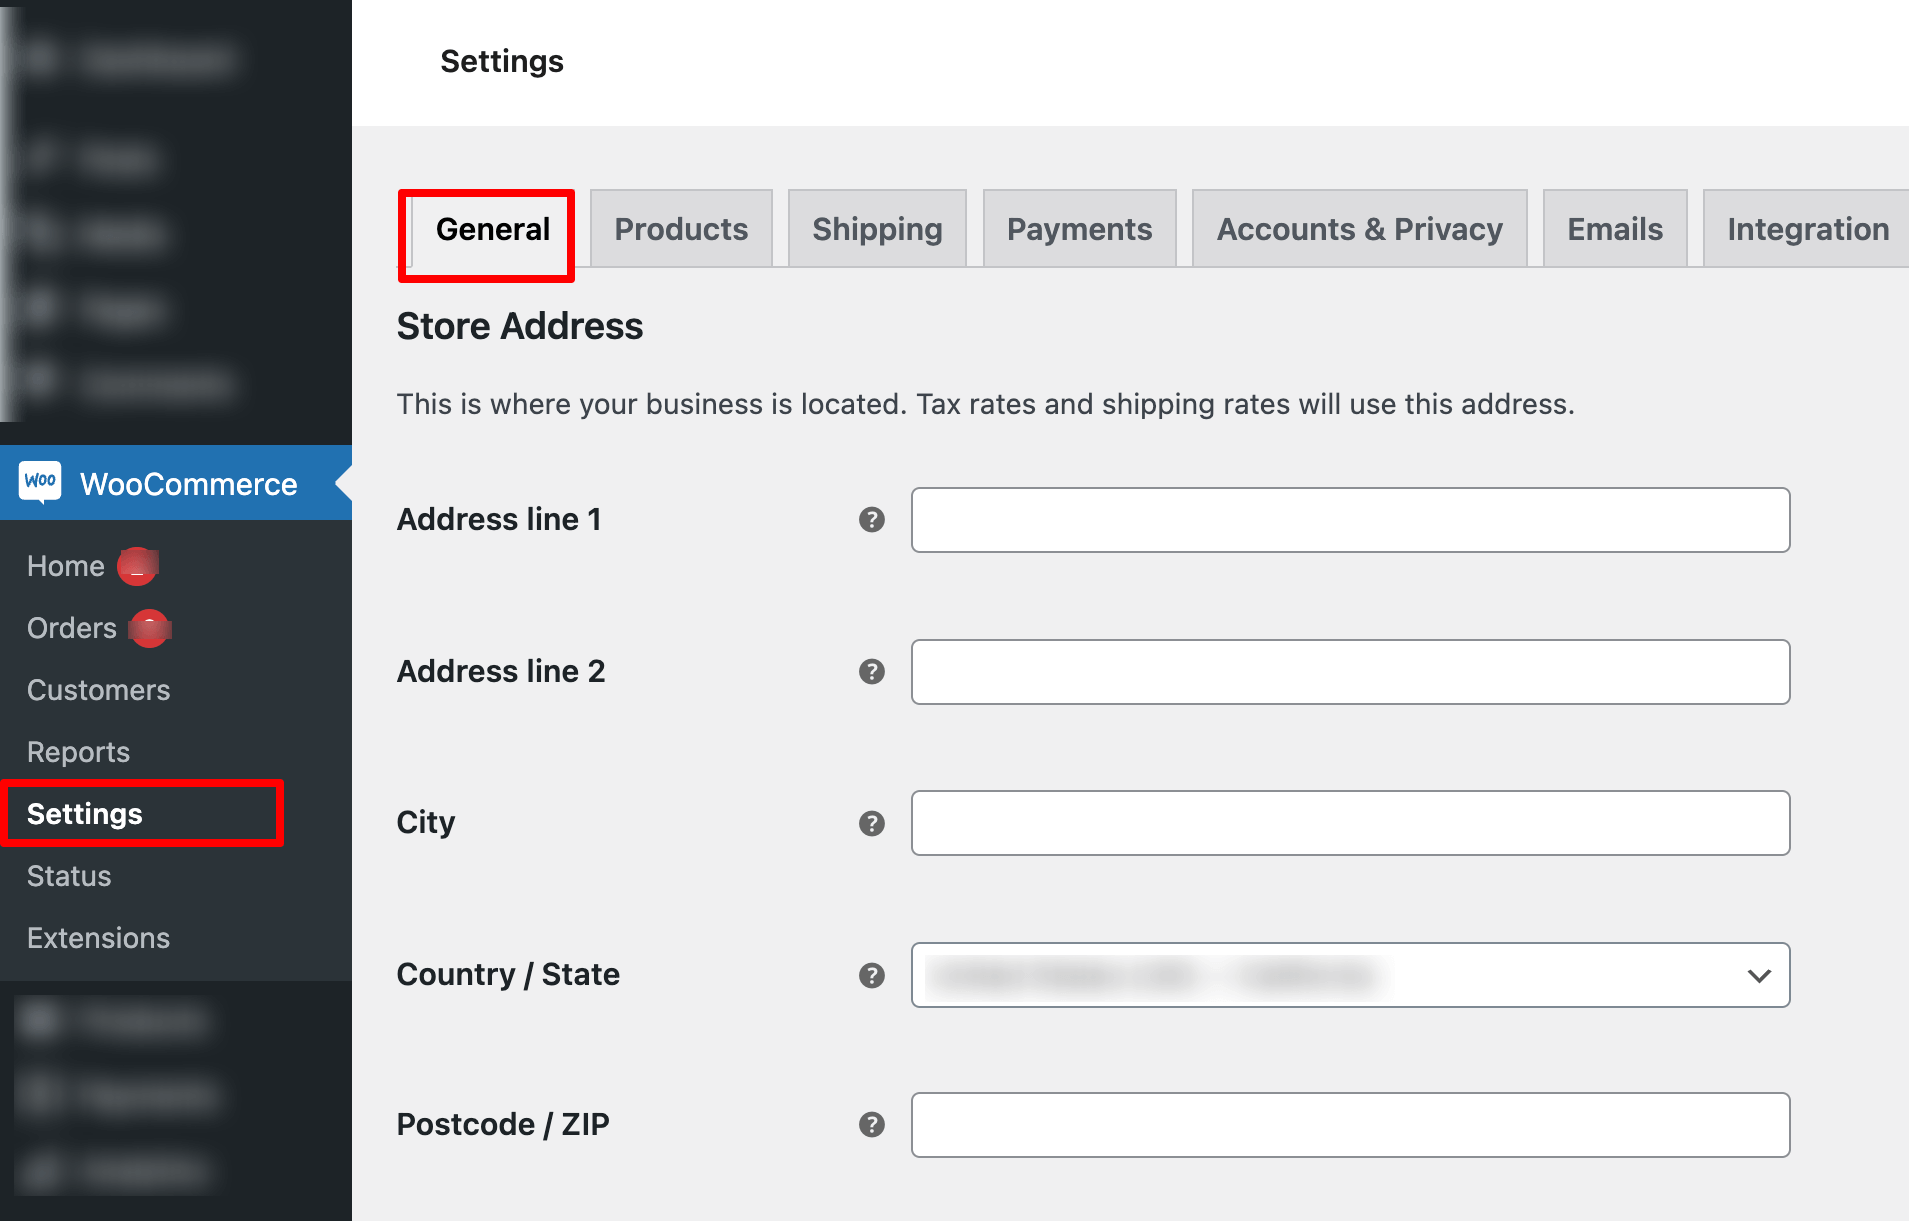
Step 1: Navigate to WooCommerce general settings
First, from the WordPress dashboard, navigate to WooCommerce ⇒ Settings and on the 'General' tab.
Step 2: Disable the shipping option
Scroll down to the General Options, and for Shipping Location, choose the value “Disable Shipping and Shipping Calculations”.
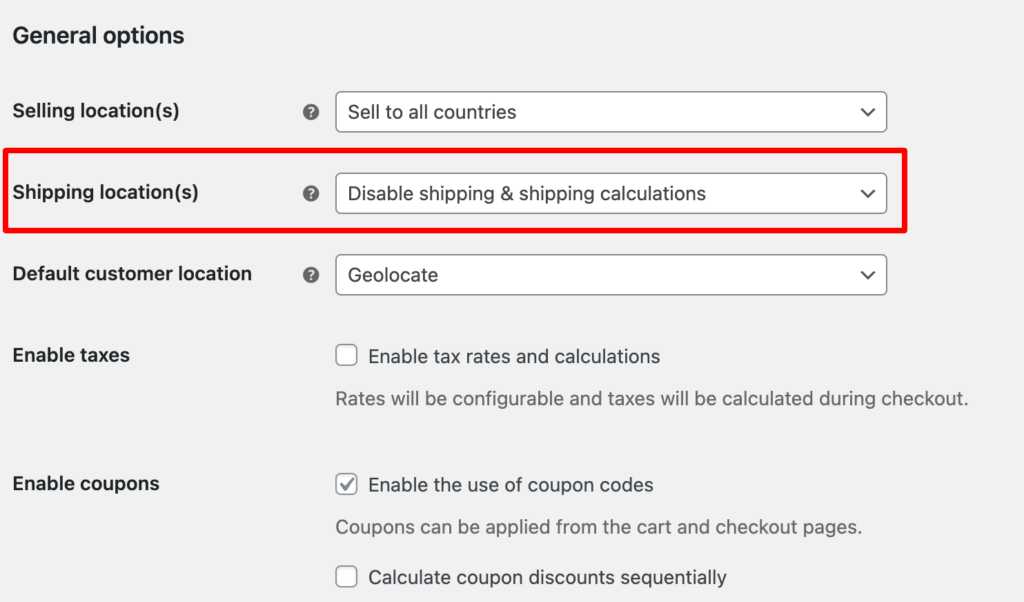
Make sure to click on “Save Changes” to update the settings.
Step 3: Test your WooCommerce checkout page
Try placing an order. You should see the checkout page, which neither shows shipping options nor asks you to enter your shipping address.

As you can see in the image above, the checkout page doesn't contain any shipping options or a shipping details section. It only has a billing details section.
Method 2: How to Remove Shipping From WooCommerce Checkout (No Code Plugin)
If you use FunnelKit Funnel Builder to optimize your WooCommerce checkout pages, you can remove shipping fields from here.
FunnelKit gives you access to the drag-and-drop WooCommerce checkout field editor, allowing you to hide shipping fields, shipping methods, and address sections without touching any code.
It has a free version available. FunnelKit Funnel Builder Pro starts at $99.50/year with advanced checkout customization, A/B testing, and a dynamic upsell engine.
Step 1: Navigate to store checkout in FunnelKit
Navigate to FunnelKit ⇒ Store Checkout in your WordPress admin dashboard.
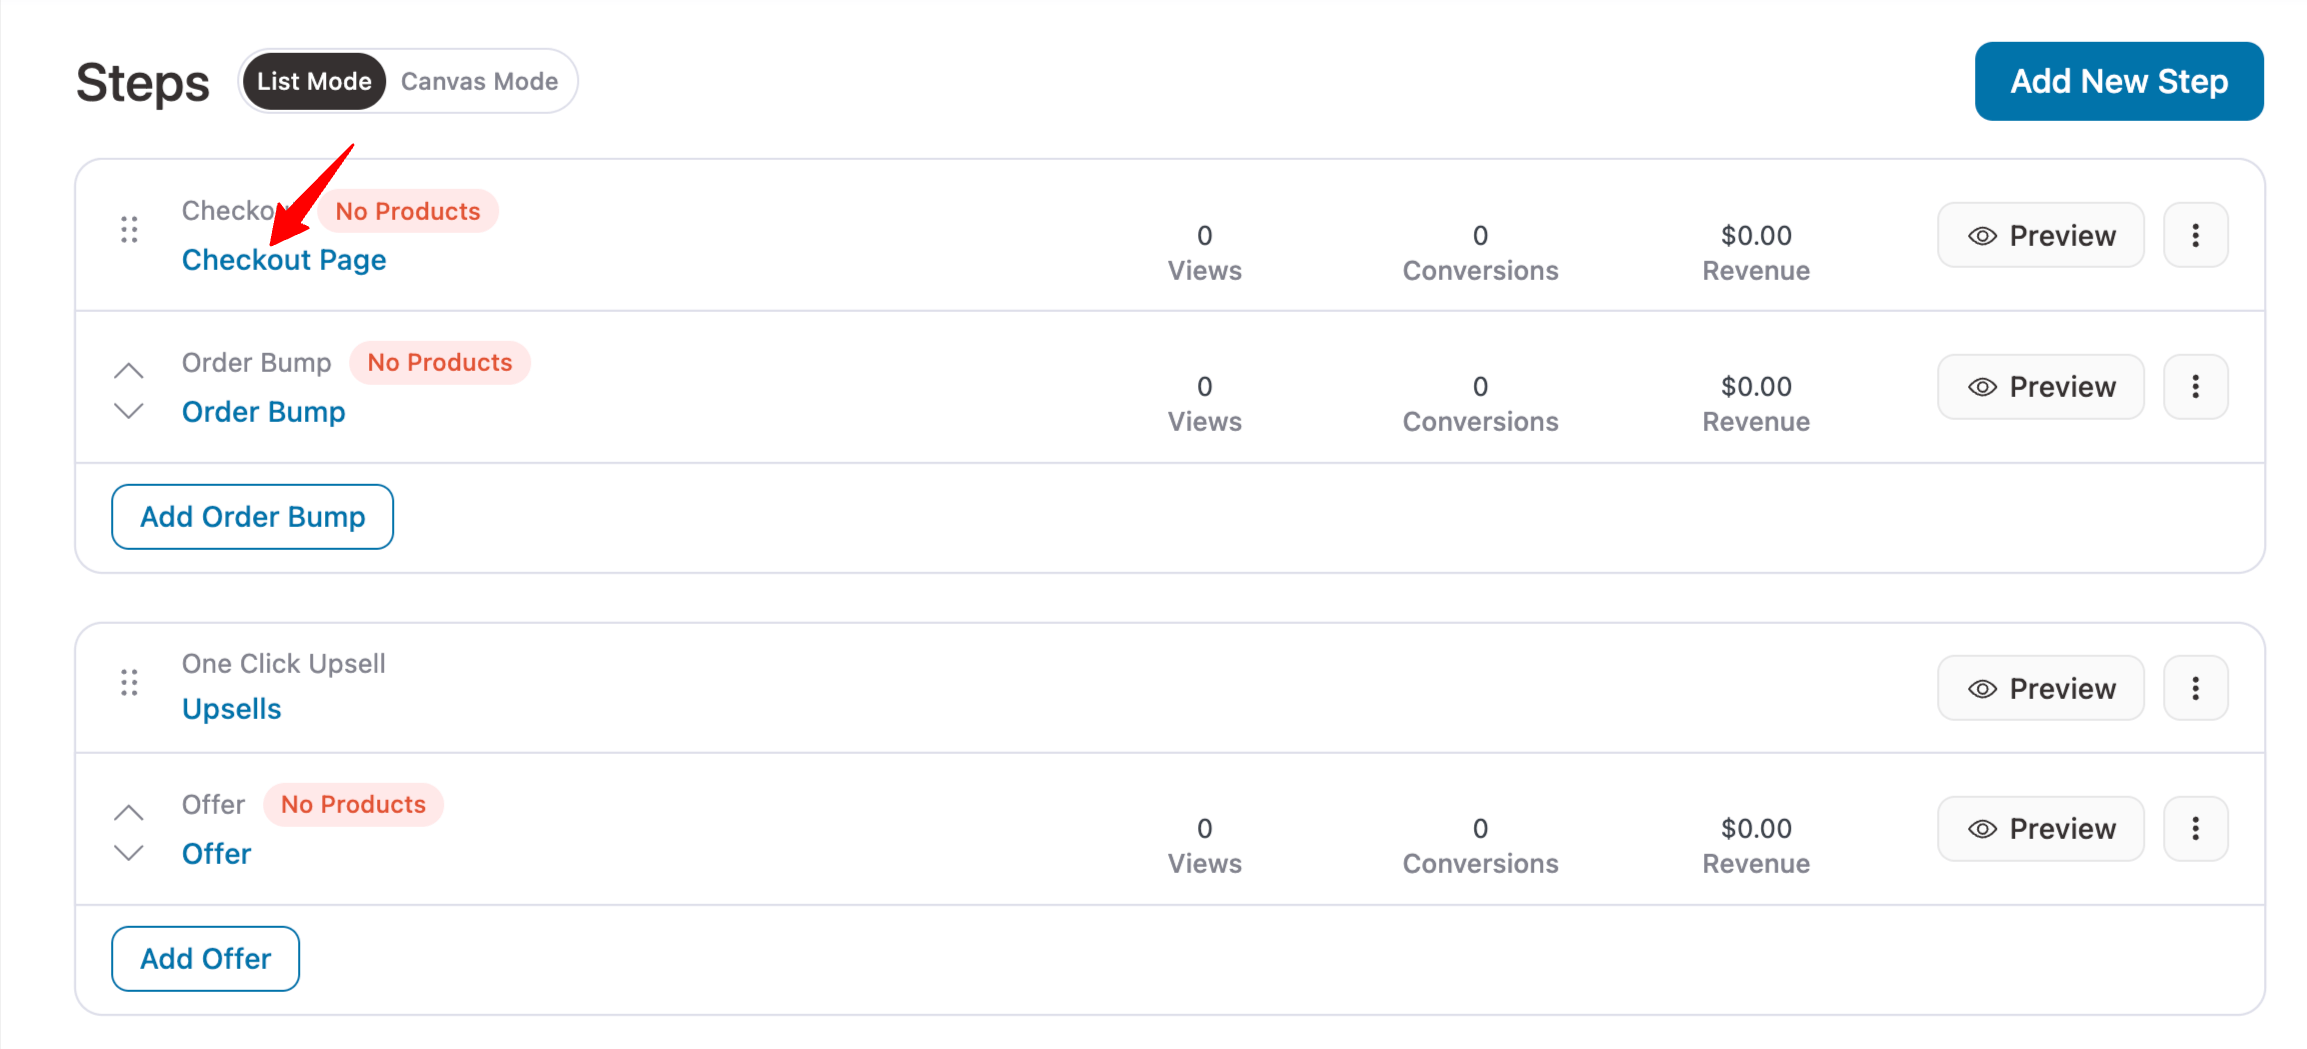
This opens FunnelKit's built-in editor, where you control which fields appear on your checkout page.
Step 2: Remove the shipping address and method field
In the checkout editor, go to the 'Shipping' section in the left sidebar. Click on the cross button to remove all shipping-related fields from checkout.
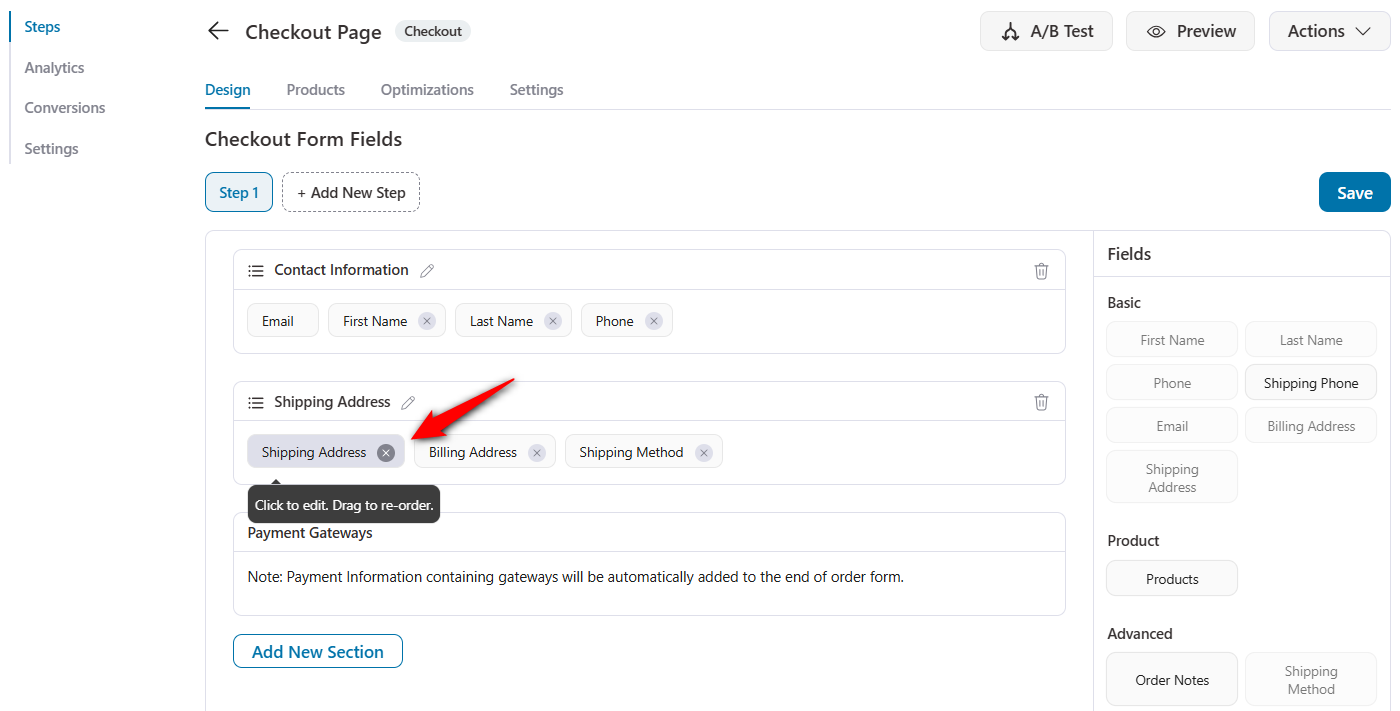
This hides shipping address fields, shipping method selection, and shipping cost calculations.
With shipping disabled, you can choose whether to keep the billing address fields.
For digital products, you might hide the address entirely and collect only email and payment information. For services or local pickup, keep the city and state for tax purposes, but hide street address lines.
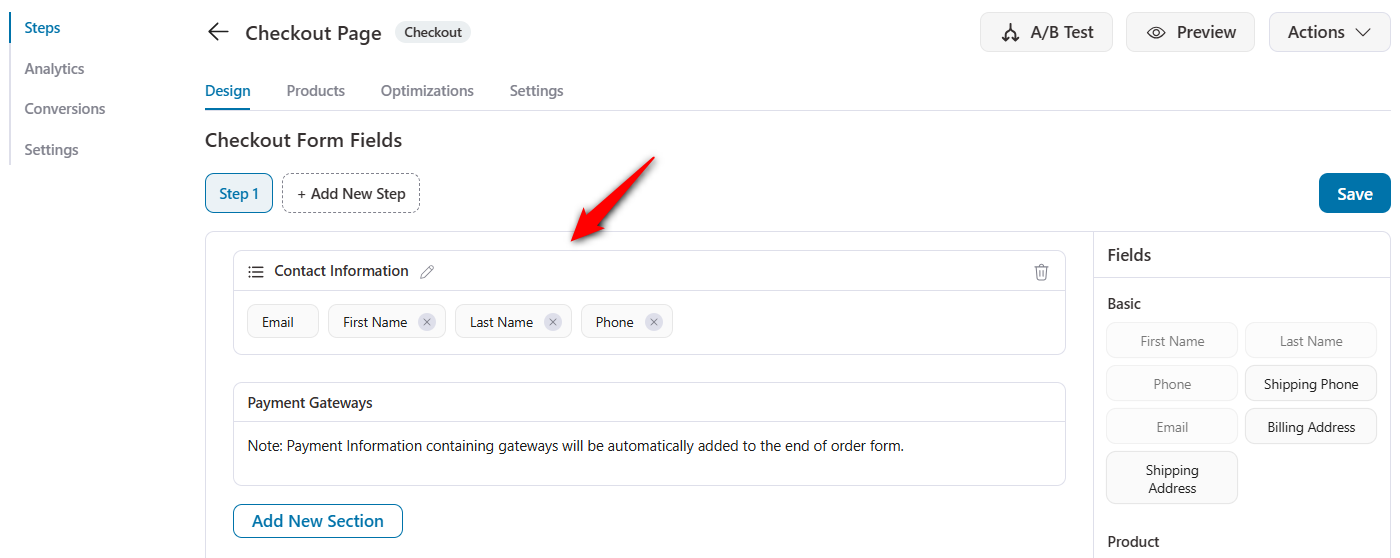
Once done, click on 'Save' to finalize your changes.
Step 3: Preview your changes
Preview to see your checkout without shipping fields.
Customers see a streamlined checkout with only the fields necessary to complete their purchase, without a shipping address or payment method, and with no additional costs.
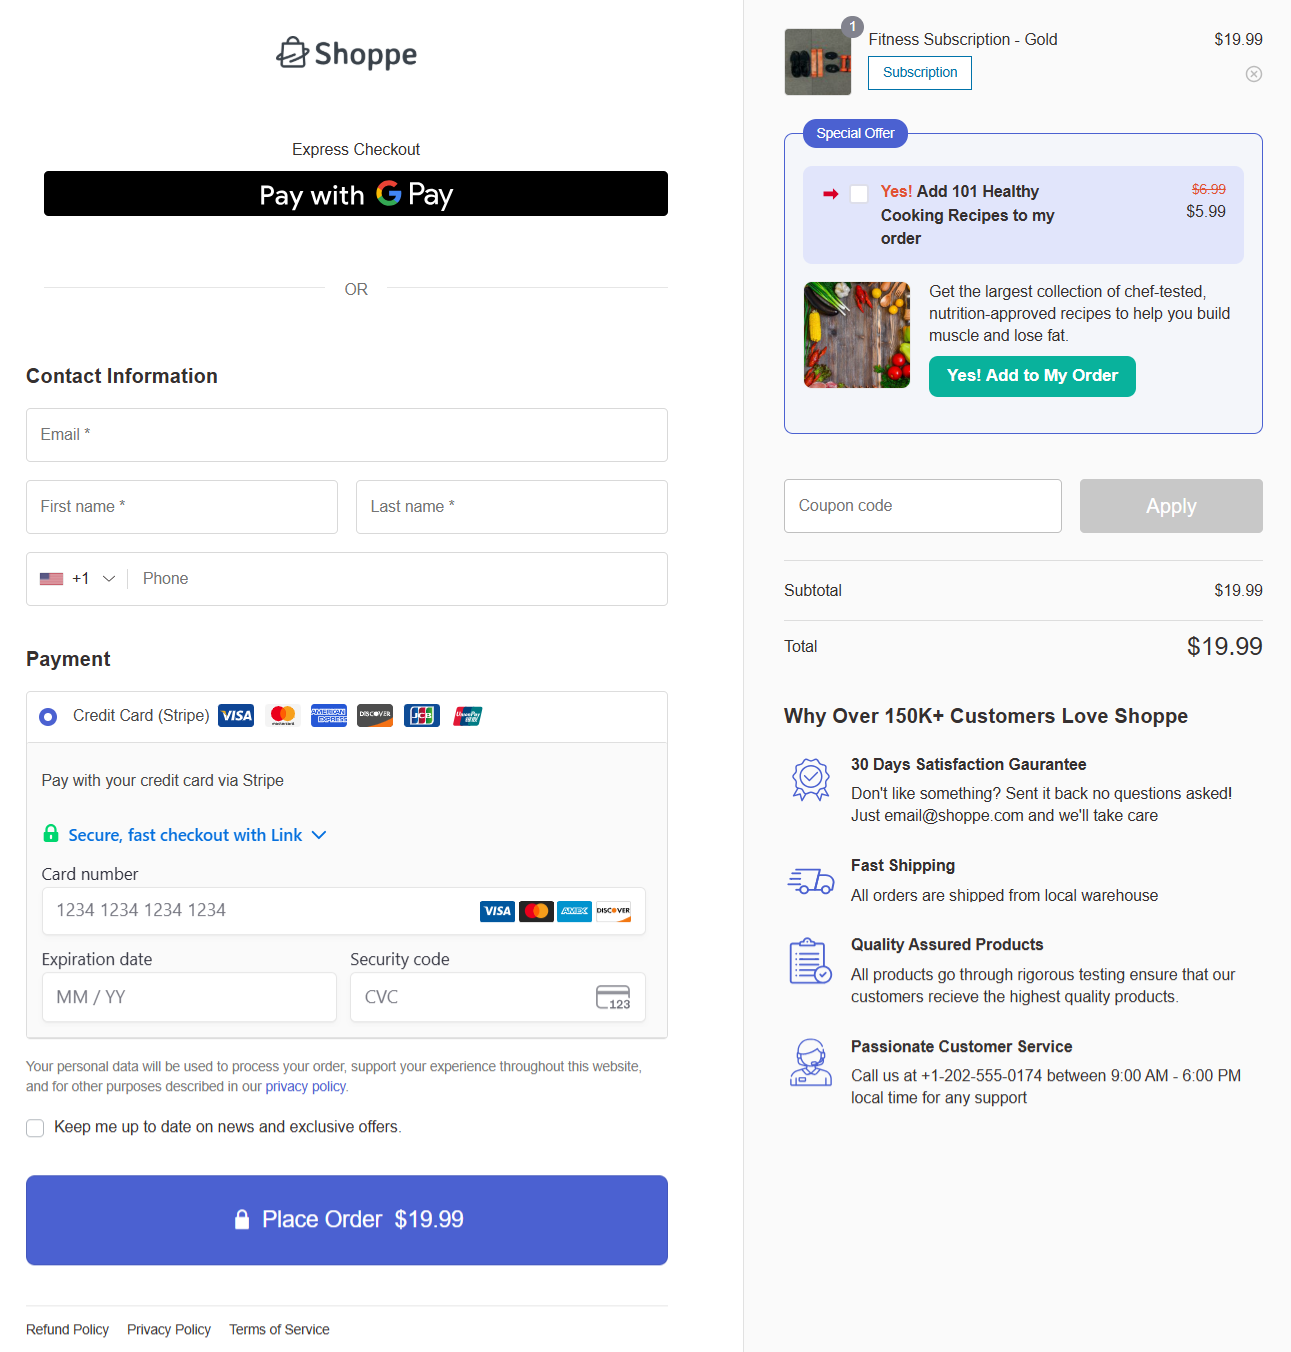
This checkout, created with FunnelKit, automatically adjusts on mobile devices to show a single-column layout without the extra vertical space that shipping fields would otherwise occupy.
Test the complete purchase flow to verify that payments process correctly and order confirmations include all necessary information.
Method 3: Remove Shipping from WooCommerce Checkout With Custom Code
Add this code to your child theme's functions.php file or use a code snippets plugin:
This code instructs WooCommerce that your cart never requires shipping, preventing the shipping fields from appearing on the checkout page.
Save the file and test your checkout.
Limitations
- This code does not provide a visual interface. All the adjustments should be made via manual code edits.
- There is a risk of conflict with other shipping-dependent plugins. It is essential to conduct thorough compatibility testing before deploying the code.
- This code removes shipping options across the entire catalog and does not support selective control for specific products or categories.
- Future WooCommerce core updates may change hook structures, requiring manual code updates to maintain functionality.
- This code only affects the customer-facing checkout process. All shipping settings will remain visible and active within the WooCommerce admin dashboard.
Alternative: Hide Shipping for Specific Products
If you sell both physical and digital products in WooCommerce, remove shipping only when the cart contains only digital items. This requires conditional logic based on product types.
Using FunnelKit
FunnelKit lets you build high-converting checkout pages. So you can set two types of checkouts (one for digital and the other for physical products).
Then set the rule to show the respective checkout pages only when the cart contains at least one physical (non-virtual, non-downloadable) product. This gives you selective control.
Using Custom Code
Add this to your child theme's functions.php:
This checks each product in the cart and only shows shipping if at least one physical product is present.
How to Hide Shipping Address Fields in WooCommerce Checkout (Offer Local Pickup)
In this method, we’ll show how to keep shipping options visible while removing the shipping address fields from checkout.
This is ideal for offering shipping options like Local Pickup.
Follow the steps below to remove the shipping fields section from the WooCommerce checkout.
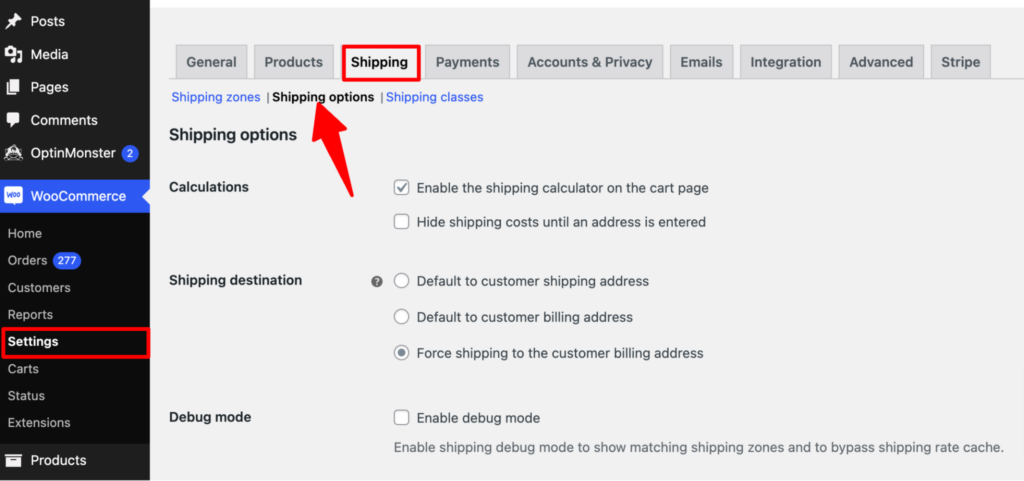
Step 1: Navigate to WooCommerce shipping options
First, from the WordPress dashboard, navigate to WooCommerce ⇒ Settings and make sure you are on the General tab.
Step 2: Force shipping to the customer's billing address
Now, for Shipping Destination, select the “Force shipping to the customer billing address” option, then click Save Changes.
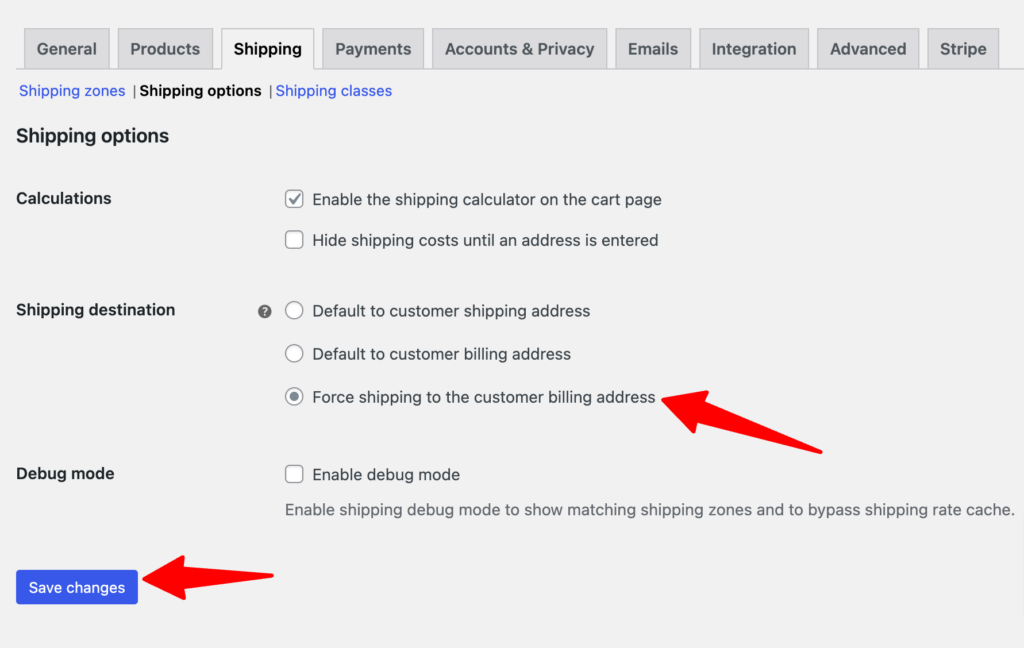
Enabling this option will consider the billing address as the shipping address.
Step 3: Test the checkout page
Now, if you test purchase an order, you’ll see the shipping options but not the shipping details.

As you can see, the checkout page no longer shows the shipping address fields, but it still offers the Local Pickup shipping option.
7 Tips to Optimize WooCommerce Checkout Page for Higher Conversions
Removing shipping details is just one of the many optimizations you can implement to improve the checkout process and boost conversions.
Explore some valuable tips below to optimize your checkout page:
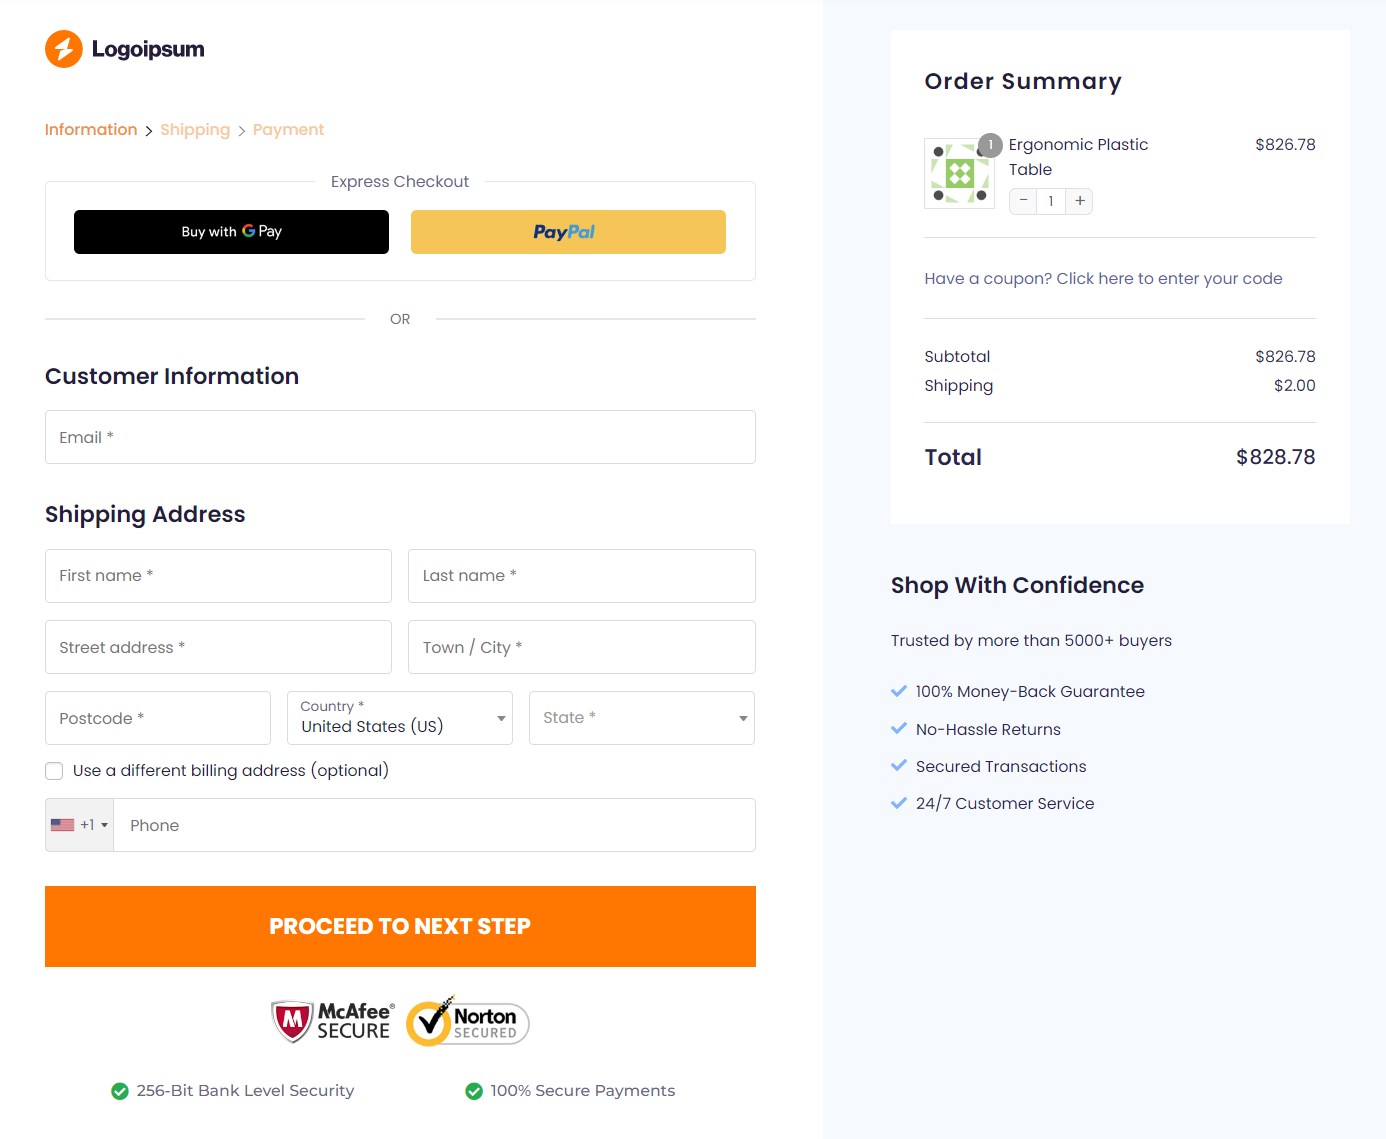
1. Use multi-step checkout to simplify the purchase flow
Make sure to use a multi-step checkout to guide customers through the process seamlessly, reducing complexity and increasing completion rates.
While many prefer one-page checkouts for selling digital goods, you can use multi-step checkouts for selling physical products.
You can easily create a multi-step checkout process using FunnelKit Funnel Builder.
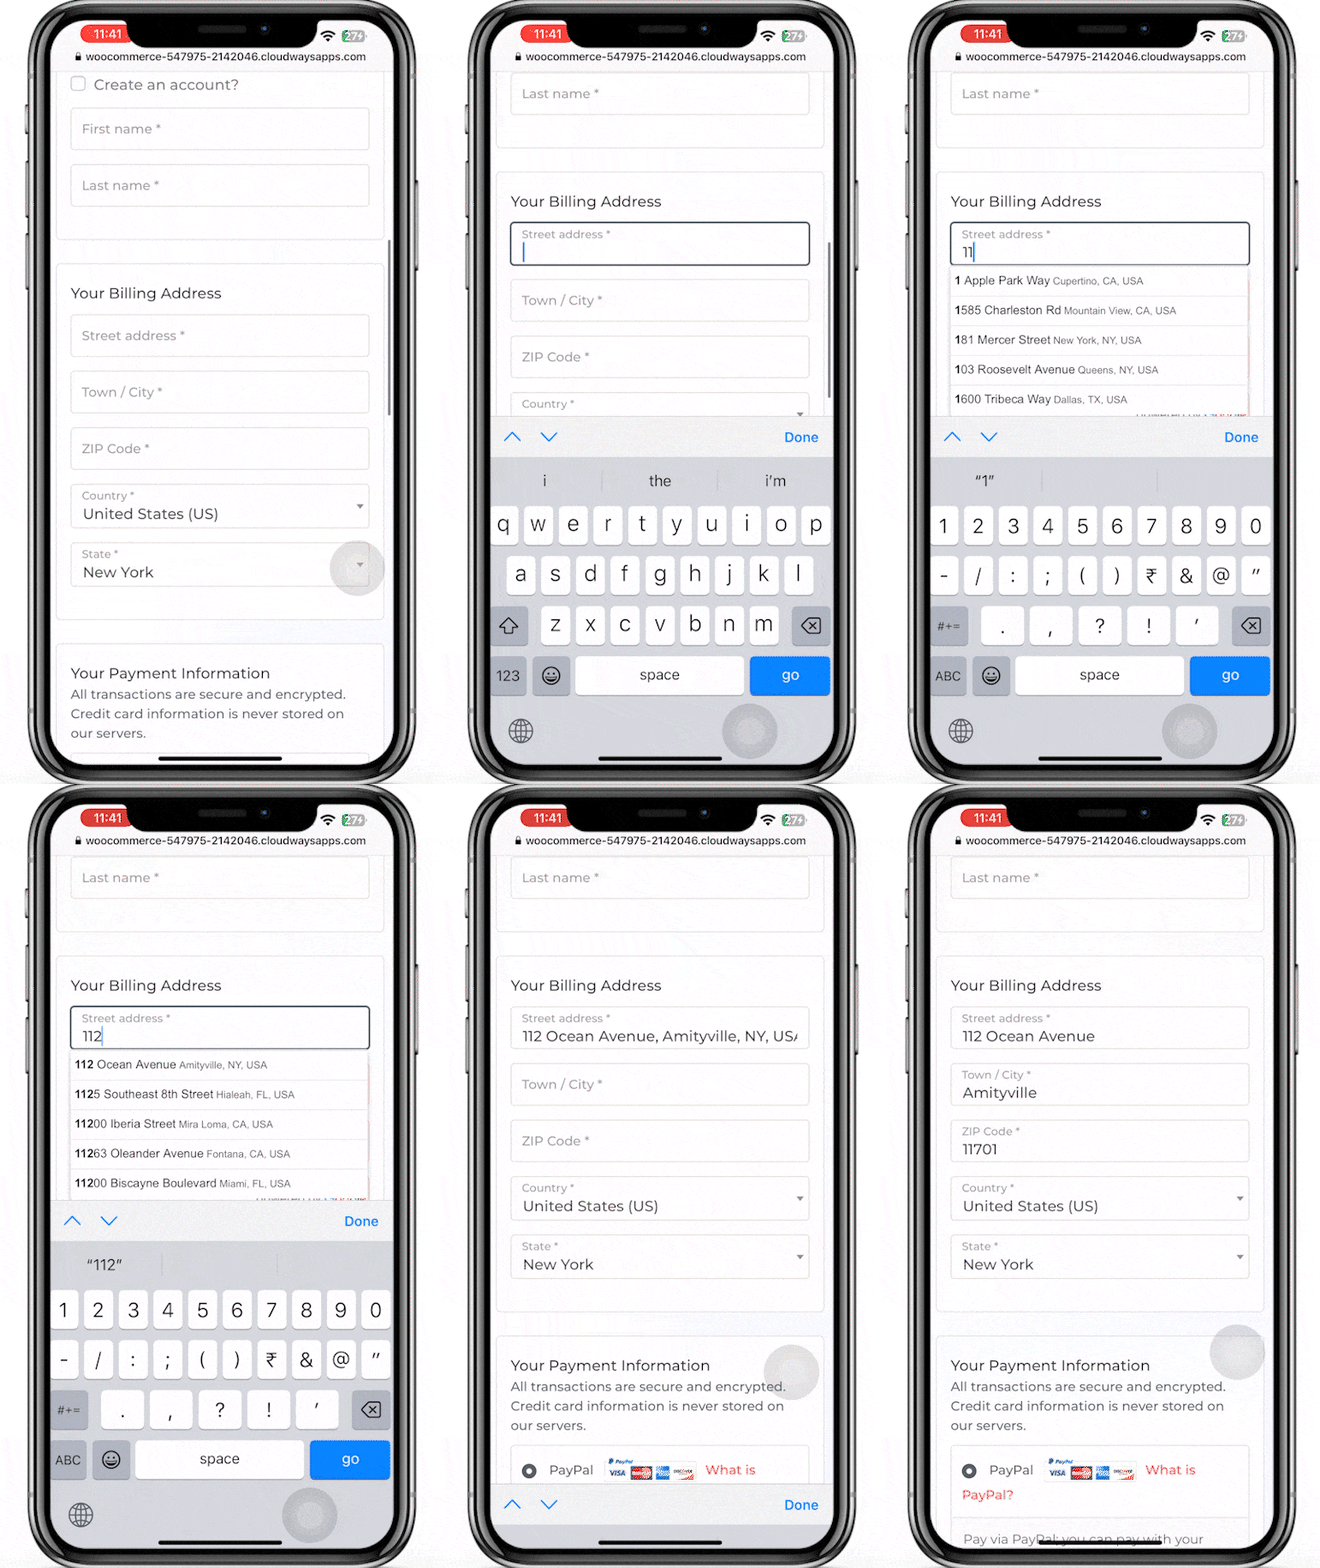
2. Add Google Address Autocomplete to prevent checkout errors
You can streamline the address input process by allowing Google address autocomplete. This will ensure accuracy and save valuable customer time, resulting in an optimized checkout experience.
When you enable Google address autocomplete, users see address suggestions when they start typing the initials of the address.
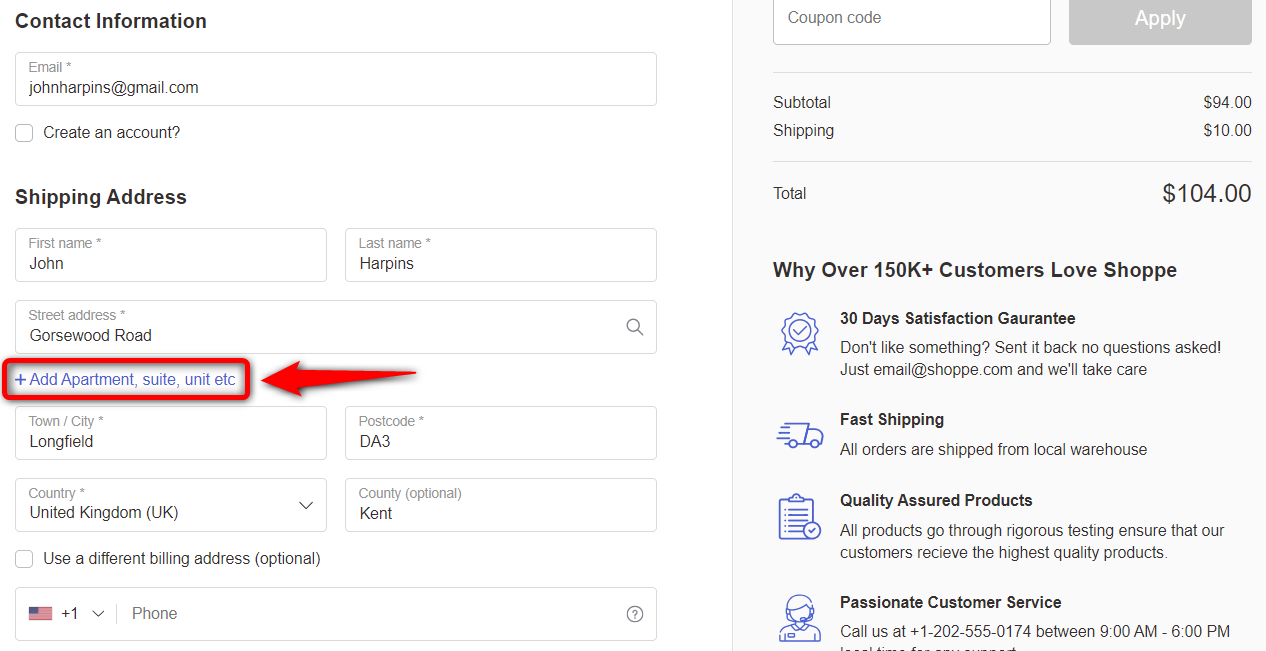
3. Collapse optional fields to streamline the checkout form
Making the optional field collapsible helps you maintain a clean and straightforward checkout page. This way, you can collect additional data from shoppers without overwhelming them with a long checkout form, thereby improving the user experience.
For example, you can provide a collapsible optional field for users to enter their apartment number and floor for a frictionless order fulfillment process.
4. Enable guest checkout to reduce cart abandonment
Guest checkout eliminates the need for shoppers to create an account before checkout, which can be time-consuming and may drive away your potential customers.
Allowing guest checkout is quite convenient for users to place their orders efficiently, reducing cart abandonment.
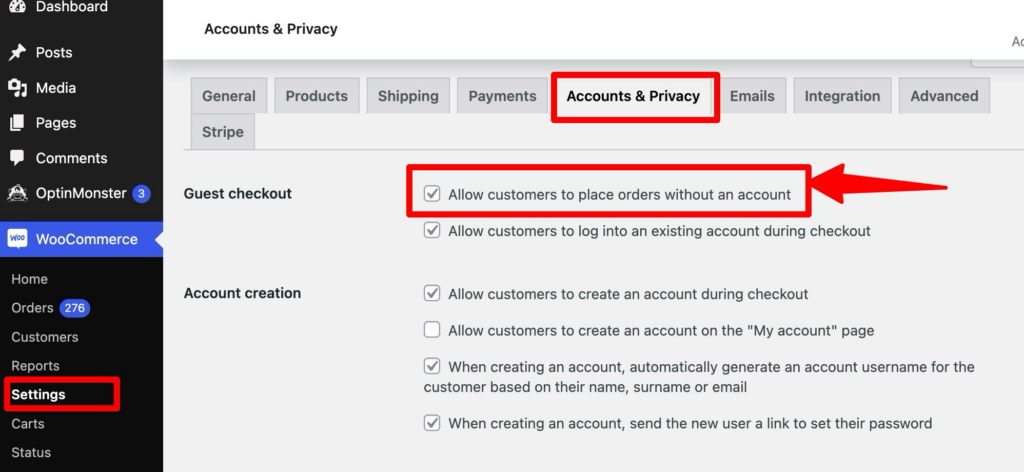
You can allow guest posts using the WooCommerce default option. Just navigate to WooCommerce ⇒ Settings ⇒ Accounts & Privacy and check the option “Allow customers to place orders without an account.”
5. Add express payment (Apple Pay or Google Pay) to speed up checkout
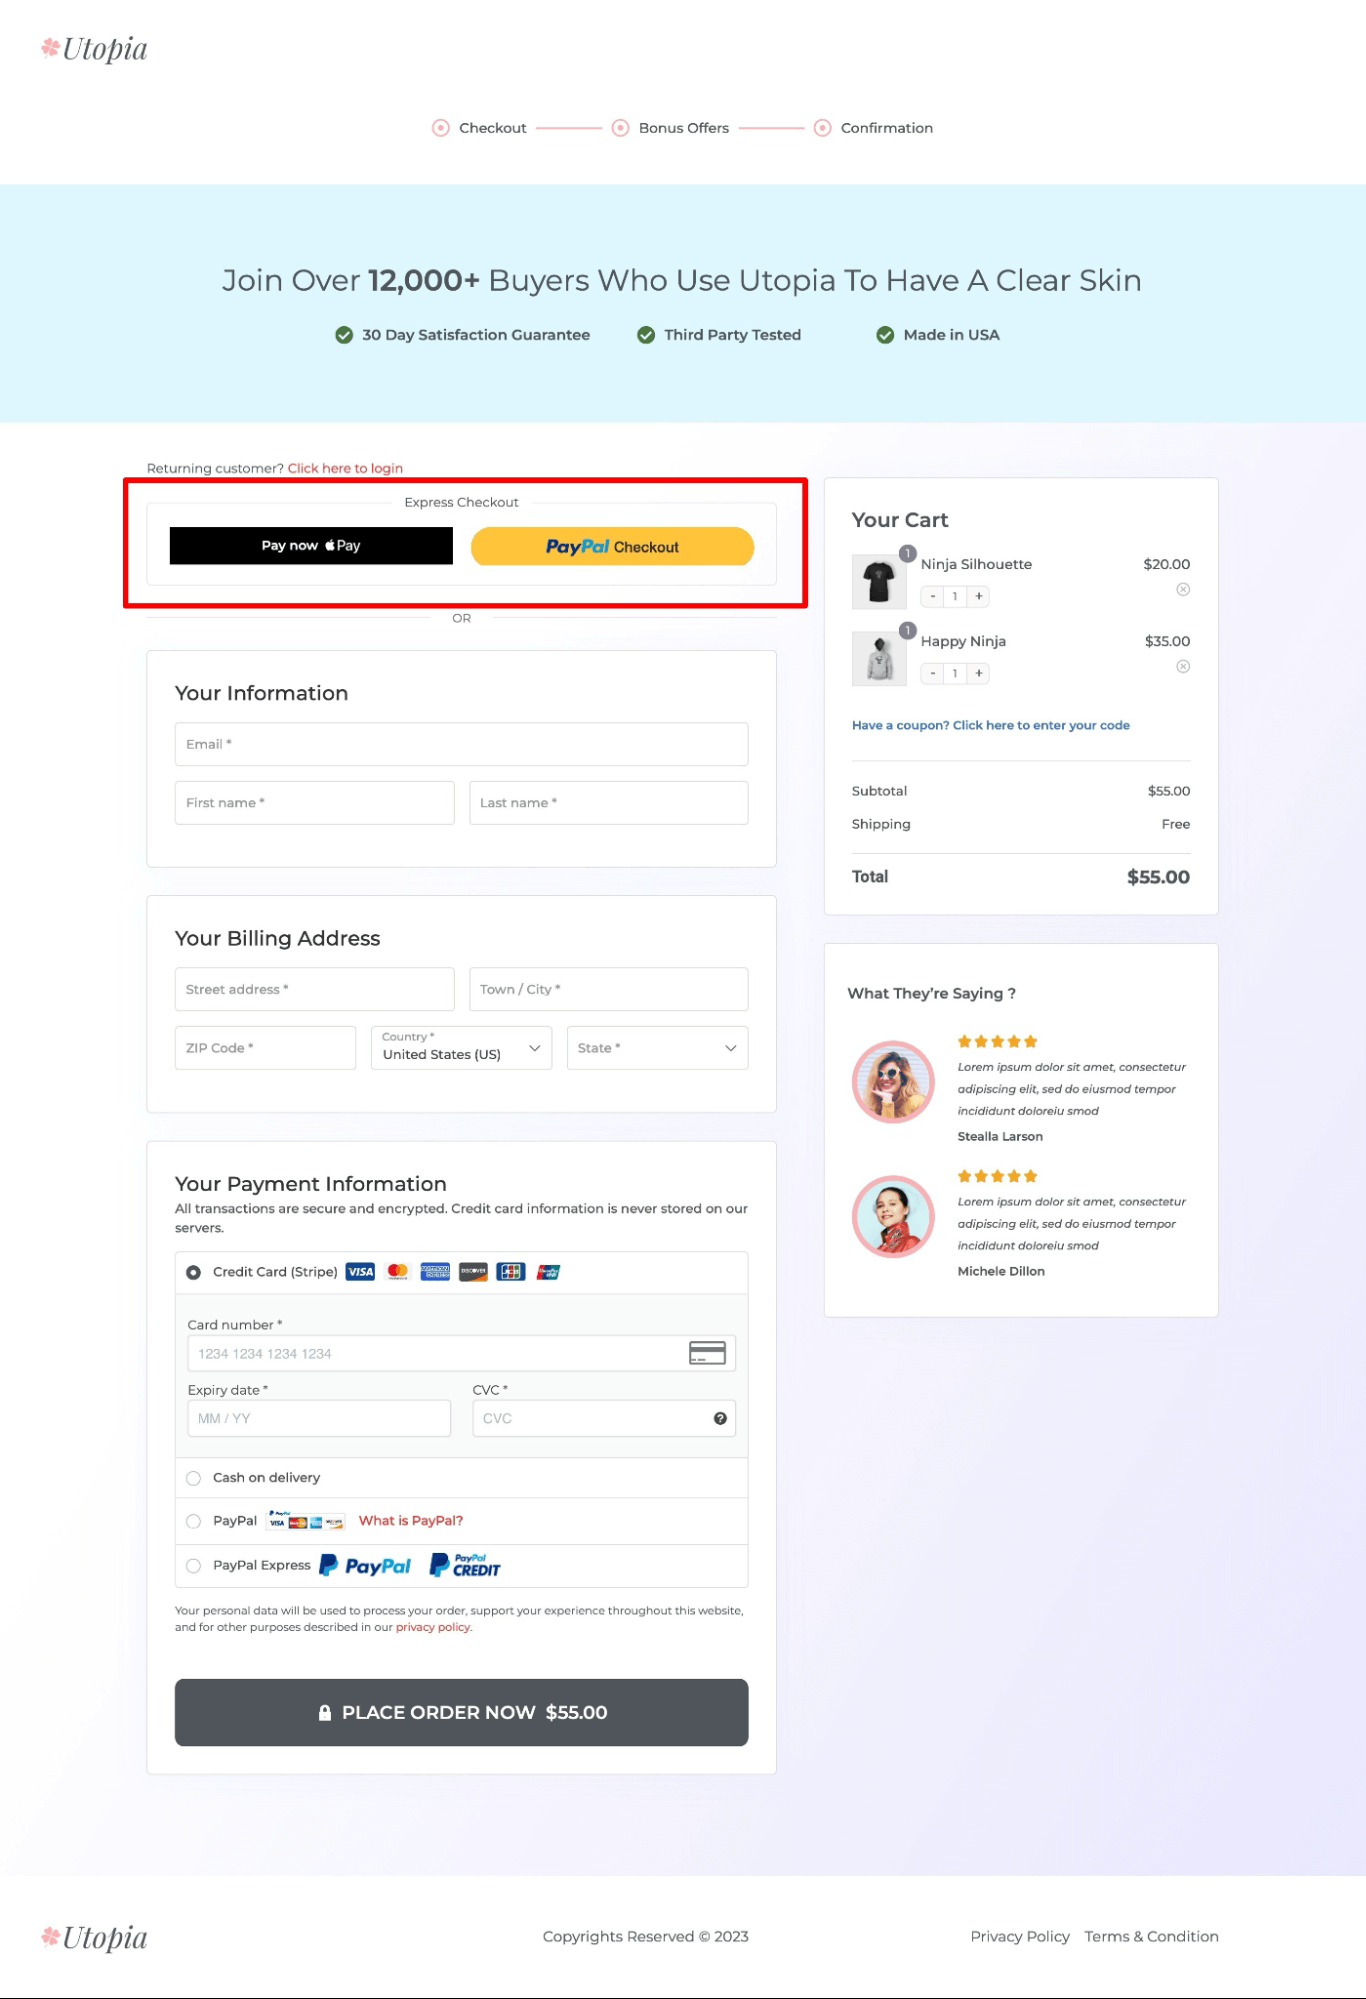
You can integrate express payment methods, such as Google and Apple Pay, to provide a faster checkout experience.
Express checkout lets users complete checkout in a single click, skipping the long checkout process.
6. A/B test checkout page to identify high-converting elements
The best way to ensure your checkout page is optimized for conversions is to offer your audience exactly what they need.
You can find out exactly what resonated with your customers through A/B testing.
With A/B split testing, you can create variants of your checkout page and see which one converts better.
7. Keep the billing address for tax compliance
Many jurisdictions require a billing address for tax calculation, even on digital products.
Removing shipping does not remove billing, so keep at least city, state, and ZIP/postal code for accurate tax rates.
More Questions About Removing Shipping Address
Have a look at some of the commonly asked questions about removing shipping from WooCommerce checkout:
Yes, you can remove shipping from WooCommerce for free using the default settings. FunnelKit offers a free version that includes the ability to remove the shipping field. Also the custom code is completely free and works with any theme.
No, not if you keep billing address fields. WooCommerce calculates tax based on billing address when shipping is disabled. Make sure your tax settings in WooCommerce ⇒ Settings ⇒ Tax are configured correctly for your jurisdiction. Some locations require physical address even for digital goods for tax purposes.
Caching or stored sessions may cause old shipping data to appear. Clear your WooCommerce transients, empty cache, and refresh the checkout to verify the updated settings.
If you used the custom code method to remove shipping entirely, you will need to remove that code and configure WooCommerce shipping zones. If you used FunnelKit, simply re-enable shipping in the checkout editor. Consider using conditional shipping checkout pages.
No, the methods shown here only affect the customer interface. Your WooCommerce admin dashboard will still show Shipping settings and options. This allows you to configure shipping later if your business needs change without affecting current customers.
For digital products, collect the billing country to ensure tax compliance and restrict sales to specific regions if necessary. Use WooCommerce geolocation or FunnelKit's country-based rules to display different checkout pages based on the customer's location. Some countries require specific information even for digital transactions.
Ready to Remove Shipping from Your WooCommerce Checkout?
Removing shipping entirely, or just the shipping address fields, from the WooCommerce checkout reduces unnecessary steps and increases the likelihood that customers will complete their purchases.
Digital product sellers, local pickup stores, and service providers benefit from faster, cleaner checkouts that reduce friction and improve conversion rates.
For most stores, the visual approach with FunnelKit provides the flexibility to adjust checkout fields without code.
For developers or those needing full control, the custom code method works with any theme and hosting setup.
Choose the method that fits your technical comfort level and business requirements. Either approach will streamline your checkout and remove the shipping complexity your store does not need.
Along with removing shipping, follow the tips we shared to maximize conversions. You can implement all the strategies we shared with FunnelKit Funnel Builder.
This ultimate WordPress sales funnel builder lets you create an optimized checkout page that streamlines the checkout process.
So, are you ready to remove shipping and optimize your checkout page?
Editorial Team
February 16, 2026Using a checkout coupon can be a smarter way to boost sales than offering direct product discounts. Coupons give you full control over your discount strategy, letting you run targeted...
Editorial Team
February 12, 2026Removing checkout fields in WooCommerce is one of the fastest ways to simplify your store's checkout and reduce cart abandonment. Every unnecessary field you ask customers to fill out adds...
Editorial Team
February 4, 2026Adding a checkbox to the WooCommerce checkout is one of the easiest ways to collect information from customers, without asking them to do much extra. Think about it. The customer...


