
Setting up a WordPress autoresponder takes the manual work out of your communication, turning passive website visitors into engaged subscribers and paying customers.
Rather than replying to form submissions by hand or individually emailing out a lead magnet, the system handles it instantly.
This keeps your audience engaged and ensures you never miss a follow-up, all without requiring you to sit at your desk 24/7.
However, the default WordPress email system is limited to basic notifications.
With an average ROI of 4,300% in the U.S., email marketing remains one of the most profitable strategies [Source: Direct Marketing Association].
Autoresponders make that possible.
If you want to do any actual marketing, like sending a welcome series to new subscribers or a follow-up offer after a purchase, you need a dedicated autoresponder.
In this post, we will cover how WordPress autoresponder systems work and walk you through setting up a complete campaign.
Table of Contents
- 1 What is a WordPress Autoresponder?
- 2 How to Set Up a WordPress Autoresponder (Step by Step)
- 3 5 Best WordPress Autoresponder Plugins (2026)
- 4 Self-Hosted vs SaaS Autoresponders: Which Is Right for You?
- 5 5 Autoresponder Sequences Every WordPress Site Needs
- 6 Start Automating Your Emails With the Perfect WordPress Autoresponder!
What is a WordPress Autoresponder?
A WordPress autoresponder is an automated email tool that automatically sends pre-written messages to people who take specific actions on your website.
You interact with these every day. It is the immediate confirmation receipt you get when you buy something online or the welcome email that includes a downloadable PDF right after you subscribe.
This way, you can provide valuable information, promote products or services, or nurture leads over time.
Some common use cases of autoresponders include:
- Instant welcome emails to confirm new subscriber signups and set expectations.
- Acknowledge form submissions to let users know their message was received.
- Automatically deliver lead magnets, such as a downloadable PDF, checklist, or guide, after someone signs up via your email subscription form.
- Send a series of drip sequences of educational, onboarding, or promotional emails after specific intervals (day 1, day 7, day 14, and so on).
- Send post-purchase follow-ups to thank customers, request reviews, or cross-sell related products after a WooCommerce order.
- Instantly confirm event registrations and send calendar details or preparation instructions.
- Trigger customer feedback requests after a support ticket is closed or a service is delivered.
An autoresponder is the backbone of WordPress email automation for any site. Whether you run a blog website, an online store, a nonprofit, or an affiliate marketing business, it's your powerhouse.
How WordPress Autoresponders Work?
Every automation relies on three moving parts:
The Trigger: The event that kicks things off. This could be a new newsletter signup, a completed WooCommerce order, or even an LMS course enrollment.
The Sequence: The actual emails you send and the delays between them. For example, sending an immediate welcome message, waiting 48 hours, and then sending a product recommendation.
The Action: The background organization. Advanced tools let you tag users, update their contact profiles, or move them to a new list based on whether they open or click your emails.
How to Set Up a WordPress Autoresponder (Step by Step)
To set up a WordPress autoresponder without writing any code, we will use FunnelKit Automations.
FunnelKit Automations is a marketing automation plugin built entirely inside WordPress. It gives you a visual workflow builder, pre-built automations, email and SMS campaigns, rich contact profiles, and detailed analytics, all from your WordPress dashboard.
It offers a free version with core automation features. The Pro plan adds advanced triggers, conditional logic, visual email builder, and more.
Before we start the main process, you need to install and activate FunnelKit Automations on your WordPress website.
Follow the step-by-step instructions below to create your first WordPress autoresponder:
Step 1: Configure SMTP on your website
This is the most crucial step that people skip. Otherwise, you'll see your autoresponder emails land in spam or never arrive at all.
By default, WordPress uses the PHP mail function, which most email providers do not trust.
The solution is to set up SMTP. The best plugins for this are WP Mail SMTP, FluentSMTP, or Post SMTP.
Next, connect it to a reliable sending service like SendGrid, Amazon SES, Mailgun, or a Gmail SMTP relay.
Set up SPF and DKIM authentication records in your domain's DNS settings. This ensures that receiving mail servers verify your emails are legitimate.
If you are using a SaaS autoresponder like Brevo or Mailchimp, they handle SMTP on their end, but you should still configure your domain’s authentication records for optimal deliverability.
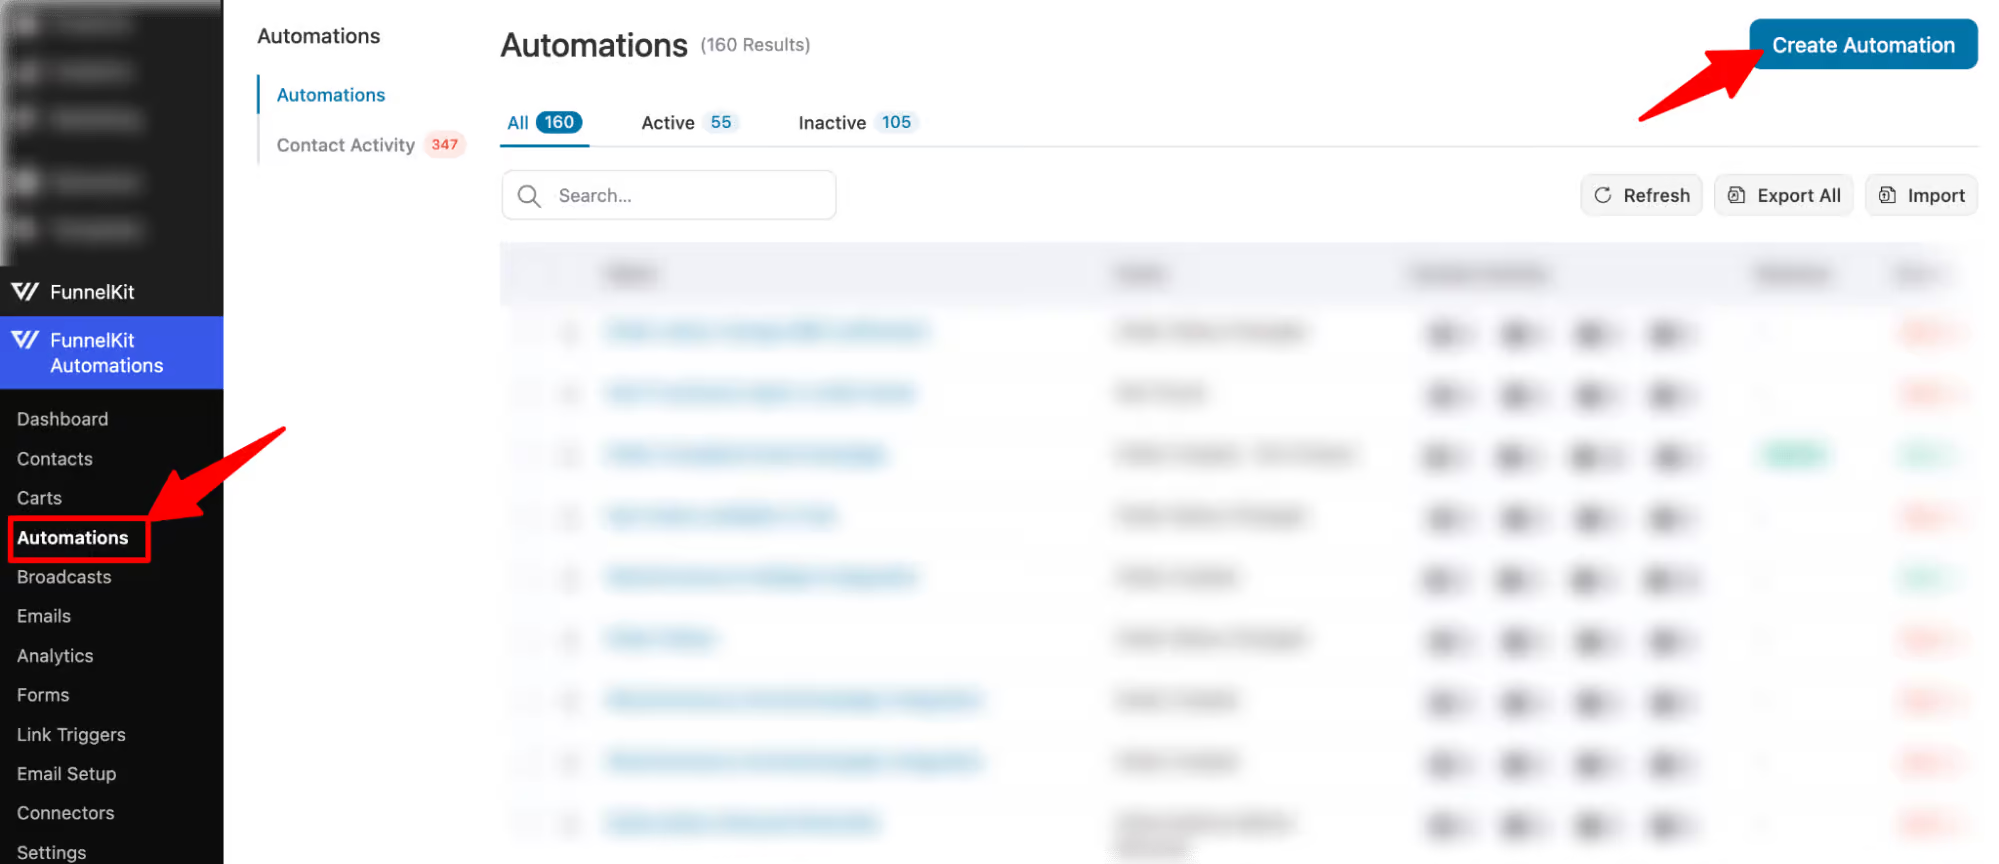
Step 2: Create a new automation
Let's create a simple lead-nurturing sequence that captures leads from a lead-gen form and sends follow-up emails.
For that, navigate to FunnelKit Automations ⇒ Automations and then click on 'Create Automation'.
Import “Optin follow-up”. For that, click on the recipe, then click on the Import button. After that, provide a name and click on Create.
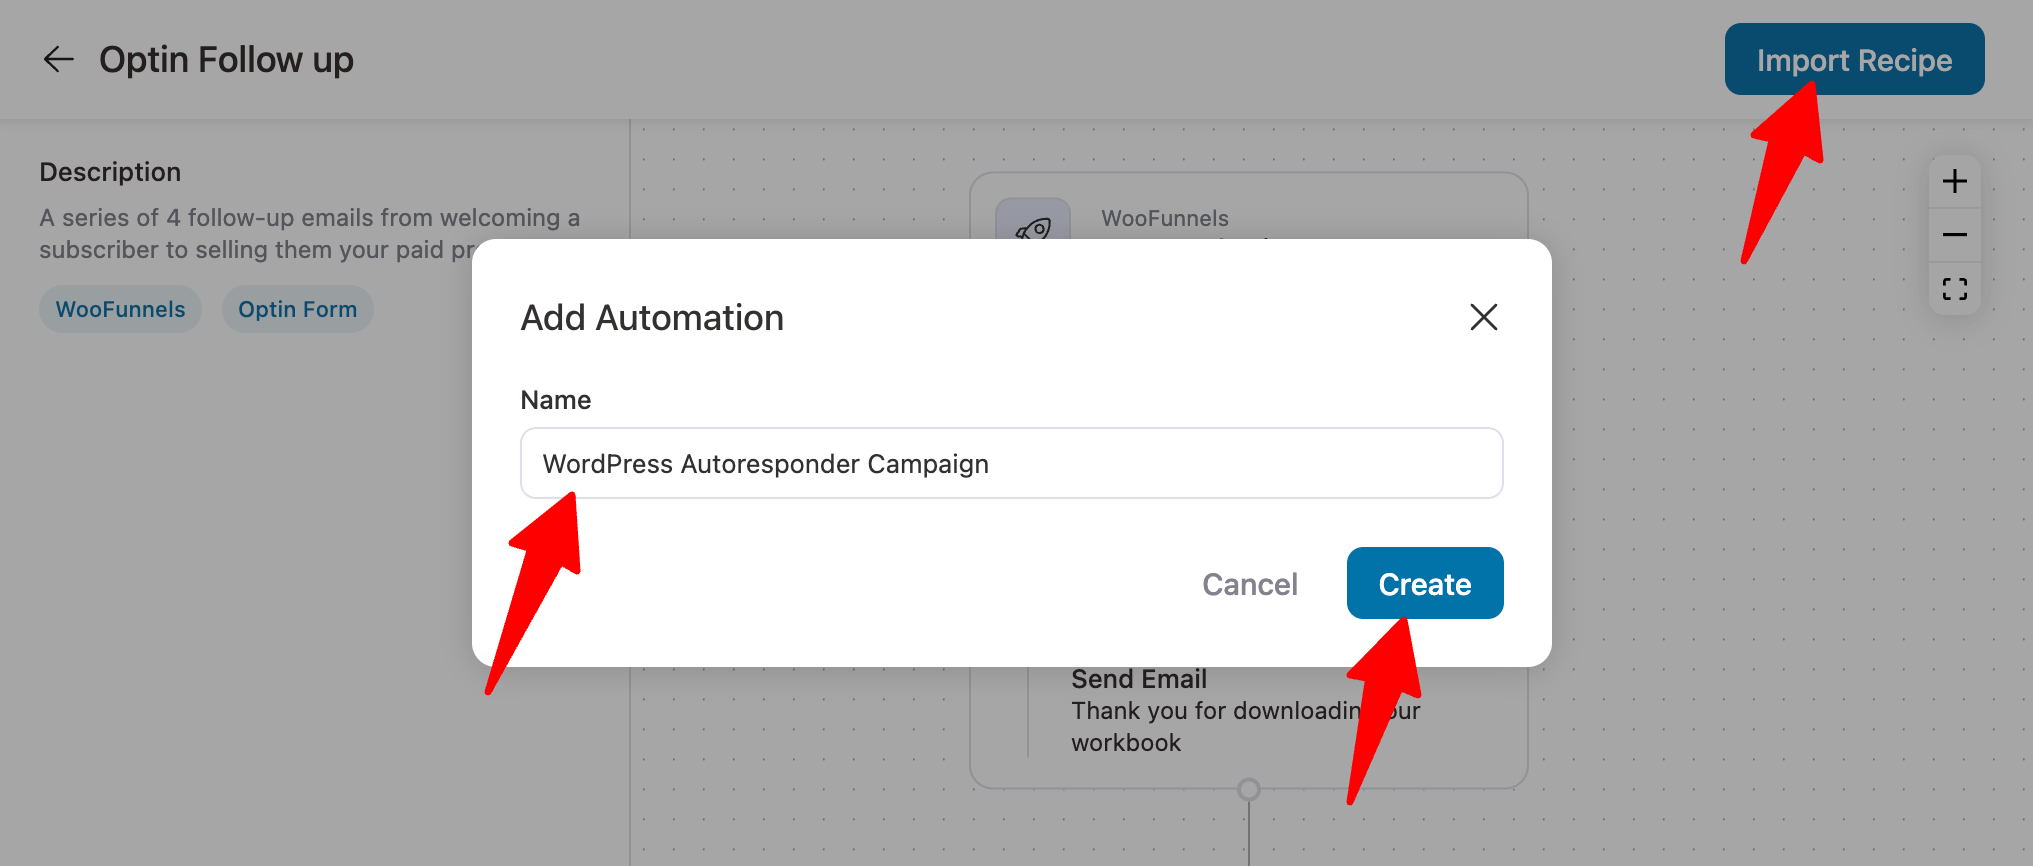
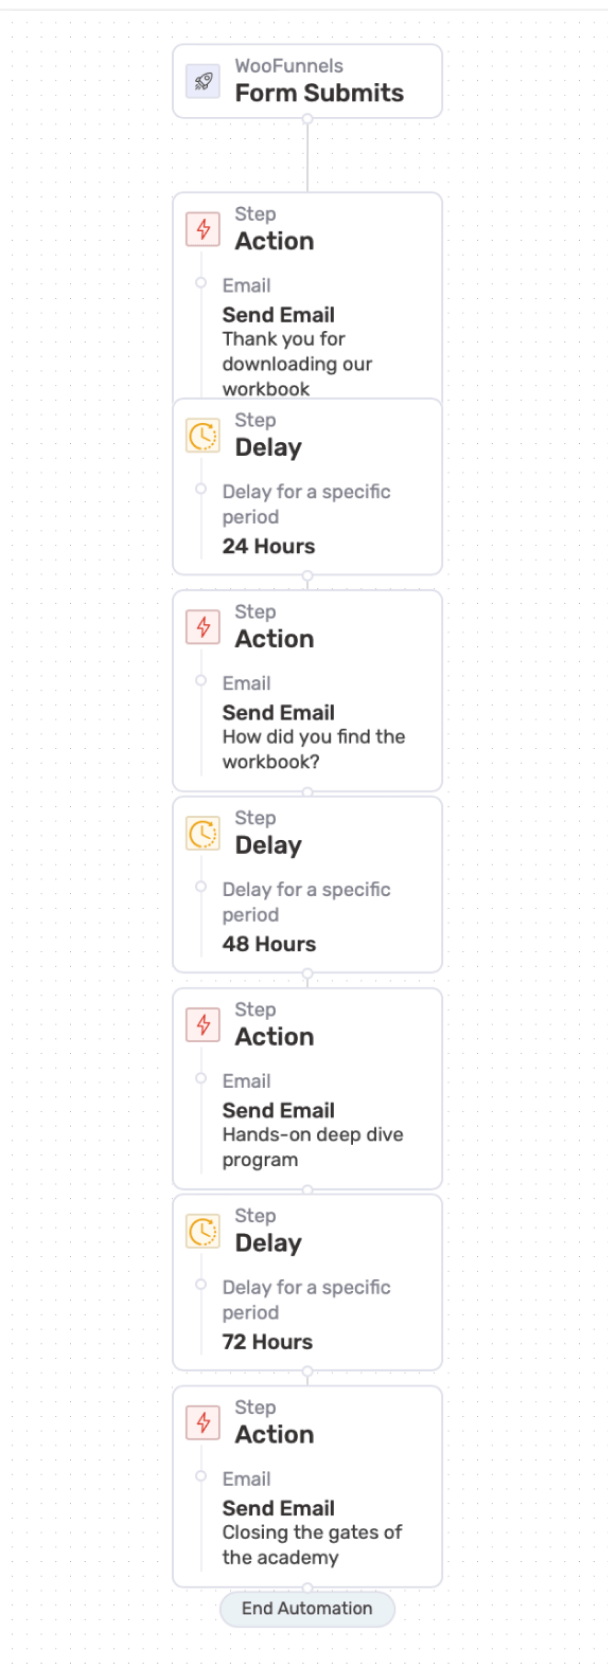
This will import a recipe that will get triggered when someone submits a form as an opt-in. Then, it will follow the defined sequence:
- Send an email with the freebie attached, thanking users for signing up.
- Wait for 24 hours. After 24 hours, it will send an email asking users how they liked the freebie and requesting some insights.
- And after another 48 hours, it will send an email pitching a paid program.
- Lastly, after 72 hours of pitching the paid course, it will send them a final reminder about the product.
So, basically, this autoresponder is designed to turn your subscribers into paying customers.
Step 3: Configure the automation event trigger
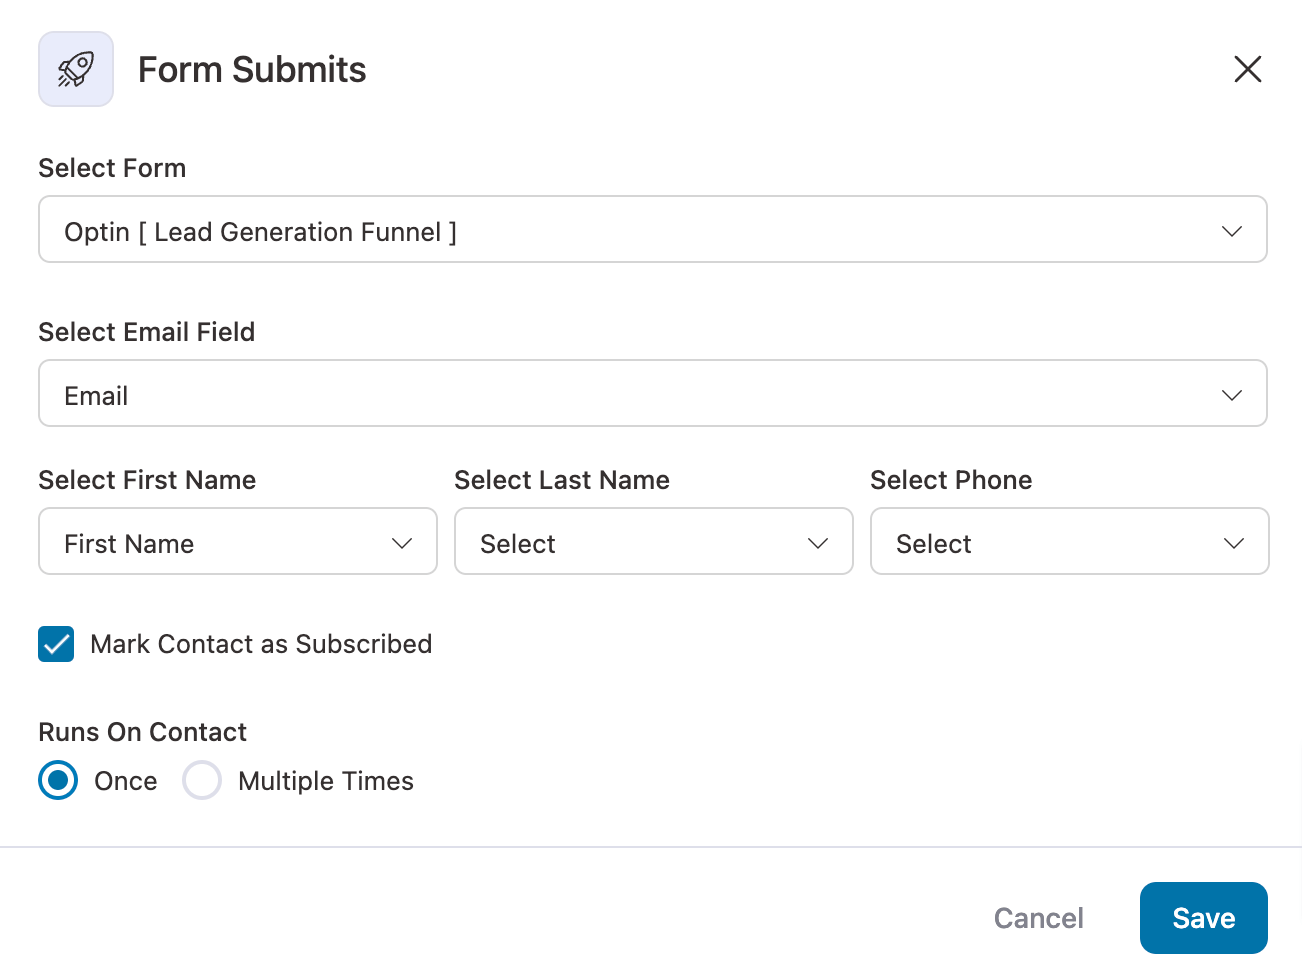
Now select the form whose submission will activate this WordPress autoresponder. To do so, click on the “Form Submits” trigger.
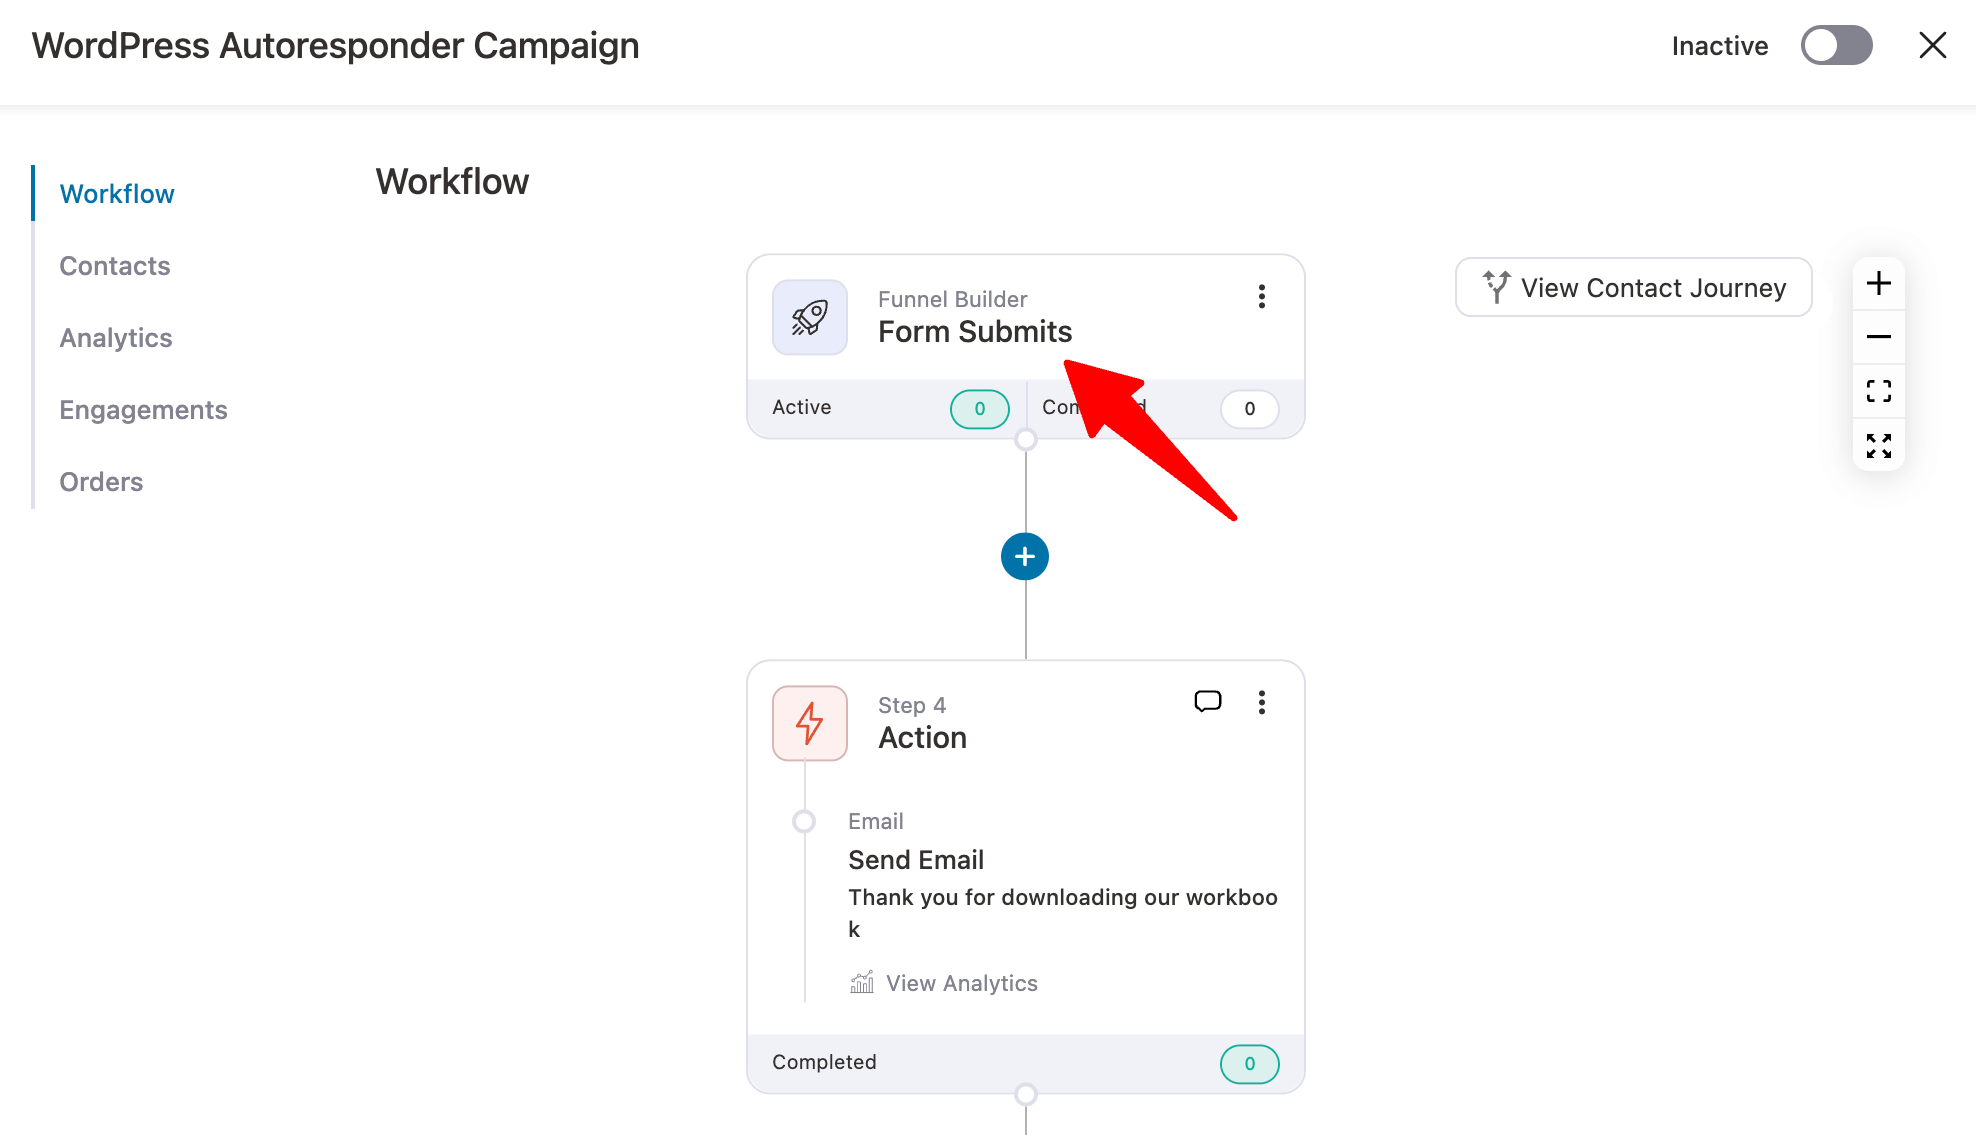
Now select the form from the existing subscription forms on your WordPress site, provide the email address field of the form, and embed the other form fields.
You can mark this user as subscribed as well.
Finally, click on Save to update the information.
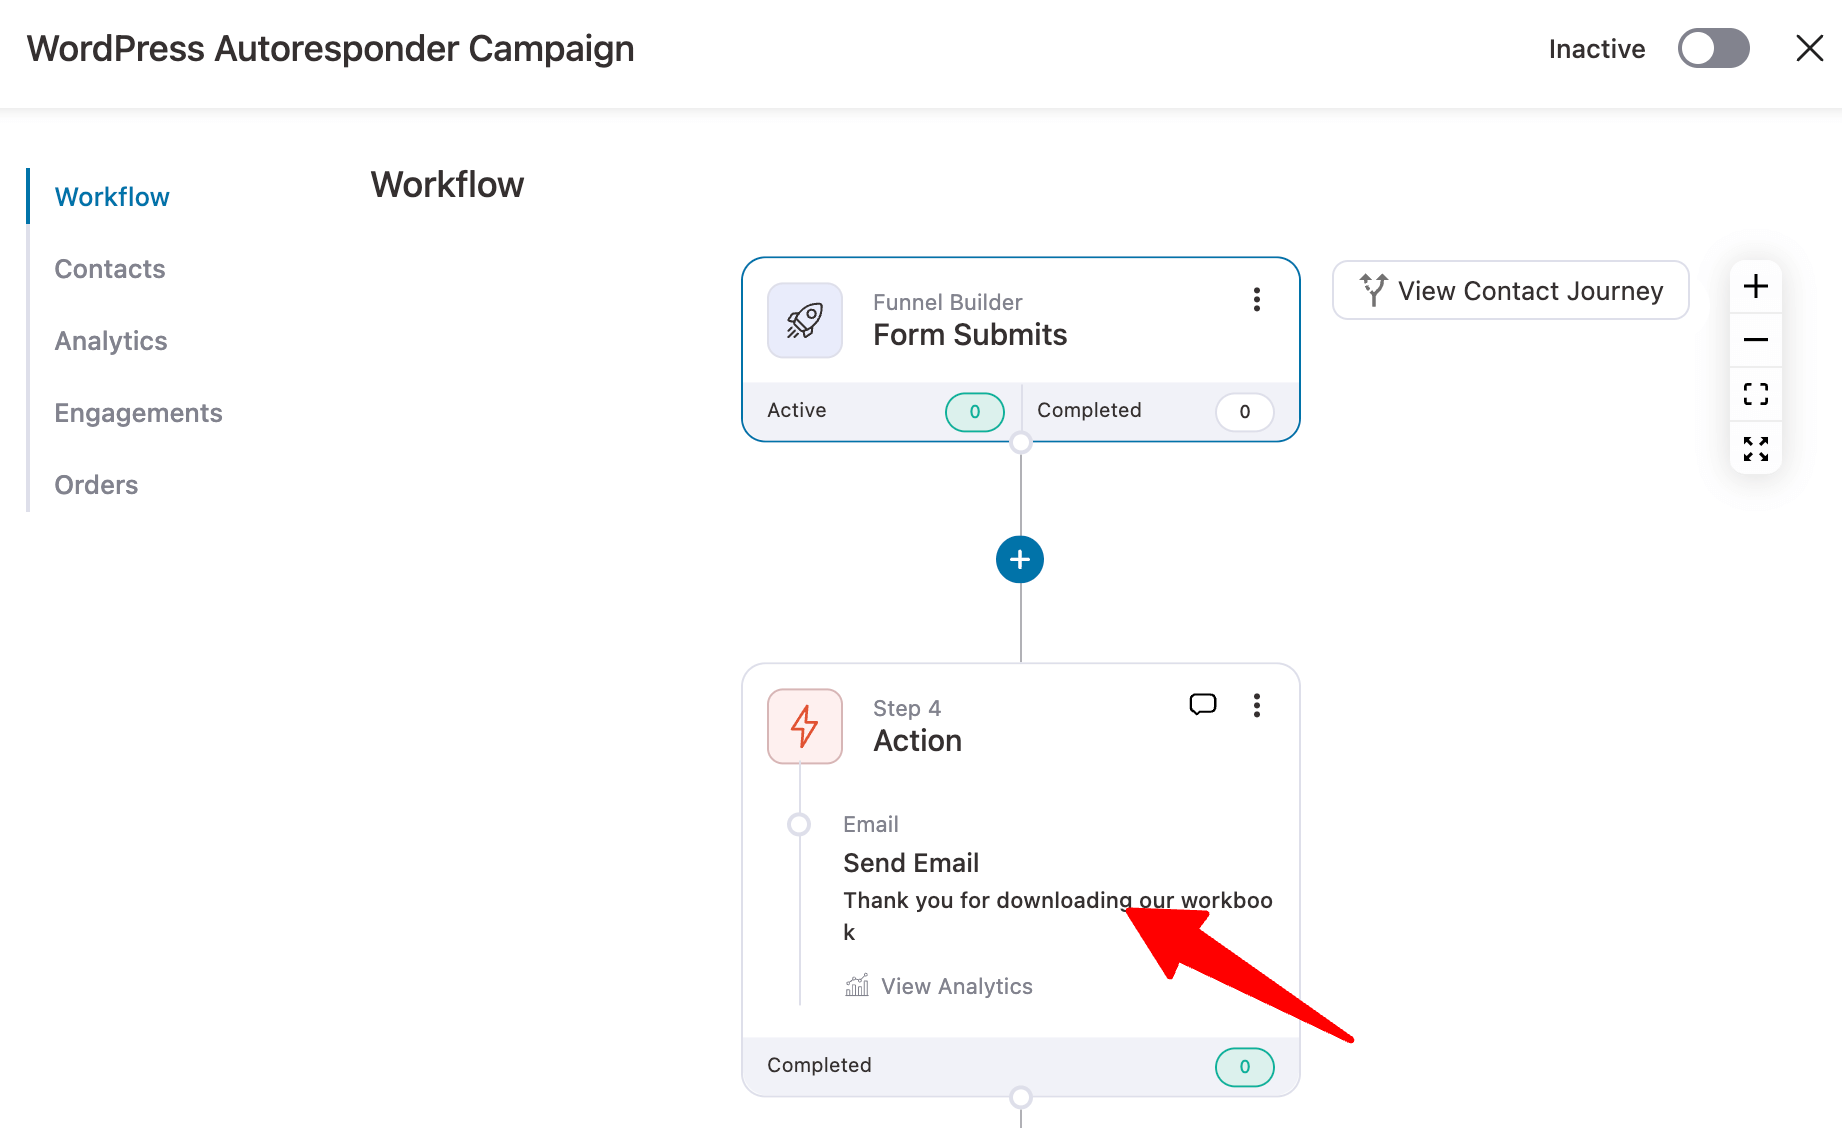
Step 4: Customize the welcome email
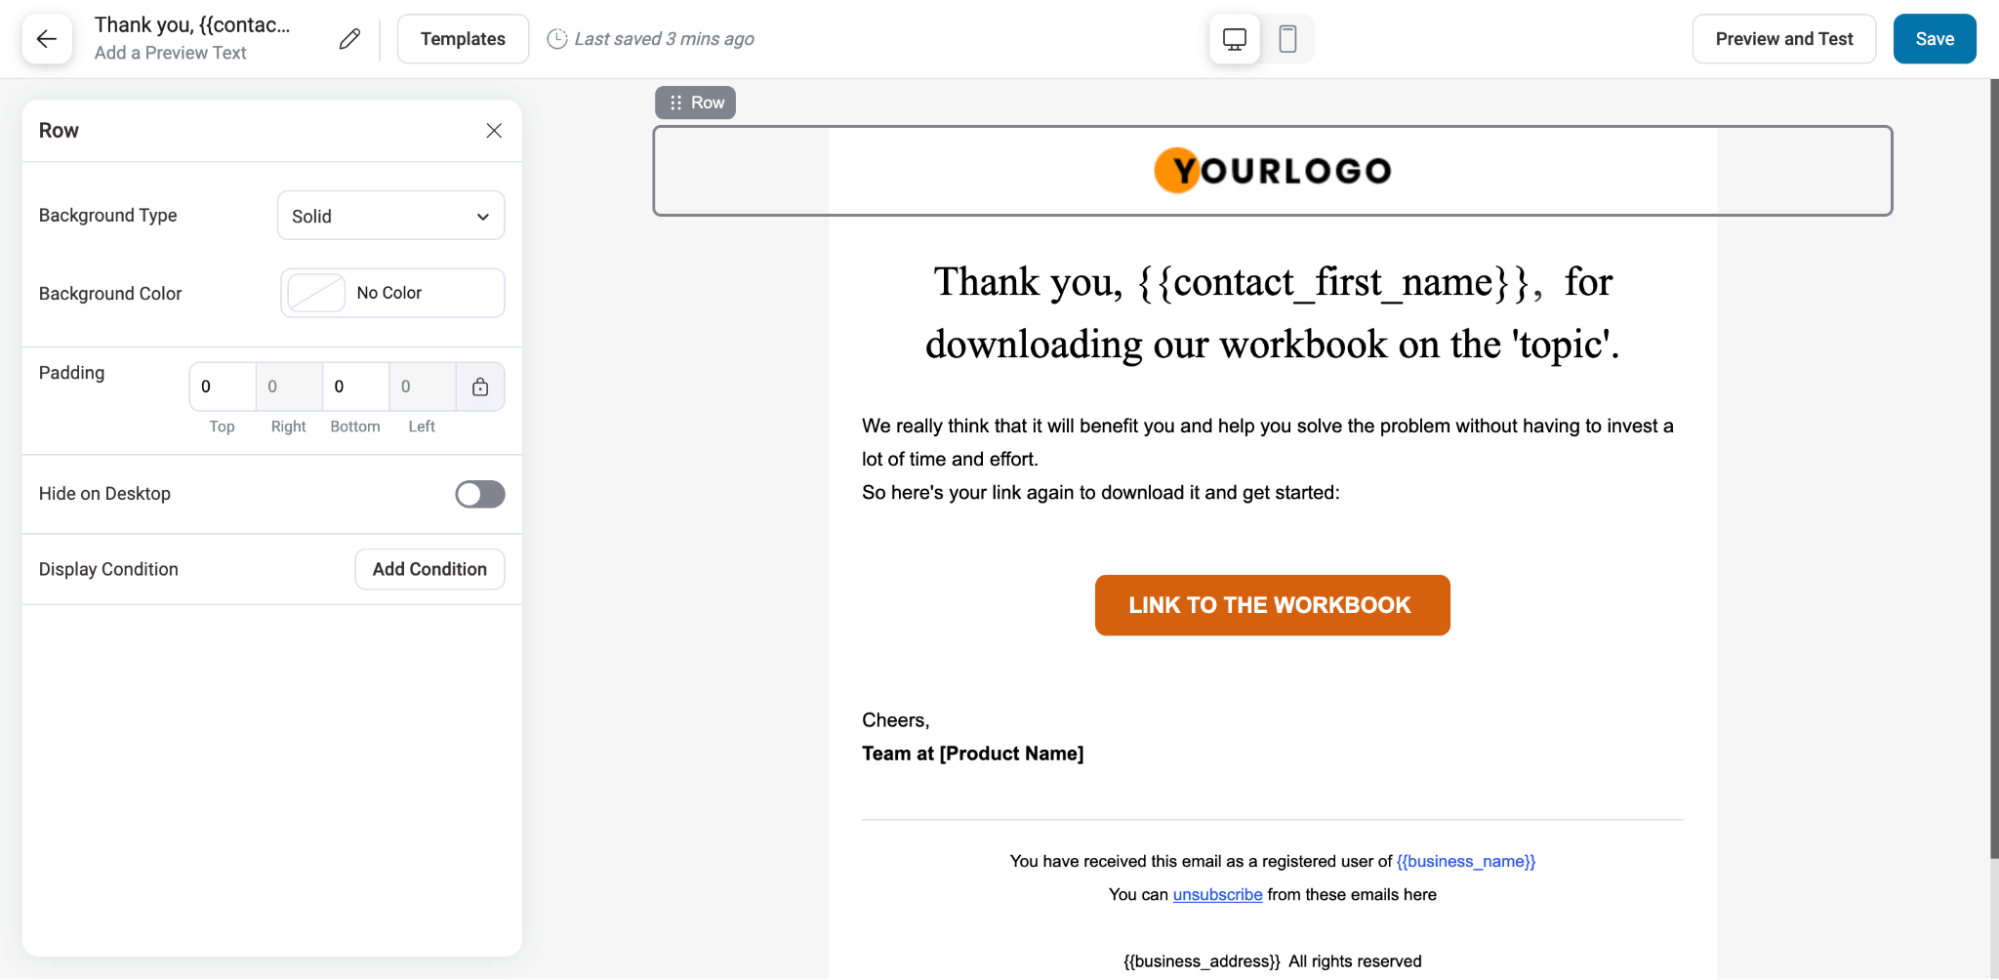
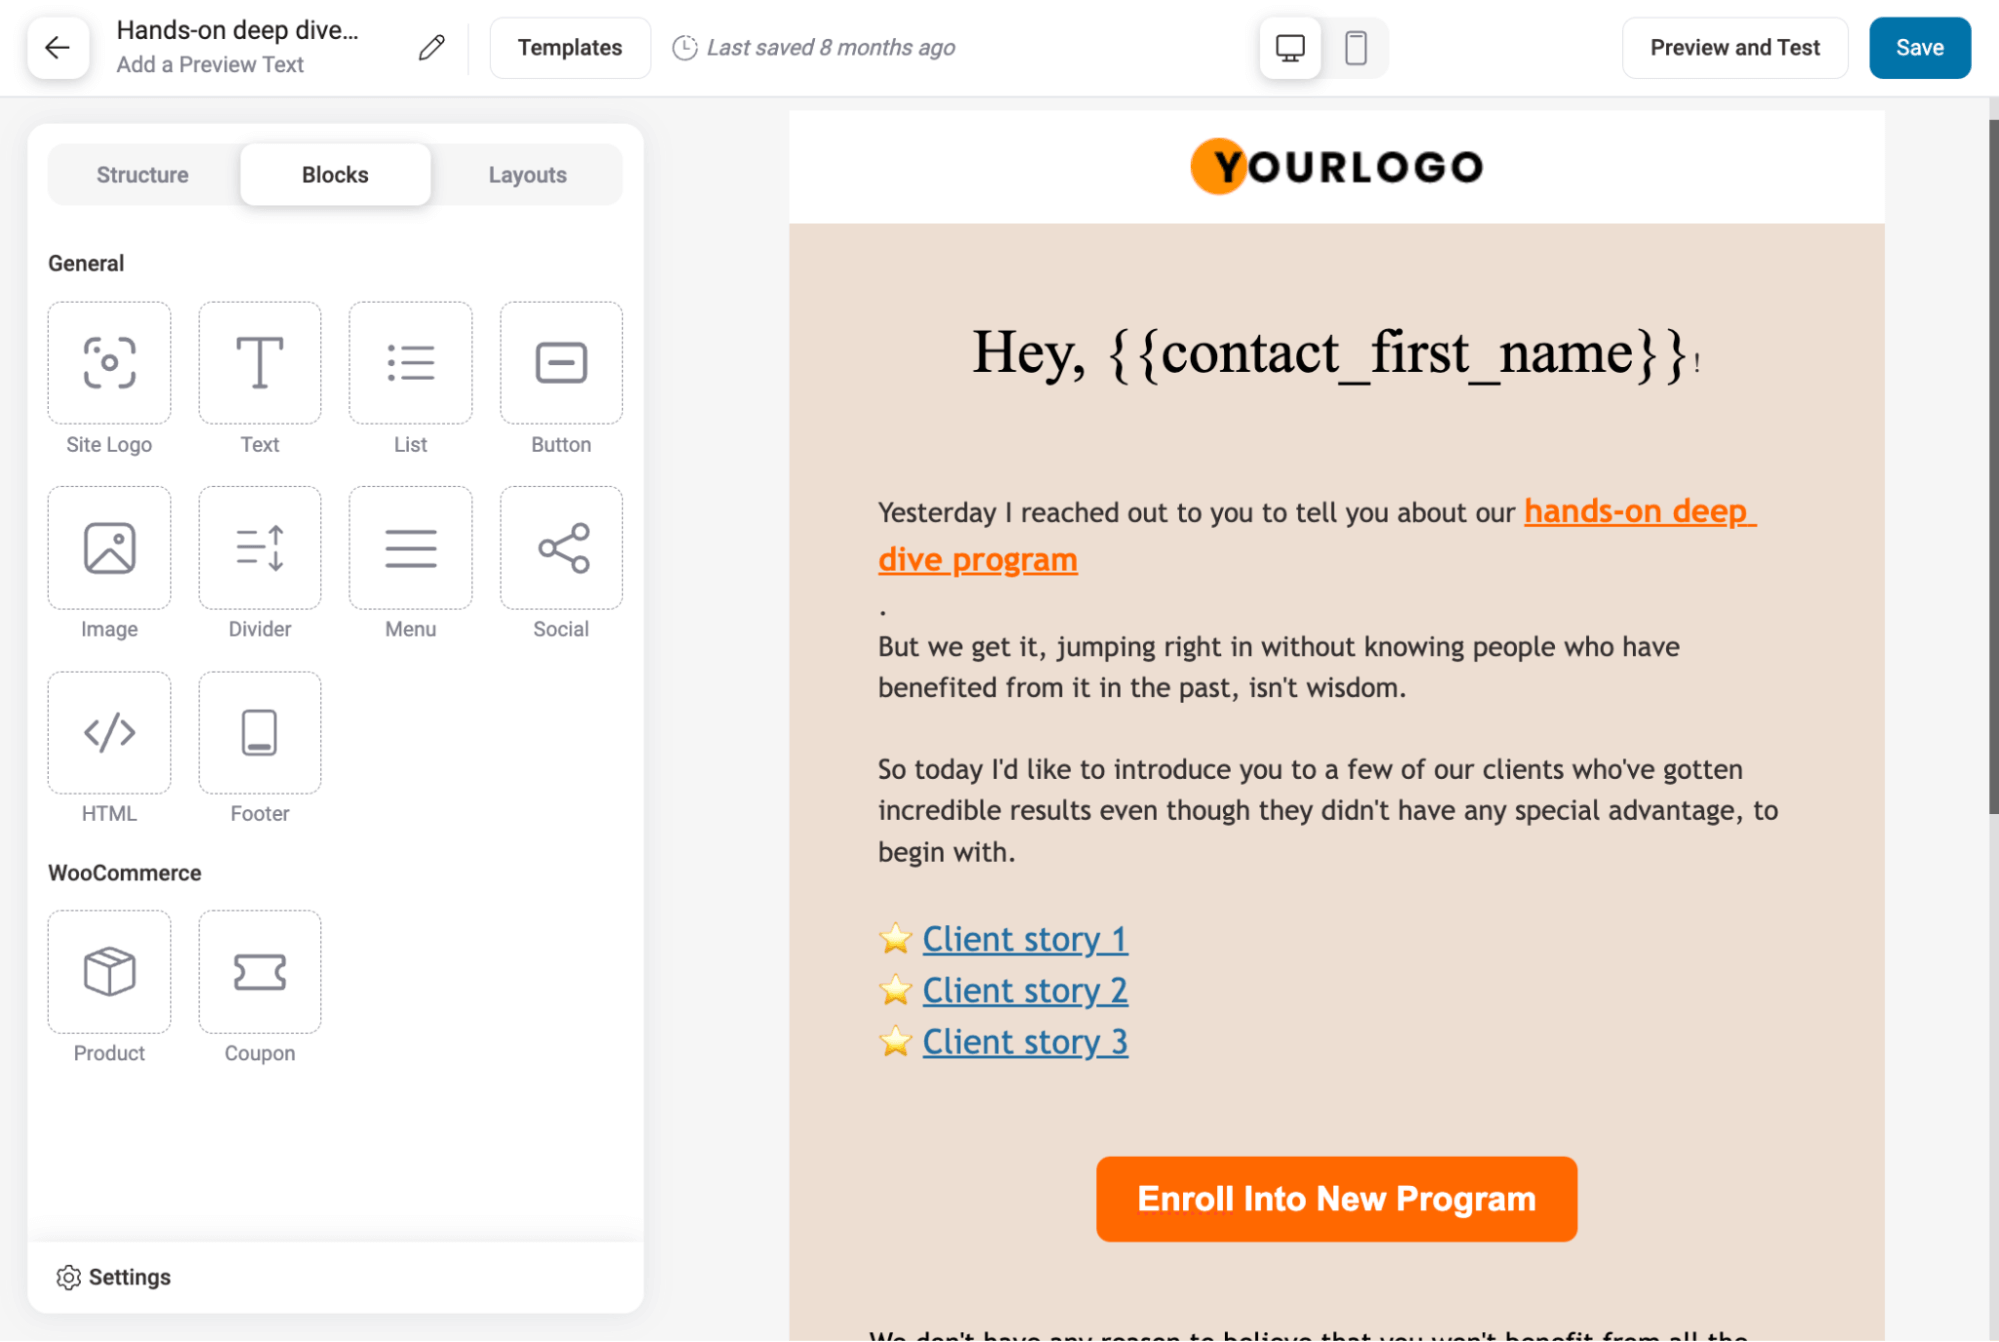
Now, it's time to customize the first email of the automation workflow. This will be the welcome email. For that, click on the “Email” step.
Here, you can customize the email body and preview text. Personalizing the email subject is always a good idea, as it’s likely to improve your email open rate.
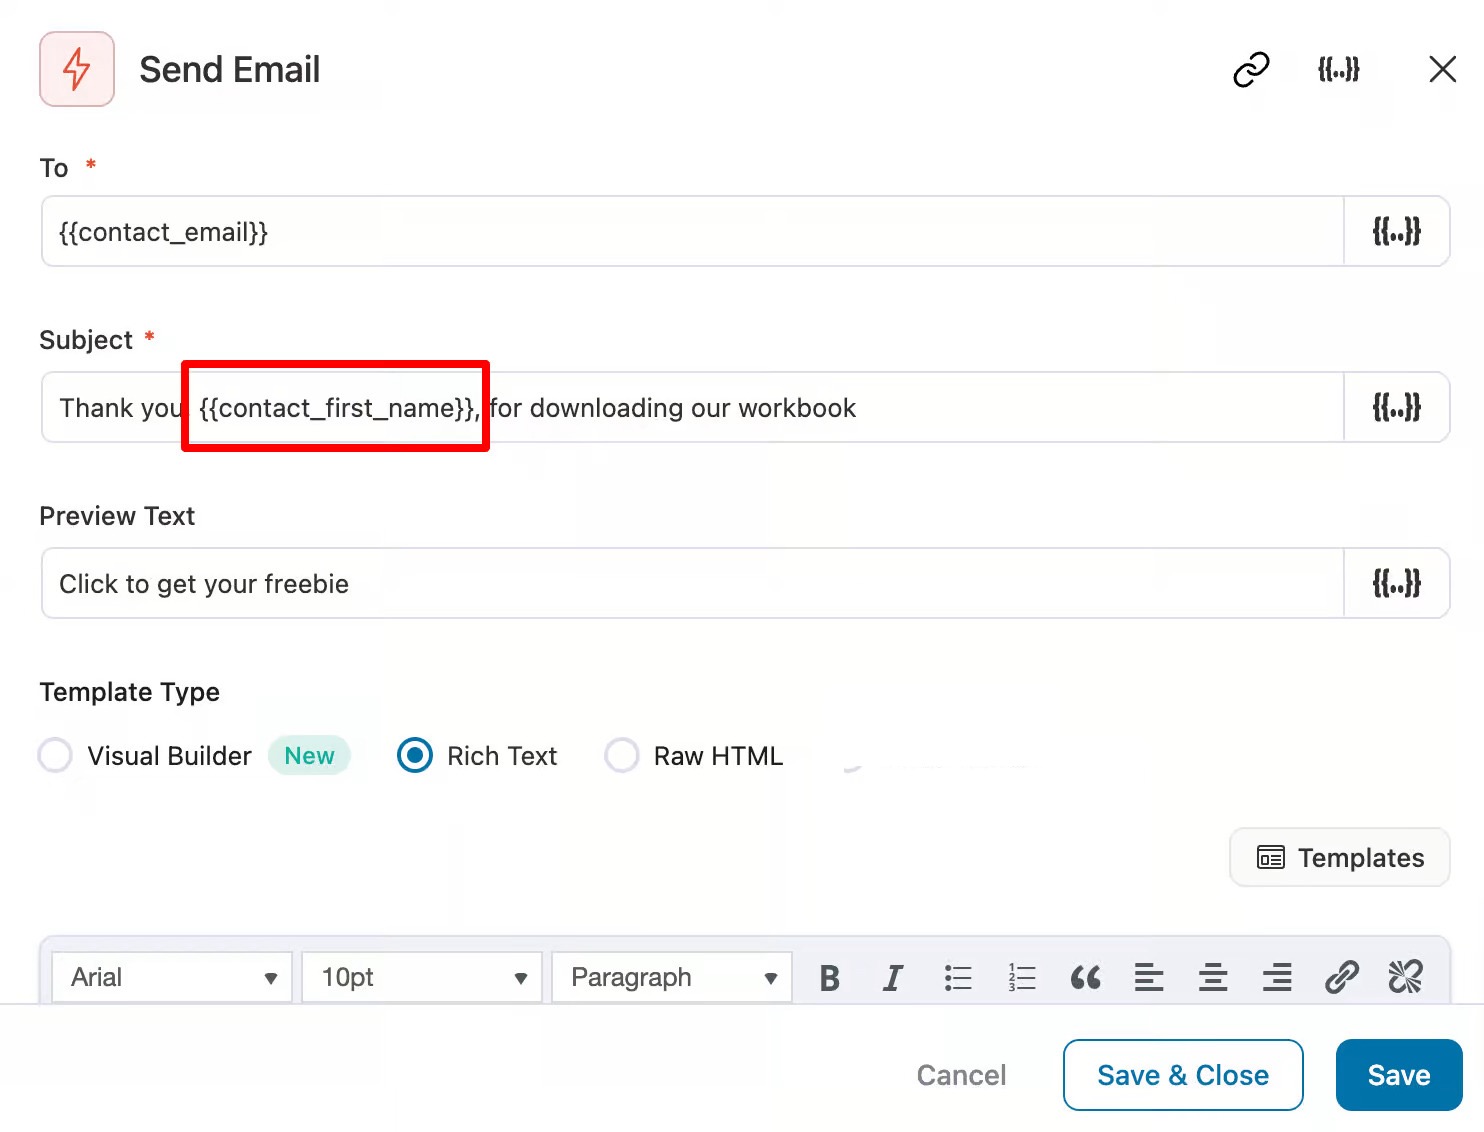
Using FunnelKit's Merge Tag feature, you can add customer information, such as the Customer's first name, to personalize the messaging.
By default, the template includes a text-based email. You can go with that or use the Visual Builder (New) to create stunning emails like those shown above:
If you want to go deep into email customization, we have a separate guide on designing your emails like a pro.
Once you are happy with the email, click on Save.
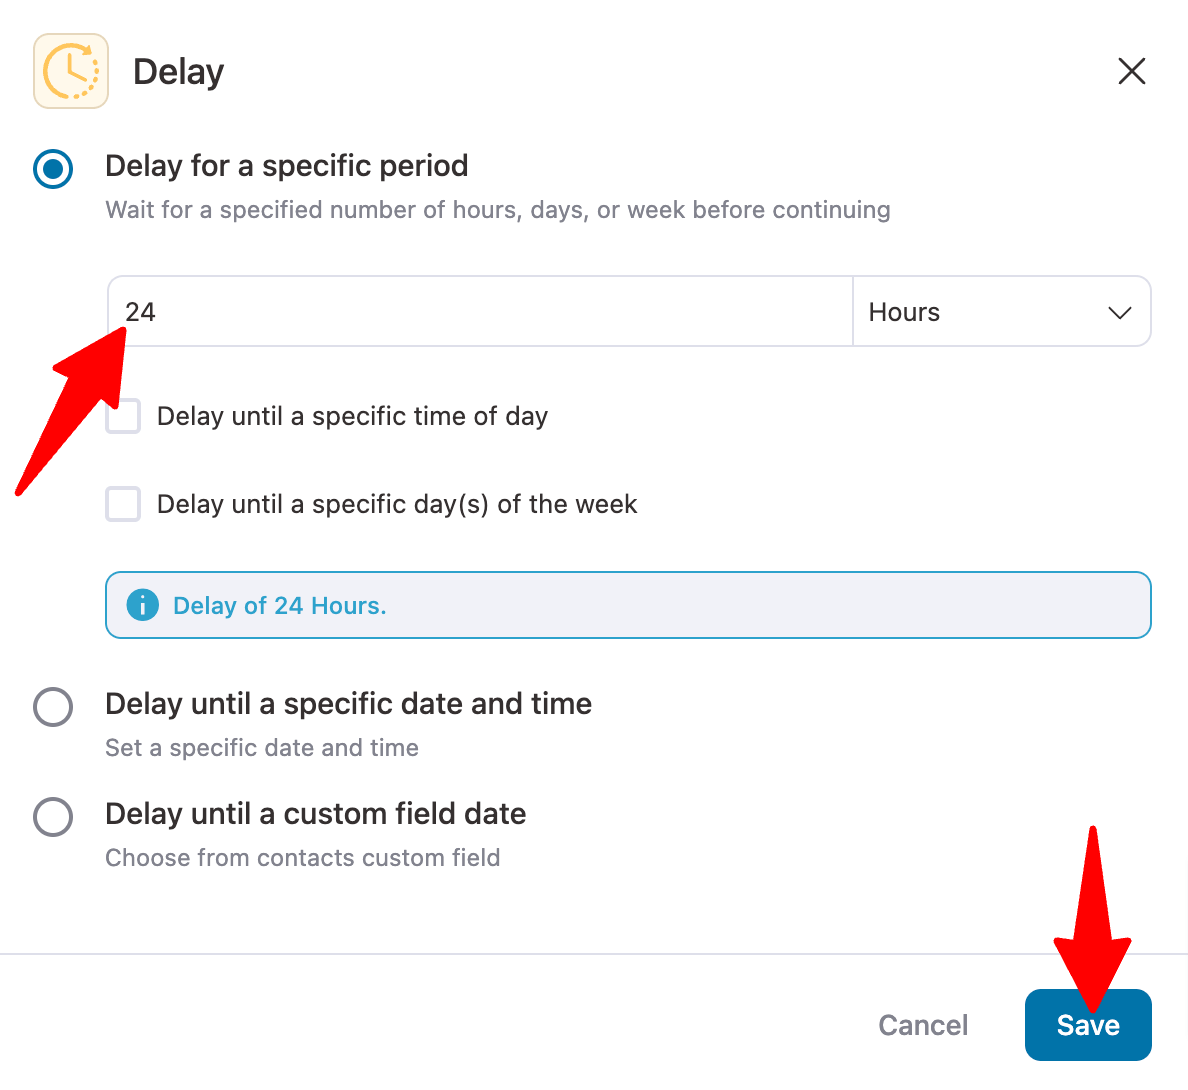
Step 5: Adjust the delay (optional)
After the first email, there is a 24-hour delay. If you want, you can adjust the delay period according to your strategy.
To adjust the delay, click on the “Delay” action.
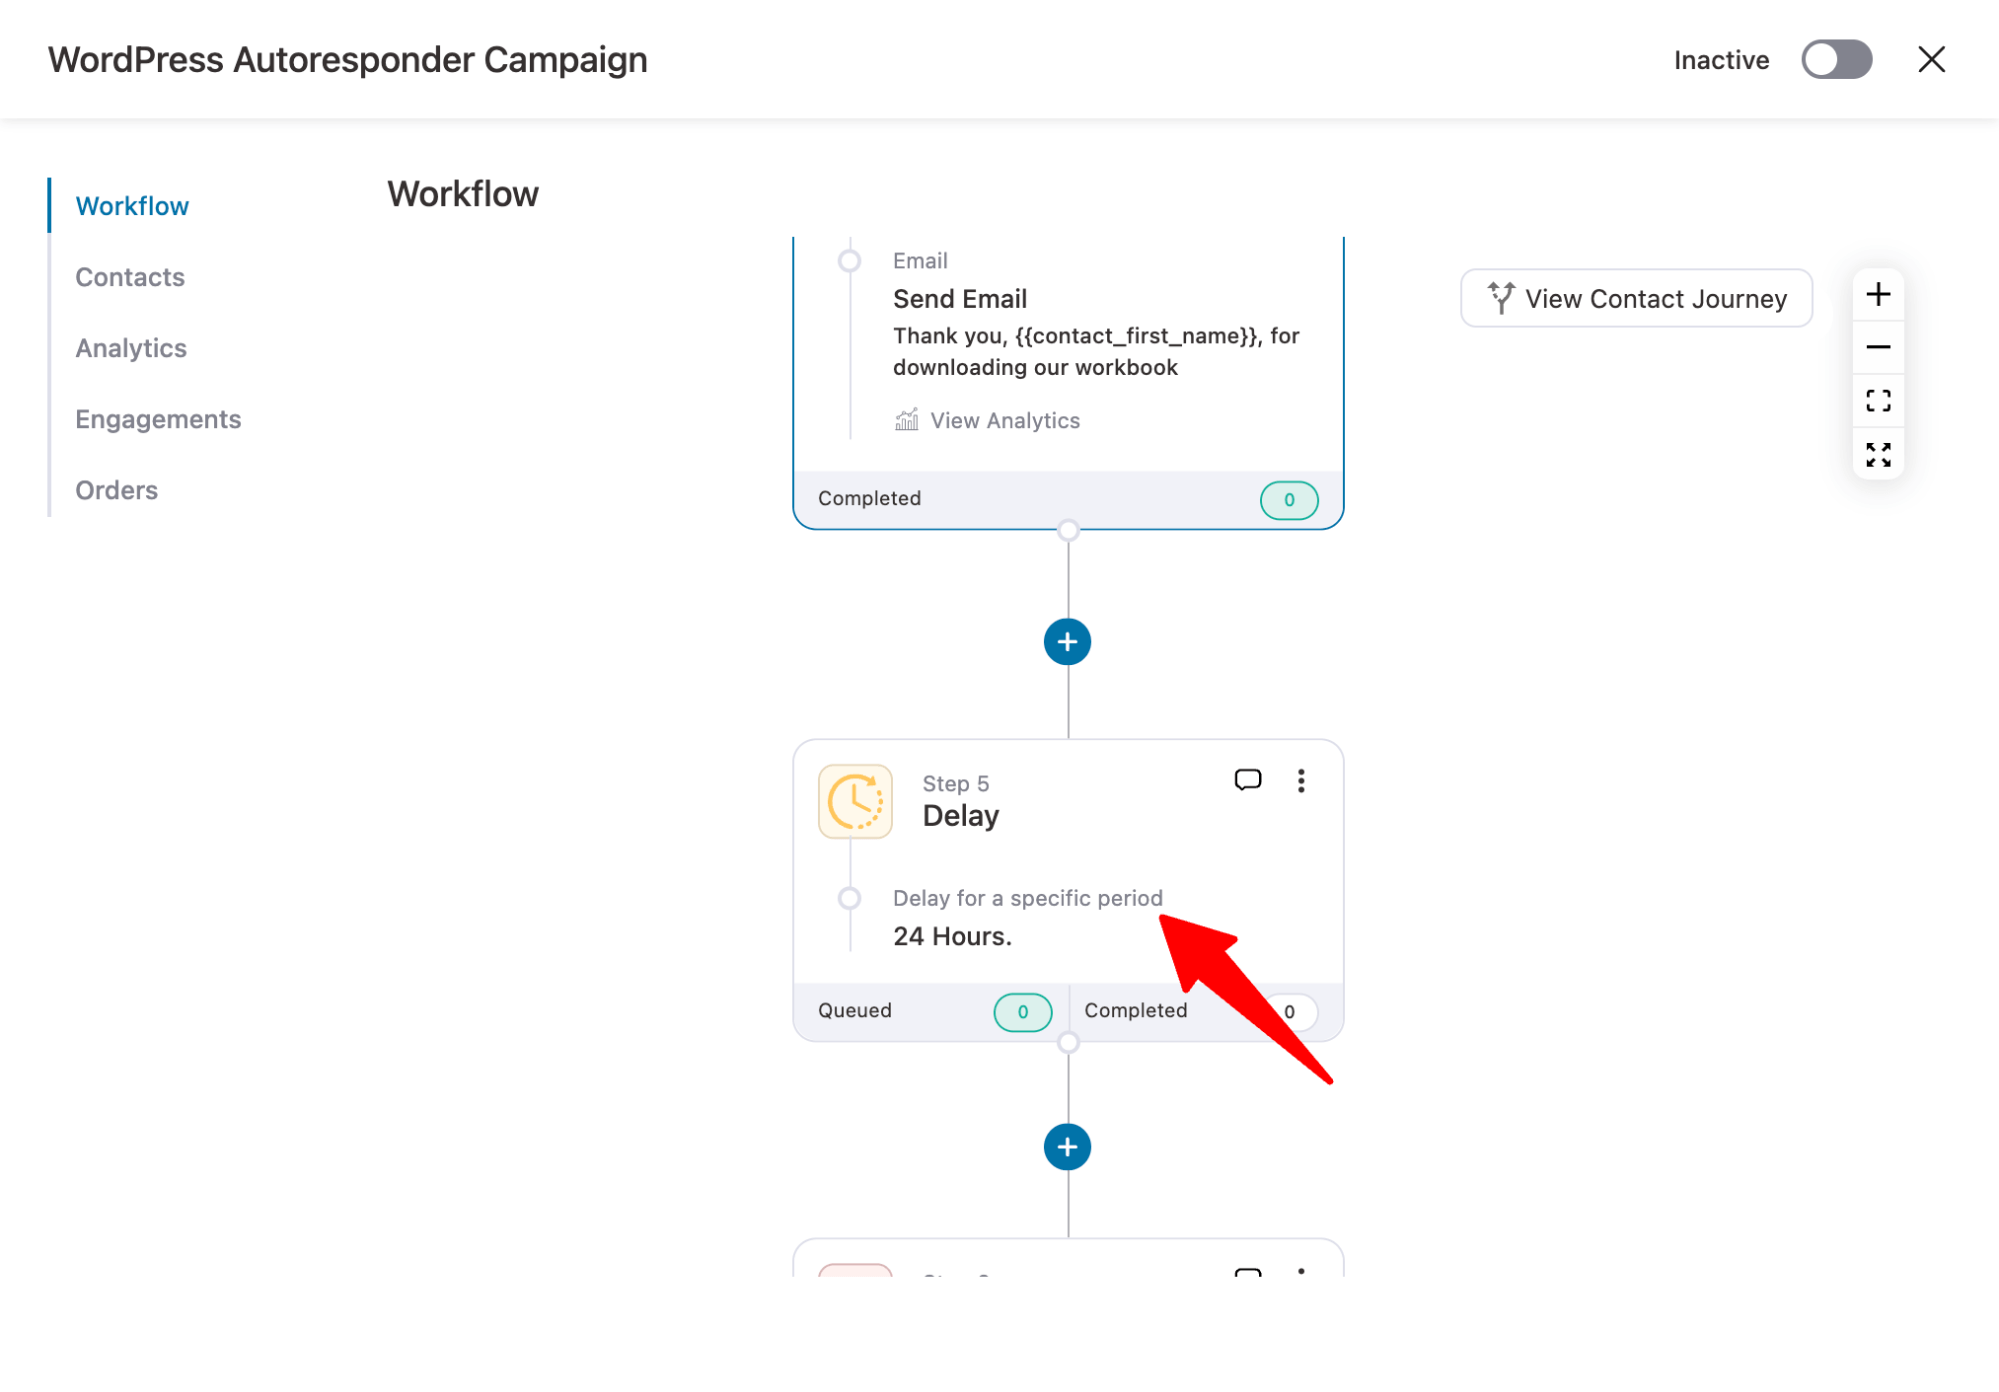
Now update the delay period, then click 'Save'.
You can set the delay in minutes, Hours, Days, Weeks, or months.
Repeat the same process to customize all the email content and delay according to your strategy.
You can even delete some steps if you don’t want them in your automation.
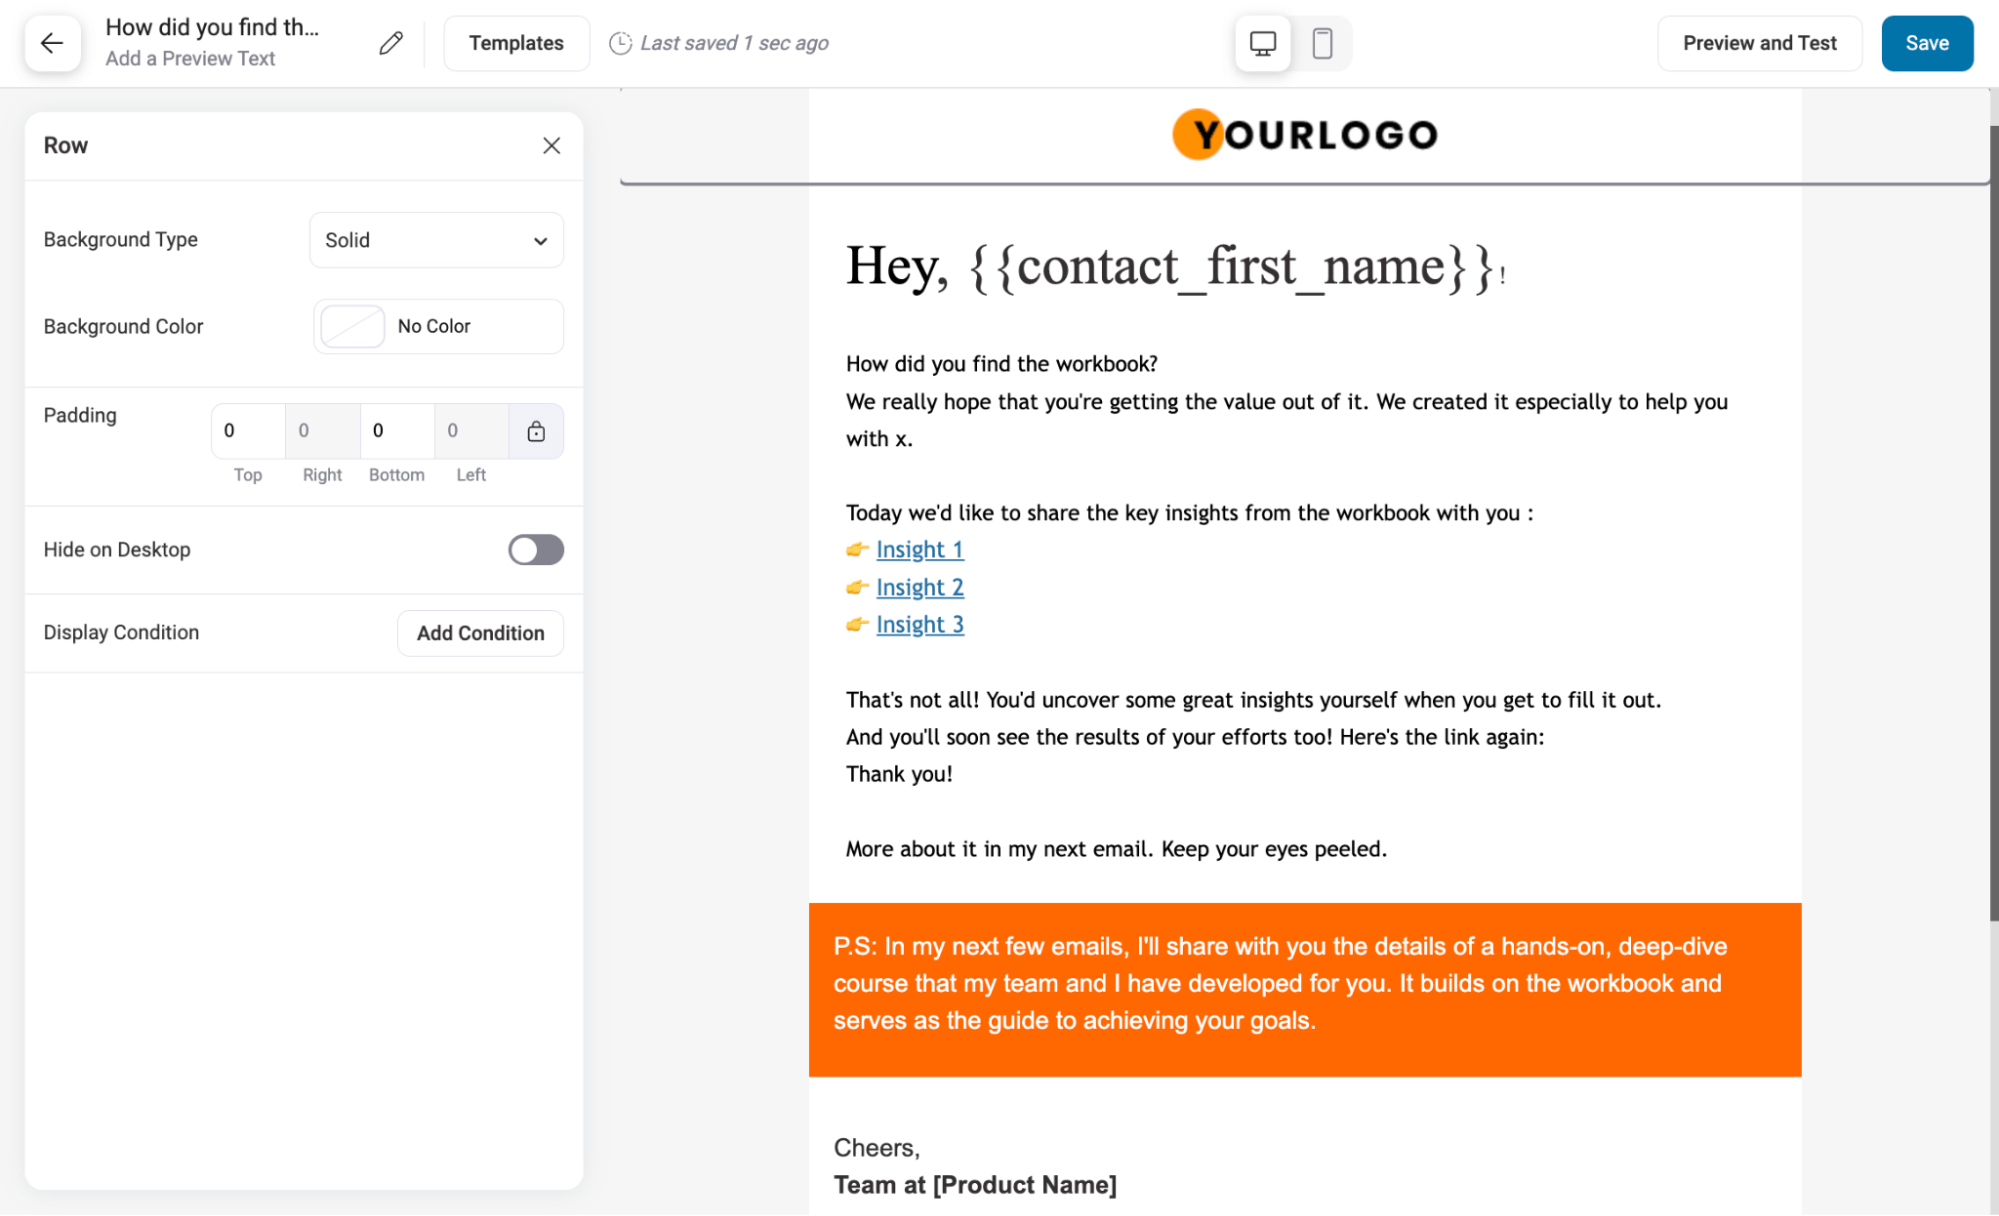
Here is the preview of the second email we designed using Visual Builder.
Here is the third email.
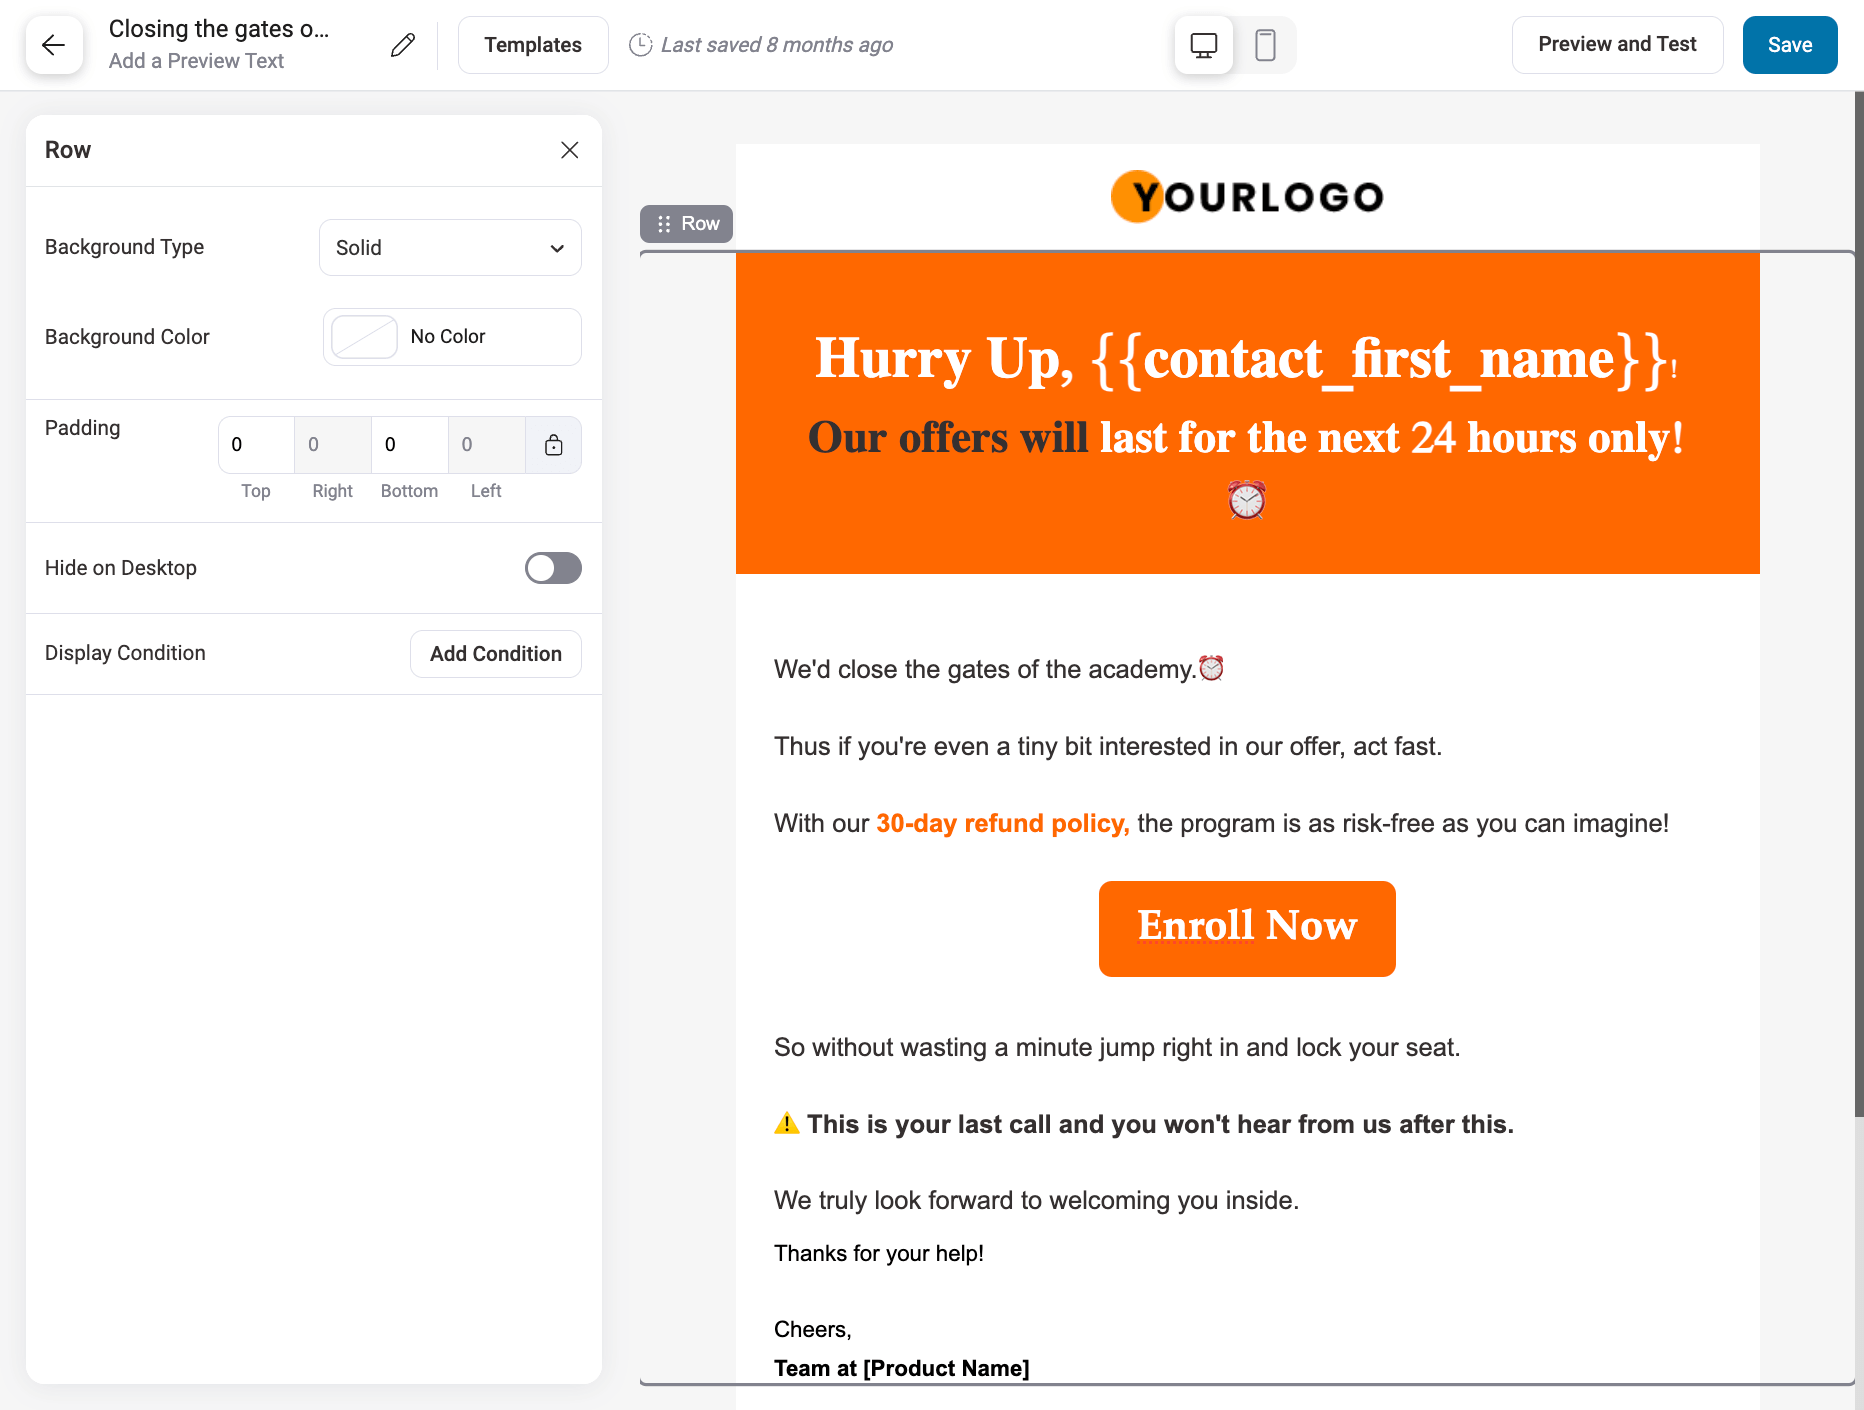
This is the last email.
After customizing all the emails and delays, move to the next step.
Step 6: Activate the WordPress Autoresponder campaign
Once you are happy with your campaign, it’s time to activate it. To do so, click on the Activate Toggle button in the top right corner.
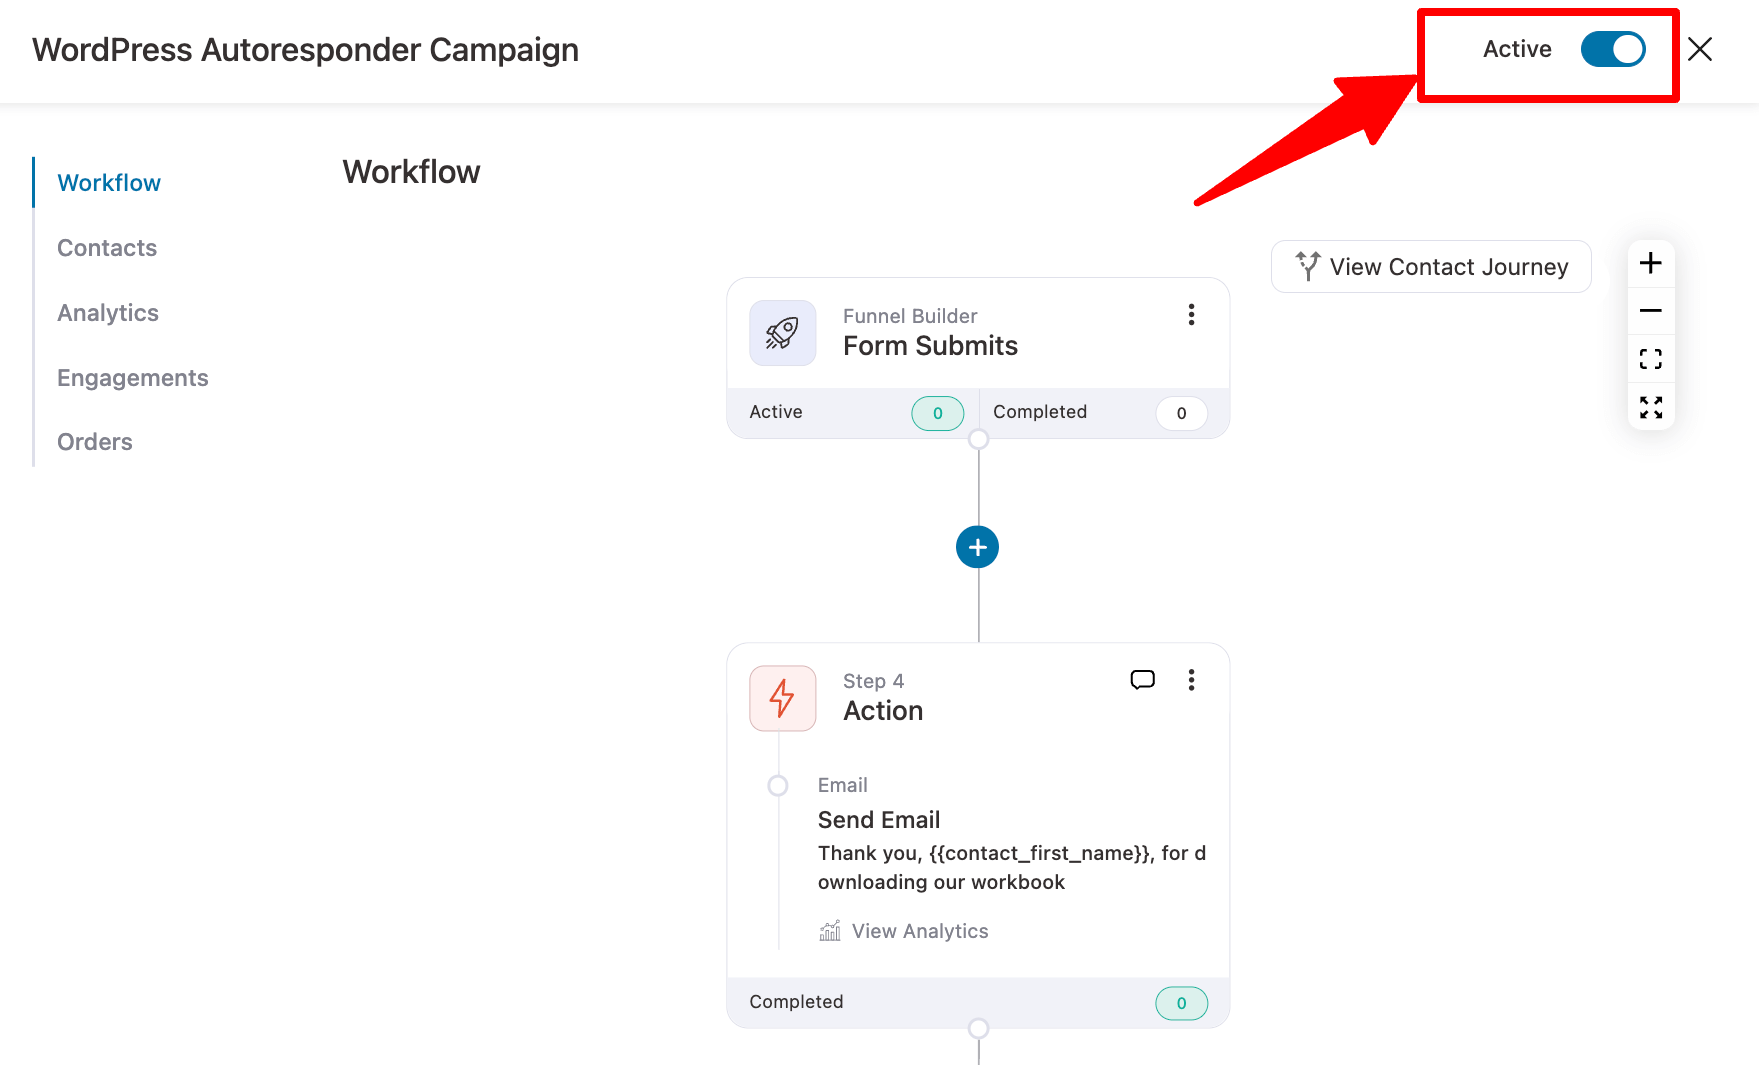
And that’s it. Your WordPress autoresponder is ready to send a series of emails to your new subscribers, turning them into paying customers.
5 Best WordPress Autoresponder Plugins (2026)
Here is a quick overview of the best autoresponder plugins for WooCommerce.
| Plugin | Key Features | Pricing |
|---|---|---|
| FunnelKit Automations | Email & SMS automation from the WordPress dashboard Visual email builder with prebuilt templates Advanced triggers & analytics Dynamic discount coupon Detailed analytics A/B testing | Free plan available, pro starts at $99.50/year |
| OptinMonster | Popup builder for lead gen Advanced display rules. Integrates with popular ESPs | Free available, pro starts at $126/year |
| HubSpot | All-in-one CRM + email automation Visual workflows & A/B testing Built-in analytics | Free available, pro starts at $50/month |
| Kit (formerly ConvertKit) | Visual automation builder Subscriber tagging & segmentation Custom templates | Free available, pro starts at $390/year (pricing increases as per your contact list) |
| Mailchimp | Email templates & automation Audience segmentation In-depth analytics | Free available, pro starts at $14/month (pricing increases as per your contact list) |
You can find more details about each plugin later in this post.
Key Criteria We Used to Pick the Best WordPress Autoresponder Plugins
We tested over 20 WordPress autoresponder plugins to find those that are not only feature-rich but also easy to use and extensible.
Here's what we focused on while narrowing down our list:
- User-friendly interface
The plugin should be intuitive with a clean dashboard, making it simple to create, manage, and monitor your campaigns without a steep learning curve.
- Flexible automation
We prioritized plugins that support a wide range of automation triggers like sign-ups, purchases, form submissions, and more, so you can build workflows that match your business needs.
- Smart Segmentation
Segmenting your audience by behavior, preferences, or user attributes is a must. We looked for tools that make this process seamless and help you deliver personalized content at scale.
- Seamless Integration
The best plugins integrate seamlessly with your CRM, eCommerce platform, lead-generation tools, and other plugins, ensuring your marketing stack works as one.
- Insightful Reporting
You need data to improve. We only picked plugins that offer built-in analytics for open rates, click-throughs, conversions, and more, so you can fine-tune your email strategy.
1. FunnelKit Automations
FunnelKit Automations is one of the best autoresponder plugins out there. We chose this as our first pick because this plugin has all the qualities and features an ideal email autoresponder should have.
Along with triggered emails, you can also send custom transactional emails, broadcast emails and SMS with this free WordPress autoresponder plugin.
The best part is that it lets you create and handle your email autoresponders directly from the WordPress dashboard.

Here are some of the key features of this all-in-one email marketing platform:
- Action triggers: FunnelKit offers a wide range of action triggers you can use to set up autoresponders based on user activity. Some triggers include users signing up, logging in, placing an order, submitting a form, or abandoning a cart.
- Custom transactional emails: In addition to multiple action triggers for various events, you can replace the default transactional emails with custom ones to enable clearer, more personalized communication.
- Prebuilt recipes: You get a wide range of prebuilt email autoresponder recipes that you can import and use in a few clicks. Some of the prebuilt recipes include abandoned cart campaigns, win-back campaigns, post-purchase sequences, etc.
- Visual email builder: Funnelkit has a built-in drag-and-drop email builder that lets you create beautiful, customized emails by dragging and dropping elements.
- In-depth Analytics: You get in-depth analytics from active contacts, completed contacts, orders, revenue, AOV, etc.
- 3rd-party integrations: FunnelKit integrates with popular CRMs, including ActiveCampaign, Drip, and Kit.
Price: You can get started with FunnelKit Automations for free. The Pro version starts at $99.50 per year.
2. OptinMonster
If lead generation is your main aim for your email autoresponder WordPress plugin, then OptinMonster is a good choice.
With its powerful pop-ups and conversion tracking, it has become highly popular among WordPress users.
With the help of Mailchimp, Constant Contact, FunnelKit Automations, or any other popular email service, you can connect it easily to OptinMonster to set up your autoresponder.
Here are some of the key features of OptinMonster:
- Drag-and-drop builder: OptinMonster has a drag-and-drop form builder that lets you create beautiful lightboxes, floating bars, and slide-in popups. You also get many pre-built templates that help you capture leads for your business.
- Advanced targeting features: You can do advanced targeting with OptinMonster by showing different pop-ups on different pages. This will help you to collect leads more effectively.
- Many email service integrations: This WordPress autoresponder plugin integrates with third-party email services, including Drip, MailChimp, HubSpot, and ActiveCampaign.
Price: A free version is available. The pro version starts from $126/year.
3. Hubspot
Hubspot makes email automation and marketing super easy for small businesses. You can easily set up your entire marketing dashboard, monitor campaigns, and handle email marketing automation.
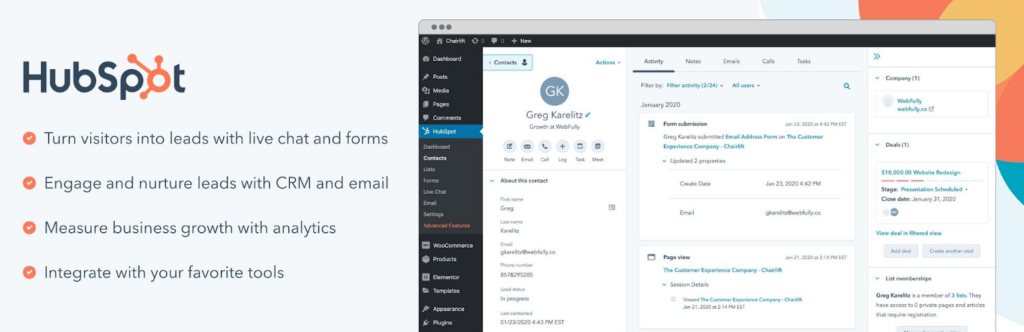
Here are some of the key features:
- Advanced automation workflows: You can create an advanced email automation workflow in HubSpot that saves you time and effort.
- Easy-to-use drag-and-drop form builder: You can create custom forms just by dragging and dropping with this useful tool.
- Lead generation tracking: You can nurture your leads by sending newsletters & automating email marketing campaigns. And easily track how the emails are performing.
- A/B test emails: You can A/B test your email newsletters with HubSpot and easily find out what resonated with your audience.
- Seamless Integrations: HubSpot integrates with various email marketing automation tools, including ActiveCampaign, Campaign Monitor, Constant Contact, Drip, and Mailchimp.
Price: The HubSpot WordPress plugin is free. The paid version starts at $50/month.
4. ConvertKit
ConvertKit is an excellent choice for a WordPress email autoresponder because of its advanced automation features, detailed analytics, and email builder.
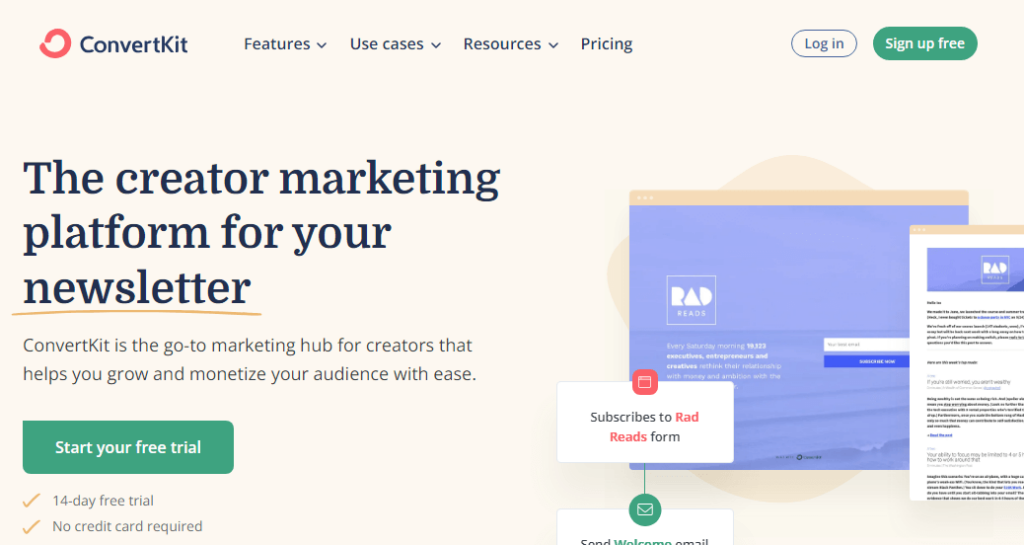
Here are some of the key features:
- Email designer: ConvertKit offers a flexible email designer that lets you create beautiful emails without any coding knowledge. You can also create your email template library.
- Design email newsletter: You can create a modern-looking email newsletter and send content, such as a PDF, via email using this tool.
- Segmentation: You can add tags to users when they sign up, thereby segmenting your audience in a meaningful way.
- Automation builder: ConvertKit includes an intuitive visual builder that lets you create automation without complications. The visual automation builder gives you an eagle-eye view of how a user enters and exits an automation.
- Integrations: ConvertKit integrates with more than 70 marketing and e-commerce platforms.
Price: You can use the ConvertKit WordPress plugin for free. The premium tool starts at $390/year, but the pricing varies as your email list grows.
5. MailChimp
With the MailChimp plugin for WordPress, you can easily grow your email list and connect to your MailChimp account in a few seconds.
With over 2 million active installations, this is one of the most popular WordPress autoresponder plugins.
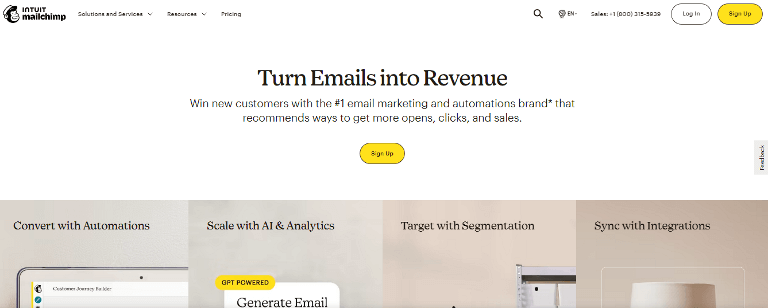
Here are some of the key features:
- Email Templates: Mailchimp provides a user-friendly interface for creating and sending email campaigns. Users can choose from a variety of professionally designed templates and use them without coding skills.
- Audience Segmentation: Mailchimp allows users to manage their email lists, segment their audience by demographics, preferences, purchase history, and more, and send targeted emails to specific segments.
- Marketing Automation: You can set up automated email sequences based on user behavior, triggers, or specific dates. This includes welcome emails, abandoned-cart reminders, birthday greetings, and more.
- Analytics and Reporting: This WordPress email autoresponder provides in-depth analytics and reporting, allowing users to track the performance of their email campaigns.
- Seamless Integrations: MailChimp integrates with Contact Form 7, Gravity Forms, Ninja Forms, WPForms, BuddyPress, MemberPress, and more.
Price: The MailChimp WordPress plugin is free. The pro version starts at $14/month.
Self-Hosted vs SaaS Autoresponders: Which Is Right for You?
You have two choices for your email engine. Self-hosted plugins. Or external SaaS platforms.
The decision usually comes down to who owns your data and how much you want to pay as your list grows.
- Self-hosted autoresponders
Self-hosted autoresponders (like FunnelKit Automations or FluentCRM) live directly inside your WordPress dashboard.
Your database holds the contacts. Your server stores the workflows. You buy an annual license and you're done. No escalating monthly fees just because your marketing actually worked and your list grew.
Plus, nobody can shut you down. You own the content.
That ownership aspect is huge. Browse any eCommerce Reddit thread and you will find horror stories of SaaS platforms suspending accounts overnight over vague policy violations.
Their campaigns were silently paused, and the service eventually locked them out completely. Email providers are getting much stricter about what you can and cannot say.
Self-hosting bypasses that completely. Your server. Your rules.
- SaaS autoresponders
SaaS autoresponders like ConvertKit, Brevo, and Mailchimp take the opposite approach. They handle the sending infrastructure. You don't have to touch SMTP settings or monitor server loads.
Deliverability is baked in. But you pay a heavy price for that convenience. They charge per-subscriber. As your list scales, so does your bill. Fast. And if they hike their prices next year? Your only option is a painful, massive migration.
Cost is where self-hosting really wins. Pair a plugin like FunnelKit with a raw sending service like Amazon SES.
SES charges roughly 10 cents for every 1,000 emails you send. If you got a list of 10,000 people, that costs maybe three bucks a month.
Try pricing out 10,000 contacts on a standard SaaS platform. You're looking at $50 to $100 a month, minimum.
If you want to keep costs under $15 a month, hooking a self-hosted plugin into Amazon SES or SendGrid's free tier is basically the only logical setup.
5 Autoresponder Sequences Every WordPress Site Needs
Here are some must-have sequences for your WordPress website.
1. Welcome series for new newsletter subscribers
A welcome email series is the first impression your brand makes.
Send an immediate welcome email that confirms the subscription, introduces your brand, and sets expectations for future content.
Follow up over the next few days with your best resources, a subscriber-exclusive offer, or a short survey to learn about their interests.
2. Recover abandoned carts with timed reminders
Set up a three-email sequence that sends a gentle reminder one hour after cart abandonment, a benefit-focused follow-up the next day, and a final email with a small incentive two to three days later.
Abandoned cart emails recover an average of 3-5% of lost sales. For e-commerce autoresponder setups, this is typically the highest-revenue automation you can build.
3. Send post-purchase follow-ups and cross-sell recommendations
After a customer completes an order, send a confirmation email, then follow up with a check-in a few days later.
Ask if they have questions about their purchase, then recommend complementary products based on what they bought.
This WordPress autoresponder for e-commerce builds customer loyalty and drives repeat purchases without manual outreach.
4. Request product reviews after delivery
Send a review request email a few days after the order is delivered. Wait long enough for the customer to use the product, but not so long that the purchase feels distant.
Include a direct link to the review form to reduce friction. Social proof from reviews builds trust and influences future buyers.
5. Re-engage inactive subscribers with a winback campaign
Subscribers who have not opened your emails in 60 to 90 days need a re-engagement sequence.
Send a “we miss you” email, followed by a “here is what you have missed” roundup, and finish with a final email that asks if they still want to hear from you.
This sequence either reactivates dormant subscribers or cleans your mailing list, both of which improve your overall deliverability and sender reputation.
Start Automating Your Emails With the Perfect WordPress Autoresponder!
We covered what a WordPress autoresponder is, how it works under the hood, and how to set up an automated email sequence step by step.
Autoresponders help you to convert customers on autopilot with minimal effort and resources.
For WordPress and WooCommerce users who want full control over their email automation and contact data, we recommend FunnelKit Automations.
It gives you a visual workflow builder, deep WooCommerce integration, rich contact profiles, pre-built automation recipes, and complete data ownership, all inside your WordPress dashboard.
So, are you ready to create your own email autoresponders in WordPress using FunnelKit?
Editorial Team
July 3, 2026Discover how a canceled order doesn't have to mean a lost customer, and how the right WooCommerce canceled order email can turn it into a second chance. WooCommerce canceled order...
Editorial Team
July 3, 2026Choosing the right WooCommerce HubSpot integration is harder than it looks because HubSpot has no first-party WooCommerce sync and every third-party option handles data differently. Pick the wrong connector and...
Editorial Team
July 1, 2026WooCommerce custom emails per product let you send a different message to customers based on the exact item they buy. To send a different email depending on what someone buys...


