

Imagine walking into a coffee shop, ordering a coffee latte, and the barista says… nothing. No offer for a pastry, no suggestion for an extra shot of espresso. Just silence. Sounds like something's missing, right?
That’s exactly what happens when your WooCommerce checkout doesn’t include upsells.
Your customers are ready to buy from your store, yet you're not offering them anything extra. This way, you're leaving easy revenue on the table.
Studies show that upselling can increase sales by up to 30%, but many store owners either don’t know how to do it or worry these will annoy shoppers.
The truth? Checkout upsells can feel seamless and helpful if you do them right.
In this guide, we'll walk you through how to add high-converting WooCommerce checkout upsells that increase your revenue without feeling pushy.
Table of Contents
- 1 What is a WooCommerce Checkout Upsell?
- 2 How Does Checkout Upsell Work in WooCommerce?
- 3 Why Add WooCommerce Checkout Upsells to Your Store's Buying Journey?
- 4 How to Set Up Pre-Purchase Upsells on the WooCommerce Checkout Page?
- 4.1 Step 1. Create a store checkout
- 4.2 Step 2. Customize the WooCommerce checkout page
- 4.3 Step 3: Add an order bump as a pre-purchase upsell
- 4.4 Step 4: Set up rules for your WooCommerce upsell on the checkout page
- 4.5 Step 5: Enable store checkout
- 4.6 Bonus step: Upgrade the cart through pre-purchase order bumps
- 5 How to Set Up WooCommerce Post-Purchase One-Click Upsells?
- 6 9 Best Practices to Increase WooCommerce Checkout Upsell Acceptance Rates
- 7 Common FAQs Regarding Checkout Upsell in WooCommerce
- 8 Are You Ready to Transform Your Checkout Page with Strategic Upsells?
What is a WooCommerce Checkout Upsell?
A WooCommerce checkout upsell is an offer presented to shoppers on the checkout page or immediately after they place their order. The goal is to recommend products that complement what the customer is buying or offer a better version.
For example, if customers add a smartphone to their cart, a checkout upsell might suggest a protective case, screen protector, or extended warranty at a discount.
These offers usually appear on the checkout page, just as the customer is about to complete their purchase. The timing is key because customers are likely to add extra items when they’re close to buying.
How Does Checkout Upsell Work in WooCommerce?
Checkout upsell in WooCommerce works by suggesting additional or related products to customers during checkout.
Here's the general workflow of the process:
- Customers add an item to the cart
- They proceed to the checkout page
- An order bump offer is presented at checkout
- They place an order
- A one-click upsell is presented after checkout
- If accepted, the upsell item is added to the cart.
- If declined, the checkout process continues as normal
- Finally, they land on the thank you page
This upsell strategy not only enhances the shopping experience but also gives store owners a simple way to increase their average order value.
It helps bring in more revenue while leaving customers satisfied.
Why Add WooCommerce Checkout Upsells to Your Store's Buying Journey?
We know that the main goal of checkout upsells is to bump up the average order value.
By suggesting related or valuable products, you’re not only boosting sales but also improving your customers' shopping experience.
It’s all about creating a win-win situation: the customer finds something they might’ve missed, and the store gets more sales without any extra work.
What else can it facilitate for your business? Let's figure it out below!
- Boost conversion rates
When customers reach the checkout, they’re already in a buying mindset. That’s the ideal moment to suggest something that fits perfectly with what they’re already getting.
By tailoring these upsell offers to be relevant, you’ve got a better shot at getting them to add a little something extra to their cart.
- Increase average order value
A well-placed upsell encourages customers to spend a bit more time on your website. By offering items that align well with what they're already buying, you make it easy for them to add extra products to their purchase.
This means more revenue per sale without always having to find new customers.
- Gives flexibility in marketing
Customizing checkout upsells gives you a great chance to get creative with your marketing. You can experiment with different offers, highlight seasonal deals, or put together special bundles right when your customers are ready to buy.
This flexibility enables quick A/B testing and strategy adjustments based on customer activity.
For example, let’s say you’re running an online clothing store. At checkout, you customize upsells to highlight a winter scarf when a customer buys a winter coat. You can test different offers, such as discounting the scarf or pairing it with gloves.
- Improves customer experience
A good experience today means a repeat customer tomorrow. When customers feel like you’re valuing them and find what they need, they’re more likely to come back.
Yes, upselling isn’t about pushing more products. Instead, it’s about making shopping better for your customers.
By suggesting related products that go well with what they’re buying, you make their experience smoother and more enjoyable.
Suppose a customer is buying a camera. Suggesting a memory card or a camera case that fits their new purchase makes their shopping easier and more convenient.
- Differentiates your brand identity
In an oversaturated online market, standing out is key. Customizing your checkout upsells is a great way to highlight what makes your brand unique.
Whether it’s showcasing a special product or offering an exclusive deal, you can use upsells to reflect your brand’s personality.
A strong brand identity attracts loyal customers. When customers see that your upsells reflect your brand’s unique focus on quality, it strengthens their connection to your brand and encourages them to return for more.
How to Set Up Pre-Purchase Upsells on the WooCommerce Checkout Page?
Now it’s time to show the customization process of upselling in your WooCommerce store. For that, we’ll use the FunnelKit builder plugin.
FunnelKit is a versatile WordPress funnel builder designed to streamline the creation of high-converting sales funnels.
With its extensive collection of customizable templates and robust tools, FunnelKit simplifies optimizing your sales process, driving more conversions and boosting your revenue.
Get FunnelKit for your WooCommerce store from the button below.
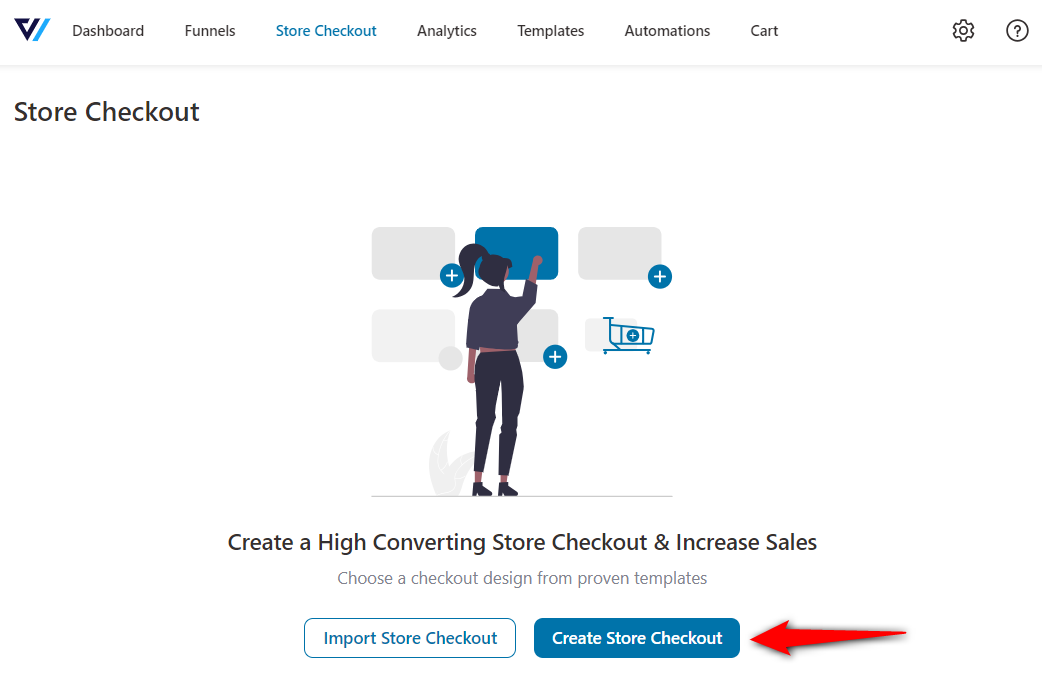
Step 1. Create a store checkout
First, go to FunnelKit’s store checkout page. Here, click on the 'Create Store Checkout' button.
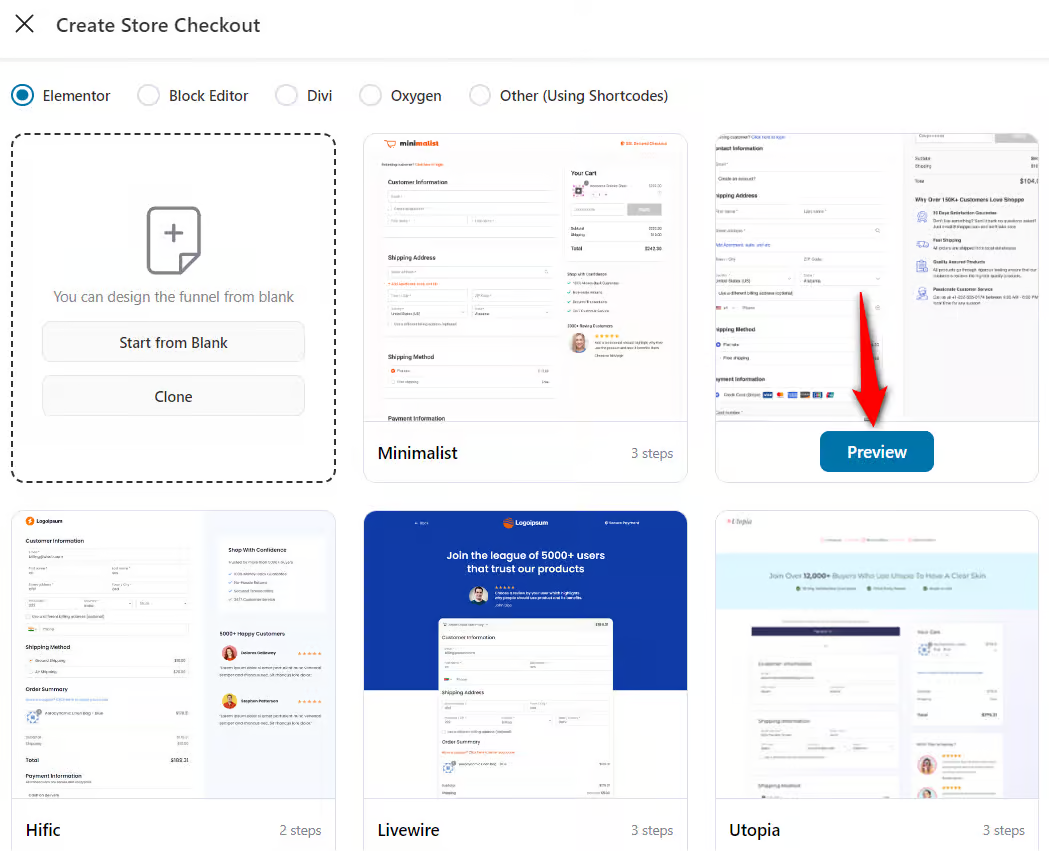
Next, you need to choose a template for your checkout page. Here are the different templates available.
Also, from the menu, you can choose a page builder or customize your checkout page.
Choose your preferred template and click on the 'Preview' button.
Here, you can preview the entire funnel’s workflow.
Select the number of steps you want on your checkout page, then click the 'Import this Funnel' button. Provide the name of your checkout page. Hit the 'Done' button.
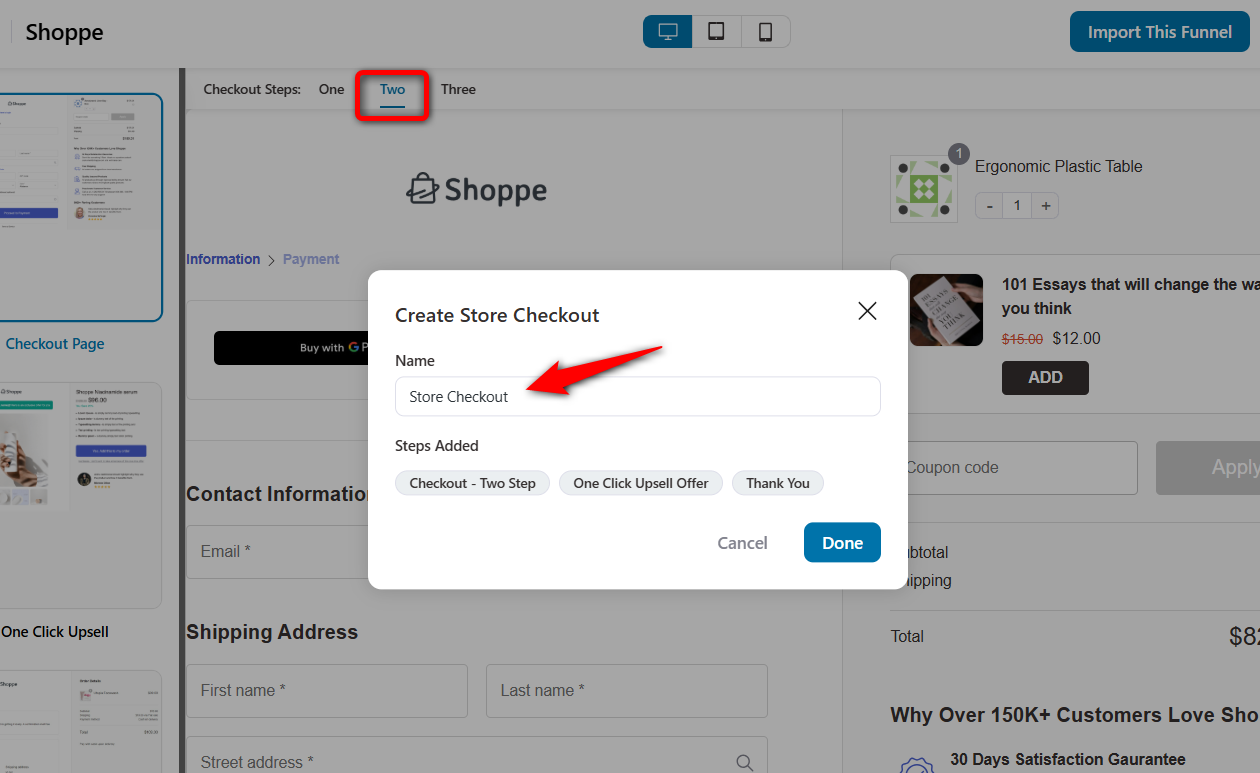
Your store checkout will be imported with a two-step checkout page, one-click upsell offer, and thank you page.
Step 2. Customize the WooCommerce checkout page
Now, click on the checkout page to customize it.
To customize the WooCommerce checkout page, you can directly edit it from here.
Just click on the 'Edit Template' button.
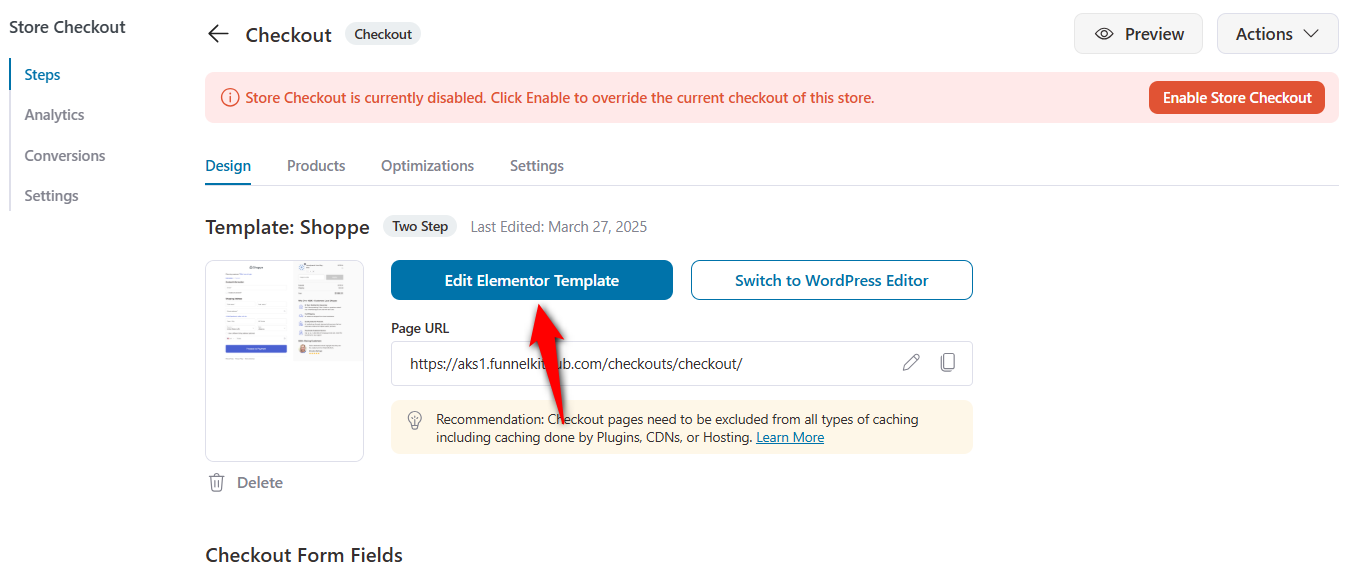
After you open the Elementor editing panel, you can easily edit the page as per your requirements.

Or you can check out the video tutorial below for more details:
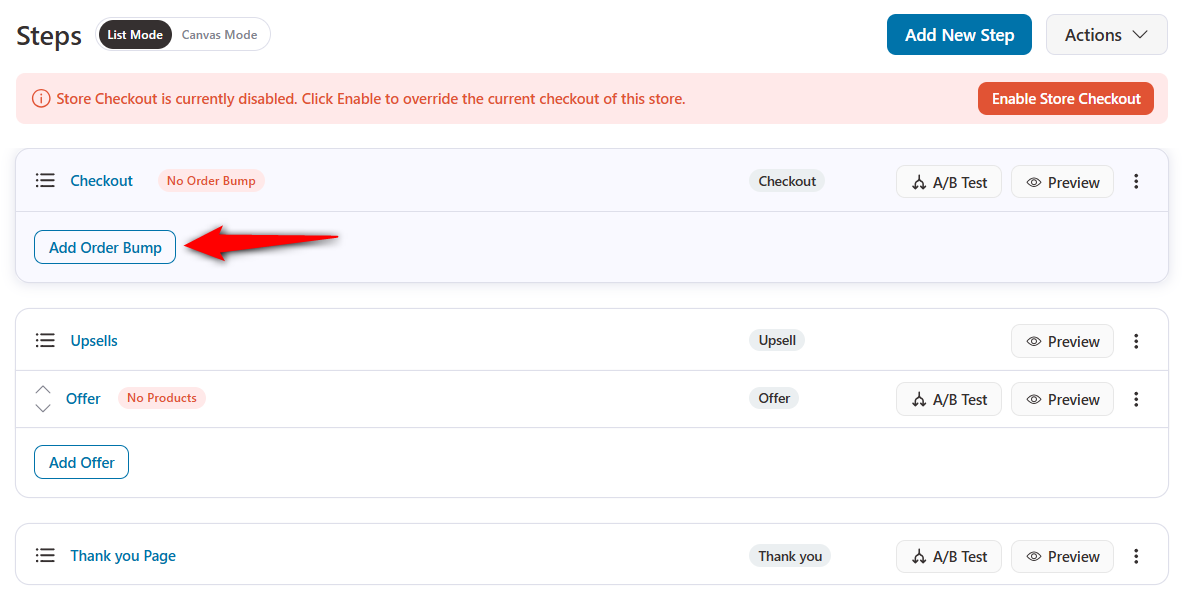
Step 3: Add an order bump as a pre-purchase upsell
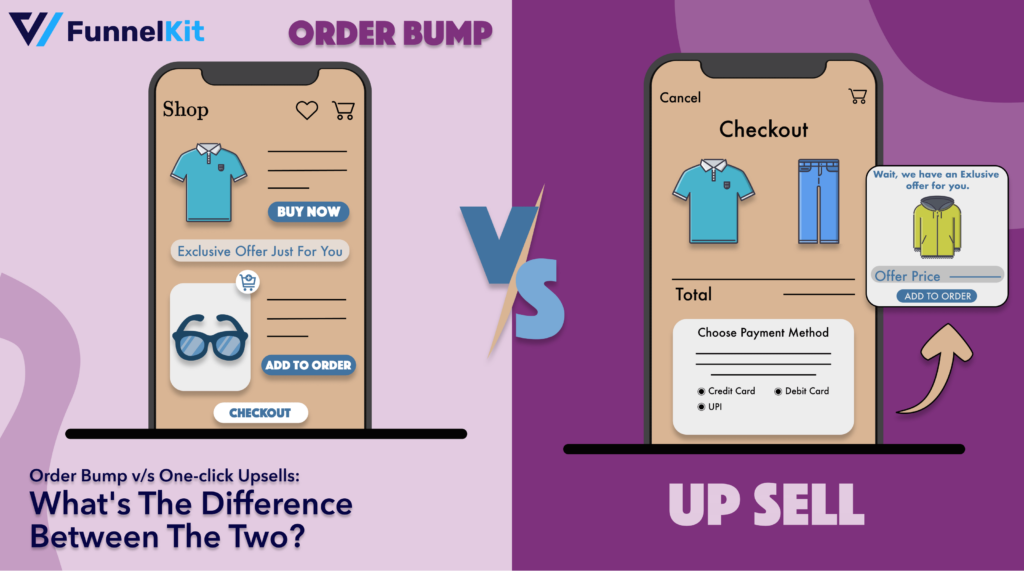
An order bump is like a last-minute suggestion you see just before you check out online. It’s usually a small, related item that you can add to your cart with just one click.
For example, suppose you're buying a book online. Right before you check out, the website suggests a related eBook for a small extra cost.
Let’s now add an order bump on the checkout page using FunnelKit.
To do that, click the 'Add Order Bump' button.
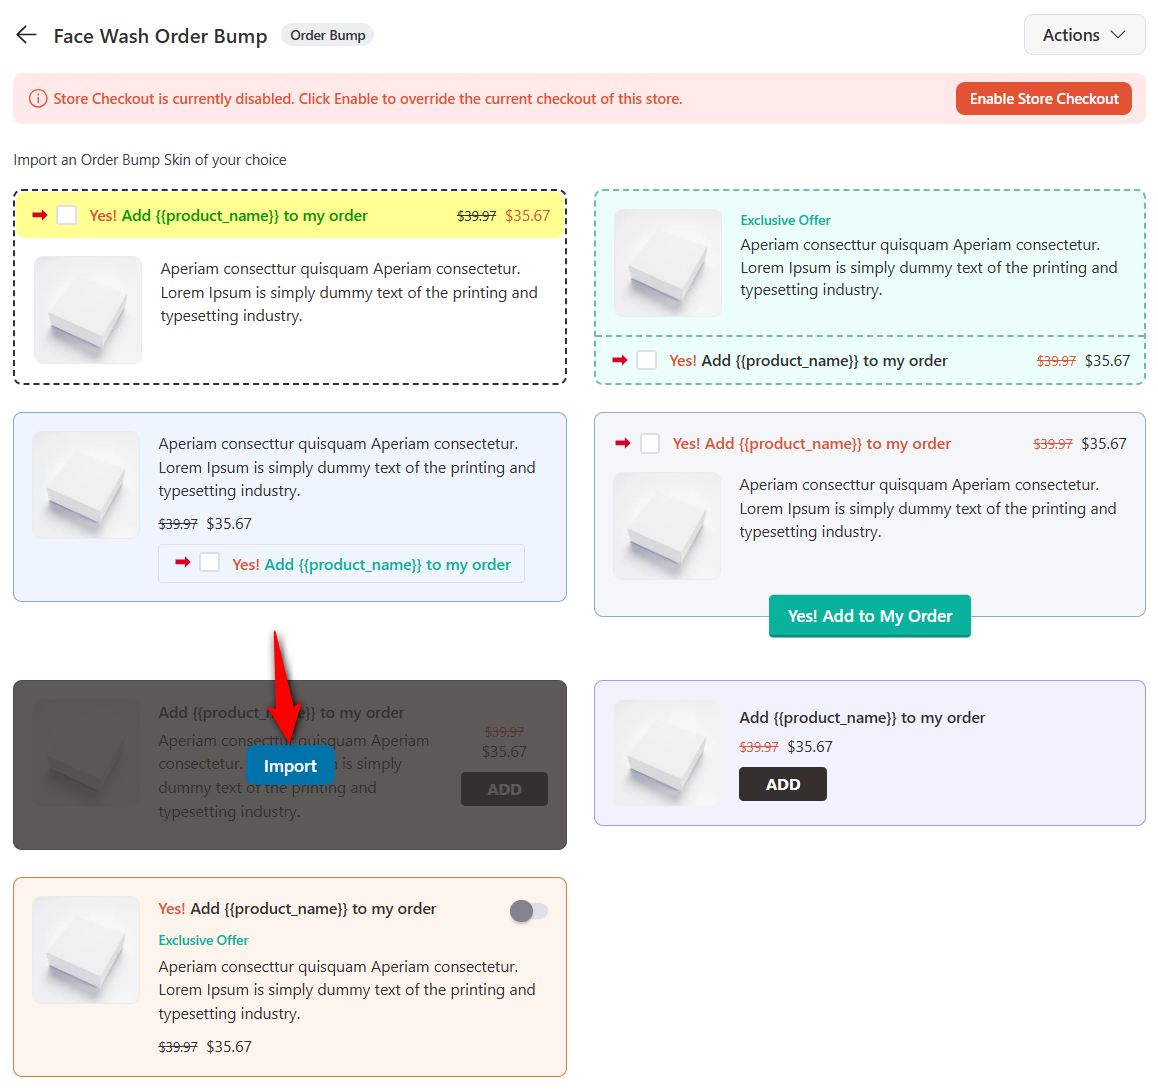
Next, give the name of the order bump. Let’s name it “Face Wash Order Bump”.
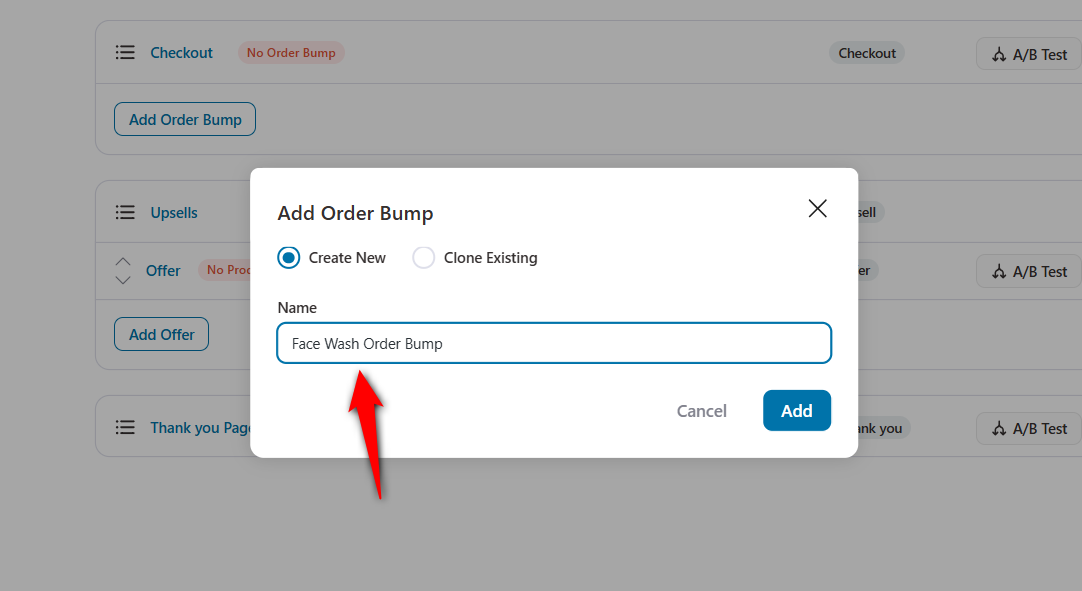
Next, choose your preferred order bump skin, then click the 'Import' button.
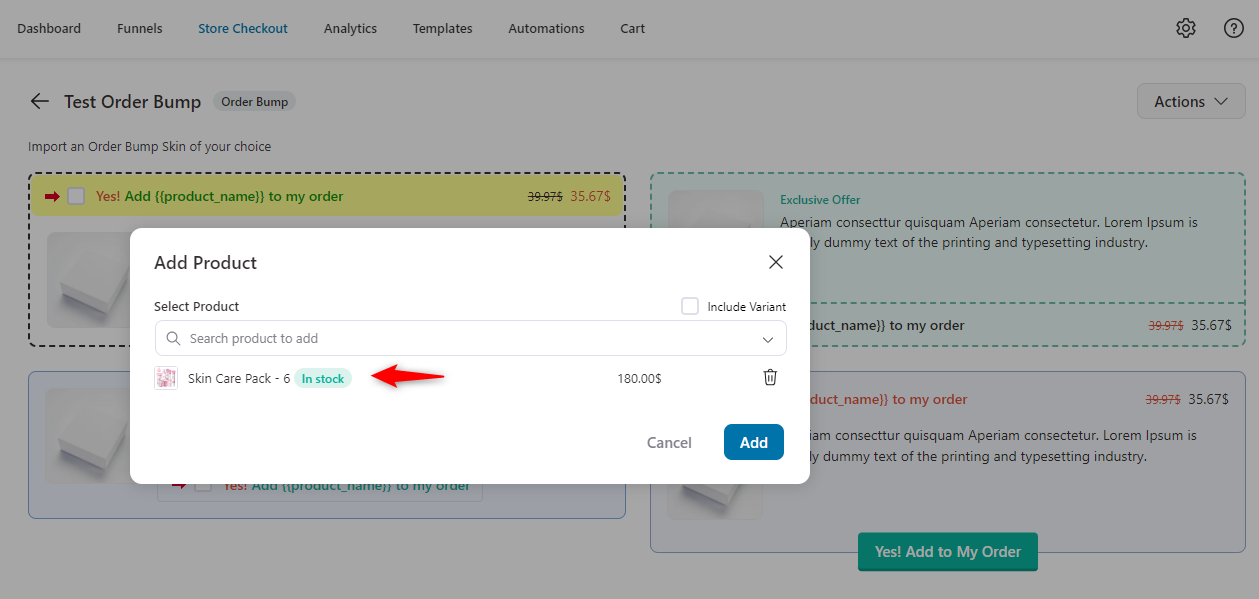
Now, you need to choose the product to offer as the order bump.
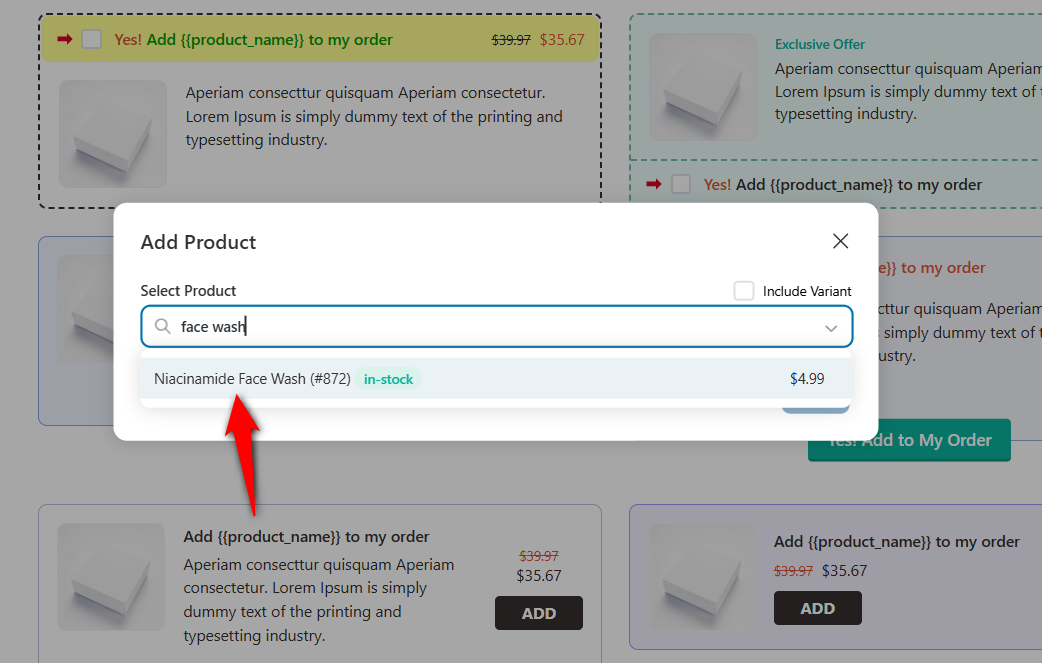
Make sure to click 'Add' when you have selected your product(s).
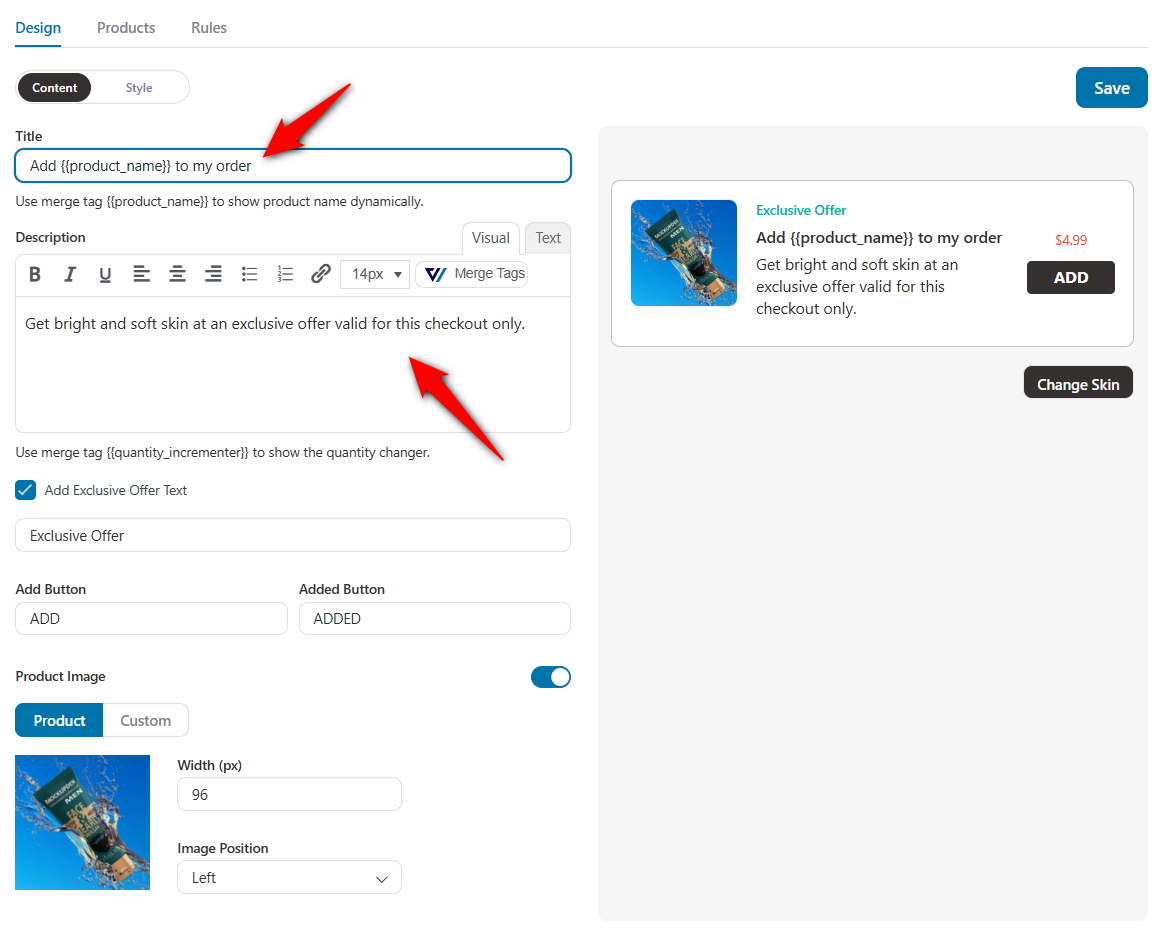
On the next page, you can customize the content of your order bumps:
- Product title: Add your preferred product title here.
- Description: Add a description that better explains the product or offer.
- Add exclusive offer text: Enable this feature to show the exclusive product or offer.
- Add button text: Before adding the product to the cart, you can set the text.
- Added button text: After adding the product to the cart, you can also set the text that will appear.
- Enable/Disable Product image: You can enable or disable the product image
- Resizing the image: Resize the product image width and position
- Enable social proof tool tip: Enter customer review or social proof about how many accept this upsell or how the product has helped them.
Also, you'll get a visual preview of the order bump so you can see the updates instantly.
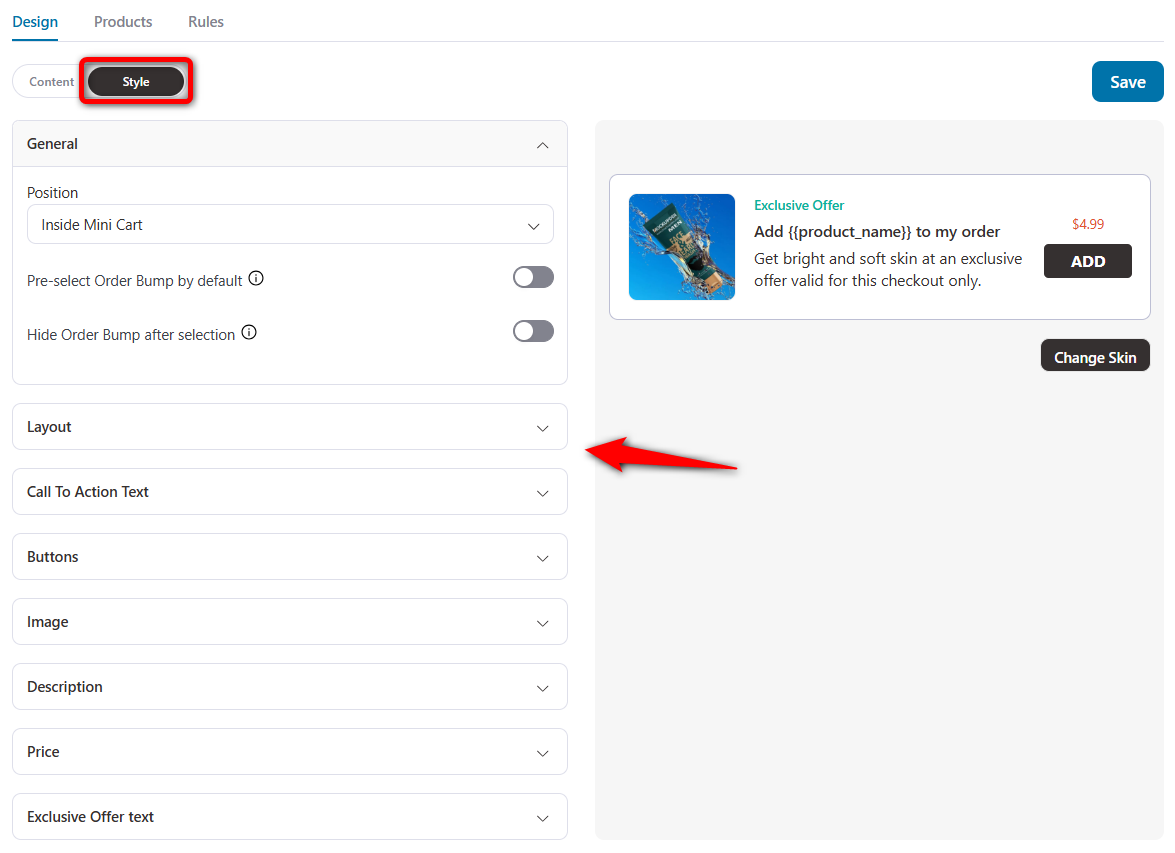
On the Style tab, you can design your order bump depending on your brand’s tone and requirements.
You can set the position, layout, call-to-action, button, image, description, price, and exclusive offer text for your WooCommerce checkout upsell offer.
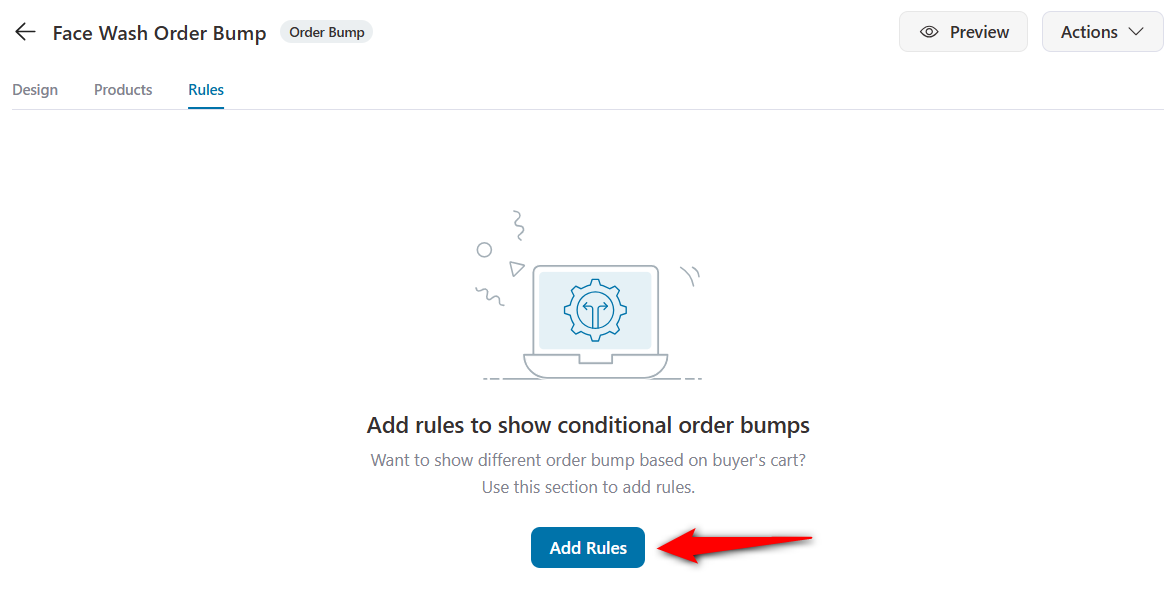
Step 4: Set up rules for your WooCommerce upsell on the checkout page
Since you've set up order bumps on your store checkout, it'll be visible to all shoppers for any product they add.
To make our WooCommerce checkout upsell offer relevant, we'll set up rules.
Suppose you want to offer a face wash if anyone buys a Gel Cream or Face Serum from your store. For that reason, it will only appear when users place an order for these products.
Let’s see how to do it.
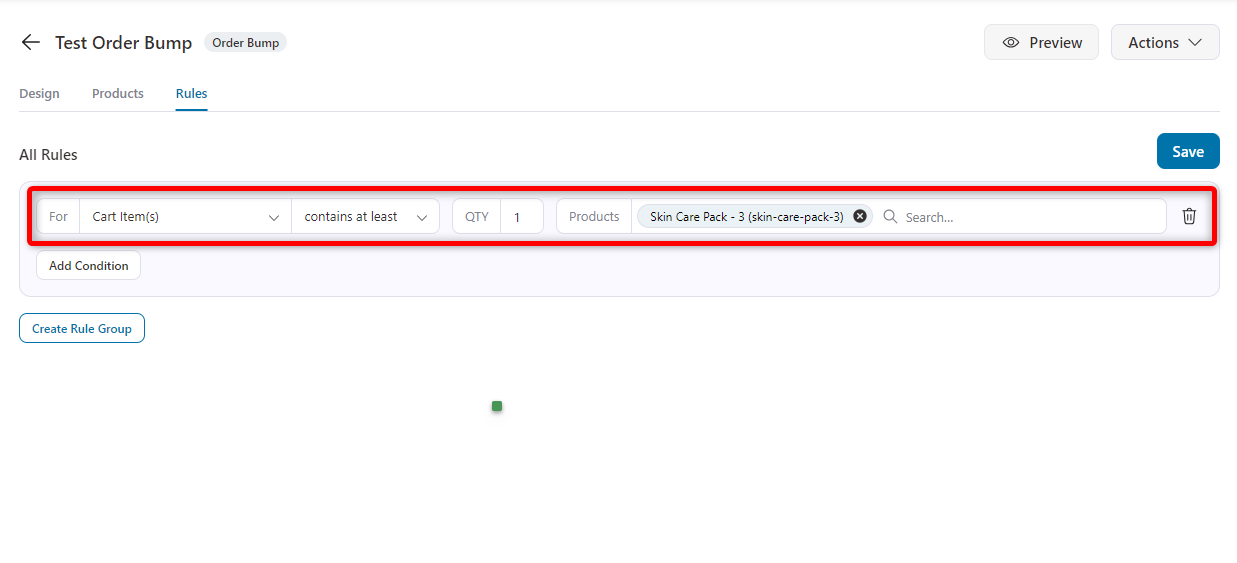
Click on the 'Add Rules' button to get started.
You can add different sets of rules. You can choose the best one for your business depending on your policy and marketing strategy.
Here, let's choose the 'Cart Item(s)' rules. This means that upsell products will appear based on the items in the cart.
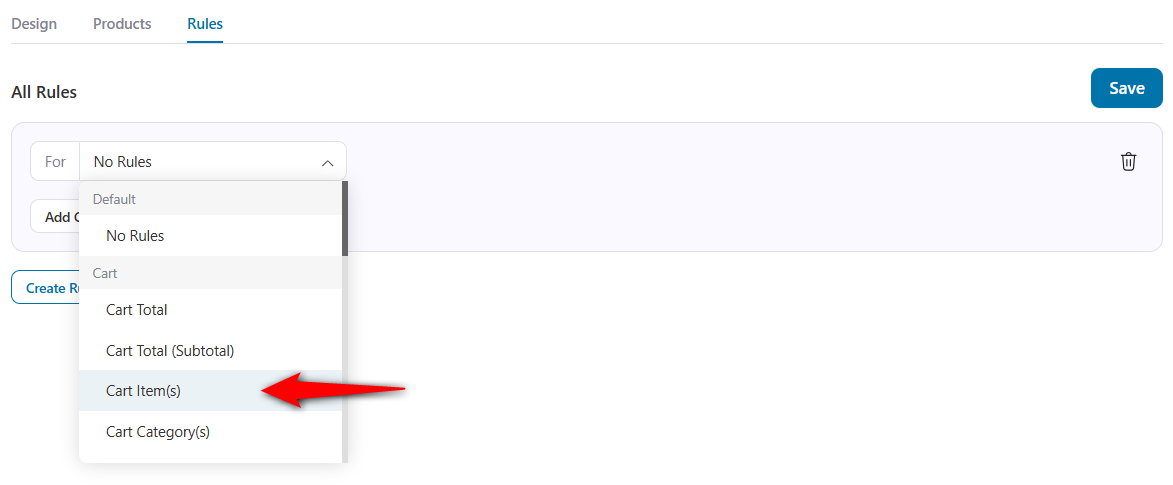
Next, select the “Contains At Least” option. And specify the item as Gel Cream and Face Serum.
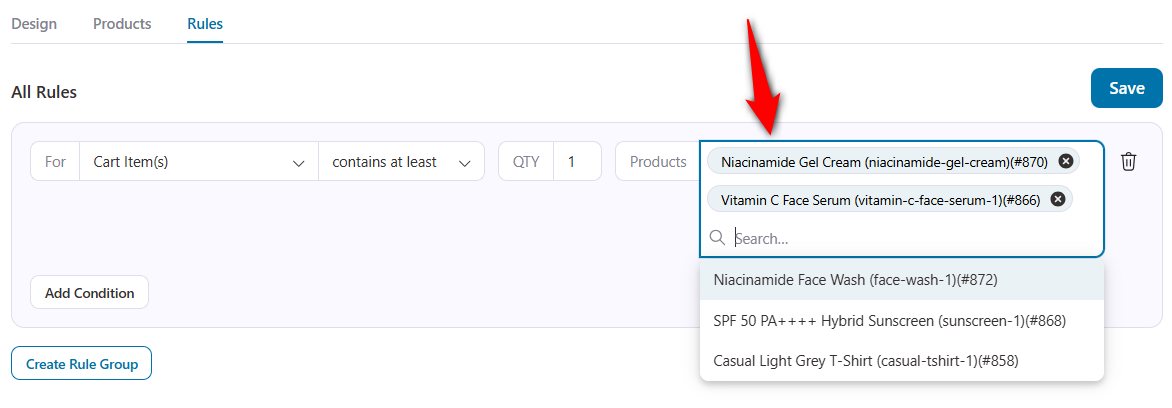
When these two items are in the cart, our checkout upsell offer of Face Wash will be shown to shoppers.
Check out this guide to learn how to apply rules to trigger order bumps.
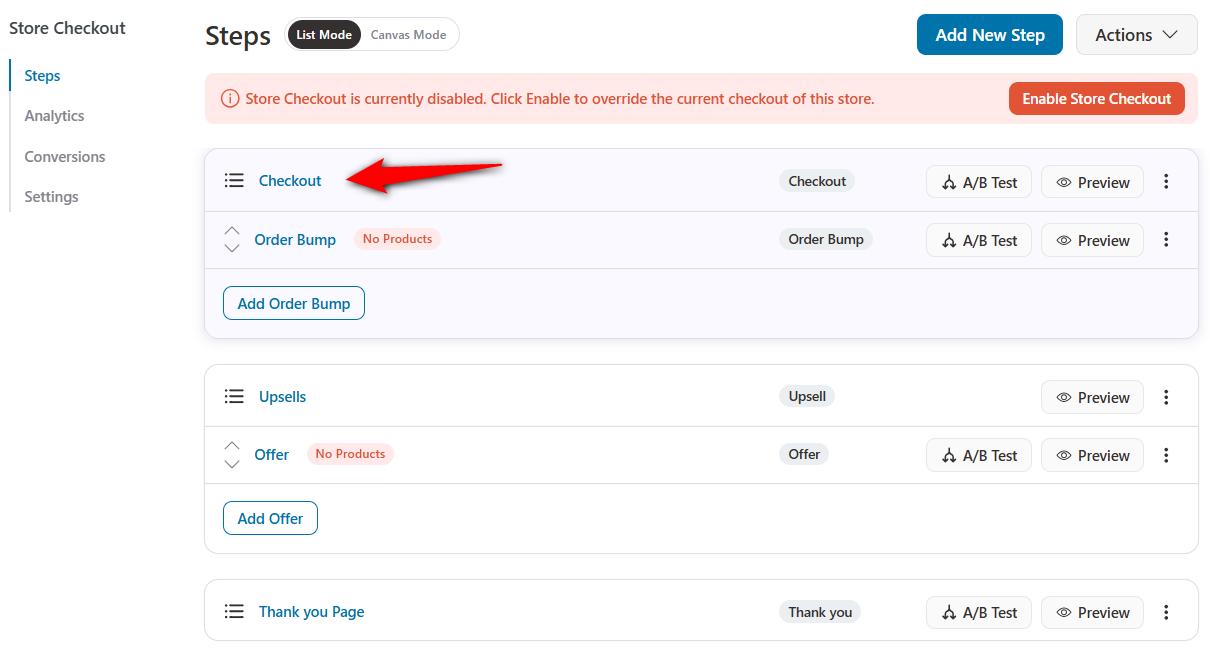
Step 5: Enable store checkout
Hit save and then click on the 'Enable Store Checkout' button.
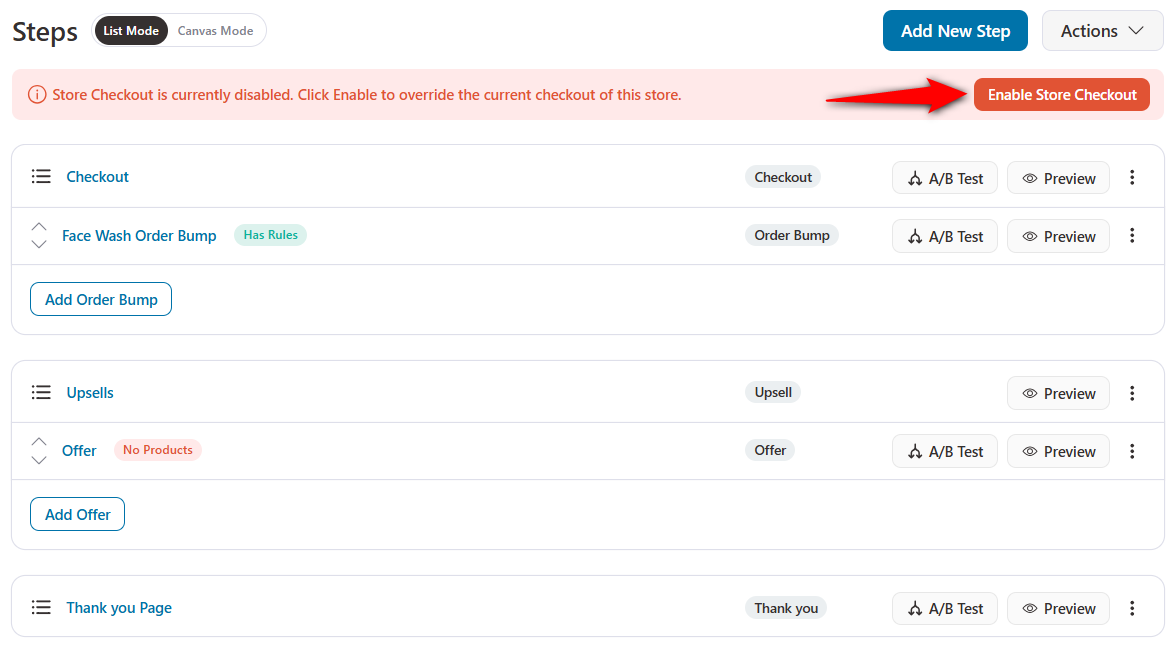
Test your checkout by adding either a Gel Cream or a Face Serum to your cart, then proceeding to the checkout page.
You'll see the order bump appearing as the WooCommerce checkout upsell:

Well done! This is how to enable relevant order bump offers on your WooCommerce checkout page.
Bonus step: Upgrade the cart through pre-purchase order bumps
An 'upgrade cart through order bump' is a sales tactic in which customers are offered a quick, one-click option to add an extra item or upgrade their purchase at checkout, thereby increasing the overall value of their order.
For example, if someone is buying a basic software package, an order bump might offer them an upgrade to the professional version with extra features at a discounted price. With one click, they can upgrade their purchase, thus increasing the cart's total value.
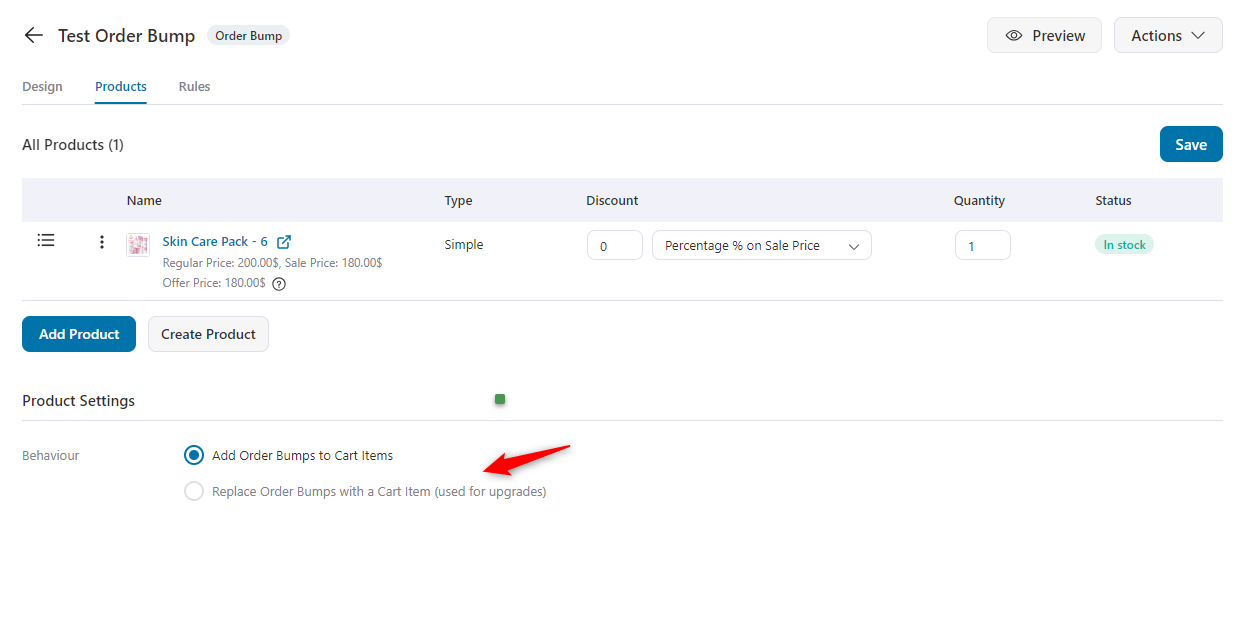
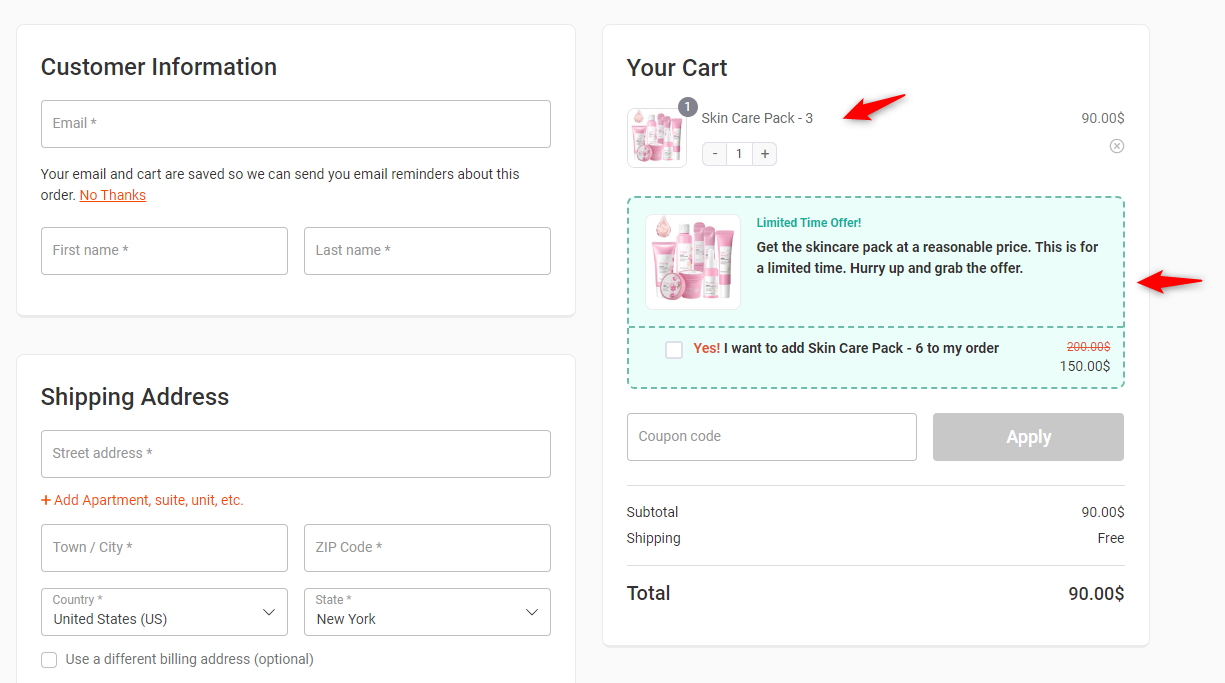
Create an “Order Bump”. Provide a name for it. Then, choose the template as in the previous step. Next, add “Skin Care Pack - 6”
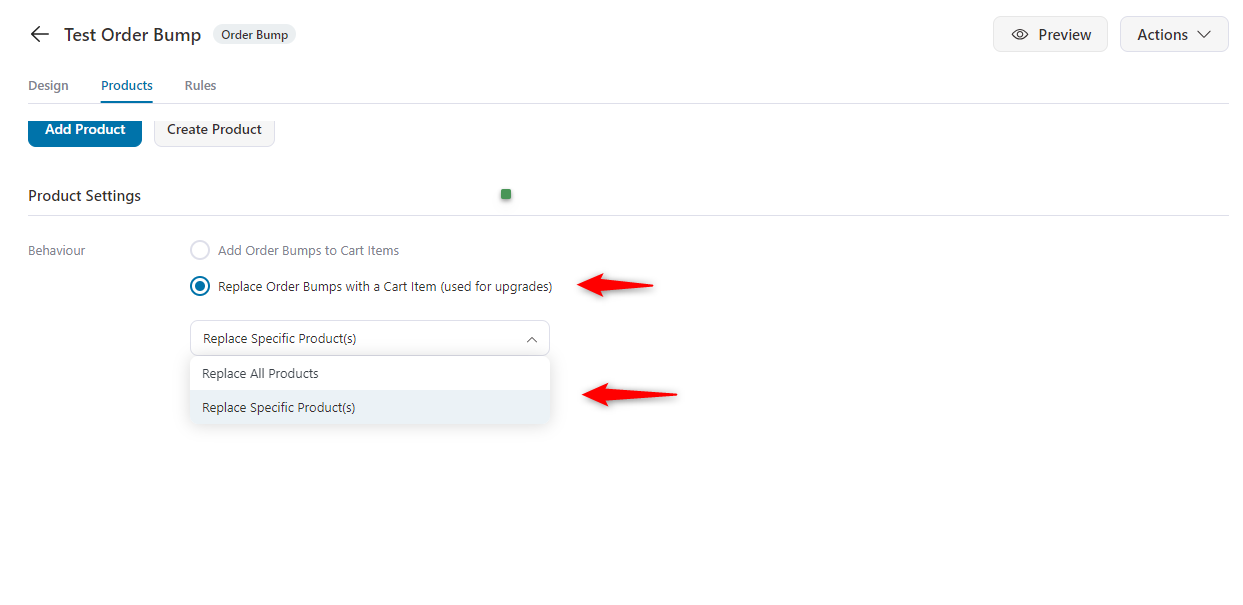
Next, tap on the product page and choose the 'Replace Order Bumps with a Cart Item (used for upgrades)' option.
Under the dropdown menu, choose the Replace Specific Product(s) option.
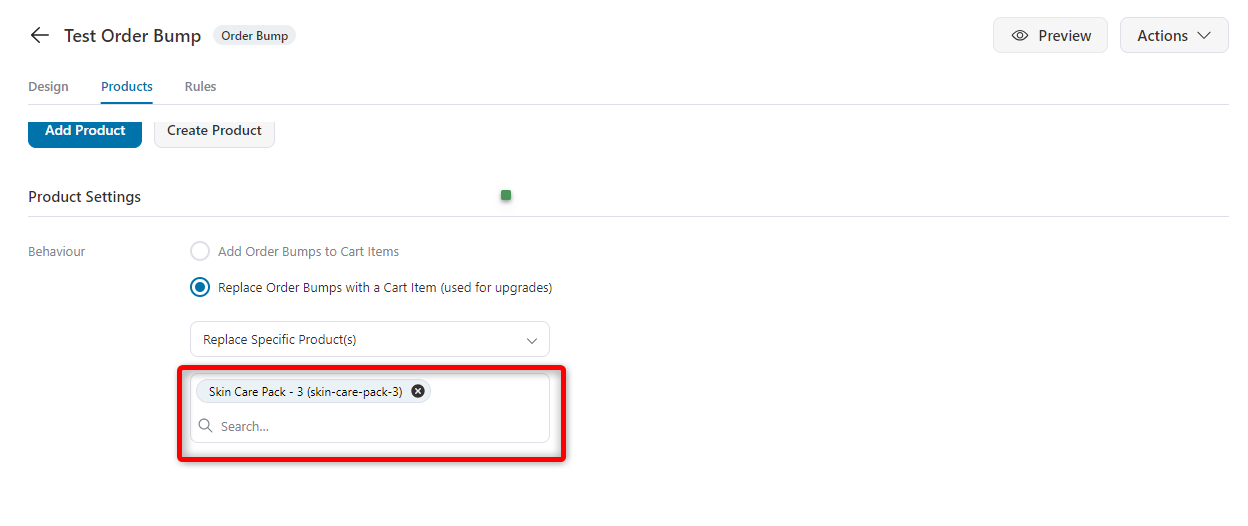
Choose the product that you want to replace with the order bump. Here, we selected the "Skin Care Pack - 3".
Now add a rule for the workflow. Tap on the rules page and select this criterion. Cart items have at least one unit of each product.
Now, if your users add the “Skin Care Pack - 3” to their cart, they will get the other variant of “Skin Care Pack - 6”.
If the user adds the “Skin Care Pack - 6” to their cart, the entire cart will be updated.
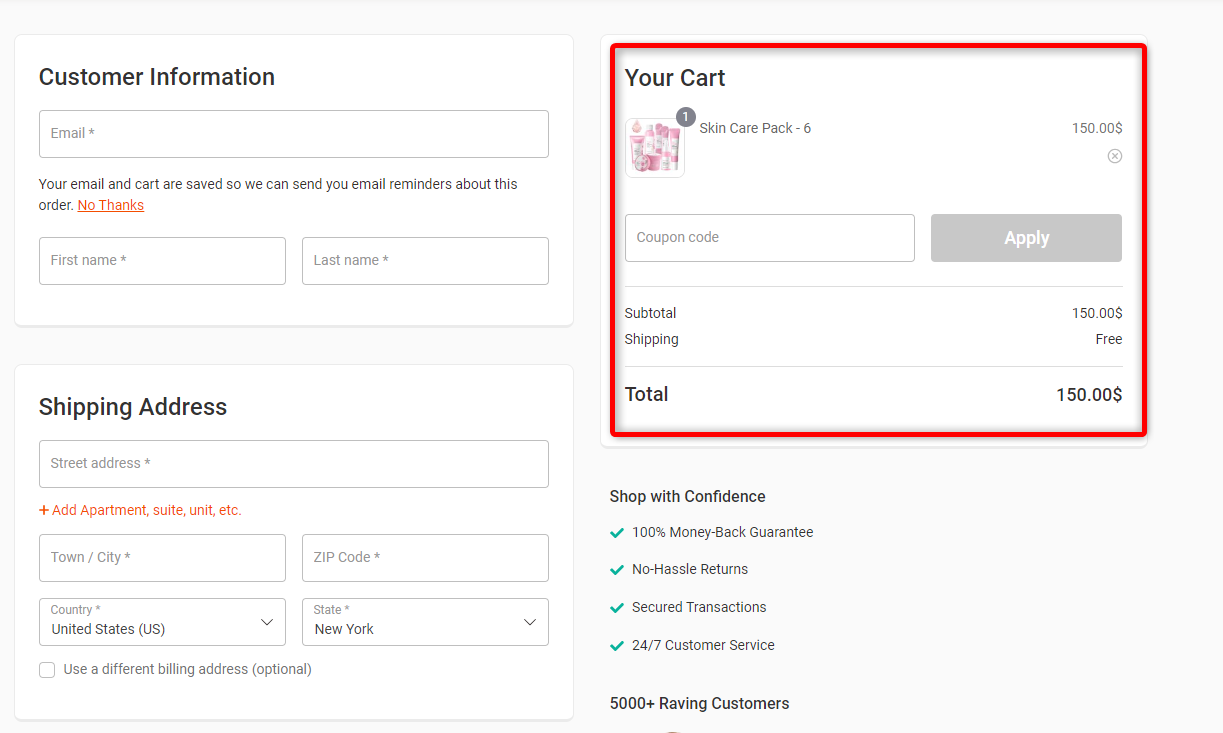
So this is how the cart update works in the order bump as a pre-purchase upsell.
How to Set Up WooCommerce Post-Purchase One-Click Upsells?
After adding an order bump, you can set “Post-purchase one-click upsell” in your checkout workflow using FunnelKit.
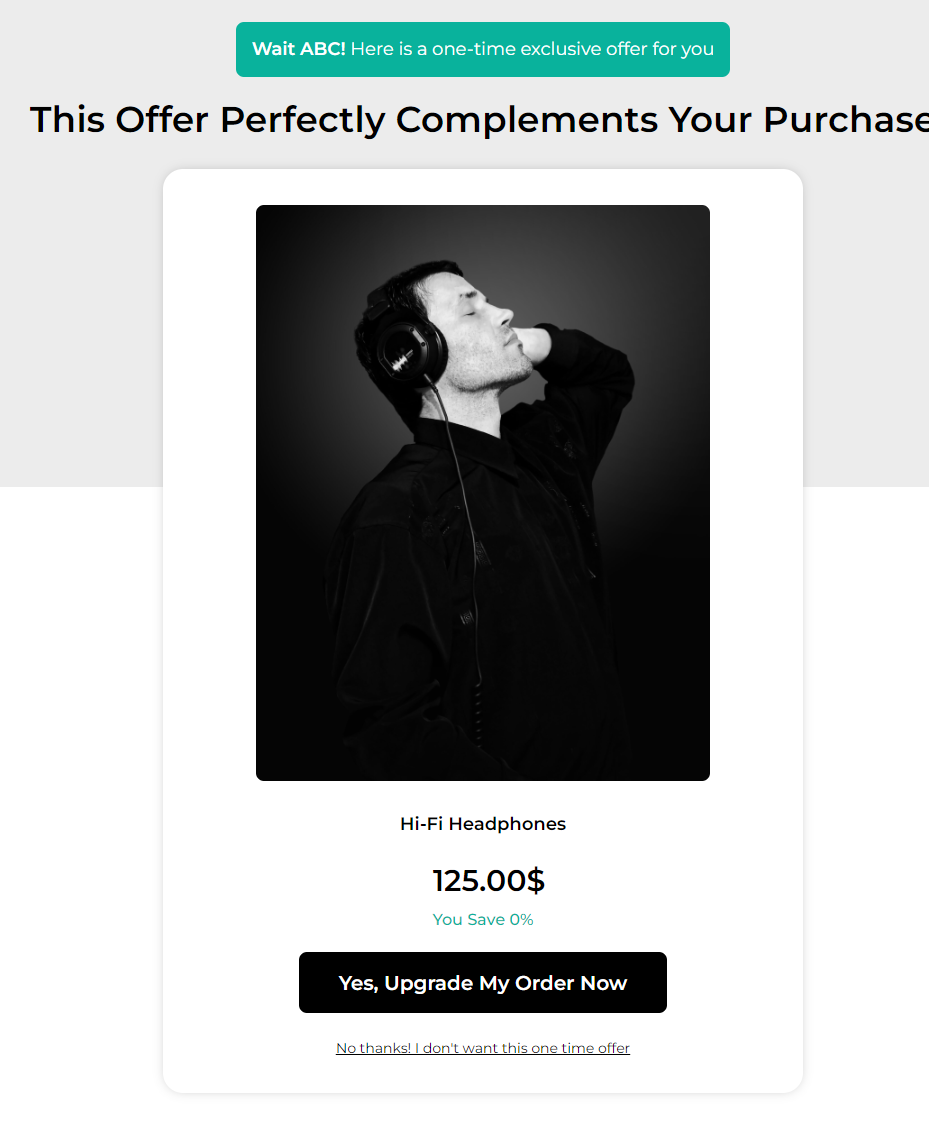
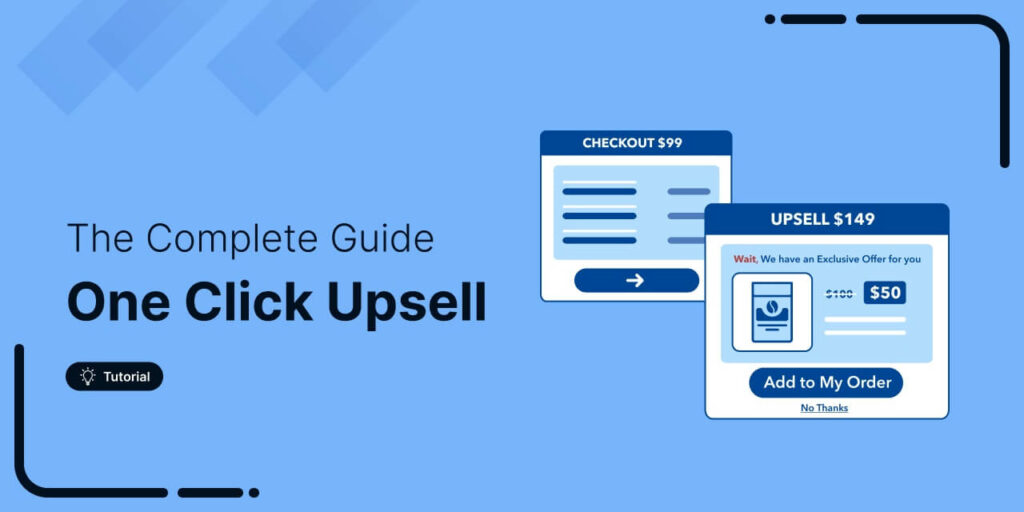
Post-purchase one-click upsells are offers you get right after you’ve completed an online purchase. Suppose you just bought a pair of headphones, and right after you hit “buy,” the store offers you a matching headphone case or a warranty extension with just one click.
The interesting thing is that you don’t have to re-enter your payment details or go through the checkout process again; they'll be added to your order automatically.
Let’s see how to do add WooCommerce post-purchase checkout upsell.
Step 1: Add upsell rules
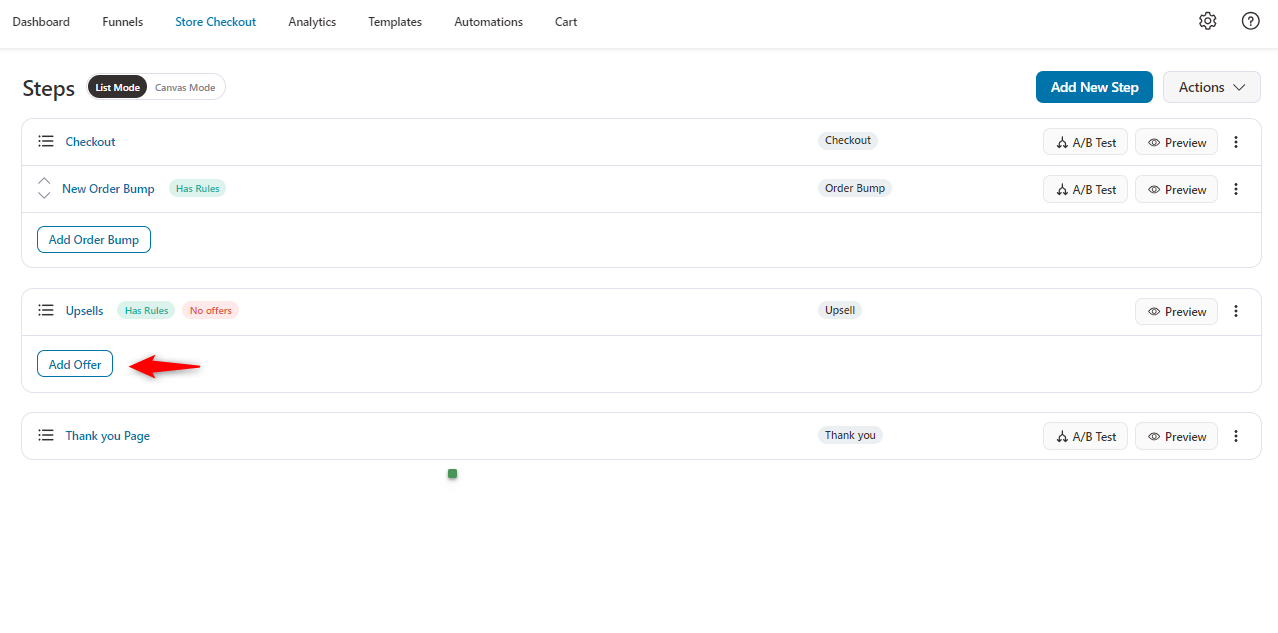
First, click on the “Upsells” page to start customizing your offer.
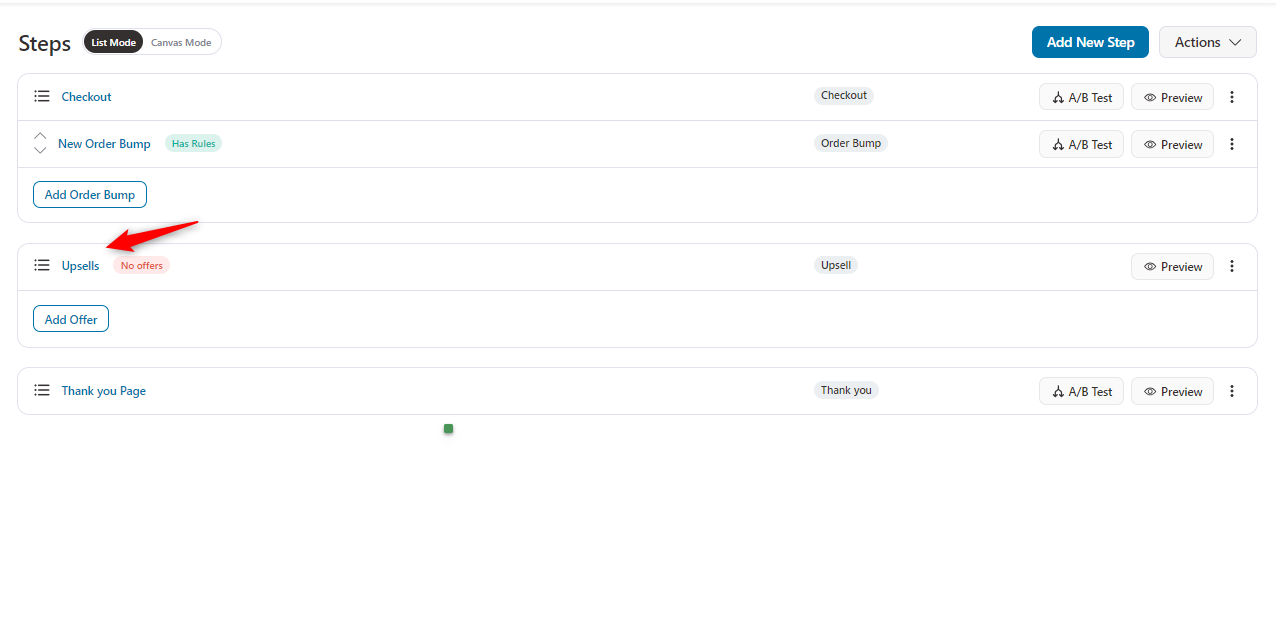
Now, set the rules here. If the cart item count is 2, the checkout upsell will be shown to users.
That means the WooCommerce checkout upsell offer will be activated if any customers add two items to their cart. And then, hit the “Save” button.

Step 2: Add a one-click upsell offer
Now click on the 'Add Offer' button.
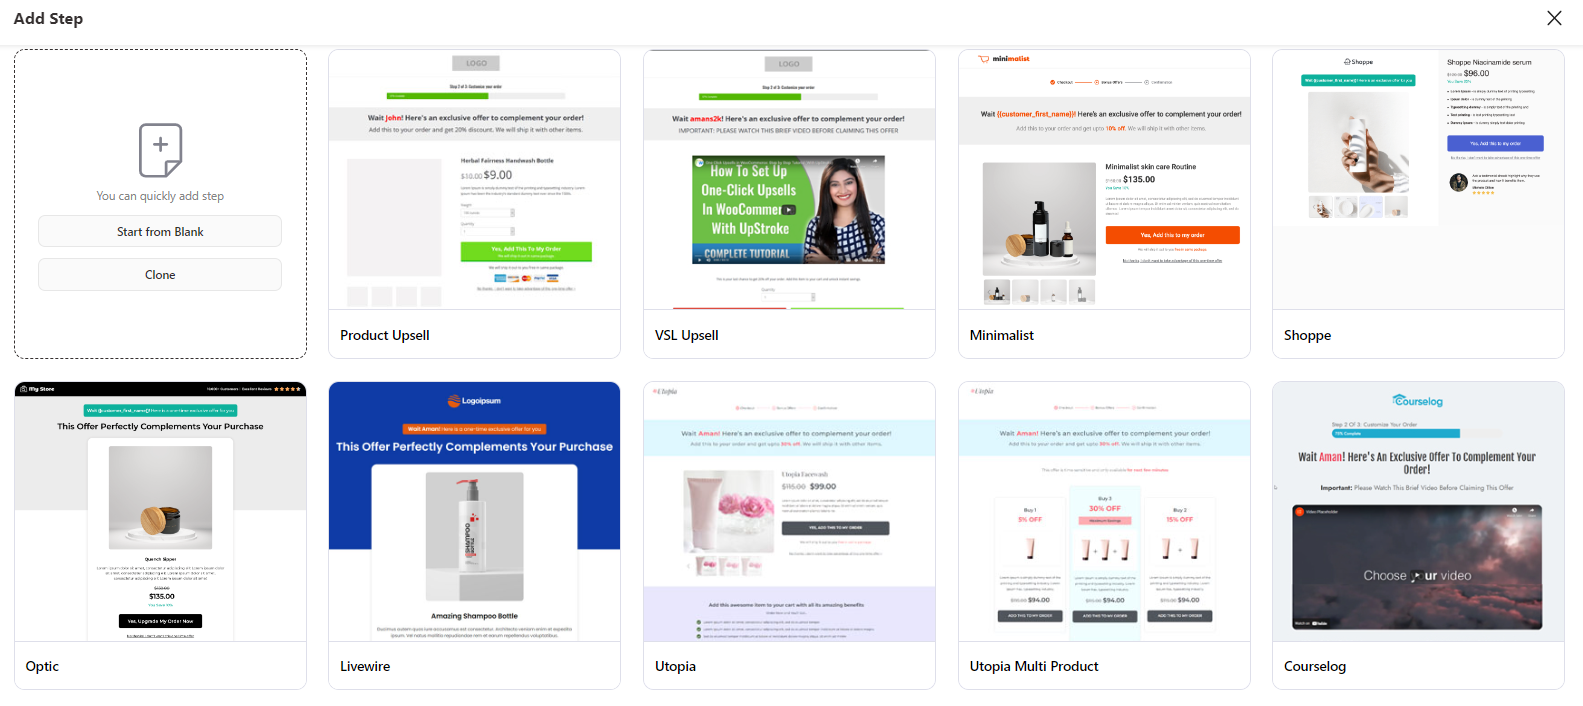
Choose your preferred template from here.
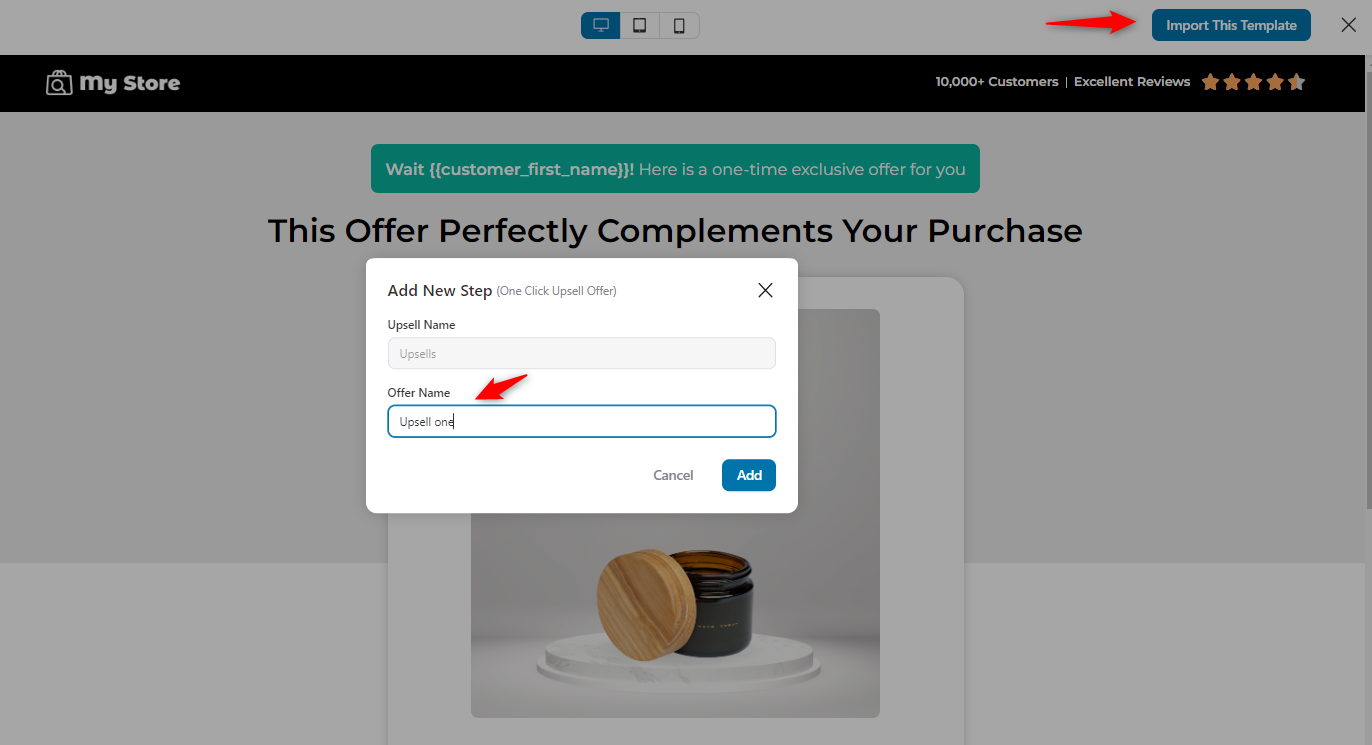
Preview the template and give it a name.
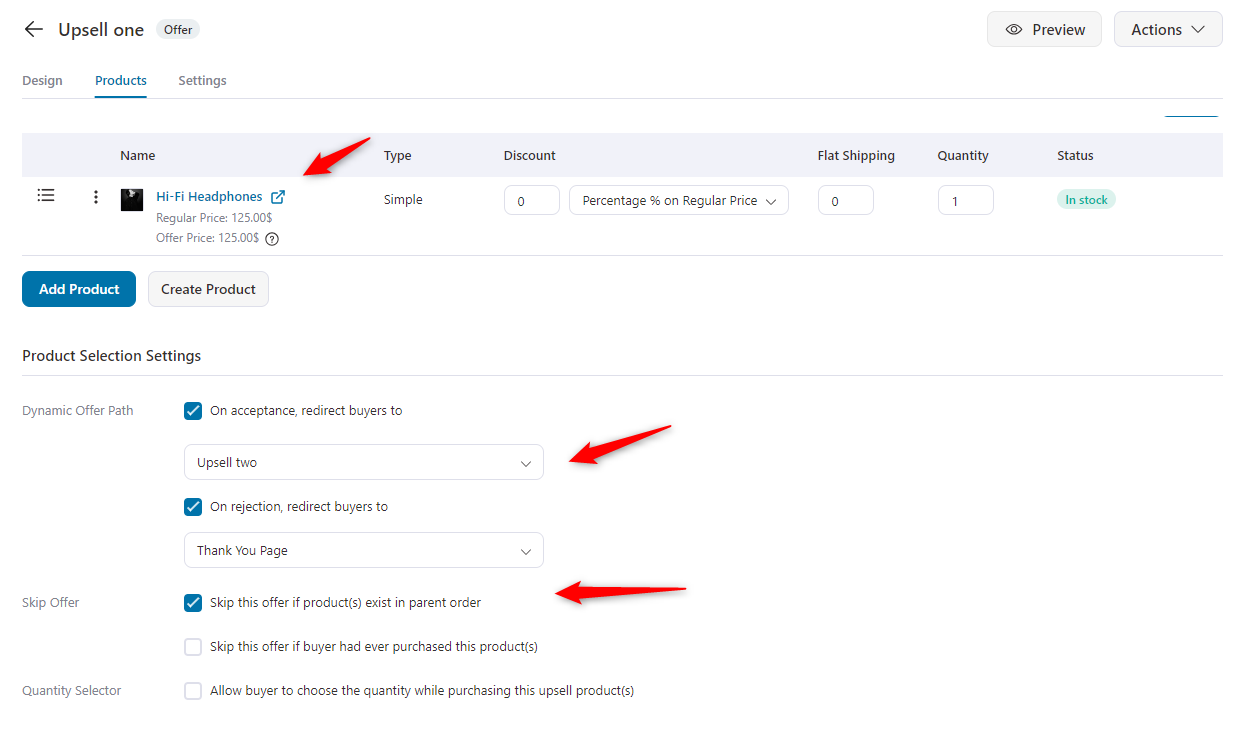
Then, add the product that you’re thinking of upselling.
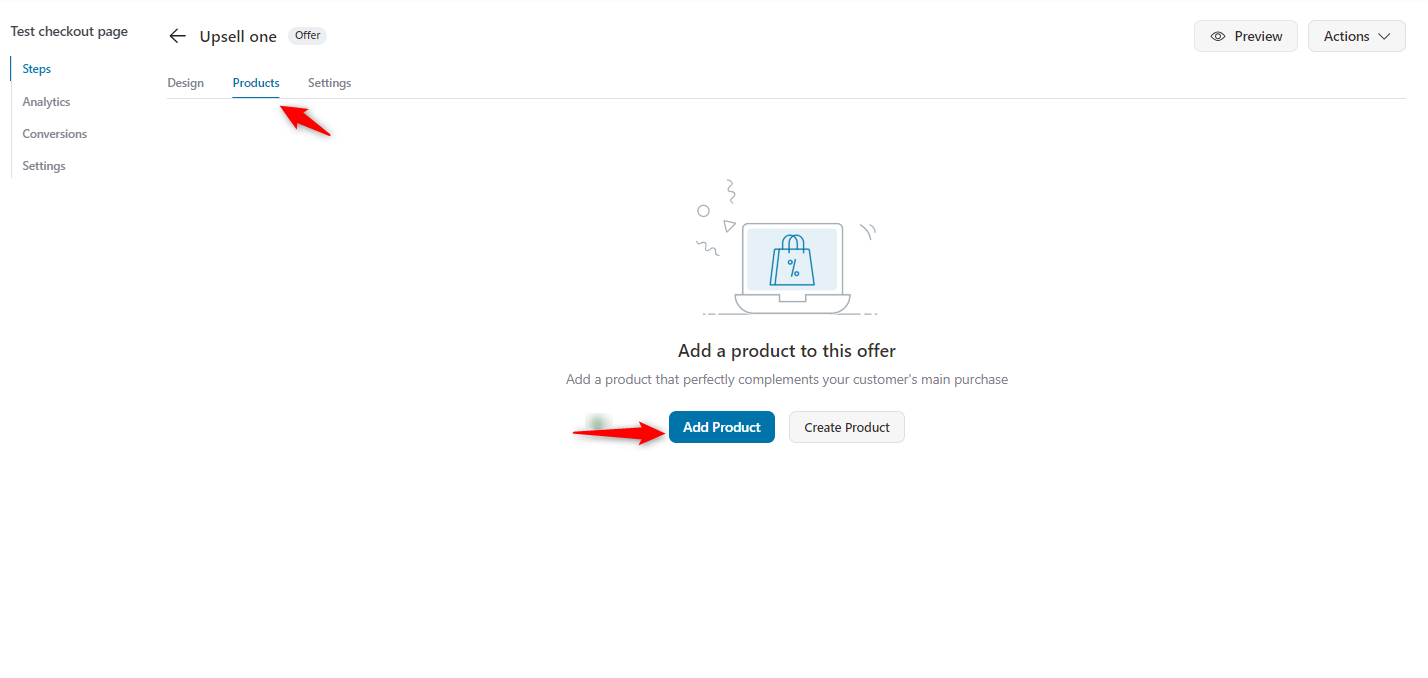
Add the product that you’re looking to upsell. Below, you can set some conditions.
If your users accept the upsell, then where will it take them? Also, regarding the rejection, on which page do you want them to send it? Here you can set it.
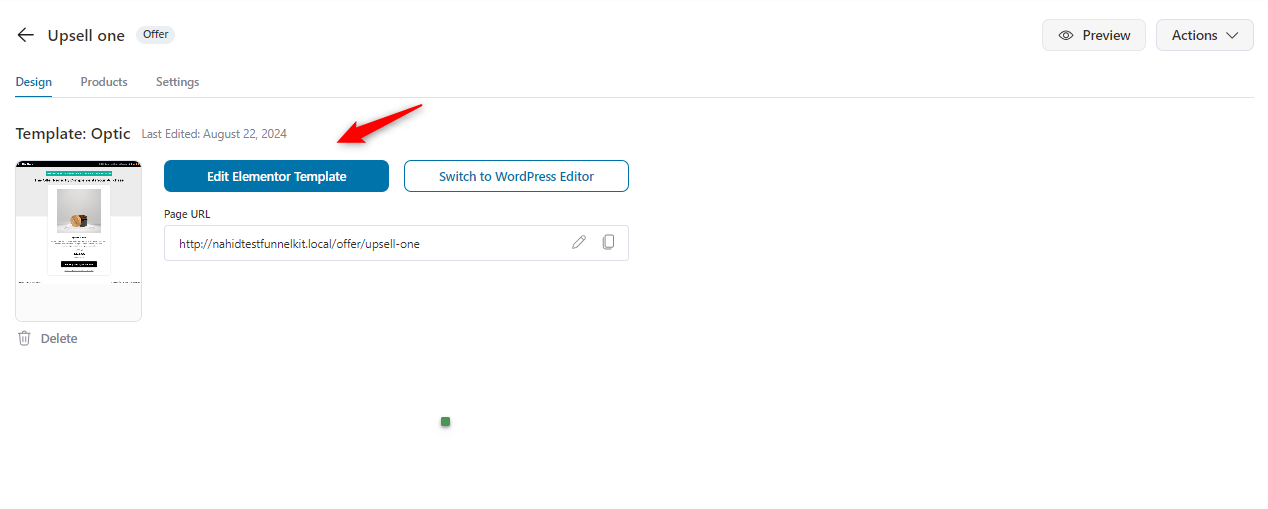
Also, you can redesign your upsell page if you’re unhappy with the current template.
To do that, navigate to the design page and click on the 'Edit Template' button.
You can add more upsell offers from the “Add Offer” button.
Depending on your audience, requirements, and needs, you can A/B test your strategy to see which upsell method brings the best result for you.

Now complete the checkout process and see the WooCommerce checkout upsells.
With FunnelKit, you can set up dynamic offer paths. This means that you can create multiple offers and present them to your customers based on their behavior.
For example, if the user rejects the first (main) one-click upsell offer, you can offer them a downsell. If a user accepts the offer, you can automatically redirect them to the thank you page.
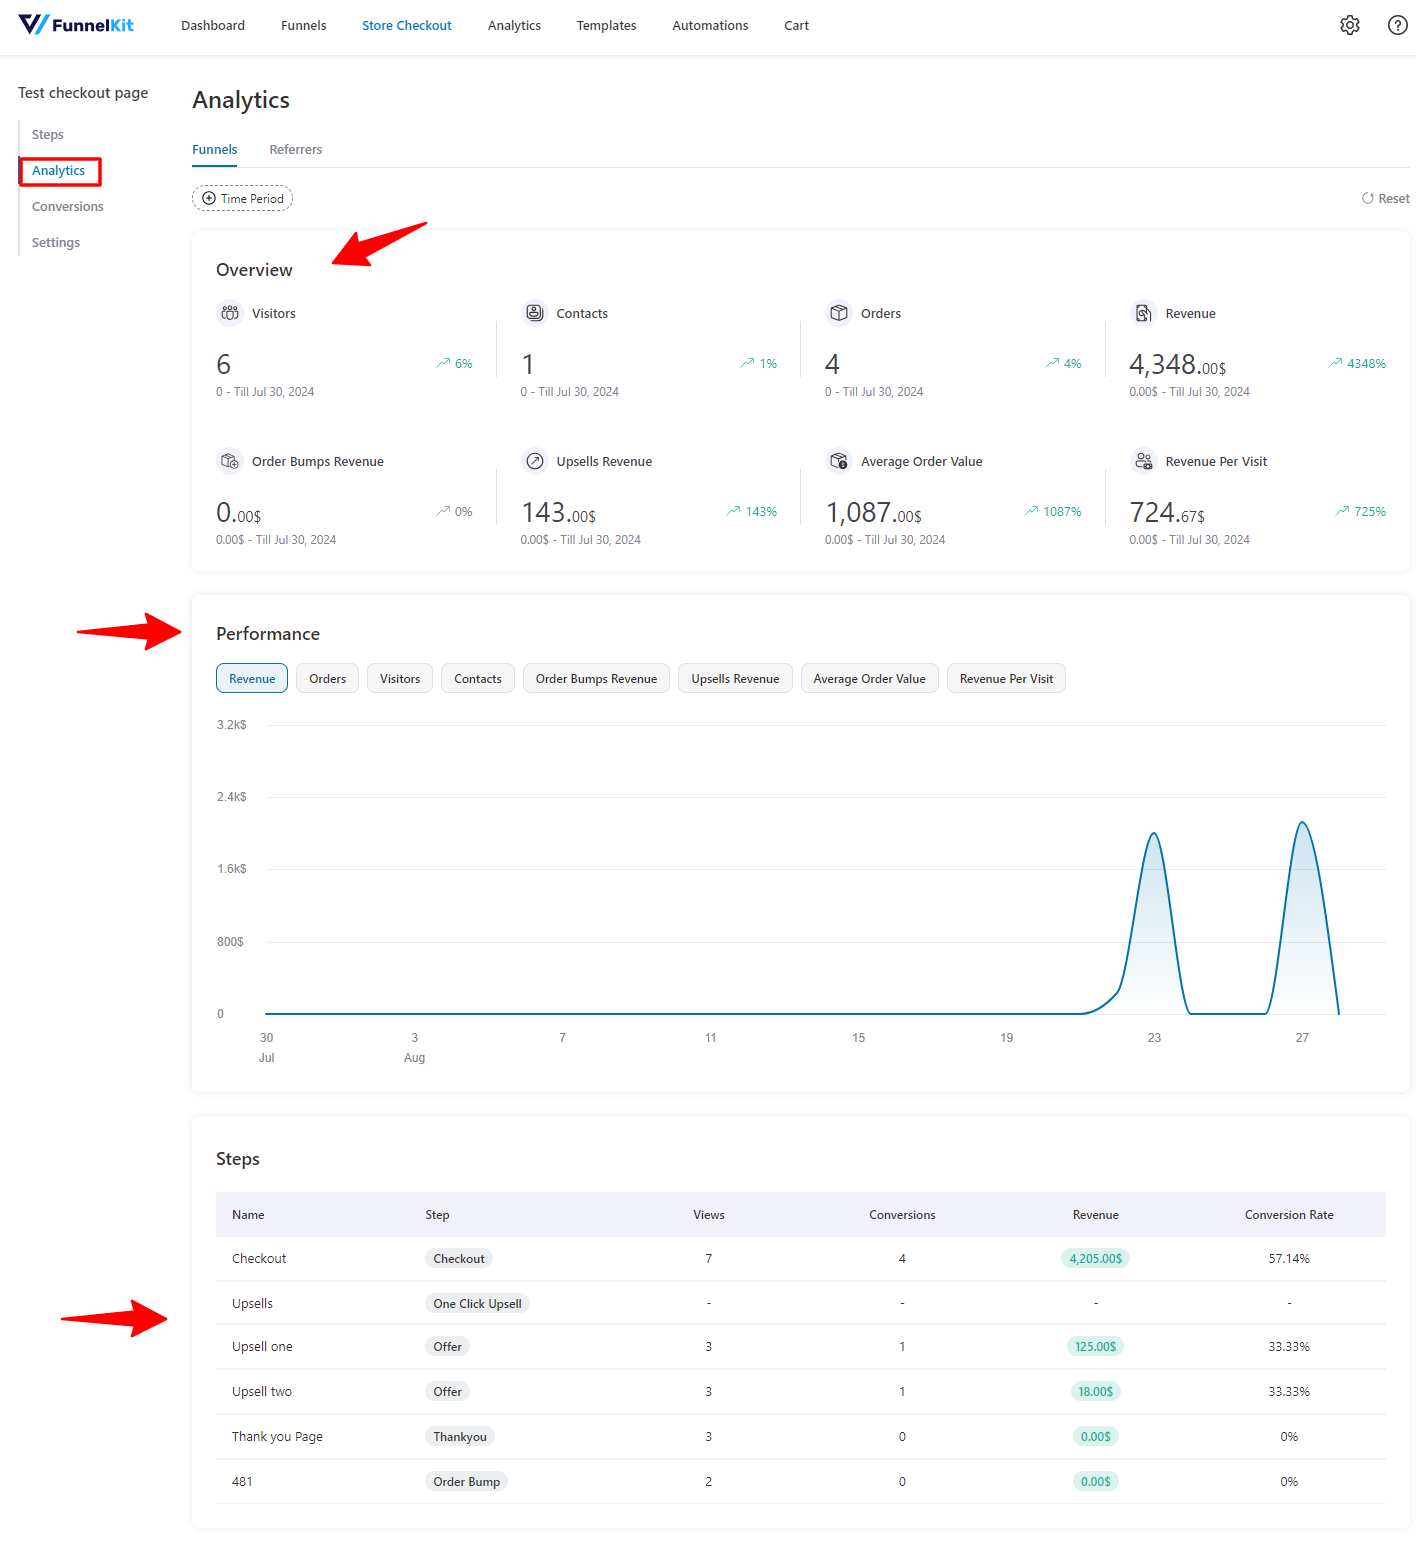
Step 3: Get full analytics of your WooCommerce checkout upsell page
Tap on the “Analytics” page and get an overview of the performance of your checkout page.
This analysis will help you determine which section needs modifications, edits, or adjustments. So you can improve your checkout page to generate more sales and revenue.
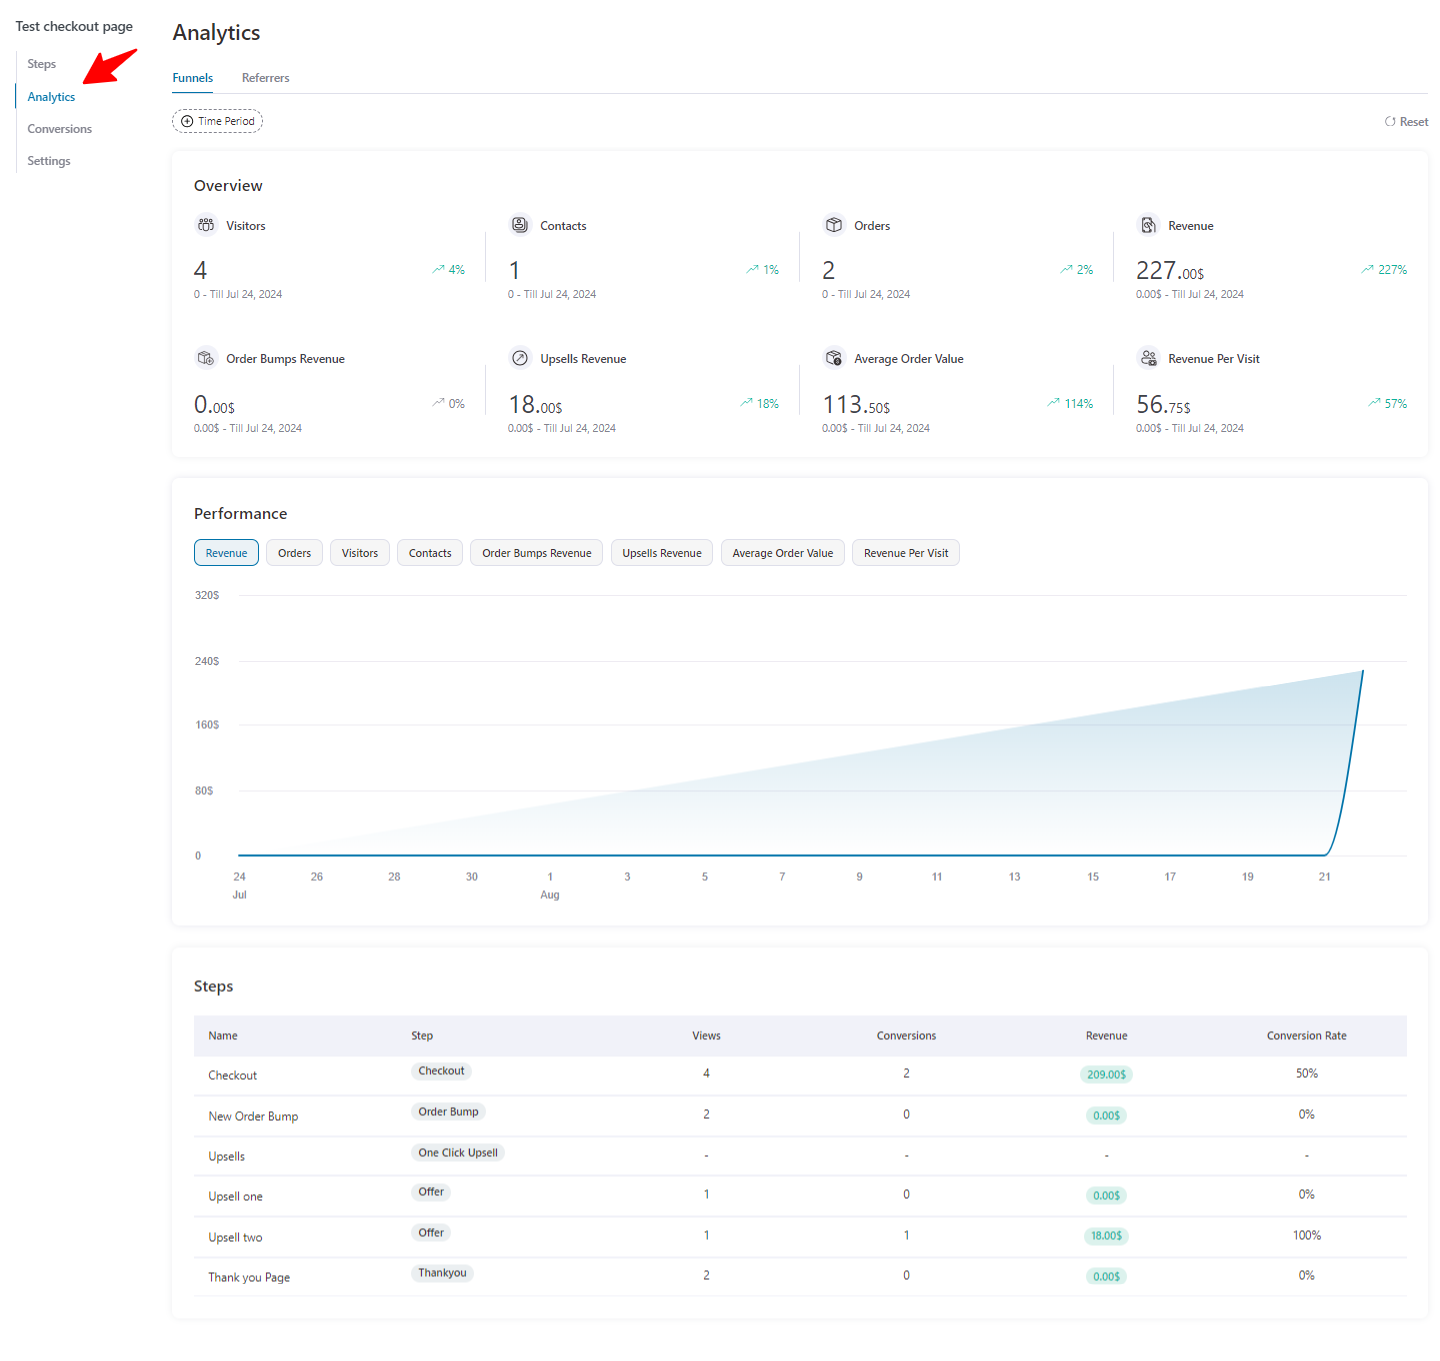
In this way, you can easily track the performance of your customized checkout upsell. It will help you to make further improvements and adjustments to your strategy.
9 Best Practices to Increase WooCommerce Checkout Upsell Acceptance Rates
Upselling at checkout is a powerful way to boost your revenue with minimal effort. By offering customers additional products or services right when they're about to complete their purchase, you can increase the average order value and improve customer satisfaction.
These practices apply across order bumps, post-purchase upsells, and cart upsells. The goal is not just to add upsells but to ensure customers actually accept them.
- Match your offers to what the customer just bought
Generic offers convert poorly. Show a maintenance kit when someone buys a tool, a warranty when they buy electronics, or a course bundle when they buy a single course.
Relevance is the single biggest driver of acceptance rates.
- Price your upsells appropriately relative to the main product
Order bumps perform best when priced at 10-30% of the cart total. Post-purchase upsells can go higher, up to 50-100% of the original purchase, since customers have more space to evaluate the value on a dedicated page.
- Limit the number of offers per checkout
Showing five order bumps creates decision fatigue and lowers acceptance for all of them.
Stick to one or two highly relevant bumps per order, and chain post-purchase upsells in sequence rather than stacking them on the same page.
- Write copy that reinforces the buying decision
Frame the offer around the outcome the customer wanted in the first place. For an electronics order, “Keep your new device protected for 2 years for $19” works better than “Add the warranty for $19.” Lead with the benefit, end with the price.
- Use clear, action-driven headlines on order bumps
"Yes, add the warranty for $12" outperforms "Optional warranty available". Make the action and the price obvious, and write the headline as if the customer is already saying yes.
- Highlight savings and value visibly
Show the strikethrough price, the percentage saved, or a “today only” framing where genuine.
According to Contentsquare's research, prominently displaying savings is one of the strongest drivers of conversion for checkout offers.
- Optimize the upsell experience for mobile
A significant majority of ecommerce traffic is now on mobile, so test how bumps and upsell pages render on smaller screens.
Make sure checkboxes are easy to tap, accept buttons are full-width, and product images do not break the layout.
- Track acceptance rates and AOV change for every offer
A checkout upsell that converts at 5% and has a low average price might not justify its place if another offer converts at 25%. Most upsell plugins, including FunnelKit, show acceptance and revenue per offer in the dashboard.
Review the data monthly and rotate or refine underperforming offers.
- A/B test offers, copy, and placement
Acceptance rates can vary widely based on placement, headline, and product choice.
Run split tests on bump position, upsell product, and offer copy to find the version that converts best for your audience.
Common FAQs Regarding Checkout Upsell in WooCommerce
Upselling and cross-selling are two different methods to increase the value of a customer’s purchase in a WooCommerce store:
- Upselling involves encouraging customers to purchase a higher-end product or an upgrade of the item they are already considering. For example, if a customer is viewing a 32GB smartphone, an upsell might suggest the 64GB version.
- Cross-selling suggests additional, complementary products to the one the customer is already purchasing. For example, if a customer is buying a laptop, cross-selling might recommend accessories like a laptop bag or a mouse.
Yes, WooCommerce upsell plugins like FunnelKit can help reduce cart abandonment by encouraging customers to see more value in their purchase before they decide to leave.
FunnelKit often suggests relevant product upgrades or add-ons, which can increase the perceived value of the shopping cart.
By offering appealing upsells at strategic points in the shopping process, such as on the product page or at checkout, you can keep customers engaged and encourage them to complete their purchases.
Yes, you can easily track the performance of your upsell campaigns in WooCommerce through FunnelKit. It has a built-in option to give you an overview of your upsell performance.
Just on the analytics tab, you’ll find all the details of your upsell performance. How many visitors are coming, the orders created in your store, the revenue generated from the orders, upsell revenue, and more.
With FunnelKit, you have all the tools you need to effectively track and improve the performance of your upsell campaigns in WooCommerce.
Here are the different types of upsells you can offer:
- Order bumps on the checkout page
- One-click post-purchase upsells
- Cart page upsells and cross-sells
- Checkout page cross-sell recommendations
- Checkout add-ons (service and product add-ons)
Yes, you can add a checkout upsell with custom code, but it is difficult to work with. Adding upsells with code requires using WooCommerce hooks such as woocommerce_review_order_before_payment or woocommerce_checkout_before_order_review to inject product offers, along with custom logic to add the product to the order, apply conditional rules, and handle post-purchase one-click flows. For most stores, a plugin is more reliable and easier to maintain.
Are You Ready to Transform Your Checkout Page with Strategic Upsells?
Upselling in your WooCommerce store isn’t just about boosting sales; it’s about enhancing your customers’ shopping experience.
By offering relevant upgrades, bundles, or complementary products, you can increase revenue while keeping your customers more satisfied.
With FunnelKit Funnel Builder, setting up and customizing these upsell strategies is simple.
Whether you're looking to upsell, cross-sell, or design a slick checkout page, FunnelKit has all the tools you need to make it easy.
So, are you ready to level up your WooCommerce store? Download FunnelKit Builder to start creating effective upsell offers today!

Editorial Team
April 22, 2026WooCommerce upsells are product recommendations shown to customers to encourage them to purchase a higher-value item or add related products to their order. When placed at the right moment in...
Editorial Team
December 17, 2025Order Bump v/s One Click Upsell: Which one to choose? We got this question from a handful of our customers: "What's the difference between a one-click upsell and an order...
Editorial Team
June 11, 2025Did you know that a one click upsell can help you to boost your revenue by 35%? Yes, and the reason this one click upsell method works is it capitalizes...


