
Stop treating every buyer the same. WooCommerce conditional checkout fields dynamically hide or display specific form fields based on customer input, cart contents, and more.
If you ask a digital download buyer for their shipping address, your conversion rate drops. If you request a B2B VAT number from a retail customer, they'll bounce.
Forcing a static, one-size-fits-all form on every user creates massive friction. You lose sales. You end up sorting through garbage data.
Out of the box, WooCommerce fails completely here. It offers no native support for conditional logic.
Need a custom text box for ring engravings? What about capturing dietary restrictions for an in-person event ticket? The default setup simply cannot handle it.
In this guide, we'll fix this setup.
Here, you'll learn how to set up conditional checkout fields both with plugins and with custom code.
We will also cover data validation, dodging GDPR compliance traps, and measuring the exact impact this setup has on your store's bottom line.
Table of Contents
- 1 What Are WooCommerce Conditional Checkout Fields?
- 2 Method 1: Add WooCommerce Conditional Checkout Fields Without Code
- 3 Method 2: Add WooCommerce Conditional Checkout Fields With Custom Code
- 4 6 Real Examples of WooCommerce Conditional Checkout Fields
- 5 Frequently Asked Questions (FAQs)
- 6 Final Thoughts: Build a Checkout That Adapts to Your Customers
What Are WooCommerce Conditional Checkout Fields?
A conditional field on the WooCommerce checkout page dynamically adapts to specific rules by appearing, becoming required, or changing behavior.
Instead of a static, one-size-fits-all form, conditional logic creates a streamlined, context-aware experience tailored to each shopper.
Some common conditions include:
- Product or category in the cart: Show a relevant field, such as 'Gift Message', only when a gift-eligible product is being purchased.
- Shipping method: Ask for delivery instructions only for local delivery, not for digital downloads.
- User role: Hide billing fields for wholesale customers who already have accounts.
- Another field value: If a customer selects "No, I haven't submitted a waiver", reveal a link to the waiver form.
- Cart total or quantity: Require a business tax ID only above a certain order value.
- Billing or shipping country: Show a tax-ID field only for EU customers.
Conditional vs. Standard Checkout Fields
| Aspect | Standard Fields | Conditional Fields |
|---|---|---|
| Visibility | Always visible | Shown/hidden based on rules |
| Required status | Fixed | Can change dynamically |
| Use case | Universal data (name, email) | Context-specific data |
| UX impact | Feels cluttered | Keeps forms short and relevant |
| Data quality | Collects irrelevant data | Collects information based on your needs |
| Conversion impact | Neutral to negative | Usually positive when well-designed |
Standard fields ask everyone for everything. Conditional fields ask the right customer for the right thing at the right time.
Benefits of Using Conditional Fields at Checkout
Shortening and personalizing your checkout is one of the highest-leverage conversion levers in eCommerce. Here's what conditional fields offer:
- Higher conversions: Every unnecessary field is a source of friction. The average checkouts contain several more fields than necessary, and reducing this count increases completion rates. Conditional field logic gives the data you genuinely need.
- Cleaner customer data: Conditional logic lets you start collecting targeted data you can act on while stopping the capture of irrelevant information (such as a company name from a B2C buyer).
- Reduced support tickets: Ask for allergy info only for food products and shipping notes only for physical shipments. This gets your team fewer support tickets.
- Better segmentation: Conditional fields feed richer metadata into orders, enabling smarter post-purchase automation, fulfillment routing, and customer service context.
- Compliance and legal coverage: For businesses that need waivers, age confirmations, prescription uploads, or tax IDs under specific circumstances, conditional fields are the cleanest way to enforce those rules only when they apply.
- Lower data-storage risk: Under GDPR and similar regulations, data minimization is a principle. Not collecting a field when it’s irrelevant reduces your exposure.
Method 1: Add WooCommerce Conditional Checkout Fields Without Code
To add conditional checkout fields in WooCommerce without writing code from scratch, we will use FunnelKit Funnel Builder.
FunnelKit lets you create modern, conversion-optimized checkout pages with a built-in drag-and-drop checkout field editor.
Adding custom fields such as text inputs, radio buttons, checkboxes, dropdowns (Select2), textareas, and more, and arranging them visually within your checkout form works like a charm.
For conditional display logic, FunnelKit lets you show specific fields or drop entire sections based on user, cart, and shipping rules.
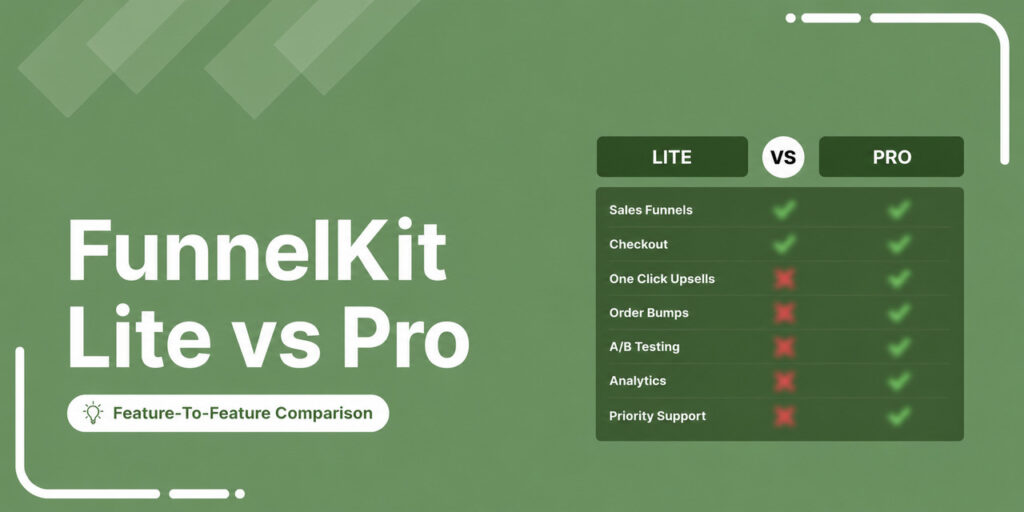
It offers a free version with checkout page templates you can import and customize. The Pro plan adds advanced field types, multi-step checkout layouts, order bumps, one-click upsells, and more.
Follow the step-by-step instructions below to add conditional checkout fields with FunnelKit:
Step 1: Edit your checkout page
Make sure to create your store checkout in WooCommerce.
Once your steps are imported, click on the checkout page to start customizing it.
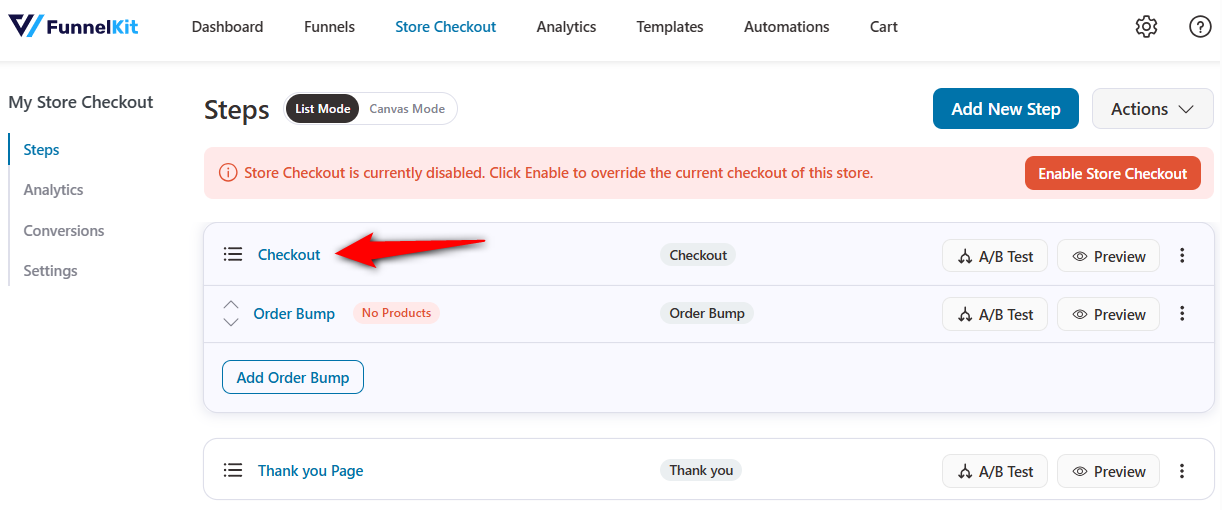
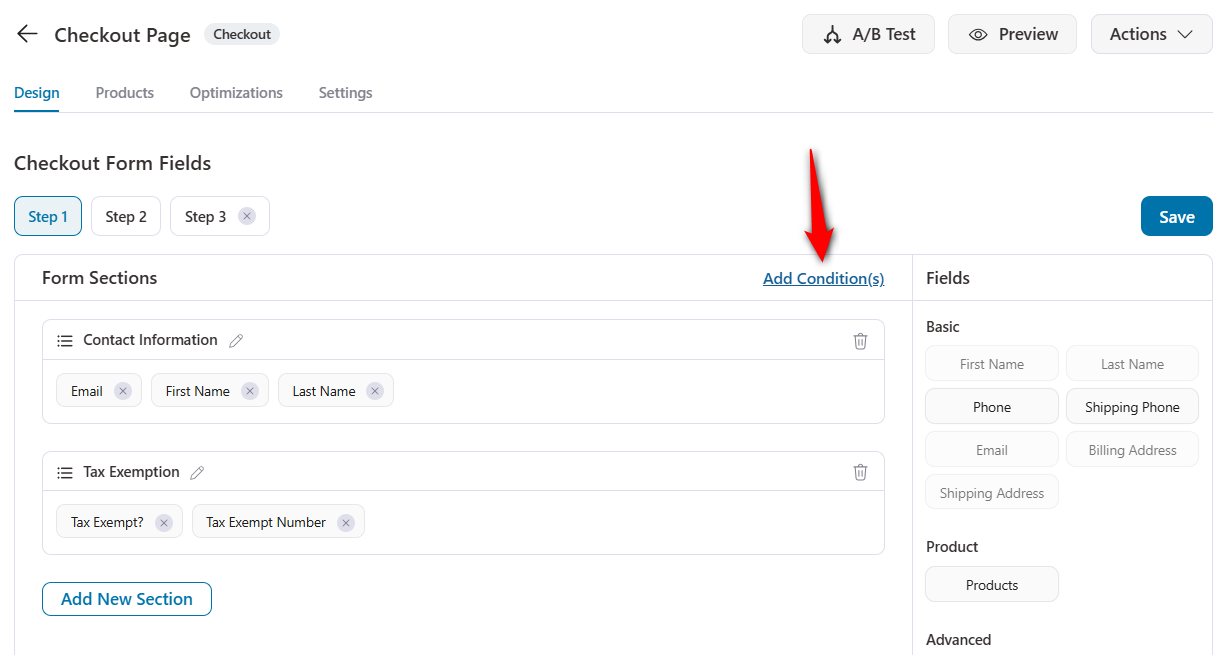
Under the Design tab, scroll down to the 'Checkout Form Fields' section.
This is where the built-in checkout field editor comes into action.
Step 2: Add the conditional field to the checkout form
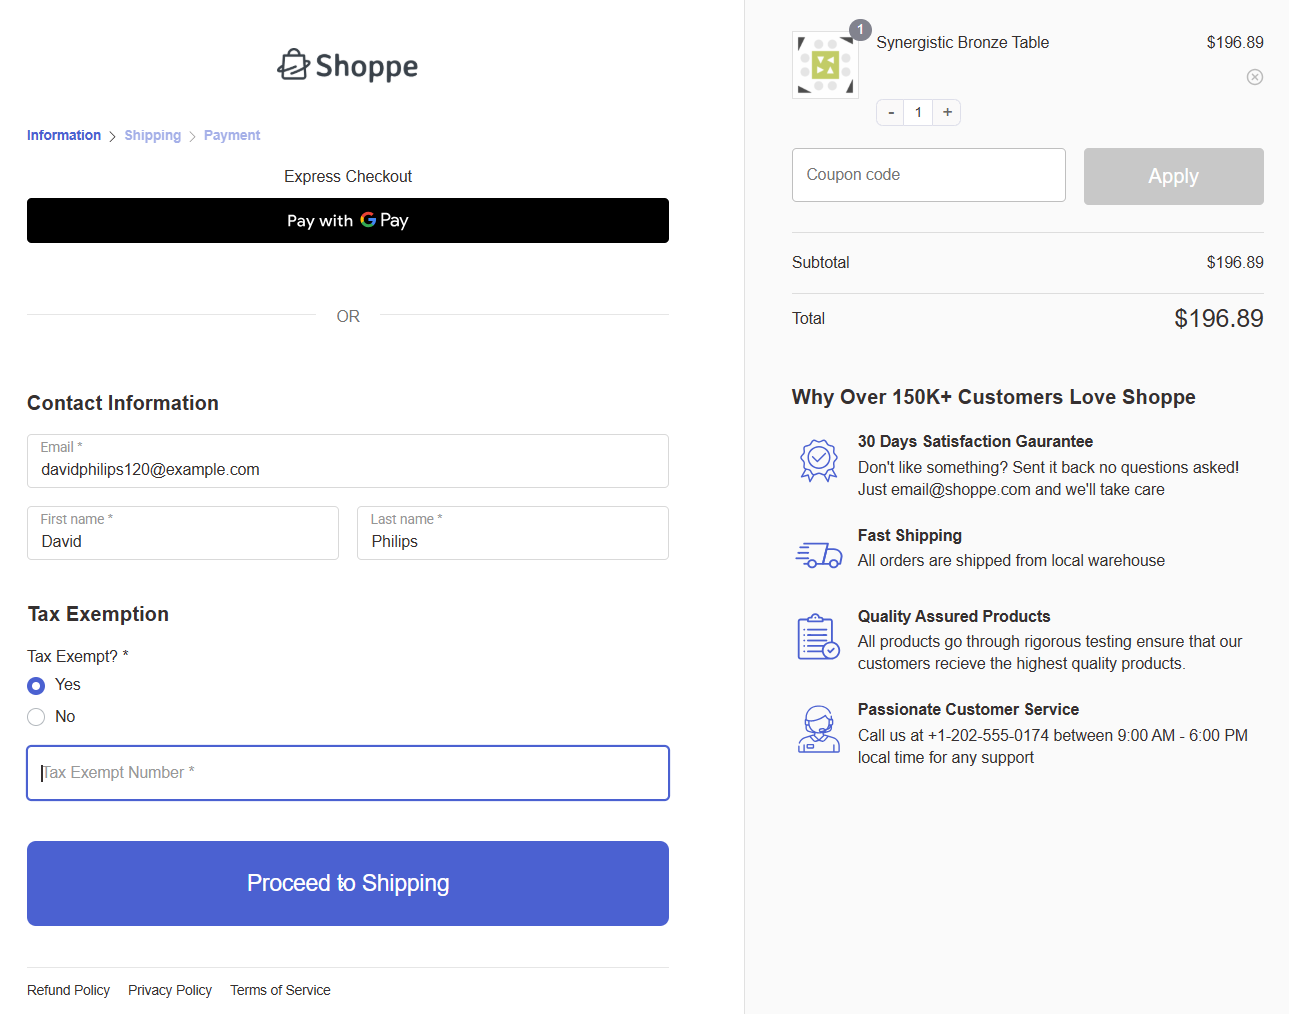
Let's create a conditional setup to collect tax-exemption information.
First, add a radio field labeled "Tax Exempt?" with options 'Yes' and 'No'. Assign a Field ID like tax_exempt.
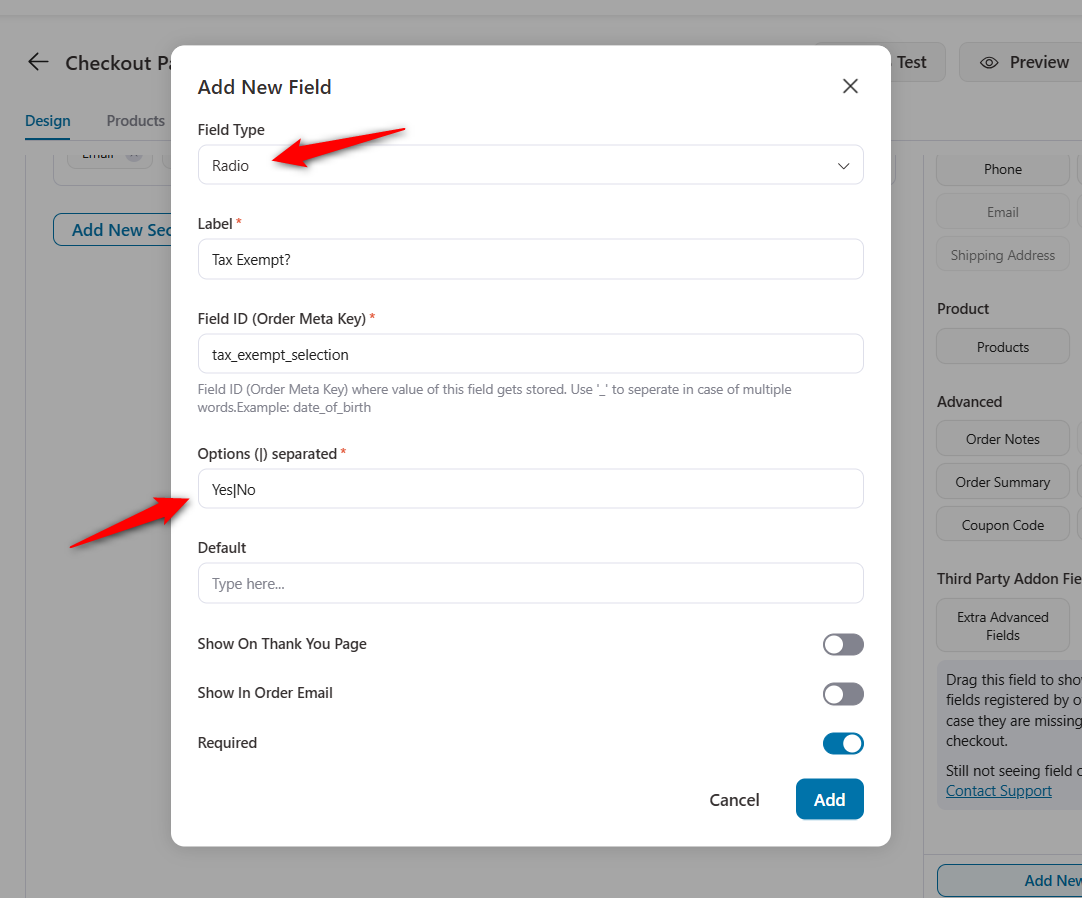
Next, create a second text field with the label “Tax Exempt Number” and a Field ID like tax_exempt_number.
Drag both fields into the billing section of your checkout form. Place the conditional field (Tax Exempt Number) directly below its trigger field (Tax Exempt?).
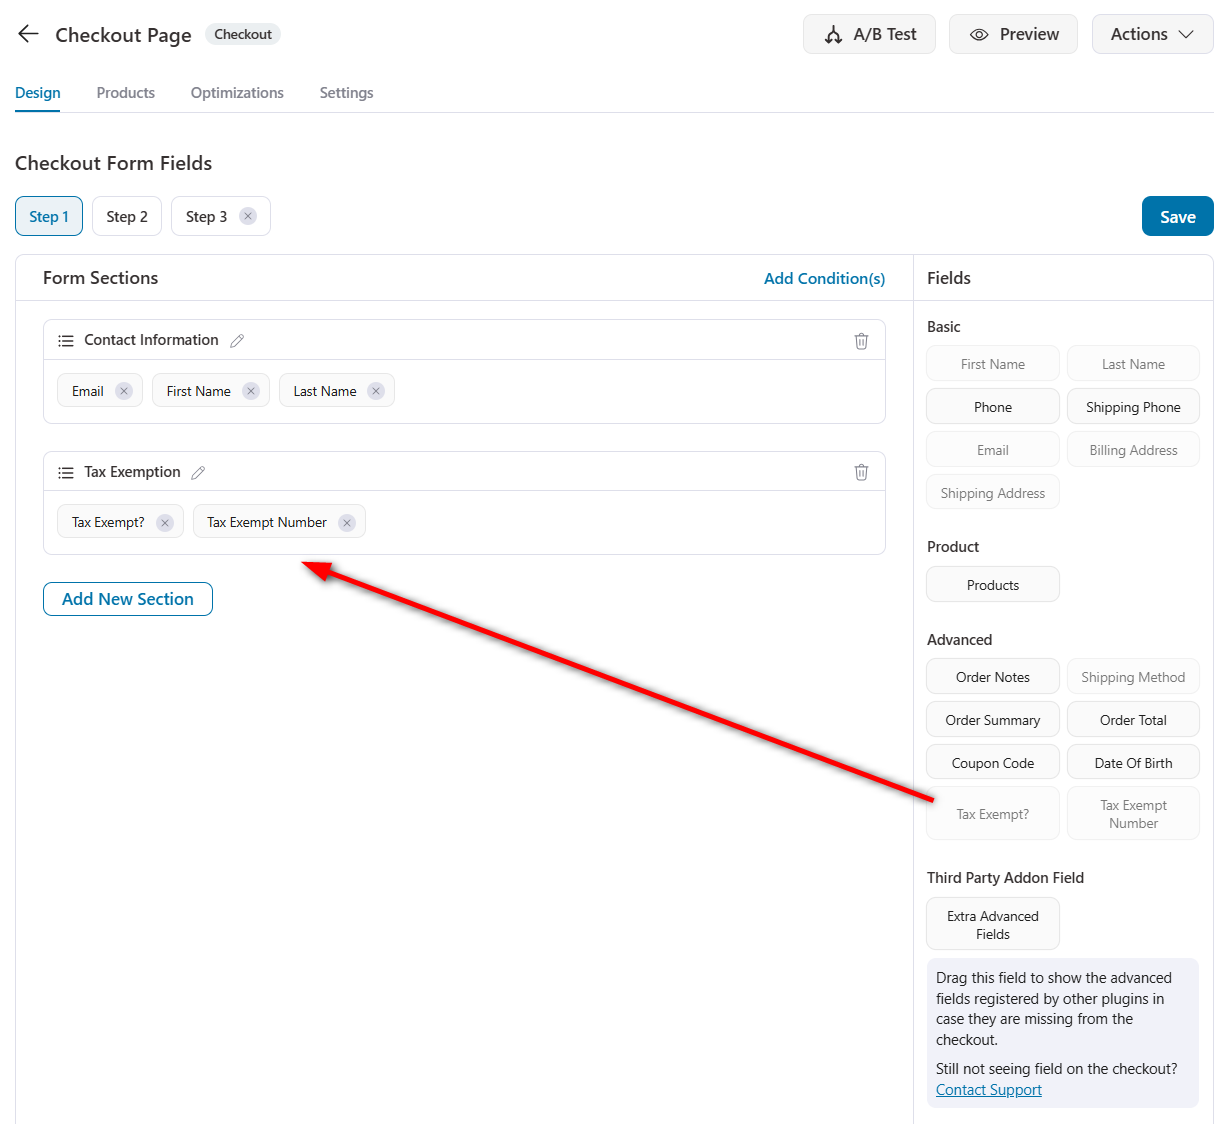
Save your changes.
Step 3: Add the conditional logic
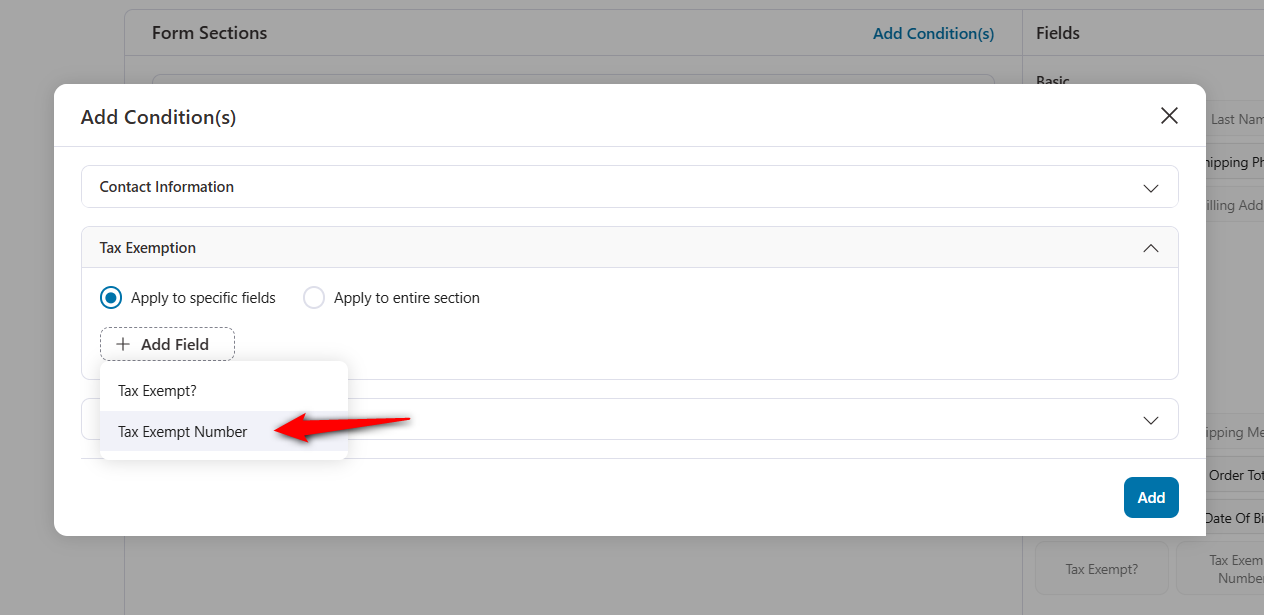
Click on 'Add Condition(s)' to set up the conditional checkout field logic.
Select the 'Apply to specific fields' option and hit '+ Add Field'.
Choose the Tax Exempt Number field here.
Next, set up the condition for the "Tax Exempt?" custom field to exactly match 'Yes'.
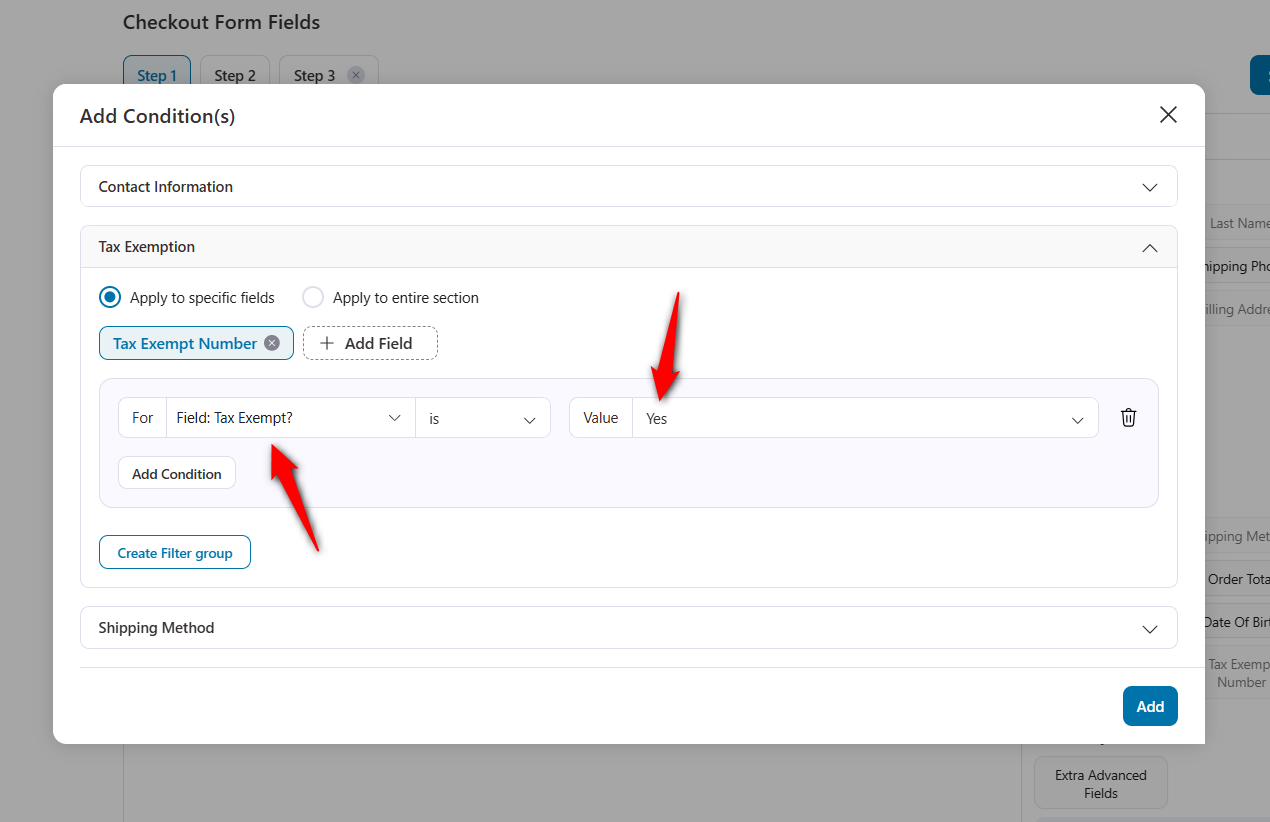
Once done, click on 'Add'.
Step 4: Save and test your conditional checkout fields
Click Save and activate your checkout page as the global checkout for your store.
Test on both desktop and mobile devices. To test, go to any product, add it to your cart, and proceed to checkout.
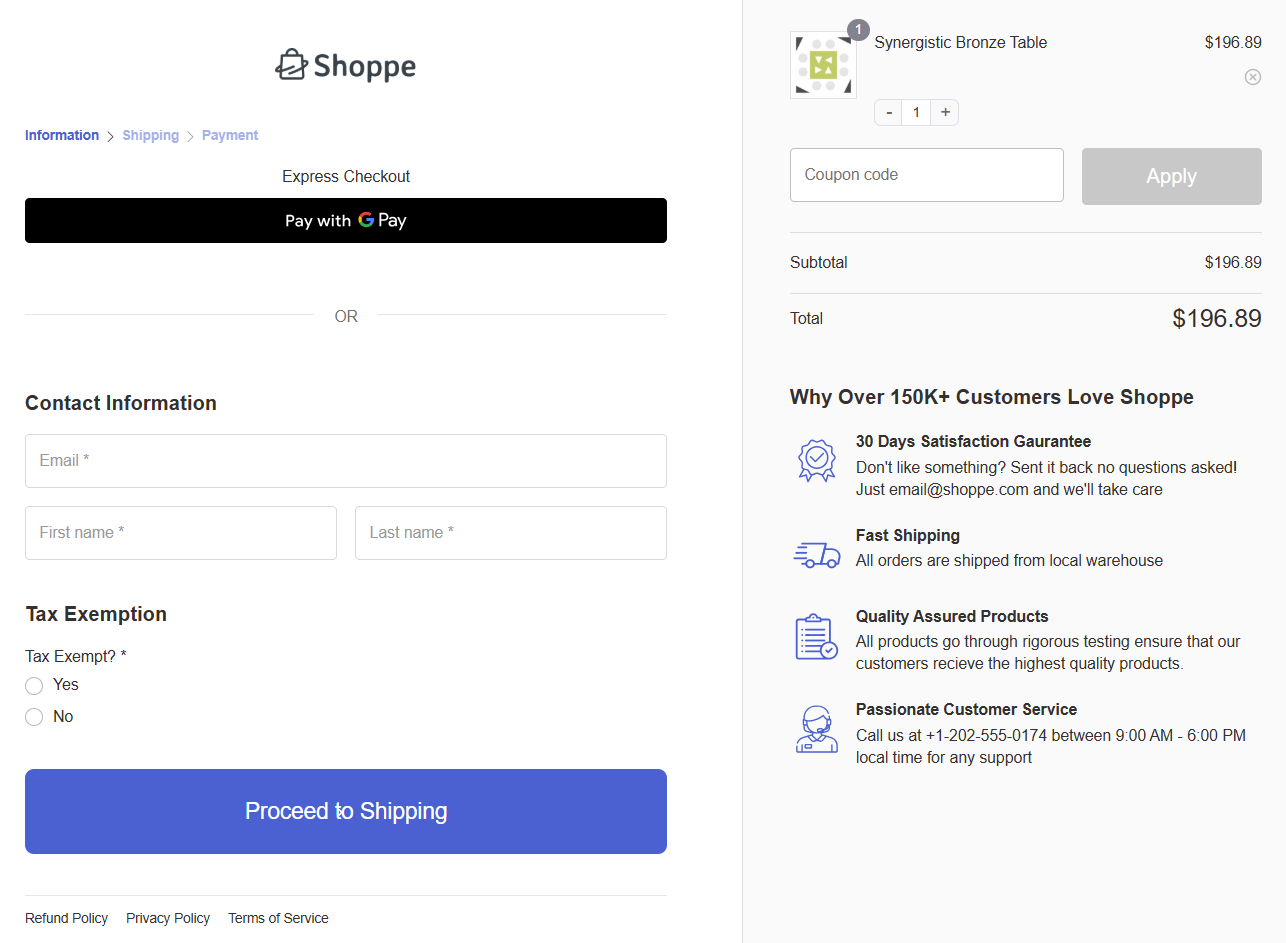
Verify that the conditional field is hidden by default and only appears when the correct trigger value (Tax Exempt in our case) is selected.
Try both trigger values to confirm the field shows and hides correctly.
Confirm that the custom field values are saved correctly under the order meta section.
Well done! This is how you can add WooCommerce conditional checkout fields to your store.
Method 2: Add WooCommerce Conditional Checkout Fields With Custom Code
If you're a developer or prefer working with WooCommerce hooks, you can use custom PHP and JavaScript to add conditional checkout fields.
This method gives you complete control but requires WordPress development experience.
Step 1: Add the trigger and conditional field to the checkout form
Use the woocommerce_after_order_notes hook.
This custom code will add a checkbox to the checkout page that will ask if the customer wants gift wrapping. Also a text area for the gift message that will be shown conditionally.
add_action( 'woocommerce_after_order_notes', 'add_gift_wrap_fields' );
function add_gift_wrap_fields( $checkout ) {
    woocommerce_form_field( 'gift_wrap', array(
        'type'  => 'checkbox',
        'class' => array( 'form-row-wide' ),
        'label' => 'Add gift wrapping to this order?',
    ), $checkout->get_value( 'gift_wrap' ) );

    woocommerce_form_field( 'gift_message', array(
        'type'        => 'textarea',
        'class'       => array( 'form-row-wide', 'gift-message-field' ),
        'label'       => 'Gift Message',
        'placeholder' => 'Enter your gift message here...',
    ), $checkout->get_value( 'gift_message' ) );
}
Step 2: Add JavaScript to show and hide the conditional field
Use this custom script to hide the gift message textarea by default and reveal it when the checkbox is checked.
add_action( 'wp_footer', 'gift_wrap_conditional_script' );
function gift_wrap_conditional_script() {
    if ( ! is_checkout() ) return;
    ?>
    <script>
    jQuery(function($) {
        var $giftField = $('.gift-message-field');
        $giftField.hide();
        $('#gift_wrap').on('change', function() {
            if ( $(this).is(':checked') ) {
                $giftField.slideDown();
            } else {
                $giftField.slideUp();
            }
        });
    });
    </script>
    <?php
}
Step 3: Save the conditional field data to the order
This ensures the custom field values appear in the WooCommerce order admin:
add_action( 'woocommerce_checkout_update_order_meta', 'save_gift_wrap_fields' );
function save_gift_wrap_fields( $order_id ) {
    if ( ! empty( $_POST['gift_wrap'] ) ) {
        update_post_meta( $order_id, '_gift_wrap', 'yes' );
    }
    if ( ! empty( $_POST['gift_message'] ) ) {
        update_post_meta( $order_id, '_gift_message', sanitize_textarea_field( $_POST['gift_message'] ) );
    }
}
Step 4: Display the field data in order emails and the My Account page (optional)
By default, custom field data only appears in the admin order screen.
To display it in customer emails and the order details page, use this snippet code:
add_action( 'woocommerce_email_order_meta', 'display_gift_wrap_in_emails', 10, 3 );
function display_gift_wrap_in_emails( $order, $sent_to_admin, $plain_text ) {
    $gift_wrap = get_post_meta( $order->get_id(), '_gift_wrap', true );
    $gift_message = get_post_meta( $order->get_id(), '_gift_message', true );
    if ( $gift_wrap === 'yes' && $gift_message ) {
        echo '<p><strong>Gift Message:</strong> ' . esc_html( $gift_message ) . '</p>';
    }
}
This is how you can add conditional checkout fields to WooCommerce with custom code.
This method is perfect for implementing basic conditional fields, but becomes difficult to manage as your requirements grow.
For complex rules, you'll need to write separate logic for each condition, ensure compatibility across various themes and caching plugins, and handle server-side validation manually.
Most WooCommerce store owners who need multiple checkout fields, multiple conditions, or frequent changes, a plugin-based approach is more practical and easier to maintain over time.
6 Real Examples of WooCommerce Conditional Checkout Fields
These examples show specific field configurations you can implement in your store. Each includes the trigger condition, the fields that appear, and the field types involved.
- Gift wrapping with a custom message
A checkbox labeled "Add Gift Wrapping". When checked, a textarea labeled "Gift Message" and a text field labeled "Recipient Name" appear below it.
This setup works well for any store that sells giftable products and wants to offer gifting messages on the checkout page.
- Business customer tax details
A Select2 dropdown labeled "I am ordering as…" with options "Individual" and "Business".
When Business is selected, three fields appear including Company Name, Tax ID / VAT Number, and Purchase Order Number.
This setup uses AND/OR logic to also show the VAT field when the billing country is an EU member state, regardless of the dropdown selection.
- Dietary restrictions for event tickets
A radio field labeled "Do you have any dietary restrictions?" with options "Yes" and "No". When yes is selected, a multi-select dropdown appears with options like Vegan, Vegetarian, Gluten-Free, Dairy-Free, and Nut Allergy.
This is a common setup for stores that sell event tickets, cooking class registrations, or catered meal packages.
As several WooCommerce store owners have discussed in community forums, this type of conditional field eliminates the need for follow-up emails to collect allergy information before the event.
- Liability waiver acknowledgment for services
A product from the "Classes" or "Rentals" category is in the cart. When detected, a checkbox labeled “I confirm that I have read and agree to the liability waiver” appears, along with a link to the waiver document.
The checkbox is set as required, so customers cannot complete checkout without acknowledging the waiver.
For stores that require waivers for children as well, an additional radio field ("Will minors be attending?") can conditionally reveal a Number of Minors field and a Minor Waiver Confirmation checkbox.
- Local pickup scheduling
The customer selects "Local Pickup" as the shipping method.
When selected, a date picker field labeled "Preferred Pickup Date" and a Select2 dropdown labeled "Pickup Time Slot" (with options like 9 AM - 12 PM, 12 PM - 3 PM, 3 PM - 6 PM, etc.) appear there.
When any other shipping method is selected, these fields keep hidden.
- Subscription delivery preferences
A subscription product (recurring payment item) is in the cart. When detected, a radio field labeled "Preferred Delivery Day" appears with options for each weekday, along with a textarea labeled "Standing Delivery Instructions" for ongoing notes like "Leave at back door" or "Ring doorbell".
These fields only appear for physical subscription orders and are stored with the subscription metadata so they persist across renewal orders.
Frequently Asked Questions (FAQs)
The most common conditions include customer input (selecting a radio button, checking a checkbox, or choosing a dropdown option), products or product categories in the cart, cart total or item count, selected shipping method, user role, billing or shipping country, etc.
Plugin-based solutions typically support all of these through a visual interface, while custom code can handle any condition you can write logic for.
Most conditional checkout field plugins currently support only the classic shortcode-based WooCommerce checkout, not the newer block-based checkout.
WPDesk offers a separate “Checkout Fields for Blocks” add-on that supports conditional logic in the block checkout.
FunnelKit replaces the default checkout entirely with its own optimized pages, so block checkout compatibility is not a concern when using FunnelKit.
If you are using the block checkout and need conditional fields, check the specific plugin documentation for block support before purchasing.
Most conditional checkout field plugins like FunnelKit Funnel Builder work with any theme that follows WooCommerce coding standards.
However, heavily customized themes or themes that override WooCommerce checkout template files can sometimes conflict with conditional field logic.
If you encounter display issues, check whether your theme modifies the form-checkout.php or form-billing.php template files.
Yes, several plugins support adding fees to conditional fields. For example, Amplify Plugins Conditional Woo Checkout Field Pro lets you charge fees per entry, per letter, per word, or per selected option. The Conditional Checkout Fields plugin on WooCommerce.com also supports field-based pricing.
With custom code, you can use the woocommerce_cart_calculate_fees hook to add dynamic fees based on checkout field values.
WooCommerce checkout pages have several sections where fields can be placed: billing details, shipping details, additional information (order notes), and the order review area.
Most plugins let you add fields to any of these sections. Some plugins also support creating entirely new sections that can be positioned before or after any existing section, including before billing fields, after shipping fields, or before order review.
You should always follow these best practices when adding conditional checkout fields to WooCommerce:
- Check for JavaScript errors
- Verify field IDs match exactly
- Clear all caches
- Check for any plugin conflicts
- Check HPOS compatibility
- Test the condition trigger yourself
Final Thoughts: Build a Checkout That Adapts to Your Customers
The stores with the highest-converting checkouts are the ones that feel tailored. Every field exists for a reason, every question lands at the right moment, and nothing gets in the customer's way.
WooCommerce conditional checkout fields will get you there fast without building a separate checkout for every segment.
Audit the highest-friction areas of your current flow. The fields most customers skip, the questions that don’t apply to digital orders, the compliance steps that matter only for a subset of buyers.
Next, write rules that surface those fields only when they're useful.
The quickest way to do this is use a conditional checkout fields plugin like FunnelKit Funnel Builder and get done in 15 minutes.
If you need logic no plugin can express, the code patterns in this guide will get you there.
Either way, the payoff is a cleaner checkout, cleaner data, and a measurably better conversion rate.
So get there fast by clicking the button below!

Editorial Team
June 16, 2026Utilizing the power of the WooCommerce sales funnel can boost your online sales and revenue. That means a product page that builds desire, an in-cart upsell, a checkout with an...
Editorial Team
June 15, 2026If you run a WooCommerce store, you've almost certainly come across FunnelKit. FunnelKit is a suite of three separate products, each with its own Lite (free) and Pro versions: FunnelKit...

Editorial Team
June 12, 2026AutomateWoo gets the job done, but switching away from AutomateWoo is becoming increasingly common among WooCommerce store owners. If you're looking for the best AutomateWoo alternative for your WooCommerce store,...


