


The WooCommerce MailerLite integration takes about 10 minutes to set up, but most store owners stop there.
They see the subscriber count starts going up, the plugin shows a green connected status, and it feels like the setup is done.
But a synced list is just the starting point. It doesn't make money until you put it to work with the right workflows.
Connecting the two platforms takes no code. The official plugin handles customer sync, the checkout opt-in, product blocks, and sales tracking out of the box.
The tricky part comes after the connection: deciding which orders should trigger a workflow, knowing when recovery emails should go out, and making sure customers who already bought don't receive an abandoned cart email.
This guide walks through the whole thing end to end.
We'll connect the two platforms, sync your existing customers, add a GDPR-friendly opt-in to checkout, and build the automations that turn a passive list into recovered orders and repeat buyers.
Table of Contents
- 1 What Connecting WooCommerce and MailerLite Actually Does
- 2 Which Method Should You Pick?
- 3 Method 1: Connect WooCommerce to MailerLite With the Official Plugin
- 4 The Automations Worth Building First
- 5 Drive MailerLite From Your Store Events With FunnelKit Automations
- 6 Troubleshooting: Common Connection and Sync Problems
- 7 Frequently Asked Questions
- 8 Start Turning Your MailerLite Sync Into Repeat Sales
What Connecting WooCommerce and MailerLite Actually Does
At its simplest, the integration keeps your store and email list in sync, so you can market to buyers based on what they actually do.
The official plugin gives you six main features:
- Customer sync: Customers who opt in to marketing are automatically added to a MailerLite group, and you can also bring in your existing customers.
- Checkout opt-in: Add a newsletter checkbox at checkout and control its position, label, and double opt-in settings.
- eCommerce automation triggers: Set up abandoned cart, abandoned checkout, purchase-based, and first-purchase triggers for workflows in MailerLite.
- Product blocks: Pull live WooCommerce products directly into newsletters and landing pages.
- Subscribe pop-ups: Add on-site pop-up forms to capture subscribers outside the checkout box.
- Sales tracking: Order data flows back to MailerLite, so you can attribute revenue to specific campaigns and see what each email generates.

Which Method Should You Pick?
Both methods below get your WooCommerce customers into MailerLite. The difference is how much control you have over where each customer ends up.
Method 1 uses the official plugin and drops every buyer into one group. It is the five-minute version and enough for most small stores.
Method 2 uses FunnelKit Automations to control exactly which group each buyer lands in and keeps MailerLite updated as orders change. Here, you can sync smarter workflows that help you grow your business.
Method 1: Connect WooCommerce to MailerLite With the Official Plugin
For the connection, we will use the official MailerLite - WooCommerce integration plugin.
MailerLite builds and maintains it, and it's free to install. But you need a MailerLite account and an active WooCommerce store.
Follow the steps below to connect your store to MailerLite:
Step 1: Install the official MailerLite plugin
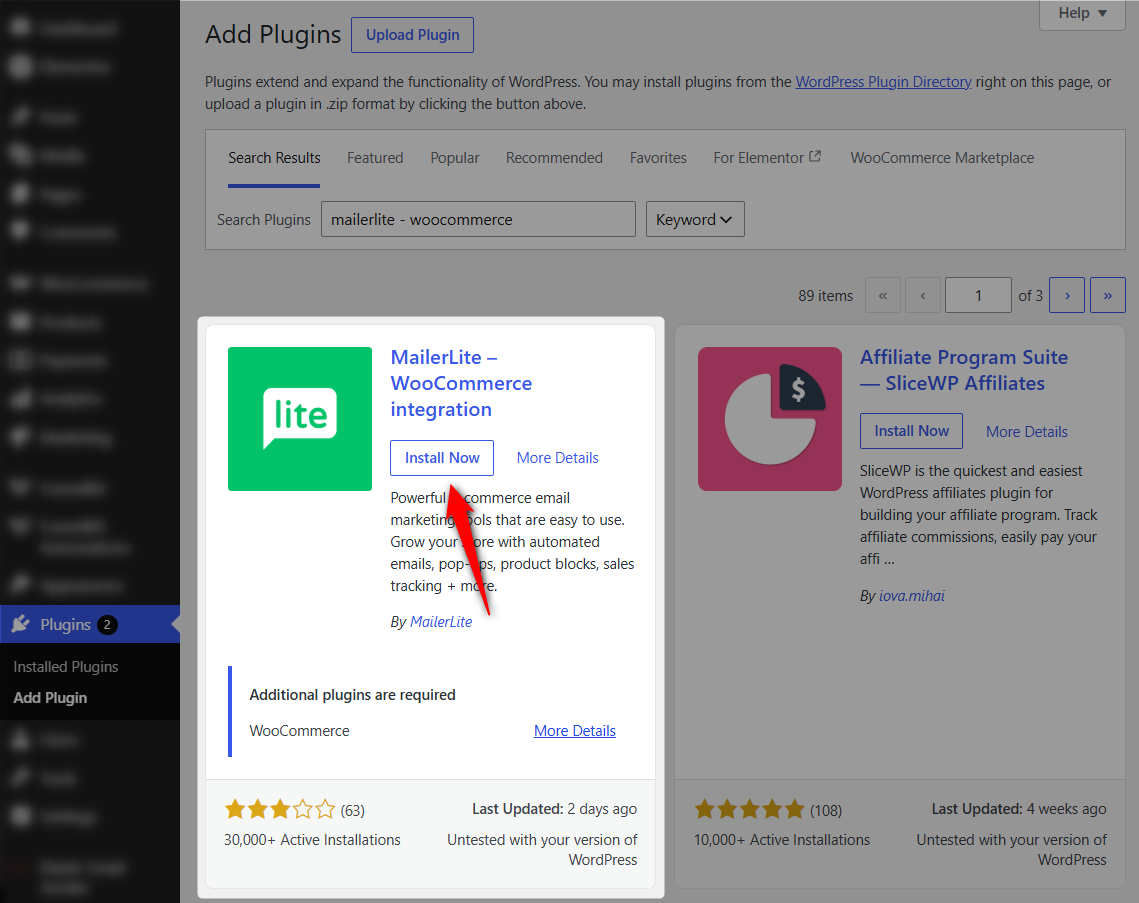
In your WordPress dashboard, go to Plugins ⇨ Add Plugin. Search for MailerLite - WooCommerce integration (the one built on the official MailerLite API).
Click Install Now, then Activate.
Step 2: Generate your MailerLite API token
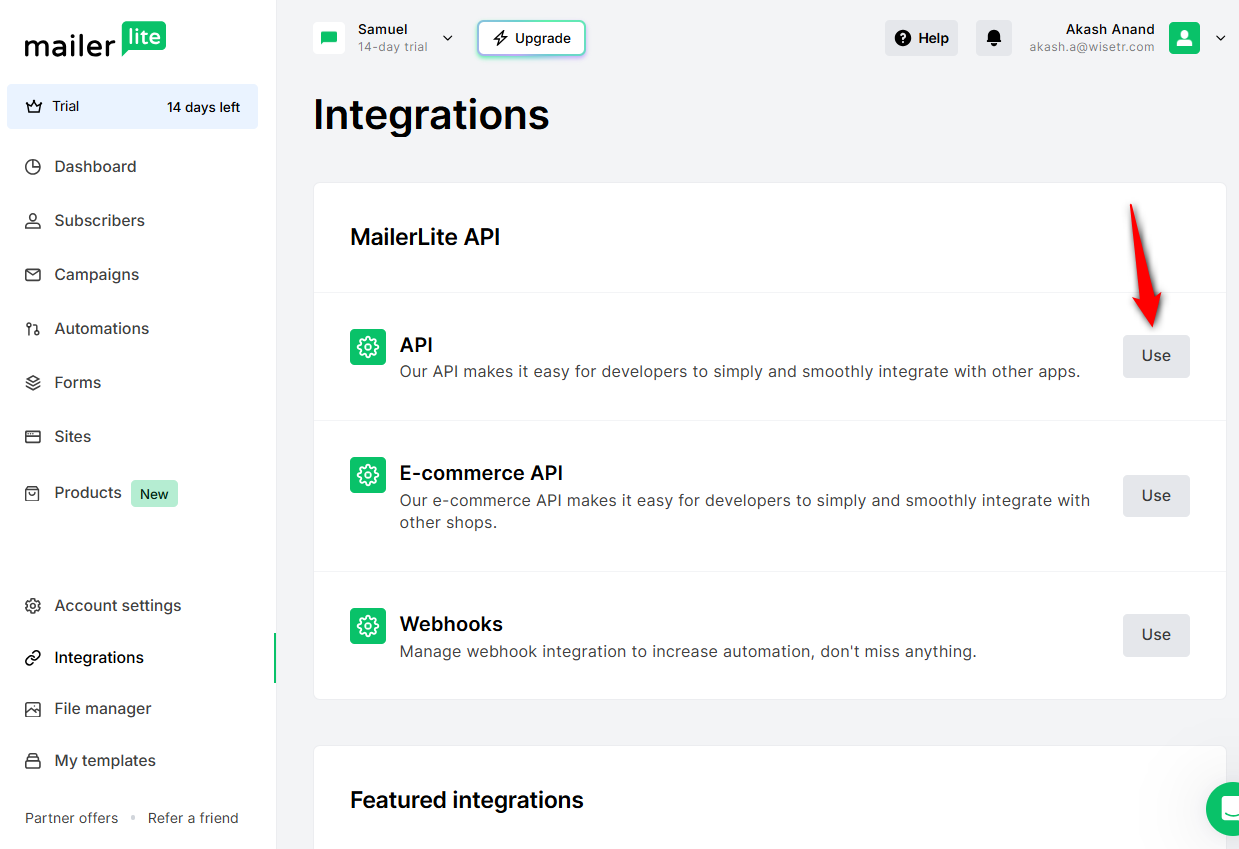
Open your MailerLite dashboard in a separate tab and go to Integrations.
Find the MailerLite API section and click 'Use'.
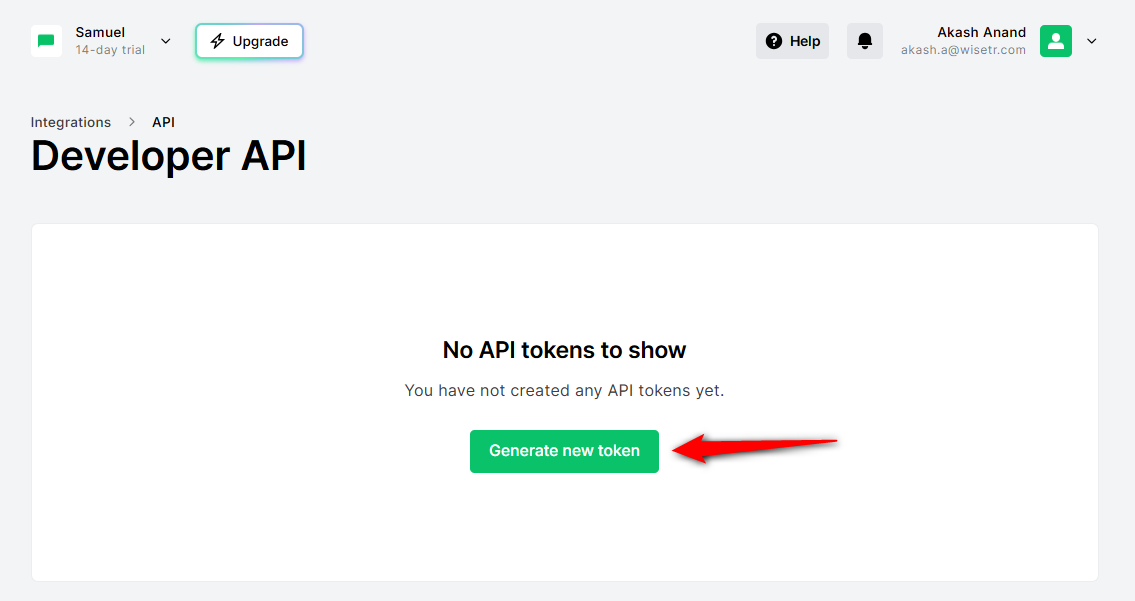
Next, click on the 'Generate new token' button.
Give your Developer API a name that you'll recognize later (for example, your store name), and click 'Create token'.
Your token will be generated.
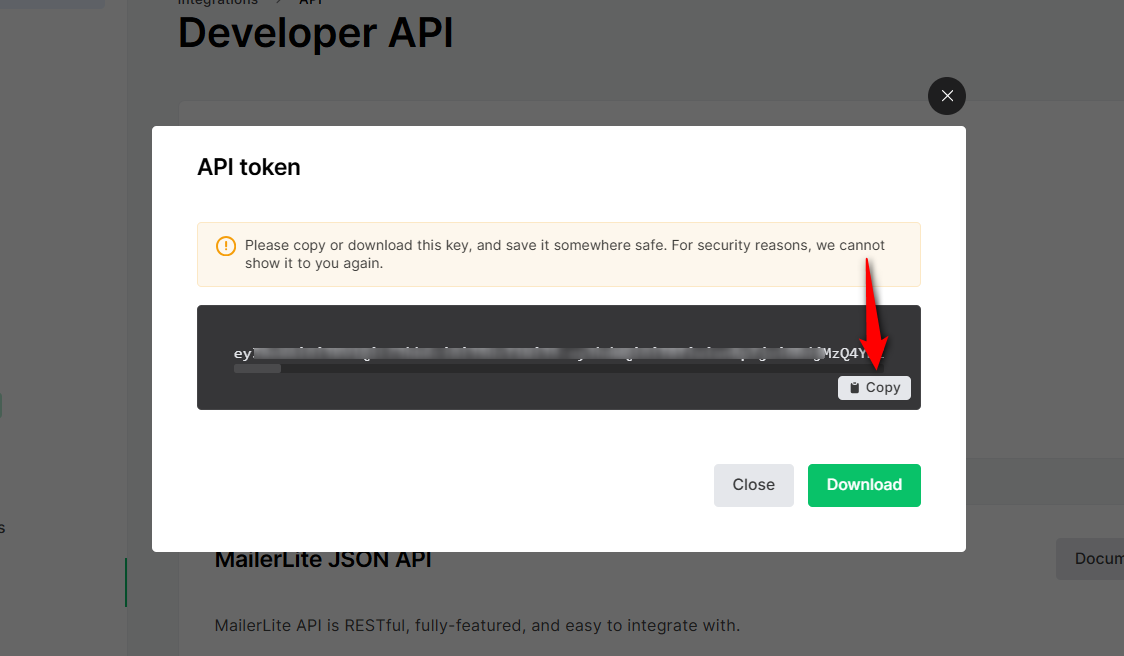
Copy it because you'll only see it once.
Step 3: Paste the token into WooCommerce
In your WordPress dashboard, go to WooCommerce ⇨ MailerLite. Paste your API token into the field and click 'Connect account'.
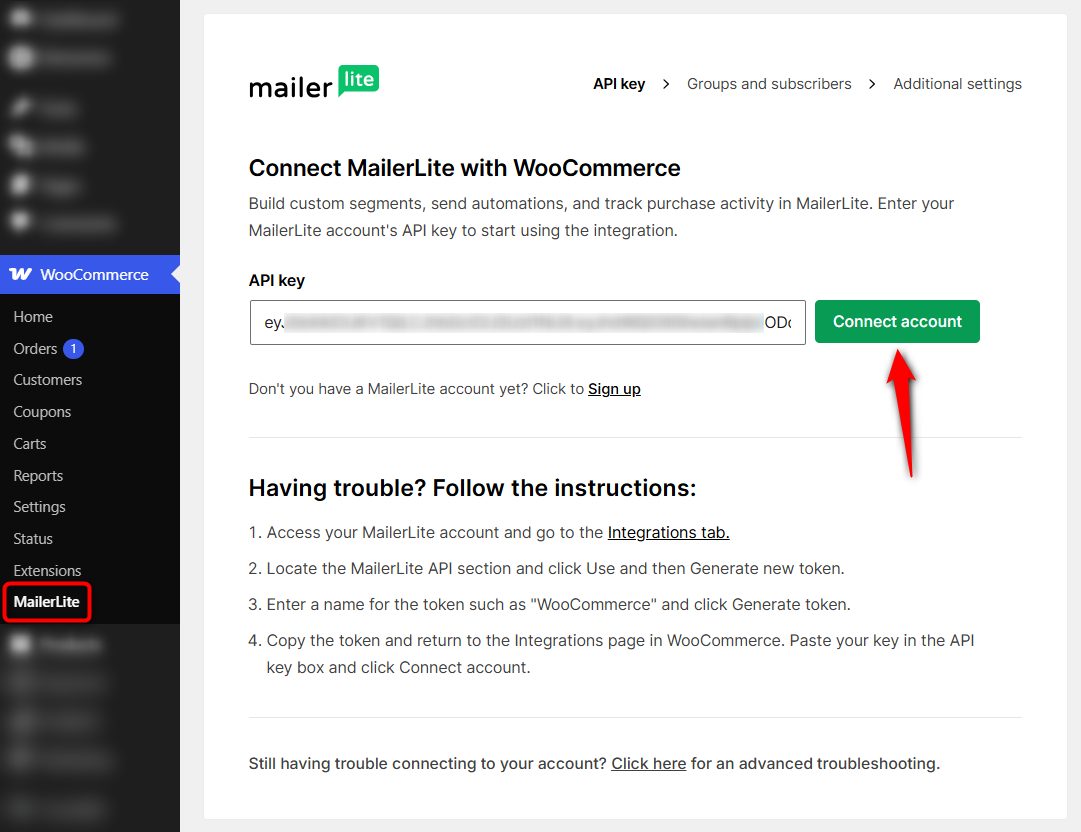
After a successful connection, you'll see your MailerLite groups in the next step.
If it fails, the token was almost always mistyped or truncated. You'll have to regenerate it and paste it carefully. (More fixes in the troubleshooting section below)
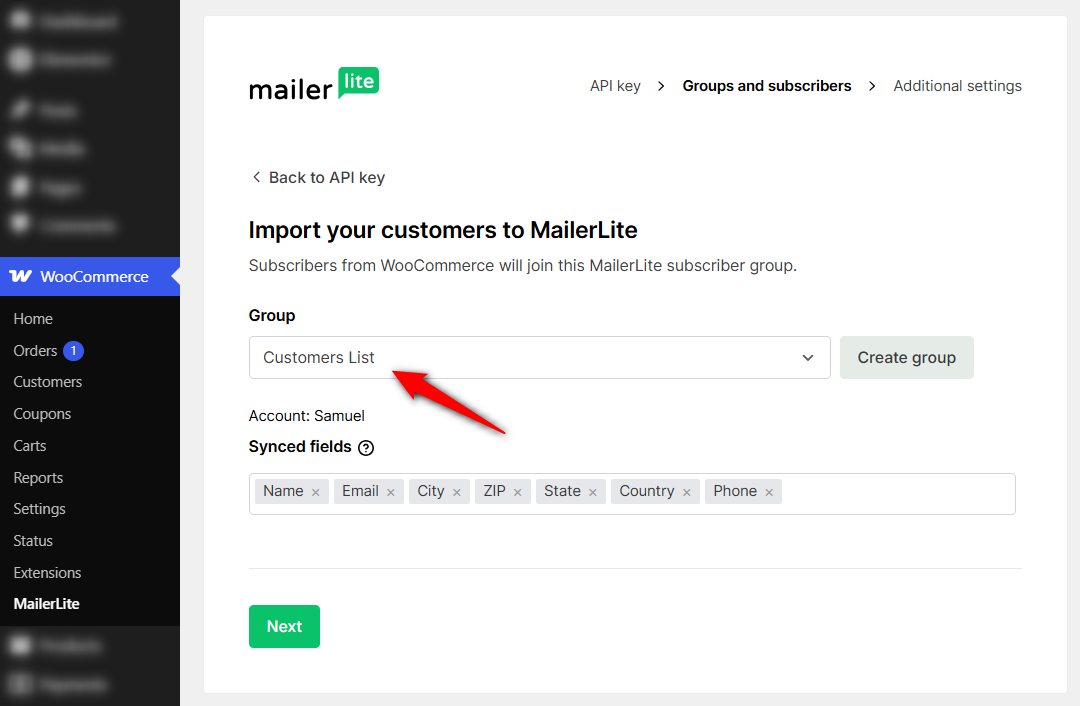
Step 4: Choose the group your customers land in
Select the MailerLite group new WooCommerce customers should be added to.
For example, we'd create a group called Store Customers so buyers are separated from newsletter-only subscribers.
Step 5: Import your existing customers
Click 'Save Changes' to sync the customers already in your store.
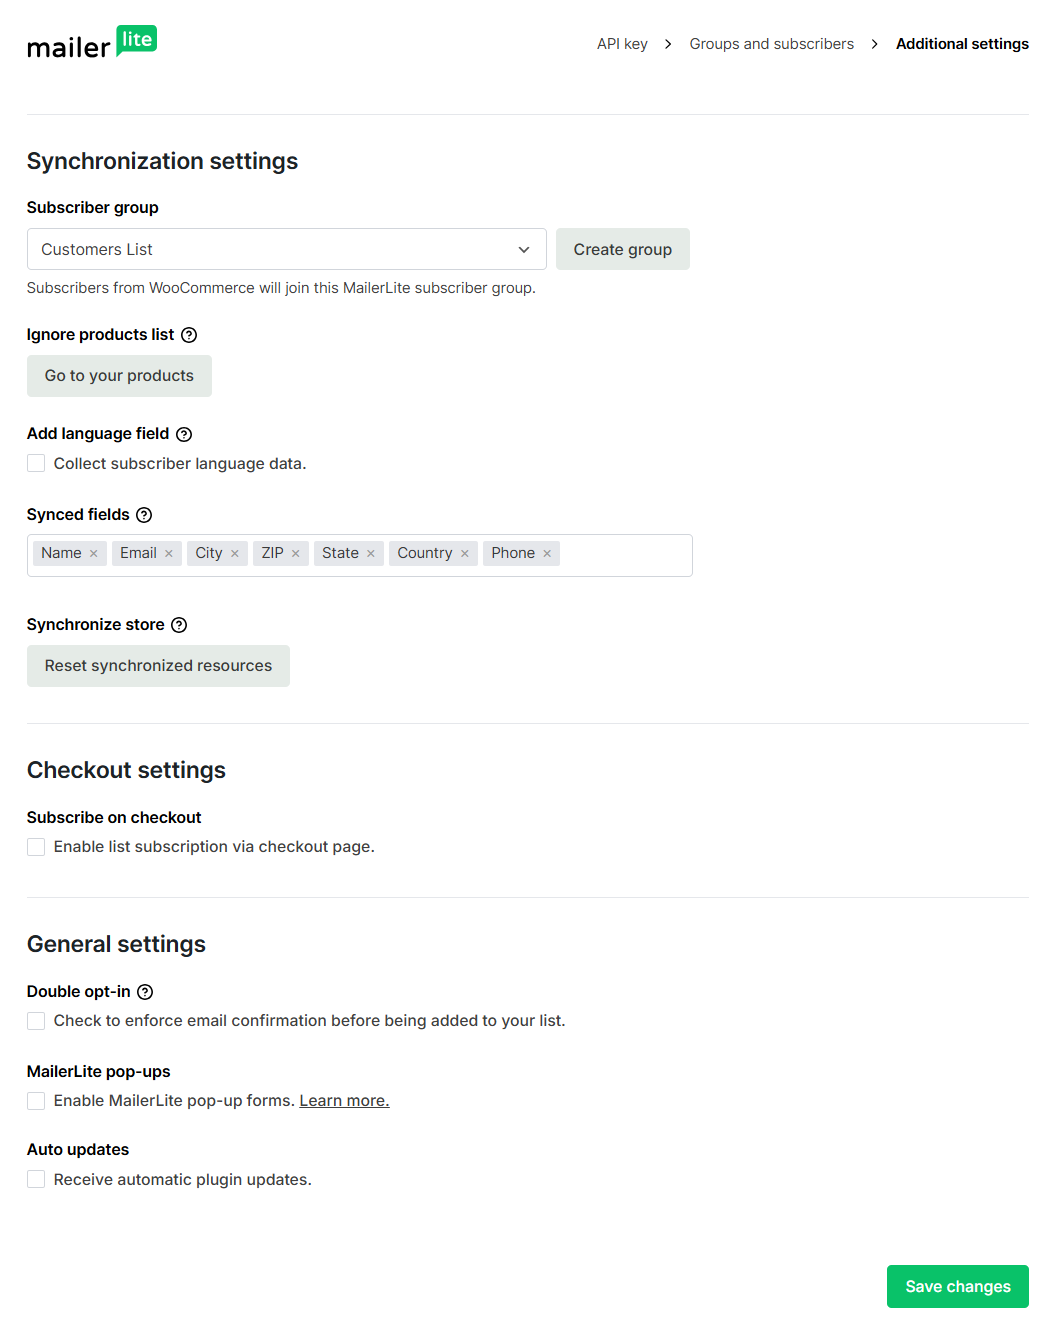
Once it finishes, every existing customer sits in your chosen group, and every new order adds to it automatically.
Here are a few additional settings to configure:
- Subscribe on checkout: An empty list grows one way that matters most: capturing buyers at the moment they're already handing over an email. The plugin adds a marketing checkbox to checkout for exactly this.
- Double opt-in: Lets subscribers confirm via email before they're added.
On GDPR, keep the box unchecked by default so consent is a deliberate action, and pair it with a clear label.
The Automations Worth Building First
Inside MailerLite, the integration gives you eCommerce triggers to build workflows around.
Here are the three most important ones, and why they come first.
1. The welcome sequence
A new subscriber is at peak interest the moment they opt in, and that attention decays fast.
For that, a welcome email sent immediately reliably outperforms one sent later.
Build a two- or three-email flow triggered when someone joins your Store Customers group: introduce your brand, set expectations for what you'll send, and point to a best-seller.
2. Abandoned cart recovery
Roughly 70% of carts are abandoned, and recovering even a slice of that is the highest-ROI email you'll send, because the buyer already wanted the product.
MailerLite's abandoned-cart trigger works with conditions worth understanding before you rely on it:
- The eCommerce integration must be fully set up before the cart is abandoned.
- To trigger the cart abandonment sequence, the shopper should reach the checkout and enter an email. No email captured means no trigger.
- The automation must be active at the time of abandonment, and a marketing-consent checkbox must be present at checkout.
Use the abandoned-cart block in your email so it pulls the exact items left behind, add a delay, and consider a second reminder a day later.
In our experience across WooCommerce stores, firing the first email instantly reads as surveillance; an hour or two feels like a helpful nudge and recovers better.
3. Post-purchase follow-up
The cheapest sale you'll ever make is the second one to an existing customer because retention runs roughly 5-7x cheaper than acquisition.
Yet most stores go silent as soon as they send order confirmation.
So you should trigger a flow on a completed order, for instance, a thank-you within a couple of days, a product-care or how-to-use email, then a review request 7-14 days after delivery once they've actually used the product.
Drive MailerLite From Your Store Events With FunnelKit Automations
The native plugin syncs on a fixed set of order statuses and adds people to one group.
That's fine for a basic list, but it can't act on what someone bought, when their spend crosses a threshold, or when a subscription lapses.
This is behavioral stuff that actually decides which email a customer should get next.
That's where FunnelKit Automations earns its place. It has a built-in MailerLite connector. Once connected, you can build WooCommerce workflows that trigger real MailerLite actions.
- Create Subscriber: Add someone to MailerLite the moment a store event happens.
- Add to Groups: Drop a customer into a specific group based on behavior.
- Remove from Groups: Pull them out when they no longer belong there.
- Update Fields: Write data (last product bought, total spend, plan tier) onto the subscriber record.
The difference is when and why these fire. The native plugin adds every customer to one group on a synced order status.
FunnelKit Automations lets you trigger on a WooCommerce event, for example, “Order created”, a specific product purchased, or a subscription cancelled. Decide the action, with merge tags like {{customer_email}} mapping the data across.
This way, you're using your store's behavior to control your MailerLite segments, instead of dumping everyone into a single bucket.
Connect MailerLite to FunnelKit Automations
The connection is quite similar to the native setup.
In MailerLite, go to Integrations ⇨ API ⇨ Use, click 'Generate new token', name it, and copy it.
Then, in WordPress, open the Connectors tab under FunnelKit Automations, click 'Connect' under MailerLite, paste the token, and hit Connect.
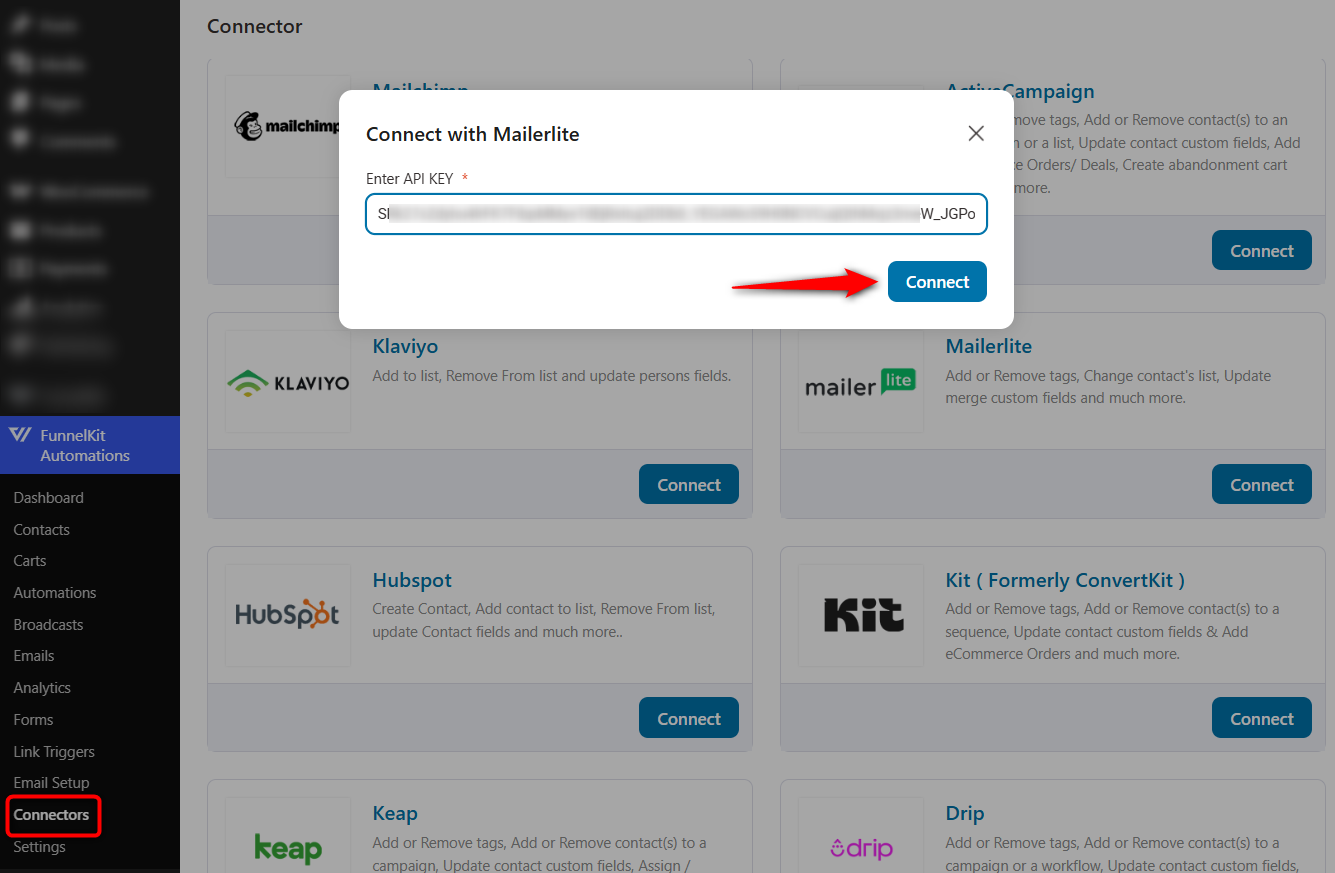
This will successfully connect your WooCommerce store to MailerLite.
Build a behavior-based workflow
Go to Automations inside FunnelKit Automations and click on 'Create Automation'.
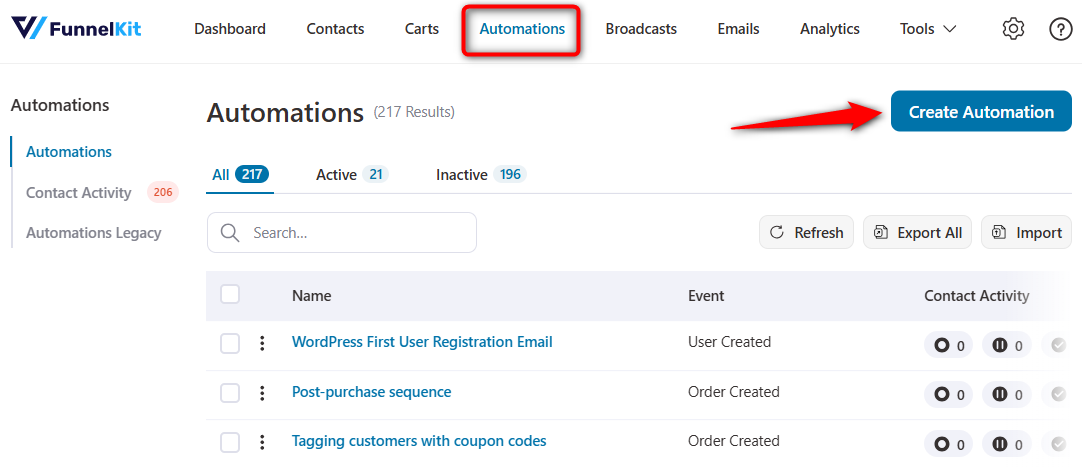
Start from scratch and name it.
1. Set the trigger
Click Select an Event and choose 'Order Created' under WooCommerce.
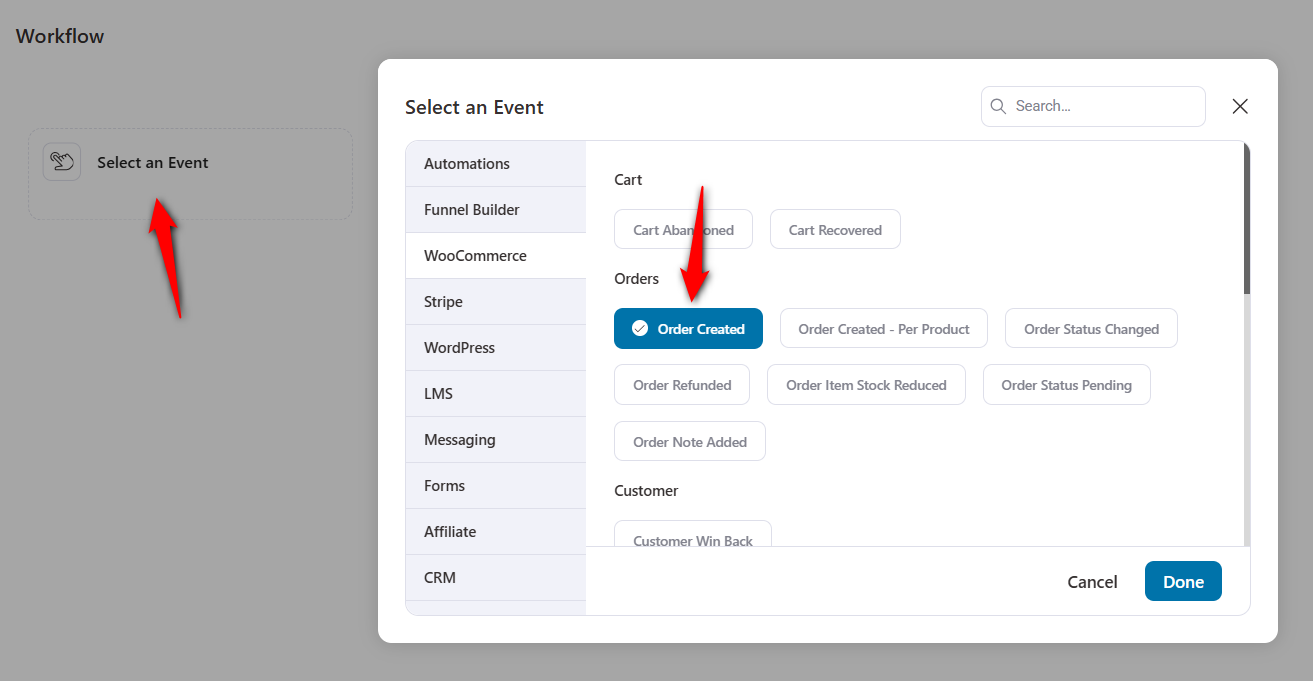
2. Add the action
Select 'Create Subscriber' under MailerLite.
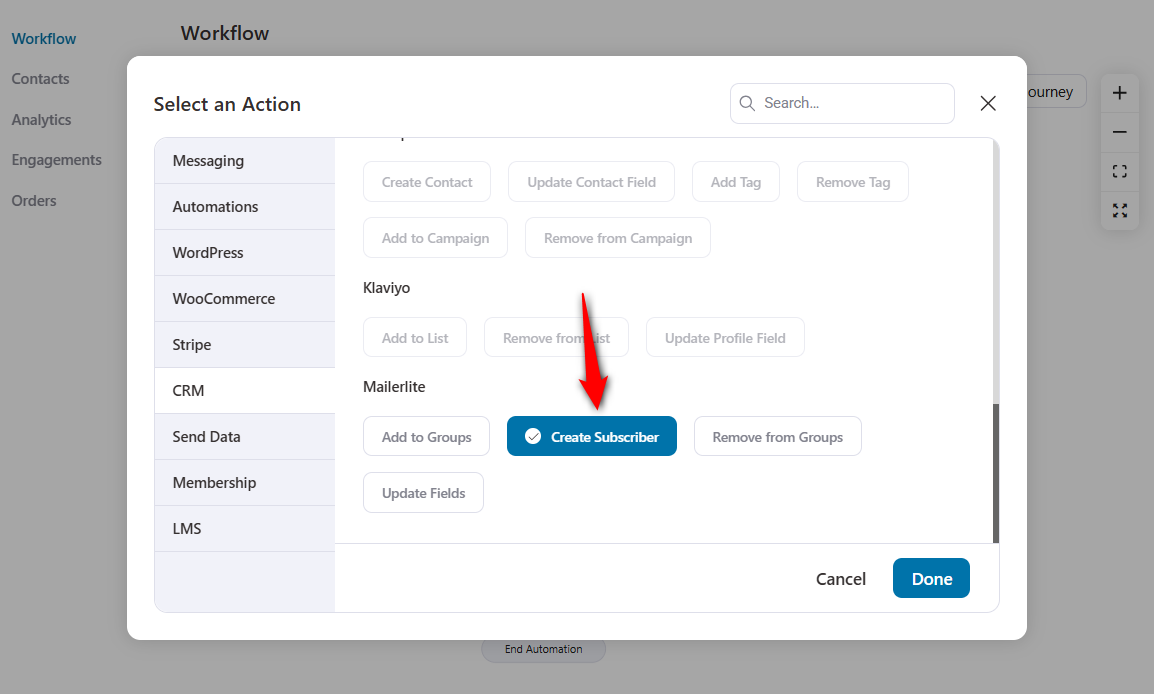
Map the email field using dynamic merge tags such as {{customer_email}}. Do the same with first name, address, etc.
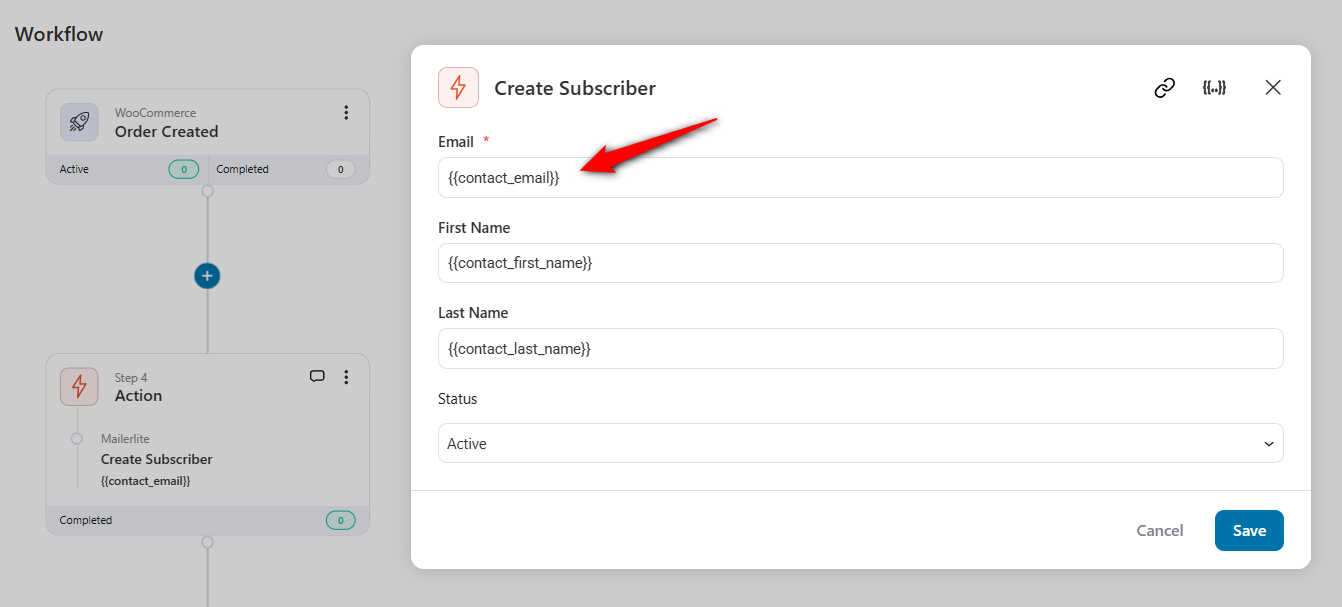
Now every buyer becomes a MailerLite subscriber at the moment of purchase, not only when the order reaches a status the native plugin happens to sync on.
3. Set a condition on what they bought
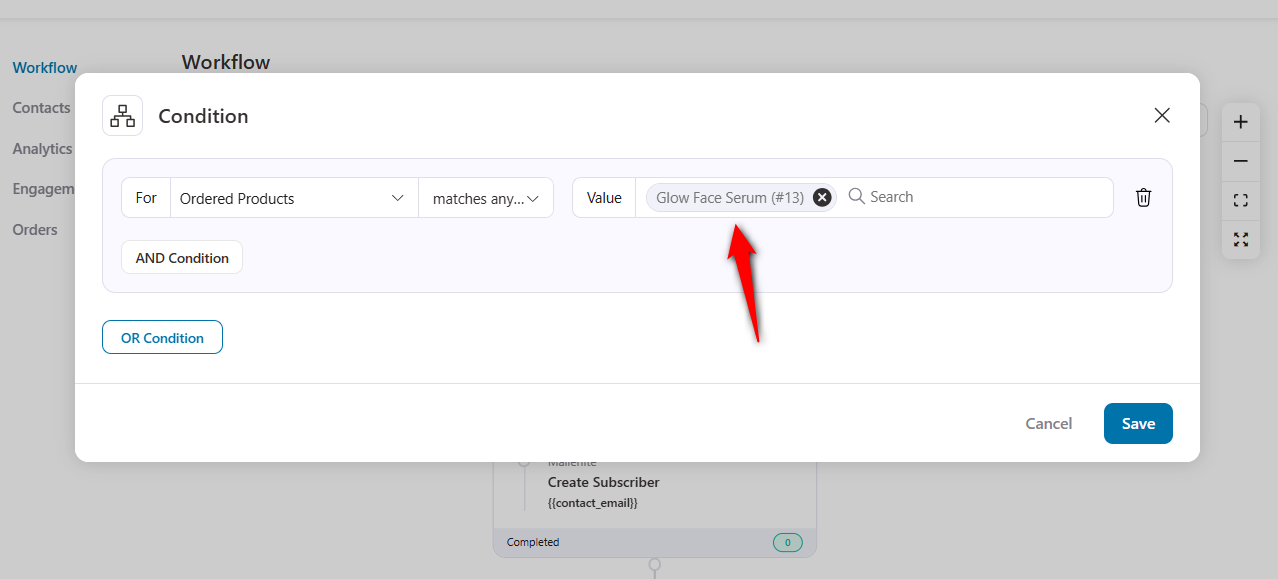
Add a condition, let's say, if the order contains a specific product or an item from a specific category.
Here, we're adding customers who purchased our "Face Serum" product.
Fire the Add to Groups action into the "Serum Buyers" group.
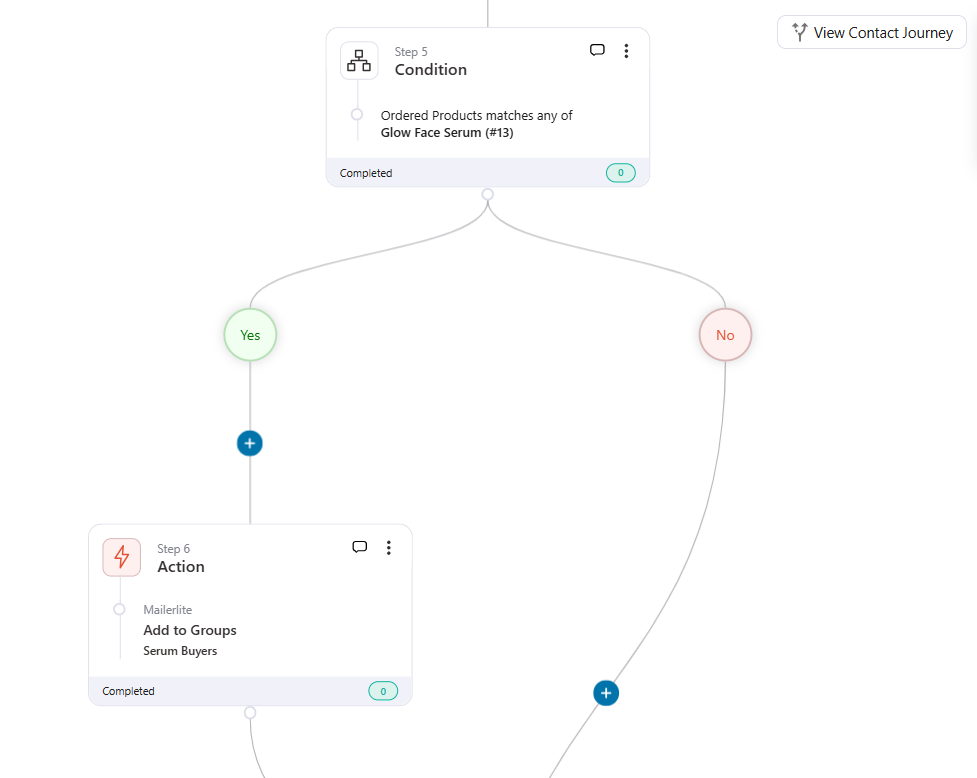
This group can drive a MailerLite replenishment sequence that the native integration can't segment for.
4. Keep the record clean
Use the Update Fields action to write last_product = Face Serum and total_spend field, so your MailerLite personalization and segments stay accurate.
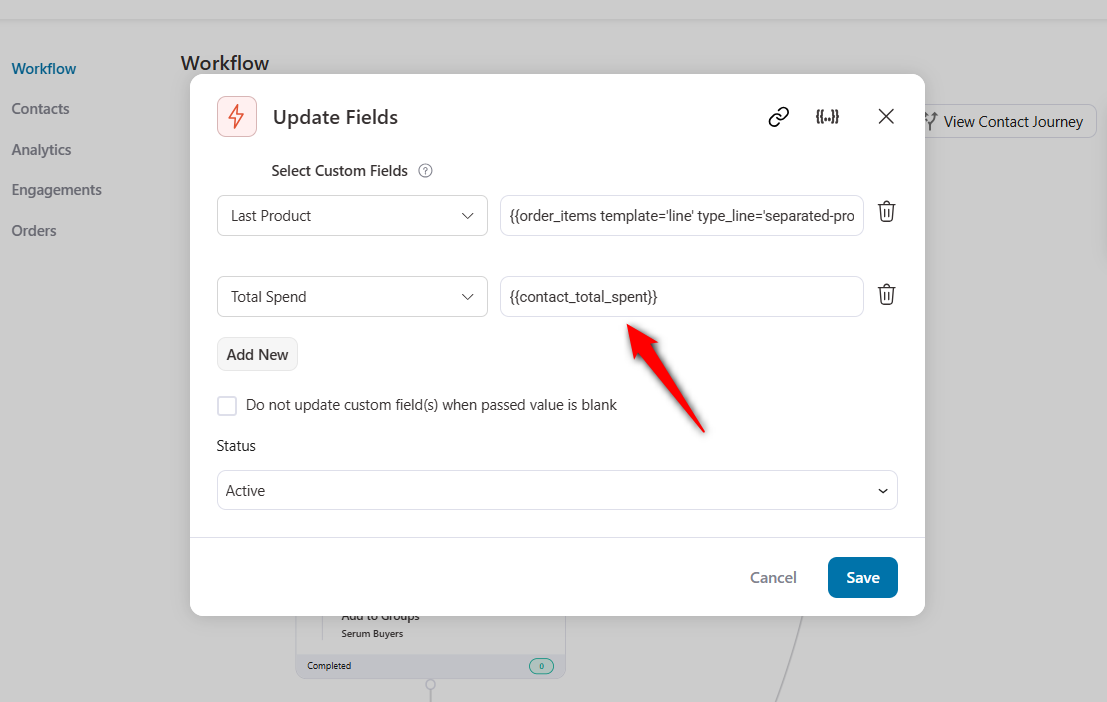
That's four store-aware actions the native plugin doesn't expose, running on top of the MailerLite account you already have.
Note: See the full range of store events you can trigger these actions from in our WooCommerce email marketing guide.
Use cases that go beyond the basic sync
Once WooCommerce events can drive MailerLite groups and fields, a lot of segmentation that used to need a spreadsheet becomes a workflow:
- Product-based segments
Buyer of the serum → Add to Groups → Serum Buyers; buyer of the moisturizer → its own group.
Each group feeds a different cross-sell or replenishment flow in MailerLite.
This is the "how do I create a new segment for customers automatically" problem store owners keep asking about, and you can solve it without Zapier.
- VIP tiering by spend
Use Update Fields to track lifetime spend, and Add to Groups → VIP once a customer crosses a threshold.
Trigger early-access and thank-you campaigns off that group.
- Category and first-time-buyer routing
Route buyers from a product category into a matching nurture group, and tag genuine first-time buyers separately from repeat customers so their welcome flow differs.
- Clean list hygiene on refunds and cancellations
Order refunded or subscription cancelled → Remove from Groups so a churned customer stops getting "thanks for being a member" emails.
This is the exit logic the native plugin has no concept of.
- Win-back on lapse
No order in 60 days → Add to Groups → Lapsed, which fires a MailerLite win-back series; a new order → Remove from Groups → Lapsed so they exit cleanly.
- Subscription lifecycle
For stores running recurring products via Sublium Subscriptions, move subscribers between MailerLite groups as a plan starts, renews, or lapses, so renewal reminders and dunning emails only reach the right people.
By the way, Sublium can send these notifications and payment recovery emails on its own.
None of this replaces MailerLite. You keep it for newsletters, broadcasts, and campaign design.
FunnelKit Automations becomes the layer that decides who lands in which group and what data rides based on real store behavior.
If you want it, native cart recovery that starts tracking at add-to-cart rather than at checkout, FunnelKit Automations closes the gap the native plugin leaves open.
For the broader playbook, see our guide to WooCommerce cart abandonment recovery and our WooCommerce email marketing guide.
Troubleshooting: Common Connection and Sync Problems
Here are the failures that come up most, and their usual fixes:
| Issue | Most Likely Cause | Fix |
|---|---|---|
| Connection fails after pasting the API token | Token mistyped, truncated, or expired | Regenerate the token in MailerLite and paste it carefully; connect over HTTPS |
| Customers not syncing | Order status hasn't reached a synced state | Orders sync on statuses like Pending payment, Processing, or Completed. Check the order's actual status |
| Buyers still getting cart emails after paying | Recovery firing on orders that haven't hit a "paid" status the flow recognizes | Confirm your automation excludes Processing/Completed orders and that order status updates correctly |
| Opt-in checkout missing | Block checkout vs classic checkout mismatch | Toggle checkout type, or confirm the plugin's checkbox setting is enabled for your checkout style |
| Product images not loading in emails | Image format | MailerLite e-commerce blocks support JPG and PNG, not WEBP. Re-upload as JPG/PNG |
| Connection drops after a WooCommerce update | Plugin/version conflict | Update the MailerLite plugin, reconnect the API token, and re-run the import if needed |
| Duplicate subscribers | Same email captured via multiple entry points | Rely on MailerLite's dedupe on email; audit your groups and merge |
If the integration keeps dropping after WooCommerce core updates and reconnecting doesn't hold up, move revenue-critical automations to a store-native tool rather than one that depends on an external API handshake.
Frequently Asked Questions
The plugin itself is free. MailerLite's free plan currently covers 250 subscribers, 2,500 emails per month, and 3 active automations following the July 2026 plan change, so most active stores need a paid plan fairly quickly.
Leave the checkout consent box unticked by default so only customers who actively opt in are marked as subscribed.
Double opt-in adds a confirmation step, which means unconfirmed subscribers will not enter your automations.
This is always an order-status issue. The recovery automation isn't correctly excluding orders that have moved to a paid/processing state, so buyers who paid but haven't shipped still look abandoned.
Check that your workflow's exit conditions account for Processing and Completed statuses.
No. MailerLite handles marketing emails, not transactional emails.
Order confirmations and receipts come from WooCommerce itself or a transactional service.
Use MailerLite for the welcome flow, cart recovery, and campaigns.
No. MailerLite has a native WooCommerce plugin, so you don't need a third-party connector for the core sync and triggers.
Zapier or Make only make sense for custom routing that the native integration doesn't cover.
Yes, you can use MailerLite and FunnelKit together. FunnelKit Automations has a MailerLite connector with specific actions that fire on WooCommerce triggers like "Order created".
You keep MailerLite for newsletters and broadcasts, and let store behavior drive which MailerLite group each customer lands in and what data rides along. See our WooCommerce email marketing guide for how to divide the work.
MailerLite is the budget-friendly, simpler option of the three. Klaviyo offers deeper eCommerce analytics and predictive segmentation at a noticeably higher price, while Mailchimp's free tier has become too limited for most stores.
For automation without per-subscriber pricing, a native plugin like FunnelKit Automations is the fourth option worth comparing.
Start Turning Your MailerLite Sync Into Repeat Sales
Connecting WooCommerce to MailerLite is a 10-minute job, and you should absolutely do it because it makes sense to have the sync, the checkout opt-in, and the newsletter tools.
But the sync alone doesn't recover a single cart or bring back a single customer.
The automations do that, and the recovery flow in particular is only as good as the moment it starts tracking.
If your store lives or dies on repeat orders and recovered carts, build those flows deliberately.
Segment buyers by what they actually bought, keep your groups clean when customers refund or lapse, and don't assume a green connected status means the revenue side is handled.
If you want smarter routing today and the option to bring automation fully inside WordPress as your list grows, start with FunnelKit Automations.
It handles your WooCommerce events and automatically drives MailerLite groups and fields, without relying on Zapier or spreadsheets.
Editorial Team
September 23, 2026A WooCommerce auto apply coupon adds the discount to the cart before shoppers have to look for a code. Supermarkets have been doing this for years. If there's a "3...
Editorial Team
September 21, 2026WooCommerce customer segmentation is what separates stores that treat every subscriber the same from stores that actually make more from their list. Sending one broadcast to everyone means new customers,...
Editorial Team
September 18, 2026WooCommerce email templates are usually one of the last things a store owner thinks about styling, even though they're among the first things customers see after placing an order. Every...






