
Want to drive more sales and customer loyalty with WooCommerce coupons?
From simple percentage discounts to advanced offers like auto-applied deals, cart-based rules, and personalized promotions, coupons are one of the most powerful tools for growing your store.
In fact, a large percentage of shoppers actively look for discounts before completing a purchase.
According to research, around 80% of consumers are willing to switch brands for a discount, making coupons one of the most effective ways to boost conversions.
In this complete guide, we’ll walk you through how to create WooCommerce coupons step by step, and then explore proven strategies to use them effectively to increase sales, recover lost customers, and boost repeat purchases.
Let’s get started!
Table of Contents
- 1 What Are WooCommerce Coupons and the Different Types of WooCommerce Coupons?
- 2 How to Create WooCommerce Coupons (Step-by-Step Guide)
- 3 How to Create a Free Shipping Coupon in WooCommerce
- 4 How to Create a Free Gift Coupon in WooCommerce
- 4.1 Step 1: Create a coupon with no discount applied
- 4.2 Step 2: Create a store checkout
- 4.3 Step 3: Add an order bump to offer a free gift
- 4.4 Step 4: Make the order bump totally free with a 100% discount
- 4.5 Step 5: Make the free gift redeemable only with a certain coupon
- 4.6 Step 6: Enable the store checkout
- 5 How to Create Personalized & Dynamic WooCommerce Coupons And Share Via Emails
- 6 More WooCommerce Coupon Strategies to Boost Sales
- 7 Common Questions About WooCommerce Coupons
- 8 Ready to Offer WooCommerce Coupons?
What Are WooCommerce Coupons and the Different Types of WooCommerce Coupons?
WooCommerce coupons are codes customers can use to get discounts, free shipping, free gifts, or other special offers in your store. They’re a proven way to attract new buyers, increase sales, and improve customer retention.
WooCommerce offers different coupon types, each designed to target specific customer behavior and marketing goals.
- Percentage or fixed discount: Reduces price directly, helping remove hesitation and encouraging faster purchases.
- Product-specific or role-based coupons: Target specific products or customer groups for more personalized and relevant offers.
- Free shipping coupon: Removes shipping cost friction, which often improves checkout completion rates.
- Free gift coupon: Adds extra value instead of reducing price, making the offer feel more rewarding.
- BOGO coupon: Encourages customers to buy more by offering additional products for free or at a discount.
- Special event coupons: Used for birthdays, first orders, or abandoned carts to trigger timely and emotional purchases.
Why must you utilize WooCommerce coupons?
Here are some of the reasons you must utilize the power of WooCommerce coupons:
- It is the easiest way to get more sales without dumping more money into ads.
- You are basically nudging people to finish what they started.
- Coupons help you grab those people who left their carts behind.
- They bring in the first-timers and give your regulars a reason to return.
Maybe it is a small price cut or just free shipping. It works. When you use them right, you are not just cutting prices. You are building a store that makes more money because people feel like they got a win.
How to Create WooCommerce Coupons (Step-by-Step Guide)
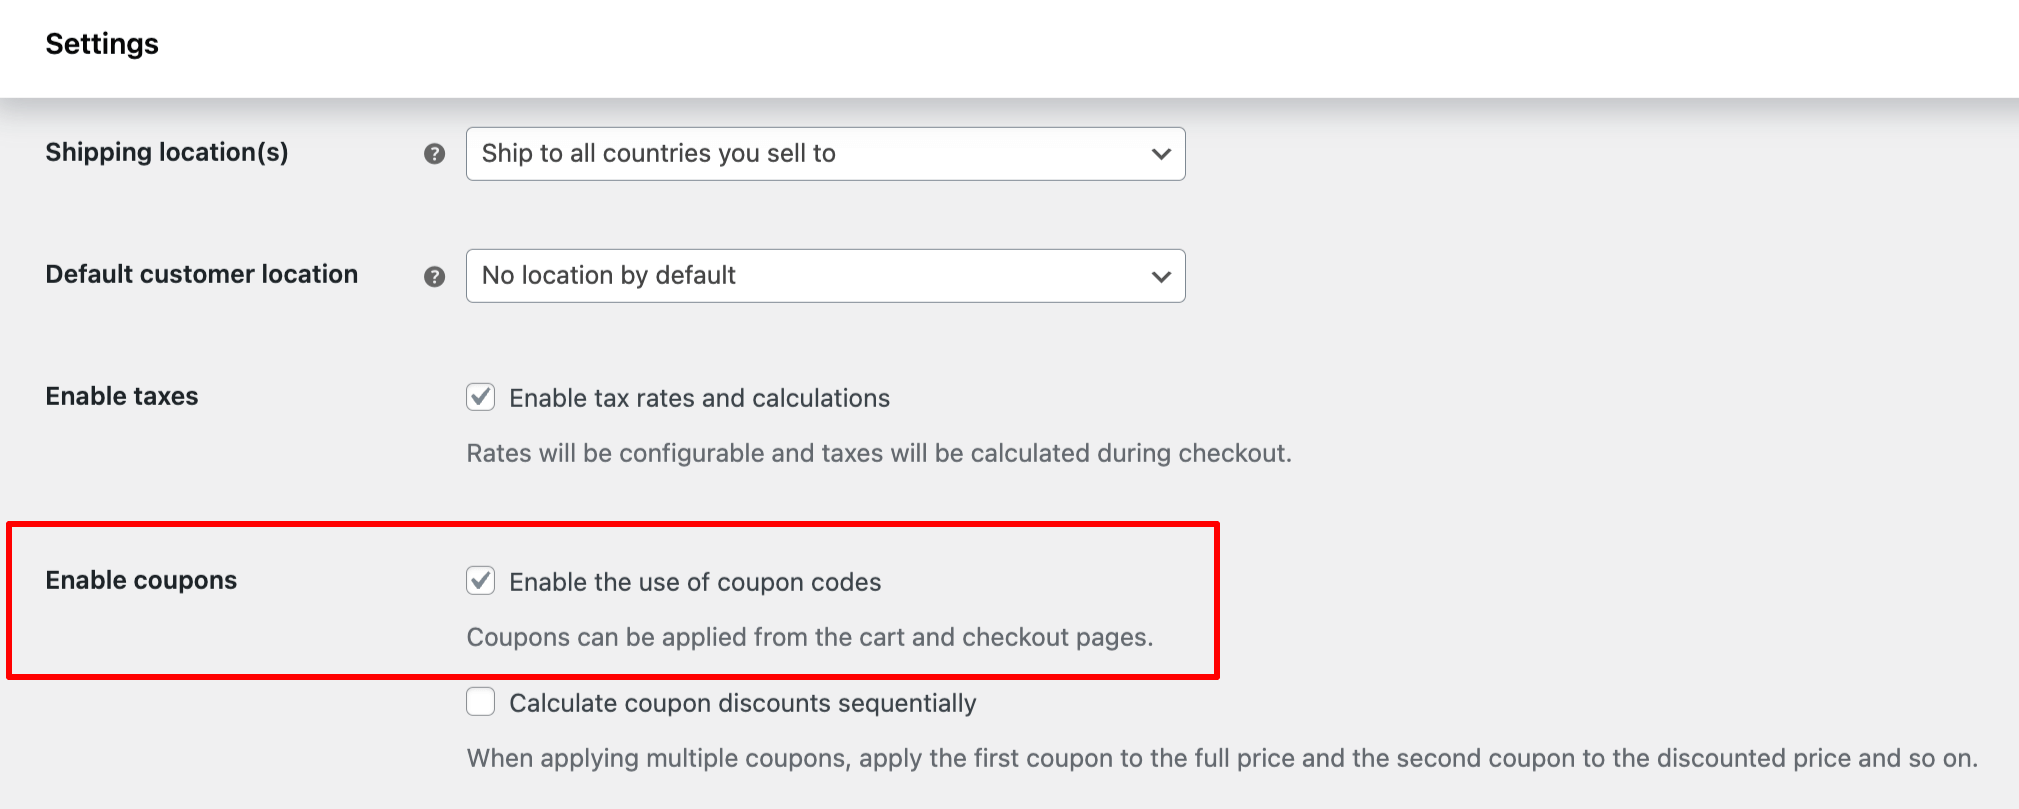
Before adding a coupon code in WooCommerce, first enable coupons by navigating to WooCommerce ⇒ Settings ⇒ General and checking the option "Enable the use of coupon codes".
Now, to offer a discount using a coupon code on your WooCommerce store, follow these steps:
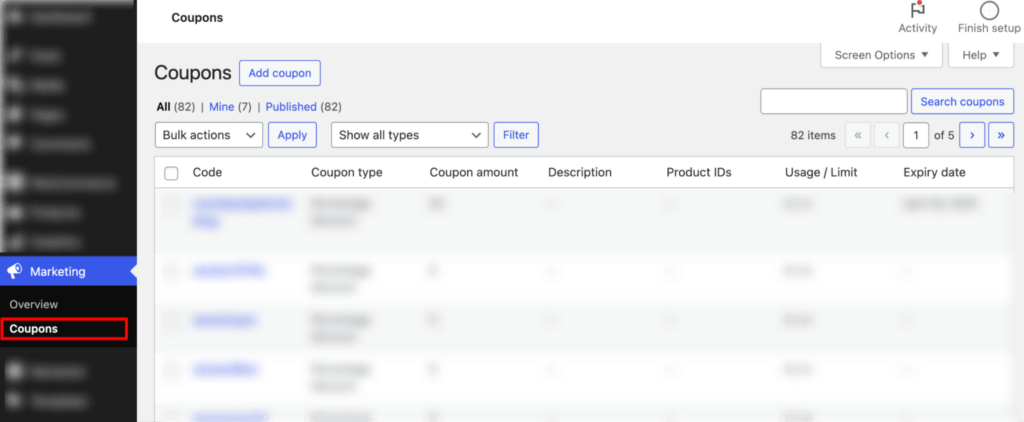
Step 1: Navigate to coupons
From the WordPress dashboard, go to Marketing ⇒ Coupons.
Step 2: Generate a coupon code
Next, click on “Add Coupon”.
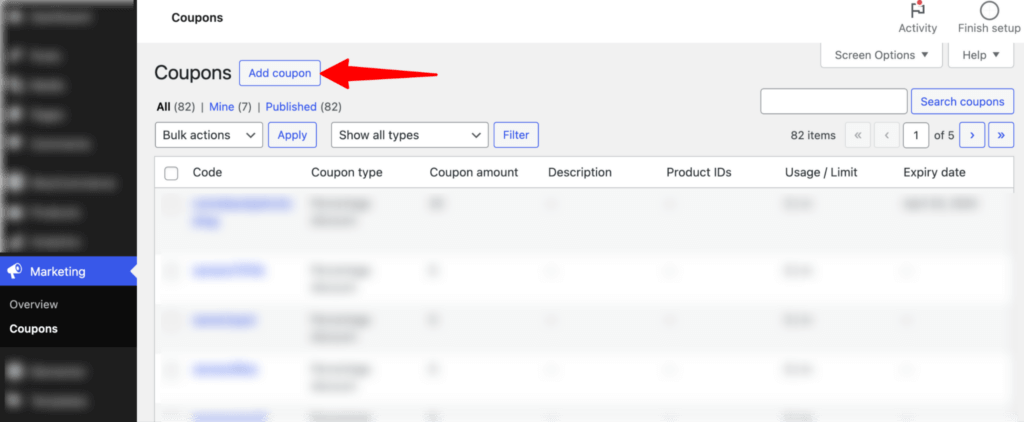
After that, you can set the coupon code or click the “Generate Coupon Code” button to generate a random coupon code. You can also add a description (optional).
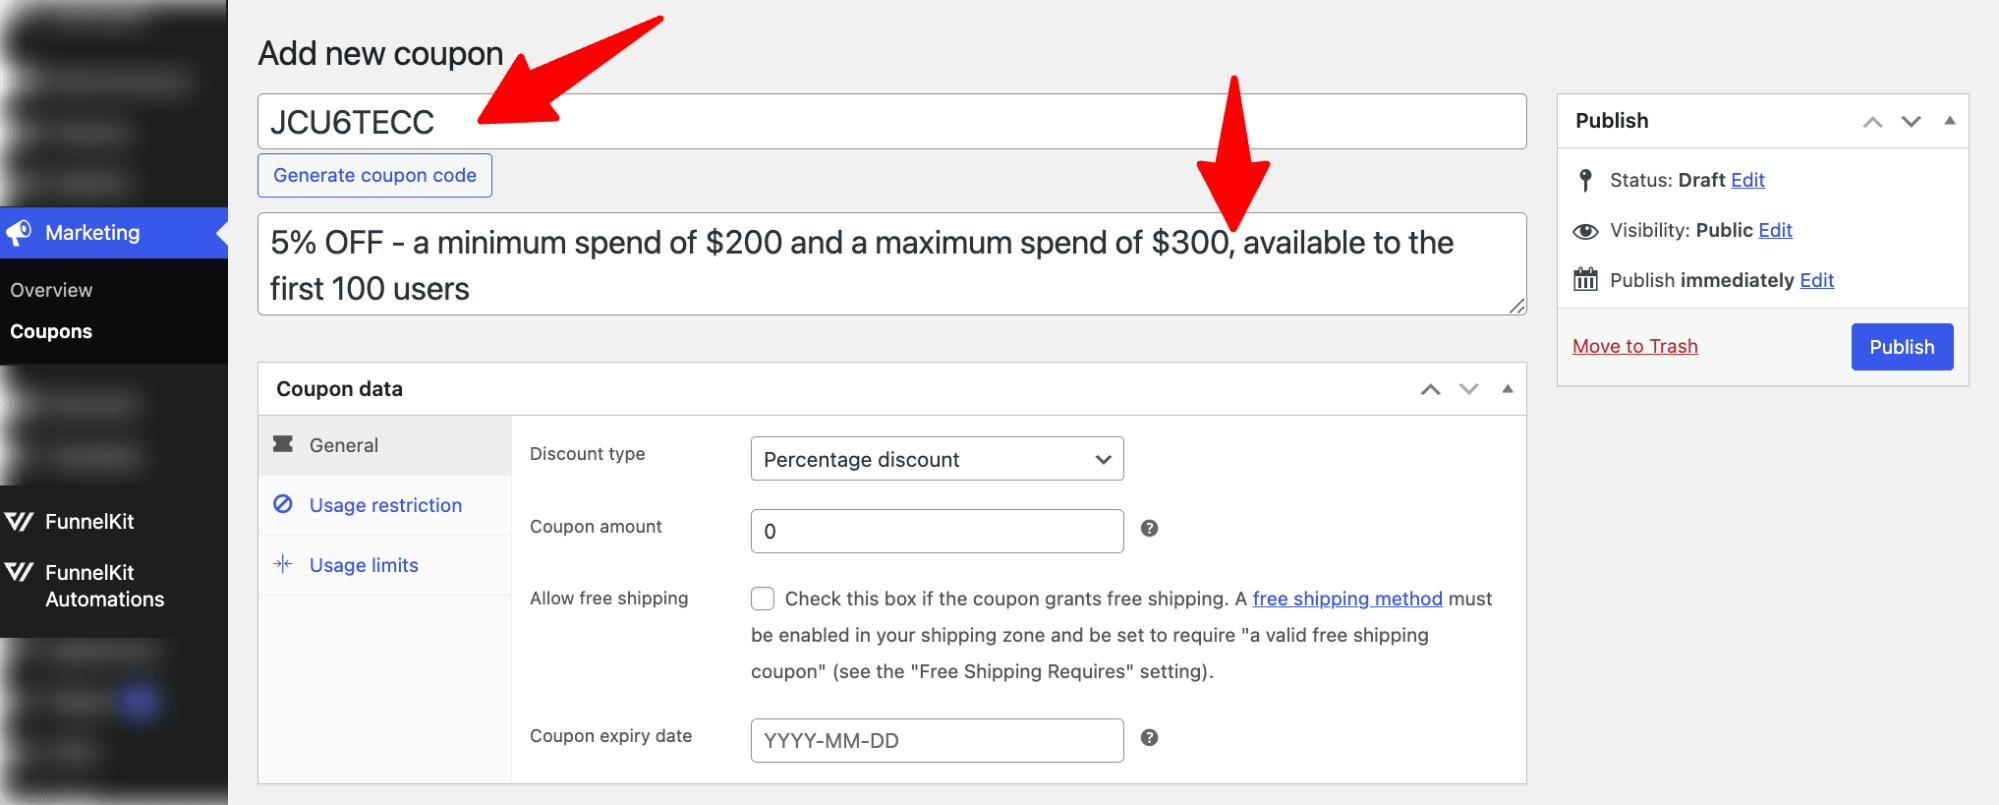
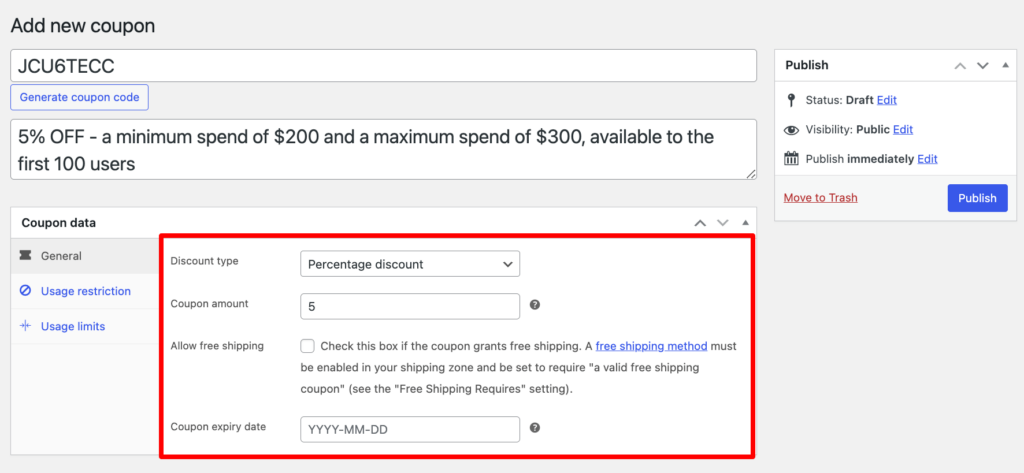
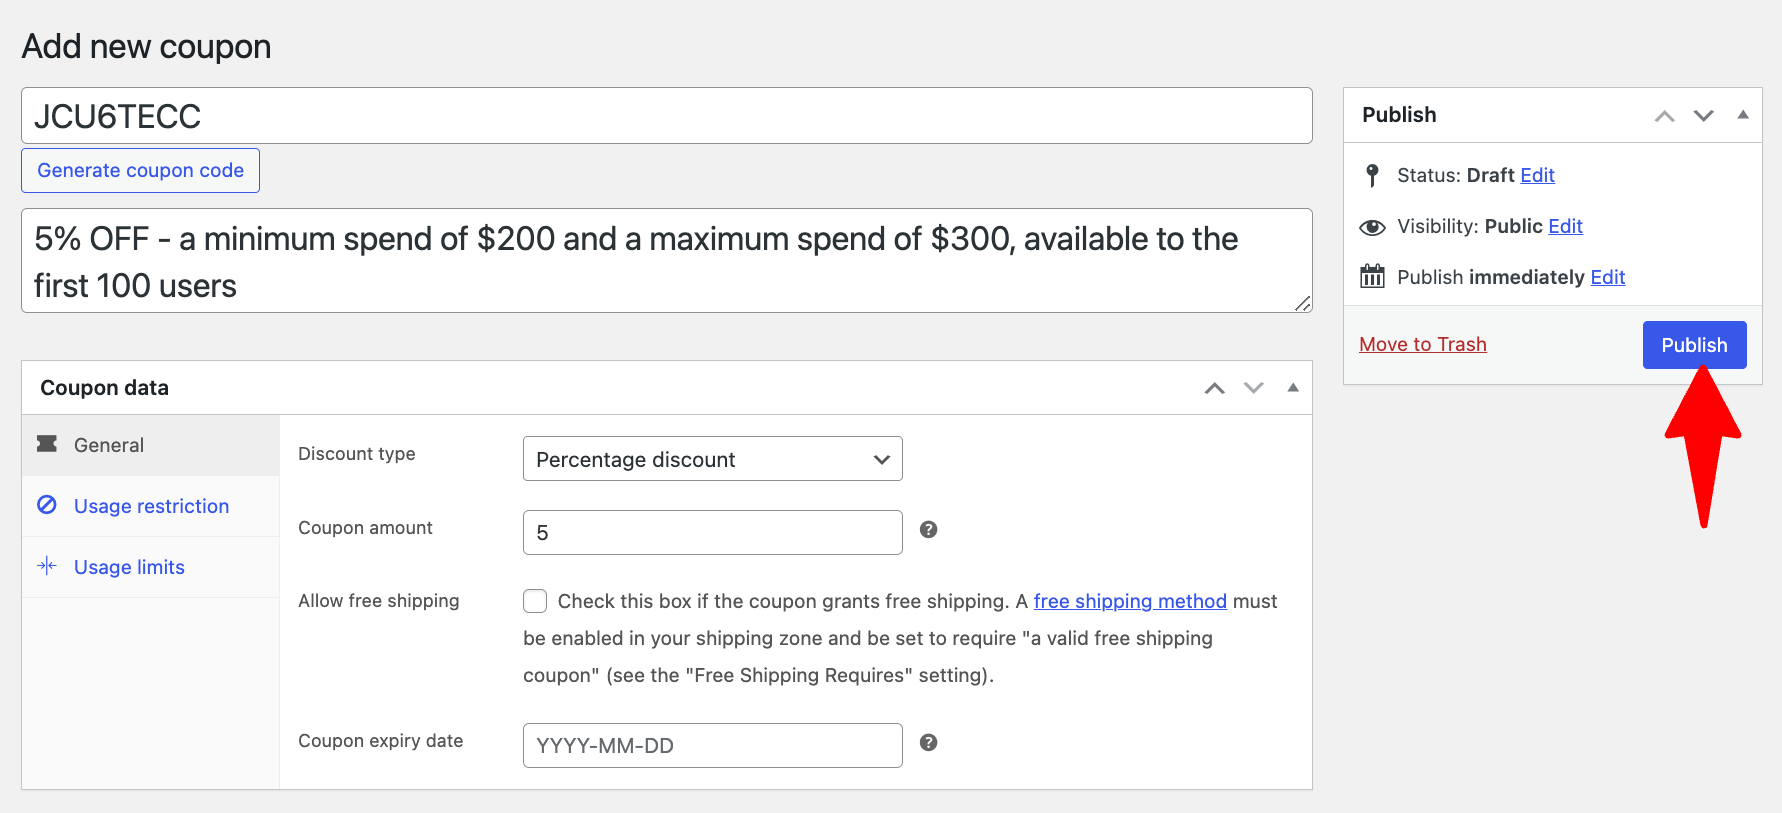
Step 3: Set up coupon details (general coupon data)
On the General tab, set up the following coupon-related information:
- Discount type: Choose from three types of discounts: percentage discount, fixed cart discount, and fixed product discount. Here, we’ll select a percentage discount.
- Coupon amount: Enter the discount amount. Here we are going with a 5% discount.
- Allow free shipping: Enable this option to offer free shipping with this discount coupon. We are not going to offer free shipping.
- Coupon expiry date: Set an expiration date for your coupon code.
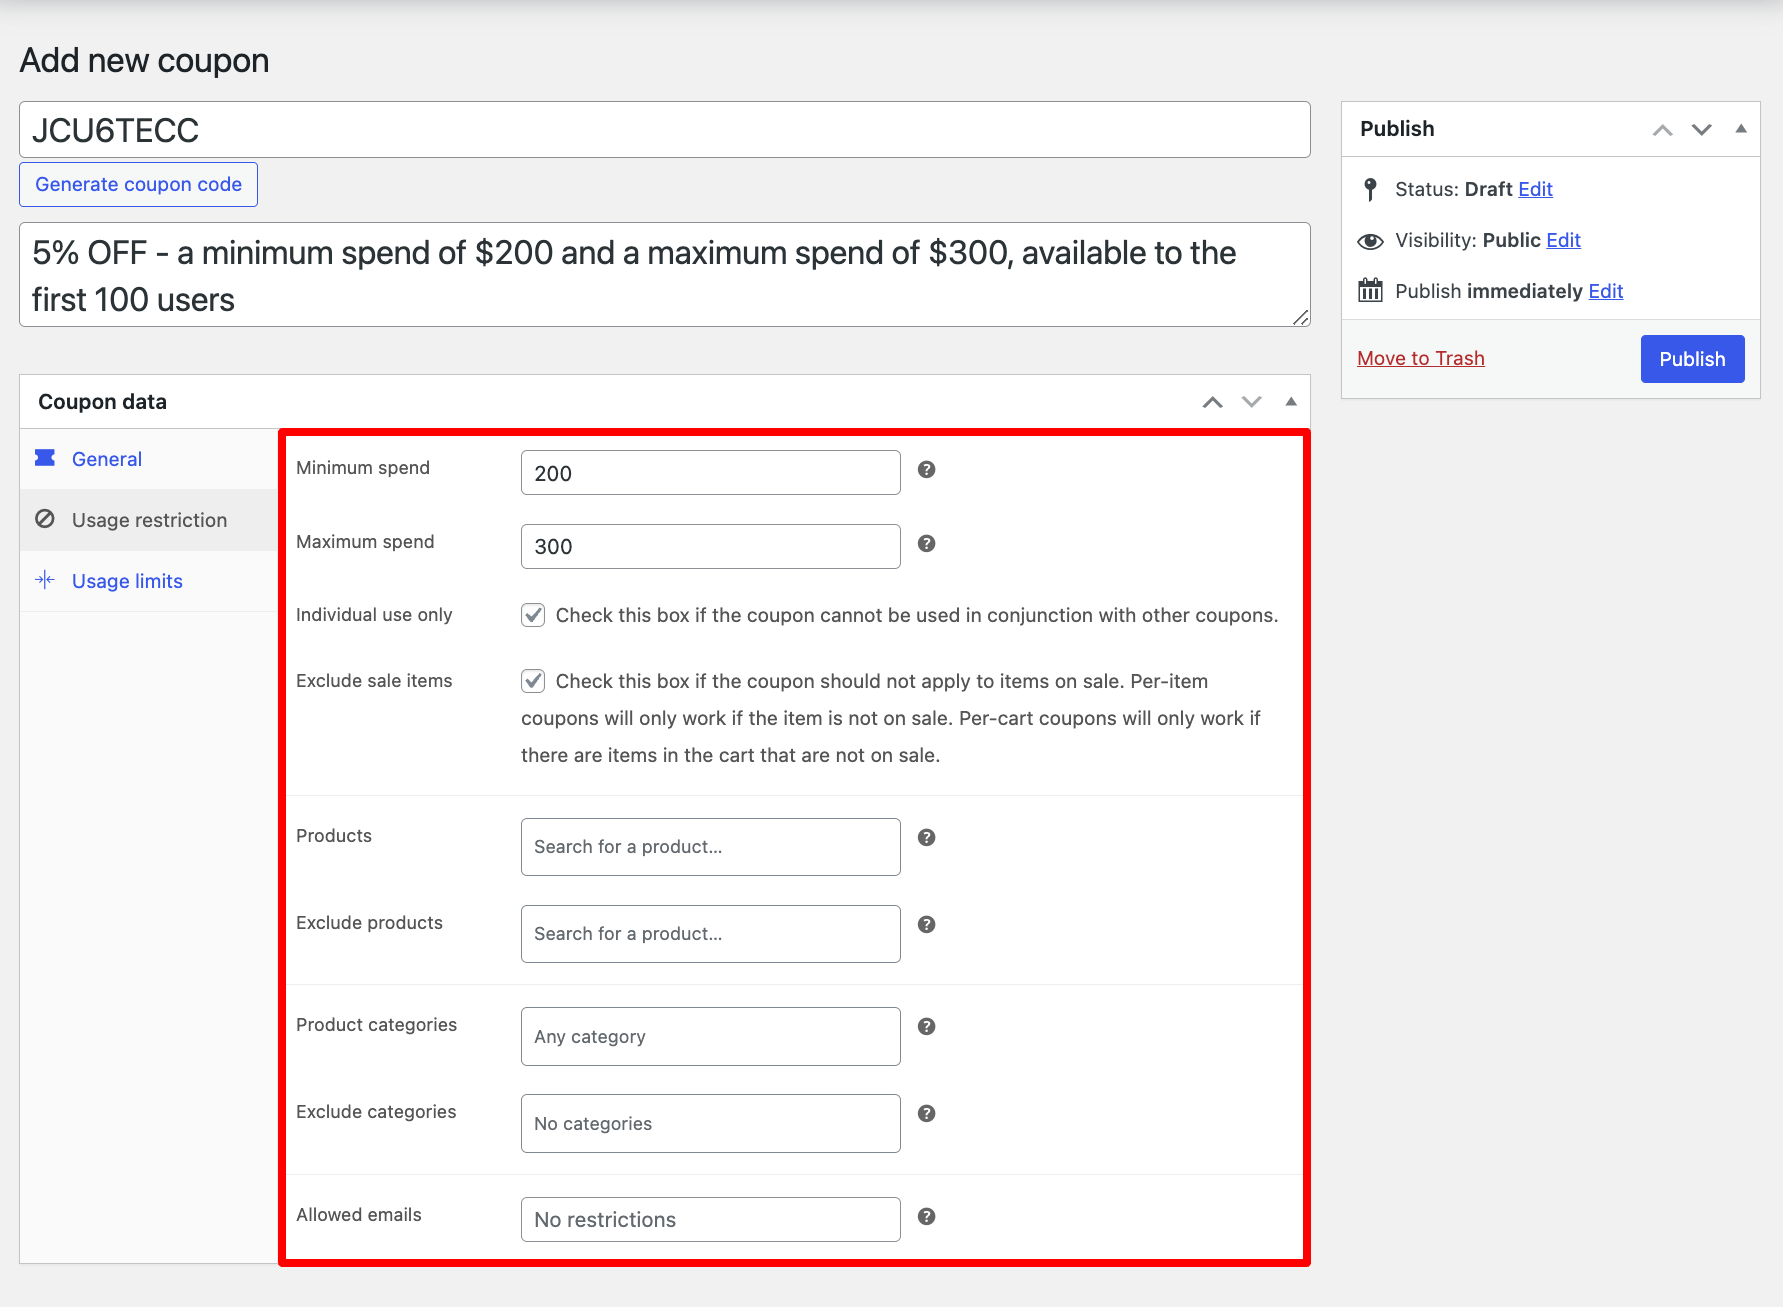
Step 4: Configure usage restrictions
Next, move to the Usage restriction tab and set the following:
- Minimum spend: Set the minimum amount a customer needs to spend to use this WooCommerce discount coupon code. Here, we are setting a minimum spending limit of $200.
- Maximum spend: Set the maximum spend allowed when using the discount code. Here, we are setting a minimum spending limit of $300.
- Individual use only: Check this box to ensure the coupon can only be used individually, not in conjunction with other coupons.
- Exclude sale items: Check this option to exclude sale items from the WooCommerce discount. This is highly recommended, as sale items already offer a discount.
- Products: Search and add the products to which this coupon will be applied. This applies to the fixed cart discount type.
- Exclude products: Set the products to which the fixed cart discount will not be applied.
- Product categories: Choose the categories eligible for the coupon.
- Exclude categories: Set the categories excluded from the coupon application.
- Allowed emails: List of allowed billing emails to check against when an order is placed. You can separate email addresses with commas.
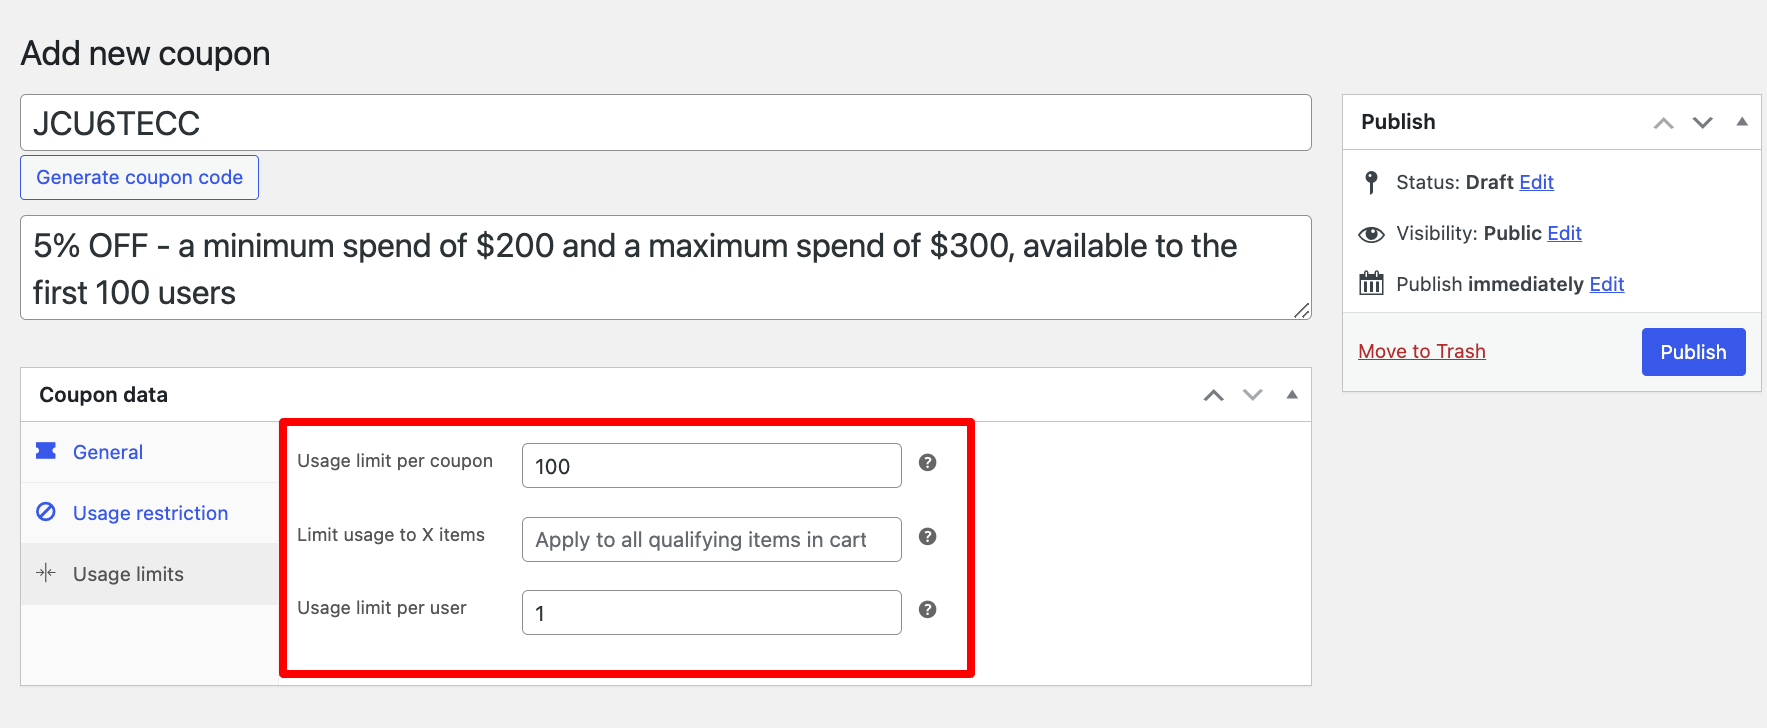
Step 5: Configure coupon usage limits
Move to the Usage Limits and set the following:
- Usage limit per coupon: Set the number of times the coupon can be used before it becomes void. We are setting it to 100 times.
- Limit usage to X items: Set the maximum number of individual items this coupon can apply to when using product discounts. Leave this blank to apply the coupon to all qualifying items in the cart.
- Usage limit per user: Set the number of times an individual can use this coupon. We are allowing each individual to use this coupon only once.
Finally, click on ‘Publish’ to create the WooCommerce discount coupon code.
Now, your WooCommerce discount coupon is ready!
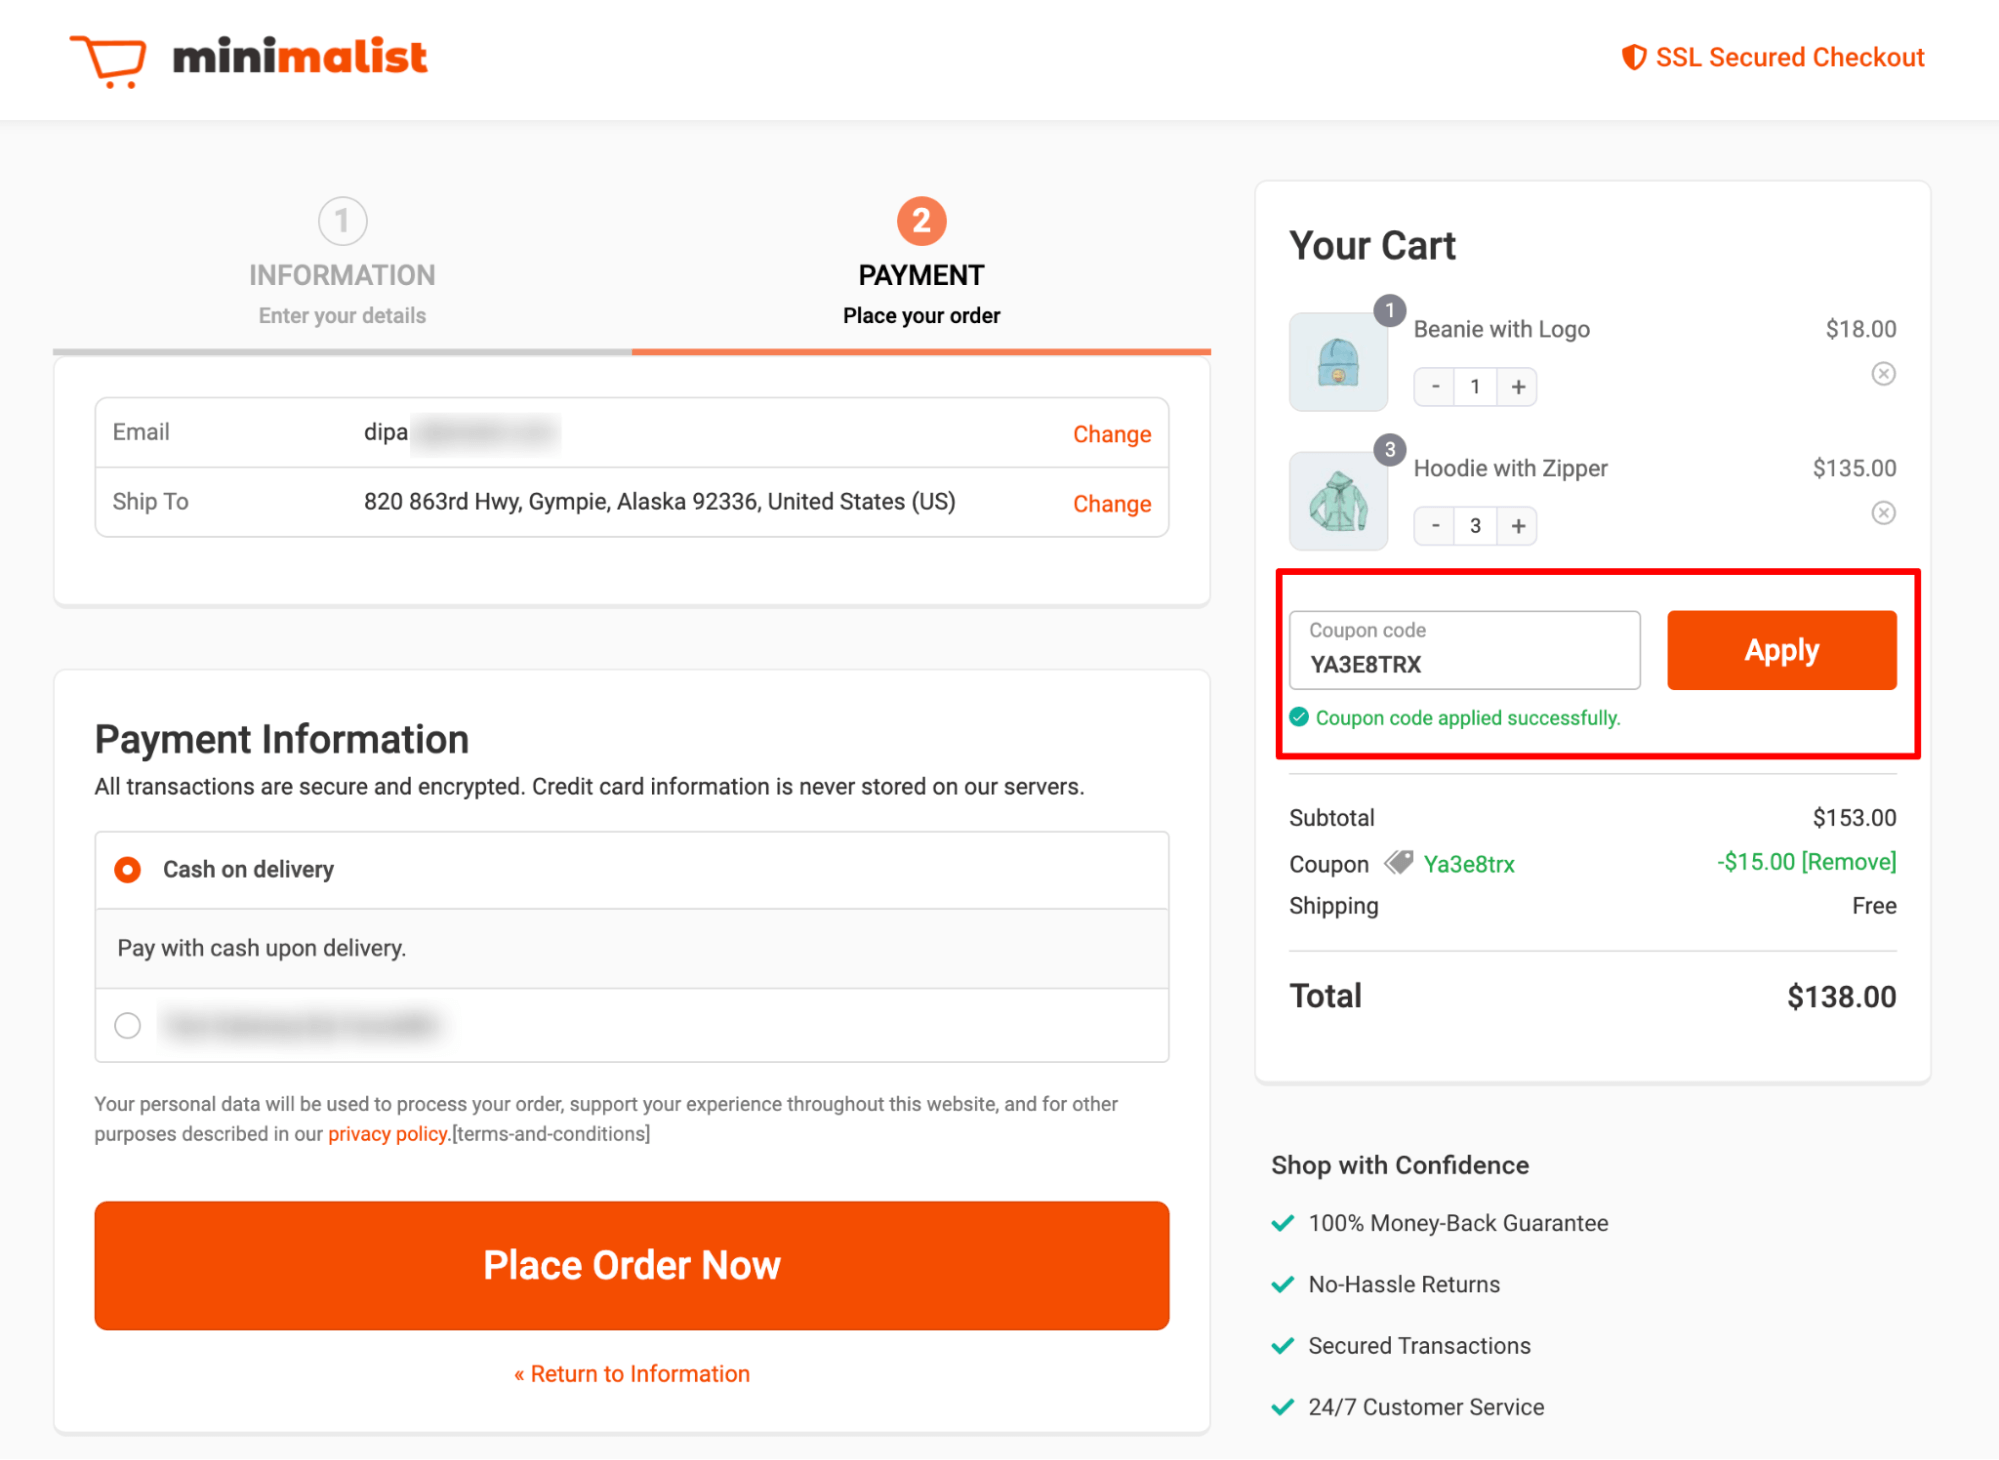
After publishing a WooCommerce coupon, it’s important to test it to ensure it works properly by placing a test order.
How to Create a Free Shipping Coupon in WooCommerce
According to statistics, 62% of shoppers won’t buy from a brand if it doesn’t offer free shipping. Plus. 47% of consumers will spend a minimum amount to get free shipping.
Creating a free shipping coupon is similar to creating a discount coupon. Here are the steps you need to follow:
Step 1: Create a coupon with free shipping
Create a coupon as we showed earlier in this blog. If you want to offer free shipping as a discount without any monetary discount, leave the coupon amount at 0; otherwise, add the discount amount.
Make sure to check the “Allow Free Shipping” option.
Here, we are creating a coupon that will offer just free shipping.

Step 2: Configure usage restrictions and coupon usage limits
Now, according to your strategy, configure the usage restriction and coupon usage limits.
Here, we are setting a minimum requirement of $300 to avail of the free shipping.
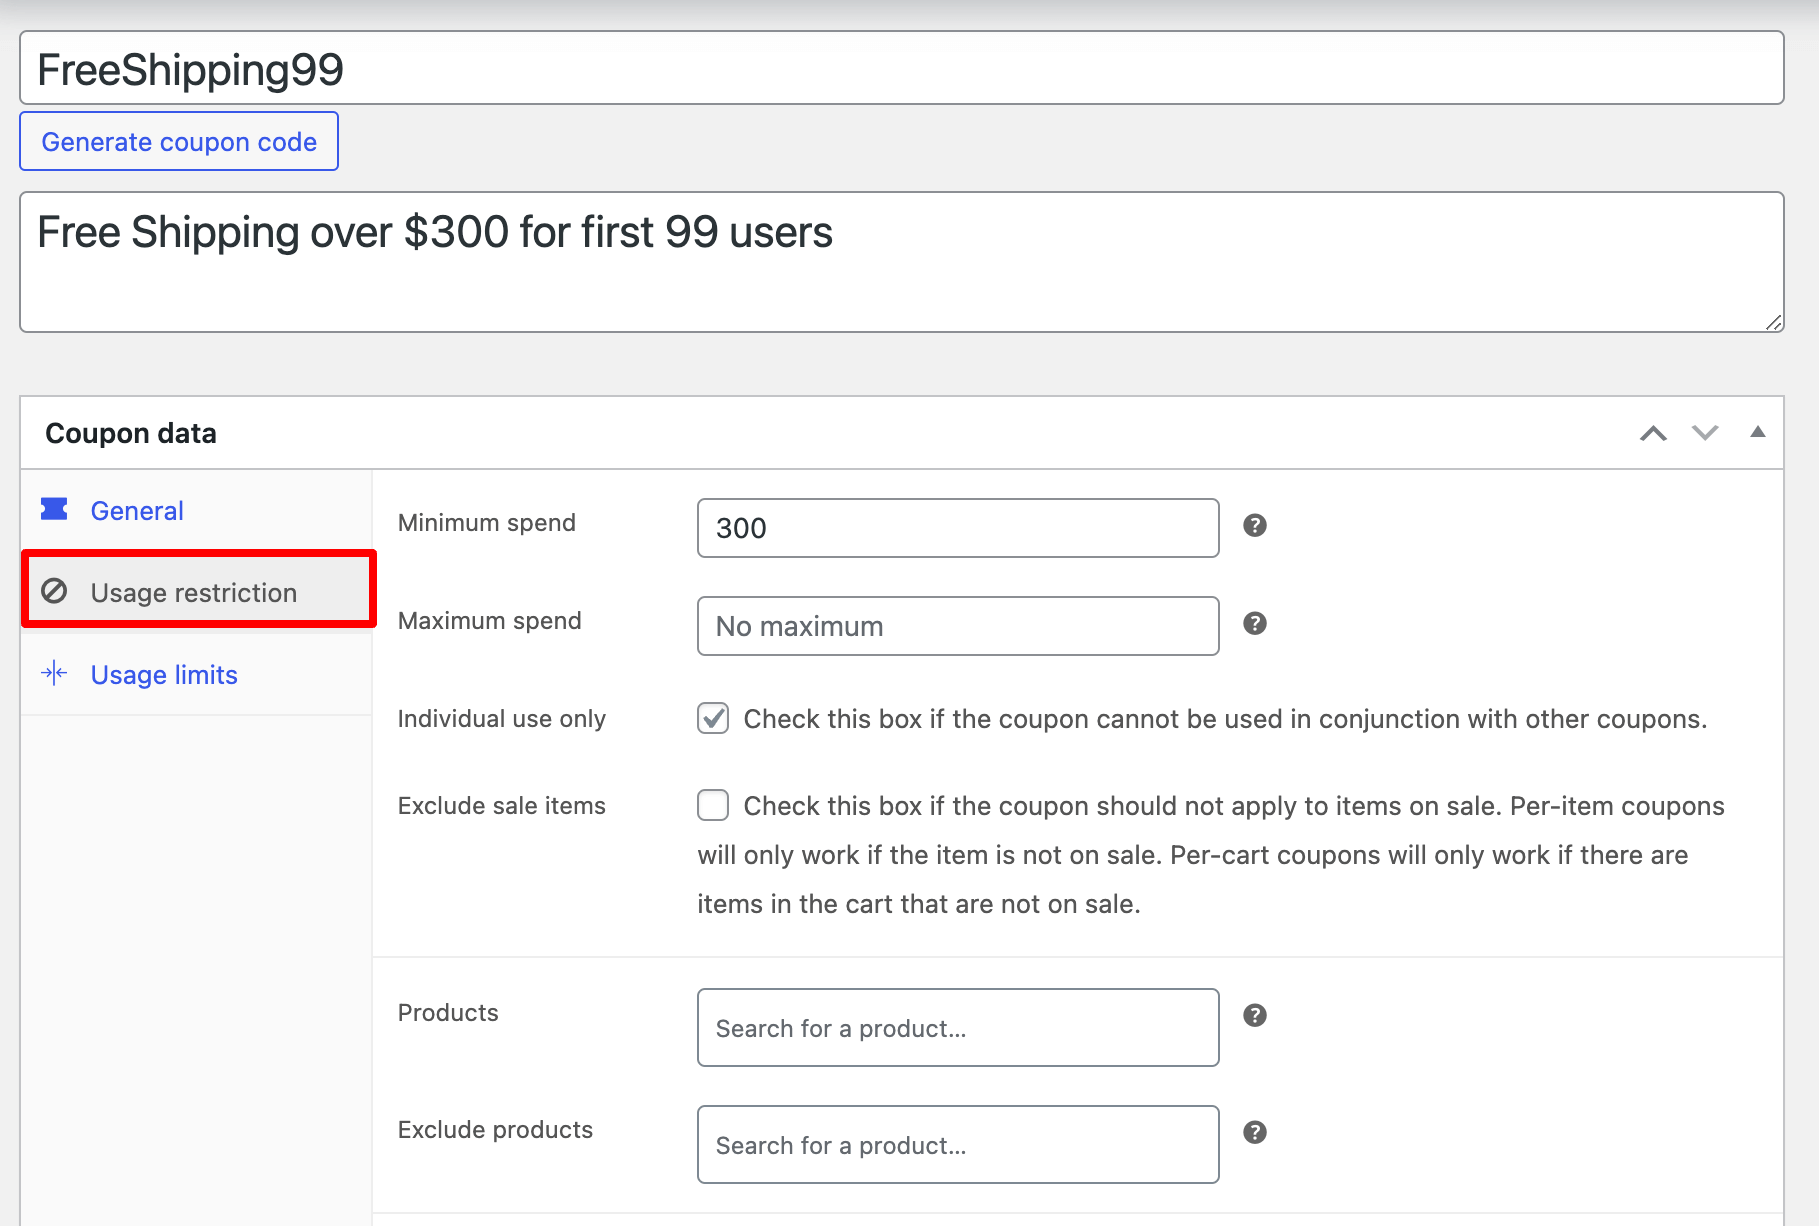
As per the usage restrictions, you only want to offer 99 free shipping, and we don’t want one person to avail this coupon more than once. You can configure the settings according to your needs.
After completing the configuration, make sure to publish the coupon.

Step 3: Set the free shipping method to require a valid free shipping coupon
This is a crucial step. After publishing the coupon, you need to go to the free shipping method for the region where you want to offer free shipping and set it to require a coupon.
To do this, go to WooCommerce ⇒ Settings ⇒ Shipping and edit the Shipping Zone for which you want to create a free shipping coupon.
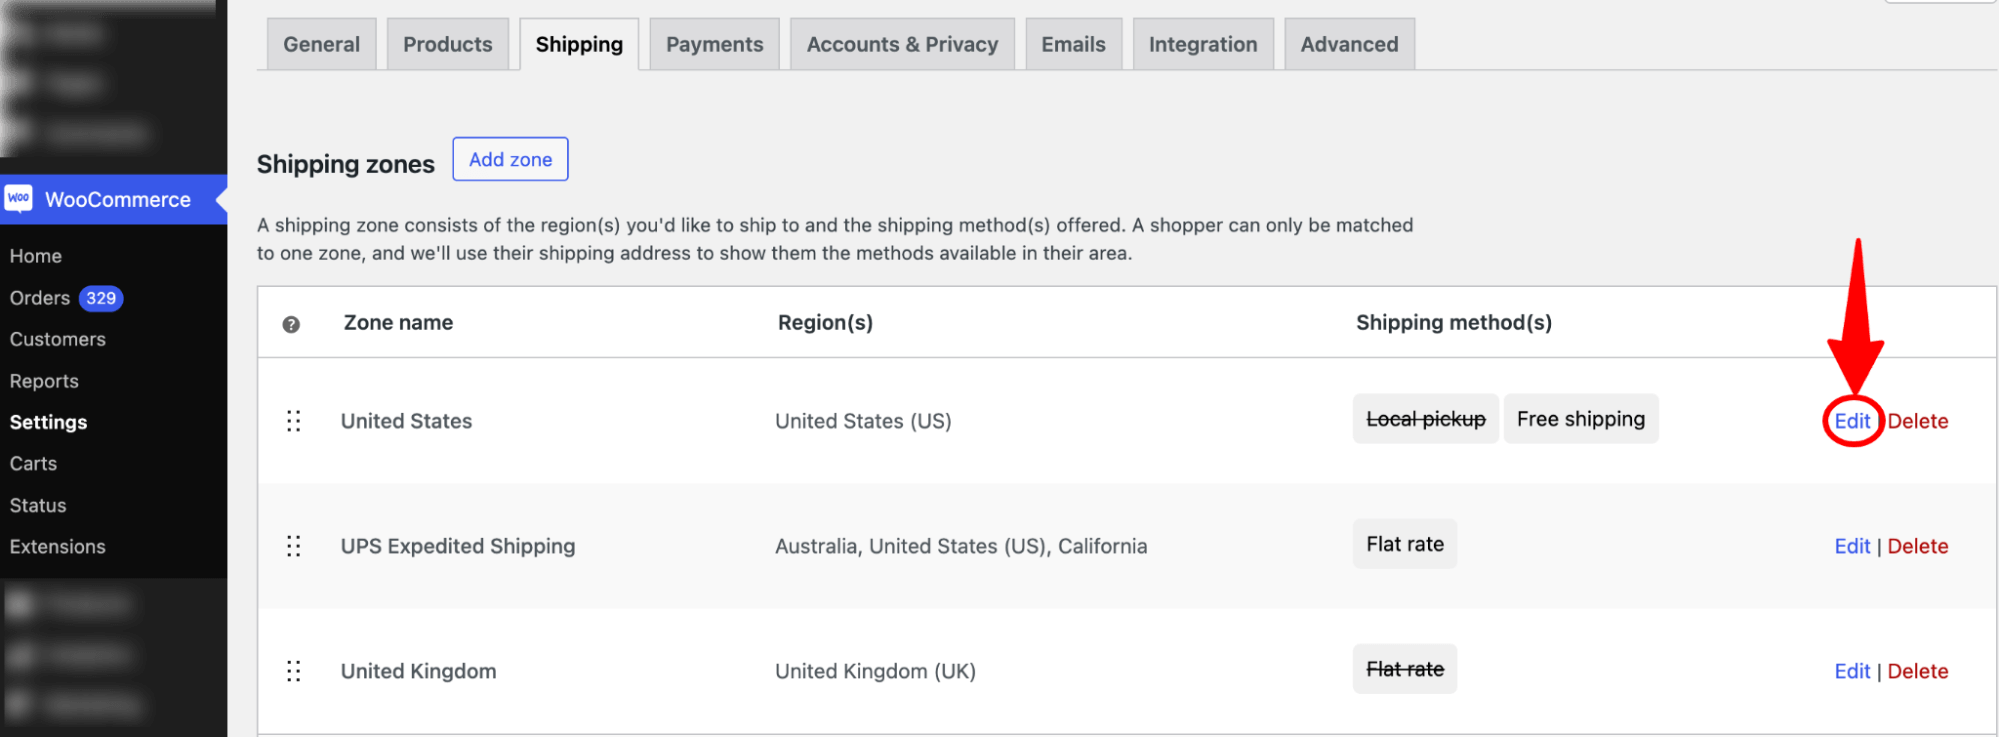
Make sure the free shipping method is turned on.
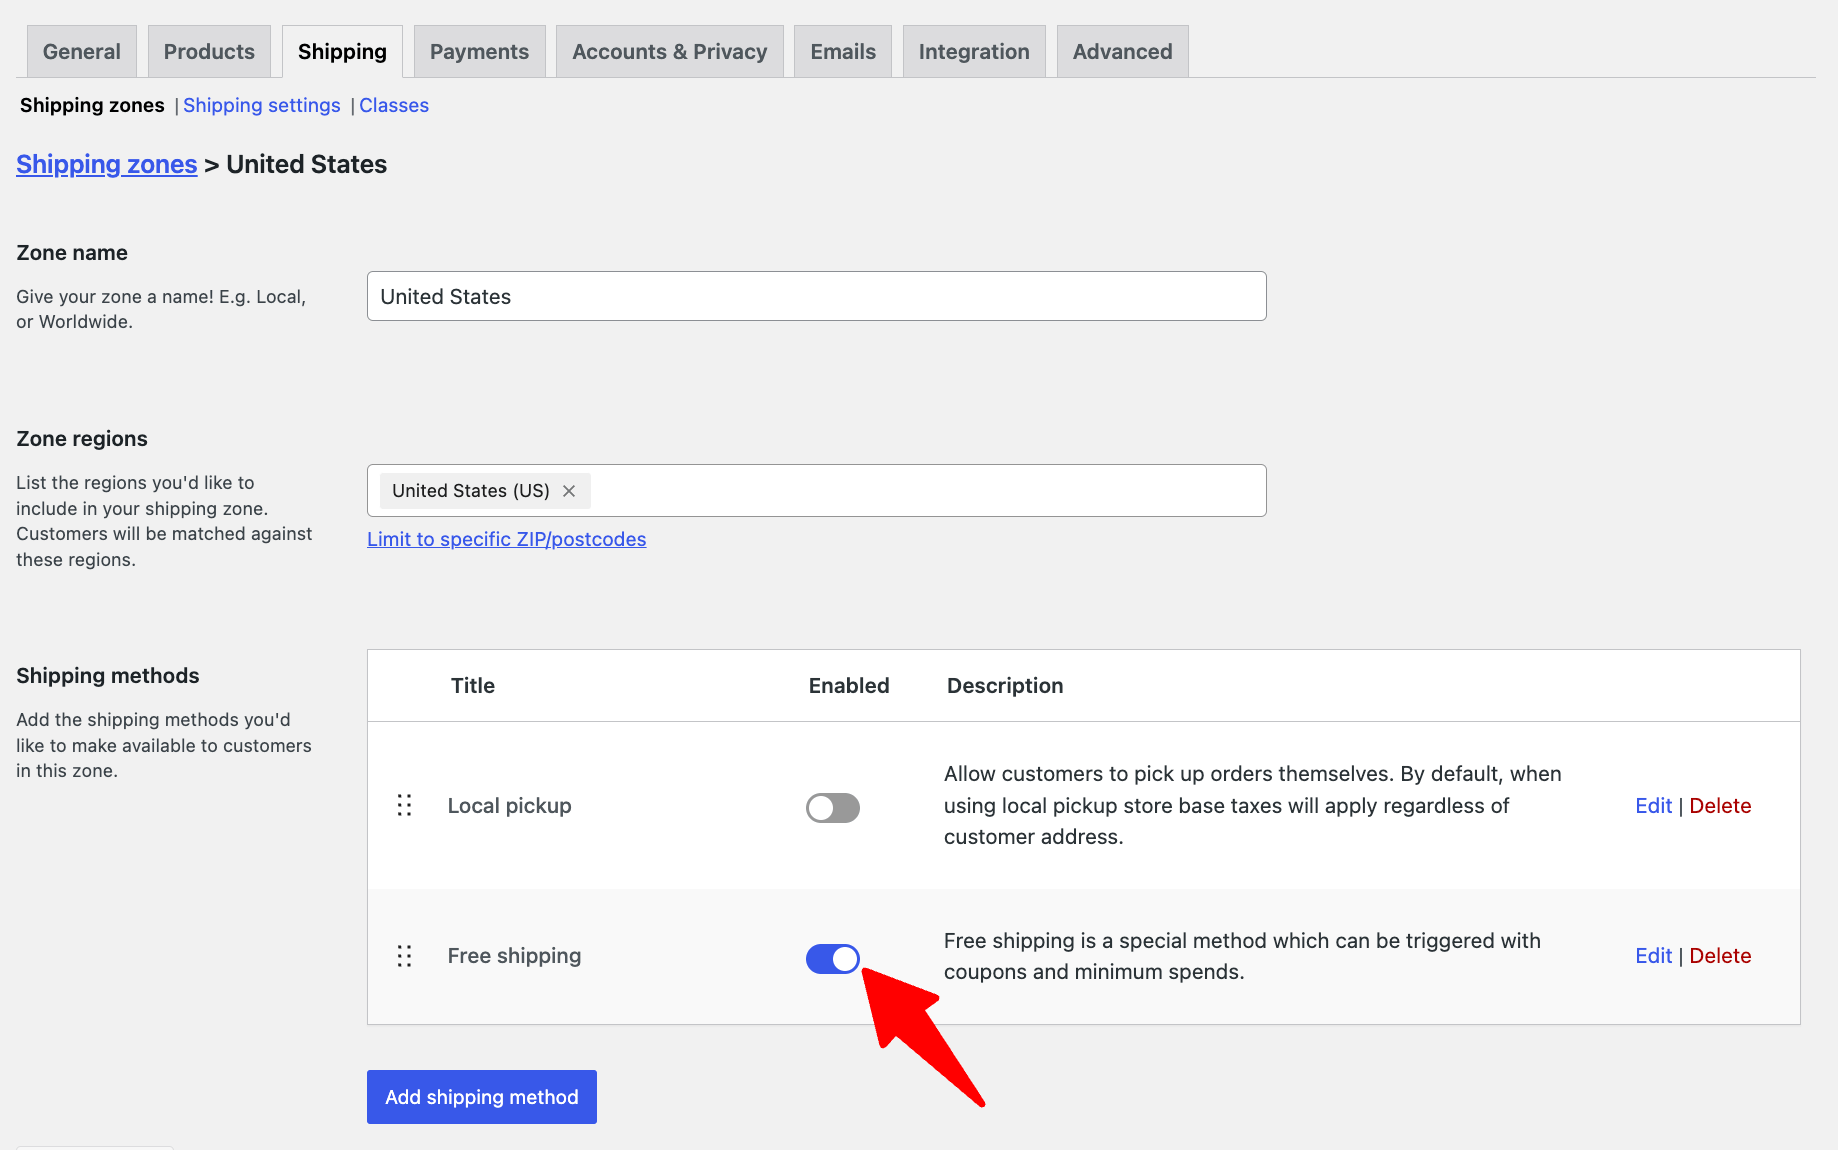
Now, edit the free shipping method and “Free Shipping Requires” option to “A valid free shipping coupon”.
After that, make sure to save it.
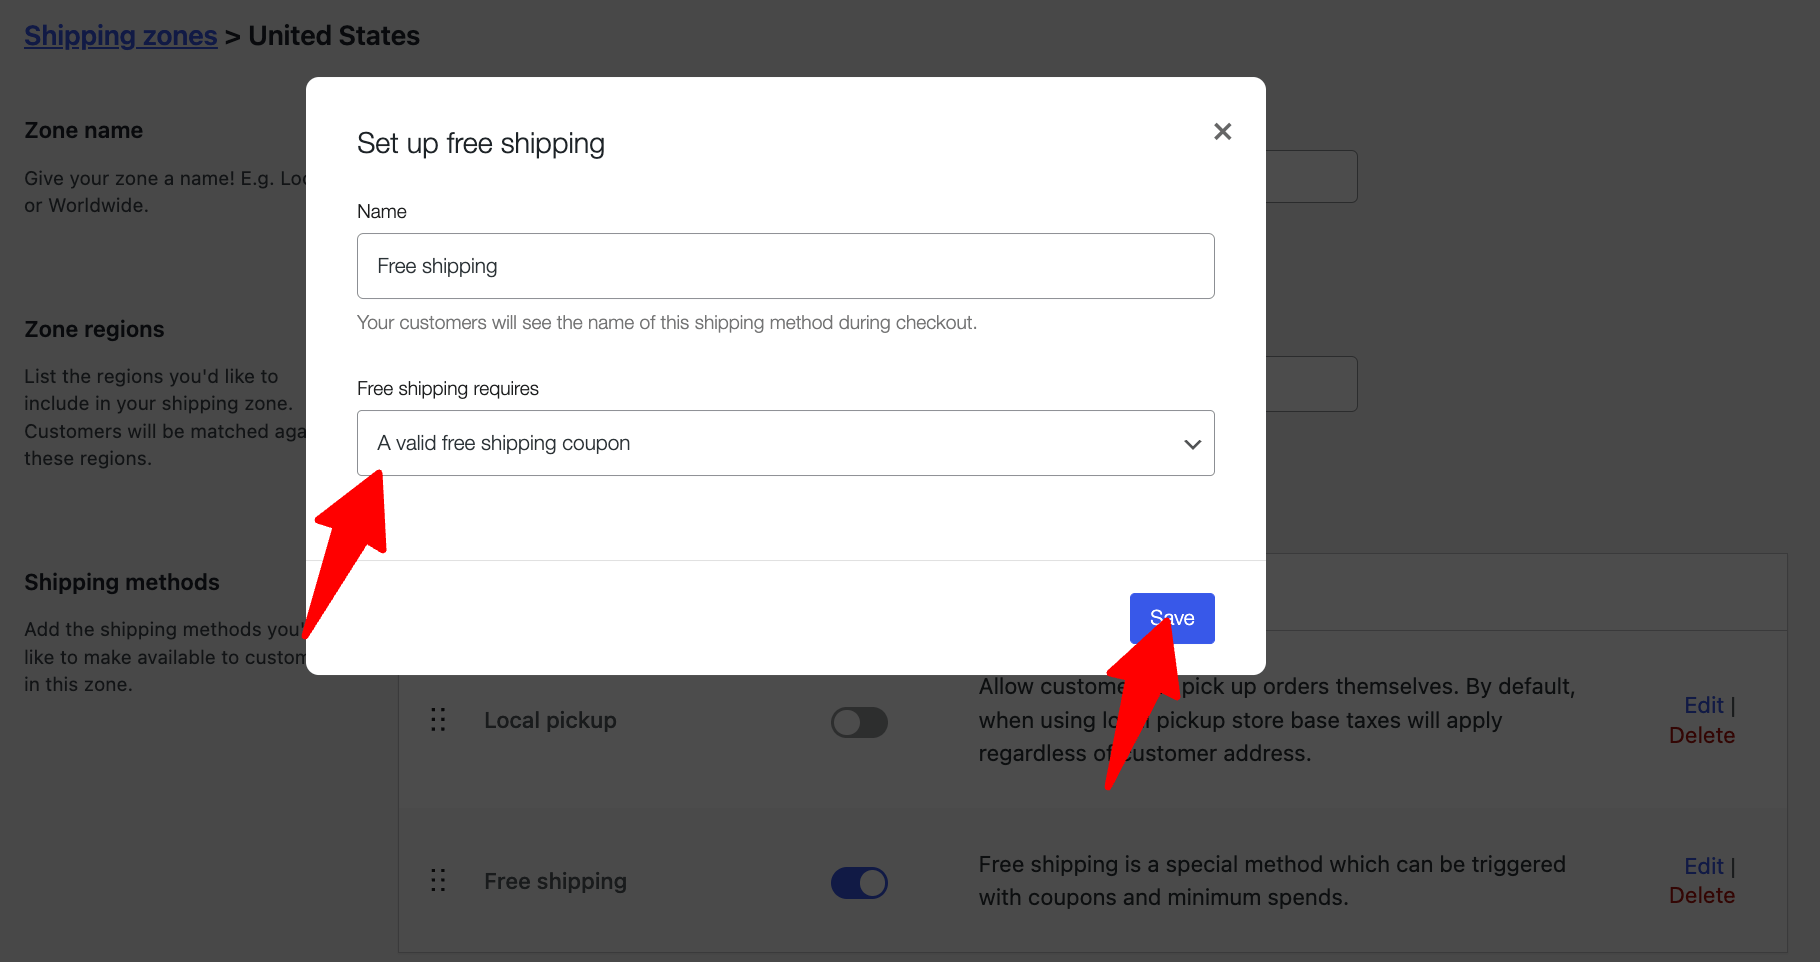
That’s it. Now your WooCommerce free shipping coupon is ready.
How to Create a Free Gift Coupon in WooCommerce
WooCommerce doesn’t offer the option to create free gift coupons. For this, you’ll need an additional plugin.
Our experts recommend FunnelKit Funnel Builder to replace your default checkout with a high-converting one and boost order value using free gift coupons as order bumps.
For this, make sure to install and activate both the free and pro versions of the plugin.
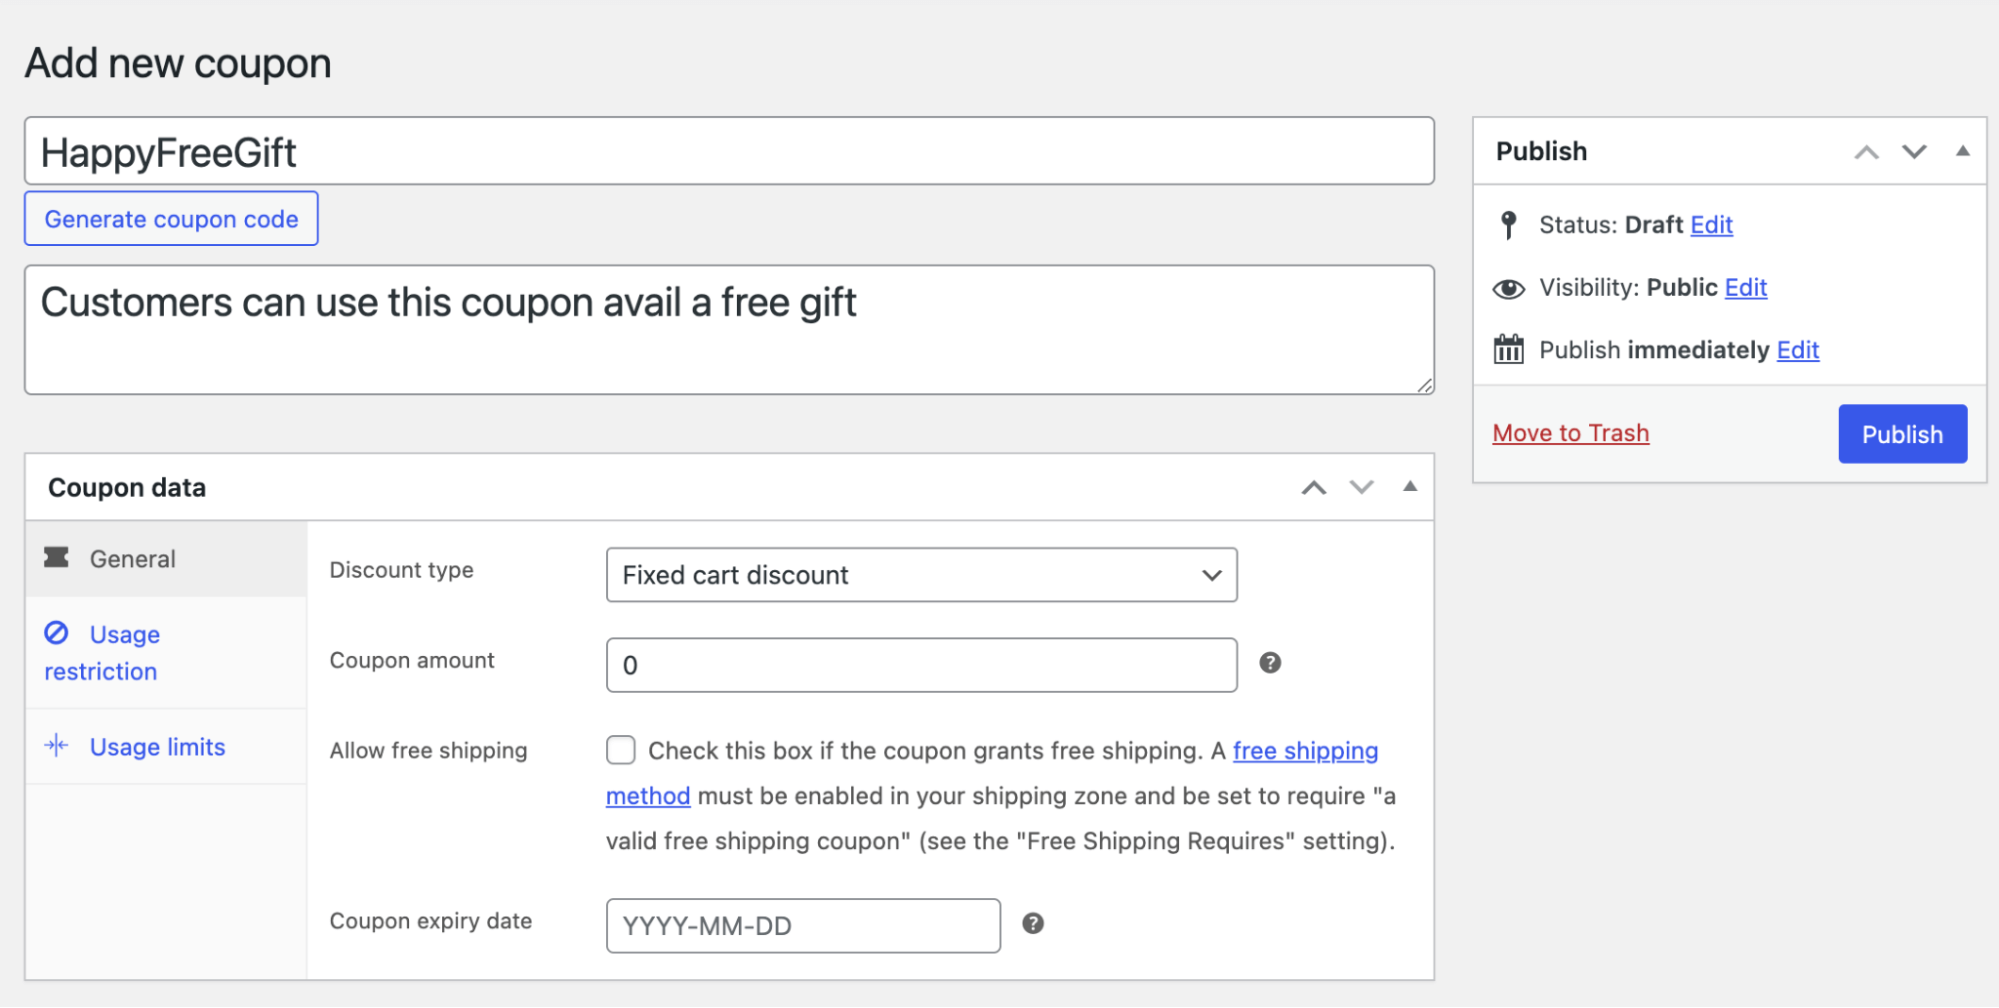
Step 1: Create a coupon with no discount applied
Create a coupon that doesn't apply a discount but allows users to receive a free gift.
There is no need to add a discount while creating the coupon; we will take care of that later.
Based on your strategy, you can add other conditions, such as a minimum or maximum requirement.
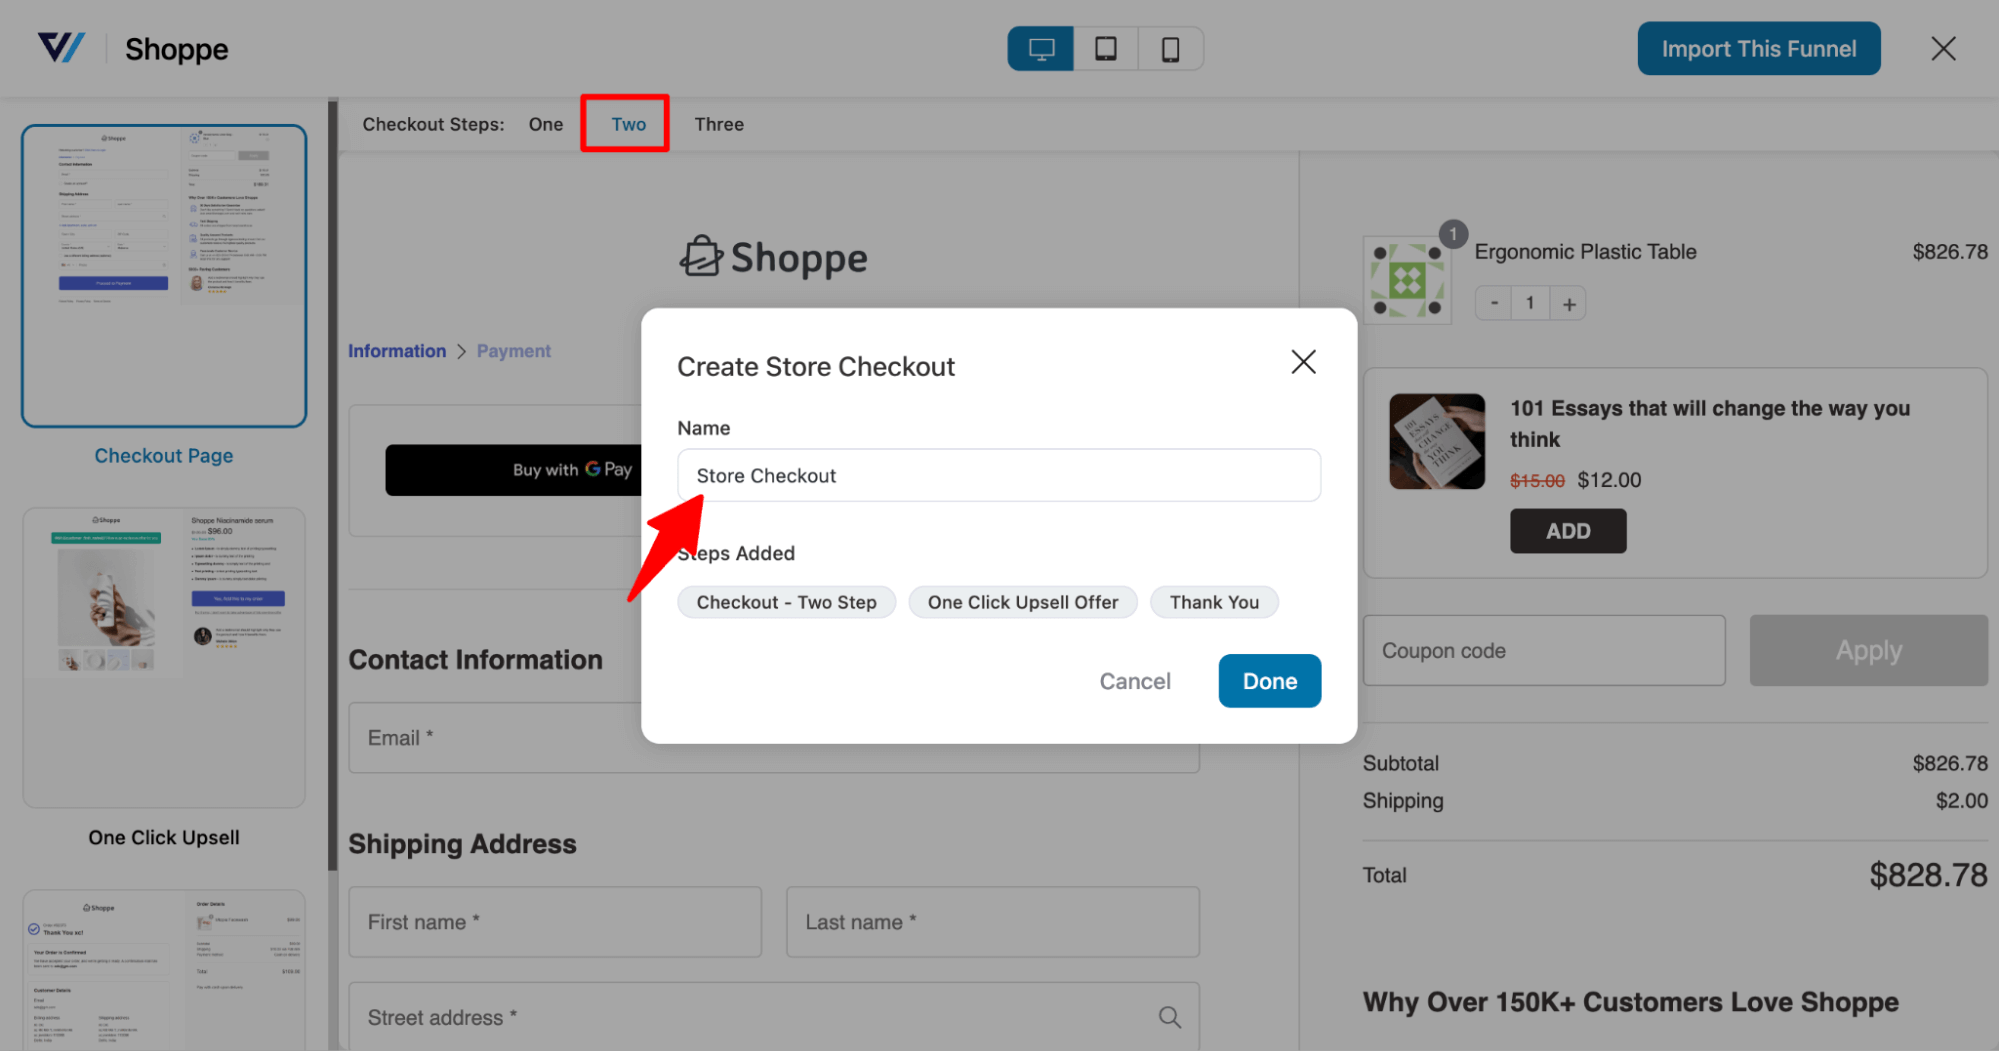
Step 2: Create a store checkout
First, you need to create a custom checkout that will replace the default WooCommerce checkout page. You can import any prebuilt template to create a custom store checkout.
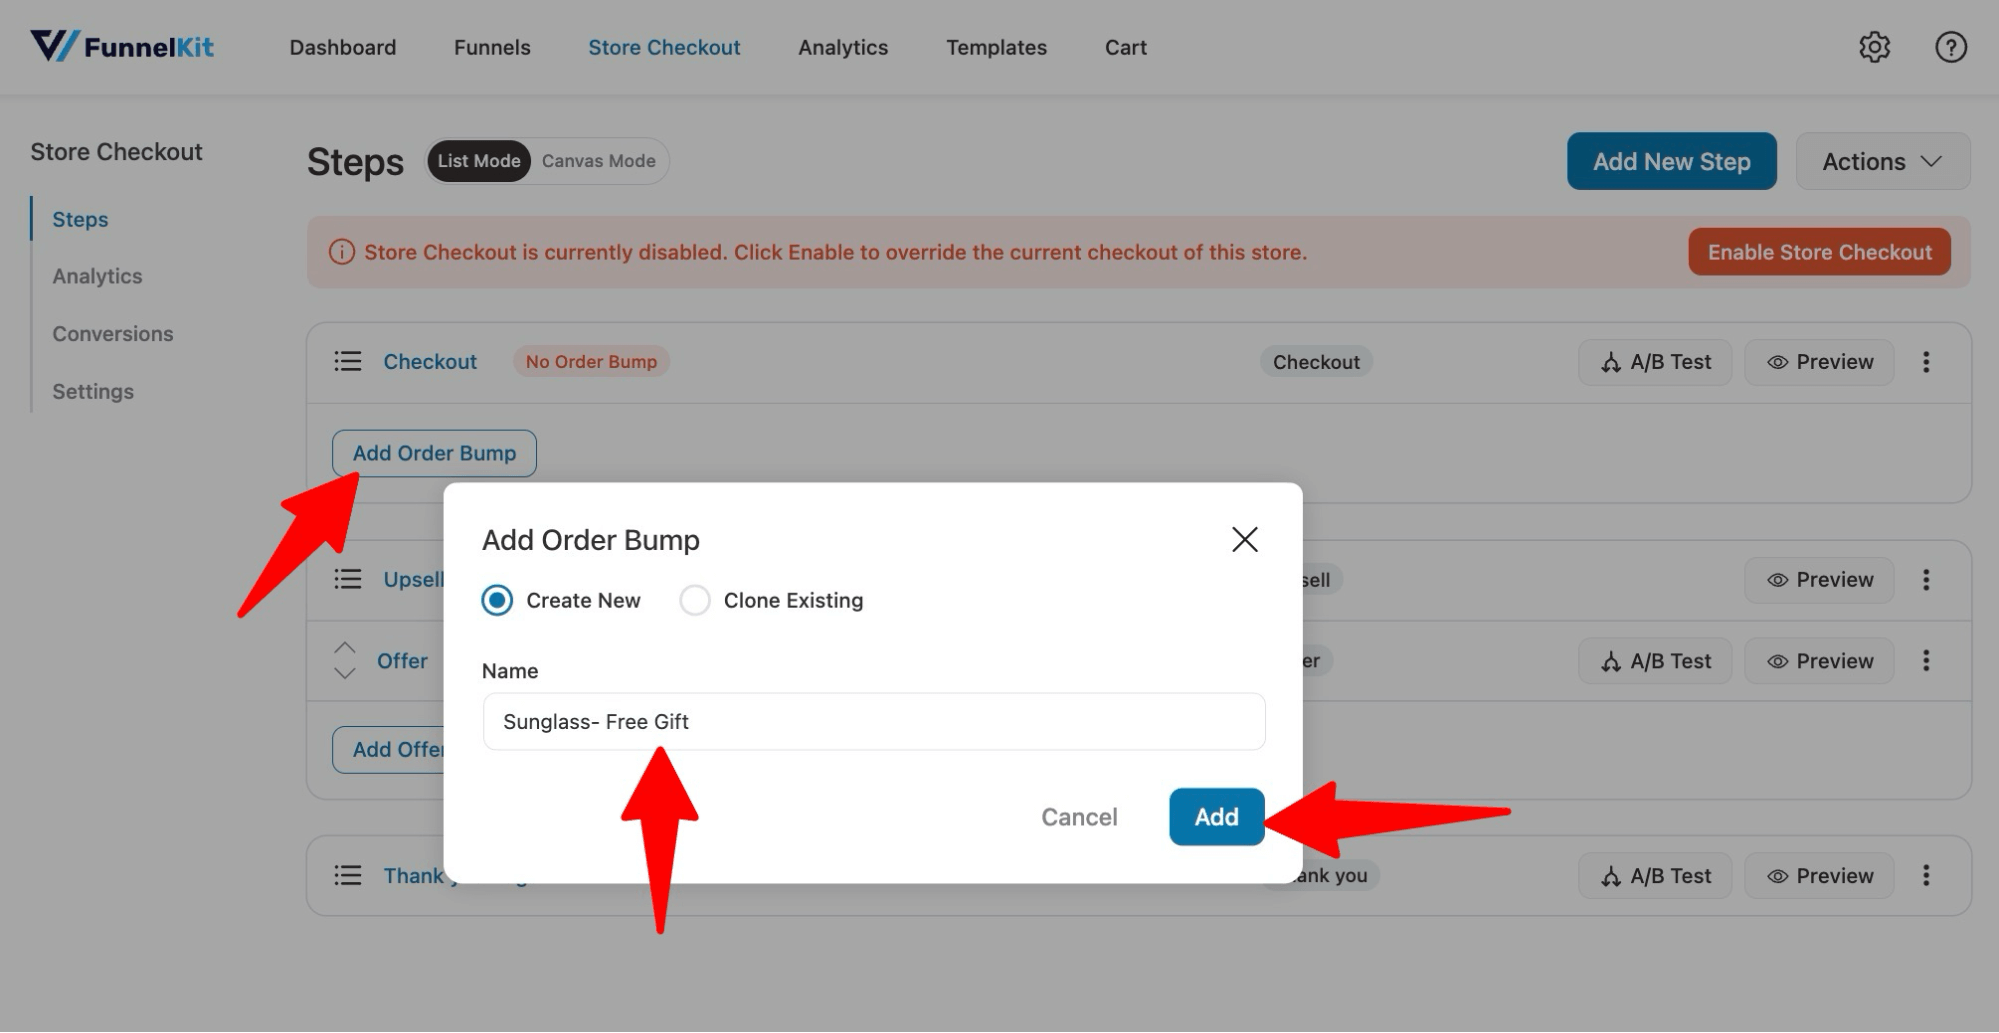
Step 3: Add an order bump to offer a free gift
As mentioned earlier, we will offer a free gift as an order bump. So, first, you need to create an order bump.
To do so, click “Add Order Bump”, provide a name, and click on Add.
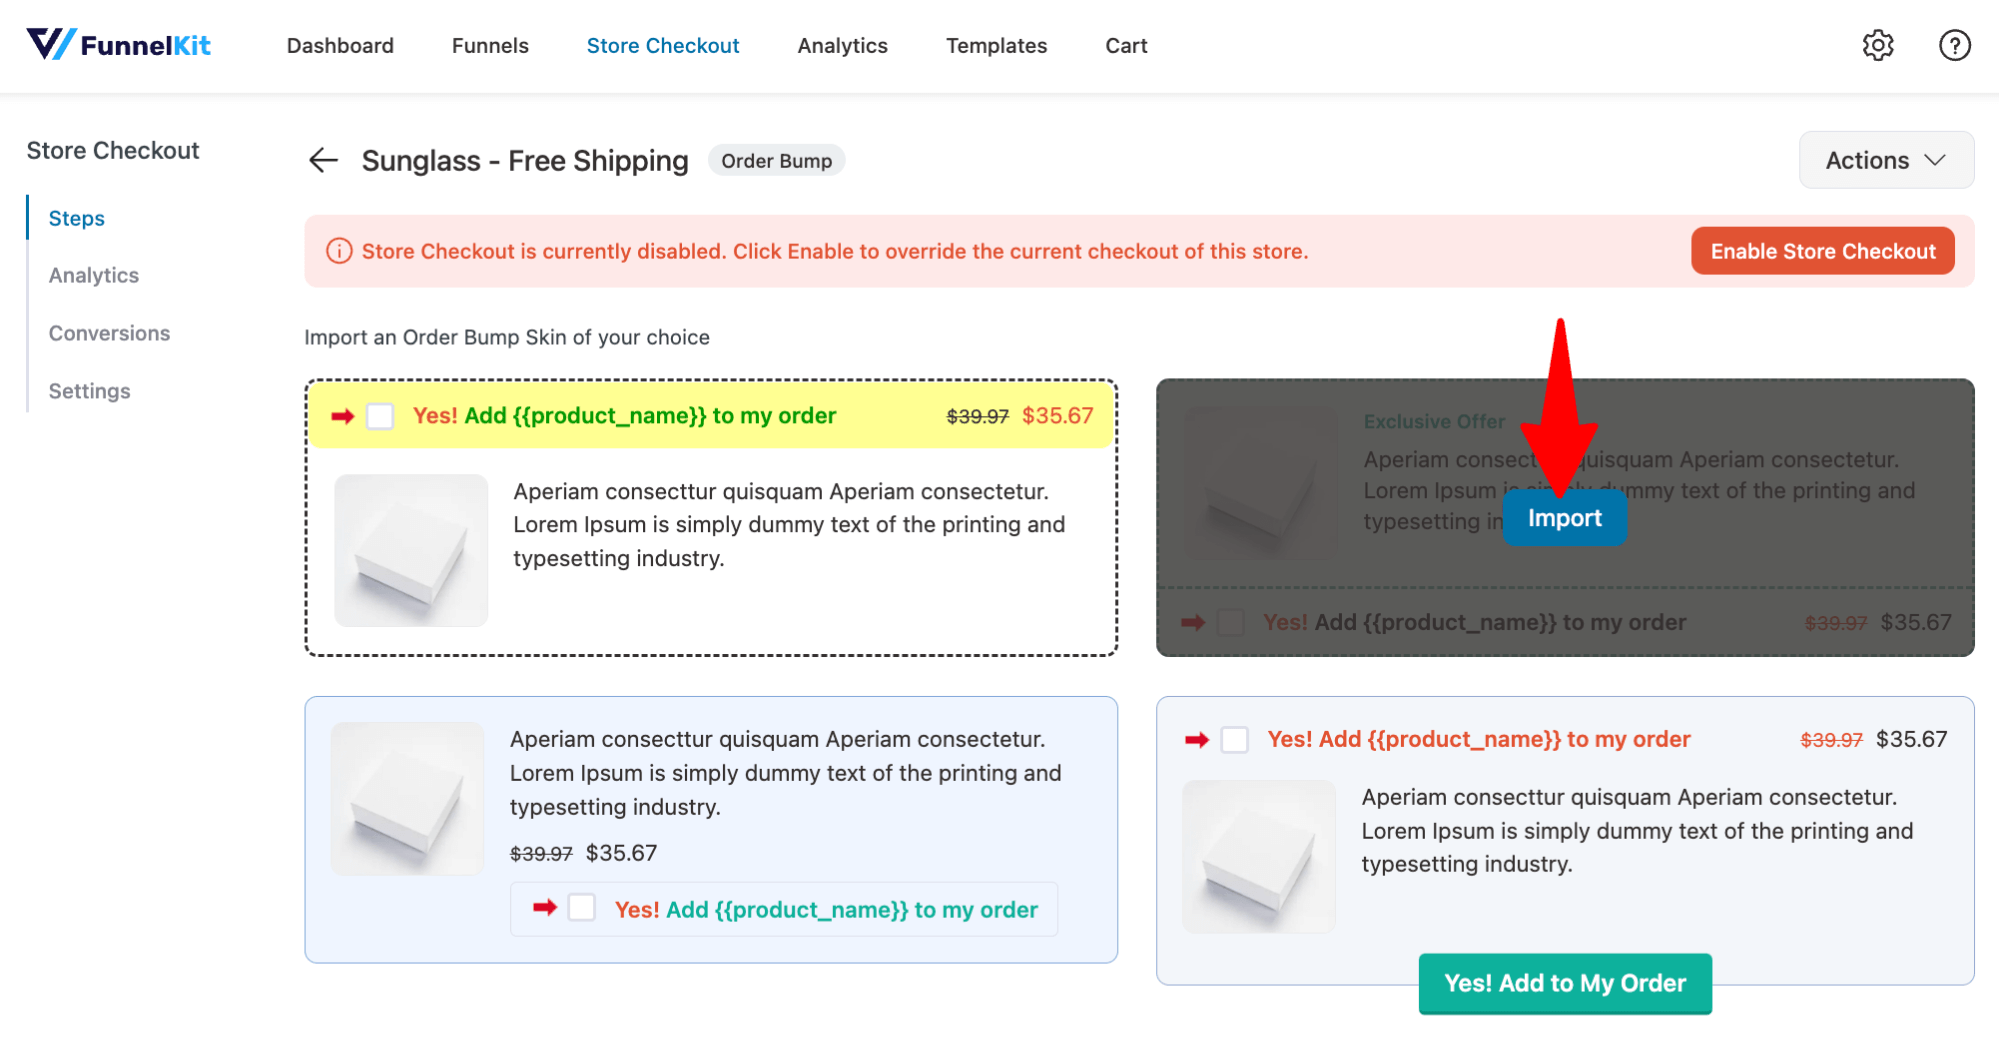
Now, choose how you want the order bump to appear on the checkout page. To select any skin, hover over it and click “Import.”
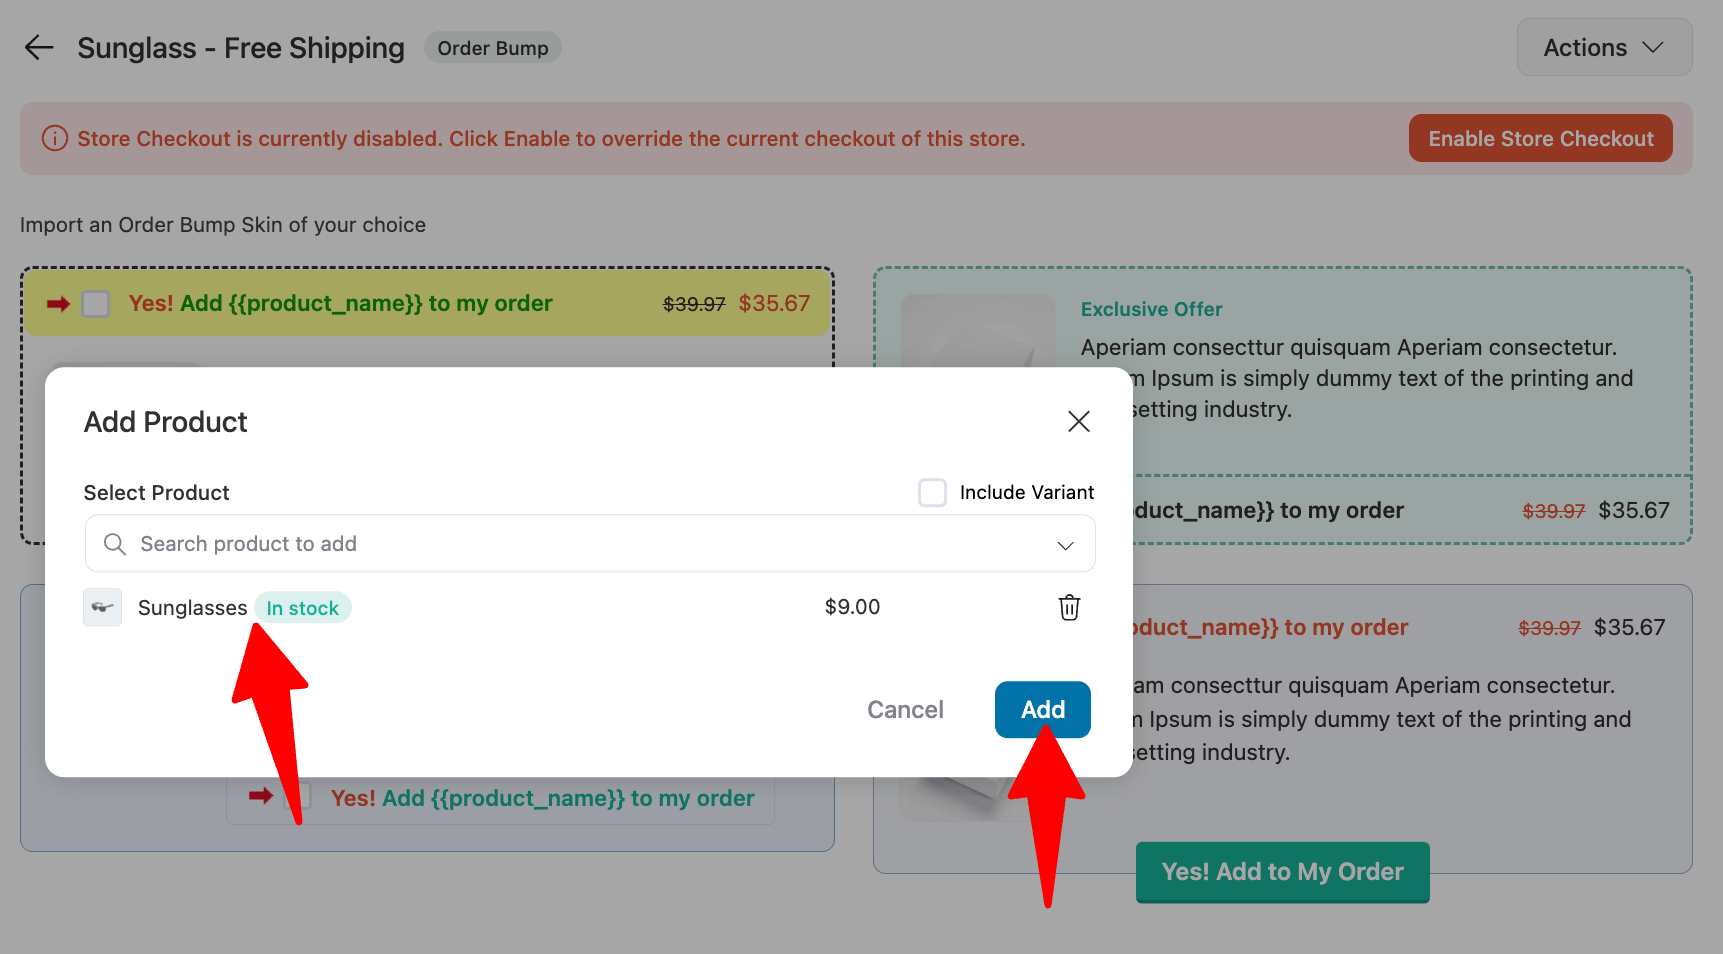
Then, search for and choose the product you want to offer for free. After that, click on Add to add the product as an order bump.
On the “Content” tab, you can customize the order-bump offers. For style customizations, move to the Style tab.
You can choose where the order bump appears on the checkout step. To auto-add the free gift to the cart, enable “Pre-select Order Bump by default.”
If you prefer not to highlight the offer, turn on “Hide Order Bump after selection.” In this setup, we’re enabling the pre-select option but keeping the bump visible
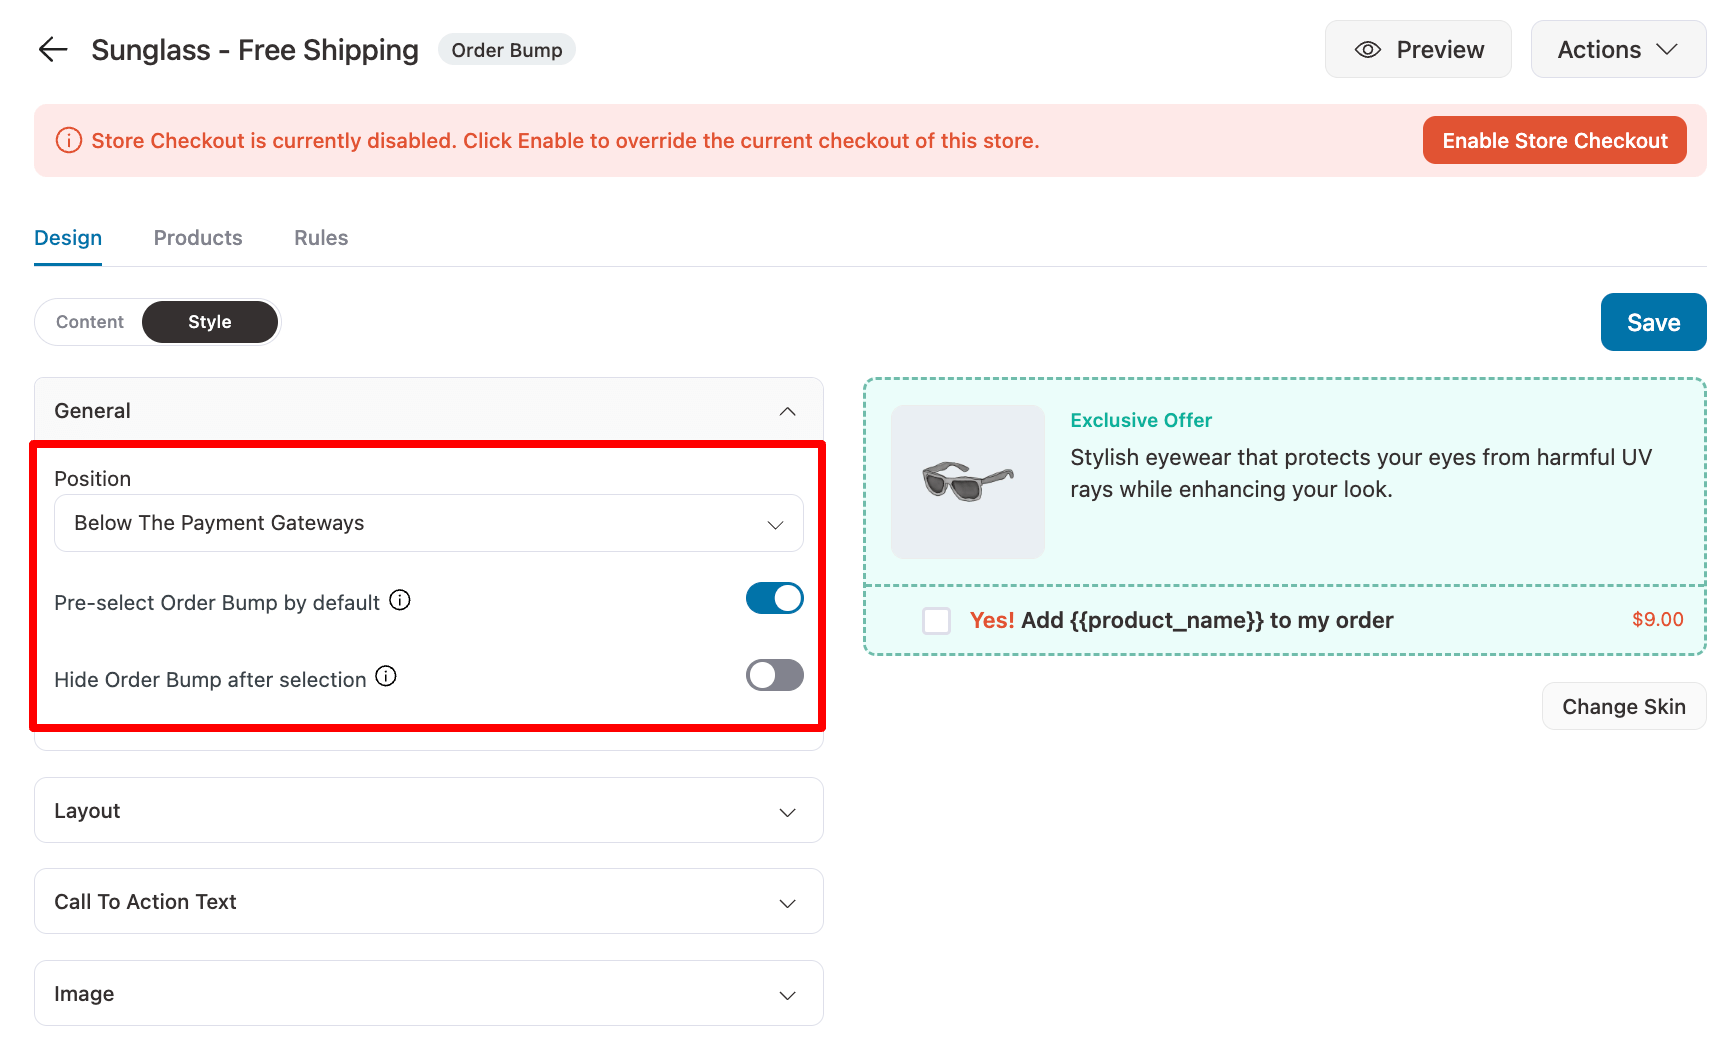
Make sure to “Save” the changes.
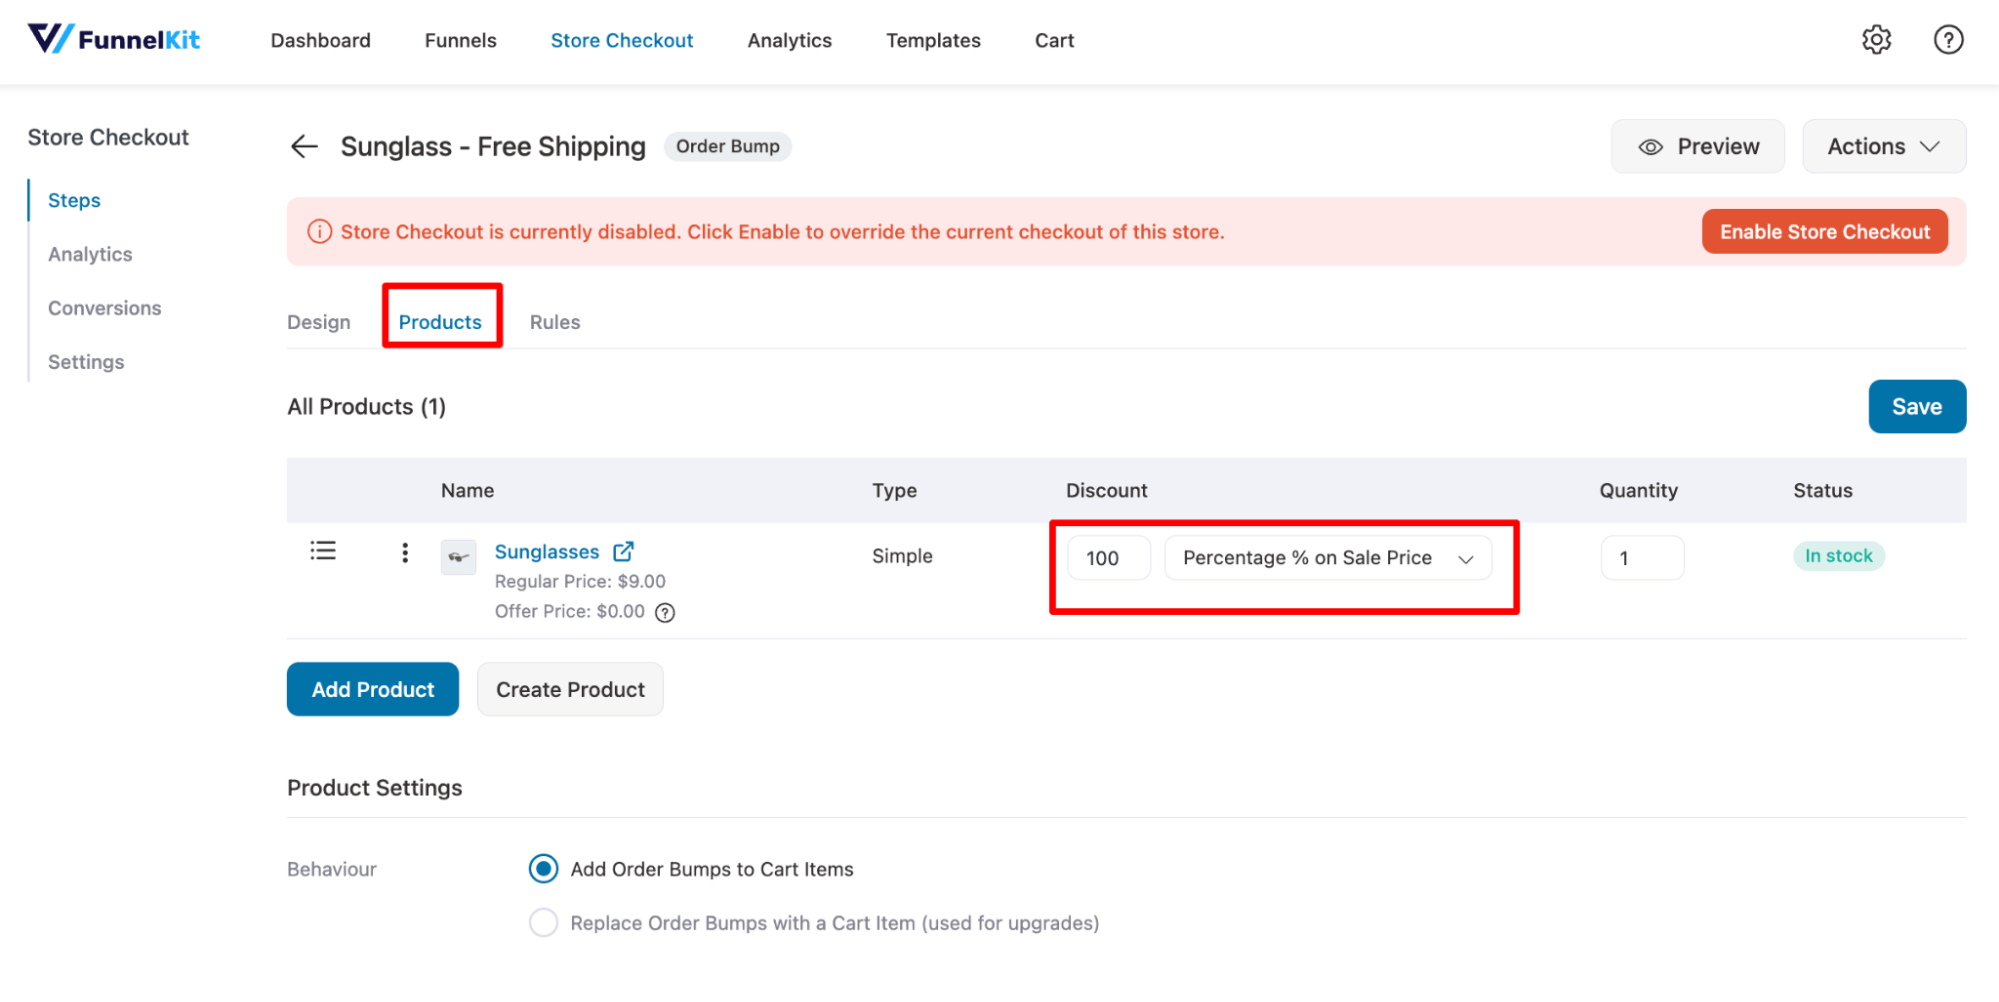
Step 4: Make the order bump totally free with a 100% discount
Now it’s time to make the order bump offer free, move to the “Products” tab, and set a 100% discount on the sale price. After that, click on Save to update.
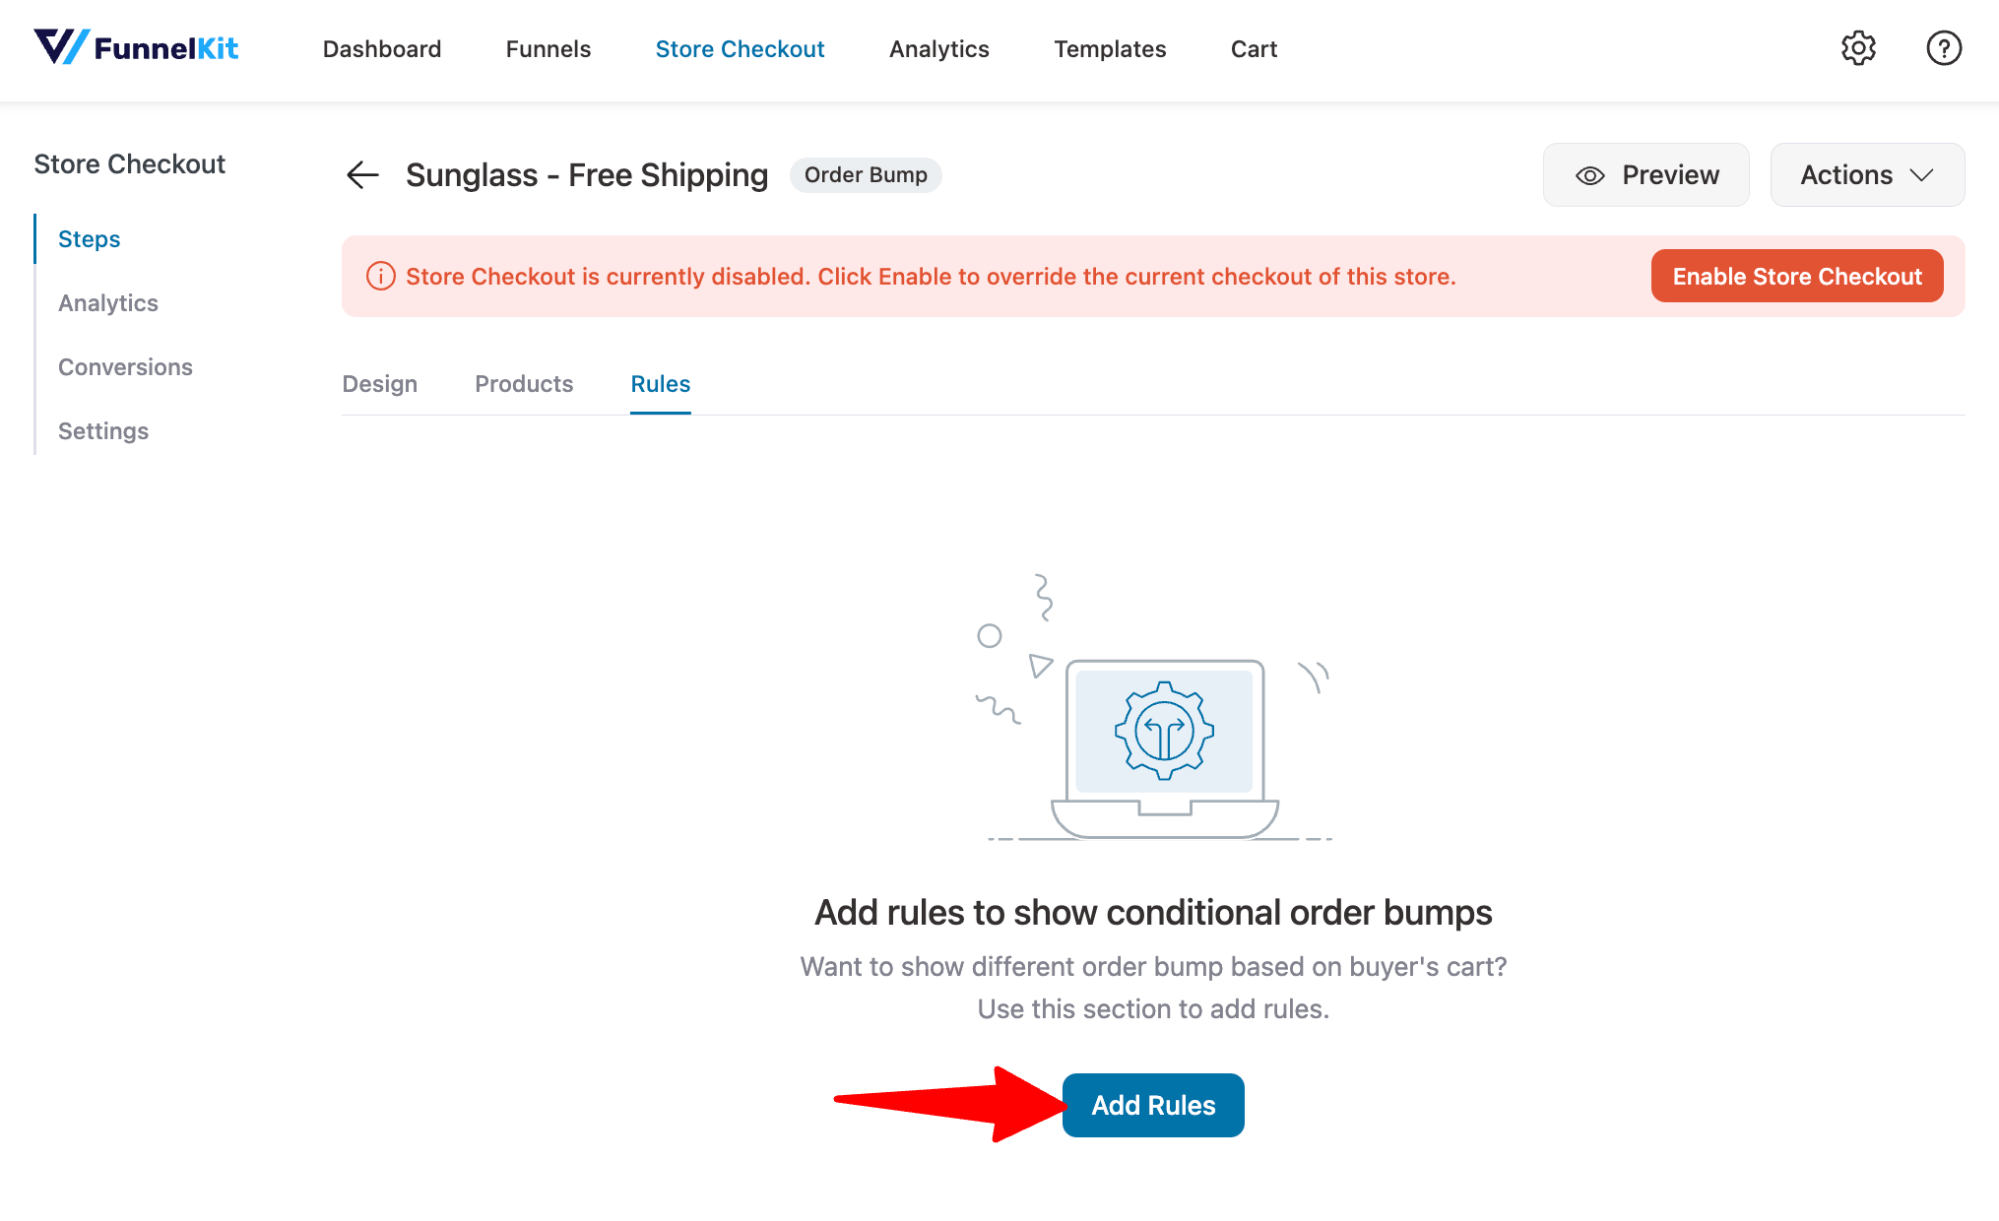
Step 5: Make the free gift redeemable only with a certain coupon
Now, we will connect the free gift coupon we created earlier to the free order bump we set.
For this, move to the Rules tab and click on “Add Rules”.
After that, set this order bump only to apply when “Car Coupons” matches the coupon you generated in the first step. Finally, save the rule.
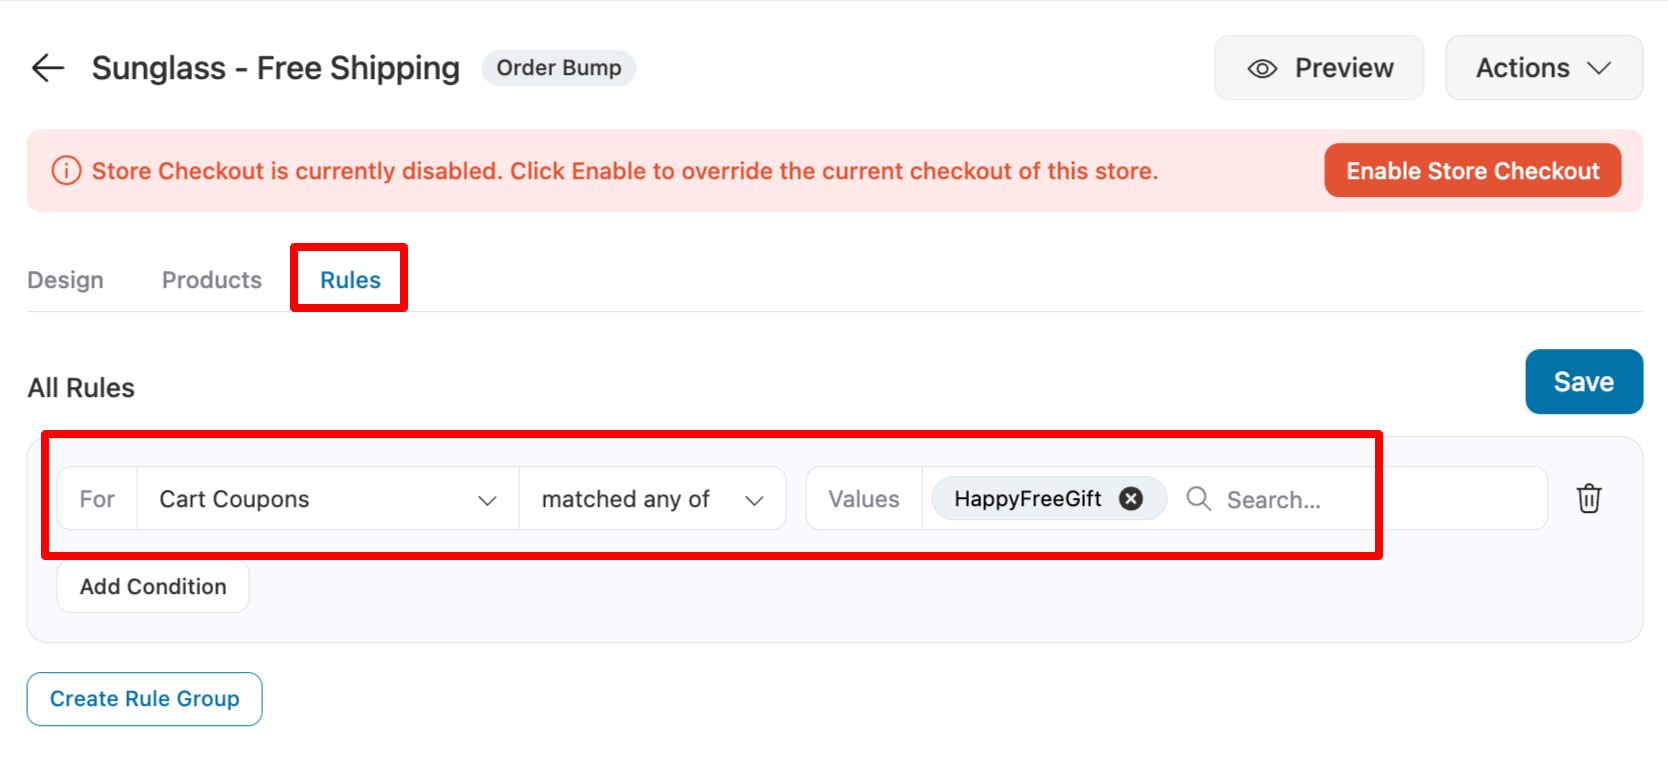
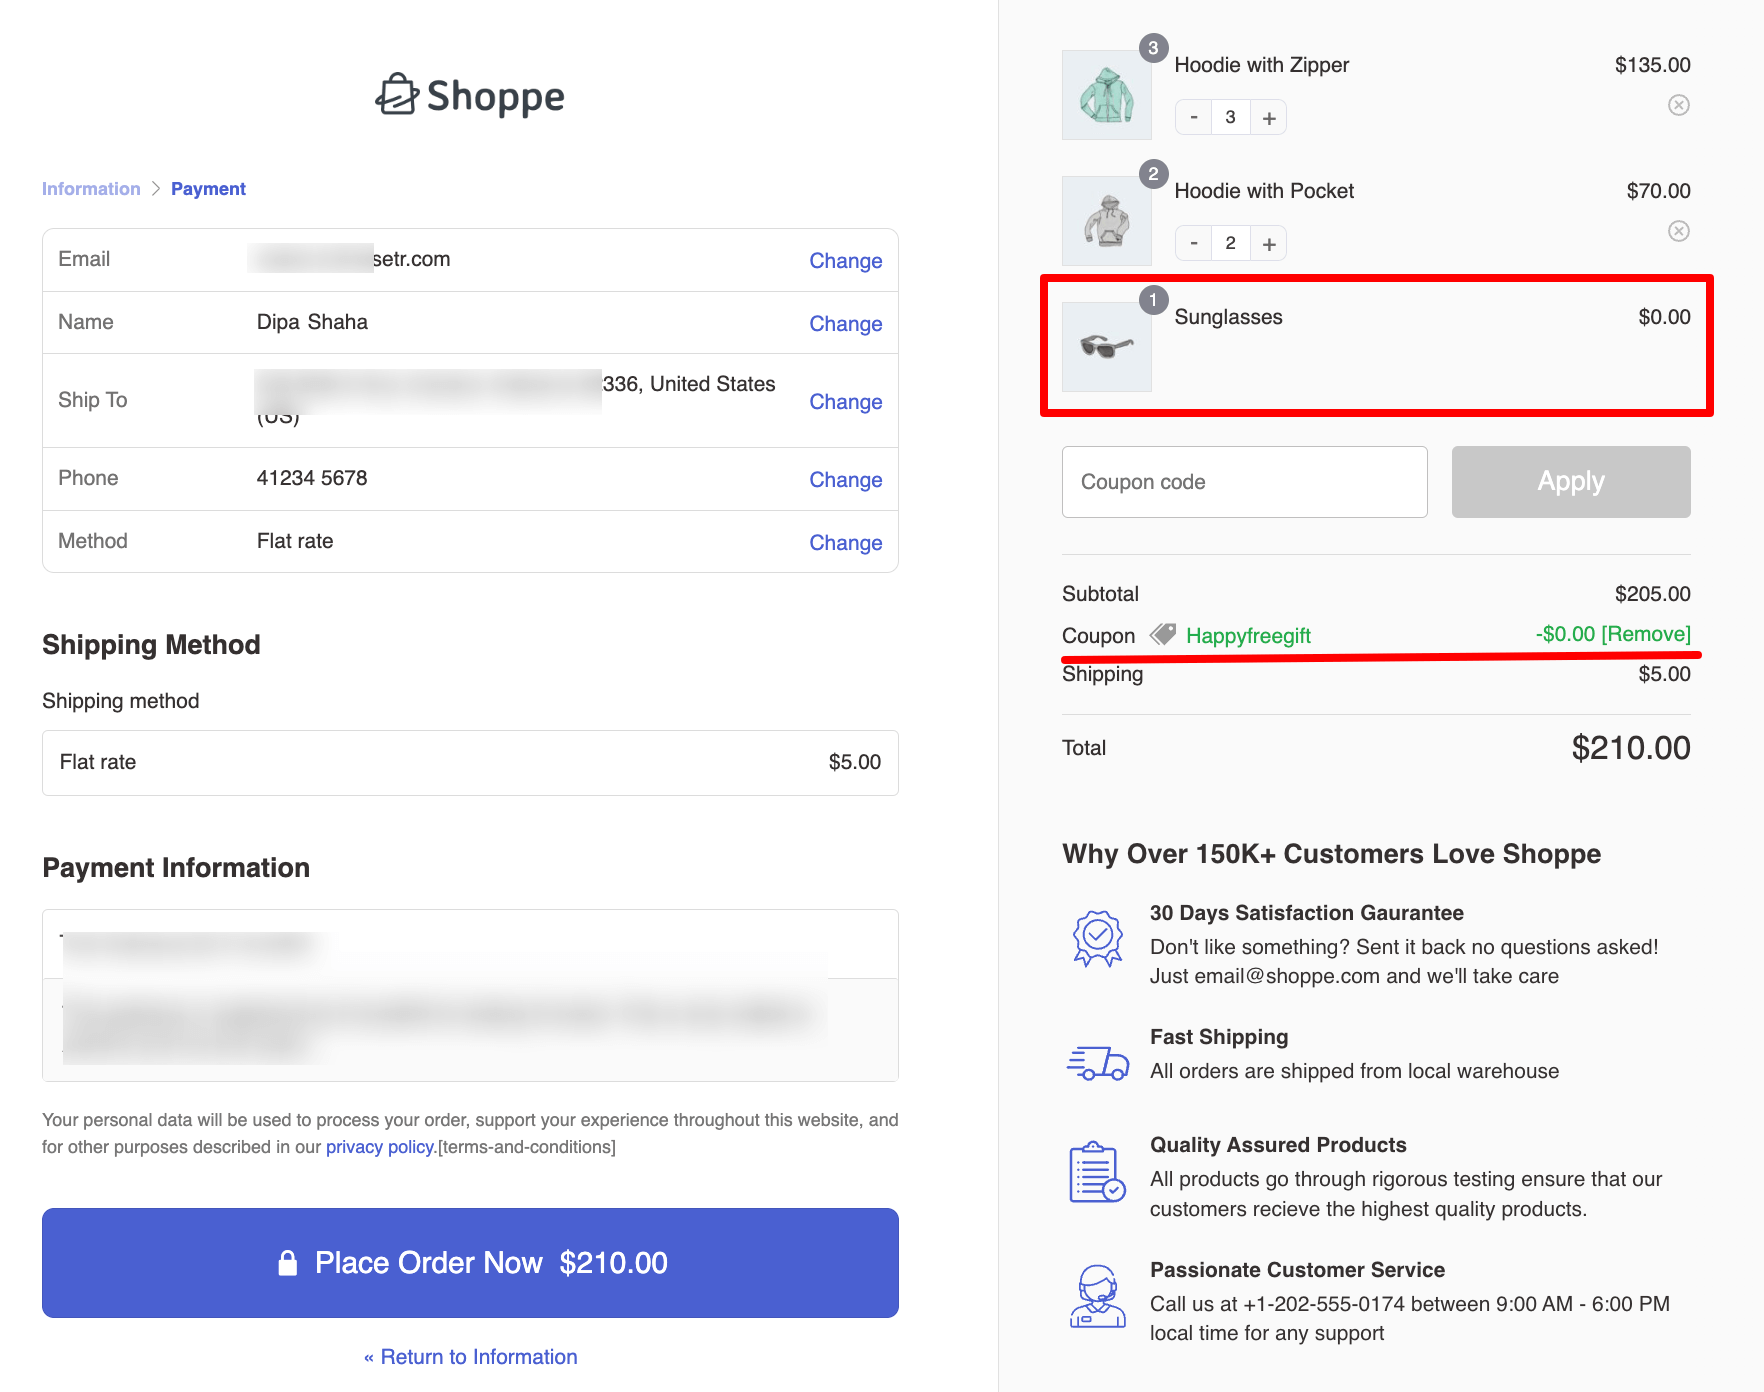
Now, users who apply this coupon to the cart can avail themselves of this free gift.
Here is a preview of how it will work:
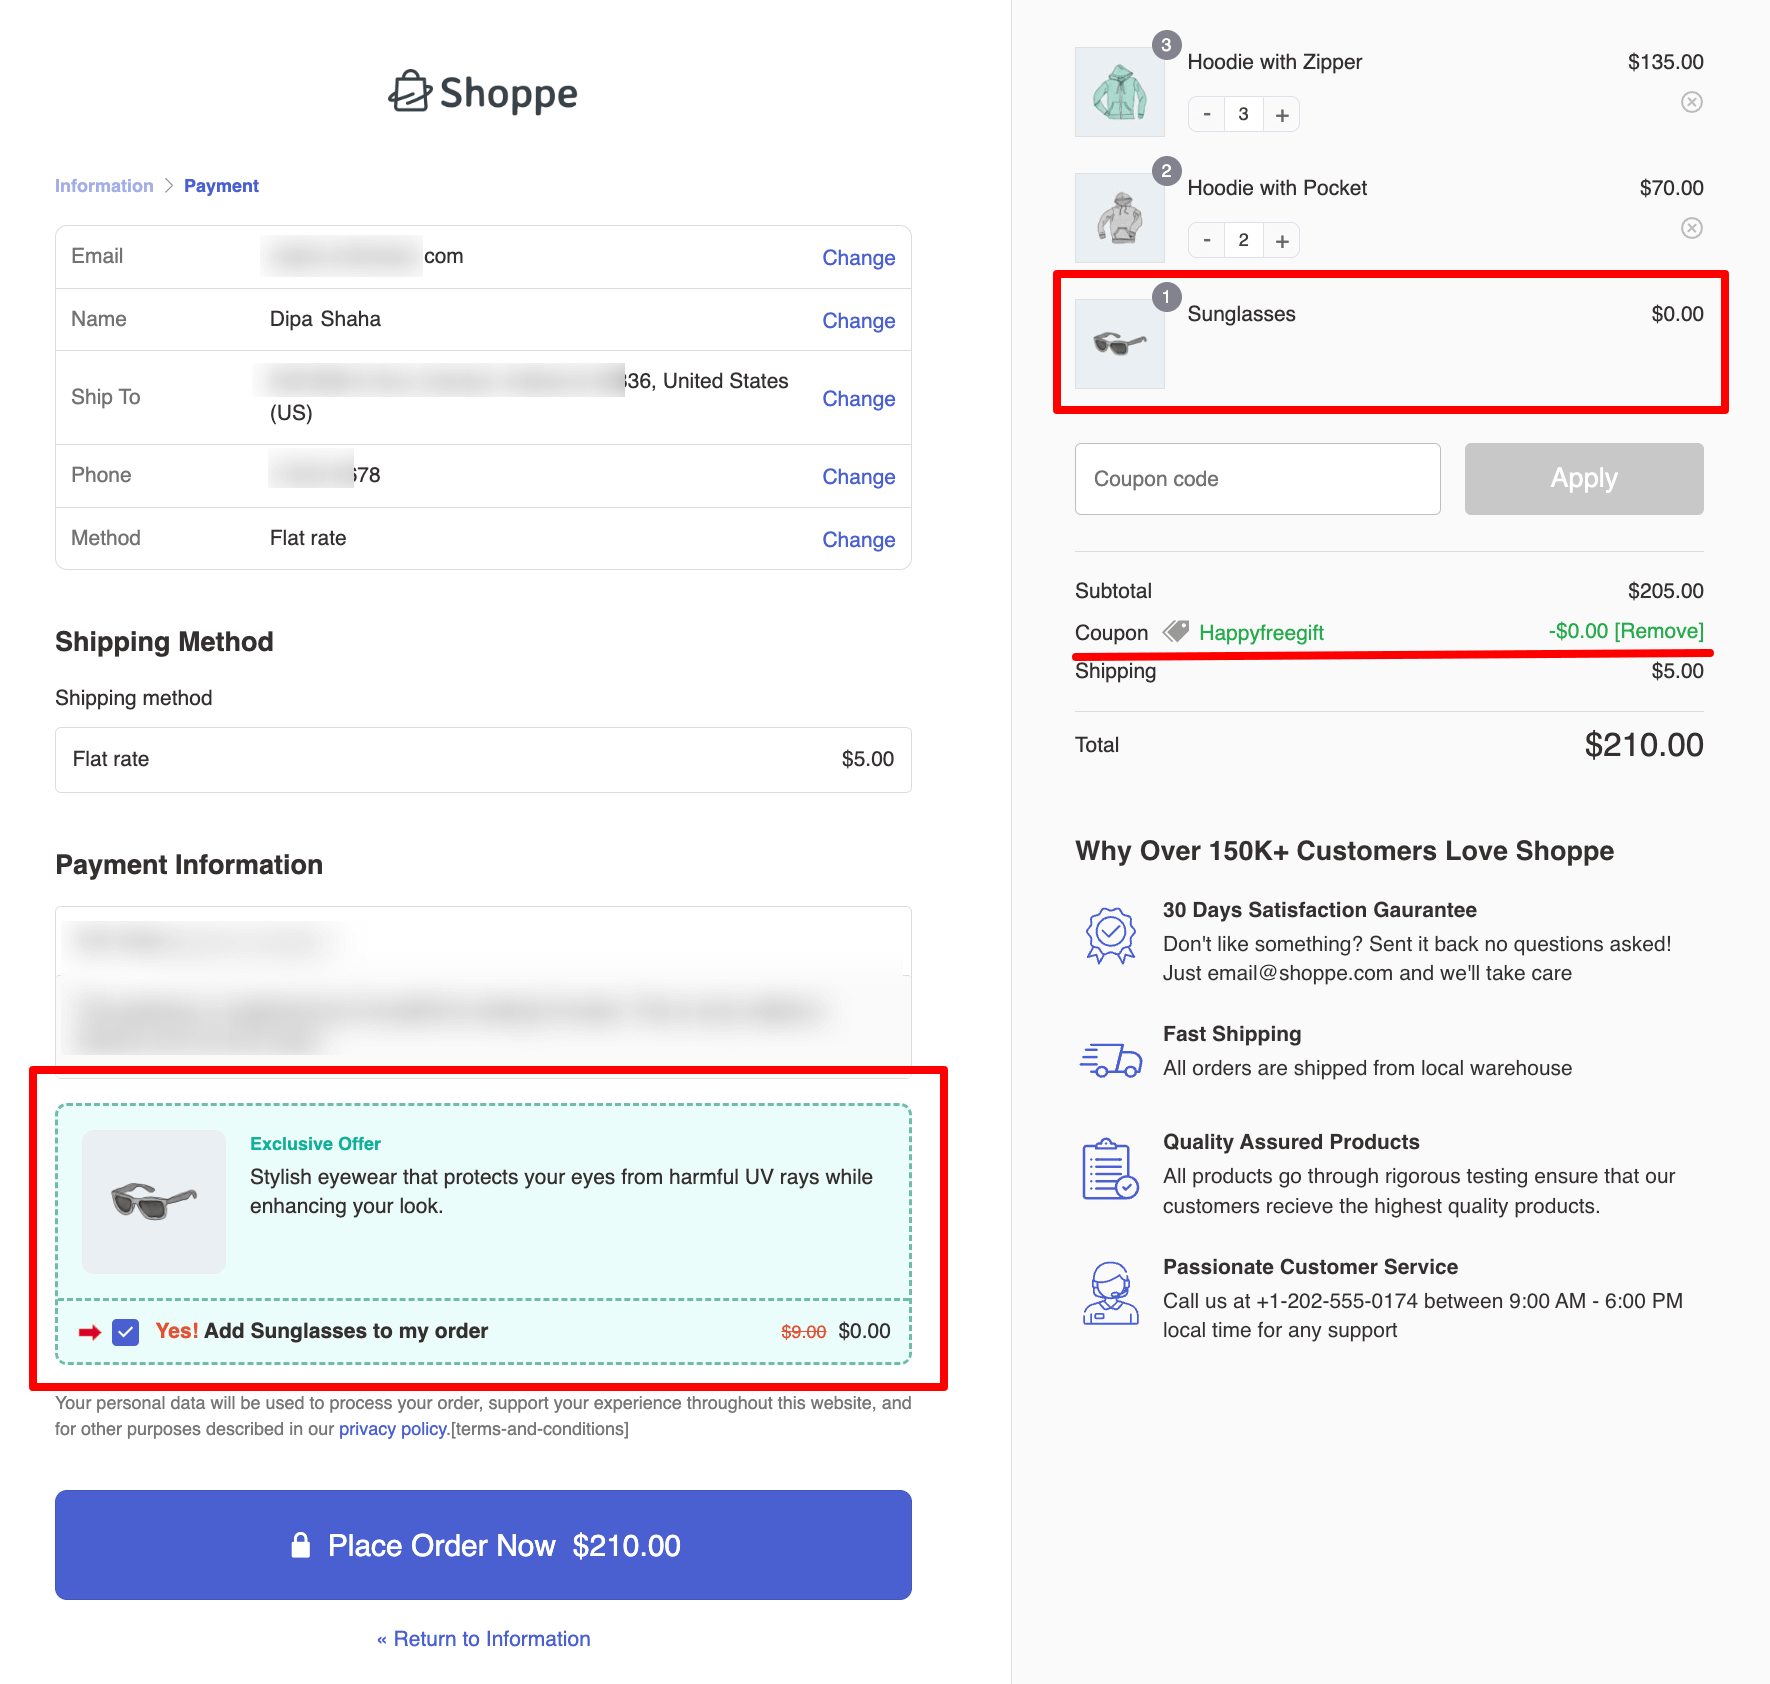
When the coupon is applied, the discount stays at zero, but the free gift is automatically added to the cart at no extra cost.
The chosen order bump skin appears under the payment section, allowing users to uncheck the free gift if they wish.
To hide this section at checkout, enable “Hide Order Bump after selection” so the gift adds silently without showing the order bump.
Here is a preview of the free gift coupon without the order bump section:
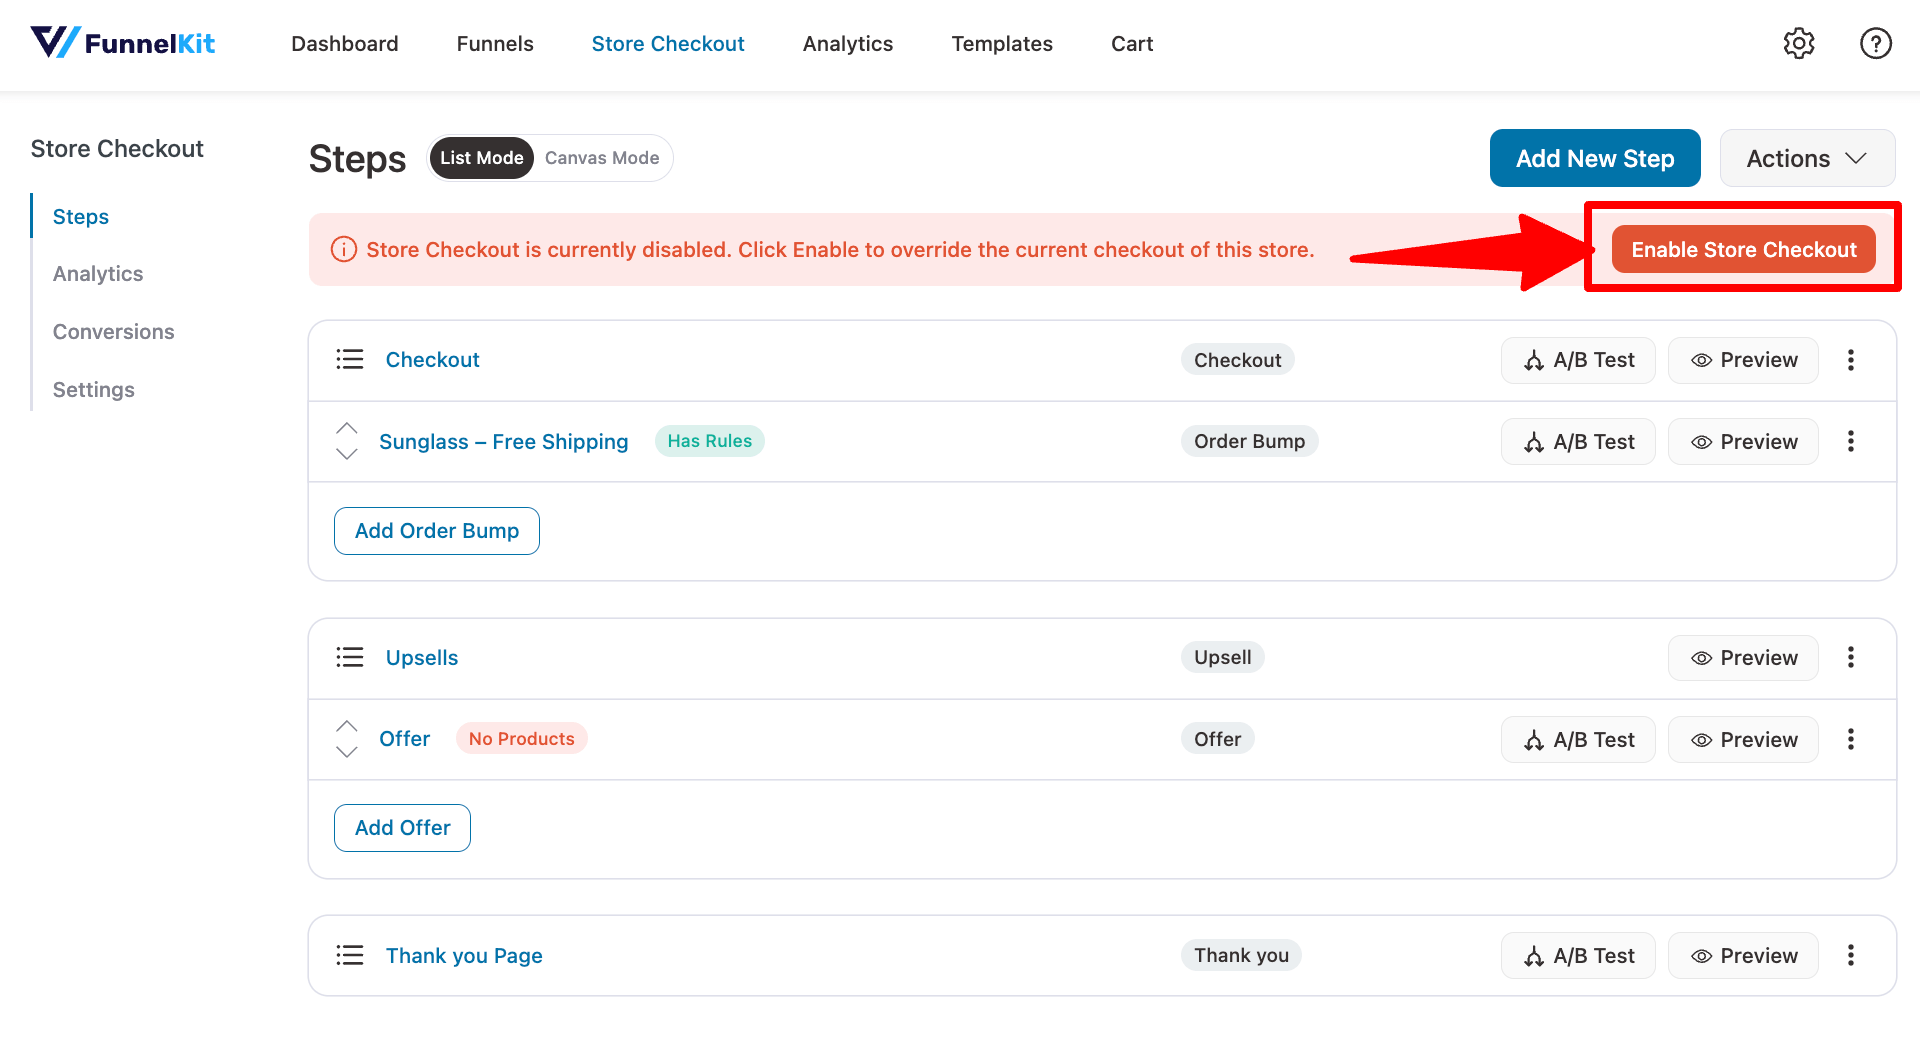
Step 6: Enable the store checkout
Finally, to make all the free gifts you set up work, you need to enable the store checkout. To do this, you just need to hit “Enable Store Checkout.”
With FunnelKit Sales Funnels, you can easily track how many people ordered using this URL coupon.
How to Create Personalized & Dynamic WooCommerce Coupons And Share Via Emails
Manually creating coupons works for promotions, but for events like cart abandonment or birthdays, automated dynamic coupons are more effective.
With tools like FunnelKit Automations, you can generate and send these coupons automatically via email or SMS based on specific triggers.
Make sure FunnelKit Automations is installed and activated.
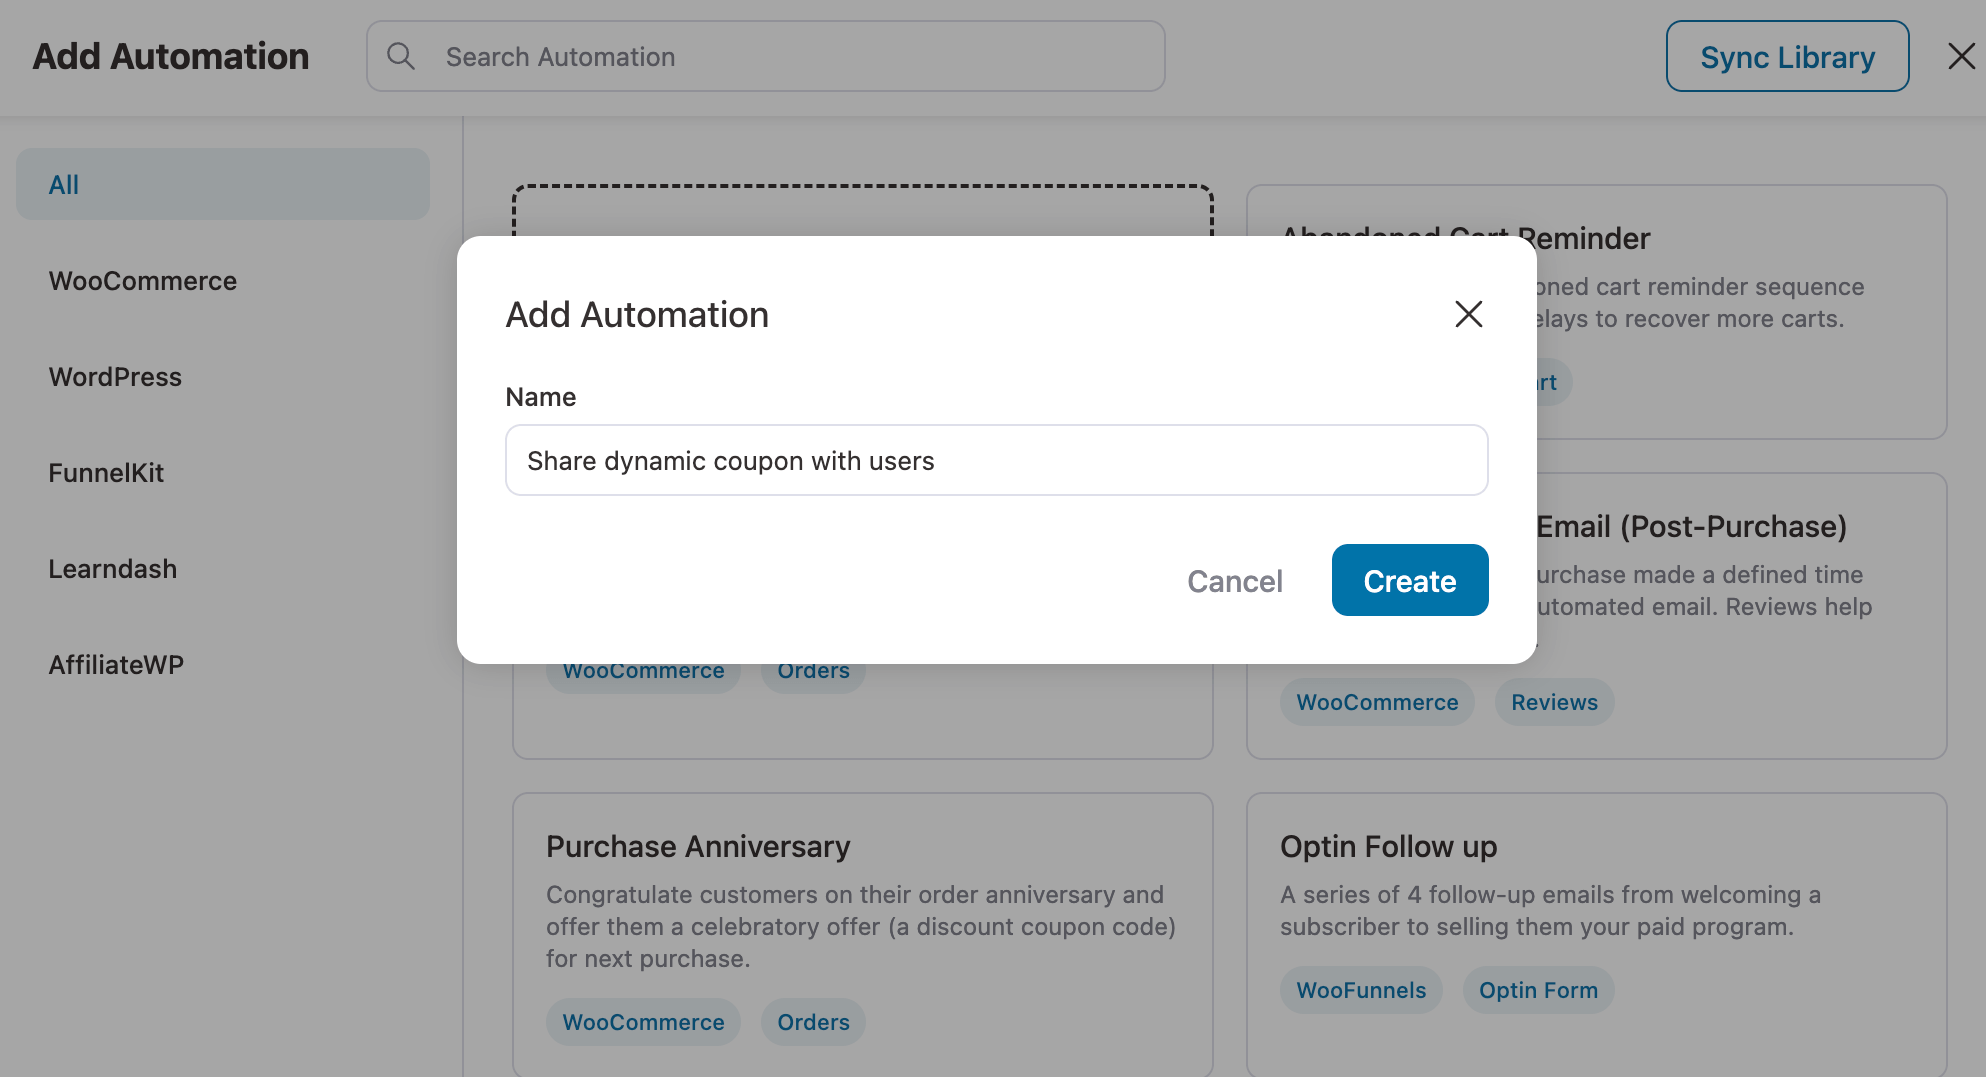
Step 1: Create an automation
First, create automation. You can create using any of the prebuilt templates or from scratch
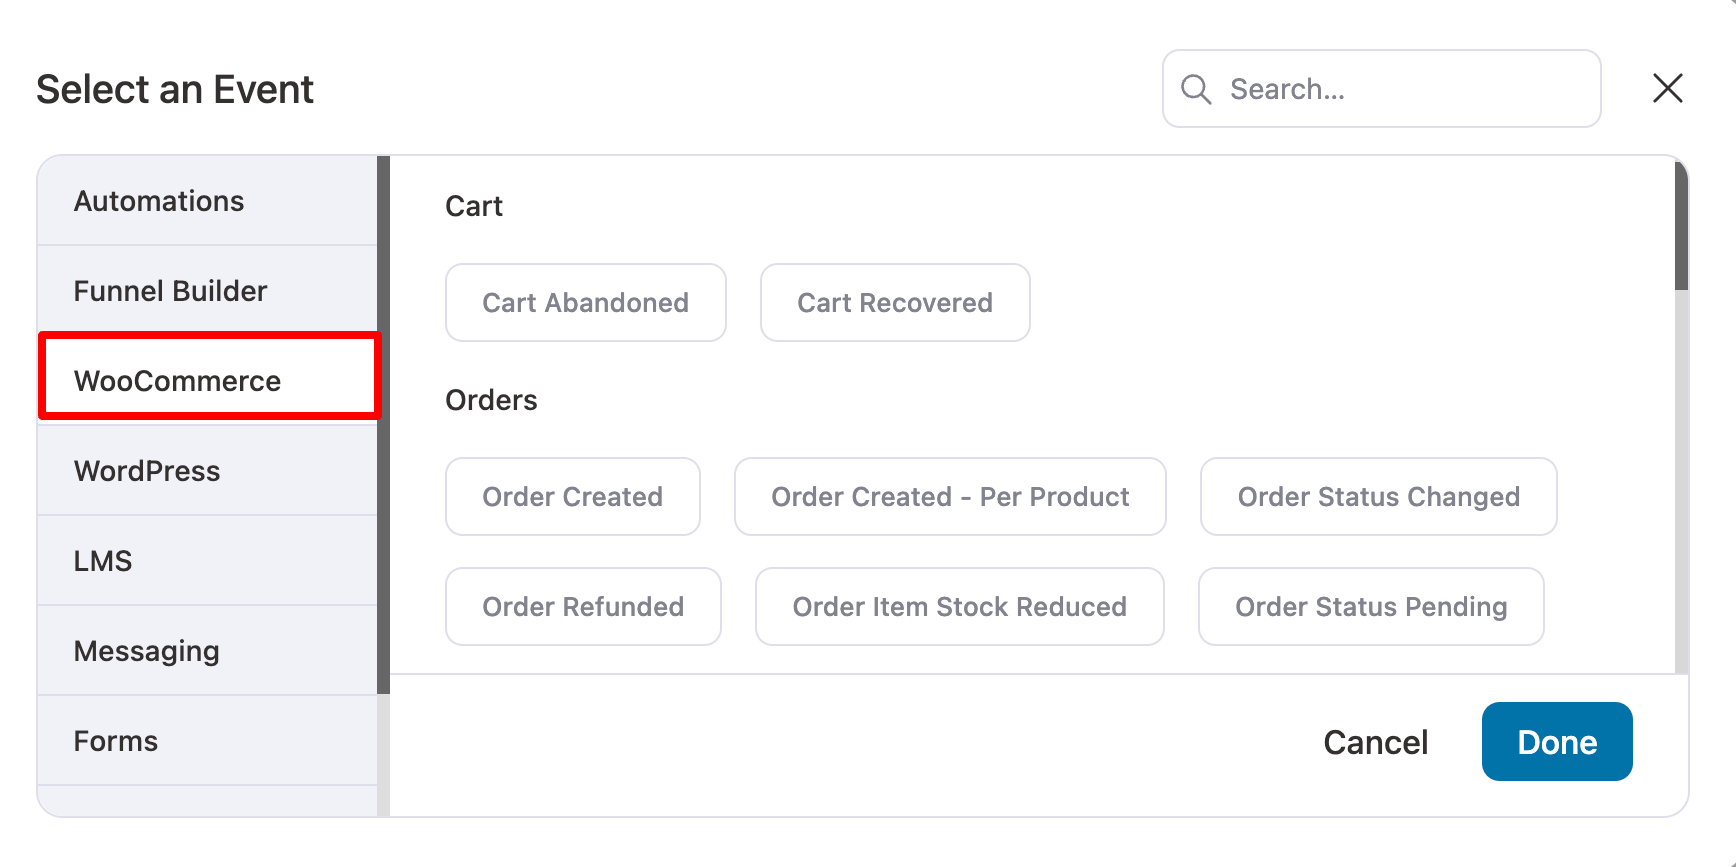
Step 2: Choose an event trigger
As mentioned earlier, you can choose many WooCommerce-related triggers such as Cart Abandoned, Cart Recovered, Order Created, Order Status Changed, etc.
You can choose any of the events to trigger the creation of a dynamic coupon and share it with your audience.
To show the purpose, here we will choose the trigger “Review Received”. Promising a discount on the next purchase if users leave a positive review is a great hack for building a strong brand.
With the review-received trigger, you can share a dynamic coupon with users as a thank-you token they can use on their next purchase.
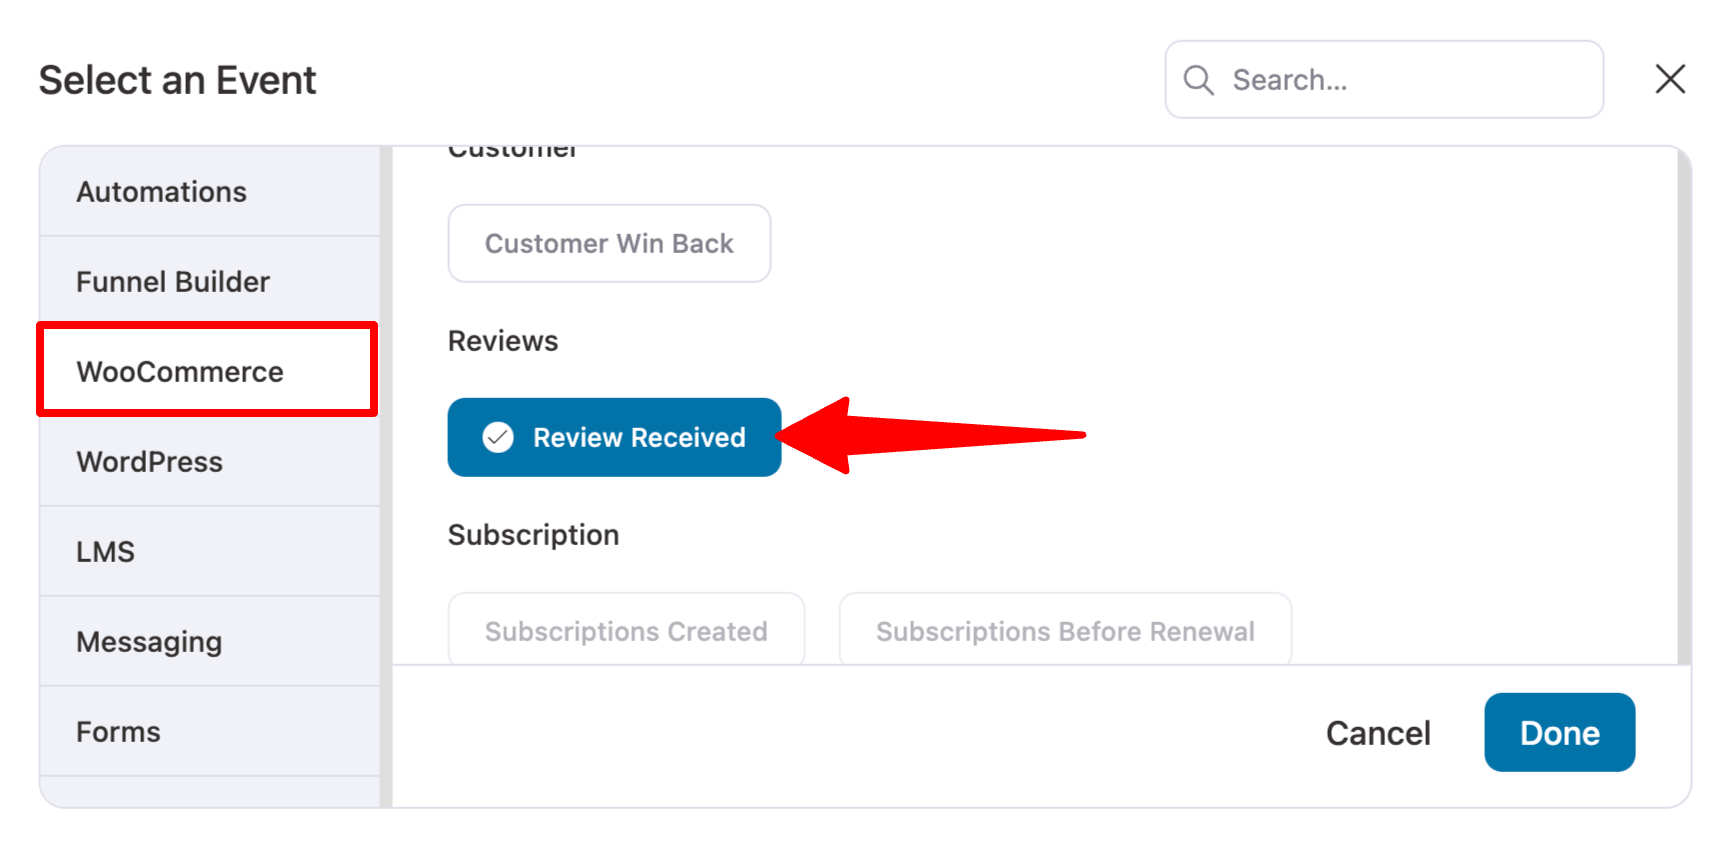
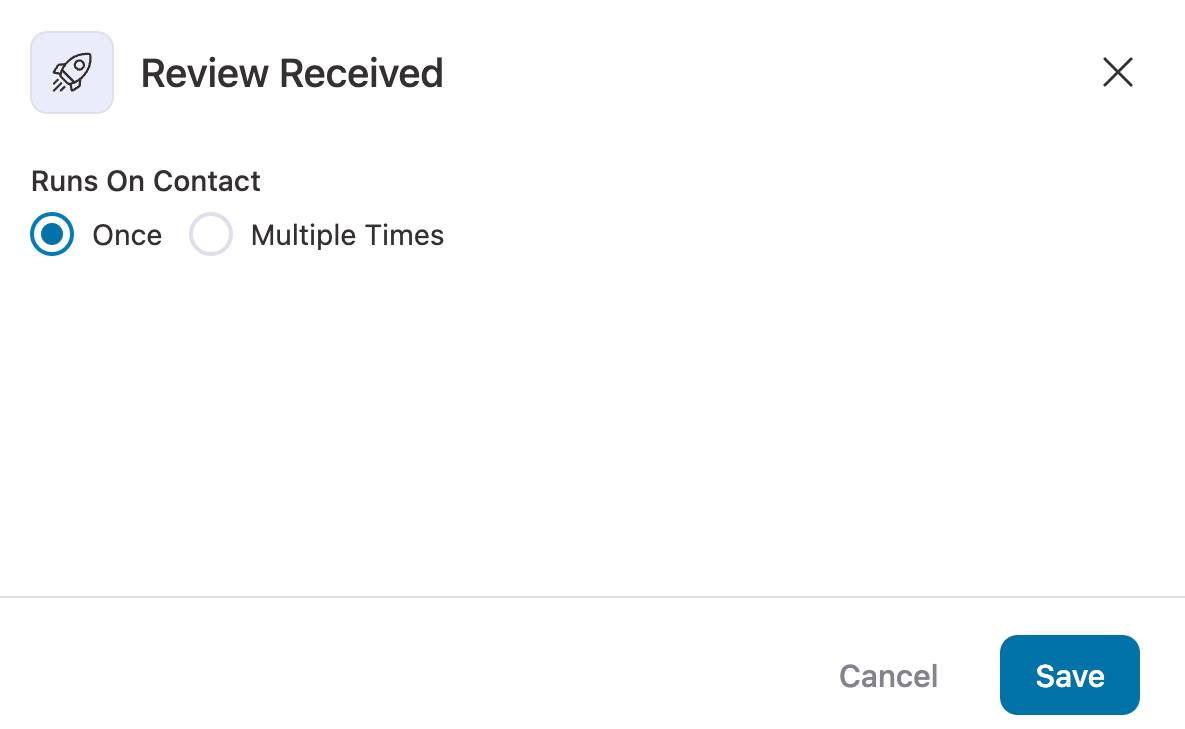
You can choose to offer this discount the very first time a user shares a view or every time. We are going with “Once”.
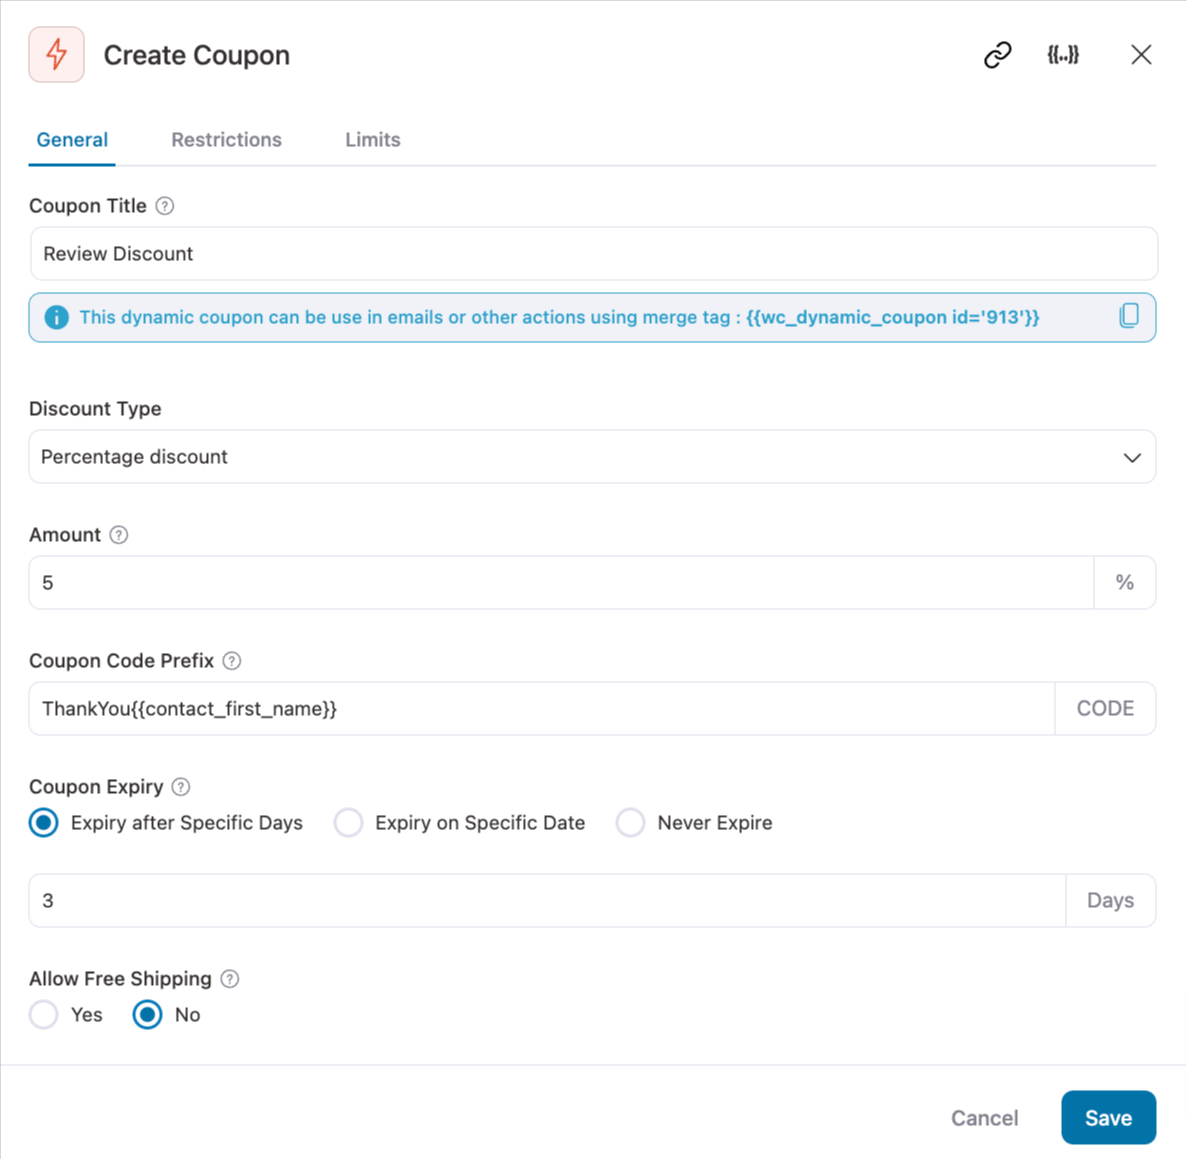
Step 3: Set up an action to create a dynamic coupon
Next, click the “+” icon and choose “Action”.
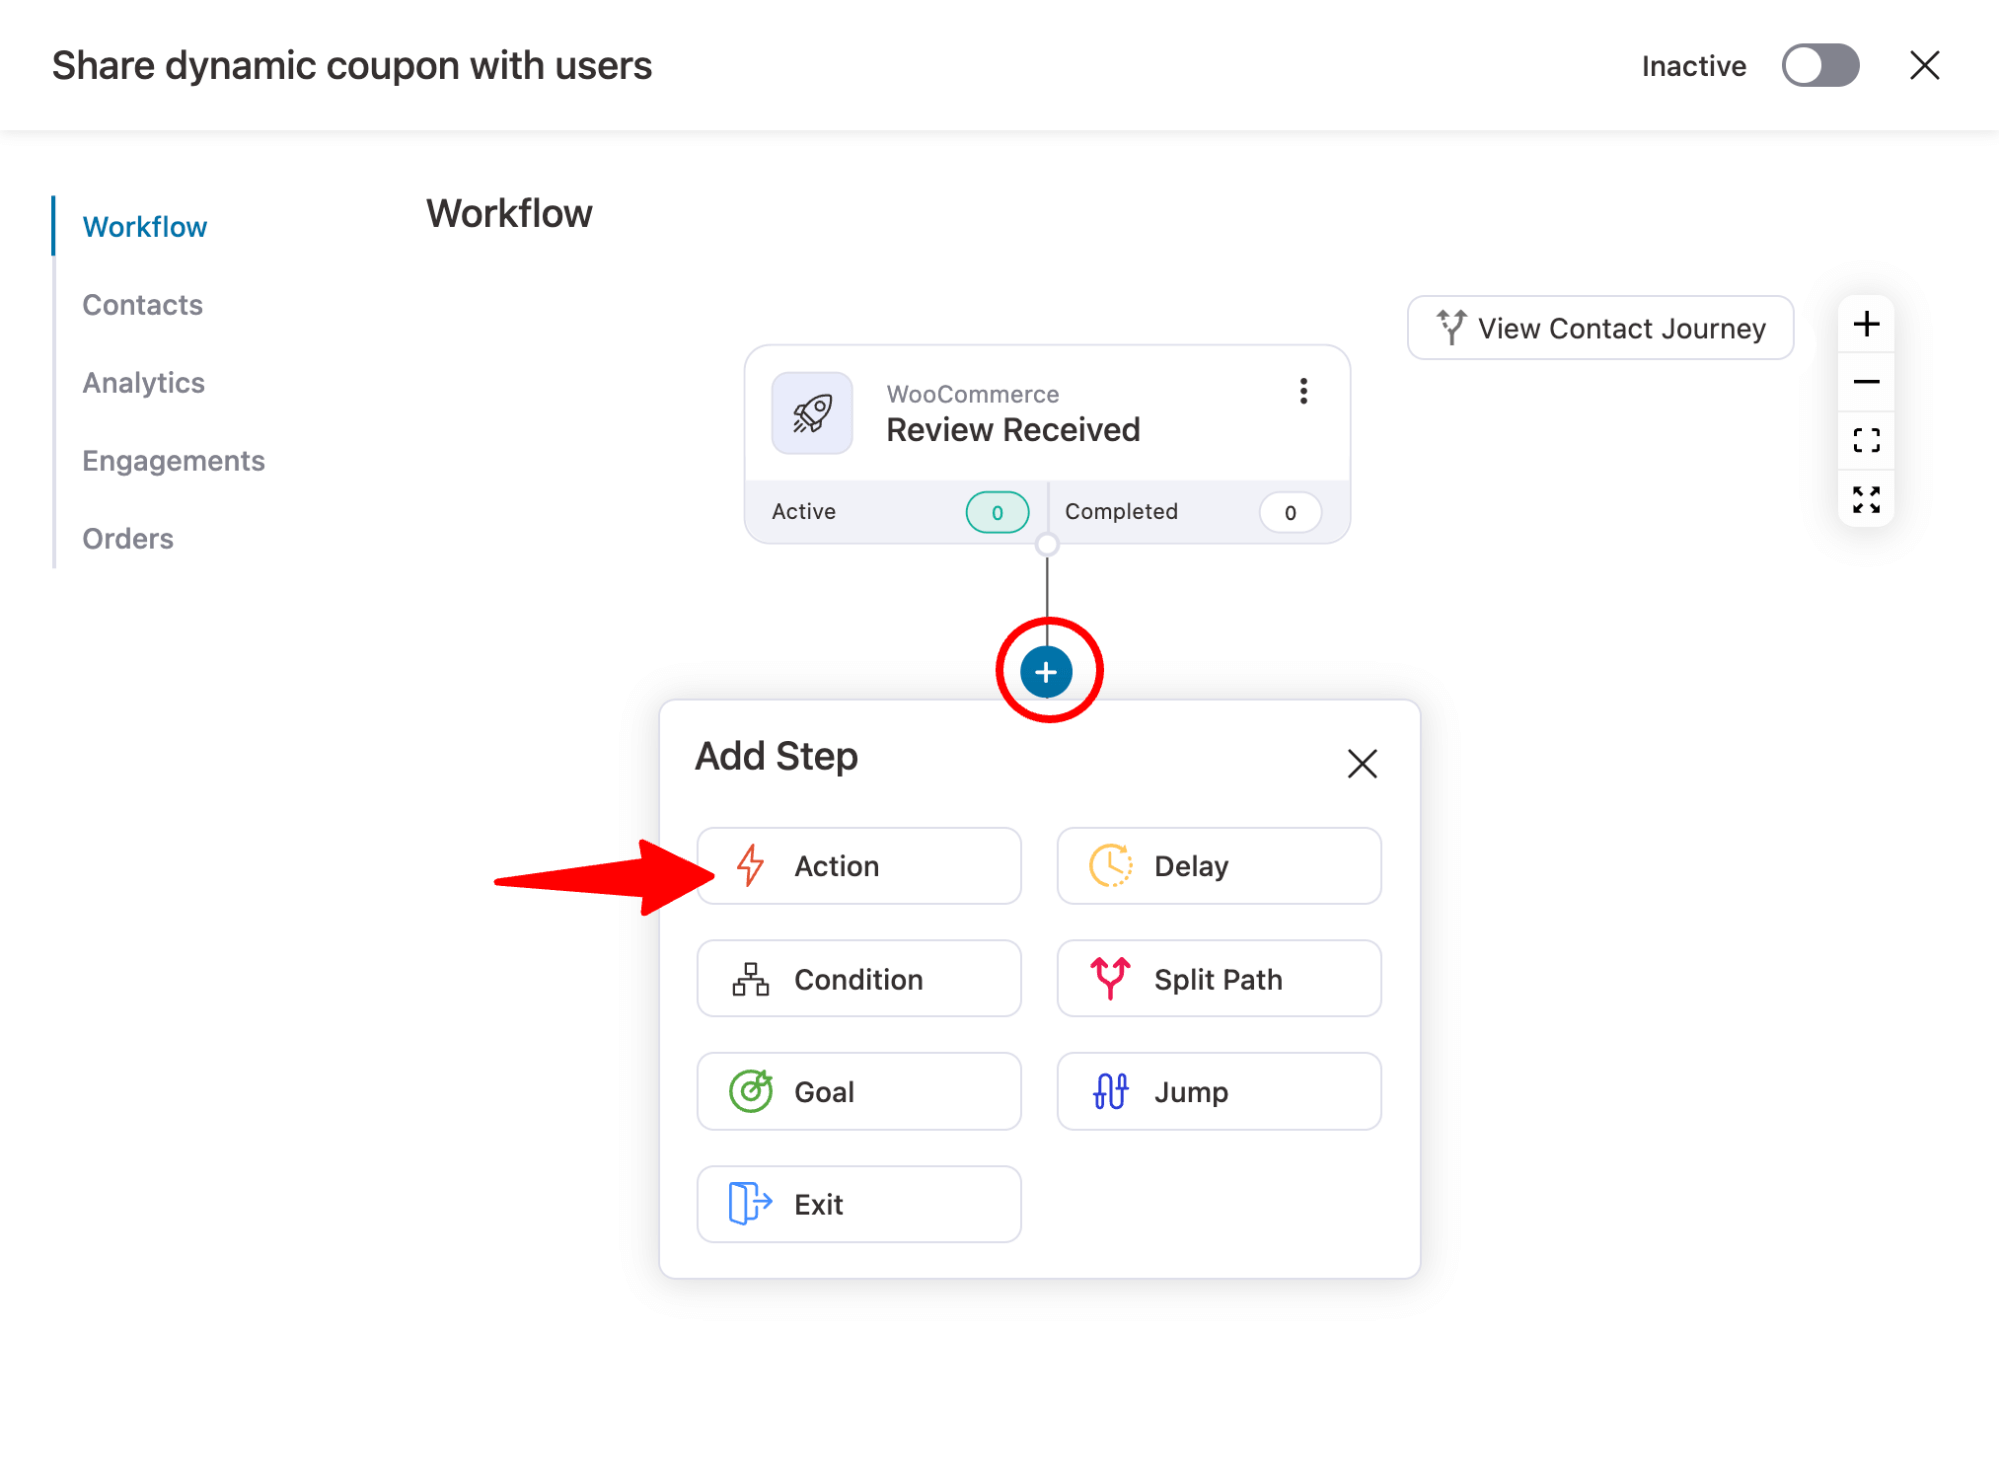
After that, select the “Create Coupon” option.
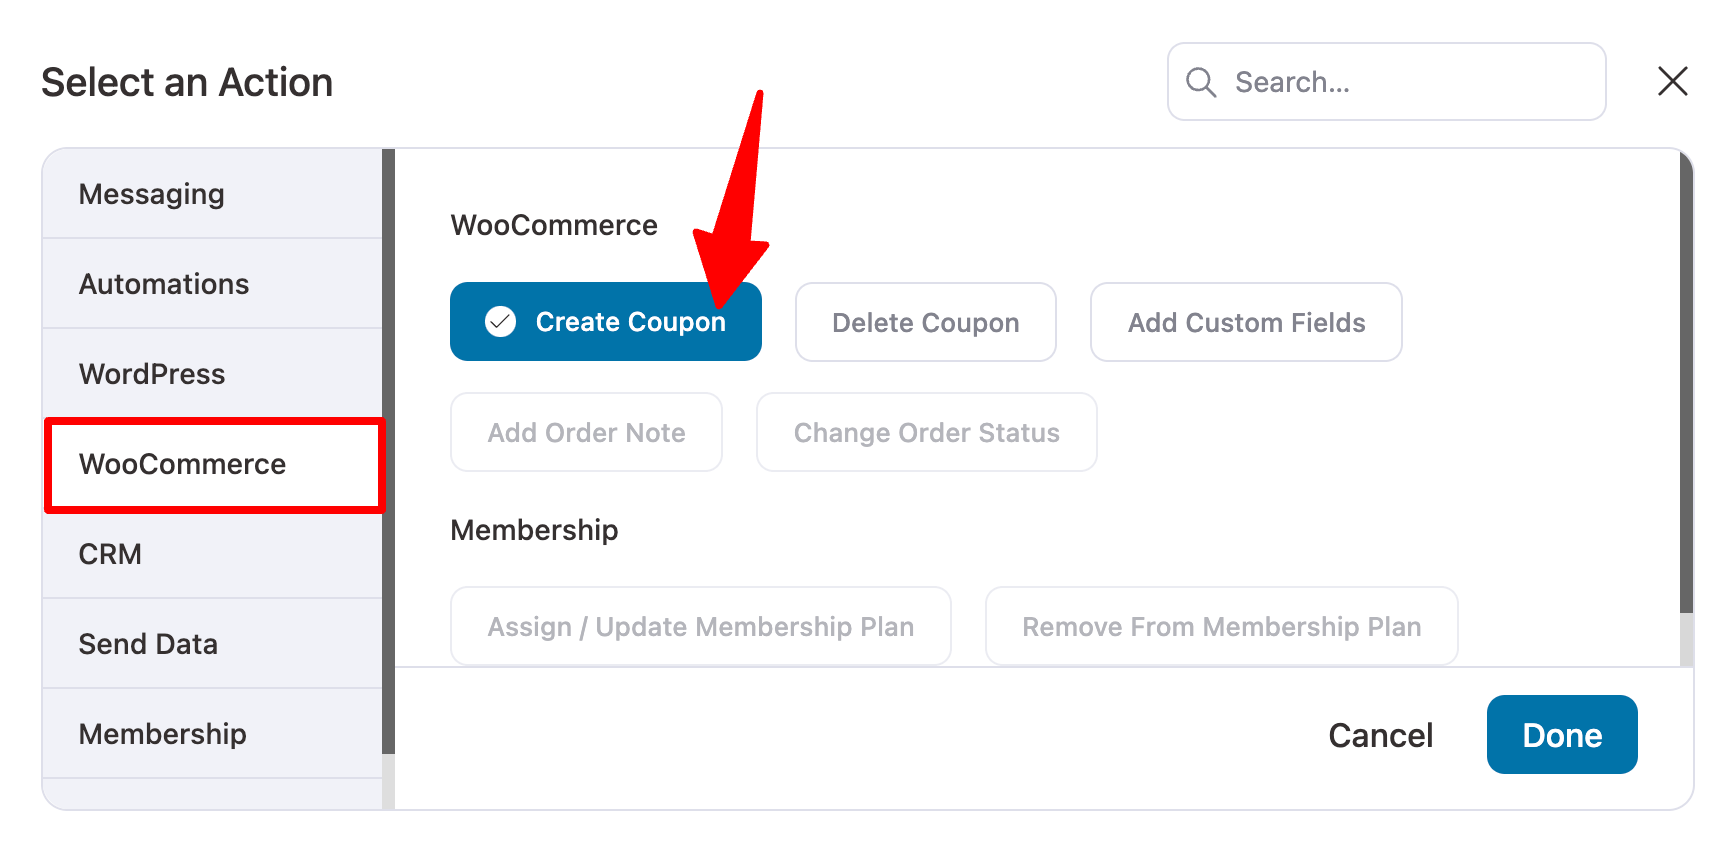
To create the coupon, add a title, select a discount type, set the amount, and optionally personalize it with the customer's name.
With FunnelKit Automations, you can also set an expiry date and enable free shipping to create urgency and drive conversions.
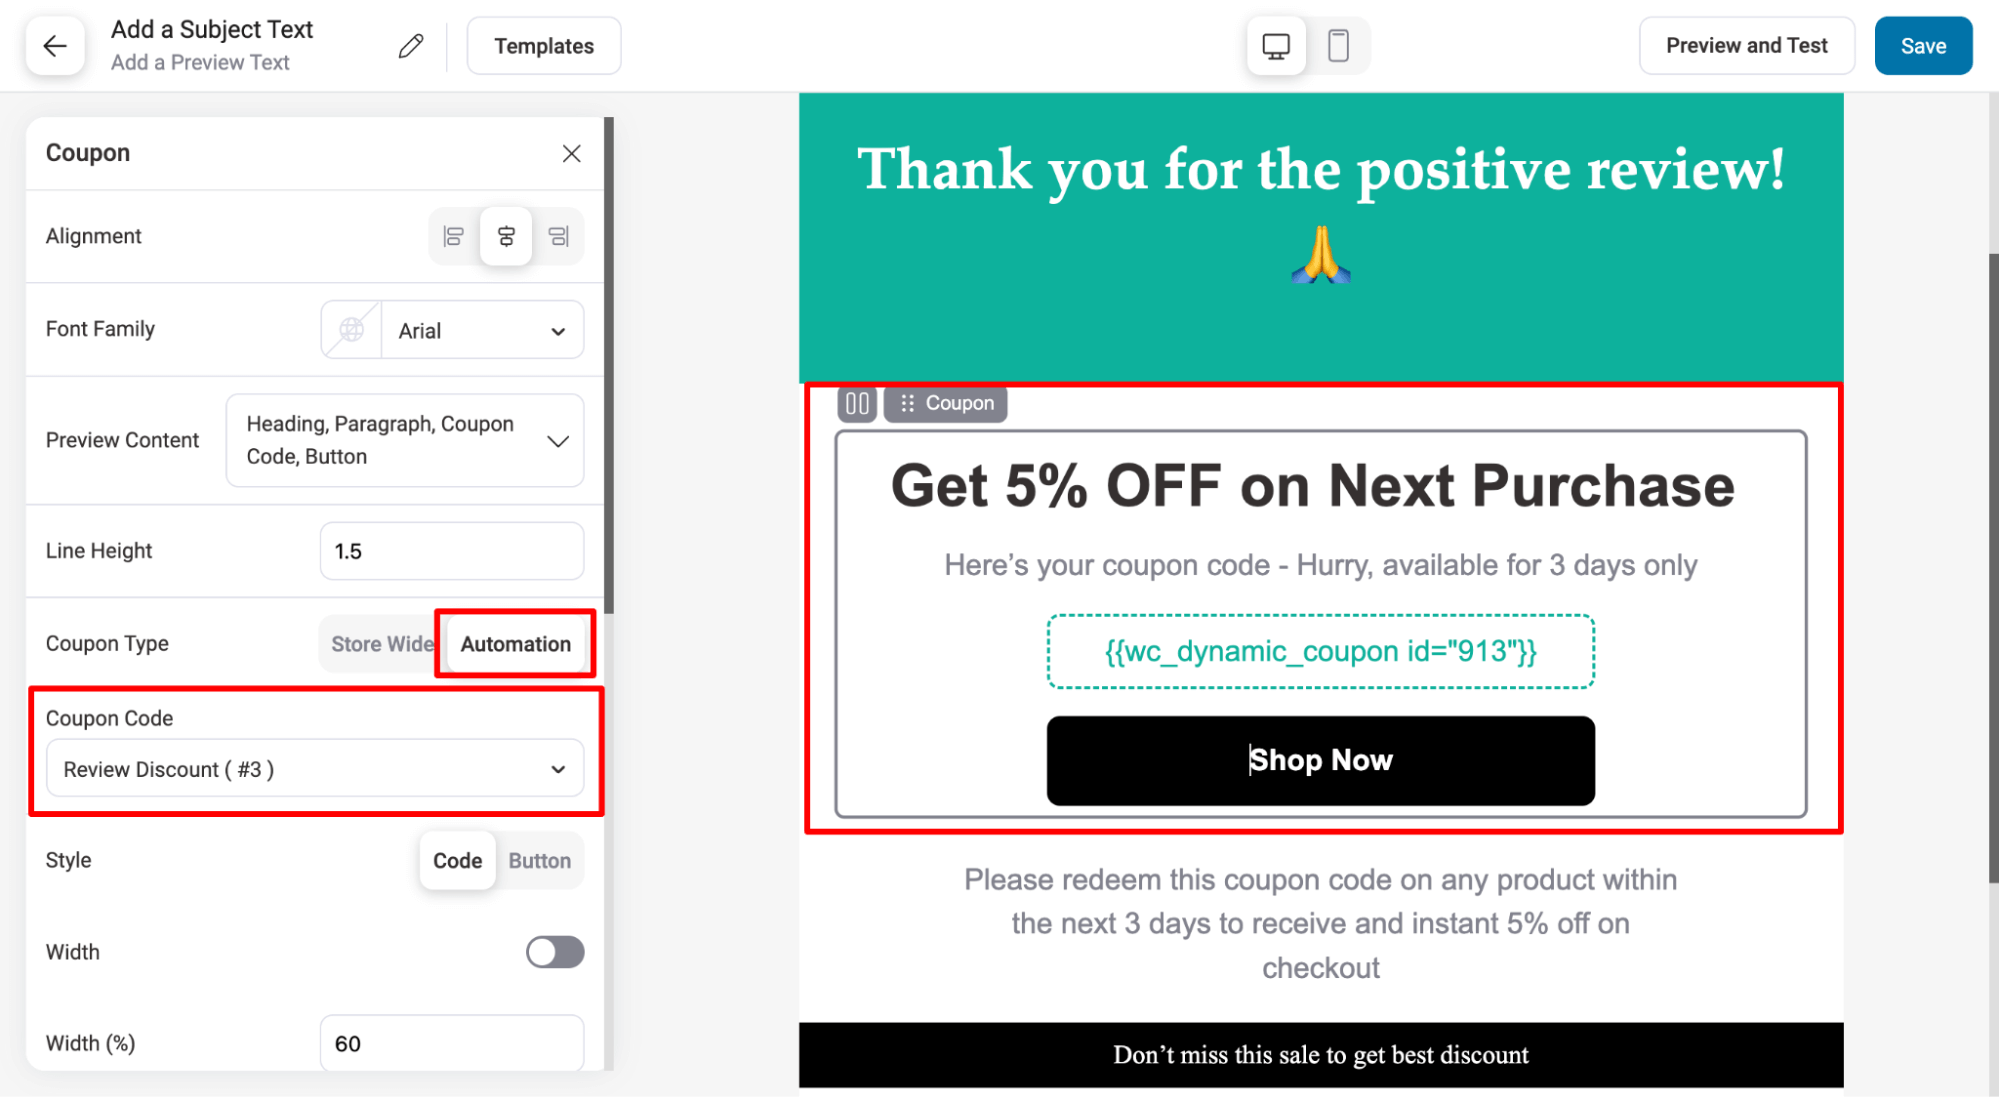
Step 4: Share the discount coupon via email or SMS
To share the dynamic coupon via email, add another action: “send email”. With FunnelKit Automations, you can design beautiful emails using an advanced visual builder.
Using its coupon block, you can easily include the dynamic coupon you’ve set up, as shown in the image below.
For more details on designing the email with dynamic coupons, read our blog on the email customizer.
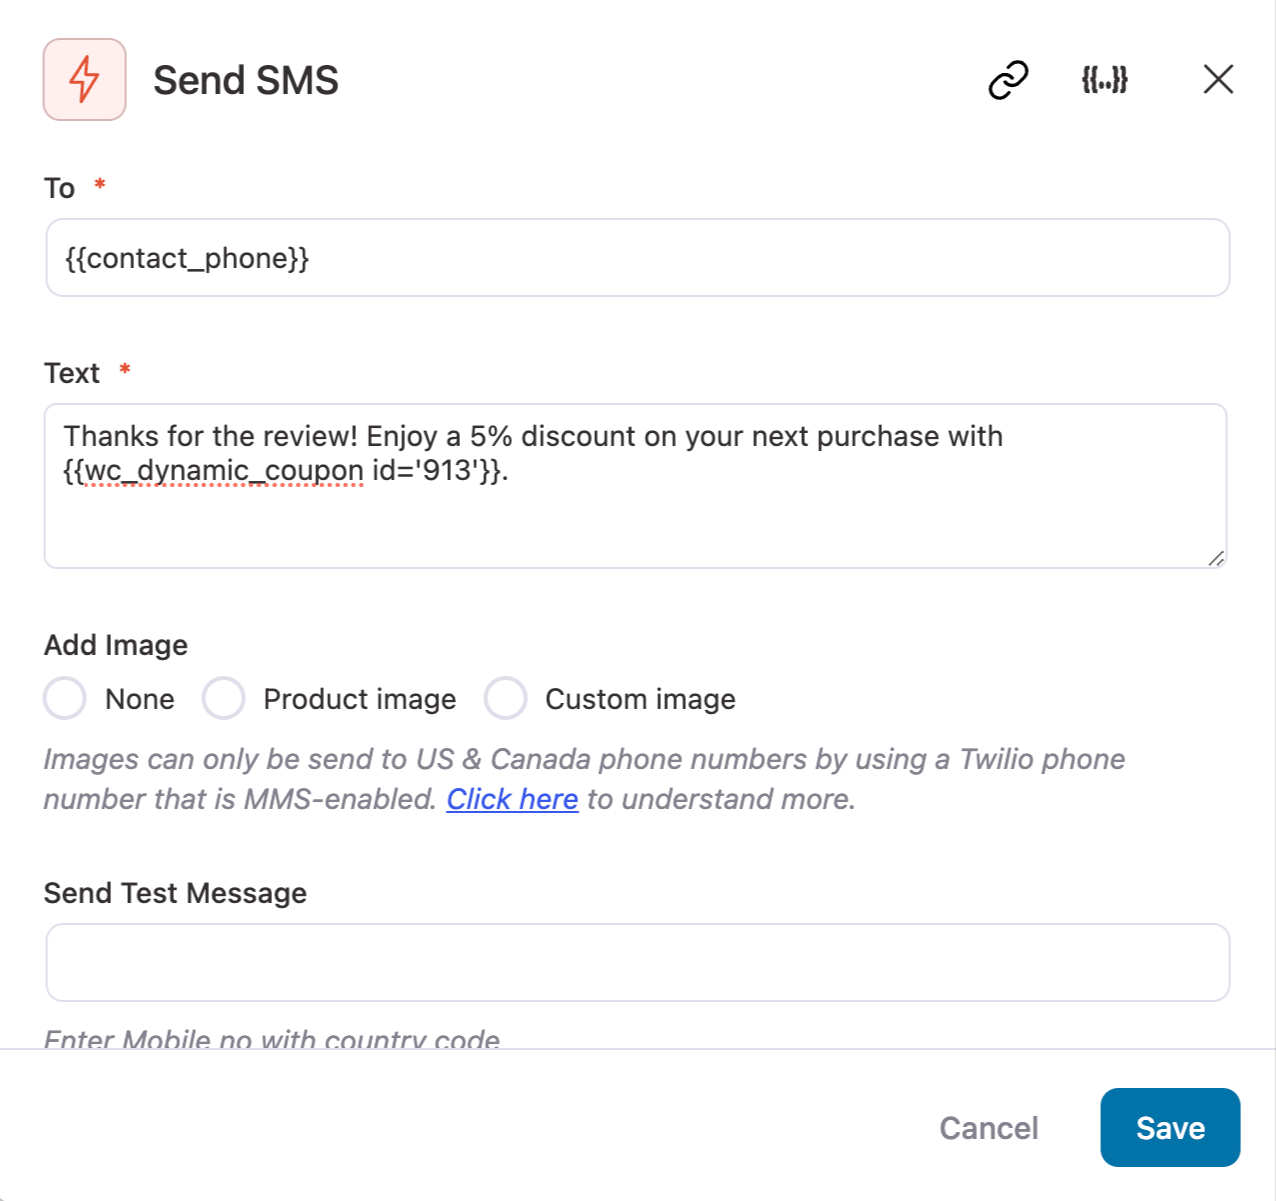
Like email, you can share the dynamic coupon using SMS. For more details, read the WooCommerce SMS notification blog.
After setting up all the steps, make sure to turn on the automation.
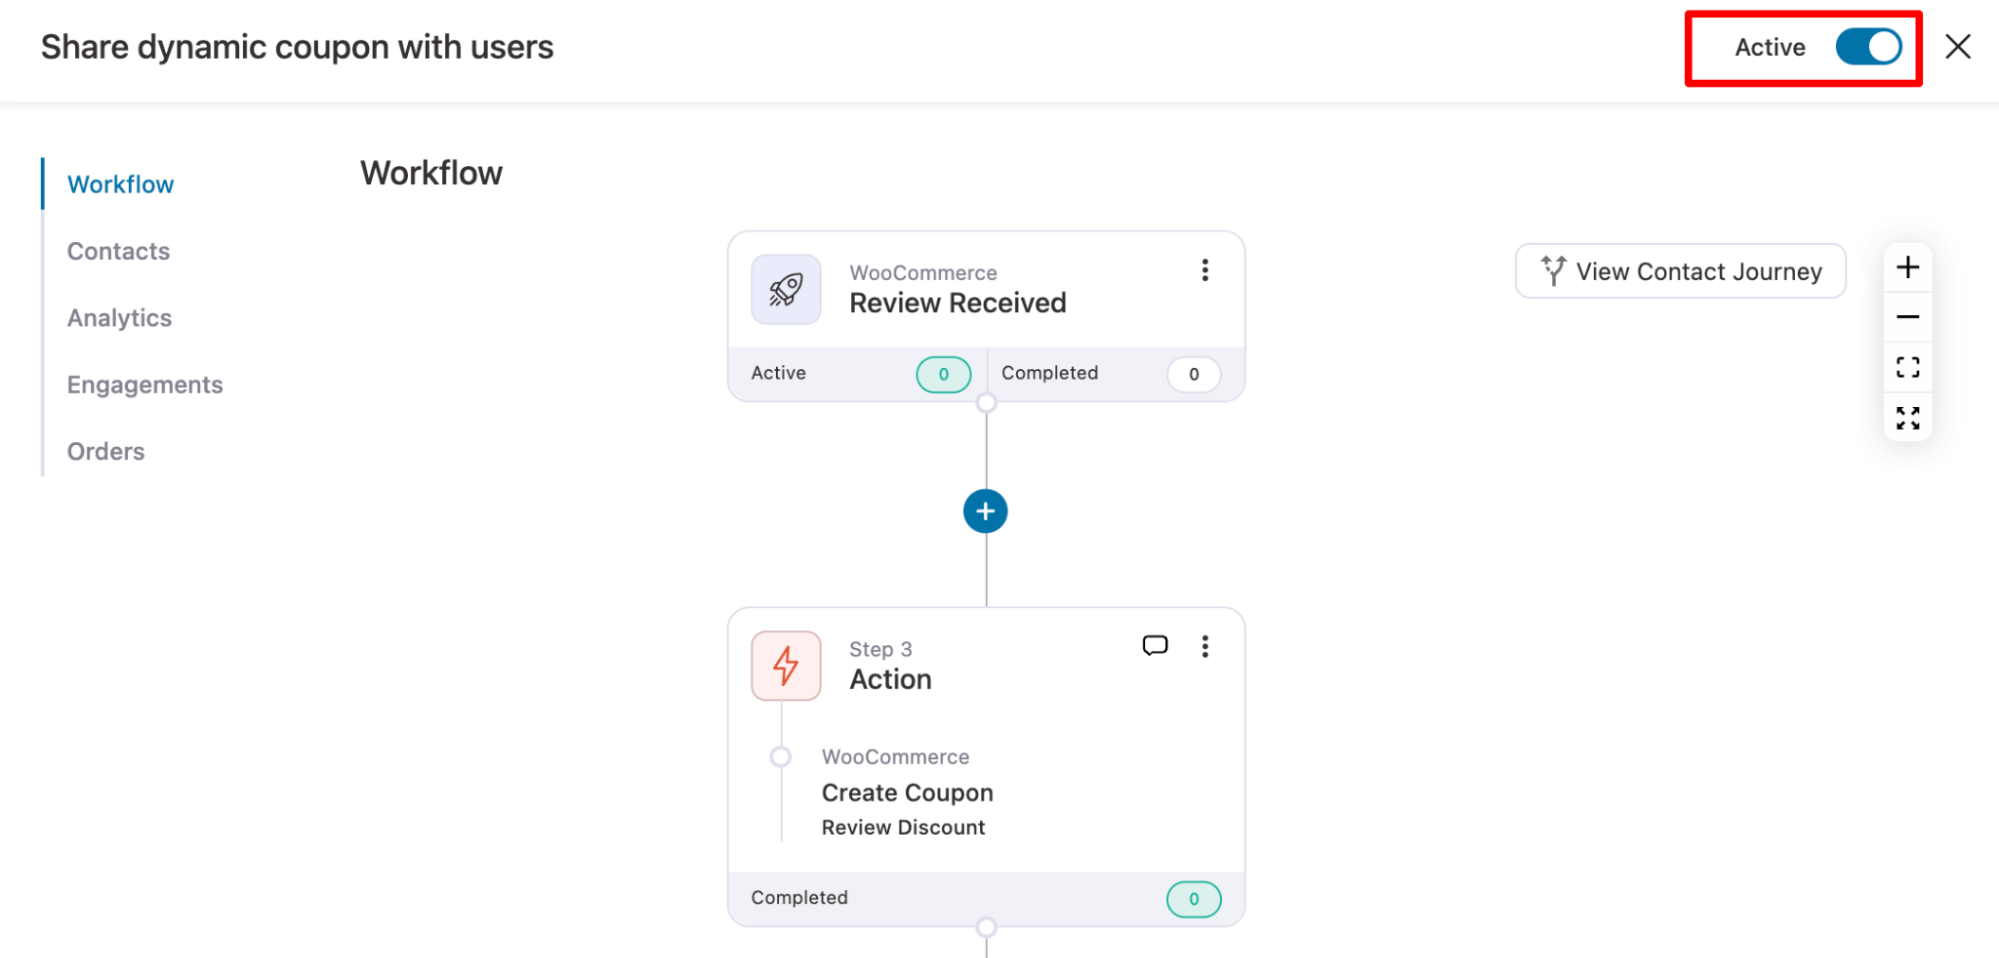
And that’s it. Now, the marketing automation will automatically share a dynamic discount coupon every time a new user leaves a review on your WooCommerce store.
More WooCommerce Coupon Strategies to Boost Sales
We’ve already covered some essential coupon strategies throughout this guide. Now let’s look at some additional advanced strategies that can help you further increase conversions and boost your average order value.
Here are six advanced strategies to move beyond basic discounts:
1. The “Come Back” Incentive (Cart Abandonment)
We’ve all been there: adding items to a cart and then getting distracted or second-guessing the total. A well-timed automated email with a limited-time discount can be the gentle push a customer needs to complete their purchase. It turns a “maybe” into a “yes” before they forget why they wanted the item in the first place.
2. The “Welcome Gift” (First-Time Buyer Discounts)
The first purchase is always the hardest to earn. To lower that barrier, offer a small incentive such as 10% off or free shipping to new visitors. This reduces the perceived risk of trying a new brand and helps convert casual browsers into first-time customers more easily.
3. The “Free Shipping” Threshold Strategy
Shipping costs are often the number one reason people abandon checkout. You can turn this into an advantage by setting a minimum order threshold, such as “Free shipping on orders over $75.” This encourages customers to add one more item to qualify, increasing your average order value without reducing product prices.
4. Zero-Friction Sales (Auto-Applied Coupons)
Nothing breaks the buying flow like a coupon code field that sends customers searching for a discount. Auto-applied coupons remove that friction entirely. By automatically applying discounts based on conditions, you create a seamless experience that keeps customers focused on completing their order.
5. The Power of Urgency (Seasonal and Flash Sales)
Human psychology responds strongly to urgency. Time-limited coupons during holidays or flash sales create a “now or never” effect. When customers know a deal will expire soon, they are far more likely to make a quick decision and complete their purchase instead of delaying it.
6. The “Birthday Bonus” (Birthday Coupons)
Birthday coupons are a simple but powerful way to make customers feel valued. By sending a personalized discount around a customer’s birthday, you create a positive emotional connection with your brand.
These coupons often have higher redemption rates because they feel personal rather than promotional. A small gift like a percentage discount or free shipping can encourage repeat purchases and strengthen long-term loyalty.
Common Questions About WooCommerce Coupons
Here are some of the commonly asked questions with answers:
To disable WooCommerce coupon codes, go to WooCommerce ⇒ Settings ⇒ General, and uncheck the option "Enable the use of coupon codes." Then, save the changes.
Yes, WooCommerce allows you to set a usage limit for coupons. You can define the total usage limit for all customers or set individual limits per user under the Usage Limits section when creating or editing a coupon.
In WooCommerce, you can apply coupons to specific product categories. While creating or editing a coupon, under the Usage Restrictions tab, use the Product Categories field to select the categories eligible for the coupon.
WooCommerce does not natively support BOGO offers, but you can create Buy One, Get One free (BOGO) coupons using the Advanced Coupons plugin. This plugin allows you to offer free products when customers purchase specific items.
WooCommerce coupons can apply to taxes or shipping based on your store settings. You can configure coupons to either apply before or after taxes. For shipping, free shipping can be offered with coupons, but discounts on shipping costs are not automatic unless specified.
Yes, you can create role-based coupons in WooCommerce using the Advanced Coupons plugin. This feature allows you to offer discounts to specific user roles, such as "VIP Customers" or "Wholesale," while excluding others.
Yes, you can schedule start and expiry dates for your WooCommerce coupon. In the Coupon Data section, simply set the Expiry Date to control when the coupon becomes active or expires, automating the promotion period.
To create a storewide discount, leave the Product field empty under the Usage Restrictions tab when setting up the coupon. This ensures the coupon applies to all products in your WooCommerce store, offering a blanket discount.
A WooCommerce coupon may not work due to several reasons such as expiry, usage limits being reached, cart conditions not being met, or product/category restrictions not matching the cart items. Always check the coupon settings and conditions first.
The most effective WooCommerce coupon strategies are the ones that match customer intent at different stages of the buying journey. Instead of random discounts, these strategies focus on behavior-driven offers that directly influence purchase decisions.
The best-performing strategies include:
- First-time buyer coupons → reduce hesitation and help new customers complete their first purchase
- Cart abandonment coupons → recover lost sales by re-engaging shoppers who left without buying
- Free shipping thresholds → increase average order value by encouraging higher cart spending
- BOGO (Buy One Get One) offers → drive higher volume purchases and improve perceived value
- Seasonal or limited-time coupons → create urgency and boost short-term conversions
- Loyalty or repeat purchase coupons → encourage customers to come back and buy again
These strategies work because they are targeted, time-sensitive, and aligned with specific customer motivations rather than generic discounts.
Ready to Offer WooCommerce Coupons?
You can boost your business by using WooCommerce coupons strategically, not just for discounts, but also for free shipping, which customers love.
Make the experience seamless with URL-based coupons, and share dynamic offers during special occasions to increase loyalty and drive more sales.
Our experts highly recommend pairing FunnelKit products with WooCommerce. This combination offers additional features to use coupons effectively.
Start leveraging the power of discount coupons to win your customers' loyalty and boost your brand.
Get FunnelKit today and grow your business with WooCommerce discounts!

Editorial Team
July 7, 2026Are shoppers adding products to their cart and leaving before they buy? According to Baymard Institute research on checkout usability, 18% of shoppers who abandon their cart do so because...
Editorial Team
July 7, 2026You’ve built your WooCommerce store, polished your product pages, and invested in marketing, but sales aren’t coming. Visitors browse, some add items to their cart, and most vanish before completing...
Editorial Team
July 3, 2026Discover how a canceled order doesn't have to mean a lost customer, and how the right WooCommerce canceled order email can turn it into a second chance. WooCommerce canceled order...


