
![How to Set Up and Customize WooCommerce New Account Emails [Plus Follow-Up]](https://funnelkit.com/wp-content/uploads/2025/02/New-Design-253.jpg)
A new account email is more than just a confirmation; it's the first touchpoint that sets the tone for user engagement.
WooCommerce sends generic, unpersonalized account emails by default.
It confirms the new account creation but fails to engage users, drive conversions, or reinforce your brand identity.
A well-structured new account email should do more than confirm access; it should welcome, guide, make you feel valued, and encourage action.
Let's check how to set and customize new account emails in WooCommerce and boost the store's engagement.
Table of Contents
- 1 Does WooCommerce Send New Account Emails?
- 2 How to Configure Default WooCommerce New Account Email?
- 3 Method A: How to Send a Personalized Custom WooCommerce New Account Email
- 4 Method B: How to Send Follow-Up to New Users to Convert Them
- 5 How to Boost Sales with New Account Email for Your WooCommerce Store (3 Use Cases)
- 6 5 Best Practices to Turn New Users into Engaged Customers
- 7 Wrapping Up
Does WooCommerce Send New Account Emails?
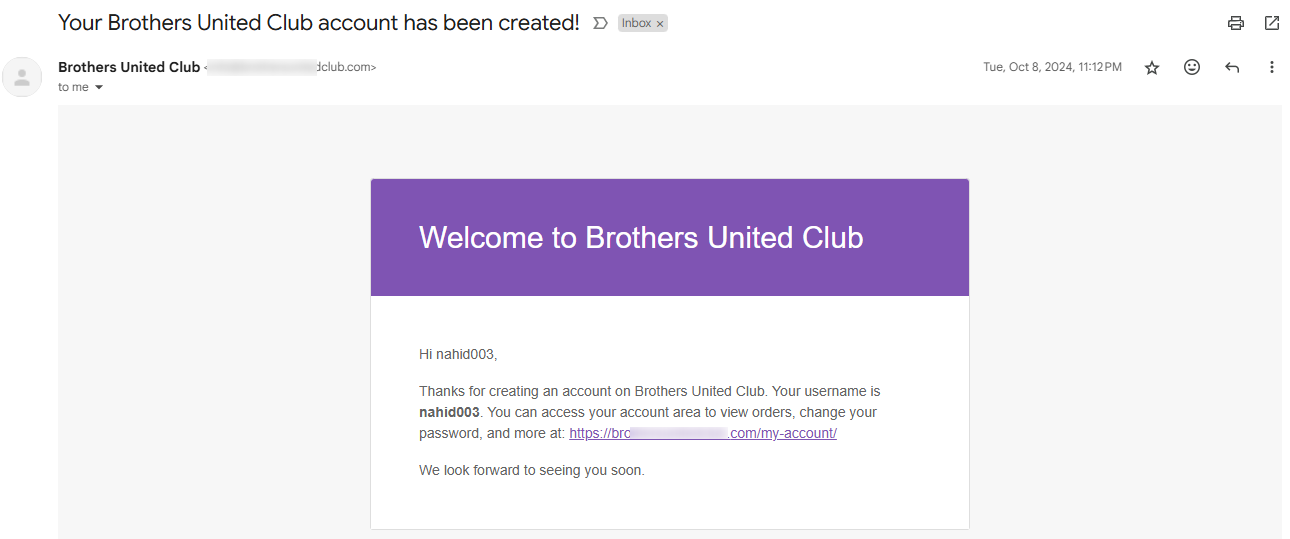
Yes, WooCommerce sends new account emails to its users after creating or registering for a new account.
New accounts can be created in several ways: manual sign-ups, admin-created accounts, or automatic account creation during checkout.
Whatever the way of signup may be, a new default account email includes
- Username
- Password reset link
- My account link
- And some basic information about the store
The next section will check how to configure the new account email.
How to Configure Default WooCommerce New Account Email?
A simple walkthrough for configuring and sending new account emails via the default WooCommerce settings.
Let's start:
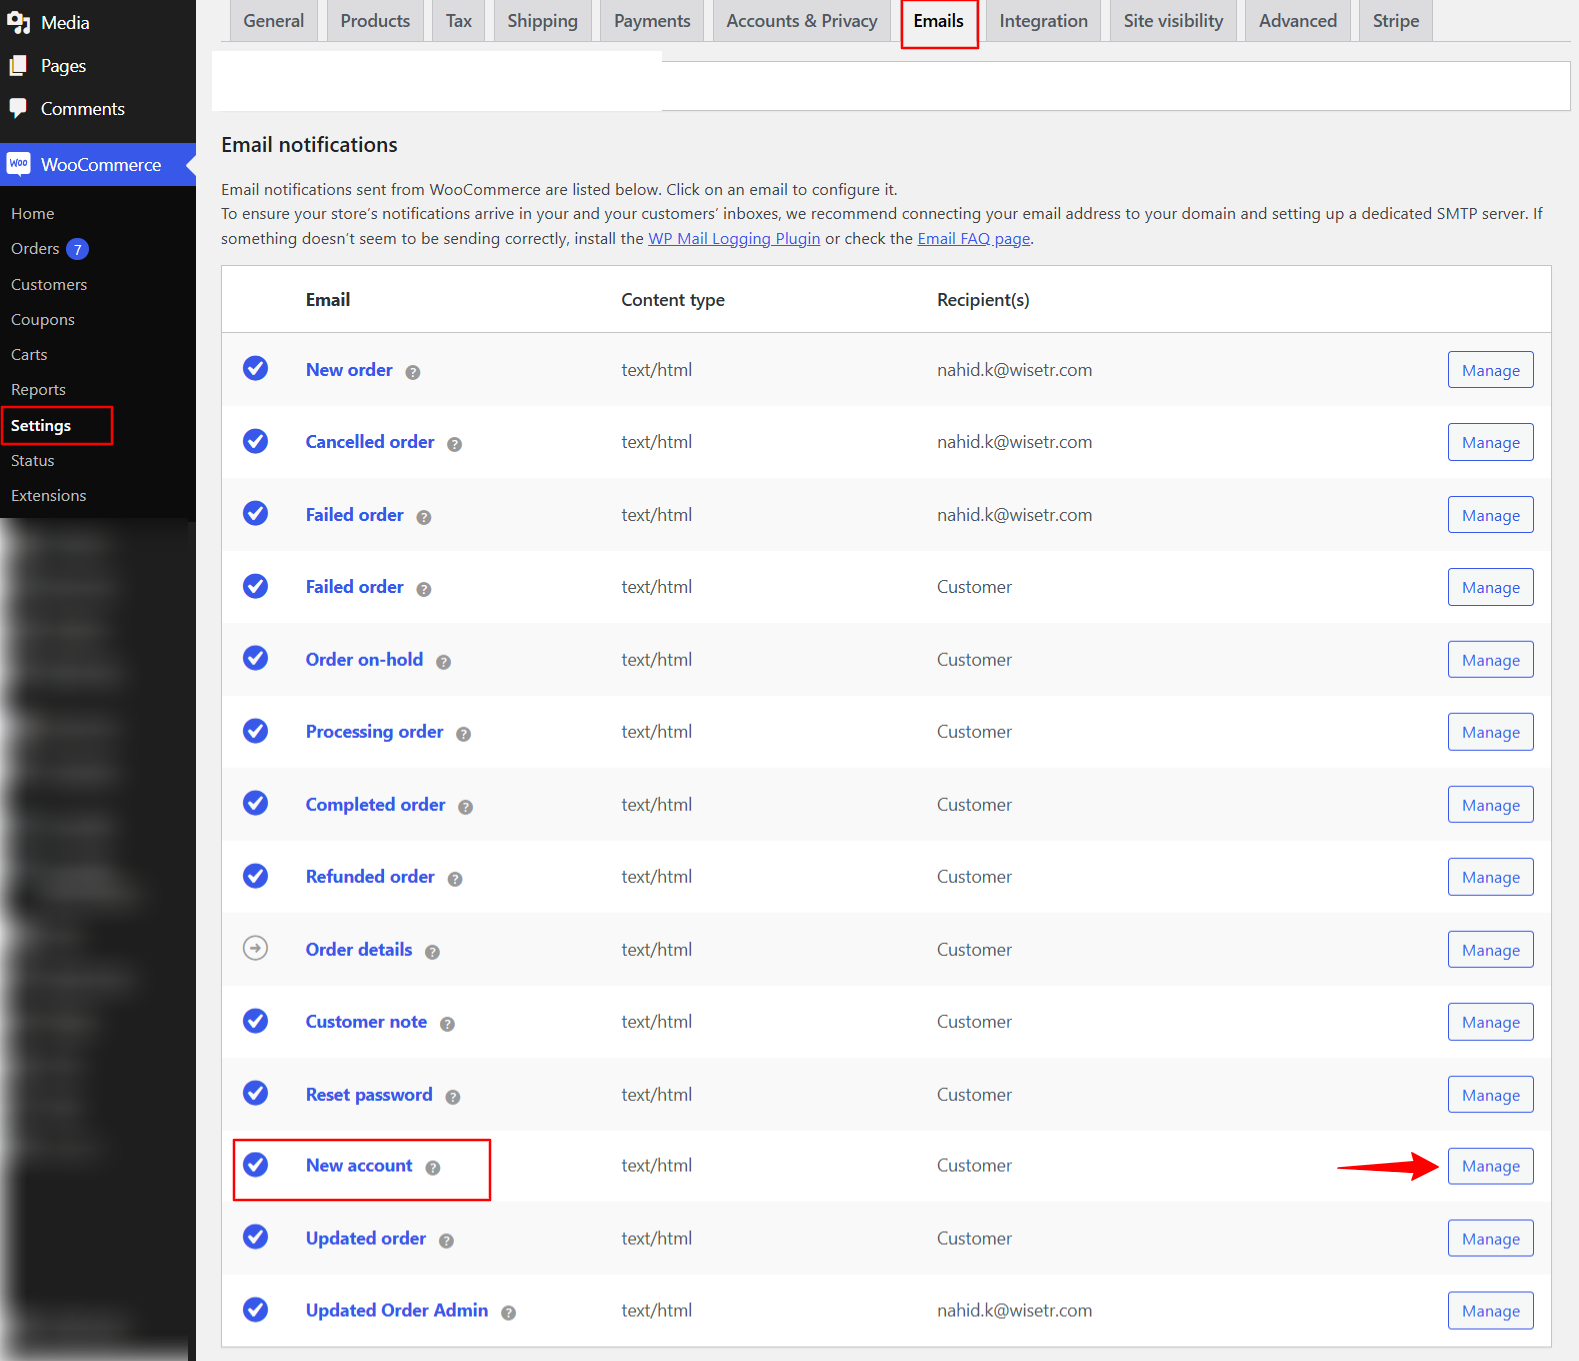
Step 1: Find the email settings in WooCommerce
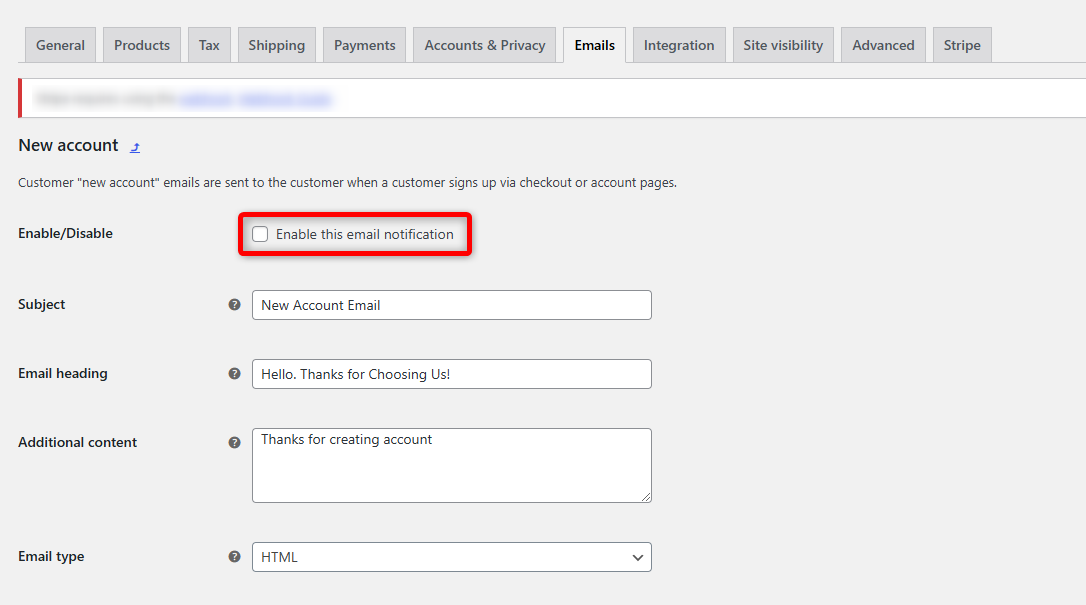
First, navigate to WooCommerce>Settings> Emails.
After that, scroll down to find the new account option. On the right side, click on the manage button.
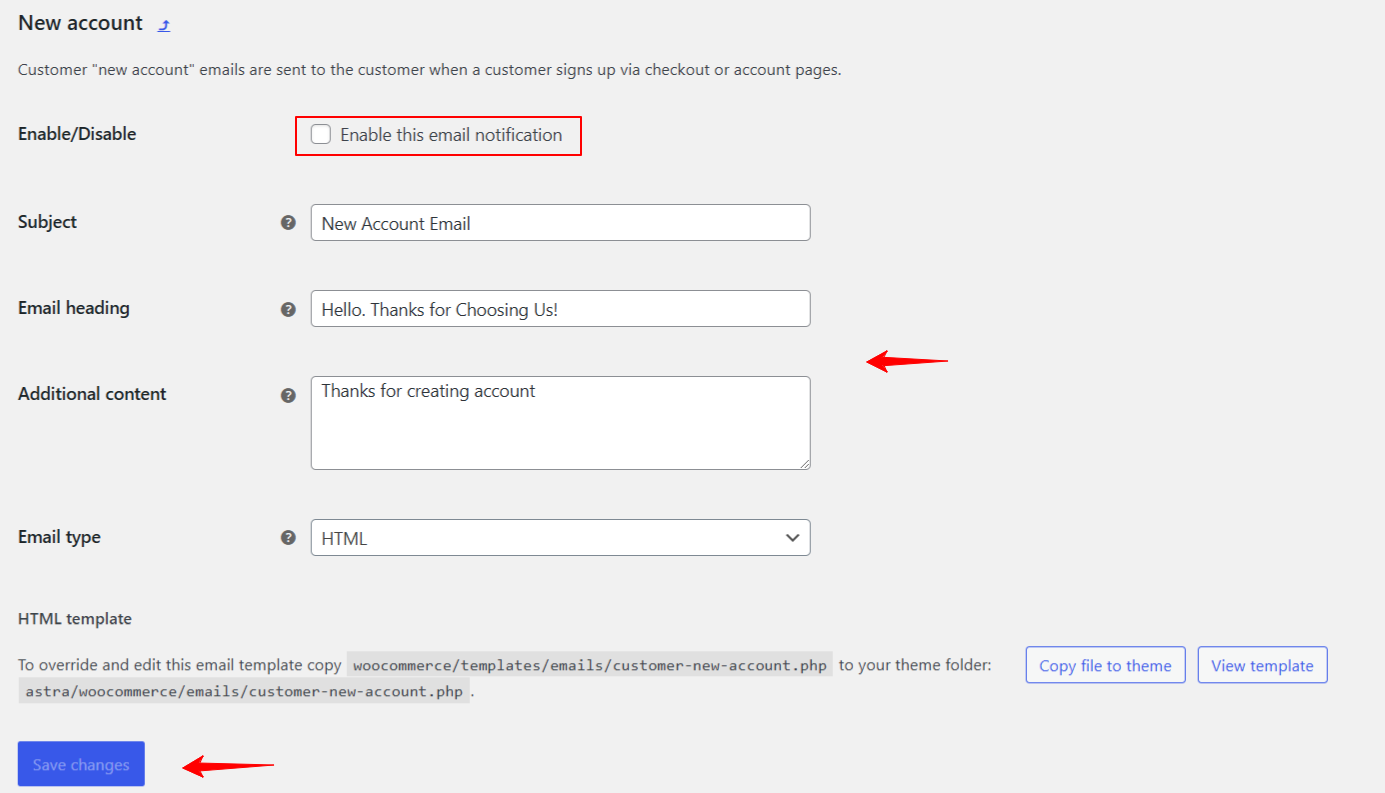
Step 2: Configure the email settings
Next, on the new account page, enable the email notification.
Then, customize the email content:
- Provide a subject line for the new account email
- Set a nice email heading
- Craft your additional email content
- Select email type between text, HTML, and multi-part
Make sure to hit Save Changes.
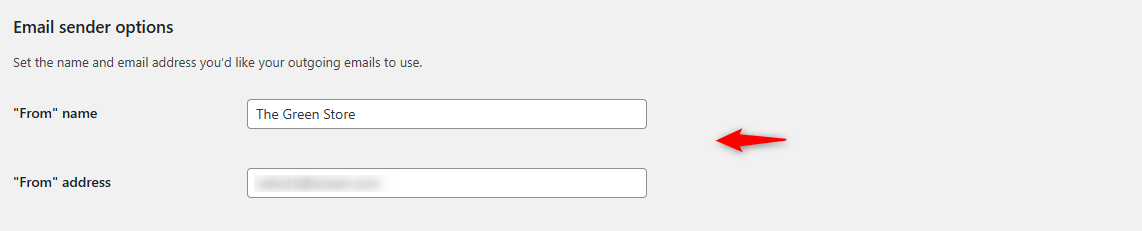
Step 3: Customize the sender options
Go back to the email settings page and scroll down to this section. Now, set these options:
- "From" name: Set the name you want to show as the sender.
- "From" address: The email address from which emails will be sent.
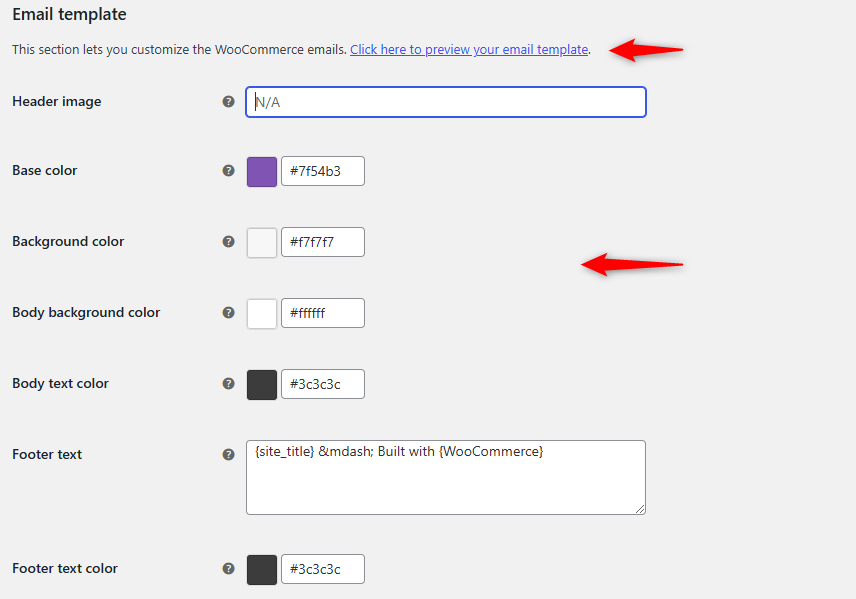
Step 4: Customize the email template
Here, you can configure some basic options for the email template.
You can add a header image and adjust the basic colors, background color, body background color, body text color, footer text color, and footer text color. You can also preview the template to see how it looks.
Once you're done, save your final settings.
That's all with the basic configuration. Users will receive an email with this format whenever a new account is generated.
Reasons that WooCommerce new account email needs customizations
The default email template has some limitations. Here are some points that we have figured out about the default email template of WooCommerce:
- Design elements to reflect the store's identity.
- Text-heavy structure without clear formatting or visual appeal.
- Misses a strong CTA like "Start Shopping" or "Explore Now."
- Feels generic, with no personal touches beyond the username.
- It doesn't include links to FAQs, support, or welcome incentives like discounts.
As a store owner, you must not want your users to get a bad impression of your store, right?
The default email template lacks the personal touch, which is essential.
Method A: How to Send a Personalized Custom WooCommerce New Account Email
To start the process, our experts recommend using FunnelKit Automations. This marketing solution sends personalized transactional emails to your new users.
Plus, it is designed to streamline your WooCommerce emails. It offers a drag-and-drop email builder, dynamic content personalization, and real-time previews to help you craft high-converting emails effortlessly.
Also, with built-in analytics and A/B testing, you can optimize performance and maximize sales.
![How to Set Up and Customize WooCommerce New Account Emails [Plus Follow-Up]](https://img.youtube.com/vi/JulODxL4Y2o/maxresdefault.jpg)
Before starting, do make sure to install and activate the FunnelKit Automations (both free and pro) on your WordPress site.
Step 1: Deactivate the default new account email
First, turn off the new account email in WooCommerce settings.
Navigate to the WooCommerce> Settings> Emails and New account email. Then, turn off the option.
From now on, WooCommerce will no longer send users new account emails. Once you're done, hit save.
Step 2: Navigate to the transactional emails
Go to the email tab under FunnelKit Automations. There, you will find a list of all the WooCommerce transactional emails.
- Processing order
- Completed order
- Order on hold
- Refunded order
- Order details
- Customer note added
- Failed order
- New account
- Reset password
- New order
- Failed order
- Cancelled order
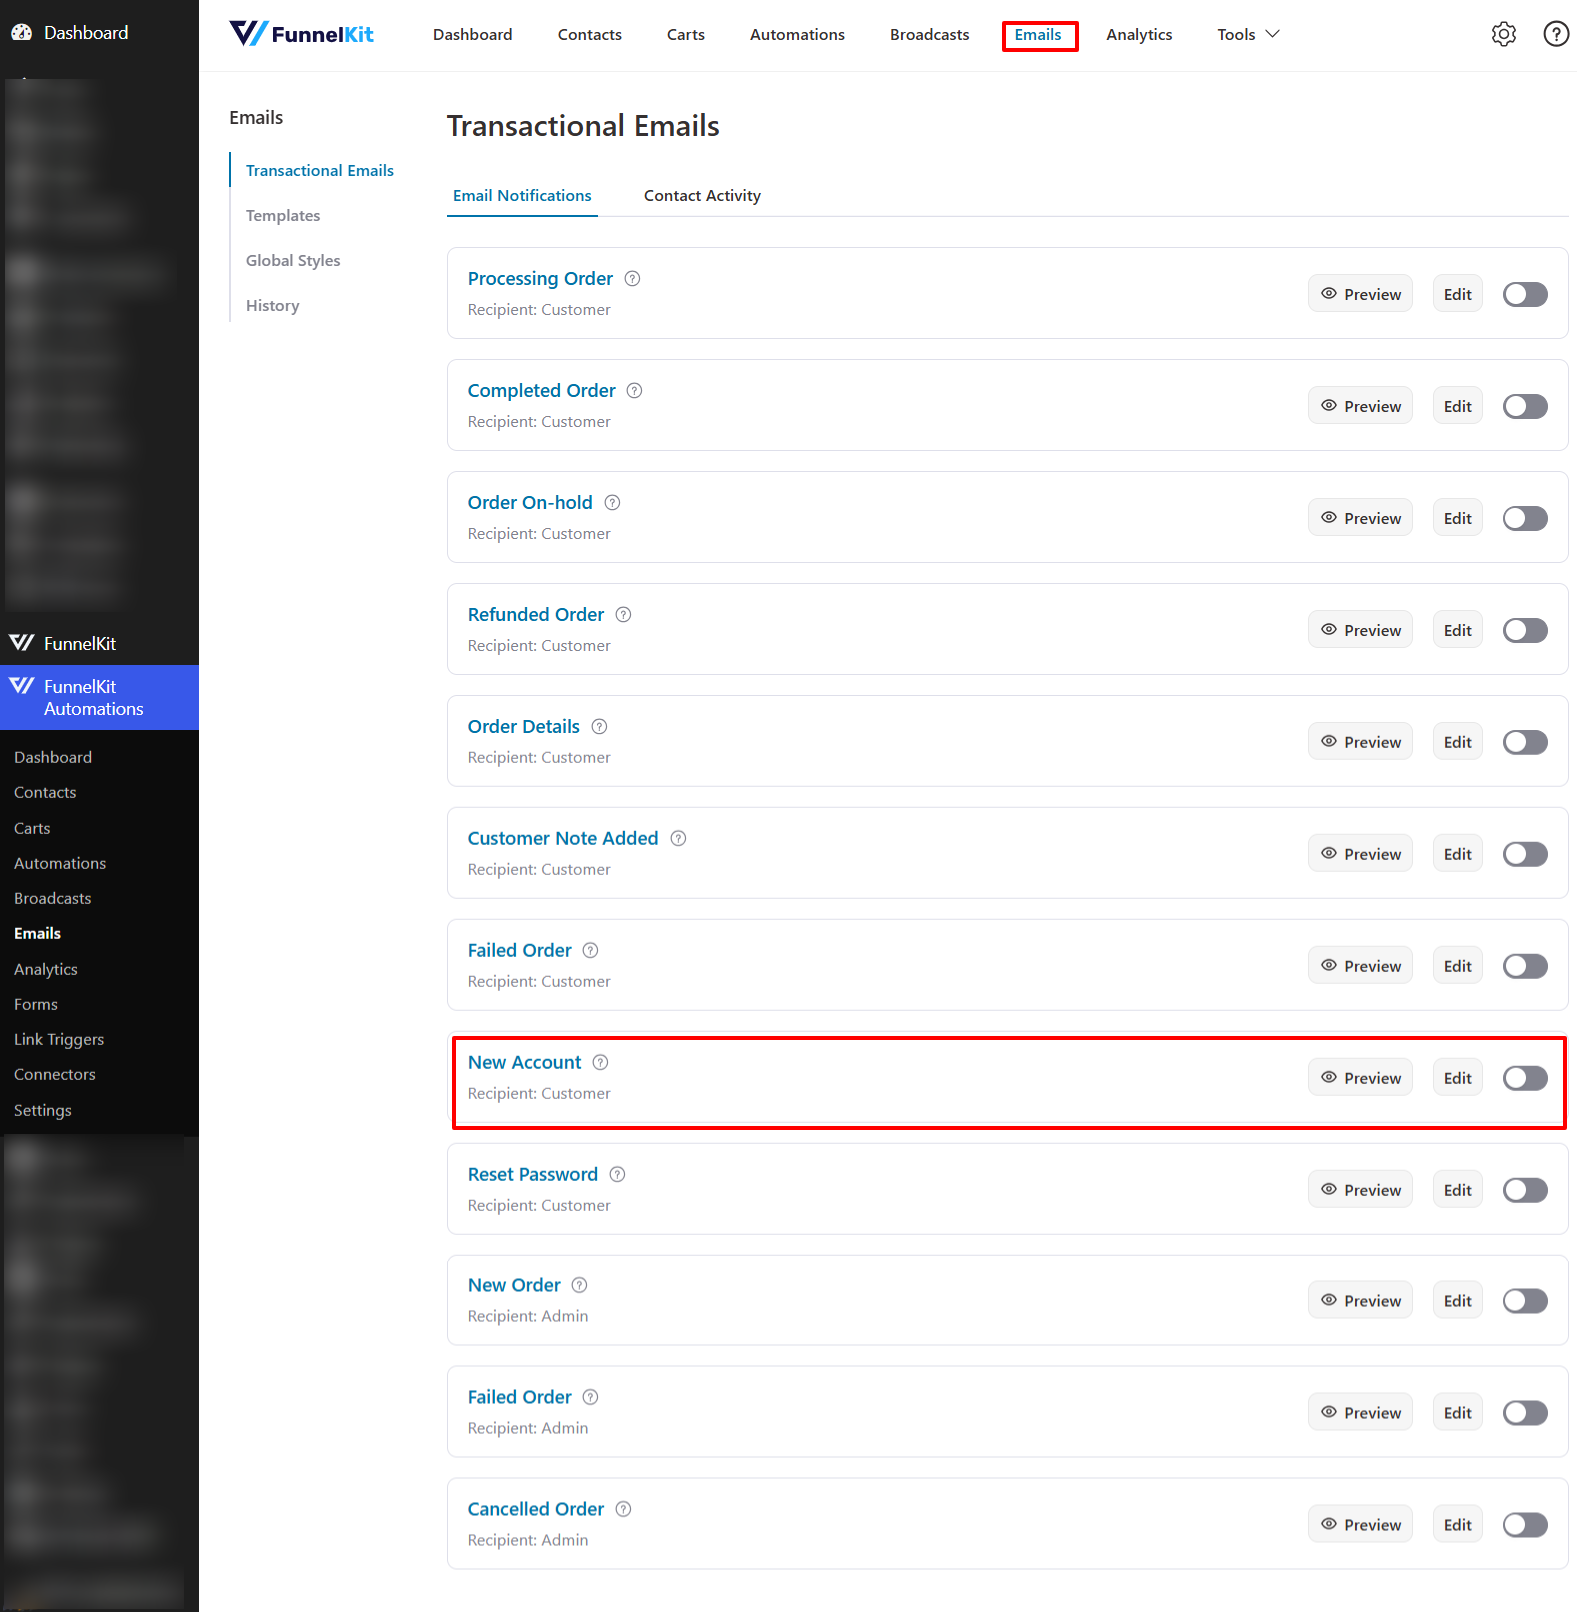
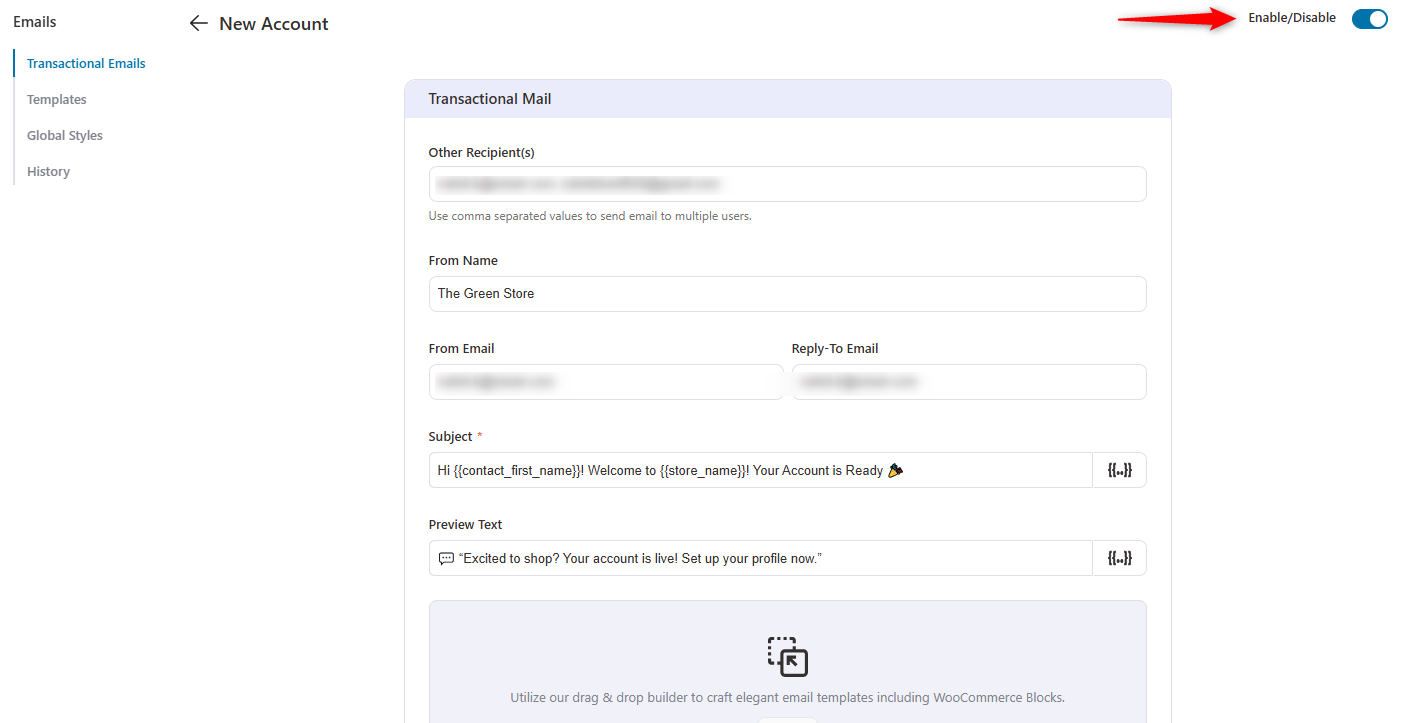
Find the "New Account" and click on the edit button.
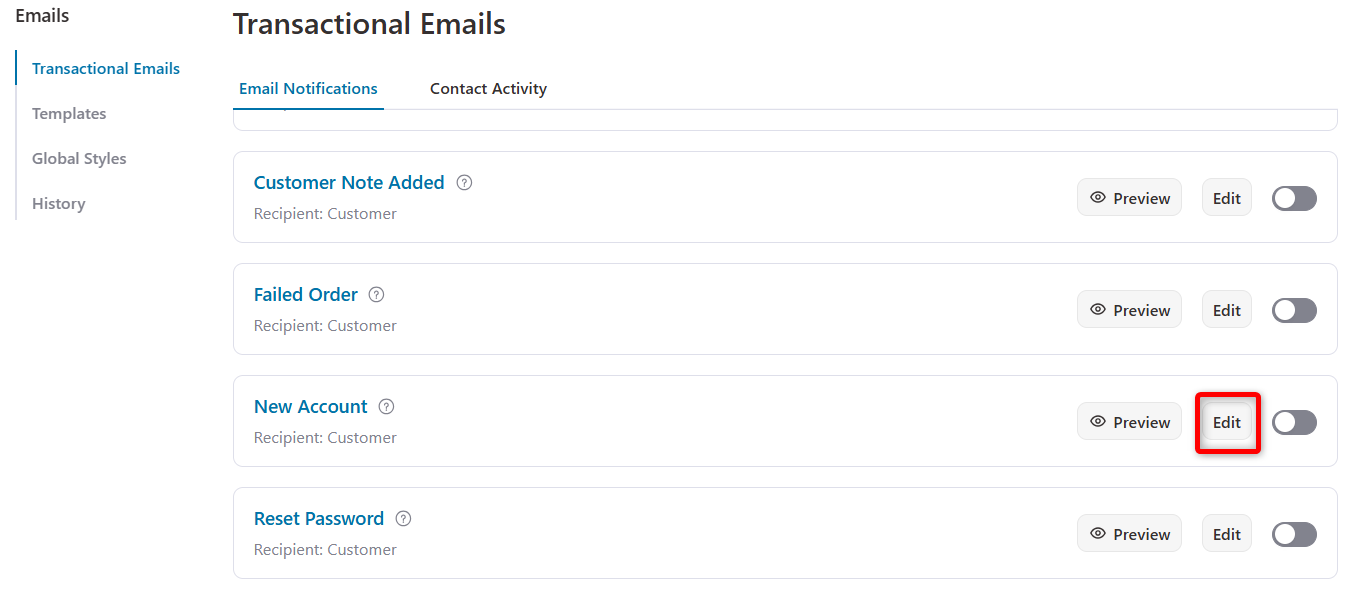
Step 3: Configure the new account email settings
After you click the edit button, you'll get to the configuration page of the email.
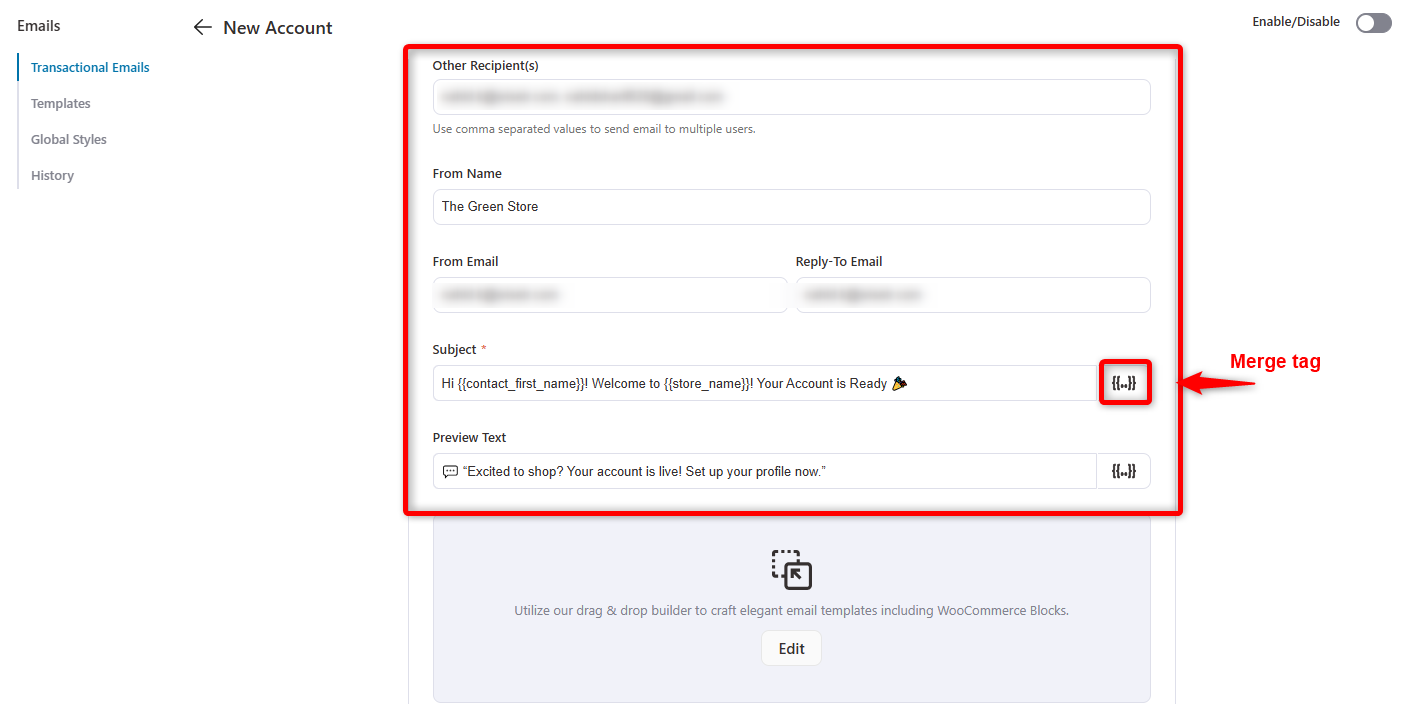
Here, you need to add the recipient email addresses separated by a comma, from name and from email and email reply to.
You can also dynamically personalize your email subject line, preview text, and body using merge tags to create a more engaging customer experience.
- Click the "{{..}}" icon in the email editor.
- Search for your desired tag (e.g., customer name, order details, coupon code).
- Please copy and paste it into your email instantly.
Here, we've used the merge tags below:
- {{store_name}} to mention the store in the email subject line
- {{contact_first_name}} to mention the customer's first name in the subject line
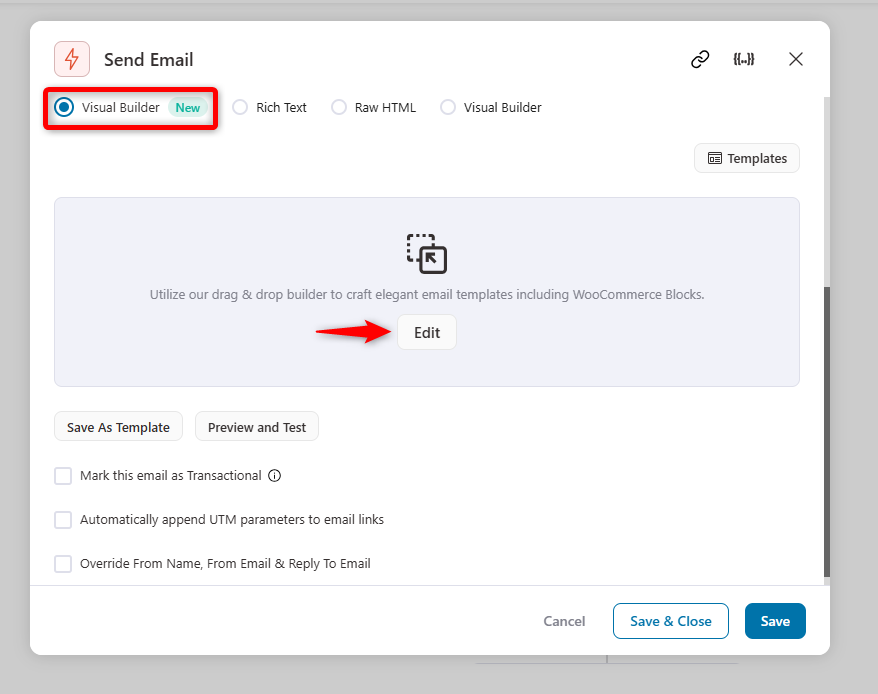
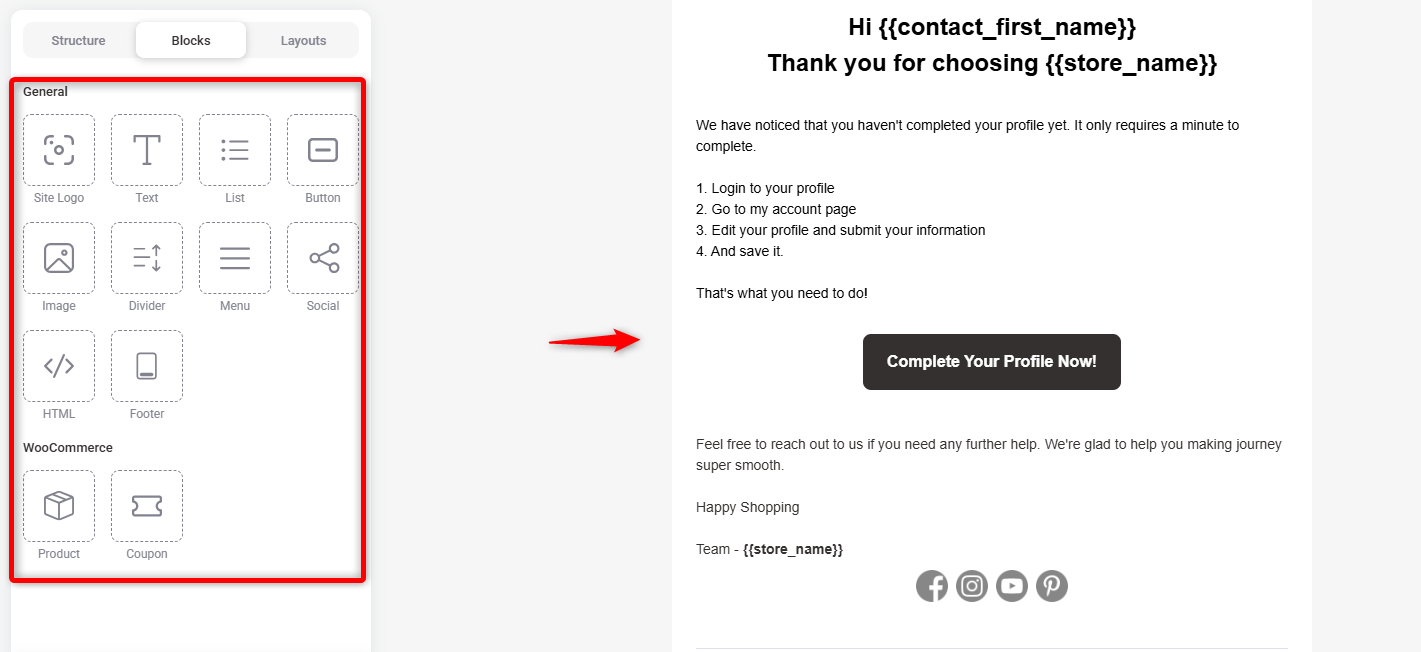
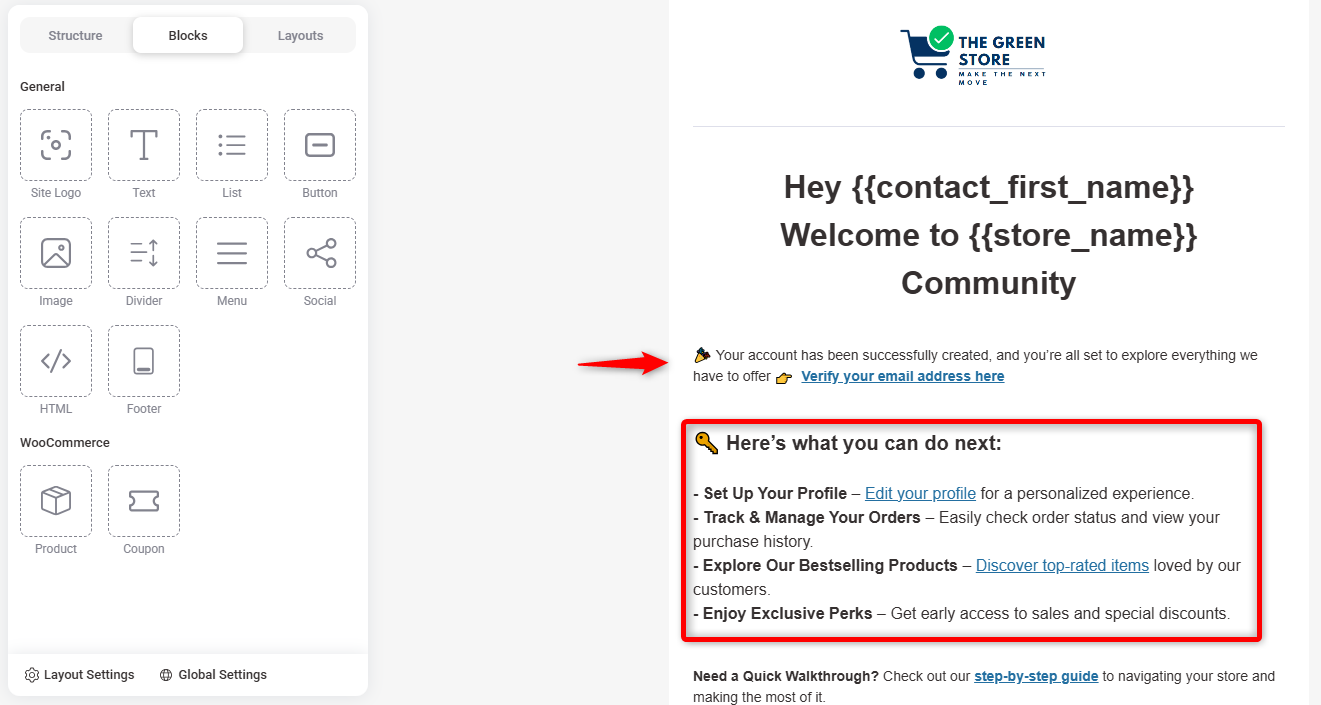
Step 4: Start designing the new account email template with the visual builder
Click the edit button to start customizing the new account email.
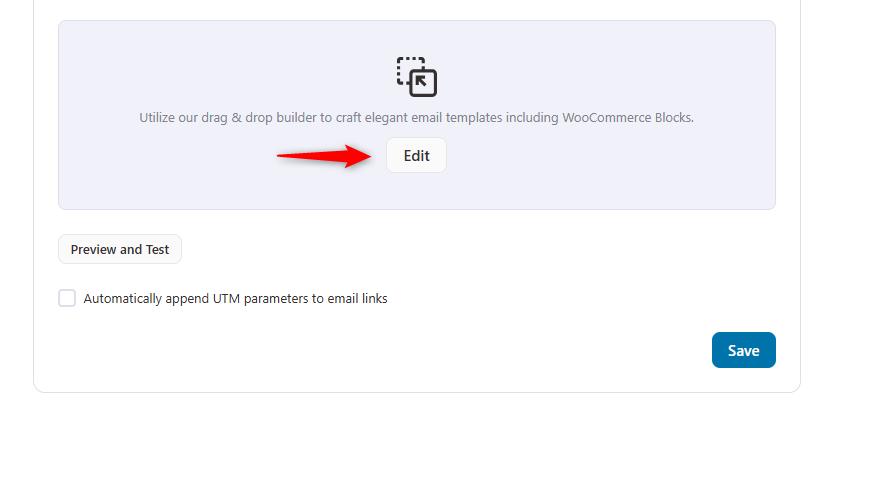
After that, you will be redirected to the email template editing panel.
On the left side, you'll find the template widgets.
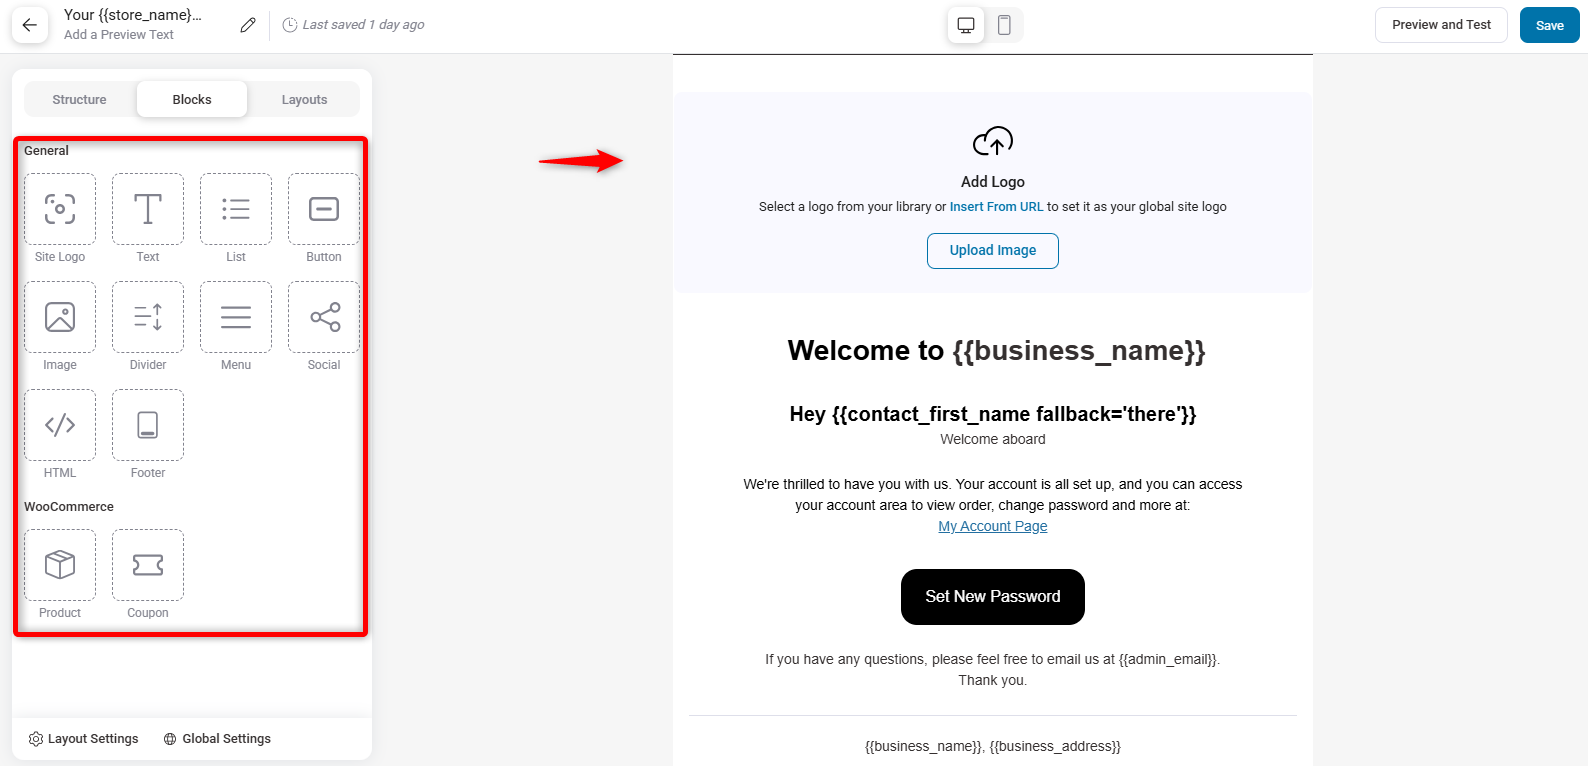
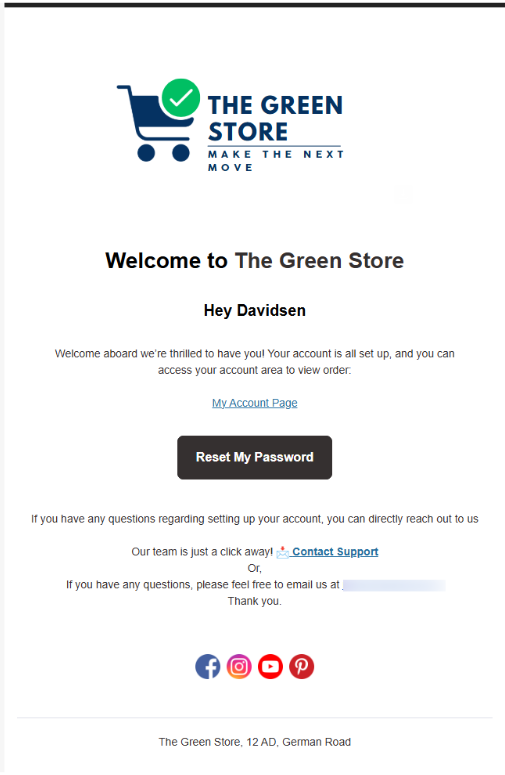
Now, take your time to customize the template to give it a proper look.
Change the logo, and you can update the current template depending on your needs and requirements.
Add the text widget and use it in different places, like the heading and email body. Also, you can use the merge tag to personalize your new account users.
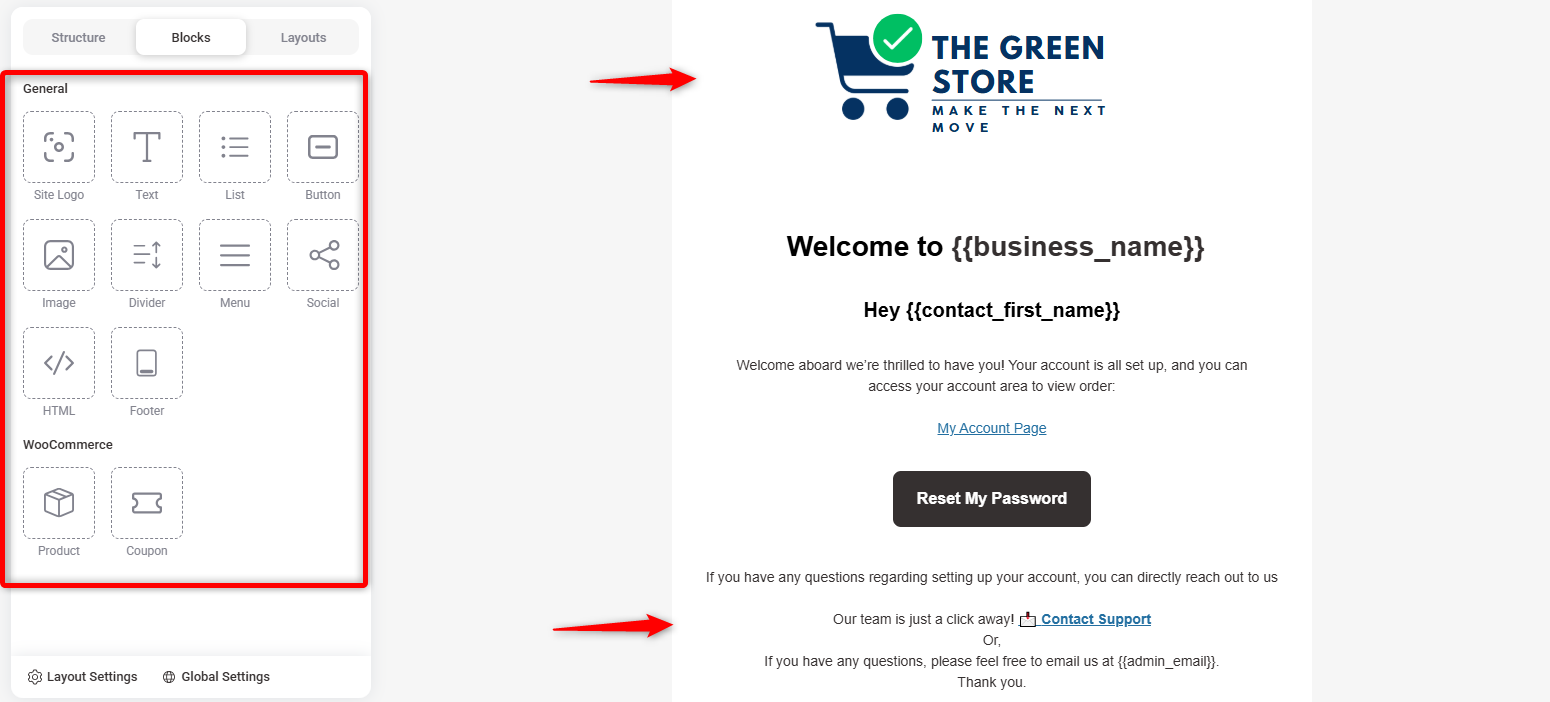
Next, you can add a social icon to the template so users can follow your brand or store's social channels.

Step 5: Preview and test
Once you finish the design, you must preview and test the email before sending it.
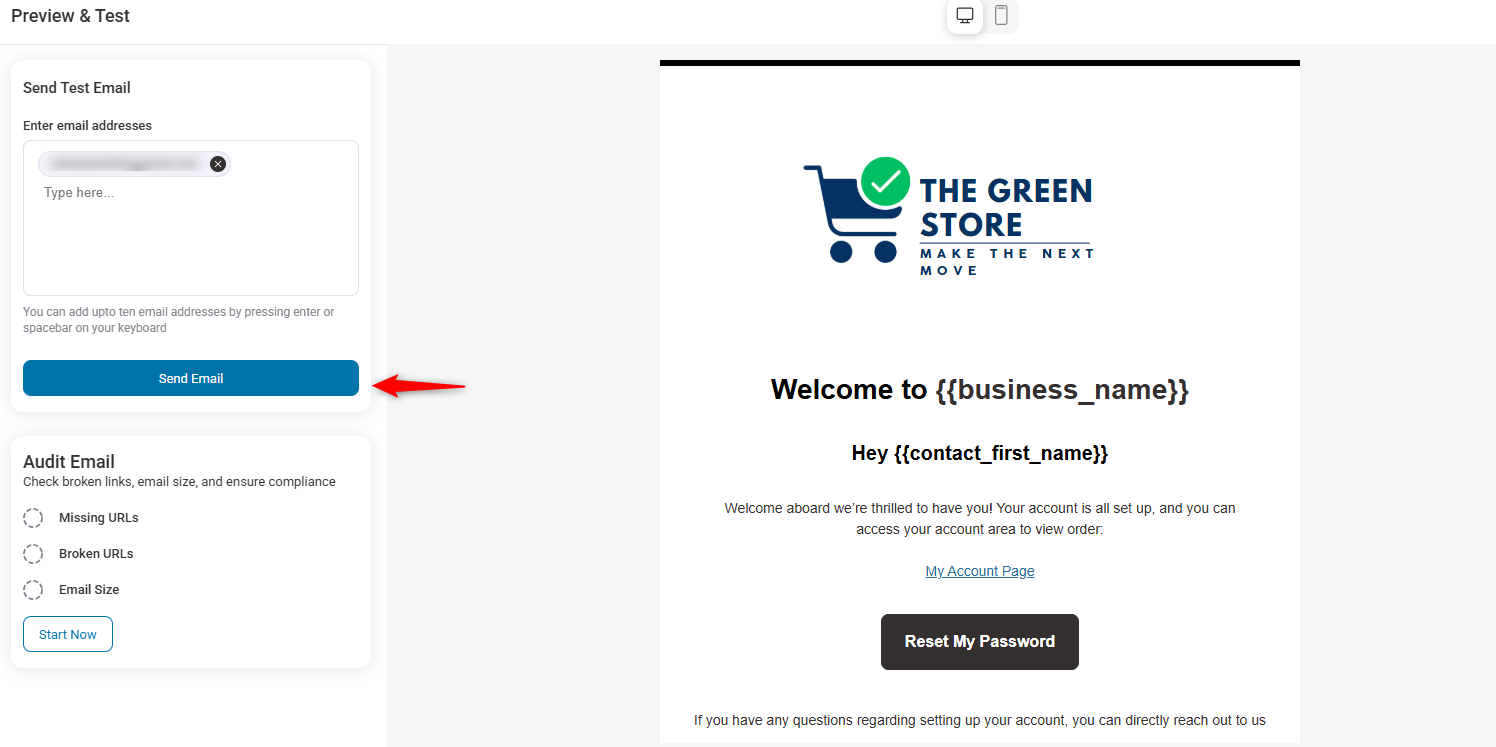
After checking the template, now send a test email. As you can see, the email is sent successfully.
Step 6: Enable the email
Go back to the configuration page and enable the new account email here.
And that's how you can send WooCommerce new account emails using the transactional email feature of FunnelKit.
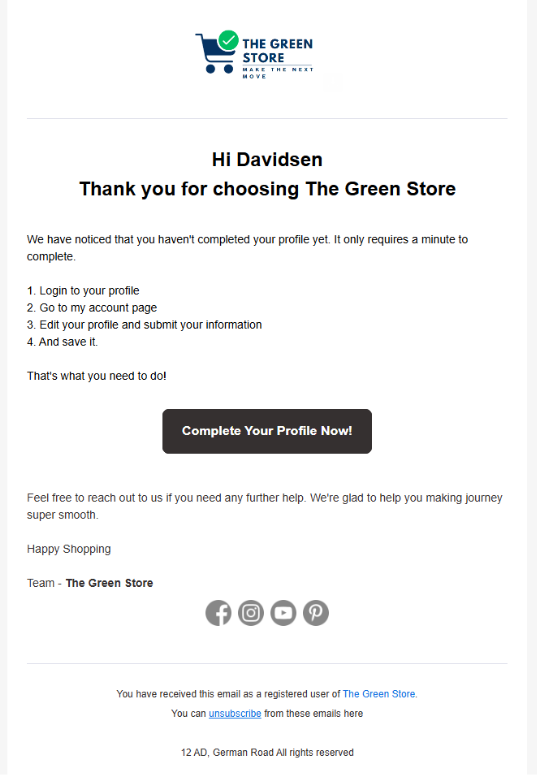
You can also add a follow-up email inside the workflow if any users don't complete their profiles or purchase anything after creating them.
Method B: How to Send Follow-Up to New Users to Convert Them
By default, WooCommerce does not provide built-in options for sending follow-up emails after a new account is created.
This means potential customers may sign up but never take further action. You need an automated system that sends personalized follow-ups at the right time to keep them engaged and encourage conversions.
With FunnelKit Automations, you can set up targeted follow-up emails that nurture new users, remind them to complete their profile, showcase product recommendations, and offer incentives to make their first purchase.
It ensures that every new sign-up is guided toward becoming a loyal customer.
Let's see how to do this:
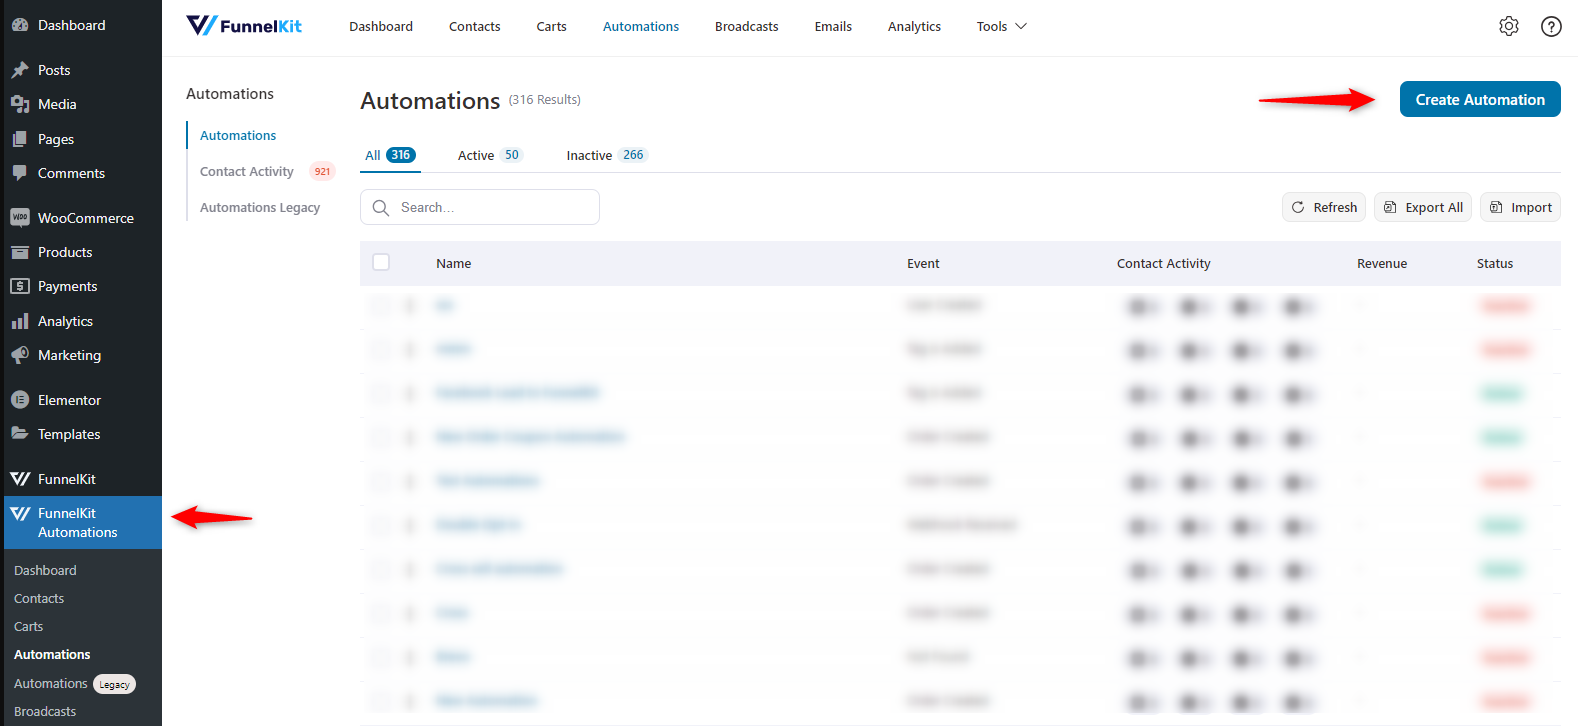
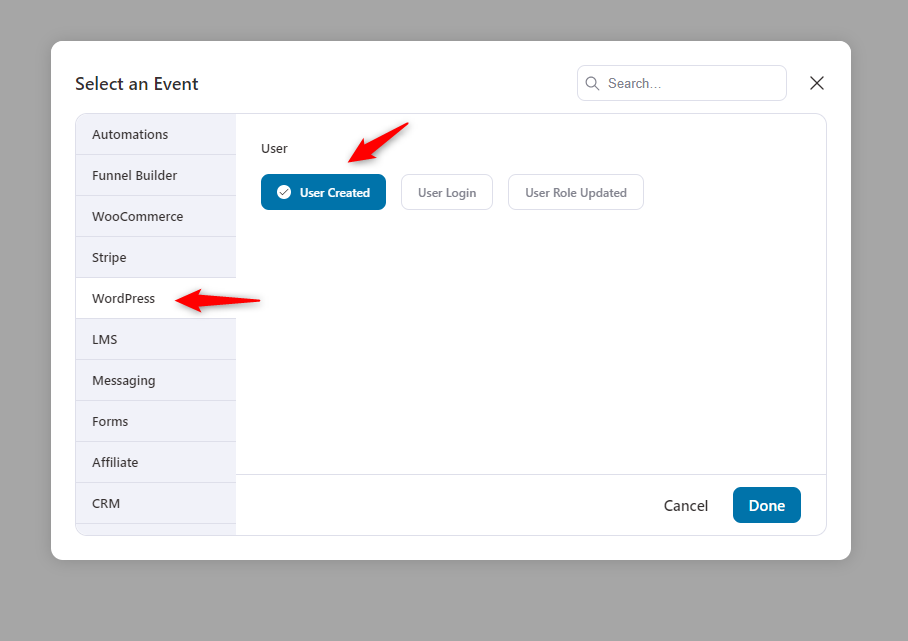
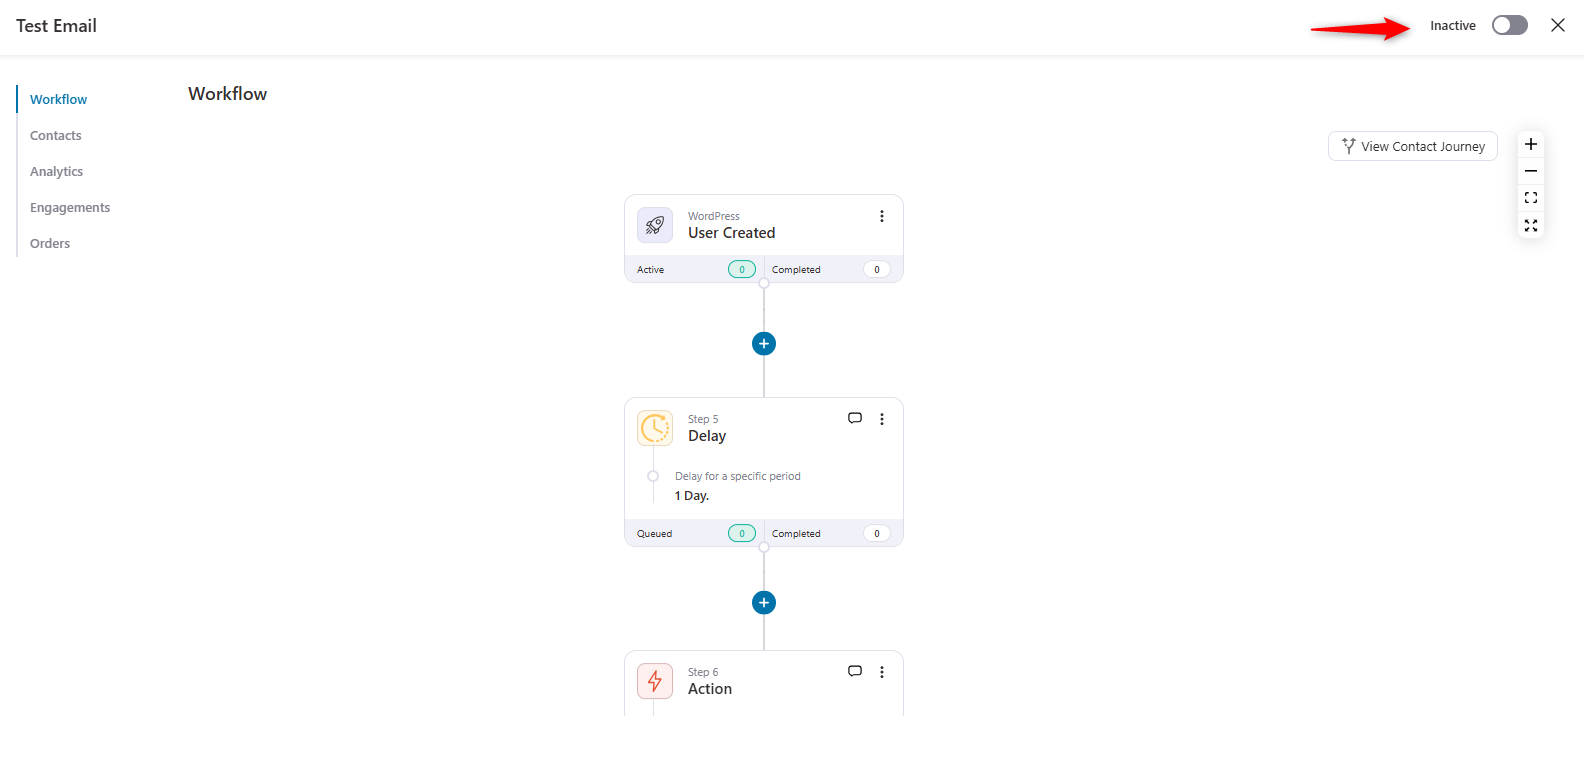
Step 1: Create an automation
First, you need to create an automation. To do so, navigate to the FunnelKit Automation and click the "Create Automation" button.
Step 2: Choose a recipe for automation
Next, you need to choose a recipe for the automation. Or, you can start from scratch.
Then, provide a name for the automation.
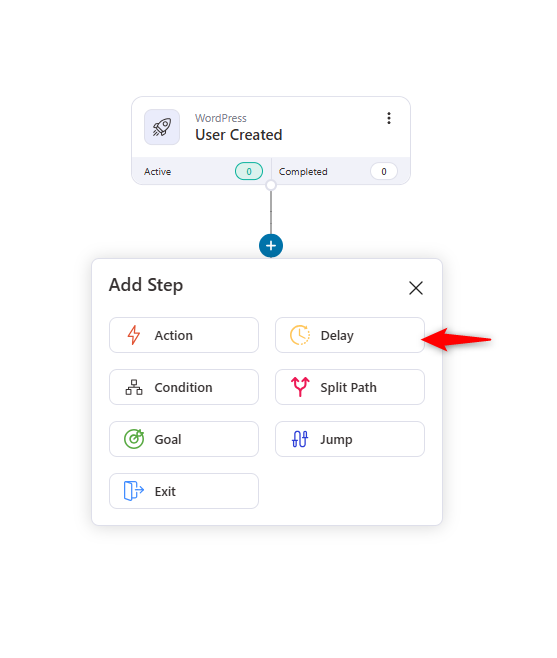
Step 3: Select an event
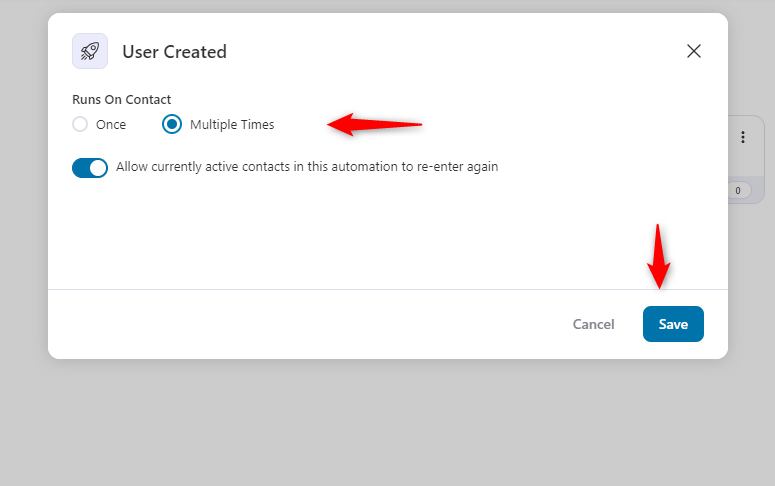
Under the WordPress tab, select the "User Created" event and hit Done.
Then, determine how it will run on contacts and hit save.
Step 4: Add a delay
When new users create an account in your store, they receive a confirmation email—but that's just the beginning.
Many users sign up but don't take immediate action. A well-timed follow-up email helps keep them engaged, encourages them to explore your store, and ultimately drives conversions.
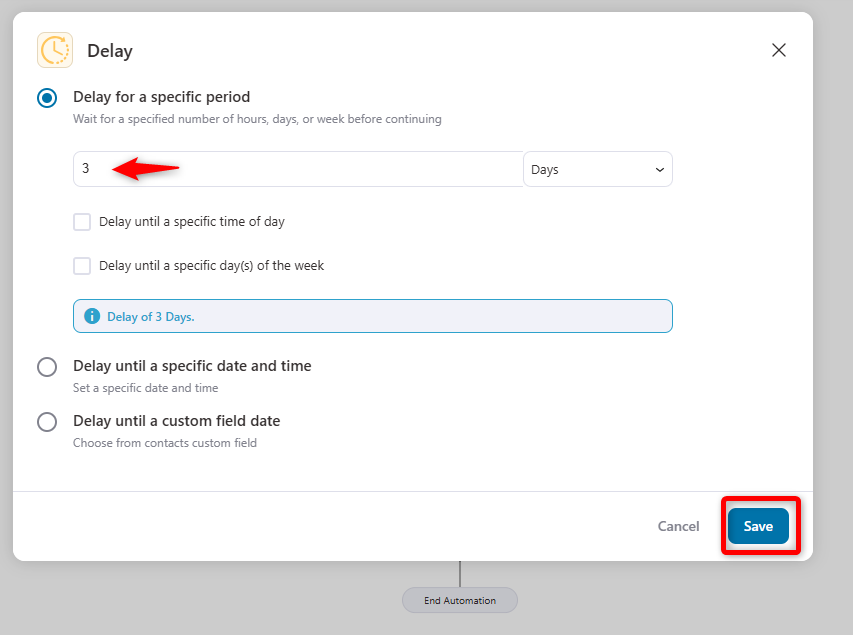
Let's see how to add a delay for a follow-up email. To do so, expand the plus icon and click on the delay.
Here, we're going to add a 3-day delay. This means that after sending the welcome email, the automation will wait 3 days and send a follow-up email.
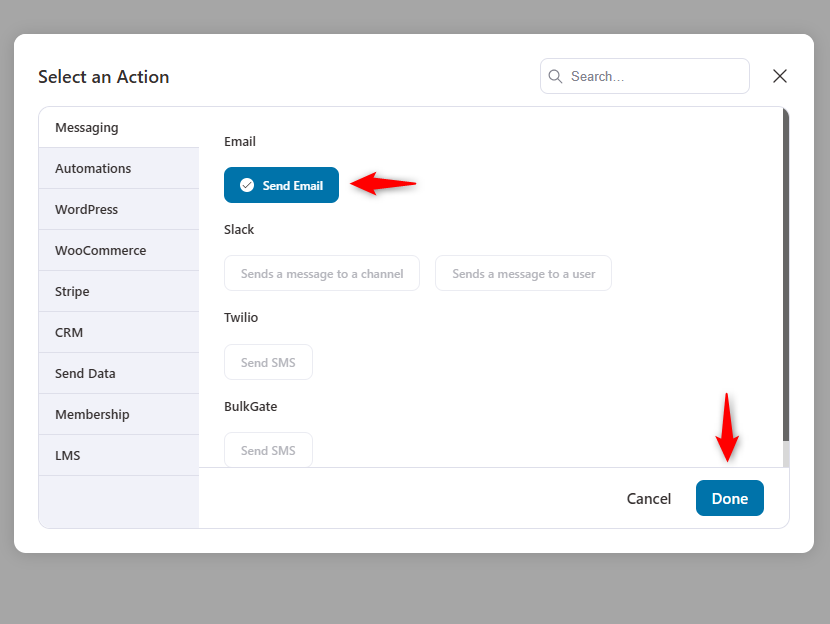
Step 5: Create a follow-up email
Similarly, create a follow-up email from here. To do so, select "Send Email" under the messaging tab.
And hit on the "Done" button.
Customize the subject and preview text following the same process shown above.
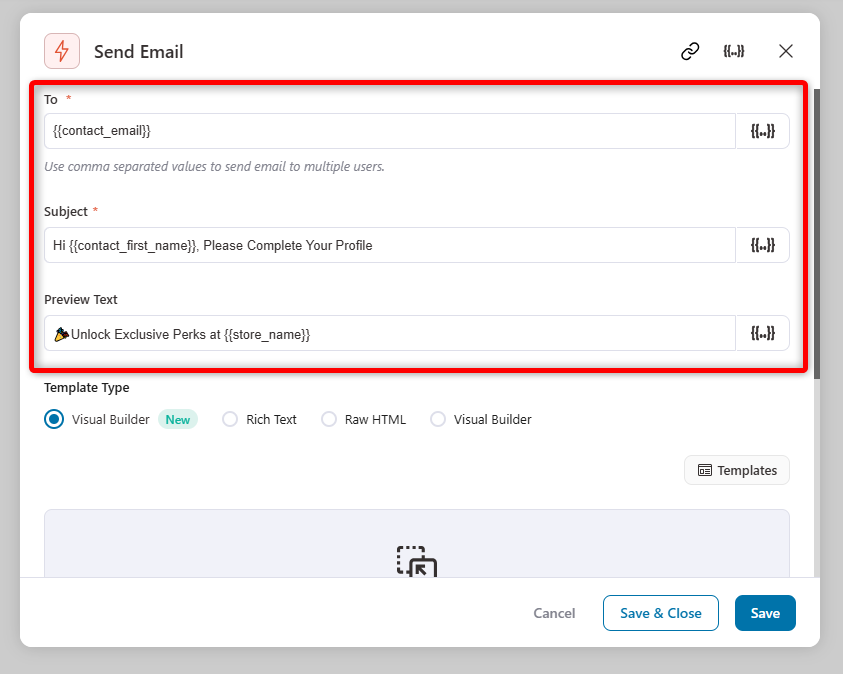
Then, craft a simple follow-up email. This time, we used the rich-text email type to craft the email. Once it's done, hit the save button.
We'll use the visual builder feature to customize the email template.
Complete editing your template, such as what a user needs to follow to complete the article. We have also added a social icon button to let users follow the brand.
🔹 Recommended Read: Learn about the six most exceptional follow-up email examples that you can send to your users.
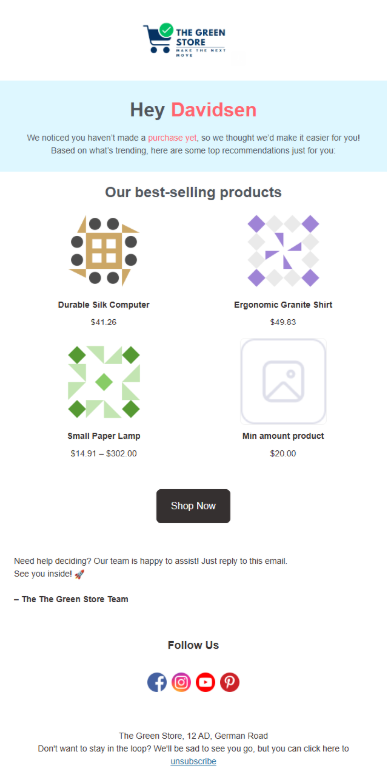
Step 6: Send another follow-up email with product recommendations
Let's send a follow-up email with product recommendations. For instance, you can suggest the best-selling products in your store so users can get a sneak peek of them.
First, choose the template.

Choose the best-selling product option in the settings.
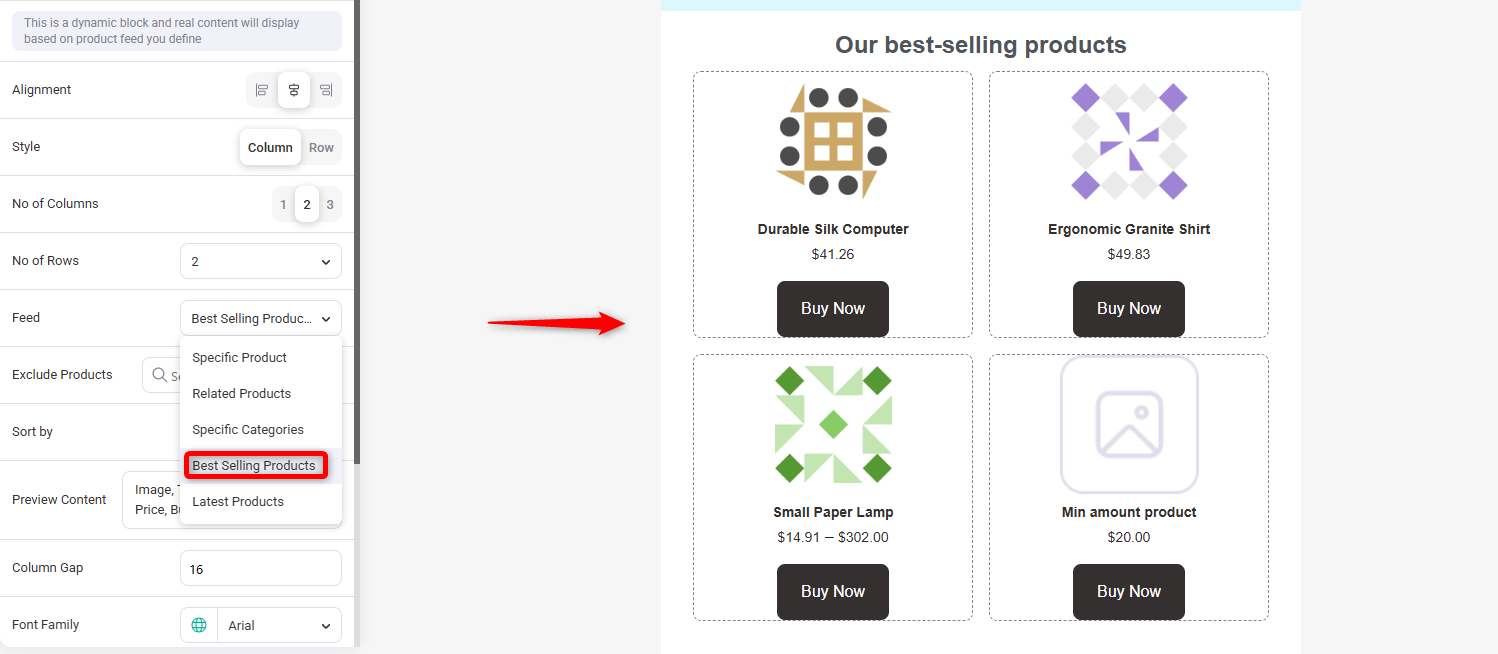
🔹 Recommended Read: Read our detailed guide on product recommendations and learn how to boost your sales with personalized suggestions.
Step 7: Enable and test the automation
Once you're done with the editing, please enable it.
Now it's time to see if it's working or not.
So when a new user registers, FunnelKit Automations will send the follow-up emails just after the WooCommerce new account confirmation email.
Here's the preview of the second follow-up email.
So that's all! That's how you can customize and send your users a new WooCommerce account email and a follow-up email using FunnelKit Automations.
How to Boost Sales with New Account Email for Your WooCommerce Store (3 Use Cases)
Let's now see how you can make your new account email more effective and conversion-driven. We'll share three use cases of how you can tweak your new account email for maximum outcomes.
Let's begin:
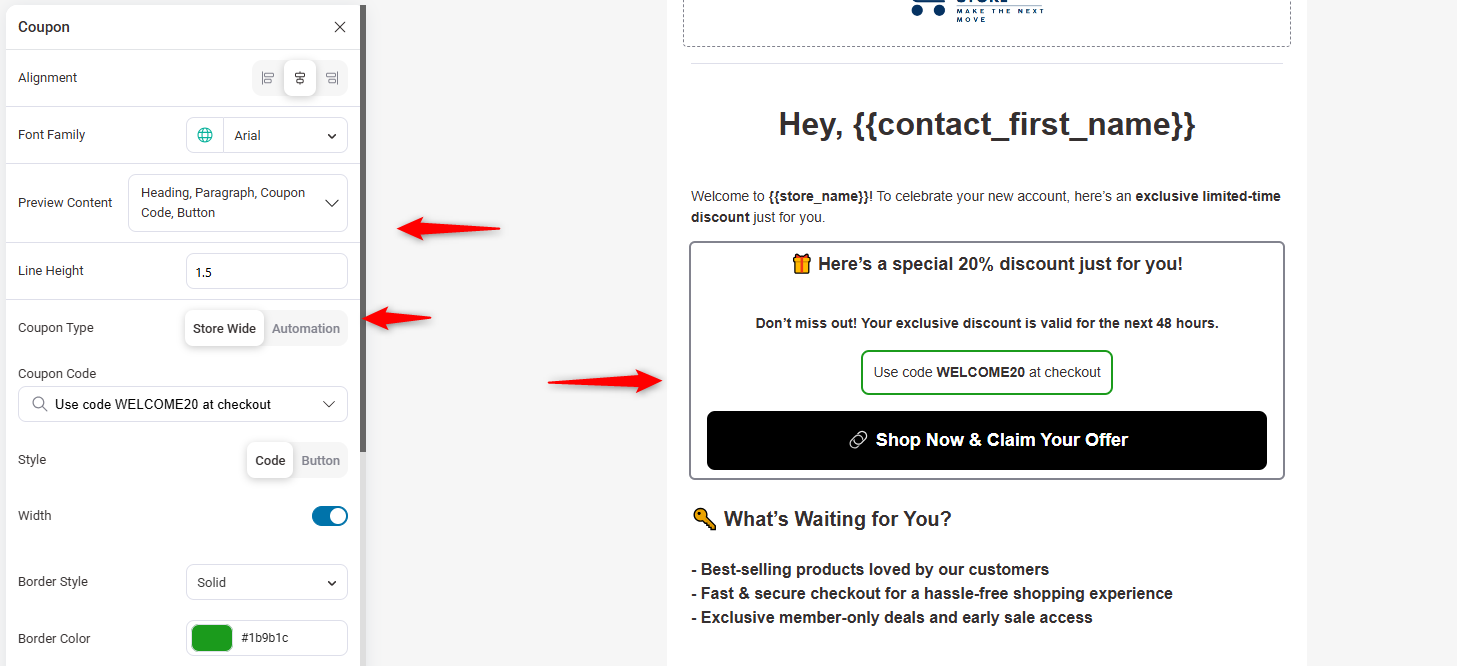
1. Share a limited-time discount to seal an order
A limited-time discount is one of the most effective ways to encourage new users to place their first order.
Instead of waiting for customers to explore independently, providing an exclusive discount with an expiration date creates urgency and increases conversions.
You can easily do that with FunnelKit Automation's coupon widget inside the visual builder. Just drag and drop it into the email body and craft your discount or offers.
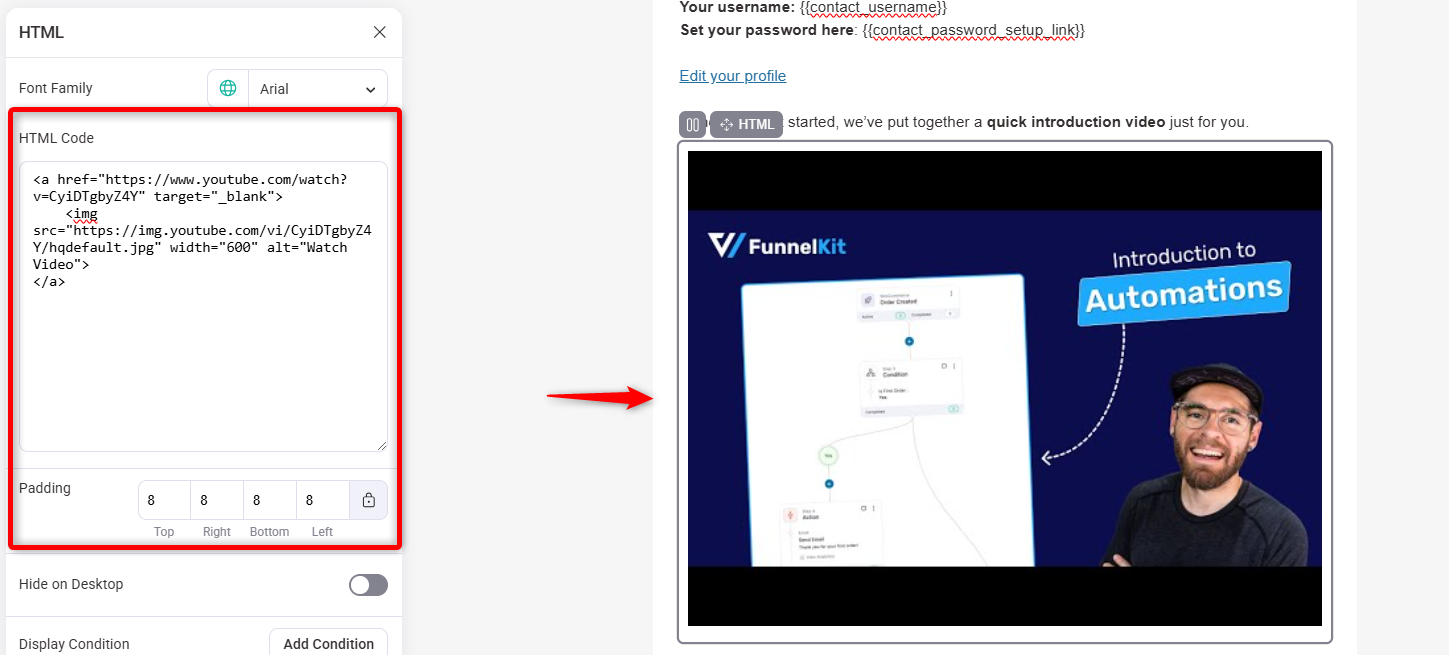
2. Personalize with a short brand introduction video.
Emails can boost engagement and drive sales by including a short brand introduction video in the new account.
Studies show that people retain 95% of a message when watching a video, compared to just 10% when reading text (Forbes).
A well-crafted welcome video can effectively introduce your brand, highlight your unique value, and build an emotional connection with new customers.
Let's do it!
Please open the email template editor and add content to it. Here, add your brand introduction video.
You need to use the HTML widget to embed a video inside the email body to do so.
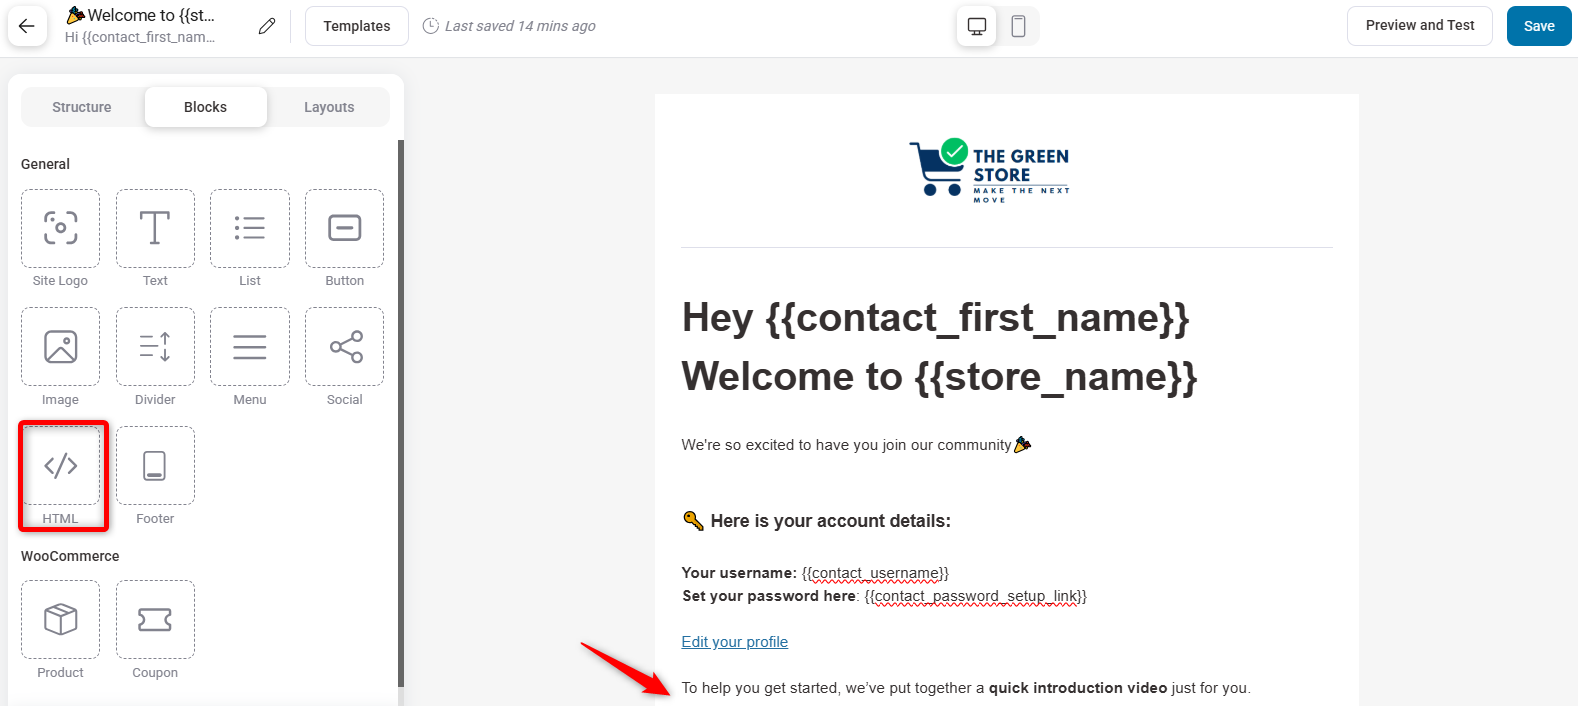
Then, create HTML code for your video and paste it here. Your video is now embedded.
Now, you can customize other stuff like we discussed above and send your email to your preferred users.
3. Give new users how to navigate your store
Giving users a simple walk-through of your product or service can help them get started.
A study by Intellum revealed that companies with formalized customer education programs experienced an average 7.6% increase in top-line revenue.
Let's see how to make a simple user account email into a product education email with FunnelKit Automation.
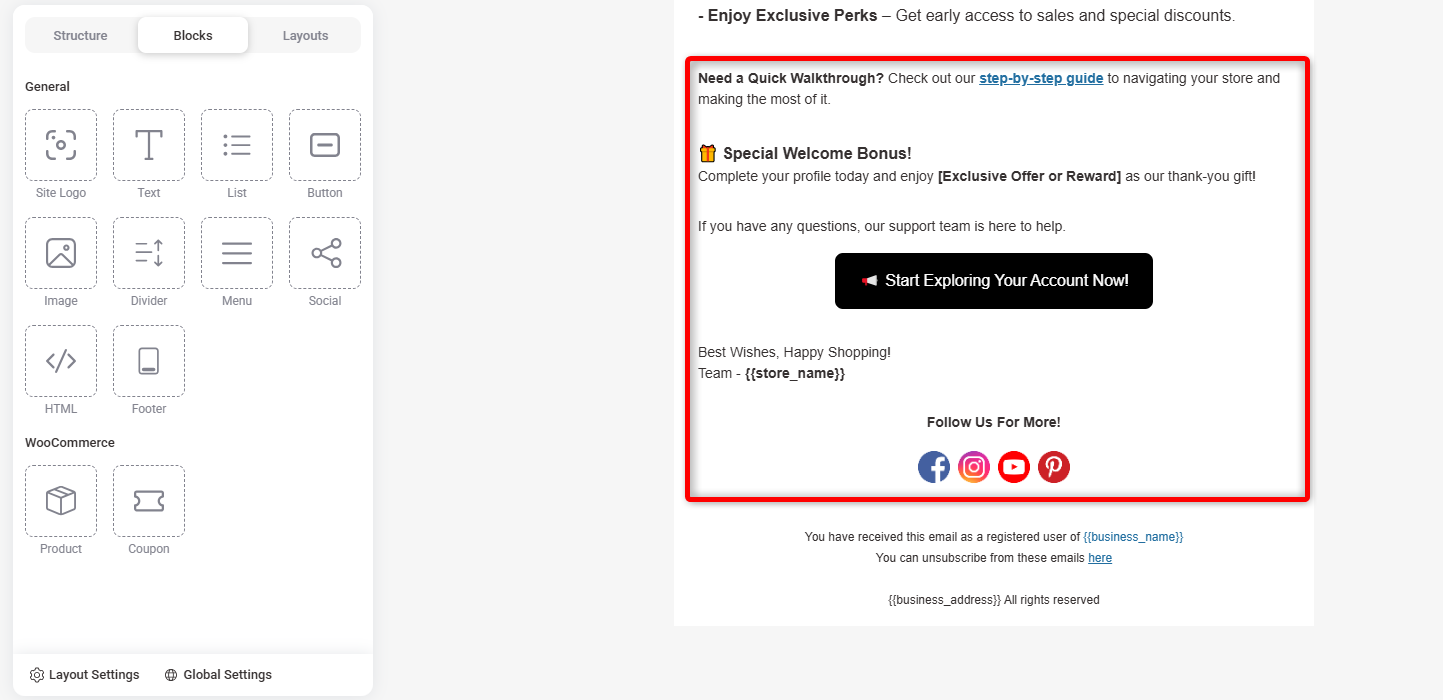
Since you're giving it a go through, you can provide the steps after the greeting using the text widget of the template.
Then, add some other content, like a documentation link and a special discount. Lastly, add the CTA button to explore your store and the social icons.
These are some of the use cases in which you can utilize the new account emails in WooCommerce and make them work for you. With great implementation and execution, they will generate the expected sales.
Bonus Use Case: Send SMS reminders to your new users about the new account
Implementing SMS reminders for new users can significantly enhance engagement and drive sales.
Additionally, 90% of people read a text message within the first 3 minutes, ensuring your reminders are promptly seen. This immediacy keeps your brand top-of-mind and encourages timely actions from users.
Recommended read: Checkout How to Send WooCommerce Twilio SMS Notifications from Your Store
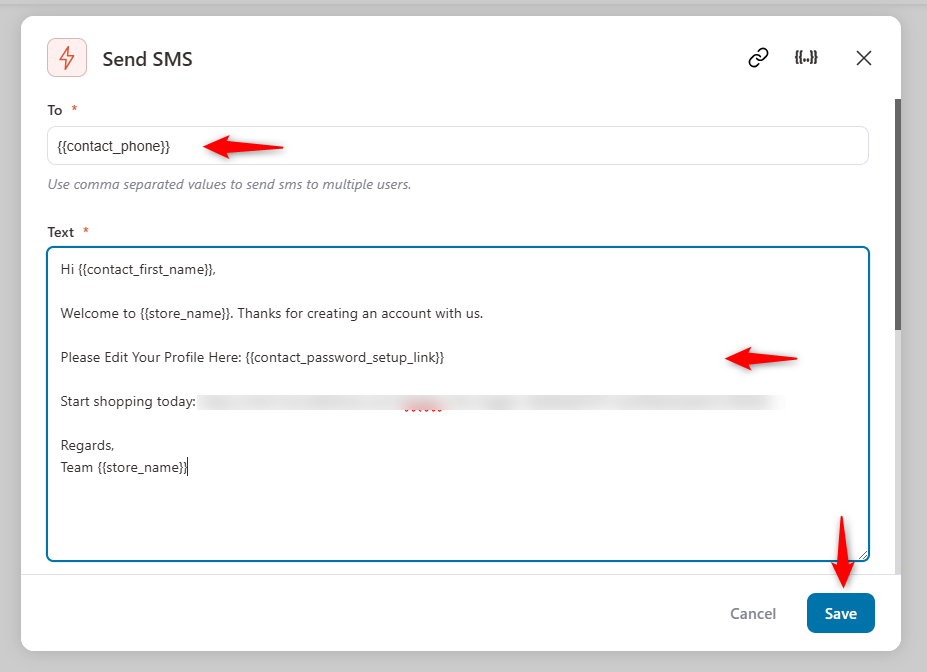
You can also add an image, send a test SMS, and add a UTM parameter to track the performance. Once you're done, hit save.
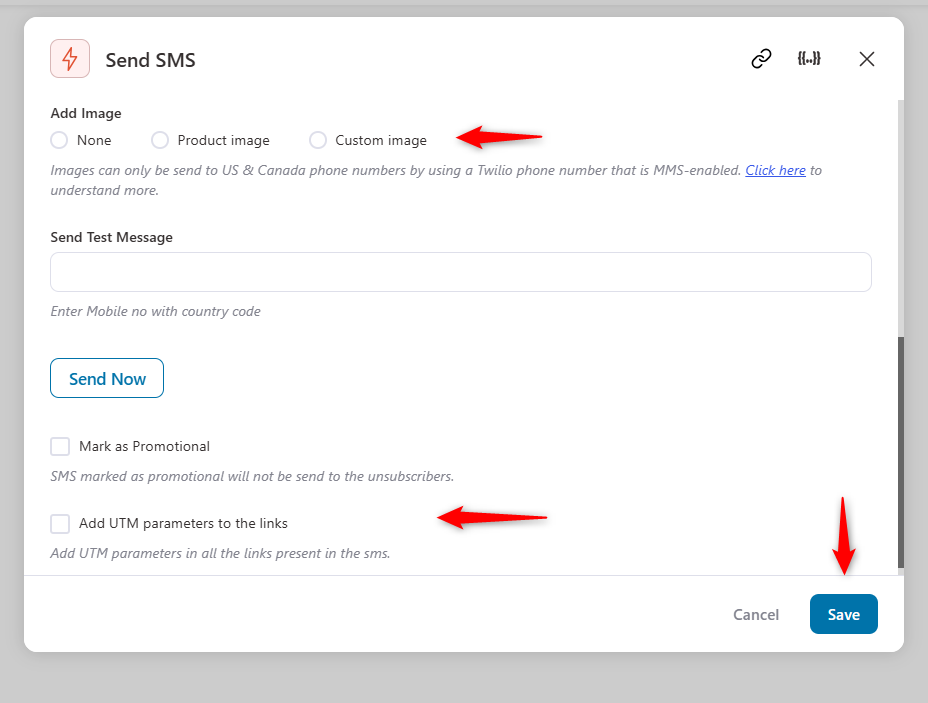
So, new users will receive the text SMS when they create an account in your store.
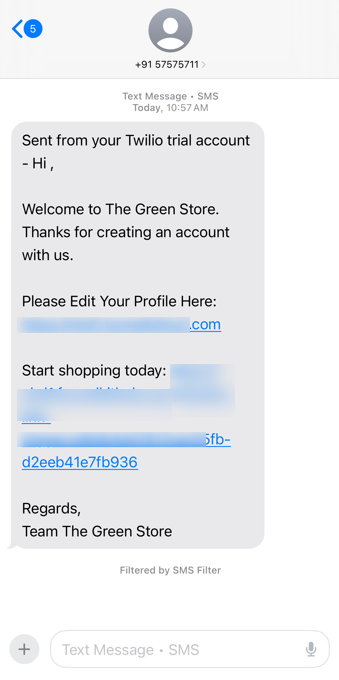
This is how you can send SMS messages to your new users and invite them to visit and complete their profiles.
5 Best Practices to Turn New Users into Engaged Customers
Before sending new account emails from your WooCommerce store, you need to know and follow a few key steps.
- Create a high-impact welcome email
A simple confirmation email isn't enough. A personalized welcome email makes new users feel valued and encourages them to explore your store. Include a short introduction, key benefits, and a clear call to action to get started.
- Offer a limited-time first-purchase incentive
Offer a time-sensitive discount for first-time buyers to encourage immediate action. Creating urgency—such as "Get 10% off your first order, valid for 48 hours!"—drives quicker conversions.
- Guide new users in taking their first action
New users may not know where to start. For a smoother experience, please give them a clear next step, such as completing their profile, exploring bestsellers, or saving payment details.
- Ask customers for social engagement & community participation
Build long-term engagement by inviting users to follow your social media pages, join a Facebook group, or share their purchases on Instagram.
Reward participation with exclusive perks or shout-outs.
- Provide an easy "Ask Us Anything" support option
Make it simple for new users to get help. Include live chat, WhatsApp, or an easy-to-access FAQ section in emails so they feel supported from day one.
A quick response can distinguish between a lost customer and a loyal one.
Wrapping Up
Customizing your WooCommerce new account emails is more than just a technical step; it's your chance to connect with your customers and set the tone for a long-lasting relationship.
Adding personalization and providing value-driven content, such as welcome offers or helpful resources, can create a seamless and engaging experience that leaves a lasting positive impression.
FunnelKit Automations should make it super easy. Take your email strategy to the next level and build stronger connections with FunnelKit Automations.

Editorial Team
July 6, 2026Discover how to collect birthdates and share personalized birthday coupons automatically in WooCommerce. Want loyal customers who keep coming back? WooCommerce birthday coupons let you offer personalized discounts or gifts,...
Editorial Team
June 29, 2026Discover why sending the same email to everyone can hurt engagement and how WooCommerce conditional emails help you deliver personalized messages for better results. Not every customer should get the...
Editorial Team
June 25, 2026There are two things most people get wrong about the WooCommerce order confirmation email. First, they don't realize it's the Processing order email they need to switch on and not...


